

Page 1
Help Guide
Smartphone
Xperia 5 II XQ-AS52/XQ-AS62/XQ-AS72
Use this manual if you encounter any problems, or have any questions about your device.
Xperia 5 II features
Photo Pro
Launching Photo Pro (Photography Pro)
Taking a photo using Photo Pro
Cinema Pro
Launching the Cinema Pro app
Combining clips and watching a film
Game enhancer
Launching the Game enhancer app
Using Game enhancer while playing
Enhancing the sound
Enhancing the sound output using Dolby Atmos®
Upscaling the quality of compressed music files (DSEE Ultimate)
1
Page 2
Reducing wind noise when recording
Side Sense
Turning Side sense on or off
Using Side sense
Setting other Side sense options
Split-screen mode
Using the Split-screen mode
Dynamic Vibration
Using Dynamic Vibration
Adjusting Dynamic Vibration settings within a media app
Ambient display
Setting the Ambient display
Smart call handling
Using Smart call handling
Getting started
About this Help Guide
Overview
Inserting a SIM card and memory card
Assembly - Dual SIM
Using a Dual SIM device
Screen protection
Starting your device for the first time
Setting up a Google account on your device
Transferring content from your old device
Device security
Making sure your device is protected
Finding the IMEI number(s) of your device
Finding, locking, or erasing a lost device
Learning the basics
2
Page 3
Turning the screen on or off
Adjusting the idle time before the screen turns off
Smart backlight control
One-handed mode
Taking a screenshot
Notification light
Icons in the status bar
Status icons
Notification icons
Battery and maintenance
Charging your device
Battery and power management
Battery and power management
Checking battery consumption for applications
Making applications exempt from the Power-saving feature
STAMINA mode
Battery Care
Updating your device
Before updating your device
Updating your device wirelessly
Updating your device using a computer
Restarting, resetting, and repairing
Restarting, resetting, and repairing your device
Repairing the device software using Xperia Companion
Resetting your applications
Improving memory performance
Viewing the memory status
Freeing up space on the internal storage
Stopping applications and services from running
Formatting the memory card
3
Page 4
Internet and networks
Mobile data connection
Increasing Wi-Fi signal strength
Controlling data usage
Basic settings
Settings menu
Volume, vibration, and sound
Volume and vibration
Sounds and tones
Screen settings
Application updates
Using location services
Date and time
Music
Transferring music from a computer to your device
Listening to music
Music app features
Camera
Getting to know your camera
Camera overview
Taking a photo or recording a video
Taking a photo using the flash
Basic camera features
Viewing, sharing, or editing photos and videos
Selecting a capturing mode
Various methods to take photos
Self-timer
Exposure, color, and light conditions
Adjusting the exposure, color, and light conditions
4
Page 5
Color and brightness
HDR video recording
Setting the right focus
People, selfies, and smiling faces
Taking photos and videos of people
Softening the skin tone
Taking a photo when someone smiles
Taking a selfie
Activating the selfie timer with the palm of your hand
Moving objects
Tracking an object
Capturing a burst of images
Recording a steady video
Bokeh effect
Using various capturing modes
Slow motion videos
Portrait selfie
Creative effect
Panorama
Resolution and memory
Diagnosing your camera
Additional camera settings
Geotagging
Grid lines
Photography advice
Photo preview settings
Different ways to use the volume key
Sound
QR Code reader
Connectivity
5
Page 6
F-172-100-11 Copyright 2020 Sony Mobile Communications Inc.
Mirroring the screen of your device wirelessly on a TV
Connecting your device to USB accessories
NFC (Near Field Communication)
Using your device as a wallet
Bluetooth® wireless technology
Turning the Bluetooth function on or off
Naming your device
Pairing with another Bluetooth device
Sending items using Bluetooth technology
Receiving items using Bluetooth technology
Accessibility
Magnification
Font size
Color correction
TalkBack
Other settings for accessibility
Real-Time Text
Support app
About the Support app
Legal information
General
Warranty, SAR, and usage guidelines
6
Page 7
Help Guide
Smartphone
Xperia 5 II XQ-AS52/XQ-AS62/XQ-AS72
Launching Photo Pro (Photography Pro)
Photo Pro has an interface designed to meet the demands of professional photographers. You can take optimal photos
with professional technology.
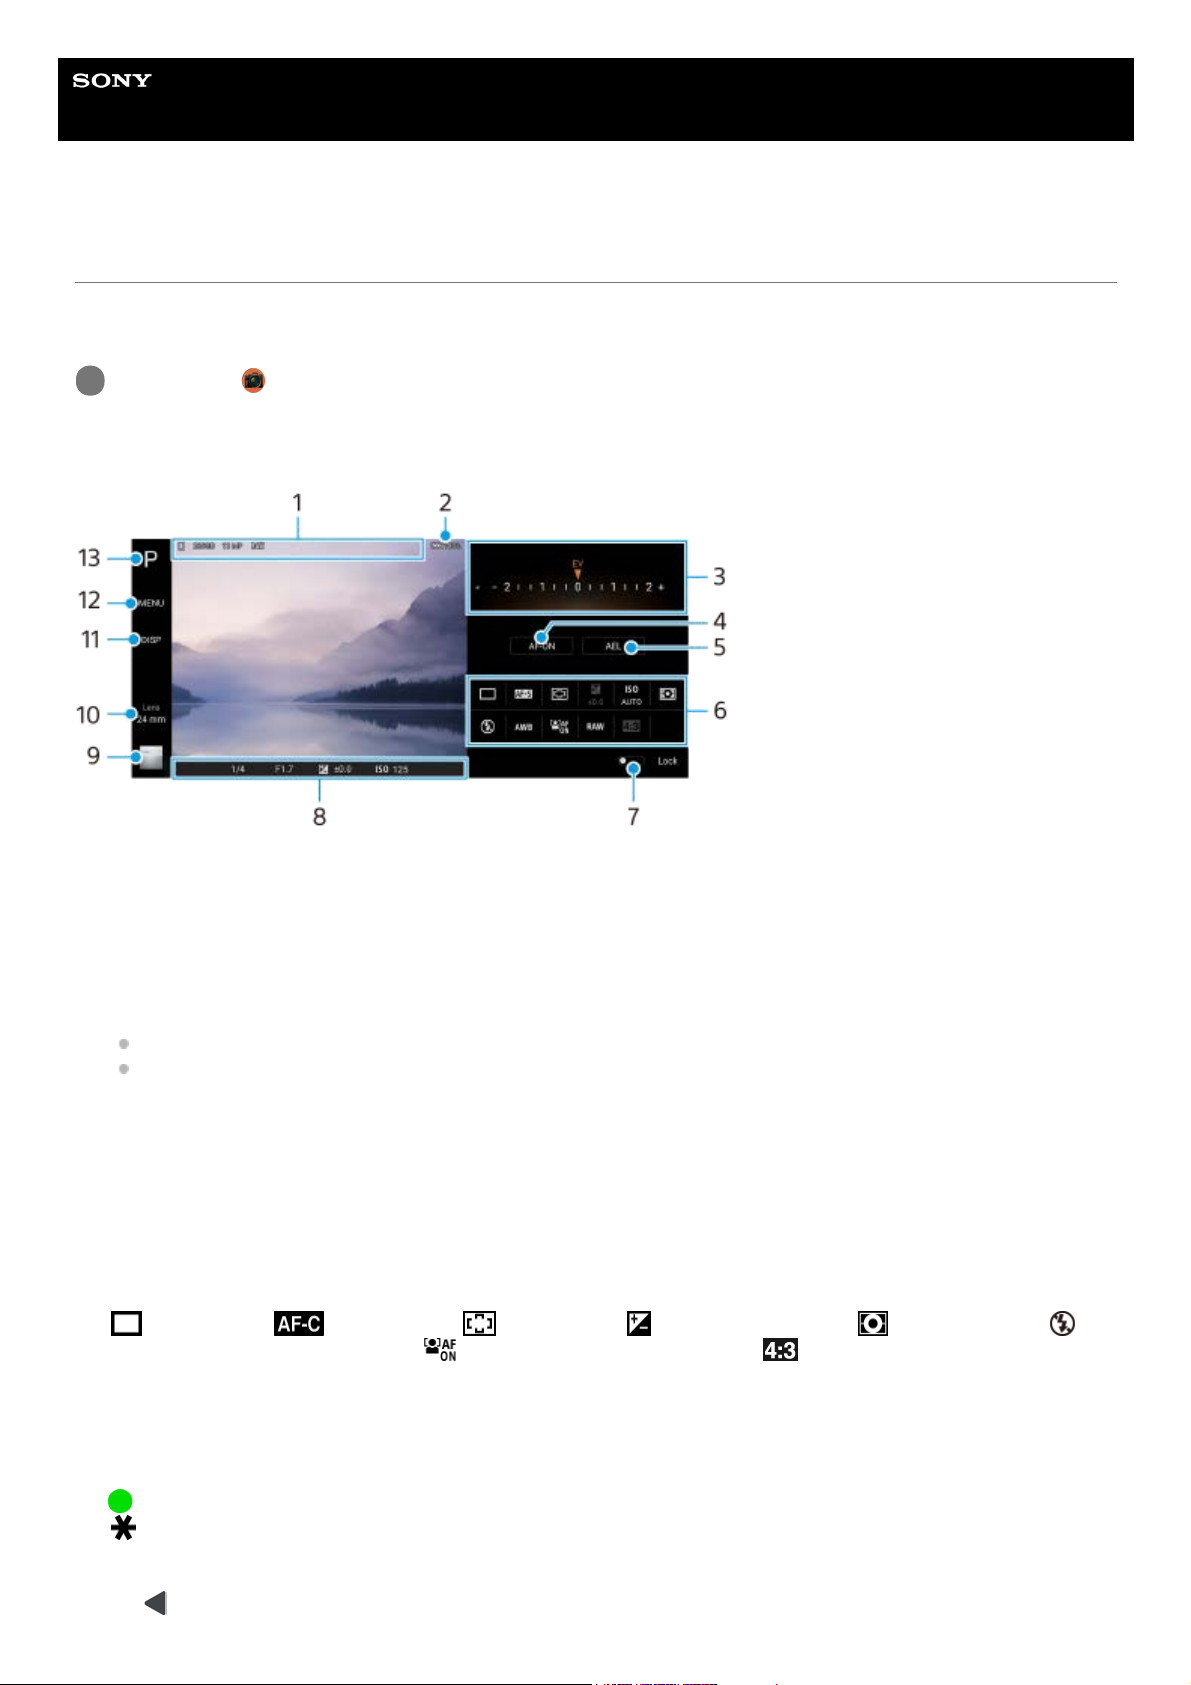
Photo Pro standby screen
Find and tap (Photo Pro icon).
1
Data storage icon/Amount of free space/Aspect ratio/File format
The scene icon or condition icon is also displayed when the AUTO mode is selected.
1.
Battery status2.
Dial
Adjust the exposure value when the P mode is selected.
Adjust the shutter speed when the S mode or M mode is selected.
3.
Tap to lock the focus.
The button turns orange when the focus is locked. Tap the button again to unlock the focus.
4.
Tap to lock the exposure.
The button turns orange when the exposure is locked. Tap the button again to unlock the exposure.
5.
Setting icons
Tap to adjust settings.
(Drive mode)/ (Focus mode)/ (Focus area)/ (Exposure)/ISO (ISO)/ (Metering mode)/
(Flash mode)/AWB (White balance)/ (Face/Eye AF)/RAW (File format)/ (Aspect ratio)
The settings depend on the mode or lens selected.
6.
Tap to lock the items on the left side of the viewfinder and the setting icons, and prevent accidental operations.7.
Focus indicator/exposure settings
(Auto focus icon) indicates that the subject is in focus.
(AE lock icon) indicates that the exposure is locked.
8.
Tap the thumbnail to view, share, or edit photos.
Tap
(Back button) to return to the Photo Pro standby screen.
9.
7
Page 8

Related Topic
Taking a photo using Photo Pro
F-172-100-11 Copyright 2020 Sony Mobile Communications Inc.
Tap to switch lenses.
To use the zoom, tap
(Open zoom dial icon), pinch in or out on the viewfinder, or use the volume key.
10.
Tap to show or hide information displayed on the viewfinder.11.
Tap to adjust more detailed settings.12.
Tap to switch the shooting mode.13.
8
Page 9
Help Guide
Smartphone
Xperia 5 II XQ-AS52/XQ-AS62/XQ-AS72
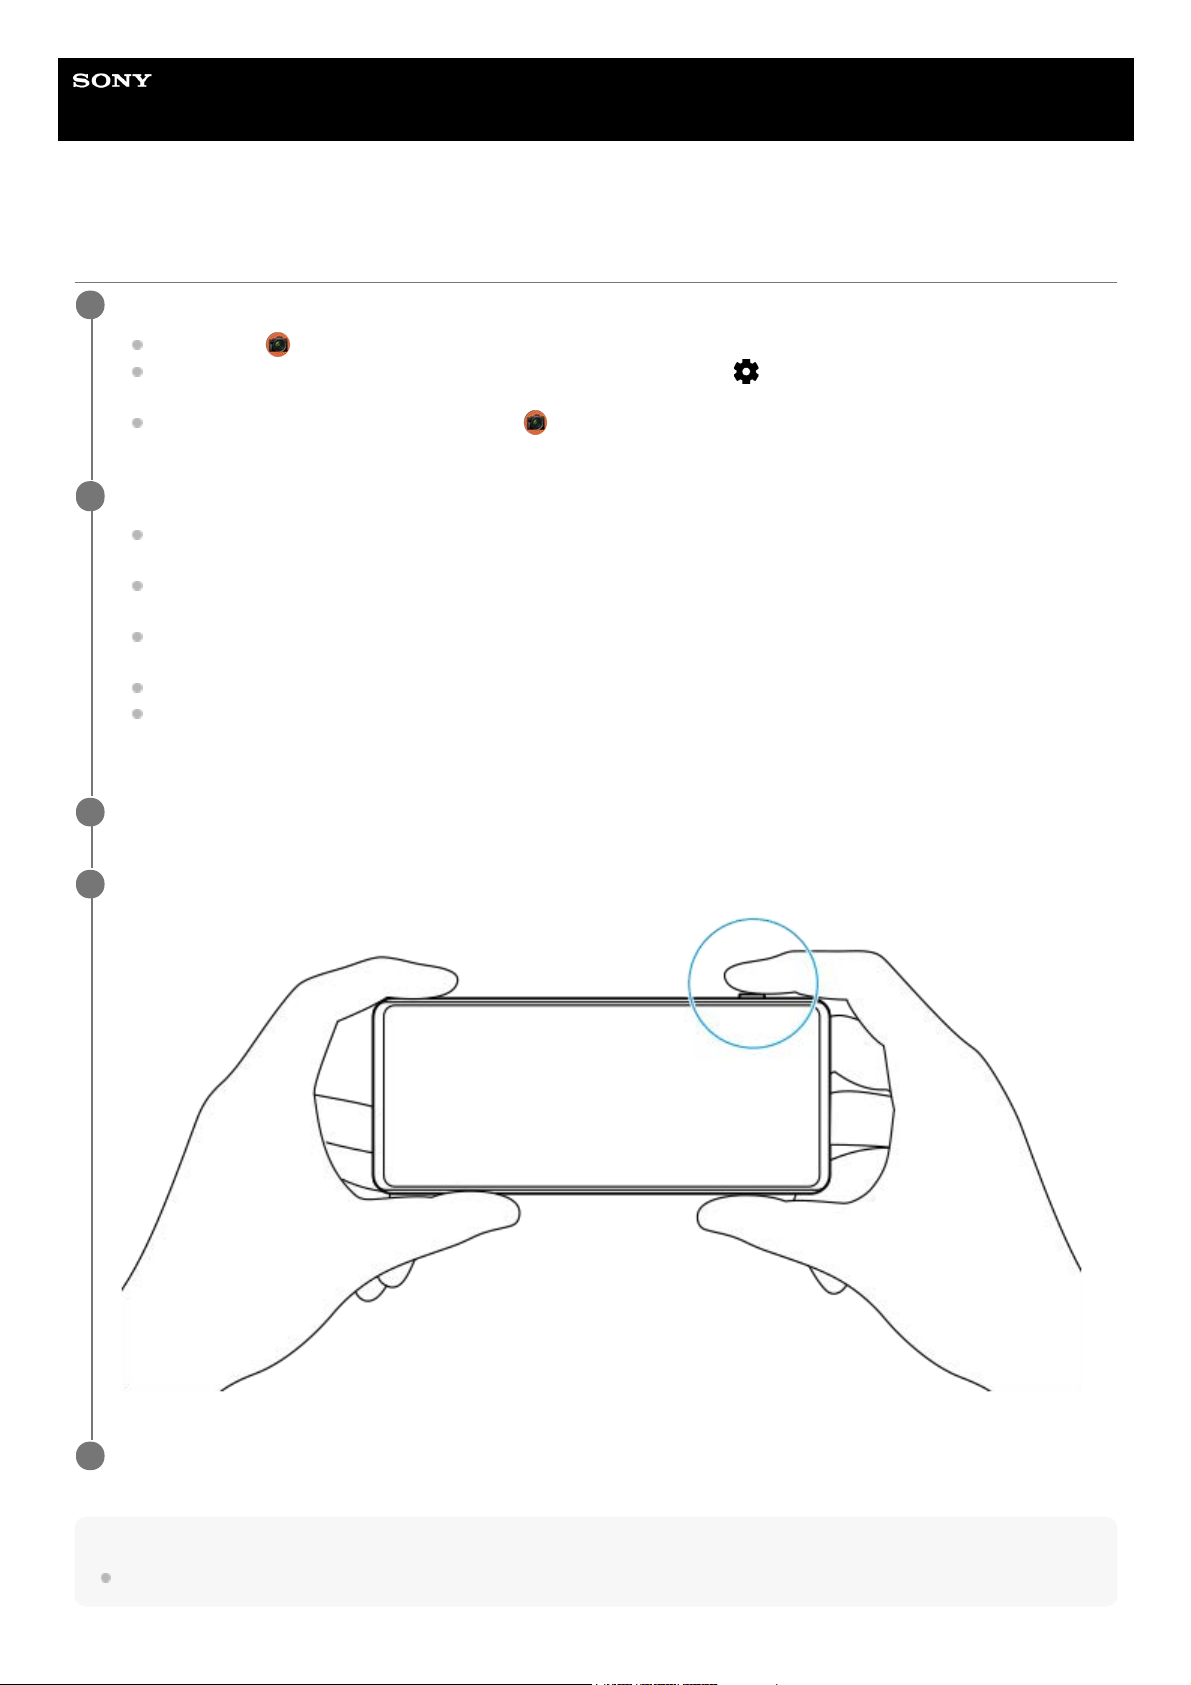
Taking a photo using Photo Pro
Note
There is no shutter button on the Photo Pro standby screen. Use the camera key on your device.
Launch Photo Pro.
Find and tap
(Photo Pro icon).
Press the camera key fully down. While using the Camera app, tap
(Settings icon) > [Launch with camera
key] > [Launch Photography Pro] to enable this function.
While using the Camera app, tap [Mode] >
(Photo Pro icon).
1
Select a shooting mode.
AUTO (Auto mode): Settings values are determined appropriately by Photo Pro so that you can take photos of
any subject under any conditions with good results.
P (Program auto): You can take photos with an automatically adjusted combination of shutter speed and ISO
value.
S (Shutter speed priority): You can take photos of fast-moving subjects, etc. with a manually adjusted shutter
speed. (The ISO value is adjusted automatically.)
M (Manual exposure): You can take photos with the desired shutter speed and ISO value.
MR (Memory recall): You can register often-used modes or settings in advance and recall them when taking
photos. Select [MR], and then tap [Set] to apply the settings displayed under [Recall camera settings].
2
Adjust the settings.
3
Press the camera key halfway down to focus.
4
Press the camera key fully down.
5
9
Page 10

To register often-used combinations of modes and settings in the MR (Memory recall) mode
Hint
To change the registered settings, repeat the procedure starting from Step 1.
Related Topic
Launching Photo Pro (Photography Pro)
F-172-100-11 Copyright 2020 Sony Mobile Communications Inc.
While using Photo Pro, adjust the settings.1.
Tap [MENU] > [Shooting] > [Camera settings memory].2.
Confirm the settings, and then tap [Save].
To change the settings, tap [Cancel], and then repeat the procedure starting from Step 1.
3.
10
Page 11
Help Guide
Smartphone
Xperia 5 II XQ-AS52/XQ-AS62/XQ-AS72
Launching the Cinema Pro app
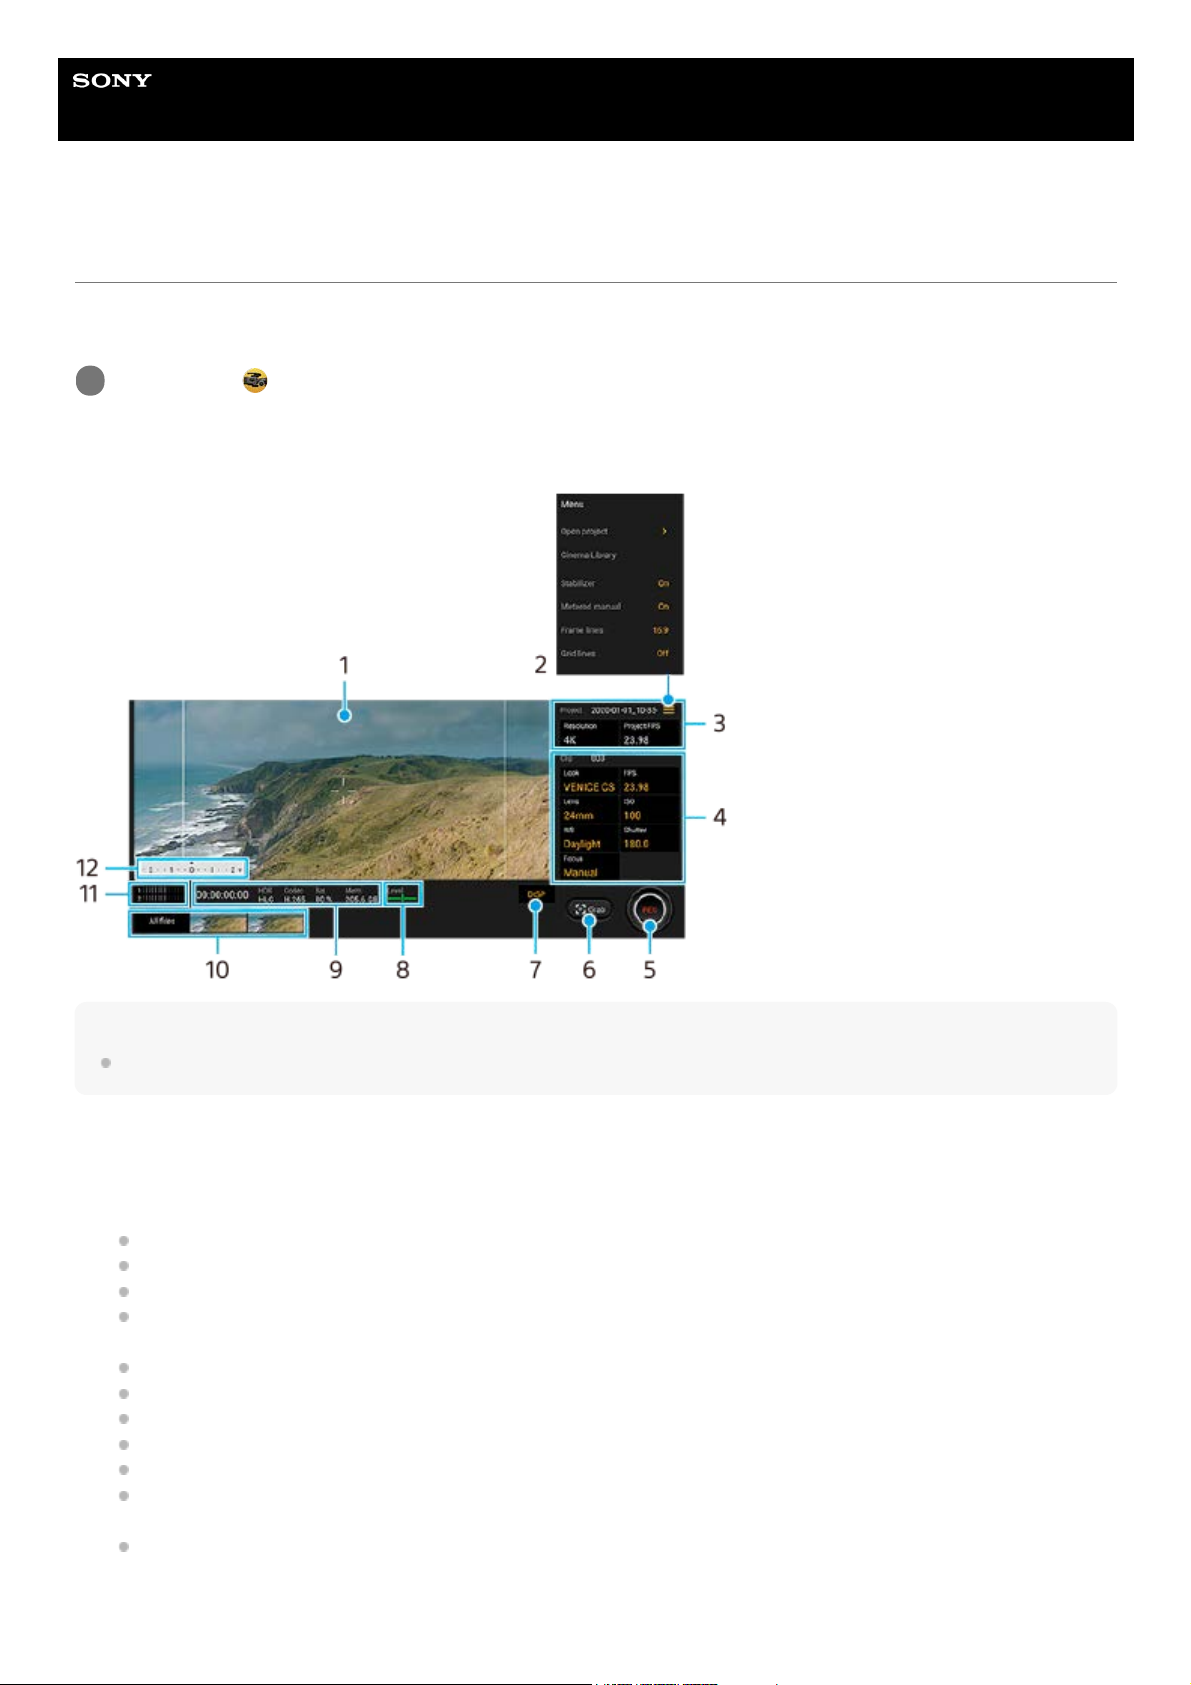
Cinema Pro is an application powered by Sony’s digital motion picture camera technology. You can create your ideal
videos by configuring professional parameters and color settings.
Cinema Pro home screen
Hint
Tap orange parameters to change settings.
Find and tap
(Cinema Pro icon).
1
Viewfinder1.
Menu icon – Tap to open the menu.
Tap [Open project] to open an existing project or to create a new project.
Tap [Cinema Library] to launch the Cinema Library app. You can open an existing project or watch a created film.
Tap [Stabilizer] to switch the stabilizer function on or off.
Tap [Metered manual] to show or hide the Metered Manual. The Metered Manual is displayed with a metering
indicator on the viewfinder.
Tap [Frame lines] repeatedly to display and select from various aspect ratios.
Tap [Grid lines] to display and balance the composition.
Tap [Level] to turn the level meter on or off.
Tap [Level calibration] to calibrate the standard for the horizontal plane to fix deviations in the direction of tilt.
Tap [Intelligent wind filter] to reduce wind noise.
Tap [Assign camera key] to use the camera key as a REC button or a Grab button. When [Record] is selected,
you can start recording by pressing the camera key even if a setting dialog is open.
Tap [Assign volume keys] to use the volume key as a REC button or to activate the volume key for the Cinema
Pro app. When [Record] is selected, you can start recording by pressing the volume key even if a setting dialog is
open.
2.
11
Page 12
Related Topic
Combining clips and watching a film
F-172-100-11 Copyright 2020 Sony Mobile Communications Inc.
Tap [Rec button pos.] to change the position of the REC button and the Grab button.
Project settings
Tap an orange parameter to adjust the resolution and frame rate of the entire project or video clips. The project
settings can only be changed before recording the first video clip.
3.
Clip settings – Parameters to adjust for each video clip.
Tap [Look] to adjust the ambience of the video clip.
Tap [FPS] to adjust the frame rate. Select [120fps] to record a video in slow motion.
Tap [Lens] to select a lens.
Tap [ISO] to adjust the ISO value. Tap [Auto] when it is orange to adjust to the appropriate ISO value
automatically.
Tap [WB] to adjust the white balance. You can use the sliders to adjust the white balance. Tap [Reset] to reset the
slider values for the selected setting.
To adjust the white balance according to a selected white area, select [Custom], tap [Set], hold your device so
that the white area fully covers the frame in the center, and then tap [Set] again.
If you select [Auto], you can set whether to lock the white balance settings.
Tap [Shutter] to adjust the shutter speed. Tap [Auto] when it is orange to adjust the appropriate shutter speed
automatically.
Tap [Focus] to adjust the focus. Tap [AF] or [MF] to switch the focus mode to auto or manual. When the focus
mode is set to manual, you can adjust the focus markers and speed of focus pulling by tapping
(Settings
icon). When the focus mode is set to auto, you can specify the focus area by tapping the viewfinder.
4.
Tap to start or stop recording.5.
Tap to capture the current frame as a still image.6.
Tap to hide or show the frame lines, grid lines, and the Metered Manual.7.
Level meter
Level meter helps you to measure the angle of the device and keep the picture horizontal. When your device senses
that it is level, the level meter turns green.
8.
Status indications9.
Tap a thumbnail to view a video clip or still image. Swipe left or right to view the previous or next video clip or still
image.
Tap [All files] to view a video clip or still image that is not in the thumbnail view. While viewing a video clip or still
image, swipe left or right to view the previous or next one.
You can capture a still image from the video by tapping
(Edit video icon) while playing. Tap (Back button)
to return to the Cinema Pro home screen.
10.
Tap to change the audio level.11.
Metered manual
The Metered Manual indicates underexposure/overexposure.
12.
12
Page 13
Help Guide
Smartphone
Xperia 5 II XQ-AS52/XQ-AS62/XQ-AS72
Combining clips and watching a film
You can combine clips to create a film, and then watch the film using the Cinema Library.
Note
Clips with different frame rates cannot be combined.
To watch the created film using the Cinema Library
Hint
You can create a shortcut for the Cinema Library app on the Home screen. Touch and hold
(Cinema Pro icon). From the
menu that opens, drag
(Cinema Library icon) to the desired location.
Related Topic
Launching the Cinema Pro app
F-172-100-11 Copyright 2020 Sony Mobile Communications Inc.
While using the Cinema Pro app, tap [All files] to display a list of clips in a project.
1
Tap
(More icon) > [Create final film].
2
Tap the clips in the order in which you want to combine them.
3
Tap [Create].
4
Launch the Cinema Library app.
While using the Cinema Pro app, tap [All files] >
(Cinema Library icon).
While using the Cinema Pro app, tap
(Menu icon) > [Cinema Library].
Touch and hold
(Cinema Pro icon), and then tap [Cinema Library] in the menu that opens.
1.
Tap [Final films], and then select a film.2.
13
Page 14
Help Guide
Smartphone
Xperia 5 II XQ-AS52/XQ-AS62/XQ-AS72
Launching the Game enhancer app
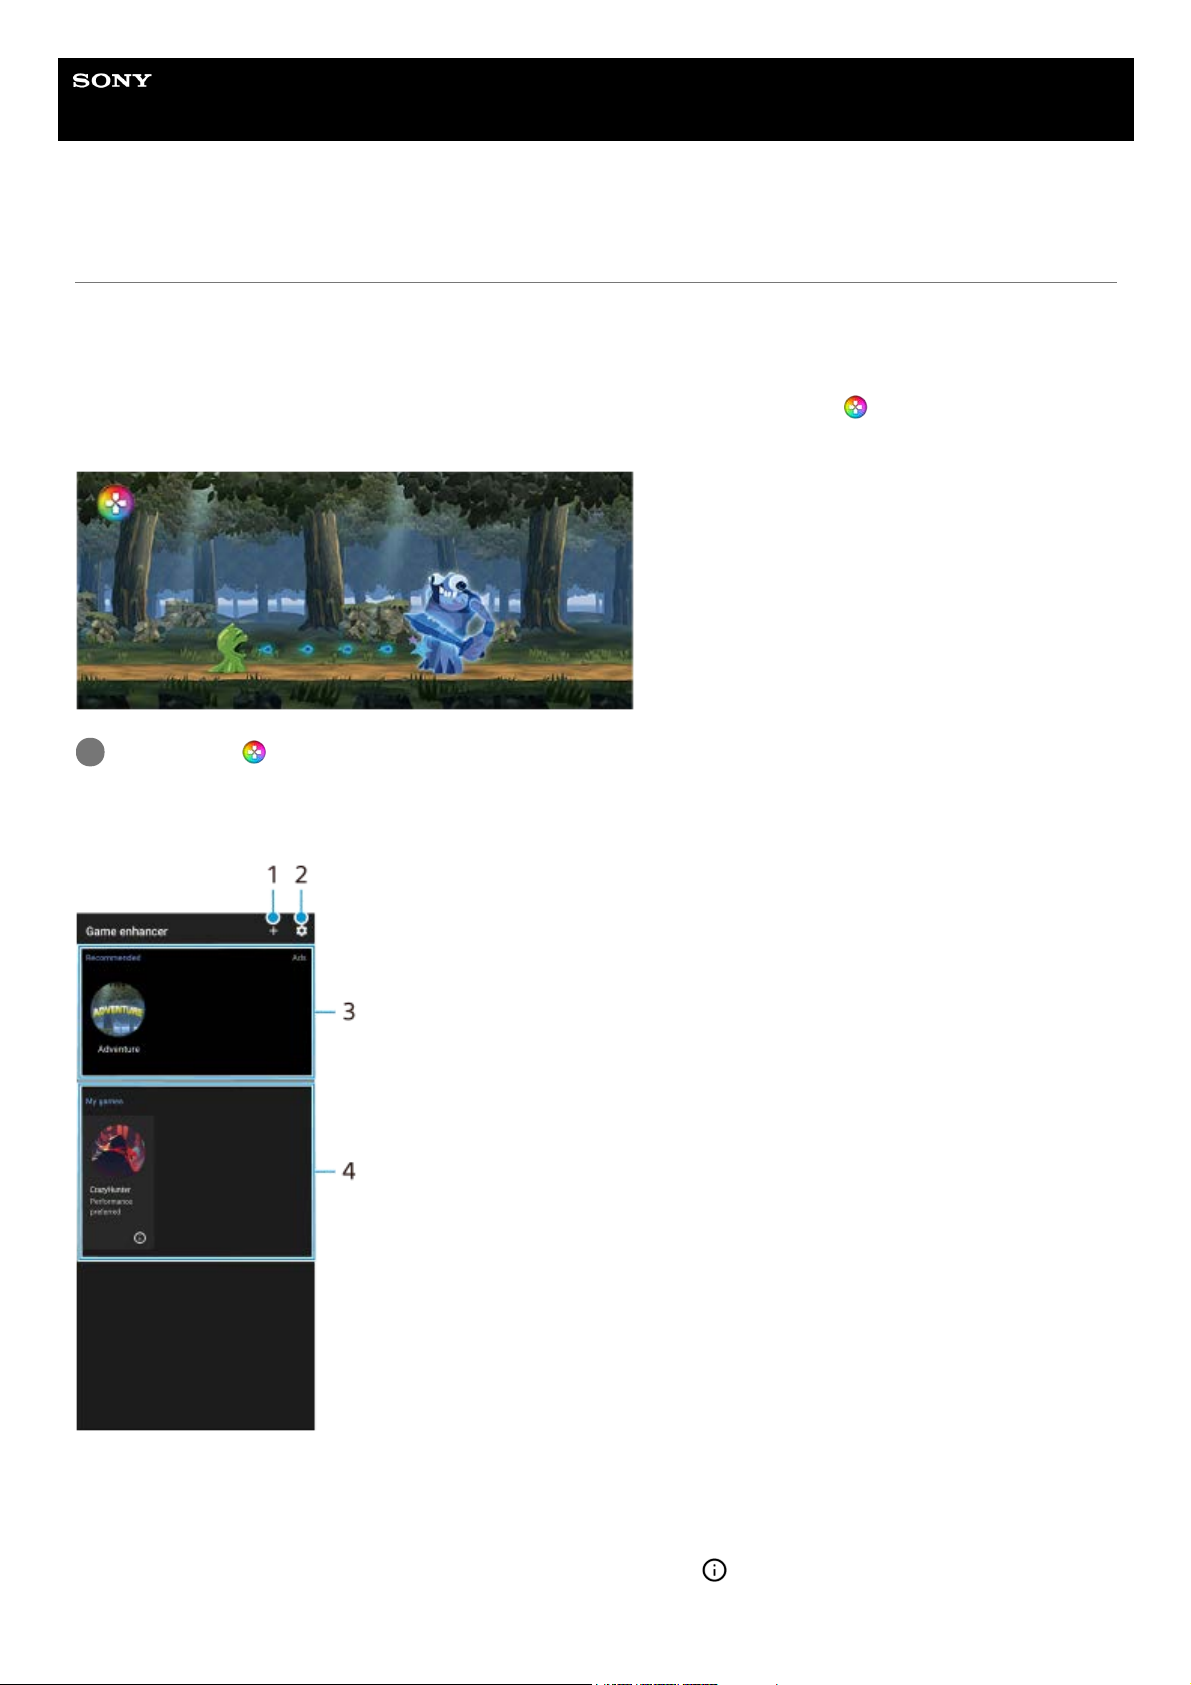
The Game enhancer app makes gameplay much more convenient with various functions. While playing a game, you
can restrict the touch area in the landscape mode, improve the microphone sound quality when voice-chatting using a
headset with a built-in mic, and more.
Downloaded games are automatically stored in the Game enhancer app, and you can quickly launch the games from
the Game enhancer menu. You can customize various settings while gaming by tapping
(Open Game enhancer
menu icon).
Screen overview
Find and tap (Game enhancer icon).
1
Add new games manually.1.
Game enhancer settings2.
Recommended – Tap to launch, download, or see more information about recommended games.3.
Game launcher
To view a screenshot or video taken by the Game enhancer app, tap
(Game profile icon).
4.
14
Page 15

Related Topic
Using Game enhancer while playing
F-172-100-11 Copyright 2020 Sony Mobile Communications Inc.
15
Page 16
Help Guide
Smartphone
Xperia 5 II XQ-AS52/XQ-AS62/XQ-AS72
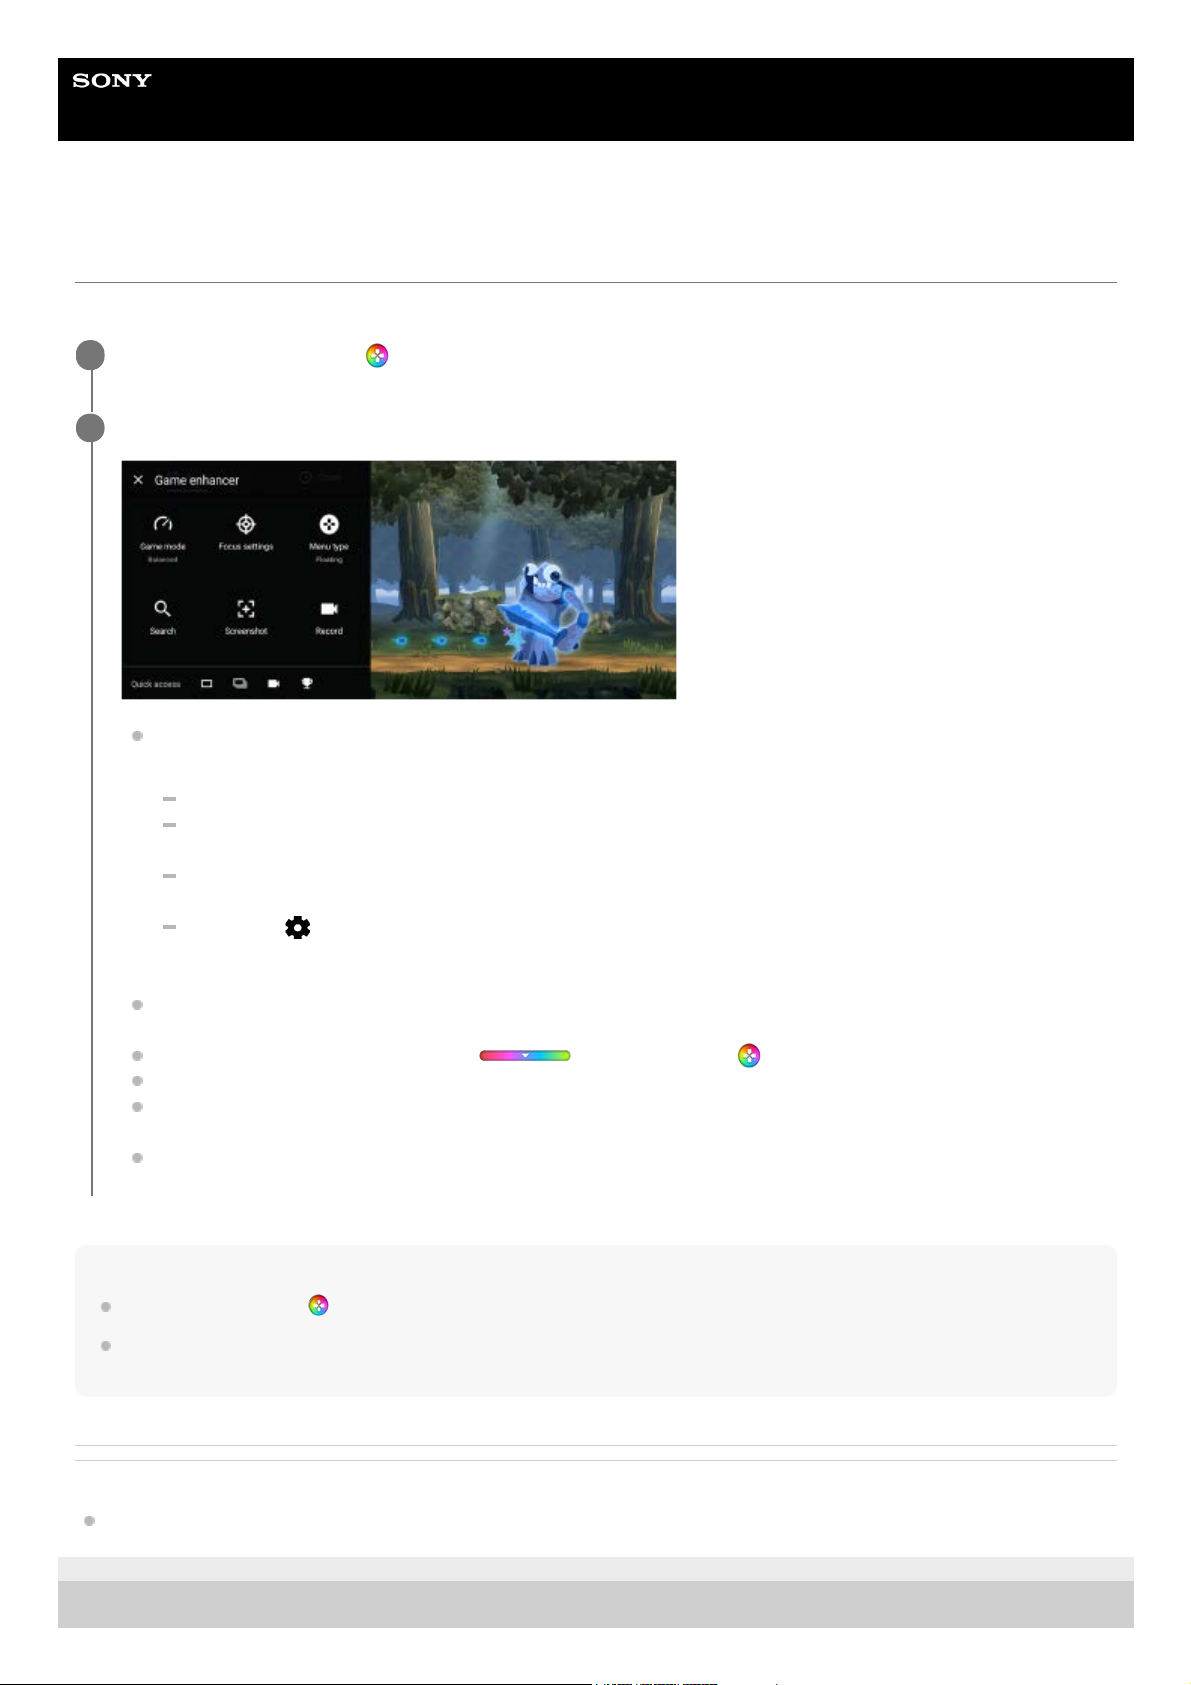
Using Game enhancer while playing
You can customize various settings while playing a game.
Hint
You can drag and move
(Game enhancer floating icon) to the desired position, such as the edge of the screen.
The STAMINA mode is turned off while you use the Game enhancer app. If you want to give priority to the battery life, set [Game
mode] to [Battery life preferred].
Related Topic
Launching the Game enhancer app
F-172-100-11 Copyright 2020 Sony Mobile Communications Inc.
While playing a game, tap
(Game enhancer floating icon).
1
In the menu that opens, tap and configure the desired settings.
[Game mode]: Select an option to optimize your device for gaming from among [Performance preferred],
[Balanced], and [Battery life preferred]. You can also set the following items.
[Optimize touch area]: Restrict the touch area in the landscape mode.
[Optimize V.C. microphone]: Improve the microphone sound quality when voice-chatting while using a
headset with a built-in mic connected to the 3.5 mm audio jack of your device, such as a gaming headset.
[H.S. power control]: Limit reductions in performance and degradation of the battery caused by the device
overheating during charging.
[Custom] >
(Settings icon): Customize the settings. Tap [Preview] to customize settings while testing out
the actual game controls. You can also drag and move the setting window to the desired position.
[Focus settings]: Focus on your game by blocking all notifications, incoming calls, the camera key, and other
settings that may compromise gameplay.
[Menu type]: Switch the menu type to
(Pull-down bar) or (Game enhancer floating icon).
[Search]: Search for strategy information while playing a game.
[Screenshot]: Take a screenshot. You can also take a burst of screenshots and capture a decisive moment in a
game.
[Record]: Record and share your gameplay, face, and commentary.
2
16
Page 17

17
Page 18

Help Guide
Smartphone
Xperia 5 II XQ-AS52/XQ-AS62/XQ-AS72
Enhancing the sound output using Dolby Atmos®
Using Dolby Atmos makes playback sound more realistic and three dimensional.
F-172-100-11 Copyright 2020 Sony Mobile Communications Inc.
Find and tap [Settings] > [Sound] > [Audio settings].
1
Enable the Dolby Atmos function by tapping the switch.
2
Tap [Dolby Atmos] for more options.
3
18
Page 19

Help Guide
Smartphone
Xperia 5 II XQ-AS52/XQ-AS62/XQ-AS72
Upscaling the quality of compressed music files (DSEE Ultimate)
The DSEE Ultimate function upscales your compressed music accurately using AI technology.
F-172-100-11 Copyright 2020 Sony Mobile Communications Inc.
Find and tap [Settings] > [Sound] > [Audio settings].
1
Enable the DSEE Ultimate function by tapping the switch.
2
19
Page 20
Help Guide
Smartphone
Xperia 5 II XQ-AS52/XQ-AS62/XQ-AS72
Reducing wind noise when recording
You can remove the noise produced by wind hitting the microphone when recording without losing the original audio
quality.
F-172-100-11 Copyright 2020 Sony Mobile Communications Inc.
Find and tap [Settings] > [Sound] > [Audio settings] > [Intelligent wind filter].
1
Tap the switch to enable the function.
2
20
Page 21
Help Guide
Smartphone
Xperia 5 II XQ-AS52/XQ-AS62/XQ-AS72
Turning Side sense on or off
Related Topic
Using Side sense
Setting other Side sense options
F-172-100-11 Copyright 2020 Sony Mobile Communications Inc.
Find and tap [Settings] > [Display] > [Advanced].
1
Tap [Side sense].
2
Tap the switch to enable or disable the function.
3
21
Page 22
Help Guide
Smartphone
Xperia 5 II XQ-AS52/XQ-AS62/XQ-AS72
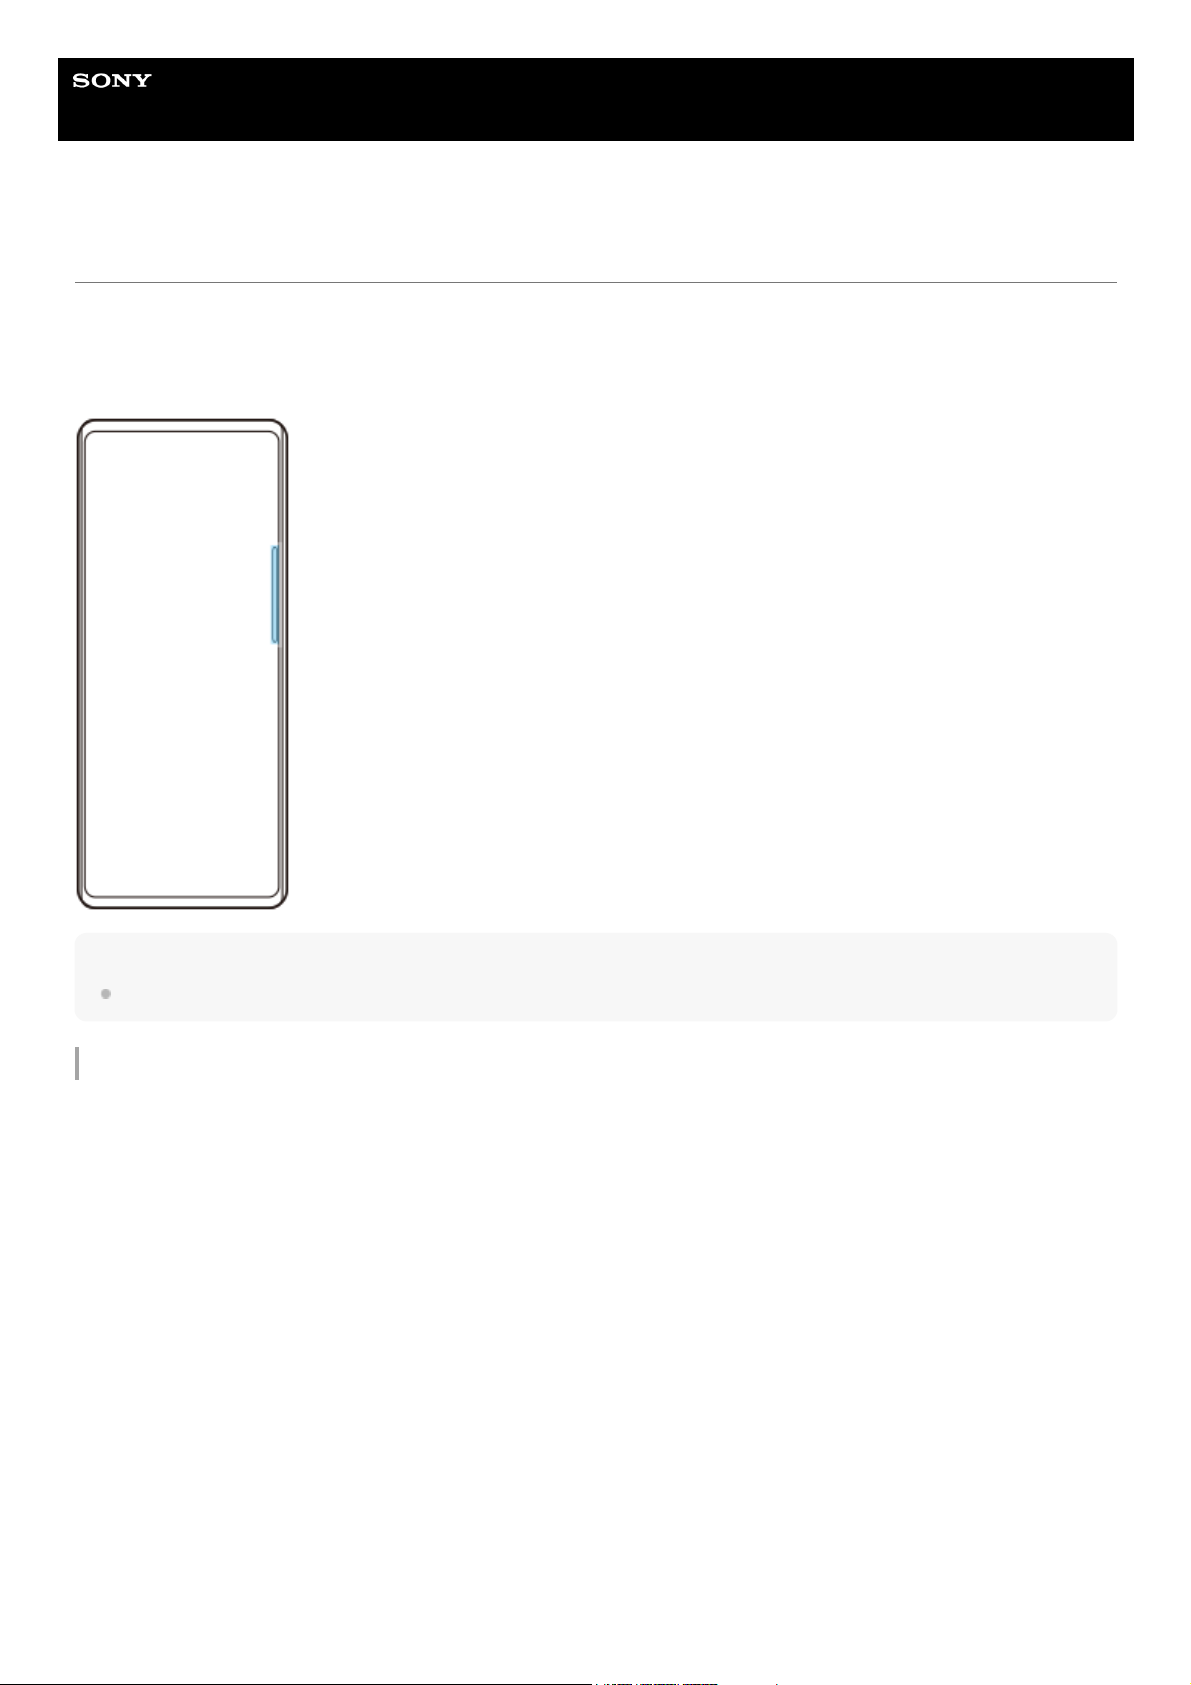
Using Side sense
You can tap the Side sense bar on the edge of the screen or slide it with one hand in order to use your device more
easily. You can display the Side sense menu as a shortcut to applications and settings, or the Multi-window menu to
select two applications in the split-screen mode. You can also return to the previous screen by sliding down along the
Side sense bar on the edge of the screen. Make sure to tap or slide your finger within the Side sense bar.
Note
Side sense is unavailable in certain situations, such as when the screen view is in landscape orientation.
Customizing the Side sense bar
To adjust the touch position, touch and hold the Side sense bar, and then drag it up or down.
To place the touch position anywhere you want on the screen, touch and hold the Side sense bar, and then drag it
toward the center of the screen. The shape of the Side sense bar changes to a circle, and you can drag and place it
anywhere you want on the screen.
22
Page 23
Hint
To return the Side sense bar to its original shape, drag the circle back to the edge of the screen.
Displaying the Side sense menu
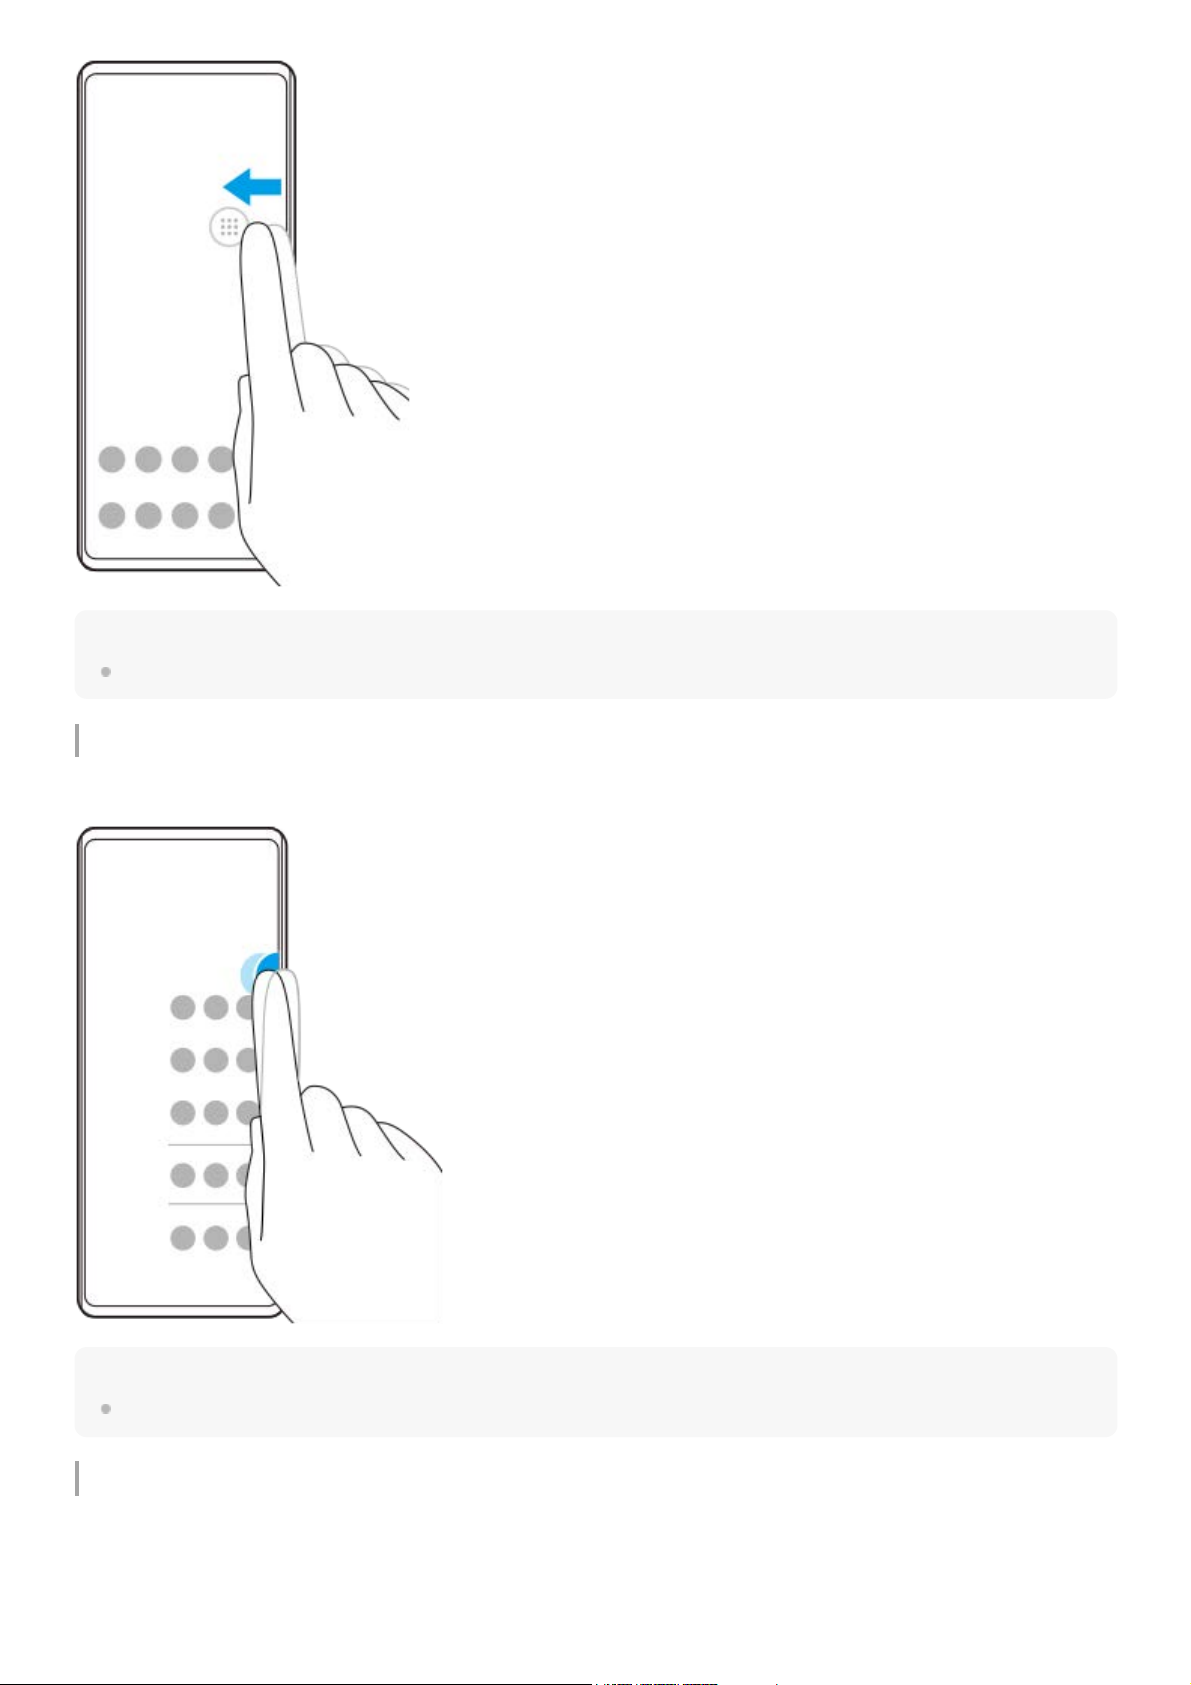
To activate the Side sense menu, double-tap the Side sense bar.
Hint
To exit the Side sense menu, double-tap the Side sense bar or tap an empty area on the screen.
Displaying the Multi-window menu
Slide your finger up along the Side sense bar to display the Multi-window menu. Follow the on-screen instructions to add
apps to a split-screen.
23
Page 24
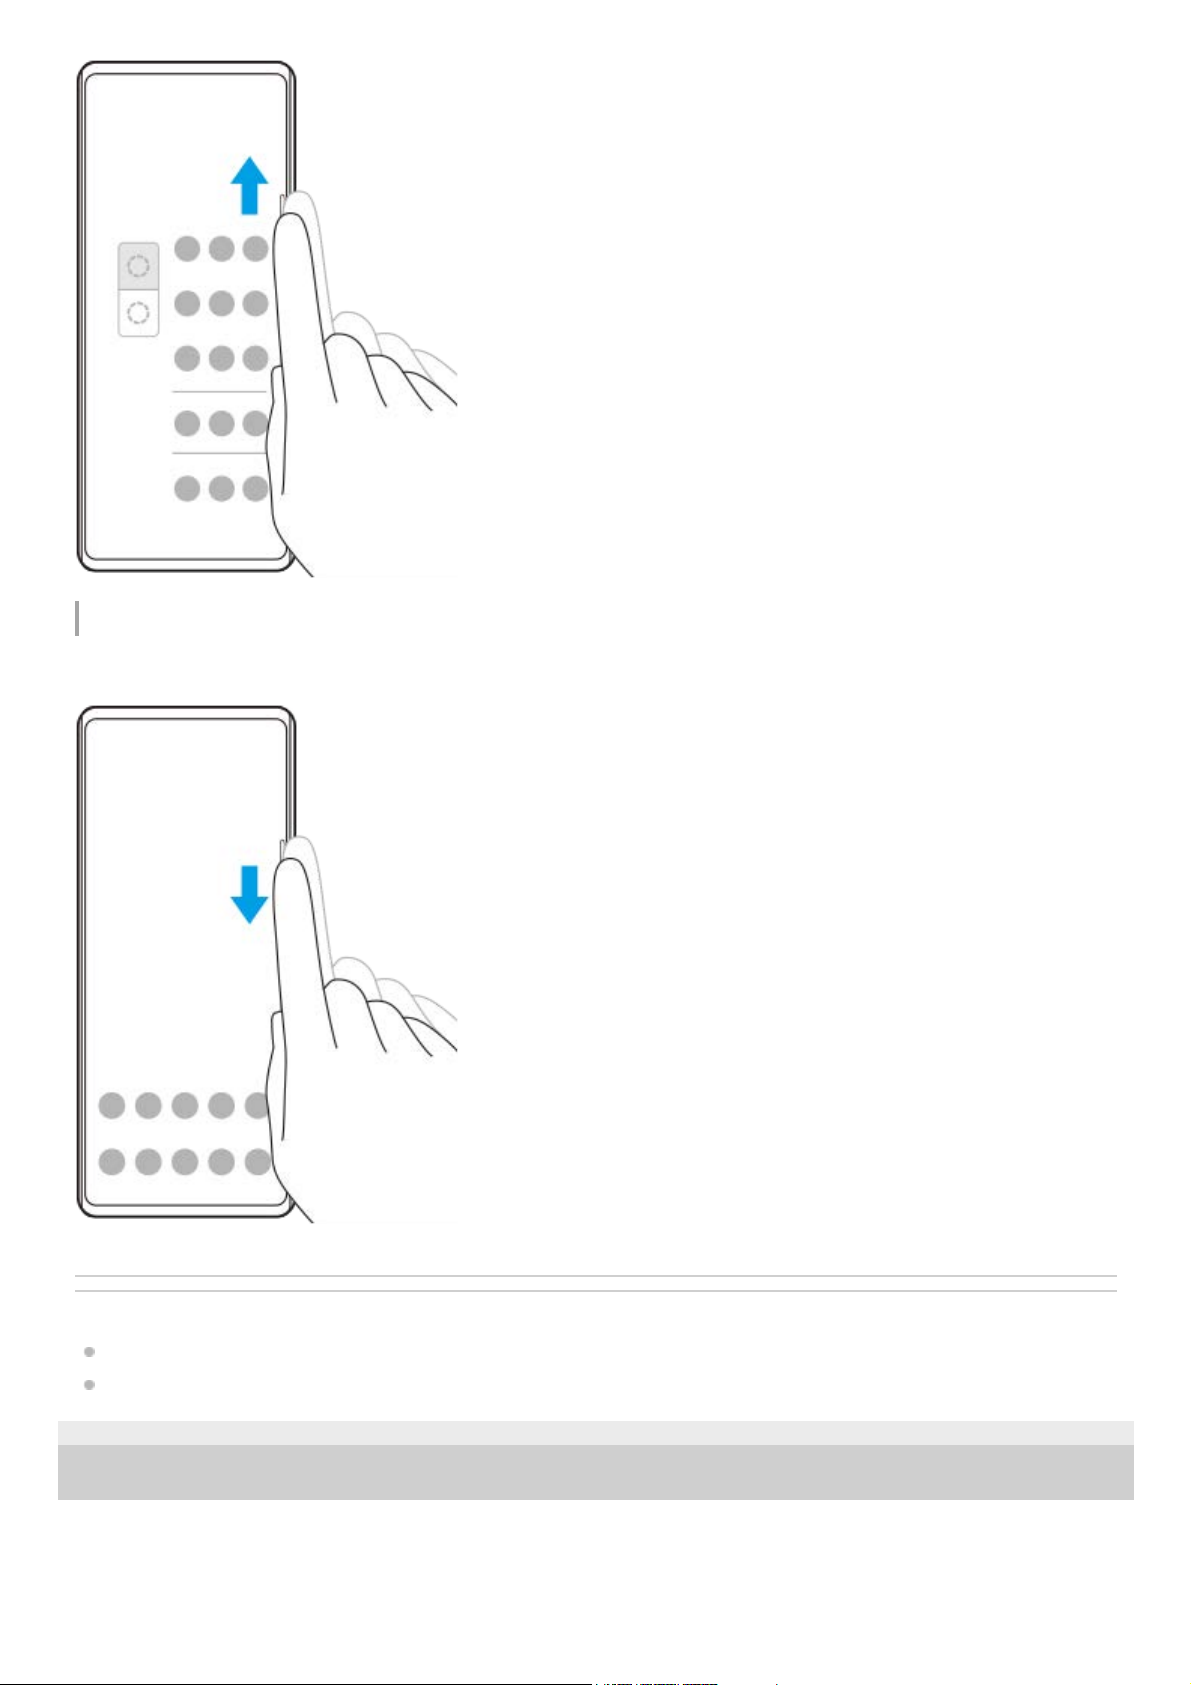
Returning to the previous screen using the side sensor
Slide your finger down along the Side sense bar to return to the previous screen.
Related Topic
Turning Side sense on or off
Setting other Side sense options
F-172-100-11 Copyright 2020 Sony Mobile Communications Inc.
24
Page 25
Help Guide
Smartphone
Xperia 5 II XQ-AS52/XQ-AS62/XQ-AS72
Setting other Side sense options
You can configure how Side sense behaves or customize the menu, etc.
For example, the following options are available for Side sense.
Whether to use Side sense on one or both sides of your device
The screen actions for gesture
Related Topic
Turning Side sense on or off
Using Side sense
F-172-100-11 Copyright 2020 Sony Mobile Communications Inc.
Find and tap [Settings] > [Display] > [Advanced].
1
Tap [Side sense].
2
Tap the switch to enable the function.
3
Follow the on-screen instructions in the lower part of the screen to edit other Side sense options.
4
25
Page 26
Help Guide
Smartphone
Xperia 5 II XQ-AS52/XQ-AS62/XQ-AS72
Using the Split-screen mode
Split-screen mode enables you to view two applications at once, for example, if you want to view your photos and the
Calendar at the same time.
Note
Not all applications support split-screen mode.
To resize the split-screen windows
To exit the split-screen mode
F-172-100-11 Copyright 2020 Sony Mobile Communications Inc.
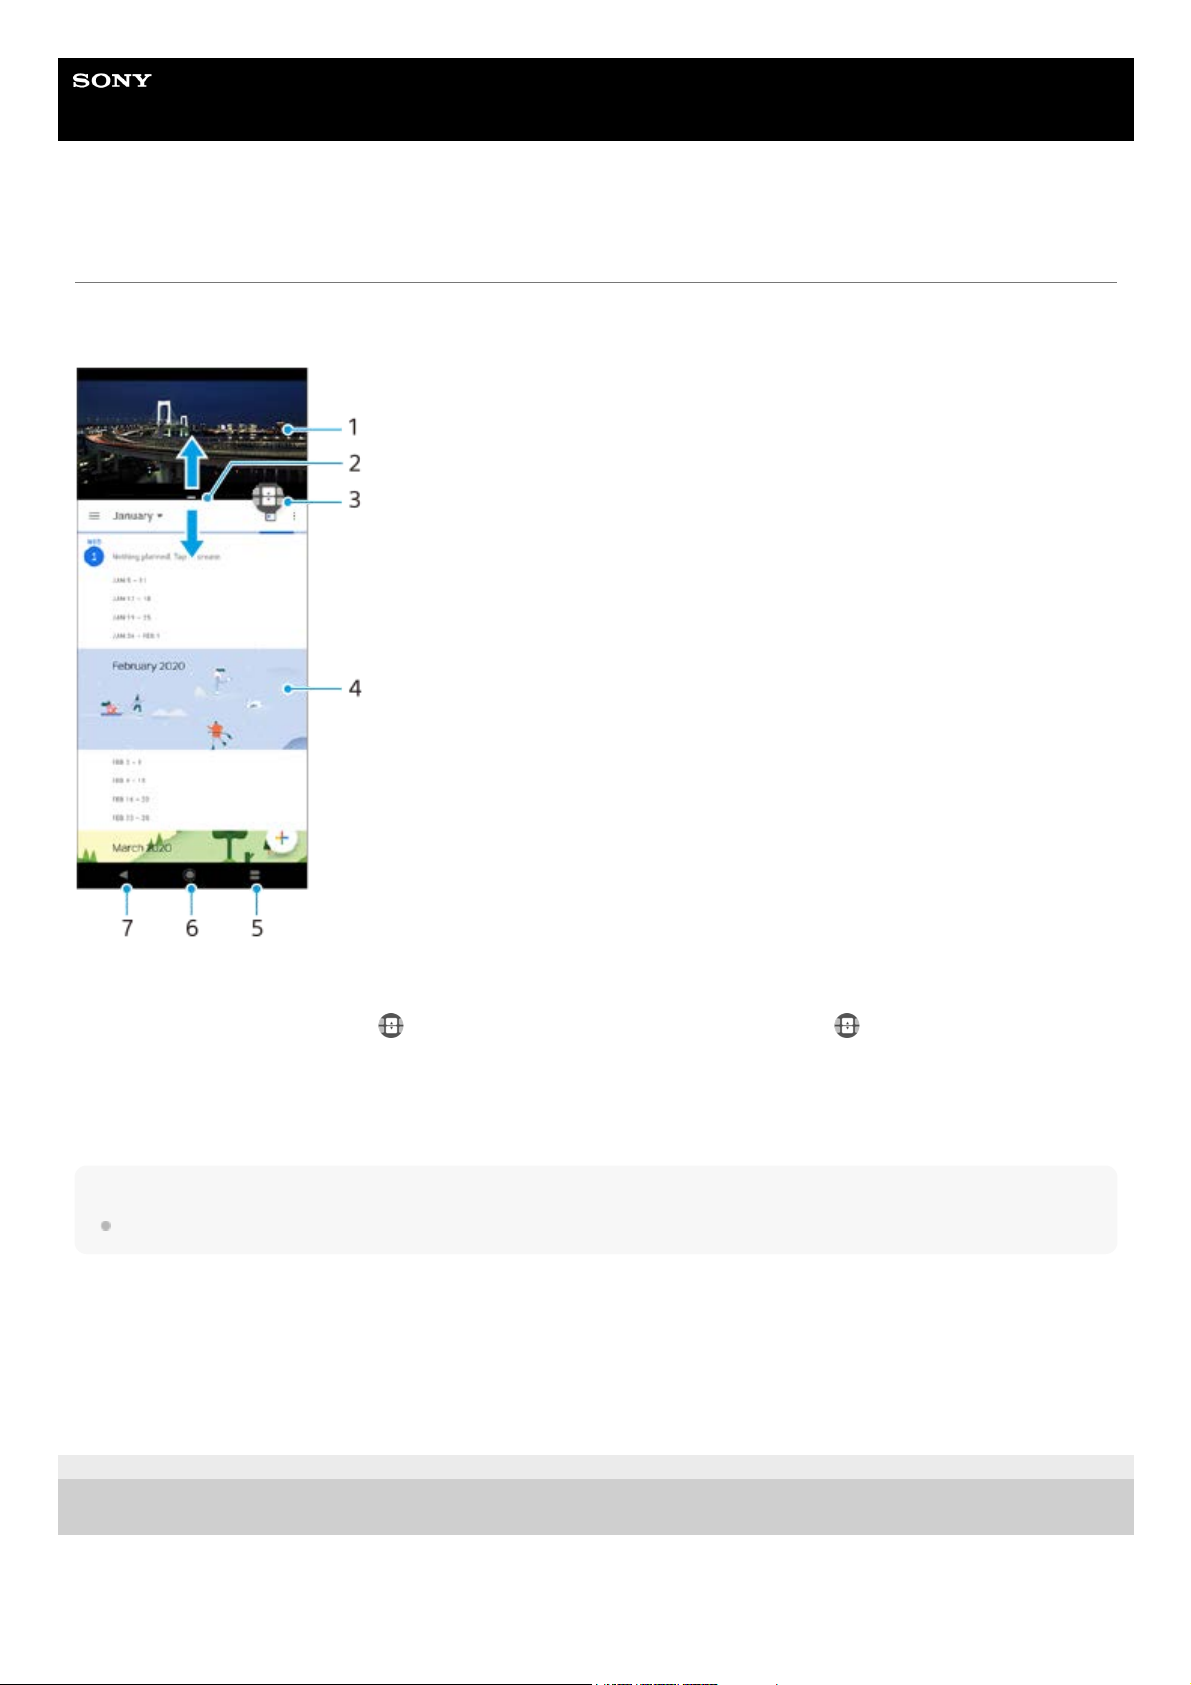
Application 11.
Split-screen border – Drag to resize windows2.
Multi-window switch icon – Tap
(Multi-window switch icon) to select applications. (Multi-window switch icon)
appears when you drag the split-screen border.
3.
Application 24.
App Overview button – Select a recently used application for the lower window5.
Home button – Go back to the Home screen6.
Back button – Go back to the previous screen within an application or close the application7.
Drag the split-screen border in the center.1.
Drag the split-screen border to the top or bottom of the screen.1.
26
Page 27
Help Guide
Smartphone
Xperia 5 II XQ-AS52/XQ-AS62/XQ-AS72
Using Dynamic Vibration
The Dynamic Vibration feature enhances your media experience by adding synchronized vibration when you watch
videos or listen to music on your device. To learn more about this feature, go to [Settings] > [Sound] > [Dynamic
Vibration].
There is no vibration in the following cases:
The media volume is set to silent.
The screen is off.
Note
Dynamic Vibration does not work with all media apps.
Related Topic
Adjusting Dynamic Vibration settings within a media app
F-172-100-11 Copyright 2020 Sony Mobile Communications Inc.
Find and tap [Settings] > [Sound] > [Dynamic Vibration].
1
27
Page 28
Help Guide
Smartphone
Xperia 5 II XQ-AS52/XQ-AS62/XQ-AS72
Adjusting Dynamic Vibration settings within a media app
You can adjust the vibration level while playing content using a media app.
Note
There is no vibration if the media volume is set to silent.
Related Topic
Using Dynamic Vibration
F-172-100-11 Copyright 2020 Sony Mobile Communications Inc.
Open the desired media app, such as the Music app.
1
Start playback of the media contents.
2
Press the volume key to open the volume panel.
3
Drag the slider for Dynamic Vibration to set the preferred level for this app.
The Dynamic Vibration setting is saved for the next time you use this app.
4
28
Page 29
Help Guide
Smartphone
Xperia 5 II XQ-AS52/XQ-AS62/XQ-AS72
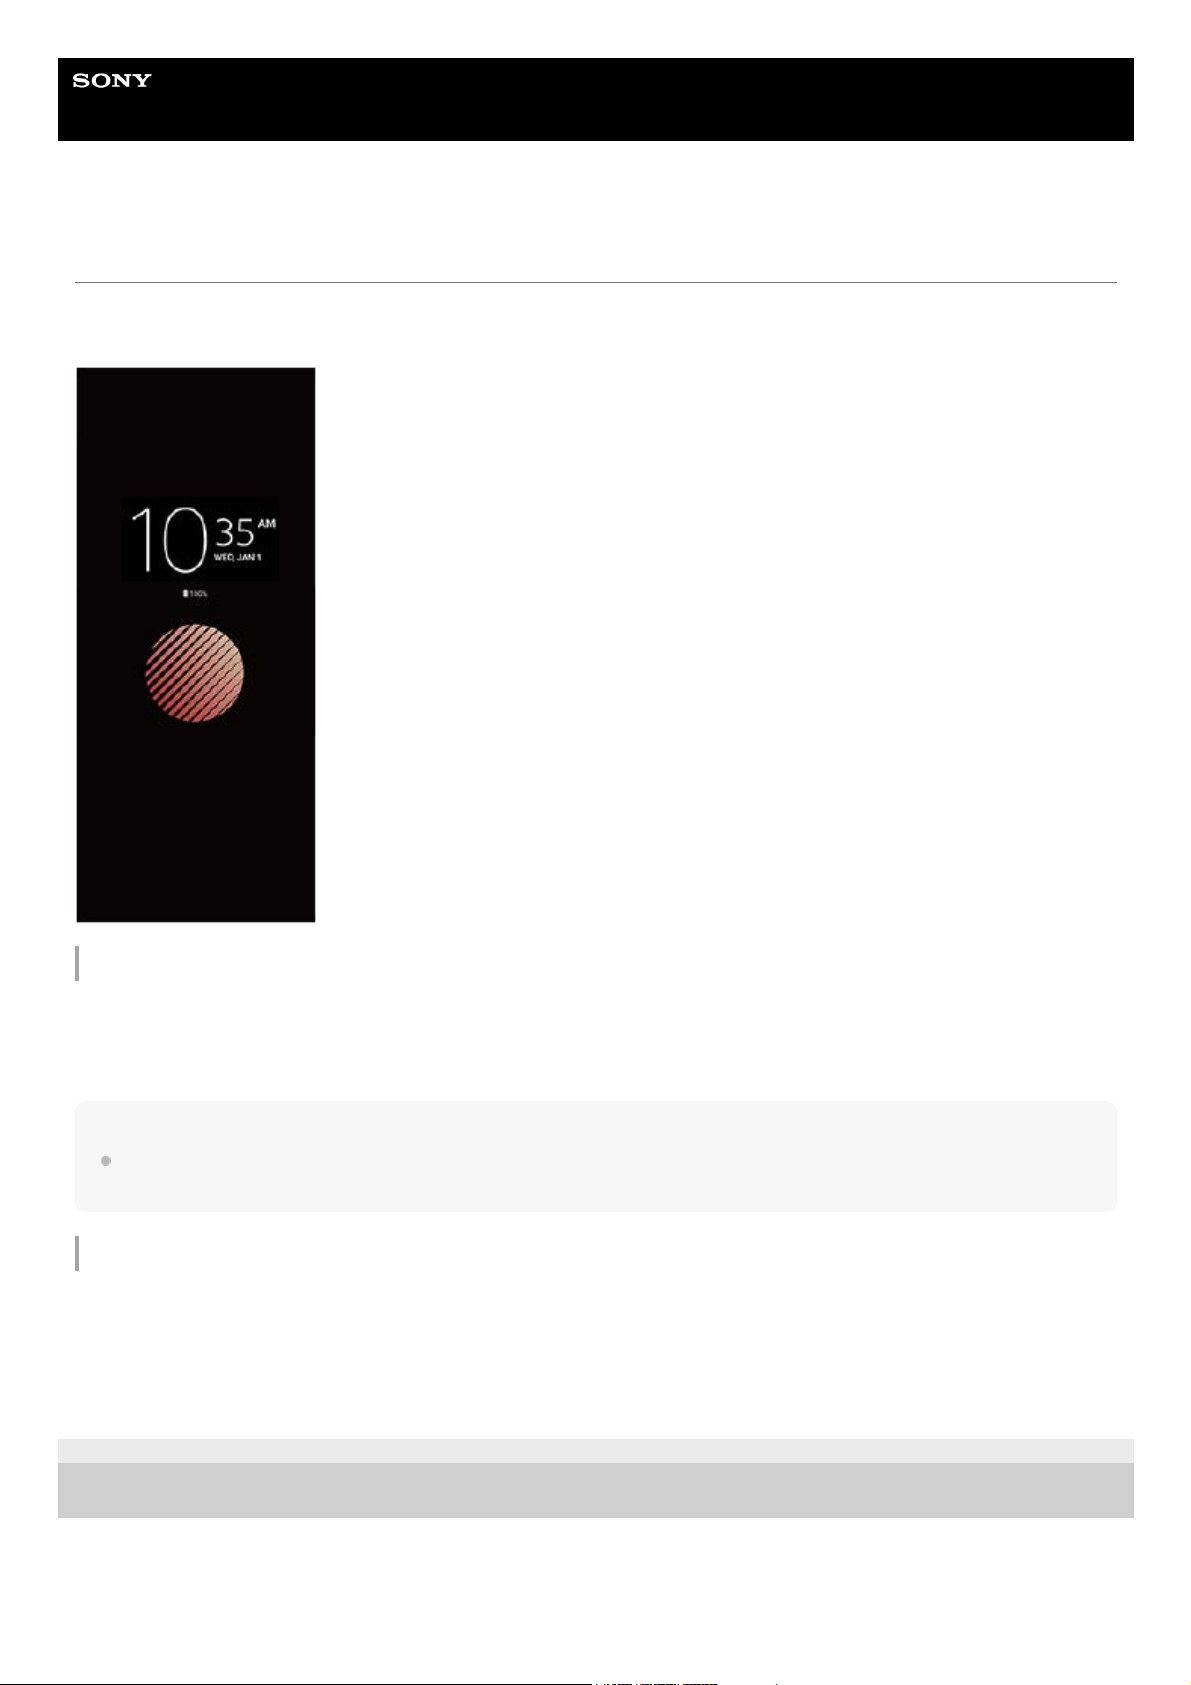
Setting the Ambient display
The Ambient display lets you view information such as the time, notifications, or music on the screen when the screen is
turned off. The Ambient display can also show album art while music is playing.
Adjusting the Ambient display settings
Hint
The default setting is [Smart activation], which activates the Ambient display when needed, for example, when walking with the
device in your hand, or when taking the device out of your pocket or bag.
Displaying an image on the Ambient display
F-172-100-11 Copyright 2020 Sony Mobile Communications Inc.
Tap [Settings] > [Appearance] > [Ambient display (Always-on display)].1.
Tap [When to show Ambient display], and then select the desired setting.2.
Close the setting menu.
The setting is saved.
3.
Tap [Settings] > [Appearance] > [Ambient display (Always-on display)].1.
Tap [Sticker], and then select your desired sticker or photo.2.
Close the setting menu.
The setting is saved.
3.
29
Page 30
Help Guide
Smartphone
Xperia 5 II XQ-AS52/XQ-AS62/XQ-AS72
Using Smart call handling
You can handle incoming calls without touching the screen by turning on the Smart call handling function. Once
activated, you can handle calls in the following way:
Answer: bring the device to your ear.
Reject: shake the device.
Ringer off: place the device face down.
F-172-100-11 Copyright 2020 Sony Mobile Communications Inc.
Find and tap [Settings] > [System] > [Gestures] > [Smart call handling].
1
Tap the switch to enable or disable the function.
2
30
Page 31

Help Guide
Smartphone
Xperia 5 II XQ-AS52/XQ-AS62/XQ-AS72
About this Help Guide
This is the Xperia 5 II Help Guide for the Android 10 software version. If you are not sure which software version your
device is running, you can check it in the Settings menu.
For information on common Android features and settings (such as Android basic settings, Wi-Fi settings, home screen
settings, content transfer, application screen navigation, notifications and other Google application features) please refer
to support.google.com/android/.
Note
System and application updates can present the features in your device in another way than described in this Help Guide. The
Android version might not be affected in an update.
To check the current software version and model number of your device
Find and tap [Settings] > [About phone]. The current software version is displayed under [Build number]. The current
model number is displayed under [Model].
Limitations to services and features
Some of the services and features described in this Help Guide may not be supported in all countries or regions, or by all
networks or service providers. The GSM International Emergency Number can always be used in all countries, regions,
networks and by all service providers, provided that the device is connected to the mobile network. Please contact your
network operator or service provider to determine the availability of any specific service or feature and whether additional
access or usage fees apply.
The use of certain features and applications described in this guide may require access to the internet. You may incur
data connection charges when you connect to the internet with your device. Contact your wireless service provider for
more information.
Related Topic
Before updating your device
Updating your device wirelessly
Updating your device using a computer
F-172-100-11 Copyright 2020 Sony Mobile Communications Inc.
31
Page 32

Help Guide
Smartphone
Xperia 5 II XQ-AS52/XQ-AS62/XQ-AS72
Overview
32
Page 33

Headset jack1.
Front camera2.
Ear speaker/Second loudspeaker3.
Second microphone4.
Proximity/Light sensor5.
Charging/Notification light6.
Volume/Zoom key7.
Power key/Fingerprint sensor8.
Google Assistant key9.
Camera key10.
Main loudspeaker11.
USB port/Charger
You can view the screen of your device on a TV or other large display device using a USB Type-C cable.
You can also access the internet via an Ethernet LAN cable by using a commercially available USB-LAN adapter.
Note
When you connect your device to a TV or other large display using a USB Type-C cable, the cable must be compatible with
the display port standard. Note that some functions or content on your Xperia device may not be displayable on the TV or
display device.
12.
Main microphone13.
Flash LED14.
RGBC IR sensor15.
Main camera16.
Sub cellular antenna17.
NFC detection area18.
4th cellular/Wi-Fi/Bluetooth/GPS antenna19.
Nano SIM/Memory card slot20.
3rd cellular antenna21.
Main cellular antenna22.
33
Page 34

F-172-100-11 Copyright 2020 Sony Mobile Communications Inc.
34
Page 35

Help Guide
Smartphone
Xperia 5 II XQ-AS52/XQ-AS62/XQ-AS72
Assembly - Dual SIM
Your device only supports nano SIM cards. Dual SIM devices support the use of either two nano SIM cards or a nano
SIM card and a memory card.
Note
To prevent data loss, make sure you turn off your device before you drag out the tray to remove the nano SIM card (or cards) or
memory card from the device.
Note
Do not cut your SIM card, as this may damage your device.
Related Topic
Finding the IMEI number(s) of your device
F-172-100-11 Copyright 2020 Sony Mobile Communications Inc.
Drag out the SIM card tray.
1
Place the main SIM card securely in position for SIM1.
2
Place either the second SIM card (SIM2) or the memory card securely in the tray, in the correct orientation.
3
Gently push the SIM card tray back into the slot until it fits into place.
4
35
Page 36

Help Guide
Smartphone
Xperia 5 II XQ-AS52/XQ-AS62/XQ-AS72
Using a Dual SIM device
A Dual SIM device enables you to do the following:
Receive incoming communications via both SIM cards.
Select the number from which to send outgoing communications, or have the option to select a SIM card each time
you place a call.
Forward calls received via SIM 1 to SIM 2 when SIM 1 is unreachable, and vice versa. This function is called Dual
SIM reachability. You must enable it manually.
Before using multiple SIM cards, you need to enable them and select a SIM card which will handle data traffic.
Hint
A Dual SIM device works with either one or two SIM cards inserted.
Enabling or disabling the use of two SIM cards
Renaming a SIM card
Selecting which SIM card handles data traffic
Setting the default SIM card for placing a call
Enabling the Dual SIM reachability function
Find and tap [Settings] > [Network & internet] > [SIM cards].
You may find the item under [Advanced].
1.
Tap the [SIM 1] and [SIM 2] switches to enable or disable the SIM cards.2.
Find and tap [Settings] > [Network & internet] > [SIM cards].
You may find the item under [Advanced].
1.
Select a SIM card and enter a new name for it.2.
Tap [OK].3.
Find and tap [Settings] > [Network & internet] > [SIM cards] > [Cellular data].
You may find the item under [Advanced].
1.
Select the SIM card you want to use for data traffic.2.
Find and tap [Settings] > [Network & internet] > [SIM cards] > [Calls].
You may find the item under [Advanced].
1.
Select an option.2.
Find and tap [Settings] > [Network & internet] > [SIM cards] > [Dual SIM reachability].
You may find the item under [Advanced].
1.
Under [Dual SIM reachability], tap the switch to enable the function.2.
Follow the on-screen instructions to complete the procedure.3.
36
Page 37

Hint
If the Dual SIM reachability function does not work after you enable it, check that you have entered the phone numbers correctly
for each SIM card. In some cases, the numbers are detected automatically during setup. Otherwise, you are prompted to enter
them manually.
F-172-100-11 Copyright 2020 Sony Mobile Communications Inc.
37
Page 38

Help Guide
Smartphone
Xperia 5 II XQ-AS52/XQ-AS62/XQ-AS72
Screen protection
Note
Before using your device, remove all protection films to enable full functionality.
Screen covers and protectors may help you protect your device against damage. We recommend you use only those
screen covers intended for your Xperia device. The use of third-party screen protection accessories may prevent your
device from working correctly by covering sensors, lenses, speakers, or microphones and can invalidate the warranty.
F-172-100-11 Copyright 2020 Sony Mobile Communications Inc.
38
Page 39

Help Guide
Smartphone
Xperia 5 II XQ-AS52/XQ-AS62/XQ-AS72
Starting your device for the first time
It is recommended that you charge the battery for at least 30 minutes before starting up your device for the first time. You
can still use your device while it is charging.
The first time you start your device, a setup guide helps you to configure basic settings, personalize your device, and
sign in to your accounts, for example a Google account.
To turn off the device
Note
It may take a while for the device to shut down.
Related Topic
Charging your device
F-172-100-11 Copyright 2020 Sony Mobile Communications Inc.
Long press the power key until your device vibrates.
1
Long press the power key until the options menu opens.1.
Tap [Power off].2.
39
Page 40

Help Guide
Smartphone
Xperia 5 II XQ-AS52/XQ-AS62/XQ-AS72
Setting up a Google account on your device
Your device from Sony runs on the Android platform developed by Google. A range of Google applications and services
is available on your device when you purchase it, for example, Gmail, Google Maps, YouTube, and the Google Play
application. To get the most out of these services, you need a Google account. For example, a Google account enables
you to do the following:
Download and install applications on Google Play.
Synchronize your email, contacts, and calendar using Gmail.
You can back up, restore, and transfer your data from an old device to your new device.
Chat with friends using the Google Duo application.
Synchronize your browsing history and bookmarks using the Chrome web browser.
Identify yourself as the authorized user after a software repair using Xperia Companion.
Remotely find, lock, or clear a lost or stolen device using the Find my device services.
For more information, go to support.google.com/.
F-172-100-11 Copyright 2020 Sony Mobile Communications Inc.
Find and tap [Settings] > [Accounts] > [Add account] > [Google].
1
Follow the on-screen instructions to create a Google account, or sign in if you already have an account.
2
40
Page 41

Help Guide
Smartphone
Xperia 5 II XQ-AS52/XQ-AS62/XQ-AS72
Transferring content from your old device
There are several ways to transfer your data from an old device to your new device.
Transfer data using the Xperia Transfer 2 app.
Synchronize data using Google account.
Copy and transfer data using a computer.
Copy and transfer data using an SD card.
Hint
For more information about transferring content from your old device, go to support.google.com/android/.
Transferring content using the Xperia Transfer 2 app
The Xperia Transfer 2 app is recommended for transferring photos, videos, music, or other files from your old device to
your new device.
The simplest way to connect devices is using a USB cable. To transfer content from an iOS device, use a USB OTG
adapter together with the USB cable. You can also connect devices using a Wi-Fi connection.
(A): USB OTG adapter (Use a USB OTG adapter to transfer content from an iOS device.)
41
Page 42

F-172-100-11 Copyright 2020 Sony Mobile Communications Inc.
On your new device, open the Xperia Transfer 2 app.
To transfer content from an Android OS device, download and open the Xperia Transfer 2 app on your old device.
1.
Follow the on-screen instructions to connect and transfer content.2.
42
Page 43

Help Guide
Smartphone
Xperia 5 II XQ-AS52/XQ-AS62/XQ-AS72
Making sure your device is protected
Your device includes security options, strongly recommended in case of loss or theft.
There are several ways to protect your device, as listed below. Find and tap [Settings], and then search for the settings
at the top of the screen.
Screen lock
Fingerprint Manager
SIM card lock
You can register fingerprints to use as a security method for unlocking your device or authenticating purchases. Find and
tap [Settings] > [Security] > [Fingerprint Manager], and then follow the on-screen instructions.
For more information, go to support.google.com/android/.
Note
When using a security option to protect your device, it is crucial to remember the details provided at set up.
F-172-100-11 Copyright 2020 Sony Mobile Communications Inc.
43
Page 44

Help Guide
Smartphone
Xperia 5 II XQ-AS52/XQ-AS62/XQ-AS72
Finding the IMEI number(s) of your device
Your device has one or two unique identification numbers that are referred to as IMEI or Product ID. You should keep a
copy of this. You may require it if your device is stolen or when contacting support.
Viewing your IMEI number(s) using the dialpad
Viewing your IMEI number(s) on the tray
F-172-100-11 Copyright 2020 Sony Mobile Communications Inc.
Find and tap
(Phone icon).1.
Tap
(Dialpad icon).2.
Enter *#06# into the dialpad. The IMEI number(s) are displayed automatically.3.
Drag out the SIM card tray. The IMEI number(s) is(are) displayed on the tray.1.
44
Page 45

Help Guide
Smartphone
Xperia 5 II XQ-AS52/XQ-AS62/XQ-AS72
Finding, locking, or erasing a lost device
Google offers a location and security web service called “Find my device”. After you sign in to a Google account, “Find
my device” is turned on by default. If you lose your device, you can use “Find my device” to find, lock, or erase it.
For more information, go to support.google.com/android/.
F-172-100-11 Copyright 2020 Sony Mobile Communications Inc.
45
Page 46

Help Guide
Smartphone
Xperia 5 II XQ-AS52/XQ-AS62/XQ-AS72
Turning the screen on or off
When your screen is turned off, your device can be locked or unlocked, depending on your screen lock setting.
The Ambient display feature enables you to view information such as the time and notifications without pressing the
power key.
Hint
If the Ambient display is set to [Smart activation] or [Show when device is lifted], the screen is turned on automatically when you
pick up your device.
Related Topic
Setting the Ambient display
F-172-100-11 Copyright 2020 Sony Mobile Communications Inc.
Briefly press the power key.
1
46
Page 47

Help Guide
Smartphone
Xperia 5 II XQ-AS52/XQ-AS62/XQ-AS72
Adjusting the idle time before the screen turns off
When your device is on and left idle for a set period of time, the screen dims and turns off to save battery power. You can
change how long your screen stays active before it turns off.
F-172-100-11 Copyright 2020 Sony Mobile Communications Inc.
Find and tap [Settings] > [Display] > [Screen timeout].
1
Select an option.
2
47
Page 48

Help Guide
Smartphone
Xperia 5 II XQ-AS52/XQ-AS62/XQ-AS72
Smart backlight control
The smart backlight control keeps the screen on as long as the device is held in your hand. Once you put down the
device, the screen turns off according to your screen timeout setting.
Related Topic
Adjusting the idle time before the screen turns off
F-172-100-11 Copyright 2020 Sony Mobile Communications Inc.
Find and tap [Settings] > [Display] > [Advanced] > [Smart backlight control].
1
Tap the switch to enable or disable the function.
2
48
Page 49

Help Guide
Smartphone
Xperia 5 II XQ-AS52/XQ-AS62/XQ-AS72
One-handed mode
Enable One-handed mode to adjust the display size so you can type with one hand more easily.
To adjust the position of the screen
To move the screen to the left side or to the right side: tap
(Left arrow icon) or (Right arrow icon)
accordingly.
To move the screen upwards or downwards: drag the horizontal stripes at the edge of the resized screen.
To resize the screen: drag
(Resize screen icon) at the edge of the resized screen.
Hint
You can shrink the screen by using the Side sense menu.
Related Topic
Using Side sense
F-172-100-11 Copyright 2020 Sony Mobile Communications Inc.
Find and tap [Settings] > [Display] > [Advanced] > [One-handed mode].
1
Tap the [One-handed mode] switch to enable or disable the function.
2
To shrink the screen, double-tap
(Home button).
To exit One-handed mode, double-tap
(Home button) again or tap an empty area on the screen.
3
49
Page 50

Help Guide
Smartphone
Xperia 5 II XQ-AS52/XQ-AS62/XQ-AS72
Taking a screenshot
You can capture still images of any screen on your device as a screenshot. Screenshots you take are automatically
saved in your device’s internal storage.
Hint
You can also take a screenshot by pressing and holding the power key and volume down key at the same time.
F-172-100-11 Copyright 2020 Sony Mobile Communications Inc.
Long press the power key until the options menu opens.
1
Tap [Screenshot].
2
50
Page 51

Help Guide
Smartphone
Xperia 5 II XQ-AS52/XQ-AS62/XQ-AS72
Notification light
The notification light informs you about battery status and some other events. The notification light is enabled by default
but can be disabled manually.
Note
If the notification light is disabled, it only lights up or flashes when there is a battery status warning, such as when the battery
level goes below 15 percent.
F-172-100-11 Copyright 2020 Sony Mobile Communications Inc.
Find and tap [Settings] > [Apps & notifications] > [Configure notifications].
1
Tap the [Use LED light to show incoming notifications] switch to enable or disable the function.
You may find the item under [Advanced].
2
51
Page 52

Help Guide
Smartphone
Xperia 5 II XQ-AS52/XQ-AS62/XQ-AS72
Status icons
(Signal strength icon)
The mobile network mode is also displayed when sending and downloading mobile data.
(No signal icon)
(Data roaming icon)
(Wi-Fi signal icon)
A Wi-Fi connection is enabled and data is being transmitted.
The number displayed to the left of the icon differs according to the Wi-Fi standard of the current connection.
(Wi-Fi connection error icon)
A Wi-Fi connection is enabled but there is no internet connection.
This icon also appears when you are trying to connect to a captive portal network. After a successful login, the
cross mark disappears.
If Google is blocked in your area, the cross mark may appear even when the device is connected to a network
and there is a Wi-Fi working internet connection.
(Battery status icon)
(Charging battery icon)
(STAMINA mode icon)
(Airplane mode icon)
(Microphone muting icon)
(Speakerphone icon)
(Muting icon)
(Vibrate icon)
(Alarm icon)
(GPS icon)
52
Page 53

Related Topic
Notification icons
F-172-100-11 Copyright 2020 Sony Mobile Communications Inc.
53
Page 54

Help Guide
Smartphone
Xperia 5 II XQ-AS52/XQ-AS62/XQ-AS72
Notification icons
Note
Not all icons that may appear on your device are listed here. This list is for reference purposes only, and changes may be made
without notice.
(New SMS icon)
(Ongoing call icon)
(Missed call icon)
(Phone call on hold icon)
(Call forward icon) Dual SIM device: Call forwarding is turned on
(Downloading data icon)
(Uploading data icon)
(Software setup icon) A basic setup of your device is available
(Install latest software icon) A software update is available
(System update icon) System updates are available
(Downloading system update icon)
(Installing downloaded system update icon)
(Battery Care icon)
(Dynamic Vibration icon)
(Screenshot icon) Screenshot captured
(Music playing icon) A song is playing
(More notifications icon) More undisplayed notifications
54
Page 55

Related Topic
Status icons
F-172-100-11 Copyright 2020 Sony Mobile Communications Inc.
55
Page 56

Help Guide
Smartphone
Xperia 5 II XQ-AS52/XQ-AS62/XQ-AS72
Charging your device
You can charge your device from a wall socket or computer. You can still use your device while charging.
If the battery is depleted, it may take up to 10 minutes for your device to respond to the charging. During this time, the
screen may remain completely dark, not showing the charging icon. It can take couple of hours for a completely drained
battery to be fully charged. Charging speed may be affected by ambient temperature.
Always use the original Sony charger and a USB cable intended for your specific Xperia model, since other types of
chargers can increase charging time, not charge at all, or may even damage your device.
Note
Your device has an embedded, rechargeable battery that can only be replaced by an authorized Sony repair center. Never try to
open or take apart the device yourself. Doing so can cause damage and void your warranty.
Hint
A wall socket charger will charge your device faster than charging via computer. You can still use your device while charging.
56
Page 57

Battery notification light status
Green: Battery is charging, charge level is greater than 90%
Orange: Battery is charging, charge level is 15–90%
Red: Battery is charging, charge level is less than 15%
Note
It is important to use the USB cable that came with your device, as other types of USB cables can damage your device.
Hint
If the battery is completely depleted, it may take up to 10 minutes before the notification light illuminates and the charging icon
appears.
Related Topic
Battery and power management
F-172-100-11 Copyright 2020 Sony Mobile Communications Inc.
Connect one end of the USB cable to the charger (or to the USB port of a computer).
1
Connect the other end of the cable to the USB port on your device.
The notification light illuminates when charging begins.
2
When the device is fully charged, disconnect the cable from your device by pulling it straight outwards.
Make sure not to bend the connector.
3
57
Page 58

Help Guide
Smartphone
Xperia 5 II XQ-AS52/XQ-AS62/XQ-AS72
Battery and power management
Your device has an embedded battery. To get the most use from it, keep track of the power consumed by different
applications and features.
You can also use Battery Care to increase the battery’s lifetime. The Power-saving feature is activated by default to
restrict applications from using battery power in the background. If you do not want an application to be affected, you can
make it exempt in the Power-saving feature menu. Phone calls and SMS are not affected.
Note
System updates may change the power-saving features available on your device.
General usage tips to improve battery performance
The following tips can help you improve battery performance:
Lower the screen brightness level.
Turn off Bluetooth, Wi-Fi, and location services when you do not need these features.
Turn off your device or use Airplane mode if you are in an area with no or low network coverage. Otherwise, your
device repeatedly scans for available networks, and this consumes power.
Use a Wi-Fi network instead of roaming when abroad. Roaming is scanning for your home network and puts
additional demands on your battery as your device must transmit with a higher output power.
Change the synchronization settings for your email, calendar, and contacts.
Check the applications that have a high battery consumption and consider the battery saving tips provided on your
device for these applications.
Change the notification level for an application.
Turn off the location-sharing permission for an application.
Uninstall applications that you are not using.
Use a Sony original handsfree device to listen to music. Handsfree devices consume less battery than your device’s
loudspeakers.
Restart your device every now and then.
To review your battery consumption
Related Topic
Charging your device
Checking battery consumption for applications
Battery Care
Making applications exempt from the Power-saving feature
Screen settings
Turning the Bluetooth function on or off
Using location services
Restarting, resetting, and repairing your device
F-172-100-11 Copyright 2020 Sony Mobile Communications Inc.
Find and tap [Settings] > [Battery] to view the estimated remaining battery percentage and battery time.1.
Tap
(More icon) > [Battery usage] to view a list of applications and features that have consumed battery power.2.
58
Page 59

Help Guide
Smartphone
Xperia 5 II XQ-AS52/XQ-AS62/XQ-AS72
Checking battery consumption for applications
You can check battery consumption for applications, and change the settings if necessary.
F-172-100-11 Copyright 2020 Sony Mobile Communications Inc.
Find and tap [Settings] > [Apps & notifications].
1
Select an application and review its battery consumption under [Battery].
You may find the item under [Advanced].
2
59
Page 60

Help Guide
Smartphone
Xperia 5 II XQ-AS52/XQ-AS62/XQ-AS72
Making applications exempt from the Power-saving feature
F-172-100-11 Copyright 2020 Sony Mobile Communications Inc.
Find and tap [Settings] > [Apps & notifications] > [Advanced] > [Special app access] > [Power-saving
feature].
1
Select [All apps] from the pull-down menu.
2
Select the application listed as [Applied], and then follow the on-screen instructions.
3
60
Page 61

Help Guide
Smartphone
Xperia 5 II XQ-AS52/XQ-AS62/XQ-AS72
STAMINA mode
The STAMINA mode prolongs the time until the battery needs charging by disabling some functions of the device. When
you turn on the STAMINA mode, the display switches to the Dark theme mode.
Depending on the STAMINA level, different features will be restricted or disabled in order to reduce battery consumption.
These include rendering performance, screen brightness, image enhancement, and GPS while the screen is off.
Synchronizing of background app data or streaming may be disabled for some applications.
You can set the STAMINA mode to turn on or off automatically according to the battery level. Follow the on-screen
instructions for detailed settings.
Hint
You can exempt applications from being optimized by STAMINA mode in the Power-saving feature menu.
Related Topic
Making applications exempt from the Power-saving feature
F-172-100-11 Copyright 2020 Sony Mobile Communications Inc.
Find and tap [Settings] > [Battery] > [STAMINA mode].
1
Tap [Turn on now].
2
61
Page 62

Help Guide
Smartphone
Xperia 5 II XQ-AS52/XQ-AS62/XQ-AS72
Battery Care
Battery Care increases the lifespan of your battery. This feature detects your charging patterns and estimates the start
and end time of your regular charging period. The charging rate is controlled so that your battery reaches 100% just
before you disconnect the charger. You can manually customize the start and end times of the charging period. For a
better battery lifespan, you can also set a charging limit so that the battery always only charges up to 80% or 90%.
Note
Battery Care will not control the charging rate until it detects a regular charging cycle of at least 4 hours over a period of several
days.
Hint
Learned patterns of the regular charging cycle are saved by Battery Care. Even if the function has been disabled, it adopts to the
learned patterns after enabling the function again.
F-172-100-11 Copyright 2020 Sony Mobile Communications Inc.
Find and tap [Settings] > [Battery] > [Battery Care].
1
Tap the switch to enable or disable Battery Care.
2
Follow the on-screen instructions, and then select an option.
[Auto] is selected by default.
3
62
Page 63

Help Guide
Smartphone
Xperia 5 II XQ-AS52/XQ-AS62/XQ-AS72
Before updating your device
You should update the software on your device to get the latest functionality, enhancements, and bug fixes in order to
ensure optimal performance. When a software update is available,
(System update icon) appears in the status bar.
You can also check for new updates manually.
The easiest way to install a software update is to do it wirelessly from your device. However, some updates are not
available for wireless download. You then need to use the Xperia Companion software on a PC or Apple Mac computer
to update your device.
Before updating your device, consider the following:
Ensure you have sufficient storage capacity.
System and application updates can present the features on your device in another way than described in this Help
Guide. The Android version might not be affected after an update.
To check for new software
Related Topic
Updating your device wirelessly
Updating your device using a computer
F-172-100-11 Copyright 2020 Sony Mobile Communications Inc.
Find and tap [Settings] > [System] > [Advanced] > [Software update].1.
63
Page 64

Help Guide
Smartphone
Xperia 5 II XQ-AS52/XQ-AS62/XQ-AS72
Updating your device wirelessly
Use the Software update application to update your device software wirelessly. The updates you can download over a
mobile network depend on your operator. It is recommended to use a Wi-Fi network instead of a mobile network to
download new software so that you can avoid data traffic costs.
To set up automatic download of system updates
To enable or disable automatic updates for applications
Related Topic
Before updating your device
Updating your device using a computer
F-172-100-11 Copyright 2020 Sony Mobile Communications Inc.
Find and tap [Settings] > [System] > [Advanced] > [Software update].
1
Follow the on-screen instructions.
2
Find and tap [Settings] > [System] > [Advanced] > [Software update].1.
Tap
(More icon) > [Settings] > [Auto update system].2.
Select the preferred option.3.
Find and tap [Settings] > [System] > [Advanced] > [Software update].1.
Tap
(More icon) > [Settings] > [Auto update apps].2.
Select the preferred option.3.
64
Page 65

Help Guide
Smartphone
Xperia 5 II XQ-AS52/XQ-AS62/XQ-AS72
Updating your device using a computer
Note
If you do not have the Xperia Companion software installed on the relevant computer, search for Xperia Companion on the Sony
customer support website and download it.
Related Topic
Before updating your device
Updating your device wirelessly
F-172-100-11 Copyright 2020 Sony Mobile Communications Inc.
Connect your device to the computer using a USB cable.
1
Drag down the status bar, and then tap [Android System] next to
(USB icon).
2
Tap [Tap for more options.], and then tap [File Transfer].
3
Computer: Open Xperia Companion, if it is not automatically launched.
Make sure that the computer can access the internet.
If a new software update is detected, a pop-up window appears.
4
Follow the on-screen instructions to run the relevant software updates.
5
65
Page 66

Help Guide
Smartphone
Xperia 5 II XQ-AS52/XQ-AS62/XQ-AS72
Restarting, resetting, and repairing your device
You can force your device to restart or shut down if it stops responding or will not restart normally. No settings or
personal data get deleted.
You can also reset your device to its original factory settings. This procedure is sometimes necessary if your device
stops functioning properly, but note that you should first back up your data, as resetting your device will erase all your
data from your device.
If your device fails to turn on or you want to reset your device’s software, you can use Xperia Companion to repair your
device. For more information on downloading and using Xperia Companion, search for Xperia Companion on the Sony
customer support website.
Restarting your device
Note
Your device may fail to restart if the battery level is low. Connect your device to a charger and try restarting again.
Forcing the device to restart or shut down
Performing a factory data reset
Note
To avoid permanent damage to your device, do not interrupt a factory data reset procedure.
Back up any data saved to the internal memory of your device. Resetting will erase all your data from your device.
Hint
Your device does not revert to an earlier software version of Android when you perform a factory data reset.
Related Topic
Repairing the device software using Xperia Companion
F-172-100-11 Copyright 2020 Sony Mobile Communications Inc.
Long press the power key.1.
In the menu that opens, tap [Restart].
The device restarts automatically.
2.
Long press the power key and the volume up key at the same time until your device vibrates.1.
Depending on whether you wish to force the device to restart or shut down, proceed as follows.
If you wish to force restart the device: Release the keys at this point. The device restarts.
If you wish to force shut down the device: Continue pressing the keys. After a few more seconds, the device
vibrates three times and turns off.
2.
Find and tap [Settings] > [System] > [Advanced] > [Reset options].1.
Tap [Erase all data (factory reset)] > [Erase all data].2.
If required, draw your screen unlock pattern or enter your screen unlock password or PIN to continue.3.
To confirm, tap [Erase all data].4.
66
Page 67

67
Page 68

Help Guide
Smartphone
Xperia 5 II XQ-AS52/XQ-AS62/XQ-AS72
Repairing the device software using Xperia Companion
You can use Xperia Companion to repair your device’s software. If you forget your screen unlock password, PIN or
pattern, you can use the device repair feature in Xperia Companion to erase the security layer. You need to provide your
Google account login details to perform this operation. By running the repair feature, you reinstall software for your
device and you may lose some personal data in the process.
If your device seems to have frozen, restarts repeatedly, or does not start at all after you update the Xperia software,
after you perform a software repair, or after a factory data reset, try forcing the device to shut down and then turning it
back on. If the problem persists, force the device to shut down and then perform a software repair.
Note
Before performing a software repair, make sure you know your Google account username and password. Depending on your
security settings, you may need to enter them in order to restart the device after a software repair.
Related Topic
Restarting, resetting, and repairing your device
F-172-100-11 Copyright 2020 Sony Mobile Communications Inc.
Make sure that Xperia Companion is installed on the computer.
1
Open the Xperia Companion software on the computer and click [Software repair] on the main screen.
2
Follow the instructions that appear on the screen to reinstall the software and complete the repair.
3
68
Page 69

Help Guide
Smartphone
Xperia 5 II XQ-AS52/XQ-AS62/XQ-AS72
Resetting your applications
You can reset an application or clear application data if your application stops responding or causes issues with your
device. Resetting application preferences does not delete any application data from your device.
To clear application data
To clear application cache
To clear the application default setting
Note
The option to clear the application data, cache, or default setting is not available for every application or service.
F-172-100-11 Copyright 2020 Sony Mobile Communications Inc.
Find and tap [Settings] > [Apps & notifications].
1
Tap the number of apps to see all apps.
2
Tap
(More icon) > [Reset app preferences] > [Reset apps].
3
Find and tap [Settings] > [Apps & notifications].1.
Select an application or service, and then tap [Storage & cache] > [Clear storage] > [OK].2.
Find and tap [Settings] > [Apps & notifications].1.
Select an application or service, and then tap [Storage & cache] > [Clear cache].2.
Find and tap [Settings] > [Apps & notifications].1.
Select an application or service, and then tap [Advanced] > [Open by default] > [Clear defaults].2.
69
Page 70

Help Guide
Smartphone
Xperia 5 II XQ-AS52/XQ-AS62/XQ-AS72
Viewing the memory status
The internal storage stores downloaded or transferred content along with personal settings and data, and it tends to fill
up as a result of normal usage. If the device starts to slow down, or applications suddenly shut down, you should
consider the following:
Close running applications that you are not using.
Uninstall downloaded applications that you do not use.
Transfer photos, videos, and music from the internal memory to the removable memory card or Google service.
Note
You can purchase a memory card separately.
If your device cannot read content on the memory card, you may need to format the card. Note that when you format the card, all
content is erased.
To view the memory status
Related Topic
Freeing up space on the internal storage
Formatting the memory card
Stopping applications and services from running
F-172-100-11 Copyright 2020 Sony Mobile Communications Inc.
Find and tap [Settings] > [Storage].1.
70
Page 71

Help Guide
Smartphone
Xperia 5 II XQ-AS52/XQ-AS62/XQ-AS72
Freeing up space on the internal storage
If the device starts to slow down, or applications suddenly shut down, freeing up space on the internal storage may solve
the problem.
Related Topic
Viewing the memory status
F-172-100-11 Copyright 2020 Sony Mobile Communications Inc.
Find and tap [Settings] > [Storage].
1
Tap [FREE UP SPACE].
If you have a memory card inserted, select [Internal shared storage] > [FREE UP SPACE].
2
Select infrequently used apps or old files to delete, and then follow the on-screen instructions.
3
71
Page 72

Help Guide
Smartphone
Xperia 5 II XQ-AS52/XQ-AS62/XQ-AS72
Stopping applications and services from running
If the performance of your device or apps is not optimal, try stopping apps and services from running.
Related Topic
Viewing the memory status
F-172-100-11 Copyright 2020 Sony Mobile Communications Inc.
Find and tap [Settings] > [Apps & notifications].
1
Select an application or service, then tap [Force stop] > [OK].
2
72
Page 73

Help Guide
Smartphone
Xperia 5 II XQ-AS52/XQ-AS62/XQ-AS72
Formatting the memory card
If your device cannot read content on the memory card, format the memory card on your device.
Note
All content on the memory card gets erased when you format it. Make sure you first make backups of all data that you want to
save. To back up your content, you can copy it to a computer.
F-172-100-11 Copyright 2020 Sony Mobile Communications Inc.
Find and tap [Settings] > [Storage] > [SD card].
1
Tap
(More icon) > [Storage settings] > [Format], and then perform formatting on the next confirmation
dialog.
2
73
Page 74

Help Guide
Smartphone
Xperia 5 II XQ-AS52/XQ-AS62/XQ-AS72
Mobile data connection
You need the correct internet settings to access the internet with a mobile data connection.
For most mobile networks and operators, these settings come pre-installed on your device so that you can start using
the internet right away.
You can manually check for updates to your internet settings. If you change or delete an internet setting by mistake,
reset the internet settings.
Find and tap [Settings] > [Network & internet] > [Mobile network] for more mobile network options.
F-172-100-11 Copyright 2020 Sony Mobile Communications Inc.
74
Page 75

Help Guide
Smartphone
Xperia 5 II XQ-AS52/XQ-AS62/XQ-AS72
Increasing Wi-Fi signal strength
There are a number of things you can do to improve Wi-Fi reception:
Move your device closer to the Wi-Fi access point.
Move the Wi-Fi access point away from any potential obstructions or interference.
Do not cover the Wi-Fi antenna area of your device.
Related Topic
Overview
F-172-100-11 Copyright 2020 Sony Mobile Communications Inc.
75
Page 76

Help Guide
Smartphone
Xperia 5 II XQ-AS52/XQ-AS62/XQ-AS72
Controlling data usage
You can keep track of the amount of data transferred to and from your device over your mobile data or Wi-Fi connection
during a given period. For example, you can view the amount of data used by individual applications. For data
transferred over your mobile data connection, you can also set data usage warnings and limits to avoid additional
charges.
Helping reduce data usage
Setting a data usage warning or a mobile data limit
Hint
You can set the date when the usage cycle resets. Under [Data warning & limit], tap [App data usage cycle], and then set the
reset date.
Note
Once your mobile data usage reaches the set limit, mobile data traffic on your device gets turned off automatically.
Checking your data usage
Controlling the data usage of individual applications
Note
The performance of individual applications may be affected if you change the related data usage settings.
F-172-100-11 Copyright 2020 Sony Mobile Communications Inc.
Find and tap [Settings] > [Network & internet] > [Data Saver].1.
Tap the switch to enable the function.2.
Make sure that mobile data traffic is turned on.1.
Find and tap [Settings] > [Network & internet] > [Mobile network] > [App data usage] >
(Settings icon).2.
Depending on whether you want to set a data warning or a data limit, proceed as follows.
To set a data usage warning, tap the [Set data warning] switch to enable the function, and then tap [Data warning]
to change the warning level.
To set a mobile data limit, tap the [Set data limit] switch to enable the function, and then tap [Data limit] to change
the data usage limit.
3.
Find and tap [Settings] > [Network & internet].1.
Depending on whether you want to check mobile data usage or Wi-Fi data usage, proceed as follows.
To check mobile data usage, tap [Mobile network] > [App data usage].
To check Wi-Fi data usage, tap [Wi-Fi] > [Wi-Fi data usage].
2.
Find and tap [Settings] > [Apps & notifications].1.
Tap the application that you want to control, and then tap [Mobile data & Wi-Fi].2.
Edit the options as desired.3.
76
Page 77

Help Guide
Smartphone
Xperia 5 II XQ-AS52/XQ-AS62/XQ-AS72
Settings menu
View and change settings for your device from the Settings menu. The Settings menu is accessible from both the
Application screen and the Quick settings panel.
Hint
To view information about your device, find and tap [Settings] > [About phone].
To search for a setting, find and tap [Settings], and then enter the name of the setting into the [Search settings] field.
F-172-100-11 Copyright 2020 Sony Mobile Communications Inc.
Find and tap [Settings].
1
77
Page 78

Help Guide
Smartphone
Xperia 5 II XQ-AS52/XQ-AS62/XQ-AS72
Volume and vibration
The volume and vibration can be changed either by using the volume keys or by changing a setting.
You can change the ring, media, alarm, and in-call volumes. Additionally, you can set your device to vibrate.
Note
App settings can override the selected volume and vibration settings.
Changing the volume
Activating the vibrating mode
Activating sound with vibration for incoming calls
F-172-100-11 Copyright 2020 Sony Mobile Communications Inc.
Press the volume key up or down to change the media volume.
To quickly turn the media volume on or off, tap
(Media volume icon).
1.
To change the in-call, ring, and notification, or alarm volumes, tap
(Adjust volume icon).
Use each slider to adjust the volume. Tap [See more] for more options.
2.
Press the volume key up or down.1.
Tap the icon displayed above the slider one or more times until
(Vibrate icon) appears.2.
Find and tap [Settings] > [Sound].1.
Tap the [Vibrate for calls] switch to enable the function.2.
78
Page 79

Help Guide
Smartphone
Xperia 5 II XQ-AS52/XQ-AS62/XQ-AS72
Sounds and tones
Setting the ringtone
Setting the notification sound
Hint
To turn off all ringtone and/or notification sounds and set your device to vibrate only, select [None] from the list.
To enable or disable other sounds and tones, find and tap [Settings] > [Sound] > [Advanced], and then tap the switches to enable
or disable the various sounds and tones.
F-172-100-11 Copyright 2020 Sony Mobile Communications Inc.
Find and tap [Settings] > [Sound].1.
Select [Phone ringtone - SIM 1] or [Phone ringtone - SIM 2].2.
Select a sound from the list.
To select a music file that is not in the list, tap [Add ringtone].
3.
To confirm, tap [OK].4.
Find and tap [Settings] > [Sound] > [Notification sound].1.
Select a sound from the list.
To select a music file that is not in the list, tap [Add notification].
2.
To confirm, tap [OK].3.
79
Page 80

Help Guide
Smartphone
Xperia 5 II XQ-AS52/XQ-AS62/XQ-AS72
Screen settings
You can change the screen’s behavior, brightness, viewing size, and quality. You can also adjust the image quality of
photos and videos.
Main screen settings
Image quality settings: Adjust the quality of photos and videos as displayed on your device.
White balance: Tap the [Set manually] switch to enable changes to the setting, and then select one of the preset
settings. You can also use the sliders to adjust the white balance.
High refresh rate: Set the refresh rate to 120 Hz for a smoother display.
Brightness level: Adjust the brightness level with the slider. You can also enable [Adaptive brightness] to
automatically optimize brightness based on surrounding light.
Dark theme: You can display the screen with a dark background.
Auto-rotate screen: Set the screen to rotate automatically when the device is turned, or set it to stay in portrait view.
Night Light: [Night Light] switches the color of the screen to amber. This makes it easier to view the screen in a
darker setting, and also makes it easier to fall asleep.
Prevent accidental operations with screen off: You can prevent your device from being activated by mistake while
placed in a pocket or a bag.
Note
When the STAMINA mode is turned on, [High refresh rate] cannot be used.
Avoid displaying very bright or static images for a long period of time. This may cause an afterimage or coloring to remain on the
screen.
Hint
[Video image enhancement] is available only for certain applications.
Even if the Auto-rotate screen function is disabled, you can rotate the screen manually by tapping
(Rotate icon) in the
navigation bar.
F-172-100-11 Copyright 2020 Sony Mobile Communications Inc.
Find and tap [Settings] > [Display].
1
Tap the setting you want to change.
Use the sliders, tap the switches, or select options to adjust.
2
80
Page 81

Help Guide
Smartphone
Xperia 5 II XQ-AS52/XQ-AS62/XQ-AS72
Application updates
If the automatic update feature is enabled, your applications get updated without you being asked, so you may not
realize that large volumes of data are being downloaded. In order to avoid potentially high data transfer costs, you can
disable automatic updates or enable automatic updates only over Wi-Fi connection. You have to disable the automatic
update feature in the Play Store app to avoid the automatic updating of applications.
F-172-100-11 Copyright 2020 Sony Mobile Communications Inc.
Find and tap
(Play Store icon).
1
Tap
(Menu icon), and then tap the settings menu.
2
Tap the auto update apps menu.
3
Select the preferred option.
4
81
Page 82

Help Guide
Smartphone
Xperia 5 II XQ-AS52/XQ-AS62/XQ-AS72
Using location services
Location services allow applications such as Maps and the camera to use information from your mobile or Wi-Fi network
as well as GPS (Global Positioning System) information to determine your approximate location.
In order to use your device to find out where you are, you need to enable location services.
For more information, go to support.google.com/.
To improve GPS accuracy
The first time you use the GPS function in your device, it can take a few minutes for your location to be found. To help
the search, make sure you have a clear view of the sky. Stand still and do not cover the GPS antenna. GPS signals can
pass through clouds and plastic, but not through most solid objects such as buildings and mountains. If your location is
not found after a few minutes, move to another location.
Related Topic
Overview
F-172-100-11 Copyright 2020 Sony Mobile Communications Inc.
Find and tap [Settings] > [Location].
1
Tap the switch to enable or disable location services.
2
82
Page 83

Help Guide
Smartphone
Xperia 5 II XQ-AS52/XQ-AS62/XQ-AS72
Date and time
You can change the date and time on your device.
F-172-100-11 Copyright 2020 Sony Mobile Communications Inc.
Find and tap [Settings] > [System] > [Date & time].
You may find the item under [Advanced].
1
To set the date or time manually, tap the [Use network-provided time] switch to disable the function.
To set the time zone manually, tap the [Use network-provided time zone] switch to disable the function.
2
Tap the desired item to edit and change the values.
3
83
Page 84

Help Guide
Smartphone
Xperia 5 II XQ-AS52/XQ-AS62/XQ-AS72
Transferring music from a computer to your device
There are two ways to transfer music from a computer to your device:
Connect your device to a computer using a USB cable. Select [File Transfer] on your device and then copy and paste
or drag and drop the files using the computer.
On the computer, save your media files using Google Drive. Then, synchronize the data on your device by logging in
to the Google account.
Note
The Music app may not support all music file formats.
F-172-100-11 Copyright 2020 Sony Mobile Communications Inc.
84
Page 85

Help Guide
Smartphone
Xperia 5 II XQ-AS52/XQ-AS62/XQ-AS72
Listening to music
Use the Music app to listen to your favorite music.
Music player overview
Hint
How to use
(Previous button) while playing a song.
During the first 5 seconds of playback, tap the button to go back to the previous song.
Minimize the full screen player1.
Search all songs saved to your device2.
View the play queue3.
View more options4.
Album art (if available)5.
Add or remove a song as a favorite6.
Elapsed time of current song7.
Add a song to a playlist8.
Progress indicator – drag or tap along the line to fast-forward or rewind9.
Length of current song10.
Repeat the current song or all songs in the play queue11.
Tap to go to the next song, touch and hold to fast-forward the current song12.
Play or pause a song13.
Tap or double-tap to go to the beginning of the current song or the previous song, touch and hold to rewind the
current song
14.
Shuffle songs in the play queue15.
85
Page 86

After 5 seconds of playback, tap the button to go back to the beginning of the current song, or double-tap it to go back to the
previous song.
Music home screen
Note
You might not be able to play copyright-protected items.
F-172-100-11 Copyright 2020 Sony Mobile Communications Inc.
Open the Music menu1.
Scroll up or down to view content2.
Tap to start playing a song in the play queue3.
Play all songs in shuffle mode4.
Go to the music player screen5.
86
Page 87

Help Guide
Smartphone
Xperia 5 II XQ-AS52/XQ-AS62/XQ-AS72
Music app features
This section explains features that are useful when using the Music app.
Editing music information
Playing music in the background
F-172-100-11 Copyright 2020 Sony Mobile Communications Inc.
While a song is playing in the Music app, tap the album art in the music player screen and then tap [Edit music info].1.
Edit the information as desired.2.
To set album art, tap
(Edit icon), then select an option.3.
When you are finished, tap [SAVE].4.
When a song is playing, tap
(Home button) to go to the Home screen.
The Music app keeps running in the background.
To open the Music app again, drag the status bar downwards and tap the Music notification. Alternatively, find and
tap
(Music icon).
1.
87
Page 88

Help Guide
Smartphone
Xperia 5 II XQ-AS52/XQ-AS62/XQ-AS72
Camera overview
F-172-100-11 Copyright 2020 Sony Mobile Communications Inc.
Tap to adjust color and brightness1.
Switch between the front and main camera2.
Camera settings3.
Geotagging status4.
Use the volume keys to zoom in or out5.
Use the camera key to activate the camera, take photos or record videos6.
Tap the thumbnail to view, share, or edit photos and videos7.
Switch between taking photos and videos8.
Use the shutter button to take photos or record videos9.
Go back or exit the camera10.
Select a capturing mode11.
Shortcut to the capturing mode last selected12.
Tap one of the angle buttons to switch lenses13.
Select an aspect ratio14.
Tap to adjust the Bokeh effect15.
Select a flash setting. The icon color changes when the flash or flashlight activates.16.
Front camera lens17.
88
Page 89

Help Guide
Smartphone
Xperia 5 II XQ-AS52/XQ-AS62/XQ-AS72
Taking a photo or recording a video
This section explains basic camera operations.
Hint
Make sure the lens is clean. A fingerprint or a little dirt can diminish photo quality.
Use the self-timer when you need extra time to prepare, or to avoid blurred photos.
Check your device’s memory status often. High-resolution photos and videos consume more memory.
Note
Note that some functions may not be available depending on the settings.
Shutter button
The shutter button is used differently depending on the capturing mode and activated features.
(Capture button): Take a photo
(Start button): Record a video/Resume recording
(Pause button): Pause a video
(Stop button): Stop recording a video
(Self-timer on icon): Self-timer is activated
(Touch capture on icon): Touch capture is activated
(Touch capture and Self-timer on icon): Touch capture and Self-timer are activated
Related Topic
Self-timer
Various methods to take photos
Basic camera features
Launch the camera.
Press the camera key fully down, swipe
(Camera icon) from the lock screen, or tap (Camera icon) from
the Application screen.
Press the power key twice. Find and tap [Settings] > [System] > [Gestures] > [Jump to camera], and then tap
the switch to enable this function.
1
Swipe the screen to select a photo or video mode.
2
Press the camera key or tap the shutter button.
3
89
Page 90

F-172-100-11 Copyright 2020 Sony Mobile Communications Inc.
90
Page 91

Help Guide
Smartphone
Xperia 5 II XQ-AS52/XQ-AS62/XQ-AS72
Taking a photo using the flash
Use the flash according to the subject and lighting conditions.
Note
Available settings depend on the capturing mode, photo mode, and video mode.
Hint
When the background is brighter than the object, use Fill flash to remove unwanted dark shadows.
F-172-100-11 Copyright 2020 Sony Mobile Communications Inc.
While using the camera, tap the flash icon displayed on the screen, for example
(Auto flash icon).
1
If required, change the flash setting.
2
Press the camera key or tap the shutter button to take a photo or record a video.
3
91
Page 92

Help Guide
Smartphone
Xperia 5 II XQ-AS52/XQ-AS62/XQ-AS72
Basic camera features
Use basic camera features that help you to take photos or record videos.
Changing the aspect ratio
Adjusting the camera settings
Note
Available settings depend on the capturing mode selected.
Hint
Tap
(Introduction to features icon) to check information on various functions.
Switching between the main and front camera
Hint
You can also switch between cameras by swiping down on the camera screen (in the portrait orientation) or swiping right on the
camera screen (in the landscape orientation).
While using the camera, tap
(Aspect ratio icon).1.
Select a setting.2.
While using the camera, tap
(Settings icon).1.
Swipe the list to view the available settings and select a setting.
2.
While using the camera, tap
(Switch camera icon) to switch between the main and front camera.1.
92
Page 93

Switching lenses
Using the zoom
Note
Zooming is only available for the main camera.
Reducing wind noise when recording
Related Topic
Taking a photo or recording a video
F-172-100-11 Copyright 2020 Sony Mobile Communications Inc.
While using the camera, tap one of the angle buttons.
(Telephoto button)
(Wide-angle button)
(Super-wide-angle button)
1.
While using the main camera, perform one of the following operations.
Pinch in or out on the camera screen.
Use the volume key.
Tap one of the angle buttons to select a lens, and then drag the angle button to the left and right (in the portrait
orientation) or up and down (in the landscape orientation).
1.
Find and tap [Settings] > [Sound] > [Audio settings] > [Intelligent wind filter].1.
Tap the switch to enable the function.2.
93
Page 94

Help Guide
Smartphone
Xperia 5 II XQ-AS52/XQ-AS62/XQ-AS72
Viewing, sharing, or editing photos and videos
View or share photos and videos in the Google Photos app after taking photos or recording videos. You can also edit
photos or videos, such as by adjusting the colors or cropping photos.
Related Topic
Taking a photo or recording a video
F-172-100-11 Copyright 2020 Sony Mobile Communications Inc.
While using the camera, tap the thumbnail to open a photo or video.
1
Swipe left or right to view your photos and videos.
2
Tap
(Share icon) to share a photo or a video, or (Edit icon) to edit it.
To hide or show icons, tap the screen.
3
94
Page 95

Help Guide
Smartphone
Xperia 5 II XQ-AS52/XQ-AS62/XQ-AS72
Selecting a capturing mode
You can select a capturing mode according to the subject or your purpose.
Capturing modes overview
The following are some of the main capturing modes.
(Slow motion icon): Add a slow-motion effect after recording a video
(Portrait selfie icon): Take better-looking selfies
(Creative effect icon): Take photos with effects and color filters
(Panorama icon): Take wide-angle and panoramic photos
(Photo Pro icon): Launch Photo Pro
Note
Available settings depend on the capturing mode selected.
Related Topic
Slow motion videos
Portrait selfie
Creative effect
Panorama
Launching Photo Pro (Photography Pro)
F-172-100-11 Copyright 2020 Sony Mobile Communications Inc.
While using the camera, tap [Mode], and then select a capturing mode.
1
95
Page 96

Help Guide
Smartphone
Xperia 5 II XQ-AS52/XQ-AS62/XQ-AS72
Various methods to take photos
Take photos using the method that suits your situation.
Launching the camera and taking a photo at the same time
Taking a photo by tapping the screen
Hint
This feature can also be used for videos.
Taking a photo when recording a video
F-172-100-11 Copyright 2020 Sony Mobile Communications Inc.
While using the camera, tap
(Settings icon), and then tap [Launch with camera key] > [Launch Camera app and
capture].
1.
Close the settings menu and exit the camera.
The setting is saved for all capturing modes.
2.
Long press the camera key to launch the camera and take a photo.3.
While using the camera, tap
(Settings icon), and then tap [Touch capture] > [On] or [Only front camera].1.
Close the settings menu.
The setting is saved in all capturing modes.
2.
Tap anywhere on the screen to take a photo.3.
When recording a video, tap
(Camera icon).
The photo is taken as soon as you release the shutter button.
1.
96
Page 97

Help Guide
Smartphone
Xperia 5 II XQ-AS52/XQ-AS62/XQ-AS72
Self-timer
Use the Self-timer to get more time to prepare for a photo. It also helps to keep your device steady and avoid blurred
photos.
F-172-100-11 Copyright 2020 Sony Mobile Communications Inc.
While using the main camera, tap
(Settings icon) > [Self-timer], select the delay time, and then close the
settings menu.
The Self-timer setting is saved.
While using the front camera, tap
(Self-timer icon), and then select a delay time.
1
Press the camera key or tap the shutter button to take a photo.
A series of beeps marks the countdown until the photo is taken.
2
97
Page 98

Help Guide
Smartphone
Xperia 5 II XQ-AS52/XQ-AS62/XQ-AS72
Adjusting the exposure, color, and light conditions
Good exposure for your photos requires the right amount of light. Different exposures are required, for example, when
taking photos of faces, moving objects or in low light.
You can also record videos in HDR to add brightness and contrast for a more realistic effect.
To optimize light conditions
Look for light with direction and color that gives a scene shape and depth. This type of light occurs just before sunrise
and at sunset. Natural light from a window is also good.
Even if light conditions are poor, try to take photos with and without the flash. Sometimes the quality is better without
the flash.
Related Topic
Color and brightness
HDR video recording
Self-timer
Taking a photo using the flash
F-172-100-11 Copyright 2020 Sony Mobile Communications Inc.
98
Page 99

Help Guide
Smartphone
Xperia 5 II XQ-AS52/XQ-AS62/XQ-AS72
Color and brightness
Your camera automatically adjusts the color and brightness value by detecting the light conditions and estimating the
color temperature of ambient light. Digital cameras can only estimate the color temperature, so you may need to adjust
the settings to get it correct.
If you experience yellow-colored photos in indoor environments or bluish photos when using the flash, try adjusting the
color.
F-172-100-11 Copyright 2020 Sony Mobile Communications Inc.
While using the camera, tap
(Color and brightness icon).
1
Drag the sliders to adjust the color and brightness.
Tap
(Cancel icon) to reset and close the color setting.
2
Press the camera key or tap the shutter button to take a photo or record a video.
3
99
Page 100

Help Guide
Smartphone
Xperia 5 II XQ-AS52/XQ-AS62/XQ-AS72
HDR video recording
Enable HDR (High Dynamic Range) to make your videos appear more dramatic and closer to what you see in real life.
Note
This setting is not available when [Video size] is set to [Full HD (60 fps)] or [HD].
F-172-100-11 Copyright 2020 Sony Mobile Communications Inc.
While using the camera, swipe the screen to select a video mode.
1
Tap
(HDR icon) and select [On].
2
100
 Loading...