

TM
TM
Troubleshooting Guide
- mechanical -
Xperia
M, Xperia
C1904, C1905, C2004, C2005
1277-1356 Rev 2
Sony Mobile Communications AB – Company Internal
M Dual

Company Internal
CONTENTS
Troubleshooting Guide (mech)
1 Problem Areas ................................................................................ 4
1.1 Power .................................................................................................... 4
1.1.1 Will not power on or will switch off randomly ........................................... 4
1.2 Keys ...................................................................................................... 5
1.2.1 Back/Home/Multi task Keys ........................................................................ 5
1.2.2 Camera Key .................................................................................................. 5
1.2.3 Volume Key .................................................................................................. 6
1.2.4 On/Off key .................................................................................................... 7
1.3 Touch Screen ....................................................................................... 9
1.3.1 Touch Screen malfunction .......................................................................... 9
1.4 Display ................................................................................................ 11
1.4.1 Graphics & Illumination ............................................................................ 11
1.5 LED/Illumination ................................................................................. 12
1.5.1 LED/Illumination ........................................................................................ 12
1.6 Speaker ............................................................................................... 14
1.6.1 Loudspeaker .............................................................................................. 14
1.7 Earspeaker .......................................................................................... 17
1.7.1 Earspeaker ................................................................................................. 17
1.8 Microphone ......................................................................................... 18
1.8.1 Microphone ................................................................................................ 18
1.8.2 Secondary Microphone ............................................................................. 20
1.9 Vibrator ............................................................................................... 21
1.9.1 Vibrator not generating alerts .................................................................. 21
1.10 Camera ................................................................................................ 22
1.10.1 Camera defects .......................................................................................... 22
1.11 Bluetooth and WLAN ......................................................................... 23
1.11.1 Bluetooth or WLAN connection failure .................................................... 23
1.12 GPS ..................................................................................................... 24
1.12.1 GPS malfunctions ...................................................................................... 24
1.13 Compass ............................................................................................. 25
1.13.1 Compass fails ............................................................................................ 25
1.14 Accelerometer .................................................................................... 26
1.14.1 Accelerometer test fails ............................................................................ 26
1.15 Light Sensor ....................................................................................... 27
1.15.1 Light Sensor malfunctions ....................................................................... 27
1.16 Proximity switch ................................................................................. 28
1.16.1 Proximity switch malfunctions ................................................................. 28
1.17 Real Time Clock ................................................................................. 29
1.17.1 Real Time Clock test fails ......................................................................... 29
1.18 Total call time ..................................................................................... 30
1.18.1 Total call time fails .................................................................................... 30
1277-1356 Rev 2
Sony Mobile Communications AB –
2(45)

Company Internal
Troubleshooting Guide (mech)
1.19 External Memory ................................................................................ 31
1.19.1 Memory Card not detected ....................................................................... 31
1.20 Security ............................................................................................... 32
1.20.1 Security fails .............................................................................................. 32
1.21 FM Radio ............................................................................................. 33
1.21.1 No/Poor FM Radio reception .................................................................... 33
1.22 Verify Certificates ............................................................................... 34
1.22.1 Verify certificates fails............................................................................... 34
1.23 Network & Signal ................................................................................ 35
1.23.1 No/Poor signal ........................................................................................... 35
1.24 SIM ...................................................................................................... 37
1.24.1 SIM not detected ........................................................................................ 37
1.24.2 Incorrect SIM indicated ............................................................................. 38
1.25 Charging ............................................................................................. 39
1.25.1 Battery will not charge .............................................................................. 39
1.26 HandsFree by Wire ............................................................................. 40
1.26.1 Connection to Portable HandsFree fails .................................................. 40
1.27 Data Communication ......................................................................... 41
1.27.1 Data transfer via System Connector fails ................................................ 41
1.28 Flash LED Defects .............................................................................. 42
1.28.1 Flash LED defects ..................................................................................... 42
1.29 NFC ..................................................................................................... 44
1.29.1 NFC malfunctions ...................................................................................... 44
2 Revision History ........................................................................... 45
1277-1356 Rev 2
Sony Mobile Communications AB –
3(45)
Company Internal
1 Problem Areas
1.1 Power
1.1.1 Will not power on or will switch
off randomly
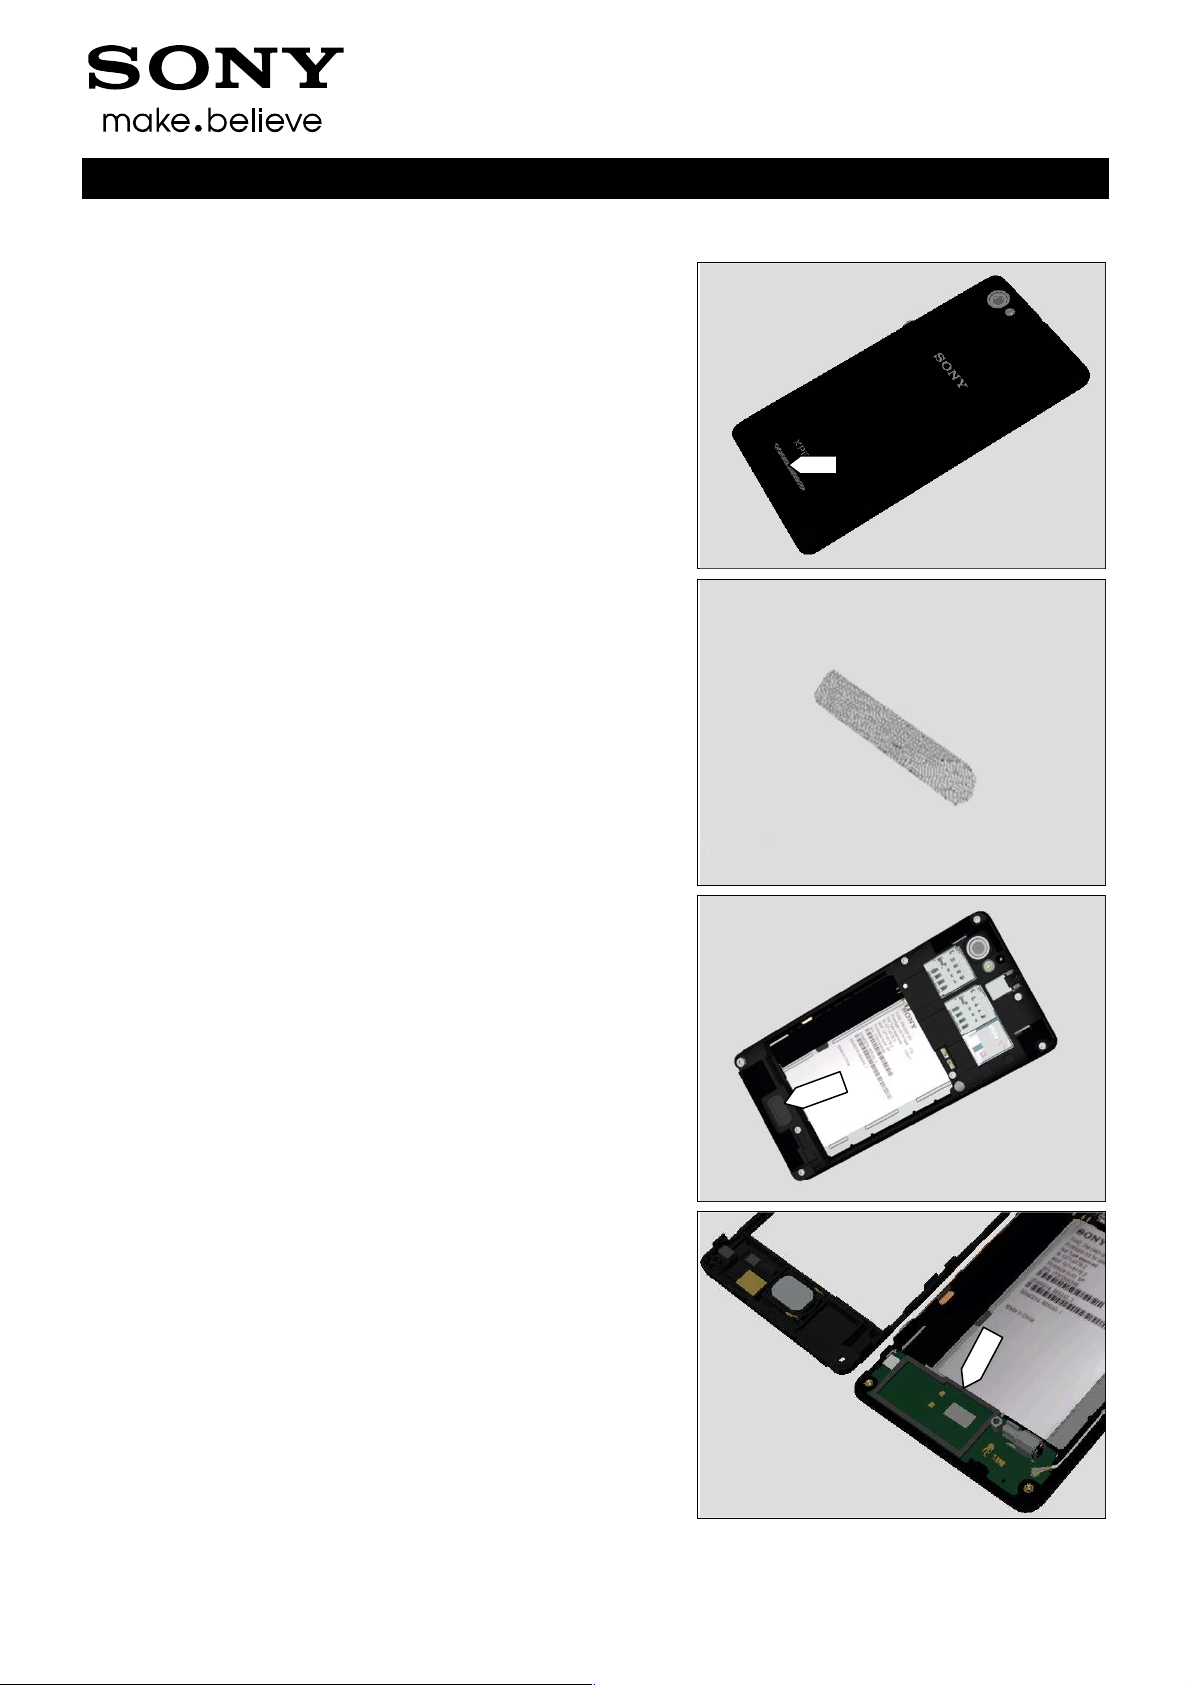
Check:
Inspect whether the phone vibrates after the on/off key is
pressed.
Action:
If activation of the vibrator is detected, refer to section 1.4
‘Display’.
Check:
Inspect the contact pads on the battery.
Action:
1. If dirty or oxidized – clean the pads.
2. If damaged – replace the battery.
Troubleshooting Guide (mech)
Check:
Inspect the battery contact pins.
Action:
1. If dirty or oxidized – clean the contact pins.
2. If adhesive is detected on the contact pins, use an eraser
to gently rub off the adhesive.
3. If damaged – replace Main PBA.
Check:
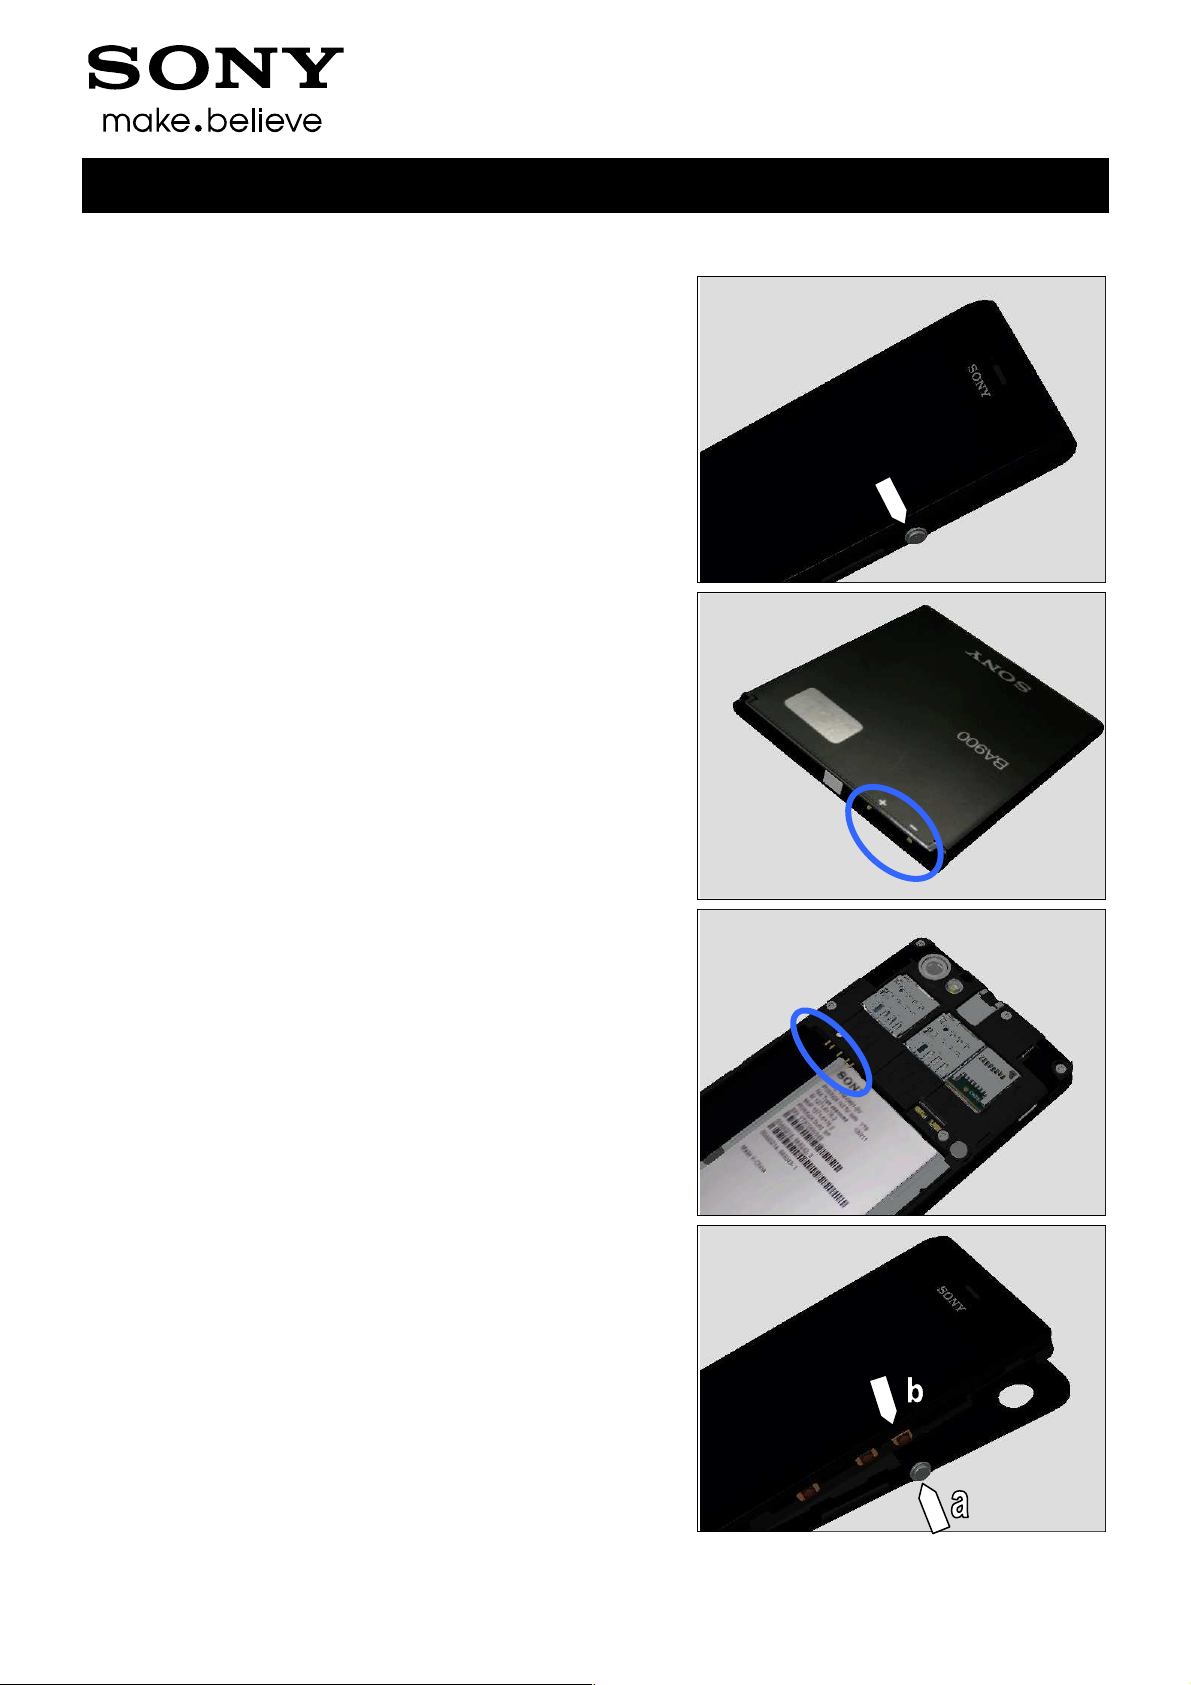
Inspect the on/off key (a) and the on/off switch (b).
Action:
Refer to section 1.2.4 ‘On/Off Key’.
1277-1356 Rev 2
Sony Mobile Communications AB –
4(45)
Company Internal
Problem Areas
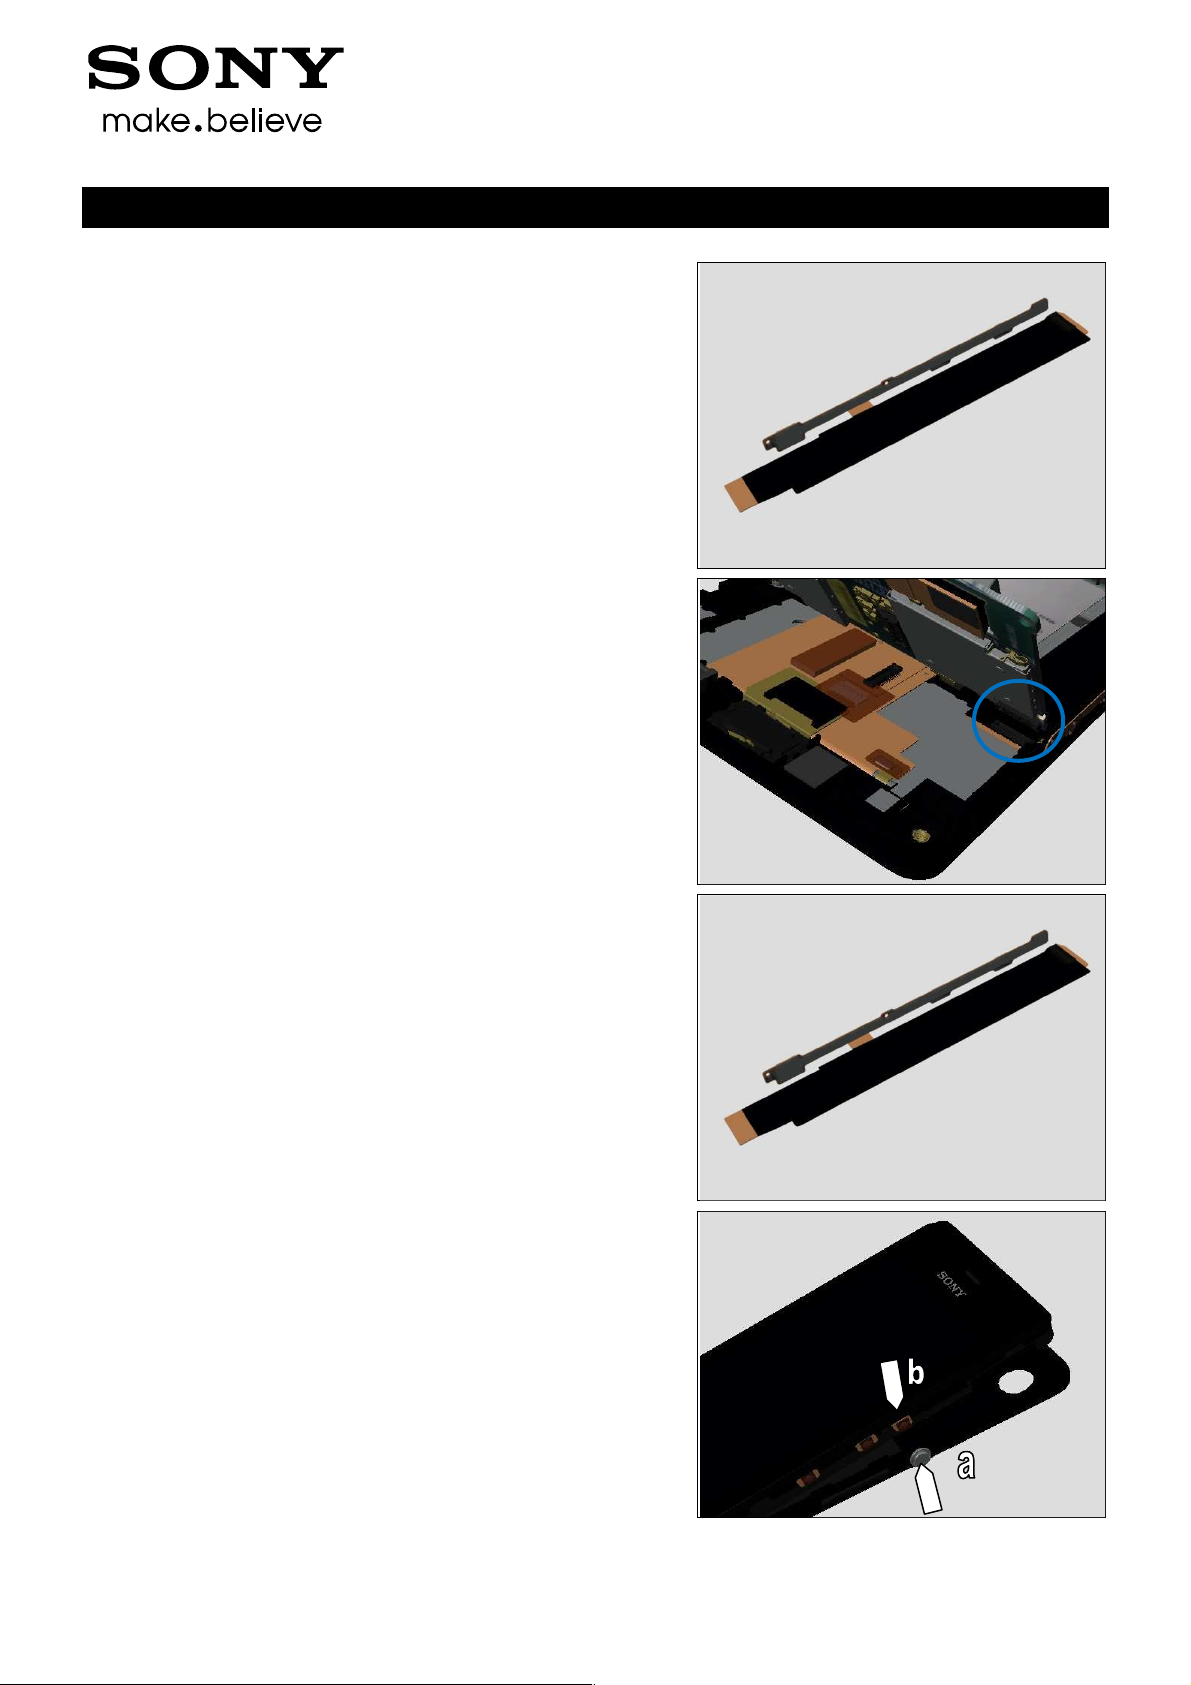
1.2 Keys
1.2.1 Back/Home/Multi task Keys
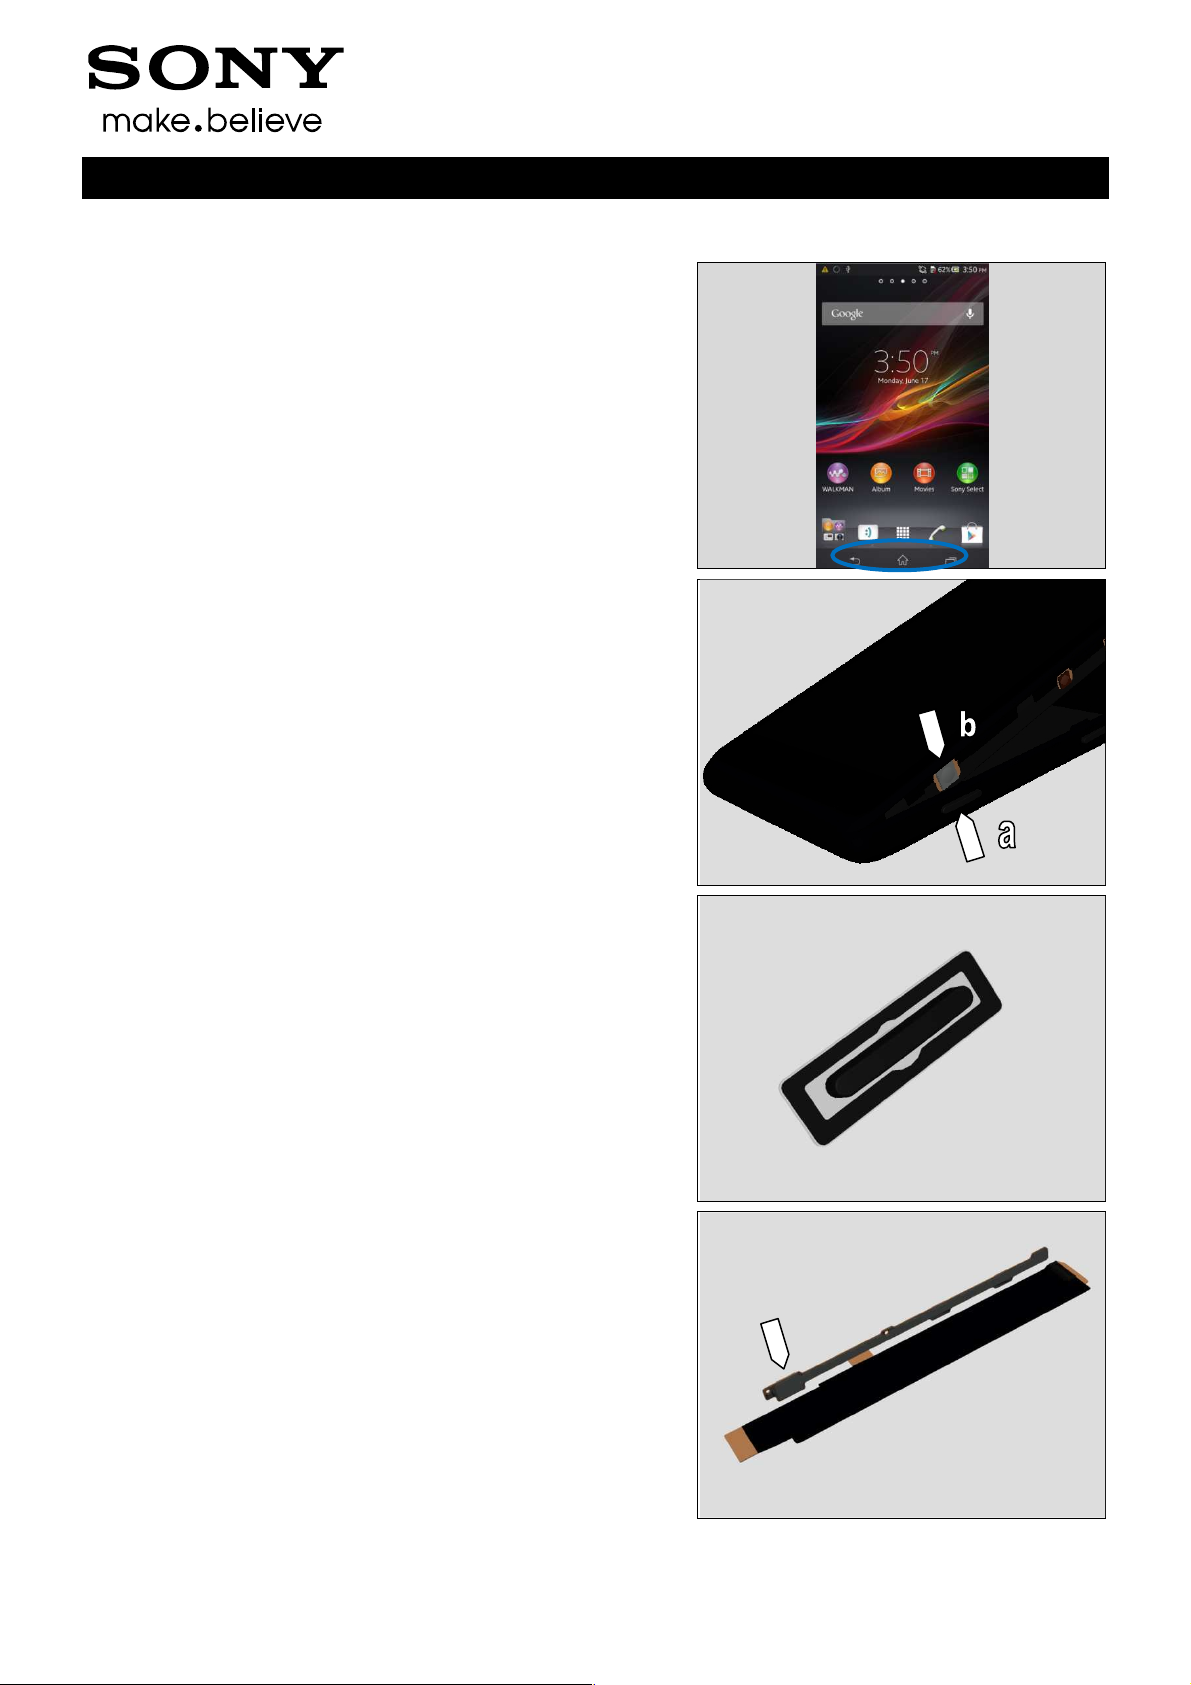
Check:
Touch the Screen to check the Back Key, Home Key and
Multi task Keys
Action:
Refer to section 1.3 ‘Touch Screen’.
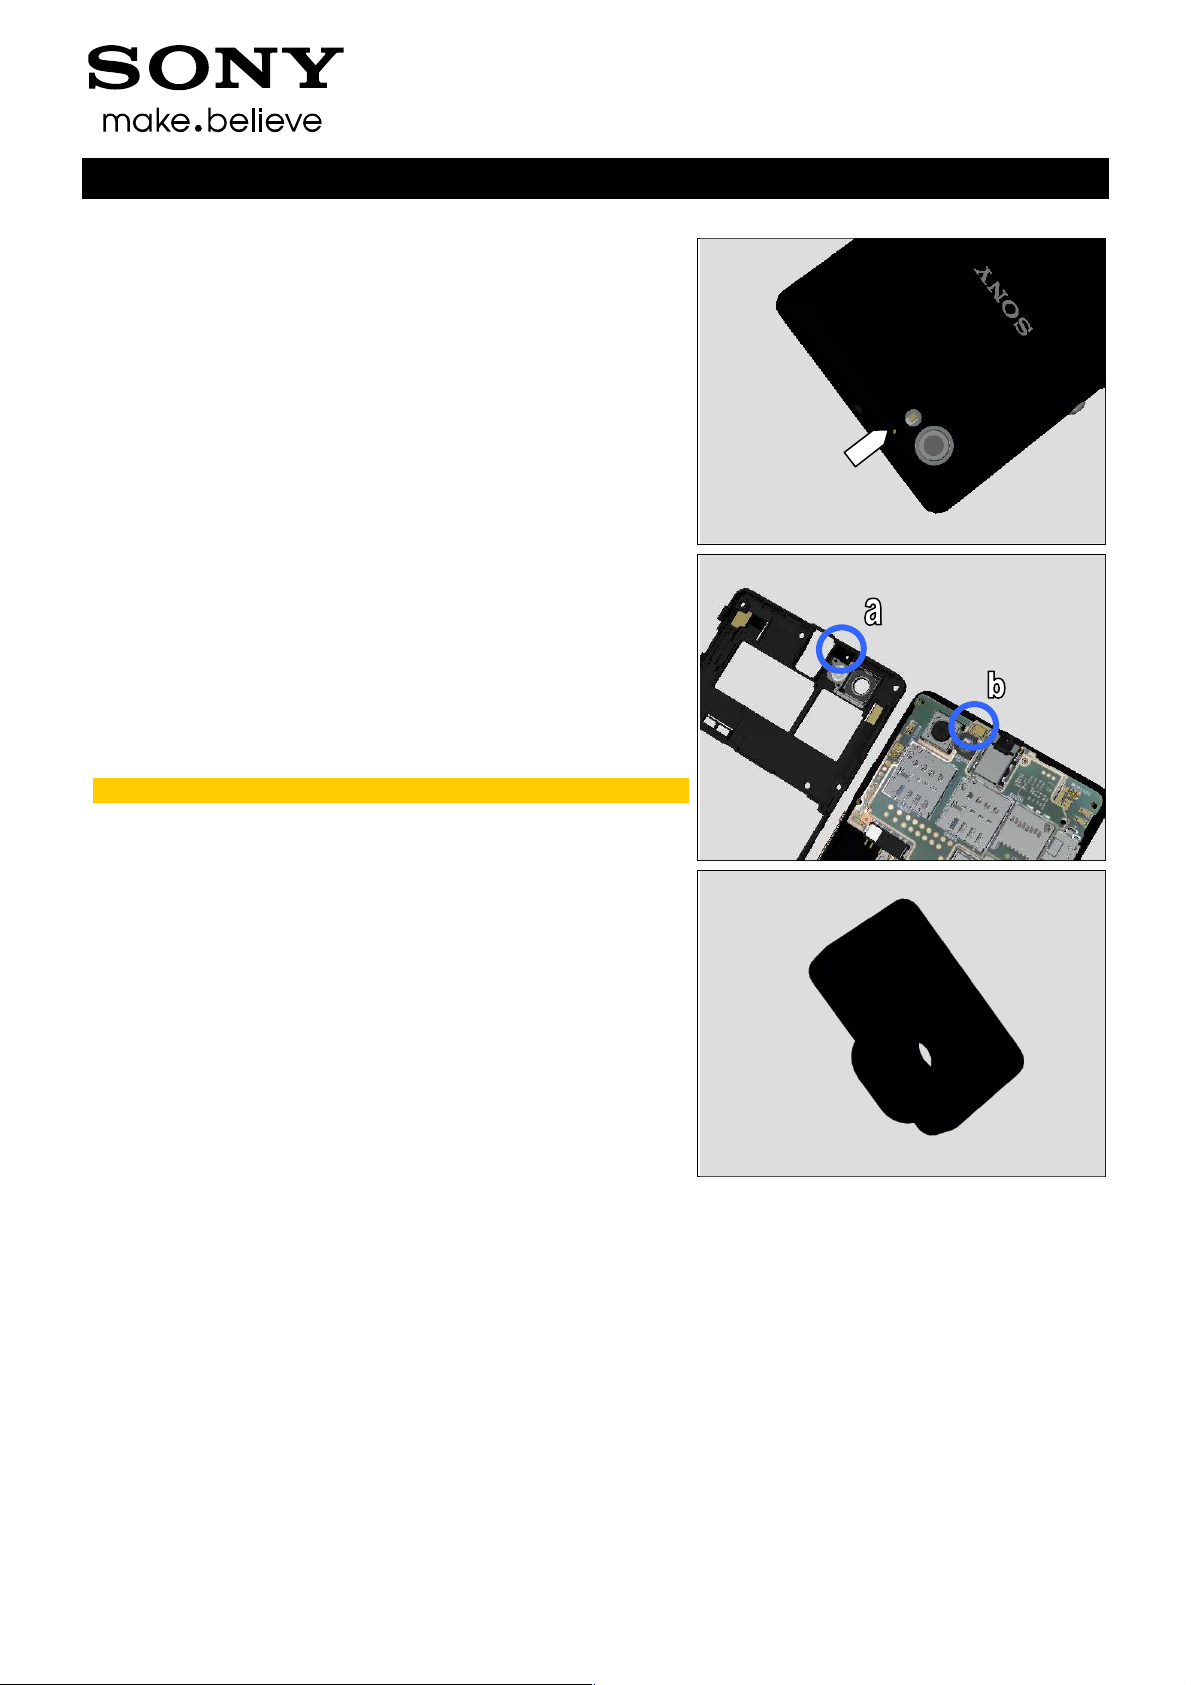
1.2.2 Camera Key
Check:
Inspect the camera key (a) on the Battery Cover Assy and
the camera key switch (b).
Action:
1. If the camera key (a) or the camera key switch (b) is dirty
or clogged – clean it.
Troubleshooting Guide (mech)
2. If the camera key (a) is damaged – replace the Camera
Key.
3. If the camera key switch (b) is damaged – replace the
Link FPC and Link FPC Gasket.
1277-1356 Rev 2
Sony Mobile Communications AB –
5(45)
Company Internal
Problem Areas: Keys
Check:
Inspect the BtB connector of the Link FPC to the Main PBA.
Action:
1. If not properly connected – disconnect and reconnect it.
2. If dirty or oxidized – clean it.
3. If the BtB connector or the camera key switch of the Link
FPC is damaged – replace the Link FPC and Link FPC
Gasket.
4. Replace Main PBA.
Troubleshooting Guide (mech)
1.2.3 Volume Key
Check:
Inspect the volume key (a) on the Battery Cover Assy and
the volume switch (b).
Action:
1. If the volume key (a) or the volume switch (b) is dirty or
clogged – clean it.
2. If the Volume Key (a) is damaged – replace the Volume
Key.
1277-1356 Rev 2
Sony Mobile Communications AB –
6(45)
Company Internal
Problem Areas: Keys
3. If the Volume Key switch (b) is damaged – replace the
Link FPC and Link FPC Gasket.
Check:
Inspect the BtB connector of the Link FPC to the Main PBA.
Action:
1. If not properly connected – disconnect and reconnect it.
2. If dirty or oxidized – clean it.
Troubleshooting Guide (mech)
3. If the BtB connector or the Volume Key switch of the Link
FPC is damaged – replace the Link FPC and Link FPC
Gasket.
4. Replace Main PBA.
1.2.4 On/Off key
Check:
Inspect the on/off key (a) on the Battery Cover Assy and the
on/off switch (b).
Action:
1. If the on/off key (a) or the on/off switch (b) is dirty or
clogged – clean it.
1277-1356 Rev 2
Sony Mobile Communications AB –
7(45)

Company Internal
Problem Areas: Keys
2. If the On/off Key (a) is damaged – replace the Volume
Key.
3. If the On/off switch (b) is damaged – replace the Link FPC
and Link FPC Gasket.
Troubleshooting Guide (mech)
Check:
Inspect the BtB connector of the Link FPC to the Main PBA.
Action:
1. If not properly connected – disconnect and reconnect it.
2. If dirty or oxidized – clean it.
3. If the BtB connector or the On/off Key switch of the Link
FPC is damaged – replace the Link FPC and Link FPC
Gasket.
4. Replace Main PBA.
1277-1356 Rev 2
Sony Mobile Communications AB –
8(45)

Company Internal
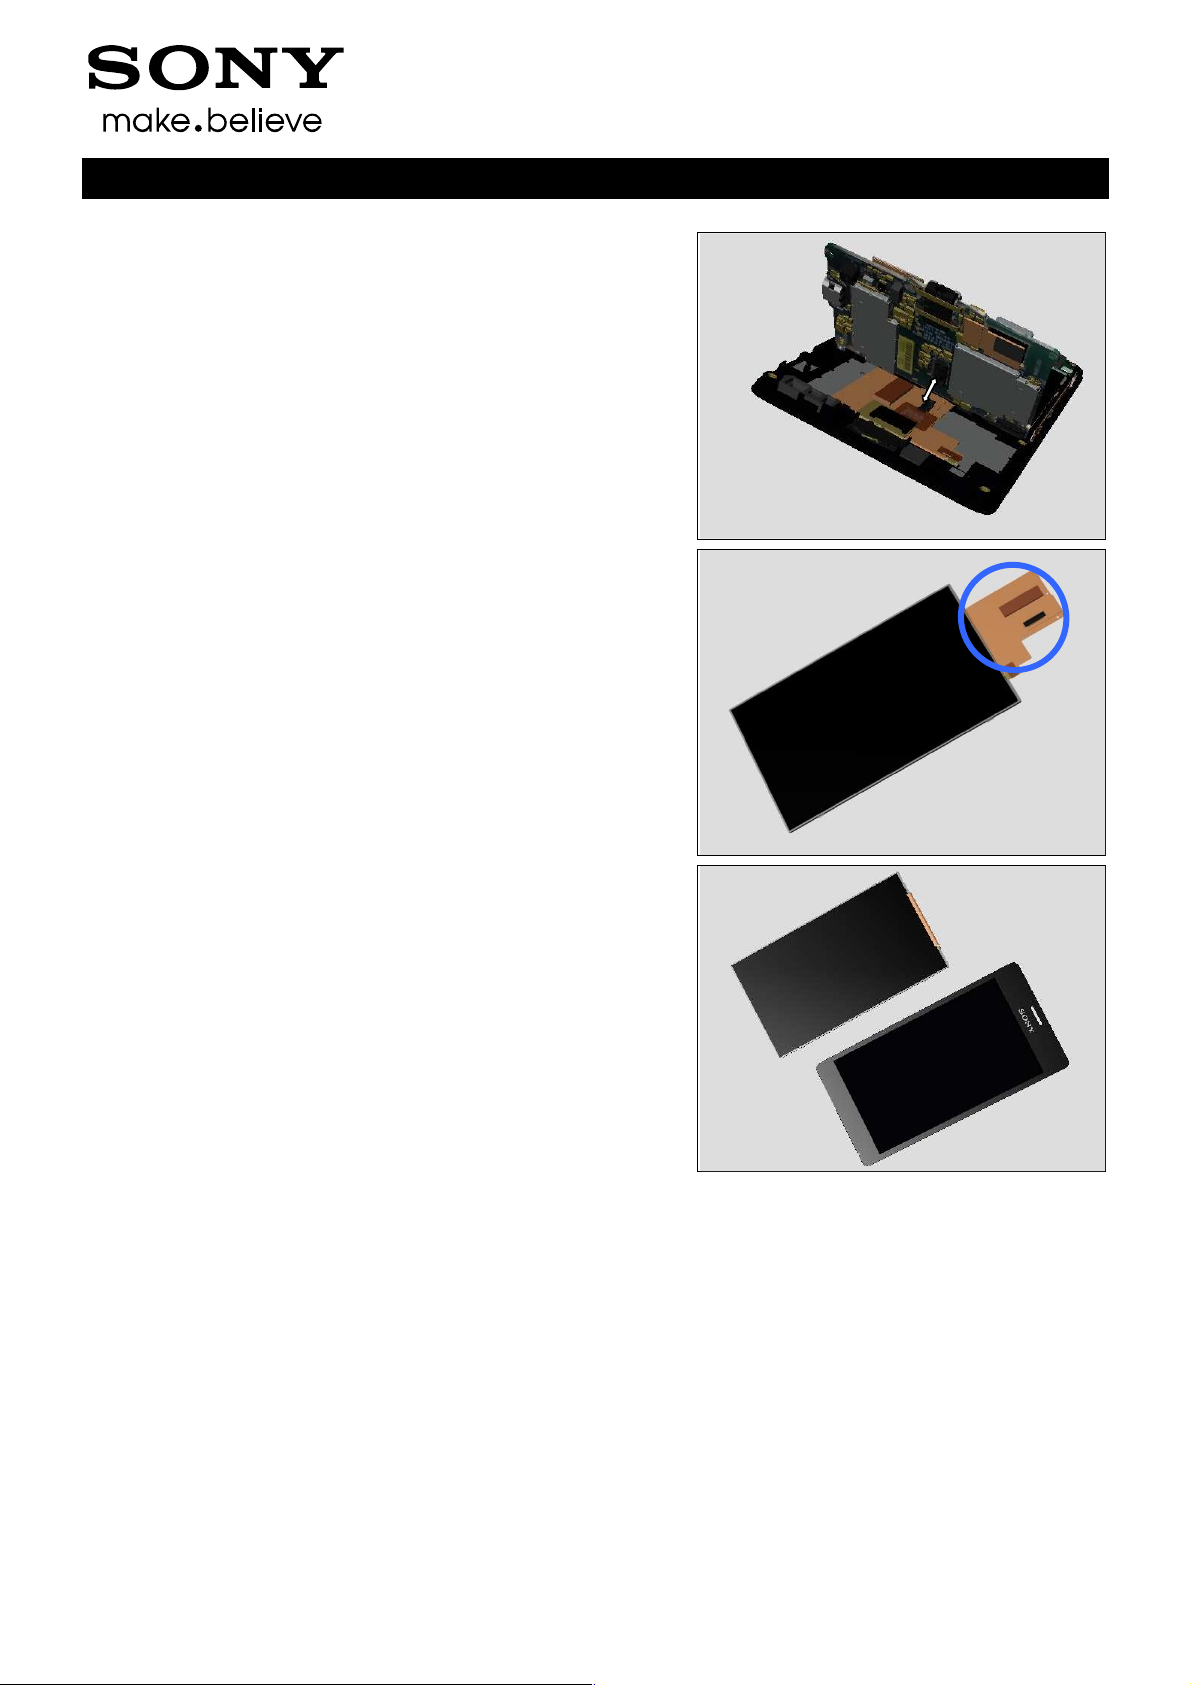
Problem Areas
1.3 Touch Screen
1.3.1 Touch Screen malfunction
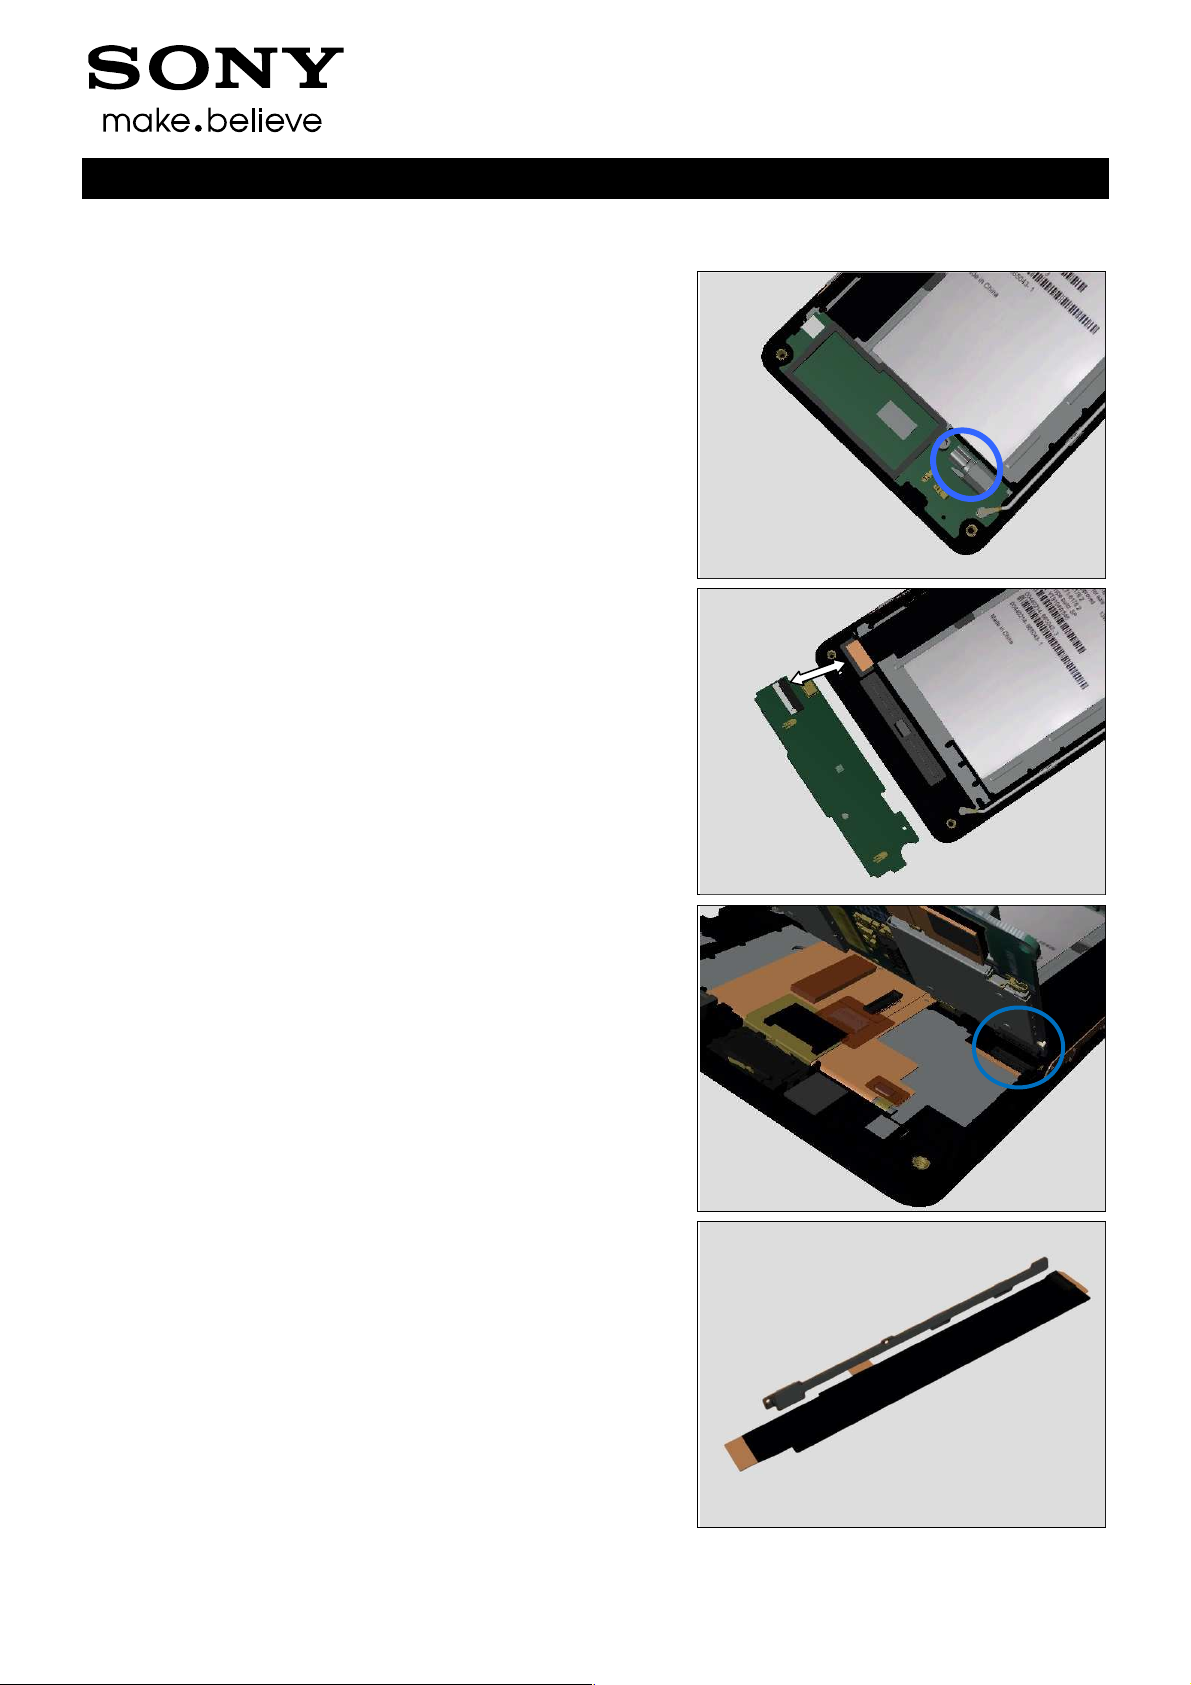
Check:
Inspect the Touch Screen.
Action:
1. If dirty – clean it.
2. If damage – replace it.
Check:
Inspect the ZIF connector of the Touch Panel to the Display.
Action:
1. If not properly connected – disconnect and reconnect it.
2. If dirty or oxidized – clean it.
Troubleshooting Guide (mech)
Check:
Inspect the FPC of the Touch Panel.
Action:
If the FPC or the touch screen is damaged – replace the
Touch Panel, Kapton Tape TP connector and Touch Panel
Adhesive.
1277-1356 Rev 2
Sony Mobile Communications AB –
9(45)
Company Internal
Problem Areas: Touch Screen
Check:
Inspect the BtB connector of the Display to the Main PBA.
Action:
1. If not properly connected – disconnect and reconnect it.
2. If dirty or oxidized – clean it.
Check:
Inspect the FPC of the Display.
Troubleshooting Guide (mech)
Action:
1. If the Display or its FPC is damaged – replace the
Display, Touch Panel, Touch Panel Adhesive and Kapton
Tape TP connector.
2. Replace Main PBA.
1277-1356 Rev 2
Sony Mobile Communications AB –
10(45)
Company Internal
Problem Areas
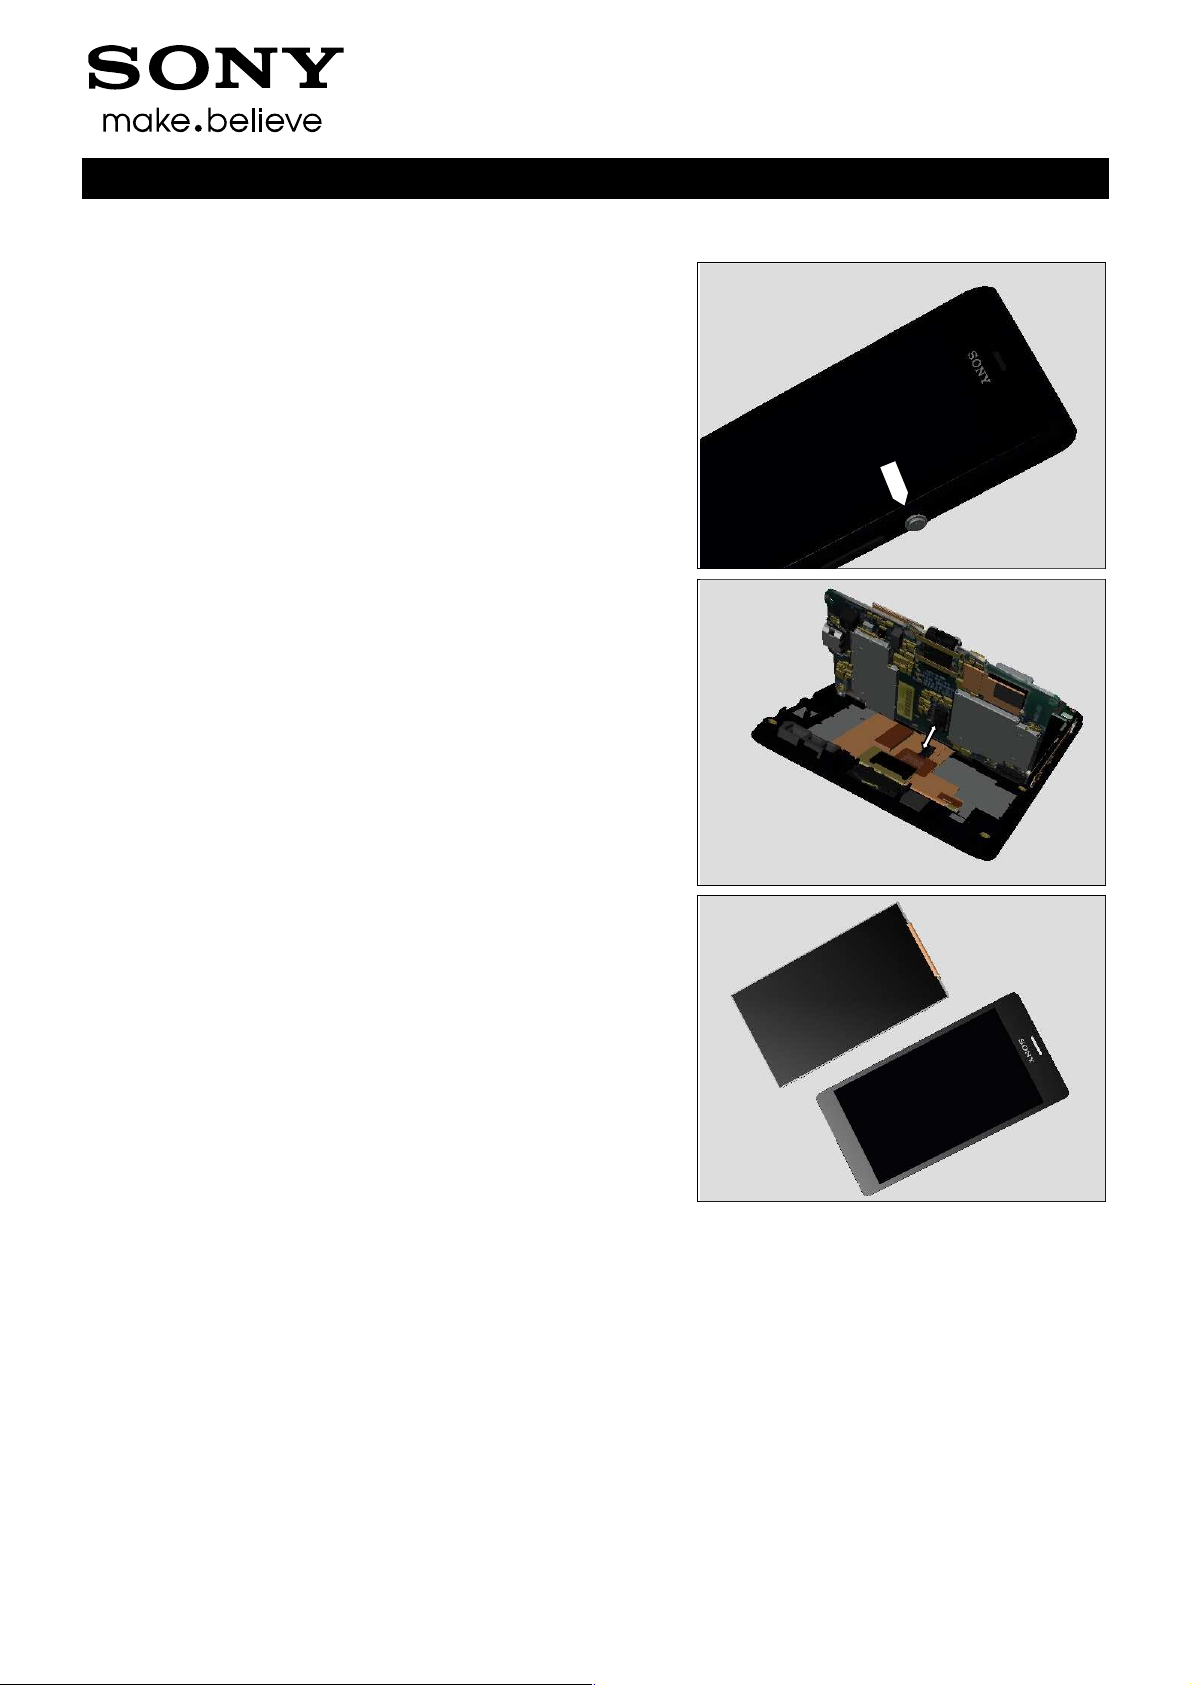
1.4 Display
1.4.1 Graphics & Illumination
Check:
Inspect whether the phone vibrates after the on/off key has
been pressed.
Action:
If the activation described above is not detected, refer to
section 1.1 ‘Power’.
Check:
Inspect the BtB connector of the Display to the Main PBA.
Action:
1. If not properly connected – disconnect and reconnect it.
2. If dirty or oxidized – clean it.
Troubleshooting Guide (mech)
Check:
Inspect the Display and its FPC.
Action:
1. If dirty – clean it.
2. If the Display or its FPC is damaged – replace the
Display, Touch Panel, Touch Panel Adhesive and Kapton
Tape TP connector.
3. Replace Main PBA.
1277-1356 Rev 2
Sony Mobile Communications AB –
11(45)
Company Internal
Problem Areas
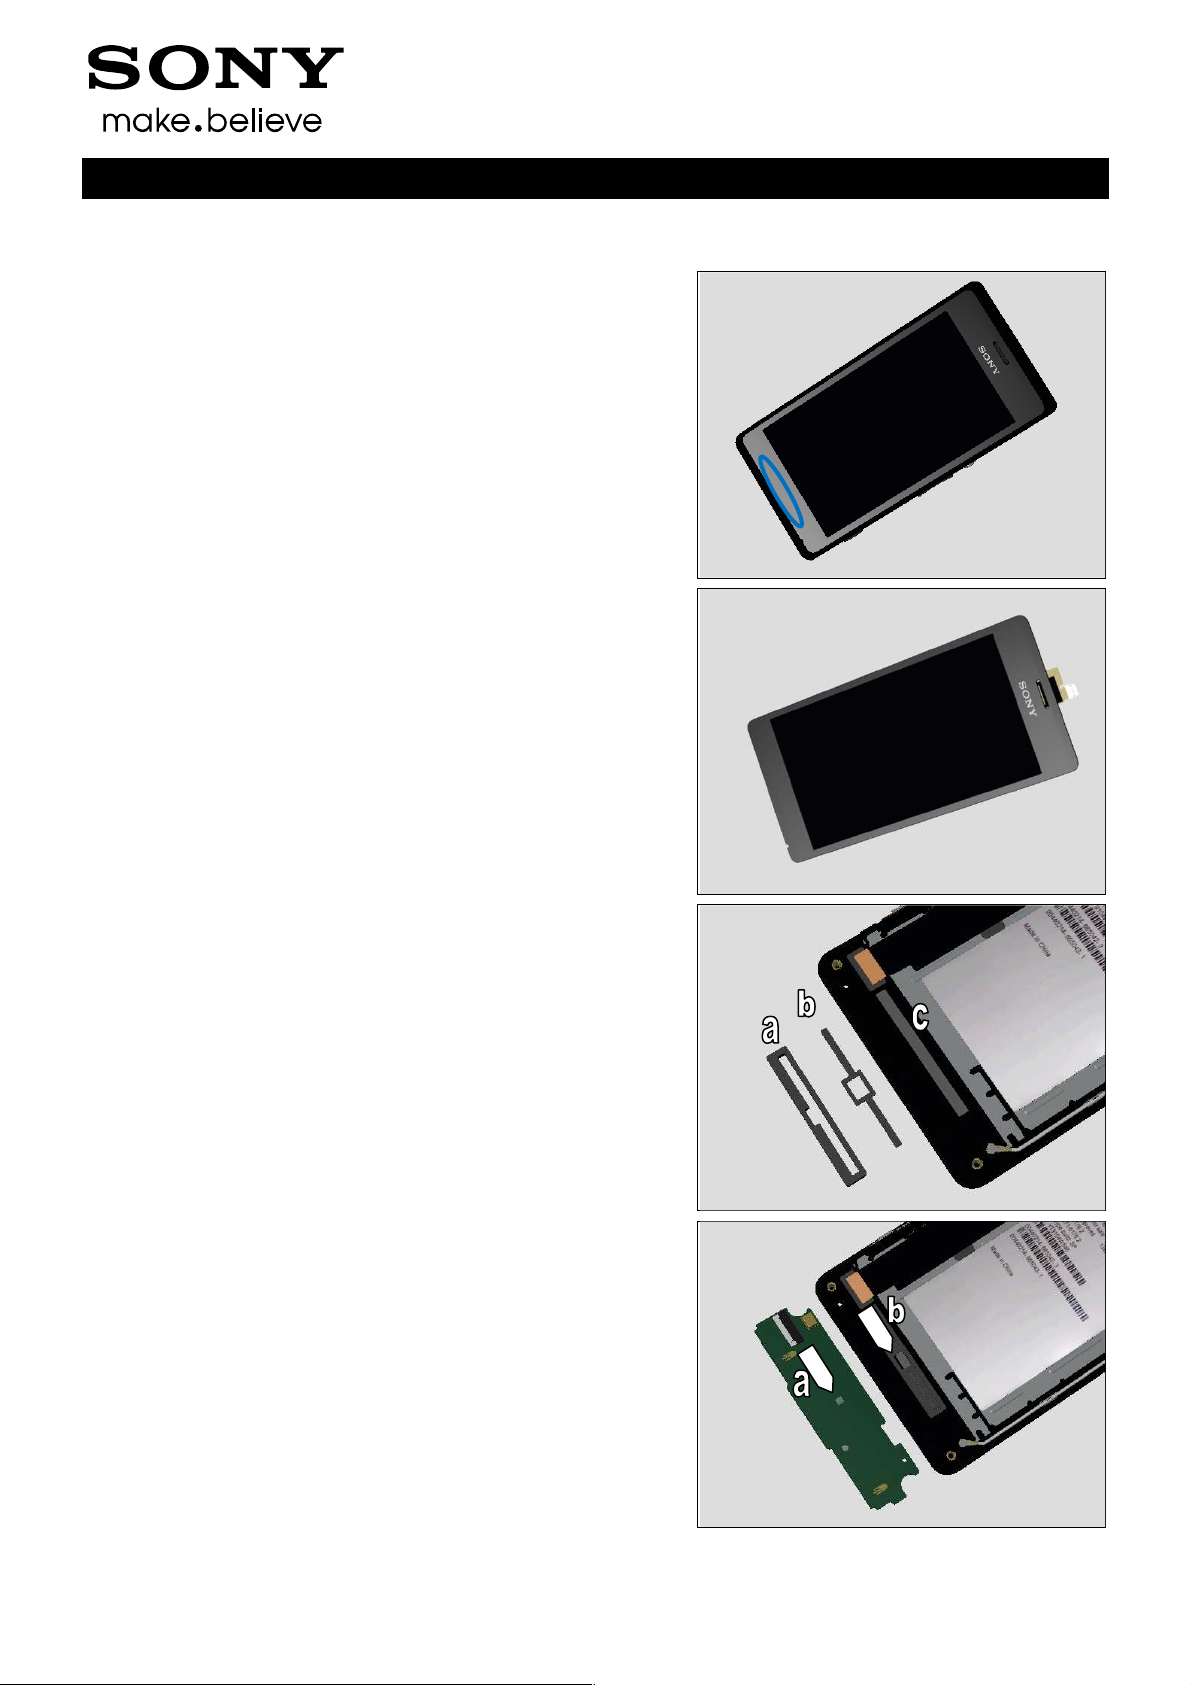
1.5 LED/Illumination
1.5.1 LED/Illumination
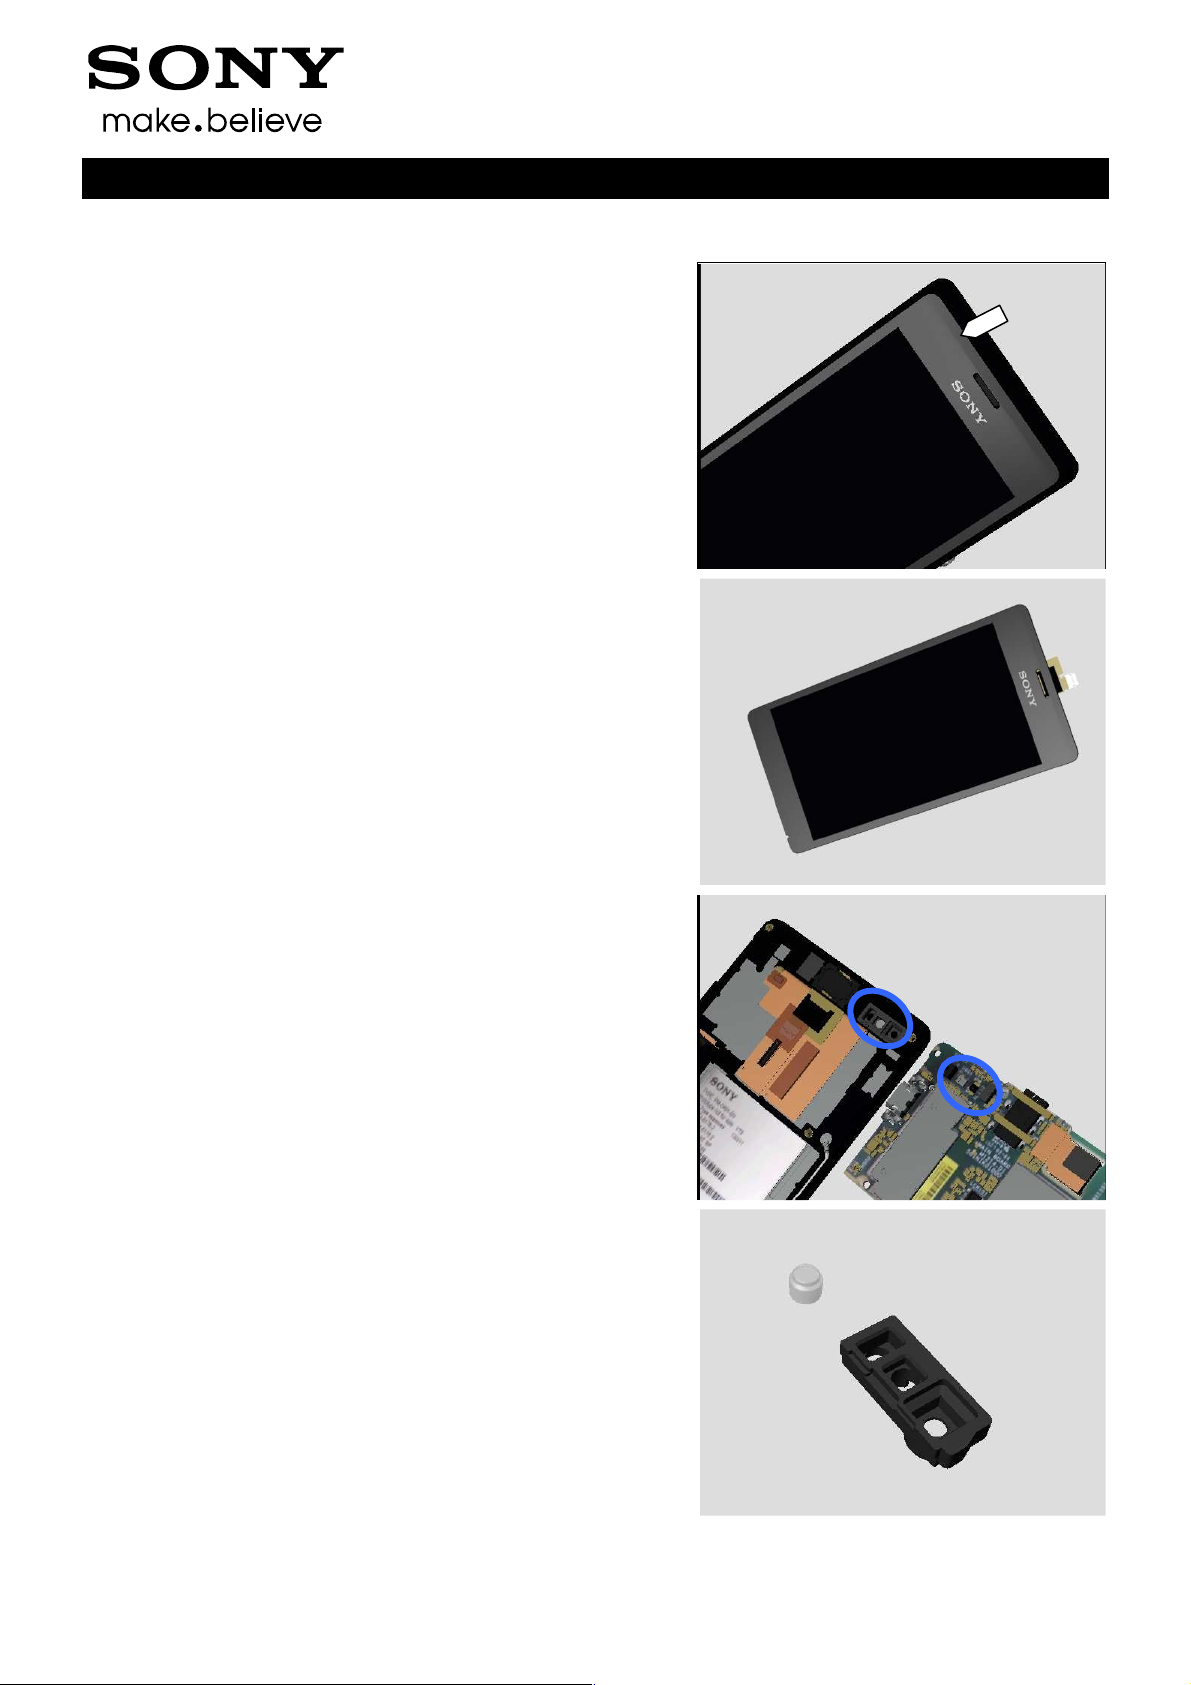
Check:
Inspect the external window area of the LED on the Touch
Panel.
Action:
1. If dirty – clean it.
Troubleshooting Guide (mech)
2. If the external window area is damaged – replace the
Touch Panel, Touch Panel Adhesive and Kapton Tape TP
connector.
Check:
Inspect the Light Bar Gasket (a) and Reflective Sheet (b)
and Diffusion Film (c) on the Front Cover Assy.
Action:
1. If misplace – reassemble them.
2. If damage – replace them.
Check:
Inspect the LED (a) on the ANT Board and the backside of
the RGB window (b).
Action:
1. If dirty – clean them.
2. If damage - replace the ANT Board.
1277-1356 Rev 2
Sony Mobile Communications AB –
12(45)

Company Internal
Problem Areas: LED/Illumination
Check:
Inspect the ZIF connector of the ANT Board to the Link FPC.
Action:
1. If not properly connected – disconnect and reconnect it.
2. If dirty or oxidized – clean it.
Check:
Inspect the BtB connector of the Link FPC to the Main PBA.
Action:
1. If not properly connected – disconnect and reconnect it.
2. If dirty or oxidized – clean it.
Troubleshooting Guide (mech)
3. If the connectors or the FPC part of Link FPC is damaged
– replace the Link FPC and Link FPC Gasket.
4. Replace Main PBA.
1277-1356 Rev 2
Sony Mobile Communications AB –
13(45)
Company Internal
Problem Areas
1.6 Speaker
1.6.1 Loudspeaker
Check:
Inspect the Loudspeaker’s external port on the Battery
Cover Assy.
Action:
1. If clogged – clean it.
Troubleshooting Guide (mech)
2. If damaged – replace the Speaker Mesh.
Check:
Inspect the Speaker Mesh on Rear Cover.
Action:
1. If dirty – clean it.
2. If damaged – replace it
Check:
Inspect the Speaker Sponge.
Action:
1. If dirty – clean it.
2. If damaged – replace it
1277-1356 Rev 2
Sony Mobile Communications AB –
14(45)

Company Internal
Problem Areas: Speaker
Check:
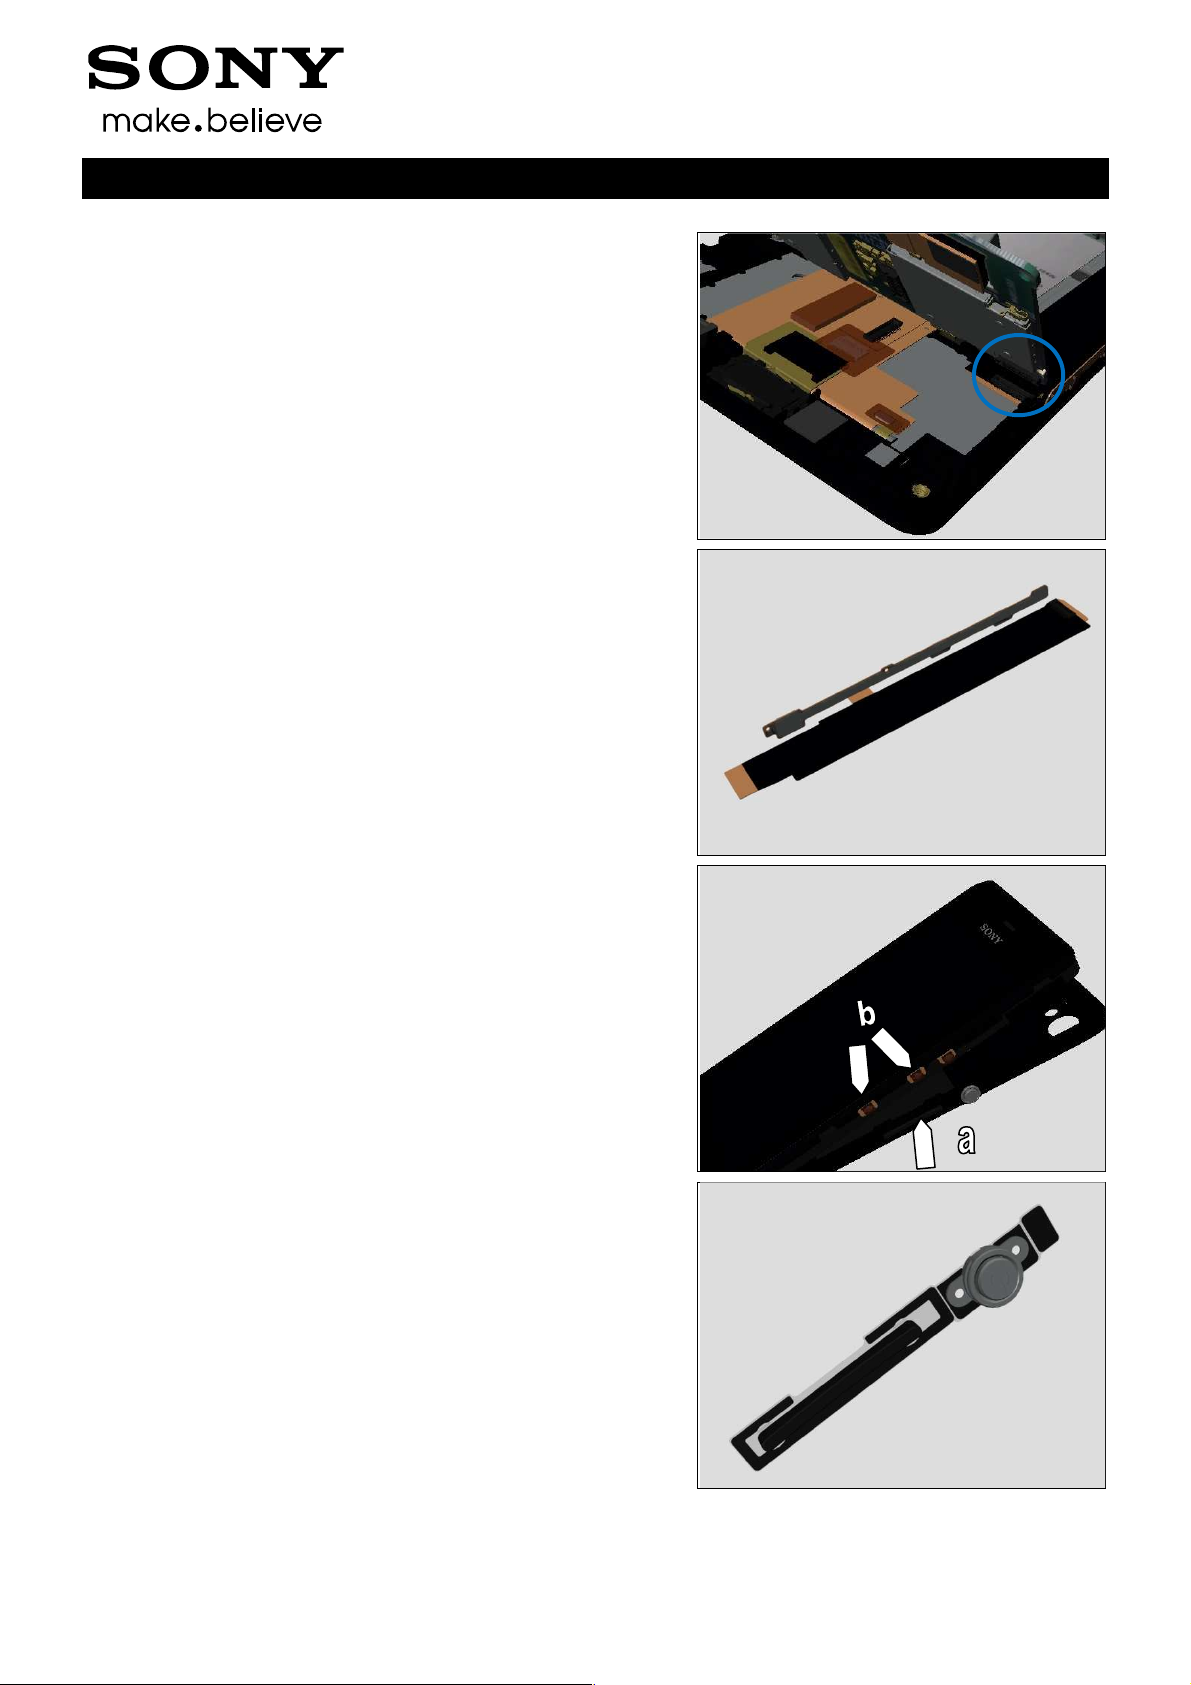
Inspect the contact pins (a) on the Loudspeaker and the
contact pads (b) on the ANT Board.
Action:
1. If dirty – clean them.
2. If the Loudspeaker or its contact pins is damaged –
replace the Loudspeaker and Speaker Gasket.
Troubleshooting Guide (mech)
Check:
Inspect the ZIF connector of the ANT Board to the Link FPC.
Action:
1. If not properly connected – disconnect and reconnect it.
2. If dirty or oxidized – clean it.
Check:
Inspect the BtB connector of the Link FPC to the Main PBA.
Action:
1. If not properly connected – disconnect and reconnect it.
2. If dirty or oxidized – clean it.
1277-1356 Rev 2
Sony Mobile Communications AB –
15(45)

Company Internal
Problem Areas: Speaker
3. If the connectors or the FPC part of Link FPC is damaged
– replace the Link FPC and Link FPC Gasket.
4. Replace Main PBA.
Troubleshooting Guide (mech)
1277-1356 Rev 2
Sony Mobile Communications AB –
16(45)

Company Internal
Problem Areas
1.7 Earspeaker
1.7.1 Earspeaker
Check:
Inspect the Earspeaker’s external port on the Front Cover
Sub Assembly.
Action:
If clogged – clean it.
Check:
Inspect the contact pins (a) of the Earspeaker and the
contact pads (b) on the Main PBA.
Action:
1. If dirty – clean them.
Troubleshooting Guide (mech)
2. If the Earspeaker or its contact pins are damaged –
replace the Earspeaker and the Earspeaker Adhesive.
3. Replace the Main PBA.
1277-1356 Rev 2
Sony Mobile Communications AB –
17(45)

Company Internal
Problem Areas
1.8 Microphone
1.8.1 Microphone
Check:
Inspect the microphone's external port on the Touch Panel.
Action:
1. If clogged – clean the port.
Troubleshooting Guide (mech)
2. If the port is damaged – replace the Touch Panel, Touch
Panel Adhesive and Kapton Tape TP connector.
Check:
Inspect the Microphone Mesh and the Microphone Rubber
(a) on the Front Cover Assy and Microphone (b) on the ANT
Board.
Action:
1. If clogged – clean them.
2. If Microphone Mesh or the Microphone Rubber (a) is
damaged – replace Microphone Mesh and the Microphone
Rubber.
1277-1356 Rev 2
Sony Mobile Communications AB –
18(45)

Company Internal
Problem Areas: Microphone
Check:
Inspect the ZIF connector of the ANT Board to the Link FPC.
Action:
1. If not properly connected – disconnect and reconnect it.
2. If dirty or oxidized – clean it.
Check:
Inspect the BtB connector of the Link FPC to the Main PBA.
Action:
1. If not properly connected – disconnect and reconnect it.
2. If dirty or oxidized – clean it.
Troubleshooting Guide (mech)
3. If the connectors or the FPC part of Link FPC is damaged
– replace the Link FPC and Link FPC Gasket.
4. Replace Main PBA.
1277-1356 Rev 2
Sony Mobile Communications AB –
19(45)
Company Internal
Problem Areas: Microphone
1.8.2 Secondary Microphone
Check:
Inspect the secondary microphone's external port on the
Battery Cover Assy.
Action:
1. If clogged – clean the port.
Troubleshooting Guide (mech)
Check:
Inspect the 2
nd
Microphone Rubber (a) on the Rear Cover
and the 2nd Microphone (b) on the Main PBA.
Action:
1. If dirty – clean them.
Liquid is not allowed!
2. If the 2
nd
Microphone Rubber is damaged – replace it.
3. Replace the Main PBA.
1277-1356 Rev 2
Sony Mobile Communications AB –
20(45)
Company Internal
Problem Areas
1.9 Vibrator
1.9.1 Vibrator not generating alerts
Check:
Inspect the Vibrator on the ANT Board.
Action:
1. If adhesive is detected on the Vibrator, use an eraser to
gently rub off the adhesive.
3. If damaged – replace the ANT Board.
Check:
Inspect the ZIF connector of the ANT Board to the Link FPC.
Action:
1. If not properly connected – disconnect and reconnect it.
2. If dirty or oxidized – clean it.
Troubleshooting Guide (mech)
Check:
Inspect the BtB connector of the Link FPC to the Main PBA.
Action:
1. If not properly connected – disconnect and reconnect it.
2. If dirty or oxidized – clean it.
3. If the connectors or the FPC part of Link FPC is damaged
– replace the Link FPC and Link FPC Gasket.
4. Replace Main PBA.
1277-1356 Rev 2
Sony Mobile Communications AB –
21(45)

Company Internal
Problem Areas
1.10 Camera
1.10.1 Camera defects
Check:
Inspect the external area of the camera window.
Action:
1. If dirty – clean it.
Troubleshooting Guide (mech)
2. If scratched or damaged – replace the Rear Cover.
Check:
Inspect the BtB connector of the Main Camera 5M to the
Main PBA.
Action:
1. If not properly connected – disconnect and reconnect it.
2. If dirty or oxidized – clean it.
Check:
Inspect the Main Camera 5M.
Action:
1. If the Camera or its BtB connector is damaged – replace
the Main Camera 5M, the Camera Connector Mylar Tape
and the Camera Gasket.
2. Replace the Main PBA.
1277-1356 Rev 2
Sony Mobile Communications AB –
22(45)

Company Internal
Problem Areas
1.11 Bluetooth and WLAN
1.11.1 Bluetooth or WLAN connection
failure
Check:
Inspect the Bluetooth and WLAN antenna on the Rear
Cover.
Troubleshooting Guide (mech)
Action:
If the antenna is damaged – replace the Rear Cover.
Check:
Inspect the Bluetooth and WLAN antenna contact pad on
the Rear Cover and the contact pins on the Main PBA.
Action:
1. If dirty – clean the pad and pins.
2. If the contact pad is damaged – replace the Rear Cover.
3. Replace the Main PBA.
1277-1356 Rev 2
Sony Mobile Communications AB –
23(45)

Company Internal
Problem Areas
1.12 GPS
1.12.1 GPS malfunctions
Check:
Inspect the GPS antenna on the Rear Cover.
Troubleshooting Guide (mech)
Action:
If the antenna is damaged – replace the Rear Cover.
Check:
Inspect the GPS antenna contact pads on the Rear Cover
and the contact pins on the Main PBA.
Action:
1. If dirty – clean the pads and pins.
2. If the contact pads are damaged – replace the Rear
Cover.
3. Replace the Main PBA.
1277-1356 Rev 2
Sony Mobile Communications AB –
24(45)

Company Internal
Problem Areas
1.13 Compass
1.13.1 Compass fails
Action:
Replace the Main PBA.
Troubleshooting Guide (mech)
1277-1356 Rev 2
Sony Mobile Communications AB –
25(45)

Company Internal
Problem Areas
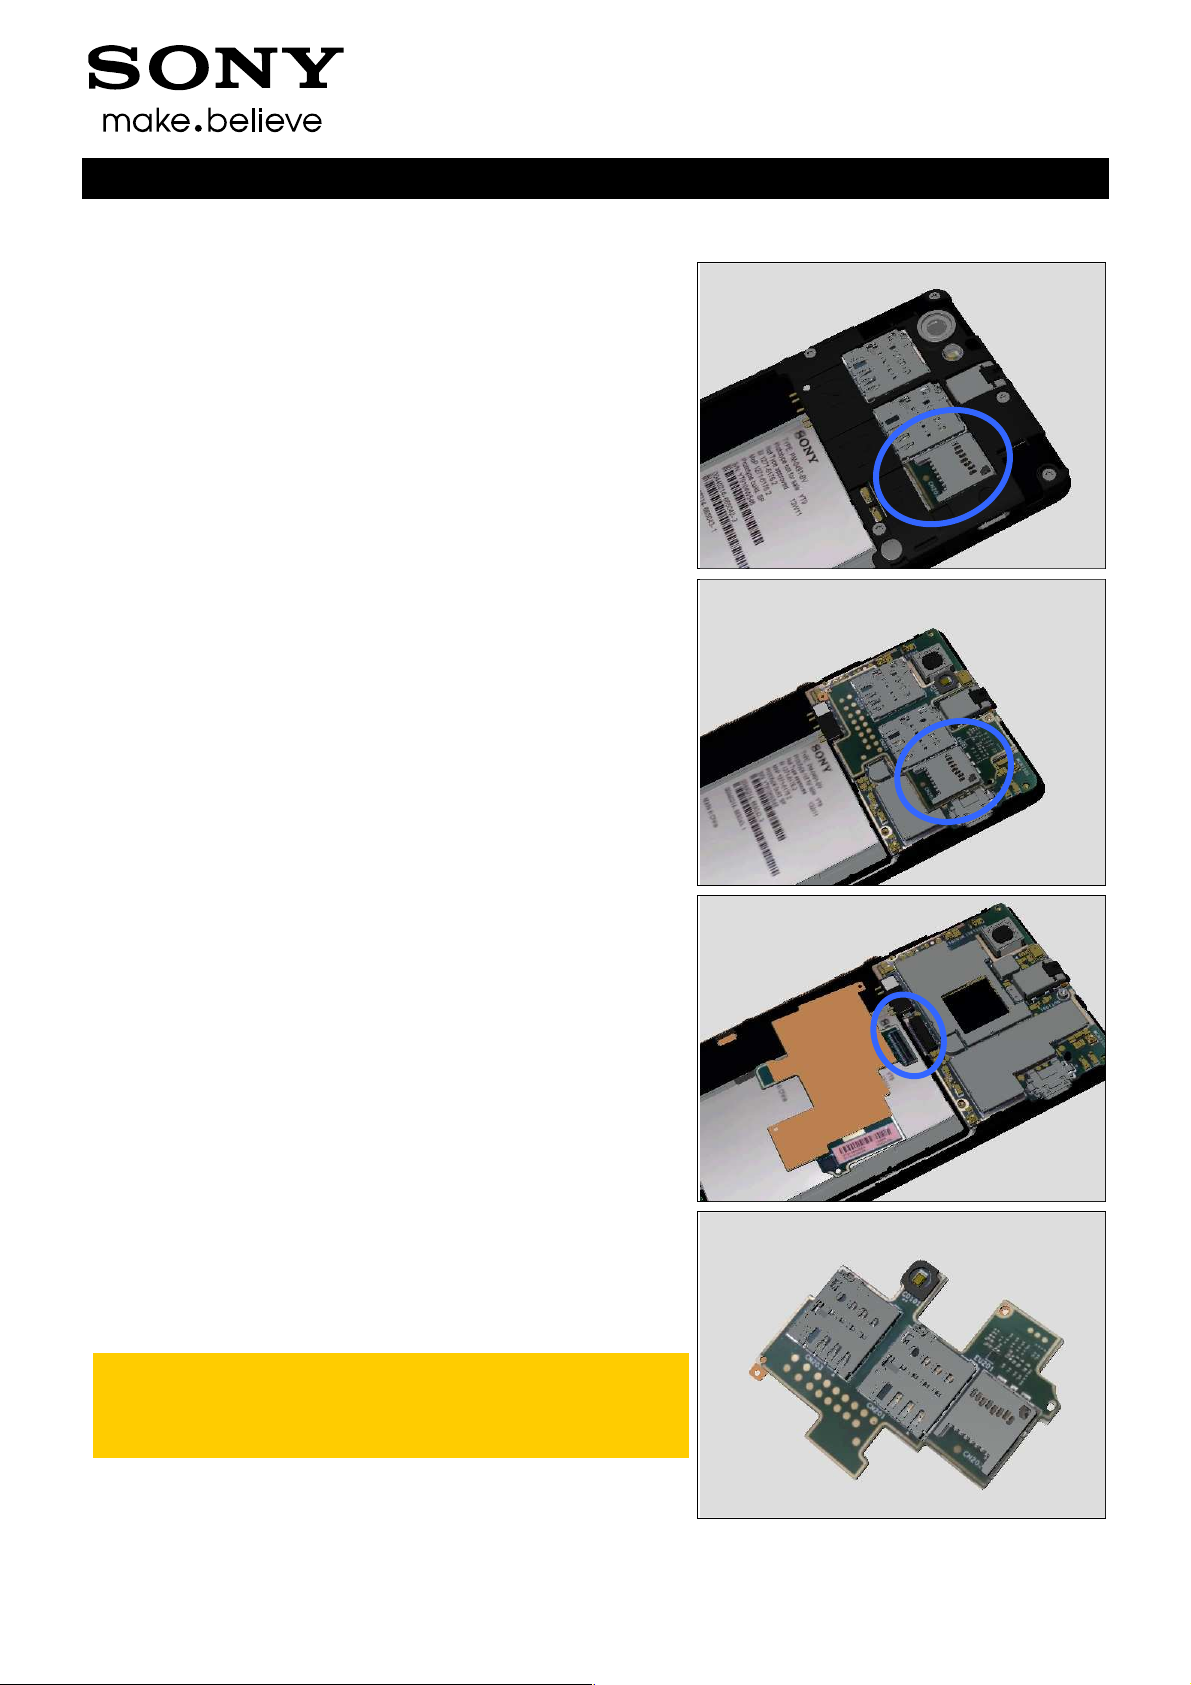
1.14 Accelerometer
1.14.1 Accelerometer test fails
Check:
Inspect the SIM Board.
Action:
If SIM Board is damaged – replace the SIM Board, SIM
Board Adhesive and Flash LED Gasket.
Check:
Check the connection of the BtB connector from SIM Board
to the Main PBA.
Action:
1. If not properly connected – disconnected and
reconnected it.
2. If dirty or oxidized – clean it.
Troubleshooting Guide (mech)
3. If the connector or the SIM card holders of the SIM Board
is damaged – replace the SIM Board.
4. Replace the Main PBA.
G-sensor Calibration should be performed after
replacing SIM Board.
For G-sensor Calibration, refer to 1277-8589 Trouble
Shooting Application.
1277-1356 Rev 2
Sony Mobile Communications AB –
26(45)
Company Internal
Problem Areas
1.15 Light Sensor
1.15.1 Light Sensor malfunctions
Check:
Inspect the external area of the Ambient Light Sensor
window.
Action:
1. If dirty – clean it.
Troubleshooting Guide (mech)
2. If the port is damaged – replace the Touch Panel.
Check:
Inspect the rubber on the Front Cover Assy and the light
sensor on the Main PBA.
Action:
1. If dirty – clean them.
2. If the rubber is damaged – replace the Rubber Sensor
and Light Pipe Sensor.
3. Replace Main PBA.
1277-1356 Rev 2
Sony Mobile Communications AB –
27(45)

Company Internal
Problem Areas
1.16 Proximity switch
1.16.1 Proximity switch malfunctions
Check:
Inspect the proximity switch and proximity sensor window
area on the Touch Panel.
Action:
1. If dirty – clean it.
Troubleshooting Guide (mech)
2. If the port is damaged – replace the Touch Panel.
Check:
Inspect the rubber on the Front Cover Assy and the
proximity switch and proximity sensor on the Main PBA.
Action:
1. If dirty – clean them.
2. If the rubber is damaged – replace the Rubber Sensor
and Light Pipe Sensor.
3. Replace Main PBA.
1277-1356 Rev 2
Sony Mobile Communications AB –
28(45)

Company Internal
Problem Areas
1.17 Real Time Clock
1.17.1 Real Time Clock test fails
Action:
Replace the Main PBA.
Troubleshooting Guide (mech)
1277-1356 Rev 2
Sony Mobile Communications AB –
29(45)

Company Internal
Problem Areas
1.18 Total call time
1.18.1 Total call time fails
Action:
Replace the Main PBA.
Troubleshooting Guide (mech)
1277-1356 Rev 2
Sony Mobile Communications AB –
30(45)
Company Internal
Problem Areas
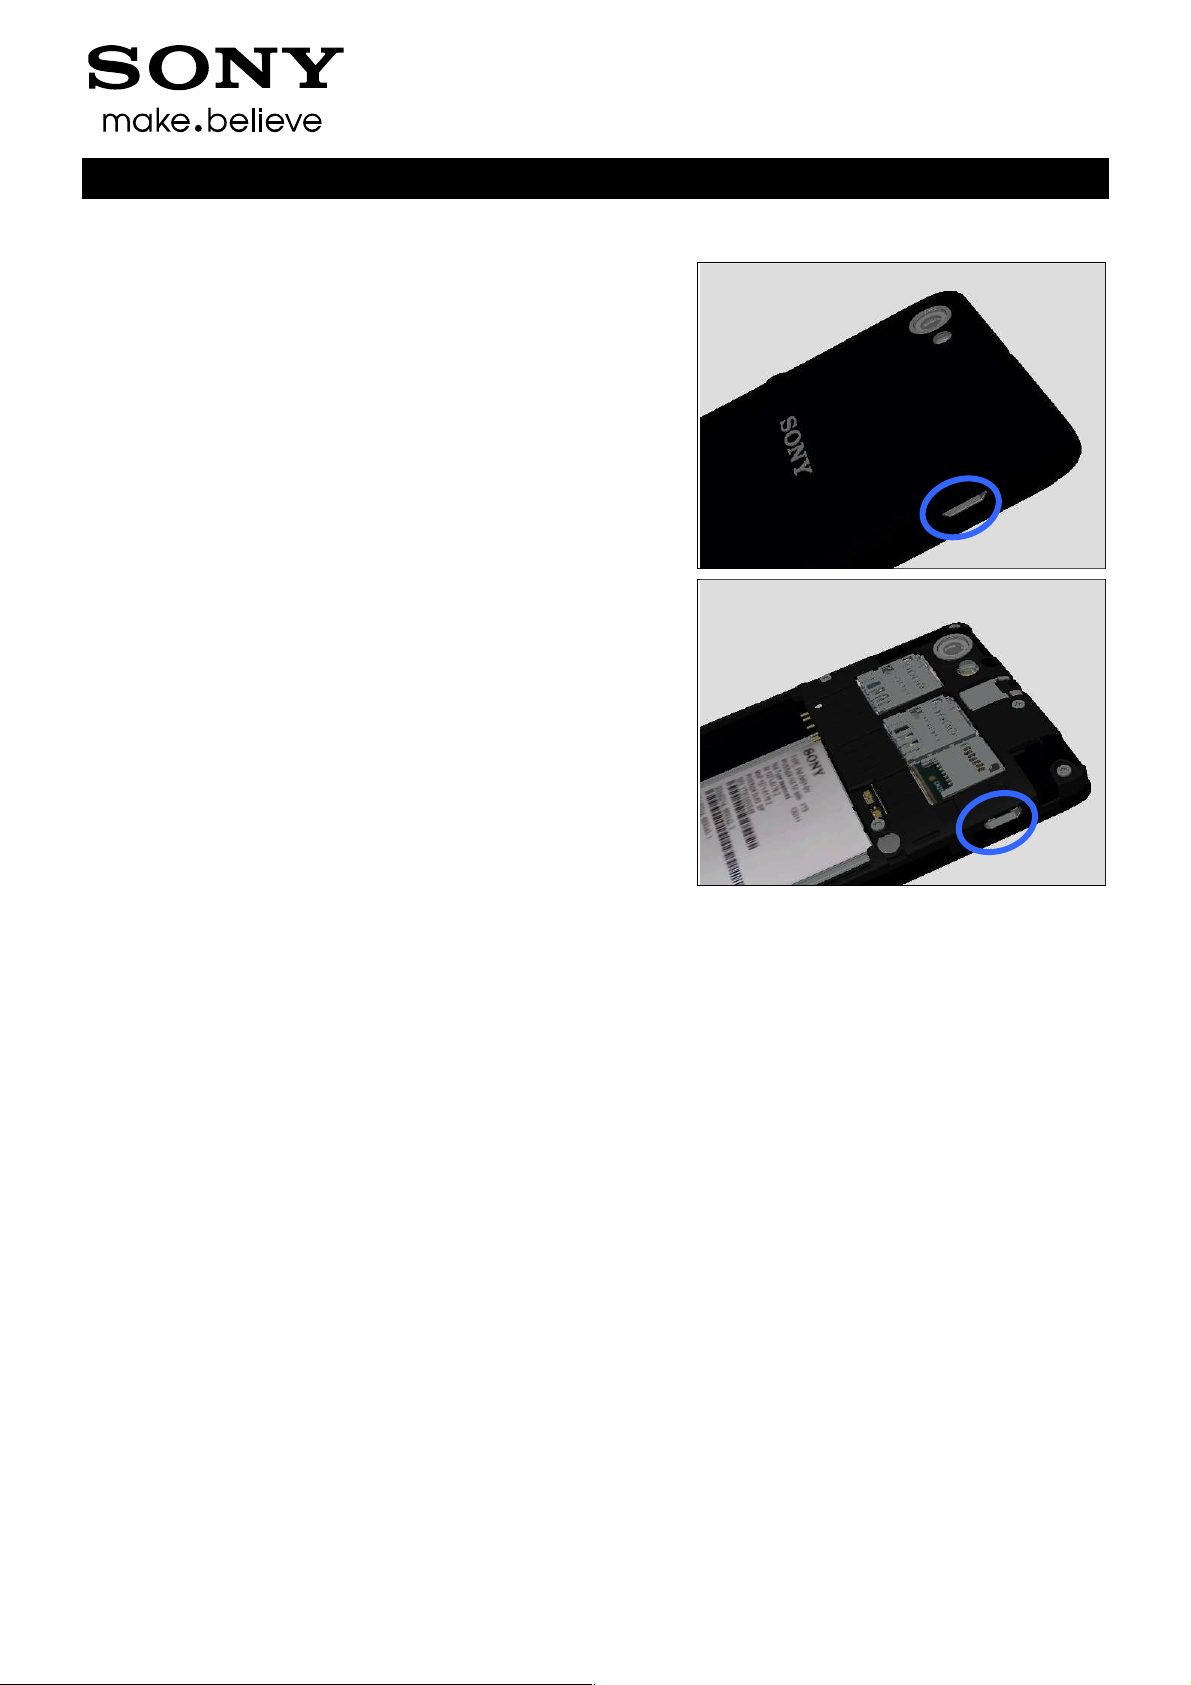
1.19 External Memory
1.19.1 Memory Card not detected
Check:
Inspect the external area of the memory card holder and
check if a memory card can be properly inserted.
Action:
1. If dirty or clogged – clean the holder.
Check:
Inspect the SIM Board.
Action:
1. If dirty or clogged – clean the holders.
2. If SIM Board is damaged – replace the SIM Board, SIM
Board Adhesive and Flash LED Gasket.
Troubleshooting Guide (mech)
Check:
Check the connection of the BtB connector from SIM Board
to the Main PBA.
Action:
1. If not properly connected – disconnected and
reconnected it.
2. If dirty or oxidized – clean it.
3. If the connector or the SIM card holders of the SIM Board
is damaged – replace the SIM Board.
4. Replace the Main PBA.
G-sensor Calibration should be performed after
replacing SIM Board.
For G-sensor Calibration, refer to 1277-8589 Trouble
Shooting Application.
1277-1356 Rev 2
Sony Mobile Communications AB –
31(45)

Company Internal
Problem Areas
1.20 Security
1.20.1 Security fails
Action:
Replace the Main PBA.
Troubleshooting Guide (mech)
1277-1356 Rev 2
Sony Mobile Communications AB –
32(45)

Company Internal
Problem Areas
1.21 FM Radio
1.21.1 No/Poor FM Radio reception
Use a CTIA type headset to do the test!
Check:
Inspect the audio jack.
Action:
If dirty or oxidized – clean it.
Check:
Inspect the audio jack on the Main PBA.
Action:
1. If dirty or oxidized – clean it.
2. Replace the Main PBA.
Troubleshooting Guide (mech)
1277-1356 Rev 2
Sony Mobile Communications AB –
33(45)

Company Internal
Problem Areas
1.22 Verify Certificates
1.22.1 Verify certificates fails
Action:
Replace the Main PBA.
Troubleshooting Guide (mech)
1277-1356 Rev 2
Sony Mobile Communications AB –
34(45)

Company Internal
Problem Areas
1.23 Network & Signal
1.23.1 No/Poor signal
Check:
Inspect the main antenna on the Rear Cover.
Troubleshooting Guide (mech)
Action:
If the antenna is damaged – replace the Rear Cover.
Check:
Inspect the main antenna contact pads on the Rear Cover
and contact pins on the Sub PBA.
Action:
1. If dirty – clean the pads and pins.
2. If the contact pads are damaged – replace the Rear
Cover.
1277-1356 Rev 2
Sony Mobile Communications AB –
35(45)

Company Internal
Problem Areas: Network & Signal
Check:
Inspect the connectors of the Coaxial Cable to the ANT
Board.
Action:
1. If not properly connected – disconnect and reconnect it.
2. If dirty or oxidized – clean it.
3. If the contact pins or the connector is damaged – replace
the ANT Board, Speaker Sponge and Ant Speaker Gasket.
Troubleshooting Guide (mech)
Check:
Inspect the connector of the Coaxial Cable to the Main PBA.
Action:
1. If not properly connected – disconnect and reconnect it.
2. If dirty or oxidized – clean it.
3. If the Coaxial Cable or either of its two connectors is
damaged – replace the Coaxial Cable.
4. Replace ANT Board
5. Replace the Main PBA.
1277-1356 Rev 2
Sony Mobile Communications AB –
36(45)

Company Internal
Problem Areas
1.24 SIM
1.24.1 SIM not detected
Check:
Inspect the external area of the SIM card holders and check
if the SIM cards can be properly inserted.
Action:
If dirty or clogged – clean the holders.
Check:
Inspect the SIM Board.
Action:
1. If dirty or clogged – clean the holders.
2. If SIM Board is damaged – replace the SIM Board, SIM
Board Adhesive and Flash LED Gasket.
Troubleshooting Guide (mech)
Check:
Check the connection of the BtB connector from SIM Board
to the Main PBA.
Action:
1. If not properly connected – disconnected and
reconnected it.
2. If dirty or oxidized – clean it.
3. If the connector or the SIM card holders of the SIM Board
is damaged – replace the SIM Board.
4. Replace the Main PBA.
G-sensor Calibration should be performed after
replacing SIM Board.
For G-sensor Calibration, refer to 1277-8589 Trouble
Shooting Application.
1277-1356 Rev 2
Sony Mobile Communications AB –
37(45)

Company Internal
Problem Areas: SIM
1.24.2 Incorrect SIM indicated
Check:
Inspect whether the phone is locked to a particular operator
and whether the correct operator SIM is being used.
Action:
1. Use a proper operator SIM or test SIM.
Check:
Inspect the SIM Board.
Action:
1. If dirty or clogged – clean the holders.
2. If SIM Board is damaged – replace the SIM Board, SIM
Board Adhesive and Flash LED Gasket.
Troubleshooting Guide (mech)
Check:
Check the connection of the BtB connector from SIM Board
to the Main PBA.
Action:
1. If not properly connected – disconnected and
reconnected it.
2. If dirty or oxidized – clean it.
3. If the connector or the SIM card holders of the SIM Board
is damaged – replace the SIM Board.
4. Replace the Main PBA.
G-sensor Calibration should be performed after
replacing SIM Board.
For G-sensor Calibration, refer to 1277-8589 Trouble
Shooting Application.
1277-1356 Rev 2
Sony Mobile Communications AB –
38(45)

Company Internal
Problem Areas
1.25 Charging
1.25.1 Battery will not charge
Check:
Inspect the contact pads of the battery.
Action:
1. If dirty or oxidized – clean the pads.
2. If damaged – replace the battery.
Check:
Inspect the battery contact pins.
Action:
1. If dirty or oxidized – clean the contact pins.
2. If adhesive is detected on the contact pins – use an
eraser to gently rub off the adhesive.
3. If the contact pins are damaged – replace the Main PBA.
Troubleshooting Guide (mech)
Check:
Inspect the USB connector.
Action:
1. If dirty or oxidized – clean the connector.
2. Replace the Main PBA.
1277-1356 Rev 2
Sony Mobile Communications AB –
39(45)

Company Internal
Problem Areas
1.26 HandsFree by Wire
1.26.1 Connection to Portable
HandsFree fails
Use a CTIA type headset to do the test!
Check:
Inspect the external area of the audio jack.
Action:
If dirty or oxidized – clean it.
Check:
Inspect the audio jack.
Action:
If dirty or oxidized – clean it.
Troubleshooting Guide (mech)
Check:
Inspect the audio jack on the Main PBA.
Action:
1. If dirty or oxidized – clean it.
2. Replace Main PBA.
1277-1356 Rev 2
Sony Mobile Communications AB –
40(45)
Company Internal
Problem Areas
1.27 Data Communication
1.27.1 Data transfer via System
Connector fails
Check:
Inspect the external area of the USB connector.
Action:
If dirty or oxidized – clean the connector.
Check:
Inspect the USB connector.
Action:
1. If dirty or oxidized – clean the connector.
2. Replace the Main PBA.
Troubleshooting Guide (mech)
1277-1356 Rev 2
Sony Mobile Communications AB –
41(45)
Company Internal
Problem Areas
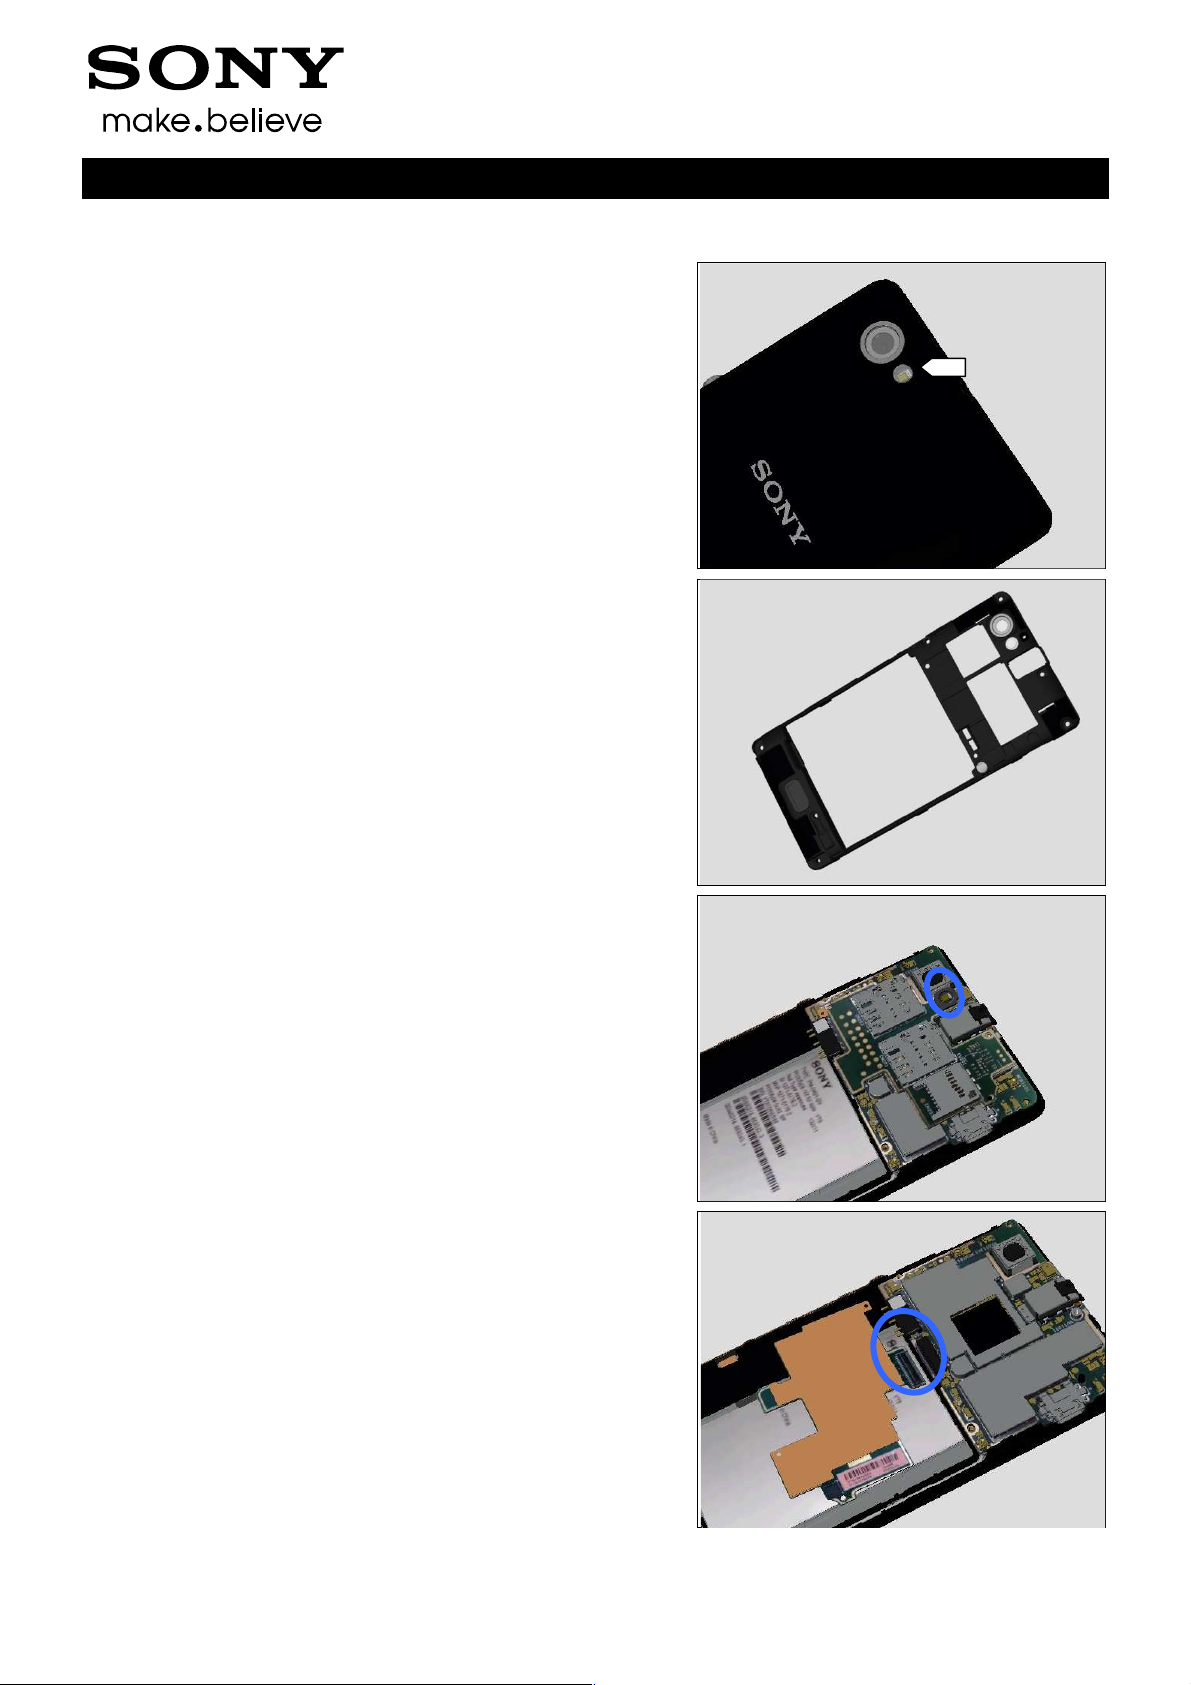
1.28 Flash LED Defects
1.28.1 Flash LED defects
Check:
Inspect the external area of the flash LED window.
Action:
1. If dirty – clean it.
Troubleshooting Guide (mech)
2. If scratched or damaged – replace the Rear Cover.
Check:
Inspect the SIM Board.
Action:
1. If dirty or clogged – clean it.
2. If SIM Board is damaged – replace the SIM Board, SIM
Board Adhesive and Flash LED Gasket.
Check:
Check the connection of the BtB connector from SIM Board
to the Main PBA.
Action:
1. If not properly connected – disconnected and
reconnected it.
2. If dirty or oxidized – clean it.
1277-1356 Rev 2
Sony Mobile Communications AB –
42(45)

Company Internal
Problem Areas: Flash LED
3. If the connector or the SIM card holders of the SIM Board
is damaged – replace the SIM Board.
4. Replace the Main PBA.
G-sensor Calibration should be performed after
replacing SIM Board.
For G-sensor Calibration, refer to 1277-8589 Trouble
Shooting Application.
Troubleshooting Guide (mech)
1277-1356 Rev 2
Sony Mobile Communications AB –
43(45)

Company Internal
Problem Areas
1.29 NFC
1.29.1 NFC malfunctions
Check:
Inspect the NFC antenna on the Battery Cover Assy.
Troubleshooting Guide (mech)
Action:
If the antenna is damaged – replace the Battery Cover Assy.
Check:
Inspect the NFC antenna contact pads on the Battery Cover
Assy and the contact pins on the Main PBA.
Action:
1. If dirty or oxidized – clean the pads and pins.
2. If the contact pads are damaged – replace the Battery
Cover Assy
3. Replace Main PBA.
1277-1356 Rev 2
Sony Mobile Communications AB –
44(45)

Company Internal
Rev.
Date
Changes / Comments
2 Revision History
1 2013-Aug-09 Initial release
2 2013-Sep-12 Update G-Sensor Calibration reference document
Troubleshooting Guide (mech)
1277-1356 Rev 2
Sony Mobile Communications AB –
45(45)
 Loading...