

Page 1

3-864-815-11(1)
Page 2

Page 3

3-858-942-31(1)
Digital Reference
Sound System
Operating Instructions
Before operating the system, please read this manual thoroughly
and retain it for future reference.
XES-Z50
Page 4

Table of Contents
Table of Contents
Overview
Overview ............................................ 4
Overview of the System ............. 4
Precautions ......................................... 5
Using the Rotary Remote ................. 7
Basic Operations.......................... 7
Other Operations ........................ 8
Using the Wireless Remote ............ 10
Getting Started
Initial Settings .................................. 12
Setting the Clock.............................. 14
Listening to CDs
Inserting CDs ................................... 16
Listening to a CD ............................. 18
To Select the Disc to Be Played
..................................................... 19
To Locate a Track ...................... 19
To Locate a Specific Point on a
Track ........................................... 19
Playing Tracks Repeatedly (Repeat
Play) ............................................ 20
Playing Tracks in Random Order
(Shuffle Play) ............................. 21
Selecting Specific Tracks for
Playback (Bank) ......................... 22
Setting Sound Effects for Each CD/
MD (Disc Sound Memory) ...... 24
Labelling a CD (Disc Memo) ......... 25
Erasing a Disc Title ................... 27
Locating a Disc by Title .................. 28
Viewing CD TEXT Information .... 30
Selecting the Disc Title Display
..................................................... 30
Scrolling Titles Automatically
..................................................... 31
Listening to the Radio
Listening to the Radio..................... 32
Using the Radio Data System
(RDS) ........................................... 34
Re-tuning the Same Programme
Automatically (Alternative
Frequencies (AF)) ...................... 35
To Turn the AF Function On or
Off by Menu Operation............ 35
Listening to a Regional
Programme ................................ 36
Presetting Radio Stations with the
Strongest Signals (BTM) ........... 37
Specifying the Station Frequency
(Manual Preset Memory) ......... 38
Presetting the RDS Stations with
AF and TA Data ........................ 40
Specifying Monaural/Stereo Mode
..................................................... 42
Receiving Only the Strongest Signals
(Local On/Off)........................... 43
Selecting a Station on the List ........ 44
Local Link Function (United
Kingdom only) .......................... 44
Listening to Traffic
Announcements ........................ 45
To Set TA Function ................... 46
Recording the Traffic
Announcements (Traffic
Information Replay (TIR)) ....... 47
To Turn On The TIR Function
..................................................... 47
Playing Back the Recorded
Traffic Announcements............ 47
To Set the TIR Function............ 48
2 Table of Contents
Page 5

Locating an RDS Station by
Programme Type (Programme
Type Selection (PTY) Function)
..................................................... 49
Selecting a Programme Type... 49
Setting the Clock Automatically ... 50
Additional Settings
Set up Menu ..................................... 51
Source Settings................................. 53
Selecting the Parametric Equalizer
Pattern......................................... 55
Selecting the Cross-over Network
Pattern......................................... 56
About Optional Equipment
Listening to an Optional CD/MD
Changer ...................................... 57
Overview
Getting Started Listening to CDs
Listening to
the Radio
Appendix
Attaching/Detaching the Electrically
Operated Display Section ........ 59
Detaching the Display Section
..................................................... 59
Attaching the Display Section
..................................................... 61
Precautions and Maintenance ....... 62
Wireless Remote ........................ 63
Troubleshooting Guide .................. 64
Error Messages on the CD/MD
Discs ............................................ 65
Specifications ................................... 66
Sample Frequency Response Table
for the FIR Filter (4095 tap) ...... 68
Table of Contents
Additional
Settings
About Optional
Equipment
Appendix
3
Page 6
Overview
Overview
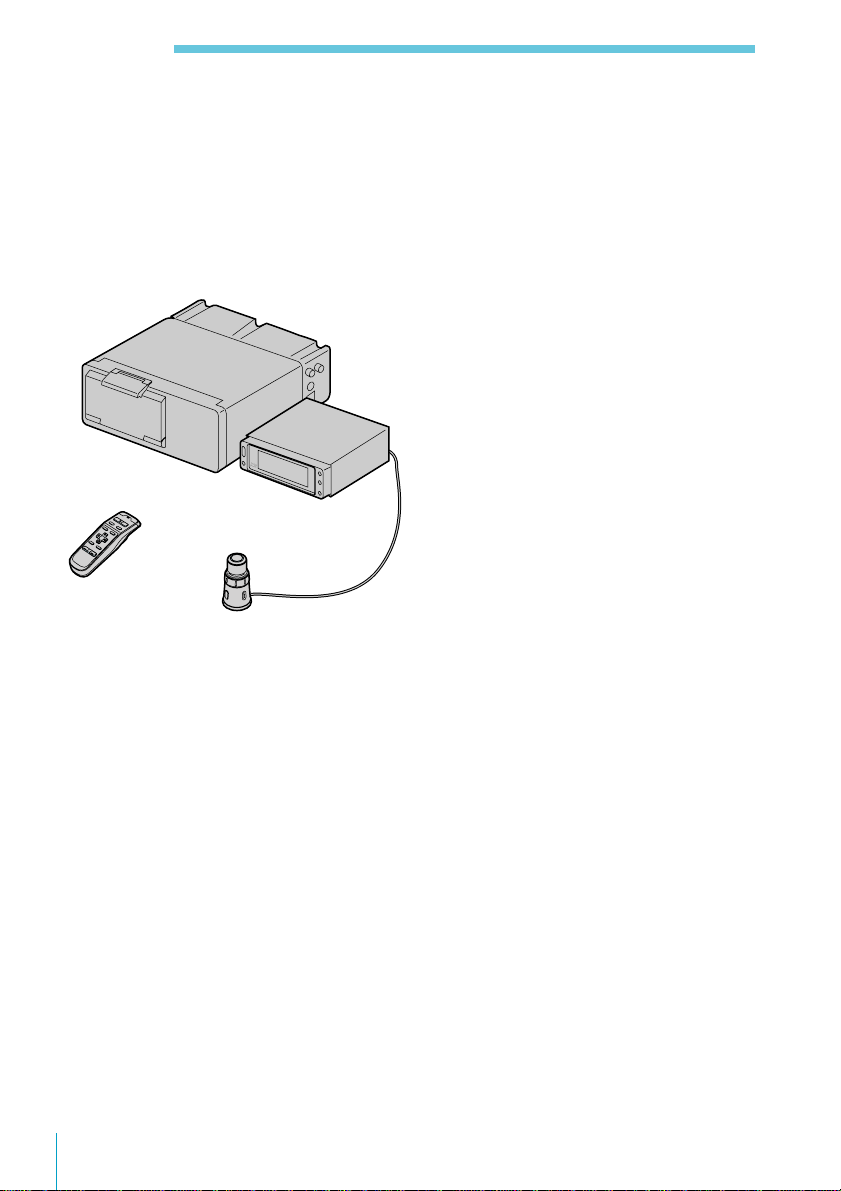
Overview of the System
This system consists of the following
sections.
CD changer (DAC/DSP pre-amplifier)
Wireless remote
Rotary remote
Useful tips
For details on connecting the XES-M50 Power
Amplifier, XES-F50 Full-range Speaker, XESH50 Ribbon Tweeter, XES-L50 Subwoofer,
and the optional CD changer and MD
changer, refer to the Installation/Connection
Manual supplied with this system.
Control unit
(with built-in
tuner section)
4 Overview
Page 7
Precautions
Overview
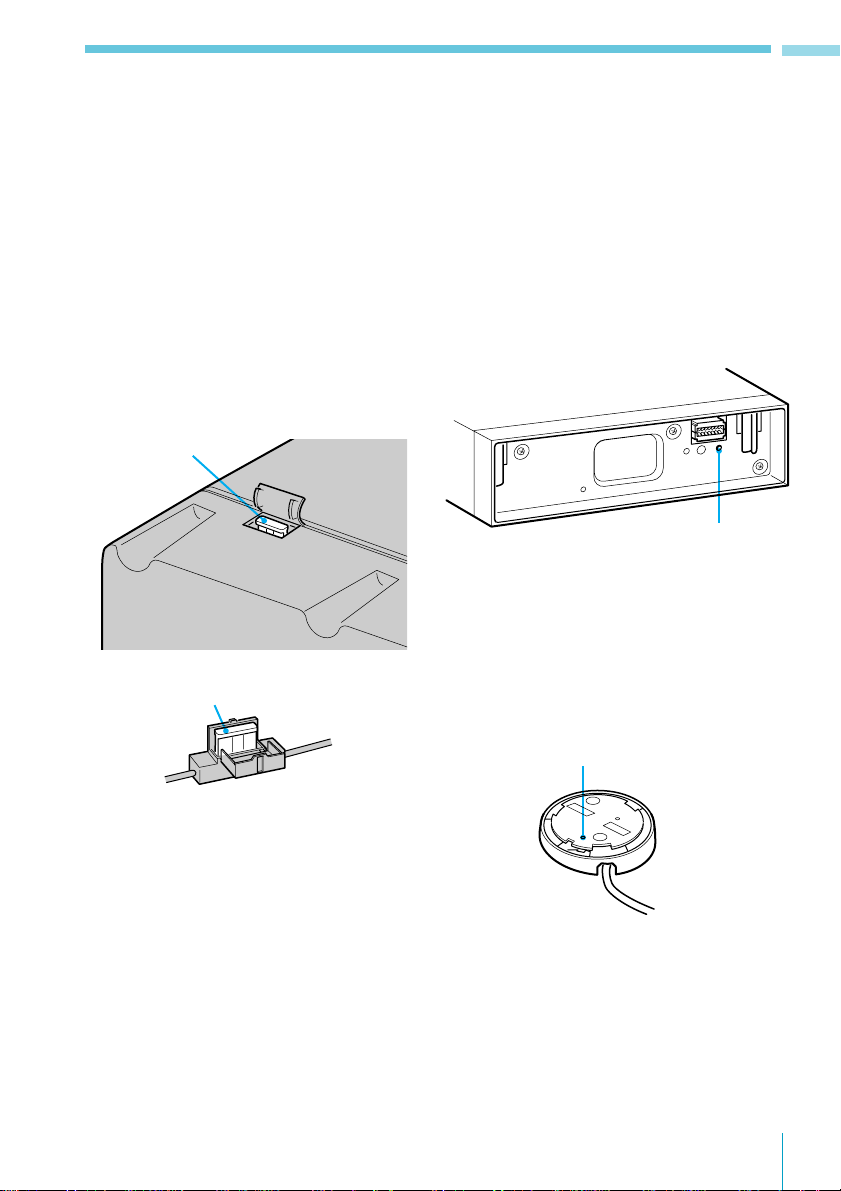
Replacing fuses
When replacing a fuse, be sure the new
fuse has the same power rating
(amperage) as the old one. If you
replace a burnt-out fuse either with a
higher-rated fuse or with a wire, the
system may be damaged or a fire may
break out.
Fuses are located at the bottom of the
CD changer and in the mains lead.
Fuse at the bottom of
the CD changer
5
Fuse in the mains lead
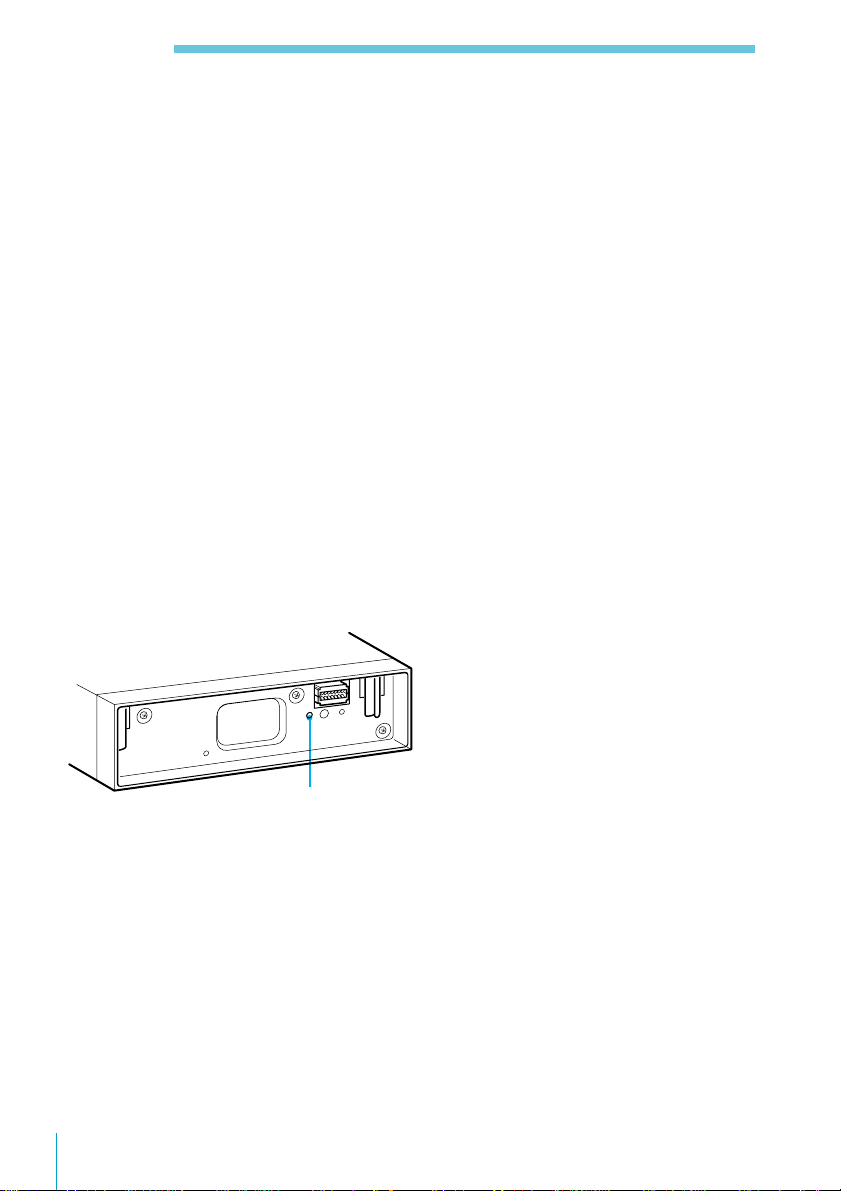
3
The reset button
After replacing the car battery, press the
reset button in the control unit with a
pointed object such as a ball-point pen.
To detach the display section from the
control unit, see “Attaching/Detaching
the Electrically Operated Display
Section” on page 59.
Reset button
Another reset button can be found on
the rotary remote holder.
When you cannot detach the display
section because the system does not turn
on, press the reset button on the rotary
remote holder.
Reset button
Adjusting the volume
For your safety, set the volume low
enough so that you can still hear the
sounds in the street around you.
The display section
Under extremely hot or cold conditions,
the display may become dim, but this is
not a malfunction. The display will
return to normal when the temperature
becomes normal.
Overview
5
Page 8
Overview
The TIR indicator
The system can automatically record
traffic announcements even while the
display section has been removed (see
page 47). The TIR indicator in the
control unit flashes for about ten
seconds when you remove the display
section while the TIR function is turned
on. The TIR indicator also flashes when
you turn the ignition switch to OFF
while the ACC Position is set to “yes,”
the TIR function is on, and the front
panel has been removed.
If you have a power aerial, it
automatically extends whenever the
preset time comes (see page 48).
If you don’t use your car frequently, be
sure to turn off the TIR function to
prevent battery wear.
Notes
• If your car was parked in direct
sunlight resulting in a considerable
rise in temperature inside the car,
allow the system to cool off before
operating it.
• If no power is being supplied to the
system, check the connections first. If
everything is in order, check the fuse.
• Avoid installing the CD changer,
wireless remote, and rotary remote in
places:
— subject to temperatures exceeding
55°C.
— subject to direct sunlight.
— near heat sources (such as heaters).
— exposed to rain or moisture.
— exposed to excessive dust or dirt.
— subject to excessive vibration.
6 Overview
TIR indicator
Page 9
Using the Rotary Remote
You can use the rotary remote for all operations
except menu operations.
Basic Operations
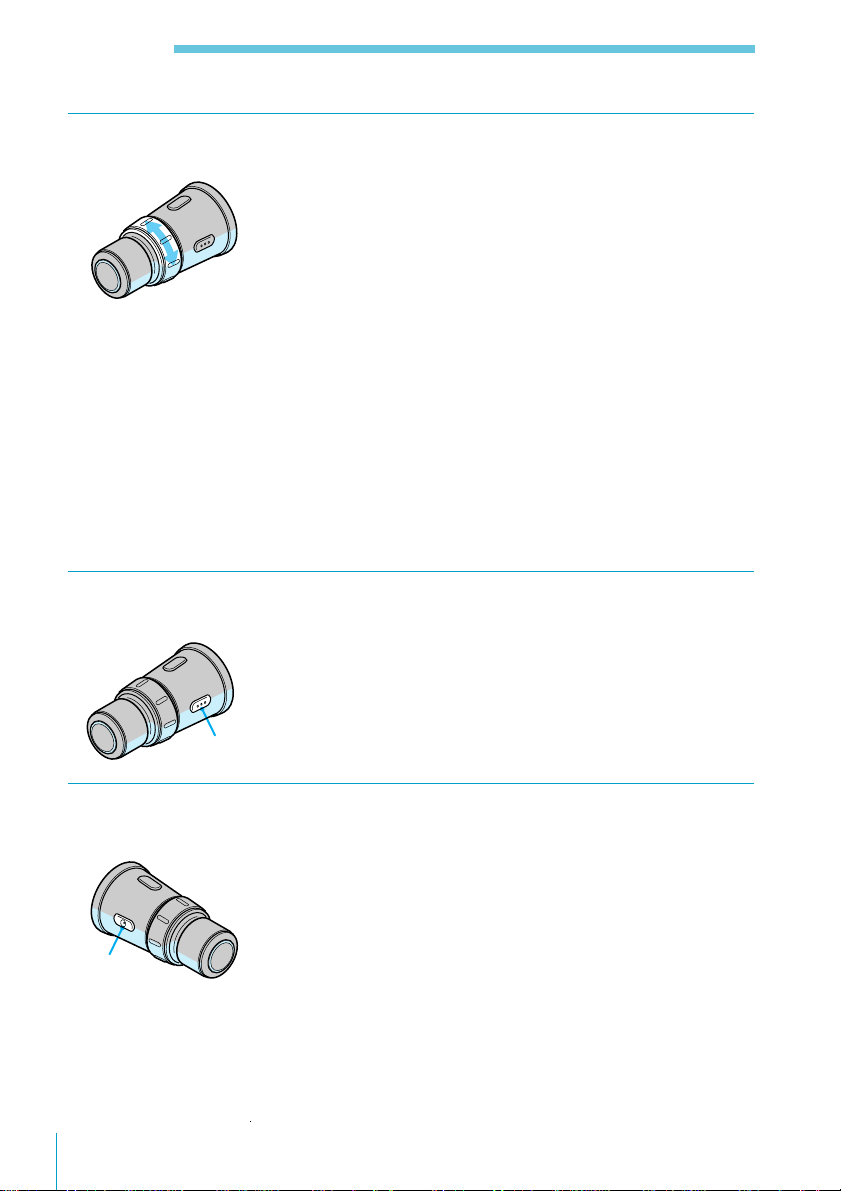
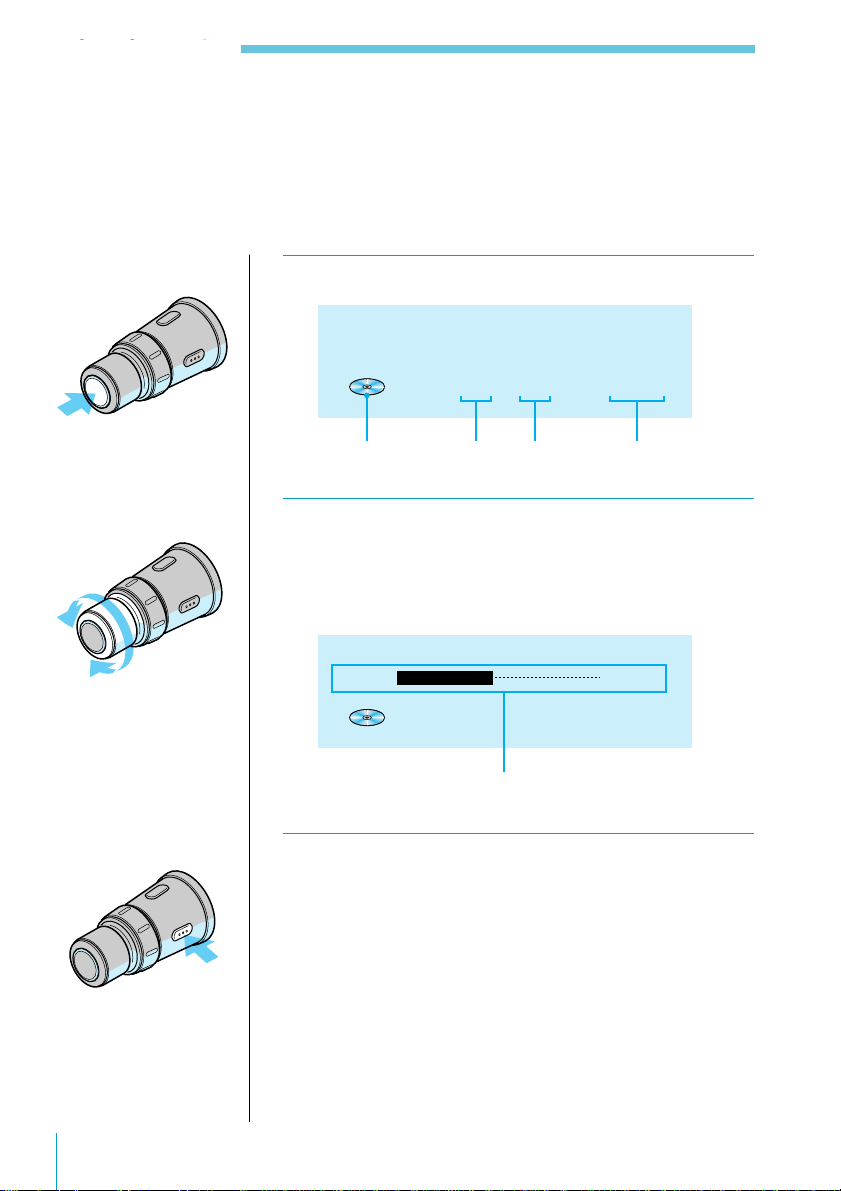
SOURCE button
Press the button.
The system turns on. Each time you press the button, the
programme source switches as follows: CD n MD (only
when an MD unit is connected) n AUX (only when
Source settings have been done: see page 53) n FMn
MW n LW n CD. When an external component is
selected, it will be indicated as an auxiliary (AUX)
component.
To turn off the system, press the OFF button on the side of
the rotary remote (see page 8).
Overview
VOL/DISC/PRESET control
Rotate the control.
You can adjust the volume.
Push in and rotate the control.
You can change the disc inside of the changer when CD or
MD is selected.
You can change the preset station in the tuner when FM,
MW, or LW is selected.
Push in and release the control.
The display section shows the list of discs or preset
stations for a few seconds, then reverts to the previous
display.
Overview
7
Page 10
Overview
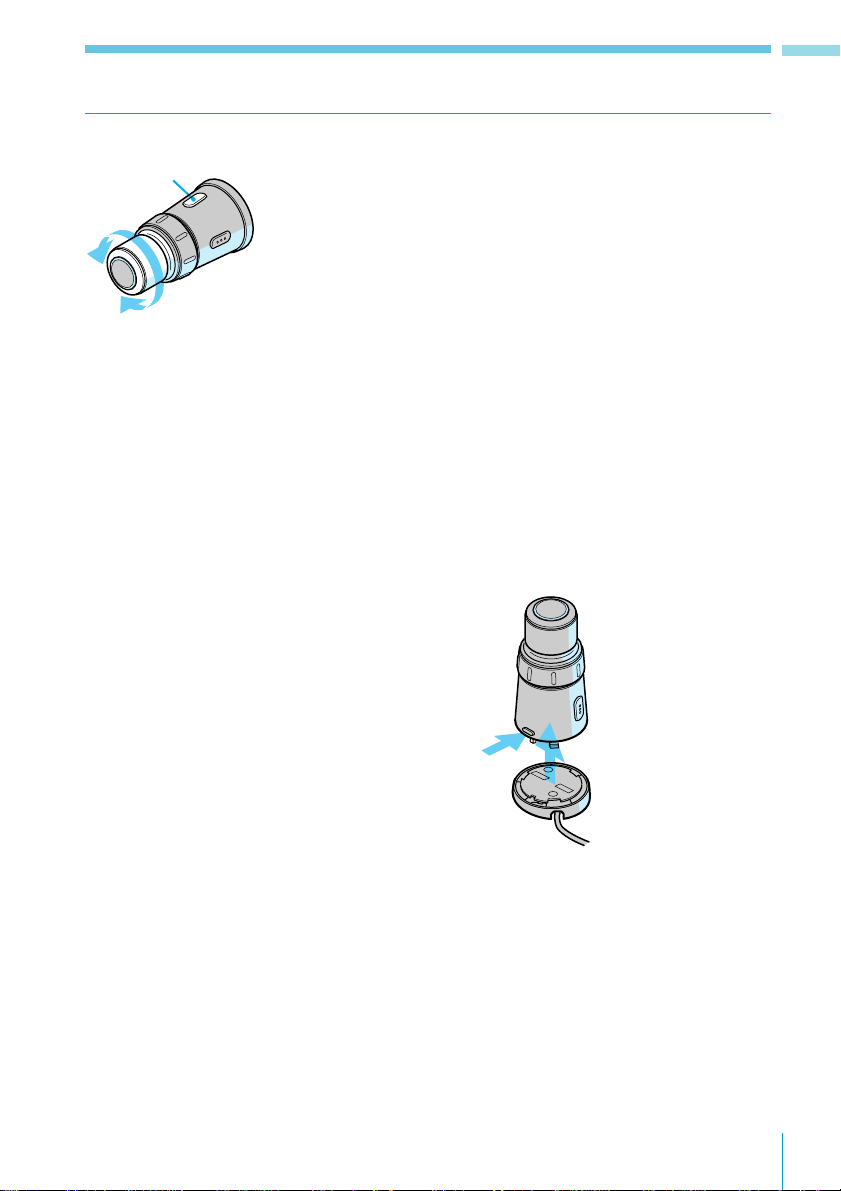
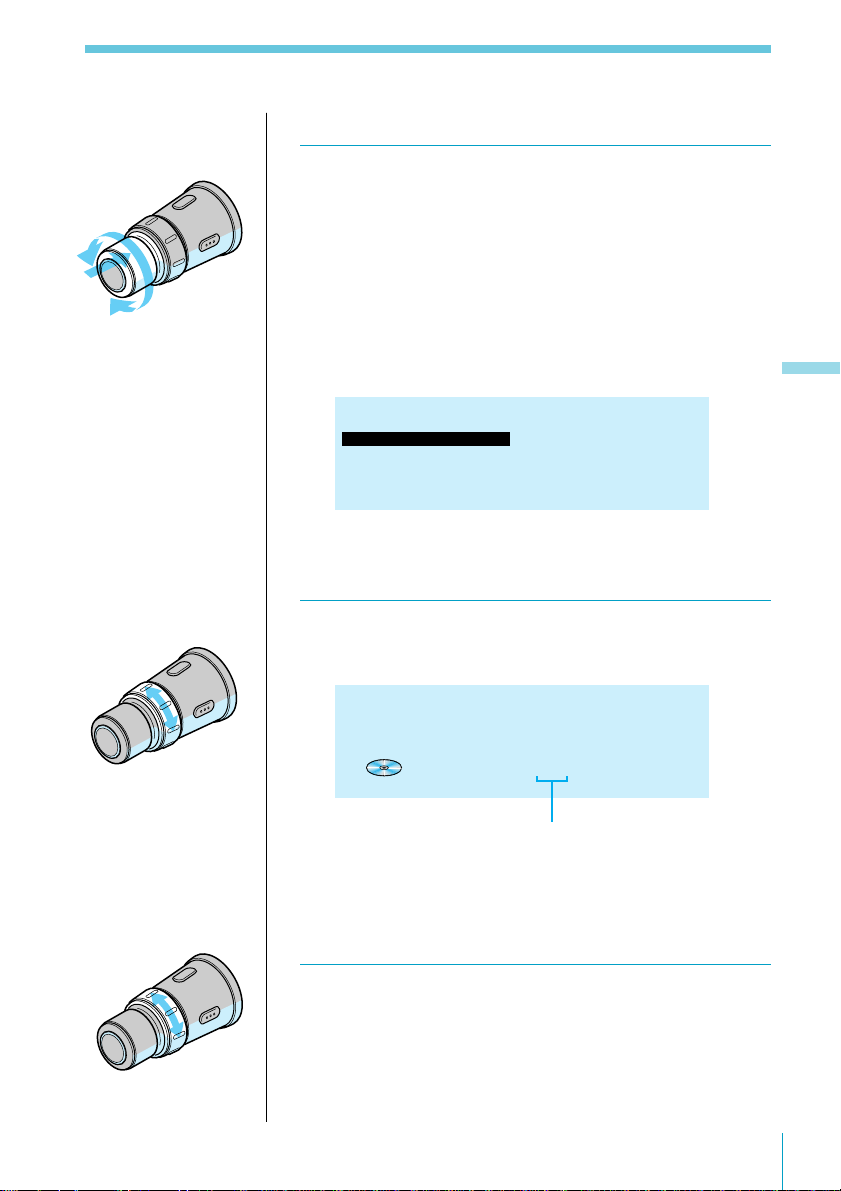
SEEK/AMS control
Other Operations
OFF button
Rotate and release the control.
You can locate the beginning of tracks when CD or MD is
selected.
When FM, MW, or LW is selected, the tuner begins
searching for a station, then stops when it detects one.
Keep the control rotated.
You can locate a specific point on a track when CD or MD
is selected. Playback at normal speed resumes when you
release the control.
When FM, MW, or LW is selected, manual tuning becomes
possible.
Press this button to turn off the system.
ATT button
ATT button
8 Overview
To turn on the system again, press the SOURCE button.
OFF button
Press this button to attenuate the sound.
To cancel the attenuation, press the button again.
Page 11
SOUND button
SOUND button
Overview
Press this button to select sound characteristics.
Each press of the button changes the display as follows:
PEQ (Parametric EQualizer) indication n CNW (Crossover NetWork) indication n previous display.
While the PEQ or CNW indication appears, rotate the
VOL/DISC/PRESET control to select 1 of 10 preset
patterns.
The previous display reappears when no operation has
been done for several seconds.
To switch the direction
of rotation of the rotary
remote
See “Set up Menu” on
page 51.
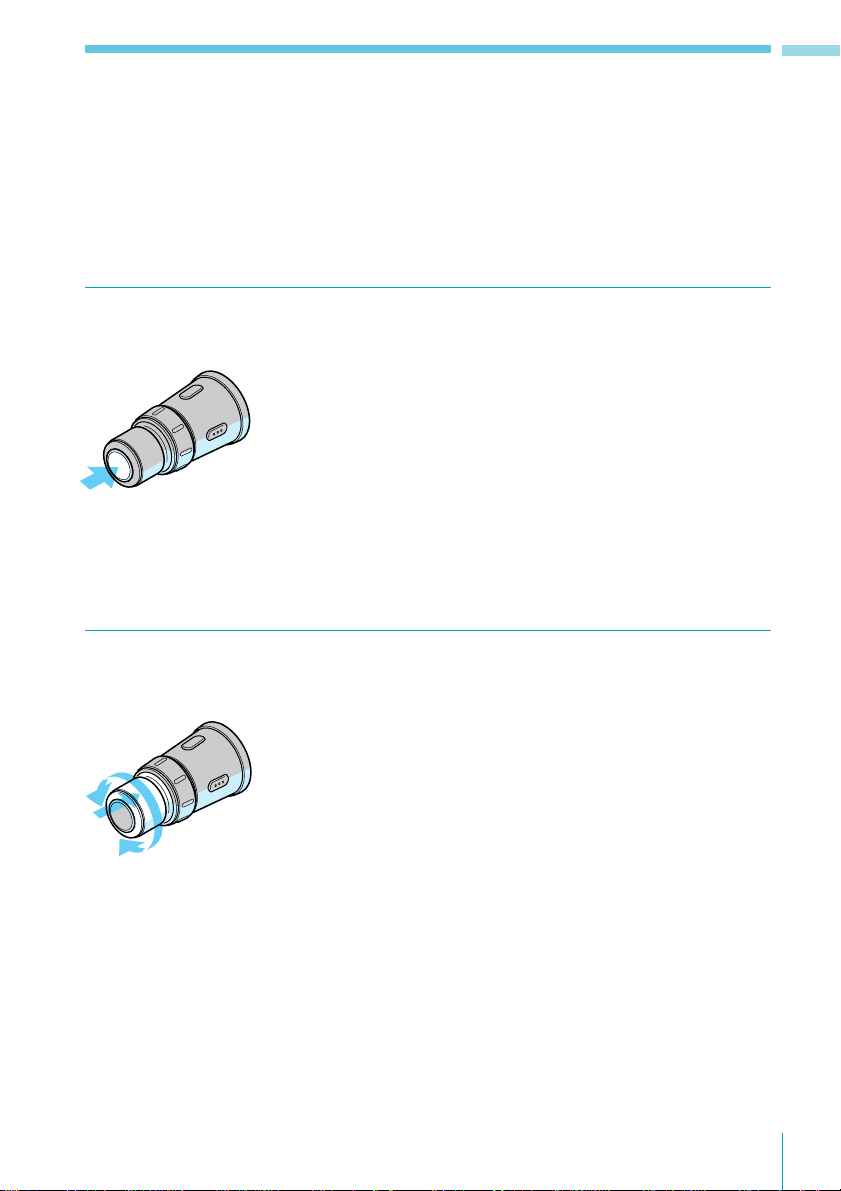
To detach the rotary remote
You can detach the rotary remote as a safety measure
against theft.
Turn the rotary remote clockwise while pressing down the
RELEASE button.
RELEASE button
Overview
9
Page 12
Overview
Using the Wireless Remote
Use the wireless remote to make the various menu settings. For your safety, system
operations with the wireless remote should be done by a passenger. If you (the
driver) want to use the wireless remote, park your car in a safe location before
performing any operations.
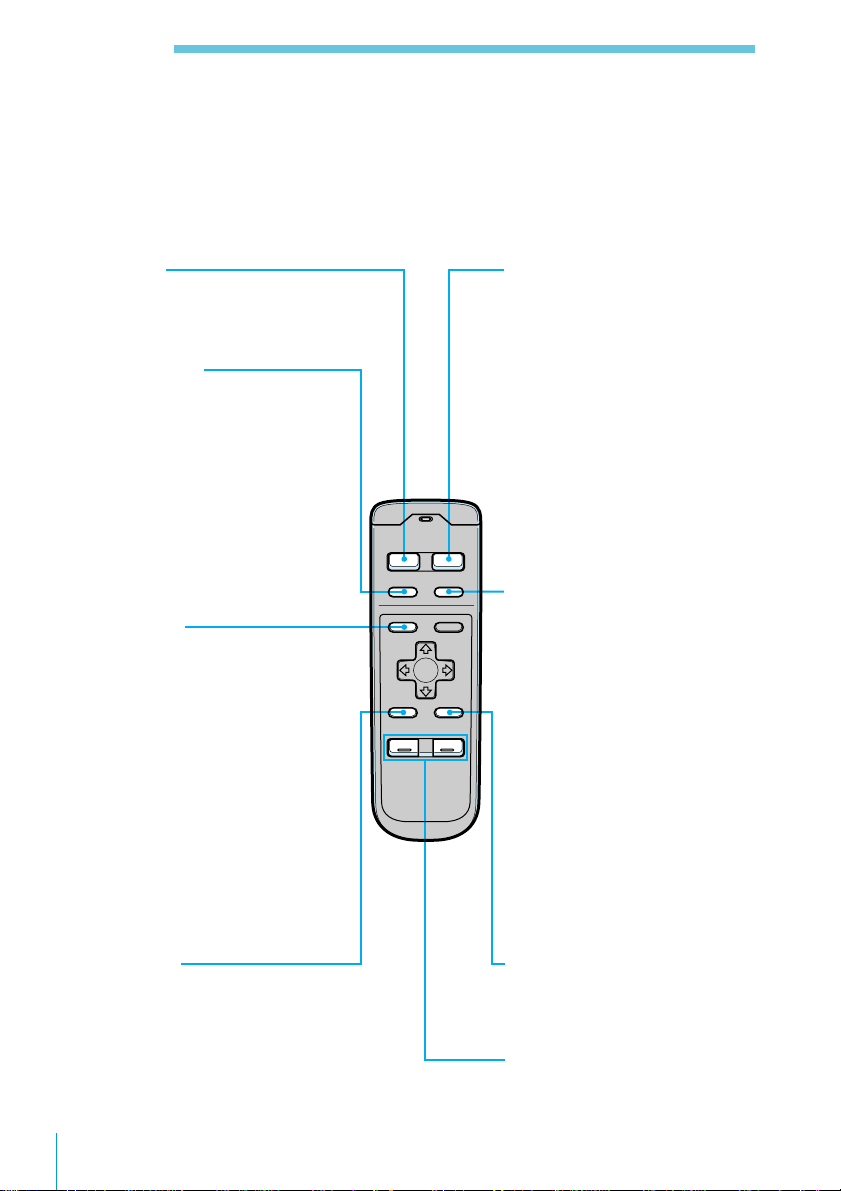
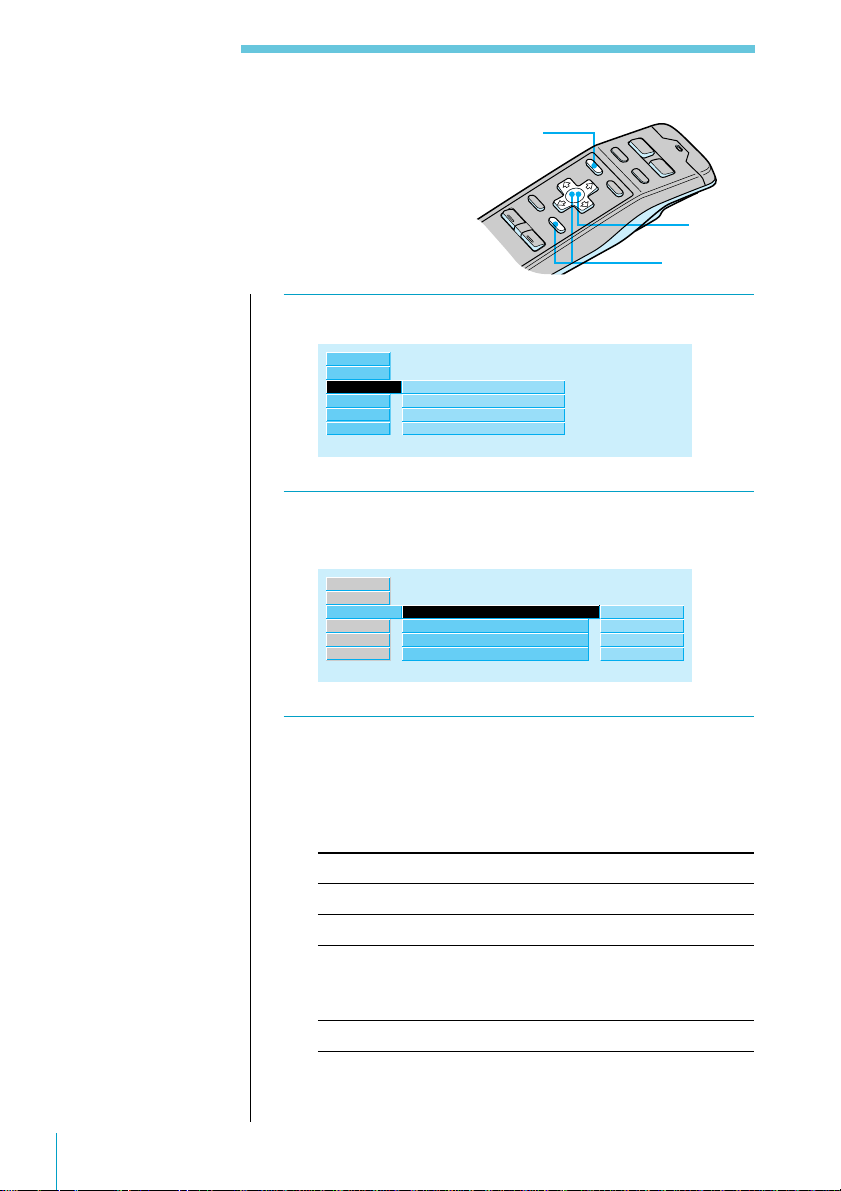
OFF button
Press to turn off the system.
D LABEL button
When DAB is selected, press to turn
the Dynamic Label.
(Temporarily inoperable)
MENU button
Press to switch to a menu
display. The menu which
appears depends on the
current programme source.
To return to the previous
display, press the button
again.
OFF
SOURCE
D LABEL
DSPL
MENU LIST
BACK
ENTER
VOL
–+
SOURCE button
Press repeatedly to specify the
source as follows:
CD n MD (only when an MD
changer is connected) n AUX
(only when Source settings have
been done) n FM n MW n LW
n CD.
DSPL (display) button
When playing a CD or MD, press
to display the disc title or track
title.
When the current disc or track has
no title, “No Disc (or Track)
Name” appears in the display.
When FM is selected, press to
activate the PTY Search function
(see page 49).
BACK button
Press to return to the normal display
during a menu operation.
10 Overview
ENTER button
Press to carry out the selected
function.
VOL buttons
Press + or – to adjust the volume.
Page 13
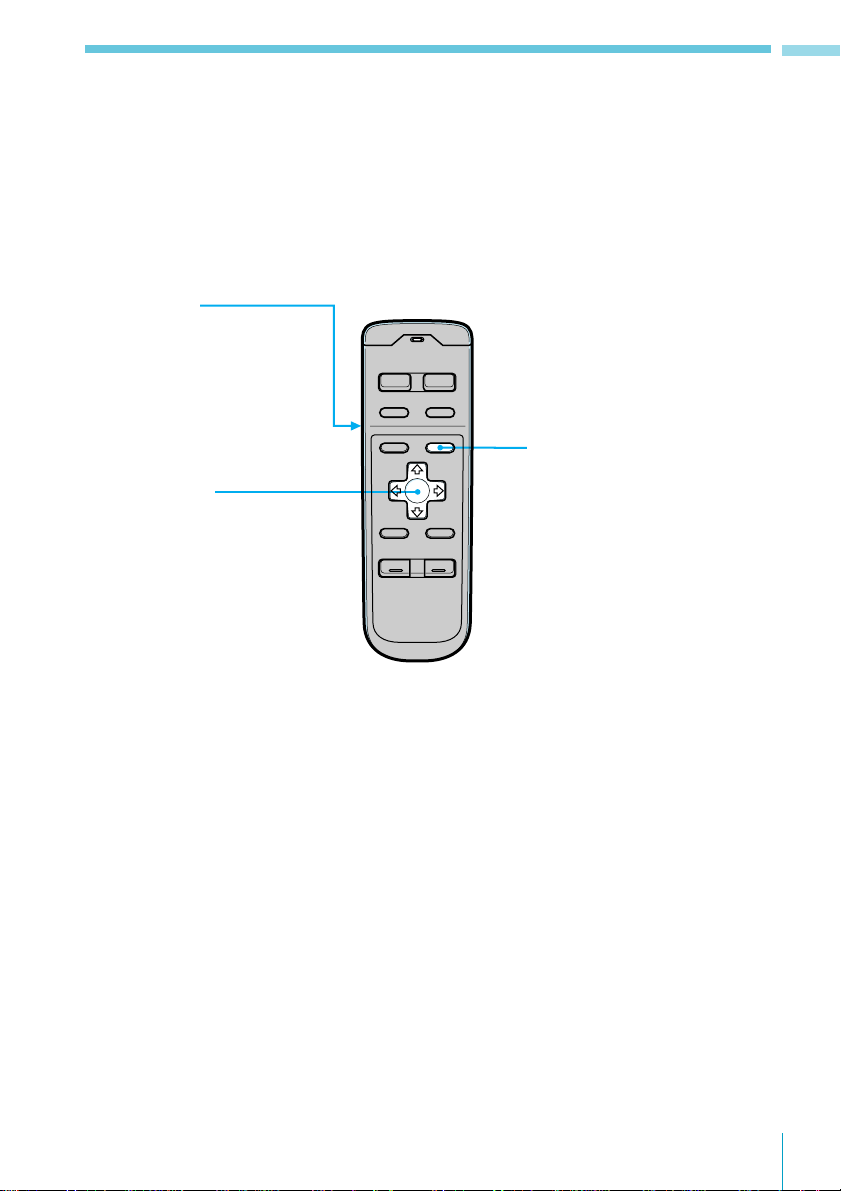
LIGHT button
Press to light up the buttons
on the wireless remote. The
light turns off after a few
seconds.
OFF
D LABEL
Overview
SOURCE
DSPL
Cursor buttons
During the menu display
appears, press to move the
cursor in a menu display.
When CD or MD is selected,
press > or . to change the disc
and ? and / to locate a track.
When FM, MW, or LW is
selected, press > or . to select a
preset station, or ? and / to
perform automatic tuning.
MENU LIST
ENTER
BACK
VOL
–+
LIST button
When CD or MD is selected,
press to display DISC NAME
LIST. While the list appears in
the display, press again to
display TRACK NAME LIST of
the current disc (see page 29).
When FM, MW, or LW is
selected, press to display PRESET
LIST.
To change the current selection,
use the cursor buttons to make
new selection, then press the
ENTER button.
Overview
11
Page 14
Getting Started
Initial Settings
Do the following initial settings at the
following times: (1) Before you operate the
system for the first time, (2) after replacing
the car battery, and (3) after resetting the
system.
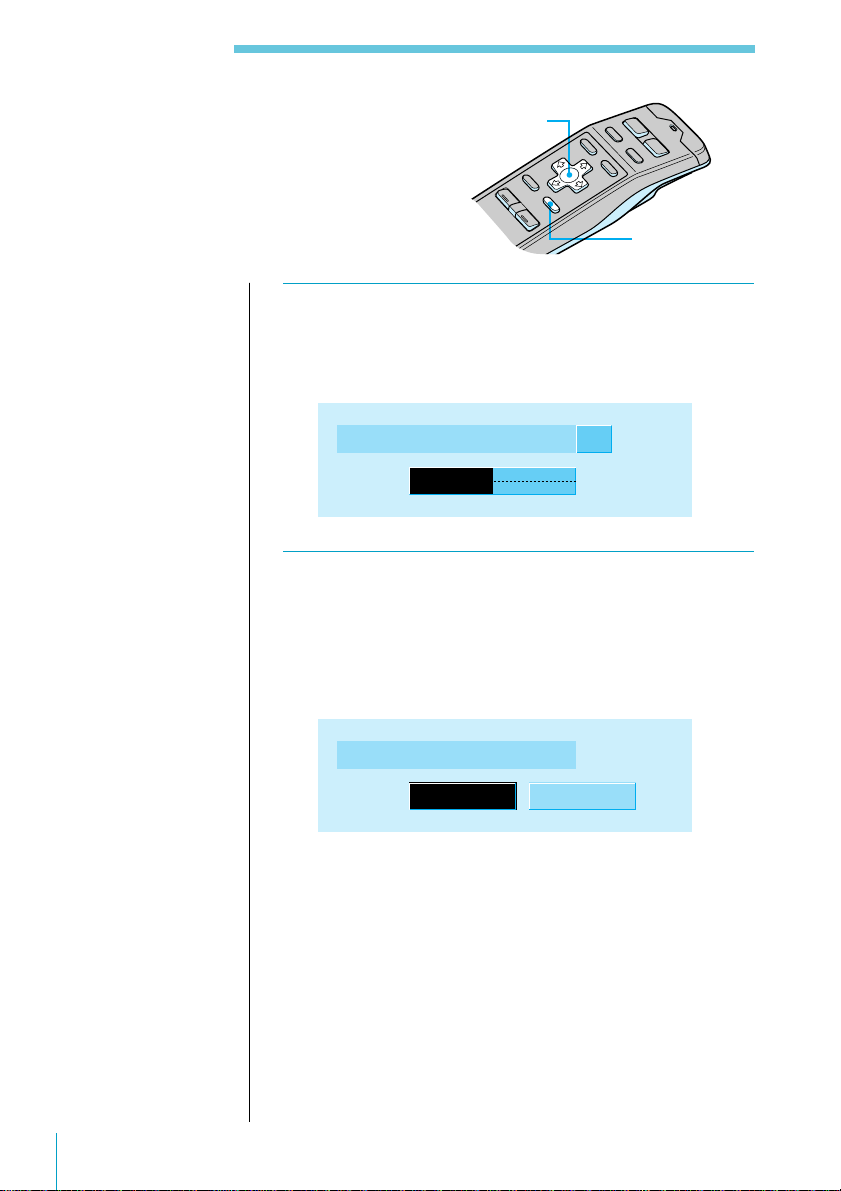
1 Press the reset button (see page 5).
The Contrast indication appears.
Press ? or /. The contrast is adjustable in 15 steps.
Contrast 8
Note
You can specify the
ACC position and
cross-over network
settings only in the
initial setting
procedure. To change
these settings
afterwards, press the
reset button and repeat
the procedure.
2 Press ENTER.
The ACC Position indication appears.
Press ? or /. Select “yes” if your car’s ignition
switch has an ACC position; select “no” if your car’s
ignition switch has no ACC position.
ACC Position
Cursor buttons
ENTER button
yes no
12 Getting Started
Page 15

Note
If you have a 3-way
speaker system,
selecting “F/R/SUBW” may cause damage
to your tweeter.
Useful tips
To change any of the
initial settings at this
time, press the cursor
buttons to select the
item you want to
change.
3 Press ENTER.
The Cross-over Network (output mode) indication
appears.
Press ? or / to select “3way” or “F (front)/R (rear)/
SUB-W (sub-woofer)” depending on your speaker
system.
Cross-over Network
3way F/R/SUB-
W
4 Press ENTER.
The Initial indication appears.
Initial” Contrast 8
Exit
ACC Position
Cross-over Network
yes
3way
Getting Started
5 To complete the initial settings, press . to
select “Exit,” then press ENTER.
Getting Started
13
Page 16
Getting Started
Setting the Clock
Set the clock with the wireless remote.
Turn the system on before setting the clock.
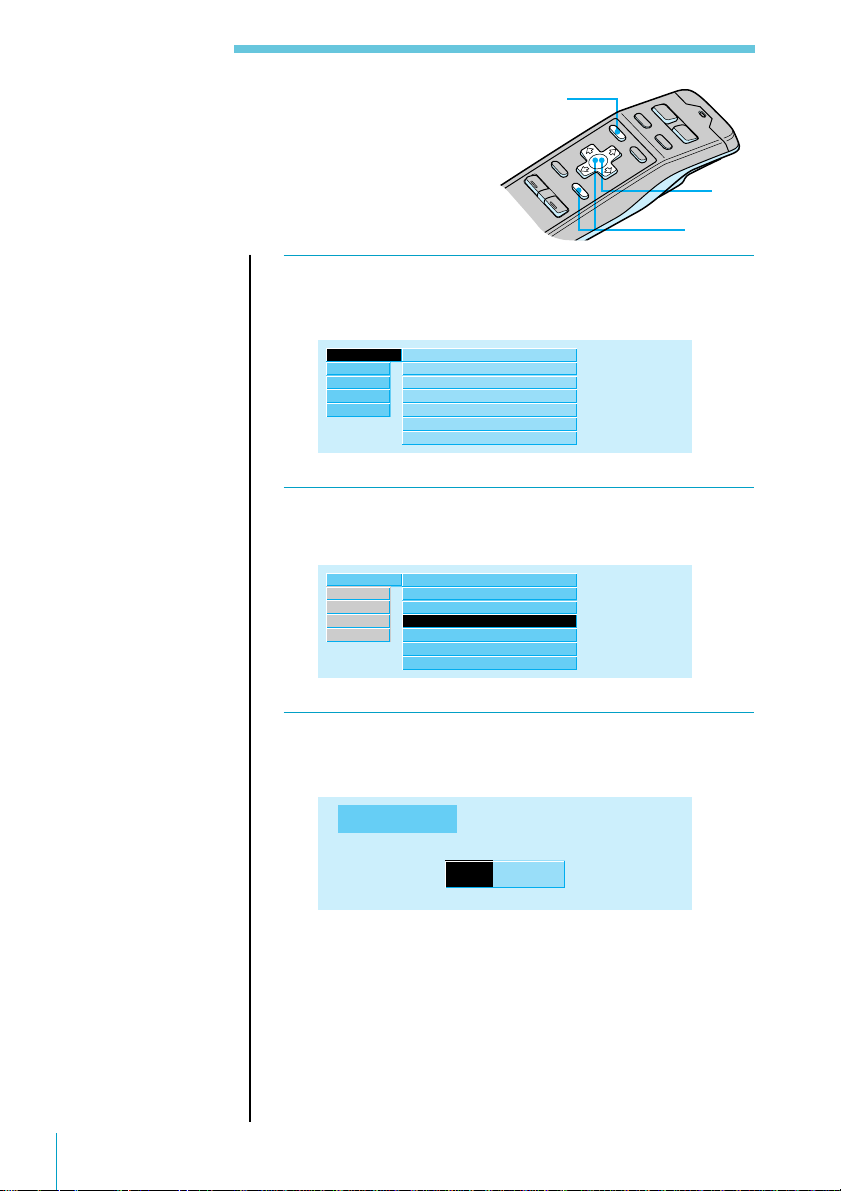
1 Press MENU.
The menu display appears.
Set up ”
RDS
R.Mode
Source
Exit
2 Select “Set up” and press / to move to the
sub menu, then select “Time Set.”
Set up ”
RDS
R.Mode
Source
Exit
1
Contrast 8
Display
Font Style
Time Set
Beep
Rotary Remote
SEEK/AMS
Contrast 8
Display
Font Style
Time Set
Beep
Rotary Remote
SEEK/AMS
Bold
off
norm
SEEK/AMS
Bold
off
norm
SEEK/AMS
2
3,4
on
on
14 Getting Started
3 Press ENTER.
The Time Set indication appears.
Time Set
:
9 33
Press > or . to set the hour.
Then press / to move to minutes and press > or . to
set the minutes.
Pressing . lowers the number and > raises the
number.
Page 17

Useful tips
You can press the
MENU button or BACK
button instead of the
ENTER button to set a
value.
4 After setting the time, press ENTER.
The time is stored and the menu display reappears.
Getting Started
To return to the normal display
Press the MENU button.
To display the current time during operation
The current time can be set to appear in the upper-right
corner of the display (except when a menu is displayed).
For details, see “Set up Menu” on page 51.
Getting Started
15
Page 18
Listening to CDs
Inserting CDs
The disc magazine inside the CD changer can
hold up to 10 discs.
Note
To play an 8-cm CD
(single CD), use the
optional CSA-8 Sony
Single CD Adaptor.
When using the singleCD adaptor, attach the
three claws to the CD
securely. Note that if
you use an adaptor
made by another
company, the CD
changer may not
operate properly. If
you play a single CD
without the adaptor,
the CD changer may be
damaged.
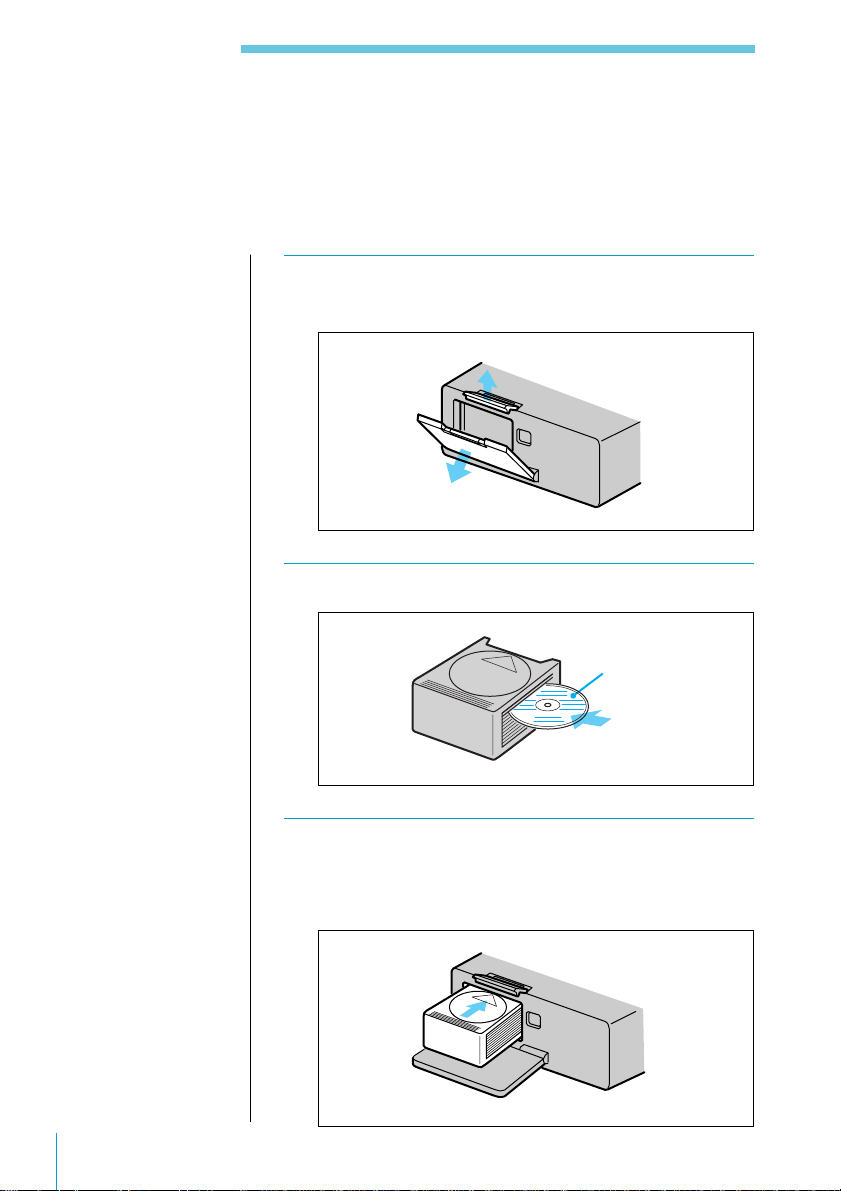
1 Lift up the lock lever and open the door of
the CD changer.
2 Insert a CD in each slot of the disc magazine.
With the label side up
16 Listening to CDs
3 Insert the disc magazine into the CD changer
in the direction of the arrow until it clicks in.
The CD changer begins verifying the CDs.
Page 19
Useful tips
The CD changer
verifies all the CDs one
after another whenever
the disc magazine is
inserted. Playing a CD
during this verifying
operation is possible.
Note, however, that
disc titles are not
displayed until they
have been verified by
the CD changer.
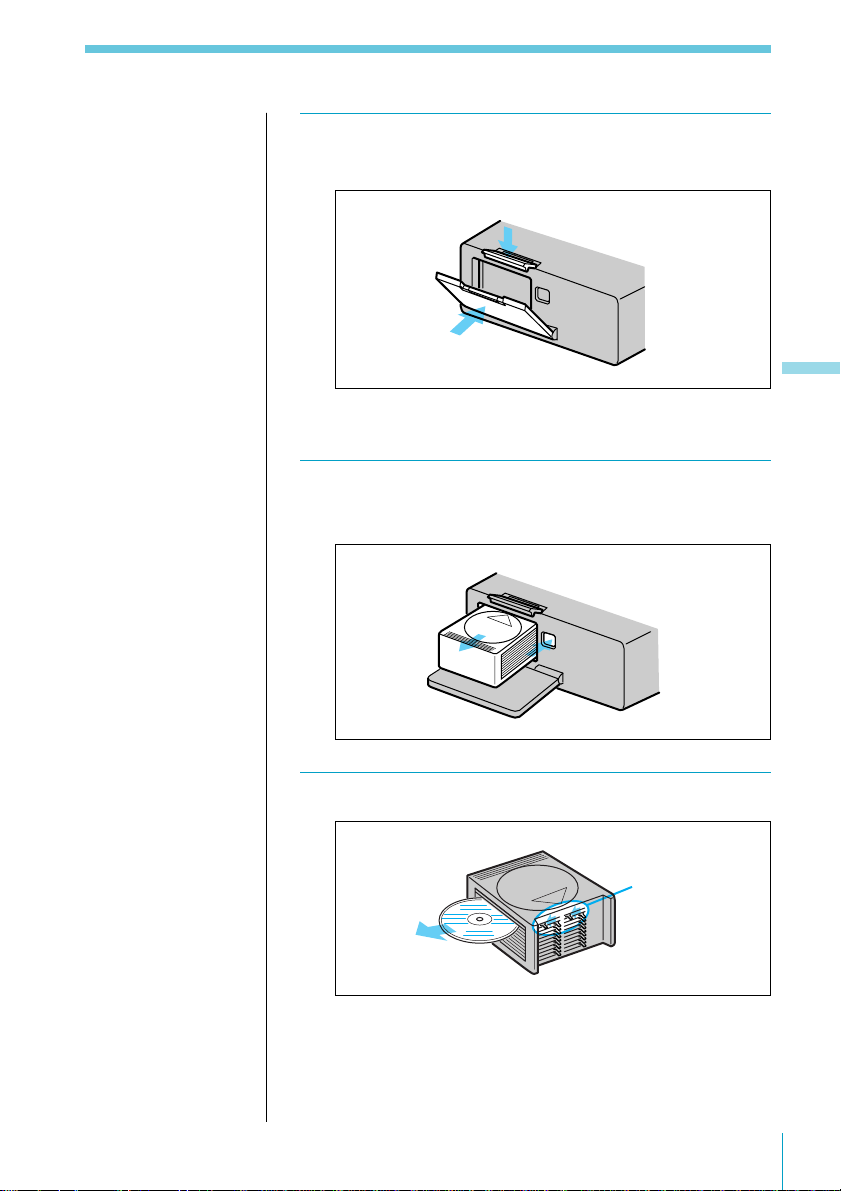
4 Close the door and lock the CD changer
securely.
Listening to CDs
Removing CDs
1 Press §.
The disc magazine comes out.
2 Slide the lever of the disc magazine.
Lever
Listening to CDs
17
Page 20
Listening to CDs
Listening to CDs
Listening to a CD
Before listening to a CD, insert one or more CDs into the disc magazine, then load the
disc magazine into the CD changer (see page 16).
1 Press SOURCE repeatedly to select “CD.”
CD 1 1 3.45
CD indication Disc number Track
number
Playing time of
the current track
2 Rotate VOL/DISC/PRESET to adjust the
volume.
Turn the control clockwise to increase the volume;
turn it counterclockwise to decrease the volume.
Volume -20dB
CD 1 1 3.45
Volume indication
3 Press OFF to turn off the system.
18 Listening to CDs
Page 21
To Select the Disc to Be Played
Push in and rotate VOL/DISC/PRESET.
The system changes to the next or previous disc. If
you keep the control rotated, the discs will continue to
change.
Push in and release the control to display DISC NAME
LIST.
For details on naming a disc, see “Labelling a CD (Disc
Memo)” on page 25.
DISC NAME LIST CD 1 6 1.30
1.CLASSIC
2.FUSION
3.POPS HIT
4.JAZZ
5.GREAT HIT
6.EURO BEAT
7.DRIVING
8.LIVE HIT
9.SUNSET.M
10.HIGHWAY*
To Locate a Track
Rotate, then release SEEK/AMS.
The system locates the next or previous track.
Listening to CDs
DISC NAME
CLASSIC
CD 1 1 3.45
Track number
To Locate a Specific Point on a Track
Keep SEEK/AMS rotated.
The system plays the track at high speed. When you
reach the point you want, release the control.
Listening to CDs
19
Page 22
Listening to CDs
Playing Tracks Repeatedly
(Repeat Play)
The Repeat Play function allows you to play a
track, a disc, or all the discs in the CD changer
repeatedly.
Useful tips
To return to previous
steps (one at a time)
Press the ? button.
To return to the
normal display
Press the MENU
button.
1 While playing a CD, press MENU.
Set up
RDS
P.Mode ”
Source
Name
Exit
Repeat
Shuffle
Bank
Disc Sound Memory
2 Select “P.Mode” and press / to move to the
sub menu, then select “Repeat” using > or ..
Set up
RDS
P.Mode ”
Source
Name
Exit
Repeat
Shuffle
Bank
Disc Sound Memory
1
2
3
off
off
off
off”
1:1track
off
2:disc
off
3:changer
off
20 Listening to CDs
3 Press / then > or . to select the repeat
mode, then press ENTER.
The selected repeat mode appears to the right of
“Repeat” in the display.
Indication Operation
1:1track Repeats the current track only
2:disc Repeats all tracks on the current disc
3:changer Repeats all the discs in the current CD
changer (in case one or more CD changers are
connected)
off Normal playback
Page 23

Playing Tracks in Random Order
(Shuffle Play)
Shuffle Play plays all tracks on the current disc or
all discs in the CD changer in random order.
Useful tips
To return to previous
steps (one at a time)
Press the ? button.
To return to the
normal display
Press the MENU
button.
1 While playing a CD, press MENU.
Set up
RDS
P.Mode ”
Source
Name
Exit
Repeat
Shuffle
Bank
Disc Sound Memory
2 Select “P.Mode” and press / to move to the
sub menu, then select “Shuffle” using > or ..
Set up
RDS
P.Mode ”
Source
Name
Exit
Repeat
Shuffle
Bank
Disc Sound Memory
1
off
off
off
off
off”
off
1:disc
2:changer
3:all
off
2
3
Listening to CDs
3 Press / then > or . to select the shuffle
mode item, then press ENTER.
The selected item appears to the right of “Shuffle” in
the display.
Indication Operation
1:disc Plays all the tracks on the current disc in
random order
2:changer Plays all the discs in the current CD changer
in random order
3:all Plays all the discs in all the CD changers in
random order (in case one or more CD
changers are connected)
off Normal playback
Listening to CDs
21
Page 24

Listening to CDs
Selecting Specific Tracks for
Playback
(Bank)
If you have labelled the disc (see page 25), the
Bank function allows you to skip certain tracks
and play only the tracks you want.
Useful tips
To return to previous
steps (one at a time)
Press the ? button.
To return to the
normal display
Press the MENU
button.
1 While playing a CD, press MENU.
Set up
RDS
P.Mode ”
Source
Name
Exit
Repeat
Shuffle
Bank
Disc Sound Memory
2 Select “P.Mode” and press / to move to the
Note
You cannot use the
Bank function for discs
that have not been
labelled using the Disc
Memo function. Be
sure to label the disc in
advance.
sub menu, then select “Bank” using > or ..
Set up
RDS
P.Mode ”
Source
Name
Exit
Repeat
Shuffle
Bank
Disc Sound Memory
1
off
off
off
off
off
off”
on
inverse
off
edit
2
3
22 Listening to CDs
3 Press / then > or . to select the bank mode,
then press ENTER.
The selected bank mode appears to the right of “Bank”
in the display.
Indication Operation
on Plays all tracks set to “Play”
inverse Plays all tracks set to “Skip”
off Normal playback
edit Sets tracks on the current disc to “Play” or
“Skip.”
Page 25

To set tracks to “Play” or “Skip”
Select “edit” in Step 3 and press the > or . button to select
“Play” or “Skip” for a track. To move to the next track,
press the / button.
Note that only tracks 1 to 24 on a disc can be set.
To complete the setting procedure, press the ENTER or
BACK button.
Listening to CDs
Listening to CDs
23
Page 26

Listening to CDs
Setting Sound Effects
for Each CD/MD
(Disc Sound Memory)
You can select and memorise particular sound
effects for CDs or MDs.
1
2
3
Note
To use this function,
select the sound effect
in advance (see page
55).
Useful tips
To return to previous
steps (one at a time)
Press the ? button.
To return to the
normal display
Press the MENU
button.
To see the current sound
effect setting
Press the SOUND
button on the rotary
remote.
1 While playing a CD or MD, press MENU.
Set up
RDS
P.Mode ”
Source
Name
Exit
Repeat
Shuffle
Bank
Disc Sound Memory
off
off
off
2 Select “P.Mode” and press / to move to the
sub menu, then select “Disc Sound Memory”
using > or ..
Set up
RDS
P.Mode ”
Source
Name
Exit
Repeat
Shuffle
Bank
Disc Sound Memory
off
off
off
”
enter
delete
3 Press / then > or . to select “enter,” then
press ENTER.
The sound effects currently specified by PEQ display
are set.
24 Listening to CDs
To clear all sound effects on the disc
Select “delete” in Step 3 above and press the ENTER
button.
Page 27

Labelling a CD (Disc Memo)
You can record a title of up to 8 characters for
each disc. The disc title appears in the display
whenever you insert the disc and play it.
1
2,4
LIST button
3,5
Useful tips
Hold down the LIST
button for 2 seconds
or more to display the
Disc Memo Write
indication directly.
Useful tips
To return to previous
steps (one at a time)
Press the ? button.
To return to the
normal display
Press the MENU
button.
1 While playing a CD, press MENU.
2 Select “Name” and press / to move to the
sub menu, then select “Disc Memo” using >
or ..
Set up
RDS
P.Mode
Source
Name ”
Exit
Disc Memo
Auto Scroll
Disc Name
off
TEXT
write
”
delete
3 Press / then > or . to select “write,” then
press ENTER.
The Disc Memo Write indication appears.
Disc
M
emo Write
CD
1 1 3.45
Listening to CDs
Listening to CDs
25
Page 28

Listening to CDs
4 Press > or . until the character you want to
enter appears, then press /.
Each press of the > button selects the next character in
the order shown below. (Press the . button to move
backwards.)
A n B n C n ...Z n 0 n 1 n 2 n ...9 n + n - n
* n / n \ n > n < n . n (space)
Disc
M
emo Write
C
CD
1 1 3.45
5 Repeat Step 4 until you have entered the
entire title, then press ENTER.
26 Listening to CDs
DISC NAME
CLASSIC
CD 1 1 3.45
Page 29

Erasing a Disc Title
1 While playing a CD, press MENU.
2 Select “Name” and press / to move to the
sub menu, then select “Disc Memo” using >
or ..
Set up
RDS
P.Mode
Source
Name ”
Exit
Disc Memo
Auto Scroll
Disc Name
off
TEXT
write
”
delete
3 Press /, then > or . to select “delete,” then
press ENTER.
The Disc Memo Delete indication appears.
Listening to CDs
Note
In Step 4, all the disc
titles stored in the CD
changer’s memory
appear in the order
they were entered. The
last title entered will
therefore appear at the
end.
4 Press > or . to select the disc title you want
to erase.
5 Hold down ENTER for 2 seconds or more.
The selected disc title is erased.
To quit the Disc Memo Delete function.
Press the BACK button.
Listening to CDs
27
Page 30

Listening to CDs
Locating a Disc by Title
Use this function to locate a disc by its title. To
add titles to discs, see page 25.
1 Press LIST.
DISC NAME LIST appears.
DISC NAME LIST CD 1 6 1.30
1.CLASSIC
2.FUSION
3.POPS HIT
4.JAZZ
5.GREAT HIT
Useful tips
To cancel the selection
Press the LIST button
twice or the BACK
button once.
You can also use the
SEEK/AMS control on
the rotary remote to
select an item in the list
(see page 52).
Note
The following
indications appear in
DISC NAME LIST.
• “NO DISC” : There
is no disc in the
given disc magazine
slot.
•“********”: The
disc is not labelled.
• “?”: The system has
not verified the disc
information.
2 Press >, ., /, or ? to select the disc.
DISC NAME LIST CD 1 6 1.30
1.CLASSIC
2.FUSION
3.POPS HIT
4.JAZZ
5.GREAT HIT
3 Press ENTER.
Playback starts from the first track of the disc.
DISC NAME
CD indication Disc number Track
POPS HIT
CD 3 1 3.45
2
6.EURO BEAT
7.DRIVING
8.LIVE HIT
9.SUNSET.M
10.HIGHWAY*
6.EURO BEAT
7.DRIVING
8.LIVE HIT
9.SUNSET.M
10.HIGHWAY*
number
1
3
Playing time of
the current track
28 Listening to CDs
Page 31

On TRACK NAME LIST
If you press the LIST button again in Step 1, TRACK
NAME LIST appears. This list displays track names
contained on CD TEXT discs and MDs with labelled
tracks. Since this system does not support track labelling,
when playing non-CD TEXT discs or MDs with unlabelled
tracks, “********” appears instead of the track title in
TRACK NAME LIST.
Listening to CDs
Listening to CDs
29
Page 32

Listening to CDs
Viewing CD TEXT Information
You can view text information contained on a CD
TEXT disc during playback.
What is a CD TEXT disc?
A CD TEXT disc is a
music CD that also
contains text data such
as album title, track
titles, and artist name.
This text data is
recorded in areas
normally unused on
conventional music
CDs. Text data
contained on the CD
TEXT discs can be
displayed in the XESZ50.
When playing a CD TEXT disc
Each time you press the DSPL/PTY button, the displayed
information changes as follows: disc title/artist name* n
track name.
* The artist name appears automatically after the disc title.
Selecting the Disc Title Display
When playing CD TEXT discs that have been labelled
using the Disc Memo function (see page 25), you can
specify the disc title that appears whenever you press the
DSPL/PTY or LIST button.
1
2
3
30 Listening to CDs
1 While playing a CD, press MENU.
2 Select “Name,” press / to move to the sub
menu, then select “Disc Name” using > or ..
Set up
RDS
P.Mode
Source
Name ”
Exit
Disc Memo
Auto Scroll
Disc Name
off
D.Memo
D. Memo
”
TEXT
3 Press /, then > or . to select “D.Memo” or
“TEXT,” then ENTER.
Indication Operation
D.Memo Displays disc titles entered by the Disc Memo
function
TEXT Displays CD TEXT information
Page 33

Scrolling Titles Automatically
When playing CD TEXT discs or MDs using an optional
MD changer, the track or disc title appears automatically
whenever a new disc or track is played. Follow the
procedure below to specify the automatic scrolling of titles
of more than 10 characters.
1 While playing a CD, press MENU.
2 Select “Name,” press / to move to the sub
menu, then select “Auto Scroll” using > or ..
Set up
RDS
P.Mode
Source
Name ”
Exit
Disc Memo
Auto Scroll
Disc Name
off
TEXT
”
on
off
3 Press /, then > or . to select “on,” then
ENTER.
To cancel the scrolling of titles
Select “off” in Step 3 and press the ENTER button.
Listening to CDs
Listening to CDs
31
Page 34

Listening to the Radio
Listening to the Radio
Before using the radio, you can store your favourite radio stations in the system’s
memory for instant tuning at a later time (see “Presetting Radio Stations with the
Strongest Signals (BTM)” on page 37).
1 Press SOURCE repeatedly to select FM, MW,
or LW.
STEREO
FM 4 97.70 MHz
Note
“No name” appears if
the received station
does not transmit RDS
data.
FM/MW/LW
indication
When you tune in an FM station that transmits RDS
data, the station name appears in the display.
Preset
station
Frequency
FM 4 BBC R1
2 Rotate VOL/DISC/PRESET to adjust the
volume.
Turn the remote clockwise to increase the volume;
turn it counterclockwise to decrease the volume.
STEREO
Volume -20dB
FM 4 BBC R1
Volume indication
32 Listening to the Radio
Page 35

3 To change the preset station, push in and
rotate VOL/DISC/PRESET.
4 Press OFF to turn off the system.
Listening to the Radio
Listening to the Radio
33
Page 36

Listening to the Radio
Using the Radio Data System (RDS)
Overview of the RDS function
The Radio Data System (RDS) is a broadcasting service
that allows FM stations to send additional digital
Note
• Depending on the
country or region,
not all of the RDS
functions are
available.
• RDS may not work
properly if the signal
strength is weak or if
the station you are
tuned to is not
transmitting RDS
data.
information along with the regular radio programme
signal.
This system offers you the following convenient RDS
features:
• Displaying the station name
• Re-tuning the same programme automatically
—Alternative Frequencies (AF)
• Listening to traffic, news, or information programmes
• Recording traffic announcements —Traffic Information
Replay (TIR)
• Locating an RDS station by programme type
—Programme Type selection (PTY) function
Playing and
recording traffic
announcements
(TIR function)
34 Listening to the Radio
Re-tuning the same programme automatically
(AF function)
Locating an RDS station by
programme type
(PTY function)
√
News
Current Affairs
Information
Sport
Displaying the station name
Education
Drama
etc.
Page 37

Re-tuning the Same Programme
Automatically
The Alternative Frequencies (AF) function
automatically selects and re-tunes the station with
the strongest signal in a network. By using the
function, you can listen to the same programme
continuously during a long-distance drive
without having to re-tune the station manually.
Notes
• When there is no
alternative station in
the area and you do
not need to search
for an alternative
station, turn the AF
function off by
pressing the AF
button again.
• “NO AF” and the
station name light up
alternately if the
system cannot find
an alternative station
in the network.
• If the station name
changes to white
after tuning to a
station with the AF
function on, this
means that no
alternative station is
available. If this
happens, rotate the
SEEK/AMS control
on the rotary remote
while the station
name is still
displayed in white.
The system starts
searching for another
frequency with the
same PI (programme
Identification) data.
“PI seek” appears in
the display and no
sound is heard at this
time. If the system
cannot find another
frequency, “NO PI”
appears and the
system returns to the
originally selected
frequency.
1 Press SOURCE repeatedly to select FM.
2 Press AF on the Display Section.
To Turn the AF Function On or Off by Menu Operation
1 While listening to an FM broadcast, press
2 Select “RDS,” then press / to move to the
(Alternative Frequencies (AF))
The system starts searching for an alternative station
with a stronger signal in the same network.
AF on
FM
MENU.
sub menu, then select “AF” using > or ..
Set up
RDS ”
R.Mode
Source
Exit
AF
TA
TIR Mode
Regional
CT on
AF
4 BBC R1
on
on”
off
on
on
on
AF button
Listening to the Radio
Listening to the Radio
35
Page 38

Listening to the Radio
3 Press /, then > or . to select “on” or “off,”
then ENTER.
Listening to a Regional Programme
The Regional function lets you stay tuned to a regional
programme without being switched to another regional
station.
1 While listening to an FM broadcast, press
MENU.
2 Select “RDS,” then press / to move to the
sub menu, then select “Regional” using > or
..
Notes
• You must turn the
AF function on.
• The regional function
does not work in
certain areas such as
the United Kingdom.
36 Listening to the Radio
Set up
RDS ”
R.Mode
Source
Exit
AF
TA
TIR Mode
Regional
CT on
on
on
on
on”
on
off
3 Press /, then > or . to select “on,” then
ENTER.
Page 39

Presetting Radio Stations with the
Strongest Signals
The BTM (Best Tuning Memory) is a function that selects the radio stations with the
strongest signals and automatically sets them to preset station numbers.
If you activate the BTM function while listening to an FM broadcast with the AF
function (see page 35) turned on and TA function (see page 45) turned off, the system
presets only the FM RDS stations.
If the TA function is on, the stations that broadcast
traffic announcements only are preset. When both
the AF and TA functions are set to off or while you’re
listening to the MW or LW broadcast, the system
presets the stations with the strongest signals in your
area.
If you activate the BTM function while listening to a
preset station, the system replaces only the contents
of preset numbers higher than the current one.
If you activate the function while tuning to a station
which is not preset, all the contents of the preset
memory will be replaced.
Notes
• If the radio can only
tune in a few stations
or only weak
frequencies, the BTM
function may not
assign frequencies to
all the preset station
numbers.
• When you preset the
RDS stations, the
system stores the AF
and TA data as well
as the frequency (see
page 40). To cancel
this, see pages 40 and
41.
1 While listening to an FM, MW, or LW
broadcast, press MENU.
2 Select “R.Mode,” press / to move to the sub
menu, then select “Preset” using > or ..
Set up
RDS
R.Mode ”
Source
Exit
3 Press /, then > or . to select “BTM,” then
ENTER.
The Best Tuning Memory function is activated.
(BTM)
Preset
Local
Mono/Stereo
1
off
stereo
”
manual
BTM
2
3
Listening to the Radio
Listening to the Radio
37
Page 40

Listening to the Radio
Specifying the Station Frequency
(Manual Preset Memory)
1
3
2,4
5,6
Useful tips
To return to previous
steps (one at a time)
Press the ? button.
To return to the
normal display
Press the MENU
button.
Useful tips
Keep the SEEK/AMS
control on the rotary
remote rotated to
continue searching,
then release the control
when the frequency
you want appears.
Note
If you selected MW or
LW in Step 1, the
“Mono/Stereo” sub
menu will not appear
in the display.
1 Press SOURCE repeatedly to select FM, MW,
or LW.
2 Hold down ? or / until the frequency you
want appears in the display, then release the
button.
3 Press MENU.
Set up
RDS
R.Mode ”
Source
Exit
Preset
Local
Mono/Stereo
off
stereo
4 Select “R.Mode”and press / to move to the
sub menu, then select “Preset” using > or ..
Set up
RDS
R.Mode ”
Source
Exit
Preset
Local
Mono/Stereo
off
stereo
”
manual
BTM
38 Listening to the Radio
Page 41

Useful tips
You can preset up to 20
FM stations, 10 MW
stations, and 10 LW
stations.
5 Press /, then > or . to select “manual,” then
ENTER.
1.
88.1‚Manual Preset
2.
9‚.3‚
FM BBC R1
AF TA
3.
4.
5.
6.
7.
92.5‚
97.7‚
95.5‚
94.9‚
1‚4.1‚
6 Press > or . to select the preset station
number to which the frequency will be stored
(the selected preset station number is
highlighted), then press ENTER.
Useful tips
You can start
Automatic Tuning by
momentarily rotating
the SEEK/AMS control
on the rotary remote,
then releasing it.
Manual Preset 88.1‚
FM BBC R1
AF TA
Over Write ?
Insert ?
Delete ?
1.
2.
3.
4.
5.
6.
7.
9‚.3‚
92.5‚
97.7‚
95.5‚
94.9‚
1‚4.1‚
7 Do the following to store the frequency.
To replace the contents of the preset station number
with the current frequency, select “Over Write ?,” then
press ENTER.
To add the current frequency to the Manual Preset list,
select “Insert ?,” then press ENTER.
To delete the frequency stored to the selected number
Select “Delete ?,” then press ENTER in Step 7.
To quit the Manual Preset Memory function
Press the BACK button.
To receive a station automatically (Automatic Tuning)
Press and release the ? or / button.
“Seek Up” or “Seek Down” appears until the system
detects a station.
Listening to the Radio
Listening to the Radio
39
Page 42

Listening to the Radio
Presetting the RDS Stations with AF and TA Data
When you preset RDS stations, the system stores each
station’s data as well as its frequency, so you don’t have to
turn on the AF or TA function every time you tune in these
preset stations. You can select a different setting (AF, TA,
or both) for each preset station, or the same setting for all
preset stations.
Making the Same Setting for All Preset Stations
1 While listening to an FM broadcast, press
MENU.
Note
You can change the AF
or TA setting for any
preset station that you
are listening to.
2 Select “R.Mode,” then press / to move to
the sub menu, then select “Preset” using > or
..
Set up
RDS
R.Mode ”
Source
Exit
Preset
Local
Mono/Stereo
off
stereo
”
manual
BTM
3 Press /, then > or . to select “BTM,” then
ENTER.
40 Listening to the Radio
Page 43

Making Different Settings for Each Preset Station
1 While listening to the desired FM broadcast,
press MENU.
2 Select “RDS,” then press / to move to the
sub menu, then select “AF” or “TA” using > or
..
Set up
RDS ”
R.Mode
Source
Exit
AF
TA
TIR Mode
Regional
CT on
on
on”
on
on
on
off
3 Press /, then > or . to select “on” or “off,”
then ENTER.
4 Select “R.Mode,” then press / to move to
the sub menu, then select “Preset” using > or
..
R.Mode ”
RDS
Set up
AUX
Exit
Preset
Local
Mono/Stereo
off
stereo
”
manual
BTM
5 Press /, then > or . to select “BTM,” then
ENTER.
Note
If you want to change the preset AF and/or TA setting after you
tune in the preset station, you can do so by turning on/off the AF
or TA function.
Listening to the Radio
Listening to the Radio
41
Page 44

Listening to the Radio
Specifying Monaural/Stereo Mode
If the FM stereo reception is poor, you can select
“mono” to improve the sound.
1
2
3
Useful tips
To return to previous
steps (one at a time)
Press the ? button.
To return to the
normal display
Press the MENU
button.
1 While listening to an FM broadcast, press
MENU.
Set up
RDS
R.Mode ”
Source
Exit
Preset
Local
Mono/Stereo
off
stereo
2 Select “R.Mode,” press / to move to the sub
menu, then select “Mono/Stereo” using > or
..
Set up
RDS
R.Mode ”
Source
Exit
Preset
Local
Mono/Stereo
off
stereo”
mono
stereo
3 Press /, then > or . to select “mono,” then
ENTER.
The selected FM mode appears to the right of “Mono/
Stereo” in the display.
42 Listening to the Radio
Page 45

Receiving Only the Strongest
Signals
The Automatic Tuning function may stop
frequently when there are many radio stations in
the area. If this happens, you can reduce the
sensitivity of the tuner so that only the strongest
signals are tuned in.
Useful tips
To return to previous
steps (one at a time)
Press the ? button.
To return to the
normal display
Press the MENU
button.
(Local On/Off)
1 While listening to an FM, MW, or LW
broadcast, press MENU.
Set up
RDS
R.Mode ”
Source
Exit
Preset
Local
Mono/Stereo
2 Select “R.Mode,” then press / to move to
the sub menu, then select “Local” using > or
..
Set up
RDS
R.Mode ”
Source
Exit
Preset
Local
Mono/Stereo
1
off
stereo
stereo
off”
on
off
2
3
Listening to the Radio
3 Press /, then > or . to select “on,” then
ENTER.
The selected mode appears to the right of “Local” in
the display.
Listening to the Radio
43
Page 46

Listening to the Radio
Selecting a Station on the List
You can use this function to select a preset station
from the list.
1 Press LIST.
PRESET LIST appears.
2
1
3
Useful tips
To cancel the selection
Press the LIST button.
You can also use the
SEEK/AMS control on
the rotary remote to
select an item in the list
(see page 52).
PRESET LIST
FM 4 BBC R4
1. BBC R1
2. BBC R2
3. BBC R3
4. BBC R4
5. BBC Kent
6. BBC 3CR
7. BBC GLR
2 Press > or . to select the station.
To search up or down the station, press and release ?
or /.
3 Press ENTER.
To select a station using the rotary remote
Push in and release the VOL/DISC/PRESET control to
display PRESET LIST.
Push and rotate the control to select the station from the
list. After about 5 seconds, the normal display reappears.
Local Link Function (United Kingdom only)
When you select a preset station, the system automatically
tunes to the available local station in a network.
44 Listening to the Radio
Page 47

Listening to Traffic Announcements
Traffic Announcement (TA) and Traffic
Programme (TP) are broadcast data that allow
you to automatically tune in an FM station that is
broadcasting traffic announcements even though
you are listening to other programme sources.
If the traffic announcement starts while you are
listening to another programme source, the
system automatically switches to the
announcement; it then goes back to the original
source when the announcement is over.
TA button
Note
“NO TP” lights up for
five seconds if the
received station does
not broadcast traffic
announcements. Then
the system starts
searching for a station
that broadcasts traffic
announcements.
1 Press SOURCE repeatedly to select FM.
2 Press TA on the Display Section.
The system starts searching for traffic information
stations. “TP” appears in the display when the system
finds a station broadcasting traffic announcements.
When the traffic announcement starts, “AF” flashes.
The flashing stops when the traffic announcement is
over.
To end the current traffic announcement
Press the TA button again.
Listening to the Radio
Listening to the Radio
45
Page 48

Listening to the Radio
To Set TA Function
1 While listening to an FM broadcast, press
MENU.
2 Select “RDS,” then press / to move to the
sub menu, then select “TA” using > or ..
Useful tips
You can also set the
volume level for the
traffic announcements
by holding down the
TA button on the
Display Section for
about 2 seconds. TA
VOL indication appears
momentarily and the
current volume level is
memorised.
Set up
RDS ”
R.Mode
Source
Exit
AF
TA
TIR Mode
Regional
CT on
on
on”
on
on
on
off
Vol MEM
3 Press /, then > or . to select TA mode item,
then ENTER.
The selected item appears to the right of “TA” in the
display.
Indication Operation
on Turns the TA function on.
off Turns the TA function off.
Vol MEM Memorises the current volume level for
listening to the traffic announcements.
Whenever a traffic announcement starts while
you are listening to the radio, the memorised
volume level is applied automatically. Note
that this setting applies to both the TA and
TIR functions.
Receiving emergency announcements
If an emergency announcement is broadcast while you are
listening to the radio, the system will automatically switch
to the announcement. If you are listening to a source other
than the radio, the system will play the emergency
announcements if you have set AF or TA to on. With this
setting, the system will automatically switch to these
announcements no matter what you are listening to at the
time.
46 Listening to the Radio
Page 49

Recording Traffic Announcements
(Traffic Information Replay (TIR))
You can listen to the latest traffic announcements
by recording them. The system automatically
records and stores up to eight traffic
announcements. The TIR function turns the
system on automatically and records traffic
announcements for up to one hour before and
after a preset time.
Useful tips
• The system will
detect and record
traffic programmes
in the background
even while you are
listening to stations
that do not broadcast
such announcements.
• The system
automatically
records and stores up
to eight traffic
announcements (or
the recording time
reaches 6.5 minutes)
and the system will
erase the oldest
recording every time
it records a new one.
•t mark lights up
orange when the TIR
function is turned on,
red while the system
is recording a traffic
announcement, and
blue when there are
recorded traffic
announcements that
you have not listened
to yet.
Note
“No Data” appears if
no traffic
announcements were
recorded.
To Turn On the TIR Function
1 Press SOURCE repeatedly to select FM.
2 Hold down TIR on the Display Section until
mark lights up orange.
The system turns on automatically and stands by for
traffic announcements for two hours (one hour before
and after the preset time).
To turn off the TIR function
Press the TIR button again until
Playing Back the Recorded Traffic Announcements
changes to blue when there are recorded traffic
t
announcements you have not listened to yet.
1 Press TIR on the Display Section.
The recorded traffic announcements are played back.
2 Press TIR to go back to the programme you
were listening to.
After you have listened to all the traffic
announcements,
mark turns off.
t
returns to orange.
t
TIR button
Listening to the Radio
t
Listening to the Radio
47
Page 50

Listening to the Radio
Notes
• The system also
stands by for traffic
announcements for
two hours after you
turn off the engine,
as long as the TIR
function is on.
• If you have a power
aerial, it
automatically
extends every time
the system searches
for a traffic
programme station.
If you have a manual
aerial, make sure that
the aerial is fully
extended.
• If you do not use
your car for about a
week and the TIR
function is on, the
TIR function will
turn off
automatically to
prevent battery wear.
To Set the TIR Function
1
While listening to an FM broadcast, press MENU.
2 Select “RDS,” then press / to move to the
sub menu, then select “TIR Mode” using > or
..
Set up
RDS ”
R.Mode
Source
Exit
AF
TA
TIR Mode
Regional
CT on
on
on
on”
on
Replay
on
off
set
3 Press /, then > or . to select TIR mode item,
then ENTER.
Indication Operation
Replay Plays back the recorded TA.
on Turns the TIR function on.
off Turns the TIR function off.
set Sets the TIR preset time. (See below).
4
To set the preset time, select “set,” then ENTER.
48 Listening to the Radio
+
TIR Set Timer1 8:00
Timer2 17:00
_
1H
+
_
1H
BBC R1
Press ENTER to select setting item (Timer1, Timer2, or
Station).
Press . or > to set the hour. Then press / to move
to minutes and press > or . to set the minutes.
For Station setting, press . or > to select the preset
station. While the cursor is on the station name
indication, press / or ? to tune to a station
manually.
5 After setting, press BACK.
Page 51

Locating an RDS Station by Programme
Type
You can locate the station you want by selecting one
of the programme types shown below.
PTY LIST
No. Indication
1. News
2. Current Affairs
3. Information
4. Sport
5. Education
6. Drama
7. Cultures
8. Science
9. Varied Speech
10. Pop Music
11. Rock Music
12. Easy Listening
13. Light Classics M
14. Serious Classics
15. Other Music
16. Weather & Metr
17. Finance
18. Children’s Progs
19. Social Affairs
20. Religion
21. Phone In
22. Travel & Touring
23. Leisure & Hobby
24. Jazz Music
25. Country Music
26. National Music
27. Oldies Music
28. Folk Music
29. Documentary
(Programme Type Selection (PTY) Function)
Selecting a Programme Type
1
While listening to an FM broadcast, press
PTY LIST appears.
RDS PTY LIST
Sport
2 Press > or . to select the programme type.
3 Press ENTER.
2
1.News
2.Current Affairs
3.Information
4.Sport
5.Education
6.Drama
7.Cultures
Listening to the Radio
1
3
DSPL.
Listening to the Radio
49
Page 52

Listening to the Radio
Setting the Clock Automatically
The CT (Clock Time) data broadcast by RDS sets
the clock automatically.
1 While listening to an FM broadcast, press
MENU.
1
2
3
Notes
• The CT function may
not work even
though an RDS
station is being
received.
• There might be a
difference between
the time set by the
CT function and the
actual time.
2 Select “RDS,” then press / to move to the
sub menu, then select “CT” using > or ..
Set up
RDS ”
R.Mode
Source
Exit
AF
TA
TIR Mode on
Regional
CT
on
on
on
on”
on
off
3 Press /, then > or . to select “on,” then
press ENTER.
To cancel the CT function
Select “off,” then press ENTER.
50 Listening to the Radio
Page 53

Additional Settings
Set up Menu
Use the Set up menu to set the contrast, clock,
beep, and rotary remote.
1 Press MENU and select “Set up.”
Set up ”
RDS
R.Mode
Source
Exit
2 Press / to move to the sub menu, then select
an item using > or ..
The current setting appears to the right of the sub
menu item.
R.Mode
RDS
Set up ”
AUX
Exit
Contrast 8
Display
Font Style
Clock
Beep
Rotary Remote
SEEK/AMS
Contrast
Display
Font Style Bold
Clock
Beep
Rotary Remote
SEEK/AMS
1
Bold
off
off
norm
SEEK/AMS
on
off”
on
norm
SEEK/AMS
on
8
Time Set
on
off
2
3
Additional Settings
3 Change the setting and press ENTER.
The new setting appears to the right of the sub menu
item.
Sub menu items and their settings are explained in the
table on the next page.
Additional Settings
51
Page 54

Additional Settings
Sub Menu item Function
Contrast Selects 1 of 15 contrast levels for the display.
Select “Contrast,” then press the ENTER
button. You can change the current setting by
using the ? or / button. Press the ENTER
button again to change the setting.
Display Select “off” to turn off the display. After you
exit the menu operation and five seconds
elapse, the display turns off automatically.
Press any button on the wireless remote or on
the display section to turn the display back
on.
When ACC Position is set to “no” (see page
12), the display does not turn off even if you
set Display to “off.”
Font Style Select the font style on the display. You can
select “Regular” or “Bold.”
Clock Select “on” to display the current time in the
upper-right corner of the display at all times.
If you select “off,” the time is displayed only
when the system is turned off. Select “Time
Set” to set the clock (see page 14).
Beep Specifies whether a beep sounds when an
operation button is pressed.
Rotary Remote Reverses the rotational direction of the rotary
remote for controlling operations. Select
“normal” for increasing volume, frequency,
track numbers, etc. by rotating the control
clockwise; select “reverse” for increasing the
same parameters by rotating the control
counterclockwise.
SEEK/AMS Switches the SEEK/AMS control function of
the rotary remote. Select “SEEK/AMS” for
normal use (see page 8). If you select “Item
sel,” rotating the SEEK/AMS control selects
an item in the list.
52 Additional Settings
Page 55

Source Settings
Use the Source menu to make settings for the
tuner. You can also use this menu to change the
selectable source. When you set the AUX Digital
and Analog settings to “on,” the AUX indication
appears when you press the SOURCE button to
select the programme source.
1 Press MENU and select “Source.”
2 Press / to move to the sub menu, then select
the item you want to set using > or ..
The current sub menu setting appears to the right of
the item.
Set up
RDS
R.Mode
Source ”
Exit
MW/LW
AUX Digital
AUX Analog
1
off
off”
off
on
off
2
3
3 Change the setting and press ENTER.
The new setting appears to the right of the item.
For an explanation of the sub menu items, see the
table on the next page.
Additional Settings
Additional Settings
53
Page 56

Additional Settings
Sub menu item Function
MW/LW Set to “off” to eliminate MW and LW from the
source.
AUX Digital Set to “on” when a Sony product that does not
support the audio bus connection or a nonSony component (e.g., a CD or MD player) is
connected to the digital input connector of the
system. When set to “on,” the “AUX Digital
Audio” indication appears when you press
the SOURCE button on the rotary remote or
the wireless remote.
AUX Analog Set to “on” when a Sony product that does not
support the audio bus connection or a nonSony component (e.g., a CD or MD player) is
connected to the analogue input connectors of
the system. When set to “on,” the “AUX
Analog Audio” indication appears when you
press the SOURCE button on the rotary
remote or the wireless remote.
GND floating Selects the ground setting when “AUX
Analog” is set to “on.” When set to “off,” the
control panel and the CD changer/preamplifier share a common ground; when set
to “on,” they are grounded separately.
Remote in When the AMP REM connector of an external
component is connected to the REM IN (AUX)
connector of the system, the programme
source automatically switches to AUX when
the connected component is turned on. When
both “AUX Digital” and “AUX Analog” are
set to “on,” set this item to “digital” or
“analog” to specify the source signal input
connector (external component) when a
control signal is detected at the REM IN
(AUX) connector.
To switch to the other programme source,
press the SOURCE button on the rotary
remote or the wireless remote.
54 Additional Settings
Page 57

Selecting the Parametric Equalizer Pattern
Useful tips
To change the contents
of the preset parametric
equalizer patterns,
consult your Sony
dealer.
You can use the built-in parametric equalizer to customise
the sound characteristics to suit the acoustics of your car
by adjusting the median frequency, level, and slope (Q, or
the extent of each characteristic) of each band.
You can select a parametric equalizer pattern for each
programme source from the 10 patterns that are included
in the system’s memory.
1 Press SOUND on the rotary remote to display
the Parametric EQ list.
Each press of the button changes the display as
follows: Parametric EQ list n Cross-over Network
list n previous display.
Parametric EQ
1.MEMORY 1
2.MEMORY 2
3.MEMORY 3
4.MEMORY 4
5.MEMORY 5
6.MEMORY 6
7.MEMORY 7
8.MEMORY 8
9.MEMORY 9
10.MEMORY10
2 With the list displayed, rotate VOL/DISC/
PRESET on the rotary remote to select a
preset pattern.
After appearing for 10 seconds, the list is replaced by
the normal display.
Additional Settings
Source sound memory
The parametric equalizer pattern is memorised in the
system for each programme source, and is activated
whenever you select that source thereafter. Turning off
power has no effect on the memorised settings.
Additional Settings
55
Page 58

Additional Settings
Selecting the Cross-over Network Pattern
Your system comes with 10 cross-over network patterns.
Useful tips
To change the contents
of the preset cross-over
network patterns
consult your Sony
dealer.
1 Press SOUND on the rotary commander twice
to display the Cross-over Network list.
Each press of the button changes the display as
follows: Parametric EQ list n Cross-over Network
list n previous display.
Cross-over Network
1.MEMORY 1
2.MEMORY 2
3.MEMORY 3
4.MEMORY 4
5.MEMORY 5
6.MEMORY 6
7.MEMORY 7
8.MEMORY 8
9.MEMORY 9
10.MEMORY10
2 With the list displayed, rotate VOL/DISC/
PRESET on the rotary remote to select a
preset pattern.
After appearing for 10 seconds, the list is replaced by
the normal display.
56 Additional Settings
Page 59

About Optional Equipment
Listening to an Optional CD/MD Changer
If an optional CD or MD changer is connected to your system, you can locate and
listen to discs in that changer in the same way that you can with the system’s CD
changer.
1 Press SOURCE repeatedly to select “CD2” or
“MD.”
Pressing the button changes the programme source as
follows:
CD1 n CD2 n MD n FM n MW n LW.
CD2 1 1 3.45
CD indication
Disc
number
Track
number
Playing time of
the current track
2 Rotate VOL/DISC/PRESET to adjust the
volume.
3 Press OFF to turn off the system.
About Optional Equipment
About Optional Equipment
57
Page 60

About Optional Equipment
Useful tips
• You can connect multiple CD or MD changers through the
optional XA-C30 Source Selector.
• When a non-Sony digital component is connected to the optical
input connector of the system, be sure to set the “AUX Digital”
sub menu in the Source menu to “on” (see page 54).
• When a non-Sony analogue component is connected to the
analogue input connectors of the system, be sure to set the
“AUX Analog” sub menu in the Source menu to “on” (see page
54).
Notes
• The Disc Sound Memory function (see page 24) is supported
only when a CD changer capable of programme play is
connected to the system. The system can memorise sound
effects for CDs or MDs.
• The display of CD TEXT disc information is possible only when
a CD TEXT disc is played.
58 About Optional Equipment
Page 61

Appendix
Attaching/Detaching the Electrically Operated Display Section
The display section can be detached from the
control unit as a safety measure against theft.
Name of parts
Wireless remote control sensor
OFF/RELEASE button
Note
When the system turns
on, press the OFF/
RELEASE button twice.
Detaching the Display Section
1 Press OFF/RELEASE at the bottom left of the
display section.
The system turns off and the left side of the display
section pops out.
Appendix
Appendix
59
Page 62

Appendix
Note
Do not touch the
connector at the rear of
the display section.
After you have
detached the display
section, keep it in the
supplied case.
2 Grasp the left side of the display section and
pull it out.
If you do not remove the display section at this time,
the display section will automatically return to its
original position to prevent the unit from falling off.
Do not press the OFF/RELEASE button at this time. If
you do, the display section will fall off.
60 Appendix
Page 63

Note
The front part of the
display section is made
of glass. Do not drop
or press down on the
display section with
excessive force.
Attaching the Display Section
1 Align the right side of the display section with
the control unit.
2 Press the left side against the display section
and push in lightly.
An automatic electrically operated mechanism in the
control unit catches the display section.
Procedure when the control panel is installed on the
dashboard, etc.
Follow the same procedures; i.e., detach it by pressing the
OFF/RELEASE button and attach it by pressing it into the
display holder until it clicks and is caught by the display
holder.
Appendix
Appendix
61
Page 64

Appendix
Precautions and Maintenance
On cleaning the front panel
connectors
If the front panel connectors are dirty,
the system may not function properly.
Use a cotton swab slightly moistened
with a mild detergent solution to clean
the connectors.
Connector on the control unit
Connector at the rear of the display section
Handling CDs
• Scratches, dust, or disc warping may
result in sound drop-out or other
problems. Follow the precautions
below to keep discs clean for
maximum listening pleasure.
— Handle discs by their edges. Do
not touch the surface.
— Do not stick paper or tape onto a
disc.
Should you encounter a CD with a
sticker on it, remove it and wipe off
any residual adhesive before
listening to it.
— Do not scratch discs.
• Do not expose discs to high heat, such
as direct sunlight, or to high humidity.
• Before playing a disc, clean it with
cleaning cloth (not supplied). Wipe
the disc from the centre towards the
edge.
• Do not use solvents such as benzene,
thinner, commercially available
cleaners or anti-static sprays intended
for analogue discs.
62 Appendix
About the LCD display on the display
section
When the temperature is extremely high
or low, the display may become dim and
hard to see. This is due to the
characteristics of the LCD and is not a
malfunction. The display will return to
normal when the temperature becomes
normal.
Page 65

Wireless Remote
Installing batteries in the wireless
remote
Insert two size-AA (R6) batteries with
the correct polarity orientation.
OPEN
]
}
]
On batteries
Battery life
When the batteries become weak, you
will not be able to operate the system
with the wireless remote. Battery life is
about six months (or shorter, depending
on the way the remote is used). If the
remote becomes inoperative, replace the
batteries, then verify that it can operate
the system.
If the red indicator no longer flashes
when you press an operation button on
the remote, it means the batteries are
weak.
}
Notes on battery use
To avoid damage from battery leakage
and corrosion:
— Make sure the polarity of the
batteries match the + and –
markings in the battery
compartment.
— Do not use an old battery with a
new one, or different types of
batteries together.
— Remove the batteries when the
system will not be used for a long
period of time.
— Do not charge the batteries.
If any battery leakage occurs, replace
both batteries after cleaning the battery
compartment.
Notes on the wireless remote
• To prevent deformation due to heat,
do not place the remote in a place
subject to direct sunlight.
• Direct sunlight may affect the system’s
ability to receive infrared signals from
the remote. If this happens, move the
remote closer to the remote control
sensor of the system.
• When parking your car, put the
remote in the glove compartment or
another such place that is away from
direct sunlight to prevent deformation
due to heat.
Appendix
Appendix
63
Page 66

Appendix
Troubleshooting Guide
The following checklist will help you remedy most problems you may encounter with
your system. Before going through the checklist, check the connections and the
operating procedures. Should a problem persist even after trying the remedy, consult
your Sony dealer.
General
Problem Cause/Remedy
No sound. • Check the connection.
• Turn up the volume.
The clock does not appear when the
power is turned off.
The beep does not sound when you
press an operation button on the
wireless remote.
CD/MD
Problem Cause/Remedy
The sound skips, drops, or breaks. • The disc is dirty. n Clean the disc.
The sound skips. The CD or MD changer is not installed at a stable
The system is installed in a car with an accessory power
supply, and “ACC Position” in the initial settings is set
to “no.” n If your car has an accessory power supply,
set “ACC Position” to “yes.”
“Beep” in the set up menu is set to “off.” n Set “Beep”
to “on.”
• The disc is damaged.
location.
Radio
Problem Cause/Remedy
The system cannot tune in a radio
broadcast; only noise is heard.
The Automatic Tuning function
frequently stops.
The Automatic Tuning function does not
stop at the station you want.
• Check the connection of the car aerial.
• Power is not being supplied to the power aerial. n
• Make sure the frequency is the one you want.
Set “Local” in the R.Mode menu to “on.”
• Only the strongest signals are received when “Local”
• Keep rotating the SEEK/AMS control until you find
64 Appendix
Connect the power aerial control lead to the REM
ANT wire (blue) of the system.
in the R.Mode menu is set to “on.” n Set “Local” in
the R.Mode menu to “off.”
the station.
Page 67

Error Messages on the CD/MD Discs
When a malfunction occurs in a CD or MD changer, an alarm is sounded and one of
the following error messages flashes for about five seconds.
Message Cause Remedy
Blank* The MD is blank. Replace with a recorded MD.
Error* The CD is inserted upside down. Insert the CD correctly.
The CD is dirty.
The MD does not play for some
reason.
High Temp The surrounding temperature has
risen to 50°C and playback becomes
impossible.
NO Disc There is no disc in the magazine. Insert a disc or discs into the
NG Discs None of the discs in the magazine can
be played.
No Magazine There is no magazine in the changer. Insert discs into the magazine and
Not Ready The door of the MD changer is not
locked.
There is no CD or MD. Insert CDs or MDs.
Push Reset The changer does not operate
for some reason.
Clean the CD.
Replace the MD.
Wait until the temperature falls.
magazine.
Replace the discs with others.
load the magazine.
Lock the changer door.
Push the reset button on the control
panel or on the rotary commander
holder.
Appendix
Appendix
65
Page 68

Appendix
Specifications
Tuner section
FM
Tuning range 87.5 - 108.0 MHz
Aerial terminal External aerial
connector
Intermediate frequency
10.7 MHz
Usable sensitivity 8 dBf
Selectivity 75 dB at 400 kHz
50 dB at 200 kHz
Signal-to-noise ratio 62 dB (stereo)
65 dB (monaural)
Harmonic distortion at 1 kHz
0.9% (stereo)
0.5% (monaural)
Separation 35 dB at 1 kHz
Frequency response 30 – 15,000 Hz
Capture ratio 2 dB
MW/LW
Tuning range MW: 531-1,602 kHz
LW: 153-281 kHz
Aerial terminal External aerial
connector
Intermediate frequency
10.71 MHz/450 kHz
Sensitivity MW: 20 µV
LW: 30 µV
CD Changer section
Signal-to-noise ratio 106 dB
Frequency response 5 - 20,000 Hz
66 Appendix
Page 69

Digital pre-amplifier section
Frequency response (+0, –1 dB)
5 - 20,000 Hz
Signal-to-noise ratio 106 dB
Harmonic distortion at 1 kHz, 20 bit
0.002%
Dynamic range at 20 bit
100 dB
Channel separation at 1 kHz
100 dB
Maximum power output
8 V rms
Maximum power input (AUX analogue
audio)
1.2 Vrms
Sampling frequency (AUX digital audio)
44.1 kHz
Audio inputs Analogue (RCA-type)
×1
Digital (optical) ×1
Audio outputs Analogue (RCA-type)
×3
General
Power requirements 12 V DC car battery
(negative ground)
Power consumption Control unit: 1.2 A
CD changer: 1.5 A
Mass Control unit: 1.9 kg
CD changer: 6.5 kg
Dimensions (w/h/d)Control unit: 178 × 50 ×
170 mm
CD changer: 318 × 106
× 259 mm
Supplied accessories
Wireless remote (1)
Wired rotary remote (1)
Disc magazine (1)
SUM-3 batteries (2)
Case for holding the
front panel and
rotary commander (1)
Installation accessories
(1 set)
Design and specifications are subject to
change without notice.
Appendix
Appendix
67
Page 70

Appendix
Sample Frequency Response Table for the FIR Filter (4095 tap)
LEVEL [dB]
10
0
–20
–40
–60
–80
–100
10
The table above shows the frequency response of the FIR filter (4095 tap) for the
following settings:
Low: Cut-off frequency 78 Hz, Slope –72 dB/oct.
Mid-L: Cut-off frequency 78 Hz, Slope –72 dB/oct.
Mid-H: Cut-off frequency 8 kHz, Slope –24 dB/oct.
High: Cut-off frequency 8 kHz, Slope –72 dB/oct.
68 Appendix
22050Hz10k1k100
Page 71

Page 72

1998 by Sony Corporation Printed in Japan
 Loading...