

Page 1
4-575-512-33(1)
FM/AM
Compact Disc
Player
Operating Instructions
Manual de instrucciones
GB
ES
To cancel the demonstration (DEMO) display, see page 9.
To switch the FM/AM tuning step, see page 6.
For the connection/installation, see page 18.
Para cancelar la pantalla de demostración (DEMO), consulte
la página 10.
Para cambiar el paso de sintonización de FM/AM, consulte la
página 6.
Para la conexión/instalación, consulte la página 20.
WX-800UI
Page 2
For safety, be sure to install this unit in the
dashboard of the car as the rear side of the unit
becomes hot during use.
For details, see “Connection/Installation”
(page 18).
Laser Diode Properties
Emission Duration: Continuous
Laser Output: Less than 53.3 μW
(This output is the value measurement at a distance
of 200 mm from the objective lens surface on the
Optical Pick-up Block with 7 mm aperture.)
The nameplate indicating operating voltage, etc., is
located on the bottom of the chassis.
WARNING: Do not ingest battery,
Chemical Burn Hazard.
The remote commander contains a coin/
button cell battery. If the coin/button cell battery is
swallowed, it can cause severe internal burns in just
2 hours and can lead to death.
Keep new and used batteries away from children. If
the battery compartment does not close securely,
stop using the product and keep it away from
children.
If you think batteries might have been swallowed or
placed inside any part of the body, seek immediate
medical attention.
Note on the lithium battery
Do not expose the battery to excessive heat such as
direct sunlight, fire or the like.
Warning if your car’s ignition has no ACC
position
Be sure to set the AUTO OFF function (page 10).
The unit will shut off completely and
automatically in the set time after the unit is
turned off, which prevents battery drain. If you
do not set the AUTO OFF function, press and hold
OFF until the display disappears each time you
turn the ignition off.
Disclaimer regarding services offered by third
parties
Services offered by third parties may be changed,
suspended, or terminated without prior notice.
Sony does not bear any responsibility in these sorts
of situations.
2GB
Page 3
Table of Contents
Guide to Parts and Controls . . . . . . . . . . . . . . . . . . 4
Getting Started
Resetting the unit . . . . . . . . . . . . . . . . . . . . . . . . . . 6
Switching the FM/AM Tuning Step . . . . . . . . . . . . . 6
Setting the Clock . . . . . . . . . . . . . . . . . . . . . . . . . . . 6
Connecting a USB Device . . . . . . . . . . . . . . . . . . . . 6
Connecting Other Portable Audio Device . . . . . . . 6
Listening to the Radio
Listening to the Radio . . . . . . . . . . . . . . . . . . . . . . . 7
Using Radio Data System (RDS) . . . . . . . . . . . . . . . 7
Playback
Playing a Disc . . . . . . . . . . . . . . . . . . . . . . . . . . . . . . 8
Playing a USB Device . . . . . . . . . . . . . . . . . . . . . . . . 8
Searching and Playing Tracks . . . . . . . . . . . . . . . . . 8
Settings
Canceling the DEMO Mode . . . . . . . . . . . . . . . . . . . 9
Basic Setting Operation . . . . . . . . . . . . . . . . . . . . . . 9
General Setup (GENERAL) . . . . . . . . . . . . . . . . . . . . 9
Sound Setup (SOUND) . . . . . . . . . . . . . . . . . . . . . . 10
Display Setup (DISPLAY) . . . . . . . . . . . . . . . . . . . . . 12
Additional Information
Updating the Firmware . . . . . . . . . . . . . . . . . . . . . . 12
Precautions. . . . . . . . . . . . . . . . . . . . . . . . . . . . . . . . 12
Maintenance. . . . . . . . . . . . . . . . . . . . . . . . . . . . . . . 13
Specifications . . . . . . . . . . . . . . . . . . . . . . . . . . . . . 14
Troubleshooting. . . . . . . . . . . . . . . . . . . . . . . . . . . . 15
Connection/Installation
Cautions . . . . . . . . . . . . . . . . . . . . . . . . . . . . . . . . . 18
Parts List for Installation . . . . . . . . . . . . . . . . . . . . 18
Connection . . . . . . . . . . . . . . . . . . . . . . . . . . . . . . . 19
Installation . . . . . . . . . . . . . . . . . . . . . . . . . . . . . . . . 21
3GB
Page 4

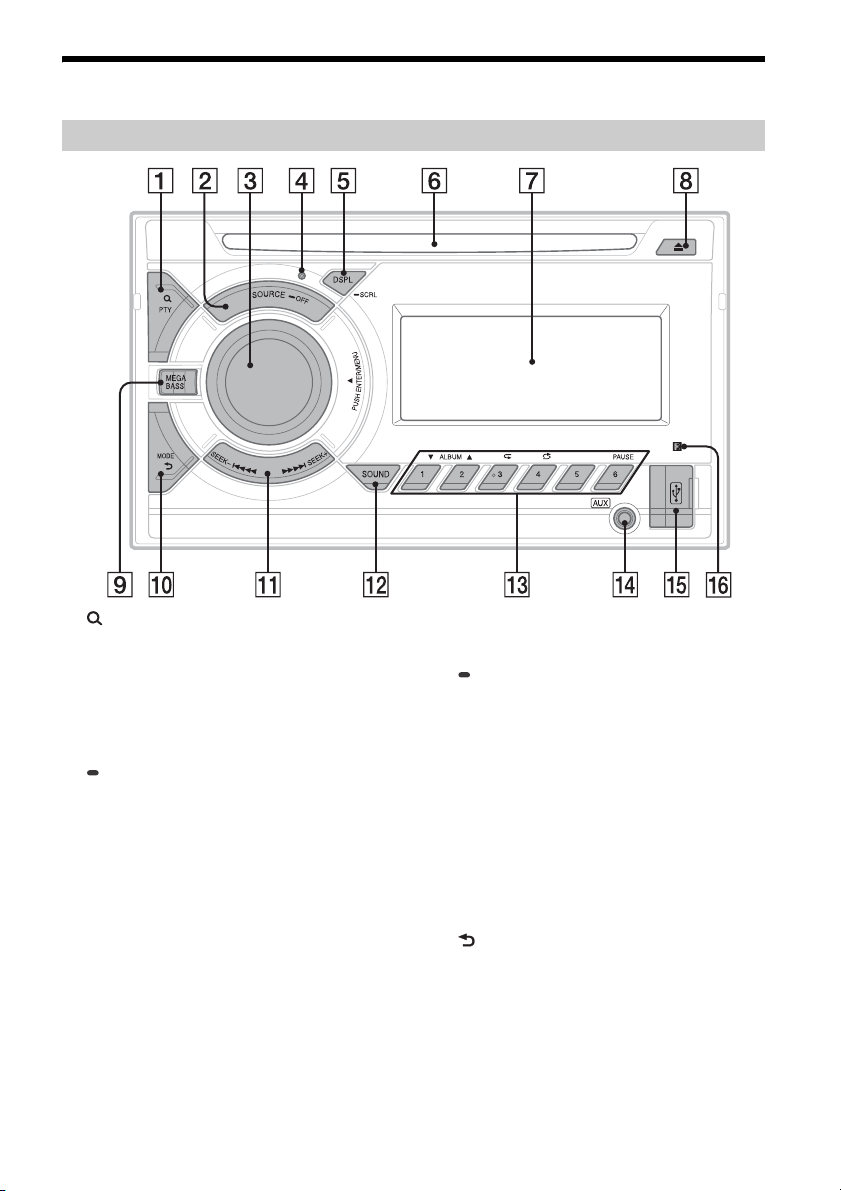
Guide to Parts and Controls
Main unit
(browse) (page 8, 9)
Enter the browse mode during playback.
PTY (program type)
Select PTY in RDS.
SOURCE
Turn o n the po we r.
Change the source.
OFF
Press and hold for 1 second to turn the source
off and display the clock.
Press and hold for more than 2 seconds to turn
off the power and the display.
If the unit is turned off and the display
disappears, operation by the remote
commander is not available.
Control dial
Rotate to adjust the volume.
PUSH ENTER
Enter the selected item.
Press SOURCE, rotate then press to change the
source.
MENU
Open the setup menu.
Reset button (page 6)
4GB
DSPL (display)
Press to change display items.
SCRL (scroll)
Press and hold to scroll a display item.
Disc slot
Display window
(disc eject)
MEGA BASS
Reinforces bass sound in synchronization with
the volume level. Press to change the MEGA
BASS setting: [1], [2], [OFF].
Automatically sets to [OFF] when [C.AUDIO+] is
set to [ON].
MODE (page 7, 8)
(back)
Return to the previous display.
SEEK +/–
Tune in radio stations automatically. Press and
hold to tune manually.
/ (prev/next)
/ (fast-revers e/fast-forward)
SOUND
Open the SOUND menu directly.
Page 5

Number buttons (1 to 6)
Receive stored radio stations. Press and hold to
store stations.
ALBUM /
Skip an album for audio device. Press and hold
to skip albums continuously.
(repeat)
(shuffle)
PAU SE
AUX input jack
USB port
Receptor for the remote commander
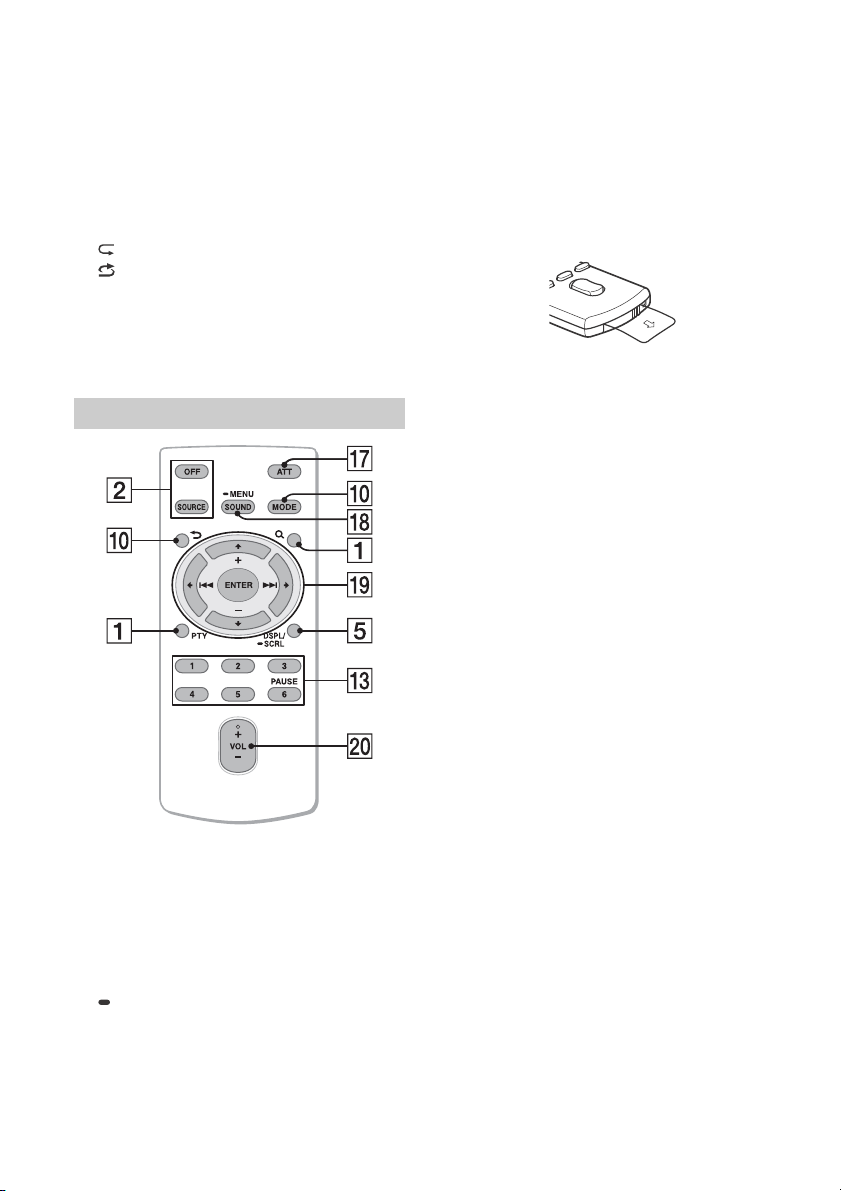
RM-X211 Remote commander
Remove the insulation film before use.
The VOL (volume) + button has a tactile dot.
ATT (attenuate)
Attenuate the sound. Press again to cancel the
attenuation.
SOUND
Open the SOUND menu directly.
MENU
Press and hold to open the setup menu.
///
Select a setup item, etc.
ENTER
Enter the selected item.
/ (prev/next)
+/– (album +/–)
VOL (Volume) +/–
5GB
Page 6
Getting Started
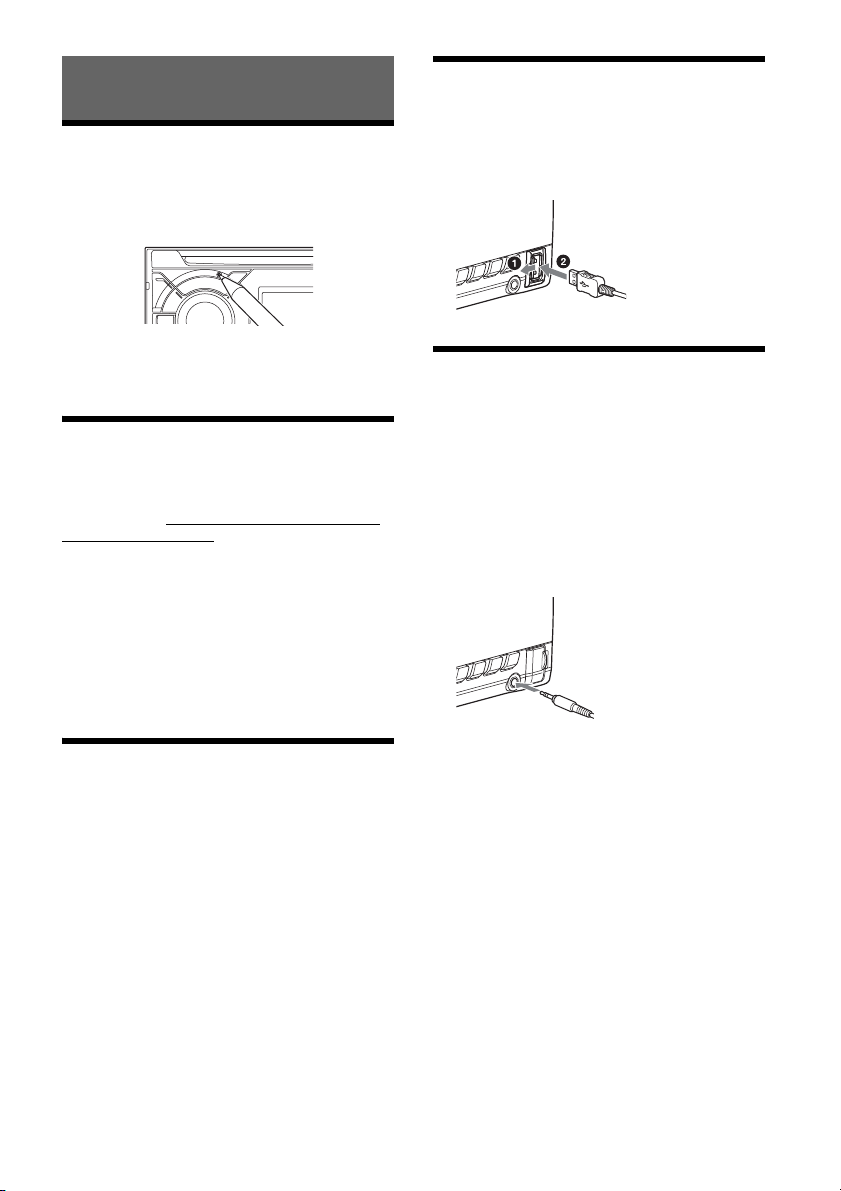
Resetting the unit
Before operating the unit for the first time, after
replacing the car battery, or changing the
connections, you must reset the unit. Press the
reset button with a ball-point pen, etc.
Note
Pressing the reset button will erase the clock setting
and some stored contents.
Connecting a USB Device
1 Turn down the volume on the unit.
2 Connect the USB device to the unit.
To connect an iPod/iPhone, use the USB
connection cable for iPod (not supplied).
Connecting Other Portable
Audio Device
Switching the FM/AM Tuning
Step
Set the FM/AM tuning step of your country. This
setting appears only while the source is off and
the clock is displayed.
1 Press MENU, rotate the control dial to
select [SET GENERAL], then press it.
2 Rotate the control dial to select [SET
TUNER-STP], then press it.
3 Rotate the control dial to select from [SET
50K/9K], [SET 100K/10K] or [SET 200K/
10K], then press it.
Setting the Clock
1 Press MENU, rotate the control dial to
select [SET GENERAL], then press it.
2 Rotate the control dial to select [SET
CLOCK-ADJ], then press it.
The hour indication flashes.
3 Rotate the control dial to set the hour
and minute.
To move the digital indication, press SEEK +/–.
4 After setting the minute, press MENU.
The setup is complete and the clock starts.
To display the clock
Press DSPL.
1 Turn off the portable audio device.
2 Turn down the volume on the unit.
3 Connect the portable audio device to the
AUX input jack (stereo mini jack) on the
unit with a connecting cord (not
supplied)*.
* Be sure to use a straight type plug.
4 Press SOURCE to select [AUX].
To match the volume level of the connected
device to other sources
Start playback of the portable audio device at a
moderate volume, and set your usual listening
volume on the unit.
Press MENU, then select [SET SOUND] [SET AUX
VOL] (page 11).
6GB
Page 7

Listening to the Radio
Using Radio Data System (RDS)
Listening to the Radio
Tuning step setting is required (page 6).
To listen to the radio, press SOURCE to select
[TUNER].
Storing automatically (BTM)
1 Press MODE to change the band (FM1,
FM2, FM3, AM1 or AM2).
2 Press MENU, rotate the control dial to
select [SET GENERAL], then press it.
3 Rotate the control dial to select [SET
BTM], then press it.
The unit stores stations in order of frequency on
the number buttons.
Tuning
1 Press MODE to change the band (FM1,
FM2, FM3, AM1 or AM2).
2 Perform tuning.
To tune manually
Press and hold SEEK +/– to locate the
approximate frequency, then press SEEK +/–
repeatedly to fine adjust to the desired
frequency.
To tune automatically
Press SEEK +/–.
Scanning stops when the unit receives a station.
Selecting program types (PTY)
1 Press PTY during FM reception.
2 Rotate the control dial until the desired
program type appears, then press it.
The unit starts to search for a station
broadcasting the selected program type.
Type of programs
NEWS (News), AFFAIRS (Current Affairs), INFO
(Information), SPORT (Sports), EDUCATE
(Education), DRAMA (Drama), CULTURE (Culture),
SCIENCE (Science), VARIE D (Varied), POP M (Pop
Music), ROCK M (Rock Music), EASY M (M.O.R.
Music), LIGHT M (Light classical), CLASSICS (Serious
classical), OTHER M (Other Music), WEATHER
(Weather), FINANCE (Finance), CHILDREN
(Children’s program), SOCIAL A (Social Affairs),
RELIGION (Religion), PHONE IN (Phone In), TRAVEL
(Travel), LEISURE (Leisure), JAZZ (Jazz Music),
COUNTRY (Country Music), NATION M (National
Music), OLDIES (Oldies Music), FOLK M (Folk Music),
DOCUMENT (Documentary)
Setting clock time (CT)
The CT data from the RDS transmission sets the
clock.
1 Set [SET CT-ON] in [SET GENERAL]
(page 10).
Storing manually
1 While receiving the station that you want
to store, press and hold a number button
(1 to 6) until [MEM] appears.
Receiving the stored stations
1 Select the band, then press a number
button (1 to 6).
7GB
Page 8
Playback
Playing a Disc
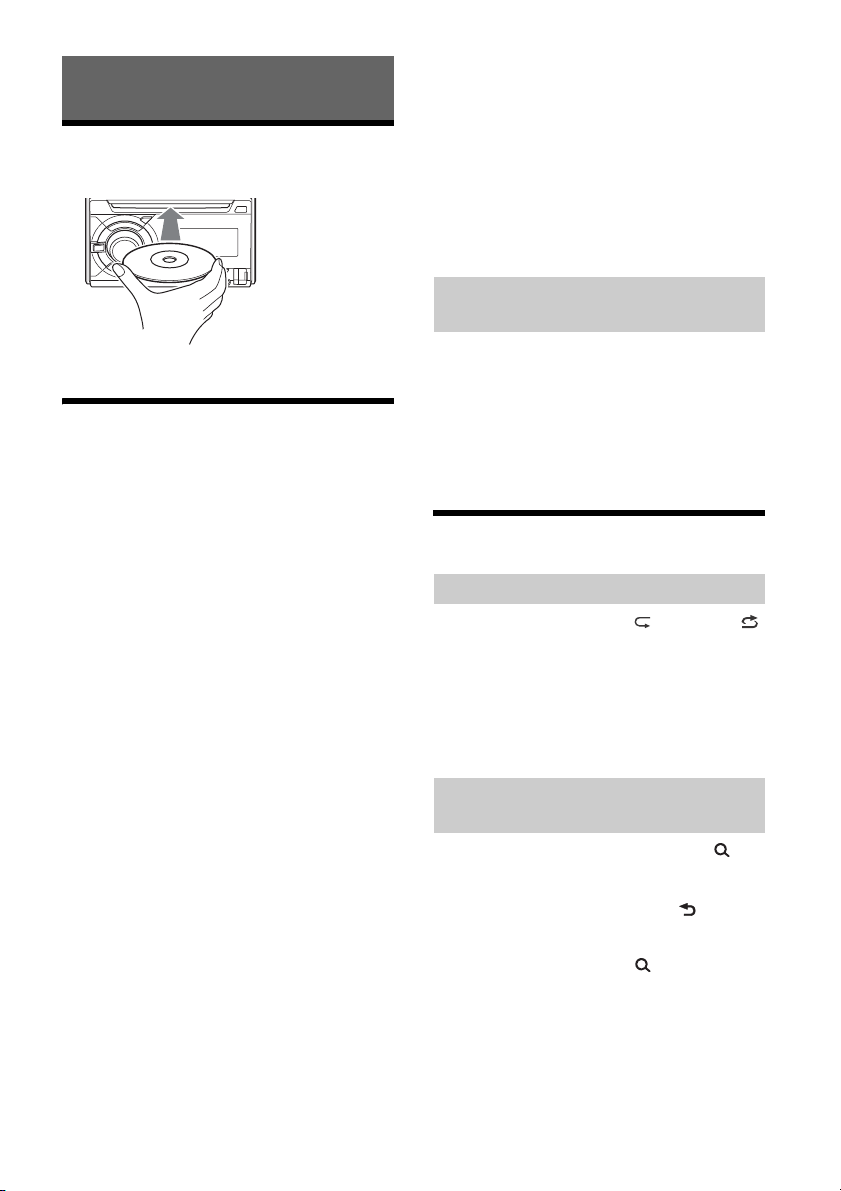
1 Insert the disc (label side up).
Playback starts automatically.
Playing a USB Device
In these Operating Instructions, “iPod” is used as a
general reference for the iPod functions on an iPod
and iPhone, unless otherwise specified by the text
or illustrations.
For details on the compatibility of your iPod, see
“About iPod” (page 13) or visit the support site on
the back cover.
MSC (Mass Storage Class) and MTP (Media Transfer
Protocol) type USB devices (such as a USB flash
drive, digital media player, Android™ phone)
compliant with the USB standard can be used.
Depending on the digital media player or Android
phone, setting the USB connection mode to MTP is
required.
Notes
For details on the compatibility of your USB device,
visit the support site on the back cover.
Playback of the following files is not supported.
MP3/WMA/AAC/FLAC:
copyright-protected files
DRM (Digital Rights Management) files
Multi-channel audio files
MP3/WMA/AAC:
lossless compression files
WAV:
Multi-channel audio files
1 Connect a USB device to the USB port
(page 6).
Playback starts.
If a device is already connected, to start
playback, press SOURCE to select [USB] ([IPD]
appears in the display when the iPod is
recognized).
2 Adjust the volume on this unit.
To stop playback
Press and hold OFF for 1 second.
To remove the device
Stop playback, then remove the device.
Caution for iPhone
When you connect an iPhone via USB, phone call
volume is controlled by the iPhone, not the unit. Do
not inadvertently increase the volume on the unit
during a call, as a sudden loud sound may result
when the call ends.
Operating an iPod directly (Passenger
control)
1 During playback, press and hold MODE
until [MODE IPOD] appears.
Operations of the iPod become available.
Note that the volume can be adjusted only by
the unit.
To exit pa sse nger co n tr ol
Press and hold MODE until [MODE AUDIO] appears.
Searching and Playing Tracks
Repeat play and shuffle play
1 During playback, press (repeat) or
(shuffle) repeatedly to select the desired
play mode.
Playback in the selected play mode may take
time to start.
Available play modes differ depending on the
selected sound source.
Searching a track by name (QuickBrowZer™)
1 During CD or USB playback, press
(browse)* to display the list of search
categories.
When the track list appears, press (back)
repeatedly to display the desired search
category.
* During USB playback, press (browse) for more
than 2 seconds to directly return to the beginning
of the category list.
2 Rotate the control dial to select the
desired search category, then press it to
confirm.
8GB
Page 9
3 Repeat step 2 to search the desired track.
Playback starts.
To exit the Qu i ck-BrowZer mod e
Press (browse).
Searching by skipping items
(Jump mode)
1 Press (browse).
2 Press SEEK +.
3 Rotate the control dial to select the item.
The list is jumped in steps of 10% of the total
number of items.
4 Press ENTER to return to the Quick-
BrowZer mode.
The selected item appears.
5 Rotate the control dial to select the
desired item, then press it.
Playback starts.
Settings
Canceling the DEMO Mode
You can cancel the demonstration display which
appears when the source is off and the clock is
displayed.
1 Press MENU, rotate the control dial to
select [SET GENERAL], then press it.
2 Rotate the control dial to select [SET
DEMO], then press it.
3 Rotate the control dial to select [SET
DEMO-OFF], then press it.
The setting is complete.
4 Press (back) twice.
The display returns to normal reception/play
mode.
Basic Setting Operation
You can set items in the following setup categories:
General setup (GENERAL), Sound setup (SOUND),
Display setup (DISPLAY)
1 Press MENU.
2 Rotate the control dial to select the setup
category, then press it.
The items that can be set differ depending on
the source and settings.
3 Rotate the control dial to select the
options, then press it.
To return to the previous display
Press (back).
General Setup (GENERAL)
DEMO (demonstration)
Activates the demonstration: [ON], [OFF].
CLOCK-ADJ (clock adjust) (page 6)
TUNER-STP (tuner step) (page 6)
(Available only while the source is off and the
clock is displayed.)
BEEP
Activates the beep sound: [ON], [OFF].
9GB
Page 10

AUTO OFF
Shuts off automatically after a desired time
when the unit is turned off: [ON] (30 minutes),
[OFF].
STEERING
Registers/resets the setting of the steering
wheel remote control.
(Available when connected with the connection
cable (not supplied).) (Available only while the
source is off and the clock is displayed.)
STR CONTROL (steering control)
Selects the input mode of the connected remote
control. To prevent a malfunction, be sure to
match the input mode with the connected
remote control before use.
CUSTOM
Input mode for the steering wheel remote
control (automatically selected when [EDIT
CUSTOM] is complete or [RESET CUSTOM] is
performed)
PRESET
Input mode for the wired remote control
excluding the steering wheel remote control
EDIT CUSTOM
Registers the functions (SOURCE, ATT, VOL +/–,
SEEK +/–) to the steering wheel remote control:
Rotate the control dial to select the function
you want to assign to the steering wheel
remote control, then press it.
While [REGISTER] is blinking, press and hold
the button on the steering wheel remote
control you want to assign the function to.
When registration is complete, [REGISTERED]
is displayed.
To register other functions, repeat steps
and .
(Available only when [STR CONTROL] is set to
[CUSTOM].)
RESET CUSTOM
Resets the setting of the steering wheel remote
control: [YES], [NO]. (Available only when [STR
CONTROL] is set to [CUSTOM].)
Notes
While making settings, only button operation on
the unit is available. For safety, park your car
before making this setting.
If an error occurs while registering, all the
previously-registered information remains. Restart
registration from the function where the error
occurred.
This function may not be available on some
vehicles. For details on the compatibility of your
vehicle, visit the support site on the back cover.
REAR/SUB
Switches the audio output: [SUB-OUT]
(subwoofer), [REAR-OUT] (power amplifier).
(Available only while the source is off and the
clock is displayed.)
CT (clock time)
Activates the CT function: [ON], [OFF].
BTM (best tuning memory) (page 7)
(Available only when the tuner is selected.)
FIRMWARE
Checks/updates the firmware version. For
details, visit the following support site:
Customers in Latin America:
http://esupport.sony.com/ES/LA/
Customers in Asia Pacific:
http://www.sony-asia.com/section/support
http://www.sony-asia.com/caraudio/
FW VERSION (firmware version)
Displays current firmware version.
FW UPDATE (firmware update)
Enters firmware update process: [YES], [NO].
(Available only while the source is off and the
clock is displayed.)
Sound Setup (SOUND)
This setup menu can also be opened by pressing
SOUND, and is available when any source is
selected.
C.AUDIO+ (ClearAudio+)
Reproduces sound by optimizing the digital
signal with the Sony recommended sound
settings: [ON], [OFF]. (Automatically sets to [OFF]
when [EQ10 PRESET] is changed and/or
[MEGABASS] is set to [1] or [2] and/or [DSO] is set
to [LOW], [MID] or [HIGH].)
EQ10 PRESET
Selects an equalizer curve from 10 equalizer
curves or off:
[OFF], [R&B], [ROCK], [POP], [DANCE], [HIP-HOP],
[ELECTRONICA], [JAZZ], [REGUETON], [SALSA],
[CUSTOM].
For India models:
[BOLLYWOOD], [R&B], [ROCK], [POP], [DANCE],
[HIP-HOP], [ELECTRONICA], [JAZZ], [REGUETON],
[CUSTOM], [OFF].
The equalizer curve setting can be memorized
for each source.
EQ10 CUSTOM
Sets [CUSTOM] of EQ10.
Setting the equalizer curve: [BAND1] 32 Hz,
[BAND2] 63 Hz, [BAND3] 125 Hz, [BAND4] 250 Hz,
[BAND5] 500 Hz, [BAND6] 1 kHz, [BAND7] 2 kHz,
[BAND8] 4 kHz, [BAND9] 8 kHz, [BAND10] 16 kHz.
The volume level is adjustable in 1 dB steps,
from -6 dB to +6 dB.
10GB
Page 11
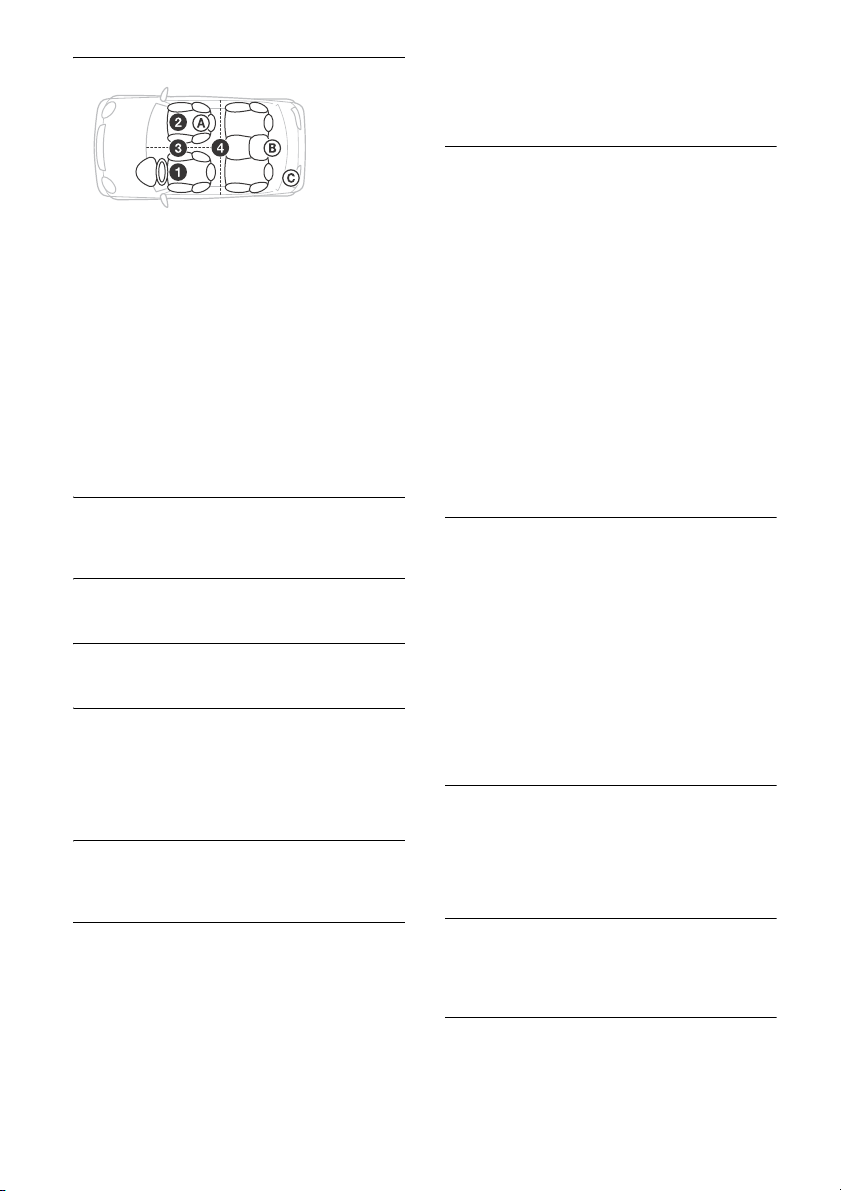
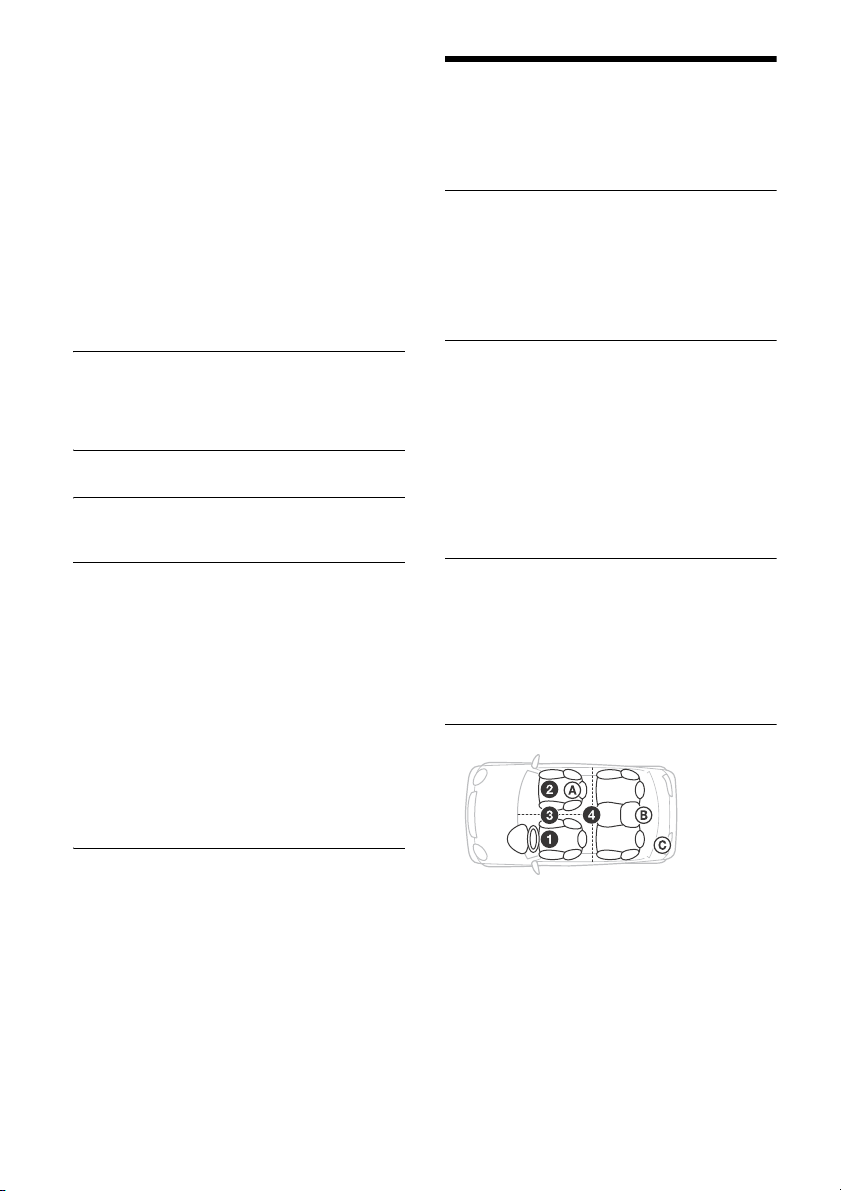
POSITION (listening position)
F/R POS (front/rear position)
Simulates a natural sound field by delaying the
sound output from speakers to suit your
position:
[FRONT L] (front left),
[FRONT R] (front right),
[FRONT] (center front),
[ALL] (center of your car),
[OFF] (no position set)
ADJ POSITION* (adjust position)
Fine-tunes the listening position setting: [+3] –
[CENTER] – [-3].
SW POS* (subwoofer position)
[NEAR] (near),
[NORMAL] (normal),
[FAR] (far)
DSO (dynamic soundstage organizer)
Creates a more ambient sound as if there were
speakers in the dashboard: [OFF], [LOW], [MID],
[HIGH].
BALANCE
Adjusts the sound balance: [RIGHT-15] –
[CENTER] – [LEFT-15].
FAD ER
Adjusts the relative level: [FRONT-15] – [CENTER]
– [REAR-15].
DSEE (digital sound enhancement engine)
Improves digitally compressed sound by
restoring high frequencies lost in the
compression process.
This setting can be memorized for each source
other than the tuner.
Selects the DSEE mode: [ON], [OFF].
AAV (advanced auto volume)
Adjusts the playback volume level of all
playback sources to the optimum level: [ON],
[OFF].
RB ENH (rear bass enhancer)
Rear Bass Enhancer enhances the bass sound by
applying a low pass filter setting to the rear
speakers. This function allows the rear speakers
to work as a subwoofer if one is not connected.
(Available only when [SW DIREC] is set to [OFF]
and/or [REAR-OUT] is selected in [REAR/SUB].)
RBE MODE (rear bass enhancer mode)
Selects the rear bass enhancer mode: [1], [2], [3],
[OFF].
LPF FREQ (low pass filter frequency)
Selects the subwoofer cut-off frequency: [50Hz],
[60Hz], [80Hz], [100Hz], [120Hz].
LPF SLOP (low pass filter slope)
Selects the LPF slope: [1], [2], [3].
SW DIREC (subwoofer direct connection)
You can use the subwoofer without a power
amplifier when it is connected to the rear
speaker lead.
(Available only when [RBE MODE] is set to [OFF]
and/or [REAR-OUT] is selected in [REAR/SUB].)
Be sure to connect a 4 – 8 ohm subwoofer to
either of the rear speaker leads. Do not connect
a speaker to the other rear speaker lead.
SW MODE (subwoofer mode)
Selects the subwoofer mode: [1], [2], [3], [OFF].
SW PHASE (subwoofer phase)
Selects the subwoofer phase: [NORM], [REV].
SW POS* (subwoofer position)
Selects the subwoofer position: [NEAR],
[NORMAL], [FAR].
LPF FREQ (low pass filter frequency)
Selects the subwoofer cut-off frequency: [50Hz],
[60Hz], [80Hz], [100Hz], [120Hz].
LPF SLOP (low pass filter slope)
Selects the LPF slope: [1], [2], [3].
S.WOOFER (subwoofer)
SW LEVEL (subwoofer level)
Adjusts the subwoofer volume level:
[+10 dB] – [0 dB] – [-10 dB].
([ATT] is displayed at the lowest setting.)
SW PHASE (subwoofer phase)
Selects the subwoofer phase: [NORM], [REV].
SW POS* (subwoofer position)
Selects the subwoofer position: [NEAR],
[NORMAL], [FAR].
LPF FREQ (low pass filter frequency)
Selects the subwoofer cut-off frequency: [50Hz],
[60Hz], [80Hz], [100Hz], [120Hz].
LPF SLOP (low pass filter slope)
Selects the LPF slope: [1], [2], [3].
HPF (high pass filter)
HPF FREQ (high pass filter frequency)
Selects the front/rear speaker cut-off frequency:
[OFF], [50Hz], [60Hz], [80Hz], [100Hz], [120Hz].
HPF SLOP (high pass filter slope)
Selects the HPF slope (effective only when [HPF
FREQ] is set to other than [OFF]): [1], [2], [3].
AUX VOL (AUX volume level)
Adjusts the volume level for each connected
auxiliary device: [+18 dB] – [0 dB] – [-8 dB].
This setting negates the need to adjust the
volume level between sources.
* Does not appear when [F/R POS] is set to [OFF].
11GB
Page 12
Display Setup (DISPLAY)
BLK OUT (black out)
Turns off the illumination automatically for any
source (e.g., during radio reception/CD
playback, etc.) if no operation is performed for 5
seconds: [ON], [OFF].
To turn the light back on, press any button on
the unit or the remote commander.
DIMMER
Changes the display brightness: [ON], [OFF].
BUTTON-C (button color)
Sets a preset color or customized color for the
buttons.
COLOR
Selects from 15 presets colors, 1 customized
color.
CUSTOM-C (custom color)
Registers a customized color for the buttons.
RGB RED, RGB GRN, RGB BLUE
Adjustable color range: [0] – [32] ([0] cannot
be set for all color ranges).
DSPL-C (display color)
Sets a preset color or customized color for the
display.
COLOR
Selects from 15 presets colors, 1 customized
color.
CUSTOM-C (custom color)
Registers a customized color for the display.
RGB RED, RGB GRN, RGB BLUE
Adjustable color range: [0] – [32] ([0] cannot
be set for all color ranges).
ALL-C (all color)
Sets a preset color or customized color for the
display and buttons.
COLOR
Selects from 15 presets colors, 1 customized
color.
CUSTOM-C (custom color)
Registers a customized color for the display and
buttons.
RGB RED, RGB GRN, RGB BLUE
Adjustable color range: [0] – [32] ([0] cannot
be set for all color ranges).
SND SYNC (sound synchronization)
Activates the synchronization of the illumination
with the sound: [ON], [OFF].
M. DISPLAY (motion display)
Shows moving patterns: [LM], [ON], [OFF].
AUTO SCR (auto scroll)
Scrolls long items automatically: [ON], [OFF].
(Not available when the AUX or tuner is
selected.)
Additional Information
Updating the Firmware
You can update the firmware of this unit from the
following support site:
Customers in Latin America:
http://esupport.sony.com/ES/LA/
Customers in Asia Pacific:
http://www.sony-asia.com/section/support
http://www.sony-asia.com/caraudio/
To update the firmware, visit the support site, then
follow the online instructions.
Precautions
Cool off the unit beforehand if your car has been
parked in direct sunlight.
Do not leave the front panel or audio devices
brought in inside the car, or it may cause
malfunction due to high temperature in direct
sunlight.
Power antenna (aerial) extends automatically.
Moisture condensation
Should moisture condensation occur inside the
unit, remove the disc and wait for about an hour for
it to dry out; otherwise the unit will not operate
properly.
To maintain high sound quality
Do not splash liquid onto the unit or discs.
Notes on discs
Do not expose discs to direct sunlight or heat
sources such as hot air ducts, nor leave it in a car
parked in direct sunlight.
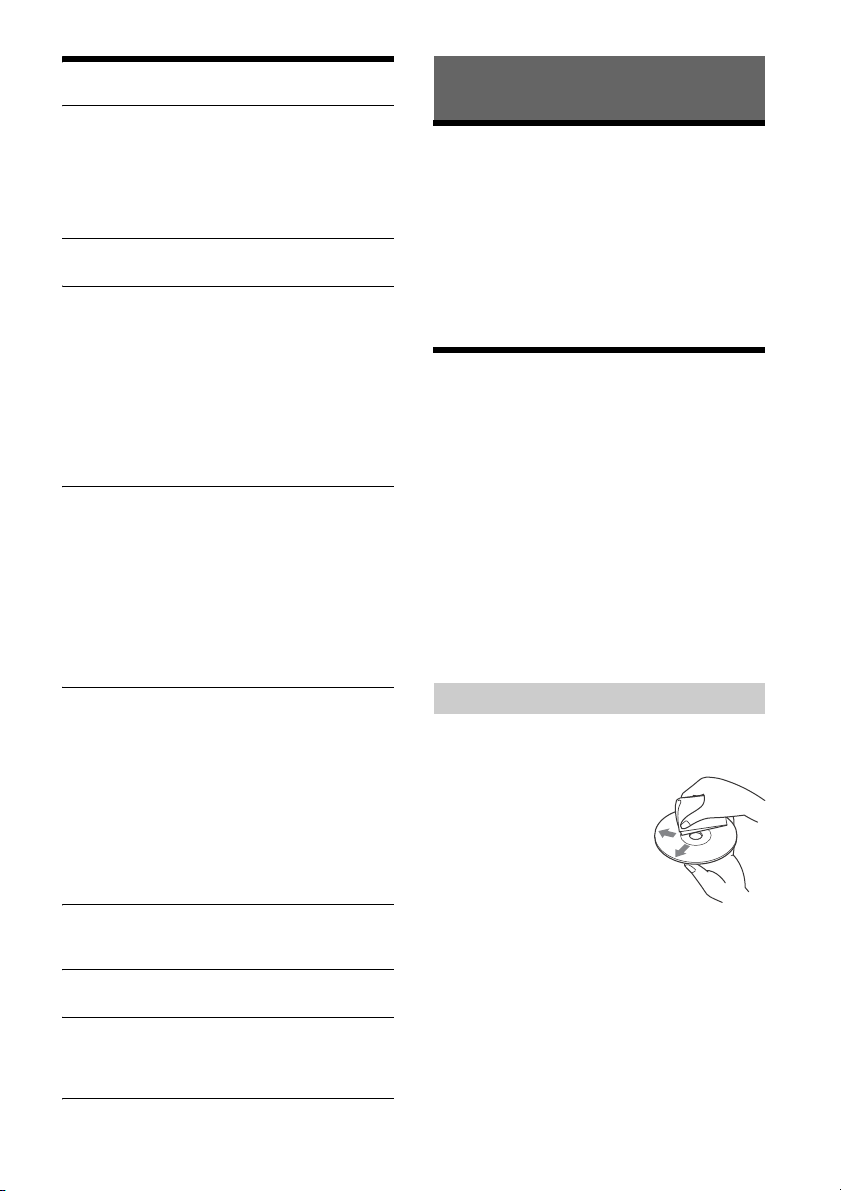
Before playing, wipe the discs
with a cleaning cloth from the
center out. Do not use
solvents such as benzine,
thinner, commercially
available cleaners.
This unit is designed to play
discs that conform to the
Compact Disc (CD) standard.
DualDiscs and some of the music discs encoded
with copyright protection technologies do not
conform to the Compact Disc (CD) standard,
therefore, these discs may not be playable by this
unit.
12GB
Page 13
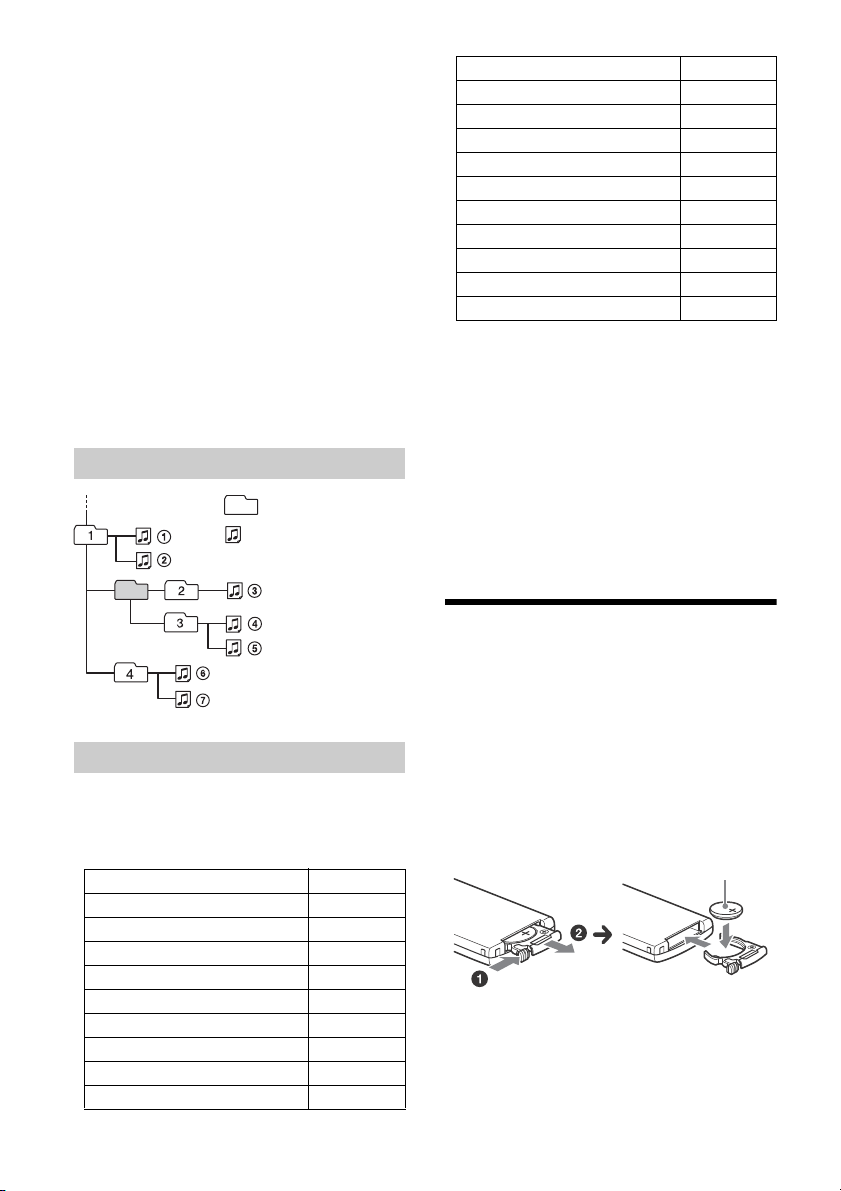
Discs that this unit CANNOT play
Folde r (alb um)
Audio file (track)
+ side up
Discs with labels, stickers, or sticky tape or
paper attached. Doing so may cause a
malfunction, or may ruin the disc.
Discs with non-standard shapes (e.g., heart,
square, star). Attempting to do so may damage
the unit.
8 cm (3
1
/4 in) discs.
Notes on CD-R/CD-RW discs
If the multi-session disc begins with a CD-DA
session, it is recognized as a CD-DA disc, and
other sessions are not played.
Discs that this unit CANNOT play
CD-R/CD-RW of poor recording quality.
CD-R/CD-RW recorded with an incompatible
recording device.
CD-R/CD-RW which is finalized incorrectly.
CD-R/CD-RW other than those recorded in
music CD format or MP3 format conforming to
ISO9660 Level 1/Level 2, Joliet/Romeo or multisession.
Playback order of audio files
Compatible Model USB
iPod touch (5th generation)
iPod touch (4th generation)
iPod touch (3rd generation)
iPod touch (2nd generation)
iPod classic
iPod nano (7th generation)
iPod nano (6th generation)
iPod nano (5th generation)
iPod nano (4th generation)
iPod nano (3rd generation)
“Made for iPod,” and “Made for iPhone,” mean
that an electronic accessory has been designed to
connect specifically to iPod or iPhone,
respectively, and has been certified by the
developer to meet Apple performance standards.
Apple is not responsible for the operation of this
device or its compliance with safety and
regulatory standards. Please note that the use of
this accessory with iPod or iPhone may affect
wireless performance.
If you have any questions or problems concerning
your unit that are not covered in this manual,
consult your nearest Sony dealer.
Maintenance
About iPod
You can connect to the following iPod models.
Update your iPod devices to the latest software
before use.
Compatible iPhone/iPod models
Compatible Model USB
iPhone 6 Plus
iPhone 6
iPhone 5s
iPhone 5c
iPhone 5
iPhone 4s
iPhone 4
iPhone 3GS
iPhone 3G
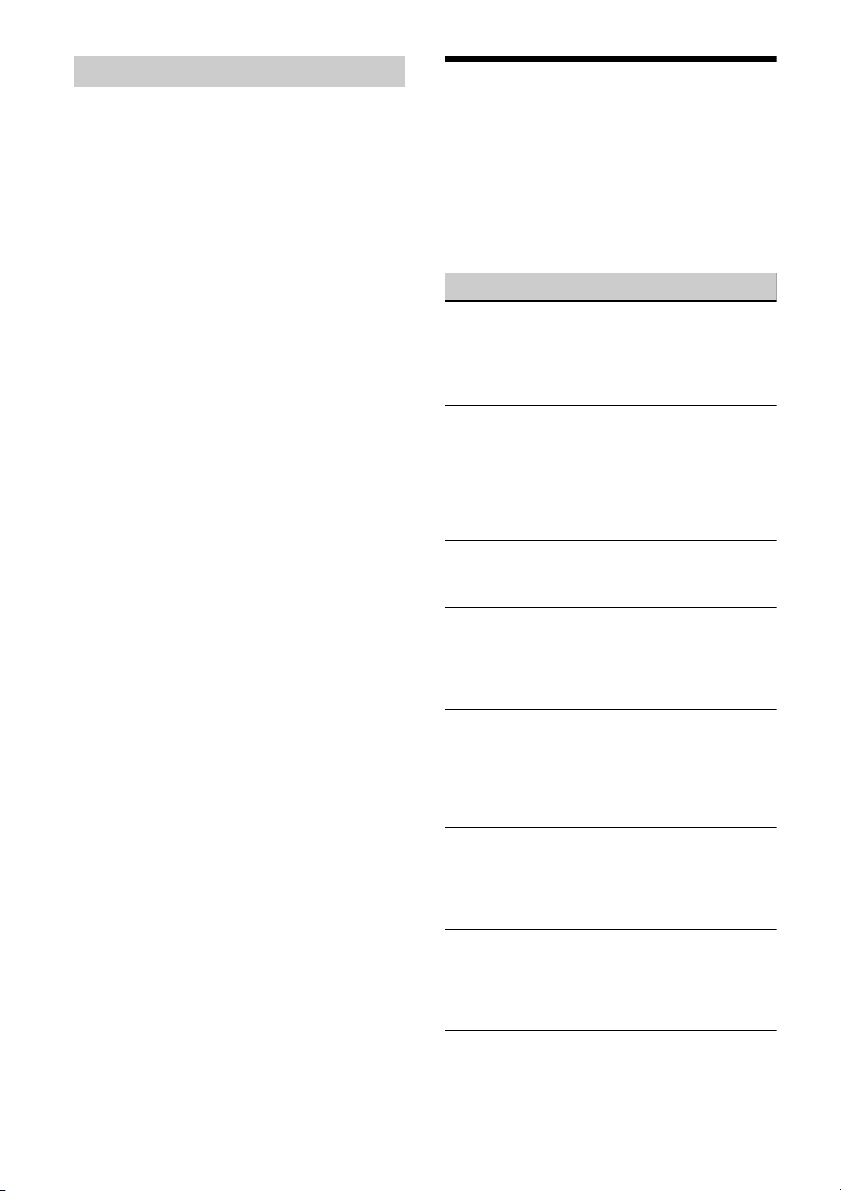
Replacing the lithium battery of the remote
commander
Under normal conditions, the battery will last
approximately 1 year. (The service life may be
shorter, depending on the conditions of use.)
When the battery becomes weak, the range of the
remote commander becomes shorter.
CAUTION
Danger of explosion if battery is incorrectly
replaced. Replaced only with the same or
equivalent type.
Notes on the lithium battery
Keep the lithium battery out of the reach of children.
Should the battery be swallowed, immediately
consult a doctor.
Wipe the battery with a dry cloth to ensure a good
contact.
13GB
Page 14

Be sure to observe the correct polarity when installing
the battery.
Do not hold the battery with metallic tweezers,
otherwise a short-circuit may occur.
WARNING
Battery may explode if mistreated.
Do not recharge, disassemble, or dispose of in
fire.
Specifications
Tuner section
FM
Tuning ra ng e:
87.5 – 108.0 MHz (at 50 kHz step)
87.5 – 108.0 MHz (at 100 kHz step)
87.5 – 107.9 MHz (at 200 kHz step)
FM tuning step:
50 kHz/100 kHz/200 kHz switchable
Antenna (aerial) terminal:
External antenna (aerial) connector
Intermediate frequency:
FM CCIR: -1,956.5 to -487.3 kHz and
+500.0 to +2,095.4 kHz
Usable sensitivity: 8 dBf
Selectivity: 75 dB at 400 kHz
Signal-to-noise ratio: 73 dB
Separation: 50 dB at 1 kHz
Frequency response: 20 – 15,000 Hz
AM
Tuning ra ng e:
531 – 1,602 kHz (at 9 kHz step)
530 – 1,710 kHz (at 10 kHz step)
AM tuning step:
9 kHz/10 kHz switchable
Antenna (aerial) terminal:
External antenna (aerial) connector
Sensitivity: 26 μV
CD Player section
Signal-to-noise ratio: 120 dB
Frequency response: 10 – 20,000 Hz
Wow and flutter: Below measurable limit
The maximum number of: (CD-R/CD-RW only)
folders (albums): 150 (including root folder)
files (tracks) and folders: 300 (may less than 300
if folder/file names contain many characters)
displayable characters for a folder/file name: 32
(Joliet)/64 (Romeo)
Corresponding codec: MP3 (.mp3), WMA (.wma)
and AAC (.m4a)
USB Player section
Interface: USB (High-speed)
Maximum current: 1 A
The maximum number of recognizable tracks:
10,000
Corresponding codec:
MP3 (.mp3)
Bit rate: 8 - 320 kbps (Supports VBR (Variable
Bit Rate))
Sampling rate: 16 - 48 kHz
WMA (.wma)
Bit rate: 32 - 192 kbps (Supports VBR
(Variable Bit Rate))
Sampling rate: 32 kHz, 44.1 kHz, 48 kHz
AAC (.m4a, .mp4)
Bit rate: 8 - 320 kbps
Sampling rate: 11.025 - 48 kHz
WAV (.wav)
Bit depth: 16 bit
Sampling rate: 44.1 kHz, 48 kHz
FLAC (.flac)
Bit depth: 16 bit, 24 bit
Sampling rate: 44.1 kHz, 48 kHz
Power amplifier section
Output: Speaker outputs
Speaker impedance: 4 – 8 ohms
Maximum power output: 55 W × 4 (at 4 ohms)
General
Outputs:
Audio outputs terminal (front, rear/sub
switchable)
Power antenna (aerial)/Power amplifier control
terminal (REM OUT)
Inputs:
Remote controller input terminal
Antenna (aerial) input terminal
AUX input jack (stereo mini jack)
USB port
Power requirements: 12 V DC car battery (negative
ground (earth))
Rated current consumption: 10 A
Dimensions:
Approx. 178 mm × 100 mm × 178 mm
1
(7
/8 in × 4 in × 7 1/8 in) (w/h/d)
Mounting dimensions:
Approx. 182 mm × 111 mm × 159 mm
1
(7
/4 in × 4 3/8 in × 6 3/8 in) (w/h/d)
Mass: Approx. 1.4 kg (3 lb 2 oz)
Package contents:
Main unit (1)
Remote commander (1): RM-X211
Parts for installation and connections (1 set)
Your dealer may not handle some of the above
listed accessories. Please ask the dealer for detailed
information.
Design and specifications are subject to change
without notice.
14GB
Page 15
Copyrights
Windows Media is either a registered trademark or
trademark of Microsoft Corporation in the United
States and/or other countries.
This product is protected by certain intellectual
property rights of Microsoft Corporation. Use or
distribution of such technology outside of this
product is prohibited without a license from
Microsoft or an authorized Microsoft subsidiary.
iPhone, iPod, iPod classic, iPod nano, and iPod
touch are trademarks of Apple Inc., registered in
the U.S. and other countries.
MPEG Layer-3 audio coding technology and patents
licensed from Fraunhofer IIS and Thomson.
Android is a trademark of Google Inc.
libFLAC
Copyright (C) 2000-2009 Josh Coalson
Copyright (C) 2011-2013 Xiph.Org Foundation
Redistribution and use in source and binary forms,
with or without modification, are permitted
provided that the following conditions are met:
Redistributions of source code must retain the
above copyright notice, this list of conditions and
the following disclaimer.
Redistributions in binary form must reproduce
the above copyright notice, this list of conditions
and the following disclaimer in the
documentation and/or other materials provided
with the distribution.
Neither the name of the Xiph.org Foundation nor
the names of its contributors may be used to
endorse or promote products derived from this
software without specific prior written
permission.
THIS SOFTWARE IS PROVIDED BY THE COPYRIGHT
HOLDERS AND CONTRIBUTORS “AS IS” AND ANY
EXPRESS OR IMPLIED WARRANTIES, INCLUDING,
BUT NOT LIMITED TO, THE IMPLIED WARRANTIES OF
MERCHANTABILITY AND FITNESS FOR A
PARTICULAR PURPOSE ARE DISCLAIMED. IN NO
EVENT SHALL THE FOUNDATION OR CONTRIBUTORS
BE LIABLE FOR ANY DIRECT, INDIRECT, INCIDENTAL,
SPECIAL, EXEMPLARY, OR CONSEQUENTIAL
DAMAGES (INCLUDING, BUT NOT LIMITED TO,
PROCUREMENT OF SUBSTITUTE GOODS OR
SERVICES; LOSS OF USE, DATA, OR PROFITS; OR
BUSINESS INTERRUPTION) HOWEVER CAUSED AND
ON ANY THEORY OF LIABILITY, WHETHER IN
CONTRACT, STRICT LIABILITY, OR TORT (INCLUDING
NEGLIGENCE OR OTHERWISE) ARISING IN ANY WAY
OUT OF THE USE OF THIS SOFTWARE, EVEN IF
ADVISED OF THE POSSIBILITY OF SUCH DAMAGE.
Troubleshooting
The following checklist will help you remedy
problems you may encounter with your unit.
Before going through the checklist below, check
the connection and operating procedures.
For details on using the fuse and removing the unit
from the dashboard, see “Connection/Installation”
(page 18).
If the problem is not solved, visit the support site on
the back cover.
General
No power is being supplied to the unit.
If the unit is turned off and the display
disappears, the unit cannot be operated with the
remote commander.
Turn on th e u nit.
No sound or the sound is very low.
The position of the fader control [FADER] is not
set for a 2-speaker system.
The volume of the unit and/or connected device
is very low.
Increase the volume of the unit and connected
device.
No beep sound.
An optional power amplifier is connected and
you are not using the built-in amplifier.
The contents of the memory have been erased.
The reset button has been pressed.
Store again into the memory.
The power supply lead or battery has been
disconnected or not connected properly.
Stored stations and correct time are erased.
The fuse has blown.
Makes a noise when the position of the ignition
is switched.
The leads are not matched correctly with the car’s
accessory power connector.
During playback or reception, the demonstration
mode starts.
If no operation is performed for 5 minutes with
[DEMO-ON] set, the demonstration mode starts.
Set [DEMO-OFF] (page 9).
The display disappears from/does not appear in
the display window.
The dimmer is set to [DIM-ON] (page 12).
The display disappears if you press and hold OFF.
Press OFF on the unit until the display appears.
The display disappears while the unit is
operating.
[BLK OUT] (black out) is set to [B.OUT-ON]
(page 12).
15GB
Page 16
The display/illumination flashes.
The power supply is not sufficient.
Check that the car battery supplies enough
power to the unit. (The power requirement is 12
V DC.)
The operation buttons do not function.
The disc will not eject.
The connection is not correct.
Check the connection of the unit.
If the situation does not improve, press the
reset button (page 6).
The contents stored in memory are erased.
For your safety, do not reset the unit while you
are driving.
Radio reception
Stations cannot be received.
The sound is hampered by noises.
The connection is not correct.
If your car has built-in radio antenna (aerial) in
the rear/side glass, connect an REM OUT lead
(blue/white striped) or accessory power supply
lead (red) to the power supply lead of a car’s
antenna (aerial) booster.
Check the connection of the car antenna
(aerial).
If the auto antenna (aerial) will not extend,
check the connection of the power antenna
(aerial) control lead.
The tuning step setting has been erased.
Set the tuning step again (page 6).
Preset tuning is not possible.
The broadcast signal is too weak.
RDS
PTY displays [- - - - - - - -].
The current station is not an RDS station.
RDS data has not been received.
The station does not specify the program type.
CD playback
The disc does not play.
Defective or dirty disc.
The CD-R/CD-RW is not for audio use (page 13).
MP3/WMA/AAC files cannot be played.
The disc is incompatible with the MP3/WMA/AAC
format and version. For details on playable discs
and formats, visit the support site on the back
cover.
MP3/WMA/AAC files take longer to play than
others.
The following discs take a longer time to start
playback.
A disc recorded with a complicated tree
structure.
A disc recorded in Multi Session.
A disc to which data can be added.
The sound skips.
Defective or dirty disc.
USB device playback
You cannot play items via a USB hub.
This unit cannot recognize USB devices via a USB
hub.
A USB device takes longer to play.
The USB device contains files with a complicated
tree structure.
The sound is intermittent.
The sound may be intermittent at a high-bit-rate.
DRM (Digital Rights Management) files may not
be playable in some cases.
Audio file cannot be played.
USB device formatted with file systems other
than FAT16 or FAT32 are unsupported.*
* This unit supports FAT16 and FAT32, but some USB
device may not support all of these FAT. For details,
refer to the operating instruction of each USB device
or contact the manufacturer.
Error displays/Messages
CD ERROR: The disc cannot be played. The disc will
be ejected automatically.
Clean or insert the disc correctly, or make sure the
disc is not blank or defective.
CD NO MUSIC: There is no playable file. The disc
will be ejected automatically.
Insert a disc containing playable files (page 14).
CD PUSH EJT: The disc could not be ejected
properly.
Press (eject).
HUB NO SUPRT: USB hubs are not supported.
IPD STOP: iPod playback has finished.
Operate your iPod/iPhone to start playback.
OVERLOAD: The USB device is overloaded.
Disconnect the USB device, then press SOURCE to
select another source.
The USB device has a fault, or an unsupported
device is connected.
16GB
Page 17
READ: Now reading information.
Wait until reading is complete and playback
starts automatically. This may take some time
depending on the file organization.
USB ERROR: The USB device cannot be played.
Connect the USB device again.
USB NO DEV: A USB device is not connected or
recognized.
Make sure the USB device or USB cable is securely
connected.
USB NO MUSIC: There is no playable file.
Connect a USB device containing playable files
(page 14).
USB NO SUPRT: The USB device is not supported.
For details on the compatibility of your USB
device, visit the support site on the back cover.
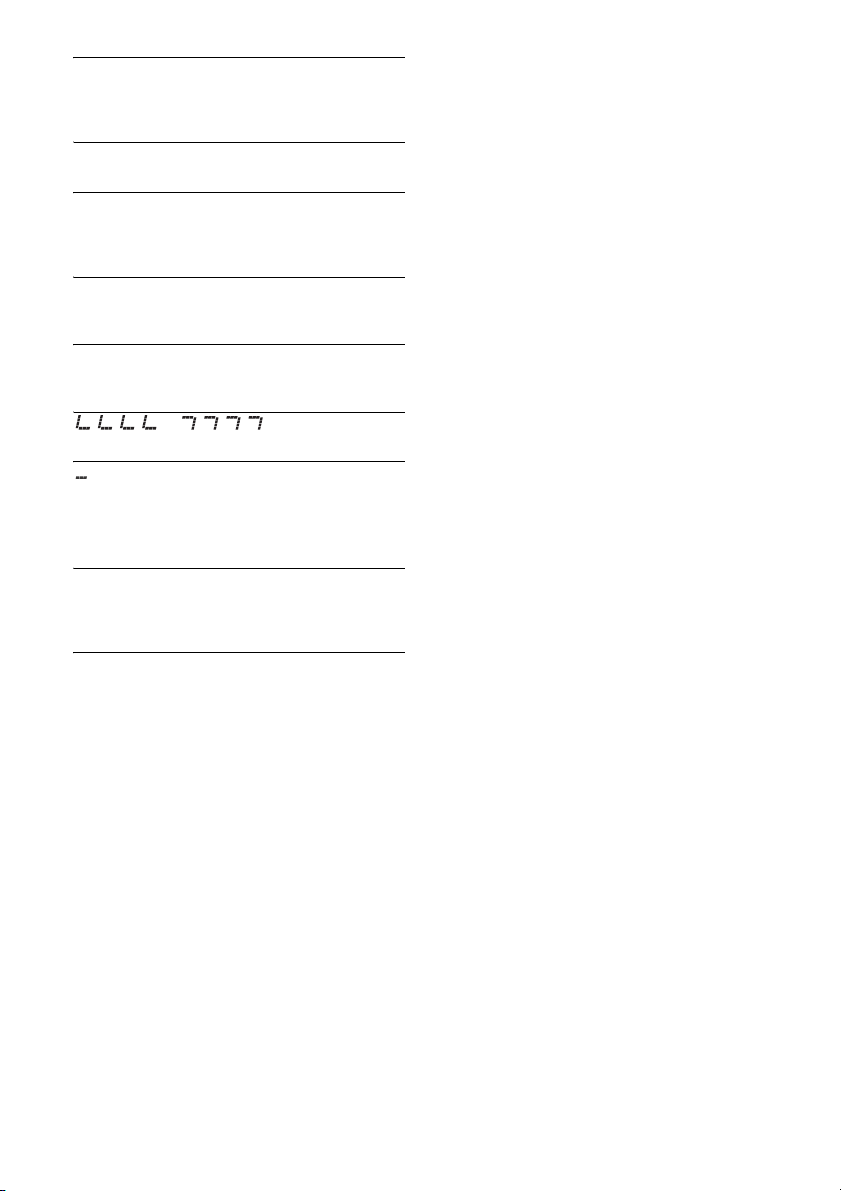
the end of the disc has been reached.
: The character cannot be displayed.
or : The beginning or
For steering wheel remote control
operation:
ERROR: An error occurred during the function
registration.
Register again from the function where the error
occurred (page 10).
TIMEOUT: The function registration failed due to a
timeout.
Try completing the registration while [REGISTER]
is blinking (about 6 seconds) (page 10).
If these solutions do not help improve the situation,
consult your nearest Sony dealer.
If you take the unit to be repaired because of CD
playback trouble, bring the disc that was used at
the time the problem began.
17GB
Page 18
Connection/Installation
5 × max. 8 mm
(7/32 × max. 5/16 in)
*
× 6
Cautions
Run all ground (earth) leads to a common
ground (earth) point.
Do not get the leads trapped under a screw, or
caught in moving parts (e.g., seat railing).
Before making connections, turn the car ignition
off to avoid short circuits.
Connect the yellow and red power supply leads
only after all other leads have been connected.
Be sure to insulate any loose unconnected leads
with electrical tape for safety.
Precautions
Choose the installation location carefully so that
the unit will not interfere with normal driving
operations.
Avoid installing the unit in areas subject to dust,
dirt, excessive vibration, or high temperature,
such as in direct sunlight or near heater ducts.
Use only the supplied mounting hardware for a
safe and secure installation.
Note on the power supply lead (yellow)
When connecting this unit in combination with other
stereo components, the amperage rating of the car
circuit to which the unit is connected must be higher
than the sum of each component’s fuse amperage
rating.
Mounting angle adjustment
Adjust the mounting angle to less than 45°.
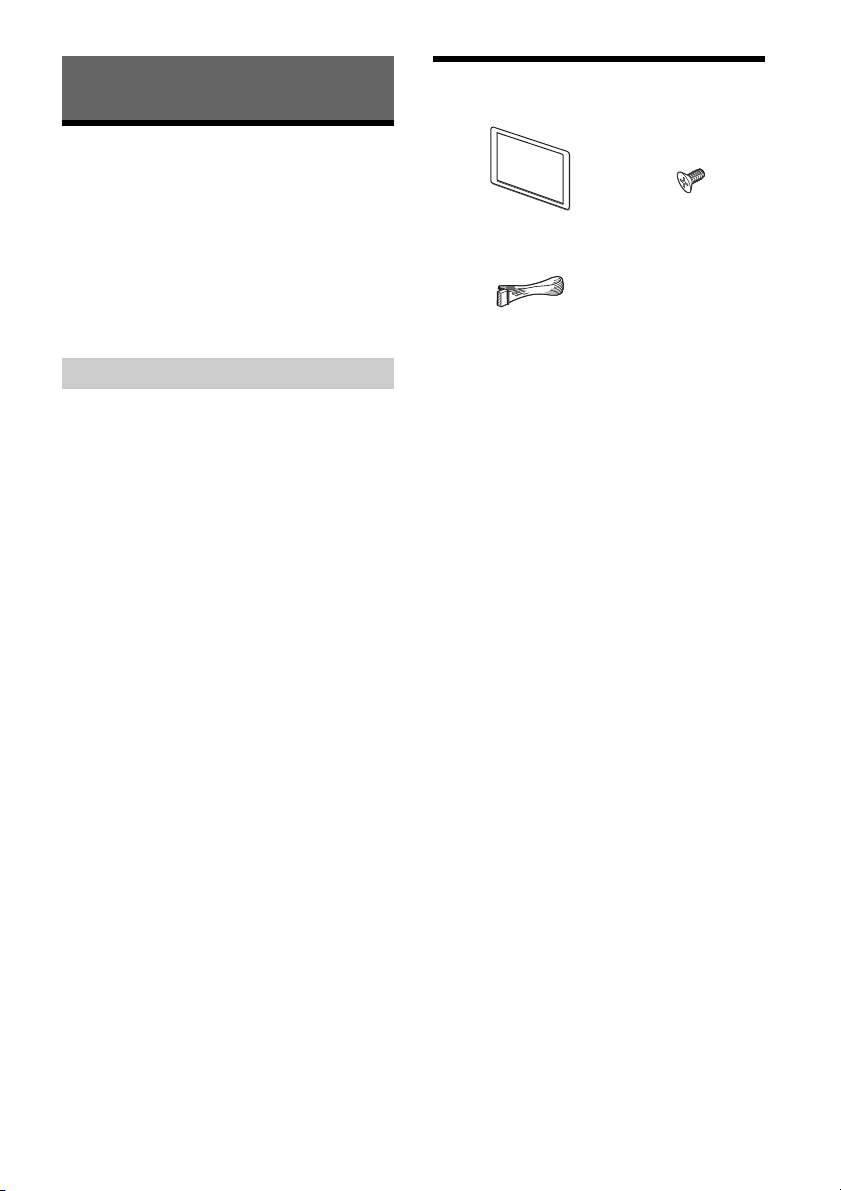
Parts List for Installation
This parts list does not include all the package
contents.
* For India models only.
18GB
Page 19
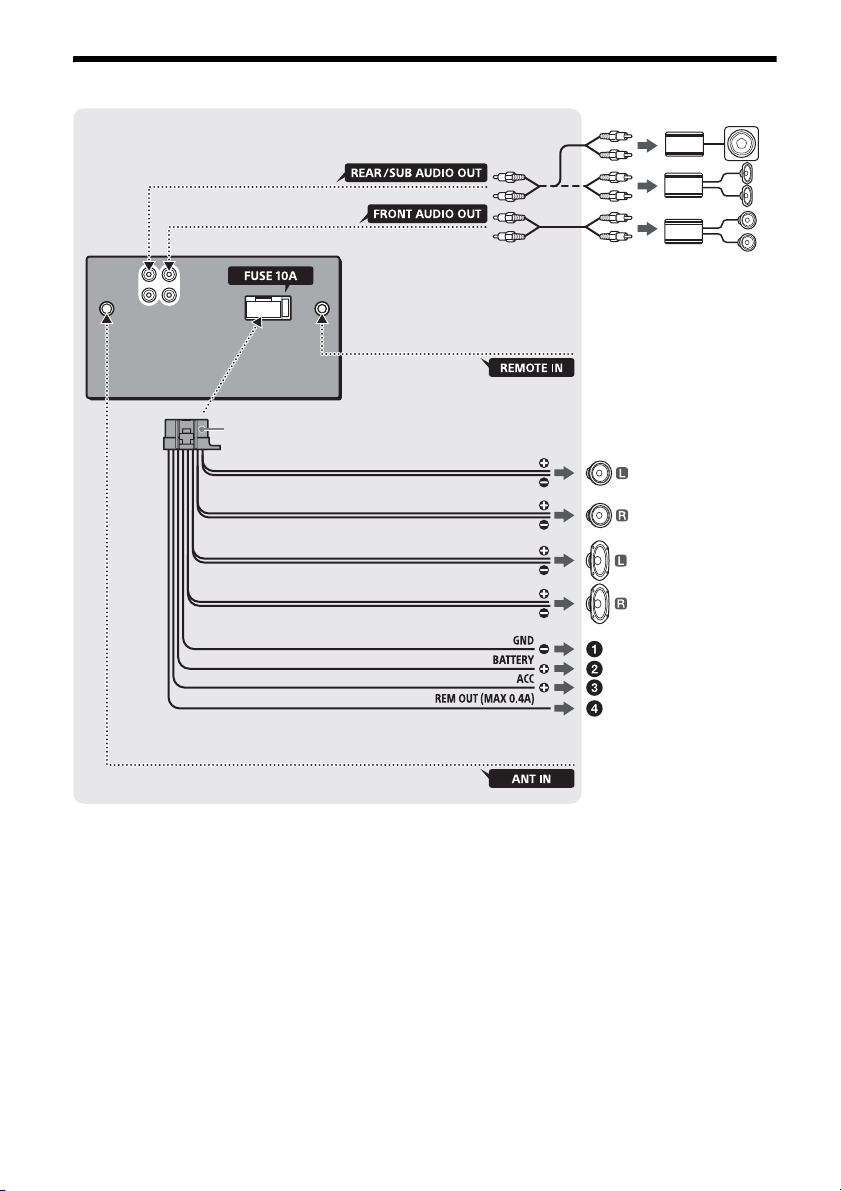
Connection
Front speaker*1*
2
White
White/black striped
Gray
Black
Yel l o w
Red
Blue/white striped
from a wire d remote control
(not supplied)*
4
For details, see “M aking
connections” (page 20).
Gray/black striped
Green
Green/black striped
Purple
Purple/black striped
*
3
*
3
Subwoofer*
1
Power amplifier*
1
from a car antenna (aerial)
Rear speaker
*1*2
*
5
*1 Not supplied
*2 Speaker impedance: 4 – 8 Ω × 4
*3 RCA pin cord (not supplied)
*4 Depending on the type of car, use an adaptor for a
*5 AUDIO OUT can be switched to SUB or REAR.
wired remote control (not supplied).
19GB
Page 20
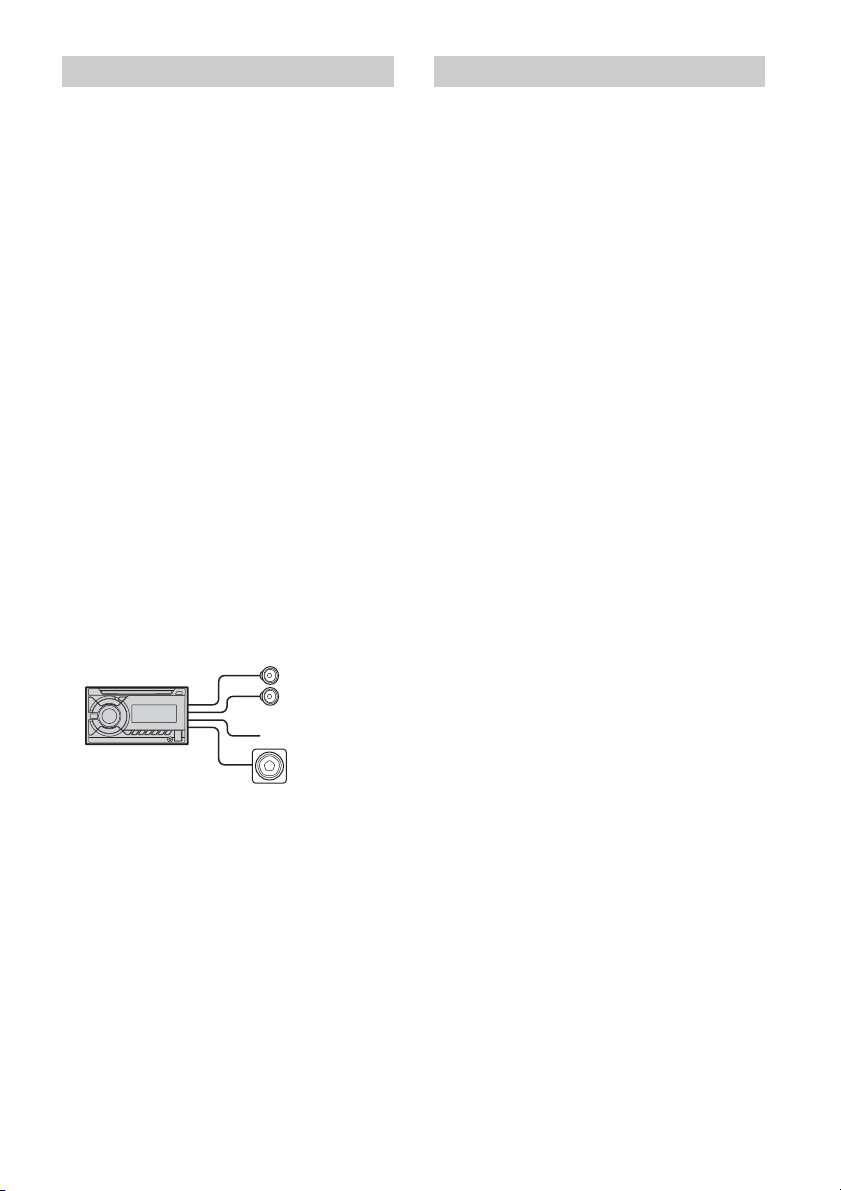
Making connections
Front speaker
Subwoofer
To a common ground (earth) point
First connect the black ground (earth) lead, then
connect the yellow and red power supply leads.
To the +12 V power terminal which is
energized at all times
Be sure to first connect the black ground (earth)
lead to a common ground (earth) point.
To the +12 V power terminal which is
energized when the ignition switch is set to
the accessory position
If there is no accessory position, connect to the
+12 V power (battery) terminal which is
energized at all times.
Be sure to first connect the black ground (earth)
lead to a common ground (earth) point.
To the power antenna (aerial) control lead or
the power supply lead of the antenna (aerial)
booster
It is not necessary to connect this lead if there is
no power antenna (aerial) or antenna (aerial)
booster, or with a manually-operated telescopic
antenna (aerial).
To AMP REMOTE IN of an optional power
amplifier
This connection is only for amplifiers and a
power antenna (aerial). Connecting any other
system may damage the unit.
Subwoofer Easy Connection
You can use a subwoofer without a power amplifier
when it is connected to a rear speaker cord.
Using the wired remote control
1 To enable the wired remote control, set
[STR CONTROL] in [SET STEERING] to
[PRESET] (page 10).
Note
Use a subwoofer with an impedance of 4 to 8 ohms,
and with adequate power handling capacities to avoid
damage.
Memory hold connection
When the yellow power supply lead is connected,
power will always be supplied to the memory
circuit even when the ignition switch is turned off.
Speaker connection
Before connecting the speakers, turn the unit off.
Use speakers with an impedance of 4 to 8 ohms,
and with adequate power handling capacities to
avoid damage.
20GB
Page 21
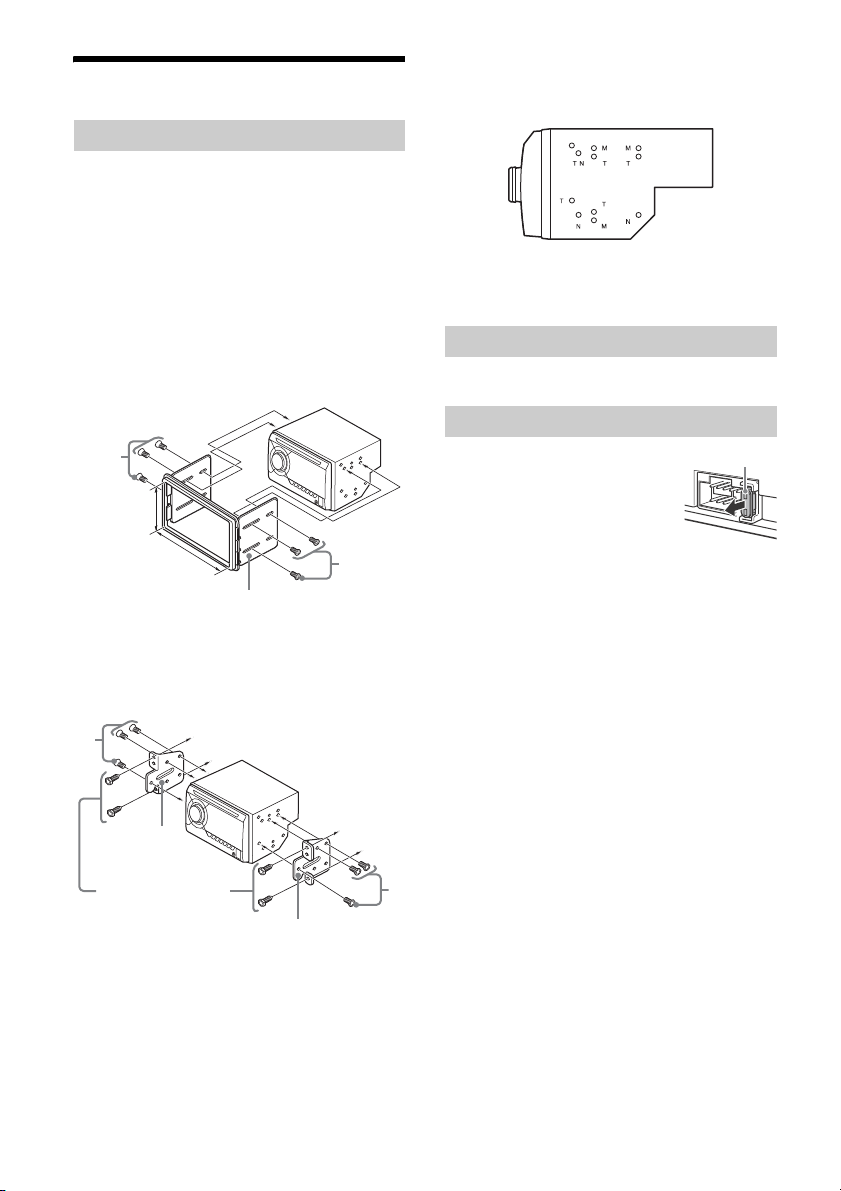
Installation
Larger than
97 mm (3 7/8 in)
Larger than
172 mm (6 7/8 in)
Installation kit (not sup plied)
to dashboard/center console
to dashboard/center console
Existing parts su pplied
with your car
Bracket
Bracket
Fuse (10 A)
Mounting the unit in the dashboard
When mounting in a Japanese car, see “Mounting
the unit in a Japanese car” (page 21).
Mounting the unit with an installation kit
(not supplied)
You can use a commercially available double DIN
installation kit. Choose an installation kit with the
following panel frame size.
Larger than 172 × 97 mm (6
an inner corner radius of less than 0.5 mm (
Note
Be sure to use the supplied screws .
7
/8 × 3 7/8 in) (w/h), with
1
/32 in).
When mounting this unit to the preinstalled
brackets of your car, use the supplied screws in
the appropriate screw holes, based on your car: T
for TOYOTA, M for MITSUBISHI and N for NISSAN.
Note
To prevent malfunction, install only with the supplied
screws .
Resetting the unit
For details, see “Resetting the unit” (page 6).
Fuse replacement
When replacing the fuse, be sure
to use one matching the
amperage rating stated on the
original fuse. If the fuse blows,
check the power connection and
replace the fuse. If the fuse blows
again after replacement, there
may be an internal malfunction. In such a case,
consult your nearest Sony dealer.
Mounting the unit in a Japanese car
You may not be able to install this unit in some
makes of Japanese cars. In such a case, consult your
Sony dealer.
21GB
Page 22
Para mayor seguridad, asegúrese de instalar esta
unidad en el panel del auto ya que la parte
trasera de la unidad se calienta durante el uso.
Para obtener más información, consulte
“Conexión/Instalación” (página 20).
Propiedades del diodo láser
Duración de la emisión: continua
Potencia del láser: menos de 53,3 μW
(esta potencia es la medición del valor a una
distancia de 200 mm de la superficie de la lente del
objetivo en el Bloque óptico con una abertura de
7 mm)
La placa de características que indica el voltaje de
funcionamiento, etc., está situada en la parte
inferior del chasis.
ADVERTENCIA: no ingiera las baterías,
riesgo de quemaduras químicas.
El control remoto contiene baterías del tipo
botón/moneda. Si la batería del tipo botón/
moneda se ingiere, podría causar quemaduras
internas severas en apenas 2 horas, y podría causar
la muerte.
Mantenga las baterías nuevas y usadas fuera del
alcance de los niños. Si el compartimento de la
batería no cierra correctamente, deje de utilizar el
producto y manténgalo fuera del alcance de los
niños.
Si considera que las baterías podrían haber sido
ingeridas o colocadas dentro de cualquier parte del
cuerpo, busque atención médica de inmediato.
Nota sobre la pila de litio
No exponga la pila a fuentes de calor excesivo
como luz solar directa, fuego o similar.
Advertencia: si el encendido del automóvil
no dispone de una posición ACC
Asegúrese de ajustar la función AUTO OFF
(página 10). La unidad se apagará completa y
automáticamente en el tiempo establecido
después de apagarla, lo cual evita que se agote
la batería. Si no ajusta la función AUTO OFF,
mantenga presionado OFF hasta que se apague
la pantalla cada vez que apague el motor.
Exención de responsabilidad sobre los
servicios prestados por otros proveedores
Los servicios prestados por otros proveedores están
sujetos a cambios, anulaciones o interrupciones sin
previo aviso. Sony no asume responsabilidad
alguna en estas situaciones.
2ES
Page 23
Tabla de contenidos
Guía para las partes y los controles . . . . . . . . . . . . 4
Procedimientos iniciales
Reinicio de la unidad . . . . . . . . . . . . . . . . . . . . . . . . 6
Cambio del paso de sintonización de FM/AM . . . 6
Ajuste del reloj . . . . . . . . . . . . . . . . . . . . . . . . . . . . . 6
Conexión de un dispositivo USB . . . . . . . . . . . . . . . 6
Conexión de otro dispositivo de audio
portátil. . . . . . . . . . . . . . . . . . . . . . . . . . . . . . . . . 6
Escuchar la radio
Escuchar la radio . . . . . . . . . . . . . . . . . . . . . . . . . . . 7
Usar el RDS (Sistema de datos de radio) . . . . . . . . 8
Reproducción
Reproducción de un disco. . . . . . . . . . . . . . . . . . . . 8
Reproducción de un dispositivo USB . . . . . . . . . . . 8
Búsqueda y reproducción de pistas . . . . . . . . . . . . 9
Ajustes
Cancelación del modo DEMO . . . . . . . . . . . . . . . . 10
Operación básica de ajustes . . . . . . . . . . . . . . . . . 10
Configuración General (GENERAL) . . . . . . . . . . . . 10
Configuración del Sonido (SOUND) . . . . . . . . . . . . 11
Configuración de Pantalla (DISPLAY) . . . . . . . . . . . 13
Información complementaria
Actualizar el Firmware . . . . . . . . . . . . . . . . . . . . . . 14
Precauciones . . . . . . . . . . . . . . . . . . . . . . . . . . . . . 14
Mantenimiento. . . . . . . . . . . . . . . . . . . . . . . . . . . . . 15
Especificaciones . . . . . . . . . . . . . . . . . . . . . . . . . . . . 15
Solución de problemas . . . . . . . . . . . . . . . . . . . . . . 17
Conexión/Instalación
Advertencias. . . . . . . . . . . . . . . . . . . . . . . . . . . . . . 20
Lista de piezas para la instalación . . . . . . . . . . . . 20
Conexión . . . . . . . . . . . . . . . . . . . . . . . . . . . . . . . . . . 21
Instalación . . . . . . . . . . . . . . . . . . . . . . . . . . . . . . . 22
3ES
Page 24
Guía para las partes y los controles
Unidad principal
(navegar) (página 9)
Para entrar al modo de navegación durante la
reproducción.
PTY (tipo de programa)
Seleccione PTY en RDS.
SOURCE
Para encender la unidad.
Para cambi ar la fuente.
OFF
Manténgalo presionado durante 1 segundo para
apagar la fuente y mostrar el reloj en la pantalla.
Manténgalo presionado durante más de
2 segundos para apagar la unidad y la pantalla.
Si se apaga la unidad y la pantalla desaparece,
la operación mediante el control remoto no se
encuentra disponible.
Control de sincronización
Gírelo para ajustar el volumen.
PUSH ENTER
Ingresar el elemento seleccionado.
Presione SOURCE, gire y luego presione para
cambiar la fuente.
MENU
Para abrir el menú de configuración.
Botón de reset (página 6)
4ES
DSPL (pantalla)
Presione para cambiar los elementos de la
pantalla.
SCRL (desplazamiento)
Manténgalo apretado para desplazarse a un
elemento de pantalla.
Ranura del disco
Ventana de visualización
(expulsión de disco)
MEGA BASS
Refuerza los sonidos graves en sincronización
con el nivel del volumen. Presione para cambiar
la configuración del MEGA BASS: [1], [2], [OFF].
Automáticamente se configura en [OFF] cuando
[C.AUDIO+] está configurado en [ON].
MODE (página 7, 9)
(volver)
Para volver a la pantalla anterior.
SEEK +/–
Para sintonizar emisoras de radio en forma
automática. Manténgalo presionado para
sintonizarlas en forma manual.
/ (anterior/siguiente)
/ (avance rápido/retroceso rápido)
Page 25
SOUND
Abra el menú SOUND directamente.
Botones numéricos (1 al 6)
Para recibir las emisoras almacenadas.
Manténgalo presionado para almacenarlas en
forma manual.
ALBUM /
Para saltearse un álbum en el dispositivo de
audio. Manténgalo apretado para saltear
álbumes en forma continua.
(repetir)
(reproducción aleatoria)
PAU SE
Toma de entrada AUX
Puerto USB
Receptor para el control remoto
Control remoto RM-X211
///
Seleccione un elemento de configuración, etc.
ENTER
Ingresar el elemento seleccionado.
/ (anterior/siguiente)
+/– (álbum +/–)
VOL (volumen) +/–
Retire la película de aislamiento antes del uso.
El botón VOL (volumen) + tiene un punto sensible al
tacto.
ATT (atenuar)
Atenuar el sonido. Presione nuevamente para
cancelar la atenuación.
SOUND
Abra el menú SOUND directamente.
MENU
Manténgalo presionado para abrir el menú de
configuración.
5ES
Page 26
Procedimientos iniciales
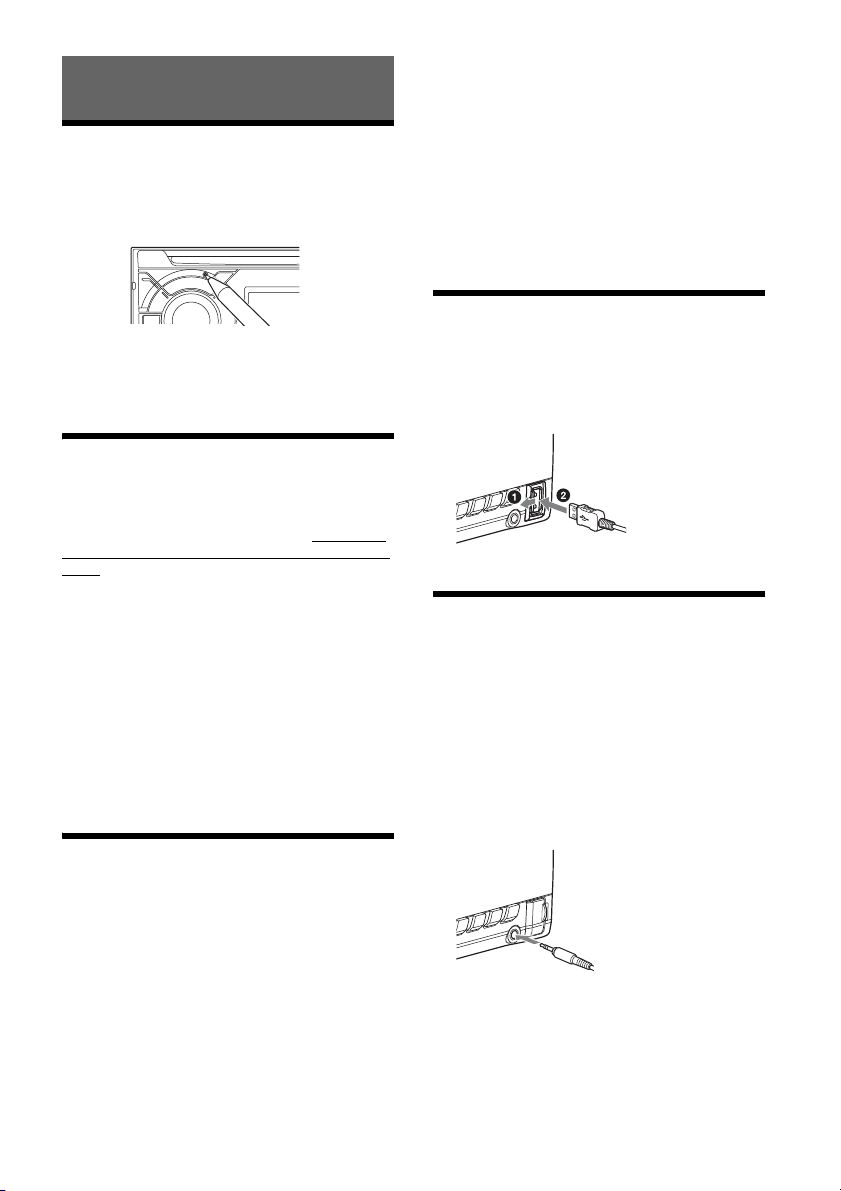
Reinicio de la unidad
Antes de operar la unidad por primera vez, luego
de remplazar la batería del automóvil o cambiar las
conexiones, debe reiniciar la unidad. Presione el
botón de reset con un bolígrafo de punta fina, etc.
3 Gire el selector de control para ajustar la
hora y los minutos.
Para mover la indicación digital, presione SEEK
+/–.
4 Una vez ajustados los minutos, presione
MENU.
El ajuste se completa y el reloj se pone en
funcionamiento.
Para visualizar el reloj
Presione DSPL.
Conexión de un dispositivo USB
Nota
Al presionar el botón de reset se borrarán la
configuración del reloj y algunos contenidos
almacenados.
Cambio del paso de
sintonización de FM/AM
Configure el intervalo de sintonización de FM/AM
de su país. Esta configuración aparece solamente
mientras la fuente esté apagada y se muestre el
reloj.
1 Presione MENU, gire el selector de
control para seleccionar [SET GENERAL] y,
a continuación, presiónelo.
2 Gire el selector de control para
seleccionar [SET TUNER-STP] y, a
continuación, presiónelo.
3 Gire el selector de control para
seleccionar entre [SET 50K/9K], [SET
100K/10K] o [SET 200K/10K] y, a
continuación, presiónelo.
Ajuste del reloj
1 Presione MENU, gire el selector de
control para seleccionar [SET GENERAL] y,
a continuación, presiónelo.
2 Gire el selector de control para
seleccionar [SET CLOCK-ADJ] y, a
continuación, presiónelo.
La indicación de la hora parpadea.
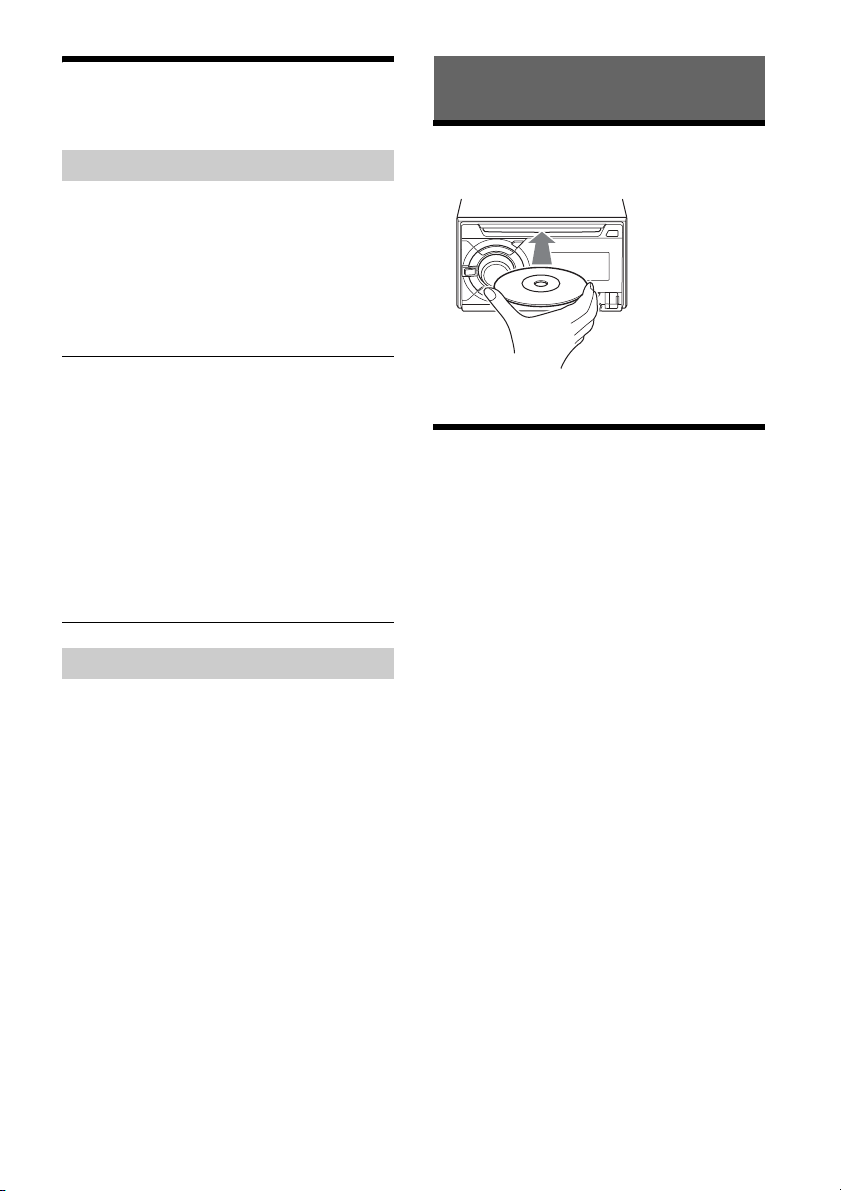
1 Baje el volumen de la unidad.
2 Conecte el dispositivo USB a la unidad.
Para conectar un iPod/iPhone, utilice el cable de
conexión USB para iPod (no suministrado).
Conexión de otro dispositivo de
audio portátil
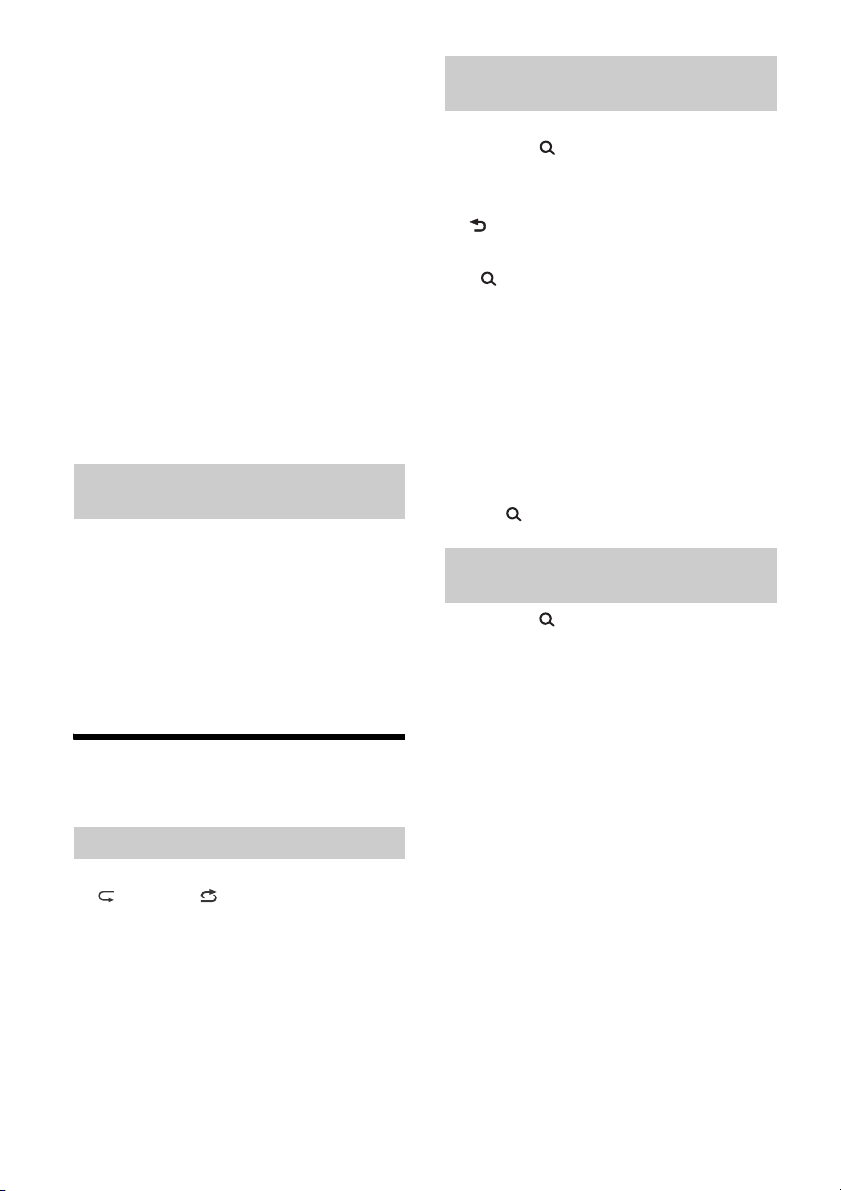
1 Apague el dispositivo de audio portátil.
2 Baje el volumen de la unidad.
3 Conecte el dispositivo de audio portátil a
la toma de entrada AUX (minitoma
estéreo) en la unidad con un cable de
conexión (no suministrado)*.
* Asegúrese de utilizar un tapón de respiradero.
6ES
Page 27

4 Presione SOURCE para seleccionar [AUX].
Coincidencia del nivel de volumen del
dispositivo conectado con otras fuentes
Comience la reproducción del dispositivo de audio
portátil en un nivel moderado y configure su nivel
habitual de volumen en la unidad.
Presione MENU, luego seleccione [SET SOUND]
[SET AUX VOL] (página 12).
Escuchar la radio
Escuchar la radio
Se necesita el ajuste del paso de sintonización
(página 6).
Para escuchar una estación de radio, presione
SOURCE para seleccionar [TUNER].
Almacenamiento automático (BTM)
1 Presione MODE para cambiar la banda
de radio (FM1, FM2, FM3, AM1 o AM2).
2 Presione MENU, gire el selector de
control para seleccionar [SET GENE RAL] y,
a continuación, presiónelo.
3 Gire el selector de control para
seleccionar [SET BTM] y, a continuación,
presiónelo.
La unidad almacena las emisoras en el orden de
frecuencia en los botones numéricos.
Sintonización
1 Presione MODE para cambiar la banda
de radio (FM1, FM2, FM3, AM1 o AM2).
2 Realice la sintonización.
Para realizar la sintonización manual
Mantenga presionado SEEK +/– para ubicar la
frecuencia aproximada y, a continuación,
presiónelo repetidas veces para ajustar la
frecuencia deseada con mayor precisión.
Para realizar la sintonización automática
Presione SEEK +/–.
La búsqueda se detiene cuando la unidad
recibe una emisora.
Almacenamiento manual
1 Mientras recibe la emisora que desea
almacenar, mantenga presionado un
botón numérico (de 1 a 6) hasta que
aparezca [MEM].
Recepción de las emisoras almacenadas
1 Seleccione la banda y, a continuación,
presione un botón numérico (de 1 a 6).
7ES
Page 28
Usar el RDS (Sistema de datos
de radio)
Selección de tipos de programa (PTY)
1 Presione PTY durante la recepción FM.
2 Gire el selector de control hasta que
aparezca el tipo de programa deseado y,
a continuación, presiónelo.
La unidad comienza a buscar una estación que
emita el tipo de programa seleccionado.
Tipos de programas
NEWS (Noticias), AFFAIRS (Temas de actualidad),
INFO (Información), SPORT (Deportes), EDUCATE
(Educación), DRAMA (Drama), CULTURE (Cultura),
SCIENCE (Ciencia), VARI ED (Variados), POP M
(Música pop), ROCK M (Música rock), EASY M
(música de carretera), LIGHT M (Clásica ligera),
CLASSICS (Clásica en serio), OTHER M (Otro tipo de
música), WEATHER (El tiempo), FINANCE
(Finanzas), CHILDREN (Programas infantiles),
SOCIAL A (Temas de sociedad), RELIGION
(Religión), PHONE IN (Entrada de teléfono), TRAVEL
(Viajes), LEISURE (Ocio), JAZZ (Música jazz),
COUN TRY (Música country), NATION M (Música
nacional), OLDIES (Música de décadas pasadas),
FOLK M (Música folk), DOCUMENT (Documental)
Ajuste de hora del reloj (CT)
Los datos CT de la transmisión RDS ajustan el reloj.
1 Ajuste [SET CT-ON] en [SET GENERAL]
(página 11).
Reproducción
Reproducción de un disco
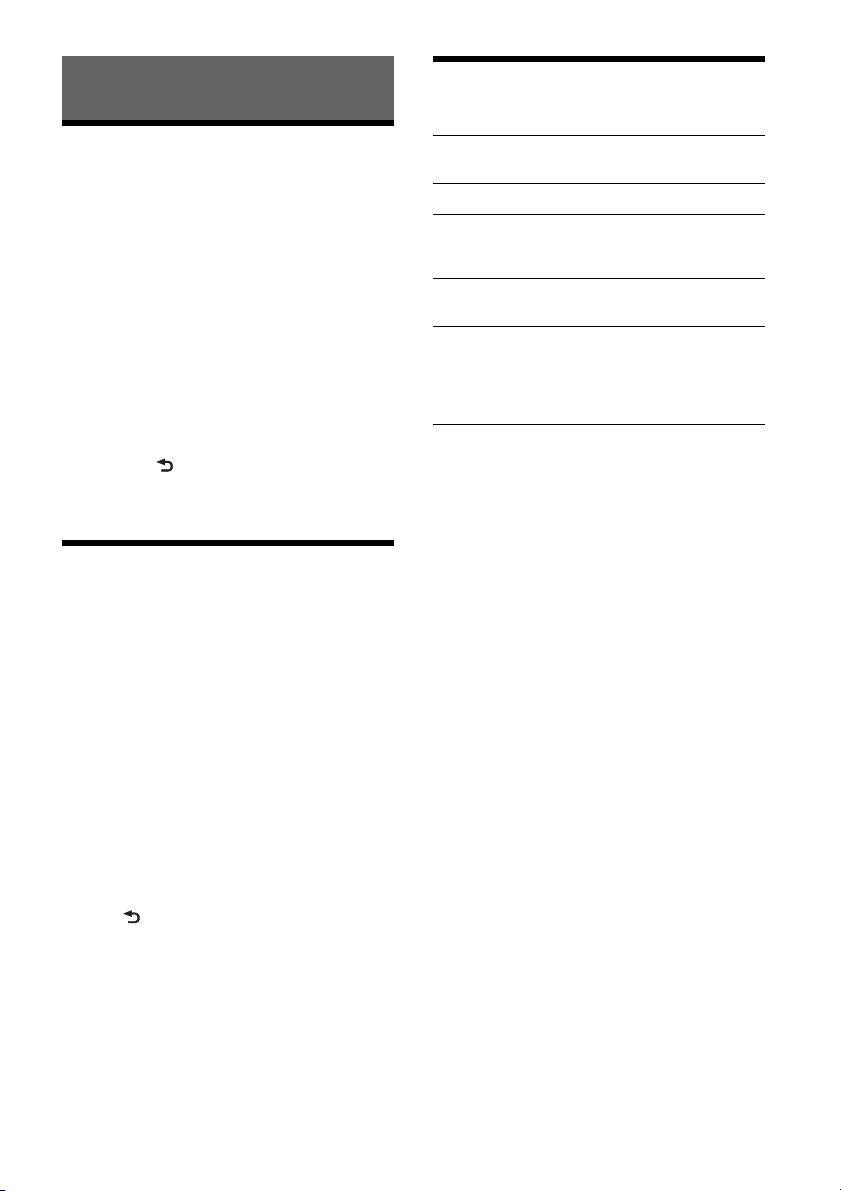
1 Inserte el disco (etiqueta hacia arriba).
La reproducción se inicia automáticamente.
Reproducción de un dispositivo
USB
En este Manual de instrucciones, “iPod” se utiliza
como referencia general para las funciones del iPod
en un iPod y un iPhone, a menos que se
especifique lo contrario en el texto o en las
ilustraciones.
Para obtener más información acerca de la
compatibilidad de su iPod, consulte “Acerca de
iPod” (página 15) o visite el sitio web de soporte
técnico que figura en la cubierta posterior.
Pueden utilizarse dispositivos de tipo USB (como
USB flash drive, reproductor de multimedia digital,
teléfono Android™) compatibles con el estándar
USB, de tipo MSC (Clase de Almacenamiento
Masivo) y MTP (Protocolo de Transferencia
Multimedia).
Según el teléfono Android o el reproductor
multimedia, se requiere que se ajuste el modo de
conexión USB a MTP.
Notas
Para obtener más información acerca de la
compatibilidad del dispositivo USB, visite el sitio web
de soporte técnico que figura en la cubierta posterior.
No es posible reproducir los archivos que se indican a
continuación.
MP3/WMA/AAC/FLAC:
archivos protegidos por derechos de autor
archivos DRM (Gestión de derechos digitales)
archivos de audio de canales múltiples
MP3/WMA/AAC:
archivos con formato de compresión sin pérdida
WAV:
archivos de audio de canales múltiples
8ES
Page 29
1 Conecte el dispositivo USB al puerto USB
(página 6).
Se inicia la reproducción.
Si ya está conectado un dispositivo, para iniciar
la reproducción pulse SOURCE para seleccionar
[USB] ([IPD] aparece en la pantalla cuando se
reconoce el iPod).
2 Ajuste el volumen de esta unidad.
Para deten er la reproducción
Mantenga presionado OFF por 1 segundo.
Para extraer el dispositivo
Detenga la reproducción y extraiga el dispositivo.
Precaución para iPhone
Al conectar un iPhone mediante USB, el volumen
de las llamadas telefónicas es controlado por el
iPhone, y no por la unidad. No aumente el volumen
de la unidad involuntariamente durante un
llamado, ya que un sonido fuerte repentino puede
aparecer cuando la llamada finalice.
Utilización directa del iPod (Control de
pasajero)
1 Durante la reproducción, mantenga
apretado MODE hasta que aparezca
[MODE IPOD].
Los funcionamientos del iPod están disponibles.
Tenga en cuenta que solamente es posible
ajustar el volumen en la unidad.
Para salir del modo de control de pasajero
Mantenga presionado MODE para que aparezca
[MODE AUDIO].
Búsqueda y reproducción de
pistas
Reproducción repetida y aleatoria
1 Durante la reproducción, presione
(repetir) o (aleatorio)
repetidamente para seleccionar el modo
de reproducción deseado.
La reproducción en el modo de reproducción
seleccionado puede tardar en comenzar.
Los modos de reproducción disponibles varían en
función de la fuente de sonido seleccionada.
Búsqueda de una pista por nombre
(Quick-BrowZer™)
1 Durante la reproducción del CD o USB,
presione (navegar)* para que
aparezca la lista de categorías de
búsqueda.
Cuando aparece la lista de pistas, presione
(volver) repetidamente hasta que aparezca
la categoría de búsqueda deseada.
* Durante la reproducción USB, presione
(navegar) durante más de 2 segundos para
volver directamente al inicio de la lista de
categorías.
2 Gire el selector de control para
seleccionar la categoría de búsqueda
deseada y, a continuación, presiónelo
para confirmarla.
3 Repita el paso 2 para buscar la pista
deseada.
Se inicia la reproducción.
Para salir del modo Quick-BrowZer
Presione (navegar).
Buscar salteando elementos
(Modo saltar)
1 Presione (navegar).
2 Presione SEEK +.
3 Gire el selector de control para
seleccionar el elemento.
Se realizan omisiones en pasos del 10 % de la
cantidad total de elementos presentes en la
lista.
4 Presione ENTER para volver al modo
Quick-BrowZer.
Aparecerá el elemento seleccionado.
5 Gire el selector de control para
seleccionar el elemento deseado y, a
continuación, presiónelo.
Se inicia la reproducción.
9ES
Page 30
Ajustes
Cancelación del modo DEMO
Puede cancelar la pantalla de muestra que aparece
cuando la fuente está apagada y se muestra el
reloj.
1 Presione MENU, gire el selector de
control para seleccionar [SET GENERAL] y,
a continuación, presiónelo.
2 Gire el selector de control para
seleccionar [SET DEMO] y, a
continuación, presiónelo.
3 Gire el selector de control para
seleccionar [SET DEMO-OFF] y, a
continuación, presiónelo.
El ajuste finalizó.
4 Presione (volver) dos veces.
La pantalla vuelve al modo de recepción/
reproducción normal.
Operación básica de ajustes
Puede seleccionar elementos de las siguientes
categorías de configuración:
Configuración general (GENERAL), configuración de
sonido (SOUND), configuración de pantalla
(DISPLAY)
1 Presione MENU.
2 Gire el selector de control para
seleccionar la categoría de configuración
y, a continuación, presiónela.
Los elementos que pueden establecerse
difieren según la fuente y los ajustes.
3 Gire el selector de control para
seleccionar las opciones y, a
continuación, presiónelas.
Para regresar a la pantalla anterior
Presione (volver).
Configuración General
(GENERAL)
DEMO (demostración)
Activa la demostración: [ON], [OFF].
CLOCK-ADJ (ajuste del reloj) (página 6)
TUNER-STP (paso de sintonización) (página 6)
(Disponible solamente mientras la fuente esté
apagada y se muestre el reloj).
BEEP
Activa el sonido de los pitidos: [ON], [OFF].
AUTO OFF
Permite apagar la alimentación
automáticamente una vez transcurrido un
período deseado cuando la unidad está
apagada: [ON] (30 minutos), [OFF].
STEERING
Registros/reinicios de la configuración del
control remoto del volante.
(Disponible cuando se conecta con el cable de
conexión (no suministrado)). (Disponible
solamente mientras la fuente esté apagada y se
muestre el reloj).
STR CONTROL (control del volante)
Selecciona el modo de entrada del control
remoto conectado. Para evitar un mal
funcionamiento, asegúrese de que el modo de
entrada coincida con el control remoto
conectado antes de usarlo.
CUSTOM
El modo de entrada del control remoto del
volante (seleccionado automáticamente
cuando se completa una [EDIT CUSTOM] o se
realiza un [RESET CUSTOM])
PRESET
Modo de entrada del control remoto
conectado, excepto el control remoto del
volante
EDIT CUSTOM
Registra las funciones (SOURCE, ATT, VOL +/–,
SEEK +/–) para el control remoto del volante:
Gire el selector de control para seleccionar la
función que quiere asignar al control remoto
del volante, luego presiónela.
Mientras [REGISTER] está parpadeando,
mantenga presionado el botón en el control
remoto del volante al que quiera asignar esta
función. Cuando el registro está completo, se
muestra [REGISTERED].
Para registrar otras funciones, repita los
pasos y .
(Disponible solo cuando [STR CONTROL] está
configurado en [CUSTOM]).
10ES
Page 31
RESET CUSTOM
Reinicia la configuración del control remoto del
volante: [YES] [NO]. (Disponible solo cuando
[STR CONTROL] está configurado en [CUSTOM]).
Notas
Cuando realice ajustes, sólo está disponible en la
unidad el botón de operación. Por seguridad,
estacione su automóvil antes de realizar este
ajuste.
Si ocurre un error durante el registro, toda la
información registrada anteriormente permanece.
Reinicie el registro desde la función de donde se
produjo el error.
Esta función puede no estar disponible en ciertos
automóviles. Para detalles acerca de la
compatibilidad de su automóvil, visite el sitio web
de soporte técnico que figura en la cubierta
posterior.
REAR/SUB
Cambia la salida de audio: [SUB-OUT]
(subwoofer), [REAR-OUT] (potencia del
amplificador). (Disponible solamente mientras la
fuente esté apagada y se muestre el reloj).
CT (hora del reloj)
Activa la función CT: [ON], [OFF].
BTM (memoria de mejor sintonización) (página 7)
(Solamente estará disponible cuando la
sintonización esté seleccionada).
FIRMWARE
Revisa/Actualiza la versión del firmware. Para
detalles, visite el siguiente sitio web de soporte
técnico:
Clientes en Latinoamérica:
http://esupport.sony.com/ES/LA/
Clientes en Asia-Pacífico:
http://www.sony-asia.com/section/support
http://www.sony-asia.com/caraudio/
FW VERSION (versión del firmware)
Muestra la versión actual del firmware.
FW UPDATE (actualización del firmware)
Ingresa el proceso de actualización del
firmware: [YES] [NO].
(Disponible solamente mientras la fuente esté
apagada y se muestre el reloj).
Configuración del Sonido
(SOUND)
Puede abrir también este menú de configuración si
presiona SOUND, y está disponible cuando se
selecciona cualquier fuente.
C.AUDIO+ (ClearAudio+)
Reproduce el sonido al optimizar la señal digital
con los ajustes de sonido recomendados por
Sony: [ON], [OFF]. (Se configura
automáticamente en [OFF] cuando [EQ10
PRESET] se cambia o [MEGABASS] se configura
en [1] o [2] o [DSO] se configura en [LOW], [MID]
o [HIGH]).
EQ10 PRESET
Selecciona una curva ecualizadora de 10 curvas
ecualizadoras o de:
[OFF], [R&B], [ROCK], [POP], [DANCE], [HIP-HOP],
[ELECTRONICA], [JAZZ], [REGUETON], [SALSA],
[CUSTOM].
Para modelos de la India:
[BOLLYWOOD], [R&B], [ROCK], [POP], [DANCE],
[HIP-HOP], [ELECTRONICA], [JAZZ], [REGUETON],
[CUSTOM], [OFF].
El ajuste de la curva de ecualizador se puede
memorizar para cada fuente.
EQ10 CUSTOM
Ajuste [CUSTOM] de EQ10.
Configuración de la curva de ecualización:
[BAND1] 32 Hz, [BAND2] 63 Hz, [BAND3] 125 Hz,
[BAND4] 250 Hz, [BAND5] 500 Hz, [BAND6] 1 kHz,
[BAND7] 2 kHz, [BAND8] 4 kHz, [BAND9] 8 kHz,
[BAND10] 16 kHz.
El nivel de volumen puede ajustarse en
intervalos de 1 dB entre -6 dB y +6 dB.
POSITION (posición de escucha)
(
F/R POS
Simula un campo de sonido natural mediante el
retardo de la salida de sonido desde los
altavoces para adecuarse a su posición:
[FRONT L] (frontal izquierdo),
[FRONT R] (frontal derecho),
[FRONT] (frontal central),
[ALL] (centro de su automóvil),
[OFF] (sin posición configurada)
ADJ POSITION* (ajustar posición)
Sintoniza con mayor precisión el ajuste de la
posición de escucha: [+3] – [CENTER] – [-3].
posición frontal/posterior
)
11ES
Page 32

SW POS* (posición subwoofer)
[NEAR] (cerca),
[NORMAL] (normal),
[FAR] (lejos)
DSO (organizador dinámico del sonido)
Crea un sonido más ambiental, como si hubieran
altavoces en el panel: [OFF], [LOW], [MID],
[HIGH].
BALANCE
Permite ajustar el balance de sonido:
[RIGHT-15] – [CENTER] – [LEFT-15].
FADER
Permite ajustar el nivel relativo: [FRONT-15] –
[CENTER] – [REAR-15].
DSEE (motor potenciador de sonido digital)
Mejora el sonido comprimido digitalmente, ya
que restaura las altas frecuencias que se pierden
en el proceso de compresión.
Este ajuste se puede memorizar para cada
fuente diferente al sintonizador.
Selecciona el modo DSEE: [ON], [OFF].
AAV (volumen automático avanzado)
Ajuste el nivel de volumen de reproducción de
todas las fuentes de reproducción al nivel
óptimo: [ON], [OFF].
RB ENH (potenciador de sonidos graves
posteriores)
El potenciador de sonidos graves posteriores
mejora los sonidos graves, ya que aplica el
ajuste del filtro de paso bajo a los altavoces
posteriores. Esta función permite que los
altavoces posteriores funcionen como altavoces
potenciadores de graves si uno de ellos no está
conectado.
(Disponible solo cuando [SW DIREC] se configura
en [OFF] o [REAR-OUT] se encuentra
seleccionado en [REAR/SUB]).
RBE MODE (potenciador posterior de sonidos
graves)
Selecciona el potenciador posterior de sonidos
graves: [1], [2], [3], [OFF].
LPF FREQ (frecuencia de filtro de paso bajo)
Selecciona la frecuencia de corte del altavoz
potenciador de graves: [50Hz], [60Hz], [80Hz],
[100Hz], [120Hz].
LPF SLOP (pendiente de filtro de paso bajo)
Selecciona la pendiente LPF: [1], [2], [3].
SW DIREC (conexión directa al altavoz potenciador
de graves)
Puede utilizar el altavoz potenciador de graves
sin un amplificador de potencia cuando está
conectado al cable del altavoz posterior.
(Disponible solo cuando [RBE MODE] se
configura en [OFF] o [REAR-OUT] se encuentra
seleccionado en [REAR/SUB]).
Asegúrese de conectar un altavoz potenciador
de graves de 4 a 8 Ω a cualquiera de los cables
del altavoz posterior. No conecte un altavoz al
otro cable de altavoz posterior.
SW MODE (modo del altavoz potenciador de
graves)
Selecciona el modo del altavoz potenciador de
graves: [1], [2], [3], [OFF].
SW PHASE (fase de altavoz potenciador de
graves)
Selecciona la fase del altavoz potenciador de
graves: [NORM], [REV].
SW POS* (posición del altavoz potenciador de
graves)
Selecciona la posición del altavoz potenciador
de graves: [NEAR], [NORMAL], [FAR].
LPF FREQ (frecuencia de filtro de paso bajo)
Selecciona la frecuencia de corte del altavoz
potenciador de graves: [50Hz], [60Hz], [80Hz],
[100Hz], [120Hz].
LPF SLOP (pendiente de filtro de paso bajo)
Selecciona la pendiente LPF: [1], [2], [3].
S.WOOFER (altavoz potenciador de graves)
SW LEVEL (nivel del subwoofer)
Ajusta el nivel de volumen del altavoz
potenciador de graves:
[+10 dB] – [0 dB] – [-10 dB].
([ATT] aparece en pantalla con el ajuste más
bajo).
SW PHASE (fase de altavoz potenciador de
graves)
Selecciona la fase del altavoz potenciador de
graves: [NORM], [REV].
SW POS* (posición del altavoz potenciador de
graves)
Selecciona la posición del altavoz potenciador
de graves: [NEAR], [NORMAL], [FAR].
LPF FREQ (frecuencia de filtro de paso bajo)
Selecciona la frecuencia de corte del altavoz
potenciador de graves: [50Hz], [60Hz], [80Hz],
[100Hz], [120Hz].
LPF SLOP (pendiente de filtro de paso bajo)
Selecciona la pendiente LPF: [1], [2], [3].
HPF (filtro de paso alto)
HPF FREQ (frecuencia de filtro de paso alto)
Permite seleccionar la frecuencia de corte: [OFF],
[50Hz], [60Hz], [80Hz], [100Hz], [120Hz].
HPF SLOP (pista del filtro de paso alto)
Selecciona la pendiente HPF (efectivo s olamente
cuando [HPF FREQ] se ajusta en un valor
diferente a [OFF]): [1], [2], [3].
AUX VOL (nivel de volumen AUX)
Ajusta el nivel de volumen de cada dispositivo
auxiliar conectado: [+18 dB] – [0 dB] – [-8 dB].
Este ajuste elimina la necesidad de ajustar el
nivel de volumen entre fuentes.
* No aparece cuando [F/R POS] se ajusta en [OFF].
12ES
Page 33

Configuración de Pantalla
(DISPLAY)
BLK OUT (desactivación de la pantalla)
Permite desactivar la iluminación de una fuente
automáticamente (por ejemplo, durante la
recepción de radio/reproducción de CD, etc.), si
no se efectúa ninguna operación durante
5 segundos: [ON], [OFF].
Para volver a encender la luz, presione cualquier
botón de la unidad o del control remoto.
DIMMER
Cambia el brillo de la pantalla: [ON], [OFF].
BUTTON-C (color para botón)
Configura un color preseleccionado o
personaliza un color para los botones.
COLOR
Selecciona a partir de 15 colores predefinidos,
1 color personalizado.
CUSTOM-C (color personalizado)
Permite registrar un color personalizado para los
botones.
RGB RED, RGB GRN, RGB BLUE
Gama de colores ajustables: [0] – [32] ([0] no
se puede utilizar para todas las gamas de
colores).
DSPL-C (color para la pantalla)
Configura un color preseleccionado o
personaliza un color para la pantalla.
COLOR
Selecciona a partir de 15 colores predefinidos,
1 color personalizado.
CUSTOM-C (color personalizado)
Permite registrar un color personalizado para la
pantalla.
RGB RED, RGB GRN, RGB BLUE
Gama de colores ajustables: [0] – [32] ([0] no
se puede utilizar para todas las gamas de
colores).
ALL-C (todo color)
Configura un color preseleccionado o
personaliza un color para la pantalla y los
botones.
COLOR
Selecciona a partir de 15 colores predefinidos,
1 color personalizado.
CUSTOM-C (color personalizado)
Permite registrar un color personalizado para la
pantalla y los botones.
RGB RED, RGB GRN, RGB BLUE
Gama de colores ajustables: [0] – [32] ([0] no
se puede utilizar para todas las gamas de
colores).
SND SYNC (sincronización de sonidos)
Activa la sincronización de la iluminación con el
sonido: [ON], [OFF].
M. DISPLAY(pantalla de movimiento)
Muestra patrones de movimiento: [LM], [ON],
[OFF].
AUTO SCR (desplazamiento automático)
Permite desplazarse por los elementos de la
pantalla automáticamente: [ON], [OFF].
(No disponible cuando está seleccionado el AUX
o sintonizador).
13ES
Page 34
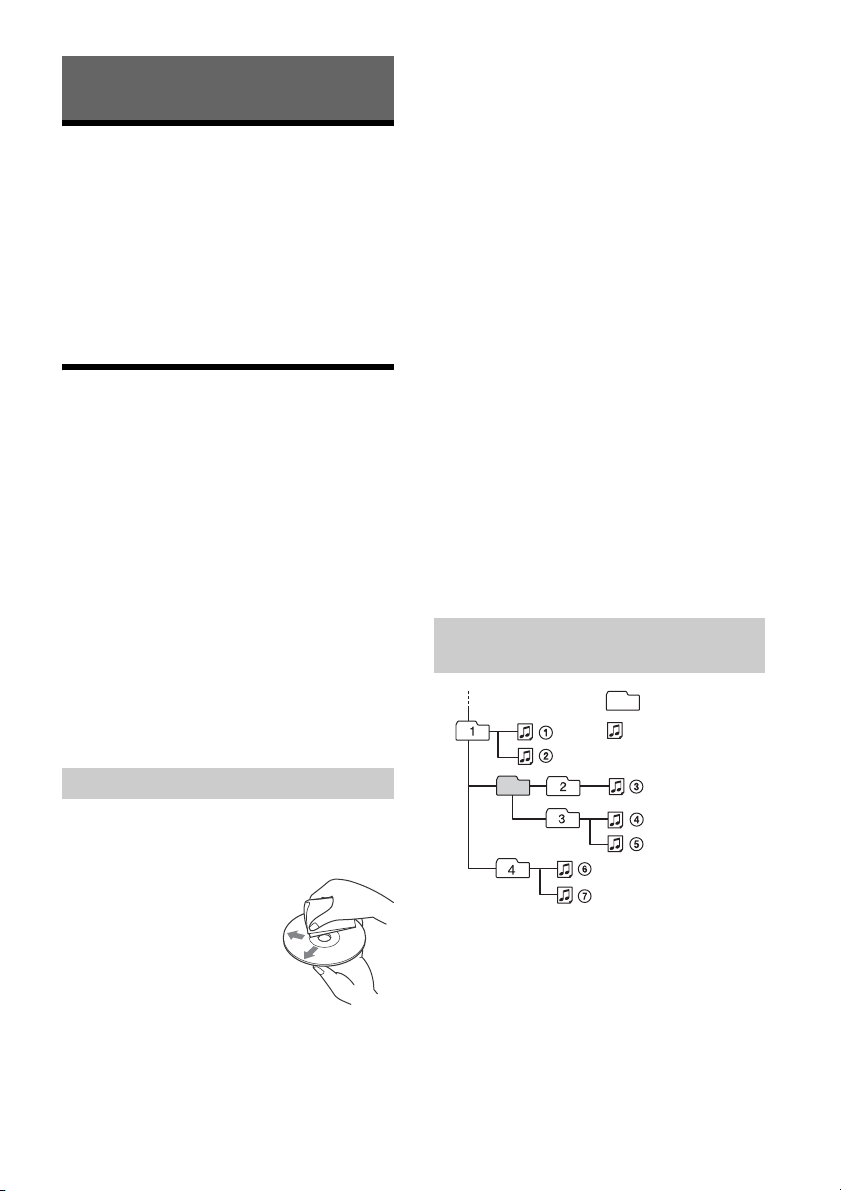
Información complementaria
Carpeta (álbum)
Archivo de audio (pista)
Actualizar el Firmware
Puede actualizar el firmware de esta unidad desde
el siguiente sitio web de soporte técnico:
Clientes en Latinoamérica:
http://esupport.sony.com/ES/LA/
Clientes en Asia-Pacífico:
http://www.sony-asia.com/section/support
http://www.sony-asia.com/caraudio/
Para actualizar el firmware, visite el sitio web de
soporte técnico, luego siga las instrucciones en
línea.
Precauciones
Deje que la unidad se enfríe antes de usarla si el
automóvil ha estado estacionado bajo la luz
directa del sol.
No deje el panel frontal o los dispositivos de
audio dentro del vehículo o podría causar fallas
en el funcionamiento debido a las altas
temperaturas bajo la luz directa del sol.
La antena de alimentación se extiende
automáticamente.
Condensación de humedad
Si se produce condensación de humedad en el
interior de la unidad, extraiga el disco y espere una
hora aproximadamente hasta que se haya secado
por completo la unidad. De lo contrario, la unidad
no funcionará correctamente.
Para mantener una alta calidad de sonido
No derrame ningún tipo de líquido sobre la unidad
o los discos.
Esta unidad se diseñó para reproducir discos que
cumplen con el estándar Compact disc (CD). Los
DualDisc y otros discos de música codificados con
tecnologías de protección de derechos de autor
no cumplen el estándar Compact disc (CD), por lo
que no podrán reproducirse con esta unidad.
Discos que NO se pueden reproducir en esta
unidad
Discos con etiquetas, autoadhesivos o cinta
adhesiva o papeles adheridos. Si utiliza este
tipo de discos, puede provocar una falla de
funcionamiento o dañar el disco.
Discos con formas no estandarizadas (por
ejemplo, formas de corazón, cuadrado o
estrella). Si lo intenta, puede dañar la unidad.
8 cm discos.
Notas sobre los discos CD-R/CD-RW
Si un disco multisesión empieza con una sesión
CD-DA, se reconoce como un disco CD-DA y las
otras sesiones no se reproducen.
Discos que NO se pueden reproducir en esta
unidad
CD-R/CD-RW de calidad de grabación
deficiente.
CD-R/CD-RW grabados con un dispositivo de
grabación no compatible.
CD-R/CD-RW no finalizados correctamente.
CD-R/CD-RW que no se hayan grabado en
formato CD de música o en formato MP3 que
cumpla la norma ISO9660 Level 1/Level 2,
Joliet/Romeo o multisesión.
Orden de reproducción de archivos de
audio
Notas sobre los discos
No exponga los discos a la luz solar directa ni a
fuentes de calor como por ejemplo, conductos de
aire caliente, ni los deje en el automóvil
estacionado bajo la luz solar directa.
Antes de reproducir los
discos, límpielos con un paño
de limpieza. Hágalo desde el
centro hacia los bordes. No
utilice disolventes como
bencina, diluyentes ni
productos de limpieza
disponibles en el mercado.
14ES
Page 35
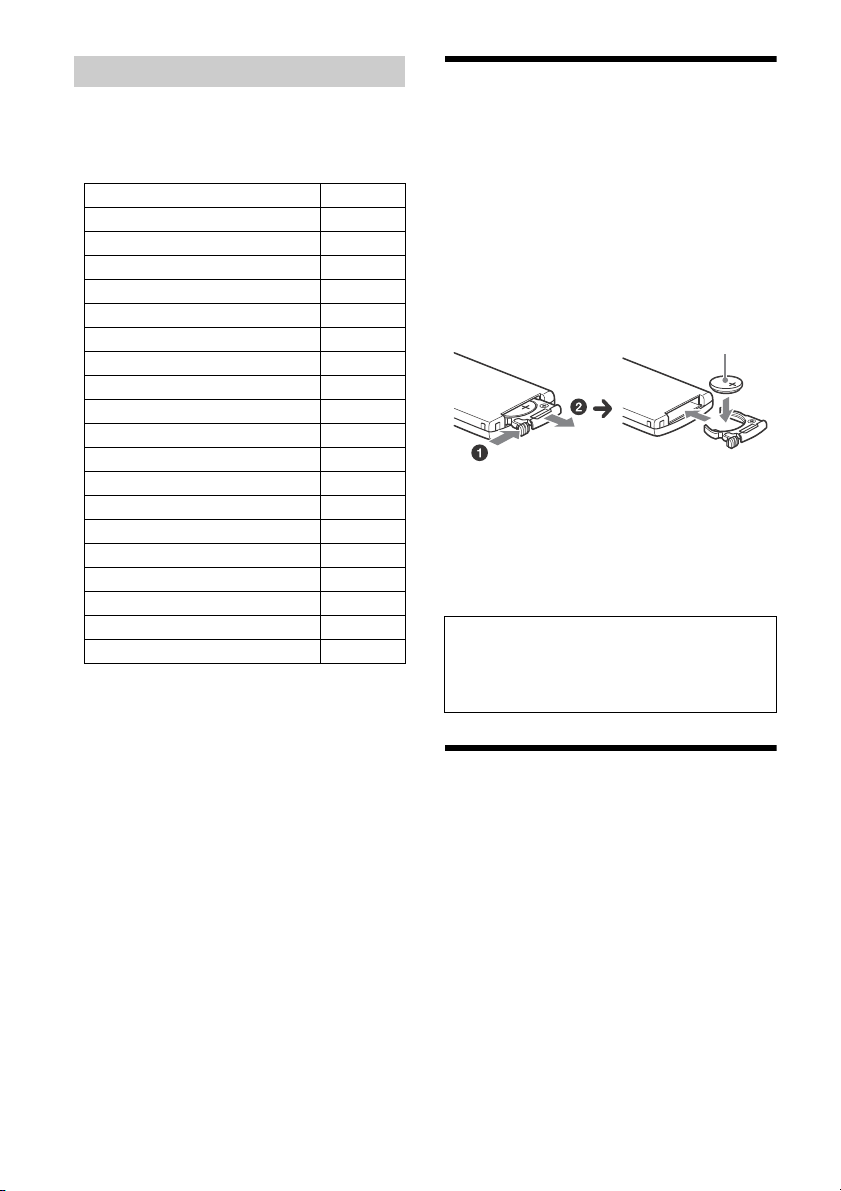
Acerca de iPod
Lado + hacia arriba
Puede conectarse a los siguientes modelos de
iPod. Actualice sus dispositivos iPod a la última
versión de software antes de utilizarlos.
Modelos compatibles de iPhone/iPod
Modelo compatible USB
iPhone 6 Plus
iPhone 6
iPhone 5s
iPhone 5c
iPhone 5
iPhone 4s
iPhone 4
iPhone 3GS
iPhone 3G
iPod touch (5ª generación)
iPod touch (4ª generación)
iPod touch (3ª generación)
iPod touch (2ª generación)
iPod classic
iPod nano (7ª generación)
iPod nano (6ª generación)
iPod nano (5ª generación)
iPod nano (4ª generación)
iPod nano (3ª generación)
“Made for iPod” y “Made for iPhone” indican que
un accesorio electrónico se diseñó para
conectarse específicamente a los dispositivos
iPod o iPhone respectivamente, y que el
fabricante obtuvo la certificación necesaria para
que cumpla con los estándares de rendimiento de
Apple. Apple no se hace responsable del
funcionamiento de este dispositivo en
cumplimiento de los estándares de seguridad y
normativa. Tenga en cuenta que el uso de este
accesorio con el iPod o el iPhone puede afectar al
rendimiento inalámbrico.
Si desea realizar alguna consulta o solucionar algún
problema relativo a la unidad que no se trate en
este manual, póngase en contacto con el
distribuidor Sony más cercano.
Mantenimiento
Sustitución de la pila de litio del control
remoto
Bajo condiciones normales, la batería durará
aproximadamente 1 año. (La vida útil puede ser
más corta, dependiendo de las condiciones de
uso).
El alcance del control remoto disminuye a medida
que se agota la pila.
ADVERTENCIA
Peligro de explosión si la batería se reemplaza
incorrectamente. Reemplazarla solamente con una
igual o equivalente.
Notas sobre la pila de litio
Mantenga la pila de litio fuera del alcance de los
niños. Si se ingiere, póngase en contacto
inmediatamente con un médico.
Limpie la batería con un paño seco para asegurar un
buen contacto.
Asegúrese de respetar la polaridad al instalarla.
No sujete la pila con pinzas metálicas, ya que podría
producirse un cortocircuito.
ADVERTENCIA
La pila puede explotar si no se emplea
adecuadamente.
No recargue la pila; tampoco la desmonte ni la
arroje al fuego.
Especificaciones
Sección del sintonizador
FM
Rango de sintonización:
87,5 – 108,0 MHz (a paso de 50 kHz)
87,5 – 108,0 MHz (a paso de 100 kHz)
87,5 – 107,9 MHz (a paso de 200 kHz)
Paso de sintonización de FM:
50 kHz/100 kHz/200 kHz intercambiable
Terminal de antena:
Conector de antena externa
Frecuencia intermedia:
FM CCIR: -1 956,5 a -487,3 kHz y
+500,0 a +2 095,4 kHz
Sensibilidad útil: 8 dBf
Selectividad: de 75 dB a 400 kHz
Relación señal-ruido: 73 dB
Separación: de 50 dB a 1 kHz
15ES
Page 36

Respuesta de frecuencia: 20 – 15 000 Hz
AM
Rango de sintonización:
531 – 1 602 kHz (a paso de 9 kHz)
530 – 1 710 kHz (a paso de 10 kHz)
Paso de sintonización de AM:
9 kHz/10 kHz seleccionable
Terminal de antena:
Conector de antena externa
Sensibilidad: 26 μV
Sección Reproductora de CD
Relación señal-ruido: 120 dB
Respuesta de frecuencia: 10 – 20 000 Hz
Fluctuación y trémolo: inferior al límite medible
Número máximo de: (solamente CD-R/CD-RW)
carpetas (álbumes): 150 (incluida la carpeta raíz)
archivos (pistas) y carpetas: 300 (si los nombres
de carpeta o archivo contienen muchos
caracteres, este número puede ser inferior a 300)
caracteres que se pueden visualizar en el nombre
de una carpeta o archivo: 32 (Joliet)/64 (Romeo)
Códec correspondiente: MP3 (.mp3), WMA (.wma) y
AAC (.m4a)
Sección Reproductora de USB
Interfaz: USB (alta velocidad)
Corriente máxima: 1 A
El número máximo de pistas reconocibles: 10 000
Códec correspondientes:
MP3 (.mp3)
Tasa de bits: 8 – 320 kbps (Compatible con
VBR (Tasa de bits variable))
Tasa de muestreo: 16 – 48 kHz
WMA (.wma)
Tasa de bits: 32 – 192 kbps (Compatible con
VBR (Tasa de bits variable))
Tasa de muestreo: 32 kHz, 44,1 kHz, 48 kHz
AAC (.m4a, .mp4)
Tasa de bits: 8 – 320 kbps
Tasa de muestreo: 11,025 – 48 kHz
WAV (.wav)
Profundidad de bit: 16 bit
Tasa de muestreo: 44,1 kHz, 48 kHz
FLAC (.flac)
Profundidad de bit: 16 bit, 24 bit
Tasa de muestreo: 44,1 kHz, 48 kHz
Sección del amplificador de corriente
Salida: salidas de altavoz
Impedancia de altavoz: 4 – 8 Ω
Salida de potencia máxima: 55 W × 4 (a 4 Ω)
Generales
Salidas:
Terminal de salidas de audio (frontal, trasero/
sub intercambiable)
Antena de alimentación/Terminal de control del
amplificador de potencia (REM OUT)
Entradas:
Terminal de entrada del control remoto
Terminal de entrada de la antena
Toma de entrada AUX (minitoma estéreo)
Puerto USB
Requisitos de alimentación: batería de automóvil
de cc 12 V (masa negativa)
Tasa de consumo actual: 10 A
Dimensiones:
Aprox. 178 mm × 100 mm × 178 mm (an/al/prf)
Dimensiones de montaje:
Aprox. 182 mm × 111 mm × 159 mm (an/al/prf)
Masa: Aprox. 1,4 kg
Contenidos del paquete:
Unidad principal (1)
Control remoto (1): RM-X211
Componentes de instalación y conexiones
(1 juego)
Es posible que su distribuidor no comercialice
algunos de los accesorios que figuran en la lista
anterior. Solicite información detallada.
El diseño y las especificaciones están sujetos a
cambios sin previo aviso.
Derechos de autor
Windows Media es una marca comercial registrada
o una marca comercial de Microsoft Corporation en
los EE. UU. y otros países.
Este producto está protegido por los derechos de
propiedad intelectual de Microsoft Corporation.
Queda prohibido el uso o la distribución de esta
tecnología fuera de este producto si no se dispone
de una licencia de Microsoft o una división
autorizada de Microsoft.
iPhone, iPod, iPod classic, iPod nano, y iPod touch
son marcas comerciales de Apple Inc., registradas
en los Estados Unidos y otros países.
Tecnología de codificación de audio MPEG Layer-3 y
patentes bajo licencia de Fraunhofer IIS y Thomson.
Android es una marca comercial de Google Inc.
libFLAC
Copyright (C) 2000-2009 Josh Coalson
Copyright (C) 2011-2013 Xiph.Org Foundation
La redistribución y el uso en formas binarias y de
fuente, con o sin modificación, están permitidos
siempre y cuando se cumplan las siguientes
condiciones:
Las redistribuciones de los códigos fuente deben
retener la nota de copyright antes mencionada,
esta lista de condiciones y el siguiente aviso.
16ES
Page 37
Las redistribuciones en forma binaria deben
reproducir la noticia de copyright antes
mencionada, la lista de condiciones y el siguiente
aviso en el documento u otros materiales
provistos con la distribución.
Ni el nombre de Xiph.org Foundation o los
nombres de sus contribuidores deben utilizarse
para promocionar o publicitar los productos
derivados de este software sin la autorización
previa por escrito.
ESTE SOFTWARE ES PROVISTO POR LOS DUEÑOS Y
CONTRIBUIDORES DEL COPYRIGHT “COMO ES” Y
CUALQUIER GARANTÍA EXPRESA O IMPLÍCITA, QUE
INCLUYE PERO NO SE LIMITA, A LAS GARANTÍAS
IMPLÍCITAS DE MERCANTIBILIDAD O APTITUD PARA
UN PROPÓSITO PARTICULAR ESTÁN DENEGADAS.
BAJO NINGÚN PUNTO DE VISTA DEBERÁN LOS
CONTRIBUIDORES SER RESPONSABLES POR
CUALQUIER DAÑO DIRECTO, INDIRECTO, ESPECIAL,
EJEMPLAR O COMO CONSECUENCIA (LO QUE
INCLUYE PERO NO SE LIMITA A LA ADQUISICIÓN DE
BIENES SUSTITUTOS O SERVICIOS; PÉRDIDA DE USO,
INFORMACIÓN O GANANCIAS; O INTERRUPCIÓN
COMERCIAL) SIN IMPORTAR CUAL SEA LA CAUSA Y
EN CUALQUIER TEORÍA DE RESPONSABILIDAD, YA
SEA POR CONTRATO, RESPONSABILIDAD ESTRICTA
O RESPONSABILIDAD EXTRACONTRACTUAL (LO QUE
INCLUYE NEGLIGENCIA U OTROS) QUE SURJA DE
CUALQUIER MANERA DEL USO DE ESTE SOFTWARE,
AÚN SI HA SIDO ADVERTIDO DE LA POSIBILIDAD DE
TAL DAÑO.
Solución de problemas
La siguiente lista de comprobación le ayudará a
solucionar los problemas que puedan producirse
con la unidad.
Antes de consultarla, revise los procedimientos de
conexión y de funcionamiento.
Para más detalles sobre el uso del fusible y sobre
cómo quitar la unidad del tablero, ver “Conexión/
Instalación” (página 20).
Si el problema no se resuelve, visite el sitio web de
soporte técnico que figura en la cubierta posterior.
Generales
La unidad no recibe alimentación.
Si la unidad está apagada y la pantalla
desaparece, no se puede operar con el control
remoto.
Encienda la unidad.
No hay sonido o el sonido es muy bajo.
La posición del control de equilibrio [FADER] no
está ajustada para un sistema de 2 altavoces.
El volumen de la unidad o dispositivo conectado
es muy bajo.
Aumente el volumen de la unidad o del
dispositivo conectado.
No se escuchan pitidos.
Se encuentra conectado un amplificador de
potencia opcional y no está usando el
amplificador integrado.
El contenido de la memoria se borró.
El botón de reset ha sido presionado.
Almacene nuevamente dentro de la memoria.
Se desconectó la batería o el cable de fuente de
alimentación, o no están conectados
correctamente.
Las emisoras almacenadas y la hora correcta se
borraron.
El fusible se fundió.
Se escucha un ruido cuando se cambia la
posición de la llave de encendido.
Los cables no se conectaron de forma correcta al
conector de alimentación auxiliar del automóvil.
Durante la reproducción o la recepción, el modo
demostración se inicia.
Si no se realiza ninguna operación durante
5 minutos y la opción [DEMO-ON] está ajustada,
se iniciará el modo de demostración.
Ajuste [DEMO-OFF] (página 10).
Las indicaciones desaparecen del visualizador o
no aparecen en él.
El atenuador está ajustado en [DIM-ON]
(página 13).
La pantalla se apaga si mantiene presionado OFF.
Presione OFF en la unidad hasta que se ilumine
la pantalla.
La pantalla se apaga mientras la unidad se
encuentra en funcionamiento.
[BLK OUT] (desactivación de la pantalla) está
configurada como [B.OUT-ON] (página 13).
La pantalla/iluminación parpadea.
El suministro de energía no es suficiente.
Compruebe que la batería del automóvil
suministre energía suficiente a la unidad. (Los
requisitos de alimentación son de 12 V cc).
Los botones de operación no funcionan.
El disco no sale expulsado.
La conexión no es correcta.
Revise la conexión de la unidad.
Si la situación no mejora, presione el botón de
reset (página 6).
Los contenidos almacenados en la memoria
son eliminados.
Por su seguridad, no realice la restauración de
la unidad mientras maneja.
17ES
Page 38
Recepción de radio
No es posible recibir emisoras.
El sonido está obstaculizado por los ruidos.
La conexión no es correcta.
Si su automóvil cuenta con una antena de radio
incluida en el vidrio lateral o posterior, conecte
un cable REM OUT (con rayas azules y blancas)
o un cable de fuente de alimentación accesorio
(rojo) al cable de fuente de alimentación del
amplificador de señal de la antena del
automóvil.
Compruebe la conexión de la antena del
automóvil.
Si la antena del automóvil no se extiende,
compruebe la conexión del cable de control de
la antena motorizada.
Se ha borrado el ajuste del paso de sintonización.
Vuelva a ajustar el intervalo de sintonización
(página 6).
No es posible utilizar la sintonización
programada.
La señal de emisión es demasiado débil.
RDS
PTY muestra [- - - - - - - -].
La emisora actual no es una emisora RDS.
No se recibieron datos RDS.
La emisora no especifica el tipo de programa.
Reproducción de CD
No se inicia la reproducción.
Disco defectuoso o sucio.
Los discos CD-R/CD-RW no son para audio
(página 14).
Los archivos MP3/WMA/AAC no pueden
reproducirse.
El disco es incompatible con el formato y la
versión de MP3/WMA/AAC. Para más
información acerca de los formatos y discos
aptos para reproducir, visite el sitio de asistencia
en la contratapa.
Los archivos MP3/WMA/AAC tardan más tiempo
en reproducirse que los otros.
El inicio de la reproducción de los siguientes
discos tarda algo más de tiempo.
Disco grabado con una estructura de árbol
complicada.
Disco grabado en Multi Session.
Disco al que es posible añadir datos.
Se producen saltos de sonido.
Disco defectuoso o sucio.
Reproducción en dispositivo USB
No es posible reproducir elementos a través de
un concentrador USB.
Esta unidad no puede reconocer dispositivos USB
a través de un concentrador USB.
El dispositivo USB tarda en reproducirse.
El dispositivo USB contiene archivos con una
estructura de árbol compleja.
El sonido es discontinuo.
Es posible que la discontinuidad del sonido se
deba una tasa alta de bits.
Es posible que, en algunos casos, los archivos
DRM (Administración de los derechos digitales)
no puedan reproducirse.
Un archivo de audio no puede reproducirse.
Los dispositivos USB formateados con sistemas
de archivos distintos a FAT16 o FAT32 no son
soportados.*
* Esta unidad soporta FAT16 y FAT32, pero algunos
dispositivos USB pueden no soportar todos estos FAT.
Para detalles, refiérase a la instrucción de operación
de cada dispositivo USB o contacte al fabricante.
Mensajes/indicaciones de error
CD ERROR: No puede reproducirse el disco. El disco
será expulsado automáticamente.
Limpie o inserte el disco correctamente, o
asegúrese de que el disco no esté en blanco o
defectuoso.
CD NO MUSIC: No hay ningún archivo apto para
reproducir. El disco será expulsado
automáticamente.
Inserte un disco que contenga archivos aptos
para reproducir (página 16).
CD PUSH EJT: No puede expulsarse el disco
correctamente.
Presione (expulsar).
HUB NO SUPRT: Los concentradores USB no son
compatibles.
IPD STOP: La reproducción del iPod ha finalizado.
Accione su iPod/iPhone para comenzar la
reproducción.
OVERLOAD: El dispositivo USB se encuentra
sobrecargado.
Desconecte el dispositivo USB, luego presione
SOURCE para seleccionar otra fuente.
El dispositivo USB tiene una falla, o se ha
conectado un dispositivo incompatible.
18ES
Page 39
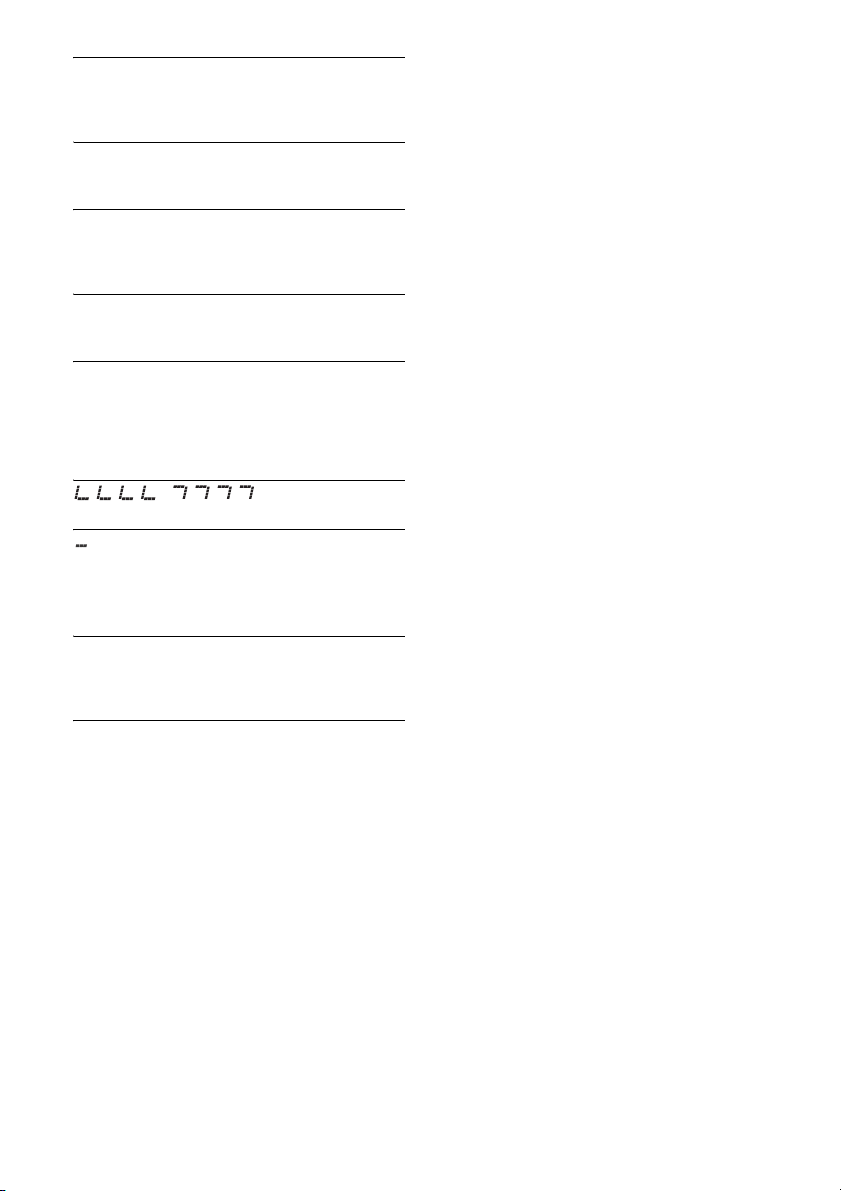
READ: Leyendo información.
Espere hasta que finalice la lectura y se inicie la
reproducción automáticamente. Esto puede
tardar un poco según la organización del archivo.
USB ERROR: No puede reproducirse el dispositivo
USB.
Conecte el dispositivo USB nuevamente.
USB NO DEV: No reconoce un dispositivo USB o no
está conectado.
Asegúrese de que el dispositivo USB o el cable
USB esté conectado de forma segura.
USB NO MUSIC: No existe un archivo reproducible.
Conecte un dispositivo USB que contenga
archivos reproducibles (página 16).
USB NO SUPRT: El dispositivo USB no es
compatible.
Para obtener más información acerca de la
compatibilidad del dispositivo USB, visite el sitio
web de soporte técnico que figura en la cubierta
posterior.
comienzo o al final del disco.
: El carácter no puede visualizarse.
o : Ha llegado al
Para funcionamiento con control remoto de
mando:
ERROR: Ocurrió un error durante el registro de la
función.
Realice el registro nuevamente desde la función
donde ocurrió el error (página 10).
TIMEOUT: Falló el registro de la función debido a
que se agotó el tiempo de espera.
Intente completar el registro mientras [REGISTER]
parpadea (alrededor de 6 segundos) (página 10).
Si estas soluciones no ayudan a solucionar el
problema, póngase en contacto con el distribuidor
Sony más cercano.
Si entrega la unidad para su reparación a causa de
problemas en la reproducción de CD, lleve el disco
que se utilizó cuando se produjo el problema.
19ES
Page 40
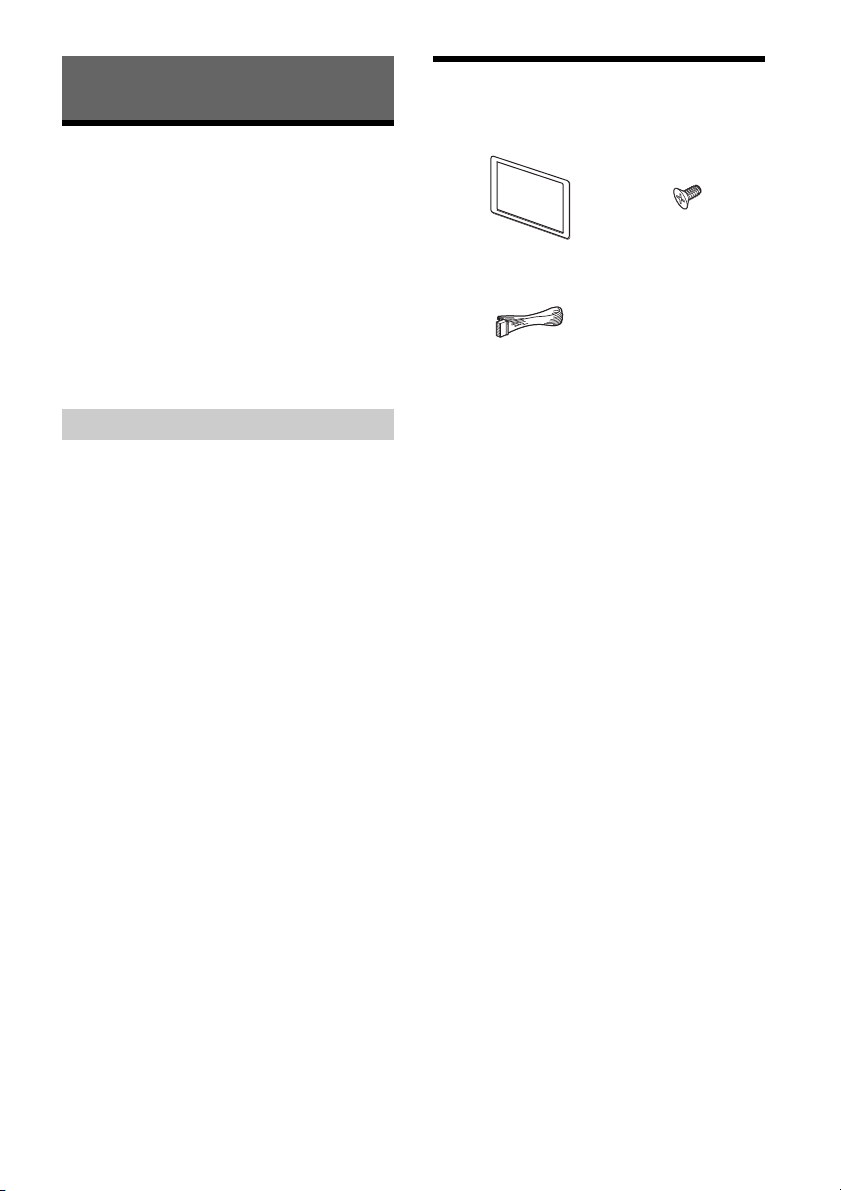
Conexión/Instalación
*
× 6
5 × máx. 8 mm
Advertencias
Conecte todos los cables hacia un punto a tierra
en común.
No deje que los cables queden atrapados debajo
de un tornillo o que se enganchen en piezas
móviles.
Antes de hacer conexiones, apague el auto para
evitar cortocircuitos.
Conecte los cables amarillo y rojo del sistema de
alimentación únicamente después de que todos
los demás cables hayan sido conectados.
Asegúrese de aislar cualquier cable suelto sin
conexión con cinta aislante para mayor
seguridad.
Precauciones
Elija la ubicación de la instalación con cuidado
para que la unidad no interfiera con las
operaciones de conducción normales.
Evite instalar la unidad en áreas expuestas a
polvo, tierra, vibración excesiva o alta
temperatura, como luz solar directa o cerca de
calefactores.
Utilice solamente el hardware de montaje
suministrado para obtener una instalación
segura.
Observe el cable del sistema de alimentación
(amarillo)
Cuando conecte esta unidad junto con otros
componentes estéreo, la capacidad nominal de la
corriente del circuito del auto al cual la unidad se
encuentra conectada debe ser mayor que la suma de la
capacidad nominal del fusible de cada componente.
Montar el ajuste del ángulo
Ajustar el ángulo de montaje a menos de 45°.
Lista de piezas para la
instalación
Esta lista de piezas no incluye todo el contenido del
paquete.
* Para modelos de India solamente.
20ES
Page 41
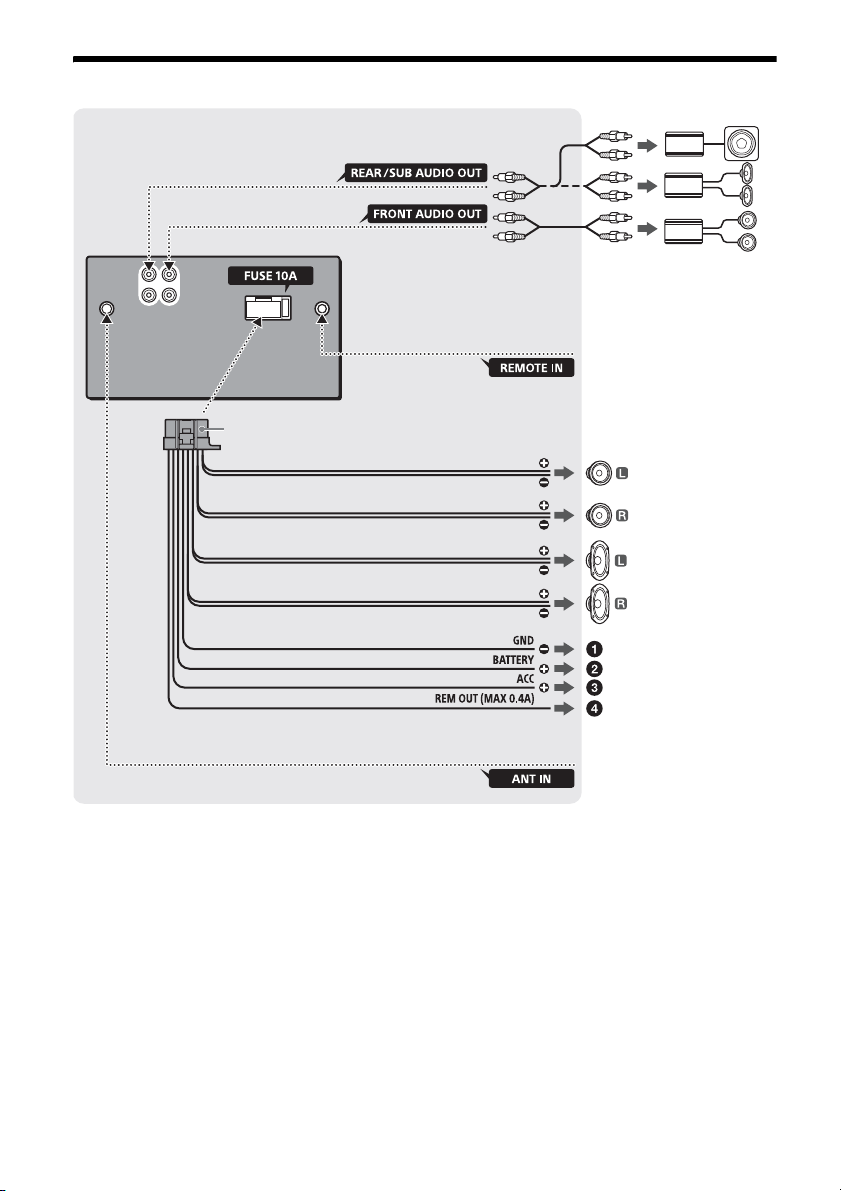
Conexión
Altavoz delantero*1*
2
Blanco
Blanco/ negro a rayas
Gris
Negro
Amarillo
Rojo
Azul/blanco a rayas
desde un control remoto
conectado (no suministrado)*
4
Para obtener más
información, consulte
“Hacer conexiones”
(página 22).
Gris /neg ro a raya s
Verd e
Verde/negro a rayas
Púrpura
Púrpura/negro a rayas
*
5
*
3
Subwoofer*
1
Amplific ador de potenci a*
1
desde una antena de auto
Altavoz trasero
*1*2
*
3
*1 No suministrado
*2 Impedancia del altavoz: 4 – 8 Ω × 4
*3 Cable con clavija RCA (no suministrado)
*4 Dependiendo del tipo de auto, utilice un adaptador
*5 AUDIO OUT puede cambiarse a SUB o REAR.
para un control remoto conectado (no suministrado).
21ES
Page 42
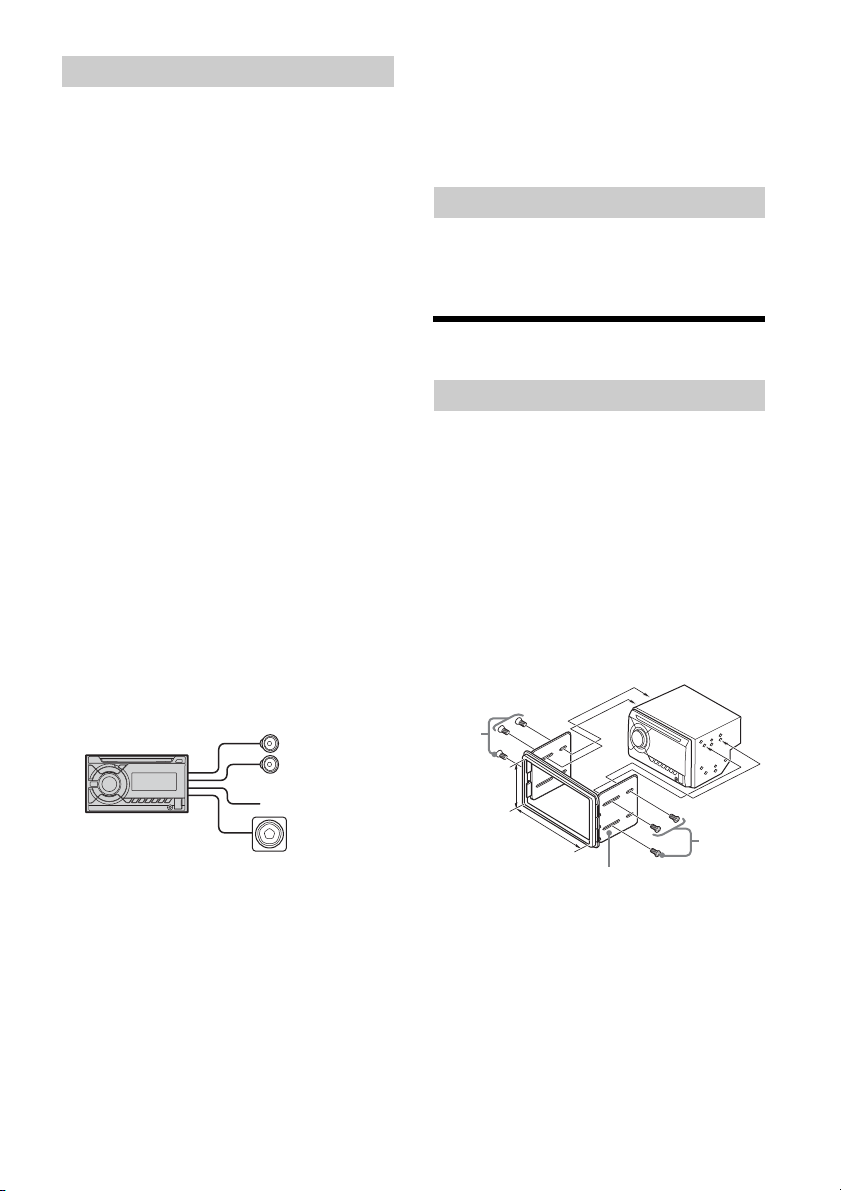
Hacer conexiones
Altavoz delantero
Subwoofer
Más grande
que 97 mm
Más grande
que 172 mm
Kit de instalación (no suminist rado)
para panel/consola central
Para un punto de puesta a tierra
Primero conecte el conector a tierra, luego
conecte los cables amarillo y rojo del sistema de
alimentación.
A la terminal de potencia +12 V que se
encuentra energizada en todo momento
Asegúrese de conectar primero el conector a
tierra negro a un punto de puesta a tierra.
A la terminal de potencia +12 V que se
encuentra energizada cuando el interruptor
de encendido se encuentra fijo en la posición
accesorio
Si no existe la posición accesorio, conecte la
terminal de potencia +12 V (batería) la cual se
encuentra energizada en todo momento.
Asegúrese de conectar primero el conector a
tierra negro a un punto de puesta a tierra.
Al cable de control de la antena motorizada o
al cable de la fuente de alimentación del
amplificador
No es necesario conectar este cable si no hay
antena motorizada o al amplificador de la
antena, o con una antena telescópica operada
manualmente.
Para AMP REMOTE IN de un amplificador de
potencia opcional
Esta conexión se usa solamente para
amplificadores y para una antena motorizada.
Conectar cualquier otro sistema puede dañar la
unidad.
Conexión fácil de subwoofer
Puede utilizar un subwoofer sin un amplificador de
potencia cuando está conectado al cable del
altavoz trasero.
Conexión del altavoz
Antes de conectar los altavoces, apague la
unidad.
Utilice los altavoces con una impedancia de 4 a
8 Ω, y con capacidades para el manejo de la
potencia adecuadas para evitar daños.
Uso del control remoto conectado
1 Para habilitar el control remoto
conectado, ajuste [STR CONTROL] del
[SET STEERING] en [PRESET] (página 10).
Instalación
Montar la unidad en el panel
Cuando lo instale en un auto japonés, consulte
“Montar la unidad en un auto japonés” (página 23).
Montaje de la unidad con un kit de
instalación (no suministrado)
Puede usar un kit de instalación de doble DIN
comercialmente disponible. Elija un kit de
instalación con el siguiente tamaño de marco del
panel.
Más grande que 172 × 97 mm (peso/altura), con un
radio de esquina interno de menos de 0,5 mm.
Nota
Asegúrese de utilizar los tornillos suministrados .
Nota
Utilice un subwoofer con una impedancia de 4 a 8 Ω y
con capacidades para el manejo de la potencia
adecuadas para evitar daños.
Conexión para sostener la memoria
Cuando el cable de la fuente de alimentación
amarillo está conectado, la alimentación siempre
abastecerá al circuito de la memoria incluso cuando
el interruptor de encendido se encuentre apagado.
22ES
Page 43
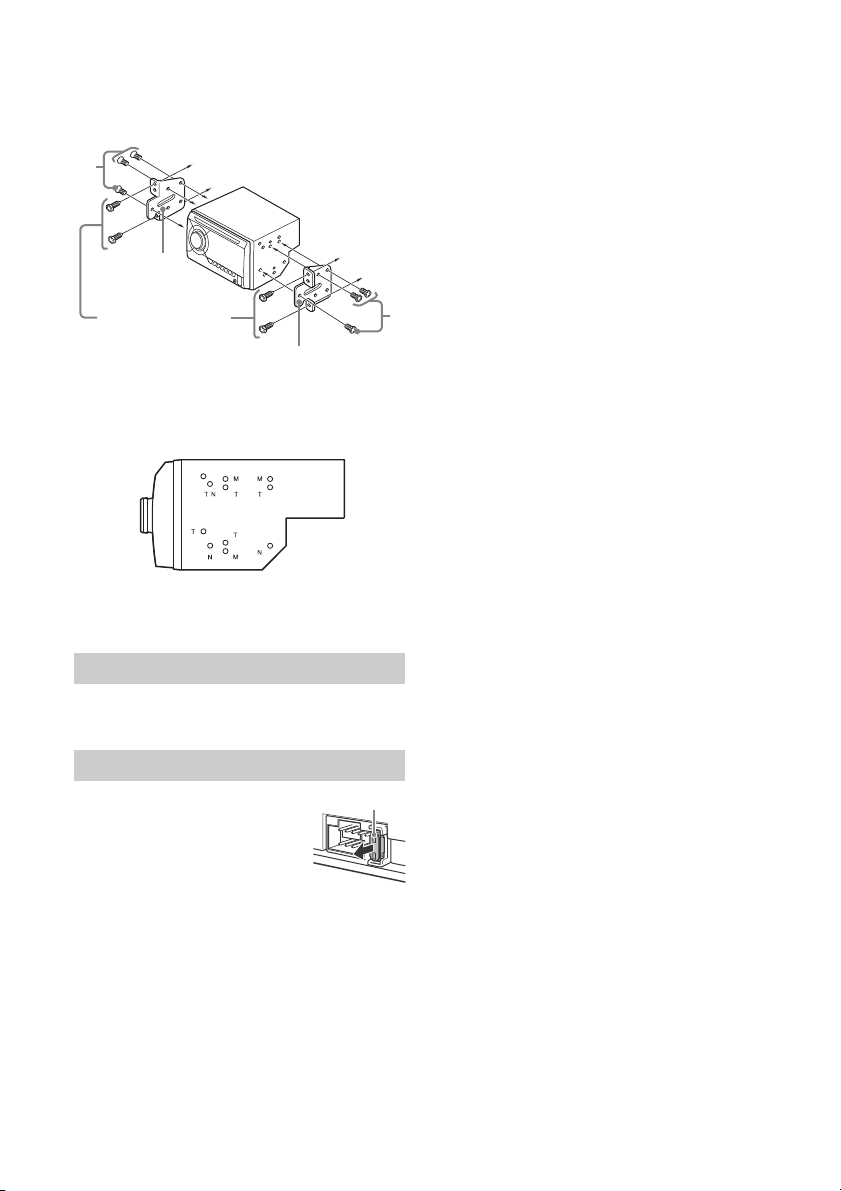
Montar la unidad en un auto japonés
para panel/consola central
Partes existentes
suministradas con su auto
Soporte
Soporte
Fusible (1 0 A)
Tal vez no pueda instalar esta unidad en algunas
marcas de autos japoneses. En dicho caso, consulte
con su distribuidor Sony.
Cuando monte esta unidad en los soportes
preinstalados de su automóvil, use los tornillos
suministrados en los orificios para tornillos que
correspondan, dependiendo de su automóvil: T
para TOYOTA, M para MITSUBISHI y N para NISSAN.
Nota
Para prevenir el mal funcionamiento, instálelo
solamente con los tornillos suministrados .
Reinicio de la unidad
Para obtener más información, consulte “Reinicio
de la unidad” (página 6).
Reemplazo del fusible
Cuando reemplace el fusible,
asegúrese de utilizar uno que
coincida con la capacidad nominal
del fusible original. Si el fusible se
quema, verifique la conexión
eléctrica y reemplace el fusible. Si
el fusible se quema nuevamente
después de reemplazarlo, puede haber un mal
funcionamiento interno. En dicho caso, consulte
con su distribuidor Sony más cercano.
23ES
Page 44
Sitio Web de soporte técnico en línea
Para resolver cualquier duda u obtener la información
más reciente sobre el soporte técnico de este producto,
visite el siguiente sitio Web:
Support site
If you have any questions or for the latest support
information on this product, please visit
the web site below:
Customers in Latin America/Clientes en Latinoamérica:
http://esupport.sony.com/ES/LA/
Customers in Asia Pacific/Clientes en Asia-Pacífico:
http://www.sony-asia.com/section/support
http://www.sony-asia.com/caraudio/
http://www.sony.net/
©2015 Sony Corporation Printed in Thailand
 Loading...