

Page 1
4-269-373-12(1)
Speaker Attachment
Bracket
Operating Instructions
Mode d’emploi
Manual de instrucciones
WS-32SE1B/WS-40SE1B/WS-46SE1B
©2011 Sony Corporation
GB
FR
ES
Page 2
About This Manual
The instructions in this manual are for model
WS-32SE1B/WS-40SE1B/WS-46SE1B. The
illustrations used in this manual are of the
WS-32SE1B model and they may be different from
your model. Any differences in operation are
marked in the manual as “WS-32SE1B model only”.
Warning about installing
the TV Sound Bar System
to the TV stand
This WS-32SE1B/WS-40SE1B/WS-46SE1B
speaker attachment bracket is used for
SA-32SE1/SA-40SE1/SA-46SE1 TV Sound Bar
System and the particular TV models only. Use with
other products or for other purposes than those
specified may cause damage or injury.
To Customers
Sufficient expertise is required for installing this
product. Be sure to pay special attention to safety
during the installation. Sony is not liable for any
damages or injury caused by mishandling or
improper installation, or installing anything other
than the specified product. Your statutory rights (if
any) are not affected.
WARNING
If the following precautions are not observed,
serious injury or death through fire or electric shock,
the product toppling over or falling can result.
Do not drop the products
or install them where
there is a possibility of
them falling down.
• Be sure to subcontract installing, moving or
dismounting the products to licensed contractors
and keep small children away during the
procedure.
• Unauthorized installation may result in serious
injury or property damage.
• Having an unauthorized dealer carry or dismount
the TV Sound Bar System or the TV Sound Bar
System-installed TV may lead to the products’
falling and result in serious injury or property
damage. Make sure that two or more persons carry
or dismount the product(s).
• Do not remove screws, etc., after mounting the TV
Sound Bar System or the TV Sound Bar Systeminstalled TV.
• Do not handle the products with excessive force
during cleaning or maintenance.
Do not place any object
on the products.
• Do not put anything on the products. If
you do so, the system may fall and cause injury or
property damage.
On Safety
Products by Sony are designed with safety in mind.
If the products are used incorrectly, however, it may
result in a serious injury through fire, electric shock,
the product toppling over, or the product dropping.
Be sure to observe the precautions for safety to
prevent such accidents.
GB
2
Do not lean or hang on
the products.
• Do not lean or hang on the products, as
they may fall on you and cause serious injury.
Page 3
Pay attention to the
location.
• Do not expose the products to rain or
moisture, or spill liquid of any kind on them. It
may cause a fire or electric shock.
• Never place the products in hot, humid or
excessively dusty places, or in a place where they
are subject to mechanical vibrations. Doing so
may cause a fire or electric shock.
• Keep flammable objects or open flames (e.g.,
candles) away from the products.
• Do not install the products over or under an air
conditioner. If the products are exposed to wind
from the air conditioner for an extended period of
time, or get wet by water leakage from the air
conditioner, this may cause a fire, an electric
shock, or malfunctions.
Do not allow the cords to
be pinched.
• If the AC power cord (mains lead) or
connecting cords are pinched between the
products and the wall, floor, or other object, or
bent or twisted by force, the internal conductors
may become exposed and cause a short circuit or
an electrical break.
This may cause a fire or an electric shock.
• Do not step on the AC power cord (mains lead) or
connecting cords when you carry the products.
The cord may be damaged, and this may result in
a fire or electric shock.
Do not cover the
ventilation holes of the
products.
• If you cover the ventilation holes (with a cloth,
etc.), heat may build up inside and cause a fire.
Do not stumble over the
cords.
• You may trip, or may cause the
products to topple over and cause injury.
CAUTION
If the following precautions are not observed, injury
or property damage may occur.
Do not install any equipment
other than the specified
product.
• The WS-32SE1B/WS-40SE1B/WS-46SE1B
speaker attachment bracket is designed for use
with the specified equipment only. If you install
equipment other than that specified, it may fall or
break, and cause injury.
• Do not modify the products.
• Do not place anything hot directly on the products.
The heat may cause discoloration or deformation
of the products.
Be sure to secure the TV Sound
Bar System and TV.
• Secure the TV Sound Bar System and TV firmly
when installing them together. Then, secure the
TV Sound Bar System-installed TV firmly on the
stand. If the TV Sound Bar System and TV are not
installed securely, they may fall or topple over,
and cause injury.
Do not apply weight to the
products or subject them to any
kind of impact.
• When installing the TV Sound Bar System to a TV
stand, do not apply weight to the TV Sound Bar
System or TV with your hand.
Do not hit the TV Sound Bar System or TV with
hard objects, such as a screwdriver, etc.
When moving the TV
Sound Bar Systeminstalled TV.
If you move the products forcefully, damage or
injury may result. Be sure to follow the proper
procedures and advice given below.
• Be sure that two or more persons carry the TV
Sound Bar System-installed TV, and only after
unplugging and removing the connected
equipment.
• Be careful not to allow your hands or feet to be
pinched under the bottom of the TV Sound Bar
System-installed TV.
GB
continued
GB
3
Page 4

• Do not drag the TV Sound Bar System-installed
TV. The base part may come off and damage the
floor.
• When carrying the TV Sound Bar Systeminstalled TV, do not hold it by the TV Sound Bar
System. Doing so may cause damage or injury.
Notes on installation
• When assembling, spread a cloth on the floor to
avoid damaging the floor.
• Install the products on a solid and flat floor.
• Be sure that two or more persons install the
products. Doing it alone may result in an accident
or injury.
• Be sure to keep children away during the process.
Be sure to install the products
securely following the
instructions.
• Tighten the screws securely. If the TV Sound Bar
System is not installed securely, it may fall and
cause damage or injury.
• Be careful not to pinch your fingers or hands when
assembling the products.
Notes on cleaning
Clean with a soft cloth slightly moistened with a
mild detergent solution. Do not use any type of
abrasive pad, scouring powder or solvent such as
thinner, benzine or alcohol.
If you have any questions or problems concerning
this product, please consult your nearest Sony
dealer.
Table of Contents
Unpacking ...................................... 5
Setting Up ...................................... 6
Installing the TV Sound Bar System
on the TV stand ..................................... 6
Preventing the TV from toppling over... 11
Adjusting the angle of the TV................ 13
Specifications .............................. 14
Notice for customers: The
following information is only
applicable to equipment sold in
countries applying EU
Directives.
The manufacturer of this product is Sony
Corporation, 1-7-1 Konan Minato-ku Tokyo,
108-0075 Japan. The Authorized Representative for
EMC and product safety is Sony Deutschland
GmbH, Hedelfinger Strasse 61, 70327 Stuttgart,
Germany. For any service or guarantee matters
please refer to the addresses given in separate
service or guarantee documents.
GB
4
Page 5
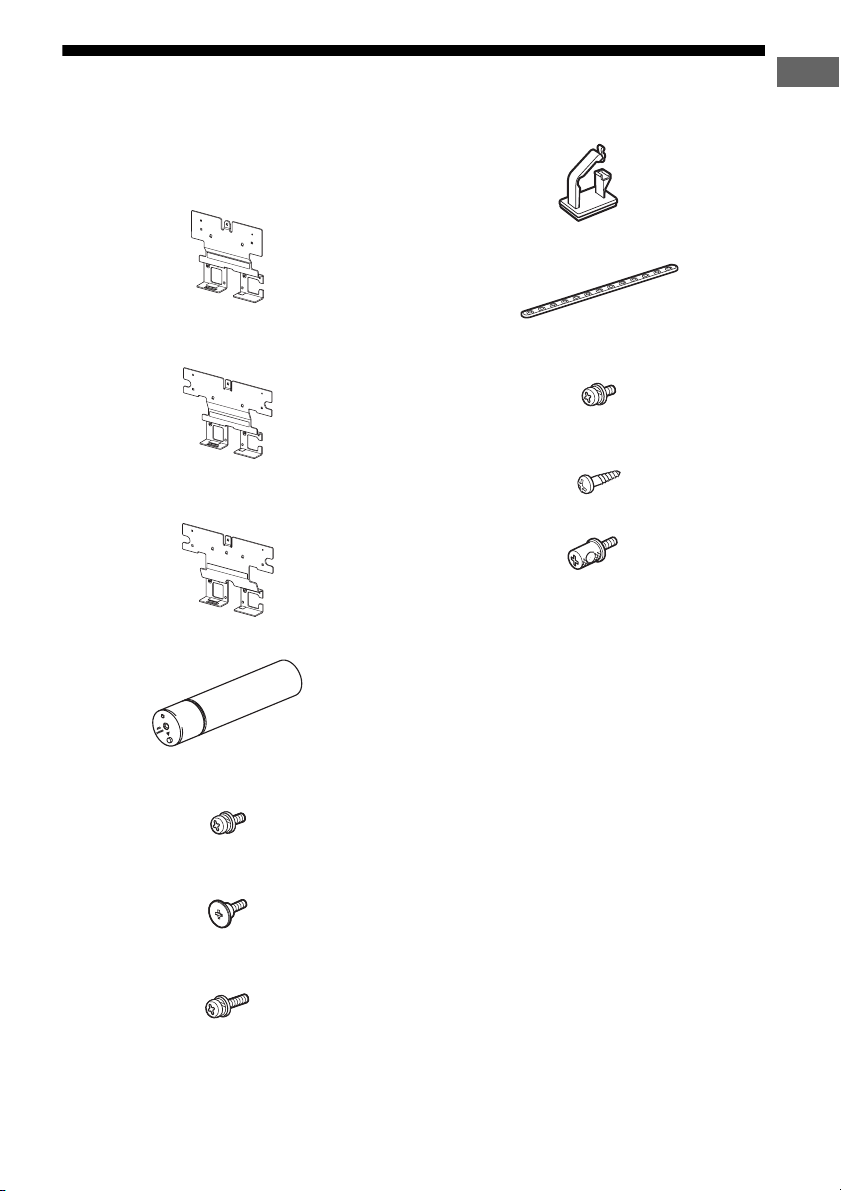
Unpacking
• Operating Instructions (this manual)
• Compatible list (1)
• Attachment bracket (A)
– 32 A (For WS-32SE1B) (1)
Unpacking
• Cable clamp (F) (2)
• Support belt (G) (1)
– 40/46 A (For WS-40SE1B/WS-46SE1B)
(1)
– 40/46 B (For WS-40SE1B (Europe model
only) /WS-46SE1B) (1)
• Extension neck for TV stand (B) (1)
• Screw for attachment bracket
(+PSW M5 × 12 mm) (C) (2)
• Screw for attachment bracket (Silver) (D)
(2)
• Screw for support belt
(+PSW M4 × 10 mm) (H) (1)
• Wood screw for support belt
(M3.8 × 20 mm) (I) (1)
• Anchor bolt (J) (2)
• Screw for TV stand head
(+PSW M5 × 20 mm) (E) (3)
GB
5
Page 6
Setting Up
You can use this speaker attachment bracket to install the TV Sound Bar System on the TV stand.
Notes
• This speaker attachment bracket is designed for use with the stand supplied with TV only.
• This speaker attachment bracket cannot be used with the SU-FL71M/SU-FL71L floor stand.
• If you want to hang the SA-32SE1/SA-40SE1/SA-46SE1 TV Sound Bar System, hang it directly on the wall.
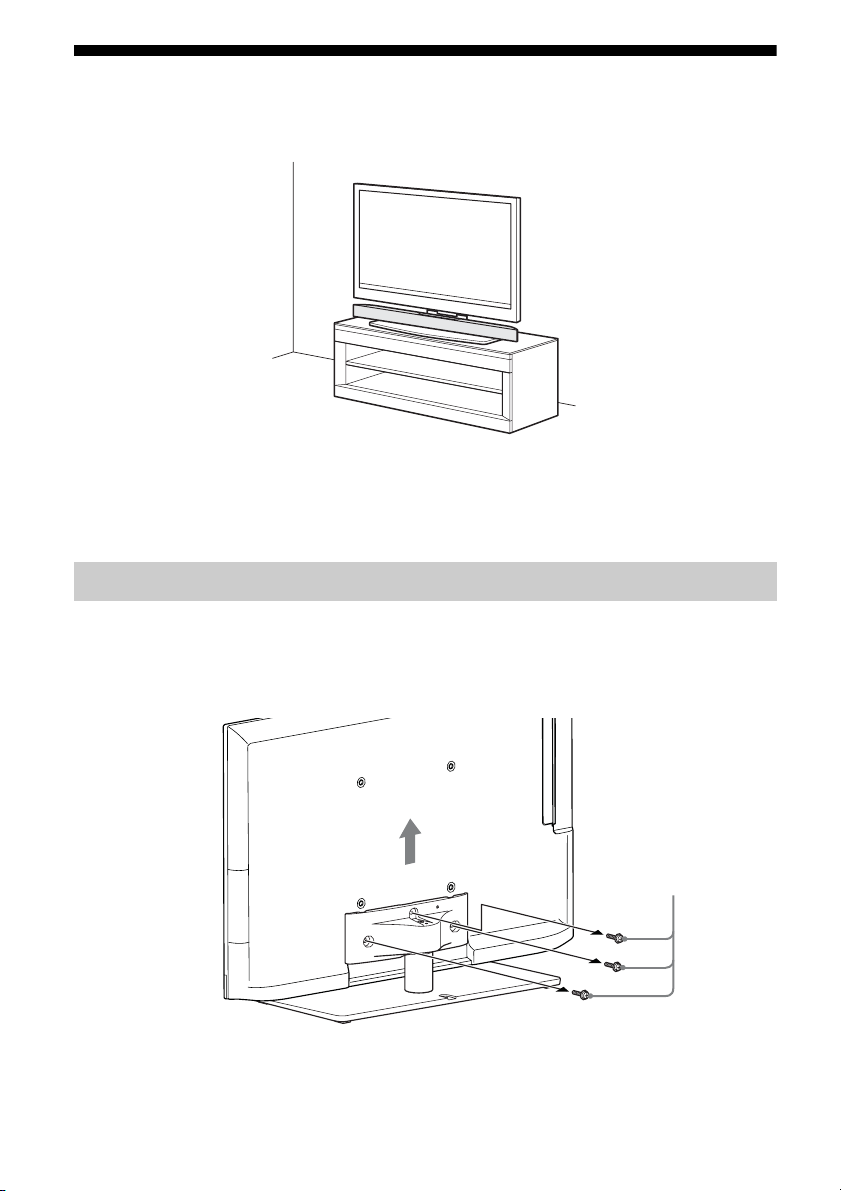
Installing the TV Sound Bar System on the TV stand
1 Remove the screws from the TV stand, then detach the TV from the TV
stand.
The screws at the TV stand
GB
6
Page 7
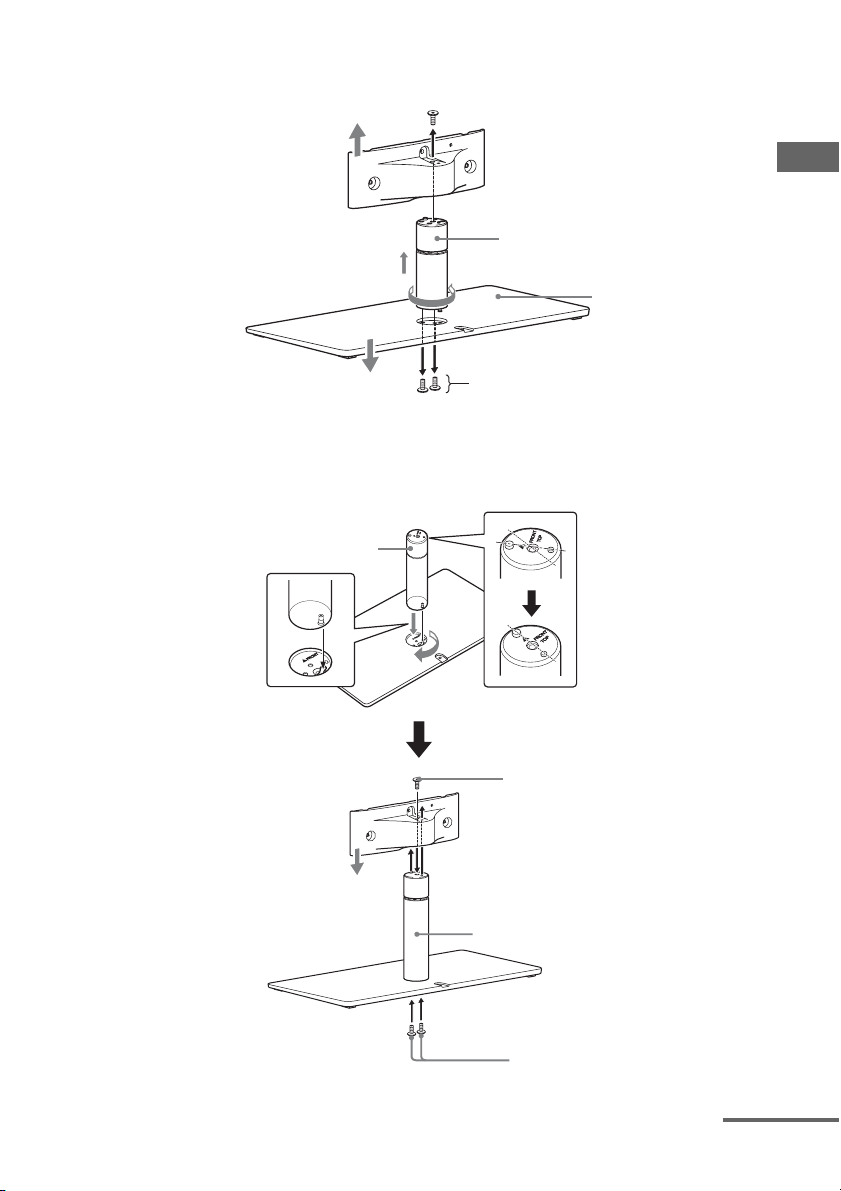
2 Remove the screws from the original neck, then detach the original
neck from the TV stand.
Original neck
2
1
Screws for the stand
• The 32 inch and 40 inch model: 2 screws
• The 46 inch model: 3 screws
Stand base
3 Install the extension neck for TV stand (B) to the TV stand using the
screws removed in step 2.
1
B
Setting Up
1
2
2
The screw removed in step 2
B
The screws removed in step 2
continued
GB
7
Page 8
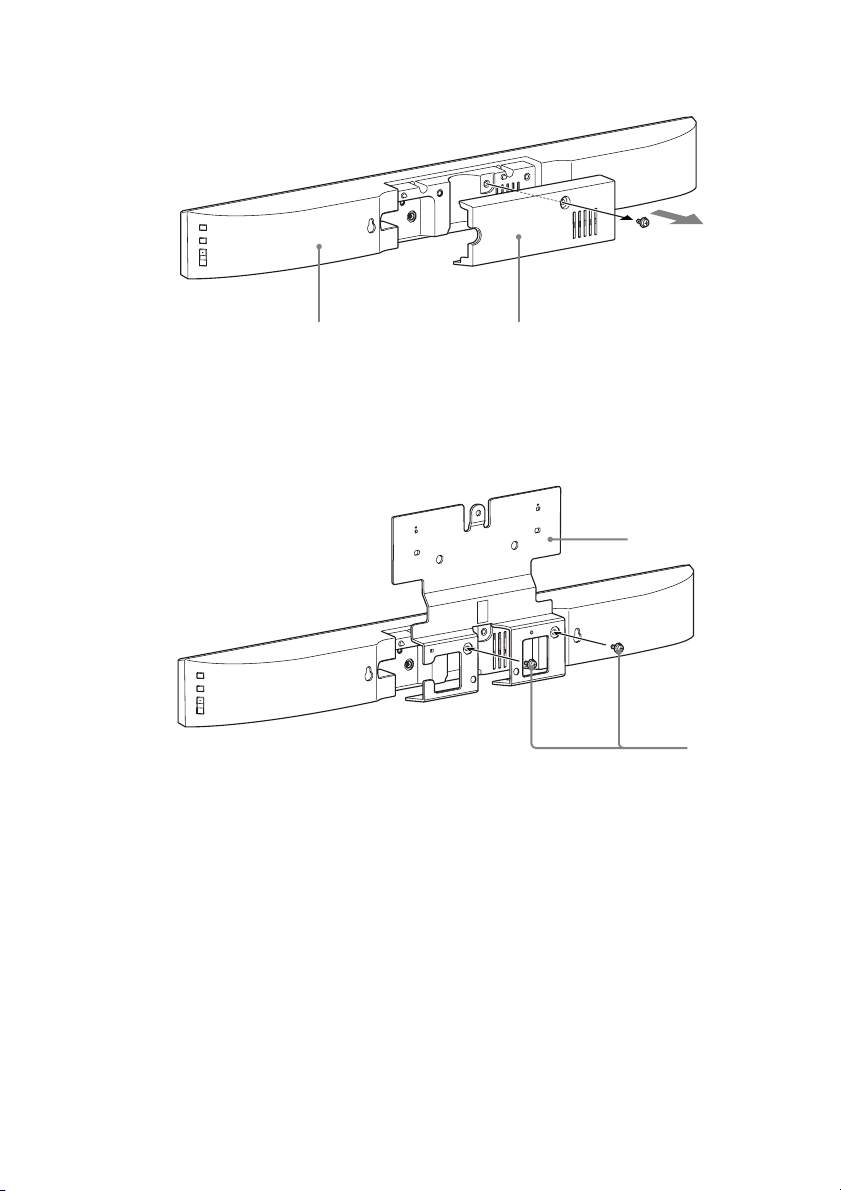
4 Remove the screw on the rear cover of the TV Sound Bar System, then
remove the rear cover.
TV Sound Bar System
Rear cover
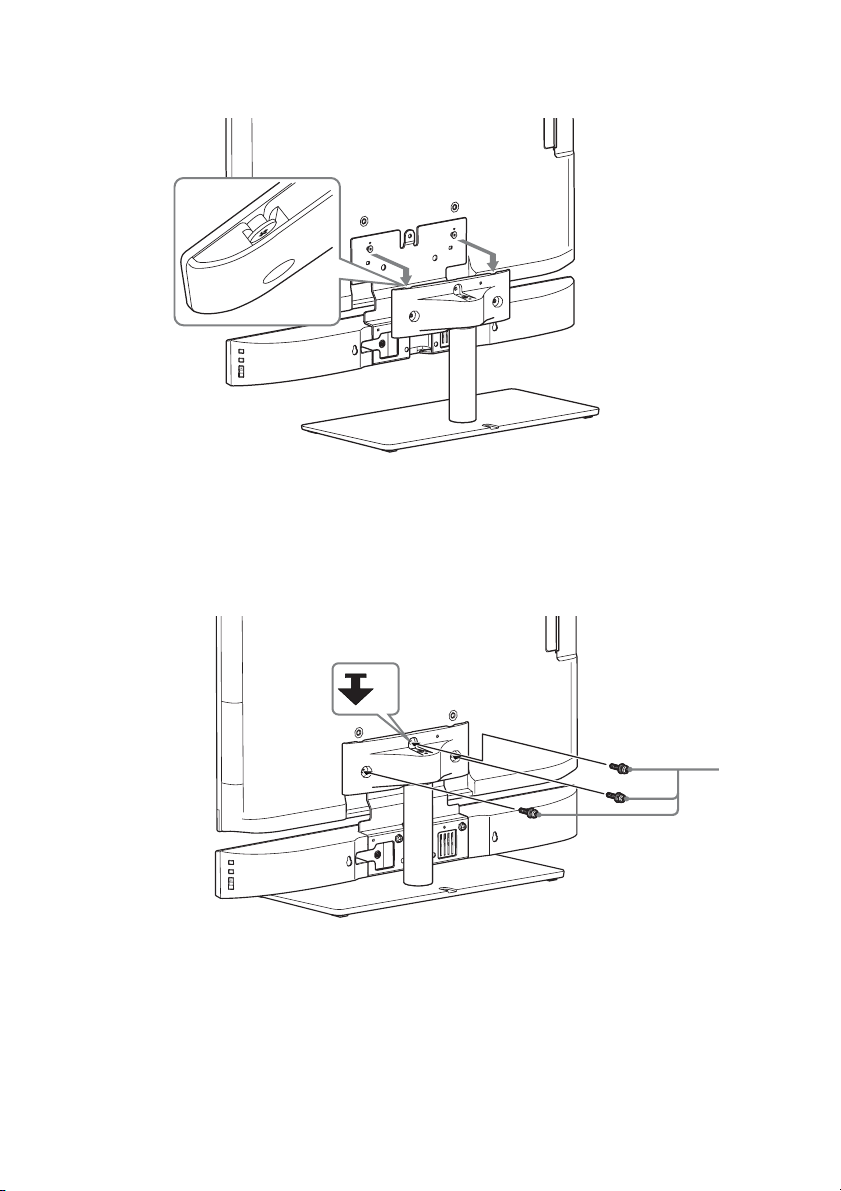
5 Mount the attachment bracket (A) to the TV Sound Bar System with the
screw for attachment bracket (+PSW M5 × 12 mm) (C).
Check the engraving on the rear of the attachment bracket and use a suitable bracket for the
TV. For details, refer to the supplied “Compatible list”.
A
C
GB
8
Page 9
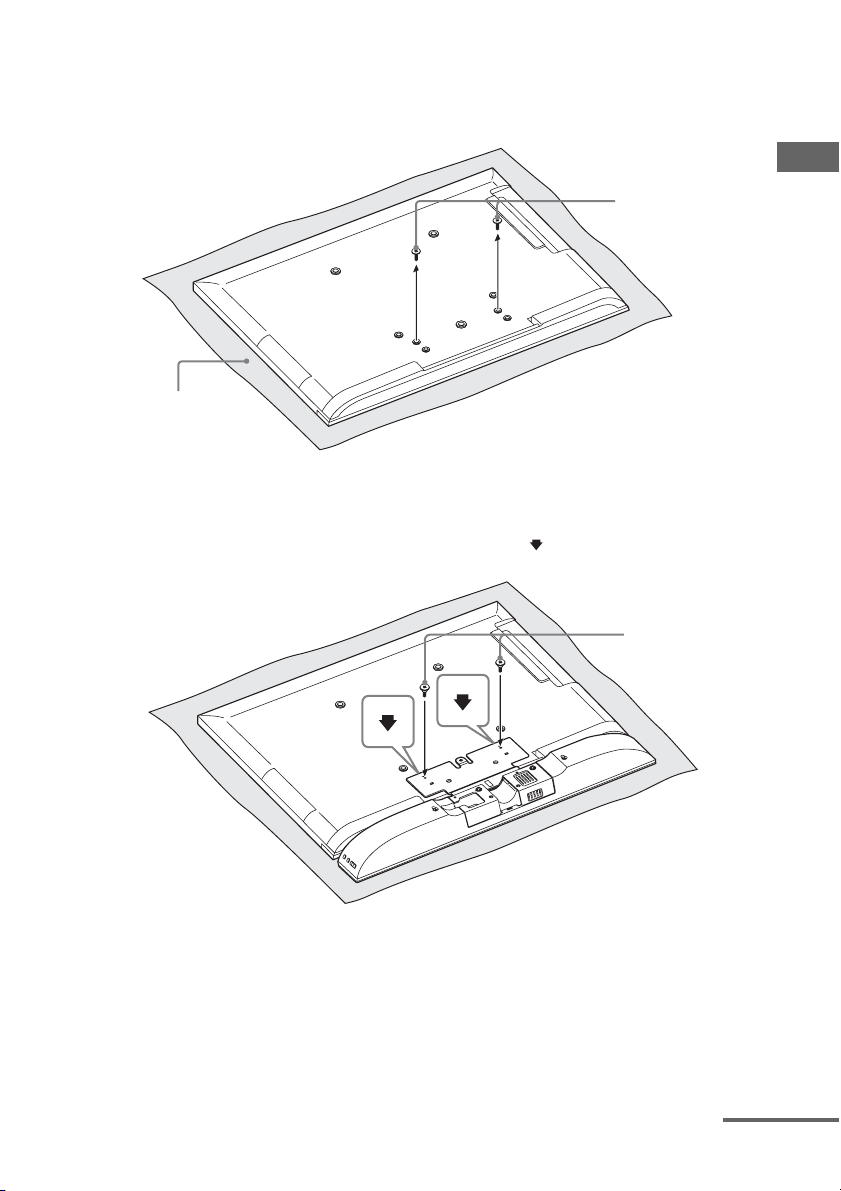
6 Remove the screws from the rear of the TV.
Be sure to place the TV on a soft thick cloth with the TV screen facing down to prevent
damaging the surface of the LCD.
The screws at the
rear of the TV
Cloth
7 Mount the TV Sound Bar System to the TV with the screw for
attachment bracket (Silver) (D).
Be sure to fasten the screws to the screw holes pointed with mark.
Setting Up
D
Notes
• After installation, the screw for attachment bracket (Silver) will protrude from the screw hole. This is not
a malfunction.
• When carrying the TV Sound Bar System-installed TV, do not hold it by the TV Sound Bar System.
Doing so may cause damage or injury.
continued
9
GB
Page 10
8 Attach the TV to the TV stand.
Match the screw protrusion to the notch on the TV stand.
Note
When attaching the TV to the TV stand, make sure to hold the TV instead of the TV Sound Bar System.
9 Secure the TV to the TV stand with the screw for TV stand head (+PSW
M5 × 20 mm) (E).
x 3
E
10After you have made all connections, you can use the cable clamp (F)
to neatly secure the cables.
Note
As a protective measure, secure the TV. For details, see “Preventing the TV from toppling over”.
GB
10
Page 11
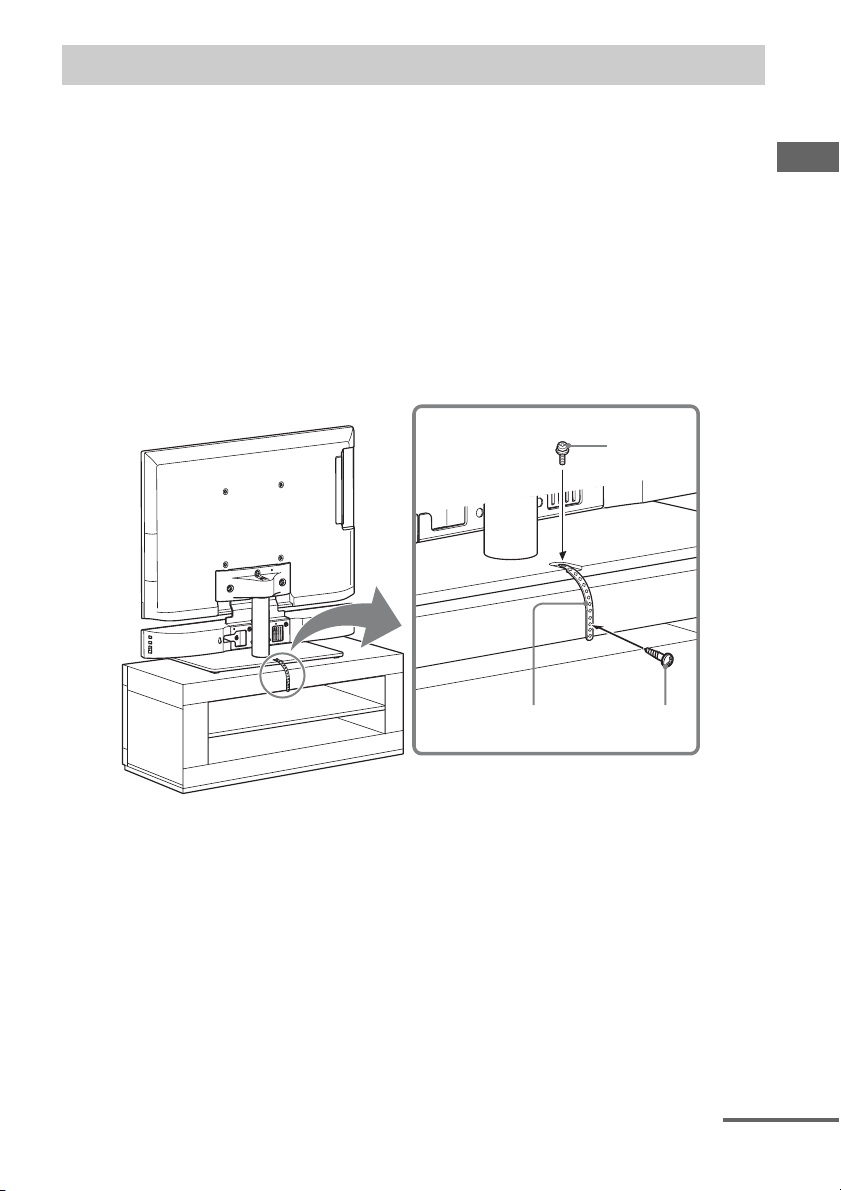
Preventing the TV from toppling over
As a protective measure, secure the TV. If you fail to do so, the TV may topple over resulting in
serious injury.
Warning
To avoid injury, place the TV Sound Bar System-installed TV less than 25 cm (9 7/8 in) from the
wall, and firmly secure the TV to the wall.
Notes
• Be careful not to pinch your fingers when setting up the TV or rack.
• Install the TV after allowing for a space of less than 25 cm (9 7/8 in) from the wall. The wall will prevent the
TV from falling even if the TV leans backward towards the wall.
When installing the TV on a rack
H
G
I
Setting Up
1 Place the TV on the center of the rack.
2 Fit the support belt (G) to the TV stand, then firmly fasten with the
screw for support belt (+PSW M4 × 10 mm) (H) using a screw driver.
3 Fasten the support belt to the rack with the wood screw for support belt
(M3.8 × 20 mm) (I).
continued
11
GB
Page 12
Securing the TV to a wall
Prepare a strong string or chain (not supplied) and a fastener (not supplied) for fastening to the wall.
Secure the fastener to a reinforced wall. Even if you have secured the TV to the rack, be sure to
secure it to a wall by following this procedure.
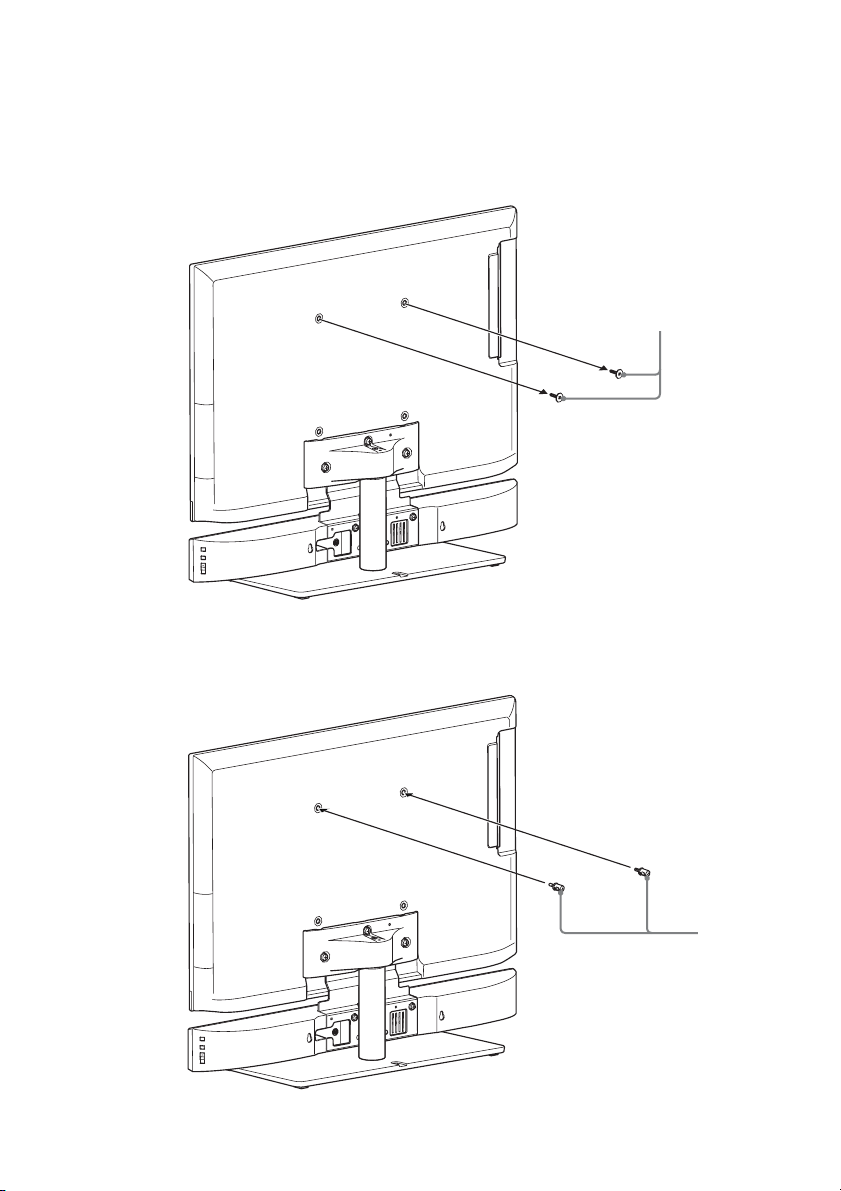
1 Remove the screws from the rear of the TV.
The screws at the rear of the TV
2 Fasten the anchor bolt (J) to the rear of the TV.
GB
12
J
Page 13

3 Secure the fastener to the reinforced wall (1), and then thread the
string or chain through the holes of the anchor bolt and the fastener
(2). Firmly tie both ends of the string or chain together.
Less than 25 cm
(9 7/8 in)
(1)
(2)
TV installed on the floor TV installed on a rack
Adjusting the angle of the TV
Less than 25 cm
(9 7/8 in)
Setting Up/Specifications
0°
6°
GB
13
Page 14

Specifications
Attachment bracket 32 A
Dimensions (w/h/d) (approx.)
250 mm × 216 mm ×
35 mm (9 7/8 in × 8 5/8 in
× 1 7/16 in)
Mass (approx.) 1.1 kg (2 lb 7 oz)
Attachment bracket 40/46 A
Dimensions (w/h/d) (approx.)
334 mm × 227 mm ×
35 mm (13 1/4 in × 9 in
× 1 7/16 in)
Mass (approx.) 1.3 kg (2 lb 14 oz)
Attachment bracket 40/46 B (Europe
model only)
Dimensions (w/h/d) (approx.)
332 mm × 232 mm ×
35 mm (13 1/8 in × 9 1/4 in
× 1 7/16 in)
Mass (approx.) 1.3 kg (2 lb 14 oz)
Extension neck for TV stand
Dimensions (approx.)
φ 43 mm × 216.8 mm
(φ 1 3/4 in × 8 5/8 in)
Mass (approx.) 0.66 kg (1 lb 8 oz)
Design and specifications are subject to change
without notice.
GB
14
Page 15

Page 16

À propos de ce manuel
Les instructions de ce manuel concernent le modèle
WS-32SE1B/WS-40SE1B/WS-46SE1B. Les
illustrations utilisées dans ce manuel correspondent
au modèle WS-32SE1B et peuvent différer du
modèle en votre possession. Toutes les différences
relatives au fonctionnement de cet appareil sont
signalées dans le manuel par la mention
«
uniquement pour le modèle WS-32SE1B ».
Avertissement à propos
de l’installation de la
barre de son sur le pied
du téléviseur
Le support de fixation d’enceinte WS-32SE1B/
WS-40SE1B/WS-46SE1B est destiné uniquement à
la barre de son SA-32SE1/SA-40SE1/SA-46SE1 et
aux modèles de téléviseurs appropriés. Le fait de
l’utiliser avec d’autres produits ou dans d’autres
buts risque d’entraîner des dommages ou des
blessures.
Avis aux clients
Une certaine expertise est requise pour installer ce
produit. Veuillez respecter attentivement les
consignes de sécurité préconisées pendant
l’installation. Sony ne peut être tenu responsable de
tout dommage ou blessure résultant d’une
manipulation ou d’une installation incorrecte ou de
l’installation d’un produit autre que celui indiqué.
Vos droits légaux (éventuels) ne sont pas affectés.
Sécurité
Les produits Sony sont conçus pour vous offrir le
maximum de sécurité. Toutefois, si les produits sont
utilisés de façon incorrecte, ils peuvent entraîner des
blessures graves en provoquant un incendie ou une
électrocution, ou encore le basculement ou la chute
de l’appareil. Veillez à observer les consignes de
sécurité préconisées pour éviter de tels accidents.
AVERTISSEMENT
Le non-respect des consignes suivantes peut être
fatal ou entraîner des blessures graves en
provoquant un incendie ou une électrocution, ou
encore le basculement ou la chute de l’appareil.
Pour éviter tout risque de
chute des produits,
installez-les à un endroit
sûr où ils ne risquent pas
de tomber.
• Veillez à confier l’installation, le déplacement ou
le démontage des produits à des installateurs
agréés et à tenir les enfants à l’écart pendant
l’intervention.
• Une installation par des techniciens non agréés
peut entraîner des blessures graves ou des
dommages matériels.
• Si des personnes autres que des installateurs agréés
transportent ou démontent la barre de son ou le
téléviseur équipé de la barre de son, le produit peut
tomber et provoquer des blessures ou des
dommages matériels importants. Deux personnes
au moins doivent porter ou démonter le(s)
produit(s).
• Ne retirez pas les vis, etc., après l’installation de la
barre de son ou du téléviseur équipé de la barre de
son.
• N’appliquez aucune force excessive sur les
produits au cours de l’entretien ou du nettoyage.
Ne posez aucun objet sur
les produits.
• Rien ne doit être placé sur les produits.
L’appareil risquerait de tomber et de provoquer
des blessures ou des dommages matériels.
Ne vous appuyez pas sur
les produits et ne vous y
suspendez pas.
• Ne vous appuyez pas sur les produits et ne vous y
suspendez pas, car ils risqueraient de tomber et de
causer des blessures graves.
FR
2
Page 17

Choisissez un
emplacement adapté.
• N’exposez pas les produits à la pluie ou
à l’humidité et veillez à ne renverser aucun liquide
sur les produits. Cela présente un danger
d’incendie ou d’électrocution.
• N’installez jamais les produits dans un lieu chaud,
humide ou excessivement poussiéreux ou dans un
endroit où ils seraient soumis à des vibrations
mécaniques. Cela présente un danger d’incendie
ou d’électrocution.
• Tenez les objets inflammables et les flammes nues
(bougie, etc.) à l’écart des produits.
• N’installez pas les produits sur ou sous un
climatiseur. L’exposition prolongée des produits à
des fuites d’eau ou à des courants d’air provenant
du climatiseur pourrait provoquer un incendie, une
électrocution ou des dysfonctionnements.
ATTENTION
Le non-respect des consignes suivantes peut
entraîner des blessures ou des dommages matériels.
N’installez aucun équipement
autre que ceux indiqués.
• Le support de fixation d’enceinte WS-32SE1B/
WS-40SE1B/WS-46SE1B est conçu pour être
utilisé exclusivement avec l’équipement spécifié.
Si vous installez un équipement autre que ceux
mentionnés, il peut tomber ou se briser et
provoquer des blessures.
• Ne modifiez pas les produits.
• Ne déposez aucun objet chaud sur les produits. La
chaleur risque de provoquer une décoloration ou
une déformation des produits.
Veillez à ne pas coincer
les câbles.
• Si le cordon d’alimentation secteur ou
les câbles de raccordement sont coincés entre les
produits et le mur, le sol ou d’autres objets ou s’ils
sont pliés ou tordus, les conducteurs internes
peuvent être exposés et provoquer un court-circuit
ou une coupure de courant.
Cela présente un danger d’incendie ou
d’électrocution.
• Veillez à ne pas marcher sur le cordon
d’alimentation secteur ou sur les câbles de
raccordement lors du transport des produits. Vous
risqueriez d’endommager le cordon et les câbles et
de provoquer un incendie ou une électrocution.
Ne couvrez pas les
orifices de ventilation
des produits.
• Si vous couvrez les orifices de ventilation (avec du
tissu ou tout autre matériau), l’appareil risque de
surchauffer et de provoquer un incendie.
Dégagez les câbles pour
éviter de les piétiner.
• Vous risquez de vous entraver dans les
câbles, de renverser les produits et de provoquer
des blessures.
Veillez à ce que l’installation de
la barre de son sur le téléviseur
soit parfaitement sûre.
• Assurez-vous que la barre de son et le téléviseur
sont rattachés solidement entre-eux. Prenez soin
ensuite de fixer fermement le téléviseur équipé de
la barre de son sur son pied. Si l’installation n’est
pas suffisamment sûre, la barre de son et le
téléviseur risquent de tomber et de provoquer des
blessures.
Veillez à ne pas soumettre les
produits à des chocs ou à une
pression trop importante.
• Lors de l’installation de la barre de son sur le pied
d’un téléviseur, n’appuyez pas avec la main sur la
barre de son ou sur le téléviseur.
Ne heurtez pas la barre de son ou le téléviseur avec
des objets durs, tels qu’un tournevis.
En cas de déplacement
du téléviseur équipé de la
barre de son.
Si vous appliquez une force excessive sur les
produits lors de leur déplacement, vous risquez de
vous blesser ou d’endommager le matériel.
Conformez-vous scrupuleusement aux procédures
et conseils indiqués ci-après.
• Demandez l’aide d’une ou plusieurs autres
personnes pour transporter le téléviseur équipé de
la barre de son en ayant pris soin auparavant de
débrancher et retirer tous les appareils raccordés.
FR
suite
FR
3
Page 18

• Veillez à ne pas vous coincer les mains ou les
pieds sous le téléviseur équipé de la barre de son.
• Soulevez le téléviseur équipé de la barre de son au
lieu de le faire glisser. Le socle risque, en effet, de
se détacher et de rayer le sol.
• Évitez de saisir le téléviseur par la barre de son
lorsque vous avez besoin de le déplacer. Vous
risqueriez, en effet, de vous blesser ou
d’endommager le matériel.
Remarques sur l’installation
• Lors de l’assemblage, placez un tissu sur le sol
pour éviter de l’abîmer.
• Installez les produits sur un sol parfaitement stable
et plat.
• Ne déplacez les produits que si vous êtes deux ou
plus. Si vous agissez seul, vous risquez de
provoquer un accident ou de vous blesser.
• Tenez les enfants à l’écart pendant la procédure
d’installation.
Veillez à installer les produits
conformément aux instructions
qui vous sont données.
• Prenez soin de bien serrer les vis. Si l’installation
n’est pas suffisamment sûre, la barre de son risque
de tomber et de provoquer des dommages ou des
blessures.
• Veillez à ne pas vous blesser les mains ou les
doigts au cours du montage des produits.
Table des matières
Déballage ....................................... 5
Mise en place ................................. 6
Installation de la barre de son sur le pied
du téléviseur .......................................... 6
Système anti-bascule.............................. 11
En ajustant l’angle du téléviseur............ 13
Spécifications .............................. 14
Remarques sur le nettoyage
Nettoyez les produits avec un chiffon doux,
légèrement humidifié à l’aide d’un détergent non
agressif. N’utilisez pas de tampons abrasifs, de
poudres à récurer ou de solvants tels que du diluant,
du benzène ou de l’alcool.
Si vous avez des questions ou en cas de problème
concernant ce produit, veuillez vous adresser à votre
revendeur Sony.
Avis à l’attention des clients : les
informations suivantes
concernent uniquement les
appareils vendus dans les pays
appliquant les directives de l’UE.
Le fabricant de ce produit est Sony Corporation,
1-7-1 Konan Minato-ku Tokyo, 108-0075 Japon. Le
représentant autorisé pour les questions de
compatibilité électromagnétique (EMC) et la
sécurité des produits est Sony Deutschland GmbH,
Hedelfinger Strasse 61, 70327 Stuttgart, Allemagne.
Pour toute question relative au SAV ou à la garantie,
merci de bien vouloir vous référer aux coordonnées
contenues dans les documents relatifs au SAV ou la
garantie.
FR
4
Page 19

Déballage
• Mode d’emploi (ce manuel)
• Liste de compatibilité (1)
• Support de fixation (A)
– 32 A (pour WS-32SE1B) (1)
Déballage
• Collier de serrage (F) (2)
• Courroie anti-basculement (G) (1)
– 40/46 A (pour WS-40SE1B/WS-46SE1B)
(1)
– 40/46 B (pour WS-40SE1B (modèle
européen uniquement) /WS-46SE1B) (1)
• Montant (rallonge) à visser sur le socle du
téléviseur (B) (1)
• Vis du support de fixation
(+PSW M5 × 12 mm) (C) (2)
• Vis du support de fixation (argent) (D) (2)
• Vis pour la courroie anti-basculement
(+PSW M4 × 10 mm) (H) (1)
• Vis à bois pour la courroie anti-basculement
(M3,8 × 20 mm) (I) (1)
• Boulon de scellement (J) (2)
• Vis à insérer dans la partie supérieure du
pied du téléviseur (+PSW M5 × 20 mm)
(E) (3)
FR
5
Page 20

Mise en place
Utilisez, si besoin est, ce support de fixation d’enceinte pour installer la barre de son sur le pied du
téléviseur.
Remarques
• Cette bride de fixation de haut-parleur est conçue pour être utilisée avec le support fourni avec le téléviseur
uniquement.
• Cette bride de fixation de haut-parleur ne peut être utilisée avec le support au sol SU-FL71M/SU-FL71L.
• Si vous souhaitez suspendre le système de barre de son pour téléviseur SA-32SE1/SA-40SE1/SA-46SE1 TV,
fixez-le directement sur le mur.
Installation de la barre de son sur le pied du téléviseur
1 Retirez les vis servant à fixer le pied au téléviseur, puis démontez le
pied du téléviseur.
Vis de fixation du
pied du téléviseur
FR
6
Page 21

2 Enlevez les vis du montant d’origine, puis dégagez le montant du socle.
Montant d’origine
2
1
Vis de fixation du socle
• Modèle 82 et 102 cm : 2 vis
• Modèle 117 cm : 3 vis
Socle
3 Assemblez l’autre montant fourni en guise de rallonge (B) au socle du
téléviseur à l’aide des vis retirées à l’étape
B
2.
1
Mise en place
1
2
2
Vis retirée à l’étape 2
B
Vis retirées à l’étape 2
suite
FR
7
Page 22

4 Retirez la vis maintenant le couvercle en place au dos de la barre de
son, puis enlevez le couvercle.
Barre de son pour téléviseur Couvercle arrière
5 Assemblez le support de fixation (A) à la barre de son à l’aide des vis
prévues à cet effet (+PSW M5 × 12
Vérifiez l’inscription gravée au dos du support de fixation afin d’utiliser un support adapté à
votre téléviseur. Pour plus d’informations à ce sujet, reportez-vous à la « liste de
compatibilité » fournie.
mm) (C).
A
C
FR
8
Page 23

6 Enlevez les vis au dos du téléviseur.
Placez un tissu épais et doux sous l’écran LCD pour éviter d’endommager sa surface.
Vis au dos du
téléviseur
Tissu
7 Fixez la barre de son au téléviseur à l’aide des vis prévues pour le
support de fixation (argent) (D).
Insérez les vis dans les trous de montage indiqués par le repère .
D
Mise en place
Remarques
• Une fois la barre de son installée, les vis du support de fixation (argent) dépassent des trous de montage.
Cela est tout à fait normal.
• Évitez de saisir le téléviseur par la barre de son lorsque vous avez besoin de le déplacer. Vous risqueriez,
en effet, de vous blesser ou d’endommager le matériel.
suite
9
FR
Page 24

8 Accrochez le téléviseur avec la barre de son sur le pied.
Introduisez les parties saillantes des vis dans les encoches prévues dans la partie supérieure du
pied du téléviseur.
Remarque
Ne soulevez jamais le téléviseur par la barre de son lorsque vous l’installez sur son pied.
9 Fixez le téléviseur sur la partie supérieure du pied à l’aide des vis
prévues à cet effet (+PSW M5 × 20
mm) (E).
x 3
E
10Une fois tous les branchements effectués, servez-vous du collier de
serrage (F) pour maintenir les câbles en place.
Remarque
Par mesure de sécurité, veillez à garantir une parfaite stabilité de votre installation. Pour plus de détails,
reportez-vous à la section « Système anti-bascule ».
FR
10
Page 25

Système anti-bascule
Par mesure de sécurité, veillez à garantir une parfaite stabilité de votre installation. Dans le cas
contraire, le téléviseur risque de basculer et de provoquer de graves blessures.
Avertissement
Pour éviter tout danger, placez le téléviseur équipé de la barre de son à moins de 25 cm (9 7/8
pouces) d’un mur et fixez-le solidement au mur.
Remarques
• Prenez garde de ne pas vous pincer les doigts lors de l’installation du téléviseur sur le meuble.
• Prévoyez un espace maximum de 25 cm (9 7/8 pouces) entre le téléviseur et le mur. Si le téléviseur venait à
basculer vers l’arrière, le mur l’empêcherait de tomber.
Installation du téléviseur sur un meuble
H
G
I
Mise en place
1 Placez le téléviseur au centre du meuble.
2 Fixez la courroie anti-basculement (G) sur le socle du téléviseur, puis
serrez la vis prévue à cet effet (+PSW M4 ×
tournevis.
10 mm) (H) à l’aide d’un
3 Reliez la courroie anti-basculement au meuble à l’aide de la vis à bois
réservée à cet usage (M3,8 ×
20 mm) (I).
suite
11
FR
Page 26

Fixation du téléviseur au mur
Préparez un lien suffisamment long (non fourni) et une attache murale (non fournie) pour relier le
téléviseur au mur. Installez l’attache sur un mur renforcé. Même si vous avez sécurisé le téléviseur
sur le meuble, veuillez le rattacher au mur en procédant comme indiqué ci-dessous.
1 Enlevez les vis au dos du téléviseur.
Vis au dos du téléviseur
2 Vissez le boulon de scellement (J) à l’arrière du téléviseur.
FR
12
J
Page 27

3 Fixez l’attache sur un mur renforcé (1), puis faites passer le lien dans
les orifices respectifs du boulon de scellement et de l’attache murale
(2). Reliez les deux extrémités du lien par un nœud solide.
Moins de 25 cm
(9 7/8 pouces)
(1)
(2)
Moins de 25 cm
(9 7/8 pouces)
Mise en place/Spécifications
Téléviseur installé à
même le sol
En ajustant l’angle du téléviseur
0°
Téléviseur installé sur
un meuble
6°
13
FR
Page 28

Spécifications
Support de fixation 32 A
Dimensions (l/h/p) (environ)
250 mm × 216 mm ×
35 mm (9 7/8 pouces ×
8 5/8 pouces × 1 7/16
pouces)
Poids (environ) 1,1 kg (2 livres 7 onces)
Support de fixation 40/46 A
Dimensions (l/h/p) (environ)
334 mm × 227 mm ×
35 mm (13 1/4 pouces ×
9 pouces × 1 7/16 pouces)
Poids (environ) 1,3 kg (2 livres 14 onces)
Support de fixation 40/46 B (modèle
européen uniquement)
Dimensions (l/h/p) (environ)
332 mm × 232 mm ×
35 mm (13 1/8 pouces ×
9 1/4 pouces × 1 7/16
pouces)
Poids (environ) 1,3 kg (2 livres 14 onces)
Montant (rallonge) à visser sur le socle
du téléviseur
Dimensions (environ)
φ 43 mm × 216,8 mm
(φ 1 3/4 pouces × 8 5/8
pouces)
Poids (environ) 0,66 kg (1 livres 8 onces)
La conception et les spécifications sont sujettes à
modifications sans préavis.
FR
14
Page 29

Page 30

Acerca de este manual
Las instrucciones que se incluyen en este manual
son para el modelo WS-32SE1B/WS-40SE1B/
WS-46SE1B. Las ilustraciones utilizadas en este
manual corresponden al modelo WS-32SE1B y
pueden no coincidir con su modelo. Las diferencias
de funcionamiento se indican en el manual con la
frase “Solo el modelo WS-32SE1B”.
Advertencia sobre la
instalación del Sistema
de barra de sonido de
televisor en el soporte de
televisor
Este soporte de fijación de altavoz WS-32SE1B/
WS-40SE1B/WS-46SE1B se utiliza solamente con
el Sistema de barra de sonido de televisor
SA-32SE1/SA-40SE1/SA-46SE1 y modelos de
televisor concretos. El uso con otros productos o
para otros fines distintos de los especificados puede
producir daños o lesiones.
ADVERTENCIA
Si no se tienen en cuenta las precauciones
siguientes, pueden producirse lesiones graves o
incluso la muerte a raíz de un incendio o una
descarga eléctrica, o el producto puede volcarse.
No deje caer los
productos ni los instale
en ningún lugar donde
puedan caerse.
• Asegúrese de contratar la instalación, transporte o
desmontaje a contratistas autorizados y mantenga
a los niños alejados durante estos procesos.
• Una instalación no autorizada podría provocar
lesiones graves o daños en la propiedad.
• Si un distribuidor no autorizado transporta o
desmonta el Sistema de barra de sonido de
televisor o el televisor instalado en el Sistema de
barra de sonido de televisor se le puede caer el
producto y provocar lesiones graves o daños en la
propiedad. Asegúrese de que dos o más personas
transportan o desmontan el producto.
• No extraiga ningún tornillo, etc., después de
desmontar el Sistema de barra de sonido de
televisor o el televisor instalado en el Sistema de
barra de sonido de televisor.
• No manipule el producto con una fuerza excesiva
cuando realice su limpieza o mantenimiento.
Información para los clientes
Para instalar este producto es necesario tener
conocimientos suficientes. Durante la instalación,
preste especial atención a la seguridad. Sony no se
hace responsable de los daños o lesiones causados
por una mala utilización, una instalación incorrecta,
o la instalación de otros productos que no sean los
especificados. Esto no afecta a sus derechos legales
(en caso de haberlos).
Seguridad
Los productos de Sony están diseñados pensando en
la seguridad. Sin embargo, si los productos se
utilizan incorrectamente, pueden producirse
lesiones graves a causa de un incendio, una
descarga, o al volcarse o caerse el producto. Para
evitar tales accidentes, asegúrese de cumplir las
precauciones de seguridad.
ES
2
No coloque objetos
encima de los productos.
• No coloque nada encima de los
productos. Si lo hace, el sistema puede caerse y
provocar daños personales o materiales.
No se apoye ni cuelgue
de los productos.
• No se apoye ni cuelgue de los
productos, ya que podrían caerse y provocar
lesiones graves.
Page 31

Preste atención a la
ubicación del producto.
• No exponga los productos a la lluvia o la
humedad, ni vierta ningún tipo de líquido sobre
ellos. Podría originarse un incendio o producirse
una descarga eléctrica.
• No coloque nunca los productos en lugares
cálidos, húmedos o excesivamente polvorientos,
ni en lugares en los que se produzcan vibraciones
mecánicas, ya que podría originarse un incendio o
producirse una descarga eléctrica.
• Mantenga la pantalla alejada de objetos
inflamables y de llamas (como, por ejemplo, de
velas).
• No instale los productos encima ni debajo de un
aparato de aire acondicionado. Si los productos
quedan expuestos al goteo o a la corriente de aire
procedentes del aparato de aire acondicionado
durante mucho tiempo, podría producirse un
incendio, una descarga eléctrica o un fallo de
funcionamiento.
Evite que los cables
queden enganchados.
• Si el cable de alimentación de ca o los
cables de conexión quedan atrapados entre los
productos y la pared, el suelo u otro objeto, o si se
doblan o tuercen con fuerza, es posible que los
conductores internos queden expuestos y que
provoquen un cortocircuito o corte eléctrico.
Esto podría provocar un incendio o producir una
descarga eléctrica.
• No pise el cable de alimentación de ca ni el cable
de conexión al transportar los productos. El cable
podría dañarse y provocar un incendio o una
descarga eléctrica.
No cubra los orificios de
ventilación de los
productos.
• Si cubre los orificios de ventilación (con un paño,
etc.), el sistema podría sobrecalentarse y provocar
un incendio.
PRECAUCIÓN
Si no se tienen en cuenta las precauciones
siguientes, se pueden producir lesiones graves o
daños en la propiedad.
No instale equipos que no sean
el producto especificado.
• El soporte de fijación de altavoz WS-32SE1B/
WS-40SE1B/WS-46SE1B se ha diseñado para
utilizarse únicamente con los equipos
especificados. Si instala equipos que no sean los
especificados, pueden caerse o romperse y
provocar lesiones.
• No modifique los productos.
• No coloque ningún objeto caliente directamente
encima de los productos. El calor puede ocasionar
la decoloración o deformación de los productos.
Asegúrese de fijar bien el
televisor y el Sistema de barra
de sonido de televisor.
• Fije firmemente el televisor y el Sistema de barra
de sonido de televisor cuando los instale juntos. A
continuación, fije firmemente el televisor
instalado en el Sistema de barra de sonido de
televisor en el soporte. Si el televisor y el Sistema
de barra de sonido de televisor no están instalados
de una forma segura, podrían caerse o volcarse y
provocar lesiones.
No aplique peso a los productos
ni los someta a golpes.
• Cuando instale el Sistema de barra de sonido de
televisor en el soporte de televisor, no se apoye
con la mano encima del televisor ni del Sistema de
barra de sonido de televisor.
No golpee el televisor ni el Sistema de barra de
sonido de televisor con objetos contundentes
como, por ejemplo, un destornillador, etc.
ES
Tenga cuidado de no
tropezar con los cables.
• Si tropezara, los productos podrían
volcarse y provocar lesiones.
continúa
ES
3
Page 32

Durante el transporte del
televisor instalado en el
Sistema de barra de
sonido de televisor.
Si transporta los productos con fuerza, pueden
provocarse daños o lesiones. Asegúrese de seguir los
procedimientos y consejos que se ofrecen a
continuación.
• Asegúrese de que al menos dos o más personas
transportan o desmontan el televisor instalado en
el Sistema de barra de sonido de televisor, y que se
ha desconectado y extraído el equipo conectado.
• Tenga cuidado de que las manos o los pies no
queden atrapados debajo de la parte inferior del
televisor instalado en el Sistema de barra de sonido
de televisor.
• No arrastre el televisor instalado en el Sistema de
barra de sonido de televisor. La pieza de la base
podría soltarse y dañar el suelo.
• Durante el transporte del televisor instalado en el
Sistema de barra de sonido de televisor, no lo coja
por el Sistema de barra de sonido de televisor, ya
que podrían producirse daños o lesiones.
Notas sobre la instalación
• Durante el montaje, disponga una tela sobre el
suelo para no dañarlo.
• Instale los productos en una superficie plana y
sólida.
• Asegúrese de que al menos dos o más personas
instalan los productos. Una persona sola puede
sufrir accidentes o lesiones.
• Durante el proceso, procure mantener alejados a
los niños.
Notas sobre la limpieza
Realice la limpieza con un paño suave ligeramente
humedecido con una solución de detergente suave.
No utilice ningún tipo de estropajo abrasivo,
detergente concentrado ni disolvente, como
diluyente, benzina o alcohol.
Si tiene alguna pregunta o problema relacionado con
este producto, consulte con el distribuidor Sony más
cercano.
Aviso para los clientes: la
siguiente información solo se
aplica al equipo que se
comercializa en países que
aplican las directivas de la UE.
El fabricante de este producto es Sony Corporation,
1-7-1 Konan Minato-ku Tokyo, 108-0075 Japón. El
representante autorizado para EMC y seguridad en
el producto es Sony Deutschland GmbH,
Hedelfinger Strasse 61, 70327 Stuttgart, Alemania.
Para cualquier asunto relacionado con servicio o
garantía por favor diríjase a la dirección indicada en
los documentos de servicio o garantía adjuntados
con el producto.
Asegúrese de seguir las
instrucciones para instalar
firmemente los productos.
• Apriete firmemente los tornillos. Si no instala el
Sistema de barra de sonido de televisor
adecuadamente, puede caerse y provocar daños o
lesiones.
• Tenga cuidado de no pillarse los dedos ni las
manos al montar los productos.
ES
4
Page 33

Índice
Desembalaje .................................. 6
Configuración ................................ 7
Instalación del Sistema de barra de
sonido de televisor en el soporte de
televisor ................................................. 7
Cómo evitar la caída del televisor.......... 12
Ajuste del ángulo del televisor............... 14
Especificaciones ......................... 15
ES
5
Page 34

Desembalaje
• Manual de instrucciones (este manual)
• Lista de dispositivos compatibles (1)
• Soporte de fijación (A)
– 32 A (En el modelo WS-32SE1B) (1)
– 40/46 A (En los modelos WS-40SE1B/
WS-46SE1B) (1)
– 40/46 B (En los modelos WS-40SE1B
(Solo el modelo de Europa) /WS-46SE1B)
(1)
• Cuello de extensión para el soporte de
televisor (B) (1)
• Abrazadera para cables (F) (2)
• Cinta de sujeción (G) (1)
• Tornillo para la cinta de sujeción
(+PSW M4 × 10 mm) (H) (1)
• Tornillo de madera para la cinta de sujeción
(M3,8 × 20 mm) (I) (1)
• Perno de anclaje (J) (2)
• Tornillo para el soporte de fijación
(+PSW M5 × 12 mm) (C) (2)
• Tornillo para el soporte de fijación
(plateado) (D) (2)
• Tornillo para la cabeza del soporte de
televisor (+PSW M5 × 20 mm) (E) (3)
ES
6
Page 35

Configuración
Este soporte de fijación de altavoz puede utilizarse para instalar el Sistema de barra de sonido de
televisor en el soporte de televisor.
Notas
• Este soporte de fijación de altavoz está diseñado para utilizarse únicamente con el soporte suministrado con
el televisor.
• Este soporte de fijación de altavoz no se puede utilizar con el soporte de suelo SU-FL71M/SU-FL71L.
• Si desea colgar el Sistema de barra de sonido de televisor SA-32SE1/SA-40SE1/SA-46SE1, cuélguelo
directamente sobre la pared.
Instalación del Sistema de barra de sonido de televisor en el soporte
de televisor
Desembalaje/Configuración
1 Extraiga los tornillos del soporte de televisor y, a continuación, separe
el televisor del soporte de televisor.
Tornillos del soporte
de televisor
continúa
7
ES
Page 36

2 Extraiga los tornillos del cuello original y, a continuación, separe el
cuello original del soporte de televisor.
Cuello original
2
1
Tornillos del soporte
• Modelos de 32 pulgadas y 40 pulgadas: 2
tornillos
• Modelo de 46 pulgadas: 3 tornillos
Base del soporte
3 Instale el cuello de extensión para el soporte de televisor (B) en el
soporte de televisor con los tornillos extraídos en el paso 2.
1
B
1
2
2
Tornillo extraído en el paso 2
B
Tornillos extraídos en el paso 2
ES
8
Page 37

4 Extraiga el tornillo de la cubierta posterior del Sistema de barra de
sonido de televisor y, a continuación, retire dicha cubierta.
Sistema de barra de sonido de televisor Cubierta posterior
5 Monte el soporte de fijación (A) en el Sistema de barra de sonido de
televisor con el tornillo para el soporte de fijación (+PSW M5 × 12
(C).
Compruebe el grabado de la parte posterior del soporte de fijación y utilice el soporte
adecuado para el televisor. Para obtener más información, consulte la “Lista de dispositivos
compatibles” suministrada.
A
mm)
Configuración
C
continúa
ES
9
Page 38

6 Extraiga los tornillos de la parte posterior del televisor.
Asegúrese de colocar el televisor encima de una tela suave y fina con la pantalla del televisor
mirando hacia abajo para evitar dañar la superficie de la pantalla LCD.
Tornillos de la parte
posterior del televisor
Te la
7 Monte el Sistema de barra de sonido de televisor en el televisor con el
tornillo para el soporte de fijación (plateado) (D).
Asegúrese de fijar los tornillos en los orificios que presentan la marca .
D
Notas
• Tras la instalación, el tornillo para el soporte de fijación (plateado) sobresaldrá del orificio. No se trata
de un fallo de funcionamiento.
• Durante el transporte del televisor instalado en el Sistema de barra de sonido de televisor, no lo coja por
el Sistema de barra de sonido de televisor, ya que podrían producirse daños o lesiones.
ES
10
Page 39

8 Coloque el televisor en el soporte de televisor.
Haga coincidir el tornillo que sobresale con la muesca del soporte de televisor.
Nota
Al colocar el televisor en el soporte de televisor, asegúrese de que sujeta el televisor en lugar del Sistema
de barra de sonido de televisor.
9 Fije el televisor en el soporte de televisor con el tornillo para la cabeza
del soporte de televisor (+PSW M5 × 20
mm) (E).
Configuración
x 3
E
10Una vez realizadas todas las conexiones, podrá utilizar la abrazadera
para cables (F) para fijar correctamente todos los cables.
Nota
Como medida de seguridad, fije el televisor. Para obtener más información, consulte “Cómo evitar la caída
del televisor”.
11
ES
Page 40

Cómo evitar la caída del televisor
Como medida de seguridad, fije el televisor. De lo contrario, el televisor puede caerse y provocar
lesiones graves.
Advertencia
Para evitar lesiones, coloque el televisor instalado en el Sistema de barra de sonido de televisor a
menos de 25 cm (9 7/8 pulg.) de la pared y fije firmemente el televisor a la pared.
Notas
• Tenga cuidado de no pillarse los dedos al colocar el televisor o estante.
• Instale el televisor tras dejar una distancia de al menos 25 cm (9 7/8 pulg.) de la pared. La pared evitará que
el televisor se caiga, incluso si se inclina hacia atrás, hacia la pared.
Cuando instale el televisor en el estante
H
G
I
1 Coloque el televisor en el centro del estante.
2 Coloque la cinta de sujeción (G) en el soporte de televisor y, a
continuación, fíjela firmemente con el tornillo para la cinta de sujeción
(+PSW M4 × 10
mm) (H) con un destornillador.
3 Fije la cinta de sujeción en el estante con el tornillo de madera para la
cinta de sujeción (M3,8 × 20
ES
12
mm) (I).
Page 41

Cómo asegurar el televisor en la pared
Prepare una cuerda o una cadena fuerte (no suministrada) y un sujetador (no suministrado) para
sujetar el televisor a la pared. Fije el sujetador en una pared reforzada. Incluso si ha fijado el
televisor al estante, asegúrese de fijarlo en una pared mediante este procedimiento.
1 Extraiga los tornillos de la parte posterior del televisor.
Tornillos de la parte
posterior del televisor
2 Fije el perno de anclaje (J) en la parte posterior del televisor.
Configuración
J
continúa
13
ES
Page 42

3 Fije el sujetador en la pared reforzada (1) y, a continuación, enhebre la
cuerda o la cadena a través de los agujeros del perno de anclaje y el
sujetador (2). Ajuste ambos extremos de la cuerda o la cadena
simultáneamente.
Menos de 25 cm
(9 7/8 pulg.)
(1)
(2)
Menos de 25 cm
(9 7/8 pulg.)
Televisor instalado en
el suelo
Ajuste del ángulo del televisor
0°
Televisor instalado en
un estante
6°
14
ES
Page 43

Especificaciones
Soporte de fijación 32 A
Dimensiones (an/al/prf) (aprox.)
250 mm × 216 mm ×
35 mm (9 7/8 pulg. × 8 5/8
pulg. × 1 7/16 pulg.)
Peso (aprox.) 1,1 kg (2 lb 7 oz)
Soporte de fijación 40/46 A
Dimensiones (an/al/prf) (aprox.)
334 mm × 227 mm ×
35 mm (13 1/4 pulg. ×
9 pulg. × 1 7/16 pulg.)
Peso (aprox.) 1,3 kg (2 lb 14 oz)
Soporte de fijación 40/46 B (solo el
modelo de Europa)
Dimensiones (an/al/prf) (aprox.)
332 mm × 232 mm ×
35 mm (13 1/8 pulg. ×
9 1/4 pulg. × 1 7/16 pulg.)
Peso (aprox.) 1,3 kg (2 lb 14 oz)
Cuello de extensión para el soporte de
televisor
Dimensiones (aprox.)
φ 43 mm × 216,8 mm
(φ 1 3/4 pulg. × 8 5/8 pulg.)
Peso (aprox.) 0,66 kg (1 lb 8 oz)
Especificaciones
El diseño y las especificaciones están sujetos a
cambios sin previo aviso.
15
ES
Page 44

Sony Corporation Printed in Malaysia
(1)
 Loading...