

Page 1
4-479-235-13(1)
Portable Wireless Server
Quick Start Guide
For smartphones/tablets
This Quick Start Guide is designed to easily help you
set up so you can start enjoying the benefits of the
device.
Read this Quick Start Guide when using this unit with
a smartphone or tablet.
When using this unit with a computer, download
“Quick Start Guide for Computer Users” from the
following website.
http://www.sony.net/c20/
WG-C20 Series
© 2013 Sony Corporation Printed in China
Expressions in This Guide
We use the following expressions in this document.
WG-C20 “This unit”
Smartphone/tablet “Device”
File handling application (File Manager) “App”
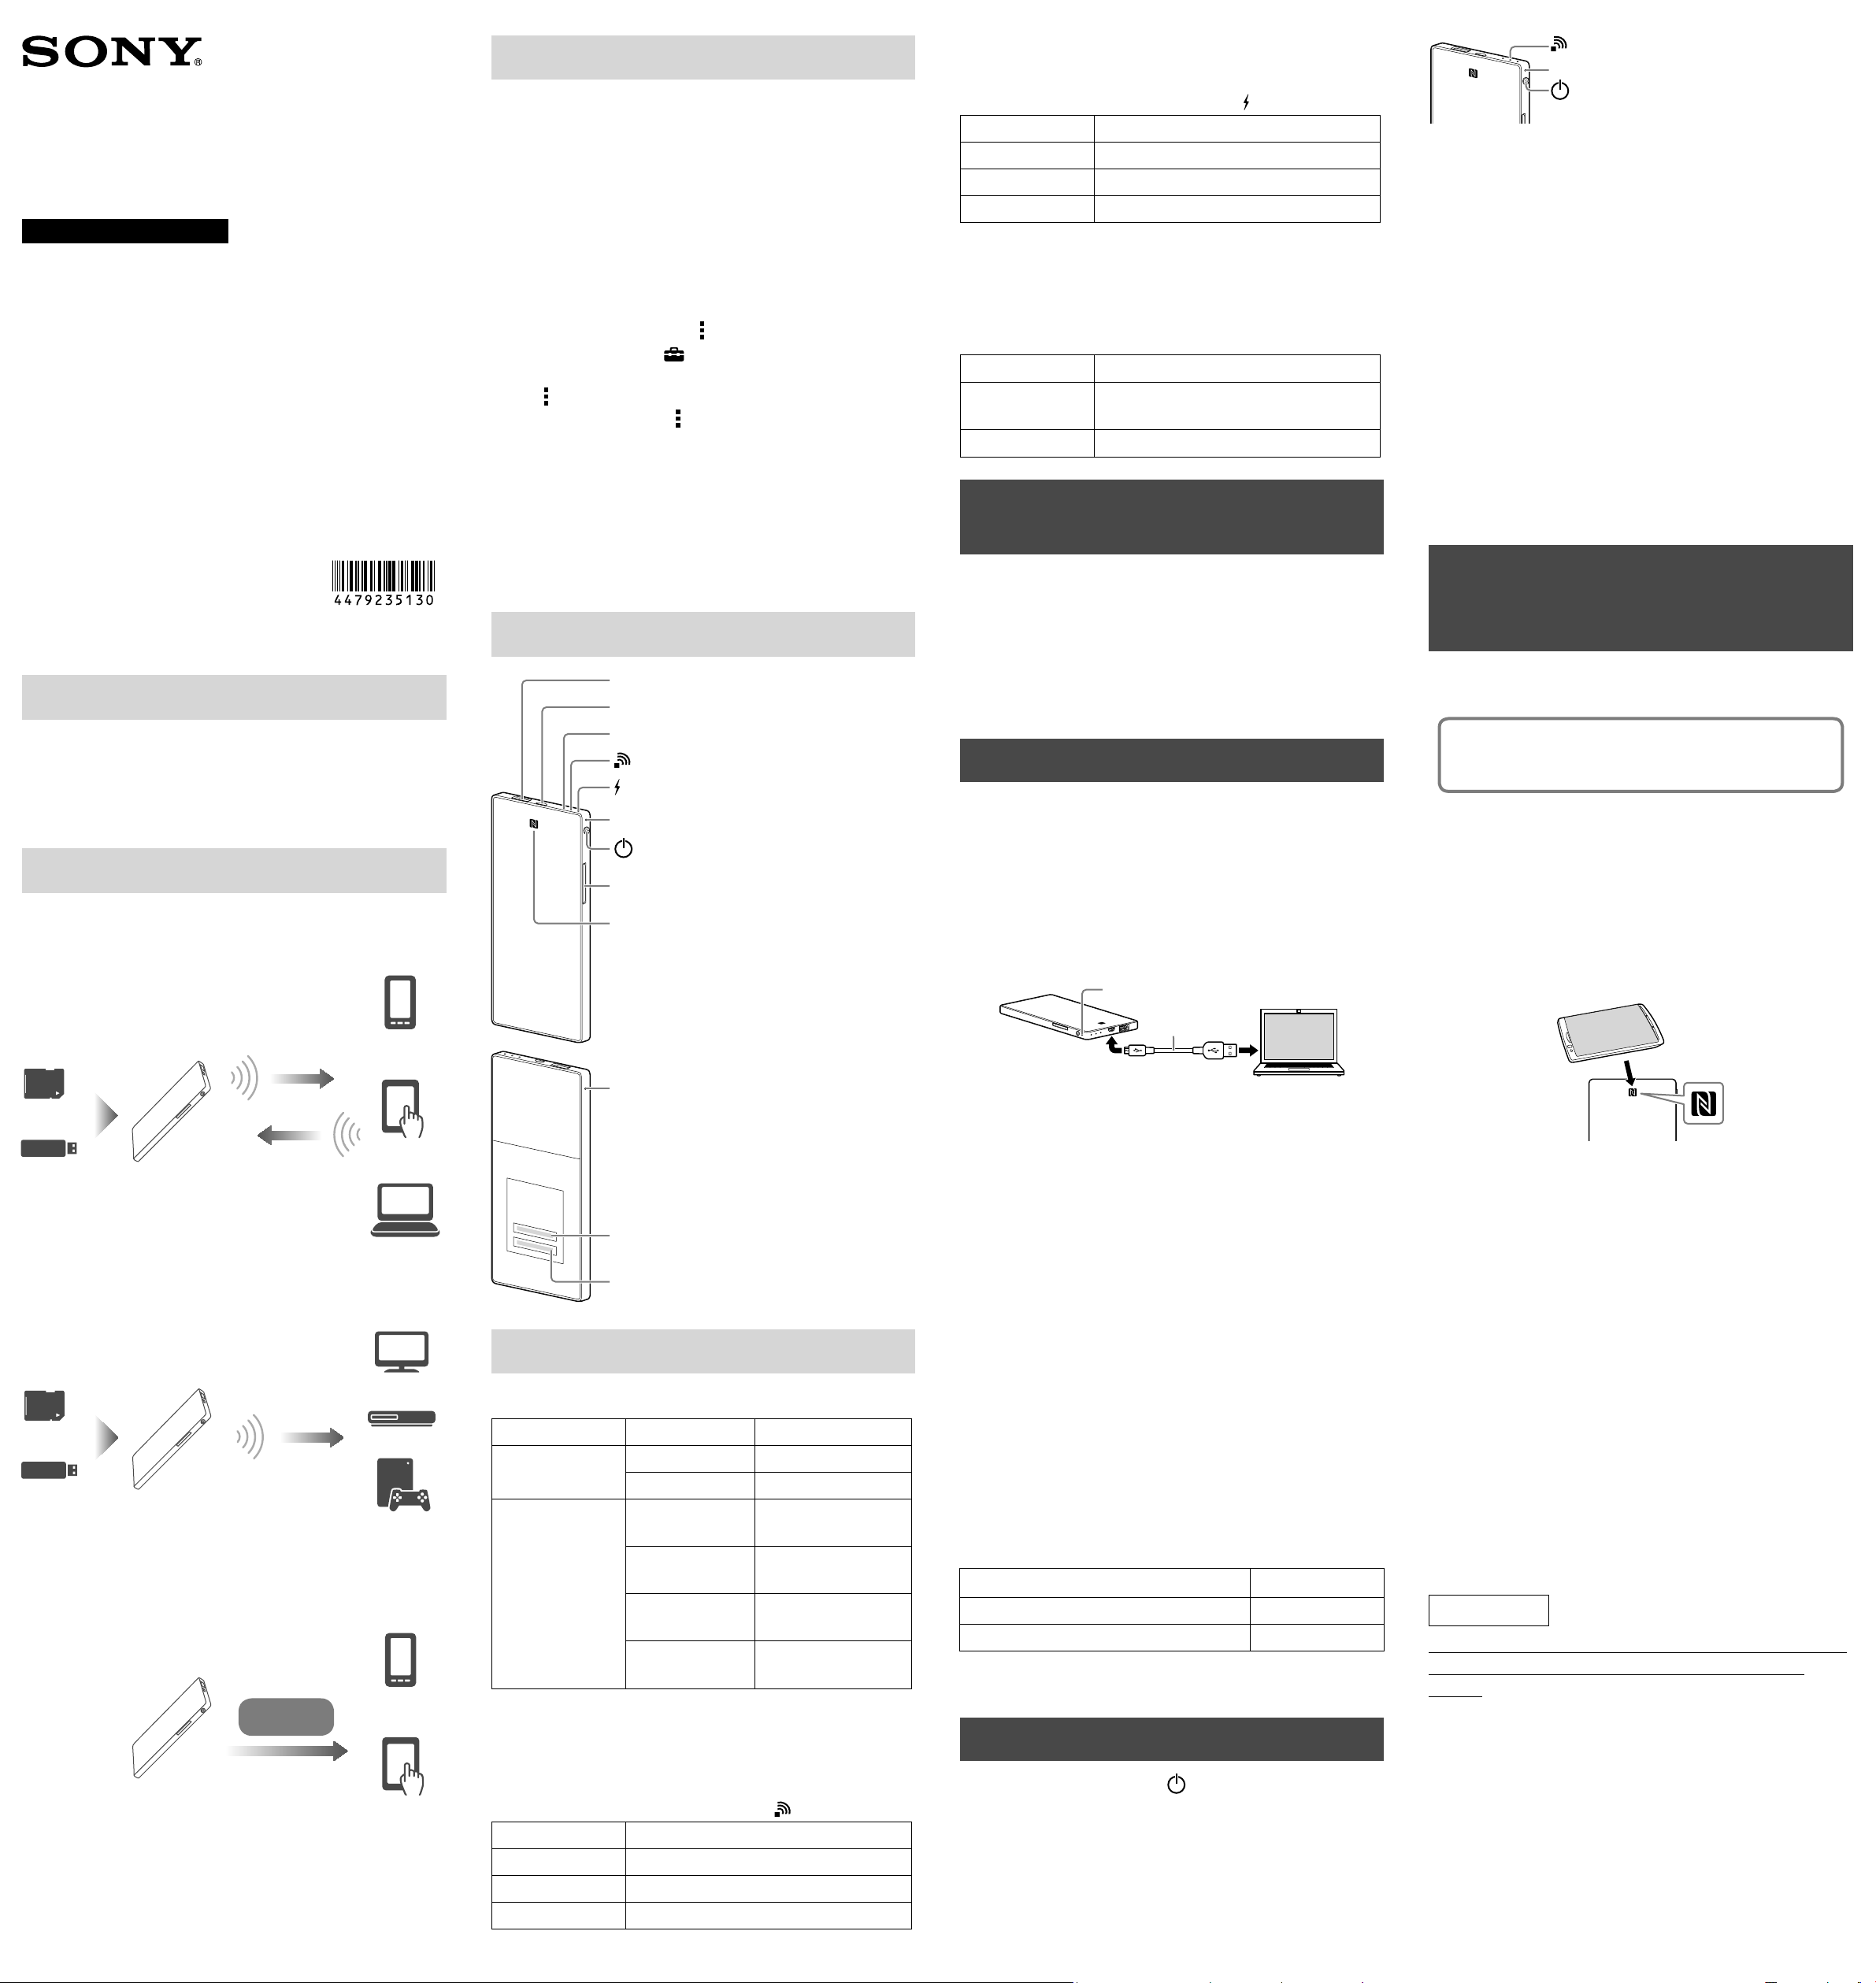
Examples of Use
Wi-Fi Storage
View &
Copy
content
Smartphone
About Help Guide
You can see Help Guide in the app or on the web
browser.
Connecting your device to the Internet is required to
download the Help Guide on the app or see the Help
Guide on your browser. If your device is connected to
this unit, see “Connecting to the Internet” on the back
page.
In the app
Download the Help Guide on your device first.
On an Android device, tap *, then tap [Help].
On an iOS device, tap
to display the setup screen,
then tap [Help].
]
[
* The
Android devices. If the
icon is not displayed on the screen of some
]
[
icon is not displayed on your
screen, press the main menu button located outside
of the screen.
On the web browser
Access the website
(http://rd1.sony.net/help/pws/c20/gb/) from your
browser.
Identifying the Parts
USB A port *1
USB microB port *2
ACCESS (data access) lamp
(Wireless LAN indicator) lamp
(Power feeding indicator) lamp
Battery indicator lamp
(Power) button
Card slot (SD card)
NFC touch point
*1 For powering your device/
For connection with USB memory, etc.
*2 For charging this unit/
For connection with a computer
When this unit is in the power feeding mode, the
lamp is turned off.
Power feeding indicator lamp
Lamp condition Status
Green During or ready for power feeding
Red, blinking Error
Off Power feeding is off
When a device such as a computer is connected to
the USB microB port, power feeding and data access
from the USB A port is not available. In this case, the
power feeding indicator is turned off.
ACCESS (data access) lamp
Lamp condition Status
Amber Updating the system software or an
error occurred
Amber, blinking Accessing data
Step1: Connecting an SD card
or a USB device to this unit
Insert an SD card into the card slot of this unit or
connect a USB device to the USB A port of this unit.
Notes
Removing an SD card or a USB device from this unit
while accessing it, can damage important data.
Before removing it, make sure that the data access
lamp is not blinking.
Step2: Charging this unit
This unit has a built-in rechargeable battery pack.
Charge this unit before use.
Charge this unit from a computer or with a USB AC
adaptor (sold separately).
Charging from a computer
Connect this unit to your computer with the USB cable
(included).
Battery indicator lamp
USB cable
(included)
(Wireless LAN indicator) lamp
Battery indicator lamp
(Power) button
Notes
When the battery level is low, the remaining battery
level indicator blinks (red). Charge this unit.
It may take several minutes for this unit to start after
turning the power on. This is not a malfunction.
To charge this unit from your computer when the
power of this unit is on, connect your computer to
an AC adaptor, then connect this unit to your
computer.
To turn off this unit
Press and hold down the (Power) button for 3
seconds or more.
The power of this unit turns off, then the wireless LAN
indicator lamp and the battery indicator lamp turn off.
Notes
Do not turn off the power of this unit during data
transfer.
Step4 (a): Installing and
launching the App (when
using NFC)
Check the operating guide of your device to see
whether your device supports NFC*.
If your device is not NFC-enabled, see “Step4
(b): Installing and launching the App (when
not using NFC).”
*NFC is a technology for short-range wireless
communication between various devices, such as a
mobile phone and IC tag, etc.
Installing the App
Make sure that NFC is set to ON in the settings of your
device.
Touch your NFC-enabled device against the NFC touch
point of this unit.
SD card
USB memory
WG-C20
DLNA Connection
SD card
USB memory WG-C20
View content
Battery Charger
connection
WG-C20
*Refer to the Help Guide for details.
Copy
content
USB
Power
feeding
Tablet
PC
Various DLNA
client devices
Smartphone
Tablet
Reset switch
MAC address
Serial number
Indicator Lamp of This Unit
Battery indicator lamp
Lamp condition Status
Charging
indicator
Remaining
battery level
indicator while
in use
* Some USB ports do not support battery charging
although they actually supply power. In this case,
even if charging is complete, the battery indicator
lamp does not turn off.
Wireless LAN indicator lamp
Lamp condition Status
Green Wireless LAN is on
Green, blinking Wireless LAN is starting up
Off Wireless LAN is off
Amber Charging in progress
Amber -> off* Charging complete
Green, blinking
slowly
Green, blinking Battery level is
Red, blinking
rapidly
Off Battery has run out
Battery level is high
medium
Battery level is low
or power is off
Charging with a USB AC adaptor (sold separately)
You can charge this unit by connecting the USB cable
(included) to this unit and the USB AC adaptor (sold
separately), then connect the USB AC adaptor to the
wall outlet (wall socket).
Refer to the support page
(http://www.sony.net/c20/) for information about
USB AC adaptors that have been confirmed to work
with this unit.
When charging is complete, the battery indicator lamp
turns off*.
When charging is complete, remove the USB cable.
* Some USB ports do not support battery charging
although they actually supply power. In this case,
even if charging is complete, the battery indicator
lamp does not turn off*.
Refer to the following table for estimating the
charging time.
Approximate charging time
Charging devices Charging time
Computer 8 hours
USB AC adaptor (when using AC-UD10) 3.5 hours*
* Approximate charging time varies depending on the
USB AC adaptor (sold separately) used.
Step3: Turning on the power
Press and hold down the (Power) button for 3
seconds or more.
The power of this unit turns on, then the battery
indicator lamp lights up.
During wireless LAN start-up, the wireless LAN
indicator lamp blinks. When start-up is complete, the
lamp remains lit.
The device will access the application page on Google
Play automatically.
If the camera and the device cannot be connected by
NFC, do as follows.
Move your device slowly over the N mark area of this
unit.
If your device is in a case, remove the case.
Notes
NFC is available while the Wireless LAN indicator
lamp is lit.
Launching the App and connecting to a wireless
LAN
Touch your device against the N mark of this unit
again.
When the home screen of the app appears, the
connection is complete.
It may take several minutes for initial setup of this unit
when using it for the first time.
mportant!
I
When starting up the app, a message prompting you
to set up security appears on the screen of your
device.
It is very important that you set up security before
using a wireless LAN device. If you do not set up
security, other compatible devices within
transmission range can connect to this unit.
See the Help Guide for how to set up security.
(Continued on the back page)
Page 2
Step4 (b): Installing and
launching the App (when not
using NFC)
When not using NFC functions, operate as follows.
Installing the App
To operate this unit, install the dedicated app onto
your device.
See the support page (http://www.sony.net/c20/) for
information about compatible operating systems and
a list of devices that have been confirmed to work
with this unit.
Search for File Manager in Google Play or the App Store
and install it.
Notes
The File Manager app is free. However,
communication fee may be charged for
downloading, depending on the communication
provider you use.
After installation, go to “Connecting by Wireless LAN”
without launching the app.
Connecting by Wireless LAN
This unit is now connected to your device by
wireless LAN.
Launching the App
Tap the icon on your device to launch the app.
It may take several minutes for initial setup of this unit
when using it for the first time.
mportant!
I
When starting up the app, a message prompting you
to set up security appears on the screen of your
device.
It is very important that you set up security before
using a wireless LAN device. If you do not set up
security, other compatible devices within
transmission range can connect to this unit.
See the Help Guide for how to set up security.
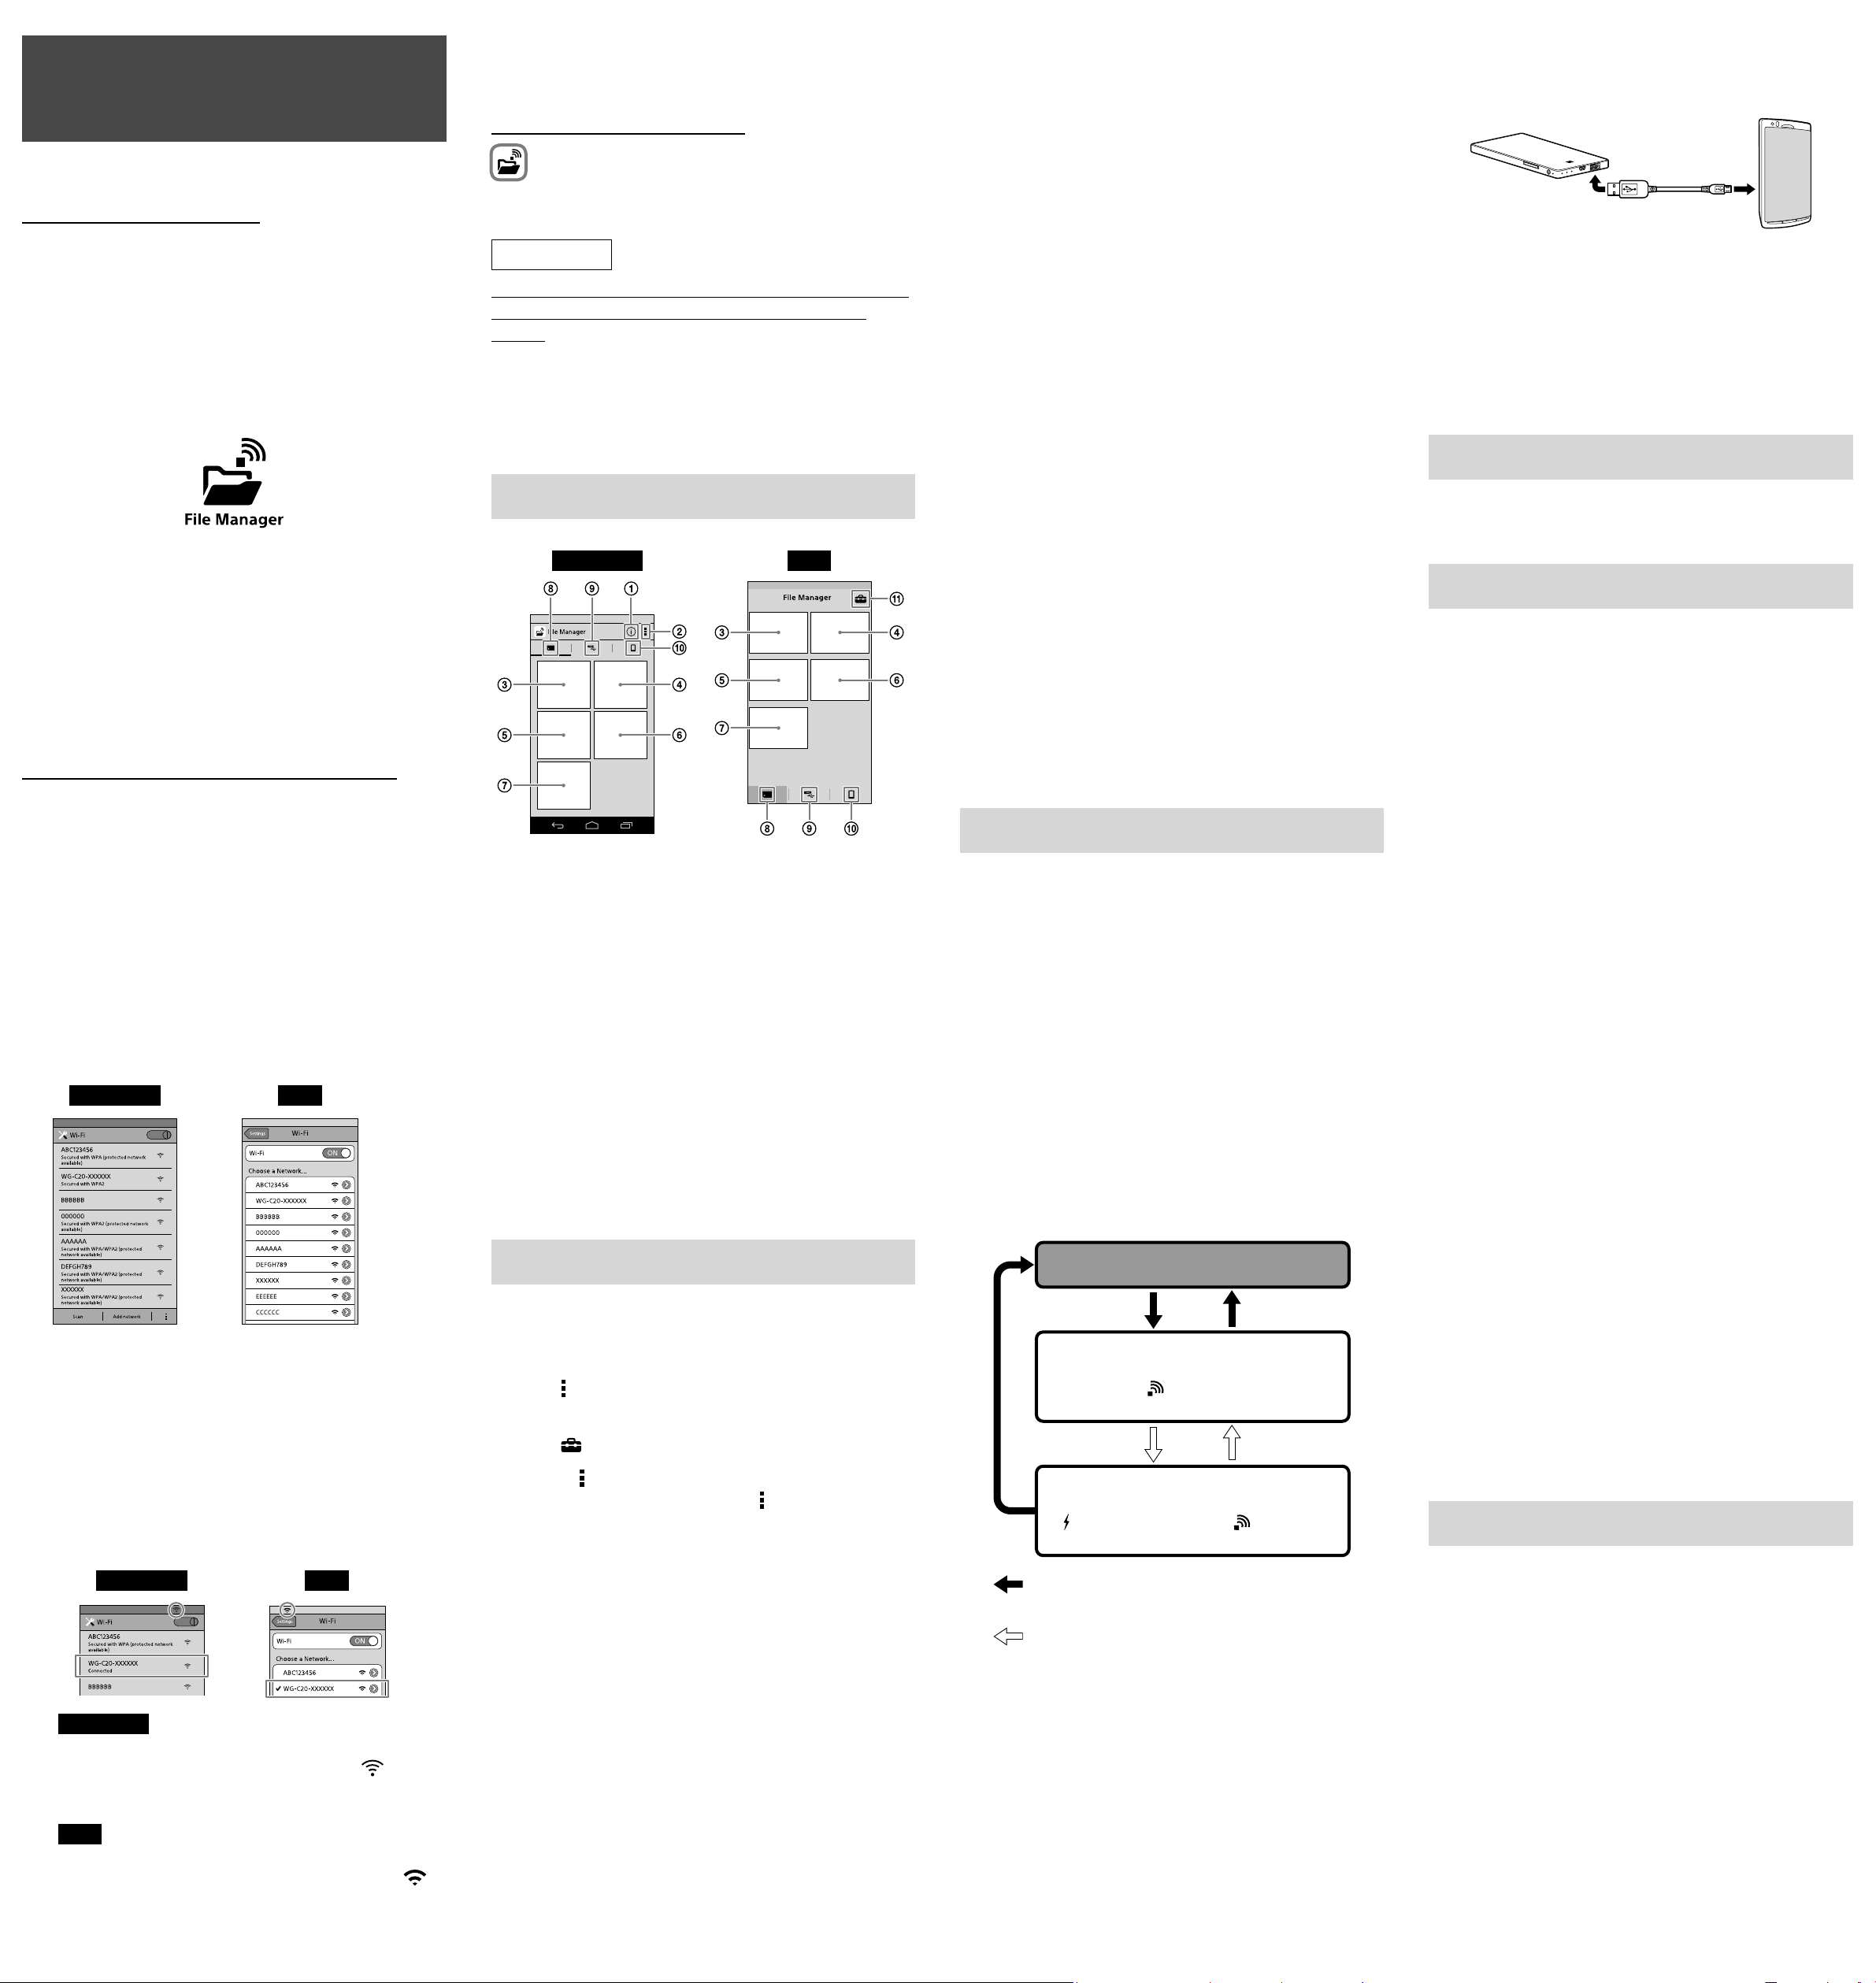
Home Screen of the App
Android iOS
If necessary, enter the password of the
5
device you want to connect to, then tap
[OK].
If you want to connect to a secured wireless LAN
router, password entry may be required.
The unit restarts and is connected to the wireless
LAN router.
Notes
Up to 8 SSIDs for wireless LAN routers can be
registered.
When using at home, an Internet connection and
wireless LAN router are required.
When using outside the home, check the wireless
LAN availability for that location through the website
of the public wireless LAN service provider or other
information source. Using such services may require
a separate contract with the service provider.
Connection to all public wireless LAN services is not
guaranteed.
Wireless LAN exchanges information by radio wave,
allowing easy access within the communication
range. Consequently, if security settings are not
made, there is a risk that a third party on the same
network could maliciously access (hack into) your
unit. Setting security is your decision and
responsibility, and is strongly recommended.
It may take time to establish connection, or
connection may not be established, depending on
the usage environment.
It is not possible to connect to any wireless LAN
router with a hidden SSID.
Connect the other end of the USB cable
3
to the USB A port of this unit.
* See the Help Guide for a list of devices that
support power feeding.
http://www.sony.net/c20/
Notes
If power supply exceeds the maximum output, a
safety function turns it off, and the power feeding
indicator lamp blinks (red).
Other Functions
See the Help Guide about playback by a DLNA
supporting device.
About the Support Page
You can see the information about products that have
been confirmed to work with this unit on the support
page. However it is not guaranteed that this unit is
fully operational with the items listed on the support
page.
http://www.sony.net/c20/
Connect this unit to your device by wireless LAN.
Perform this setting after installing the dedicated app.
Notes
When this connection is made, the internet
connection of your device is disconnected.
Turn on the power of this unit.
1
From the Settings menu of your device,
2
turn Wi-Fi on and open the Wi-Fi
networks screen.
Android iOS
PWS (this unit) information
Other menus
Viewing pictures
Watching a video
Listening to music
Seeing a document
Searching from folders
SD card
Data in the SD card inserted into this unit.
USB device
Data in the USB device connected to this unit.
Local storage
Data in your device.
Settings
Notes
The screen display may be subject to change.
Powering Other Devices
Turn on the power of this unit.
1
Connect the included USB cable* to the
2
device you want to power.
* For connecting to iPhone, iPad or iPod touch,
use the special cable included when you
purchased that device.
Before Powering
Check that the remaining battery level of this unit
is sufficient.
Power feeding
Feeding power is available when this unit is in the
wireless LAN mode or the power feeding mode.
Tap this unit’s SSID [WG-C20-XXXXXX]*
3
from the list of Wi-Fi networks to
connect.
* “xxxxxx” is the last 6 digits of the MAC address.
The MAC address is shown on the back side of
this unit.
Confirm the connection.
4
Android iOS
Android
Connection is completed when [Connected] is
displayed under the selected SSID and
displayed at the top of the screen.
iOS
Connection is completed when a check mark
appears on the left of the selected SSID and
displayed at the top of the screen.
:
:
is
is
Connecting to the Internet
Make sure this unit is turned on.
1
Android
*
Tap
iOS
Tap
* The
some Android devices. If the
displayed on your screen, press the main menu
button located outside of the screen.
Tap [Internet settings].
2
Set the switch at the top right of the
3
screen to ON.
The list of available wireless LAN router access
points is displayed.
Tap the SSID of the access point you
4
want to connect to.
Tap the connected or registered SSID to display
its network information.
, then tap [Settings].
to display the setup screen.
[
]
icon is not displayed on the screen of
]
[
icon is not
Power-off
Wireless LAN mode
lights up.
Power feeding mode
lights up green, and turns off.
Press and hold the power button for 3
seconds or more.
Press the power button 0.5 to 1 second.
In power feeding mode, high power feed is
available to charge your device at a maximum
output of 1.5 A.
High power feed is not available in the wireless
LAN mode.
Trademarks
Apple, iPhone, iPad and iPod touch are trademarks
of Apple Inc., registered in the U.S. and other
countries.
App Store is a service mark of Apple Inc.
Android and Google Play are trademarks of Google
Inc.
Wi-Fi® and Wi-Fi Alliance® are registered marks of
the Wi-Fi Alliance.
The N Mark is a trademark or registered trademark
of NFC Forum, Inc. in the United States and in other
countries.
DLNA and DLNA CERTIFIED are trademarks and/or
service marks of Digital Living Network Alliance.
Other product names, trade names, service names
etc. used in this manual are trademarks or registered
trademarks of their respective companies or
organizations.
 Loading...