

Sony WF-SP800N User Manual
Help Guide
Wireless Noise Canceling Stereo Headset
WF-SP800N
Use this manual if you encounter any problems, or have any questions.
Update the software of the headset and “Sony | Headphones Connect” app to the latest version. For details, refer to the following:
https://www.sony.net/elesupport/
Getting started
What you can do with the Bluetooth function
About the voice guidance
Supplied accessories
Checking the package contents
Replacing the earbuds
Replacing the arc supporters
When you have finished using the headset
On water resistant/dust proofing performance of the headset
Parts and controls
Location and function of parts
1
About the indicator
Wearing the headset
Wearing the headset
Using only one unit of the headset
About the touch sensor
Power/Charging
Charging
Available operating time
Checking the remaining battery charge
Turning on the headset
Turning off the headset
Making connections
How to make a wireless connection to Bluetooth devices
Easy setup with app
Connecting with the “Sony | Headphones Connect” app
Android smartphone
Pairing and connecting with an Android smartphone
Connecting to a paired Android smartphone
iPhone (iOS devices)
Pairing and connecting with an iPhone
Connecting to a paired iPhone
Computers
Pairing and connecting with a computer (Windows 10)
Pairing and connecting with a computer (Windows 8.1)
Pairing and connecting with a computer (Mac)
Connecting to a paired computer (Windows 10)
Connecting to a paired computer (Windows 8.1)
Connecting to a paired computer (Mac)
Other Bluetooth devices
Pairing and connecting with a Bluetooth device
2
Connecting to a paired Bluetooth device
Disconnecting Bluetooth connection (after use)
Listening to music
Listening to music via a Bluetooth connection
Listening to music from a device via Bluetooth connection
Controlling the audio device (Bluetooth connection)
Disconnecting Bluetooth connection (after use)
Noise canceling function
What is noise canceling?
Using the noise canceling function
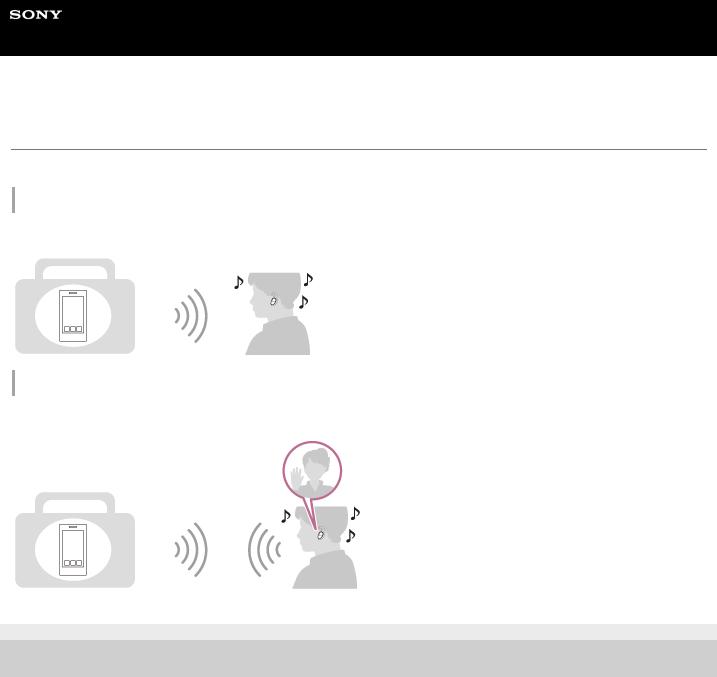
Listening to ambient sound
Listening to ambient sound during music playback (Ambient Sound Mode)
Listening to ambient sound quickly (Quick Attention Mode)
Sound quality mode
About the sound quality mode
Supported codecs
Making phone calls
Receiving a call
Making a call
Functions for a phone call
Disconnecting Bluetooth connection (after use)
Using the voice assist function
Using the Google Assistant
Using Amazon Alexa
Using the voice assist function (Google app)
Using the voice assist function (Siri)
Using the apps
What you can do with the “Sony | Headphones Connect” app
Installing the “Sony | Headphones Connect” app
3
Accessing support information from the “Sony | Headphones Connect” app
Updating the headset software
Important information
Precautions
License notice
Trademarks
Customer support websites
Troubleshooting
What can I do to solve a problem?
Power/Charging
Unable to turn on the headset.
Charging cannot be done.
Charging time is too long.
Charging cannot be done even if the charging case is connected to a computer.
The remaining battery charge of the headset is not displayed on the screen of smartphone.
Sound
No sound
Low sound level
There is a difference in volume between the left and right units of the headset, insufficient low-frequency sound.
Low sound quality
Sound skips frequently.
The effect of noise canceling is not sufficient.
Bluetooth connection
Pairing cannot be done.
Unable to make a Bluetooth connection.
Distorted sound
The headset does not operate properly.
Cannot hear a person on a call.
Low voice from callers
4

Resetting or initializing the headset
Resetting the headset
Initializing the headset to restore factory settings
5-013-129-11(2) Copyright 2020 Sony Corporation
5
Help Guide
Wireless Noise Canceling Stereo Headset
WF-SP800N
What you can do with the Bluetooth function
The headset uses BLUETOOTH® wireless technology, allowing you to do the following.
Listening to music
You can receive audio signals from a smartphone or music player to enjoy music wirelessly.
Talking on the phone
You can make and receive calls hands-free, while leaving your smartphone or mobile phone in your bag or pocket.
5-013-129-11(2) Copyright 2020 Sony Corporation
6

Help Guide
Wireless Noise Canceling Stereo Headset
WF-SP800N
About the voice guidance
In the factory setting, when the headset is worn on your ears, you will hear the English voice guidance via the headset. You can change the language of the voice guidance and turn on/off the voice guidance using “Sony | Headphones Connect” app. For more details, refer to the “Sony | Headphones Connect” app help guide. https://rd1.sony.net/help/mdr/hpc/h_zz/
You will hear a voice guidance in the following situations via the left and right units of the headset.
 When the headset is turned on: “Power on”
 When informing the remaining battery charge of the headset: “Battery about XX %” (The “XX” value indicates the approximate remaining charge. Use it as a rough estimate.) / “Battery fully charged”
 When the remaining battery charge of the headset is low: “Low battery, please recharge headset”
  When automatically turning off due to low battery of the headset: “Please recharge headset. Power off”
You will hear a voice guidance in the following situations via the left unit (or via the right unit when you are wearing only the right unit on your ear) of the headset.
 When powering off with the “Sony | Headphones Connect” app: “Power off”
 When entering pairing mode: “Bluetooth pairing”
 When establishing a Bluetooth connection: “Bluetooth connected”
 When disconnecting a Bluetooth connection: “Bluetooth disconnected”
 When turning on the noise canceling function: “Noise canceling”
 When turning on the Ambient Sound Mode: “Ambient sound”
 When turning off the noise canceling function and Ambient Sound Mode: “Ambient Sound Control off”
You will hear a voice guidance in the following situation via the unit to which the Google Assistant feature is assigned.
 When the Google Assistant is not available on the smartphone connected to the headset even if you operate the touch sensor on the unit to which the Google Assistant feature is assigned: “The Google Assistant is not connected”
  When the Google Assistant is not available during software update: “The Google assistant is not available during update. Please wait a moment until the update completes.”
You will hear a voice guidance in the following situation via the unit to which the Amazon Alexa feature is assigned.
 When Amazon Alexa is not available on the smartphone connected to the headset even if you operate the touch sensor on the unit to which the Amazon Alexa feature is assigned: “Either your mobile device isn’t connected; or you need to open the Alexa App and try again”
Note
When the only one unit of the headset is worn on your ear, you will hear a voice guidance via the unit you are wearing.
It takes about 20 minutes when you change the language of the voice guidance.
When you initialize the headset to restore the factory settings after you change the language of the voice guidance, the language will also return to the factory setting.
If the voice guidance is not heard after changing the voice guidance language or updating the software of the headset, set the headset into the charging case to turn it off, then remove the headset from the charging case to turn it on again.
Related Topic
 Using only one unit of the headset
7

5-013-129-11(2) Copyright 2020 Sony Corporation
8
Help Guide
Wireless Noise Canceling Stereo Headset
WF-SP800N
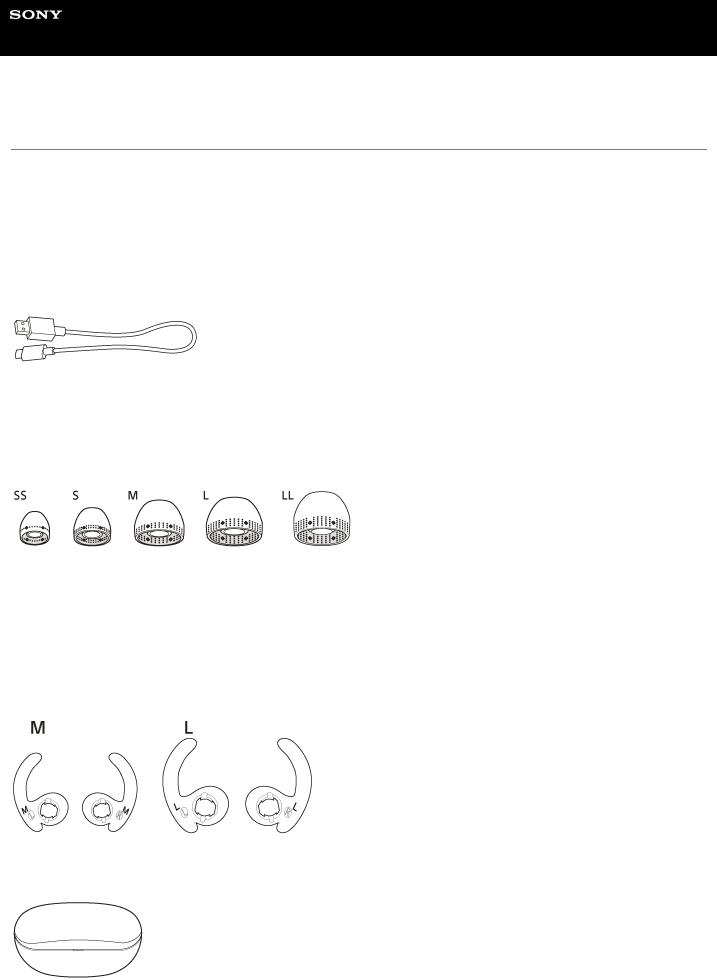
Checking the package contents
After opening the package, check that all of the items in the list are included. If any items are missing, contact your dealer.
Numbers in ( ) indicate the item amount.
Wireless Noise Canceling Stereo Headset
USB Type-C® cable (USB-A to USB-C®) (approx. 20 cm (7.88 in.)) (1)
Hybrid silicone rubber earbuds (SS/S/M/L/LL 2 each)
 M-sized earbuds come attached to the left and right units of the headset at the time of purchase.
The size of the earbuds can be determined based on the number of dotted lines inside the bottom of the earbuds.
SS size: 1 line
S size: 2 lines
M size: 3 lines
L size: 4 lines
LL size: 5 lines
Arc supporters (M/L 2 each)
 M-sized arc supporters come attached to the left and right units of the headset at the time of purchase.
Charging case (1)
9

5-013-129-11(2) Copyright 2020 Sony Corporation
10
Help Guide
Wireless Noise Canceling Stereo Headset
WF-SP800N
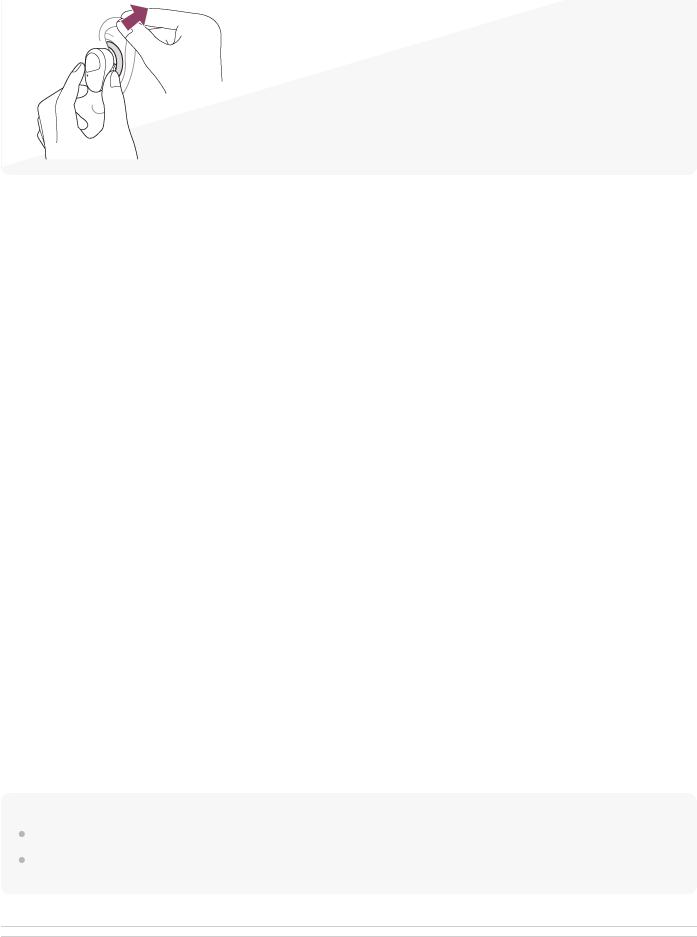
Replacing the earbuds
For the proper sound quality and noise canceling function to be effective, select the earbuds that fit your ears the best. If the size of the earbuds does not match the size of the ear holes, or the earbuds are not properly worn, the noise canceling function and sound quality may be significantly affected.
When you feel the noise canceling function and low frequency sound are insufficient, change the earbuds to ones that feel more sealed.
When changing the earbuds, try the earbud sizes in order from the larger sizes to the smaller sizes. The size of the left and right earbuds may be different.
Hybrid silicone rubber earbuds
The size of the earbuds can be determined based on the number of dotted lines inside the bottom of the earbuds.
SS size: 1 line
S size: 2 lines
M size: 3 lines
L size: 4 lines
LL size: 5 lines
1Remove the earbud.
 Do not pinch the end of the earbud when removing it.
2Attach the earbud.
 Firmly insert the earbud all the way. Do not attach the earbud in a loose or skewed manner.
5-013-129-11(2) Copyright 2020 Sony Corporation
11

Help Guide
Wireless Noise Canceling Stereo Headset
WF-SP800N
Replacing the arc supporters
M-sized arc supporters come attached to the left and right units of the headset at the time of purchase.
If you feel the size of the arc supporters does not fit to your ears, change the arc supporters to another size to comfortably and snugly fit your left and right ears.
1Remove the earbud, then remove the arc supporter.
 Hold the base of the arc supporter when removing it. Do not pull the end of the arc supporter.
2Attach the arc supporter.
Example: When attaching the left side arc supporter
A:front
B:backside
12

A: Align
 Align the protruding part of the headset with the recessed part of the arc supporter, and firmly insert the arc supporter all the way. Do not attach the arc supporter in a loose or skewed manner.
5-013-129-11(2) Copyright 2020 Sony Corporation
13
Help Guide
Wireless Noise Canceling Stereo Headset
WF-SP800N
When you have finished using the headset
When you have finished using the headset, be sure to keep the headset in the charging case. Close the lid of the charging case.
Note
If perspiration or water is left on the charging port, it may impair the ability to charge the unit. Immediately wipe off any perspiration or water on the charging port after use.
5-013-129-11(2) Copyright 2020 Sony Corporation
14

Help Guide
Wireless Noise Canceling Stereo Headset
WF-SP800N
On water resistant/dust proofing performance of the headset
On water resistant/dust proofing performance of the headset
 The charging case is not water resistant/dust proofing.
 The water resistant specifications of this headset are equivalent to IPX5 in IEC 60529 “Degrees of protection against ingress of water (IP Code)”, which specifies the degree of protection provided against the entry of water, and the dust proofing specifications of this unit are equivalent to IP5X in IEC 60529 “Degrees of protection against solid foreign objects (IP Code)”, which specifies the degree of protection provided against the entry of solid foreign objects. Unless the headset is used correctly, water or dust may get into the headset and cause fire, electrocution, or malfunctions. Note the following cautions carefully and use the headset correctly.
IPX5: The headset will maintain its operability even when exposed to direct jet streams of water from any direction (except for the sound conduits (sound output tubes) of the headset).
IP5X: The headset will maintain its safety and satisfactory operation in the event of an ingress of dust.  The sound conduits (sound output tubes) of the headset are not completely watertight.
Liquids that the water resistant performance specifications apply to
Applicable: |
Fresh water, tap water, perspiration |
|
|
Not |
Liquids other than those above (examples: soapy water, detergent water, water with bath agents, |
applicable: |
shampoo, hot spring water, pool water, seawater, etc.) |
|
|
The water resistant/dust proofing performance of the headset is based on measurements performed by Sony under the conditions described above. Note that malfunctions resulting from water immersion caused by customer misuse are not covered by the warranty.
To maintain water resistant/dust proofing performance
Carefully note the precautions below to ensure proper use of the headset.
 Do not splash water forcibly into the sound output holes.
 Do not drop the headset into water, and do not use underwater.
 Do not allow the headset to remain wet in a cold environment, as the water may freeze. To prevent malfunction, make sure to wipe off any water after use.
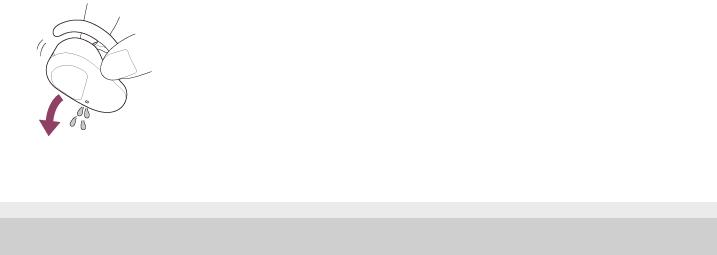
 Use a soft dry cloth to wipe off any water that gets on the headset. If water remains in the sound output holes, the sound may become muffled or completely inaudible. If this happens, remove the earbuds, position the sound output holes facing downward, and shake several times to get the water out.
 Turn the microphone hole downward and gently tap it about 5 times towards a dry cloth etc. If any water drops are left in the microphone hole, it may cause corrosion.
15
 If the headset is cracked or deformed, refrain from using the headset near water or contact your nearest Sony dealer.
5-013-129-11(2) Copyright 2020 Sony Corporation
16
Help Guide
Wireless Noise Canceling Stereo Headset
WF-SP800N
Location and function of parts
Headset
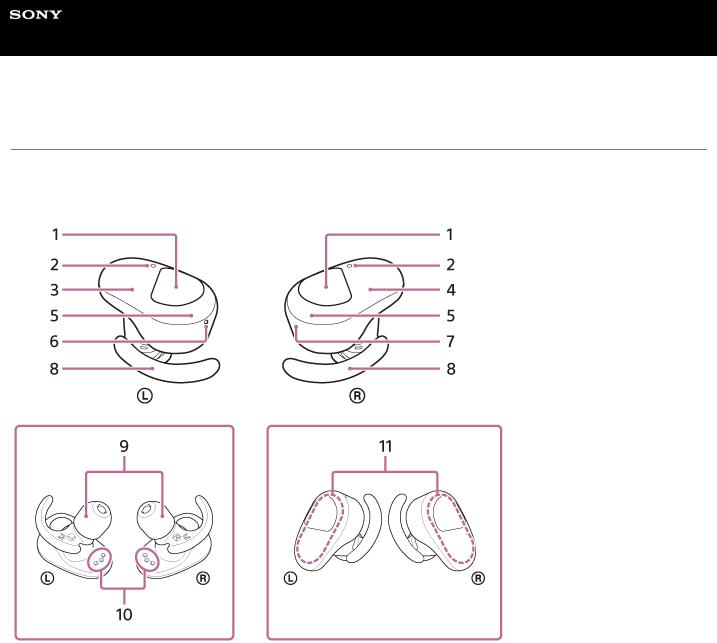
1.Touch sensors (left, right) Tap to operate the headset.
In the factory setting, in order to prevent the headset react incorrectly, the headset will not work even if you tap the touch sensor when the headset is not worn on your ears.
2.Microphones (left, right)
Pick up the sound of your voice (when talking on the phone) and noise (when using the noise canceling function).
3.Left unit of the headset
4.Right unit of the headset
5.Indicators (red/blue) (left, right) Light up in red while charging.
Light up in red or blue to indicate the power or communication status of the headset. In the factory setting, when the headset is worn on your ears, the indicators turn off.
6. (left) mark and tactile dot
There is a tactile dot on the left unit of the headset.
7. (right) mark
8.Arc supporters (left, right)
9.Earbuds (left, right)
10.Charging ports (left, right)
11.Built-in antennas (left, right)
A Bluetooth antenna is built into both the left and right units of the headset.
17
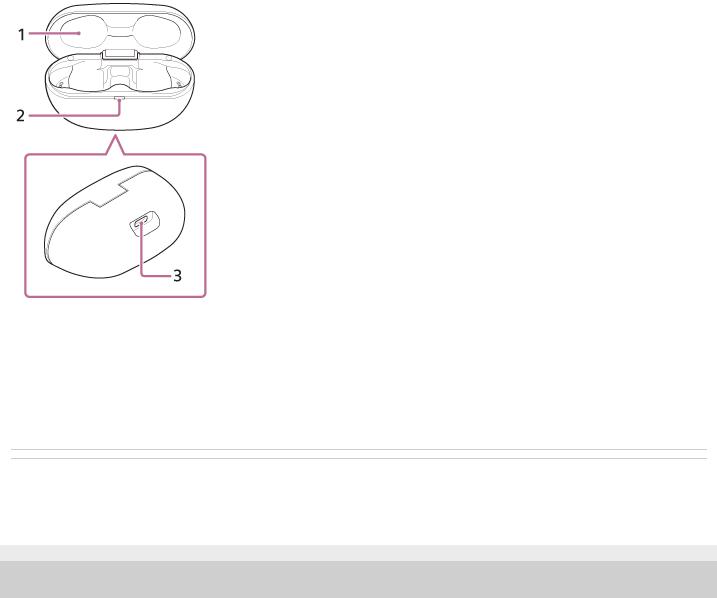
Charging case
1.Lid
2.Indicator (red)
Shows the charging state.
3.USB Type-C port
Connect the charging case to an AC outlet via a commercially available USB AC adaptor or to a computer with the supplied USB Type-C cable to simultaneously charge both the headset and the charging case.
Related Topic
 About the indicator
 Checking the remaining battery charge
5-013-129-11(2) Copyright 2020 Sony Corporation
18

Help Guide
Wireless Noise Canceling Stereo Headset
WF-SP800N
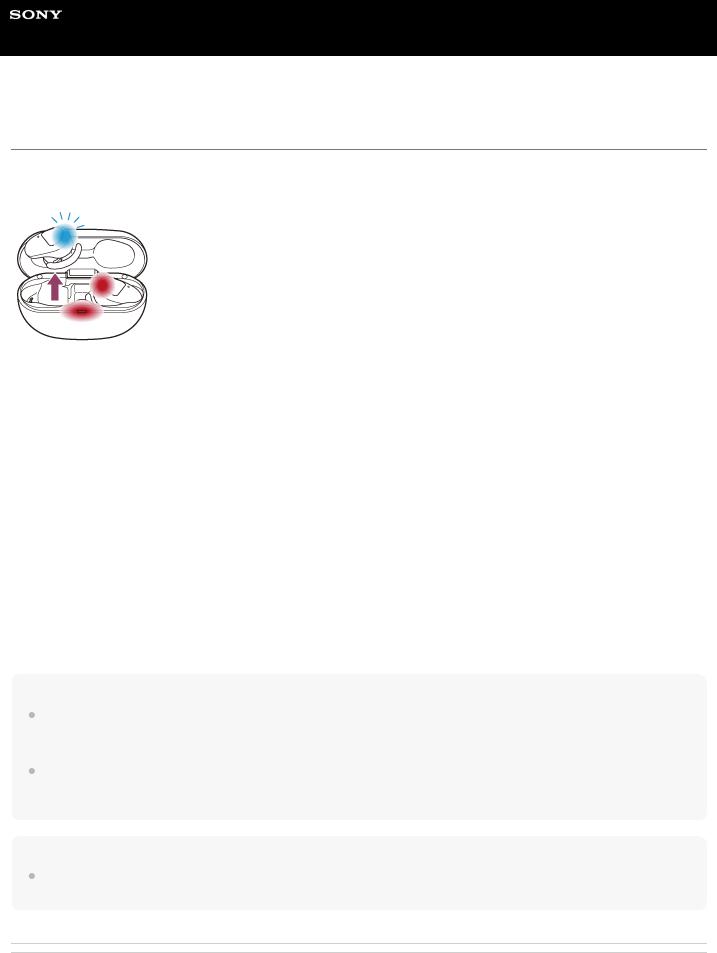
About the indicator
You can check various statuses of the headset by the indicator.
 : Turns on in blue /
  : Turns on in red / -: Turns off
Turning on
The headset turns on when it is removed from the charging case.  -
-  (flashes twice in blue)
In this case, when the remaining battery charge of the headset is 20% or lower (requires charging), the indicator lights successively as follows.
 -
-  -
-  (repeatedly flashes slowly in red for about 15 seconds) For details, see “Checking the remaining battery charge”.
Turning off
When the headset is not worn on your ears for about 5 minutes after being removed from the charging case, the headset turns off automatically.
 (lights up in blue for about 2 seconds)
When the remaining battery charge is low (headset/charging case)
 When the remaining battery charge of the headset is low
When the remaining battery charge of the headset is 20% or lower, the indicator (red) lights successively as follows.  -
-  -
-  (repeatedly flashes slowly in red for about 15 seconds)
 When the remaining battery charge of the charging case becomes low
When you close the lid of the charging case, if the remaining battery charge of the charging case is 30% or lower, the indicator (red) on the charging case lights as follows.
 -
-  -
-  (repeatedly flashes slowly in red for about 15 seconds)
Charging (indicated by the indicator of the charging case)
You can check the charging state with the indicator (red) on the charging case.
 While charging the headset / While charging the charging case
 (lights up in red)
When the headset is placed in the charging case and is being charged, the indicator (red) on the charging case lights up. The indicator (red) of the charging case turns off after charging of the headset is complete.
When charging the headset and charging case by connecting the charging case to an AC outlet, the indicator (red) on the charging case turns off after both charging of the headset and charging case are completed.
 Abnormal temperature
- - |
- - (repeatedly flashes twice in red) |
Abnormal charging |
|
- - |
- - (repeatedly flashes slowly in red) |
Bluetooth function
In the factory setting, when you put the headset on your ears, the indicator turns off. If you disable the wearing detection automatic power off function on the “Sony | Headphones Connect” app, the indicator will not turn off even when the headset is worn.
 Device registration (pairing) mode
 - -
- -  - - (repeatedly flashes twice in blue)
19

Not connected |
|
|
|
- - |
- - |
- - |
- - (repeatedly flashes in blue at about 1-second intervals) |
 Connection process completed


 (repeatedly flashes quickly in blue for about 5 seconds)
 Connected
 - - - - - -
  - - - - - - (repeatedly flashes in blue at about 5-second intervals)
 Incoming call


 (repeatedly flashes quickly in blue)
The unconnected and connected status indications automatically turn off after a period of time has passed. They start flashing again for a period of time when some operation is performed. When the remaining battery charge becomes low, the indicator starts flashing in red.
Other
Updating software |
|
- - |
- - (repeatedly flashes slowly in blue) |
Initialization completed |
|

 (flashes 4 times in blue)
For details, see “Initializing the headset to restore factory settings”.
Hint
In the factory setting, when you put the headset on your ears, the indicators turn off. When the headset is worn, you can check various statuses of the headset by the voice guidance.
Related Topic
 Checking the remaining battery charge
 What you can do with the “Sony | Headphones Connect” app
 About the voice guidance
 Initializing the headset to restore factory settings
5-013-129-11(2) Copyright 2020 Sony Corporation
20
Help Guide
Wireless Noise Canceling Stereo Headset
WF-SP800N
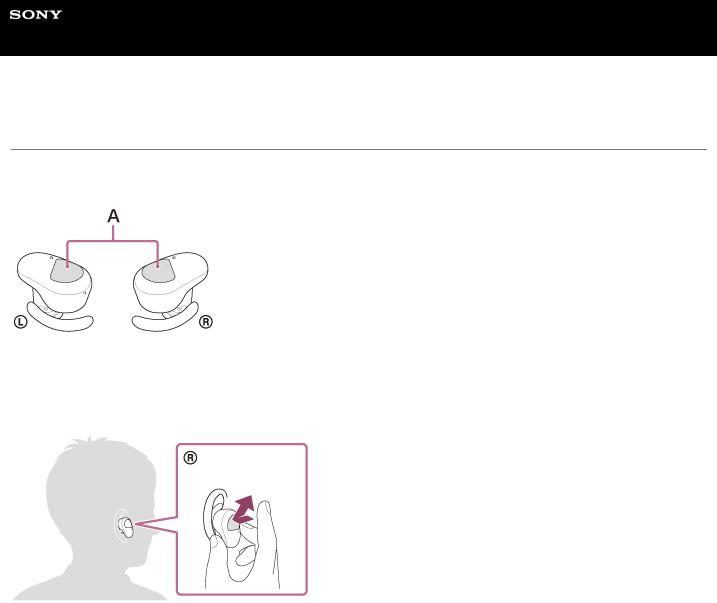
Wearing the headset
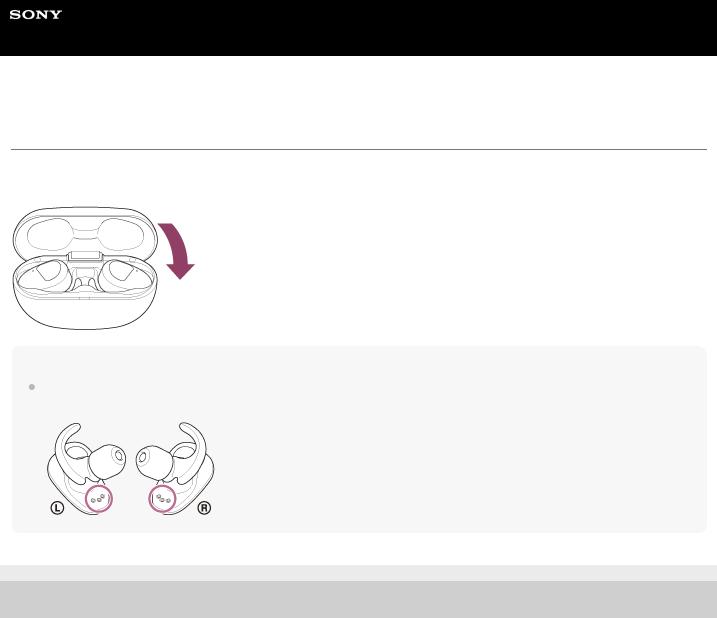
1Insert the headset units into both ears.
Put the unit with the  (left) mark on your left ear and the unit with the
  (right) mark on your right ear. The left unit has a tactile dot.
Be careful not to come in contact with the touch sensor when you put the headset on your ears.
A:Tactile dot
B:Touch sensors (left, right)
2Twist the headset to secure the arc supporter to your ear grooves.
A:Ear grooves
B:Arc supporter
Hint
The earbud will be easier to slide deep into your ear if you pull up on the top of the ear lightly while twisting the headset.
21
If you feel the arc supporters are too small
M-sized arc supporters come attached to the left and right units of the headset at the time of purchase. When the headset is worn following the procedures described above and you feel the arc supporters are too small, replace them with the size L arc supporters.
For the proper sound quality and noise canceling function to be effective
If the size of the earbuds does not match the size of the ear holes, or the earbuds are not properly worn, the noise canceling function and sound quality may be significantly affected.
When you feel the noise canceling function and low frequency sound are insufficient, change the earbuds to ones that feel more sealed.
When changing the earbuds, try the earbud sizes in order from the larger sizes to the smaller sizes. The size of the left and right earbuds may be different.
When attaching and removing the headset
In the factory setting, the built-in sensors detect when the headset is attached to or removed from your ears, enabling the headset to pause or resume music playback, as well as control the touch sensors, indicators, and voice guidance.
When the headset is worn
 The indicators of the headset turn off.
 You can use the touch sensors to play music, make and receive calls, etc.
 You will hear a voice guidance corresponding to the operation and status.
When the headset is removed
 When you listen to music while the headset is worn on both ears, the headset will pause music playback if one unit of the headset is removed. When the unit is worn again, the headset resumes music playback.
 When the headset is not worn in your ears for about 5 minutes after being removed from the charging case, the headset turns off automatically to save the battery. Turn the headset on by tapping the touch sensor or by putting the headset on your ears.
 In order to prevent the headset from reacting incorrectly, music playback, making and receiving calls, and other operations cannot be performed when not wearing the headset on your ears, even if you tap the touch sensor.
Hint
You can also play music, make and receive calls, etc. when only one unit of the headset is worn on your ear.
By using the “Sony | Headphones Connect” app, you can change the setting of automatically pausing and resuming the music playback, or automatically turning off the headset.
Related Topic
 Replacing the earbuds
 Replacing the arc supporters
 Using only one unit of the headset
22

 What you can do with the “Sony | Headphones Connect” app
5-013-129-11(2) Copyright 2020 Sony Corporation
23
Help Guide
Wireless Noise Canceling Stereo Headset
WF-SP800N
Using only one unit of the headset
You can remove one unit from the charging case and use it by itself.
In this case, only the unit that has been removed from the charging case will turn on.
When you put on the other unit of the headset
The connection between the left and right units is established automatically, and you will hear the music or other audio on both units of the headset.
About the voice guidance
When only one unit of the headset is worn on your ear, you will hear a voice guidance from that unit.
Some instances of the voice guidance can be heard only from the left unit when both the left and right units are worn on your ears. When only wearing the right unit on your ear, all instances of the voice guidance will be heard from the right unit.
Assigning functions to the touch sensors
Depending on the unit you are wearing, some functions may not be available in the factory setting. In this case, you can change the assignment of functions to the touch sensors using the “Sony | Headphones Connect” app.
Hint
The Google Assistant feature can be assigned to either the left or right unit of the headset.
When the Google Assistant feature is assigned to the headset and you want to use only one unit of the headset, use the unit with the Google Assistant feature assigned.
The Amazon Alexa feature can be assigned to either the left or right unit of the headset.
When the Amazon Alexa feature is assigned to the headset and you want to use only one unit of the headset, use the unit with the Amazon Alexa feature assigned.
Note
When you play music or other stereo audio while wearing only one unit, you will hear the sound of either left or right channel depending on the unit you are wearing. You cannot hear monaural sound with the left and right channels mixed.
Related Topic
 What you can do with the “Sony | Headphones Connect” app
24

5-013-129-11(2) Copyright 2020 Sony Corporation
25
Help Guide
Wireless Noise Canceling Stereo Headset
WF-SP800N
About the touch sensor
Tap the touch sensor for various operations, such as music playback, phone calls, or changing the setting of the noise canceling function.
A: Touch sensors (left, right)
To operate the touch sensor, hold the headset between your thumb and middle finger, then tap the touch sensor with your forefinger.
Some available operations
|
Left |
Right |
|
|
|
|
|
|
To switch the noise canceling |
|
|
Tap |
function and Ambient Sound |
To play or pause music |
|
|
Mode |
|
|
|
|
|
|
|
|
To skip to the beginning of the next |
|
Tap twice |
To receive or end a call |
track |
|
|
|
To receive or end a call |
|
|
|
|
|
|
|
To skip to the beginning of the previous |
|
Tap 3 times |
- |
track (or the current track during |
|
|
|
playback) |
|
|
|
|
|
Hold your finger to the touch sensor |
To activate Quick Attention |
To use or cancel the voice assist |
|
Mode |
function (Siri/Google app) |
||
|
|||
|
|
|
|
Hold your fingers to the touch sensors on |
To enter the device |
To enter the device registration |
|
both the left and right units for about 7 |
|||
registration (pairing) mode |
(pairing) mode |
||
seconds |
|||
|
|
||
|
|
|
26

Hint
When tapping the touch sensor 2 or 3 times, tap it quickly with an interval of about 0.4 seconds between taps.
You can change the assignment of the functions to the touch sensors of both the left and right units using the “Sony | Headphones Connect” app. For example, the music playback function that is assigned to the touch sensor of the right unit in the factory setting can be changed to the touch sensor of the left unit.
You can also change the settings that do not assign the music playback function, noise canceling function, Ambient Sound Mode and playback volume adjustment function, etc. In this case, you can pair the device, reset the headset and initialize the headset.
Note
You cannot operate the touch sensors when not wearing the headset. If you disable the wearing detection automatic power off function on the “Sony | Headphones Connect” app, the touch sensors can be operated even when the headset is not worn.
When you make initial settings for the Google Assistant on your smartphone, the assignment of functions to the touch sensors may change automatically.
Check the assignment of the functions to the touch sensors with the “Sony | Headphones Connect” app.
When you make initial settings for Amazon Alexa on your smartphone, the assignment of functions to the touch sensors may change automatically.
Check the assignment of the functions to the touch sensors with the “Sony | Headphones Connect” app.
Related Topic
 What you can do with the “Sony | Headphones Connect” app
5-013-129-11(2) Copyright 2020 Sony Corporation
27
Help Guide
Wireless Noise Canceling Stereo Headset
WF-SP800N
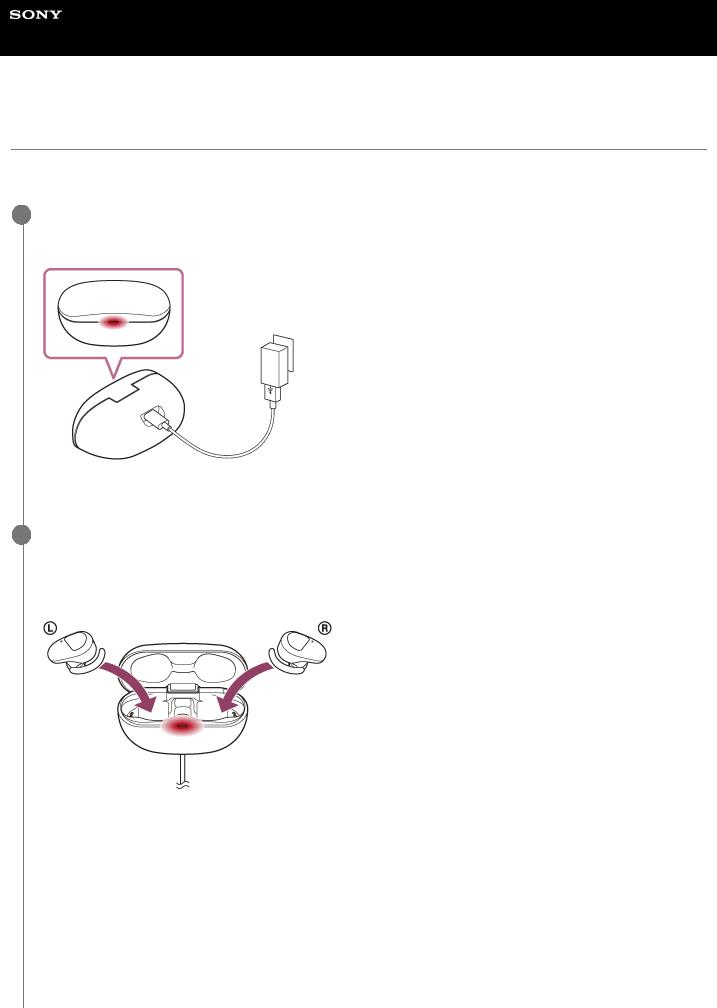
Charging
The headset and the charging case contain built-in lithium-ion rechargeable batteries. Use the supplied USB Type-C cable to charge the headset before use.
1Connect the charging case to an AC outlet.
Use the supplied USB Type-C cable and a commercially available USB AC adaptor.
The indicator (red) on the charging case lights up, and the charging case starts charging.
2Set the headset into the charging case.
Put the left unit of the headset (the unit with the tactile dot) back into the left hole of the charging case, and put the right unit of the headset back into the right hole of the charging case. Each unit of the headset will be set to the correct position by the built-in magnet.
The indicators (red) on the headset light up, and the headset starts charging.
 Close the lid of the charging case after setting the headset into the charging case.
 If one unit of the headset is finished charging when you open the lid of the charging case, the indicator (red) of the unit is not lit. The other unit continues charging.
 When charging of the headset and the charging case is complete, the indicator (red) on the charging case turns off automatically. When you open the lid of the charging case after charging is completed, the indicators (red) of the headset will remain lit for a while.
After charging is complete, disconnect the USB Type-C cable.
28

About the charging time
The required time for fully charging the left and right units of the headset is about 2.5 hours (*). The required time for fully charging the headset and the charging case is about 3 hours (*).
*Time required for charging the empty battery to its full capacity. The charging time may differ depending on the conditions of use.
Charging the headset when you are outside
A rechargeable battery is built into the charging case. If you charge the charging case in advance, you can use it to charge the headset when you go out without a power supply.
If the charging case is fully charged, you can charge the headset about once.
Notes on charging the headset when you are outside
 When the headset is placed in the charging case, if the indicator (red) on the charging case flashes and then immediately turns off, the remaining battery charge of the charging case is low and the headset cannot be charged.
  If the indicator (red) on the charging case does not turn on/flash even when the headset is placed in the charging case, the battery charge of the charging case is empty.
System requirements for battery charge using USB
USB AC adaptor
A commercially available USB AC adaptor capable of supplying an output current of 0.5 A (500 mA) or more
Personal computer
Personal computer with a standard USB port
 We do not guarantee operation on all computers.
 Operations using a custom-built or homebuilt computer are not guaranteed.
Hint
The headset can be also charged by connecting the charging case to a running computer using the supplied USB Type-C cable.
Note
Charging may not be successful with cables other than the supplied USB Type-C cable.
Charging may not be successful depending on the type of USB AC adaptor.
When the charging case with the headset placed in is connected to an AC outlet or computer, all operations such as turning on the headset, registering or connecting to Bluetooth devices, and music playback cannot be performed.
The headset cannot be charged when the computer goes into standby (sleep) or hibernation mode. In this case, change the computer settings, and start charging the headset once again.
If the headset is not used for a long time, the rechargeable battery usage hours may be reduced. However, the battery life will improve after a few recharges. If you store the headset for a long time, charge the battery to its full capacity once every 6 months to avoid over-discharge.
If the headset is not used for a long time, it may take longer to charge the battery.
Be sure to close the lid of the charging case to prevent the battery of the charging case from being consumed.
If the headset or the charging case detects a problem while charging due to the following causes, the indicator (red) of the charging case flashes. In this case, charge once again within the charging temperature range. If the problem persists, consult your nearest Sony dealer.
Ambient temperature exceeds the charging temperature range of 5 °C - 35 °C (41 °F - 95 °F). There is a problem with the rechargeable battery.
It is recommended to charge in a place with an ambient temperature between 15 °C and 35 °C (59 °F - 95 °F). Efficient charging may not be possible beyond this range.
If the headset is not used for a long time, the indicator (red) on the charging case may not immediately light up when charging. Please wait a moment until the indicator (red) lights up.
29

If the usage hours of the built-in rechargeable battery decrease significantly, the battery should be replaced. Consult your nearest Sony dealer to replace the rechargeable battery.
Avoid exposure to extreme temperature changes, direct sunlight, moisture, sand, dust, and electrical shock. Never leave the headset in a parked vehicle.
When connecting the charging case to a computer, use only the supplied USB Type-C cable, and be sure to directly connect them. Charging will not be properly completed when the charging case is connected through a USB hub.
5-013-129-11(2) Copyright 2020 Sony Corporation
30
 Loading...