

Sony WEGA KE-MV42A1 Operating Instructions Manual

2-189-214-13(1)
Plasma TV
Operating Instructions
• Before operating the unit, please read this manual throughly and retain it for
future reference.
KE-MV42A1
©2004 Sony Corporation
Safety Information
For Safety
AC power cord
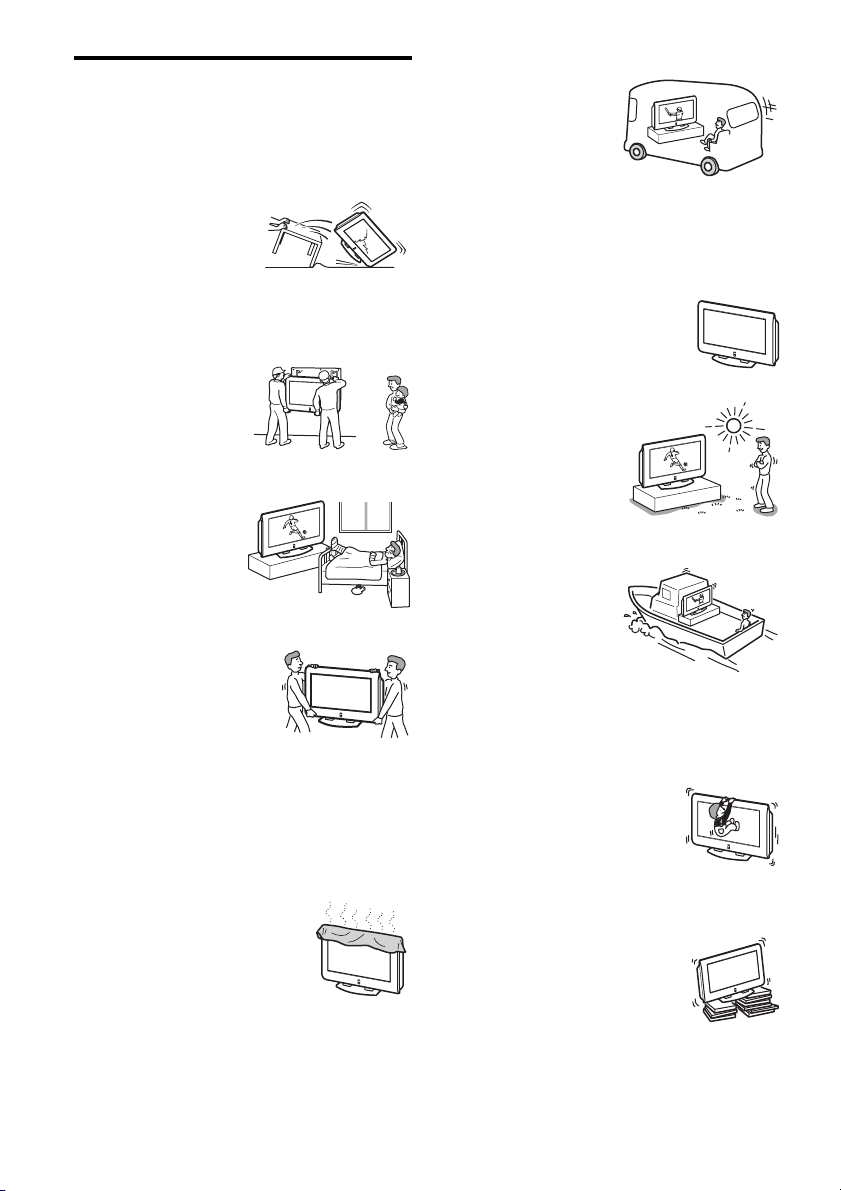
Unplug the AC power cord when
moving the Plasma TV. Do not
move the Plasma TV with the
AC power cord plugged in. It
may damage the AC power cord
and result in fire or electric
shock. If the Plasma TV has been dropped or damaged, have
it checked immediately by qualified service personnel.
Installation
Installation of the Plasma TV
on the wall should be carried
out by qualified servicemen.
Improper installation may
render the Plasma TV unsafe.
Medical institution
Do not place this Plasma TV
in a place where medical
equipment is in use. It may
cause malfunction of medical
instruments.
Carrying
Carrying the Plasma TV requires
two or more people. If you carry the
Plasma TV in a manner other than
that specified, it may drop and a
serious injury may be caused. Be
sure two or more people carry the
Plasma TV. When transporting, do
not subject the Plasma TV to shocks or excessive vibration.
The Plasma TV may fall and be damaged or cause serious
injury.
Installation and moving
Ventilation
Never cover the ventilation holes in the
cabinet. It may cause overheating and
result in fire. Unless proper ventilation is
provided, the Plasma TV may gather dust
and get dirty. For proper ventilation,
observe the following:
• Do not install the Plasma TV turne d
backward or sideways.
• Do not install the Plasma TV turned over or upside down.
• Do not install the Plasma TV on a shelf or in a closet.
• Do not place the Plasma TV on a rug or bed.
• Do not cover the Plasma TV with cloth, such as curtains, or
items such as newspapers, etc.
Vehicle and ceiling
Do not install this Plasma TV
in a vehicle or hang it from the
ceiling. Bumping of the
vehicle may cause the Plasma
TV to fall down and cause
injury.
Water and moisture
Do not use this Plasma TV near water - for example, near a
bathtub or shower room. Also do not expose to rain. It may
result in fire or electric shock.
Optional accessories
When installing the Plasma TV, use the
supplied stand or wall-mount bracket (not
supplied). If not, the Plasma TV may fall
and cause serious injury.
Outdoor us e
Do not install this Plasma TV
outdoors. If the Plasma TV is
exposed to rain, it may result in
fire or electric shock. If the
Plasma TV is exposed to direct
sunlight, the Plasma TV may
heat up and it may damage the
Plasma TV.
Ship and vessel
Do not install this Plasma TV
in a ship or vessel. If the
Plasma TV is exposed to
seawater, it may cause fire or
damage the Plasma TV.
Cord arrangement
Arrange the power cords or connecting cords in a safe place
to avoid tripping on them.
Fall
Place the Plasma TV on a secure, stable
stand. Do not hang anything on the Plasma
TV. The Plasma TV may fall from the
stand or wall-mount bracket (not
supplied), causing damage or serious
injury.
Recommended place for the Plasma TV
Place the Plasma TV on a stable, level
surface. Otherwise, it may fall and cause
injury.
2
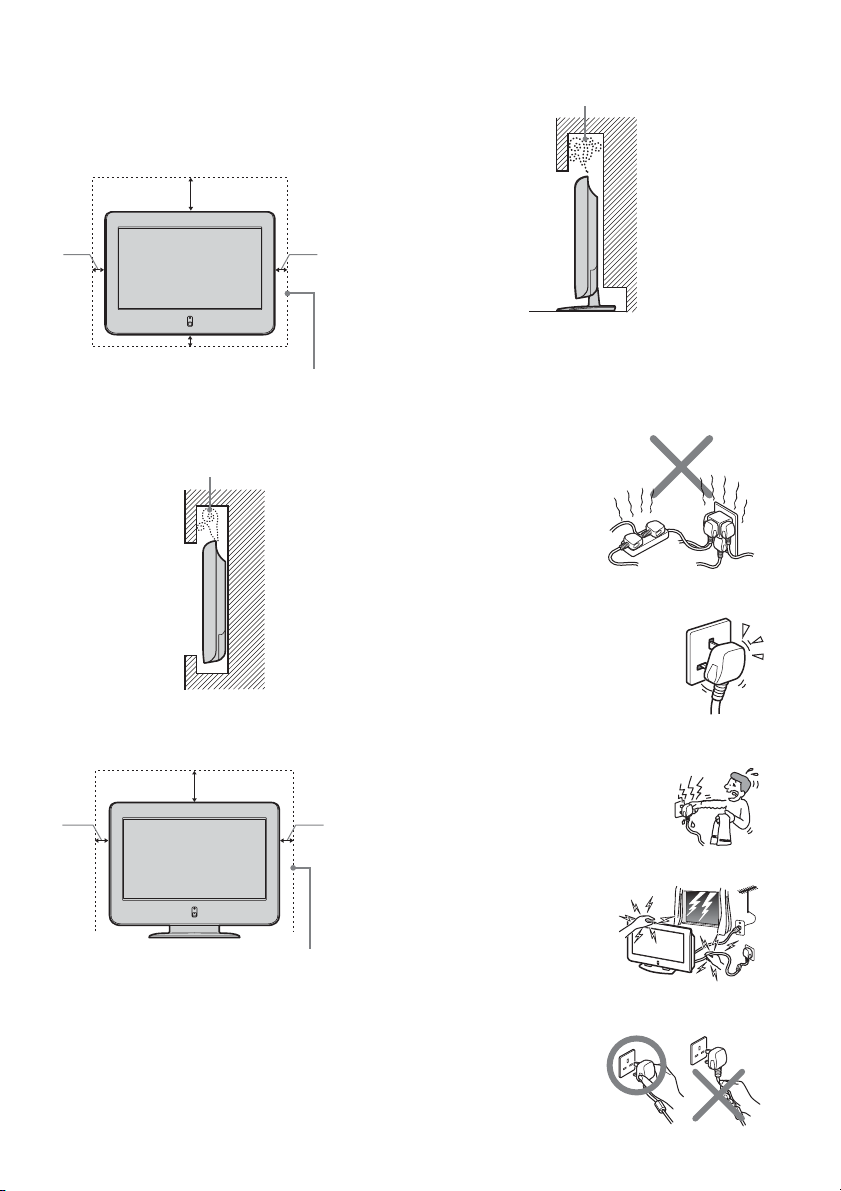
Ventilation
Leave space around the Plasma TV. Otherwise, adequate aircirculation may be blocked causing overheating and cause
fire or damage the Plasma TV.
When installing the Plasma TV on the wall
30cm
10cm10cm
10cm
Never install the Plasma TV as follows:
Air circulation is blocked.
Wall
Leave this space at least.
Never install the Plasma TV as follows:
Air circulation is blocked.
Wall
When installing the Plasma TV using a stand
30cm
10cm10cm
Leave this space at least.
Power Sources
Overloading
This Plasma TV is designed to
operate on a 110-240V AC
supply for the Plasma TV.
Take care not to connect too
many appliances to the same
AC power socket as this could
result in fire or electric shock.
AC power outlet
Do not use a poor fitting AC power socket.
Insert the plug fully into the AC power outlet.
If it is loose, it may cause arcing and result in
fire. Contact your electrician to have the AC
power socket changed.
When you disconnect the AC power cord,
disconnect it from the AC outlet first.
Moisture
Do not touch the AC power cord with a wet
hand. If you plug/unplug the AC power
cord with a wet hand, it may cause electric
shock.
Lightning storms
For your own safety, do not
touch any part of the Plasma TV,
AC power cord or antenna lead
during lightning storms.
AC power cord protection
Pull out the AC power cord by
the plug. Do not pull on the AC
power cord itself.
3
Wiring
Unplug the AC power cord when wiring cables. Be sure to
unplug the AC power cord for your safety, when hooking up.
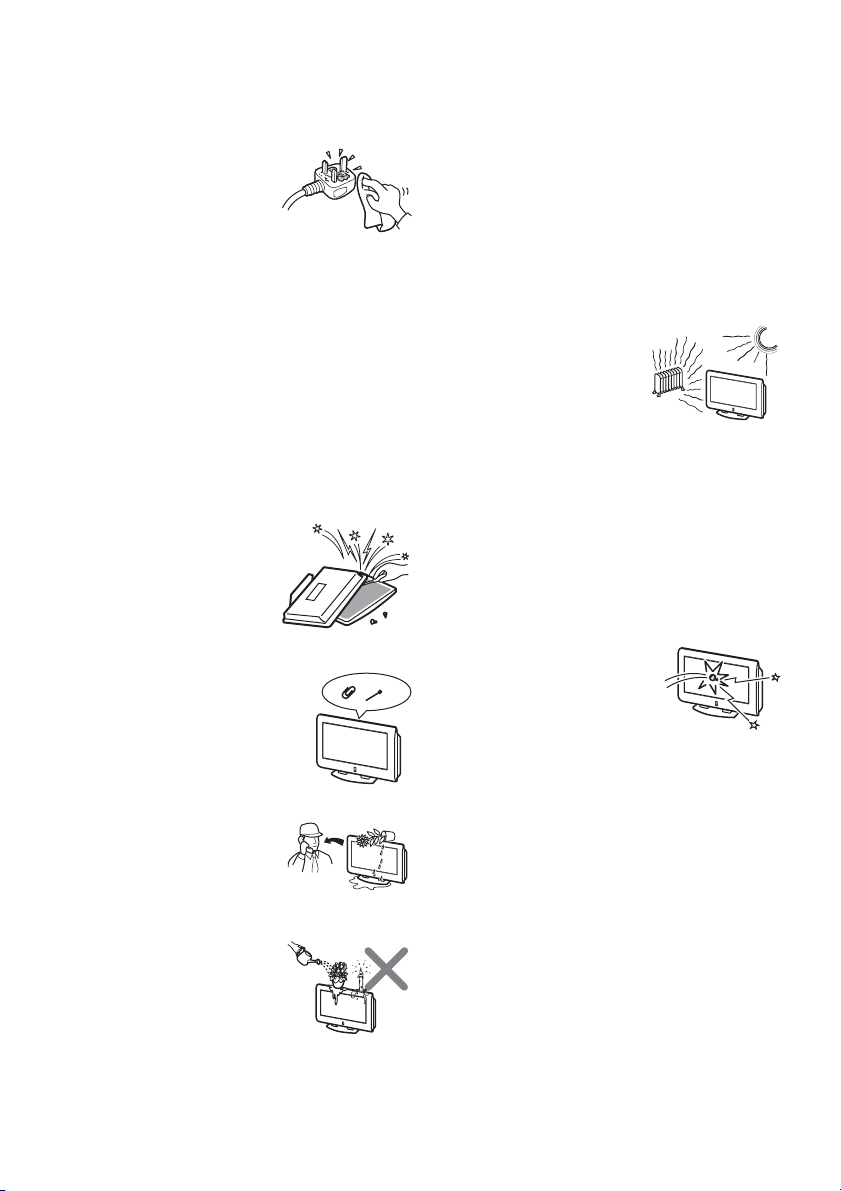
Cleaning
Clean the AC power plug regularly.
If the plug is covered with dust and
it picks up moisture, its insulation
may deteriorate and result in fire.
Unplug the AC power plug and
clean it regularly.
Grounding
To avoid electric shock, be sure to connect the supplied AC
power cord to a grounded power outlet.
If the plug fails to fit, contact your electrician to have the
outlet changed.
Use
Damage requiring service
If the surface of the Plasma TV cracks, do not touch it until
you unplug the AC power cord. Otherwise electric shock may
result.
Servicing
Do not open the cabinet and the rear
cover of the Plasma TV. Refer to
qualified service personnel only.
Ventilation holes
Do not insert anything in the ventilation
holes. If metal or something flammable
enters, it may result in fire or electric
shock.
Moisture and flammable
• Do not let this Plasma TV get wet.
Never spill liquid of any kind on
the set. If any liquid or solid object
does fall through, do not operate
the Plasma TV. It may result in
electric shock or damage to the Plasma TV. Have it
checked immediately by qualified personnel.
• Do not place any objects on the
Plasma TV. The Plasma TV shall
not be exposed to dripping or
splashing and that no objects filled
with liquids, such as vases, shall be
placed on the Plasma TV.
• To prevent fire, keep inflammable
objects or naked lights (e.g. candles) away from the Plasma
TV.
Additional Safety Information
Electric shock
Do not touch the Plasma TV with a wet hand. Doing so may
cause electric shock or damage the Plasma TV.
Protruding location
Do not install the Plasma TV in protruding locations. If you
install the unit in the following locations, injury may res ult.
• Do not install the Plasma TV in a location where the
Plasma TV protrudes, such as pillars.
• Do not install the Plasma TV in a location where your face
may bump.
Placement
Never place the Plasma TV in hot,
humid or excessively dusty places.
Do not install the Plasma TV where
it may be exposed to mechanical
vibrations. Do not use the Plasma
TV where insects may enter.
Oils
Do not install this Plasma TV in restaurants that use oil. Dust
absorbing oil may enter into the Plasma TV and damage the
Plasma TV.
Accessories
Secure the Plasma TV from falling down.
If the Plasma TV is not secured properly, it may fall and
cause injury. Take measures against it using the supplied
stand or a wall-mount bracket (not supplied).
Broken pieces
Do not throw anything at the Plasma
TV. The screen glass may explode by
the impact and cause serious injury.
Corrosion
If you use this Plasma TV near the seashore, salt may corrode
metal parts of the Plasma TV and cause internal damage or
fire. It may also shorten the life of the Plasma TV. If the
Plasma TV will be subjected to none of these conditions,
steps should be taken to reduce the humidity and temperature
of the area where the Plasma TV is located.
Cleaning
Unplug the AC power cord when cleaning this Plasma TV. If
not, it may result in electric shock.
4
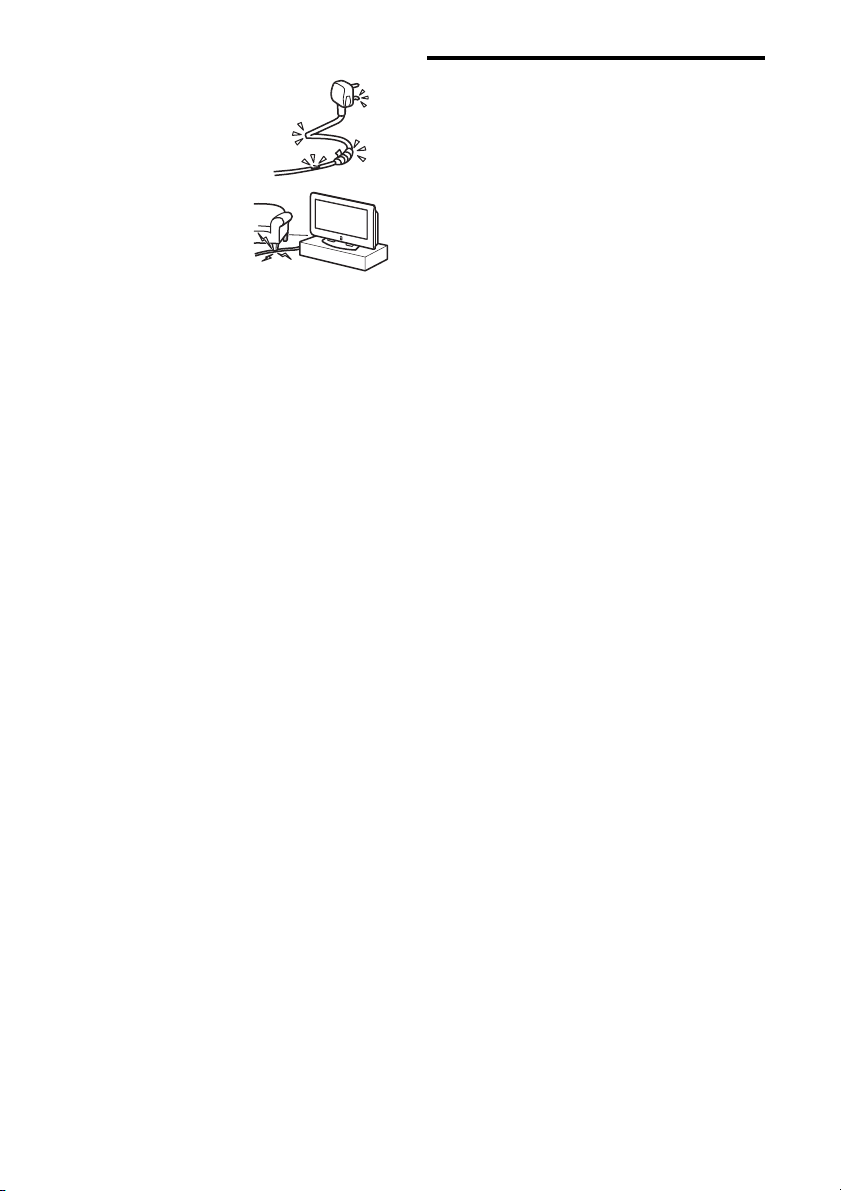
AC power cord
If you damage the AC power
cord, it may result in fire or
electric shock.
• Do not pinch, bend, or twist the
cable excessively. The core
lines may be bared and cut, and
cause short-circuit, resulting in
fire or electric shock.
• Do not convert or damage the
AC power cord.
• Do not put anything heavy on
the AC power cord. Do not pull
the AC power cord.
• Keep the AC power cord away
from heat sources.
• Be sure to grasp the plug when disconnecting the AC
power cord.
If the AC power cord is damaged, stop using it and ask your
dealer or Sony service center to exchange it.
Not in use
For environmental and safety reasons, it is recommended that
the Plasma TV is not left in standby mode when not in use.
Disconnect from the AC power outlet.
Cable wiring
Take care not to catch your feet on the cables. It may damage
the Plasma TV.
Installation
Do not install optional components too close to the Plasma
TV. Keep optional components at least 30 cm away from the
Plasma TV. If a VCR is installed in front or beside the Plasma
TV, the picture may distort.
Heat
Do not touch the surface of the Plasma TV. It remains hot,
even for some time after the Plasma TV is turn ed off.
Precautions
On viewing the Plasma TV comfortably
• To view the Plasma TV comfortably, the recommended
viewing position is from four to seven times of the screen’s
vertical length away from the Plasma TV.
• View the Plasma TV in a moderate light room, as viewing
the Plasma TV in poor light taxes your eyes. And watching
the screen continuously long times taxes your eyes, too.
On installing the Plasma TV
• Use the specified wall-mount bracket or stands.
• Do not install the Plasma TV in places subject to extreme
temperature, for example in direct sunlight, or near a
radiator, or heating vent. If the Plasma TV is exposed to
extreme temperature, the Plasma TV may heat up and it
may cause deformations of the casing or malfunctions.
• Do not install the Plasma TV in a place exposed to direct
air conditioning. If the Plasma TV is installed in such a
location, moisture may condense on the glass or PDP panel
inside the Plasma TV. It may cause a malfunction.
• After transporting the Plasma TV directly from a cold to a
warm location, or if the room temperature has changed
suddenly, pictures may be blurred or show poor color over
portions of the picture. This is because moisture has
condensed on the glass or PDP panel inside the Plasma TV.
Let the moisture evaporate before using the Plasma TV.
• To obtain a clear picture, do not expose the screen to direct
illumination or direct sunlight. If possible, use spot lighting
direct down from the ceiling.
On adjusting volume
• Adjust the volume so as not to trouble neighbors. Sound
carries very easily at night time. Therefore, closing the
windows or using headphones is suggested.
• When using headphones, adjust the volume so as to avoid
excessive levels, as hearing damage may result.
On image retention
• If the following images ar e displayed for an extended
period time, image retention (afterimage) in are as of the
screen may result due to the characteristics of the Plasma
Display Panel.
– Black bars at the top and bottom that appear wit h a wide
video source (Letterbox picture).
– Black bars to the left and right that appear with a 4:3
video source (conventional TV broadcasts).
– Video game sources
– PC images
– DVD on-screen menu displays
– On-screen menus, channel numbers, etc., of connected
equipment such as Set top box, Cable modem, VCR, etc.
The risk of this is higher if the set is in “Dynamic” mode or
has a high contrast setting. This image cannot be removed
once burnt onto the screen. To avoid the risk of occurrence
do not leave the TV set operating on such a picture, or
program for a long time, use the “Screen Saver” function or
lower the contrast setting. Repeated extended daily usage
of the same image, or program can also result in this
occurrence. IMAGE RETENTION IS NOT COVERED
BY THE SONY WARRANTY.
• To reduce image retention, this Plasma TV has the “Screen
Saver” function. The default setting of the “Orbit” function
in “Screen Saver” is “On”.
5

On the PDP (Plasma Display Panel)
Please note that the PDP screen is made with high-precision
technology. However, black points or bright points of light
(red, blue, or green) may appear constantly on the PDP
screen, and irregular colored stripes or brightness may appear
on the PDP screen. This is not a malfunction.
On handling the remote control
• Handle the remote control with care. Do not drop or step on
it, or spill liquid of any kind.
• Do not place the remote control in a location near heat
source, or in a place subject to direct sunlight, or in a damp
room.
On handling and cleaning the screen surface
of the Plasma TV
The screen of this Plasma TV has an anti-reflection screen
coating. To avoid screen degradation, follow the points
mentioned below. Do not push on or scratch with hard
objects, or throw anything at the screen. The screen may be
damaged.
• Be sure to unplug the AC power cord connected to the
Plasma TV from the AC power outlet before cleaning.
• Do not touch the display panel after operating continuously
for a long period as the display panel becomes hot.
• The screen of this Plasma TV has an anti-reflection screen
coating. We recommend not to touch much of the screen
surface.
• Clean the screen with the supplied cleaning cloth or a soft
cloth lightly moistened with a mild detergent solution.
• Never use any type of abrasive pad, scouring powder, or
solvent, such as alcohol or benzine. This type of contact
may result in damage to the screen surface.
On cleaning the cabinet
• Be sure to unplug the AC power cord connected to the
Plasma TV from the AC power outlet before cleaning.
• Clean the cabinet with the supplied cleaning cloth or a soft
cloth lightly moistened with a mild detergent solution.
• Note that material deterioration or screen coating
degradation may occur if the Plasma TV is exposed to a
volatile solvent, such as alcohol, thinner, benzine or
insecticide, or if prolonged contact is maintained with
rubber or vinyl materials.
Disposal of Old Electrical & Electronic
Equipment (Applicable in the European
Union and other European countries with
separate collection systems)
This symbol is on the remote control.
6

Table of Contents
Safety Infor mation
Precautions
Using Your New TV
Getting Started . . . . . . . . . . . . . . . . . . . . . . . . . . . . . . . . . . . . . . . . . . . . . . . . . . . . . . . 8
Step 1: Install the TV . . . . . . . . . . . . . . . . . . . . . . . . . . . . . . . . . . . . . . . . . . . . . . . 8
Step 2: Connect an Antenna and a VCR . . . . . . . . . . . . . . . . . . . . . . . . . . . . . . . . 9
Step 3: Insert the Batteries into the Remote Control . . . . . . . . . . . . . . . . . . . . . . 11
Step 4: Set Up Your TV Automatically . . . . . . . . . . . . . . . . . . . . . . . . . . . . . . . . . 11
Connecting Optional Components . . . . . . . . . . . . . . . . . . . . . . . . . . . . . . . . . . . . . . .13
Watching the TV . . . . . . . . . . . . . . . . . . . . . . . . . . . . . . . . . . . . . . . . . . . . . . . . . . . . .17
Advanced Operations
Sleep Timer Function . . . . . . . . . . . . . . . . . . . . . . . . . . . . . . . . . . . . . . . . . . . . . . . . .19
Picture Off Function . . . . . . . . . . . . . . . . . . . . . . . . . . . . . . . . . . . . . . . . . . . . . . . . . . 19
Picture Freeze Function . . . . . . . . . . . . . . . . . . . . . . . . . . . . . . . . . . . . . . . . . . . . . . .20
Teletext . . . . . . . . . . . . . . . . . . . . . . . . . . . . . . . . . . . . . . . . . . . . . . . . . . . . . . . . . . . .20
Setting Up the Remote Control to Work with Other Connected Equipment . . . . . . . . 21
Adjusting Your Setup (MENU)
Introducing the Menu System . . . . . . . . . . . . . . . . . . . . . . . . . . . . . . . . . . . . . . . . . . . 24
Picture . . . . . . . . . . . . . . . . . . . . . . . . . . . . . . . . . . . . . . . . . . . . . . . . . . . . . . . . . . . .27
Sound . . . . . . . . . . . . . . . . . . . . . . . . . . . . . . . . . . . . . . . . . . . . . . . . . . . . . . . . . . . . . 29
Wide Screen . . . . . . . . . . . . . . . . . . . . . . . . . . . . . . . . . . . . . . . . . . . . . . . . . . . . . . . .31
Features . . . . . . . . . . . . . . . . . . . . . . . . . . . . . . . . . . . . . . . . . . . . . . . . . . . . . . . . . . .34
Set Up . . . . . . . . . . . . . . . . . . . . . . . . . . . . . . . . . . . . . . . . . . . . . . . . . . . . . . . . . . . . .35
Additional Information
Troubleshooting . . . . . . . . . . . . . . . . . . . . . . . . . . . . . . . . . . . . . . . . . . . . . . . . . . . . . 39
Self-diagnosis Function . . . . . . . . . . . . . . . . . . . . . . . . . . . . . . . . . . . . . . . . . . . . . . . 43
Identifying Parts and Controls . . . . . . . . . . . . . . . . . . . . . . . . . . . . . . . . . . . . . . . . . .44
Index . . . . . . . . . . . . . . . . . . . . . . . . . . . . . . . . . . . . . . . . . . . . . . . . . . . . . . . . . . . . . .49
Specifications . . . . . . . . . . . . . . . . . . . . . . . . . . . . . . . . . . . . . . . . . . . . . . . . Back cover
7
Using Your New TV
Getting Started
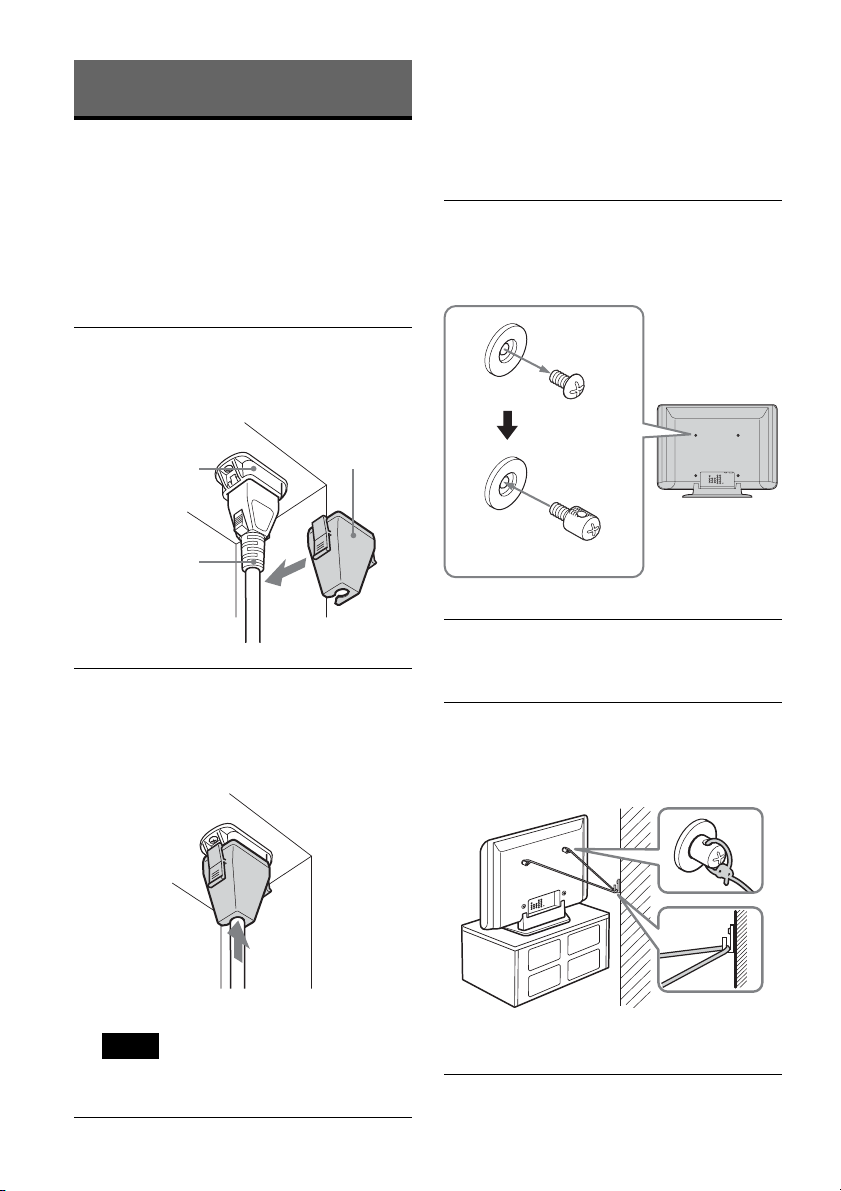
Preventing the TV from falling down
After antenna and other equipment connecti on s
are completed, be sure to attach the supplied
clamp screws to the rear of the TV, and thread a
sturdy cord or chain through it and attach it to a
wall or pillar.
Step 1: Install the TV
Securing the AC plug
You must secure the AC plug to the TV’s AC I N
jack.
1 Attach the AC plug holder (supplied) to the
AC power cord.
AC IN (power
supply input)
jack of the TV
AC power cord
(supplied)
Plug holder
(supplied)
2 Clip on the AC IN jack until you hear
clicking.
To unplug the AC power cord, pull down t he
AC plug holder by pushing in both sides of the
holder, then pull out t he plug.
1 Remove one of the two screws on the rear
of the TV, then install the supplied clamp
screw in the screw hole.
Attached
screw
Clamp screw
(supplied)
2 Repeat step 1 to install the other clamp
screw.
3 Attach a sturdy cord or chain securely to
each clamp screw, and attach the cord or
chain to a wall or pillar.
Note
• W hen you disconnect th e A C power cord,
disconnect it from the AC outlet first.
8
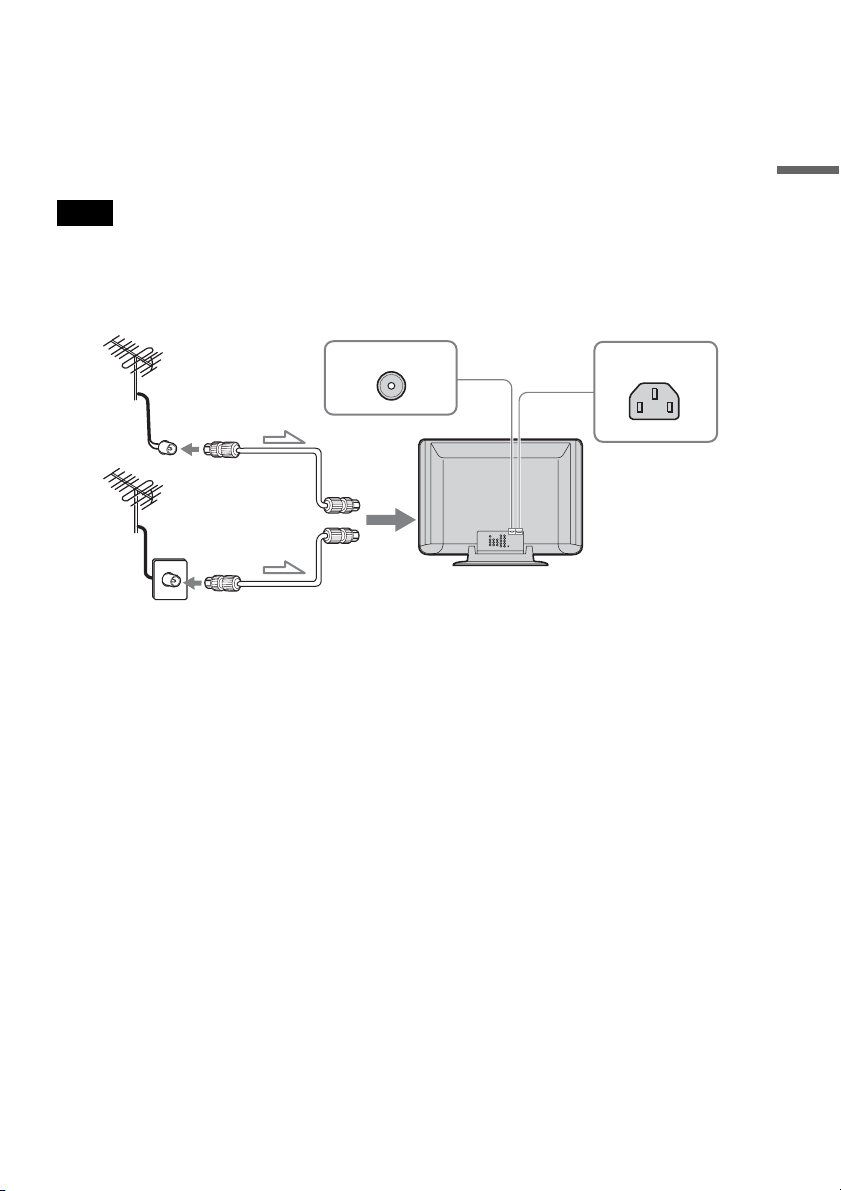
Step 2: Connect an Antenna and a VCR
For optimum perfo rmance
To connect the TV to the antenna or the VCR, use an ant enna cable (supplied) .
Note that one end of the cable has a male plug fitted while the other end is fitted with a female socket.
Connect the male plug t o t he
Note
• Do not connect the power co rd untill all other c onnectio ns are complet e; otherwise, a minima l current le akage thro ugh
the antenna and/or other termi na ls to the ground could occur.
Connecting an antenna
8 VHF/UHF (antenna) terminal of the TV.
Using Your New TV
8 VHF/UHF
Connect the supplied anten na cable.
AC IN
9

Connecting a VCR with an antenna
For more details regarding VCR connection, refer to “Connecting Optional Components” on page 13.
VIDEO IN
VIDEO OUT
To video and
audio outputs
l: Signal flow
Antenna cable (supplied)
To antenna
output
VCR
VIDEO
AUDIO
R L
Audio/Video cable
(not supplied)
To 8 VHF/UHF
(antenna)
S video cable
(not suppli e d)
To
S 1 VIDEO
(S video input)
To S video
output
To t VIDEO 1/2 IN (vid eo input)
9 AUDIO-L (MONO) (white)
9 AUDIO-R (red)
12 12
S VIDEO
VIDEO
L
(MONO)
AUDIO
R
VIDEO (yellow)
8 VHF/UHF
VIDEO IN
MONITOR
OUT
Rear of TV
COMPONENT VIDEO IN
Y
PB/
C
B
PR/
C
R
L
AUDIO
R
RESET
Notes
• If you connect a monaural VCR, connec t the yellow pl ug to VIDEO (the yellow jack) and the black plug to
AUDIO-L (MONO) (the white jack).
• If you connect a VCR to th e 8 VHF/UHF (antenna) terminal, preset the signal output from the VCR to the program
number 0 on the TV.
• If the S video cable is connected to th is TV and the VCR, the S video signal is aut o mat ically selected.
10
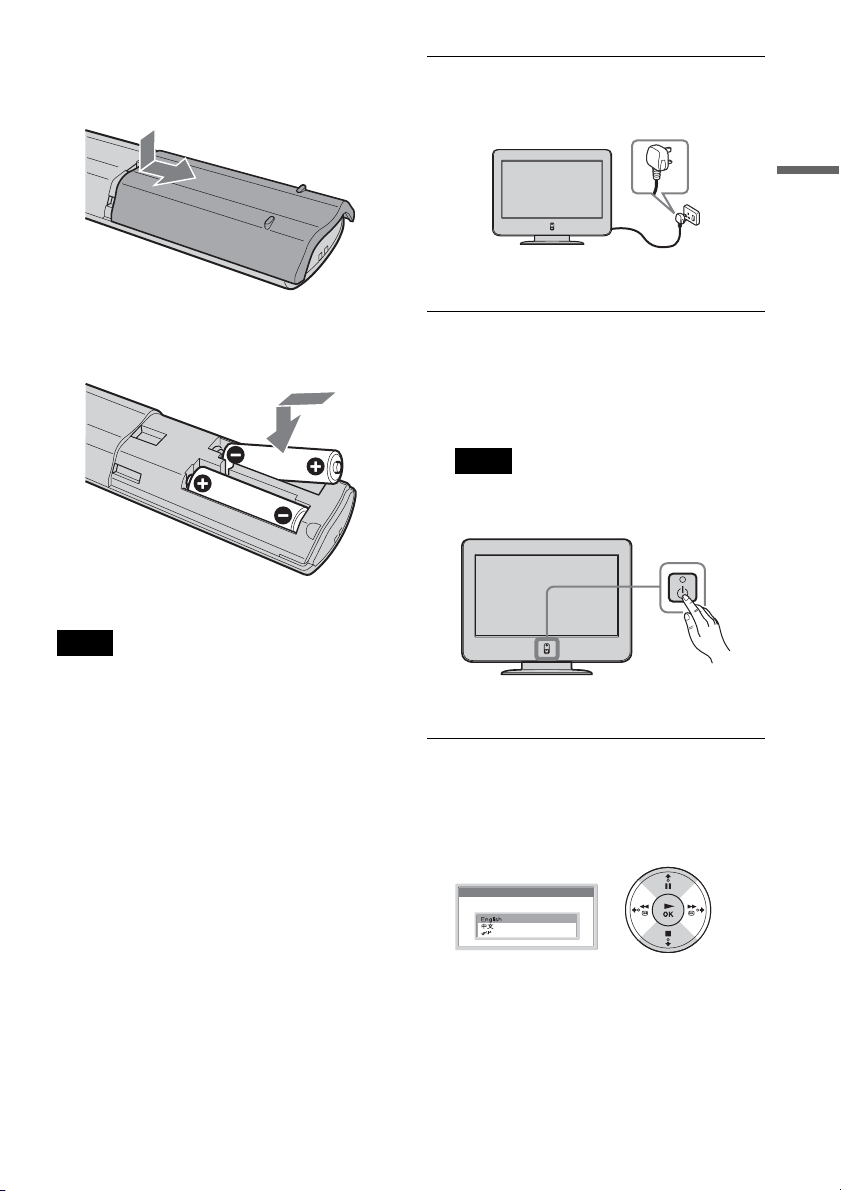
Step 3: Insert the Batteries into
the Remote Control
1 Connect the TV to the AC outlet (110–240 V
AC, 50/60 Hz).
Using Your New TV
m
Notes
• Make sure you insert the supplied batteries observing
the correct polarity.
• Always remember to dispose of used batteries in an
environmentally friendly way.
• Do not use different types of batteries together or mix
old and new batteries.
Step 4: Set Up Your TV
Automatically
The first tim e you tu rn on your TV, a se quen ce of
menu screens appears on the TV enabling you to:
1) choose the language of the menu screen, and 2)
search and store al l available channels (T V
Broadcast).
However, if you need to change any of these
settings at a later date, you can do so by selecting
the appropriate option in the “Set Up” menu (see
page 35).
2 Press the 1 (Power) switch on the TV to
switch it on.
The first time you switch on the TV, the
Language menu appears automatically on the
screen (Auto Start up).
Note
• To perform Auto Startup later, press 0 on the
rear pane l of the TV.
3 Press v/V on the remote control to select
the language, then press OK to confirm
your select i on.
From now on, all the menus will ap pear in t he
selected language.
Language
Select Language
,continued
11
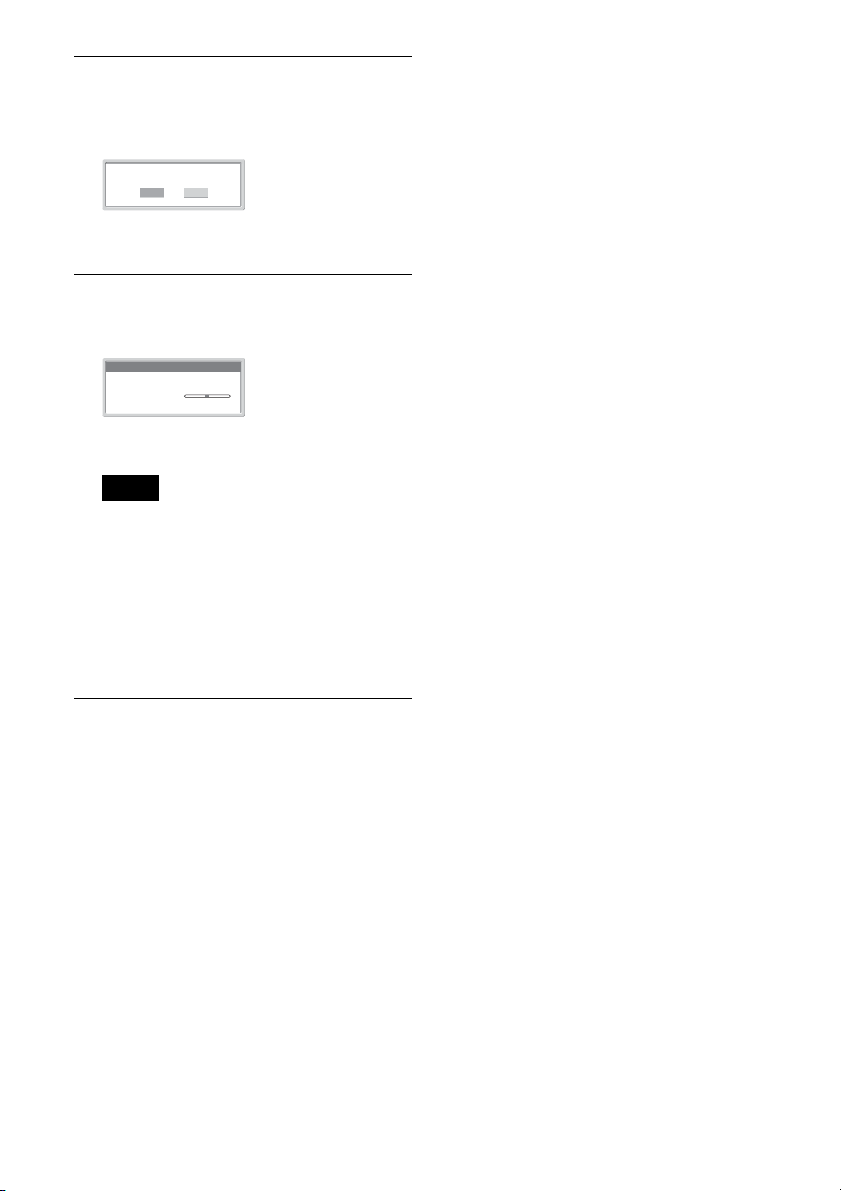
4 The Auto Program me nu appears
automatically on the screen.
Press OK to select Yes.
First please connect cable/antenna
Start auto program now ?
Yes No
5 The TV starts searching and storing all
available broadcast channels.
Auto Program
01
Program :
D/K
TV System :
Channel : VHF
Notes
• This procedure could tak e some minutes. Please
be patient and do not press any buttons, otherwise
the auto programing will not be completed
properly.
• If no channels are found during the auto
programing process, a new menu appears
automatically on the screen asking you to connect
the antenna. Please connect the antenna (see
page 9) and press OK. The auto programing
process will start again.
Searching...
12

Connecting Op ti on al Components
Using the following instructions, you can connect a wide range of optional equipment to your TV.
(Connecting cabl es are not supplied.)
Connecting to the front of the TV
To open the drop-down panel of your TV, push up the panel door just under the mark until you hear
a click, then the panel door will open.
TV Front Panel
,
Using Your New TV
S VIDEO VIDEO L AUDIO R
To i
S video cable
(not supplied)
To S video
output
Headphones
(not suppli e d)
Notes
• You can also connect video e quipment to the t VIDEO 1 or 2 IN (video input) jacks or COMPONENT
VIDEO 1 or 2 IN jacks at the rear of your TV.
• If the signals are input to both S VIDEO (S video input) and VIDEO (video input), the S video signal is
automatically selected.
Video game
equipment
(MONO)
VIDEO 3 IN
To t VIDEO 3 IN
VIDEO (yellow)
9 AUDIO-L (MONO) (white)
9 AUDIO-R (red)
Audio/Video cable
(not supplied)
To video and audio outputs
S VHS/Hi8/DVC
camcorder
13
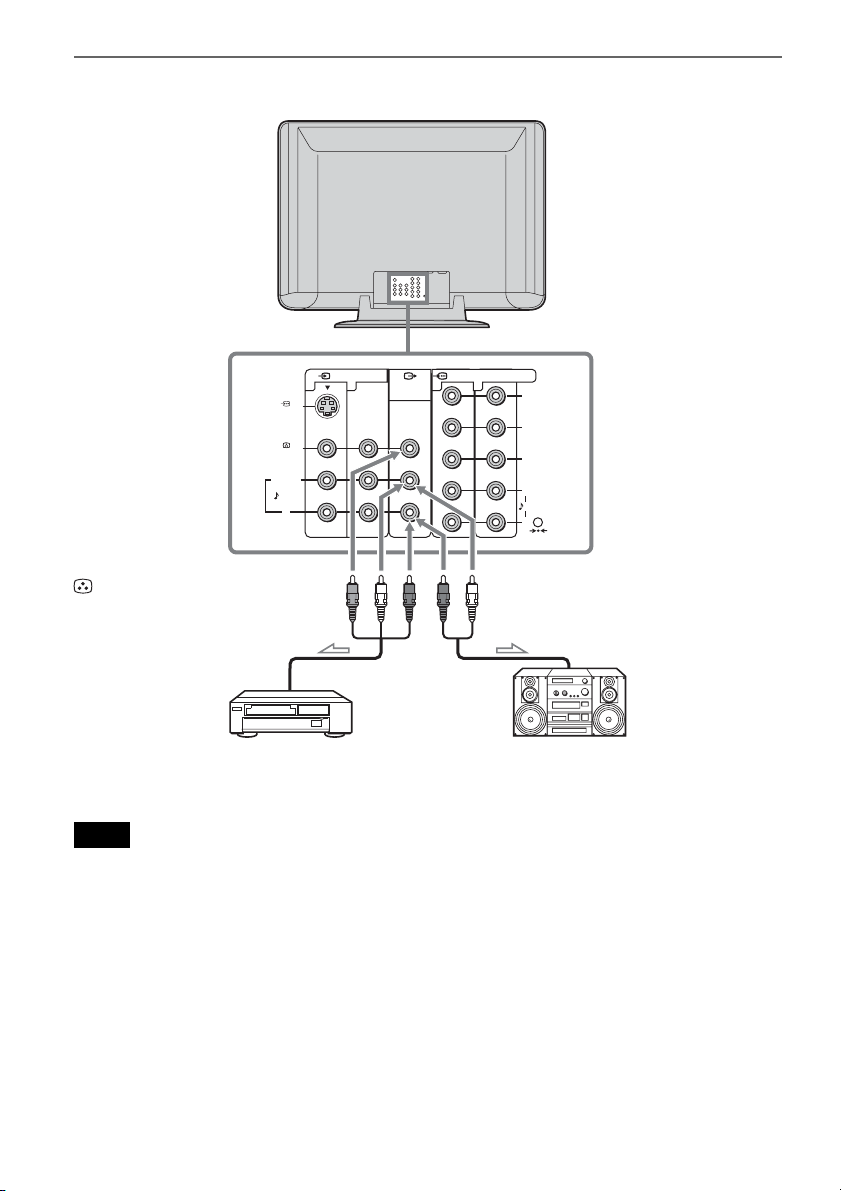
Connecting audio/video equipment using the T MONITOR OUT jacks
VIDEO IN
12 12
S VIDEO
VIDEO
L
(MONO)
AUDIO
R
MONITOR
OUT
COMPONENT VIDEO IN
Y
PB/
C
B
PR/
C
R
L
AUDIO
R
RESET
To T MONITOR OUT (monitor output)
VIDEO (yellow)
9 AUDIO -L (MONO) (white)
9 AUDIO -R (red)
Audio/Video cable
Audio cable
(not suppli e d)
(not suppli e d)
or
VCR Audio system
l: Signal flow
Note
• If you select “HD/DVD 1” or “HD/DVD 2” on your TV screen (see page 18), sound will be heard but no picture will
be output from T MONITOR OUT. This does not indicate a malfunction.
14
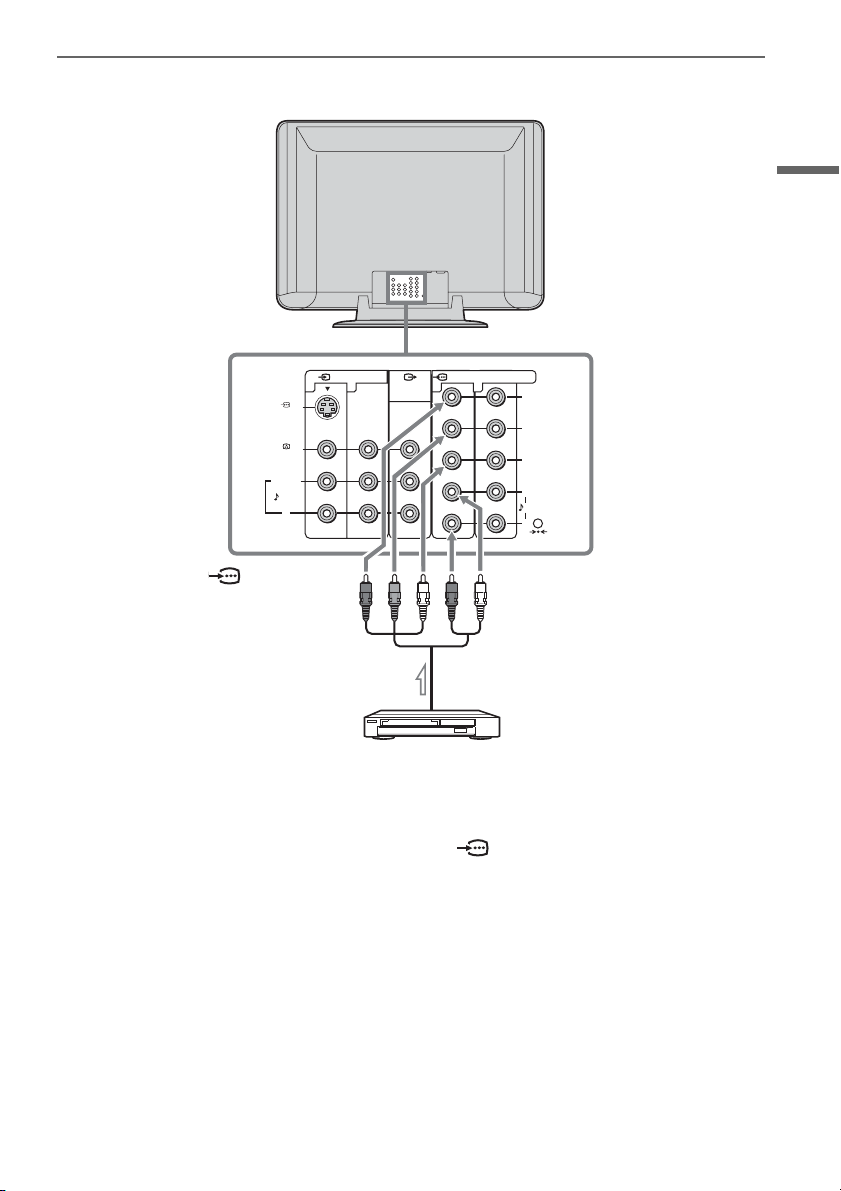
Connecting a DVD player
Using Your New TV
VIDEO IN
12 12
S VIDEO
VIDEO
L
(MONO)
AUDIO
R
To COMPONENT
VIDEO 1 IN (component
MONITOR
OUT
COMPONENT VIDEO IN
Y
PB/
C
B
PR/
C
R
L
AUDIO
R
RESET
To 9 AUDIO-L (white )
9 AUDIO-R (red)
video input)
Component video cable
(not supplied)
l: Signal flow
DVD player
If the DVD player has the component video output jacks
Connect the component video cable and audio cable to the COMPONENT VIDEO 1 or 2 IN jacks.
You do not need to co nnect the video cable.
If the DVD player does not have the comp onent video output jacks
Connect the vi deo cable and audio cable to the t VIDEO 1 or 2 IN jacks.
15
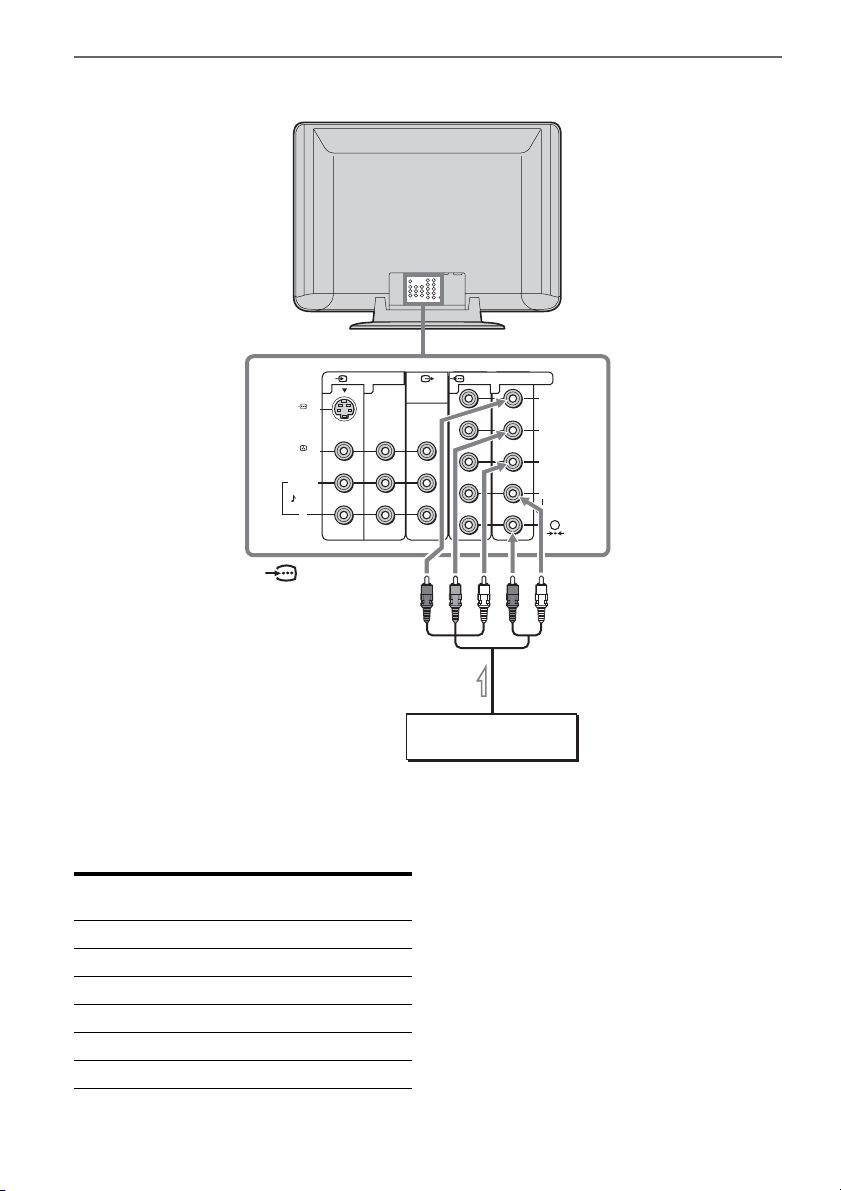
Connecting a Digital TV receiver
VIDEO IN
12 12
S VIDEO
VIDEO
L
(MONO)
AUDIO
R
To COMPONENT
VIDEO 2 IN (component
video input)
l: Signal flow
Tip
• The TV accepts the following signal formats:
Total scanning
line
Effective
scanning line
fV (Hz)
1125i 1080i 50 / 60
750p 720p 50 / 60
625p 576p 50
625i 576i 50
525p 480p 60
525i 480i 60
COMPONENT VIDEO IN
MONITOR
OUT
Digital TV receiver
Y
PB/
C
B
PR/
C
R
L
AUDIO
R
RESET
To 9 AUDIO-L (white)
9 AUDIO-R (red)
Component video cable
(not supplied)
16
 Loading...