

Sony WAHT-SBP1 Operating Instructions Manual
4-148-450-11(1)
Wireless Surround
Speaker Kit
WAHT-SBP1
©2009 Sony Corporation
Operating Instructions
Mode d’emploi
Manual de instrucciones
GB
FR
ES
CT
3
Table of Contents
Enjoying a 7.1 Channel System ......... 5
Unpacking .......................................... 6
Hooking Up ........................................ 6
Setting Up the Wireless System ......... 8
Troubleshooting ...............................12
Specifications ................................... 13
Index to Parts ................................... 15
WARNING
Do not install the appliance in a confined space,
such as a bookcase or built-in cabinet.
To reduce the risk of fire, do not cover the
ventilation opening of the apparatus with
newspapers, tablecloths, curtains, etc.
Do not place the naked flame sources such as
lighted candles on the apparatus.
To reduce the risk of fire or electric shock, do not
expose this apparatus to dripping or splashing, and
do not place objects filled with liquids, such as
vases, on the apparatus.
Excessive sound pressure from earphones and
headphones can cause hearing loss.
Indoor use only.
For the customers in the
U.S.A. and Canada
WARNING
To reduce the risk of fire or electric
shock, do not expose this apparatus
to rain or moisture.
For the customers in the
U.S.A.
This symbol is intended to alert the user
to the presence of uninsulated
“dangerous voltage” within the
product’s enclosure that may be of
sufficient magnitude to constitute a risk
of electric shock to persons.
This symbol is intended to alert the user
to the presence of important operating
and maintenance (servicing) instructions
in the literature accompanying the
appliance.
Owner's Record
The model and serial numbers are located on the
side exterior of the unit. Record the serial number
in the space provided below. Refer to them
whenever you call upon your Sony dealer
regarding this product.
Model No. WAHT-SBP1
Serial No. ________________
Date of Manufacture Marking is located on the
bottom exterior.
The following FCC statement applies only to the
version of this model manufactured for sale in the
U.S.A. Other versions may not comply with FCC
technical regulations.
NOTE:
This equipment has been tested and found to
comply with the limits for a Class B digital device,
pursuant to Part 15 of the FCC Rules. These limits
are designed to provide reasonable protection
against harmful interference in a residential
installation. This equipment generates, uses and
can radiate radio frequency energy and, if not
installed and used in accordance with the
instructions, may cause harmful interference to
radio communications. However, there is no
guarantee that interference will not occur in a
particular installation.
If this equipment does cause harmful interference
to radio or television reception, which can be
determined by turning the equipment off and on,
the user is encouraged to try to correct the
interference by one or more of the following
measures:
– Reorient or relocate the receiving antenna
(aerial).
– Increase the separation between the
equipment and receiver.
– Connect the equipment into an outlet on a
circuit different from that to which the
receiver is connected.
– Consult the dealer or an experienced radio/
TV technician for help.
GB
2
CAUTION
You are cautioned that any changes or
modifications not expressly approved in this
manual could void your authority to operate this
equipment.
Important Safety Instructions
1) Read these instructions.
2) Keep these instructions.
3) Heed all warnings.
4) Follow all instructions.
5) Do not use this apparatus near water.
6) Clean only with dry cloth.
7) Do not block any ventilation openings. Install
in accordance with the manufacturer’s
instructions.
8) Do not install near any heat sources such as
radiators, heat registers, stoves, or other
apparatus (including amplifiers) that produce
heat.
9) Do not defeat the safety purpose of the
polarized or grounding-type plug. A polarized
plug has two blades with one wider than the
other. A grounding type plug has two blades
and a third grounding prong. The wide blade or
the third prong are provided for your safety. If
the provided plug does not fit into your outlet,
consult an electrician for replacement of the
obsolete outlet.
10)Protect the power cord from being walked on
or pinched particularly at plugs, convenience
receptacles, and the point where they exit from
the apparatus.
11)Only use attachments/accessories specified by
the manufacturer.
12) Use only with the cart, stand, tripod, bracket, or
table specified by the manufacturer, or sold
with the apparatus. When a cart is used, use
caution when moving the cart/apparatus
combination to avoid injury from tip-over.
For the wireless transceiver
(EZW-RT10/EZW-RT10A)
This equipment must not be co-located or operated
in conjunction with any other antenna or
transmitter.
This equipment complies with FCC radiation
exposure limits set forth for uncontrolled
equipment and meets the FCC radio frequency
(RF) Exposure Guidelines in Supplement C to
OET65.
This equipment should be installed and operated
with at least 20cm and more between the radiator
and person’s body (excluding extremities: hands,
wrists, feet and ankles).
For the customers in Canada
For the wireless transceiver
(EZW-RT10/EZW-RT10A)
This Class B digital apparatus complies with
Canadian ICES-003.
This device complies with RSS-Gen of IC Rules.
Operation is subject to the following two
conditions: (1) this device may not cause
interference, and (2) this device must accept any
interference, including interference that may cause
undesired operation of this device.
This equipment complies with IC radiation
exposure limits set forth for uncontrolled
equipment and meets RSS-102 of the IC radio
frequency (RF) Exposure rules.
This equipment should be installed and operated
with at least 20cm and more between the radiator
and person’s body (excluding extremities: hands,
wrists, feet and ankles).
GB
13)Unplug this apparatus during lightning storms
or when unused for long periods of time.
14)Refer all servicing to qualified service
personnel. Servicing is required when the
apparatus has been damaged in any way, such
as power-supply cord or plug is damaged,
liquid has been spilled or objects have fallen
into the apparatus, the apparatus has been
exposed to rain or moisture, does not operate
normally, or has been dropped.
GB
3

For the customers in Europe
Disposal of Old
Electrical &
Electronic
Equipment
(Applicable in the
European Union and
other European
countries with
separate collection
systems)
This symbol on the product or on its packaging
indicates that this product shall not be treated as
household waste. Instead it shall be handed over to
the applicable collection point for the recycling of
electrical and electronic equipment. By ensuring
this product is disposed of correctly, you will help
prevent potential negative consequences for the
environment and human health, which could
otherwise be caused by inappropriate waste
handling of this product. The recycling of
materials will help to conserve natural resources.
For more detailed information about recycling of
this product, please contact your local Civic
Office, your household waste disposal service or
the shop where you purchased the product.
Notice for customers: the following information is
only applicable to equipment sold in countries
applying EU directives.
The manufacturer of this product is Sony
Corporation, 1-7-1 Konan Minato-ku Tokyo, 1080075 Japan. The Authorized Representative for
EMC and product safety is Sony Deutschland
GmbH, Hedelfinger Strasse 61, 70327 Stuttgart,
Germany. For any service or guarantee matters,
please refer to the addresses given in separate
service or guarantee documents.
For the wireless transceiver
(EZW-RT10/EZW-RT10A)
Refer to “Wireless Product Safety Information”.
For the customers in Australia
This equipment should be installed and operated
with at least 20 cm and more between the radiator
and person’s body (excluding extremities: hands,
wrists, feet and ankles).
For the customers in
Singapore
Precautions
On power sources
• The unit is not disconnected from the mains as
long as it is connected to the AC outlet, even if
the unit itself has been turned off.
• As the main plug is used to disconnect the unit
from the mains, connect the unit to an easily
accessible AC outlet. Should you notice an
abnormality in the unit, disconnect the main p lug
from the AC outlet immediately.
On placement
• Do not place the system in locations that are hot
and subject to direct sunlight, dusty, very humid,
or extremely cold.
• Use caution when placing the system on a
specially treated (waxed, oiled, polished, etc.)
floor, as staining or discoloration may result.
• Allow adequate air circulation to prevent internal
heat buildup.
• Do not place the system on surfaces (rugs,
blankets, etc.) or near materials (curtains,
draperies) that may block the ventilation slots.
• Do not install the system near heat sources such
as radiators or air ducts, or in a place subject to
direct sunlight, excessive dust, mechanical
vibration or shock.
• Do not install the system in an inclined position.
It is designed to be operated in a horizontal
position only.
• Keep the system away from equipment with
strong magnets, such as microwave ovens, or
large loudspeakers.
• Do not place heavy objects on the system.
• If you use more than one set of S-AIR products,
position them away from each other to avoid
cross talk.
• Install this surround amplifier and S-AIR
products at least 50 cm away from people.
• To prevent fire or shock hazard, do not place
objects filled with liquids, such as vases, on the
apparatus.
• Do not place the system on carpet, as
discoloration may result.
• If you use more than one surround amplifier, do
not place one on top of the other.
GB
4
On cleaning
Clean the cabinets only with a soft dry cloth. Do
not use any type of abrasive pad, scouring powder
or solvent such as alcohol or benzene.
Safety
• If anything falls into the cabinet, unplug the unit
and have it checked by qualified personnel
before operating it any further.
• Unplug the unit from the wall outlet (mains) if
you do not intend to use it for an extended period
of time. To disconnect the cord, pull it out by the
plug, never by the cord.
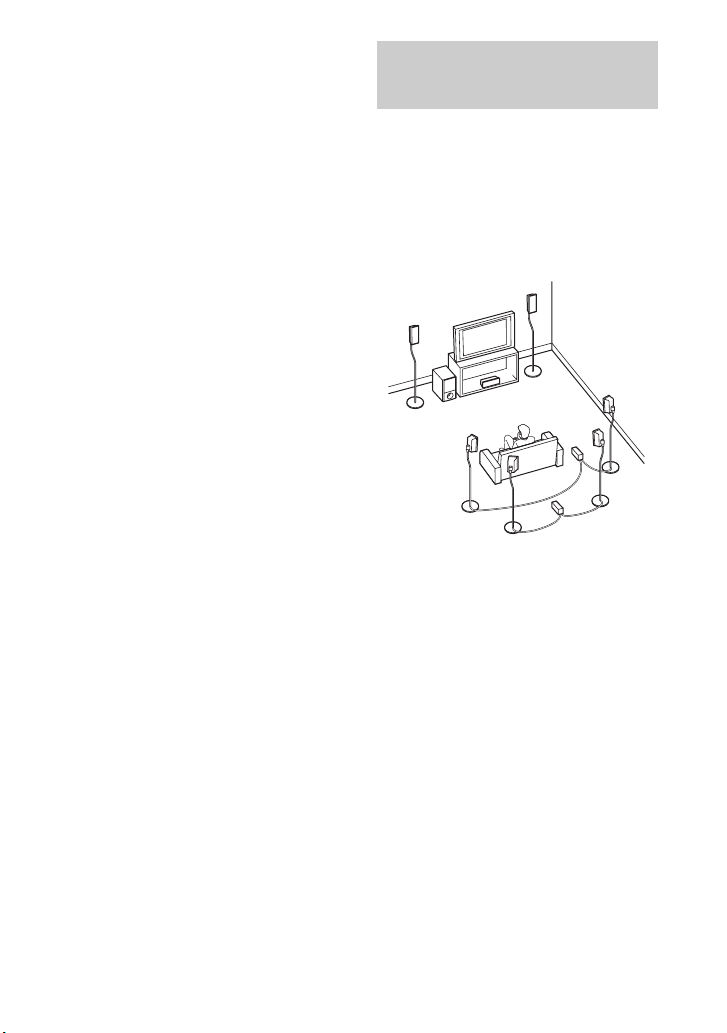
Enjoying a 7.1 Channel
System
The Wireless Surround Speaker Kit
(WAHT-SBP1) includes two surround back
speakers and a surround amplifier. By using
this kit along with a Sony Home Theatre
System, you can enjoy the more realistic
surround sound effect of a 7.1 channel
speaker configuration.
B
A
H
A Front left speaker
B Front right speaker
C Center speaker
D Surround left speaker
E Surround right speaker
F Surround back left speaker
G Surround back right speaker
H Subwoofer
I Surround amplifier
(for surround speakers)
J Surround amplifier
(for surround back speakers)
C
E
D
F
G
I
J
GB
5
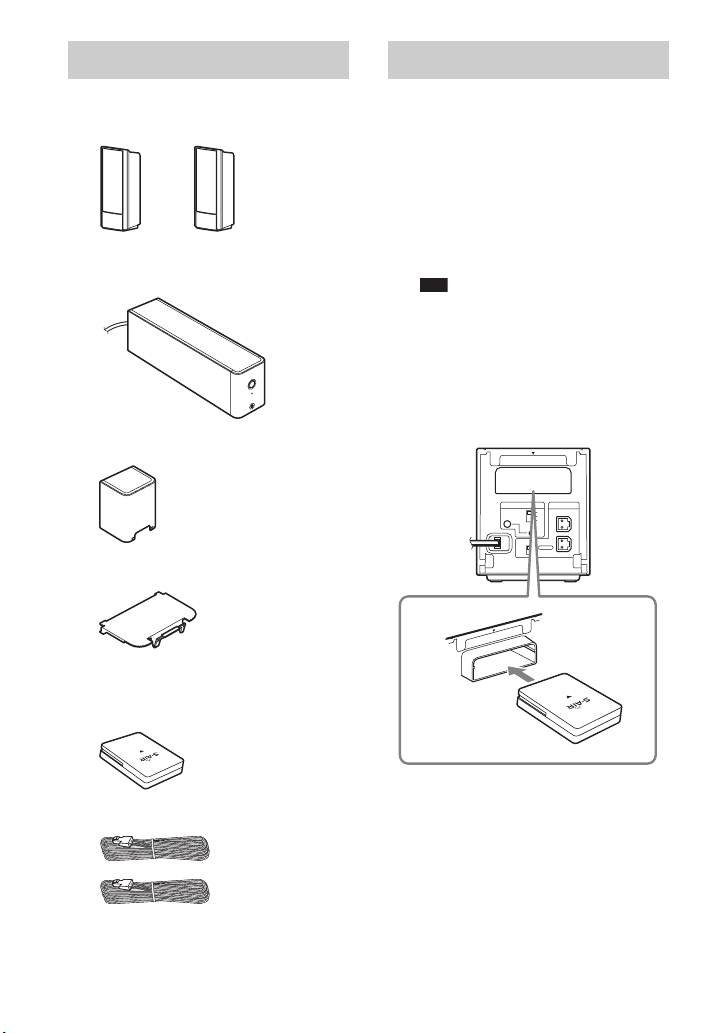
Unpacking
Hooking Up
Surround back speakers
(SS-TSB92) (2)
Surround amplifier
(TA-SA100WR) (1)
POWER
E
N
I
L
N
O
/
R
E
W
O
P
PHONES
Speaker cord cover (1)
Speaker cord holder (1)
Wireless transceiver
(EZW-RT10/EZW-RT10A*) (1)
* For North American and European models.
Before installing, make sure to
remove the AC power cords
(mains lead) of all S-AIR
products from wall outlets
(mains).
1 Insert the wireless transceiver
(supplied) in the slot on the rear
of the surround amplifier.
Note
• Do not touch the terminals of the
wireless transceiver.
• Insert the wireless transceiver so th at the
V marks are aligned.
• Do not insert anything other than the
wireless transceiver into the EZW-RT10
slot.
EZW-RT10
S-AIR ID
SPEAKER
A
B
C
L
PAIRING
SURROUND SELECTOR
R
SURROUND
SURROUND
BACK
10
T
-R
ZW
E
Speaker cords (2)
Operating Instructions (1)
GB
6
2 Insert the wireless transmitter
(supplied with the S-AIR main
unit) in the slot on the
S-AIR main unit.
For S-AIR main units that do not
include a wireless transmitter, prepare
the optional S-AIR Adapter (EZWT100).
For details, refer to the operating
instructions of the S-AIR main unit.
The illustration of the rear panel of an
S-AIR main unit is an example. Not all
S-AIR main units look exactly the
same.
Rear panel
SPEAKER
CENTER SUBWOOFER
COMPONENT VIDEO OUT
VIDEO OUT
Y
PB / CBPR / C
R
HDMI OUT
LAN(100)
SPEAKER
FRONT L SUR R
FRONT R
SUR L
-T100
EZW
EZW-T100
AUDIO
TV
TV
SAT/CABLE
EXT
DIGITAL IN
DIGITAL IN
DC5V
500mA MAX
DMPORT
DC5V
700mA MAX
COAXIAL
OPTICAL
RLR
AUDIO IN AUDIO IN
L
3 Connect the speakers.
Connect the speaker cords to match the
color of the SPEAKER jacks of the
unit.
x To connect the speaker cords
to the surround amplifier
When connecting to the surround
amplifier, insert the connector until it
clicks.
10
T
-R
W
Z
E
R
E
K
A
E
P
S
ID
IR
A
-A
S
L
B
C
PAIRI N G
R
R
O
T
C
E
L
E
S
D
D
N
N
U
U
O
R
O
R
R
U
S
R
U
D
S
N
U
O
R
R
U
S
ANTENNA
COAXIAL75
FM
A. CAL MIC
ECM-AC2
K
C
A
B
Gray
(Speaker
(R: right))
x To connect the speaker cords
to the speakers
Be sure to match the speaker cords to
the appropriate terminals on the
speakers: the speaker cord with the
color tube to 3, and the speaker cord
without the color tube to #. Do not
catch the speaker cord insulation in the
speaker terminals.
Connector
Blue
(Speaker
(L: left))
Color tube
#
Rear of
the speaker
3
GB
7

Note
• Do not connect the speaker cords supplied with
the Wireless Surround Speaker Kit to any of the
speaker jacks on your S-AIR main unit.
Setting Up the Wireless
System
4 Connect the AC power cords
(mains leads).
Before connecting the AC power cords
(mains leads) of your S-AIR main unit
and the surround amplifier to wall
outlets (mains), make sure that all
speakers are connected.
To use the wireless system, you need to set
up the surround amplifier and your S-AIR
main unit. Before setting, make sure that the
wireless adapters are correctly inserted in
the S-AIR main unit and surround
amplifier(s).
Setting up the S-AIR main
unit
For details on using the S-AIR main unit,
refer to the operating instructions of the
S-AIR main unit.
1 Turn on the S-AIR main unit.
The system turns on.
2 Set [Surround Back] in [Speaker
Settings] of the S-AIR main unit
to [Yes].
3 Set up the S-AIR main unit so it is
ready for ID setting.
4 Select the ID for the S-AIR main
unit.
You can select any ID (A, B, or C).
5 If there is a surround amplifier
included with the S-AIR main
unit, make sure the SURROUND
SELECTOR switch is set to
SURROUND.
GB
8
Setting up the surround
amplifier
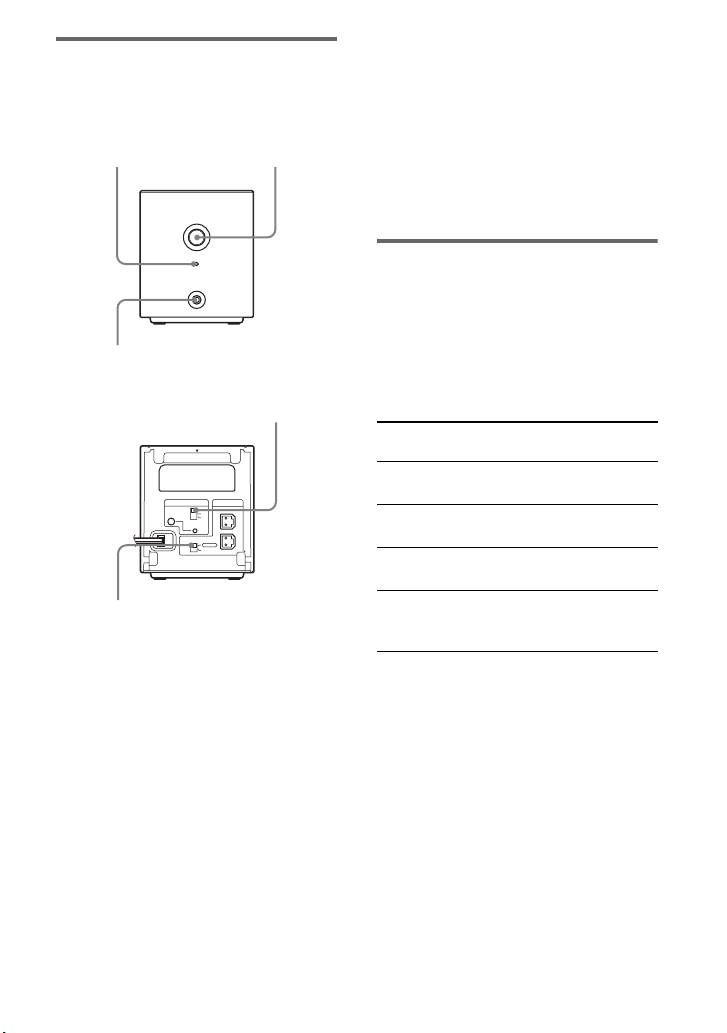
Front panel
POWER / ON LINE
Indicator
POWER
POWER
4 Set up the speakers.
If the S-AIR main unit has the Auto
Calibration function, perform Auto
Calibration.
If the S-AIR main unit does not have
the Auto Calibration function, perform
the appropriate speaker setting.
For details, refer to the operating
instructions of the S-AIR main unit.
POWER/ON LINE
PHONES
PHONES jack
Rear panel
S-AIR ID switch
EZW-RT10
S-AIR ID
SPEAKER
A
B
C
L
PAIRING
SURROUND SELECTOR
R
SURROUND
SURROUND
BACK
SURROUND
SELECTOR switch
1 Set the SURROUND SELECTOR
switch of the surround amplifier
of this kit to SURROUND BACK.
2 Set the S-AIR ID switch of the
surround amplifier to match the
ID (A, B, or C) of the S-AIR main
unit.
3 Press POWER on the surround
amplifier.
The POWER / ON LINE indicator
turns green. If not, see “Checking the
transmission status” (page 9).
Checking the
transmission status
You can check the status of sound
transmission between the S-AIR main unit
and surround amplifier by checking the
POWER / ON LINE indicator on the
surround amplifier.
POWER / ON
LINE indicator
Turns green Sound transmission is
Flashes green Sound transmission is not
Turns red The surround amplifier
Turns off The surround amplifier
For details, see “Troubleshooting”
(page 12).
Status
established.
established.
does not output sound.
turns off or its protection is
active.
GB
9
Enjoying the sound by
using headphones
You can enjoy the system’s sound in a place
away from the S-AIR main unit by
connecting the headphones to the PHONES
jack on the surround amplifier.
Note
• When you connect headphones to the surround
amplifier, none of the speakers output sound.
• The volume of the S-AIR main unit is minimized
if you turn off the surround amplifier with
headphones connected, or radio reception is
poor. In either case, check radio reception, and
set the volume again.
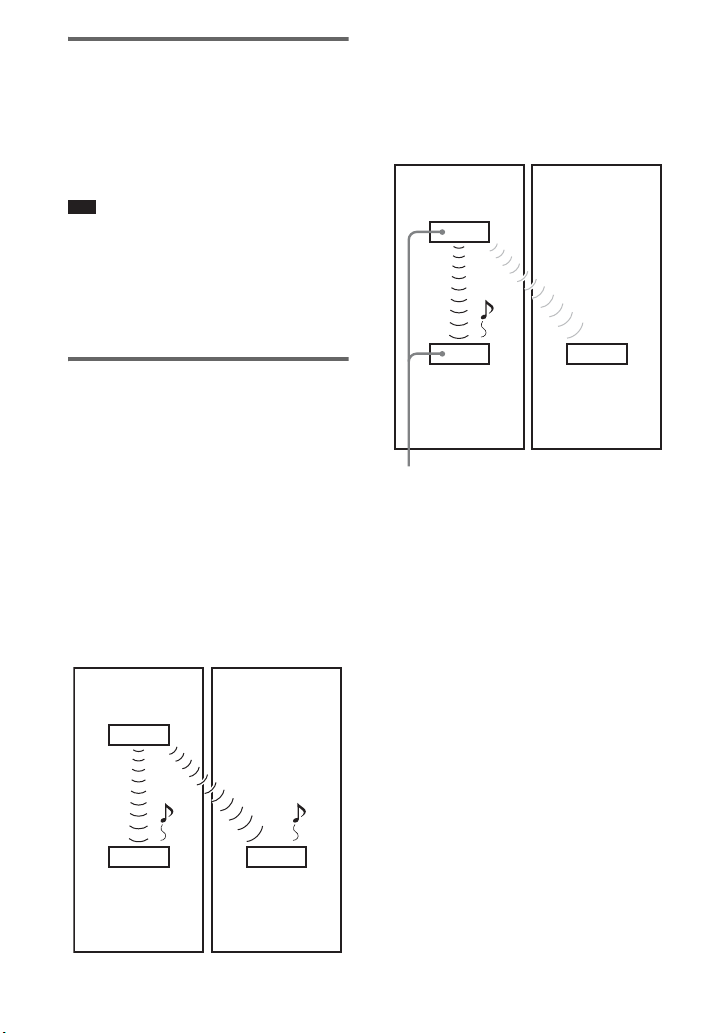
Preventing transmission
to neighbors (Pairing)
If your neighbors also have S-AIR products
and their IDs are the same as yours, your
neighbors could receive the sound of your
S-AIR main unit. To prevent this, you can
identify your S-AIR products by performing
the pairing operation.
x Before the pairing operation
(example)
The sound transmission is established by the
ID.
Your room Neighbor
S-AIR main unit
ID A
ID A
10
Surround
amplifier
GB
S-AIR receiver
ID A
x After the pairing operation
(example)
Sound transmission is established between
the surround amplifier and the S-AIR main
unit that performed the pairing operation.
Your room Neighbor
S-AIR main unit
ID A
ID A ID A
Surround
amplifier
Pairing
No transmission
S-AIR receiver
1 Turn on the S-AIR main unit and
the surround amplifier.
The system turns on.
2 Match the IDs of the S-AIR main
unit and the surround amplifier.
3 Set up the S-AIR main unit so it is
ready for pairing.
For details, refer to the operating
instructions of the S-AIR main unit.
The POWER / ON LINE indicator on
the surround amplifier flashes green.
4 Press PAIRING on the rear panel
of the surround amplifier.
The PAIRING indicator flashes red
when pairing starts.
When sound transmission is
established, the POWER / ON LINE
indicator turns green and the PAIRING
indicator turns on.
If you use more than one surround
amplifier, perform Steps 3 and 4 for
those also.
Note
p
• If you perform the pairing operation between the
surround amplifier and another S-AIR main unit,
sound transmission established by the ID is
canceled.
• Pairing will not be canceled unless you change
the ID setting.
Ti
• To press the PAIRING button, a slim instrument,
such as a paper clip, can be used.
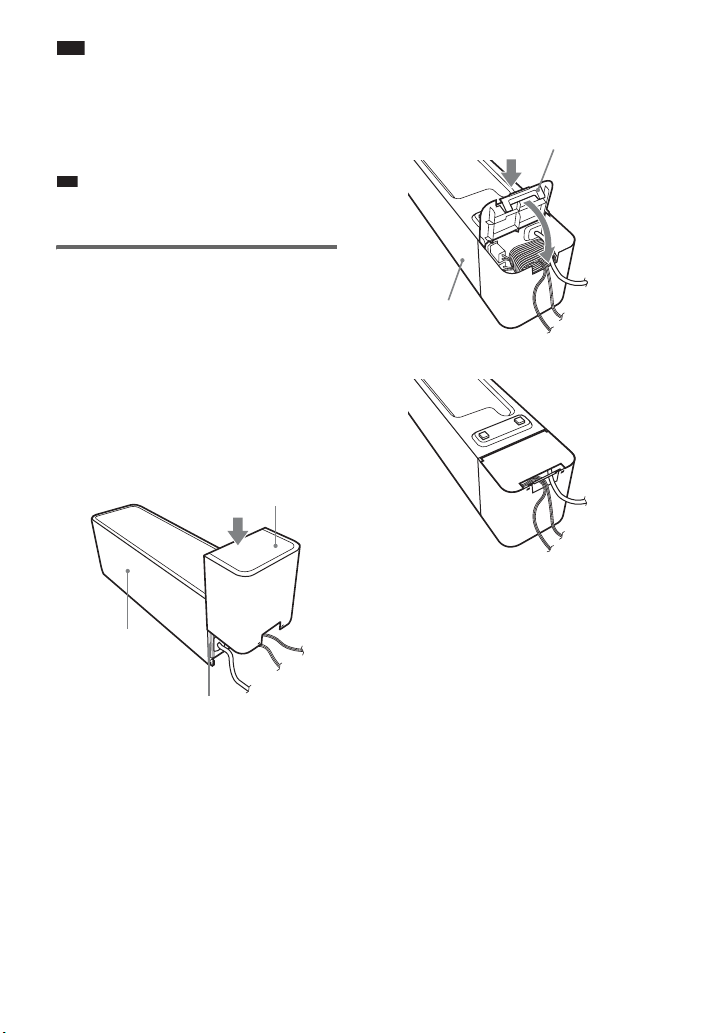
Attaching the cover to
the surround amplifier
After connecting and setting, you can attach
the cover to the surround amplifier to
organize and store excess speaker cords.
1 Attach the speaker cord cover by
sliding it down along the grooves
on the edges of the surround
amplifier.
Speaker cord cover
2 Insert the tabs of the speaker
cord holder in the slots of the
speaker cord cover, and press it
into place.
Speaker cord holder
Surround
amplifier
m
Surround
amplifier
Grooves
Push the speaker cord cover down until
you hear a click. Turn the surround
amplifier upside down, and store the
cords in the speaker cord cover.
GB
11

Troubleshooting
If you experience any of the following
difficulties while using the system, use this
troubleshooting guide to help remedy the
problem before requesting repairs. Should
any problem persist, consult your nearest
Sony dealer.
Note that if service personnel changes some
parts during repair, these parts may be
retained.
In the event of a problem with the surround
amplifier, have a Sony dealer check the
entire system together (system, speakers,
and wireless adapters).
Power
The power is not turned on.
• Check that the AC power cord (mains lead) is
connected securely.
The POWER / ON LINE indicator does not
turn on.
Turn off the surround amplifier and remove
the AC power cord (main leads) of the
surround amplifier, then check the
following items.
• Are the + and – speaker cords short-circuited?
• Is anything blocking the ventilation holes of
the surround amplifier?
• After checking the above items and fixing
any problems, connect the AC power cord
(mains lead) of the surround amplifier and
turn on the surround amplifier. If the cause of
the problem cannot be found even after
checking all the above items, consult your
nearest Sony dealer.
Sound
There is no sound.
Check the status of the POWER / ON LINE
indicator on the surround amplifier.
– turns green
• Set [Surround Back] in [Speaker Settings] of
the S-AIR main unit to [Yes].
• Change the SURROUND SELECTOR
switch (SURROUND or SURROUND
BACK) of the surround amplifier to match
the S-AIR main unit.
• Check the speaker connections and settings.
GB
12
• The volume of the S-AIR main unit is set to
minimum.
• The S-AIR main unit is in muting status.
• Depending on the source or the settings of the
S-AIR main unit, the effect of the speakers
may be less noticeable.
• Headphones are connected.
– flashes green
• The S-AIR main unit is not turned on.
• The S-AIR main unit is paired to another
S-AIR product.
• The surround amplifier is paired to another
S-AIR main unit.
• Confirm the IDs of the S-AIR main unit and
surround amplifier (pages 8, 9).
• Pairing operation is not completed.
• Sound transmission is poor. Move the
surround amplifier so that the POWER / ON
LINE indicator turns green.
• Install the system and surround amplifier(s)
apart from another wireless product.
• Stop using another wireless product.
• The wireless transceiver and/or the wireless
transmitter are/is not inserted correctly.
– turns red
• Change the SURROUND SELECTOR
switch (SURROUND or SURROUND
BACK) of the surround amplifier to match
the S-AIR main unit.
No sound is heard from the S-AIR main
unit.
• Volume becomes the minimum when you
turn off the surround amplifier with
headphones connected before you turn off the
S-AIR main unit or if radio reception is poor.
In these cases, check radio reception, and set
the volume again.
Severe hum or noise is heard.
• Check that the S-AIR products are connected
securely.
• Check that the connecting cords are away
from a transformer or motor, and at least 3
meters (10 ft) away from your TV set or a
fluorescent light.
• Move your TV away from the audio
components.
• The plugs and jacks are dirty. Wipe them with
a cloth slightly moistened with alcohol.
• Clean the disc.
No sound or only a very low-level sound is
heard from the speakers.
• Check the speaker connections and settings.
• Check the decoding mode setting.
• Depending on the source, the effect of the
speakers may be less noticeable.
• Wireless setting of the speaker is not correct.
• A 2 channel source is being played.

No sound is heard or sound is cut off.
• The S-AIR main unit and/or the surround
amplifier is installed in a place such as on a
metal shelf.
• Wireless LANs, a microwave (oven) and
Bluetooth applications, etc. are placed near
the surround amplifier.
• Move away the other components from the
surround amplifier or turn off the other
components.
Operation
The system does not work normally.
• Disconnect the AC power cord (mains lead)
from the wall outlet (mains), then reconnect
after several minutes.
Specifications
SS-TSB92 (Speakers)
Speaker system Full range Bass
Speaker unit 65 mm (2
Rated impedance 3 ohms
Dimensions (approx.) 105 mm × 225 mm
Mass (approx.) 0.6 kg (1 lb 6 oz)
TA-SA100WR
(Surround amplifier)
AUDIO POWER SPECIFICATIONS
for the US model
POWER OUTPUT AND TOTAL
HARMONIC DISTORTION:
Amplifier section
US models:
Surround mode (reference) RMS output power
Other models:
Stereo mode (rated) 80 W + 80 W (at
reflex
5
/8 in)
cone type
× 85 mm (4
7
8
1
/4 in ×
/8 in × 3 3/8 in)
(w/h/d)
With 3 ohm loads,
both channels
driven, from 120 20,000 Hz; rated 50
watts per channel
minimum RMS
power, with no
more than 0.7 %
total harmonic
distortion from 250
milli watts to rated
output.
: 143 W (per
channel at 3 ohms,
1 kHz, 10 %
THD)*
3 ohms, 1 kHz, 1 %
THD)
13
GB

Surround mode (reference) RMS output power
:143 W (per
channel at 3 ohms,
1 kHz, 10 %
THD)*
* Depending on the source, there may be no
sound output.
Rated impedance 3 - 16 Ω
General
Power requirements:
North American models 120 V AC, 60 Hz
Other models 220 V – 240 V AC,
50/60 Hz
Power consumption On: 50 W
Dimensions (approx.) 85 mm × 100 mm ×
3
330 mm (3
/8 in ×
4 in × 13 in) (w/h/
d) (incl. Wireless
transceiver)
85 mm × 100 mm ×
345 mm (3
4 in × 13
3
/8 in ×
5
/8 in) (w/
h/d) incl. speaker
cord cover and
speaker cord
holder
Mass (approx.) 1.7 kg (3 lb 12 oz)
incl. speaker cord
cover and speaker
cord holder
EZW-RT10/EZW-RT10A*
(Wireless transceiver)
Communication System S-AIR
Specification
version 1.0
Frequency band 2.4000 GHz -
2.4835 GHz
Modulation method DSSS
Power requirements DC 3.3 V, 350 mA
Dimensions (approx.) 50 mm × 13 mm ×
60 mm (2 in ×
in × 2
3
/8 in) (w/h/
17
/32
d)
Mass (approx.) 24 g (1 oz)
* For North American and European models.
Design and specifications are subject to change
without notice.
“S-AIR” and its logo are trademarks of Sony
Corporation.
14
GB
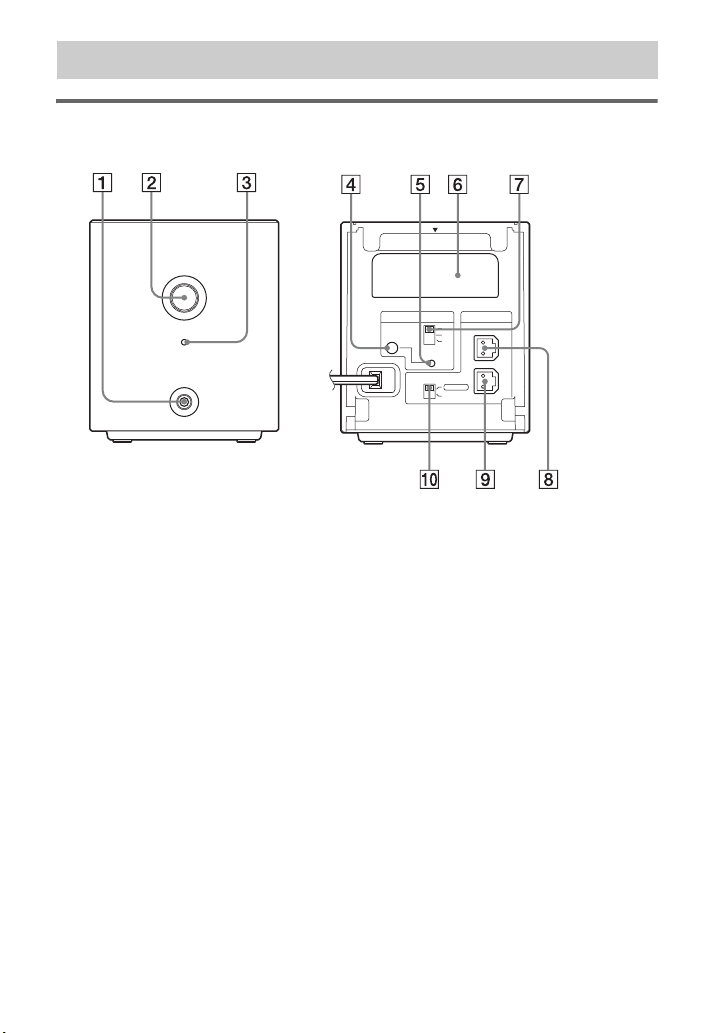
Index to Parts
Surround amplifier
Front panel
POWER
Rear panel
EZW-RT10
POWER/ON LINE
PHONES
A PHONES jack
B POWER button (ON/OFF)
C POWER / ON LINE indicator
D PAIRING indicator
E PAIRING button
F Wireless transceiver (EZW-RT10) slot
G S-AIR ID switch
H SPEAKER L jack
I SPEAKER R jack
J SURROUND SELECTOR switch
S-AIR ID
PAI RI N G
SURROUND SELECTOR
A
B
C
SURROUND
SURROUND
BACK
SPEAKER
L
R
15
GB
3
Table des matières
Utilisation d’un système 7.1 canaux
.............................................................4
Déballage ........................................... 4
Raccordements ................................... 5
Configuration du système sans fil ...... 7
Dépannage ........................................11
Spécifications ................................... 13
Index des composants ...................... 14
Pour les clients au Canada
Pour l’émetteur-récepteur sans fil
(EZW-RT10/EZW-RT10A)
Cet appareil numérique de la classe B est conforme
à la norme NMB-003 du Canada.
Cet appareil est conforme à la nor me RSS-Gen des
réglementations d’IC.
Son utilisation est soumise aux deux préalables
suivants : (1) cet appareil ne peut pas produire
d’interférences et (2) il doit accepter toutes les
interférences, y compris celles qui sont
susceptibles de provoquer un fonctionnement
indésirable.
AVERTISSEMENT
N’installez pas l’appareil dans un espace confiné
comme dans une bibliothèque ou un meuble
encastré.
Pour réduire le risque d’incendie, n’obstruez pas
l’orifice de ventilation de l’appareil avec un
journal, une nappe, une tenture, etc. Ne posez pas
non plus de source de flamme nue, notamment une
bougie allumée, sur l’appareil.
Pour réduire le risque d’incendie ou
d’électrocution, n’exposez pas cet appareil à des
éclaboussures ou des gouttes d’eau et ne posez pas
dessus des objets remplis de liquides, notamment
des vases.
Une pression sonore excessive provenant des
écouteurs ou du casque peut entraîner une perte
d’audition.
N’utilisez pas l’appareil à l’extérieur.
Pour les clients aux Etats-Unis
et au Canada
AVERTISSEMENT
Pour réduire les risques d’incendie
ou d’électrocution, gardez cet
appareil à l’abri de la pluie et de
l’humidité.
Cet appareil est conforme aux limites d’exposition
aux rayonnements définies par IC pour des
appareils non contrôlés. Il répond en outre à la
norme RSS-102 des réglementations d’exposition
aux hautes fréquences (HF) définies par IC.
Cet appareil doit être installé et utilisé à une
distance minimale de 20 cm entre le radiateur et
une personne (à l’exception de ses extrémités :
mains, poignets, pieds et chevilles).
Pour les clients en Europe
Traitement des
appareils électriques
et électroniques en
fin de vie (Applicable
dans les pays de
l’Union Européenne
et aux autres pays
européens disposant
de systèmes de
collecte sélective)
Ce symbole, apposé sur le produit ou sur son
emballage, indique que ce produit ne doit pas être
traité avec les déchets ménagers. Il doit être remis
a un point de collecte approprié pour le recyclage
des équipements électriques et électroniques. En
s’assurant que ce produit est bien mis au rebut de
maniere appropriée, vous aiderez à prévenir les
conséquences négatives potentielles pour
l’environnement et la santé humaine. Le recyclage
des matériaux aidera à préserver les ressources
naturelles. Pour toute information supplémentaire
au sujet du recyclage de ce produit, vous pouvez
contacter votre municipalité, votre déchetterie ou
le magasin où vous avez acheté le produit.
FR
2

Notice destinée aux clients : les informations
suivantes s’appliquent uniquement aux appareils
vendus dans des pays où les directives UE sont en
vigueur.
Le fabricant de ce produit est Sony Corporation,
1-7-1 Konan Minato-ku Tokyo, 108-0075 Japon.
Le représentant autorisé pour les questions de
compatibilité électromagnétique (EMC) et la
sécurité des produits est Sony Deutschland GmbH,
Hedelfinger Strasse 61, 70327 Stuttgart,
Allemagne. Pour toute question relative au SAV
ou à la garantie, merci de bien vouloir vous référer
aux coordonnées contenues dans les documents
relatifs au SAV ou la garantie.
Pour l’émetteur-récepteur sans fil
(EZW-RT10/EZW-RT10A)
Reportez-vous à la section « Wireless Product
Safety Information ».
Précautions
Alimentation
• L’appareil n’est pas déconnecté du secteur tant
qu’il reste branché sur la prise de courant, même
si l’appareil proprement dit a été mis hors
tension.
• Comme la prise secteur sert à déconnecter
l’appareil du secteur, reliez l’appareil à une prise
de courant accessible. Si vous remarquez une
anomalie sur l’appareil, débranchez
immédiatement la prise secteur.
Installation
• Evitez d’installer le système dans un endroit trop
chaud ou trop froid, ou exposé à la lumière
directe du soleil, à la poussière ou à l’humidité.
• Soyez particulièrement prudent lorsque vous
placez le système sur une surface ayant subi un
traitement spécial (cirée, huilée, polie, etc.), car
il peut laisser des taches ou entraîner la
décoloration du revêtement de sol.
• Prévoyez une circulation d’air suffisante de
manière à éviter toute surchauffe interne.
• Ne placez pas le système sur une surface
moelleuse (comme un tapis, une couverture,
etc.) ou près de tissus (comme un rideau ou une
tenture) risquant de bloquer les fentes d’aération.
• N’installez pas le système à proximité de sources
de chaleur telles que des radiateurs ou des
conduites d’air chaud, ni à des endroits exposés
à la lumière directe du soleil, à une poussière
excessive, à des vibrations mécaniques ou à des
chocs.
• N’installez pas le système en position inclinée.
Ce système est conçu pour fonctionner
uniquement à l’horizontale.
• Gardez le système à l’écart de tout équipement
contenant des aimants puissants, par exemple
des fours à micro-ondes ou de puissants hautparleurs.
• Ne posez pas d’objets lourds sur le système.
• Si vous utilisez plusieurs produits S-AIR,
éloignez-les les uns des autres afin d’éviter toute
diaphonie.
• Installez cet amplificateur surround et les
produits S-AIR à 50 cm au moins de toute
personne.
• Pour prévenir tout risque d’incendie ou
d’électrocution, ne placez pas d’objets remplis
de liquides, comme des vases, sur l’appareil.
• Ne posez pas le système sur un tapis, car celui-ci
risquerait de se décolorer.
• Si vous utilisez plusieurs amplificateurs
surround, ne les superposez pas.
Entretien
Nettoyez les boîtiers uniquement avec un chiffon
sec. N’utilisez pas de tampons abrasifs, de poudre
à récurer ou de solvant tel que l’alcool ou le
benzène.
Sécurité
• Si un objet ou du liquide venait à pénétrer à
l’intérieur du boîtier, débranchez l’appareil et
faites-le vérifier par un personnel qualifié avant
de le remettre en marche.
• Débranchez l’appareil de la prise murale si vous
prévoyez de ne pas l’utiliser pendant une période
prolongée. Pour débrancher le cordon, tirez sur
la fiche, mais ne tirez jamais sur le cordon
proprement dit.
FR
FR
3
Utilisation d’un système
7.1 canaux
Le Wireless Surround Speaker Kit
(WAHT-SBP1) comprend deux enceintes
arrière surround et un amplificateur
surround. Vous pouvez utiliser ce kit avec
un Sony Home Th eatre System pour profiter
d’un effet sonore surround plus réaliste
grâce à une configuration d’enceintes à 7.1
canaux.
B
A
H
C
E
D
F
G
I
J
Déballage
Enceinte arrière surround
(SS-TSB92) (2)
Amplificateur surround
(TA-SA100WR) (1)
POWER
E
N
I
L
N
O
/
R
E
W
O
P
PHONES
Cache du cordon d’enceinte (1)
A Enceinte avant gauche
B Enceinte avant droite
C Enceinte centrale
D Enceinte gauche surround
E Enceinte droite surround
F Enceinte arrière gauche surround
G Enceinte arrière droite surround
H Caisson de graves
I Amplificateur surround
(pour enceintes surround)
J Amplificateur surround
(pour enceintes arrière surround)
FR
4
Support du cordon d’enceinte (1)
Emetteur-récepteur sans fil
(EZW-RT10/EZW-RT10A*) (1)
* Pour les modéles nord-américains et
européens.
Cordons d’enceinte (2)
Mode d’emploi (1)
 Loading...