

Sony WAHT-SA1 Operating Manual
Wireless
Surround Kit
3-286-052-21(1)
WAHT-SA1
©2008 Sony Corporation
Operating Instructions
Manual de instrucciones
Instrukcja obsługi
Bruksanvisning
GB
ES
PL
SE
3
Table of Contents
About This Operating Instructions ..... 3
Overview ............................................ 4
Unpacking ..........................................5
Hooking Up ........................................5
Connecting the AC Power Cords
(Mains Leads) ....................................8
Setting up the Wireless System ..........8
Troubleshooting ...............................12
Specifications ...................................13
Index to Parts ...................................15
WARNING
To reduce the risk of fire or electric
shock, do not expose this apparatus
to rain or moisture.
Do not install the appliance in a confined space,
such as a bookcase or built-in cabinet.
To prevent fire, do not cover the ventilation of the
apparatus with news papers, table-cloths, curtains,
etc. And don’t place lighted candles on the
apparatus.
To prevent fire or shock hazard, do not place
objects filled with liquids, such as vases, on the
apparatus.
In door use only.
NOTICE FOR THE CUSTOMERS IN
THE UNITED KINGDOM
A moulded plug complying with BS1363 is fitted
to this equipment for your safety and convenience.
Should the fuse in the plug supplied need to be
replaced, a fuse of the same rating as the supplied
one and approved by ASTA or BSI to BS1362,
(i.e., marked with mark or mark) must be
used.
If the plug supplied with this equipment has a
detachable fuse cover, be sure to attach the fuse
cover after you change the fuse. Never use the plug
without the fuse cover.
If you should lose the fuse cover, please contact
your nearest Sony service station.
Disposal of Old
Electrical &
Electronic
Equipment
(Applicable in the
European Union and
other European
countries with
separate collection
systems)
This symbol on the product or on its packaging
indicates that this product shall not be treated as
household waste. Instead it shall be handed over to
the applicable collection point for the recycling of
electrical and electronic equipment. By ensuring
this product is disposed of correctly, you will help
prevent potential negative consequences for the
environment and human health, which could
otherwise be caused by inappropriate waste
handling of this product. The recycling of
materials will help to conserve natural resources.
For more detailed information about recycling of
this product, please contact your local Civic
Office, your household waste disposal service or
the shop where you purchased the product.
The manufacturer of this product is Sony
Corporation, 1-7-1 Konan Minato-ku Tokyo, 1080075 Japan. The Authorized Representative for
EMC and product safety is Sony Deutschland
GmbH, Hedelfinger Strasse 61, 70327 Stuttgart,
Germany. For any service or guarantee matters
please refer to the addresses given in separate
service or guarantee documents
GB
2

Precautions
On power sources
• AC power cord must be changed only at a
qualified service shop.
• Install this system so that the AC power cord
(mains lead) can be unplugged from the wall
outlet (mains) immediately in the event of
trouble.
On placement
• Do not place the system in locations that are hot
and subject to direct sunlight, dusty, very humid,
or extremely cold.
• Use caution when placing the system on a
specially treated (waxed, oiled, polished, etc.)
floor, as staining or discoloration may result.
• Allow adequate air circulation to prevent internal
heat buildup.
• Do not place the system on surfaces (rugs,
blankets, etc.) or near materials (curtains,
draperies) that may block the ventilation slots.
• Do not install the system near heat sources such
as radiators or air ducts, or in a place subject to
direct sunlight, excessive dust, mechanical
vibration or shock.
• Do not install the system in an inclined position.
It is designed to be operated in a horizontal
position only.
• Keep the system away from equipment with
strong magnets, such as microwave ovens, or
large loudspeakers.
• Do not place heavy objects on the system.
• If you use more than one set of S-AIR products,
position them away from each other to avoid
cross talk.
• Install this surround amplifier and S-AIR
products at least 50 cm away from people.
• To prevent fire or shock hazard, do not place
objects filled with liquids, such as vases, on the
apparatus.
• Do not place the system on carpet, as
discoloration may result.
• If you use more than one surround amplifier, do
not place one on top of the other.
On cleaning
Clean the cabinets only with a soft dry cloth. Do
not use any type of abrasive pad, scouring powder
or solvent such as alcohol or benzene.
Safety
• If anything falls into the cabinet, unplug the unit
and have it checked by qualified personnel
before operating it any further.
• Unplug the unit from the wall outlet (mains) if
you do not intend to use it for an extended period
of time. To disconnect the cord, pull it out by the
plug, never by the cord.
About This Operating
Instructions
WAHT-SA1 is a surround amplifier for
Sony S-AIR products. The amplifier is for
models that have an “EZW-RT10” or
“EZW-T100” slot on their rear panel.
GB
GB
3
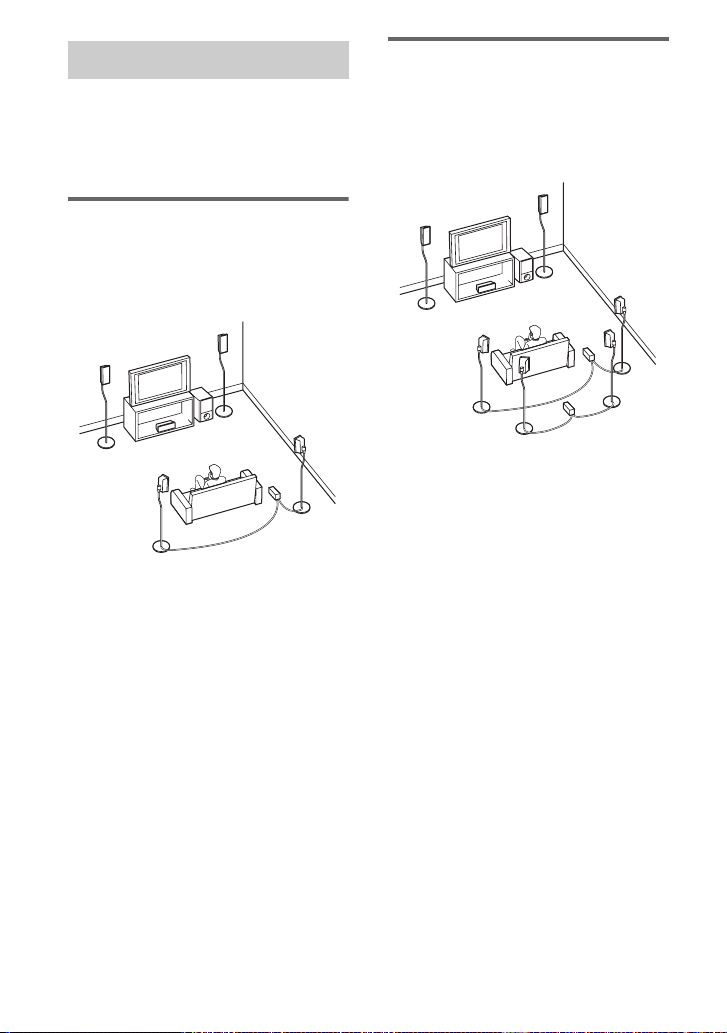
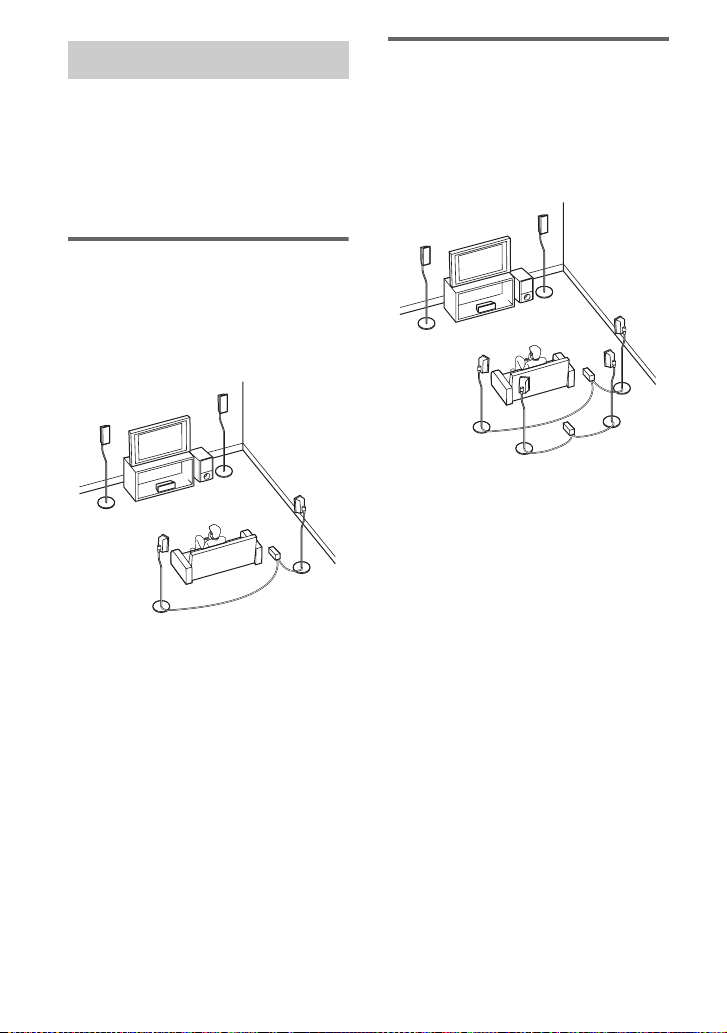
Overview
This surround amplifier allows you to use a
5.1 channel system (five speakers and one
subwoofer) or 7.1 channel system (seven
speakers and one subwoofer).
Enjoying a 7.1 channel
system
S-AIR makes possible a 7.1 channel system,
using two surround and two surround back
speakers.
Enjoying a 5.1 channel
system
S-AIR can avoid cluttered cords to keep
your room tidy.
B
A
H
C
E
D
I
B
A
A Front left speaker
B Front right speaker
C Center speaker
D Surround left speaker
E Surround right speaker
F Surround back left speaker
G Surround back right speaker
H Subwoofer
I Surround amplifier
(for surround speakers)
J Surround amplifier
(for surround back speakers)
H
C
D
F
J
E
G
I
GB
4
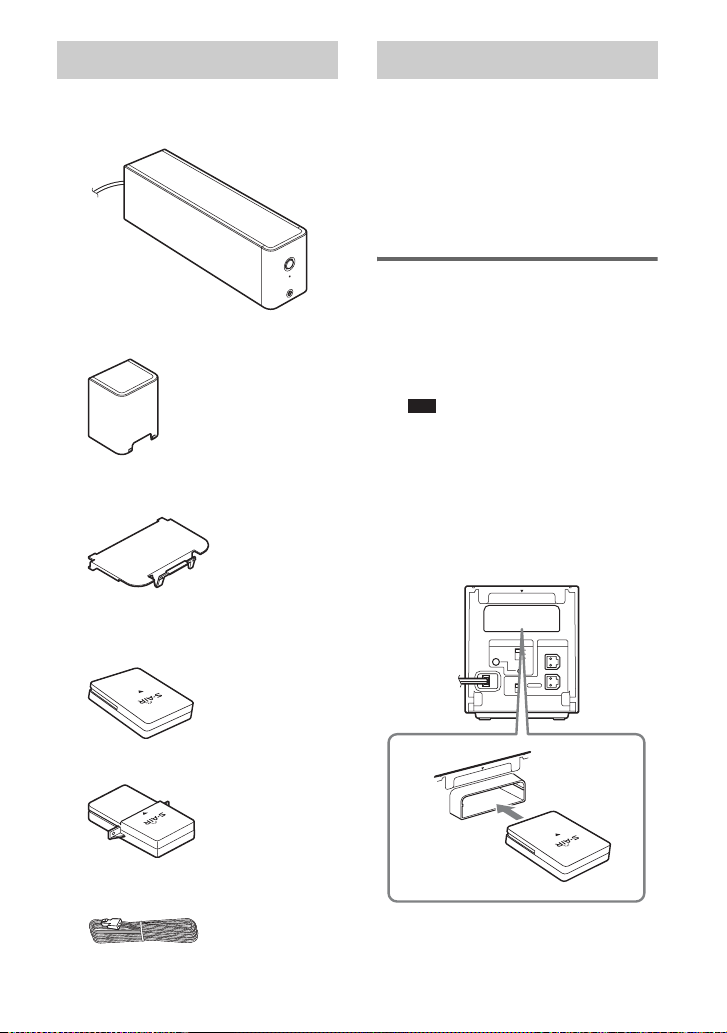
Unpacking
Hooking Up
Surround amplifier
TA-SA100WR (1)
Speaker cord cover (1)
Speaker cord holder (1)
Wireless adapters
Wireless transceiver (EZW-RT10) (1)
Connect the surround amplifier to your
S-AIR main unit.
Before installing, make sure to
remove the AC power cords
(mains lead) of all S-AIR
products from wall outlets
(mains).
R
E
W
O
P
E
N
I
L
N
O
/
R
E
W
O
P
S
E
N
O
H
P
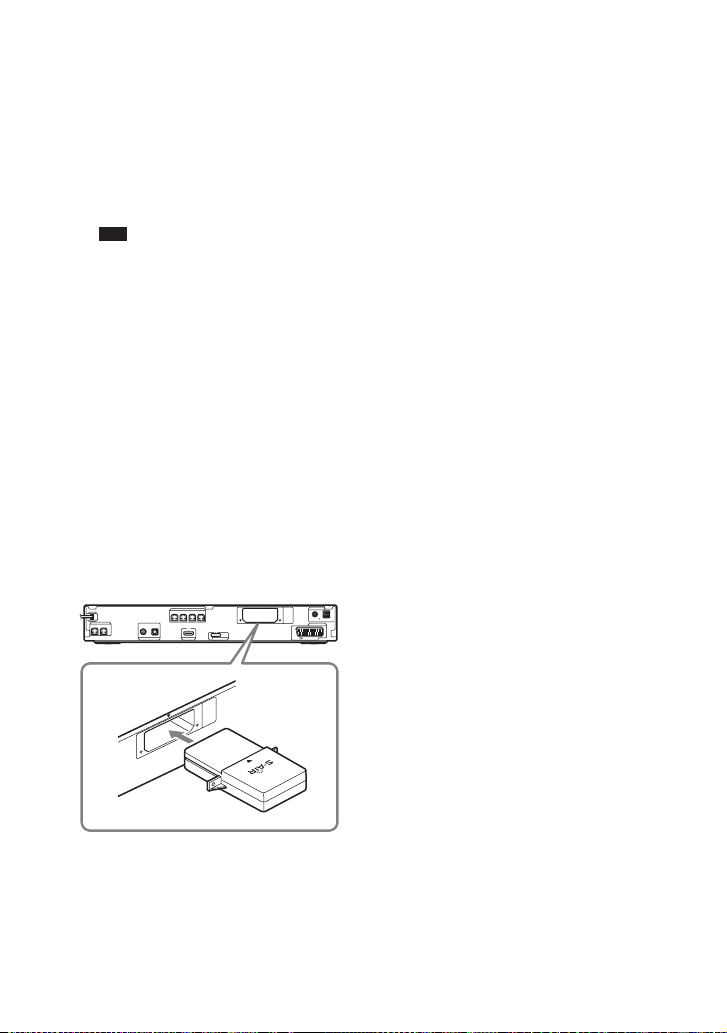
Inserting wireless
adapters
1 Insert the wireless transceiver
(supplied) in the slot on the rear
of the surround amplifier.
Note
• Insert the wire less transceiver (supplied)
with the S-AIR logo facing up. Also,
make sure the V marks on the wireless
transceiver (supplie d) and the slot on the
surround amplifier are aligned when
inserting.
• Do not touch the terminals of the
wireless adapters.
EZW-RT10
S-AIR ID
SPEAKER
A
B
C
L
PAIRING
SURROUND SELECTOR
R
SURROUND
SURROUND
BACK
Wireless transmitter (EZW-T100) (1)
Speaker cords (2)
Operating Instructions (1)
10
T
-R
ZW
E
GB
5
2 Insert the wireless transmitter
E
Z
W
-T
1
00
(supplied) in the slot on the
S-AIR main unit.
For details, refer to the operating
instructions of the S-AIR main unit.
The illustration of the rear panel of an
S-AIR main unit is an example. Not all
S-AIR main units look exactly the
same.
Note
• Insert th e wireless transmitter (supplie d)
with the S-AIR logo facing up. Also,
make sure the V marks on the wireless
transmitter (supplied) and the slot on the
S-AIR main unit are aligned when
inserting.
• Do not touch the terminals of the
wireless adapters.
• If wireless adapter(s) come with your
S-AIR main unit, you do not have to use
the wireless transmitter included in this
wireless surround kit for your S-AIR
main unit. If you do not intend to use the
wireless transmitter (supplied) for an
extended period of time, do not place it
in locations that are hot and subject to
direct sunlight.
Rear panel
SPEAKER
CENTER SUBWOOFER
DIGITAL IN
COAXIAL OPTICAL
TV/VIDEO HDMI OUT
SPEAKER
FRONT R FRONT L SUR R SUR L
DMPORT
ANTENNA
EZW-T100
COAXIAL 75
FM
EURO AV
OUTPUT(TO TV)
AM
GB
6
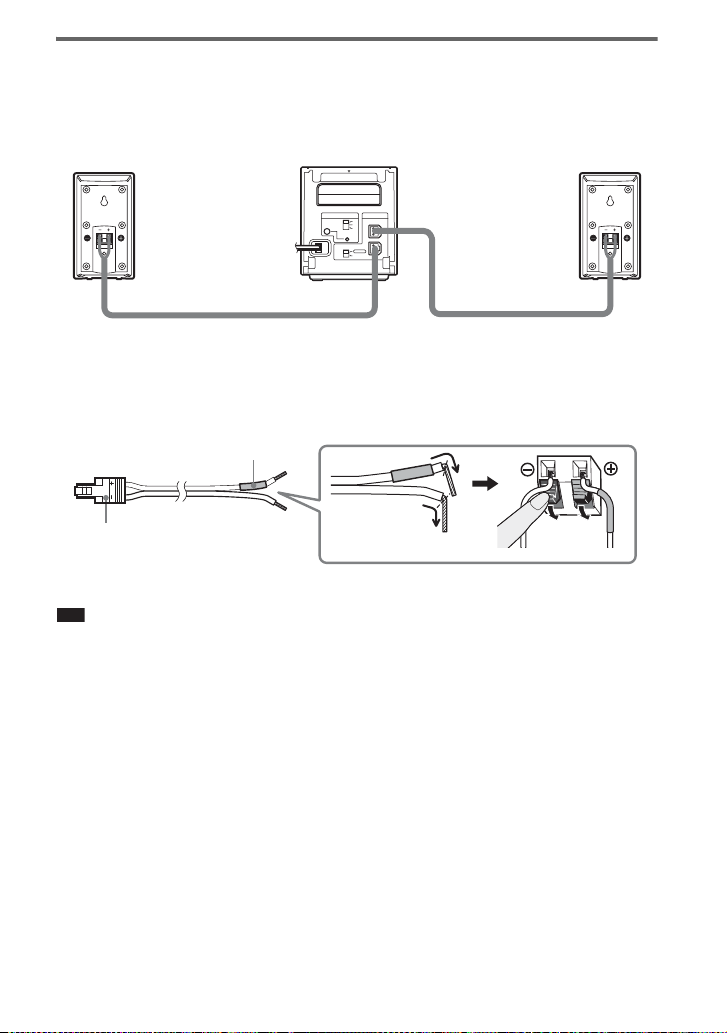
Connecting the speakers
Insert the connectors of the speaker cords (supplied) into their corresponding speaker jacks.
The connectors of the speaker cords are the same color as their corresponding jacks. The
speakers shown are for illustration purposes only. Not all the speakers are identical.
EZW-RT
10
S-AIR ID
SPEAKER
A
B
C
L
PAIRING
SURROUND SELECTOR
R
SURROUND
SURROUND
BACK
Speaker (L:left)Speaker (R:right)
The connector and color tube of the speaker cords are the same color as the label of their
corresponding jacks. Be sure to match the speaker cords to the appropriate terminals on the
speakers: the speaker cord with the color tube to 3, and the speaker cord without the color tube
to #. Do not catch the speaker cord insulation in the speaker terminals.
Rear of speaker
Color tube
(+)
Connector
(–)
When connecting to the surround amplifier, insert the connector until it clicks.
Note
• When you use this wireless surround kit, do not connect the speaker cord(s) to the surround speaker jack(s)
on your Sony Home Theatre System (DAV).
GB
7
Connecting the AC Power Cords (Mains Leads)
Before connecting the AC power cords (mains leads) of your S-AIR main unit and the surround
amplifier to wall outlets (mains), make sure that all speakers are connected.
Setting up the Wireless System
To use the wireless system, you need to set
up the surround amplifier and your S-AIR
main unit. Before setting, make sure that the
wireless adapters are correctly inserted in
the S-AIR main unit and surround amplifier.
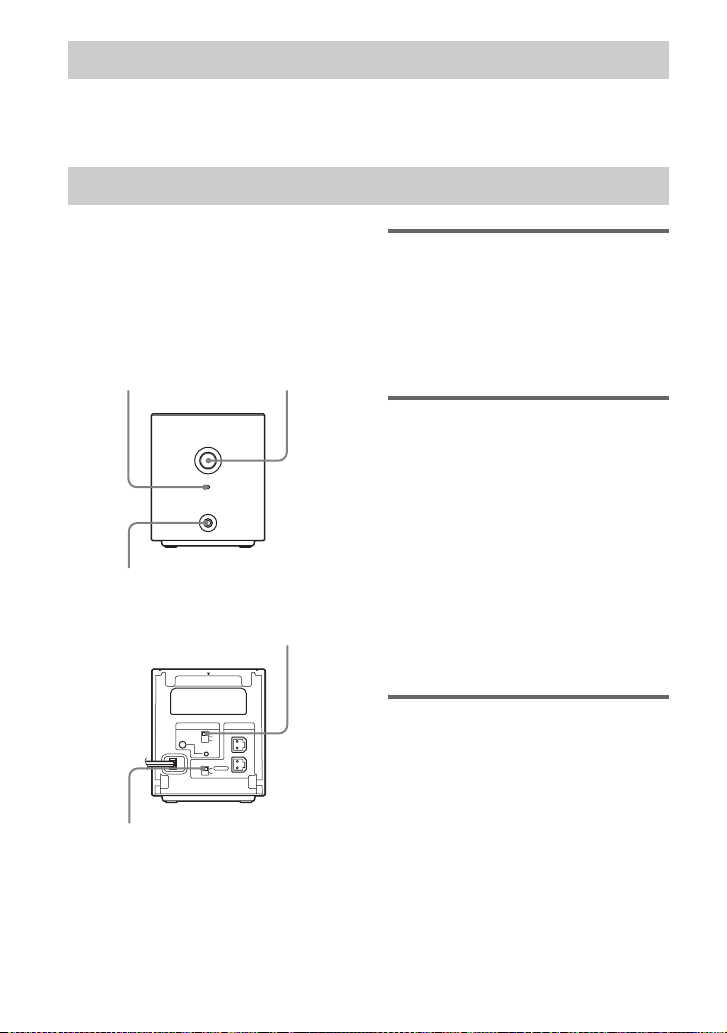
Front panel
POWER / ON LINE
Indicator
POWER
POWER/ON LINE
PHONES
PHONES jack
POWER
Rear panel
S-AIR ID switch
EZW-RT10
S-AIR ID
SPEAKER
A
B
C
L
PAIRING
SURROUND SELECTOR
R
SURROUND
SURROUND
BACK
SURROUND
SELECTOR switch
ID setting
By matching the ID of the surround
amplifier and your S-AIR main unit, you
can establish sound transmission. You can
also use multiple S-AIR products by setting
a different ID for each product.
Setting up the S-AIR main
unit
1 Turn on the S-AIR main unit.
The system turns on.
2 Set up the S-AIR main unit so it is
ready for ID setting.
3 Select the ID for the S-AIR main
unit.
You can select any ID (A, B, or C).
For details, refer to the operating
instructions of the S-AIR main unit.
Setting up the surround
amplifier
1 Set the SURROUND SELECTOR
switch (SURROUND or
SURROUND BACK) of the
surround amplifier to match the
S-AIR main unit.
2 Set the S-AIR ID switch of the
surround amplifier to match the
ID (A, B, or C) of the S-AIR main
unit.
GB
8
3 Press POWER on the surround
amplifier.
The POWER / ON LINE indicator
turns green. If not, see “Checking the
transmission status” (page 9).
4 Set up the speakers.
If the S-AIR main unit has the Auto
Calibration function, perform Auto
Calibration. If the S-AIR main unit
does not have the Auto Calibration
function, perform the appropriate
speaker setting. For details, refer to the
operating instructions of the S-AIR
main unit.
Checking the
transmission status
You can check the status of sound
transmission between the S-AIR main unit
and surround amplifier by checking the
POWER / ON LINE indicator on the
surround amplifier.
Enjoying the sound by
using headphones
You can enjoy the system’s sound in a place
away from the S-AIR main unit by
connecting the headphones to the PHONES
jack on the surround amplifier.
Note
• When you connect headphones to the surround
amplifier, neither the surround amplifier nor the
S-AIR main unit outputs sound from the
system’s speakers.
• The volume of the S-AIR main unit is mini mized
if you turn off the surround amplifier with
headphones connected, or radio reception is
poor. In either case, check radio reception, and
set the volume again.
POWER / ON
LINE indicator
Turns green Sound transmission is
Flashes green Sound transmission is not
Turns red The surround amplifier
Turns off The surround amplifier
Status
established.
established. For deta ils, see
“Troubleshooting”
(page 12).
does not output sound. For
details, see
“Troubleshooting”
(page 12).
turns off or its protection is
active. For details, see
“Troubleshooting”
(page 12).
GB
9
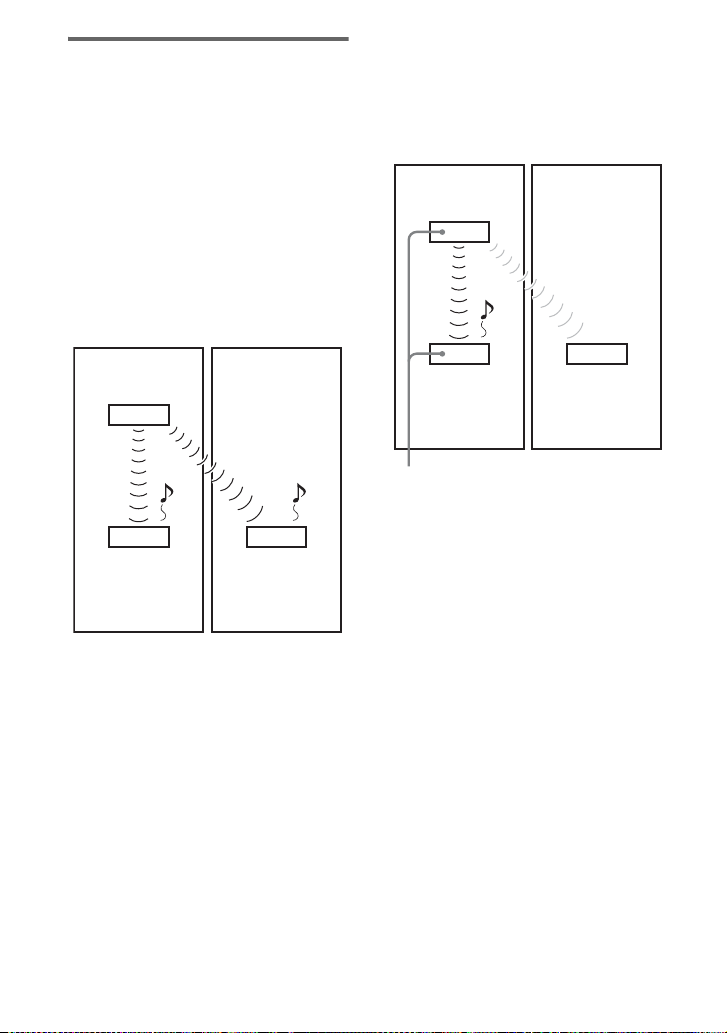
Preventing transmission
to neighbors (Pairing)
If your neighbors also have S-AIR products
and their IDs are the same as yours, your
neighbors could receive the sound of your
S-AIR main unit. To prevent this, you can
identify your S-AIR products by performing
the pairing operation.
x Before the pairing operation
(example)
The sound transmission is established by the
ID.
Your room Neighbor
S-AIR main unit
ID A
ID A
10
Surround
amplifier
GB
S-AIR receiver
ID A
x After the pairing operation
(example)
Sound transmission is established between
the surround amplifier and the S-AIR main
unit that performed the pairing operation.
Your room Neighbor
S-AIR main unit
ID A
ID A ID A
Surround
amplifier
Pairing
No transmission
S-AIR receiver
1 Turn on the S-AIR main unit and
the surround amplifier.
The system turns on.
2 Match the IDs of the S-AIR main
unit and the surround amplifier.
3 Set up the S-AIR main unit so it is
ready for pairing.
For details, refer to the operating
instructions of the S-AIR main unit.
The POWER / ON LINE indicator on
the surround amplifier flashes green.
4 Press PAIRING on the rear panel
of the surround amplifier.
The PAIRING indicator flashes red
when pairing starts.
When sound transmission is
established, the POWER / ON LINE
indicator turns green and the PAIRING
indicator turns on.
If you use more than one surround
amplifier, perform Steps 3 and 4 for
those also.
Note
p
• If you perform the pairing operation between the
surround amplifier and another S-AIR main unit,
sound transmission established by the ID is
canceled.
• Pairing will not be canceled unless you change
the ID setting.
Ti
• To press the PAIRING button, a slim instrument,
such as a paper clip, can be used.
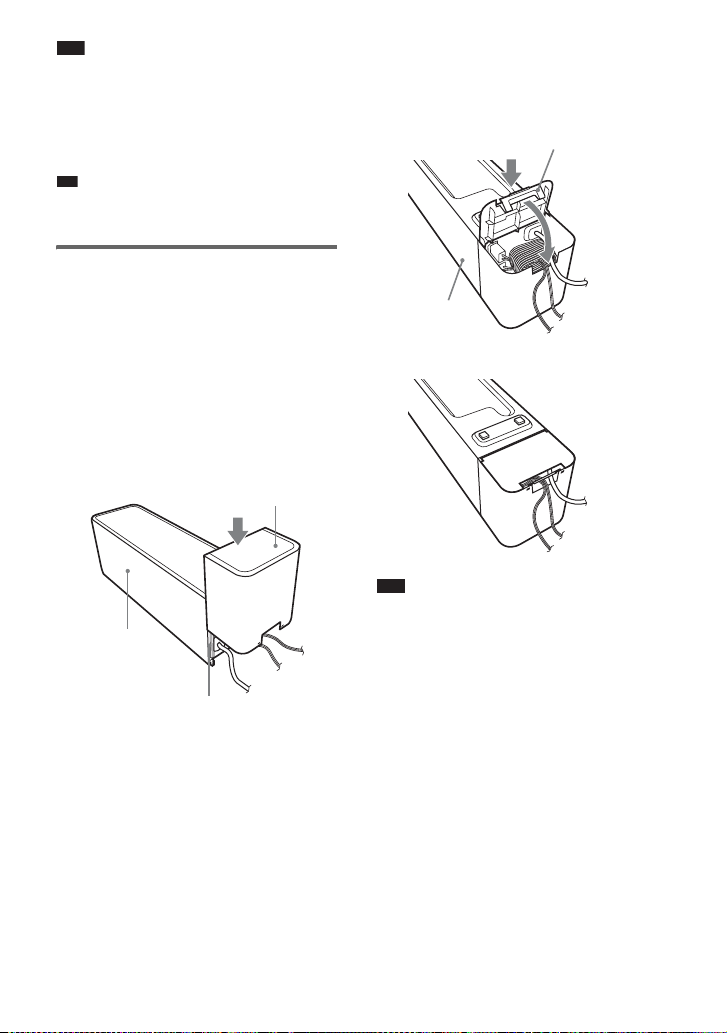
Attaching the cover to
the surround amplifier
After connecting, you can attach the cover
to the surround amplifier to organize and
store excess speaker cords.
1 Attach the speaker cord cover by
sliding it down along the grooves
on the edges of the surround
amplifier.
Speaker cord cover
Surround
amplifier
Grooves
Push the speaker cord cover down until
you hear a click. Turn the surround
amplifier upside down, and store the
cords in the speaker cord cover.
2 Insert the tabs of the speaker
cord holder in the slots of the
speaker cord cover, and press it
into place.
Speaker cord holder
Surround
amplifier
m
Note
• When detaching, remove the speaker cord
holder, then remove the speaker cord cover. To
remove the speaker cord holder, slightly press
the catch of the holder and lift off. To remove the
speaker cord cover, slightly splay open the edges
of the cover and slide down.
• Do not use excessive force to store the cords.
GB
11
Troubleshooting
If you experience any of the following
difficulties while using the system, use this
troubleshooting guide to help remedy the
problem before requesting repairs. Should
any problem persist, consult your nearest
Sony dealer.
Note that if service personnel changes some
parts during repair, these parts may be
retained.
In the event of a problem with the surround
amplifier, have a Sony dealer check the
entire system together (system, speakers,
and wireless adapters).
Power
The power is not turned on.
• Check that the AC power cord (mains lead) is
connected securely.
The POWER / ON LINE indicator does not
turn on.
Turn off the surround amplifier and
remove the AC power cord (main leads) of
the surround amplifier, then check the
following items.
• Are the + and – speaker cords short-circuited?
• Is anything blocking the ventilation holes of
the surround amplifier?
• After checking the above items and fixing
any problems, connect the AC power cord
(mains lead) of the surround amplifier and
turn on. If the cause of the problem cannot be
found even after checking all the above items,
consult your nearest Sony dealer.
Sound
There is no sound.
Check the status of the POWER / ON LINE
indicator on the surround amplifier.
– turns green
• The speaker cord is not connected securely.
• Check the speaker connections and settings.
• The volume of the S-AIR main unit is set to
minimum.
• The S-AIR main unit is in mute status.
• Depending on the source or the settings of the
S-AIR main unit, the effect of the speakers
may be less noticeable.
• Headphones are connected.
– flashes green
• The S-AIR main unit is not turned on.
• The S-AIR main unit is paired to another
S-AIR product.
• The surround amplifier is paired to another
S-AIR main unit.
• Confirm the IDs of the S-AIR main unit and
surround amplifier (page 8).
• Pairing operation is not completed.
• Sound transmission is poor. Move the
surround amplifier so that the POWER / ON
LINE indicator turns green.
• Move the system away from any other
wireless products.
• Stop using another wireless product.
• The wireless transceiver and/or the wireless
transmitter are/is not inserted correctly.
– turns red
• Change the SURROUND SELECTOR
switch (SURROUND or SURROUND
BACK) of the surround amplifier to match
the S-AIR main unit.
No sound is heard from the S-AIR main
unit.
• Volume becomes the minimum when you
turn off the surround amplifier with
headphones connected before you turn off the
S-AIR main unit or if radio reception is poor.
In these cases, check radio reception, and set
the volume again.
Severe hum or noise is heard.
• Check that the S-AIR products are connected
securely.
• Check that the connecting cords are away
from a transformer or motor, and at least 3
meters (10 ft) away from your TV set or a
fluorescent light.
• Move your TV away from the audio
components.
• The plugs and jacks are dirty. Wipe them with
a cloth slightly moistened with alcohol.
• Clean the disc.
No sound or only a very low-level sound is
heard from the speakers.
• Check the speaker connections and settings.
• Check the decoding mode setting.
• Depending on the source, the effect of the
speakers may be less noticeable.
• Wireless setting of the speaker is not correct.
• A 2 channel source is being played.
No sound is heard or sound is cut off.
• The S-AIR main unit and/or the surround
amplifier is installed in a place such as on a
metal shelf.
• Wireless LANs, a microwave (oven) and
Bluetooth applications, etc. are placed near
the surround amplifier.
12
GB

• Move away the other components from the
surround amplifier or turn off the other
components.
Operation
The system does not work normally.
• Disconnect the AC power cord (mains lead)
from the wall outlet (mains), then reconnect
after several minutes.
Specifications
TA-SA100WR
(Surround amplifier)
Amplifier section
Stereo mode (rated) 80 W + 80 W (at 3
ohms, 1kHz, 1%
THD)
Surround mode (reference) RMS output power
: 143 W
(per channel at 3
ohms, 1 kHz, 10 %
THD)
* Depending on the source, there may be no
sound output.
Rated impedance: 3 - 16 Ω
General
Power requirements: 220 V – 240 V AC,
50/60 Hz
Power consumption On: 50 W
Dimensions (approx.) 85 mm × 100 mm ×
330 mm (w/h/d)
(incl. EZW-RT10)
85 mm × 100 mm ×
345 mm (w/h/d)
incl. speaker cord
cover and speaker
cord holder
Mass ( approx.) 1.7 kg incl. speaker
cord cover and
speaker cord
holder
EZW-RT10
Communication System S-AIR
Specification
version 1.0
Output 12.0 mW
Frequency band 2.4000 GHz -
2.4835 GHz
Modulation method DSSS
Power requirements DC 3.3 V, 350 mA
Dimensions (approx.) 50 mm × 13 mm ×
60 mm (w/h/d)
13
GB

Mass (approx.) 24 g
EZW-T100
Communication System S-AIR
Specification
version 1.0
Output 12.0 mW
Frequency band 2.4000 GHz -
2.4835 GHz
Modulation method DSSS
Power requirements DC 4 V, 550 mA
DC 5 V, 15 mA
Dimensions (approx.) 52 mm × 24 mm ×
95 mm
(max 77 mm ×
24 mm × 95 mm)
(w/h/d)
Mass (approx.) 61 g
Design and specifications are subject to change
without notice.
“S-AIR” and its logo are trademarks of Sony
Corporation.
• Halogenated flame retardants
are not used in the printed
wiring boards.
• Over 85 % power efficiency of
amplifier block is achieved
with the full digital amplifier,
• Packaging cushions are made of paper.
S-master.
14
GB
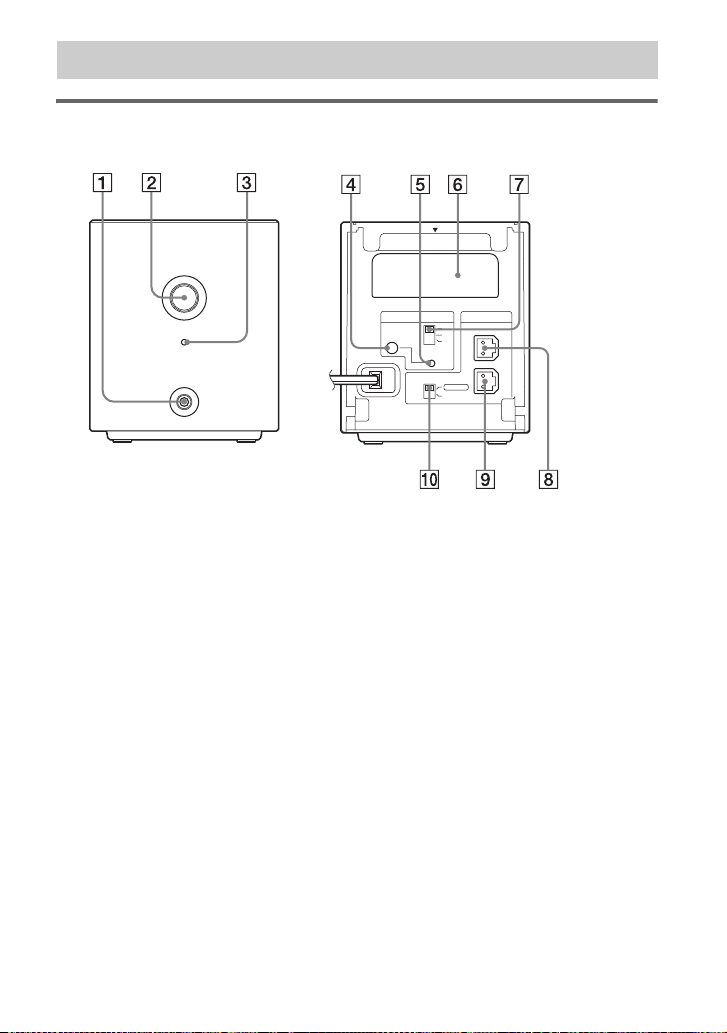
Index to Parts
Surround amplifier
Front panel
POWER
Rear panel
EZW-RT10
POWER/ON LINE
PHONES
A PHONES jack
B POWER button (ON/OFF)
C POWER / ON LINE indicator
D PAIRING indicator
E PAIRING button
F Wireless transceiver (EZW-RT10) slot
G S-AIR ID switch
H SPEAKER L jack
I SPEAKER R jack
J SURROUND SELECTOR switch
S-AIR ID
PAI RI N G
SURROUND SELECTOR
A
B
C
SURROUND
SURROUND
BACK
SPEAKER
L
R
15
GB
3
Índice
Acerca de este manual de
instrucciones .......................................3
Descripción general ............................ 4
Desembalaje .......................................5
Conexión ............................................5
Conexión de los cables de
alimentación de ca ..............................8
Configuración del sistema
inalámbrico .........................................8
Solución de problemas .....................12
Especificaciones ...............................13
Índice de componentes .....................15
ADVERTENCIA
Para reducir el riesgo de incendio o
descarga eléctrica, no exponga este
aparato a la lluvia ni a la humedad.
No sitúe el aparato en un espacio cerrado, como
una estantería o un armario empotrado.
Para evitar el riesgo de incendio, no cubra los
orificios de ventilación del aparato con periódicos,
manteles, cortinas, etc. Además, no coloque velas
encendidas sobre el aparato.
Para evitar el riesgo de incendio o electrocución,
no coloque sobre el aparato objetos que contengan
líquidos como, por ejemplo, un jarrón.
Solo para uso en interiores.
Tratamiento de
los equipos
eléctricos y
electrónicos al
final de su vida
útil (aplicable en
la Unión Europea
y en países
europeos con
sistemas de recogida selectiva de
residuos)
Este símbolo en el equipo o el embalaje indica
que el presente producto no puede ser tratado
como residuos domésticos normales, sino que
debe entregarse en el correspondiente punto de
recogida de equipos eléctricos y electrónicos.
Al asegurarse de que este producto se desecha
correctamente, Ud. ayuda a prevenir las
consecuencias negativas para el medio
ambiente y la salud humana que podrían
derivarse de la incorrecta manipulación en el
momento de deshacerse de este producto. El
reciclaje de materiales ayuda a conservar los
recursos naturales. Para recibir información
detallada sobre el reciclaje de este producto,
póngase en contacto con el ayuntamiento, el
punto de recogida más cercano o el
establecimiento donde ha adquirido el
producto.
El fabricante de este producto es Sony
Corporation, 1-7-1 Konan Minato-ku Tokyo,
108-0075 Japón. El representante autorizado
para EMC y seguridad en el producto es Sony
Deutschland GmbH, Hedelfinger Strasse 61,
70327 Stuttgart, Alemania. Para cualquier
asunto relacionado con servicio o garantía por
favor diríjase a la dirección indicada en los
documentos de servicio o garantía adjuntados
con el producto.
ES
2

Precauciones
Fuentes de alimentación
• El cable de alimentación de ca sólo debe
cambiarse en el centro de servicio técnico
especializado.
• Instale el sistema de modo que el cable de
alimentación de ca se pueda desenchufar de la
toma de pared de forma inmediata en caso de
problemas.
Ubicación
• No coloque el sistema en lugares cálidos y
expuestos a la luz solar directa, con mucho
polvo, muy húmedos o extremadamente fríos.
• Tenga cuidado al colocar el sistema en suelos
tratados de manera especial (encerados,
barnizados con aceites, pulidos, etc.) ya que
pueden mancharse o decolorarse.
• Compruebe que existe una circulación adecuada
de aire para evitar el recalentamiento interno de
la unidad.
• No coloque el sistema sobre superficies
(alfombras, mantas, etc.) ni cerca de materiales
(cortinas, tapices) que puedan bloquear las
ranuras de ventilación.
• No instale el sistema cerca de fuentes de calor,
como radiadores o conductos de aire, ni en
lugares expuestos a la luz solar directa, polvo
excesivo, vibraciones mecánicas o golpes.
• No instale el sistema en posición inclinada. Está
diseñado para funcionar sólo en posición
horizontal.
• Mantenga el sistema alejado de equipos
provistos de imanes potentes, como hornos
microondas o altavoces de gran tamaño.
• No coloque objetos pesados sobre el sistema.
• Si utiliza más de un sistema de pro ductos S-AIR,
colóquelos separados entre sí para evitar
interferencias.
• Instale este amplificador de sonido envolvente y
los productos S-AIR a una distancia mínima de
50 cm de las personas.
• Para evitar el riesgo de incendio o electrocución,
no coloque sobre el aparato objetos que
contengan líquidos como, por ejemplo, un
jarrón.
• No coloque el sistema sobre una alfombra, ya
que podría decolorarse.
• Si utiliza más de un amplificador de sonido
envolvente, no los coloque apilados.
Limpieza
Limpie la unidad solamente con un paño suave y
seco. No utilice estropajos abrasivos, detergente en
polvo ni disolventes, como alcohol o benceno.
Seguridad
• Si se introduce algún objeto en la unidad,
desenchúfela y haga que la revise un técnico
especializado antes de volver a utilizarla.
• Desenchufe la unidad de la toma de corriente de
la pared si no va a utilizarla durante un largo
período de tiempo. Para desconectar el cable, tire
del enchufe, nunca del cable.
Acerca de este manual de
instrucciones
El modelo WAHT-SA1 es un amplificador
de sonido envolvente para productos Sony
S-AIR. Este amplificador es para modelos
que tengan una ranura “EZW-RT10” o
“EZW-T100” en el panel posterior.
ES
ES
3
Descripción general
Este amplificador de sonido envolvente
permite utilizar un sistema de 5.1 canales
(cinco altavoces y un altavoz potenciador de
graves) o un sistema de 7.1 canales (siete
altavoces y un altavoz potenciador de
graves).
Utilización de un sistema
de 7.1 canales
El sistema S-AIR permite utilizar un sistema
de 7.1 canales, con dos altavoces de sonido
envolvente y dos altavoces de sonido
envolvente posteriores.
B
Utilización de un sistema
de 5.1 canales
El sistema S-AIR permite evitar los enredos
de cables y mantener así la habitación
ordenada.
B
A
H
C
E
D
I
A
A Altavoz frontal izquierdo
B Altavoz frontal derecho
C Altavoz central
D Altavoz de sonido envolvente
izquierdo
E Altavoz de sonido envolvente
derecho
F Altavoz de sonido envolvente
posterior izquierdo
G Altavoz de sonido envolvente
posterior derecho
H Altavoz potenciador de graves
I Amplificador de sonido envolvente
(para altavoces de sonido
envolvente)
J Amplificador de sonido envolvente
(para altavoces de sonido
envolvente posteriores)
H
C
D
F
G
I
J
E
ES
4
 Loading...