

Page 1

Digital Signage
Player
3-296-172-13(1)
Setup Instructions
Before operating the unit, please read this manual thoroughly and retain it for future
reference.
VSP-NS7
VSPA-D7
© 2007 Sony Corporation
Page 2

NOTICE TO USERS
© 2007, 2008 Sony Corporation. All rights reserved. This
manual or the software described herein, in whole or in
part, may not be reproduced, translated or reduced to any
machine readable form without prior written approval
from Sony Corporation.
SONY CORPORATION PROVIDES NO WARRANTY
WITH REGARD TO THIS MANUAL, THE
SOFTWARE OR OTHER INFORMATION
CONTAINED HEREIN AND HEREBY EXPRESSLY
DISCLAIMS ANY IMPLIED WARRANTIES OF
MERCHANTABILITY OR FITNESS FOR ANY
PARTICULAR PURPOSE WITH REGARD TO THIS
MANUAL, THE SOFTWARE OR SUCH OTHER
INFORMATION. IN NO EVENT SHALL SONY
CORPORATION BE LIABLE FOR ANY
INCIDENTAL, CONSEQUENTIAL OR SPECIAL
DAMAGES, WHETHER BASED ON TORT,
CONTRACT, OR OTHERWISE, ARISING OUT OF OR
IN CONNECTION WITH THIS MANUAL, THE
SOFTWARE OR OTHER INFORMATION
CONTAINED HEREIN OR THE USE THEREOF.
Sony Corporation reserves the right to make any
modification to this manual or the information contained
herein at any time without notice.
The software described herein may also be governed by
the terms of a separate user license agreement.
Trademarks
• Microsoft, Windows, and Internet Explorer are
registered trademarks of Microsoft Corporation in the
United States and other countries/regions.
• Any other company and product names mentioned
herein may be the trademarks or registered trademarks of
their respective companies. Furthermore, “™” or “®”
are not mentioned in each case.
2
Page 3

Table of Contents
Introduction .................................................4
Flow of Installation and Setup Operations ... 4
Settings Required for System Introduction... 4
Settings Required Before Installation .......5
Internet Explorer Settings............................. 5
Settings for the Entire System ...................... 6
Setting the Network Addresses for Players and
Registering the Players with the VSPA-
D7 Software......................................... 8
Installation .................................................11
Settings Required After Installation ........12
Making Player-Related Settings ................. 12
Sending the Settings to the Players............. 16
Changing Settings After Starting Operation
17
Adding a Player .......................................... 17
Deleting a Player......................................... 17
Changing a Player’s Network Address....... 17
Changing Other Player-Related Settings.... 17
Data Backup...............................................18
Backing Up Materials, Schedules and Setup
Data ................................................... 18
Using Backed Up Data ............................... 19
Reflecting the Settings of a Player ..........19
Reflecting a Network Address Assigned for a
Player................................................. 19
Specifying the Password and HTTP Port
Number Used on a Player in the VSPA-
D7 Software....................................... 20
Table of Contents
3
Page 4
Introduction
Settings Required for System Introduction
These Setup Instructions describe the installation and
setup operations that are required when introducing a
system that uses the VSP-NS7 Digital Signage Players.
When installing the system, see also the VSP-NS7
Operating Instructions.
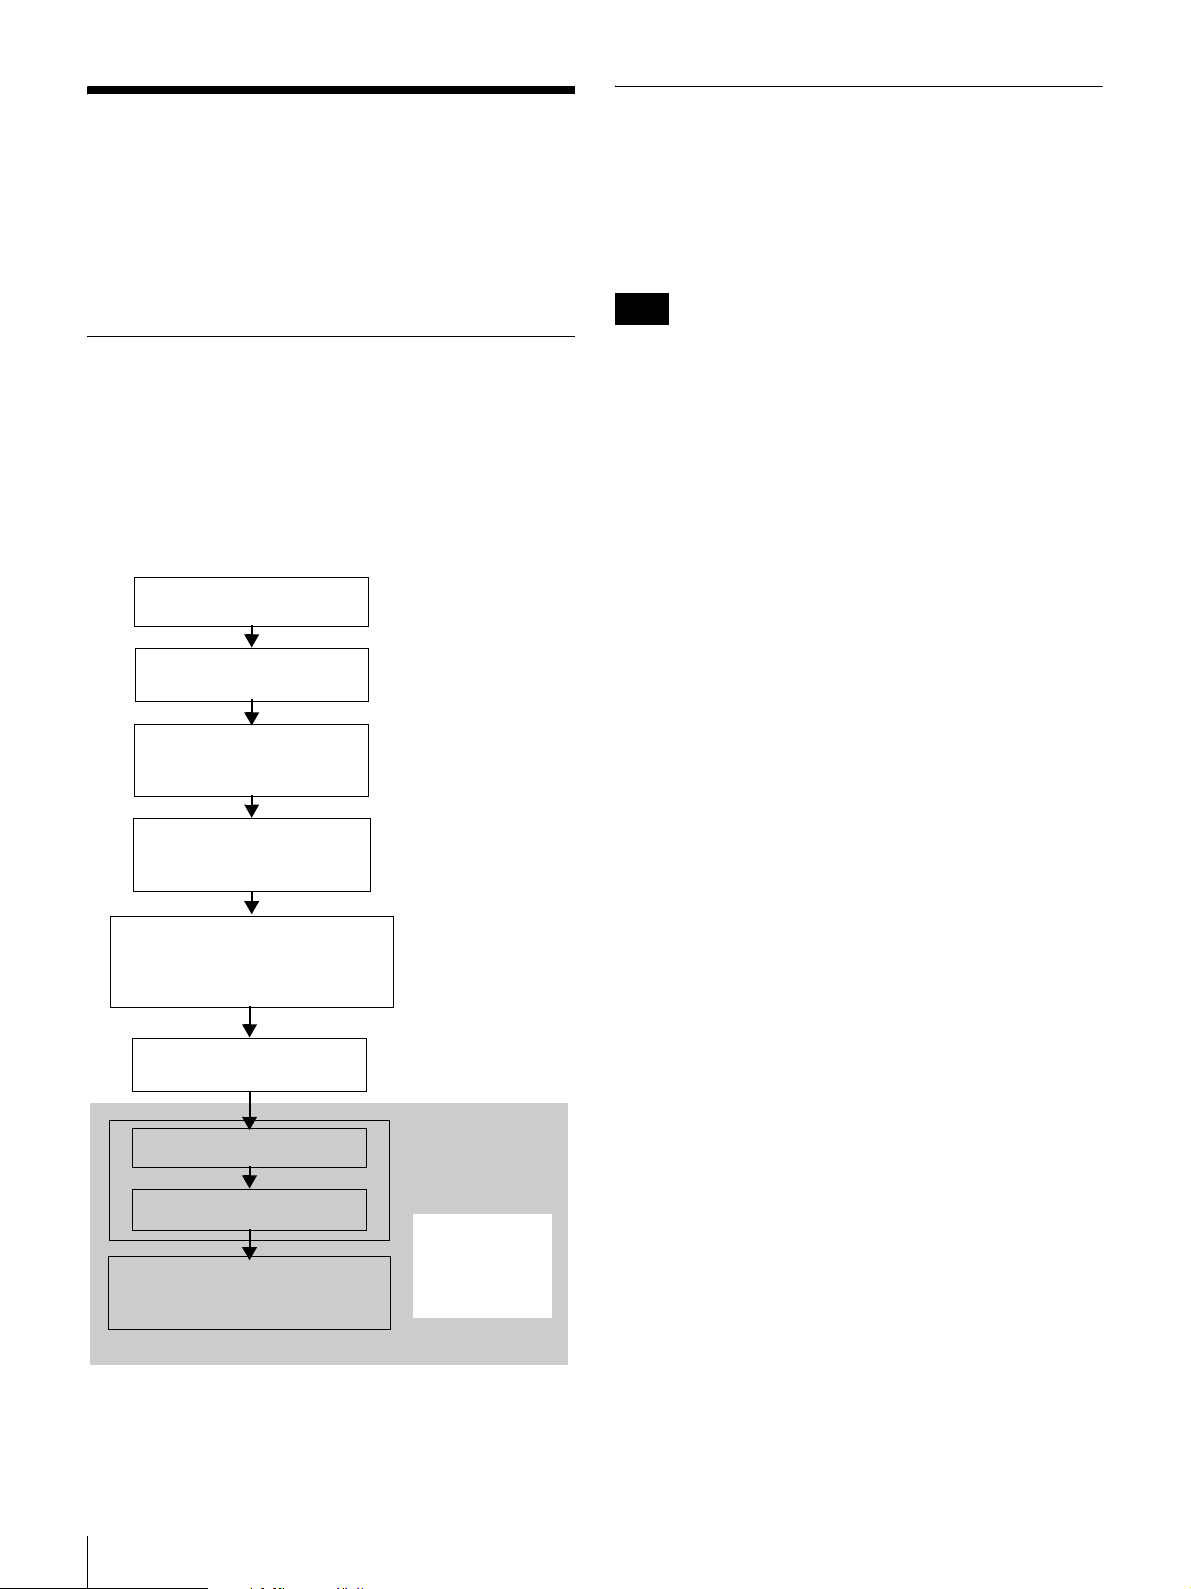
Flow of Installation and Setup Operations
The following figure shows the flow of installation and
setup operations.
Note that some of the settings may have to be made before
installing the VSP-NS7 player, depending on the
installation environment.
Check and modify Internet
Explorer settings (see page 5)
Start VSPA-D7, and perform the
system setup (see page 6)
Assign network address to
VSP-NS7s, and register them
(see page 8)
Install VSP-NS7s and make
hardware connections
(see page 11)
Perform setup related to VSP-NS7s
(see page 12)
o Detailed settings
o Registration of display devices
Send the settings to VSP-
NS7s (see page 16)
Create groups
Register VSP-NS7s in groups
Select the material to use, make any
optional settings, and the standard
display layout settings
Repeat for as
many devices as
you are using
If necessary,
repeat for as
many devices as
you are using
Repeat for as
many groups as
you want to
create
For details on these
operations, refer to
the VSPA-D7
Operating
Instructions.
The settings required for using the VSP-NS7 player
(henceforth called the “player” in this manual) are all made
on the computer on which the VSPA-D7 Digital Signage
Player Management Software has been installed.
Note
Use the computer that will be used for routine operation for
setup. When making the settings related to the players, the
VSPA-D7 software stores the setup data required for its
operation.
Make the following settings when introducing the system.
Checking and modifying the settings for
Internet Explorer
The VSPA-D7 software communicates with each player
via a network such as the Internet or a LAN, using the
settings for Internet Explorer. If a proxy server is used on
the network, make the setting that indicates the proxy
server is not to be used for communication between the
VSPA-D7 software and the players.
Settings on the VSPA-D7 software
The setup items appear in different windows, depending
on their type. When the VSPA-D7 software is started for
the first time after being installed, the items that are
required for using the system appear automatically in
successive windows, from the “System Setup” window to
the “VSP-NS7 Setup” window. Make the required settings
while referring to these Setup Instructions.
VSPA-D7 system settings
The “System Setup” window contains setup items related
to the system as a whole. These include the storage
location of content, schedules, and settings that the VSPAD7 software manages, the times for turning the players
used in the system on and off, and whether to always
synchronize the players’ clocks with the computer that is
running the VSPA-D7 software.
Player’s network address and player registration
The player receives data such as content or playback
schedules sent from the VSPA-D7 software via a network
such as the Internet or a LAN. For this reason, a fixed IP
address must be set for the player. When using multiple
players, a different IP address must be set for each player.
Then, each player’s name and resolution should be
registered with the VSPA-D7 software, together with the
IP address assigned to the player.
4
Introduction
Page 5
Note
An automatic player detection function is supported to set
IP addresses for the players and to register the players with
the VSPA-D7 software. Note that, if the players will be
connected to a different network (segment) from that of the
computer where the VSPA-D7 software is operating, this
function must be used before moving the players to their
actual operating locations.
Player settings
After installing the players in their actual operating
locations, you can adjust the volume, and set the time zone
and daylight saving time of the installation location, using
the “VSP-NS7 Setup” window.
When you use a display device that is controlled via a
network, it is also registered and assigned to the player that
controls it in this window.
Then, you can set data related to the player by sending the
data from this window to the player.
Other settings
You can make the settings shown in gray in “Flow of
Installation and Setup Operations” even after starting
system operation.
Settings Required Before Installation
Internet Explorer Settings
During communication with a player, both the VSPA-D7
and VSPA-M7 software use the web browser (Internet
Explorer) settings. Set the following two items.
• Connecting the computer to the Internet using a LAN
• Make the setting that indicates a proxy server is not to be
used for communication with the players
Note
The illustrations used in the following steps are those of
Internet Explorer Version 7.0. The procedure is the same
even if you are using another version of Internet Explorer.
1
Start the web browser (Internet Explorer).
The Internet Explorer window appears.
For details about these setup operations, refer to the
VSPA-D7 Operating Instructions.
Each setup window corresponds to one of the operation
guide buttons on the left side of the VSPA-D7 main
window. You can add or change these settings even after
starting operation. If the buttons for the setup windows are
not displayed, click to display them.
2
Click [Tools] on the menu bar, then click [Internet
Options] from the pull down menu.
The “Internet Options” window appears.
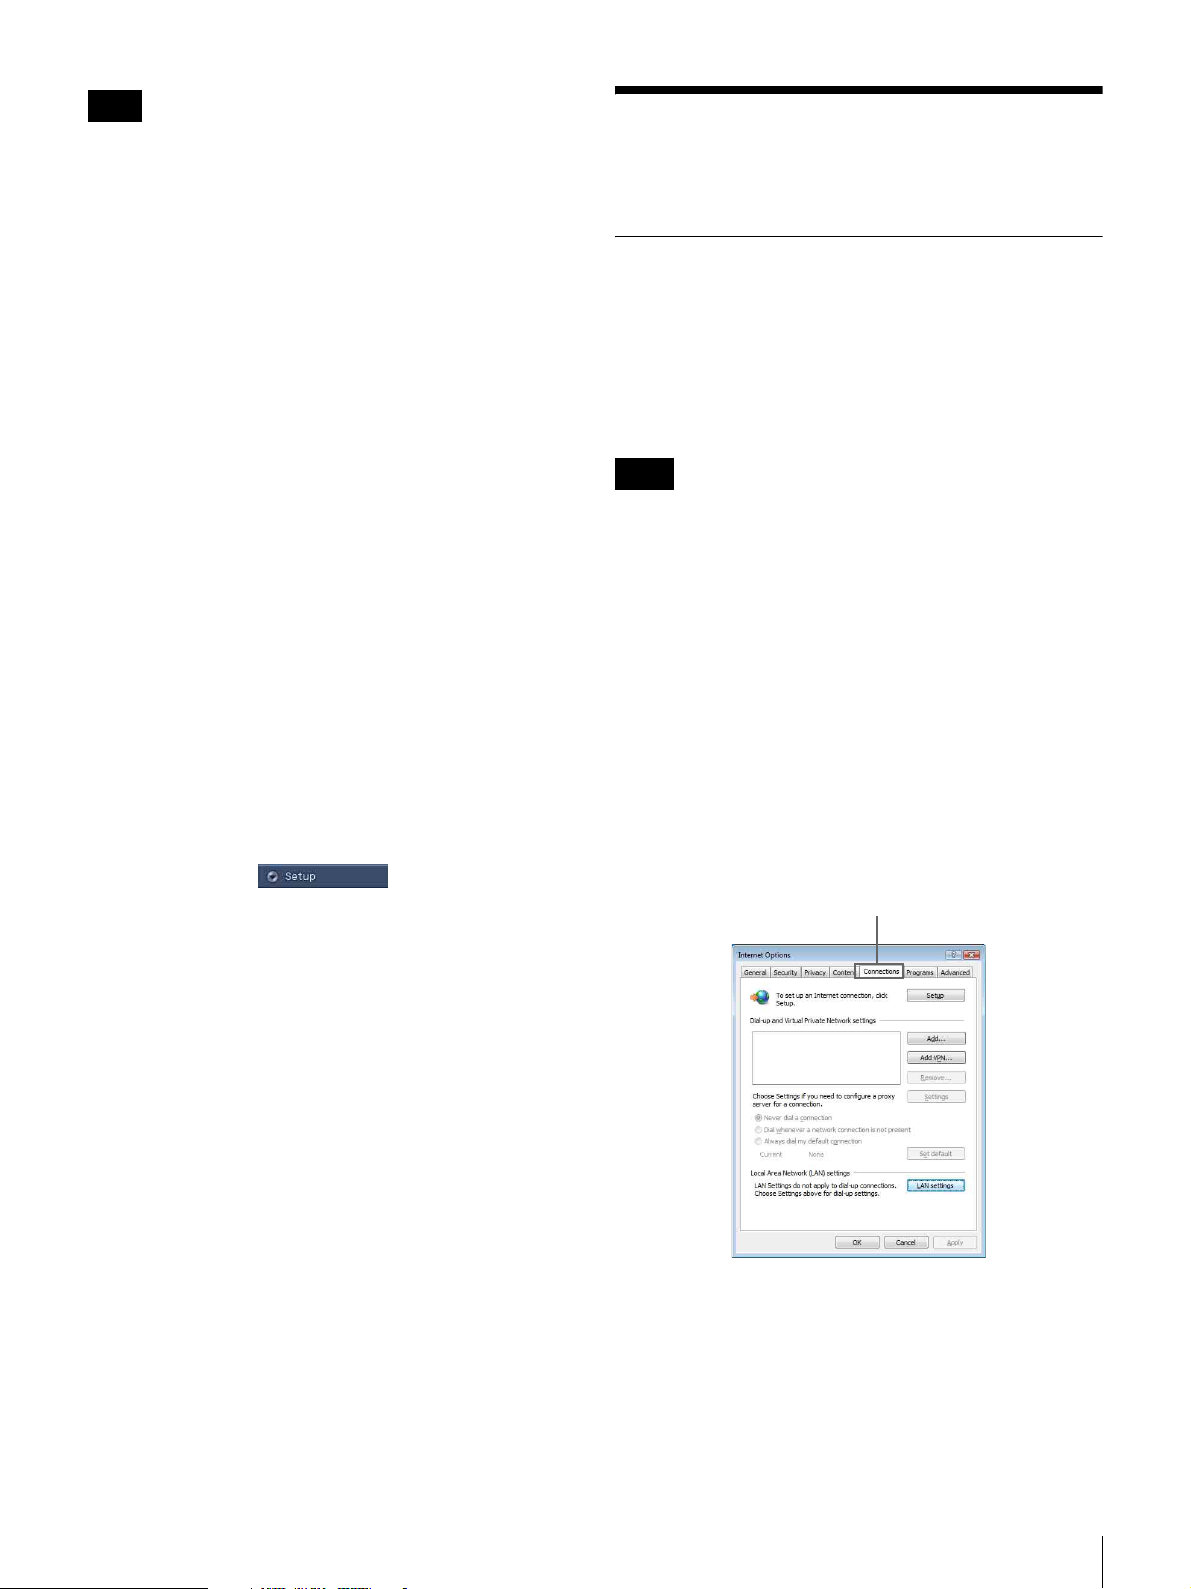
3
Click the “Connections” tab.
The following window appears.
Click [Connections].
4
Click [LAN Settings].
The “Local Area Network (LAN) Settings” window
appears.
5
Make the following settings in the “Local Area
Network (LAN) Settings” window.
Settings Required Before Installation
5
Page 6

When a proxy server is not to be used on the
network that is used during operation
1 Remove all check marks.
2 Click [OK].
Proceed to step 8 when the “Internet Options” window
returns.
When a proxy server is to be used on the network
that is used during operation
1 Remove check marks.
2 Place a check mark.
2 Click [OK].
1 Enter all IP addresses for players in the “Do not
use proxy server for addresses beginning with:”
text box. Add a ; (semi colon) if multiple IP
addresses are entered.
Use an * (asterisk) as a wild card. In this
example, “192.168.1.1” to “192.168.1.254” are
specified.
7
Click [OK] in the “Local Area Network (LAN)
Settings” window.
The “Internet Options” window returns.
8
Click [OK] in the “Internet Options” window.
3 Make settings according to
the instructions of your
network administrator.
4 Click [Advanced].
The “Proxy Settings” window appears.
6
Make the following settings in the “Proxy Settings”
window.
Settings for the Entire System
Use the “System Setup” window to make the settings that
relate to the system as a whole. These include the storage
location of content, schedules, and settings that the VSPAD7 software manages, the times for turning the players
used in the system on and off, and whether to always
synchronize the players’ clocks with the computer that is
running the VSPA-D7 software.
The “System Setup” window appears automatically the
first time that setup is performed after installation.
Start the VSPA-D7 software, by double-clicking the
VSPA-D7 shortcut on the Windows desktop.
The VSPA-D7 main window appears as follows:
6
Settings Required Before Installation
Page 7
Setting procedure
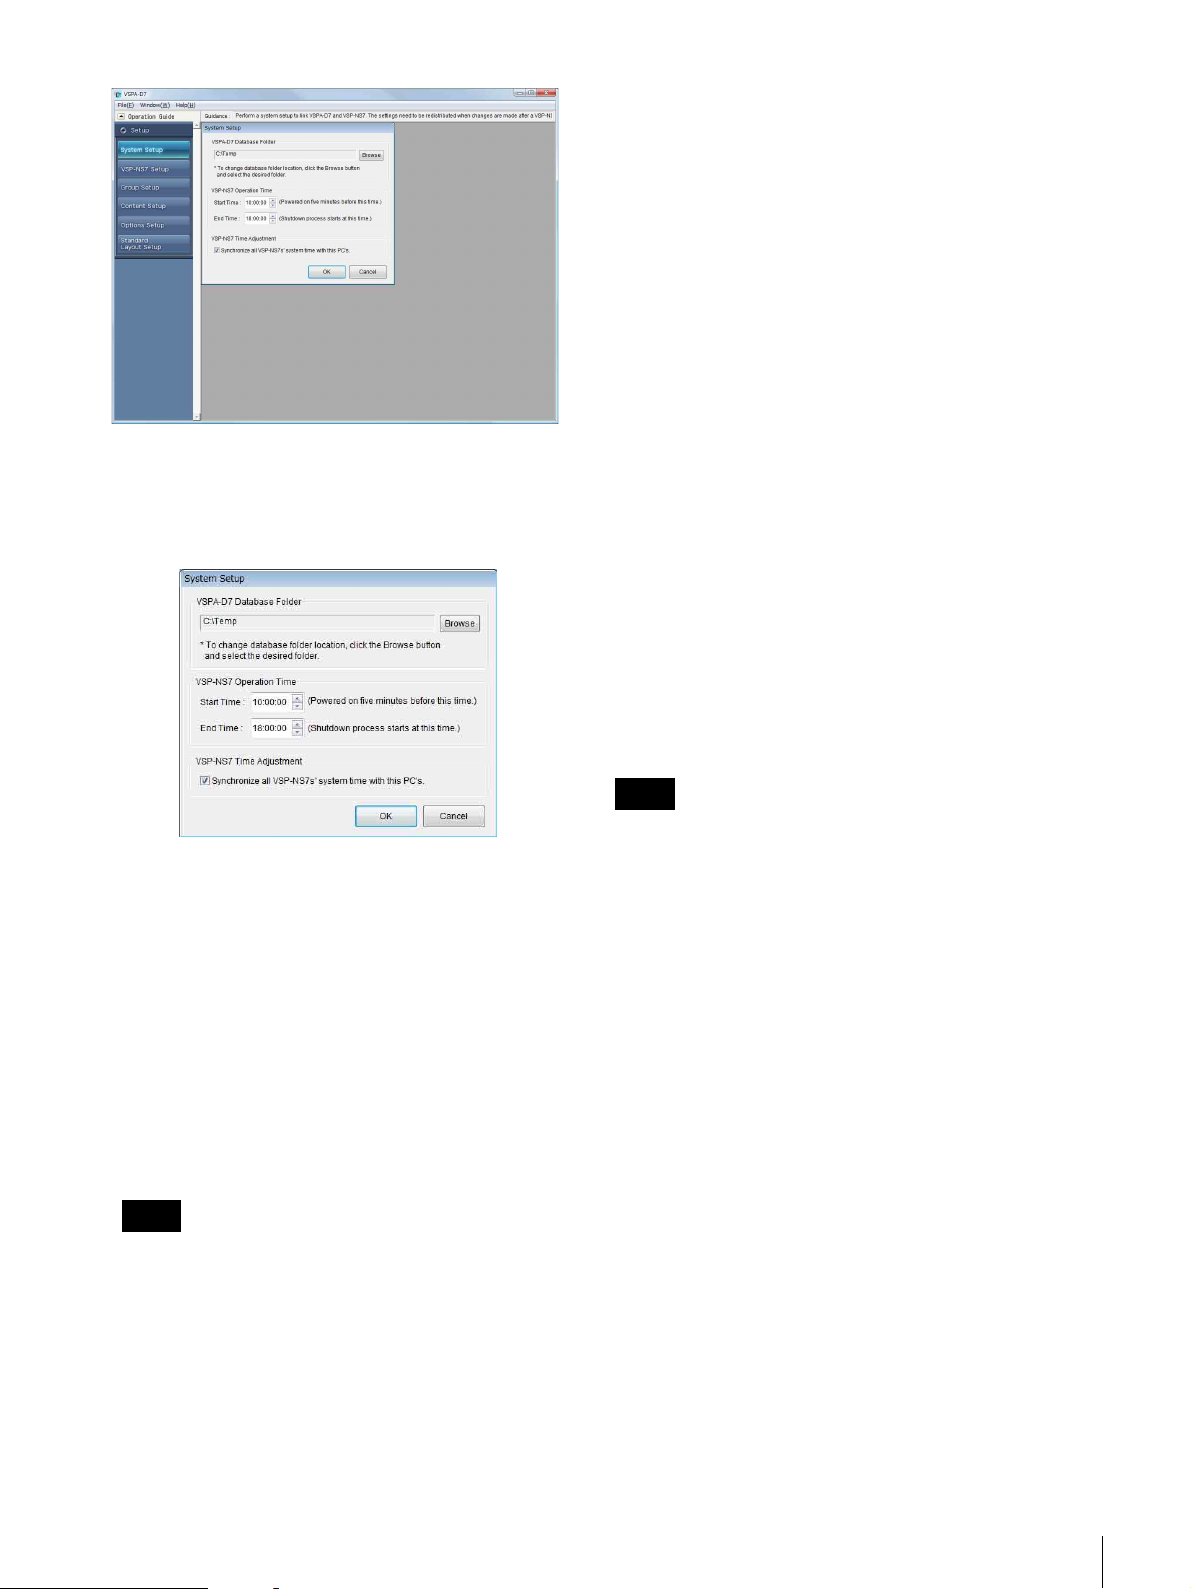
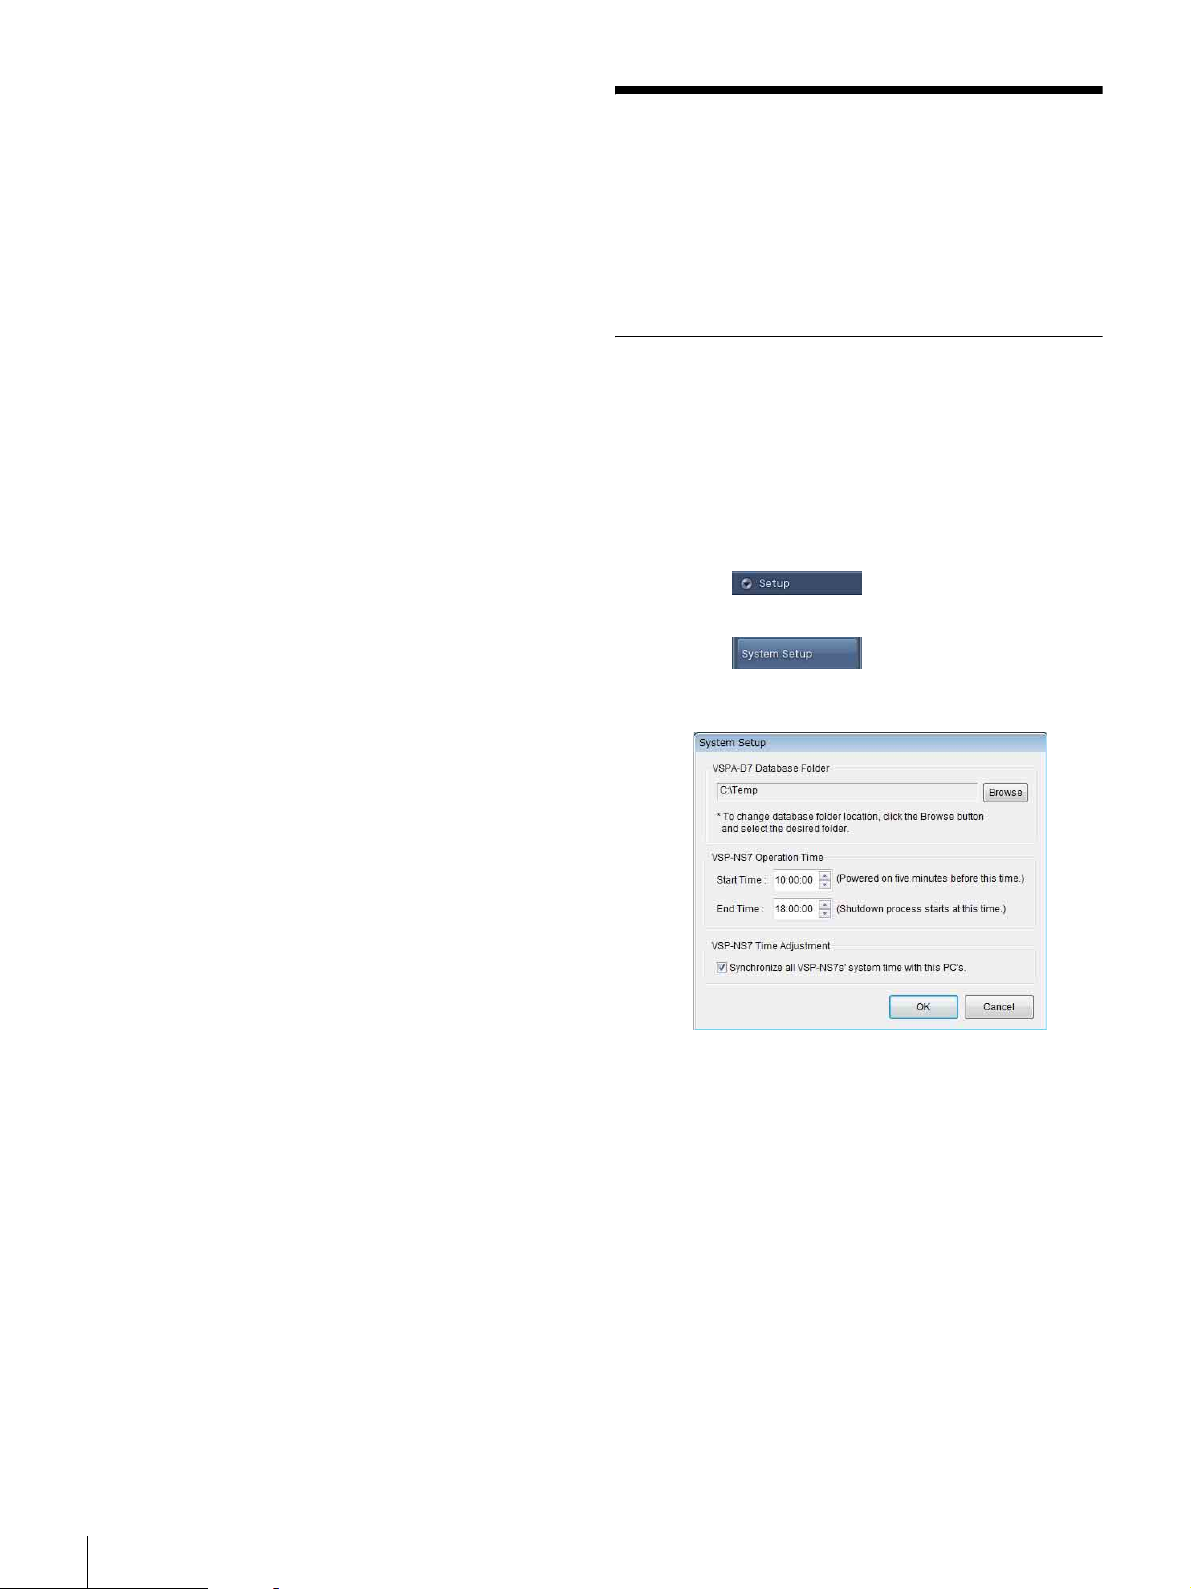
The following figure shows the “System Setup” window
that appears in the VSPA-D7 main window, first.
Setup items in the System Setup window
VSPA-D7 Database Folder
This item specifies the folder that stores materials,
playback schedules, and setup data. Data are stored
separately by type in the VspaData folder, which is
automatically created in the folder that is specified here.
Normally, you do not need to change this setting.
VSP-NS7 Operation Time
The “Start Time” and “End Time” specify the daily
operating time for the players.
Set them according to the time slot in which you want to
perform scheduled playback and the time slot in which
data is delivered from the VSPA-D7 software.
The player automatically starts earlier than the specified
time so that the operation can be started at the specified
time; however, specify the “Start Time” even earlier if the
player cannot finish its startup in time.
VSP-NS7 Time Adjustment: Synchronize all VSPNS7s’ system time with this PC’s
Place a check mark in this check box to automatically
synchronize the clocks of all players within the system
with the computer that is running the VSPA-D7 software.
If you want to synchronize the player times individually
with an NTP server, do not place a check mark in this
check box. Instead, specify the NTP server in “Detailed
Settings” of the “VSP-NS7 Setup” window.
1
Change the settings as required.
For details about setup items, see “Setup items in the
System Setup window” below.
2
Click [OK].
The “System Setup” window closes.
When you have not yet made the setup in the “VSPNS7 Setup” window, the window appears
automatically.
Note
When you modify the “VSP-NS7 Operation Time”
and/or “VSP-NS7 Time Adjustment” settings, you
have to send the settings to the player.
See “Sending the Settings to the Players” on page 16
and send the settings from the “VSP-NS7 Setup”
window.
Note
When operating players with their clocks synchronized to
the computer that is running the VSPA-D7 software, set a
fixed IP address for that computer. The players access the
computer via port 123 to adjust the time. So, if the
computer has a fire wall, permission must be given to
receive data via port 123. Also, do not power off the
computer while the players are operating, and make sure
that the computer will not go in the standby (powersaving) mode.
Further, to ensure that the system operates according to an
accurate time, the computer time must be synchronized
with the NTP server or manually adjusted on a regular
basis. To manually adjust the time, double-click the “Date
and Time” icon on the Windows Control Panel and make
the settings in the “Properties” window of “Date and
Time.”
Avoid manually adjust the computer time while the player
are operating. Players adjust their clocks upon startup. But
once they have started, they can only adjust their clocks in
very small steps.
Settings Required Before Installation
7
Page 8
Setting the Network Addresses for Players and Registering the Players with the VSPA-D7 Software
Connect the players one by one to the network on which
the computer that is running the VSPA-D7 software is
connected, set the network addresses, then register their
names, resolution, and IP addresses with the VSPA-D7
software.
Note that, when the players will be used at distant places
and connected to different networks, this setting should be
done before moving the players in their actual operating
locations.
Procedure
Connections
The VSPA-D7 software detects the players on the network
automatically, using the UDP2380 port. Connect the
players one by one, to the network on which the computer
that is running the VSPA-D7 software is connected.
Also, connect a display device to the connector on the
player using an RGB cable, connect the power cord to the
player, and turn it on.
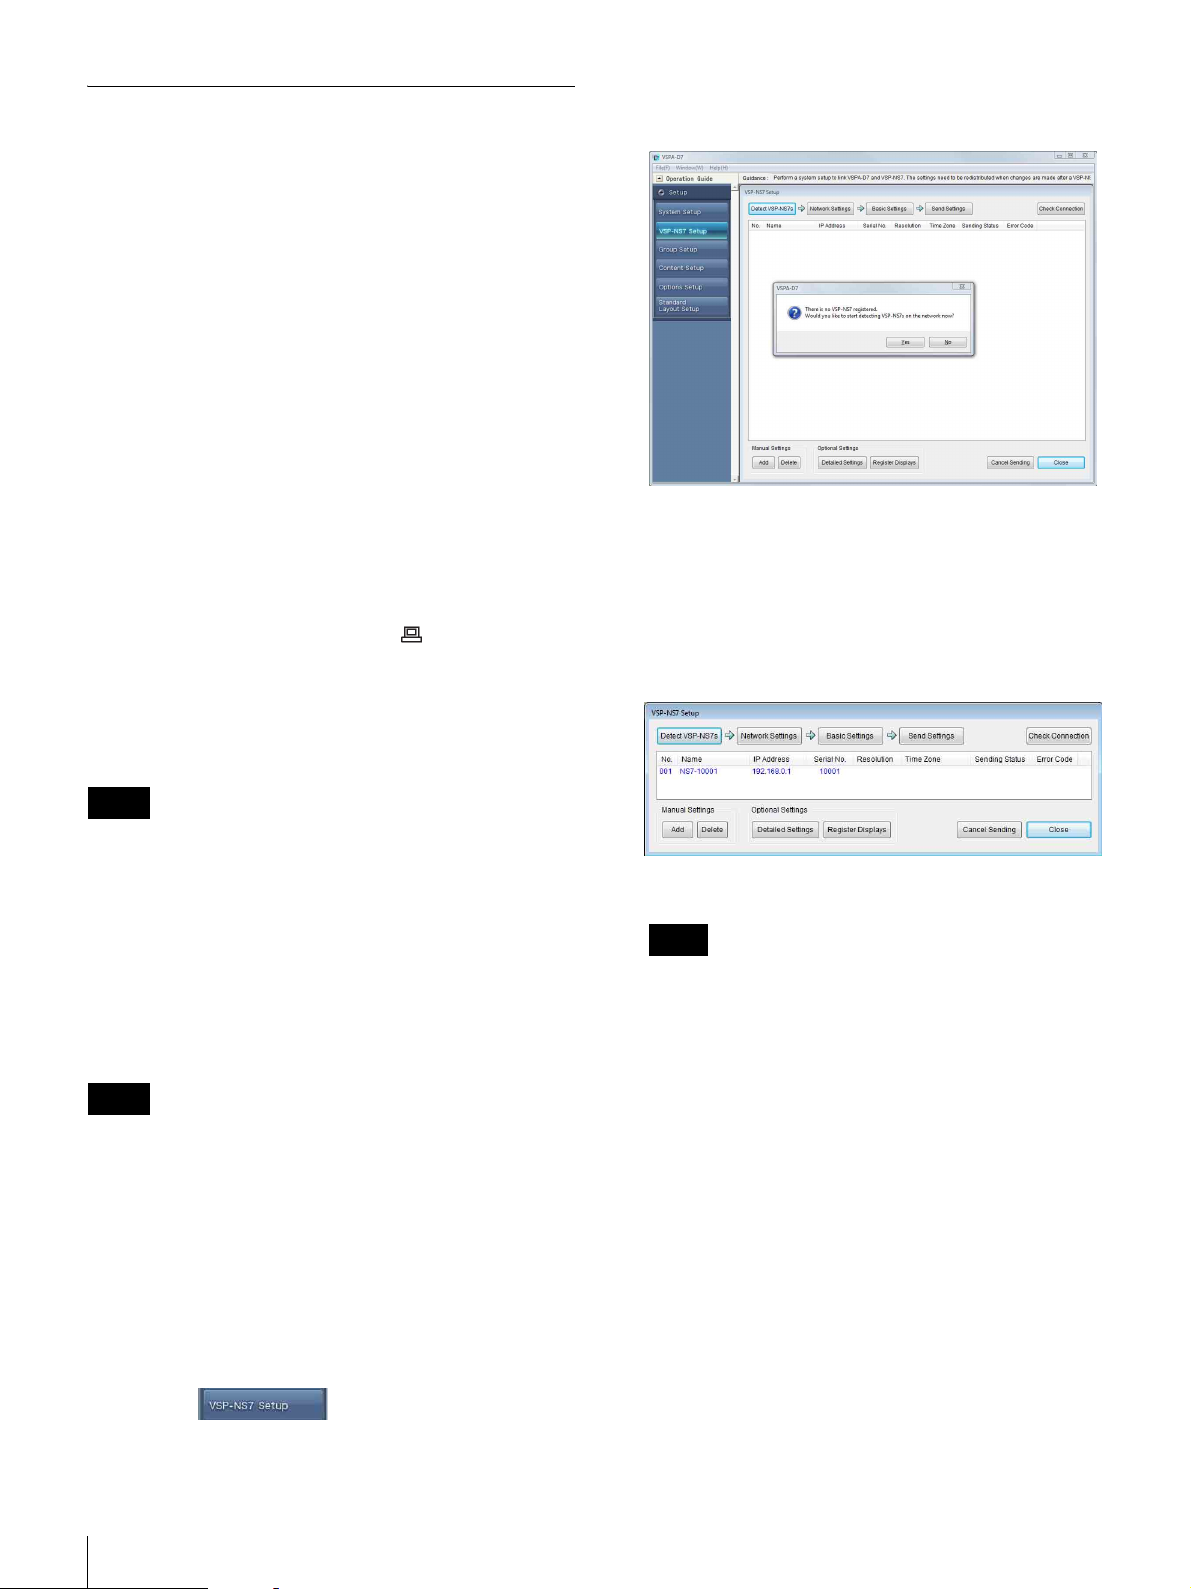
The following window appears.
2
Click [Yes].
The VSPA-D7 software starts detecting the player on
the network. The detected player will be named from
its serial number automatically, and shown in the
“VSP-NS7 Setup” window.
The player is turned on automatically when the power is
supplied.
Notes
• The default IP address set at the factory for all players is
“192.168.0.1.”
For this reason, if there is a device whose IP address is
“192.168.0.1” on the network, it may not operate
correctly. Power that device off while you set the
network addresses to the players.
• Connect a display device to the player using an RGB
cable to set up the player.
Setting the network address
Notes
• Set a different network address for each player.
• In a system configuration where data is sent and received
between the players and a computer that is running the
VSPA-D7 software via the Internet, a global IP address
must be used for each player.
If the computer and players are connected by a LAN
only, you may use a private IP address.
For details about the network addresses that you can use,
ask your network administrator.
Note
No player will be detected if communication using the
UDP2380 port is not possible on the network.
In such a case, set a network address for each player by
connecting the players, one by one, to the computer
that is running the VSPA-D7 software.
See “If a player is not detected in automatic player
detection” on page 10 for details.
3
Select the detected player on the list, then click
[Network Settings].
The “Network Settings” window appears.
1
When the “VSP-NS7 Setup” window is not shown,
click the button in the operation guide
area on the left of the VSPA-D7 main window.
8
Settings Required Before Installation
Page 9
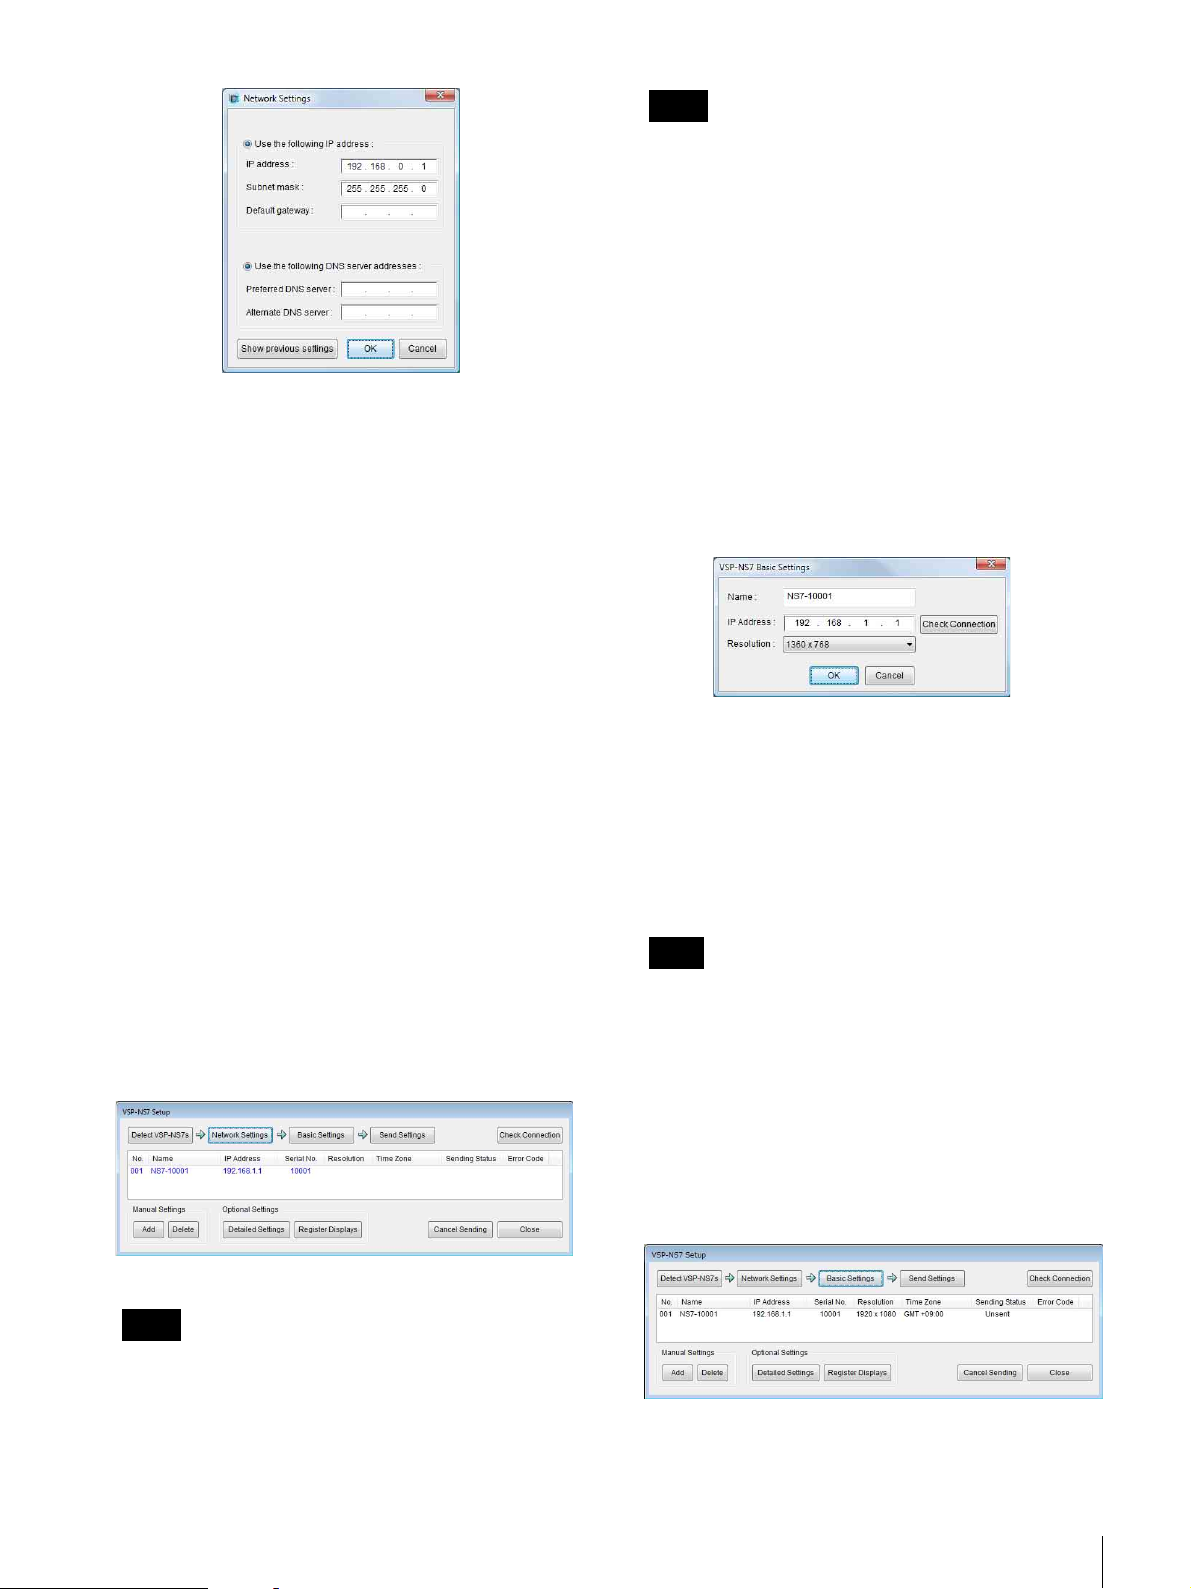
4
Enter the IP address to be set for the player in the “IP
address” text box in the “Use the following IP address”
group, and if necessary, enter the appropriate subnet
mask in the corresponding text box.
5
Enter the address of the default gateway, which will be
used by the player in its actual operating location, in
the corresponding text box.
6
When using DNS servers, enter the IP addresses of the
DNS servers that are set in the network that is
connected during operation in the “Preferred DNS
server” and “Alternative DNS server” text boxes, then
click [OK].
Hint
Clicking [Show previous settings] in the “Network
Settings” window shows the settings for the player that
was specified last in the window. This is helpful when
you are specifying a series of IP addresses for the
players, for example.
Registering the player with the VSPA-D7 software
Next, register the name of the player, IP address you have
just set to it, and the resolution used on the player with the
VSPA-D7 software.
1
Select the player to which you have just assigned a
network address in the “VSP-NS7 Setup” window,
and click [Basic Settings].
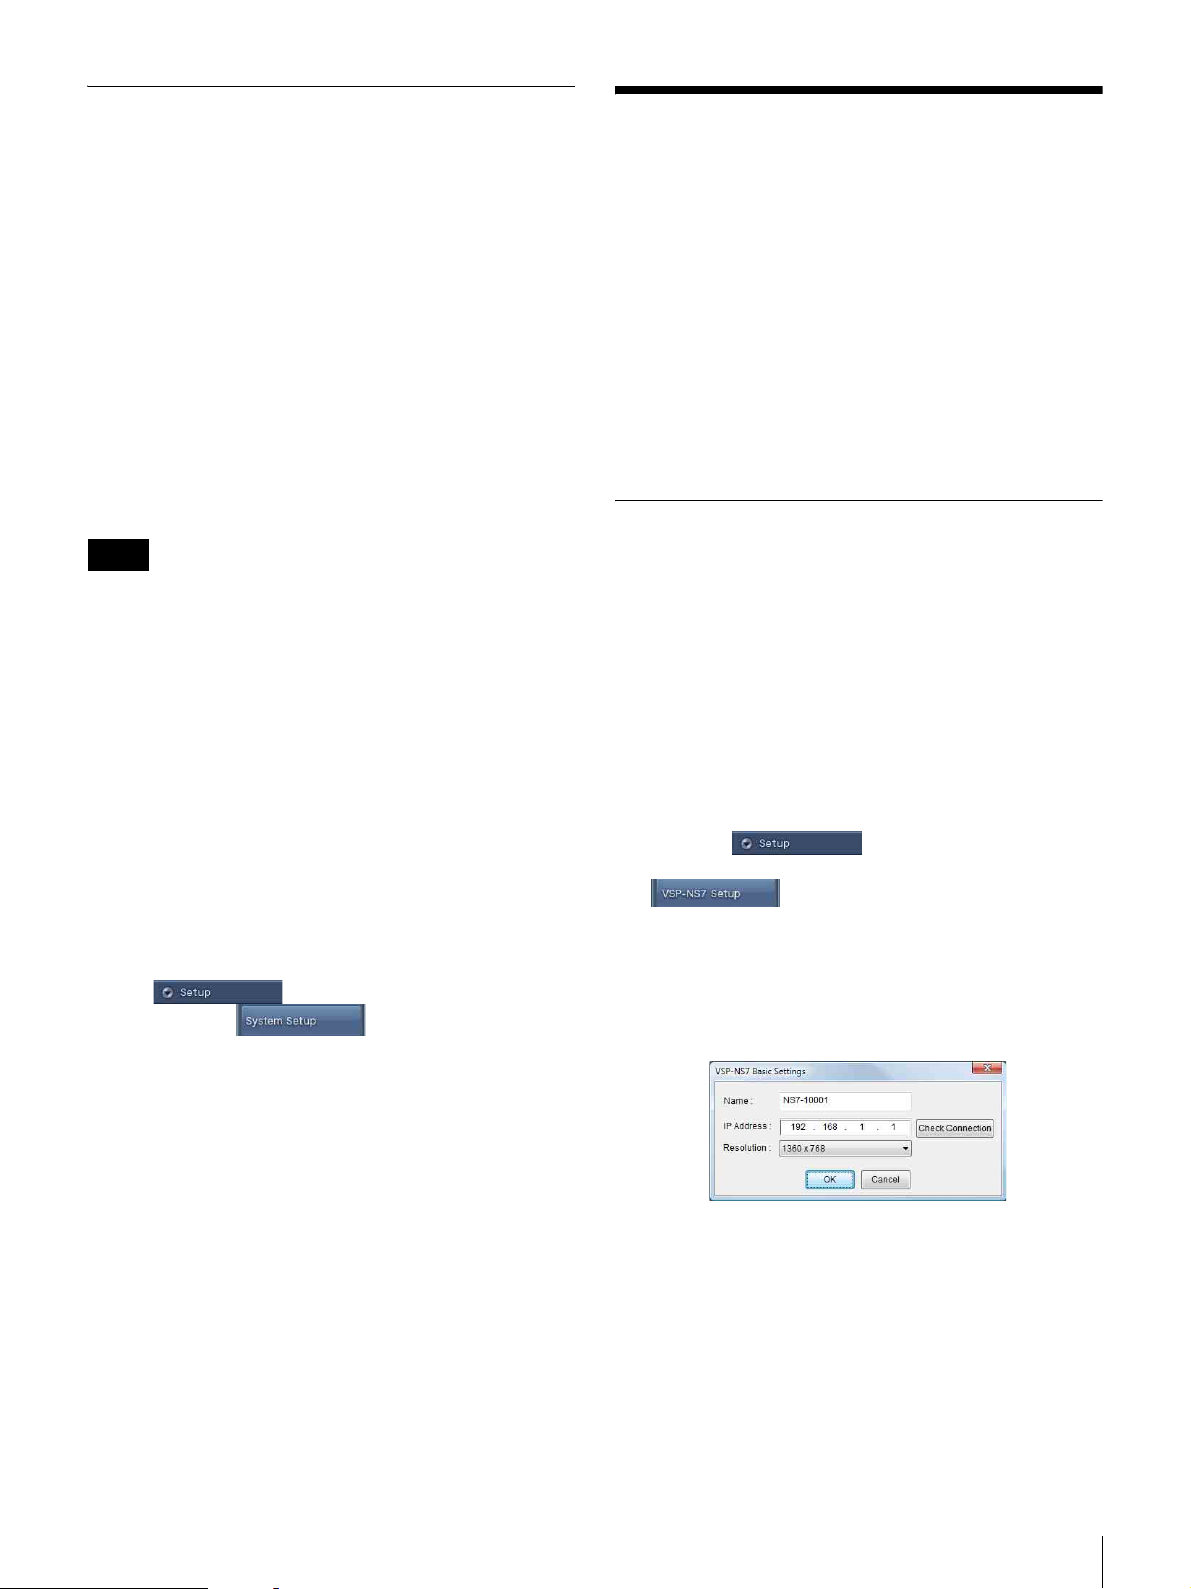
The “VSP-NS7 Basic Settings” window for the player
appears.
2
Click [Check Connection].
When not using a DNS server, leave the text boxes in
the “Use the following DNS Server addresses” group
cleared, and click [OK].
You can leave them cleared if you do not use web page
material for playout.
The specified addresses are specified for the player,
and its IP address is shown in the “VSP-NS7 Setup”
window.
The following image shows an example when
“192.168.1.1” was specified for the player “NS7-
10001.”
Note
At the end of this process, the player may restart
automatically. Read the message shown by the VSPAD7 software.
The connection to the selected player is checked and a
message appears.
3
Select the display resolution with the “Resolution”
drop-down list box, then click [OK].
Hint
You can modify the name of the player in this window.
To modify the name, edit the name in the “Name” text
box before clicking [OK].
Do NOT modify the IP address for the player,
however, in this window.
The “VSP-NS7 Basic Settings” window closes, and
the player is registered in the VSPA-D7 software.
Information on the registered player appears in black
in the “VSP-NS7 Setup” window.
Settings Required Before Installation
9
Page 10
4
To move the player, press the power button on the
player to power it off, and disconnect it from the
network.
5
Repeat the steps from “Connections” on page 8 for all
other players.
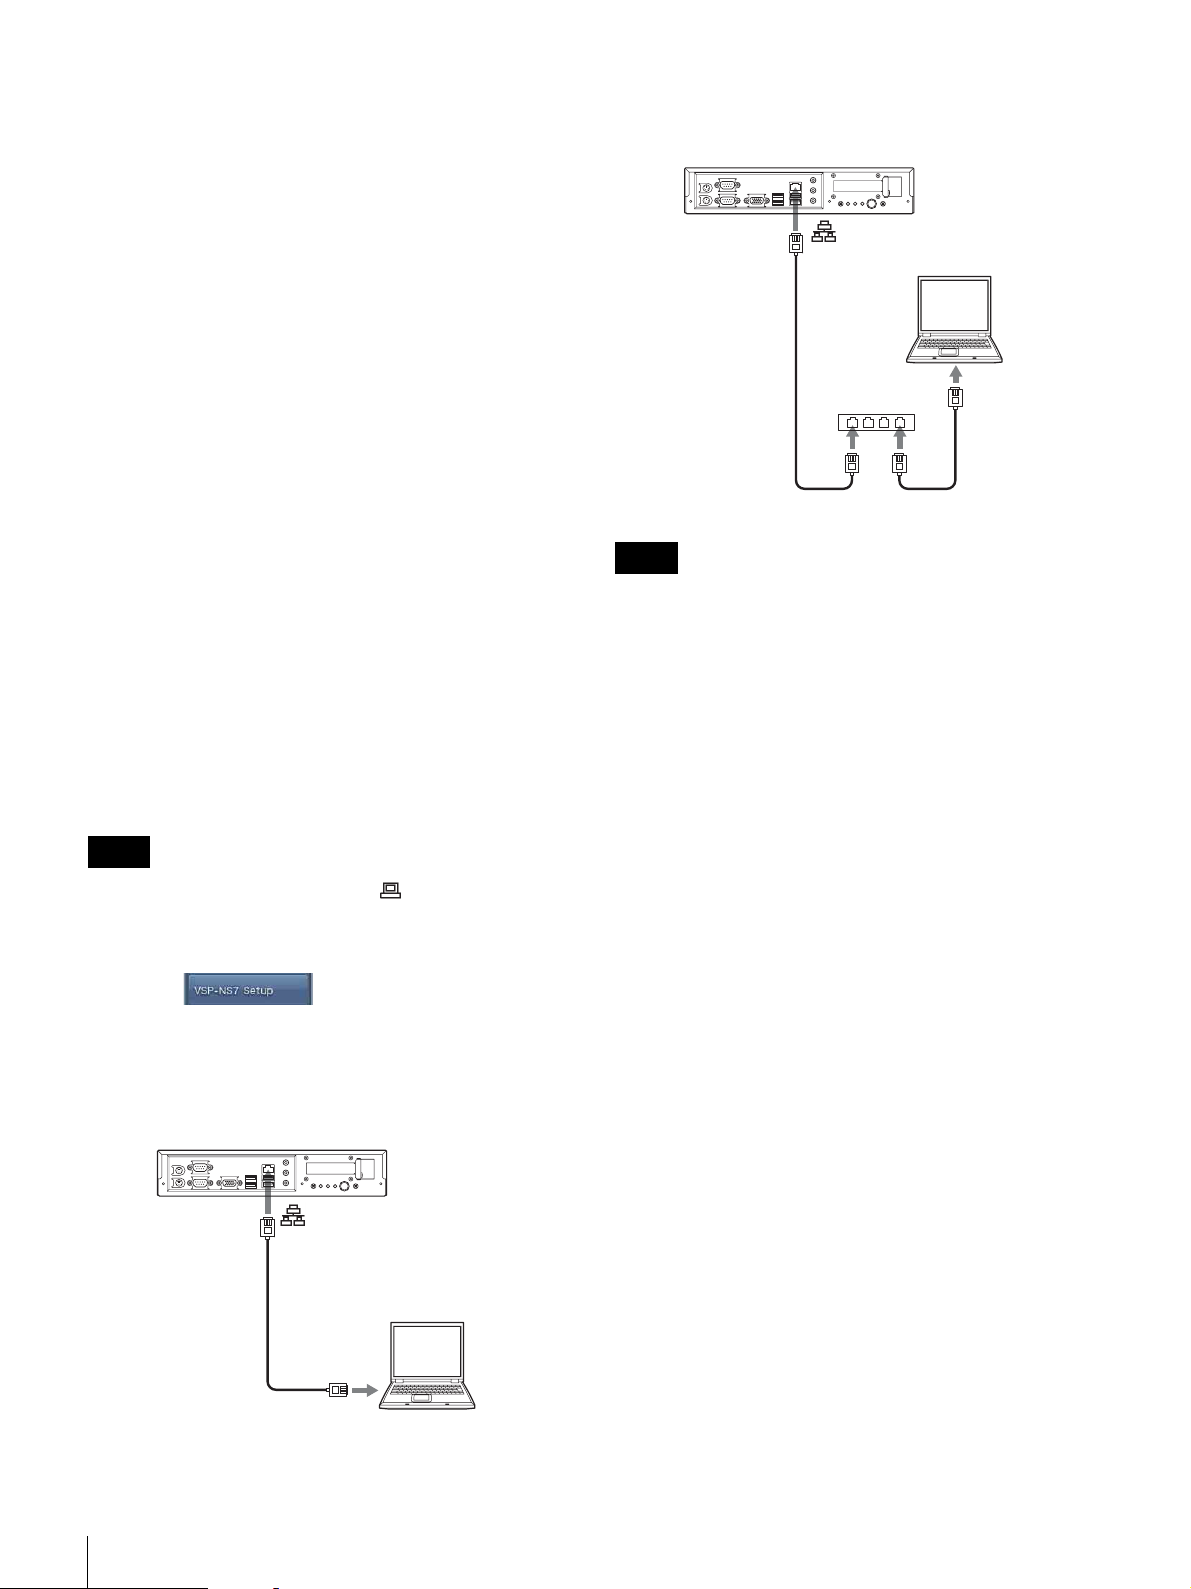
To connect the player and computer via a
switching hub
Player
For the second player and later, click [Detect VSPNS7s] to start automatic player detection, after you
connect the player to the network.
Then, install the players in their actual operating
locations, and continue setup operations.
See “Installation” on page 11 for details on
installation of the players, and “Settings Required
After Installation” on page 12 for details on the setup
operations after installation.
If a player is not detected in automatic
player detection
If communication using the UDP2380 port is not allowed
on the network between the VSPA-D7 software running on
a computer and a player, the player will not be detected in
the automatic player detection process. In such a case,
connect the computer and the player using either of the
following two methods, and retry the procedures described
in “Setting the network address” on page 8 and
“Registering the player with the VSPA-D7 software” on
page 9.
Computer
Switching hub
Network cable
(straight cable)
Note
Network cable
(straight cable)
When connecting multiple players in turn to perform the
setup, some switching hubs may not recognize a connected
player. If this happens, turn the power of the hub off once
and then turn the power on again.
Notes
• Connect a display device to the connector of the
player using an RGB cable to set up the player.
• If a message asking whether you would like to start
automatic player detection does not appear when you
click the button to open the “VSP-NS7
Setup” window, click [Detect VSP-NS7s] in the
window.
To connect the player and computer directly
Player
Computer
Network cable (cross cable)
10
Settings Required Before Installation
Page 11
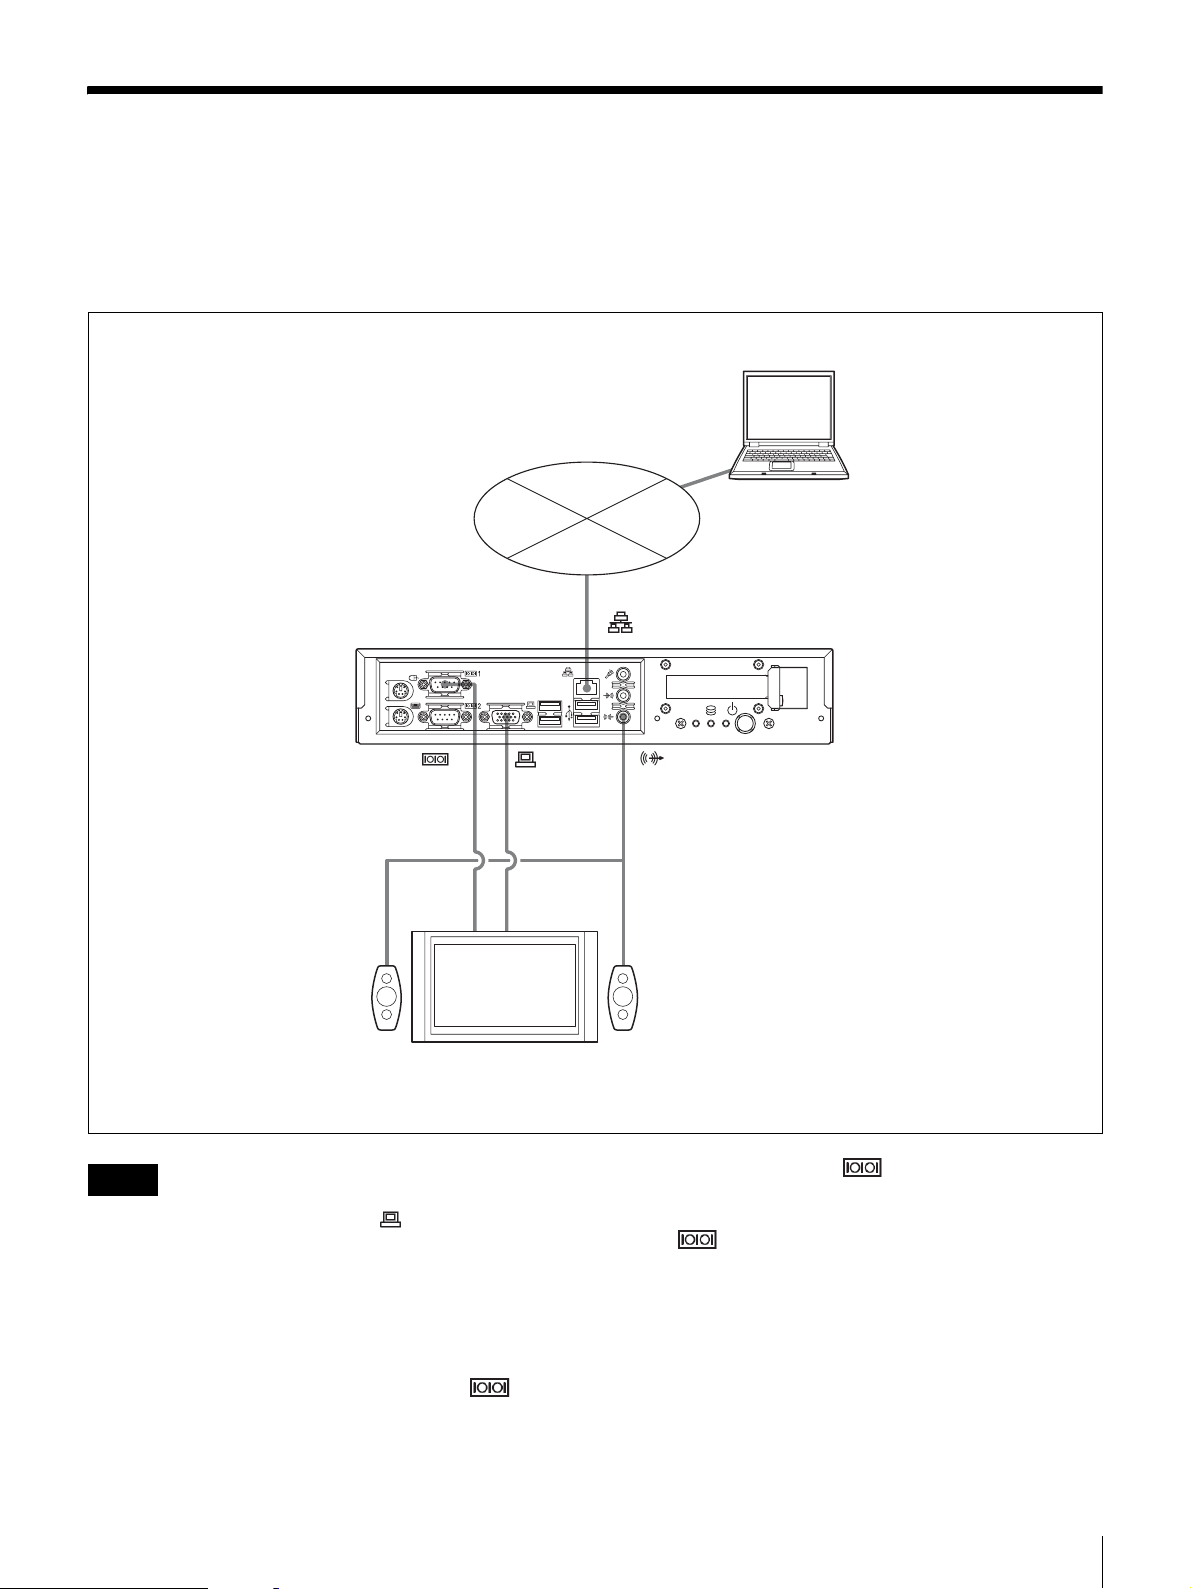
Installation
After setting a network address for all the players and
registering the players with the VSPA-D7 software, install
each player in its actual operating location and connect
them as shown in the figure below.
Network (Internet/intranet)
VSP-NS7
Digital Signage Player
1
For details such as how to install rubber feet on a player
and how to install a player onto the back of a professional
display device, refer to the player’s Operating
Instructions.
Computer
(Running the VSPA-D7
Management Software)
RS-232C
connector
Speaker Display device Speaker
Notes
Analog RGB
connector
• Connect a display device to the connector of each
player with an RGB cable. If a player is not connected to
a display device, it cannot start operation.
• The figure above shows an example of controlling the
display device using an RS-232C connection. A display
device can be controlled from a player via a network,
depending on the model of the display device.
In such a case, the connection between the 1
connector and the RS-232C connector of the display
device is not required. Instead, connect the display
device to the network.
• Be sure to use the upper 1 as the serial connector
for the player that you want to connect to the display
device.
This 1 connector is a dedicated connector for
controlling display devices in this system. Be careful
that if a non-supported device is connected to it and data
is sent to the connector, it may result in a malfunction.
Installation
11
Page 12
Settings Required After Installation
After installing the players, make the detailed settings
related to the player, and send the settings to the players.
Note
Players are specified to be powered off automatically at
GMT 18:00 as the default. If a player goes off during the
setup process, power it on again and continue the setup.
Making Player-Related Settings
Check the volume and the time zone of the installation
location, and modify the settings, if necessary, and send
the data to the player. And register the display device(s) to
be controlled by each player via the network, if any.
Flow of player-related setup
Power each player on, start the
VSPA-D7 software, and open
the “VSP-NS7 Setup” window
Check the volume and time zone
settings in the “Detailed Settings”
window, and modify the settings,
if necessary
Register display devices
controlled by the selected
player via the network, if any
Send the settings to the players
(see page 16)
Repeat for as
many players as
you are using
2
If you are applying the same set of detailed settings to
all the players in the system, check that “Common” is
selected in the “Setting Name” drop-down list box,
change the other settings in the window as required,
then click the button.
Clicking this button overwrites the setting file named
“Common.”
Then, click [Close] to close the “Detailed Settings”
window, and proceed to step 4.
See “Setup items in the Detailed Settings window” on
page 13 for details on the setup items.
If you want to apply a different detailed setting file to
the players, according to the installation locations, for
example, select the name for the setting file to be
applied to the selected player in the “Setting Name”
drop-down list box, then click [Apply].
Note that you have to make the desired setting file and
name and save it in advance.
See “Saving player-related detailed settings” on page
14 for details on this procedure.
Setting procedure
1
Select one of the players listed in the “VSP-NS7
Setup” window, and click [Detailed Settings] in the
“Optional Settings” group.
The “Detailed Settings” window for the selected
player appears.
12
Settings Required After Installation
3
Repeat steps 1 and 2 for all players in the system.
4
If you use display devices connected to the network
and controlled by a player via the network connection,
register the display devices.
See “Registering display devices” on page 15 for
details on how to register display devices controlled
via the network.
This step is not necessary when you only use display
devices controlled via RS-232C connections.
After making the settings related to the players, send
the settings to the players.
Page 13
See “Sending the Settings to the Players” on page 16
for details.
See also “Changing Other Player-Related Settings” on
page 17.
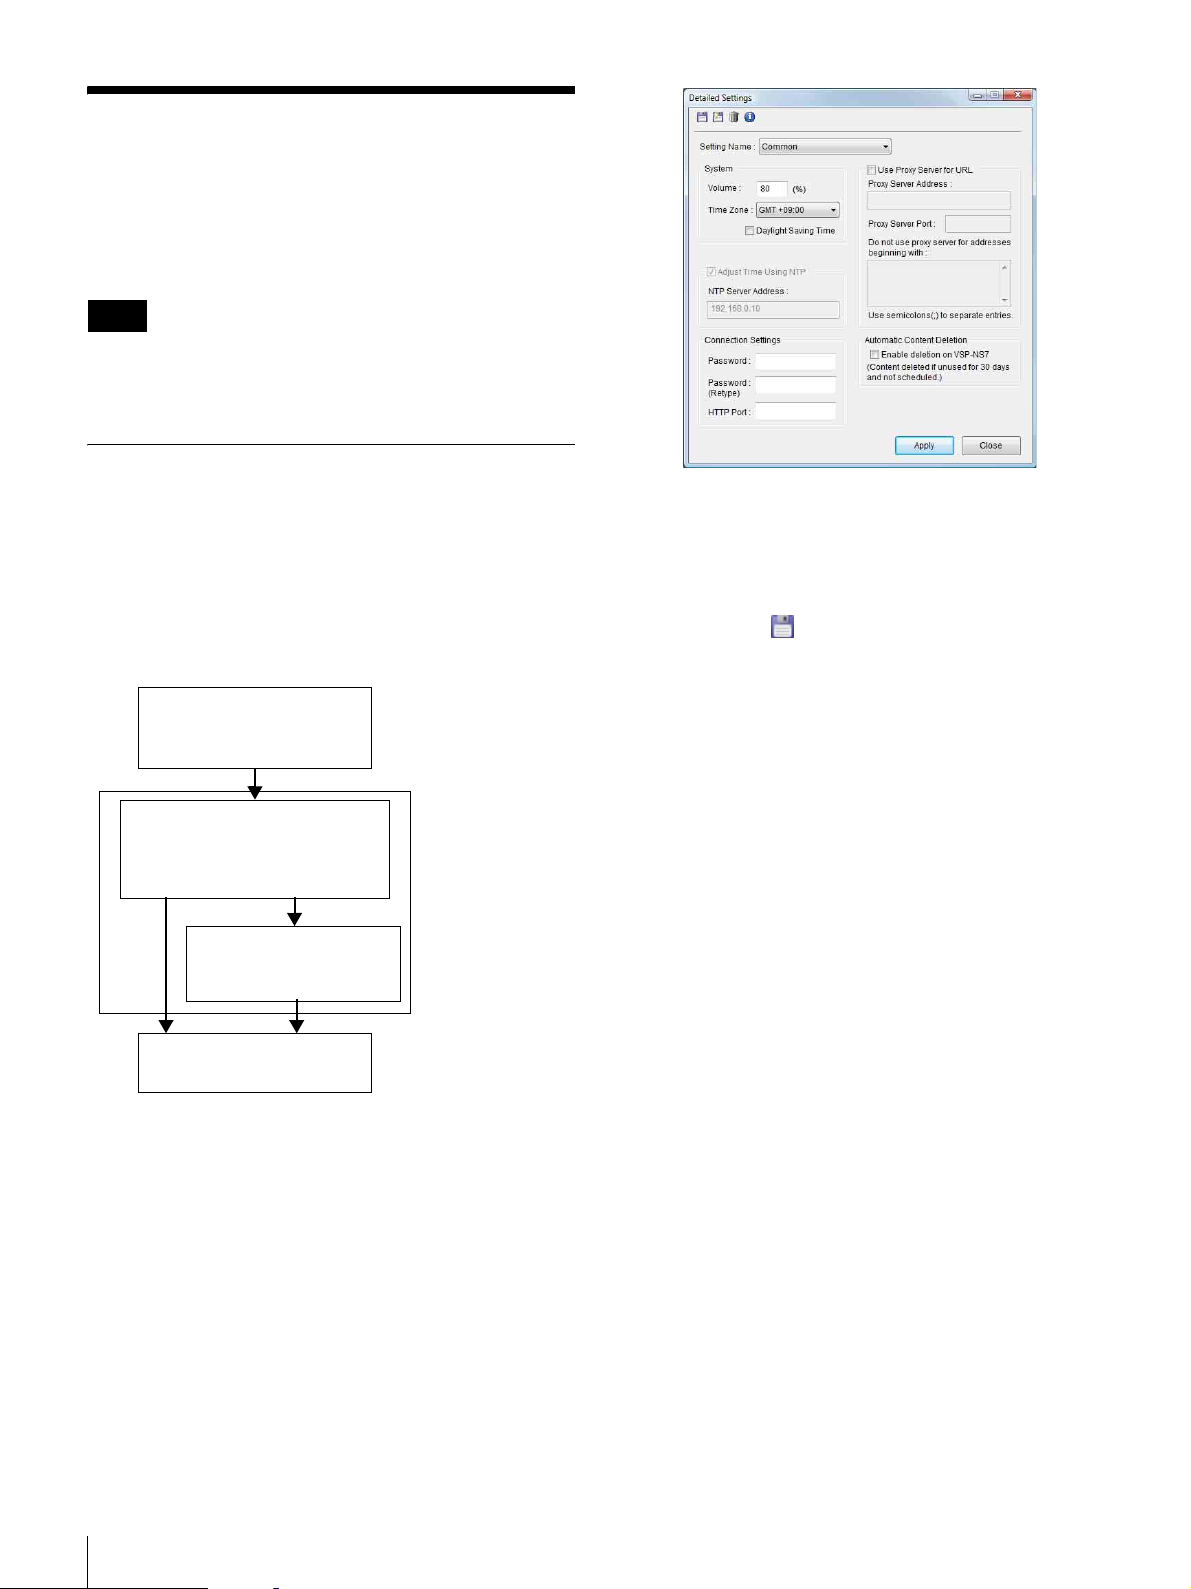
Setup items in the Detailed Settings
window
The “Detailed Settings” window provides the following
items:
Toolbar
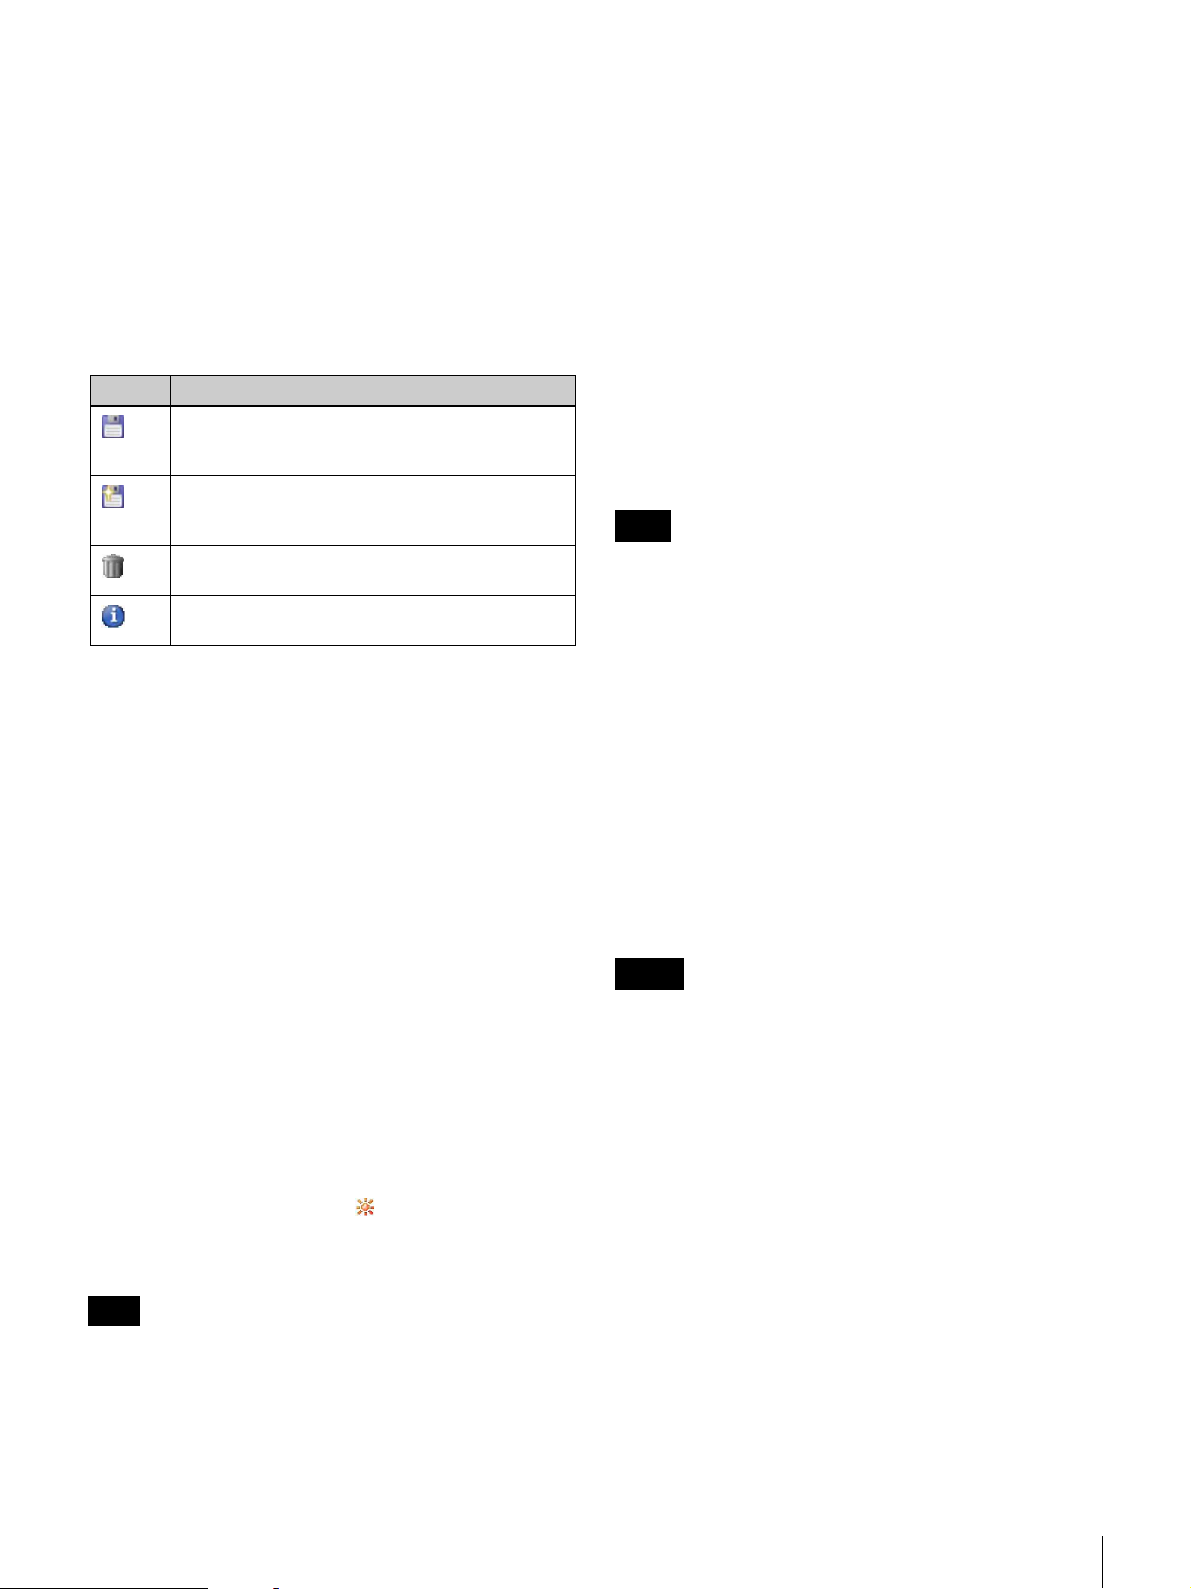
There are the following buttons on the “Detailed Settings”
window toolbar.
Button Description
Overwrites the setting file selected in the “Setting
Name” drop-down list box with the modified
settings.
Saves the displayed settings with a new name.
Clicking this button opens the window used for
specifying the name for the setting file.
Deletes the setting file selected in the “Setting
Name” drop-down list box.
Opens a window for modifying the name of the
setting file.
Setting Name
This item shows the name for the currently displayed set of
settings in the window. Selecting another name in the
drop-down list box shows the corresponding setting file
saved with that name.
When no user-defined detailed setting file is saved, the
setting file named “Common” is shown here. The VSPAD7 software applies the “Common” settings to the players
unless you apply any other detailed setting file to them.
System: Volume
This item sets the default volume of the player sound that
is output.
System: Time Zone
This item sets the time zone in which the player is used.
System: Daylight Saving Time
When daylight saving time starts, place a check mark here,
then send the settings to the player. And when daylight
saving time ends, clear the check mark here, and send the
settings to the player.
The daylight saving time mark appears for the player
set in daylight saving time in the “VSP-NS7 Setup”
window.
Note
Players do not put daylight saving time into effect
automatically. Modify this setting and send the settings to
the players at the start and end of the period.
Adjust Time Using NTP
When the “System Setup” window has been set to
synchronize all the player times with the time of the
computer that is running the VSPA-D7 software, you do
not need to change this setting.
If the “Synchronize all VSP-NS7s’ system time with this
PC’s” check box is cleared in the “System Setup” window,
the following settings must be made.
To always keep the players’ times correct, place a check
mark in the “Adjust Time Using NTP” check box and enter
the IP address of the computer (NTP server) to be used as
the standard in the “NTP Server Address” text box.
Clear the check box if you don’t have to keep the players’
times correct.
Note
The players use an internal system clock to perform
scheduled playback. Like any other clock, this internal
system clock may become inaccurate over time.
If you do not use the “Adjust Time Using NTP” setting,
check the time of each player with the VSPA-D7
maintenance window periodically, and adjust it if
necessary.
For details about the VSPA-D7 maintenance window,
refer to the VSPA-D7 Operating Instructions.
Connection Settings
To change the password and HTTP port number, which are
required for the player to allow connection during
communication, enter the password and port number that
you want in the corresponding text boxes.
Notes
• The players are set with a default password and HTTP
port number. The default port number is 4980.
If the password and HTTP (port number) fields are blank
after you change the settings, the default settings are
applied.
• We recommend changing the password if you are
connecting the player to an external network such as the
Internet.
• If you change the password or port number, keep a
record of the new password or port number.
If the computer that is running the VSPA-D7 software
malfunctions and you do not know the password or port
number, you may not be able to use the player.
Use Proxy Server for URL
This item sets whether or not to use a proxy server when
displaying a Web page as material in content playback
using the player.
Settings Required After Installation
13
Page 14
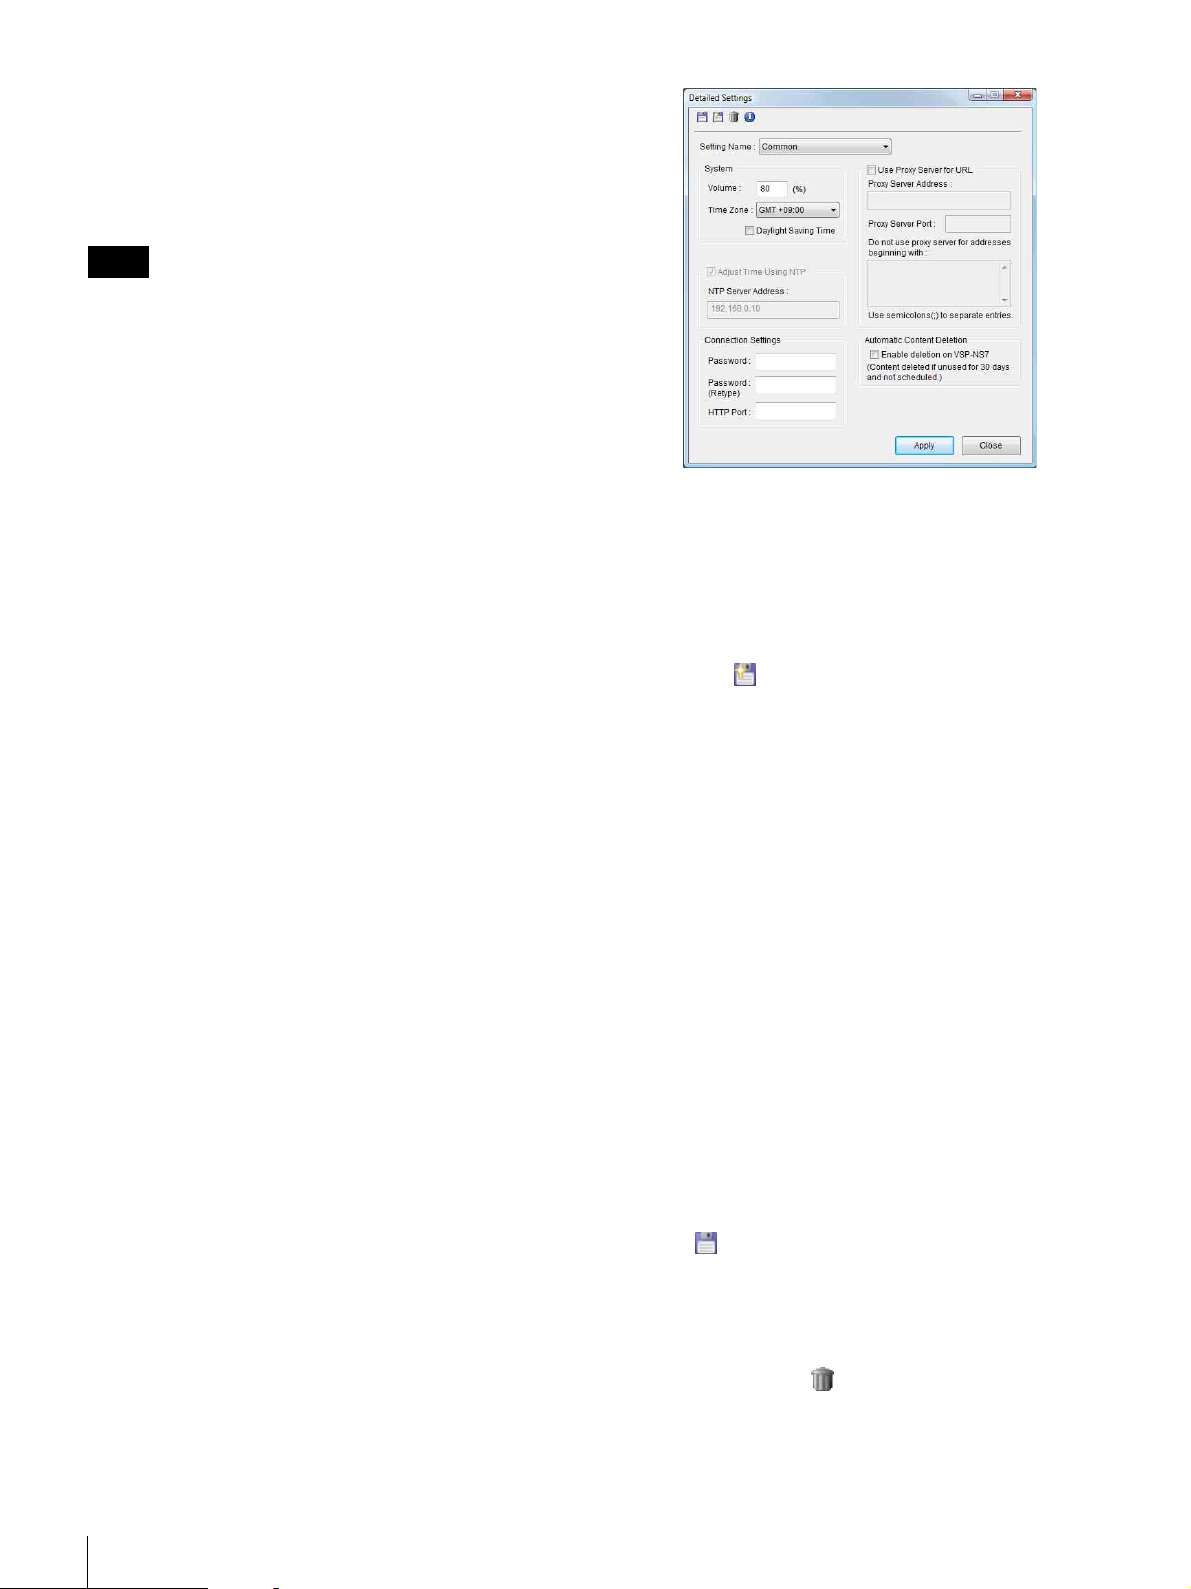
When using a proxy server, place a check mark in the “Use
Proxy Server for URL” check box and enter an IP address
and port for the proxy server in the corresponding text
boxes.
In addition, when using a site that is accessed without
going via the proxy server, enter its address here.
Note
For details about the proxy server, ask your network
administrator.
Automatic Content Deletion: Enable deletion on
VSP-NS7
Place a check mark in this check box to remove materials
from the players after they are used and prevent them from
accumulating and using up all the memory. Content such
as materials are automatically removed when the player is
started 30 days after the scheduled playback finishes.
If this check box is cleared to disable the automatic
deletion, you will need to check the contents of each player
individually and perform manual removal.
Apply button
This button applies the settings saved with the name shown
in the “Setting Name” drop-down list box to the selected
player.
Close button
This button closes the “Detailed Settings” window.
2
Specify the settings in the “Detailed Settings”
window, as desired.
See “Setup items in the Detailed Settings window” on
page 13 for details on the setup items.
3
Click the button on the “Detailed Settings”
window toolbar.
The “Edit Name” window appears.
Saving player-related detailed settings
The settings for the items in the “Detailed Settings”
window can be saved as a file in the VSPA-D7 software.
This feature is useful to manage more than one set of
detailed settings.
You can apply the desired setting file by selecting its name
and clicking [Apply] to a player. The setting file stored
with the name “Common” will be applied to the players for
which you do not expressly apply any setting file.
The following procedure saves a detailed setting file.
1
Select one of the players listed in the “VSP-NS7
Setup” window, and click [Detailed Settings] in the
“Optional Settings” group.
The “Detailed Settings” window for the selected
player appears.
4
Enter the name for the currently displayed set of
detailed setting into the “Name” text box, and click
[OK].
This saves the settings as a file with the entered name.
The name automatically appears in the “Setting
Name” drop-down list box in the “Detailed Settings”
window.
5
If you want to apply the setting file you have saved just
now to the player selected in step 1, click [Apply].
6
Click [Close] to close the “Detailed Settings” window.
Modifying a set of detailed settings saved
previously
Selecting the name of the detailed setting file in the
“Setting Name” drop-down list box recalls the settings
saved in the window. Modify the items as desired, then
click the button on the toolbar.
Deleting a set of detailed settings saved
previously
Select the name of the detailed setting file to be deleted in
the “Setting Name” drop-down list box to recall the
settings, then click the button on the toolbar.
A confirmation message is displayed, then the selected
detailed setting file is deleted. The “Detailed Settings”
window shows the “Common” settings.
14
Settings Required After Installation
Page 15
Modifying the name of a set of detailed settings
saved previously
Select the name of the detailed setting file in the “Setting
Name” drop-down list box to recall the settings, then click
the button on the toolbar. Edit the name in the newly
opened “Edit Name” window, then click [OK].
Registering display devices
Each player can manage a single display device via an RS232C connection and up to four via the network. To use
display devices controlled via the network, you have to
register them and then associate them with the players that
control them.
1
Select a player that controls display device(s) via the
network in the “VSP-NS7 Setup” window, and click
[Register Displays] in the “Optional Settings” group.
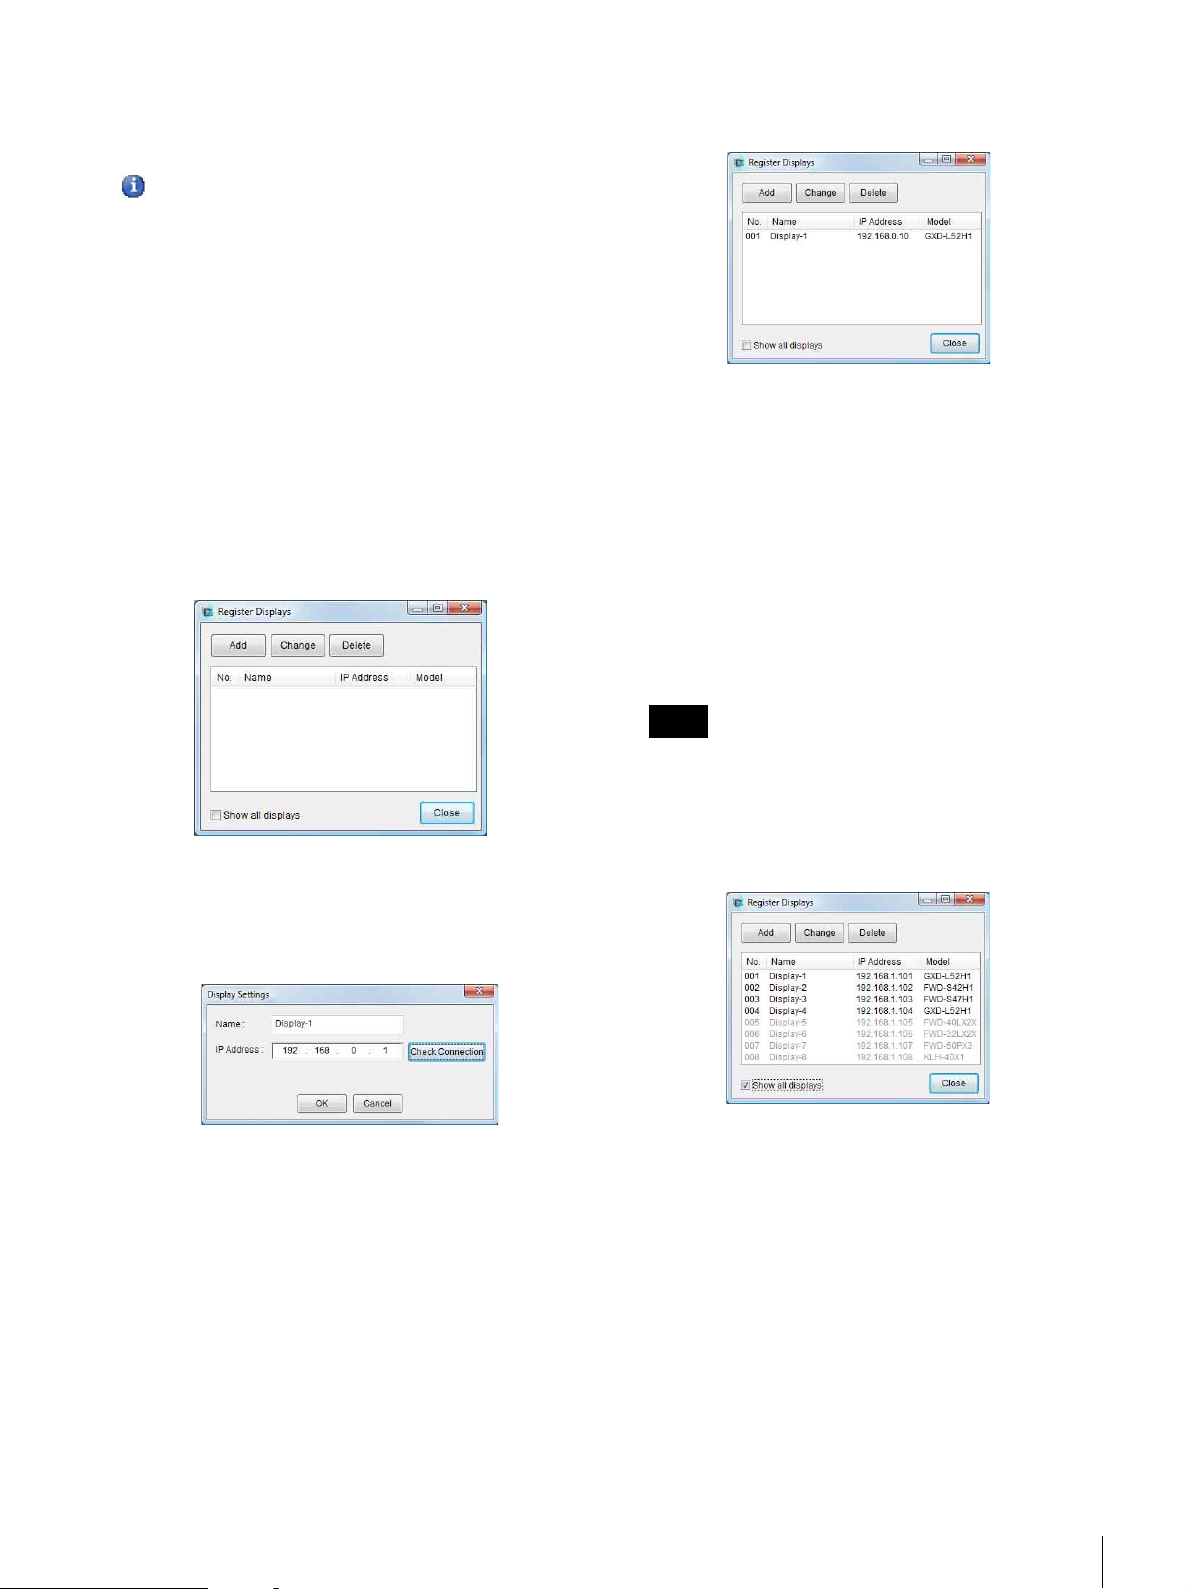
The “Register Displays” window for the selected
player appears.
registered display device appears in the “Register
Displays” window.
5
Repeat steps 2 to 4 to register another display device
to be controlled by the same player via the network, if
any.
If there are no more display devices to be associated
with the selected player, click [Close] to close the
“Register Displays” window.
6
Repeat steps 1 to 5 to register and associate all display
devices controlled via the network with the
corresponding players respectively.
2
Click [Add].
The “Display Settings” window appears.
3
Enter the name and IP address already specified on the
display device that should be controlled by the
selected player via the network in the corresponding
text boxes, and click [Check Connection].
The connection to the display device is checked and a
message appears.
4
Click [OK].
The “Display Settings” window closes, and the
Hint
Checking the “Show all displays” check box in the
“Register Displays” window shows all the players that
have been registered. The display devices associated
with the currently selected player are shown in black,
and the others are shown in gray.
You can check whether you have registered all the
display devices.
The “Register Displays” window enables you to
modify the name and/or IP address of a display device
stored in the VSPA-D7 software, or delete the
registration, provided the display device is shown in
black. To modify the name and/or IP address, select
the desired display device, and click [Change]. To
delete the registration, select the display device to be
deleted, and click [Delete].
Settings Required After Installation
15
Page 16
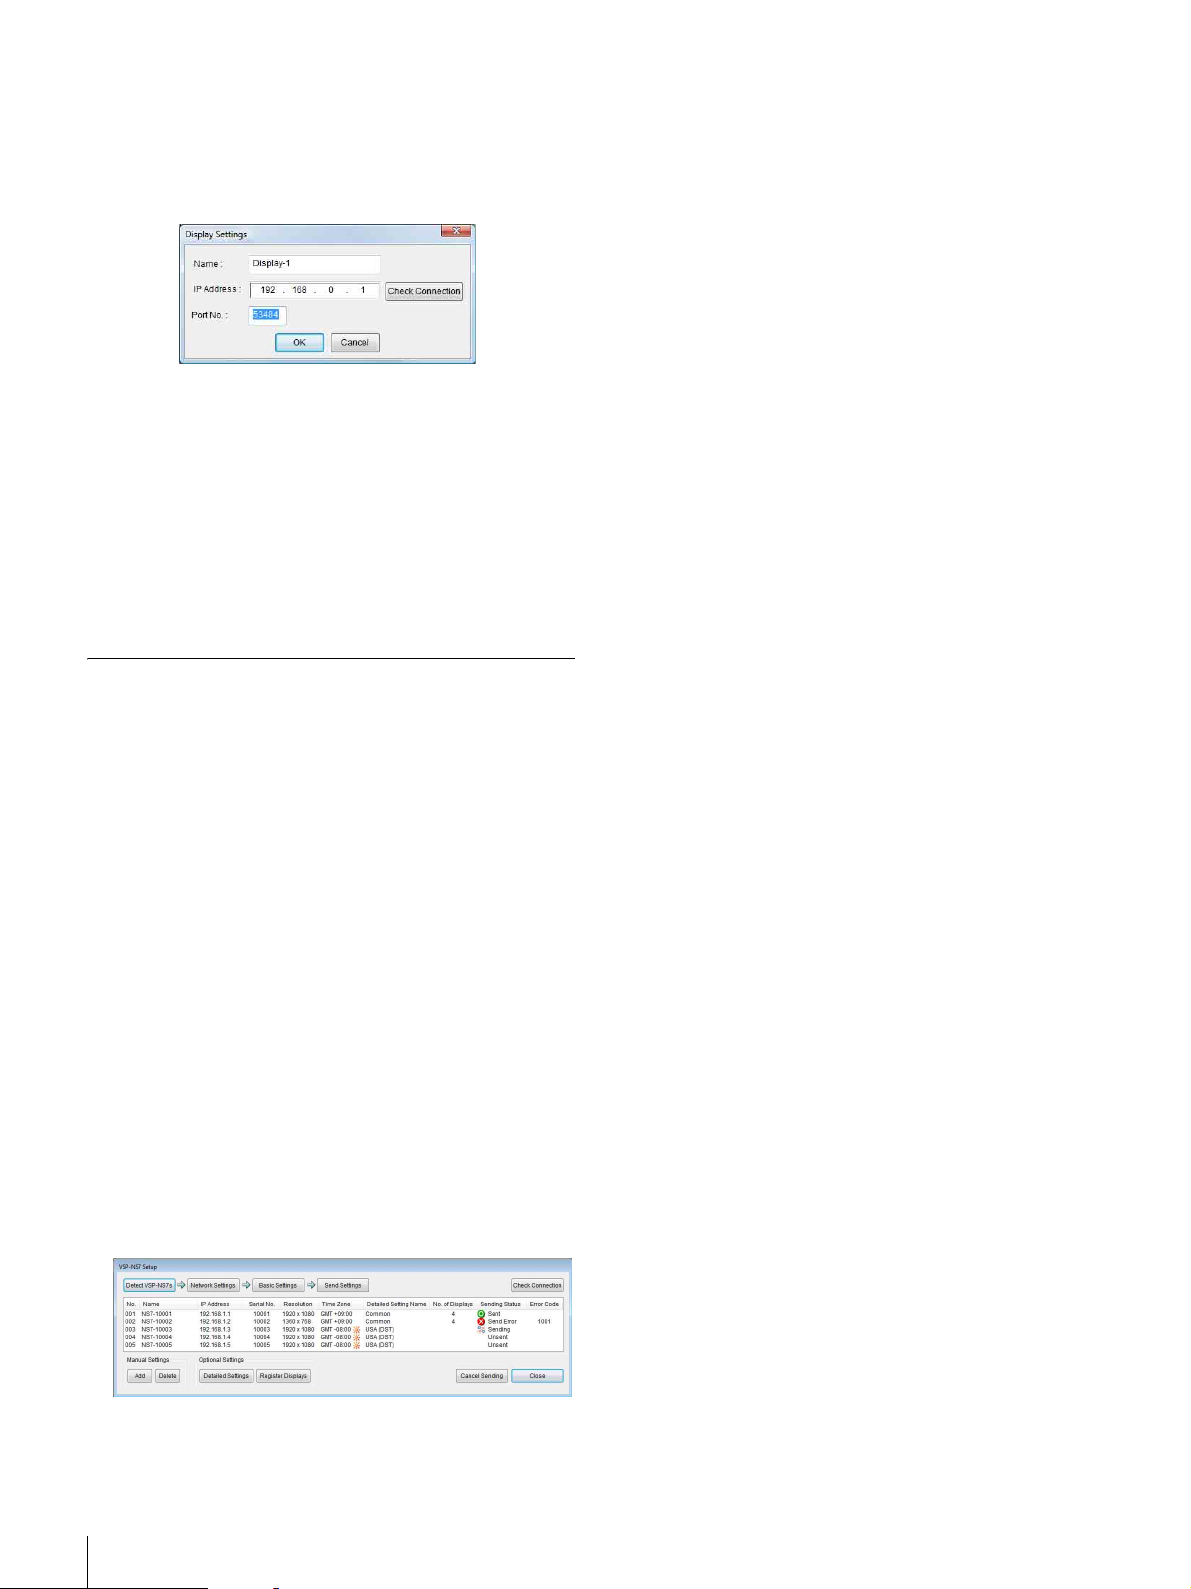
If checking connection to the display device fails
If checking of the connection to the display device fails in
step 3 in the procedure above, the “Port No.” text box will
appear in the “Display Settings” window with a message,
as follows:
The number shown in the “Port No.” text box is the port
number used by the player when it tries to communicate
with the display device.
If a different port number used for communication is
specified on the display device, enter that number in the
‘Port No.” text box and retry checking the connection.
If this is not the case, check the IP address specified on the
display device.
2
After sending the settings to the players, click [Close]
in the “VSP-NS7 Setup” window.
The “VSP-NS7 Setup” window closes.
Sending the Settings to the Players
After making the settings related to the players, send the
settings to the players.
1
In the “VSP-NS7 Setup” window, select the players
for which “Unsent” is shown in the “Sending Status”
column, then click [Send Settings].
To select more than one player, hold down the “Ctrl”
key and click the desired players in turn.
To select all the players in a range, hold down the
“Shift” key and click the first and last players in the
range.
The “VSP-NS7 Operation Time” and “VSP-NS7 Time
Adjustment” settings in the “System Setup” window,
the name and resolution of the player in the “VSP-NS7
Basic Settings” window, and all the settings in the
“Detailed Settings” window are sent to each player.
A message appears after the data is sent, and the status
of data sending is shown on the list.
Each player restarts automatically when it receives the
settings.
16
Settings Required After Installation
Page 17
The “VSP-NS7 Setup” window appears.
Changing Settings After Starting Operation
To change the settings after starting operation, for
example, to add or remove players from the system, use the
following procedures.
Adding a Player
1
Set network addresses for the players that you want to
add, and register the players with the VSPA-D7
software.
See “Setting the Network Addresses for Players and
Registering the Players with the VSPA-D7 Software”
(page 8) for details.
2
Install the players whose network addresses you have
set.
See “Installation” (page 11) for details.
2
Select the player that you want to delete, and click
[Delete] in the “Manual Settings” group.
Changing a Player’s Network Address
See also “Setting the Network Addresses for Players and
Registering the Players with the VSPA-D7 Software”
(page 8) for details on the “Network Settings” window.
1
Click the button in the VSPA-D7
software to display the setup buttons, then click the
button.
The “VSP-NS7 Setup” window appears.
2
Select the player with the address you want to change,
and click [Network Settings].
The “Network Settings” window for the selected
player appears.
3
Make the detailed settings for the players to be added,
and register the display device(s) controlled by them
via the network, if any.
See “Making Player-Related Settings” (page 12) for
details.
4
Send the settings to the new players.
See “Sending the Settings to the Players” (page 16)
for details.
5
Click the button.
The “Group Settings” window appears.
6
Register the new players in one of the groups.
Or, create a new group and register the new players in
it.
For details about group operations, refer to the VSPAD7 Operating Instructions.
Deleting a Player
3
In the “IP Address” text box under “Use the following
IP address,” enter the new address.
4
Edit or enter the subnet mask, IP address of the default
gateway, and the DNS servers to be used in the
corresponding text box, as necessary, then click [OK].
The entered IP address is specified on the selected
player, and the address appears in the “VSP-NS7
Setup” window.
Changing Other Player-Related Settings
When you modify the following setting(s), you have to
send the modified settings to the player.
• The “VSP-NS7 Operation Time” and “VSP-NS7 Time
Adjustment” settings in the “System Setup” window
• The name and resolution of the player in the “VSP-NS7
Basic Settings” window
• Any of the settings in the “Detailed Settings” window
• Display device information in the “Register Displays”
window.
1
Click the button in the VSPA-D7
software to display the setup buttons, then click the
button.
1
Click the button on the VSPA-D7
software to display the setup buttons.
Changing Settings After Starting Operation
17
Page 18
2
Click the button that corresponds to the setup item that
you want to modify to display the corresponding
setting window.
3
Modify the settings for the items as required.
4
Send the new settings to the player.
For details on sending the settings, see “Sending the
Settings to the Players” (page 16).
Data Backup
You can back up the materials, schedules, and setup data
that are used in the system to a separate location. We
recommend that you make regular backups to guard
against hard disk failures or if you are preparing to replace
your computer.
Backing Up Materials, Schedules and Setup Data
The VSPA-D7 software saves all data in the VspaData
folder. This is the database folder that is set in the “System
Setup” window.
Use the following procedure to check the folder and copy
the data.
1
Click the button on the VSPA-D7
software to display the setup buttons.
2
Click the button.
The “System Setup” window appears.
3
Check the folder in the “VSPA-D7 Database Folder”
field.
4
Copy the VspaData folder in the specified folder to the
storage medium you are using for backup.
For example, if “C:\Documents and Settings\All
Users\Documents” is displayed in the folder field, use
Windows explorer to copy the VspaData folder that is
in the “C:\Documents and Settings\All
Users\Documents” folder to an external hard disk or a
network drive.
18
Data Backup
Page 19
Using Backed Up Data
If you are changing the computer that is running the
VSPA-D7 software to a different computer or replacing
the hard disk, you can copy the backed up materials,
schedules and setup data to continue operation.
When saving created data and settings on the
internal hard disk of a computer
Copy the backed up VspaData folder to the folder
specified in “VSPA-D7 Database Folder.”
For example, if the database folder in the “System Setup”
window is “C:\Documents and Settings\All
Users\Documents,” use Windows explorer to copy the
VspaData folder to the “C:\Documents and Settings\All
Users\Documents” folder.
When you start the VSPA-D7 software, you can operate
the system as before.
Hint
Reflecting the Settings of a Player
This section describes how to modify the settings saved in
the VSPA-D7 software when they are not identical to those
specified on a player.
This may happen when the computer used for making the
player-related settings becomes unavailable, and you have
to use another computer for the VSPA-D7 software
operation.
With this exception, the operations described in this
section are not necessary.
Reflecting a Network Address Assigned for a Player
You can also copy the backed up VspaData folder to the
desired location, then specify that location as the “VSPAD7 Database Folder” using the procedure described in
“When saving created data and settings on a server,”
below.
When saving created data and settings on a
server
If you want to operate the system by saving materials,
schedules or setup data on a network device, such as a
server, use the backed up data by following the procedure
below.
1
Start the VSPA-D7 software.
2
If the “System Setup” window does not appear, click
the button to display the setup buttons
and click the button.
The “System Setup” window appears.
3
Click [Browse] in the “VSPA-D7 Database Folder”
and specify the location of the VspaData folder.
Each item in the “System Setup” window is set to the
same setting value as before.
Normally, the VSPA-D7 software is used to specify a
network address for a player, and the player is registered in
the VSPA-D7 software at that time.
When the VSPA-D7 software cannot communicate with a
player because the IP address specified on the player is not
stored in the VSPA-D7 software, you can register the
player and its IP address using the following operation.
1
Check the connections of the player and turn on the
power.
Click the button in the VSPA-D7
software to display the setup buttons, then click the
button.
The “VSP-NS7 Setup” window appears.
2
Click [Add] in the “Manual Settings” group.
The “VSP-NS7 Basic Settings” window appears.
4
Click [OK] in the “System Setup” window.
The “System Setup” window closes.
This completes the process and you can now operate
the system as before.
3
Enter the name and the IP address specified on the
player in the corresponding text boxes, and click
[Check Connection].
The connection to the player is checked and a message
appears.
4
Select the display resolution with the “Resolution”
drop-down list box, then click [OK].
Reflecting the Settings of a Player
19
Page 20
The “VSP-NS7 Basic Settings” window closes, and
the added player appears in the “VSP-NS7 Setup”
window.
5
Repeat steps 2 to 4 to register all players to be added.
6
Check the items in the “System Setup” window, and
modify the “VSP-NS7 Operation Time” and “VSPNS7 Time Adjustment” settings, if necessary.
7
Check the player-related items, and modify the
settings, if necessary.
See “Making Player-Related Settings” (page 12) for
details.
8
Send the settings to the player.
See “Sending the Settings to the Players” (page 16)
for details.
Specifying the Password and HTTP Port Number Used on a Player in the VSPA-D7 Software
3
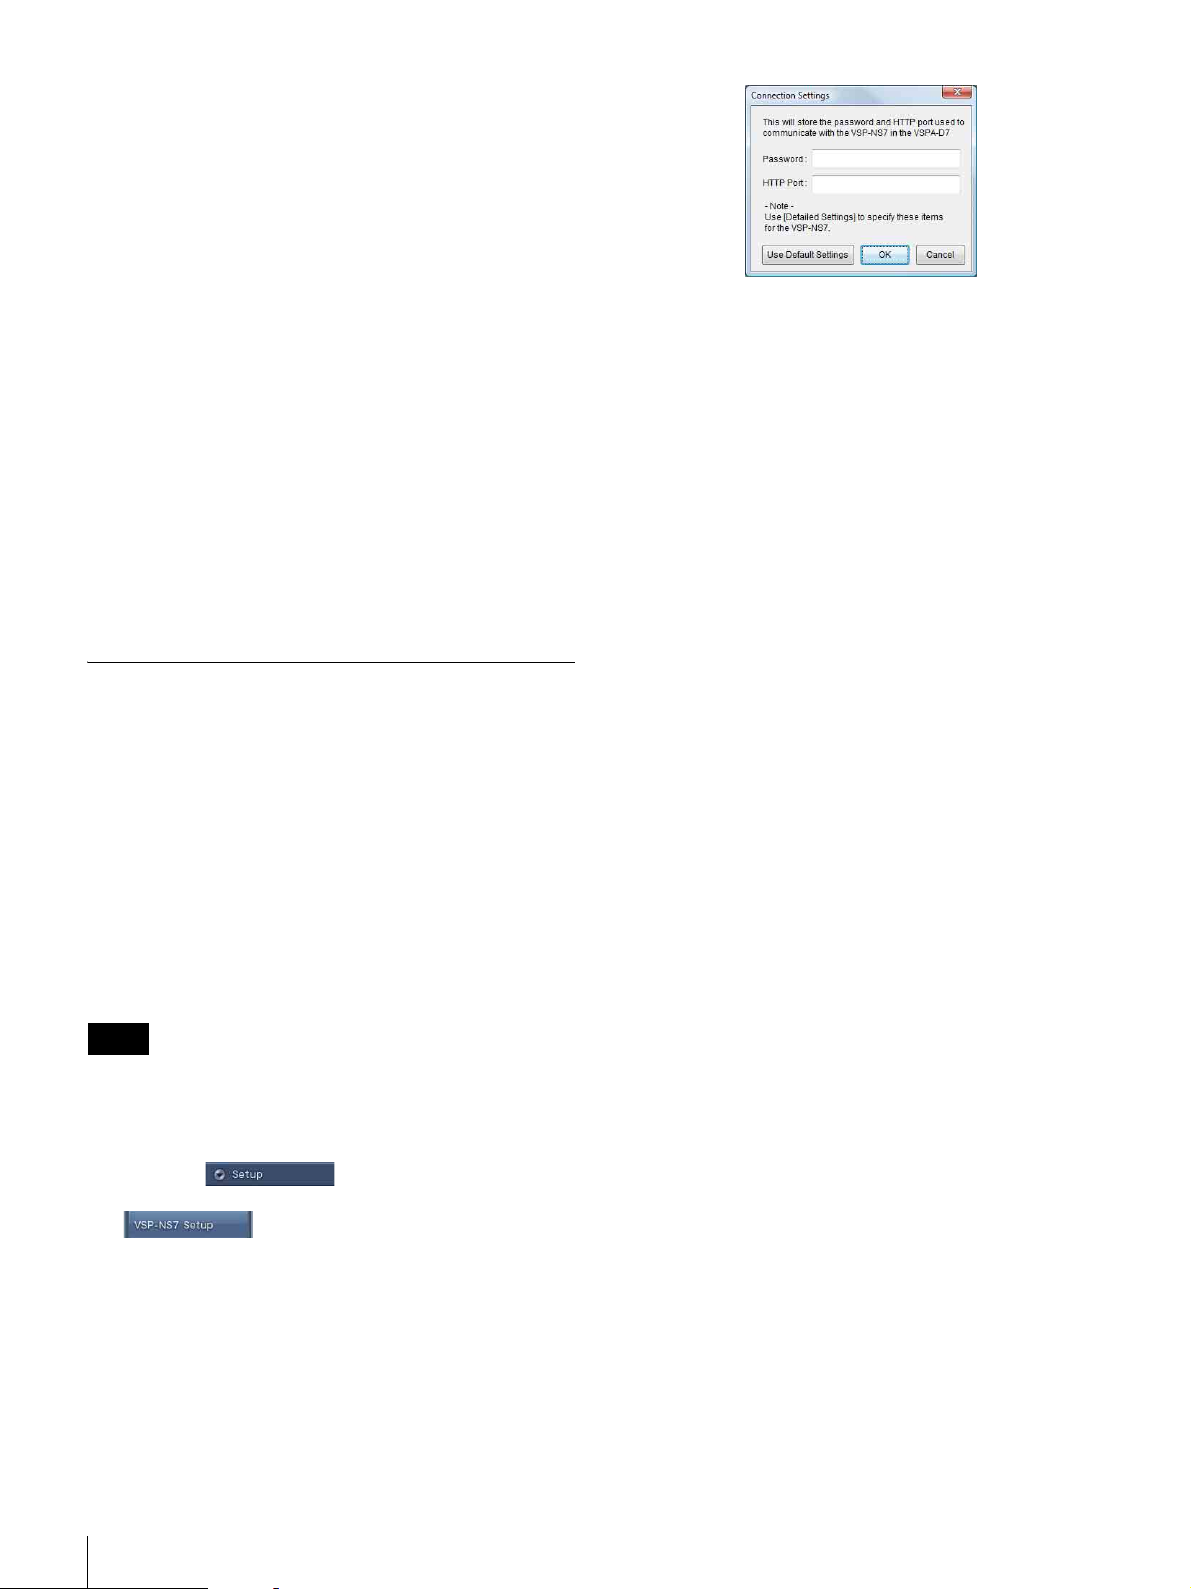
Enter the password and the HTTP port number used
for communication on the selected player in the
corresponding text boxes, and click [OK].
Or, click [Use Default Settings].
The “Connection Settings” window closes in either
case.
When you enter the password and the HTTP port
number, they are stored in the VSPA-D7 software to
be used for communication with the selected player.
When you click [Use Default Settings], the default
password and the HTTP port number that were
specified on every player at the factory are stored in
the VSPA-D7 software.
4
Repeat steps 2 and 3 to store the password and HTTP
port number specified on each player in the VSPA-D7
software.
Normally, the VSPA-D7 software is used to specify the
password and HTTP port number used for communication
on a player, so that they are also stored in the VSPA-D7
software at the same time, and the VSPA-D7 software can
communicate with the player using them.
When the VSPA-D7 software cannot communicate with a
player because of mismatched password and/or HTTP port
number, you can specify these items on the player in the
VSPA-D7 software using the following operation.
Note
Note that this operation does not obtain the password and
HTTP port number from a player. It does not specify them
on a player, either
1
Click the button in the VSPA-D7
software to display the setup buttons, then click the
button.
The “VSP-NS7 Setup” window appears.
2
Right-click the desired player, then select [Connection
Settings] on the popup menu.
The “Connection Settings” window for the selected
player appears.
20
Reflecting the Settings of a Player
Page 21

Sony Corporation
 Loading...