

Sony VGP-MR200U-E User Manual

Network Media Receiver
VGP-MR200U/E
Operating Instructions

About Macrovision
This product incorporates copyright protection
technology that is protected by U.S. patents
and other intellectual property rights. Use of
this copyright protection technology must be
authorized by Macrovision, and is intended
for home and other limited viewing uses only
unless otherwise authorized by Macrovision.
Reverse engineering or disassembly is
prohibited.
Trademarks
• VAIO, , and VAIO Media are
registered trademarks of Sony Corporation.
• Microsoft and Windows are registered
trademarks of Microsoft Corporation in the
United States and/or other countries.
• Manufactured under license from Dolby
Laboratories.
“Dolby”, “Pro Logic”, and the double-D
symbol are trademarks of Dolby
Laboratories.
• ATHEROS and Atheros Total 802.11
Super G are trademarks of Atheros
Communications, Inc. The Atheros and
Atheros Total 802.11 Super G logos are
registered trademarks of Atheros
Communications, Inc.
• Other system names and product names
appearing in this document are generally
registered trademarks or trademarks of their
manufacturers.
•™ and ® marks are not shown in this
document.
• In this manual, Microsoft® Windows® XP
Home Edition, Microsoft® Windows® XP
Professional and Microsoft® Windows® XP
Media Center Edition are referred to as
Windows XP.
This product is protected by certain
intellectual property rights of Microsoft
Corporation. Use or distribution of such
technology outside of this product is
prohibited without a license from Microsoft or
an authorized Microsoft subsidiary.
About the supplied guides
The following guides are included with
this Network Media Receiver.
• Operating Instructions (this
document)
Contains information on how to use the
Network Media Receiver.
• Quick Connection Guide
Contains information on how to
connect the Network Media Receiver.
• Quick Start Guide
Contains information on how to setup
the Network Media Receiver.
• How to use Windows® Media
Connect
Contains information on how to setup
the Windows Media Connect.
• For users connecting the
Network Media Receiver to a
computer by wireless LAN
Contains information on how to set up
a wireless LAN connection with the
Network Media Receiver.-
z Illustrations used in this manual
Illustrations and screens used in this guide
may vary from the actual screens.
2

Table of Contents
Introduction
What this product can do ..................... 5
Operating environment ........................ 8
Computers that can be connected to
this product: .............................. 8
Check the supplied accessories ........... 9
Names of parts ................................... 10
Setup
Setup overview .................................. 13
Connection between the Network
Media Receiver and computer 13
Getting ready .............................. 14
1 Prepare the remote control for use . 15
Inserting the batteries .................. 15
Programming the remote control ...
2 Connect the Network Media Receiver
to a TV ........................................... 18
3 Connect the Network Media Receiver
to the computer through a network
cable ............................................... 21
Network cable connection .......... 21
To connect the Network Media
Receiver to a network ............. 25
Assigning a fixed IP address to the
computer ................................. 27
4 Connect power ............................... 29
5 Configure wireless LAN settings .. 30
Using the software keyboard ...... 32
6 Change the settings of the Network
Media Receiver to match the network
connection ..................................... 33
7 Configure settings at the computer 35
16
Operation
Operation flow ................................... 36
Turn on the power ............................. 38
To turn off the power .................. 39
Selecting a server ............................... 39
To select a server ........................ 40
To refresh the server list ............. 40
To remove a server from the list . 41
Selecting content ............................... 41
To change the display format ..... 42
Changing the sort order .............. 43
Watching video sources ..................... 44
Video playback ........................... 44
Using the film roll function ........ 45
Using the time search function ... 45
Listening to music ............................. 46
Music playback ........................... 46
Assigning background music to a
slide show ............................... 48
Viewing photos .................................. 48
Using the slide show function ..... 48
Adding background music to a slide
show ........................................ 50
Changing the slide show settings ..
51
Introduction
3

Advanced Features
How to get the most out of your
Network Media Receiver ............... 52
Having the computer start up
automatically ........................... 52
Checking or changing the time
required to enter Standby ........ 53
Changing the settings of the Network
Media Receiver .............................. 54
To bring up the “System Settings”
screen ...................................... 54
Settings available on the “System
Settings” screen ...................... 55
To update the firmware ............... 55
To return the Network Media
Receiver to the default
settings .................................... 56
To select the TV type .................. 56
To control the file playback
method .................................... 57
To change the display language .. 57
About the Standby, STATUS and
WIRELESS indicators ................... 58
Meaning of STATUS and
WIRELESS indicators during
hardware diagnosis ................. 59
Notes on Use ..................................... 60
Specifications .................................... 62
Getting Help ...................................... 63
Troubleshooting
Power ................................................. 64
Power does not come on ............. 64
Network Media Receiver cannot be
switched off ............................ 64
Computer does not come on (does
not start up from Standby or
Hibernate mode) ..................... 65
Remote control .................................. 65
My remote control does not work 65
Video, audio ...................................... 66
Sound or picture from the Network
Media Receiver is not reproduced
on the TV ................................ 66
Picture or sound sometimes stops or
is distorted ............................... 66
Video playback suffers from
dropped frames ....................... 66
A screen saver image is shown on
the TV ..................................... 66
Connection, registration .................... 67
I cannot connect to a computer ... 67
I cannot register the Network Media
Receiver at the computer ........ 68
The computer does not show up on
the “Select a server...” screen ...
I can no longer connect to a
computer after performing a hard
disk drive recovery on the
computer ................................. 68
68
4

Introduction
What this product can do
You can use your TV set to enjoy photos, video, or music stored on your computer.
Support for connecting multiple computers
Multiple computers can be connected through a router with a built-in Ethernet hub (or a stand-alone
Ethernet hub).
When multiple computers are connected, you can view media content from the computer.
Introduction
5

Video
• Play video files stored on the computer (page 44)
• Use the film roll feature to search for a desired scene during video playback (page 45)
• Search for a specific scene by specifying the time while watching a video (page 45)
Music
• Play music files stored on the computer
(page 46)
• Locate songs (page 46)
• Perform repeat playback (page 47)
The VAIO Web site always has the latest information and allows you to download software
upgrades that may be useful in resolving various issues. To get the most out of this product,
periodically visit the site listed in “Getting Help” (page 63).
Photos
• Play a slide show of photos stored on
the computer (page 48)
• View a single photo (page 49)
• Listen to background music during a
slide show (page 50)
6

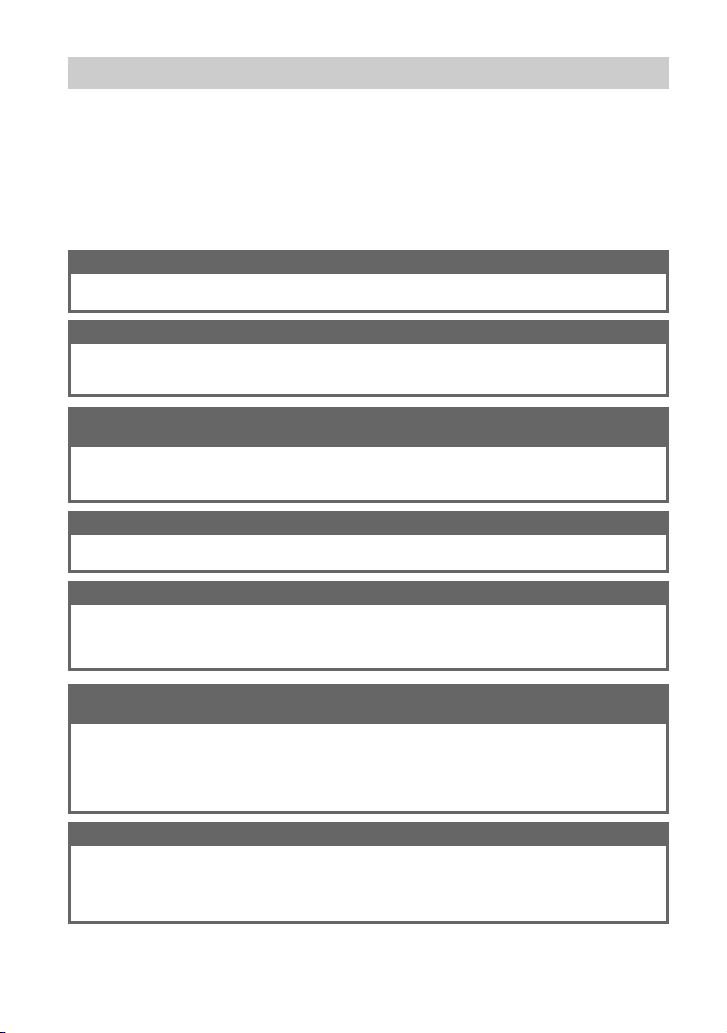
Files that can be played back
Category Content Supported file types
Video • Video Capsules recorded on
Music Music files and playlists stored
Photos Photo (still image) files stored
Notes
• During playback of multichannel music files in WMAPro format (files with 3 or more channels) and
WMV format video files containing music tracks in this format, the multichannel information is mixed
down to two tracks before being output from the analog and digital optical audio connectors.
• WMV7 and WMV8 format video files are played back using the transcode function of VAIO Media
Integrated Server.
a VAIO with Giga Pocket,
VAIO Zone, or other video
files stored on the computer
on the computer
on the computer
• Video Capsule
• MPEG1
• MPEG2
• WMV9
• DVR-MS*
* not all DVR-MS files are supported
• LPCM (WAV) format
• MP3 format
• WMA format
• Depending on the connected computer, the
following file types may also be supported:
– ATRAC3 format
– ATRAC3plus format
• JPEG format
• PNG format
• Depending on the connected computer, the
following file types may also be supported:
– Bitmap format
– GIF format
– TIFF format
Introduction
7

Operating environment
Computers that can be connected to this product:
• Sony VAIO computers with Windows XP installed and VAIO Media Version
4.1 or later pre-installed
• Sony VAIO computers sold after September 2002 with VAIO Media Version
2.0 pre-installed and upgraded with VAIO Media Upgrade Program 4.1 or
later
Note
Depending on the usage environment of your computer, certain operation limitations may apply. For the
latest information and details on VAIO Media Updates, visit the Web site listed below.
For customers in the U.S.A. and Canada
For customers in Europe
• Server equipment compliant to the DLNA guidelines (DLNA HNv1 compliant)
• Computer running Windows XP SP2, with Windows Media Connect installed,
and support for network connection to the Network Media Receiver
Notes
– Depending on the computer performance and usage environment, there may be certain limitations
regarding operation.
– For latest information on Windows Media Connect, see the Microsoft Corporation Web site.
http://esupport.sony.com/
http://www.vaio-link.com/
8

Check the supplied accessories
After unpacking the unit, make sure that the accessories listed below are present. If anything is
missing, contact the Sony dealer where you purchased this product or a Sony service representative
in your area.
You can use the boxes ❏ to check off items.
Network Media Receiver (1)
❏
Remote control (1)
❏
R6 (size AA) battery (2)
❏
AC adapter (1)
❏
Power cord (1)
❏
Audio/video connection cable (1)
❏
Network cable (5 m) (1)
❏
Crossover cable (1 m) (1)
❏
Printed documentation
❏
• Quick Start Guide (1)
• Quick Connection Guide (1 or 2)
• For users connecting the Network Media Receiver to a computer by wireless
LAN (1)
• How to Use Windows® Media Connect (1 or 2)
• Warranty (1)
• End User License Agreement (1)
• Safety Regulations (1)
• Additional information and notes documentation (1)
CD-ROM (1)
❏
2
1
1
2
Introduction
1 The number supplied varies depending on the country or region of purchase.
2 May not be supplied in some countries or regions.
9

Names of parts
This section briefly identifies the parts of the unit. For details, see the pages shown in brackets ( ).
Front view
1 POWER button/standby indicator (pages 29, 38, 58)
Press this button to turn the unit on and off.
z Hint
When the standby indicator is lit red, the unit is in Standby mode and can be turned on.
When the unit is on, the standby indicator is lit in green.
Note
If the standby indicator does not light up in red about 20 seconds after the power cord is connected,
visit the Sony Web site for additional instructions. See “Getting Help” (page 63).
2 Remote control sensor (page 15)
3 STATUS indicator (page 58)
4 WIRELESS indicator (page 58)
Side view
1 Ventilation holes
2 SET UP button (page 54)
Press this button when the standby indicator is lit green to display the “System Settings” screen.
10
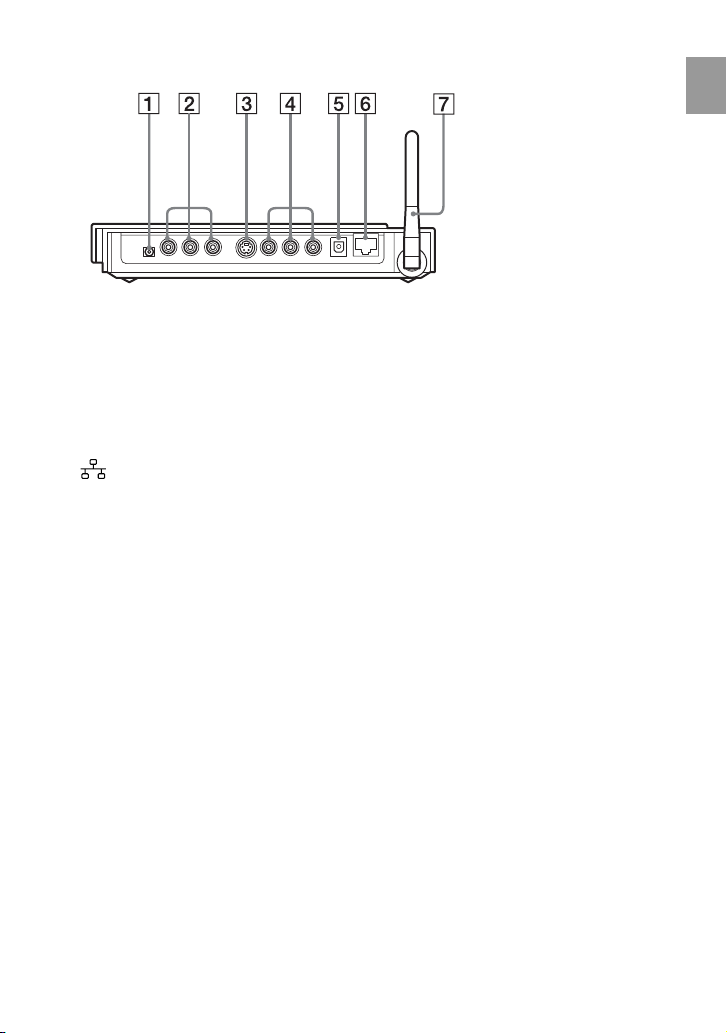
Rear view
1 1 DC IN 5.2V connector (page 29)
2 COMPONENT VIDEO OUT connectors (page 19)
3 S VIDEO OUT connector (page 18)
4 VIDEO OUT connector
AUDIO OUT (left/right) connectors (page 18)
5 OPTICAL OUT connector (page 20)
6 NETWORK connector (pages 25, 26, 27)
7 Antenna
When connecting the unit to a wireless LAN, raise the antenna to the upright position by
rotating it clockwise.
Introduction
11
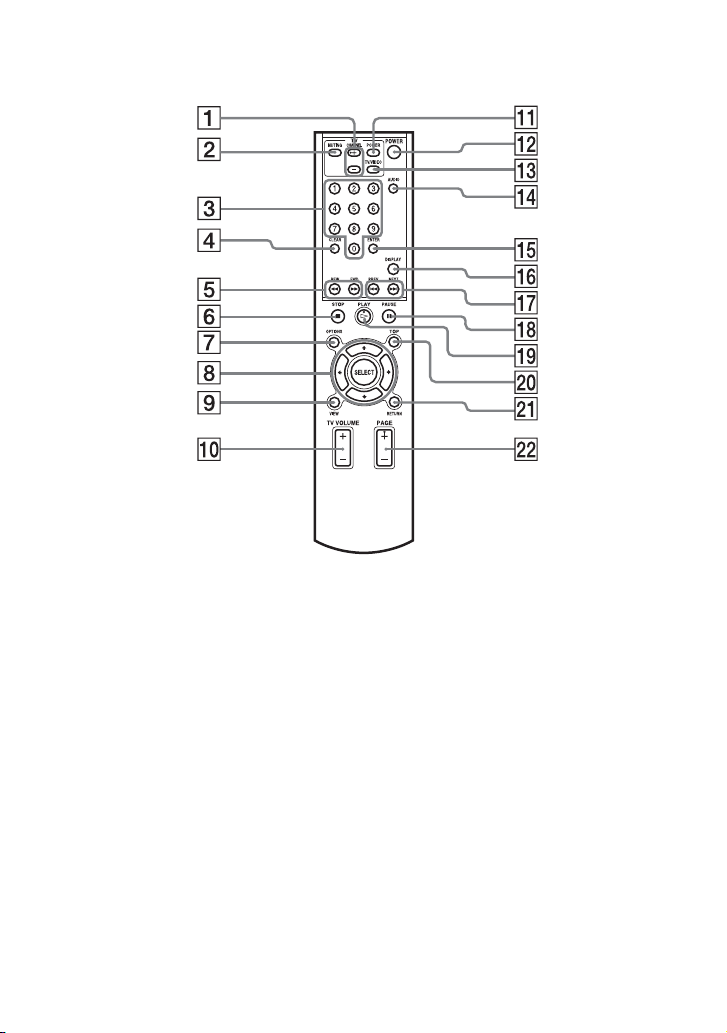
Remote control
1
TV CHANNEL +/– buttons
2 TV MUTING button
3 Number buttons (page 16)
4 CLEAR button (page 45)
5 REW/FWD buttons (page 46)
6 STOP button (pages 44, 46, 49)
7 OPTIONS button (page 40)
8 V/v/B/b/SELECT buttons (page 16)
9 VIEW button (page 42)
0 TV VOLUME +/– buttons
qa TV POWER button (pages 30, 33,
38, 39)
qs Network Media Receiver POWER
button (pages 30, 33, 38, 39)
qd TV/VIDEO button (pages 30, 33, 38)
qf AUDIO button (page 44)
qg ENTER button (page 45)
qh DISPLAY button (page 45)
qj PREV/NEXT buttons (page 46, 49)
qk PAUSE button (pages 44, 46, 49)
ql PLAY button (pages 44, 46, 49)
w; TOP button (pages 37, 40, 42, 54)
wa RETURN button (pages 45, 46)
ws PAGE +/– buttons (page 42)
12

Setup
Setup overview
Connection between the Network Media Receiver and computer
This product offers two network interfaces, wireless and Ethernet cable. To connect the Network
Media Receiver to the computer, select the network interface that is best suited to your situation.
Note
If both network interfaces are used at the same time, the network interface specified in “Network Type”
has priority.
Wireless connection
The wireless LAN interface built into the Network Media Receiver can be used to connect to a
computer through a wireless LAN access point.
Note
The Network Media Receiver always operates in
wireless LAN infrastructure mode (access point
network mode). Ad-Hoc (Peer-to-Peer) mode is
not supported.
Cable based connection
Using the Ethernet cable connection, the Network Media Receiver is connected to the computer
using a network cable.
Depending on the number of computers and type of equipment, various configurations are possible.
The illustration below shows an example for connecting the Network Media Receiver to the
computer through a hub (a device for connecting multiple devices on a network).
Setup
13
Getting ready
The steps necessary to prepare the unit for use differ, depending on whether a wireless LAN or a
network cable is used to connect to the computer.
It is also possible to use the “Wireless LAN Setting Tool” that is included on the supplied utility
CD-ROM.
Network Media Receiver to a computer by wireless LAN”.
For details on how to do this, see the separate document “For users connecting the
z
A useful tutorial and the EULA are also included on the supplied utility CD-ROM.
1. Prepare the remote control for use c Page 15
The remote control is necessary for operating the Network Media Receiver.
2. Connect the Network Media Receiver to a TV c Page 18
Select a suitable connector and cable according to the requirements of the TV monitor. It is also
possible to make the connection to the TV through a VCR.
3.
Connect the Network Media Receiver to computer
Connect the Network Media Receiver to the computer using a network cable. When using a
wireless connection, this step is not required.
4. Connect power c Page 29
Connect the supplied AC adapter to the Network Media Receiver to supply power.
5. Configure wireless LAN settings c Page 30
When the Network Media Receiver is to be connected to the computer through a wireless
connection, without using a network cable, several wireless LAN settings must be configured.
When using a network cable connection, this step is not required.
through
a network cable
c Page 21
6. Change the settings of the Network Media Receiver to match the
network connection c Page 33
Depending on the network environment, some settings of the Network Media Receiver may
have to be changed. You have to define whether the IP address should be obtained
automatically or whether a fixed address should be used. The default setting is “Automatic
assignment (using router)”.
7. Configure settings at the computer c Page 35
The computer must be configured to share its photos, video, and music.
When using a VAIO computer, the VAIO Media software must be configured.
When using a different kind of computer, corresponding settings must be configured.
14

1 Prepare the remote control for use
Inserting the batteries
As shown in the illustration, open the battery cover lid of the remote control, and insert two AA
(R6) batteries (supplied).
Verify e/E polarities, and
insert the batteries from the E
side.
Using the remote control
To use the remote control, point it towards the remote control sensor on the Network Media
Receiver, and press the appropriate buttons.
Remote control sensor
Setup
z Hints
• If the operating range of the remote control decreases, replace both batteries with fresh ones.
• After replacing the batteries, the TV manufacturer code (pages 16, 17) must be set again.
15
Programming the remote control
Your remote control is preprogrammed to control certain TVs. Find the code number for your TV’s
manufacturer in the table below. The remote control may not be compatible with some TV models,
even when the appropriate TV manufacturer code is entered.
If you are using a Sony TV set, you do not need to program the remote control, as it is set by
default.
To program the remote control:
1 Press and hold the SELECT button.
2 Enter your TV code number, using the channel number buttons.
3 Release the SELECT button after you have entered the TV code number.
Note
After replacing the batteries in your remote control, the TV manufacturer’s code requires resetting.
Reset the code each time you replace the batteries.
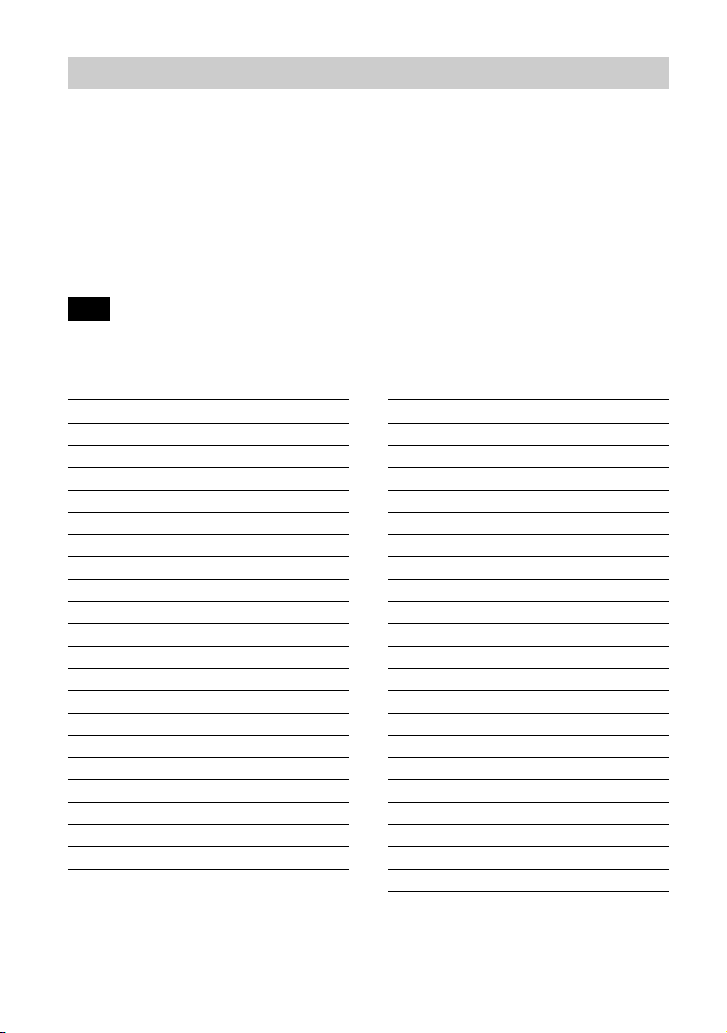
For customers in the U.S.A. and Canada
TV Manufacturer Code Number
Admiral 02, 09, 14
AOC 12
Bell & Howell 09, 14
Brocsonic 03, 12
Craig 20, 21, 22, 23
Croslex 11
Curtis Mathis 03, 19, 23
Daewoo 3, 35, 36
Daytron 13
Emerson 03, 13, 15, 20, 21, 22, 23
Fisher 25
GE 02, 03, 18
Goldstar/LG 03, 12, 13, 30
Hitachi 03, 13, 31
JC Penney 02, 03, 30
JVC 28
KTV 3, 13, 23
LXI (Sears) 02, 03, 11, 12, 19, 25
Magnavox 03, 11, 12, 13
Mitsubishi 03, 12, 24
TV Manufacturer Code Number
NEC 03, 12
Panasonic 16, 18
Philco 03, 11, 13
Philips 11
Pioneer 18, 19, 37
Portland 03
Quasar 18
Radio Shack 02, 12, 23, 24
RCA/PROSCAN 02, 03
Samsung 03, 12, 13, 26
Sanyo 25
Scott 12, 23
Sharp 13, 14, 15
Signature 09, 14
Sony 01
Sylvania 03, 11, 12
Symphonic 23
Toshiba 14, 19
Vidtech 03, 12, 31
Wards 03, 12, 13, 15
Zenith 09
16

For customers in Europe
TV Manufacturer Code Number
Akai 02, 04
Beko 25
Daewoo 04, 05, 06
Finlux 26
Goldstar/LG 04, 07
Grundig 07
Hitachi 04, 27, 28
JVC 02, 11
Loewe 04, 07
Medion 04
Mitsubishi 13, 14
Mivar 15
TV Manufacturer Code Number
NEC 16
Panasonic 17
Philips 04
Pioneer 19
Samsung 04, 07
Sanyo 02
Schneider 02, 03, 04
Sharp 21
Sony 01
Thomson 22
Toshiba 03, 24
Setup
17

2 Connect the Network Media Receiver to a
TV
Note
Make sure that the power cord is not plugged into an AC outlet when you connect the Network Media
Receiver to the TV, or the Network Media Receiver may not operate properly.
Use the supplied audio/video cable to connect the Network Media Receiver to the TV.
The plugs of the audio/video cable are color-coded. Insert each plug into the respective connector.
When using an S-Video cable (not supplied), do not connect the yellow video plug of the audio/
video cable.
To video input
S-Video cable
(not supplied)
Audio/video cable
(supplied)
To AUDIO/
VIDEO OUT
To S VIDEO
OUT connector
Note
Do not place the Network Media Receiver on top of the TV. Avoid high locations where tension on the
cable could cause the unit to fall.
connectors
1
l : Signal flow
18

To connect the Network Media Receiver to a TV through a VCR
Connect as shown below.
To audio/video input
Audio/video cable
(supplied)
To AUDIO/VIDEO
connectors
l : Signal flow
To connect the Network Media Receiver to a TV with component video
input
Use a component video cable (not supplied) to connect the Network Media Receiver to the
component video input on the TV, as shown below. Insert each plug into the respective connector.
To component
video input
Component video
cable (not supplied)
To COMPONENT
VIDEO OUT connectors
l : Signal flow
Setup
19

To use the digital audio output
Make the connections to an amplifier with digital input, as shown below.
Optical fiber cable
(not supplied)
To OPTICAL OUT
connector
To digital
input (optical)
l : Signal flow
20

3 Connect the Network Media Receiver to
the computer through a network cable
This step is not required when using a wireless connection between the Network Media Receiver
and the computer. Proceed to “4 Connect power” (page 29).
Note
Make sure that the power cord is not plugged into an AC outlet when you connect the Network Media
Receiver to the computer or the Network Media Receiver may not operate properly.
Network cable connection
To connect the Network Media Receiver to the computer, the network port of the computer must be
free, or a hub with at least one free port must be available.
Depending on your system environment, the connection will differ.
Also refer to the separate Quick Connection Guide.
Setup
21
 Loading...