

Page 1

1.MS-1-D.1
Chapter 1. Disassembly & Assembly Guide
1-3. Disassembly & Assembly
- Main Section -
MS-1 Main Section Disassembly
Confidential
B Series
Page 2
1.MS-1-D.2
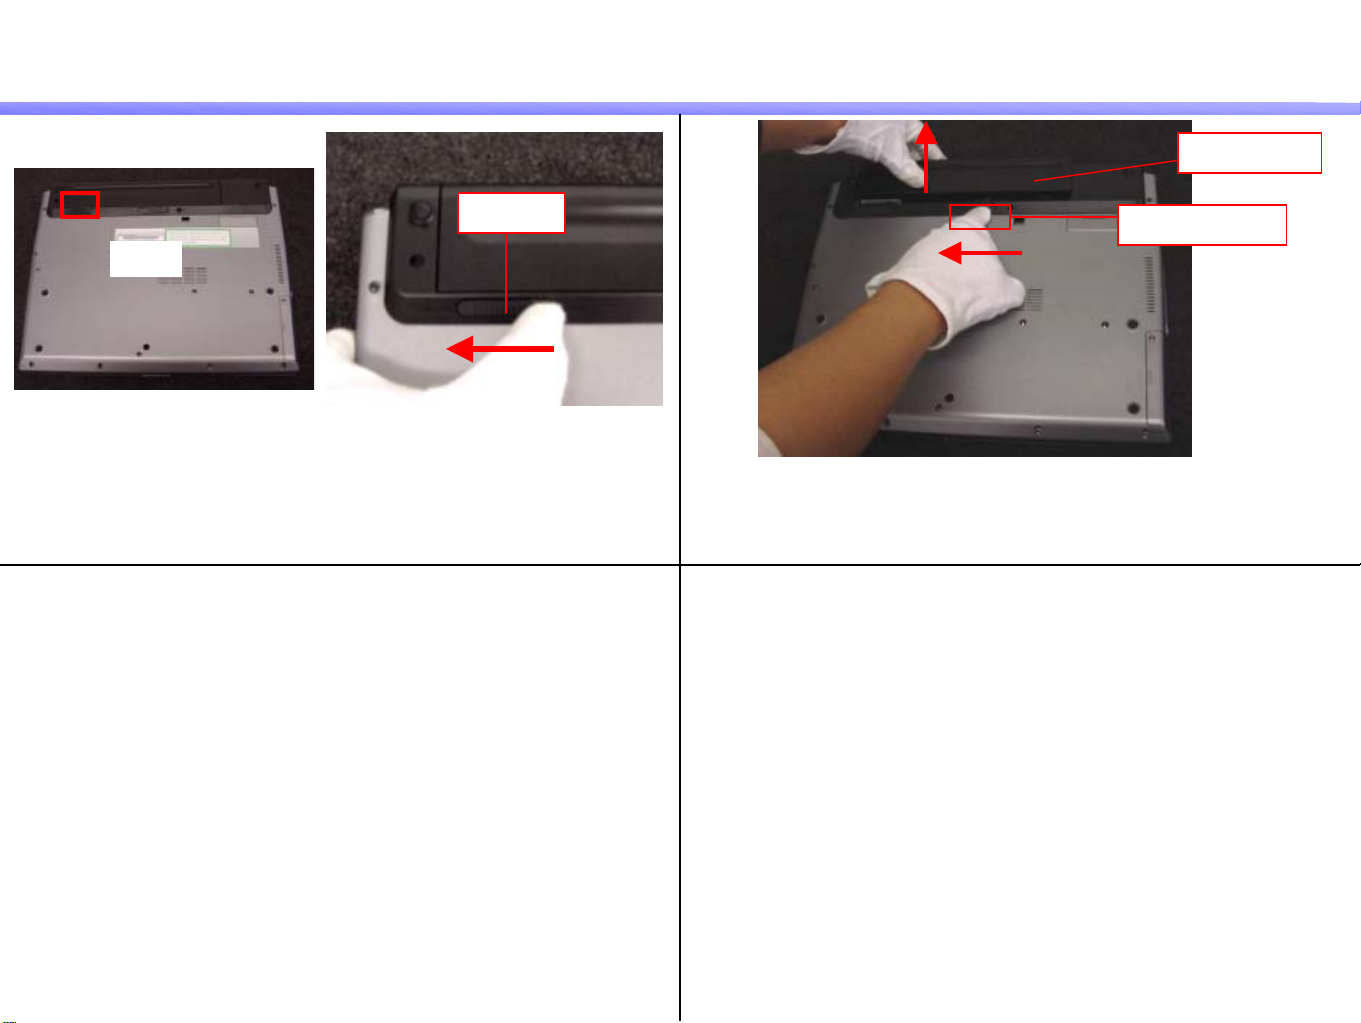
Battery Pack
Confidential
1)
Knob (L)
Move the Knob (L) to the UNLOCK side.
2)
2
Knob (Release)
1
With the Knob (Release) moved on the Unlock side,
remove the Battery Pack.
Battery Pack
B Series
Page 3
1.MS-1-D.3
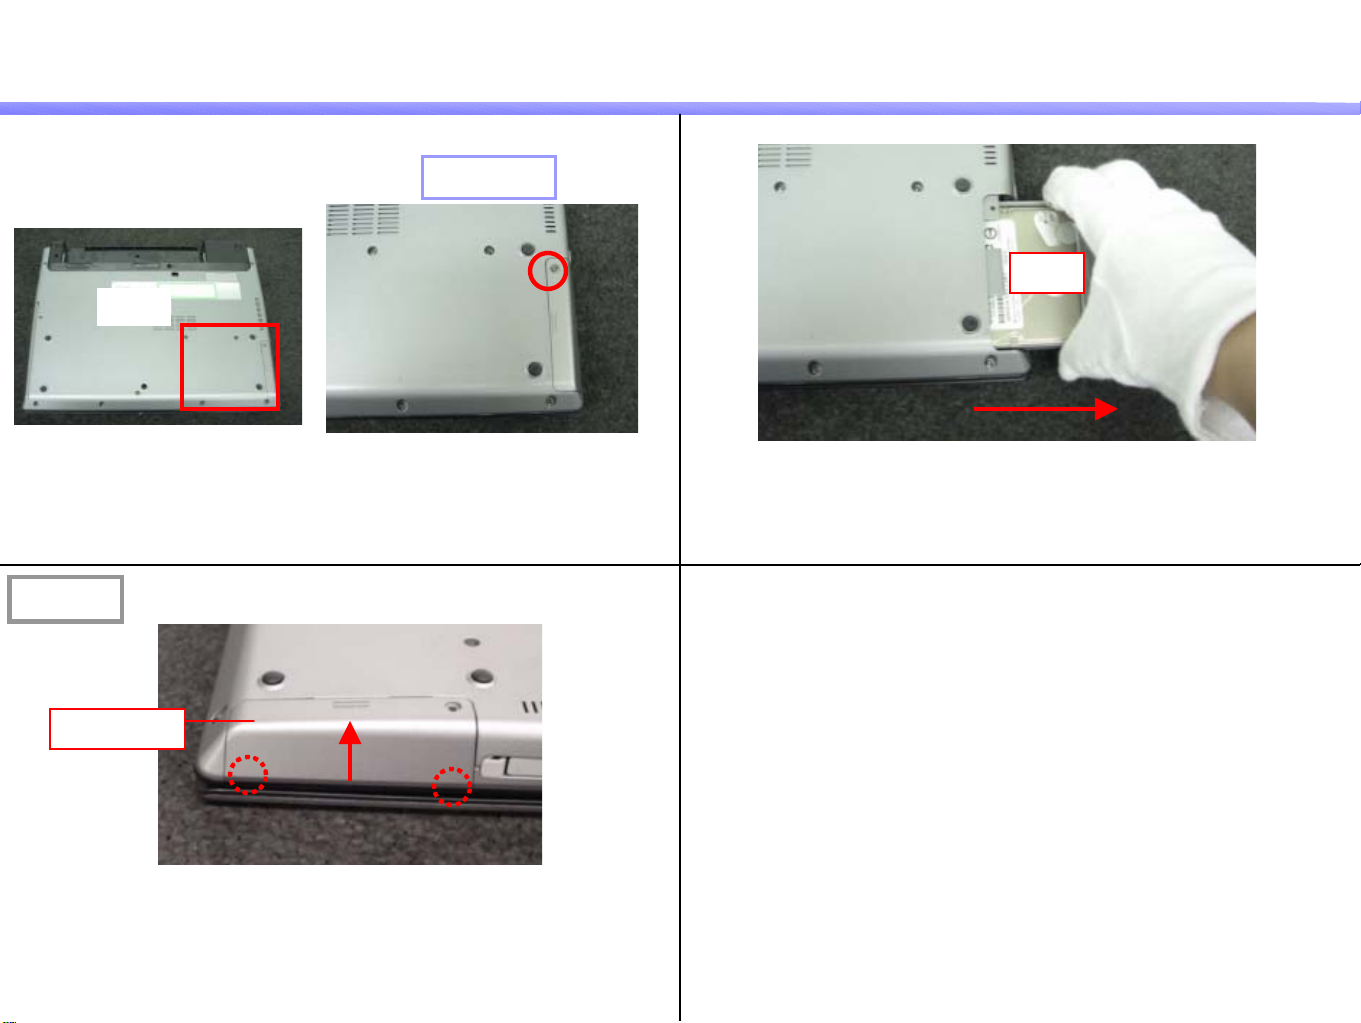
HDD
Confidential
1)
Remark
Remove the screw.
2)
Screw: B10
HDD
Pull out the HDD in the direction of the arrow.
Escutcheon
The Escutcheon is engaged with the two detents on the Main Unit.
It is recommended to remove the HDD by lifting the Escutcheon lightly in
the direction of the arrow to disengage the detents.
B Series
Page 4
1.MS-1-D.4
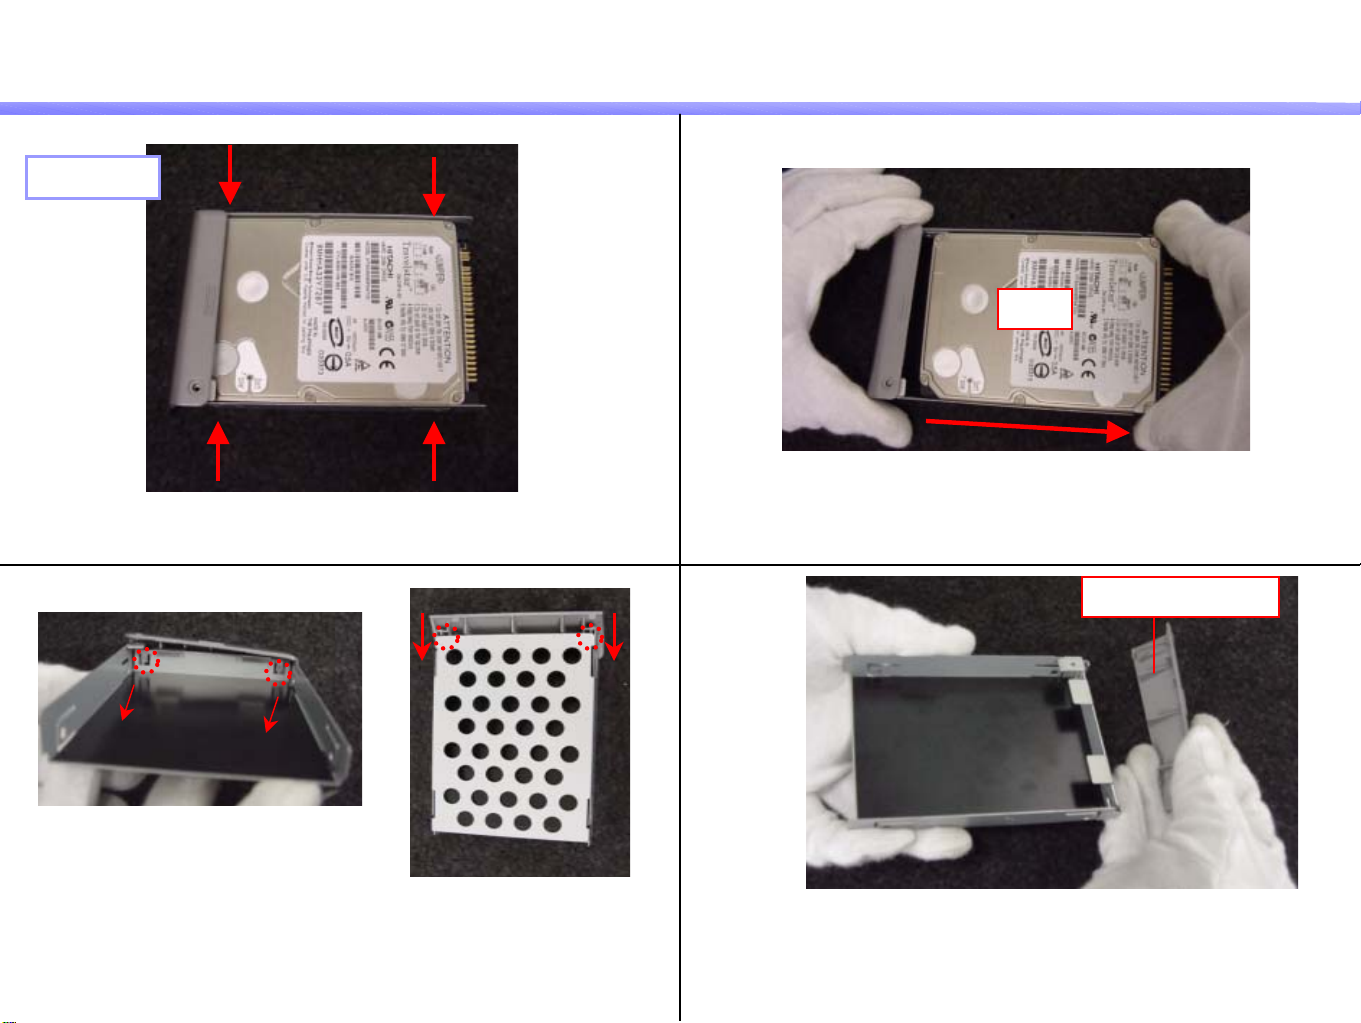
Parts of the HDD-1
Confidential
1)
Screw: B18
Remove the four screws.
3) 4)
2)
HDD
Remove the HDD in the directio n of th e arrow.
*Handle only by sides of base so that the HDD does n ot b e
damaged.
Escutcheon (HDD)
Press the detent (two places) in the direction of the arrow. Remove the Escutcheon.
B Series
Page 5

1.MS-1-D.5
Parts of the HDD-2
5)
Put back the detent (two places) in the original position.
Confidential
B Series
Page 6

1.MS-1-D.6
Optical Disc Drive
Confidential
1)
Screw: B10
2)
Optical Disc Drive
Remove the two screws.
Remove the Optical Disc Drive.
B Series
Page 7
1.MS-1-D.7
Keyboard-1
Confidential
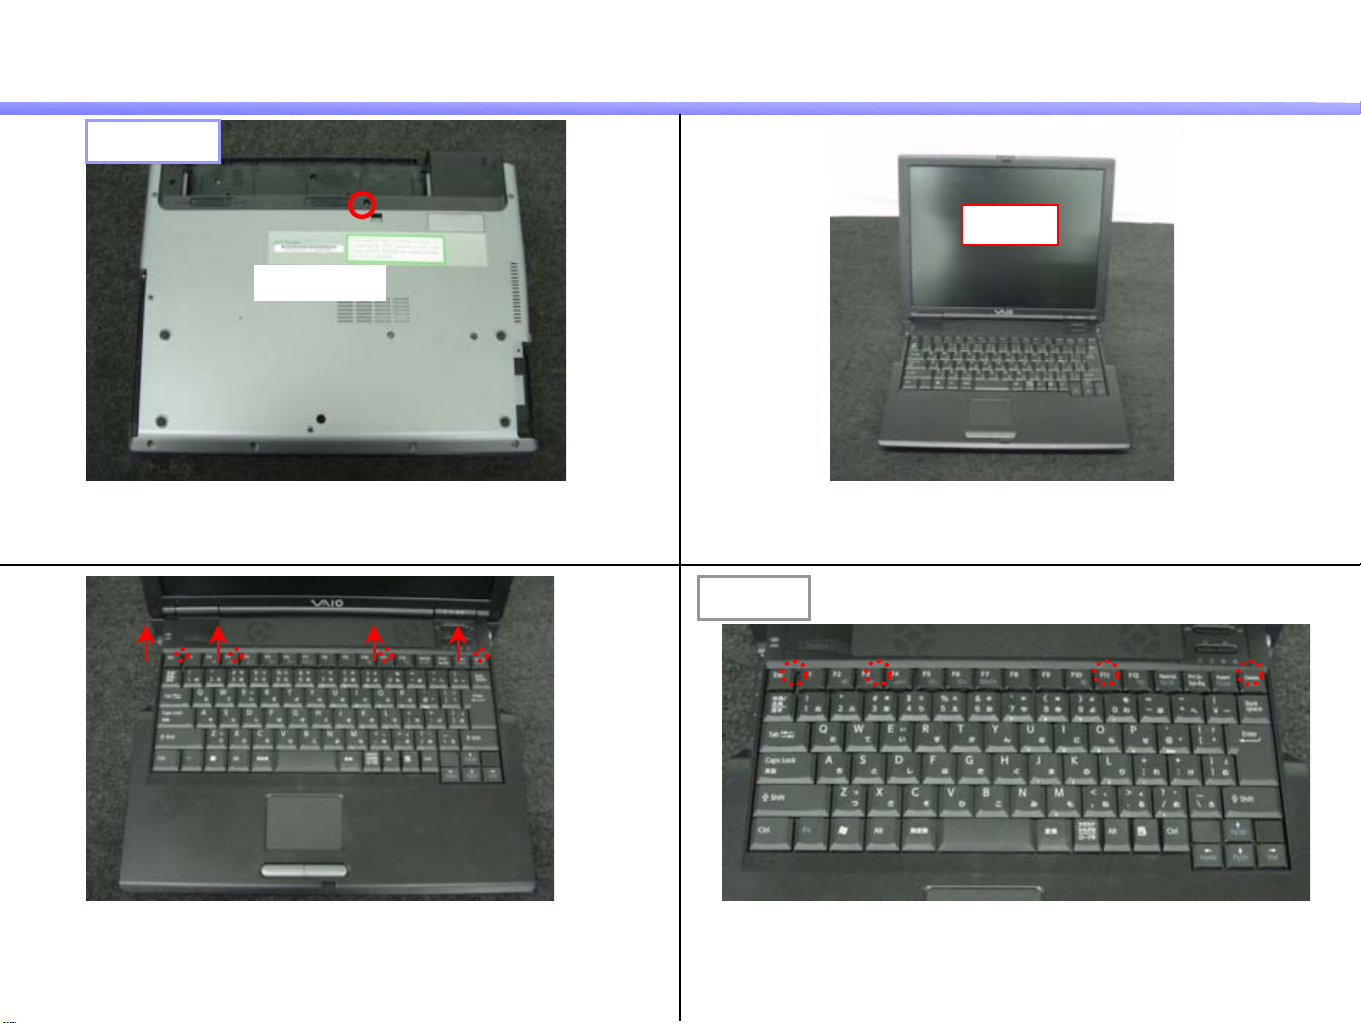
1)
3)
Screw: B11
4 3 2 1
2)
LCD 部
Remove the screw. Turn over the Main Unit, and open the LCD Section.
Remark
Move the detent (four places) in the direction of the arrow with
a thin tool and disengage them.
*Be careful not to damage the Keyboard.
*It is recommended to disengage the detents from right side.
Detents are located between the Esc and F1 Key, under the
F3, F11, and Delete Key.
B Series
Page 8

1.MS-1-D.8
Keyboard-2
Confidential
4)
6)
Keyboard
FPC
Move the Keyboard in the direction of the arrow to release
the detent on the front.
*The FPC is on the backside.
FPC
5)
Lock Lever
Raise the lock lever in the direction of the arrow
and release the lock.
Remove the FPC, and then the Keyboard.
B Series
Page 9

1.MS-1-D.9
Palmrest-1
Confidential
1)
Screw: Red-B3 / Blue-B10
Remove the 12 screws on the bottom.
3) 4)
Screw: B10
2)
FFC-1
FFC-3
FFC-2
Disconnect the FFC (three places).
*FFC-1/FFC-2: Raise the lock lever to release the lock.
*FFC-3: Pull out the FFC vertically.
Remove the three screws.
FFC
Remove the Palmrest by pushing it toward the left.
* The rear left of the Palmrest is engaged with the connectors and detents.
* The FFC is connected on the backside.
B Series
Page 10

1.MS-1-D.10
Palmrest-2
Remark
Confidential
5)
FFC
Palmrest
Pull out the FFC (one location) in the direction of the arrow.
Position of the Detent
B Series
Page 11

1.MS-1-D.11
Confidential
Wireless LAN Card
1)
Peel off the Filament Tape (three places).
*Filament Tape: 12X30
3)
Wireless LAN Model
Filament Tape
2)
Tab
1
Wireless LAN Card
Outspread the tabs (two places) simultaneously to unlock,
and remove the Wireless LAN Card in the direction of the arrow.
2
1
Ferrite Core
Remove the Ferrite Core portion.
B Series
Page 12

1.MS-1-D.12
Confidential
Parts of the Wireless LAN Card
Remark
Coaxial Cable
If you do not exchange the Wireless LAN Card or the
[Wireless LAN]-related part, perform the work without disconnecting
the Coaxial Cables.
2)
Wireless LAN Card
Wireless LAN Model
1)
Filament Tape
Peel off the Filament Tape.
3)
White
Black
Disconnect the Coaxial Cables.
*Hold the connector, and pull out it directly above to disconnect it.
Connector
Ferrite Core
Remove the Ferrite Core (one place).
* Pass the Cable one by one.
B Series
Page 13

1.MS-1-D.13
Bracket, DC Jack
Confidential
1)
2)
Screw: B5
Remove the two screws. Remove the Bracket (one place), an d t he n t he DC Jack.
Bracket (DC) DC Jack
B Series
Page 14

1.MS-1-D.14
LCD Section
Confidential
1)
Screw: B5
Remove the screw.
* Caulking side is up.
3) 4)
Screw: B8
2)
Harness (LCD)
Disconnect the Harness (LCD) directly above.
LCD Section
Remove the four screws.
Remove the LCD Section.
B Series
Page 15

1.MS-1-D.15
Heatsink, Fan
Confidential
1)
Screw: B5
Remove the two screws.
3) 4)
Screw: B5
2)
Heatsink
Thermal Sheet
Remove the Heatsink (one place).
*The Thermal Sheet is attached on the backside.
Fan
Harness
Remove the three screws. Disconnect the Harness (one place), and then the Fan.
B Series
Page 16

1.MS-1-D.16
ANL-55 Board
Confidential
1)
3)
2)
Screw: B2
ANL Board
FFC
Mother Board
Pull out the FFC (one place) in the direction of the arrow. Remove the screw, and then the ANL Board.
FFC
Pull out the FFC (one location) in the direction of the arrow.
B Series
Page 17

1.MS-1-D.17
CNX-281 Board-1
Confidential
1)
3)
FFC
Pull out the FFC (one place).
Screw: B2
2)
Filament Tape
Peel off the Filament Tape (one place).
*Filament Tape: 12X30
4)
Bracket (Ether)
Remove the two screws.
Remove the Bracket (one place).
B Series
Page 18

1.MS-1-D.18
CNX-281 Board-2
Confidential
5)
7)
6)
CNX Board
Ferrite Bead
Remove the CNX Board (one place).
Remove the Ferrite Bead (one place).
8)
Screw: B7
Bracket (DSUB)
Remove the two screws, and then the Bracket.
FFC
Pull out the FFC (one place) in the direction of the arrow.
B Series
Page 19

1.MS-1-D.19
Mother Board
Confidential
1)
3)
Harness
Take out the connector portion of the Harness (one place).
Reserve Battery
2)
Screw: B2
Remove the four screws.
Remark
Adhesive Tape
Mother Board
Housing (Bottom)
Peel off the Reserve Battery (one place) from the Housing (Bottom),
and remove the Mother Board.
The adhesive tape is attached on the backside of the Reserve Battery.
B Series
Page 20

1.MS-1-D.20
Parts of the Housing (Bottom)-1
Confidential
1)
3)
Screw: B5
2)
Cover (PR)
Bracket (PR)
Remove the Cover (one place).
Remove the three screws, and then the Bracket.
4)
Screw: Blue-B16 / Red-B17
Remove the eight screws.
Display Base
Remove the Display Base.
B Series
Page 21

1.MS-1-D.21
Parts of the Housing (Bottom)-2
Confidential
5)
7)
Release Lever
Screw: B17
Remove the six screws.
Spring
6)
Housing (Bottom)
Cover (BATT)
Lift up the Housing (Bottom), and remove the Cover
from backside.
Release Lever
a a
While pushing the a-portion in the direction of the arrow, remove the Release Lever (two places) and Spring (one place).
B Series
Page 22

1.MS-1-D.22
Parts of the Housing (Bottom)-3
8)
Knob (Release) Knob (Left)
Remove the Knob (two places).
Confidential
B Series
Page 23

Confidential
Update History
Date Contents Version No.
- - -
[ADD]---Addition [DEL]---Deletion [CHG]---Change [COR]---Correction [MA]---Model Addition
-
B Series
 Loading...