

Sony VGFCP1 User Manual

© 2008 Sony Corporation / Printed in Japan
3-300-630-31 (1)
Digital Photo Frame
VGF-CP1
Operating Instructions
Printed on 70% or more recycled paper
using VOC (Volatile Organic Compound)
-free vegetable oil based ink.
VGF-CP1 Series 3-300-630-31(1) VGF-CP1 Series 3-300-630-31(1)
WARNING
r
e
i
e
d
w
o
2
r
o
p
p
p
t
e
o
m
e
Owner’s Record
The model number and serial number are located on the
rear of this unit.
Record the serial number in the space provided below.
Refer to this number whenever you call your Sony dealer
regarding this product.
Model No. VGF-CP1
Serial No.________________________
This User Guide and the information contained
herein shall not be reproduced in whole or in part
and shall not be lent to any third parties.
The terms of warranty for this product are defined
in the separate warranty certificate provided with
your home server.
The license agreement for the supplied software
is defined in the software license agreement for
each software application.
Sony Corporation provides no warranty with
regard to the supplied software. In no event shall
Sony Corporation be liable for any incidental,
consequential, or special damages, where based
on tort, contract, or otherwise, arising out of or in
connection with the supplied software.
Sony Corporation reserves the right to make any
modification to this product and the supplied
software. The specifications of this product and
the supplied software are subject to change
without prior notice.
Sony Corporation and the software vendors
reserve the right to terminate or suspend the
network services to the supplied software. In no
event shall Sony Corporation be liable for
inconvenience wholly or partially resulted from
the termination or suspension of the services.
Some functions described in this User Guide and/
or in the help files on the supplied software may
not be implemented due to restrictions imposed
by using such software on this product. Sony
Corporation assumes no liability for
inconvenience resulted from the restrictions.
For C
Sony he
with th
provisio
To ob ta
with th
URL ad
http://w
This pr
EN 550
comme
Audi
•
equi
equi
•
This
with
conn
feet).
•
Disp
•
In so
batte
prohi
•
Pleas
2
VGF-CP1 Series 3-300-630-31(1)
ed
part
fined
with
are
for
shall
l,
sed
or in
any
d
nd
no
om
s.
and/
may
osed
.
For Customer in Europe
Sony hereby declares that this equipment is in compliance
with the essential requirements and other relevant
provisions of European Directive 1999/5/EC.
To obtain a copy of the declaration of conformity (DoC)
with the R&TTE Directive, please access the following
URL address.
http://www.compliance.sony.de/
This product also complies with EN 55022 Class B and
EN 55024, for use in following areas: residential,
commercial and light industrial.
•
Audio and picture distortion may occur if this
equipment is positioned in close proximity to any
equipment emitting electromagnetic radiation.
•
This product has been tested and found to compliant
with the limits set out in the EMC Directive for using
connection cables not longer than 3 metres (9.8
feet).
•
Dispose of the battery properly at its end-of-life.
•
In some areas the disposal of non-hazardous
batteries in household or business waste may be
prohibited.
•
Please use the public collection system.
Disposal of Old Electrical &
Electronic Equipment
(Applicable in the
European Union and other
European countries with
separate collection
systems)
Disposal of waste batteries
(applicable in the European
Union and other European
countries with separate
collection systems)
This symbol on the battery or on the packaging indicates
that the battery provided with this product shall not be
treated as household waste.
By ensuring these batteries are disposed of correctly, you
will help prevent potentially negative consequences for
the environment and human health which could
otherwise be caused by inappropriate waste handling of
the battery. The recycling of the materials will help to
conserve natural resources.
In case of products that for safety, performance or data
integrity reasons require a permanent connection with an
incorporated battery, this battery should be replaced by
qualified service staff only.
To ensure that the battery will be treated properly, hand
over the product at end-of-life to the applicable collection
point for the recycling of electrical and electronic
equipment.
For all other batteries, please view the section on how to
remove the battery from the product safely.
Hand the battery over to the applicable collection point
for the recycling of waste batteries.
For more detailed information about recycling of this
product or battery, please contact your local Civic Office,
your household waste disposal service or the shop where
you purchased the product.
VGF-CP1 Series 3-300-630-31(1)
3

b
t
u
t
r
a
o
e
r
h
o
u
b
r
a
r
r
r
S
m
m
o
A
o
p
G
b
For Customer in U.S.A.
This equipment has been tested and found to comply
with the limits for a Class B digital device, pursuant to
Part 15 of the FCC Rules. These limits are designed to
provide reasonable protection against harmful
interference in a residential installation. This equipment
generates, uses, and can radiate radio frequency energy
and, if not installed and used in accordance with the
instructions, may cause harmful interference to radio
communications. However, there is no guarantee that
interference will not occur in a particular installation. If
this equipment does cause harmful interference to radio
or television reception, which can be determined by
turning the equipment off and on, the user is encouraged
to try to correct the interference by one or more of the
following measures:
Reorient or relocate the receiving antenna.
Increase the separation between the equipment and
receiver.
Connect the equipment into an outlet on a circuit
different from that to which the receiver is connected.
Consult the dealer or an experienced radio/TV
technician for help.
You are cautioned that any changes or modifications not
expressly approved in this manual could void your
authority to operate this equipment.
All cables used to connect peripherals must be shielded
and grounded. Operation with cables connected to
peripherals that are not shielded and grounded may result
in interference to radio and television reception.
This device complies with Part 15 of the FCC Rules.
Operation is subject to the following two conditions: (1)
this device may not cause harmful interference, and (2)
this device must accept any interference received,
including interference that may cause undesired
operation.
This equipment complies with FCC radiation exposure
limits set forth for an uncontrolled environment. This
equipment should be installed and operated with
minimum distance 8 inches (20 cm) between the radiator
and your body (excluding extremities: hands, wrists, feet
and ankles).
This device and its antenna(s) must not be co-located or
operating with any other antenna or transmitter except
Grant condition.
Caution
The socket-outlet shall be installed near the
•
equipment and shall be easily accessible.
Danger of explosion if battery is incorrectly replaced.
•
Replace only with the same or equivalent type
recommended by the manufacturer. Discard used
batteries according to the manufacturer’s
instructions.
The battery used in this device may present a fire or
chemical burn hazard if mistreated. Do not
disassemble, heat above 140°F (60°C) or incinerate.
Dispose of used battery promptly. Keep away from
children. Do not short circuit.
4
For the State of California, USA only
Perchlorate Material - special handling may apply, See
www.dtsc.ca.gov/hazardouswaste/perchlorate
Perchlorate Material: Lithium battery contains perchlorate.
Ta
Get
Abo
Loca
F
B
B
R
Befo
C
C
In
Basi
Basic
T
A
Pl
D
C
Pl
Avail
F
F
F
Exa
Exa
Go
O
L
U
D
VGF-CP1 Series 3-300-630-31(1)

only
See
Table of Contents
hlorate.
Getting Started 6
About This Unit ........................................................... 6
Locating Controls and Ports ................................8
Front ......................................................................................8
Back ........................................................................................9
Bottom ..............................................................................10
Remote Control ...........................................................11
Before Use ................................................................... 12
Checking Accessories ..............................................12
Connecting ....................................................................12
Inserting and Removing Memory Cards .....14
Basic Operation 16
Basic Use ....................................................................... 16
Turning the Power On ............................................. 16
About the Home Screen ........................................17
Playing Back Photos Frame of Sample Images
............................................................................................18
Displaying Data with the Browse Screen .... 18
Creating a Frame ........................................................20
Playing Back a Frame ................................................23
Available Frames ..................................................... 24
Frame Created from Photo Browse Screen
............................................................................................24
Frame Created from Music Browse Screen
............................................................................................26
Frame Created from Information Browse
Screen .............................................................................27
Examples 28
Example 2: Displaying Photos Stored on
your Computer ...................................................... 36
Confirming the Computer to Use as a Server
............................................................................................36
Setting up a Server .................................................... 38
Displaying Photos on a Computer Set to Use
with This Unit .............................................................39
Connection/Settings 41
Connecting to a Wireless Network .............. 41
Checking Type of Access Points ........................41
Setting with AOSS ...................................................... 41
Setting Manually .........................................................44
Options Menu List ................................................. 47
Settings Menu ........................................................... 50
Troubleshooting 53
Troubleshooting ...................................................... 53
Getting Help ..............................................................60
About Sony’s support options ........................... 60
Precautions/Others 61
Specifications ............................................................ 61
Precautions ................................................................. 62
Trademarks..................................................................64
Important notices on the software .............65
Index ............................................................................... 89
Example 1: Using [Picasa Web Albums by
Google] ....................................................................... 28
Obtaining an Account for “Picasa Web
Albums by Google” ................................................. 28
Logging in to “Picasa Web Albums by Google”
............................................................................................29
Uploading Photos to “Picasa Web Albums by
Google” from This Unit .........................................31
Displaying Photos from “Picasa Web Albums
by Google”.................................................................... 33
VGF-CP1 Series 3-300-630-31(1)
5
Getting Started
a
w
w
h
v
n
e
t
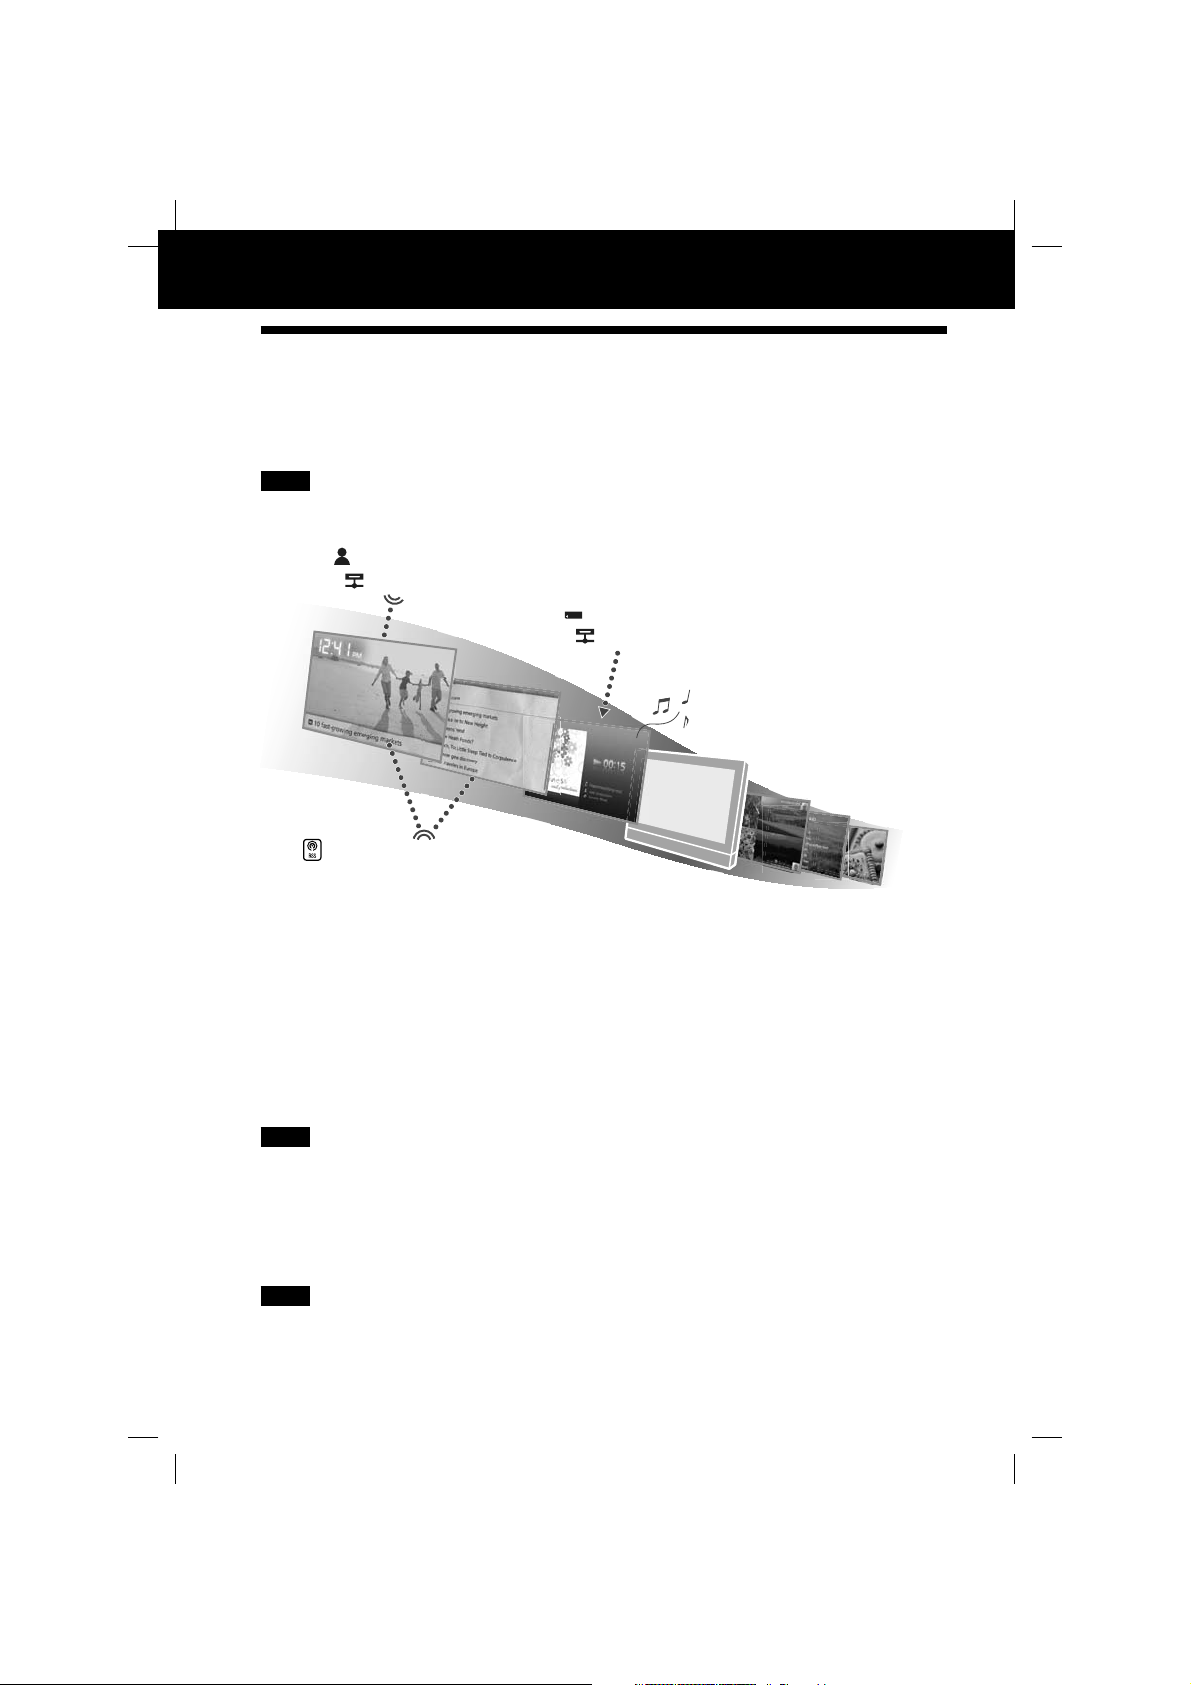
About This Unit
This unit is a Digital Photo Frame for displaying photos with Internet access.
In addition to displaying photos, you can also enjoy music and information by creating various frames (page
18).
Note
For home wireless network connection, you will need a subscription to an Internet service provider and a wireless LAN
router.
Picasa Web Albums, etc.
Home server
Memory Stick media, etc.
Home server
Registered RSS information, etc.
You c
Ne
The
bro
Ot
If you gi
First, co
view th
You can display the following:
Photos stored on memory cards such as Memory Sticks.
Photos stored on your computer or home server through your wireless home network.
Photos stored on a Web photo organizer or a home server supporting the Remote Home Access
function. In order to use these functions, some network and server settings need to be configured.
A slide show of your favorite photos, with photo effects and music.
Photos stored on your home server supporting the Remote Home Access function - even if you are away
from home.
Note
This unit cannot display movies shot by a digital camera or video camera.
You can play back music files:
Stored on memory cards such as Memory Sticks.
Stored on your computer through your wireless home network.
Note
This unit cannot play back music files with copyright protection.
6
VGF-CP1 Series 3-300-630-31(1)
Illustra

(page
AN
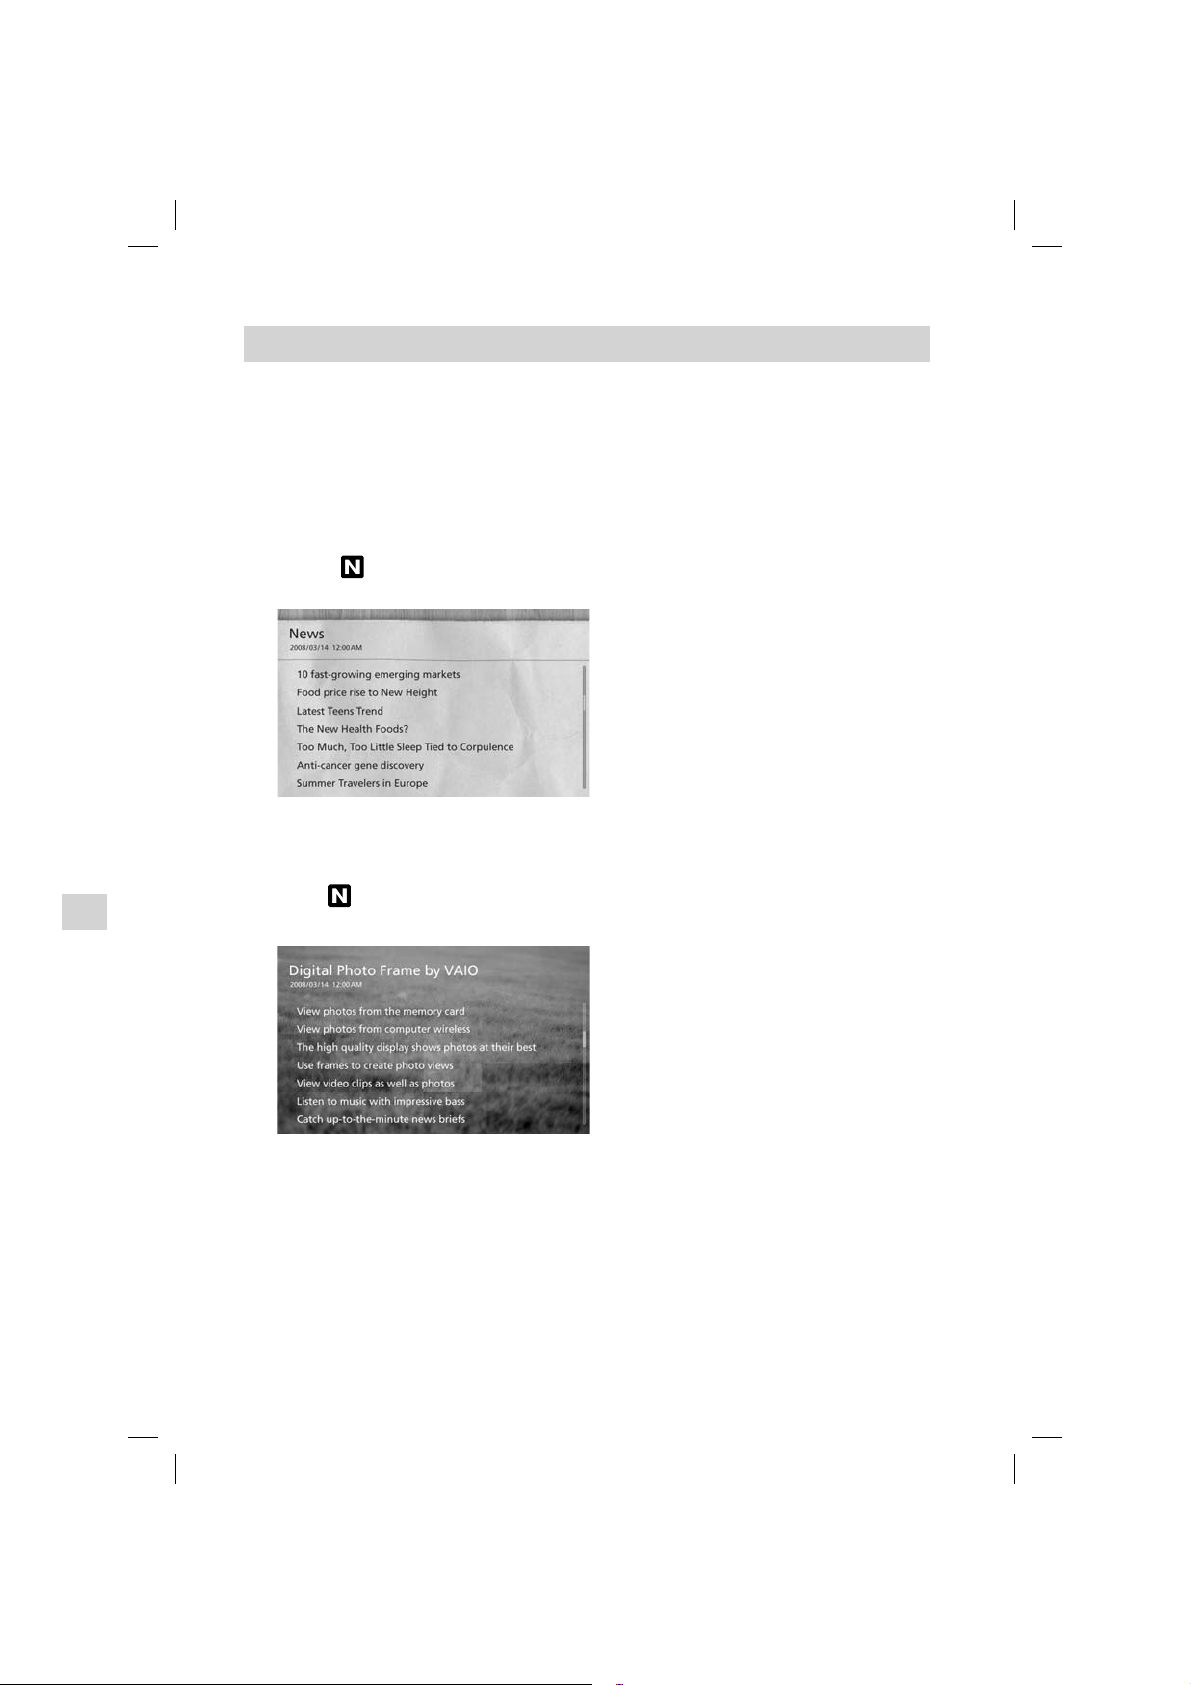
You can display the following information:
News from Google News UK (UK model) or Google News (USA model)
The latest information from Web sites broadcasting RSS. You can register to receive RSS feeds in the Web
browser (Opera) screen (page 47).
Other way to use
If you give this unit to distant family or friends as a gift, you can send your photos to them through the Web service.
First, configure the network and server settings with this unit, and save the Web photo organizer in frames, then you can
view the latest photos uploaded to the Web service by switching frames with the remote control.
.
away
Illustrations and screen images in this manual may differ from the actual product.
7
VGF-CP1 Series 3-300-630-31(1)
Locating Controls and Ports
c
r
W
h
h
A
r
r
O
r
u
r
r
f
r
n
o
O
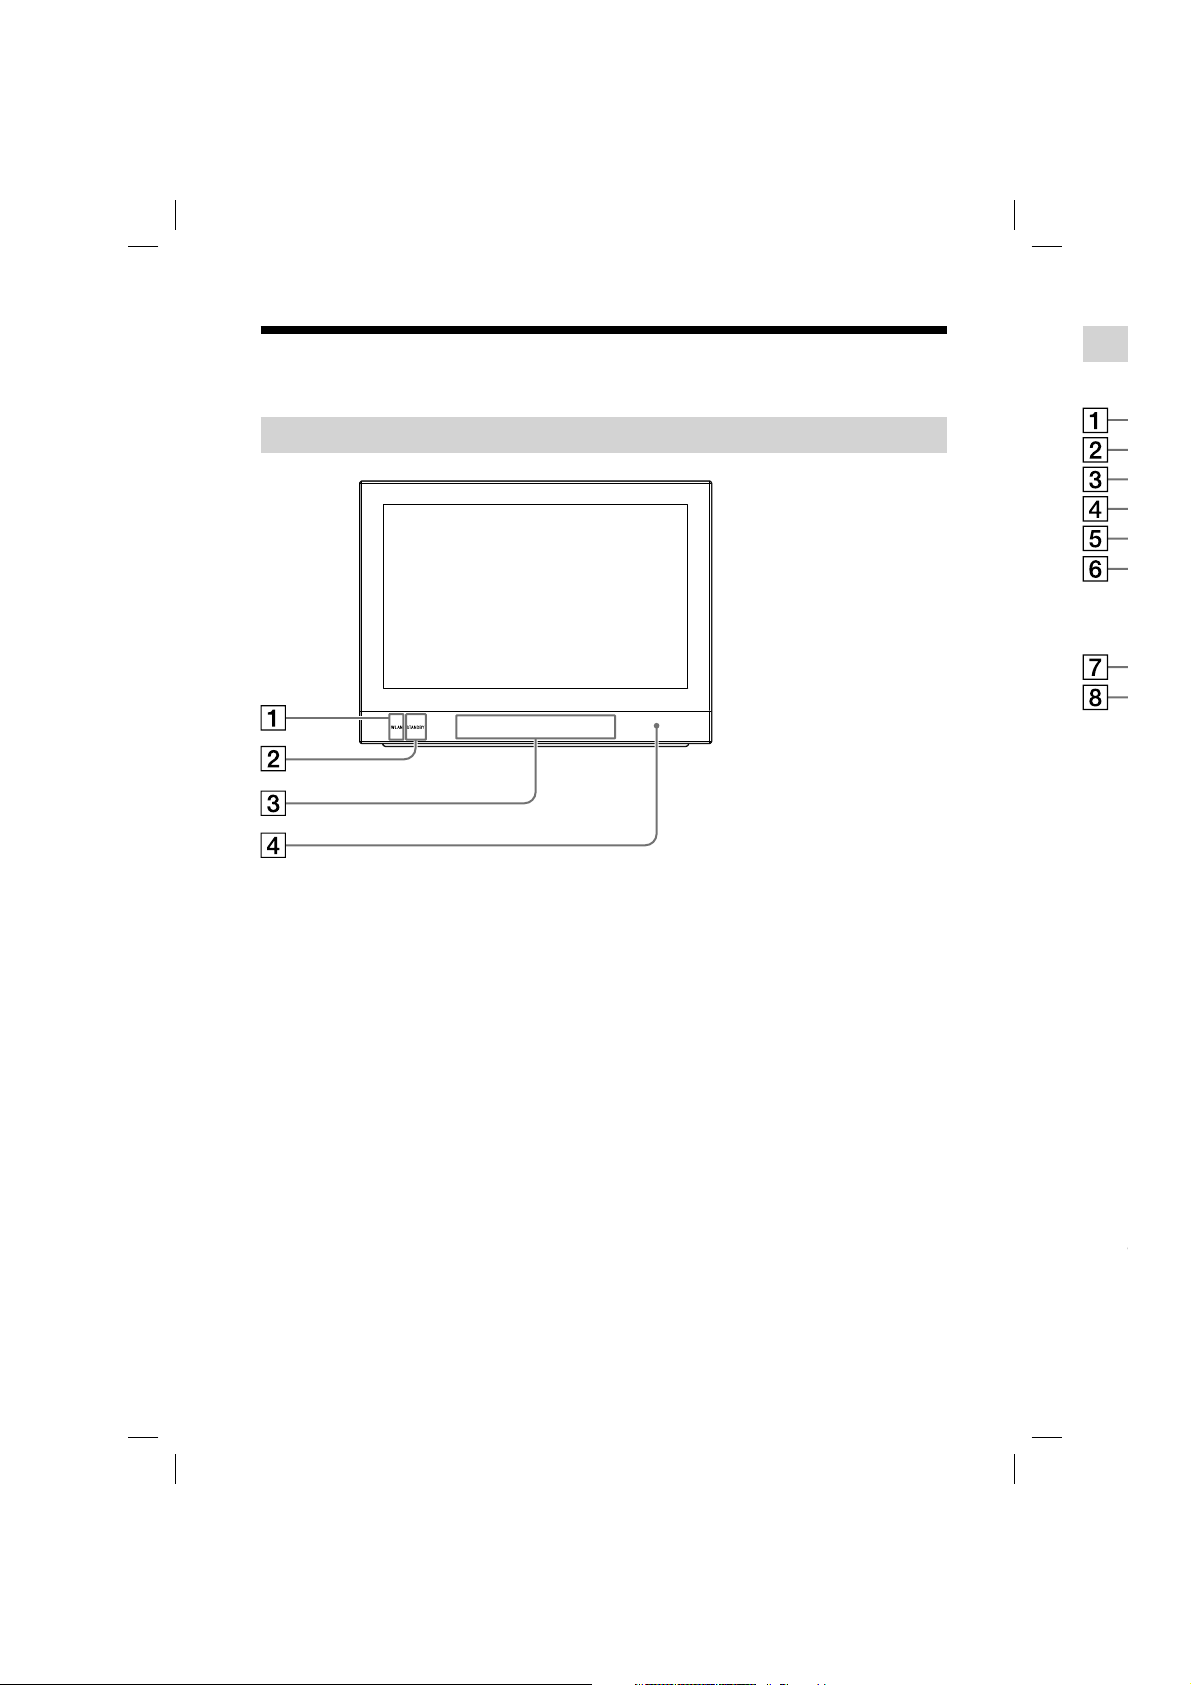
Front
WLAN (wireless LAN) indicator
Lights up when the wireless LAN turns on.
STANDBY indicator
Lights up in standby mode.
New Info indicator
Blinks when receiving new information. Also
can be turned on as a light.
Remote control sensor
Receives a signal from the remote control.
Ba
P
t
t
B
P
p
P
c
H
P
P
o
P
o
8
VGF-CP1 Series 3-300-630-31(1)
P
(P
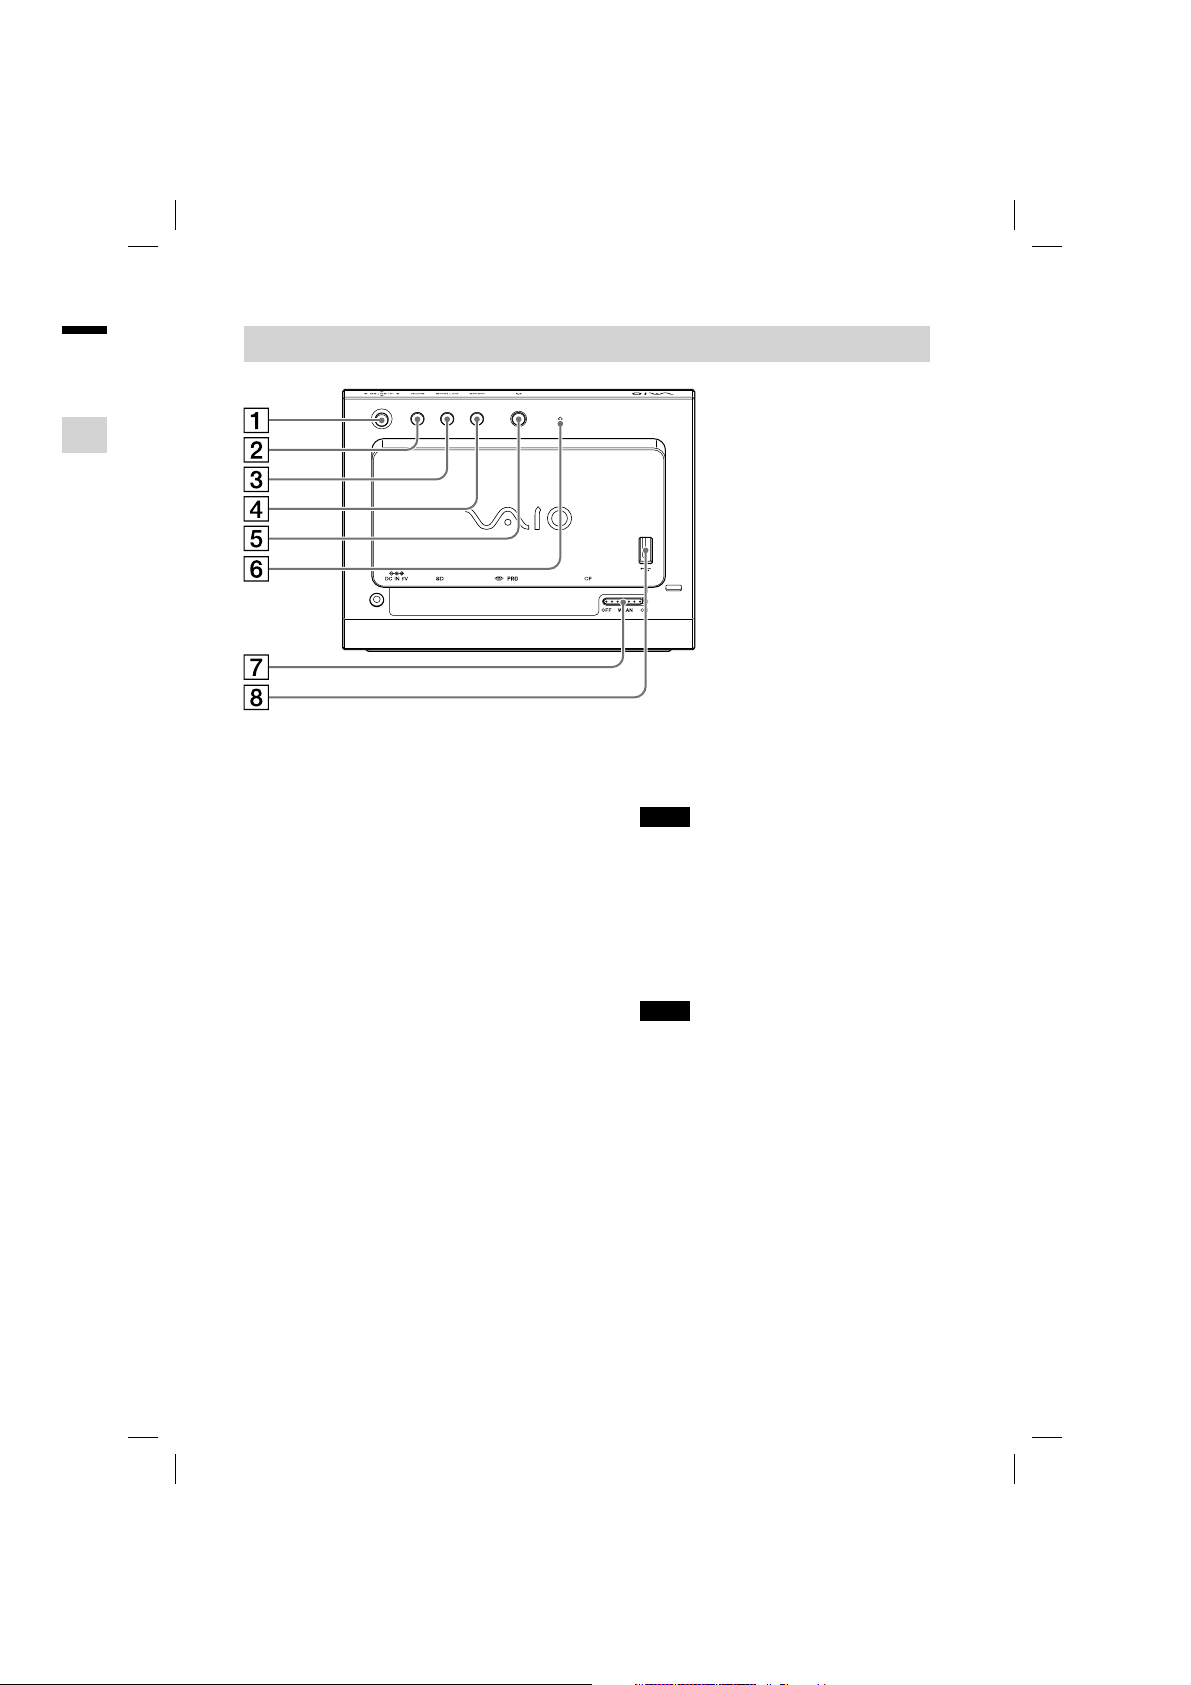
Back
. Also
rol.
/ENTER button
Press to select options and enter.
While the browse screen or the screen other
than the Options screen is displayed, adjust
the sound volume by pressing .
BACK button
Press to quit setting and return to the
previous screen.
OPTIONS button
Press to display the setting screen of the
current feature.
HOME button
Press to return to the Home screen.
(POWER) button
Press to turn on the power when in power
off or standby mode.
Press to enter standby mode during power
on.
Hint
Power turns off by pressing and holding the
(POWER) button during power on.
Light sensor
Detects ambient light around the unit.
Note
Keep sharp objects away from the sensor.
WLAN ON/OFF switch
Press to switch ON/OFF of the wireless LAN.
(USB) connector
Connects a digital still camera or USB
memory device.
Note
A USB hub should not be connected.
VGF-CP1 Series 3-300-630-31(1)
9
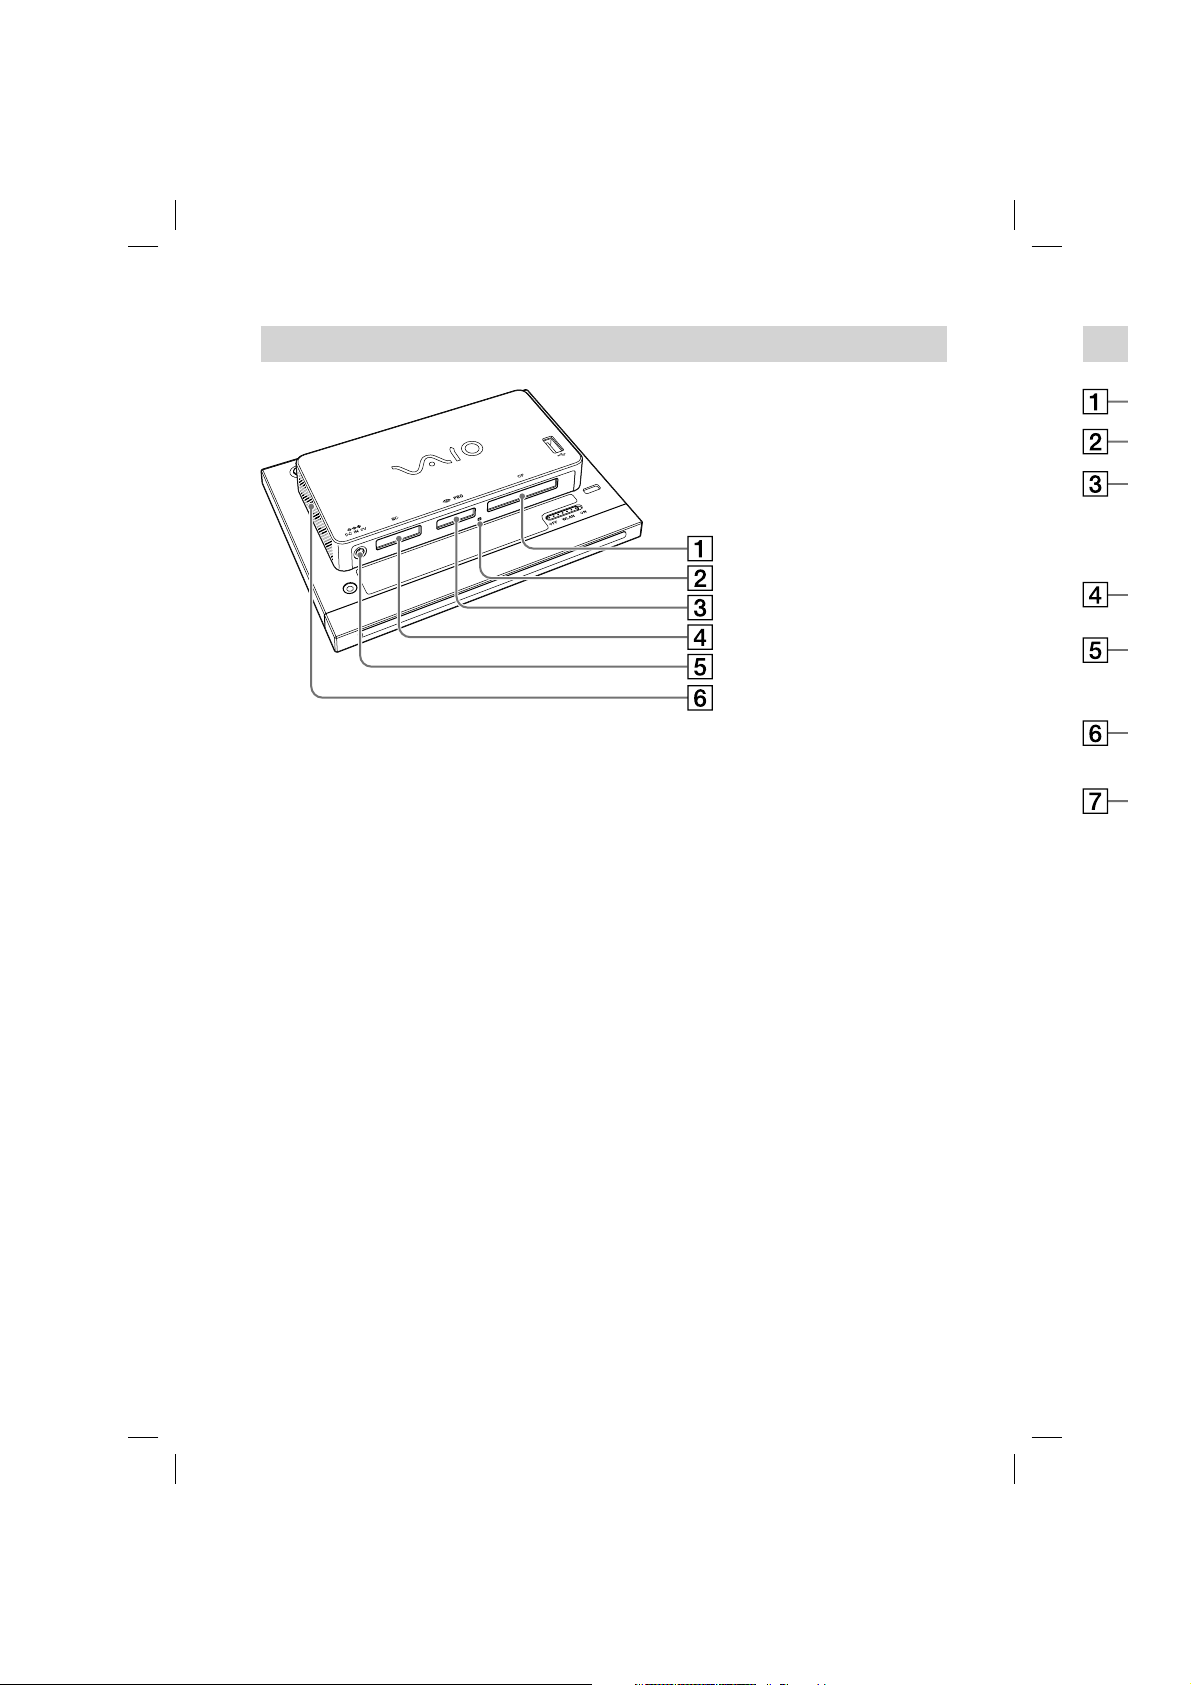
Bottom
m
r
f
r
n
r
r
A
r
r
r
Re
CF (CompactFlash) slot
Accesses CompactFlash data.
Media access indicator
Lights up in orange when accessing memory
card data.
Memory Stick slot
Accesses Memory Stick, Memory Stick PRO,
Memory Stick Duo or Memory Stick PRO Duo
media data.
SD memory card slot
Accesses SD/SDHC memory card data.
6V DC IN port
Connects an AC adapter and to power outlet.
Speakers
Outputs sound when playing back music.
There is another speaker on the other side.
P
o
P
o
P
D
P
B
P
p
H
P
10
VGF-CP1 Series 3-300-630-31(1)
outlet.
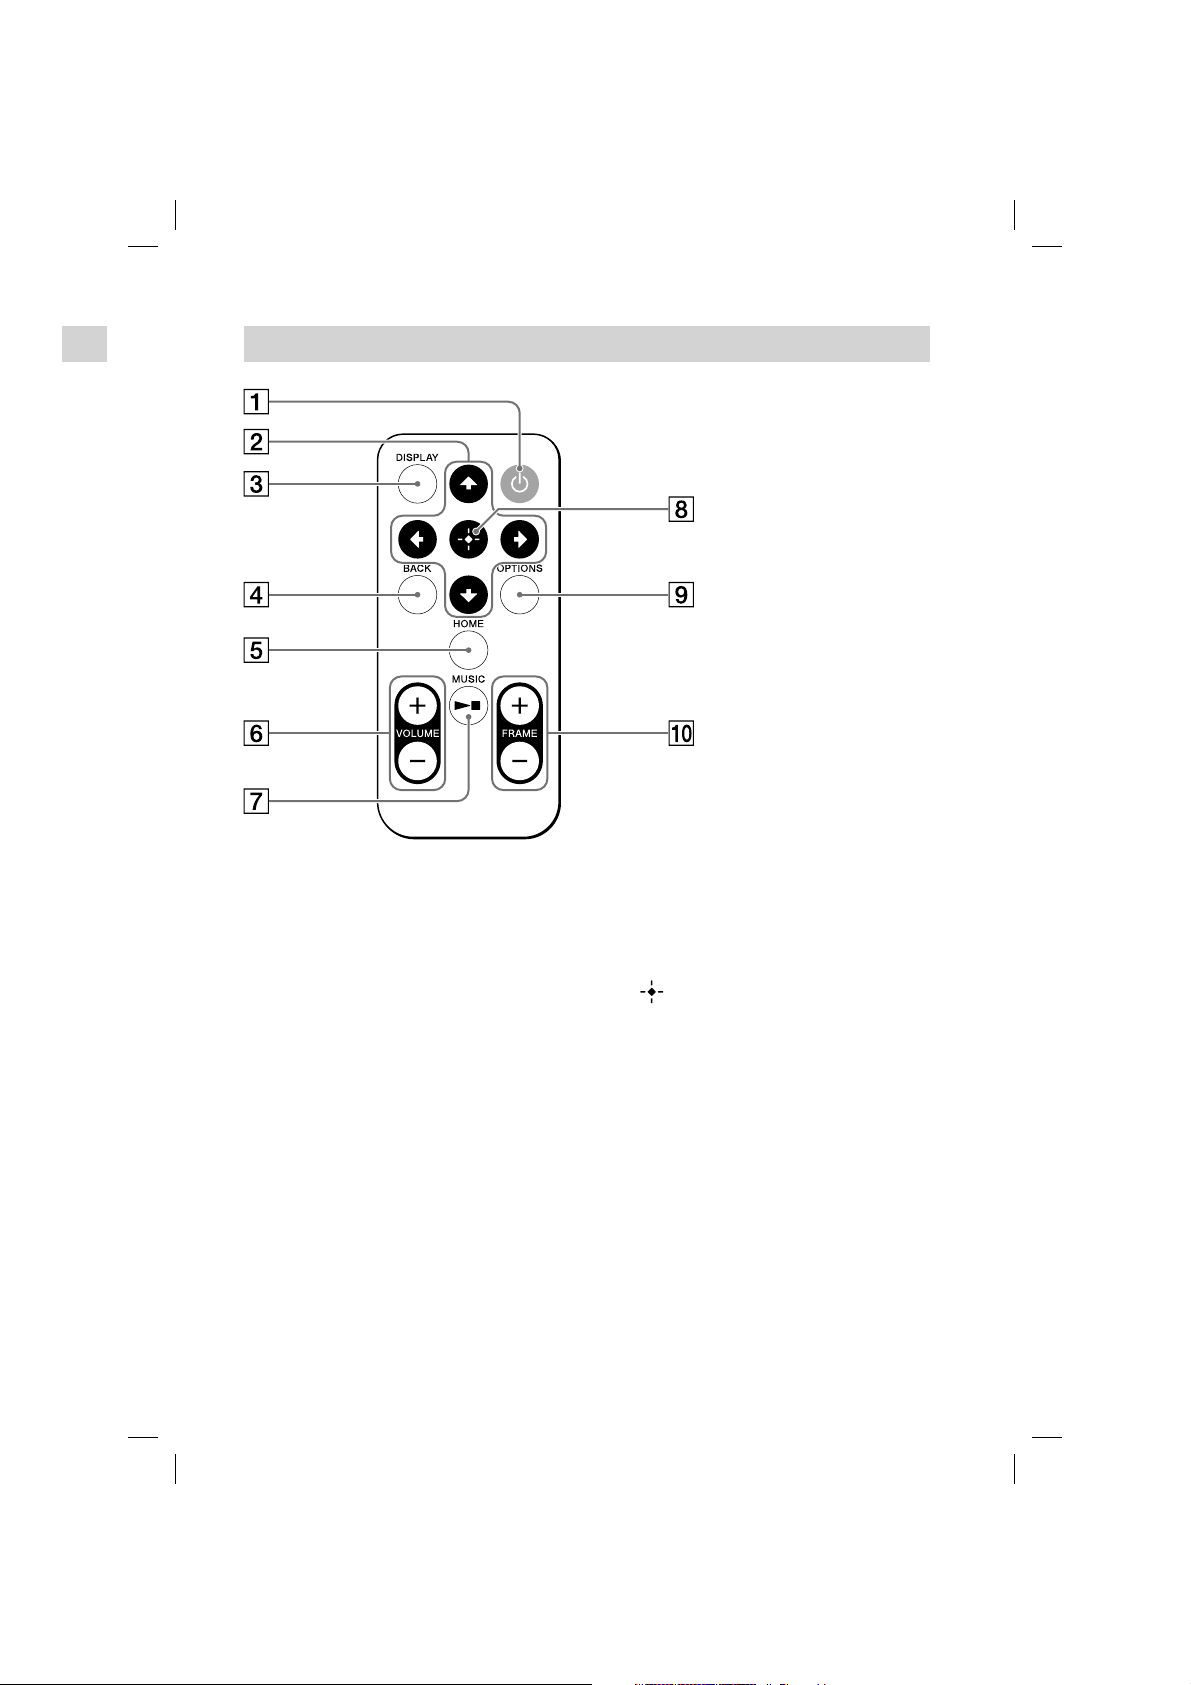
Remote Control
sic.
ide.
(POWER) button
Press to turn on the power when in power
off or standby mode.
Press to enter standby mode during power
on.
buttons
Press to select options in the setting screen.
DISPLAY button
Press to display the guide.
BACK button
Press to quit setting and return to the
previous screen.
HOME button
Press to return to the Home screen.
VOLUME +/– buttons
Press to adjust the sound volume.
MUSIC/ button
Press to start / stop music playback.
(ENTER) button
Press to enter your selection.
OPTIONS button
Press to display the setting screen of the
current feature.
FRAME +/– buttons
Press to switch frames.
11
VGF-CP1 Series 3-300-630-31(1)
Before Use
o
h
L
Checking Accessories
3
C
t
After unpacking, make sure the following accessories are supplied with your unit. If you find something
missing or broken, contact a local dealer in your area.
Digital Photo Frame
AC adapter
Power cord
Remote control
Stand
Installation CD
Operating Instructions (this book)
VGF-CP1 Quick Reference Guide
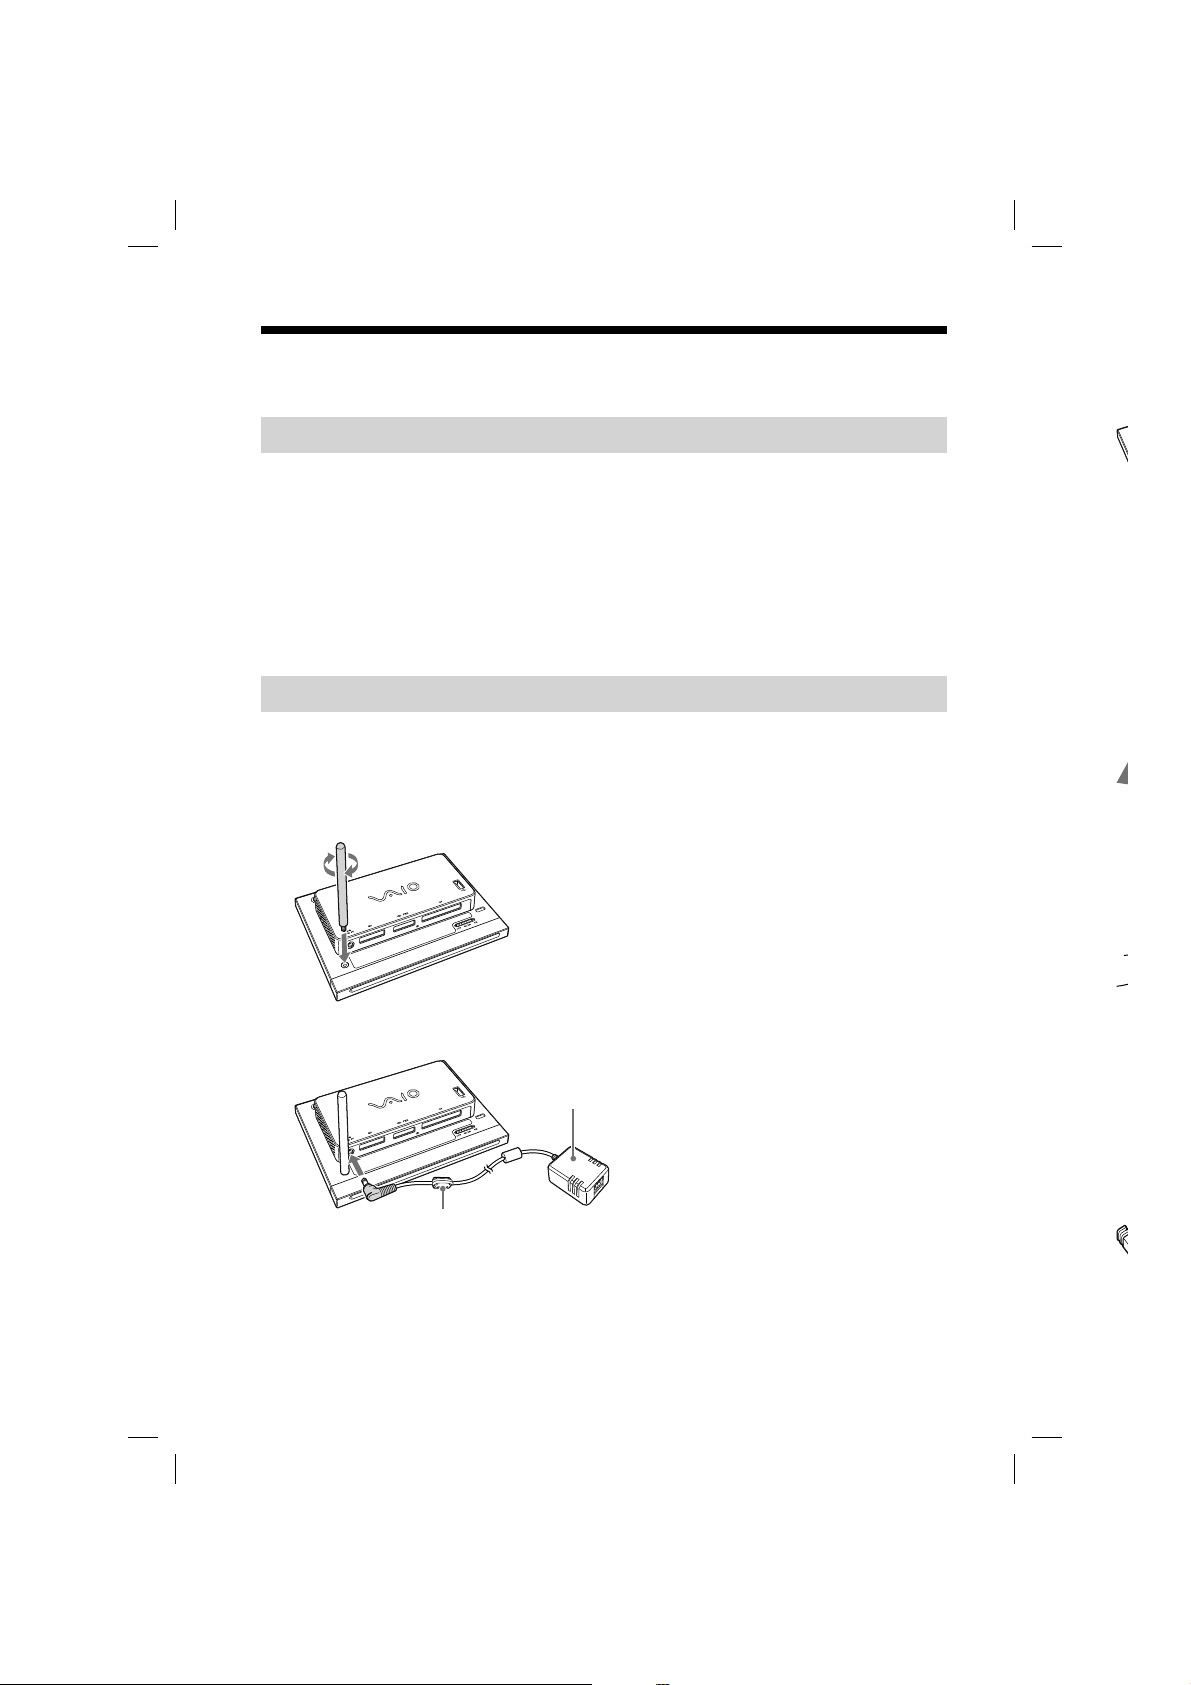
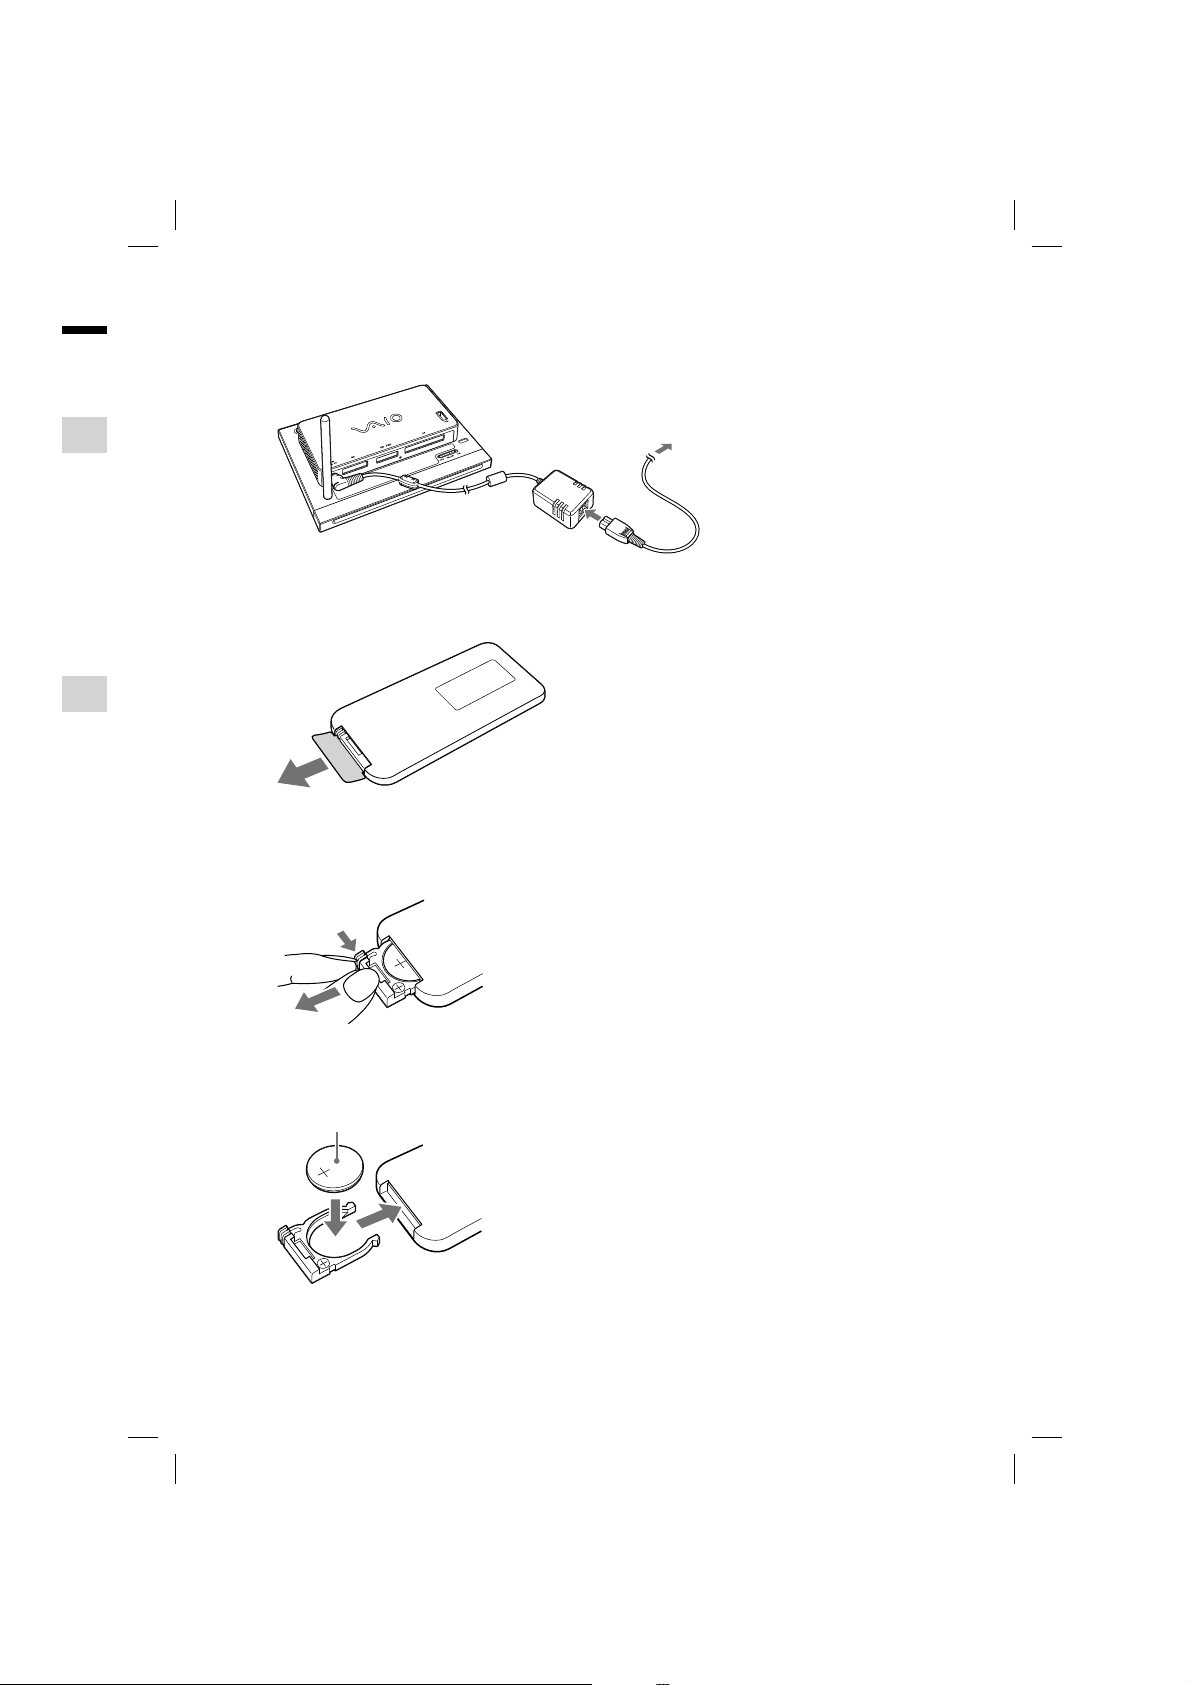
Connecting
Attach the stand to the unit and connect the AC adapter.
1
Attach the threaded portion of the stand to the threaded hole at the bottom
left corner on the back of the unit by turning clockwise.
2
Connect the AC adapter plug to the unit.
AC adapter
4
R
Repla
1
R
2
R
T
b
12
The ferrite core is supplied
with U.K. model only.
VGF-CP1 Series 3-300-630-31(1)
g
m
3
Connect the power cord to the AC adapter, then connect the power cord plug
to the wall outlet.
To wall outlet
The power turns on and the start-up screen appears.
4
Remove the insulation sheet from the remote control.
Replacing the battery
1
Release the battery tray.
2
Replace with a new CR2025 lithium battery with + side up, then restore the
battery tray.
Lithium battery
VGF-CP1 Series 3-300-630-31(1)
13

Inserting and Removing Memory Cards
t
m
h
M
h
o
d
o
a
h
h
h
B
o
m
h
h
a
m
h
u
You can play back photos or music stored on Memory Stick, Memory Stick PRO, Memory Stick Duo or
Memory Stick PRO Duo media, or an SD/SDHC memory card, CompactFlash card or digital still camera with
USB connection or USB memory device.
Inserting and removing memory cards
Insert memory card as illustrated below.
CompactFlash card
Memory Stick media
SD/SDHC memory card
When removing Memory Stick, Memory Stick PRO, Memory Stick Duo or Memory Stick PRO Duo media, or
an SD/SDHC memory card, make sure the media access indicator is not lit. Push fully in once and pull out.
When removing a CompactFlash card, make sure the media access indicator is not lit, and pull out.
Attaching and detaching a USB cable or USB memory device
Insert the connector of a USB cable connected to a digital still camera or USB memory device to the (USB)
connector of this unit. Pull out the connector when detaching.
Abou
Usable
For det
Me
T
T
D
T
T
T
SD
T
T
Co
Y
a
d
G
w
m
m
fe
T
g
14
VGF-CP1 Series 3-300-630-31(1)

a with
ia, or
out.
(USB)
About compatible memory cards
Usable memory cards with this unit are Memory Stick media, SD memory card and Compact Flash.
For details on memory card restrictions, see below.
Memory Stick media
The following Memory Stick media can be used with this unit.
Memory Stick / Memory Stick Duo / Memory Stick PRO / Memory Stick PRO Duo
This unit has a slot for both standard / Duo-size types.
You can insert Memory Stick Duo or Memory Stick PRO Duo media directly into the Memory Sick slot without an
adapter.
Do not insert Memory Stick and Memory Stick Duo media at the same time. Improper insertion of media may
damage both Memory Stick slot and media.
This unit does not support the MagicGate feature; data with copyright protection cannot be accessed.
This unit does not support 8-bit parallel data transfer (high speed data transfer).
This unit has been tested and found compatible with Sony branded Memory Stick media with a capacity of up to 8
GB; available as of May 2008. However, not all Memory Stick media that meet these specifications are guaranteed to
work.
SD memory card
This unit has been tested and found compatible only with SD memory cards of a capacity up to 2 GB, and SDHC
memory cards of a capacity up to 8 GB, available as of May 2008. However, not all SD memory cards or SDHC
memory cards that meet these specifications are guaranteed to work.
The SD memory card slot on this unit does not support the copyright protection and high-speed data transfer
features of SD memory cards and SDHC memory cards.
CompactFlash card
This unit supports Type I and II CompactFlash cards. However, not all CompactFlash cards that meet specifications are
guaranteed to work.
VGF-CP1 Series 3-300-630-31(1)
15

Basic Operation
o
c
s
s
r
r
e
n
e
r
a
p
b
n
O
M
t
Basic Use
Turning the Power On
For the customers purchasing the U.K. model
After connecting the power cord for the first time, user registration requiring screen appears. Please confirm
the requiring contents and advance to the following procedure.
1
Make sure the stand, power and remote control are ready for use by following
the steps in “Connecting” (page 10).
This unit turns on after connecting the power cord.
Hint
Press (POWER) to turn the power on when in standby mode.
To set to standby mode
“Standby Mode” reduces power consumption by deactivating the screen.
1
Press (POWER) on the remote control pointing at the remote control sensor
of this unit.
The STANDBY indicator lights up in orange and turns to standby mode.
Hint
This unit can also be set to standby mode by pressing (POWER) on the back of this unit.
To turn off the power
The steps below show how to turn off the power when removing the AC adapter, etc.
1
Press (POWER) on the back of this unit.
The STANDBY indicator lights up in orange and standby mode is set.
2
Press and hold (POWER) on the back of this unit.
The New Info indicator blinks and turns off when the power turns off.
Ab
The Ho
Sele
pres
pres
F
D
a
n
D
o
n
O
Pl
o
c
(
16
Note
The power cannot be turned off by the remote control.
Press and hold (POWER) only when in standby mode. If turning the power off from a mode other than standby mode,
stored data may be discarded.
VGF-CP1 Series 3-300-630-31(1)
Note
The we
flash co
Hin
Press H
The HO
comple
tion
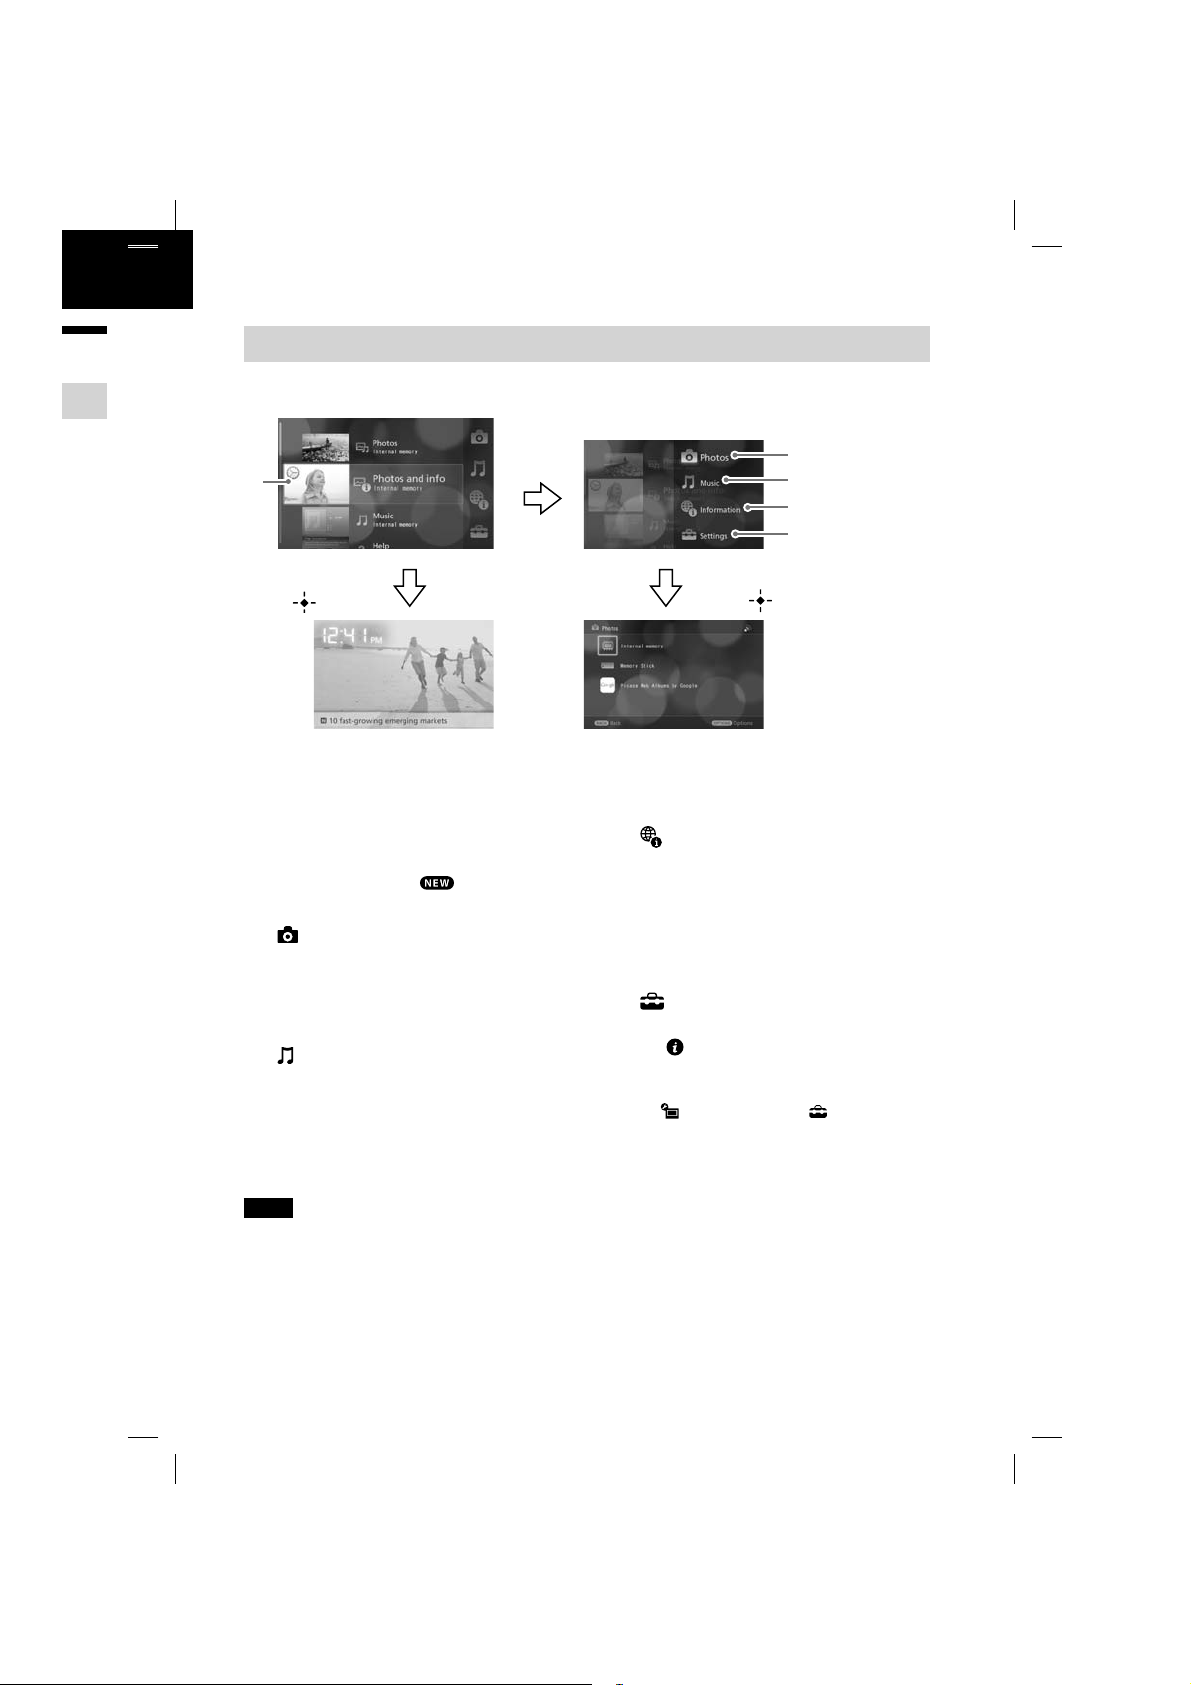
About the Home Screen
The Home screen appears by turning the power on. All functions can be selected from the Home screen.
onfirm
ing
nsor
Select a frame by
pressing and
press
(ENTER).
Frame playback starts.
Frame list
Displays registered frames. If Shared frames
are created (page 23),
new photos are uploaded.
Photos
Displays photo files stored in the memory or
on the server. Playing a slide show, creating
new frames, etc., can be performed from the
Options menu (page 45).
Music
Plays back music files stored in the memory
or on the server. Creating a new frame, etc.,
can be performed from the Options menu
(page 46).
appears when
Press .
Select desired item
by pressing and
press (ENTER).
The browse screen or
setting screen appears.
Information
Starts the registered RSS or news provided
from Google News U.K. (for U.K. model)/
Google News (for U.S.A. model) can be
displayed. Creating a new frame, etc., can be
performed from the Options menu (page
46).
Settings
Configures various settings of this unit (page
48). appears when update information for
software is available. The information can be
checked by selecting [Important messages]
of [
System settings] in [ Settings] (page
50).
y mode,
Note
The web browser equipped with this unit is for mainly checking news or registered RSS information, etc. Some web sites or
flash contents may not be properly displayed or played.
Hint
Press HOME to return to the Home screen while displaying photos or playing music.
The HOME button does not work while the selection screen (for [Yes], [No] or [Close]) is displayed. Press HOME after
completing selection or confirmation.
VGF-CP1 Series 3-300-630-31(1)
17

Playing Back Photos Frame of Sample Images
n
o
W
e
n
h
Frames using sample images and music pre-stored on this unit are used to demonstrate what a frame is. For
details on creating or playing back a frame, see page 18, 21.
2
I
F
Playing back a frame of sample images and music from the Home screen
1
Press HOME on the remote control.
The Home screen appears.
2
Select a frame by pressing on the remote control, and press (ENTER).
The selected frame starts playing back.
Displaying Data with the Browse Screen
On the browse screen, photos or music stored in the memory or the server can be played back, or RSS
information on the Internet can be displayed. Creating a new frame can also be performed from the browse
screen (page 18).
Hint
In addition to the photo browse screen explained in this section, the music browse screen to play back music files, or the
information browse screen to display RSS information, are also available.
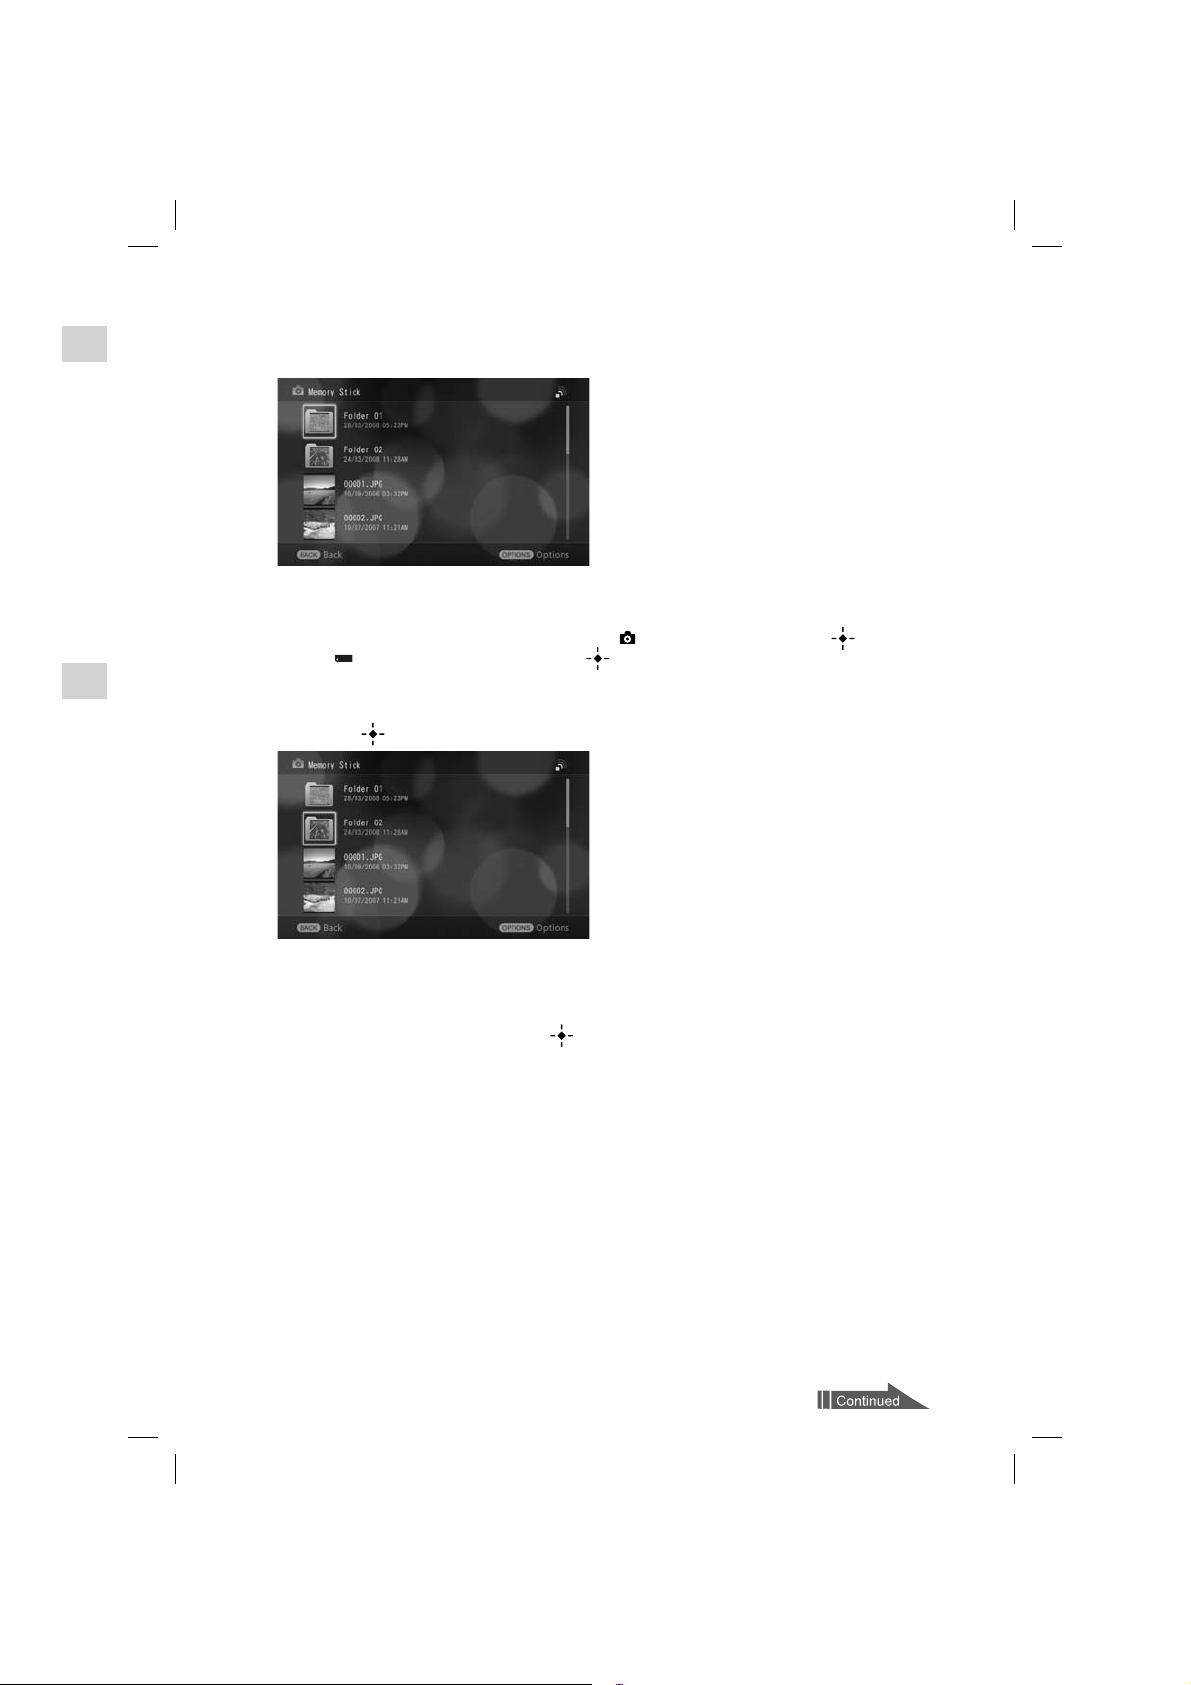
Displaying photos on Memory Stick media
As an example, the following steps show how to display photos on Memoriy Stick media shot by a digital
still camera.
1
Turn the power on (page 14).
The Home screen appears.
Hint
When the Home screen is not displayed, press HOME on the remote control.
3
S
a
T
18
VGF-CP1 Series 3-300-630-31(1)
is. For
2
Insert Memory Stick media into this unit (page 12).
Folders or photos on Memory Stick media appear after about 5 seconds.
).
S
rowse
r the
ital
Hint
When folders of photos do not appear, do the following:
Press on the remote control in the Home screen. Select [
3
Select a folder including a target photo by pressing on the remote control,
Memory Stick] by pressing , and press (ENTER).
Select [
Photos] by pressing , and press (ENTER).
and press (ENTER).
The photo list appears.
Hint
The selected folder may contain subfolders. In this case, repeat step 3 until a target photo appears.
If [Cannot show the server list.] appears, press (ENTER) to return to the previous screen.
Photos in Web services, on other memory cards or computers on a home LAN can be displayed in the same way.
For Web services or computers on a home LAN, you should configure the connection settings (page 26, 39).
VGF-CP1 Series 3-300-630-31(1)
19

4
e
E
e
h
e
h
e
Select a photo by pressing , and press (ENTER).
A photo is displayed.
Hint
If you insert a memory card while a screen other than the browse, Settings or Options screen is displayed, the
photo (folder) list of the memory card appears.
You can save currently displayed photos in the internal memory. For details, see “About internal memory” (page
47).
3
S
(
A
Al
4
S
Creating a Frame
A frame is a collection of your favorite photos or music that can be easily selected.
Once you have created several frames, you can easily change photos or music to match your mood by
selecting one of the frames in the Home screen.
Hint
In addition to the Photos and Info frame explained in this section, you can also save Music frames to play back music files
and Memories frames to display photos in order by shooting date and time. For details on other frames, see “Available
Frames” (page 22).
Creating a Photos and Info frame
As an example, the following steps show how to create a “Photos and Info” frame to display photos in a
folder.
1
Display photos in a folder to create a Photos and Info frame by following the
steps in “Displaying Data with the Browse Screen” (page 16).
2
Press OPTIONS on the remote control.
The Options menu appears.
T
5
S
T
In
M
s
20
VGF-CP1 Series 3-300-630-31(1)
he
age
y
c files
le
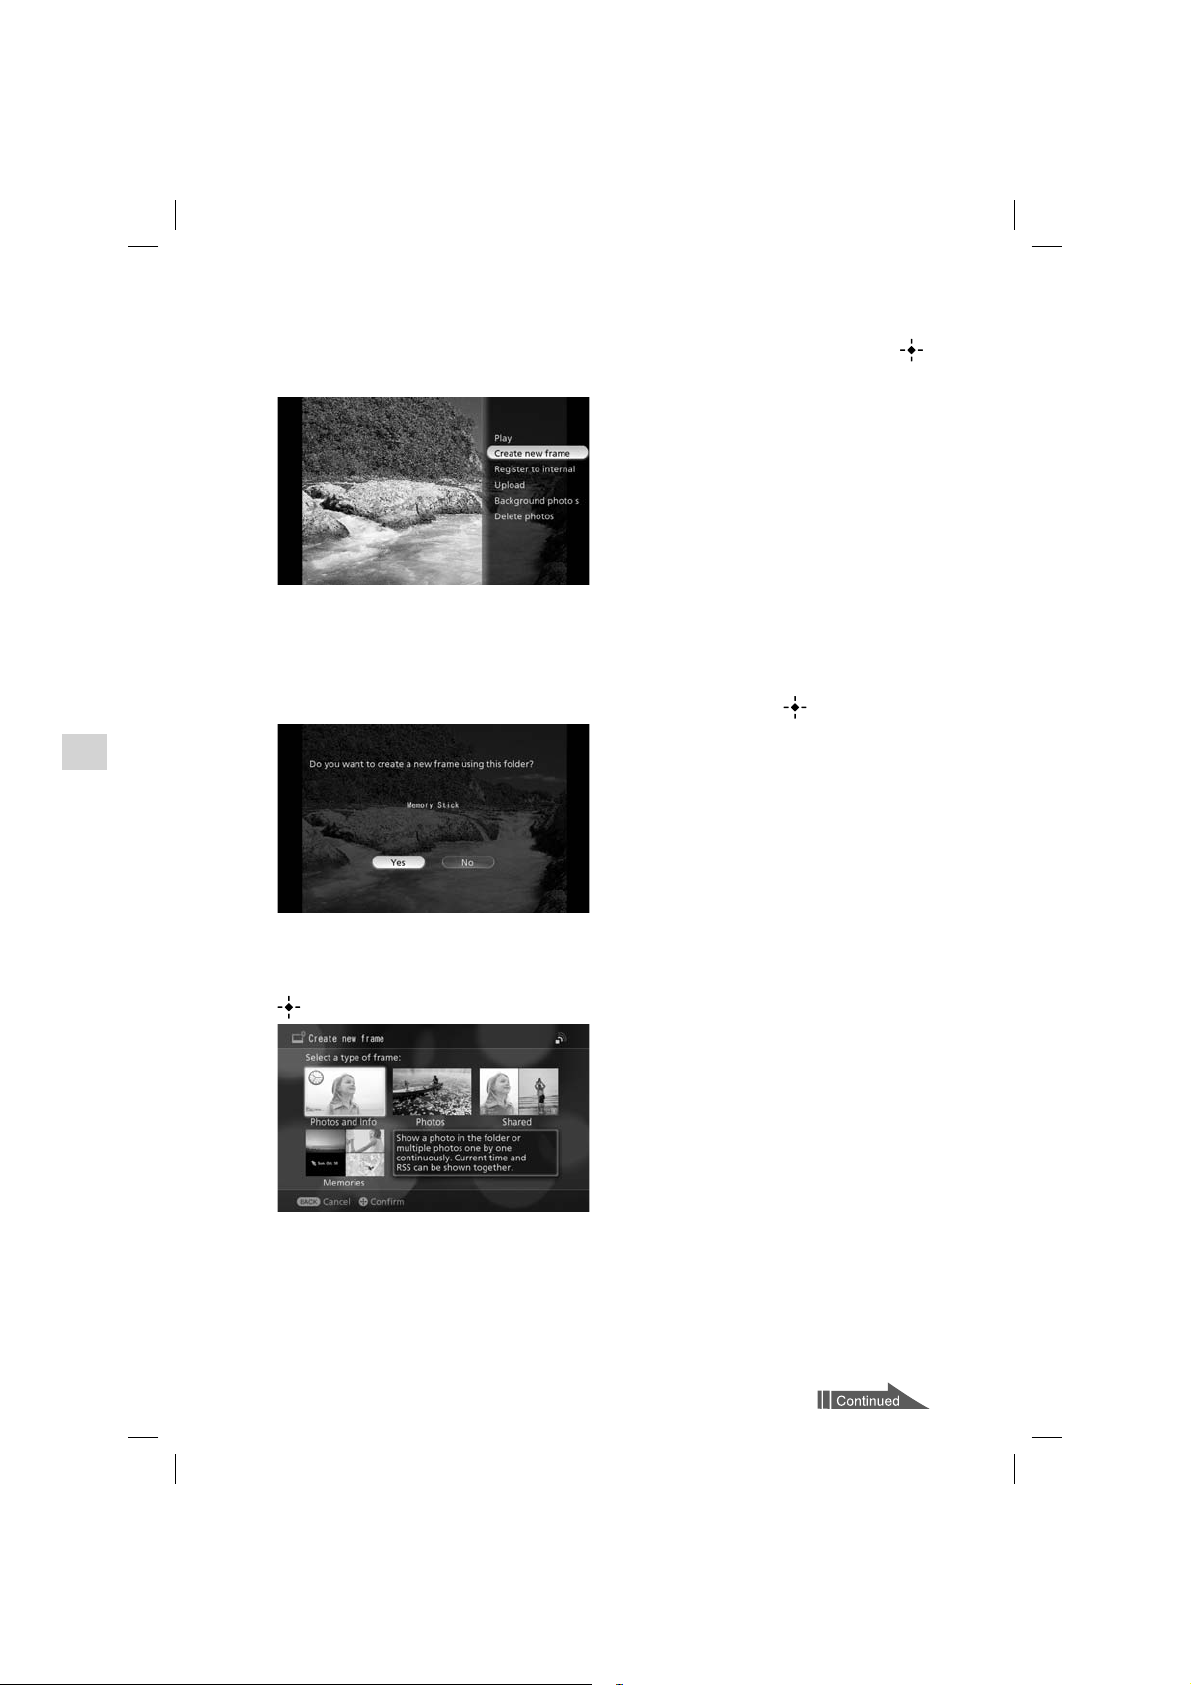
3
Select [Create new frame] by pressing on the remote control, and press
(ENTER).
A confirmation screen for creating a frame appears.
Hint
All photos in the folder storing a target photo are saved in the frame.
4
Select [Yes] by pressing on the remote control, and press (ENTER).
The “Create new frame” screen appears.
a
he
5
Select [Photos and Info] by pressing
on the remote control, and press
(ENTER).
The “Create Photos and info frame” screen appears.
Hint
In addition to the Photos and Info frame, you can select a Photo frame (page 23), a Shared frame (page 23) or a
Memories frame (page 23). However, the Shared frame can be selected only when displaying photos in the Web
server on the Internet in step 1.
VGF-CP1 Series 3-300-630-31(1)
21
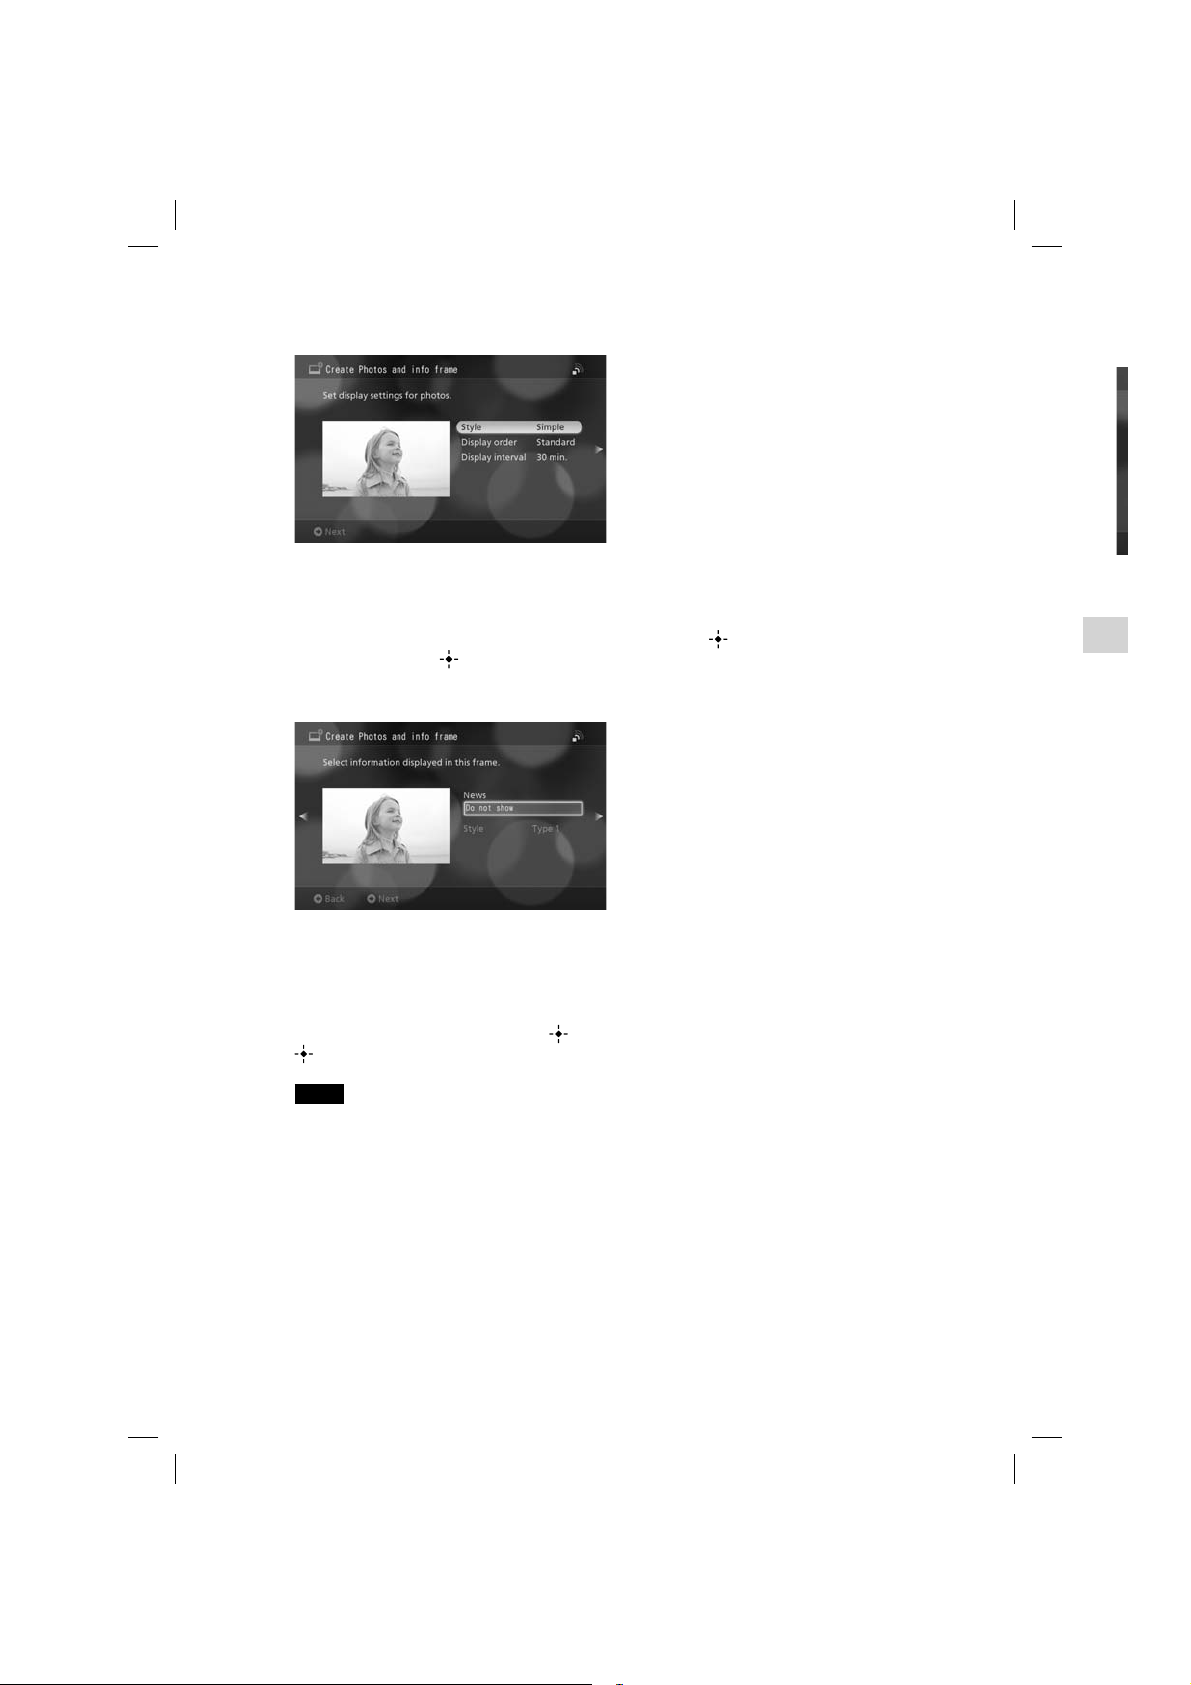
6
e
h
y
n
n
h
e
E
h
g
n
r
h
o
Press on the remote control.
8
S
A setting screen for display information appears.
Hint
You can set the style, order and interval for displaying photos in the Photos and Info frame. To change the settings,
select the desired setting by pressing on the remote control and press
by pressing and press
7
Press on the remote control.
A confirmation screen for the selected settings appears.
Hint
The selection to display news information provided from Google News U.K. (for U.K. model)/Google News (for U.S.A.
model) in the Photos and Info frame can be set in this screen. To change the settings, select the desired setting by
pressing on the remote control and press
(ENTER).
Note
To display News, a wireless network should be set up before connecting the unit to the Internet. For details on the
setting, see “Connecting to a Wireless Network” (page 39).
(ENTER).
(ENTER), then select the desired option by pressing and press
(ENTER), then select the desired option
Pla
You ca
FRAME
Playi
1
P
2
S
Chan
You ca
1
P
T
T
(
T
P
c
Y
22
VGF-CP1 Series 3-300-630-31(1)

8
Select [Yes] by pressing on the remote control, and press (ENTER).
The Photo and Info frame created with the selected settings appears.
ings,
option
U.S.A.
g by
press
the
Playing Back a Frame
You can play back saved frames from the Home screen, or change frames to another frame by pressing
FRAME on the remote control.
Playing back a frame from the Home screen
1
Press HOME on the remote control.
The Home screen appears.
2
Select the desired frame by pressing on the remote control, and press
(ENTER).
The selected frame starts playing back.
Hint
You can play back the frame by pressing FRAME while displaying a screen other than a frame.
The operation guide for frames can be displayed by pressing DISPLAY repeatedly.
Changing a frame
You can change a frame to another frame during playback.
1
Press FRAME on the remote control.
Press FRAME + to change to the next frame up in the frame list in the Home screen. Press FRAME – to
change to the next frame down in the frame list.
Hint
You can re-arrange the frame order or delete unnecessary frames in the Home screen (page 45).
VGF-CP1 Series 3-300-630-31(1)
23
Available Frames
o
y
e
u
n
n
o
e
y
e
o
c
n
s
o
t
You can choose from 8 frame types, and save up to 20 frames.
About the icons in this section
: Data in the internal memory can be used.
: Data on memory cards can be used.
: Data in the Web service can be used (Internet connection necessary).
: Data sent from the home server supported by the Remote Home Access function can be used (Internet connection
necessary).
: Data sent from a server using software such as “VAIO Media” can be used (Home LAN connection necessary).
: Data sent from Samba can be used (Home LAN connection necessary).
: Information such as news on the Internet can be displayed (Internet connection necessary).
Phot
Displa
togeth
Hin
You can
24
Frame Created from Photo Browse Screen
From the photo browse screen, you can create 4 types of frames for decorating photos in various ways. To
create a frame, select the desired photo file or folder from the photo browse screen, and select [Create new
frame] in the Options menu (page 45).
If a folder is selected from the list when creating a frame, all photos in the folder currently selected till the
5th level folder are displayed in the frame. If you select a photo from the list when creating a frame, only
photos in the folder where the photo is stored will be displayed in the frame (photos in the sub folder are
not displayed).
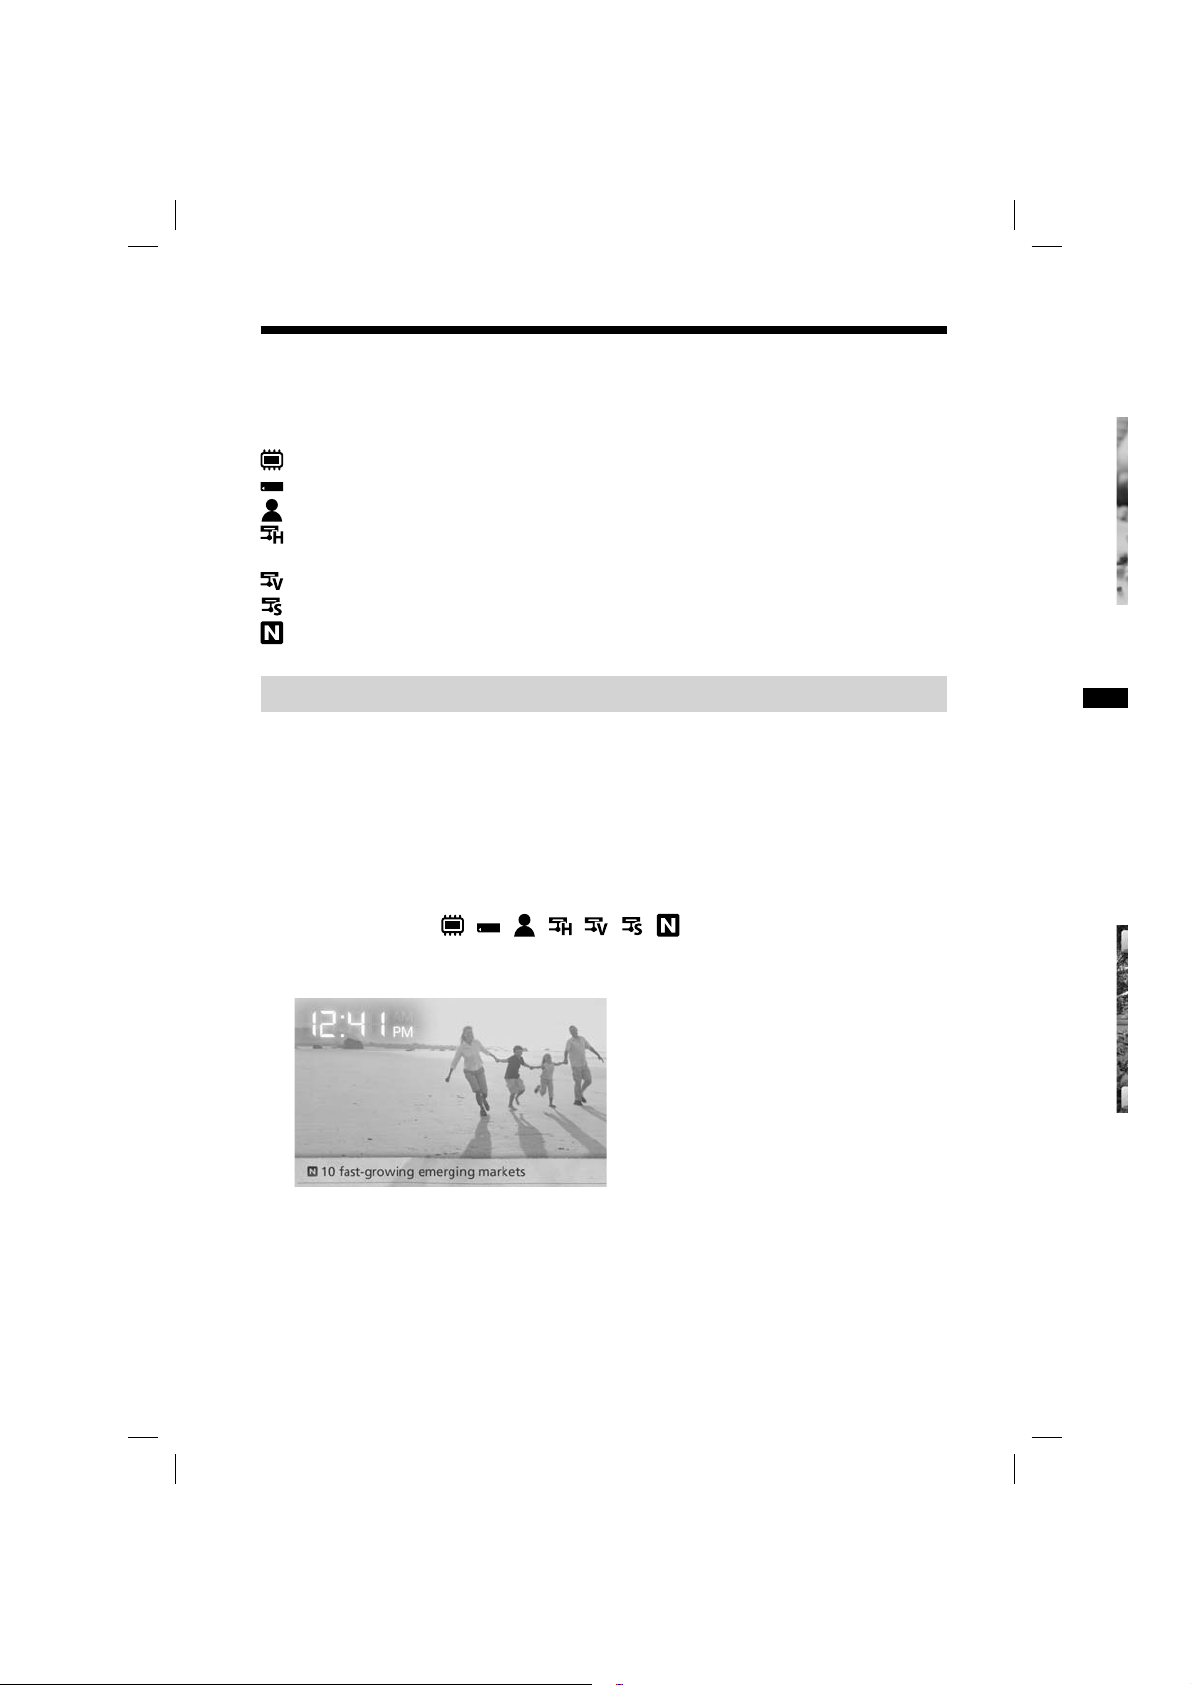
Photos and Info frame / / / / / /
Displays a photo or photos in the specified folder one after another.
You can also display the current time or registered RSS information with the photos.
Hint
Each time you press DISPLAY, the display changes as follows:
“Photo with analog clock” “Photo with digital clock” “Photo only” “Photo with guide” “Photo with analog
clock”…
Note
If yo
the n
Whe
Whe
Phot
Shar
Displa
memb
Hin
Up t
You
Whe
light
phot
Each
“Pho
VGF-CP1 Series 3-300-630-31(1)
ction
s. To
e new
the
nly
r are
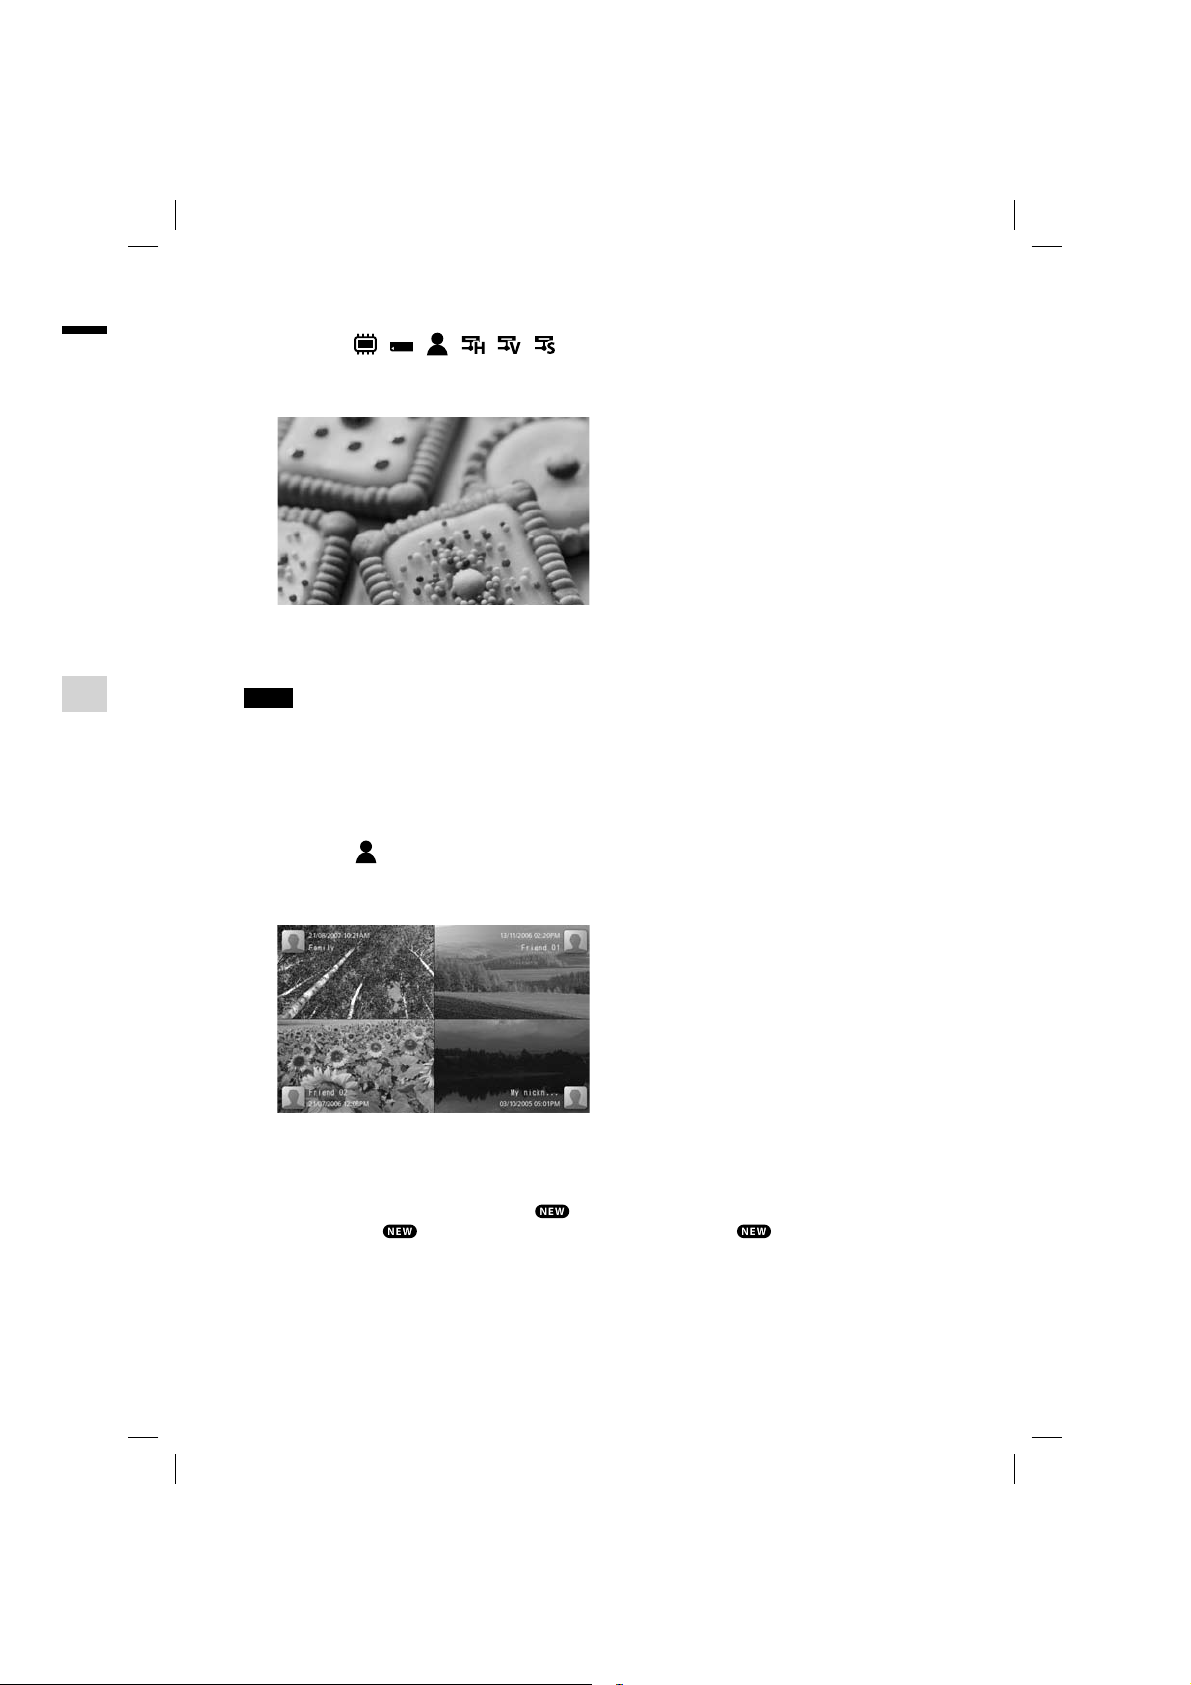
Photos frame / / / / /
Displays photos in the specified folder one after another with photo effects. You can also play back music
together with your photos by selecting a music file in the internal memory.
Hint
You can set the transition speed for displaying photos in [Frame settings] (page 45).
Note
If you change music to [Not specified] in the Options menu while a Photos frame is displayed, changes will be applied
the next time the frame is played back.
When playing a Photos frame, the first photo may be repeatedly displayed.
When playing a Photos frame, the first photo in the Web service may take time to display.
Photos in the Web service may not be displayed due to slow connection speeds or excessive accesses to the Internet.
Shared frame
Displays photos uploaded in the Web photo organizer by members at the same time. Information from
members such as friends or family can be shared by displaying respective photos at the same time.
Hint
Up to 4 members can be registered for 1 Shared frame.
You can set the style, order and interval for displaying photos in [Frame settings] (page 45).
When new photos are uploaded to a Web server, is displayed on the Home screen and the New Info indicator
lights up (page 6, 15).
photos by
Each time you press DISPLAY, the display changes as follows:
“Photo with face icon” “Photo only” “Photo with guide” “Photo with face icon”…
on the remote control.
is displayed to members while displaying Shared frames. disappears when changing
25
VGF-CP1 Series 3-300-630-31(1)
Note
m
n
O
a
y
r
y
c
It may take some time to display the first photo after starting the Shared frame.
Depending on the number of photos in the folder, it may take some time to display the first photo.
The more members (up to 4) are sharing the folder at the same time, the longer it takes to display the first photo.
Photos in the Web photo organizer may not be displayed due to slow connection speed or excessive access to the
Internet.
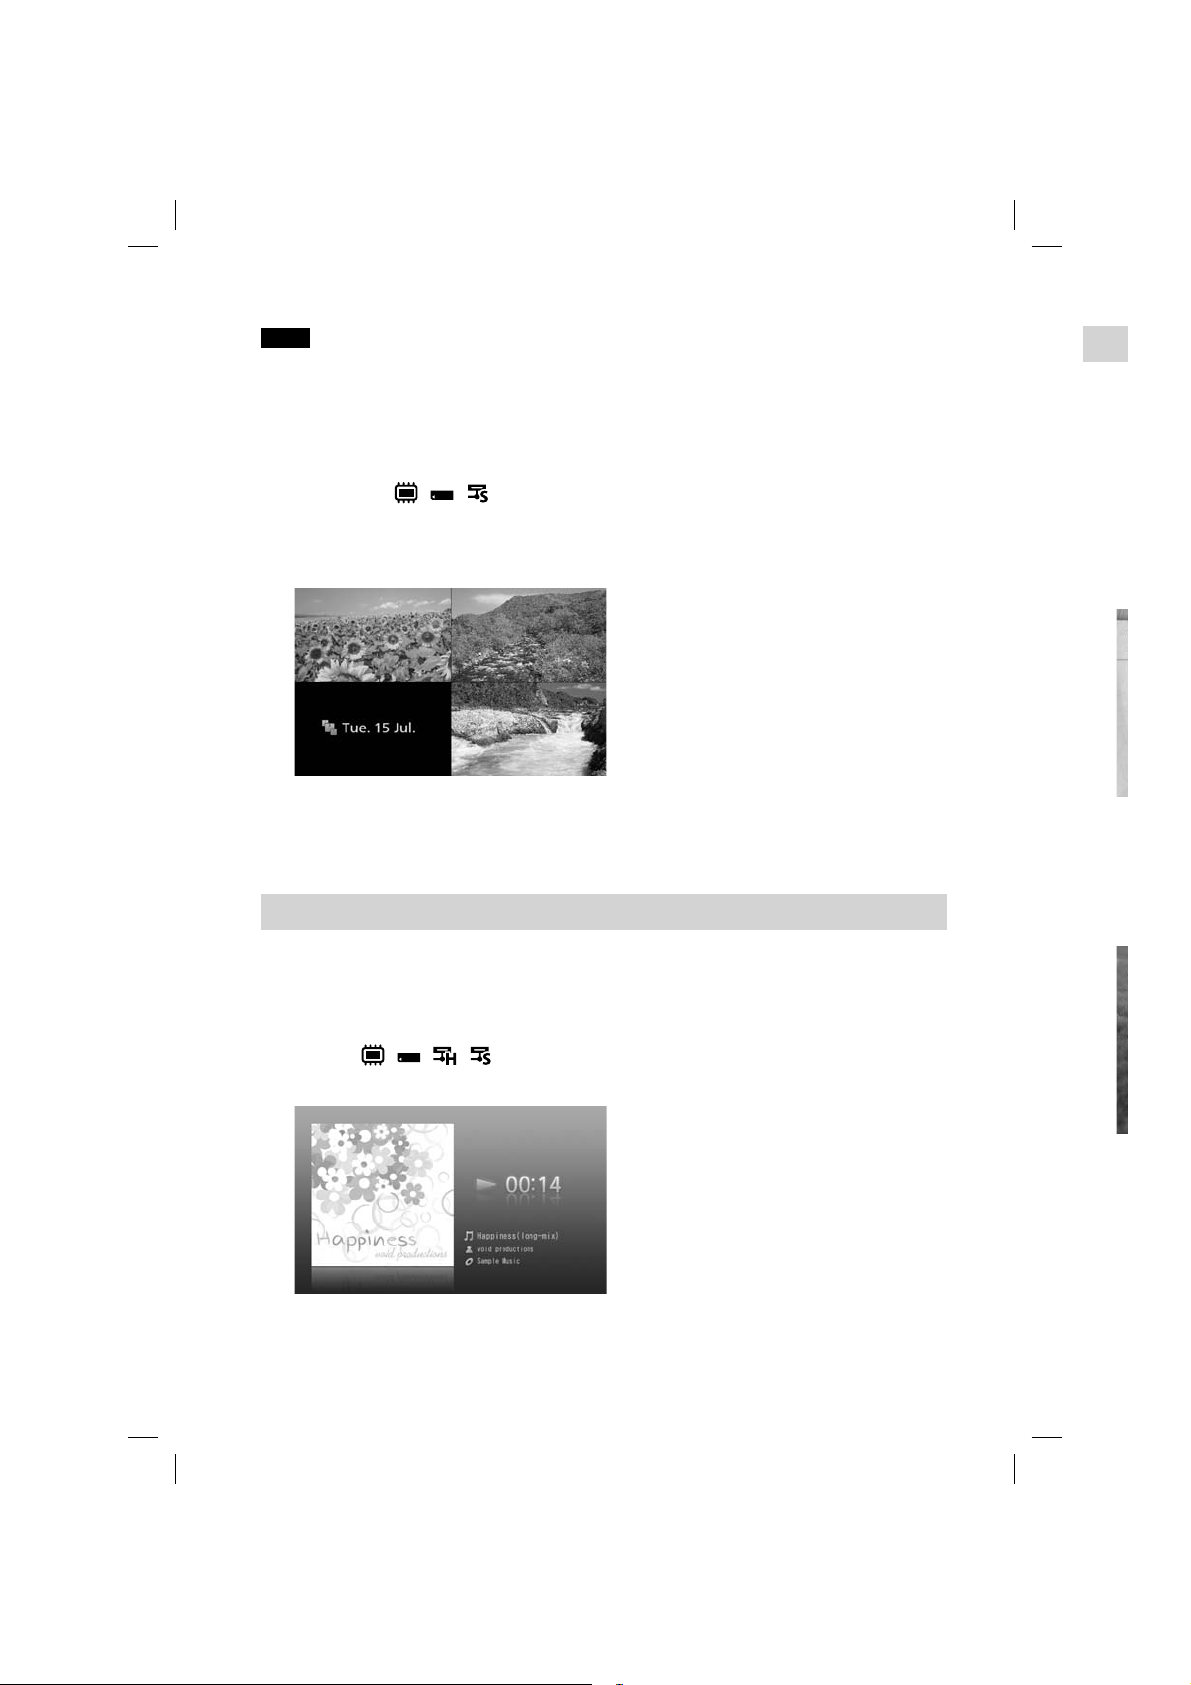
Memories frame / /
Displays photos shot or updated within one month from today in the specified folder at random. Photos
shot in “this time some years ago” may be displayed since this unit displays photos regardless of shooting
year. You can recall the days the photos were shot.
Hint
You can set the screen separation, style and interval for displaying photos in [Frame settings] (page 45).
It is recommended to store as many photos in a single folder as possible.
Fra
In the i
site.
To crea
in the
Hin
The rele
News
Displa
Hin
You can
26
Frame Created from Music Browse Screen
In the music browse screen, you can create frames to play back music.
To create a frame, select the desired music file or folder from the music browse screen, and select [Create
new frame] in the Options menu (page 45).
Music frame / / /
Plays back your favorite music.
Hint
Only the sleeve images of ID3 tag on music can be displayed.
To stop playing music, press on the remote control.
RSS f
Displa
Hin
For d
You
VGF-CP1 Series 3-300-630-31(1)
t
Frame Created from Information Browse Screen
.
e
tos
ing
In the information browse screen, you can create frames to display information, such as news from an RSS
site.
To create a frame, select the desired RSS from the information browse screen, and select [Create new frame]
in the Options menu (page 45). Up to 3 types of frame are available depending on the RSS.
Hint
The release date of the latest information from a Web site sending RSS feeds is displayed under each frame title (RSS name).
News frame
Displays RSS information provided from Google News U.K. (for U.K. model)/Google News (for U.S.A. model).
Hint
You can set the background design in [Frame settings] (page 46).
RSS frame
Displays information from RSS feeds to which you are registered.
ate
Hint
For details on RSS registration, see “About RSS registration” (page 47).
You can set the background design in [Frame settings] (page 46).
VGF-CP1 Series 3-300-630-31(1)
27

Examples
t
G
h
n
h
n
f
g
h
h
Example 1: Using [Picasa Web Albums by Google]
“Picasa Web Albums by Google” is a Web service on the Internet provided from Google. With this wireless
device, you can display photos on the Internet or upload photos to the Internet using “Picasa Web Albums
by Google”.”
This section shows how to use “Picasa Web Albums by Google.”
Note
For Internet Web service, restrictions, such as numbers of photos to store, may be changed without notice. Check the Web
site of the Web services for the latest information.
Obtaining an Account for “Picasa Web Albums by Google”
You need a computer in order to set up your account.
You need a Google account obtain a “Picasa Web Albums by Google” account.
If you already have an account for Picasa Web Albums for Google, proceed to “Logging in to Picasa Web
Albums by Google” (page 27).
Hint
For details on “Picasa Web Albums by Google,” see Google help.
Wi
1
2
C
T
3
E
T
4
R
i
A
Pi
Lo
In orde
For det
28
Without a Google account
1
Go to http://www.google.com.
2
Click [more]-[Photos].
The log-in screen for “Picasa Web Albums by Google” appears.
3
Click [Create a new Google Account].
The Create a new Google Account screen appears.
4
Create the Google account and register for “Picasa Web Albums by Google” by
following the on-screen instructions.
After creating the Google account and completing the user registration for “Picasa Web Albums by
Google,” proceed to “Logging in to Picasa Web Albums by Google” (page 27).
1
P
T
2
P
T
VGF-CP1 Series 3-300-630-31(1)
 Loading...