

Page 1

User Guide
Personal Computer
VGC-RC110G Series
N
Page 2

Contents
Before Use .........................................................................................................................................................................6
Documentation .............................................................................................................................................................6
Ergonomic Considerations...........................................................................................................................................9
Getting Started .................................................................................................................................................................11
Locating Controls and Ports.......................................................................................................................................12
About the Indicator Lights ..........................................................................................................................................15
Setting Up Your Computer.........................................................................................................................................16
Shutting Down Your Computer Safely .......................................................................................................................30
Using Your VAIO Computer .............................................................................................................................................31
Using the Keyboard ...................................................................................................................................................32
Using the Mouse ........................................................................................................................................................37
Using the Optical Disc Drive ......................................................................................................................................43
Using the TV Function ...............................................................................................................................................49
Using the Memory Stick Media ..................................................................................................................................65
Using Other Memory Cards .......................................................................................................................................69
Using the Internet.......................................................................................................................................................72
2
nN
Page 3

3
nN
Using Peripheral Devices .................................................................................................................................................73
Connecting an External Microphone..........................................................................................................................74
Connecting a VCR or Camcorder ..............................................................................................................................75
Connecting a Universal Serial Bus (USB) Device......................................................................................................77
Connecting a Printer ..................................................................................................................................................79
Connecting an i.LINK Device .....................................................................................................................................81
Connecting to a Network (LAN) .................................................................................................................................83
Customizing Your VAIO Computer ..................................................................................................................................85
Setting the Password .................................................................................................................................................86
Setting Up Your Computer with VAIO Central ...........................................................................................................88
Using the Power Saving Modes.................................................................................................................................89
Upgrading Your VAIO Computer......................................................................................................................................92
Before Upgrading Your Computer .............................................................................................................................93
Opening and Closing the Computer...........................................................................................................................94
Adding and Removing Memory..................................................................................................................................97
Installing an Add-on Card ........................................................................................................................................103
Replacing the Lithium Battery ..................................................................................................................................106
Installing the Hard Disk Drive...................................................................................................................................109
Installing the IDE Device..........................................................................................................................................118
Page 4

4
nN
Precautions ....................................................................................................................................................................128
On Handling the LCD Screen ..................................................................................................................................129
On Using the Power Source ....................................................................................................................................130
On Handling Your Computer....................................................................................................................................131
On Handling Floppy Disks .......................................................................................................................................133
On Handling Discs ...................................................................................................................................................134
On Using Headphones.............................................................................................................................................134
On Handling Memory Stick Media............................................................................................................................135
On Handling the Hard Disk ......................................................................................................................................136
Troubleshooting .............................................................................................................................................................137
Computer .................................................................................................................................................................138
System Security .......................................................................................................................................................145
Internet.....................................................................................................................................................................147
CDs and DVDs.........................................................................................................................................................149
Display .....................................................................................................................................................................153
Printing.....................................................................................................................................................................154
Microphone ..............................................................................................................................................................155
Mouse ......................................................................................................................................................................156
Speakers..................................................................................................................................................................158
Keyboard..................................................................................................................................................................160
Floppy Disks ............................................................................................................................................................161
Audio/Video..............................................................................................................................................................162
Memory Stick Media ................................................................................................................................................163
Peripherals ...............................................................................................................................................................164
Page 5

5
nN
Support Options .............................................................................................................................................................165
Sony Support Information ........................................................................................................................................165
Program Support Information...................................................................................................................................166
Page 6

nN
Before Use
Before Use
Congratulations on your purchase of this Sony VAIO® computer, and welcome to the on-screen User Guide. Sony has
combined leading-edge technology in audio, video, computing, and communications to provide state-of-the-art personal
computing.
Documentation
Your documentation includes printed information and user guides to read on your VAIO computer.
Printed Documentation
❑ Welcome mat — Contains an overview of connections, setting up information, etc.
❑ Safety information — Contains safety guidelines and owner information.
6
Page 7

7
nN
Before Use
Non-printed Documentation
❑ User Guide (this manual) — Contains features of your computer. It also includes information about the software
programs included with your computer, as well as information on solving common problems.
❑ Specifications — The online Specifications describe the hardware and software configuration of your VAIO computer.
To view the online Specifications:
1 Connect to the Internet.
2 Go to the Sony online support Web site at http://www.sony.com/pcsupport
at http://www.sony.ca/support
American countries or areas.
❑ VAIO Recovery Guide — Provides information about restoring individual software programs, software drivers, and drive
partition(s) or your entire hard disk drive to the original factory installed settings.
To access this online VAIO Recovery Guide:
1 Click Start, point to All Programs, and click VAIO Support Central.
2 Click VAIO Documentation.
3 Click VAI O Recovery Guide.
❑ RAID guide — Provides an overview of RAID systems and the various RAID levels (or types) that can be configured with
your VAIO computer. It lists detailed procedures for using the RAID Recovery program to configure the hard disk drives,
change your computer's RAID array, or to remove the RAID configuration. Additional procedures are also provided for
using the VAIO Recovery utility and the Intel Storage Utility programs.
To access this online guide:
1 Click Start, point to All Programs, and click VAIO Support Central.
2 Click VAI O Documentation.
3 Click RAID guide.
for customers in Canada, or at http://www.sony.com/lapcsupport for customers in Latin
for customers in USA,
Page 8

nN
Before Use
❑ MCE guide (MCE models only) — Provides information about using the Windows XP Media Center Edition operating
system.
To access this online MCE guide:
1 Click Start, point to All Programs, and click VAIO Support Central.
2 Click VAI O Documentation.
3 Click MCE guide.
8
Page 9
Ergonomic Considerations
Whenever possible, you should attempt to take account of the following ergonomic considerations:
9
nN
Before Use
❑ Stable work surface — Use a stable work surface large enough to support the computer and other peripheral equipment.
❑ Ventilation – Leave at least eight inches of space on the left and back sides of your computer to enable proper ventilation.
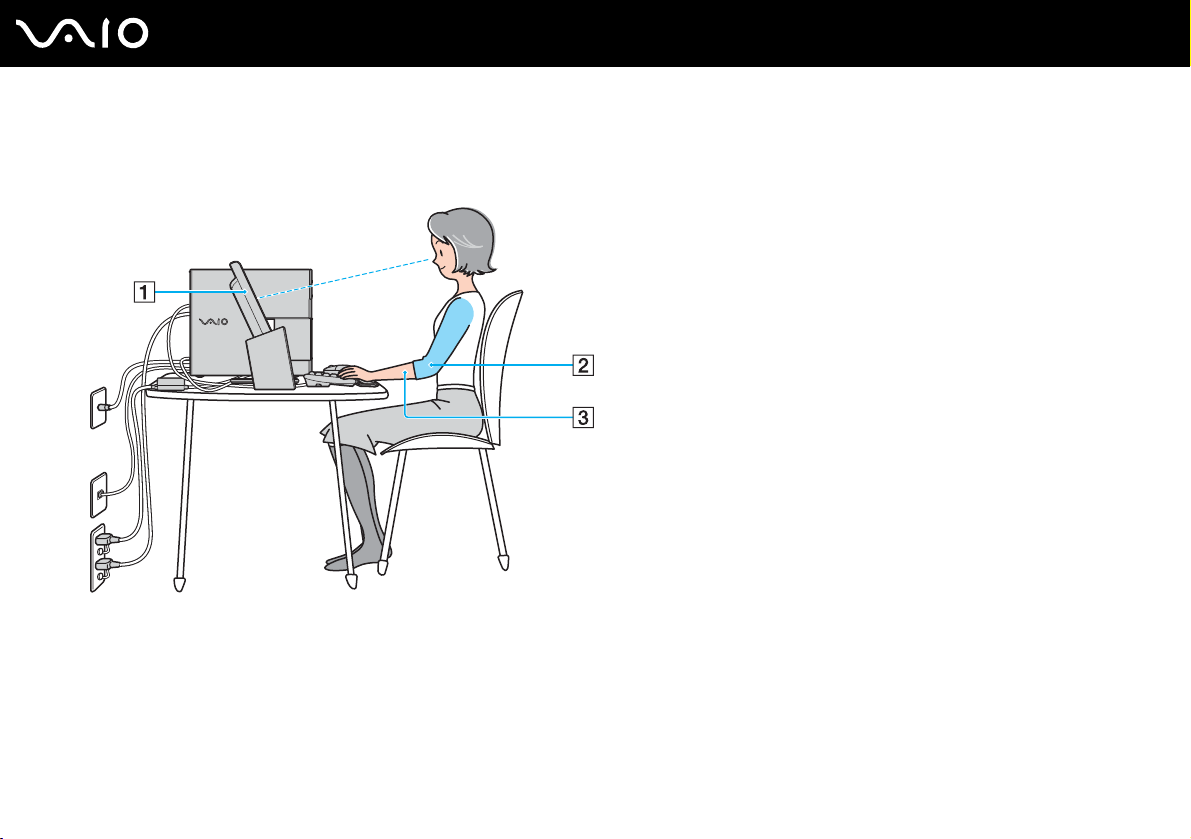
❑ Position of your computer – Place the display directly in front of you (1). Keep your forearms horizontal (2), with your
wrists in a neutral, comfortable position (3) while using the keyboard, pointing device, or external mouse. Let your upper
arms hang naturally at your sides. Have breaks during sessions with your computer. Excessive use of the computer may
strain muscles or tendons.
Page 10

10
nN
Before Use
❑ Furniture and posture – Sit in a chair with good back support and armrests. Adjust the level of the chair so your feet are
flat on the floor. A footrest may make you more comfortable. Sit with relaxed, upright posture — avoid slouching forward
or leaning far backward.
❑ Viewing angle of the display – Position the display 18 to 26 inches directly in front of you, with the top of the screen at
or a little below eye level. Use the display's tilting feature to find the best position. You can reduce eye strain and muscle
fatigue by placing the display in the proper position.
❑ Lighting – Choose a location where windows and lights do not create glare and reflection on the display. Use indirect
lighting to avoid bright spots on the display. You can also purchase accessories for your display that help reduce glare.
Proper lighting adds to your comfort and work effectiveness.
Page 11

Getting Started
This section describes how to get started with using your VAIO computer.
❑ Locating Controls and Ports (page 12)
❑ About the Indicator Lights (page 15)
❑ Setting Up Your Computer (page 16)
❑ Shutting Down Your Computer Safely (page 30)
11
nN
Getting Started
Page 12

Getting Started
Locating Controls and Ports
Take a moment to identify the controls and ports shown on the following pages.
!
Your computer may not be equipped with all of the hardware features described in this section. The location of the controls, ports, and jacks may vary
from the illustrations shown below, depending on the model you purchased. See the online Specifications for your computer's specific hardware
configuration.
12
nN
Page 13

Front
A Optical disc drive 1 (page 43)
See the online Specifications for your computer's hardware
configuration.
B Drive 1 eject button (page 43)
Getting Started
C Optical disc drive 2 (page 43)
See the online Specifications for your computer's hardware
configuration.
D Drive 2 eject button (page 43)
E Hi-Speed USB (USB 2.0) port
F i.LINK
®
(IEEE1394) S400 port (page 81)
*1
(page 77)
G VAIO power indicator (page 15)
H Hi-Speed USB (USB 2.0) ports
*1
(page 77)
I SM/xD-Picture Card slot (page 69)
J CF (CompactFlash
®
) memory card slot (page 69)
K Media Access indicator (page 15)
L Memory Stick media slot
*2
(page 69)
M SD memory card slot (page 69)
N Drive indicator (page 15)
O Standby indicator (page 15)
P Power button
Q Headphones jack (page 19)
R Microphone jack (page 74)
S S Video In port (page 75)
T Composite Video In jack (page 75)
U Composite Audio In jacks (page 75)
*1
Supports high-/full-/low- speeds.
*2
Your computer supports Memory Stick Duo media and Memory Stick Pro
high speed and high capacity capabilities.
13
nN
Page 14
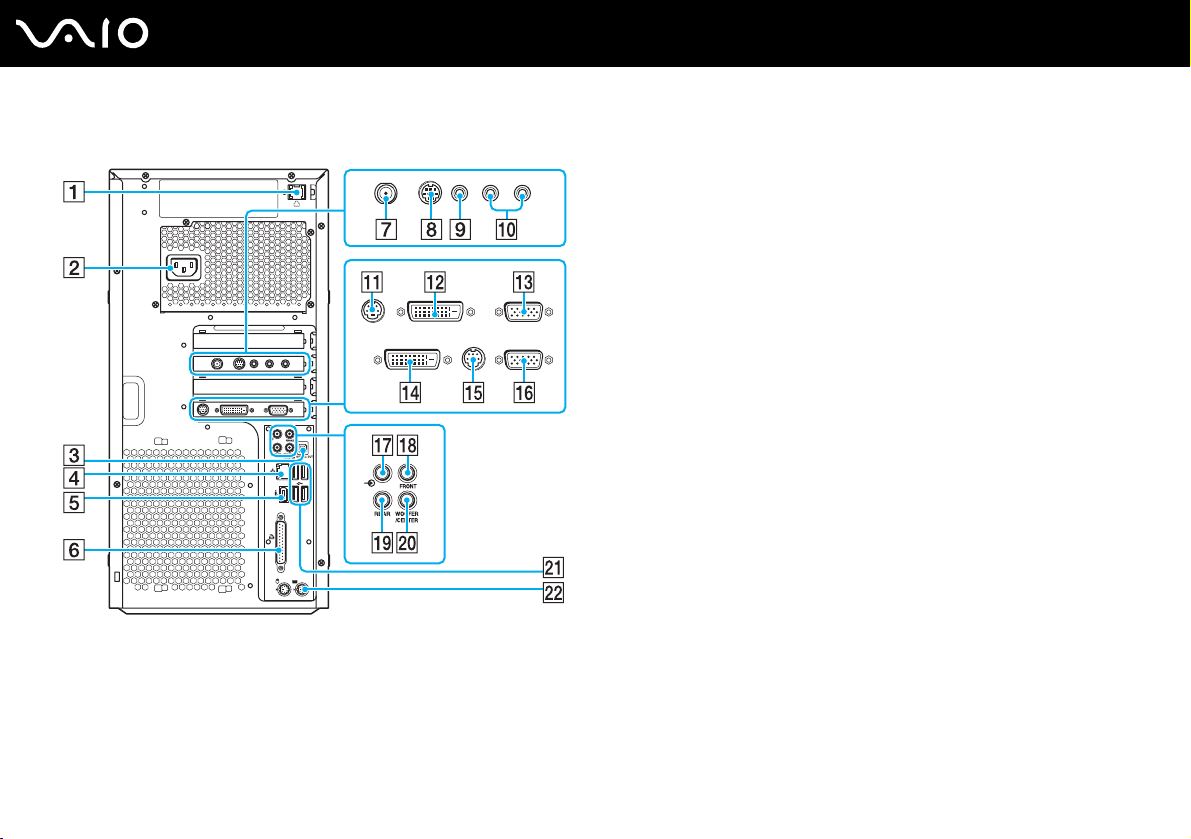
Back
A Modem port (page 25)
B AC Input port (page 28)
C S/PDIF Optical Out port for connecting digital equipment such as an
AV amplifier.
D Network (Ethernet) port (page 83)
E i.LINK® (IEEE1394) S400 port (page 81)
F Printer port (page 80)
G VHF/UHF port (page 50)
H S Video In port (page 75)
I Composite Video In jack (page 75)
J Composite Audio In (L/R) jacks (page 75)
K TV Out (S Video/Video) jack
L DVI-D port
M Monitor port
N DVI-D port
*1
(page 17)
*1
(page 17)
*2
(page 17)
O TV Out (S Video/Video) jack
P Monitor port
*2
(page 17)
*1
for connecting a TV monitor.
*2
for connecting a TV monitor.
Q Line In jack (page 19)
R FRONT jack (page 19)
S REAR jack (page 19)
T WOOFER/CENTER jack (page 19)
U Hi-Speed USB (USB 2.0) ports
*3
(page 77)
V Keyboard port (page 21)
*1
On models with the NVIDIA video controller.
*2
On models with the ATI video controller.
*3
Supports high-/full-/low- speeds.
14
nN
Getting Started
Page 15
About the Indicator Lights
Your computer is equipped with the following indicator lights.
Indicator Functions
VAIO power Illuminates when the computer is on and turns off when the computer is off.
Standby Illuminates in orange only when the computer is in Standby mode.
Media Access Illuminates when data is read from or written to a memory card. (Do not enter Standby mode or turn
off the computer when this indicator is on.) When the indicator is off, the memory card is not being used.
Drive
Illuminates when data is read from or written to the hard disk or optical disc drive. Do not enter Standby mode
or turn off the computer when this indicator is on.
15
nN
Getting Started
Page 16

16
nN
Getting Started
Setting Up Your Computer
Your computer may not be equipped with all of the hardware features described in this section. The location of the controls,
ports, and jacks may vary from the illustrations shown below, depending on the model you purchased. See the online
Specifications for your computer's specific hardware configuration.
❑ Connecting a Display (Monitor) (page 17)
❑ Connecting Speaker Systems (page 19)
❑ Connecting the Keyboard and Mouse (page 21)
❑ Connecting the Radio Frequency Receiver for the Wireless Keyboard and Mouse (page 23)
❑ Connecting the Telephone and Modem (page 25)
❑ Connecting the Power Cord (page 28)
Page 17
nN
Getting Started
Connecting a Display (Monitor)
Your computer may be supplied with a display. For details on the bundled accessories, see the online Specifications.
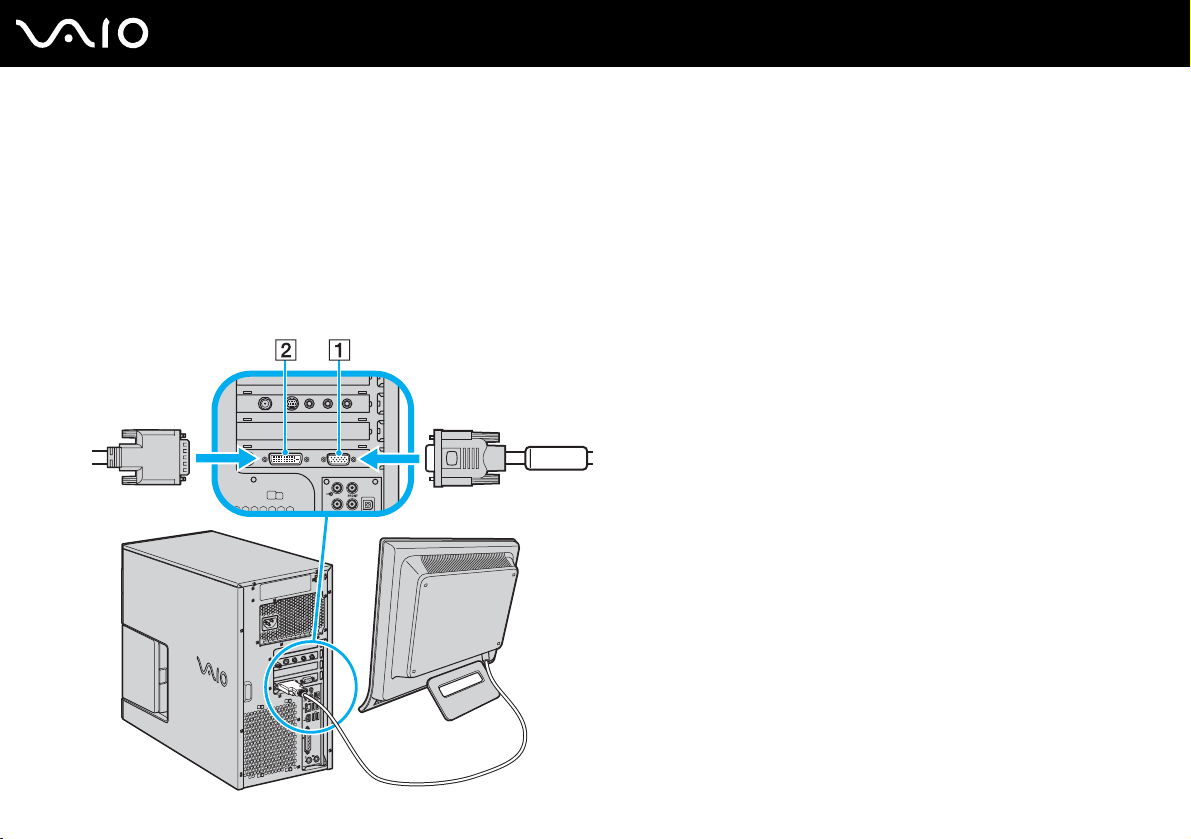
To connect a display
1 If you want to connect a VGA monitor, plug the display's cable into the monitor (VGA) port (1).
2 If you want to connect a DVI monitor, plug the display's cable into the DVI-D port (2).
3 If necessary, plug the display's cable into the rear of the display.
17
Page 18

Getting Started
!
A video adapter device is required to connect a VGA monitor using the DVI-D port.
Models with the NVIDIA video controller are compliant with the High-bandwidth Digital Content Protection (HDCP) specification. To view contents that
require the HDCP specification for playback or output, use an HDCP-compliant display.
18
nN
Page 19

19
nN
Getting Started
Connecting Speaker Systems
Your computer may be supplied with a speaker system, or you may wish to use your own speaker system. Note that speaker
configuration varies, depending on the speaker components in use.
To set up the speakers with the computer
❑ Match the color of the mini stereo plugs (from the speaker system) to the color of the speaker jacks on the back of the
computer.
❑ Review the connection instructions provided with your speaker system, as the connection setup may vary.
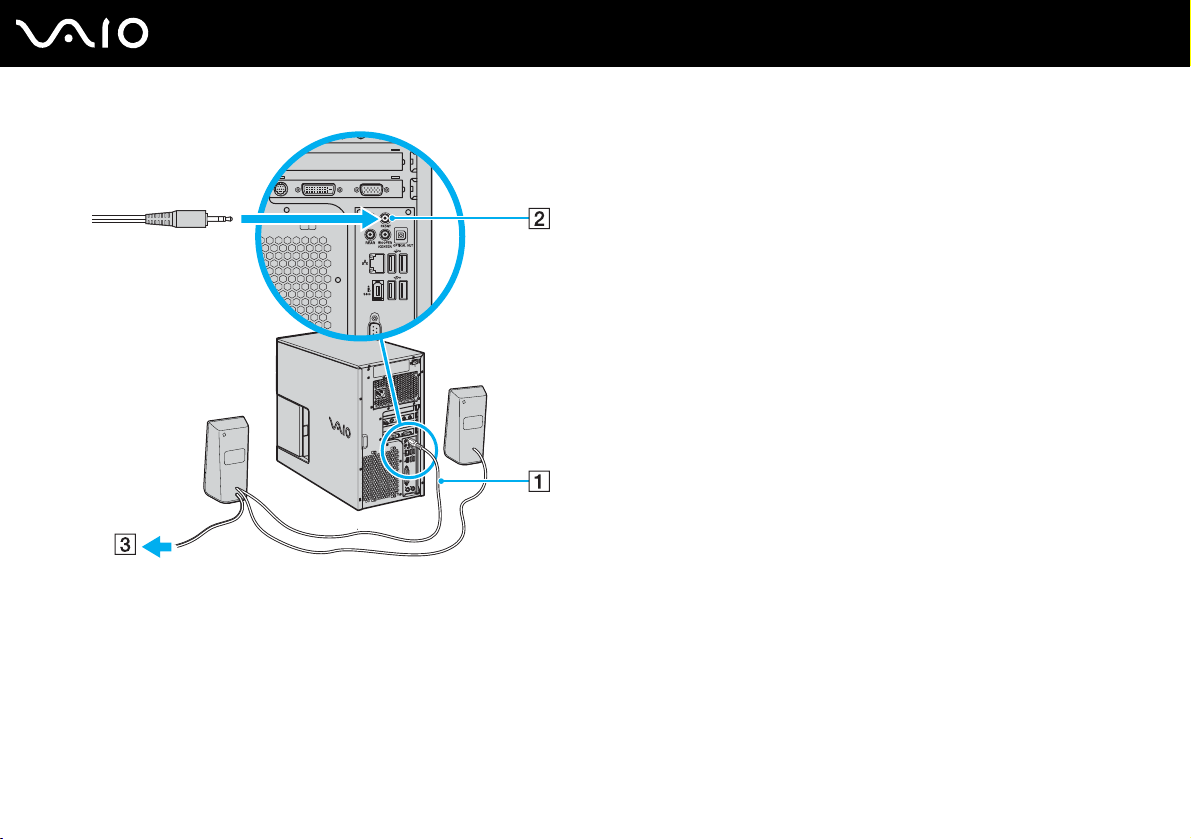
To connect the supplied 2-channel speakers
1 Plug the speaker cable (1) from the back of the right speaker to the FRONT jack (2) on the back of the computer.
2 Plug the power cable from the right speaker to a grounded AC wall outlet, surge protector, or Universal Power Supply
(UPS) (3).
Page 20
To select the speaker system
1 Click Start and then Control Panel.
2 Click Sounds, Speech, and Audio Devices.
3 Click Sounds and Audio Devices.
4 Click Advanced under Speaker settings on the Vo lu me tab.
5 Select your speaker system from the Speaker setup drop-down list.
20
nN
Getting Started
Page 21

21
nN
Getting Started
Connecting the Keyboard and Mouse
Your computer may be supplied with a PS/2 keyboard and a USB mouse. For details on the bundled accessories, see the
online Specifications.
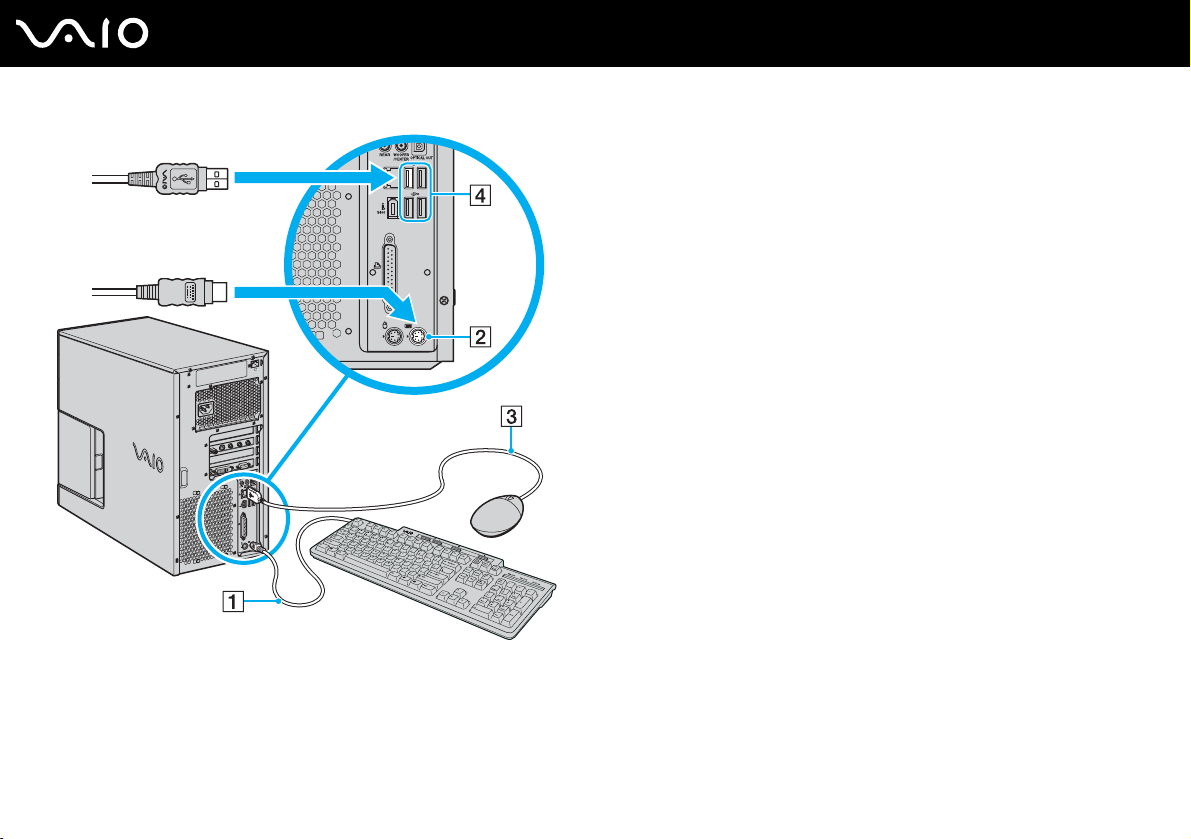
To connect the keyboard and mouse
1 Plug the keyboard cable (1) into the keyboard port (2) on the back of the computer.
2 Plug the mouse cable (3) into one of the USB ports (4) on the back of the computer.
Page 22
22
nN
Getting Started
Page 23

23
nN
Getting Started
Connecting the Radio Frequency Receiver for the Wireless Keyboard and Mouse
If your computer is supplied with a wireless keyboard and mouse, a radio frequency receiver is also supplied to enable the
computer to communicate with the wireless keyboard and mouse. Make sure to connect the radio frequency receiver before
using the wireless keyboard and mouse.
For establishing communication with the wireless keyboard and mouse, see Using the Wireless Keyboard (page 32) and
Using the Mouse (page 37).
Page 24
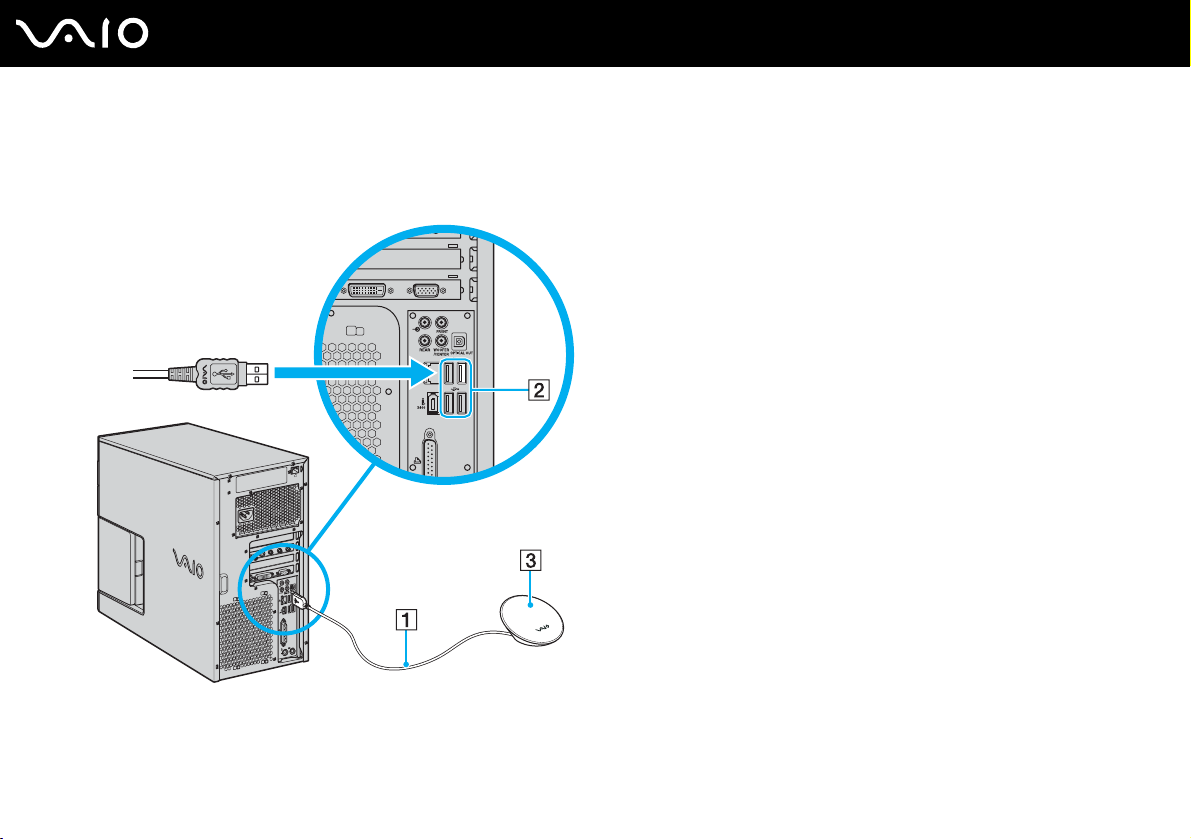
To connect the radio frequency receiver
1 Plug the radio frequency receiver cable (1) into one of the USB ports (2) on the back of the computer.
You can now use your radio frequency receiver (3).
24
nN
Getting Started
Page 25

25
nN
Getting Started
Connecting the Telephone and Modem
Your computer is equipped with a single modem port to connect the internal modem with a telephone wall jack. To use the
wall jack for both telephone and modem lines, purchase an additional RJ-11 phone cable and a "1-to-2" port adapter device
(splitter).
To connect the modem
1 Unplug your telephone from the wall jack and set aside.
2 Plug another phone cable (not supplied) into the modem port on the back of the computer.
3 Plug the other end of the cable into the wall jack.
Page 26
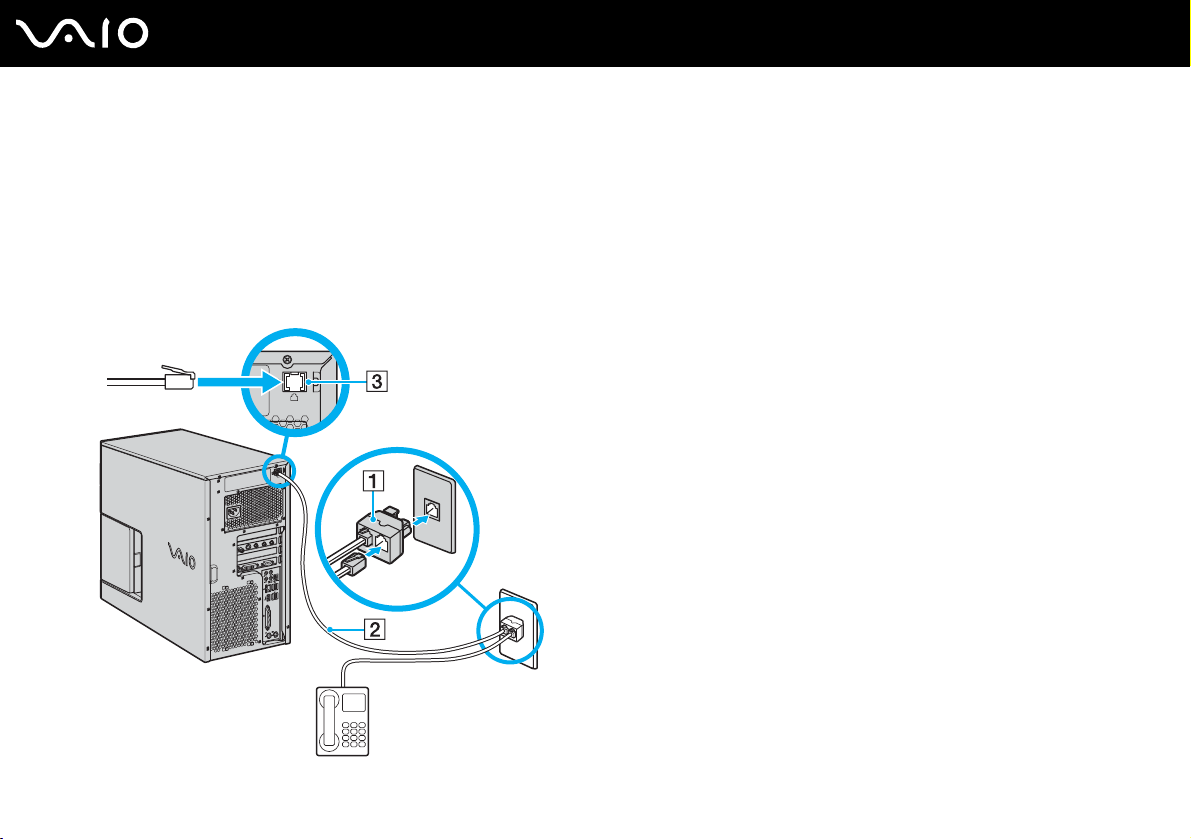
To connect the telephone and modem
1 Unplug the phone cable to your telephone from the wall jack.
2 Plug it into one of the ports on a "1-to-2" port adapter device (splitter) (1).
3 Plug one end of a second phone cable (not supplied) into the other port on the splitter device.
4 Insert the plug end of the splitter device into the wall jack.
5 Plug the other end of the second phone cable (2) into the modem port (3) on the back of the computer.
26
nN
Getting Started
Page 27
Getting Started
!
Your computer has a protective sticker covering the Network (Ethernet) port located on the back of the computer. Connect 10BASE-T, 100BASETX, or 1000BASE-T cables to the Network (Ethernet) port, depending on your computer's Network (Ethernet) port specification. Using incorrect cables
or a phone cable may result in an electric current overload that can cause a malfunction, excessive heat, or fire in the Network (Ethernet) port. For help
on connecting to a network, see your network administrator.
27
nN
Page 28

28
nN
Getting Started
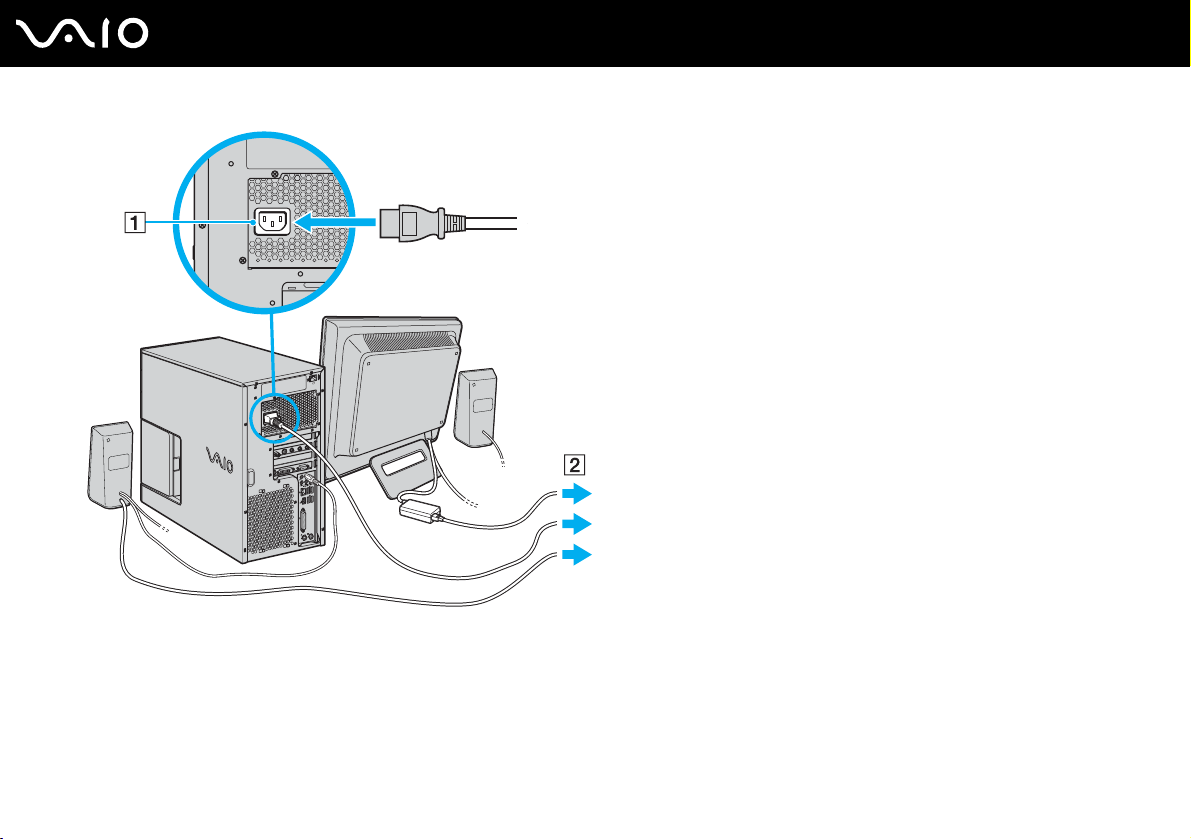
Connecting the Power Cord
Your computer's power cord must be plugged into an AC power source, such as an AC wall outlet, surge protector, or
Uninterruptible Power Supply (UPS), before you can establish communication with your wireless keyboard and wireless
mouse.
!
Use only the power cord supplied with the computer.
To connect the power cord
1 Insert the power cord into the AC In port (1) on the back of the computer.
2 Insert the power cord plugs from the display, computer, and speakers into a grounded AC wall outlet, surge protector, or
Universal Power Supply (UPS) (2).
Page 29
29
nN
Getting Started
✍
To disconnect the computer completely from AC power, unplug the power cord.
Make sure that the AC outlet is easily accessible.
If you are interrupted and need to leave your computer suddenly, place the computer into Hibernate mode. See Using Hibernate Mode (page 91). This
power saving mode saves the time of shutting down and the time of resuming.
Page 30

30
nN
Getting Started
Shutting Down Your Computer Safely
To avoid losing unsaved data, be sure to shut down your computer properly, as described below.
To shut down your computer
1 Turn off any peripherals connected to the computer.
2 Click Start and then Turn Off Computer.
The Turn off computer window appears.
3 Click Turn O ff.
4 Respond to any prompts warning you to save documents or to consider other users and wait for the computer to turn off
automatically.
The VAIO power indicator turns off.
Page 31

Using Your VAIO Computer
This section describes how to get the most out of using your VAIO computer.
❑ Using the Keyboard (page 32)
❑ Using the Mouse (page 37)
❑ Using the Optical Disc Drive (page 43)
❑ Using the TV Function (page 49)
❑ Using the Memory Stick Media (page 65)
❑ Using Other Memory Cards (page 69)
❑ Using the Internet (page 72)
31
nN
Using Your VAIO Computer
Page 32

32
nN
Using Your VAIO Computer
Using the Keyboard
A wireless or wired keyboard may be supplied with your computer, depending on the model you purchased. See the online
Specifications for details on the bundled accessories.
The wireless and wired keyboards both use a standard key arrangement with additional keys that perform specific functions.
Using the Wireless Keyboard
A Function keys
Perform certain tasks. The task associated with each function
key varies among software applications.
B Mute button
Turns the volume on and off.
C Volume control buttons
Increases (+) or decreases (-) the volume.
D Standby button
Provides for the lowest level of power consumption.
For details on power management, see Using the Power
Saving Modes (page 89).
E Windows keys
Display the Start menu.
F Applications key
Displays a shortcut menu in certain software applications.
G Direction arrows
Move the pointer on the computer screen.
H Numeric keypad
Use the numeric keypad to type numbers or to perform basic
math calculations.
Page 33

33
nN
Using Your VAIO Computer
Before You Use the Keyboard
Two AA alkaline batteries are supplied with your computer for use in the wireless keyboard. Before attempting to use the
wireless keyboard, you must install the batteries and establish communication between the computer and the keyboard. To
connect your wireless keyboard, it must be located within a range of 11 inches from the radio frequency receiver.
!
To maintain good communication, operate the wireless keyboard within the distance limitations of keyboard: approximately 2 feet (approximately 60
cm) from the radio frequency receiver.
Confirm that the supplied AA batteries are properly installed.
Press the CONNECT button located on the bottom of the radio frequency receiver first, and then press the CONNECT button on the bottom of the
keyboard.
Verify the radio frequency receiver is free of obstructions that may prevent proper operation.
Avoid using radio-controlled toys or equipment, CB radios, and other wireless devices in the area near the wireless keyboard. These devices may cause
interference, causing the keyboard to stop working properly.
Do not place metal furniture near the computer or wireless keyboard, as this may create interference, causing the keyboard to stop working properly.
Do not mix old (used) and new batteries when replacing batteries in the wireless keyboard. Always use the same type and manufacture of battery.
Do not mix alkaline with manganese batteries. Using incompatible batteries or mixing used, new or different types of batteries can damage the keyboard.
Page 34

Using Your VAIO Computer
To connect the wireless keyboard
1 Insert the supplied two AA batteries (1) into the battery compartment (2) on the bottom of the wireless keyboard.
2 Turn on the computer.
3 Press the CONNECT button on the bottom of the radio frequency receiver.
4 Press the CONNECT button (3) on the bottom of the keyboard.
Communication between the wireless keyboard and the computer should now be established.
!
Steps 3 and 4 must be completed within 10 seconds of each other.
34
nN
Page 35

Using Your VAIO Computer
✍
You can check the keyboard's battery power level by clicking (wireless keyboard icon) on the taskbar. A warning message may also appear on the
screen when the keyboard's battery power becomes low.
If the wireless keyboard does not operate properly, the batteries may need to be replaced. If the wireless keyboard is not being used for an extended
period of time, remove the batteries to avoid possible damage from battery leakage.
If you want to put the keyboard in a more 'ergonomical' position, open the keyboard feet.
35
nN
Page 36

Using the Wired Keyboard
Using Your VAIO Computer
A Function keys
Perform certain tasks. The task associated with each function
key varies among software applications.
B Volume control buttons
Increases (+) or decreases (-) the volume.
C Mute button
Turns the volume on and off.
D Standby button
Provides for the lowest level of power consumption.
For details on power management, see Using the Power
Saving Modes (page 89).
E Windows keys
Display the Start menu.
F Applications key
Displays a shortcut menu in certain software applications.
G Direction arrows
Move the pointer on the computer screen.
H Numeric keypad
Use the numeric keypad to type numbers or to perform basic
math calculations.
36
nN
Page 37

37
nN
Using Your VAIO Computer
Using the Mouse
A wireless or wired mouse may be supplied with your computer, depending on the model you purchased. See the online
Specifications for details on the bundled accessories.
Using the Wireless Mouse
Your computer may be supplied with a wireless optical mouse, which has no cables to plug in and uses a light-emitting diode
(LED) instead of a ball.
A Left button
Click or double-click the left button to select items. To drag and
drop items, hold the left button down while sliding the mouse,
then release the button to drop the item.
B Central wheel
Rotate the central wheel to scroll up or down a page. Press the
wheel once to lock the scroll action and control the movement
by moving the entire mouse (the scroll function is available only
with applications that support it).
C Right button
Press the right button once to display a context-sensitive
shortcut menu (not always an active function).
D Power switch
Slide the switch to turn the mouse on and off. This will help you
save battery power.
E CONNECT button
Press to enable communication between the computer and the
wireless mouse.
Page 38

38
nN
Using Your VAIO Computer
Before You Use the Mouse
Two AA alkaline batteries are supplied with your computer for use in the wireless mouse. Before using the wireless mouse,
you must install the batteries and establish communication between your computer and the mouse. To connect the wireless
mouse, it must be located within a range of 11 inches from the radio frequency receiver.
!
To maintain good communication, operate the wireless mouse within the distance limitation of the mouse: approximately 2 feet (60 m) from the radio
frequency receiver.
Confirm that the supplied AA batteries are properly installed.
Press the CONNECT button located on the bottom of the radio frequency receiver first, and then press the CONNECT button on the bottom of the mouse.
Verify the radio frequency receiver is free of obstructions that may prevent proper operation.
Avoid using radio-controlled toys or equipment, CB radios, and other wireless devices in the area near the wireless mouse. These devices may cause
interference, causing the mouse to stop working properly.
Use surfaces such as plain paper, card stock, or fabric that have minimal repetitive patterns.
Avoid surfaces such as mirrors, smooth glass, or magazines that have half- tone printing.
Do not place metal furniture near the computer or wireless mouse, as this may create interference, causing the mouse to stop working properly.
Do not mix old (used) and new batteries when replacing batteries in the wireless mouse. Always use the same type and manufacture of battery.
Do not mix alkaline with manganese batteries. Using incompatible batteries or mixing used, new or different types of batteries can damage the mouse.
Page 39

Using Your VAIO Computer
To connect the wireless mouse
1 Insert the supplied two AA batteries into the wireless mouse as shown below.
2 Turn on the computer.
3 Press the CONNECT button on the bottom of the radio frequency receiver.
4 Turn over the wireless mouse, slide the power switch to the ON position, and press the CONNECT button.
Communication between the wireless mouse and the computer should now be established.
39
nN
!
Step 3 and 4 must be completed within 10 seconds of each other.
Page 40

Using Your VAIO Computer
✍
You can check the battery power level for the mouse by clicking (wireless mouse icon) on the taskbar.
If the wireless mouse does not operate properly, the batteries may need to be replaced. If the wireless mouse is not being used for an extended period
of time, remove the batteries to avoid possible damage from battery leakage.
40
nN
Page 41

Using the Wired Mouse
Using Your VAIO Computer
A Left button
Click or double-click the left button to select items. To drag and
drop items, hold the left button down while sliding the mouse,
then release the button to drop the item.
B Central wheel
Rotate the central wheel to scroll up or down a page. Press the
wheel once to lock the scroll action and control the movement
by moving the entire mouse (the scroll function is available only
with applications that support it).
C Right button
Press the right button once to display a context-sensitive
shortcut menu (not always an active function).
41
nN
Page 42

Adjusting the Mouse Functions
1 Click Start and then Control Panel.
2 Click Printers and Other Hardware.
3 Click Mouse.
The Mouse Properties window appears.
4 Change the settings.
42
nN
Using Your VAIO Computer
Page 43

nN
Using Your VAIO Computer
Using the Optical Disc Drive
Your computer may be equipped with one or two optical disc drives. See the online Specifications for your computer's
specific hardware configuration.
To insert a disc
1 Turn on the computer.
2 Press the drive eject button (1) on the top or bottom optical disc drive, depending on your computer's hardware
configuration.
The tray slides out.
3 Place a disc in the middle of the tray with the label side facing up and gently push until the disc clicks into place.
43
4 Close the tray by pushing it in gently.
!
Do not remove the optical disc when the computer is in a power saving mode (Standby or Hibernate). Doing so may cause the computer to malfunction.
Page 44

44
nN
Using Your VAIO Computer
Reading and Writing CDs and DVDs
Your computer plays and records CDs and DVDs, depending on the model you purchased. Check your specifications for the
type of optical disc drive installed on your model. Use the table below to see which types of media your optical disc drive
supports.
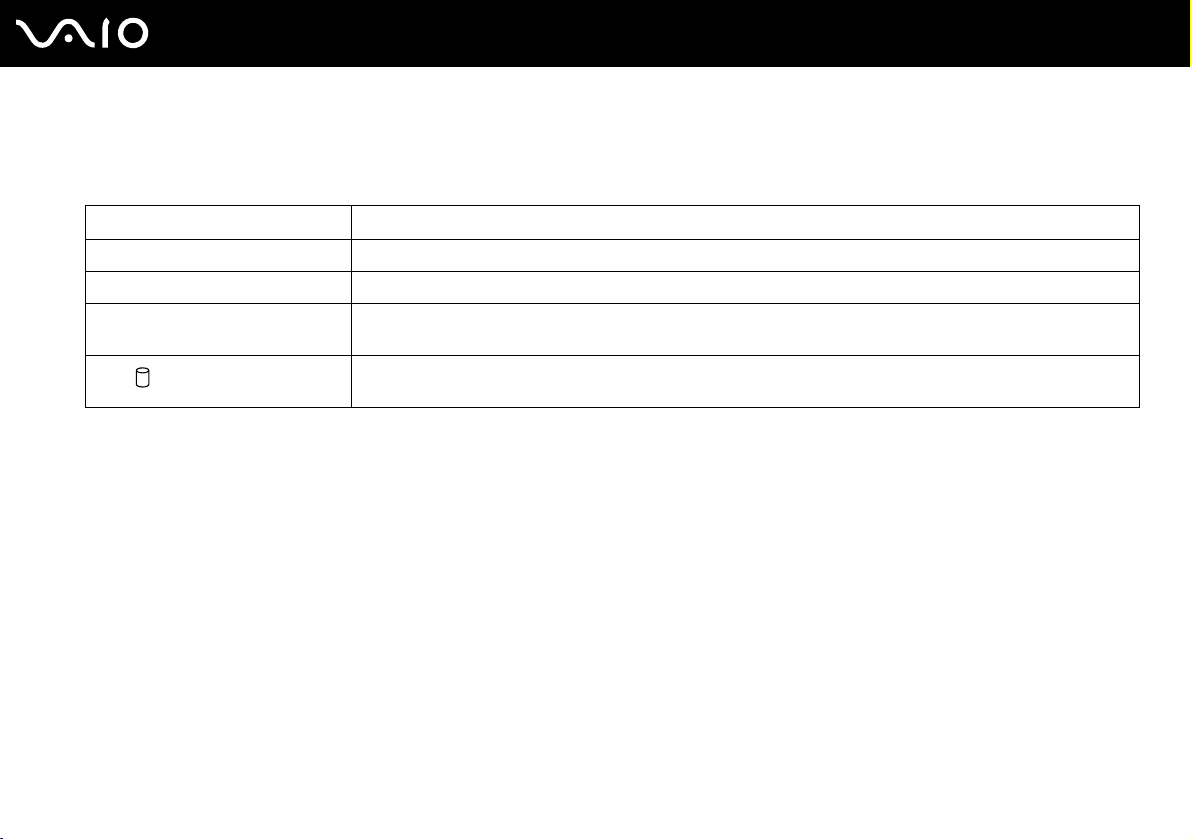
Optical disc drive Plays Records to
CD-ROM CD, CD-R, and CD-RW —
DVD-ROM CD, CD-R, CD-RW, DVD and most DVD-R, DVD-RW,
DVD+R, DVD+RW and DVD+R DL (Double Layer)
CD-RW/DVD-ROM CD, CD-R, CD-RW, DVD, most DVD-R, DVD-RW,
DVD+R, DVD+R DL (Double Layer)
DVD±RW CD, CD-R, CD-RW, DVD, most DVD-R, DVD-RW,
DVD+R, DVD+R DL (Double Layer)
* On selected models only.
*
and DVD+RW
*
and DVD+RW
!
This product is designed to playback discs that conform to the Compact Disc Digital Audio standard specifications (CD Standard). A DualDisc is a two
sided disc product which mates DVD recorded material on one side with digital audio material on the other side. Please be aware that the audio side
(non-DVD side) of a DualDisc may not play on this product because it does not conform to the CD Standard.
—
*
CD-R and CD-RW
CD-R, CD-RW, DVD-R, DVD-RW, DVD+R,
DVD+R DL (Double Layer)* and DVD+RW
!
Due to the multiple formats of discs now available, when buying pre-recorded or blank discs for use with a VAIO computer, be sure to read the notices
on the disc packaging carefully to check both playback and recording compatibility with your computer's optical disc drives. Sony does NOT guarantee
the compatibility of VAIO CD drives with discs that not compliant with the official "CD" format standard (or "DVD" standard in relation to DVD drives).
USING NON-COMPLIANT DISCS CAN CAUSE FATAL DAMAGE TO YOUR VAIO PC OR CREATE SOFTWARE CONFLICTS AND CAUSE SYSTEM HANGING.
For inquiries about disc formats, contact the individual publisher of the pre-recorded disc or the manufacturer of the recordable disc.
Page 45

45
nN
Using Your VAIO Computer
✍
Supports writing to DVD-RW discs compliant with DVD-RW version 1.1/1.2.
Supports writing to DVD-R discs compliant with DVD-R for General version 2.0/2.1.
Supports 8cm disc reading, but does not support 8cm disc writing.
Writing to DVD+R DL (Double Layer) discs is available only on discs supporting DVD+R DL (Double Layer) recording.
Notes on writing data onto a disc
❑ To make the data on a disc readable on an optical disc drive, you need to close the session when you eject it. To complete
this process, follow the instructions included with your software.
❑ Only use circular discs. Do not use discs in any other shape (star, heart, card, etc.), as this may damage the optical disc
drive.
❑ Do not strike or shake the computer while writing data onto a disc.
❑ Deactivate the screen saver and exit anti-virus software before writing data onto a disc.
❑ Do not use memory-resident utility software while writing data to a disc. This may cause the computer to malfunction.
❑ When using your software application to burn discs, make sure you exit and close all other applications.
❑ Never touch the surface of the disc. Fingerprints and dust on the surface of a disc may cause writing errors.
❑ Do not switch power modes while using the pre-installed software and while using the CD burning software.
❑ Never put stickers on discs. This will affect the use of the disc irreparably.
Page 46

46
nN
Using Your VAIO Computer
Notes on playing DVDs
To achieve optimum performance when playing DVDs, you should follow these recommendations.
❑ Close all open applications before playing a DVD movie.
❑ Do not use memory-resident utility software to speed up disc access when playing a DVD. This may cause the computer
to malfunction.
❑ Deactivate the screen saver and exit anti-virus software before playing a disc.
❑ Some discs recorded at 20 or 24 bits may produce noise while playing. If you have audio devices connected, this may
damage your hearing and the speakers. Reduce the volume before playing a DVD.
❑ Do not switch power saving modes while the computer is playing a DVD.
❑ Region code indicators are labeled on the DVDs to indicate in which region and on what type of player you can play the
disc. If the DVD is labeled "all," this means that you can play this DVD in most regions of the world. If the region code of
your residence area is different from the label on the DVD disc or on the packaging, you cannot play the disc on this player.
Playing CDs
To play an audio CD
1 Insert the disc into the optical disc drive.
2 If nothing appears on the desktop once you insert an audio CD disc, then click Start, point to All Programs, and click to
open a CD program, such as the SonicStage software.
If the Audio CD window appears, click to select an option.
Page 47

nN
Using Your VAIO Computer
Copying Files to CDs
To determine which type of CD your computer supports, see Reading and Writing CDs and DVDs (page 44).
To copy files to a CD-RW or CD-R
!
Do not strike or shake the computer while writing data onto a disc.
1 Insert a blank CD-R or CD-RW disc into the optical disc drive.
If the CD Drive window appears, click Take no action.
2 Open Windows Explorer by pressing the Windows key and the E key simultaneously.
3 In the Folders panel on the left, locate the file(s) or folder(s) you want to copy and either:
❑ Right-click the file(s) or folder(s), point to Send To, and click the optical disc drive
❑ Drag the file(s) or folder(s) onto the optical disc drive icon in the Files Stored on This Computer panel.
4 Close Windows Explorer.
5 Click Start and then My Computer.
6 Click the optical disc drive icon under Devices with Removable Storage. A new window appears with the file(s) or
folder(s) you want to copy listed under Files Ready to Be Written to the CD.
7 In the CD Writing Tasks box, click Write these files to CD.
8 Follow the instructions in the CD Writing Wizard.
* The read/write drive letter designation may vary, depending on your system's hardware configuration.
*
name.
47
Page 48

48
nN
Using Your VAIO Computer
Playing DVDs
To play a DVD
1 Close all open programs.
2 Insert the DVD into the optical disc drive.
3 Click Start and point to All Programs.
4 Select a DVD software program to play the DVD.
For instructions on how to use a program, see the help guide included with the DVD software program.
Copying Files to DVDs
The DVD writing function is available on selected models only. See the online Specifications to see whether your model is
equipped with an optical disc drive capable of DVD writing.
To copy files to a DVD-R or DVD-RW
1 Insert the disc into the optical disc drive.
2 Click Start and point to All Programs.
3 Select a DVD software program you want to use from the submenu.
For instructions on how to use a program, see the help guide included with the DVD software program.
Page 49

49
nN
Using Your VAIO Computer
Using the TV Function
Your computer may have a TV tuner board installed along with the Microsoft Windows XP Media Center Edition operating
system to enhance your computing experience. See the online Specifications to see if the TV function is available on your
model.
Media Center provides you with a wide range of TV, DVD, and video viewing, as well as music recording and playback. This
section describes how to set up your TV, set-top box, and other equipment. See the online MCE guide for more information
on Media Center features.
To access the online MCE guide
1 Click Start, point to All Programs, and click VAIO Support Central.
2 Click VAIO Documentation.
3 Click MCE guide.
Page 50

50
nN
Using Your VAIO Computer
Setting Up TV Connections
!
The following connections may not be available depending on the country or area of your residency.
The best method of connecting your computer system, TV monitor or display, and cable service access, depends on the type
of cable connection available in your home.
TV signal reception strength will vary widely depending on service availability in your area as well as the type of connection
available.
One primary cable to connect the computer to a TV cable or antenna is the TV coaxial cable (not supplied). One end connects
to the computer's VHF/UHF port, and the other end connects to the cable service access or antenna.
A TV coaxial cable
Page 51

Using Your VAIO Computer
Connecting to standard cable access (CATV)
To connect in CATV mode (Option 1)
1 Connect one end of the TV coaxial cable (1) (not supplied) to your cable service access (wall outlet) (2).
2 Connect the other end of the coaxial cable to the VHF/UHF port (3) on the computer.
51
nN
Page 52

52
nN
Using Your VAIO Computer
To connect in CATV mode (Option 2)
1 Connect one end of a TV coaxial cable (1) (not supplied) to your cable service access (wall outlet) (2). Connect the other
end to the single-connection side of a splitter adapter (3) (not supplied).
2 Connect a second TV coaxial cable (4) (not supplied) to the double-connection side of the splitter adapter (3). Connect
the other end to the VHF/UHF port (5) on the computer.
3 Connect a third TV coaxial cable (6) (not supplied) to the double-connection side of the splitter adapter (3). Connect the
other end to the VHF/UHF port (7) on the back of your TV monitor or display.
Page 53

53
nN
Using Your VAIO Computer
Connecting to a standard antenna
You can connect your computer to an indoor/outdoor antenna system, using Option 1 or Option 2 from the previous section,
Connecting to standard cable access (CATV) (page 51). Depending on the type of antenna system in your home, your
connection may require a VHF/UHF RF combiner/transformer (not supplied) to connect the computer and the indoor/outdoor
antenna system.
✍
If you are connecting to an indoor/outdoor antenna, you may need to reorient the antenna for best reception. Move the antenna cable away from other
power sources or connectors to reduce reception interference.
To connect in terrestrial mode (Option 1)
1 Connect one end of a TV coaxial cable (1) (not supplied) to your antenna outlet (2). Connect the other end to a VHF/UHF
RF combiner/transformer (3) (not supplied).
2 Connect another TV coaxial cable (4) (not supplied) from the combiner/transformer (3) to the VHF/UHF port (5) on the
computer.
Page 54

54
nN
Using Your VAIO Computer
To connect in terrestrial mode (Option 2)
1 Connect one end of the antenna's 300-ohm twin lead cable (1) to the screw-type grips at your antenna outlet (2). Connect
the other end to the grips on the VHF/UHF RF combiner/transformer (3).
2 Connect a TV coaxial cable (4) (not supplied) from the combiner/transformer (3) to the VHF/UHF port (5) on the computer.
Page 55

55
nN
Using Your VAIO Computer
Connecting with a cable or satellite set-top box (STB)
You can connect your computer to cable service access that uses a set-top box (cable or satellite). When using the set-top
box (STB) setup, you can only change channels through the STB, using its controls or supplied remote commander.
When using the STB setup:
❑ A standard TV remote control cannot be used to change TV channels. You can use your TV remote control to set the TV
to the channel-out number (channel 3, 4, etc.) or direct video input specified by your cable or satellite service provider.
❑ You may be able to use a universal remote control or commander to change TV channels, if the device is able to control
the STB.
To connect in STB mode (Option 1)
1 Connect one end of a TV coaxial cable (1) (not supplied) to your cable service access (wall outlet) (2). Connect the other
end to the VHF/UHF IN jack on the back panel of your set-top box (STB) (3).
2 Connect a second TV coaxial cable (4) (not supplied) to the VHF/UHF OUT jack on your STB unit (3). Connect the other
end to the single-connection end of a splitter device (5) (not supplied).
3 Connect a third TV coaxial cable (6) (not supplied) to the double-connection end of the splitter device (5). Connect the
other end to the VHF/UHF port (7) on the computer.
4 Connect a fourth TV coaxial cable (8) (not supplied) to the double-connection end of the splitter device (5). Connect the
other end to the VHF/UHF port (9) on the rear of your TV monitor or display.
Page 56

56
nN
Using Your VAIO Computer
Page 57

57
nN
Using Your VAIO Computer
To connect in STB mode (Option 2)
1 Connect one end of the TV coaxial cable (1) (not supplied) to your cable service access (wall outlet) (2). Connect the
other end to the VHF/UHF IN jack on the back panel of your set-top box (STB) (3).
2 Connect a second TV coaxial cable (4) (not supplied) to the VHF/UHF OUT jack on your STB unit (3). Connect the other
end to the VHF/UHF port (5) on the rear of your TV monitor or display.
3 Connect one end of a stereo A/V dubbing cable with triple RCA jacks (6) (not supplied), to the Composite Audio Out (L/
R) jacks (7) and the Video Out jack (8) on the back panel of your STB unit (3), matching the plug and jack colors.
4 Connect the other RCA jacks of the stereo A/V dubbing cable (6) into the Composite Audio In (L/R) jacks (9) and the
Composite Video In jack (10) on the computer, matching the plug and jack colors.
Page 58

58
nN
Using Your VAIO Computer
Page 59

nN
Using Your VAIO Computer
Using the Remote Commander
If your computer supports the TV function, then it is supplied with a remote commander for using Media Center features,
including TV channel selection.
A MY MUSIC button
Press to view and listen to your music playlists.
B MY TV button
Press to view the My TV menu.
C STOP button
Press to stop media playback or TV recording session.
PAU SE button
Press to pause media playback. Press again to resume
playback.
FWD button
Press to fast-forward media at three speeds.
SKIP button
Press to move media forward, for example, one audio track, one
DVD chapter, and 30 seconds of recorded TV or video.
REPLAY button
Press to move media backward, for example, one audio track,
one DVD chapter, and seven seconds of TV or video.
REW button
Press to move media backward at two speeds.
RECORD button
Press to begin recording.
PLAY N button
Press to begin media playback.
59
Page 60

60
nN
Using Your VAIO Computer
BACK button
D
Press to return to the previous window.
E VOL button
Press to increase (+) or decrease (-) the volume.
F RECORDED TV button
Press to view previously recorded TV programs (In My TV
window).
G GUIDE button
Press to view the TV program guide for your area.
H Channel number buttons (0-9)
Press to select specific channels or enter text. (Press Enter or OK
to activate the channel selection.)
I CLEAR button
Use to backspace and delete entered text.
J STANDBY button
Press to place the computer in Standby mode to reduce power
consumption.
K MY PICTURES button
Press to view pictures or a slide show.
L MY VIDEOS button
Press to view videos from your video collection.
M MORE button
Press to view additional options that are available for Media
Center features.
N Directional arrow buttons
Press the M, m, <, and , buttons to move the pointer on the
screen.
OK button
Press OK to select the desired action or window option. When
watching full-screen TV, press OK to return to the previous
channel. Press OK again to switch between channels.
O CH/PG (Channel/Page) button
Press to change or page up/down channels (no number input
required).
P START button
Press to open the Media Center Start menu.
MUTE button
Press to turn off the sound. Press again to restore the sound.
Q DVD MENU button
Press to open the main menu on a DVD.
R LIVE TV button
Press to view TV programming.
S ENTER button
Press to activate feature or action, such as channel selection or
return to previous channel. (This button's actions are similar to
using the OK button.)
Page 61

61
nN
Using Your VAIO Computer
Before you use the remote commander
Before using the remote commander, you need to insert the supplied AA manganese batteries and connect the remote sensor
to enable communication between the computer and the remote commander.
To insert batteries
1 Turn the remote commander over.
2 Press in the tab (1) and lift the battery cover up.
3 Insert the supplied two AA batteries into the remote commander.
4 Align the battery cover to the remote commander.
5 Press down until the cover clicks into place.
✍
If the remote commander does not operate properly, you may need to replace the batteries. When the remote commander is not being used for extended
periods of time, remove the batteries to avoid possible damage from battery leakage.
Page 62

To connect the remote sensor
1 Choose the USB port (1) you prefer to use.
2 Plug the remote sensor cable (2) into the USB post.
3 Position the remote sensor (3) to enable unobstructed communication with the remote control.
62
nN
Using Your VAIO Computer
Page 63

63
nN
Using Your VAIO Computer
If you are using a cable or satellite set-top box, you can attach the remote sensor control to the remote sensor, which enables
you to control the set-top box with the remote commander.
To connect the remote sensor control
1 Plug the remote sensor control cable (1) into either jack (1 or 2) on the back of the remote sensor (2).
2 Remove the adhesive tape cover from the bottom of the remote sensor control.
Page 64

3 Attach the remote sensor control (3) onto the set-top box (4) near the infrared port (5).
!
Do not cover the infrared port when attaching the remote sensor control.
The remote sensor must be visible in a line-of-sight with the remote commander in order to function properly.
64
nN
Using Your VAIO Computer
Page 65

65
nN
Using Your VAIO Computer
Using the Memory Stick Media
Your computer supports the Memory Stick media. Memory Stick media is a compact, portable, and versatile device especially
designed for exchanging and sharing digital data with compatible products, such as digital cameras, mobile phones and other
devices. Because it is removable, it can be used for external data storage.
For the latest information on Memory Stick media, visit the Sony online support Web site at http://www.sony.com/pcsupport
for customers in USA, at http://www.sony.ca/support
customers in Latin American countries or areas.
Write-protecting a Memory Stick Media
Some versions of Memory Stick media are designed with an erasure prevention switch to protect valuable data from
accidental erasure or overwriting.
Move the tab horizontally or vertically
be saved on the Memory Stick media. When the erasure prevention switch is on, data can be read from but not saved on the
Memory Stick media.
*
to set or release write-protection. When the erasure prevention switch is off, data can
for customers in Canada, or at http://www.sony.com/lapcsupport for
* Some versions of Memory Stick media do not have an erasure prevention switch.
Page 66

66
nN
Using Your VAIO Computer
Inserting a Memory Stick Media
The Memory Stick slot is located behind a protective cover on the front of the computer. You need to open the cover before
accessing the memory card slots.
To insert a Memory Stick media
1 Flip the upper front panel down, using your fingertip.
2 Locate the Memory Stick media slot.
3 Hold the Memory Stick media with the arrow facing toward the front of the computer and insert it into the Memory Stick
media slot in the direction of the arrow.
4 Carefully slide the Memory Stick media into the slot until it clicks in place.
The Memory Stick media is automatically detected by your system and appears in your My Computer window as a local
drive, under the appropriate letter (depending on the configuration of the computer).
Page 67

Using Your VAIO Computer
!
Be sure to hold the Memory Stick media with the arrow pointing in the correct direction as you insert it into the slot. To avoid damaging the computer
or the Memory Stick media, do not force the Memory Stick media into the slot if it does not insert smoothly.
Do not insert more than one Memory Stick media into the Memory Stick media slot. Inserting the media improperly may damage the computer.
✍
The computer supports Memory Stick Duo media and is equipped with the Memory Stick combo slot that is compatible with both standard- and duo-
size media. For more information on Memory Stick Duo media, visit the Memory Stick web site at http://www.memorystick.com/en/
.
To view the contents of the Memory Stick media
1 Click Start and then My Computer to open the My Computer window.
2 Double-click the Memory Stick media icon to view the list of data files saved in the Memory Stick media.
To format a Memory Stick media
Use the Memory Stick Formatter software. See the help file on the Memory Stick Formatter software for details.
67
nN
Page 68

Using Your VAIO Computer
Removing a Memory Stick Media
To remove a Memory Stick media
1 Flip the upper front panel down, using your fingertip.
2 Check that the Media Access indicator is off.
3 Push the Memory Stick media in toward the computer.
The Memory Stick media ejects.
4 Pull the Memory Stick media out of the slot.
!
Always remove the Memory Stick media gently, or it may pop out unexpectedly.
Do not remove the Memory Stick media while the Media Access indicator is turned on. If you do, you may lose data. Large volumes of data may take
time to load, so be sure the indicator is off before removing the Memory Stick media.
68
nN
Page 69

69
nN
Using Your VAIO Computer
Using Other Memory Cards
In addition to the Memory Stick media slot, your computer is equipped with three other memory card slots to accommodate
many popular types of memory cards. You can use these slots to transfer data between digital cameras, camcorders, music
players, and other audio/video devices.
The memory card slots are located behind a protective cover on the front of the computer. You need to open the cover before
accessing the memory card slots.
Before You Use Memory Cards
Your computer supports the following memory cards:
❑ CompactFlash
❑ Multi Media Card (MMC)
❑ Microdrive
❑ SmartMedia
❑ xD-PictureCards
❑ Secure Digital (SD)
For the latest information on compatible memory cards, visit the Sony online support Web site regularly.
!
Always insert the correct memory card into the appropriate memory card slot.
Do not attempt to insert a different memory card or memory card adapter into a different memory card slot. An incompatible memory card or adapter
may be difficult to remove from the wrong slot and can cause damage your computer.
Use care when inserting or removing a memory card from the slot. Do not force the memory card in or out of the slot.
Page 70

Inserting a Memory Card
To insert a memory card
1 Flip the upper front panel down, using your fingertip.
Do not use force to open the cover.
2 Locate the appropriate slot for the memory card you want to use.
3 Hold the memory card with the arrow facing up and toward the memory card slot.
4 Carefully slide the memory card into the slot until it clicks in place.
Do not force the card into the slot.
✍
If the memory card does not go into the slot easily, remove it gently and verify you are inserting it in the proper direction.
70
nN
Using Your VAIO Computer
Page 71

71
nN
Using Your VAIO Computer
Removing a Memory Card
The correct way to remove a memory card from a memory card slot varies, depending on the media or slot. Use care when
removing a memory card to avoid damage to the slot or card.
!
Do not remove a memory card while the Media Access indicator light is on. The card or its data may become damaged.
To remove a Secure Digital (SD), MultiMediaCard, SmartMedia, or xD-Picture Card media
1 Flip the upper front panel down, using your fingertip.
2 Check that the Media Access indicator is off.
3 Press the extended part of the memory card, causing it to extend out from the slot.
4 When the card extends, carefully pull it out of the slot.
To remove a CompactFlash media
1 Flip the upper front panel down, using your fingertip.
2 Check that the Media Access indicator is off.
3 Firmly grasp the extended part of the memory card.
4 Carefully pull it out of the slot.
Page 72

nN
Using Your VAIO Computer
Using the Internet
Setting Up a Dial-up Internet Connection
Before you can connect to the Internet, you need to connect your computer to a telephone line via a telephone cable (not
supplied). Once you set up your telephone cable, you're ready to connect to the Internet.
For details of telephone cable connections, see Connecting the Telephone and Modem (page 25).
To set up a dial-up connection to the Internet
1 Click Start, point to All Programs, Accessories, Communications, and click New Connection Wizard.
The New Connection Wizard appears.
2 Click Next. If the Location Information window appears, follow the on-screen instructions.
3 If it is not already selected, click to select Connect to the Internet, and click Next.
4 Follow the on-screen instructions.
72
Page 73

Using Peripheral Devices
You can add functionality to your computer by using the various ports on the computer.
❑ Connecting an External Microphone (page 74)
❑ Connecting a VCR or Camcorder (page 75)
❑ Connecting a Universal Serial Bus (USB) Device (page 77)
❑ Connecting a Printer (page 79)
❑ Connecting an i.LINK Device (page 81)
❑ Connecting to a Network (LAN) (page 83)
73
nN
Using Peripheral Devices
Page 74

nN
Using Peripheral Devices
Connecting an External Microphone
If you need to use a sound input device (for example, to chat on the Internet) you need to plug in an external microphone.
To connect an external microphone
Plug the microphone cable (1) into the microphone jack (2) m.
✍
Make sure your microphone is designed for computer use.
74
Page 75

75
nN
Using Peripheral Devices
Connecting a VCR or Camcorder
Your computer has both audio and video connection capability. You can locate the appropriate connections on the back of
the computer or behind the lower bottom panel on the front. You can connect a VCR or camcorder using the Composite Audio
In jacks. Your VCR or camcorder may have either standard video or S Video connection capability.
To connect a VCR or camcorder with an audio and an S-Video cable
1 Connect a dual audio cable (1) (not supplied) to the Composite Audio In (L/R) jacks on the computer.
2 Connect the other ends of the dual audio cable to your VCR or camcorder.
3 Connect an S-Video cable (2) (not supplied) directly into the S Video port on the computer.
4 Connect the other end of the S-Video cable into the appropriate port on the VCR or camcorder.
Page 76

76
nN
Using Peripheral Devices
To connect a VCR or camcorder with a stereo A/V dubbing cable
1 Connect a stereo A/V dubbing cable with triple RCA plugs at each end (not supplied) directly into the Composite Video
In port, and the Composite Audio In (L/R) jacks on the computer.
2 Connect the other ends of the stereo A/V dubbing cable into the appropriate jacks on the VCR or camcorder.
Page 77

Connecting a Universal Serial Bus (USB) Device
Connecting a USB Floppy Disk Drive
You can purchase a USB floppy disk drive and connect it to your computer.
To connect a USB floppy disk drive
1 Choose the USB port you prefer to use.
2 Plug the USB floppy disk drive cable into the USB port.
Your USB floppy disk drive is now ready for use.
!
When using a USB floppy disk drive, do not apply force on the USB port. This may cause a malfunction.
77
nN
Using Peripheral Devices
Page 78

78
nN
Using Peripheral Devices
Disconnecting a USB floppy disk drive
You can disconnect a USB floppy disk drive when the computer is on or off. Disconnecting the drive when the computer is in
a power saving mode (Standby or Hibernate) may cause the computer to malfunction.
If the computer is off, you can unplug the USB cable directly from the computer.
To disconnect a USB floppy disk drive
1 Close all programs accessing the floppy disk drive.
2 Double-click the Safely Remove Hardware icon on the taskbar.
The Safely Remove Hardware window appears.
3 Select the floppy disk drive you want to unplug.
4 Click Stop.
The Stop a Hardware device window appears.
5 Make sure the floppy disk drive is selected, and click OK.
A message appears stating it is now safe to remove the hardware device.
6 Remove the floppy disk drive from the computer.
Page 79

Connecting a Printer
You can connect a Windows-compatible printer to your computer to print documents.
Connecting a Printer Using the USB Port
You can connect a USB printer compatible with your version of Windows to the computer.
To connect a printer using the USB port
1 Plug the printer power cord into an AC outlet (1).
2 Choose the USB port (3) you prefer to use.
3 Plug one end of a USB printer cable (2) into the USB port and the other end to your printer.
79
nN
Using Peripheral Devices
Page 80

Using Peripheral Devices
Connecting a Printer Using the Printer Port
To connect a printer using the printer port
1 Plug the printer power cord (1) into an AC outlet.
2 Plug the printer cable (2) supplied with your printer into the printer port (3) on the back of the computer.
✍
Before connecting the printer, turn off the computer and the printer, and unplug the AC adapter and the power cord.
80
nN
Page 81

81
nN
Using Peripheral Devices
Connecting an i.LINK Device
Notes on connecting i.LINK devices
❑ The computer includes an i.LINK (IEEE1394) port, which you can use to connect to an i.LINK device such as a digital
video camera recorder or to connect two VAIO computers in order to copy, delete or edit files.
❑ The computer is equipped with a 4-pin and a 6-pin i.LINK port. A 4-pin i.LINK port cannot supply power to a connected
i.LINK device. A 6-pin i.LINK port can supply power (10V to 12V) to a connected i.LINK device, if the device is equipped
with a 6-pin connector. The total power supplied by the 6-pin i.LINK port does not exceed 6 watts.
❑ The i.LINK port supports transfer rates up to 400 Mbps; however, the actual transfer rate depends on the transfer rate of
the external device.
❑ i.LINK cables compatible with the computer include cables with the following part numbers:
VMC-IL4415 (a 1.5 meter cable with a 4-pin connector at each end), VMC-IL4408 Series (a 0.8 meter cable with a 4-pin
connector at each end).
❑ The optional i.LINK cables may not be available, depending on the country or area of your residency.
❑ An i.LINK connection with other compatible devices is not fully guaranteed.
❑ The i.LINK connection varies depending on the software applications, operating system and i.LINK compatible devices
you use. Refer to the manual that came with your software for more information.
❑ Check the working conditions and OS compatibility of i.LINK-compatible PC peripherals (for example, an HDD or CD-RW
drive) before you connect them to the computer.
Page 82

82
nN
Using Peripheral Devices
Connecting a Digital Video Camera Recorder
To connect a digital video camera recorder
1 Plug one end of the i.LINK cable (1) into the i.LINK port (2) on the computer and the other end into the DV In/Out ports
(3) on the digital video camera recorder.
2 Launch the DVgate Plus software.
✍
On Sony digital video cameras, ports labeled DV Out, DV In/Out or i.LINK are i.LINK-compatible.
The Sony digital video camera recorder shown here is an example; your digital video camera recorder may need to be connected differently.
You cannot access the pictures stored on a Memory Stick media when using an i.LINK connection.
Page 83

83
nN
Using Peripheral Devices
Connecting to a Network (LAN)
You can connect your computer to 1000BASE-T/100BASE-TX/10BASE-T-type networks via an Ethernet network cable.
Connect one end of an optional network cable to the Network (Ethernet) port on the back of the computer and the other end
to your network. For detailed settings and devices needed to connect to the network, see your network administrator.
!
Your computer has a protective sticker covering the Network (Ethernet) port located on the back of the computer. Connect a 10BASE-T, 100BASE-
TX, or 1000BASE-T cable to the Network (Ethernet) port. Using an incorrect cable or a phone cable may result in an electric current overload that can
cause a malfunction, excessive heat, or fire in the Network (Ethernet) port. For help on connecting to a network, see your network administrator.
✍
The computer can be connected to the network with the default settings.
Page 84

Using Peripheral Devices
!
Telephone lines cannot be connected to the Network (LAN) connector on your computer.
If the Network (LAN) connector is connected to the telephone lines mentioned below, high electric current to the connector may cause damage,
overheating or fire.
- Home (intercom speakerphone) or business-use telephone lines (multi-line business telephone)
- Public telephone subscriber line
- PBX (private branch exchange)
!
Do not plug a telephone cable into the network port.
84
nN
Page 85

Customizing Your VAIO Computer
This section briefly describes how to change the main settings of your computer.
❑ Setting the Password (page 86)
❑ Setting Up Your Computer with VAIO Central (page 88)
❑ Using the Power Saving Modes (page 89)
85
nN
Customizing Your VAIO Computer
Page 86

86
nN
Customizing Your VAIO Computer
Setting the Password
Use one of the BIOS functions to set the password.
Once you have set the password, you will have to enter the password after the VAIO logo appears to start your computer.
The power-on password will allow you to protect your computer from unauthorized access.
Adding the Power-on Password
!
Once you have set the power-on password, you cannot start the computer without entering the password. Make sure not to forget the password. Write
down your password and keep it safe and private from other people.
If you forget the power-on password and need assistance to reset, a password reset fee will be charged, and your computer may need to be sent in for
depot service for password reset.
To add the power-on password
1 Turn on the computer.
2 Press the F2 key when the VAIO logo appears.
The BIOS setup screen appears.
3 Use the < or , key to select Security on the Boot menu to display another screen.
4 Use the < or , key to select the password type that you want to add (Set Supervisor Password or Set User
Password) and press the Enter key.
5 At the new password entry prompt, enter a new password and press the Enter key.
The password needs to be at least 6 and at most 19 characters long.
6 At the confirmation prompt, enter the same password once again and press the Enter key.
The password type you selected in step 4 should now be indicated as Installed.
Page 87

87
nN
Customizing Your VAIO Computer
Changing/Removing the Power-on Password
To remove the power-on password
1 Turn on the computer.
2 Press the F2 key when the VAIO logo appears.
3 Enter the current password for Enter Current Password:
The BIOS setup screen appears.
4 Use the < or , key to select Security on the Boot menu to display another screen.
5 Use the < or , key to select the password type that you want to remove and press the Enter key.
6 At the new password entry prompt, press the Enter key without an entry.
7 At the confirmation prompt, press the Enter key once again.
The password type you selected in step 5 should now be indicated as Not Installed.
To change the power-on password
Remove the current password and then follow the procedure described in Adding the Power-on Password (page 86) to
add a new password.
Page 88

Customizing Your VAIO Computer
Setting Up Your Computer with VAIO Central
The VAIO Central utility allows you to consult system information and specify preferences for system behavior.
To use VAIO Central
1 Click Start, point to All Programs, and click VAIO Central.
The VAIO Central window appears.
2 Select the desired control item and change the settings.
3 Once finished, click OK.
The setting of the desired item has been changed.
✍
Some of the control items will not be visible if you open VAIO Central as a limited user.
88
nN
Page 89

89
nN
Customizing Your VAIO Computer
Using the Power Saving Modes
In addition to the normal operating mode, which allows you to turn off specific devices, your computer has two distinct power
saving modes: Standby and Hibernate.
To set the timer for the computer to automatically enter Standby or Hibernate mode after a certain amount of time, click Start
and Control Panel. Click Performance and Maintenance and Power Options, and then change the settings under Power
Schemes.
Using Normal Mode
This is the normal state of the computer when it is in use. To save power while not working, you can turn off a specific device
such as the LCD or the hard disk.
Page 90

90
nN
Customizing Your VAIO Computer
Using Standby Mode
Standby mode turns off the LCD screen and sets the hard disk and the CPU to a low power consumption mode. The orange
Standby indicator light illuminates in this mode.
To activate Standby mode
1 Click Start and then Turn Off Computer.
2 Click Stand By.
✍
Alternatively, you can press the Standby button on the keyboard to put the computer in Standby mode.
To return to Normal mode
Press any key.
!
If you press the power button for more than four seconds, the computer will switch off automatically. You will lose any unsaved data.
✍
When the computer is in Standby mode, you cannot insert a disc.
The computer comes out of Standby mode quicker than out of Hibernate mode.
Standby mode uses more power than Hibernate mode.
If the computer is not used for more than 20 minutes, it will enter Standby mode. To avoid this, you can change the Standby
mode settings.
Page 91

91
nN
Customizing Your VAIO Computer
Using Hibernate Mode
In Hibernate mode, the state of the system is saved on the hard disk and power is turned off. The VAIO power indicator is off
in this mode.
To activate Hibernate mode
1 Click Start and then Turn Off Computer.
2 Click Hibernate.
To return to Normal mode
Turn on the computer by pressing the power button.
The computer returns to its previous state.
!
If you press the power button for more than four seconds, the computer will switch off automatically.
✍
If you do not use the computer for a long period of time, put the computer into Hibernate mode. This power saving mode saves you the time of shutting
down or resuming.
When the computer is in Hibernate mode, you cannot insert a disc.
Hibernate mode requires more time than Standby mode to be activated.
It takes more time to return to Normal mode from Hibernate mode than from Standby mode.
Hibernate mode uses less power than Standby mode.
!
Do not move the computer until the VAIO power indicator turns off.
Page 92

92
nN
Upgrading Your VAIO Computer
Upgrading Your VAIO Computer
Your computer and memory modules use high precision components and electronic connectors technology. To avoid the
invalidation of your guarantee due to mishandling, we recommend that:
❑ You contact your dealer to install a new memory module.
❑ You do not install it yourself, if you are not familiar with upgrading memory on a computer.
❑ You do not touch the connectors on the memory module.
For the type of module and amount of memory installed on your model, see the online Specifications.
For assistance, contact an authorized Sony Service Center. To find the nearest center or agent, visit the Sony online support
Web site.
❑ Before Upgrading Your Computer (page 93)
❑ Opening and Closing the Computer (page 94)
❑ Adding and Removing Memory (page 97)
❑ Installing an Add-on Card (page 103)
❑ Replacing the Lithium Battery (page 106)
❑ Installing the Hard Disk Drive (page 109)
❑ Installing the IDE Device (page 118)
Page 93

93
nN
Upgrading Your VAIO Computer
Before Upgrading Your Computer
The upgrading procedures described in this section assume that you are familiar with the general terminology associated with
personal computers, safety practices, required regulatory compliances, and the modification of electronic equipment.
Disconnect the computer from its power source and from telecommunications links, networks, or modems before you open
the computer or follow any procedures in this section.
!
Failure to disconnect the computer from its power source may result in personal injury or equipment damage. Always turn the power off before you
open the computer or connect peripheral equipment. Otherwise, damage may occur to the integrated circuits.
Your model may not be equipped with all of the hardware features mentioned in this section. The interior hardware
configuration of the computer may vary from the illustrations, depending on the model you purchased.
✍
You may need to temporarily remove add-on cards or other components that may be near the slot cover you plan to remove.
!
Electrostatic discharge (ESD) can damage disk drives, add-on cards, and other components. Follow the procedures described here only at an ESD
workstation. If such a station is not available, do not work in a carpeted area and do not handle materials that produce or hold static electricity (for
example, cellophane wrappers). Ground yourself by maintaining continuous contact with an unpainted metal portion of the chassis while performing
the procedure.
Page 94

94
nN
Upgrading Your VAIO Computer
Opening and Closing the Computer
When you access memory modules, add-on cards, and the lithium battery inside your computer, you need to remove and
replace the side panel beforehand and afterward.
Opening the Computer
!
If you remove the side panel immediately after you shut down the computer, the internal components may be too hot to touch. Wait about one hour to
let the components cool down before you attempt to remove the panel.
To remove the side panel
1 Shut down the computer and turn off all peripheral devices, such as a printer.
2 Unplug the computer and disconnect any peripheral devices.
3 Place the computer on its left side.
4 Unscrew the two screws on the back of the computer.
5 Slide the side panel toward the back of the computer, lift the panel, and set it aside.
Page 95

95
nN
Upgrading Your VAIO Computer
Page 96

Upgrading Your VAIO Computer
Closing the Computer
To replace the side panel
1 Insert the tabs on the bottom of the side panel diagonally into the tracks on the bottom edge of the chassis frame.
2 Slide the side panel toward the front of the computer.
3 Tighten the two screws on the back of the computer to secure the side panel.
96
nN
Page 97

97
nN
Upgrading Your VAIO Computer
Adding and Removing Memory
If you want to expand the functionality of your computer, you can increase the memory by installing optional memory modules.
Before you upgrade your computer's memory, read the notes and procedures in this section. The number of available slots
depends on your computer's hardware configuration.
Notes on adding/removing memory modules
❑ Be careful when changing memory. Improper installation of memory modules may cause damage to your system. This
damage may void your manufacturer's warranty.
❑ Only use memory modules that are compatible with the computer. If a memory module is not detected by the computer
or Windows becomes unstable, contact your sales dealer or the manufacturer of your memory module.
❑ Electrostatic discharge can damage electronic components. Before touching a memory module, ensure the following:
❑ The procedures described in this document assume familiarity with the general terminology associated with personal
computers and with the safety practices and regulatory compliance required for using and modifying electronic
equipment.
❑ Turn off the computer and disconnect the system from its power source and from any telecommunication links,
networks, or modems before you open the computer. Failure to do so may result in personal injury or equipment
damage.
❑ Electrostatic Discharge (ESD) can damage memory modules and other components. Install the memory module only
at an ESD workstation. If such a station is not available, do not work in a carpeted area, and do not handle materials
that produce or hold static electricity (cellophane wrappers, for example). Ground yourself by maintaining contact with
an unpainted metal portion of the chassis while performing the procedure.
❑ Do not open the memory module package until you are ready to change the module. The package protects the module
from ESD.
Page 98

98
nN
Upgrading Your VAIO Computer
❑ Use the special bag delivered with the memory module or wrap the module in aluminum foil to protect it from electrostatic
discharge.
❑ Introducing any liquids or any foreign substances or objects into the memory slots, or other internal components of the
computer, will result in damage to the computer and any repair costs will not be covered by the warranty.
❑ Do not place the memory module in places subject to:
❑ Heat sources such as radiators or air ducts
❑ Direct sunlight
❑ Excessive dust
❑ Mechanical vibration or shock
❑ Strong magnets or speakers that are not magnetically shielded
❑ Ambient temperature of more than 95°F (35°C) or less than 41°F (5°C)
❑ High humidity
❑ Handle the memory module with care. To avoid injuries to your hands and fingers, do not touch the edges of the
components and circuit boards inside the computer.
Page 99

Removing and Installing a Memory Module
To change or add a memory module
1 Remove the side panel.
See Opening the Computer (page 94) for the detailed instructions.
2 Push the tabs on the bracket and lift the bracket out of the computer.
99
nN
Upgrading Your VAIO Computer
3 Touch a metal object (such as the chassis frame) to discharge static electricity.
4 Locate the memory module(s) you wish to remove.
Page 100

Upgrading Your VAIO Computer
5 Push down on the latches (1), located on both sides of the module, to gently eject it from the slot.
6 Grasp the memory module by the sides and remove from the computer. Store the module in a static-free bag.
100
nN
 Loading...