

Page 1
3-207-399-13(2)
Digital Photo Printer
Operating Instructions Page 2 ______________________________
Mode d’emploi Page 25 ____________________________________
Manual de instrucciones página 47 ___________________________
GB
FR
ES
UP-DX100
© 2003 Sony Corporation
Page 2

Owner’s Record
The model and serial numbers are located at the rear.
Record these number in the space provided below.
Refer to these numbers whenever you call upon your
Sony dealer regarding this product.
Model No. __________________________________
This device requires shielded inte rface cables to comply
with FCC emission li mits
The shielded interface cable recommended in this
manual must be used with this equipment in order to
comply with the lim its for a digital device pursuant to
Subpart B of Part 15 of FCC R ules.
Serial No. __________________________________
WARNING
To prevent fire or shock hazard, do not
expose the unit to rain or moisture.
T o av oid electrical shock, do not open the
cabinet. Refer servicing to qualified
personnel only.
WARNING
This unit has no power switch.
When installing this unit, incorporate a readi ly
accessible disconnect device in the fixed wiring, or
connect the power cord to socket-outlet which must be
provided near the unit and easily accessible.
If a fault should occur during operation of the unit,
operate the disconnect device to switch the power
supply off, or disconnect the power cord.
For the customers in the USA
This equipment has been tested and found to comply
with the limits for a Class B digital device, pursuant to
Part 15 of the FCC Rules. These limits are designed to
provide reasonable protection against harmful
interferen ce in a residential installation . This equipment
generates, uses, and can radiate radio frequency energy
and, if not installed and used in accordance with the
instructions, may cause harmful interference to radio
communications. However, there is no guarantee that
interference will not occur in a particular instal lation. If
this equipment does cause h armful int erference to radio
or television reception, which can be determined by
turning the equipment of f and on, the user is encourage d
to try to correct the interference by one or more of the
following measures:
– Reorient or relocate the receiving antenna.
– Increase the separation between the equipment and
receiver.
– Connect the equipment into an outlet on a circuit
different from that to which the receiver is connected.
– Consult the dealer or experienced radio/TV technician
for help.
If you have any questions about this product, you may
call:
Sony’s Business Information Center (BIC) at
1-800-686-SONY (7669) or Sony Web site at
www.sony.com.
Declaration of conformity
Trade Name: SONY
Model: UP-DX100
Responsible Party: Sony Electronics Inc.
Address: 16450 W. Bernardo Dr,
San Diego, CA 92127 U.S.A.
Telephone Number: 858-942-2230
This device complies with part 15 of the FCC Rules.
Operation is subject to the following two conditions:
(1) This device may not cause harmful interference,
and (2) this device must accept any interference
received, including interference that may cause
undesired operation.
For the customers in Canada
This Class B digital apparatus complies with Canadian
ICES-003.
Operation is subjec t to the follow ing two con dition s: (1) th is
device may not caus e interference, an d (2) this device m ust
accept any interference, including interference that may
cause undesired opoeration of the device.
The term “IC” before the certification/registration number
only signifies that the Industry Canada technical
specifications were met.
Y o u are cautioned that any c hanges or modif ications n ot
expressly approved in this manual could void your
authority to operate this equipment.
2
Page 3
For the customers in Europe
Hereby, Sony Corporation, declares that this UP-DX100 is
in compliance with the essential requirements and other
relevant provisions of the Directive 1999/5/EC.
For details, please access the following URL:
http://www.compliance.sony.de/
This product is intended to be used in the following
countries : Austria, Belgium, Denmark, Finland, France,
Germany, Greece, Ireland, Italy, Luxembourg, The
Netherlands, Portugal, Spain, Sweden, United Kingdom,
Iceland, Norway, Swit zerlan d, Lie chten stein, and Lithua nia.
Para clientes na Europa
A Sony Corporation declara que o UP-DX100 está em
conformidade com os requisitos essenciais e outras
disposições importantes da Directiva 1999/5/CE.
Para mais informações, aceda ao URL apresentado em
seguida:
http://www.compliance.sony.de/
For kunder i Europa
Sony Corporation erklærer herve d, at de nne UP-DX1 00 er
i overensstemmelse med de essentielle krav og andre
relevante bestemmelser i direktiv 1999/5/EC.
åbn venligst den følgende URL angående detaljer:
http://www.compliance.sony.de/
Dette produkt er beregnet til brug i de følgende lande:
Østrig, Belgien, Danmark, Finland, Frankrig, Tyskland,
Grækenland, Irland, Italien, Luxembourg, Holland,
Portugal, Spanien, Sverige, Storbritannien, Island, Norge,
Svejts, Liechtenstein og Litauen.
Euroopassa oleville asiakkaille
Sony Corporation vakuuttaa täten, että tämä UP-DX100
vastaa direktiivin 1999/5/EC olennaisia vaatimuksia ja
muita asiaankuuluvia määräyksiä. Katso tarkemmat tiedot
osoitteesta:
http://www.compliance.sony.de/
Tämä tuote on tarkoitettu käytettäväksi seuraavissa
maissa: Itävalta, Belgia, Tanska, Suomi, Ranska, Saksa,
Kreikka, Irlanti, Italia, Luxemburg, Alankomaat, Portugal,
Espanja, Ruotsi, Yhdistynyt kuningaskunta, Islanti, Norja,
Sveitsi, Liechtenstein ja Liettua.
Este produto pode ser utilizado nos seguintes países:
Áustria, Bélgica, Dinamarc a, Finlând ia, França, Al emanha,
Grécia, Irlanda, Itália, Luxemburgo, Holanda, Portugal,
Espanha, Suécia, Reino Unido, Islâ ndi a, Noruega, Suíça,
Liechtenstein e Lituânia.
Voor klanten in Europa
Sony Corporation verklaart hierbij dat deze UP-DX100
voldoet aan de primaire vereisten en andere relevante
voorschriften van richt lijn 1999/5/EC va n de Europese Unie.
Voor verdere informatie bezoekt u de volgende website:
http://www.compliance.sony.de/
Dit product is bedoeld voor gebruik in de volgende landen:
Belgi, Denemarken, Duitsland, Finland, Frankrijk,
Griekenland, Ierland, Itali, Liechtenstein, Litouwen,
Luxemburg, Nederland, Noorwegen, Oostenrijk, Portugal,
Spanje, Verenigd Koninkrijk, IJsland, Zweden en
Zwitserland.
För kunder i Europa
Sony Corporation förkunnar härmed att denna UP-DX100
uppfyller de huvudsakliga kraven och andra relevanta
villkor i direktivet 1999/5/EC.
Se följande URL för närmare detaljer:
http://www.compliance.sony.de/
GB
Denna produkt är avsedd för användning i följande länder:
Österrike, Belgien, Danm ark, Finlan d, Frankrike , Tyskland,
Grekland, Irland, Italien, Luxemburg, Nederländerna,
Portugal, Spanien, Sverige, Storbritannien, Island, Norge,
Schweiz, Liechtenstein och Litauen.
3
Page 4

• Windows® is a registered trademark of Microsoft
Corporation in the Unit ed States and other cou ntries.
• All other companies and product names mentioned
herein may be the trademarks or registered
trademarks of their respective companies.
Furthermore, “™” and “®” are not mentioned in
each case in this manual.
Duplication, edition, or printing of a CD, TV
programs, copyrighted materials such as pictures or
publications, or any other materials except for your
own recording or creation is limited to private or
domestic use only . Unless you hol d copyright or ha ve
permission of copyri ght holders for the materials to be
duplicated, use of those materials beyond this limit
may infringe the provisions of the copyright law and
be subject to the copyright holder’ s claim for damages.
When using photo images wit h this printer , pay special
attention not to i nfringe the provisi ons of the copyright
law. Any unauthorized use or modification of ot hers’
portrait may also infringe their rights.
For some demonstrations, performances, or exhibits,
photography may be forbidden.
4
Page 5

Table of Contents
Overview ................................................................. 6
Features .............................................................. 6
Location of Parts ....................................................7
Preparations ...........................................................9
Unpacking the Printer .........................................9
Preparing a Printing Pa ck ...................................9
Loading the Print Cartridge ................................9
Changing the Print Cartridge ............................10
Attaching the Paper Holder ..............................10
Inserting the Print Pa per ................................... 11
Connecting the Printer to a Wall Outlet ...........12
Connecting to a Computer ................................ 12
Menu ..................................................................... 13
Structure of the Menu .......................................13
Functions of Each Menu Item ..........................13
Bluetooth ..............................................................14
Bluetooth Wireless Technology ....................... 14
The “Basic Imaging Profil e” ............................14
Communication Between the Pr inter and Ano ther
Device Using the Bluetooth Function ............14
Authentication .................................................. 15
Giving Your Printer a Device Number .............16
Printing a Picture ................................................16
Reprinting a Picture St ored in Memory
(COPY PRINT) ..............................................17
Adjustments ......................................................... 17
Adjusting the Printing Location
(PRINT SETTING) .......................................17
Adjusting the Print Quality
(COLOR ADJUST) ........................................18
Precautions ...........................................................20
Safety ................................................................ 20
Installation ........................................................ 20
Cleaning ...........................................................20
Specifications ........................................................21
Troubleshooting ...................................................22
Printer ............................................................... 22
Bluetooth Function ...........................................23
Error messages .................................................24
5
Page 6
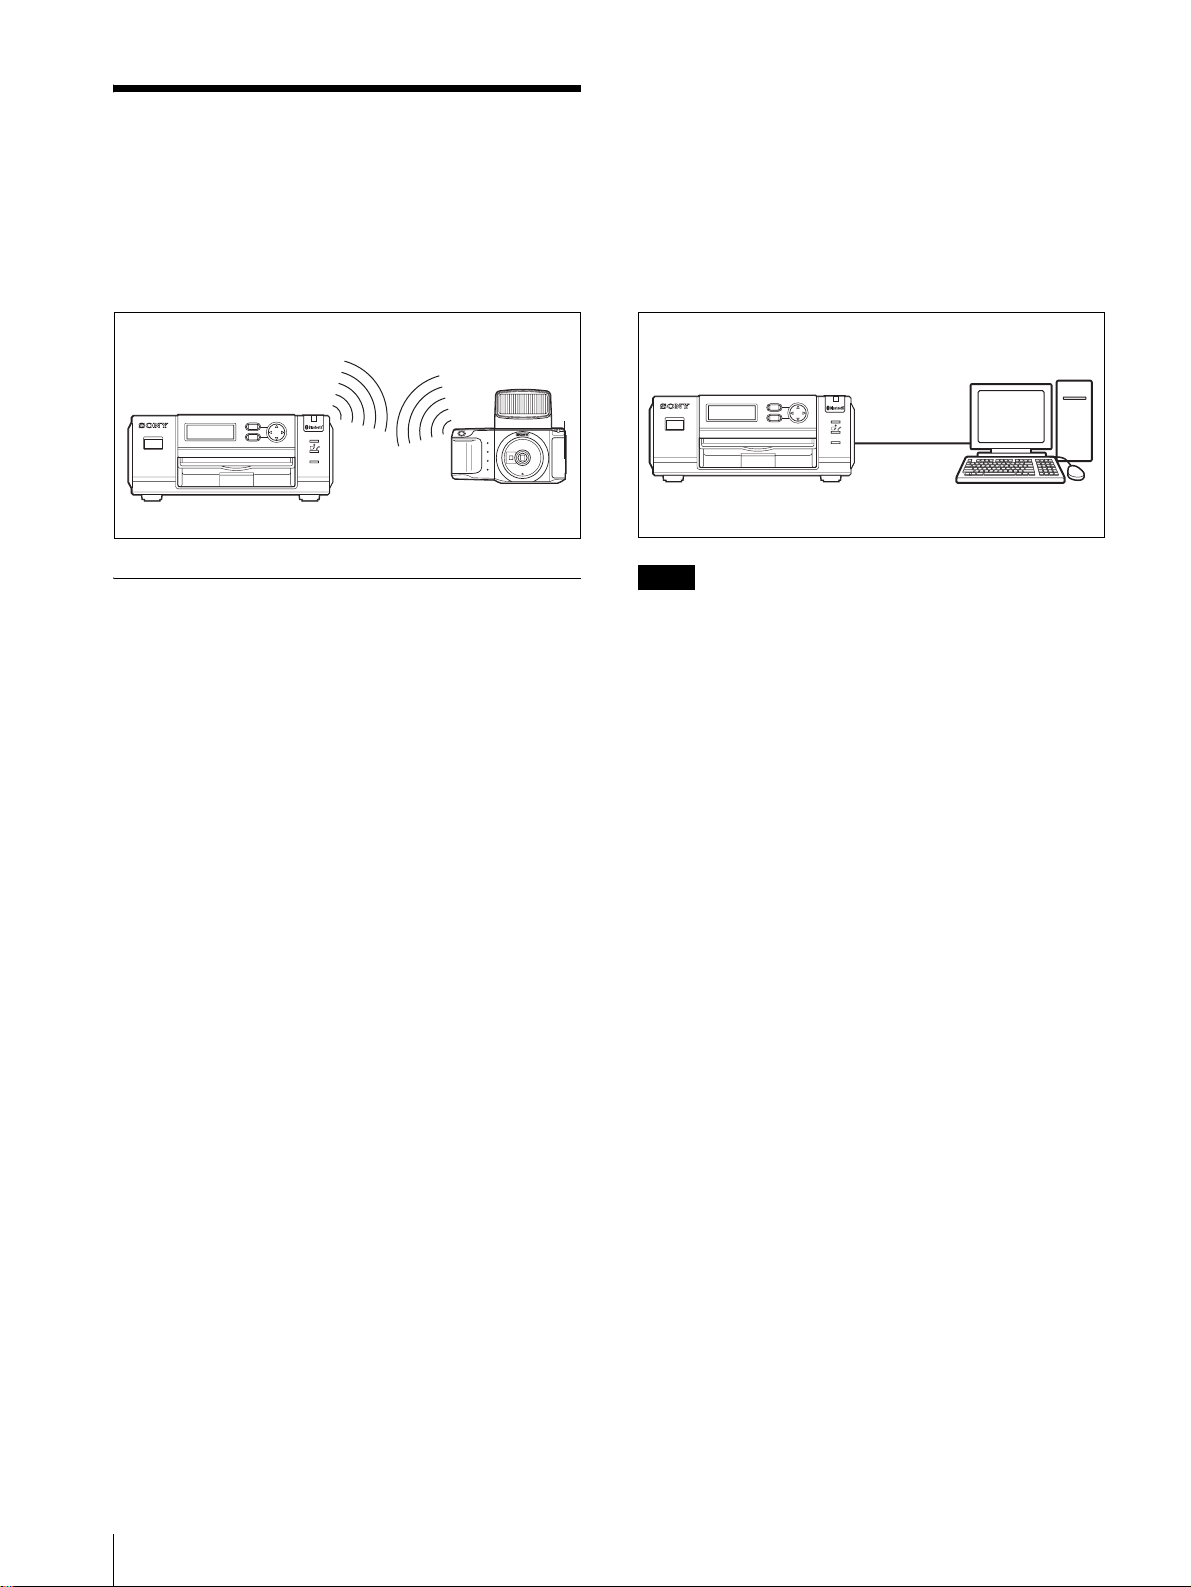
Overview
The Sony UP-DX100 Digital Ph oto Printer is an
extension printer for the UPX-C200 Digital Printing
System. As a second or third printer for the UPX-C200
system, the UP-DX100 can receive and print images
from a digital camera that sends signals to the printer
using Bluetooth wireless technology.
Bluetooth wireless connection
MENU
EXEC
1
DIGITAL PHOTO PRINTER
UP-DX100 Digital camera
Features
The UP-DX100 has the following features:
Photo-realistic printing
With its dye sublimation printing system, the printer can
make photo-realistic prints meeting a nu mber of
different requirements.
PRINT
ALARM
Printing from your computer wi th a co nvenient
USB connection
By connecting the printer and your computer with a
USB cable (commercially available) and installing the
supplied printer driver software on your computer, you
can print images from your computer.
F or detai ls on connecting a computer, r efer to “Read me
(English)” stored in the supplied CD-ROM.
USB connection
MENU
EXEC
1
DIGITAL PHOTO PRINTER
UP-DX100 Computer, etc.
PRINT
ALARM
Note
When connecting a computer using a USB cable,
depending on the type of computer, normal operation
may not be obtained. In such a case, use a commerc ially
available USB hub.
Super Coat 2 feat ure
The Super Coat 2 enables high durability and moisture
or fingerprint resistance, keeping your prints in good
picture quality for an extended period of time.
Selection of print sizes
You can select from a large, dynamic Post card (4×6
inch) size (UPC-X46) or an economical Small
(3.5×4inch) size (UPC-X34) print.
If an UPA-DX100TR optional paper tray is inserted in
the printer, you can also use UPC-X45 print paper on
which stamping with water-based ink is possible.
Paper tray allowing bulk printing of 25/30
sheets
With the supplied paper tray, you can print up to 25
sheets for Post card size and 30 sheets for Small size
print paper at one time.
6
Overview
Page 7
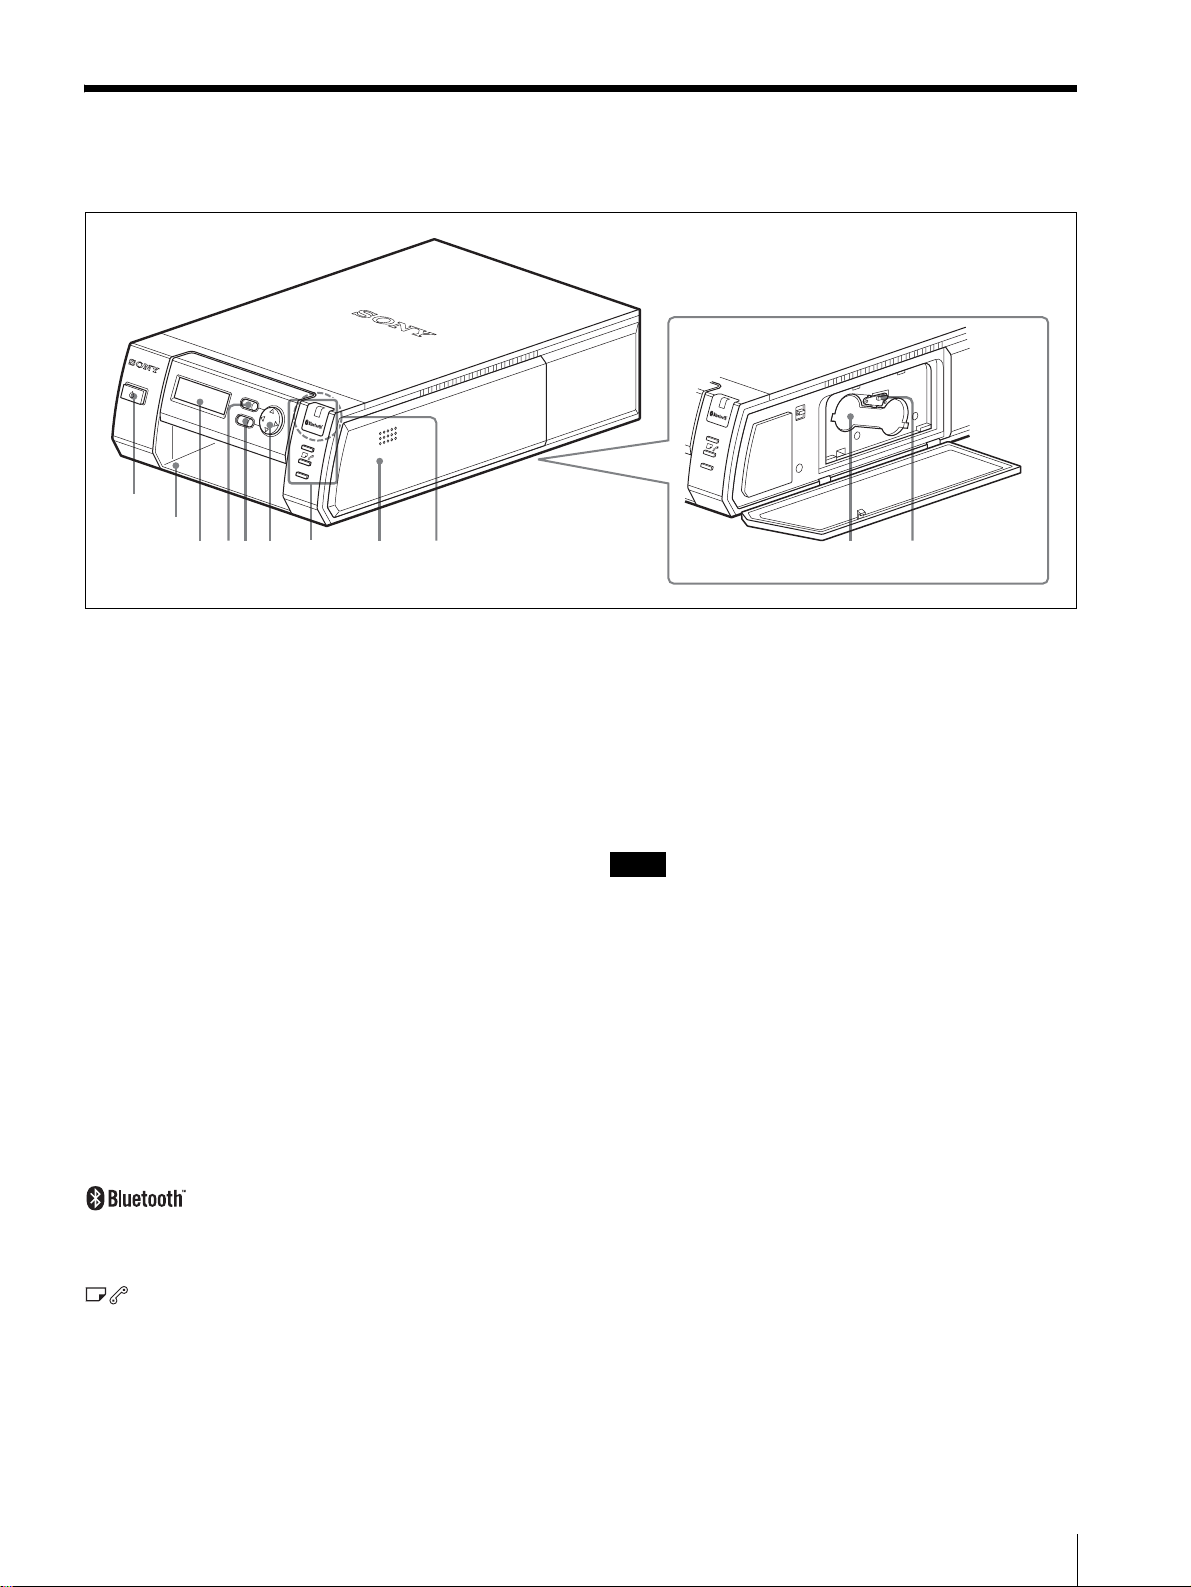
Location of Parts
Front
ME
N
U
DIGI
TA
L
P
H
O
1
T
O
P
R
I
N
T
ER
2
EXEC
N
E
PRINT
ALARM
34 0956 8
7
P
O
H
S
U
P
Bluetooth antenna (inside)
PRINT
ALA
R
M
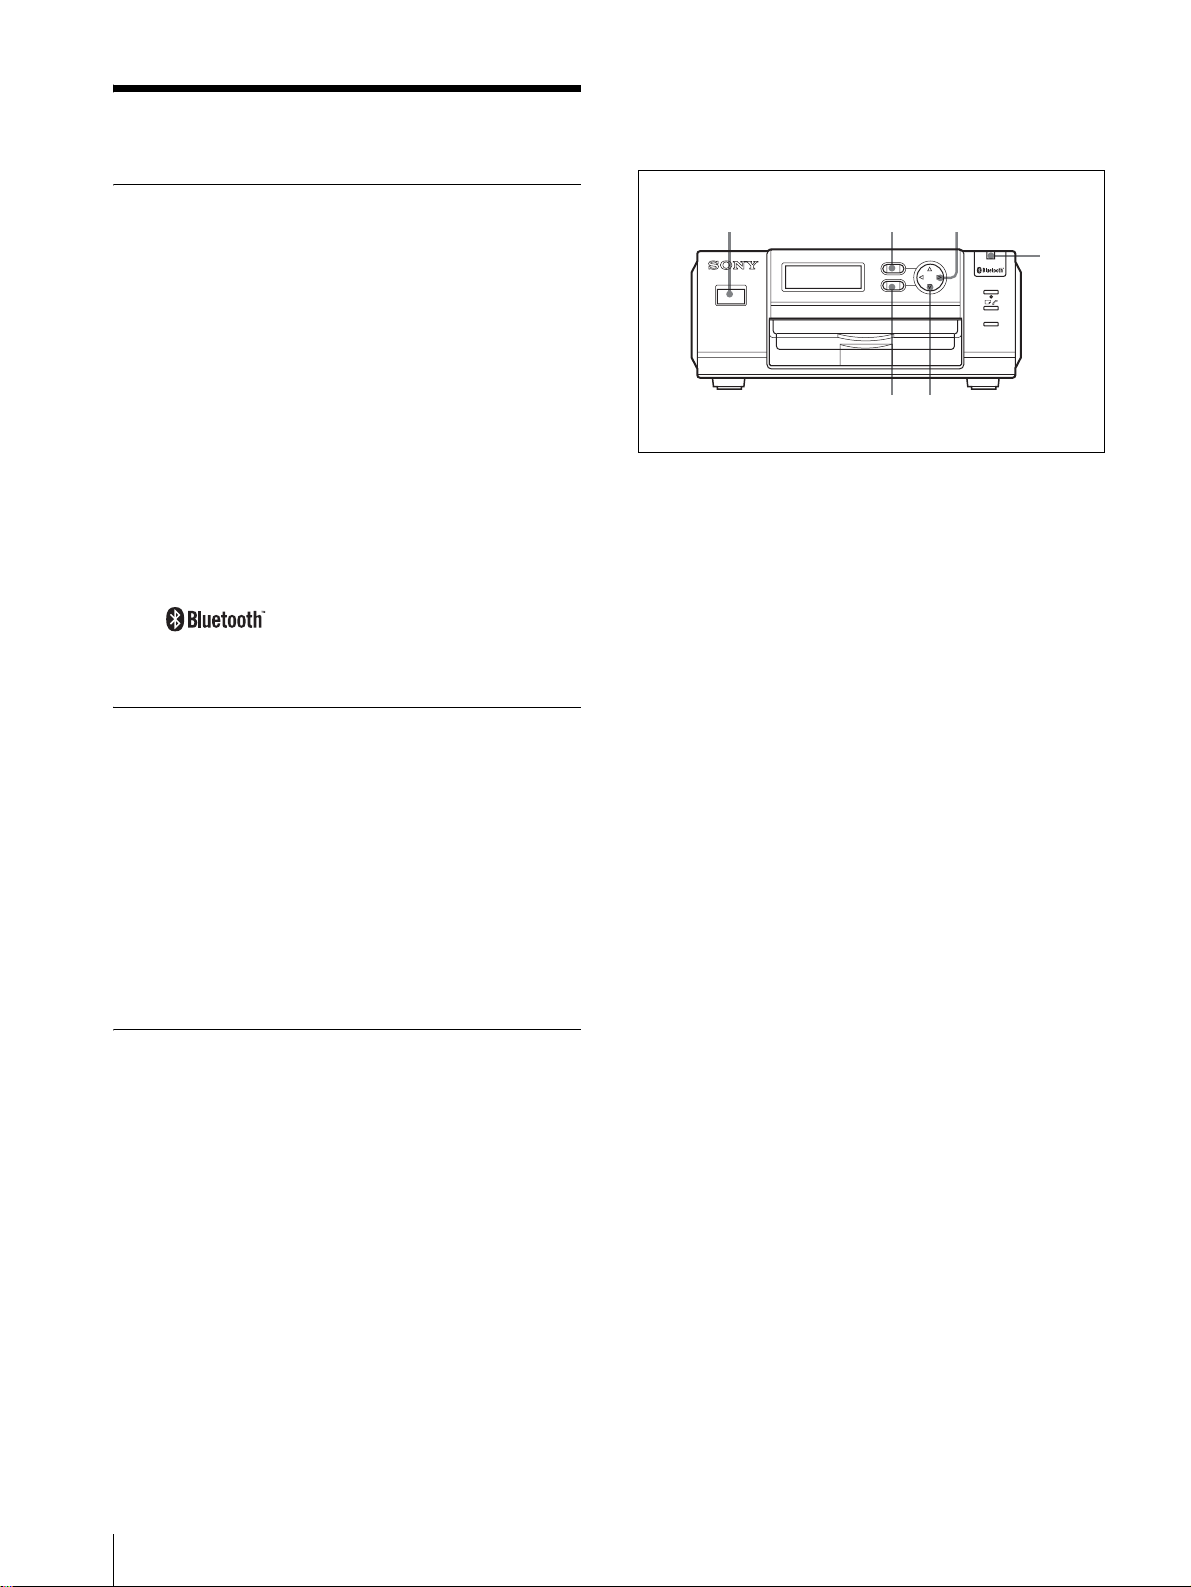
A 1 (on/standby) b ut t on a nd la mp
Press to turn on the printer, and the lamp lights. Pressing
it again makes the lamp go out , and the printer enters the
standby mode.
B Paper tray slot
Insert the paper tray.
C Operation display
When the printer is turned on, the operation mode or
menu item appears.
D MENU button
Press to display the menu it em or to cancel an y change s
made on the menu items that you have not registered.
E EXEC button
Press to decide the selection for each Menu items.
F Control button
Press to select a menu item an d to settle the selection.
G Lamps
lamp: Lights when the Blue tooth fun ction
is enabled.
PRINT lamp: Lights while pr inting is in pr ogress, and
flashes while the printer is receiving image data.
lamp: Lights i f paper ru ns out, t he print ca rtridge
is out of ink, or cartridges and paper of different
types or sizes are mixed.
ALARM lamp: Lights in case of occurrence of
problem.
H Cartridge compartment cover
Open the cover to insert and remove the print ca rtridge.
I Cartridge compartment
Insert the print cartrid ge.
J Cartridge eject lever
Push up the lever to eject the inserted cartridge.
Note
The lever is disabled while printing.
Location of P arts
7
Page 8
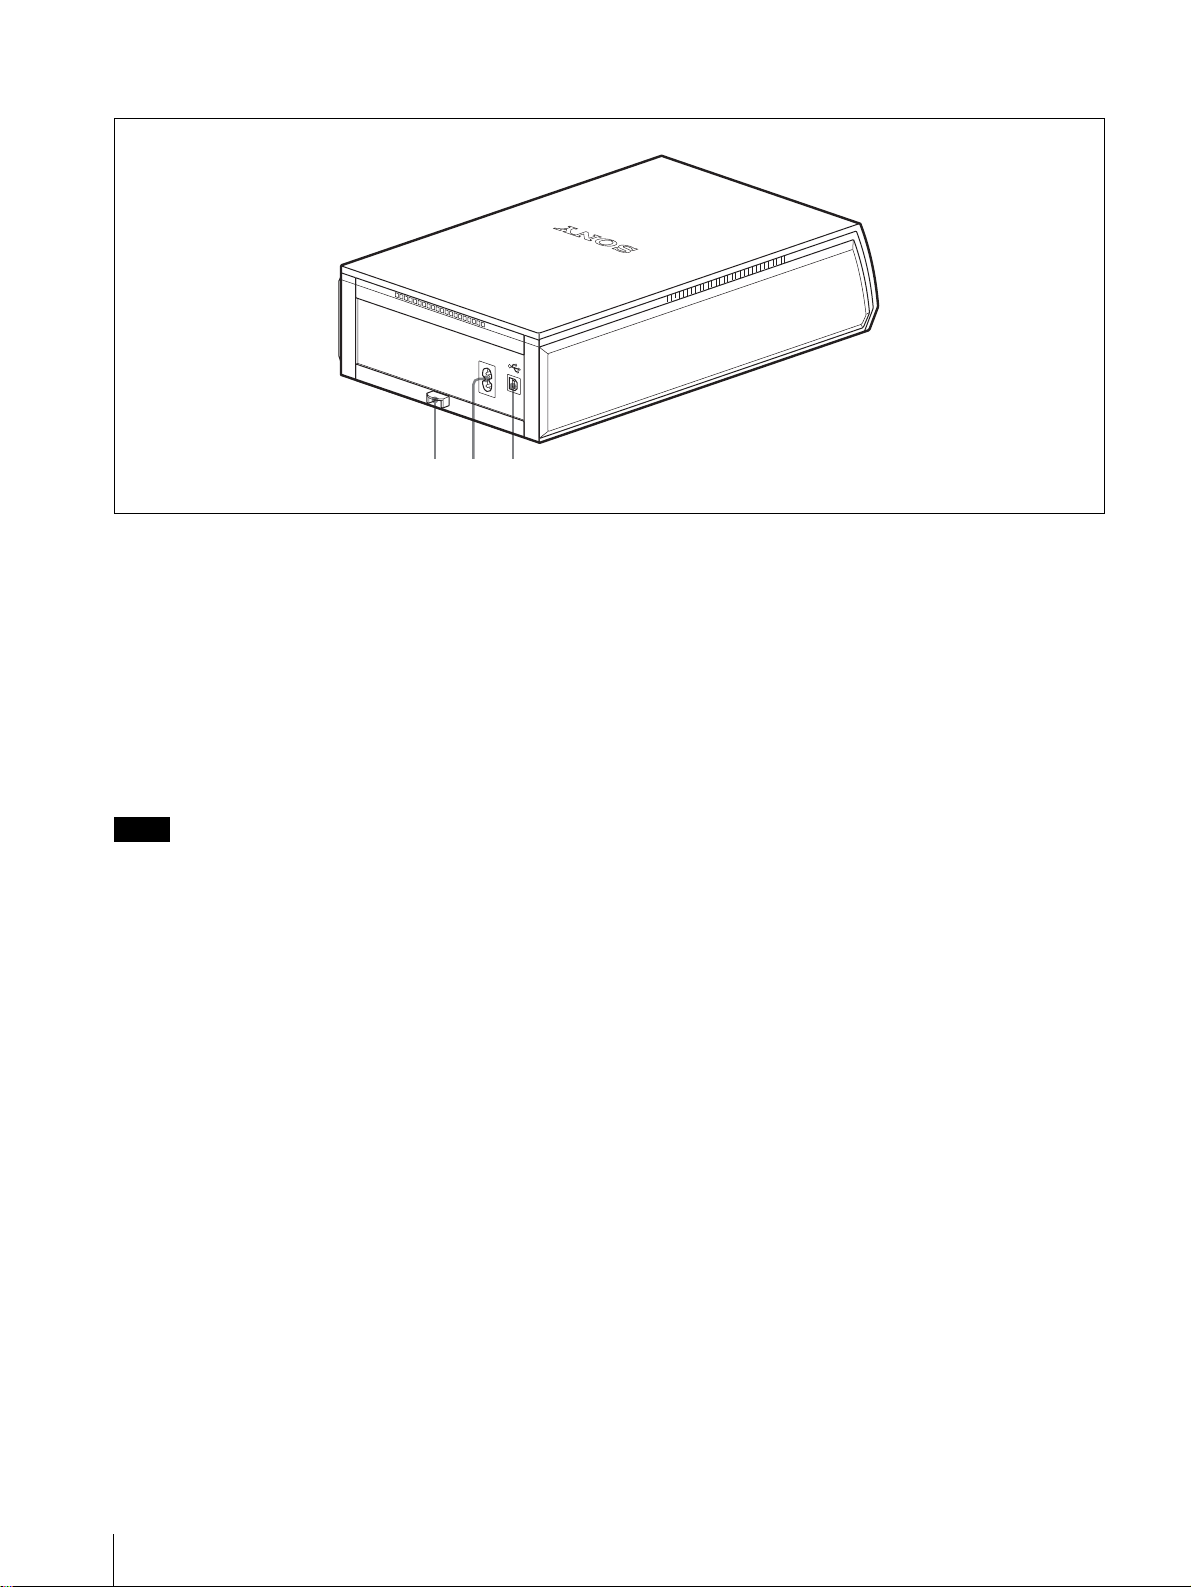
Rear
- AC IN
123
A Paper jam remove cover
When a paper jam occurs, remove this cover, and
remove the jammed paper.
B -AC IN connector
Connect to a wall outlet using the supplied AC power
cord.
C USB connector
Connect to the USB connector on a computer using a
USB cable.
Note
When connecting a computer using a USB cable,
depending on the type of computer, normal operation
may not be obtained. In such a case, use a commer cially
available USB hub.
8
Location of Parts
Page 9
Preparations
Before using the printer for the first time, you need to
install a print cartridge and the paper tray, as indicated
below. These preparations are not needed for everyday
print operations, but are to be done as required.
Unpacking the Printer
Make sure that the following accessories are supplied
with your printer.
• AC power cord (1)
• Paper trays (2, large/small)
• Paper holder (2)
• Tray cover (1)
•CD-ROM (1)
- Sony UP-DX100 Printer Driver Software
- Operating Instructions
• Cleaning cassette (1)
• Operating Instructions (1)
• Software License Agreement (1)
Preparing a Printing Pa ck
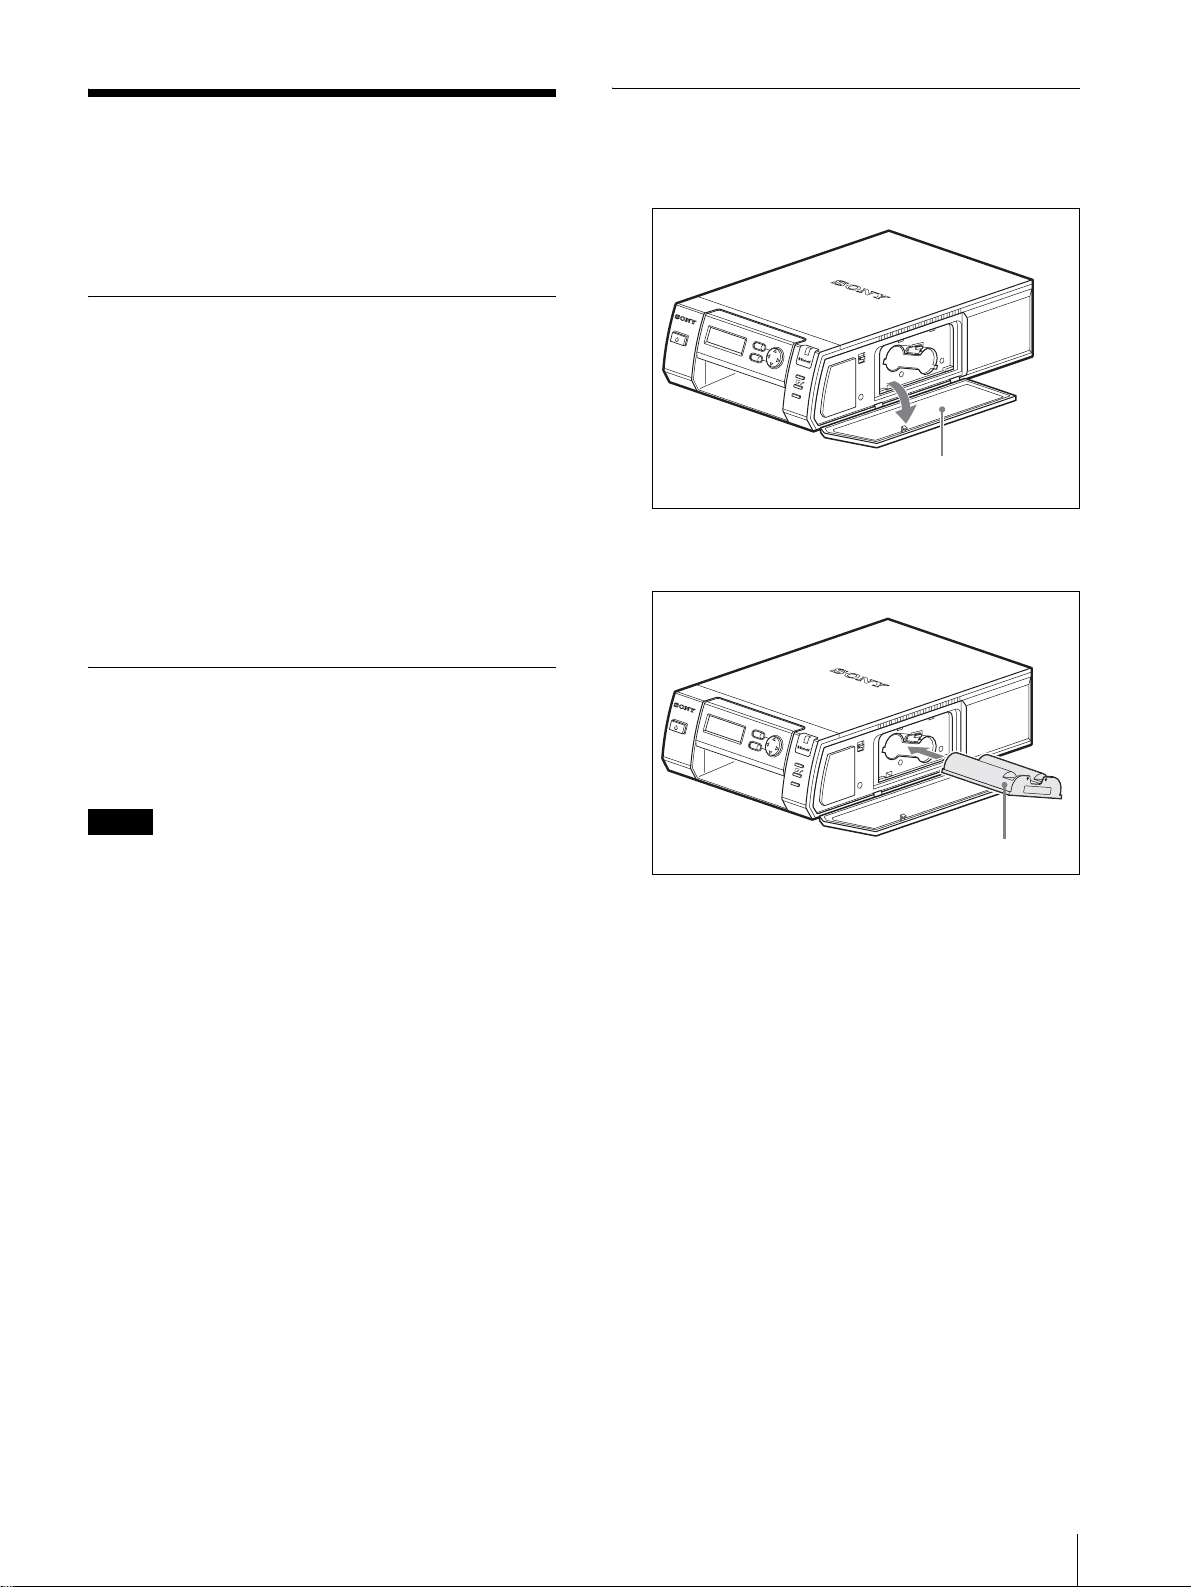
Loading the Print Cartridge
1
Push on PUSH OPEN, and open the cartridge
compartment cover.
MENU
E
X
E
DIGI
T
A
L
PH
O
TO
P
R
I
N
T
ER
2
Insert the print cartridge into the printer firmly until
it clicks into place.
C
P
R
I
N
T
A
L
A
RM
Cartridge
compartment cover
You need an optional printing pack (UPC-X46 or UPCX34) designed for the print er . The pack contains a set of
print paper and a p rint cartridge.
Notes
• Do not rewind the ink ribbon and use the rewound
print cartridge for printing. Otherwise, proper
printing result will not be obtained, or even a
breakdown may occur.
• Use the printi ng pack for this printer only.
• Always use the print cartridge designed for the size of
the print paper you use. If you mix cartridges and
paper of different types or sizes, printing may not be
possible, or a paper jam or other trouble may occur.
• Do not print on the used print paper. Printing an image
twice on the same paper will not make the printed
image thicker. This may even cause a malfuncti on or
breakdown.
• Do not touch the ink ribbon of the print car tridge or the
printing surface of the print paper. If there are
fingerprints or dust on the printing surface or the ink
ribbon, the printing quality may deteriorate.
• For high quality print s, avoid placing the printing p ack
in locations that are subject to high temperature, hi gh
humidity, excessive dust, or direct sunlight.
• When storing a partia lly used pack of the print
cartridge and print paper, store it in its original bag or
in a similar container.
MENU
E
X
E
DIGI
T
A
L
PH
O
TO
P
R
I
N
T
ER
3
Close the cartridge compartment cover.
C
P
R
I
N
T
A
L
A
RM
Print cartridge
Preparations
9
Page 10
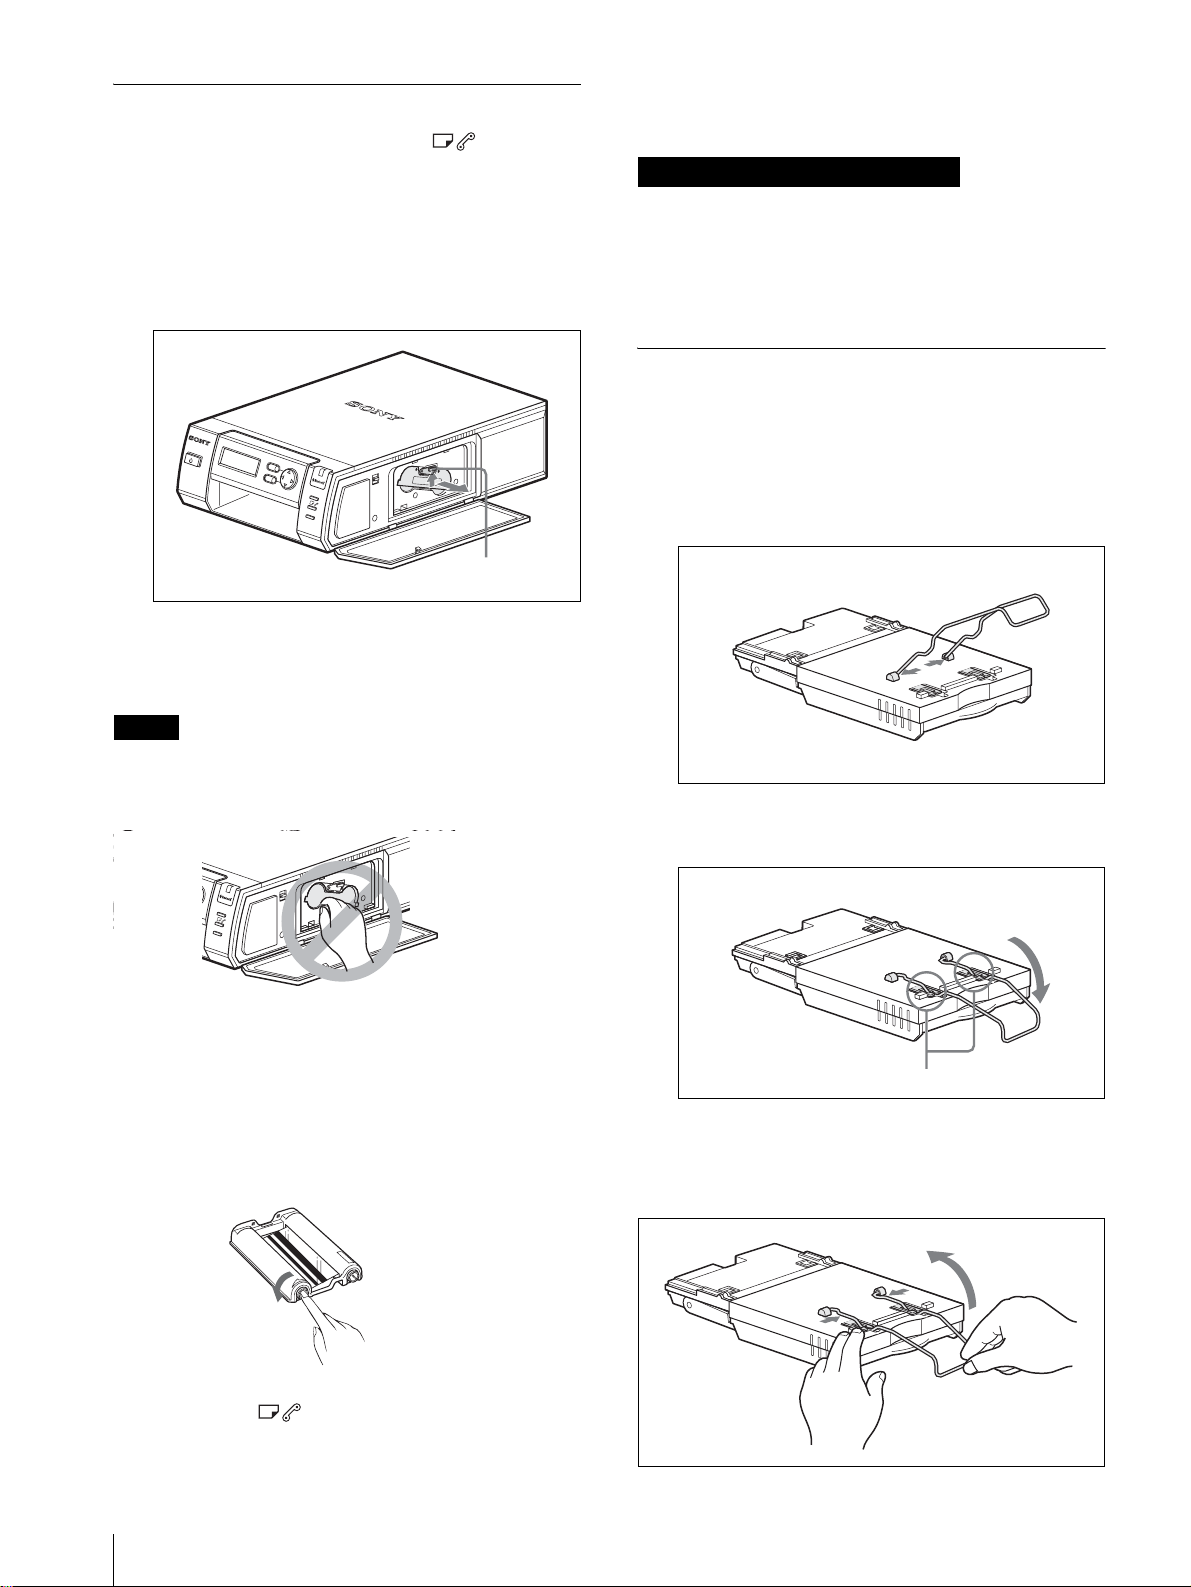
Changing the Print Cartridge
When the print cartridge runs out , the lamp lights
and an error message appears on the operation display.
Replace the print cartridge.
1
Push on PUSH OPEN, and open the cartridge
compartment cover.
2
Press up the cartridge release lever.
MENU
E
X
E
DIGI
T
A
L
PH
O
TO
P
R
I
N
T
ER
C
P
R
I
N
T
A
L
A
RM
ribbon may result in imperfect printing.
• Do not change the print cartridge while printing.
Notes on storing the print cartridge
• Avoid placing the print cartridge in a location subject
to high temperatures, high hu midity , e xcessi ve dust or
direct sunlight
• When you are going to store a partiall y used cartridge,
store it in its original ba g.
Attaching the Paper Holder
Attach the supplied paper holder to the paper tray as
follows:
1
Insert the tips of bot h ends of the paper holder into
the holes located at the bottom of the paper tray,
pinching the portions near the two ends.
Cartridge release
lever
The cartridge pops out. Remove the cartridge.
3
Insert a new print cartridge, and close the cover.
Notes
• Never put your hand into the cartrid ge compartment.
The thermal head reaches high temperatures,
especially after repeated printing.
MENU
E
X
E
C
P
R
I
N
T
A
L
A
RM
• Do not rewind the ink ribbon and use the rewound
print cartridge for printing. Otherwise, proper
printing result will not be obtained, or even a
breakdown may occur.
• If the print cartridge does not click into place, remove
it and then re-insert it. If the ink ribbon i s too slack t o
be loaded, wind the ink ribbon in the direction of the
arrow to remove the slack.
Paper holder
Paper tray
(
2
Push the paper ho lder i nto t he sto ppers firmly until
it snaps into place, making a click sound.
(
Stoppers
Removing the paper holder
Push out the paper holder gent l y fr om the stoppers, and
remove it, pinching the portions near the two ends.
• If the print cartridge is not loaded when you turn on
the printer, the
lamp lights up.
• Do not touch the ink ribbon or place the p rint cartridge
in a dusty location. Fingerprints or dust on the ink
10
Preparations
Page 11
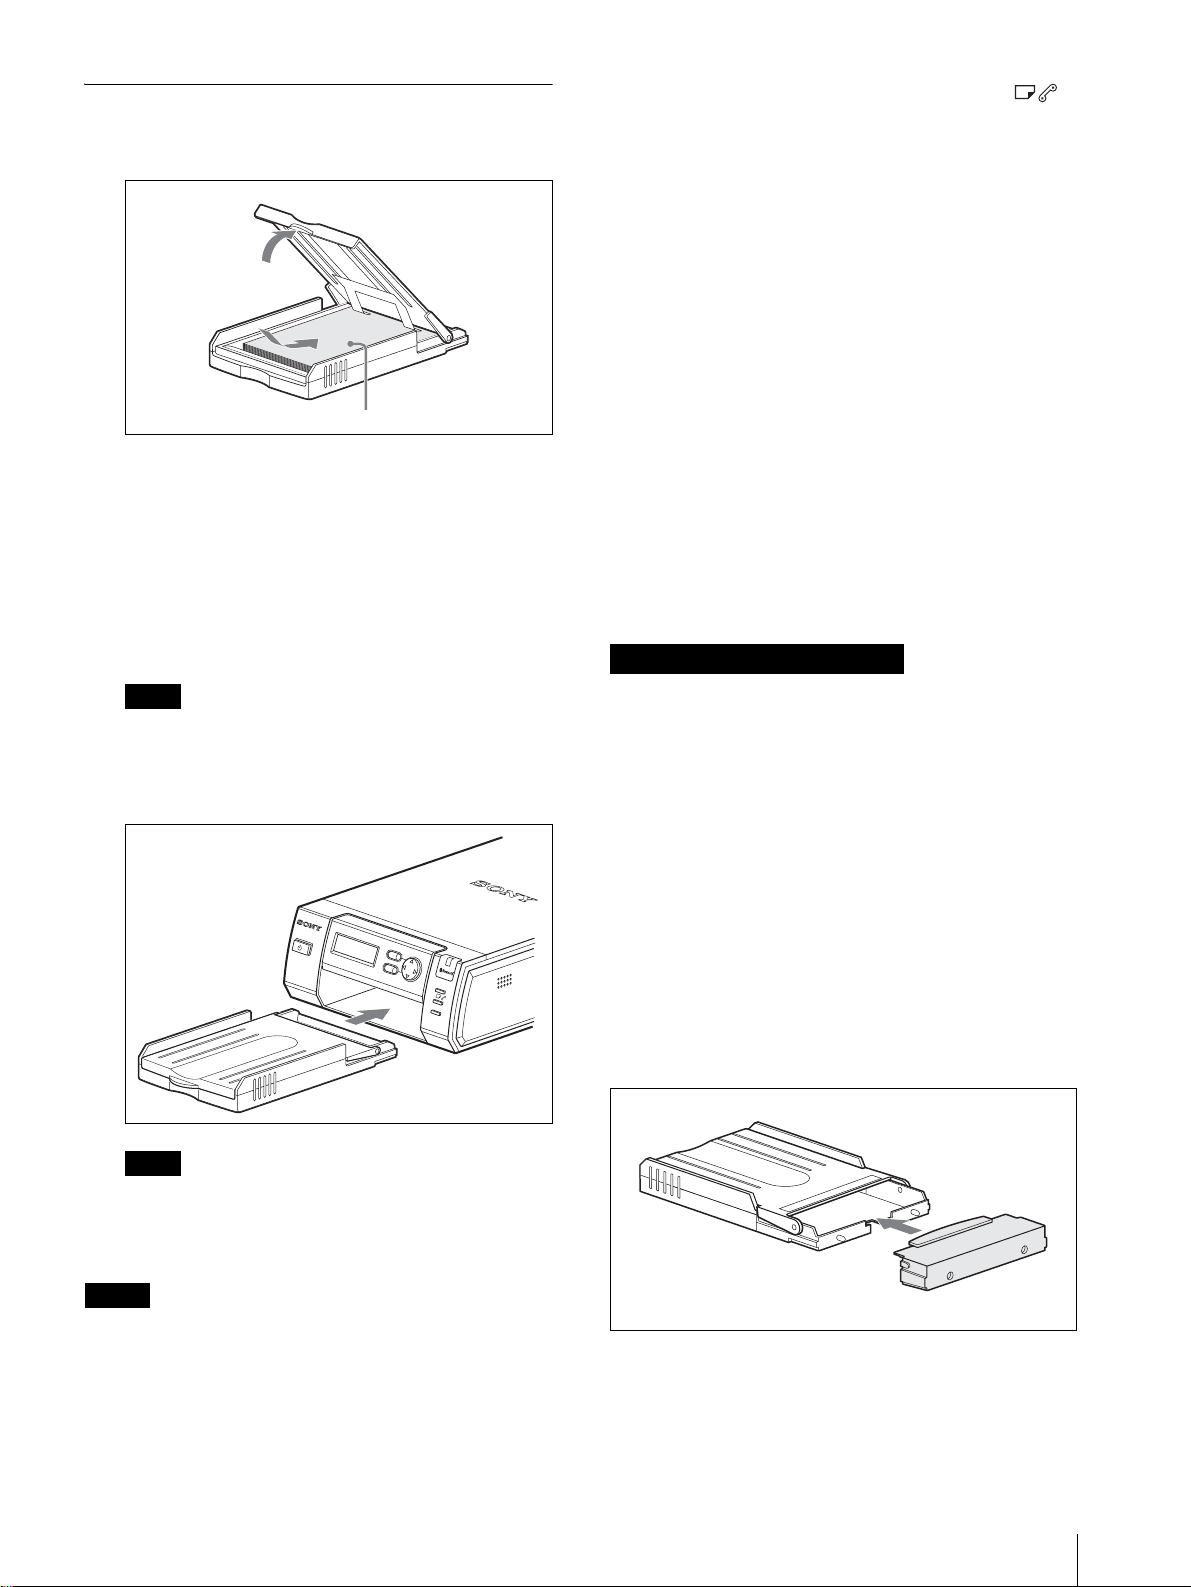
Inserting the Print Paper
1
Set the print paper into the tray.
Print paper
Riffle the print paper. Then insert the print paper
with its printing surface (the side with no imprint)
facing up and the arrow pointing in the same
direction as the arrow in the tray.
You can set 25 sheets when the UPC-X46 is used,
and 30 sheets when the UPC-X34 is used.
2
Remove the protective sheet on the print paper.
• If print paper does not feed automatically, the
lamp lights. Pull out the paper tray and check for a
paper jam.
• When adding print paper to a partially full tray, make
sure that the total number of sh eets does not exceed 25
for the UPC-X46 or 30 for the UPC-X34. Do not
place different types or sizes of paper in the tray.
Otherwise, a paper jam or malfunction may occur.
• Do not write or type on the printing surface of the
paper before printing. You may not be able to proceed
with printing. If you want to write greetings or draw
on the printed surface after printing, use an oil ink pe n.
• Do not attach stickers or an yth ing el se on th e print ing
surface before printing.
• Do not print on the used print paper . Printi ng an image
twice on the same paper will not make the printed
image thicker. This may even cause a malfunction or
breakdown.
• Before printing, do not fold or bend the print paper.
• Do not leave more than five sheets of ejected printed
paper on the paper tray because they may cause a
paper jam.
Notes on storing the print paper
Note
Be sure to keep the protective sheet, which is used
for cleaning the inside of the printer.
3
Insert the tray to the printe r.
ME
N
U
DIGITA
L
P
H
O
TO
P
R
I
NTER
EXEC
PR
I
NT
A
L
A
RM
Note
Do not touch the printing surface. Fingerprints on
the printing surface may result in imperfect
printing.
PUSH OPEN
• Avoid placing the print paper in a location subject to
high temperatures, high humidity, excessive dust or
direct sunlight.
• Avoid storing the paper with the printed faces
touching each other or in cont act with rubber or plastic
products including vi nyl chloride or plasticizer for an
extended period of time; color changes or
deterioration of the printed image may occur.
• When you are going to stor e partially-used print paper,
store it in its original bag.
Attaching the tray cover
Keep the supplied tray cover attached to the paper tray
when not in use to protect print pap er pl aced i n t he tr ay
from dust. The tray cover can be attached to either paper
tray for the UPC-X46 or for the UPC-X34.
Notes
• Set the paper of the UPC-X46 into the large paper tray,
and that of the UPC-X34 into the small paper tray. If
the paper size and tray size do not match, a paper jam
may occur.
• Do not remove or i nsert the paper tray during pri nting.
Tray cover
Preparations
11
Page 12

Connecting the Printer to a Wall Outlet
Connect the supplied AC power cord to the AC IN
connector of the printer and then to wall outlet.
UP-DX100
-AC IN
-AC IN
AC power cord
(supplied)
to wall outlet
Connecting to a Computer
Notes
• For connection, use a commercially available A-B
TYPE USB cable less than 3 meters long. As the
proper cable may differ according to the type of
computer, determine the type of cable you need,
consulting the instruction manual for your computer.
• Refer to the instruction manual for your computer, as
well.
• The supplied Sony UP-DX100 Printer Driver does not
support a network printer, nor can be used with a
commercially available printer buffer unit.
• Do not connect or disconnect the USB cable during
data transfer or printing. Proper printing results may
not be obtained.
• When connecting a computer using a USB cable,
depending on the type of comp ut er, normal operation
may not be obtained. In such a case, use a
commercially available USB hub.
To print images from your computer, connect the USB
connectors of the printer and a computer (a PC with
Windows) using a commercially available USB cable,
and install the supplied printer driver on the computer.
For details on instal lation and operation of the printer
driver, refer to “Read me (English)” contained on the
supplied CD-ROM.
UP-DX100
-AC IN
USB cable
12
Computer
Preparations
Page 13
Menu
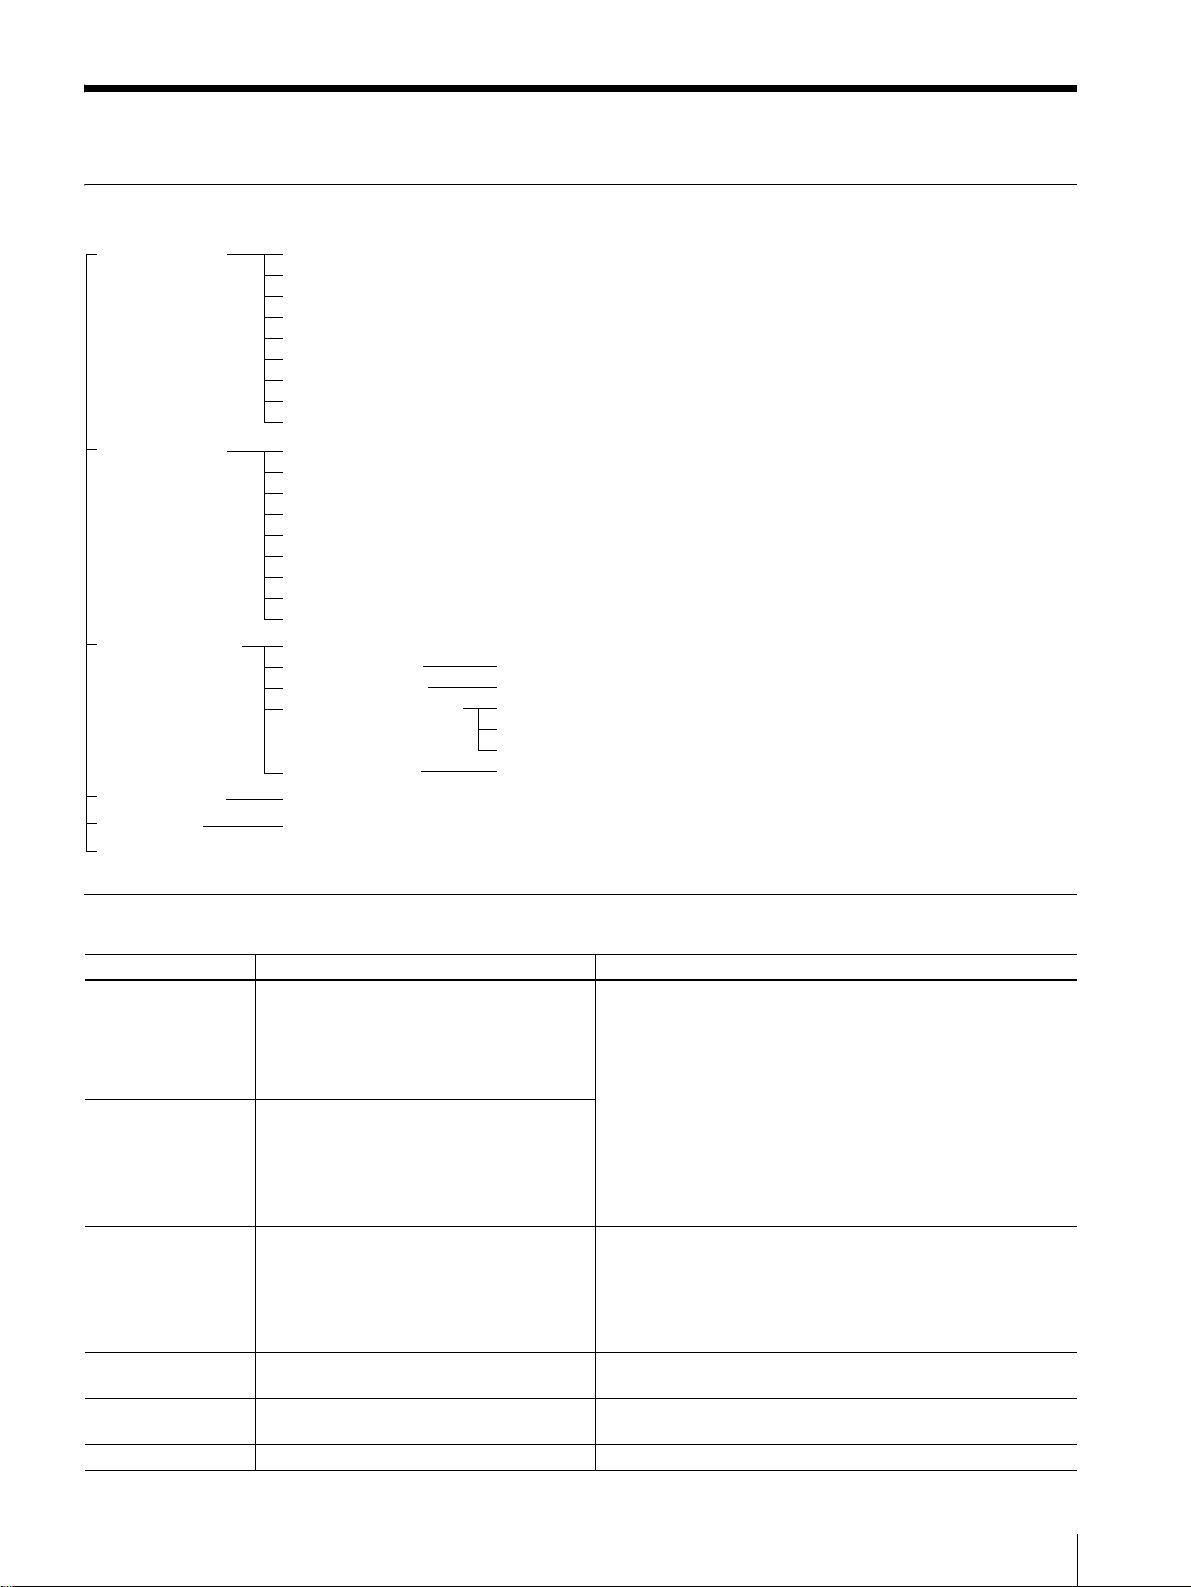
Structure of the Menu
COLOR ADJUST CYN-RED (–7 to +7)
COLOR(S)* MAG-GRN (–7 to +7)
YEL-BLU (–7 to +7)
DARK (–7 to +7)
LIGHT (–7 to +7)
SHARPNESS (0 to +7)
GAMMA (–7 to +7)
SAVE SETTING (1/2/3)
LOAD SETTING (1/2/3)
COLOR ADJUST CYN-RED (–7 to +7)
B/W(S)* MAG-GRN (–7 to +7)
YEL-BLU (–7 to +7)
DARK (–7 to +7)
LIGHT (–7 to +7)
SHARPNESS (0 to +7)
GAMMA (–7 to +7)
SAVE SETTING (1/2/3)
LOAD SETTING (1/2/3)
Bluetooth SETTING Bluetooth ADDR
PASS KEY INPUT PASS KEY INPUT [1:2:3:4]
MY DEVICE NAME Sony UP- DX100 [NONE – 9]
CONNECTION RECORD 1. Sony DKC-C200X
MODULE POWER POWER: (ON/OFF)
PRINT SETTING PRINT OFFSET: (–2/–1/0/1/2)
COPY PRINT COPY PRINT: 1 [1 – 9]
TOTAL PRINTS
2. NONE
3. NONE
* When the UPC-X45 print paper is used,
(S) is displayed.
Functions of Each Menu Item
Menu item Function Setting
COLOR ADJUST
COLOR
COLOR ADJUST
B/W
Bluetooth SETTING You can make Bluetooth settings. Bluetooth ADDR: The Bluetooth address is displayed.
PRINT SETTING The printing location on print paper of the
COPY PRINT The newest data stored in memory is
TOTAL PRINTS The total number of sheets printed is shown. —
You can adjust the print quality for color
pictures.
You can adjust the print quality for blackand-white pictures.
UPC-X46 is fine- a dju ste d.
reprinted.
CYN-RED: The cyan and the red are adjusted.
MAG-GRN: The magenta and the green are adjusted.
YEL-BLU: The yellow and the blue are adjusted.
DARK: The brightness of a dark area is adjusted.
LIGHT: The brightness of a bright area is adjusted.
SHARPNESS: The sharpness of edges of objects in a picture is
adjusted.
GAMMA: The tone of a picture is adjusted.
SAVE SETTING (1/2/3): The adjusted values are stored in the
built-in memory.
LOAD SETTING (1/2/3): The adjusted values stored in memory
are loaded.
PASSKEY INPUT: A passkey is set or changed.
MY DEVICE NAME: The printer can be assigned a number.
CONNECTION RECORD: The connection record is displayed.
MODULE POWER: The power of the Bluetooth circuits is
turned on or off.
PRINT OFFSET (–2/–1/0/1/2)
The printing location can be shifted by 0.5 mm.
[1 – 9]
The number of sheets to be printed is set.
Menu
13
Page 14
Bluetooth
Checking the current setting
Y ou can check the current passkey set tings on the printer
as follows:
Bluetooth Wireless Technology
The Bluetooth1) wireless technology allows
communication between various Bluetooth devices
without using cables. Devices which can use this
technology include computers, computers peripheral
devices, PDAs, and mobile phones.
This omnidirectional communications system enables
communication even if the Bluetooth device is in a bag
or if there are obstacles between the devices.
Also, the Bluetooth wireless technology has advanced
security functions, such as scrambled frequencies and
data encruption.
• When using the Bluetooth function, the distance
between the camera and the printer you intend to
connect must be within 10 m (33 feet) without
obstacles.
1) The trademark is owned by their proprietor and
used by Sony Corporation un der license. The word Bluetooth
is printed in plain text througho ut thi s docu me nt.
The “Basic Imaging Profile”
The “Basic Imaging Profile” (BIP) is the specifications
used when sending or receiving still images between
Bluetooth devices. The main fea tures o f the BIP enabl e
sending or receiving images, and use of the remote
shutter feature of a digital still camera.
T o conn ect with your pr inter, the Bluetooth device must
be compatible with the “Image Push Feature” of the
“Basic Imaging Profile” (BIP).
Before using the Bluetoot h device, check the Bluetooth
and BIP specifications of the dev ic e.
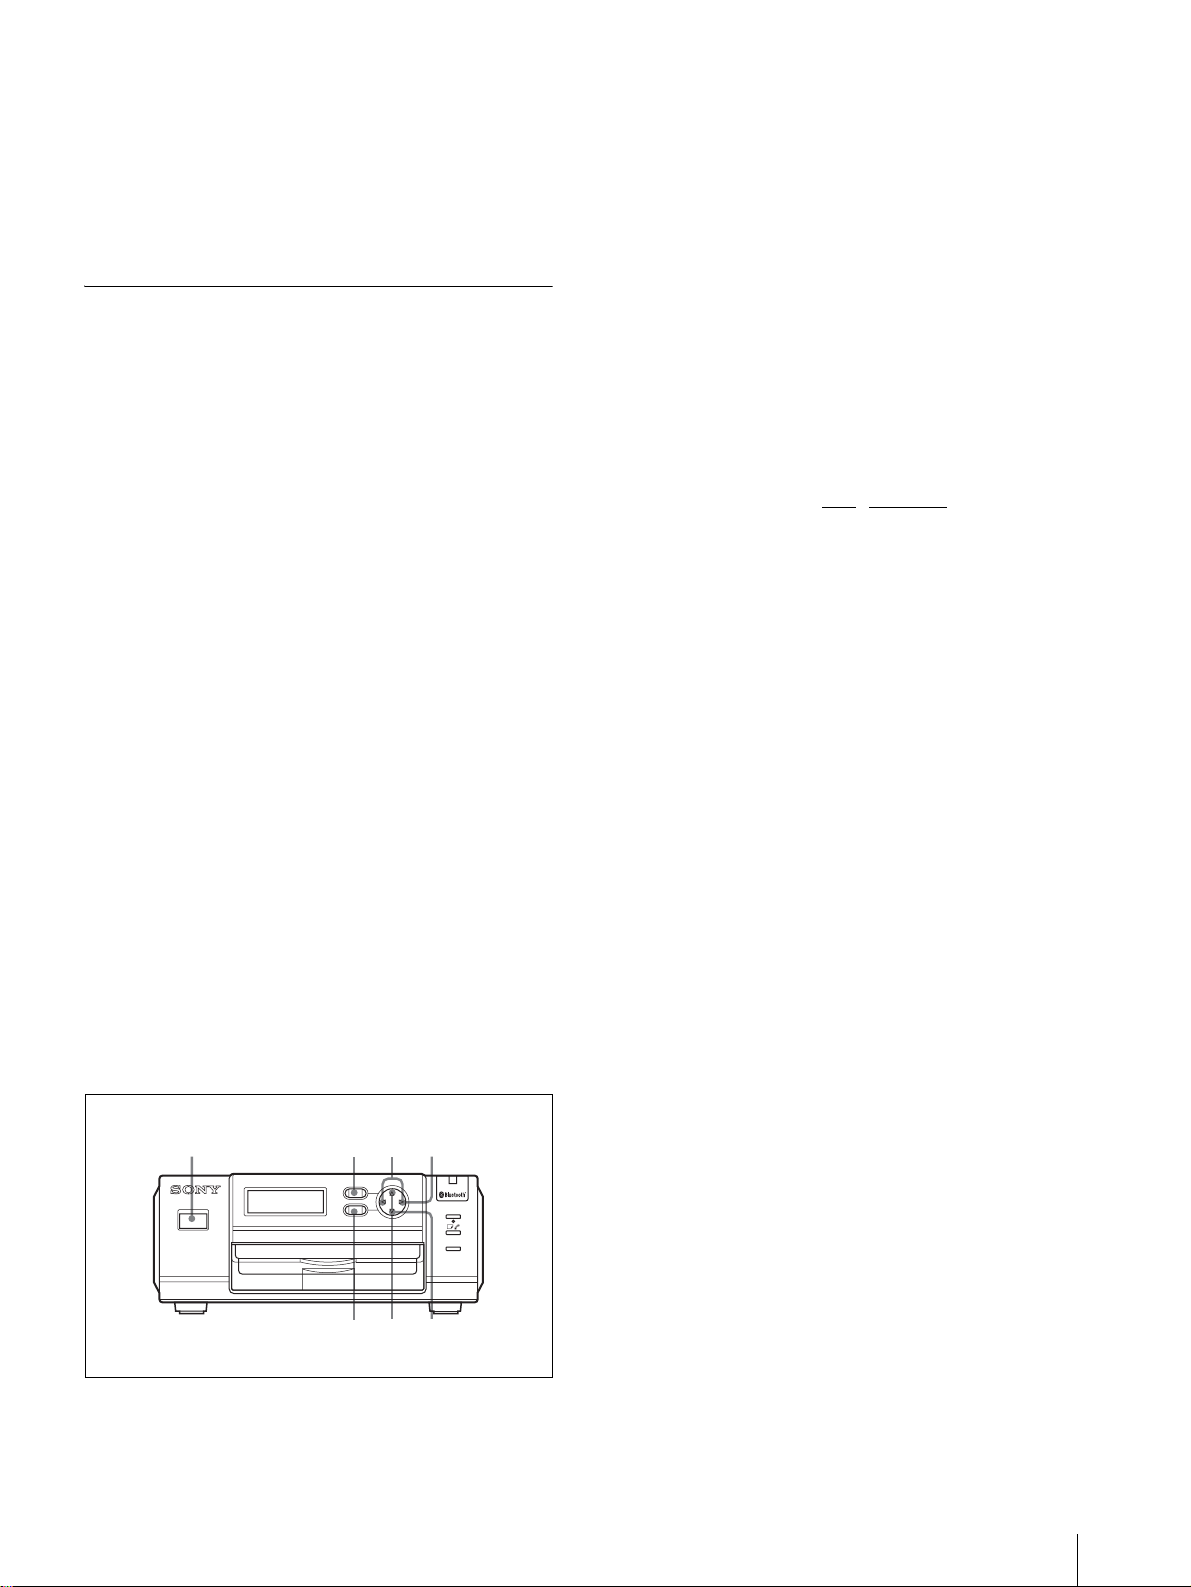
1 2 4,6
Lit
1
DIGITAL PHOTO PRINTER
MENU
EXEC
PRINT
ALARM
7 3,5
1
Turn on the printer.
2
Press the MENU button.
3
Press V of the cont rol b utton to displ ay “Bluetoo th
SETTING [>>]” on the operation display.
4
Press B of the control button.
The Bluetooth address appears.
5
Press V of the contro l button to display “PASSKEY
INPUT [>>]” on the operation display.
6
Press B of the control button.
The passkey currently set appears on the P ASSKEY
INPUT display.
7
Press the EXEC button.
To exit the MENU operation, press the MENU button.
Communication Between the Printer and Another Device Using the Bluetooth Function
For communication between the printer and another
device with Bluetooth functions, the following settings
are required:
• The same passkey is set on the printer and the other
device.
• The Bluetooth lamp is lit.
14
Bluetooth
If the Bluetooth lamp is off
If the Bluetooth l amp is off, turn it on in the following
manner:
1
Press the MENU button.
2
Press V of the cont rol b utton to displ ay “Bluetoo th
SETTING [>>].”
3
Press B of the control button.
“Bluetooth ADDR None” appears.
4
Press V of the control b utton to display “MODULE
POWER [>>].”
5
Press B of the control button.
Page 15
6
Press b or B of the control button to set the
POWER to ON.
7
Press the EXEC button.
“Ready BT RSSI [----]”appears on the operation
display.
2
Press the MENU button.
“REBOOTING” appears. Then the printer is restarted,
and the Bluetooth lamp lights.
Authentication
What's a passkey
Passkey is used to authenticate two Bluetooth devices
that have not previously connected to each other and
create a trusted relationship between them.
You need to enter the same characters (passkey ) to each
device on passkey authentication process. This printer
uses a 4-digit number as a passkey.
Once authentication of the device has been confirmed,
the printer registered the device as a record. Since then
you can connect the device without entering a passkey.
To ensure proper security, the passkey entry has a time
limit (30 seconds), based on the Bluetooth standards.
The passkey entry may be required when the
authentication v alid period of th e printer or ot her device
is expired, the record is deleted, or the security setting is
changed.
Passkey entry may be required, depending on devices,
each time you intend to connect.
This “Passkey” is also referred to as a “Bluetooth
passkey” etc. “PIN” i s also used wit h the same meaning.
When the passkey entry screen appears
on the other device
Enter the desired passkey on your printer. Then, enter
the same passkey on the other device
3
Press V of the control button to display “Bluetooth
SETTING [>>].”
4
Press B of the control button.
“Bluetooth ADDR” appears.
5
Press V of the control button to display
“PASSKEY INPUT [>>].”
6
Press B of the control button.
“PASSKEY INPUT <1> [X:X:X:X]” appears.
||
Current digit to be set Passkey
7
Press b or B of the control button to select a digit
of the passkey to be set.
This <1> shows the leftmost digit, and <4> shows
the rightmost digit.
8
Press v or V of the control button to set the value
of the passkey.
Value from 0 to 9 can be used.
Repeat Steps 7 and 8 until t he four -d igit pa sske y is
set.
9
Press the EXEC button.
“PASSKEY INPUT Saving. . .” appears, and your
passkey setting is stored.
Entering the passkey
Enter the same passkey on the printer and the other
device to be connected, as follows:
1 2,10 7 4,6
MENU
1
DIGITAL PHOTO PRINTER
1
Turn on the printer.
EXEC
98
PRINT
ALARM
3,5
10
When the setting is completed, press the MENU
button.
Bluetooth
15
Page 16
Giving Your Printer a Device Number
When two or more printers are used in a system, it is
conv enient that each printer ha ve a de vice number (from
1 to 9).
1
Turn on the printer.
“Ready BT RSSI [----]” appears on the operation
display.
2
Press the MENU button.
3
Press V of the control button to display “Bluetooth
SETTING [>>].”
Printing a Picture
The UP-DX100 automatically receives and prints the
image sent from the camera that is connected with the
Bluetooth func tions. Only JPEG-format graphic-image
files can be received. Graphic images sent from a
computer connected with the pri nter usi ng a USB cabl e
can also be printed out.
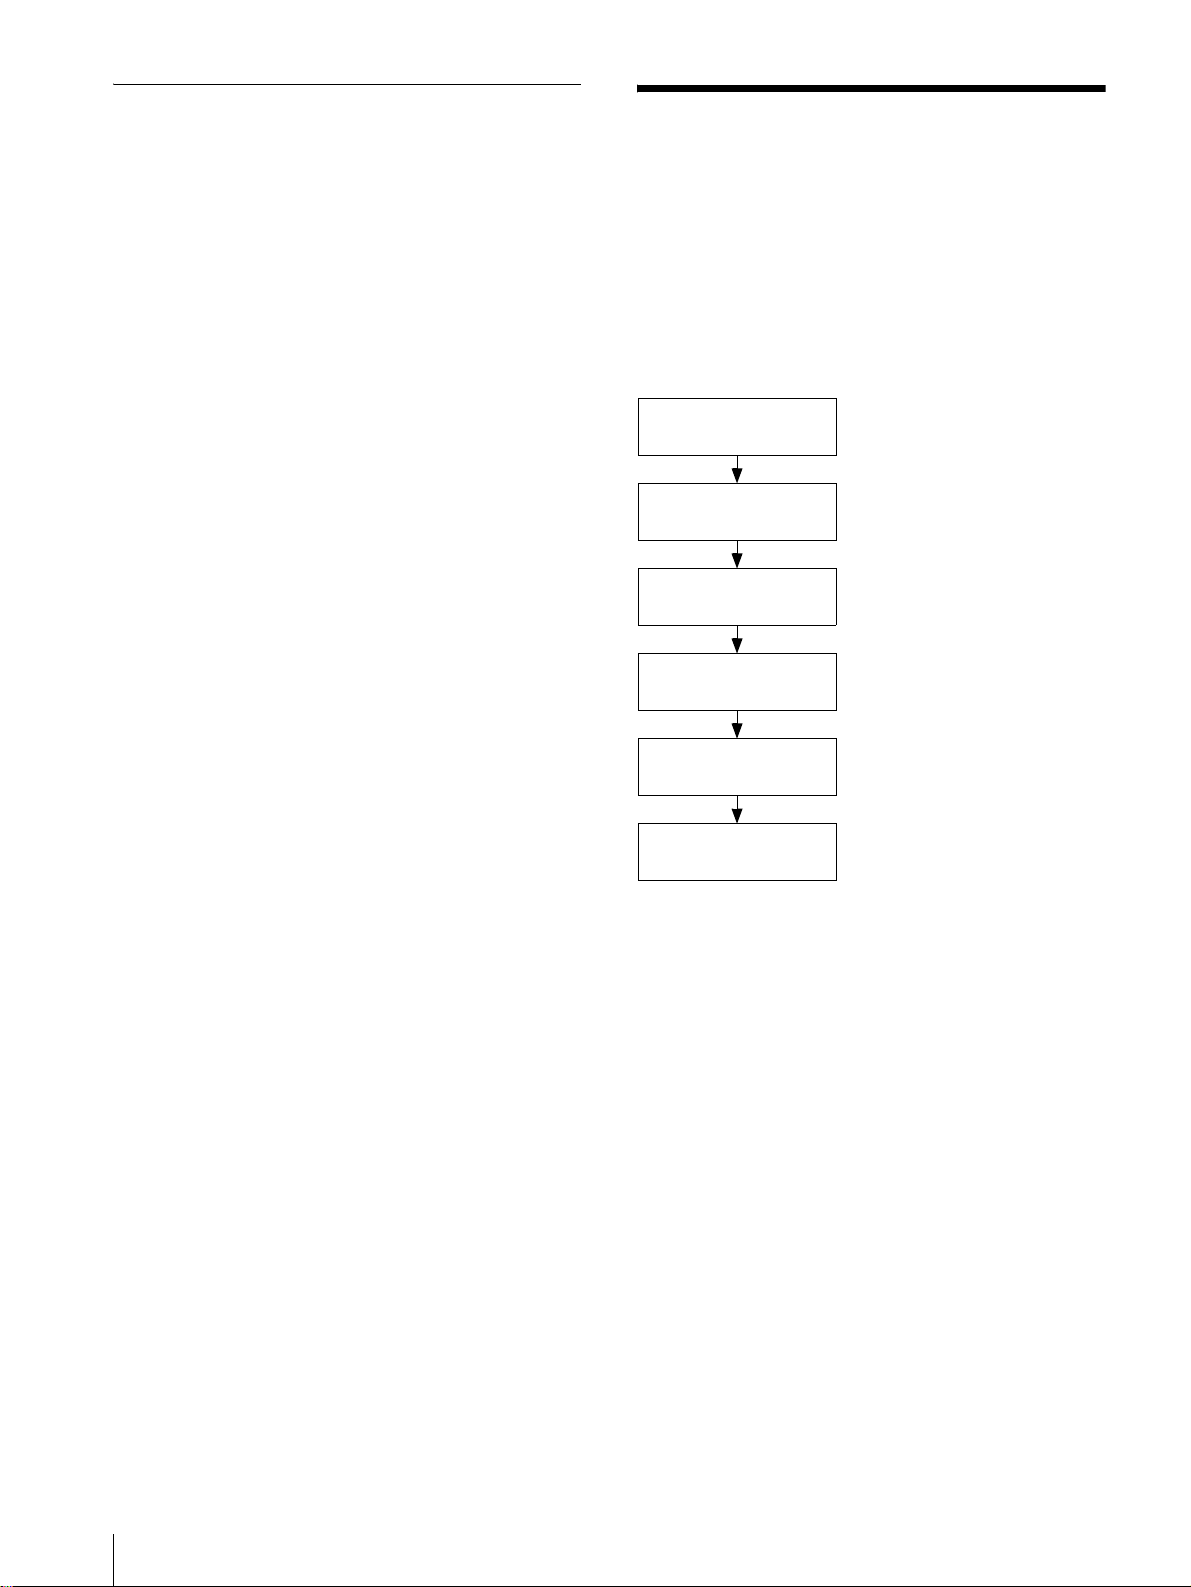
During printing of grap hic images sent fr om the camera
or computer, the process is displayed on the operation
display, as follows:
Receiving Image
BT [>>>>>>>>>>]
Receiving image data
(This is an example of the
Bluetooth conn e ct i on .)
4
Press B of the control button.
5
Press V of the control button to display “MY
DEVICE NAME [>>].”
6
Press B of the control button.
“Sony UP-DX100 [NONE-9: EXEC]” appears.
7
Press v or V of the control button to set the device
number.
8
Press the EXEC button.
“DEVICE NAME Saving. . .” appears, and the
device number you have set is stored.
9
When the setting is completed, press the MENU
button.
PROCESSING
PRINTING
[YELLOW]
PRINTING
[MAGENTA]
PRINTING
[CYAN]
PRINTING
[LAMI]
When printing is completed, “Ready BT RSSI [))))]”
appears.
Processing received data
Printing the yellow
Printing the magenta
Printing the cyan
Laminating a printo ut
16
Printing a Picture
Page 17

Reprinting a Picture Stored in Memory (COPY PRINT)
The data of the last picture printed is stored in the
memory of the printer. You can reprint the picture.
Note
When the printer is set to standby mode, data stored in
memory are deleted. You cannot reprint the picture.
13
MENU
1
DIGITAL PHOTO PRINTER
EXEC
54
1
Press the MENU button.
2
Press V of the control button to display “COPY
PRINT [>>].”
3
Press B of the control button.
“COPY PRINT:1 [1-9 PRINT:EXEC]” appears.
4
Press v or V of the control b utton to set the nu mber
of sheets to be printed.
A value from 1 to 9 can be set.
5
Press the EXEC button.
The number of pictures set in Step 4 is printed.
PRINT
ALARM
2
Adjustments
The printing location and print quality can be adj usted.
After checking the printing results, make any
adjustments, necessary.
Adjusting the Printing Location (PRINT SETTING)
Adjust so that a printed image is correctly located on the
print paper when the UPC-X46 is used. The printing
location can be shifted by 0.5 mm.
1234
MENU
1
DIGITAL PHOTO PRINTER
EXEC
65
1
Turn on the printer.
2
Press the MENU button.
3
Press v or V of the control button to display
“PRINT SETTING.”
4
Press B of the control button.
“PRINT OFFSET:” appears.
5
Press b or B of the control button to select the
offset value.
PRINT
ALARM
When printing is comple ted, the display returns to
“Ready.”
6
Press the EXEC button.
The offset v alue selected in Step 5 is registered, and
the display returns to “PRINT SETTIN G.”
Make a test printout and check if the image is printed in
the correct location on the print paper. If further
adjustment is needed, repeat the above steps.
To exit PRINT SETTING
Press the MENU button. The display returns to “Read y, ”
and the printer is read y to print.
Adjustments
17
Page 18

Adjusting the Print Qu al it y (COLOR ADJUST)
With the MENU function, you can adjust the picture
quality . You can check the adjusted resul ts by printing a
guide image.
Three sets of adjusted values for color pictures and for
black-and-white pictures can be stored in memory and
retrieved later.
Note
The print quality adjustment described here is enabled
only when the camera and printer are connected using
the Bluetooth funct ion. I f the prin ter is conn ected t o the
computer, the picture quality can be adjusted using the
printer driv er. F or details on installation and operati on of
the printer driver, refer to “Read me (English)”
contained on the supplied CD-ROM.
Adjusting the print quality for color
pictures
123
MENU
1
DIGITAL PHOTO PRINTER
EXEC
PRINT
ALARM
MAG-GRN: Pressing b gives the picture more
magenta, while pressing B makes the picture
more greenish.
YEL-BLU: Pressing b makes the picture more
yellowish, while pressing B makes the picture
more bluish.
DARK: Contrast i n the dark areas is adjusted.
Pressing B increases the darkness.
LIGHT: Contrast in the bright areas is adjusted.
Pressing B increases the brightness.
SHARPNESS: P ressing B makes the edges of
objects in a picture sharper.
GAMMA: Pressing b makes the color tone of the
whole picture lighter , while pressing B makes it
deeper.
6
Press the EXEC button when the adjustment is
completed.
The display returns to “COLOR ADJUST COLOR
[>>].”
Adjusting the print quality for black-andwhite pictures
When you press V of the control button after pressing
the Menu but ton in s tep 2 in “Adjusting the print quality
for color pictures,” COLOR ADJUST B/W [>>]
appears, and you can adjust the print quality for blackand-white pictures. The adjusting method is th e same as
that for color pictures.
645
1
Turn on the printer.
2
Press the MENU button.
“COLOR ADJUST COLOR [>>]” appears.
3
Press B of the control button.
“CYN-RED:” appears.
4
Press b or B of the control button for ad justment.
5
Press V of the control button.
“MAG-GRN:” appears.
Repeat Steps 4 and 5 to make necessary
adjustments. Adjustable content for each
adjustment item is as follows:
CYN-RED: Pressing b gives the picture more
cyan, while pressing B makes it more reddish.
Printing out a guide image
To check the results of your adjustments, print out the
camera’s guide images.
Press the SIZE button of the camera to select Guide
Print-RGB or Guide Print-DLGm, then execute printing.
For details, refer to the Instruction Manual (Advanced
Operations) of the UPX-C200.
Storing your adjustments
Once the color adjustment is completed, save the
adjusted values as follows:
1
In the COLOR ADJUST COLOR [>>] or B/W
[>>] display, press B of the control button.
2
Press V of the control button repeatedly until
“SAVE SETTING” appears.
3
Press b or B of the control button to select the
memory-cell number (1, 2, or 3).
4
Press the EXEC button.
18
Adjustments
Page 19

The adjusted values are stored in the memory cell
with the number selected in Step 3.
Loading the adjusted values
Adjusted values stored in the memory can be retrieved.
1
In the COLOR ADJUST COLOR [>>] or B/W
[>>] display, press B of the control button.
2
Press V of the control button repeatedly until
“LOAD SETTING” appears.
3
Press b or B of the control button to select the
memory-cell number (1, 2, or 3).
4
Press the EXEC button.
The adjusted values stored in the memory cell with
the number selected in Step 3 are retrieved and in
force.
To exit COLOR ADJUST
After a menu operation, such as COLOR ADJUST
setting, saving of ad justed v alues, or retri eving of stored
values, is completed, press the MENU button. The
display returns to “Re ady.”
Adjustments
19
Page 20

Precautions
Safety
• Operate the printer using the power source specif ied in
“Specifications” on page 21.
• This unit is not disconnected from the mains as long a s
it is connected to the mains outlet, even if the unit
itself has been turned off.
• Be careful not to damage the po wer cor d by placi ng or
dropping heavy obj ects on it; it is dangerous t o use the
printer with a damaged power cord.
• If you do not intend t o use t he pr in ter f or a long time,
disconnect the power cord.
• Unplug the power cord by grasping the plug, not the
cord itself.
• Do not apply mechanical shock or drop the unit.
• Do not disassemble or convert the unit.
• Do not remove the cov er . There is a danger of electric
shock from the internal parts.
• Be careful not to spill water or other liquids on the
unit, or to allow combustible or metallic mate rial to
enter the cabinet. If used with foreign matter in the
cabinet, the unit is liable to fail, or present a risk of fire
or electric shock.
• Ventilation holes are provided to prevent the printer
from overheating. Be careful not to obstruct them
with other units or by co ver ing the printer wit h a cloth
etc.
• If the printer malfunctions or if a foreign body falls
into the cabinet, disconnect the power immediately
and consult your Sony service facility or your Sony
dealer.
Installation
Condensation
• If the printer is subject to wide and sudden changes in
temperature, such as when it is moved from a cold
room to a warm room or when it is left i n a room with
a heater that tends to produce large amounts of
moisture, condensation may form inside the printer.
In such cases the printer will probably not work
properly , and may e ven de velop a fau lt if you persist in
using it. If condensation forms, set the printer to
standby mode and lea ve the pri nter to stand for at least
one hour.
• If the printing pack is subjected to wide and sudden
changes in temperature, condensation may form on
the print cartridge or paper. This will cause the printer
to malfunction. Also , if the printing pack is used in
this state, spots are likely to appear on the printout.
Therefore, av oid stori ng the printing pac k in locatio ns
subject to wide and sudden changes of temperature.
• To store a half-used printing pack, replace it in its
original packing and reseal the package. If possible,
keep the sealed printing pack in a coo l, dark location.
To subsequently use the printing pack, place it, in its
sealed package, in a warm room for several hours.
Doing so prevents condensation from forming when
the printing pack is removed from its package.
Location
To prevent internal heat built-up, leave enough room
around the printer for air to circulate through the vents
on the left hand side of the cabinet.
On transportation
• Do not transport the printer with the supplied
accessories. Doing so may cause malfunction.
• Retain the original carton and packing materials in
case you have to transport th e u nit in the future.
• Avoid placing the printer in a location subjec t to:
– mechanical vibration
– high humidit y
– excessive dust
– where it is exposed to rain
– direct or excessive sunlight
– extremely high or low temperatures
– close to sources of strong magnetism
– close to sources of powerful electromagnetic
radiation, such as radios or TV transmitters
• Do not use other electronic equipment near the printer .
It will not work properly in strong electromagnetic
fields.
• Do not place a heavy object such as a monitor on the
printer.
20
Precautions
Cleaning
• Before cleaning the printer, press the on/standby
button of the printer so that the lamp goes out, and
unplug the power cord.
• Clean the cabinet, panel and controls with a soft dry
cloth, or a soft cloth lightly moistened with a mild
detergent solution. Do not use any type o f solvent,
such as alcohol or benzine, which may damage the
finish.
Page 21

Pin assignment of the U SB co nn ec to r
Specifications
Printer
Power supply 100 – 240 V AC, 50/60 Hz
Current consumption
1.1 A max. (during printing)
Operating temperature
5°C to 35°C (41°F to 95°F)
Storage/transport t emperature
–20°C to +60°C (–4°F to +140°F)
Operating humidity
20% to 80% (non condensation)
Maximum dimensions (w/h/d)
203 × 85 × 305 mm
(8 × 33/8 × 121/8 inches)
Mass Approx. 2.7 kg (5 lb 15 oz) (main un it
only)
Printing method Four-surface sequential sublimation
thermal transfer process
(yellow, magenta, cyan, laminate)
Printing resolution
403 × 403 dpi
Thermal head 403 dots/inch
Printing grada tions
8 bits for yellow, m agenta, cyan
Printing time UPC-X46: 100 sec./sheet
UPC-X34: 65 sec./sheet
Paper supply method
Autofeed from paper tray
Maximum capacity of paper tray
UPC-X46: 25 sheets
UPC-X34: 30 sheets
Paper eject method
Front ejection
Sheets are ejected in order on top of
paper tray
Printing capacity of ribbon cartridge
UPC-X46: 25 sheets
UPC-X34: 30 sheets
Inputs AC IN (power inlet)
Maximum print size
UPC-X46: 101.6 × 151.4 mm
UPC-X34: 70.1 × 95.3 mm
Print pixels UPC-X46: 1664 × 2440 dots
UPC-X34: 1112 × 1512 dots
USB interface
Data-transmission system
Compliant with the Universal Serial
1
(4 × 6
/8 inches) (no border)
7
(2
/8 × 37/8 inches) (with border)
Bus Specification Revision 1.1
I/O Signal Function
V
CC
I/O –Data Data
I/O +Data Data, can be pulled up to +3.3 V
GROUND Cable ground
Cable power, maximum current:
100 mA
via a 1.5-kohm resistor
Bluetooth specifications
Communication type
Bluetooth specifi cation, ver.1.1
Maximum transmission speed
1)
About 723 Kbps
Output Bluetooth specification, Power Class
2
Communication distance
2)
About 10 m (3.3 feet) without
obstacles
Compatible Bluetooth profile
3)
Basic Imaging Profile (Image Push
Responder)
Frequency band 2.4GHz (2.400 GHz – 2.4835 GHz)
1) Maximum data transmission speed based on Bluetooth
specification, Ver.1.1. This speed depends on the distance
between the devices, obstacles, radio wave conditions,
application software, or the OS.
2) This distance depends on the distance between the devices,
obstacles, radio wave conditions, application so ftware, or the
OS.
3) This specification is in accordance with the intended use
between two Bluetooth devices. This is defined by the
Bluetooth specification.
Supplied accessories
Paper tray for the UPC-X46 (1)
Paper tray for the UPC-X34 (1)
Tray cover (1)
Paper holder (2)
AC power cord (1)
Cleaning cassette (1)
CD-ROM (1)
Operating instructions (1)
Software License Agreement (1)
Optional accessories
UPA-DX100TR Paper Tray
10UPC-X46 Self-la minating Color Printing Pack
(250 sheets)
10UPC-X45 Self-la minating Color Printing Pack
(250 sheets)
10UPC-X34 Self-la minating Color Printing Pack
(300 sheets)
Design and specifications are subject to change without
notice.
Specifications
21
Page 22

Troubleshooting
If you run into any problem when using your
UP-DX100, use the following table as a guide to
troubleshoot the problem. If the problem persists,
contact your Sony dealer or local author ized Sony
service facility.
2
Remove the paper tray, and remove the jammed
paper from the paper tray slot.
3
Remove the cov er on the rear panel, and check that
the paper does not remain in the printer. If the
jammed paper is still in the printer, remove it.
Printer
Symptom Cause/Action
Cannot operate the
printer after the printer
is turned on.
Cannot print. • The print paper and print cartridge
The beeps sound. tCheck that you are f ol l owing the
Cannot remove the
print cartridge.
The ALARM indicator
is lit or blinking, and an
error message is
displayed.
There is a white line or
dots in the printed
pictures.
• The AC power cor d is not connec ted
correctly.
tConnect the AC power cord to an
AC outlet securely (page 12).
do not match.
tUse the recommended printing
pack, the same size of the print
paper and print ca r tr idge.
• The thermal head may be
overheated. “Waiting” appears on
the operation display.
tLeave the printer until the head
cools down and the printer
resumes printing.
• The print paper may jam.
tRemove the jammed paper, if
any.
correct procedures.
tThe print cartridge cannot be
removed while prin ting. Wait until
printing is finished.
If this does not solve the problem,
contact your Sony service facility
or your Sony dealer.
tFollow the instructions on the
operation display.
• Dust may be attached to the thermal
head.
tThe print head or paper path may
be soiled. Use the supplied
cleaning cassette to clean the
head and path.
• The roller inside the printer may
damage the print paper.
tReduce the number of sheets on
the paper tray.
- A
C
IN
Rear cover
4
After removing the jammed paper, be sure to
g
- A
C
IN
Jammed paper
replace the cover.
5
Insert the paper tray.
6
Turn on the printer.
Note
If you cannot remove the jammed paper, contact your
Sony service facility or your Sony dealer.
Cleaning the inside of the printer
If white lines or dots are printed on the pictures, clean
inside the printer u s ing the supplied cleaning cassette
and the protective sheet contained in the printing pack.
Notes
• Make cleaning only when there are white lines or d ots
on the print.
• When you can obtain proper printing performances,
cleaning will not improve the printed pict ure quality.
1
Remove the paper tray from the printer. If there is
print paper in the tray, remove the pr int p aper from
the tray .
2
Place the protective sheet with the imprint side
facing down and the arrow pointing in the same
direction as the arrow in the tray.
3
Open the cartridge compartment co v er and remo v e
the print cartridge.
If paper jams
If the print pape r jams, the ALARM lamp lights, an error
message appears, and printing stops.
1
Press the on/standby button to turn off the lamp.
22
Troubleshooting
4
Insert the supplied cleaning cassette into the printer
and close the cartridge compartment cover.
A buzzer sounds, and “HEAD CLEANING/PUSH
[EXEC]” appears on the operation display.
Page 23

5
Press the EXEC button.
The cleaning cassette and protective sheet will
clean inside the pri nter. After the cleaning is
finished, the protective sheet is automatically
ejected.
6
Remove the cleaning cassette from the printer and
set the print cartridge and print paper.
Bluetooth Function
Symptom Cause/Action
Data cannot be
transmitted.
The connection is
disconnected from
the desired device.
• The distance between the device and the
printer is too great.
tLocate the devices within the
maximum communicable distance.
• T he Bluetooth antenna portion of the
printer and/or the camera i s cov ered with
a hand, etc.
tDo not cover the antenna port ion.
• The device you wish to connect with the
printer has been already conn ected with
another device.
tReconnect the device with the printer
after the device’s task with another
device is finished.
• Authentication failed.
tReconnect the printer with the device,
and enter the same passkey correctly
on both devices.
• The connected device interrupted the
transmission.
tCheck the status of the connected
device, then reconnect.
• The Bluetooth connection is interrupted
on the side of the con nected device.
tCheck the status of the connected
device.
• The authentication time limit (30
seconds) elapsed.
tEnter the same passkey correctly both
on the printer and the device within
30 seconds.
• T he same passkey is not entered.
tEnter the same passkey correctly both
on the printer and the device within
30 seconds.
• The device disconnec te d or en de d the
connection.
tCh eck the status of the device, try to
connect to the device again, and ente r
the passkey correctly.
Symptom Cause/Action
Authentication
failed.
Data transmission
speed is too low.
Even with the
distance between
the printer and the
desired device
within 10 m (33
feet), connection
cannot be
established.
• The authentication time limit (30
seconds) elapsed.
tEnter the same passkey correctly both
on the printer and the device within
30 seconds.
• T he same passkey is not entered.
tEnter the same passkey correctly both
on the printer and the device.
• The device disconnected or ended the
connection.
tCheck the status of the device, try to
connect to the device again, and enter
the passkey correctly.
• The Bluetooth antenna portion of the
printer and/or the camer a is cove red with
a hand, etc.
tDo not cover the antenna portion.
Data transmission speed varies
depending on the distance between
the printer and the device, ob stac les,
or radio wave conditions. Change the
position of the printer or set the
printer closer to the device.
• The Bluetooth antenna portion of the
printer and/or the camer a is cove red with
a hand, etc.
tDo not cover the antenna portion.
Data transmission speed varies
depending on the distance between
the printer and the device, ob stac les,
radio wave conditions, application
software, or the OS.
Change the position of the printer or
set the printer closer to the device.
• The desired device is now connecting to
another de vic e .
tWhen the device is connected to
another device, the device may not be
displayed a s an a v ai lab le de vi ce or be
connectable at that time.
• The device is not connectable with the
Bluetooth functions.
tSet the device so that it is
connectable.
Troubleshooting
23
Page 24

Error messa ges
Error message Cause/Action
RIBBON END
SET CARTRIDGE
SET PAPER
PUSH EXEC
PAPER JAMMING
REMOVE PRINTS
MEDIA MISMATCH
PUSH EXEC
REMOVE PRINTS
PUSH EXEC
PRINTER ERROR
SERVICE CALL
Bluetooth ERROR
SERVICE CALL
• The print cartridge runs out.
tReplace the print cartridge.
• The print paper runs out .
tPut the print paper in the paper
tray, and press the EXEC button.
• The paper tray is not inserted to the
printer.
tIn sert the paper tray, and press the
EXEC button.
• The print paper may jam.
tRemove the jammed paper, if any.
See “If paper jams” on page 22.
• T he print paper and print cartridge do
not match.
tPut the same size of the print paper
as the print cartrid ge, an d press th e
EXEC button.
• The print paper remains at the ejection
slot.
tRemove the paper tray, then the
print paper. Then press the EXEC
button.
• Some trouble occurs on the printer.
tContact your Sony service facility
or your Sony dealer.
• Some trouble occurs on the Bluetooth
function.
tContact your Sony service facility
or your Sony dealer.
24
Troubleshooting
Page 25

AVERTISSEMENT
Pour ne pas risquer un incendie ou une
électrocution, n’exposez pas cet appareil
à la pluie ou à l’humidité.
N’ouvrez pas son boîtier pour ne pas
vous exposer à une électrocution.
Confiez exclusivement les interventions
à un technicien qualifié.
AVERTISSEMENT
Cet appareil ne comporte pas d’interrupteur
d’alimentation.
Lors de l’installation de cet appareil, prévoyez un coupecircuit facilement accessible sur la partie f ixe du câblage
ou branchez le cordon d’alimentation à une prise de
courant située à proximité de l’appareil et facilement
accessible.
En cas d’anomalie pendant le fonctionnement de
l’appareil, coupez le courant à l’ai de du coupe-circuit ou
débranchez le cordon d’alimentation.
Pour les utilisateurs au Canada
Cet appareil numèrique de la classe B est conforme à la
norme NMB-003 du Canada.
L’utilisation doit répondre aux deux conditions
suivantes : (1) ce matériel ne doit pas provoquer de
brouillage et (2) il doit accepter tout brouillage, même
celui qui est susceptible d’affecter son fonctionnement.
La mention « IC » devant le numéro de certification/
homologation signif ie uniquement que les spécifications
techniques d’Industrie Canada sont remplies.
• Windows® est une marque déposée de Microsoft
Corporation aux États-Unis et dans d’autres pays.
• Tous les autres noms de société et de produit
mentionnés dans ce manuel peuvent être soit des
marques soit des marques déposées des sociétés
respectives. Notez que «™» et «®» ne sont pas
mentionnés dans tous les cas dans ce manuel.
La duplication, l’édition ou l’impression d’un CD,
d’émissions de télévision, d’œuvres protégées par des
droits d’auteur tel les qu’image s ou publicat ions ou de
toute autre œuvre autre que vos propres
enregistrements ou créations sont limitées à un usage
privé ou familial. À moins que vous ne déteniez les
droits d’auteur des œuvres à dupliquer ou
l’autorisation de le urs titulaires, l’utilisation de ces
œuvres au-delà de cette limite peut constituer une
infraction aux dispositions de la loi sur les droits
d’auteur et donner lieu à une réclamation en
dommages-intérêts par le titulaire des droits d’auteur.
Lors de l’utilisation de cette imprimante pour des
images photos, veillez à ne pas contrevenir aux
dispositions de la loi sur les droits d’auteur. Une
utilisation ou modification non autorisée de l’image
d’autrui peut également porter atteinte aux droits des
personnes.
La photographie peut être interdite pour certaines
manifestations, représentations ou expositions.
GB
FR
Pour les clients en Europe
Sony Corporation déclare par ces présentes que le UPDX100 est conforme aux exigences essentielles et aux
dispositions applicables de la Directive 1999/5/EC.
Pour les détails, accédez à l’URL suivante :
http://www.compliance.sony.de/
Ce produit est prévu pour être utilisé dans les pays
suivants :
Autriche, Belgique, Danemark, Finlande, France,
Allemagne, Grèce, Irlande, Italie, Luxembourg, Pays-Bas,
Portugal, Espagne, Suède, Royaume-Uni, Islande,
Norvège, Suisse, Liechtenstein et Lituanie.
25
Page 26

Table des matières
Description générale ............................................27
Caractéristiques ................................................ 27
Emplacement des pièces ...................................... 28
Préparation .......................................................... 30
Déballage de l’imprimante ............................... 30
Préparation d’un kit d’impression .................... 30
Chargement de la cartouche d’impression ....... 30
Remplacement de la cartouche d’impression ... 31
Mise en place du porte-papier .......................... 31
Insertion du papier impression ......................... 32
Branchement de l’imprimante à une prise
murale ............................................................. 33
Raccordement à un ordinateur .........................33
Menu .....................................................................34
Structure du menu ............................................ 34
Fonctions des différents paramètres du menu .. 34
Bluetooth .............................................................. 35
T ec hno logi e sans f i l Blue too th ......................... 35
Le « Basic Imaging Profile » ........................... 35
Communication entre l’imprimante et un autre
appareil à l’aide de la fonction Bluetooth ...... 35
Authentication .................................................. 36
Attribution d’un numéro d’unité à
l’imprimante ...................................................37
Impression d’une image ......................................37
Réimpression d’une image enregistrée en
mémoire (COPY PRINT) ...............................38
Réglages ................................................................ 38
Réglage de la position d’ impression
(PRINT SETTING) ................................ ........38
Réglage de la qualité d’impression
(COLOR ADJUST) ........................................39
Précautions ........................................................... 41
Sécurité ............................................................. 41
Installation ........................................................41
Nettoyage ......................................................... 41
Spécifications ....................................................... 42
Dépannage ............................................................43
Imprimante ....................................................... 43
Fonction Bluetooth ...........................................44
Messages d’erreur ............................................ 45
26
Page 27

Description générale
L’imprimante photo numérique UP-DX100 Sony est
une imprimante d’extension pour le système
d’impression numérique UPX-C200. Utilisée comme
seconde ou troisième imprimante dans le système UPXC200, l’UP-DX100 peut recevoir et imprimer des
images d’un appareil photo numérique qui lui transmet
des signaux à l’aide de la technolog ie sans f il Bluetooth .
Connexion sans fil Bluetooth
MENU
1
DIGITAL PHOTO PRINTER
UP-DX100
EXEC
Caractéristiques
L’UP-DX100 présente les caractéristiques suivantes :
Impression photo très réaliste
Avec son système d’impression à sublimation, cette
imprimante procure des tirages photo réalistes qui
répondent à un certain nombre d’exigences d’ordre
différent.
PRINT
ALARM
Appareil photo
numérique
Impression depuis l’ordinateur par une
connexion USB pratique
En raccordant l’imprimante à un ordinateur par un câble
USB (en vente dans le commerce) et en installant le
pilote d’imprimante fourni sur l’ordinateur , vous pouvez
imprimer des images depuis l’ordinateur.
Pour plus d’informations sur le raccordement d’un
ordinateur, consultez le fichier « Read me (English) »
sur le CD-ROM fourni.
Connexion USB
MENU
EXEC
1
DIGITAL PHOTO PRINTER
UP-DX100 Ordinateur, etc.
PRINT
ALARM
Remarque
Pour certains types d’ordinateur , la conne xion par câ ble
USB ne permet pas d’obtenir un fonctionnement
normal. Utilisez alors un concentrateur (hub) USB en
vente dans le commerce.
Lamination Super Coat 2
La lamination Super Coat 2 confère aux tirages une
grande endurance et une excellente résistance à
l’humidité et aux traces de doigts, préservant la qualité
d’image pendant des durées prolongées.
Choix du format d’impression
Vous avez le choix entre un tirage grand format carte
postale (4 × 6 pouces) (UPC-X46) et un tirage petit
format (3,5 × 4 pouces) (UPC-X34) plus économique.
Si un bac à papier UPA-DX100TR en option est inséré
dans l’imprimante, vous pouvez également utiliser du
papier impression UPC-X45 sur lequel un tamponnage
à l’encre à base d’eau est possible.
Bac à papier permettant une impression en
série de 25/30 feuilles
Avec le bac à papier fourni, vous pouvez imprimer
jusqu’à 25 feuilles en format carte postale ou 30 feuilles
en petit format en une seule opération.
Description générale
27
Page 28

Emplacement des pièces
Avant
ME
N
U
DIGI
T
A
L
P
H
1
O
T
O
P
R
I
N
T
ER
2
EXEC
N
E
PRINT
ALA
RM
34 0956 8
7
P
O
H
S
U
P
Antenne Bluetooth (intérieure)
PRINT
ALARM
A Touche 1 (marche/veille) et témoin
Appuyez sur cette touche pour mettre l’imp rimante sous
tension. Le témoin s’allume. Lorsque vous appuyez à
nouveau sur la touche, le témoin s’éteint et l’imprimante
est mise en veille.
B Fente à bac à papier
Insérez le bac à papier dans cette fente.
C Afficheur
Lorsque l’imprimante est sous tension, l’afficheur
indique le mode de f onctionnement ou un paramètre du
menu.
D Touche MENU
Appuyez sur cette touche pour af fi cher un paramètre du
menu ou pour abandonner des modifications des
paramètres du menu n’ayant pas encore été validées.
E Touche EXEC
Appuyez sur cette touche pour valider une sélection
pour un paramètre du menu.
F Touche de commande
Appuyez sur cette touche pour sélectionner un
paramètre du menu et une option pour ce paramètre.
Témoin : S’allume lorsqu’il n’y a plus de papier,
lorsque la cartouche d’impression est épuisée ou
lorsque la type ou le format de la cartouche ne
correspond pas à celui du papier.
Témoin ALARM: S’allume en cas de problème.
H Couvercle du compartiment de la cartouche
Ouvrez ce couvercle pour insérer et retirer la cartouche
d’impression.
I Compartiment de la cartouche
Insérez la cartouche d’impression.
J Levier d’éjection de la cartouche
Poussez ce levier vers le haut pour éjecter la cartouche.
Remarque
Le lever est désactivé pendant l’impression.
G Témoins
Témoin : S’allume lorsque la fonction
Bluetooth est activée.
Témoin PR INT : S’allume l orsqu’une impression est en
cours. Clignote lorsque l’imprimante reçoit des
données d’image.
28
Emplacement des pièces
Page 29

Arrière
- AC IN
123
A Couvercle d’extraction des feu illes bloquées
En cas de bourrage papier, retirez ce couvercle et
enlevez les feuilles bloquées.
B Connecteur - AC IN
Raccordez ce connecteur à une prise murale à l’aide du
cordon d’alimentation secteur fourni.
C Connecteur USB
Raccordez ce connecteur au connecteur USB d’un
ordinateur à l’aide d’un câble USB.
Remarque
Pour certains types d’ordinat eur , la con nexio n par câble
USB ne permet pas d’obtenir un fonctionnement
normal. Utilisez alors un concentrateur (hub) USB en
vente dans le commerce.
Emplacement des pièces
29
Page 30

Préparation
Avant la première utilisation de l’im primante, vous
devez installer un e cartouche d’impression et le bac à
papier comme il est indiqué ci-dessous. Ces opérations
ne sont pas requises avant chaque utilisation, mais
seulement quand elles sont nécessaires.
élevée, une poussière e xc essive ou aux rayons directs
du soleil.
• Av ant de stock er un kit cartouche d’ impression/papier
partiellement utilisé, re mettez-le dans sa pochette
d’origine ou dans un emballage similaire.
Chargement de la cartouche d’impression
Déballage de l’imprim a nt e
Assurez-vous que les accessoires suivants sont livrés
avec votre imprimante.
• Cordon d’alimentation secteur (1)
• Bacs à papier (2, grand/petit)
• Porte-papier (2)
• Couvercle du bac à papier (1)
•CD-ROM (1)
-Pilote de l’imprima nte UP-DX100 Sony
-Mode d’emploi
• Cassette de nettoyage (1)
• Mode d’emploi (1)
• Contrat de lice nce d’utilisation (1)
Préparation d’un kit d’impression
Vous devez u tiliser un kit d’i mpression en optio n (UPC X46 ou UPC-X34) conçu pour l’imprimante. Ce kit est
constitué par du papier impression et une cartouche
d’impression.
Remarques
• Ne rembobinez pas le ruban encreur et n’utilisez pas
une cartouche d’impression rembobinée pour
l’impression. L ’impression risquerait d’être incorrecte
et il pourrait en résulter une panne.
• N’utilise z que le kit d’impression dest iné à cette
imprimante.
• Utilisez toujours la cartouche d’im pression
correspondant au format du papier impression. Si le
type ou le format de la cartouche et du papier ne
correspondent pas, il pourra résulter une impression
impossible, un bourrage papier ou un autre problème.
• N’imprimez pas sur du papier impressi on déjà util isé.
En imprimant deux fo is une image sur la même
feuille, vous ne rendrez pas l’image imprimée plus
épaisse. Ceci pourra même entraîner un
dysfonctionnement ou une panne.
• Ne touchez pas le ruban encreur de la cartouche
d’impression ou la face imprimabl e du papier. S’il y a
des traces de doigts ou de la poussière sur la face
imprimable ou le ruban encreur, la qualité
d’impression pourra se dégrader.
• Pour pouvoir obtenir des tirages de haute qualité, ne
placez pas le kit d’impression dans des endroits
exposés à de hautes températures, une humidité
1
Appuyer sur PUSH OPEN et ouvrez le couvercle
du compartiment de la cartouche.
MENU
E
X
E
DIGI
T
A
L
PH
O
TO
P
R
I
N
T
ER
C
P
R
I
N
T
A
L
A
RM
Couvercle du compartiment
de la cartouche
2
Insérez fermement la cartouche d’impression dans
l’imprimante jusqu’au déclic.
MENU
E
X
E
DIGI
T
A
L
PH
O
TO
P
R
I
N
T
ER
C
P
R
I
N
T
A
L
A
RM
Cartouche d’impression
3
Fermez le couvercle du compartiment de la
cartouche.
30
Préparation
Page 31

Remplacement de la cartouche d’impression
Lorsque la cartouche d’impression est épuisée, le
témoin
sur l’afficheur. Remplacez la cartouche d’impression.
1
Appuyer sur PUSH OPEN et ouvrez le couvercle
du compartiment de la cartouche.
s’allume et un message d’erreur apparaît
• Si la cartouche d’impression n’est pas en place l orsque
vous mettez l’imprimante sous tension, le témoin
s’allume.
• Ne touchez pas le ruban encreur et ne placez pas la
cartouche d’imprimante dans un endroi t poussi éreux.
La présence de traces de doigt s ou de poussière sur le
ruban encreur entraînerait une impression imparfaite.
• Ne remplacez pas la cartouche d’impression pendant
l’impression.
2
Poussez le levier de d év e rrou il l age de la cartouche
vers le haut.
MENU
E
X
E
DIGI
T
A
L
PH
O
TO
P
R
I
N
T
ER
C
P
R
I
N
T
A
L
A
RM
Levier de déverrouillage de
la cartouche
La cartouche se soulève. Retirez la cartouche.
3
Insérez une cartouche d’impression neuve et
refermez le couvercle.
Remarques
• Ne placez jamais la main dans compartiment de la
cartouche. La tête ther m ique atteint de hautes
températures, tout pa rticulièrement après des
impressions répétées.
Remarques sur le stockage de la cartouche
d’impression
• Ne placez pas la cartouche d’impression dans un
endroit exposé à de hautes températures, une humi dité
élevée, une poussière excessive ou aux rayons directs
du soleil.
• Avant de stocker une cartouche partiellement ut ilisée,
remettez-la dans sa pochette d’origine.
Mise en place du porte-papier
Fixez le porte-papier fourni sur le bac à papier de la
manière suivante:
1
Insérez les deux extrémités du porte-papier dans les
orifices de la face inférieure du bac à papier, en
pinçant les tiges prè s des deux extrémités.
Porte-papier
MENU
E
X
E
C
P
R
I
N
T
A
L
A
RM
• Ne rembobinez pas le ruban encreur et n’utilisez pas
une cartouche d’impression rembob inée pour
l’impression. L ’impression r isquerait d’être incorrecte
et il pourrait en résulter une panne.
• Si la cartouche d’impression n e se v errou ille pa s a ve c
un déclic, retirez-la et réinsérez-la. Si le ruban encreur
est insuff isamment te ndu pour ê tre charg é, bobinez- le
dans le sens de la flèche pour reprendre le mou.
Bac à papier
2
Enfoncez fermement le porte-papier dans les
coinceurs jusqu’au déclic.
Coinceurs
Préparation
31
Page 32

Retrait du porte-papier
Poussez doucement le porte-papier hors des coince urs et
retirez-le en pinçant, les tiges près des deux extrémités.
Insertion du papier impression
1
Mettre le papier impression en place dans le bac.
Papier impression
Feuilletez le papier impression. Insérez ensuite le
papier impression dans le bac avec sa face
imprimable (face sans inscriptions) vers l e haut et la
flèche tournée dans le même sens que la flèche du
bac.
Vous pouvez placer 25 f euilles lorsque vous u tilisez
un kit UPC-X46 ou 30 feuilles lor sque vous utilisez
un kit UPC-X34.
2
Retirez la feuille protectrice du papier impression.
Remarque
Conservez la feuille protectrice car elle sert à
nettoyer l’intérieur de l’imprimante.
3
Insérez le bac dans l’imprimante.
ME
N
U
DIGITAL P
H
O
TO
P
R
I
NTER
EXEC
PR
I
NT
SH OPEN
PU
A
L
A
RM
Remarque
Ne touchez pas la face imprimabl e. La présence de
traces de doigts sur la face imprimable pourrait
entraîner une impression imparfaite.
Remarques
• Placez le papier d’un kit UPC-X46 dans le grand bac
à papier et celui d’un kit UPC-X34 dans le petit bac à
papier. Si le format du papier ne correspond pas au
format du bac, il pou rra en résult er un bourrage p apier .
• Ne retirez pas ou n’insérez pas le bac à papier pendant
l’impression.
• Si l’alimentation papier ne s’effectue pas
automatiquement, le témoin
s’allume. Retirez le
bac à papier et vérifiez s’il n’y a pas de bourrage.
• Lorsque vous ajoutez du papier dans un bac qui en
contient déjà, assurez-vous que le nombre total de
feuilles ne dépasse pas 25 po ur un kit UPC-X46 o u 30
pour un kit UPC-X34. Ne placez pas des papiers de
type ou de format différent ensemble dans le bac. Il
pourrait en résulter un bourrage papier ou un
dysfonctionnement.
• N’inscrivez ou ne tapez rien sur l a face imprimable du
papier avant l’impression. L’impression pourrait être
impossible. Pour ajouter des salutat ions ou dessins sur
la face imprimable après l’impression, utilisez un
stylo à encre grasse.
• Ne collez pas d’étiquettes ou autres sur la face
imprimable a vant l’impression.
• N’imprimez pas sur du papier impression déjà utilisé.
En imprimant de ux fois une image sur la même
feuille, vous ne rendrez pas l’image imprimée plus
épaisse. Ceci pourra même entraîner un
dysfonctionnement ou une panne.
• Avant l’impression, le pliez pas et ne courbez pas le
papier impression.
• Ne laissez pas plus de 5 feuilles imprimées éjectées
sur le bac à papier car ceci pourrait provoquer un
bourrage.
32
Préparation
Page 33

Remarques sur le stockage du papier impression
• Ne placez pas le papier impression dans un endroit
exposé à de hautes températures, un e humidité élevée,
une poussière excessive ou aux rayons directs du
soleil.
• Ne stockez pas le papier avec des faces imprimées qui
se touchent ou en contact prolongé avec des produits
en caoutchouc ou plastique (chlorure de vinyle ou
plastifiant compris). Il pourrait en résulter une
altération des cou leurs ou une dé térioration de l’ image
imprimée.
• Avant de stocker du papier impression partiellement
utilisé, remettez-le dans sa pochette d’origine.
Raccordement à un ordinateur
Pour imprimer des images depuis un ordi nateur,
raccordez le connecteur USB de l’imprimante à ce lui de
l’ordinateur (ordinateur avec Windows) à l’aide d’un
câble USB en vente dans le commerce et installez le
pilote d’impression fourni sur l’ordinateur. Pour plus
d’informations sur l’installation et l’utilisation du pilote
d’imprimante, consultez le fichier
« Read me (English) » sur le CD-ROM fourni.
UP-DX100
Mise en place du couvercle du bac à
papier
Laissez toujours le couvercle fourni en place sur le bac
à papier lorsque vous n’utilisez pas l’imprimante pour
protéger le papier impression dans le bac contre la
poussière. Vous pouvez placer le couvercle aussi bien
sur le bac à papier pour UPC-X46 ou le bac à papier pou r
UPC-X34.
Couvercle du bac à papier
Branchement de l’imprimante à une prise murale
Branchez le cordon d’alimentation secteur fourni au
connecteur AC IN de l’imprimante, puis à une prise
murale.
UP-DX100
-AC IN
-AC IN
Cordon d’alimentation
secteur
(fourni)
vers prise murale
-AC IN
Câble USB
Ordinateur
Remarques
• Pour le raccordement, utilisez un câble USB TYPE AB en vente dans l e commerce de moins de 3 mètres de
long. Le type de câble à utiliser peut être différent
selon les ordinateurs. Consultez la documentation de
l’ordinateur pour déterminer le type de câble
nécessaire.
• Consultez également la documentation de
l’ordinateur.
• Le pilote d’imprimante UP-DX100 Sony fourni ne
prend pas en charge une impri mante réseau et ne p eut
pas non plus être utilisé av ec un tampon d’imprimant e
disponible dans le commerce.
• Ne branchez pas et ne débranchez pas le câble USB
pendant le transfert des données ou l’impression.
L’impression pourrait laisser à désirer.
• Pour certains types d’ordinateur, la connexion par
câble USB ne permet pas d’obtenir un fonctionnemen t
normal. Utilisez alors un concentrateur (hub) USB en
vente dans le commerce.
Préparation
33
Page 34

Menu
Structure du menu
COLOR ADJUST CYN-RED (–7 à +7)
COLOR(S)* MAG-GRN (–7 à +7)
YEL-BLU (–7 à +7)
DARK (–7 à +7)
LIGHT (–7 à +7)
SHARPNESS (0 à +7)
GAMMA (–7 à +7)
SAVE SETTING (1/2/3)
LOAD SETTING (1/2/3)
COLOR ADJUST CYN-RED (–7 à +7)
B/W(S)* MAG-GRN (–7 à +7)
YEL-BLU (–7 à +7)
DARK (–7 à +7)
LIGHT (–7 à +7)
SHARPNESS (0 à +7)
GAMMA (–7 à +7)
SAVE SETTING (1/2/3)
LOAD SETTING (1/2/3)
Bluetooth SETTING Bluetooth ADDR
PASSKEY INPUT PASSKEY INPUT [1:2:3:4]
MY DEVICE NAME Sony UP- DX100 [NONE – 9]
CONNECTION RECORD 1. Sony DKC-C200X
MODULE POWER POWE R: ( ON / OF F)
PRINT SETTING PRINT OFFSET: (–2/–1/0/1/2)
COPY PRINT COPY PRINT: 1 [1 – 9]
TOTAL PRINTS
2. NONE
3. NONE
* Lorsque le papier impression UPC-X45
est utilisé, (S) s’affiche.
Fonctions des différents paramètres du menu
Paramètre du menu Fonction Option
COLOR ADJUST
COLOR
COLOR ADJUST
B/W
Bluetooth SETTING Permet de paramétrer la fonction
PRINT SETTING
COPY PRINT Permet de réimprimer les dernières
TOTAL PRINTS Indique le nombre total de feuilles
Permet de régler la qualité d’impression
pour des images couleur.
Permet de régler la qualité d’impression
pour des images noir et blanc.
Bluetooth.
Permet de régler finement la position
d’impression sur le papier de l’UPC-X46.
données enregistrées en mémoire.
imprimées.
CYN-RED: Règle le cyan et le rouge.
MAG-GRN: Règle le magenta et le vert.
YEL-BLU: Règle le jaune et le bleu.
DARK: Règle la luminosité des zones obscures.
LIGHT: Règle la luminosité des zones claires.
SHARPNESS: Règle la netteté des contours des objets sur l’image.
GAMMA: Règle la tonalité de l’image.
SAVE SETTING (1/2/3): Enregistre les valeurs réglées dans la
mémoire de l’imprimante.
LOAD SETTING (1/2/3): Charge les valeurs réglées depuis la
mémoire de l’imprimante.
Bluetooth ADDR: Affiche l’adresse Bluetooth.
PASSKEY INPUT: Permet de spécifier ou de changer le mot de
passe.
MY DEVICE NAME: Permet d’attribuer un numéro à
l’imprimante.
CONNECTION RECORD: Affiche le relevé des connexions.
MODULE POWER: Permet de mettre les circuits Bluetooth
sous tension ou hors tension.
PRINT OFFSET (–2/–1/0/1/2)
La position d’impression peut être déplacée de 0,5 mm.
[1
– 9]
Permet de spécifier le nombre de feuilles à imprimer.
—
34
Menu
Page 35

Bluetooth
Vérification du paramétrage actuel
Vous pouvez vérifier le mot de passe actuel sur
l’imprimante en procédant comme suit:
Technologie sans fil Bluetooth
La technologie sans fil Bluetooth1) permet à différents
appareils Bluetooth de communiquer entre eux sans
câbles. Les appareils pouvant utiliser cette technologie
sont les ordinateurs, les périphériques d’ordinateur,
PDAs et les téléphones mobiles.
Ce système étant omnidirectionnel, la communication
est possible même lorsque l’appareil Bluetooth se trouv e
dans un sac ou qu’il y a des obstacles entre les appareils.
La technologie sans fil Bluetooth offre également des
fonctions de sécurité av ancées telles que le cryptage des
fréquences et des données.
• Lors de l’utilisation de la fonction Bluetooth, la
distance entre l’appareil photo et l ’imprimante ne doit
pas dépasser 10 mètres (33 pieds) sans obstacles.
1) La marque est la propriété de son détenteur et est
utilisée sous licence par Sony Corporation. Le mot Bluetooth
est imprimé en clair dans tout ce document.
Le « Basic Imaging Profile »
Le « Basic Imaging Profile » (BIP) est la spécification
utilisée lors de l’émission ou la réception d’images f ixes
entre des appareils Bluetooth. Les principales
fonctionnalités du BIP sont l’émission ou la réception
d’images et l’utilisation de la fonction de déclenchement
à distance d’un appareil photo numérique.
Pour pouvoir être connecté à l’imprimante, l’appareil
Bluetooth doit être compatible avec l’« Image Push
Feature » du « Basic Imaging Profile » (BIP).
Avant d’utiliser l’appareil Bluetooth, vérifiez ses
spécifications Bluetooth et BIP.
1 2 4,6
MENU
1
DIGITAL PHOTO PRINTER
EXEC
PRINT
ALARM
7 3,5
1
Mettez l’imprimante sous tension.
2
Appuyez sur la touche MENU.
3
Appuyez sur V de la touche de commande pour
faire apparaître « Bluetooth SETTING [>>] »
(paramétrage Bluetooth) sur l’afficheur.
4
Appuyez sur B de la touche de commande.
L’adresse Bluetooth apparaît.
5
Appuyez sur V de la touche de commande pour
faire apparaître « PASSKEY INPUT [>>] » (saisie
du mot de passe) sur l’affi cheur.
6
Appuyez sur B de la touche de commande.
Le mot de passe actuellement spécifié apparaît sur
l’affichage PASSKEY INPUT (saisie du mot de
passe).
Allumé
Communication entre l’imprimante et un autre appareil à l’aide de la fonction Bluetooth
Les conditions suivantes sont nécessaires pour la
communication entre l’imprimante et un autre appareil à
l’aide de la fonction Bluetooth:
• Le même mot de passe doit être spécifié sur
l’imprimante et l’autre appareil.
• Le témoin Bluetooth doit être allumé.
7
Appuyez sur la touche EXEC.
Pour quitter le mode MENU, appuyez sur la touche
MENU.
Si le témoin Bluetooth est éteint
Si le témoin Bluetooth est éteint, allumez-le en
procédant comme suit:
1
Appuyez sur la touche MENU.
2
Appuyez sur V de la touche de commande pour
afficher « Bluetooth SETTING [>>] » (paramétrage
Bluetooth).
Bluetooth
35
Page 36

3
Appuyez sur B de la touche de commande.
« Bluetooth ADDR None » (adresse Bluetooth nul)
apparaît.
4
Appuyez sur V de la touche de commande pour
afficher « MODULE PO WER [>>] » (Alimentation
module).
5
Appuyez sur B de la touche de commande.
6
Appuyez sur b ou B de la touche de commande
pour placer POWER (alimentation) sur ON
(marche).
7
Appuyez sur la touche EXEC.
« REBOOTING » (redémarrage ) apparaît.
L’imprimante redémarre alors et le témoin Bluetooth
s’allume.
Authentication
Qu’est-ce qu’un mot de passe?
Le mot de passe est utilisé pour authentifier deux
appareils Bluetooth n’ayant pas encore été connectés
entre eux afin d’établir une liaison sécurisée entre eux.
Lors du processus d’authentification du mot de passe,
vous devez saisir les mêmes caractères (mot de passe)
sur chaque appareil. Cette imprimante utilise un no mbre
à 4 chiffres comme mot de passe.
Une fois l’authentification de l’appareil vérifiée,
l’imprimante enregistre cet appareil dans le relevé. La
connexion de l’imprimante à cet appareil est alors
possible sans saisir un mot de passe.
Par mesure de sécurité, le mot de passe doit être saisi
dans un certain délai (30 secondes) conformément à la
norme Bluetooth.
La saisie du mot de passe peut être requise lorsque la
période de validité d’authentification de l’imprimante
ou de l’autre appareil est expirée, lorsque le rele vé a été
supprimé ou lorsque le paramétrage de la sécurité a été
modifié.
Pour certains appareils, il peut être nécessaire de saisir
le mot de passe à chaque connexion.
Ce « Passkey » est également appelé « Bluetooth
passkey » ou « PIN » , etc.
Saisie du mot de passe
Saisissez le même mot de passe sur l’imprimante et
l’autre appareil en procédant comme suit:
1 2,10 7 4,6
MENU
1
DIGITAL PHOTO PRINTER
EXEC
98
1
Mettez l’imprimante sous tension.
« Ready BT RSSI [----] » apparaît sur l’afficheur.
2
Appuyez sur la touche MENU.
3
Appuyez sur V de la touche de commande pour
afficher « Bluetooth SETTING [>>] » (paramétrage
Bluetooth).
4
Appuyez sur B de la touche de commande.
« Bluetooth ADDR » (adresse Bluetooth) apparaît.
5
Appuyez sur V de la touche de commande pour
afficher « PASSKEY INPUT [>>] » (saisie du mot
de passe).
6
Appuyez sur B de la touche de commande.
« PASSKEY INPUT <1> [X:X:X:X] » (saisie du
mot de passe) apparaît.
Chiffre actuel à spécifier Mot de passe
7
Appuyez sur b ou B de la touche de commande
pour sélectionner le chiffre du mot de passe à
spécifier.
<1> indique le premier chiffre et <4> le dernier.
8
Appuyez sur v ou V de la touche de commande
pour spécifier la valeur du mot de passe.
PRINT
ALARM
3,5
Lorsque l’écran de saisie du mot de
passe apparaît sur l’autre appareil
Saisissez le mot de passe désiré sur votre imprimante.
Saisissez ensuite le même mot de passe sur l’autre
appareil.
36
Bluetooth
Vous pouvez spécifier une valeur de 0 à 9.
Répétez les opérations des étapes 7 et 8 jusqu’à ce
que les quatre chiffres du mot de passe aient été
spécifiés.
Page 37

9
Appuyez sur la touche EXEC.
« PASSKEY INPUT Saving. . . » (enregistrement
du mot de passe saisi) apparaît et le mot de passe est
enregistré.
10
Après avoir te rminé, a ppuyez sur la touch e MENU.
Attribution d’un numéro d’unité à l’imprimante
Lorsque plusieurs imprimantes sont utilisées dans un
système, il est pratique que chaque imprimante ait un
numéro d’unité (1 à 9).
1
Mettez l’impriman te sous tension.
« Ready BT RSSI [----] » apparaît sur l’afficheur.
2
Appuyez sur la touche MENU.
3
Appuyez sur V de la touche de commande pour
affiche r « Bluetooth SETTING [>>] » (paramétra ge
Bluetooth).
4
Appuyez sur B de la touche de c ommande.
Impression d’une image
L’UP-DX100 reçoit et imprime automatiquement les
images qu’elle reçoit de l’appareil photo connecté à
l’aide de la fonction Bluetooth. Seuls des fichiers
d’images graphiques au format JPEG peuvent être reçus.
Des images graphiques reçues d’un ordi nateur raccordé
à l’imprimante par un câble USB peuv ent également être
imprimées.
Pendant l’impression d’images graphiques reçues d’un
appareil photo ou d’un ordinateur, les opérations sont
indiquées comme suit sur l’afficheur:
Receiving Image
BT [>>>>>>>>>>]
PROCESSING
PRINTING
[YELLOW]
PRINTING
[MAGENTA]
Réception des données
d’image (Ceci est un exemple
de connexion Bluetooth.)
Traitement des données
reçues
Impression du jaune
Impression du mage nta
5
Appuyez sur V de la touche de commande pour
afficher « MY DEVICE NAME [>>]. » (nom de
mon unité)
6
Appuyez sur B de la touche de c ommande.
« Sony UP-DX100 [NONE-9:EXEC] » apparaît.
7
Appuyez sur v ou V de la touche de commande
pour spécifier le numéro d’unité.
8
Appuyez sur la touche EXEC.
« DEVICE NAME Sa ving . . . » (enr e gistremen t du
nom d’unité) et le numéro d’unité spécifié est
enregistré.
9
Après avoir te rminé, a ppuyez sur la touch e MENU.
PRINTING
[CYAN]
PRINTING
[LAMI]
Après l’impression, « Ready BT RSSI [))))] » apparaît.
Impression du cyan
Lamination d’un tirage
Impression d’une image
37
Page 38

Réimpression d’une image enregistrée en mémoire (COPY PRINT)
Les données de la dernière image imprimée sont
enregistrées dans la mémoire de l’imprimante. Ceci
vous permet de réimprimer l’image.
Remarque
Lorsque vous mettez l’imprimant e en veille, les données
enregistrées en mémoire sont supprimées. Vous ne
pouvez plus réimprimer l’image.
13
Réglages
Il est possible de régler la position d’impression et la
qualité d’impression. Effectuez les réglages nécessaires
après avoir vérifié le résultat d’impression.
Réglage de la position d’impression (PRINT SETTING)
Lorsque le kit UPC-X46 est utilisé, réglez la position
d’impression de façon que l’image imprimée soit
correctement positionnée sur le papier.
La position d’impression peut être déplacée de 0,5 mm.
MENU
1
DIGITAL PHOTO PRINTER
EXEC
54
1
Appuyez sur la touche MENU.
2
Appuyez sur V de la touche de commande pour
afficher « COPY PRINT [>>] » (copie de tirage).
3
Appuyez sur B de la touche de commande.
« COPY PRINT: 1 [1-9 PRINT:EXEC] » (copie de
tirage) apparaît.
4
Appuyez sur v ou V de la touche de commande
pour spécifier le nombre de feu illes à imprimer.
Vous pouvez spécifier une valeur de 1 à 9.
PRINT
ALARM
2
1234
MENU
1
DIGITAL PHOTO PRINTER
EXEC
PRINT
ALARM
65
1
Mettez l’imprimante sous tension.
2
Appuyez sur la touche MENU.
3
Appuyez sur v ou V de la touche de commande
pour afficher « PRINT SETTING » (paramétrage
de l’impression).
4
Appuyez sur B de la touche de commande.
« PRINT OFFSET: » (décalage de l’impression)
apparaît.
38
5
Appuyez sur la touche EXEC.
Le nombre d’images spécifié à l’étape 4 est
imprimé.
Après l’impression, l’affichage revient sur
« Ready. »
Réglages
5
Appuyez sur b ou B de la touche de commande
pour sélectionner la valeur de décalage.
6
Appuyez sur la touche EXEC.
La valeur de décalage sélectionnée à l’étape 5 est
enregistrée et l’affichage revient à « PRINT
SETTING » (paramétrage de l’impression).
Effectuez un test d’impression et vérifiez si l’image est
imprimée sur la position correcte sur le papier. Si un
autre réglage est nécessaire, répétez les opérations cidessus.
Page 39

Pour quitter le mode PRINT SETTING
(paramétrage de l’impression)
Appuyez sur la touche MENU. L’aff ichage revient sur
« Ready » (prêt) et l’imprimante est prête à imprimer.
Réglage de la qualité d’impression (COLOR ADJUST)
Vous pouvez régler la qualité d’image avec la fonction
MENU. Vous pouvez vérifier le résultat du réglage en
imprimant une image-guide.
Trois jeux de v ale urs réglées pour les images co uleur et
les images noir et blanc peuvent être enregistrés en
mémoire pour être rappelés plus tard.
Remarque
Le réglage de la qualité d’impression décrit ici n’est
autorisé que lorsque l’appareil photo est raccordé à
l'imprimante à l’aide de la fonction Bluetooth. Si
l'imprimante est raccordée à l’ordinateur, vous pouvez
régler la qualité d’image à l’aide du pilote d’imprimante.
Pour plus d’informations sur l'installation et l'utilisation
du pilote d'imprimante, consultez le fichier « Read me
(English) » sur le CD-ROM fourni.
Réglage de la qualité d’impression pour
des images couleur
123
MENU
1
DIGITAL PHOTO PRINTER
EXEC
PRINT
ALARM
645
« MAG-GRN: » apparaît.
Répétez les opérations des étapes 4 et 5 pour
effectuer les réglages nécessaires. Les différents
paramètres permettent d’effectuer les réglages
suivants:
CYN-RED: Une pression sur b donne plus de
cyan à l’image, tandis qu’une pression sur B la
rend plus rouge.
MAG-GRN: Une pression sur b donn e plus de
magenta à l’image, tandis qu’une pression sur B
la rend plus verte.
YEL-BLU: Une pression sur b donne plus de
jaune à l’image, tandis qu’une pression sur B la
rend plus bleue.
DARK: Règle le contraste des zones obscures. Une
pression sur B augmente l'obscurité.
LIGHT: Règle le contraste des zones claires. Une
pression sur B augmente la luminosité.
SHARPNESS: Une pression sur B augmente la
netteté des contours des objets sur l'image.
GAMMA: Une pression sur b éclaircit la tonalité
des couleurs de l’ensemble de l’image, tandis
qu’une pression sur B la fonce.
6
Après voir terminé le réglage, appuyez sur la
touche EXEC.
L’affichage revient sur « COLOR ADJUST
COLOR [>>] » (réglage de la couleur).
Réglage de la qualité d’impression pour
des images noir et blanc
Lorsque vous appuyez sur V de la touche de command e
après avoir appuyé sur la touche MENU à l’étape 2 de
« Réglage de la qualité d’impression pour des images
couleur », COLOR ADJUST B/W [>>] apparaît et vous
pouvez régler la qualité d’impression pour des images
noir et blanc. La méthode de réglage est la même que
pour des images couleur.
1
Mettez l’imprimante sous tension.
2
Appuyez sur la touche MENU.
« COLOR ADJUST COLOR [>>] » (réglage de la
couleur) apparaît.
3
Appuyez sur B de la touche de commande.
« CYN-RED: » apparaît.
4
Appuyez sur b ou B de la touche de commande
pour le réglage.
5
Appuyez sur V de la touche de commande.
Impression d’une image-guide
Pour vérifier le résultat de vos réglages, imprimez les
images-guides de l’appareil photo. Appuyez sur la
touche SIZE de l’appareil photo pour sélectionner Guide
Print-RGB ou Guide Print-DLGm, puis exécutez
l’impression.
Pour plus d’informations, consultez le mode d’emploi
(Opérations avancées) de l’UPX-C200.
Réglages
39
Page 40

Enregistrement de vos réglages
Après voir terminé le réglage de la couleur , enregistrez
les valeurs réglées en procédant comme suit :
1
Sur l’affichage COLOR ADJUST COLOR [>>] ou
B/W [>>], appuyez sur B de la touche de
commande.
2
Appuyez plusieurs fois sur V de la touche de
commande jusqu’à ce que « SAVE SETTING »
(enregistrer les réglages) apparaisse.
3
Appuyez sur b ou B de la touche de commande
pour sélectionner le numéro de cellule de mémoire
(1, 2 ou 3).
4
Appuyez sur la touche EXEC.
Les valeurs réglées sont enregistrées dans la cellule
de mémoire portant le numéro sélectionné à
l’étape 3.
Chargement des valeurs réglées
Les valeurs réglées enregistrées en mémoire peuvent
être rappelées.
1
Sur l’affichage COLOR ADJUST COLOR [>>] ou
B/W [>>], appuyez sur B de la touche de
commande.
2
Appuyez plusieurs fois sur V de la touche de
commande jusqu’à ce que « LOAD SETTING »
(charger réglages) apparaisse.
3
Appuyez sur b ou B de la touche de commande
pour sélectionner le numéro de cellule de mémoire
(1, 2 ou 3).
4
Appuyez sur la touche EXEC.
Les valeurs réglées enregistrées dans la cellule de
mémoire portant le numéro sélectionné à l’étape 3
sont rappelées.
Pour quitter le mode COLOR ADJUST
(réglage de la couleur)
Après avoir terminé une opération de menu telle que le
paramétrage de COLOR ADJUST (réglage de la
couleur), l’enregistrement des valeurs réglées ou le
rappel des valeurs enregistrées, appuyez sur la touche
MENU. L’affichage revient sur « Ready » (prêt).
40
Réglages
Page 41

Précautions
Sécurité
• Utilisez l’imprimante avec l’alimentation spécifiée
dans « Spécifications » (page 42).
• Cet appareil n’est pas isolé du secteur tant qu’il reste
branché à la prise secteur, même s’il est éteint.
• V eillez à n e pas endommager le co rdon d’alimentation
en plaçant ou faisant to mber des ob jets l ourds dessus.
Il est dangereux d’utiliser l’imprimante avec un
cordon d’alime ntation endommag é.
• Si vous prévoyez que l’i mprimant e restera longt emps
inutilisée, débranchez le cordon d’alimentation.
• Pour débrancher le cordon d’alimentation, tirez-le par
sa fiche. Ne tirez pas sur le cordon lui-même.
• Veillez à ne pas soumettre l’imprimante à des chocs
mécaniques et à ne pas la faire tomber.
• Ne démontez pas et ne transformez pas l’imprimante.
• Ne retirez pas le capot. Les pièces internes présentent
un risque d’électrocution.
• Veillez à ne pas renverser d’eau ou d’autres liquides
sur l’imprimante et à ne pas laisser des substances
combustibles ou métalliques pénétrer dans le boîtier.
Une utilisation av ec des substances ét rangères dans le
boîtier peut provoquer une défaillance de
l’imprimante et fait courir un risque d’incendie ou
d’électrocution.
• Les orifices d’aération empêchent la surchauffe de
l’imprimante. Ne les obstruez pas avec d’autres
appareils ou en couvrant l’imprimante avec un tissu,
etc.
• En cas de dysfonctionnement de l’imprimante ou de
pénétration de substances étrangères d ans son boî tier,
débranchez-la immédiatement et consultez le service
après-vente Sony ou votre revendeur Sony.
Installation
• Ne placez pas l’imprimante dans un endroit :
– soumis à des vibrations mécaniques
– très humide
– excessivement poussiéreux
– exposé à la pluie
– directement ou excessivement exposé au soleil
– soumis à des températures très élevées ou basses
– proche de sources magnétiques puissantes
– proche d’un rayonnement électromagnétique
puissant (émetteurs de radio ou de télévision, par
exemple)
• N’utilisez pas un autre matériel électronique près de
l’imprimante. L’imprimante ne fonctionne pas
correctement dans un champ électromagnétique
puissant.
• Ne placez pas d’objets lourds tel qu’un écran sur
l’imprimante.
Condensation
• De la condensation peut se former dans l’imprimante
si elle est soumise à de fortes et brusques variations de
température (passage d’une pièce froide à une pièce
chaude, par exemple) ou exposée à un système de
chauffage produisant une forte humidité.
L’imprimante peut alors de ne pas fonctionner
correctement et, si l’on persiste à l’ utili ser, tomber en
panne. Si de la condensation se forme, mettez
l’imprimante en veille et attendez au moins une heure.
• Si le kit d’impression est soumis à de fortes et
brusques variations de température, de la
condensation peut se former sur la cartouche
d’impression ou le papier. Ceci provoque un
dysfonctionnement de l’imprimante. Si l’on utilise le
kit d’impression dans cette condition, des taches
peuvent apparaître à l’impression. Ne stockez donc
pas le kit d’impression dans un endroi t soumis à de
fortes et brusques variations de température.
• Avant de stocker un kit d’impression partiellement
utilisé, remettez-le dans son emballage d’origine que
vous scellerez. Si possible, g ardez le kit d’impression
scellé dans un endroit frais et sombre. Avant de
réutiliser le kit d’impression, placez-le dans une pièce
chaude pendant plusieurs heures dans son emballage
scellé. Ceci empêchera la formation de condensation
lorsque vous le retirerez de son emballage.
Emplacement
Pour empêcher une accumulation de chaleur interne,
laissez un dégagement su ffisant autour de l’imprima nt e
pour permettre la circulation d’air par les orifices
d’aération sur la face gauche de l’imprimante.
Transport
• Ne transportez pas l’imprimante avec les accessoires
fournis. Ceci pourrait provoquer un dysfonctionnement.
• Conservez le carton et les matériaux d’emballage
d’origine pour un transport ultérieur éventuel.
Nettoyage
• Av ant de nettoyer l’impr imante, appuyez sur sa touche
marche/veille de façon que le témoin s’éteigne et
débranchez le cordon d’alimentation.
• Nettoyez le boîtier , le panneau et les commandes a vec
un chiffon dou x et sec ou un c hiffon doux légèrement
imbibé d’une solution détergente douce. N’utilisez
aucun type de solvant tel qu’alcool ou benzine qui
pourrait ternir la finition.
Précautions
41
Page 42

Brochage du connecteur USB
Spécifications
Imprimante
Alimentation 100 – 240 V CA, 50/60 Hz
Intensité consommée
1,1 A max. (pendant l’impression)
Température de fonctionnement
5°C à 35°C (41°F à 95°F)
Te mpérature de stockage/transport
–20°C à +60°C (–4°F à +140°F)
Humidité de fonctionnement
20% à 80% (sans condensation)
Dimensions maximales (l/h/p)
203 × 85 × 305 mm
3
/8 × 121/8 pouces)
(8 × 3
Poids 2,7 kg (5 lb 15 oz) environ (ensemble
principal seulement)
Méthode d’impression
Transfert thermique par sublimation
séquentielle à quatre passes
(jaune, magenta, cyan, lamination)
Résolution d’impression
403 × 403 dpi
Tête thermique 403 points/pouce
Gradations d’impression
8 bits pour le jaune, magenta, cyan
Durée d’impression
UPC-X46: 100 s/feuille
UPC-X34: 65 s/feuille
Méthode d’introduction du papier
Introduction automatique depuis le
bac à papier
Capacité maximale du bac à papier
UPC-X46: 25 feuilles
UPC-X34: 30 feuilles
Méthode d’éjection du papier
Éjection par l’avant
Les feuilles sont éjectées dans l’ordre
au-dessus du bac à papier
Capacité d’impression de la cartouche de ruban
UPC-X46: 25 feuilles
UPC-X34: 30 feuilles
Entrées AC IN (entrée secteur)
Format d’impression maximum
UPC-X46: 101,6 × 151,4 mm
1
/8 pouces) (sans bordure)
(4 × 6
UPC-X34: 70,1 × 95,3 mm
7
/8 × 37/8 pouces) (avec bordure)
(2
Pixels d’impression
UPC-X46: 1664 × 2440 points
UPC-X34: 1112 × 1512 points
Interface USB
Système de transmission-des données
Compatible avec la spécification
Universal Serial Bus Révision 1.1
E/S Signal Fonction
V
CC
E/S –Data Données
E/S +Data Données, peut être monté jusqu’à
GROUND Masse du câble
Alimentation par câble, intensité
maximale: 100 mA
+3,3 V via une résistance de
1,5 kohms
Spécifications Bluetooth
Type de communication
Spécification Bluetooth, ver.1.1
Vitesse de transmission maximale
1)
723 Kbps environ
Sortie Spécification Bluetooth, classe de
puissance 2
Distance de communication
10 m (33 pieds) environ sans obstacles
Profil Bluetooth compatible
2)
3)
Basic Imaging Profile (Image Push
Responder)
Bande de fréquences
2,4 GHz (2,400 – 2,4835 GHz)
1) Vitesse de transmission maximale des données sur la base de la
spécification Bluetooth, ver.1.1. Cette vitesse dépend de la
distance entre les appareils, des obstacles, des conditions des
ondes radio, du logiciel d’application et du système
d’exploitation.
2) Cette distance dépend de la distance entre les appareils, des
obstacles, des conditions des ondes radio, du logiciel
d’application et du système d’exploitation.
3) Cette spécification dépend de l’usage auquel sont destinés les
deux appareils Bluetooth. Ceci est défini dans la spécification
Bluetooth.
Accessoires fournis
Bac à papier pour l’UPC-X46 (1)
Bac à papier pour l’UPC-X34 (1)
Couvercle du bac à papier (1)
Porte-papier (2)
Cordon d’alimentation secteur (1)
Cassette de nettoyage (1)
CD-ROM (1)
Mode d’emploi (1)
Contrat de licence d’utilisation (1)
Accessoires en option
Bac à papier pour l’UPA-DX100TR
Kit d’impression couleur à auto-lamination 10UPC-X46
(250 feuilles)
Kit d’impression couleur à auto-lamination 10UPC-X45
(250 feuilles)
Kit d’impression couleur à auto-lamination 10UPC-X34
(300 feuilles)
Conception et spécifications susceptibles d’être
modifiées sans préavis.
42
Spécifications
Page 43

Dépannage
En cas de problème l’ors de l’utilisation de la UPDX100, utilisez le tableau suivant comme guide pour y
remédier . Si le problème persiste, adressez-v ous à v otre
revendeur Sony ou à un centre de service après-vente
Sony local.
En cas de bourrage papier
En cas de bourrage papier, le témoin ALARM s’allume,
un message d’erreur apparaît et l’impression s’arrête.
1
Appuyez sur la touche marche/veille de façon que
le témoin s’éteigne.
2
Retirez le bac à papier et enlevez les feuilles
bloquées par la fente à bac à papier.
Imprimante
Symptôme Cause/Mesure
L’imprimante ne
fonctionne pas après
voir été mise sous
tension.
Impression impossible. • Le papier et la cartouche
Un bip se fait entendre. tVérifiez si vous avez bien suivi la
La cartouche
d’impression ne peut
pas être retirée.
Le témoin ALARM
s’allume ou clignote et
un message d’erreur
s’affiche.
Présence de lignes ou
points blancs sur les
images imprimées.
• Le cordon d’alimentation secteur
n’est pas correctement branché.
tBranchez correctement le cordon
d’alimentation secteur à une
prise de courant (page 33).
d’impression ne correspondent pas.
tUtilisez le kit d’impression
recommandé avec du papier et
une cartouche d’impression de
même format.
• La tête thermique a peut être
surchauffé. « Waiting » (patientez)
apparaît sur l’afficheur.
tNe faites pas fonctionner
l’imprimante tant que la tête ne
s’est pas refroidie et que
l’impression n’a pas repris.
• Il y a peut-être un bourrage papier.
tEnlevez les feuilles bloquées
éventuelles.
procédure correcte.
tIl n’est pas possible de retirer la
cartouche d’impression pendant
l’impression. Attendez la fin de
l’impression.
Si cela ne résout pas le problème,
adressez-vous à un centre de
service après-vente Sony ou à
votre revendeur Sony.
tSuivez les instructions sur
l’afficheur .
• Il y a peut-être de la poussière sur la
tête thermique.
tLa tête d’impression ou le trajet
du papier sont peut-être souillés.
Utilisez la cassette de nettoyage
fournie pour nettoyer la tête et le
trajet du papier.
• Le galet à l’intérieur de
l’imprimante peut endommager le
papier impression.
tDiminuer le nombre de feuilles
dans le bac à papier.
3
Retirez le couvercle du panneau arrière et assurezvous qu’il ne reste pas de papier dans l’imprimante.
S’il reste des feuilles bloquées dans l’imprimante,
enlevez-les.
- AC IN
- AC IN
g
Couvercle arrière
4
Après avoir enle vé les feuilles bloquées, remettez le
couvercle en place.
5
Insérez le bac à papier dans cette fente.
6
Mettez l’imprimante sous tension.
Remarque
Si vous ne parvenez pas à enlever les feuilles bloquées,
adressez-vous à un centre de service après-vente Sony
ou à votre revendeur Sony.
Nettoyage de l’intérieur de l’imprimante
Si des lignes ou points blancs sont imprimés sur les
images, nettoyez l’intérieur de l’imprimante à l’aide de
la cassette de nettoyage fournie et de la feuille
protectrice se trouvant dans le kit d’impression.
Remarques
• Ne procédez à ce nettoyage que s’il y a des lignes ou
points blancs sur le tirage.
• Si les performances d’impression sont correctes, le
nettoyage n’améliorera pas la qualité de l’image
imprimée.
1
Retirez le bac à papier de l’imprimante. S’il reste du
papier impression dans le bac, enlevez-le.
2
Placez la feuille protectrice a v ec l a fa ce portant le s
inscriptions vers le bas et la flèche tournée dans le
même sens que la flèche du bac.
Feuille bloquée
Dépannage
43
Page 44

3
Ouvrez le couvercle du compartiment de la
cartouche et retirez la cartouche d’impression.
4
Insérez la cartouche de nettoyage fournie dans
l’imprimante et refermez le couvercle du
compartiment de la cartouche.
Un signal sonore se fait entendre et « HEAD
CLEANING/PUSH [EXEC] » (nettoyage de la
tête/appuyez sur [Exec]) apparaît sur l’afficheur.
5
Appuyez sur la touche EXEC.
La cassette de nettoyage et la feuille protectrice
nettoient l’intérieur de l’imprimante. Après le
nettoyage, la feuille protectrice est
automatiquement éjectée.
6
Retirez la cassette de nettoyage de l’imprimante et
remettez la cartouche d’impression et le papier
impression en place.
Fonction Bluetooth
Symptôme Cause/Mesure
Les données ne
sont pas
transmises.
• La distance entre l’appareil et
l’imprimante est excessive.
tPositionnez les appareils dans le
rayon de communication maximal.
• La partie antenne Bluetooth de
l’imprimante et/ou de l’appareil photo
numérique est couverte par une main,
etc.
tNe couvrez pas la partie antenne.
• L’appareil que vous désirez connecter à
l’imprimante est déjà connecté à un autre
appareil.
tAttendez que la tâche des deux autres
appareils soit terminée avant de
reconnecter l’imprimante à l’appareil.
• L’authentification a échoué.
tReconnectez l’imprimante à
l’appareil et saisissez correctement le
même mot de passe sur les deux
appareils.
• L’appareil connecté a interrompu
l’émission.
tVérifiez l’état de l’appareil connecté,
puis reconnectez-le à l’imprimante.
• La connexion Bluetooth est interrompue
du côté de l’appareil connecté.
tVérifiez l’état de l’appareil connecté.
Symptôme Cause/Mesure
La connexion à
l’appareil que vous
désirez connecter
est coupée.
L’authentification
a échoué.
La vitesse de
transmission des
données est
insuffisante.
• La délai maximum d’authentification (30
secondes) est écoulé.
tSaisissez correctement le même mot
de passe sur l’imprimante et
l’appareil dans les 30 secondes.
• Le même mot de passe n’a pas été saisi.
tSaisissez correctement le même mot
de passe sur l’imprimante et
l’appareil dans les 30 secondes.
• L’appareil a été déconnecté ou a terminé
la connexion.
tVérifiez l’état de l’appareil, essayez à
nouveau de connecter l’imprimante à
l’appareil et saisissez correctement le
mot de passe.
• La partie antenne Bluetooth de
l’imprimante et/ou de l’appareil photo
numérique est couverte par une main,
etc.
tNe couvrez pas la partie antenne.
La vitesse de transmission des
données dépend de la distance entre
l’imprimante et l’appareil, des
obstacles ou des conditions des ondes
radio. Changez la position de
l’imprimante ou rapprochez-la de
l’appareil.
44
Dépannage
Page 45

Symptôme Cause/Mesure
La connexion ne
peut pas être
établie bien que la
distance entre
l’imprimante et
appareil auquel
vous désirez la
connecter ne
dépasse pas 10 m
(33 pieds).
• La partie antenne Bluetooth de
l’imprimante et/ou de l’appareil photo
numérique est couverte par une main,
etc.
tNe couvrez pas la partie antenne.
La vitesse de transmission des
données dépend de la distance entre
l’imprimante et l’appareil, des
obstacles, des conditions des ondes
radio, du logiciel d’application et du
système d’exploitation.
Changez la position de l’imprimante
ou rapprochez-la de l’appareil.
• L’appareil auquel vous désirez connecter
l’imprimante est en cours de connexion à
un autre appareil.
tLorsque l’appareil est connecté à un
autre appareil, il se peut qu’il ne soit
pas affiché comme disponible ou
qu’il ne soit pas alors possible d’y
connecter l’imprimante.
• L’appareil ne peut pas être connecté à
l’imprimante avec la fonction Bluetooth.
tParamétrer l’appareil pour qu’il
puisse être connecté.
Message d’erreur Cause/Mesure
Bluetooth ERROR
SERVICE CALL
• Une anomalie s’est produite dans la
fonction Bluetooth.
tConsultez un centre de service
après-vente Sony ou votre
revendeur Sony.
Messages d’erreur
Message d’erreur Cause/Mesure
RIBBON END
SET CARTRIDGE
SET PAPER
PUSH EXEC
PAPER JAMMING
REMOVE PRINTS
MEDIA MISMATCH
PUSH EXEC
REMOVE PRINTS
PUSH EXEC
PRINTER ERROR
SERVICE CALL
• La cartouche d’impression est
épuisée.
tRem pl acez la cartouche
d’impression.
• Le papier impression est épuisé.
tRemettez du papier impression
dans le bac à papier et appuyez sur
la touche EXEC.
• Le bac à papier n’est pas inséré dans
l’imprimante.
tInsérez le bac à papier et appuyez
sur la touche EXEC.
• Il y a peut-être un bourrage papier.
tEnlevez les feuilles bloquées
éventuelles.Voir « En cas de
bourrage papier » à la page 43.
• Le papier et la cartouche d’impression
ne correspondent pas.
tUtilisez du papier de même taille
que la cartouche et appuyez sur la
touche EXEC.
• Il reste du papier impression dans la
fente d’éjection.
tRetirez le bac à papier, puis le
papier impression. Appuyez
ensuite sur la touche EXEC.
• Une anomalie s’est produite dans
l’imprimante.
tConsultez un centre de service
après-vente Sony ou votre
revendeur Sony.
Dépannage
45
Page 46

46
Dépannage
Page 47

ADVERTENCIA
Para evitar el riesgo de incendio o
electrocución, no exponga la unidad a la
lluvia ni a la humedad.
Para evitar recibir descargas eléctricas,
no abra el aparato. Contrate
exclusiv amente los servicios de personal
cualificado.
ADVERTENCIA
Esta unidad no dispone de interruptor de alimentación.
Cuando instale la unidad, coloque un dispositivo de
apagado de fácil acceso en el c able o conecte el cable de
alimentación a una toma de corriente que esté cerca de
la unidad y sea de fácil acceso. Si se produjera algún
fallo durante el funcionamiento de la misma, utilice el
dispositivo de apagado para apagar la alimentación o
desconecte el cable de alimentación.
La duplicación, edición o impresión de un CD,
programas de TV, imágenes o publicaciones
protegidas por copyright o cualquier otro tipo de
material están limitadas a la grabación o creac ión para
su uso privado o doméstico. Si no es titular del
copyright o no dispone del permiso de sus titulares
para la duplicación de materiales, el uso de tales
materiales más allá de estas restricciones puede
suponer la infracción de la ley sobre derechos de autor
y estar sujeto a reclamaciones por daños y perjuicios
del titular del copyright.
Si utiliza imágenes fotográficas con esta impresora,
preste atención especial en no infringir las
disposiciones establecidas por la ley sobre los
derechos de autor. El uso o modificación no
autorizado del retrato de otras personas puede
constituir igualmente la infracción de sus derechos.
En ciertos tipos de demostraciones, actuaciones o
exposiciones la utilización de fotografías puede estar
prohibida.
GB
Para los clientes de Europa
Sony Corporation declara aquí que este modelo, UPDX100, cumple los requisitos esenciales y demás
provisiones pertinentes de la Directiva 1999/5/EC.
Para obtener información detallada, vaya a la siguiente
dirección URL:
http://www.compliance.sony.de/
Este producto está destinado a utilizarse en los siguientes
países: Alemania, Austria, Bélgica, Dinamarca, España,
Finlandia, Francia , Grecia, Holanda, Irlanda, Islandia, Italia ,
Liechtenstein, Lituania, Luxemburgo, Noruega, Portugal,
Reino Unido, Suecia y Suiza.
• Windows® es una marca comercial registrada de
Microsoft Corporation en los Estados Unidos y en
otros países.
• Todos l os demás nombres de compañías y productos
que aquí se mencionan pueden ser marcas
comerciales o marcas comerciales registradas de sus
respectivas compañías. Además, en este manual no
se menciona, en cada caso, “™” ni “®”.
FR
ES
47
Page 48

Índice
Introducción .........................................................49
Características .................................................. 49
Ubicación de las partes .......................................50
Preparativos ......................................................... 52
Desempaquetar la impresora ............................ 52
Preparar un paquete de impresión ....................52
Cargar el cartucho de impresión ...................... 52
Cambiar el cartucho de impresión ...................53
Instalar el soporte de papel ............................... 53
Insertar el papel de impresión ..........................54
Conectar la impresora a un enchufe ................. 55
Conectar a un ordenador .................................. 55
Menú .....................................................................56
Estructura del menú .........................................56
Funciones de cada elemento de menú ..............56
Bluetooth .............................................................. 57
Tecnología inalámbrica Bluetooth ...................57
El “Basic Imaging Profile” ...............................57
Comunicación entre la impresora y otro
dispositivo mediante la función Bluetooth ..... 57
Autentificación ................................................. 58
Asignar a la impresora un número de
dispositivo ...................................................... 59
Imprimir una fotografía ..................................... 59
Imprimir de nuevo una imagen almacenada en
la memoria (COPY PRINT) ...........................60
Ajustes .................................................................. 60
Ajustar la Posición de impresión
(PRINT SETTING) ........................................60
Ajustar la calidad de impresión
(COLOR ADJUST) ........................................61
Precauciones ........................................................63
Seguridad ..........................................................63
Instalación ........................................................ 63
Limpieza ........................................................... 63
Especificaciones ................................................... 64
Solución de problemas ........................................ 65
Impresora .........................................................65
Función Bluetooth ............................................66
Mensajes de error .............................................67
48
Page 49

Introducción
La impresora fotográfica digital Sony UP- DX100 es una
impresora que extiende el sistema de impresión digital
UPX-C200. Como segunda o tercera impresora para el
sistema UPX-C200, la UP-DX100 puede recibir e
imprimir imágenes procedentes de una cámara digital
que envíe señales a la impresora mediante la tecnología
inalámbrica Bluetooth.
Conexión inalámbrica Bluetooth
MENU
EXEC
1
DIGITAL PHOTO PRINTER
PRINT
ALARM
Imprimir desde el ordenador con una cómoda
conexión USB
Para imprimir imágenes desde el ordenador , conec te la
impresora y el ordenador con un cable USB (disponible
en el mercado) e instale en el ordenador el software
controlador que se suministra.
P ara ver información detallada sobre cómo conectar un
ordenador, consulte “Read me (English)”, que se
encuentra almacenado en el CD-ROM que se
suministra.
Conexión USB
MENU
EXEC
1
DIGITAL PHOTO PRINTER
PRINT
ALARM
UP-DX100 Cámara digital
Características
Las características de la UP-DX100 son las siguientes:
Impresión fotorrealista
Con su sistema de impresión por sublimación de
pigmentos, la impresora puede realizar impresiones
fotorrealistas que satisfacen una amplia gama de
necesidades.
Super Coat 2
Super Coat 2 aporta larga duración y alta resistencia a la
humedad y a las huellas de dedos, y mantiene una alta
calidad en las impresiones durante extensos periodos de
tiempo.
Selección de tamaños de impresión
Puede seleccionar entre impresiones en tamaño grande,
dinámico de postal (4×6 pulgadas) (UPC-X46) o en
tamaño pequeño, económico (3,5×4 pulgadas) (UPCX34).
Si hay una bandeja de papel opcional UPA-DX100TR
insertada en la impresora, también se puede utilizar
papel de impresión UPC-X45, en el que se puede
realizar estampación con tinta de base acuosa.
UP-DX100 Ordenador, etc.
Nota
Es posible que, al conectar el ordenador mediante un
cable USB, no obtenga un funcionamiento normal,
dependiendo del tipo de ordenador. En tal caso, utilice
un concentrador USB comercial.
Bandeja de papel para impresiones de gran
volumen, para 25/30 hojas
Con la bandeja de papel que se suministra es posible
imprimir, como máximo, 25 hojas de tamaño postal y 30
hojas de tamaño pequeño de una vez.
Introducción
49
Page 50

Ubicación de las partes
Frontal
ME
N
U
DIGI
T
A
L
P
H
O
1
T
O
P
R
I
N
T
ER
2
EXEC
N
E
PRINT
ALARM
34 0956 8
7
P
O
H
S
U
P
Antena Bluetooth (interior)
PRINT
ALA
R
M
A 1 (Encendido/espera), botón y lámpara
Púlselo para encender la impresora y la lámpara se
encenderá. Al pulsarlo de nuevo la lámpara se apaga, y
la impresora entra en el modo de espera.
B Ranura de la bandeja de papel
Inserte la bandeja de papel.
C Pantalla de funcionamiento
Cuando se enciende la impresora, aparece el modo de
funcionamiento o el elemento de menú.
D Botón MENU
Púlselo para mostrar el elemento de menú o para
cancelar los cambios realizados en elementos de menú
que no haya registrado.
E Botón EXEC
Pulse para decidir la selección para cada elemento de
menú.
F Botón de control
Pulse para seleccionar un elemento de menú y para
confirmar la selección.
Lámpara ALARM: Se ilumina cuando se produce un
problema.
H Tapa del compartimento del cartucho
Abra la tapa para insertar y retirar el cartucho de
impresión.
I Compartimento del cartucho
Inserte el cartucho de impresión.
J Palanca de expulsión del cartucho
Levante la palanca para expulsar el cartucho insertado.
Nota
La palanca está desactivada durante la impresión.
G Lámparas
lámpara: Se ilumina cuando está activa la
función Bluetooth.
Lámpara PRINT: Se ilumina cuando hay una
impresión en curso y parpadea cuando la imp resora
está recibiendo datos de imagen.
lámpara: Se ilumina si se agota el papel, si se
agota la tinta del cartucho o si se mezcla papel de
diferentes tipos o tamaños.
50
Ubicación de las partes
Page 51

Trasera
- AC IN
123
A Tapa de eliminación de atascos de papel
Cuando se produzca un atasco de papel, quite esta tapa
y retire el papel atascado.
B - Conexión AC IN
Conéctela a un enchufe mediante el cable de
alimentación CA que se suministra.
C Conector USB
Conéctela a la conexión USB de un ordenador medi ante
un cable USB.
Nota
Es posible que, al conectar el ordenador mediante un
cable USB, no obtenga un funcionamiento normal,
dependiendo del tipo de ordenador. En tal caso, utilice
un concentrador USB comercial.
Ubicación de las partes
51
Page 52

Preparativos
Antes de utilizar la impresora por primera vez,
necesitará instalar un cartucho de impresión y la bandeja
de papel, como se indica a continuación. Estos
preparativos no son necesarios para las operaciones de
impresión diarias, pero deben realizarse cuando sea
necesario.
Desempaquetar la impresora
Asegúrese de que la impresora se suministra con los
siguientes accesorios.
• Cable de alimentación CA (1)
• Bandejas de papel (2, grande/pequeña)
• Soporte de papel (2)
• Tapa de la bandeja (1)
•CD-ROM (1)
-Software controlador para la impresora
Sony UP-DX100
-Instrucciones de funcionamiento
• Casete de limpieza (1)
• Instrucciones de funcionamiento (1)
• Contrato de licencia de software (1)
temperaturas, elev ada humedad, e xceso de polvo o luz
solar directa.
• Cuando almacene un paquete de cartucho y papel de
impresión parcialme nte utilizado, hágalo en su bolsa
original o en un contenedor similar.
Cargar el cartucho de impresión
1
Presione PUSH OPEN y a bra la tapa del
compartimento del cartucho.
MENU
E
X
E
DIGI
T
A
L
PH
O
TO
P
R
I
N
T
ER
2
Inserte firmemente el cartucho en la impresora
hasta que encaje en su lugar.
C
P
R
IN
T
A
L
A
RM
Tapa del compartimento
del cartucho
Preparar un paquete de impresión
Necesitará un paquete de impresión opcional (UPC-X46
o UPC-X34) diseñado para la impresora. El paquete
contiene un juego de papel de impresión y un cartucho
de impresión.
Notas
• No rebobine la cinta de tinta ni utilice el cartucho de
impresión rebobinado para la impresión. Si lo hace
así, obtendrá una impresión incorrecta e, incluso,
puede provocar una avería.
• Utilice el pa quete de impresión sólo para esta
impresora.
• Utilice siempre el cartucho de impresión diseñado
para el tamaño de papel que utilice para la impr esión.
Si mezcla cartuchos y papeles de diferentes tipos o
tamaños, la impresión puede no ser posible, y puede
provocar atascos de papel u otros problemas.
• No imprima en papel de impresión usado. Imprimir
una imagen dos veces en el mismo papel no hará que
la imagen impresa sea más densa. Incluso puede
provocar averías o errores de funcionamiento.
• No toque la cinta de tinta del ca rtucho de impre sión ni
la superficie d e impresión del papel. Si hay huellas de
dedos o polvo en l a superfi cie de impre sión de la ci nta
de tinta, la calidad de la impresión pue de deter iorar se.
• Para obtener impresiones de alta calidad, ev ite situar
el paquete de impresión en lugares sujetos a altas
MENU
E
X
E
DIGI
T
A
L
PH
O
TO
P
R
I
N
T
ER
C
P
R
I
N
T
A
L
A
RM
Cartucho de impresión
3
Cierre la tapa del compartimento del cartucho.
52
Preparativos
Page 53

Cambiar el cartucho de impresión
Cuando se agote el cartucho de impresión se iluminará
la lámpara
pantalla de funcionamiento. Sustituya el cartucho de
impresión.
1
Presione PUSH OPEN y abra la tapa del
compartimento d el cartucho.
2
Levante la palanca de liberación del cartucho.
DIGI
T
A
L
PH
O
TO
El cartucho se desplazará hacia fuera. Retire el
cartucho.
3
Inserte un nuevo cartucho de impresión y cierre la
tapa.
y aparecerá un mensaje de error en la
MENU
E
X
E
P
R
I
N
T
ER
C
P
R
I
N
T
A
L
A
RM
Palanca de liberación
del cartucho
• Si el cartucho de impresión no está cargado al
encender la impresora, se iluminará la lámpara
• No toque la cinta de tinta ni coloque el cartucho de
impresión en un lugar en que hay a pol vo. Las huellas
de dedos o el polvo en la cinta de tinta pueden
provocar una impresión imperfecta.
• No cambie el cartucho durante la impresión.
Notas sobre el alma cenamiento del cartuc ho de
impresión
• Evite situar el cartucho de impresión en lugares
expuestos a altas temperaturas, elevada humedad,
exceso de polvo o luz solar directa.
• Cuando vaya a almacenar un cartucho parcialmente
utilizado, hágalo en su bolsa original.
Instalar el soporte de papel
Instale el soporte de papel que se suministra en la
bandeja de papel, de la manera siguiente:
1
Inserte las puntas de ambos extremos del soporte de
papel en los orificios que se encuentran en la parte
inferior de la bandeja de papel, presionando hacia
dentro cerca de los dos extremos.
Soporte de papel
.
Notas
• No toque nunca el compartimento del cartucho. El
cabezal térmico alcanza altas temperaturas,
especialmente después de imprimir repetidamente.
MENU
E
X
E
C
P
R
I
N
T
A
L
A
RM
• No rebobine la cinta de tinta ni utilice el cartucho de
impresión rebobinado para la impresión. Si lo hace
así, obtendrá una impresión incorrecta e, incluso,
puede provocar una avería.
• Si el cartucho de impresión no encaja en su lugar,
retírelo e insértelo de nuevo. Si la cinta de tinta e s tá
demasiado floja para c argarla, bobínel a en la dirección
de la flecha para apretarla.
Bandeja de papel
2
Presione el soporte de papel sobre los topes,
firmemente, hasta que encaje en su lugar con un
sonido característico.
Topes
Preparativos
53
Page 54

Retirar el soporte de papel
Separe suavemente el soporte de papel de los topes y
retírelo, presionando hacia dentro cerca de los dos
extremos.
Insertar el papel de impresión
ME
N
U
E
DIGITAL
P
H
O
TO
P
R
I
NTER
XEC
A
N
PR
I
NT
PUSH OPE
L
A
RM
Nota
No toque la superficie de impresión. Las huellas de
dedos en la superficie de impresión pueden
provocar una impresi ón impe rfec ta.
1
Coloque el papel de impresión en la bandeja.
Papel de impresión
Abra en abanico el papel de impresión para que se
separen las hojas. A continuación, inserte el papel
con la cara de impresión (la cara que no está
marcada) hacia arriba y con la flecha apuntando en
el mismo sentido que la flecha de la bandeja.
Puede colocar 25 hojas si utiliza el UPC-X46, y 30
hojas si utiliza el UPC-X34.
2
Retire la hoja protectora del papel de impresión.
Nota
Conserve la hoja protectora, que se utiliza pa r a
limpiar el interior de la impresora.
3
Inserte la bandeja en la impresora.
Notas
• Coloque el papel del UPC-X46 en la bandeja grande
de papel, y el del UPC-X34 en l a ba ndej a p equeña de
papel. Si el tamaño del papel y el de la bandeja no
coinciden, puede producirse un atasco de papel.
• No retire ni inserte la bandeja de papel durante la
impresión.
• Si el papel de impresión no se introduce
automáticamente, se ilu m inará la lámpara
.
Retire la bandeja de papel y compruebe si hay un
atasco de papel.
• Cuando agregue papel de impresión a una bandeja
parcialmente llena, asegúrese de que el número total
de hojas no supere las 25 para el UPC-X46 o las 30
para el UPC-X34. No coloque diferentes tipos o
tamaños de papel en la bandeja. Si lo hace así, puede
producirse un atasco de papel o una avería.
• No escriba a mano ni a máqu ina sobr e la superf ic ie de
impresión del papel antes de imprimir. Puede ocurrir
que no le sea posible continuar imprimiend o. Si desea
escribir un saludo o dibuj ar sobre la superficie im presa
después de la impresión, utilice un rotulador graso.
• No coloque etiquetas adhesivas ni ninguna otra cosa
sobre la superficie de impresión antes de imprimir.
• No imprima en papel de impresión usado. Im primir
una imagen dos veces en el mismo papel no hará que
la imagen impresa sea más densa. Incluso puede
provocar averías o errores de funcionamiento.
• Antes de la impresión, no pl ie gue ni doble el papel de
impresión.
• No deje más de 5 hojas de papel impreso e xpulsado en
la bandeja de papel, ya que podrían prov ocar un atasco
de papel.
54
Preparativos
Page 55

Notas sobre el almacenamiento del papel de
impresión
• Evite situar el papel de impresión en l ugares expuestos
a altas temperaturas, elevada humedad, exceso de
polvo o luz solar directa.
• Evite almacenar el papel con las caras impresas en
contacto entre sí o en c ontacto con pro ductos de goma
o de plástico, incluido el cloruro de vinilo y el
plastificador, durante un periodo largo de tiempo;
pueden producirse cambios de color o el deterioro de
la imagen impresa.
• Cuando vaya a almacenar papel de impresión
parcialmente utili zado, hágalo en su bolsa original.
Conectar a un ordenador
Para imprimir imágenes desde el ordenador, conecte las
conexiones USB de la impr esora y del ordenador (un PC
con Windows) mediante un cable USB comercial e
instale el controlador de impreso ra que se sumini stra en
el ordenador. Para ver información detallada sobre la
instalación y el funcionamiento del controlador de
impresora, consulte “Read me (English)”, cont eni do en
el CD-ROM que se suministra.
UP-DX100
Instalar la tapa de la bandeja
Mantenga instalada en la bandeja de pa pel la tapa que se
suministra, cuando no esté utilizando la bandeja, para
proteger frente al polvo el papel de impresión que
contiene. La tapa de bandeja puede instalarse en
cualquiera de las ban dejas de pap el de la UPC-X46 o de
la UPC-X34.
Tapa de bandeja
Conectar la impresora a un enchufe
Conecte el cable de alimentación de CA que se
suministra a la conexión AC IN de la impresora y, a
continuación, al enchufe.
UP-DX100
-AC IN
-AC IN
Cable de alimentación CA
(suministrado)
al enchufe
-AC IN
Cable USB
Ordenador
Notas
• Para la conexión, utilice un cable USB tipo A-B
comercial de menos de 3 metros de longitud. Dado
que el tipo de cable adecuado puede variar según el
tipo de ordenador , consulte el manual de instruc ciones
del ordenador para determinar el tipo de cable que
necesita.
• Consulte tambié n el manual de instrucciones del
ordenador.
• El Controlador de impresora Sony UP-DX100 que se
suministra no es compatible con impresoras de red , ni
puede utilizarse con unidades comerciales de búfer
para impresora.
• No conecte ni desconecte el cable USB durante la
transferencia de datos ni durante la impresión. Es
posible que los resulta dos de la impresión no sean
correctos.
• Es posible que, al conectar el ordenador mediante un
cable USB, no obtenga un funcionamiento normal,
dependiendo del tipo de ord enador . En tal caso, utilice
un concentrador USB comercial.
Preparativos
55
Page 56

Menú
Estructura del menú
COLOR ADJUST CYN-RED (–7 a +7)
COLOR(S)* MAG-GRN (–7 a +7)
YEL-BLU (–7 a +7)
DARK (–7 a +7)
LIGHT (–7 a +7)
SHARPNESS (0 a +7)
GAMMA (–7 a +7)
SAVE SETTING (1/2/3)
LOAD SETTING (1/2/3)
COLOR ADJUST CYN-RED (–7 a +7)
B/W(S)* MAG-GRN (–7 a +7)
YEL-BLU (–7 a +7)
DARK (–7 a +7)
LIGHT (–7 a +7)
SHARPNESS (0 a +7)
GAMMA (–7 a +7)
SAVE SETTING (1/2/3)
LOAD SETTING (1/2/3)
Bluetooth SETTING Bluetooth ADDR
PASSKEY INPUT PASSKEY INPUT [1:2:3:4]
MY DEVICE NAME Sony UP- DX100 [NONE – 9]
CONNECTION RECORD 1. Sony DKC-C200X
MODULE POWER POWE R: ( ON / OF F)
PRINT SETTING PRINT OFFSET: (–2/–1/0/1/2)
COPY PRINT COPY PRINT: 1 [1 – 9]
TOTAL PRINTS
2. NONE
3. NONE
* Cuando se utiliza papel de impresión
UPC-X45 se muestra (S).
Funciones de cada elemento de menú
Elemento de menú Función Configuración
COLOR ADJUST
COLOR
COLOR ADJUST
B/W
Bluetooth SETTING Es posible configurar Bluetooth. Bluetooth ADDR: Se muestra la dirección Bluetooth.
PRINT SETTING La posición de impresión sobre el papel
COPY PRINT Los datos más recientes almacenados en
TOTAL PRINTS Se muestra el número total de hojas
Permite ajustar la calidad de impresión
de las imágenes en color.
Permite ajustar la calidad de impresión
de las imágenes en blanco y negro.
de la UPC-X46 se ajusta con precisión.
la memoria se imprimen de nuevo.
impresas.
CYN-RED: Se ajusta el cián y el rojo.
MAG-GRN: Se ajusta el magenta y el verde.
YEL-BLU: Se ajusta el amarillo y el azul.
DARK: Se ajusta el brillo de un área oscura.
LIGHT: Se ajusta el brillo de un área oscura.
SHARPNESS: Se ajusta la nitidez de los bordes de los objetos
de una imagen.
GAMMA: Se ajusta el tono de una imagen.
SAVE SETTING (1/2/3): Los valores ajustados se almacenan en
la memoria incorporada.
LOAD SETTING (1/2/3): Los valores ajustados se almacenan
en la memoria incorporada.
PASS KEY INPUT: Se establece o se modifica una contraseña.
MY DEVICE NAME: Es posible asignar un número a la
impresora.
CONNECTION RECORD: Se muestra el registro de conexión.
MODULE POWER: Se activa o se desactiva la alimentación de
los circuitos Bluetooth.
PRINT OFFSET (
–2/–1/0/1/2)
La ubicación de impresión puede desplazarse en 0,5 mm.
[1
– 9]
Se establece el número de hojas que se va a imprimir.
—
56
Menú
Page 57

Bluetooth
Comprobar la configuración actual
Puede comprobar la configuración de contraseña actual
de la impresora, de la manera siguiente:
Tecnología inalámbrica Bluetooth
La tecnología inalámbrica Bluetooth1) permite la
comunicación entre varios dispo si tivos Bluetooth sin
necesidad de usar cables. Entre los dispositivos que
pueden utilizar esta tecnología se incluyen ordenadores,
dispositivos periféricos para ordenadores, PDA y
teléfonos móviles.
Este sistema de comunicaciones omnidireccional
permite la conexión aunque el dispositivo Bluetooth se
encuentre en una bolsa o aunque haya obstáculos entre
los dispositivos.
Además, la tecnología inalámbrica Bluetooth dispone de
avanzadas funciones de seguridad, tales como
frecuencias aleatorizadas y cifrado de datos.
• Cuando utilice la función Bluetooth, la distancia entre
la cámara y la impresora a la que desee conectarse
deberá ser menor a 10 m (33 pie) sin obstáculos.
1) La marca comercial pertenece a su propietario y
es utilizada por Sony Corporation bajo licencia. El nombre
Bluetooth aparece impreso en letra normal a lo largo de este
documento.
El “Basic Imaging Profile”
El “Basic Imaging Profile” (BIP) son las
especificaciones que se utilizan para enviar o recibir
imágenes fijas entre dispositivos Bluetooth. Las
funciones del BIP permiten enviar o recibir imágenes y
utilizar la función de disparador remoto de las cámaras
digitales de imagen fija.
Para conectar con la impresora, el disp ositi vo Blueto oth
debe ser compatible con la función “Image Push
Feature” del “Basic Imaging Profile” (BIP).
Antes de usar el dispositivo Bluetooth, compruebe las
especificaciones Bluetooth y BIP del dispositivo.
1 2 4,6
MENU
1
DIGITAL PHOTO PRINTER
EXEC
PRINT
ALARM
7 3,5
1
Encienda la impresora.
2
Pulse el botón MENU.
3
Pulse V en el botón de control para mostrar
“Bluetooth SETTING [>>]” en la pantalla de
funcionamiento.
4
Pulse B en el botón de control.
Aparece la dirección Bluetooth.
5
Pulse V en el botón de control para mostrar
“PASSKEY INPUT [>>]” en la pantalla de
funcionamiento.
6
Pulse B en el botón de control.
La contraseña actualmente establecida aparecerá en
la pantalla PASSKEY INPUT.
7
Pulse el botón EXEC.
Para salir del MENU, pulse el botón MENU.
Iluminada
Comunicación entre la impresora y otro dispositivo mediante la función Bluetooth
Para la comunicación entre la impresora y otro
dispositivo con funciones Bluetooth, son necesarias las
siguientes configuraciones:
• Debe estar establecida la misma contraseña en la
impresora y en el otro dispositivo.
• La lámpara Bluetooth está iluminada.
Si la lámpara Bluetooth está apagada
Si la lámpara Bluetooth está apagada, enciéndala de la
manera siguiente:
1
Pulse el botón MENU.
2
Pulse V en el botón de control para mostrar
“Bluetooth SETTING [>>].”
3
Pulse B en el botón de control.
Aparecerá “Bluetooth ADDR None”.
4
Pulse V en el botón de control para mostrar
“MODULE POWER [>>].”
Bluetooth
57
Page 58

5
Pulse B en el botón de control.
6
Pulse b o B en el botón de control para establecer
POWER en ON.
7
Pulse el botón EXEC.
Aparecerá “REBOOTING”. A continuación, la
impresora se reiniciará y se iluminará la lámpara
Bluetooth.
Autentificación
Qué es una contraseña
La contraseña se utiliza para autentificar dos
dispositivos Bluetooth que previamente no se han
conectado entre sí y crear una relación de confianza
entre ellos.
Es necesario escribir los mismos caracteres (contraseña)
en cada uno de los dispositivos durante el proceso de
autentificación de la contraseña. Esta impresora utiliza
un número de cuatro dígitos como contraseña.
Una vez confirmada la autentif icación del dispositi vo, la
impresora registra el dispositivo en un registro. A partir
de este momento, es posible conectar el dispositivo sin
escribir una contraseña.
Para garantizar que la segurida d es adecuada, la entrada
de contraseña tiene un límite de tiempo (30 segundos),
basado en los estándares Bluetooth.
La entrada de contraseña puede ser necesaria cuando
caduca el periodo válido de autentificación de la
impresora o de otro dispositivo, cuando se elimina el
registro o cuando se modifica la configuración de
seguridad.
Puede ser necesario escribir la contraseña, según los
dispositivos, cada vez que se desee establecer la
conexión.
Esta “Passkey” también se conoce como “Bluetooth
passkey” etc. También se utiliza “PIN” con el mismo
significado.
Cuando aparece la pantalla de entrada de
contraseña en el otro dispositivo
Escriba la contraseña que desee en la impresora. A
continuación, escriba la misma contraseña en el otro
dispositivo.
1 2,10 7 4,6
MENU
1
DIGITAL PHOTO PRINTER
EXEC
98
1
Encienda la impresora.
En la pantalla de funcionamiento aparecerá “Ready
BT RSSI [----]”.
2
Pulse el botón MENU.
3
Pulse V en el botón de control para mostrar
“Bluetooth SETTING [>>].”
4
Pulse B en el botón de control.
Aparecerá “Bluetooth ADDR”.
5
Pulse V en el botón de control para mostrar
“PASSKEY INPUT [>>].”
6
Pulse B en el botón de control.
Aparecerá “PASSKEY INPUT <1> [X:X:X:X]” .
Dígito actual a establecer Contraseña
7
Pulse b o B en el botón de control para seleccionar
un dígito de la contraseña para establecerlo.
Este <1> muestra el dígito del extremo izquierdo, y
<4> muestra el dígito del extremo derecho.
8
Pulse v o V en el botón de control para establecer
el valor de la contraseña.
Puede utilizar valores de 0 a 9.
Repita los pasos 7 y 8 hasta establecer la contraseña
de cuatro dígitos.
PRINT
ALARM
3,5
| |
Escribir la contraseña
Escriba la misma contraseña en la impresora y en el otro
dispositivo que se va a conectar, de la manera siguiente:
58
Bluetooth
9
Pulse el botón EXEC.
“PASSKEY INPUT Saving. . .” aparecerá en la
pantalla, y se almacenará la configuración de la
contraseña.
10
Una vez completada la configuración, pulse el
botón MENU.
Page 59

Asignar a la impresora un número de dispositivo
Cuando se utiliza dos o más impresoras en un sistema,
es conveniente que cada impresora tenga un número de
dispositivo (de 1 a 9).
1
Encienda la impresora.
En la pantalla de funcionamiento aparecerá “Ready
BT RSSI [----]”.
2
Pulse el botón MENU.
Imprimir una fotografía
La UP-DX100 recibe e imprime automáticamente la
imagen enviada desde l a cámara conectada mediante las
funciones Bluetooth. Sólo es posib le recibir ar chiv o s de
imagen gráfica en formato JPEG. También es posible
imprimir imágenes gráficas enviadas desde un
ordenador conectado a la impresora mediante un cable
USB.
Durante la impresión de imágenes gráficas enviadas
desde la cámara o el ordenador , el proceso se muestra e n
la pantalla de funcionamiento de la manera siguiente:
3
Pulse V en el botón de control para mostrar
“Bluetooth SETTING [>>].”
4
Pulse B en el botón de control.
5
Pulse V en el botón de control para mostrar “MY
DEVICE NAME [>>].”
6
Pulse B en el botón de control.
Aparecerá “Sony UP-DX100 [NONE-9: EXEC]” .
7
Pulse v o V en el botón de control para establecer
el número de dispositivo.
8
Pulse el botón EXEC.
Aparecerá “DEVICE NAME Saving. . .” y el
número de dispositivo establecido quedará
almacenado.
9
Una vez completada la configuración, pulse el
botón MENU.
Receiving Image
BT [>>>>>>>>>>]
PROCESSING
PRINTING
[YELLOW]
PRINTING
[MAGENTA]
PRINTING
[CYAN]
PRINTING
[LAMI]
Una vez completada la impresión, aparece “Ready BT
RSSI [))))]”.
Recibiendo datos de im agen
(Éste es un ejemplo de
conexión Bluetooth.)
Procesando los datos
recibidos
Imprimiendo el amarillo
Imprimiendo el mag e nta
Imprimiendo el cián
Laminando una impresión
Imprimir una fotogr afía
59
Page 60

Imprimir de nuevo una imagen almacenada en la memoria (COPY PRINT)
Los datos de la última imagen impr esa se almac enan en
la memoria de la impresora. Es posible imprimir de
nuevo la imagen.
Nota
Cuando se establece la impresora en el mod o de espera,
los datos almacenados en la memoria se eliminan. No es
posible imprimir de nu evo la imagen.
13
Ajustes
Es posible ajustar la posició n y la ca lidad de imp re sión.
Después de comprobar los resultados de la impresión,
haga los ajustes que sean necesarios.
Ajustar la Posición de impresión (PRINT SETTING)
Cuando utilice la UPC-X46, ajústela de modo que la
imagen impresa quede correctamente ubicada sobre el
papel de impresión. La ubicación de impresión puede
desplazarse en 0,5 mm.
MENU
1
DIGITAL PHOTO PRINTER
EXEC
54
1
Pulse el botón MENU.
2
Pulse V en el botón de control para mostrar
“COPY PRINT [>>].”
3
Pulse B en el botón de control.
Aparecerá “COPY PRINT:1 [1 -9 PRINT:EXEC]”.
4
Pulse v o V en el botón de control para establecer
el número de hojas que se va a imprimir.
Puede utilizar valores de 1 a 9.
5
Pulse el botón EXEC.
PRINT
ALARM
2
1234
MENU
1
DIGITAL PHOTO PRINTER
EXEC
PRINT
ALARM
65
1
Encienda la impresora.
2
Pulse el botón MENU.
3
Pulse v o V en el botón de control para mostrar
“PRINT SETTING.”
4
Pulse B en el botón de control.
Aparecerá “PRINT OFFSET:”.
5
Pulse b o B en el botón de control para sel eccionar
el valor de desplazamiento.
60
Se imprimirá el número de imágene s establecido en
el Paso 4.
Cuando termina la impresión, la pantalla vuelve a
“Ready.”
Ajustes
6
Pulse el botón EXEC.
El valor de desplazamiento seleccion ado en el Paso
5 se registra, y la pantalla vuelve a “PRINT
SETTING.”
Haga una impresión de pr ueba y compruebe si la imagen
se imprime en la posición correcta del papel de
impresión. Si necesita más ajustes, repita los pasos
anteriores.
Para salir de PRINT SETTING
Pulse el botón MENU. La pantalla vuelve a “Ready,” y
la impresora queda preparada para imprimir.
Page 61

Ajustar la calidad de impresión (COLOR ADJUST)
Con la función MENU, es posible ajustar la calidad de
impresión. Puede comproba r los resultados del ajuste
mediante la impresión de una imagen guía.
Es posible almacenar en la memoria tres conjuntos de
valores de ajuste para imágenes en color y imágene s e n
blanco y negro, y recuperarlos para utiliza rlos más tarde.
Nota
El ajuste de calidad de la impresora aquí descrito sólo se
activa cuando la cá mara y la impresora están conectadas
mediante la función Bluetooth. Si la impresora está
conectada al ordenador, la calidad de imagen puede
ajustarse mediante el controlador de impresora. Para ver
información detallada sobre la instalación y el
funcionamiento del controlador de impresora, con s ul te
“Read me (English)”, contenido en el CD-ROM que se
suministra.
Ajustar la calidad de impresión de las
imágenes en color
123
MENU
1
DIGITAL PHOTO PRINTER
EXEC
PRINT
ALARM
CYN-RED: Al pulsar b se aporta a la imagen más
cián, mientras que al pulsar B se hace más
rojiza.
MAG-GRN: Al pulsar b se aporta a la imagen más
magenta, mientras que al pulsar B se hace más
verdosa.
YEL-BLU: Al pulsar b se hace la imagen más
amarillenta, mientras que al pulsar B se hace
más azulada.
DARK: Se ajusta el contraste en las áreas oscuras.
Al pulsar B se hace más oscura.
LIGHT: Se ajusta el contraste en las áreas oscuras.
Al pulsar B se hace más clara.
SHARPNESS: Al pulsar B los bordes de los
objetos de la imagen se hace más nítidos.
GAMMA: Al pulsar b el tono del color de toda la
imagen se hace más claro, mientras que al pulsar
B se hace más profundo.
6
Pulse el botón EXEC cuando complete el ajuste.
La pantalla volverá a “COLOR ADJUST COLOR
[>>]”.
Ajustar la calidad de impresión de las
imágenes en blanco y negro
Si pulsa V en el botón de control, después de pulsar el
botón MENU en el paso 2 de “Ajustar la calidad de
impresión de las imágenes en color”, aparecerá COLOR
ADJUST B/W [>>], y podrá ajustar la calidad de
impresión de las imágenes en blanco y negro. El método
de ajuste es el mismo que el de las imágenes en color.
645
1
Encienda la impresora.
2
Pulse el botón MENU.
Aparecerá “COLOR ADJUST COLOR [>>]” .
3
Pulse B en el botón de control.
Aparecerá “CYN-RED:”.
4
Pulse b o B en el botón de control para realizar el
ajuste.
5
Pulse V en el botón de control.
Aparecerá “MAG-GRN:”.
Repita los pasos 4 y 5 para realizar los ajustes
necesarios. El contenido ajustable para cada
elemento de ajuste es el siguiente:
Imprimir una imagen guía
Para comprobar los resultados de los ajustes, imprima
las imágenes guía de la cámara.
Pulse el botón SIZE de la cámara para seleccionar Guide
Print-RGB o Guide Print-DLGm y , a continuaci ón,
ejecute la impresión.
P ara obtener informa ción detallada, consulte el Manual
de instrucciones (operaciones avanzadas) de la UPXC200.
Almacenar los ajustes
Una vez completado el ajuste de color, guarde los
valores de ajuste de la manera siguiente:
1
En la pantalla COLOR ADJUST COLOR [>>] o
B/W [>>], pulse B en el botón de control.
2
Pulse V en el botón de control repetidamente hasta
que aparezca “SAVE SETTING”.
3
Pulse b o B en el botón de control para seleccionar
el número de celda de memoria (1, 2 o 3).
Ajustes
61
Page 62

4
Pulse el botón EXEC.
Los valores de ajuste se almacenan en la celda de
memoria con el número seleccionado en el Paso 3.
Cargar los valores de ajuste
Es posible recuperar los valores de ajuste almacenados
en la memoria.
1
En la pantalla COLOR ADJUST COLOR [>>] o
B/W [>>], pulse B en el botón de control.
2
Pulse V en el botón de control repetidamente hasta
que aparezca “LOAD SETTING”.
3
Pulse b o B en el botón de control para seleccionar
el número de celda de memoria (1, 2 o 3).
4
Pulse el botón EXEC.
Los valores de ajuste almacenados en la celda de
memoria con el número seleccionado en el Paso 3
se recuperan y se aplican.
Para salir de COLOR ADJUST
Después de completar una operación de menú, tal como
la configuración de COLOR ADJUST, el
almacenamiento de valores de ajuste o la recuperación
de valores almacenados, pulse el botón MENU. La
pantalla volverá a “Ready.”
62
Ajustes
Page 63

Precauciones
Seguridad
• Utilice la impresora con la fuente de alimentación
especificada en “Especificaciones” (página 64).
• Esta unidad no se desconectará de la fuente de
alimentación mientras esté conecta da a la toma mural,
aunque se haya apagado la propia unidad.
• Teng a cuidado de no dañar el cable de alimentació n al
colocar o dejar caer objetos pesados sobre él; es
peligroso utilizar la impresora con un cable de
alimentación dañado.
• Si no piensa utilizar la impresora durante un largo
periodo de tiempo, desconecte el cable de
alimentación.
• Para desconectar el cable de alimentación tire del
enchufe, no del propio cable.
• No aplique sacudidas mecánicas ni deje caer la
unidad.
• No desmonte ni modifique la unidad.
• No quite la tapa. Existe riesgo de descarga eléctrica
procedente de las piezas internas.
• Tenga cuidado de no derramar agua ni ningún otro
líquido en la unidad, y no p ermita que ningún mate rial
combustible o metálico entre en la carcasa. Si se
utiliza con materiales extr años en la carcasa, la unida d
puede fallar, o presentar riesgo de fuego o descarga
eléctrica.
• La impresora dispone de orificios de ven til ación par a
evitar el calentamiento e xcesiv o. Tenga cuidado de no
obstruirlos con otras unidades, cubriendo la impr esora
con un paño, etc.
• Si la impresora se avería o si cae un cuerpo extraño en
la carcasa, desconecte la alimentación
inmediatamente y consulte con la oficina de Sony o
con el distribuidor de Sony.
Instalación
• Evite situar la impresora en una ubicación sujeta a:
– vibraciones mecánicas
– elevada humedad
– exceso de polvo
– exposición a la lluvia
– luz solar directa o excesiva
– temperaturas extremadamente altas o bajas
– cerca de fuentes intensas de magnetismo
– cerca de fuentes potentes de radiación
electromagnética, tales como radios o transmisores
de TV
• No utilice otros equipos electrónicos cerca de la
impresora. No funcionará correctamente en campos
electromagnéticos fuertes.
• No ponga un objeto pesado, tal como un monitor,
sobre la impresora.
Condensación
• Si la impresora se somete a cambios de temperatura
amplios y repentinos, como cuando se mueve de una
habitación fría a una calient e o cua ndo se deja en una
habitación con un aparato de calefacci ón que tiende a
producir altos niveles de humedad, es posible que se
forme condensación dentro de la impresora. En tales
casos, es probable que la impresora no funcione
correctamente, e incluso puede desarrollar averías si
persiste en utilizarla. Si se forma condensación,
establezca la impresora en modo de espera y espere
durante al menos una hora.
• Si se somete el paquete de impresión a cambios
amplios y repentinos de temperatura, puede formarse
condensación en el cartucho o en el papel de
impresión. Esto provocará averías en la impresora.
Además, si se utiliza el paquete de impresión en este
estado, es probable que aparezcan manchas en el
resultado de la impresión. Por lo tanto, evite
almacenar el paquete de impresión en lugares
sometidos a cambios de temperatura amplios y
repentinos.
• Para almacenar un paquete de impresi ón parcialmente
usado, vuelva a colocarlo en su embalaje original y
cierre de nuevo el emb alaje. Si es posible, conserv e el
paquete de impresión cerrado en un lugar fresco y
oscuro. Para volver a utilizar el paquete de impresión
déjelo varias horas, en su embalaje cerrado, en una
habitación caldeada. Al hacerlo así evitará que se
forme condensación cuando retire el paquete de
impresión de su embalaje.
Ubicación
Para evitar la acumulación de calor en el interior, deje
alrededor de la impresora espacio suf icient e para que el
aire circule por los orificios de circulación que se
encuentran en el lado izquierdo de la carcasa.
Transporte
• No transporte la impresora con los accesorios que se
suministran. Si lo hace así puede provocar una avería.
• Conserve la caja y los materiales de embalaje
originales por si debe transportar la unidad en el
futuro.
Limpieza
• Antes de limpiar la impresora, pulse el botón
encendido/espera de la impresora de modo que se
apague la lámpara y desenchufe el cable de
alimentación.
• Limpie la carcasa, el panel y los controles con un paño
suave seco o con un paño suave humedecido
ligeramente con detergente suave diluido. No utilice
ningún tipo de disolv ente, tal co mo alcohol o benci na,
ya que pueden dañar el acabado.
Precauciones
63
Page 64

Especificaciones
Impresora
Suministro de energía
100 – 240 V AC, 50/60 Hz
Consumo de corriente
1,1 A máx. (durante la impresión)
Temperatura de funcionamiento
5°C a 35°C (41°F a 95°F)
Temperatura de almacenamiento/transporte
–20°C a +60°C (–4°F a +140°F)
Humedad de funcionamiento
20% a 80% (sin condensación)
Dimensiones máximas (ancho/alto/profundidad)
203 × 85 × 305 mm
3
/8 × 121/8 pulgadas)
(8 × 3
Masa Aprox. 2,7 Kg. (5 lb 15 oz) (sólo la
unidad principal)
Método de impresión
Proceso de transferencia térmica por
sublimación secuencial de cuatro
superficies
(amarillo, magenta, cián, laminado)
Resolución de impresión
403 × 403 ppp
Cabezal térmico 403 puntos/pulgada
Gradaciones de impresión
8 bits para amarillo, magenta y cián
Tiempo de impresión
UPC-X46: 100 seg./hoja
UPC-X34: 65 seg./hoja
Método de suministro de papel
Alimentación automática desde la
bandeja de papel
Capacidad máxima de la bandeja de papel
UPC-X46: 25 hojas
UPC-X34: 30 hojas
Método de expulsión del papel
Expulsión frontal
Las hojas se expulsan en orden sobre
la bandeja de papel
Capacidad de impresión del cartucho de cinta
UPC-X46: 25 hojas
UPC-X34: 30 hojas
Entradas AC IN (entra da de ali mentación)
Tamaño máximo de impresión
UPC-X46: 101,6 × 151,4 mm
1
/8 pulgadas) (sin borde)
(4 × 6
UPC-X34: 70,1 × 95,3 mm
7
/8 × 37/8 pulgadas) (con borde)
(2
Píxeles de impresión
UPC-X46: 1664 × 2440 puntos
UPC-X34: 1112 × 1512 puntos
Interfaz USB
Sistema de transmisión de datos
Compatible con la especificación
Universal Serial Bus Revisión 1.1
Asignación de terminales de la conexión USB
I/O Señal Función
V
CC
I/O
I/O + Datos Datos, puede elevarse hasta +3,3
– Datos Datos
GROUND Tierra
Alimentación del cable,
intensidad máxima: 100 mA
V mediante una resistencia de
1,5 K ohmios
Especificaciones Bluetooth
Tipo de comunicación
Especificación Bluetooth, ver.1.1
Velocidad máxima de transmisión
1)
Alrededor de 723 Kbps
Salida Especificación Bluetooth, Clase de
potencia 2
Distancia de comunicación
2)
Alrededor de 10 m (33 pies) sin
obstáculos
Perfil Bluetooth compatible
3)
Basic Imaging Profile (Image Push
Responder)
Banda de frecuencia
2,4 GHz (2,400 GHz – 2,4835 GHz)
1) Velocidad máxima de transmisión de datos sobre la base de los
especificación Bluetooth, Ver.1.1. Esta ve locidad depende de la
distancia entre dispositivos, obstáculos, condiciones de ondas
de radio, software de aplicación y SO.
2) Esta distancia depende de la distancia entre di sposi tivos,
obstáculos, condiciones de ondas de radio, software de
aplicación y SO.
3) Esta especificación se ajusta al uso definido entre dos
dispositivos Bluetooth. Se define mediante los especificación
Bluetooth.
Accesorios que se suministran
Bandeja de papel para la UPC-X46 (1)
Bandeja de papel para la UPC-X34 (1)
Tapa de la bandeja (1)
Soporte de papel (2)
Cable de alimentación CA (1)
Casete de limpieza (1)
CD-ROM (1)
Instrucciones de funcionamiento (1)
Contrato de licencia de software (1)
Accesorios opcionales
UPA-DX100TR Bandeja de papel
Paquete de impresión en color con laminado automático
10UPC-X46 (250 hojas)
Paquete de impresión en color con laminado automático
10UPC-X45 (250 hojas)
Paquete de impresión en color con laminado automático
10UPC-X34 (300 hojas)
El diseño y las especificaciones están sujetos a
modificaciones sin previo aviso.
64
Especificaciones
Page 65

Solución de problemas
Si encuentra cualquier problema al utilizar la
UP-DX100, use la tabla siguiente como guía para
solucionar el problema. Si el problema persiste, póngase
en contacto con el distribuidor de Sony o co n l a oficina
de servicio local autorizada de Sony.
Impresora
Síntoma Causa/Acción
No se puede utilizar la
impresora después de
encenderla.
No se puede imprimir. • El papel de impresión y el cartucho
Sonará un tono. t Compruebe que está siguiendo los
No se puede retirar el
cartucho de impresión.
El indicador ALARM
está iluminado o
intermitente y se
muestra un mensaje de
error.
• El cable de alimentación CA no está
conectado correctamente.
tConecte firmemente el cable de
alimentación CA a un enchufe de
CA (página 55).
de impresión no coinciden.
tUtilice el paquete de impresión
recomendado, el mismo tamaño
de papel de impresión y cartucho
de impresión.
• Es posible que el cabezal térmico se
haya calentado excesivamente. En
la pantalla de funcionamiento
aparece “Waiting”.
tDeje la impresora hasta que se
enfríe el cabezal y se reanude la
impresión.
• Es posible que haya un atasco de
papel.
tRetire el papel atascado, si lo
hay.
procedimientos correctos.
tNo es posible retirar el cartucho de
impresión durante la impresión.
Espere hasta que termine la
impresión.
Si esto no soluciona el problema,
póngase en contacto con la oficina
de servicio de Sony o con el
distribuidor de Sony.
tSiga las instrucciones de la
pantalla de funcionamiento.
Síntoma Causa/Acción
Hay una línea en blanco
o puntos en las
fotografías impresas.
• Puede que el cabezal térmico tenga
polvo.
tEs posible que el cabezal de
impresión o la trayectoria del
papel estén sucios. Utilice la
casete de limpieza que se
proporciona para limpiar el
cabezal y la trayectoria.
• El rodillo que se encuentra dentro
de la impresora puede dañar el
papel de impresión.
tReduzca el número de hojas de
la bandeja de papel.
Si el papel se atasca
Si se atasca el papel, la lámpara ALARM se iluminará,
aparecerá un mensaje de error y se detendrá la
impresión.
1
Pulse el botón encendido/espera para apagar la
lámpara.
2
Retire la bandeja de papel y quite el pa pel atascado
de la ranura de la bandeja de papel.
3
A continuación, retire la tapa del panel posterior y
compruebe que no quede papel en la impresora. Si
continúa habiendo papel atascado en la impresora,
retírelo.
- AC IN
- AC IN
g
Tapa trasera
4
Después de quitar el papel atascado, no olvide
volver a colocar la tapa.
5
Inserte la bandeja de papel.
6
Encienda la impresora.
Nota
Papel atascado
Si no puede quitar el papel atascado, póngase en
contacto con el servicio técnico de Sony o el distribuidor
de Sony.
Limpiar el interior de la impresora
Si se imprimen líneas o puntos blancos en las imágenes,
limpie el interior de la impresora mediante la casete de
limpieza que se proporciona y la hoja pro tectora que se
incluye en el paquete de impresión.
Solución de problemas
65
Page 66

Notas
• Realice la limpieza sólo cuando haya líneas o puntos
blancos en la impresión.
• Si obtiene rendimientos de impresión correctos, la
limpieza no mejorará la calidad de la imagen impresa.
1
Retire la bandeja de papel de la impresora. Si hay
papel de impresión en la bandeja, retire el papel de
impresión de la bandeja.
2
Coloque la hoja protectora con el lado de impresión
hacia abajo y la flecha apuntando en el mismo
sentido que la flecha de la bandeja.
3
Abra la tapa del compartimento del cartucho y
retire el cartucho de impresión.
4
Inserte la casete de limpieza que se suministra en la
impresora y cierre la tapa del compartimento del
cartucho.
Sonará un zumbador y aparecerá “HEAD
CLEANING/PUSH [EXEC]” en la pantalla de
funcionamiento.
5
Pulse el botón EXEC.
La casete de limpieza y la hoja protectora limpiarán
el interior de la impresora. Una vez terminada la
limpieza, se expulsará automáticamente la hoja
protectora.
6
Retire de la impresora la casete de limpieza y
coloque el cartucho de impresión y el papel de
impresión.
Función Bluetooth
Síntoma Causa/Acción
No es posible
transmitir datos.
La conexión se ha
desconectado del
dispositivo
deseado.
• La distancia entre el dispositivo y la
impresora es demasiado grande.
tUbique los dispositivos dentro de la
distancia máxima de comunicación.
• La parte de antena Bluetooth de la
impresora, de la cámara o de ambas está
cubierta con una mano, etc.
tNo cubra la parte de la antena.
• El dispositivo que desea conectar con la
impresora ya se ha conectado con otro
dispositivo.
tConecte de nuevo el dispositivo con
la impresora una vez que termine la
tarea del dispositivo con el otro
dispositivo.
• Error de autentificación.
tConecte de nuevo al impresora con el
dispositivo y escriba la misma
contraseña, correctamente, en ambos
dispositivos.
• El dispositivo conectado interrumpió la
transmisión.
tCompruebe el estado del dispositivo
conectado y, a continuación, con ecte
de nuevo.
• La conexión Bluetooth ha sido
interrumpida por parte del dispositivo
conectado.
tCompruebe el estado del dispositivo
conectado.
• Ha transcurrido el límite de tiempo de
autentificación (30 segundos).
tEscriba la misma contraseña,
correctamente, tanto en la impresora
como en el dispositivo antes de
30 segundos.
• No se ha escrito la misma contraseña.
tEscriba la misma contraseña,
correctamente, tanto en la impresora
como en el dispositivo antes de
30 segundos.
• El dispositivo desconectó o terminó la
conexión.
tCompruebe el estado del dispositivo,
intente conectar el dispositivo de
nuevo y escriba la contraseña
correctamente.
66
Solución de problemas
Page 67

Síntoma Causa/Acción
Error de
autentificación.
La velocidad de
transmisión de
datos es demasiado
baja.
Aunque la
distancia entre la
impresora y
dispositivo
deseado está
dentro de 10 m
(33 pies), no es
posible establecer
la conexión.
• Ha transcurrido el límite de tiempo de
autentificación (30 segundos).
tEscriba la misma contraseña,
correctamente, tanto en la impresora
como en el dispositivo antes de
30 segundos.
• No se ha escrito la misma contraseña.
tEscriba la misma contraseña,
correctamente, tanto en la impresora
como en el dispositivo ant es de
30 segundos.
• El dispositivo desconectó o terminó la
conexión.
tCompruebe el estado del dispositivo,
intente conectar el dispositivo de
nuevo y escriba la contraseña
correctamente.
• La parte de antena Bluetooth de la
impresora, de la cámara o de ambas está
cubierta con una mano, etc.
tNo cubra la parte de la antena.
La velocidad de transmisión de datos
varía según la distancia entre la
impresora y el dispositivo, los
obstáculos y las condiciones de las
ondas de radio. Cambie la posición de
la impresora o ubique la impresora
más cerca del dispositivo.
• La parte de antena Bluetooth de la
impresora, de la cámara o de ambas está
cubierta con una mano, etc.
tNo cubra la parte de la antena.
La velocidad de transmisión de datos
varía según la distancia entre la
impresora y el dispositivo, los
obstáculos, las condiciones de las
ondas de radio, el software de
aplicación y el SO.
Cambie la posición de la impresora o
ubique la impresora más cerca del
dispositivo.
• El dispositivo deseado está conectado
ahora a otro dispositivo.
tCuando el dispositivo esté conectado
a otro dispositivo, es posible que no
se muestre como un dispositivo
disponible o que no se pueda conectar
en ese momento.
• El dispositivo no puede conectarse con la
función Bluetooth.
tConfigure el dispositivo de modo que
pueda conectarse.
Mensaje de error Causa/Acción
SET PAPER
PUSH EXEC
PAPER JAMMING
REMOVE PRINTS
MEDIA MISMATCH
PUSH EXEC
REMOVE PRINTS
PUSH EXEC
PRINTER ERROR
SERVICE CALL
Bluetooth ERROR
SERVICE CALL
• El papel se ha agotado.
tColoque papel de impresión en la
bandeja de papel y pulse el botón
EXEC.
• La bandeja de papel no está insertada
en la impresora.
tInserte la bandeja de papel y pulse
el botón EXEC.
• Es posible que haya un atasco de
papel.
tRetire el papel atascado, si lo hay.
Consulte
la página 65.
• El papel de impresión y el cartucho de
impresión no coinciden.
tColoque papel de impresión del
tamaño correspondiente al
cartucho de impresión y pulse el
botón EXEC.
• El papel permanece en la ranura de
expulsión.
tRetire la bandeja de papel y, a
continuación, el papel impreso. A
continuación, pulse el botón
EXEC.
• Hay algún problema en la impresora.
tPóngase en contacto con el
servicio técnico de Sony o con el
distribuidor de Sony.
• Hay algún problema en la función
Bluetooth.
tPóngase en contacto con el
servicio técnico de Sony o con el
distribuidor de Sony.
“Si el papel se atasca” en
Mensajes de error
Mensaje de error Causa/Acción
RIBBON END
SET CARTRIDGE
• El cartucho de impresión se ha
agotado.
tSustituya el cartucho de impresión.
Solución de problemas
67
Page 68

Sony Corporation
Printed in Japan
3207399130
 Loading...