

Page 1
3-207-400-13(1)
Digital Photo Printer
Operating Instructions
______________________________________ GB
UP-DX100
© 2003 Sony Corporation
Page 2

Owner’s Record
The model and serial numbers are located at the rear.
Record these number in the space provided below.
Refer to these numbers whenever you call upon your
Sony dealer regarding this product.
For the customers in the U.S.A.
If you have any questions about this product, you may
call:
Sony Customer Information Service Center
1-800-222-7669 or
http://www.sony.com/
Model No. __________________________________
Serial No. __________________________________
WARNING
To reduce the risk of fire or electric
shock, do not expose this apparatus to
rain or moisture.
To avoid electrical shock, do not open the
cabinet. Refer servicing to qualified
personnel only.
For the customers in the U.S.A.
This equipment has been tested and found to comply
with the limits for a Class B digital device, pursuant to
Part 15 of the FCC Rules. These limits are designed to
provide reasonable protection against harmful
interference in a residential installation. This equipment
generates, uses, and can radiate radio frequency energy
and, if not installed and used in accordance with the
instructions, may cause harmful interference to radio
communications. However, there is no guarantee that
interference will not occur in a particular installation. If
this equipment does cause harmful interference to radio
or television reception, which can be determined by
turning the equipment off and on, the user is encouraged
to try to correct the interference by one or more of the
following measures:
– Reorient or relocate the receiving antenna.
– Increase the separation between the equipment and
receiver.
– Connect the equipment into an outlet on a circuit
different from that to which the receiver is connected.
– Consult the dealer or experienced radio/TV technician
for help.
Declaration of conformity
Trade Name: SONY
Model: UP-DX100
Responsible Party: Sony Electronics Inc.
Address: 16530 Via Esprillo,
San Diego, CA 92127 U.S.A.
Telephone Number: 858-942-2230
This device complies with part 15 of the FCC Rules.
Operation is subject to the following two conditions:
(1) this device may not cause harmful interference,
and (2) this device must accept any interference
received, including interference that may cause
undesired operation.
For the customers in the U.S.A.
This transmitter must not be co-located or operated in
conjunction with any other antenna or transmitter.
For the customers in Canada
This Class B digital apparatus complies with Canadian
ICES-003.
Operation is subject to the following two conditions: (1)
this device may not cause interference, and (2) this
device must accept any interference, including
interference that may cause undesired operation of the
device.
The term “IC:” before the radio certification number
only signifies that Industry Canada technical
specifications were met.
You are cautioned that any changes or modifications not
expressly approved in this manual could void your
authority to operate this equipment.
All interface cables used to connect peripherals must be
shielded in order to comply with the limits for a digital
device pursuant to Subpart B of Part 15 of FCC Rules.
2
Page 3

WARNING
This unit has no power switch.
When installing the unit, incorporate a readily
accessible disconnect device in the fixed wiring, or
connect the power plug to an easily accessible socketoutlet near the unit. If a fault should occur during
operation of the unit, operate the disconnect device to
switch the power supply off, or disconnect the power
plug.
WARNING on Power Connection
Use a proper power cord for your local power
supply.
1. Use the approved Power Cord (2-core mains lead)/
Appliance Connector/Plug that conforms to the safety
regulations of each country if applicable.
2. Use the Power Cord (2-core mains lead)/Appliance
Connector/Plug conforming to the proper ratings
(Voltage, Ampere).
If you have questions on the use of the above Power
Cord/Appliance Connector/Plug, please consult a
qualified service personnel.
For the customers in Europe
Hereby, Sony Corporation, declares that this “UPDX100” is in compliance with the essential
requirements and other relevant provisions of the
Directive 1999/5/EC.
For details, please access the following URL :
http://www.compliance.sony.de/
All companies and product names mentioned herein
may be the trademarks or registered trademarks of
their respective companies. Furthermore, “™” and
“®” are not mentioned in each case in this manual.
Duplication, edition, or printing of a CD, TV
programs, copyrighted materials such as pictures or
publications, or any other materials except for your
own recording or creation is limited to private or
domestic use only. Unless you hold copyright or have
permission of copyright holders for the materials to be
duplicated, use of those materials beyond this limit
may infringe the provisions of the copyright law and
be subject to the copyright holder’s claim for damages.
When using photo images with this printer, pay special
attention not to infringe the provisions of the copyright
law. Any unauthorized use or modification of others’
portrait may also infringe their rights.
For some demonstrations, performances, or exhibits,
photography may be forbidden.
Dotyczy klientów w Europie
Niniejszym Sony Corporation oświadcza, że model
„UP-DX100” jest zgodne z zasadniczymi
wymaganiami oraz innymi stosownymi
postanowieniami Dyrektywy
1999/5/WE.
Szczegółowe informacje znaleźć można pod
następującym adresem URL:
http://www.compliance.sony.de/
For the customers in Europe
The manufacturer of this product is Sony Corporation,
1-7-1 Konan, Minato-ku, Tokyo, Japan.
The Authorized Representative for EMC and product
safety is Sony Deutschland GmbH, Hedelfinger Strasse
61, 70327 Stuttgart, Germany. For any service or
guarantee matters please refer to the addresses given in
separate service or guarantee documents.
3
Page 4

Table of Contents
Overview ................................................................ 5
Features .............................................................. 5
Location of Parts ................................................... 6
Preparations ........................................................... 8
Unpacking the Printer ........................................ 8
Preparing a Printing Pack ................................... 8
Loading the Print Cartridge ................................ 8
Changing the Print Cartridge ............................. 9
Attaching the Paper Holder ................................ 9
Inserting the Print Paper ................................... 10
Connecting the Printer to a Wall Outlet ........... 11
Connecting to a Computer ............................... 11
Menu ..................................................................... 12
Structure of the Menu ...................................... 12
Functions of Each Menu Item .......................... 12
Bluetooth .............................................................. 13
Bluetooth Wireless Technology ....................... 13
The “Basic Imaging Profile” ............................ 13
Communication Between the Printer and Another
Device Using the Bluetooth Function ............ 13
Authentication .................................................. 14
Giving Your Printer a Device Number ............. 15
Printing a Picture ................................................ 15
Reprinting a Picture Stored in Memory
(COPY PRINT) .............................................. 16
Adjustments ......................................................... 16
Adjusting the Printing Location
(PRINT SETTING) ........................................ 16
Adjusting the Print Quality
(COLOR ADJUST) ........................................ 17
Precautions ........................................................... 19
Safety ............................................................... 19
Installation ........................................................ 19
Cleaning ........................................................... 19
Specifications ....................................................... 20
Troubleshooting ................................................... 21
Printer ............................................................... 21
Bluetooth Function ........................................... 22
Error messages ................................................. 23
4
Table of Contents
Page 5

Overview
The Sony UP-DX100 Digital Photo Printer is an
extension printer for the UPX-C200
Printing System. As a second or third printer for the
UPX-C200
and print images from
to the printer
DIGITAL PHOTO PRINTER
/C300 system, the UP-DX100 can receive
a digital camera that sends signals
using Bluetooth wireless technology.
Bluetooth wireless connection
MENU
EXEC
1
UP-DX100 Digital camera
PRINT
ALARM
Features
The UP-DX100 has the following features:
Photo-realistic printing
With its dye sublimation printing system, the printer can
make photo-realistic prints meeting a number of
different requirements.
/C300 Digital
Printing from your computer with a convenient
USB connection
By connecting the printer and your computer with a
USB cable (commercially available) and installing the
supplied printer driver software on your computer, you
can print images from your computer.
For details on connecting a computer, refer to “Read me
(English)” stored in the supplied CD-ROM.
USB connection
MENU
EXEC
1
DIGITAL PHOTO PRINTER
UP-DX100 Computer, etc.
PRINT
ALARM
Note
When connecting a computer using a USB cable,
depending on the type of computer, normal operation
may not be obtained. In such a case, use a commercially
available USB hub.
Super Coat 2 feature
The Super Coat 2 enables high durability and moisture
or fingerprint resistance, keeping your prints in good
picture quality for an extended period of time.
Selection of print sizes
You can select from a large, dynamic Post card (4×6
inch) size
(3.5×4inch) size
(UPC-X46) or an economical Small
(UPC-X34) print.
If an UPA-DX100TR optional paper tray is inserted in
the printer, you can also use UPC-X45 print paper on
which stamping with water
-based ink is possible (not
supported by the UPX-C300).
Paper tray allowing bulk printing of 25/30
sheets
With the supplied paper tray, you can print up to 25
sheets for Post card size
and 30 sheets for Small size
print paper at one time.
Overview
5
Page 6
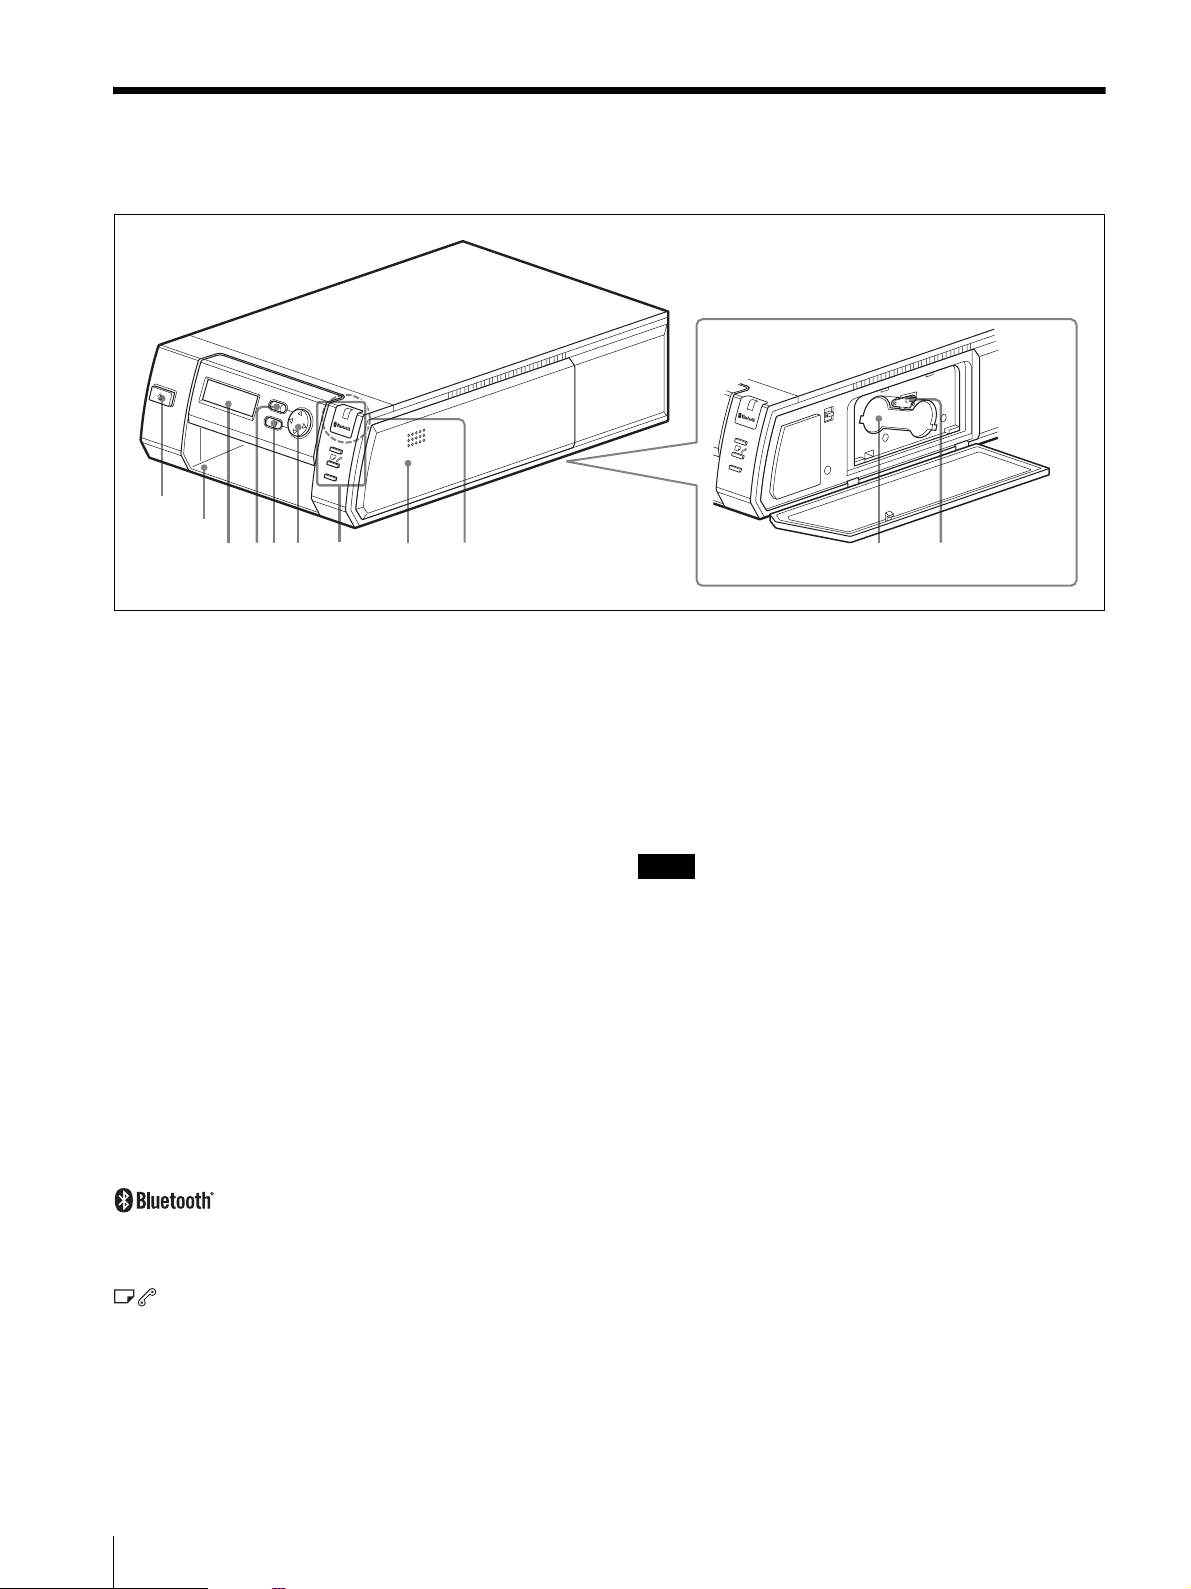
Location of Parts
Front
M
E
N
U
E
X
E
D
I
G
I
T
A
L
P
H
1
O
T
O
P
R
I
N
T
E
R
2
C
PRINT
ALARM
34 0956 8
7
N
E
P
O
H
S
U
P
PRINT
ALARM
Bluetooth antenna (inside)
A 1 (on/standby) button and lamp
Press to turn on the printer, and the lamp lights. Pressing
it again makes the lamp go out, and the printer enters the
standby mode.
B Paper tray slot
Insert the paper tray.
C Operation display
When the printer is turned on, the operation mode or
menu item appears.
D MENU button
Press to display the menu item or to cancel any changes
made on the menu items that you have not registered
.
E EXEC button
Press to decide the selection for each Menu items.
F Control button
Press to select a menu item and to settle the selection.
G Lamps
lamp: Lights when the Bluetooth function
is enabled.
PRINT lamp: Lights while printing is in progress, and
flashes while the printer is receiving image data.
lamp: Lights if paper runs out, the print cartridge
is out of ink, or cartridges and paper of different
types or sizes are mixed.
ALARM lamp: Lights in case of occurrence of
problem.
H Cartridge compartment cover
Open the cover to insert and remove the print cartridge.
I Cartridge compartment
Insert the print cartridge.
J Cartridge eject lever
Push up the lever to eject the inserted cartridge.
Note
The lever is disabled while printing.
6
Location of Parts
Page 7

Rear
- AC IN
123
A Paper jam remove cover
When a paper jam occurs, remove this cover, and
remove the jammed paper.
B -AC IN connector
Connect to a wall outlet using the supplied AC power
cord.
C USB connector
Connect to the USB connector on a computer using a
USB cable.
Note
When connecting a computer using a USB cable,
depending on the type of computer, normal operation
may not be obtained. In such a case, use a commercially
available USB hub.
Location of Par ts
7
Page 8

Preparations
Before using the printer for the first time, you need to
install a print cartridge and the paper tray
below. These preparations are not needed for everyday
print operation
s, but are to be done as required.
Unpacking the Printer
Make sure that the following accessories are supplied
with your printer.
• AC power cord (1)
• Paper trays (2, large/small)
• Paper holder (2)
• Tray cover (1)
•CD-ROM (1)
- Sony UP-DX100 Printer Driver Software
- Operating Instructions
• Cleaning cassette (1)
• Operating Instructions (1)
• Software License Agreement (1)
Preparing a Printing Pack
, as indicated
Loading the Print Cartridge
1
Push on PUSH OPEN, and open the cartridge
compartment cover.
M
E
N
U
E
X
E
D
I
G
I
T
A
L
P
H
O
T
O
P
R
I
N
T
E
R
2
Insert the print cartridge into the printer firmly until
it clicks into place
C
P
R
I
N
T
A
L
A
R
M
Cartridge
compartment cover
.
You need an optional printing pack (UPC-X46 or UPCX34) designed for the printer. The pack contains a set of
print paper and a print cartridge.
Notes
• Do not rewind the ink ribbon and use the rewound
print cartridge for printing. Otherwise, proper
printing result will not be obtained, or even a
breakdown may occur.
• Use the printing pack for this printer only.
• Always use the print cartridge designed for the size of
the print paper you use. If you mix cartridges and
paper of different types or sizes, printing may not be
possible, or a paper jam or other trouble may occur.
• Do not print on the used print paper. Printing an image
twice on the same paper will not make the printed
image thicker. This may even cause a malfunction or
breakdown.
• Do not touch the ink ribbon of the print cartridge or the
printing surface of the print paper. If there are
fingerprints or dust on the printing surface or the ink
ribbon, the printing quality may deteriorate.
• For high quality prints, avoid placing the printing pack
in locations that are subject to high temperature, high
humidity, excessive dust, or direct sunlight.
• When storing a partially used pack of the print
cartridge and print paper, store it in its original bag or
in a similar container.
M
E
N
U
E
X
E
D
I
G
I
T
A
L
P
H
O
T
O
P
R
I
N
T
E
R
3
Close the cartridge compartment cover.
C
P
R
I
N
T
A
L
A
R
M
Print cartridge
8
Preparations
Page 9

Changing the Print Cartridge
When the print cartridge runs out, the lamp lights
and an error message appears on the operation display.
Replace the print cartridge.
1
Push on PUSH OPEN, and open the cartridge
compartment cover.
2
Press up the cartridge release lever.
MENU
D
IG
ITAL PH
O
TO
P
R
IN
TER
EXEC
PRINT
ALARM
ribbon may result in imperfect printing.
• Do not change the print cartridge while printing.
Notes on storing the print cartridge
• Avoid placing the print cartridge in a location subject
to high temperatures, high humidity, excessive dust or
direct sunlight
• When you are going to store a partially used cartridge,
store it in its original bag.
Attaching the Paper Holder
Attach the supplied paper holder to the paper tray as
follows:
1
Insert the tips of both ends of the paper holder into
the holes located
pinching the portions near the
at the bottom of the paper tray,
two ends.
Cartridge release
lever
The cartridge pops out. Remove the cartridge.
3
Insert a new print cartridge, and close the cover.
Notes
• Never put your hand into the cartridge compartment.
The thermal head reaches high temperatures,
especially after repeated printing.
MENU
EXEC
PRINT
ALARM
• Do not rewind the ink ribbon and use the rewound
print cartridge for printing. Otherwise, proper
printing result will not be obtained, or even a
breakdown may occur.
• If the print cartridge does not click into place, remove
it and then re-insert it. If the ink ribbon is too slack to
be loaded, wind the ink ribbon in the direction of the
arrow to remove the slack.
Paper holder
Paper tray
2
Push the paper holder into the stoppers firmly until
it
snaps into place, making a click sound.
Stoppers
Removing the paper holder
Push out the paper holder gently from the stoppers, and
remove it
, pinching the portions near the two ends.
• If the print cartridge is not loaded when you turn on
the printer, the
lamp lights up.
• Do not touch the ink ribbon or place the print cartridge
in a dusty location. Fingerprints or dust on the ink
Preparations
9
Page 10

Inserting the Print Paper
1
Set the print paper into the tray.
Print paper
Riffle the print paper. Then insert the print paper
with its printing surface (the side with no imprint)
facing up and the arrow pointing in the same
direction as the arrow in the tray.
You can set 25 sheets when the UPC-X46 is used,
and 30 sheets when the UPC-X34 is used.
2
Remove the protective sheet on the print paper.
• If print paper does not feed automatically, the
lamp lights. Pull out the paper tray and check for a
paper jam.
• When adding print paper to a partially full tray, make
sure that the total number of sheets does not exceed 25
for the UPC-X46 or 30 for the UPC-X34. Do not
place different types or sizes of paper in the tray.
Otherwise, a paper jam or malfunction may occur.
• Do not write or type on the printing surface of the
paper before printing. You may not be able to proceed
with printing. If you want to write greetings or draw
on the printed surface after printing, use an oil ink pen.
• Do not attach stickers or anything else on the printing
surface before printing.
• Do not print on the used print paper. Printing an image
twice on the same paper will not make the printed
image thicker. This may even cause a malfunction or
breakdown.
• Before printing, do not fold or bend the print paper.
• Do not leave more than five sheets of ejected printed
paper
on the paper tray because they may cause a
paper jam
Notes on storing the print paper
.
Note
Be sure to keep the protective sheet, which is used
for cleaning the inside of the printer.
3
Insert the tray to the printer.
M
E
N
U
E
X
E
D
IG
IT
A
L
P
H
O
T
O
P
R
IN
T
E
R
C
P
R
IN
T
A
L
A
R
M
Note
Do not touch the printing surface. Fingerprints on
the printing surface may result in imperfect
printing.
PUSH OPEN
• Avoid placing the print paper in a location subject to
high temperatures, high humidity, excessive dust or
direct sunlight.
• Avoid storing the paper with the printed faces
touching each other or in contact with rubber or plastic
products including vinyl chloride or plasticizer for an
extended period of time; color changes or
deterioration of the printed image may occur.
• When you are going to store partially-used print paper,
store it in its original bag.
Attaching the tray cover
Keep the supplied tray cover attached to the paper tray
when not in use to protect
from dust. The tray cover can be attached to either paper
tray for the UPC-X46 or
print paper placed in the tray
for the UPC-X34.
Notes
• Set the paper of the UPC-X46 into the large paper tray,
and that of the UPC-X34 into the small paper tray. If
the paper size and tray size do not match, a paper jam
may occur.
• Do not remove or insert the paper tray during printing.
10
Preparations
Tray c ov e r
Page 11

Connecting the Printer to a Wall Outlet
Connect the supplied AC power cord to the AC IN
connector of the printer and then to wall outlet.
UP-DX100
-AC IN
-AC IN
AC power cord
(supplied)
to wall outlet
Connecting to a Computer
Notes
• For connection, use a commercially available A-B
TYPE USB cable less than 3 meters long. As
proper
cable may differ according to the type of
computer,
consulting the instruction manual
determine the type of cable you need,
for your computer.
the
• Refer to the instruction manual for your computer, as
well.
• The supplied Sony UP-DX100 Printer Driver does not
support a network printer, nor can be used with a
commercially available printer buffer unit.
• Do not connect or disconnect the USB cable during
data transfer or printing
. Proper printing results may
not be obtained.
• When connecting a computer using a USB cable,
depending on the type of computer, normal operation
may not be obtained. In such a case, use a
commercially available USB hub.
To print images from your computer, connect the USB
connectors of the printer and a computer (
a PC with
Windows) using a commercially available USB cable,
and install the supplied printer driver
on the computer.
For details on installation and operation of the printer
driver, refer to
“Read me (English)” contained on the
supplied CD-ROM.
UP-DX100
-AC IN
USB cable
Computer
Preparations
11
Page 12

Menu
Structure of the Menu
COLOR ADJUST CYN-RED (–7 to +7)
COLOR(S)* MAG-GRN (–7 to +7)
YEL-BLU (–7 to +7)
DARK (–7 to +7)
LIGHT (–7 to +7)
SHARPNESS (0 to +7)
GAMMA (–7 to +7)
SAVE SETTING (1/2/3)
LOAD SETTING (1/2/3)
COLOR ADJUST CYN-RED (–7 to +7)
B/W(S)* MAG-GRN (–7 to +7)
YEL-BLU (–7 to +7)
DARK (–7 to +7)
LIGHT (–7 to +7)
SHARPNESS (0 to +7)
GAMMA (–7 to +7)
SAVE SETTING (1/2/3)
LOAD SETTING (1/2/3)
Bluetooth SETTING Bluetooth ADDR
PASSKEY INPUT PASSKEY INPUT [1:2:3:4]
MY DEVICE NAME Sony UP- DX100 [NONE – 9]
CONNECTION RECORD 1. Sony DKC-C200X/DKC-C300X
MODULE POWER POWER: (ON/OFF)
PRINT SETTING PRINT OFFSET: (–2/–1/0/1/2)
COPY PRINT COPY PRINT: 1 [1 – 9]
TOTAL PRINTS
2. NONE
3. NONE
* When the UPC-X45 print paper is used,
(S) is displayed.
Functions of Each Menu Item
Menu item Function Setting
COLOR ADJUST
COLOR
COLOR ADJUST
B/W
Bluetooth SETTING You can make Bluetooth settings. Bluetooth ADDR: The Bluetooth address is displayed.
PRINT SETTING The printing location on print paper of the
COPY PRINT The newest data stored in memory is
TOTAL PRINTS The total number of sheets printed is shown. —
You can adjust the print quality for color
.
pictures
You can adjust the print quality for blackand-white picture
UPC-X46
s.
is fine-adjusted.
reprinted.
CYN-RED: The cyan and the red are adjusted.
MAG-GRN: The magenta and the green are adjusted.
YEL-BLU: The yellow and the blue are adjusted.
DARK: The brightness of a dark area is adjusted.
LIGHT: The brightness of a bright area is adjusted.
SHARPNESS: The sharpness of edges of objects in a picture is
adjusted.
GAMMA: The tone of a picture is adjusted.
SAVE SETTING (1/2/3): The adjusted values are stored in the
built-in memory.
LOAD SETTING (1/2/3): The adjusted values stored in memory
are loaded.
PASSKEY INPUT: A passkey is set or changed.
MY DEVICE NAME: The printer can be assigned a number.
CONNECTION RECORD: The connection record is displayed.
MODULE POWER: The power of the Bluetooth circuits is
turned on or off.
PRINT OFFSET (–2/–1/0/1/2)
The printing location can be shifted by 0.5 mm.
[1 – 9]
The number of sheets to be printed is set.
12
Menu
Page 13

Bluetooth
Checking the current setting
You can check the current passkey settings on the printer
as follows:
Bluetooth Wireless Technology
The Bluetooth1) wireless technology allows
communication between various Bluetooth devices
without using cables. Devices which can use this
technology include computers, computers peripheral
devices, PDAs, and mobile phones.
This omnidirectional communications system enables
communication even if the Bluetooth device is in a bag
or if there are obstacles between the devices.
Also, the Bluetooth wireless technology has advanced
security functions, such as scrambled frequencies and
data encruption.
• When using the Bluetooth function, the distance
between the camera and the printer you intend to
connect must be within 10 m (
obstacles.
1) The trademark is owned by their proprietor and
used by Sony Corporation under license. The word Bluetooth
is printed in plain text throughout this document.
33 feet) without
The “Basic Imaging Profile”
The “Basic Imaging Profile” (BIP) is the specifications
used when sending or receiving still images between
Bluetooth devices. The main features of the BIP enable
sending or receiving images, and use of the remote
shutter feature of a digital still camera.
To connect with your printer, the Bluetooth device must
be compatible with the
“
Basic Imaging Profile” (BIP).
Before using the Bluetooth device, check the Bluetooth
and BIP specifications of the device.
“Image Push Feature” of the
1 2 4,6
Lit
1
DIGITAL PHOTO PRINTER
MENU
EXEC
PRINT
ALARM
7 3,5
1
Turn on the printer.
2
Press the MENU button.
3
Press V of the control button to display “Bluetooth
SETTING [>>]
4
Press B of the control button.
The Bluetooth address appears.
5
Press V of the control button to display “PASSKEY
INPUT [>>]
6
Press B of the control button.
The passkey currently set appears on the PASSKEY
INPUT display.
7
Press the EXEC button.
To exit the MENU operation, press the MENU button.
” on the operation display.
” on the operation display.
Communication Between the
Printer and
the Bluetooth
For communication between the printer and another
device with Bluetooth function
are required:
• The same passkey is set on the printer and the other
device.
•The Bluetooth lamp is lit.
Another Device Using
Function
s, the following settings
If the Bluetooth lamp is off
If the Bluetooth lamp is off, turn it on in the following
manner:
1
Press the MENU button.
2
Press V of the control button to display “Bluetooth
SETTING [>>]
3
Press B of the control button.
“Bluetooth ADDR None” appears.
4
Press V of the control button to display “MODULE
POWER [>>]
5
Press B of the control button.
.”
.”
Bluetooth
13
Page 14

6
Press b or B of the control button to set the
POWER to ON.
7
Press the EXEC button.
“Ready BT RSSI [----]”appears on the operation
display.
2
Press the MENU button.
“REBOOTING” appears. Then the printer is restarted,
and the
Bluetooth lamp lights.
Authentication
What's a passkey
Passkey is used to authenticate two Bluetooth devices
that have not previously connected to each other and
create a trusted relationship between them.
You need to enter the same characters (passkey) to each
device on passkey authentication process. This printer
uses a 4-digit number as a passkey.
Once authentication of the device has been confirmed,
the printer registered the device as a record. Since then
you can connect the device without entering a passkey.
To ensure proper security, the passkey entry has a time
limit (30 seconds), based on the Bluetooth standards.
The passkey entry may be required when the
authentication valid period of the printer o
is expired, the record is deleted, or the security setting is
changed.
Passkey entry may be required, depending on devices,
each time you intend to connect.
This “Passkey” is also referred to as a “Bluetooth
passkey
” etc. “PIN” is also used with the same meaning.
When the passkey entry screen appears
on the other device
Enter the desired passkey on your printer. Then, enter
the same passkey on
the other device
r other device
3
Press V of the control button to display “Bluetooth
SETTING [>>]
4
Press B of the control button.
“Bluetooth ADDR” appears.
5
Press V of the control button to display
“
PASSKEY INPUT [>>].”
6
Press B of the control button.
“PASSKEY INPUT <1> [X:X:X:X]” appears.
.”
| |
Current digit to be set Passkey
7
Press b or B of the control button to select a digit
of the passkey to be set.
This <1> shows the leftmost digit, and <4> shows
the rightmost digit.
8
Press v or V of the control button to set the value
of the passkey.
Value from 0 to 9 can be used.
Repeat Steps 7 and 8 until the four-digit passkey is
set.
9
Press the EXEC button.
“PASSKEY INPUT Saving. . .” appears, and your
passkey
setting is stored.
Entering the passkey
Enter the same passkey on the printer and the other
device to be connected, as follows:
1 2,10 7 4,6
MENU
EXEC
9 8
3,5
14
1
DIGITAL PHOTO PRINTER
1
Turn on the printer.
Bluetooth
PRINT
ALARM
10
When the setting is completed, press the MENU
button.
Page 15

Giving Your Printer a Device Number
When two or more printers are used in a system, it is
convenient that each printer ha
1 to 9).
1
Turn on the printer.
“Ready BT RSSI [----]” appears on the operation
display.
2
Press the MENU button.
3
Press V of the control button to display “Bluetooth
SETTING [>>]
.”
ve a device number (from
Printing a Picture
The UP-DX100 automatically receives and prints the
image sent from the camera that is connected with the
Bluetooth function
files can be received. Graphic images sent from
computer connected with the printer using a USB cable
can also be printed out.
During printing of graphic images sent from the camera
or computer, the process is displayed on the operation
display, as follows:
Receiving Image
BT [>>>>>>>>>>]
s. Only JPEG-format graphic-image
a
Receiving image data
(This is an example of the
Bluetooth connection.)
4
Press B of the control button.
5
Press V of the control button to display “MY
DEVICE NAME [>>]
6
Press B of the control button.
“Sony UP-DX100 [NONE-9: EXEC]” appears.
7
Press v or V of the control button to set the device
number.
8
Press the EXEC button.
“DEVICE NAME Saving. . .” appears, and the
device number
9
When the setting is completed, press the MENU
button.
.”
you have set is stored.
PROCESSING
PRINTING
[YELLOW]
PRINTING
[MAGENTA]
PRINTING
[CYAN]
PRINTING
[LAMI]
When printing is completed, “Ready BT RSSI [))))]”
appears.
Processing received data
Printing the yellow
Printing the magenta
Printing the cyan
Laminating a printout
Printing a Picture
15
Page 16

Reprinting a Picture Stored in Memory (COPY PRINT)
The data of the last picture printed is stored in the
memory of the printer. You can reprint the picture.
Note
When the printer is set to standby mode, data stored in
memory are deleted. You cannot reprint the picture.
13
MENU
1
DIGITAL PHOTO PRINTER
EXEC
54
1
Press the MENU button.
2
Press V of the control button to display “COPY
PRINT [>>]
3
Press B of the control button.
“COPY PRINT:1 [1-9 PRINT:EXEC]” appears.
4
Press v or V of the control button to set the number
of sheets to be printed.
A value from 1 to 9 can be set.
5
Press the EXEC button.
The number of pictures set in Step 4 is printed.
.”
PRINT
ALARM
2
Adjustments
The printing location and print quality can be adjusted.
After checking the print
adjustment
s, necessary.
Adjusting the Printing Location (PRINT SETTING)
Adjust so that a printed image is correctly located on the
print paper
location can be sh
when the UPC-X46 is used. The printing
1234
1
DIGITAL PHOTO PRINTER
1
Turn on the printer.
2
Press the MENU button.
3
Press v or V of the control button to display
“
PRINT SETTING.”
4
Press B of the control button.
“PRINT OFFSET:” appears.
5
Press b or B of the control button to select the
offset value.
ing results, make any
ifted by 0.5 mm.
MENU
EXEC
65
PRINT
ALARM
16
When printing is completed, the display returns to
“
Ready.”
Adjustments
6
Press the EXEC button.
The offset value selected in Step 5 is registered, and
the display returns to
Make a test printout and check if the image is printed in
the correct location on the print paper. If further
adjustment is needed, repeat the above steps.
“PRINT SETTING.”
To exit PRINT SETTING
Press the MENU button. The display returns to “Ready,”
and the printer is ready to print.
Page 17

Adjusting the Print Quality (COLOR ADJUST)
With the MENU function, you can adjust the picture
quality.
guide
Three sets of adjusted values for color pictures and for
black-and-white pictures
retrieved later.
Print quality adjustment from the printer is only enabled
when the camera and printer are connected via
Bluetooth in a UPX-C200 system.
• When the printer is connected to the computer via
• When using a UPX-C300 system, you can adjust print
You can check the adjusted results by printing a
image.
can be stored in memory and
Notes
USB, you can adjust print quality using the printer
driver installed on the computer. For details on
installation and operation of the printer driver, refer to
“Read me (English)” contained on the supplied CDROM.
quality using the camera. For details, refer to the
operating instructions for the UPX-C300.
Adjusting the print quality for color
pictures
123
MENU
1
DIGITAL PHOTO PRINTER
EXEC
PRINT
ALARM
Repeat Steps 4 and 5 to make necessary
adjustment
adjustment item is as follows:
CYN-RED: Pressing b gives the picture more
cyan, while pressing B makes it more reddish.
MAG-GRN: Pressing b gives the picture more
magenta, while pressing B makes the picture
more greenish.
YEL-BLU: Pressing b makes the picture more
yellowish, while pressing B makes the picture
more bluish.
DARK: Contrast in the dark areas is adjusted.
Pressing B increases the darkness.
LIGHT: Contrast in the bright areas is adjusted.
Pressing B increases the brightness.
SHARPNESS: Pressing B makes the edges of
objects in a picture sharper.
GAMMA: Pressing b makes the color tone of the
whole picture lighter, while pressing B makes it
deeper.
6
Press the EXEC button when the adjustment is
completed.
The display returns to “COLOR ADJUST COLOR
[>>].”
s. Adjustable content for each
Adjusting the print quality for black-andwhite pictures
When you press V of the control button after pressing
the Menu button in step 2 in “Adjusting the print quality
for color picture
appears, and you can adjust the print quality for blackand-white picture
that for color picture
s,” COLOR ADJUST B/W [>>]
s. The adjusting method is the same as
s.
64 5
1
Turn on the printer.
2
Press the MENU button.
“COLOR ADJUST COLOR [>>]” appears.
3
Press B of the control button.
“CYN-RED:” appears.
4
Press b or B of the control button for adjustment.
5
Press V of the control button.
“MAG-GRN:” appears.
Printing out a guide image
To check the results of your adjustments, print out the
camera’s
Operate the camera to select Guide Print-RGB or Guide
Print-DLGm, and then print.
For details, refer to the Instruction Manual (Advanced
Operations) for the UPX-C200 or the operating
instructions for the UPX-C300.
guide images.
Storing your adjustments
Once the color adjustment is completed, save the
adjusted values as follows:
1
In the COLOR ADJUST COLOR [>>] or B/W
[>>] display, press B of the control button.
2
Press V of the control button repeatedly until
“
SAVE SETTING” appears.
Adjustments
17
Page 18

3
Press b or B of the control button to select the
memory
4
Press the EXEC button.
The adjusted values are stored in the memory cell
with the number selected in Step 3.
-cell number (1, 2, or 3).
Loading the adjusted values
Adjusted values stored in the memory can be retrieved.
1
In the COLOR ADJUST COLOR [>>] or B/W
[>>] display, press B of the control button.
2
Press V of the control button repeatedly until
“
LOAD SETTING” appears.
3
Press b or B of the control button to select the
memory
4
Press the EXEC button.
The adjusted values stored in the memory cell with
the number selected in Step 3
force
-cell number (1, 2, or 3).
are retrieved and in
.
To exit COLOR ADJUST
After a menu operation, such as COLOR ADJUST
setting, saving of adjusted values,
values, is completed, press the MENU button. The
display returns to
“Ready.”
or retrieving of stored
18
Adjustments
Page 19

Precautions
Safety
• Operate the printer using the power source specified in
“Specifications” on page 20.
• This unit is not disconnected from the mains as long as
it is connected to the mains outlet, even if the unit
itself has been turned off.
• Be careful not to damage the power cord by placing or
dropping heavy objects on it; it is dangerous to use the
printer
with a damaged power cord.
• If you do not intend to use the printer for a long time,
disconnect the power cord.
• Unplug the power cord by grasping the plug, not the
cord itself.
• Do not apply mechanical shock or drop the unit.
• Do not disassemble or convert the unit.
• Do not remove the cover. There is a danger of electric
shock from the internal parts.
• Be careful not to spill water or other liquids on the
unit, or to allow combustible or metallic material to
enter the cabinet. If used with foreign matter in the
cabinet, the unit is liable to fail, or present a risk of fire
or electric shock.
• Ventilation holes are provided to prevent the printer
from overheating. Be careful not to obstruct them
with other units or by covering the printer with a cloth
etc.
• If the printer malfunctions or if a foreign body falls
into the cabinet, disconnect the power immediately
and consult your Sony service facility or your Sony
dealer.
Installation
Condensation
• If the printer is subject to wide and sudden changes in
temperature, such as when it is moved from a cold
room to a warm room or when it is left in a room with
a heater that tends to produce large amounts of
moisture, condensation may form inside the printer.
In such cases the printer will probably not work
properly, and may even develop a fault if you persist in
using it. If condensation forms,
standby mode
one hour.
• If the printing pack is subjected to wide and sudden
changes in temperature, condensation may form on
the print cartridge or paper. This will cause the printer
to malfunction. Also, if the printing pack is used in
this state, spots are likely to appear on the printout.
Therefore, avoid storing the printing pack in locations
subject to wide and sudden changes of temperature.
• To store a half-used printing pack, replace it in its
original packing and reseal the package. If possible,
keep the sealed printing pack in a cool, dark location.
To subsequently use the printing pack, place it, in its
sealed package, in a warm room for several hours.
Doing so prevents condensation from forming when
the printing pack is removed from its package.
and leave the printer to stand for at least
set the printer to
Location
To prevent internal heat built-up, leave enough room
around the printer for air to circulate through the vents
on the left hand side of the cabinet.
On transportation
• Do not transport the printer with the supplied
accessories. Doing so may cause malfunction.
• Retain the original carton and packing materials in
case you have to transport the unit in the future.
• Avoid placing the printer in a location subject to:
– mechanical vibration
– high humidity
– excessive dust
– where it is exposed to rain
– direct or excessive sunlight
– extremely high or low temperatures
– close to sources of strong magnetism
– close to sources of powerful electromagnetic
radiation, such as radios or TV transmitters
• Do not use other electronic equipment near the printer.
It will not work properly in strong electromagnetic
fields.
• Do not place a heavy object such as a monitor on the
printer.
Cleaning
• Before cleaning the printer, press the on/standby
button
of the printer so that the lamp goes out, and
unplug the power cord.
• Clean the cabinet, panel and controls with a soft dry
cloth, or a soft cloth lightly moistened with a mild
detergent solution. Do not use any type of solvent,
such as alcohol or benzine, which may damage the
finish.
Precautions
19
Page 20

Pin assignment of the USB connector
Specifications
Printer
Power supply 100 – 240 V AC, 50/60 Hz
Current consumption
1.1 A max. (during printing)
Operating temperature
5°C to 35°C (41°F to 95°F)
Storage/transport temperature
–20°C to +60°C (–4°F to +140°F)
Operating humidity
20% to 80% (non condensation)
Maximum dimensions (w/h/d)
203 × 85 × 305 mm
(8 × 33/8 × 121/8 inches)
Mass Approx. 2.7 kg (5 lb 15 oz) (main unit
only)
Printing method Four-surface sequential sublimation
thermal transfer process
(yellow, magenta, cyan, laminate)
Printing resolution
403 × 403 dpi
Thermal head 403 dots/inch
Printing gradations
8 bits for yellow, magenta, cyan
Printing time UPC-X46: 100 sec./sheet
UPC-X34: 65 sec./sheet
Paper supply method
Autofeed from paper tray
Maximum capacity of paper tray
UPC-X46: 25 sheets
UPC-X34: 30 sheets
Paper eject method
Front ejection
Sheets are ejected in order on top of
paper tray
Printing capacity of ribbon cartridge
UPC-X46: 25 sheets
UPC-X34: 30 sheets
Inputs AC IN (power inlet)
Maximum print size
UPC-X46: 101.6 × 151.4 mm
(4 × 61/8 inches) (no border)
UPC-X34: 70.1 × 95.3 mm
(27/8 × 37/8 inches) (with border)
Print pixels UPC-X46: 1664 × 2440 dots
UPC-X34: 1112 × 1512 dots
USB interface
Data-transmission system
Compliant with the Universal Serial
Bus Specification Revision 1.1
I/O Signal Function
V
CC
I/O –Data Data
I/O +Data Data, can be pulled up to +3.3 V
GROUND Cable ground
Cable power, maximum current:
100 mA
via a 1.5-kohm resist
or
Bluetooth specifications
Communication type
Bluetooth specification, ver.1.1
Maximum transmission speed
1)
About 723 Kbps
Output Bluetooth specification, Power Class
2
Communication distance
2)
About 10 m (3.3 feet) without
obstacles
Compatible Bluetooth profile
3)
Basic Imaging Profile (Image Push
Responder)
Frequency band 2.4GHz (2.400 GHz – 2.4835 GHz)
1) Maximum data transmission speed based on Bluetooth
specification, Ver.1.1. This speed depends on the distance
between the devices, obstacles, radio wave conditions,
application software, or the OS.
2) This distance depends on the distance between the devices,
obstacles, radio wave conditions, application software, or the
OS.
3) This specification is in accordance with the intended use
between two Bluetooth devices. This is defined by the
Bluetooth
specification.
Supplied accessories
Paper tray for the UPC-X46 (1)
Paper tray for the UPC-X34 (1)
Tray cover (1)
Paper holder (2)
AC power cord (1)
Cleaning cassette (1)
CD-ROM (1)
Operating instructions (1)
Software License Agreement (1)
Optional accessories
UPA-DX100TR Paper Tray
10UPC-X46 Self-laminating Color Printing Pack
(250 sheets)
10UPC-X45 Self-laminating Color Printing Pack
(250 sheets)
10UPC-X34 Self-laminating Color Printing Pack
(300 sheets)
20
Design and specifications are subject to change without
notice.
Specifications
Page 21

Notes
• Always verify that the unit is operating properly
before use.
SONY WILL NOT BE LIABLE FOR DAMAGES
OF ANY KIND INCLUDING, BUT NOT
LIMITED TO, COMPENSATION OR
REIMBURSEMENT ON ACCOUNT OF
FAILURE TO PRINT CONTENT OF ANY TYPE
OR LOSS OF DATA DUE TO FAILURE OF THIS
UNIT OR ITS PRINTING MEDIA, ASSOCIATED
SOFTWARE, EXTERNAL STORAGE, OR
OTHER EXTERNAL DEVICE.
• SONY WILL NOT BE LIABLE FOR DAMAGES
OF ANY KIND INCLUDING, BUT NOT
LIMITED TO, COMPENSATION OR
REIMBURSEMENT ON ACCOUNT OF THE
LOSS OF PRESENT OR PROSPECTIVE
PROFITS DUE TO FAILURE OF THIS UNIT,
EITHER DURING THE WARRANTY PERIOD
OR AFTER EXPIRATION OF THE WARRANTY,
OR FOR ANY OTHER REASON
WHATSOEVER.
Troubleshooting
If you run into any problem when using your
UP-DX100, use the following table as a guide to
troubleshoot the problem. If the problem persists,
contact your Sony dealer or local authorized Sony
service facility.
Printer
Symptom Cause/Action
Cannot operate the
printer after the
is turned on.
Cannot print. • The print paper and print cartridge
The beeps sound. tCheck that you are following the
Cannot remove the
print cartridge.
The ALARM indicator
is lit or blinking, and an
error message is
displayed.
There is a white line or
dots in the printed
pictures.
printer
• The AC power cord is not connected
correctly.
tConnect the AC power cord to an
AC outlet securely
do not match.
tUse the recommended printing
pack, the same size of the print
paper and print cartridge.
• The thermal head may be
overheated. “Waiting” appears on
the operation display.
tLeave the printer until the head
cools down and the printer
resumes printing.
• The print paper may jam.
tRemove the jammed paper, if
any.
correct procedures.
tThe print cartridge cannot be
removed while printing. Wait until
printing is finished.
If this does not solve the problem,
your Sony service facility
contact
or your Sony dealer.
tFollow the instructions on the
operation display.
• Dust may be attached to the thermal
head.
tThe print head or paper path may
be soiled. Use the supplied
cleaning cassette to clean the
head and path.
• The roller inside the printer may
damage the print paper.
tReduce the number of sheets on
the paper tray.
(page 11).
If paper jams
If the print paper jams, the ALARM lamp lights, an error
message appears, and printing stops.
1
Press the on/standby button to turn off the lamp.
Troubleshooting
21
Page 22

2
Remove the paper tray, and remove the jammed
paper from the paper tray slot.
3
Remove the cover on the rear panel, and check that
the paper does not remain in the printer. If the
jammed paper is still in the printer, remove it.
- A
C
IN
Rear cover
4
After removing the jammed paper, be sure to
replace the
5
Insert the paper tray.
6
Turn on the printer.
Note
rear cover.
g
- A
C
IN
Jammed paper
If you cannot remove the jammed paper, contact your
Sony service facility or
your Sony dealer.
Cleaning the inside of the printer
If white lines or dots are printed on the pictures, clean
inside the printer using
and the protective sheet contained in the printing pack
Notes
• Make cleaning only when there are white lines or dots
on the print.
• When you can obtain proper printing performances,
cleaning will not improve the printed picture quality.
1
Remove the paper tray from the printer. If there is
print paper in the tray, remove the print paper from
the tray.
2
Place the protective sheet with the imprint side
facing down and the arrow pointing in the same
direction as the arrow in the tray.
3
Open the cartridge compartment cover and remove
the print cartridge.
the supplied cleaning cassette
White lines
4
Insert the supplied cleaning cassette into the printer
and close the cartridge compartment cover.
A buzzer sounds, and “HEAD CLEANING/PUSH
[EXEC]” appears on the operation display.
5
Press the EXEC button.
The cleaning cassette and protective sheet will
clean inside the printer. After the cleaning is
finished, the protective sheet is automatically
ejected.
6
Remove the cleaning cassette from the printer and
set the print cartridge and print paper.
Bluetooth Function
Symptom Cause/Action
Data cannot be
transmitted.
.
The connection is
disconnected from
the desired device.
• The distance between the device and the
printer is too
tLocate the devices within the
maximum communicable distance.
•The Bluetooth antenna portion of the
printer and/or the
a hand, etc.
tDo not cover the antenna portion.
• The device you wish to connect with the
printer has been already connected with
another device.
tReconnect the device with the printer
after the device’s task with another
device is finished.
• Authentication failed.
tReconnect the printer with the device,
and enter the same passkey correctly
on both devices.
• The connected device interrupted the
transmission.
tCheck the status of the connected
device
• The Bluetooth connection is interrupted
on the side of the connected device.
tCheck the status of the connected
device.
• The authentication time limit (30
seconds)
tEnter the same passkey correctly both
on the printer and the device within
30 seconds.
• The same passkey is not entered.
tEnter the same passkey correctly both
on the printer and the device within
30 seconds.
• The device disconnected or ended the
connection.
tCheck the status of the device, try to
connect to the device again, and enter
the passkey correctly.
great.
camera is covered with
, then reconnect.
elapsed.
22
Troubleshooting
Page 23

Symptom Cause/Action
Authentication
failed.
Data transmission
speed is too low.
Even with the
distance between
the printer and the
desired device
within 10 m (33
feet), connection
cannot be
established.
• The authentication time limit (30
seconds) elapsed.
tEnter the same passkey correctly both
on the printer and the device within
30 seconds.
• The same passkey is not entered.
tEnter the same passkey correctly both
on the printer and the device.
• The device disconnected or ended the
connection.
tCheck the status of the device, try to
connect to the device again, and enter
the passkey correctly.
•The Bluetooth antenna portion of the
printer and/or the camera is covered with
hand, etc.
a
tDo not cover the antenna portion.
Data transmission speed varies
depending on the distance between
the printer and the device, obstacles,
or radio wave conditions. Change the
position of the printer or set the
printer closer to the device.
•The Bluetooth antenna portion of the
printer and/or the
hand, etc.
a
tDo not cover the antenna portion.
Data transmission speed varies
depending on the distance between
the printer and the device, obstacles,
radio wave conditions, application
software, or the OS.
Change the position of the printer or
set the printer closer to the device.
• The desired device is now connecting to
another device.
tWhen the device is connected to
another device, the device may not be
displayed as an available device or be
connectable at that time.
• The device is not connectable with the
Bluetooth function
tSet the device so that it is
connectable.
camera is covered with
s.
Error messages
Error message Cause/Action
SET NEW RIBBON
PUSH [EXEC]
SET PAPER
PUSH [EXEC]
MEDIA MISMATCH
PUSH [EXEC]
PAPER JAMMING
REMOVE PRINTS
REMOVE PRINTS
PUSH [EXEC]
PRINTER ERROR
PLEASE RETRY
PRINTER ERROR
SERVICE CALL
BLUETOOTH ERROR
SERVICE CALL
• The print cartridge is not installed
properly.
tInstall the print cartridge properly,
and press the EXEC button.
• The print cartridge has run out.
tReplace the print cartridge, and
press the EXEC button.
• The paper tray is not installed.
tInstall the paper tray, and press the
EXEC button.
• The print paper has run out.
tInsert print paper, and press the
EXEC button.
• The print paper and print cartridge do
not match.
tInsert the correct print paper and
press the EXEC button.
• There is a print paper jam.
tRemove the jammed paper, and try
printing again. (See
jams” (page 21))
• Print paper remains in the ejection
slot.
tRemove the paper tray, remove the
print paper, and then press the
EXEC button.
• An error has occurred with the printer.
tTry printing again.
• There is a problem with the printer.
tContact your nearest Sony dealer.
• There is a problem with the Bluetooth
function.
tContact your nearest Sony dealer.
“If paper
Troubleshooting
23
Page 24

Sony Corporation
 Loading...