

Sony TRV38 - MiniDV 1Megapixel Camcorder, DCR-TRV38, DCR-HC65 Operating Manual
DCR-TRV38
Operating Guide for
Sony DCR-TRV38 & DCR-HC65
Prociency Required
DCR-HC65
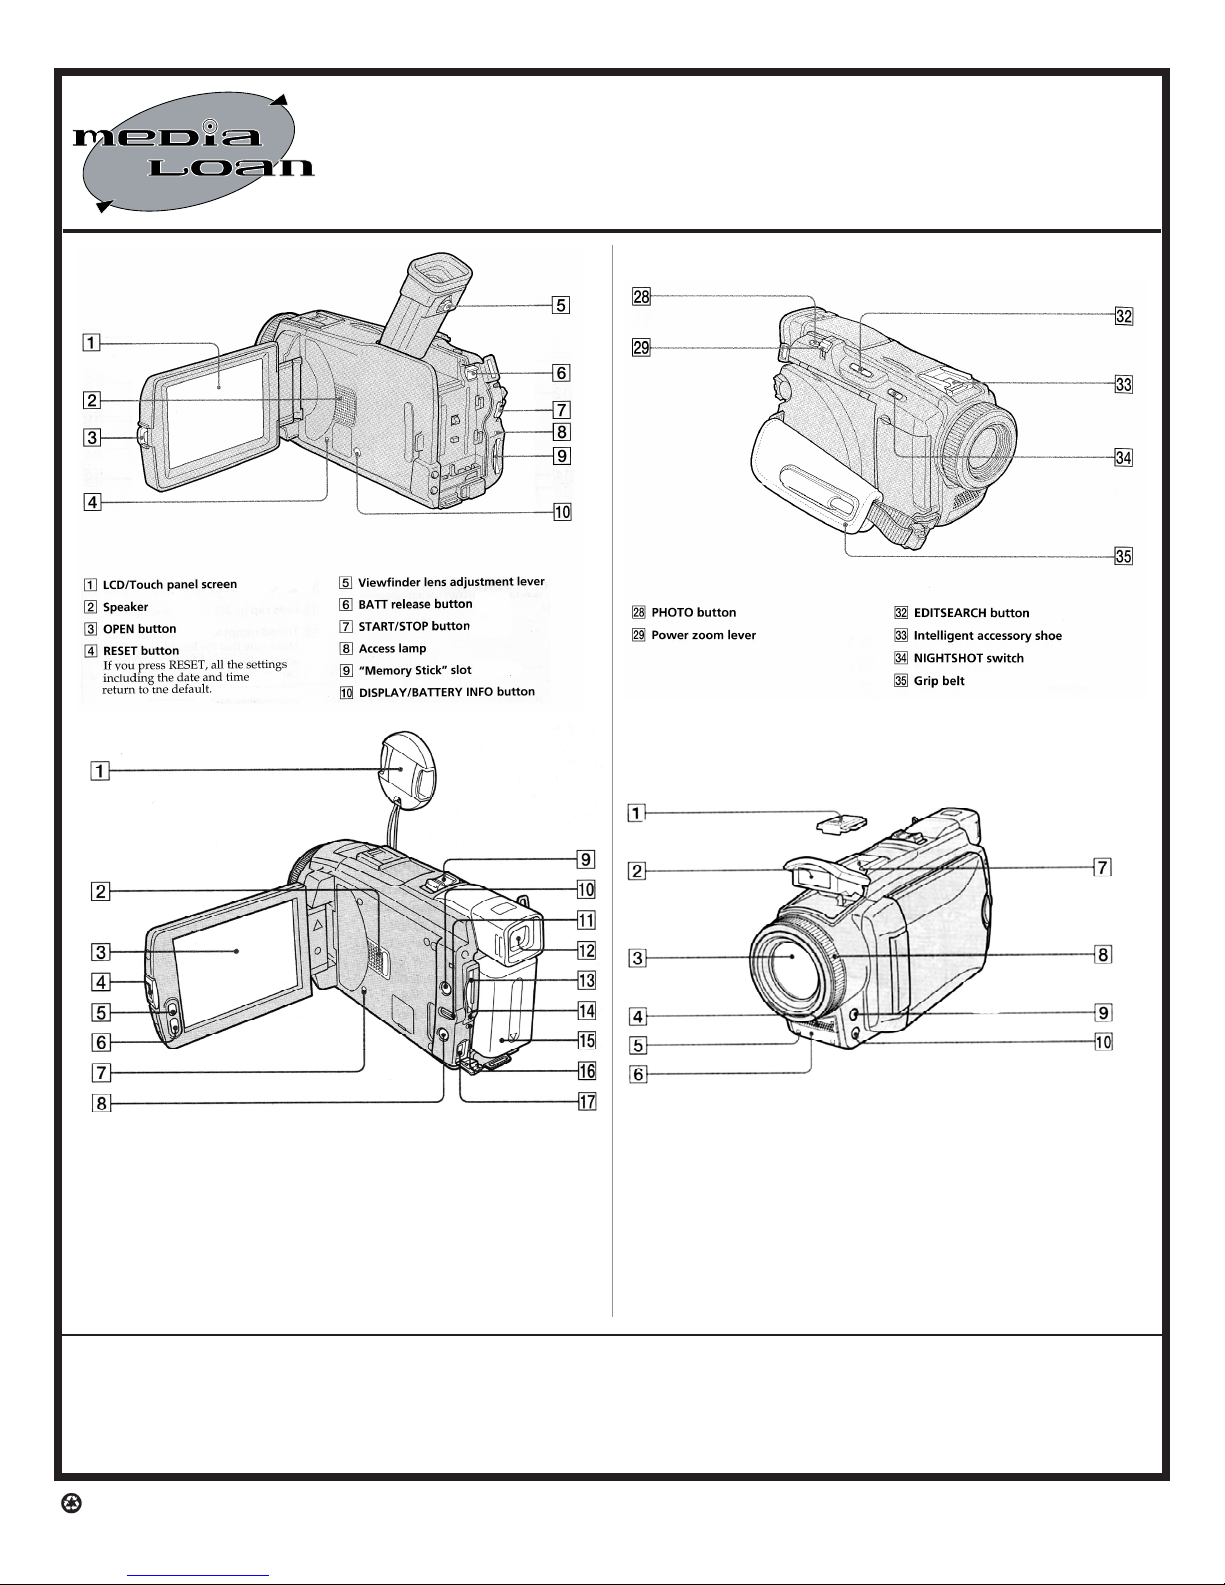
1. Lens cap
2. Internal speaker
3. LCD/touch panel screen
4. OPEN button
5. LCD backlight
6. REC. start/stop
7. RESET (all setting return
to default)
8. [ignore]
9. Power zoom lever
10. DISPLAY/BATT info
1. EASY button
12. Viewnder
13. "Memory Stick" slot
14. Access lamp
15. Battery pack
16. [ignore]
17. DC IN jack
1. Shoe cover
2. Flash (for DCR-HC65
3. Lens
4. Microphone (internal)
5. Camera recording lamp
6. Remote sensor
7. Intelligent accessory
8. Focus ring
9. Focus button
10. Back light button
Media Loan The Library Group (360) 867-6253
The Evergreen State College Olympia, WA 98505
Recycled & Recyclable
http://www.evergreen.edu/media/ml/
SONYPALMCORDERS/10.01.07/JW

GENERAL PRECAUTIONS
As with any sensitive piece of equipment, care
*
should be taken when using digital camcorders.
Do not expose this equipment to rain or moisture.
To avoid damage to the internal parts of the EVF
(electronic viewnder), do not aim your camcorder
at the sun or other bright objects.
Extended high temperature or sudden changes in
*
temperature should be avoided.
Do not leave your camcorder or the power supply
*
turned on when not in use.
Store and handle your camcorder so that it will not
*
be subjected to unnecessary shaking or striking
movement.
Do not record over a previously used tape, this
*
degrades quality and gets the video heads dirty.
We recommend that you use MiniDV tapes to record
and play back in Standard Play (SP) mode only,
especially if you plan to edit later. Recording time: SP
mode, 30 or 60 minutes; Long Play (LP) mode, 45 or
90 minutes depending on tape size.
IMPORTANT NOTE ABOUT USING THE TOUCH
PANEL: (TRV-HC65 ONLY)
When using the touch panel, press operation buttons
lightly with your nger supporting the LCD panel
from the back side of it.
Do not press the LCD screen with sharp objects.
Do not press the LCD screen too hard.
Do not touch the LCD screen with wet hands.
If FN is not on the LCD screen, touch the LCD screen
lightly to make it appear. You can control the display
with DISPLAY/BATTERY INFO on your camcorder.
When executing each item, the green bar appears
above the item. If the items are not available, the
color of the items changes to gray. You can operate
with the touch panel using the viewnder.
MEDIA LOAN CAMCORDER PACKAGE
GENERALLY INCLUDES:
AC adapter w/battery charger and DC cable
Dubbing cables (S-VHS & RCA)
A/V docking station
Remote control
Lens cap and case
EXTRAS AVAILABLE AT MEDIA LOAN:
Battery pack (Extended life battery available)
DV interface cable (4 to 4 or 4 to 6 pins cables for
dubbing between camcorders or to other digital
equipment)
Headphones; tripods; light kits; microphones;
monitors.
There are two ways to power the camcorder:
battery or AC Adaptor.
POWERING WITH THE AC ADAPTOR
Open DC In jack cover, insert DC cable into place.
Make the connection between the DC cable and the
AC adaptor. Then plug in the AC Adaptor.
Always unplug the AC Adaptor from the AC outlet
when not in use.
REMOVING BATTERY
To remove the battery press the BATT RELEASE
button and slide the battery upwards. Be careful not
to hit the BATT RELEASE switch accidentally. The
battery may be warm after charging or after use.
BATTERY CHARGING
To charge
the battery,
disconnect
DC Cable, if it
is connected.
Plug the AC
adapter into
the wall.
Power lamp
will light
up. Attach
the battery.
Charge lamps
will ash and
then turn
solid green
to indicate current charge level. When all 4 lamps are
constantly on, the battery is fully charged (takes about
1 1/2 hour). Expect approximately 1 hour of operation
when fully charged with the standard battery. The
extended life battery lasts about 4 hours and takes 2
1/2 hours to charge.
Note: Batteries check out from Media Loan may no
longer be fully charged as rechargeable batteries start
to discharge when removed from charger.
PAGE 2
 Loading...