

Page 1
SERVICE MANUAL
BG-1S
CHASSIS
MODEL COMMANDER DEST. CHASSIS NO.
KV-T29SN81
RM-870 New Zealand SCC-K37E-A
MODEL COMMANDER DEST. CHASSIS NO.
TRINITRON
®
COLOR TV
Page 2
KV-T29SN81
RM-870
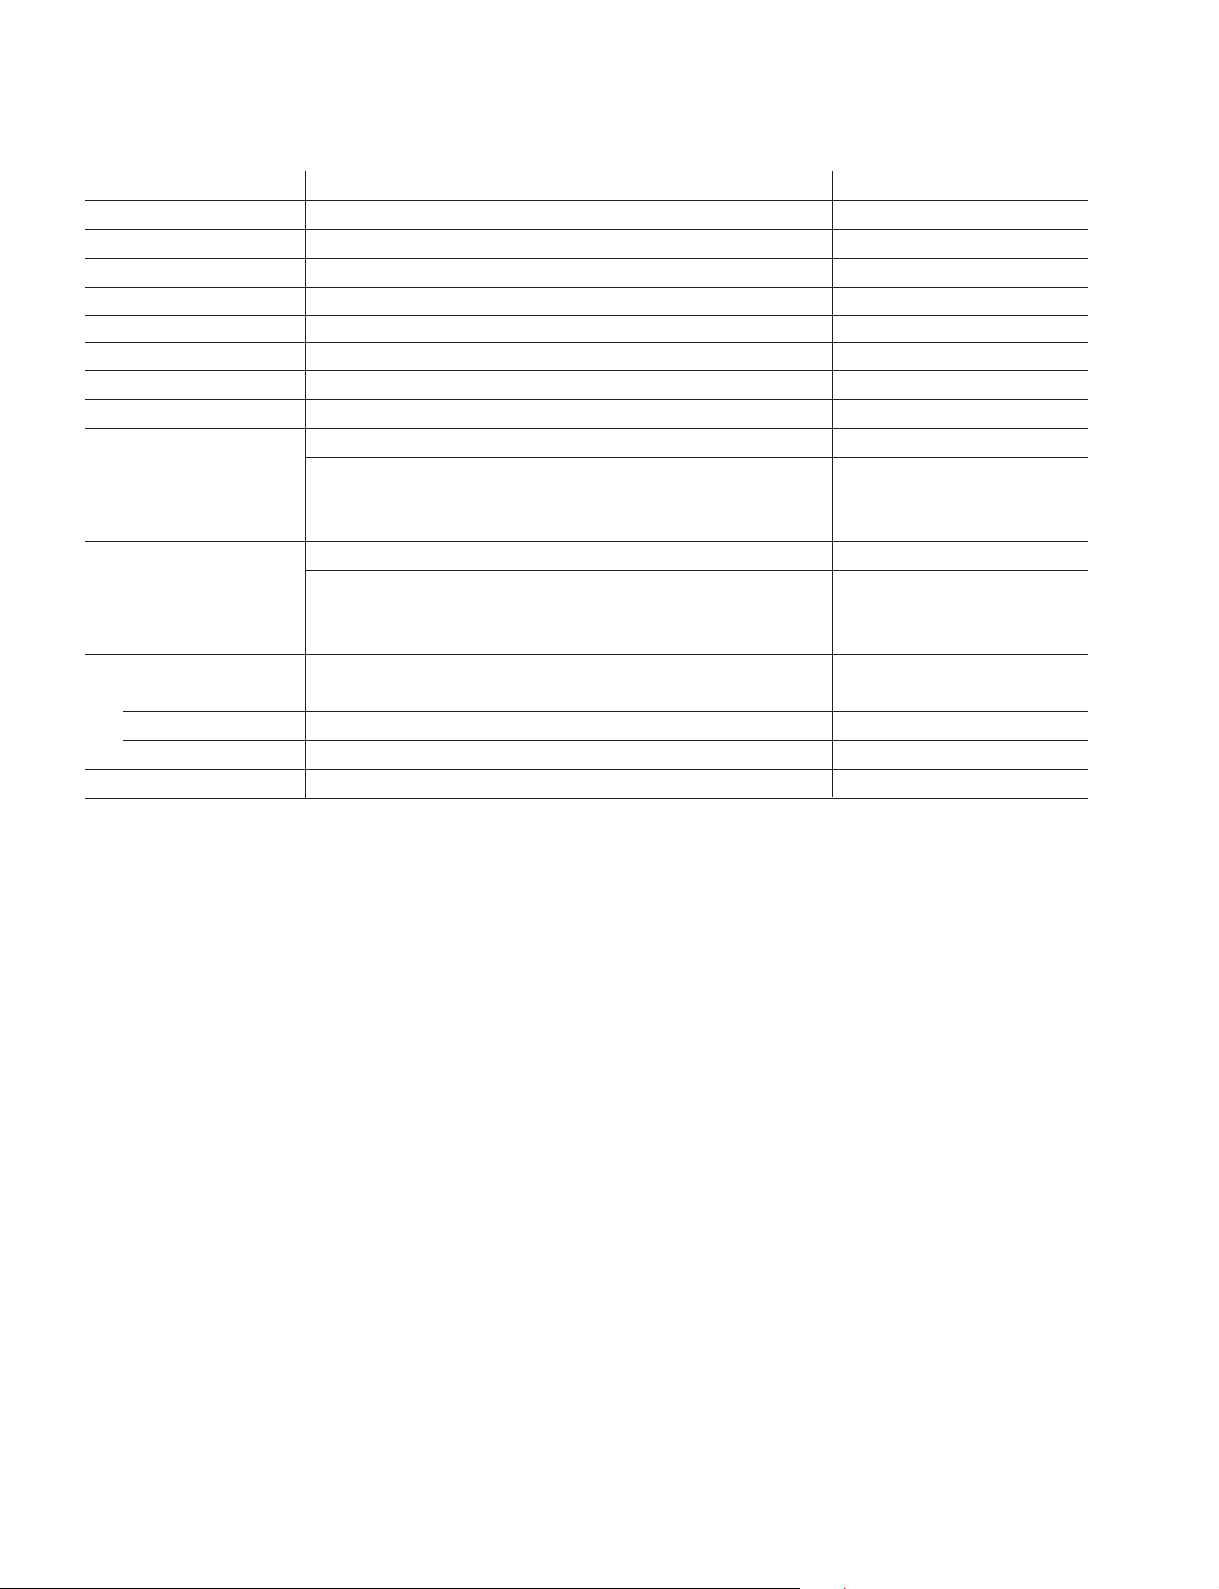
Power requirements 110-240 V AC, 50/60 Hz
Power consumption (W) Indicated on the rear of the TV
Television system B/G
Color system PAL, PAL 60, NTSC4.43, NTSC3.58 (AV IN)
Stereo/Bilingual system NICAM Stereo/Bilingual B/G, A2 Stereo/Bilingual (German) B/G
Teletext language English, German, Swedish, Italian, French, Spanish
Channel coverage VHF: 1 to 11/UHF: E21 to E69/CATV: S01 to S03, S1 to S41
Audio output (speaker) 5W × 2
Inputs Antenna: 75 ohms
Outputs Headphone jack: minijack
Picture tube 29 in.
Tube size (cm) 72 Measured diagonally
Screen size (cm) 68 Measured diagonally
Dimensions (w/h/d, mm) 686 × 617 × 537
Mass (kg) 43
SPECIFICATIONS
Note
VIDEO IN jacks: phono jacks
Video: 1 Vp-p, 75 ohms
Audio: 500 mVrms, high impedance
MONITOR OUT jacks: phono jacks
Video: 1 Vp-p, 75 ohms
Audio: 500 mVrms
CAUTION
SHORT CIRCUIT THE ANODE OF THE PICTURE TUBE AND
THE ANODE CAP TO THE METAL CHASSIS, CRT SHIELD, OR
CARBON PAINTED ON THE CRT, AFTER REMOVING THE
ANODE.
Design and specifications are subject to change without notice.
SAFETY-RELATED COMPONENT WARNING!!
COMPONENTS IDENTIFIED BY SHADING AND MARK ! ON THE
SCHEMA TIC DIA GRAMS, EXPLODED VIEWS AND IN THE P AR TS
LIST ARE CRITICAL TO SAFE OPERATION. REPLACE THESE
COMPONENTS WITH SONY PARTS WHOSE PART NUMBERS
APPEAR AS SHOWN IN THIS MANUAL OR IN SUPPLEMENTS
PUBLISHED BY SONY. CIRCUIT ADJUSTMENTS THAT ARE
CRITICAL TO SAFE OPERATION ARE IDENTIFIED IN THIS
MANUAL. FOLLOW THESE PROCEDURES WHENEVER
CRITICAL COMPONENTS ARE REPLACED OR IMPROPER
OPERATION IS SUSPECTED.
– 2 –
Page 3

KV-T29SN81
TABLE OF CONTENTS
Section Title Page Section Title Page
RM-870
SELF DIAGNOSIS REMOVAL............................. 4
1. GENERAL.................................................................... 5
2. DISASSEMBLY
2-1. Rear Cover Removal............................................ 11
2-2. A Board Removal ................................................ 11
2-3. F1 Board Removal ............................................... 11
2-4. Service Position ................................................... 11
2-5. Replacement of Parts ........................................... 12
2-6. Demagnetization Coil Removal .......................... 12
2-7. Picture Tube Removal.......................................... 13
3. SET-UP ADJUSTMENTS
3-1. Beam Landing ...................................................... 14
3-2. Convergence......................................................... 15
3-3. Focus Adjustment ................................................ 18
3-4. G2 (Screen) and White Balance Adjustments..... 18
4. CIRCUIT ADJUSTMENTS
4-1. Adjustments with Commander ............................ 19
4-2. Adjustment Method ............................................. 20
4-3. A Board Adjustment after IC003 (Memory)
Replacement......................................................... 23
4-4. Picture Distortion Adjustment ............................. 23
5. DIAGRAMS
5-1. Block Diagram ...................................................... 25
5-2. Circuit Boards Location ....................................... 29
5-3. Schematic Diagrams and Printed Wiring Boards
(1) Sc hematic Diag ram of A Board ........................... 33
(2) Schematic Diag rams of A3, F and V1 Boards ..... 38
(3) Schematic Diag rams of C and VM Boards .......... 45
5-4. Semiconductors..................................................... 49
6. EXPLODED VIEW
6-1. Chassis .................................................................. 53
7. ELECTRICAL PARTS LIST ................................... 55
– 3 –
Page 4
KV-T29SN81
RM-870
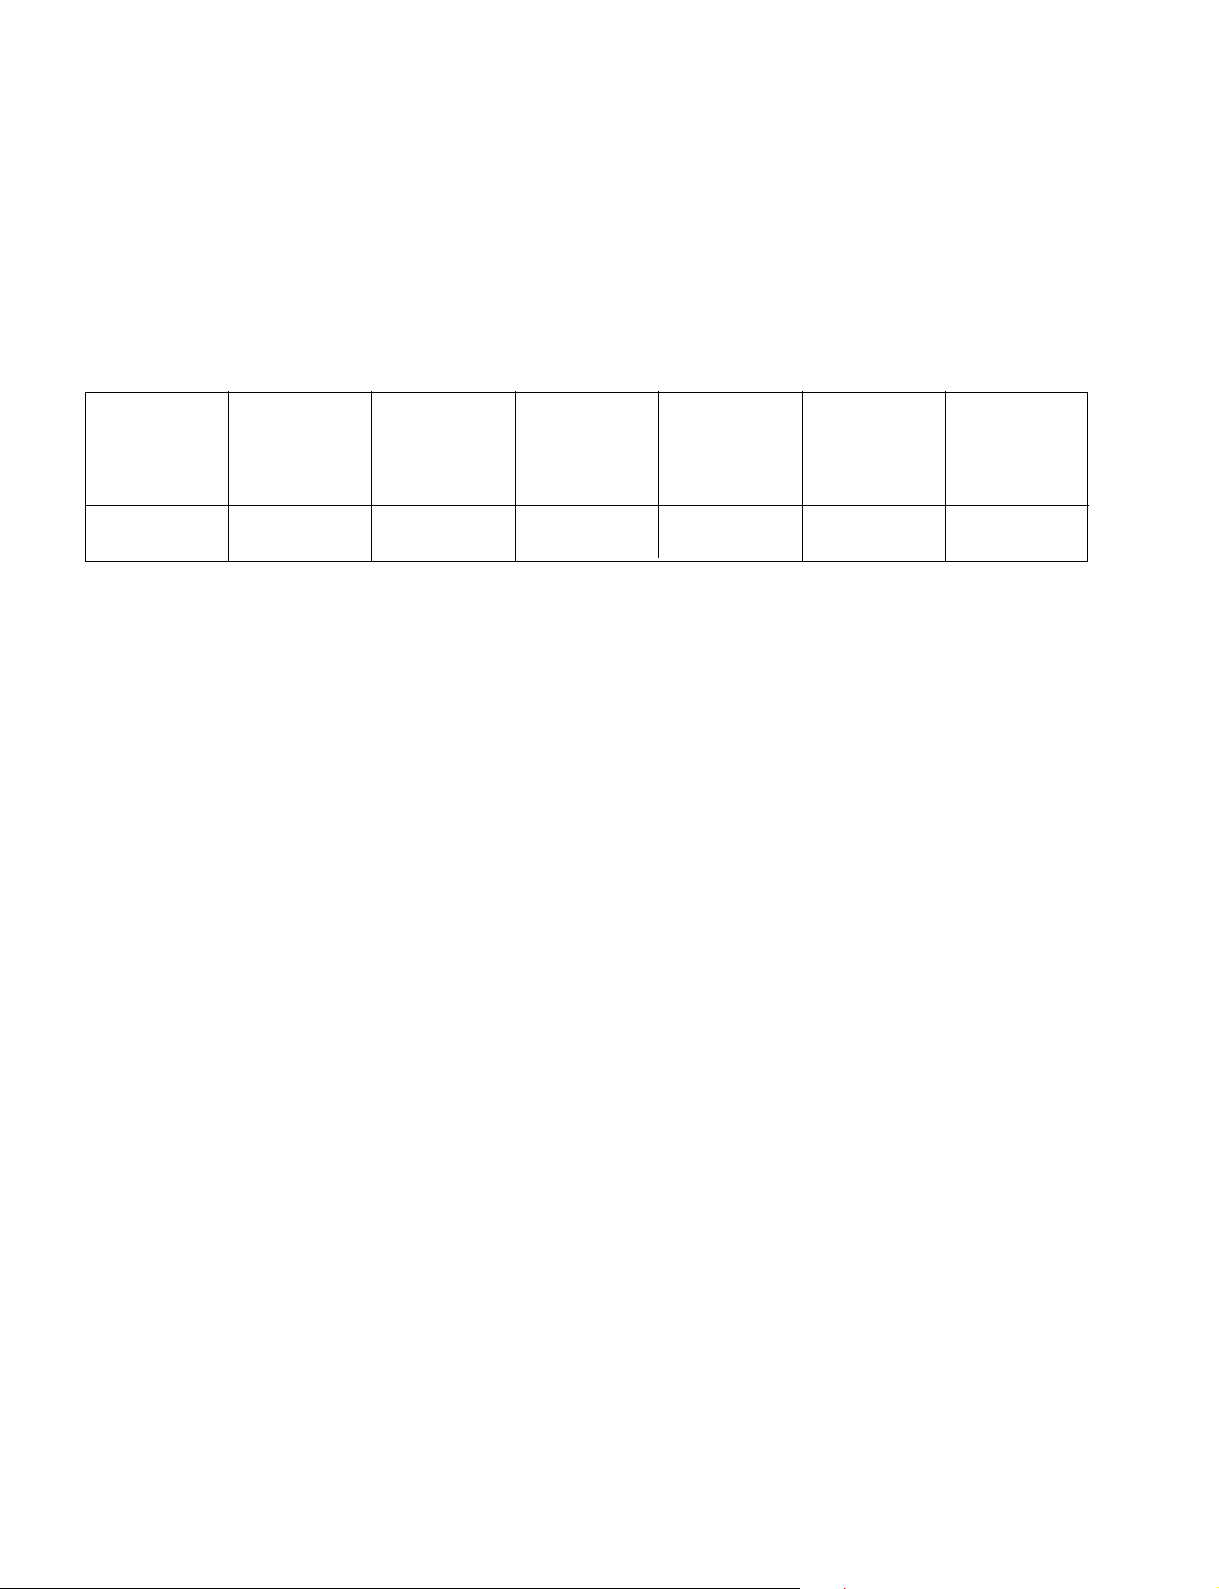
SELF DIAGNOSIS FUNCTION
If no acknowledgement is returned from a device which is turned "ON", the device has a problem.
In this case, one of the LED's responding to the problem device will flicker a defined number of times.
Flickering is operated by lighting the LED's for 60ss each time.
The flickering frequency responding to each failed device is shown below.
NONVOLATILE
Device
Flickering
Frequency
All the devices are checked one after another from the left of the table.
If an error is found, the responding LED will start flickering.
So, if more than 1 device have failed, only the one on the left side will flicker.
MEMORY
1
—
—
Y/C JUNGLE
3
—
—
—
—
AUDIO
PROCESSOR
(TDA8424)
6
– 4 –
Page 5
– 5 –
2
3
AUTO PROGR
AUTO PROGR
SECTION 1
GENERAL
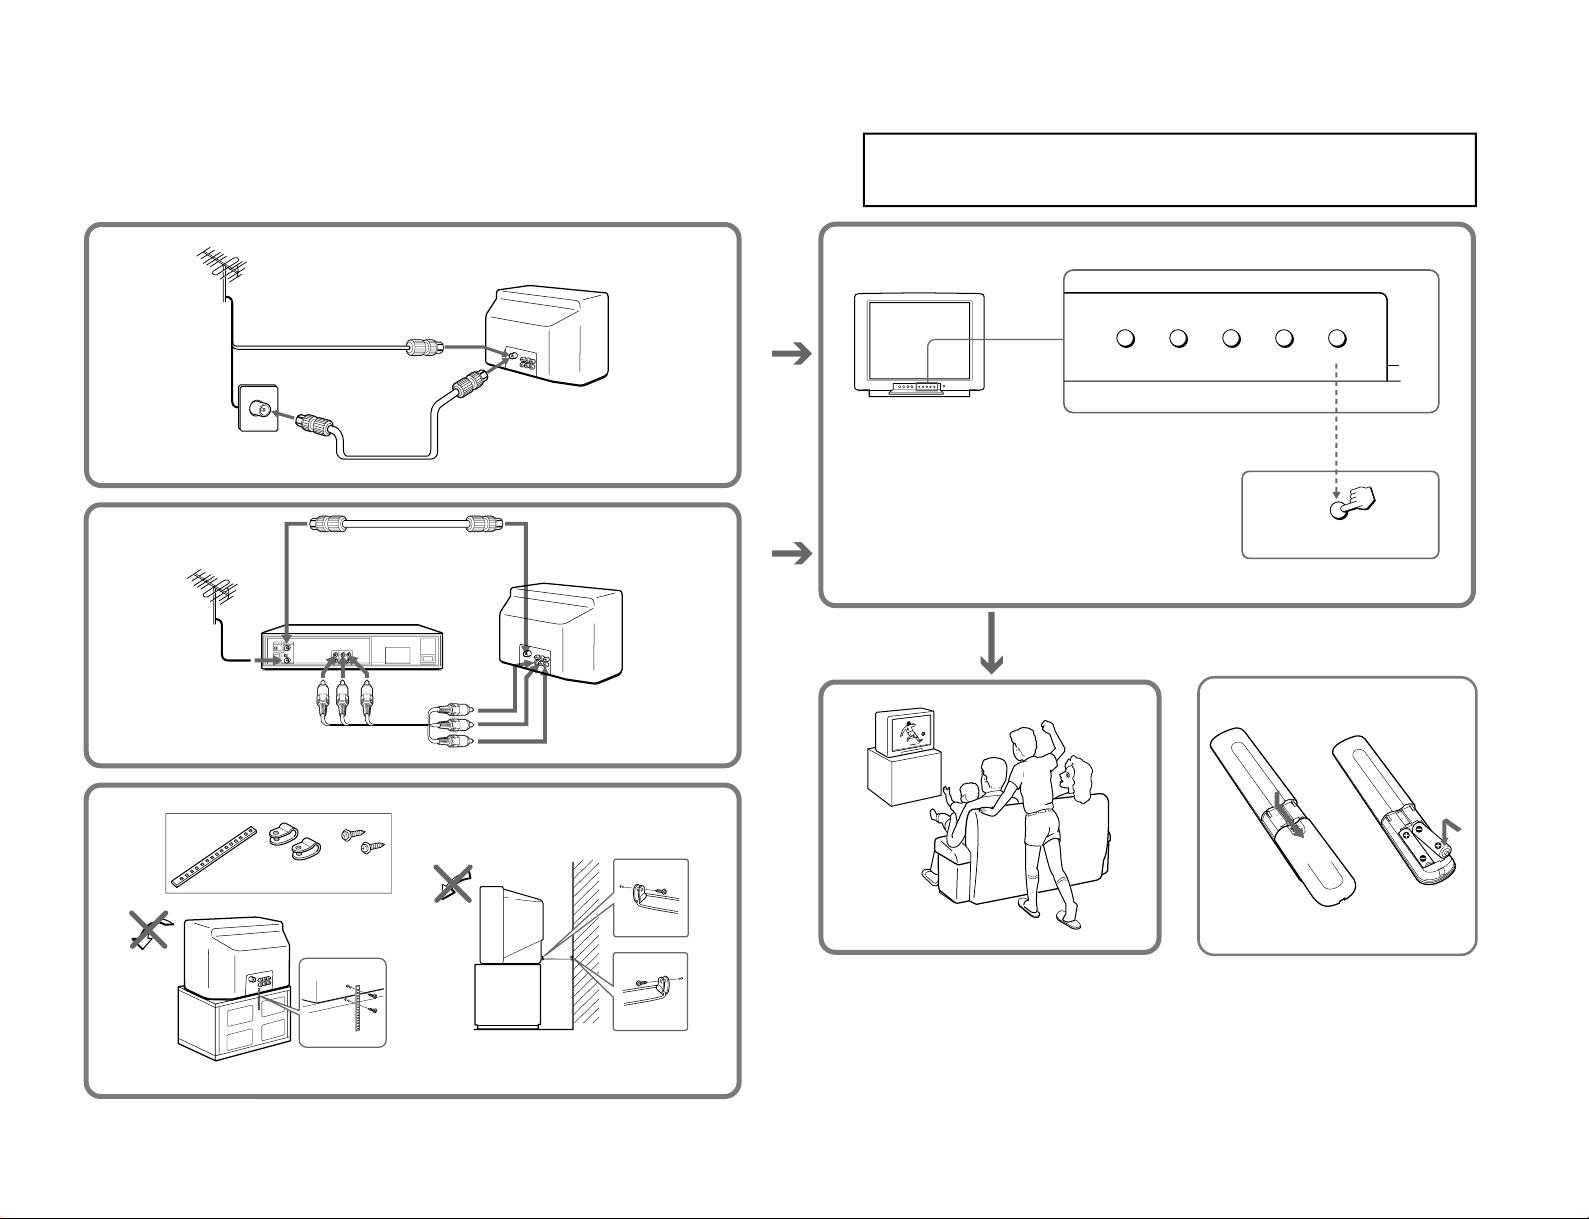
The operating instructions mentioned here are partial abstracts from the
Operating Instructions Manual. The page numbers of the Operating
Instruction Manual remain as in this manual.
KV-T29SN81
RM-870
Page 6
Getting Started
4
Connections
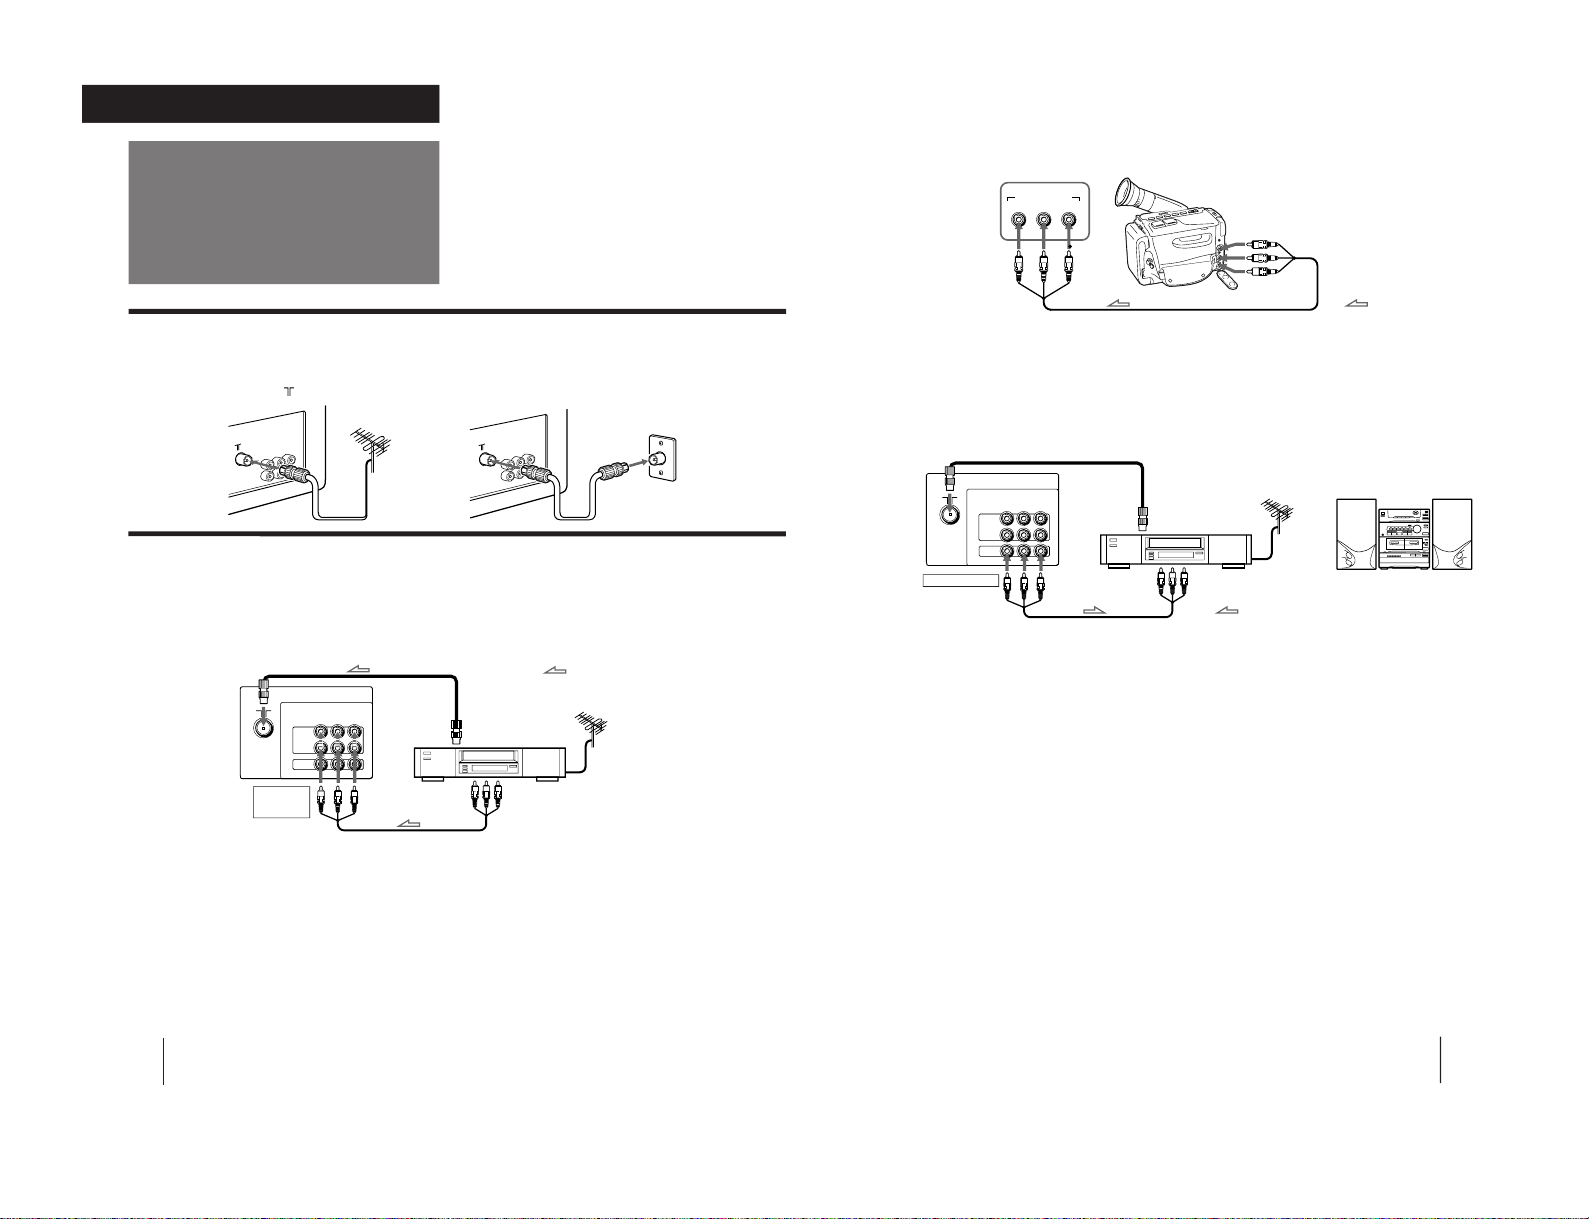
Connecting a VHF antenna or a combination VHF/UHF antenna
— 75-ohm coaxial cable (round)
Attach an optional IEC antenna connector to the 75-ohm coaxial cable.
Plug the connector into the
(antenna) socket at the rear of the TV.
Rear of TV
or
On a wall
Rear of TV
Getting Started
Connecting optional equipment
You can connect optional audio/video equipment to your TV such as a VCR, multi disc player, camcorder, video
game or stereo system.
Connecting video equipment using video input jacks
to antenna socket
to video
and audio
outputs
: Signal flow
to antenna
output
VCR
VIDEO IN 1
or
VIDEO IN 2
Rear of TV
VIDEO
L
(
MONO
)
AUDIO
R
VIDEO
IN
MONITOR
OUT
2
1
When connecting a monaural VCR
Connect the yellow plug to VIDEO and the black
plug to AUDIO-L (MONO).
Getting Started
5
Front of TV
MONITOR OUT
to antenna
socket
Rear of TV
When recording through the MONITOR OUT jacks
If you change the channel or video input while recording with a VCR, the channel or video input you are recording also will be changed.
CAUTION
Do not connect the power cord until you have completed making all other connections; otherwise a minimum leakage
current might flow through the antenna and other terminals to ground.
to antenna
output
VCR
to video
and audio
inputs
or
Audio system
EN
MONITOR
OUT
VIDEO
L
(
MONO
)
AUDIO
R
VIDEO
IN
2
1
: Signal flow
When using the video input jacks
Do not connect video equipment to the video input jacks at the front and the rear (VIDEO IN 1 for this model) of your TV simultaneously;
otherwise the picture will not be displayed properly on the screen.
: Signal flow
Camcorder
VIDEO
L (MONO
)
VIDEO 1 INPUT
AUDIO
R
to video and
audio outputs
Connecting audio/video equipment using MONITOR OUT jacks
– 6 –
KV-T29SN81
RM-870
Page 7
Getting Started
6
MANUAL PROGR
COLOR SYSTEM
SELECT
TV SYSTEM
AUTO PROGR
POWER
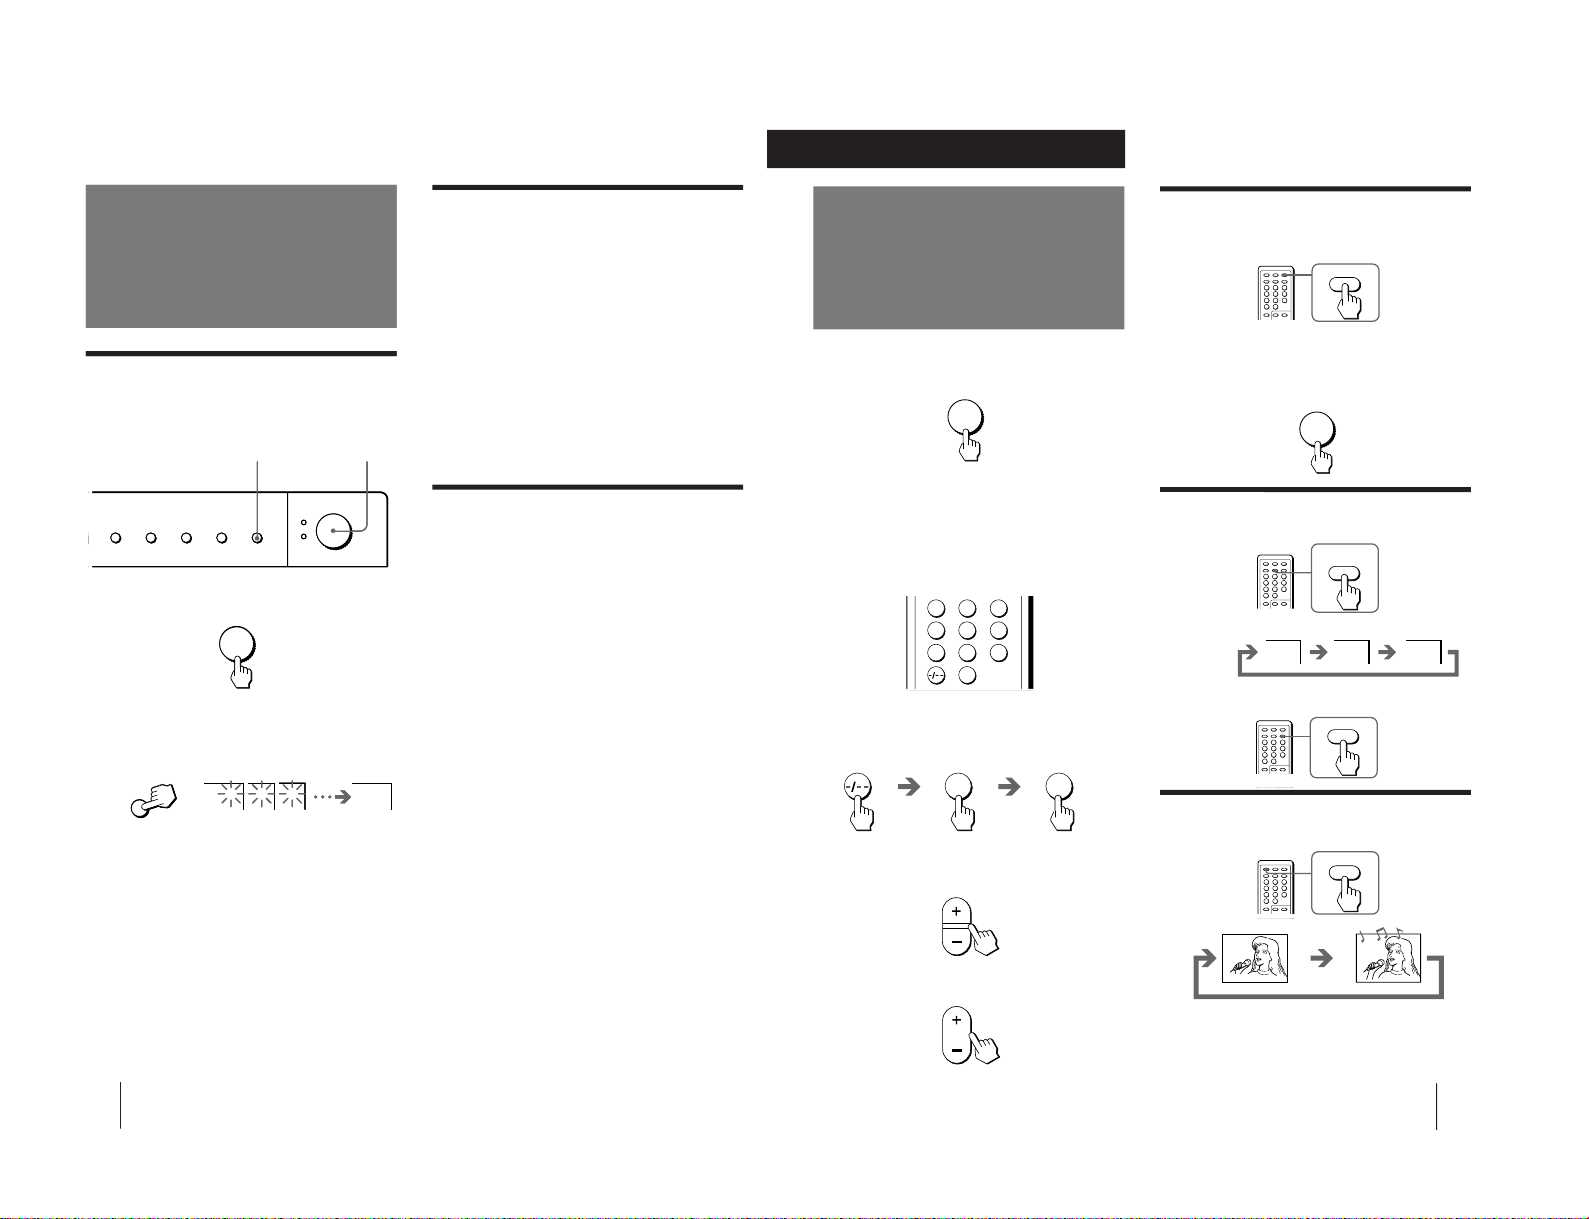
Presetting channels
Presetting channels automatically
You can preset up to 80 TV channels in numerical
sequence from program position 1.
Front of TV
1
Press POWER.
When the TV is in standby mode after pressing
POWER, press POWER on the remote commander.
2
Press AUTO PROGR.
To start presetting channels automatically
from the specified program position
1 Press MANUAL PROGR.
2 Press PROGR +/– to select the program position.
3 Press AUTO PROGR.
1 2
3 1
AUTO PROGR
Presetting channels manually
To change the channel for a particular program
position or to receive a channel with a weak signal,
preset the channel manually.
1
Press MANUAL PROGR.
2
Press PROGR +/– until the required program
position appears on the screen.
3
Press VOLUME +/– on the TV until the
required channel picture appears on the
screen.
4
Press MANUAL PROGR.
Disabling program positions
By disabling unused or unwanted program positions,
you can skip those positions when you press PROGR
+/–.
1
Press PROGR +/– until the unused or
unwanted program position appears on the
screen.
2
Press MANUAL PROGR.
3
Press PIC MODE on the remote commander.
4
Press MANUAL PROGR.
To cancel the skip setting
Preset the channel manually or automatically again.
POWER
1
2
MANUAL PROGR
COLOR SYSTEM
SELECT
TV SYSTEM
AUTO PROGR
POWER
Presetting channels
1 2
3 1
AUTO PROGR
POWER
1
2
Presetting channels automatically
You can preset up to 80 TV channels in numerical
sequence from program position 1.
Front of TV
1
Press POWER.
When the TV is in standby mode after pressing
POWER, press POWER on the remote commander.
2
Press AUTO PROGR.
To start presetting channels automatically
from the specified program position
1 Press MANUAL PROGR.
2 Press PROGR +/– to select the program position.
3 Press AUTO PROGR.
7
Operations
123
46
789
0
5
Watching the TV
Switching off the TV
To switch off the TV temporarily, press POWER on the
remote commander.
To switch off the TV completely, press POWER on the
TV.
If the power on the TV is turned off in standby mode,
the STANDBY indicator may remain alight for a while.
Watching the video input
Press VIDEO/HOLD.
1
Press POWER to turn the TV on.
To scan through channels
Press PROGR +/– until the channel you want
appears.
3
Press VOL +/– to adjust the volume.
When the TV is in standby mode after pressing
POWER, press POWER on the remote commander.
2
Select the TV channel you want to watch.
To select a channel directly
Press a number button.
To select a two-digit channel, press “-/--” before
the number buttons.
For example: to select channel 25, press “-/- -,” and
then “2” and “5.”
POWER
Operations
To watch TV, press TV.
Muting the sound
Press MUTING.
MUTING
MUTING
HOLD
VIDEO
VIDEO 1 VIDEO 2
1
POWER
2 5
VOL
PROGR
POWER
TV
– 7 –
KV-T29SN81
RM-870
Page 8
Operations
8
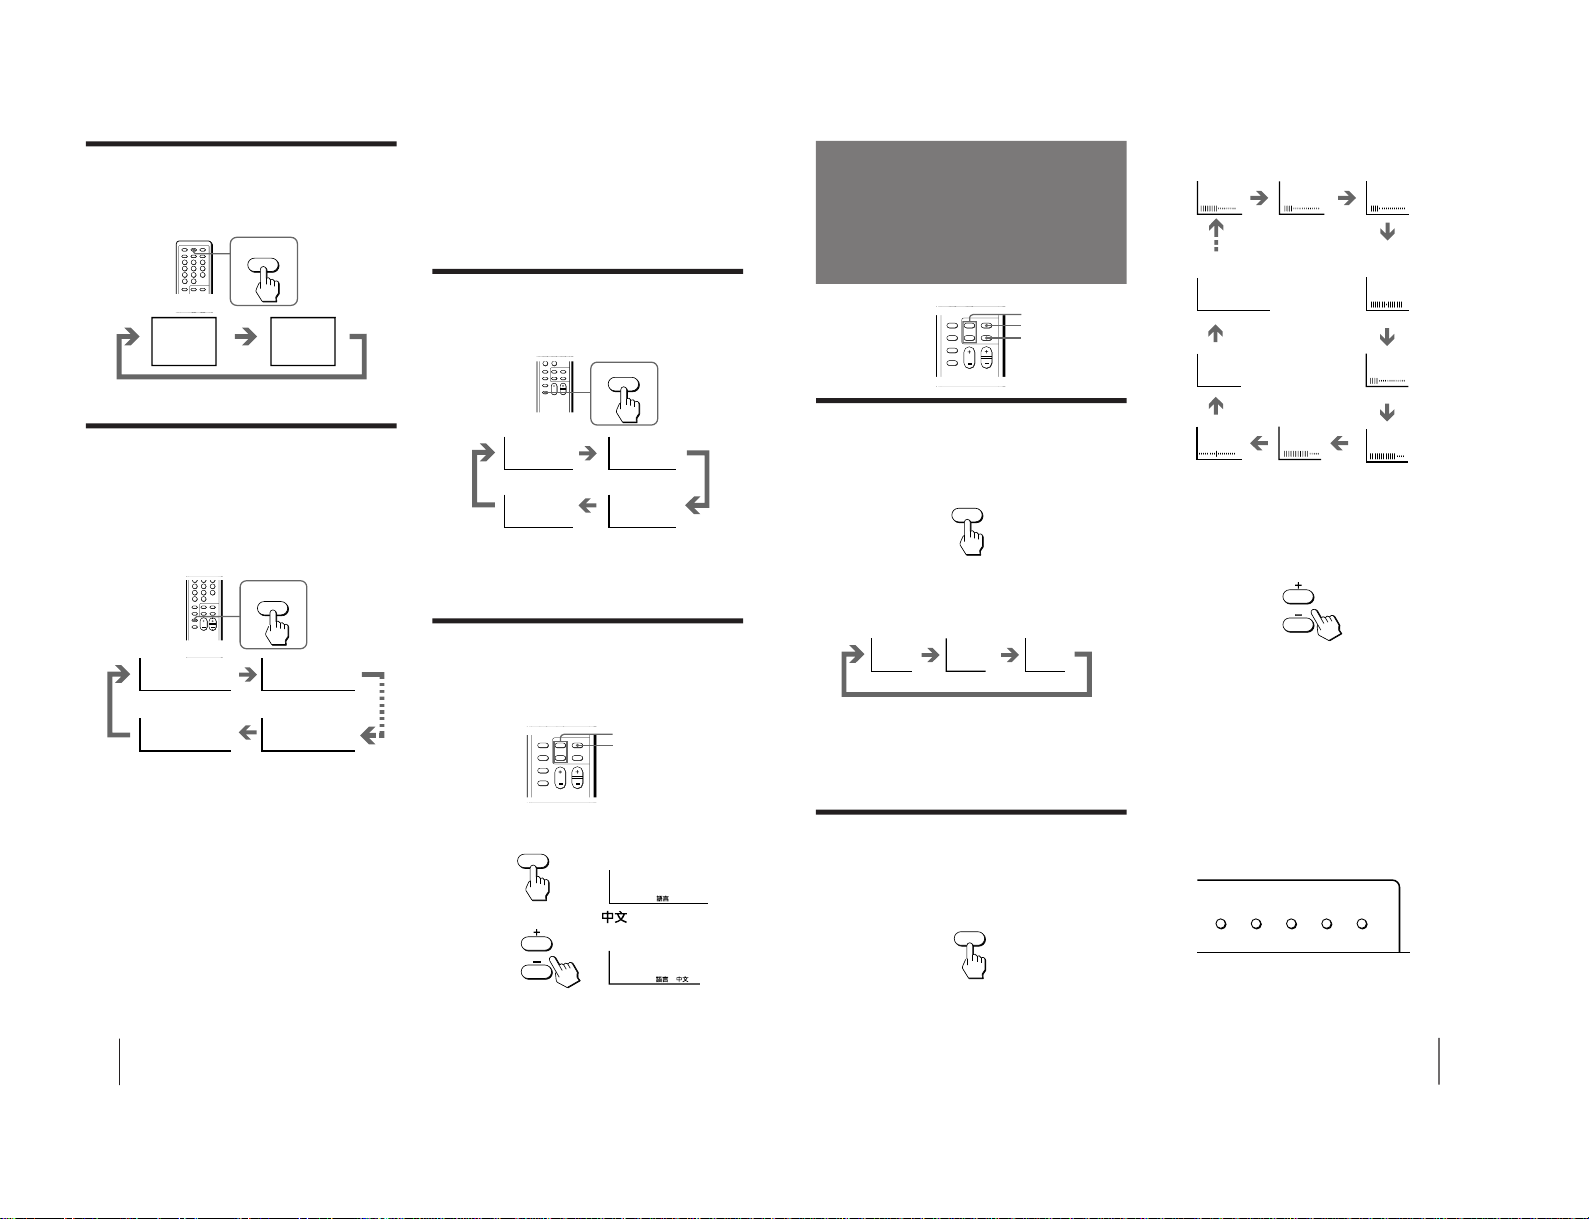
Displaying on-screen information
Press DISPLAY/REVEAL.
The program position, local system, and TV settings are
displayed on the screen.
REVEAL
DISPLAY
1
AUTO B/G
STANDARD
INDEX
WAKE UP
No wake up timer
WAKE UP TIMER:00H00M
WAKE UP TIMER:00H10M
WAKE UP TIMER:OFF
WAKE UP TIMER:12H00M
After 10 minutes
• The last TV program position or video mode just before the TV
turns into Standby mode will appear when the TV turns on
using the Wake Up Timer.
• If no buttons or controls are pressed for more than two hours
after the TV is turned on using the Wake Up Timer, the TV
automatically turns into standby mode. When you want to
continue watching the TV, press any button or control on the
TV or remote commander.
Setting the Sleep Timer
You can set the TV to turn off automatically after the
period of time you want.
Press SLEEP.
To cancel the Sleep Timer, press SLEEP repeatedly
until “SLEEP TIMER: OFF” appears, or turn the TV off.
Changing the on-screen display
language
If you prefer Chinese to English, you can change the
on-screen display language. You can use buttons on
both the remote commander and the TV.
1
Press SELECT until the screen appears as
follows:
2
Press + or – to select “
”.
Note
• You can also use VOLUME +/ – on the TV to select the on-
screen display language.
SLEEP
SLEEP TIMER:30
SLEEP TIMER:60
SLEEP TIMER:OFF
SLEEP TIMER:90
After 30 minutes
After 90 minutes
No sleep timer
SELECT
+ or -
SELECT
Setting the Wake Up Timer
You can set the TV to turn on automatically after the
period of time you want.
1
Press WAKE UP/INDEX repeatedly to set the
timer.
The on-screen display appears and the WAKE UP
indicator lights up.
2
If you want a particular TV program or
video input to be displayed using the Wake
Up Timer, select the TV program or video
mode.
3
Press POWER on the remote commander or
set the Sleep Timer to turn off the TV in
standby mode.
To cancel the Wake Up Timer, press WAKE UP/INDEX
repeatedly until “WAKE UP TIMER: OFF” appears, or
turn off the main power of the TV.
Notes
• The Wake Up Timer starts immediately after the on-screen
display disappears.
After 12 hours
After 60 minutes
LANGUAGE / : ENGLISH
LANGUAGE / :
9
Operations
Each time you press SELECT, the screen changes as
follows:
Note on TILT CORRECTION (KV-T29 only)
• The earth's magnetic field may affect the tilt of the TV picture.
You can adjust the picture tilt using TILT CORRECTION.
2
Press + or – to adjust the item.
3
To adjust other items, repeat steps 1 and 2.
Note
• You can also use VOLUME +/– on the TV to adjust the picture
and sound settings.
If the color of the picture is abnormal
Press COLOR SYSTEM or adjust the color setting until
the color becomes normal.
Note
• Normally set COLOR SYSTEM to AUTO.
Front of TV
Adjusting the picture
and sound
+ or –
SELECT
PIC MODE
PIC MODE
DYNAMIC
STANDARDSOFT
High contrast
picture
SELECT
MANUAL PROGR
COLOR SYSTEM
SELECT
TV SYSTEM
AUTO PROGR
Selecting the picture mode
Press PIC MODE until the mode you want
appears.
Each time you press PIC MODE, the screen changes as
follows:
Note
• If you change the picture mode after the following
adjustments, the adjustment changes in accordance with the
picture mode.
Adjusting the picture and sound
settings
1
Press SELECT until the item you want to
adjust appears.
Soft picture
(good for
video games)
(Operative for
KV-T29 only)
(Operative for
NTSC signal only)
PICTURE COLOR
BRIGHT
HUE
SHARPNESS
BASS
BALANCE
TREBLE
SURROUND
TILT CORRECTION
– 8 –
KV-T29SN81
RM-870
Page 9
11
Operations
DISPLAY/REVEAL
TEXT
TEXT CLR
WAKE UP/INDEX
A/B/ENLARGE
VIDEO/HOLD
Number
FASTEXT
PROGR +/–
TV
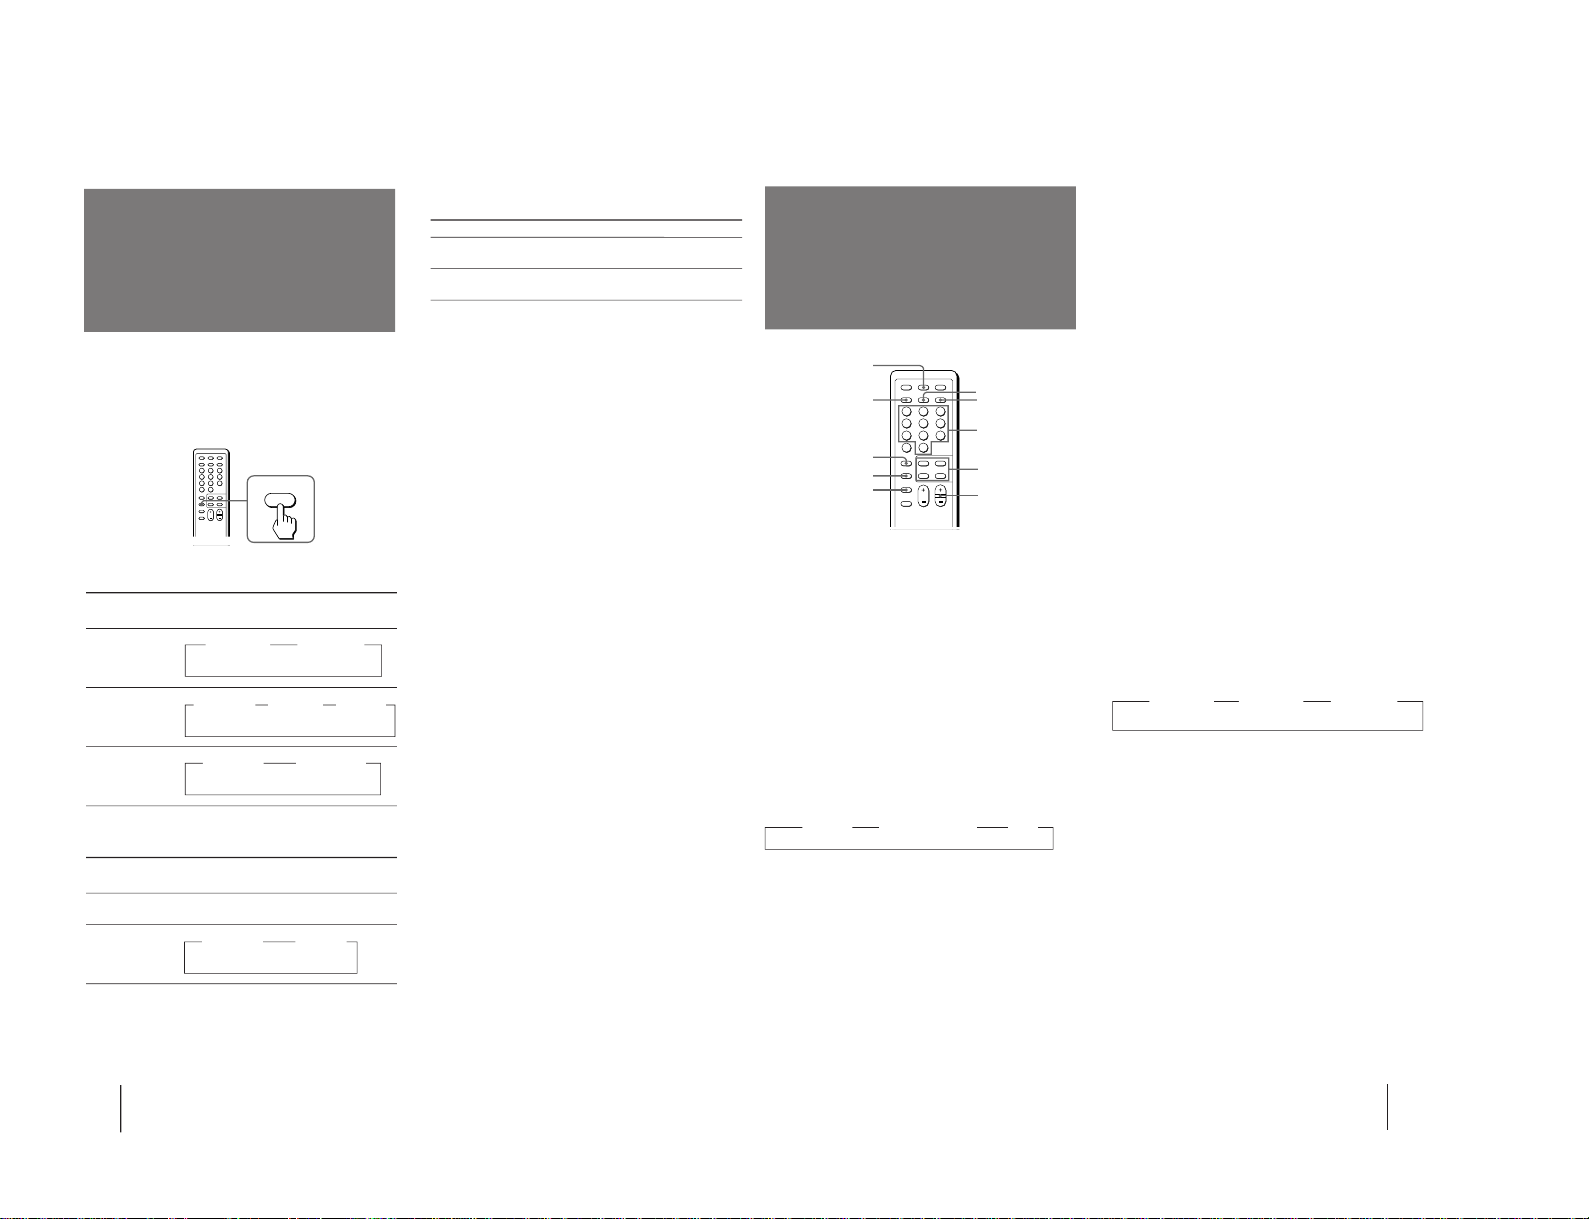
Viewing Teletext
Press the color button which corresponds to the colorcoded menu.
The page is displayed after a few seconds.
Selecting a Teletext page
To input the three-digit page number of the Teletext
page, press the number buttons.
If you make a mistake, key in the correct page number
again.
To access the next or previous page, press PROGR +/–.
Holding a Teletext page (subpage)
Press VIDEO/HOLD.
The HOLD symbol “j” is displayed at the top left
corner of the screen.
To resume normal Teletext operation, press VIDEO/
HOLD again or TEXT.
Revealing concealed information
Press DISPLAY/REVEAL.
To conceal the information, press DISPLAY/REVEAL
again.
Enlarging the Teletext display
Press A/B/ENLARGE.
Each time you press A/B/ENLARGE, the Teletext
display changes as follows:
zz z Normal size
Waiting for a Teletext page while watching a
TV program (TEXT CLEAR)
1
Key in the page number of the Teletext that you
want to refer, then press TEXT CLR.
2
When the page number is displayed on the screen,
press TEXT to switch the Teletext on.
Enlarge
lower half
Enlarge
upper half
Displaying Teletext
1
Select a TV channel which carries the Teletext
broadcast you want to watch.
2
Press TEXT to display the Teletext.
A Teletext page is displayed (normally the index
page). If there is no Teletext broadcast, 100 is
displayed at the top left corner of the screen.
To cancel the Teletext display, press TV.
Superimposing a Teletext page on the TV
picture
Press TEXT.
Each time you press TEXT, the screen changes as
follows:
z Teletext z Teletext and TV z TV
Checking the contents of a Teletext service
(INDEX)
Press WAKE UP/INDEX to display an overview of the
Teletext contents and page numbers.
Using FASTEXT
This feature allows you to quickly access a Teletext
page that uses FASTEXT. When a FASTEXT page is
broadcasted, a color-coded menu appears at the bottom
of the screen. The colors of the menu correspond to the
RED, GREEN, YELLOW, and CYAN buttons on the
remote commander.
10
Operations
Selecting a stereo or
bilingual program
Press A/B/ENLARGE repeatedly until you
receive the sound you want.
The on-screen display changes corresponding to the
selected sound and the WAKE UP/STEREO indicator
also lights up.
When receiving a NICAM program
Broadcasting
NICAM stereo
NICAM bilingual
NICAM monaural
When receiving a A2 (German) program
Broadcasting
A2 (German) stereo
A2 (German)
bilingual
ENLARGE
A/B
On-screen display
(Selected sound)
NICAM
z MONO
(Regular sound)
NICAM
z MONO
(Regular
sound)
NICAM
z MAIN
(Main sound)
NICAM
z SUB
(Sub sound)
NICAM
z MAIN
(Main sound)
NICAM
z MONO
(Regular sound)
NICAM
z(Stereo sound)
Receiving area for NICAM and A2 (German)
programs
System
NICAM
A2 (German)
Notes
• If the signal is very weak, the sound becomes monaural
automatically.
• If the stereo sound is noisy, select “regular sound.” The sound
becomes monaural, however, the noise will be reduced.
Receiving area
Hong Kong, Singapore, New Zealand,
etc.
Australia, Malaysia, Thailand, etc.
On-screen display
(Selected sound)
STEREO
z MAIN
(Main sound)
STEREO
z SUB
(Sub sound)
STEREO
(Stereo sound)
– 9 –
KV-T29SN81
RM-870
Page 10
Additional Information
12
Troubleshooting
If you have any problems, read this manual again and
check the countermeasure for each of the symptoms
listed below.
If the problem persists, contact your nearest authorized
service center or dealer.
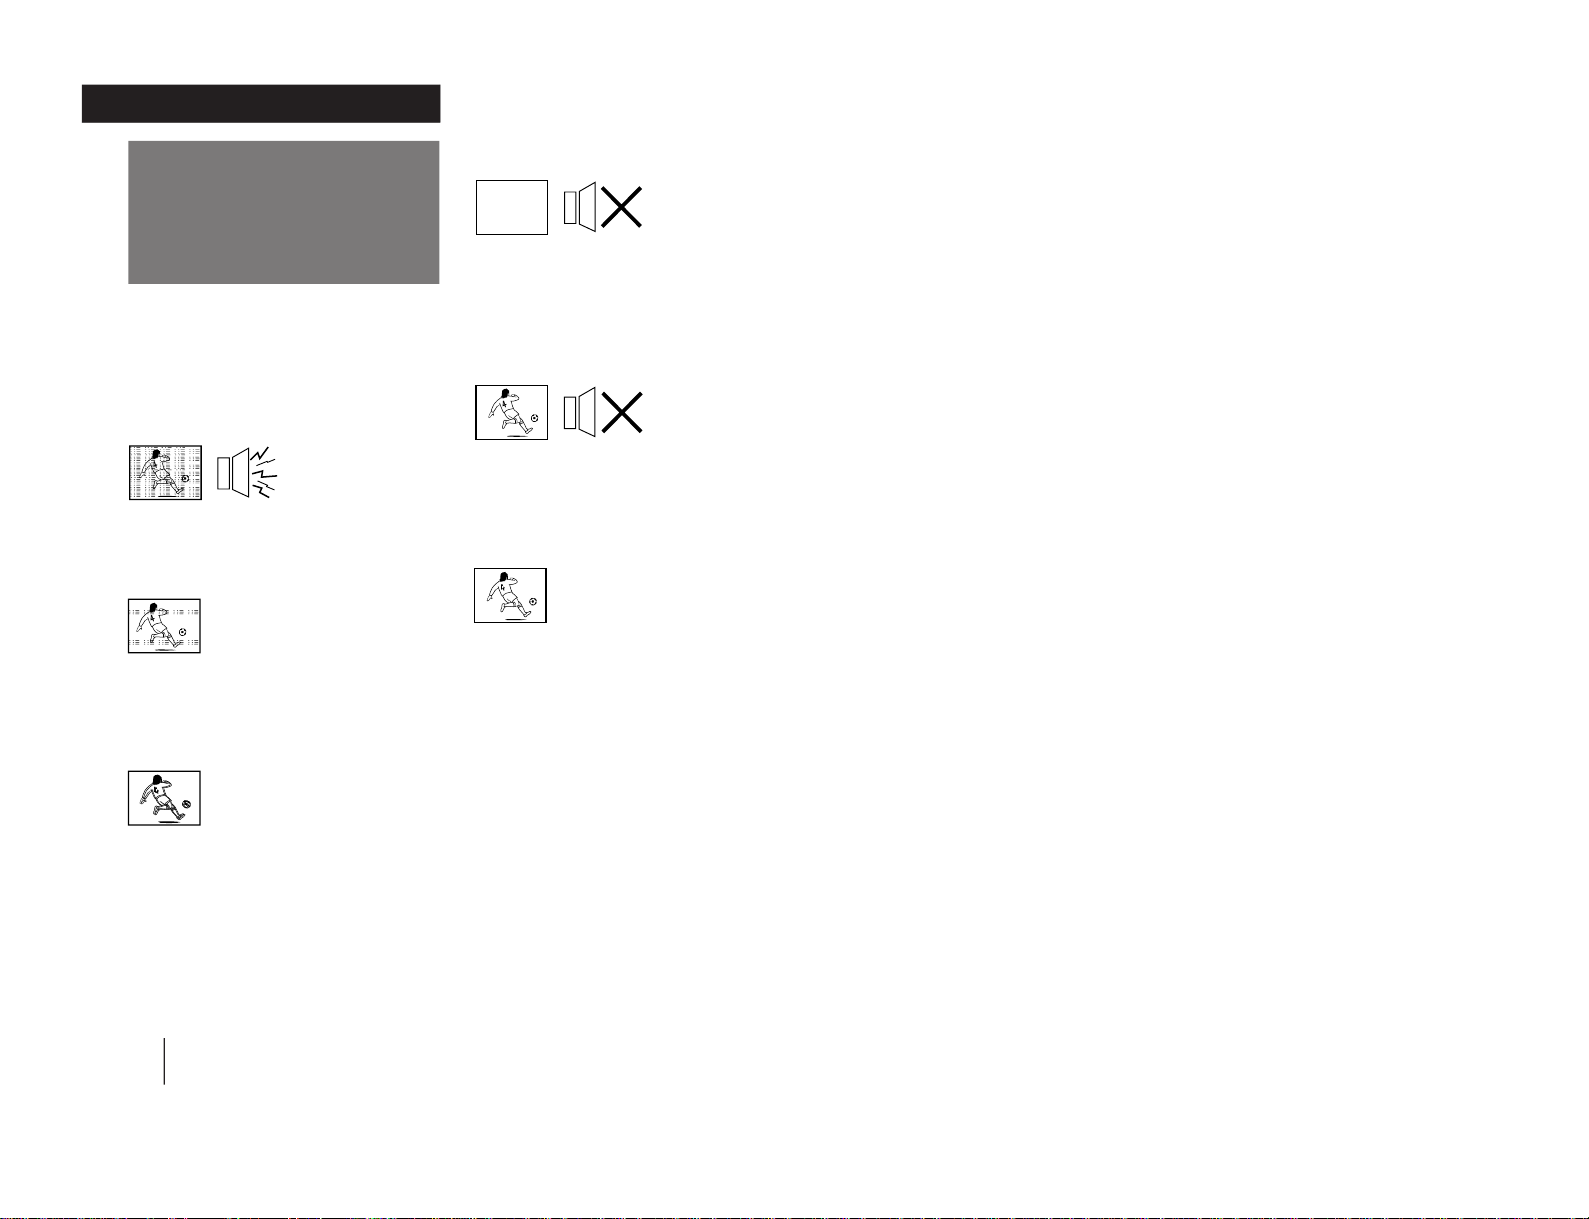
Snowy picture
Noisy sound
/ Check the antenna.
/ Check the antenna connection on the TV
and on the wall.
Dotted lines or stripes
/ This may be caused by local interference
(e.g. cars, neon signs and hair dryers).
Adjust the antenna for minimum
interference.
Double images or “ghosts”
/ This may be caused by reflections from
nearby mountains or buildings. A highly
directional antenna may improve the
picture.
Notes
• When you switch on the TV, you may hear the “boon” sound
that is caused by the demagnetization of the TV. This does not
indicate a malfunction.
• The picture color may become abnormal if you change the
direction of your TV. To obtain the normal picture color , press
POWER on the TV to switch off the TV for five minutes and
then switch it on again.
No picture
No sound
/ Press POWER.
/ Check the antenna connection.
/ Check the VCR connections.
/ Check the power cord connection.
/ Check the standby mode.
Good picture
No sound
/ Press VOLUME +.
/ Press MUTING.
/ Press A/B/ENLARGE
No color
/ Adjust the COLOR level in the on-screen
display.
/ Check the COLOR SYSTEM setting.
TV cabinet creaks
/ Even if the picture or the sound is normal,
changes in the room temperature
sometimes make the TV cabinet expand or
contract, making a noise. This does not
indicate a malfunction.
Note on the remote commander
• The supplied remote commander is used on several models of
the TV. If you do not find instructions for some controls that
are on the remote commander, that means your TV does not
employ the features of those controls, e.g. TEXT.
Note on the TV SYSTEM button
• The TV SYSTEM button is not used on your TV.
WARNING
Do not install the appliance in a confined space, such as
a bookcase or built-in cabinet.
Additional Information
KV-T29SN81
RM-870
– 10 –
Page 11
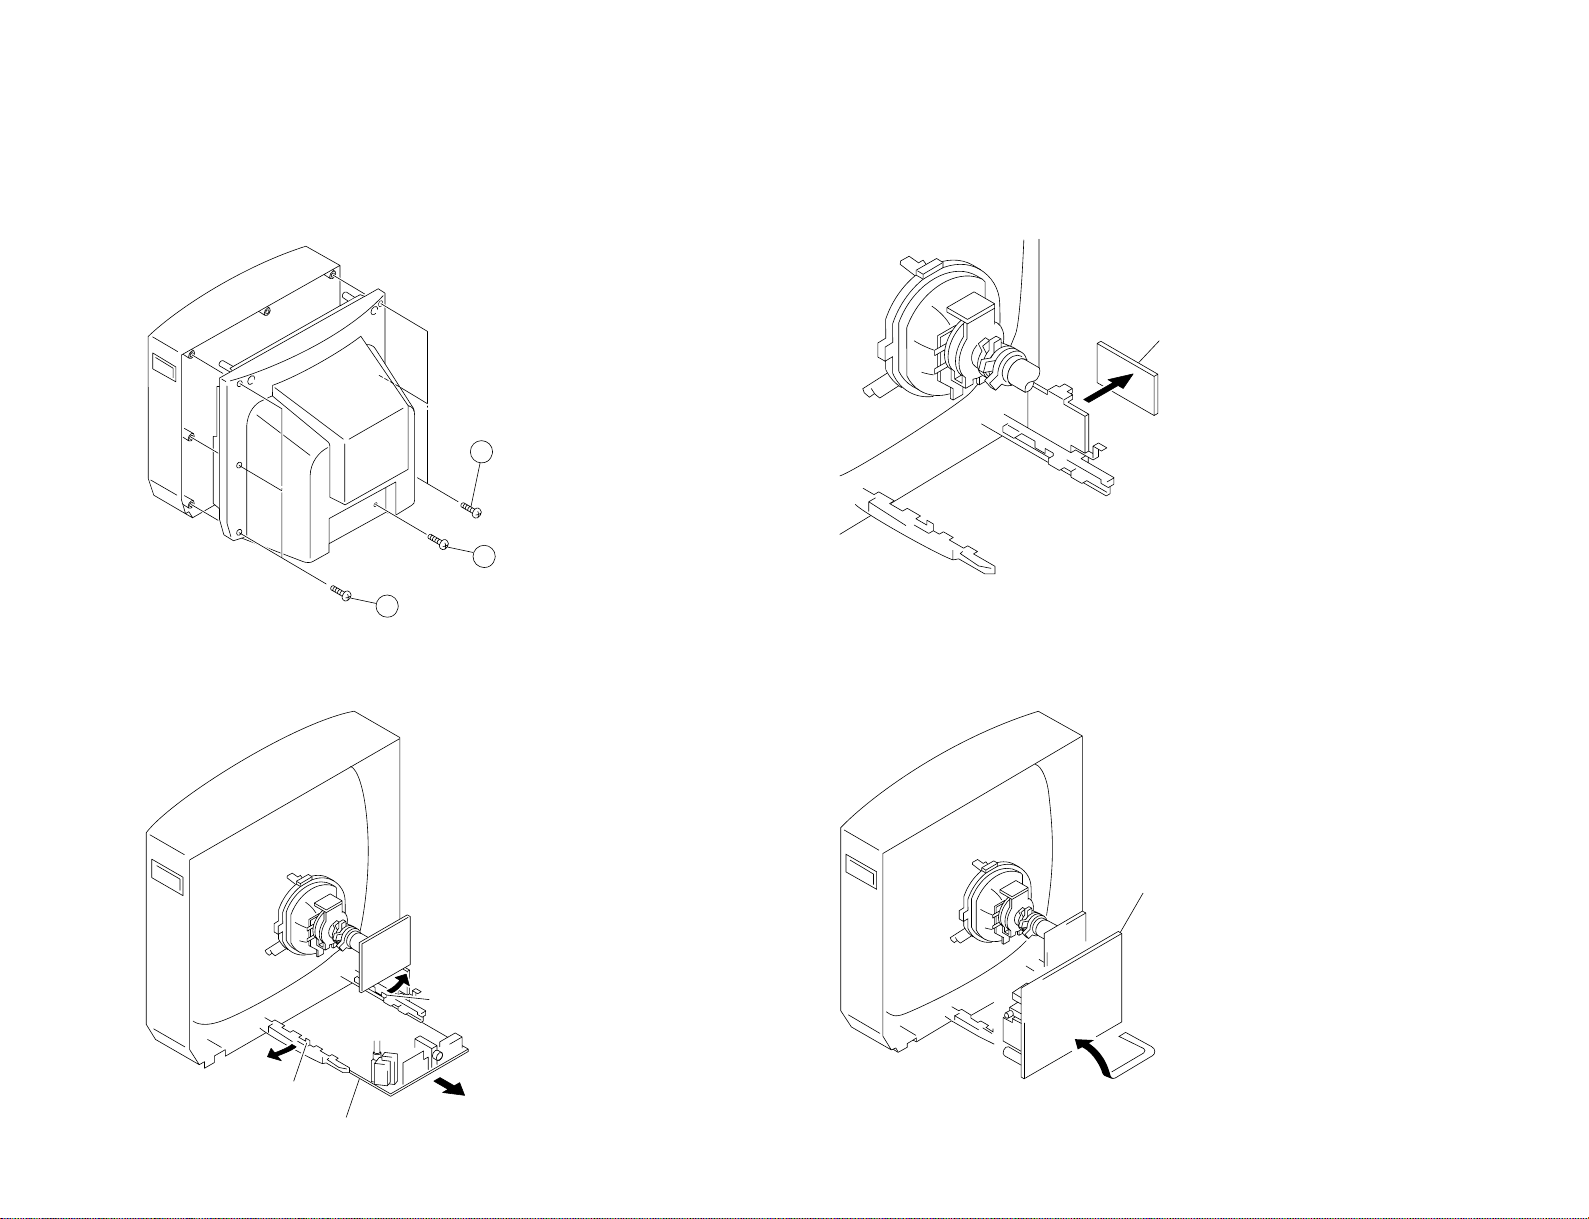
SECTION 2
2
Three screws
(BVTP 4×16)
4
One screw
(BVTP 3×16)
1
Three screws
(BVTP 4×16)
A board
Lever
Lever
A board
F1 board
DISASSEMBLY
2-1. REAR COVER REMOVAL
– 11 –
2-2. A BOARD REMOVAL
2-3. F1 BOARD REMOVAL
2-4. SERVICE POSITION
KV-T29SN81
RM-870
Page 12
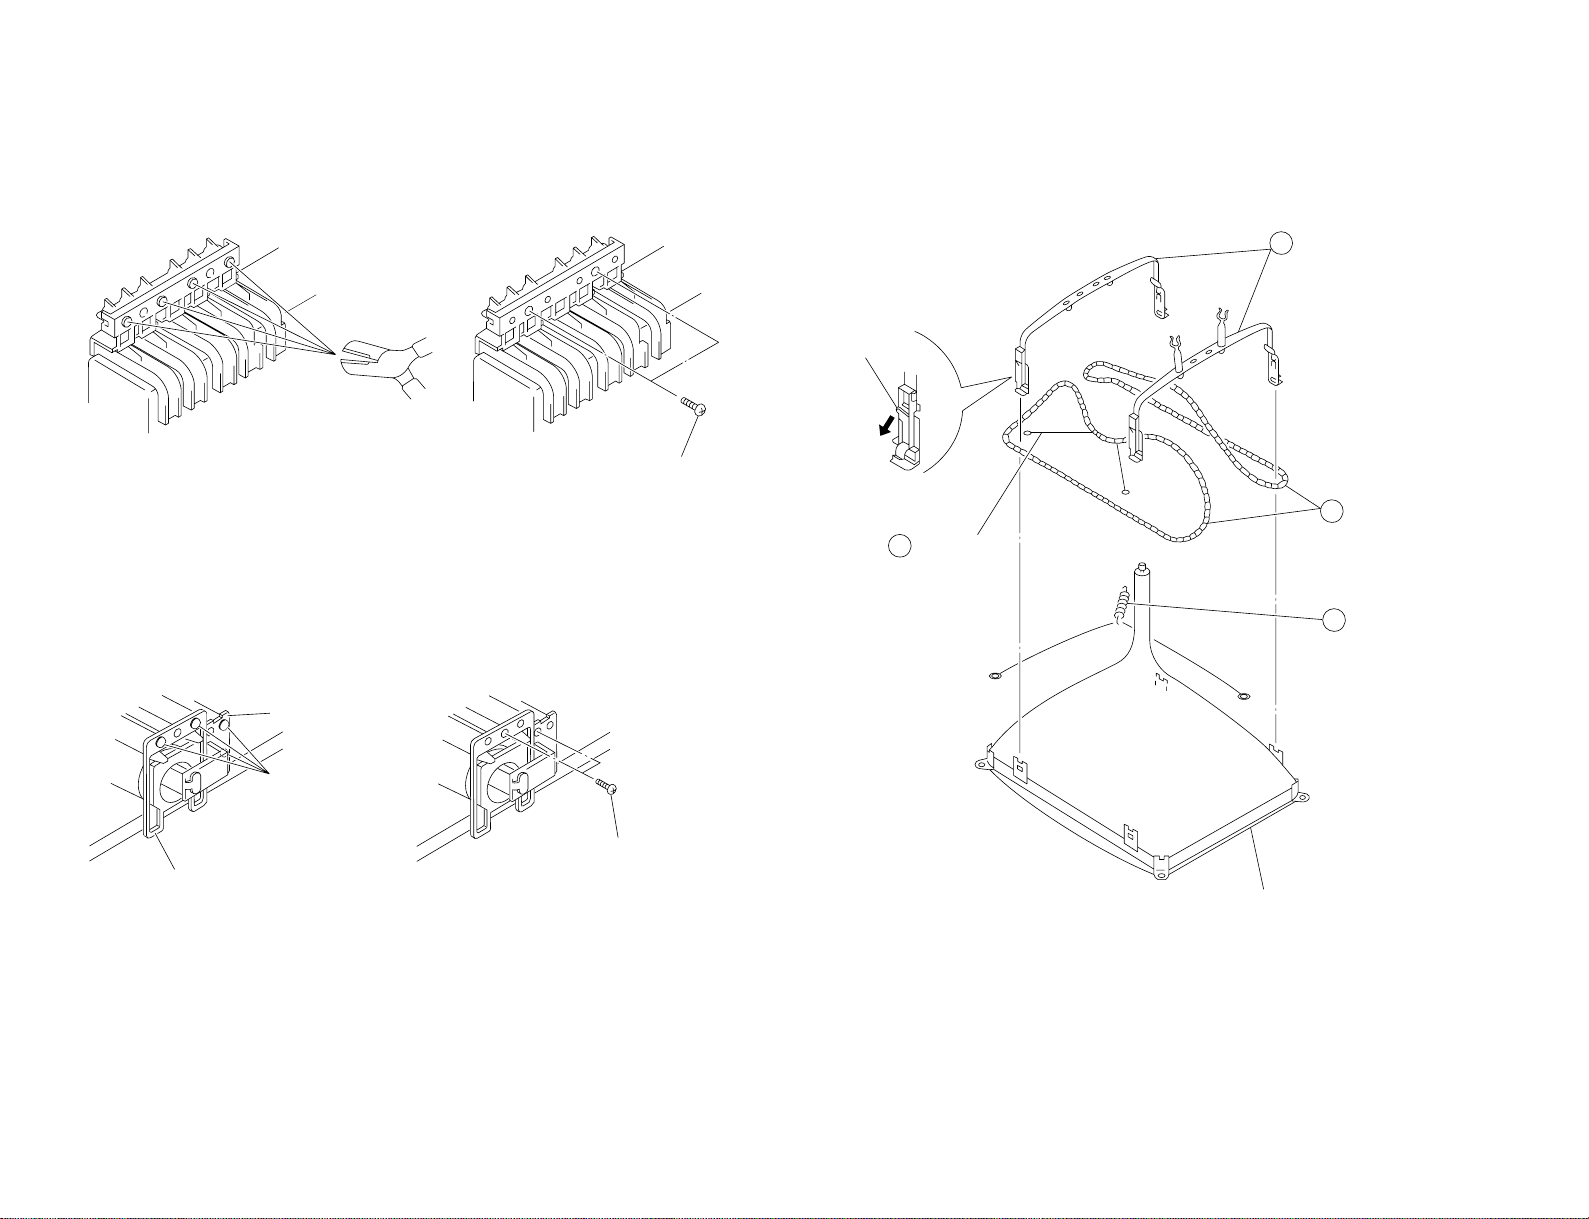
KV-T29SN81
3
Demagnetization coil
4
Tension spring
Picture tube
2
DGC holder
1
DGC band
Remove the claw
Two screws
(BVTP 3×12)
Cut
Light guide
Power button
Two screws
(BVTP 3×12)
2-5. REPLACEMENT OF PARTS
For replacement of the Multi Button, Power Button and Light Guide, cut the welded portions
from them, exchange with the new parts, and fix them with screws (+BVTP) respectively.
2-5-1. REPLACEMENT OF MULTI BUTTON
– 12 –
2-5-2. REPLACEMENT OF LIGHT GUIDE POWER BUTTON
2-6. DEMAGNETIZATION COIL REMOVAL
RM-870
Page 13
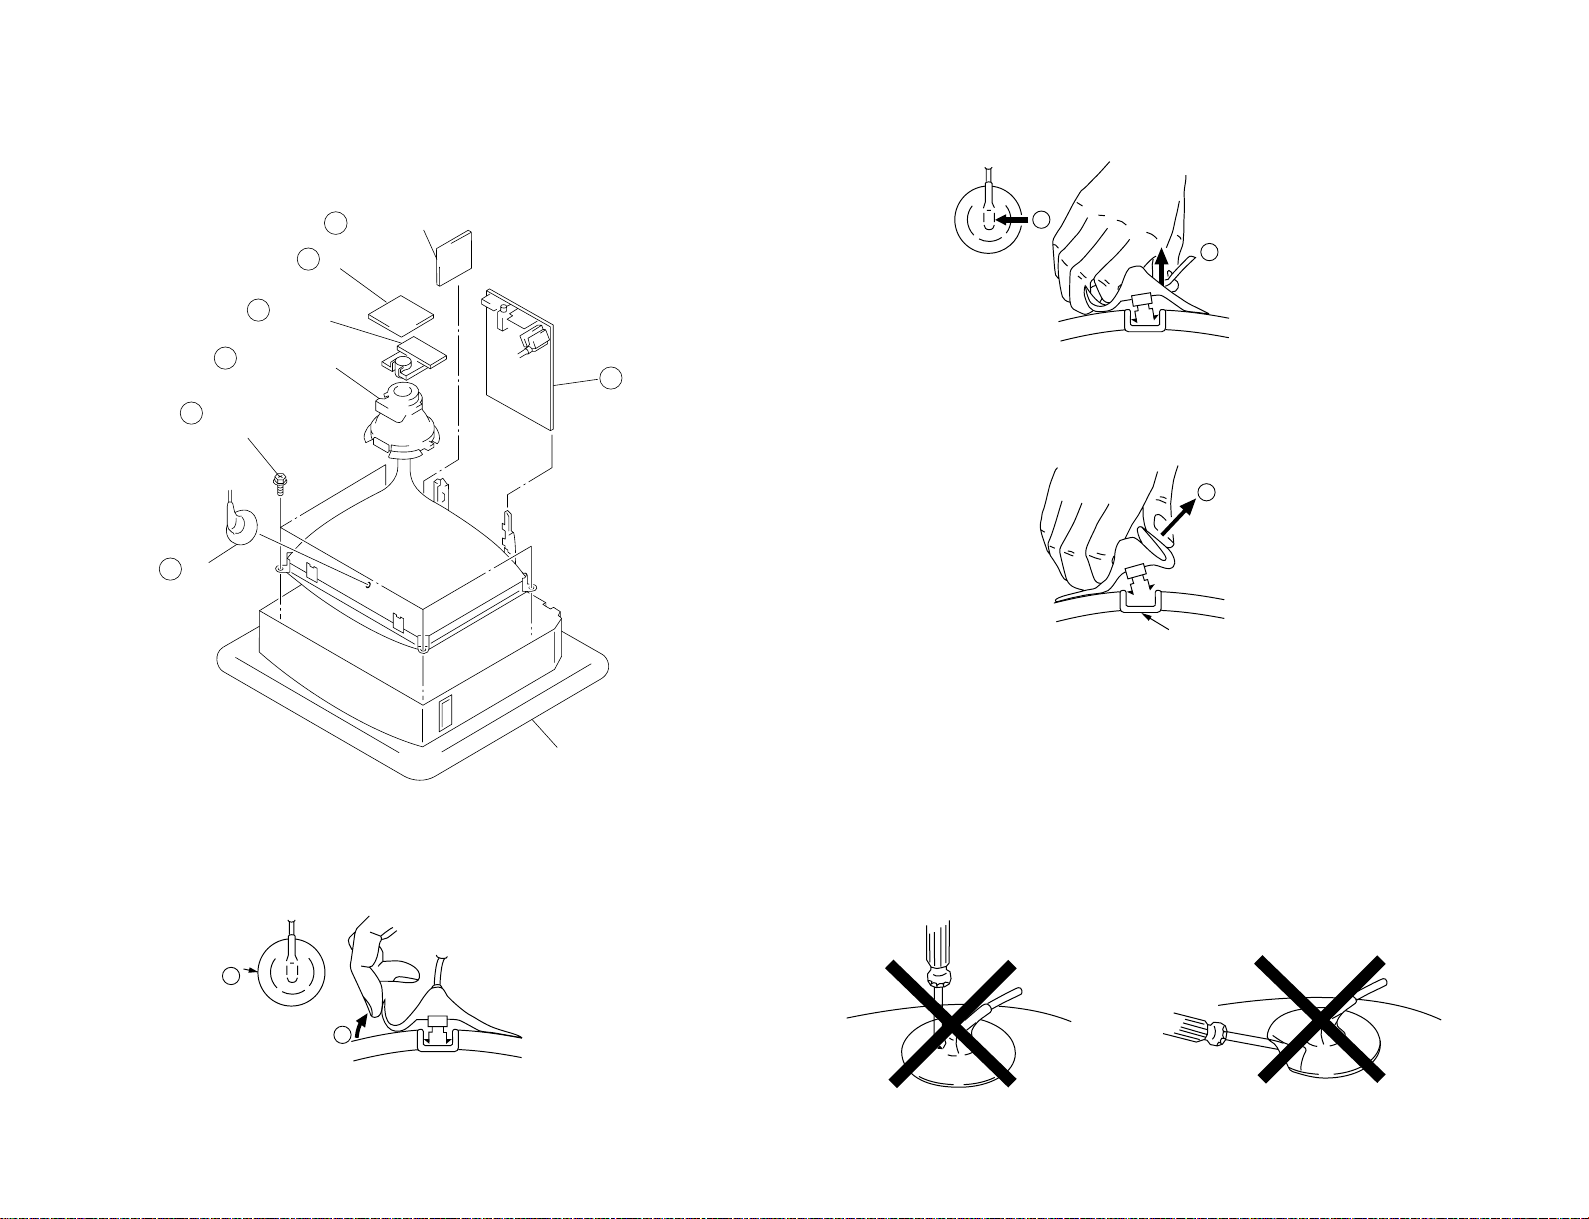
2-7. PICTURE TUBE REMOV AL
b
b
c
Anode button
2 A board
4 C board
6 Deflection yoke
5 VM board
Cushion
7 Four screws
(Tapping screws)
1 Anode cap
3 F1 board
a
a
NOTE : The picture tube for this model is upside-down and the position for the anode-cap and
tension spring is changed accordingly
– 13 –
2 Using a thumb press down then pull up the rubber cap firmly in the direction
indicated by the arrow b.
•REMOVAL OF ANODE-CAP
NOTE : After removing the anode, short circuit the anode of the picture tube and the an-
•REMOVING PROCEDURES
1 Turn up one side of the rubber cap in the direction indicated by the arrow a.
ode cap to the metal chassis, CRT shield or carbon paint on the CRT.
Anode Button
3 When one side of the rubber cap is separated from the anode button, the anode-
cap can be removed by turning up the rubber cap and pulling it up in the direction of the arrow c.
• HOW TO HANDLE AN ANODE-CAP
1 Do not damage the surface of anode-caps with sharp shaped objects.
2 Do not press the rubber too hard so as not to damage the inside of anode-caps.
A metal fitting called the shatter-hook terminal is built into the rubber.
3 Do not turn the foot of rubber over too hard.
The shatter-hook terminal will stick out or damage the rubber.
KV-T29SN81
RM-870
Page 14
KV-T29SN81
GREEN
BLUE RED
RM-870
SECTION 3
SET-UP ADJUSTMENTS
• The following adjustments should be made when a complete
realignment is required or a new picture tube is installed.
• These adjustments should be performed with rated power
supply voltage unless otherwise noted.
Controls and switch should be set as follows unless otherwise noted:
PICTURE control........................................................... normal
BRIGHTNESS control................................................... normal
................................................................................................................................................................................................................................
Preparation :
• In order to reduce the influence of geomagnetism on the set's
picture tube face it east or west.
• Switch on the set's power and degauss with the degausser.
Perform the adjustments in order as follows :
1. Beam Landing
2. Convergence
3. Focus
4. White Balance
Note : Test Equipment Required.
1. Color-bar/Pattern Generator
2. Degausser
3. Oscilloscope
Purity control
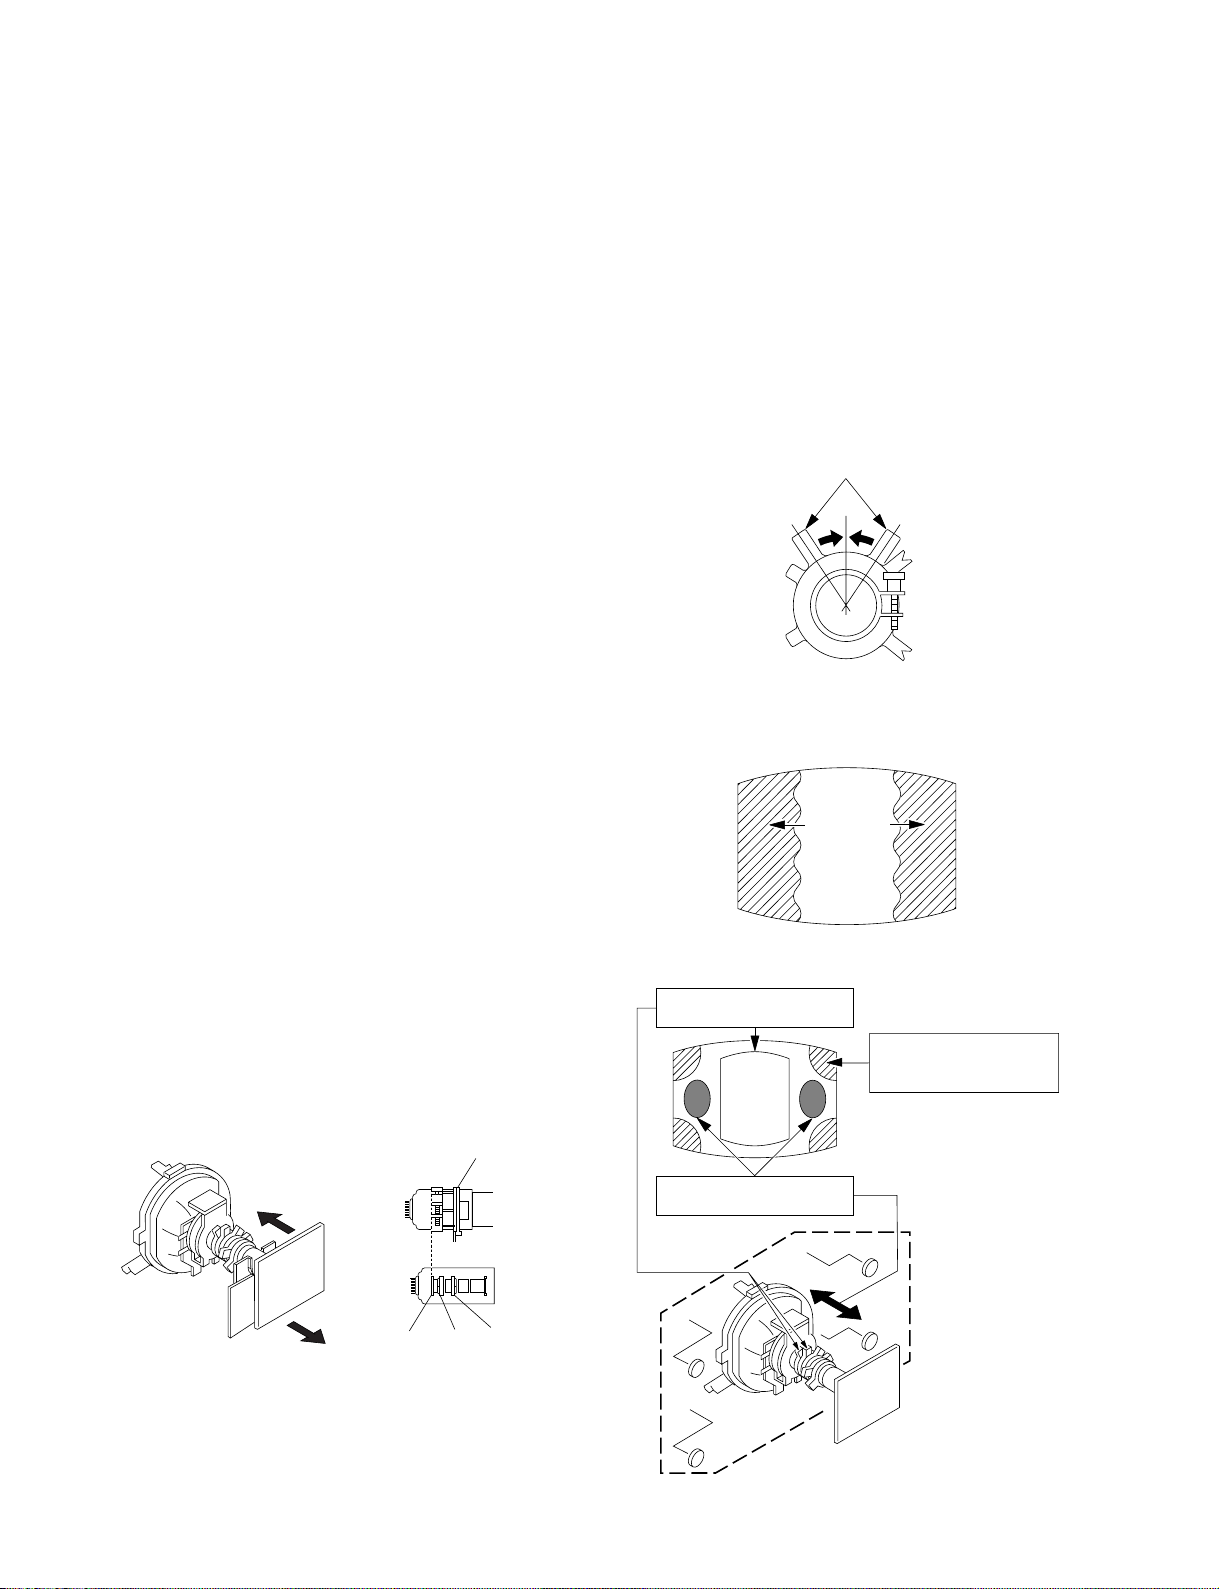
3-1. BEAM LANDING
1. Input a white signal with the pattern generator.
Contrast
Brightness
2. Position neck assy as shown in Figure 3-1.
3. Set the pattern generator raster signal to green.
4. Move the deflection yoke to the rear and adjust with the purity
control so that the green is at the center and the blue and the red
take up equally sized areas on each side.
(See Figures 3-1 through 3-3.)
5. Move the deflection yoke forward and adjust so that entire
screen is green. (See Figure 3-1.)
6. Switch the raster signal to blue, then to red and verify the
condition.
7. When the position of the deflection yoke has been decided,
fasten the deflection yoke with the screws.
8. If the beam does not land correctly in all the corners, use a
magnet to adjust it. (See Figure 3-4.)
}
normal
Fig. 3-2
Fig. 3-3
Purity control corrects
this area.
a
b
Disk magnets or rotatable
disk magnets correct
these areas (a-d).
Fig. 3-1
Neck assy
G1 G2 G3
– 14 –
c
Deflection yoke positioning
corrects these areas.
b
d
d
Fig. 3-4
a
c
Page 15
KV-T29SN81
RM-870
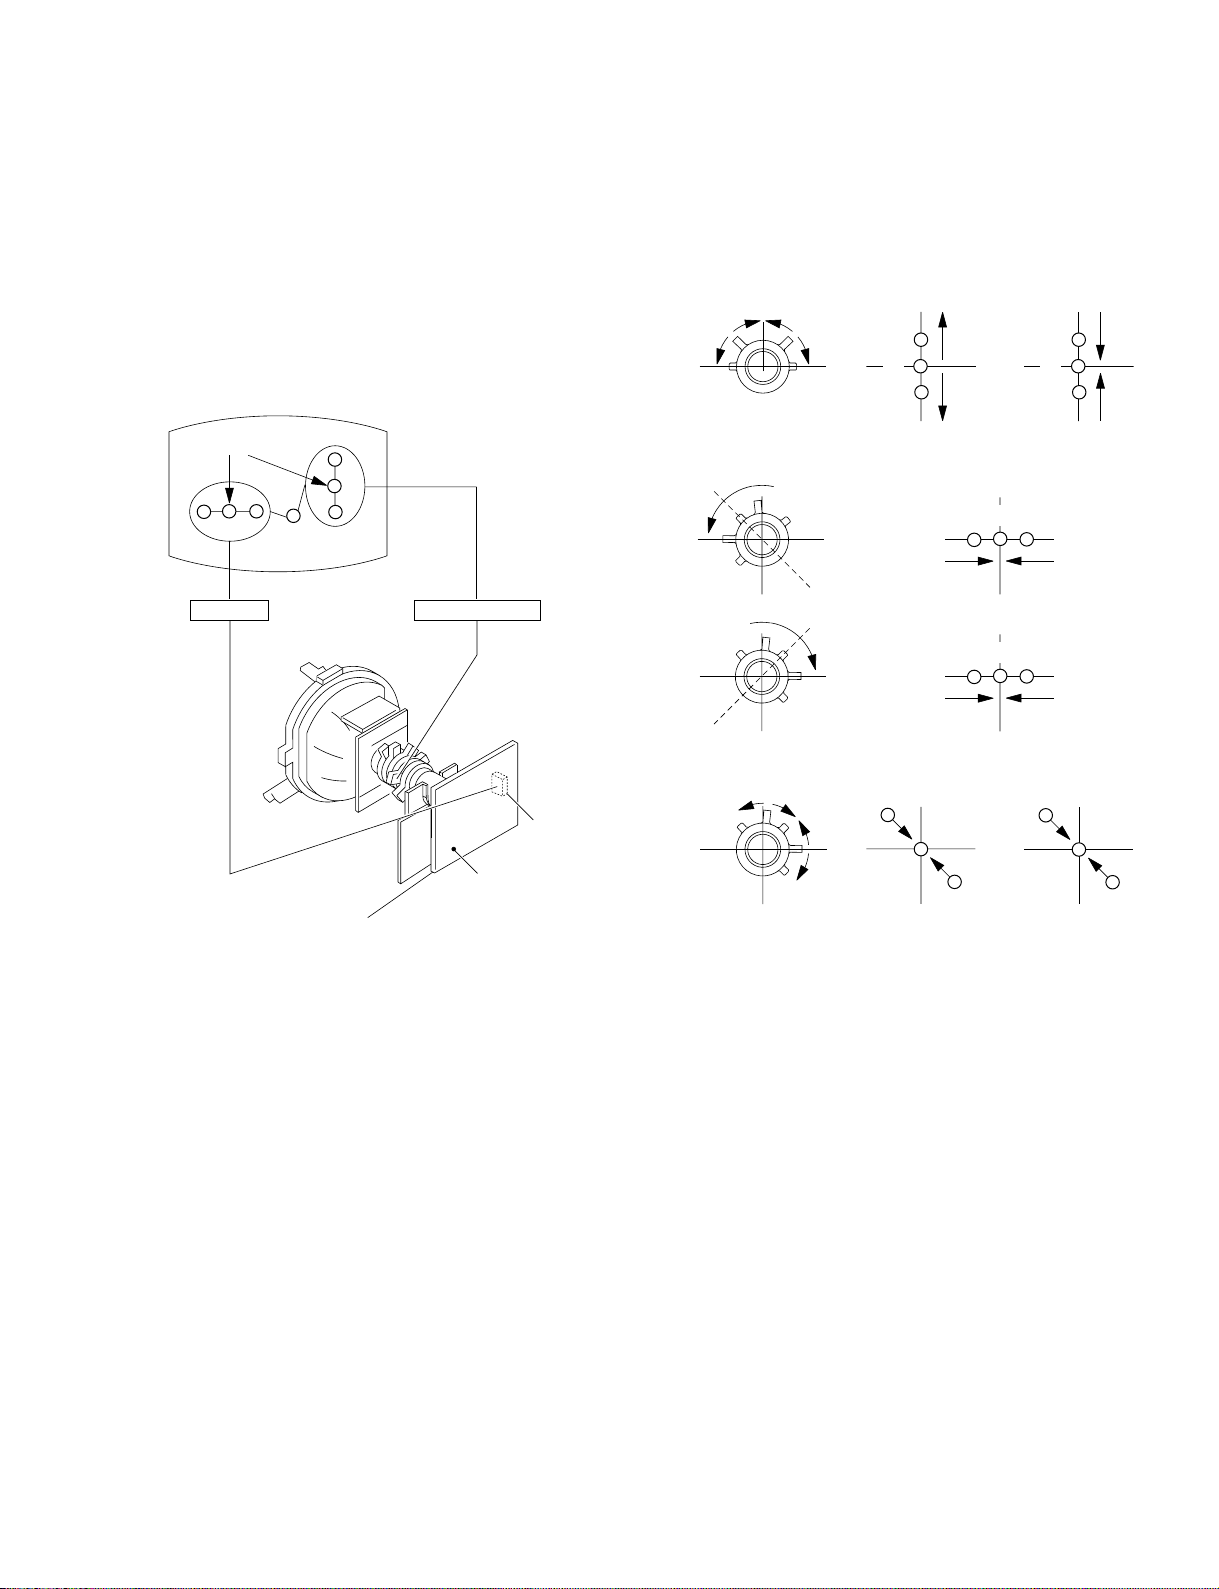
3-2. CONVERGENCE
Preparation :
• Before starting this adjustment, adjust the focus, horizontal size,
and vertical size.
• Minimize the brightness setting.
• Provide dot pattern.
(1) Horizontal and Vertical Static Convergence
Center dot
R G B
H.STAT V.STAT Magnet
R
G
B
• If the V.STAT magnet is moved in the direction of the a and
b arrows, the red, green, and blue points move as sho wn below.
1
2
a
bb
a
b
ab
B
GG
R
R G B
B G R
B
R
a
b
RV 702
H.STAT
RV 701
SCREEN (G2)
C board
1. (Moving vertically), adjust the V.STAT magnet so that the red,
green, and blue points are on top of each other at the center of
the screen.
2. (Moving horizontally), adjust the H.STAT VR magnet so that
the red, green, and blue points are on top of each other at the
center of the screen.
3
b
b
a
a
R
G
B
b
B
G
R
– 15 –
Page 16
KV-T29SN81
RM-870
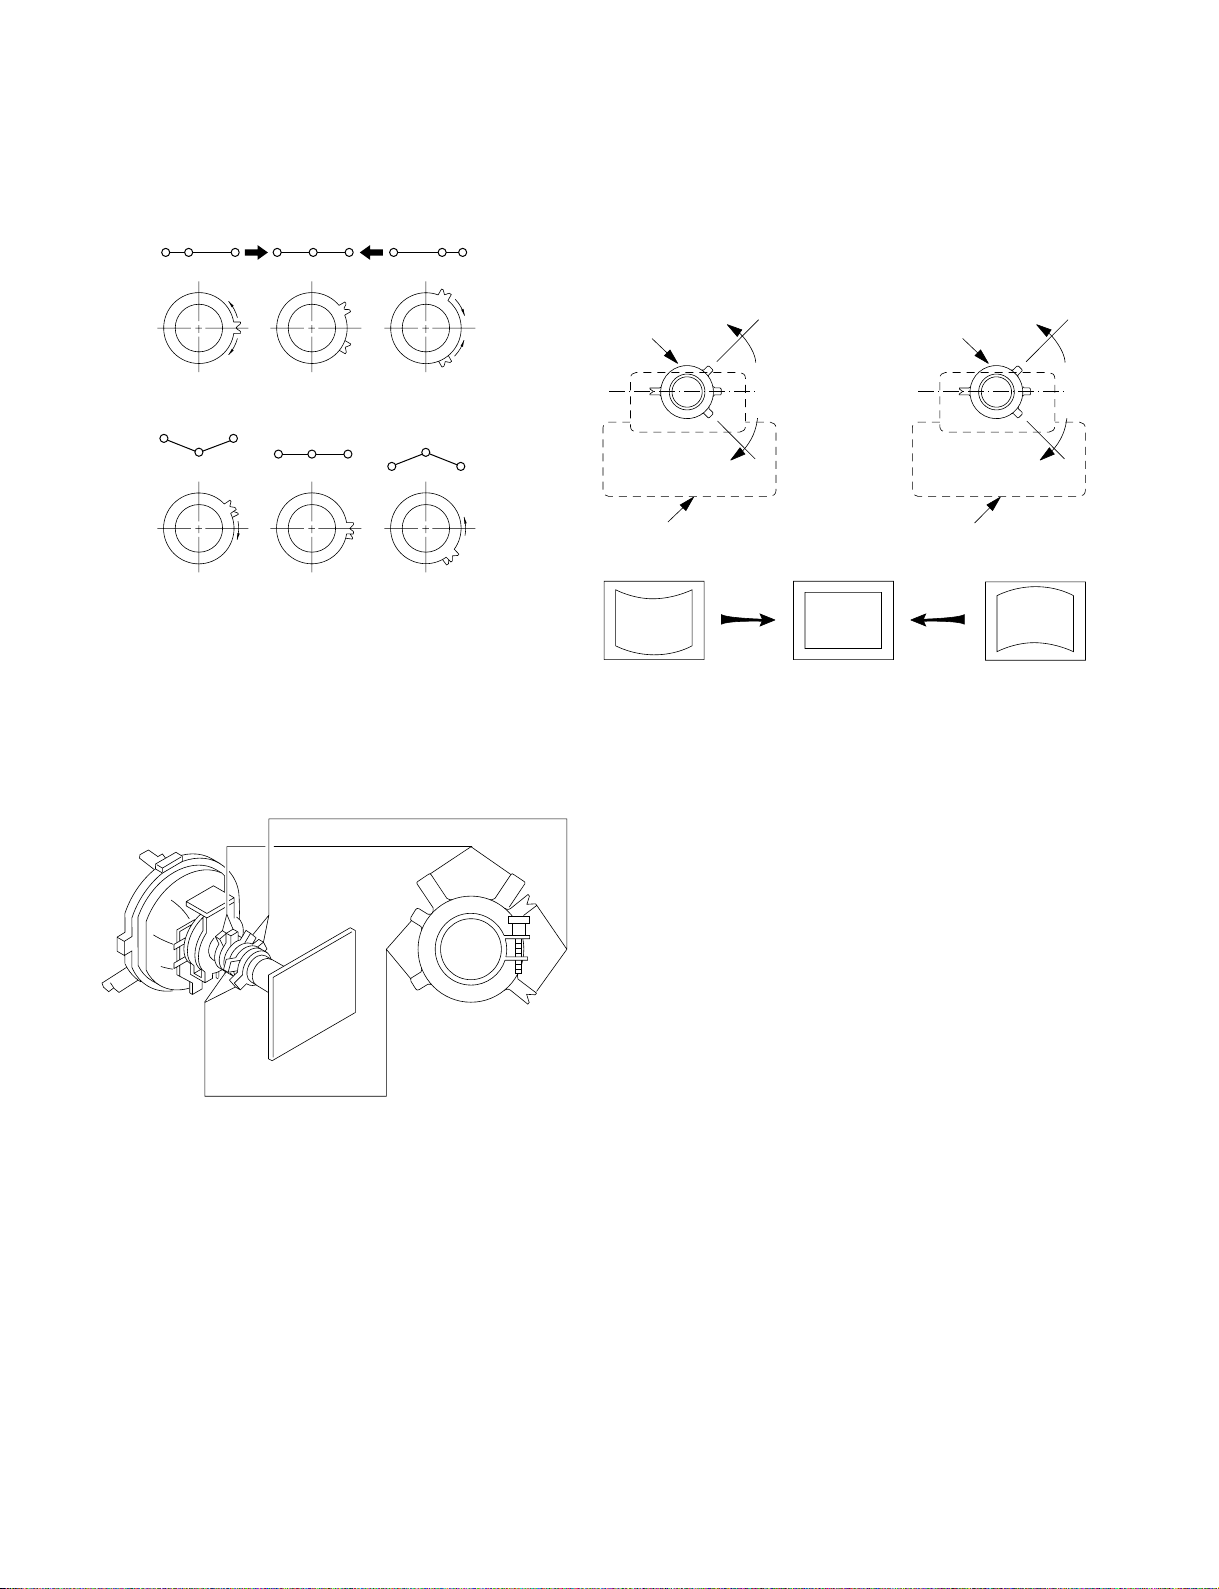
• Operation of BMC (Hexapole) Magnet
If the red, green and blue dots are not balanced or aligned, then
use the BMC magnet to adjust in the manner described below.
RG B
R
G
RGB R GB
B
RGB
R
G
B
• Then use the H.STAT VR to adjust the red, green, and blue
dots so that they coincide at the center of screen.
The respective dot position resulting from moving each
magnet interact, so be sure to perform adjustment while
tracking.
BMC (Hexapole)
Purity
• Y separation axis correction magnet adjustment.
1. Receive the cross-hatch signal and adjust [PICTURE] to “MIN”
and [BRIGHTNESS] to “STANDARD” .
2. Adjust the Y se paration axis correction magnet on the neck
assembly so that the horizontal lines at the top and bottom of
the screen are straight.
Neck assy Neck assy
VM board
Blue
Red
VM board
Red
Blue
Note: 1) The Red and Blue magnets should be equally far from
the horizontal center line.
2) Do not se parate the Red and Blue magnets too far.
(Less than 8 mm)
V.STAT
– 16 –
Page 17
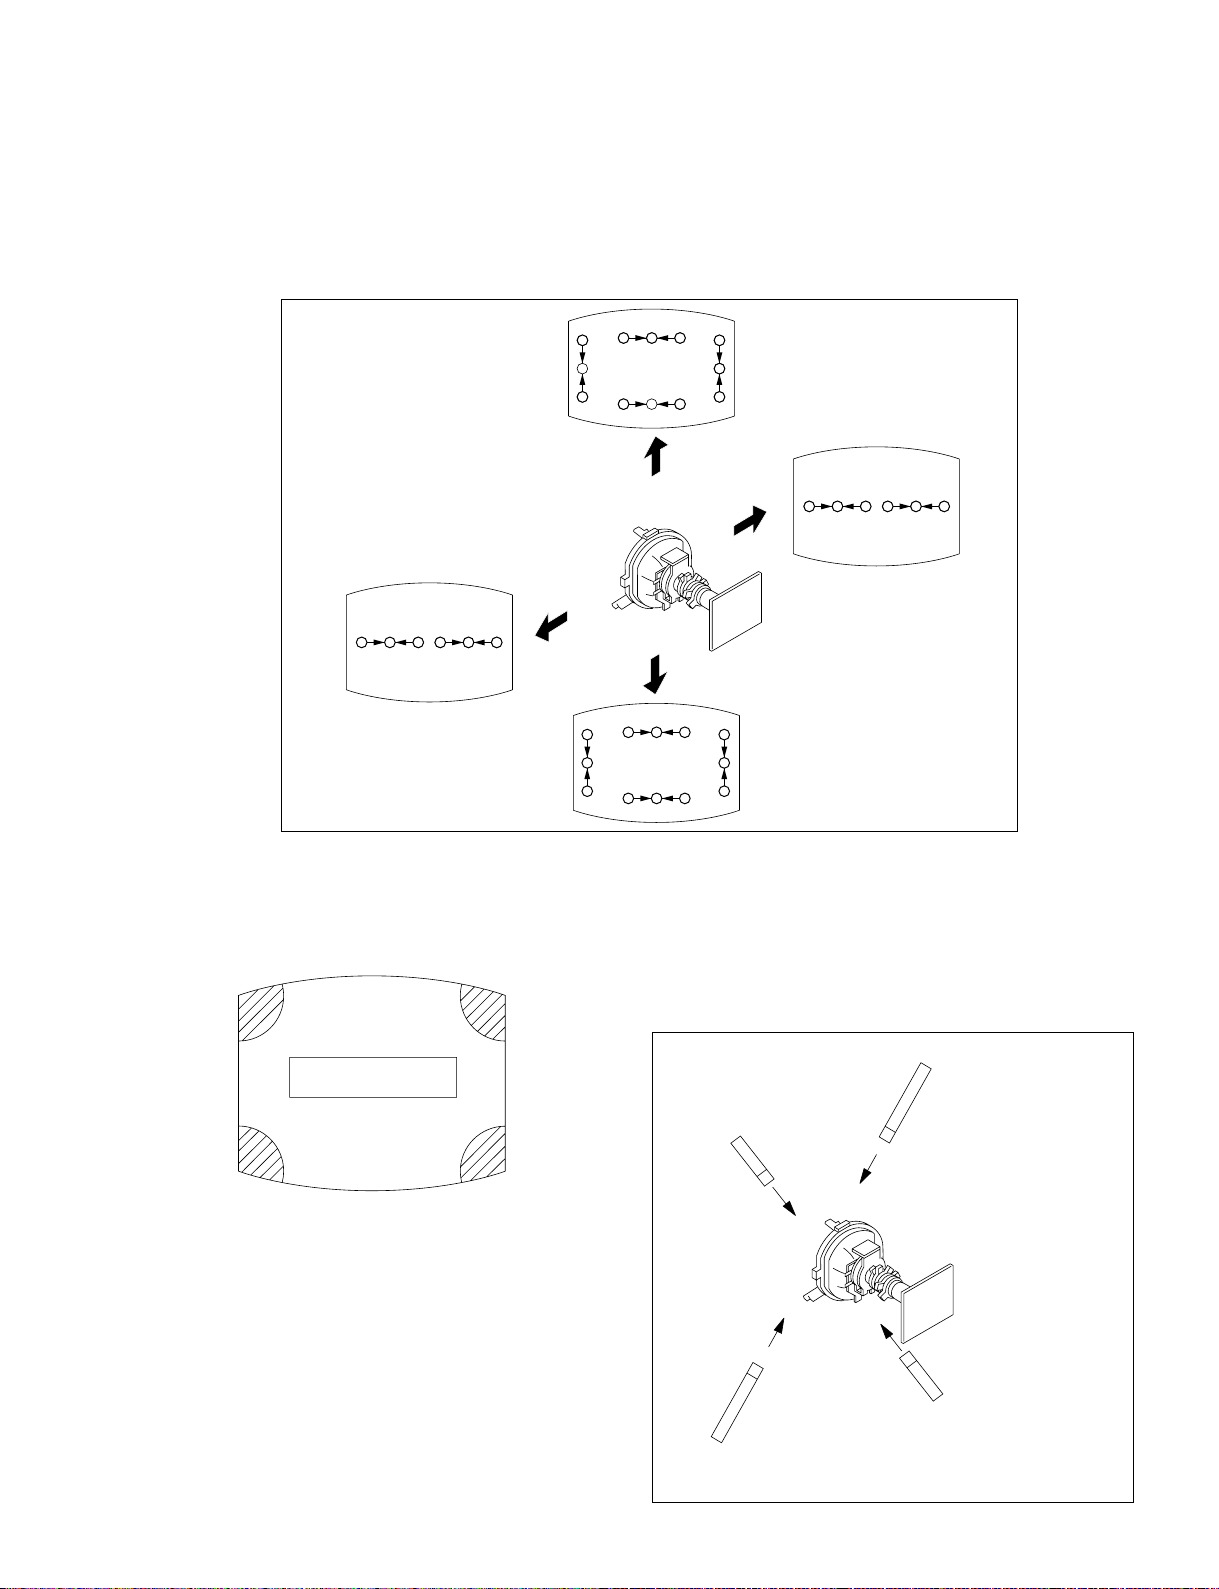
Fix a Permalloy assy
corresponding to the
misconverged areas
Permalloy assembly
a
b
c
d
(2) Dynamic Convergence Adjustment
Preparation :
• Before starting this adjustment, adjust the horizontal static
convergence and the vertical static convergence.
1. Slightly loosen the deflection yoke screws.
2. Remove the deflection yoke spacer.
KV-T29SN81
RM-870
3. Move the deflection yoke as shown in the figure below and
optimize the convergence.
4. Tighten the deflection yoke screws.
5. Install the deflection yoke spacer.
RGB RGB
R
G
RGB
B
B
R
G
R
B
RGB
G
R
RGBRGB
R
B
G
G
RGB
B
(3) Screen-corner Convergence
b
a-d : screen-corner
misconvergence
c
a
d
– 17 –
Page 18
KV-T29SN81
RM-870
3-3. FOCUS ADJUSTMENT
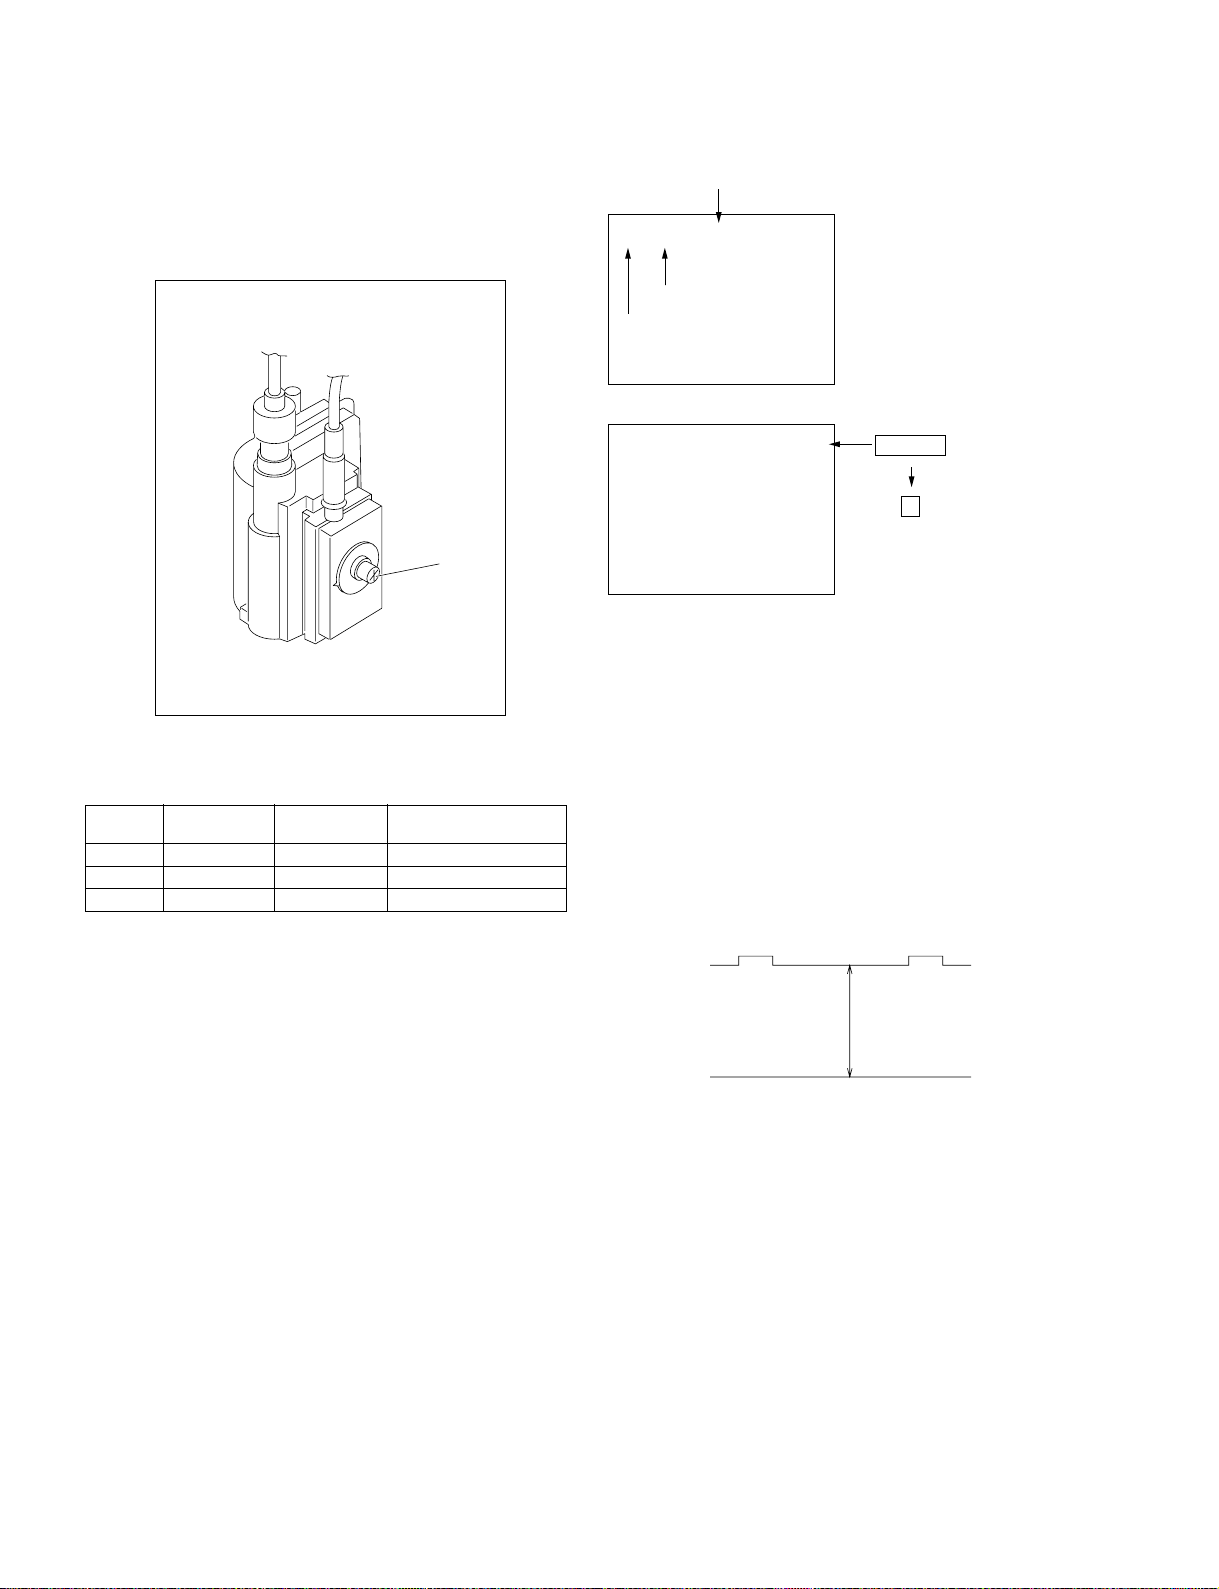
Adjust FOCUS control on the flyback transformer for the best
focus.
Focus
Note: Screen VR is not use.
a. AN ITEM OF ADJUSTMENT
Item
number
09 RDR 25 WHITE POINT R
0A GDR 20 WHITE POINT G
0B BDR 20 WHITE POINT B
Adjustment
item
NoteInitial DATA
DATA
SERVICE
1 F
RDR
09
Adjustment Item
Item number
WRITE1 FRDR09
MUTING
0
Executes the writing
3-4. G2 (SCREEN) AND WHITE BALANCE
ADJUSTMENTS
1. G2 (SCREEN) ADJUSTMENT (RV701)
1) Set the PICTURE and BRIGHTNESS to normal.
2) Put to VIDEO input mode without signals.
3) Connect R, G, and B of the C board cathode to the oscilloscope.
4) Adjust G2 (RV701) volume to the value below.
b. METHOD OF CANCELLATION FROM SERVICE
MODE
Set the standby condition (Press [POWER] button on the commander)
and then press [POWER] button again, hereupon it becomes TV
mode.
c. METHOD OF WRITE FOR MEMORY
1) Set to Service Mode.
2) Press 1 (UP) and 4 (DO WN) to select an item of adjustments.
3) Press [MUTING] button and it will indicate WRITE on screen.
4) Press - button to write into memory.
d. MEMORY WRITE CONFIRMATION METHOD
1) After adjustment, pull out the plug from AC outlet, and then
plug into AC outlet again.
2) Turn the power switch ON and set to Service Mode.
3) Call the adjusted items again, confirm they were adjusted.
177 ± 2 V DC
180 V DC
0 V
2. WHITE BALANCE ADJUSTMENTS
1) Set the Service Mode.
2) Input an entire white signal.
3) Set the PICTURE to maximum.
4) Select RDR(09) with 1 and 4 , and then set the level to 25
with 3 and 6 .
5) Select GDR(0A) and BDR(0B) with 1 and 4 and adjust
the level with 3 and 6 for the best white balance.
6) Write into the memory by pressing [MUTING] → then - .
– 18 –
Page 19
SECTION 4
SERVICE Mode08
DATA
RGB
50 Depends on the signals
PAL, SECAM : 50
NTSC : 60
10000000
Adjustment item
00
Item number
CIRCUIT ADJUSTMENTS
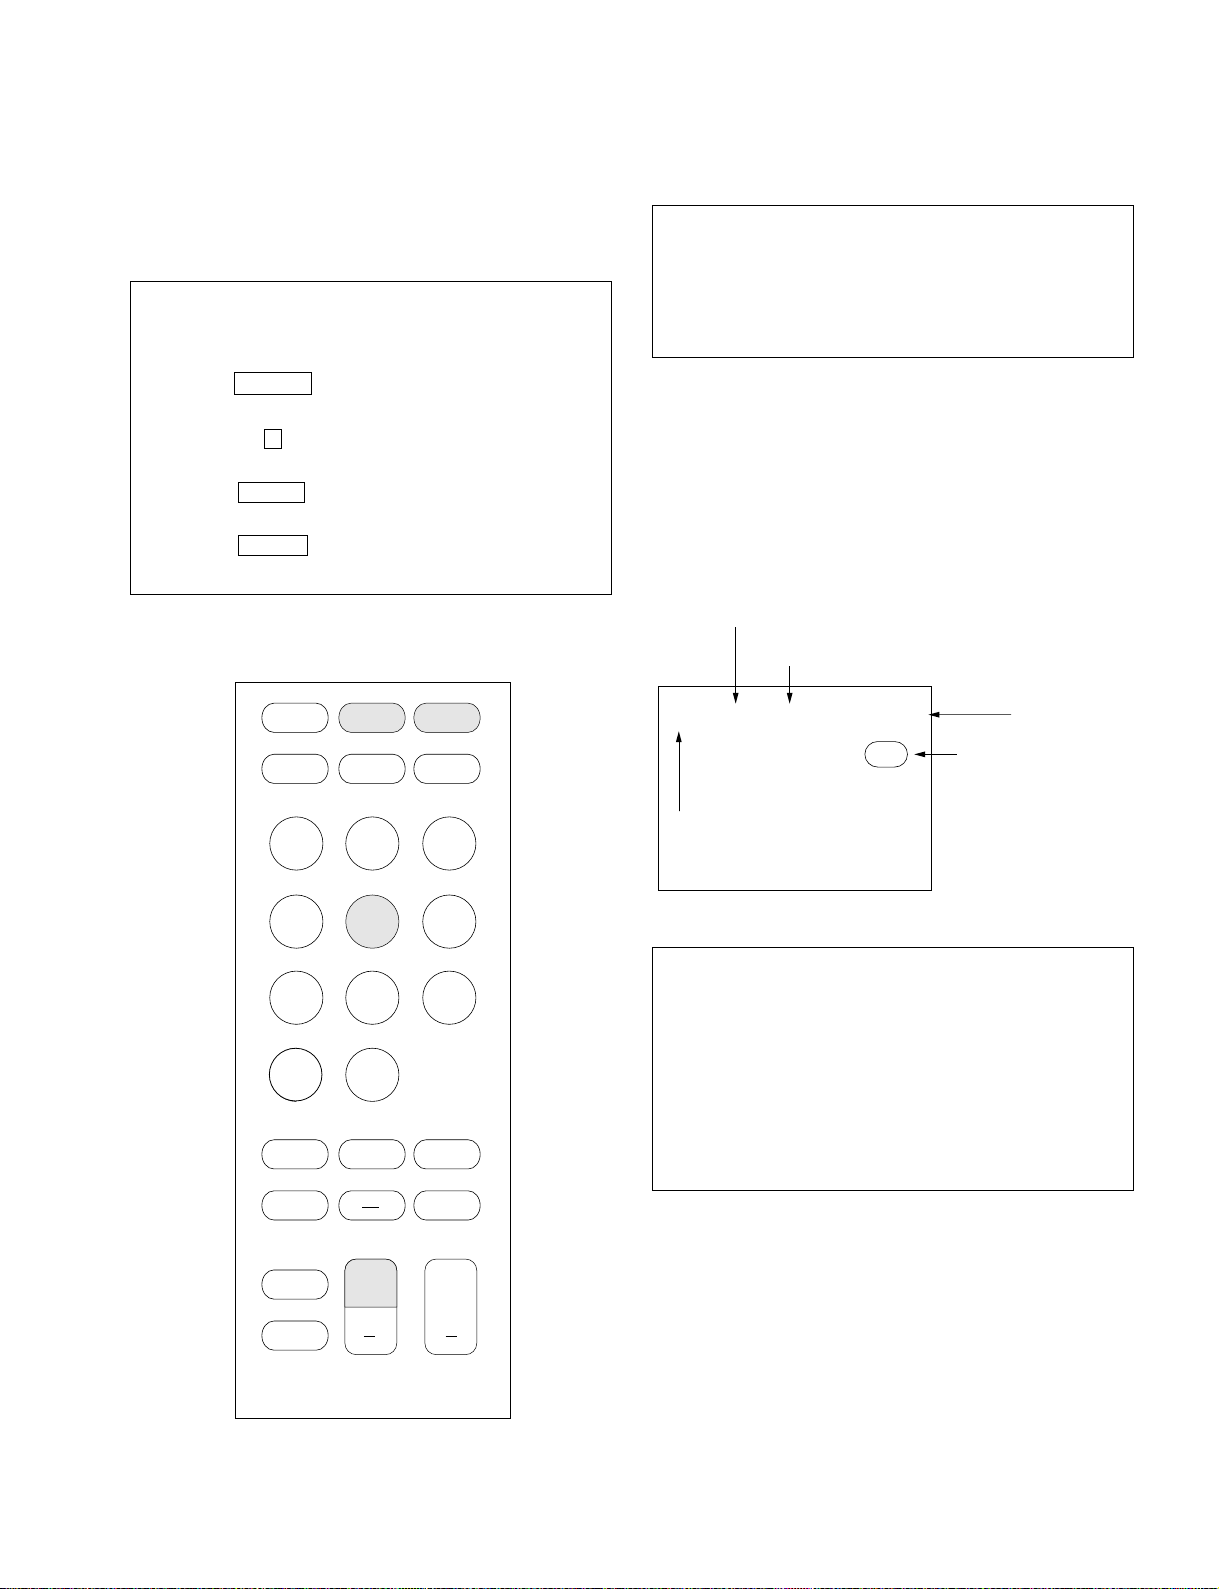
4-1. ADJUSTMENTS WITH COMMANDER
Service adjustments are made with the RM-870 that comes with
this unit.
Entering service mode
With the unit on standby
↓
DISPLAY
↓
5
↓
VOL (+)
↓
POWER
The operation sequence puts the unit into service mode.
KV-T29SN81
RM-870
[1], [4] Raise/lower the service item number
[3], [6] Raise/lower the data
[MUTING] Writes
[0] Executes the writing
[7], [0] The data all becomes the values in memory
[8], [0] User control all goes to the standard state
[5], [0] Service data initialization (Be sure not to use
usually.)
[2], [0] Write 50Hz adjustment data to 60Hz, or
viceversa.
The screen display is :
MUTING
TEXT
DISPLAY
REVEAL
VIDEO
HOLD
1 2 3
4 5 6
7 8 9
÷
TEXT CLR
A/B
ENLARGE
WAKE UP
INDEX
SLEEP
0
+ SELECT
+
VOL
POWER
TV
[1], [4] Select the adjustment item.
↓
[3], [6] Raise/lower the data.
↓
[MUTING] Writes
↓
[0] Executes the writing.
PIC MODE
+
PROGR
RM-870
– 19 –
Page 20
KV-T29SN81
RM-870
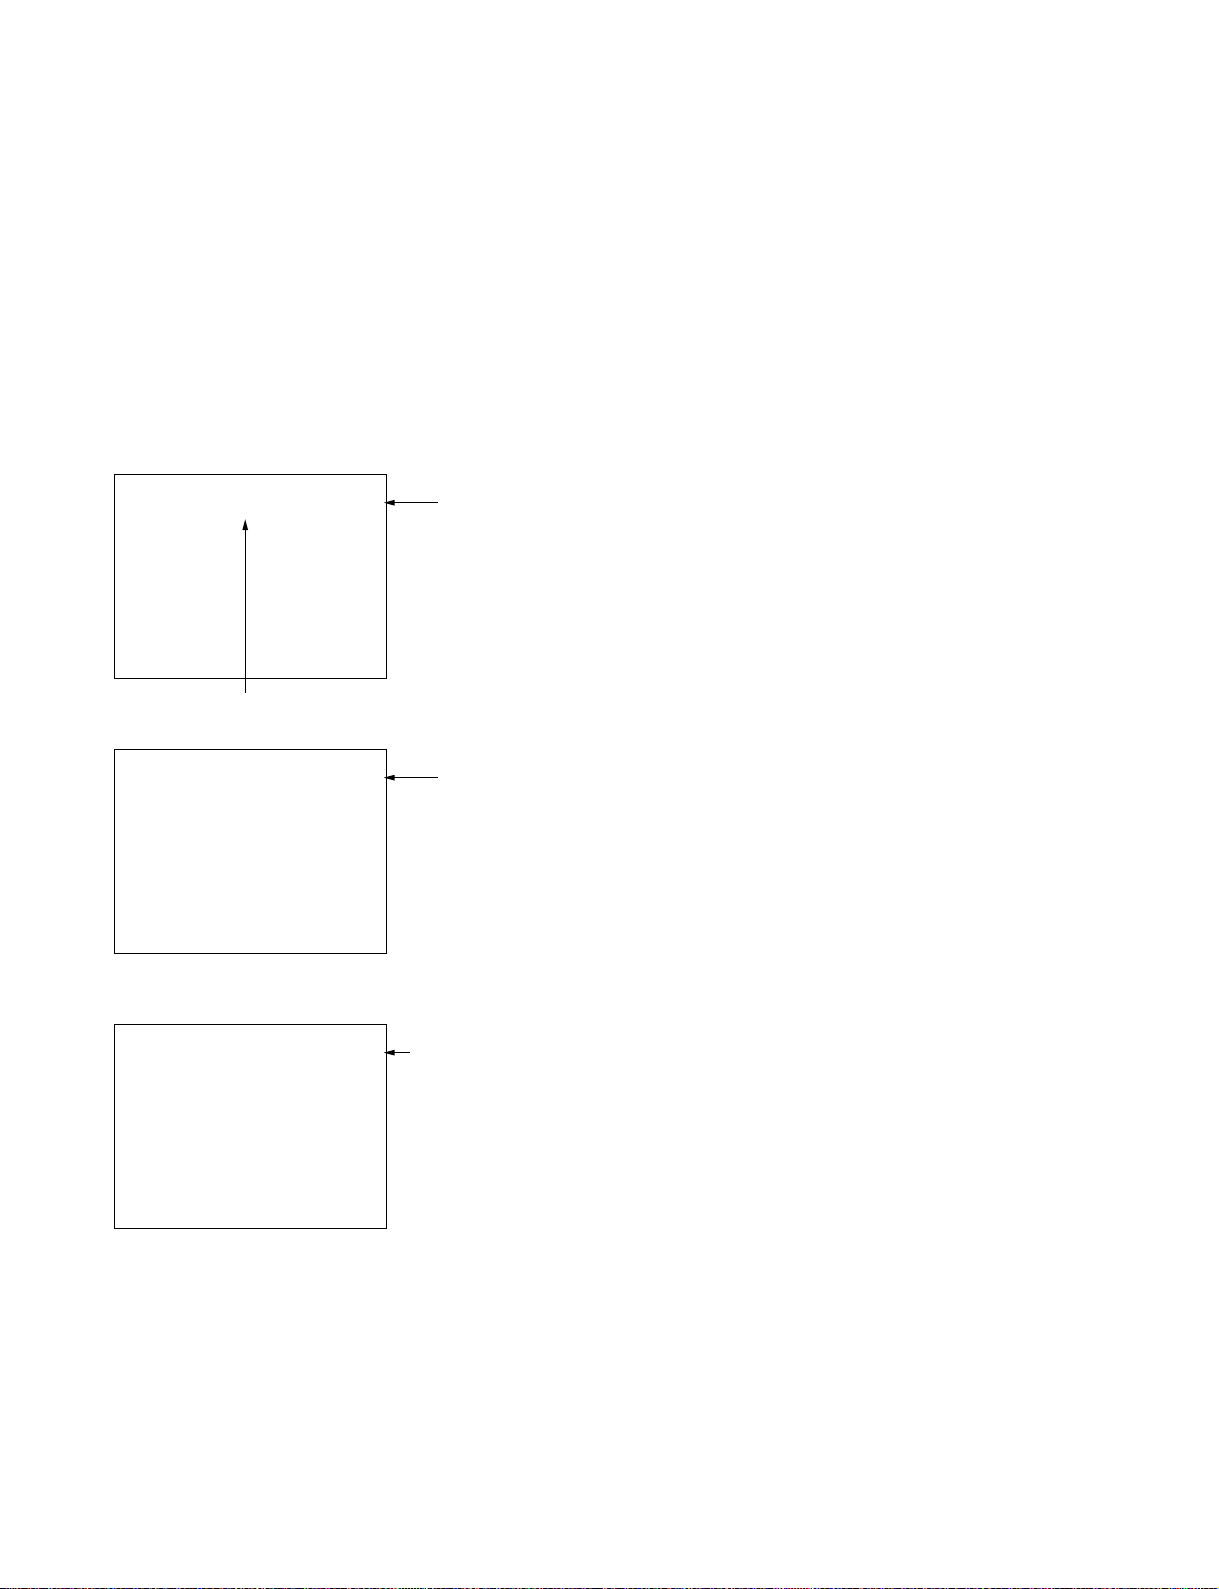
4-2. ADJUSTMENT METHOD
Item Number 08
This explanation uses V-SHIFT as an example.
1. Select 08 V-SHIFT with the [1] and [4] buttons.
2. Raise/lower the data with the [3] and [6] buttons.
3. Select the optimum state. (The standard is 0F for PAL
reception.)
4. Write with the [MUTING] button.
5. Execute the writing with the [0] button. (The WRITE
display returns to green SERVICE.)
Use the same method for Items Number 00-4B. Use [1] and [4] to
select the adjustment item, use [3] and [6] to adjust, write with
[MUTING], then execute the write with [0].
SERVICE
50
Adjust with the [3] and [6] buttons.
Adjusted with “3” and “6” buttons
WRITE
50
Written with “MUTING”
Written with the [MUTING].
0CVSF08
WRITE
50
GREEN0CVSF08
GREEN0CVSF08
GREEN
GREEN
The WRITE display
The WRITE dispaly
will be changed back
will change back to
to SERVICE.
SERVICE.
Write executed with “0”
Write executed with [0].
– 20 –
Page 21
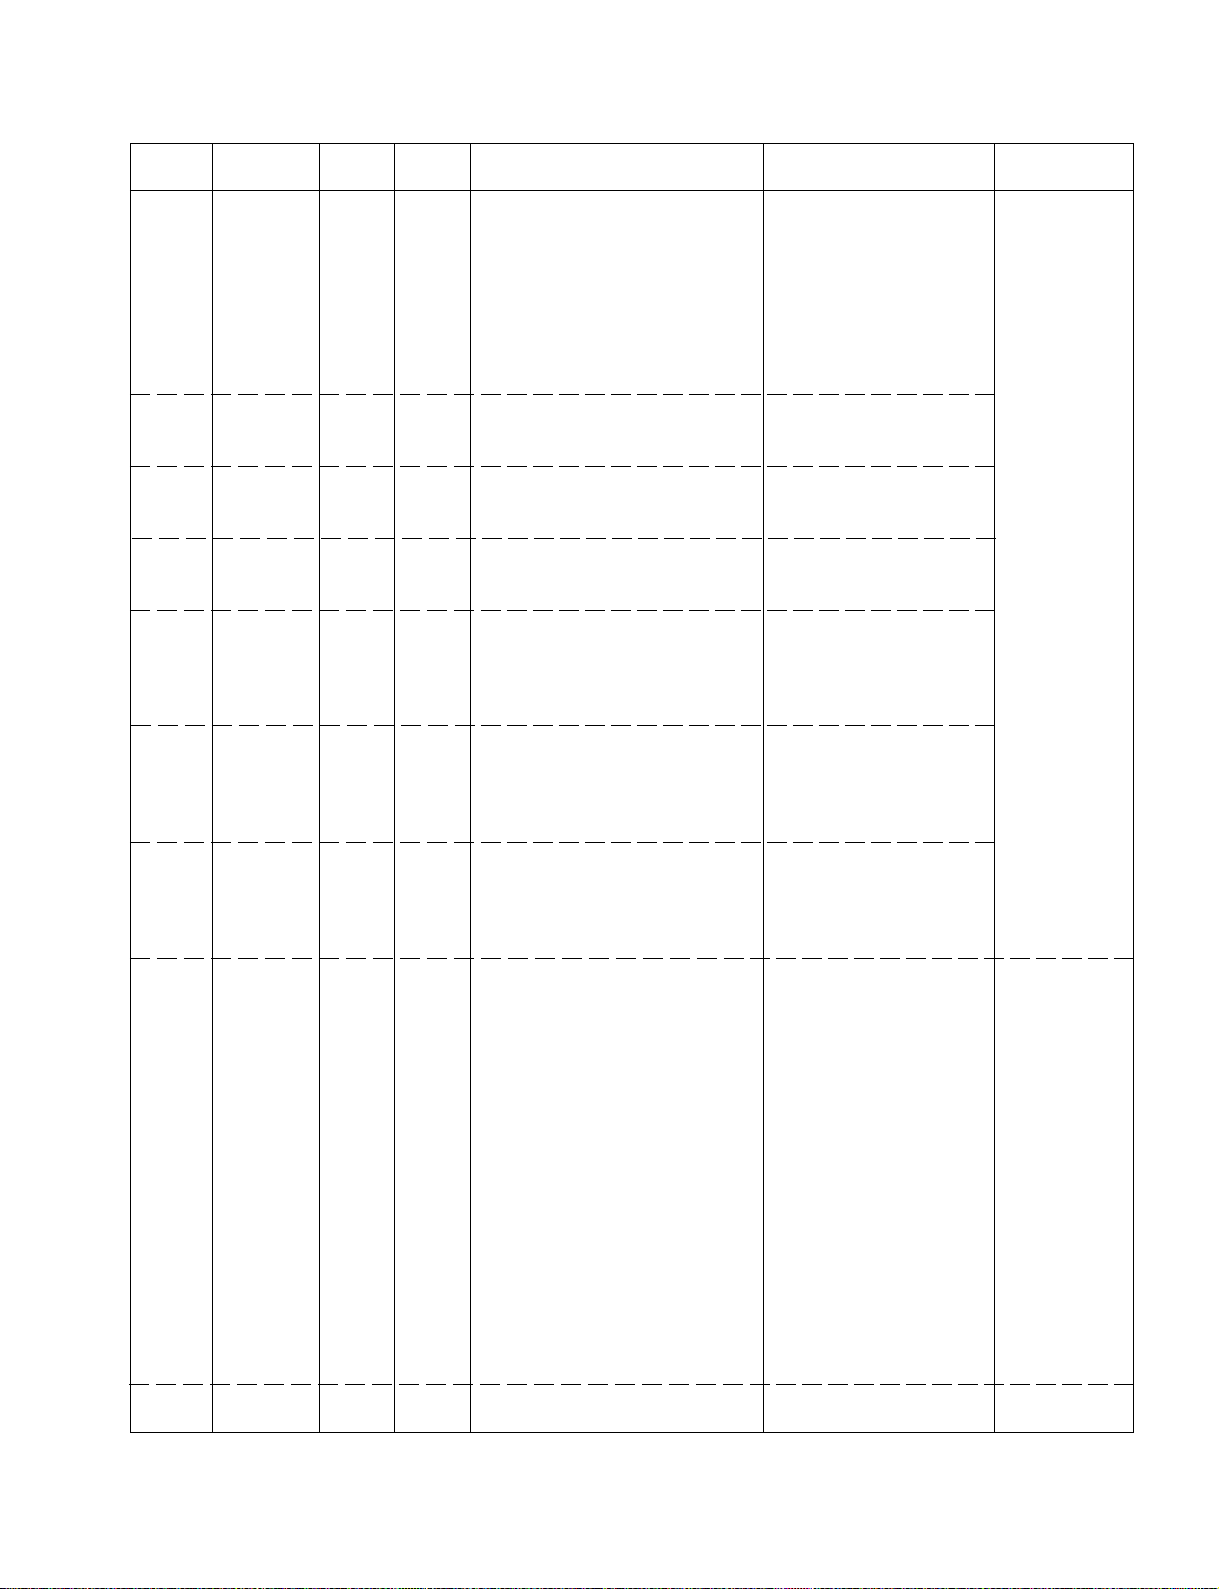
Adjustment Item Table
Item Adjustment
number Item
00 HSF 00–3F 2 H SHIFT TDA8375A
01 HSZ 00–3F 23 H SIZE TDA8375A
02 PAP 00–3F 21 PIN AMPLITUDE TDA8375A
03 CNP 00–3F 29 CORNER PIN TDA8375A
04 TLT 00–3F 20 TILT TDA8375A
05 VSL 00–3F 20 V SLOPE TDA8375A
06 VAP 00–3F 1D V AMPLITUDE TDA8375A
07 SCR 00–3F 20 S CORRECTION TDA8375A
08 VSF 00–3F 20 V SHIFT TDA8375A
09 RDR 00–3F 25 WHITE POINT R TDA8375A
0A GDR 00–3F 20 WHITE POINT G TDA8375A
0B BDR 00–3F 20 WHITE POINT B TDA8375A
0C FO 00–03 00 PHI-1 TIME CONSTANT TDA8375A
0D AGC 00–3F 30 AGC TAKE OVER TDA8375A
0E VSW 00–01 00 VIDEO MUTE TDA8375A
0F FOR 00–03 00 FORCED FIELD FREQ. TDA8375A
10 DL 00–01 00 INTERLACE TDA8375A
11 POC 00–01 00 SYNCHRO MODE FIX TDA8375A
12 VID 00–01 00 VIDEO IDENT MODE TDA8375A
13 HCO 00–01 00 EHT TRACKING MODE TDA8375A
14 EVG 00–01 00 ENABLE V GUARD TDA8375A
15 SBL 00–01 00 SERVICE BLANKING TDA8375A
16 PRD 00–01 00 OVER-VOLTAGE INPUT TDA8375A
17 COR 00–01 00 NOISE CORING PEAK TDA8375A
18 PMX 00–3F 27 PICTURE MAX DATA TDA8375A
19 PMI 00–3F 05 PICTURE MIN DATA TDA8375A
1A SBR 00–7F 4B SUB-BRIGHTNESS TDA8375A
1B SHU 00–0F 07 SUB-HUE TDA8375A
1C SSH 00–03 01 SUB-SHARPNESS TDA8375A
1D SC1 00–3F 1F SUB-COLOR LOWER TDA8375A
1E SC2 00–3F 0B SUB-COLOR HIGHER TDA8375A
1F AIP 00–7F 3F ADJUSTMENT IF PLL TDA8375A
20 VZM 00–3F 19 VERTICAL ZOOM TDA8375A
21 FAW 00–FF 08 NICAM FAW THRESH MSP3410
22 CTM 00–FF 08 NICAM ERROR BIT (MONO) MSP3410
23 CTN 00–FF 50 NICAM ERROR BIT (NICAM) MSP3410
24 WCD 00–FF 0A W. G. CHANGE DATA MSP3410
25 WST 00–FF 15 W. G. STEREO CUT POINT MSP3410
26 WTM 00–FF 50 W. G. TIMER CHANGE MSP3410
27 WBT 00–FF EA W. G. BILINGUAL MSP3410
28 ACG 00–01 01 AGC AUTO/CONST. MSP3410
29 CDB 00–3F 28 AGC GAIN CONST. MSP3410
2A FGP 00–7F 24 FM (BG, I, DK) PRESCALE MSP3410
2B FMP 00–7F 40 FM (M) PRESCALE MSP3410
2C WGP 00–7F 3C W. G. PRESCALE MSP3410
2D NIP 00–7F 7F NICAM PLESCALE MSP3410
2E CRM 00–01 00 CARRIER MUTE MSP3410
2F CML 00–03 00 CARRIER MUTE LEVEL MSP3410
30 ACO 00–01 01 AUDIO CLOCK OUT MSP3410
31 WAC 00–01 01 W . G . AGREEMENT COUNT MSP3410
32 DLY 00–FF 30 STEREO SEARCH DELAY MSP3410
33 DLG 00–FF 10 INTERVAL OF ID CHECK MSP3410
34 TXP 00–0F 09 TEXT PICTURE CONT. SAA5281
35 MXP 00–0F 0D TEXT MIX MODE PICTURE SAA5281
Data
range
Initial
data
Standard data Note Device
KV-T29SN81
RM-870
– 21 –
Page 22
KV-T29SN81
RM-870
Adjustment Item Table
Item Adjustment
number Item
36 BKP 00–3F 00 BLK OFF PICTURE
37 HBL 00–3F 25 H BLK LEFT WIDTH
38 HBR 00–3F 20 H BLK RIGHT WIDTH
39 VBH 00–7F 00 V BLK HIGHT WIDTH
3A VBL 00–FF FF V BLK LOW WIDTH
3B ODL 00–FF 10 POWER ON DELAY
3C OFR 00–0F 00 STBY n ON RGB OUT
3D OFM 00–0F 00 MAIN POWER RGB OUT
3E OSH 00–3F 0A OSD POSITION H
3F DKS 00–01 00 D/K NICAM
40 MUT 00–01 01 NO SYNC. MUTE
41 DWZ 00–01 00 DISABLE WIDEZOOM
42 ABL 00–01 01 BRIGHT ABL
43 DTV 00–01 00 DISABLE TV SYSTEM KEY
44 SCM 00–01 00 SECAM TRAP ACTIVE
45 ROC 00–0F 07 ROTATION CENTER
46 ROS 00–07 03 ROTATION STEP WIDTH
47 DVM 00–01 00 DISABLE VM MUTE
48 FBT 00–01 00
49 OP0 00–FF 40 OPTION 0
4A OP1 00–FF 07 OPTION 1
4B OP2 00–FF 00 OPTION 2
Data
range
Initial
data
Standard data Note Device
u
.CON
u
.CON
u
.CON
u
.CON
u
.CON
u
.CON
u
.CON
u
.CON
u
.CON
u
.CON
u
.CON
u
.CON
u
.CON
u
.CON
u
.CON
u
.CON
u
.CON
u
.CON
C/M FOR FBT LAYER SHORTu.CON
u
.CON
u
.CON
u
.CON
NOTE
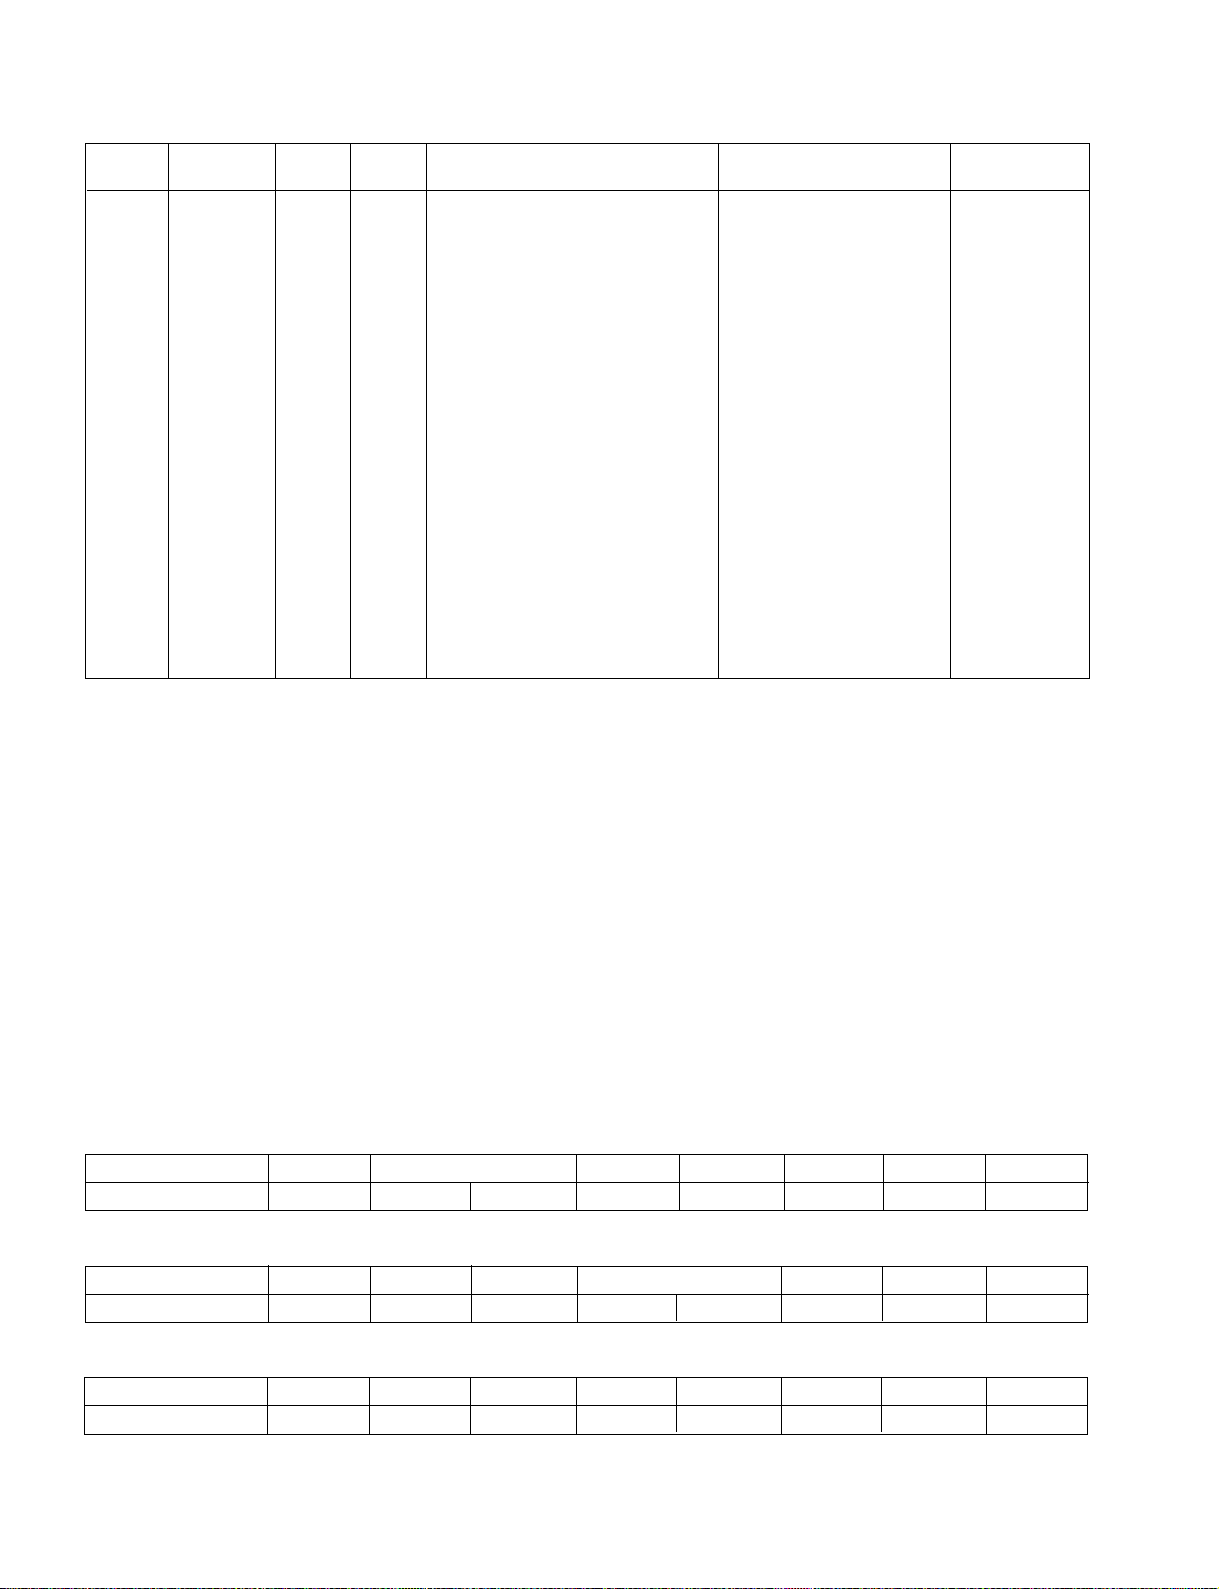
• Standard Data: Those are the standard data values written on the microprocessor. Therefore, the data values of the
modes are stored respectively in the memory.
In case of a device replacement, adjustment by rewriting the data value is necessary for some items.
• 50 ...................... 50 Hz data
• 60 ...................... 60 Hz data
• Standard data listed on the adjustment item table are reference values, therefore it is different for every model.
ITEM INFORMATION
• 10. DL: TV/MIX Mode 0=Interlace 1=interlace, TEXT Mode 0=interlace 1=Interlace
• 42. ABL: Bright ABL ON/OFF ON=1 OFF=0
• 49. OP0 • 4A. OP1 • 4B. OP2
Input data are different according to models.
AV INPUT : 00 → NO MODEL, 01 → MONO, CXA1315, 10/11 → STEREO, TDA8424
TV System : 00 → Multi model, 01 → B/G, 10 → D/K.I, 11 → B/G D/K
NTSC, SECAM, Chin
Shrp : Dynamic Mode @ 1 → Sharpness 50%, 0 → Sharpness 70%.
VM Operation : 0 → OFF, 1 → ON
No. 49 OP0 * Input data are different according to models
Item – AV Input Shrp 50% Remote preset Auto program Video T ext Reserved
KV-T29SN81 0 1 1 1 0000
No. 4A OP1
Item – Tilt – TV System NTSC 3.58 SECAM Chinese
KV-T29SN81 0 1 0 0 1101
No. 4B OP2
Item – Sound Mode Child Lock
KV-T29SN81 0 0 0 0 0000
Sound Effect
High Dev. 100 Prg. 4:3 Wide S Video
– 22 –
Page 23
KV-T29SN81
RM-870
4-3. A BOARD ADJUSTMENT AFTER IC003
(MEMORY) REPLACEMENT
1. Enter to Service Mode.
2. Press commander buttons [5] and [0] (Data Initialize), and [2]
and [0] (Data Copy) to initialize the data.
3. Call each item number, and check if the respective screen shows
the normal picture.
In case some items are not well-adjusted, give them fine
adjustment.
Write the data per each item number ([MUTING] + [0]).
4. Select item numbers “49” (OP0), “4A” (OP1) and "4B" (OP2)
respectively set the bit per model with command buttons [3]
and [6].
5. Press commander buttons [8] and [0] (Test Normal) to retur n to
the data that was set on the shipment from the factory.
(= Cancel Service Mode.)
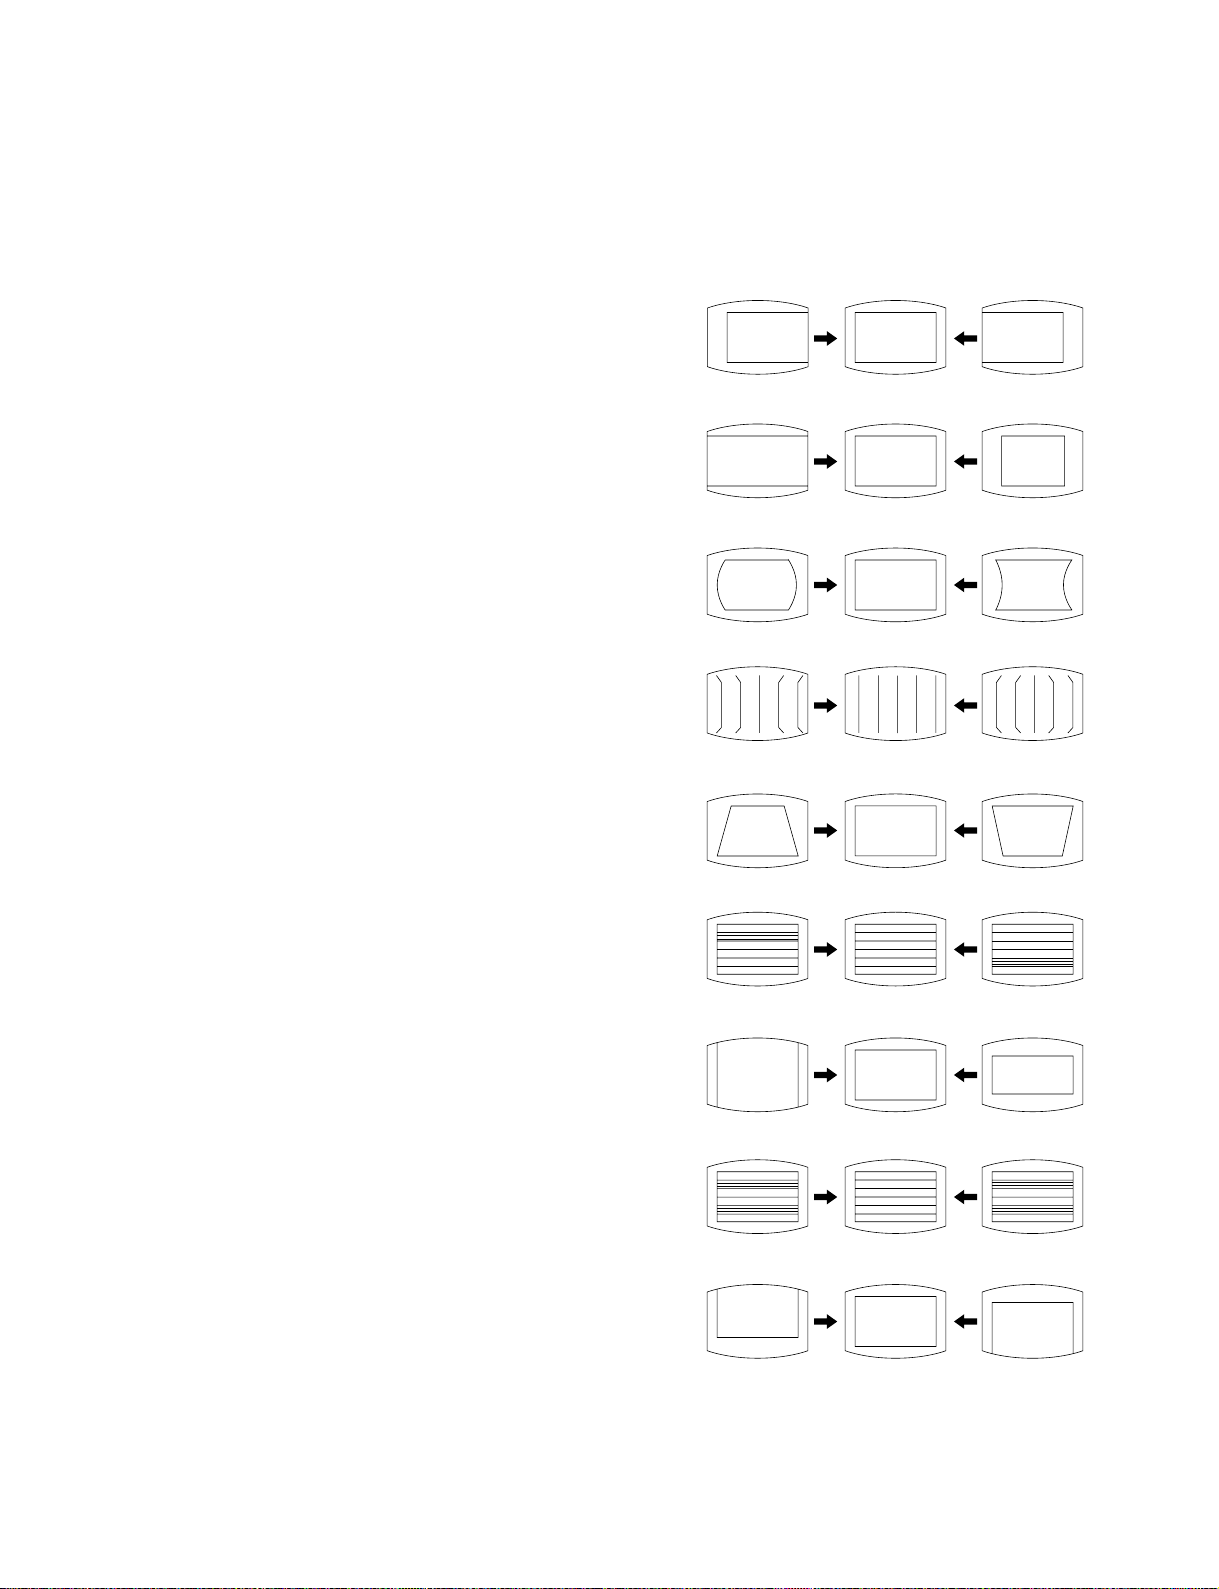
4-4. PICTURE DISTORTION ADJUSTMENT
Item Number 00 – 08
00 HSF (H SHIFT)
00 HSF (H SHIFT)
01 HSZ (H SIZE)
01 HSZ (H SIZE)
02 PAP (PIN AMP)
02 PAP (PIN AMPLITUDE)
03 CNP (CORNER PIN)
03 CNP (CORNER PIN)
04 TLT (TILT)
04 TLT (TILT)
05 VSL (V SLOPE)
05 VSL (V SLOP)
06 VAP (V AMPLITUDE)
06 VAP (V ANP)
07 SCR (S CORRECTION)
07 SCR (S CORRECTION)
08 VSF (V SHIFT)
08 VSF (V SHIFT)
– 23 –
Page 24
KV-T29SN81
RM-870
MEMO
○○○○○○○○○○○○○○○○○○○○○○○○○○○○○○○○○○○○○○○○○○○○○○○○○○○○○○○○○○○○○○○
○○○○○○○○○○○○○○○○○○○○○○○○○○○○○○○○○○○○○○○○○○○○○○○○○○○○○○○○○○○○○○○
○○○○○○○○○○○○○○○○○○○○○○○○○○○○○○○○○○○○○○○○○○○○○○○○○○○○○○○○○○○○○○○
○○○○○○○○○○○○○○○○○○○○○○○○○○○○○○○○○○○○○○○○○○○○○○○○○○○○○○○○○○○○○○○
○○○○○○○○○○○○○○○○○○○○○○○○○○○○○○○○○○○○○○○○○○○○○○○○○○○○○○○○○○○○○○○
○○○○○○○○○○○○○○○○○○○○○○○○○○○○○○○○○○○○○○○○○○○○○○○○○○○○○○○○○○○○○○○
○○○○○○○○○○○○○○○○○○○○○○○○○○○○○○○○○○○○○○○○○○○○○○○○○○○○○○○○○○○○○○○
○○○○○○○○○○○○○○○○○○○○○○○○○○○○○○○○○○○○○○○○○○○○○○○○○○○○○○○○○○○○○○○
○○○○○○○○○○○○○○○○○○○○○○○○○○○○○○○○○○○○○○○○○○○○○○○○○○○○○○○○○○○○○○○
○○○○○○○○○○○○○○○○○○○○○○○○○○○○○○○○○○○○○○○○○○○○○○○○○○○○○○○○○○○○○○○
○○○○○○○○○○○○○○○○○○○○○○○○○○○○○○○○○○○○○○○○○○○○○○○○○○○○○○○○○○○○○○○
○○○○○○○○○○○○○○○○○○○○○○○○○○○○○○○○○○○○○○○○○○○○○○○○○○○○○○○○○○○○○○○
○○○○○○○○○○○○○○○○○○○○○○○○○○○○○○○○○○○○○○○○○○○○○○○○○○○○○○○○○○○○○○○
○○○○○○○○○○○○○○○○○○○○○○○○○○○○○○○○○○○○○○○○○○○○○○○○○○○○○○○○○○○○○○○
○○○○○○○○○○○○○○○○○○○○○○○○○○○○○○○○○○○○○○○○○○○○○○○○○○○○○○○○○○○○○○○
○○○○○○○○○○○○○○○○○○○○○○○○○○○○○○○○○○○○○○○○○○○○○○○○○○○○○○○○○○○○○○○
○○○○○○○○○○○○○○○○○○○○○○○○○○○○○○○○○○○○○○○○○○○○○○○○○○○○○○○○○○○○○○○
○○○○○○○○○○○○○○○○○○○○○○○○○○○○○○○○○○○○○○○○○○○○○○○○○○○○○○○○○○○○○○○
○○○○○○○○○○○○○○○○○○○○○○○○○○○○○○○○○○○○○○○○○○○○○○○○○○○○○○○○○○○○○○○
○○○○○○○○○○○○○○○○○○○○○○○○○○○○○○○○○○○○○○○○○○○○○○○○○○○○○○○○○○○○○○○
○○○○○○○○○○○○○○○○○○○○○○○○○○○○○○○○○○○○○○○○○○○○○○○○○○○○○○○○○○○○○○○
○○○○○○○○○○○○○○○○○○○○○○○○○○○○○○○○○○○○○○○○○○○○○○○○○○○○○○○○○○○○○○○
○○○○○○○○○○○○○○○○○○○○○○○○○○○○○○○○○○○○○○○○○○○○○○○○○○○○○○○○○○○○○○○
○○○○○○○○○○○○○○○○○○○○○○○○○○○○○○○○○○○○○○○○○○○○○○○○○○○○○○○○○○○○○○○
○○○○○○○○○○○○○○○○○○○○○○○○○○○○○○○○○○○○○○○○○○○○○○○○○○○○○○○○○○○○○○○
○○○○○○○○○○○○○○○○○○○○○○○○○○○○○○○○○○○○○○○○○○○○○○○○○○○○○○○○○○○○○○○
○○○○○○○○○○○○○○○○○○○○○○○○○○○○○○○○○○○○○○○○○○○○○○○○○○○○○○○○○○○○○○○
○○○○○○○○○○○○○○○○○○○○○○○○○○○○○○○○○○○○○○○○○○○○○○○○○○○○○○○○○○○○○○○
○○○○○○○○○○○○○○○○○○○○○○○○○○○○○○○○○○○○○○○○○○○○○○○○○○○○○○○○○○○○○○○
○○○○○○○○○○○○○○○○○○○○○○○○○○○○○○○○○○○○○○○○○○○○○○○○○○○○○○○○○○○○○○○
○○○○○○○○○○○○○○○○○○○○○○○○○○○○○○○○○○○○○○○○○○○○○○○○○○○○○○○○○○○○○○○
○○○○○○○○○○○○○○○○○○○○○○○○○○○○○○○○○○○○○○○○○○○○○○○○○○○○○○○○○○○○○○○
○○○○○○○○○○○○○○○○○○○○○○○○○○○○○○○○○○○○○○○○○○○○○○○○○○○○○○○○○○○○○○○
○○○○○○○○○○○○○○○○○○○○○○○○○○○○○○○○○○○○○○○○○○○○○○○○○○○○○○○○○○○○○○○
○○○○○○○○○○○○○○○○○○○○○○○○○○○○○○○○○○○○○○○○○○○○○○○○○○○○○○○○○○○○○○○
○○○○○○○○○○○○○○○○○○○○○○○○○○○○○○○○○○○○○○○○○○○○○○○○○○○○○○○○○○○○○○○
○○○○○○○○○○○○○○○○○○○○○○○○○○○○○○○○○○○○○○○○○○○○○○○○○○○○○○○○○○○○○○○
– 24 –
Page 25
KV-T29SN81
1
1
2
3
4
RM-870
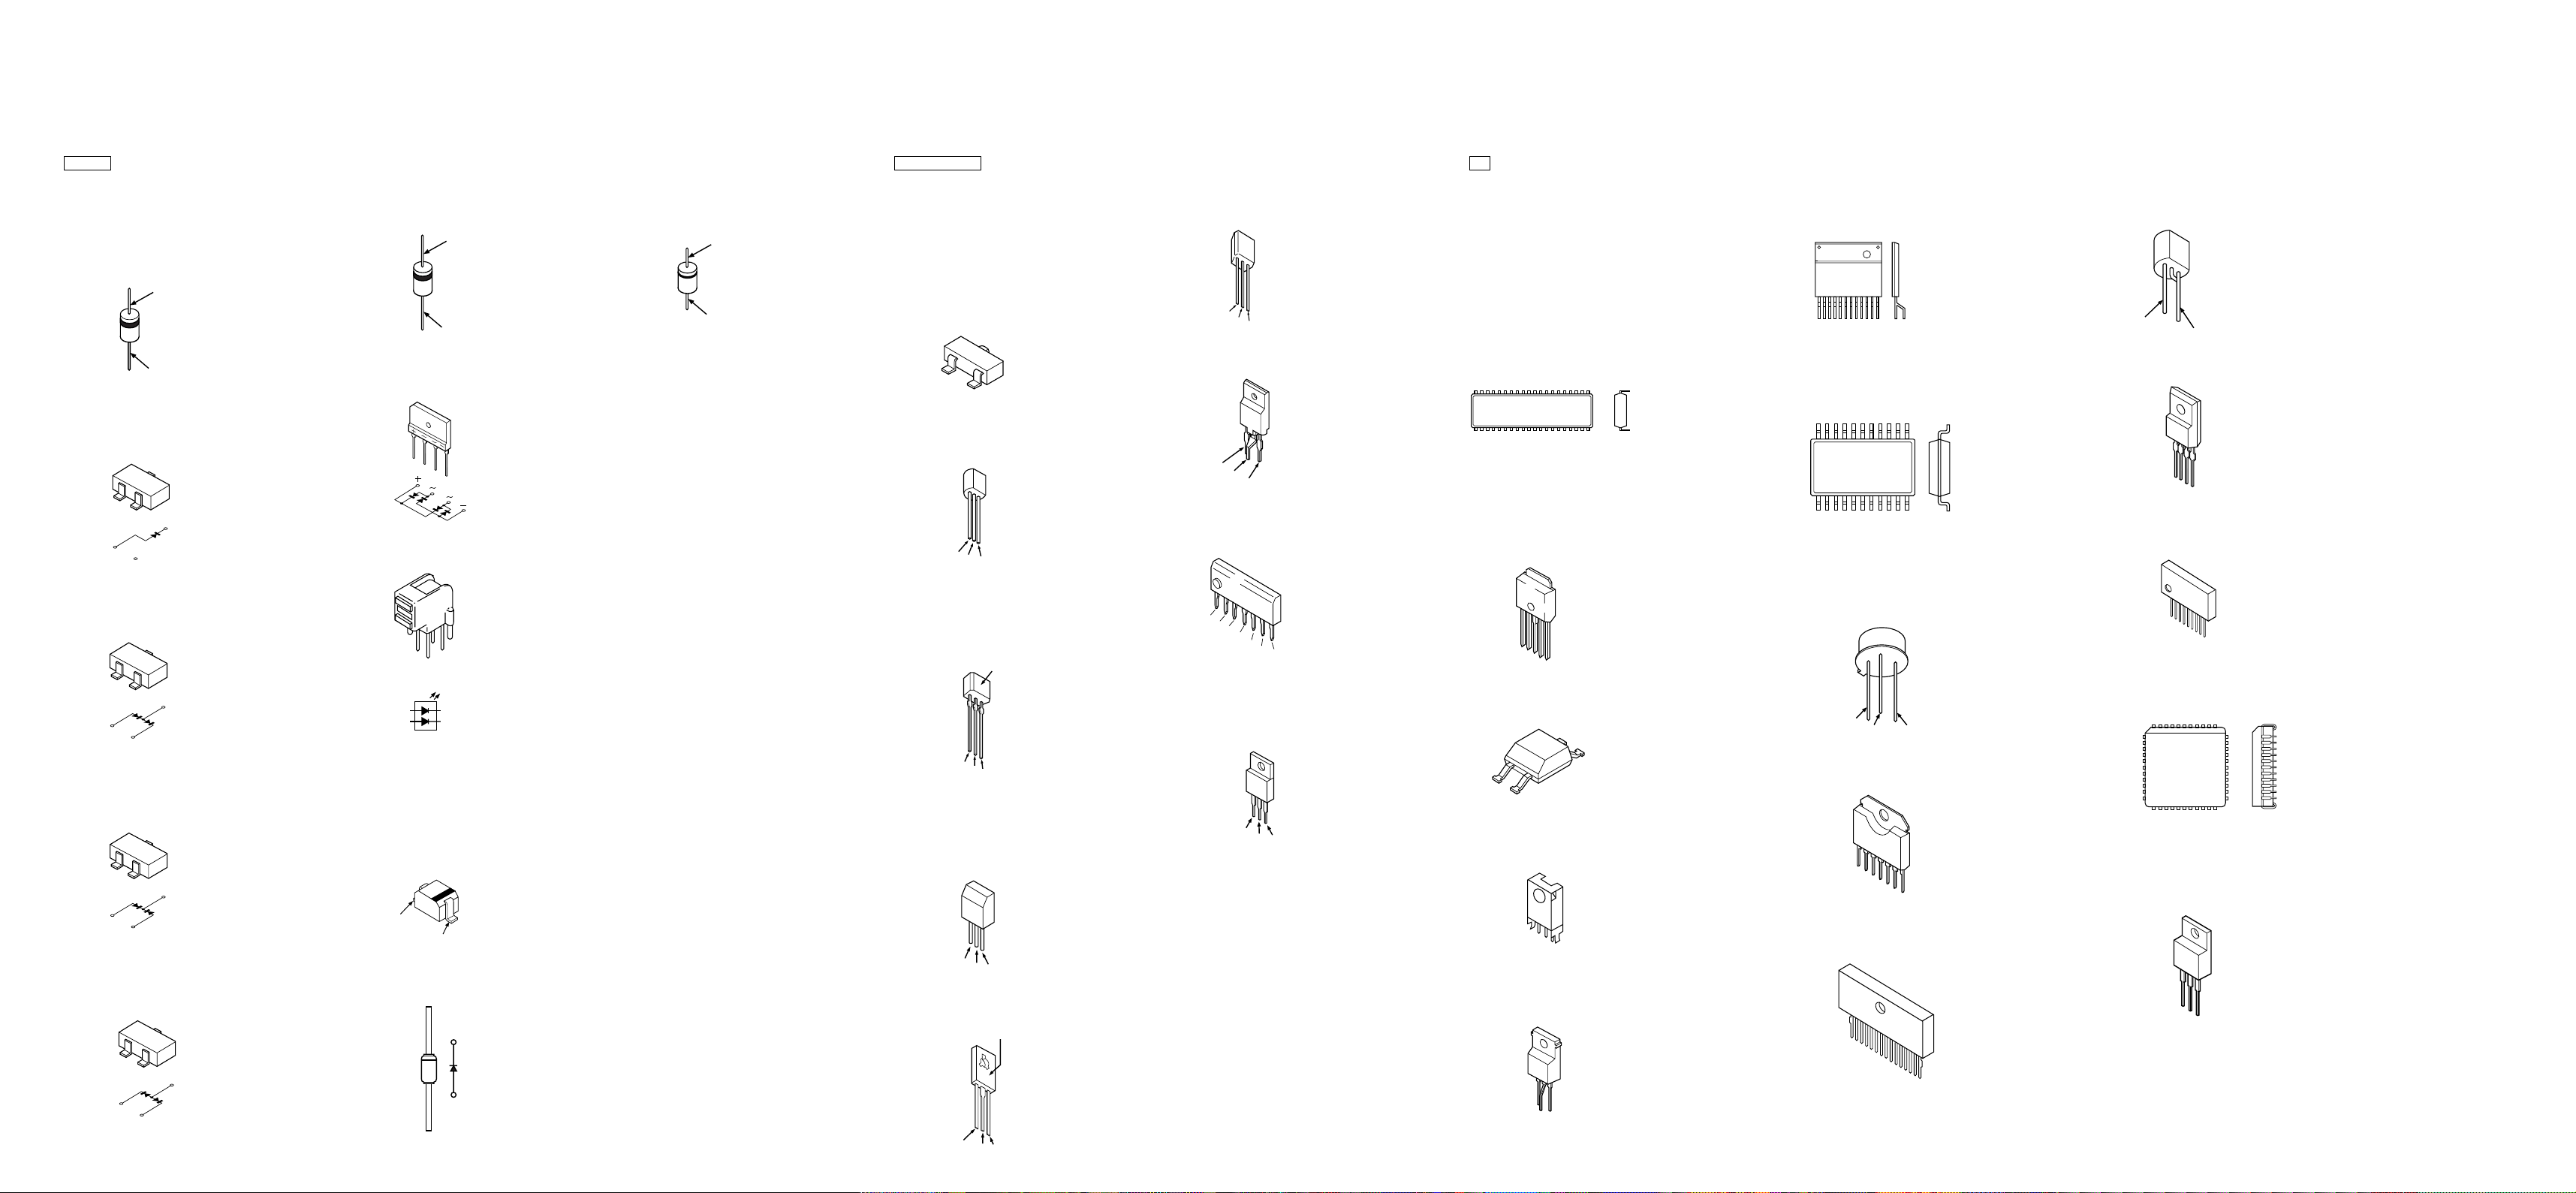
5-5. SEMICONDUCTORS
DIODE TRANSISTOR IC
KV-T29SN81
RM-870
KV-T29SN81
RM-870
D1NL20
EL1Z
GP08D
HZT33-02TE
RGP02-17EL-6433
CATHODE
ANODE
RD3.6M-B2
RD5.6M-B2
3
2
1
2
1
DA204K
3
2
1
2
1
DAN202K
3
2
1
2
1
DAP202K
ERC06-15S
S3L20UF4
LN4SB60
CATHODE
ANODE
ERD29-08J
RU4DS
CATHODE
ANODE
DTA114EKA-T146
DTC114EKA-T146
DTC143TKA-T146
DTC144EK
TR DTC144EKA
2SA1037K-T-146-QR
2SA1162-G
2SC1623-L5L6
2SC2712-YG
C
B
E
2SC2669-0
E
2SC4793
ST24C08FB (8PIN)
STR-S6708N
UPC574J
CXA1110BS (30PIN)
CXA1315P (16PIN)
CXP85224A-072S (64PIN)
MARKING SIDE VIEW
NJM2903D (8PIN)
NJM2904D (8PIN)
P83C654FBP/540 (40PIN)
SAA5281ZP/E (52PIN)
TDA4665T/V5-118 (16PIN)
C
B
TDA8366/N3D (56PIN)
TDA8375A (56PIN)
TDA8424 (20PIN)
TDA9821 (16PIN)
1
Zig-zag In -line Package
~
ANODE
PQ09RA1
CATHODE
UPC4558G2 (8PIN)
2SA1091-0
2SC2551-0
B
C
E
3
LNK0220022G
E
C
B
2SC4927-01
2SA1175-HFE
2SC2410SN
2SC2785-HFE
2
1
4
2
LETTER SIDE
D1
G1
S1
NC
S2
G2
D2
2SA1837
3
DTZ9.1
MA113-TX
2
1
4
3
E
C
B
2SD2394-EF
2SD2394-F
RD13ES-B2
RD2.2ES-B2
RD3.6ES-B1
RD39ES-B2
RD4.7ES-B2
RD5.1ES-B1
1SS119-25
3
ANODE
CATHODE
2SC2958
2SC3209LK
2SC3733
2SD774-34
B
C
E
E
C
B
RD9.1ES-L2
2SC2611
3
LETTER SIDE
1
TOP VIEW
Dual In-line Package
Pin 6
~
98
L78LR05D-MA
PC123F2
4
1
2
SBX1981-11
SE135N
1
TOP VIEW
NJM2234L
Single In -line Package
Pin 6~98
NJM78L12A
1
8
MSP3410D-PP-B4
1
3
3
2
1
LA7845
TOP VIEW
Quad Flat J-leaded Package
Pin 20~996
TA7805S
TA8223K
2
1
3
2
1
– 50 – – 51 – – 52 –
E
C
B
Page 26
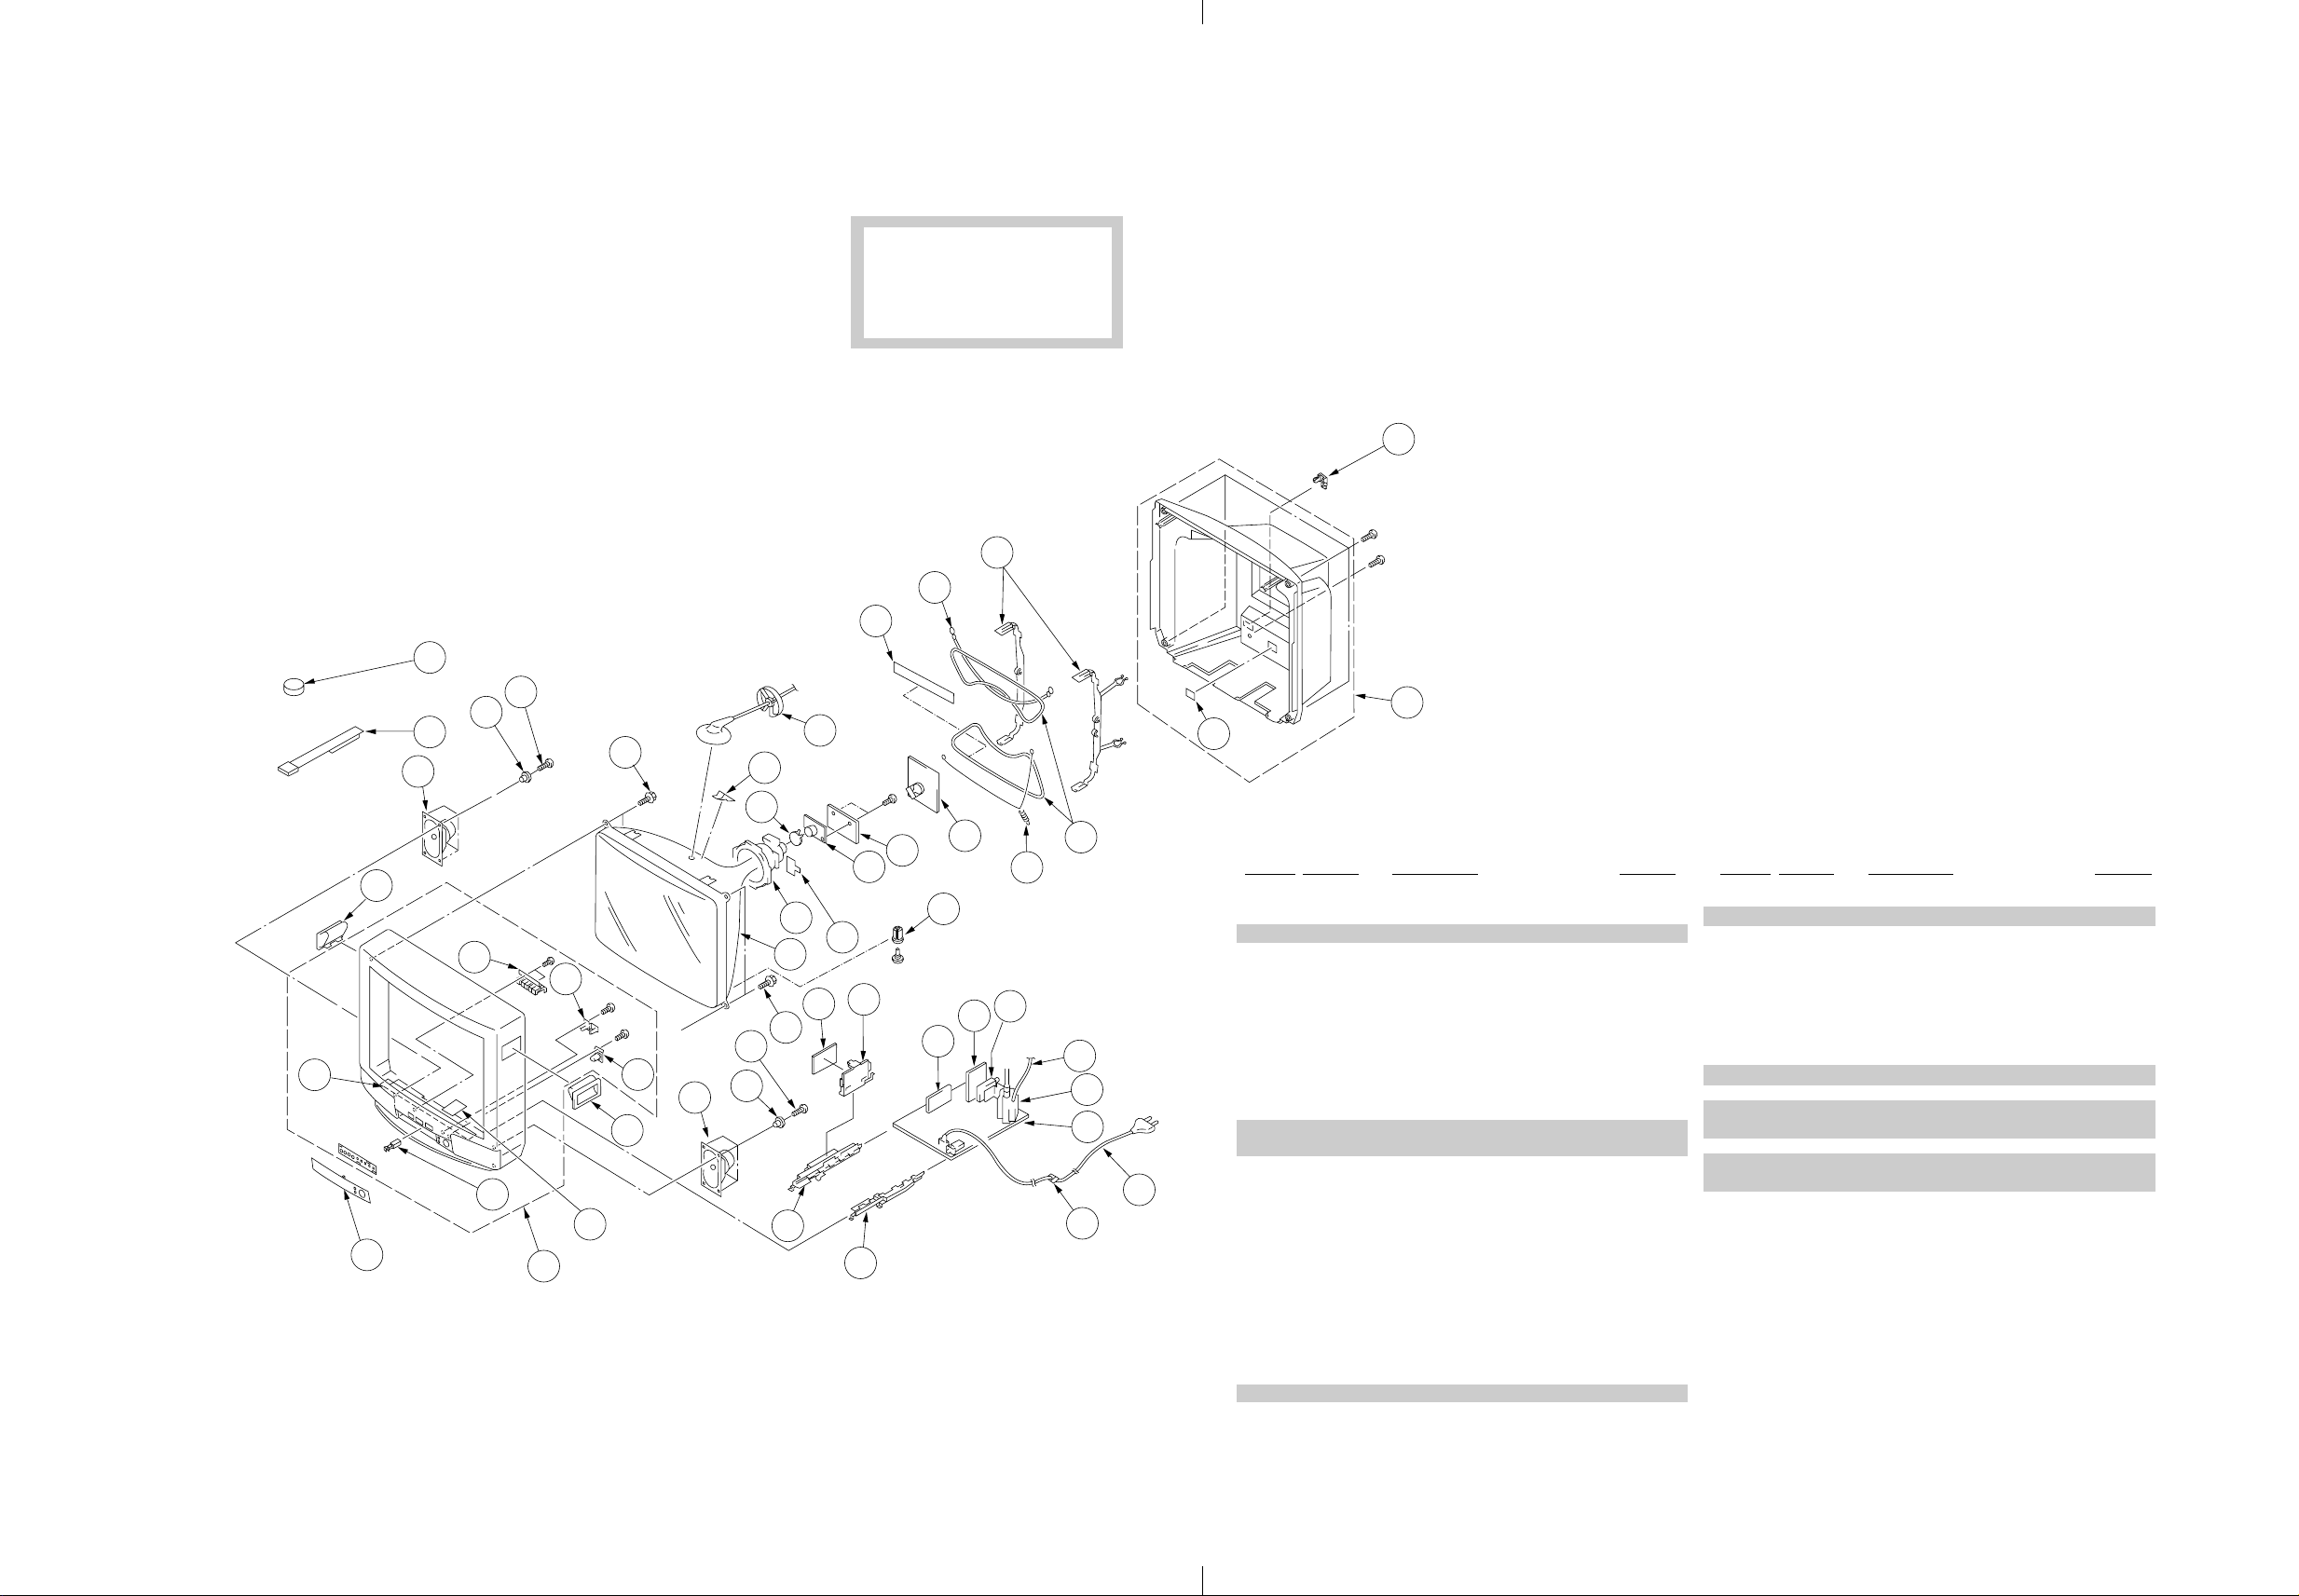
SECTION 6
EXPLODED VIEW
KV-T29SN81
RM-870
KV-T29SN81
RM-870
NOTE:
• Items with no part number and no
description are not stocked because they
are seldom required for routine service.
• The construction parts of an assembled
part are indicated with a collation number
in the remark column.
6-1. CHASSIS
[: BVTP3 × 12 7-685-648-79
L: BVTP4 × 16 7-685-663-71
8: BVTP3 × 16 7-685-650-79
41
42
8
• Items marked " * " are not stocked since
they are seldom required for routine
service. Some delay should be
anticipated when ordering these items.
10
9
11
20
21
The components identified by
shading and mark ! are critical
for safety.
Replace only with part number
specified.
25
24
19
28
p
4
27
26
44
4
13
5
r
14
12
6
r
31
11
r
2
7
10
9
8
4
43
45
1
3
29
32
30
16
r
17
33
15
18
34
35
22
23
36
39
37
38
40
REF. NO. PART NO. DESCRIPTION REMARK
1 4-053-733-11 DOOR, CONTROL
2 4-048-540-01 CUSHION, CRT
3 ! X-4033-773-13 BEZNET ASSY 2, 5-7, 43
4 4-048-691-01 HANDLE
5 4-048-687-01 BUTTON, MULTI
6 4-049-123-01 GUIDE, LIGHT
7 4-053-732-01 BUTTON, POWER
8 1-503-902-11 SPEAKER (15X6.5 CM)
9 * 4-379-189-11 CUSHION, SPEAKER
10 4-054-981-01 SCREW, STEP TAPPING
11 4-046-765-01 SCREW , TAPPING 7+CRO WN WASHER
12 ! 8-733-868-05 PICTURE TUBE (M68KZT71X)
13 ! 8-451-467-21 DEFLECTION YOKE (Y29GXA2-S)
14 4-034-272-01 PLATE, CORRECTION, TLV
4-034-272-11 PLATE, CORRECTION, TLV
4-034-272-41 PLATE, CORRECTION, TLV
15 4-049-122-01 RIVET
16 1-452-762-31 NECK ASSEMBLY NA294
17 * A-1347-116-A VM BOARD, COMPLETE
18 * A-1331-740-A C BOARD, MOUNTED
19 * 4-045-290-11 CUSHION (50X290), DGC
20 4-046-600-11 SPACER, DY
REF. NO. PART NO. DESCRIPTION REMARK
26 4-049-416-01 SHEET, BLIND
27 ! X-4033-774-1 REAR COVER ASSY 26
28 4-049-130-01 CLAMPER, CORD
29 * 4-048-690-01 RAIL (L), GUIDE
30 * 4-048-689-01 RAIL (R), GUIDE
31 * A-1241-269-A F1 BOARD, MOUNTED
32 * 4-049-158-01 BRACKET, F1 PC BOARD
33 * A-1347-103-A V1 BOARD, COMPLETE
34 * A-1297-523-A A3 BOARD, COMPLETE
35 ! 8-598-323-50 TUNER, VSS BT-AG401
36 ! 1-900-700-27 LEAD ASSY, FOCUS
37 ! 1-453-219-11 TRANSFORMER ASSY, FLYBACK (NX-4002//M3J4)
38 * A-1298-958-A A BOARD, COMPLETE
39 ! 4-389-778-11 HOLDER, AC CORD
40 ! 1-574-358-51 CORD, POWER (WITH CONNECTOR) 7.5A/250V
41 1-452-032-00 MAGNET,DISC
42 X-4387-214-3 PERMALOY ASSY , CORRECTION
43 4-047-464-01 CATCHER, PUSH
44 1-452-278-22 MAGNET, PURITY
1-452-278-32 MAGNET, PURITY
45 * 4-053-736-01 LABEL, PROTECTION
– 53 –
21 * 3-704-372-11 HOLDER, HV CABLE
22 4-369-318-61 SPRING, TENSION
23 ! 1-403-672-12 COIL, DEMAGNETIZATION
24 1-900-700-10 DGC BAND
25 * 4-043-036-01 HOLDER, DGC
– 54 –
Page 27
SECTION 7
ELECTRICAL PARTS LIST
KV-T29SN81
RM-870
A
KV-T29SN81
RM-870
The components identified by shading
and mark ! are critical for safety.
Replace only with part number specified.
A
NOTE:
The components identified by shading
and mark ! are critical for safety.
Replace only with part number specified.
When indicating parts by reference
number, please include the board name.
REF.NO. PART NO. DESCRIPTION REMARK
* A-1298-958-A A BOARD,COMPLETE
*********************
* 1-580-798-11 CONNECTOR PIN (DY) 6P
* 4-049-131-01 CASE (A), SHIELD
4-352-844-01 PIN, LEAD, COATING
4-382-854-11 SCREW (M3X10), P, SW (+)
7-682-950-01 SCREW +PSW 3X12
<CAPACITOR>
C001 1-163-011-11 CERAMIC CHIP 0.0015MF 10% 50V
C002 1-126-965-11 ELECT 22MF 20% 50V
C004 1-126-961-11 ELECT 2.2MF 20% 50V
C007 1-126-959-11 ELECT 0.47MF 20% 50V
C008 1-163-117-00 CERAMIC CHIP 100PF 5% 50V
C009 1-163-133-00 CERAMIC CHIP 470PF 5% 50V
C010 1-163-037-11 CERAMIC CHIP 0.022MF 10% 50V
C011 1-104-664-11 ELECT 47MF 20% 16V
C013 1-163-009-11 CERAMIC CHIP 0.001MF 10% 50V
C014 1-163-009-11 CERAMIC CHIP 0.001MF 10% 50V
C015 1-101-884-00 CERAMIC 56PF 5% 50V
C016 1-101-884-00 CERAMIC 56PF 5% 50V
C017 1-163-117-00 CERAMIC CHIP 100PF 5% 50V
C018 1-163-117-00 CERAMIC CHIP 100PF 5% 50V
C019 1-163-009-11 CERAMIC CHIP 0.001MF 10% 50V
C020 1-163-009-11 CERAMIC CHIP 0.001MF 10% 50V
C021 1-163-009-11 CERAMIC CHIP 0.001MF 10% 50V
C022 1-163-009-11 CERAMIC CHIP 0.001MF 10% 50V
C023 1-163-009-11 CERAMIC CHIP 0.001MF 10% 50V
C024 1-163-009-11 CERAMIC CHIP 0.001MF 10% 50V
C025 1-163-009-11 CERAMIC CHIP 0.001MF 10% 50V
C026 1-163-009-11 CERAMIC CHIP 0.001MF 10% 50V
C027 1-163-009-11 CERAMIC CHIP 0.001MF 10% 50V
C028 1-163-009-11 CERAMIC CHIP 0.001MF 10% 50V
C029 1-163-009-11 CERAMIC CHIP 0.001MF 10% 50V
C034 1-164-004-11 CERAMIC CHIP 0.1MF 10% 25V
C035 1-163-009-11 CERAMIC CHIP 0.001MF 10% 50V
C036 1-163-009-11 CERAMIC CHIP 0.001MF 10% 50V
C037 1-163-117-00 CERAMIC CHIP 100PF 5% 50V
C038 1-163-117-00 CERAMIC CHIP 100PF 5% 50V
C040 1-163-117-00 CERAMIC CHIP 100PF 5% 50V
C042 1-163-117-00 CERAMIC CHIP 100PF 5% 50V
C044 1-163-117-00 CERAMIC CHIP 100PF 5% 50V
C045 1-163-117-00 CERAMIC CHIP 100PF 5% 50V
C046 1-163-117-00 CERAMIC CHIP 100PF 5% 50V
C047 1-163-117-00 CERAMIC CHIP 100PF 5% 50V
C048 1-164-004-11 CERAMIC CHIP 0.1MF 10% 25V
• Items marked " ∗ " are not stocked since they
are seldom required for routine service.
Some delay should be anticipated when ordering these items.
• All variable and adjustable resistors have
characteristic curve B, unless otherwise
noted.
• All resistors are in ohms
• F : nonflammable
CAPACITORS
• MF : µF, PF : µµF
COILS
• MMH : mH, UH : µH
REF.NO. PART NO. DESCRIPTION REMARK
C049 1-164-004-11 CERAMIC CHIP 0.1MF 10% 25V
C050 1-126-960-11 ELECT 1MF 20% 50V
C051 1-163-117-00 CERAMIC CHIP 100PF 5% 50V
C052 1-164-004-11 CERAMIC CHIP 0.1MF 10% 25V
C053 1-163-009-11 CERAMIC CHIP 0.001MF 10% 50V
C055 1-126-941-11 ELECT 470MF 20% 16V
C056 1-163-009-11 CERAMIC CHIP 0.001MF 10% 50V
C057 1-163-243-11 CERAMIC CHIP 47PF 5% 50V
C058 1-163-117-00 CERAMIC CHIP 100PF 5% 50V
C059 1-163-117-00 CERAMIC CHIP 100PF 5% 50V
C060 1-163-009-11 CERAMIC CHIP 0.001MF 10% 50V
C061 1-164-505-11 CERAMIC CHIP 2.2MF 16V
C072 1-126-941-11 ELECT 470MF 20% 16V
C074 1-163-001-11 CERAMIC CHIP 220PF 10% 50V
C101 1-163-029-11 CERAMIC CHIP 0.0047MF 50V
C105 1-126-933-11 ELECT 100MF 20% 16V
C106 1-126-964-11 ELECT 10MF 20% 50V
C108 1-126-767-11 ELECT 1000MF 20% 16V
C109 1-163-017-00 CERAMIC CHIP 0.0047MF 10% 50V
C110 1-136-165-00 FILM 0.1MF 5% 50V
C111 1-163-009-11 CERAMIC CHIP 0.001MF 10% 50V
C114 1-163-117-00 CERAMIC CHIP 100PF 5% 50V
C115 1-163-093-00 CERAMIC CHIP 10PF 5% 50V
C116 1-136-165-00 FILM 0.1MF 5% 50V
C117 1-163-117-00 CERAMIC CHIP 100PF 5% 50V
C118 1-126-965-11 ELECT 22MF 20% 50V
C119 1-163-059-00 CERAMIC CHIP 0.01MF 50V
C120 1-130-493-00 MYLAR 0.068MF 5% 50V
C121 1-130-493-00 MYLAR 0.068MF 5% 50V
C122 1-126-933-11 ELECT 100MF 20% 16V
C124 1-164-004-11 CERAMIC CHIP 0.1MF 10% 25V
C125 1-164-004-11 CERAMIC CHIP 0.1MF 10% 25V
C127 1-163-077-00 CERAMIC CHIP 0.1MF 10% 25V
C128 1-163-077-00 CERAMIC CHIP 0.1MF 10% 25V
C131 1-163-117-00 CERAMIC CHIP 100PF 5% 50V
C132 1-163-117-00 CERAMIC CHIP 100PF 5% 50V
C201 1-126-960-11 ELECT 1MF 20% 50V
C202 1-126-933-11 ELECT 100MF 20% 16V
C203 1-126-960-11 ELECT 1MF 20% 50V
C204 1-126-933-11 ELECT 100MF 20% 16V
C205 1-163-989-11 CERAMIC CHIP 0.033MF 10% 25V
C206 1-163-018-00 CERAMIC CHIP 0.0056MF 10% 50V
C207 1-126-961-11 ELECT 2.2MF 20% 50V
C208 1-126-961-11 ELECT 2.2MF 20% 50V
C209 1-163-018-00 CERAMIC CHIP 0.0056MF 10% 50V
C210 1-163-989-11 CERAMIC CHIP 0.033MF 10% 25V
C211 1-164-004-11 CERAMIC CHIP 0.1MF 10% 25V
C233 1-104-664-11 ELECT 47MF 20% 16V
REF.NO. PART NO. DESCRIPTION REMARK REF.NO. PART NO. DESCRIPTION REMARK
C234 1-104-664-11 ELECT 47MF 20% 16V
C235 1-104-664-11 ELECT 47MF 20% 16V
C236 1-126-948-11 ELECT 100MF 20% 35V
C237 1-126-933-11 ELECT 100MF 20% 16V
C238 1-136-167-00 FILM 0.15MF 5% 50V
C239 1-126-933-11 ELECT 100MF 20% 16V
C240 1-136-167-00 FILM 0.15MF 5% 50V
C241 1-126-942-61 ELECT 1000MF 20% 25V
C242 1-163-021-91 CERAMIC CHIP 0.01MF 10% 50V
C243 1-128-551-11 ELECT 22MF 20% 25V
C244 1-126-942-61 ELECT 1000MF 20% 25V
C246 1-128-551-11 ELECT 22MF 20% 25V
C247 1-126-942-61 ELECT 1000MF 20% 25V
C253 1-126-933-11 ELECT 100MF 20% 16V
C254 1-163-017-00 CERAMIC CHIP 0.0047MF 10% 50V
C255 1-163-017-00 CERAMIC CHIP 0.0047MF 10% 50V
C257 1-130-494-11 MYLAR 0.082MF 5% 50V
C258 1-130-494-11 MYLAR 0.082MF 5% 50V
C300 1-104-664-11 ELECT 47MF 20% 16V
C304 1-164-004-11 CERAMIC CHIP 0.1MF 10% 25V
C305 1-164-004-11 CERAMIC CHIP 0.1MF 10% 25V
C306 1-216-295-91 SHORT 0
C307 1-164-004-11 CERAMIC CHIP 0.1MF 10% 25V
C308 1-164-004-11 CERAMIC CHIP 0.1MF 10% 25V
C309 1-164-004-11 CERAMIC CHIP 0.1MF 10% 25V
C310 1-164-004-11 CERAMIC CHIP 0.1MF 10% 25V
C311 1-163-231-11 CERAMIC CHIP 15PF 5% 50V
C312 1-163-231-11 CERAMIC CHIP 15PF 5% 50V
C313 1-126-933-11 ELECT 100MF 20% 16V
C314 1-164-161-11 CERAMIC CHIP 0.0022MF 10% 50V
C315 1-165-320-11 CERAMIC CHIP 0.47MF 10% 16V
C316 1-102-125-00 CERAMIC 0.0047MF 10% 50V
C319 1-164-004-11 CERAMIC CHIP 0.1MF 10% 25V
C320 1-164-004-11 CERAMIC CHIP 0.1MF 10% 25V
C321 1-164-004-11 CERAMIC CHIP 0.1MF 10% 25V
C322 1-216-295-91 SHORT 0
C323 1-163-235-11 CERAMIC CHIP 22PF 5% 50V
C324 1-115-565-11 CERAMIC CHIP 2.2MF 10% 10V
C326 1-163-095-00 CERAMIC CHIP 12PF 5% 50V
C328 1-164-004-11 CERAMIC CHIP 0.1MF 10% 25V
C329 1-163-016-00 CERAMIC CHIP 0.0039MF 10% 50V
C330 1-164-004-11 CERAMIC CHIP 0.1MF 10% 25V
C331 1-126-964-11 ELECT 10MF 20% 50V
C332 1-136-165-00 FILM 0.1MF 5% 50V
C333 1-164-004-11 CERAMIC CHIP 0.1MF 10% 25V
C335 1-102-973-00 CERAMIC 100PF 5% 50V
C337 1-126-933-11 ELECT 100MF 20% 16V
C338 1-165-320-11 CERAMIC CHIP 0.47MF 10% 16V
C339 1-163-121-00 CERAMIC CHIP 150PF 5% 50V
C340 1-163-009-11 CERAMIC CHIP 0.001MF 10% 50V
C341 1-163-117-00 CERAMIC CHIP 100PF 5% 50V
C342 1-164-004-11 CERAMIC CHIP 0.1MF 10% 25V
C344 1-126-964-11 ELECT 10MF 20% 50V
C349 1-126-963-11 ELECT 4.7MF 20% 50V
C359 1-126-933-11 ELECT 100MF 20% 16V
C361 1-163-009-11 CERAMIC CHIP 0.001MF 10% 50V
C367 1-164-004-11 CERAMIC CHIP 0.1MF 10% 25V
C802 1-107-364-11 MYLAR 0.01MF 10% 200V
C368 1-164-004-11 CERAMIC CHIP 0.1MF 10% 25V
C369 1-164-004-11 CERAMIC CHIP 0.1MF 10% 25V
C370 1-164-004-11 CERAMIC CHIP 0.1MF 10% 25V
C374 1-126-967-11 ELECT 47MF 20% 50V
C375 1-126-967-11 ELECT 47MF 20% 50V
C376 1-164-005-11 CERAMIC CHIP 0.47MF 25V
C401 1-163-021-91 CERAMIC CHIP 0.01MF 10% 50V
C402 1-163-021-91 CERAMIC CHIP 0.01MF 10% 50V
C403 1-126-965-11 ELECT 22MF 20% 50V
C404 1-163-021-91 CERAMIC CHIP 0.01MF 10% 50V
C405 1-163-017-00 CERAMIC CHIP 0.0047MF 10% 50V
C406 1-163-017-00 CERAMIC CHIP 0.0047MF 10% 50V
C407 1-163-017-00 CERAMIC CHIP 0.0047MF 10% 50V
C408 1-163-017-00 CERAMIC CHIP 0.0047MF 10% 50V
C410 1-163-103-00 CERAMIC CHIP 27PF 5% 50V
C411 1-163-113-00 CERAMIC CHIP 68PF 5% 50V
C413 1-126-933-11 ELECT 100MF 20% 16V
C415 1-163-017-00 CERAMIC CHIP 0.0047MF 10% 50V
C420 1-104-664-11 ELECT 47MF 20% 16V
C423 1-163-129-00 CERAMIC CHIP 330PF 5% 50V
C425 1-163-021-91 CERAMIC CHIP 0.01MF 10% 50V
C501 1-102-228-00 CERAMIC 470PF 10% 500V
C523 1-126-933-11 ELECT 100MF 20% 16V
C548 1-106-220-00 MYLAR 0.1MF 10% 100V
C551 1-126-948-11 ELECT 100MF 20% 35V
C552 1-126-948-11 ELECT 100MF 20% 35V
C554 1-162-815-11 CERAMIC 47PF 5% 500V
C555 1-102-230-00 CERAMIC 4PF 0.25PF 500V
C562 1-126-933-11 ELECT 100MF 20% 16V
C572 1-163-021-91 CERAMIC CHIP 0.01MF 10% 50V
C601 1-162-318-11 CERAMIC 0.001MF 10% 500V
C602 1-161-830-00 CERAMIC 0.0047MF 99% 500V
C603 1-161-830-00 CERAMIC 0.0047MF 99% 500V
C604 1-113-608-11 ELECT(BLOCK) 470MF 20% 400V
C605 1-161-830-00 CERAMIC 0.0047MF 99% 500V
C606 1-161-830-00 CERAMIC 0.0047MF 99% 500V
C607 1-161-830-00 CERAMIC 0.0047MF 99% 500V
C608 1-104-332-11 CERAMIC 470PF 10% 2KV
C609 1-124-347-00 ELECT 100MF 20% 160V
C610 1-126-943-11 ELECT 2200MF 20% 25V
C612 1-102-228-00 CERAMIC 470PF 10% 500V
C613 1-102-824-00 CERAMIC 470PF 5% 50V
C614 1-126-943-11 ELECT 2200MF 20% 25V
C615 ! 1-113-900-51 CERAMIC 470PF 10% 250V
C616 1-102-228-00 CERAMIC 470PF 10% 500V
C618 1-163-005-11 CERAMIC CHIP 470PF 10% 50V
C619 1-162-116-00 CERAMIC 680PF 10% 2KV
C621 ! 1-104-705-51 FILM 0.1MF 20% 250V
C622 1-106-383-00 MYLAR 0.047MF 10% 200V
C623 1-126-969-11 ELECT 220MF 20% 50V
C624 1-126-767-11 ELECT 1000MF 20% 16V
C625 1-102-074-00 CERAMIC 0.001MF 10% 50V
C627 1-162-116-00 CERAMIC 680PF 10% 2KV
C630 ! 1-113-900-51 CERAMIC 470PF 10% 250V
C631 1-161-830-00 CERAMIC 0.0047MF 99% 500V
C633 1-161-754-00 CERAMIC 0.001MF 10% 3KV
C634 1-163-005-11 CERAMIC CHIP 470PF 10% 50V
C801 1-123-024-21 ELECT 33MF 160V
– 55 –
– 56 –
Page 28
The components identified by shading
and mark ! are critical for safety.
Replace only with part number specified.
KV-T29SN81
RM-870
A
REF. NO. PART NO. DESCRIPTION REMARK
C802 1-107-364-11 MYLAR 0.01MF 10% 200V
C804 1-163-009-11 CERAMIC CHIP 0.001MF 10% 50V
C805 1-102-244-00 CERAMIC 220PF 10% 500V
C806 1-126-960-11 ELECT 1MF 20% 50V
C807 1-136-597-11 FILM 0.89MF 5% 200V
C808 1-129-723-00 FILM 0.068MF 5% 400V
C809 1-162-115-00 CERAMIC 330PF 10% 2KV
C810 1-106-365-00 MYLAR 0.0082MF 99% 200V
C811 1-162-318-11 CERAMIC 0.001MF 10% 500V
C812 1-136-085-00 FILM 0.016MF 3% 2KV
C816 1-107-636-11 ELECT 10MF 20% 160V
C820 1-162-116-00 CERAMIC 680PF 10% 2KV
C821 1-104-999-11 MYLAR 0.1MF 10% 200V
C822 1-136-111-00 FILM 1MF 5% 200V
C823 1-163-017-00 CERAMIC CHIP 0.0047MF 10% 50V
C825 1-107-364-11 MYLAR 0.01MF 10% 200V
C850 1-126-941-11 ELECT 470MF 20% 25V
C852 1-104-574-11 CERAMIC 0.0047MF 10% 2KV
C853 1-162-318-11 CERAMIC 0.001MF 10% 500V
C854 1-126-941-11 ELECT 470MF 20% 25V
C855 4-352-844-01 PIN, LEAD, COATING
C856 1-162-318-11 CERAMIC 0.001MF 10% 500V
C857 1-136-495-11 FILM 0.068MF 5% 50V
C860 1-102-228-00 CERAMIC 470PF 10% 500V
C861 1-107-654-11 ELECT 33MF 20% 250V
REF. NO. PART NO. DESCRIPTION REMARK
C1230 1-164-004-11 CERAMIC CHIP 0.1MF 10% 25V
C1513 1-126-968-11 ELECT 100MF 20% 50V
<CONNECTOR>
CN101 * 1-508-797-00 PIN, CONNECTOR 4P
CN102 * 1-564-508-11 PLUG, CONNECTOR 5P
CN103 * 1-564-509-11 PLUG, CONNECTOR 6P
CN106 * 1-770-747-11 CONNECTOR, BOARD TO BOARD 12P
CN110 * 1-564-505-11 PLUG, CONNECTOR 2P
CN111 * 1-564-505-11 PLUG, CONNECTOR 2P
CN112 * 1-508-784-00 PIN, CONNECTOR (5MM PITCH) 1P
CN251 * 1-564-507-11 PLUG, CONNECTOR 4P
CN601*!1-580-843-11 PIN, CONNECTOR (POWER)
CN602 * 1-508-765-00 PIN, CONNECTOR (5MM PITCH) 3P
CN603 * 1-508-786-00 PIN, CONNECTOR (5MM PITCH) 2P
CN604 1-695-915-11 TAB (CONTACT)
CN607 1-695-915-11 TAB (CONTACT)
CN609 * 1-564-506-11 PLUG, CONNECTOR 3P
CN811 1-695-915-11 TAB (CONTACT)
CN812 1-695-915-11 TAB (CONTACT)
CN813 1-695-915-11 TAB (CONTACT)
CN814 1-695-915-11 TAB (CONTACT)
CN815 1-695-915-11 TAB (CONTACT)
CN816 1-695-915-11 TAB (CONTACT)
C875 1-128-562-11 ELECT 47MF 20% 100V
C876 1-107-369-11 MYLAR 0.068MF 10% 100V
C891 1-163-007-11 CERAMIC CHIP 680PF 10% 50V
C898 1-136-169-00 FILM 0.22MF 5% 50V
C901 1-163-133-00 CERAMIC CHIP 470PF 5% 50V
C902 1-163-133-00 CERAMIC CHIP 470PF 5% 50V
C1201 1-126-933-11 ELECT 100MF 20% 16V
C1202 1-164-004-11 CERAMIC CHIP 0.1MF 10% 25V
C1203 1-164-004-11 CERAMIC CHIP 0.1MF 10% 25V
C1204 1-126-933-11 ELECT 100MF 20% 16V
C1205 1-164-004-11 CERAMIC CHIP 0.1MF 10% 25V
C1206 1-164-004-11 CERAMIC CHIP 0.1MF 10% 25V
C1207 1-126-933-11 ELECT 100MF 20% 16V
C1208 1-164-005-11 CERAMIC CHIP 0.47MF 25V
C1209 1-164-005-11 CERAMIC CHIP 0.47MF 25V
C1210 1-126-933-11 ELECT 100MF 20% 16V
C1212 1-126-960-11 ELECT 1MF 20% 50V
C1213 1-126-960-11 ELECT 1MF 20% 50V
C1214 1-126-964-11 ELECT 10MF 20% 50V
C1215 1-163-021-91 CERAMIC CHIP 0.01MF 10% 50V
C1216 1-164-005-11 CERAMIC CHIP 0.47MF 25V
C1217 1-126-933-11 ELECT 100MF 20% 16V
C1218 1-163-123-00 CERAMIC CHIP 180PF 5% 50V
C1219 1-126-933-11 ELECT 100MF 20% 16V
C1221 1-164-005-11 CERAMIC CHIP 0.47MF 25V
C1222 1-164-005-11 CERAMIC CHIP 0.47MF 25V
C1223 1-164-346-11 CERAMIC CHIP 1MF 16V
C1224 1-216-295-91 SHORT 0
C1225 1-164-005-11 CERAMIC CHIP 0.47MF 25V
C1226 1-126-934-11 ELECT 220MF 20% 16V
C1227 1-164-004-11 CERAMIC CHIP 0.1MF 10% 25V
C1228 1-164-346-11 CERAMIC CHIP 1MF 16V
CN817 1-695-915-11 TAB (CONTACT)
CN818 1-695-915-11 TAB (CONTACT)
CN851 * 1-508-766-00 PIN, CONNECTOR (5MM PITCH) 4P
CN852 * 1-508-784-00 PIN, CONNECTOR (5MM PITCH) 1P
CN853 * 1-564-506-11 PLUG, CONNECTOR 3P
<TRIMMER>
CT55 1-404-801-11 TRAP, CERAMIC
<DIODE>
D001 8-719-109-81 DIODE RD4.7ESB2
D002 8-719-911-19 DIODE 1SS119-25
D003 8-719-041-97 DIODE MA113-(TX)
D004 8-719-109-84 DIODE RD5.1ESB1
D005 8-719-109-84 DIODE RD5.1ESB1
D008 8-719-109-89 DIODE RD5.6ESB2
D103 8-719-914-42 DIODE DA204K
D251 8-719-911-19 DIODE 1SS119-25
D252 8-719-914-42 DIODE DA204K
D301 8-719-041-97 DIODE MA113-(TX)
D305 8-719-041-97 DIODE MA113-(TX)
D306 8-719-911-19 DIODE 1SS119-25
D307 8-719-911-19 DIODE 1SS119-25
D308 8-719-109-54 DIODE RD2.2ESB2
D310 8-719-041-97 DIODE MA113-(TX)
D311 8-719-109-68 DIODE RD3.6ESB1
D312 8-719-070-15 DIODE NNCD8.2A-T1
D315 8-719-070-16 DIODE NNCD9.1A-T1
D351 8-719-908-03 DIODE GP08D
D399 8-719-977-22 DIODE DTZ9.1
– 57 –
Page 29
KV-T29SN81
RM-870
A
REF. NO. PART NO. DESCRIPTION REMARK REF. NO. PART NO. DESCRIPTION REMARK
The components identified by shading
and mark ! are critical for safety.
Replace only with part number specified.
D403 8-719-911-19 DIODE 1SS119-25
D513 8-719-109-84 DIODE RD5.1ESB1
D551 8-719-908-03 DIODE GP08D
D561 8-719-911-19 DIODE 1SS119-25
D591 8-719-911-19 DIODE 1SS119-25
D601 8-719-052-84 DIODE LN4SB60
D602 8-719-108-18 THYRISTOR 5P6M
D603 8-719-110-36 DIODE RD13ESB2
D604 8-719-301-64 DIODE RU4DS
D605 8-719-510-73 DIODE S3L20UF4
D606 8-719-510-73 DIODE S3L20UF4
D607 8-719-510-26 DIODE D1NL20-TA
D609 8-719-510-26 DIODE D1NL20-TA
D610 8-719-510-26 DIODE D1NL20-TA
D611 8-719-510-26 DIODE D1NL20-TA
D612 8-719-301-64 DIODE RU4DS
D801 8-719-945-80 DIODE ERC06-15S
D802 8-719-900-26 DIODE ERD29-08J
D851 8-719-302-43 DIODE EL1Z
D852 8-719-028-72 DIODE RGP02-17EL-6433
D853 8-719-302-43 DIODE EL1Z
D855 8-719-302-43 DIODE EL1Z
D857 8-719-908-03 DIODE GP08D
D858 8-719-908-03 DIODE GP08D
D860 8-719-911-19 DIODE 1SS119-25
D891 8-719-945-80 DIODE ERC06-15S
D901 8-719-054-60 DIODE LNK0220022G
D1201 8-719-070-16 DIODE NNCD9.1A-T1
D1202 8-719-070-16 DIODE NNCD9.1A-T1
D1203 8-719-070-16 DIODE NNCD9.1A-T1
D1204 8-719-070-16 DIODE NNCD9.1A-T1
D1205 8-719-070-16 DIODE NNCD9.1A-T1
D1206 8-719-070-16 DIODE NNCD9.1A-T1
D1207 8-719-070-16 DIODE NNCD9.1A-T1
D1208 8-719-070-16 DIODE NNCD9.1A-T1
D1209 8-719-070-16 DIODE NNCD9.1A-T1
D1504 8-719-911-19 DIODE 1SS119-25
D1505 8-719-109-81 DIODE RD4.7ESB2
<FERRITE BEAD>
IC202 8-759-708-12 IC NJM78L12A
IC203 8-759-336-30 IC TA8223K
IC300 8-759-365-26 IC TDA8375A
IC351 8-759-565-20 IC TDA4665T/V5-118
IC521 8-759-054-12 IC PQ09RA1
IC551 8-759-280-35 IC LA7845
IC601 8-749-014-01 IC STR-S6708N
IC602 8-749-920-61 IC SE-135N
IC603 ! 8-749-010-64 PHOTO COUPLER PC123F2
IC801 8-759-100-96 IC UPC4558G2
IC1201 8-759-157-40 IC UPC574J
IC1203 8-759-701-75 IC NJM7805FA
IC1210 8-759-100-96 IC UPC4558G2
IC1211 8-759-711-23 IC NJM2234L
IC1212 8-759-711-23 IC NJM2234L
<JACK>
J251 1-770-786-11 JACK
J1201 1-770-659-11 JACK BLOCK, PIN 9P
J1202 1-695-585-11 JACK BLOCK, PIN (L TYPE) 3P
<CHIP CONDUCTOR>
JR051 1-216-295-91 SHORT 0
JR101 1-216-295-91 SHORT 0
JR103 1-216-295-91 SHORT 0
JR107 1-216-295-91 SHORT 0
JR108 1-216-295-91 SHORT 0
JR112 1-216-295-91 SHORT 0
JR114 1-163-121-00 CERAMIC CHIP 150PF 5% 50V
JR115 1-216-295-91 SHORT 0
JR116 1-216-295-91 SHORT 0
JR117 1-216-295-91 SHORT 0
<COIL>
L001 1-408-397-00 INDUCTOR 1UH
L002 1-410-509-11 INDUCTOR 10UH
L003 1-408-605-31 INDUCTOR 15UH
L101 1-410-470-11 INDUCTOR 10UH
L301 1-408-602-31 INDUCTOR 8.2UH
FB101 1-410-397-21 FERRITE 1.1UH
FB102 1-410-397-21 FERRITE 1.1UH
FB251 1-410-397-21 FERRITE 1.1UH
FB601 1-410-397-21 FERRITE 1.1UH
FB603 1-410-397-21 FERRITE 1.1UH
FB610 1-410-396-41 FERRITE 0UH
FB612 1-410-397-21 FERRITE 1.1UH
FB801 1-410-397-21 FERRITE 1.1UH
<IC>
IC001 8-752-886-04 IC CXP85224A-072S
IC002 8-759-805-37 IC L78LR05D-MA
IC003 8-759-370-34 IC ST24C08FB6
IC004 8-742-041-12 HYB IC SBX1981-11
IC201 8-759-090-21 IC TDA8424
L401 1-410-498-11 INDUCTOR 1.2UH
L402 1-410-510-11 INDUCTOR 12UH
L406 1-410-507-11 INDUCTOR 6.8UH
L410 1-410-501-11 INDUCTOR 2.2UH
L802 1-412-527-11 INDUCTOR 15UH
L804 1-459-075-00 COIL,DYNAMIC CONVERSION CHOKE
L805 1-411-955-12 COIL, HORIZONTAL LINEARITY
L807 1-459-390-00 INDUCTOR 390UH
L808 1-412-553-11 INDUCTOR 3.3MMH
L821 1-459-111-00 INDUCTOR 10MMH
L850 1-408-947-00 INDUCTOR 2.2MMH
<TRANSISTOR>
Q030 8-729-120-28 TRANSISTOR 2SC1623-L5L6
Q108 8-729-120-28 TRANSISTOR 2SC1623-L5L6
– 58 –
Page 30
The components identified by shading
and mark ! are critical for safety.
Replace only with part number specified.
KV-T29SN81
RM-870
A
REF. NO. PART NO. DESCRIPTION REMARK
Q109 8-729-120-28 TRANSISTOR 2SC1623-L5L6
Q110 8-729-120-28 TRANSISTOR 2SC1623-L5L6
Q202 8-729-920-72 TRANSISTOR 2SA1037K-T-146-QR
Q207 8-729-920-72 TRANSISTOR 2SA1037K-T-146-QR
Q208 1-801-806-11 TRANSISTOR DTC144EK-T146
Q209 8-729-027-56 TRANSISTOR DTC143TKA-T146
Q210 8-729-027-56 TRANSISTOR DTC143TKA-T146
Q301 8-729-027-43 TRANSISTOR DTC114EKA-T146
Q302 8-729-120-28 TRANSISTOR 2SC1623-L5L6
Q303 8-729-120-28 TRANSISTOR 2SC1623-L5L6
Q401 8-729-120-28 TRANSISTOR 2SC1623-L5L6
Q402 8-729-922-66 TRANSISTOR 2SC2410SN
Q406 8-729-920-72 TRANSISTOR 2SA1037K-T-146-QR
Q408 8-729-120-28 TRANSISTOR 2SC1623-L5L6
Q409 8-729-920-72 TRANSISTOR 2SA1037K-T-146-QR
Q414 8-729-120-28 TRANSISTOR 2SC1623-L5L6
Q561 8-729-200-17 TRANSISTOR 2SA1091-O
Q601 8-729-120-28 TRANSISTOR 2SC1623-L5L6
Q801 8-729-140-50 TRANSISTOR 2SC3209LK
Q802 8-729-016-32 TRANSISTOR 2SC4927-01
Q821 8-729-018-99 TRANSISTOR 2SD2394-F
Q902 1-801-806-11 TRANSISTOR DTC144EK-T146
Q903 1-801-806-11 TRANSISTOR DTC144EK-T146
Q1201 8-729-120-28 TRANSISTOR 2SC1623-L5L6
Q1202 8-729-120-28 TRANSISTOR 2SC1623-L5L6
Q1203 8-729-120-28 TRANSISTOR 2SC1623-L5L6
Q1204 8-729-920-72 TRANSISTOR 2SA1037K-T-146-QR
Q1205 8-729-920-72 TRANSISTOR 2SA1037K-T-146-QR
Q1206 8-729-120-28 TRANSISTOR 2SC1623-L5L6
Q1207 8-729-120-28 TRANSISTOR 2SC1623-L5L6
Q1208 8-729-120-28 TRANSISTOR 2SC1623-L5L6
Q1264 8-729-027-56 TRANSISTOR DTC143TKA-T146
Q1265 8-729-027-56 TRANSISTOR DTC143TKA-T146
Q1513 8-729-120-28 TRANSISTOR 2SC1623-L5L6
REF. NO. PART NO. DESCRIPTION REMARK
R031 1-216-049-91 RES,CHIP 1K 5% 1/10W
R032 1-216-057-00 RES,CHIP 2.2K 5% 1/10W
R033 1-216-049-91 RES,CHIP 1K 5% 1/10W
R035 1-216-049-91 RES,CHIP 1K 5% 1/10W
R036 1-216-049-91 RES,CHIP 1K 5% 1/10W
R037 1-216-049-91 RES,CHIP 1K 5% 1/10W
R039 1-216-049-91 RES,CHIP 1K 5% 1/10W
R041 1-216-025-91 RES,CHIP 100 5% 1/10W
R042 1-216-039-00 RES,CHIP 390 5% 1/10W
R045 1-216-057-00 RES,CHIP 2.2K 5% 1/10W
R047 1-216-025-91 RES,CHIP 100 5% 1/10W
R048 1-216-025-91 RES,CHIP 100 5% 1/10W
R051 1-216-085-00 RES,CHIP 33K 5% 1/10W
R052 1-216-089-91 RES,CHIP 47K 5% 1/10W
R053 1-216-057-00 RES,CHIP 2.2K 5% 1/10W
R054 1-216-073-00 RES,CHIP 10K 5% 1/10W
R056 1-216-065-91 RES,CHIP 4.7K 5% 1/10W
R057 1-216-049-91 RES,CHIP 1K 5% 1/10W
R058 1-216-065-91 RES,CHIP 4.7K 5% 1/10W
R060 1-216-037-00 RES,CHIP 330 5% 1/10W
R061 1-216-057-00 RES,CHIP 2.2K 5% 1/10W
R062 1-216-057-00 RES,CHIP 2.2K 5% 1/10W
R063 1-216-057-00 RES,CHIP 2.2K 5% 1/10W
R065 1-216-033-00 RES,CHIP 220 5% 1/10W
R066 1-216-033-00 RES,CHIP 220 5% 1/10W
R067 1-216-033-00 RES,CHIP 220 5% 1/10W
R068 1-216-025-91 RES,CHIP 100 5% 1/10W
R071 1-216-037-00 RES,CHIP 330 5% 1/10W
R076 1-216-025-91 RES,CHIP 100 5% 1/10W
R077 1-216-025-91 RES,CHIP 100 5% 1/10W
R090 1-216-073-00 RES,CHIP 10K 5% 1/10W
R101 1-216-065-91 RES,CHIP 4.7K 5% 1/10W
R102 1-216-049-91 RES,CHIP 1K 5% 1/10W
R113 1-216-081-00 RES,CHIP 22K 5% 1/10W
R114 1-216-041-00 RES,CHIP 470 5% 1/10W
<RESISTOR>
R001 1-216-065-91 RES,CHIP 4.7K 5% 1/10W
R002 1-216-065-91 RES,CHIP 4.7K 5% 1/10W
R003 1-216-065-91 RES,CHIP 4.7K 5% 1/10W
R004 1-216-065-91 RES,CHIP 4.7K 5% 1/10W
R007 1-216-073-00 RES,CHIP 10K 5% 1/10W
R008 1-216-049-91 RES,CHIP 1K 5% 1/10W
R010 1-216-049-91 RES,CHIP 1K 5% 1/10W
R012 1-216-017-91 RES,CHIP 47 5% 1/10W
R013 1-216-049-91 RES,CHIP 1K 5% 1/10W
R015 1-216-043-91 RES,CHIP 560 5% 1/10W
R016 1-216-049-91 RES,CHIP 1K 5% 1/10W
R017 1-216-057-00 RES,CHIP 2.2K 5% 1/10W
R018 1-216-033-00 RES,CHIP 220 5% 1/10W
R019 1-216-101-00 RES,CHIP 150K 5% 1/10W
R020 1-216-025-91 RES,CHIP 100 5% 1/10W
R021 1-216-065-91 RES,CHIP 4.7K 5% 1/10W
R025 1-216-057-00 RES,CHIP 2.2K 5% 1/10W
R027 1-216-065-91 RES,CHIP 4.7K 5% 1/10W
R028 1-216-025-91 RES,CHIP 100 5% 1/10W
R029 1-216-065-91 RES,CHIP 4.7K 5% 1/10W
R115 1-216-081-00 RES,CHIP 22K 5% 1/10W
R116 1-216-081-00 RES,CHIP 22K 5% 1/10W
R117 1-216-081-00 RES,CHIP 22K 5% 1/10W
R118 1-216-081-00 RES,CHIP 22K 5% 1/10W
R119 1-216-055-00 RES,CHIP 1.8K 5% 1/10W
R120 1-216-109-00 RES,CHIP 330K 5% 1/10W
R131 1-216-464-11 METAL OXIDE 18K 5% 2W F
R180 1-216-033-00 RES,CHIP 220 5% 1/10W
R181 1-216-033-00 RES,CHIP 220 5% 1/10W
R182 1-216-033-00 RES,CHIP 220 5% 1/10W
R203 1-216-033-00 RES,CHIP 220 5% 1/10W
R204 1-216-033-00 RES,CHIP 220 5% 1/10W
R241 1-216-031-00 RES,CHIP 180 5% 1/10W
R242 1-216-031-00 RES,CHIP 180 5% 1/10W
R243 1-216-073-00 RES,CHIP 10K 5% 1/10W
R244 1-216-073-00 RES,CHIP 10K 5% 1/10W
R245 1-216-069-00 RES,CHIP 6.8K 5% 1/10W
R246 1-216-069-00 RES,CHIP 6.8K 5% 1/10W
R247 1-216-053-00 RES,CHIP 1.5K 5% 1/10W
R248 1-216-053-00 RES,CHIP 1.5K 5% 1/10W
R249 1-216-049-91 RES,CHIP 1K 5% 1/10W
R250 1-216-049-91 RES,CHIP 1K 5% 1/10W
– 59 –
Page 31
KV-T29SN81
RM-870
A
REF. NO. PART NO. DESCRIPTION REMARK REF. NO. PART NO. DESCRIPTION REMARK
The components identified by shading
and mark ! are critical for safety.
Replace only with part number specified.
R251 1-216-295-91 SHORT 0
R252 1-249-411-11 CARBON 330 5% 1/4W
R253 1-216-073-00 RES,CHIP 10K 5% 1/10W
R254 1-249-389-11 CARBON 4.7 5% 1/4W
R255 1-249-389-11 CARBON 4.7 5% 1/4W
R256 1-249-411-11 CARBON 330 5% 1/4W
R257 1-216-295-91 SHORT 0
R264 1-216-061-00 RES,CHIP 3.3K 5% 1/10W
R265 1-216-061-00 RES,CHIP 3.3K 5% 1/10W
R266 1-216-089-91 RES,CHIP 47K 5% 1/10W
R300 1-249-441-11 CARBON 100K 5% 1/4W
R302 1-216-295-91 SHORT 0
R303 1-216-025-91 RES,CHIP 100 5% 1/10W
R304 1-216-025-91 RES,CHIP 100 5% 1/10W
R305 1-216-025-91 RES,CHIP 100 5% 1/10W
R306 1-216-025-91 RES,CHIP 100 5% 1/10W
R307 1-216-025-91 RES,CHIP 100 5% 1/10W
R308 1-216-033-00 RES,CHIP 220 5% 1/10W
R309 1-216-033-00 RES,CHIP 220 5% 1/10W
R310 1-216-097-91 RES,CHIP 100K 5% 1/10W
R311 1-216-075-00 RES,CHIP 12K 5% 1/10W
R312 1-216-025-91 RES,CHIP 100 5% 1/10W
R313 1-216-089-91 RES,CHIP 47K 5% 1/10W
R314 1-216-025-91 RES,CHIP 100 5% 1/10W
R315 1-216-295-91 SHORT 0
R316 1-216-065-91 RES,CHIP 4.7K 5% 1/10W
R317 1-216-049-91 RES,CHIP 1K 5% 1/10W
R318 1-216-099-00 RES,CHIP 120K 5% 1/10W
R319 1-216-113-00 RES,CHIP 470K 5% 1/10W
R320 1-216-083-00 RES,CHIP 27K 5% 1/10W
R321 1-216-689-11 METAL CHIP 39K 0.50% 1/10W
R322 1-216-083-00 RES,CHIP 27K 5% 1/10W
R324 1-208-291-11 RES,CHIP 4.7M 5% 1/10W
R325 1-216-295-91 SHORT 0
R326 1-216-039-00 RES,CHIP 390 5% 1/10W
R327 1-216-025-91 RES,CHIP 100 5% 1/10W
R328 1-216-025-91 RES,CHIP 100 5% 1/10W
R329 1-216-025-91 RES,CHIP 100 5% 1/10W
R330 1-216-043-91 RES,CHIP 560 5% 1/10W
R331 1-216-117-00 RES,CHIP 680K 5% 1/10W
R332 1-216-033-00 RES,CHIP 220 5% 1/10W
R334 1-216-041-00 RES,CHIP 470 5% 1/10W
R335 1-216-073-00 RES,CHIP 10K 5% 1/10W
R336 1-216-057-00 RES,CHIP 2.2K 5% 1/10W
R338 1-216-295-91 SHORT 0
R341 1-216-049-91 RES,CHIP 1K 5% 1/10W
R342 1-216-036-00 RES,CHIP 300 5% 1/10W
R343 1-216-035-00 RES,CHIP 270 5% 1/10W
R345 1-259-880-11 CARBON 2.2M 5% 1/4W
R351 1-216-001-00 RES,CHIP 10 5% 1/10W
R355 1-216-001-00 RES,CHIP 10 5% 1/10W
R356 1-216-049-91 RES,CHIP 1K 5% 1/10W
R357 1-216-107-00 RES,CHIP 270K 5% 1/10W
R360 1-208-291-11 RES,CHIP 4.7M 5% 1/10W
R401 1-216-085-00 RES,CHIP 33K 5% 1/10W
R402 1-216-081-00 RES,CHIP 22K 5% 1/10W
R403 1-216-021-00 RES,CHIP 68 5% 1/10W
R404 1-216-035-00 RES,CHIP 270 5% 1/10W
R406 1-216-065-91 RES,CHIP 4.7K 5% 1/10W
R407 1-216-063-91 RES,CHIP 3.9K 5% 1/10W
R408 1-216-055-00 RES,CHIP 1.8K 5% 1/10W
R409 1-216-025-91 RES,CHIP 100 5% 1/10W
R414 1-216-041-00 RES,CHIP 470 5% 1/10W
R416 1-216-033-00 RES,CHIP 220 5% 1/10W
R419 1-216-049-91 RES,CHIP 1K 5% 1/10W
R420 1-216-039-00 RES,CHIP 390 5% 1/10W
R421 1-216-033-00 RES,CHIP 220 5% 1/10W
R424 1-216-057-00 RES,CHIP 2.2K 5% 1/10W
R425 1-216-039-00 RES,CHIP 390 5% 1/10W
R426 1-216-029-00 RES,CHIP 150 5% 1/10W
R429 1-216-031-00 RES,CHIP 180 5% 1/10W
R433 1-216-081-00 RES,CHIP 22K 5% 1/10W
R434 1-216-041-00 RES,CHIP 470 5% 1/10W
R440 1-216-029-00 RES,CHIP 150 5% 1/10W
R441 1-216-021-00 RES,CHIP 68 5% 1/10W
R521 1-216-049-91 RES,CHIP 1K 5% 1/10W
R550 1-216-049-91 RES,CHIP 1K 5% 1/10W
R552 1-216-109-00 RES,CHIP 330K 5% 1/10W
R553 1-216-295-91 SHORT 0
R554 1-216-113-00 RES,CHIP 470K 5% 1/10W
R555 1-249-429-11 CARBON 10K 5% 1/4W
R558 1-216-061-00 RES,CHIP 3.3K 5% 1/10W
R559 1-216-073-00 RES,CHIP 10K 5% 1/10W
R560 1-216-073-00 RES,CHIP 10K 5% 1/10W
R561 1-249-421-11 CARBON 2.2K 5% 1/4W
R562 1-249-420-11 CARBON 1.8K 5% 1/4W F
R563 1-247-885-00 CARBON 180K 5% 1/4W
R564 1-216-091-00 RES,CHIP 56K 5% 1/10W
R565 1-216-091-00 RES,CHIP 56K 5% 1/10W
R566 1-216-065-91 RES,CHIP 4.7K 5% 1/10W
R569 1-247-883-00 CARBON 150K 5% 1/4W
R570 1-216-295-91 SHORT 0
R571 1-216-295-91 SHORT 0
R603 1-249-416-11 CARBON 820 5% 1/4W F
R604 1-249-416-11 CARBON 820 5% 1/4W F
R606 1-215-915-11 METAL OXIDE 470 5% 3W F
R609 1-249-381-11 CARBON 1 5% 1/4W
R610 1-215-924-00 METAL OXIDE 15K 5% 3W F
R611 1-202-933-61 FUSIBLE 0.1 10% 1/2W F
R613 1-219-134-11 FUSIBLE 0.1 10% 1/4W
R614 1-215-877-11 METAL OXIDE 22K 5% 1W F
R615 1-249-389-11 CARBON 4.7 5% 1/4W
R616 ! 1-218-265-91 METAL 8.2M 5% 1W
R617 1-215-924-00 METAL OXIDE 15K 5% 3W F
R618 1-532-845-21 LINK, IC
R619 1-219-134-11 FUSIBLE 0.1 10% 1/4W
R620 1-202-962-11 CEMENTED 3.3 5% 10W
R622 1-217-191-21 WIREWOUND 0.18 10% 2W F
R623 1-247-807-31 CARBON 100 5% 1/4W
R624 1-215-881-11 METAL OXIDE 15 5% 2W F
R625 1-249-424-11 CARBON 3.9K 5% 1/4W
R626 1-249-420-11 CARBON 1.8K 5% 1/4W
R627 1-249-417-11 CARBON 1K 5% 1/4W
R628 1-249-417-11 CARBON 1K 5% 1/4W
R629 1-249-399-11 CARBON 33 5% 1/4W
R635 1-215-882-00 METAL OXIDE 22 5% 2W F
– 60 –
Page 32
The components identified by shading
and mark ! are critical for safety.
Replace only with part number specified.
KV-T29SN81
RM-870
A
REF. NO. PART NO. DESCRIPTION REMARK
R636 1-215-924-00 METAL OXIDE 15K 5% 3W F
R801 1-215-945-11 METAL OXIDE 3.3K 5% 5W F
R802 1-249-381-11 CARBON 1 5% 1/4W F
R803 1-216-057-00 RES,CHIP 2.2K 5% 1/10W
R804 1-216-049-91 RES,CHIP 1K 5% 1/10W
R805 1-216-081-00 RES,CHIP 22K 5% 1/10W
R809 1-247-756-11 CARBON 2.2K 5% 1/2W F
R811 1-216-347-11 METAL OXIDE 0.68 5% 1W F
R812 1-216-067-00 RES,CHIP 5.6K 5% 1/10W
R816 1-249-435-11 CARBON 33K 5% 1/4W
R821 1-215-910-00 METAL OXIDE 68 5% 3W F
R822 1-216-429-00 METAL OXIDE 270 5% 1W F
R823 1-249-931-11 CARBON 2.2K 5% 1/4W F
R825 1-249-392-11 CARBON 8.2 5% 1/4W F
R826 1-216-059-00 RES,CHIP 2.7K 5% 1/10W
R827 1-216-097-91 RES,CHIP 100K 5% 1/10W
R828 1-216-063-91 RES,CHIP 3.9K 5% 1/10W
R829 1-216-067-00 RES,CHIP 5.6K 5% 1/10W
R831 1-215-861-00 METAL OXIDE 47 5% 1W F
R832 1-216-057-00 RES,CHIP 2.2K 5% 1/10W
R834 1-216-073-00 RES,CHIP 10K 5% 1/10W
R851 1-249-448-11 CARBON 1.2 5% 1/4W F
R852 1-217-778-11 FUSIBLE 1K 5% 1W F
R853 1-249-377-11 CARBON 0.47 5% 1/4W F
R854 1-249-377-11 CARBON 0.47 5% 1/4W F
R855 1-202-818-00 SOLID 1K 20% 1/2W
R856 1-249-431-11 CARBON 15K 5% 1/4W
R857 1-249-439-11 CARBON 68K 5% 1/4W
R858 1-216-370-11 METAL OXIDE 1.2 5% 2W F
R860 1-247-887-00 CARBON 220K 5% 1/4W
R881 1-216-041-00 RES,CHIP 470 5% 1/10W
R882 1-216-059-00 RES,CHIP 2.7K 5% 1/10W
R895 1-216-349-00 METAL OXIDE 1 5% 1W F
R896 1-216-001-00 RES,CHIP 10 5% 1/10W
R898 1-249-421-11 CARBON 2.2K 5% 1/4W
R902 1-216-065-91 RES,CHIP 4.7K 5% 1/10W
R904 1-216-065-91 RES,CHIP 4.7K 5% 1/10W
R905 1-216-049-91 RES,CHIP 1K 5% 1/10W
R906 1-216-049-91 RES,CHIP 1K 5% 1/10W
R907 1-216-055-00 RES,CHIP 1.8K 5% 1/10W
R908 1-216-055-00 RES,CHIP 1.8K 5% 1/10W
R909 1-216-061-00 RES,CHIP 3.3K 5% 1/10W
REF. NO. PART NO. DESCRIPTION REMARK
R1211 1-216-021-00 RES,CHIP 68 5% 1/10W
R1212 1-216-049-91 RES,CHIP 1K 5% 1/10W
R1213 1-216-049-91 RES,CHIP 1K 5% 1/10W
R1214 1-216-113-00 RES,CHIP 470K 5% 1/10W
R1215 1-216-113-00 RES,CHIP 470K 5% 1/10W
R1216 1-216-113-00 RES,CHIP 470K 5% 1/10W
R1218 1-216-041-00 RES,CHIP 470 5% 1/10W
R1219 1-216-073-00 RES,CHIP 10K 5% 1/10W
R1220 1-216-049-91 RES,CHIP 1K 5% 1/10W
R1221 1-216-073-00 RES,CHIP 10K 5% 1/10W
R1222 1-216-049-91 RES,CHIP 1K 5% 1/10W
R1223 1-216-073-00 RES,CHIP 10K 5% 1/10W
R1224 1-216-073-00 RES,CHIP 10K 5% 1/10W
R1225 1-216-025-91 RES,CHIP 100 5% 1/10W
R1226 1-216-689-11 RES,CHIP 39K 5% 1/10W
R1227 1-216-689-11 RES,CHIP 39K 5% 1/10W
R1228 1-216-049-91 RES,CHIP 1K 5% 1/10W
R1229 1-216-041-00 RES,CHIP 470 5% 1/10W
R1230 1-216-073-00 RES,CHIP 10K 5% 1/10W
R1231 1-216-049-91 RES,CHIP 1K 5% 1/10W
R1232 1-216-063-91 RES,CHIP 3.9K 5% 1/10W
R1233 1-216-057-00 RES,CHIP 2.2K 5% 1/10W
R1234 1-216-689-11 RES,CHIP 39K 5% 1/10W
R1235 1-216-689-11 RES,CHIP 39K 5% 1/10W
R1236 1-216-073-00 RES,CHIP 10K 5% 1/10W
R1237 1-216-073-00 RES,CHIP 10K 5% 1/10W
R1238 1-216-041-00 RES,CHIP 470 5% 1/10W
R1239 1-249-389-11 CARBON 4.7 5% 1/4W F
R1240 1-216-025-91 RES,CHIP 100 5% 1/10W
R1241 1-216-049-91 RES,CHIP 1K 5% 1/10W
R1242 1-216-049-91 RES,CHIP 1K 5% 1/10W
R1243 1-216-025-91 RES,CHIP 100 5% 1/10W
R1244 1-216-025-91 RES,CHIP 100 5% 1/10W
R1245 1-216-037-00 RES,CHIP 330 5% 1/10W
R1246 1-216-037-00 RES,CHIP 330 5% 1/10W
R1247 1-216-041-00 RES,CHIP 470 5% 1/10W
R1248 1-216-051-00 RES,CHIP 1.2K 5% 1/10W
R1249 1-216-041-00 RES,CHIP 470 5% 1/10W
R1513 1-216-073-00 RES,CHIP 10K 5% 1/10W
R1514 1-216-065-91 RES,CHIP 4.7K 5% 1/10W
R1515 1-216-025-91 RES,CHIP 100 5% 1/10W
R910 1-216-061-00 RES,CHIP 3.3K 5% 1/10W
R911 1-216-071-00 RES,CHIP 8.2K 5% 1/10W
R913 1-216-041-00 RES,CHIP 470 5% 1/10W
R914 1-216-041-00 RES,CHIP 470 5% 1/10W
R915 1-216-071-00 RES,CHIP 8.2K 5% 1/10W
R1201 1-216-023-00 RES,CHIP 82 5% 1/10W
R1202 1-216-049-91 RES,CHIP 1K 5% 1/10W
R1203 1-216-089-91 RES,CHIP 47K 5% 1/10W
R1204 1-216-089-91 RES,CHIP 47K 5% 1/10W
R1205 1-216-023-00 RES,CHIP 82 5% 1/10W
R1206 1-216-089-91 RES,CHIP 47K 5% 1/10W
R1207 1-216-089-91 RES,CHIP 47K 5% 1/10W
R1208 1-216-023-00 RES,CHIP 82 5% 1/10W
R1209 1-216-061-00 RES,CHIP 3.3K 5% 1/10W
R1210 1-216-061-00 RES,CHIP 3.3K 5% 1/10W
<VARIABLE RESISTOR>
RV301 1-241-769-11 RES, ADJ, CARBON 470K
RV302 1-237-525-21 RES, ADJ, CARBON 2.2M
<SWITCH>
S601 ! 1-571-433-31 SWITCH, PUSH (AC POWER)
S801 1-572-707-11 SWITCH, LEVER
S901 1-570-577-11 SWITCH, PUSH
S902 1-570-577-11 SWITCH, PUSH
S903 1-570-577-11 SWITCH, PUSH
S904 1-570-577-11 SWITCH, PUSH
S905 1-570-577-11 SWITCH, PUSH
– 61 –
Page 33
KV-T29SN81
RM-870
A3
REF. NO. PART NO. DESCRIPTION REMARK REF. NO. PART NO. DESCRIPTION REMARK
The components identified by shading
and mark ! are critical for safety.
Replace only with part number specified.
A
<SPARK GAP>
SG801 1-519-422-11 GAP, SPARK
<SURF ACE WA VE FILTER>
SWF401 1-577-169-12 SAWF
<TRANSFORMER>
T601 ! 1-429-139-21 TRANSFORMER, CONVERTER (SRT)
T605 ! 1-424-461-11 TRANSFORMER, LINE FILTER
T801 1-437-195-11 TRANSFORMER, HORIZONTAL DRIVE
T851 ! 1-453-219-11 TRANSFORMER ASSY, FLYB ACK(NX-4002//M3J4)
<THERMISTOR>
THP601!1-810-961-11 THERMISTOR, POSITIVE
<TUNER>
TU101 ! 8-598-323-50 VSS TUNER BT-A G401
<CRYSTAL>
X101 1-577-082-11 VIBRATOR, CERAMIC
X300 1-411-752-11 COIL
X358 1-567-505-11 OSCILLATOR, CRYSTAL
X443 1-567-504-11 OSCILLATOR, CRYSTAL
****************************************************************************
* A-1297-523-A A3 BOARD, COMPLETE
**********************
C1222 1-164-004-11 CERAMIC CHIP 0.1MF 10% 25V
C1223 1-164-004-11 CERAMIC CHIP 0.1MF 10% 25V
C1224 1-164-004-11 CERAMIC CHIP 0.1MF 10% 25V
C1225 1-163-093-00 CERAMIC CHIP 10PF 5% 50V
C1226 1-163-009-11 CERAMIC CHIP 0.001MF 10% 50V
C1227 1-163-131-00 CERAMIC CHIP 390PF 5% 50V
C1228 1-163-131-00 CERAMIC CHIP 390PF 5% 50V
C1229 1-126-157-11 ELECT 10MF 20% 16V
C1231 1-126-157-11 ELECT 10MF 20% 16V
C1232 1-124-234-00 ELECT 22MF 20% 16V
C1233 1-126-162-11 ELECT 3.3MF 20% 50V
C1234 1-164-004-11 CERAMIC CHIP 0.1MF 10% 25V
C1235 1-163-005-11 CERAMIC CHIP 470PF 10% 50V
C1236 1-163-005-11 CERAMIC CHIP 470PF 10% 50V
C1237 1-163-009-11 CERAMIC CHIP 0.001MF 10% 50V
C1238 1-164-004-11 CERAMIC CHIP 0.1MF 10% 25V
C1239 1-126-157-11 ELECT 10MF 20% 16V
C1240 1-164-222-11 CERAMIC CHIP 0.22MF 25V
C1241 1-124-589-11 ELECT 47MF 20% 16V
C1242 1-104-760-11 CERAMIC CHIP 0.047MF 10% 50V
C1243 1-163-021-91 CERAMIC CHIP 0.01MF 10% 50V
C1244 1-163-021-91 CERAMIC CHIP 0.01MF 10% 50V
C1245 1-163-021-91 CERAMIC CHIP 0.01MF 10% 50V
C1246 1-163-231-11 CERAMIC CHIP 15PF 5% 50V
C1247 1-163-229-11 CERAMIC CHIP 12PF 5% 50V
C1248 1-163-009-11 CERAMIC CHIP 0.001MF 10% 50V
C1250 1-163-009-11 CERAMIC CHIP 0.001MF 10% 50V
C1252 1-216-295-91 SHORT 0
C1253 1-216-295-91 SHORT 0
C1254 1-124-234-00 ELECT 22MF 20% 16V
C1255 1-124-584-00 ELECT 100MF 20% 10V
C1256 1-164-005-11 CERAMIC CHIP 0.47MF 25V
C1257 1-164-222-11 CERAMIC CHIP 0.22MF 25V
C1258 1-163-033-91 CERAMIC CHIP 0.022MF 50V
C1260 1-163-251-11 CERAMIC CHIP 100PF 5% 50V
C1262 1-163-251-11 CERAMIC CHIP 100PF 5% 50V
C1263 1-163-137-00 CERAMIC CHIP 680PF 5% 50V
<CAPACITOR>
C1201 1-163-021-91 CERAMIC CHIP 0.01MF 10% 50V
C1202 1-164-004-11 CERAMIC CHIP 0.1MF 10% 25V
C1205 1-163-017-00 CERAMIC CHIP 0.0047MF 10% 50V
C1206 1-163-017-00 CERAMIC CHIP 0.0047MF 10% 50V
C1207 1-163-021-91 CERAMIC CHIP 0.01MF 10% 50V
C1208 1-163-083-00 CERAMIC CHIP 1PF 0.25PF 50V
C1209 1-163-109-00 CERAMIC CHIP 47PF 5% 50V
C1210 1-163-017-00 CERAMIC CHIP 0.0047MF 10% 50V
C1211 1-124-584-00 ELECT 100MF 20% 10V
C1212 1-163-017-00 CERAMIC CHIP 0.0047MF 10% 50V
C1213 1-126-151-11 ELECT 4.7MF 20% 16V
C1214 1-163-017-00 CERAMIC CHIP 0.0047MF 10% 50V
C1215 1-163-123-00 CERAMIC CHIP 180PF 5% 50V
C1216 1-124-465-00 ELECT 0.47MF 20% 50V
C1217 1-163-033-91 CERAMIC CHIP 0.022MF 50V
C1218 1-163-021-91 CERAMIC CHIP 0.01MF 10% 50V
C1219 1-124-584-00 ELECT 100MF 20% 10V
C1221 1-164-004-11 CERAMIC CHIP 0.1MF 10% 25V
C1264 1-163-251-11 CERAMIC CHIP 100PF 5% 50V
C1265 1-124-234-00 ELECT 22MF 20% 16V
C1266 1-124-589-11 ELECT 47MF 20% 16V
C1267 1-164-004-11 CERAMIC CHIP 0.1MF 10% 25V
C1268 1-124-584-00 ELECT 100MF 20% 10V
<CONNECTOR>
CN1201 1-691-109-11 PLUG (L TYPE) 12P
<DIODE>
D1201 8-719-908-03 DIODE GP08D
<FERRITE BEAD>
FB1201 1-412-911-11 FERRITE 0UH
FB1202 1-412-911-11 FERRITE 0UH
FB1203 1-412-911-11 FERRITE 0UH
FB1204 1-412-911-11 FERRITE 0UH
– 62 –
Page 34
The components identified by shading
and mark ! are critical for safety.
Replace only with part number specified.
KV-T29SN81
RM-870
CA3
REF. NO. PART NO. DESCRIPTION REMARK
FB1205 1-412-911-11 FERRITE 0UH
FB1206 1-412-911-11 FERRITE 0UH
<FILTER>
FL1201 1-239-803-11 ENCAPSULATED COMPONENT
<IC>
IC1201 8-752-059-57 IC CXA1110BS
IC1202 8-759-493-49 IC MSP3410D-PP-B4
IC1203 8-759-231-53 IC TA7805S
<CHIP CONDUCTOR>
JR1 1-216-295-91 SHORT 0
JR2 1-216-295-91 SHORT 0
JR3 1-216-295-91 SHORT 0
JR4 1-216-295-91 SHORT 0
JR5 1-216-295-91 SHORT 0
JR6 1-216-295-91 SHORT 0
JR7 1-216-295-91 SHORT 0
JR8 1-216-295-91 SHORT 0
JR9 1-216-295-91 SHORT 0
JR10 1-216-295-91 SHORT 0
JR11 1-216-295-91 SHORT 0
REF. NO. PART NO. DESCRIPTION REMARK
R1211 1-216-015-00 RES,CHIP 39 5% 1/10W
R1212 1-216-097-91 RES,CHIP 100K 5% 1/10W
R1213 1-216-097-91 RES,CHIP 100K 5% 1/10W
R1214 1-216-033-00 RES,CHIP 220 5% 1/10W
R1217 1-216-073-00 RES,CHIP 10K 5% 1/10W
R1218 1-216-049-91 RES,CHIP 1K 5% 1/10W
R1219 1-216-047-91 RES,CHIP 820 5% 1/10W
R1220 1-216-049-91 RES,CHIP 1K 5% 1/10W
R1223 1-216-051-00 RES,CHIP 1.2K 5% 1/10W
R1224 1-216-059-00 RES,CHIP 2.7K 5% 1/10W
R1225 1-216-059-00 RES,CHIP 2.7K 5% 1/10W
R1226 1-216-295-91 SHORT 0
R1227 1-216-295-91 SHORT 0
R1228 1-216-049-91 RES,CHIP 1K 5% 1/10W
R1229 1-216-069-00 RES,CHIP 6.8K 5% 1/10W
R1230 1-216-069-00 RES,CHIP 6.8K 5% 1/10W
R1231 1-216-049-91 RES,CHIP 1K 5% 1/10W
R1232 1-216-027-00 RES,CHIP 120 5% 1/10W
R1233 1-216-045-00 RES,CHIP 680 5% 1/10W
R1234 1-216-045-00 RES,CHIP 680 5% 1/10W
R1240 1-216-041-00 RES,CHIP 470 5% 1/10W
R1241 1-216-075-00 RES,CHIP 12K 5% 1/10W
R1242 1-216-027-00 RES,CHIP 120 5% 1/10W
R1243 1-216-037-00 RES,CHIP 330 5% 1/10W
R1244 1-216-059-00 RES,CHIP 2.7K 5% 1/10W
R1245 1-216-057-00 RES,CHIP 2.2K 5% 1/10W
R1246 1-260-306-51 CARBON 15 5% 1/2W
<COIL>
L1201 1-408-593-31 INDUCTOR 1.5UH
L1202 1-412-010-41 INDUCTOR CHIP 22UH
L1203 1-408-602-31 INDUCTOR 8.2UH
L1204 1-408-591-11 INDUCTOR 1UH
L1205 1-408-602-31 INDUCTOR 8.2UH
L1206 1-412-951-11 INDUCTOR 10UH
L1207 1-412-951-11 INDUCTOR 10UH
<TRANSISTOR>
Q1201 8-729-230-49 TRANSISTOR 2SC2712-YG
Q1203 8-729-266-92 TRANSISTOR 2SC2669-O
Q1205 8-729-216-22 TRANSISTOR 2SA1162-G
Q1206 8-729-216-22 TRANSISTOR 2SA1162-G
Q1207 8-729-230-49 TRANSISTOR 2SC2712-YG
Q1211 8-729-230-49 TRANSISTOR 2SC2712-YG
Q1212 8-729-230-49 TRANSISTOR 2SC2712-YG
<RESISTOR>
R1201 1-216-022-00 RES,CHIP 75 5% 1/10W
R1202 1-216-085-00 RES,CHIP 33K 5% 1/10W
R1203 1-216-081-00 RES,CHIP 22K 5% 1/10W
R1204 1-216-035-00 RES,CHIP 270 5% 1/10W
R1205 1-216-027-00 RES,CHIP 120 5% 1/10W
R1207 1-216-053-00 RES,CHIP 1.5K 5% 1/10W
R1209 1-216-035-00 RES,CHIP 270 5% 1/10W
R1210 1-216-041-00 RES,CHIP 470 5% 1/10W
<SWITCH>
SW1201 1-579-560-11 FILTER, SAWTOOTH WAVE
SW1202 1-579-559-11 FILTER, SAWTOOTH WAVE
<TRANSFORMER>
T1202 1-416-000-11 COIL
<CRYSTAL>
X1201 1-760-094-11 VIBRAT OR, CRYSTAL
****************************************************************************
* A-1331-740-A C BOARD, MOUNTED
********************
<CAPACITOR>
C701 1-162-114-00 CERAMIC 0.0047MF 2KV
C702 1-102-074-00 CERAMIC 0.001MF 10% 50V
C704 1-130-202-00 FILM 0.022MF 5% 400V
C708 1-102-114-00 CERAMIC 470PF 10% 50V
C709 1-102-114-00 CERAMIC 470PF 10% 50V
– 63 –
Page 35
KV-T29SN81
RM-870
C
REF. NO. PART NO. DESCRIPTION REMARK REF. NO. PART NO. DESCRIPTION REMARK
The components identified by shading
and mark ! are critical for safety.
Replace only with part number specified.
C710 1-102-114-00 CERAMIC 470PF 10% 50V
C712 1-102-107-00 CERAMIC 120PF 10% 50V
C713 1-102-107-00 CERAMIC 120PF 10% 50V
C714 1-102-107-00 CERAMIC 120PF 10% 50V
C716 1-126-968-11 ELECT 100MF 20% 50V
<CONNECTOR>
CN701 1-508-766-00 PIN, CONNECTOR (5MM PITCH) 4P
CN703 * 1-564-509-11 PLUG, CONNECTOR 6P
CN704 1-695-915-11 TAB (CONTACT)
<DIODE>
D701 8-719-911-19 DIODE 1SS119-25
D702 8-719-911-19 DIODE 1SS119-25
D703 8-719-911-19 DIODE 1SS119-25
D704 8-719-911-19 DIODE 1SS119-25
D705 8-719-911-19 DIODE 1SS119-25
D706 8-719-911-19 DIODE 1SS119-25
D707 8-719-911-19 DIODE 1SS119-25
D708 8-719-911-19 DIODE 1SS119-25
D709 8-719-911-19 DIODE 1SS119-25
D710 8-719-911-19 DIODE 1SS119-25
D711 8-719-911-19 DIODE 1SS119-25
D712 8-719-911-19 DIODE 1SS119-25
D716 8-719-911-19 DIODE 1SS119-25
D717 8-719-121-26 DIODE RD9.1ESL2
<JACK>
J701 ! 1-251-595-11 SOCKET, CRT
<RESISTOR>
R701 1-244-941-00 CARBON 680K 5% 1/2W
R702 1-249-496-11 CARBON 100K 5% 1/2W
R703 1-249-496-11 CARBON 100K 5% 1/2W
R705 1-216-345-11 METAL OXIDE 0.47 5% 1W F
R710 1-215-899-11 METAL OXIDE 15K 5% 2W F
R711 1-247-760-11 CARBON 4.7K 5% 1/2W
R712 1-215-899-11 METAL OXIDE 15K 5% 2W F
R713 1-247-760-11 CARBON 4.7K 5% 1/2W
R714 1-215-899-11 METAL OXIDE 15K 5% 2W F
R715 1-247-760-11 CARBON 4.7K 5% 1/2W
R716 1-249-405-11 CARBON 100 5% 1/4W F
R717 1-249-405-11 CARBON 100 5% 1/4W F
R718 1-249-405-11 CARBON 100 5% 1/4W F
R719 1-215-485-00 METAL 470K 1% 1/4W
R720 1-249-417-11 CARBON 1K 5% 1/4W F
R721 1-215-491-00 METAL 820K 1% 1/4W
R722 1-249-923-11 CARBON 1K 5% 1/4W F
R723 1-215-479-00 METAL 270K 1% 1/4W
R724 1-249-417-11 CARBON 1K 5% 1/4W F
R725 1-249-422-11 CARBON 2.7K 5% 1/4W
R726 1-249-422-11 CARBON 2.7K 5% 1/4W
R727 1-249-422-11 CARBON 2.7K 5% 1/4W
R728 1-249-412-11 CARBON 390 5% 1/4W
R729 1-249-412-11 CARBON 390 5% 1/4W
R730 1-249-412-11 CARBON 390 5% 1/4W
R731 1-247-807-31 CARBON 100 5% 1/4W
R732 1-247-807-31 CARBON 100 5% 1/4W
R733 1-247-807-31 CARBON 100 5% 1/4W
R734 1-247-739-11 CARBON 100 5% 1/2W
R738 1-247-807-31 CARBON 100 5% 1/4W
<COIL>
L701 1-410-667-31 INDUCTOR 22UH
L703 1-408-615-31 INDUCTOR 100UH
L705 1-408-615-31 INDUCTOR 100UH
L707 1-408-615-31 INDUCTOR 100UH
<TRANSISTOR>
Q701 8-729-326-11 TRANSISTOR 2SC2611
Q702 8-729-326-11 TRANSISTOR 2SC2611
Q703 8-729-326-11 TRANSISTOR 2SC2611
Q704 8-729-326-11 TRANSISTOR 2SC2611
Q705 8-729-326-11 TRANSISTOR 2SC2611
Q706 8-729-326-11 TRANSISTOR 2SC2611
Q707 8-729-200-17 TRANSISTOR 2SA1091-O
Q708 8-729-200-17 TRANSISTOR 2SA1091-O
Q709 8-729-200-17 TRANSISTOR 2SA1091-O
Q710 8-729-119-78 TRANSISTOR 2SC2785-HFE
Q711 8-729-119-78 TRANSISTOR 2SC2785-HFE
Q712 8-729-119-78 TRANSISTOR 2SC2785-HFE
Q714 8-729-255-12 TRANSISTOR 2SC2551-O
R739 1-247-807-31 CARBON 100 5% 1/4W
R740 1-247-807-31 CARBON 100 5% 1/4W
R747 1-216-489-11 METAL OXIDE 27K 5% 3W F
R749 1-216-490-11 METAL OXIDE 39K 5% 3W F
R751 1-215-926-00 METAL OXIDE 33K 5% 3W F
R753 1-249-429-11 CARBON 10K 5% 1/4W
R755 1-249-427-11 CARBON 6.8K 5% 1/4W
R756 1-249-427-11 CARBON 6.8K 5% 1/4W
R757 1-249-427-11 CARBON 6.8K 5% 1/4W
R758 1-249-419-11 CARBON 1.5K 5% 1/4W
R759 1-249-419-11 CARBON 1.5K 5% 1/4W
R760 1-249-419-11 CARBON 1.5K 5% 1/4W F
<VARIABLE RESISTOR>
RV701 1-230-641-11 RES, ADJ, METAL GLAZE 2.2M
RV702 1-241-656-21 RES, ADJ, METAL FILM 110M
****************************************************************************
– 64 –
Page 36
The components identified by shading
and mark ! are critical for safety.
Replace only with part number specified.
KV-T29SN81
RM-870
V1F1
REF. NO. PART NO. DESCRIPTION REMARK
* A-1241-269-A F1 BOARD, MOUNTED
*********************
1-533-223-11 CLIP, FUSE
<CAPACITOR>
C1601 ! 1-104-706-51 FILM 0.22MF 20% 250V
<CONNECTOR>
CN1601* 1-580-843-11 PIN, CONNECTOR (POWER)
CN1602* 1-580-843-11 PIN, CONNECTOR (POWER)
<FUSE>
F1601 ! 1-532-350-11 FUSE, TIME-LAG 4A/250V
<RESISTOR>
R1601 ! 1-202-916-91 SOLID 5.6M 20% 1/2W
<TRANSFORMER>
REF. NO. PART NO. DESCRIPTION REMARK
C20 1-163-117-00 CERAMIC CHIP 100PF 5% 50V
C22 1-126-791-11 ELECT 10MF 20% 16V
C23 1-163-038-91 CERAMIC CHIP 0.1MF 25V
C24 1-163-117-00 CERAMIC CHIP 100PF 5% 50V
C25 1-126-791-11 ELECT 10MF 20% 16V
C26 1-104-665-11 ELECT 100MF 20% 10V
C27 1-104-665-11 ELECT 100MF 20% 16V
C28 1-163-099-00 CERAMIC CHIP 18PF 5% 50V
C29 1-163-099-00 CERAMIC CHIP 18PF 5% 50V
C30 1-163-099-00 CERAMIC CHIP 18PF 5% 50V
C31 1-163-099-00 CERAMIC CHIP 18PF 5% 50V
C32 1-104-665-11 ELECT 100MF 20% 10V
<CONNECTOR>
CN01 * 1-770-748-11 CONNECTOR, BOARD TO BOARD 12P
<DIODE>
D01 8-719-105-52 DIODE RD3.6M-B2
D03 8-719-914-43 DIODE DAN202K
D04 8-719-105-91 DIODE RD5.6M-B2
D05 8-719-914-44 DIODE DAP202K
D06 8-719-914-43 DIODE DAN202K
T1601 ! 1-424-436-11 TRANSFORMER, LINE FILTER
T1602 ! 1-424-436-11 TRANSFORMER, LINE FILTER
FB01 1-410-397-21 FERRITE 1.1UH
***************************************************************************
* A-1347-103-A V1 BOARD, COMPLETE
**********************
4-049-406-01 CASE (BOTTOM LID), SHIELD
4-049-407-01 CASE (UPPER LID), SHIELD
<CAPACITOR>
C01 1-163-037-11 CERAMIC CHIP 0.022MF 10% 50V
C02 1-124-907-11 ELECT 10MF 20% 50V
C03 1-163-037-11 CERAMIC CHIP 0.022MF 10% 50V
C04 1-164-004-11 CERAMIC CHIP 0.1MF 10% 25V
C05 1-124-907-11 ELECT 10MF 20% 50V
C06 1-163-227-11 CERAMIC CHIP 10PF 0.5PF 50V
C07 1-163-009-11 CERAMIC CHIP 0.001MF 10% 50V
C08 1-163-231-11 CERAMIC CHIP 15PF 5% 50V
C09 1-164-004-11 CERAMIC CHIP 0.1MF 10% 25V
C10 1-164-004-11 CERAMIC CHIP 0.1MF 10% 25V
C11 1-164-004-11 CERAMIC CHIP 0.1MF 10% 25V
C12 1-164-004-11 CERAMIC CHIP 0.1MF 10% 25V
C13 1-163-009-11 CERAMIC CHIP 0.001MF 10% 50V
C14 1-216-295-91 SHORT 0
C15 1-104-668-11 ELECT 33MF 20% 35V
C16 1-126-963-11 ELECT 4.7MF 20% 50V
C17 1-164-004-11 CERAMIC CHIP 0.1MF 10% 25V
C19 1-164-004-11 CERAMIC CHIP 0.1MF 10% 25V
IC01 8-759-324-28 IC P83C654FBP/540
IC02 8-759-298-63 IC SAA5281ZP/E
JR02 1-216-295-91 SHORT 0
JR03 1-216-295-91 SHORT 0
JR04 1-216-295-91 SHORT 0
JR07 1-216-295-91 SHORT 0
JR08 1-216-295-91 SHORT 0
JR09 1-216-295-91 SHORT 0
L01 1-410-464-11 INDUCTOR 3.3UH
L03 1-410-464-11 INDUCTOR 3.3UH
L04 1-410-464-11 INDUCTOR 3.3UH
L05 1-410-464-11 INDUCTOR 3.3UH
L06 1-410-464-11 INDUCTOR 3.3UH
Q01 8-729-120-28 TRANSISTOR 2SC1623-L5L6
Q02 8-729-027-43 TRANSISTOR DTC114EKA-T146
Q03 8-729-120-28 TRANSISTOR 2SC1623-L5L6
Q04 8-729-120-28 TRANSISTOR 2SC1623-L5L6
Q05 8-729-920-72 TRANSISTOR 2SA1037K-T-146-QR
<FERRITE BEAD>
<IC>
<CHIP CONDUCTOR>
<COIL>
<TRANSISTOR>
– 65 –
Page 37
KV-T29SN81
RM-870
REF. NO. PART NO. DESCRIPTION REMARK REF. NO. PART NO. DESCRIPTION REMARK
The components identified by shading
and mark ! are critical for safety.
Replace only with part number specified.
V1VM
Q06 8-729-120-28 TRANSISTOR 2SC1623-L5L6
Q07 8-729-019-01 TRANSISTOR 2SD2394-EF
Q08 8-729-140-96 TRANSISTOR 2SD774-34
Q09 8-729-027-23 TRANSISTOR DTA114EKA-T146
<RESISTOR>
R01 1-216-061-00 RES,CHIP 3.3K 5% 1/10W
R02 1-216-057-00 RES,CHIP 2.2K 5% 1/10W
R03 1-216-085-00 RES,CHIP 33K 5% 1/10W
R04 1-216-025-91 RES,CHIP 100 5% 1/10W
R05 1-216-057-00 RES,CHIP 2.2K 5% 1/10W
R06 1-216-075-00 RES,CHIP 12K 5% 1/10W
R07 1-216-025-91 RES,CHIP 100 5% 1/10W
R08 1-216-025-91 RES,CHIP 100 5% 1/10W
R09 1-216-057-00 RES,CHIP 2.2K 5% 1/10W
R10 1-216-083-00 RES,CHIP 27K 5% 1/10W
R11 1-216-069-00 RES,CHIP 6.8K 5% 1/10W
R12 1-216-057-00 RES,CHIP 2.2K 5% 1/10W
R13 1-216-061-00 RES,CHIP 3.3K 5% 1/10W
R14 1-164-004-11 CERAMIC CHIP 0.1MF 10% 25V
R16 1-216-073-00 RES,CHIP 10K 5% 1/10W
R17 1-216-065-91 RES,CHIP 4.7K 5% 1/10W
R18 1-216-059-00 RES,CHIP 2.7K 5% 1/10W
R19 1-216-049-91 RES,CHIP 1K 5% 1/10W
R20 1-216-049-91 RES,CHIP 1K 5% 1/10W
R21 1-216-065-91 RES,CHIP 4.7K 5% 1/10W
R22 1-216-041-00 RES,CHIP 470 5% 1/10W
R24 1-216-025-91 RES,CHIP 100 5% 1/10W
R25 1-216-025-91 RES,CHIP 100 5% 1/10W
R26 1-216-049-91 RES,CHIP 1K 5% 1/10W
R27 1-216-071-00 RES,CHIP 8.2K 5% 1/10W
R28 1-216-025-91 RES,CHIP 100 5% 1/10W
R29 1-216-025-91 RES,CHIP 100 5% 1/10W
R30 1-216-071-00 RES,CHIP 8.2K 5% 1/10W
R31 1-216-025-91 RES,CHIP 100 5% 1/10W
R32 1-216-071-00 RES,CHIP 8.2K 5% 1/10W
R33 1-216-065-91 RES,CHIP 4.7K 5% 1/10W
R34 1-216-065-91 RES,CHIP 4.7K 5% 1/10W
R35 1-216-065-91 RES,CHIP 4.7K 5% 1/10W
R36 1-216-025-91 RES,CHIP 100 5% 1/10W
R37 1-216-049-91 RES,CHIP 1K 5% 1/10W
R38 1-260-095-11 CARBON 470 5% 1/2W
R41 1-216-063-91 RES,CHIP 3.9K 5% 1/10W
R42 1-216-077-00 RES,CHIP 15K 5% 1/10W
R43 1-216-295-91 SHORT 0
R44 1-216-083-00 RES,CHIP 27K 5% 1/10W
****************************************************************************
* A-1347-116-A VM BOARD, COMPLETE
**********************
4-382-854-11 SCREW (M3X10), P, SW (+)
<CAPACITOR>
C1721 1-126-964-11 ELECT 10MF 20% 50V
C1722 1-102-114-00 CERAMIC 470PF 10% 50V
C1723 1-102-951-00 CERAMIC 15PF 5% 50V
C1724 1-101-888-00 CERAMIC 68PF 5% 50V
C1751 1-136-153-00 FILM 0.01MF 5% 50V
C1761 1-161-830-00 CERAMIC 0.0047MF 500V
C1762 1-102-951-00 CERAMIC 15PF 5% 50V
C1763 1-107-638-11 ELECT 33MF 20% 160V
C1764 1-126-933-11 ELECT 100MF 20% 16V
C1768 1-106-383-00 MYLAR 0.047MF 10% 200V
C1769 1-107-667-11 ELECT 2.2MF 20% 160V
C1770 1-104-999-11 MYLAR 0.1MF 10% 200V
C1771 1-126-964-11 ELECT 10MF 20% 50V
C1772 1-126-933-11 ELECT 100MF 20% 16V
C1773 1-106-383-00 MYLAR 0.047MF 10% 200V
C1774 1-102-959-91 CERAMIC 22PF 5% 50V
C1775 1-126-933-11 ELECT 100MF 20% 16V
C1776 1-126-964-11 ELECT 10MF 20% 50V
C1777 1-101-888-00 CERAMIC 68PF 5% 50V
C1778 1-130-471-00 MYLAR 0.001MF 5% 50V
C1779 1-130-471-00 MYLAR 0.001MF 5% 50V
C1780 1-126-964-11 ELECT 10MF 20% 50V
C1781 1-107-714-11 ELECT 10MF 20% 16V
C1782 1-136-153-00 FILM 0.01MF 5% 50V
C1783 1-136-153-00 FILM 0.01MF 5% 50V
C1784 1-102-244-00 CERAMIC 220PF 10% 500V
C1788 1-136-153-00 FILM 0.01MF 5% 50V
C1789 1-107-714-11 ELECT 10MF 20% 16V
C1790 1-126-964-11 ELECT 10MF 20% 50V
C1791 1-126-964-11 ELECT 10MF 20% 50V
C1841 1-136-155-00 FILM 0.015MF 5% 50V
C1844 1-108-700-11 MYLAR 0.047MF 10% 200V
C1845 1-137-194-81 FILM 0.47MF 5% 50V
C1846 1-126-964-11 ELECT 10MF 20% 50V
C1901 1-136-060-00 FILM 0.047MF 5% 400V
<CONNECTOR>
R45 1-216-021-00 RES,CHIP 68 5% 1/10W
R46 1-216-021-00 RES,CHIP 68 5% 1/10W
R47 1-216-021-00 RES,CHIP 68 5% 1/10W
R48 1-216-049-91 RES,CHIP 1K 5% 1/10W
R49 1-216-049-91 RES,CHIP 1K 5% 1/10W
R50 1-216-049-91 RES,CHIP 1K 5% 1/10W
<CRYSTAL>
X01 1-579-266-31 CR YSTAL VIBRAT OR
CN1701* 1-564-509-11 PLUG, CONNECTOR 6P
CN1702* 1-564-510-11 PLUG, CONNECTOR 7P
CN1703* 1-564-506-11 PLUG, CONNECTOR 3P
CN1704* 1-564-506-11 PLUG, CONNECTOR 3P
CN1705 4-352-844-01 PIN, LEAD, COATING
CN1901* 1-508-784-00 PIN, CONNECTOR (5MM PITCH) 1P
CN1902* 1-564-506-11 PLUG, CONNECTOR 3P
– 66 –
Page 38
The components identified by shading
and mark ! are critical for safety.
Replace only with part number specified.
KV-T29SN81
RM-870
VM
REF. NO. PART NO. DESCRIPTION REMARK
<DIODE>
D1761 8-719-911-19 DIODE 1SS119-25
D1763 8-719-911-19 DIODE 1SS119-25
D1764 8-719-911-19 DIODE 1SS119-25
D1767 8-719-110-88 DIODE RD39ESB2
D1768 8-719-110-88 DIODE RD39ESB2
D1769 8-719-911-19 DIODE 1SS119-25
D1770 8-719-911-19 DIODE 1SS119-25
D1774 8-719-109-84 DIODE RD5.1ESB1
D1775 8-719-109-84 DIODE RD5.1ESB1
D1840 8-719-302-43 DIODE EL1Z
D1841 8-719-911-19 DIODE 1SS119-25
D1842 8-719-109-84 DIODE RD5.1ESB1
<IC>
IC1701 8-759-729-03 IC NJM2903D
IC1702 8-759-700-42 IC NJM2904D
<COIL>
L1721 1-408-617-31 INDUCTOR 150UH
L1722 1-408-617-31 INDUCTOR 180UH
L1723 1-410-468-11 INDUCTOR 6.8UH
L1761 1-410-478-11 INDUCTOR 47UH
L1762 1-408-610-31 INDUCTOR 39UH
L1841 1-459-075-00 COIL,DYNAMIC CONVERSION CHOKE
L1843 1-459-104-00 COIL, WITH CORE
L1901 1-459-104-00 COIL, WITH CORE
REF. NO. PART NO. DESCRIPTION REMARK
R1726 1-247-815-91 CARBON 220 5% 1/4W
R1727 1-249-419-11 CARBON 1.5K 5% 1/4W
R1728 1-249-417-11 CARBON 1K 5% 1/4W
R1729 1-249-437-11 CARBON 47K 5% 1/4W
R1730 1-249-438-11 CARBON 56K 5% 1/4W
R1731 1-247-815-91 CARBON 220 5% 1/4W
R1732 1-249-419-11 CARBON 1.5K 5% 1/4W
R1736 1-249-419-11 CARBON 1.5K 5% 1/4W
R1753 1-249-425-11 CARBON 4.7K 5% 1/4W
R1762 1-247-815-91 CARBON 220 5% 1/4W
R1764 1-247-734-11 CARBON 39 5% 1/2W F
R1765 1-249-414-11 CARBON 560 5% 1/4W F
R1766 1-249-418-11 CARBON 1.2K 5% 1/4W
R1768 1-249-418-11 CARBON 1.2K 5% 1/4W
R1769 1-249-387-11 CARBON 3.3 5% 1/4W F
R1770 1-249-435-11 CARBON 33K 5% 1/4W
R1772 1-249-432-11 CARBON 18K 5% 1/4W
R1774 1-215-912-11 METAL OXIDE 150 5% 3W F
R1775 1-249-417-11 CARBON 1K 5% 1/4W F
R1776 1-249-432-11 CARBON 18K 5% 1/4W
R1777 1-249-438-11 CARBON 56K 5% 1/4W
R1778 1-249-430-11 CARBON 12K 5% 1/4W
R1779 1-249-414-11 CARBON 560 5% 1/4W
R1780 1-249-420-11 CARBON 1.8K 5% 1/4W
R1781 1-249-410-11 CARBON 270 5% 1/4W
R1782 1-249-387-11 CARBON 3.3 5% 1/4W F
R1784 1-247-807-31 CARBON 100 5% 1/4W
R1785 1-249-400-11 CARBON 39 5% 1/4W F
R1786 1-249-435-11 CARBON 33K 5% 1/4W
R1787 1-249-428-11 CARBON 8.2K 5% 1/4W
<TRANSISTOR>
Q1721 8-729-119-78 TRANSISTOR 2SC2785-HFE
Q1722 8-729-119-78 TRANSISTOR 2SC2785-HFE
Q1723 8-729-119-78 TRANSISTOR 2SC2785-HFE
Q1756 8-729-119-78 TRANSISTOR 2SC2785-HFE
Q1761 8-729-119-78 TRANSISTOR 2SC2785-HFE
Q1762 8-729-119-76 TRANSISTOR 2SA1175-HFE
Q1763 8-729-017-05 TRANSISTOR 2SA1837
Q1764 8-729-119-78 TRANSISTOR 2SC2785-HFE
Q1765 8-729-017-06 TRANSISTOR 2SC4793
Q1766 8-729-119-78 TRANSISTOR 2SC2785-HFE
Q1767 8-729-142-86 TRANSISTOR 2SC3733
Q1768 8-729-119-78 TRANSISTOR 2SC2785-HFE
Q1769 8-729-119-76 TRANSISTOR 2SA1175-HFE
Q1770 8-729-119-78 TRANSISTOR 2SC2785-HFE
Q1771 8-729-119-76 TRANSISTOR 2SA1175-HFE
Q1777 8-729-326-11 TRANSISTOR 2SC2611
Q1840 8-729-119-78 TRANSISTOR 2SC2785-HFE
Q1841 8-729-195-82 TRANSISTOR 2SC2958-L
<RESISTOR>
R1721 1-249-413-11 CARBON 470 5% 1/4W
R1722 1-249-411-11 CARBON 330 5% 1/4W
R1723 1-249-406-11 CARBON 120 5% 1/4W
R1724 1-247-815-91 CARBON 220 5% 1/4W
R1725 1-249-408-11 CARBON 180 5% 1/4W
R1788 1-249-419-11 CARBON 1.5K 5% 1/4W
R1789 1-249-413-11 CARBON 470 5% 1/4W
R1790 1-216-451-11 METAL OXIDE 120 5% 2W F
R1791 1-249-411-11 CARBON 330 5% 1/4W
R1793 1-249-429-11 CARBON 10K 5% 1/4W
R1794 1-215-892-11 METAL OXIDE 1K 5% 2W F
R1795 1-249-389-11 CARBON 4.7 5% 1/4W F
R1796 1-249-377-11 CARBON 0.47 5% 1/4W F
R1797 1-215-862-11 METAL OXIDE 68 5% 1W F
R1800 1-249-429-11 CARBON 10K 5% 1/4W
R1801 1-249-437-11 CARBON 47K 5% 1/4W
R1805 1-249-429-11 CARBON 10K 5% 1/4W
R1806 1-249-429-11 CARBON 10K 5% 1/4W
R1812 1-249-425-11 CARBON 4.7K 5% 1/4W
R1816 1-249-415-11 CARBON 680 5% 1/4W
R1817 1-249-429-11 CARBON 10K 5% 1/4W
R1818 1-249-429-11 CARBON 10K 5% 1/4W
R1819 1-249-403-11 CARBON 68 5% 1/4W
R1820 1-249-417-11 CARBON 1K 5% 1/4W
R1841 1-249-435-11 CARBON 33K 5% 1/4W
R1842 1-260-111-11 CARBON 10K 5% 1/2W
R1843 1-249-421-11 CARBON 2.2K 5% 1/4W
R1844 1-249-421-11 CARBON 2.2K 5% 1/4W
R1847 1-249-399-11 CARBON 33 5% 1/4W F
R1848 1-216-434-11 METAL OXIDE 1.8K 5% 1W F
R1849 1-260-111-11 CARBON 10K 5% 1/2W
R1850 1-249-417-11 CARBON 1K 5% 1/4W
– 67 –
Page 39
KV-T29SN81
RM-870
VM
REF. NO. PART NO. DESCRIPTION REMARK REF. NO. PART NO. DESCRIPTION REMARK
The components identified by shading
and mark ! are critical for safety.
Replace only with part number specified.
R1851 1-249-393-11 CARBON 10 5% 1/4W
R1901 1-249-399-11 CARBON 33 5% 1/4W F
<VARIABLE RESISTOR>
RV1814 1-241-764-11 RES, ADJ, CARBON 10K
<TRANSFORMER>
T1901 1-413-059-00 TRANSFORMER, FERRITE (DFT)
****************************************************************************
****************************************************************************
MISCELLANEOUS
*************
! 1-403-672-12 COIL, DEMAGNETIZATION
1-452-032-00 MAGNET,DISC
1-452-278-22 MAGNET, PURITY
1-452-278-32 MAGNET, PURITY
1-452-762-31 NECK ASSEMBLY NA294
1-503-902-11 SPEAKER (15X6.5 CM)
! 1-574-358-51 CORD, POWER (WITH CONNECTOR) 7.5A/250V
1-900-700-10 DGC BAND
! 1-900-700-27 LEAD ASSY, FOCUS
! 8-451-467-21 DEFLECTION YOKE (Y29GXA2-S)
ACCESSORIES AND PACKING MATERIALS
*********************************
3-701-910-00 SCREW, SPECIAL (DIA. 3.8X20)
3-861-432-62 MANUAL, INSTRUCTION
* 4-029-168-01 BAG, PROTECTION
* 4-053-737-01 CUSHION (UPPER)(ASSY)
* 4-053-740-01 CUSHION (LOWER)(ASSY)
* 4-053-743-01 INDIVIDUAL CARTON
* 4-053-744-01 TRAY
4-065-210-01 JOINT
4-392-003-11 BAND, HOLD
4-392-004-11 CLIP
REMOTE COMMANDER
****************
1-473-323-11 REMOTE COMMANDER (RM-870)
9-902-546-01 BATTERY COVER, REMOTE COMMANDER
! 8-733-868-05 PICTURE TUBE (M68KZT71X)
****************************************************************************
9-965-741-01
Sony Corporation
SONY TV Industries (M) Sdn. Bhd.
TV Business of General Area
– 68 –
English
99EG70068-1
Printed in Malaysia
1999. 5
 Loading...