

Sony Trinitron KV-9PT60, Trinitron KV-9PT50, KV-9PT50 Operating Instructions Manual
S ON'Y_,
-7
3-810-578-11 (1)
Trinitro_ Color TV
Operating Instructions
Manual de instrucciones
KV-9PT50
KV-9PT60
©1995 by Sony Corporation
For details concernin8 safety precautions,
see the attaching leaflet "IMPORTANT
SAFEGUARDS."
To prevent fire or shock
hazard, do not expose
the television to rain or
moisture.
lhis _wnbol is intended to
alert the user to the
presence of uninsulated
"dangerous voltage"
within the product's
enclosure that may be of
sufficient magnitude to
constitute a risk of electric
shock to persons.
This symbol is intended to
alert the user to the
presence of important
operating and
maintenance (servicing)
instructions in the
literature accompanying
the appliance.
Safety precautions
• For KV-9PT50, operate on 120 V AC, 60
Hz. For KV-9PT60, operate on 120 V
AC or on 12 V DC.
• To operate from a car battery, use only
the supplied car battery cord.
• Unplug the TV from the wall outlet if
you are not going to use it for several
days or more.
• Unplug the car battery cord if you are
not using the TV,
• To prevent electric shock, do not use
this polarized AC plug with an
extension cord, receptacle or other
outlet unless the blades can be fully
inserted to prevent blade exposure.
2EN I
CAUTION
• To reduce the risk of fire, do not p[ace
any heating or cooking appliance
beneath the TV.
• When using TV games, computers, and
similar products with your TV, keep the
brightness and contrast functions at low
settings. If a fixed (non-moving) pattern
is left on the screen for long periods of
time at a high brightness or contrast
setting, the image can be permanently
imprinted onto the screen. These types
of imprints are not covered by your
warranty because they are the result of
misuse.
• When using the shelf installation
bracket, follow the instruction (p. 5-9) in
the exact order given. If you do not, the
TV may fall from the bracket. (KV-
9PT50 only)
Installation
• To prevent internal heat build-up, do
not block the ventilation openings.
• Do not place the TV in direct sunlight,
near a heater, or where the humidity is
high.
Note to CATV system installer
This reminder is provided to call the
CATV system installer's attention to
Article 820 - 40 of the NEC that provides
guidelines for proper grounding and, in
particular specifies that the cable ground
shall be connected to the grounding
system of the building, as close to the
point of cable entry as practical.
Owner's Record
The model and serial numbers are located
at the rear of the TV. Record these
numbers in the spaces provided below.
Refer to them whenever you call upon
your Sony dealer regarding this product.
Model No.
Serial No.
Welcom,,! 4
Setting Up
Settingup the Kv-gPI5O 5
Attaching the TV 5
Removing the TV 9
Using house current 10
Connecting the supplied telescopic antenna
Setting up the KV-9PT60 11
Using house current 11
Using a car battery 11
Connecting the supplied telescopic antenna
Connections 13
Connecting to outdoor antenna 13
Connecting to cable TV system 14
Connecting video equipment 14
Watching a VCR picture 14
Setting up the remote commander 15
Setting cable TV on or off 16
Presetting channels 18
Erasing or adding channels 19
10
12
Available Features
Functions 20
Adjusting the picture 22
Customizing the channel number buttons 24
Blocking out a channel (CHANNEL BLOCK)
26
Additional Information
Troubleshooting 27
Specifications 28
I 3E N
l hal _k y_)u/or p u, chasn ig the _ol _y I rinitroil €._olor 1 V. Bctol c
operating the TV, please read this manual thoroughly and retain it tot
future reference.
The instructions in this manual are for the models listed on the front
cover. Before you start reading, check your model number by looking at
the rear of your TV.
Here are some of the features you will enjoy with your TV:
• A 181-channel frequency synthesis tuner.
• On-screen menus that let you set the picture quality and other
settings.
• A sleep timer that automatically turns off the TV after the time you
selected.
• An Audio/Video input jack to connect your VCR to the TV.
• Dual mode swivel bracket to attach the TV to a kitchen shelf or
cabinet and to use the TV with the stand (KV-9PT50 only).
• Coiled power cord (KV-9PT50 only).
• Two-way AC/DC power supply (KV-9PT60 only).
_Setting Up
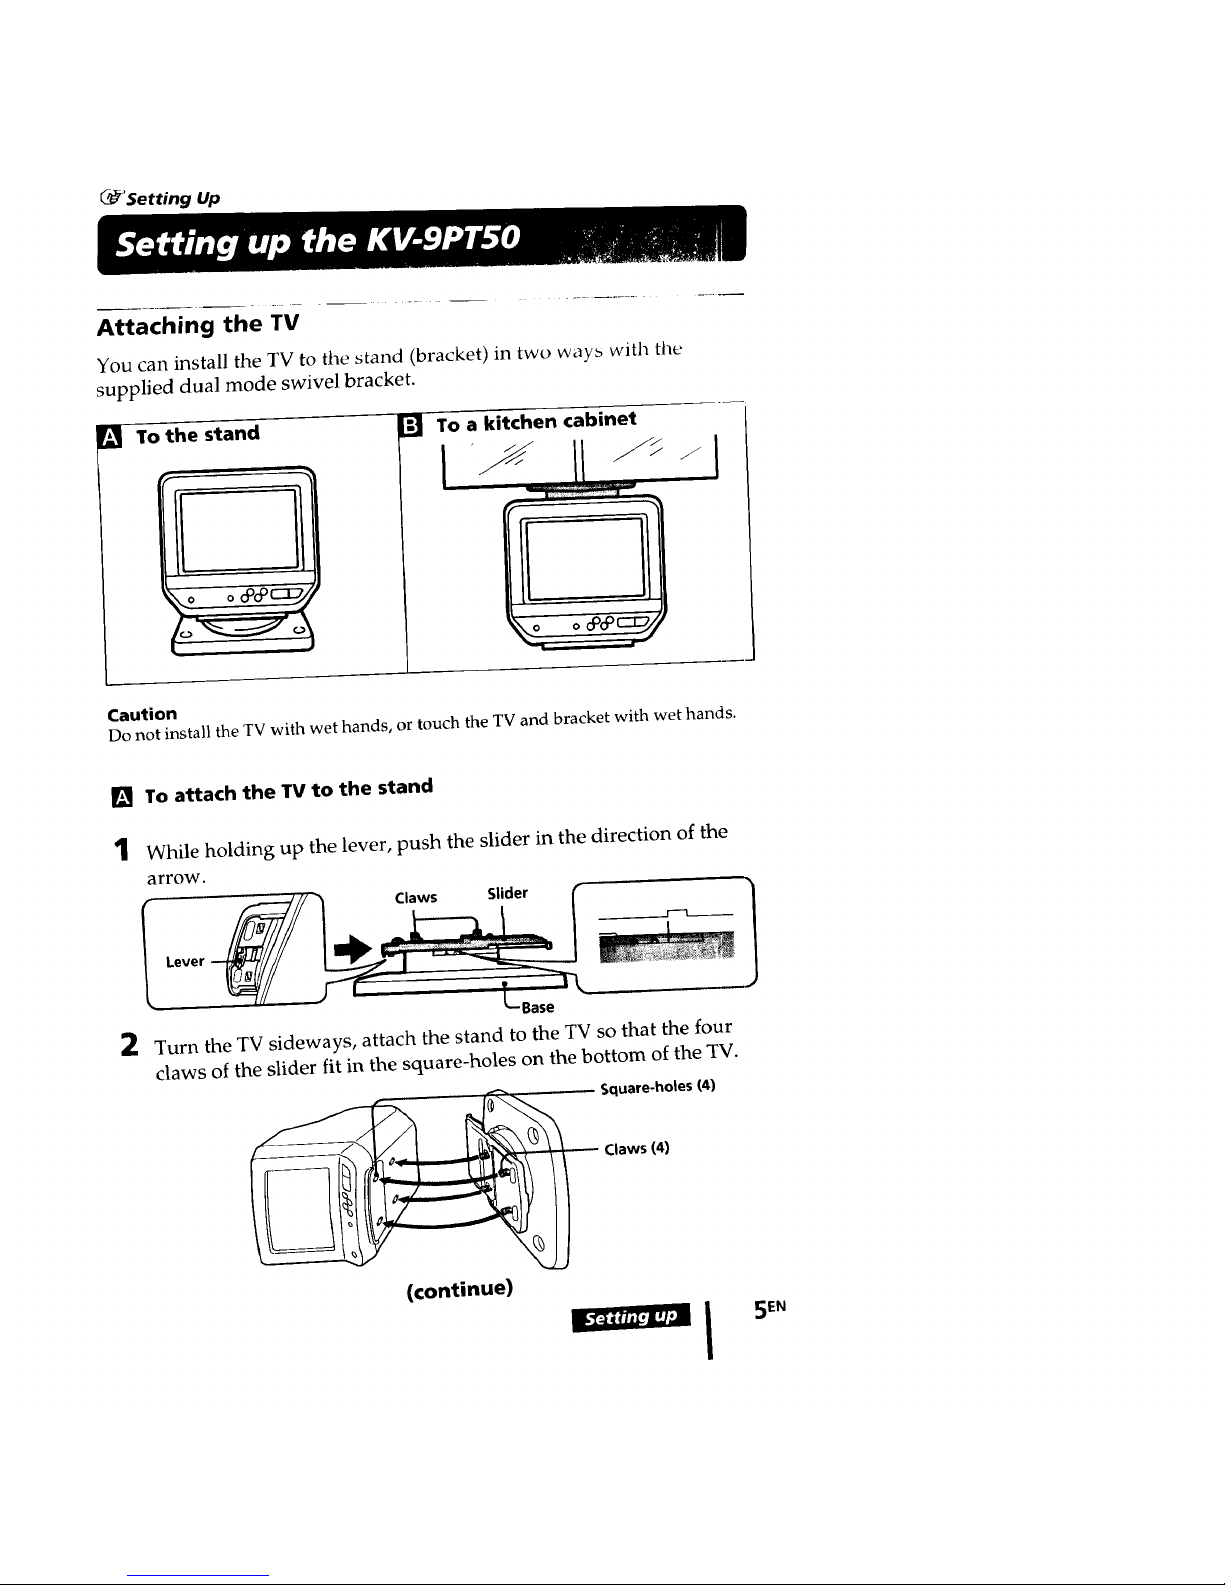
Attaching the TV
You can install the TV to the stand (bracket) in two ways with the
supplied dual mode swivel bracket.
[] To the stand
[] To a kitchen cabinet
j/
Caution
Do not install the TV with wet hands, or touch the TV and bracket with wet hands.
[] To attach the TV to the stand
1 While holding up the lever, push the slider in the direction of the
arrow.
2
Lever
Claws Slider I
__-..-..-.F"___
Turn the TV sideways, attach the stand to the TV so that the four
claws of the slider fit in the square-holes on the bottom of the TV.
_ Square-holes (4)
(continue)
SEN
3
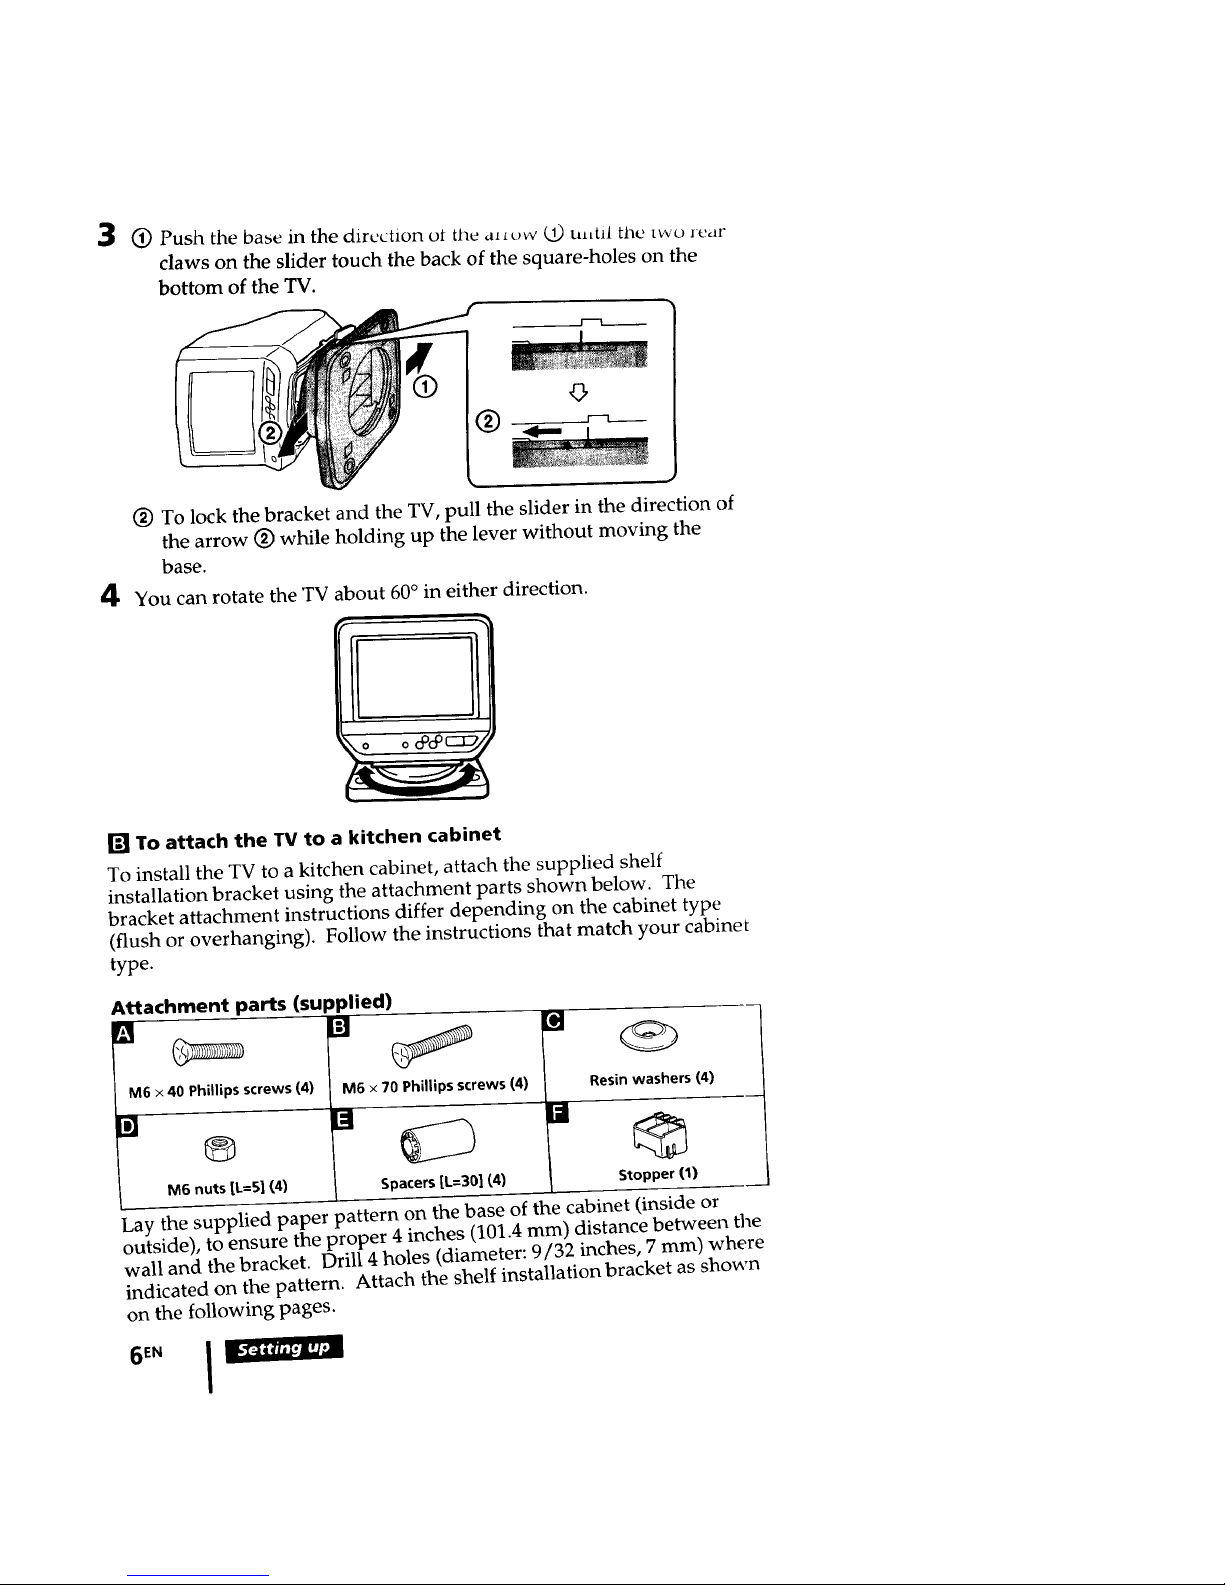
1_ Push the base in the direction ot the alL¢_w (2) ulttil tile two rear
claws on the slider touch the back of the square-holes on the
bottom of the TV.
r----i
4
(_) To lock the bracket and the TV, pull the slider in the direction of
the arrow (_) while holding up the lever without moving the
base.
You can rotate the TV about 60° in either direction.
!
[] To attach the TV to a kitchen cabinet
To install the TV to a kitchen cabinet, attach the supplied shelf
installation bracket using the attachment parts shown below. The
bracket attachment instructions differ depending on the cabinet type
(flush or overhanging). Follow the instructions that match your cabinet
type.
Attachment parts (SUl
[]
M6 x 40 Phillips screws (4)
[]
®
M6 nuts [k=S] (4)
3plied)
M6 x 70 Phillips screws (4)
Spacers[L.--301(4)
Resin washers (4)
[] G
Stopper (1)
Lay the supplied paper pattern on the base of the cabinet (inside or
outside), to ensure the proper 4 inches (101.4 mm) distance between the
wall and the bracket. Drill 4 holes (diameter: 9/32 inches, 7 mm) where
indicated on the pattern. Attach the shelf installation bracket as shown
on the following pages.
11111111:33
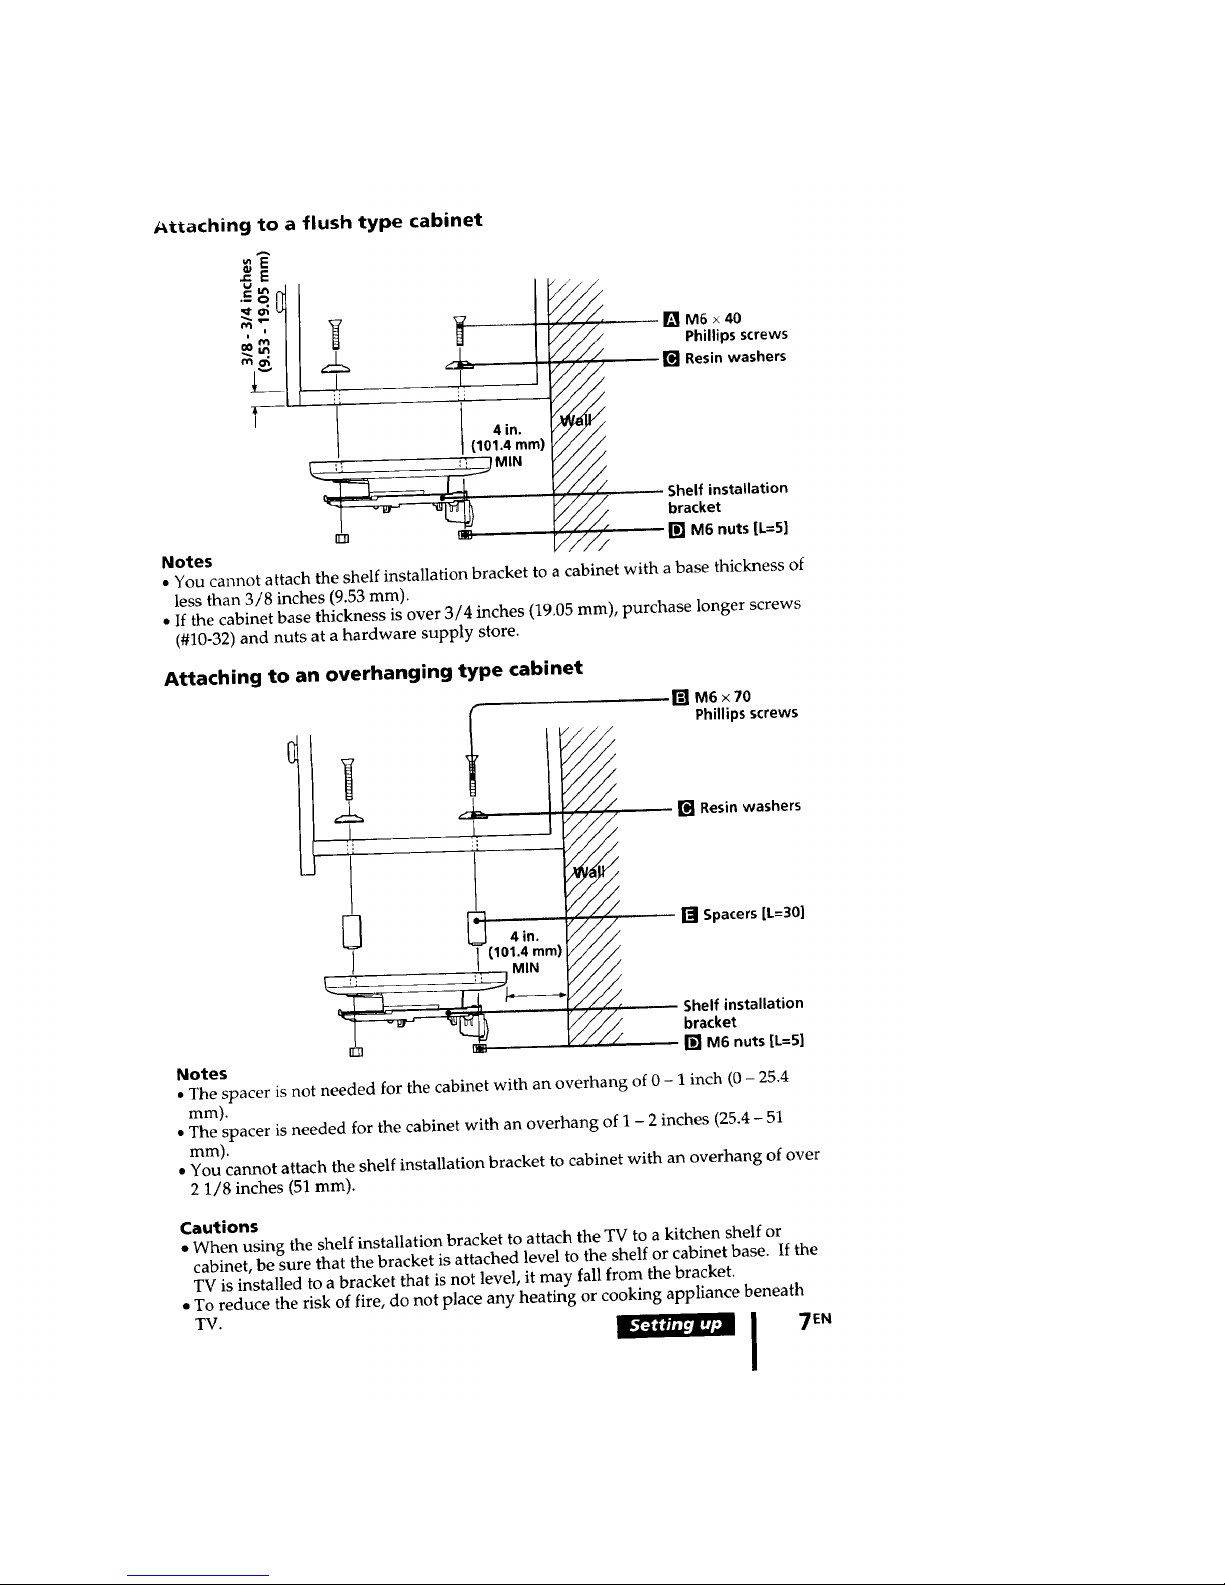
Attaching to a flush type cabinet
e-
_-, , _7 _?........ / -Ir_M6x40
_ _ [1 I _/"// Phillips screws
., I fl; I _//_ _ [] Resinwashers
_-- /
4 in. /
T I(101.4 ram) _'_'/../
_MI" _.///_/ Shelf installation
_/.////_. bracket
n-n _ _,,/'// [] Me nuts [L=51
Notes
• You cannot attach the shelf installation bracket to a cabinet with a base thickness of
less than 3/8 inches (9.53 ram).
• If the cabinet base thickness is over 3/4 inches (19.05 ram), purchase longer screws
(#10-32) and nuts at a hardware supply store.
Attaching to an overhanging type cabinet
[] M6 x 70
Phillips screws
+ + // _ Resinwashers
L_ [] Spacers[L=30]
_] 4 in.
(11)1.4ram) _/i
, ,I I MIN
_ Shelf installation
_///_ bracket
[] _n [] M6 nuts [L=5]
Notes
• The spacer is not needed for the cabinet with an overhang of 0 - 1 inch (0 - 25.4
Film).
• The spacer is needed for the cabinet with an overhang of 1 - 2 inches (25.4 - 51
1Tin'l).
• You cannot attach the shelf installation bracket to cabinet with an overhang of over
2 1/8 inches (51 ram).
Cautions
• When using the shelf installation bracket to attach the TV to a kitchen shelf or
cabinet, be sure that the bracket is attached level to the shelf or cabinet base. If the
TV is installed to a bracket that is not level, it may fall from the bracket.
• To reduce the risk of fire, do not place any heating or cooking appliance beneath
TV. j 7E N
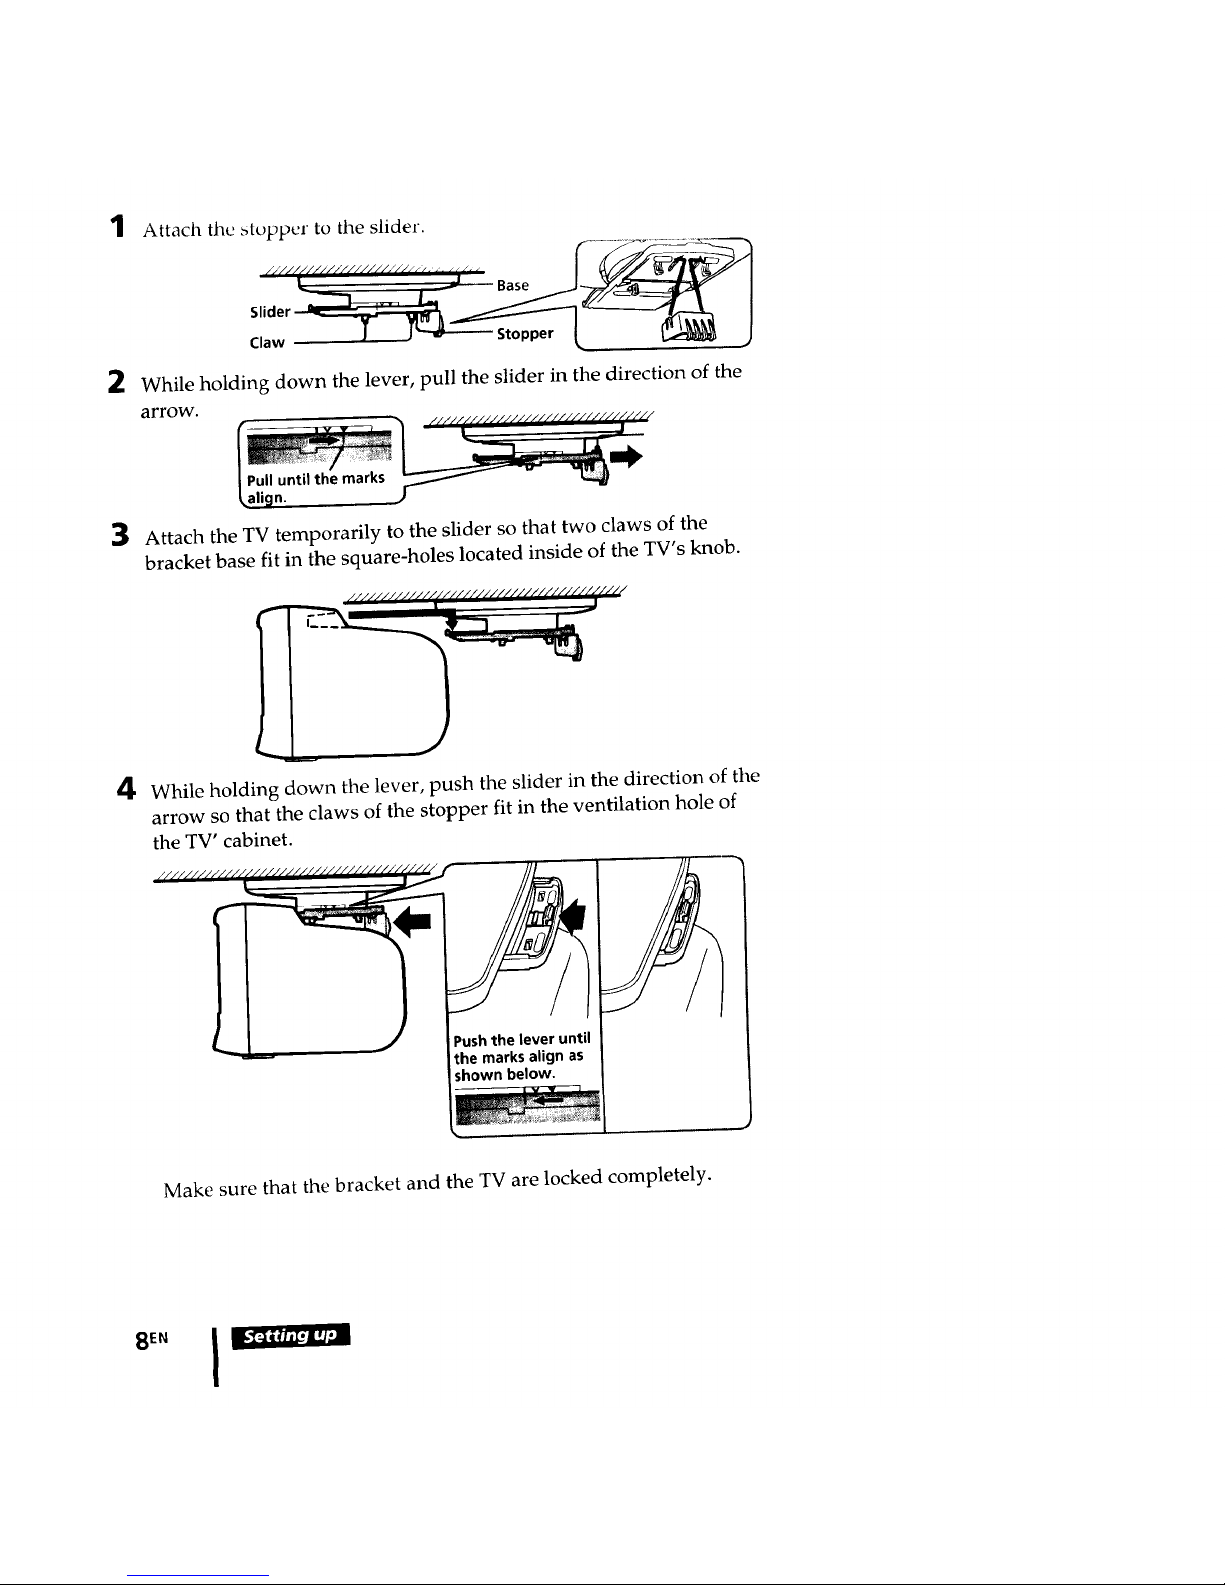
1
2
Attach the stopper to the slider.
//'/////i////////l/.///// ( i [ i ¢_ d, ( I __Jl
• . _ Base
Claw 1 J _ Stopper
While holding down the lever, pull the slider in the direction of the
arrow.
3
n.
Attach the TV temporarily to the slider so that two claws of the
bracket base fit in the square-holes located inside of the TV's knob.
4
While holding down the lever, push the slider in the direction of the
arrow so that the claws of the stopper fit in the ventilation hole of
the TV' cabinet.
//_////////////_ ///_
/__ j Pushthe lever until
the marks align as
shown below.
Make sure that the bracket and the TV are locked completely.
SEN

5 You can rotate the IV about OO_ in either direction. Be sure to rotate
the TV slowly and gently.
Caution
• Take care that a child does not hang on the TV or pull it forcibly.
Removing the TV
[] To remove the TV from the stand
1 While holding up the lever, push the slider in the direction of the
arrow to unlock the bracket and the TV.
2 Remove the TV from the stand.
t"
r'- 1
[] To remove the TV from the bracket
1 While holding down the lever, pull the slider in the direction of the
arrow to unlock the bracket and the TV.
2 Pull the TV toward you to remove the TV from the bracket.
_////////////////////
Caution
• If you do not support the TV as illustrated, the TV may fall when it separates from
the bracket. _ I 9EN
 Loading...