

Page 1

4-159-962-11(1)
TransferJet™ Station
Operating Instructions
Mode d’emploi
Manual de instrucciones
TJS-1
©2010 Sony Corporation
Page 2

2
US
WARNING
Owner’s Record
The model number and the serial number
are located on the bottom.
Record the serial number in the space
provided below. Refer to them whenever you
call upon your Sony dealer regarding this
product.
Model No.: TJS-1
Serial No.:
Do not use this product in an airplane.
For customers in the
U.S.A.
If you have any questions about this product,
you may call: Sony Customer Information
Service Center 1-800-222-SONY (7669).
The number below is for the FCC related
matters only.
For customers in the
U.S.A. and Canada
The following FCC and IC statement applies
only to the version of this model
manufactured for sale in the USA and
Canada. Other versions may not comply
with FCC and IC technical regulations.
Regulatory Information
Declaration of Conformity
Trade Name: SONY
Model No.: TJS-1
Responsible Party: Sony Electronics Inc.
Address: 16530 Via Esprillo, San Diego,
CA 92127 U.S.A.
Telephone number: 858-942-2230
This device complies with Part 15 of the
FCC Rules. Operation is subject to the
following two conditions: (1) this device
may not cause harmful interference, and
(2) this device must accept any
interference received, including
interference that may cause undesired
operation.
This device complies with Part 15 of FCC
Rules and RSS-Gen of IC Rules.
Operation is subject to the following two
conditions: (1) this device may not cause
interference, and (2) this device must accept
any interference, including interference that
may cause undesired operation of this
device.
CAUTION
You are cautioned that any changes or
modifications not expressly approved in this
manual could void your authority to operate
this equipment.
NOTE
This equipment has been tested and found to
comply with the limits for a Class B digital
device, pursuant to Part 15 of the FCC Rules.
These limits are designed to provide
reasonable protection against harmful
interference in a residential installation. This
equipment generates, uses and can radiate
radio frequency energy and, if not installed
and used in accordance with the
instructions, may cause harmful interference
to radio communications. However, there is
no guarantee that interference will not occur
Page 3

in a particular installation. If this equipment
does cause harmful interference to radio or
television reception, which can be
determined by turning the equipment off
and on, the user is encouraged to try to
correct the interference by one or more of
the following measures:
– Reorient or relocate the receiving
antenna.
– Increase the separation between the
equipment and receiver.
– Connect the equipment into an outlet
on a circuit different from that to which
the receiver is connected.
– Consult the dealer or an experienced
radio/TV technician for help.
This Class B digital apparatus complies with
Canadian ICES-003.
US
3
US
Page 4

4
US
Table Of Contents
Before use ................................................................................................. 5
Getting started ......................................................................................... 6
How to place a TransferJet technology compatible device on this
product .................................................................................................. 7
Example: Importing photos or movies in a camera to a PC ..................9
Example: Displaying photos in a camera on a digital photo frame ...11
Troubleshooting .....................................................................................12
On cleaning .............................................................................................13
Specifications ..........................................................................................13
Page 5

Before use
This product enables you to transfer data from/to a TransferJet technology
compatible device*. Connect this product to a PC, etc., with a USB cable, and then
place a TransferJet technology compatible device (camera, etc.) on this product.
Device files can be managed via the PC without the need for direct USB
connection to a camera, etc.**
* TransferJet technology compatible devices bear the mark.
This product can communicate with a TransferJet technology compatible device of SCSI
Block Device Target.
** Operation may differ from connecting directly with a USB cable.
What is TransferJet?
TransferJet is a close-proximity wireless transfer
technology which can rapidly transfer data
simply by placing a device you want to connect
in close proximity to a reading device. Large
volumes of data such as photos or movies can
be transferred without connecting a cable.
What can you do with this product?
You can transfer photos or movies to a PC from a TransferJet technology
compatible device, such as a digital camera, placed on this product.
You can display photos on a digital photo frame* or a TV* from a TransferJet
technology compatible device, such as a digital camera, placed on this product.
* USB port-equipped devices that can display photos can be used.
For the latest information, see the website.
Notes
Only a connected device guaranteed by the manufacturer to work via its USB port can be used.
Refer also to the instruction manual(s) of the TransferJet technology compatible device
placed on this product.
Do not use this product outside the area you purchased it. Depending on the area, use of this
product may infringe on the wave regulations and may be subject to penalty.
US
For the latest information and devices that can be
connected, see the following website.
http://esupport.sony.com/
5
US
Page 6
6
US
Getting started
O
N
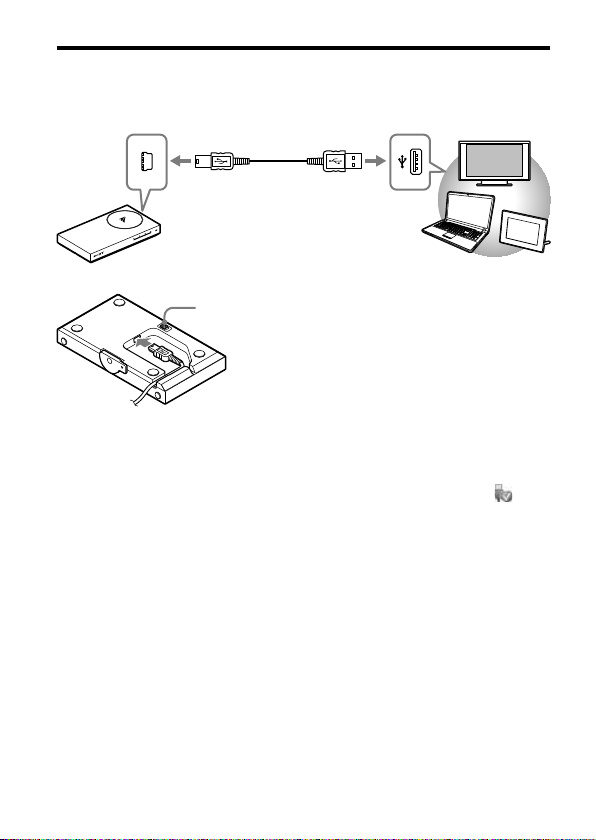
Before use, connect the supplied USB cable to the bottom of this product, and
then connect the USB cable to a device, such as a PC.
Bottom
Mode Switch
This switch is for future expansion. Before using
this product, check the switch is set to “MODE 1”
(factory default).
Notes
Use the supplied USB cable.
When connecting to a PC, connect the USB cable to the USB port of the PC directly.
Operation during connection via a USB hub is not assured.
If using a Windows PC when disconnecting a USB cable from a PC, click the icon
remove USB Mass Storage Device] at the bottom right of the desktop of the computer, then
unplug the USB cable. The screenshots are from Windows Vista. Screen and operation
procedure may vary depending on the operating system of the computer.
[Safely
Page 7
How to place a TransferJet technology
O
N
O
N
ON
compatible device on this product
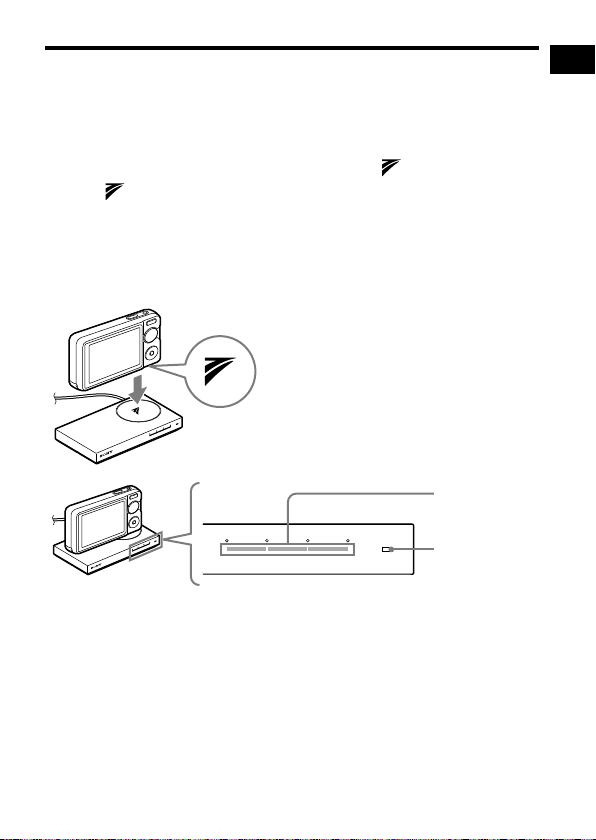
Before placing a TransferJet technology compatible device on this product, turn
on the connected device and check that the power indicator of this product lights
up. When placing the device on this product, align the mark on the device
with the mark on this product.
Then adjust the position of the TransferJet technology compatible device for the
highest reading on the connection indicator. The higher the reading, the more
rapidly the data can be transferred.*
* Depending on the TransferJet technology compatible device and surrounding wireless
device, the connection indicator status may vary.
Connection
indicator
Power indicator
Notes
Turn on the TransferJet technology compatible device, and activate the TransferJet function
in advance.
If the device is a camera, operation on the camera may be required.
If the device is a camera, a Memory Stick
in the camera beforehand.
The connection indicator may stay lit for a few seconds after the TransferJet technology
compatible device has been removed from this product. This is not a malfunction.
with TransferJet may be required to be inserted
US
Continued
7
US
Page 8

8
US
Tip
O
N
O
N
When the mark is on the side of a device:
Set up this product and then place this product and device with their marks in close
proximity.
Rotate the stand 90-degrees for stability.
Pass the USB cable through the groove as
illustrated above.
Page 9
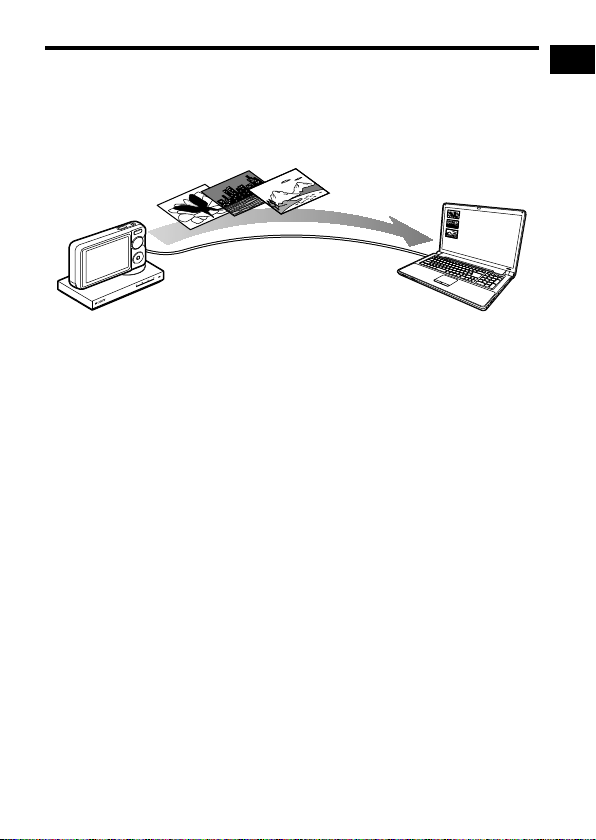
Example: Importing photos or movies in a
O
N
camera to a PC
You can import photos or movies in a TransferJet technology compatible camera
to a PC.
Recommended PC environment
OS: Windows
Windows 7
Windows Vista (Service Pack2)
Windows XP (Service Pack3)
Macintosh
Mac OS X (v10.3-v10.6)
USB port
Notes
Operation with all computer environments is not assured.
Depending on the combination of hardware and software, this product may not operate
correctly, even if the environment meets the above requirements.
Depending on the PC, this product may not operate properly if the connected PC has been
in standby or sleep mode. In this case, disconnect and then reconnect the USB cable.
1 Turn on the PC.
The power indicator of this product lights up.
2 Place a TransferJet technology compatible camera on this product.
Notes
Turn on the TransferJet technology compatible device, and activate the TransferJet
function in advance.
Depending on a camera, a Memory Stick
inserted in the camera beforehand.
For details on how to place on this product, see "How to place a TransferJet technology
compatible device on this product" (page 7).
with TransferJet may be required to be
Continued
US
9
US
Page 10

10
US
3 Transfer the data to the PC.
When using a Windows PC with PMB (Picture Motion Browser)* installed:
The [Import Media Files to PMB] window is displayed.
*PMB is a software supplied with certain Sony products such as a camera.
Click [Import] to import photos or movies. If the window is not displayed,
select the media on the liquid-crystal display of the camera.
When using a Windows PC not installed with PMB:
Open the folder for this product from Explore.
Drag and drop the image data in the folder to copy to the PC. The folder in
which data is stored varies depending on your PC environment or
TransferJet technology compatible device. For Windows Vista and
Windows XP, four folders for this product appear. For Windows 7, only
the folder in which the data is stored appears.
When using Macintosh:
Open the newly recognized drive icon on the desktop. Drag and drop the
image data in it to copy to the Macintosh. The folder in which data is
stored varies depending on your Macintosh environment or TransferJet
technology compatible device.
Note
Depending on the TransferJet technology compatible device, it may not be possible to write
and delete files to the device from the PC.
Page 11

Example: Displaying photos in a camera
O
N
on a digital photo frame
You can display photos in a TransferJet technology compatible camera by
connecting this product to a USB port-equipped digital photo frame.
1 Turn on the digital photo frame.
The power indicator of this product lights up.
2 Place a TransferJet technology compatible camera on this product.
3 Operate the digital photo frame to display photos.
For details on how to operate, refer to the instruction manual(s) of the digital
photo frame.
Notes
Turn on the TransferJet technology compatible device, and activate the TransferJet
function in advance.
Depending on the camera, a Memory Stick
inserted in the camera beforehand.
Only a USB port-equipped device that can display photos can be used.
For details on how to place on this product, see "How to place a TransferJet technology
compatible device on this product" (page 7).
with TransferJet may be required to be
US
You can display photos by connecting a TV*.
*Only a USB port-equipped TV that can display photos can be used. Some TV can
display a slide show.
Operate the TV to display photos.
For details on how to operate, refer to the instruction manual(s) of the TV.
11
US
Page 12

12
US
Troubleshooting
If you run into any problems using this
product, check the following points
once again.
The power indicator
does not light up.
Check that the USB cable is plugged
into the USB port firmly.
Data cannot be
transferred.
Check that the
product and TransferJet technology
compatible device are properly
aligned, according to the connection
indicator.
Check that a metallic device other
than a TransferJet technology
compatible device is not placed on
this product.
Check that a metallic device other
than a TransferJet technology
compatible device is not close to this
product.
Check only one device is placed on
this product at one time.
Check that a TransferJet technology
compatible device is placed on this
product. Depending on the device, a
Memory Stick* with TransferJet
may be required to be inserted in the
device beforehand.
Check that the TransferJet
technology compatible device is
turned on and the TransferJet
function is activated.
If the device is a camera, selecting a
destination media may be required.
For details on how to operate, refer
marks of this
to the instruction manual(s) of the
camera.
Others
Depending on the TransferJet
technology compatible device, it
may not be possible to write and
delete files to a TransferJet
technology compatible device such
as camera from a device such as a
PC.
This product may become warm
during operation. This is not a
malfunction.
This product is not designed to
charge the battery of the placed
device.
The connection indicator may stay
lit for a few seconds after the
TransferJet technology compatible
device has been removed from this
product. This is not a malfunction.
Do not disconnect the USB cable or
remove the device from this product
while transferring files as files may
be corrupted.
If this product cannot be recognized
from the connected device,
disconnect and then reconnect the
USB cable.
Depending on the specifications of
the TransferJet technology
compatible device, it may not be
possible to communicate with this
product. For details, see the website
(page 5).
* A Memory Stick with TransferJet is not
released depending on the regulations of
the country/region.
Page 13

On cleaning
Clean this product with a soft dry
cloth. If it is heavily soiled, clean this
product with a soft cloth slightly
moistened with a mild detergent
solution, and then wipe it with a dry
cloth.
Avoid the following to avoid
damage to the finish:
– Using chemicals such as thinner,
benzine, alcohol or insecticide.
– Leaving the casing in contact with
rubber or vinyl objects for a long
period of time.
When using chemical cloths, follow
the warnings.
Specifications
Communication system
TransferJet Specifications
PHY-CNL Spec.Rev.1.0
Compliant
PCL Spec Rev.1.0 Compliant
Frequency band
4.48 GHz (central frequency)
(4.20 GHz - 4.76 GHz)
Supported protocol class
(communication type or tool)
SCSI Block Device Initiator*
External interface
USB2.0 (High-Speed)
Dimensions (w/d/h)
Approx. 110 mm × 62 mm ×
16 mm
(4 3/8 in. × 2 1/2 in. × 21/32 in.)
Mass
Approx. 100 g (3.5 oz) (excluding
cable)
Operational temperature
0 °C - 40 °C (32 °F - 104 °F)
Power supply
DC 5 V, 0.25 A
(supplied from USB)
* This product can communicate with
a TransferJet technology compatible
device of SCSI Block Device Target
protocol class.
Design and specifications of this
product are subject to change without
notice.
US
Supplied items
TransferJet Station (1), USB cable
(length: approx. 0.5 m (1.6 ft)) (1),
Operating Instructions (this manual)
(1)
13
US
Page 14

License and Trademark
Notice
"Memory Stick", "TransferJet" and
TransferJet logo are registered
trademarks or trademarks of Sony
Corporation.
Microsoft, Windows, and Windows
Vista are registered trademarks or
trademarks of Microsoft
Corporation in the United States
and/or other countries.
Macintosh and Mac OS are
registered trademarks of Apple Inc.
in the U.S. and other countries.
Reproduction of this manual, in
whole or in part, without written
permission by Sony Corporation is
prohibited.
The content of this manual is subject
to change without notice.
All other company names, product
names and system names mentioned
herein may be the trademarks or
registered trademarks of their
respective companies. Furthermore,
and are not mentioned in each
case in this manual.
For the latest
information and
devices that can be
connected, see the
following website.
http://esupport.sony.com/
14
US
Page 15

Page 16

2
FR
AVERTISSEMENT
Mémo du propriétaire
Le numéro de modèle et le numéro de série
sont indiqués sous l’appareil.
Notez le numéro de série dans l’espace cidessous. Reportez-vous à ces informations
chaque fois que vous appelez votre détaillant
Sony au sujet de ce produit.
N° de modèle : TJS-1
N° de série :
N’utilisez pas ce produit dans un avion.
Pour les utilisateurs aux
États-Unis
Pour toute question au sujet de cet appareil,
appeler : Sony Centre d’information à la
clientèle 1-800-222-SONY (7669). Le
numéro ci-dessous concerne seulement les
questions relevant de la Commission
fédérale des communications des États- Unis
(FCC).
Pour les utilisateurs aux
États-Unis et au Canada
La déclaration du FCC et au IC suivante ne
s’applique qu’à la version de ce modèle
fabriqué pour la vente aux Etats-Unis et au
Canada. Il se peut que d’autres versions ne
soient pas conformes à la réglementation
technique du FCC et au IC.
Information réglementaire
Déclaration de conformité
Nom commercial : SONY
N° de modèle : TJS-1
Responsable : Sony Electronics Inc.
Adresse : 16530 Via Esprillo, San Diego,
CA 92127 É.-U.
No de téléphone : 858-942-2230
Cet appareil est conforme à la Partie 15
de la réglementation de la FCC des ÉtatsUnis. Son utilisation est sujette aux deux
conditions suivantes : (1) cet appareil ne
doit pas générer d’interférences nuisibles
et (2) il doit être en mesure d’accepter
toute interférence reçue, y compris les
interférences pouvant générer un
fonctionnement indésirable.
Cet appareil est conforme à la Partie 15 des
réglementations FCC et au CNR-Gen des
réglementations d’Industrie Canada.
Son fonctionnement est soumis à ces deux
conditions : (1) cet appareil ne doit pas causer
d’interférences, et (2) cet appareil doit accepter
toutes les interférences, incluant celles qui
pourraient compromettre son fonctionnement.
ATTENTION
Vous êtes informé que tout changement ou
modification non expressément approuvé
dans ce manuel pourrait résilier votre
mandat à utiliser cet équipement.
REMARQUE
Cet équipement a été testé et déterminé
comme satisfaisant aux limites pour un
dispositif numérique de Classe B,
conformément à la Partie 15 du règlement du
FCC. Ces limites sont destinées à fournir une
protection raisonnable contre des interférences
nuisibles dans une installation résidentielle.
Cet équipement génère, utilise et peut émettre
une énergie de fréquence radio et, s’il n’est pas
installé et utilisé conformément aux
instructions, il peut provoquer des
interférences nuisibles aux communications
Page 17

radio. Il n’y a toutefois aucune garantie que
des interférences ne se produiront pas dans
une installation particulière. Si cet équipement
provoque des interférences nuisibles à la
réception radio ou télévision, ce qui peut être
déterminé en l’éteignant et en le remettant en
marche, il est suggéré à l’utilisateur d’essayer
de remédier à ces interférences par l’une ou
plusieurs des mesures suivantes :
– Réorientez ou repositionnez l’antenne
de réception.
– Augmentez la distance séparant
l’équipement et le récepteur.
– Branchez l’équipement sur une prise de
de courant se trouvant sur un circuit
différent de celui auquel le récepteur est
branché.
– Contactez le distributeur ou un
technicien radio / télévision expérimenté
pour obtenir de l’aide.
Cet appareil numérique de la classe B est
conforme à la norme NMB-003 du Canada.
FR
3
FR
Page 18

4
FR
Table des matières
Avant toute utilisation ............................................................................. 5
Prise en main .............................................................................................6
Comment placer un appareil compatible avec la technologie
TransferJet sur ce produit ....................................................................7
Exemple : Importation des photos ou films d’un appareil photo sur un
PC ........................................................................................................... 9
Exemple : Affichage des photos d’un appareil photo sur un cadre de
photo numérique ...............................................................................11
Dépannage ..............................................................................................12
Nettoyage ............................................................................................... 13
Caractéristiques ......................................................................................13
Page 19

Avant toute utilisation
Ce produit vous permet de transférer des données vers/depuis un appareil compatible
avec la technologie TransferJet*. Raccordez ce produit à un appareil tel qu’un PC en
utilisant un câble USB, puis placez un appareil compatible avec la technologie TransferJet
(tel qu’un appareil photo) sur ce produit.
Vous pourrez alors accéder aux fichiers de cet appareil à partir du PC, sans devoir établir
de connexion USB directe avec l’appareil photo.**
* Les appareils compatibles avec la technologie TransferJet sont identifiés par le symbole .
Ce produit peut communiquer avec un appareil compatible avec la technologie TransferJet
de classe SCSI Block Device Target.
**
Le fonctionnement peut être différent d’avec un raccordement direct en utilisant un câble USB.
Qu’est-ce que TransferJet?
TransferJet est une technologie de transfert sans
fil à proximité immédiate permettant de
transférer rapidement les données en plaçant
simplement un appareil que vous souhaitez
raccorder à proximité d’un appareil de lecture.
Les fichiers de grande taille, tels que les films ou
les photos, peuvent être transférés sans
nécessiter la connexion d’un câble.
Que pouvez-vous faire avec ce produit?
Vous pouvez transférer des photos ou films sur un PC à partir d’un appareil
compatible avec la technologie TransferJet, tel qu’un appareil photo numérique
placé sur ce produit.
Vous pouvez afficher des photos sur un cadre de photo numérique* ou un
téléviseur* à partir d’un appareil compatible avec la technologie TransferJet, tel
qu’un appareil photo numérique placé sur ce produit.
* Vous pouvez utiliser les appareils équipés d’un port USB et permettant d’afficher les photos.
Pour obtenir les plus récentes informations, consultez le site Internet.
Remarques
Utilisez uniquement un appareil raccordé dont le fonctionnement via le port USB est garanti
par le fabricant.
Reportez-vous également au(x) mode(s) d’emploi de l’appareil compatible avec la
technologie TransferJet placé sur ce produit.
N’utilisez pas ce produit en dehors de la zone où vous l’avez acheté. Selon les régions, l’utilisation
de ce produit peut enfreindre les réglementations relatives aux ondes et être punie par la loi.
FR
Pour obtenir les plus récentes informations et la liste
des appareils pouvant être raccordés, consultez le
site Internet suivant.
http://esupport.sony.com/
5
FR
Page 20

6
FR
Prise en main
O
N
Avant toute utilisation, connectez le câble USB fourni en dessous de ce produit,
puis connectez l’autre extrémité du câble USB à un appareil, tel qu’un PC.
Dessous
Interrupteur de mode
Cet interrupteur est conçu pour permettre une
expansion future. Avant d’utiliser ce produit, veillez à
ce que l’interrupteur soit réglé sur « MODE 1 » (réglage
par défaut).
Remarques
Utilisez le câble USB fourni.
Lors du raccordement à un PC, connectez le câble USB directement au port USB du PC. Le
fonctionnement n’est pas garanti lorsque le raccordement est effectué via un concentrateur
USB.
Si vous utilisez un PC Windows, lors de la déconnexion du câble USB du PC, cliquez sur
l’icône [Retirer Périphérique de stockage de masse USB en toute sécurité] dans le coin
inférieur droit du bureau de votre ordinateur, puis déconnectez le câble USB. Les copies
d’écran proviennent de Windows Vista. L’écran et la procédure d’utilisation peuvent varier
en fonction du système d’exploitation de l’ordinateur.
Page 21

Comment placer un appareil compatible
O
N
O
N
ON
avec la technologie TransferJet sur ce
produit
Avant de placer un appareil compatible avec la technologie TransferJet sur ce
produit, mettez l’appareil raccordé en marche, puis assurez-vous que le témoin
d’alimentation de ce produit s’allume. Lorsque vous placez l’appareil sur ce
produit, alignez le symbole de l’appareil avec le symbole sur ce
produit.
Ajustez ensuite la position de l’appareil compatible avec la technologie TransferJet
de façon à obtenir le niveau de lecture le plus élevé sur le témoin de connexion.
Plus ce niveau est élevé, plus le transfert de données s’effectue rapidement.*
* Selon l’appareil compatible avec la technologie TransferJet utilisé et les appareils sans fil
installés à proximité, l’état du témoin de connexion peut varier.
Témoin de
connexion
Témoin
d’alimentation
Remarques
Mettez l’appareil compatible avec la technologie TransferJet en marche, puis activez la
fonction TransferJet à l’avance.
Si vous utilisez un appareil photo, il peut être nécessaire d’effectuer certaines opérations sur
celui-ci.
Si vous utilisez un appareil photo, il peut être nécessaire d’insérer un Memory Stick
TransferJet dans l’appareil photo avant de le placer sur le socle.
Le témoin de connexion peut demeurer allumé pendant quelques secondes après le retrait
de l’appareil compatible avec la technologie TransferJet de ce produit. Il ne s’agit pas d’un
problème de fonctionnement.
avec
Suite
FR
7
FR
Page 22

8
FR
Conseil
O
N
O
N
Lorsque le symbole apparaît sur le côté d’un appareil :
Installez ce produit, puis placez ce produit et l’appareil de façon à ce que les symboles
soient à proximité.
Tournez le pied d’appui à 90 degrés pour
assurer la stabilité. Faites passer le câble USB
dans la fente, tel qu’illustré ci-dessus.
Page 23

Exemple : Importation des photos ou films
O
N
d’un appareil photo sur un PC
Vous pouvez importer les photos ou films d’un appareil photo compatible avec la
technologie TransferJet sur un PC.
Environnement recommandé pour l’ordinateur
Système d’exploitation : Windows
Windows 7
Windows Vista (Service Pack2)
Windows XP (Service Pack3)
Macintosh
Mac OS X (v10.3-v10.6)
Port USB
Remarques
Le fonctionnement n’est pas garanti dans tous les environnements informatiques.
Selon la configuration matérielle et logicielle, ce produit peut ne pas fonctionner
correctement, même si l’environnement informatique respecte les exigences ci-dessus.
Selon le PC utilisé, ce produit peut ne pas fonctionner correctement si le PC raccordé est en
mode de veille ou d’inactivité. En pareil cas, déconnectez le câble USB, puis reconnectez-le.
1 Mettez le PC en marche.
Le témoin d’alimentation de ce produit s’allume.
2 Placez un appareil photo compatible avec la technologie TransferJet
sur ce produit.
Remarques
Mettez l’appareil compatible avec la technologie TransferJet en marche, puis activez la
fonction TransferJet à l’avance.
Selon le modèle d’appareil photo, il peut être nécessaire d’insérer un Memory Stick
avec TransferJet dans l’appareil photo avant de le placer sur le socle.
Pour plus de détails sur l’installation de l’appareil sur ce produit, consultez la section
« Comment placer un appareil compatible avec la technologie TransferJet sur ce
produit » (page 7).
Suite
FR
9
FR
Page 24

10
FR
3 Transfert des données vers le PC.
Lorsque vous utilisez un PC Windows sur lequel PMB (Picture Motion
Browser)* est installé :
La fenêtre [Importer les fichiers multimédias dans PMB] s’affiche.
* PMB est un logiciel fourni avec certains produits Sony, tels que des appareils photo.
Cliquez sur [Importer] pour importer des photos ou films. Si la fenêtre ne
s’affiche pas, sélectionnez le support sur l’afficheur à cristaux liquides de
l’appareil photo.
Lorsque vous utilisez un PC Windows sur lequel PMB n’est pas installé :
Ouvrez le dossier de ce produit à partir de l’Explorateur.
Glissez-déposez les données d’image dans le dossier pour les copier sur le
PC. Le dossier dans lequel les données sont sauvegardées varie selon
l’environnement informatique de votre PC ou l’appareil compatible avec la
technologie TransferJet utilisé. Pour Windows Vista et Windows XP,
quatre dossiers s’affichent pour ce produit. Pour Windows 7, seul le dossier
dans lequel les données sont sauvegardées s’affiche.
Lorsque vous utilisez un Macintosh :
Ouvrez l’icône du lecteur nouvellement reconnu sur le bureau. Glissezdéposez les données d’image à l’intérieur pour les copier sur le Macintosh.
Le dossier dans lequel les données sont sauvegardées varie selon
l’environnement informatique de votre Macintosh ou l’appareil compatible
avec la technologie TransferJet utilisé.
Remarque
Selon l’appareil compatible avec la technologie TransferJet utilisé, il peut être impossible de
créer et de supprimer des fichiers sur l’appareil à partir du PC.
Page 25

Exemple : Affichage des photos d’un
O
N
appareil photo sur un cadre de photo
numérique
Vous pouvez afficher les photos d’un appareil photo compatible avec la
technologie TransferJet en raccordant ce produit à un cadre de photo numérique
équipé d’un port USB.
1 Mettez le cadre de photo numérique en marche.
Le témoin d’alimentation de ce produit s’allume.
2 Placez un appareil photo compatible avec la technologie TransferJet
sur ce produit.
3 Utilisez le cadre de photo numérique pour afficher les photos.
Pour plus de détails sur le fonctionnement, reportez-vous au(x) mode(s)
d’emploi du cadre de photo numérique.
Remarques
Mettez l’appareil compatible avec la technologie TransferJet en marche, puis activez la
fonction TransferJet à l’avance.
Selon le modèle d’appareil photo, il peut être nécessaire d’insérer un Memory Stick
avec TransferJet dans l’appareil photo avant de le placer sur le socle.
Utilisez uniquement un appareil équipé d’un port USB et permettant d’afficher les photos.
Pour plus de détails sur l’installation de l’appareil sur ce produit, consultez la section
« Comment placer un appareil compatible avec la technologie TransferJet sur ce
produit » (page 7).
FR
Vous pouvez afficher les photos en raccordant un
téléviseur*.
* Utilisez uniquement un téléviseur équipé d’un port USB et permettant d’afficher les
photos. Certains téléviseurs peuvent afficher un diaporama.
Faites fonctionner le téléviseur pour afficher les photos.
Pour plus de détails sur le fonctionnement, reportez-vous au(x) mode(s)
d’emploi du téléviseur.
11
FR
Page 26

12
FR
Dépannage
En cas de problème avec ce produit,
vérifiez les points suivants à nouveau.
Le témoin
d’alimentation ne
s’allume pas.
Veillez à ce que le câble USB soit
branché correctement au port USB.
Les données ne sont pas
transférées.
Veillez à ce que les symboles
de ce produit et de l’appareil
compatible avec la technologie
TransferJet soient correctement
alignés en vérifiant le témoin de
connexion.
Veillez à ne pas placer d’appareil
métallique autre qu’un appareil
compatible avec la technologie
TransferJet sur ce produit.
Veillez à ne pas placer d’appareil
métallique autre qu’un appareil
compatible avec la technologie
TransferJet à proximité de ce
produit.
Veillez à placer un seul appareil sur
ce produit.
Veillez à ce qu’un appareil
compatible avec la technologie
TransferJet soit placé sur ce produit.
Selon l’appareil utilisé, il peut être
nécessaire d’insérer un Memory
Stick* avec TransferJet dans
l’appareil avant de le placer sur le
socle.
Veillez à ce que l’appareil
compatible avec la technologie
TransferJet soit mis en marche et
que la fonction TransferJet soit
activée.
Si vous utilisez un appareil photo, il
peut être nécessaire de sélectionner
un support de destination. Pour plus
de détails sur le fonctionnement,
reportez-vous au(x) mode(s)
d’emploi de l’appareil photo.
Autres
Selon l’appareil compatible avec la
technologie TransferJet utilisé, il
peut être impossible de créer et de
supprimer des fichiers sur un
appareil compatible avec la
technologie TransferJet tel qu’un
appareil photo à partir d’un appareil
tel qu’un PC.
Ce produit peut générer de la chaleur
pendant l’utilisation. Il ne s’agit pas
d’un problème de fonctionnement.
Ce produit n’est pas conçu pour charger
la pile de l’appareil placé sur celui-ci.
Le témoin de connexion peut
demeurer allumé pendant quelques
secondes après le retrait de l’appareil
compatible avec la technologie
TransferJet de ce produit. Il ne s’agit
pas d’un problème de fonctionnement.
Ne déconnectez pas le câble USB ou
ne retirez pas l’appareil de ce
produit pendant le transfert car vous
pourriez corrompre les fichiers.
Si ce produit n’est pas reconnu par
l’appareil raccordé, déconnectez le
câble USB, puis reconnectez-le.
Selon les caractéristiques de
l’appareil compatible avec la
technologie TransferJet, il peut être
impossible d’établir la
communication avec ce produit.
Pour plus de détails, consultez le site
Internet (page 5).
* Un Memory Stick avec TransferJet n’est
pas disponible en fonction des
réglementations du pays/de la région.
Page 27

Nettoyage
S’il est très sale, nettoyez ce produit
à l’aide d’un chiffon doux
légèrement imbibé d’une solution
détergente diluée, puis essuyez-le
avec un chiffon sec.
Pour éviter d’endommager le fini :
– N’utilisez pas de produits
chimiques tels que les diluants, le
benzène, l’alcool ou les
insecticides.
– Ne laissez pas le boîtier entrer en
contact avec des objets en
caoutchouc ou en vinyle pendant
de longues périodes de temps.
Lors de l’utilisation de lingettes
imbibées de produits chimiques,
respectez toutes les mises en garde.
Caractéristiques
Système de communication
Caractéristiques TransferJet
Conforme à la norme PHY-CNL
révision 1.0
Conforme à la norme PCL
révision 1.0
Gamme de fréquences
4,48 GHz (fréquence pivot)
(4,20 GHz - 4,76 GHz)
Classe de protocole prise en charge
(outil ou type de
communication)
SCSI Block Device Initiator*
Interface externe
USB2.0 (Haut débit)
Dimensions (l/p/h)
Environ 110 mm × 62 mm × 16 mm
(4 3/8 po × 2 1/2 po × 21/32 po)
Poids
Environ 100 g (3,5 oz) (sans le
câble)
Température de fonctionnement
0 °C - 40 °C (32 °F - 104 °F)
Alimentation
5 V CC, 0,25 A (fournie via USB)
* Ce produit peut communiquer avec
un appareil compatible avec la
technologie TransferJet de classe de
protocole SCSI Block Device Target.
La conception et les caractéristiques
techniques de ce produit sont sujettes à
modification sans préavis.
FR
Accessoires fournis
Station TransferJet (1), câble USB
(longueur : environ 0,5 m (1,6 pi)) (1),
Mode d’emploi (ce manuel) (1)
13
FR
Page 28

Mention relative aux
licences et marques
commerciales
« Memory Stick », « TransferJet » et
le logo TransferJet sont des marques
déposées ou des marques
commerciales de Sony Corporation.
Microsoft, Windows et Windows
Vista sont des marques déposées ou
des marques de commerce de
Microsoft Corporation aux ÉtatsUnis et/ou dans les autres pays.
Macintosh et Mac OS sont des
marques déposées de Apple Inc. aux
États-Unis et dans d’autres pays.
La reproduction de ce manuel, en
tout ou en partie, est défendue sans
la permission écrite de Sony
Corporation.
Le contenu de ce manuel est sujet à
modification sans préavis.
Tous les autres noms d’entreprises,
de produits et de systèmes
mentionnés peuvent être des
marques déposées ou des marques
commerciales de leurs propriétaires
respectifs. De plus, les symboles
et ne sont pas toujours utilisés
dans ce manuel.
Pour obtenir les plus
récentes informations
et la liste des appareils
pouvant être raccordés,
consultez le site
Internet suivant.
http://esupport.sony.com/
14
FR
Page 29

Page 30

2
ES
ADVERTENCIA
Anotaciones del
propietario
El número de modelo y el número de serie se
encuentran en la parte inferior.
Escriba el número de serie en el espacio
proporcionado a continuación. Consúltelos
siempre que acuda a su distribuidor Sony
con respecto a este producto.
N° de modelo: TJS-1
N° de serie:
No utilice este producto en un avión.
Para los clientes en
EE.UU.
En caso de preguntas o dudas sobre este
producto, puede llamar al siguiente número
de teléfono: Centro de servicio de
información al cliente de Sony 1-800-222SONY (7669). El número indicado a
continuación debe utilizarse únicamente
para cuestiones relacionadas con la FCC.
Para los clientes en
EE. UU. y Canadá
El siguiente comunicado de la FCC y IC sólo
es aplicable a la versión de este modelo
fabricada para su venta en los Estados
Unidos de América y Canadá. Es posible que
otras versiones no cumplan con las normas
técnicas de la FCC y IC.
Información reguladora
Declaración de conformidad
Nombre de la marca: SONY
N° de modelo: TJS-1
Parte responsable: Sony Electronics Inc.
Dirección: 16530 Via Esprillo, San Diego,
CA 92127 EE.UU.
Número de teléfono: 858-942-2230
Este equipo cumple con la sección 15 del
reglamento de la FCC. El funcionamiento
está sujeto a las dos condiciones
siguientes: (1) este dispositivo no debe
provocar interferencias peligrosas y (2)
este dispositivo debe aceptar las
interferencias recibidas, incluidas las que
provoquen un funcionamiento no
deseado.
Este dispositivo cumple con la sección 15 del
reglamento de la FCC y la normativa RSSGen de las normas de la IC.
El funcionamiento está sujeto a las dos
condiciones siguientes: (1) este dispositivo
no debe provocar interferencias y (2) este
dispositivo debe aceptar las interferencias,
incluidas las que provoquen un
funcionamiento no deseado de este
dispositivo.
PRECAUCIÓN
Se le advierte que cualquier cambio o
modificación no autorizados expresamente
en este manual podrá anular la autorización
que usted tiene para utilizar este equipo.
NOTA
Este equipo ha sido probado y se ha
encontrado que cumple con los límites
estipulados para un dispositivo digital de
Clase B, en conformidad con el apartado
15 de las normas de la FCC. Estos límites
están designados para ofrecer protección
razonable contra las interferencias nocivas
en una instalación residencial. Este equipo
genera, utiliza y puede radiar energía de
Page 31

radiofrecuencia y, si no se instala y utiliza de
acuerdo con las instrucciones, podrá
ocasionar interferencias nocivas para las
comunicaciones de radio. Sin embargo, no
hay garantía de que no vayan a ocurrir
interferencias en una instalación en
particular. Si este equipo ocasiona
interferencias de radio nocivas para la
recepción de radio o televisión, lo que podrá
determinarse apagando y encendiendo el
equipo, se sugiere que el usuario intente
corregir las interferencias tomando una o
más de las medidas siguientes:
– Reoriente o reubique la antena de
recepción.
– Aumente la separación entre el equipo y
el receptor.
– Conecte el equipo a una toma de
corriente de un circuito diferente al que
está conectado el receptor.
– Consulte al distribuidor o a un técnico
con experiencia en radio/TV para que le
ayude.
Este equipo digital de Clase B cumple con la
normativa ICES-003 de Canadá.
ES
3
ES
Page 32

4
ES
Índice de contenido
Antes de utilizar el producto ...................................................................5
Procedimientos iniciales .......................................................................... 6
Colocación de un dispositivo compatible con la tecnología
TransferJet en el producto...................................................................7
Ejemplo: Importación de fotografías o películas de una cámara a una
computadora ........................................................................................9
Ejemplo: Visualización de fotos de una cámara en un marco de fotos
digital ..................................................................................................11
Solución de problemas ..........................................................................12
Limpieza .................................................................................................. 13
Especificaciones ......................................................................................13
Page 33

Antes de utilizar el producto
Este producto permite transferir datos de un dispositivo compatible con la
tecnología TransferJet*. Conecte el producto a una computadora, etc., mediante
un cable USB y, a continuación, coloque un dispositivo compatible con la
tecnología TransferJet (como una cámara, etc.) en dicho producto.
Los archivos del dispositivo se pueden utilizar a través de una computadora sin
necesidad de efectuar una conexión USB directa a una cámara, etc.**
* Los dispositivos compatibles con la tecnología TransferJet llevan la marca .
Este producto se puede comunicar con un dispositivo compatible con la tecnología
TransferJet de SCSI Block Device Target (destino de los dispositivos de bloques SCSI).
** El funcionamiento puede variar del de la conexión establecida directamente mediante un
cable USB.
¿Qué es TransferJet?
TransferJet es una tecnología de transferencia
inalámbrica de corto alcance que permite
transferir datos rápidamente, simplemente
colocando el dispositivo que desea conectar
cerca de otro dispositivo lector. Los volúmenes
grandes de datos como las fotos o las películas
pueden transferirse sin necesidad de conectar
ningún cable.
¿Qué se puede hacer con este producto?
Es posible transferir fotografías o películas a una computadora desde un
dispositivo compatible con la tecnología TransferJet, como una cámara digital,
colocado en el producto.
Es posible reproducir fotografías sobre un marco para fotos digital* o un
televisor* desde un dispositivo compatible con la tecnología TransferJet, como
una cámara digital, colocado en el producto.
* Es posible utilizar dispositivos equipados con puerto USB que permiten visualizar fotos.
Para obtener la información más reciente, consulte el sitio web.
Notas
Únicamente puede utilizarse un dispositivo conectado garantizado por el fabricante para
utilizarse a través del puerto USB.
Asimismo, consulte el manual de instrucciones del dispositivo compatible con la tecnología
TransferJet colocado en el producto.
No utilice este producto fuera del área en la que lo adquirió. En función del área, es posible
que la utilización de este producto infrinja reglamentos sobre ondas y comporte sanciones.
ES
Para obtener la información más reciente y los dispositivos que se
pueden conectar, consulte el siguiente sitio web.
http://esupport.sony.com/
5
ES
Page 34

6
ES
Procedimientos iniciales
O
N
Antes de utilizar el producto, conecte el cable USB suministrado a la parte inferior
del producto y, a continuación, conecte el cable USB a un dispositivo, por
ejemplo, una computadora.
Parte inferior
Selector de modo
Este selector se incluye para futuras ampliaciones.
Antes de utilizar el producto, compruebe que el
selector esté ajustado en “MODE 1” (ajuste
predeterminado).
Notas
Utilice el cable USB suministrado.
Para establecer la conexión a una computadora, conecte el cable USB al puerto USB de la
computadora directamente. No se garantiza el funcionamiento con conexiones a través de
un concentrador USB.
Si utiliza una computadora con sistema Windows al desconectar el cable USB de la
computadora, haga clic en el icono [Extracción segura de Dispositivo de
almacenamiento masivo USB] de la parte inferior derecha del escritorio de la computadora
y, a continuación, desconecte el cable USB. Las capturas de pantalla son de Windows Vista.
La pantalla y el procedimiento de funcionamiento pueden variar según el sistema operativo
de la computadora.
Page 35

Colocación de un dispositivo compatible
O
N
O
N
ON
con la tecnología TransferJet en el
producto
Antes de colocar un dispositivo compatible con la tecnología TransferJet en el
producto, encienda el dispositivo conectado y compruebe si se ilumina el
indicador de alimentación de dicho producto. Para colocar el dispositivo en el
producto, alinee la marca del dispositivo con la marca de dicho
producto.
A continuación, ajuste la posición del dispositivo compatible con la tecnología
TransferJet para efectuar la lectura más elevada en el indicador de conexión.
Cuanto más elevada sea la lectura, más rápidamente se podrán transferir los datos.*
* En función del dispositivo compatible con la tecnología TransferJet y del dispositivo
inalámbrico circundante, es posible que el estado del indicador de conexión varíe.
Indicador
de conexión
Indicador de
alimentación
Notas
Encienda el dispositivo compatible con la tecnología TransferJet y active la función
TransferJet antes de colocarlo.
Si el dispositivo es una cámara, es posible que resulte necesario realizar operaciones en esta.
Si el dispositivo es una cámara, es posible que resulte necesario insertar un Memory Stick
con TransferJet en la cámara de antemano.
Es posible que el indicador de conexión permanezca iluminado durante unos segundos
después de haber retirado el dispositivo compatible con la tecnología TransferJet del
producto, pero no se trata de ningún error de funcionamiento.
Continúa
ES
7
ES
Page 36

8
ES
Sugerencia
O
N
O
N
Si la marca se encuentra en el lateral de un dispositivo:
Instale el producto y, a continuación, coloque dicho producto y el dispositivo con las marcas
cerca.
Gire el soporte 90 grados para obtener mayor
estabilidad. Pase el cable USB a través de la
ranura tal y como se indica en la ilustración
anterior.
Page 37

Ejemplo: Importación de fotografías o
O
N
películas de una cámara a una
computadora
Es posible importar fotografías o películas de una cámara compatible con la
tecnología TransferJet a una computadora.
Entorno informático recomendado
Sistema operativo: Windows
Windows 7
Windows Vista (Service Pack2)
Windows XP (Service Pack3)
Macintosh
Mac OS X (de v10.3 a v10.6)
Puerto USB
Notas
No se garantiza el funcionamiento con todos los entornos informáticos.
En función de la combinación de hardware y software, es posible que el producto no
funcione correctamente, aunque el entorno cumpla con los requisitos anteriores.
En función de la computadora, es posible que el producto no funcione adecuadamente si la
computadora conectada ha estado en modo de espera o de reposo. De ser así, desconecte y
vuelva a conectar el cable USB.
1 Encienda la computadora.
El indicador de alimentación del producto se ilumina.
2 Coloque una cámara compatible con la tecnología TransferJet en el
producto.
Notas
Encienda el dispositivo compatible con la tecnología TransferJet y active la función
TransferJet antes de colocarlo.
En función de la cámara, es posible que resulte necesario insertar un Memory Stick
con TransferJet en la cámara de antemano.
Para obtener información detallada sobre cómo colocar dispositivos en este producto,
consulte “Colocación de un dispositivo compatible con la tecnología TransferJet en el
producto” (página 7).
Continúa
ES
9
ES
Page 38

10
ES
3 Transfiera los datos a la computadora.
Si utiliza una computadora con sistema Windows que cuente con PMB
(Picture Motion Browser)* instalado:
Se visualizará la ventana [Importar archivos multimedia a PMB].
* PMB es un software suministrado con determinados productos Sony como las
cámaras.
Haga clic en [Importar] para importar fotos o películas. Si la ventana no se
visualiza, seleccione el soporte en la pantalla de cristal líquido de la cámara.
Si utiliza una computadora con sistema Windows que no disponga de
PMB instalado:
Abra la carpeta del producto desde el explorador.
Arrastre y suelte los datos de imagen en la carpeta que desee copiar en la
computadora. Los datos se almacenan en una carpeta diferente en función
del entorno informático o del dispositivo compatible con la tecnología
TransferJet. En Windows Vista y Windows XP, aparecen cuatro carpetas
para el producto. En Windows 7, únicamente aparece la carpeta en la que
se encuentran almacenados los datos.
Si utiliza Macintosh:
Abra el icono de disco nuevo reconocido recientemente en el escritorio.
Arrastre y suelte los datos de imagen del escritorio que desee copiar en el
equipo Macintosh. Los datos se almacenan en una carpeta diferente en
función del entorno Macintosh o del dispositivo compatible con la
tecnología TransferJet.
Nota
En función del dispositivo compatible con la tecnología TransferJet, es posible que no se
puedan escribir y eliminar archivos en el dispositivo desde la computadora.
Page 39

Ejemplo: Visualización de fotos de una
O
N
cámara en un marco de fotos digital
Es posible reproducir fotografías en una cámara compatible con la tecnología
TransferJet mediante la conexión de este producto a un marco de fotos digital
equipado con un puerto USB.
1 Encienda el marco de fotos digital.
El indicador de alimentación del producto se ilumina.
2 Coloque una cámara compatible con la tecnología TransferJet en el
producto.
3 Opere el marco de fotos digital para visualizar fotos.
Si desea obtener más información acerca del funcionamiento, consulte el
manual de instrucciones del marco de fotos digital.
Notas
Encienda el dispositivo compatible con la tecnología TransferJet y active la función
TransferJet antes de colocarlo.
En función de la cámara, es posible que resulte necesario insertar un Memory Stick
con TransferJet en la cámara de antemano.
Únicamente puede utilizarse un dispositivo equipado con puerto USB que pueda
mostrar fotos.
Para obtener información detallada sobre cómo colocar dispositivos en este producto,
consulte “Colocación de un dispositivo compatible con la tecnología TransferJet en el
producto” (página 7).
ES
Es posible visualizar fotos mediante la conexión a
un televisor*.
* Únicamente puede utilizarse un televisor equipado con puerto USB que pueda mostrar
fotos. Algunos televisores pueden mostrar presentaciones de diapositivas.
Opere el televisor para visualizar fotos.
Si desea obtener más información acerca del funcionamiento, consulte el
manual de instrucciones del televisor.
11
ES
Page 40

Solución de problemas
Si surge algún problema durante la
utilización de este producto, compruebe
los siguientes puntos otra vez.
El indicador de
alimentación no se
ilumina.
Compruebe que el cable USB esté
firmemente conectado al puerto USB.
Los datos no se pueden
transferir.
Compruebe que las marcas del
producto y del dispositivo compatible
con la tecnología TransferJet estén
alineadas correctamente, según el
indicador de conexión.
Compruebe que no se haya colocado
ningún otro dispositivo metálico
distinto al dispositivo compatible con
la tecnología TransferJet en el
producto.
Compruebe que no haya ningún
otro dispositivo metálico distinto al
dispositivo compatible con la
tecnología TransferJet cerca del
producto.
Compruebe que solo se encuentre
colocado un dispositivo en el
producto a la vez.
Compruebe que se haya colocado un
dispositivo compatible con la
tecnología TransferJet en el
producto. En función del
dispositivo, es posible que resulte
necesario insertar un Memory
Stick* con TransferJet en el
dispositivo de antemano.
Compruebe que el dispositivo
compatible con la tecnología
TransferJet esté encendido y que la
función TransferJet esté activada.
12
ES
Si el dispositivo es una cámara, es
posible que resulte necesario
seleccionar un soporte de destino. Si
desea obtener más información acerca
del funcionamiento, consulte el
manual de instrucciones de la cámara.
Otros
En función del dispositivo compatible
con la tecnología TransferJet, es posible
que no se puedan escribir y eliminar
archivos en un dispositivo compatible
con la tecnología TransferJet, como
una cámara, desde un dispositivo
como, por ejemplo, una computadora.
Es posible que el producto se caliente
durante el funcionamiento. No se
trata de una falla de funcionamiento.
El producto no está diseñado para cargar
la batería del dispositivo colocado.
Es posible que el indicador de conexión
permanezca iluminado durante unos
segundos después de haber retirado el
dispositivo compatible con la
tecnología TransferJet del producto. No
se trata de una falla de funcionamiento.
No desconecte el cable USB ni retire
el dispositivo del producto durante
la transferencia de los archivos, ya
que estos podrían dañarse.
Si el dispositivo conectado no puede
reconocer el producto, desconecte el
cable USB y, a continuación, vuelva
a conectarlo.
En función de las especificaciones
del dispositivo compatible con la
tecnología TransferJet, es posible
que no se pueda comunicar con el
producto. Para obtener más
información, consulte el sitio web
(página 5).
* Es posible que un Memory Stick con
TransferJet no se encuentre disponible en
función de las normativas del país o región
correspondiente.
Page 41

Limpieza
Si se encuentra muy sucio, limpie
dicho producto con un paño suave
ligeramente humedecido con una
solución de detergente poco
concentrada y, a continuación,
límpielo con un paño seco.
No realice ninguna de las acciones
siguientes para evitar dañar el
acabado:
– Usar productos químicos como
diluyentes, bencina, alcohol o
insecticidas.
– Dejar la cubierta en contacto con
objetos de goma o vinilo durante
un tiempo prolongado.
Cuando utilice paños con productos
químicos, siga las advertencias.
Especificaciones
Sistema de comunicación
Especificaciones de TransferJet
Compatible con PHY-CNL
Revisión de especificación 1.0
Compatible con PCL Revisión de
especificación 1.0
Banda de frecuencia
4,48 GHz (frecuencia central)
(4,20 GHz - 4,76 GHz)
Tipo de protocolo admitida
(tipo de comunicación o
herramienta)
SCSI Block Device Indicator*
Interfaz externa
USB 2.0 (alta velocidad)
Dimensiones (an/al/prf)
Aprox. 110 mm × 62 mm × 16 mm
(4 3/8
in × 2 1/2
in × 21/32
Peso
Aprox. 100 g (3,5 oz) (sin el
cable)
Temperatura de funcionamiento
de 0 °C - 40 °C (32 °F - 104 °F)
Suministro de energía
cc de 5 V, 0,25 A
(suministrado por USB)
* Este producto se puede comunicar
con un dispositivo compatible con la
tecnología TransferJet de clase de
protocolo SCSI Block Device Target
(destino de los dispositivos de
bloques SCSI).
El diseño y las especificaciones del
producto están sujetos a cambios sin
previo aviso.
in)
ES
Elementos suministrados
Estación de TransferJet (1), cable USB
(longitud: aprox. 0,5 m (1,6 ft)) (1),
Manual de instrucciones (este manual)
(1)
13
ES
Page 42

Aviso sobre licencia y
marcas comerciales
“Memory Stick”, “TransferJet” y el
logotipo de TransferJet son marcas
comerciales o marcas comerciales
registradas de Sony Corporation.
Microsoft, Windows y Windows
Vista son marcas comerciales
registradas o marcas comerciales de
Microsoft Corporation en los
Estados Unidos y/o en otros países.
Macintosh y Mac OS son marcas
comerciales registradas de Apple
Inc. en los EE.UU. y en otros países.
Queda prohibida la reproducción de
este manual en su totalidad o en
parte sin el permiso por escrito de
Sony Corporation.
El contenido de este manual está
sujeto a cambios sin previo aviso.
El resto de nombres de compañías,
productos y sistemas mencionados
pueden ser marcas comerciales o
marcas comerciales registradas de
sus respectivas compañías. Además,
y no se mencionan en cada caso
en este manual.
Para obtener la
información más
reciente y los
dispositivos que se
pueden conectar,
consulte el siguiente
sitio web.
http://esupport.sony.com/
14
ES
Page 43

Page 44

Printed in Japan
 Loading...