

SONY
Stereo Cassette Deck
Operating Instructions

© 1989 by Sony Corporation
Owner's Record
The model and serial numbers are located at the rear. Record these numbers in the spaces provided below. Refer to these numbers whenever you call upon your Sony dealer regarding this product.
Model No._____ Serial No._____
WARNING
To prevent fire or shock hazard, do not expose the unit to rain or moisture.


This symbol is intended to alert the user to the presence of uninsulated "dangerous voltage" within the product's enclosure that may be of sufficient magnitude to constitute a risk of electric shock to persons.

This symbol is intended to alert the user to the presence of important operating and maintenance (servicing) instructions in the literature accompanying the appliance.
* The graphical symbols are on the rear enclosure.
INFORMATION
This equipment generates and uses radio frequency energy and if not installed and used properly, that is, in strict accordance with the manufacturer's instructions, may cause interference to radio and television reception. It has been type tested and found to comply with the limits for a Class B computing device in accordance with the specifications in Subpart J of Part 15 of FCC Rules, which are designed to provide reasonable protection against such interference in a residential installation. However, there is no guarantee that interference will not occur in a particular installation. If this equipment does cause interference to radio or television reception, which can be determined by turning the equipment off and on, the user is encouraged to try to correct the interference by one or more of the following measures:
Reorient the receiving antenna
Relocate the equipment with respect to the receiver Move the equipment away from the receiver Plug the equipment into a different outlet so that equipment and receiver are on different branch circuits.
If necessary, the user should consult the dealer or an experienced radio/television technician for additional suggestions. The user may find the following booklet prepared by the Federal Communications Commission helpful:
"How to Identify and Resolve Radio-TV Interference Problems". This booklet is available from the U.S. Government Printing Office, Washington, DC 20402, Stock No. 004-000-00345-4.
This apparatus complies with the Class B limits for radio noise emissions set out in Radio Interference Regulations.
Table of Contents
Getting started
| Features | 3 |
|---|---|
| Installation | 4 |
| Precautions | 4 |
| Connections | 5 |
| Identification of rear panel parts | 5 |
| Notes on connections | 5 |
| Connection diagram | 5 |
| Identification of front panel parts | 6 |
Using your stereo cassette deck
| Playback |
6
8 0 2 2 |
|---|---|
| Recording |
4
4 5 |
| Tape dubbing 1 Dubbing only desired selections 1 Dubbing only desired portions 1 |
6
8 8 |
| What is Dolby HX PRO system? | 0 |
Maintaining your unit
Maintenance...... 21
Getting into the details
Specifications....................................
Troubleshooting
Troubleshooting guide ...... 23
Features
- B and C type Dolby NR* systems to reduce tape hiss noise.
- The Dolby HX PRO* system which improves the linearity of the tape's high-range response during recording. (TC-WR710 only)
- Easy-to-read counter function (digital on TC-WR710 and mechanical on TC-WR610) which shows the elapsed recording or playback time.
- A relay function for long playback.
- Auto-synchro dubbing at normal or high (double) speed.
- AMS and blank skip functions which provide easy access to a desired selection.
- * Dolby noise reduction and HX Pro headroom extension manufactured under license from Dolby Laboratories Licensing Corporation. HX Pro originated by Band & Olufsen.
"DOLBY" and the double-D symbol D are trademarks of Dolby Laboratories Licensing Corporation.
Differences between the TC-WR710 and TC-WR610
This instruction manual covers the TC-WR710 and the TC-WR610. The differences between them are:
- The TC-WR710 has a digital counter function for both decks A and B while the TC-WR610 has a mechanical counter function for deck B only.
- The TC-WR710 has the HX-PRO system and the TC-WR610 does not.
Precautions
On safety
- Operate the unit on 120 V AC, 60 Hz only.
- Should anything fall into the cabinet, unplug the unit and have it checked by qualified personnel before operating it any further.
- Unplug the unit from the wall outlet if it will not be used for a long time. To disconnect the cord, pull it out by grasping the plug. Never pull the cord itself.
On operation
- When the unit is not being used, turn the power off to conserve energy and to extend the useful life of your unit.
- Because of a safety mechanism, the function buttons will not operate if the cassette holder is not completely closed, if there is no cassette, or if a cassette has been incorrectly inserted into the cassette holder.
On head cleaning
The heads and tape path should be cleaned after every 10 hours of operation. Dirty heads and a dirty tape path may cause:
Loss of high frequency response Loss of sound volume Sound drop-out
If you have any questions or problems concerning your unit, please contact your nearest Sony dealer.
For detailed safety precautions, see the leaflet "IMPORTANT SAFEGUARDS".
Installation
Notes on installation
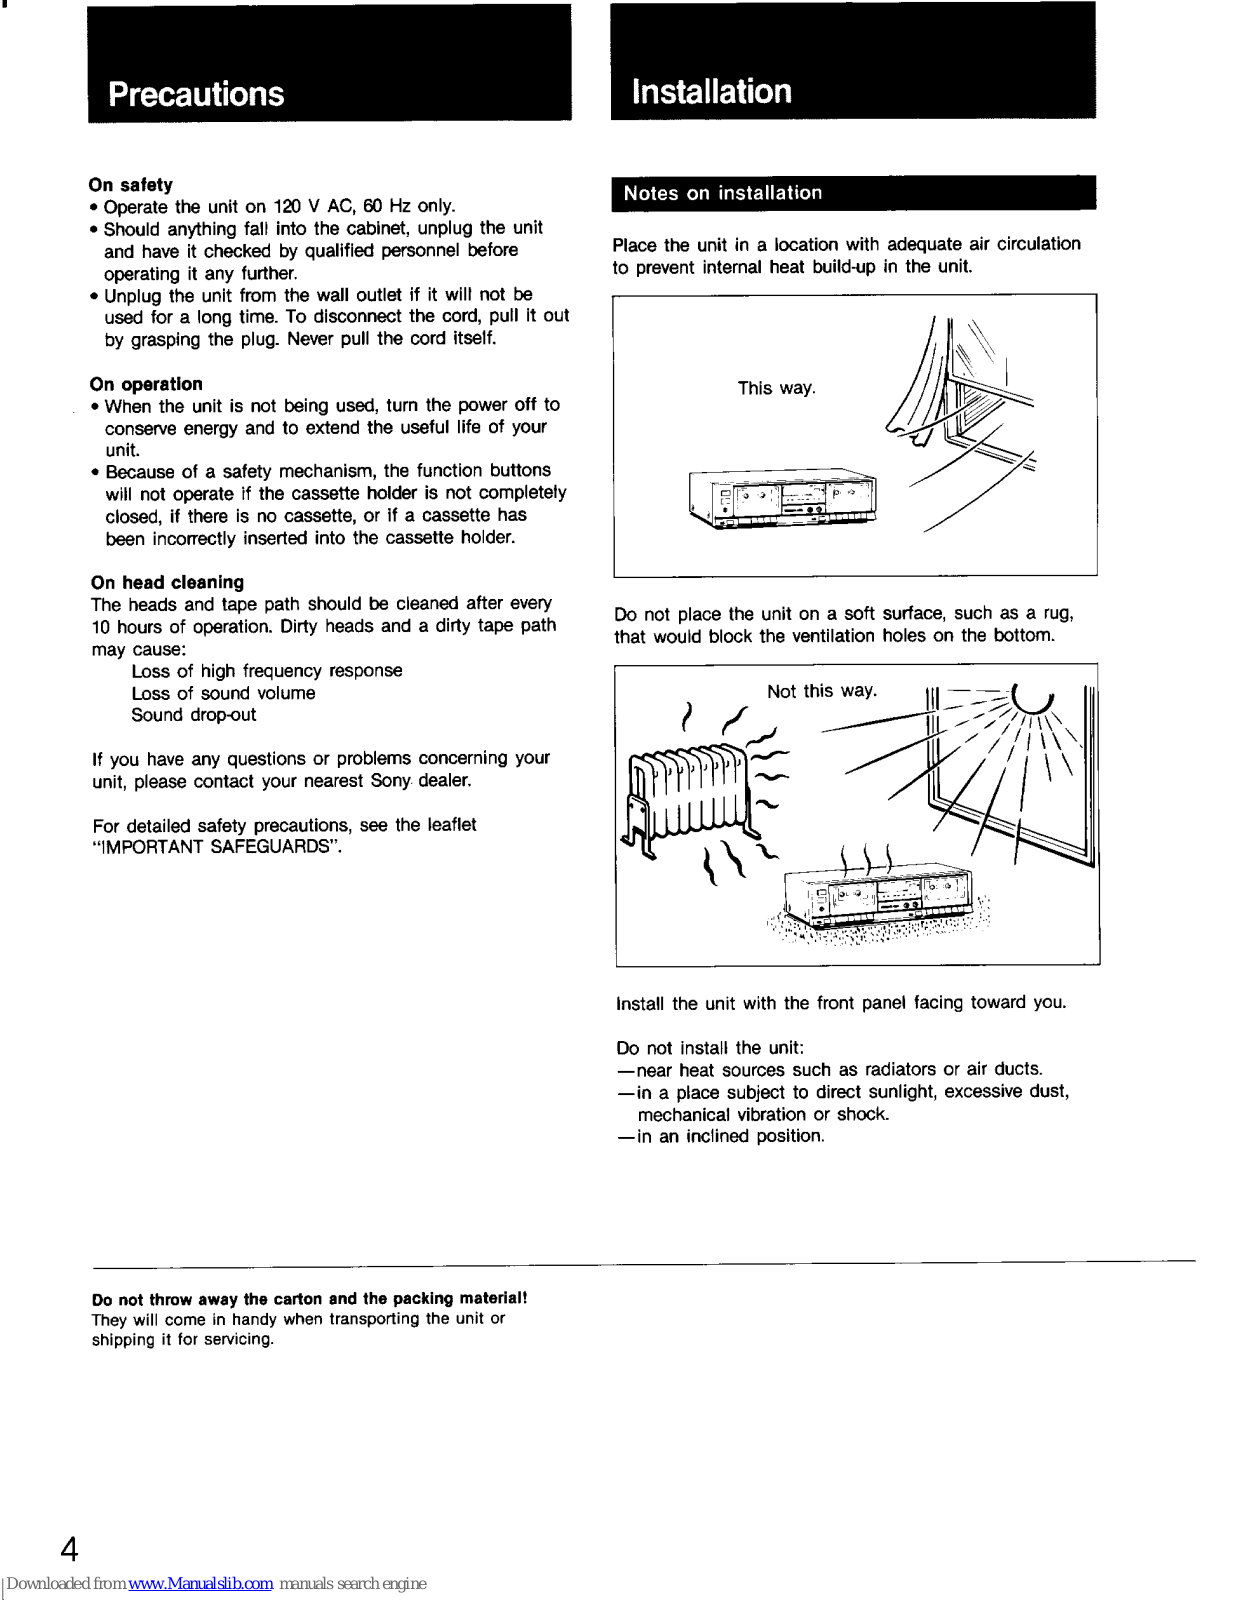
Place the unit in a location with adequate air circulation to prevent internal heat build-up in the unit.

Do not place the unit on a soft surface, such as a rug, that would block the ventilation holes on the bottom.

Install the unit with the front panel facing toward you.
Do not install the unit:
- -near heat sources such as radiators or air ducts.
- -in a place subject to direct sunlight, excessive dust, mechanical vibration or shock.
- -in an inclined position.
Do not throw away the carton and the packing material! They will come in handy when transporting the unit or shipping it for servicing.
Δ
Identification of Rear Panel Parts

* REMOTE switch
If you have a remote commander supplied with a Sony receiver or amplifier, you can control both decks by using the A/B deck selector.
However, if your commander is not equipped with an A/B deck selector and controls only deck A, setting this switch will allow you to control both decks.
To do this, first turn the power off , then set the switch to REMOTE 2. (Under this setting, the commander controls the deck in which a cassette is loaded. If both decks are loaded, it controls only deck B.)

Playback (On Either Deck A or B)

How to select DIRECTION MODE
To play back one side, select <del>*</del>. To play back both sides continuously*, select •.
* After playing back five times, the deck automatically stops.
When both decks A and B are in playback mode Only playback from deck A will be audible.
6


Cassette side being played back
A direction mode indicator illuminates to indicate the side of the cassette being played back or recorded.
FWD REV Front side Reverse side
Playing Back Both Decks in Succession (from Deck A to B or Vice Versa)------------------------------------


How to use the DOLBY NR switch
Set the DOLBY NR switch to the same system that was used when the cassette was recorded.
| Dolby NR system | Switch setting |
|---|---|
| B type | |
| C type | |
| OFF |
What is the Dolby NR system?
The Dolby NR (noise reduction) system reduces tape hiss noise in low-level, high-frequency signals by boosting the signals during recording and then lowering them during playback.
Select the appropriate TAPE selector position when you use deck B
- Cassette tapes can be classified into four major types: TYPE I, II, III and IV. TYPE I, II and IV cassette tapes can be used with this unit.
- Characteristics of the cassette tapes within each type may vary slightly depending on manufacturer or grade.
- The following reference table shows the classification of Sony cassette tapes.
| Tape type | Tapes (C30–C90) |
|---|---|
| TYPE I (Normal) |
SONY: EF, HF, HF-S, HF-ES
Others TYPE I equivalent tapes (For 120 µs EQ, NORMAL BIAS) |
| TYPE II (CrO₂) |
SONY: UX, UX-S, UX-ES, US-PRO
Other TYPE II equivalent tapes (For 70 µs EQ, HIGH BIAS) |
| TYPE IV (Metal) |
SONY: METAL-ES
Other TYPE IV equivalent tapes (For 70 µs EQ, METAL BIAS) |
When using deck A, the automatic tape type detection system adjusts the equalization setting to the optimum according to the type of cassette the system detects.

Playback sequence of relay play
Relay play follows the sequence below regardless of where playback starts.

To play back more than two cassettes in succession
Replacing cassettes that have finished playing with new ones allows you to play back two or more cassettes alternately on each deck.
Locating the Beginning of a Selection During Playback—Automatic Music Sensor (AMS)

What is the AMS?
It detects the blank space between selection and locates the beginning of a selection during playback. To assure correct operation of the AMS, there must be a blank of 4 seconds or longer between selections.
If the >> or << button is pressed immediately before the following selection
The AMS may locate selection after the one immediately following.
The AMS will treat the following as blanks:
-a long pause in the music
-a passage of low frequencies or very low volume
--- a passage of gradual increase or decrease of volume Should the above happen, press AMS/BLK SKIP to deactivate the function.

Check the direction indicator and press be or
| Direction | Desired selection | |
|---|---|---|
|
mode
Indicator |
Next selection |
Selection
being played |
| FWD | ||
| + | ► | |
- The AMS does not function on both decks simultaneously • The AMS is activated for the deck whose ►► or ◄◄ button is pressed first.
- If the AMS is activated for deck B during playback on deck A, deck B fast winds to the beginning of the selection and stops. If the AMS is activated for deck A during playback on deck B, deck A fast winds to the beginning of the selection and begins playback. The sound from deck B will be cut off when playback begins on deck A.
The AMS may not operate
- If there is noise in the space between selections
- If the space is less than 4 seconds long.

Starting Playback Automatically After Fast Winding—Auto Play


If playback starts in the middle of a selection when you try to do auto play
AMS function is activated (AMS/BLK SKIP indicator is on). Press AMS/BLK SKIP to deactivate the function.


Recording (Only on Deck B)

How to use the TAPE switch (Step 2) and the DOLBY NR switch (Step 3) See page 8
How to select DIRECTION MODE (Step 4)
To record on one side, select . To record on one side and then the other, select . Even at the position, recording automatically stops when the tape reaches the end of the reverse side.
To start recording (Step 6)
To start recording from the front side, press ▷ while keeping ● pressed. To start recording from the reverse side, press < while keeping ● pressed.
How to start recording more precisely
1 Press II.
- 2 Press ▷ or ⊲, keeping pressed.
- 3 Press II again at the desired point.
The direction mode indicator blinks when
Recording is possible only on side(s) indicated by a blinking indicator. If a cassette tab has been removed to prevent accidental erasure, the indicator for that side will not blink.
Recording Level Adjustment
Adjust the recording level according to the tape type by observing the PEAK LEVEL METER and referring to the diagram on the right.
Recommended maximum PEAK LEVEL METER reading

If the recording level frequently exceeds the range for the tape type, the level is too high.

If the side whose tab has been removed is selected for recording
The deck will start playback instead of recording.
When you select C with the DIR MODE selector for recording
The deck will stop at the end of the reverse side of the tape even if the position is specified by the DIR MODE selector.
Note
Playback from deck A is not output while deck B is the recording.
Tips on recording level adjustment
Adjust the recording level as high as possible without causing distortion in the recorded sound.
If the recording level setting is too high, the recording will be distorted; if it is too low, the tape will produce a hissing sound.
If the program source to be recorded has many high frequency signals, set the level to a relatively low position.
Inserting a Blank Space during Recording—Record Muting
Using the O button during recording, you can insert a blank space on the tape to help you locate a selection (AMS function, see page 10). In addition, this function enables you to eliminate unwanted input by replacing it with a blank space.

1 While recording, press O.
If you want the blank to be four seconds long, press and release the button immediately.
The PAUSE indicator will flicker and no incoming signals will be recorded on the tape. After four seconds, the tape will pause automatically and the indicator will light up.
If you want the blank to be longer, keep pressing for as long as you want. After four seconds, the PAUSE indicator flickers more rapidly. When you release O , the unit goes into the pause mode.
2 Press II to resume recording.
Tape Dubbing (from Deck A to Deck B)

To stop dubbing
During normal-speed dubbing, press
How to select DIRECTION MODE (Step 3)
To dub on one side of the cassette:
To dub on both sides of a cassette
Dubbing the reverse side starts independently of deck A: Dubbing of the reverse side starts simultaneously with deck A: RELAY

Is it necessary to adjust the recording level and select the Dolby NR system?
No. Because the tape in deck B is recorded with the same recording level and Dolby noise reduction system as the original tape in deck A.
During high-speed dubbing
Only the button is operative
If the indicator on either the NORMAL or HIGH SPEED button blinks three times
The tab(s) of the cassette inserted into deck B has (have) been removed. Dubbing is not possible on that cassette. Cover the slot(s) with plastic tape (see page 20).


What is Dolby HX PRO system?
This system provides improved linearity in high-range frequency response during recording. Tapes recorded with this system retain the same high quality even when played back on other tape decks.

Established bias current
As shown above, characteristics such as output level and distortion differ widely according to the bias (highfrequency) current. In conventional systems, the bias current is susceptible to variations in certain recording signals (see diagram below) which may cause fluctuations in frequency response, distortion, or other unwanted characteristics.

With the Dolby HX PRO System, the effective bias is controlled in millisecond units to greatly reduce distortion, improving linearity in high-range response and ensuring high-intensity recording with minimal distortion and noise.
Notes on Cassettes
To prevent accidental erasure
To protect the recording or either side A or B Break out the tab for the respective side.

To reuse a cassette
Cover the respective tab with plastic tape.

Cassettes exceeding 90 minutes are not recommended except for long continuous recording and playback Cassettes exceeding 90 minutes use extremely thin tape which tangles easily when the tape transport is stopped and started frequently.
When using TYPE II (CrO2) or TYPE IV (metal) cassettes
Be careful not to cover the detector slots which are necessary for automatic tape type detection of deck A.

Cassette care
- Avoid touching the tape surface of a cassette, as any dirt or dust will contaminate the heads.
- Keep cassettes away from equipment with magnets, such as speakers and amplifiers, as erasure or distortion on the recorded tape could occur.
- Do not expose cassettes to direct sunlight, extremely cold temperatures or moisture.
Cleaning the Heads and Tape Path (both decks)
Clean all surfaces over which the tape travels after every 10 hours of operation Otherwise, the following symptoms might appear.
- -low-quality sound -a decrease in sound level
- -excessive wow. flutter or dropout —incomplete erasure
- -recording cannot be made
To obtain high-quality recording sound, cleaning before every recording is recommended.


Demagnetizing the Heads (both decks)
After 20 or 30 hours of use, or when you notice hiss and/or loss of high frequencies, the residual magnetism built up on the heads should be removed.
1 Turn off POWER
2 Demagnetize the heads with any commercially available demagnetizer Refer to the instruction manual of the demagnetizer
for detailed instructions.
Cleaning the Cabinet
Clean the cabinet, panel and controls with a soft cloth slightly moistened with a mild detergent solution.
Important
Do not use any type of abrasive pad, scouring powder or solvents such as alcohol or benzine.
Recording system
4-track 2-channel stereo
Fast winding time
Approx. 90 sec. (with HF-60 cassette) Rias AC Bias
Signal-to-noise ratio (NAB, at peak level)
|
Dolby NR switch
Cassette |
OFF | B-TYPE ON | C-TYPE ON |
|---|---|---|---|
| TYPE IV (Sony METAL-ES) | 58 dB | 65 dB | 71 dB |
| TYPE II (Sony UX-S) | 57 dB | 64 dB | 70 dB |
| TYPE I (Sony HF-S) | 54 dB | 61 dB | 67 dB |
Total harmonic distortion
1.0 % (with Sony METAL-ES cassettes)
Frequency response (DOLBY NR OFF)
|
TYPE IV cassette
(Sony METAL-ES) |
30-15,000 Hz (±3 dB)
30-13,000 Hz (0VU recording) |
|---|---|
|
TYPE II cassette
(Sony UX-S) |
30–15,000 Hz (±3 dB) |
|
TYPE I cassette
(Sony HF-S) |
30–14,000 Hz (±3 dB) |
Wow and flutter 0.09% WRMS (NAB)
Inputs
| Line inputs | Sensitivity | 77.5 mV (-20 dB) |
|---|---|---|
| (phono jacks) | Input impedance | 50k ohms |
Outputs
|
Line outputs
(phono jacks) |
Rated output level |
0.44 V (-5 dB) at a load
impedance 47k ohms |
|---|---|---|
| Load impedance | Over 10k ohms | |
|
Headphone output
(stereo phone jack) |
Output level | 0-0.3 mW at a load impedance of 32 ohms |
General
| Power requiren | nents |
|---|---|
| 120 V AC, 60 Hz | |
| Power consum | ption |
| 26 watts | |
| Dimensions | Approx. 430×118×275 mm (w/h/d) |
| (17 × 4 3 /, × 10 7 /, inches) |
| including projecting parts and controls | |
|---|---|
| Veight | Approx. 4.3 kg (9 lbs 8 oz) |
Supplied accessory
Audio connecting cord (2)
Design and specifications subject to change without notice.
The following trouble checks will help you correct the most common problems encountered with your tape deck. Should any problems persist after you have made these checks, consult your nearest Sony dealer. Before proceeding with these trouble checks, first check these basic points:
- The power cord is firmly connected.
- Amplifier connections are firmly made.
- Heads, capstans and pinch rollers are clean.
- The amplifier controls and switches are set correctly.
| Function buttons and tape transport problems | |||
|---|---|---|---|
| Symptom | Cause | Remedy | |
| Function buttons do not activate. | Cassette holder is not fully closed. | Close the holder completely. | |
| button does not activate. | No cassette in the holder. | Insert a cassette. | |
| Tab has been removed from the cassette. | Cover the hole with plastic tape. (page 20) | ||
| Automatic shut-off mechanism activates | Tape is slack. | Take up the tape slack. | |
| before the tape comes to its end. | Cassette shell is deformed. | Use another cassette. | |
| The inside of the cassette holder is illuminated by strong light. | Remove the light source. | ||
|
Excessively loud tape transport noise
during fast winding |
This depends on the cassette used and is not a problem. | - | |
| Recording and playback problems | ||
|---|---|---|
| Symptom | Cause | Remedy |
| Auto reverse function does not operate. | DIR MODE selector is set to . | Set DIR MODE to 🖘. |
| Recording or playback cannot be made or there is a decrease in sound level. | Record/playback and erase heads are either dirty or magnetized. | Clean or demagnetize the heads. |
| Improper connection | Make connections properly. (page 5) | |
| Improper setting of the amplifier controls | Set the amplifier controls to the appropriate positions. | |
| Excessive wow, flutter or dropout | Head, capstan or pinch roller is dirty. | Clean in accordance with instructions shown on page 21 |
| Imcomplete erasure | Erase head is dirty. | Clean the erase head. |
|
Increased noise or poor reproduction in
high frequencies |
Head is magnetized. | Demagnetize the head. |
| Unbalanced tone in high frequencies | Improper setting of the DOLBY NR switch. | When playing back, set the switch to the same position used in recording. |
| Improper setting of the TAPE selector. |
If recorded with the wrong switch setting,
adjust the tone controls of the amplifier in playback. |
|
| The unit is placed near a television set. | Move the unit away from the television set. | |
| The desired selection cannot be located even if you activate the AMS. |
|
— |
| • The space is less than 4 seconds long. | Press O to insert a longer blank space. | |
|
||
| Playback or fast winding may begin in the middle of the selection when AMS or blank skip is activated. |
|
_ |
| Noise | |||
|---|---|---|---|
| Symptom | Cause | Remedy | |
| Hum noise |
The unit is stacked on or under the
amplifier. |
Separate the units. | |
| Noise is recorded. |
Recording was made near equipment such
as a television set or a color monitor, and interference has affected the recording on the tape and the Dolby NR system. |
Move the unit away from television set or color monitor. | |


 Loading...