

Page 1
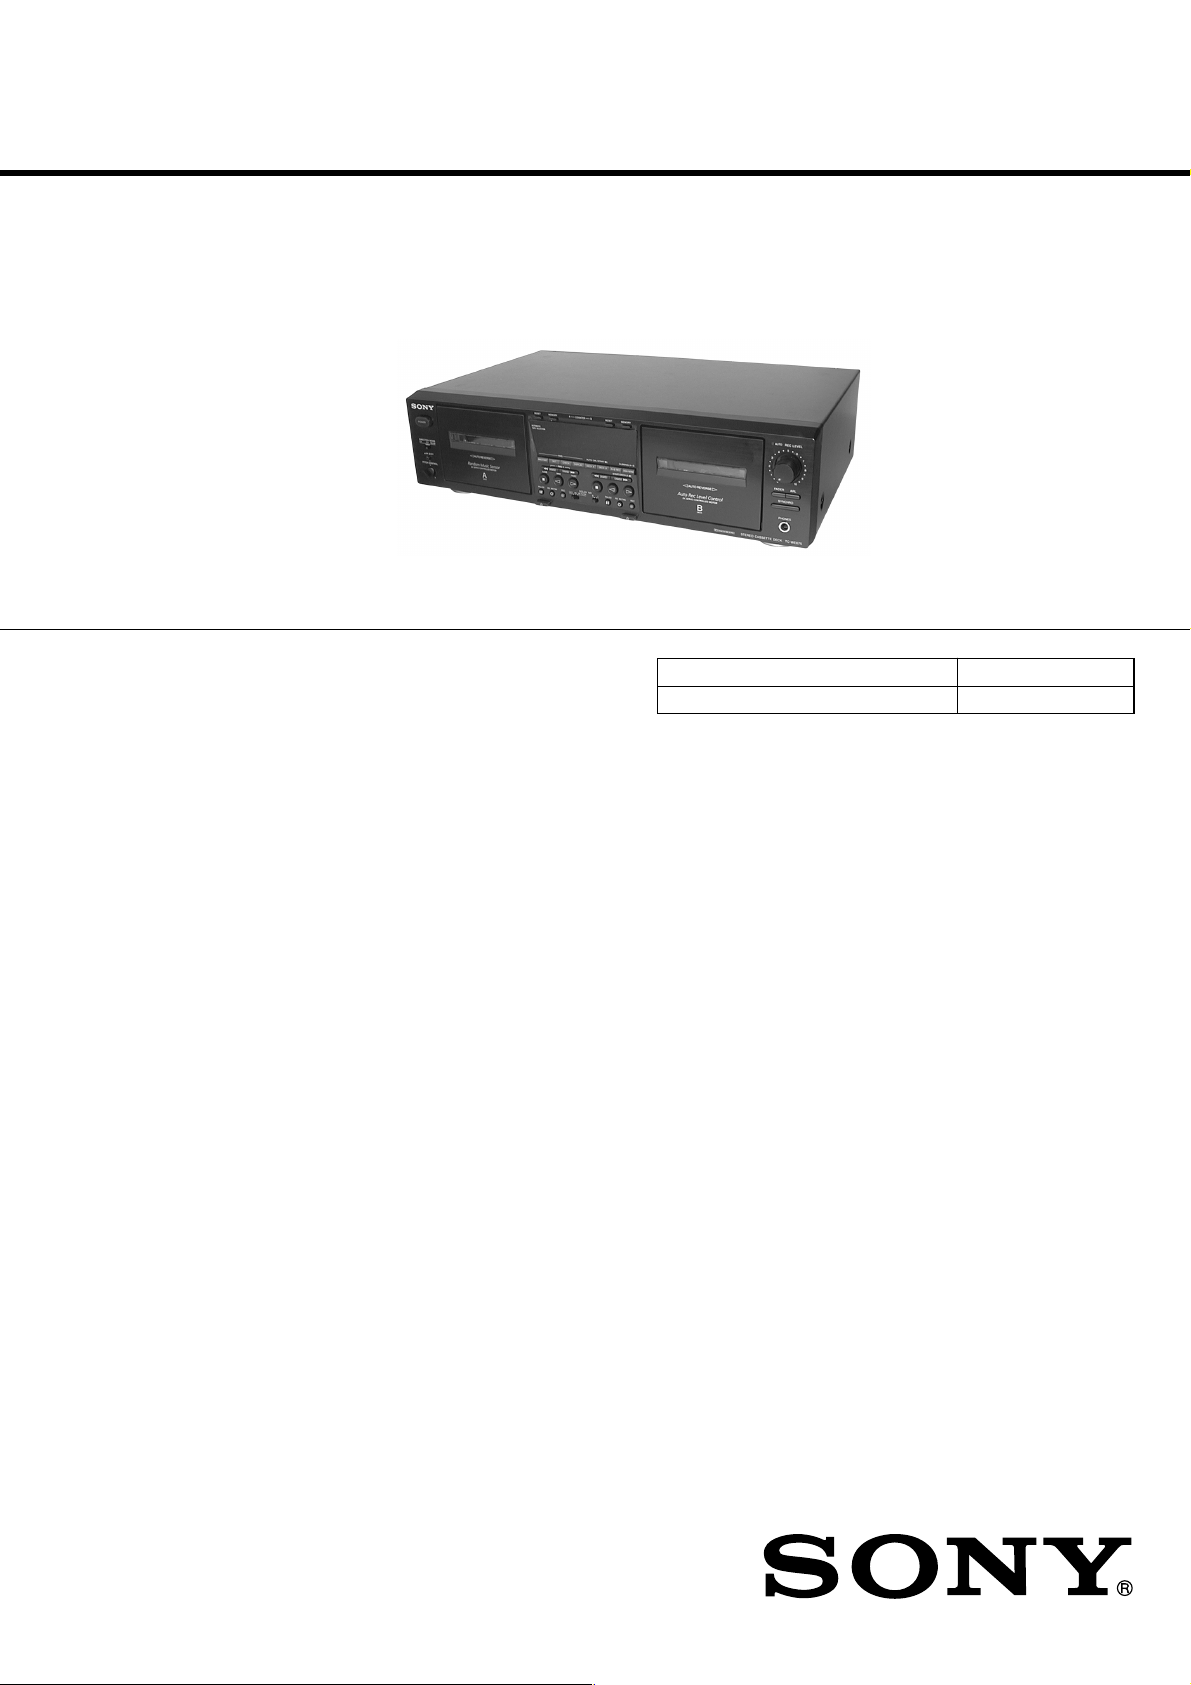
TC-WE675
SERVICE MANUAL
Ver 1.0 2001.04
Dolby noise reduction extension manufactured under license
from Dolby Laboratories Licensing Corporation.
HX Pro originated by Bang & Olufsen. “DOLBY”, the double-D
symbol ; and “HX PRO” are trademarks of Dolby Laboratories
Licensing Corporation.
US Model
Canadian Model
AEP Model
UK Model
E Model
Australian Model
Model Name Using Similar Mechanism TC-WE635
Transport Mechanism Type TCM-230ASR41B
System
Fast-winding time
Approx.100 sec. (with Sony C-60 cassette)
Signal-to-noise ratio (at peak level and weighted with Dolby
NR off)
55 dB, using Sony TYPE I cassette
57 dB, using Sony TYPE II cassette
58 dB, using Sony TYPE IV cassette
S/N ratio improvement
With Dolby B NR on:
Approx. 5 dB at 1 kHz, 10 dB at 5 kHz
With Dolby C NR on:
Approx. 15 dB at 500 Hz, 20 dB at 1 kHz
Harmonic distortion
0.4% (using Sony TYPE Icassette):
160 nWb/m 315 Hz, 3rd H.D.)
1.8% (using Sony TYPE IV cassette):
250 nWb/m 315 Hz, 3rd H.D.)
Frequency response (DOLBY NR OFF)
30-16,000 Hz (±3 dB, IEC), 20-17,000 Hz
(±6 dB), using Sony TYPE I cassette
30-17,000 Hz (±3 dB, IEC), 20-18,000 Hz
(±6 dB), using Sony TYPE II cassette
30-19,000 Hz (±3 dB, IEC), 20-20,000 Hz
(±6 dB), 30-13,000 Hz (±3 dB, –4dB recording),
using Sony TYPE IV cassette
SPECIFICATIONS
Wow and flutter
±0.13% W. Peak (IEC)
0.1% W. RMS (NAB)
±0.2% W. Peak (DIN)
Variable pitch range
Approx. –30 to +30 %
Inputs
Line inputs (phono jacks)
sensitivity 0.16 V, input impedance 47 kilohms
Outputs
Line outputs (phono jacks)
rated output level 0.5 V at a load impedance of
47 kilohms, load impedance over 10 kilohms
Headphones (stereo phone jack)
output level 0.25 mW at a load impedance of
32 ohms
— Continued on next page —
9-873-894-11
2001D0900-1
© 2001. 4
STEREO CASSETTE DECK
Sony Corporation
Home Audio Company
Shinagawa Tec Service Manual Production Group
Page 2
TC-WE675
General
Power requirements
U.S.A.and Canadian models:
120 V AC, 60Hz
European models:
230 V AC, 50/60Hz
Australian models:
240 V AC, 50/60Hz
Other models:
120/220/230-240 V AC, 50/60Hz
Adjustable with voltage selector
Power consumption
22 watts
Dimensions (w/h/d)
Approx. 430 × 120 × 300 mm
Mass 4.2 kg
Supplied accessories
Audio connecting cords (2)
Control A1II cable (1)*
*Supplied for Canadian models only
Design and specifications are subject to change
without notice.
SAFETY CHECK-OUT
After correcting the original service problem, perform the following safety checks before releasing the set to the customer:
Check the antenna terminals, metal trim, “metallized” knobs, screws,
and all other exposed metal parts for A C leakage. Check leakage as
described below.
LEAKAGE
The AC leakage from any exposed metal part to earth Ground and
from all exposed metal parts to any exposed metal part having a
return to chassis, must not exceed 0.5 mA (500 microampers). Leakage current can be measured by any one of three methods.
1. A commercial leakage tester, such as the Simpson 229 or RCA
WT-540A. Follow the manufacturers’ instructions to use these
instruments.
2. A battery-operated AC milliammeter. The Data Precision 245
digital multimeter is suitable for this job.
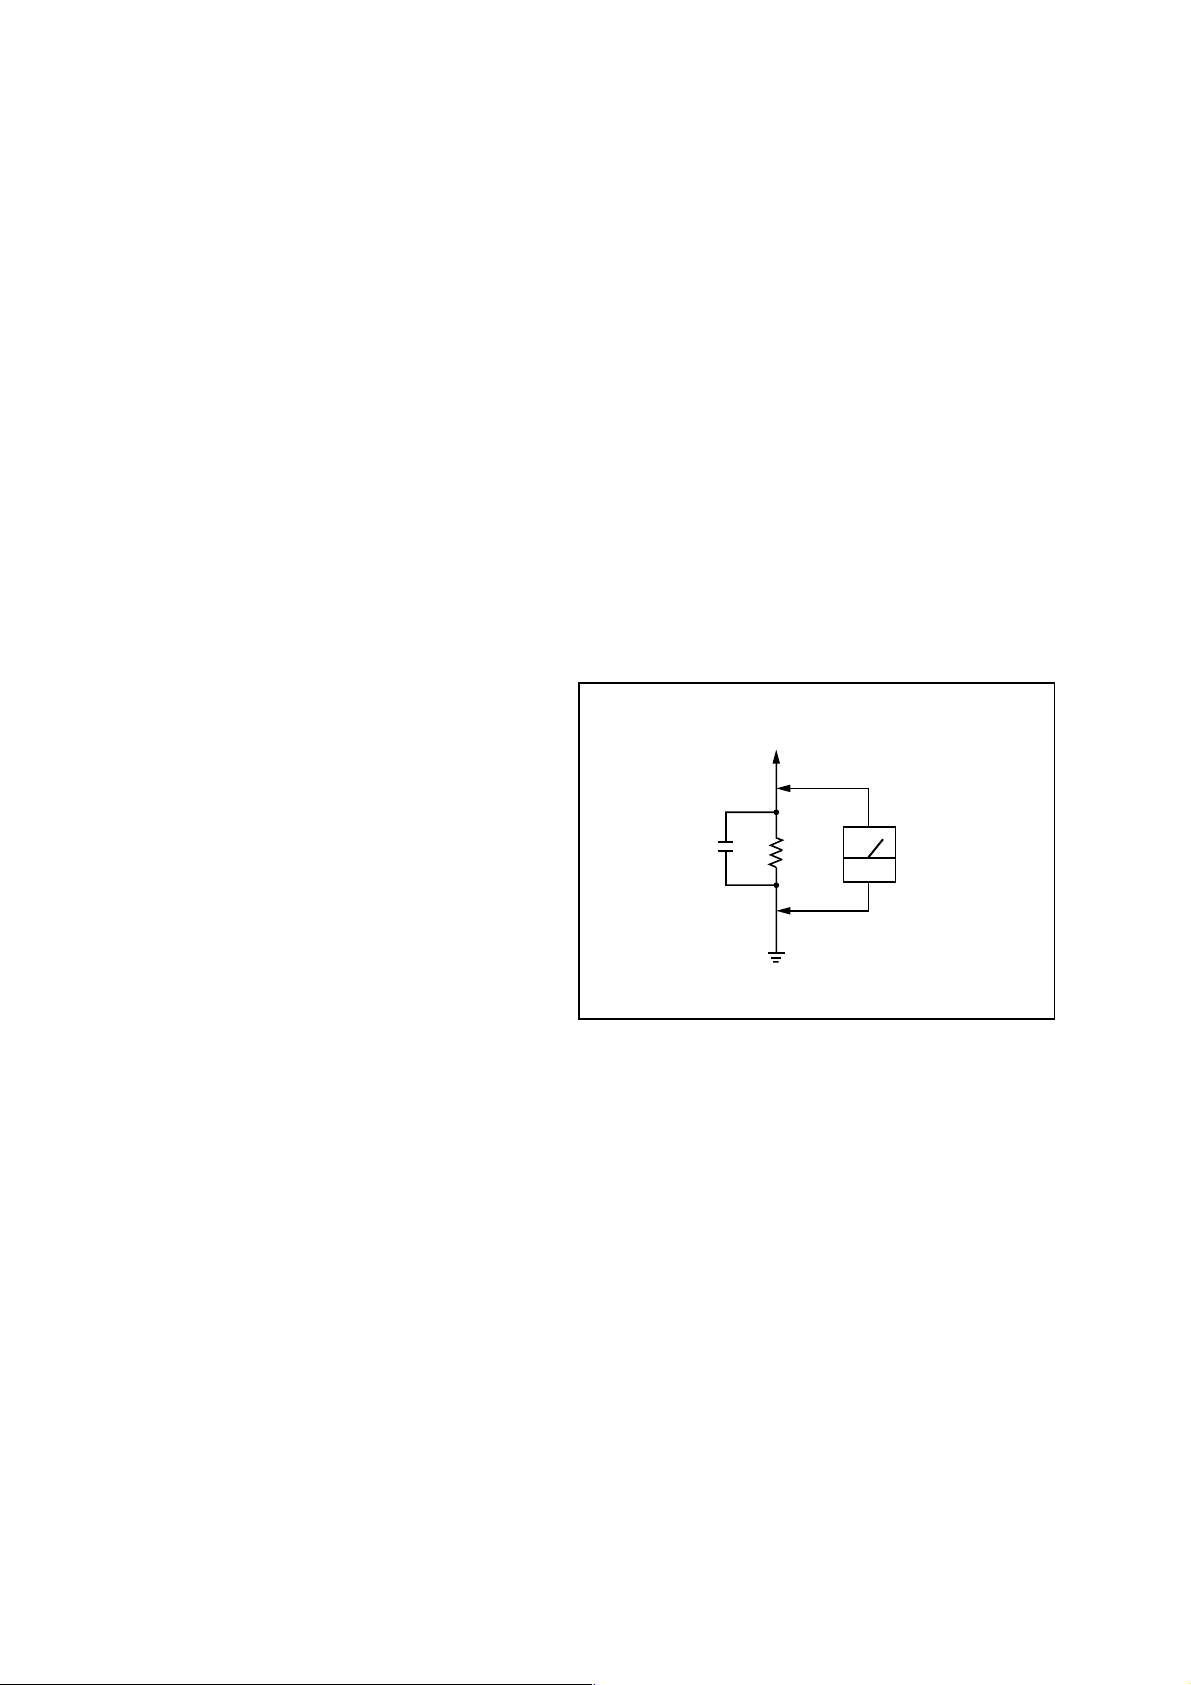
3. Measuring the voltage drop across a resistor by means of a V OM
or battery-operated A C v oltmeter. The “limit” indication is 0.75
V, so analog meters must have an accurate low-voltage scale.
The Simpson 250 and Sanwa SH-63Trd are examples of a passive VOM that is suitable. Nearly all battery operated digital
multimeters that have a 2V AC range are suitable. (See Fig. A)
To Exposed Metal
Parts on Set
0.15µF
1.5kΩ
Earth Ground
AC
voltmeter
(0.75V)
Fig. A. Using an AC voltmeter to check AC leakage.
SAFETY-RELATED COMPONENT WARNING!!
COMPONENTS IDENTIFIED BY MARK 0 OR DOTTED LINE
WITH MARK 0 ON THE SCHEMA TIC DIA GRAMS AND IN THE
PARTS LIST ARE CRITICAL TO SAFE OPERATION. REPLACE THESE COMPONENTS WITH SONY PARTS WHOSE
P ART NUMBERS APPEAR AS SHOWN IN THIS MANUAL OR
IN SUPPLEMENTS PUBLISHED BY SONY.
ATTENTION AU COMPOSANT AYANT RAPPORT
À LA SÉCURITÉ!!
LES COMPOSANTS IDENTIFIÉS P AR UNE MARQUE 0 SUR LES
DIAGRAMMES SCHÉMA TIQ UES ET LA LISTE DES PIÈCES SONT
CRITIQUES POUR LA SÉCURITÉ DE FONCTIONNEMENT. NE
REMPLACER CES COMPOSANTS QUE PAR DES PIÈCES SONY
DONT LES NUMÉROS SONT DONNÉS DANS CE MANUEL OU
DANS LES SUPPLÉMENTS PUBLIÉS PAR SONY.
2
Page 3
TC-WE675
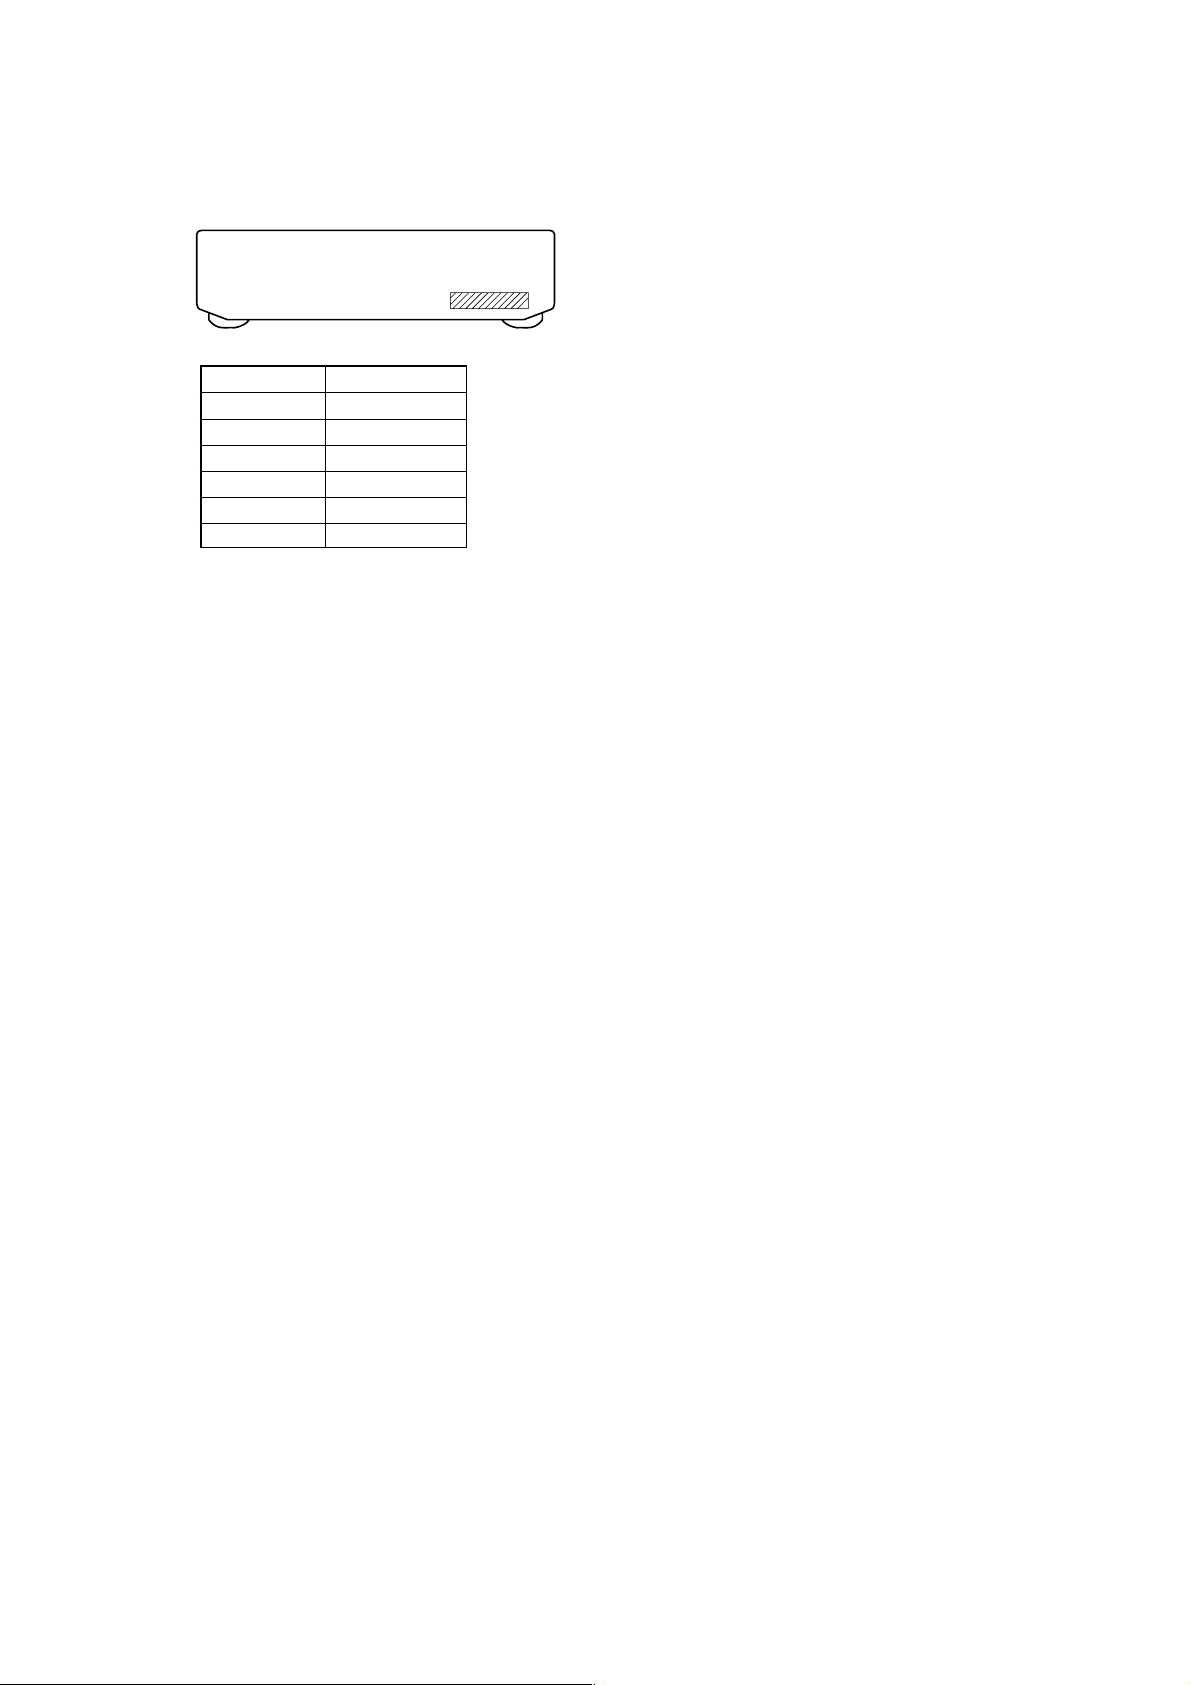
MODEL IDENTIFICATION
–Back panel–
P ARTS No. MODEL
4-232-414-0s US model
4-232-414-1s CND model
4-232-414-2s AEP model
4-232-414-3s UK model
4-232-414-4s SP model
4-232-414-5s AUS model
• Abbreviation
CND : Canadian model
SP : Singapore model
AUS : Australian model
Part No.
TABLE OF CONTENTS
1. GENERAL .......................................................................... 4
2. DISASSEMBLY
2-1. Case ......................................................................................5
2-2. Front Panel Assy ................................................................... 5
2-3. Cassette Lid Assy (Deck A/B) .............................................. 6
2-4. Mechanism Deck Assy (Deck A/B) ...................................... 6
3. SERVICE MODE .............................................................. 7
4. MECHANICAL ADJUSTMENTS................................. 8
5. ELECTRICAL ADJUSTMENTS ................................. 8
6. DIAGRAMS
6-1. Circuit Boards Location ...................................................... 12
6-2. Printed Wiring Board – MAIN Section – ........................... 14
6-3. Schematic Diagram – MAIN (1/4) Section – ..................... 15
6-4. Schematic Diagram – MAIN (2/4) Section – ..................... 16
6-5. Schematic Diagram – MAIN (3/4) Section – ..................... 17
6-6. Schematic Diagram – MAIN (4/4) Section – ..................... 18
6-7. Printed Wiring Board – DECK Section – ........................... 19
6-8. Schematic Diagram – DECK Section – .............................. 19
6-9. Schematic Diagram – LEAF SW Section – ........................ 20
6-10. Printed Wiring Board – LEAF SW Section – ...................21
6-11. Schematic Diagram – PANEL Section –...........................22
6-12. Printed Wiring Board – PANEL Section –........................23
6-13. Schematic Diagram – POWER Section – ......................... 24
6-14. Printed Wiring Board – POWER Section – ......................25
6-15. IC PIN FUNCTION .......................................................... 26
7. EXPLODED VIEWS
7-1. Case Section ........................................................................ 27
7-2. Chassis Section ...................................................................28
7-3. Cassette Holder Section ...................................................... 29
7-4. Front Panel Section ............................................................. 30
7-5. Tape Mechanism Section .................................................... 31
8. ELECTRICAL PARTS LIST ........................................ 32
3
Page 4
TC-WE675
Front Panel
rs
ra
SECTION 1
GENERAL
1 2 3 4 5 6 7
wges wh
wdwle;
wa
8
9
0
qa
r;
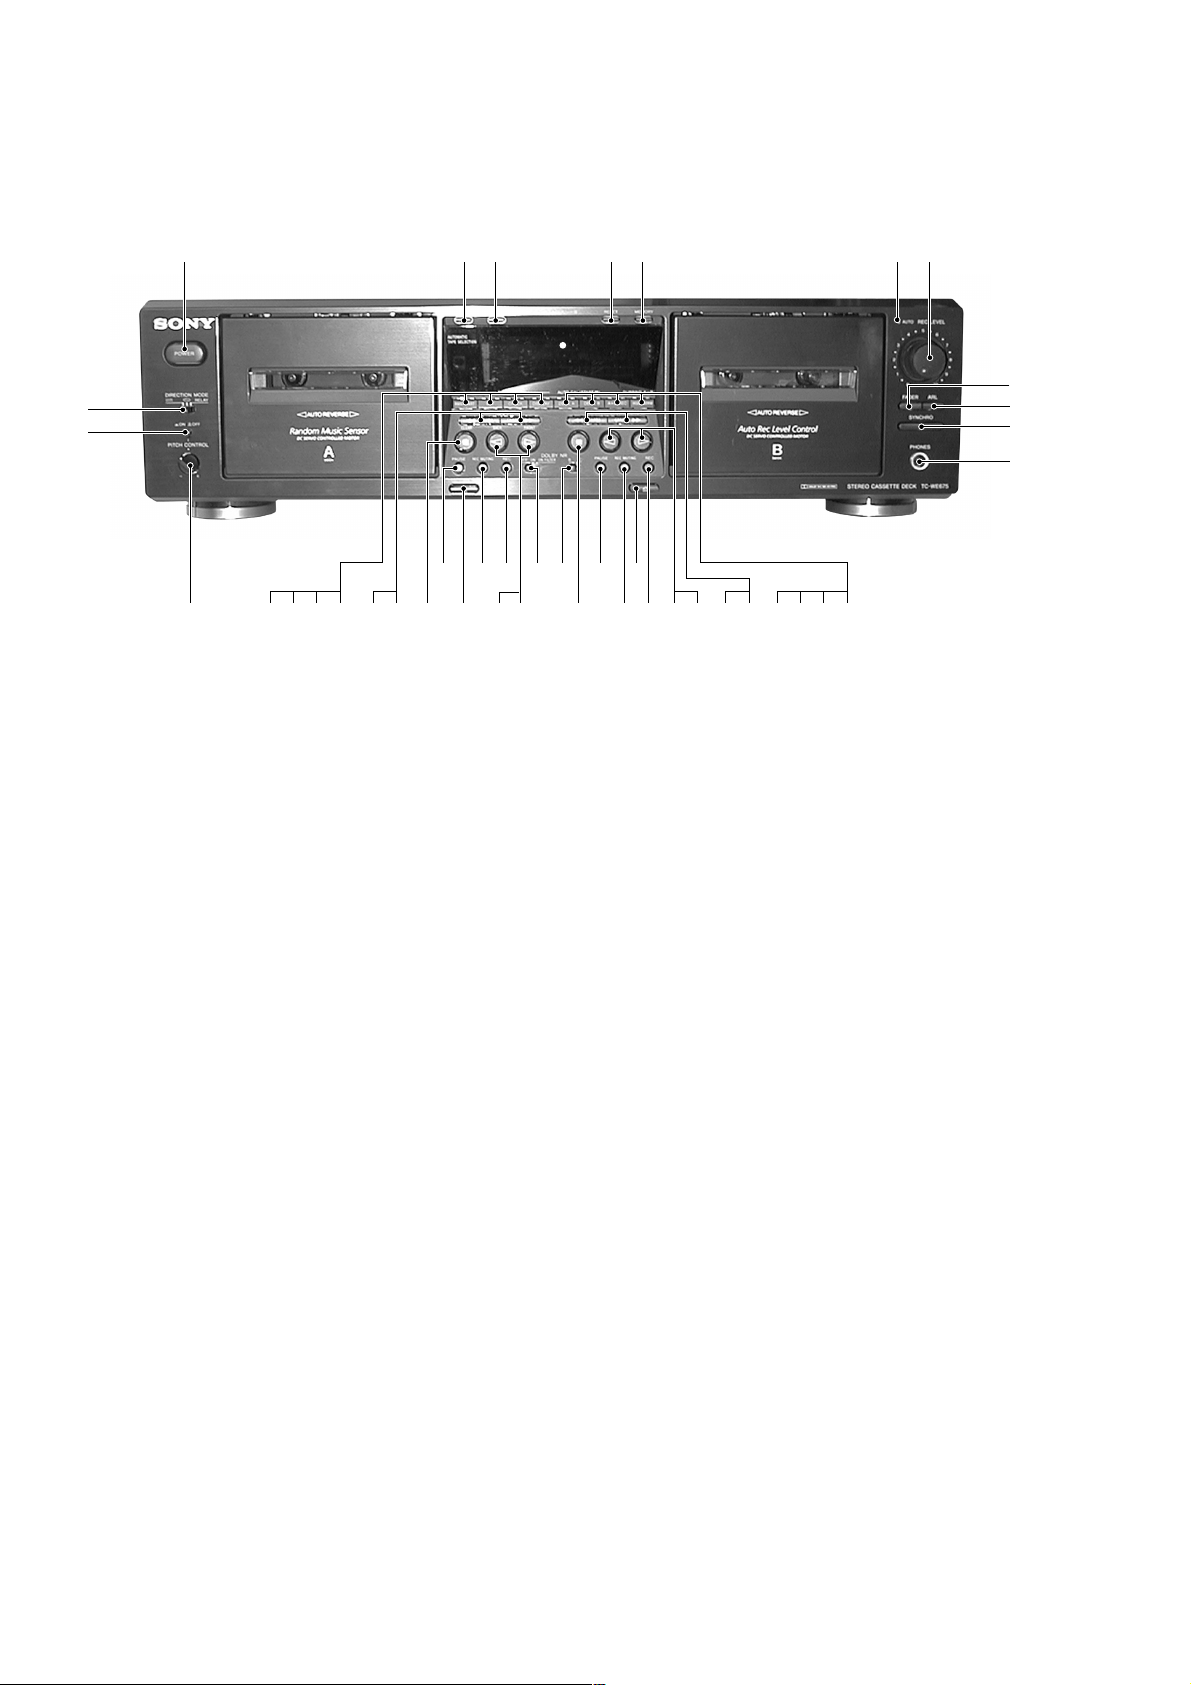
Location of Parts and Controls
1 POWER button
2 RESET (Deck A) button
3 MEMORY (Deck A) button
4 RESET (Deck B) button
5 MEMORY (Deck B) button
6 AUTO REC LEVEL indicator
7 REC LEVEL knob
8 FADER button
9 ARL button
0 SYNCHRO button
qa PHONES jack
qs HIGH/NOMAL button
qd A+B REC button
qf DECK B button
qg DECK A button
qh (AMS) M (Deck B) button
qj m (AMS) (Deck B) button
qk H (Deck B) button
ql h (Deck B) button
w; REC z (Deck B) button
wa A (Eject) (Deck B) button
ekel ejeh
wfwjwk
eaed
ws w; qlqk qj qfqg qdqsqhegef
ws REC MUTING W (Deck B) button
wd PAUSE X (Deck B) button
wf x (Deck B) button
wg DOLBY NR B/C switch
wh DOLBY NR OFF/ON FILTER
wj H/FRONT (Deck A) button
wk h/BACK (Deck A) button
wl REC z (Deck A) button
e; REC MUTING W (Deck A) button
ea A (Eject) (Deck A) button
es PAUSE X (Deck A) button
ed x/CLEAR (Deck A) button
ef (AMS) M (Deck A) button RMS +
eg m (AMS) (Deck A) button RMS –
eh DISPLAY button
ej CHECK button
ek SET button
el RMS/START button
r; PITCH CONTROL knob
ra PITCH CONTROL button
rs DIRECTION switch
• AMS is the abbreviation for Automatic Music Sensor.
4
Page 5
SECTION 2
DISASSEMBLY
• The equipment can be removed using the following procedure.
Set Case
Note : Follow the disassembly procedure in the numerical order given.
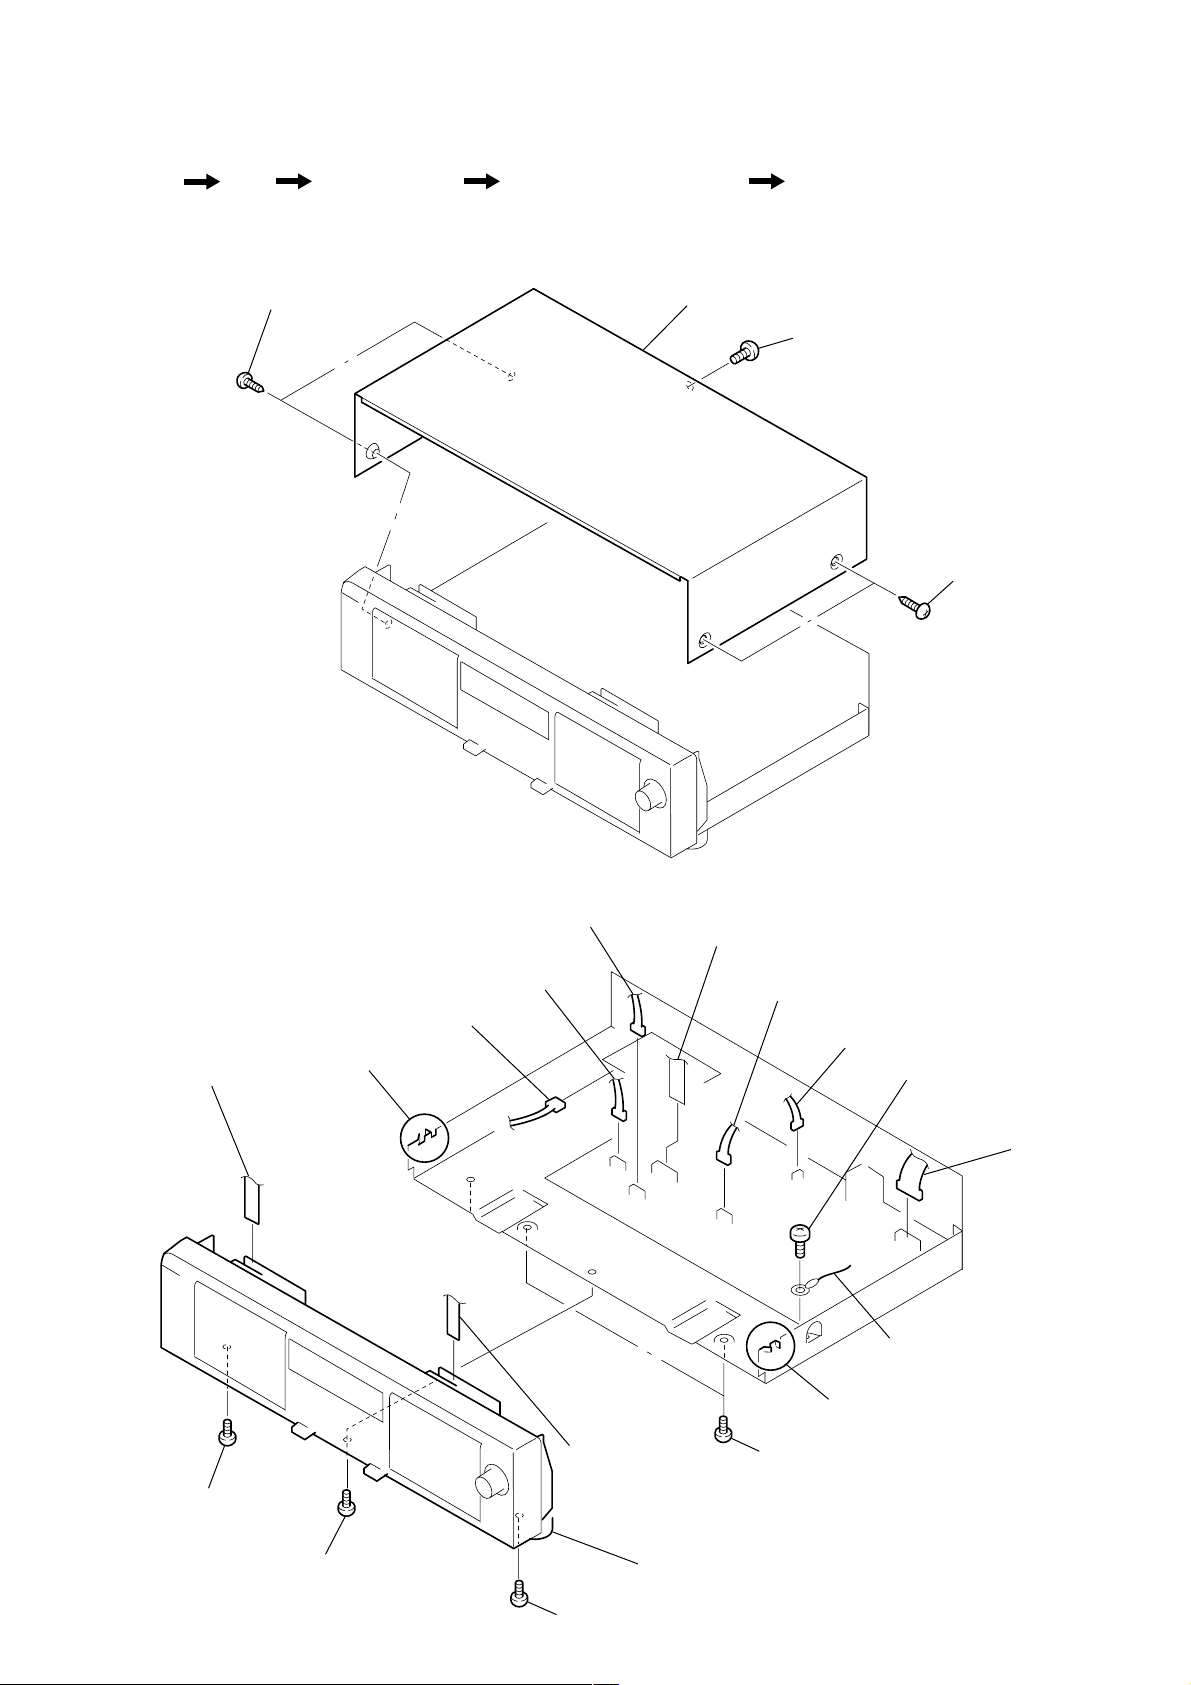
2-1. CASE
Front Panel Assy Cassette Lid Assy (Deck A/B) Mechanism Deck Assy (Deck A/B)
3
two screws
(case 3 TP2)
4
case
1
screw
(BVTT 3x6)
TC-WE675
2
two screws
(case 3 TP2)
2-2. FRONT PANEL ASSY
5
flat type wire
(Deck A)
qf
screw
(BVTP 3x8)
qj
claw
9
CN002
8
CN301
2
CN807
6
flat type wire
(Deck B)
1
CN5802
3
CN803
4
qh
claw
qg
two screws
(BVTT 3x6)
CNA806
0
(BVTP 3x8)
qa
wire
screw
7
CN401
qd
screw
(BVTP 3x8)
qk
qs
screw
(BVTP 3x8)
front panel assy
5
Page 6
TC-WE675
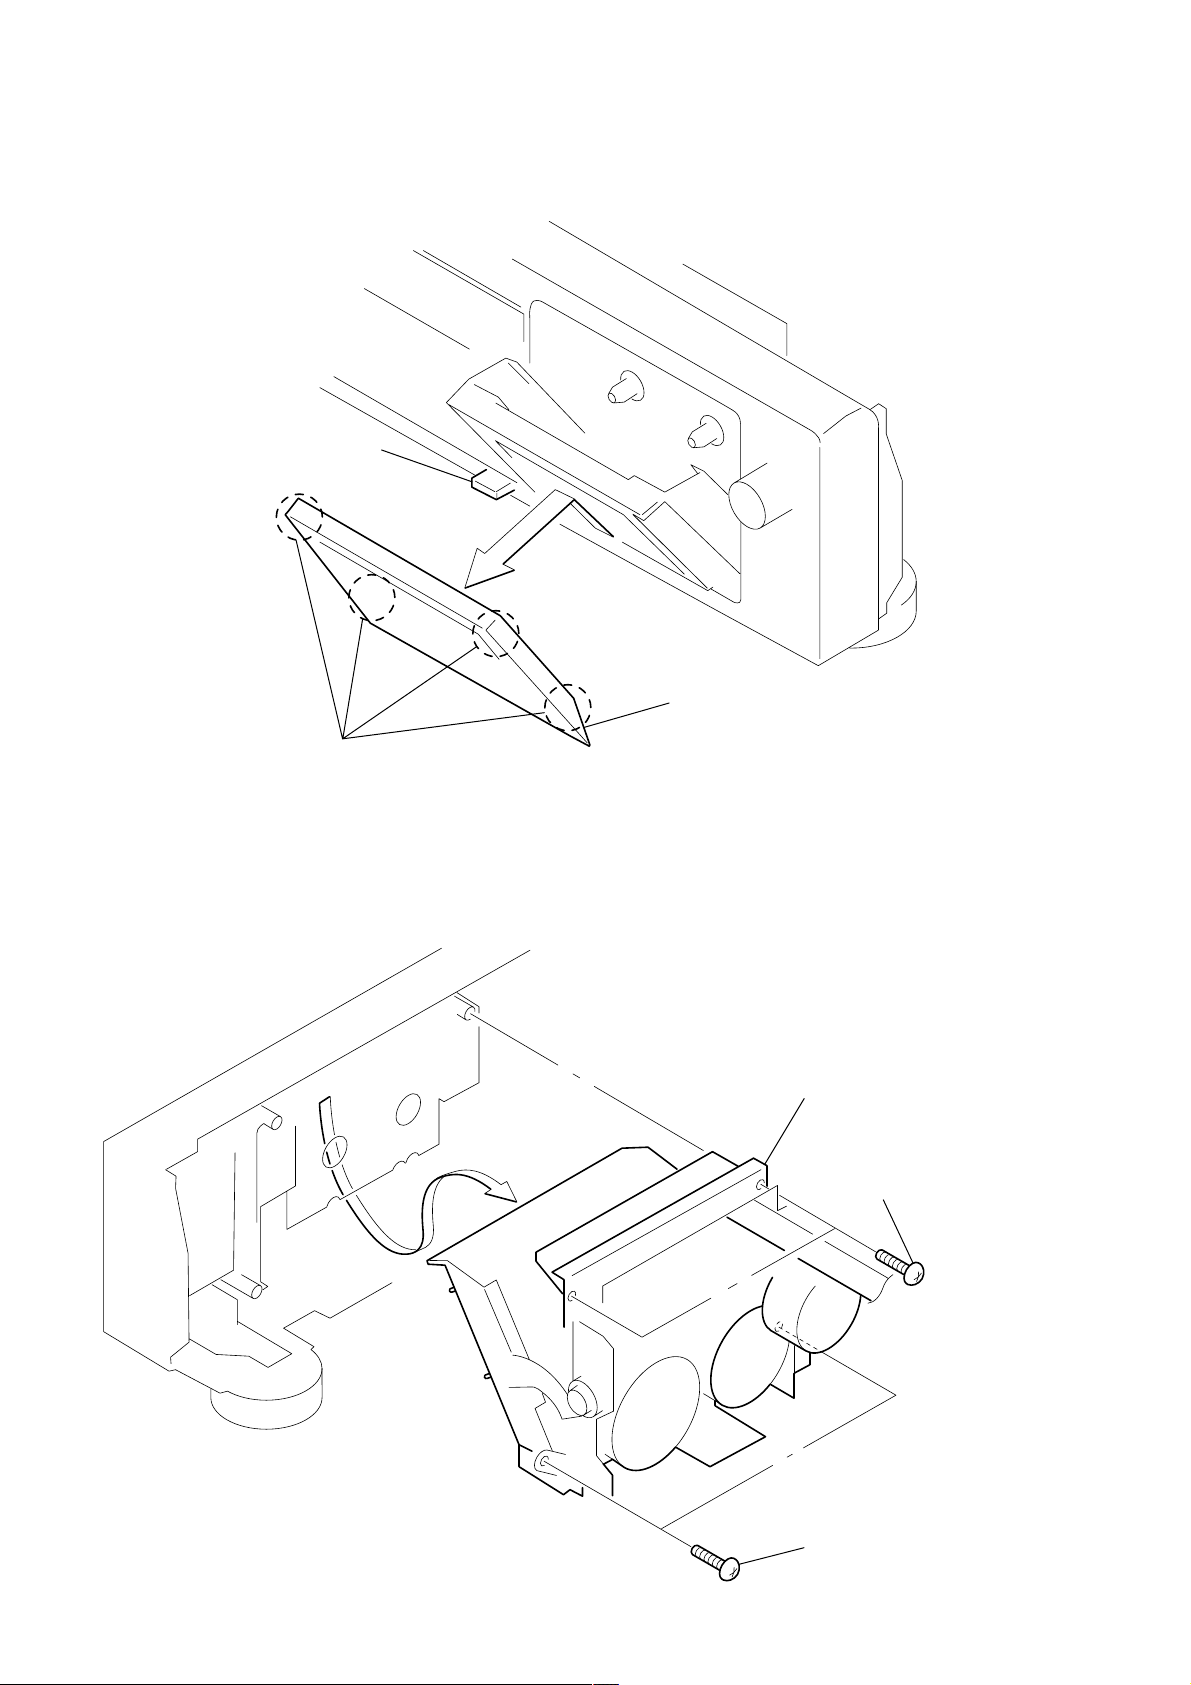
2-3. CASSETTE LID ASSY (DECK A/B)
1
Push the EJECT button.
2
four claws
2-4. MECHANISM DECK ASSY (DECK A/B)
3
cassette lid assy
3
mechanism deck assy
1
two screws
(BVTP 2.6x8)
2
two screws
(BVTP 2.6x8)
6
Page 7
TC-WE675
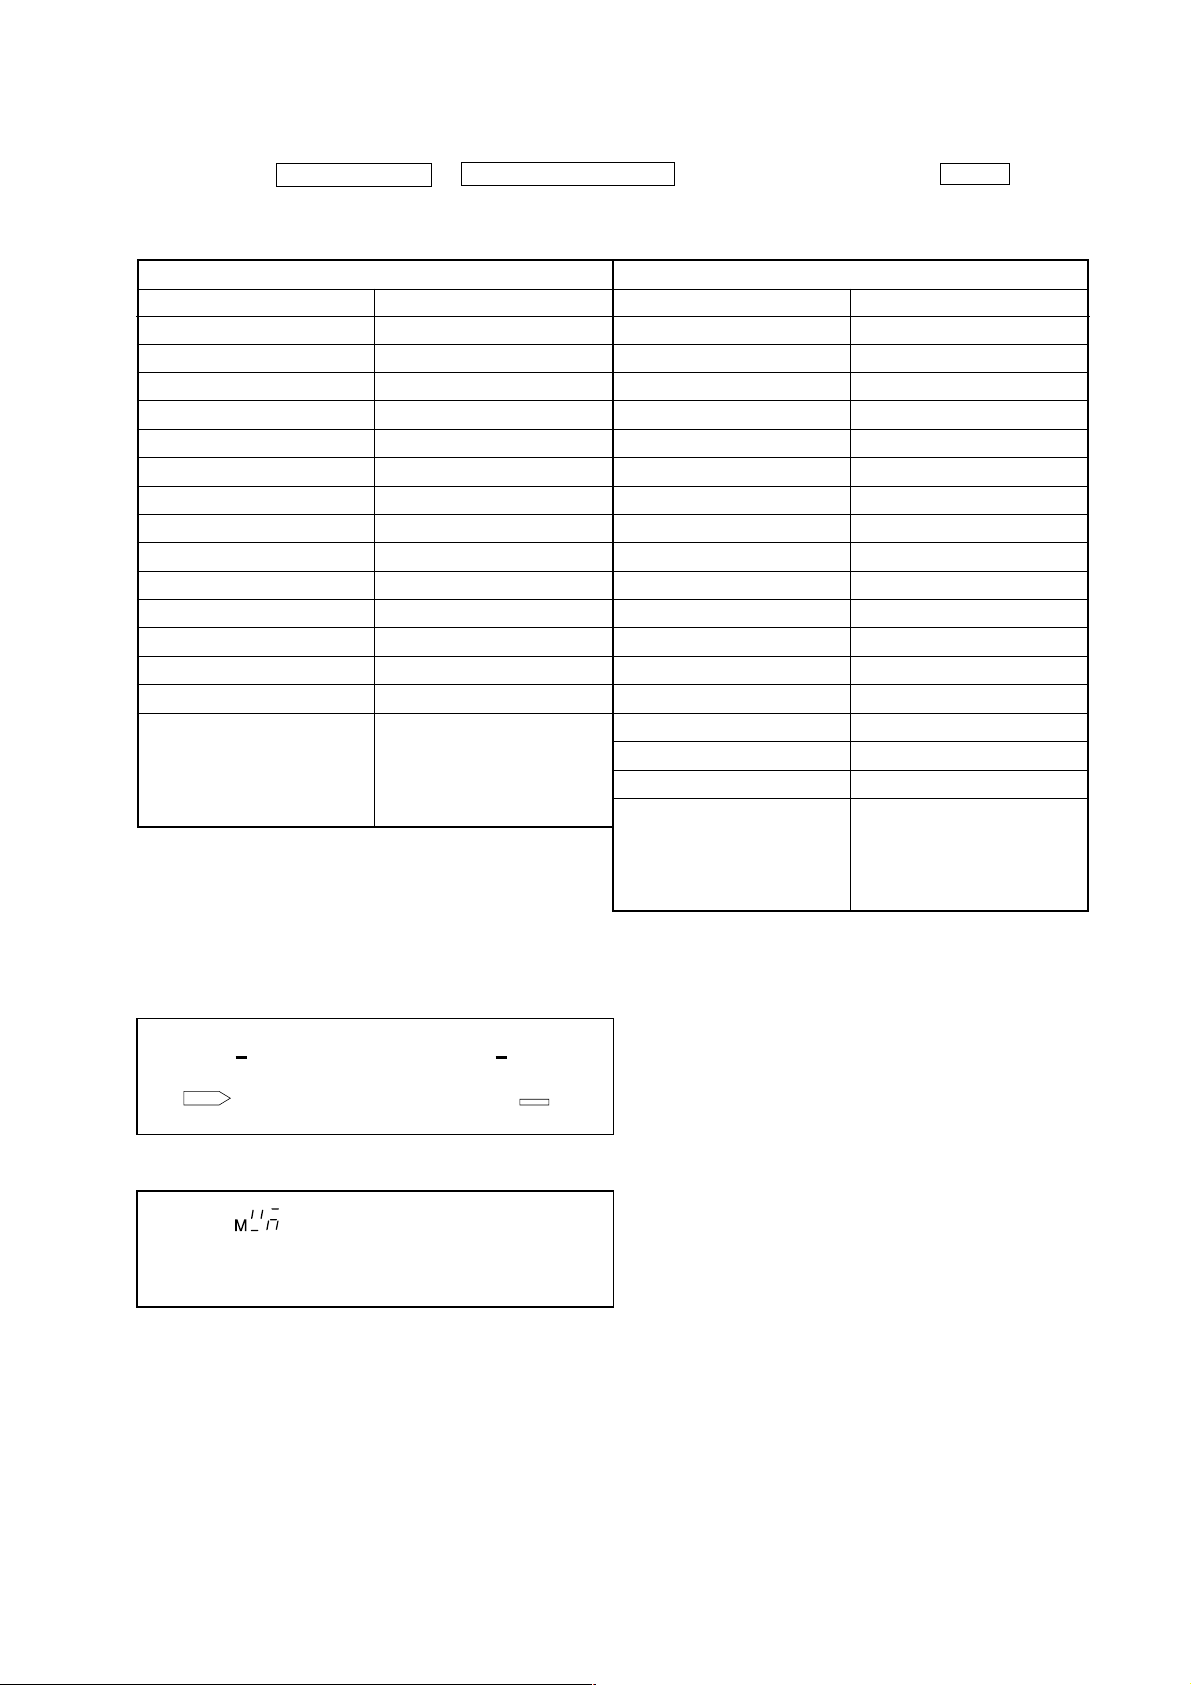
SECTION 3
SER VICE MODE
KEY CHECK & DISPLAY CHECK MODE
While pressing the h/BACK (A deck) and REC MUTING W (B deck) buttons with the po wer of f, press the PO WER b utton to turn on
the power.
The fluorescent display tube displays the number or special message corresponding to the button pressed.
The message displayed differs according to the position of the switch.
A deck side
Button Display
RESET 0
MEMORY 1
RMS/START 2
SET 3
CHECK 4
DISPLAY 5
m (AMS) 6
(AMS) M 7
x/CLEAR Grid check display (*1)
n/BACK 8
N/FRONT 9
PAUSE X A
REC MUTING W b
REC z C
DIRECTION MODE switch
g h
s PLAY
RELAY H
B deck side
Button Display
RESET 0
MEMORY 1
DECK A 2
DECK B 3
A+B REC 4
HIGH/NOMAL 5
m (AMS) 6
(AMS) M 7
x Segment check display (*2)
h 8
H 9
PAUSE X A
REC MUTING W b
REC z C
FADER d
ARL E
SYNCHRO All lit
DOLBY NR switch (*3)
OFF h
B PLAY
C H
Grit check display (*1)
RMS
Segment check display (*2)
(*3) The DOLBY NR switch consists of a pair of switches.
B and C are valid only in the ON or ON FILTER state.
7
Page 8
TC-WE675
r
SECTION 4
MECHANICAL ADJUSTMENTS
SECTION 5
ELECTRICAL ADJUSTMENTS
PRECAUTION
1. Clean the following parts with a denatured alcohol-moistened
swab :
record/playback/erase head pinch roller
rubber belts capstan
idlers
2. Demagnetize the record/playback head with a head demagnetizer.
3. Do not use a magnetized screwdriver for the adjustment.
4. After the adjustments, apply suitable locking compound to the
parts adjusted.
5. The adjustments should be performed with the rated power supply voltage unless otherwise noted.
Torque Measurement
Mode Torque meter Meter reading
Forward
Forward
back
tension
Reverse CQ-102RC
Reverse
back
tension
FF/REW
CQ-102C
CQ-102C
CQ-102RC
CQ-201B
30 to 65 g • cm
(0.42 to 0.90 oz • inch)
DECK A : 1 to 6 g • cm
(0.014 to 0.083 oz • inch)
DECK B : 2 to 9 g • cm
(0.028 to 0.125 oz • inch)
30 to 65 g • cm
(0.42 to 0.90 oz • inch)
1 to 6 g • cm
(0.014 to 0.083 oz • inch)
70 to 120 g • cm
(0.97 to 1.67 oz • inch)
PRECAUTION
1. The adjustment should be performed in the publication.
(Be sure to male playback adjustment at first.)
2. The adjustments and measurement should be performed for both
L-CH and R-CH.
• Switch position
DOLBY NR switch : OFF
DIRECTION MODE switch : g
• Standard record position :
Deliver the standard input signal le vel to input jack and set the
REC LEVEL knob to obtain the standard output signal level
as follows.
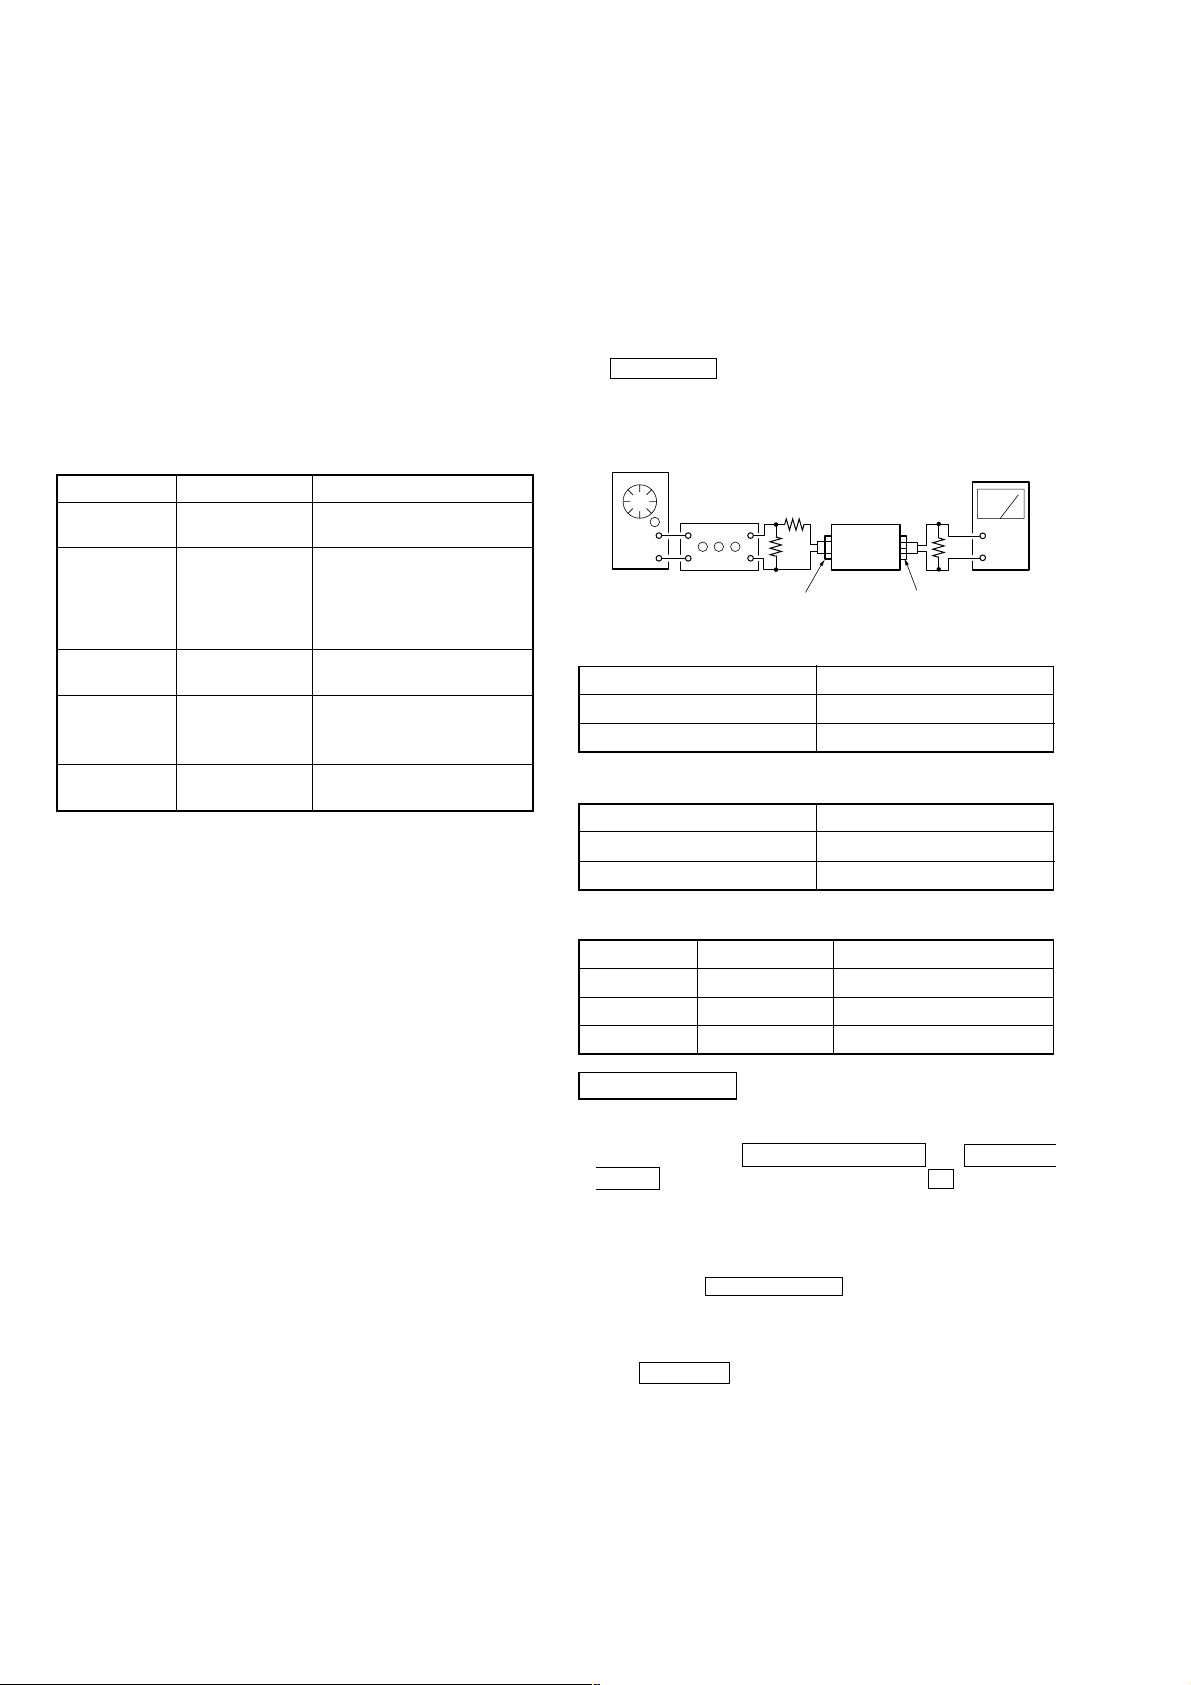
– Record Mode–
AF OSC
attenuator
Standard Input Level
Input terminal LINE IN
source impedance 10 kΩ
input signal level 0.5 V (–3.8 dBs)
Standard Output Level
Input terminal LINE IN
source impedance 10 kΩ
input signal level 0.5 V (–3.8 dBs)
10 kΩ
600 Ω
LINE IN
set
LINE OUT
level mete
47 kΩ
+
–
Test T ape
Tape Contents Use
P-4-A100 10 kHz, –10 dB Azimuth Adjustment
WS-48B 3 kHz, 0 dB Tape Speed Adjustment
P-4-L300 315 Hz, 0 dB PB Level Adjustment
0 dBs = 0.775 V
Test Mode
1. While pressing the H/FRONT (DECK A) and REC MUT-
ING W buttons with the power of f, press the ! button to turn
on the power. The fluorescent display tube lights up for about
one second, and the test mode is set. The test mode performs the
following two special functions.
• Playback speed switching function
Pressing the HIGH/NORMAL button switches the playback
speed between standard/double speed.
• Counter RESET & MEMORY function
Resets the counter when recording starts. When rewound with
the m (AMS) button after recording, stops at the point where
recording started.
2. To release the test mode, turn OFF the power switch.
8
Page 9
TC-WE675
r
r
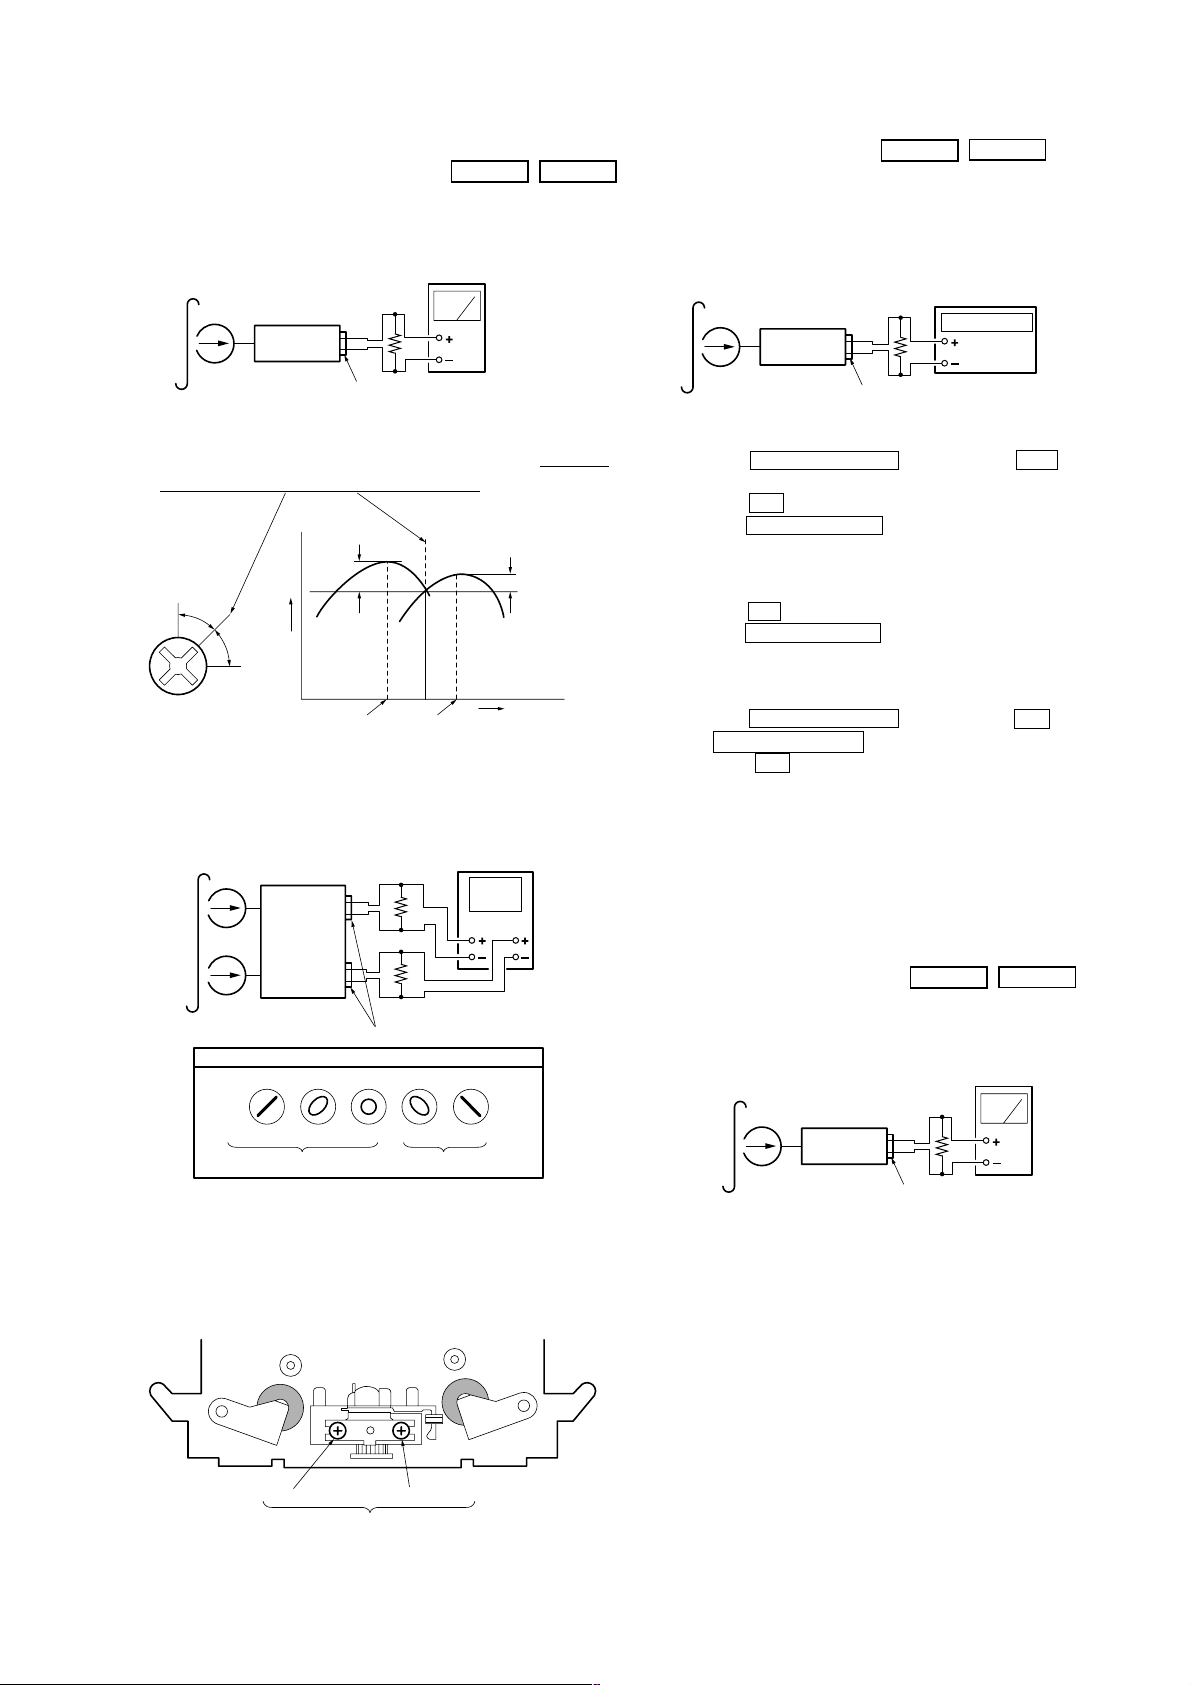
Record/Playback Head Azimuth Adjustment
DECK A DECK B
Procedure:
1. Forward Playback Mode
test tape
P-4-A100
(10 kHz, –10 dB)
set
LINE OUT
level mete
47 kΩ
2. Turn the adjustment screw for the maximum output levels. If
these levels do not match, turn the adjustment screw until both
of output levels match together within 1 dB.
L-CH
peak
screw
position
R-CH
peak
output
level
1 dB
L-CH
peak
R-CH
peak
within
1 dB
screw position
within
3. Playback Mode
test tape
P-4-A100
(10 kHz, –10 dB)
L-CH
set
47 kΩ
oscilloscope
VH
Tape speed Adjustment DECK A DECK B
Adjust DECK A first
Procedure:
– Forward Playback Mode –
test tape
WS-48B
(3 kHz, 0 dB)
set
LINE OUT
47 kΩ
frequency counter
(High speed adjustment)
1. Press the PITCH CONTROL button to set to OFF .
2. Set to test mode. (Refer to page 11.)
3. Press the H button to playback.
4. Press the HIGH/NORMAL button to playback at double speed.
5. Adjust RV316 (DECK A), RV416 (DECK B) so that the frequency counter reading becomes 5,980 ± 80 Hz.
(Normal speed adjustment)
6. Press the H button to playback.
7. Press the HIGH/NORMAL button to playback at normal speed.
8. Adjust RV317 (DECK A), RV417 (DECK B) so that the frequency counter reading becomes 3,000 ± 90 Hz.
(Pitch control adjustment) (DECK A)
9. Press the PITCH CONTROL button to set to ON .
10. Set PITCH CONTROL knob to mechanical center.
11. Press the H button to playback.
12. Adjust RV318 so that the frequency counter reading becomes
2,990 ± 90 Hz.
Adjustment Location: MAIN board (See page 14.)
Sample value of wow and flutter
W.RMS (JIS) less than 0.3% .
(test tape : WS-48B)
R-CH
In phase 45˚ 90˚ 135˚ 180˚
good wrong
47 kΩ
LINE OUT
Screen Pattern
4. Change the reverse playback mode and repeat the steps 1 to 3.
5. After the adjustment, lock the adjustment screws with suitable
locking compound.
Adjustment Location: – record/playback head –
forward sidereverse side
adjustment screws
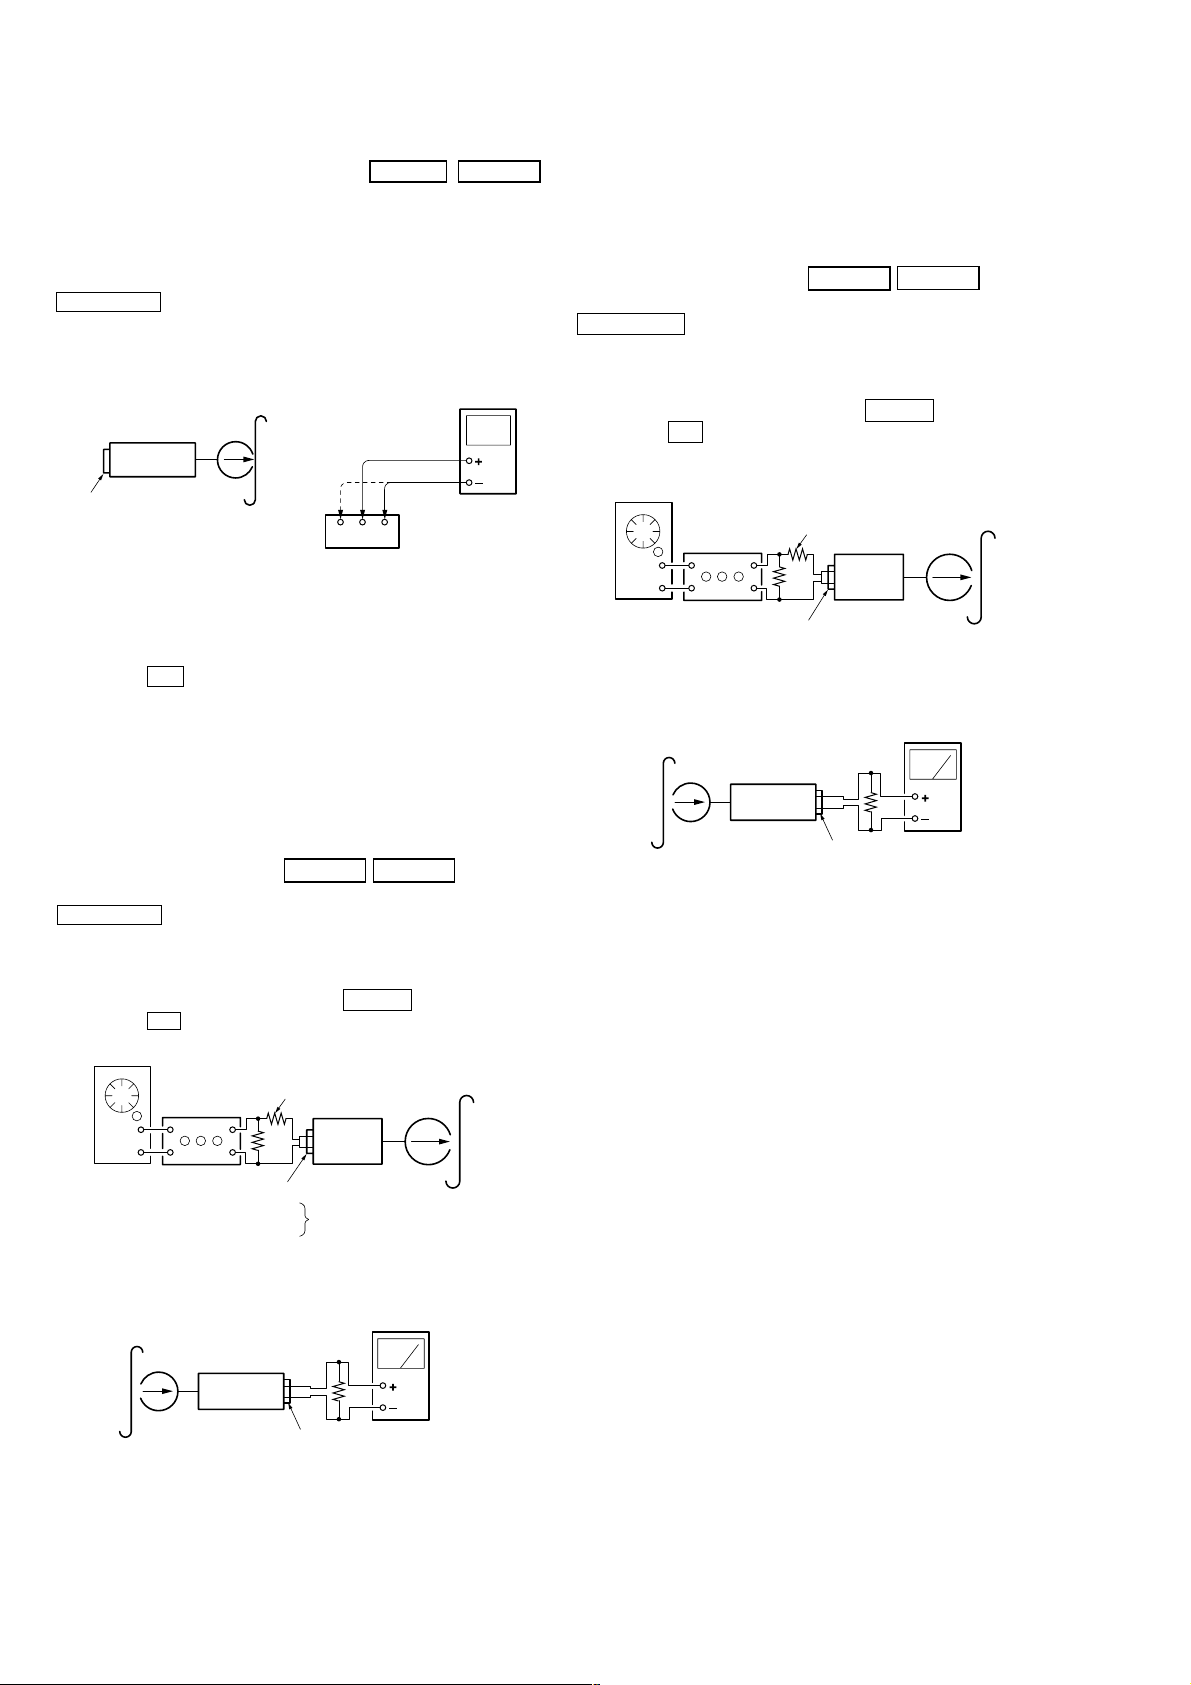
Playback Level Adjustment DECK A DECK B
Procedure:
– Forward Playback Mode –
test tape
P-4-L300
(315 Hz, 0 dB)
set
LINE OUT
level mete
47 kΩ
Adjust DECK A : RV111 (L-CH), RV211 (R-CH) and
DECK B : R V121 (L-CH), RV221 (R-CH) so the level meter reading becomes the adjustment limits below.
Adjustment V alue:
LINE OUT level : –7.7 dBs ± 0.5 dB (0.301 to 0.338 V)
Level difference between channels : within 0.5 dB
Confirm that the LINE OUT level does not change in playback mode
while changing the mode from playback to stop several times.
Adjustment Location: MAIN board (See page 14.)
9
Page 10
TC-WE675
e
r
e
r
Bias Consumption Current Adjustment
DECK A DECK B
This adjustment should be performed when replacing the head assy
or the bias oscillator transformer (T131, T231),(T141, T241).
Setting:
REC LEVEL knob : standard recording position (See page 11.)
Procedure:
digital
voltmeter
TP331 (DECK A)
TP441 (DECK B)
LINE IN
no signal
blank tape
CS-413
set
L-CHR-CH
321
1. Connect the digital voltmeter to test point TP331 (DECK A) and
TP441 (DECK B).
2. Set DECK A: RV131 (L-CH), RV231 (R-CH) and DECK B:
RV141 (L-CH), RV241 (R-CH) to mechanical center.
3. Press the H button to playback.
4. Adjust DECK A: T131 (L-CH), T231 (R-CH) and DECK B:
T141 (L-CH), T241 (R-CH) so that the digital voltmeter reading becomes minimum.
Adjustment V alue: Maximum 220 mV
Adjustment Location: MAIN board (See page 14.)
Record Bias Adjustment DECK A DECK B
Setting:
REC LEVEL knob : standard record position (See page 11.)
Procedure:
1. Set to test mode (See page 11.)
2. Insert a tape into deck B, press the REC z button and then
press the H button to start recording.
AF OSC
blank tap
CS-123
attenuator
10 kΩ
600 Ω
LINE IN
1) 315 Hz
2) 10 kHz
set
50 mV (–23.8 dBs)
Adjustment level:
The palyback output of 10 kHz level difference against 315 Hz reference should be ± 0.5 dB.
Adjustment Location: MAIN board (See page 14.)
Record Level Adjustment DECK A DECK B
Setting:
REC LEVEL knob : standard record position (See page 11.)
Procedure:
1. Set to test mode (See page 11.)
2. Insert a tspe into deck B, press the REC z button and then
press the H button to start recording.
3. Record Mode
AF OSC
10 kΩ
attenuator
set
600 Ω
LINE IN
315 Hz, 50 mV (–23.8 dBs)
blank tap
CS-123
4. Playback Mode
recorded
portion
set
LINE OUT
level mete
47 kΩ
5. Confirm playback the signal recorded in step 2 become adjustment level as follows.
If the selevels do not adjustment lev el, adjust the DECK A: R V102
(L-CH), RV202 (R-CH) and DECK B: RV101 (L-CH), RV201
(R-CH) to repeat steps 3 and 4.
Adjustment V alue:
LINE OUT level : –23.8 dBs ± 0.5 dB (47.2 to 53.0 mV)
Adjustment Location: MAIN board (See page 14.)
3. Record Mode
recorded
portion
set
LINE OUT
level mete
47 kΩ
4. Playback Mode
5. Confirm playback the signal recorded in step 2 become adjustment level as follows.
If the selevels do not adjustment level, adjust DECK A: RV131
(L-CH), R V231 (R-CH) and DECK B: RV141 (L-CH), RV241
(R-CH) to repeat steps 3 and 4.
10
Page 11
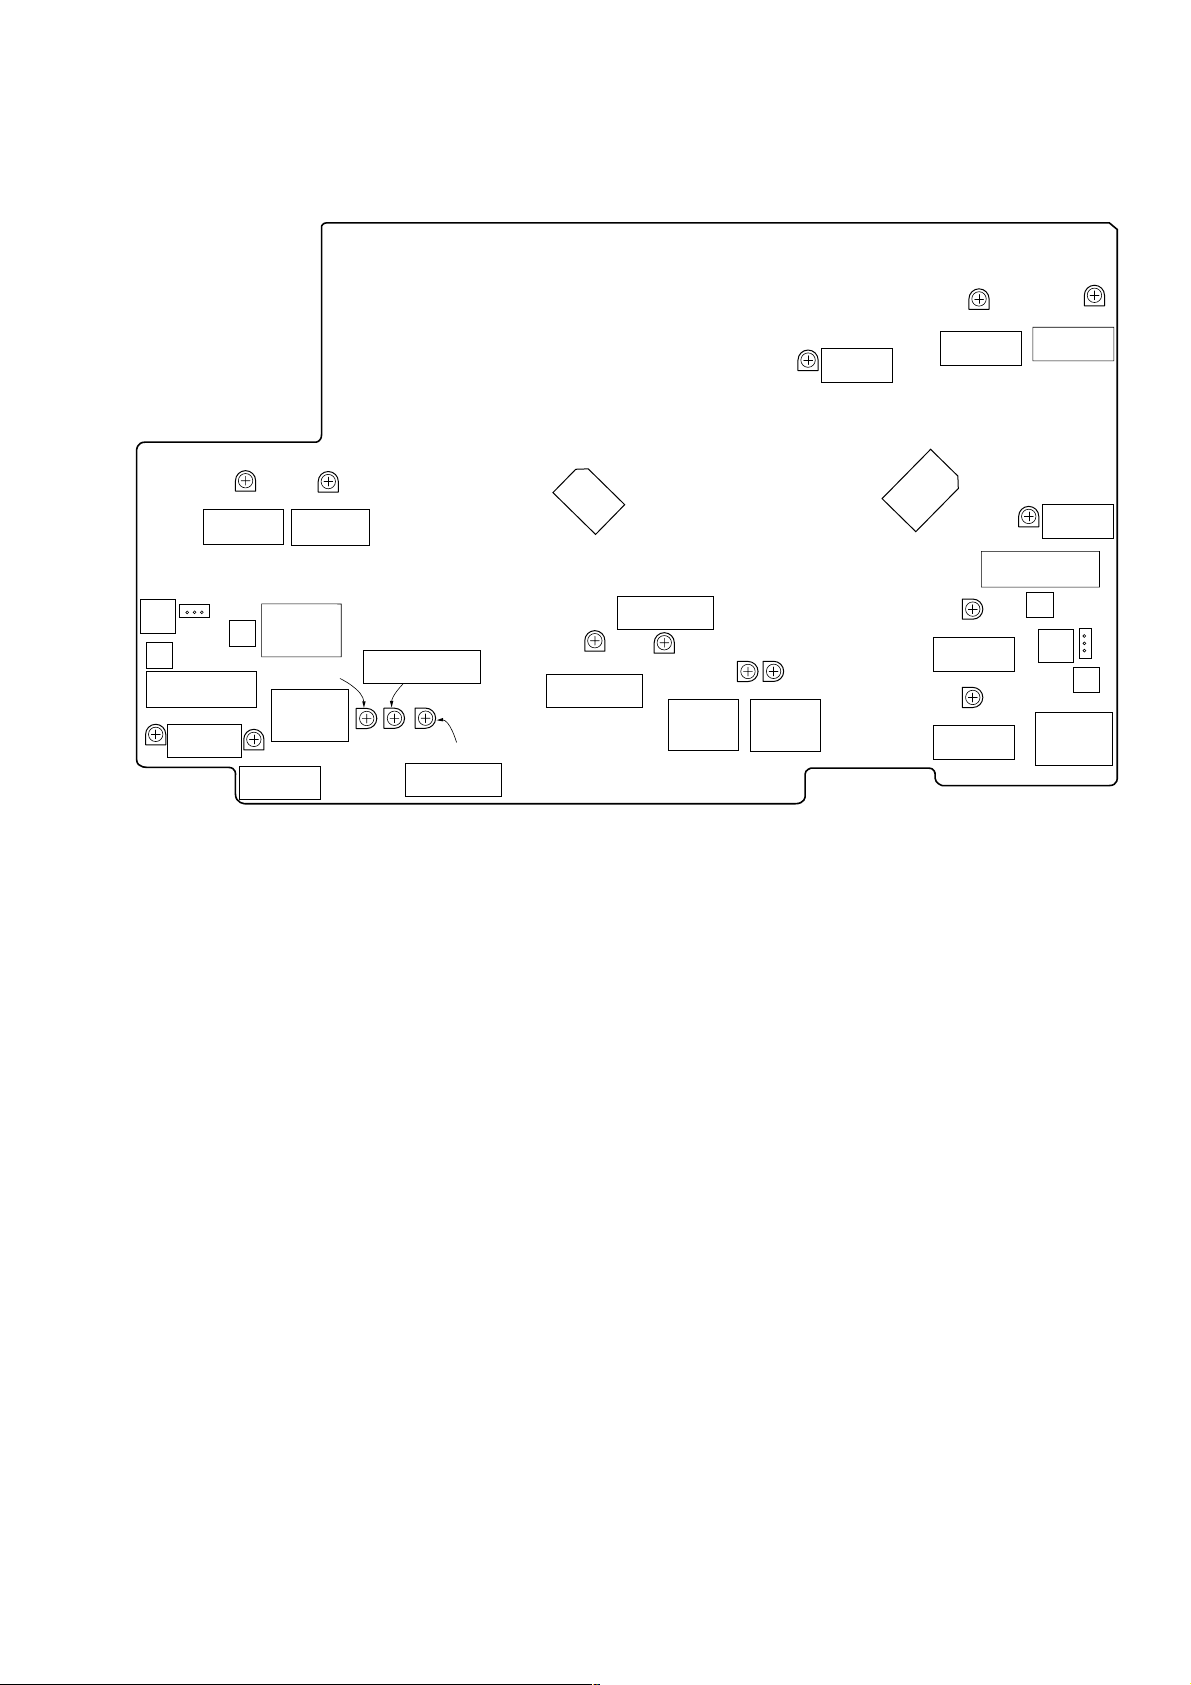
Adjustment Location: main board
[MAIN board] (Component side)
TC-WE675
PB LEVEL
DECK A (L)
TP331
REC
BIAS
T131
BIAS CURRENT
DECK A (L)
RV131
REC BIAS
DECK A (L)
RV111
RV231
REC BIAS
DECK A (R)
RV211
PB LEVEL
DECK A (R)
T231
BIAS
CURRENT
DECK A (R)
RV318
PITCH
CONTROL
(DECK A)
RV317
NORMAL SPEED
(DECK A)
RV316
HIGH SPEED
(DECK A)
100
81
IC801
80
51
RV102
REC LEVEL
DECK A (L)
1
50
30
31
RV202
REC LEVEL
DECK A (R)
NORMAL
(DECK B)
RV417
SPEED
RV416
HIGH
SPEED
(DECK B)
RV101
REC
LEVEL (L)
33
32
20
51
IC551
19
RV121
PB LEVEL
DECK B (L)
52
64
1
BIAS CURRENT
RV141
REC BIAS
DECK B (L)
RV241
REC BIAS
DECK B (R)
RV221
PB LEVEL
DECK B (R)
RV201
LEVEL (R)
DECK B (L)
T141
REC
BIAS
T241
BIAS
CURRENT
DECK B (R)
REC
TP441
11
Page 12
TC-WE675
)
6-1. CIRCUIT BOARDS LOCATION
LEAF SW (REC/PB) board
(Deck A)
SECTION 6
DIAGRAMS
TRANS (A) board (v E)
(Except SP)
TRANS (B) board (v B)
POWER board (
DIRECTION board (
v
F)
v
C)
HEAD RELAY (REC/PB) board
(Deck A)
PANEL board (
LEAF SW (REC/PB) board
(Deck B)
v
A)
• vA to vG are including into the mounted PANEL board.
H.P board (v D)
HEAD RELAY (REC/PB) board
(Deck B)
MAIN board
RECVOL board (
v
G
12
Page 13

TC-WE675
THIS NOTE IS COMMON FOR PRINTED WIRING
BOARDS AND SCHEMATIC DIAGRAMS.
(In addition to this, the necessary note is printed
in each block.)
For schematic diagrams.
Note:
• All capacitors are in µF unless otherwise noted. pF: µµF
50 WV or less are not indicated except for electrolytics
and tantalums.
• All resistors are in Ω and 1/
specified.
• % : indicates tolerance.
f
•
• 5 : fusible resistor.
• C : panel designation.
Note:
The components identified by mark 0 or dotted
line with mark 0 are critical for safety.
Replace only with part
number specified.
• A : B+ Line.
• B : B– Line.
• H : adjustment for repair.
• Voltage is dc with respect to ground under no-signal
• Voltages are taken with a VOM (Input impedance 10 MΩ).
• Waveforms are taken with a oscilloscope.
• Circled numbers refer to waveforms.
• Signal path.
• Abbreviation
: internal component.
(detuned) condition.
no mark : STOP
( ) : REC
< > : PB
Voltage variations may be noted due to normal production tolerances.
Voltage variations may be noted due to normal production tolerances.
E : PB
a : REC
CND : Canadian model.
AUS : Australian model.
SP : Singapore model.
: Can not be measured.
∗
4
W or less unless otherwise
Note:
Les composants identifiés par
une marque 0 sont critiques
pour la sécurité.
Ne les remplacer que par une
piéce portant le numéro
spécifié.
WAVEFORMS
– MAIN SECTION (3/4) –
1
4.4Vp-p
10MHz
IC801 el EXT AL
For printed wiring boards.
Note:
• X : parts extracted from the component side.
• : Pattern from the side which enables seeing.
• Transistor of “B” and “C” indication is omitted.
• Indication of transistor
C
EB
These are omitted
13 13
Page 14

TC-WE675
6-2. PRINTED WIRING BOARD – MAIN SECTION –
• See page 12 for Circuit Boards Location.
(Page 23)
(Page 25)
(Page 23)
(Page 21)
(Page 23)
(Page 19)
14 14
(Page 23)
(Page 23)
(Page 19)
Page 15

6-3. SCHEMATIC DIAGRAM – MAIN (1/4) SECTION –
• Semiconductor Location
Ref. No. Location
D306 F-10
D307 F-10
D318 F-10
D351 F-11
D451 C-1
D521 E-9
D522 E-9
D601 A-6
D701 B-10
D702 B-10
D703 A-10
D704 A-10
D705 A-10
D706 A-10
D707 B-10
D708 A-7
D709 A-8
D710 B-8
D711 A-8
D712 A-10
D713 B-11
D714 C-10
D715 C-10
D716 B-11
D801 F-6
IC321 D-12
IC331 G-13
IC421 A-2
IC431 F-2
IC501 D-3
IC502 A-6
IC504 F-7
IC561 D-9
IC701 A-8
IC801 D-7
IC802 E-6
IC803 G-9
IC804 G-8
IC805 G-4
IC806 G-3
Q101 B-3
Q102 A-5
Q103 F-7
Ref. No. Location
Q104 C-5
Q201 C-2
Q202 A-4
Q203 F-7
Q204 E-1
Q302 H-7
Q303 H-7
Q306 F-10
Q307 G-10
Q308 F-10
Q311 H-8
Q314 H-8
Q316 G-10
Q317 G-10
Q318 G-10
Q341 D-13
Q342 D-13
Q343 D-13
Q351 G-11
Q371 C-10
Q373 C-10
Q402 G-6
Q403 G-6
Q411 G-5
Q414 G-5
Q417 F-5
Q441 G-2
Q442 H-2
Q443 H-2
Q451 C-1
Q471 C-8
Q473 C-8
Q501 A-5
Q502 E-9
Q503 E-9
Q505 G-11
Q506 F-3
Q601 A-5
Q701 A-8
Q702 A-7
Q703 A-9
Q704 A-10
Q707 C-10
Q708 C-11
Q801 F-6
(Page 22)
TC-WE675
(Page 17)
(Page 17)
(Page 17)
(Page
19)
(Page 16) (Page 16)
15 15
(Page 18)
(Page 17)
(Page 18)
Page 16

TC-WE675
6-4. SCHEMATIC DIAGRAM – MAIN (2/4) SECTION –
(Page 22)
(Page 15)(Page 15)
(Page 17)(Page 17)
(Page 18)
(Page 18)
(Page
19)
(Page 18)
(Page 18)
(Page 17)
16 16
Page 17

6-5. SCHEMATIC DIAGRAM – MAIN (3/4) SECTION –
• See page 13 for Waveforms.
• See page 14 for Printed Wiring Board.
• See page 26 for IC Pin Functions.
TC-WE675
(Page
15)
(Page 22)
(Page 22)
(Page 20)
(Page
15)
(Page
15)
(Page
15)
(Page 16) (Page 16)
(Page 18) (Page 18) (Page 18) (Page 18)
(Page 16)
(Page 24)
17 17
Page 18

TC-WE675
6-6. SCHEMATIC DIAGRAM – MAIN (4/4) SECTION –
(Page 16)
(Page 15)
(Page
16)
(Page 17) (Page 17) (Page 17)
(Page 15) (Page 17)
(Page 22)
(Page
16)
(Page
16)
18 18
Page 19

TC-WE675
6-7. PRINTED WIRING BOARD – LEAF SW SECTION –
• See page 12 for Circuit Boards Location.
* PLUNGER SOLENOID is supplied as the Mechanism Deck
(TCM-230ASR41B : A-2100-942-A).
6-8. SCHEMATIC DIAGRAM – LEAF SW SECTION –
TO MAIN BOARD
(Page 14)
TO
MAIN BOARD
(Page 16)
19 19
Page 20

TC-WE675
6-9. SCHEMATIC DIAGRAM – DISPLAY SECTION –
20 20
(Page 17)
Page 21

6-10. PRINTED WIRING BOARD – DISPLAY SECTION –
• See page 12 for Circuit Boards Location.
TC-WE675
(Page 14)
21 21
• Semiconductor
Location
Ref. No. Location
D904 B-3
D905 B-2
D906 B-2
D907 B-2
D908 B-2
IC901 B-5
IC902 A-2
Q901 A-2
Page 22

TC-WE675
6-11. SCHEMATIC DIAGRAM – PANEL SECTION –
(Page 18)
(Page 17)
(Page 17)
(Page 15, 16)
22 22
Page 23

6-12. PRINTED WIRING BOARD – PANEL SECTION –
• See page 12 for Circuit Boards Location.
TC-WE675
(Page 14)
(Page 14)
A
(Page 14)
12
B
(Page 14)
23 23
Page 24

TC-WE675
6-13. SCHEMATIC DIAGRAM – POWER SECTION –
(Page 17)
24 24
Page 25

6-14. PRINTED WIRING BOARD – POWER SECTION –
• See page 12 for Circuit Boards Location.
TC-WE675
(Page 14)
25 25
Page 26

TC-WE675
6-15. IC PIN FUNCTION
• IC801 SYSTEM CONTROL (CXP82432A-007Q) (MAIN board)
Pin No.
1 PLAYSW (B) I Play switch input (DECK B)
2 70U (B) O 70µ output (DECK B)
3 METAL (B) I METAL input (DECK B)
4 SIRCS IN I Sircs signal input
5 POWER IN I Power hold input
6 VOL OUT O Volume output
7 A/B SEL I Playback A/B selector input “L” : A, “H” : B
8 CONTROL-A IN I Control A signal input
9 CONTROL-A OUT O Control A signal output
10 FL CLK I FL CLK control input
11 FL DATA IN I Display control input
12 FL DATA OUT O Display control output
13 CS I Sircs signal input
14 REC MUTE A O Recording mute output “L” : Mute ON
15 REC /PB O Record /playback dolby NR mode selector output “L” : Playback
16 REC CAL 0 (B) O Recoding CAL control 0 (DECK B)
17 REC CAL 1 (B) O Recoding CAL control 1 (DECK B)
18 GP CAL 0 (B) O GP CAL control 0 (DECK B)
19 GP CAL 1 (B) O GP CAL control 1 (DECK B)
20 REC CAL 0 (A) O Recoding CAL control 0 (DECK A)
21 REC CAL 1 (A) O Recoding CAL control 1 (DECK A)
22 GP CAL 0 (A) O GP CAL control 0 (DECK A)
23 GP CAL 1 (A) O GP CAL control 1 (DECK A)
23 NC – Not used
24 REC MUTE B O Recording mute output (DECK B)
25 CAL/OFF/S O CAL select switch
26 C/B/OFF O Dolby selector “H ”: C,“Open”: B, “L”: Dolby off
27 REC EQ H/N O REC EQ high/normal selector output “L”: Dolby
28 PASS/MUTE/DOLBY O Audio selector “H”: Pass , “Open”: Mute,“L”: Recording
29 BS/AMS/OFF O AMS amp selector “H”: BS, “Open”: AMS, “L”: OFF
30 RELAY (B) I Relay swich input (DECK B)
31 RELAY (A) I Relay swich input (DECK A)
32 METER (L) I Meter L-CH input
33 METER (R) I Meter R-CH input
34 HALF (B) I Half swich input (DECK B)
35 SHUT (B) I Capstan motor rotation detection input (DECK B)
36 SHUT (A) I Capstan motor rotation detection input (DECK A)
37 HALF (A) I Half swich input (DECK A)
38 RESET I System reset input
39 EXTAL O System clock oscillator output (10 MHz)
40 XTAL I System clock oscillator input (10 MHz)
41 VSS –
42 TX – Ground
43 TEX –
44 VOL IN I Auto rec level control input
45 DIR MODE IN I Key input
46 AVREF – Connected to power supply
47 AV SS – Ground
48 AR LED O AUTO LED driver “H”: ON
Pin Name I/O Function
Pin No.
49 CD SYNC LED O SYNCHRO LED driver “L”: ON
50 CAP, M2 (B) O
51 CAP, M4 (B) O
52 CAP, M3 (B) O
53 CAP, M1 (B) O
54 BIAS CAL 0 (B) O BIAS CAL control 0 (DECK B)
55 BIAS CAL 1 (B) O BIAS CAL control 1 (DECK B)
56 BIAS CAL 2 (B) O BIAS CAL control 2 (DECK B)
57 BIAS CAL 3 (B) O BIAS CAL control 3 (DECK B)
58 CAP, M2 (A) O
59 CAP, M1 (A) O
60 CAP, M3 (A) O
61 CAP, M4 (A) O
62 BIAS CAL 0 (A) O BIAS CAL control 0 (DECK A)
63 BIAS CAL 1 (A) O BIAS CAL control 1 (DECK A)
64 BIAS CAL 2 (A) O BIAS CAL control 2 (DECK A)
65 BIAS CAL 3 (A) O BIAS CAL control 3 (DECK A)
66 NC – Not used
67 CAP, M H/L O Capstan motor high/normal selector output “L”: ON
68 PITCH ON/OFF O Pitch control ON/OFF output
69 OSC ON/OFF O CAL detection ON/OFF select output
70 OSC H/L O CAL oscillator ON/OFF select output
71 LINE MUTE O Line mute ON/OFF control output
72 to 87 NC – Not used
88 VF – Ground
89 VDD – Power supply (+5V)
90 N.C – Not used
91 VSS – Ground
92 BIAS (A) O Bias ON/OFF output (DECK A)
93 BIAS (B) O Bias ON/OFF output (DECK B)
94 PITCH CON-SW O Pitch control ON/OFF control output “L”: ON
95 AMS IN I AMS amp selector
96 TRG (B) O Trigger control output (DECK B)
97 TRG (A) O Trigger control output (DECK A)
98 NC – Not used
99 PLAYSW (A) I Play swich input (DECK A)
100 70U (A) I 70µ output (DECK A)
Pin Name I/O Function
Capstan motor driver (DECK B)
Capstan motor driver (DECK A)
26 26
Page 27

SECTION 7
EXPLODED VIEWS
TC-WE675
NOTE:
• Items marked “*” are not stocked since they are
seldom required for routine service. Some delay
should be anticipated when ordering these items.
• The mechanical parts with no reference number in
the exploded views are not supplied.
• Color Indication of Appearance Parts
Example:
KNOB, BALANCE (WHITE) . . . (RED)
↑↑
Parts Color Cabinet's Color
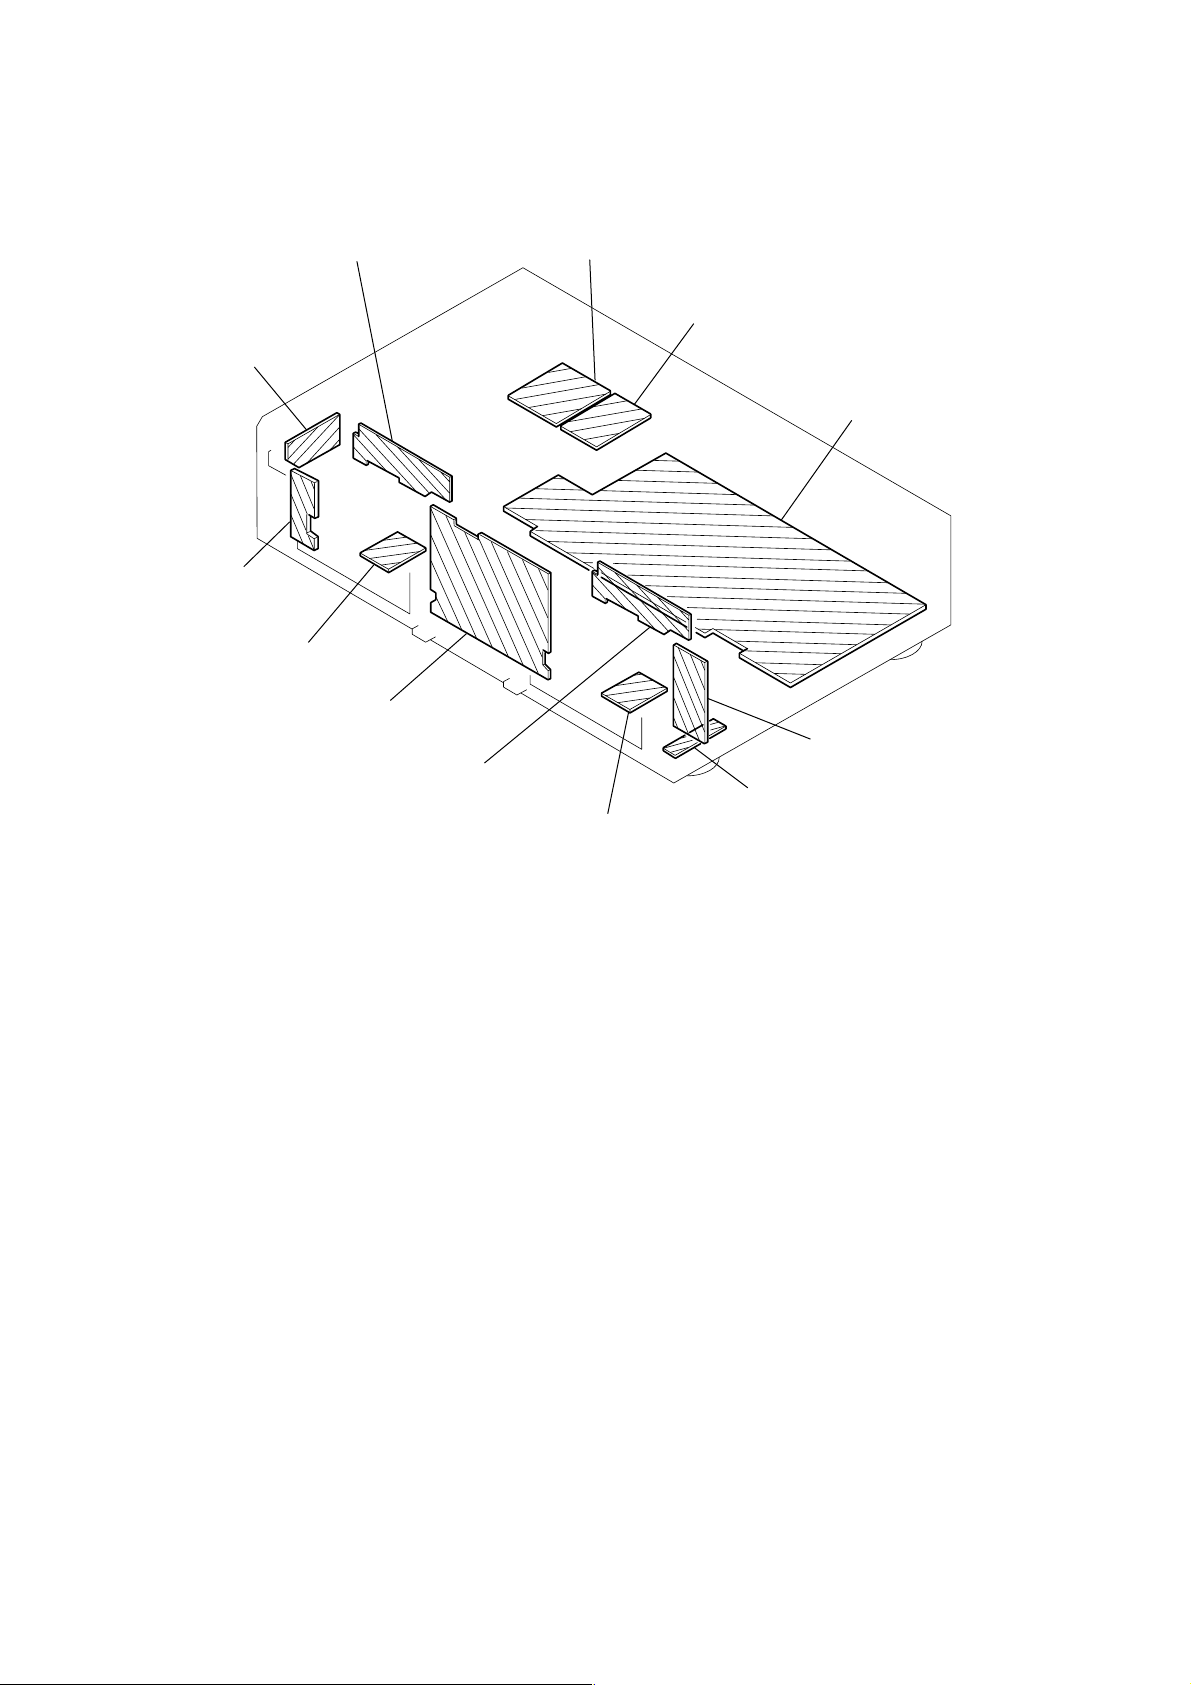
7-1. CASE SECTION
4
• Hardware (# mark) list and accessories and packing materials are given in the last of this parts list.
• Abbreviation
CND : Canadian model
SP : Singapore model
AUS : Australian model
#2
2
The components identified by
mark 0 or dotted line with mark
0 are critical for safety.
Replace only with part number
specified.
Les composants identifiés par une
marque 0 sont critiques pour la
sécurité.
Ne les remplacer que par une
piéce portant le numéro spécifié.
4
3
6
5
not supplied
Ref. No. Part No. Description Remark
1 4-232-414-01 PANEL, BACK (US)
1 4-232-414-11 PANEL, BACK (CND)
1 4-232-414-21 PANEL, BACK (AEP)
1 4-232-414-31 PANEL, BACK (UK)
1 4-232-414-41 PANEL, BACK (SP)
1 4-232-414-51 PANEL, BACK (AUS)
#1
#1
#1
#1
#1
#1
1
Ref. No. Part No. Description Remark
2 4-232-149-71 CASE(410726)
3 3-703-244-00 BUSHING (2104), CORD
4 3-363-099-01 SCREW(CASE 3 TP2)
5 1-535-688-11 TERMINAL
6 1-692-155-11 SELECTOR, POWER VOLTAGE (SP)
27
Page 28

TC-WE675
7-2. CHASSIS SECTION
US, CND
UK
53
v
E
v
B
56
AUS
AEP, SP
#1
53
53
51
53
not supplied
52
T901
#2
57
54
58
55
#2
#2
not supplied
55
#1
57
54
#1
vB and vE are including into the mounted PANEL board (Ref No. 160).
vB TRANS (B) board
vE TRANS (A) board (EXCEPT SP)
The components identified by
mark 0 or dotted line with mark
0 are critical for safety.
Replace only with part number
specified.
Ref. No. Part No. Description Remark Ref. No. Part No. Description Remark
51 1-696-656-11 WIRE(FLAT TYPE) (13 CORE)
52 1-769-976-11 WIRE(FLAT TYPE) (13 CORE)
0 53 1-575-651-21 CORD, POWER (SP)
0 53 1-751-535-11 CORD, POWER (UK)
0 53 1-777-107-11 CORD, POWER (AEP)
0 53 1-777-218-11 CORD, POWER (AUS)
0 53 1-783-531-51 CORD, POWER (US,CND)
* 54 4-978-398-21 CUSHION
* 55 3-346-265-31 HOLDER, PC BOARD
Les composants identifiés par une
marque 0 sont critiques pour la
sécurité.
Ne les remplacer que par une
piéce portant le numéro spécifié.
56 A-2007-866-A MAINBOARD, COMPLETE (US,CND,SP,AUS)
56 A-2007-869-A MAINBOARD, COMPLETE (AEP,UK)
57 4-232-237-01 FOOT(DIA. 30)
58 3-970-608-01 SUMITITE (B3), +BV
0 T901 1-431-786-12 TRANSFORMER, POWER (AEP,UK,AUS)
0 T901 1-431-788-12 TRANSFORMER, POWER (US,CND)
0 T901 1-431-789-12 TRANSFORMER, POWER (SP)
28
Page 29

7-3. CASSETTE HOLDER SECTION
101
102
103
110
109
108
104
114
105
114
114
112
111
114
108
113
112
107
106
115
115
105
104
114
#4
#4
#3
#3
#3
#3
114
TCM-230ASR41B
TCM-230ASR41B
TC-WE675
Ref. No. Part No. Description Remark Ref. No. Part No. Description Remark
101 X-4953-496-1 LID(A) ASSY, CASSETTE
102 X-4953-497-1 LID(B) ASSY, CASSETTE
103 4-232-407-01 BUTTON (EJECT)
104 3-022-410-01 DAMPER
105 3-019-450-01 PLATE (L), FULCRUM
106 X-4953-543-1 HOLDER (R) ASSY, CASSETTE
107 3-019-455-01 SPRING (R), LOADING
108 3-019-451-01 PLATE (R), FULCRUM
109 X-4953-542-1 HOLDER (L) ASSY, CASSETTE
110 3-019-454-01 SPRING (L), LOADING
111 3-019-453-01 LEVER (LOCK R)
112 3-019-456-01 SCREW, STEP
113 3-019-452-01 LEVER (LOCK L)
114 4-951-620-01 SCREW (2.6X8), +BVTP
115 4-959-229-11 DETENT, CASSETTE
29
Page 30

TC-WE675
)
7-4. FRONT PANEL SECTION
vA to vG are including into the mounted PANEL board (Ref No. 160).
vA PANEL board
vC DIRECTION board
vD H.P board
vF POWER board
vG RECVOL board
v
F
156
151
157
158
154
154
v
C
154
159
154
160
(Including v A to v G
v
A
153
154
155
152
not supplied
FLT901
not supplied
not
supplied
154
154
v
#5
G
v
D
Ref. No. Part No. Description Remark Ref. No. Part No. Description Remark
151 X-4953-492-1 PANEL (US) ASSY, FRONT (US,CND)
151 X-4953-493-1 PANEL (EU) ASSY, FRONT (AEP,UK,SP,AUS)
152 4-232-409-01 KNOB (DIA. 21)
153 4-232-410-01 KNOB (SLIDE)
154 4-951-620-01 SCREW (2.6X8), +BVTP
* 155 4-978-398-21 CUSHION
156 4-231-973-01 BUTTON (POWER)
157 4-232-412-01 BUTTON (DIA 3.5) (US,CND,AEP,UK,SP,AUS)
157 4-232-412-11 BUTTON (DIA 3.5)(SILVER) (AEP)
158 3-931-378-01 KNOB (F10)
159 1-769-950-11 WIRE (FLAT TYPE) (11 CORE)
160 A-2007-867-A PANEL BOARD, COMPLETE (US,CND)
160 A-2007-868-A PANEL BOARD, COMPLETE (AUS)
160 A-2007-870-A PANEL BOARD, COMPLETE (AEP,UK)
160 A-2007-871-A PANEL BOARD, COMPLETE (SP)
30
Page 31

7-5. TAPE MECHANISM SECTION
TC-WE675
211
212
213
not supplied
205
203
202
not supplied
204
206
207
not supplied
208
(TCM-230ASR41B)
201
213
209
210
Ref. No. Part No. Description Remark Ref. No. Part No. Description Remark
201 A-2100-942-A MECHANISM DECK
202 X-3374-155-5 PINCH LEVER (FWD) ASSY
203 X-3374-156-5 PINCH LEVER (REV) ASSY
204 4-227-872-11 SCREW (+PTT 2X4), GROUND POINT
205 X-4953-986-1 BASE (B) ASSY, HEAD
206 A-4476-817-A HEAD BOARD, COMPLETE
207 A-4476-816-A LEAF SW BOARD, COMPLETED
208 3-041-947-01 BELT (FR)
209 3-041-946-01 BELT (CAPSTAN B)
210 X-4952-851-1 FLYWHEEL (B-FWD) ASSY
211 X-4952-852-1 FLYWHEEL (B-REV) ASSY
212 A-2004-854-A MOTOR ASSY, CAPSTAN
213 3-359-464-01 WASHER (CAPSTAN)
31
Page 32

TC-WE675
HEAD RELAY
SECTION 8
ELECTRICAL PARTS LIST
LEAF SW
Note:
• Due to standardization, replacements in the
parts list may be different from the parts
specified in the diagrams or the components
used on the set.
• -XX, -X mean standardized parts, so they
may have some difference from the original
one.
• Items marked “*” are not stocked since they
are seldom required for routine service. Some
delay should be anticipated when ordering
these items.
• RESISTORS
All resistors are in ohms
METAL: Metal-film resistor
METAL OXIDE: Metal Oxide-film resistor
F : nonflammable
Ref. No. Part No. Description Remark Ref. No. Part No. Description Remark
1-676-221-11 HEAD RELAY (REC/PB) BOARD
CN1003 1-564-722-11 PIN, CONNECTOR (SMALL TYPE) 6P
**************************************************************
A-4476-816-A LEAF SW BOARD, COMPLETE
CN1001 1-568-444-11 SOCKET, CONNECTOR 13P
MAIN
************************
< CONNECTOR >
***********************
< CONNECTOR >
• SEMICONDUCTORS
In each case, u: µ , for example:
uA...: µ A..., uPA...: µ PA..., uPB...: µPB...,
uPC...: µ PC..., uPD...: µ PD...
• CAPACITORS
uF : µ F
• COILS
uH : µ H
• Abbreviation
CND : Canadian model
SP : Singapore model
MY : Malaysia model
AUS : Australian model
C104 1-126-963-11 ELECT 4.7uF 20.00% 50V
C105 1-162-302-11 CERAMIC 0.0022uF 20.00% 16V
C106 1-126-963-11 ELECT 4.7uF 20.00% 50V
C107 1-126-964-11 ELECT 10uF 20.00% 50V
C108 1-130-495-00 MYLAR 0.1uF 5% 50V
C109 1-137-375-11 MYLAR 0.068uF 5.00% 50V
C110 1-126-964-11 ELECT 10uF 20.00% 50V
C111 1-126-959-11 ELECT 0.47uF 20.00% 50V
C112 1-126-963-11 ELECT 4.7uF 20.00% 50V
C113 1-126-963-11 ELECT 4.7uF 20.00% 50V
C114 1-126-961-11 ELECT 2.2uF 20.00% 50V
C115 1-137-436-11 MYLAR 0.0039uF 5.00% 50V
The components identified by
mark 0 or dotted line with mark
0 are critical for safety.
Replace only with part number
specified.
Les composants identifiés par une
marque 0 sont critiques pour la
sécurité.
Ne les remplacer que par une
piéce portant le numéro spécifié.
When indicating parts by reference
number, please include the board
name.
< DIODE >
D1001 8-719-991-33 DIODE 1SS133T-77
< IC >
IC1002 8-749-014-38 IC PHOTO INTERRUPTER SG-264
< RESISTOR >
R1002 1-249-409-11 CARBON 220 5% 1/4W F
R1003 1-249-414-11 CARBON 560 5% 1/4W F
R1004 1-247-834-11 CARBON 1.3K 5% 1/4W
R1005 1-247-818-91 CARBON 300 5% 1/4W
< SWITCH >
S1002 1-570-953-11 SWITCH, PUSH (1 KEY)(PLAY SW)
S1005 1-771-205-11 SWITCH, LEAF (REC A SIDE)
S1006 1-771-333-11 SWITCH, LEAF (HALF)
S1007 1-771-205-11 SWITCH, LEAF (B METAL)
S1008 1-771-205-11 SWITCH, LEAF (REC B SIDE)
S1009 1-771-205-11 SWITCH, LEAF
*************************************************************
A-2007-866-A MAIN BOARD, COMPLETE (US,CND,SP,AUS)
A-2007-869-A MAIN BOARD, COMPLETE (AEP,UK)
*********************
C116 1-126-959-11 ELECT 0.47uF 20.00% 50V
C117 1-126-963-11 ELECT 4.7uF 20.00% 50V
C120 1-162-289-31 CERAMIC 390PF 10.00% 50V
C121 1-162-294-31 CERAMIC 0.001uF 10% 50V
C122 1-162-282-31 CERAMIC 100PF 10% 50V
C123 1-137-372-11 MYLAR 0.022uF 5.00% 50V
C124 1-126-963-11 ELECT 4.7uF 20.00% 50V
C125 1-162-289-31 CERAMIC 390PF 10.00% 50V
C126 1-162-282-31 CERAMIC 100PF 10% 50V
C127 1-137-372-11 MYLAR 0.022uF 5.00% 50V
C128 1-126-963-11 ELECT 4.7uF 20.00% 50V
C131 1-162-288-31 CERAMIC 330PF 10% 50V
0 C132 1-107-609-11 CERAMIC 75PF 5.00% 500V
C133 1-130-472-00 MYLAR 0.0012uF 5% 50V
C134 1-102-973-00 CERAMIC 100PF 5% 50V
C135 1-136-356-11 FILM 470PF 5.00% 100V
C136 1-137-374-11 MYLAR 0.047uF 5.00% 50V
C137 1-161-494-00 CERAMIC 0.022uF 25V
C138 1-162-306-11 CERAMIC 0.01uF 30.00% 16V
C141 1-162-288-31 CERAMIC 330PF 10% 50V
0 C142 1-107-609-11 CERAMIC 75PF 5.00% 500V
C143 1-130-472-00 MYLAR 0.0012uF 5% 50V
C144 1-102-973-00 CERAMIC 100PF 5% 50V
C145 1-136-356-11 FILM 470PF 5.00% 100V
C146 1-137-374-11 MYLAR 0.047uF 5.00% 50V
< CAPACITOR >
C101 1-162-284-31 CERAMIC 150PF 10.00% 50V
C102 1-126-961-11 ELECT 2.2uF 20.00% 50V
C103 1-162-600-11 CERAMIC 0.0047uF 30.00% 16V
32
C147 1-161-494-00 CERAMIC 0.022uF 25V
C148 1-162-306-11 CERAMIC 0.01uF 30.00% 16V
C201 1-162-284-31 CERAMIC 150PF 10.00% 50V
C202 1-126-961-11 ELECT 2.2uF 20.00% 50V
C203 1-162-600-11 CERAMIC 0.0047uF 30.00% 16V
Page 33

TC-WE675
MAIN
Ref. No. Part No. Description Remark Ref. No. Part No. Description Remark
C204 1-126-963-11 ELECT 4.7uF 20.00% 50V
C205 1-162-302-11 CERAMIC 0.0022uF 20.00% 16V
C206 1-126-963-11 ELECT 4.7uF 20.00% 50V
C207 1-126-964-11 ELECT 10uF 20.00% 50V
C208 1-130-495-00 MYLAR 0.1uF 5% 50V
C209 1-137-375-11 MYLAR 0.068uF 5.00% 50V
C210 1-126-964-11 ELECT 10uF 20.00% 50V
C211 1-126-959-11 ELECT 0.47uF 20.00% 50V
C212 1-126-963-11 ELECT 4.7uF 20.00% 50V
C213 1-126-963-11 ELECT 4.7uF 20.00% 50V
C214 1-126-961-11 ELECT 2.2uF 20.00% 50V
C215 1-137-436-11 MYLAR 0.0039uF 5.00% 50V
C216 1-126-959-11 ELECT 0.47uF 20.00% 50V
C217 1-126-963-11 ELECT 4.7uF 20.00% 50V
C220 1-162-289-31 CERAMIC 390PF 10.00% 50V
C221 1-162-294-31 CERAMIC 0.001uF 10% 50V
C222 1-162-282-31 CERAMIC 100PF 10% 50V
C223 1-137-372-11 MYLAR 0.022uF 5.00% 50V
C224 1-126-963-11 ELECT 4.7uF 20.00% 50V
C225 1-162-289-31 CERAMIC 390PF 10.00% 50V
C226 1-162-282-31 CERAMIC 100PF 10% 50V
C227 1-137-372-11 MYLAR 0.022uF 5.00% 50V
C228 1-126-963-11 ELECT 4.7uF 20.00% 50V
C231 1-162-288-31 CERAMIC 330PF 10% 50V
0 C232 1-107-609-11 CERAMIC 75PF 5.00% 500V
C233 1-130-472-00 MYLAR 0.0012uF 5% 50V
C234 1-102-973-00 CERAMIC 100PF 5% 50V
C235 1-136-356-11 FILM 470PF 5.00% 100V
C236 1-137-374-11 MYLAR 0.047uF 5.00% 50V
C237 1-161-494-00 CERAMIC 0.022uF 25V
C238 1-162-306-11 CERAMIC 0.01uF 30.00% 16V
C241 1-162-288-31 CERAMIC 330PF 10% 50V
0 C242 1-107-609-11 CERAMIC 75PF 5.00% 500V
C243 1-130-472-00 MYLAR 0.0012uF 5% 50V
C244 1-102-973-00 CERAMIC 100PF 5% 50V
C245 1-136-356-11 FILM 470PF 5.00% 100V
C246 1-137-374-11 MYLAR 0.047uF 5.00% 50V
C247 1-161-494-00 CERAMIC 0.022uF 25V
C248 1-162-306-11 CERAMIC 0.01uF 30.00% 16V
C321 1-104-664-11 ELECT 47uF 20.00% 25V
C322 1-104-664-11 ELECT 47uF 20.00% 25V
C331 1-104-664-11 ELECT 47uF 20.00% 25V
0 C332 1-107-584-11 CERAMIC 4PF 0.25PF 500V
C333 1-126-965-11 ELECT 22uF 20.00% 50V
C334 1-126-959-11 ELECT 0.47uF 20.00% 50V
C441 1-136-293-11 FILM 0.0082uF 5.00% 100V
C443 1-130-299-00 MYLAR 0.012uF 5.00% 50V
C444 1-137-436-11 MYLAR 0.0039uF 5.00% 50V
C445 1-137-436-11 MYLAR 0.0039uF 5.00% 50V
C446 1-126-965-11 ELECT 22uF 20.00% 50V
C451 1-126-964-11 ELECT 10uF 20.00% 50V
C501 1-126-964-11 ELECT 10uF 20.00% 50V
C502 1-126-964-11 ELECT 10uF 20.00% 50V
C503 1-126-964-11 ELECT 10uF 20.00% 50V
C505 1-126-960-11 ELECT 1uF 20.00% 50V
C506 1-130-497-00 MYLAR 0.15uF 5% 50V
C507 1-136-173-00 MYLAR 0.47uF 5.00% 50V
C508 1-126-959-11 ELECT 0.47uF 20.00% 50V
C509 1-126-965-11 ELECT 22uF 20.00% 50V
C510 1-126-960-11 ELECT 1uF 20.00% 50V
C511 1-126-916-11 ELECT 1000uF 20.00% 6.3V
C521 1-137-457-11 MYLAR 0.0027uF 5.00% 50V
C522 1-130-494-11 MYLAR 0.082uF 5% 50V
C523 1-137-374-11 MYLAR 0.047uF 5.00% 50V
C524 1-137-366-11 MYLAR 0.0022uF 5.00% 50V
C530 1-126-965-11 ELECT 22uF 20.00% 50V
C561 1-136-168-00 MYLAR 0.18uF 5.00% 50V
C562 1-137-150-11 MYLAR 0.01uF 5.00% 50V
C563 1-136-175-00 MYLAR 0.68uF 5.00% 50V
C601 1-164-159-11 CERAMIC 0.1uF 50V
C701 1-128-547-11 ELECT 6800uF 20.00% 16V
C702 1-126-937-11 ELECT 4700uF 20.00% 16V
C703 1-126-960-11 ELECT 1uF 20.00% 50V
C704 1-126-969-11 ELECT 220uF 20.00% 50V
C705 1-126-963-11 ELECT 4.7uF 20.00% 50V
C706 1-126-926-11 ELECT 1000uF 20.00% 10V
C707 1-126-926-11 ELECT 1000uF 20.00% 10V
C708 1-126-963-11 ELECT 4.7uF 20.00% 50V
C710 1-126-935-11 ELECT 470uF 20.00% 6.3V
C711 1-126-947-11 ELECT 47uF 20.00% 35V
C801 1-104-665-11 ELECT 100uF 20.00% 10V
C802 1-161-494-00 CERAMIC 0.022uF 25V
C803 1-126-959-11 ELECT 0.47uF 20.00% 50V
C810 1-161-494-00 CERAMIC 0.022uF 25V
C811 1-164-159-11 CERAMIC 0.1uF 50V
C830 1-161-494-00 CERAMIC 0.022uF 25V
C831 1-161-494-00 CERAMIC 0.022uF 25V
C834 1-161-494-00 CERAMIC 0.022uF 25V
C836 1-161-494-00 CERAMIC 0.022uF 25V
C341 1-136-293-11 FILM 0.0082uF 5.00% 100V
C343 1-130-299-00 MYLAR 0.012uF 5.00% 50V
C344 1-137-436-11 MYLAR 0.0039uF 5.00% 50V
C345 1-137-436-11 MYLAR 0.0039uF 5.00% 50V
C346 1-126-965-11 ELECT 22uF 20.00% 50V
C351 1-126-964-11 ELECT 10uF 20.00% 50V
C417 1-126-959-11 ELECT 0.47uF 20.00% 50V
C421 1-104-664-11 ELECT 47uF 20.00% 25V
C422 1-104-664-11 ELECT 47uF 20.00% 25V
C431 1-104-664-11 ELECT 47uF 20.00% 25V
0 C432 1-107-584-11 CERAMIC 4PF 0.25PF 500V
C433 1-126-965-11 ELECT 22uF 20.00% 50V
C434 1-126-959-11 ELECT 0.47uF 20.00% 50V
< CONNECTOR >
CN301 1-691-770-11 PLUG (MICRO CONNECTOR) 8P
CN311 1-784-774-11 CONNECTOR, FFC 13P
CN401 1-691-770-11 PLUG (MICRO CONNECTOR) 8P
CN411 1-784-774-11 CONNECTOR, FFC 13P
* CN803 1-568-934-11 PIN, CONNECTOR 7P
* CN807 1-568-954-11 PIN, CONNECTOR 5P
CNA806 1-506-468-11 PIN, CONNECTOR 3P
CNM701 1-691-769-11 PLUG (MICRO CONNECTOR) 7P
CNS802 1-568-830-11 CONNECTOR, FFC 11P
The components identified by
mark 0 or dotted line with mark
0 are critical for safety.
Replace only with part number
specified.
Les composants identifiés par une
marque 0 sont critiques pour la
sécurité.
Ne les remplacer que par une
piéce portant le numéro spécifié.
33
Page 34

TC-WE675
MAIN
Ref. No. Part No. Description Remark Ref. No. Part No. Description Remark
< DIODE >
< FILTER >
D306 8-719-911-19 DIODE 1SS119-25
D307 8-719-911-19 DIODE 1SS119-25
D318 8-719-911-19 DIODE 1SS119-25
D351 8-719-911-19 DIODE 1SS119-25
D451 8-719-911-19 DIODE 1SS119-25
D521 8-719-911-19 DIODE 1SS119-25
D522 8-719-911-19 DIODE 1SS119-25
D601 8-719-911-19 DIODE 1SS119-25
D701 8-719-024-99 DIODE 11ES2-NTA2B
D702 8-719-024-99 DIODE 11ES2-NTA2B
D703 8-719-024-99 DIODE 11ES2-NTA2B
D704 8-719-024-99 DIODE 11ES2-NTA2B
D705 8-719-911-19 DIODE 1SS119-25
D706 8-719-911-19 DIODE 1SS119-25
D707 8-719-024-99 DIODE 11ES2-NTA2B
D708 8-719-911-19 DIODE 1SS119-25
D709 8-719-933-33 DIODE HZS6A1L
D710 8-719-933-35 DIODE HZS6A3L
D711 8-719-933-33 DIODE HZS6A1L
D712 8-719-933-35 DIODE HZS6A3L
D713 8-719-911-19 DIODE 1SS119-25
D714 8-719-911-19 DIODE 1SS119-25
D715 8-719-911-19 DIODE 1SS119-25
D716 8-719-985-95 DIODE HZS7A2LTA
D801 8-719-911-19 DIODE 1SS119-25
< IC >
IC321 8-759-710-59 IC NJM4580D-D
IC331 8-759-106-56 IC uPC1297CA
IC421 8-759-710-59 IC NJM4580D-D
IC431 8-759-106-56 IC uPC1297CA
IC501 8-752-075-27 IC CXA1878Q
IC502 8-759-694-61 IC NJM4565L
IC504 8-752-070-67 IC CXA1597P
IC561 8-759-694-61 IC NJM4565L
IC701 8-759-634-51 IC NJM4558D
IC801 8-752-902-28 IC CXP82432A-007Q
IC802 8-759-165-82 IC PST600E-T
IC803 8-759-916-14 IC MC74HC04AN
IC804 8-759-000-48 IC MC14052BCP
IC805 8-759-916-14 IC MC74HC04AN
IC806 8-759-000-48 IC MC14052BCP
< JACK >
J501 1-770-614-11 JACK, PIN 4P
* J601 1-764-188-11 JACK (SMALL TYPE) (DIA. 3.5)
(S-LINK CONTROL A1)
* J602 1-764-188-11 JACK (SMALL TYPE) (DIA. 3.5)
(S-LINK CONTROL A1)
< COIL >
L131 1-410-780-11 INDUCTOR 27MH
L141 1-410-780-11 INDUCTOR 27MH
L231 1-410-780-11 INDUCTOR 27MH
L241 1-410-780-11 INDUCTOR 27MH
LPF101 1-233-271-11 FILTER, LOW PASS
LPF201 1-233-271-11 FILTER, LOW PASS
< TRANSISTOR >
Q101 8-729-029-94 TRANSISTOR DTC143TSA
Q102 8-729-142-25 TRANSISTOR 2SD1020-HFE
Q103 8-729-030-02 TRANSISTOR DTC144ESA
Q104 8-729-030-02 TRANSISTOR DTC144ESA
Q201 8-729-029-94 TRANSISTOR DTC143TSA
Q202 8-729-142-25 TRANSISTOR 2SD1020-HFE
Q203 8-729-030-02 TRANSISTOR DTC144ESA
Q204 8-729-030-02 TRANSISTOR DTC144ESA
Q302 8-729-801-93 TRANSISTOR 2SD1387-3
Q303 8-729-030-02 TRANSISTOR DTC144ESA
Q306 8-729-030-02 TRANSISTOR DTC144ESA
Q307 8-729-030-02 TRANSISTOR DTC144ESA
Q308 8-729-030-02 TRANSISTOR DTC144ESA
Q311 8-729-801-84 TRANSISTOR 2SB1013-4
Q314 8-729-030-02 TRANSISTOR DTC144ESA
Q316 8-729-029-56 TRANSISTOR DTA144ESA
Q317 8-729-029-56 TRANSISTOR DTA144ESA
Q318 8-729-029-56 TRANSISTOR DTA144ESA
Q341 8-729-119-76 TRANSISTOR 2SA1175-HFE
Q342 8-729-194-57 TRANSISTOR 2SC945-P
Q343 8-729-194-57 TRANSISTOR 2SC945-P
Q351 8-729-119-76 TRANSISTOR 2SA1175-HFE
Q371 8-729-140-04 TRANSISTOR 2SB1116A-L
Q373 8-729-030-02 TRANSISTOR DTC144ESA
Q402 8-729-801-93 TRANSISTOR 2SD1387-3
Q403 8-729-030-02 TRANSISTOR DTC144ESA
Q411 8-729-801-84 TRANSISTOR 2SB1013-4
Q414 8-729-030-02 TRANSISTOR DTC144ESA
Q417 8-729-029-56 TRANSISTOR DTA144ESA
Q441 8-729-119-76 TRANSISTOR 2SA1175-HFE
Q442 8-729-194-57 TRANSISTOR 2SC945-P
Q443 8-729-194-57 TRANSISTOR 2SC945-P
Q451 8-729-119-76 TRANSISTOR 2SA1175-HFE
Q471 8-729-140-04 TRANSISTOR 2SB1116A-L
Q473 8-729-030-02 TRANSISTOR DTC144ESA
Q501 8-729-119-76 TRANSISTOR 2SA1175-HFE
Q502 8-729-620-05 TRANSISTOR 2SC2603-EF
Q503 8-729-620-05 TRANSISTOR 2SC2603-EF
Q505 8-729-029-94 TRANSISTOR DTC143TSA
Q506 8-729-029-94 TRANSISTOR DTC143TSA
Q601 8-729-620-05 TRANSISTOR 2SC2603-EF
Q701 8-729-141-83 TRANSISTOR 2SB1094-LK
Q702 8-729-209-15 TRANSISTOR 2SD2012
Q703 8-729-141-83 TRANSISTOR 2SB1094-LK
Q704 8-729-620-05 TRANSISTOR 2SC2603-EF
Q707 8-729-119-76 TRANSISTOR 2SA1175-HFE
Q708 8-729-140-04 TRANSISTOR 2SB1116A-L
Q801 8-729-029-66 TRANSISTOR DTC114ESA
< RESISTOR >
34
R101 1-249-429-11 CARBON 10K 5% 1/4W
Page 35

TC-WE675
MAIN
Ref. No. Part No. Description Remark Ref. No. Part No. Description Remark
R102 1-247-887-00 CARBON 220K 5% 1/4W
R103 1-249-441-11 CARBON 100K 5% 1/4W
R104 1-249-420-11 CARBON 1.8K 5% 1/4W F
R105 1-247-843-11 CARBON 3.3K 5% 1/4W
R106 1-247-842-11 CARBON 3K 5% 1/4W
R107 1-249-417-11 CARBON 1K 5% 1/4W F
R108 1-249-427-11 CARBON 6.8K 5% 1/4W F
R109 1-249-429-11 CARBON 10K 5% 1/4W
R110 1-249-425-11 CARBON 4.7K 5% 1/4W F
R111 1-247-881-00 CARBON 120K 5% 1/4W
R112 1-247-807-31 CARBON 100 5% 1/4W
R113 1-247-882-11 CARBON 130K 5% 1/4W
R114 1-247-850-11 CARBON 6.2K 5% 1/4W
R115 1-249-433-11 CARBON 22K 5% 1/4W
R116 1-247-843-11 CARBON 3.3K 5% 1/4W
R117 1-249-429-11 CARBON 10K 5% 1/4W
R118 1-249-409-11 CARBON 220 5% 1/4W F
R119 1-249-417-11 CARBON 1K 5% 1/4W F
R120 1-249-439-11 CARBON 68K 5% 1/4W
R121 1-247-881-00 CARBON 120K 5% 1/4W
R122 1-247-807-31 CARBON 100 5% 1/4W
R123 1-247-882-11 CARBON 130K 5% 1/4W
R124 1-247-850-11 CARBON 6.2K 5% 1/4W
R125 1-249-440-11 CARBON 82K 5% 1/4W
R126 1-249-421-11 CARBON 2.2K 5% 1/4W F
R127 1-249-430-11 CARBON 12K 5% 1/4W
R128 1-249-417-11 CARBON 1K 5% 1/4W F
R129 1-249-421-11 CARBON 2.2K 5% 1/4W F
R130 1-249-434-11 CARBON 27K 5% 1/4W
R131 1-249-430-11 CARBON 12K 5% 1/4W
R132 1-247-883-00 CARBON 150K 5% 1/4W
0 R133 1-219-153-11 FUSIBLE 10 5% 1/4W
R134 1-249-435-11 CARBON 33K 5% 1/4W
R135 1-249-431-11 CARBON 15K 5% 1/4W
R141 1-249-430-11 CARBON 12K 5% 1/4W
R142 1-247-883-00 CARBON 150K 5% 1/4W
0 R143 1-219-153-11 FUSIBLE 10 5% 1/4W
R144 1-249-435-11 CARBON 33K 5% 1/4W
R145 1-249-431-11 CARBON 15K 5% 1/4W
R151 1-249-437-11 CARBON 47K 5% 1/4W
R152 1-249-433-11 CARBON 22K 5% 1/4W
R153 1-249-427-11 CARBON 6.8K 5% 1/4W F
R201 1-249-429-11 CARBON 10K 5% 1/4W
R202 1-247-887-00 CARBON 220K 5% 1/4W
R203 1-249-441-11 CARBON 100K 5% 1/4W
R204 1-249-420-11 CARBON 1.8K 5% 1/4W F
R205 1-247-843-11 CARBON 3.3K 5% 1/4W
R206 1-247-842-11 CARBON 3K 5% 1/4W
R207 1-249-417-11 CARBON 1K 5% 1/4W F
R208 1-249-427-11 CARBON 6.8K 5% 1/4W F
R209 1-249-429-11 CARBON 10K 5% 1/4W
R210 1-249-425-11 CARBON 4.7K 5% 1/4W F
R211 1-247-881-00 CARBON 120K 5% 1/4W
R212 1-247-807-31 CARBON 100 5% 1/4W
R213 1-247-882-11 CARBON 130K 5% 1/4W
R214 1-247-850-11 CARBON 6.2K 5% 1/4W
R215 1-249-433-11 CARBON 22K 5% 1/4W
R216 1-247-843-11 CARBON 3.3K 5% 1/4W
R217 1-249-429-11 CARBON 10K 5% 1/4W
R218 1-249-409-11 CARBON 220 5% 1/4W F
R219 1-249-417-11 CARBON 1K 5% 1/4W F
R220 1-249-439-11 CARBON 68K 5% 1/4W
R221 1-247-881-00 CARBON 120K 5% 1/4W
R222 1-247-807-31 CARBON 100 5% 1/4W
R223 1-247-882-11 CARBON 130K 5% 1/4W
R224 1-247-850-11 CARBON 6.2K 5% 1/4W
R225 1-249-440-11 CARBON 82K 5% 1/4W
R226 1-249-421-11 CARBON 2.2K 5% 1/4W F
R227 1-249-430-11 CARBON 12K 5% 1/4W
R228 1-249-417-11 CARBON 1K 5% 1/4W F
R229 1-249-421-11 CARBON 2.2K 5% 1/4W F
R230 1-249-434-11 CARBON 27K 5% 1/4W
R231 1-249-430-11 CARBON 12K 5% 1/4W
R232 1-247-883-00 CARBON 150K 5% 1/4W
0 R233 1-219-153-11 FUSIBLE 10 5% 1/4W
R234 1-249-435-11 CARBON 33K 5% 1/4W
R235 1-249-431-11 CARBON 15K 5% 1/4W
R241 1-249-430-11 CARBON 12K 5% 1/4W
R242 1-247-883-00 CARBON 150K 5% 1/4W
0 R243 1-219-153-11 FUSIBLE 10 5% 1/4W
R244 1-249-435-11 CARBON 33K 5% 1/4W
R245 1-249-431-11 CARBON 15K 5% 1/4W
R251 1-249-437-11 CARBON 47K 5% 1/4W
R252 1-249-433-11 CARBON 22K 5% 1/4W
R253 1-249-427-11 CARBON 6.8K 5% 1/4W F
R301 1-249-437-11 CARBON 47K 5% 1/4W
R302 1-249-414-11 CARBON 560 5% 1/4W F
R303 1-249-437-11 CARBON 47K 5% 1/4W
R304 1-249-419-11 CARBON 1.5K 5% 1/4W F
R306 1-249-433-11 CARBON 22K 5% 1/4W
R309 1-249-433-11 CARBON 22K 5% 1/4W
R311 1-249-437-11 CARBON 47K 5% 1/4W
R312 1-249-419-11 CARBON 1.5K 5% 1/4W F
R313 1-249-414-11 CARBON 560 5% 1/4W F
R314 1-249-437-11 CARBON 47K 5% 1/4W
R316 1-249-434-11 CARBON 27K 5% 1/4W
R317 1-249-433-11 CARBON 22K 5% 1/4W
R318 1-249-426-11 CARBON 5.6K 5% 1/4W
R341 1-249-429-11 CARBON 10K 5% 1/4W
R342 1-249-429-11 CARBON 10K 5% 1/4W
R343 1-249-390-11 CARBON 5.6 5% 1/4W F
R344 1-249-390-11 CARBON 5.6 5% 1/4W F
R345 1-249-440-11 CARBON 82K 5% 1/4W
R346 1-249-440-11 CARBON 82K 5% 1/4W
R351 1-249-429-11 CARBON 10K 5% 1/4W
R352 1-249-425-11 CARBON 4.7K 5% 1/4W F
R361 1-247-876-11 CARBON 75K 5% 1/4W
R362 1-249-417-11 CARBON 1K 5% 1/4W F
R363 1-249-425-11 CARBON 4.7K 5% 1/4W F
R364 1-249-425-11 CARBON 4.7K 5% 1/4W F
R371 1-249-417-11 CARBON 1K 5% 1/4W F
R372 1-249-429-11 CARBON 10K 5% 1/4W
R401 1-249-437-11 CARBON 47K 5% 1/4W
R402 1-249-414-11 CARBON 560 5% 1/4W F
The components identified by
mark 0 or dotted line with mark
0 are critical for safety.
Replace only with part number
specified.
Les composants identifiés par une
marque 0 sont critiques pour la
sécurité.
Ne les remplacer que par une
piéce portant le numéro spécifié.
35
Page 36

TC-WE675
MAIN
Ref. No. Part No. Description Remark
R403 1-249-437-11 CARBON 47K 5% 1/4W
R404 1-249-419-11 CARBON 1.5K 5% 1/4W F
R411 1-249-437-11 CARBON 47K 5% 1/4W
R412 1-249-419-11 CARBON 1.5K 5% 1/4W F
R413 1-249-414-11 CARBON 560 5% 1/4W F
R414 1-249-437-11 CARBON 47K 5% 1/4W
R416 1-249-434-11 CARBON 27K 5% 1/4W
R417 1-249-433-11 CARBON 22K 5% 1/4W
R441 1-249-429-11 CARBON 10K 5% 1/4W
R442 1-249-429-11 CARBON 10K 5% 1/4W
R443 1-249-390-11 CARBON 5.6 5% 1/4W F
R444 1-249-390-11 CARBON 5.6 5% 1/4W F
R445 1-249-440-11 CARBON 82K 5% 1/4W
R446 1-249-440-11 CARBON 82K 5% 1/4W
R451 1-249-429-11 CARBON 10K 5% 1/4W
R452 1-249-425-11 CARBON 4.7K 5% 1/4W F
R461 1-247-876-11 CARBON 75K 5% 1/4W
R462 1-249-417-11 CARBON 1K 5% 1/4W F
R463 1-249-425-11 CARBON 4.7K 5% 1/4W F
R464 1-249-425-11 CARBON 4.7K 5% 1/4W F
R471 1-249-417-11 CARBON 1K 5% 1/4W F
R472 1-249-429-11 CARBON 10K 5% 1/4W
R501 1-215-455-00 METAL 27K 1% 1/4W
R502 1-215-452-00 METAL 20K 1% 1/4W
R503 1-249-417-11 CARBON 1K 5% 1/4W F
R504 1-249-422-11 CARBON 2.7K 5% 1/4W F
R505 1-247-903-00 CARBON 1M 5% 1/4W
R506 1-249-429-11 CARBON 10K 5% 1/4W
R507 1-249-429-11 CARBON 10K 5% 1/4W
R508 1-249-413-11 CARBON 470 5% 1/4W F
R509 1-249-417-11 CARBON 1K 5% 1/4W F
R510 1-249-437-11 CARBON 47K 5% 1/4W
R511 1-249-429-11 CARBON 10K 5% 1/4W
R512 1-249-413-11 CARBON 470 5% 1/4W F
R513 1-249-437-11 CARBON 47K 5% 1/4W
R514 1-249-401-11 CARBON 47 5% 1/4W F
R515 1-215-455-00 METAL 27K 1% 1/4W
R516 1-249-401-11 CARBON 47 5% 1/4W F
R521 1-249-433-11 CARBON 22K 5% 1/4W
R522 1-249-426-11 CARBON 5.6K 5% 1/4W
R523 1-249-436-11 CARBON 39K 5% 1/4W
R524 1-249-425-11 CARBON 4.7K 5% 1/4W F
R525 1-249-425-11 CARBON 4.7K 5% 1/4W F
R526 1-249-441-11 CARBON 100K 5% 1/4W
R527 1-249-441-11 CARBON 100K 5% 1/4W
R528 1-249-424-11 CARBON 3.9K 5% 1/4W F
R529 1-249-413-11 CARBON 470 5% 1/4W F
R530 1-249-429-11 CARBON 10K 5% 1/4W
R561 1-249-437-11 CARBON 47K 5% 1/4W
R562 1-249-437-11 CARBON 47K 5% 1/4W
R563 1-249-437-11 CARBON 47K 5% 1/4W
R564 1-249-431-11 CARBON 15K 5% 1/4W
R565 1-249-429-11 CARBON 10K 5% 1/4W
R571 1-249-418-11 CARBON 1.2K 5% 1/4W F
R572 1-249-426-11 CARBON 5.6K 5% 1/4W
R573 1-249-427-11 CARBON 6.8K 5% 1/4W F
R575 1-247-852-11 CARBON 7.5K 5% 1/4W
R576 1-249-430-11 CARBON 12K 5% 1/4W
36
Ref. No. Part No. Description Remark
R577 1-249-428-11 CARBON 8.2K 5% 1/4W F
R578 1-249-428-11 CARBON 8.2K 5% 1/4W F
R579 1-249-426-11 CARBON 5.6K 5% 1/4W
R580 1-249-422-11 CARBON 2.7K 5% 1/4W F
R581 1-249-425-11 CARBON 4.7K 5% 1/4W F
R582 1-249-425-11 CARBON 4.7K 5% 1/4W F
R583 1-247-852-11 CARBON 7.5K 5% 1/4W
R584 1-249-430-11 CARBON 12K 5% 1/4W
R585 1-249-428-11 CARBON 8.2K 5% 1/4W F
R586 1-249-428-11 CARBON 8.2K 5% 1/4W F
R587 1-249-422-11 CARBON 2.7K 5% 1/4W F
R588 1-249-426-11 CARBON 5.6K 5% 1/4W
R601 1-249-429-11 CARBON 10K 5% 1/4W
R602 1-249-417-11 CARBON 1K 5% 1/4W F
R603 1-249-425-11 CARBON 4.7K 5% 1/4W F
R604 1-249-429-11 CARBON 10K 5% 1/4W
R605 1-249-393-11 CARBON 10 5% 1/4W F
R701 1-249-414-11 CARBON 560 5% 1/4W F
R703 1-247-843-11 CARBON 3.3K 5% 1/4W
R704 1-249-425-11 CARBON 4.7K 5% 1/4W F
R705 1-249-427-11 CARBON 6.8K 5% 1/4W F
R706 1-249-419-11 CARBON 1.5K 5% 1/4W F
R707 1-247-854-11 CARBON 9.1K 5% 1/4W
R708 1-249-419-11 CARBON 1.5K 5% 1/4W F
R709 1-249-425-11 CARBON 4.7K 5% 1/4W F
R710 1-249-417-11 CARBON 1K 5% 1/4W F
R711 1-249-427-11 CARBON 6.8K 5% 1/4W F
R712 1-249-427-11 CARBON 6.8K 5% 1/4W F
R713 1-249-417-11 CARBON 1K 5% 1/4W F
R714 1-249-429-11 CARBON 10K 5% 1/4W
R715 1-249-422-11 CARBON 2.7K 5% 1/4W F
R716 1-249-433-11 CARBON 22K 5% 1/4W
R717 1-249-421-11 CARBON 2.2K 5% 1/4W F
R718 1-249-429-11 CARBON 10K 5% 1/4W
R719 1-249-430-11 CARBON 12K 5% 1/4W
0 R720 1-219-136-11 FUSIBLE 0.22 10% 1/4W
0 R722 1-219-137-11 FUSIBLE 0.33 10% 1/4W
0 R723 1-219-137-11 FUSIBLE 0.33 10% 1/4W
R801 1-249-417-11 CARBON 1K 5% 1/4W F
R803 1-249-429-11 CARBON 10K 5% 1/4W
R804 1-249-429-11 CARBON 10K 5% 1/4W
R805 1-247-807-31 CARBON 100 5% 1/4W
R806 1-249-433-11 CARBON 22K 5% 1/4W
R807 1-249-441-11 CARBON 100K 5% 1/4W
R808 1-249-441-11 CARBON 100K 5% 1/4W
R809 1-249-417-11 CARBON 1K 5% 1/4W F
R810 1-247-807-31 CARBON 100 5% 1/4W
R811 1-249-429-11 CARBON 10K 5% 1/4W
R812 1-249-429-11 CARBON 10K 5% 1/4W
R813 1-247-807-31 CARBON 100 5% 1/4W
R830 1-247-807-31 CARBON 100 5% 1/4W
R831 1-249-431-11 CARBON 15K 5% 1/4W
R832 1-249-429-11 CARBON 10K 5% 1/4W
R833 1-249-421-11 CARBON 2.2K 5% 1/4W F
R834 1-247-852-11 CARBON 7.5K 5% 1/4W
R835 1-247-866-11 CARBON 30K 5% 1/4W
R836 1-247-874-11 CARBON 62K 5% 1/4W
The components identified by
mark 0 or dotted line with mark
0 are critical for safety.
Replace only with part number
specified.
Les composants identifiés par une
marque 0 sont critiques pour la
sécurité.
Ne les remplacer que par une
piéce portant le numéro spécifié.
Page 37

TC-WE675
Ref. No. Part No. Description Remark
R837 1-249-434-11 CARBON 27K 5% 1/4W
R838 1-249-434-11 CARBON 27K 5% 1/4W
R839 1-249-434-11 CARBON 27K 5% 1/4W
R840 1-249-434-11 CARBON 27K 5% 1/4W
R841 1-249-429-11 CARBON 10K 5% 1/4W
R842 1-249-429-11 CARBON 10K 5% 1/4W
R843 1-249-429-11 CARBON 10K 5% 1/4W
R844 1-249-429-11 CARBON 10K 5% 1/4W
R845 1-249-431-11 CARBON 15K 5% 1/4W
R846 1-249-429-11 CARBON 10K 5% 1/4W
R847 1-247-864-11 CARBON 24K 5% 1/4W
R849 1-249-424-11 CARBON 3.9K 5% 1/4W F
R853 1-249-421-11 CARBON 2.2K 5% 1/4W F
R854 1-247-852-11 CARBON 7.5K 5% 1/4W
R855 1-247-866-11 CARBON 30K 5% 1/4W
R856 1-247-874-11 CARBON 62K 5% 1/4W
R857 1-249-431-11 CARBON 15K 5% 1/4W
R858 1-249-434-11 CARBON 27K 5% 1/4W
R859 1-249-434-11 CARBON 27K 5% 1/4W
R860 1-249-434-11 CARBON 27K 5% 1/4W
R861 1-249-434-11 CARBON 27K 5% 1/4W
R863 1-249-429-11 CARBON 10K 5% 1/4W
R864 1-249-429-11 CARBON 10K 5% 1/4W
R865 1-249-429-11 CARBON 10K 5% 1/4W
R866 1-249-429-11 CARBON 10K 5% 1/4W
MAIN
Ref. No. Part No. Description Remark
T341 1-429-222-11 TRANSFORMER, BIAS OSCILLATION
T441 1-429-222-11 TRANSFORMER, BIAS OSCILLATION
< TEST PIN >
TP331 1-766-276-11 PIN, CONNECTOR (PC BOARD) 3P
TP441 1-766-276-11 PIN, CONNECTOR (PC BOARD) 3P
< VIBRATOR >
X801 1-579-175-11 VIBRATOR, CERAMIC (10MHz)
**************************************************************
A-2007-867-A PANEL BOARD, COMPLETE (US,CND)
A-2007-868-A PANEL BOARD, COMPLETE (AUS)
A-2007-870-A PANEL BOARD, COMPLETE (AEP,UK)
A-2007-871-A PANEL BOARD, COMPLETE (SP)
**********************
(TRANS (A), TRANS (B), DIRECTION, H.P, POWER, RECVOL
BOARD are included.)
< CAPACITOR >
0 C001 1-113-925-11 CERAMIC 0.01uF 20.00% 250V
C517 1-162-294-31 CERAMIC 0.001uF 10% 50V
C518 1-162-294-31 CERAMIC 0.001uF 10% 50V
C751 1-164-159-11 CERAMIC 0.1uF 50V
C752 1-137-374-11 MYLAR 0.047uF 5.00% 50V
PANEL
R867 1-247-864-11 CARBON 24K 5% 1/4W
R868 1-249-429-11 CARBON 10K 5% 1/4W
R869 1-249-424-11 CARBON 3.9K 5% 1/4W F
< VARIABLE RESISTOR >
RV101 1-241-765-11 RES, ADJ, CARBON 22K
RV102 1-241-765-11 RES, ADJ, CARBON 22K
RV111 1-241-764-11 RES, ADJ, CARBON 10K
RV121 1-241-764-11 RES, ADJ, CARBON 10K
RV131 1-241-765-11 RES, ADJ, CARBON 22K
RV141 1-241-765-11 RES, ADJ, CARBON 22K
RV201 1-241-765-11 RES, ADJ, CARBON 22K
RV202 1-241-765-11 RES, ADJ, CARBON 22K
RV211 1-241-764-11 RES, ADJ, CARBON 10K
RV221 1-241-764-11 RES, ADJ, CARBON 10K
RV231 1-241-765-11 RES, ADJ, CARBON 22K
RV241 1-241-765-11 RES, ADJ, CARBON 22K
RV316 1-241-764-11 RES, ADJ, CARBON 10K
RV317 1-241-765-11 RES, ADJ, CARBON 22K
RV318 1-241-764-11 RES, ADJ, CARBON 10K
RV416 1-241-764-11 RES, ADJ, CARBON 10K
RV417 1-241-765-11 RES, ADJ, CARBON 22K
< RELAY >
C753 1-137-374-11 MYLAR 0.047uF 5.00% 50V
C901 1-104-665-11 ELECT 100uF 20.00% 10V
C902 1-161-494-00 CERAMIC 0.022uF 25V
C903 1-162-207-31 CERAMIC 22PF 5% 50V
C904 1-126-960-11 ELECT 1uF 20.00% 50V
< CONNECTOR >
* CN001 1-580-230-31 PIN, CONNECTOR (PC BOARD) 2P (SP)
* CN002 1-568-226-11 PIN, CONNECTOR 2P (US,CND,AEP,UK,AUS)
CN901 1-568-830-11 CONNECTOR, FFC 11P
< DIODE >
D901 8-719-313-43 DIODE SEL6210S-TH10 (SYNCHRO)
D902 8-719-313-43 DIODE SEL6210S-TH10 (AUTO)
D904 8-719-911-19 DIODE 1SS119-25
D905 8-719-911-19 DIODE 1SS119-25
D906 8-719-911-19 DIODE 1SS119-25
D907 8-719-911-19 DIODE 1SS119-25
D908 8-719-911-19 DIODE 1SS119-25
< FLUORESCENT INDICATOR >
FLT901 1-517-263-11 INDICATOR TUBE, FLUORESCENT
< IC >
RY351 1-755-061-11 RELAY
RY451 1-755-061-11 RELAY
< TRANSFORMER >
T131 1-433-381-11 TRANSFORMER, BIAS OSCILLATOR
T141 1-433-381-11 TRANSFORMER, BIAS OSCILLATOR
T231 1-433-381-11 TRANSFORMER, BIAS OSCILLATOR
T241 1-433-381-11 TRANSFORMER, BIAS OSCILLATOR
IC901 8-759-459-86 IC NJL64H400A
IC902 8-759-547-59 IC M35500BGP
< JACK >
J502 1-568-519-41 JACK, LARGE TYPE (PHONES)
The components identified by
mark 0 or dotted line with mark
0 are critical for safety.
Replace only with part number
specified.
Les composants identifiés par une
marque 0 sont critiques pour la
sécurité.
Ne les remplacer que par une
piéce portant le numéro spécifié.
37
Page 38

TC-WE675
PANEL
Ref. No. Part No. Description Remark
< TRANSISTOR >
Q901 8-729-029-94 TRANSISTOR DTC143TSA
< RESISTOR >
R901 1-249-413-11 CARBON 470 5% 1/4W F
R902 1-249-413-11 CARBON 470 5% 1/4W F
R904 1-247-807-31 CARBON 100 5% 1/4W
R905 1-249-441-11 CARBON 100K 5% 1/4W
R906 1-247-807-31 CARBON 100 5% 1/4W
R911 1-249-418-11 CARBON 1.2K 5% 1/4W F
R912 1-249-420-11 CARBON 1.8K 5% 1/4W F
R913 1-249-422-11 CARBON 2.7K 5% 1/4W F
R914 1-249-424-11 CARBON 3.9K 5% 1/4W F
R915 1-249-427-11 CARBON 6.8K 5% 1/4W F
R916 1-249-431-11 CARBON 15K 5% 1/4W
R917 1-249-437-11 CARBON 47K 5% 1/4W
R921 1-249-418-11 CARBON 1.2K 5% 1/4W F
R922 1-249-420-11 CARBON 1.8K 5% 1/4W F
R923 1-249-422-11 CARBON 2.7K 5% 1/4W F
R924 1-249-424-11 CARBON 3.9K 5% 1/4W F
R925 1-249-427-11 CARBON 6.8K 5% 1/4W F
R926 1-249-431-11 CARBON 15K 5% 1/4W
R927 1-249-437-11 CARBON 47K 5% 1/4W
R931 1-249-418-11 CARBON 1.2K 5% 1/4W F
R932 1-249-420-11 CARBON 1.8K 5% 1/4W F
R933 1-249-422-11 CARBON 2.7K 5% 1/4W F
R934 1-249-418-11 CARBON 1.2K 5% 1/4W F
R935 1-249-420-11 CARBON 1.8K 5% 1/4W F
R936 1-249-422-11 CARBON 2.7K 5% 1/4W F
R937 1-249-424-11 CARBON 3.9K 5% 1/4W F
R941 1-249-418-11 CARBON 1.2K 5% 1/4W F
R942 1-249-420-11 CARBON 1.8K 5% 1/4W F
R943 1-249-422-11 CARBON 2.7K 5% 1/4W F
R944 1-249-424-11 CARBON 3.9K 5% 1/4W F
Ref. No. Part No. Description Remark
S915 1-771-349-21 SWITCH, KEYBOARD (WREC MUTING (A DECK))
S916 1-771-349-21 SWITCH, KEYBOARD (j (AMS)(B DECK))
S917 1-771-349-21 SWITCH, KEYBOARD (J (AMS)(B DECK))
S918 1-771-349-21 SWITCH, KEYBOARD (zREC (B DECK))
S921 1-771-349-21 SWITCH, KEYBOARD (s (B DECK))
S922 1-771-349-21 SWITCH, KEYBOARD (X (B DECK))
S923 1-771-349-21 SWITCH, KEYBOARD (G (B DECK))
S924 1-771-349-21 SWITCH, KEYBOARD (g (B DECK))
S925 1-771-349-21 SWITCH, KEYBOARD (WREC MUTING (B DECK))
S926 1-771-349-21 SWITCH, KEYBOARD (j (AMS) RMS -
(A DECK))
S927 1-771-349-21 SWITCH, KEYBOARD (J (AMS) RMS +
(A DECK))
S928 1-771-349-21 SWITCH, KEYBOARD (zREC (A DECK))
S931 1-771-349-21 SWITCH, KEYBOARD (RESET (A DECK))
S932 1-771-349-21 SWITCH, KEYBOARD (MEMORY (A DECK))
S933 1-771-349-21 SWITCH, KEYBOARD (FADER)
S934 1-771-349-21 SWITCH, KEYBOARD (ARL)
S935 1-771-349-21 SWITCH, KEYBOARD (SYNCHRO)
S936 1-786-127-11 SWITCH, SLIDE (DOLBY NR OFF-ON-MPX)
S937 1-762-251-11 SWITCH, SLIDE (DOLBY NR B-C)
S941 1-771-349-21 SWITCH, KEYBOARD (DISPLAY (RMS))
S942 1-771-349-21 SWITCH, KEYBOARD (RMS START (RMS))
S943 1-771-349-21 SWITCH, KEYBOARD (CHECK (RMS))
S944 1-771-349-21 SWITCH, KEYBOARD (SET (RMS))
S945 1-771-349-21 SWITCH, KEYBOARD (A+B REC (START
(DECK B X)))
S946 1-771-349-21 SWITCH, KEYBOARD (DUBBING A+B, HIGH/
NORMAL (START (DECK B X)))
S947 1-762-609-11 SWITCH, SLIDE (DIRECTION G/j/RELAY)
S951 1-771-349-21 SWITCH, KEYBOARD (RESET (B DECK))
S952 1-771-349-21 SWITCH, KEYBOARD (MEMORY (B DECK))
S953 1-771-349-21 SWITCH, KEYBOARD (DECK A (AUTO CAL
(START X)))
S954 1-771-349-21 SWITCH, KEYBOARD (DECK B (AUTO CAL
(START X)))
R945 1-249-427-11 CARBON 6.8K 5% 1/4W F
R951 1-249-418-11 CARBON 1.2K 5% 1/4W F
R952 1-249-420-11 CARBON 1.8K 5% 1/4W F
R953 1-249-422-11 CARBON 2.7K 5% 1/4W F
R955 1-249-429-11 CARBON 10K 5% 1/4W
R956 1-249-429-11 CARBON 10K 5% 1/4W
R957 1-249-429-11 CARBON 10K 5% 1/4W
R958 1-249-437-11 CARBON 47K 5% 1/4W
R960 1-249-429-11 CARBON 10K 5% 1/4W
R961 1-249-429-11 CARBON 10K 5% 1/4W
R962 1-249-441-11 CARBON 100K 5% 1/4W
< VARIABLE RESISTOR >
RV901 1-225-707-11 RES, VAR, CARBON 20K
RV902 1-225-619-11 RES, VAR, CARBON 10K
< SWITCH >
0 S850 1-762-581-11 SWITCH, AC POWER PUSH (1 KEY)(POWER)
S911 1-771-349-21 SWITCH, KEYBOARD (s (CLEAR)(A DECK))
S912 1-771-349-21 SWITCH, KEYBOARD (X (A DECK))
S913 1-771-349-21 SWITCH, KEYBOARD (G (FRONT)(A DECK))
S914 1-771-349-21 SWITCH, KEYBOARD (g (BACK)(A DECK))
38
S960 1-554-118-00 SWITCH, PUSH (1 KEY)(PITCH CON ON/OFF)
**************************************************************
MISCELLANEOUS
***************
51 1-696-656-11 WIRE (FLAT TYPE) (13 CORE)
52 1-769-976-11 WIRE (FLAT TYPE) (13 CORE)
0 53 1-575-651-21 CORD, POWER (SP)
0 53 1-751-535-11 CORD, POWER (UK)
0 53 1-777-107-11 CORD, POWER (AEP)
0 53 1-777-218-11 CORD, POWER (AUS)
0 53 1-783-531-51 CORD, POWER (US,CND)
162 1-769-950-11 WIRE (FLAT TYPE) (11 CORE)
0 T901 1-431-786-12 TRANSFORMER, POWER (AEP,UK,AUS)
0 T901 1-431-788-12 TRANSFORMER, POWER (US,CND)
0 T901 1-431-789-12 TRANSFORMER, POWER (SP)
(PLUNGER SOLENOID is supplied as the Mechanism Deck (TCM-230ASR41B :
A-2100-942-A)).
**************************************************************
The components identified by
mark 0 or dotted line with mark
0 are critical for safety.
Replace only with part number
specified.
Les composants identifiés par une
marque 0 sont critiques pour la
sécurité.
Ne les remplacer que par une
piéce portant le numéro spécifié.
Page 39

Ref. No. Part No. Description Remark
ACCESSORIES & PACKING MATERIALS
********************************
1-776-263-51 CORD, CONNECTION
1-777-241-11 CORD, CONNECTION (CONTROL A1II CABLE)
(CND)
4-232-596-11 MANUAL, INSTRUCTION (ENGLISH)
4-232-596-21 MANUAL, INSTRUCTION (FRENCH,SPANISH)
(CND,AEP,SP)
4-232-596-31 MANUAL, INSTRUCTION
(GERMAN,DUTCH,SWEDISH,ITALIAN,POLISH)(AEP)
TC-WE675
**************************************************************
#1 7-685-646-79 SCREW +BVTP 3X8 TYPE2 N-S
#2 7-685-871-01 SCREW +BVTT 3X6 (S)
#3 7-685-851-09 SCREW +BVTT 2X4 (S)
#4 7-685-852-04 SCREW +BVTT 2X5 (S)
#5 7-685-902-21 SCREW +PTPWH 2.6X8 (TYPE2)
4-232-596-71 MANUAL, INSTRUCTION (CHINESE)(SP)
**************
HARDWARE LIST
**************
39
Page 40

TC-WE675
REVISION HISTORY
Clicking the version allows you to jump to the revised page.
Also, clicking the version at the upper right on the revised page allows you to jump to the next revised
page.
Ver. Date Description of Revision
1.0 2001.04 New
40
 Loading...