

Sony TCM-455V, TCM-473V, TCM-454VK operating Manual
3-862-202-32(1)
English
Español
Cassette-Corder
Operating instructions
Manual de instrucciones
Manual de instruções
Bedienungsanleitung (Rückseite)
TCM-473V/455V/454VK/453V
Sony Corporation 1998 Printed in Taiwan, R.O.C.
WARNING
To prevent fire or shock hazard, do not
expose the unit to rain or moisture.
ADVERTENCIA
Para evitar incendios o descargas
eléctricas, no exponga la unidad a la
lluvia ni a la humedad.
ADVERTÊNCIA
Para evitar o risco de incêndio ou de
choque eléctrico, não exponha o
aparelho à chuva nem à humidade.
Vorsicht
Um die Gefahr von Feuer und eines
elektrischen Schlags zu vermeiden, darf
das Gerät weder Regen noch
Feuchtigkeit ausgesetzt werden.
About This Manual
The instructions in this manual are for 4 models. The TCM453V is the model used for illustration purposes. Their
differences are shown in the table below:
EAR (earphone) jack — ®®
2 (Stereo headphones) jack ® ——
Battery charger adaptor — ® —
Rechargeable batteries — ® —
AC power adaptor — ® —
®: provided or supplied —: not provided or not supplied
Acerca de este manual
Las instrucciones de este manual hacen referencia a 4
modelos. En las ilustraciones se muestra el modelo TCM453V. Las diferencias existentes entre los modelos se
describen en la tabla siguiente:
Toma EAR (auriculares) — ®®
Toma 2 (auriculares estéreo) ® ——
Adaptador de cargador de pilas — ® —
Pilas recargables — ® —
Adaptador de alimentación — ® —
de CA
®: suministrado —: no suministrado
Sobre este manual
As instruções apresentadas neste manual referem-se a 4
modelos. Para fins ilustrativos, utilizamos as ilustrações do
modelo TCM-453V. As diferenças entre os referidos modelos
são apresentadas na tabela abaixo:
Jack EAR (auricular) — ®®
jacks 2 (auscultadores estéreo) ® ——
Adaptador para o — ® —
carregador de pilhas
Pilhas recarregáveis — ® —
Transformador de corrente — ® —
CA
®: disponibilizada ou fornecida
—: não disponibilizada ou não fornecida
Zu dieser Anleitung
Die Anweisungen in dieser Anleitung gelten für 4 Modelle.
Die Abbildungen zeigen das Modell TCM-453V. In der
folgenden Tabelle sehen Sie die Unterschiede zwischen den
Modellen:
Ohrhörerbuchse EAR — ®®
Buchse 2 (Stereokopfhörer) ® ——
Landegerätadapter — ® —
Akkus — ® —
Netzteil — ® —
®: vorhanden bzw. mitgeliefert —: nicht vorhanden bzw. nicht
mitgeliefert
(no verso)
TCM-473V 454VK 455V/453V
TCM-473V 454VK 455V/453V
TCM-473V 454VK 455V/453V
TCM-473V 454VK 455V/453V
A
a
bc
d
Battery charger adaptor
Adaptador de cargador de
pilas
Power indicator
Indicador de alimentación
AC power adaptor
Adaptador de alimentación de CA
DC IN 3V
e
BATT lamp
Indicador
BATT
f
AC power adaptor
Adaptador de alimentación de CA
DC IN 3V
B
a
b
c
C
D
SPEED CONTROL
0 REW/REVIEW
E
EAR(TCM-455V/454VK/453V)
Built-in
microphone
Micrófono
incorporado
rREC
pSTOP
0REW/
REVIEW
PAUSE
Side A
Cara A
2(TCM-473V)
MIC VOR
A
MIC (PLUG IN POWER)
VOL
p STOP
( PLAY
) FF/CUE
PAUSE
Erase head
Cabezal de borrado
Record/playback head
Cabezal de grabación/
reproducción
Capstan
Cabrestante
Pinch-roller
Rodillo de apriete
Tab for side A
Lengüeta de la
cara A
Cotton swab
Bastoncillo de
algodón
Welcome!
Thank you for purchasing the Sony Cassette-Corder.
Some features are:
•VOR (Voice Operated Recording) system that starts and
stops recording automatically in response to the sound, to
save tapes and batteries.
•SPEED CONTROL function that lets you increase or
decrease the tape playback speed.
•Stereo playback function that lets you enjoy pre-recorded
stereo tapes with the supplied headphones (TCM-473V
only).
z Getting Started
Preparing a Power Source
Choose one of the following power sources.
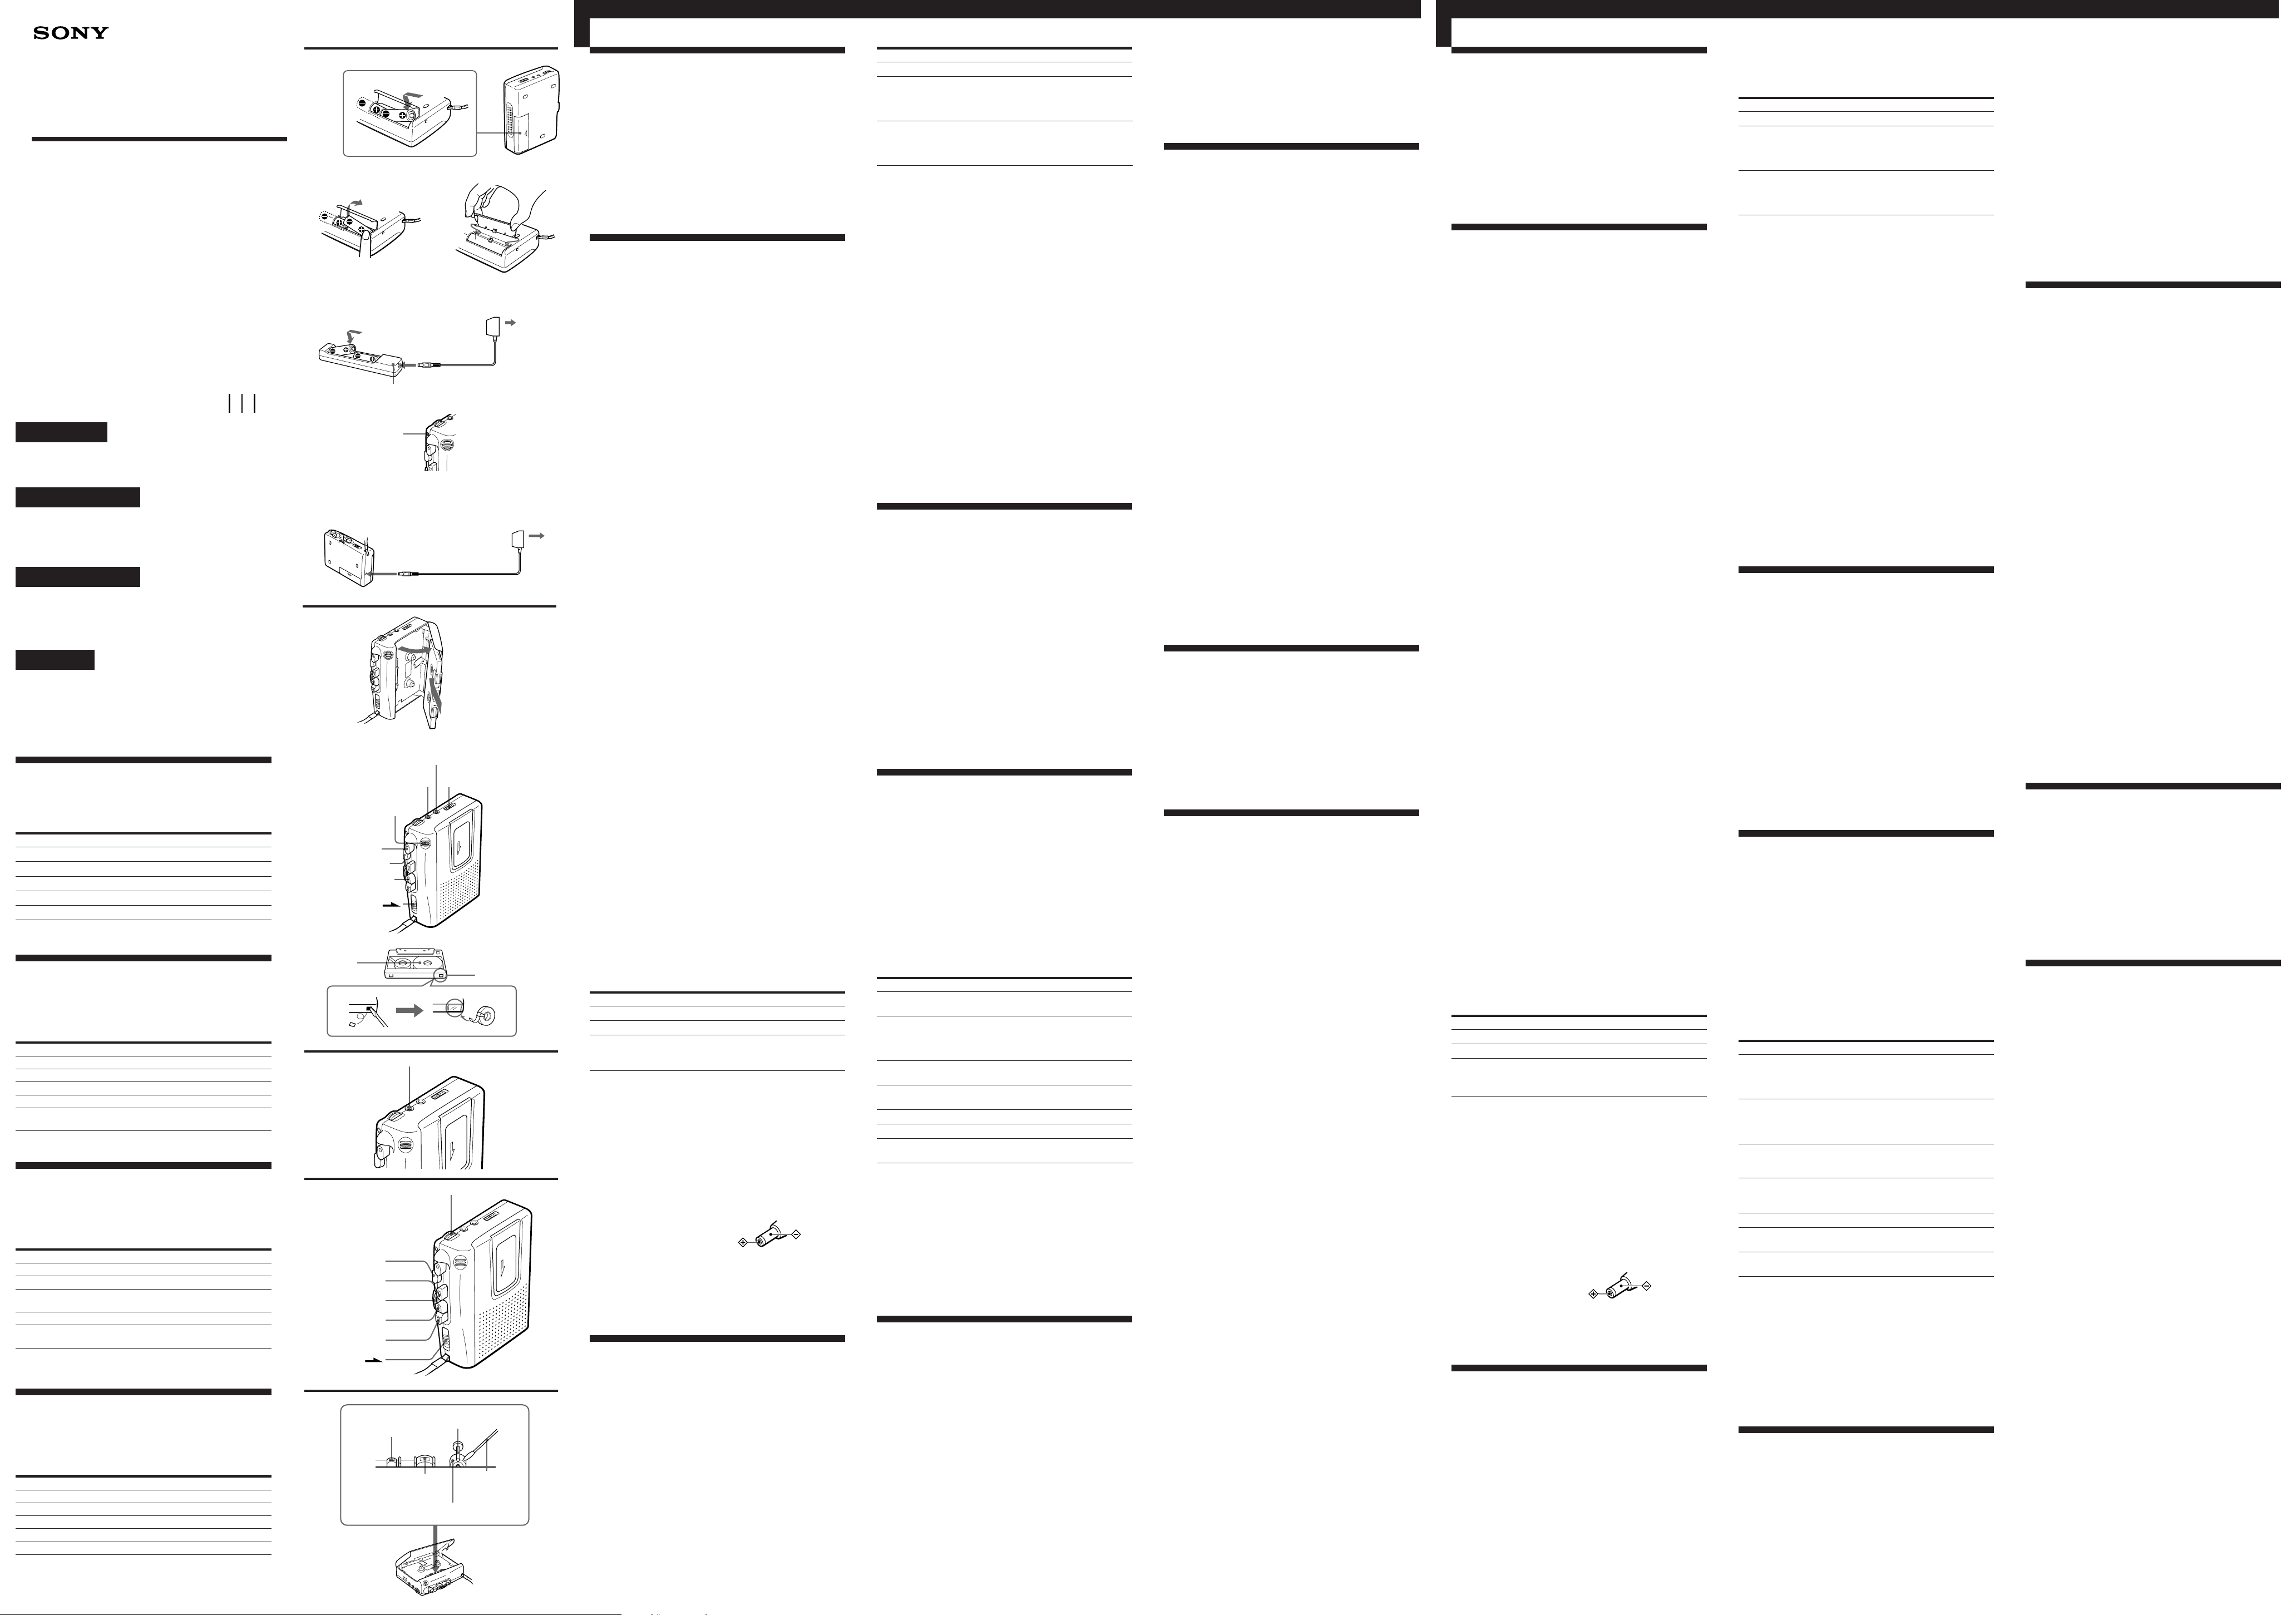
Dry Batteries (see Fig. A-a)
Make sure that nothing is connected to the DC IN 3V jack.
1 Open the battery compartment lid.
2 Insert two size R6 (AA) batteries (not supplied) with
correct polarity and close the lid.
Notes
•Do not charge a dry battery.
•Do not use a new battery with an old one.
•Do not use different types of batteries.
•When you do not use the unit for a long time, remove the
batteries to avoid any damage caused by battery leakage and
subsequent corrosion.
•Dry batteries will not be expended when another power source
is connected.
To take out the batteries (see Fig. A-b)
To attach the battery compartment lid if it is
accidentally detached (see Fig. A-c)
Rechargeable Batteries (supplied to TCM-
454VK only) (see Fig. A-d)
Before using the rechargeable batteries, charge them with
the supplied battery charger adaptor and AC power
adaptor.
1 Insert the rechargeable batteries (NC-AA) into the
battery charger adaptor with correct polarity.
2 Connect the AC power adaptor (supplied to TCM-
454VK) to the DC IN 3V jack of the battery charger
adaptor and to the wall outlet.
The power indicator lights up.
3 Unplug the AC power adaptor from the wall outlet and
from the battery charger adaptor after about eight hours.
Notes
•The power indicator lights in green as long as the AC power
adaptor is plugged to the wall outlet and the DC IN 3V jack,
even when the charging has not been done.
•Use only the supplied or recommended AC power adaptor,
battery charger adaptor and rechargeable batteries.
•The rechargeable batteries can be charged approximately 500
times.
•Do not leave the battery charger adaptor plugged in for more
than 20 hours. Overcharging may damage the rechargeable
batteries.
When to replace the batteries (see Fig. A-
e)
Replace the batteries with new ones or charge the batteries
(TCM-454VK only) when the BATT lamp dims.
Notes
•After the batteries have been used for a while, the BATT
lamp may flicker with the playback sound when you turn up
the volume; however, this does not mean that you need to
replace the batteries.
•The unit will play back normally for a while even after the
BATT lamp dims. However, replace the batteries as soon as
you can. If you do not, subsequent recording will not be done
correctly.
Battery life (Approximate hours) (EIAJ*)
Playback Recording
Sony alkaline LR6 (SG) 11 11
Sony R6P (SR) 3 3
Sony rechargeable battery
(NC-AA) fully charged 3.5 4
(TCM-454VK only)
* Measured value by the standard of EIAJ (Electronic Industries
Association of Japan). (Using a Sony HF series cassette tape)
Note
The battery life may shorten depending on the operation of the
unit.
House Current (see Fig. A-f)
Connect the AC power adaptor to DC IN 3V and to the wall
outlet. The AC power adaptor is supplied only with the
TCM-454VK. For other models, use the AC-E30HG AC
power adaptor (not supplied). Do not use any other AC
power adaptor.
Polarity of the plug
Note
Specifications for AC-E30HG varies for each area. Check your
local voltage and the shape of plug before purchasing.
z Operating the Unit
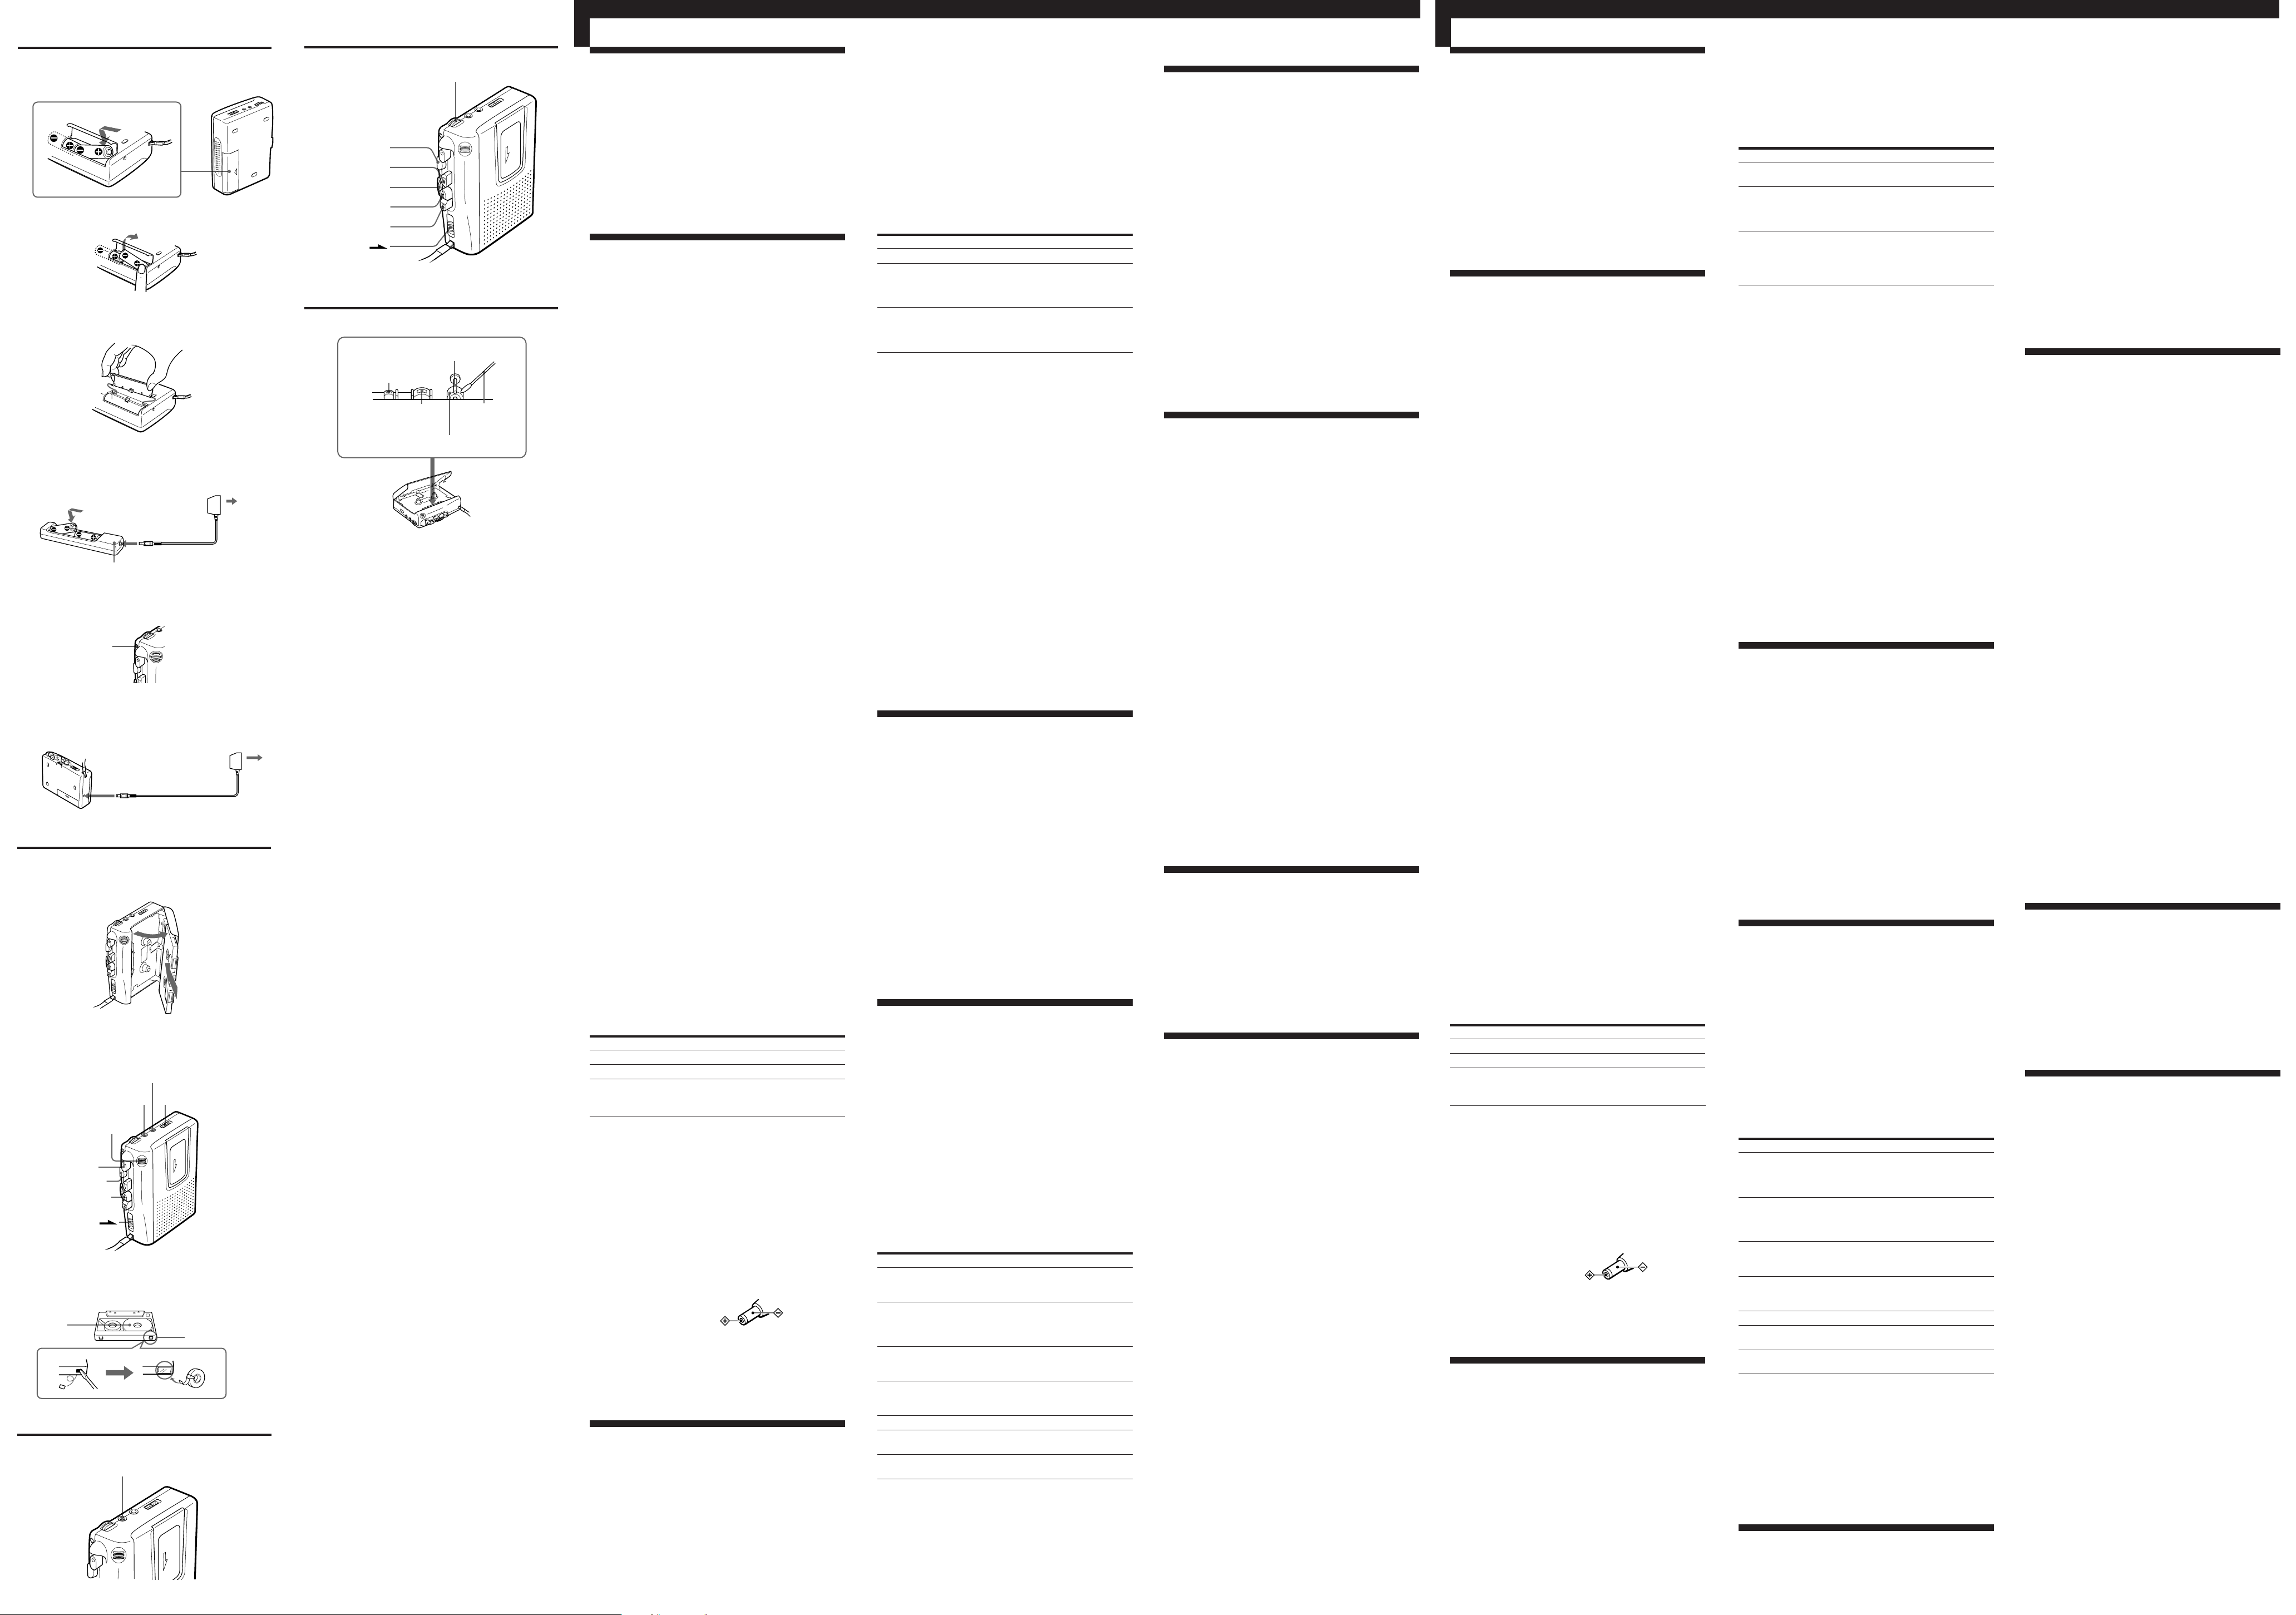
Recording (see Fig. B-a, b)
You can record right away with the built-in microphone.
Make sure that nothing is connected to the MIC jack.
1 Insert a normal (TYPE I) tape with the side to start
recording facing the cassette holder.
2 Set VOR to: H or L to start and pause recording
automatically to the sound.
H (high) to record at meetings or in a quiet and/or
spacious place.
L (low) to record for dictation or in a noisy place.
OFF to start and stop recording manually.
Note
When the sound to be recorded is not loud enough, set the VOR
switch to OFF, or the unit may not start recording.
3 Press r REC.
Recording starts.
At the end of the tape, recording stops and the unit turns off
automatically.
To Press or slide
Stop recording p STOP
Pause recording PAUSE c in the direction of the
Review the portion Press and hold 0 REW/REVIEW
just recorded during recording.
* PAUSE c will be also automatically released when p STOP
is pressed (stop-pause-release function).
arrow
To release pause recording, release
PAUSE c*.
Release the button at the point to start
playback.
To monitor the sound
For TCM-473V: Connect stereo headphones (supplied)
firmly to the 2 (headphones) jack.
For TCM-455V/454VK/453V: Connect an earphone (not
supplied) firmly to the EAR jack.
Notes
•Do not use a CrO2 (TYPE II) or metal (TYPE IV) tape,
otherwise the sound may be distorted when you play back the
tape, or the previous recording may not be erased completely.
•The SPEED CONTROL switch works in the playback mode
only. Recording will be made independent of this control.
Notes on VOR (Voice Operated Recording)
•When you use the VOR system in a noisy place, the unit will
stay in the recording mode. If the sound is too soft, on the
contrary, the unit will not start recording. Set VOR to H (high)
or L (low) depending on the conditions to pick up necessary
sound only.
•The VOR system depends on the environmental conditions.
If you cannot get the desired results even though you adjust
VOR to H or L, set VOR to OFF.
To prevent a tape from being accidentally
recorded over (see Fig. B-c)
Break out and remove the cassette tabs. To reuse the tape for
recording, cover the tab hole with adhesive tape.
Recording from Various Sound
Sources
The sound is recorded in monaural.
Recording with an External Microphone
Connect a microphone to the MIC jack. The raised dot near
the MIC jack identifies as the jack for a microphone, not an
earphone. Use a microphone of low impedance (less than 3
kilohms) such as ECM-T110 (not supplied).
When using a plug-in-power system microphone, the power
to the microphone is supplied from this unit.
Note
When recording with an external microphone, the VOR system
may not work properly because of the difference in sensitivity.
Recording from Another Equipment
Connect another equipment to the MIC jack using the RKG64HG connecting cord (not supplied).
(see Fig. C)
Playing a Tape (see Fig. D)
1 Insert a cassette with the side to start playing facing the
cassette holder.
2 Adjust the tape playback speed.
Set SPEED CONTROL to:
SLOW (slow) to play back a tape slower.
Center position to play back a tape at normal speed.
FAST (fast) to play back a tape faster.
3 Press ( PLAY then adjust the volume. There is a raised
dot to show the direction to turn down volume beside
VOL.
At the end of the tape, playback stops and the unit turns off
automatically.
To
Stop playback/stop fast
forward or rewind
Pause playback
Search forward during
playback (CUE)
Search backward during
playback (REVIEW)
Fast forward**
Rewind**
Start recording
during playback
* PAUSE c will be also automatically released when p STOP
is pressed (stop-pause-release function).
**If you leave the unit after the tape has been wound or
rewound, the batteries will be consumed rapidly. Be sure to
depress p STOP.
Press or slide
p STOP
PAUSE c in the direction of the
arrow
To release pause playback, release
PAUSE c*.
Press and hold ) FF/CUE and
release it at the point you want
Press and hold 0 REW/REVIEW
and release it at the point you want
) FF/CUE during stop
0 REW/REVIEW during stop
r REC
To play back a tape recorded in stereo
(TCM-473V only)
The built-in speaker on this unit is monaural.
To enjoy stereo sound, use the supplied headphones.
z Additional Information
Precautions
On power
•Operate the unit only on 3V DC. For AC operation, use the
AC power adaptor recommended for the unit. Do not use
any other type. For battery operation, use two size R6 (AA)
batteries.
On the unit
•Do not leave the unit in a location near heat sources, or in a
place subject to direct sunlight, excessive dust or
mechanical shock.
•Should any solid object or liquid fall into the unit, remove
the batteries or disconnect the AC power adaptor, and
have the unit checked by qualified personnel before
operating it any further.
•Keep personal credit cards using magnetic coding or
spring-wound watches etc. away from the unit to prevent
possible damage from the magnet used for the speaker.
•If the unit has not been used for a long time, set it in the
playback mode and warm it up for a few minutes before
inserting a tape.
On tapes longer than 90 minutes
We do not recommend the use of tapes longer than 90
minutes except for a long continuous recording or playback.
They are very thin and tend to be stretched easily.
If you have any questions or problems concerning your unit,
please consult your nearest Sony dealer.
Troubleshooting
Should any problem persist after you have made these
checks, consult your nearest Sony dealer.
You cannot press r REC.
m The tab on the tape has been removed.
You cannot press ( PLAY.
m The tape has reached the end. Rewind the tape.
The unit does not operate.
m The batteries have been inserted with incorrect
polarity.
m The batteries are weak.
m PAUSE c is slid in the direction of the arrow.
m The AC power adaptor or car battery cord is not firmly
connected.
m The batteries have been inserted, but simultaneously
the AC power adaptor is connected and not to be done
to the wall outlet.
No sound comes from the speaker.
m The earphone or headphones is plugged in.
m The volume is turned down completely.
Tape speed is too fast or too slow in the
playback mode.
m SPEED CONTROL is set at a point other than the
center.
The sound drops out or comes with excessive
noise.
m The volume is turned down completely.
m The batteries are weak.
m The heads are contaminated. See “Maintenance.”
Recording cannot be made.
m Connection is made incorrectly.
m The batteries are weak.
m The record/playback head is contaminated.
m VOR has been set to the improper position when VOR
function works.
Recording is interrupted.
m VOR is set to H or L. When you do not use VOR, set it
to OFF.
Recording cannot be erased completely.
m The erase head is contaminated.
m Recording or erasing is being made using recorded
CrO
2 (TYPE II) or metal (TYPE IV) tape.
Maintenance (see Fig. E)
To clean the tape heads and path
Wipe the heads, pinch rollers, and the capstans with a cotton
swab moistened with alcohol every 10 hours of use.
To clean the exterior
Use a soft cloth slightly moistened in water. Do not use
alcohol, benzine or thinner.
Note (TCM-473V only)
Clean the headphones plug periodically.
Specifications
Recording system
2-track 1 channel monaural
Frequency range
TCM-473V: Recording: 250-6,300Hz
TCM-455V/454VK/453V: 250-6,300Hz
Speaker
Approx. 3.6 cm (17⁄16 in.) dia.
Power output
TCM-473V: 130mW (at 10 % harmonic distortion)
TCM-455V/454VK/453V: 300mW (at 10 % harmonic
distortion)
Input
TCM-473V: Microphone input jack (minijack) sensitivity 0.2
mV for 3 kilohms or lower impedance microphone
TCM-455V/454VK/453V: Microphone input jack (minijack)
sensitivity 0.14 mV for 3 kilohms or lower impedance
microphone
Output
TCM-473V: 2 (headphones) jack (stereo minijack) for 8 - 300
ohms headphones
TCM-455V/454VK/453V: Earphone jack (minijack) for 8 300 ohms earphone
Variable range of the tape speed
From +30 % to –15 %
Power requirements
•Two size R6 (AA) batteries (not supplied): 3V DC
•Two NC-AA rechargeable batteries (1.2 V) (supplied to
TCM-454VK)
DC IN 3 V jack accepts:
•Sony AC power adaptor (supplied to TCM-454VK) or
AC-E30HG AC power adaptor (not supplied) suitable in
the country where the unit is to be used.
•Sony DCC-E230 car battery cord (not supplied) for use on
12 V car battery.
Dimensions (w/h/d) (incl. projecting parts and controls)
113 × 91 × 37 mm (41⁄2 × 35⁄8 × 11⁄2 in.)
Mass (not incl. batteries)
TCM-473V: 185 g (6.6 oz.)
TCM-455V/454VK/453V: 170 g (6.0 oz.)
Supplied accessories
Hand strap (1) (attached to the unit)
AC power adaptor (1) (TCM-454VK)
Battery charger adaptor (1) (TCM-454VK)
Rechargeable batteries (NC-AA, 1.2V, 700mAh, Ni-Cd) (2)
(TCM-454VK)
Headphones (1) (TCM-473V)
Design and specifications are subject to change without notice.
Playback: 100-8,000Hz
¡Bienvenido!
Felicitaciones por la adquisición de la grabadora Sony.
A continuación se indican algunas de las características:
•Sistema VOR (grabación activada por voz), que inicia y
detiene la grabación automáticamente en respuesta al
sonido con el fin de ahorrar cinta y la energía de las pilas.
•Función SPEED CONTROL, que permite aumentar o
reducir la velocidad de reproducción de la cinta.
•Función de reproducción en estéreo, que permite disfrutar
de cintas previamente grabadas en estéreo con los
auriculares suministrados (sólo para TCM-473V).
z Procedimientos iniciales
Preparación de una fuente de
alimentación
Seleccione una de las siguientes fuentes de alimentación.
Pilas secas (consulte la figura A-a)
Asegúrese de no realizar ninguna conexión a la toma DC IN
3V.
1 Abra la tapa del compartimiento de las pilas.
2 Inserte dos pilas R6 (tamaño AA) (no suministradas) con
la polaridad correcta y cierre la tapa.
Notas
•No cargue las pilas secas.
•No emplee una pila nueva con otra usada.
•No utilice distintos tipos de pilas.
•Cuando no vaya a utilizar la unidad durante varios días, retire
las pilas para evitar que se produzcan daños derivados de
fugas y corrosión de las mismas.
•La pilas secas no se consumirán cuando se conecte otra fuente
de alimentación.
Para extraer las pilas (consulte la figura A-b)
Para ajustar la tapa del compartimiento de las
pilas si ésta se desprende accidentalmente
(consulte la figura A-c)
Pilas recargables (suministradas sólo con
TCM-454VK) (consulte la figura A-d)
Antes de utilizar las pilas recargables, cárguelas con el
adaptador de cargador de pilas y el de alimentación de CA
suministrados.
1 Inserte las pilas recargables (NC-AA) en el adaptador de
cargador de pilas con la polaridad correcta.
2 Conecte el adaptador de alimentación de CA
(suministrado con el TCM-454VK) a la toma DC IN 3V
del adaptador de cargador de pilas y a la toma mural.
El indicador de alimentación se ilumina.
3 Desenchufe el adaptador de alimentación de CA de la
toma mural y del adaptador de cargador de pilas
transcurridas aproximadamente ocho horas.
Notas
•El indicador de alimentación se ilumina en verde mientras el
adaptador de alimentación de CA esté enchufado a la toma
mural y a la toma DC IN 3V, aunque no se haya realizado la
carga.
•Emplee sólo el adaptador de alimentación de CA, adaptador de
cargador de pilas y pilas recargables suministrados o
recomendados.
•Las pilas recargables pueden cargarse aproximadamente 500
veces.
•No deje enchufado el adaptador de cargador de pilas durante
más de 20 horas. La sobrecarga puede dañar las pilas
recargables.
Cuándo sustituir las pilas (consulte la
figura A-e)
Sustituya las pilas por otras nuevas o cárguelas (sólo para
TCM-454VK) cuando se atenúe la luz del indicador BATT.
Notas
•Después de utilizar las pilas durante un tiempo, es posible que
el indicador BATT parpadee con el sonido de reproducción al
aumentar el volumen; no obstante, esto no significa que sea
necesario sustituirlas.
•La unidad realizará la reproducción con normalidad durante
un tiempo incluso después de atenuarse el indicador BATT.
No obstante, sustituya las pilas tan pronto como sea posible.
En caso contrario, las grabaciones posteriores no se realizarán
correctamente.
Duración de las pilas (Horas aproximadas) (EIAJ*)
Reproducción Grabación
Pila alcalina Sony LR6 (SG) 11 11
Pila Sony R6P (SR) 3 3
Pila recargable Sony
(NC-AA) completamente cargada 3,5 4
(sólo para TCM-454VK)
* Valor medido por la norma de EIAJ (Electronic Industries
Association of Japan). (Con una cinta de cassette Sony de la
serie HF)
Nota
La duración de las pilas puede reducirse en función del empleo
de la unidad.
Corriente doméstica
(consulte la figura A-f)
Conecte el adaptador de alimentación de CA a la toma DC
IN 3V y a la toma mural. Dicho adaptador se suministra sólo
con el modelo TCM-454VK. Para otros modelos, emplee el
adaptador de CA AC-E30HG (no suministrado). No utilice
otro tipo de adaptador de CA.
Polaridad del enchufe
Nota
Las especificaciones del AC-E30HG varían en función de la
zona. Compruebe la tensión local y la forma del enchufe antes
de la adquisición.
z Funcionamiento de la unidad
Grabación (consulte la figura B-a, b)
Es posible grabar inmediatamente con el micrófono
incorporado.
Asegúrese de no realizar ninguna conexión a la toma MIC.
1 Inserte una cinta normal (TYPE I) con la cara que desee
grabar orientada hacia el portacassettes.
2 Ajuste VOR en la posición: H o L para que la grabación
se inicie o se interrumpa automáticamente en función de
la intensidad del sonido.
H (alto) para grabar en reuniones o en una sala
silenciosa y/o amplia.
L (bajo) para grabar un dictado o en un lugar ruidoso.
OFF para iniciar y detener la grabación manualmente.
Nota
Cuando el nivel del sonido que va a grabarse no es
suficientemente alto, ajuste el interruptor VOR en la
posición OFF, ya que es posible que la unidad no inicie la
grabación.
3 Pulse r REC.
Se inicia la grabación.
Al final de la cinta, la grabación se detiene y la unidad se
desactiva automáticamente.
Para Pulse o deslice
Detener la grabación p STOP
Introducir una pausa PAUSE c en la dirección
Comprobar la parte Pulse y mantenga pulsado 0 REW/
recién grabada REVIEW durante la grabación. Suelte el
* PAUSE c también se quitará automáticamente al pulsar
p STOP (función de liberación de pausa con STOP).
de la flecha
Para quitar la pausa en la grabación,
suelte PAUSE c*.
botón en el punto de inicio de la
reproducción.
Para controlar el sonido
Para el TCM-473V: Conecte los auriculares estéreo
(suministrados) firmemente a la toma 2 (auriculares).
Sólo para TCM-455V/454VK/453V: Conecte un auricular
(no suministrado) firmemente a la toma EAR.
Notas
•No emplee una cinta CrO2 (TYPE II) o de metal (TYPE IV), ya
que puede distorsionarse el sonido al reproducir la cinta, o es
posible que la grabación anterior no se borre completamente.
•El interruptor SPEED CONTROL sólo es operativo en el modo
de reproducción. La grabación se realizará con independencia
de este control.
Notas sobre la función VOR (Grabación activada por voz)
•Cuando utilice el sistema VOR en un lugar ruidoso, la unidad
permanecerá en el modo de grabación. Por el contrario, si el
sonido es demasiado bajo, la unidad no iniciará la grabación.
Ajuste VOR en H (alto) o L (bajo) en función de las condiciones
para recoger solamente el sonido necesario.
•El sistema VOR depende de las condiciones del entorno. Si no
obtiene los resultados deseados aunque ajuste VOR en H o en
L, ajuste VOR en OFF.
Para evitar que una cinta se grabe
accidentalmente sobre una grabación previa
(consulte la figura B-c)
Rompa y retire las lengüetas del cassette. Para volver a
grabar la cinta, cubra el orificio de las lengüetas con cinta
adhesiva.
Grabación de distintas fuentes
de sonido
El sonido se graba en monofónico.
Grabación con un micrófono externo
Conecte un micrófono a la toma MIC. El punto que
sobresale, situado junto a la toma MIC, es una toma de
micrófono y no de auriculares.
Utilice un micrófono de baja impedancia (inferior a 3
kiloOhmios), como el ECM-T110 (no suministrado).
Si utiliza un micrófono de sistema de alimentación por
enchufe, la alimentación se suministra desde esta unidad.
Nota
Al grabar con un micrófono externo, es posible que el sistema
VOR no funcione correctamente debido a la diferencia de
sensibilidad.
Grabación desde otro equipo
Conecte otro equipo a la toma MIC mediante el cable de
conexión RK-G64HG (no suministrado).
(consulte la figura C)
Reproducción de una cinta
(consulte la figura D)
1 Inserte una cinta con la cara que desee reproducir
orientada hacia el portacassettes.
2 Ajuste la velocidad de reproducción de la cinta.
Ajuste SPEED CONTROL en la posición:
SLOW (lento) para reproducir una cinta lentamente.
Central para reproducir una cinta a velocidad normal.
FAST (rápido) para reproducir una cinta rápidamente.
3 Pulse ( PLAY y, a continuación, ajuste el volumen. Al
lado de VOL hay un punto en relieve que muestra la
dirección para bajar el volumen.
Al final de la cinta, la reproducción se detiene y la unidad se
desactiva automáticamente.
Para
Detener la
reproducción/detener el
avance o rebobinado
rápido de cinta
Introducir una pausa
Buscar hacia delante
durante la reproducción
(CUE)
Buscar hacia atrás
durante la reproducción
(REVIEW)
Avanzar rápidamente**
Rebobinar**
Iniciar la grabación
durante la reproducción
* PAUSE c también se liberará automáticamente si se pulsa
p STOP (función de liberación de pausa con STOP).
**Si deja la unidad encendida después de bobinar la cinta, las
pilas se consumirán con rapidez. Asegúrese de pulsar
p STOP.
Pulse o deslice
p STOP
PAUSE c en la dirección de la
flecha
Para quitar la pausa en la
reproducción,suelte PAUSE c*.
Pulse y mantenga pulsado ) FF/
CUE, y suéltelo en el punto que desee
Pulse y mantenga pulsado 0 REW/
REVIEW, y suéltelo en el punto que
desee
) FF/CUE durante la detención
0 REW/REVIEW durante la
detención
r REC
Para reproducir una cinta grabada en estéreo
(sólo para TCM-473V)
El altavoz incorporado de esta unidad es monofónico.
Para disfrutar de sonido estéreo, utilice los auriculares
suministrados.
z Información adicional
Precauciones
Alimentación
•Alimente la unidad sólo con 3V CC. Para utilizar CA,
emplee el adaptador de alimentación de CA recomendado
para la unidad. No emplee ningún otro tipo de adaptador.
Para utilizar pilas, emplee dos pilas R6 (tamaño AA).
Sobre la unidad
•No deje la unidad cerca de fuentes de calor, ni en un lugar
expuesto a la luz directa del sol, al polvo excesivo o a
golpes mecánicos.
•Si cae algún objeto sólido o se vierte líquido en el interior
de la unidad, retire las pilas o desconecte el adaptador de
alimentación de CA y solicite asistencia técnica de personal
cualificado para revisar la unidad antes de utilizarla de
nuevo.
•Aleje de la unidad tarjetas de crédito con código magnético
o relojes de cuerda, etc., para evitar que se produzcan
posibles daños causados por el imán del altavoz.
•Si no se ha utilizado la unidad durante un largo periodo de
tiempo, introduzca el modo de reproducción y deje que se
caliente durante unos minutos antes de insertar una cinta.
Cintas superiores a 90 minutos
No se recomienda utilizar cintas superiores a 90 minutos,
excepto para realizar grabaciones o reproducciones largas y
continuas, ya que la película es muy fina y tiende a estirarse
con facilidad.
Si tiene alguna duda o problema en relación a la unidad,
póngase en contacto con su proveedor Sony más cercano.
Solución de problemas
Si no se soluciona el problema después de realizar las
siguientes comprobaciones, póngase en contacto con su
proveedor Sony más cercano.
No es posible pulsar r REC.
m Se ha retirado la lengüeta de la cinta.
No es posible pulsar ( PLAY.
m La cinta ha llegado al final. Rebobínela.
La unidad no funciona.
m Las pilas se han insertado con la polaridad incorrecta.
m Las pilas están agotándose.
m PAUSE c se desliza en la dirección de la flecha.
m El adaptador de alimentación de CA o el cable de la
batería del automóvil no están conectados firmemente.
m Se han insertado pilas, pero simultáneamente se ha
conectado el adaptador de alimentación de CA y no se
ha enchufado a la toma mural.
No se recibe sonido por el altavoz.
m Los auriculares están enchufados.
m El volumen se ha bajado completamente.
La velocidad de cinta es demasiado alta o
demasiado baja en el modo de reproducción.
m SPEED CONTROL está ajustado en un punto que no
es el central.
El sonido aparece o desaparece con un nivel de
ruido excesivo.
m Ha disminuido el volumen por completo.
m Las pilas disponen de poca energía.
m Los cabezales están contaminados. Consulte
“Mantenimiento”.
No es posible grabar.
m La conexión se ha realizado incorrectamente.
m Las pilas están agotándose.
m El cabezal de grabación/reproducción está sucio.
m VOR se ha situado en una posición incorrecta cuando
la función VOR está operativa.
Se ha interrumpido la grabación.
m VOR se encuentra en la posición H o L. Si no utiliza la
función VOR, sitúelo en la posición OFF.
No es posible borrar la grabación por completo.
m El cabezal de borrado está sucio.
m Realiza la grabación o el borrado con cintas de cromo
(TYPE II) o de metal (TYPE IV) grabadas.
Mantenimiento (consulte la figura E)
Para limpiar los cabezales y el recorrido de la
cinta
Limpie los cabezales, rodillos de apriete y los cabrestantes
con un bastoncillo de algodón humedecido en alcohol cada
10 horas de uso.
Para limpiar el exterior
Utilice un paño suave ligeramente humedecido en agua. No
emplee alcohol, bencina ni diluyente.
Nota (sólo para TCM-473V)
Limpie periódicamente la clavija de los auriculares.
Especificaciones
Sistema de grabación
2 pistas 1 canal monoaural
Gama de frecuencias
TCM-473V: Grabación: 250-6.300Hz
Reproducción: 100-8.000Hz
TCM-455V/454VK/453V: 250-6.300Hz
Altavoz
Aprox. 3,6 cm (17⁄16 plgds.) de diámetro.
Salida de potencia
TCM-473V: 130mW (distorsión armónica de 10 %)
TCM-455V/454VK/453V: 300mW (distorsión armónica de 10
%)
Entrada
TCM-473V: Toma de entrada de micrófono (minitoma) con
sensibilidad de 0,2 mV para micrófono de 3 kiloOhmios o
impedancia inferior
TCM-455V/454VK/453V: Toma de entrada de micrófono
(minitoma) con sensibilidad de 0,14 mV para micrófono de 3
kiloOhmios o impedancia inferior
Salida
TCM-473V: Toma 2 (auriculares) (minitoma estéreo) para
auriculares de 8 - 300 ohmios
TCM-455V/454VK/453K: Toma de auriculares (minitoma)
para auriculares de 8 a 300 Ohmios
Rango variable de la velocidad de cinta
De +30 % a –15 %
Requisitos de alimentación
•Dos pilas R6 (tamaño AA) (no suministradas): 3V CC
•Dos pilas recargables NC-AA (1,2 V) (suministradas con el
TCM-454VK)
Toma DC IN 3 V que admite:
•Adaptador de alimentación de CA Sony (suministrado con
el TCM-454VK) o adaptador de alimentación de CA ACE30HG (no suministrado) adecuado para el país donde va a
utilizarse la unidad.
•Cable de batería de automóvil Sony DCC-E230 (no
suministrado) para utilizar una batería de automóvil de
12 V.
Dimensiones (an/al/f) (incluidas partes y controles
salientes.)
113 × 91 × 37 mm
Masa (sin incluir pilas)
TCM-473V: 185 g
TCM-455V/454VK/453V: 170 g
Accesorios suministrados
Asa de mano (1) (fijada a la unidad)
Adaptador de alimentación de CA (1) (TCM-454VK)
Adaptador de cargador de pilas (1) (TCM-454VK)
Pilas recargables (NC-AA, 1,2V, 700mAh, Ni-Cd) (2)
(TCM-454VK)
Auriculares (1) (TCM-473V)
Diseño y especificaciones sujetos a cambio sin previo aviso.
Português
Deutsch
A
a
b
c
d
e
f
B
a
b
c
Lado A
Seite A
C
Adaptador para o
carregador de pilhas
Ladegerätadapter
DC IN 3V
Indicador de corrente
Netzanzeige
Indicador
luminoso BATT
Anzeige BATT
Transformador de corrente
CA
Netzteil
DC IN 3V
EAR(TCM-455V/454VK/453V)
Microfone
integrado
Eingebautes
Mikrofon
rREC
pSTOP
0REW/
REVIEW
PAUSE
2(TCM-473V)
MIC VOR
A
MIC (PLUG IN POWER)
Transformador de
corrente CA
Netzteil
Patilha do lado A
Überspielschutzlasche
für Seite A
D
p STOP
( PLAY
SPEED CONTROL
0 REW/REVIEW
) FF/CUE
PAUSE
E
Cabeça de eliminação
Löschkopf
Cabeça de gravação/
reprodução
Aufnahme-/
Wiedergabekopf
VOL
Cabrestante
Kapstan
Rolete de
compressão
Wattestäbchen
Cotonete de algodão
Andruckwalze
Bem-vindo!
Obrigado por ter adquirido o gravador de cassetes da Sony.
Apresentamos abaixo algumas das funções:
•Sistema VOR (Gravação activada por voz) que inicia e pára
automaticamente a gravação em resposta ao som,
poupando a fita e as pilhas.
•A função SPEED CONTROL que permite aumentar ou
diminuir a velocidade de reprodução da fita.
•Função de reprodução estéreo que lhe permite ouvir
cassetes estéreo pré-gravadas com os auscultadores
fornecidos (só para o modelo TCM-473V).
z Começar
Preparação da fonte de
alimentação
Escolha uma das seguintes fontes de alimentação.
Pilhas secas (ver a Fig. A-a)
Certifique-se de que não está nada ligado à ficha (tipo jack)
CC IN de 3V.
1 Abra a tampa do compartimento das pilhas.
2 Introduza duas pilhas tamanho R6 (AA) (não fornecidas)
com a polaridade correcta e feche a tampa.
Notas
•Não carregue pilhas secas.
•Não misture pilhas novas com velhas.
•Não utilize tipos diferentes de pilhas.
•Se não pretender utilizar o aparelho durante algum tempo,
retire as pilhas de modo a evitar o derramamento do líquido
das pilhas e a subsequente corrosão.
•As pilhas não se gastam mesmo se ligar outra fonte de
alimentação.
Para retirar as pilhas (ver a Fig. A-b)
Para voltar a montar a tampa do compartimento
das pilhas se esta se soltar acidentalmente
(ver a Fig. A-c)
Pilhas recarregáveis (fornecidas só com o
modelo TCM-454VK) (consulte a figura A-d)
Antes de utilizar as pilhas recarregáveis, carregue-as
utilizando o adaptador para o carregador de pilhas
fornecido e o transformador de corrente CA.
1 Coloque as pilhas recarregáveis (NC-AA) no adaptador
para o carregador de pilhas com a polaridade correcta.
2 Ligue o transformador de corrente CA (fornecido com o
modelo TCM-454VK) ao jack DC IN 3V do adaptador
para o carregador de pilhas e à tomada de parede.
O indicador de corrente acende-se.
3 Desligue o transformador de corrente CA da tomada de
parede e do adaptador para o carregador de pilhas
depois de decorridas cerca de oito horas.
Notas
•O indicador de corrente acende-se a verde enquanto o
transformador de corrente CA estiver ligado à tomada de
parede e ao jack DC IN 3V, mesmo que a carga não tenha sido
efectuada.
•Utilize apenas o transformador de corrente CA, o adaptador
para o carregador de pilhas e as pilhas recarregáveis
fornecidos ou recomendados.
•Pode carregar as pilhas recarregáveis cerca de 500 vezes.
•Não deixe o adaptador para o carregador de pilhas ligado
durante mais de 20 horas. Uma sobrecarga pode danificar as
pilhas recarregáveis.
Substituição das pilhas (ver a Fig.A-e)
Substitua as pilhas por pilhas novas ou carregue-as (só para
o modelo TCM-454VK) quando a luz do indicador BATT
começar a ficar fraca.
Notas
•Depois de ter utilizado as pilhas durante algum tempo, o
indicador luminoso BATT pode tremer quando aumentar o
som da reprodução. No entanto, isto não significa que as pilhas
têm de ser substituídas.
•Mesmo depois da luz do indicador luminoso BATT se apagar,
o aparelho continuará, durante algum tempo, a efectuar a
reprodução. Deve, no entanto, substituir as pilhas logo que
possível. Se não o fizer, as gravações seguintes podem não ser
efectuadas correctamente.
Duração da pilha (número de horas aproximado) (EIAJ*)
Reprodução Gravação
Pilhas alcalinas Sony LR6 (SG) 11 11
Pilhas Sony R6P (SR) 3 3
Pilha recarregável da Sony
(NC-AA) com a carga total 3,5 4
(Só para o modelo TCM-454VK)
* Valor medido de acordo com a norma da EIAJ(Electronic
Industries Association of Japan). (Utilizando uma cassete da
série HF da Sony)
nota
A duração da pilha pode ser menor dependendo das condições
de utilização do aparelho.
Corrente eléctrica doméstica
(ver a Fig. A-f)
Ligue o transformador de corrente CA a DC IN 3V e à
tomada de parede. O transformador de corrente CA só é
fornecido com o modelo TCM-454VK. Com os outros
modelos, utilize o transformador de corrente CA AC-E30HG
(não fornecido). Não utilize qualquer outro tipo de
transformador de corrente CA.
Polaridade da ficha
Nota
As características do AC-E30HG variam de zona para zona.
Antes de adquirir o aparelho, verifique a tensão de corrente local
e a forma da ficha.
z Funcionamento do aparelho
Gravação (ver a Fig. B-a, b)
O microfone incorporado permite-lhe gravar imediatamente.
Certifique-se de que não está nada ligado à ficha (tipo jack)
MIC.
1 Introduza uma cassete normal (TYPE I) com o lado em
que pretende gravar virado para o suporte das cassetes.
2 Ajuste VOR para: a posição H ou L para iniciar e
interromper automaticamente a gravação.
H (alto) para gravações em reuniões ou em locais
silenciosos e/ou espaçosos.
L (baixo) para gravações de ditados ou em locais
ruidosos.
OFF para iniciar e parar manualmente a gravação.
Nota
Se o som de gravação não estiver suficientemente alto, ajuste
o comutador VOR para a posição OFF. Se não o fizer, o
aparelho pode não iniciar a gravação.
3 Carregue em r REC.
O gravador começa a gravar.
A gravação pára no final da cassete e o gravador desliga-se
automaticamente.
Para Carregue ou faça deslizar
Parar de gravar p STOP
Fazer uma pausa na Mova PAUSE c na direcção da
gravação seta
Rever a parte que foi Carregue continuamente em 0
gravada REW/REVIEW durante a gravação.
* Ao carregar em p STOP (função de libertação stop-pause)
liberta também automaticamente a tecla PAUSE c.
Para retomar a gravação após uma
pausa, liberte PAUSE c*.
Solte a tecla quando iniciar a
reprodução.
Para controlar o som
Para o modelo TCM-473V: Ligue bem os auscultadores
estéreo (fornecidos) aos jacks 2 (auscultadores).
Só para o modelo TCM-455V/454VK/453V: Ligue um
auricular (não fornecido) à ficha tipo jack EAR.
Notas
•Não utilize cassetes CrO2 (TYPE II) ou de metal (TYPE IV). Se o
fizer, o som pode ficar distorcido quando reproduzir a cassete
ou a gravação anterior pode não ser totalmente apagada.
•O comutador SPEED CONTROL só funciona no modo de
reprodução. A gravação é efectuada independentemente deste
controlo.
Notas sobre o VOR (gravação activada pela voz)
•Quando utilizar o sistema VOR num local barulhento, o
aparelho permanece no modo de gravação. Se, pelo contrário,
o som for demasiado baixo, o aparelho não inicia a gravação.
Dependendo das condições, coloque VOR na posição H (alta)
ou L (baixa), de forma a captar apenas o som necessário.
•O sistema VOR depende das condições ambientais. Se não
conseguir obter os resultados pretendidos mesmo depois de ter
regulado VOR para H ou L, coloque VOR na posição OFF.
Para evitar a desgravação acidental de uma
cassete gravada (ver a Fig. B-c)
Parta as patilhas da cassete e deite-as fora. Para que possa
voltar a gravar na mesma cassete, tape o orifício da patilha
com fita adesiva.
Gravação a partir de várias
fontes de som
O som é gravado em mono.
Gravação com um microfone exterior
Ligue um microfone à ficha tipo jack MIC. O ponto
sobreposto, próximo da ficha (tipo jack) MIC, identifica-o
como sendo adequado para um microfone e não para um
auricular. Utilize um microfone de baixa impedância
(inferior a 3 kilohms), tal como o ECM-T110 (não fornecido).
Se utilizar um microfone “plug-in-power”, a corrente do
microfone é fornecida pelo gravador.
Nota
Se gravar com um microfone exterior, o sistema VOR pode não
funcionar correctamente devido à diferença de sensibilidade.
Gravação a partir de outro
equipamento
Ligue outro equipamento à ficha (tipo jack) MIC, utilizando
o cabo de ligação RK-G64HG (não fornecido).
(ver a Fig. C)
Reprodução de cassetes
(ver a Fig. D)
1 Introduza uma cassete com lado que pretende
reproduzir virado para o suporte das cassetes.
2 Ajuste a velocidade de reprodução da fita.
Ajuste SPEED CONTROL para:
SLOW (lento) para reproduzir uma cassete lentamente.
Posição central para reproduzir uma cassete à velocidade
normal.
FAST (rápido) para reproduzir uma cassete
rapidamente.
3 Carregue em ( PLAY e depois ajuste o volume. Ao
lado de VOL existe um ponto em relevo que indica a
direcção para onde tem de rodar o selector para baixar o
volume de som.
A reprodução pára no final da cassete e o gravador desligase automaticamente.
Para
Parar a reprodução/
parar o avanço rápido
ou rebobinar
Fazer uma pausa na
reprodução
Pesquisar para a frente
durante a reprodução
(CUE)
Pesquisar para trás
durante a reprodução
(REVIEW)
Avançar rapidamente**
Rebobinar**
Começar a gravar
durante a reprodução
* Ao carregar em p STOP (função de libertação stop-pause)
PAUSE c também é libertada automaticamente.
**Se deixar o aparelho ligado depois da cassete ter sido
rebobinada, as pilhas gastam-se rapidamente. Não se esqueça
de carregar na tecla p STOP.
Para reproduzir uma cassete gravada em estéreo
(só para o modelo TCM-473V)
O altifalante deste aparelho é mono.
Para obter som estéreo, utilize os auscultadores fornecidos.
Carregue ou faça deslizar
p STOP
Mova PAUSE c na direcção da
seta
para retomar a reprodução, liberte a
tecla PAUSE c*.
Carregue continuamente em ) FF/
CUE e depois solte-a no ponto
pretendido
Carregue continuamente em 0
REW/REVIEW e depois solte-a no
ponto pretendido
) FF/CUE durante a paragem
0 REW/REVIEW durante a
paragem
r REC
z Informações adicionais
Precauções
Corrente eléctrica
•Este aparelho só funciona com corrente de 3V CC. Para
funcionar com CA, utilize o transformador de corrente CA
recomendado para este aparelho. Não utilize nenhum outro
tipo. Para funcionar com pilhas, introduza duas pilhas de R6
(tamanho AA).
Aparelho
•Não coloque o aparelho perto de fontes de calor, em locais
sujeitos à incidência directa dos raios solares, poeiras ou a
choques mecânicos.
•Se cair um objecto ou um líquido dentro do aparelho, retire as
pilhas ou desligue o adaptador de corrente CA e mande-o
reparar por pessoal qualificado antes de voltar a utilizá-lo.
•Mantenha os cartões de crédito com códigos magnéticos, os
relógios de corda, etc. longe do aparelho de modo a evitar
possíveis danos provacados pelo íman do altifalante.
•Se o gravador já não é utilizado há muito tempo, coloque-o em
modo de reprodução e deixe-o aquecer durante alguns
minutos antes de introduzir a cassete.
Cassetes com uma duração superior a 90
minutos
Não recomendamos a utilização de cassetes com uma
duração superior a 90 minutos, excepto durante gravações
ou reproduções muito longas. A fita destas cassetes é muito
fina e estica com grande facilidade.
Se surgirem dúvidas ou problemas relacionados com o
aparelho, consulte o agente Sony mais próximo.
Resolução de problemas
Se os problemas persistirem depois de efectuar estas
verificações, consulte o agente Sony mais próximo.
Não consegue carregar em r REC.
m A patilha da cassete foi retirada.
Não consegue carregar em ( PLAY.
m A cassete chegou ao fim. Rebobine-a.
O gravador não funciona.
m Introduziu as pilhas com a polaridade invertida.
m As pilhas estão gastas.
m Moveu PAUSE c na direcção da seta.
m O transformador de corrente CA ou a bateria do
automóvel não foi ligada correctamente.
m O transformador de corrente CA não pode estar ligado
à tomada de parede quando introduzir as pilhas.
Não sai som do altifalante.
m O auricular ou os auscultadores estão ligados.
m O volume está na posição mais baixa.
A velocidade da fita é demasiado rápida ou
lenta no modo de reprodução.
m SPEED CONTROL não está colocado na posição
central.
Há cortes de som ou o som está demasiado alto.
m O volume está no mínimo.
m As pilhas estão fracas.
m As cabeças estão sujas. Consulte “Manutenção.”
Não consegue gravar.
m A ligação está mal feita.
m As pilhas estão gastas.
m A cabeça de reprodução/gravação está suja.
m VOR foi ajustado para a posição errada.
A gravação é interrompida.
m VOR está ajustado para a posição H ou L. Se não
pretende utilizar VOR, ajuste-o para a posição OFF.
Não se consegue apagar completamente a
gravação.
m A cabeça de eliminação está suja.
m Está a fazer uma gravação/eliminação utilizando uma
cassete gravada CrO
(TYPE II) ou de metal (TYPE IV).
2
Manutenção (ver a Fig. E)
Para limpar as cabeças da cassete e respectivos
acessórios
Em cada 10 horas de utilização, limpe as cabeças, os roletes
de compressão e o cabrestante com um cotonete de algodão
humedecido em álcool.
Para limpar a caixa
Utilize um pano macio ligeiramente humedecido em água.
Não utilize álcool, benzina nem diluente.
Nota (só para o modelo TCM-473V)
Limpe a ficha dos auscultadores periodidamente.
Especificações
Sistema de gravação
2 faixas, 1 canal mono
Gama de frequência
TCM-473V: Gravação: 250-6,300Hz
TCM-455V/454VK/453V: 250-6,300Hz
Altifalante
Aprox. 3,6 cm de diâmetro.
Saída da corrente
TCM-473V: 130mW (a 10 % de distorção harmónica)
TCM-455V/454VK/453V: 300mW (a 10 % de distorção
harmónica)
Entrada
TCM-473V: Ficha tipo jack de entrada do microfone (minificha) sensibilidade de 0,2 mV para 3 kilohms ou microfone
de baixa impedância
TCM-455V/454VK/453V: Ficha tipo jack de entrada do
microfone (mini-ficha) sensibilidade de 0,14 mV para 3
kilohms ou microfone de baixa impedância
Saída
TCM-473V: jacks 2 (auscultadores) (minijack estéreo) para
auscultadores de 8 - 300 ohms
TCM-455V/454VK/453K: Ficha tipo jack auricular (minificha) para auricular de 8 - 300 ohms
Variação de velocidade da fita
de +30 % a –15 %
Condições de alimentação necessárias
•Pilhas de R6 (tamanho AA) (não fornecidas): 3V CC
•Duas pilhas recarregáveis NC-AA (1.2 V) (fornecidas para o
modelo TCM-454VK)
A ficha tipo jack CC IN de 3V aceita:
•Transformador de corrente CA da Sony (fornecido para o
TCM-454VK) ou transformador de corrente CA AC-E30HG
(não fornecido) adequado ao país em que o aparelho foi
adquirido.
•O cabo de ligação à bateria do automóvel Sony DDC-E230
(não fornecido) para utilização com uma bateria de
automóvel de 12 V.
Dimensões (l/a/p) (incluindo peças salientes e controlos)
113 × 91 × 37 mm (41/2 × 35/8 × 11/2 pol.)
Peso (não incluindo pilhas)
TCM-473V: 185 g (6,6 onças)
TCM-455V/454VK/453V: 170 g (6,0 onças)
Acessórios fornecidos
Pega para o pulso (1) (presa ao aparelho)
Transformador de corrente CA (1) (TCM-454VK)
Adaptador para o carregador de pilhas (1) (TCM-454VK)
Pilhas recarregáveis (NC-AA, 1.2V, 700mAh, Ni-Cd) (2)
(TCM-454VK)
Auscultadores (1) (TCM-473V)
O design e as especificações estão sujeitos a alterações sem aviso
prévio.
Reprodução: 100-8,000Hz
Willkommen!
Danke, daß Sie sich für das Diktiergerät von Sony
entschieden haben.
Im folgenden sind einige Funktionen Ihres Geräts
aufgeführt:
•Das VOR-System (VOR = Voice Operated Recording,
stimmgesteuertes Aufnahmesystem) startet und stoppt die
Aufnahme automatisch als Reaktion auf das
Vorhandensein bzw. Fehlen von Ton. Dies spart Bandlänge
und schont die Batterien.
•Mit der Funktion zur Geschwindigkeitssteuerung (SPEED
CONTROL) können Sie die
Bandwiedergabegeschwindigkeit erhöhen oder verringern.
•Mit der Stereowiedergabefunktion können Sie bespielte
Stereokassetten mit den mitgelieferten Kopfhörern
wiedergeben lassen (nur TCM-473V).
z Vorbereitungen
Vorbereiten der Stromquelle
Wählen Sie eine der folgenden Stromquellen.
Trockenbatterien (siehe Abb. A-a)
Vergewissern Sie sich, daß nichts an die Buchse DC IN 3V
angeschlossen ist.
1 Öffnen Sie den Batteriefachdeckel.
2 Legen Sie zwei R6-Batterien der Größe AA (nicht
mitgeliefert) polaritätsrichtig ein, und schließen Sie den
Deckel.
Hinweise
•Versuchen Sie nicht, eine Trockenbatterie aufzuladen.
•Verwenden Sie eine neue Batterie nicht zusammen mit einer
alten.
•Verwenden Sie keine unterschiedlichen Batterietypen
zusammen.
•Wenn Sie das Gerät längere Zeit nicht benutzen, nehmen Sie
die Batterien heraus, um Schäden durch auslaufende
Batterieflüssigkeit und Korrosion zu vermeiden.
•Den Trockenbatterien wird kein Strom entzogen, wenn eine
andere Stromquelle angeschlossen ist.
So nehmen Sie die Batterien heraus
(siehe Abb. A-b)
So bringen Sie den Batteriefachdeckel wieder
an, wenn er sich versehentlich gelöst hat
(siehe Abb. A-c)
Akkus (nur beim TCM-454VK mitgeliefert)
(siehe Abb. A-d)
Bevor Sie die Akkus benutzen, laden Sie sie mit dem
mitgelieferten Ladegerätadapter und dem Netzteil.
1 Legen Sie die Akkus (NC-AA) polaritätsrichtig in den
Ladegerätadapter ein.
2 Schließen Sie das Netzteil (beim TCM-454VK
mitgeliefert) an die Buchse DC IN 3V am
Ladegerätadapter und an eine Netzsteckdose an.
Die Netzanzeige leuchtet auf.
3 Lösen Sie das Netzteil nach etwa acht Stunden von der
Netzsteckdose und vom Ladegerätadapter.
Hinweise
•Die Netzanzeige leuchtet grün, solange das Netzteil an die
Netzsteckdose und die Buchse DC IN 3V angeschlossen ist,
auch wenn der Ladevorgang noch nicht beendet ist.
•Verwenden Sie nur mitgelieferte oder empfohlene Netzteile,
Ladegerätadapter und Akkus.
•Sie können die Akkus ca. 500 Mal aufladen.
•Lassen Sie den Ladegerätadapter nicht länger als 20 Stunden
angeschlossen. Durch Überladen können die Akkus beschädigt
werden.
Wann müssen die Batterien
ausgetauscht werden?
Tauschen Sie die Batterien gegen neue aus, bzw. laden Sie
die Akkus (nur TCM-454VK), wenn die Anzeige BATT
schwächer wird.
Hinweise
•Wenn die Batterien etwas schwächer werden, flackert bei
hoher Wiedergabelautstärke möglicherweise die Anzeige
BATT, ohne daß die Batterien ausgetauscht werden müssen.
•Die Wiedergabe erfolgt noch eine Zeitlang normal, auch wenn
die Anzeige BATT schwächer wird. Dennoch sollten Sie die
Batterien möglichst bald wechseln. Andernfalls wird eine
anschließende Aufnahme nicht korrekt durchgeführt.
Ungefähre Lebensdauer der Batterien (in Stunden)
Alkali-Batterie LR6 (SG) von Sony 11 11
R6P (SR) von Sony 3 3
Sony-Akku
(NC-AA) vollständig geladen 3,5 4
(nur TCM-454VK)
* Gemessener Wert nach EIAJ-Standard (Electronic Industries
Association of Japan) unter Verwendung einer Kassette der
HF-Serie von Sony
Hinweis
Je nach den Betriebsbedingungen ist die Lebensdauer der
Batterie möglicherweise kürzer.
(siehe Abb.A-e)
(EIAJ*)
Wiedergabe Aufnahme
Netzstrom (siehe Abb. A-f)
Schließen Sie das Netzteil an die Buchse DC IN 3V und eine
Netzsteckdose an. Das Netzteil wird nur beim TCM-454VK
mitgeliefert. Bei anderen Modellen verwenden Sie das
Netzteil AC-E30HG (nicht mitgeliefert). Benutzen Sie kein
anderes Netzteil.
Polarität des Steckers
Hinweis
Die Spezifikationen für AC-E30HG variieren je nach Region.
Stellen Sie vor dem Erwerb fest, welche örtliche
Betriebsspannung gilt und welchen Steckertyp Sie benötigen.
z Betrieb
Aufnahme (siehe Abb. B-a, b)
Sie können den Ton einfach über das eingebaute Mikrofon
aufzeichnen.
Dabei darf nichts an die Buchse MIC angeschlossen sein.
1 Legen Sie eine normale Kassette (TYPE I) ein. Die Seite,
auf der die Aufnahme beginnen soll, muß zum
Bandhalter weisen.
2 Stellen Sie VOR auf H bzw. L. Die Aufnahme wird als
Reaktion auf das Vorhandensein bzw. Fehlen von Ton
automatisch gestartet bzw. unterbrochen.
H (hoch) zum Aufnehmen bei Besprechungen, in
ruhiger Umgebung und/oder in einem größeren
Raum.
L (niedrig) zum Aufnehmen bei einem Diktat oder in
lauter Umgebung.
OFF zum Starten und Stoppen der Aufnahme von
Hand.
Hinweis
Wenn der aufzunehmende Ton nicht laut genug ist, stellen
Sie den Schalter VOR auf OFF. Andernfalls startet das Gerät
die Aufnahme möglicherweise nicht.
3 Drücken Sie r REC.
Die Aufnahme beginnt.
Am Ende des Bandes stoppt die Aufnahme, und das Gerät
schaltet sich automatisch aus.
Funktion Taste/Schieber
Stoppen der Drücken Sie p STOP.
Aufnahme
Unterbrechen der Schieben Sie PAUSE c in
Aufnahme Pfeilrichtung.
Überprüfen des Drücken Sie beim Aufnehmen die
gerade Taste 0 REW/REVIEW, und
aufgenommenen halten Sie sie gedrückt. Lassen Sie
Abschnitts die Taste an der Stelle los, an der die
* PAUSE c springt automatisch heraus, wenn Sie p STOP
drücken (Stop-Pause-Funktion).
Zum Fortsetzen der Aufnahme nach einer
Pause
lassen Sie PAUSE c los*.
Wiedergabe starten soll.
So überprüfen Sie den Ton
TCM-473V: Schließen Sie Stereokopfhörer (mitgeliefert) fest
an die Buchse 2 (Kopfhörer) an.
Nur TCM-455V/454VK/453V: Schließen Sie einen Ohrhörer
(nicht mitgeliefert) fest an die Buchse EAR an.
Hinweise
•Verwenden Sie keine CrO2-Kassette (TYPE II) oder
Metallkassette (TYPE IV). Andernfalls kann der Ton bei der
Wiedergabe des Bandes verzerrt sein, oder die vorherige
Aufnahme wird nicht vollständig gelöscht.
•Der Schalter SPEED CONTROL arbeitet nur im
Wiedergabemodus. Die Aufnahme erfolgt unabhängig von der
Geschwindigkeitseinstellung.
Hinweise zum VOR-System (VOR = Voice Operated
Recording)
•Wenn Sie das VOR-System in lauter Umgebung einsetzen,
nimmt das Gerät permanent auf. Ist der Ton dagegen zu leise,
beginnt das Gerät nicht mit der Aufnahme. Stellen Sie VOR je
nach Umgebungsbedingungen auf H (high - hoch) oder L (low
- niedrig), so daß nur der gewünschte Ton aufgezeichnet wird.
•Die Funktion des VOR-Systems hängt von den jeweiligen
Umgebungsbedingungen ab. Wenn Sie nicht die gewünschten
Ergebnisse erzielen, auch wenn Sie VOR auf H oder L stellen,
stellen Sie VOR auf OFF.
So vermeiden Sie es, versehentlich ein Band zu
überspielen (siehe Abb. B-c)
Brechen Sie die Überspielschutzlaschen an der Kassette
heraus. Wenn Sie später wieder auf das Band aufnehmen
wollen, überkleben Sie die Aussparungen mit Klebeband.
Aufnehmen von verschiedenen
Tonquellen
Der Ton wird monaural aufgenommen.
Aufnehmen mit einem externen
Mikrofon
Schließen Sie ein Mikrofon an die Buchse MIC an. Der kleine
Vorsprung bei der Buchse MIC zeigt an, daß es sich um eine
Mikrofonbuchse, nicht um eine Ohrhörerbuchse handelt.
Verwenden Sie ein Mikrofon mit niedriger Impedanz
(weniger als 3 Kiloohm) wie z. B. ECM-T110 (nicht
mitgeliefert).
Bei einem Plug-in-Power-Mikrofon liefert dieses Gerät den
Strom für das Mikrofon.
Hinweis
Wenn Sie mit einem externen Mikrofon aufnehmen, arbeitet das
VOR-System möglicherweise aufgrund der unterschiedlichen
Empfindlichkeit nicht korrekt.
Aufnehmen von anderen Geräten
Schließen Sie ein anderes Gerät über das Verbindungskabel
RK-G64HG (nicht mitgeliefert) an die Buchse MIC an.
(siehe Abb. C)
Wiedergeben eines Bandes
(siehe Abb. D)
1 Legen Sie eine Kassette ein. Die wiederzugebende Seite
muß zum Bandhalter weisen.
2 Stellen Sie die Bandwiedergabegeschwindigkeit ein.
Stellen Sie SPEED CONTROL auf:
SLOW (langsam) zur langsamen Wiedergabe eines
Bandes.
Mittlere Position zur Wiedergabe bei normaler
Geschwindigkeit.
FAST (schnell) zur schnellen Wiedergabe eines Bandes.
3 Drücken Sie ( PLAY, und stellen Sie die Lautstärke
ein. Eine kleine Erhebung neben VOL gibt die Richtung
an, in der Sie die Lautstärke herunterdrehen.
Am Bandende stoppt die Wiedergabe, und das Gerät
schaltet sich automatisch aus.
Funktion
Stoppen der
Wiedergabe/Stoppen
des schnellen Vor-oder
Zurückspulens
Unterbrechen der
Wiedergabe
Vorwärtssuchen
während der
Wiedergabe (CUE)
Rückwärtssuchen
während der
Wiedergabe (REVIEW)
Vorspulen **
Zurückspulen**
Starten der Aufnahme
* PAUSE c springt automatisch heraus, wenn Sie p STOP
drücken (Stop-Pause-Funktion).
** Sie müssen nach dem Vor- bzw. Zurückspulen in den
Stopmodus wechseln, da sonst die Batterien rasch verbraucht
werden. Achten Sie also darauf, die Taste p STOP zu
drücken.
Taste/Schieber
Drücken Sie p STOP.
Schieben Sie PAUSE c in
Pfeilrichtung.
Zum Fortsetzen der Wiedergabe nach
einer Pause lassen Sie PAUSE c los*.
Drücken Sie ) FF/CUE, halten Sie die
Taste gedrückt, und lassen Sie sie an der
gewünschten Stelle los.
Drücken Sie 0 REW/REVIEW, halten
Sie die Taste gedrückt, und lassen Sie sie
an der gewünschten Stelle los.
Drücken Sie im Stopmodus ) FF/CUE.
Drücken Sie im Stopmodus 0 REW/
REVIEW.
Drücken Sie während der Wiedergabe
r REC.
So lassen Sie eine Kassette mit
Stereoaufnahmen wiedergeben (nur TCM-473V)
Der eingebaute Lautsprecher dieses Geräts ist monaural.
Den Stereoton können Sie über die mitgelieferten Kopfhörer
wiedergeben lassen.
z Weitere Informationen
Sicherheitsmaßnahmen
Stromversorgung
•Betreiben Sie das Gerät nur mit 3 V Gleichstrom.
Verwenden Sie bei Wechselstrom ausschließlich das für
das Gerät empfohlene Netzteil. Für Batteriebetrieb
verwenden Sie zwei R6-Batterien der Größe AA.
Umgang mit dem Gerät
•Verwenden Sie das Gerät nicht in der Nähe von
Wärmequellen oder an Orten, an denen es direktem
Sonnenlicht, übermäßig viel Staub oder mechanischen
Erschütterungen ausgesetzt ist.
•Sollten Fremdkörper oder Flüssigkeiten in das Gerät
gelangen, nehmen Sie die Batterien heraus, bzw. trennen
Sie es vom Netzteil, und lassen Sie es von qualifiziertem
Fachpersonal überprüfen, bevor Sie es wieder benutzen.
•Halten Sie Kreditkarten mit Magnetcodierung oder
Zugfederuhren (mechanische Uhren) etc. vom Gerät fern,
um mögliche Schäden durch den Lautsprechermagneten
zu vermeiden.
•Wenn das Gerät längere Zeit nicht benutzt wurde, starten
Sie den Wiedergabemodus. Das Gerät benötigt einige
Minuten Aufwärmzeit, kann können Sie eine Kassette
einlegen.
Bänder mit mehr als 90 Minuten
Aufnahmedauer
Sie sollten Bänder mit einer Aufnahmedauer von über 90
Minuten - wenn überhaupt - nur für langes
ununterbrochenes Aufnehmen oder Wiedergeben
verwenden. Diese Bänder sind sehr dünn und leicht zu
überdehnen.
Sollten an Ihrem Gerät Probleme auftreten oder sollten Sie
Fragen haben, wenden Sie sich bitte an Ihren Sony-Händler.
Störungsbehebung
Sollte eine Funktionsstörung auch nach der Überprüfung
der folgenden Punkte fortbestehen, wenden Sie sich bitte an
Ihren Sony-Händler.
r REC kann nicht gedrückt werden.
m Die Überspielschutzlasche der Kassette wurde
entfernt.
( PLAY kann nicht gedrückt werden.
m Das Band ist am Bandende angelangt. Spulen Sie das
Band zurück.
Das Gerät arbeitet nicht.
m Die Batterien sind nicht polaritätsrichtig eingelegt.
m Die Batterien sind zu schwach.
m PAUSE c wurde in Pfeilrichtung geschoben.
m Das Netzteil oder das Autobatterieadapterkabel ist
nicht korrekt angeschlossen.
m Die Batterien sind zwar eingelegt, aber gleichzeitig ist
das Netzteil angeschlossen, jedoch ist dieses nicht mit
der Netzsteckdose verbunden.
Kein Ton ertönt aus dem Lautsprecher.
m Die Ohr- oder Kopfhörer sind angeschlossen.
m Die Lautstärke wurde vollständig heruntergedreht.
Die Bandgeschwindigkeit ist im
Wiedergabemodus zu schnell oder zu langsam.
m SPEED CONTROL befindet sich nicht in der mittleren
Position.
Der Ton fällt aus oder wird nur mit vielen
Nebengeräuschen wiedergegeben.
m Die Lautstärke ist vollständig heruntergedreht.
m Die Batterien sind zu schwach.
m Die Tonköpfe sind verschmutzt (siehe dazu den
Abschnitt “Wartung”).
Aufnehmen ist nicht möglich.
m Die Anschlüsse wurden nicht ordnungsgemäß
vorgenommen.
m Die Batterien sind zu schwach.
m Der Aufnahme-/Wiedergabekopf ist verschmutzt.
m VOR befindet sich in einer ungeeigneten Position,
wenn die VOR-Funktion aktiviert wurde.
Die Aufnahme wird unterbrochen.
m VOR ist auf H oder L gestellt. Wenn Sie das VOR-
System nicht verwenden wollen, stellen Sie VOR auf
OFF.
Eine vorhandene Aufnahme läßt sich nicht
vollständig löschen.
m Der Löschkopf ist verschmutzt.
m Beim Aufnehmen oder Löschen wurde eine bespielte
CrO
- (TYPE II) oder eine Metallkassette (TYPE IV)
2
verwendet.
Wartung (siehe Abb. E)
So reinigen Sie die Tonköpfe und den
Bandtransportweg
Reinigen Sie nach jeweils 10 Gebrauchsstunden Tonköpfe,
Andruckwalzen und Kapstan mit einem Wattestäbchen, das
Sie mit Alkohol angefeuchtet haben.
So reinigen Sie das Gehäuse
Nehmen Sie ein weiches, leicht mit Wasser angefeuchtetes
Tuch. Verwenden Sie keinen Alkohol, Benzin oder
Verdünnung.
Hinweis (nur TCM-473V)
Reinigen Sie den Kopfhörerstecker regelmäßig.
Technische Daten
Aufnahmesystem
2 Spuren, 1 Kanal, monaural
Frequenzbereich
TCM-473V: Aufnahme: 250 - 6.300 Hz
TCM-455V/454VK/453V: 250-6.300 Hz
Lautsprecher
Durchmesser ca. 3,6 cm
Leistungsabgabe
TCM-473V: 130 mW (bei 10 % harmonischer Verzerrung)
TCM-455V/454VK/453V: 300 mW (bei 10 % harmonischer
Verzerrung)
Eingang
TCM-473V: Empfindlichkeit der Mikrofoneingangsbuchse
(Minibuchse) 0,2 mV für Mikrofon mit einer Impedanz von 3
Kiloohm oder weniger
TCM-455V/454VK/453V: Empfindlichkeit der
Mikrofoneingangsbuchse (Minibuchse) 0,14 mV für Mikrofon
mit einer Impedanz von 3 Kiloohm oder weniger
Ausgang
TCM-473V: Kopfhörerbuchse 2 (Stereominibuchse) für
Kopfhörer mit 8 - 300 Ohm
TCM-455V/454VK/453V: Ohrhörerbuchse (Minibuchse) für
Ohrhörer mit 8 - 300 Ohm
Variabler Bereich der Bandgeschwindigkeit
von +30% bis –15%
Stromversorgung
•Zwei R6-Batterien der Größe AA (nicht mitgeliefert): 3 V
Gleichstrom
•Zwei NC-AA-Akkus (1,2 V) (beim TCM-454VK
mitgeliefert)
Buchse DC IN 3 V für:
•Netzteil von Sony (beim TCM-454VK mitgeliefert) oder
Netzteil AC-E30HG (nicht mitgeliefert), geeignet für das
Land, in dem das Gerät benutzt werden soll.
•Autobatterieadapterkabel DDC-E230 von Sony (nicht
mitgeliefert) für Betrieb an 12-V-Autobatterie.
Abmessungen (B/H/T) (einschl. vorstehender Teile und Bedienelemente)
113 × 91 × 37 mm
Gewicht (ohne Batterien)
TCM-473V: 185 g
TCM-455V/454VK/453V: 170 g
Mitgeliefertes Zubehör
Trageriemen (1) (am Gerät angebracht)
Netzteil (1) (TCM-454VK)
Ladegerätadapter (1) (TCM-454VK)
Akkus (NC-AA, 1,2 V, 700 mAh, Ni-Cd) (2) (TCM-454VK)
Kopfhörer (1) (TCM-473V)
Änderungen, die dem technischen Fortschritt dienen, bleiben
vorbehalten.
Wiedergabe: 100 - 8.000 Hz
 Loading...