

English
A
中文
Cassette-Corder
Operating Instructions
使用說明書
TCM-400DV
Sony Corporation © 2001
A
A
B
D
E
DC IN 3V
C
BATT
3-234-084-81(1)
AC power adaptor
AC 電源轉換器
B
A
B
C
REC
STOP
REW/
REVIEW
PAUSE
Side A
A 面
EAR
TAPE COUNTER
MIC
VOR
Flat mic
扁平麥克風
REC
REC TIME
DC IN 3V
Tab for side A
A 面的翼片
Welcome !
Thank you for purchasing the Sony
Cassette-Corder.
This Cassette-Corder is equipped
with a REC TIME switch that lets
you record double the normal
length on any cassette.
Note
Tapes recorded with the REC TIME
switch in the DOUBLE position cannot
be played properly on a tape recorder
without the REC TIME switch
function.
BGetting Started
Preparing a Power
Source
Choose one of the following power
sources.
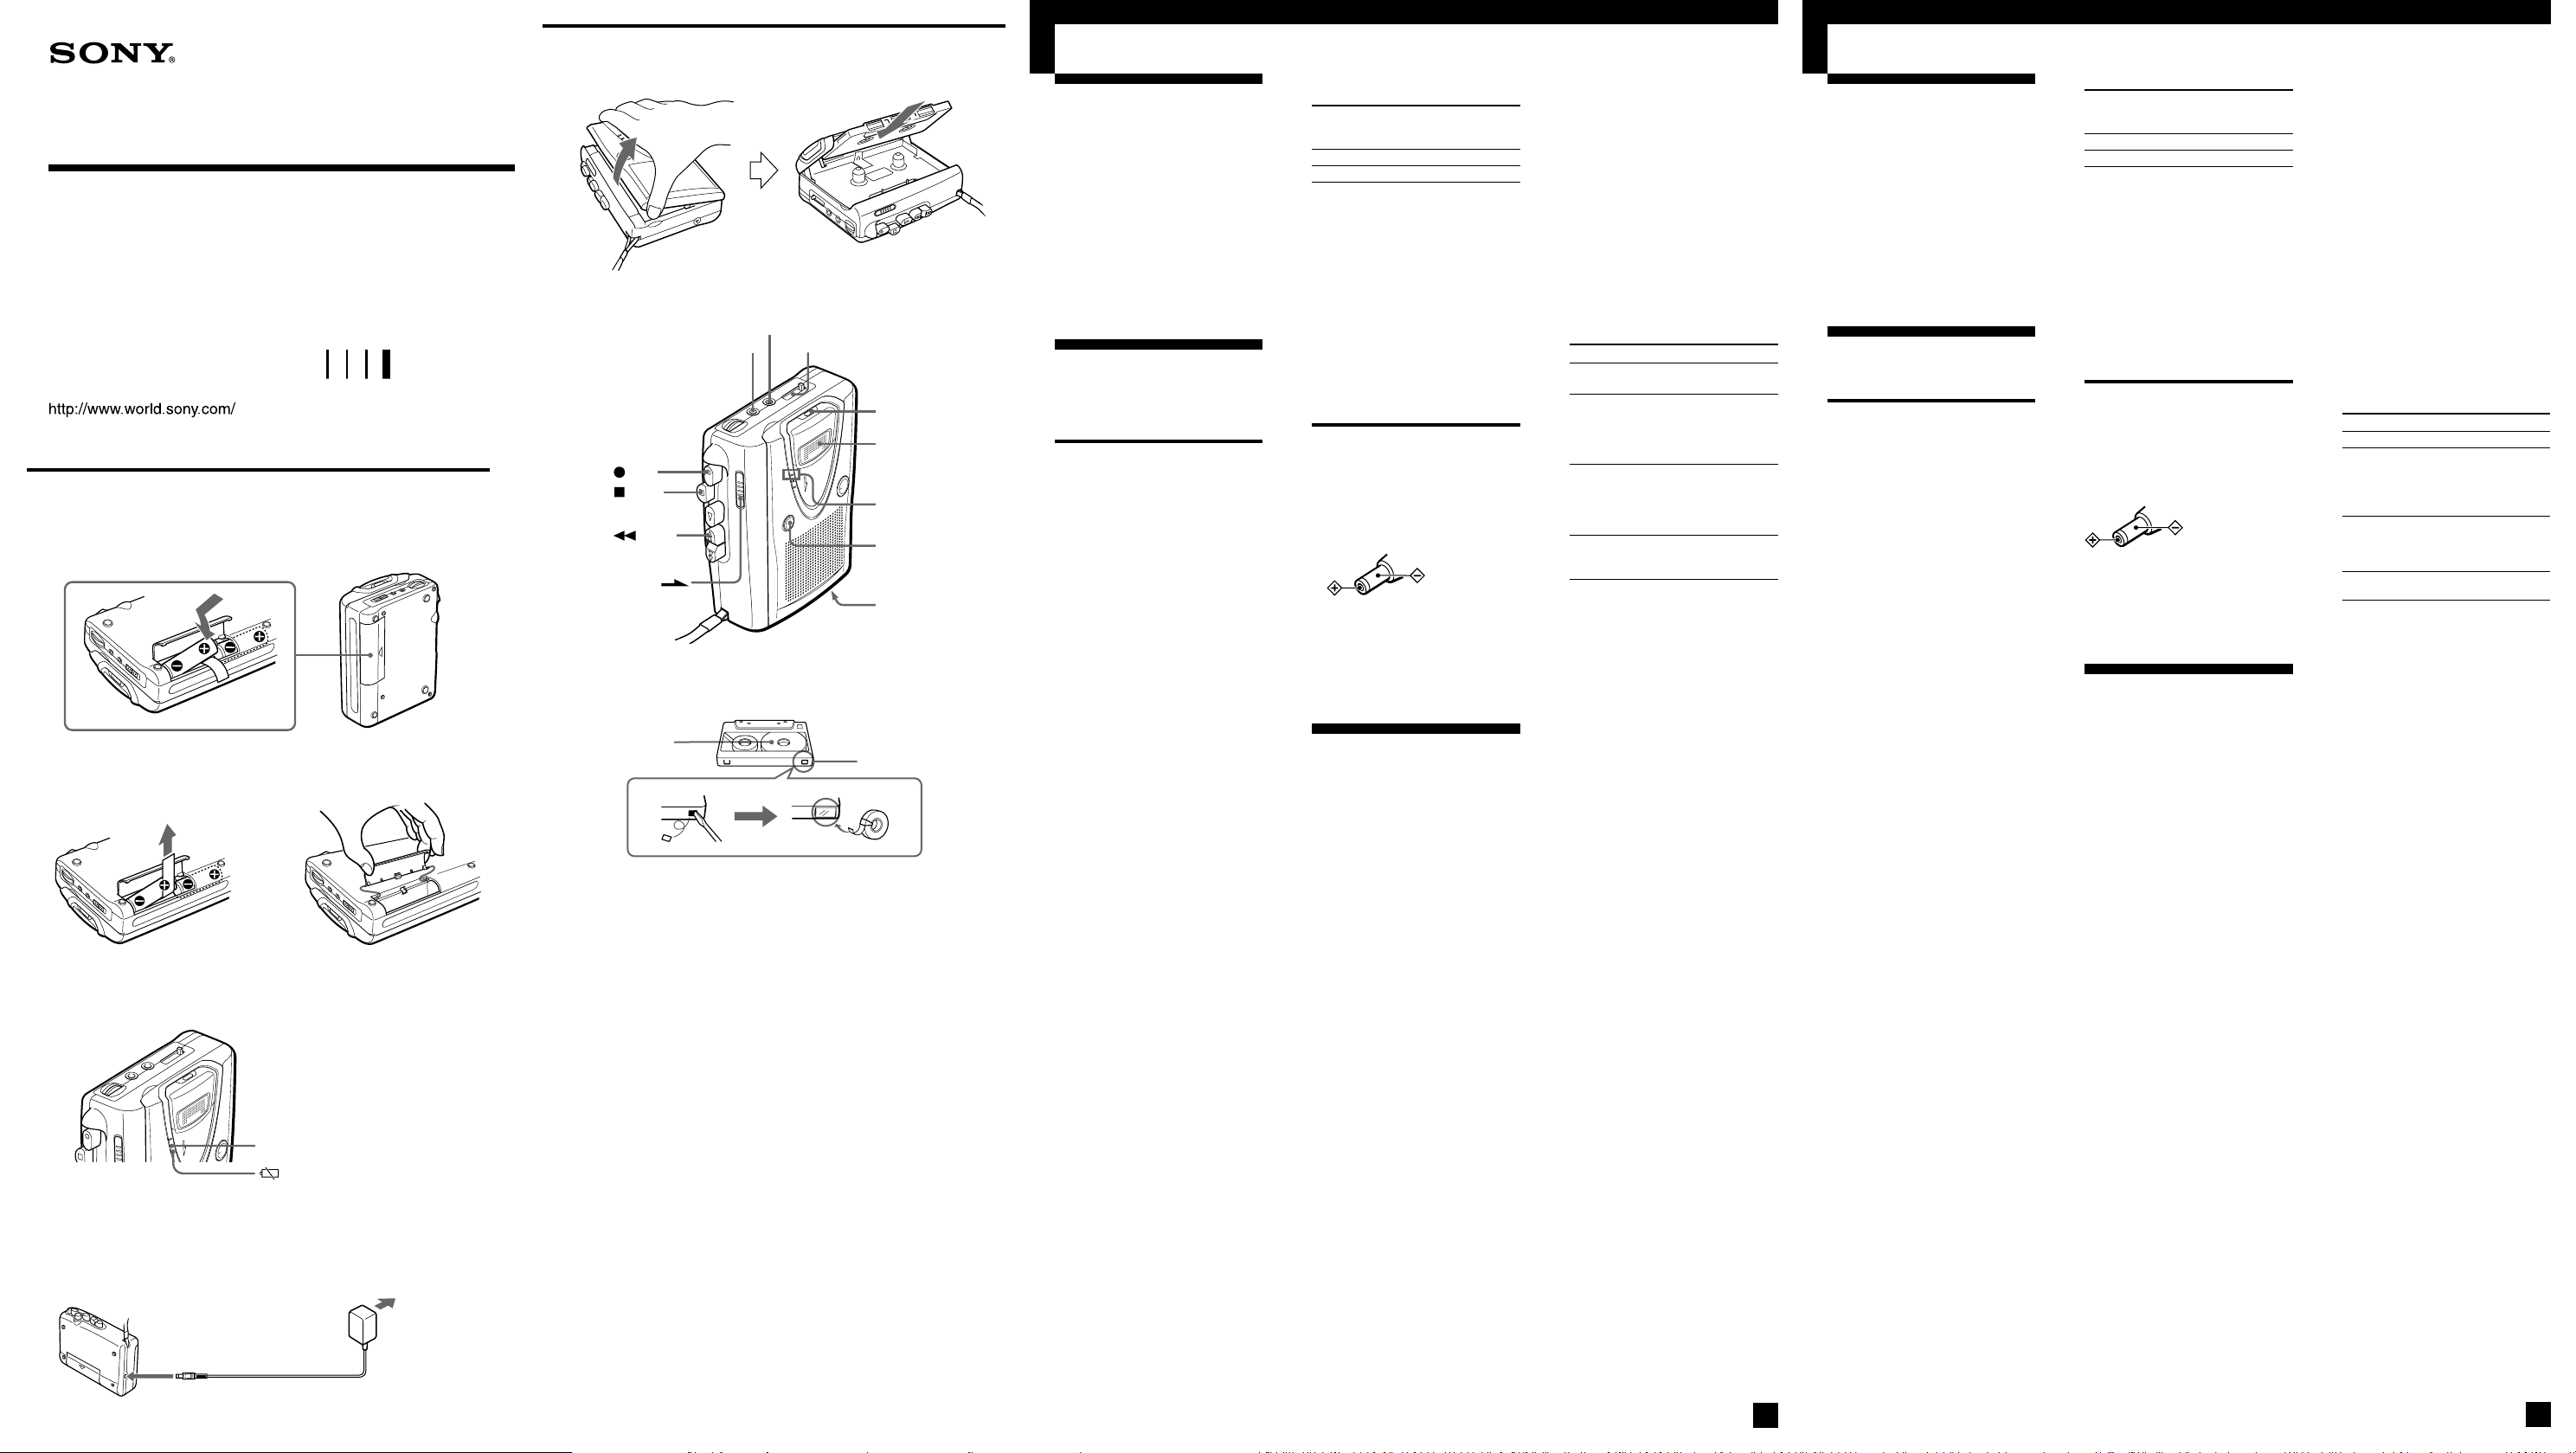
Dry Batteries
Make sure that nothing is connected
to the DC IN 3V jack.
1 Open the battery compartment
lid.
2 Insert two R6 (size AA)
batteries with correct polarity
and close the lid.
Notes
• Do not charge a dry battery.
• Do not use a new battery with an old
one.
• Do not use different types of
batteries.
• When you do not use the unit for a
long time, remove the batteries to
avoid any damage caused by battery
leakage and subsequent corrosion.
• Dry batteries will not be drained
when another power source is
connected.
To take out the batteries
(see Fig. A-B)
To attach the battery
compartment lid if it is
accidentally detached (see
Fig. A-C)
When to replace the
batteries (see Fig.A-D)
Replace the batteries with new ones
when the BATT lamp goes off and
the E lamp flashes.
Notes
• The unit will play back normally for
a while, even after the E lamp
flashes. However, replace the
batteries as soon as you can. If not,
the playback cannot be made with
normal sound, noise may be
recorded and the recorded sound
will not be loud enough.
• The E lamp flashes to indicate
battery replacement during
playback, recording and pause
(during paused by VOR function
also).
• In the following cases you do not
need to replace the batteries:
– if the BATT lamp flashes with the
playback sound when you turn up
the volume.
– if the E lamp lights momentarily
when the tape starts running or at
the end of the tape.
– if the E lamp flashes during FF/
CUE or REW/REVIEW.
(see Fig. A-A)
Battery life
(Approx. hours) (JEITA*)
Sony Sony
alkaline R6P
Playback 16 3.5
Recording 24 6
* Measured value by the standard of
JEITA (Japan Electronics and
Information Technology Industries
Association). (Using a Sony HF
series cassette tape)
** When using a Sony LR6 (SG)
“STAMINA” alkaline dry batteries
(produced in Japan)
Note
The battery life may shorten
depending on the operation of the
unit.
For maximum performance we
recommend that you use alkaline
batteries.
LR6 (SG)** (SR)
House Current
(see Fig. A-E)
Connect the AC power adaptor to
DC IN 3V and to a wall outlet. Use
the AC-E30HG AC power adaptor
(not supplied). Do not use any other
AC power adaptor.
Polarity of
the plug
Note
Specifications for AC-E30HG vary for
each area. Check your local voltage
and the shape of the plug before
purchasing.
BOperating the Unit
Recording
(see Fig. B-A, B)
You can record right away with the
built-in microphone.
Make sure that nothing is connected
to the MIC jack.
Place the unit on a hard surface
such as a desk with the cassette
holder side up so that the flat mic
can record effectively.
1 Press TAPE COUNTER to reset
the tape counter.
2 Insert a normal (TYPE I) tape
with the side to be recorded
facing the cassette holder.
3 Set REC TIME to the desired
mode.
NORMAL (4.8cm/s): for
optimum sound.
Recommended for normal
recordings.
DOUBLE (2.4cm/s): for double
recording time (for example,
120 minutes using both sides of
a 60-minute cassette). Suitable
for recording conferences,
dictations, etc. Not
recommended for recording
music.
4 Set VOR to: H or L to start and
pause recording automatically,
depending on the recording
condition.
H (high) to record at
meetings or in a quiet and/
or spacious place.
L (low) to record for
dictation or in a noisy
place.
Set VOR to OFF to start and
stop recording manually.
Note
When the sound to be recorded is
not loud enough, set the VOR
switch to OFF, or the unit may
not start recording.
5 Press z REC.
N PLAY is pressed
simultaneously and recording
starts.
While the tape is running, the
REC lamp lights and flickers
depending on the strength of
the sound.
At the end of the tape, recording
stops and the unit turns off
automatically.
To
Stop
recording
Pause
recording
Review the
portion just
recorded
Eject a
cassette
* PAUSE . will also be
automatically released when
x STOP is pressed (stop-pauserelease function).
Press or slide
x STOP
PAUSE . in the
direction of the arrow
To release pause
recording, release
PAUSE .*.
Press and hold
m REW/REVIEW
during recording.
Release the button at
the point to start.
Press x STOP and open
the cassette
compartment lid.
To monitor the sound
Connect an earphone (not supplied)
firmly to the EAR jack.
You cannot adjust the monitoring
volume.
Notes
• Do not use a High-position (TYPE II)
or metal (TYPE IV) tape. If you do
so, the sound may be distorted when
you play back the tape, or the
previous recording may not be
erased completely.
• The SPEED CONTROL switch (see
reverse side) works in Playback
mode only. Recording will be made
independent of this control.
Notes on VOR (Voice Operated
Recording)
• When you use the VOR system in a
noisy place, the unit will stay in
Recording mode. If the sound is too
soft, on the contrary, the unit will
not start recording. Set VOR to H
(high) or L (low), depending on the
conditions to pick up the necessary
sound only.
• The VOR system depends on the
environmental conditions. If you
cannot get the desired results even
after adjusting VOR to H or L, set
VOR to OFF.
To prevent a tape from
being accidentally recorded
over (see Fig. B-C)
Break off and remove the cassette
tabs. To reuse the tape for
recording, cover the tab hole with
adhesive tape.
(turn over)
歡迎惠顧!
感謝您選購 Sony 卡帶錄音機使
用。
本卡帶錄音機配備有 REC TIME
開關,可用任何長短卡帶以雙倍於正
常長度進行錄音。
註
REC TIME 開關設定於 DOUBLE (雙倍)
位置時所錄磁帶是不能用不具備 REC
TIME 開關功能的磁帶錄音機進行適當
的放音的。
B
啟用
準備電源
選擇下列電源之一使用。
乾電池(參照圖 A-A)
確認 DC IN 3V 插孔並沒有連接
任何裝置。
1 打開電池室蓋。
2 裝入兩個 R6(AA,3 號)電池,
注意裝對極性,然後關上蓋子。
註
• 不可試圖給乾電池充電。
• 不可混用新、舊電池。
• 不可混用不同型式的電池。
• 長期不使用機器時,請卸下電池保
存,以免因電池漏液腐蝕損壞機器。
• 當接用其他電源使用時,並不消耗裝
在機器內的乾電池。
要取出電池時(參照圖 A-B)
要安裝因意外掉下來的電池室蓋時
(參照圖 A-C)
何時須更換電池
(參照圖 A-D)
當 BATT 燈熄滅了而 E 燈閃爍
著時,便請全換新電池。
註
• 雖然 E 燈開始閃爍了,機器仍能再
操作一會兒。但是,盡可能還是盡快
更換新電池。否則將不能再現正常聲
音,錄音將夾進噪聲或錄音不夠宏
亮。
• 播放,錄音和暫停中(或因 VOR 功能
的暫停中),E 燈起閃爍時,表示是
表示更換電池。
• 下列情況下是不必更換電池的:
– 當您調大音量時,如果 BATT 燈隨著
播放聲而起閃爍。
– 當錄音帶開始轉動或到達錄音帶的
終端時,如果 E 燈點亮片刻。
– 在 FF/CUE(快進繞提示)或 REW/
REVIEW(重繞檢閱)當中,如果
E 燈起閃爍。
電池壽命(大約時數) (JEITA *)
Sony 牌 Sony
鹼電池 R6P
放音 16 3.5
錄音 24 6
* 用 JEITA (Japan Electronics and
Information Technology Industries
Association) 標準的測定值。(使
用 Sony HF 系列卡式磁帶。)
** 當使用 Sony LR6 (SG)“STAMINA”鹼
電池(日本製)時
註
根據機器的操作狀況,電池壽命或可能
縮短些。
為獲得最佳性能,最好請使用
鹼電池。
LR6 (SG)** (SR)
家用電源(參照圖 A-E)
將 AC 電源轉接器連接到 DC
IN 3 V 和牆上電源插座。請利用
AC-E30HG 型 AC 電源轉接器(無附
帶)。請別使用任何別種 AC 電源轉
接器。
插頭的極性
註
AC-E30HG 的規格應地區而不同。購買機
器前,請先查明當地的電壓和電源線插
頭的形狀。
B 操作機器
錄音(參照圖 B-A,B)
利用內裝麥克風,可以立即錄
音。
確認 MIC(麥克風)插孔是否沒
連接著任何裝置。
請將機器放在例如桌面等結實
的平面上並讓卡帶座的一面朝上,如
此則扁平麥克風便可更有效地進行錄
音。
1 按 TAPE COUNTER 以重調磁帶計
數器。
2 裝入標準 (TYPE Ⅰ) 磁帶讓要開
始錄音的一面朝磁帶架方向。
3 將 REC TIME 設定於所要模式。
NORMAL(4.8 cm秒):音質最
佳。
適用於普通的錄音。
DOUBLE(2.4 cm秒):雙倍錄
音時間(例如用 60 分鐘卡帶兩
面錄音,可錄 120 分鐘)。適用
於會議,口授等錄音。最好不用
於錄音樂。
4 VOR 設定於:H 或 L 以隨錄音條
件自動地開始和暫停錄音。
H (高),用於會議或在寧靜
和或空廣地方的錄音。
L (低),用於口授或在吵雜
地方的錄音。
把 VOR 設定於 OFF(關掉),以
便手動開始及停止錄音。
註
所要錄的聲音不夠大時,請將 VOR
開關設定於 OFF,否則機器可能不
會開始錄音。
5 按下 z REC。
N PLAY 將同時被按下而開始錄
音。
走帶中 REC 燈點亮並隨聲音強弱
而起閃爍。
當磁帶錄到終端時,即停止錄
音而機器將自動地關掉電源。
要 請按或滑動
停止錄音 x STOP
暫停錄音 PAUSE . 沿箭頭
檢閱剛錄的部分 錄音中,按住 m
排出卡帶 按 x STOP 並打開
*當按 x STOP 時,PAUSE . 也將自
動地釋放(停止–暫停–釋放功
能)。
所指方向。
要解除暫停錄音模式
時,請釋放
PAUSE
.*。
REW/REVIEW(倒繞
再檢查)。在要開始
的播放點釋放按鈕。
卡帶室蓋。
要監聽聲音時
將耳機(無附帶)接穩到 EAR 插
孔上。
監聽的音量是不能調節的。
註
• 別使用高位 (TYPE Ⅱ) 或金屬 (TYPE
Ⅳ) 磁帶。用這類磁帶錄音,當播放
時,聲音可能會失真,或二次錄音
時,可能不能抹音完全舊錄音。
• SPEED CONTROL(速度控制)開關(參
看倒繞面)只有在放音模式時起作
用。錄音將與此開關無關。
VOR (聲操作錄音) 功能須知
• 在吵雜的地方使用 VOR 系統時,機器
可能一直停留在錄音狀態。相反的,
如果聲音太柔弱,機器則不能起動錄
音。請按照所須拾取聲音的條件將
VOR 設定於 H(高)或 L (低)。
• VOR 系統受環境條件影響。假如雖經
調整 VOR 於 H 或 L 之後,仍不能獲
得理想結果時,即請把 VOR 設定於
OFF(關掉)。
為防止磁帶意外重複錄音
(參照圖 B-C)
請折除卡式磁帶上的翼片。當
要重新利用磁帶錄音時,可用黏膠帶
蓋住翼片孔。
(續下頁)
C
D
E
REC
STOP
PLAY
REW/
REVIEW
FF/CUE
PAUSE
Record/playback
head
錄音放音磁頭
MIC (PLUG IN POWER)
VOL
Erase head
擦拭磁頭
Pinch-roller
壓輪
Lever
控制桿
Capstan
主動輪
SPEED CONTROL
REC TIME
Cotton swab
棉棒
English
Recording from
Various Sound
Sources
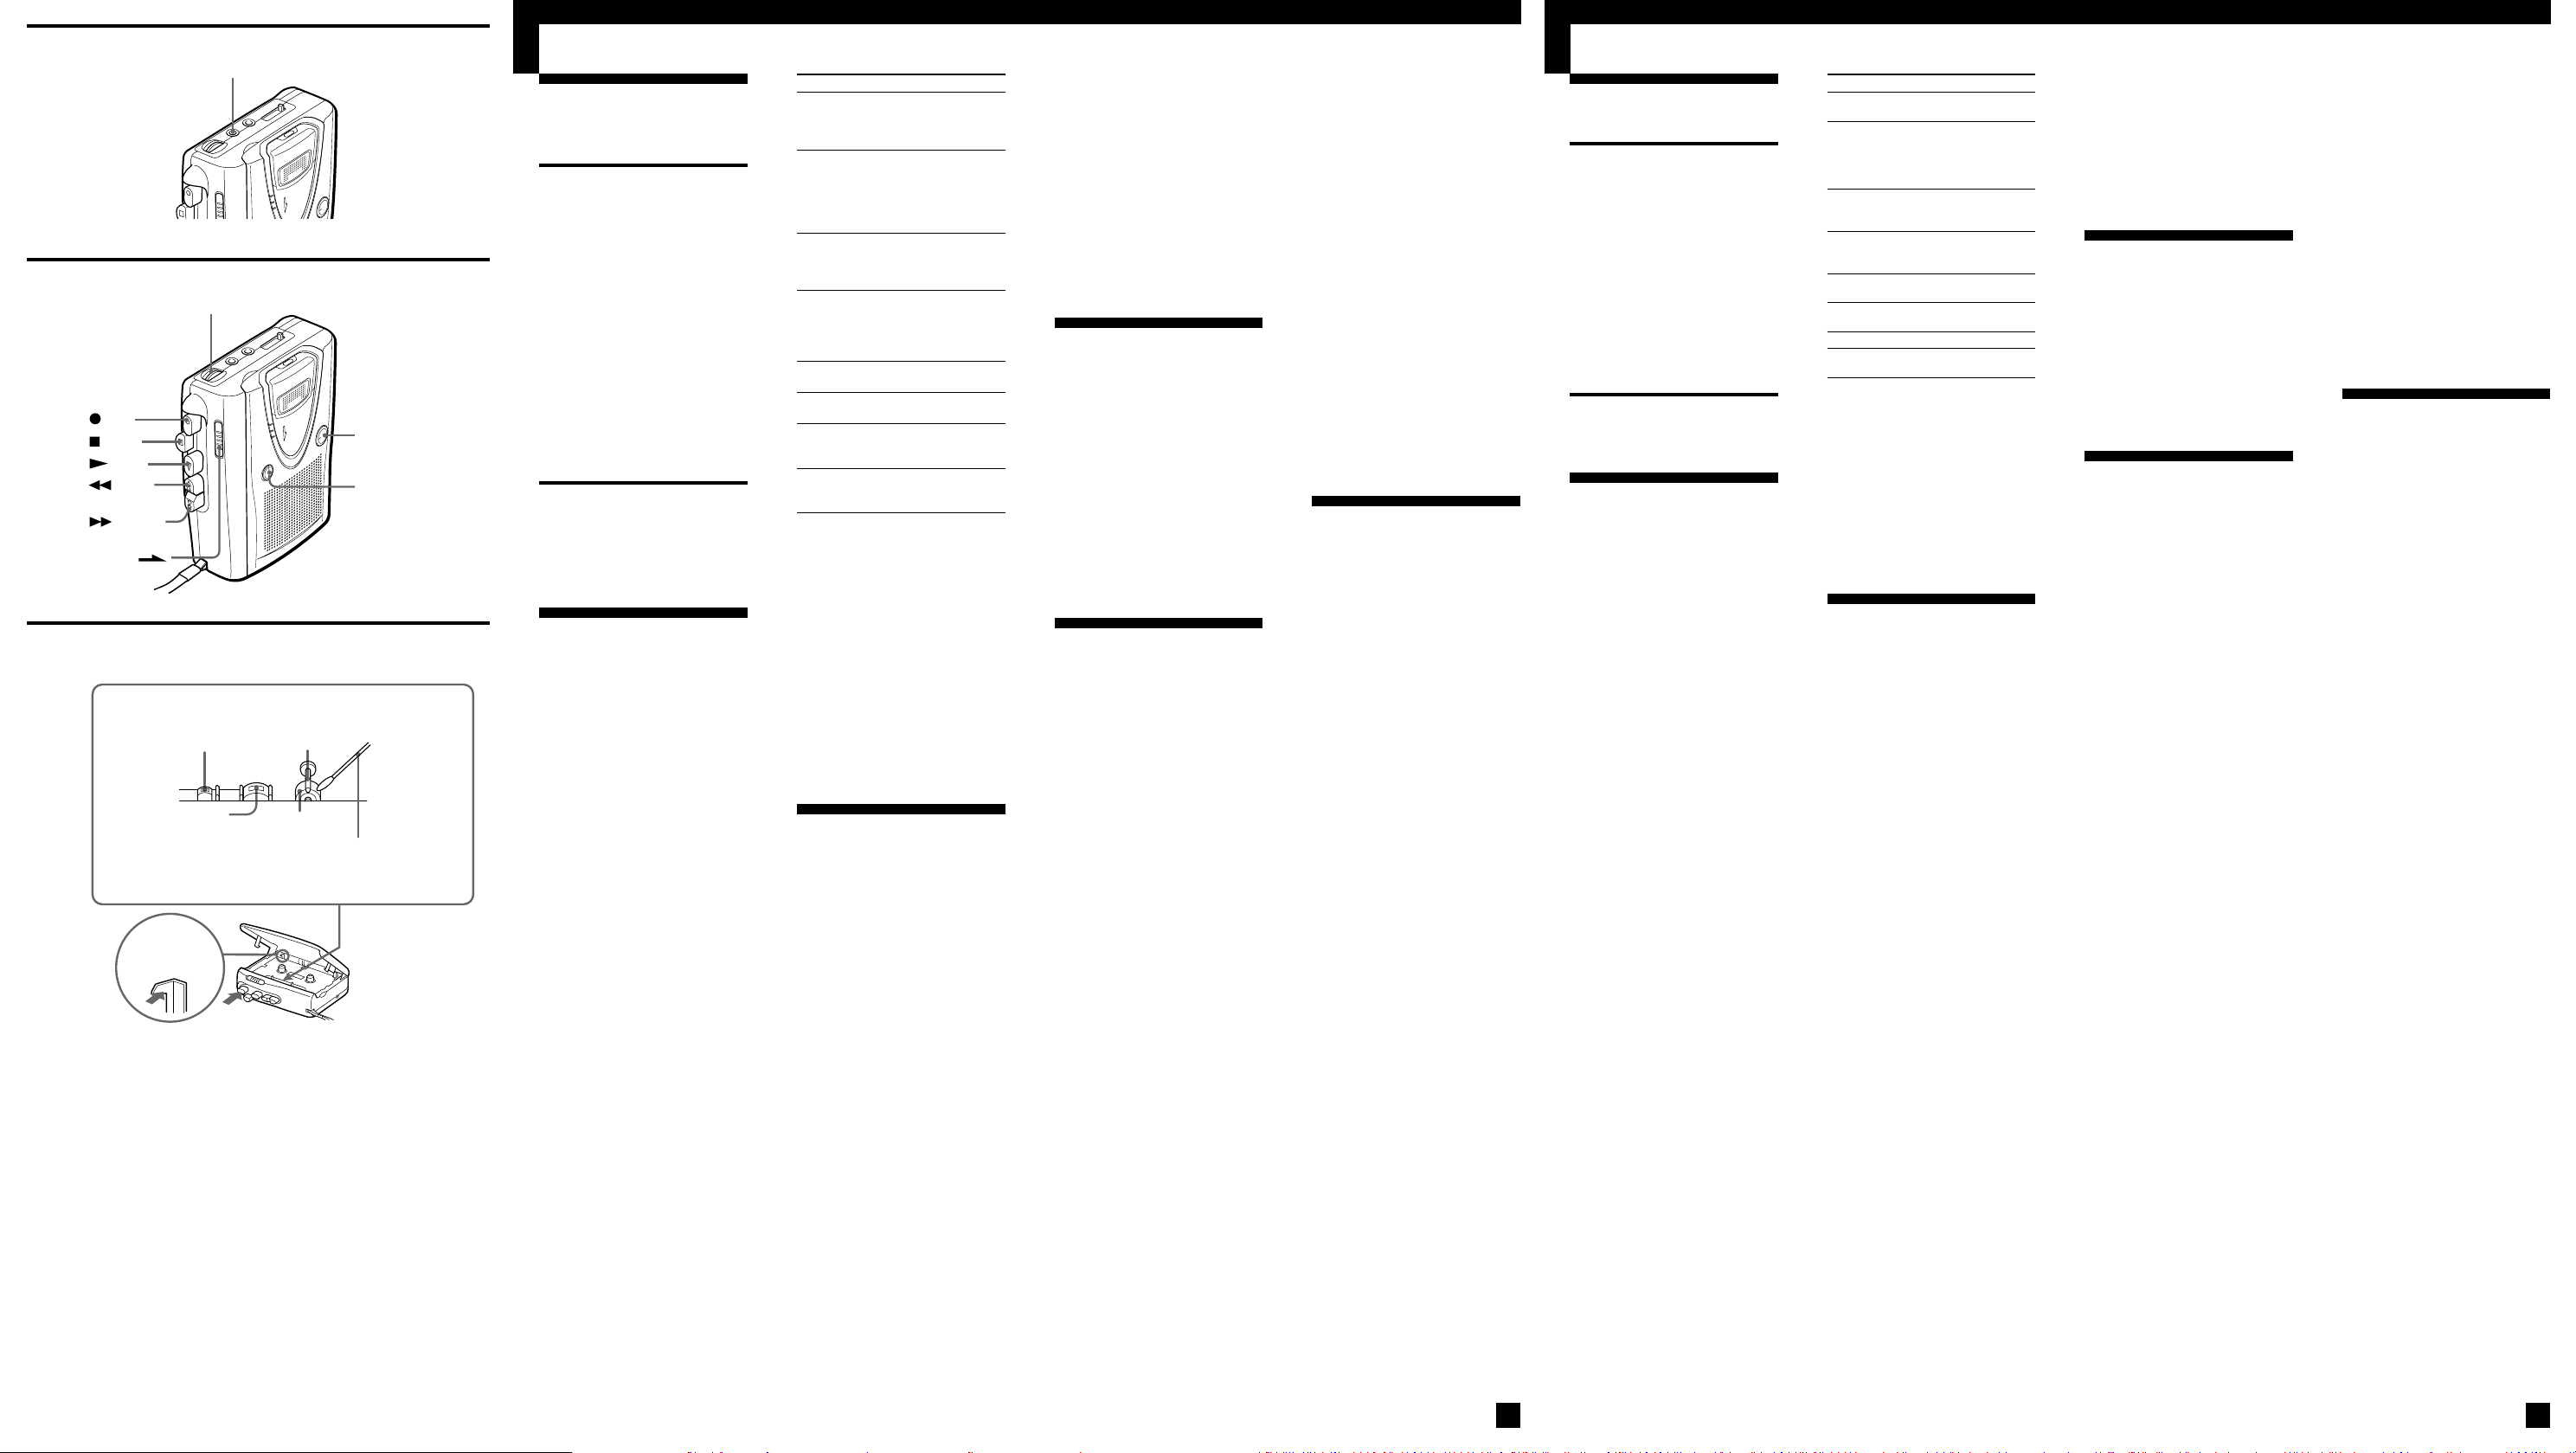
Recording with an
External Microphone
Connect a microphone to the MIC
jack.
There is a tactile dot beside the MIC jack.
Use a microphone of low
impedance (less than 3 kΩ) such as
the ECM-T6 (not supplied).
When using a plug-in-power
system microphone, the power to
the microphone is supplied from
this unit.
Note
When recording with an external
microphone, the VOR system may not
work properly due to difference in
sensitivity.
Recording from Another
Equipment
Connect another equipment to the
MIC jack using the RK-G64HG
connecting cord (not supplied).
(see Fig. C)
Playing a Tape (see
Fig. D)
1 Insert a cassette with the side to
be played facing the cassette
holder.
2 Set REC TIME to the same
position as that used for
recording.
To playback commercially
available music tape, etc., select
NORMAL.
3 Press N PLAY and then adjust
the volume.
The N PLAY button has a tactile
dot on it and the VOL control also
has a tactile dot beside it to show the
direction to turn up the volume.
4 Adjust the tape playback speed.
Turn SPEED CONTROL to:
SLOW (slow) to play back at a
slower speed.
Center position to play back at
normal speed.
FAST (fast) to play back at a
faster speed.
At the end of the tape, playback
stops and the unit turns off
automatically.
If you plug in headphones (not
supplied) to the EAR jack, you will
get monaural output from both left
and right channels.
To
Stop playback/
stop fast
forward or
rewind
Pause playback
Search forward
during
playback (CUE)
Search
backward
during
playback
(REVIEW)
Fast forward**
Rewind**
Start recording
during
playback
Eject a
cassette
* PAUSE . will also be
automatically released when
x STOP is pressed (stop-pauserelease function).
** If you leave the unit after the tape
has been wound or rewound, the
batteries will be consumed rapidly.
Be sure to press x STOP.
Note on REVIEW
Playback may not start automatically
even if you release
m REW/REVIEW at the end of the
tape. To start playback again, press
x STOP, then press N PLAY.
Press or slide
x STOP
PAUSE . in the
direction of the
arrow
To release pause
playback, release
PAUSE .*.
Press and hold
M FF/CUE and
release it at the point
you want
Press and hold
m REW/REVIEW
and release it at the
point you want
M FF/CUE during
stop
m REW/REVIEW
during stop
z REC
Press x STOP and
open the cassette
compartment lid.
B Additional
Information
Precautions
On power
• Operate the unit only on 3 V DC.
For AC operation, use the AC
power adaptor recommended for
the unit. Do not use any other
type. For battery operation, use
two R6 (size AA) batteries.
On the unit
• Do not leave the unit in a location
near heat sources, or in a place
subject to direct sunlight,
excessive dust or mechanical
shock.
• Should any solid object or liquid
fall into the unit, remove the
batteries or disconnect the AC
power adaptor, and have the unit
checked by qualified personnel
before operating it any further.
• Keep personal credit cards using
magnetic coding or spring-wound
watches, etc. away from the unit
to prevent possible damage from
the magnet used in the speaker.
• If the unit has not been used for a
long time, set it in the playback
mode to warm it up for a few
minutes before inserting a tape.
On tapes longer than 90
minutes
We do not recommend the use of
tapes longer than 90 minutes except
for a long continuous recording or
playback. They are very thin and
tend to be stretched easily. This
may cause malfunction of the unit
or sound deterioration.
If you have any questions or
problems concerning your unit,
please consult your nearest Sony
dealer.
Maintenance
(see Fig. E)
To clean the tape heads and
path
Press z REC while pushing the
lever in the tape compartment.
Wipe the heads, pinch roller, and
the capstan with a cotton swab
moistened with alcohol after every
10 hours of use.
To clean the exterior
Use a soft cloth slightly moistened
in water. Do not use alcohol,
benzine or thinner.
Troubleshooting
Should any problem persist after
you have made these checks,
consult your nearest Sony dealer.
The unit does not operate.
• The batteries have been inserted
with incorrect polarity.
• The batteries are weak.
• PAUSE . is slid in the
direction of the arrow.
• The AC power adaptor is not
firmly connected.
• When trying to run on dry
batteries, the AC power adaptor
you left plugged in to the DC IN
3V jack, but not to the power
source.
You cannot press z REC.
• The tab on the tape has been
removed.
Recording cannot be made.
• Connection is made incorrectly.
• VOR has been set to the improper
position when VOR function
works.
Recording is interrupted.
• VOR is set to H or L. When you
do not use VOR, set it to OFF.
Recording cannot be erased
completely.
• The erase head is contaminated.
• You are using a High-position
(TYPE II) or metal (TYPE IV) tape.
You cannot press N PLAY.
• The tape has reached the end.
Rewind the tape.
The sound drops out or has with
excessive noise.
• The volume is turned down
completely.
• The batteries are weak.
• Use the unit away from
radiowave-emitting devices such
as cellular phones.
• The heads need cleaning. See
“Maintenance.”
• Direct placement of the cassette
tape on the speaker resulted in
magnetization and deteriorated
tonal quality.
• You are using a High-position
(TYPE II) or metal (TYPE IV) tape.
Tape speed is too fast or too slow
in Playback mode.
• Improper setting of the REC TIME
switch. Set it to the same speed as
that used for recording.
• SPEED CONTROL is set at a point
other than the center.
• The batteries are weak.
Specifications
Recording system
2-track 1 channel monaural
Tape speed
4.8 cm/s or 2.4 cm/s
Frequency range
250 - 6 300 Hz using nomal (TYPE
I) cassette (with REC TIME switch
at “NORMAL”)
Speaker
Approx. 3.6 cm (1
Power output
250 mW (at 10 % harmonic
distortion)
Input
Microphone input jack (minijack)
sensitivity 0.2 mV for 3 kΩ or
lower impedance microphone
Output
Earphone jack (minijack) for 8 300 Ω earphone
Variable range of the tape speed
From approx. +30% to –15% (with
REC TIME switch at “NORMAL”)
Power requirements
3 V DC batteries R6 (AA) × 2/
External DC 3 V power sources
Dimensions (w/h/d) (incl. projecting
parts and controls)
Approx. 86.7 × 114.4 × 35.4 mm
1
(3
/2 × 4 5/8 × 1
Mass
Approx. 160 g (5.7 oz.) (main unit
only)
Design and specifications are subject
to change without notice.
7
/16 in.) dia.
7
/16 in.)
中文
從各種不同聲源錄音
(參照圖 C)
使用外部麥克風錄音
將麥克風連接到 MIC 插孔。
在 M I C (麥克風)插孔旁邊有一觸感
點。
請使用較低阻抗(3 kΩ以下)
的麥克風,例如 ECM-T6(無附帶)
等。當使用插入式電源系統麥克風
時,給麥克風的電源是由本機提供
的。
註
當使用外接麥克風錄音時,VOR 系統可
能不能發揮適當的作用。因為所用麥克
風的靈敏度各不相同。
從其他設備錄音
請用 RK-G64HG 連接導線(無附
帶)將其他設備接插到 MIC 插孔。
播放磁帶(參照圖 D)
1 裝入卡式磁帶讓要播放面朝磁帶
架方向。
2 將 REC TIME 設定於和錄音所用
相同的位置。
要播放巿售錄音帶等時,請選擇
NORMAL(正常)。
3 按 N PLAY,然後調整音量。
N
PLAY 按鈕上有一觸感點,VOL
控制器旁邊也有一觸感點表示能直
接轉大音量。
4 調整磁帶速度。
將 SPEED CONTROL(速度控制)
轉到:
SLOW(慢)以較慢速度播放。
中央位置以便常速播放。
FAST(快)以較快速度播放。
當磁帶播到終端時,即停止播
放而機器將自動地關掉電源。
若將耳機(另售)插入 EAR 插
孔,您將從左、右聲道獲得單耳聲
音。
要
停止播放停止
快前繞或倒繞
暫停播放
播放中向前搜索
(CUE)
播放中向後搜索
(REVIEW)
快前繞 **
倒繞 **
播放中,開始錄音
排出卡帶
*當按 x STOP 時,PAUSE . 也將自
動地釋放(停止–暫停–釋放功
能)。
** 如果磁帶已經繞完或倒繞完而機器仍
被放置著時,電池將消耗得很快。故
一定要按 x STOP。
請按或滑動
x STOP
PAUSE . 沿箭頭
所指方向
要解除暫停放音模式
時,請釋放
PAUSE .*。
按住 M FF/CUE
而在所要播放點上釋
放之
按住 m REW/
REVIEW而在所要播放
點上釋放之
停止中,按 M
FF/CUE
停止中,按 m
REW/REVIEW
z REC
按 x STOP 並打開
卡帶室蓋。
REVIEW(檢閱)須知
在磁帶末端,即使釋放了 m REW/
REVIEW 播放仍然可能不會自動地開
始。要再開始播放時,請按 x STOP,
然後按 N PLAY。
B
附加資訊
使用前須注意
電源須知
• 限使用 DC 3 V 電源操作機器。
使用 AC 電源操作時,須用適用於
機器的 AC 電源轉換器。請勿使用
其他型式的轉換器。
用電池操作時,請用兩個 R6(AA,
3 號)電池。
機器須知
• 不要讓機器靠近熱源,可直接照射
到陽光,多塵,潮濕或可受到機械
衝擊的地方放置。
• 萬一有任何雜物或液體掉入機器內
時,即取出電池或拔下 AC 電源轉
換器,然後找持有資格的人檢查過
以後才可以再接電源使用。
• 用磁碼的個人信用卡等或用發條的
手錶等應遠離機器放置以免被揚聲
器所用磁鐵損壞。
• 曾經長時間沒用的機器,在裝插磁
帶使用以前,請呈放音模式溫機幾
分鐘之後才操作使用。
長過 90 分的磁帶之須知
除非要作長時間的連續錄音或
放音,否則最好不採用長 90 分以上
的磁帶。因為這種磁帶極薄,很容易
拉伸變形。這可能引起機器故障或聲
音變質。
凡對您的機器抱有任何疑問
時,即請洽詢附近的 Sony 銷售店。
維護(參照圖 E)
要清潔磁頭和磁帶通道時
按著磁帶室中操作桿,同時按
z REC。
每使用過 10 個小時之後,即請
用棉棒蘸濕酒精擦拭磁頭,壓輪,和
主動輪。
清潔機器外殼
用軟布蘸濕清水擦拭之。請勿
使用酒精,油精或稀釋劑清潔。
故障排除
用下列各項檢察過後而仍不能
解決問題時,請洽詢附近的 Sony 銷
售店。
機器不操作。
• 電池裝錯電極。
• 電池電力變弱了。
• PAUSE . 被滑向箭頭所指方向。
• AC 電源轉換器沒有接插穩固。
• 試圖用乾電池驅動時,AC 電源轉接
器仍保留接插在 DC IN 3 V 插孔而
轉接器的另一端並沒有接到 AC 電
源。
按不下 z REC。
• 磁帶上的小翼已被折除。
不能錄音。
• 沒連接正確。
• VOR 功能起作用時,VOR 設定的位
置不妥當。
錄音呈間歇狀態。
• VOR 設定於 H 或 L。不用 VOR 時,
請把它設定於 OFF。
錄音時不能完全擦除舊錄音。
• 擦除磁頭髒了。
• 使用高位 (TYPE Ⅱ) 或金屬 (TYPE
Ⅳ) 磁帶。
按不下 N PLAY。
• 磁帶已到達終端。請倒繞磁帶。
揚聲器沒聲音。
• 連接著耳機。
• 音量被轉得最小。
聲音忽降或噪音過大。
• 音量被轉得最小。
• 電池電力變弱了。
• 在遠離行動電話等無線電波發射裝
置處使用本機。
• 磁頭必須清潔。參照“維護”。
• 直接將磁帶放在揚聲器上會引起磁
化和音質劣化。
• 使用高位 (TYPE Ⅱ) 或金屬 (TYPE
Ⅳ)磁帶。
放音模式中,磁帶速度太快或太
慢。
• REC TIME(錄音時間)開關設定得
不適當。請把它設定於錄音時用的
相同的速度。
• SPEED CONTROL 不是設定在中央位
置。
• 電池電力變弱了。
規格
錄音系統
2 軌跡 1 聲道單耳聲
磁帶速度
4.8 cm秒或 2.4 cm秒
頻率範圍
250 - 6 300 Hz,使用標準 (TYPE Ⅰ)
磁帶(REC TIME 開關設定於
“NORMAL”(正常))
揚聲器
大約 3.6 cm 直徑
功率輸出
250 mW(10% 諧波失真時)
輸入端子
麥克風輸入插孔(小型插孔)靈敏
度 0.2 mV,用於 3 kΩ以下阻抗的麥
克風
輸出端子
8 - 300Ω耳機用的耳機插孔(小型
插孔)
磁帶速度的可變範圍
從 +30% 到 -15%(REC TIME 開關設
定於“NORMAL”(正常))
電源
3 V DC 電池 R 6(AA,3 號)× 2
外部 DC 3 V 電源
尺寸(含突出部分和控制器)
大約寬 86.7 × 高 114.4 × 縱深
35.4 mm
質量
大約 160 g(主機為限)
設計和規格有所變更時,恕不
另行奉告。
No sound comes from the
speaker.
• The earphone is plugged in.
• The volume is turned down
completely.
 Loading...