

Page 1
2-670-721-21(3)
3
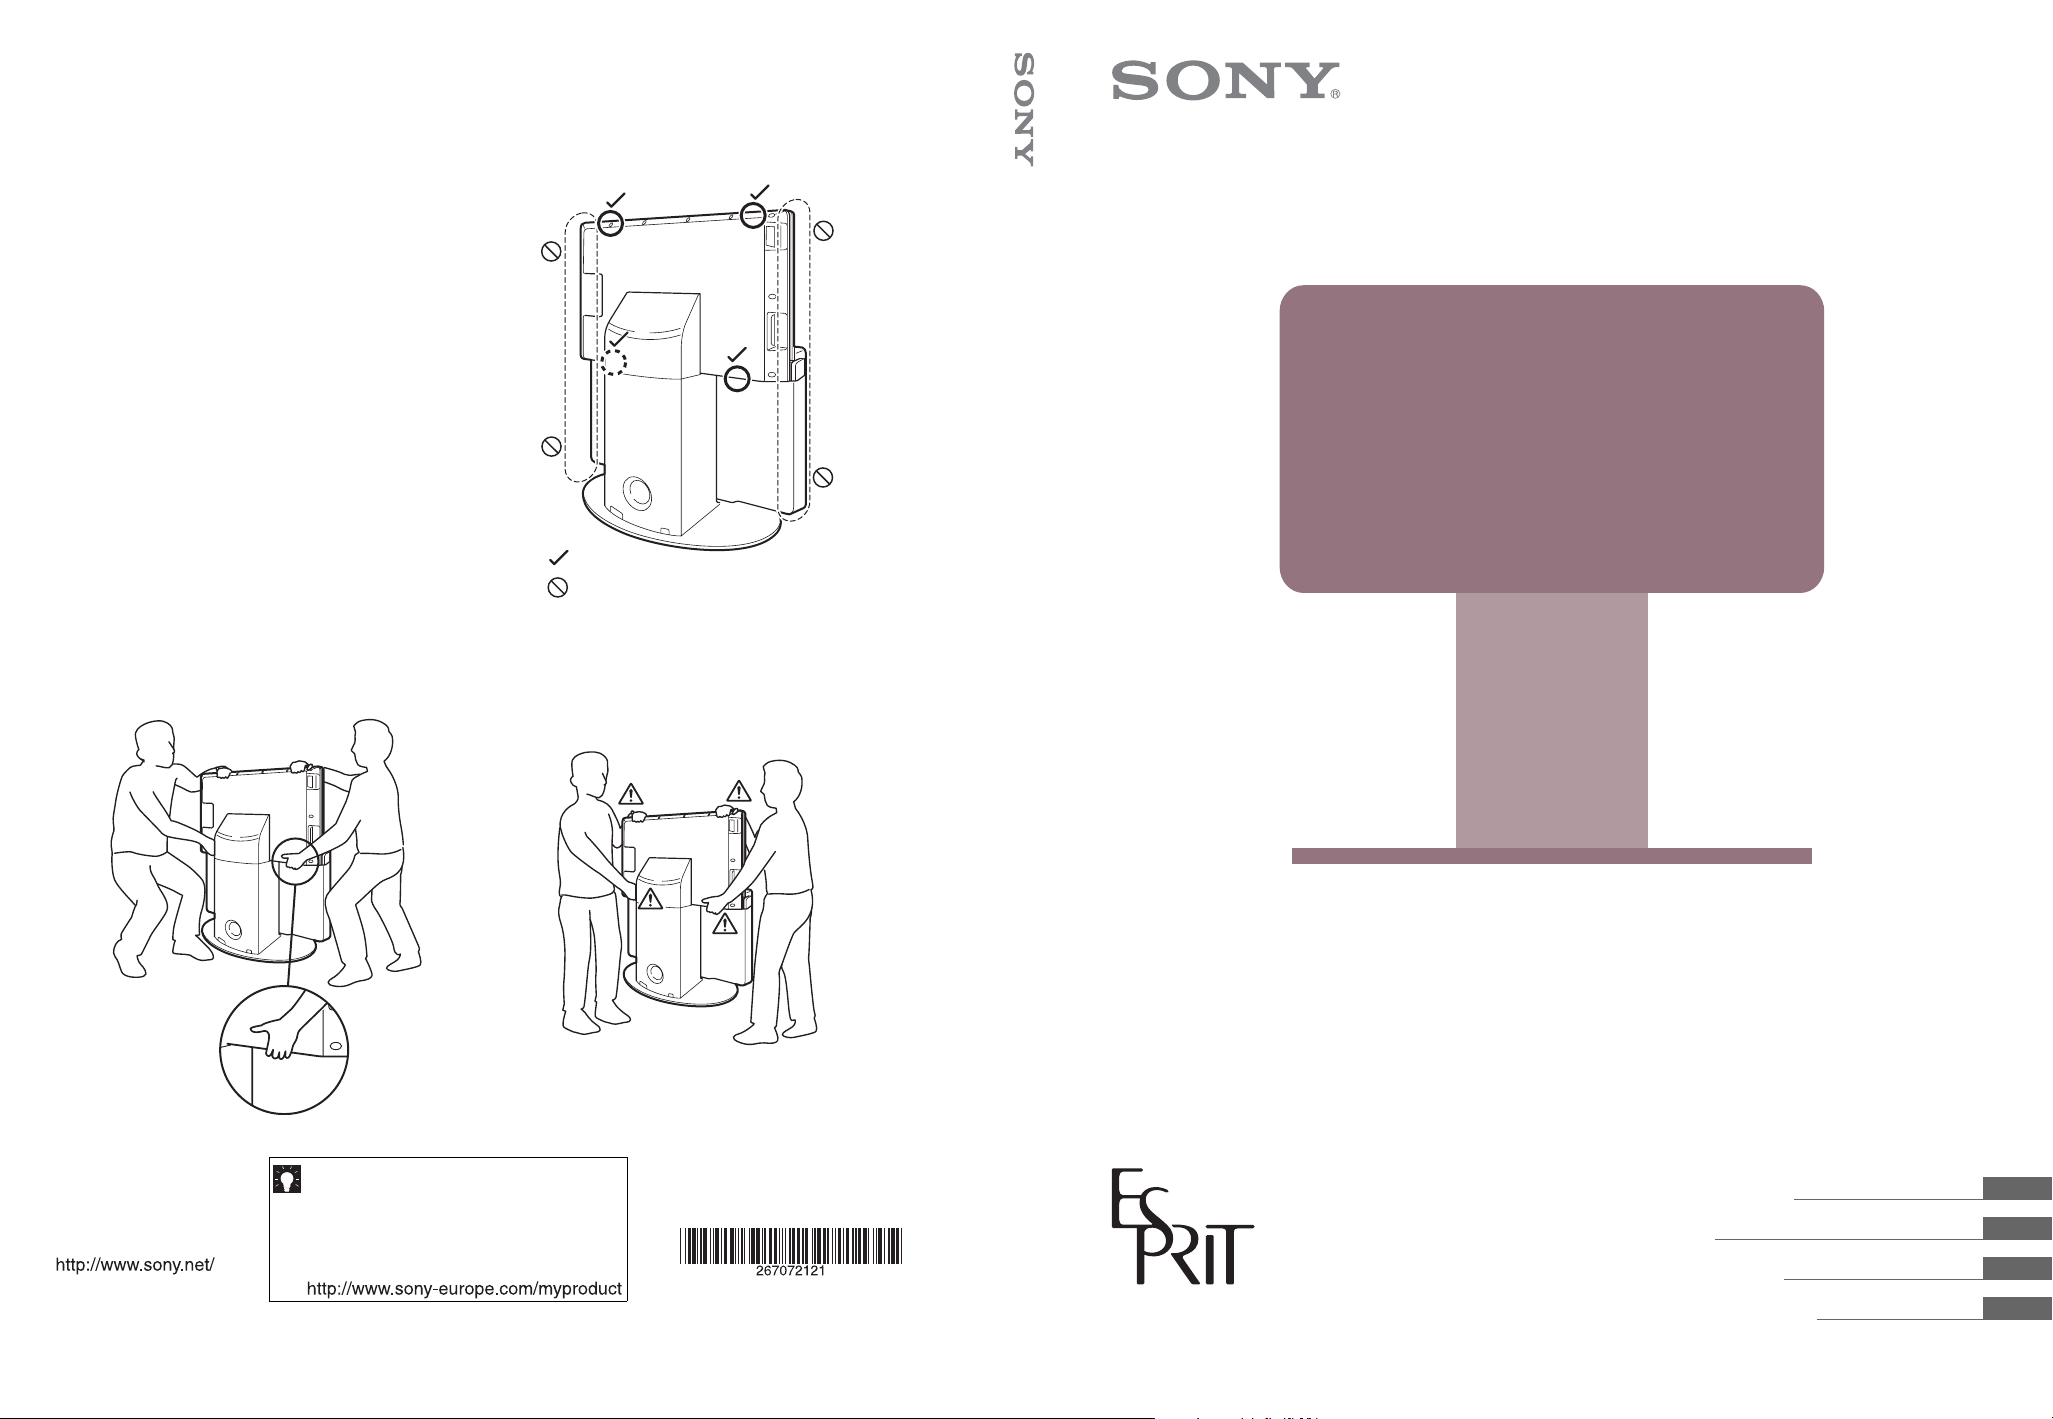
When transporting the system,
follow the protection procedure
(page 9).
Lors du transport de la chaîne,
respectez la procédure de
protection (page 9).
Wenn Sie die Anlage transportieren
wollen, führen Sie die angegebenen
Schritte zum Schutz der Anlage aus
(Seite 9).
Cuando transporte el sistema, siga
las instrucciones de protección
(página 9).
2
1
OK/OK/OK/Correcto
:
:
Do not hold/Ne pas saisir cette partie/
Nicht hier halten/No lo sostenga por
esta zona
TV Integrated AV System TAV- L1
TAV-L1
Printed in Spain
For useful information about Sony products
Pour obtenir les informations utiles
concernant les produits Sony
Fur hilfreiche Informationen zu Sony
Produkten
Información de utilidad para productos Sony
2-670-721-21(3)
TAV-L1
© 2006 Sony Corporation
TV Integrated AV System
Operating Instructions
Mode d’emploi
Bedienungsanleitung
Manual de instrucciones
GB
FR
DE
ES
Page 2
Before operating the system, please read the
“Safety Information” section of this manual.
Retain this manual for future reference.
WARNING
• This apparatus has to be connected to a mains socket outlet
with a protective earthing connection.
• To prevent the risk of electric shock, if the mains lead or
plug is damaged, do not insert the plug into the mains
socket outlet. This plug cannot be used and should be
destroyed.
• Dangerously high voltages are present inside the system.
Do not open the cabinet. Refer servicing to qualified
personnel only.
• Do not install the appliance in a confined space, such as a
bookcase or built-in cabinet.
To reduce the risk of fire or electric shock, do not
expose this apparatus to rain or moisture.
To prevent fire, do not cover the ventilation of the apparatus
with news papers, table-cloths, curtains, etc. And don’t place
lighted candles on the apparatus.
To prevent fire or shock hazard, do not place objects filled
with liquids, such as vases, on the apparatus.
Don’t throw away the battery with general
house waste, dispose of it correctly as
chemical waste.
This appliance is classified as a
CLASS 1 LASER product. This
marking is located on the rear of
the unit.
Disposal of the system
Disposal of Old Electrical &
Electronic Equipment
(Applicable in the European
Union and other European
countries with separate
collection systems)
This symbol on the product or on
its packaging indicates that this
product shall not be treated as
household waste. Instead it shall
be handed over to the applicable
collection point for the recycling
of electrical and electronic equipment. By ensuring this
product is disposed of correctly, you will help prevent
potential negative consequences for the environment and
human health, which could otherwise be caused by
inappropriate waste handling of this product. The recycling
of materials will help to conserve natural resources. For more
detailed information about recycling of this product, please
contact your local Civic Office, your household waste
disposal service or the shop where you purchased the
product.
Notice for Digital TV
• Any functions related to Digital TV will only work
in the following countries: France, Italy, Germany,
Spain, Finland, Sweden, and Denmark.
• Any functions related to Digital TV (with
logo) will only work in countries or areas where
DVB-T (MPEG 2) digital terrestrial signals are
broadcasted.
Please confirm with your local dealer if you can
receive a DVB-T signal where you live.
• Although this system follows DVB-T
specifications, compatibility with future DVB-T
digital terrestrial broadcasts cannot be guaranteed.
Introduction
Thank you for choosing this Sony product.
Before operating the system, please read this manual
thoroughly and retain it for future reference.
Trademark information
• is a registered trademark of the DVB project.
• “PlayStation” is a trademark of Sony Computer
Entertainment, Inc.
• Manufactured under license from Dolby Laboratories.
“Dolby,” “Pro Logic,” and the double-D symbol are
trademarks of Dolby Laboratories.
• Manufactured under license from Digital Theater
Systems, Inc.
“DTS” and “DTS Digital Surround” are registered
trademarks of Digital Theater Systems, Inc.
• This system incorporates
High-Definition Multimedia
Interface (HDMI™) technology. HDMI, the HDMI logo
and High-Definition Multimedia Interface are trademarks
or registered trademarks of HDMI Licensing LLC.
GB
2
Page 3
Table of Contents
About this manual ....................................... 5
Safety information ....................................... 5
Precautions ................................................. 8
Notes about the discs ....................................... 9
Guide to basic operations of this
system.................................................. 10
Overview of the remote ............................. 11
Overview of the system/lift unit buttons and
indicators.............................................. 13
Basic Operations
Getting Started
1: Checking the accessories......................14
2: Inserting batteries into the remote .........14
3: Connecting a TV aerial/VCR/DVD
player....................................................15
4: Connecting the FM wire antenna
(aerial) ..................................................16
5: Switching on the system........................17
6: Selecting the TV language and country/
region....................................................17
7: Auto-tuning the TV.................................18
8: Selecting the DVD language
(Quick Setup)........................................19
Watching TV
: for digital channels only
Watching TV ..............................................21
Checking the Digital Electronic Programme
Guide (EPG) ................................23
Using the Favourite list .....................25
Viewing pictures from connected
equipment.............................................26
Enjoying Discs
Available discs ...........................................27
System sound feature................................29
Playing discs..............................................31
Various play modes..........................................32
(PBC Playback) (Resume Play)
Searching for a particular point or a scene on a
disc.............................................................34
(Scan, Slow-motion Play, Freeze Frame)
(Picture Navigation)
Displaying various angles and subtitles ..........35
Enjoying the FM Radio
Listening to the FM radio...........................36
Presetting FM radio stations......................37
3
GB
GB
Page 4

Advanced Operations
Using the TV Menu
Using the Lift Unit/Front Panel
Display
Navigating through menus........................ 38
Picture Adjustment menu .......................... 39
Sound Adjustment menu........................... 40
Screen menu.............................................41
Features menu .......................................... 42
Timer menu ............................................... 43
Set Up menu ............................................. 44
Using the DVD’s Menu
Navigating through DVD’s menu............... 51
Enjoying DivX
®
videos .............................. 51
Using the Player Control Menu
Navigating through menus........................ 53
Overview of the menus.................................... 53
Searching/selecting the disc ..................... 55
Searching for a title/chapter/track/
scene, etc.................................................. 55
Selecting [ORIGINAL] or [PLAY LIST] on a
DVD-R/DVD-RW ........................................ 56
Viewing information about the disc................. 56
Using the play mode ................................. 58
Creating your own programme ....................... 58
(Programme Play)
Playing in random order.................................. 59
(Shuffle Play)
Playing repeatedly........................................... 60
(Repeat Play)
Enjoying the slide show............................. 61
About MP3 audio tracks and JPEG image
files ............................................................ 61
Playing DATA CDs or DATA DVDs with MP3
audio track and JPEG image files............. 62
Playing audio tracks and images as a slide show
with sound ................................................. 63
Locking discs............................................. 65
(CUSTOM PARENTAL CONTROL,
PARENTAL CONTROL)
Using the Setup Display ............................ 67
Overview of the items.......................................71
Enjoying the sound at low volume....................72
(AUDIO DRC)
Enjoying a bilingual DVD disc..........................72
(DUAL MONO)
Reinforcing bass frequencies ..........................73
(SW LEVEL)
Using the lift function........................................73
(Lift Mode)
Using Optional Equipment
Connecting optional equipment.................75
Additional Information
Specifications ............................................78
PC specifications .............................................80
Language code list (DVD function only) ..........81
Troubleshooting .........................................82
Self-diagnosis function (DVD function only).....87
Index..........................................................88
GB
4
Page 5
About this manual
Safety information
• The instructions in this manual describe the controls on
the remote. You can also use the controls on the system if
they have the same or similar names as those on the
remote.
• The Control Menu items may be different depending on
the area.
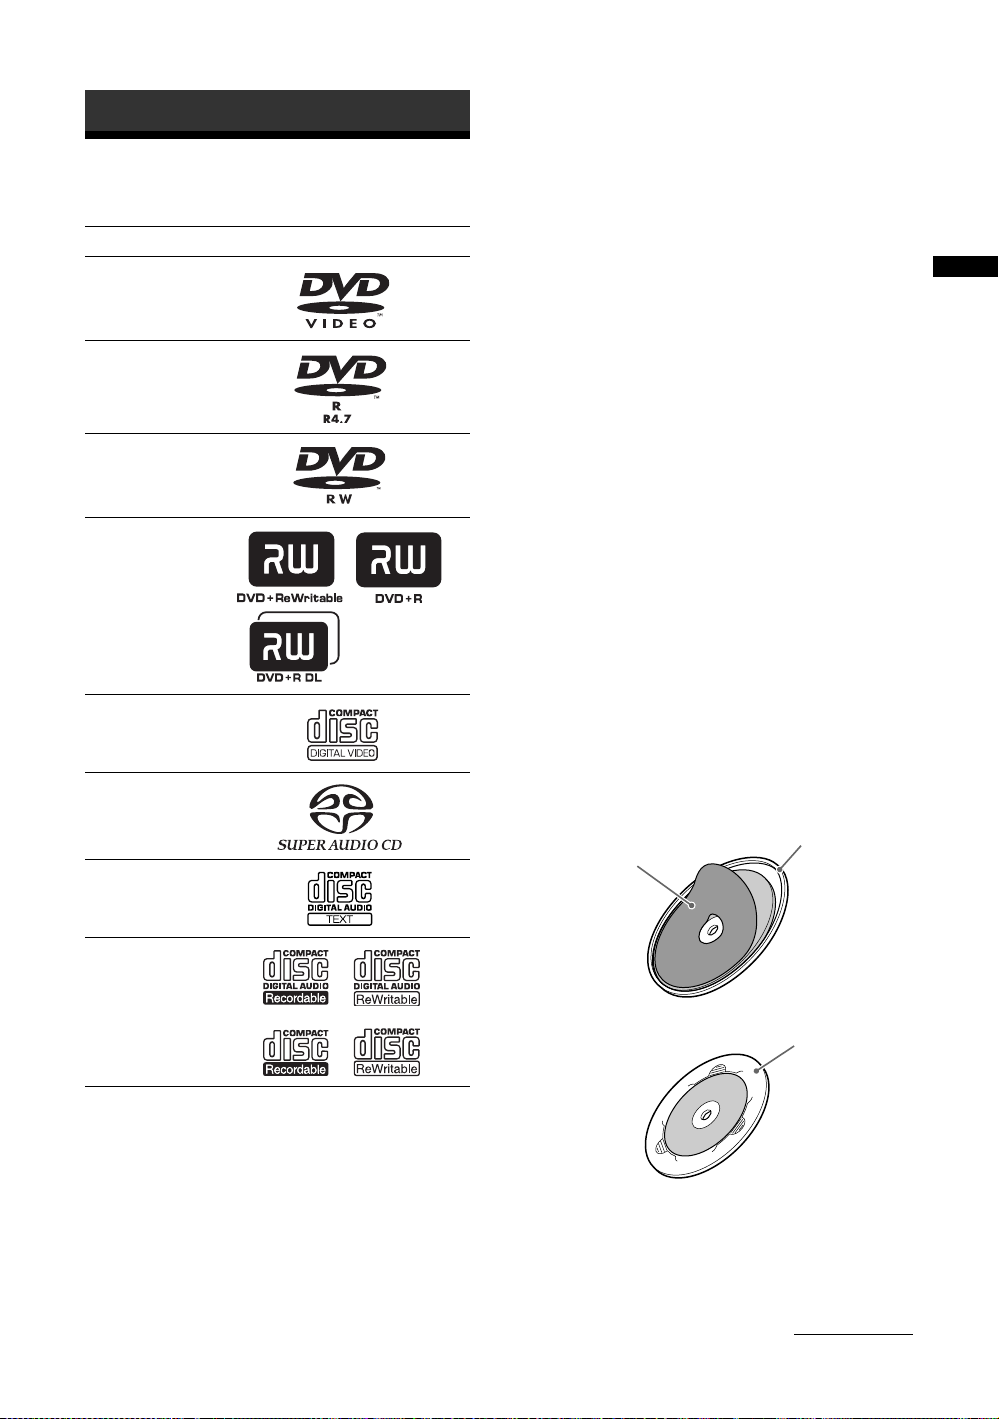
• “DVD” may be used as a general term for DVD VIDEOs,
DVD+RWs/DVD+Rs, and DVD-RWs/DVD-Rs.
• The following symbols are used in this manual.
Symbol Functions available for
DVD VIDEOs, DVD-Rs/DVDRWs in video mode, and
DVD+Rs/DVD+RWs
DVD-Rs/DVD-RWs in VR
(Video Recording) mode
VIDEO CDs (including Super
VCDs or CD-Rs/CD-RWs in
video CD format or Super VCD
format)
Super Audio CDs
Music CDs or CD-Rs/CD-RWs in
music CD format
DATA CDs (CD-ROMs/CD-Rs/
CD-RWs containing MP3*
1
audio
tracks, JPEG image files, and
DivX*2*3 video files)
DATA DVDs (DVD-ROMs/
DVD-Rs/DVD-RWs/DVD+Rs/
DVD+RWs containing MP3*
audio tracks, JPEG image files,
and DivX*
*1 MP3 (MPEG1 Audio Layer 3) is a standard format defined by
ISO/MPEG which compresses audio data.
®
is a video file compression technology, developed by
*2 DivX
DivX, Inc.
*3 DivX, DivX Certified, and associated logos are trademarks of
DivX, Inc. and are used under license.
2*3
video files)
1
AC power cord (mains
lead)
• Unplug the AC power
cord (mains lead)
when moving the
system. Do not move
the system with the
AC power cord
(mains lead) plugged in. It may damage the AC power
cord (mains lead) and result in fire or electric shock.
• If you damage the AC power cord
(mains lead), it may result in fire or
electric shock.
– Do not pinch, bend, or twist the
AC power cord (mains lead)
excessively. The core conductors
may be exposed or broken,
causing a short-circuit, which
may cause fire or electric shock.
– Do not modify or damage the AC
power cord (mains lead).
– Do not put anything heavy on the
AC power cord (mains lead). Do
not pull the AC power cord
(mains lead).
– Keep the AC power cord (mains lead) away from heat
sources.
– Be sure to grasp the plug when disconnecting the AC
power cord (mains lead).
• If the AC power cord (mains lead) is damaged, stop using
it and ask your dealer or Sony service centre to exchange
it.
• Do not use the supplied AC power cord (mains lead) on
any other equipment.
• Use only an original Sony AC power cord (mains lead),
not other brands.
AC power cord (mains lead)/
cable protection
Pull out the AC power cord (mains
lead)/cable by the plug. Do not
pull on the AC power cord (mains
lead)/cable itself.
AC power source (mains)
Do not use a poor fitting mains socket. Insert
the plug fully into the mains socket. A poor fit
may cause arcing and result in fire. Contact
your electrician to have the mains socket
changed.
Continued
GB
5
Page 6
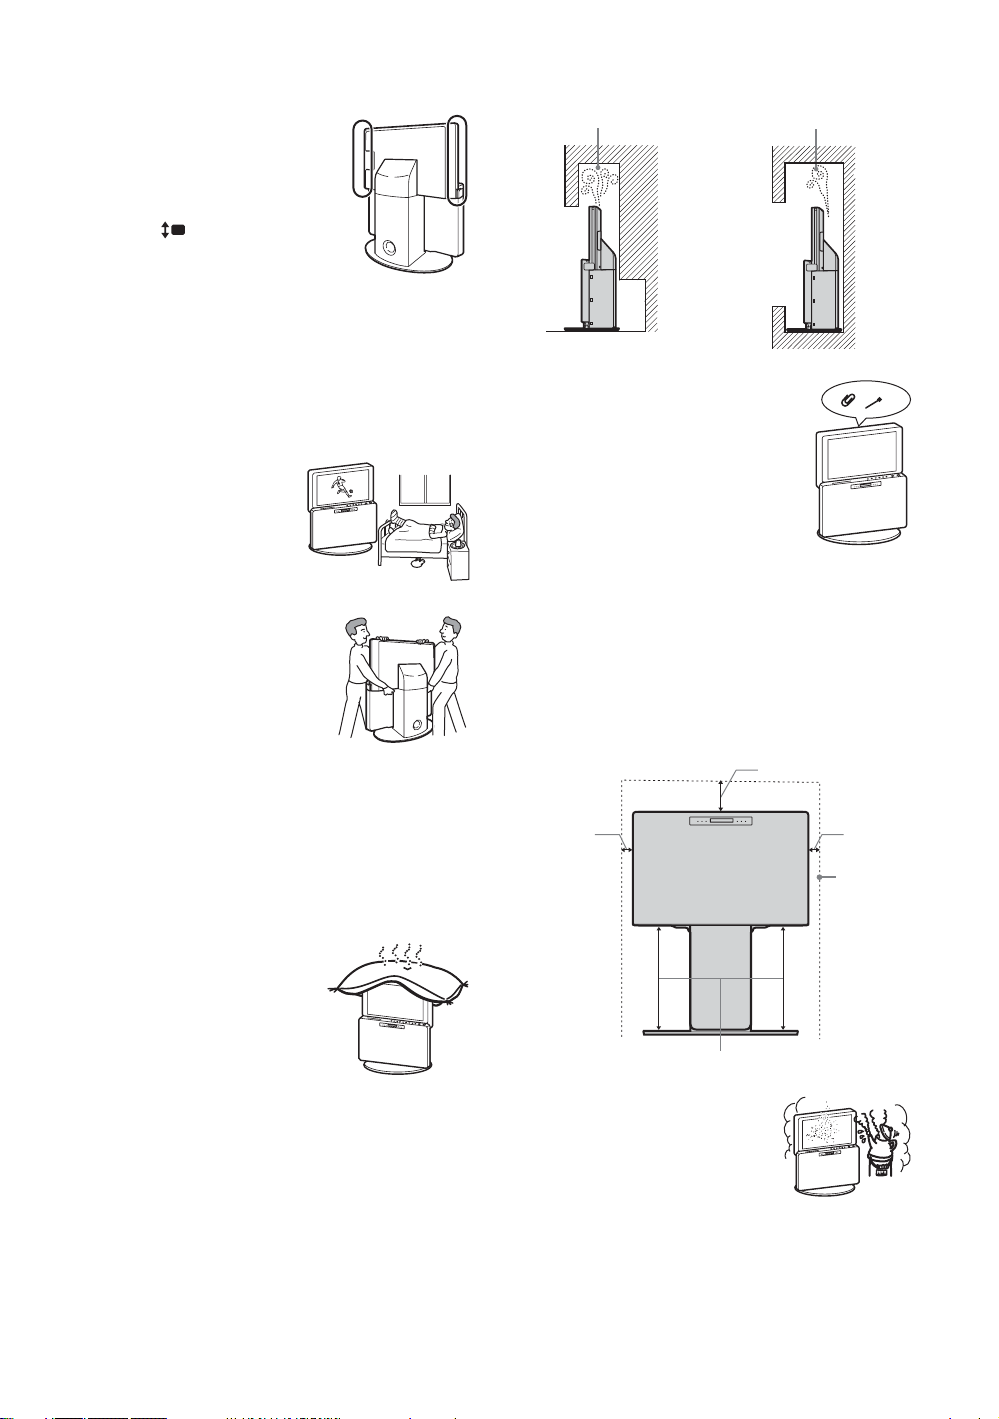
Notes about moving the lift unit up/down
• The lift unit moves up and down
automatically when the system is
turned on/off, and when the input is
switched with “AUTO” selected in
“Lift Mode” (page 74). You can also
make the lift unit move up/down by
pressing .
• To prevent operational mistakes, this
system features a “LOCK” function
(page 74).
• When connecting other components to the side of the
system (e.g., AV 4 connections), make sure not to place
any cords under the lift unit to avoid trapping them as the
lift unit moves.
• Do not touch the lift unit (especially the circled areas in
the right illustration) while it is moving. Especially, watch
out for small children.
• Do not operate this system while the lift unit is moving.
Medical institutions
Do not place this system in a
place where medical equipment is
in use. It may cause malfunction
of medical instruments.
Carrying
• Before relocating the system,
perform the procedure in “On
moving the system” (page 9), then
disconnect all the cables from the
system.
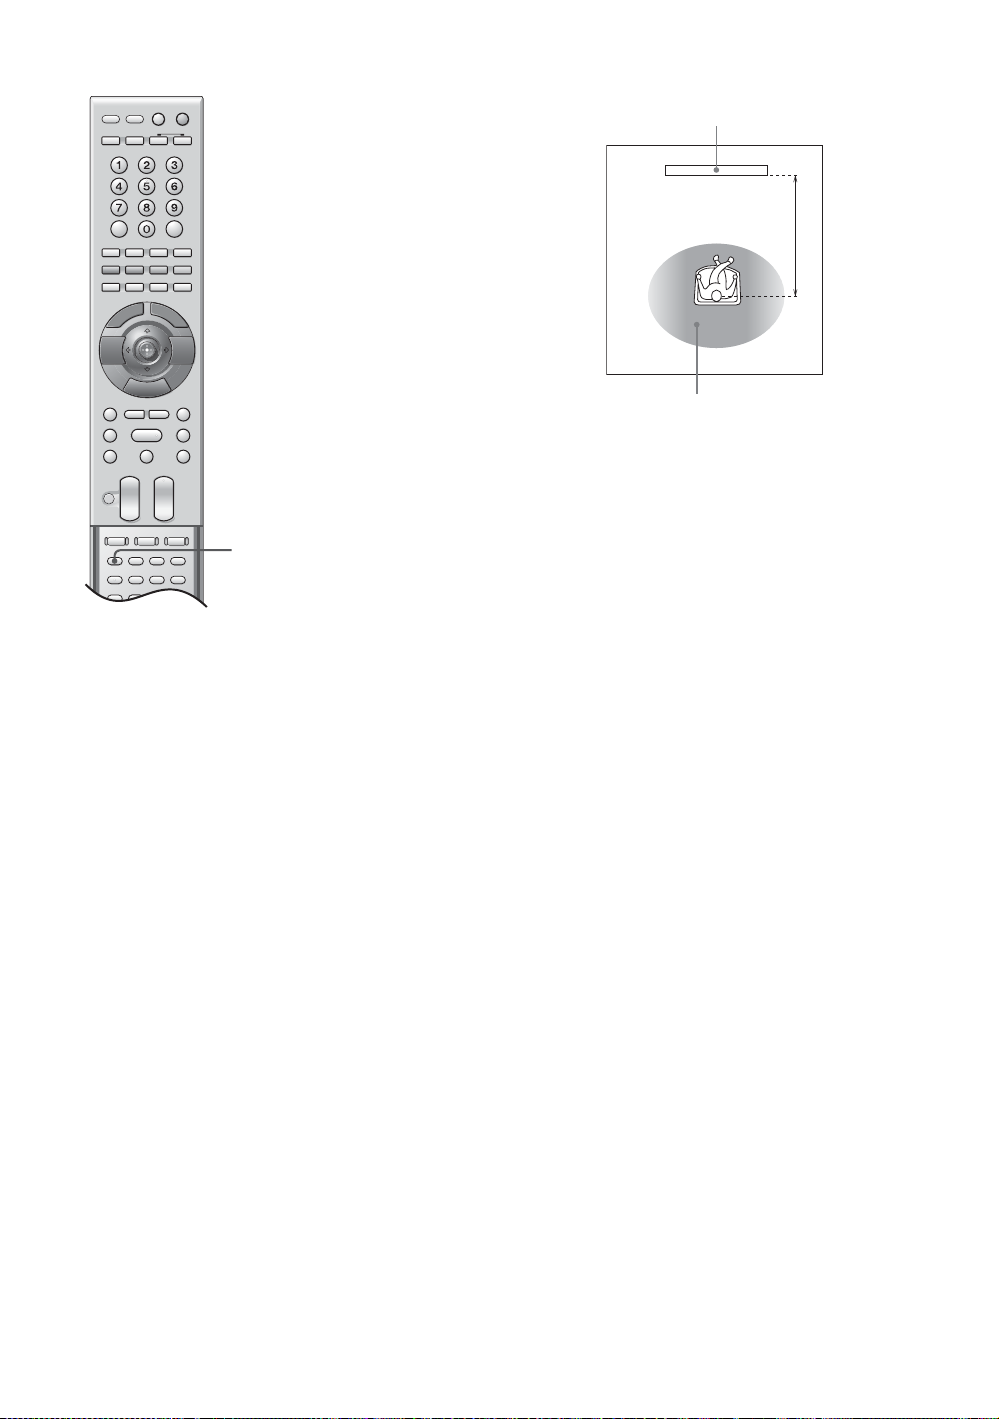
• When you carry the system by hand,
hold the system as illustrated on the
right. If you do not do so, the system
may fall and be damaged or cause serious injury. If the
system has been dropped or damaged, have it checked
immediately by qualified service personnel.
• When transporting it, do not subject the system to jolts or
excessive vibration. The system may fall and be damaged
or cause serious injury.
• When you carry the system in for repair or when you move
it, pack it using the original carton and packing material.
• Carrying the system requires two or more people.
Ventilation
• Never cover the ventilation holes
in the cabinet. It may cause
overheating and result in fire.
• Unless proper ventilation is
provided, the system may gather
dust and get dirty. For proper
ventilation, observe the
following:
– Do not install the system turned backwards or
sideways.
– Do not install the system turned over or upside down.
– Do not install the system on a shelf or in a closet.
– Do not place the system on a rug or bed.
– Do not cover the system with cloth, such as curtains, or
items such as newspapers, etc.
• Never install the system as follows:
Air circulation is
blocked.
Wall Wall
Air circulation is
blocked.
Ventilation holes
• Do not insert anything in the ventilation
holes, gaps betw een the TV screen and the
lift unit or the disc slot. If metal or liquid
is inserted in these holes, it may result in
fire or electric shock.
• If anything falls into the cabinet, unplug
the unit and have it checked by qualified
personnel before operating it any further.
• Do not block the ventilation slots by putting anything on
the system. The system is equipped with a high power
amplifier. If the ventilation slots are blocked, the unit can
overheat and malfunction.
Placement
• Do not obstruct the area where the lift unit moves up and
down. It may cause a malfunction. Leave some space
around the system. Otherwise, air-circulation may be
inadequate and cause overheating, which may cause fire
or damage to the system or the lift unit.
30 cm
10 cm
Do not place any objects under the area
where the lift unit moves up/down.
• Never place the system in hot,
humid or excessively dusty places.
• Do not install the system where
insects may enter.
10 cm
Leave at
least this
much
space.
GB
6
Page 7
• Place the system on a stable, level
surface. Otherwise, the system may fall
and cause injury.
• Do not install the system in a location
where it may protrude, such as on or
behind a pillar, or where you might
bump your head on it. Otherwise, it may
result in injury.
Water and moisture
• Do not use this system near
water – for example, near a
bathtub or shower room. Also do
not expose to rain, moisture or
smoke. This may result in fire or electric shock.
• Do not touch the AC power cord
(mains lead) and the system with wet
hands. Doing so may cause electric
shock or damage to the system.
Moisture and flammable objects
• Do not let this system get wet. Never
spill liquid of any kind on the system.
If any liquid or solid object does fall
through openings in the cabinet, do
not operate the system. It may result
in electric shock or damage to the
system.
Have it checked immediately by
qualified service personnel.
• To prevent fire, keep flammable
objects (candles, etc.) and electric bulbs away from the
system.
Oils
Do not install this system in restaurants that use oil. Dust
absorbing oil may enter and damage the system.
Fall
Do not allow children to
climb up on or hang from
the system.
Vehicle or ceiling
Do not install this system in a
vehicle. The motion of the vehicle
may cause the system to fall down
and cause injury. Do not hang this
system from the ceiling.
Ships and other vessels
Do not install this system on a ship
or other vessel. If the system is
exposed to seawater, it may cause
fire or damage the system.
Outdoor use
• Do not expose the system to
direct sunlight. The system may
heat up and this may result in
damage to the system.
• Do not install this system
outdoors.
Wiring
• Unplug the AC power cord (mains lead) when wiring
cables. When hooking up, be sure to unplug the AC power
cord (mains lead) for your safety.
• Take care not to catch your feet on the cables. It may
damage the system.
Cleaning
• Unplug the AC power cord (mains lead)
when cleaning the plug and this system. If
you do not, it may result in electric shock.
• Clean the mains plug regularly. If the plug
is covered with dust and it picks up
moisture, its insulation may deteriorate
and result in fire.
Lightning storms
For your own safety, d o not touch any
part of the system, AC power cord
(mains lead), or aerial lead during
lightning storms.
Damage requiring service
If the surface of the system cracks, do not touch it until you
have unplugged the AC power cord (mains lead). Otherwise
electric shock may result.
Servicing
Do not open the cabinet.
Entrust the system to qualified
service personnel only.
Small accessories removal and fittable
Keep accessories out of children’s reach. If they are
swallowed, choking or suffocation may occur. Call a doctor
immediately.
Broken glass
Do not throw anything at the system. The
screen glass may explode by the impact
and cause serious injury.
When not in use
For environmental and safety
reasons, it is recommended that
the system is not left in standby
when unused. Disconnect from
the AC power source (mains).
However, some systems may
have features which need the
system to be left in standby to work correctly. The
instructions in this manual will inform you if this applies.
Continued
GB
7
Page 8

Viewing the TV screen
• To view the TV screen comfortably, the recommended
viewing position is from four to seven times the screen’s
vertical length away from the system.
• View the TV screen in moderate light, as viewing the TV
screen in poor light strains your eyes. Watching the screen
continuously for long periods of time can also strain your
eyes.
Volume adjustment
• Adjust the volume so as not to trouble your neighbours.
Sound carries very easily at night time. Therefore, closing
the windows or using headphones is suggested.
• When using headphones, adjust the volume so as to avoid
excessive levels, as hearing damage may result.
• Do not turn up the volume while listening to a section with
very low level inputs or no audio signals. If you do, the
speakers may be damaged when a peak level section is
suddenly played.
Overloading
This system is designed to operate on
a 220–240 V AC supply only. Take
care not to connect too many
appliances to the same mains socket
as this could result in fire or electric
shock.
Heat
Do not touch the surface of the system. It remains hot, even
after the system has been turned off for some time.
Corrosion
If you use this system near the seashore, salt may corrode
metal parts of the system and cause internal damage or fire.
It may also shorten the life of the system. Steps should be
taken to reduce the humidity and moderate the temperature
of the area where the system is located.
Precautions
Safety
• The unit is not disconnected from the AC power source
(mains) as long as it is connected to the wall outlet
(mains), even if the unit itself has been turned off. To
disconnect the system completely, pull the plug from the
AC power source (mains).
• Unplug the unit from the wall outlet (mains) if you do not
intend to use it for an extended period of time.
LCD Screen
• Although the LCD screen is made with high-precision
technology and 99.99% or more of the pixels are effective,
black dots may appear or bright points of light (red, blue,
or green) may appear constantly on the LCD screen. This
is a structural property of the LCD panel and is not a
malfunction.
• Do not expose the LCD screen surface to the sun. Doing
so may damage the screen surface.
• Do not push or scratch the front filter, or place objects on
top of this system. The image may be uneven or the LCD
panel may be damaged.
• If this system is used in a cold place, a smear may occur in
the picture or the picture may become dark.
This does not indicate a failure. These phenomena
disappear as the temperature rises.
• Ghosting may occur when still pictures are displayed
continuously. It may disappear after a few moments.
• The screen and cabinet get warm when this system is in
use. This is not a malfunction.
• The LCD contains a small amount of liquid crystal and
mercury. The fluorescent tube used in this system also
contains mercury. Follow your local ordinances and
regulations for disposal.
Fluorescent lamp
This system uses a special fluorescent lamp as its light
source. If the screen image becomes dark, flickers, or does
not appear, the fluorescent lamp has worn out and should be
replaced. For replacement, consult qualified service
personnel.
Installing the system
• Do not install the system in places subject to extreme
temperature, for example in direct sunlight, or near a
radiator, or heating vent or excessive dust, mechanical
vibration, or shock. If the system is exposed to extreme
temperature, the system may overheat and cause
deformation of the casing or cause the system to
malfunction.
• To obtain a clear picture, do not expose the screen to direct
illumination or direct sunlight. If possible, use spot
lighting directed down from the ceiling.
• Do not install optional components too close to the
system. Keep optional components at least 30 cm away
from the system. If a VCR is installed in front of the
system or beside the system, the picture may become
distorted.
• Picture distortion and/or noisy sound may occur if the
system is positioned in close proximity to any equipment
emitting electromagnetic radiation.
• Allow adequate air circulation to prevent internal heat
buildup.
GB
8
Page 9

• Do not place the unit on surfaces (rugs, blankets, etc.) or
near materials (curtains, draperies) that may block the
ventilation slots.
• Do not install the unit in an inclined position. It is designed
to be operated in a horizontal position only.
• Keep the unit and discs away from equipment with strong
magnets, such as microwave ovens, or large loudspeakers.
• If the unit is brought directly from a cold to a warm
location, moisture may condense inside this system and
cause damage to the lenses. When you first install the unit,
or when you move it from a cold to a warm location, wait
for about 30 minutes before operating the unit.
Handling and cleaning the screen surface/cabinet of
the system
The screen surface is finished with a special coating to
prevent strong light reflections.
To avoid material degradation or screen coating degradation,
observe the following precautions.
• Do not push on the screen, scratch it with a hard object, or
throw anything at it. The screen may be damaged.
• Do not touch the display panel after operating the system
continuously for a long period as the display panel
becomes hot.
• We recommend that the screen surface be touched as little
as possible.
• To remove dust from the screen surface/cabinet, wipe
gently with a soft cloth. If dust is persistent, wipe with a
soft cloth slightly moistened with a diluted mild detergent
solution. You can wash and repeatedly use the soft cloth.
• Never use any type of abrasive pad, alkaline/acid cleaner,
scouring powder, or volatile solvent, such as alcohol,
benzene, thinner or insecticide. Using such materials or
maintaining prolonged contact with rubber or vinyl
materials may result in damage to the screen surface and
cabinet material.
If you have any questions or problems concerning your
system, please consult your nearest Sony dealer.
• The ventilation holes can accumulate dust over time. To
ensure proper ventilation, we recommend removing the
dust periodically (once a month) using a vacuum cleaner.
On placement
At high volume, over long periods of time, the cabinet
becomes hot to the touch. This is not a malfunction.
However, touching the cabinet should be avoided.
On cleaning discs, disc/lens cleaner
Do not use a commercially available cleaning disc
or disc/lens cleaner (wet or spray type). These may
cause apparatus to malfunction.
On moving the system
When you carry the system, use the following procedure to
protect the inner mechanism.
1 Press (input select) repeatedly to select “DVD.”
2 Make sure that the disc is removed from the system.
3 Press x (stop) and 1 on the system simultaneously.
“MECHA LOCK” appears in the front panel display.
The lift unit is now set in the shipping position (down).
4 Remove the AC power cord (mains lead) from the
wall outlet (mains).
Notes about the discs
On handling discs
• To keep the disc clean, handle the disc by its edge. Do not
touch the surface.
• Do not stick paper or tape on the disc.
• Do not expose the disc to direct sunlight or heat sources
such as hot air ducts, or leave it in a car parked in direct
sunlight as the temperature may rise considerably inside
the car.
• After playing, store the disc in its case.
On cleaning
• Before playing, clean the disc with a cleaning cloth.
Wipe the disc from the centre out.
• Do not use solvents such as benzine, thinner,
commercially available cleaners, or anti-static spray
intended for vinyl LPs.
This system can only play back a standard circular disc.
Using neither standard nor circular discs (e.g., card, heart, or
star shape) may cause a malfunction.
Do not use a disc that has a commercially available accessory
attached, such as a label or ring.
GB
9
Page 10
Guide to basic
Using the remote
operations of this
system
This system is a TV with DVD player. The lift unit of
this system has built-in 2.1 channel speakers. You can
enjoy high quality and exciting sound from TV, DVD,
FM and other connected components.
About the lift unit
A
B
C
D
E
F
Lift unit
When you select “AUTO” in “Lift Mode” (page 74),
the lift unit moves up/down according to the selected
input. For example, when you watch TV or DVD, or
turn the system on, the lift unit moves down.
Conversely, listening to FM radio or turning the
system off moves the lift unit up. You can also operate
the lift unit manually by pressing .
x Direct input select buttons D
• TV: Switches the TV input select to either A-TV or
D-TV (whichever was selected last).
• DIGITAL*: Switches the input select to digital
broadcast (D-TV).
• ANALOG: Switches the input select to analogue
broadcast (A-TV).
• DVD: Switches the input select to DVD.
• FM: Switches the input select to FM.
* Note that this button may not be available in some countries.
x Input select button A
Switches the input select. Each time you press the
button, the input select changes as below.
TV (A-TV or D-TV*) t AV1 t AV2 t DVD t
AV4 t PC t HDMI t TV (A-TV or D-TV*)
t........
Note
After pressing TV C, if you press the input select button A,
the input does not switch to AV1, but goes back to the
previous status before pressing TV C.
* Note that this input select may not be available in some
countries.
10
GB
Page 11

x Auto input select button F
While the input is except DVD, if you press Z on the
system or H, the input will be changed to DVD
automatically.
Overview of the remote
Using the menu
This system has various types of menus:
• TV: TV MENU
• DVD: DVD MENU
DVD TOP MENU
DVD DISPLAY
• FM: FM MENU
These menus are available when either input is
selected.
• TV/DVD/FM: AMP MENU
x CURSOR MODE buttons B
When one of these buttons lights up, you can operate
its menu (</M/m/,/).
TV: Lights up when TV input is selected by TV (direct
input select button
DVD/FM: Lights up when DVD or FM is selected by
DVD, FM (direct input select button
pressing DVD MENU.
If the </M/m/,/ buttons
press the CURSOR MODE button
use </M/m/,/ buttons
Notes
• The status shown by the CURSOR MODE buttons will
change to TV when you press these buttons below:
(Circled numbers refer to the remote illustration on
page 11).
4 – Previous channel
5 DIGITAL*/ANALOG (direct input select)
6 Coloured buttons
* – EPG (Digital Electronic Programme
Guide)
* – Favourite
/ – Text
qj – Picture Freeze
wa / – Info/Text reveal
• The status shown by the CURSOR MODE buttons will
change to DVD/FM when you press these buttons below:
(Circled numbers refer to the remote illustration on
page 11).
8 DVD DISPLAY
qd AMP MENU
FM MENU
qg PICTURE NAVI
ql DVD TOP MENU
D), or by pressing TV MENU.
D), or by
E cannot be used,
B (if not lit), then
E.
* – Digital text off
ws
wa
w;
ql
qk
qj
qh
1
2
3
4
5
6
7
8
9
0
qa
qs
qd
qf
qg
With cover opened.
* Note that this button may not be available in some countries.
Continued
11
GB
Page 12

Common operations
1 / – Input select/Text hold
• In TV mode (page 26): Selects the input source
from equipment connected to the system.
• In Text mode (page 22): Holds the current page.
• In TV/DVD/FM mode (page 10): Switches the
input source.
– Lift up/down (page 73)
"/1 – On/standby (page 21)
Switches off the system temporarily. The 1
(standby) indicator on the system (front of the lift
unit) lights up. Press again to switch on the system
from the standby mode.
– Sleep timer (page 43)
3 Number buttons
• In TV mode: Selects channels. For channel
numbers 10 and above, enter the second digit
within two seconds.
• In Text mode: Enters the three digit page number
to select the page.
• In DVD mode: Selects the item, title, chapter,
etc. Enters the password and area code.
• In FM mode: Selects the preset number.
The number 5 button has a tactile dot.*
1
9 </M/m/,/ – Cursor, OK, ENTER (page 17)
qs % – Muting (page 21)
2 +/– – Volume +/–
qd DIMMER (page 71)
qh SOUND FIELD (page 29)
To control the TV
2 TV (CURSOR MODE) (page 11)
4 – Previous channel
Returns to the previous channel watched (for more
than five seconds).
2
5 DIGITAL*
(page 21)
6 Coloured buttons (page 23)
Guide) (page 23)
/ – Text (page 22)
0 TV MENU (page 18)
qs PROG +/– (page 21)
The PROG + button has a tactile dot.*
qf – Picture Mode (page 39)
Reduces the power consumption of the system.
/ANALOG (direct input select)
2
– Digital text off (page 22)
*
2
*
– EPG (Digital Electronic Programme
2
– Favourite (page 25)
*
– Power Saving (page 42)
1
– Screen mode (page 22)
qj – Picture Freeze (page 22)
Freezes the TV picture.
wa / – Info/Text reveal
• In digital mode*
2
: Displays brief details of the
programme currently being watched.
• In analogue mode: Displays information such as
current channel number and screen mode.
• In Text mode (page 22): Reveals hidden
information (e.g., answers to a quiz).
ws TV (direct input select) (page 10)
To control the DVD
2 DVD (CURSOR MODE) (page 11)
7 DVD MENU (page 51)
8 DVD DISPLAY (page 53)
qa ./> – Next/Previous +/– (page 31)
X – Pause (page 31)
H – Play (page 31)
The H button has a tactile dot.*
1
, – Replay, Advance, Step
(page 31)
m/, M/ – Scan, Slow +/– (page 34)
x – Stop (page 31)
qd AMP MENU (page 72)
qg ANGLE (page 35)
AUDIO (page 32)
The AUDIO button has a tactile dot.*
1
PICTURE NAVI (page 34)
REPEAT (page 60)
SA-CD/CD (page 33)
SUBTITLE (page 35)
TIME/TEXT (page 56)
qk O RETURN (page 33)
ql DVD TOP MENU (page 51)
w; CLEAR (page 55)
ws DVD (direct input select) (page 10)
To control the FM tuner
2 FM (CURSOR MODE) (page 11)
5 FM (direct input select) (page 10)
qa m/, M/ – Tuning (page 37)
qs PROG +/– (page 36)
The PROG + button has a tactile dot.*
qd FM MENU (page 37)
*1Use the tactile dot as a reference when operating the system.
*2Note that this button may not be available in some countries.
1
12
GB
Page 13
Overview of the system/
qsqdq
q
qjq
0 q
42 653
lift unit buttons and
indicators
Touch panel buttons (2 – 9): Touch any of these
buttons once, to activate the panel (buttons light up), then
touch the desired button.
8
79
TVTV
FMFMPROGPROG
a
UP/DOWNUP/DOWN
5 2 +/– – Volume
Increases (+)/decreases (–) volume.
6 PROG +/–
• In TV mode: Select next (+)/previous (–)
channel.
• In FM mode: Select next (+)/previous (–) preset
station.
7 FM
Change input select to FM directly.
8 TV
Change input select to TV directly.
9 – Input select
Select the input select of connected equipment.
Each time you press the button, the input select
changes as below.
1 Disc slot
2 Z – Eject
Eject a disc.
3 H – Play
Play a disc.
4 x – Stop
Stop a disc.
qk
1
A-TV t D-TV*1 t AV1 t AV2 t DVD t
AV4 t PC t HDMI t A-TV t D-TV*
1
t........
0 UP/DOWN – Lift unit up/down
Move the lift unit up/down.
qa 1 – Standby
Switch system on/off. While the system is on, if
you press "/1 on the remote, the system enters
standby mode.
qs ` – Power indicator
Lights green when system is on.
qd 1 – Standby indicator
Lights red when system is in standby mode.
2
qf *
– Picture Off (page 42)/Timer indicator
(page 43)
• Lights up in amber when the “Sleep Timer” is
set or when a digital event is programmed.
• Lights up in green when “Picture Off” is set.
• Lights up in red when digital REC starts.
FRONT
2CH STEREOAUTO
SURROUND
qg Front panel display (page 71)
qh Sound Field indicator
h
g
f
qj – Remote control sensor
qk Lift unit
*1Note that this input select may not be available in some
countries.
*2Note that this indicator may not light up in some countries.
GB
13
Page 14
Getting Started
2: Inserting batteries
1: Checking the
accessories
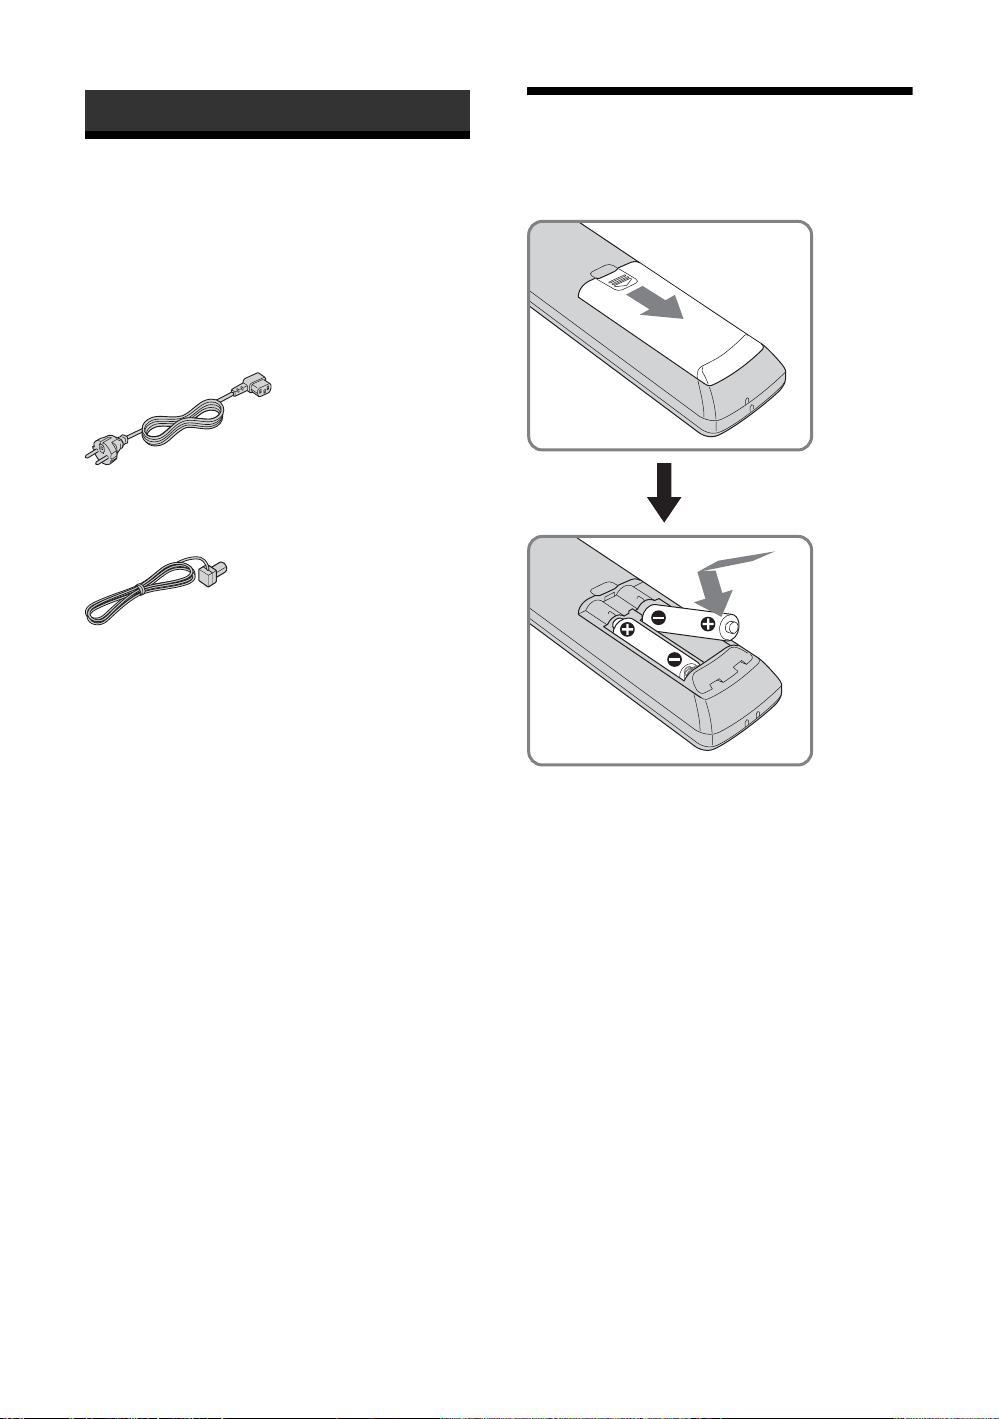
Remote RM-ANU005 (1)
Size AA batteries (R6 type) (2)
AC power cord (mains lead) (1)
Screws (2)
FM wire antenna (aerial) (1)
Frame grille (1)
Quick Start Guide (1)
into the remote
14
Notes
• Observe the correct polarity when inserting batteries.
• Dispose of batteries in an environmentally friendly way.
Certain regions may regulate disposal of the battery.
Please consult your local authority.
• Do not use different types of batteries together or mix old
and new batteries.
• Handle the remote with care. Do not drop or step on it, or
spill liquid of any kind onto it.
• Do not place the remote in a location near a heat source, or
in a place subject to direct sunlight, or in a damp room.
GB
Page 15
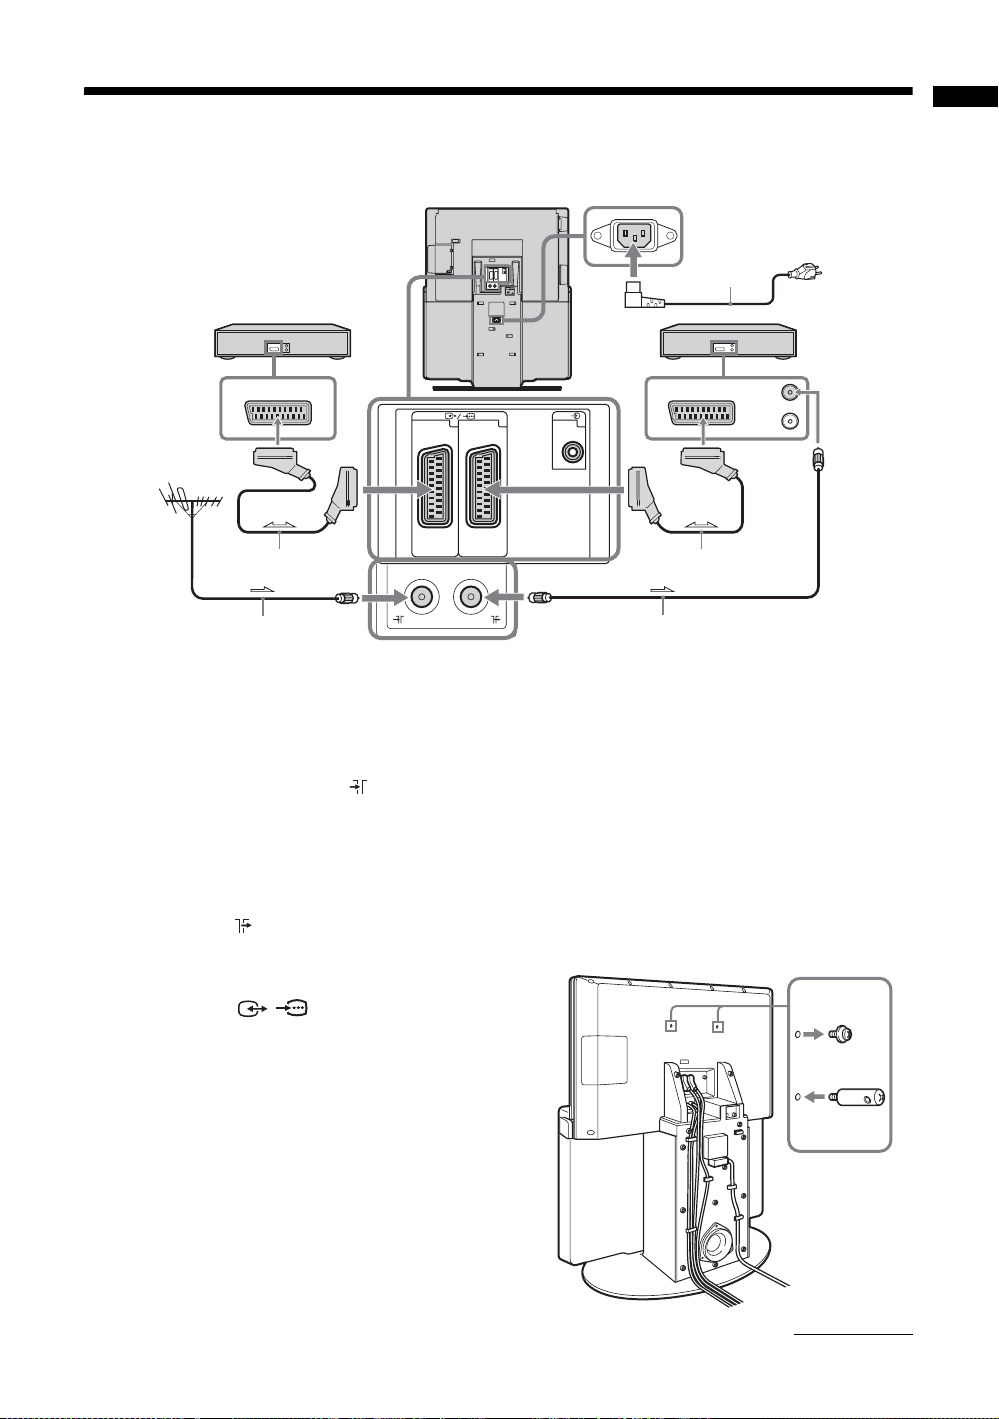
3: Connecting a TV aerial/VCR/DVD player
Rear of the system
AC power cord
(mains lead)
(supplied)
DVD player
VCR
12 5
(SmartLink)
PC
Getting Started
IN
OUT
Scart lead (not supplied)
Coaxial cable
(not supplied)
1 Remove the covers.
When all connections have been made, replace the
covers.
2 Connect your aerial to the socket on
the rear of the system.
If connecting to an aerial only
Go to step 4.
3 Connect your VCR/DVD player.
1 Connect the socket on the rear of the
system to the input socket on your VCR with
the RF lead.
2 Connect the scart socket on your VCR/DVD
player to the / 1 or 2 scart socket on
the rear of the system with a scart lead.
4 Connect the supplied AC power cord
(mains lead) to the AC IN socket on the
rear of the system.
Note
Do not connect the AC power cord (mains lead) to your
mains socket until all connections are complete.
Scart lead (not supplied)
RF lead (not supplied)
To prevent the system from toppling over
Notes
• Be sure to take measures to prevent the system from
toppling over. If you fail to do so, the system may
topple over and cause injury. Anchor the system to a
wall, pillar, etc., to prevent it from toppling over.
• Any wall alternations (drilling, etc.) are your own
responsibility.
Prepare a commercially available strong rope or chain
and wall anchor bracket beforehand.
1 Remove the two small screws, and then
attach the two large screws to the screw
holes on the rear of the system.
a
b
Continued
15
GB
Page 16
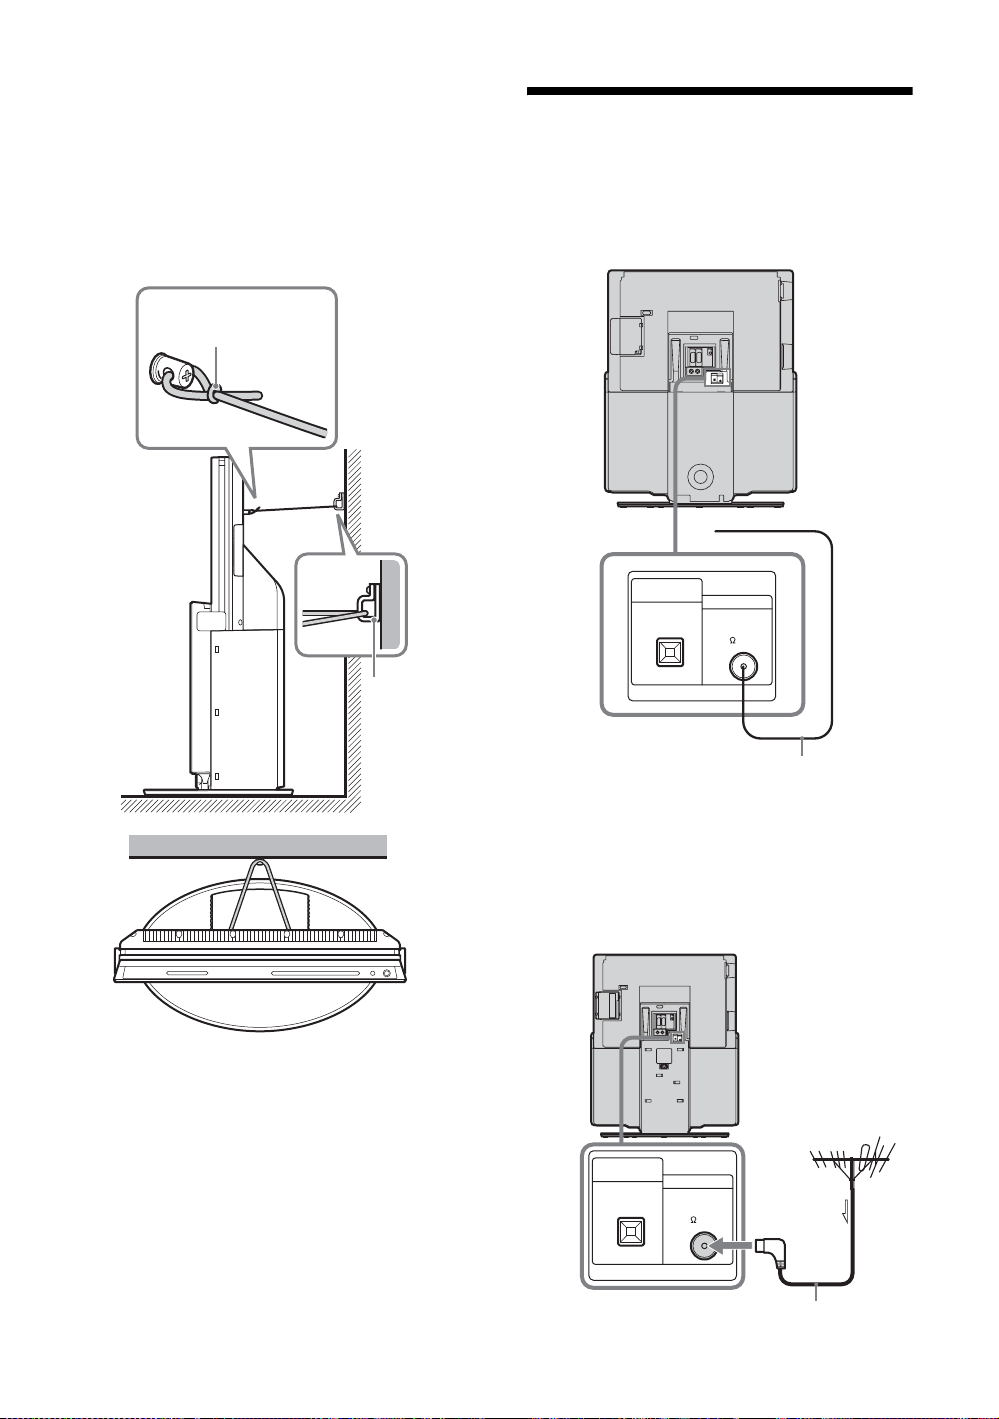
2 Secure the wall anchor bracket to a wall
or pillar.
3 Thread the rope or chain through both
holes of the screws, and then tighten the
other end of the rope or chain to the wall
anchor bracket.
A commercially available
strong rope or chain
A commercially
available wall
screw
4: Connecting the FM
wire antenna (aerial)
Connect the supplied FM wire antenna (aerial) for
listening to the FM radio. Thread the wire antenna
(aerial) through the slit of the cover, and then replace
the cover.
DVD
DIGITAL OUT
OPTICAL
FM ANTENNA
FM 75
COAXIAL
FM wire antenna (aerial)
Notes
• Be sure to fully extend the FM wire antenna (aerial).
• After connecting the FM wire antenna (aerial), keep it as
horizontal as possible.
Tip
If you have poor FM reception, use an “L” type 75-ohms
coaxial cable (not supplied) to connect the system to an
outdoor FM antenna (aerial) as shown below. If you use a
75-ohms coaxial cable other than “L” type, you may not be
able to replace the covers properly.
Outdoor FM antenna
(aerial)
DVD
DIGITAL OUT
OPTICAL
FM ANTENNA
FM 75
COAXIAL
“L” type 75-ohms c oaxial
cable (not supplied)
16
GB
Page 17
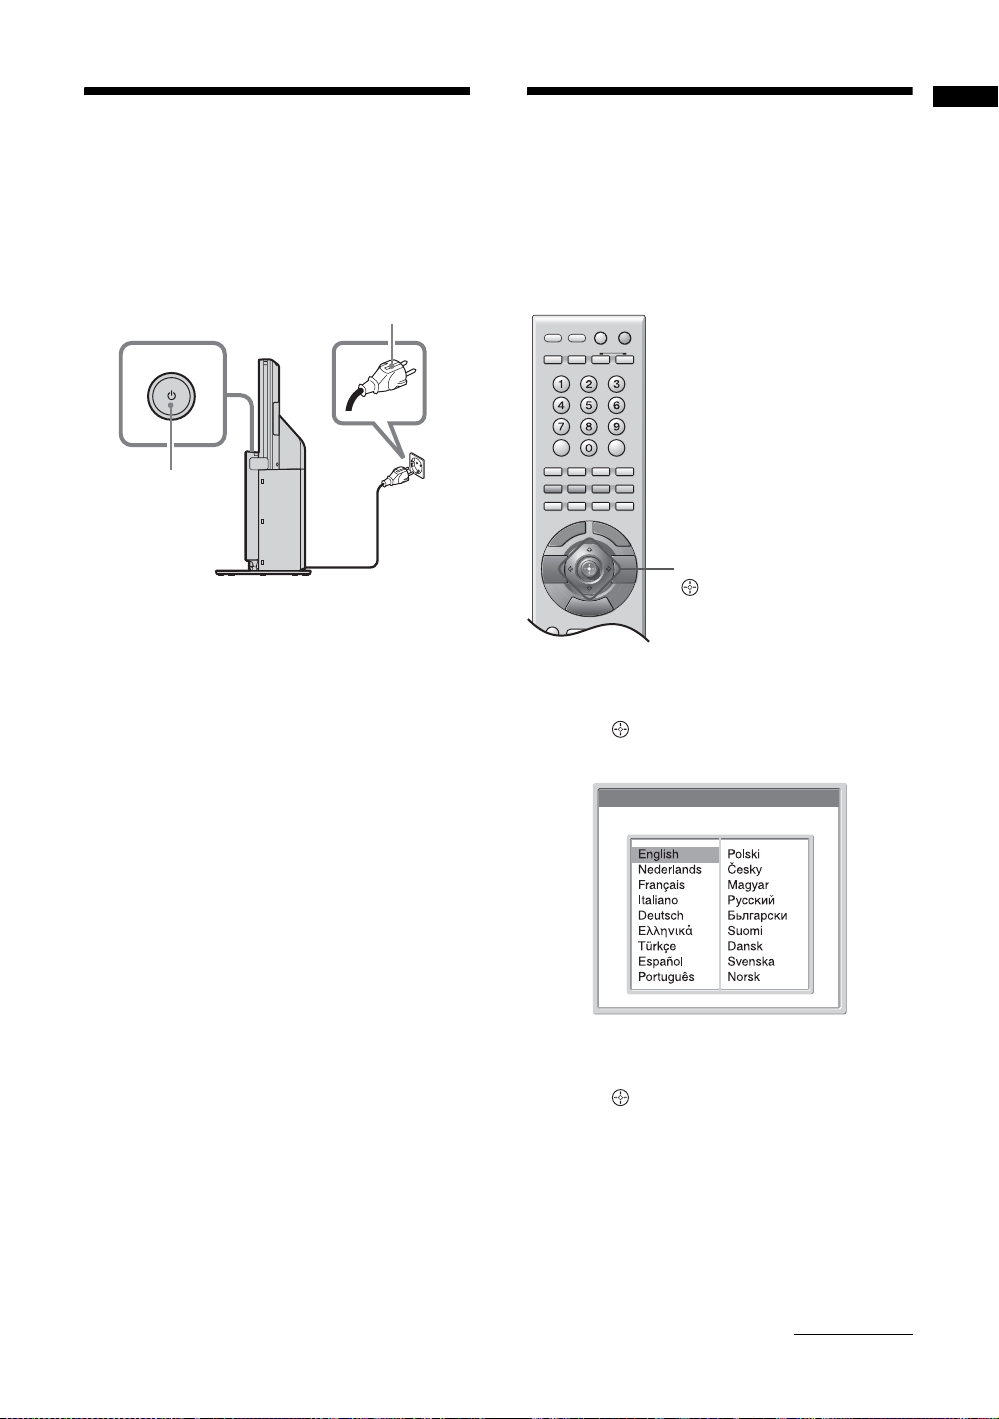
5: Switching on the
6: Selecting the TV
Getting Started
system
Install this system so that the power cord can be
unplugged from the wall socket immediately in the
event of trouble.
AC power cord
(mains lead)
1
1 Connect the system to your mains socket
(220-240V AC, 50Hz).
2 Press 1 on the system (top of the lift
unit).
When you switch on the system for the first time,
the Language menu appears on the screen, then go
to “6: Selecting the TV language and country/
region” (page 17).
When the system is in standby mode (the 1
(standby) indicator on the system is red), press
+/1 on the remote to switch on the system.
Notes
• Depending on the Lift Mode setting or selected input,
the lift unit will move down when turning on the
system.
• To recall from standby mode by pressing 1 on the
system, press 1 to turn off the system, and then press
and hold 1 again until ` (power indicator) lights up in
green.
To save the power in standby mode
Press "/1 on the remote while the system turns on. To
cancel standby mode, press "/1 once.
language and country/
region
When you switch on the system for the first time, the
Language menu appears on the screen.
</M/m/,
(OK)
1 Press </M/m/, to select the language
displayed on the menu screens, then
press (OK).
Language
Select Language
2 Press M/m to select the country/region in
which you will operate the system, then
press (OK).
The message confirming the system start autotuning appears on the screen.
Continued
17
GB
Page 18
Country
Select Country
–
Ireland
Nederland
België/Belgique
Luxembourg
France
Italia
Schweiz/Suisse/Svizzera
Deutschland
Österreich
Türkiye
If the country/region in which you want to use the
system does not appear in the list, select [-] instead
of a country/region.
The message confirming the system start autotuning appears on the screen, then go to “7: Autotuning the TV” (page 18).
7: Auto-tuning the TV
After selecting the language and country/region, a
message confirming the system start auto-tuning
appears on the screen.
You must tune the system to receive channels (TV
broadcasts). Do the following to search and store all
available channels.
(OK)
TV MENU
1 Press (OK) to select [Yes].
Do you want to start
automatic tuning ?
Ye s No
m
Digital auto-tune display*
Number of Services found 14
Searching. 40%
Cancel:
m
Analogue auto-tune display
Auto Tuning
Programmes found:
5
Searching...
18
GB
Page 19

The system starts searching for all available
digital channels, followed by all available
analogue channels. This may take some time,
please be patient and do not press any buttons on
the system or remote.
Once all available digital and analogue channels
have been stored, the system returns to normal
operation, displaying the digital channel stored on
channel number 1. If no digital channels are
found, the analogue channel stored on channel
number 1 is displayed.
When a message appears for you to confirm the
aerial connections
No digital or analogue channels are found. Check
all the aerial connections and press (OK) to
start auto-tuning again.
2 The Programme Sorting menu appears
on the screen.
Note
If some digital channel is found, this step will not
appear.
3 To change the order in which the
channels are stored on the system. See
page 46.
4 Press TV MENU to exit.
The system has now tuned in all the available
channels.
Hint
To stop Digital Auto Tuning, select [Cancel]. Digital
Auto Tuning is cancelled, and Analogue Auto Tuning
starts.
* Note that this Digital auto-tune display may not appear in some
countries.
8: Selecting the DVD
language (Quick Setup)
You can set the display language.
DVD
M/m/ (ENTER)
1 Press DVD (direct input select) to switch
the input to DVD.
[Press [ENTER] to run QUICK SETUP.] appears
at the bottom of the screen. This message does not
appear if the disc is loaded or Quick Setup is
already done.
2 Press (ENTER) without inserting a
disc.
The Setup Display for selecting the language used
in the on-screen display appears.
Getting Started
LANGUAGE SETUP
OSD:
MENU:
AUDIO:
SUBTITLE:
ENGLISH
ENGLISH
FRANÇAIS
DEUTSCH
ITALIANO
ESPAÑOL
NEDERLANDS
DANSK
SVENSKA
3 Press M/m to select a language.
The system displays the on-screen display, the
menu and subtitles in the selected language.
Note
The selectable language is different depending on the
area.
4 Press (ENTER).
Quick Setup is finished. All connections and setup
operations are complete.
Continued
19
GB
Page 20
To quit the Quick Setup
Press DVD DISPLAY in any step.
To recall the Quick Setup display
1 Press DVD DISPLAY. (If a disc is playing, press x to
stop playback, then press DVD DISPLAY.)
The Control Menu appears.
2 Press M/m to select [SETUP], then press
(ENTER).
The options for [SETUP] appear.
)
1 2 ( 2 7
)
1 8 ( 3 4
: :
QUICK
QUICK
CUSTOM
RESET
3 Press M/m to select [QUICK], then press
(ENTER).
The Quick Setup display appears.
DVD VIDEO
20
GB
Page 21

Watching TV
Watching TV
1 Press 1 on the system to switch on the
system.
When the system is in standby mode (the 1
(standby) indicator on the system is red), press
"/1 on the remote to switch on the system.
Watching TV
2 Press DIGITAL to switch to digital mode
or ANALOG to switch to analogue mode.
The channels available vary depending on the
mode.
3 Press the number buttons or PROG
1
1
+/– to select a TV channel.
To select channel numbers 10 and above using the
number buttons, enter the second and third digits
within two seconds.
To select a digital channel using the Digital
Electronic Programme Guide (EPG), see page 23.
In digital mode
An information banner appears briefly. The
following icons may be indicated on the banner.
"/1
Number
buttons
DIGITAL*
ANALOG
PROG +/–
: Interactive service is available (MHEG Digital
Text)
: Interactive service (MHEG Digital Text) is
currently disabled
: Radio service
: Scrambled/Subscription service
: Multiple audio languages available
: Subtitles available
: Subtitles available for the hearing impaired
: Recommended minimum age for current
programme (from 4 to 18 years)
: Parental Lock
: Current programme is being recorded
* Note that this button may not be available in some countries.
Additional operations
To Do this
Turn off the system
temporarily
(Standby mode)
Turn off the system
completely
Adjust the volume Press 2 + (increase)
Press "/1 on the remote.
Press 1 on the system.
/– (decrease).
Continued
21
GB
Page 22
To Do th is
Mute the sound Press %. Press again to restore.
Switch to digital
mode
Hide interactive
prompts from the
screen (in digital
mode only)
Switch to analogue
mode
Return to the
previous channel
watched (for more
than five seconds)
Access the
Programme index
table (in analogue
mode only)
To access the Input
signal index table
* Note that this button may not be available in some countries.
Press DIGITAL*.
Press ANALOG.
Press .
Press (OK). To select a
channel, press M/m, then press
(OK).
Press (OK). Press , to
select the desired input signal,
press m/M, then press (OK).
To access Digital Text*
Many broadcasters provide a Digital Text service.
Digital Text offers graphically rich contents,
compared to Analogue Text.
Select a digital channel which provides Digital Text,
then press /.
When a broadcaster provides a dedicated Digital Text
channel, select this channel to access Digital Text.
To navigate through Digital Text, follow the
instructions on the screen.
To exit Digital Text, press .
To move around, press M/m/</,.
To select items, press (OK) and the number
buttons.
To access shortcuts, press the coloured buttons.
Tips
• Ensure that the system is receiving a good signal, or some
text errors may occur.
• Most TV channels broadcast a Text service. For
information on the use of the service, select the index
page.
• While you are viewing Teletext, press repeatedly to
choose between four different options of brightness.
• When four coloured items appear at the bottom of the Text
page, Fastext is available. Fastext allows you to access
pages quickly and easily. Press the corresponding
coloured button to access the page.
Picture Freeze
Freezes the TV picture (e.g. to make a note of a
telephone number or recipe).
1 Press .
2 Press </M/m/, to adjust the position
of the window.
3 Press to remove the window.
4 Press again to return to normal TV
mode.
To change the screen mode manually to
suit the broadcast
Press repeatedly to select Wide, Smart, 4:3, 14:9,
or Zoom.
Wide
Displays wide screen (16:9) broadcasts in the correct
proportions.
Smart*
* Note that this function may not be available in some countries.
To access Analogue Text
In analogue mode, press /. Each time you press /,
the display changes cyclically as follows:
Text t Text over the TV picture (mix mode) t No
Text (exit the Text service)
To select a page, press the number buttons or PROG
+/–.
To hold a page, press / .
To reveal hidden information, press / .
GB
22
Displays conventional 4:3 broadcasts with an
imitation wide screen effect. The 4:3 picture is
stretched to fill the screen.
4:3
Page 23
Displays conventional 4:3 broadcasts (e.g., non-wide
screen TV) in the correct proportions.
14:9*
Checking the Digital
Electronic Programme
Watching TV
Guide (EPG)
Displays 14:9 broadcasts in the correct proportions.
As a result, black border areas are visible on the
screen.
Zoom*
Displays cinemascopic (letter box format) broadcasts
in the correct proportions.
* Parts of the top and bottom of the picture may be cut off.
Tips
• Alternatively, you can set [Auto Format] to [On]. If the
broadcaster sends format information, the system will
automatically select the best mode to suit the broadcast
(page 41).
• You can adjust the portion of the picture when selecting
Smart, 14:9, or Zoom. Set the CURSOR MODE button to
TV, and then press M/m to move up or down (e.g., to read
subtitles).
(France, Italy, Germany, Spain, Finland,
Sweden, and Denmark only)
All Categories
Thu 27 May
001
BBC ONE Wales
002
BBC 2W
003
ITV 1 Wales
006
ITV 2
007
BBC THREE
008
Channel 4
009
Teletext
014
E4
024
price-drop.tv
029
UKTV FOOD
030
CBBC Channel
040
BBC NEWS 24
Select: Action list: +/- 1 day on/off:
Digital Electronic Programme Guide
(EPG)
Thu 27 May 10:31
10:30 11:00
City Hospital Houses Be… Bargain Hu… Cash in the…
The… The… Sch… Sch… The Daily Politics
This M… i i This Morning i This Morning
Sally Jessy Rap… Judge Judy Judge J… Judge J…
This is BBC THREE This is BB…
Self… The Vi… Teen Big B… From Th… News at N…
No Event Information
E4 Preview
No Event Information
Food and D… Ready Stea… No Event Information
Mat… Mat… K… K… K… Look… Look… Zig Zag
BBC News BBC News BBC News
11:30 12:00
NextPrevious 30 min view Categor y
OK
1 In digital mode, press to display the
Digital Electronic Programme Guide
(EPG).
2 Perform the desired operation, as shown
in the following table.
Note
Programme information will only be displayed if the TV
station is transmitting it.
To Do this
Turn off the EPG Press .
Move through the
EPG
Display the previous
or next six channels
Watch a current
programme
Press </M/m/,.
Press the red (previous) or green
(next) button.
Press (OK) while the current
programme is selected.
Continued
23
GB
Page 24

To Do th is
Sort the programme
information by
category – Category
list
1 Press the blue button.
2 Press </M/m/, to
select a category. The
category name is
displayed on the side.
The categories available
include:
Favourite
Contains all the channels that
have been stored in the
Favourite list (page 25).
All Categories
Contains all available
channels.
News
Contains all news channels.
3 Press (OK).
The Digital Electronic
Programme Guide (EPG)
now only displays the current
programmes from the
category selected.
To Do this
Set a programme to
be recorded – Timer
REC
1 Press </M/m/, to
select the future
programme you want to
record.
2 Press (OK).
3 Press M/m to select
[Timer REC].
4 Press (OK) to set the
system and your VCR
timers.
A symbol appears by that
programme’s information.
The indicator on the lift
unit lights up in standby
mode.
Notes
• You can set VCR timer recording
on the system only for Smartlink
compatible VCRs. If your VCR is
not Smartlink compatible, a
message will be displayed to
remind you to set your VCR timer.
• Once a recording has begun, you
can switch the system to standby
mode, but do not switch off the
system completely or the
recording may be cancelled.
• If an age restriction for
programmes has been selected, a
message asking for PIN Code
will appear on the screen. For
more details refer to Parental
Lock (page 49).
Set a programme to
be displayed
automatically on the
screen when it starts
– Reminder
1 Press </M/m/, to
select the future
programme you want to
display.
2 Press (OK).
3 Press M/m to select
[Reminder].
4 Press (OK) to
automatically display the
selected programme
when the programme
starts.
A c symbol appears by that
programme’s information.
The c indicator on the lift
unit lights up in standby
mode.
Note
If you switch the system to standby
mode, it will automatically turn
itself on when the programme is
about to start.
24
GB
Page 25
To Do th is
Set the time and date
of a programme you
want to record –
Manual timer REC
1 Press (OK).
2 Press M/m to select
[Manual timer REC].
3 Press M/m to select the
date, then press ,.
4 Set the start and stop
time in the same way as
in step 3.
5 Press M/m to select the
channel, then press
(OK) to set the system
and your VCR timers.
A symbol appears by that
programme’s information.
The indicator on the lift
unit lights up in standby
mode.
Notes
• You can set VCR timer recording
on the system only for Smartlink
compatible VCRs. If your VCR is
not Smartlink compatible, a
message will be displayed to
remind you to set your VCR timer.
• Once a recording has begun, you
can switch the system to standby
mode, but do not switch off the
system completely or the
recording may be cancelled.
• If an age restriction for
programmes has been selected, a
message asking for PIN Code
will appear on the screen. For
more details refer to Parental
Lock (page 49).
Cancel a recording/
reminder – Timer list
1 Press (OK).
2 Press M/m to select
[Timer list].
3 Press M/m to select the
programme you want to
cancel, then press
(OK).
A display appears to confirm
that you want to cancel the
programme.
4 Press , to select [Yes],
then press (OK) to
confirm.
Using the Favourite list
(France, Italy, Germany, Spain, Finland,
Sweden, and Denmark only)
1 In digital mode, press to display the
Favourite list.
A message appears asking if you want to add
channels to the Favourite list when the Favourite
list is blank.
2 Perform the desired operation, as shown
in the following table.
To Do this
Create your Favourite
list for the first time
Turn off the
Favourite list
Move through in the
Favourite list
Display the previous
or next five channels
See brief details on
current programmes
Watch a channel Press (OK) while selecting a
A message appears asking if you
want to add channels to the
Favourite list when you press
for the first time.
1 Press (OK) to select
[Yes].
2 Press M/m to select the
channel you want to add,
then press (OK).
If there are more than five
channels in the list, press the
green button for the next five
channels or press the red
button for the previous five
channels. If you know the
channel number, you can use
the number buttons to
directly select a channel.
3 Press (OK).
Channels that are stored in
the Favourite list are
indicated by a symbol.
Press .
Press M/m.
Press the red (previous) or green
(next) button.
Press while selecting a
channel. Press again to cancel.
channel.
Watching TV
Continued
25
GB
Page 26
To Do th is
Add or remove
channels in the
Favourite list
1 Press the blue button.
Channels that are stored in
the Favourite list are
indicated by a symbol.
2 Press M/m to select the
channel you want to add
or remove.
If there are more than five
channels in the list, press the
green button for the next five
channels or press the red
button for the previous five
channels. If you know the
channel number, you can use
the number buttons to
directly select a channel.
3 Press (OK).
4 Press the blue button to
return to the Favourite
list.
Remove all channels
from the Favourite
list
1 Press the blue button.
2 Press the yellow button.
A display appears to confirm
that you want to delete all
channels from the Favourite
list.
3 Press < to select [Yes],
then press (OK) to
confirm.
Viewing pictures from
connected equipment
Switch on the connected equipment, then
perform one of the following operation.
For equipment connected to the scart sockets using a
fully-wired 21-pin scart lead
Start playback on the connected equipment.
The picture from the connected equipment appears on
the screen.
For an auto-tuned VCR (page 15)
Press PROG +/–, or the number buttons, to select the
video channel. You can also press / repeatedly
until the correct input symbol (see below) appears on
the screen.
For other connected equipment
Press / repeatedly until the correct input
symbol (see below) appears on the screen or press OK
to access the Input signal index table. Press , to
select an input source, press m/M, then press OK.
1/ 1, 2/ 2:
Audio/video or RGB input signal through the scart
socket / 1 or 2. appears only if an RGB
source has been connected.
4/ 4:
Video input signal through the video socket 4, and
audio input signal through the audio socket L/G/S/I
(MONO), R/D/D/D sockets 4. appears only if
the equipment is connected to the S video socket 4
instead of the video socket 4, and S video input
signal is input through the S video socket 4.
5:
RGB input signal through the PC connectors 5, and
audio input signal through the socket .
6:
Digital audio/video signal is input through the HDMI IN
6 socket. Audio input signal is analogue only if the
equipment has been connected using the DVI and audio
out socket.
26
GB
Additional operations
To Do this
Return to the normal
TV operation
Access the Input
signal index table
* Note that this button may not be available in some countries.
Press DIGITAL* or ANALOG.
Press (OK), then press ,. To
select an input source, press M/m,
then press (OK).
Page 27
Enjoying Discs
Available discs
Format of discs Disc logo
DVD VIDEO
DVD-R
Note about CDs/DVDs
The system can play CD-ROMs/CD-Rs/CD-RWs
recorded in the following formats:
– audio CD format.
– video CD format.
– MP3 audio tracks, JPEG image files, and DivX
video files of format conforming to ISO 9660 Level
1/Level 2, or its extended format, Joliet.
The system can play DVD-ROMs/DVD+RWs/DVDRWs/DVD+Rs/DVD-Rs recorded in the following
formats:
– MP3 audio tracks, JPEG image files and DivX
video files of format conforming to UDF (Universal
Disc Format).
Enjoying Discs
DVD-RW
DVD+RW/
DVD+R
VIDEO CD
Super Audio CD
Audio CD
CD-R/CD-RW
(audio data)
(MP3 files)
(JPEG files)
*2
Example of discs that the system cannot
play
The system cannot play the following discs:
• CD-ROMs/CD-Rs/CD-RWs other than those
recorded in the formats listed on page 27.
• CD-ROMs recorded in PHOTO CD format.
• Data part of CD-Extras.
• DVD Audios.
• DVD-RAMs.
• A DVD VIDEO with a different region code
(page 28).
• DATA CDs/DATA DVDs that do not contain MP3
audio tracks, JPEG image files, or DivX video files.
• A disc that has a non-standard shape (e.g., card
*1
shaped, heart shaped).
• A disc that has a commercially available accessory
attached, such as a label or ring.
Ring
Label
• An adapter to convert an 8 cm disc to standard size.
Adapter
The “DVD VIDEO,” “DVD-R,” “DVD-RW,” “DVD+RW,”
“DVD+R,” and “CD” logos are trademarks.
*1Except for multi-channel playback area.
*2 CD text data can be displayed (disc title only).
• A disc with paper or stickers on it.
• A disc that has the adhesive of cellophane tape or a
sticker still left on it.
Continued
27
GB
Page 28

Notes about CD-R/CD-RW/DVD-R/DVD-RW/DVD+R/
DVD+RW
In some cases, CD-R/CD-RW/DVD-R/DVD-RW/DVD+R/
DVD+RW cannot be played on this system due to the
recording quality or physical condition of the disc, or the
characteristics of the recording device and authoring
software.
The disc will not play if it has not been correctly finalized.
For more information, see the operating instructions for the
recording device.
Note that discs created in the Packet Write format cannot be
played.
Note that some playback functions may not work with some
DVD+Rs/DVD+RWs, even if they have been correctly
finalized. In this case, view the disc by normal playback.
Also some DATA CDs/DATA DVDs created in Packet
Write format cannot be played.
Music discs encoded with copyright protection
technologies
This product is designed to play back discs that conform to
the Compact Disc (CD) standard.
Recently, various music discs encoded with copyright
protection technologies are marketed by some record
companies. Please be aware that among those discs, there are
some that do not conform to the CD standard and may not be
playable by this product.
Note on DualDisc
A DualDisc is a two sided disc product which mates DVD
recorded material on one side with digital audio material on
the other side. However, since the audio material side does
not conform to the Compact Disc (CD) standard, playback on
this product is not guaranteed.
About Multi Session CD
• This system can play Multi Session CDs when an
MP3 audio track is contained in the first session.
Any subsequent MP3 audio tracks recorded in later
sessions can also be played back.
• This system can play Multi Session CDs when a
JPEG image file is contained in the first session.
Any subsequent JPEG image files recorded in later
sessions can also be played back.
• If audio tracks and images in music CD format or
video CD format are recorded in the first session,
only the first session will be played back.
About the Super Audio CD
Super Audio CD is a new high-quality audio disc
standard where music is recorded in the DSD (Direct
Stream Digital) format (conventional CDs are
recorded in the PCM format). The DSD format, using
a sampling frequency 64 times higher than that of a
conventional CD, and with 1-bit quantization,
achieves both a wide frequency range and a wide
dynamic range across the audible frequency range,
and so provides music reproduction extremely faithful
to the original sound.
Types of Super Audio CDs
There are two types of discs, depending on the Super
Audio CD layer and CD layer combination.
• Super Audio CD layer: A high-density signal
layer for Super Audio CD
•CD layer*
1
: A layer that is readable by a
conventional CD player
Single layer disc
(a disc with a single Super Audio CD layer)
Super Audio CD
layer
Hybrid disc*
(a disc with an Super Audio CD layer and a CD layer)
*1You can play the CD layer on a conventional CD player.
*2 Since both layers are on one side, it is not necessary to turn the
disc over.
*3To select a layer, see “Selecting a playback layer for a Super
Audio CD (Super Audio CD only)” (page 33).
2
3
CD layer*
Super Audio CD layer*
3
Region code
Your system has a region code printed on the back of
the unit and will only play DVDs labelled with the
same region code.
DVD VIDEOs labelled will also play on this
ALL
system.
If you try to play any other DVD VIDEO, the message
[Playback prohibited by area limitations.] will appear
on the TV screen. Depending on the DVD VIDEO, no
region code indication may be given even though
playing the DVD VIDEO is prohibited by area
restrictions.
Note on playback operations of DVDs and
VIDEO CDs
Some playback operations of DVDs and VIDEO CDs
may be intentionally set by software producers. Since
this system plays DVDs and VIDEO CDs according to
the disc contents the software producers designed,
some playback features may not be available. Also,
refer to the instructions supplied with the DVDs or
VIDEO CDs.
28
GB
Page 29
Copyrights
This product incorporates copyright protection
technology that is protected by U.S. patents and other
intellectual property rights. Use of this copyright
protection technology must be authorized by
Macrovision, and is intended for home and other
limited viewing uses only unless otherwise authorized
by Macrovision. Reverse engineering or disassembly
is prohibited.
This system incorporates with Dolby*
Dolby Pro Logic (II) adaptive matrix surround
decoder and the DTS*
*1 Manufactured under license from Dolby Laboratories.
“Dolby,” “Pro Logic,” and the double-D symbol are
trademarks of Dolby Laboratories.
*2 Manufactured under license from Digital Theater Systems,
Inc.
“DTS” and “DTS Digital Surround” are trademarks of Digital
Theater Systems, Inc.
2
Digital Surround System.
1
Digital and
System sound feature
\
You can take advantage of this front surround sound
simply by selecting one of system's preprogrammed
sound fields. They bring the exciting and powerful
sound of movie theaters into your home.
Enjoying Discs
FRONT
2CH STEREOAUTO
SURROUND
Sound field indicator
Continued
29
GB
Page 30
SOUND FIELD
With cover opened.
1 Press SOUND FIELD.
The present sound field appears in the front panel
display.
2 Press SOUND FIELD repeatedly until
the sound field you want appears in the
front panel display.
The selected sound field indicator lights up*.
* When you press SOUND FIELD and the selected field is
AUTO, AUTO and the selected sound field indicator (FRONT
SURROUND or 2CH STEREO) light up.
Available sound fields
x AUTO (AUTO MODE)
This mode selects the sound field (FRONT
SURROUND or 2CH STEREO) automatically,
according to the type of audio signal being input.
x FRONT SURROUND (FRONT SUR)
You can enjoy surround sound in the FRONT
SURROUND area, as illustrated below. This sound
system employs S-Force PRO Front Surround
technology*.
The system
2 m
FRONT SURROUND area
x 2CH STEREO
This mode outputs 2 channel sound regardless of the
audio signal type being input.
x HP 2CH
This sound field is only for headphones. When you
connect headphones, the sound field is HP 2CH only.
* About S-Force PRO Front Surround
Sony’s long-term involvement in surround technology (and the
vast amounts of acoustic data accumulated as a result) has led
to the development of all-new processing method and
advanced DSP to handle this task effectively, which we call SForce PRO Front Surround. Compared with previous front
surround technologies, S-Force PRO Front Surround
reproduces a more convincing sense of distance and space,
resulting in a true surround sound experience without the need
for rear speakers.
Notes
• When the system receives DVD multi-channel signals, the
default AUTO setting is FRONT SURROUND.
• When the system receives CDs or DATA CDs, the AUTO
setting is 2CH STEREO.
• When using headphones, the sound field is HP 2CH
regardless of source.
• When the selected input is other than DVD, the default
AUTO setting is 2CH STEREO.
• The sound field for Super Audio CDs is 2CH STEREO
only.
• The surround effect might be difficult to hear depending
on the type of source signals (e.g., digital stereo signals,
digital multi signals, etc.) except for DVD multi-channel
signals.
30
GB
Page 31

Playing discs
Depending on the DVD VIDEO or VIDEO CD, some
operations may be different or restricted.
Refer to the operation details supplied with your disc.
HZ
UP/DOWNUP/DOWN
TVTVFMFMPROGPROG
Disc slot
"/1
DVD
1 Press "/1.
The system turns on.
Unless the system input is already set to “DVD,”
press DVD.
2 Load a disc.
Push the disc into the disc slot until the disc is
pulled in automatically.
Label facing forward.
3 Press H.
The system starts playback (continuous play).
Adjust the volume.
Additional operations
To Press
Stop x
Enjoying Discs
./>
H
x
X
2 +/–
%
Pause X
Resume play after pause X or H
Go to the next chapter,
track, or scene
Go back to the preceding
chapter, track, or scene
Mute the sound %. To cancel muting,
Stop play and remove the
disc
Replay the previous
1
scene*
,
Briefly fast forward the
current scene*
*1DVD VIDEOs/DVD-RWs/DVD-Rs only. The button can be
used except for MP3 audio tracks, JPEG image files, and
DivX video files.
*2DVD VIDEOs/DVD-RWs/DVD-Rs/DVD+RWs/DVD+Rs
only. The button can be used except for MP3 audio tracks,
JPEG image files, and DivX video files.
2
> (except for JPEG)
. (except for JPEG)
press it again or 2 + to
adjust the sound volume.
Z on the system.
(instant replay)
during playback.
(instant advance)
during playback.
Continued
31
GB
Page 32

Various play modes
Changing the sound
(DVD VIDEO, DVD-VR, VIDEO CD, CD, DATA
CD, DATA DVD only)
When playing a DVD VIDEO or DATA CD/DATA
DVD (DivX video files) recorded in multiple audio
formats (PCM, Dolby Digital, MPEG audio, or DTS),
you can change the audio format. If the DVD VIDEO
is recorded with multilingual tracks, you can also
change the language.
With VIDEO CDs, CDs, or DATA CDs/DATA
DVDs (MP3 audio), you can select the sound from the
right or left channel and listen to the sound of the
selected channel through both the right and left
speakers of the lift unit.
1 Press AUDIO during playback.
The following display appears.
1:ENGLISH DOLBY DIGITAL 3/2.1
2 Press AUDIO repeatedly to select the
desired audio signal.
x When playing a DVD VIDEO
The choice of language varies depending on the
DVD VIDEO.
When 4 digits are displayed, they indicate a
language code. Refer to “Language code list
(DVD function only)” (page 81) to see which
language the code represents. When the same
language is displayed two or more times, the DVD
VIDEO is recorded in multiple audio formats.
x When playing a DVD-R/DVD-RW
The audio streams recorded on a disc are
displayed.
Example:
• [1: AUDIO]
• [2: AUDIO]
Note
[2: AUDIO] does not appear when one audio stream is
recorded on the disc.
x When playing a VIDEO CD, CD, or DATA CD/
DATA DVD (MP3 audio)
• [STEREO]: The standard stereo sound.
• [1/L]: The sound of the left channel (monaural).
• [2/R]: The sound of the right channel
(monaural).
x When playing a DATA CD/DATA DVD (DivX
video)
• The choice of DATA CD or DATA DVD audio
signal formats differ, depending on the DivX
video file contained on the disc. The format is
shown in the display.
x When playing a Super VCD
• [1:STEREO]: The stereo sound of the audio
track 1.
• [1:1/L]: The sound of the left channel of the
audio track 1 (monaural).
• [1:2/R]: The sound of the right channel of the
audio track 1 (monaural).
• [2:STEREO]: The stereo sound of the audio
track 2.
• [2:1/L]: The sound of the left channel of the
audio track 2 (monaural).
• [2:2/R]: The sound of the right channel of the
audio track 2 (monaural).
Note
While playing a Super VCD on which the audio track 2 is not
recorded, no sound will come out when you select
[2:STEREO], [2:1/L], or [2:2/R].
To check the audio signal format
(DVD VIDEO, DATA CD, DATA DVD only)
If you press AUDIO repeatedly during playback, the
format of the current audio signal (PCM, Dolby
Digital, DTS, etc.) appears on the screen. This
function is prohibited on some discs.
x When playing a DVD VIDEO
Example: Dolby Digital 5.1 ch
LFE
Surround (L/R)
1:ENGLISH DOLBY DIGITAL
Example: Dolby Digital 3 ch
Front (L/R)
2:SPANISH DOLBY DIGITAL
(Low Frequency Effect)
3 / 2 .1
Front (L/R) +
Center
Surround
(Monaural)
2 / 1
32
GB
Page 33

x When playing a DATA CD/DATA DVD (DivX
video)
Example: MP3 audio
1: MP3 128k
Bit rate
Selecting a playback layer for a Super
Audio CD
(Super Audio CD only)
Some Super Audio CDs consist of a Super Audio CD
layer and a CD layer. You can select the playback
layer you want to listen to.
Press SA-CD/CD. (If a disc is playing, press
x to stop playback, then press SA-CD/CD.)
Each time you press the button, a Super Audio CD
layer or a CD layer is alternately selected. When
playing a Super Audio CD layer, “SA-CD” lights up
in the front panel display.
Notes
• For details about Super Audio CD discs, see page 28.
• Each play mode function works only within the selected
layer.
Playing VIDEO CDs with PBC functions
(Ver.2.0)
(PBC Playback)
(VIDEO CD only)
With PBC (Playback Control) functions, you can
enjoy simple interactive operations, search functions,
and other such operations.
PBC playback allows you to play VIDEO CDs
interactively by following the menu on the TV screen.
1 Start playing a VIDEO CD with PBC
functions.
The menu for your selection appears.
2 Select the item number you want by the
number buttons.
3 Press (ENTER).
4 Follow the instructions in the menu for
interactive operations.
Refer to the operation details supplied with the
disc, as the operating procedure may differ
depending on the VIDEO CD.
To go back to the menu
Press O RETURN.
Notes
• You cannot use Programme Play, Shuffle Play, or Repeat
Play with Video CDs with PBC playback.
• Depending on the VIDEO CD, [Press ENTER] in step 3
may appear as [Press SELECT] in the instructions
supplied with the disc. In this case, press H.
Tip
To play without using PBC, press ./> or the number
buttons while the system is stopped to select a track, then
press H or (ENTER).
You cannot play still pictures such as a menu. To return to
PBC playback, press x twice, then press H.
Resuming playback from the point where
you stopped the disc
(Resume Play)
(DVD VIDEO, DVD-VR, VIDEO CD, Super
Audio CD, CD, DATA CD, DATA DVD only)
When you stop the disc, the system remembers the
point where you pressed x and you can start playback
from the point you stopped the disc.
1 While playing a disc, press x to stop
playback.
“Resume” appears in the front panel display.
If “Resume” does not appear, Resume Play is not
available.
2 Press H.
The system starts playback from the point where
you stopped the disc in step 1.
To enjoy a disc that is played before by resume
playback (Multi-disc Resume)
(DVD VIDEO, VIDEO CD only)
This system stores the point where you stopped the
disc for up to 40 discs and resumes playback the next
time you insert the same disc. If you store a resume
playback point for the 41st disc, the resume playback
point for the first disc is deleted.
To activate this function, set [MULTI-DISC
RESUME] in [CUSTOM SETUP] to [ON]. For
details, see “[MULTI-DISC RESUME] (DVD
VIDEO/VIDEO CD only)” (page 70).
Notes
• If [MULTI-DISC RESUME] in [CUSTOM SETUP] is set
to [OFF] (page 70), the resume point is cleared when you
change the input.
• The point where you stopped playing may be cleared
when:
– you change the play mode.
– you change or reset the settings on the Setup Display.
– you change the input.
– you disconnect the AC power cord (mains lead) for a
long period of time.
Enjoying Discs
Continued
33
GB
Page 34

• For DVD-Rs/DVD-RWs in VR mode, CDs, Super Audio
CDs, DATA CDs, and DATA DVDs the system
remembers the resume playback point for the current disc.
The resume point is cleared when:
– you eject the disc.
– the system enters standby mode (DATA CD/DATA
DVD only).
• Resume Play does not work during Programme Play and
Shuffle Play.
• This function may not correctly work with some discs.
• Depending on where you stop the disc, the system may not
resume playback from exactly the same point.
• If you play a disc for which Parental Control is set, this
function does not work.
Tip
To play from the beginning of the disc, press x twice, then
press H.
Searching for a particular point or a
scene on a disc
Searching for a particular point on a disc
(Scan, Slow-motion Play, Freeze Frame)
(DVD VIDEO, DVD-VR, VIDEO CD, Super
Audio CD, CD, DATA CD, DATA DVD only)
Note
Depending on the DVD/VIDEO CD, you may not be able to
do some of the operations described.
Locating a point quickly by playing a disc in fast
forward or fast reverse (Scan)
(except for JPEG)
Press m or M while playing a disc. When
you find the point you want, press H to return to
normal speed. Each time you press m or M
during scan, the playback speed changes. With each
press the indication changes as shown below. Actual
speeds may differ with some discs.
Playback direction
×2B t 1M t 2M t 3M
Watching frame by frame (Slow-motion Play)
(DVD VIDEO, DVD-R, DVD-RW, DivX video,
VIDEO CD
only)
Press m or M when the system is in pause
mode. To return to the normal playback speed, press
H. Each time you press m or M during
Slow-motion Play, the playback speed changes. Two
speeds are available. With each press the indication
changes as follows:
Playback direction
2 y 1
Opposite direction (DVD VIDEO/DVD-R/DVD-RW
only)
2 y 1
With each press, playback speed becomes faster.
Playing one frame at a time (Freeze Frame)
(except for Super Audio CD, CD, MP3, and JPEG)
When the system is in the pause mode, press
(step) to go to the next frame.
Press (step) to go to the preceding frame
(DVD VIDEO/DVD-R/DVD-RW only).
To return to normal playback, press H.
Notes
• You cannot search for a still picture on a DVD-R/DVDRW in VR mode.
• For DATA CDs/DATA DVDs, this function works only
for DivX video files.
Searching by scene
(Picture Navigation)
(DVD VIDEO, VIDEO CD only)
You can divide the screen into 9 subscreens and find
the desired scene quickly.
1 Press PICTURE NAVI during playback.
The following display appears.
CHAPTER VIEWER
ENTER
3M (DVD VIDEO/DVD-R/DVD-RW/DivX
video/VIDEO CD only)
×2B (DVD VIDEO/Super Audio CD/CD only)
Opposite direction
×2b t 1m t 2m t 3m
3m (DVD VIDEO/DVD-R/DVD-RW/
DivX video/VIDEO CD only)
×2b (DVD VIDEO only)
With each press, playback speed becomes faster.
GB
34
2 Press PICTURE NAVI repeatedly to
select an item.
• [TITLE VIEWER] (DVD VIDEO only)
• [CHAPTER VIEWER] (DVD VIDEO only)
• [TRACK VIEWER] (VIDEO CD only)
Page 35

3 Press (ENTER).
The first scene of each title, chapter, or track
appears as follows.
1
2
3
Notes
• Depending on the DVD VIDEO, you may not be able to
change the subtitles even if multilingual subtitles are
recorded on it. You also may not be able to turn them off.
• You can change the subtitles if the DivX video file has an
“.AVI” or “.DIVX” extension and contains subtitle
information within the same file.
4
7
5
8
6
9
4 Press </M/m/, to select a title,
chapter, or track, and press (ENTER).
Playback starts from the selected scene.
To return to normal play during setting
Press O RETURN or DVD DISPLAY.
Note
Depending on the disc, you may not be able to select some
items.
Displaying various angles and
subtitles
Changing the angles
(DVD VIDEO only)
If various angles (multi-angles) for a scene are
recorded on a DVD VIDEO, you can change the
viewing angle.
Press ANGLE during playback.
Each time you press ANGLE, the angle changes.
Note
Depending on the DVD VIDEO, you may not be able to
change the angle even if multi-angles are recorded on the
DVD VIDEO.
Enjoying Discs
Displaying the subtitles
(DVD VIDEO, DVD-VR, DATA CD,DATA DVD
only)
If subtitles are recorded on a disc, you can turn the
subtitles on or off while playing. If multilingual
subtitles are recorded on the disc, you can change the
subtitle language while playing, or turn the subtitles
on or off whenever you want.
Press SUBTITLE during playback.
Each time you press SUBTITLE, the subtitle language
changes. A 4-digit language code number appears.
Refer to “Language code list” on page 81.
35
GB
Page 36

Enjoying the FM Radio
You can also select a preset station by entering its
number with number buttons, then press
(ENTER).
Listening to the FM
radio
Preset FM radio stations in the system’s memory first
(see “Presetting FM radio stations” (page 37)).
FM
m/M
2 +/–
PROG +/–
1 Press FM.
“FM” appears in the front panel display.
The last received station is tuned in.
TUNED ST
2 Press PROG + or – repeatedly to select
the preset station you want.
Each time you press the button, the system tunes
in one preset station.
3 Adjust the volume by pressing 2 +/–.
To turn off the FM radio
Press "/1.
To listen to non-preset FM radio stations
Use manual or automatic tuning in step 2.
For manual tuning, press M or m repeatedly.
For automatic tuning, press and hold M or m.
Press x when you stop the automatic tuning.
When an FM programme is noisy
1 Press FM MENU.
2 Press M/m repeatedly until “FM MODE?” appears in
the front panel display, then press (ENTER).
3 Press M/m to select “MONO”, then press
(ENTER).
Sound will not be stereo, but the reception will
improve. Press the button again to restore stereo.
Tips
• To improve reception, reorient the supplied antenna
(aerial).
• You can check the frequency by pressing TIME/TEXT
repeatedly.
Using the Radio Data System (RDS)
What is the Radio Data System
The Radio Data System (RDS) is a broadcasting
service that allows radio stations to send additional
information along with the regular programme signal.
This tuner offers convenient RDS features, such as
station name display. RDS is available only for FM
stations.*
Note
RDS may not work properly if the station you are tuned to is
not transmitting the RDS signal properly, or if the signal
strength is weak.
* Not all FM stations provide RDS service, nor do they provide
the same type of services. If you are not familiar with the RDS
system, check with your local radio stations for details on RDS
services in your area.
Receiving RDS broadcasts
Simply select a station from the FM band.
When you tune in a station that provides RDS
services, the station name* appears in the tuner
information.
* If an RDS broadcast is not received, the station name may not
appear in the display.
36
GB
Page 37

Presetting FM radio
stations
6 Press M/m to select the preset number
you want.
TUNED ST
You can preset 20 FM stations. Before tuning, make
sure to turn down the volume to minimum.
FM
M/m/ (ENTER)
m/M
FM MENU
With cover opened.
7 Press (ENTER).
The station is stored.
TUNED ST
8 Repeat 1 to 7 to store other stations.
Enjoying the FM Radio
To change the preset number
Restart from step 1.
Note
These preset settings will be reset when the AC power cord
(mains lead) is disconnected for more than a half of a day.
1 Press FM.
“FM” appears in the front panel display.
2 Press and hold M or m until the auto
scanning starts.
Scanning stops when the system tunes in a station.
“TUNED” and “ST” (for stereo programme)
appear in the front panel display.
TUNED ST
3 Press FM MENU.
4 Press M/m repeatedly until “Memory?”
appears in the front panel display.
5 Press (ENTER).
A preset number appears in the front panel
display.
TUNED ST
37
GB
Page 38

Using the TV Menu
Navigating through
menus
Overview of the TV menus
The following options are available in each menu. For
details on navigating through menus, see page 38.
Also, see page in parentheses for details of each menu.
Picture Adjustment
1
2
3
4
5
6
Picture Mode
Contrast
Brightness
Colour
Hue
Sharpness
Backlight
Colour Tone
Reset
Noise Reduction
Custom
Max
50
50
0
15
5
Warm
Auto
</M/m/,
(OK)
TV MENU
1 Press TV MENU to display the menu.
2 Press M/m to select a menu icon, press
,.
3 Press </M/m/, to select an option.
4 Press </M/m/, to change/set the
setting, then press (OK).
To exit the menu, press TV MENU.
To return to the last display, press <.
Note
You cannot use the TV menus while receiving the FM
signals.
Select: Set: End:
OK
MENU
1 Picture Adjustment
Picture Mode (39)
Contrast/Brightness/Colour/Hue/Sharpness/
Backlight (39)
Colour Tone (40)
Reset (40)
Noise Reduction (40)
2 Sound Adjustment
Sound Effect (40)
Treble/Bass/Balance (40)
Reset (41)
Dual Sound (41)
3 Screen
Auto Format (41)
Screen Format (41)
RGB Center (41)
4 Features
Power Saving (42)
Light Sensor (42)
AV2 Output (42)
PC Adjustment (42)
38
5 Timer
Sleep Timer (43)
Clock Set (43)
Timer (43)
GB
Page 39

6 Set Up
Auto Startup (44)
Language (44)
Country (44)
Auto Tuning (44)
Programme Sorting (44)
Programme Labels (45)
AV Preset (45)
– Label/Skip/Sound Offset
Manual Programme Preset (46)
– Programme/System/Channel/Label/AFT/Audio
Filter/Skip/Decoder/ATT/Confirm
Digital Set Up* (48)
– Digital Tuning/Digital Set-up
Note
The options you can adjust vary depending on the situation.
Only the options that can be operated are displayed.
* Note that this function may not be available in some countries.
Picture Adjustment
menu
Picture Adjustment
Picture Mode
Contrast
Brightness
Colour
Hue
Sharpness
Backlight
Colour Tone
Reset
Noise Reduction
Select: Set: Back:OKEnd:
You can select the options listed below on the Picture
Adjustment menu. To select options, see “Navigating
through menus” (page 38).
Tip
When you set [Picture Mode] to [Vivid] or [Standard], you
can adjust only [Contrast], and [Reset].
Picture Mode
Selects the picture mode.
Custom
Max
50
50
0
15
5
Warm
Auto
MENU
Using the TV Menu
1 Press (OK) to select [Picture Mode].
2 Press M/m to select one of the following
picture modes, then press (OK).
• [Vivid]: For enhanced picture contrast and
sharpness.
• [Standard]: For standard picture. Recommended
for home entertainment.
• [Custom]: Allows you to store your preferred
settings.
Tip
You can also change the picture mode by pressing
repeatedly.
Contrast/Brightness/Colour/Hue/
Sharpness/Backlight
1 Press (OK) to select the option.
2 Press </, to set the level, then press
(OK).
Tip
[Hue] can only be adjusted for an NTSC colour signal
(e.g., U.S.A. video tapes).
[Brightness], [Colour], [Hue], [Sharpness] and
[Backlight] only appear and can be adjusted if [Picture
Mode] is set to [Custom].
Continued
39
GB
Page 40

Colour Tone
1 Press (OK) to select [Colour Tone].
2 Press M/m to select one of the following,
then press (OK).
• [Cool]: Gives the white colours a blue tint.
• [Neutral]: Gives the white colours a neutral tint.
• [Warm]: Gives the white colours a red tint.
Tip
[Warm] only appears and can be adjusted if [Picture
Mode] is set to [Custom].
Reset
Reset all the picture settings to the factory settings.
1 Press (OK) to select [Reset].
2 Press M/m to select [OK], then press
(OK).
Sound Adjustment
menu
Sound Adjustment
Sound Effect
Tre b l e
Bass
Balance
Reset
Dual Sound
Select: Set: Back:OKEnd:
You can select the options listed below on the Sound
Adjustment menu. To select options, see “Navigating
through menus” (page 38).
Note
These sound settings are not effective for DVD/FM.
1
0
0
0
A
MENU
Noise Reduction
Reduces the picture noise (snowy picture) in a weak
broadcast signal.
1 Press (OK) to select [Noise
Reduction].
2 Press M/m to select one of the options,
and then press (OK).
Sound Effect
1 Press (OK) to select [Sound Effect].
2 Press M/m to select one of the following
sound effects, then press
• [1]: Flat response.
• [2]: Emphasize bass and treble.
• [3]: Reduce bass, and emphasize treble.
• [4]: Emphasize bass, and reduce treble.
Treble/Bass/Balance
Adjusts higher-pitched sounds (Treble), adjusts
lower-pitched sounds (Bass), and emphasizes left or
right speaker balance (Balance).
(OK).
1 Press (OK) to select the option.
2 Press </, to set the level, then press
(OK).
40
GB
Page 41

Reset
Resets the [Treble], [Bass] and [Balance] settings to
the factory settings.
1 Press (OK) to select [Reset].
2 Press M/m to select [OK], then press
(OK).
Dual Sound
Selects the sound from the speaker for a stereo or
bilingual broadcast.
1 Press (OK) to select [Dual Sound].
2 Press M/m to select one of the following,
then press
• [Stereo]/[Mono]: For a stereo broadcast.
• [A]/[B]/[Mono]: For a bilingual broadcast,
select [A] for sound channel 1, [B] for sound
channel 2, or [Mono] for a mono channel, if
available.
Tip
If you select other equipment connected to the system,
set [Dual Sound] to [Stereo], [A] or [B].
Note
When DVD is selected, the [Dual Sound] menu does not
appear.
(OK).
Screen menu
Screen
Auto For mat
Screen Format
RGB Center
Select: Set: Back:OKEnd:
You can select the options listed below on the Screen
menu. To select options, see “Navigating through
menus” (page 38).
Auto Format
Automatically changes the screen format according to
the broadcast signal.
1 Press (OK) to select [Auto Format].
2 Press M/m to select [On], then press
(OK).
To keep your setting, select [Off].
Tips
• Even if you have selected [On] or [Off] in [Auto
Format], you can always modify the format of the
screen by pressing repeatedly.
• [Auto Format] is available for PAL and SECAM
signals only.
On
Smart
0
MENU
Using the TV Menu
Screen Format
For details about the screen mode, see page 22.
1 Press (OK) to select [Screen Format].
2 Press M/m to select [Wide], [Smart],
[4:3], [14:9] or [Zoom] (see page 22 for
details), then press
(OK).
RGB Center
Adjusts the horizontal picture position so that the
picture is in the middle of the screen.
1 Press (OK) to select [RGB Center].
2 Press </, to adjust the centre of the
picture between -5 and +5, then press
(OK).
Tip
This option is only available if an RGB source has been
connected to the Scarts connectors 1/ 1 or
2/ 2 on the rear of the system.
41
GB
Page 42

Features menu
Features
Power Saving
Light Sensor
AV2 Output
PC Adjustment
Select: Set: Back:OKEnd:
You can select the options listed below on the
Features menu. To select options, see “Navigating
through menus” (page 38).
Power Saving
Reduces the power consumption of the system.
1 Press (OK) to select [Power Saving].
2 Press M/m to select [Reduce], then press
(OK).
• [Standard]: Default settings.
• [Reduce]: Reduces the power consumption of
the TV.
• [Picture Off]: Switches off the picture. You can
listen to the sound with the picture off.
Light Sensor
Automatically optimizes the picture settings
according to the ambient light in the room.
Standard
On
D-TV
MENU
• [AV1]: Outputs signals from equipment
connected to the / 1 socket.
• [AV4]: Outputs signals from equipment
connected to the 4/ 4 socket.
• [Auto]: Outputs one of the signals above.
*1 Note that this function may not be available in some
countries.
*2 Note that [TV] may appear in some countries.
PC Adjustment
Customizes the TV screen as a PC monitor.
1 Press (OK) to select [PC Adjustment].
2 Press M/m to select one of the following,
then press
• [Phase]: Adjust the screen when a part of a
displayed text or image is not clear.
• [Pitch]: Enlarges or shrinkes the screen size
horizontally.
• [H Center]: Moves the screen to the left or to the
right.
• [V Center]: Moves the screen up or down.
• [Power Saving]: Turns to standby mode if no PC
signal is received.
• [Reset]: Resets to the factory settings.
Tip
This option is only available if you are in PC Mode.
Note
When “AUTO” in “Lift Mode” and “On” in “Power
Saving” is selected, the lift unit moves up automatically
if the system enters standby mode.
(OK).
1 Press (OK) to select [Light Sensor].
2 Press M/m to select [On] then press
(OK).
AV2 Output
Sets a signal to be output through the socket labelled
/ 2 on the rear of the system. If you connect a
VCR or other recording equipment to the / 2
socket, you can then record from the equipment
connected to other sockets of the system.
1 Press (OK) to select [AV2 Output].
2 Press M/m to select one of the following,
then press
•[D-TV]*1: Outputs a digital broadcast.
•[A-TV]*
GB
42
(OK).
2
: Outputs an analogue broadcast.
Page 43

Timer menu
4 Press m/M to select the minute, then
press
The clock starts.
(OK).
Timer
Sleep Timer
Clock Set
Timer
Select: Set: Back:OKEnd:
You can select the options listed below on the Timer
menu. To select options, see “Navigating through
menus” (page 38).
Notes
• When the FM is selected, you cannot set the Timer menu.
• If “AUTO” is set in “Lift Mode,” the lift unit moves up
when the system is turned off, or moves down when the
system is turned on by the timer (page 74).
Off
Fri 20. 8 21:30
Off
MENU
Sleep Timer
Sets a period of time after which the system
automatically switches itself into standby mode.
1 Press (OK) to select [Sleep Timer].
2 Press M/m to select the desired time
period ([30min]/[60min]/[90min]/
[120min]), then press
The (Timer) indicator on the lift unit lights up
in amber.
Tips
• You can also set the sleep timer by pressing
repeatedly.
• If you switch off the system and switch it on again,
[Sleep Timer] is reset to [Off].
• [Sleep timer will end soon. Power will be turned off.]
appears on the screen one minute before the system
switches to standby mode. This message does not
appear when the FM is selected.
• If you press / , the remaining time in minutes
before the system switches to standby mode is
displayed on the screen.
(OK).
Timer*
Sets a predefined period of time after which the
system automatically switches on/off.
* Note that this function may not be available in some countries.
1 Press (OK) to select [Timer].
2 Press m/M to select [Set], then press
(OK).
3 Press , to select the desired period
([One Day], [Daily], [Mon-Fri] or
[Weekly]), then press
(OK).
4 Press m/M to select [On Time] or [Off
Time], then press
(OK).
5 Press m/M to active. Press ,, then
press </M/m/,, to set time you wish to
switch on/off the system. Press
to confirm.
Timer setting is complete. The (Timer)
indicator on the lift unit lights up in amber.
(OK)
Using the TV Menu
Clock Set*
* Note that this function may not be available in some countries.
1 Press (OK) to select [Clock Set].
2 Press m/M to select the day, then press
,.
3 Set the month, year, and hour in the
same way as in step 2.
43
GB
Page 44

Set Up menu
Set Up
Auto Startup
Language
Country
Auto Tuning
Programme Sorting
Programme Labels
AV Preset
Manual Programme Preset
Digital Set Up
Select: Set: Back:OKEnd:
You can select the options listed below on the Set Up
menu. To select options, see “Navigating through
menus” (page 38).
Auto Startup
Starts the “first time operation menu” to tune in all the
available channels. Usually you do not need to do this
operation because the channels are already tuned
when the system was first installed (page 18).
However, this option allows you to repeat the process
(e.g., to retune the system after moving house, or to
search for new channels that have been launched by
broadcasters).
1 Press (OK) to select [Auto Startup].
2 Press </M/m/, to select the language,
then press
(OK).
English
-
MENU
Country
Selects the country/region where you operate the
system.
1 Press (OK) to select [Country].
2 Press M/m to select the country/region in
which you will operate the system, then
press
If the country/region in which you want to use the
system does not appear in the list, select [-] instead
of a country/region.
(OK).
Auto Tuning (Analogue mode only)
Tunes in all the available analogue channels.
Usually you do not need to do this operation because
the channels are already tuned when the system was
first installed (page 18). However, this option allows
you to repeat the process (e.g., to retune the system
after moving house, or to search for new channels that
have been launched by broadcasters).
1 Press (OK) to select [Auto Tuning].
2 Press (OK) to select [Yes].
The auto-tune display appears on the screen.
3 Follow step 1 to 4 of “7: Auto-tuning the
TV” (page 18).
When all available analogue channels have been
tuned, the system returns to normal operation.
3 Press M/m to select the country/region in
which you will operate the system, then
press
(OK).
4 Press (OK) to select [Yes].
The auto-tune display appears on the screen.
5 Follow steps 1 to 4 of “7: Auto-tuning the
TV” (page 18).
Language
Selects the language in which the menus are
displayed.
1 Press (OK) to select [Language].
2 Press M/m to select the language, then
press
All menus will appear in the selected language.
GB
44
(OK).
Programme Sorting
(Analogue mode only)
Changes the order in which the analogue channels are
stored on the system.
1 Press (OK) to select [Programme
Sorting].
2 Press M/m to select the channel you
want to move to a new position, then
press
(OK).
3 Press M/m to select the new position for
your channel, then press (OK).
Repeat the procedure in steps 2 and 3 to move other
channels if required.
Page 45

Programme Labels
(Analogue mode only)
Assigns a channel name of your choice up to five
letters or numbers. The name will be displayed briefly
on the screen when the channel is selected. (Names for
channels are usually taken automatically from Text (if
available).)
1 Press (OK) to select [Programme
Labels].
2 Press M/m to select the channel you
want to name, then press
(OK).
3 Press </M/m/, to select the desired
letter or number ([s] for a blank space),
then press
If you input a wrong character
Press </M/m/, to select %/5 and press
(OK) repeatedly until the wrong character is
selected. Then, press </M/m/, to select the
correct character and press
(OK).
(OK).
4 Repeat the procedure in step 3 until the
name is complete.
5 Press </M/m/, to select [End], then
press
Repeat the procedure in steps 2 and 3 to move other
channels if required.
(OK).
AV Preset
Do the following options.
1 Press (OK) to select [AV Preset].
2 Press M/m to select the desired input
source, then press
(OK).
3 Press M/m to select the desired option
below, then press
Option Description
Label
(OK).
You can conveniently assign a
name to any equipment
connected to the side and rear
sockets. The name will be
displayed briefly on the screen
when the equipment is
selected.
Press M/m to select one of
the following, then press
(OK).
[AV1] (or [AV2]/[AV4])/
[VIDEO]/ [DVD]/[CABLE]/
[GAME]/[CAM]/[SAT]: Uses
one of these preset labels.
[Edit]: Creates your own label.
Follow steps 3 through 5 of
Programme Labels (page 45).
[Skip]:
Skips an input source that is
not connected to any
equipment when you press
M/m to select the input source.
After selecting this option,
press
(OK).
Using the TV Menu
Sound Offset
Sets an independent volume
level to each equipment
connected to the system. This
setting is effective except for
the DVD function.
Press , to select [Sound
Offset], then press
Press M/m to select the desired
volume level.
(OK).
Continued
45
GB
Page 46

Manual Programme Preset
(Analogue mode only)
Before selecting [Label]/[AFT]/[Audio Filter]/[Skip]/
[Decoder]/[ATT], press PROG +/– to select the
programme number with the channel. You cannot
select a programme number that is set to skip
(page 47).
1 Press (OK) to select [Manual
Programme Preset].
2 Press M/m to select one of the following
options, then press
Option Description
Programme
Presets programme channels
manually.
1 Press M/m to select
2 Press M/m to select the
System 3 Press M/m to select
4 Press M/m to select
(OK).
[Programme], then
press (OK).
programme number
you want to manually
tune (if tuning a VCR,
select channel 0), then
press <.
[System], then press
(OK).
Note
Depending on the country/
region selected for
[Country] (page 44), this
option may not be
available.
one of the following TV
broadcast systems,
then press <.
[B/G]: For western
European countries/regions
[D/K]: For eastern
European countries/regions
[I]: For the United
Kingdom
[L]: For France
Option Description
Channel 5 Press M/m to select
[Channel], then press
(OK).
6 Press M/m to select [S]
(for cable channels) or
[C] (for terrestrial
channels), then press
,.
7 Tune the channels as
follows:
If you do not know the
channel number
(frequency)
Press M/m to search for the
next available channel.
When a channel has been
found, the search will stop.
To continue searching,
press M/m.
If you know the channel
number (frequency)
Press the number buttons to
enter the channel number
of the broadcast you want
or your VCR channel
number.
8 Press (OK).
9 Press m to select
[Confirm], then press
OK.
10 Press m to select [OK],
(OK).
Label
then press
Repeat the procedure above to
preset other channels manually.
Assigns a name of your choice,
up to five letters or numbers, to
the selected channel. This
name will be displayed briefly
on the screen when the channel
is selected.
1 Follow steps 3 to 5 of
[Programme Labels
(Analogue mode only)]
(page 45).
2 Press m to select
[Confirm], then press
(OK).
3 Press m to select [OK],
then press
(OK).
46
GB
Page 47

Option Description
AFT
Fine-tunes the selected
programme number manually
if you feel that a slight tuning
adjustment will improve the
picture quality. (Normally, fine
tuning is performed
automatically.)
1 Press M/m to adjust the
fine tuning over a
range of –15 to +15,
then press
2 Press m to select
[Confirm], then press
(OK).
3 Press m to select [OK],
then press
To restore automatic fine
tuning, select [On] in step 1.
Audio Filter
Improves the sound for
individual channels in the case
of distortion in mono
broadcasts. Sometimes a nonstandard broadcast signal can
cause sound distortion or
intermittent sound muting
when watching mono
programmes.
1 Press M/m to select
[Low] or [High], then
press (OK).
If you do not experience
any sound distortion, we
recommend that you leave
this option set to the factory
setting [Off].
2 Press m to select
[Confirm], then press
(OK).
3 Press m to select [OK],
then press
Notes
• You cannot receive stereo or
dual sound when [Low] or
[High] is selected.
• Not available when [System] is
set to [L].
(OK).
(OK).
(OK).
Option Description
Skip
Skips unused analogue
channels when you press
PROG +/– to select channels.
(You can still select a skipped
channel using the number
buttons.)
1 Press M/m to select
[Yes], then press
(OK).
2 Press m to select
[Confirm], then press
(OK).
3 Press m to select [OK],
then press
To restore a skipped channel,
select [No] in step 1.
Decoder
Views and records the
scrambled channel selected
when using a decoder
connected to the scart
connector / 2 either
directly or via a VCR.
Note
Depending on the country/region
selected for [Country] (page 44),
this option may not be available.
1 Press M/m to select
[On], then press
(OK).
2 Press m to select
[Confirm], then press
(OK).
3 Press m to select [OK],
then press
To cancel this function
afterwards, select [Off] in step
1.
ATT
Attenuates the RF signal. In
case of a strong RF signal,
some video interference may
be displayed.
1 Press M/m to select
[On], then press
(OK).
2 Press m to select
[Confirm], then press
(OK).
3 Press m to select [OK],
then press
(OK).
Using the TV Menu
(OK).
(OK).
Continued
47
GB
Page 48

Digital Set Up*
Displays the [Digital Set Up] menu. You can change/
set the digital settings using this menu.
* Note that this function may not be available in some countries.
1 Press (OK) to select [Digital Set Up].
2 Press M/m to select the desired icon
below, then press
Digital Tuning
Digital Auto Tuning
Programme List Edit
Digital Manual Tuning
Select: Enter:
Digital Tuning menu
(OK).
Exit:
OK
MENU
3 Press M/m to select one of the following
options, then press
Option Description
Digital Tuning
Digital Auto
Tuning
Tunes in all the available
digital channels.
Usually you do not need to do
this operation because the
channels are already tuned
when the system was first
installed (page 18). However,
this option allows you to repeat
the process (e.g., to retune the
system after moving house, or
to search for new channels that
have been launched by
broadcasters).
1 Press (OK) to start
2 Press <.
(OK).
digital auto-tuning.
When all available digital
channels have been tuned,
a message stating that the
auto-tuning process is
finished appears.
Option Description
Programme
List Edit
Removes any unwanted digital
channels stored on the system,
and changes the order of the
digital channels stored on the
system.
1 Press M/m to select the
channel you want to
remove or move to a
new position.
If you know the channel
number (frequency)
Press the number buttons to
enter the three-digit
programme number of the
broadcast you want.
To display the previous or
next five channels
Press the red button
(previous) or the green
button (next).
2 Remove or change the
order of the digital
channels as follows:
To remove the digital
channel
Press
message that confirms
whether the selected
digital channel is to be
deleted appears. Press ,
to select [Yes], then press
(OK).
To change the order of
the digital channels
Press ,, then press M/m
to select the new position
for the channel and press
(OK). Repeat the
procedure in steps 1 and 2
to move other channels if
required.
3 Press <.
(OK). A
48
GB
Page 49

Option Description
Digital Manual
Tuning
Tunes the digital channels
manually.
1 Press the number
button to select the
channel number you
want to manually tune,
then press M/m to tune
the channel.
2 When the available
channels are found,
press M/m to select the
channel you want to
store, then press
(OK).
To display the previous or
next five channels
Press the red button
(previous) or the green
button (next).
3 Press M/m to select the
programme number
where you want to
store the new channel,
then press
Repeat the procedure above to
tune other channels manually.
Digital Set-up
Subtitle
Setting
Subtitle
Language
Audio
Language
Displays digital subtitles on the
screen.
Press M/m to select [Off],
[Basic], or [For Hard Of
Hearing], then press (OK).
When [For Hard Of Hearing] is
selected, some visual aids may
also be displayed with the
subtitles (if TV channels
broadcast such information).
Selects which language
subtitles are displayed in.
Press M/m to select the
language, then press
Selects the language used for a
programme. Some digital
channels may broadcast several
audio languages for a
programme.
Press M/m to select the audio
language, then press (OK).
(OK).
(OK).
Option Description
Parental Lock Sets an age restriction for
programmes. Any programme
that exceeds the age restriction
can only be watched after a
PIN Code is entered correctly.
1 Press the number
buttons to enter your
existing PIN code.
If you have not previously
set a PIN, a message
appears to inform you.
Press
the instruction of [PIN
Code] below.
(OK), then follow
2 Press M/m to select the
age restriction or
[None] (for unrestricted
watching), then press
(OK).
Using the TV Menu
3 Press <.
PIN Code Sets a PIN Code for the first
time, or to change your PIN
Code.
1 Enter a PIN as follows:
If you have previously set
a PIN:
Press the number buttons to
enter your existing PIN.
If you have not set a PIN:
Press the number buttons to
enter the factory setting
PIN of 9999.
2 Press the number
buttons to enter the
new PIN code.
3 When requested, press
the number buttons to
enter the new PIN
again for confirmation.
A message appears to
inform you that the new
PIN has been accepted.
4 Press <.
Tip
PIN Code 9999 is always
accepted.
Audio Type Increases the sound level.
Press M/m to select [Basic] or
[For Hard Of Hearing], then
press
(OK).
Continued
49
GB
Page 50

Option Description
Technical
Set-up
Displays the Technical Set-up
menu. Do the following
options.
1 Press M/m to select the
desired option, then
press (OK).
[Auto Service Update]:
Enables the system to
detect and store new digital
services as they become
available.
[Software Download]:
Enables the system to
automatically receive
software updates, free
through your existing aerial
(when issued). Sony
recommends that this
option is set to [On] at all
times. If you do not want
your software to be
updated, set this option to
[Off].
[System Information]:
Displays the current
software version and the
signal level. Instead of step
2, Press <.
2 Press M/m to select the
[On], then press
(OK).
50
GB
CA Module
Set-up
This option will allow you to
access a Pay Per View service
once you obtain a Conditional
Access Module (CAM) and a
view card. See page 76 for the
location of the MODEM and
(PCMCIA) sockets.
Page 51

Using the DVD’s Menu
Enjoying DivX® videos
Navigating through
DVD’s menu
A DVD is divided into a lot of sections, which make
up a picture or music feature. These sections are called
“titles.” When you play a DVD which contains several
titles, you can select the title you want using DVD
TOP MENU.
When you play DVDs that allow you to select items
such as the language for the subtitles and the language
for the sound, select these items using DVD MENU.
Number buttons
DVD TOP MENU
DVD MENU
</M/m/,
(ENTER)
1 Press DVD TOP MENU or DVD MENU.
The disc’s menu appears on the TV screen.
The contents of the menu vary from disc to disc.
2 Press </M/m/, or the number buttons
to select the item you want to play or
change.
About DivX video files
DivX® is a video file compression technology,
developed by DivX, Inc. This product is an official
®
DivX
Certified product.
You can play DATA CDs and DATA DVDs that
contain DivX
DATA CDs and DATA DVDs that the system can play
Playback of DATA CDs (CD-ROMs/CD-Rs/CDRWs) and DATA DVDs (DVD-ROMs/DVD-Rs/
DVD-RWs/DVD+Rs/DVD+RWs) on this system is
subject to certain conditions:
– With DATA CDs/DATA DVDs that contain DivX
video files in addition to MP3 audio tracks or JPEG
image files, the system plays only the DivX video
files.
However, this system only plays DATA CDs whose
logical format is ISO 9660 Level 1/Level 2 or Joliet,
and DATA DVDs of Universal Disk Format (UDF).
Refer to the instructions supplied with the disc drives
and the recording software (not supplied) for details
on the recording format.
About playback order of data on DATA CDs or DATA
DVDs
See “Playback order of MP3 audio tracks or JPEG
image files” (page 61). Note that the playback order
may not be applicable, depending on the software
used for creating the DivX video file, or if there are
more than 200 albums and 600 DivX video files in
each album.
Note
The system may not be able to play some DATA CDs/DATA
DVDs created in the Packet Write format.
®
video files.
Using the DVD’s Menu
3 Press (ENTER).
Continued
51
GB
Page 52

DivX video files that the system can play
The system can play data that is recorded in DivX
format, and which has the extension “.AVI,” or
“.DIVX.” The system will not play files with the
extension “.AVI” or “.DIVX” if they do not contain a
DivX video.
Tip
For details about playable MP3 audio tracks or JPEG image
files on DATA CDs/DATA DVDs, see “MP3 audio track or
JPEG image file that the system can play” (page 61).
Notes
• The system may not play a DivX video file when the file
has been combined from two or more DivX video files.
• The system cannot play a DivX video file of size more
than 720 (width) × 576 (height) or 2GB.
• The system cannot play some DivX video files that are
longer than 3 hours.
• Depending on the DivX video file, the picture may pause
or be unclear. In which case, it is recommended that you
create the file at a lower bit rate. If the sound is still noisy,
MP3 is the recommended audio format. Note, however,
this system does not conform to WMA (Windows Media
Audio) format.
• Because of the compression technology used for DivX
video files, it may take some time after you press H for
the picture to appear.
Selecting an album
To go to the next or previous page
Press </,.
To return to the previous display
Press O RETURN.
To stop playback
Press x.
To play the next or previous DivX video file
without turning on the above file list
You can select the next or previous DivX video
file in the same album by pressing ./>.
You can also select the first file of the next album
by pressing > during playback of the last file of
the current album. Note that you cannot return to
the previous album by pressing .. To return to
the previous album, select it from the album list.
Tip
If the number of viewing times is preset, you can play the
DivX video files as many times as the preset number. The
following occurrences are counted:
– when the system is turned off.
– when the disc tray is opened.
– when another file is played.
1 Press DVD MENU.
A list of albums on the disc appears. Only albums
that contain DivX video files are listed.
2 Press M/m to select the album you want
to play.
3 Press H.
The system starts playing the selected album.
To select DivX video files, see “Selecting a DivX
video file” (page 52).
To go to the next or previous page
Press </,.
To turn off the display
Press DVD MENU repeatedly.
To stop playback
Press x.
Selecting a DivX video file
1 After step 2 of “Selecting an album,”
press (ENTER).
The list of files in the album appears.
2 Press M/m to select a file and press
(ENTER).
The selected file starts playing.
52
GB
Page 53

Using the Player Control Menu
Navigating through
menus
DVD DISPLAY
Use the Control Menu to select a function and to view
related information. Press DVD DISPLAY repeatedly
to turn on or change the Control Menu display as
follows:
Control Menu display 1
,
m
Control Menu display 2 (appears for certain discs only)
m
Control Menu display off
To turn off the display
Press DVD DISPLAY.
Overview of the menus
The Control Menu display 1 and 2 will show different
items depending on the disc type. For details about
each item, see the pages in parentheses.
Control Menu items
34
12
1 2 ( 2 7
1 8 ( 3 4
T
qs
qa
OFF
OFF
DISC
TITLE
CHAPTER
REPEAT
0
1 Currently playing title number*
2 Currently playing chapter number*
3 Total number of titles*
4 Total number of chapters*
)
)
1 : 3 2 : 5 5
ENTER DISPLAY
Quit:
1
2
DVD VIDEO
1
2
5
6
7
8
9
5 Playback status (N Playback, X Pause,
x Stop, etc.)
6 Type of disc being played*
7 Playing time*
4
3
8 Current setting
9 Options
q; Operation message
qa Function name of selected Control Menu item
qs Selected item
*1 Displays the scene number for VIDEO CDs (PBC is on), track
number for VIDEO CDs/Super Audio CDs/CDs, album
number for DATA CDs/DATA DVDs.
*2Displays the index number for VIDEO CDs/Super Audio
CDs, MP3 audio track nu mber, or JPEG image file number for
DATA CDs/DATA DVDs.
*3Displays Super VCD as “SVCD.” Displays “MP3” in the
Control Menu display 1 or “JPEG” in the Control Menu 2 for
DATA CDs/DATA DVDs.
*4Displays the date for JPEG files.
Using the Player Control Menu
Example: Control Menu display 1 when playing a
DVD VIDEO.
Continued
53
GB
Page 54

List of Control Menu items
Item Item Name, Function, Relevant Disc Type
[TITLE] (page 55)/[SCENE] (page 55)/[TRACK] (page 55)
Selects the title, scene, or track to be played.
[CHAPTER] (page 55)/[INDEX] (page 55)
Selects the chapter or index to be played.
[INDEX] (page 55)
Displays the index and selects the index to be played.
[TRACK] (page 55)
Selects the track to be played.
[ORIGINAL/PLAY LIST] (page 56)
Selects the type of titles (DVD-R/DVD-RW) to be played, the [ORIGINAL] one, or an edited [PLAY LIST].
[TIME/TEXT] (page 55)
Checks the elapsed time and the remaining playback time.
Input the time code for picture and music searching.
Displays the DVD/CD text or the MP3 track name.
[PROGRAM] (page 58)
Selects the track to play in the order you want.
[SHUFFLE] (page 59)
Plays the track in random order.
[REPEAT] (page 60)
Plays the entire disc (all titles/all tracks/all albums) repeatedly or one title/chapter/track/album repeatedly.
[PARENTAL CONTROL] (page 65)
Sets to prohibit playback on this system.
[SETUP] (page 67)
[QUICK] Setup (page 19)
Use Quick Setup to choose the desired DVD language.
[CUSTOM] Setup
In addition to the Quick Setup setting, you can adjust various other settings.
[RESET]
Returns the settings in [SETUP] to the default setting.
[ALBUM] (page 55)
Selects the album to be played.
[FILE] (page 55)
Selects the JPEG image file and DivX video file to be played.
[DATE] (page 58)
Displays the date when the picture was taken.
[INTERVAL] (page 64)
Specifies the duration for which the slides are displayed on the screen.
[EFFECT] (page 64)
Selects the effects to be used for changing slides during a slide show.
[MODE (MP3, JPEG)] (page 63)
Selects the data type; MP3 audio track (AUDIO), JPEG image file (IMAGE) or both (AUTO) to be played when
playing a DATA CD/DATA DVD.
Tip
The Control Menu icon indicator lights up in green
t
[OFF] ([PROGRAM], [SHUFFLE], [REPEAT] only). The
[ORIGINAL/PLAY LIST] indicator lights up in green when
you select [PLAY LIST] (default setting).
GB
54
when you select any item except
Page 55

Searching/selecting the
disc
Searching for a title/chapter/track/
scene, etc.
You can search a DVD by title or chapter, and you can
search a VIDEO CD/Super Audio CD/CD/DATA
CD/DATA DVD by track, index, or scene. As titles
and tracks are assigned unique numbers on the disc,
you can select the desired one by entering its number.
Or, you can search for a scene using the time code.
x When playing a Super Audio CD
[TRACK]
[INDEX]
x When playing a CD
[TRACK]
x When playing a DATA CD/DATA DVD (MP3
audio)
[ALBUM]
[TRACK]
x When playing a DATA CD/DATA DVD (JPEG
file/DivX video)
[ALBUM]
[FILE]
Example: when you select [CHAPTER]
[** (**)] is selected (** refers to a number).
The number in parentheses indicates the total
number of titles, chapters, tracks, indexes, scenes,
albums or files.
)
1 2 ( 2 7
)
1 8 ( 3 4
T
1 : 3 2 : 5 5
Selected row
DVD VIDEO
CLEAR
M/m/ (ENTER)
DVD DISPLAY
1 Press DVD DISPLAY. (When playing a
DATA CD/DATA DVD with JPEG image
files, press DVD DISPLAY twice.)
The Control Menu appears.
2 Press M/m to select the search method.
x When playing a DVD VIDEO/DVD-R/DVD-RW
[TITLE]
[CHAPTER]
[TIME/TEXT]
Select [TIME/TEXT] to search for a starting point
by inputting the time code.
x When playing a VIDEO CD without PBC
Playback
[TRACK]
[INDEX]
x When playing a VIDEO CD with PBC Playback
[SCENE]
3 Press (ENTER).
[** (**)] changes to [– – (**)].
)
1 2 ( 2 7
)
( 3 4
T
1 : 3 2 : 5 5
DVD VIDEO
4 Press M/m or the number buttons to
select the title, chapter, track, index,
scene, etc., number you want to search
for.
If you make a mistake
Cancel the number by pressing CLEAR, then
select another number.
5 Press (ENTER).
The system starts playback from the selected
number.
To search for a scene using the time code
(DVD VIDEO/DVD-R/DVD-RW only)
1 In step 2, select [TIME/TEXT].
[T **:**:**] (playing time of the current title) is
selected.
Using the Player Control Menu
Continued
55
GB
Page 56

2 Press (ENTER).
[T **:**:**] changes to [T --:--:--].
3 Input the time code using the number
buttons, then press (ENTER).
For example, to find the scene at 2 hours, 10
minutes, and 20 seconds after the beginning, just
enter [2:10:20].
Tip
When the Control Menu display is turned off, you can search
for a chapter (DVD VIDEO/DVD-R/DVD-RW), track
(Super Audio CD/CD), or file (DATA CD/DATA DVD
(DivX video)) by pressing the number buttons and
(ENTER).
Note
You cannot search for a scene on a DVD+R/DVD+RW using
the time code.
Selecting [ORIGINAL] or [PLAY LIST]
on a DVD-R/DVD-RW
Some DVD-Rs/DVD-RWs in VR (Video Recording)
mode have two types of titles for playback: originally
recorded titles ([ORIGINAL]) and titles that can be
created on recordable DVD players for editing
([PLAY LIST]). You can select the type of title to be
played.
The options for [ORIGINAL/PLAY LIST]
appear.
)
1 ( 4 4
(
3
2 8
T
1 : 3 0 : 5 0
PLAY LIST
PLAY LIST
ORIGINAL
)
DVD-VR
3 Press M/m to select a setting.
• [PLAY LIST]: Plays the titles created from
[ORIGINAL] for editing.
• [ORIGINAL]: Plays the titles originally
recorded.
4 Press (ENTER).
Viewing information about the disc
M/m/ (ENTER)
DVD DISPLAY
x
1 Press DVD DISPLAY. (If a disc is
playing, press x to stop playback, then
press DVD DISPLAY.)
The Control Menu appears.
2 Press M/m to select [ORIGINAL/
PLAY LIST], then press (ENTER).
GB
56
DVD DISPLAY
TIME/TEXT
Viewing the playing time and remaining
time in the front panel display
You can check disc information, such as the
remaining time, total number of titles in a DVD, tracks
in a VIDEO CD, Super Audio CD, CD, or MP3, file
name of a DivX video using the front panel display
(page 71).
Page 57

Press TIME/TEXT.
Each time you press TIME/TEXT while playing the
disc, the display changes 1 t 2 t ... t 1
t ...
When playing a DATA CD/DATA DVD (DivX video)
1 Playing time of the current file
2 Current file name
3 Current album and file number
When playing a DVD VIDEO or DVD-R/DVD-RW
1 Playing time and number of the current title
2 Remaining time of the current title
3 Playing time and number of the current chapter
4 Remaining time of the current chapter
5 Disc name
6 Title and chapter
When playing a VIDEO CD (without PBC functions),
Super Audio CD, or CD
1 Playing time of the current track
2 Remaining time of the current track
3 Playing time of the disc
4 Remaining time of the disc
5 Disc name
6 Track and index*
* Except for CD.
When playing an MP3
1 Playing time and current track number
2 Track (file) name
Notes
• The system can only display the first level of the DVD/CD
text, such as the Disc name or title.
• If an MP3 file name cannot be displayed, “*” will appear
in the front panel display instead.
• The disc name or track name may not be displayed
depending on the text.
• Playing time of MP3 audio tracks and DivX video files
may not be displayed correctly.
Checking the playing time and remaining
time
You can check the playing time and remaining time of
the current title, chapter, or track, and the total playing
time or remaining time of the disc. You can also check
the DVD text and MP3 folder name/file name
recorded on the disc.
1 Press TIME/TEXT during playback.
The following display appears.
T 1:01:57
Time information
2 Press TIME/TEXT repeatedly to change
the time information.
The display and the kinds of time that you can
check depend on the disc you are playing.
x When playing a DVD VIDEO or DVD-R/DVDRW
• T **:**:**
Playing time of the current title
• T–**:**:**
Remaining time of the current title
• C **:**:**
Playing time of the current chapter
• C–**:**:**
Remaining time of the current chapter
x When playing a VIDEO CD (with PBC
functions)
•**:**
Playing time of the current scene
x When playing a VIDEO CD (without PBC
functions), Super Audio CD, or CD
• T **:**
Playing time of the current track
• T–**:**
Remaining time of the current track
•D **:**
Playing time of the current disc
• D–**:**
Remaining time of the current disc
x When playing a DATA CD/DATA DVD (MP3
audio)
• T **:**
Playing time of the current track
x When playing a DATA CD/DATA DVD (DivX
video)
•**:**:**
Playing time of the current file
Notes
• Only alphabetical letters and numbers can be displayed.
• Depending on the type of disc being played, the system
can only display a limited number of characters. Also,
depending on the disc, not all text characters will be
displayed.
Checking the play information of the disc
To check DVD/Super Audio CD/CD text
Press TIME/TEXT repeatedly in step 2 to display text
recorded on the DVD/Super Audio CD/CD.
The DVD/Super Audio CD/CD text appears only
when text is recorded in the disc. You cannot change
the text. If the disc does not contain text, “NO TEXT”
appears.
Using the Player Control Menu
Continued
57
GB
Page 58

BRAHMS SYMPHONY
To check DATA CD/DATA DVD (MP3 audio/DivX
video) text
By pressing TIME/TEXT while playing MP3 audio
tracks on a DATA CD/DATA DVD or DivX video
files on a DATA CD/DATA DVD, you can display
the name of the album/track/file, and the audio bit rate
(the amount of data per second of the current audio) on
the TV screen.
Bit rate*
128k
17:30T
Using the play mode
Creating your own programme
(Programme Play)
You can play the contents of a disc in the order you
want by arranging the order of the tracks on the disc to
create your own programme. You can programme up
to 99 tracks.
JAZZ
RIVER SIDE
Album name Track/file name
* Appears when:
– playing an MP3 audio track on DATA CDs/DATA
DVDs.
– playing a DivX video file that contains MP3 audio
signals on DATA CDs/DATA DVDs.
Checking the date information
(JPEG only)
You can check the date information during playback
when the Exif* tag is recorded in the JPEG image
data.
Press DVD DISPLAY twice during playback.
The Control Menu appears.
)
1 ( 8
)
1 ( 2 0
01/ 01/ 2003
Date information
* “Exchangeable Image File Format” is a digital camera image
format defined by the Japan Electronics and Information
Technology Industries Association (JEITA).
Tip
Date information is [DD/MM/YYYY].
DD: Day
MM: Month
YYYY: Year
DATA CD
JPEG
M/m/,/ (ENTER)
DVD DISPLAY
H
1 Press DVD DISPLAY.
The Control Menu appears.
2 Press M/m to select [PROGRAM],
then press (ENTER).
The options for [PROGRAM] appear.
3 Press M/m to select [SET t], then press
(ENTER).
[TRACK] is displayed when you play a VIDEO
CD, Super Audio CD, or CD.
PROGRAM
ALL CLEAR
1. TRACK
– –
2. TRACK
– –
3. TRACK
– –
4. TRACK
– –
5. TRACK
– –
6. TRACK
– –
7. TRACK
Tracks recorded
on a disc
0:00:00
T
– –
01
02
03
04
05
06
Total time of the
programmed tracks
4 Press ,.
The cursor moves to the track row [T] (in this
case, [01]).
58
GB
Page 59

PROGRAM
ALL CLEAR
1. TRACK
2. TRACK
3. TRACK
4. TRACK
5. TRACK
6. TRACK
7. TRACK
– –
– –
– –
– –
– –
– –
– –
0:00:00
T
– –
01
02
03
04
05
06
5 Select the track you want to programme.
For example, select track [02].
Press
to select [02] under [T], then press
M/m
(ENTER). The track number may be displayed in
3 digits for a Super Audio CD.
Selected track
– –
– –
– –
– –
– –
– –
0:15:30
T
– –
01
02
03
04
05
06
PROGRAM
ALL CLEAR
1. TRACK 0 2
2. TRACK
3. TRACK
4. TRACK
5. TRACK
6. TRACK
7. TRACK
Total time of the programmed tracks
6 To programme other tracks, repeat steps
4 to 5.
The programmed tracks are displayed in the
selected order.
3 Follow step 5 for new programming. To
cancel a programme, select [--] under
[T], then press (ENTER).
To cancel all of the tracks in the
programmed order
1 Follow steps 1 to 3 of “Creating your own
programme.”
2 Press M and select [ALL CLEAR].
3 Press (ENTER).
Playing in random order
(Shuffle Play)
You can have the system “shuffle” tracks. Subsequent
“shuffling” may produce a different playing order.
Using the Player Control Menu
7 Press H to start Programme Play.
Programme Play starts.
“PGM” appears in the front panel display.
When the programme ends, you can restart the
same programme again by pressing H.
To return to normal play
Press CLEAR, or select [OFF] in step 3. To play the
same programme again, select [ON] in step 3 and
press (ENTER).
To turn off the Control Menu
Press DVD DISPLAY repeatedly until the Control
Menu is turned off.
To change or cancel a programme
1 Follow steps 1 to 3 of “Creating your own
programme.”
2 Select the programme number of the
track you want to change or cancel using
M/m. If you want to delete the track from
the programme, press CLEAR.
M/m/ (ENTER)
DVD DISPLAY
1 Press DVD DISPLAY during playback.
The Control Menu appears.
2 Press M/m to select [SHUFFLE],
then press (ENTER).
The options for [SHUFFLE] appear.
3 Press M/m to select the item to be
shuffled.
x When playing a VIDEO CD, Super Audio CD,
or CD
• [TRACK]: Shuffles tracks on the disc.
x When Programme Play is activated
• [ON]: Shuffles tracks selected in Programme
Play.
Continued
59
GB
Page 60

4 Press (ENTER).
Shuffle Play starts.
“SHUF” appears in the front panel display.
To return to normal play
Press CLEAR, or select [OFF] in step 3.
To turn off the Control Menu
Press DVD DISPLAY repeatedly until the Control
Menu is turned off.
Tip
You can set Shuffle Play while the system is stopped.
Playing repeatedly
(Repeat Play)
You can play all of the titles, tracks or albums on a
disc or a single title, chapter, track, or album
repeatedly.
You can use a combination of Shuffle or Programme
Play modes.
x When playing a DVD VIDEO or DVD-R/DVDRW
• [OFF]: Does not play repeatedly.
• [DISC]: Repeats all of the titles on the disc.
• [TITLE]: Repeats the current title on a disc.
• [CHAPTER]: Repeats the current chapter.
x When playing a VIDEO CD, Super Audio CD,
or CD
• [OFF]: Does not play repeatedly.
• [DISC]: Repeats all of the tracks on the disc.
• [TRACK]: Repeats the current track.
x When playing a DATA CD or DATA DVD
• [OFF]: Does not play repeatedly.
• [DISC]: Repeats all of the albums on the disc.
• [ALBUM]: Repeats the current album.
• [TRACK] (MP3 audio tracks only): Repeats the
current track.
• [FILE] (DivX video files only): Repeats the
current file.
4 Press (ENTER).
The item is selected.
To return to normal play, press CLEAR, or select
[OFF] in step 3.
M/m/ (ENTER)
DVD DISPLAY
1 Press DVD DISPLAY during playback.
The Control Menu appears.
2 Press M/m to select [REPEAT],
then press (ENTER).
The options for [REPEAT] appear.
3 Press M/m to select the item to be
repeated.
The default setting is [OFF]. The system does not
play repeatedly when [OFF] is selected.
To turn off the Control Menu
Press DVD DISPLAY repeatedly until the Control
Menu is turned off.
Note
When [MODE (MP3, JPEG)] is set to [IMAGE (JPEG)]
(page 63), you cannot select [TRACK].
Tip
Depending on the repeat type you set, indication in the front
panel display may differ:
– “REP”: Repeat all titles, tracks, or albums on a disc.
– “REP1”: Repeat single title, chapter or album on a disc.
60
GB
Page 61

Enjoying the slide show
About MP3 audio tracks and JPEG
image files
What is MP3/JPEG?
MP3 is audio compression technology that satisfies
the ISO/MPEG regulations. JPEG is image
compression technology.
Discs that the system can play
You can play back DATA CDs (CD-ROMs/CD-Rs/
CD-RWs) or DATA DVDs (DVD-ROMs/DVD-Rs/
DVD-RWs/DVD+Rs/DVD+RWs) recorded in MP3
(MPEG1 Audio Layer 3) and JPEG format. However,
the DATA CDs must be recorded according to ISO
9660 Level 1, Level 2 or Joliet format and DATA
DVDs of Universal Disk Format for the system to
recognize the tracks (or files). You can also play discs
recorded in Multi Session*.
See the instructions supplied with the CD-Rs/
CD-RWs or DVD-Rs/DVD-RWs/DVD+Rs/
DVD+RWs drives and the recording software (not
supplied) for details on the recording format.
* About the multi-session disc: If MP3 audio tracks or JPEG
image files are recorded in the first session, the system will also
play MP3 audio tracks or JPEG image files in other sessions. If
audio tracks and images in audio CD format or video CD
format are recorded in the first session, only the first session
will be played back.
Note
The system may not be able to play some DATA CDs/DATA
DVDs created in the Packet Write format.
MP3 audio track or JPEG image file that the
system can play
The system can play the MP3 audio tracks or JPEG
image files:
• which have the extension “.MP3” (MP3 audio track) or
“.JPG”/“.JPEG” (JPEG image file)
• which conform to the DCF* image file format
* “Design rule for Camera File system”: Image standards for
digital cameras regu lated by Japan Electronics and Information
Technology Industries Association (JEITA).
Notes
• The system will play any data with the extension “.MP3,”
“.JPG,” or “.JPEG” even if they are not in MP3 or JPEG
format. Playing this data may generate a loud noise which
could damage your speaker system.
• The system does not conform to audio in MP3PRO
format.
Playback order of MP3 audio tracks or JPEG
image files
The playback order of MP3 audio tracks or JPEG
image files recorded on a DATA CD/DATA DVD is
as follows:
Structure of disc contents
Tree 1 Tree 2 Tree 3 Tree 4 Tree 5
ROOT
Track (MP3 audio) or
Album
File (JPEG image)
When you insert a DATA CD/DATA DVD and press
H, the numbered tracks (or files) are played
sequentially, from 1 through 7. Any sub-albums/
tracks (or files) contained within a currently selected
album take priority over the next album in the same
tree. (Example: C contains D so 4 is played before
5.)
When you press DVD MENU and the list of album
names appears (page 62), the album names are
arranged in alphabetical order (A t B t C t D
t F t G). Albums that do not contain tracks (or
files) (such as album E) do not appear in the list.
Tips
• If you add numbers (01, 02, 03, etc.) to the front of the
track/file names when you store the tracks (or files) in a
disc, the tracks and files will be played in that order.
• If a disc consists of many trees, it takes longer to start
playback.
Notes
• Playback order may differ from the illustration depending
on the software you use to create the DATA CD/DATA
DVD, or if there are more than 200 albums and 300 files
in each album.
• The system can recognize up to 200 albums, and will not
play any albums beyond the 200th.
Continued
Using the Player Control Menu
61
GB
Page 62

• The system may take longer time to playback, when
progressing to the following album or jump to other
album.
• Some type of JPEG files cannot be played.
Playing DATA CDs or DATA DVDs with
MP3 audio track and JPEG image
files
3 Press M/m to select an album.
x When selecting an album
Press H to start playing the selected
album.
x When selecting a track
Press (ENTER).
A list of the tracks contained in the album
appears.
DVD MENU
</M/m/,
(ENTER)
H
PICTURE NAVI
With cover opened.
Selecting an MP3 audio track or album
1 Load a DATA CD or DATA DVD.
The system starts playing from the first album.
M Y FAVOURITE SONG
1 ( 2 5 6
WALTZ FOR DEBBY
MY ROMANCE
MILES TONES
MY FUNNY VALENTINE
AUTUM LEAVES
ALL BLUES
SOMEDAY MY PRINCE W...
)
Press M/m to select a track, then press
(ENTER).
The selected track starts playing. You can turn
the track list off by pressing DVD MENU.
Pressing DVD MENU again will display the
album list.
To play the next or previous MP3 audio track
Press ./>. Note that you can select the next
album by continuing to press > after the last track
on the first album, but that you cannot return to the
previous album by pressing .. To return to the
previous album, select the album from the album list.
To return to the previous display
Press O RETURN.
To stop playback
Press x.
To turn off the display
Press DVD MENU.
Selecting a JPEG image file or album
2 Press DVD MENU.
The albums recorded on the DATA CD or DATA
DVD appear. When an album is being played, its
title is shaded.
(
3 0
)
62
3
ROCK BEST HIT
KARAOKE
MY FAVOURITE SONG
R&B
JAZZ
CLASSIC
SALSA OF CUBA
BOSSA NOVA
GB
1 Load a DATA CD or DATA DVD.
The system starts playing from the first album.
2 Press DVD MENU.
The albums recorded on the DATA CD or DATA
DVD appear. When an album is being played, its
title is shaded.
Page 63

(
3 0
)
3
ROCK BEST HIT
KARAOKE
MY FAVOURITE SONG
R&B
JAZZ
CLASSIC
SALSA OF CUBA
BOSSA NOVA
3 Press M/m to select an album.
x When selecting an album
Press H to start playing the selected
album.
x When selecting an image
Press PICTURE NAVI.
Thumbnail images in the album appear in 16
subscreens.
1234
5678
9101112
Rotating direction
Press CLEAR to return to normal view.
To stop playback
Press x.
Playing audio tracks and images as a
slide show with sound
You can play a slide show with sound by first placing
both MP3 and JPEG files in the same album on a
DATA CD or DATA DVD. When you play back the
DATA CD or DATA DVD, select [AUTO] mode as
explained below.
Using the Player Control Menu
13 14 15 16
Press </M/m/, to select the image,
then press (ENTER).
To play the next or previous JPEG image file
Press </, when the Control Menu is not displayed.
Note that you can select the next album by continuing
to press , after the last image on the first album, but
that you cannot return to the previous album by
pressing <. To return to the previous album, select
the album from the album list.
To rotate a JPEG image
When a JPEG image file is displayed on the
you can rotate the image by 90 degrees.
Press M/m while viewing an image. Each time you
press M, the image rotates counterclockwise by 90
degrees.
Example of when you press M once:
screen,
DVD MENU
DVD DISPLAY
M/m/ (ENTER)
H
x
1 Load a DATA CD or DATA DVD.
The system starts playing from the first album.
2 Press x.
The system stops playback.
3 Press DVD DISPLAY.
The Control Menu appears.
Continued
63
GB
Page 64

4 Press M/m to select [MODE
(MP3, JPEG)], then press (ENTER).
The options for [MODE (MP3, JPEG)] appear.
5 Press M/m to select the setting you want
and press (ENTER).
• [AUTO]: Plays both the JPEG image files and
MP3 audio tracks in the same album as a slide
show.
• [AUDIO (MP3)]: Plays only MP3 audio tracks
continuously.
• [IMAGE (JPEG)]: Plays only JPEG image files
as a slide show.
• [FAST]: Sets the duration shorter than
[NORMAL].
• [SLOW1]: Sets the duration longer than
[NORMAL].
• [SLOW2]: Sets the duration longer than
[SLOW1].
4 Press (ENTER).
The selected setting takes effect.
Note
Some JPEG files may take longer to display than others,
which may make the duration seems longer that the option
you selected. Espec ially progressive JPEG files or JPEG files
of 3,000,000 pixels or more.
6 Press DVD MENU.
The list of albums recorded on the DATA CD or
DATA DVD appears.
7 Press M/m to select the album you want
and press H.
The system starts playing the selected album.
You can turn the album list on and off by pressing
DVD MENU repeatedly.
Tip
When you select [AUTO], the system can recognize up to
300 MP3 tracks and 300 JPEG files in a single album. When
you select [AUDIO (MP3)] or [IMAGE (JPEG)], the system
can recognize up to 600 MP3 and 600 JPEG files in a single
album. A maximum of 200 albums can be recognized
regardless of the selected mode.
Notes
• You cannot playback JPEG files and MP3 tracks at the
same time if they are not contained in the same album.
• PICTURE NAVI does not work when [AUDIO (MP3)] is
selected.
• If you play large MP3 track data and JPEG image data at
the same time, the sound may skip. It is recommended that
you set the MP3 bit rate to 128 kbps or lower when
creating the file. If the sound still skips, then reduce the
size of the JPEG file.
Specifying the slide show duration
(DATA CD/DATA DVD only)
When you play JPEG image files using slide show,
you can specify the duration for slides to appear on the
screen.
Selecting an effect for image files in the
slide show
(DATA CD/DATA DVD only)
When you play a JPEG image file, you can select the
effect to be used when viewing the slide show.
1 Press DVD DISPLAY twice.
The Control Menu for JPEG appears.
2 Press M/m to select [EFFECT],
then press (ENTER).
The options for [EFFECT] appear.
3 Press M/m to select the setting you want.
• [MODE1]: The image sweeps in from top to
bottom.
• [MODE2]: The image stretches out from left to
right of the screen.
• [MODE3]: The image stretches out from the
centre of the screen.
• [MODE4]: The images randomly cycle through
the effects.
• [MODE5]: The next image slides over the
previous image.
• [OFF]: Turns off this function.
4 Press (ENTER).
The selected setting takes effect.
1 Press DVD DISPLAY twice.
The Control Menu for JPEG appears.
2 Press M/m to select [INTERVAL],
then press (ENTER).
The options for [INTERVAL] appear.
3 Press M/m to select the setting you want.
• [NORMAL]: Sets the duration to about 6 to 9
seconds.
GB
64
Page 65

Locking discs
(CUSTOM PARENTAL CONTROL, PARENTAL
CONTROL)
4 Press M/m to select [ON t], then press
(ENTER).
x If you have not entered a password
The display for registering a new password
appears.
You can set 2 kinds of playback restrictions for the
desired disc.
• Custom Parental Control
You can set playback restrictions so that the system
will not play inappropriate discs.
• Parental Control
Playback of some DVD VIDEOs can be limited
according to a predetermined level such as the age
of the users. Scenes may be blocked or replaced
with different scenes.
The same password is used for both Custom Parental
Control and Parental Control.
Number
buttons
M/m/ (ENTER)
DVD DISPLAY
x
Preventing playback of specific discs
[CUSTOM PARENTAL CONTROL]
You can set the same Custom Parental Control
password for up to 40 discs. When you set the 41stdisc, the first disc is cancelled.
1 Insert the disc you want to lock.
If the disc is playing, press x to stop playback.
2 Press DVD DISPLAY.
The Control Menu appears.
PARENTAL CONTROL
Enter a new 4-digit password,
ENTER
then press
.
Enter a 4-digit password using the number
buttons, then press (ENTER).
The display for confirming the password appears.
x When you have already registered a
password
The display for entering the password appears.
PARENTAL CONTROL
Enter password, then press
ENTER
.
5 Enter or re-enter your 4-digit password
using the number buttons, then press
(ENTER).
[Custom parental control is set.] appears and the
screen returns to the Control Menu.
To turn off the Custom Parental Control function
1 Follow steps 1 through 3 of “Preventing playback of
specific discs [CUSTOM PARENTAL CONTROL].”
2 Press M/m to select [OFF t], then press
(ENTER).
3 Enter your 4-digit password using the number
buttons, then press (ENTER).
To play a disc for which Custom Parental Control is
set
1 Insert the disc for which Custom Parental Control is
set.
The [CUSTOM PARENTAL CONTROL] display
appears.
Using the Player Control Menu
3 Press M/m to select [PARENTAL
CONTROL], then press (ENTER).
The options for [PARENTAL CONTROL]
appear.
Continued
65
GB
Page 66

CUSTOM PARENTAL CONTROL
Custom parental control is already
set. To play, enter your password
ENTER
and press
.
2 Enter your 4-digit password using the number
buttons, then press (ENTER).
The system is ready for playback.
Tip
If you forget your password, enter the 6-digit number
“199703” using the number buttons when the [CUSTOM
PARENTAL CONTROL] display asks you for your
password, then press (ENTER). The display will ask you
to enter a new 4-digit password.
Limiting playback for children [PARENTAL
CONTROL]
(DVD VIDEO only)
Playback of some DVD VIDEOs can be limited
according to a predetermined level such as the age of
the users. The [PARENTAL CONTROL] function
allows you to set a playback limitation level.
x When you have already registered a
password
The display for entering the password appears.
PARENTAL CONTROL
Enter password, then press
ENTER
.
4 Enter or re-enter your 4-digit password
using the number buttons, then press
(ENTER).
The display for setting the playback limitation
level appears.
PARENTAL CONTROL
LEVEL: OFF
STANDARD:
USA
1 Press DVD DISPLAY. (If a disc is
playing, press x to stop playback, then
press DVD DISPLAY.)
The Control Menu appears.
2 Press M/m to select [PARENTAL
CONTROL], then press (ENTER).
The options for [PARENTAL CONTROL]
appear.
3 Press M/m to select [PLAYER t], then
press (ENTER).
x If you have not entered a password
The display for registering a new password
appears.
PARENTAL CONTROL
Enter a new 4-digit password,
ENTER
then press
.
Enter a 4-digit password using the number
buttons, then press (ENTER).
The display for confirming the password appears.
5 Press M/m to select [STANDARD], then
press (ENTER).
The selection items for [STANDARD] are
displayed.
6 Press M/m to select a geographic area
as the playback limitation level, then
press (ENTER).
The area is selected.
When you select [OTHERS t], select and enter
a standard code in the table on page 81 using the
number buttons.
7 Press M/m to select [LEVEL], then press
(ENTER).
The selection items for [LEVEL] are displayed.
8 Press M/m to select the level you want,
then press (ENTER).
Parental Control setting is complete.
The lower the value, the stricter the limitation.
To turn off the Parental Control function
Set [LEVEL] to [OFF] in step 8.
66
GB
Page 67

To play a disc for which Parental Control is set
1 Insert the disc and press H.
The display for entering your password appears.
2 Enter your 4-digit password using the number
buttons, then press (ENTER).
The system starts playback.
Tip
If you forget your password, remove the disc and repeat steps
1 to 3 of “Preventing playback of specific discs [CUSTOM
PARENTAL CONTROL].” When you are asked to enter
your password, enter “199703” using the number buttons,
then press (ENTER). The display will ask you to enter a
new 4-digit password. After you enter a new 4-digit
password, replace the disc in the system and press H. When
the display for entering your password appears, enter your
new password.
Notes
• When you play discs which do not have the Parental
Control function, playback cannot be limited on this
system.
• Depending on the disc, you may be asked to change the
parental control level while playing the disc. In this case,
enter your password, then change the level. If the Resume
Play mode is cancelled, the level returns to the previous
level.
Changing the password
1 Press DVD DISPLAY. (If a disc is
playing, press x to stop playback, then
press DVD DISPLAY.)
The Control Menu appears.
Using the Setup Display
By using the Setup Display, you can make various
adjustments to items such as picture and sound.
Note
Playback settings stored in the disc take priority over the
Setup Display settings and not all the functions described
may work.
DVD Setup Display list
The order of the displayed items may be different from the
actual display.
See page in parentheses for details of each menu.
LANGUAGE SETUP
OSD (69)
MENU (69)
AUDIO (69)
SUBTITLE (69)
SCREEN SETUP
SCREEN SAVER (69)
BACKGROUND (69)
CUSTOM SETUP
PAUSE MODE (70)
TRACK SELECTION (70)
MULTI-DISC RESUME (70)
DivX (70)
Using the Player Control Menu
2 Press M/m to select [PARENTAL
CONTROL], then press (ENTER).
The options for [PARENTAL CONTROL]
appear.
3 Press M/m to select [PASSWORD t],
then press (ENTER).
The display for entering the password appears.
4 Enter your 4-digit password using the
number buttons, then press (ENTER).
5 Enter a new 4-digit password using the
number buttons, then press (ENTER).
6 To confirm your password, re-enter it
using the number buttons, then press
(ENTER).
If you make a mistake entering your password
Press < before you press (ENTER) and input the
correct number.
Continued
67
GB
Page 68

SCREEN SETUP
SCREEN SAVER:
BACKGROUND:
Options
ON
ON
OFF
M/m/ (ENTER)
DVD DISPLAY
x
1 Press DVD DISPLAY. (If a disc is
playing, press x to stop playback, then
press DVD DISPLAY.)
The Control Menu appears.
2 Press M/m to select [SETUP],
then press (ENTER).
The options for [SETUP] appear.
3 Press M/m to select [CUSTOM], then
press (ENTER).
The Setup Display appears.
4 Press M/m to select the setup item from
the displayed list: [LANGUAGE SETUP],
[SCREEN SETUP], or [CUSTOM
SETUP]. Then press (ENTER).
The Setup item is selected.
Example: [SCREEN SETUP]
Selected item
6 Select a setting using M/m, then press
(ENTER).
The setting is selected and setup is complete.
SCREEN SETUP
SCREEN SAVER:
BACKGROUND:ONJACKET PICTURE
Selected setting
To reset all of the [SETUP] settings
1 Select [RESET] in step 3 and press
(ENTER).
2 Select [YES] using M/m.
You can also quit the process and return to the
Control Menu by selecting [NO] here.
3 Press (ENTER).
All the settings explained on pages 68 to 70 return
to the default settings*. Do not press [/1 while
resetting the system as it takes a few seconds to
complete.
* Except for Parental Control settings.
Note
When you turn the system on after resetting, the guide
message appears on the TV screen. To perform the Quick
Setup (page 19), press (ENTER), to return to normal
screen, press CLEAR.
SCREEN SETUP
SCREEN SAVER:
BACKGROUND:ONJACKET PICTURE
Setup items
5 Select an item using M/m, then press
(ENTER).
The options for the selected item appear.
Example: [SCREEN SAVER]
GB
68
Setting the display or sound track language
[LANGUAGE SETUP]
[LANGUAGE SETUP] allows you to set various
languages for the on-screen display or sound track.
Page 69

Select [LANGUAGE SETUP] in the Setup Display.
SCREEN SETUP
SCREEN SAVER:
BACKGROUND:ONJACKET PICTURE
To use the display, see “Using the Setup Display”
(page 67).
LANGUAGE SETUP
OSD:
MENU:
AUDIO:
SUBTITLE:
ENGLISH
ENGLISH
ORIGINAL
AUDIO FOLLOW
x [SCREEN SAVER]
The screen saver image appears when you leave the
system in pause or stop mode for 15
minutes, or when
you play back a Super Audio CD, CD, or DATA CD/
DATA DVD (MP3 audio) for more than 15 minutes.
The screen saver will help prevent your display device
from becoming damaged (ghosting). Press
H
to turn
off the screen saver.
[ON] Turns on the screen saver.
x [OSD] (On-Screen Display)
Switches the display language on the screen.
x [MENU] (DVD VIDEO only)
You can select the desired language for the disc’s
menu.
x [AUDIO] (DVD VIDEO only)
Switches the language of the sound track.
When you select [ORIGINAL], the language given
priority in the disc is selected.
x [SUBTITLE] (DVD VIDEO only)
Switches the language of the subtitle recorded on the
DVD VIDEO.
When you select [AUDIO FOLLOW], the language
for the subtitles changes according to the language
you selected for the sound track.
Tip
If you select [OTHERS t] in [MENU], [AUDIO], and
[SUBTITLE], select and enter a language code from
“Language code list (DVD function only)” (page 81) using
the number buttons.
Note
When you select a language in [MENU], [AUDIO], or
[SUBTITLE] that is not recorded on the DVD VIDEO, one
of the recorded languages will be automatically selected
(depending on the disc, the language may not be selected
automatically).
Settings for the display
[SCREEN SETUP]
Choose the TV screen settings.
Select [SCREEN SETUP] in the Setup Display. To
use the display, see “Using the Setup Display”
(page 67).
[OFF] Turns off the screen saver.
x [BACKGROUND]
The background can be set/displayed during the
following:
– When a DVD or Video CD, DATA CD/DATA
DVD (JPEG files) are stopped.
– When a Super Audio CD, CD, or DATA CD/DATA
DVD (MP3 audio) are played back or stopped.
[JACKET
PICTURE]
The jacket picture (still picture)
appears, but only when the jacket
picture is already recorded on the
disc (CD-EXTRA, etc.). If the
disc does not contain a jacket
picture, the [GRAPHICS] picture
appears.
[GRAPHICS] A preset picture stored in the
system appears.
[BLUE] The background colour is blue.
[BLACK] The background colour is black.
Custom settings
[CUSTOM SETUP]
Use this to set up playback-related (and other)
settings.
Select [CUSTOM SETUP] in the Setup Display. To
use the display, see “Using the Setup Display”
(page 67).
CUSTOM SETUP
PAUSE MODE:
TRACK SELECTION:
MULTI-DISC RESUME:
DivX:
Registration Code
AUTO
OFF
ON
Using the Player Control Menu
Continued
69
GB
Page 70

x [PAUSE MODE] (DVD VIDEO/DVD-R/DVD-RW
only)
Selects the picture in pause mode.
[AUTO] The picture, including subjects
that move dynamically, is output
with no jitter. Normally select this
position.
[FRAME] The picture, including subjects
that do not move dynamically, is
output in high resolution.
x [TRACK SELECTION] (DVD VIDEO only)
Gives the sound track which contains the highest
number of channels priority when you play a DVD
VIDEO on which multiple audio formats (PCM, DTS,
MPEG audio, or Dolby Digital format) are recorded.
[OFF] No priority given.
[AUTO] Priority given.
Notes
• When you set the item to [AUTO], the language may
change. The [TRACK SELECTION] setting has higher
priority than the [AUDIO] settings in [LANGUAGE
SETUP] (page 69). (Depending on the disc, this function
may not work.)
• If PCM, DTS, Dolby Digital sound, and MPEG audio
tracks have the same number of channels, the system
selects PCM, DTS, Dolby Di gital sound, and MPEG audio
tracks in this order.
x [MULTI-DISC RESUME] (DVD VIDEO/VIDEO CD
only)
Switches the Multi-disc Resume setting on or off.
[ON] Stores the resume settings in
memory for up to 40 discs.
[OFF] Does not store the resume settings
in memory. Playback restarts at
the resume point only for the
current disc in the system.
x [DivX]
Displays the registration code for this system.
For more information, go to
http://www.divx.com
GB
70
on the Internet.
Page 71

Using the Lift Unit/Front Panel Display
8
9
4
Overview of the items
About the indications in the lift unit/front panel display
31
TITLE CHAP REP REP1 SHUF PGM TUNED ST MONO
SA-CD
NTSC
62
75
1 Current surround format (Except for JPEG and
Super Audio CD)
2 Playing status (DVD function only)
3 Lights up when the time information of a title or
chapter appears in the front panel display. (DVD
only)
4 Current play mode
5 Lights up when an FM radio station is tuned. (37)
6 Lights up when an FM stereo broadcast is tuned.
(37)
7 Lights up when listening the FM radio in
monaural effect. (36)
8 Current disc type
9 Lights up when playing NTSC discs (DVD function
only).
Adjusting the brightness of the display
Press DIMMER repeatedly to turn the display on or off while the system is on.
Each time you press the button, the display changes as follows:
DIMMER OFF (high brightness) y DIMMER ON (low brightness)
Using the Lift Unit/Front Panel Display
Continued
71
GB
Page 72

Enjoying the sound at low volume
Enjoying a bilingual DVD disc
(AUDIO DRC)
Narrows the dynamic range of a Dolby Digital sound
track. Useful for watching movies at low volume late
at night.
M/m/,/ (ENTER)
AMP MENU
With cover opened.
1 Press AMP MENU.
2 Press M/m repeatedly until “AUDIO DRC”
appears in the front panel display, then
press (ENTER) or ,.
3 Press M/m to select the setting.
• “DRC OFF”: No compression of dynamic range.
• “DRC STD”: Reproduces the sound track with
the kind of dynamic range that the recording
engineer intended.
• “DRC MAX”: Compresses dynamic range fully.
4 Press (ENTER).
Note
AUDIO DRC only applies to Dolby Digital sources.
(DUAL MONO)
You can play bilingual broadcasts recorded on
DVD-R/DVD-RWs in VR mode.
Note
This setting works for the DVD function only.
M/m/,/ (ENTER)
AMP MENU
With cover opened.
1 Press AMP MENU.
2 Press M/m repeatedly until “DUAL MONO”
appears in the front panel display, then
press (ENTER) or ,.
3 Press M/m to select the sound you want.
• “MAIN”: Main sound is output from the left and
right speakers.
• “SUB”: Sub sound is output from the left and
right speakers.
• “MAIN+SUB”: Main sound and Sub sound are
output from the left and right speakers.
• “MAIN/SUB”: Main sound is output from the
left speaker and Sub sound is output from the
right speaker.
72
4 Press (ENTER).
GB
Page 73

Reinforcing bass frequencies
Using the lift function
(SW LEVEL)
You can reinforce bass frequencies on any source.
M/m/,/ (ENTER)
AMP MENU
With cover opened.
1 Press AMP MENU.
(Lift Mode)
The lift unit moves up and down by pressing on
the system or remote. The lift unit can also be moved
automatically, according to the selected input or
system power on/off when you select “AUTO” in
“Lift Mode.”
M/m/,/ (ENTER)
AMP MENU
Using the Lift Unit/Front Panel Display
2 Press M/m repeatedly until “SW LEVEL”
appears in the front panel display, then
press (ENTER) or ,.
3 Press M/m to select the desired
subwoofer level, then press (ENTER).
The setting is selected and setup is complete.
With cover opened.
1 Press AMP MENU.
2 Press M/m repeatedly until “Lift Mode”
appears in the front panel display, then
press (ENTER) or ,.
3 Press M/m to select the desired lift mode,
then press (ENTER).
• “AUTO”: Lift unit can be set to move
automatically according to a selected inputs or
when the system is turned on/off. Also you can
move it by pressing .
• “MANUAL”: Lift unit is moved by pressing
.
• “LOCK”: Lift unit will not move, even if you
press .
Notes
• If you change the lift mode setting, change it while the lift
unit is not moving.
• The lift unit has a sensor in its top and bottom. If the sensor
detects an obstacle, it stops moving. If this occurs, remove
any obstacles, press "/1 or 1 on the system, and then
press . The lift unit starts moving again.
Continued
73
GB
Page 74

• When you connect headphones, the lift unit will stop
moving. And will not move even if you press until
you disconnect the headphones.
• When connecting other components to the system, make
sure not to trap any cords in the lift unit.
Moving the lift unit automatically (AUTO)
The lift unit can be moved automatically, according to
the selected input or system power on/off. See the
table below.
Operation: Direction
Turn off system up
Turn on system (except
FM function)
Turn on system (FM
function)
FM function up
Except FM function down
Tip
Even in AUTO mode, you can move the lift unit up and down
by pressing . The lift unit moves in the same way with
the MANUAL mode.
Note
The lift unit will automatically move when the system is
activated with “AUTO” set in “Lift Mode,” and in the
following situations:
– [On Time] in [Timer]
– [Off Time] in [Timer]
– other than [Off] in [Sleep Timer]
– no signal from TV
– no input signal from a connected PC.
down
up
Moving the lift unit manually (MANUAL)
The lift unit can be moved manually by pressing
on the system or remote. The lift unit moves up or
down accordingly. See the table below.
Status:
completely down up
moving up down
completely up down
moving down up
Note
When the lift unit is completely up, you cannot use OSDrelated functions, and “NOT IN USE” appears in the front
panel display. In this case, press to move the lift unit
down.
Press to move
Locking the lift unit (LOCK)
The lift unit will not move, even if you press . It is
recommended setting this mode if you have small
children.
GB
74
Page 75

Using Optional Equipment
Connecting optional equipment
You can connect a wide range of optional equipment to the system. Connecting cables are not supplied.
Notes
• When connecting optional equipments, make sure not to trap any cords in the lift unit, or area where the unit moves.
• Do not connect any equipment while the lift unit is moving.
• Depending on the connected equipment cords, the back covers may not attach properly. In this case, try other cords, or use the
system without the back covers.
Connecting to the system (rear)
Rear of the system
Personal Computer
C
PlayStation 2
Decoder
A
12 5
(SmartLink)
B
DVD recorder/
Hard disc recorder
PC
DVD
DIGITAL OUT
OPTICAL
FM ANTENNA
FM 75
COAXIAL
D
Using Optional Equipment
DVD
Decoder
VCR
AV amplifier
Continued
75
GB
Page 76

To connect Do this
“PlayStation 2”,
DVD player or
decoder A
Connect to the scart socket /
1. When you connect the
decoder, the scrambled signal from
the TV tuner is output to the decoder,
then the unscrambled signal is output
from the decoder.
DVD recorder or
VCR that supports
SmartLink B
Connect to the scart socket /
2. SmartLink is a direct link
between the system and a VCR/
DVD recorder. For more
information on SmartLink, refer to
the instruction manual supplied
with your VCR or DVD recorder.
Personal Computer
(Audio signal) C
Connect to the PC 5 on the rear
of the system (page 75).
AV amplifier D Connect to the DVD DIGITAL
OUT on the rear of the system.
Refer to the instruction manual
supplied with your AV amplifier.
Note
Super Audio CD/MP3/Video CD
audio signals are not output from the
DVD DIGITAL OUT jack.
Connecting to the system (side)
Digital satellite
receiver
E
IN
L/G/S/I
6
R/D/D/D
To connect Do this
Digital satellite
receiver E
Connect only to the HDMI IN 6
socket. The digital video and audio
signals are input from the digital
satellite receiver. If the digital
satellite receiver has a DVI socket
and not an HDMI socket, connect
the DVI socket to the HDMI IN 6
socket, and connect the audio
socket to the audio sockets HDMI
IN 6. The digital video and
analogue audio signals are input
from the digital satellite receiver.
Note
If you use only the HDMI
connection, and the connected
equipment does not conform to PCM
output, or equipment setting is
incorrect, audio signal may not be
output. Refer to the instruction
manual supplied with the connected
equipment for settings, etc.
S VHS/Hi 8/DVC
camcorder F
Connect to the S video socket
4 or the video socket 4,
and the audio sockets 4. To
avoid picture noise, do not connect
the camcorder to the video socket
4 and the S video socket
4 at the same time. If you
connect mono equipment, connect
to the L/G/S/I sockets 4, and
set [Dual Sound] to [A] (page 41).
Headphones G Connect to the i socket to listen
to sound on headphones.
76
GB
F
S VHS/Hi 8/DVC
camcorder
G
Headphones
(MONO)
Note
When connecting headphones, the lift unit does not move
even if is pressed.
4
S
L/G/
S/I
R/D/
D/D
Page 77

Personal Computer
H
I
J
To connect Do this
Personal Computer HConnect to the PC Input socket
5 and the audio socket C
on the rear of the system
(page 75).
CAM (Conditional
Access Module) I
For encripted PPV
(Pay per View)
Remove the dummy card from the
CAM slot and insert the CAM.
Insert the viewing card into the
CAM.
services.
Notes
• Switch off the system before inserting the CAM.
• Keep always the dummy card into the CAM slot when you
remove the CAM.
Modem connector
For future use only.
J
Using Optional Equipment
77
GB
Page 78

Additional Information
Specifications
Display unit
Power Requirements:
220–240 V AC, 50/60 Hz
Screen Size:
32 inches
Approx. 101.5 cm measured diagonally
Display Resolution:
1,366 dots (horizontal) × 768 lines (vertical)
Power Consumption:
240 W
Standby Power Consumption:
1 W or less
Dimensions (w × h × d):
Approx. 856.0 × 1,069.0 × 470.0 mm
Mass:
Approx. 58.0 kg
Panel system
LCD (Liquid Crystal Display) Panel
TV system
Analogue: Depending on your country/region
selection:
B/G/H, D/K, L, I
Digital: DVB-T
Colour system
Analogue: PAL, SECAM
NTSC 3.58, 4.43 (only Video In)
Digital: MPEG-2 MP@ML
Aerial
75 ohm external terminal for VHF/UHF
Channel coverage
Analogue:
VHF: E2-E12
UHF: E21–E69
CATV: S1–S20
HYPER: S21–S41
D/K: R1–R12, R21–R69
L: F2–F10, B–Q, F21–F69
I: UHF B21–B69
Digital: VHF/UHF
Terminals
• AV1: / 1
21-pin Scart connector (CENELEC standard) including
audio/video input, RGB input, and TV audio/video output.
• AV2: / 2 (SMARTLINK)
21-pin Scart connector (CENELEC standard) including
audio/video input, RGB input, selectable audio/video
output, and SmartLink interface.
• AV3: 3 (internal connection: DVD input)
• AV4: 4S video input (4-pin mini DIN)
4 Video input (phono jack)
4 Audio input (phono jacks)
• AV5: 5
PC Input (15 Dsub)
G: 0.7 Vp-p, 75 ohms, non Sync on Green
B: 0.7 Vp-p, 75 ohms, non Sync on Green
R: 0.7 Vp-p, 75 ohms, non Sync on Green
HD: 1-5 Vp-p
VD: 1-5 Vp-p
PC audio input: minijack.
• AV6: 6
HDMI: Video: 480i, 575i, 480p, 576p, 720p, 1080i
Audio: Two channel linear PCM 32, 44.1 and
48 kHz, 16, 20 and 24 bits.
AUDIO: 500 mVrms (100% modulation)
Impedance: 47 kilo ohms
• i Headphones jack
• CAM (Conditional Access Module) slot
• MODEM
Modem jack (Not supported on this system)
Amplifier section
Front Power output (rated): 40 W + 40 W
(6 ohms, 1 kHz, THD 1 %)
Continuous RMS power output
(reference): 50 W + 50 W
(6 ohms at 1 kHz, THD 10 %)
Subwoofer Power output (rated): 80 W
(3 ohms, 100 Hz, THD 1 %)
Continuous RMS power output
(reference): 100 W
(3 ohms at 100 Hz, THD 10 %)
Super Audio CD/DVD system
Laser Semiconductor laser
(DVD: λ = 650 nm)
(CD: λ = 790 nm)
Emission duration: continuous
Signal format system NTSC/PAL
FM section
System PLL quartz-locked digital
synthesizer system
Tuning range 87.5 – 108.0 MHz
(50 kHz step)
Antenna (aerial) FM wire antenna (aerial)
Antenna (aerial) terminals75 ohms, unbalanced
Intermediate frequency 10.7 MHz
Speakers
Front
Speaker system 2-way Bass reflex type
Speaker unit 25 mm Dome type,
80 mm Cone type
Subwoofer
Speaker system Bass reflex type
Speaker unit 130 mm Cone type × 2
78
GB
Page 79

Supplied accessories
• Remote RM-ANU005 (1)
• Size AA batteries (R6 type) (2)
• AC power cord (mains lead) (1)
•Screws (2)
• FM wire antenna (aerial) (1)
• Frame grille (1)
• Quick Start Guide (1)
Design and specifications are subject to change
without notice.
Continued
79
Additional Information
GB
Page 80

PC specifications
Signals
VGA 640 480 31.5KHz 60Hz VGA
SVGA 800 600 35.1KHz 56Hz VESA Guidelines
XGA 1024 768 48.4KHz 60Hz VESA Guidelines
WXGA 1280 768 47.40KHz 60Hz VESA
Horizontal
(Pixel)
640 480 37.9KHz 72Hz VESA
640 480 37.5KHz 75Hz VESA
720 400 31.47KHz 70Hz VGA-T
800 600 37.9KHz 60Hz VESA Guidelines
800 600 48.1KHz 72Hz VESA
800 600 46.9KHz 75Hz VESA
1024 768 56.5KHz 70Hz VESA
1024 768 60.0KHz 75Hz VESA
1280 768 47.78KHz 60Hz VESA
Vertical
(Line)
Horizontal
frequency
(kHz)
Vertical
frequency
(Hz)
Standard
This system does not support Sync on Green or Composite Sync.
If a signal other than in the above chart is input, it may not be displayed properly or may not be displayed as you set.
Using the Vertical frequency (Hz) of the personal computer at 60 is recommended.
80
GB
Page 81

Language code list (DVD function only)
The language spellings conform to the ISO 639: 1988 (E/F) standard.
Code Language Code Language Code Language Code Language
1027 Afar
1028 Abkhazian
1032 Afrikaans
1039 Amharic
1044 Arabic
1045 Assamese
1051 Aymara
1052 Azerbaijani
1053 Bashkir
1057 Byelorussian
1059 Bulgarian
1060 Bihari
1061 Bislama
1066 Bengali; Bangla
1067 Tibetan
1070 Breton
1079 Catalan
1093 Corsican
1097 Czech
1103 Welsh
1105 Danish
1109 German
1130 Bhutani
1142 Greek
1144 English
1145 Esperanto
1149 Spanish
1150 Estonian
1151 Basque
1157 Persian
1165 Finnish
1166 Fiji
1171 Faroese
1174 French
1181 Frisian
1183 Irish
1186 Scots Gaelic
1194 Galician
1196 Guarani
1203 Gujarati
1209 Hausa
1217 Hindi
1226 Croatian
1229 Hungarian
1233 Armenian
1235 Interlingua
1239 Interlingue
1245 Inupiak
1248 Indonesian
1253 Icelandic
1254 Italian
1257 Hebrew
1261 Japanese
1269 Yiddish
1283 Javanese
1287 Georgian
1297 Kazakh
1298 Greenlandic
1299 Cambodian
1300 Kannada
1301 Korean
1305 Kashmiri
1307 Kurdish
1311 Kirghiz
1313 Latin
1326 Lingala
1327 Laothian
1332 Lithuanian
1334 Latvian;Lettish
1345 Malagasy
1347 Maori
1349 Macedonian
1350 Malayalam
1352 Mongolian
1353 Moldavian
1356 Marathi
1357 Malay
1358 Maltese
1363 Burmese
1365 Nauru
1369 Nepali
1376 Dutch
1379 Norwegian
1393 Occitan
1403 (Afan)Oromo
1408 Oriya
1417 Punjabi
1428 Polish
1435 Pashto; Pushto
1436 Portuguese
1463 Quechua
1481 Rhaeto-Romance
1482 Kirundi
1483 Romanian
1489 Russian
1491 Kinyarwanda
1495 Sanskrit
1498 Sindhi
1501 Sangho
1502 Serbo-Croatian
1503 Singhalese
1505 Slovak
1506 Slovenian
1507 Samoan
1508 Shona
1509 Somali
1511 Albanian
1512 Serbian
1513 Siswati
1514 Sesotho
1515 Sundanese
1516 Swedish
1517 Swahili
1521 Tamil
1525 Telugu
1527 Tajik
1528 Thai
1529 Tigrinya
1531 Turkmen
1532 Tagalog
1534 Setswana
1535 Tonga
1538 Turkish
1539 Tsonga
1540 Tatar
1543 Twi
1557 Ukrainian
1564 Urdu
1572 Uzbek
1581 Vietnamese
1587 Volapük
1613 Wolof
1632 Xhosa
1665 Yoruba
1684 Chinese
1697 Zulu
1703 Not specified
Additional Information
Parental control area code list
Code Area Code Area Code Area Code Area
2044 Argentina
2047 Australia
2046 Austria
2057 Belgium
2070 Brazil
2079 Canada
2090 Chile
2092 China
2115 Denmark
2165 Finland
2174 France
2109 Germany
2248 India
2238 Indonesia
2254 Italy
2276 Japan
2304 Korea
2363 Malaysia
2362 Mexico
2376 Netherlands
2390 New Zealand
2379 Norway
2427 Pakistan
2424 Philippines
2436 Portugal
2489 Russia
2501 Singapore
2149 Spain
2499 Sweden
2086 Switzerland
2528 Thailand
2184 United
Kingdom
81
GB
Page 82

Troubleshooting
Check whether the 1 (standby) indicator is flashing in red or “PROTECT” appears in the front
panel display.
When 1 is flashing or “PROTECT” appears
The self-diagnosis function is activated.
1 Count how many times 1 (standby) flashes every two seconds and check if any LED lights blink or
any messages or letters/numbers appear in the front panel display.
For example, the indicator flashes three times, then there is a two second break, followed by another three flashes, etc.
2 Press 1 on the system to switch it off, disconnect the AC power cord (mains lead), and inform your
dealer or Sony service centre of how the indicator flashes (number of flashes), or any messages or
letters/numbers that appear in the front panel display.
When 1 is not flashing or “PROTECT” does not appear
1 Check the items in the tables below.
2 If the problem still persists, have your system serviced by qualified service personnel.
Note that if service personnel changes some parts during repair, these parts may be retained.
Power
Problem Cause/Remedy
The power is not turned on
• Check that the AC power cord (mains lead) is connected securely.
Picture
Problem Cause/Remedy
No picture (screen is dark) and
no sound
No picture or no menu
information from equipment
connected to the scart
connector
Distorted picture
Double images or ghosting
Only snow and noise appear
on the screen
• Check the aerial connection.
• Connect the system to the AC power source (mains), and press 1 on the
system.
• If the 1 (standby) indicator lights up in red, press "/1.
• Check that the optional equipment is on and press / repeatedly until
the correct input symbol is displayed on the screen.
• Check the connection between the optional equipment and the system.
• Check if any connected optional equipment is installed in front of the
system or beside the system. When installing optional equipment, leave
some space between the optional equipment and the system.
• When changing programmes or selecting Text, turn off any equipment
connected to the scart connector on the rear of the system.
• Check aerial/cable connections.
• Check the aerial location and direction.
• Check if the aerial is broken or bent.
• Check if the aerial has reached the end of its serviceable life (three to five
years in normal use, one to two years at the seaside).
82
GB
Page 83

Problem Cause/Remedy
Picture (dotted lines or stripes)
noise
• Keep the system away from electrical noise sources such as cars,
motorcycles, or hair-dryers.
• Make sure that the aerial is connected using the supplied coaxial cable.
• Keep the aerial cable away from other connecting cables.
• Do not use a 300-ohm twin lead cable as interference may occur.
Picture noise when viewing a
TV channel
• Select [Manual Programme Preset] in the [Set Up] menu and adjust [AFT]
(Automatic Fine Tuning) to obtain better picture reception (page 47).
• Select [Noise Reduction] in the [Picture Adjustment] menu to reduce the
noise in the picture (page 40).
Stripe noise during playback/
recording of a VCR
• Video head interference. Keep your component away from the system.
• Leave a space of 30 cm between your component and the system to avoid
noise.
• Avoid installing your component in front of the system or beside the system.
Some tiny black points and/or
bright points on the screen
No colour on programmes
• The picture of a display unit is composed of pixels. Tiny black points and/or
bright points (pixels) on the screen do not indicate a malfunction.
• Select [Reset] in the [Picture Adjustment] menu to return to the factory
settings (page 40).
There is no picture
• If the FM function is selected, there will be no picture - ensure that this
function is not selected.
Picture noise appears
• The disc is dirty or flawed.
• If picture noise occurs during AV1 or AV2 connection, check the output
setting of the connected equipment. See the operating instructions of the
connected equipment for details.
Sound
Problem Cause/Remedy
No sound, but good picture
• Press 2 +/– or %.
No sound when using HDMI
connection
Noisy sound
Audio distortion
There is no sound
• If you use only the HDMI connection, and the connected equipment does
not conform to PCM output, or equipment setting is incorrect, audio signal
may not be output. Refer to the instruction manual supplied with the
connected equipment for settings, etc.
• See the “Picture noise” causes/remedies on page 83.
• If audio noise occurs during AV1 or AV2 connection, check the output
setting of the connected equipment. See the operating instructions of the
connected equipment for details.
• See “Audio Filter” on page 47.
• Press % on the remote if “MUTING ON” is displayed in the front panel
display.
• The system is in pause mode or in Slow-motion Play mode. Press H to
return to normal play mode.
• Fast forward or fast reverse is performed. Press H to return to normal play
mode.
Continued
83
Additional Information
GB
Page 84

Problem Cause/Remedy
Severe hum or noise is heard
• Check that the components are connected securely.
• Check that the connecting cords are away from a transformer or motor, and
at least 3 meters away from the system or a fluorescent light.
• Move the system away from the audio components.
• The plugs and jacks are dirty. Wipe them with a cloth slightly moistened
with alcohol.
• Clean the disc.
The sound loses stereo effect
when you play a VIDEO CD,
CD or DATA CD/DATA DVD
(MP3 audio)
The surround effect is difficult
to hear when you are playing a
Dolby Digital, DTS, or MPEG
audio sound track
• Set [AUDIO] to [STEREO] by pressing AUDIO (page 32).
• Make sure the system is connected properly.
• Make sure the sound field is set to “FRONT SURROUND” (page 30).
• Depending on the DVD, the output signal may not be the entire 5.1 channel.
It may be monaural or stereo even if the sound track is recorded in Dolby
Digital or MPEG audio format.
Channels
Problem Cause/Remedy
The desired channel cannot be
selected
Some channels are blank
Digital channel is not displayed
• Switch between digital and analogue mode and select the desired digital/
analogue channel.
• Scrambled/Subscription only channel. Subscribe to the Pay Per View
service.
• Channel is used only for data (no picture or sound).
• Contact the broadcaster for transmission details.
• Check that the aerial is plugged directly into the system (not through other
equipment).
• Contact a local installer to find out if digital transmissions are provided in
your area.
• Upgrade to a higher gain aerial.
• Digital TV broadcast may not be available in some countries.
General
Problem Cause/Remedy
“Lift Stop” appears in the front
panel display or the lift unit
does not move
The system turns off
automatically (the system
enters standby mode)
The system turns on
automatically
Some input sources cannot be
selected
GB
84
• To prevent a malfunction, the lift unit stops moving when the unit’s sensor
detects an obstacle. If this occurs, remove any obstacles, then turn off the
system. Turn on the system again, and then press to move the lift unit.
• The lift unit does not move when headphones are connected.
• The system automatically switches to standby mode in the following
situations:
– [Off Time] in [Timer]
– other than [Off] in [Sleep Timer]
– no signal from TV
– no input signal from a connected PC.
• Check if the [Timer] is activated (page 43).
• Select [AV Preset] in the [Set Up] menu and cancel [Skip] of the input
source (page 45).
Page 85

Problem Cause/Remedy
The remote does not function
• Check that the remote is set correctly for the equipment you are using.
• Replace the batteries.
FM stations cannot be tuned in
The remote does not function
The disc does not play
The menu operations do not
work
The MP3 audio track cannot be
played
• Check that the aerial is connected securely. Adjust the aerial or connect an
external aerial if necessary (page 16).
• The signal strength of the stations is too weak (when tuning in with
automatic tuning). Use direct tuning.
• No stations have been preset or the preset stations have been cleared (when
tuning by scanning preset stations). Preset the stations (page 37).
• Press TIME/TEXT so that the frequency appears in the front panel display.
• There are obstacles between the remote and the system.
• The distance between the remote and the system is too far.
• The remote is not pointed at the remote sensor on the system.
• The batteries in the remote are weak.
• There is no disc inserted.
• The disc is upside down.
Insert the disc with its label facing forward.
• The system cannot play CD-ROMs, etc. (page 27).
• The region code on the DVD does not match the system.
• Moisture has condensed inside the system and may cause damage to the
lenses. Remove the disc and leave the system turned on for about half an
hour.
• Check the CURSOR MODE buttons (page 11).
• The DATA CD is not recorded in the MP3 format that conforms to ISO 9660
Level 1/Level 2 or Joliet.
• The DATA DVD is not recorded in the MP3 format that conforms to UDF
(Universal Disk Format).
• The MP3 audio track does not have the extension “.MP3.”
• The data is not formatted in MP3 even though it has the extension “.MP3.”
• The data is not MPEG1 Audio Layer 3 data.
• The system cannot play audio tracks in MP3PRO format.
• The [MODE (MP3, JPEG)] setting has been set to [IMAGE (JPEG)]
(page 63).
• The DATA CD/DATA DVD contains a DivX video file.
Additional Information
The JPEG image file cannot be
played
The MP3 audio tracks and
JPEG image file starts playing
simultaneously
• The DATA CD is not recorded in a JPEG format that conforms to ISO 9660
Level 1/Level 2, or Joliet.
• The DATA DVD is not recorded in the MP3 format that conforms to UDF
(Universal Disk Format).
• It has an extension other than “.JPEG” or “.JPG.”
• It is larger than 3,072 (width) × 2,048 (height) in normal mode, or more than
2,000,000 pixels in Progressive JPEG which is used on Internet Web site
mainly.
• It does not fit the screen (those images are reduced).
• The [MODE (MP3, JPEG)] setting has been set to [AUDIO (MP3)]
(page 63).
• The DATA CD/DATA DVD contains a DivX video file.
• [AUTO] has been selected in [MODE (MP3, JPEG)] (page 63).
Continued
85
GB
Page 86

Problem Cause/Remedy
The DivX video file cannot be
played
• The file is not created in DivX format.
• The file has an extension other than “.AVI” or “.DIVX.”
• The DATA CD/DATA DVD (DivX video) is not created in a DivX format
that conforms to ISO 9660 Level 1/Level 2 or, Joliet/UDF.
• The DivX video file is larger than 720 (width) × 576 (height).
The titles of album/track/file
name are not displayed
correctly
A disc does not start playing
from the beginning
The system starts playing the
disc automatically
Playback stops automatically
You cannot perform some
functions such as Stop,
Search, Slow-motion Play, or
Repeat Play
Messages do not appear on
the screen in the language you
want
The language for the sound
track cannot be changed
The subtitle language cannot
be changed
• The system can only display numbers and letters of the alphabets. Other
characters are displayed as [*].
• Programme play, Shuffle Play, or Repeat Play has been selected.
Press CLEAR to cancel these functions before playing a disc.
• Resume Play has been selected.
During stop, press x on the system or the remote and then start playback
(page 33).
• The title, DVD or PBC menu automatically appears on the TV screen.
• The DVD features an auto playback function.
• Some discs may contain an auto pause signal. While playing such a disc, the
system stops playback at the auto pause signal.
• Depending on the disc, you may not be able to perform some of the
operations above. See the operating manual that came with the disc.
• In the Setup Display, select the desired language for the on-screen display in
[OSD] under [LANGUAGE SETUP] (page 69).
• Multilingual tracks are not recorded on the DVD being played.
• The DVD prohibits changing the language for the sound track.
• Multilingual subtitles are not recorded on the DVD being played.
• The DVD prohibits changing the subtitles.
The subtitle cannot be turned
off
The angles cannot be changed
A disc cannot be ejected and
“LOCKED” appears in the front
panel display
[Data error] appears on the TV
screen when playing a DATA
CD or DATA DVD
“DEMO” appears in the front
panel display
The system does not work
normally
GB
86
• The DVD prohibits turning off subtitles.
• Multi-angles are not recorded on the DVD being played (page 35).
• The DVD prohibits changing the angles.
• Contact your Sony dealer or local authorized Sony service facility.
• The MP3 audio track/JPEG image file/DivX video file you want to play is
broken.
• The data is not MPEG1 Audio Layer 3 data.
• The JPEG image file format does not conform to DCF.
• The JPEG image file has the extension “.JPG” or “.JPEG,” but is not in
JPEG format.
• The file you want to play has the extension “.AVI” or “.DIVX” but is not in
DivX format, or is in DivX format but does not conform to a DivX Certified
profiles.
• Contact your Sony dealer or local authorized Sony service facility.
• Disconnect the AC power cord (mains lead) from the wall outlet (mains),
then reconnect after several minutes.
Page 87

Self-diagnosis function (DVD function only)
(When letters/numbers appear in the display)
When the self-diagnosis function is activated to prevent the system from malfunctioning, a 5-character service
number (e.g., C 13 50) with a combination of a letter and 4 digits appears on the screen and the front panel display.
In this case, check the following table.
C:13:50
First 3 characters of the service
number
C 13 The disc is dirty.
C 31 The disc is not inserted correctly.
E XX
(xx is a number)
Cause and/or corrective action
Clean the disc with a soft cloth (page 9).
Restart the system, then re-insert the disc correctly.
To prevent a malfunction, the system has performed the self-diagnosis
function.
Contact your nearest Sony dealer or local authorized Sony service facility
and give the 5-character service number.
Example: E 61 10
When displaying the version number on the screen
When you turn on the system, the version number [VER.X.XX] (X is a number) may appear on the screen. Although this
is not a malfunction and for Sony service use only, normal system operation will not be possible. Turn off the system, and
then turn on the system again to operate.
VER.X.XX
Additional Information
87
GB
Page 88

Index
Numerics
14:9 23
22
4:3
5.1 Channel Surround
A
Accessories supplied 14
Aerial, connecting
47
AFT
55
ALBUM
AMP MENU
ANALOG
35
ANGLE
ATT
47
Audio
AUDIO
AUDIO DRC
Audio Filter
Audio Language
Audio Type
Auto Format
Auto Startup
Auto Tuning
analogue and digital channels
analogue channels only
digital channel only
AV Preset
AV2 Output
B
BACKGROUND 69
Backlight
40
Balance
Bass
40
Brightness
15, 16
72
21
32, 69
72
47
49
41
44
18
45
42
39
39
32
49
48
44
C
CA Module Set-up 50
Category list
Channels
CHAPTER
CLEAR
Clock Set
Colour
Connecting
Continuous play
Contrast
Control Menu display
Country
CUSTOM
D
DATA CD 51, 62
DATA DVD
Decoder
Digital
DIMMER
Disc slot
DivX®
DUAL MONO
Dual Sound
DVD
24
Channel
46
21
selecting
55
12
43
Colour
39
Colour Tone
Coloured buttons
a TV aerial/VCR/DVD player
optional equipment
the AC power cord (m ains lead)
40
23
15
75
17
60
39
53
44
CUSTOM
CUSTOM PARENTAL
CUSTOM SETUP
54
CONTROL
69
65
51, 62
47
DIGITAL
Digital Auto Tuning
Digital Manual Tuning
Digital Set Up
Digital Set-up
Digital text off ( )
21
48
49
48
49
12
71
13
51, 70
72
41
DVD
10
DVD (CURSOR MODE)
DVD DISPLAY
DVD MENU
DVD TOP MENU
DVD’s menu
DVD-R
DVD-RW
51
51
27, 56
27, 56
11
53
51
E
EFFECT 64
Eject (Z)
ENTER ( )
EPG (Digital Electronic Programme
Guide) ( )
F
Fast forward (M ) 34
Fast reverse ( m )
Fastext
Favourite list ( )
Features menu
FILE
FM
Freeze Frame
Front panel display
H
Handling discs 9
Headphones
Hue
I
INDEX 55
Info ( )
Input select ( )
Input signal index table
Instant advance ( )
Instant replay ( )
Interactive service
INTERVAL
J
JPEG 61
L
Label 45, 46
Language
Lift Mode
Lift unit
Lift up/down ( )
Light Sensor
13
19
23
34
22
25
42
55
10
FM
FM (CURSOR MODE)
FM MENU
FM radio
37
36
34
71
76
39
12
10
26
21
64
Language
Language code list
LANGUAGE SETUP
44
73
10
73
42
11
31
31
81
68
88
GB
Page 89

M
Manual Programme Preset 46
Manual timer REC
MODE (MP3, JPEG)
61
MP3
Multi Session CD
Multi-angle
MULTI-DISC RESUME
Mute (%)
N
Next (>) 31
Noise Reduction
Number buttons
O
OK ( ) 17
On/Standby ("/1)
ORIGINAL
69
OSD
P
PARENTAL CONTROL 65, 81
Parental Lock
Pause (X)
PAUSE MODE
PBC Playback
PC Adjustment
Picture
Picture Adjustment menu
Picture Freeze ( )
Picture Mode ( )
PICTURE NAVI
Picture Navigation
Picture Off ( ) indicator
PIN Code
Play (H)
PLAY LIST
Power
Power (") indicator
Power Saving ( )
Preset station
Previous (.)
Previous channel ( )
PROG +/–
Programme
Programme
Programme index table
Programme Labels
Programme List Edit
Programme Play
Programme Sorting
25
64
28
35
70
22
40
21
21
56
49
31
70
33
42
22
39
62
34
49
31
56
13
42
37
31
12
21
46
22
45
48
58
44
39
13
R
Region code 28
Reminder
Remote
REPEAT
Reset
Resume Play
RETURN (O)
RGB Center
S
SA-CD/CD 33
Scan
SCENE
Screen
Searching
Setup
Sharpness
Shuffle Play
Skip
Sleep
Slide show
Slow-motion Play
Smart
Sound Adjustment menu
SOUND FIELD
Sound field indicator
Sound Offset
Specifications
Standby (1) indicator
Standby (1) switch
Stop (x)
Subtitle
Super Audio CD
SW LEVEL
System
24
control sensor
inserting batteries
overview
13
11
12
picture adjustment
54
RESET
sound adjustment
33
12
41
34
55
Screen Format
Screen menu
Screen mode ( )
SCREEN SAVER
SCREEN SETUP
41
41
34, 55
Set Up menu
SETUP
Setup Display
44
20
67
39
59
47
Sleep Timer ( ) indicator
Sleep Timer ( ) button
61
34
22
30
29
45
78
13
13
31
SUBTITLE
Subtitle Language
Subtitle Setting
35, 69
49
28, 33
73
46
14
41
69
69
49
40
22
40
43
43
T
Technical Set-up 50
Text
Text (/)
Text hold ( )
Text reveal ( )
TIME/TEXT
Timer
Timer
Timer ( ) indicator
Timer list
Timer menu
Timer REC
TITLE
Touch panel buttons
TRACK
TRACK SELECTION
Treble
Troubleshooting
TV
TV
TV (CURSOR MODE)
TV MENU
U
Usable discs 27
V
VIDEO CD 33
Volume (2) +/–
W
Wide 22
Z
Zoom 23
12
56
43
25
43
24
55
55
40
82
10
18, 38
21
12
12
13
13
70
11
Additional Information
89
GB
Page 90

Avant d’utiliser la chaîne, lisez attentivement la
section « Consignes de sécurité » de ce manuel.
Conservez ce manuel pour toute référence
ultérieure.
AVERTISSEMENT
• Cet appareil doit être raccordé à une prise secteur
raccordée à la terre.
• Pour éviter un risque de déch arge électrique, n’introduisez
pas la fiche dans la prise secteur si le cordon
d’alimentation secteur ou la fiche est endommagé. Cette
fiche ne doit pas être utilisée, mais détruite.
• À l’intérieur de la chaîne, certains points présentent une
tension élevée pouvant être dangereuse. N’ouvrez pas le
boîtier. Confiez la réparation à un personnel qualifié
uniquement.
• N’installez pas l’appareil dans un espace confiné comme
dans une bibliothèque ou un meuble encastré.
Pour prévenir tout risque d’incendie ou
d’électrocution, gardez cet appareil à l’abri de la
pluie et de l’humidité.
Pour prévenir tout risque d’incendie, ne recouvrez pas les
orifices de ventilation de l’appareil avec des journaux, des
nappes, des rideaux, etc. Ne placez pas non plus de bougies
allumées sur l’appareil.
Pour prévenir tout risque d’incendie ou d’électrocution, ne
placez pas d’objets rem plis de liquides, comme des vases, sur
l’appareil.
Ne jetez pas la batterie avec les déchets
ménagers, éliminez–la correctement
comme un déchet chimique.
Cet appareil fait partie des
produits CLASS 1 LASER.
L’étiquette est située à l’arrière
de l’appareil.
Mise au rebut de la chaîne
Traitement des appareils
électriques et électroniques
en fin de vie (Applicable dans
les pays de l’Union
Européenne et aux autres
pays européens disposant de
systèmes de collecte
sélective)
Ce symbole, apposé sur le produit
ou sur son emballage, indique que
ce produit ne doit pas être traité
avec les déchets ménagers. Il doit
être remis à un point de collecte approprié pour le recyclage
des équipements électriques et électroniques. En s’assurant
que ce produit est bien mis au rebut de manière appropriée,
vous aiderez à prévenir les conséquences négatives
potentielles pour l’environnement et la santé humaine. Le
recyclage des matériaux aidera à préserver les ressources
naturelles. Pour toute information supplémentaire au sujet du
recyclage de ce produit, vous pouvez contacter votre
municipalité, votre déchetterie ou le magasin où vous avez
acheté le produit.
Avis relatif à télévision numérique
• Toutes les fonctions liées à la télévision numérique sont
disponibles uniquement dans les pays suivants : France,
Italie, Allemagne, Espagne, Finlande, Suède et Danemark.
• Toutes les fonctions liées à la télévision numérique
(renseignées par le logo ) sont disponibles
uniquement dans les pays et régions où les signaux
numériques terrestres DVB-T (MPEG 2) sont diffusés.
Vérifiez auprès de votre revendeur local si vous pouvez
recevoir les signaux DVB-T dans votre lieu de résidence.
• Même si cette chaîne est conforme aux spécifications
DVB-T, sa compatibilité avec les futures émissions
numériques terrestres DVB-T ne peut pas être garantie.
Introduction
Nous vous remercions d’avoir porté votre choix sur ce
produit Sony.
Avant d’utiliser la chaîne, lisez attentivement ce
manuel et conservez-le pour vous y référer
ultérieurement.
Informations sur les marques
commerciales
• est une marque déposée du DVB Project.
• « PlayStation » est une marque commerciale de Sony
Computer Entertainment, Inc.
• Fabriqué sous licence de Dolby Laboratories.
Les termes « Dolby » et « Pro Logic », ainsi que le sigle
double D sont des marques commerciales de Dolby
Laboratories.
• Fabriqué sous licence de Digital Theater Systems, Inc.
« DTS » et « DTS Digital Surround » sont des marques
commerciales de Digital Theater Systems, Inc.
• Cette chaîne intègre la
technologie HDMI™ (HighDefinition Multimedia Interf ace). HDMI, le logo HDMI et
High-Definition Multimedia Interface sont des marques
commerciales ou déposées de HDMI Licensing LLC.
FR
2
Page 91

Table des matières
A propos de ce mode d’emploi.................... 5
Consignes de sécurité................................. 5
Précautions ................................................. 8
Remarques sur les disques............................... 9
Guide des opérations de base de cette
chaîne .................................................. 10
Présentation de la télécommande............. 12
Présentation des touches et témoins de la
chaîne/façade ...................................... 14
Fonctions élémentaires
Préparation
1 : Vérification des accessoires .................15
2 : Insertion des piles dans la
télécommande ......................................15
3 : Raccordement d’une antenne TV/d’un
magnétoscope/d’un lecteur de DVD.....16
4 : Raccordement de l’antenne filaire
FM ........................................................17
5 : Mise sous tension de la chaîne ............18
6 : Sélection de la langue et du pays ou de la
région du téléviseur ..............................18
7 : Réglage automatique du téléviseur ......19
8 : Sélection de la langue du DVD
(Installation rapide) ...............................20
Regarder la télévision
: pour chaînes numériques uniquement
Regarder la télévision................................22
Vérification du guide électronique numérique
de programmes (EPG) ................24
Utilisation de la liste de favoris .........26
Affichage d’images depuis un appareil
raccordé................................................27
Lecture de disques
Disques disponibles...................................29
Fonction son de la chaîne ........................31
Lecture de disques ....................................33
Différents modes de lecture.............................34
(Lecture PBC) (Reprise de la lecture)
Recherche d’un point spécifique ou d’une scène
sur le disque...............................................36
(Balayage, Lecture au ralenti, Arrêt sur
image) (Navigation par images)
Affichage de différents angles et des
sous-titres...................................................37
Utilisation de la radio FM
Ecoute de la radio FM ...............................39
Présélection des stations de radio FM ......40
3
FR
FR
Page 92

Fonctions avancées
Utilisation du menu TV
Utilisation de la façade ou de
l’affichage du panneau frontal
Navigation au sein des menus.................. 42
Menu Contrôle de l’image ......................... 43
Menu Contrôle du son ............................... 44
Menu Commande écran............................ 45
Menu Fonctions......................................... 46
Menu Temporisation .................................47
Menu Réglage........................................... 48
Utilisation du menu d’un DVD
Navigation au sein du menu d’un DVD ..... 56
Lecture de vidéos DivX
® ...................................56
Utilisation du menu de
commande des lecteurs
Navigation au sein des menus.................. 58
Vue d’ensemble des menus............................ 58
Recherche/sélection du disque................. 61
Recherche d’un titre/chapitre/plage/scène,
etc.............................................................. 61
Sélection du paramètre [ORIGINAL] ou [PLAY
LIST] sur un DVD-R/DVD-RW .................... 62
Affichage d’informations relatives au
disque........................................................ 62
Utilisation du mode de lecture................... 65
Création de votre propre programme............. 65
(Lecture programmée)
Lecture dans un ordre quelconque................. 66
(Lecture aléatoire)
Lecture répétée............................................... 67
(Lecture répétée)
Lecture du diaporama ............................... 68
A propos des plages audio MP3 et des fichiers
image JPEG............................................... 68
Lecture de DATA CD ou DATA DVD contenant
des plages audio MP3 et des fichiers image
JPEG.......................................................... 69
Lecture de plages audio et d’images sous forme
de diaporama avec du son ....................... 71
Verrouillage de disques............................. 72
(VERROUILLAGE PARENTAL PERSONNA-
LISE, CONTROLE PARENTAL)
Utilisation du menu d’installation............... 75
Vue d’ensemble des éléments.........................79
Reproduction du son à faible volume..............80
(AUDIO DRC)
Lecture d’un disque DVD bilingue...................80
(DUAL MONO)
Renforcement des fréquences graves.............81
(SW LEVEL)
Utilisation de la façade.....................................81
(Lift Mode)
Utilisation d’un appareil
optionnel
Raccordement d’un appareil optionnel ......83
Informations complémentaires
Spécifications ............................................86
Caractéristiques du PC....................................88
Liste des codes de langue
(fonction DVD uniquement)........................89
Dépannage ................................................90
Fonction d’auto-diagnostic
(fonction DVD uniquement)........................96
Index..........................................................97
FR
4
Page 93

A propos de ce mode
Consignes de sécurité
d’emploi
• Les instructions contenues dans le présent mode d’emploi
décrivent les commandes de la télécommande. Vous
pouvez également utiliser les commandes de la chaîne, si
elles portent le même nom ou un nom analogue à celles de
la télécommande.
• Les paramètres du menu de commande peuvent varier
suivant la région.
• « DVD » peut être utilisé comme terme générique pour les
DVD VIDEO, les DVD+RW/DVD+R, ainsi que les
DVD-RW/DVD-R.
• Les symboles suivants sont utilisés dans ce manuel.
Symbole
*1 MP3 (MPEG1 Audio Layer 3) est un format standard défini
par ISO/MPEG qui compresse les données audio.
®
est une technologie de compression des fichiers vidéo
*2 DivX
développée par DivX, Inc.
*3 DivX, DivX Certified et les logos associés sont des marques
commerciales de DivX, Inc. et sont utilisés sous licence.
Fonctions disponibles avec les
DVD VIDEO, DVD-R/DVD-RW
en mode vidéo et les DVD+R/
DVD+RW
DVD-R/DVD-RW en mode VR
(enregistrement vidéo)
CD VIDEO (notamment les
Super VCD ou les CD-R/CD-RW
au format CD vidéo ou Super
VCD)
Super Audio CD
CD musicaux ou CD-R/CD-RW
au format de CD musical
les DATA CD (CD-ROM/CD-R/
CD-RW contenant des plages
audio MP3*
1
, des fichiers image
JPEG et des fichiers vidéo
DivX*2*3)
les DATA DVD (DVD-ROM/
DVD-R/DVD-RW/DVD+R/
DVD+RW contenant des plages
audio MP3*
1
, des fichiers image
JPEG et des fichiers vidéo
DivX*2*3)
Cordon d’alimentation
secteur
• Débranchez le cordon
d’alimentation secteur
avant de déplacer la
chaîne. Ne déplacez
jamais la chaîne
lorsque le cordon
d’alimentation secteur est branché. Cela pourrait abîmer le
cordon et provoquer un incendie ou une décharge
électrique.
• Si vous endommagez le cordon
d’alimentation secteur, cela peut
provoquer un incendie ou une
décharge électrique.
– Ne pliez pas et ne tordez pas
exagérément le cordon
d’alimentation secteur. Il se peut
que les conducteurs du noyau
soient mis à nu ou rompus et
créent un court-circuit entraînant
un risque d’incendie ou
d’électrocution.
– Ne modifiez pas et
n’endommagez pas le cordon
d’alimentation secteur.
– Ne posez jamais d’objet lourd sur le cordon
d’alimentation secteur. Ne tirez jamais sur le cordon
d’alimentation secteur.
– Eloignez le cordon d’alimentation secteur des sources
de chaleur.
– Saisissez toujours le cordon par sa fiche lorsque vous le
débranchez.
• Si le cordon d’alimentation secteur est endommagé,
cessez de l’utiliser et demandez à votre centre de service
après-vente Sony de le remplacer.
• N’utilisez pas le cordon d’alimentation fourni avec un
autre appareil.
• Utilisez uniquement un cordon d’alimentation d’origine
Sony et pas un cordon d’une autre marque.
Protection du câble/cordon
d’alimentation secteur
Débranchez le câble/cordon
d’alimentation secteur en tirant
directement sur la fiche. Ne tirez
jamais sur le câble/cordon d’alimentation secteur
proprement dit.
Prise de courant
Pour la prise de courant, n’utilisez jamais une
prise de mauvaise qualité. Insérez la fiche à
fond dans la prise secteur. Si elle n’est pas
solidement insérée, des étincelles peuvent se
produire et provoquer un incendie. Prenez
contact avec votre électricien pour remplacer
cette prise par une prise plus adéquate.
Suite
FR
5
Page 94

Remarques sur l’abaissement/soulèvement de la
façade
• La façade s’élève et s’abaisse
automatiquement lorsque la chaîne est
mise sous/hors tension et lorsque vous
basculez l’entrée alors que « AUTO »
est sélectionné dans « Lift Mode »
(page 82). Vous pouvez aussi abaisser/
relever manuellement la façade en
appuyant sur .
• Pour éviter toute utilisation fortuite,
cette chaîne dispose d’une fonction
« LOCK » (page 82).
• Lorsque vous raccordez d’autres composants sur le côté
de la chaîne (par exemple des connexions AV4), veillez à
ne pas placer de cordon sous la façade pour éviter de les
coincer lors des déplacements de celle-ci.
• Ne touchez pas la façade (particulièrement les zones
entourées d ’un cercle dans l’il lustration ci-contre) p endant
son déplacement. Surveillez tout particulier les jeunes
enfants.
• N’utilisez pas cette chaîne alors que la façade se déplace.
Centres médicaux
Cette chaîne ne doit pas être
installée dans un lieu où sont
utilisés des équipements
médicaux. Cela pourrait entraîner
un mauvais fonctionnement de
ceux-ci.
Transport
• Avant de transporter la chaîne,
procédez de la manière décrite à la
section « Transport de la chaîne »
(page 9) et débranchez tous ses
câbles.
• Pour transporter la chaîne, saisissezla de la manière illustrée ci-contre.
Sinon, la chaîne risque de tomber et
d’être endommagée ou de provoquer des blessures graves.
Si la chaîne est tombée ou a été endommagée, faites-la
vérifier immédiatement par un technicien de service
après-vente qualifié.
• Lorsque vous transportez la chaîne, ne la soumettez pas à
des secousses ou des vibrations excessives. La chaîne peut
tomber, être endommagée et provoquer des blessures
graves.
• Lorsque vous transportez la chaîne pour la porter à réparer
ou lorsque vous déména gez, glissez-la dans son emballage
et son carton d’origine.
• Le transport de la chaîne exige au moins deux personnes.
Aération
• N’obstruez jamais les orifices
d’aération de la chaîne. Cela
pourrait entraîner une surchauffe
et provoquer un incendie.
• Si la chaîne ne dispose pas d’une
bonne aération, elle peut
accumuler poussière et saleté.
Pour une bonne aération,
appliquez les conseils suivants :
– Ne placez pas la chaîne vers l’arrière ou sur le côté.
– N’installez pas la chaîne inversée ou à l’envers.
– N’installez pas la chaîne sur une étagère ou dans un
meuble.
– Ne posez pas la chaîne sur un tapis ou sur un lit.
– Ne couvrez pas la chaîne avec des tissus tels que des
rideaux, pas plus qu’avec des journaux, etc.
• N’installez jamais la chaîne de la façon suivante :
La circulation de
l’air est bloquée.
Mur Mur
La circulation de
l’air est bloquée.
Orifices d’aération
• Ne jamais rien introduire dans les orifices
d’aération, dans l’espace entre l’écran du
téléviseur et la façade ou dans la fente
pour disque. Si un objet métallique ou du
liquide pénétrait dans ces derniers, cela
pourrait provoquer un incendie ou une
décharge électrique.
• Si un objet ou du liquide venait à pénétrer
à l’intérieur du boîtier, débranchez l’appareil et faites-le
vérifier par un personnel qualifié avant de le remettre en
marche.
• N’obstruez pas les orifices de ventilation en posant
quelque chose sur l’appareil. La chaîne est équipée d’un
amplificateur haute puissance. Si les orifices de
ventilation sont bouchés, l’appareil peut surchauffer et
mal fonctionner.
Disposition
• N’obstruez pas la zone dans laquelle la façade se relève et
s’abaisse. Cela pourrait provoquer un dysfonctionnement.
Laissez un espace libre autour de la chaîne, faute de quoi
la circulation d’air peut être inadéquate et entraîner une
surchauffe susceptible de provoquer un incendie, ou
encore d’endommager la chaîne ou la façade.
30 cm
10 cm
Ne placez aucun objet sous la zone dans
laquelle la façade se relève et s’abaisse.
• Ne jamais placer la chaîne dans un
endroit excessivement chaud,
humide ou poussiéreux.
• Ne pas installer la chaîne dans un
endroit accessible aux insectes.
10 cm
Laissez
au moins
cet
espace.
FR
6
Page 95

• Placer la chaîne sur une surface stable et
horizontale. Sinon, la chaîne risque de
tomber et de provoquer des blessures.
• Ne pas installer la cha îne dans un e ndroit
où elle serait en saillie, notamment sur
ou derrière un pilier, ou encore dans un
emplacement où vous pourriez la heurter
avec la tête. En effet, vous risqueriez de vous blesser.
Eau et humidité
• Ne jamais utiliser cette chaîne
près d’un point d’eau – par
exemple près d’une baignoire ou
d’une douche. Ne pas non plus
exposer la chaîne à la pluie, à l’humidité ou à la fumée.
Cela pourrait provoquer un incendie ou l’électrocution.
• Ne pas toucher le cordon
d’alimentation secteur et la chaîne avec
des mains humides. Cela risquerait de
provoquer l’électrocution ou
d’endommager la chaîne.
Humidité et objets inflammables
• Ne pas mouiller la chaîne. Ne jamais
renverser de liquide d’aucune sorte
sur la chaîne. Si un objet liquide ou
solide tombe sur la chaîne, ne la
mettez pas sous tension. Cela
risquerait de provoquer
l’électrocution ou d’endommager la
chaîne.
Contacter un technicien qualifié pour
une vérification immédiate.
• Pour éviter les risques d’incendie, tenir la chaîne à l’écart
d’objets inflammables (bougies, etc.) et de lampes à
incandescence.
Huiles
Ne pas installer cette chaîne dans des restaurants qui utilisent
de l’huile. La poussière imprégnée d’huile peut s’introduire
dans la chaîne et l’endommager.
Chute
Ne pas laisser les enfants
grimper sur la chaîne. Ne
rien suspendre à la chaîne.
Véhicules ou plafonds
Ne pas installer la chaîne dans un
véhicule. Les mouvements du
véhicule risquent de provoquer la
chute de la chaîne ainsi que des
blessures. Ne pas suspendre la
chaîne au plafond.
Bateau ou voilier
Ne jamais installer la chaîne sur un
bateau ou un voilier. Si elle est
exposée à l’eau de mer, un incendie
peut se déclarer ou la chaîne peut
être endommagée.
Utilisation à l’extérieur
• Ne pas exposer la chaîne aux
rayons directs du soleil. La
chaîne risque de chauffer et
d’être endommagée.
• Ne jamais installer la chaîne à
l’extérieur.
Câblage
• Débrancher le cordon d’alimentation secteur pendant les
raccordements des câbles. Pour votre propre sécurité,
assurez-vous que le cordon d’alimentation secteur est
débranché lorsque vous réalisez des connexions.
• Veiller à ne pas trébucher dans les câbles. Cela pourrait
endommager la chaîne.
Nettoyage
• Débrancher le cordon d’alimentation
secteur avant de nettoyer la fiche secteur et
la chaîne. Si elle est branchée, vous pouvez
recevoir une décharge électrique.
• Nettoyer régulièrement la fiche du cordon
d’alimentation secteur. Si la fiche
accumule de la poussière et reçoit de
l’humidité, l’isolation peut se détériorer et un incendie se
déclarer.
Orages
Pour votre sécurité ne touchez au cune
des parties de la chaîne, pas plus que
le cordon d’aliment ation secteur ou le
câble de l’antenne pendant les orages.
Panne exigeant une intervention
Si la surface de l’écran se fendille, ne touchez pas la chaîne
avant d’avoir débranché le cordon d’alimentation secteur.
Faute de quoi, vous pourriez recevoir une décharge
électrique.
Entretien
Ne pas ouvrir le boîtier de
l’appareil. Confier la chaîne à
un technicien qualifié
uniquement.
Petits accessoires amovibles et enfichables
Conserver les accessoires hors de la portée des enfants. S’ils
les avalent, ils risquent de suffoquer ou d’étouffer. Appeler
immédiatement un médecin.
Verre cassé
Ne rien jeter sur la chaîne. Le verre de
l’écran pourrait exploser lors de l’impact
et provoquer des blessures graves.
Suite
FR
7
Page 96

Au repos
Pour des raisons de sécurité et
de protection de
l’environnement, il est
conseillé de ne pas laisser la
chaîne en mode de veille
lorsqu’elle n’est pas utilisée.
Débranchez-la du secteur.
Toutefois, certaines chaînes possèdent des fonctionnalités
dont le bon fonctionnement exige que l’appareil demeure
sous tension lorsqu’il est en mode de veille. Si cela
s’applique à votre appareil, vous trouverez les instructions
correspondantes dans le présent manuel.
Regarder la télévision
• Pour regarder confortablement la télévision, nous vous
conseillons de vous trouver à une distance du téléviseur
égale à quatre à sept fois la diagonale de l’écran.
• Regarder la télévision dans une pièce modérément
éclairée ou peu éclairée soumet vos yeux à un effort. Par
ailleurs, fixer l’écran pendant de longs moments entraîne
aussi une fatigue pour les yeux.
Réglage du volume
• Maintenez le volume sonore à un niveau qui ne gêne pas
les voisins. Le son se transmet très facilement pendant la
nuit. Nous vous conseillons donc de fermer les fenêtres ou
d’utiliser un casque.
• Si vous utilisez un casque, réglez le volume de façon à
éviter un niveau sonore excessif qui pourrait altérer votre
capacité auditive.
• N’augmentez pas le volume lorsque vous écoutez un
passage avec de très faibles niveaux d’entrée ou sans
signal audio. Vous risqueriez d’endommager les enceintes
lorsqu’un passage caractérisé par un niveau sonore de
crête est lu soudainement.
Surcharge
Cette chaîne est conçue pour
fonctionner sur une alimentation de
220 – 240 V CA uniquement. Prenez
soin de ne pas brancher un trop grand
nombre d’appareils sur la même prise
de courant, ce qui pourrait provoquer
un incendie ou une décharge électrique.
Chaleur
Ne touchez pas la surface de la chaîne. Elle reste chaude un
certain temps après la mise hors tension de la chaîne.
Corrosion
Si vous utilisez cette chaîne au bord de la mer, la salinité peut
faire rouiller les parties métalliques et causer des dégâts
internes ou provoquer un incendie. Elle peut aussi raccourcir
la durée de vie de la chaîne. Si la chaîne doit être soumise à
l’une de ces conditions, il convient de prendre des mesures
qui réduiront l’humidité et la température du lieu dans lequel
elle est placée.
Précautions
Sécurité
• L’appareil n’est pas déconnecté du secteur tant qu’il reste
branché sur la prise secteur, même si l’appareil
proprement dit a été mis hors tension. Pour déconnecter
totalement la chaîne, débranchez la fiche de la prise
secteur.
• Débranchez l’appareil de la prise murale si vous prévoyez
de ne pas l’utiliser pendant une longue période.
Ecran LCD
• Bien que l’écran LCD soit le fruit d’une technologie de
pointe et que 99,99 % ou plus des pixels sont efficaces,
des points noirs ou des points lumineux (rouges, bleus ou
verts) peuvent apparaître en permanence sur l’écran LCD.
Ceci est une propriété structurelle du panneau LCD et ne
constitue pas un problème de fonctionnement.
• Ne pas exposer la surface de l’écran LCD à la lumière
directe du soleil. Cela pourrait endommager la surface de
l’écran.
• Ne pas appuyer sur le filtre avant, ne pas l’égratigner et ne
pas placer d’objets sur cette chaîne. L’image pourrait être
instable ou le panneau LCD être endommagé.
• Si cette chaîne est utilisée dans un environnement froid,
l’image peut apparaître sale ou sombre.
Ce n’est pas le signe d’une défaillance. Ce phénomène
disparaît au fur et à mesure que la température augmente.
• Une image rémanente peut apparaître lorsque des images
fixes sont affichées en continu. Elle peut disparaître au
bout d’un certain temps.
• L’écran et le boîtier se réchauffent lorsque la chaîne est en
cours d’utilisation. Ceci n’a rien d’anormal.
• L’écran LCD contient une petite quantité de cristaux
liquides et de mercure. Le tube fluorescent utilisé dans
cette chaîne contient également du mercure. Respectez les
réglementations locales en vigueur concernant
l’élimination de cet équipement.
Lampe fluorescente
Cette chaîne utilise une lampe fluorescente spéciale comme
source lumineuse. Si l’image à l’écran devient sombre,
tremblote ou ne s’affiche pas, la lampe fluorescente est usée
et l’écran LCD doit être remplacé. Pour cela, consultez un
technicien qualifié.
Installation de la chaîne
• N’installez pas la chaîne dans des lieux sujets à des
températures extrêmes, par exemple en plein soleil, près
d’un radiateur, d’une bouche d’air chaud, ne l’exposez pas
non plus à une poussière excessive, à des vibrations
mécaniques ou des chocs. Si la chaîne est exposée à de
fortes températures, elle peut chauffer excessivement et
ceci peut entraîner la déformation des pièces moulées ou
un mauvais fonctionnement.
• Pour obtenir une image nette, n’exposez pas directement
l’appareil à une lumière intense ou aux rayons directs du
soleil. Si possible, utilisez une source de lumière dirigée
du plafond vers le sol.
• N’installez pas les appareils optionnels trop près de la
chaîne. Laissez un intervalle de 30 cm au moins. Si un
magnétoscope est installé devant ou à côté de la chaîne,
l’image risque d’être déformée.
FR
8
Page 97

• Une déformation de l’image et/ou un son bruyant peuvent
se produire si la chaîne est placée à proximité immédiate
d’un appareil émettant des rayonnements
électromagnétiques.
• Prévoyez une circulation d’air suffisante de manière à
éviter toute surchauffe interne.
• Ne placez pas l’appareil sur une surface moelleuse
(comme un tapis, une couverture, etc.) ou près de tissus
(comme un rideau ou une tenture) risquant de bloquer les
fentes d’aération.
• N’installez pas l’appareil en position inclinée. L’appareil
est conçu pour fonctionner uniquement à l’horizontale.
• Gardez l’appareil et les disques à l’écart de tout
équipement contenant des aimants puissants, par exemple
des fours à micro-ondes ou de puissants haut-parleurs.
• Si vous transportez l’appareil directement d’une pièce
froide dans une pièce chaude, de l’humidité peut
apparaître par condensation à l’intérieur de la chaîne et
endommager l’optique. Lorsque vous installez l’appareil
pour la première fois, ou lorsque vous le déplacez d’un
endroit froid à un endroit chaud, attendez environ
30 minutes avant de le faire fonctionner.
Traitement et nettoyage du boîtier et de la surface de
l’écran de la chaîne
La surface de l’écran est recouverte d’un enduit spécial
destiné à prévenir l’éblouissement par des reflets lumineux.
Pour éviter toute dégradation du matériau ou du revêtement
de l’écran, respectez les précautions suivantes.
• N’exercez pas de pression et ne rayez pas l’écran avec des
objets durs. Ne jetez jamais rien sur l’écran. Cela pourrait
l’endommager.
• Ne touchez pas la surface de l’écran alors que la chaîne a
fonctionné de manière continue pendant une période
prolongée, car l’écran est alors chaud.
• Nous vous conseillons d’éviter le plus possible de toucher
la surface de l’écran.
• Pour ôter la poussière du boîtier ou de la surface de
l’écran, frottez délicatement avec un linge doux. En cas de
saleté tenace, frottez avec un linge doux légèrement
imprégné d’une solution à base de détergent doux dilué.
Vous pouvez laver et réutiliser le linge doux.
• N’utilisez jamais aucune éponge abrasive, produit de
nettoyage alcalin/acide, poudre à récurer ou solvant
volatil, qu’il s’agisse d’alcool, d’essence, de diluant ou
d’insecticide. L’utilisation de ces produits ou tout contact
prolongé avec des matériaux en caoutchouc ou en vinyle
peut endommager la surface de l’écran et le matériau du
boîtier.
Pour toute question ou tout problème concernant votre
chaîne, n’hésitez pas à consulter votre revendeur Sony le
plus proche.
• Avec le temps, la poussière peut s’accumuler sur les
ouvertures d’aération. Pour une ventilation correcte, nous
vous conseillons d’aspirer régulièrement la poussière (une
fois par mois).
Installation
En cas de volume élevé sur de longues périodes, le boîtier
devient chaud au toucher. Il ne s’agit pas d’un
dysfonctionnement. Cependant, il est conseillé de ne pas le
toucher.
A propos du nettoyage des disques et des produits de
nettoyage des disques/lentilles
N’utilisez pas de disque de nettoyage ou de produit
de nettoyage des disques/lentilles (liquide ou
aérosol) disponible dans le commerce. Ils risquent
d’altérer le bon fonctionnement de l’appareil.
Transport de la chaîne
Lorsque vous transportez la chaîne, appliquez la procédure
ci-dessous afin de protéger le mécanisme interne.
1 Appuyez plusieurs fois sur (sélecteur d’entrée)
pour sélectionner « DVD ».
2 Vérifiez que le disque est retiré de la chaîne.
3 Appuyez simultanément sur les touches x (arrêt) et
1 de la chaîne. « MECHA LOCK » apparaît sur
l’affichage du panneau frontal. La façade est à
présent en position de transport (abaissée).
4 Débranchez le cordon d’alimentation de la prise
secteur.
Remarques sur les disques
Manipulation des disques
• Pour que les disques restent propres, tenez-les par la partie
périphérique. Ne touchez jamais la surface.
• Ne collez ni papier, ni ruban adhésif sur le disque.
• N’exposez pas les disques au rayonnement direct du soleil
ou à des sources de chaleur, telles que des conduits de
chauffage et ne les laissez pas dans une voiture garée en
plein soleil étant donné que la température à l’intérieur de
l’habitacle risque d’augmenter considérablement.
• Après avoir lu un disque, rangez-le dans son boîtier.
Entretien
• Avant de lire un disque, nettoyez-le à l’aide d’un chiffon
de nettoyage.
Essuyez les disques en allant du centre vers l’extérieur.
• N’utilisez pas de solvants, tels que la benzine, les diluants,
les nettoyants disponibles dans le commerce ou les sprays
antistatiques destinés aux disques en vinyle.
Cet appareil peut uniquement lire les disques de forme
circulaire standard. L’utilisation d’un autre type de disque
(par exemple en forme de carte, de cœur ou d’étoile) peut
entraîner un dysfonctionnement.
N’utilisez pas de disque accompagné d’un accessoire
disponible dans le commerce, comme une étiquette ou un
anneau.
FR
9
Page 98

Guide des opérations
Utilisation de la télécommande
de base de cette chaîne
Cette chaîne est un téléviseur équipé d’un lecteur de
DVD. Sa façade est équipée d’enceintes 2.1 canaux.
Vous pouvez bénéficier d’un son exaltant de haute
qualité provenant de la télévision, d’un DVD, de la
radio FM et d’autres composants raccordés.
A propos de la façade
A
B
C
D
E
F
Façade
Lorsque vous sélectionnez « AUTO » dans « Lift
Mode » (page 82), la façade se relève/s’abaisse en
fonction de l’entrée sélectionnée. Par exemple,
lorsque vous regardez la télévision ou un DVD, ou
lorsque vous mettez la chaîne sous tension, la façade
s’abaisse. Inversement, si vous écoutez la radio FM ou
mettez la chaîne hors tension, la façade se relève.
Vous pouvez également actionner manuellement la
façade en appuyant sur .
x Touches de sélection directe de l’entrée D
• TV : fait basculer la sélection de l’entrée TV vers
A-TV ou TNT (selon la dernière entrée
sélectionnée).
• DIGITAL* : fait basculer la sélection de l’entrée
vers la diffusion numérique (TNT).
• ANALOG : fait basculer la sélection de l’entrée
vers la diffusion analogique (A-TV).
• DVD : fait basculer la sélection de l’entrée vers
DVD.
• FM : fait basculer la sélection de l’entrée vers FM.
* Remarquez qu’il est possible que cette touche ne soit pas
disponible dans certains pays.
x Touche de sélection de l’entrée A
Modifie la sélection de l’entrée. A chaque pression sur
cette touche, la sélection de l’entrée change comme
suit.
TV (A-TV ou TNT*) t AV1 t AV2 t DVD t
AV4 t PC t HDMI t TV (A-TV ou TNT*)
t........
10
FR
Page 99

Remarque
Lorsque vous avez appuyé sur la touche TV C, si vous
appuyez sur la touche de sélection de l’entrée A, l’entrée ne
bascule pas sur AV1, mais revient à son état antérieur à
l’appui de la touche TV C.
* Remarquez qu’il est possible que la sélection directe ne soit pas
disponible dans certains pays.
x Touche de sélection automatique de l’entrée F
Si le signal d’entrée provient d’une source autre qu’un
DVD et que vous appuyez sur la touche Z de la chaî ne
ou sur H, le DVD est automatiquement sélectionné
comme entrée.
Utilisation du menu
Cette chaîne possède différents types de menus :
•TV: TV MENU
• DVD : DVD MENU
DVD TOP MENU
DVD DISPLAY
•FM: FM MENU
Ces menus sont disponibles lorsque l’une ou l’autre
entrée est sélectionnée.
• TV/DVD/FM: AMP MENU
x Touches CURSOR MODE B
Lorsque l’une de ces touches s’allume, vous pouvez
utiliser son menu (</M/m/,/).
TV : s’allume lorsque l’entrée TV est sélectionnée à
l’aide de la touche TV (touche de sélection directe de
l’entrée
D) ou de la touche TV MENU.
DVD/FM : s’allume lorsque l’entrée DVD ou FM est
sélectionnée à l’aide des touches DVD, FM (touche de
sélection directe de l’entrée
MENU.
Si vous ne pouvez pas utiliser les touches </M/m/
,/
E, appuyez sur la touche CURSOR MODE
B (si elle n’est pas allumée), puis utilisez les touches
</M/m/,/ E.
Remarques
• L’état affiché par les touches CURSOR MODE devient
TV lorsque vous appuyez sur les touches suivantes :
(Les numéros entourés font référence à l’illustration de la
télécommande, page 12).
4 – Chaîne précédente
5 DIGITAL*/ANALOG (sélection directe de
l’entrée)
6 Touches de couleur
* – Texte numérique désactivé
– EPG (Digital Electronic Programme
*
Guide - Guide électronique numérique des
programmes)
* – Favoris
/ – Texte
qj – Arrêt sur image
wa / – Infos/Affichage du texte
D) ou de la touche DVD
• L’état affiché par les touches CURSOR MODE devient
DVD/FM lorsque vous appuyez sur les touches suivantes :
(Les numéros entourés font référence à l’illustration de la
télécommande, page 12).
8 DVD DISPLAY
qd AMP MENU
FM MENU
qg PICTURE NAVI
ql DVD TOP MENU
* Remarquez qu’il est possible que cette touche ne soit pas
disponible dans certains pays.
Suite
11
FR
Page 100

Présentation de la
télécommande
ws
wa
w;
ql
qk
qj
qh
1
2
3
4
5
6
7
8
9
0
qa
qs
qd
qf
qg
Opérations courantes
1 / – Sélecteur d’entrée/Maintien du texte
• En mode TV (page 27) : permet de sélectionner
la source d’entrée à partir de l’appareil connecté
à la chaîne.
• En mode Texte (page 23) : maintient l’affichage
de la page en cours.
• En mode TV/DVD/FM (page 10) : change la
source dventrée.
– Relever/abaisser la façade (page 81)
"/1 – Activité/veille (page 22)
Met temporairement la chaîne hors tension. Le
témoin 1 (veille) de la chaîne (situé à l’avant de
la façade) s’allume. Appuyez à nouveau sur cette
touche pour mettre la chaîne sous tension et
quitter le mode de veille.
– Minuterie de veille (page 47)
3 Touches numériques
• En mode TV : permettent de sélectionner les
chaînes. Pour les numéros de chaînes 10 et
supérieurs, saisissez le deuxième chiffre dans les
deux secondes.
• En mode Texte : permettent de saisir le numéro
de page à trois chiffres afin de la sélectionner.
• En mode DVD : permettent de sélectionner
l’élément, le titre, le chapitre, etc. et de saisir le
mot de passe ainsi que le code de zone.
• En mode FM : permettent de choisir le numéro
de présélection.
La touche 5 possède un point tactile.*
9 </M/m/,/ – Curseur, OK, ENTER (page 18)
qs % – Silencieux (page 22)
2 +/– – Volume +/–
qd DIMMER (page 79)
qh SOUND FIELD (page 31)
1
Pour commander le téléviseur
12
FR
Avec le couvercle ouvert.
2 TV (CURSOR MODE) (page 11)
4 – Chaîne précédente
Permet de revenir à la chaîne que vous avez
regardée précédemment (pendant plus de
cinq secondes).
2
5 DIGITAL*
l’entrée) (page 22)
6 Touches de couleur (page 24)
- Guide électronique numérique des
programmes) (page 24)
/ANALOG (sélection directe de
2
*
– Texte numérique désactivé (page 23)
2
– EPG (Digital Electronic Programme Guide
*
2
– Favoris (page 26)
*
 Loading...