

Page 1
Tablet Device Help Guide
Read This First
Downloading the Help guide
Turning On or Shutting Down Your Tablet Device
Turning the Screen On/Off (Sleep Mode)
Setting the Time that Elapses Before the Screen Turns Off (Goes to Sleep)
Notes on Using the AC Adapter
Charging the Battery
Notes on Charging
Installing/Removing the Battery Pack
Touch Screen Operations
Notes on the Screen
Turning On/Off the Wi-Fi Function
Connecting to Wi-Fi
Connecting by Pressing the WPS Button on the Wi- Fi Router
Connecting from the Wi-Fi Network List
Notes on Using the Wi-Fi Function
Turning On/Off the Bluetooth Function
Paring with a Bluetooth Device
Notes on Using the Bluetooth Function
Enabling Mobile Communications
Disabling Mobile Communications
Inserting/Removing a SIM Card
Notes on the SIM Card
Setting Up an Access Point
Using Location Services
Notes on GPS Function
Removing/Inserting a microSD Memory Card
Notes on microSD Memory Cards
Compatibility of microSD Memory Cards
Connecting to a Computer
Parts and Controls
Checking the Supplied Items
Notes on Holding Your Tablet Device
Resetting Your Tablet Device
Reverting to Factory Default (Initializing Data)
Page 2

How to Maintain Battery Life
Adjusting the Screen Brightness
Notes on Using Voice Communications Apps
Notes on Use
Checking the Android Version
Updating Android to the Latest Version
Using the Home Screen
Sharing the Tablet Device with Family or Friends (Guest Mode)
Switching to Guest Mode
Adding Apps or Widgets to the Home Screen
Using the Apps & Widgets List
Using “Small Apps”
Searching with Google
Confirming Download or Update Information on the Status Bar
Configuring Screen Rotation
Configuring to Lock the Screen
Entering Text
Selecting Text
Configuring a Google Account
Backing Up Data on Your Tablet Device
Importing Content from Your Computer
Supported Formats
Changing the Settings
Checking the Free Space
Synchronizing the Account
List of Apps
Using the Calendar
Shooting Photos/Movies
Notes on Recorded Photos/Movies
Configuring an E-mail Account
Composing/Sending an E-mail
Receiving/Deleting E -mails
Browsing Websites
Adding Bookmarks
Accessing Sites from Bookmarks/Access History
Using the Calculator
Registering Contacts
Grouping/Joining Contacts
Displaying the Clock
Sharing Moving Experiences via Social Networks
Registering an Account with the Social Feed Reader
Adding/Deleting an Account for the Social Feed Reader
Setting Filters for the Social Feed Reader
Reading/Writing Posts on the Social Feed Reader
Searching for Posts (Articles) or Friends on the Social Feed Reader
Using Sony Select
Page 3

Playing Photos/Videos
Sharing Photos/Videos
Editing Photos
Checking the Wi-Fi Connection
Reading Digital Books
Movies
WALKMAN
Album
Socialife
Using the “Video Unlimited” Video Delivery Service
Using the “Music Unlimited” Music Delivery Service
Using “Gmail”
Searching for Apps
Using “Media Go”
Using “Video chat for Sony Tablet P - plugged into Skype(TM)”
Support for PlayStation(R) in General
Purchasing Games from PS Store
Ustream
Evernote
Foursquare
Crackle
Top HD Games - Gameloft
PlayMemories Online
Xperia Link
Trademarks
Specifications
The tablet device does not turn on.
The tablet device starts up slowly.
The battery does not charge.
The charge indicator does not appear.
Battery consumption increases.
The charge indicator blinks.
Heat builds up in the tablet device, the battery, and the AC adapter while the tablet device is in use or being
charged.
The screen is dark.
Some points on the screen are not displayed properly.
A Bluetooth(R) device was not found.
Your tablet device becomes slow or is not performing as expected.
Your tablet device does not work.
Your tablet device needs to be reset.
The sound from the speaker is distorted.
The screen brightness is not stable.
The screen brightness cannot be adjusted.
The screen brightness does not adjust automatically as expected.
The brightness of the upper and lower screen is different.
The color of the upper and lower screen is different.
The screen disappears/darkens unexpectedly.
The touch screen does not work as expected.
Page 4

The date and time are reset.
You want to turn off the tap sound (operation sound).
The screen does not rotate when you turn your tablet device.
You want to turn off screen rotation.
You want to deactivate the lock screen function/use your tablet device without locking the screen.
A headset cannot be used.
A file cannot be displayed or does not play.
The video is interrupted/is jumpy/is not synchronized with the audio.
Your tablet device cannot receive GPS signals or takes a long time for positioning.
The results of GPS positioning are different from the actual location.
The photos and movies taken with the camera are blurry.
Some applications are not displayed in the selected language.
Some applications cannot be uninstalled.
A website for mobile phones or smartphones is displayed.
You cannot use Internet telephone or voice chat.
Your tablet device cannot connect to a Wi-Fi network.
Page 5
Read This First
This Help guide is for Android version 4.0.3 (release5).
Congratulations on your purchase of a Sony tablet device.
Before you start using your tablet device, read the supplied Important Information (safety instructions). This Help
guide explains how to operate your tablet device and apps. You can download the Help guide (PDF file) to the
tablet device [Details].
Charging the battery
The battery charge level may be low when you purchase your tablet device. Charge the battery before you start
using your tablet device [Details].
About software (Android version) updates
When you update the software (Android version), be sure to install the latest version of each app. Otherwise,
some apps may not start. To find a newer version of apps, check Play Store [Details].
About Google account
Having a Google account enables you to use Google services such as Google Play Store (free registration).
Using a Google account, you can sync Google services you use on your computer, or other devices with apps on
the tablet device such as mail, calendar and user applications [Details].
Note
Some models are not available in some countries/regions.
Related Topic
Downloading the Help guide
Charging the Battery
Configuring a Google Account
Checking the Android Version
Searching for Apps
Page 6
Downloading the Help guide
You can download the PDF Help guide to your tablet device.
Install the Reader by Sony app or another PDF reader app to view the PDF file on your tablet device.
1. Tap “Download Help guide (PDF file)” from the top page of the Help guide.
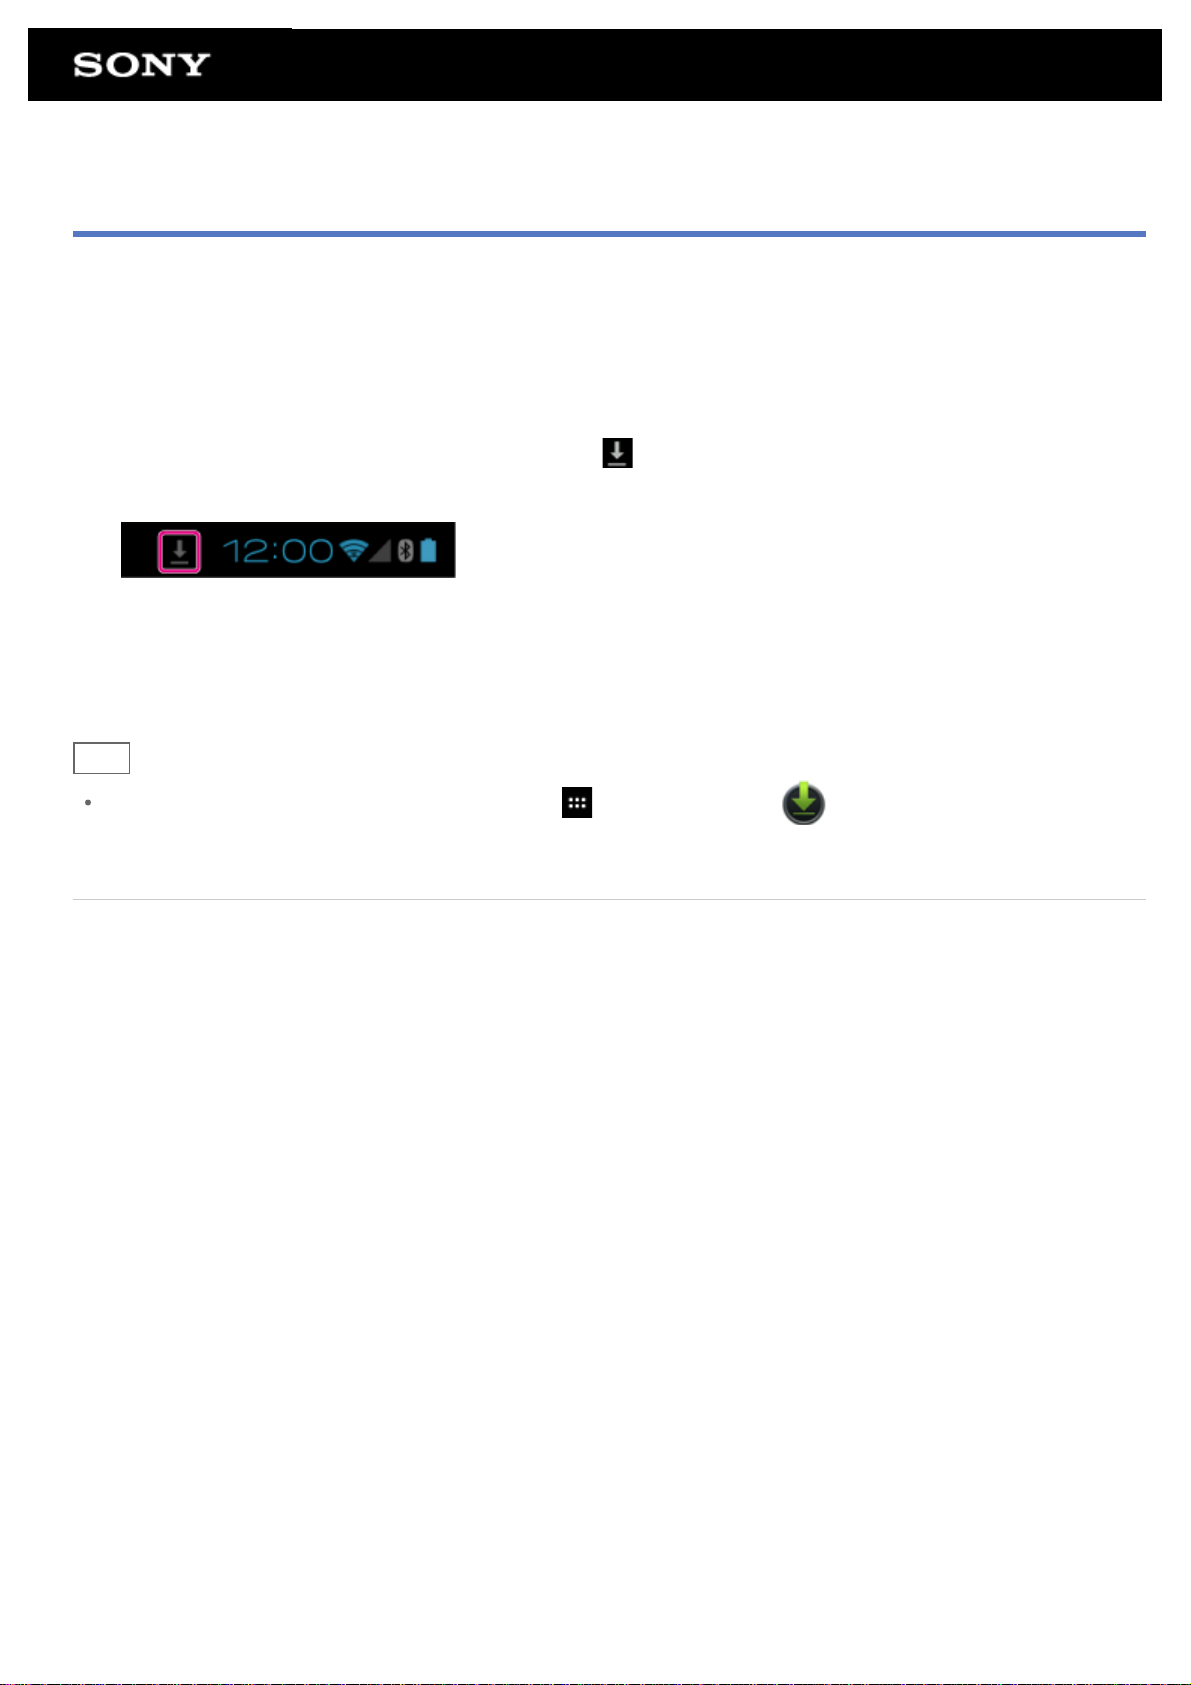
2. After downloading the Help guide has finished and
screen, tap the status bar.
The notification panel is displayed.
3. Tap “helpguide_pdf.pdf.”
Select and tap an application with which to view the PDF file, and the Help guide will be displayed.
Hint
You can also display the Help guide by tapping [ Apps & Widgets] - [ Downloads] and selecting
“helpguide_pdf.pdf.”
Related Topic
Searching for Apps
Confirming Download or Update Information on the Status Bar
appears on the status bar at the bottom right of the
Page 7
Turning On or Shutting Down Your Tablet Device
Turning on your tablet device
1. Install the battery pack to your tablet device, and then charge the tablet device.
2. Lift the touch screen lid.
3. Press and hold the power button for three seconds.
When you use the tablet device for the first time, set up the tablet device by following the on-screen
instructions.
Note
Do not use your tablet device without installing the battery pack as the tablet device may malfunction without
the battery pack installed.
If you press the power button with the touch screen lid closed, your tablet device will not turn on.
In the default setting, if you do not operate the tablet device for a certain period of time, the screen turns off
and becomes locked. Press the power button again to display the screen, and then unlock it.
Shutting down your tablet device
It is recommended that you turn off (shut down) the tablet device if you will not use it for a long time.
1. Press and hold the power button until a confirmation screen appears.
2. Tap [OK].
The tablet device will automatically turn off in a few seconds.
Note
If you turn off the tablet device while downloading or transferring data, that data may be damaged.
If your tablet device will not shut down by following the procedure described above, press and hold the power
button for about 10 seconds to force it to shut down.
Related Topic
Parts and Controls
Charging the Battery
Turning the Screen On/Off (Sleep Mode)
Setting the Time that Elapses Before the Screen Turns Off (Goes to Sleep)
Resetting Your Tablet Device
Page 8
Turning the Screen On/Off (Sleep Mode)
In the default setting, if you do not operate the tablet device for a certain period of time, the screen turns off and
becomes locked. To turn on the screen, press the power button to display the screen, and then unlock it.
When you are not using the tablet device, you can turn off the screen (switch to sleep mode) manually.
1. Press the power button.
The screen goes to sleep. The power is not completely turned off. To deactivate sleep mode and turn on the
screen, press the power button again, then unlock the screen.
Hint
You can change the time that elapses before the screen turns off (goes to sleep). You can prevent the screen
from becoming locked and also change the pattern for the screen lock.
Related Topic
Setting the Time that Elapses Before the Screen Turns Off (Goes to Sleep)
Configuring to Lock the Screen
Page 9
Setting the Time that Elapses Before the Screen Turns Off (Goes
to Sleep)
In the default setting, the screen automatically goes to sleep if the tablet device has not been operated for a
certain period. You can change the time that elapses before the screen turns off.
1. Tap [
2. Select and tap the time that elapses before your tablet device goes to sleep.
Hint
You can set the screen to not turn off even after the set time elapses only when charging. Tap [ Apps &
Widgets] - [
Related Topic
Changing the Settings
Apps & Widgets] - [ Settings] - [Display] - [Sleep].
Settings] - [Developer options], and then add a check mark on [Stay awake].
Page 10
Notes on Using the AC Adapter
Use the AC adapter supplied with your tablet device or a genuine Sony AC adapter. Do not use any other AC
adapter as it may cause malfunctions.
Do not connect the AC adapter to a power conversion device such as a travel power converter. Doing so may
cause overheating or a malfunction.
Cease using the AC adapter cable if it becomes damaged.
Related Topic
Notes on Charging
Page 11
Charging the Battery
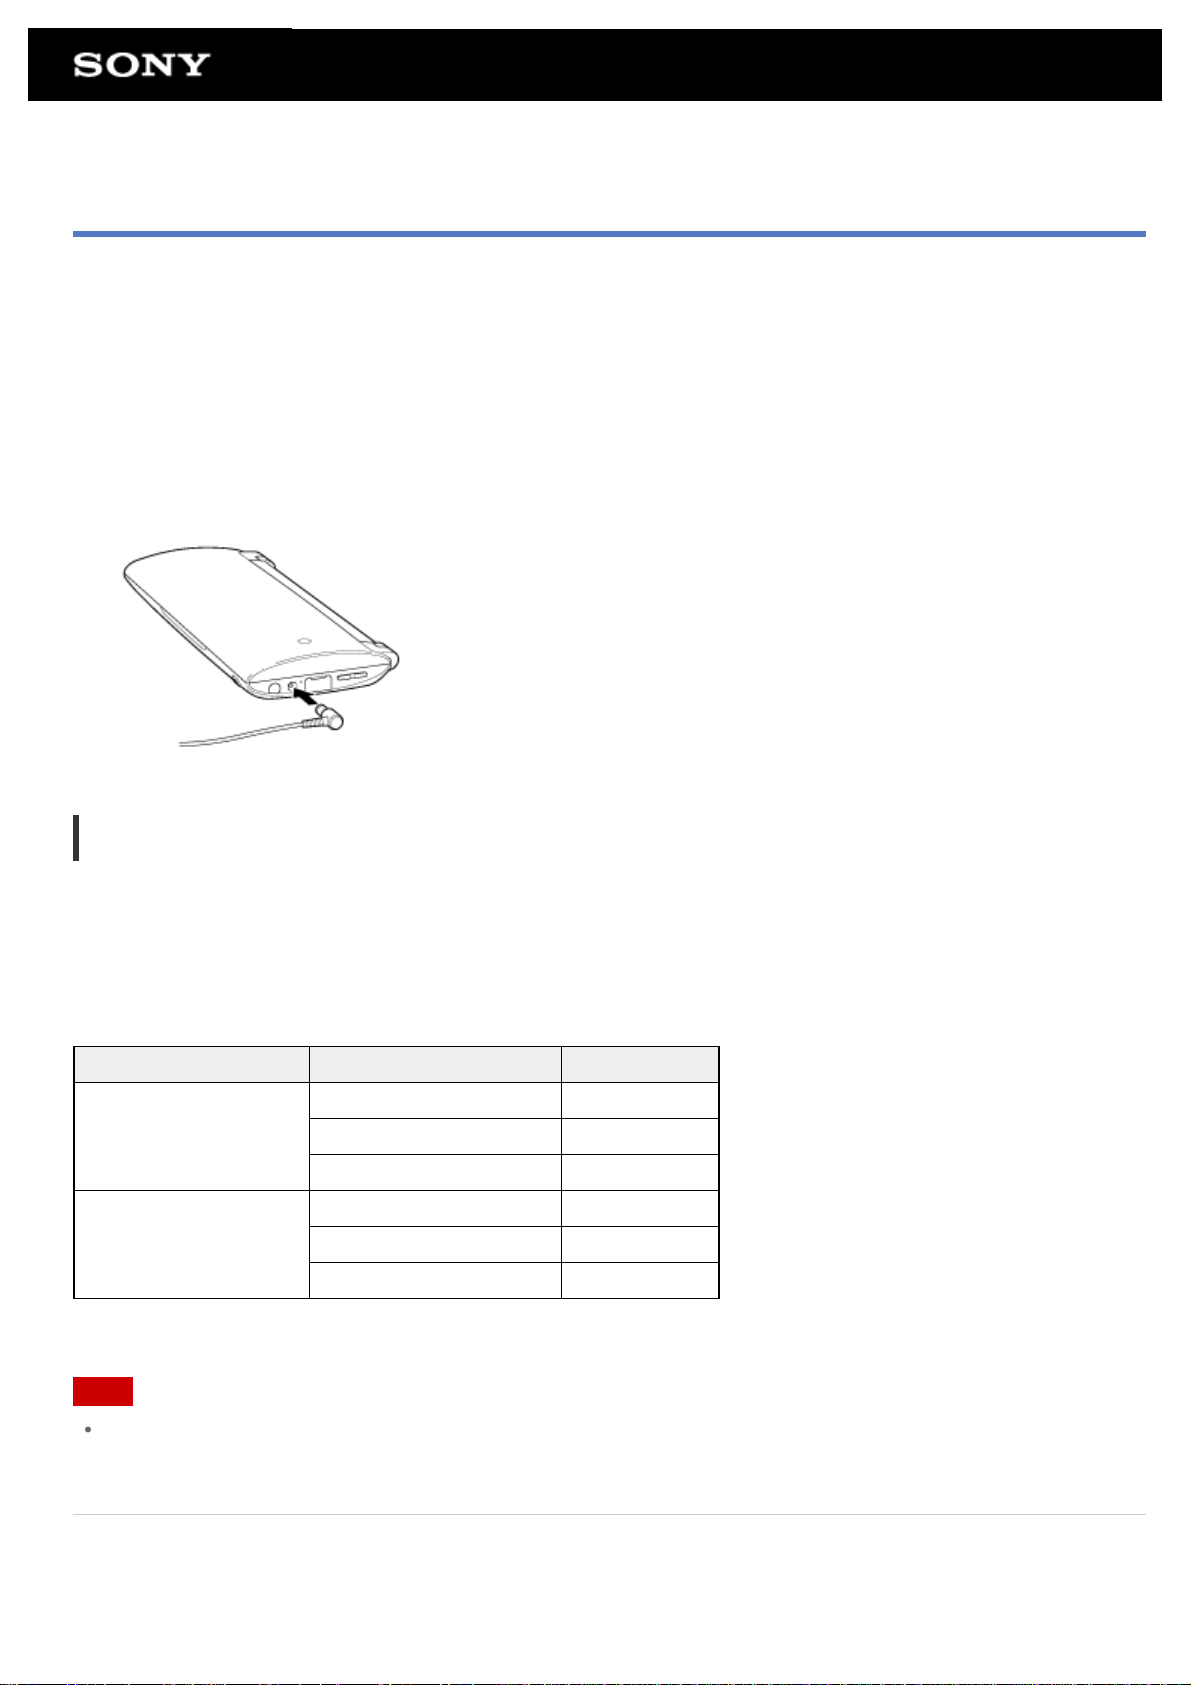
The battery charges while your tablet device is plugged in. Charging time will vary depending on how you use
your tablet device.
1. Install the battery pack into your tablet device [Details].
2. Plug the AC power cord (mains lead) into the AC adapter.
3. Plug the other end of the AC power cord (mains lead) into an AC outlet (wall socket).
4. Plug the AC adapter into the charge connector of your tablet device.
The charge indicator shows the battery charging status.
Checking the remaining battery level/charging status
You can check the remaining battery level with the icon displayed on the status bar on the Home screen.
The charge indicator tells you the charging status. The charge indicator lights up in different colors, depending on
the remaining battery level.
Charging status Remaining battery level Display status
Low (0 - 15 %) Red
With the AC adapter
Without the AC adapter
Note
Mid (16 - 89 %) Orange
Full (90 - 100 %) Green
Low (0 - 15 %) Red flashing
Mid (16 - 89 %) Off
Full (90 - 100 %) Off
The charge indicator flashes in red when the battery level becomes low and the tablet device requires
charging to continue operation.
Related Topic
Parts and Controls
Specifications
Page 12

Confirming Download or Update Information on the Status Bar
Notes on Using the AC Adapter
Notes on Charging
Page 13

Notes on Charging
Battery pack
The supplied battery pack is designed specifically for your tablet device.
For your safety, use only the supplied battery pack or an optional battery pack specified by Sony.
Performance and safety are not guaranteed if you use an AC adapter other than the AC adapter designed for
the tablet device.
Depending on the ambient temperature or how you use your tablet device, the battery may not be charged or
it may take a long time to charge the battery.
Do not charge the battery near fire or in direct sunlight.
Your tablet device will run on AC power when it is plugged in with a battery pack installed.
The supplied battery pack is not fully charged when shipped.
Heat builds up in the battery while it is in use or being charged. This is normal and is not cause of concern. If
your tablet device or the AC adapter becomes abnormally hot, shut down your tablet device and unplug the
AC power cord (mains lead) from the AC adapter.
Do not use your tablet device without the battery pack inserted.
Battery discharge
After charging, the battery gradually loses its charge even if it is not used. If it is left unused for a long time,
the battery charge may be depleted. We recommend recharging the battery before use.
If you do not use your tablet device for an extended period of time, fully charge the battery every six months.
Battery life
Battery life varies depending on usage, settings, and temperatures.
Battery deterioration and replacement
The capacity of the battery pack gradually declines through repeated recharging and discharging. As a result,
the battery life may become short or the battery pack may not perform optimally even when fully charged. If
the battery life has become short, replace it with a new battery pack specified by Sony.
If the battery pack quickly runs out of power after being fully charged or will no longer accept a charge,
replace it with a new one.
Page 14
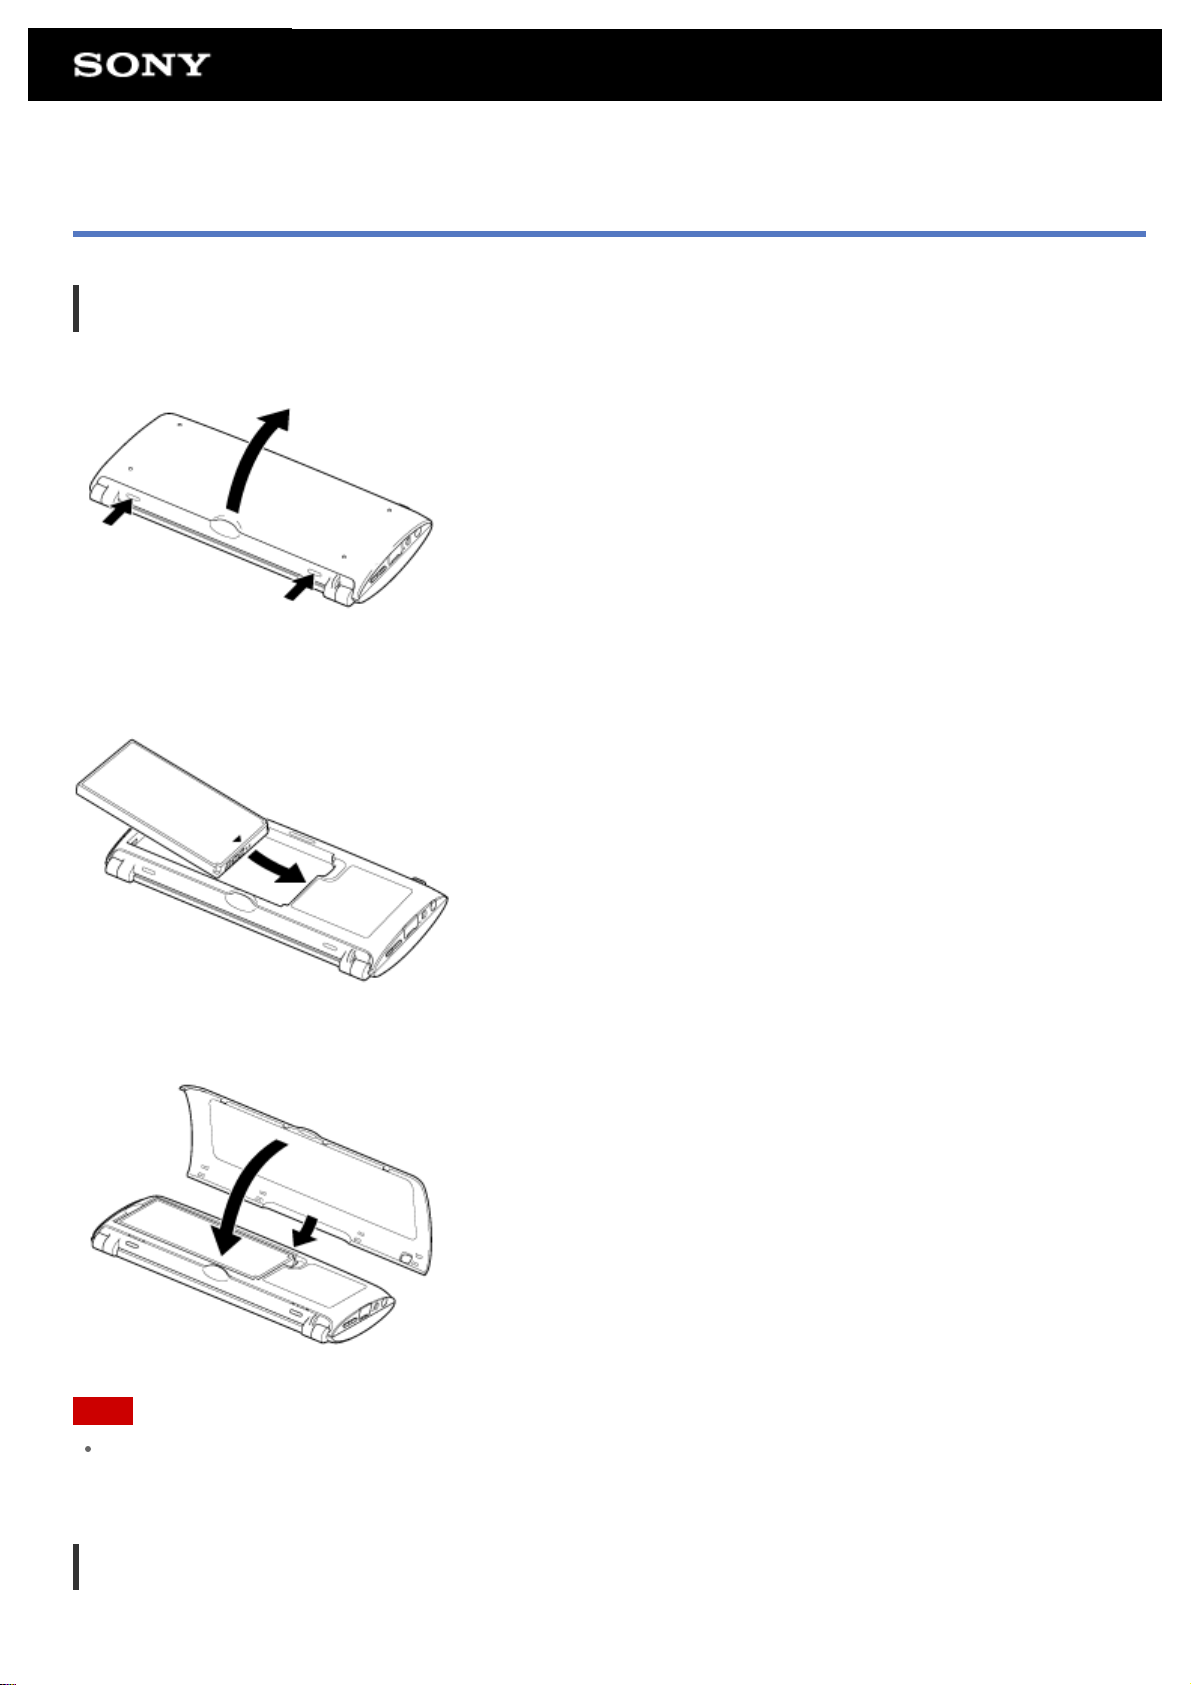
Installing/Removing the Battery Pack
To install the battery pack
1. Press the two buttons to open the bottom cover.
2. Orient the contacts as shown, and then insert the battery pack.
3. Close the bottom cover.
Note
If you insert the battery pack into your tablet device with the touch screen lid opened, the backlight of the LCD
screen may be lit for a few seconds and then turn off. This does not indicate a malfunction.
To remove the battery pack
1. Press the two buttons to open the bottom cover.
Page 15
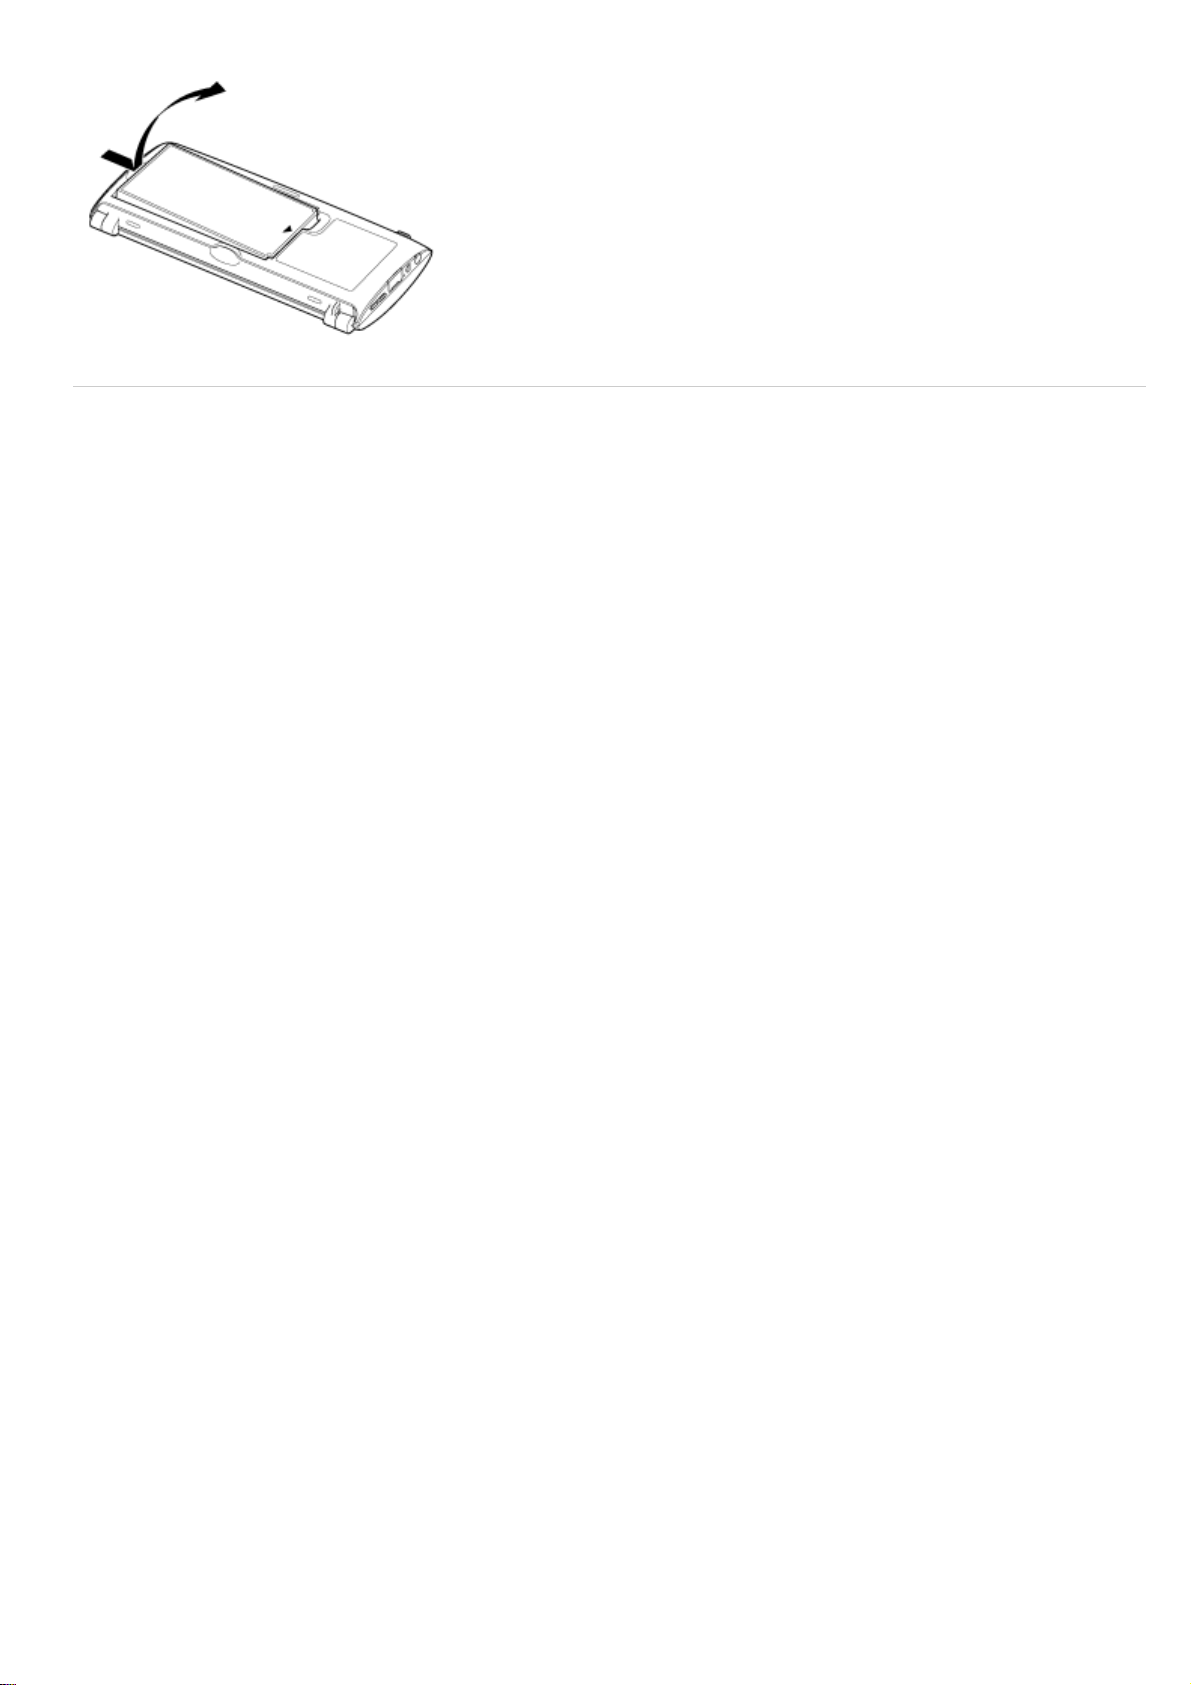
2. Remove the battery pack.
Related Topic
Notes on Charging
Page 16
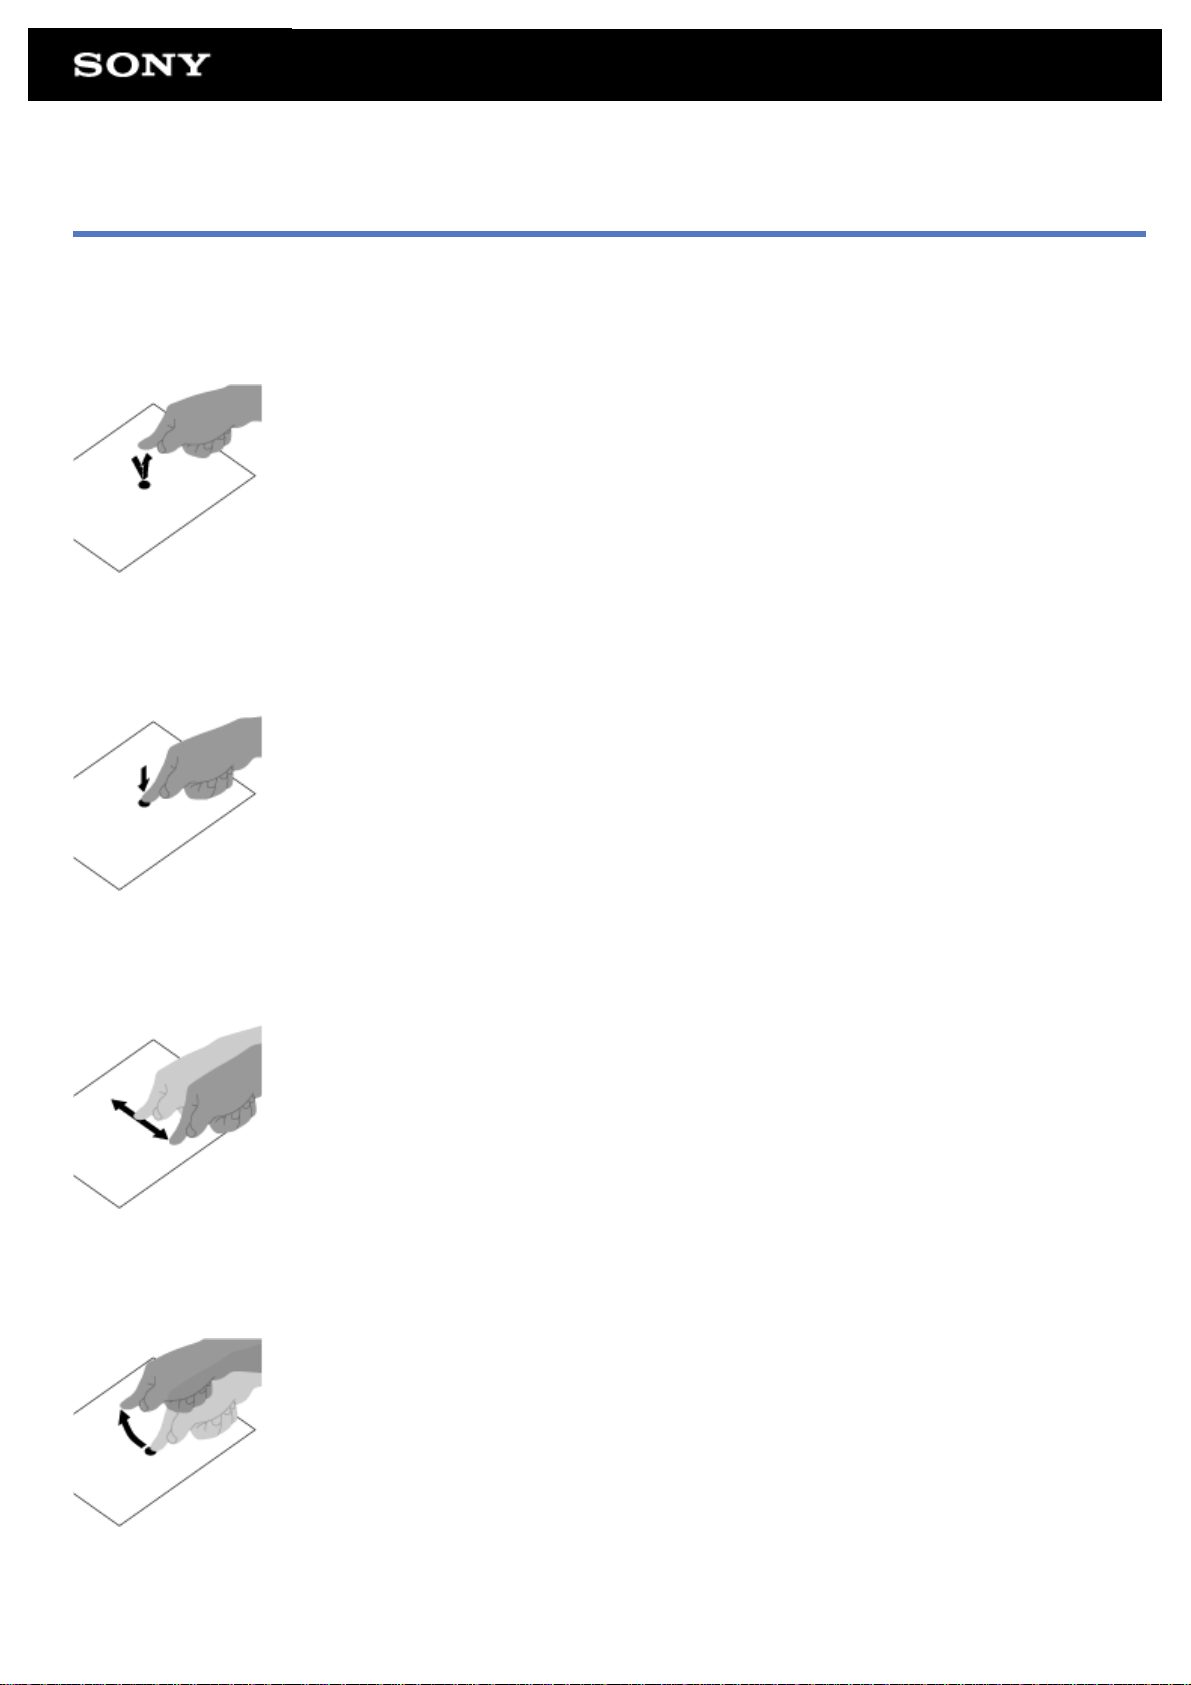
Touch Screen Operations
Tap
Selects an icon or option.
Tapping quickly twice allows you to zoom in or out on images or other on-screen items.
Tap & hold
Opens an option menu.
Drag
Moves an item or scrolls a page slowly.
Flick
Scrolls a page quickly.
Pinch
Zooms in or out.
Page 17

Related Topic
Notes on the Screen
Page 18

Notes on the Screen
Notes on the touch screen
Your tablet device uses a capacitive touch screen. Tap the screen directly with your fingertip. Do not scratch it
or tap it with a sharp object such as a needle, pen, or fingernails. You cannot operate the touch screen with a
stylus.
If you tap the touch screen with gloved fingers, the touch screen may operate incorrectly or may not operate
at all.
Do not operate your tablet device with objects on the touch screen.
If the touch screen is touched by anything other than your fingertip, it may not react correctly.
Do not put the touch screen close to other electrical devices. Electrostatic discharges may cause the touch
screen to malfunction.
If there are water droplets on the touch screen, or if you touch it with wet fingertips, the touch screen may not
react correctly.
Do not put the touch screen in humid places. The touch screen may malfunction in humid conditions or when
exposed to water.
Notes on the LCD screen
Do not leave the LCD screen facing the sun. Be sure to block direct sunlight when using your tablet device
near a window.
Using your tablet device in low temperature conditions may produce a residual image on the LCD screen.
This does not indicate a malfunction. The screen will return to normal when the tablet device returns to normal
temperature.
The LCD screen may become warm during operation. This is normal and does not indicate a malfunction.
The LCD screen is manufactured using high -precision technology. You may, however, see tiny black points
and/or bright points (red, blue, or green) on the LCD screen. This is a normal result of the manufacturing
process and does not indicate a malfunction.
The LCD screen is made of glass. If the glass is damaged (cracked, etc.), do not touch the touch screen or
try to repair it yourself. Handle the LCD screen carefully as it is vulnerable to damage from dropping or
mechanical shock. We cannot provide warranty for any damages caused by customers due to incorrect
handling.
Do not exert excessive pressure on the LCD screen lid with the lid closed as doing so may scratch or dirty
the LCD screen.
You may see a difference in color or brightness between upper and lower LCD screens. This is a normal
result of the manufacturing process and does not indicate a malfunction.
Page 19
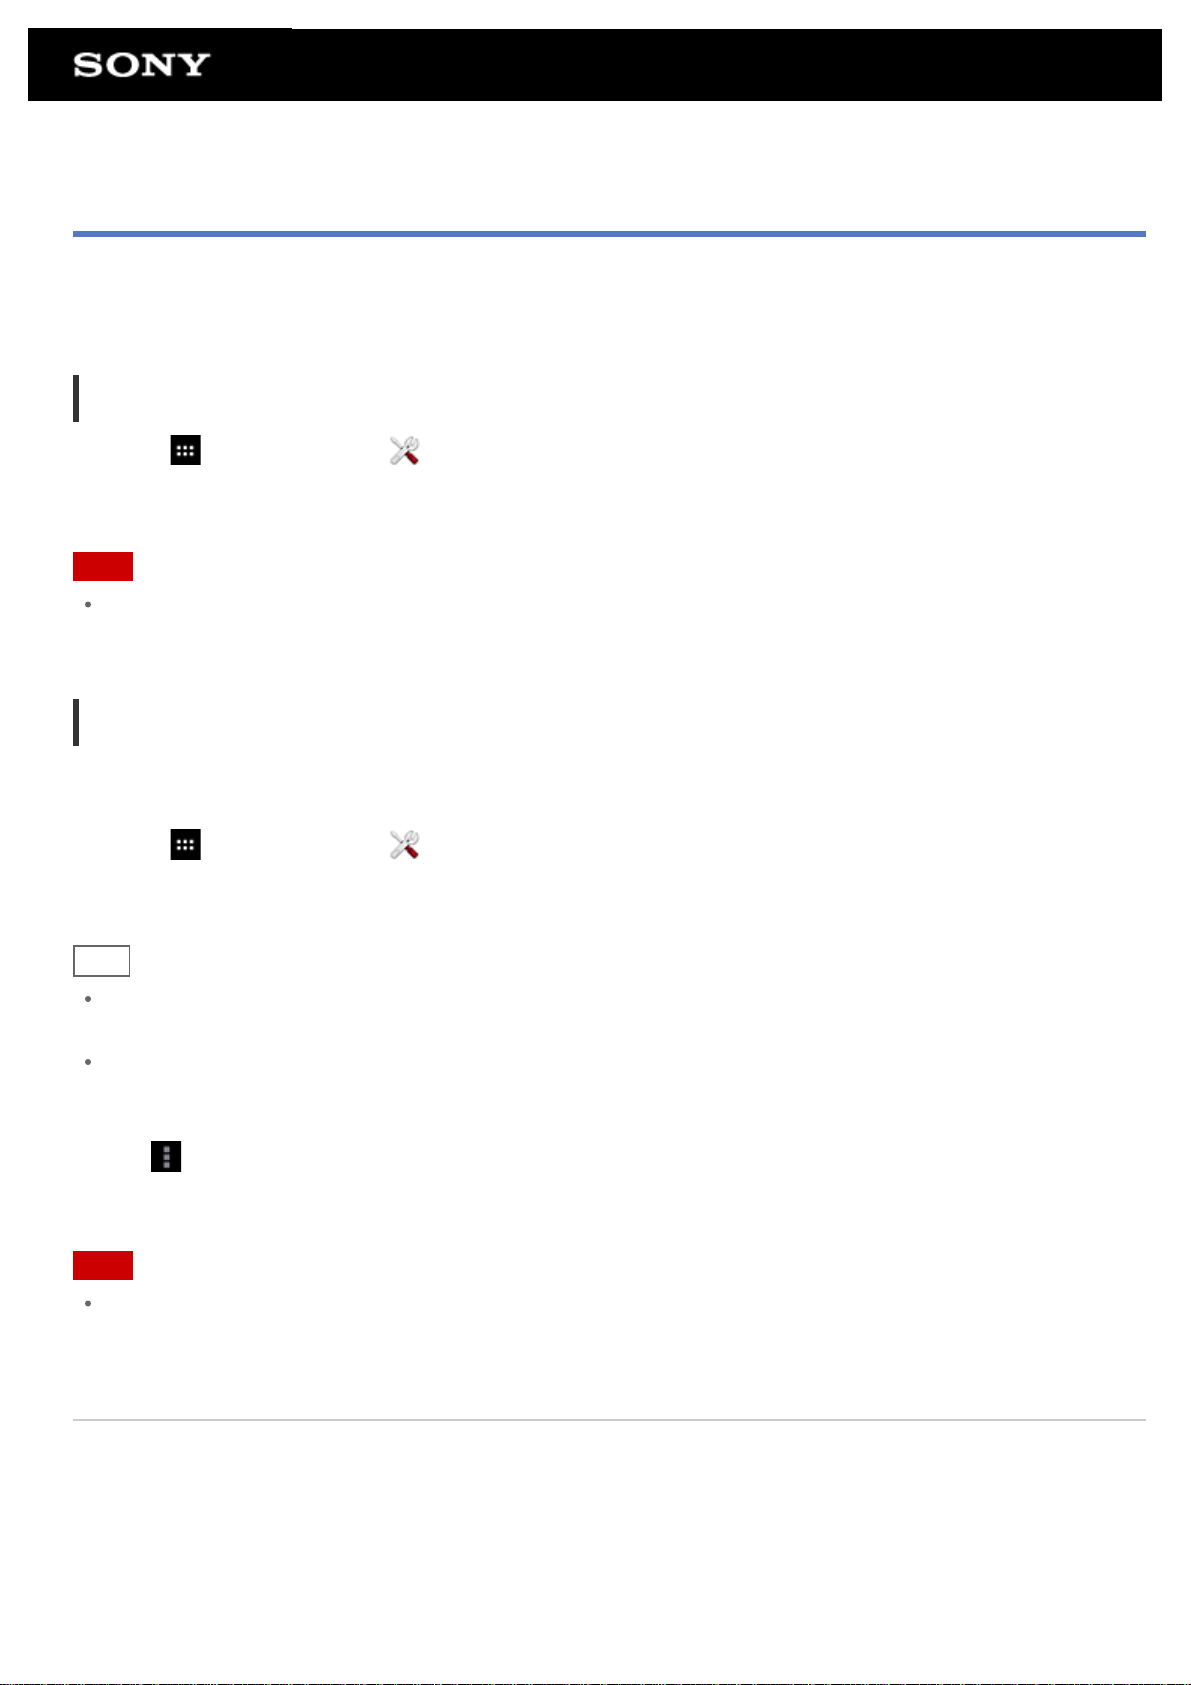
Turning On/Off the Wi-Fi Function
To download apps or enjoy Internet content, connect the tablet device to a Wi-Fi network (access point). To set
the Wi-Fi connection, turn on the Wi-Fi function of the tablet device.
To turn on the Wi-Fi function
1. Tap [ Apps & Widgets] - [ Settings] - [Wi-Fi].
2. Set [Wi-Fi] to [ON].
Note
The Wi-Fi antenna is built in to your tablet device. If you cover the antenna with your hands or other objects
while connected to the Internet using the Wi-Fi function, the communications quality may deteriorate.
To turn off the Wi-Fi function
When you are not using Internet, you can save power by turning off the Wi-Fi function.
1. Tap [
2. Set [Wi-Fi] to [OFF].
Hint
To disconnect the Wi-Fi function temporarily in an area where Wi-Fi communications is restricted, turn on
[Airplane mode] on the control panel displayed from the status bar.
The screen of your tablet device will be off (in sleep mode) when apps are running, such as when the music
player app is playing back content, but the tablet device will still be operating. You can choose whether to
keep the Wi-Fi connection active or not when the screen is off (in sleep mode).
Tap (Option menu) - [Advanced] - [Wi-Fi disconnect policy], and then select the desired item on the [Wi-Fi
disconnect policy] screen.
Note
Regardless of the setting in [Wi-Fi disconnect policy], the Wi-Fi connection is disconnected if no app is
running during sleep mode. The Internet connection will initially be off when the screen turns on after being off
(deactivating sleep mode), but the tablet device will then connect to the Internet automatically.
Apps & Widgets] - [ Settings] - [Wi-Fi].
Related Topic
Connecting to Wi-Fi
Connecting by Pressing the WPS Button on the Wi-Fi Router
Connecting from the Wi-Fi Network List
Notes on Using the Wi-Fi Function
Page 20

Confirming Download or Update Information on the Status Bar
Notes on Holding Your Tablet Device
Page 21
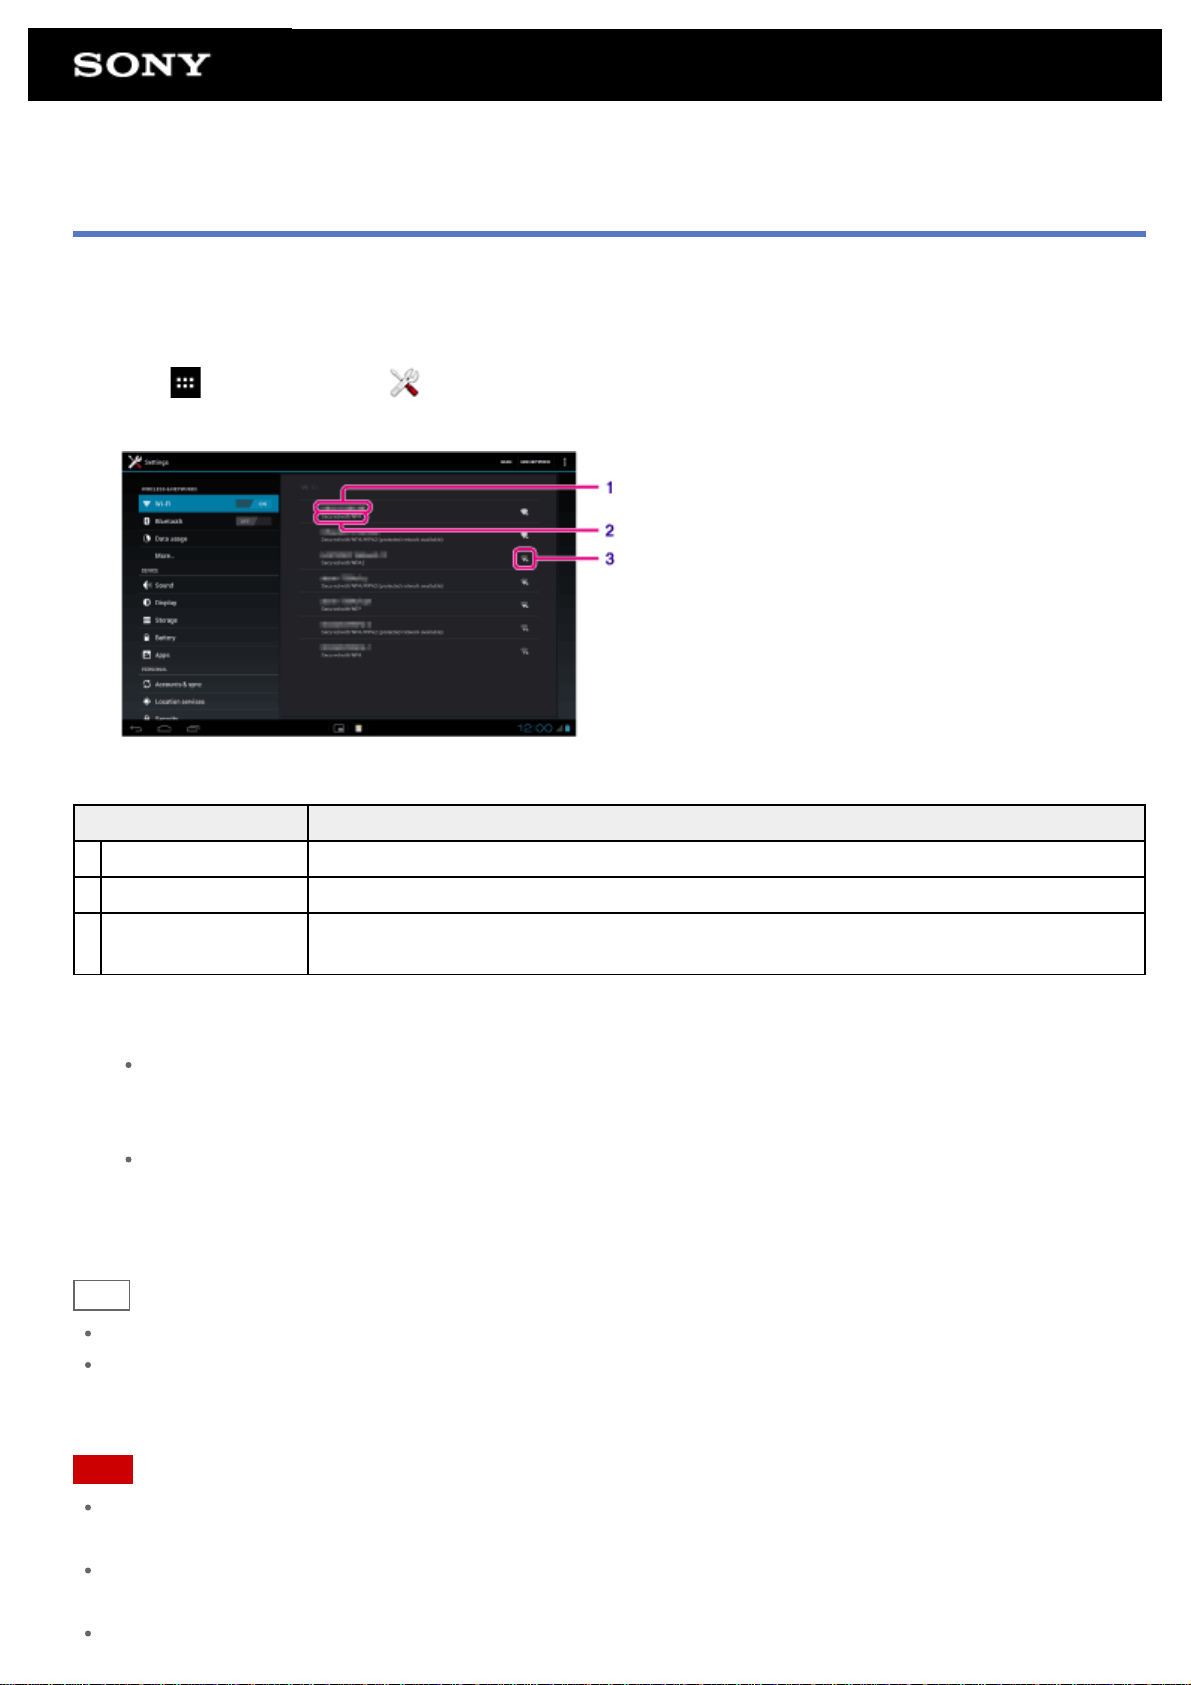
Connecting to Wi-Fi
Set the Wi- Fi connection on the tablet device to connect to the Internet. Connect the tablet device to the Wi-Fi
router (access point) in a manner suitable for the situation: at home or the office or using a public wireless
service, etc.
1. Tap [
Detected Wi-Fi networks are listed on the right side of the screen.
Display on the screen Description
1 Network SSID The name of a wireless network.
2 Security The security protocol of the Wi-Fi router.
3 Security availability
Apps & Widgets] - [ Settings] - [Wi-Fi].
When using a security-enabled Wi-Fi router, the lock icon will appear at the bottom
right of the icon.
2. Configure the Wi-Fi setting in one of the following ways.
Establish a connection by pressing the WPS button on the Wi-Fi router:
If you use a Wi-Fi router compatible with WPS, press the WPS button, and the connection settings and
security settings will be configured automatically.
Connect from the Wi- Fi network list:
If you are at home or using a public wireless service, connect the tablet device to a network available
from the Wi-Fi network list.
Hint
If no network is displayed in step 1, tap [SCAN] on the top right of the screen.
If the Wi-Fi function is turned on where a Wi-Fi network connection is available, the tablet device will
automatically reconnect if it had made a connection to that network previously.
Note
Any communications and connection charges that apply for the use of the Wi-Fi router are the responsibility of
the customer.
For details on the network SSID and security format, refer to the operating instructions supplied with the Wi-Fi
router.
When connecting to a public wireless service, refer to the provider’s website, etc. for instructions.
Page 22

Related Topic
Turning On/Off the Wi-Fi Function
Connecting by Pressing the WPS Button on the Wi-Fi Router
Connecting from the Wi-Fi Network List
Checking the Wi-Fi Connection
Notes on Using the Wi-Fi Function
Notes on Holding Your Tablet Device
Page 23
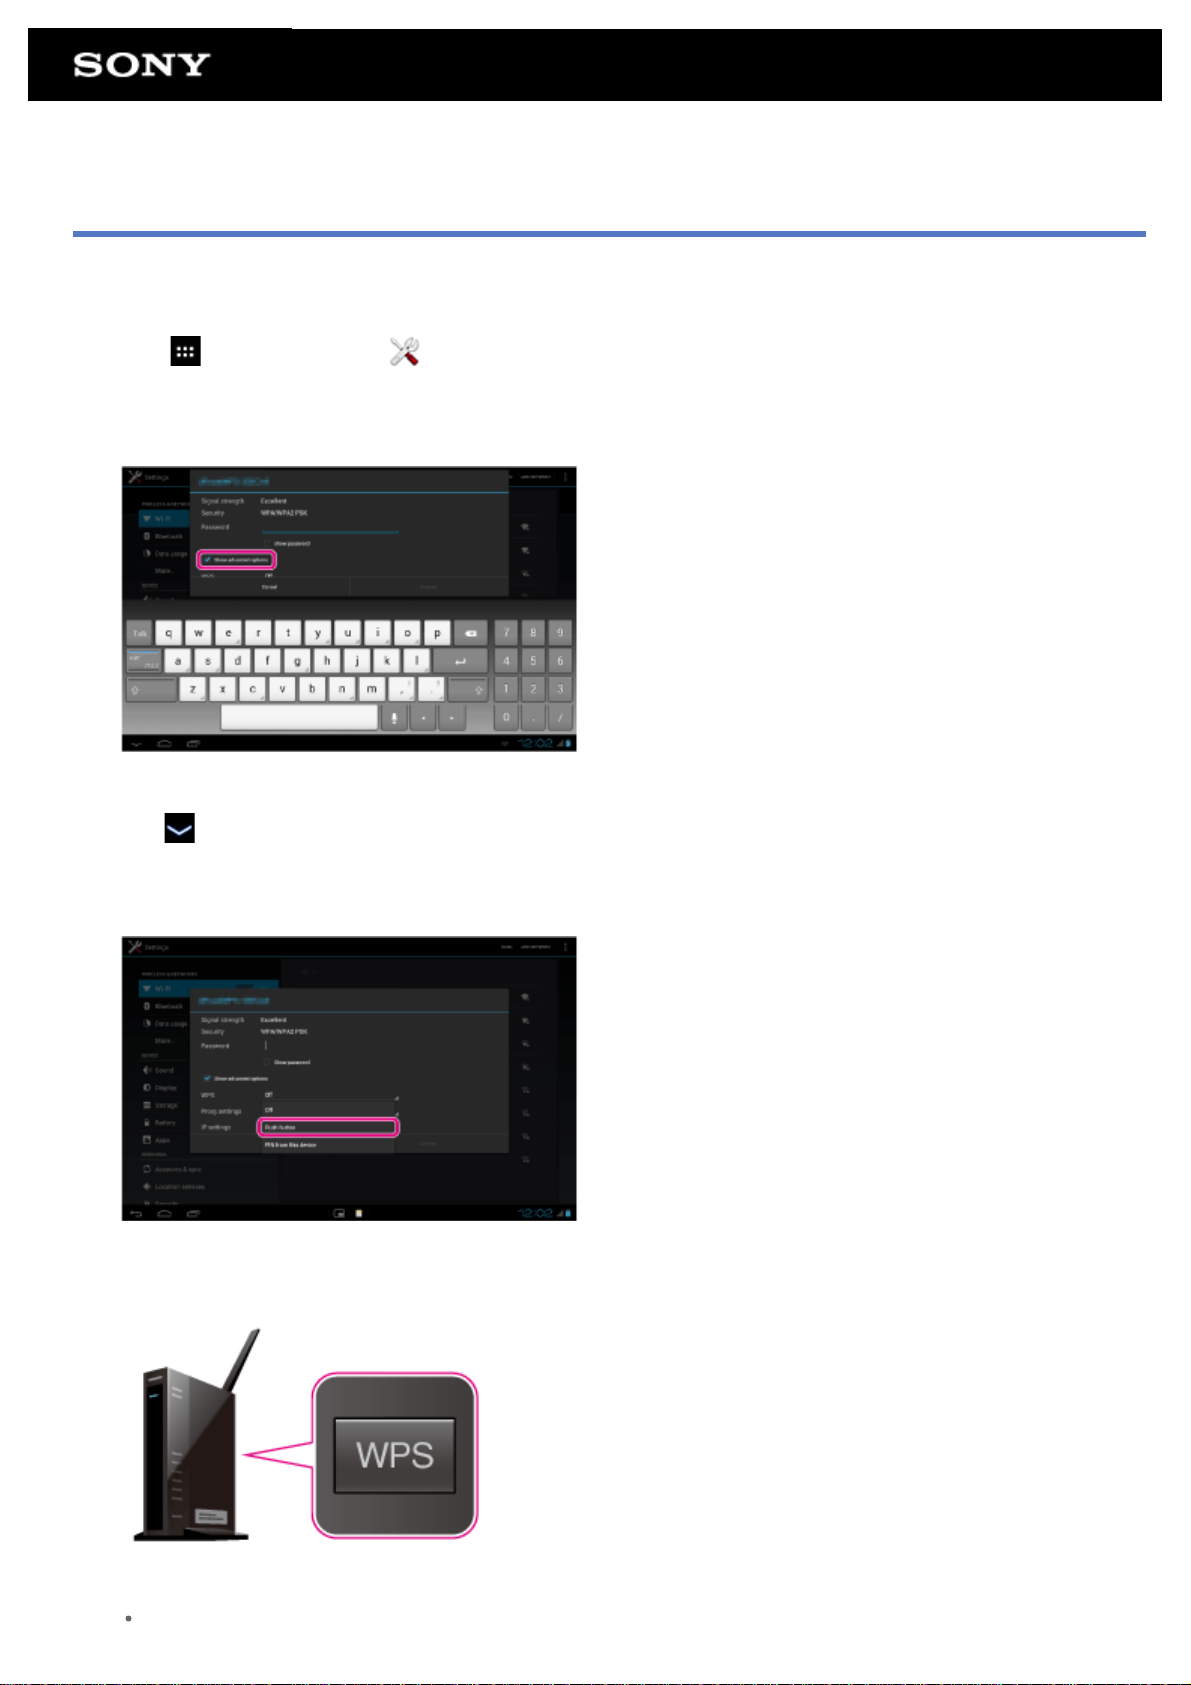
Connecting by Pressing the WPS Button on the Wi-Fi Router
If you use a Wi-Fi router compatible with WPS, press the WPS button to automatically configure the connection
settings and security settings.
1. Tap [
2. Tap the network to connect to from those on the Wi- Fi network list.
3. Tap [Show advanced options].
A check mark is put in the box.
4. Tap
The keyboard disappears.
5. Tap [Off] for [WPS], and then tap [Push button].
Apps & Widgets] - [ Settings] - [Wi-Fi].
on the bottom left of the screen.
6. Press the WPS button on the Wi-Fi router (access point).
The Wi-Fi settings of the tablet device are automatically configured.
Hint
For details on how to use the WPS button, refer to the operating instructions supplied with the Wi-Fi
Page 24
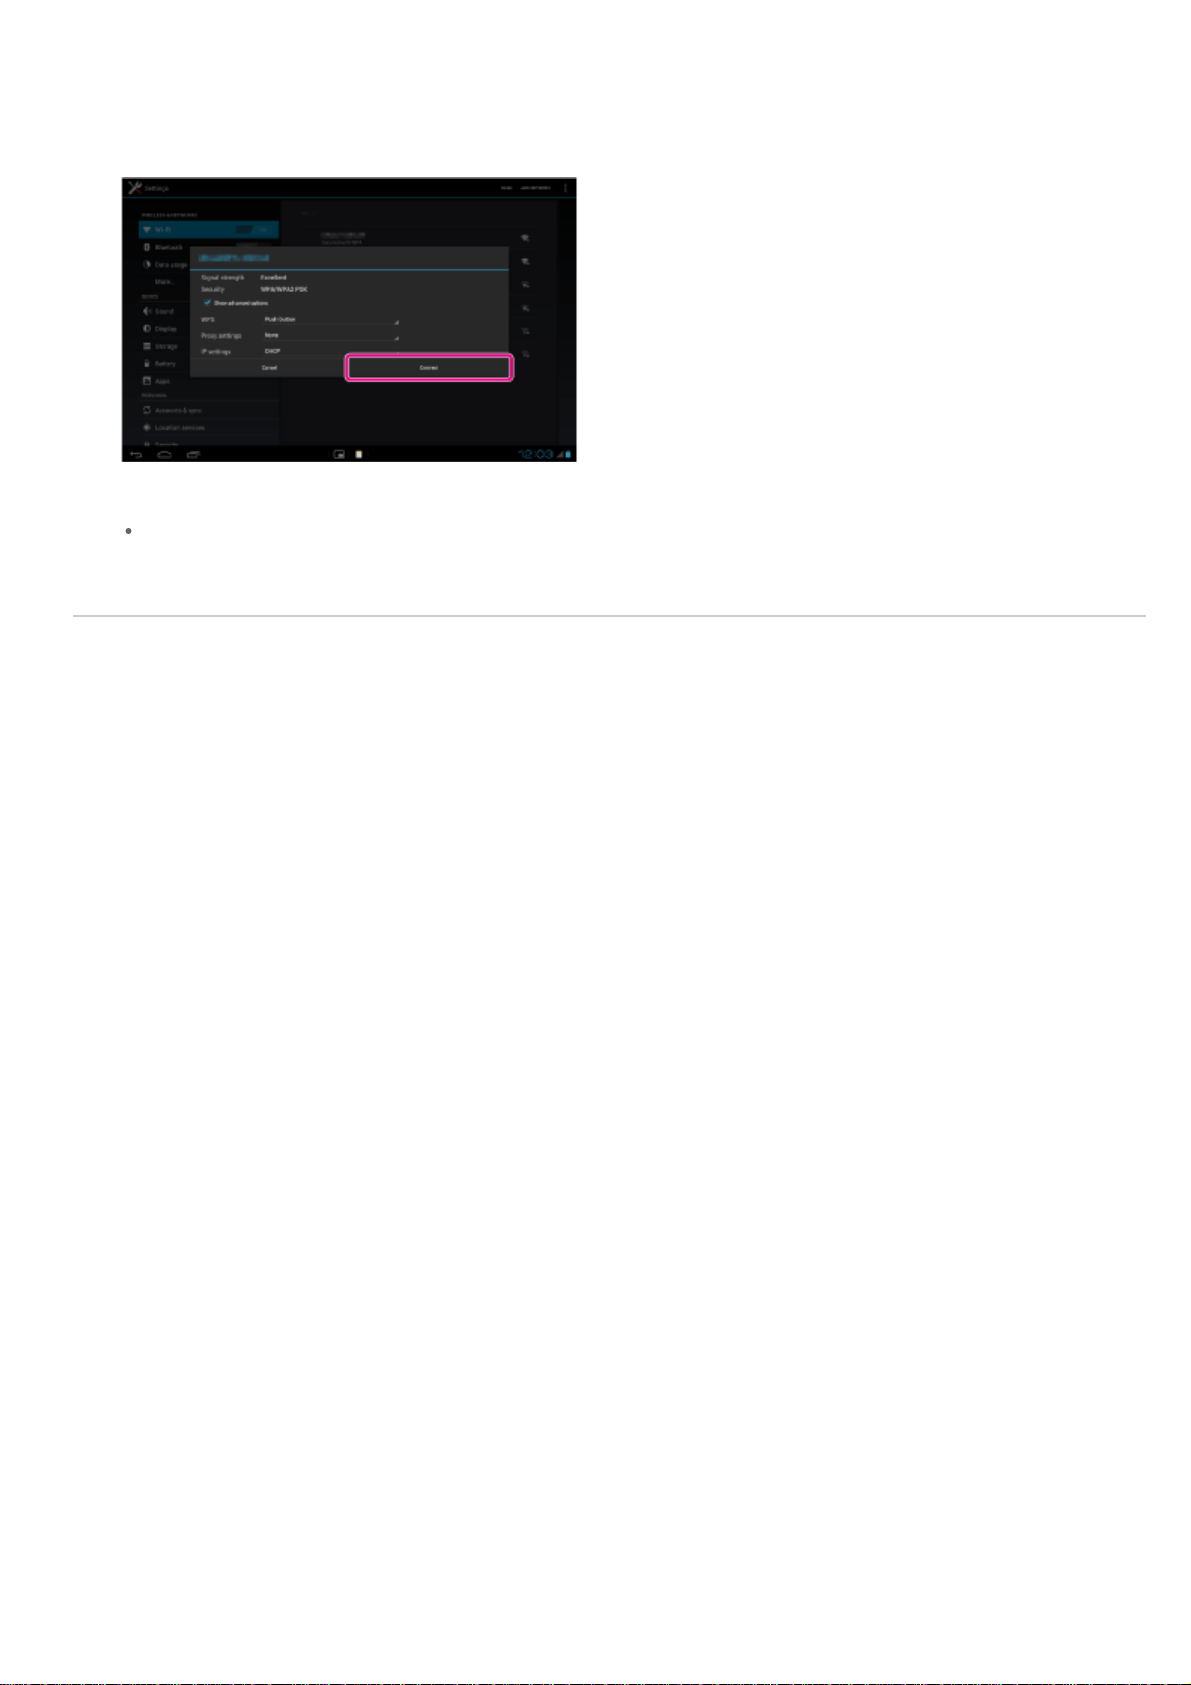
router.
7. Tap [Connect] on the tablet device.
When a connection is established, [Connected] appears under the SSID of the network the tablet device is
connected to.
Hint
When the tablet device connects using Wi-Fi, the Wi- Fi icon is displayed on the status bar at the bottom
right of the screen.
Related Topic
Turning On/Off the Wi-Fi Function
Connecting to Wi-Fi
Connecting from the Wi-Fi Network List
Confirming Download or Update Information on the Status Bar
Notes on Using the Wi-Fi Function
Checking the Wi-Fi Connection
Page 25
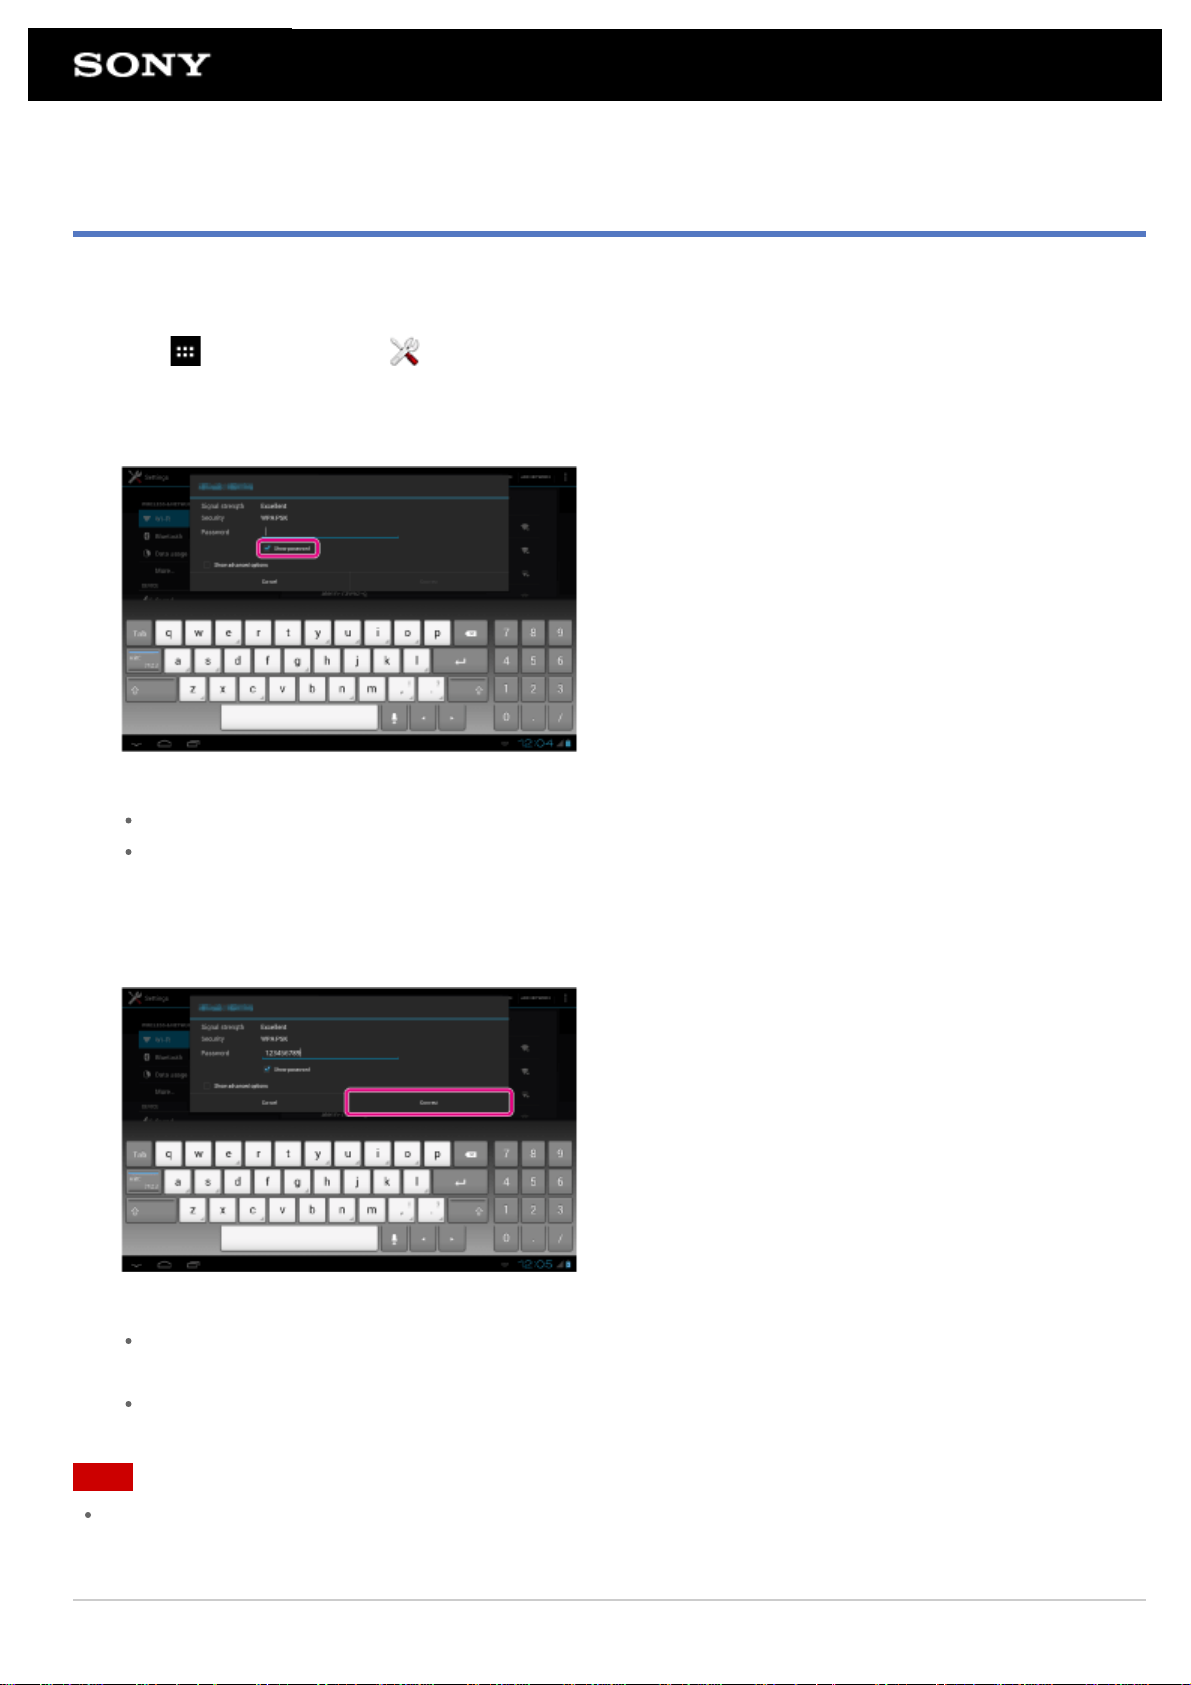
Connecting from the Wi-Fi Network List
If you are at home or using a public wireless service, connect the tablet device to an available network on the WiFi network list. Some Wi -Fi routers (access points) require you to enter a password.
1. Tap [
2. Tap the network to connect to from those on the Wi- Fi network list.
3. Enter the password if required.
Hint
4. Tap [Connect].
When a connection is established, [Connected] appears under the SSID of the network the tablet device is
connected to.
Apps & Widgets] - [ Settings] - [Wi-Fi].
You can check the password you entered by tapping [Show password].
Some Wi-Fi routers call a password a “PIN CODE,” “WEP key,” “KEY,” etc.
Hint
When the tablet device connects using Wi-Fi, the Wi- Fi icon is displayed on the status bar at the bottom
right of the screen.
For proxy and IP settings, tap [Show advanced options] in step 4.
Note
When connecting to a public wireless service, you are sometimes required to enter a user name and
password in the browser. For details, refer to the provider’s website.
Related Topic
Page 26

Turning On/Off the Wi-Fi Function
Connecting to Wi-Fi
Connecting by Pressing the WPS Button on the Wi-Fi Router
Confirming Download or Update Information on the Status Bar
Notes on Using the Wi-Fi Function
Checking the Wi-Fi Connection
Page 27
Notes on Using the Wi-Fi Function
Use of Wi-Fi devices may be restricted by local regulations in some countries or regions.
Wi-Fi devices work on the 2.4 GHz band, which is used by a variety of devices. Wi- Fi devices therefore use
technology to minimize radio interference from other devices that use the same band. However, radio
interference may still cause slower data transfer speeds, reduce communications range or cause
communications failure.
If both the Bluetooth function and the 2.4 GHz Wi-Fi function of your tablet device are enabled, interference
may occur and cause slower data transfer speeds or other problems.
To communicate via Wi-Fi while traveling, you may need to contract with a Wi-Fi connection service provider.
Data transfer speed and communications range may vary depending on the following conditions:
Distance between devices
Presence of obstacles between devices
Device configuration
Signal conditions
Surrounding environment (wall material, etc.)
Software in use
Communications failure may occur in some signal conditions.
The data transfer rate noted in the specifications is the theoretical maximum, and it may not reflect actual
data transfer rate.
Actual data transfer speed may not be as fast as the speed displayed on your tablet device.
Communications is not available between the 2.4 GHz and 5 GHz Wi-Fi frequency bands.
The data transfer rate for IEEE 802.11g and IEEE 802.11n (2.4 GHz) devices may be affected by interference
when those protocols are used with IEEE 802.11b products. Also, products using IEEE 802.11g and IEEE
802.11n automatically lower the transfer rate to maintain compatibility with IEEE 802.11b products.
When the data transfer speed is not as fast as expected, changing the wireless channel on the Wi-Fi router
may increase the speed.
Related Topic
Specifications
Page 28

Turning On/Off the Bluetooth Function
You can establish wireless connections and communications between your tablet device and other Bluetooth
devices such as a computer, mobile phone, headset, headphones or wireless keyboard. Data can be transferred
between these devices without cables at a range of up to 33 feet / 10 meters in an open area.
To turn on the Bluetooth function
Turn on the Bluetooth function when paring or connecting with a Bluetooth device.
1. Tap [
2. Set [Bluetooth] to [ON].
Hint
Note
The Bluetooth antenna is built in to your tablet device. If you cover the antenna with your hands or other
objects while using the Bluetooth function, the communications quality may deteriorate.
Apps & Widgets] - [ Settings] - [Bluetooth].
When the Bluetooth function is turned on, the Bluetooth icon is displayed on the status bar at the bottom
right of the screen.
To turn off the Bluetooth function
To reduce battery consumption, turn off the Bluetooth function when not in use.
1. Tap [
2. Set [Bluetooth] to [OFF].
Related Topic
Apps & Widgets] - [ Settings] - [Bluetooth].
Paring with a Bluetooth Device
Notes on Using the Bluetooth Function
Confirming Download or Update Information on the Status Bar
Notes on Holding Your Tablet Device
Page 29
Paring with a Bluetooth Device
To connect with a Bluetooth device, pair the tablet device and Bluetooth device. Once you pair them, your tablet
device automatically connects to the Bluetooth device by just turning on both devices the next time.
1. Make sure the setting of the Bluetooth device pairing with the tablet device is in a detectable mode.
2. Tap [
3. Tap [SEARCH FOR DEVICES] at the top right of the screen.
The [AVAILABLE DEVICES] list is displayed.
4. Tap the name of the device you want to connect to.
5. Tap [Pair], and enter the device passkey (e.g. 0000) if necessary to connect to the Bluetooth device.
Hint
To make the Bluetooth device settings detectable, refer to the operating instructions supplied with the
Bluetooth device.
To set the tablet device so that it can be detected by the Bluetooth device, tap the model name of your tablet
device in the list displayed on the right side of the screen in step 3.
To connect to the paired device again, tap the device name in the [Paired devices] list.
Apps & Widgets] - [ Settings] - [Bluetooth].
To unpair a device
You can unpair paired devices from the tablet device.
1. Tap
of the device you want to unpair from your tablet device in the [Paired devices] list.
2. Tap [Unpair].
Related Topic
Turning On/Off the Bluetooth Function
Notes on Using the Bluetooth Function
Page 30

Notes on Using the Bluetooth Function
Use of Bluetooth function may be restricted by local regulations in some countries or regions.
The Bluetooth function may not work with some devices, depending on the manufacturer or the software
version employed by the manufacturer. Check the system requirements of the Bluetooth device before
purchasing.
Some Bluetooth devices require authentication (pairing) before establishing a connection with another device.
Perform the authentication process before connecting to such a device.
Bluetooth devices work on the 2.4 GHz band, which is used by a variety of devices. Bluetooth devices use
technology to minimize radio interference from other devices that use the same band. However, radio
interference may still cause slower data transfer speeds, reduce communications range or cause
communications failure.
Data transfer speed and communications range may vary depending on the following conditions:
Distance between communicating devices
Presence of obstacles between devices
Surrounding environment (wall material, etc.)
Device configuration
Software in use
Signal conditions
Communications failure may occur in some signal conditions.
Interference may occur if both the Bluetooth function and the 2.4 GHz Wi-Fi function are enabled. That will
result in slower data transfer speeds or other problems.
Large files may occasionally be corrupted during continuous transfer due to limitations of the Bluetooth
standard and due to signal conditions.
Connecting multiple Bluetooth devices to your tablet device may cause channel congestion, resulting in poor
device performance. This is normal with Bluetooth technology and does not indicate a malfunction.
Video and audio may not be synchronized if you play videos on your tablet device with audio output from a
connected Bluetooth device. This is a frequent occurrence with Bluetooth technology and does not indicate a
malfunction.
All Bluetooth devices must be certified through procedures stipulated by Bluetooth SIG to ensure that they
comply with the Bluetooth standard. Even if the Bluetooth standard is complied with, operation procedures
may differ or you may not be able to transfer data depending on characteristics and specifications of the
individual device.
Output sound may not be switched between a Bluetooth audio device and the built-in speaker when you
connect or disconnect the device while an app such as game is running. If that occurs, exit the app and
restart the device. You can avoid this problem by switching the sound before starting the app.
Sound of apps such as games may be delayed when heard from Bluetooth audio devices connected to your
tablet device. If that occurs, output sound from the built- in speaker or connect an audio device to the
headphone jack of your tablet device to hear the sound.
If you turn off a Bluetooth audio device connected to your tablet device while an app such as a game is
running, the app may no longer work properly. If that occurs, exit the app and restart your tablet device.
Bluetooth security
Bluetooth wireless technology has an authentication function that allows you to determine with whom you choose
Page 31

to communicate. With the authentication function, you can prevent any anonymous Bluetooth devices from
accessing your tablet device. The first time two Bluetooth devices communicate, a common passkey (a password
required for authentication) should be determined for both devices to be registered. Once a device is registered,
there is no need to re-enter the passkey.
Your tablet device will be detected by other Bluetooth devices only when it is set to allow detection by such
devices. You can set how long your tablet device is detectable or whether or not to allow reception after a
connection is established.
Related Topic
Specifications
Page 32
Enabling Mobile Communications
1. Tap [ Apps & Widgets] - [ Settings] - [More…] - [Mobile networks] - [Data enabled].
A check mark is put in the box for that setting.
Note
Make sure a SIM card is inserted before using the mobile communications function.
The mobile communications antenna is built in to your tablet device. If you cover the antenna with your hands
or other objects while connected to the Internet using the mobile communications function, the
communications quality may deteriorate.
When you are outside a mobile communications area, you cannot connect to the Internet using the mobile
communications function. Check the communications conditions, and move to an area with mobile
communications reception.
When you are outside a mobile communications area with the mobile communications function activated,
battery consumption is greater than when you are inside a mobile communications area.
Related Topic
Inserting/Removing a SIM Card
Setting Up an Access Point
Disabling Mobile Communications
Notes on the SIM Card
Notes on Holding Your Tablet Device
Page 33
Disabling Mobile Communications
1. Tap [ Apps & Widgets] - [ Settings] - [More…] - [Mobile networks] - [Data enabled].
The check mark is removed from the box for that setting.
Hint
To temporarily turn off functions that use mobile networks in an area where wireless communications is
restricted, turn on [Airplane mode] on the control panel displayed from the status bar.
Related Topic
Enabling Mobile Communications
Confirming Download or Update Information on the Status Bar
Page 34
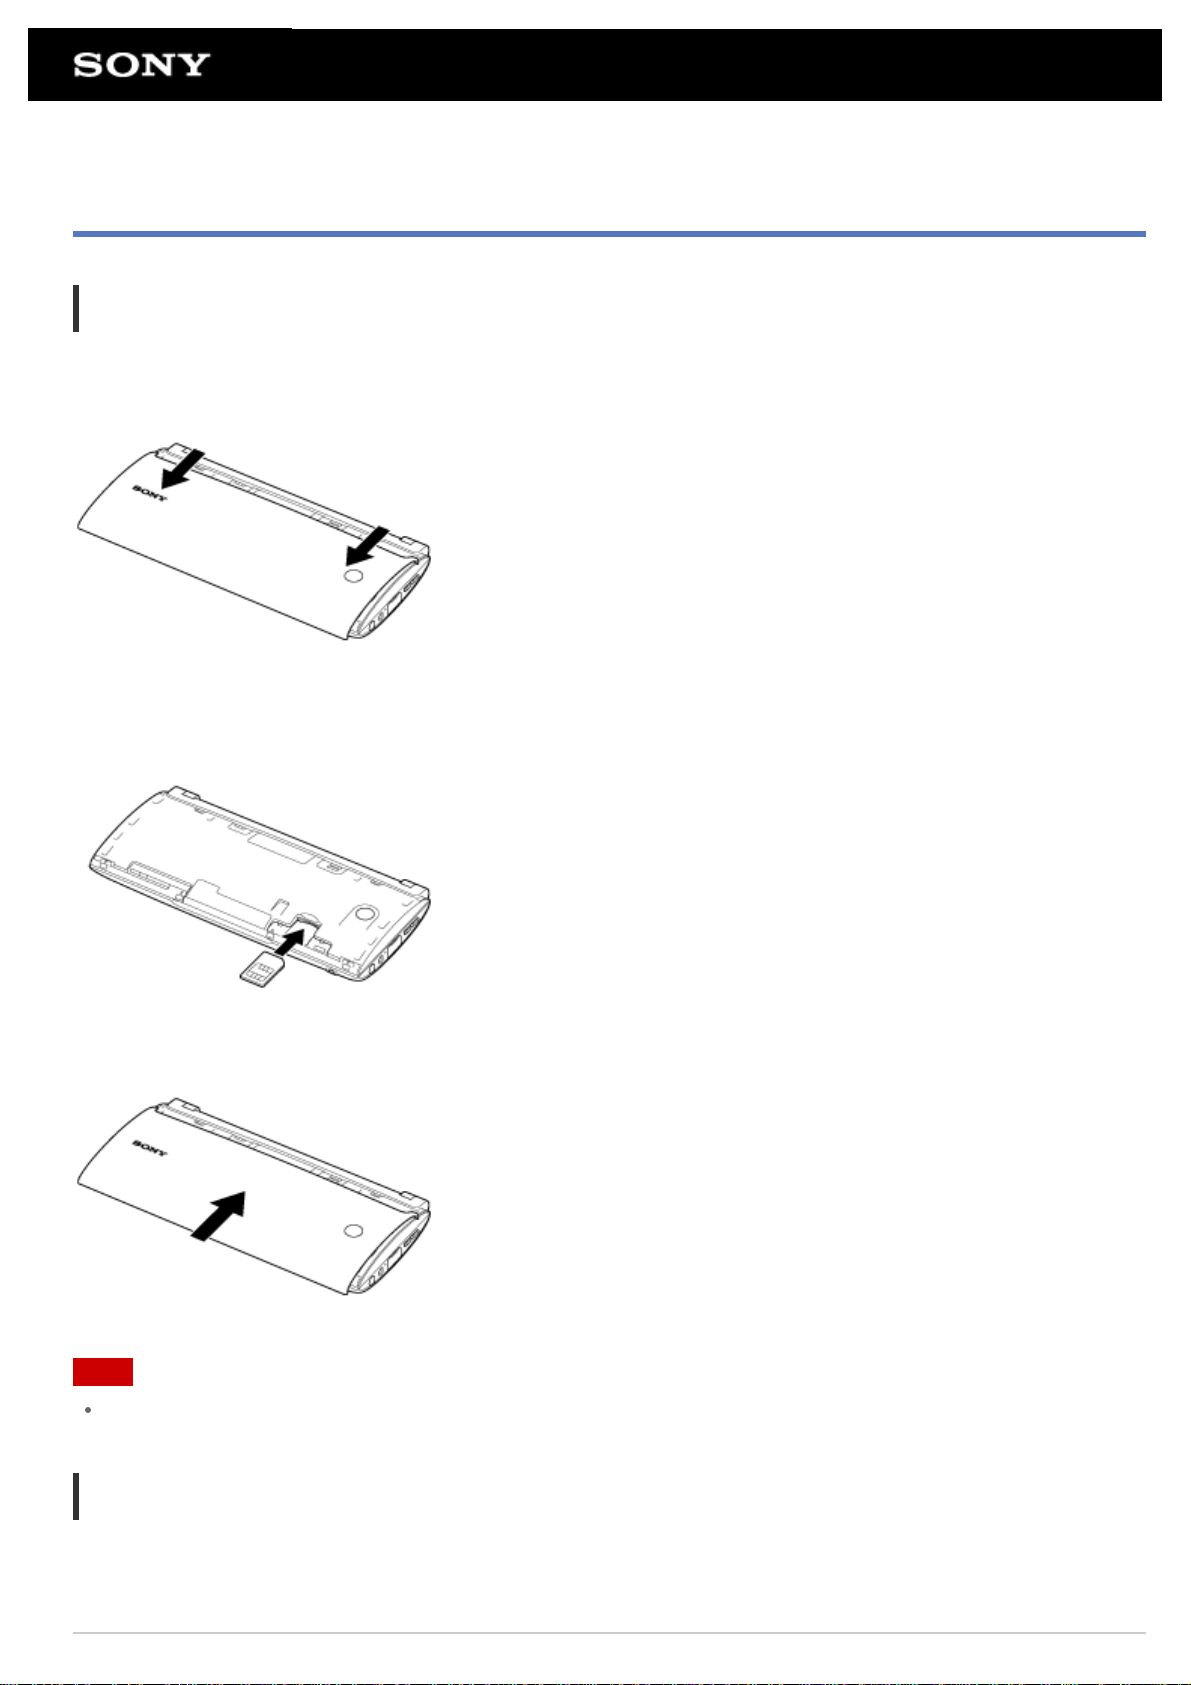
Inserting/Removing a SIM Card
To insert a SIM card
1. Make sure all the cables are unplugged from your tablet device, and then turn off your tablet device.
2. Slide off the upper cover.
3. Align a SIM card with the mark above the slot, and then carefully slide the SIM card into the slot until it clicks
into place.
4. Slide the upper cover back in.
Note
Make sure not to insert the SIM card in the reverse direction.
To remove a SIM card
1. Follow the procedures up to step 2 of “To insert a SIM card,” then push in the SIM card all the way and
release it.
Page 35

Related Topic
Enabling Mobile Communications
Turning On or Shutting Down Your Tablet Device
Setting Up an Access Point
Notes on the SIM Card
Page 36

Notes on the SIM Card
Make sure the power of your tablet device is turned off before inserting or removing the SIM card.
Do not press the SIM card more than necessary when inserting or removing a SIM card.
If you remove the SIM card right after using your tablet device, the SIM card may be warm. This is normal
and does not indicate a malfunction.
Avoid exposing the SIM card to very cold, hot, or humid places.
Do not touch the contacts or terminals with your fingers or metal objects. If dirty, wipe the card with a soft
cloth and keep it clean.
Do not drop, press, or bend the SIM card.
Do not insert the SIM card with labels or stickers in place.
Page 37
Setting Up an Access Point
To confirm the current access point
1. Tap [ Apps & Widgets] - [ Settings] - [More…] - [Mobile networks] - [Access Point Names].
To add an access point
1. Tap [ Apps & Widgets] - [ Settings] - [More…] - [Mobile networks] - [Access Point Names].
2. Tap
3. Tap [Name], and enter the profile name of the network you want to add.
4. Tap [APN], and enter an access point name.
5. Enter all the items required by the carrier.
6. Tap
The settings are saved.
(Option menu) - [New APN].
.
To reset the access point
1. Tap [ Apps & Widgets] - [ Settings] - [More…] - [Mobile networks] - [Access Point Names].
2. Tap
Related Topic
Enabling Mobile Communications
Inserting/Removing a SIM Card
(Option menu) - [Reset to default].
Page 38
Using Location Services
You can enable apps to use location information using GPS satellites or wireless networks. That enables you to
search your present location and routes to a destination.
Enabling location information
1. Tap [ Apps & Widgets] - [ Settings] - [Location services].
2. To enable reception of location information via wireless communications, tap [Google’s location service].
To enable reception of location information via GPS satellites, tap [GPS satellites].
A check mark is put in the box for that setting.
Disabling location information
1. Tap [ Apps & Widgets] - [ Settings] - [Location services].
2. Tap [Google’s location service] or [GPS satellites].
The check mark is removed from the box for that setting, and location information is disabled.
Hint
The GPS (Global Positioning System) function provides location information by receiving signals from GPS
satellites. You can see the location where you are with your tablet device by using an app that supports the
GPS function.
Note
The GPS antenna is built in to your tablet device. If you cover the antenna with your hands or other objects
while using the GPS function, the positioning accuracy may deteriorate.
Related Topic
Notes on GPS Function
Notes on Holding Your Tablet Device
Page 39

Notes on GPS Function
Move your tablet device as little as possible in an area with a clear view of the sky until the present location is
displayed by the GPS function. The present location can be displayed quicker when stationary than while
moving. If the present location is not displayed or if the wrong location is displayed, move to an area with a
clear view of the sky.
Direction may not be measured correctly due to the surrounding environment.
When other electronic devices are near your tablet device, electromagnetic waves or magnetic interference
from those may prevent your tablet device from providing accurate location information. Keep electronic
devices away from your tablet device.
When your tablet device is in an area with poor reception of GPS signals, you may encounter positioning
errors. To receive more accurate information, avoid using your tablet device in the following locations.
Inside buildings or vehicles
In tunnels or underground
Under elevated tracks
Between tall buildings
In dense trees
In valleys
Page 40
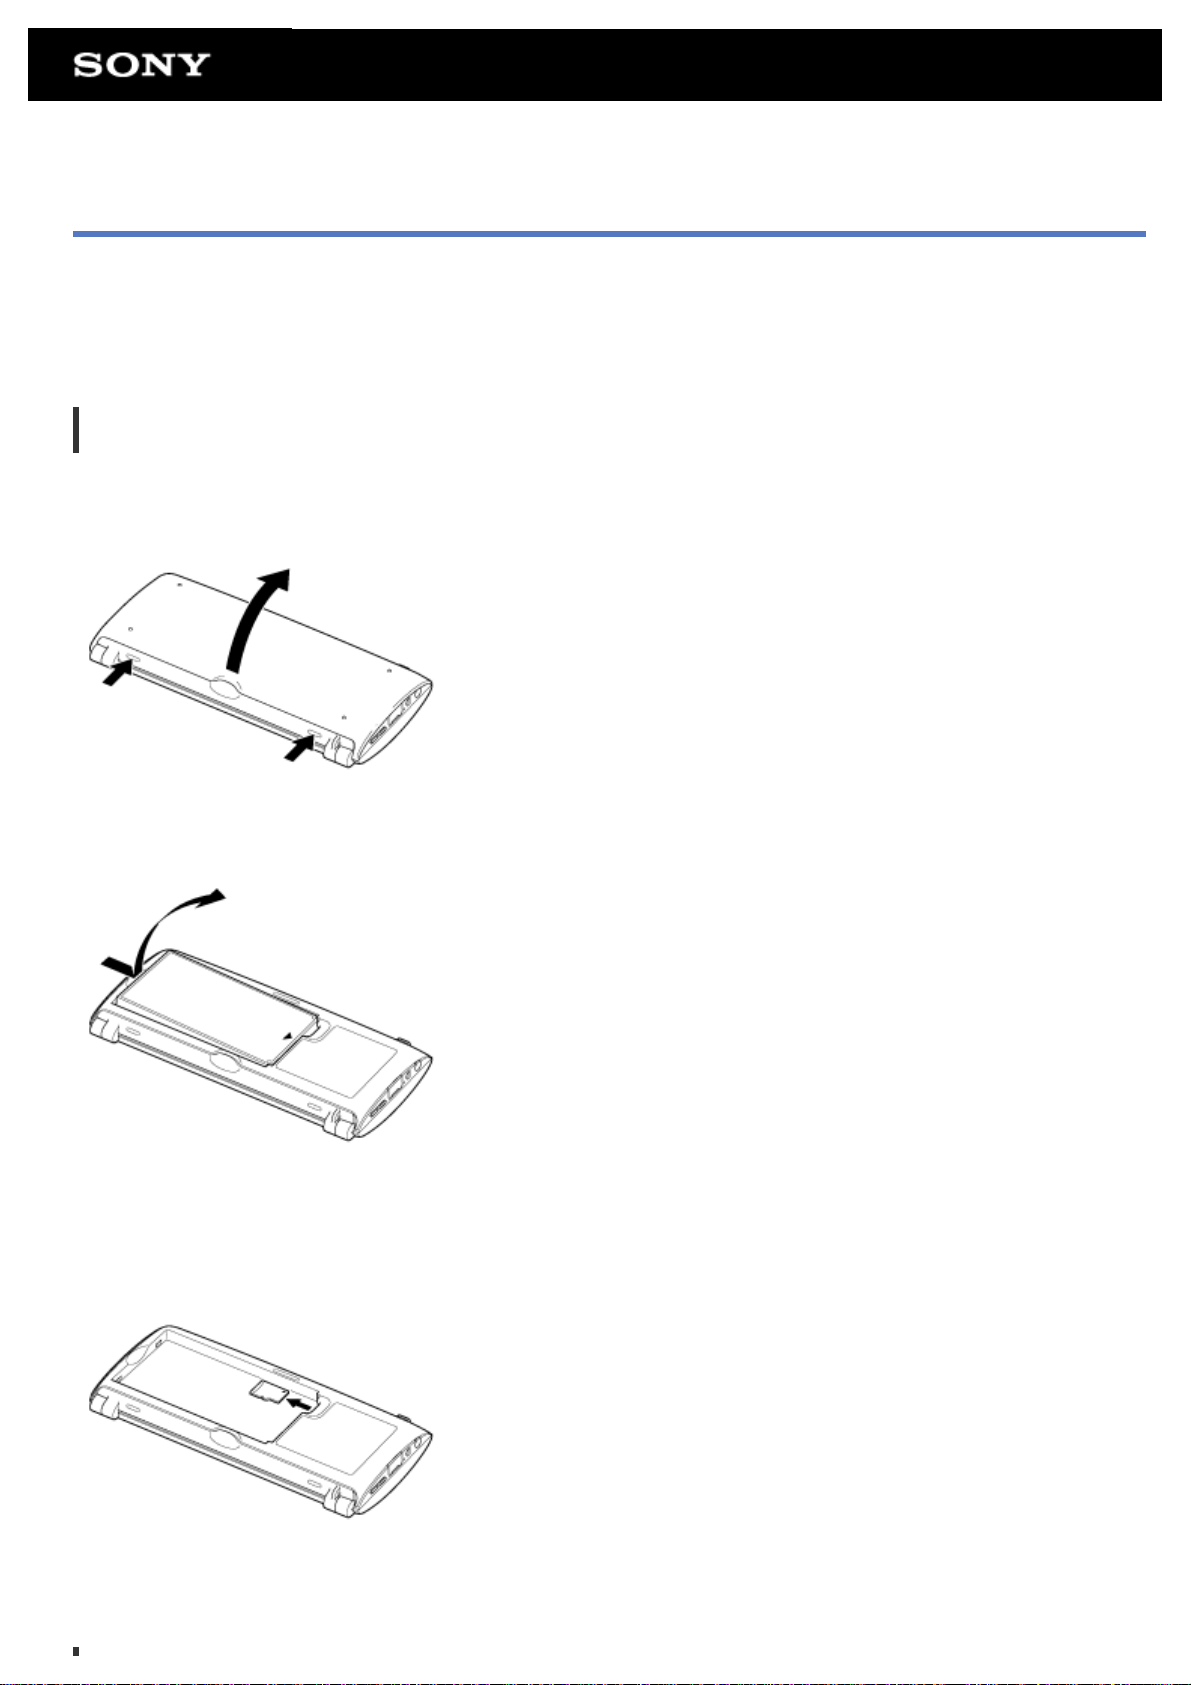
Removing/Inserting a microSD Memory Card
Your tablet device is equipped with a microSD memory card slot. A microSD memory card is inserted in the
microSD memory card slot at time of purchase. When you replace a microSD memory card with a new one, follow
the procedure below.
To remove a microSD memory card
1. Make sure files are not being transferred, and then turn off your tablet device.
2. Press the two buttons to open the bottom cover.
3. Remove the battery pack.
4. Locate the microSD memory card slot.
5. Push in the microSD memory card all the way and release.
The microSD memory card is ejected.
6. Hold the microSD memory card, and pull it out of the slot.
Page 41
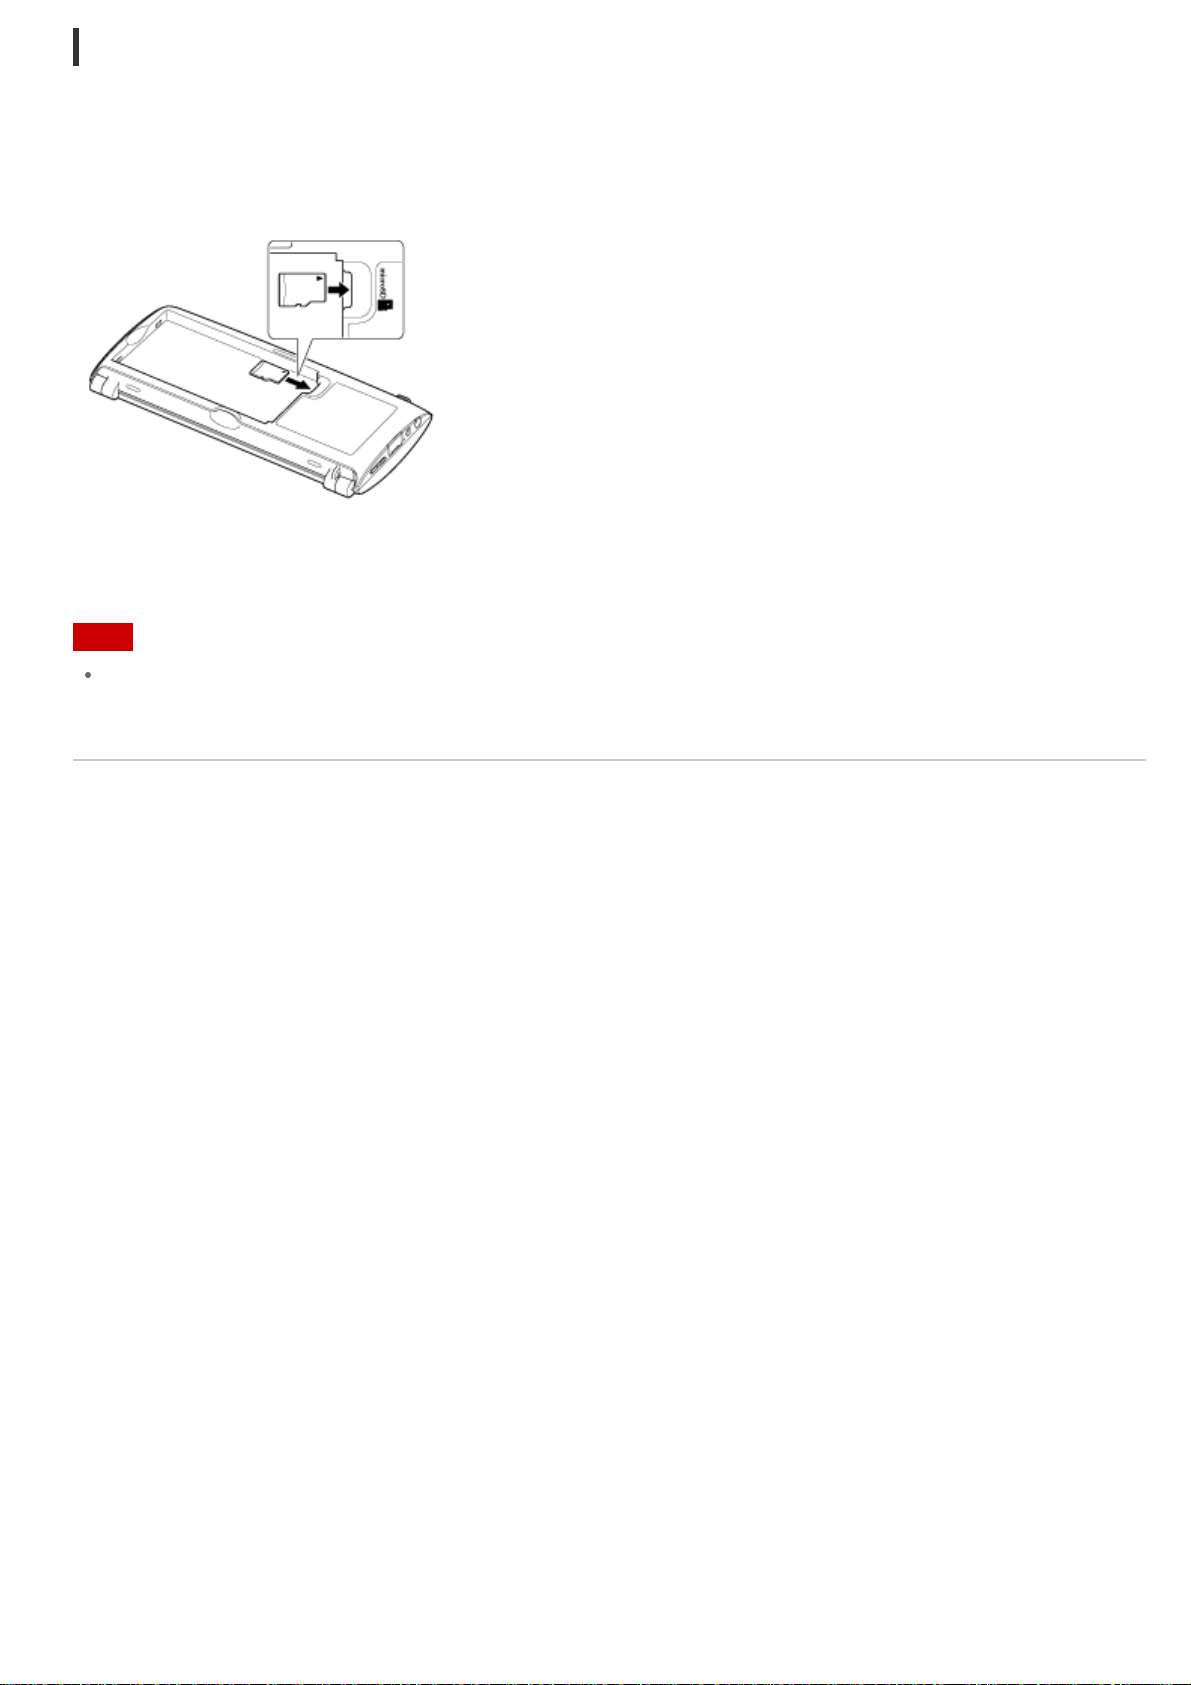
To insert a microSD memory card
1. Open the bottom cover and remove the battery pack.
2. Locate the microSD memory card slot.
3. Hold the microSD memory card with the contacts facing down and the arrow pointing toward the microSD
memory card slot.
4. Carefully slide the microSD memory card into the slot until it clicks into place.
Note
Be careful not to insert a microSD memory card at the wrong orientation. If you force it into the slot upside
down, the slot may be damaged. For details, refer to the manual of the microSD memory card.
Related Topic
Compatibility of microSD Memory Cards
Notes on microSD Memory Cards
Page 42

Notes on microSD Memory Cards
Keep away from infants. Swallowing microSD memory cards is harmful.
Do not touch the contacts with fingers or metal objects.
Delicate electronic components are included in microSD memory cards. Do not subject cards to excessive
force, bend or drop them.
Do not disassemble or modify.
Avoid moisture.
Do not use or store in the following locations:
Places with high temperature, such as inside a closed car in the sunshine
Places exposed to direct sunlight
Humid or corrosive environments
Excessively dusty places
Be sure to use microSD memory cards that are compliant with the standards supported by your tablet device.
A card of the wrong size may become jammed in the slot, causing damage to your tablet device.
It is recommended that you make a backup copy of important data.
To avoid losing stored data, keep microSD memory cards away from static electricity or electrical noise that
may interfere with the card.
When carrying microSD memory cards, be sure to put them in their case to avoid static electricity damage.
Before using a microSD memory card with a device other than a tablet device, such as a digital camera or a
portable audio, format (initialize) the microSD memory card using the device. Some devices may not support
the file format for tablet devices and show you a message that recommends you to format the card. In this
case, copy data from the card to your tablet device (or to other devices via the network) and format the card
using a device other than the tablet. Note that formatting a card will delete all current data contained on it. For
more details, refer to the manual of the device.
Do not insert foreign objects into the microSD memory card slot.
The microSD memory card slot can be used for reading/writing supported cards only, and it cannot be used
for other purposes.
Removing the microSD memory card while your tablet device is turned on may cause unexpected situations
such as loss of data or rebooting of the tablet device.
Page 43

Compatibility of microSD Memory Cards
microSD memory cards (up to 2 GB) and microSDHC memory cards (up to 32 GB) available as of September
2011 have been tested and found compatible with your tablet device. However, this does not guarantee that all
microSD memory cards or microSDHC memory cards will be compatible with your tablet device.
Page 44
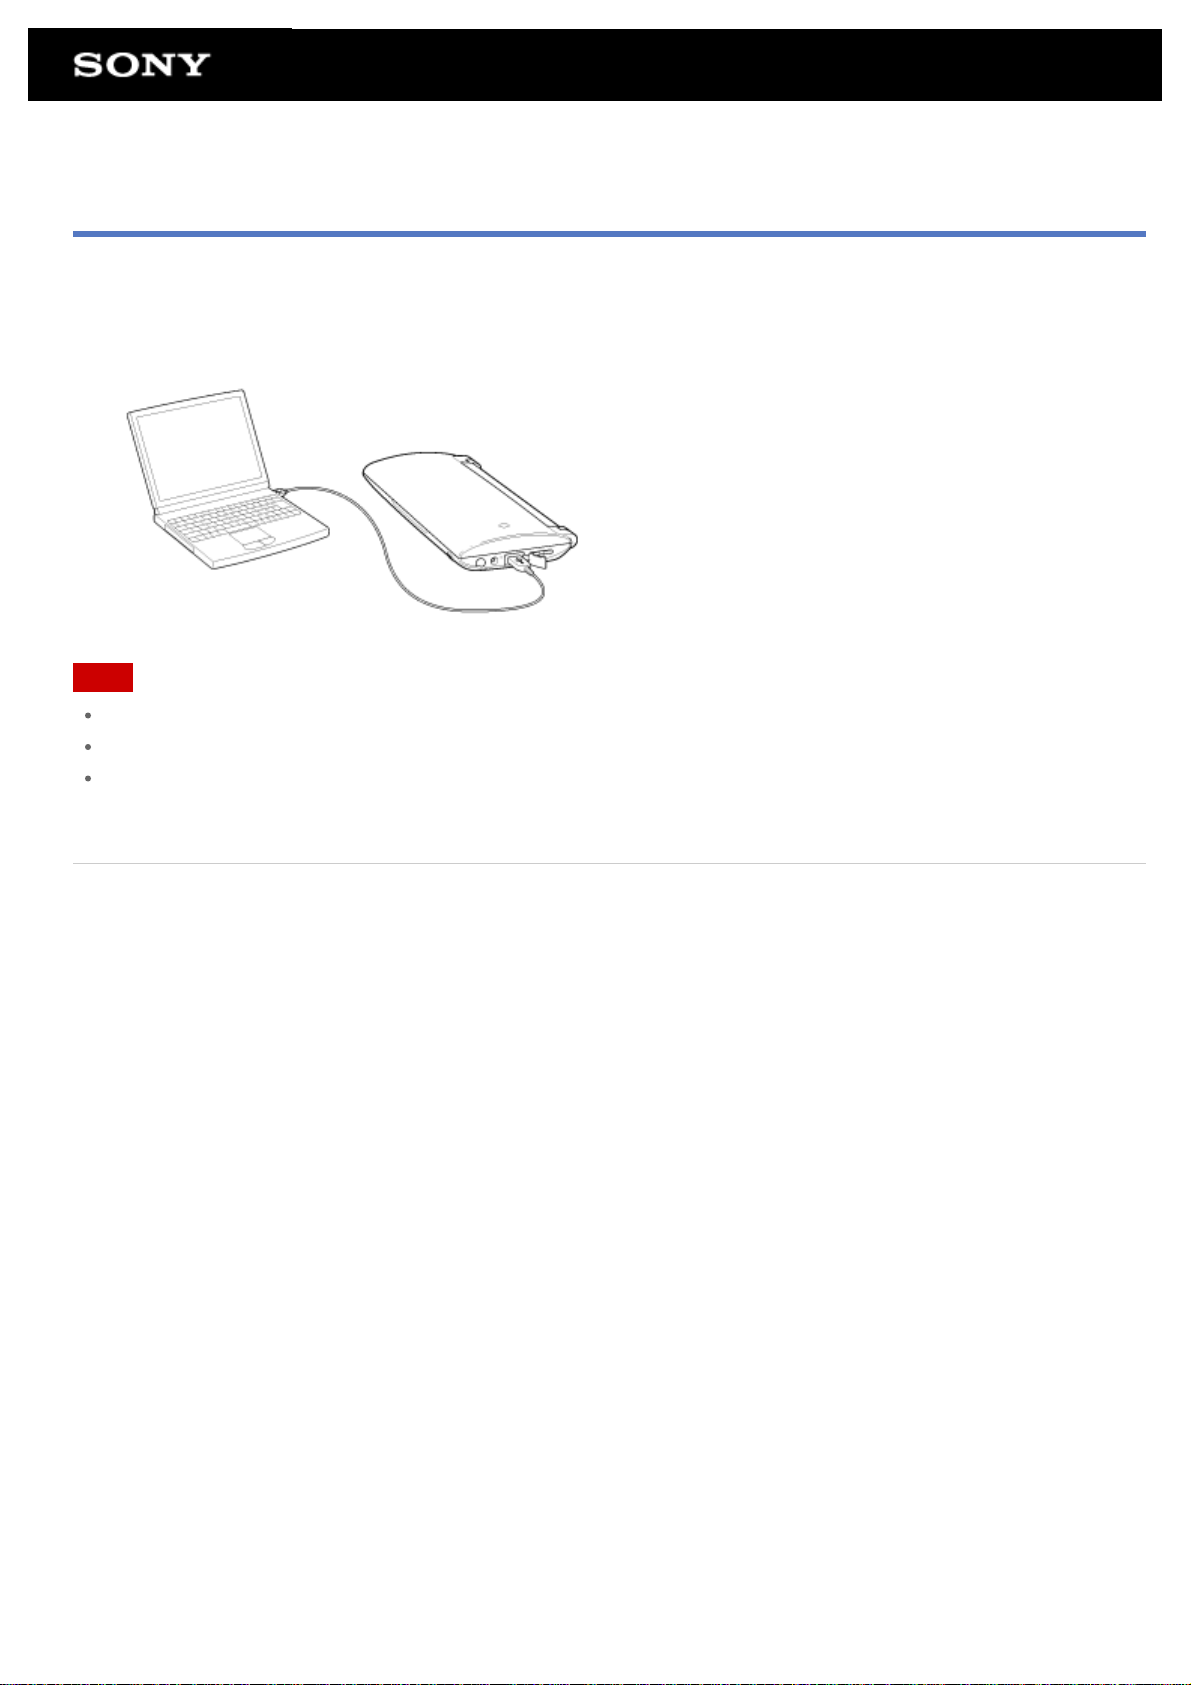
Connecting to a Computer
You can connect your tablet device to a computer by using the USB Micro-B connector of the tablet device.
1. Connect your tablet device to a computer using a Sony Micro-USB cable type S (SPA -US2/SPA- US15, sold
separately) or a commercially available Micro-USB cable.
Note
Do not turn off your tablet device while reading and writing data.
Your tablet device does not support charging the battery via USB connection from a computer or a charger.
Do not disconnect the Micro- USB cable while writing and reading data. Doing so may result in loss of that
data.
Related Topic
Supported Formats
Importing Content from Your Computer
Page 45
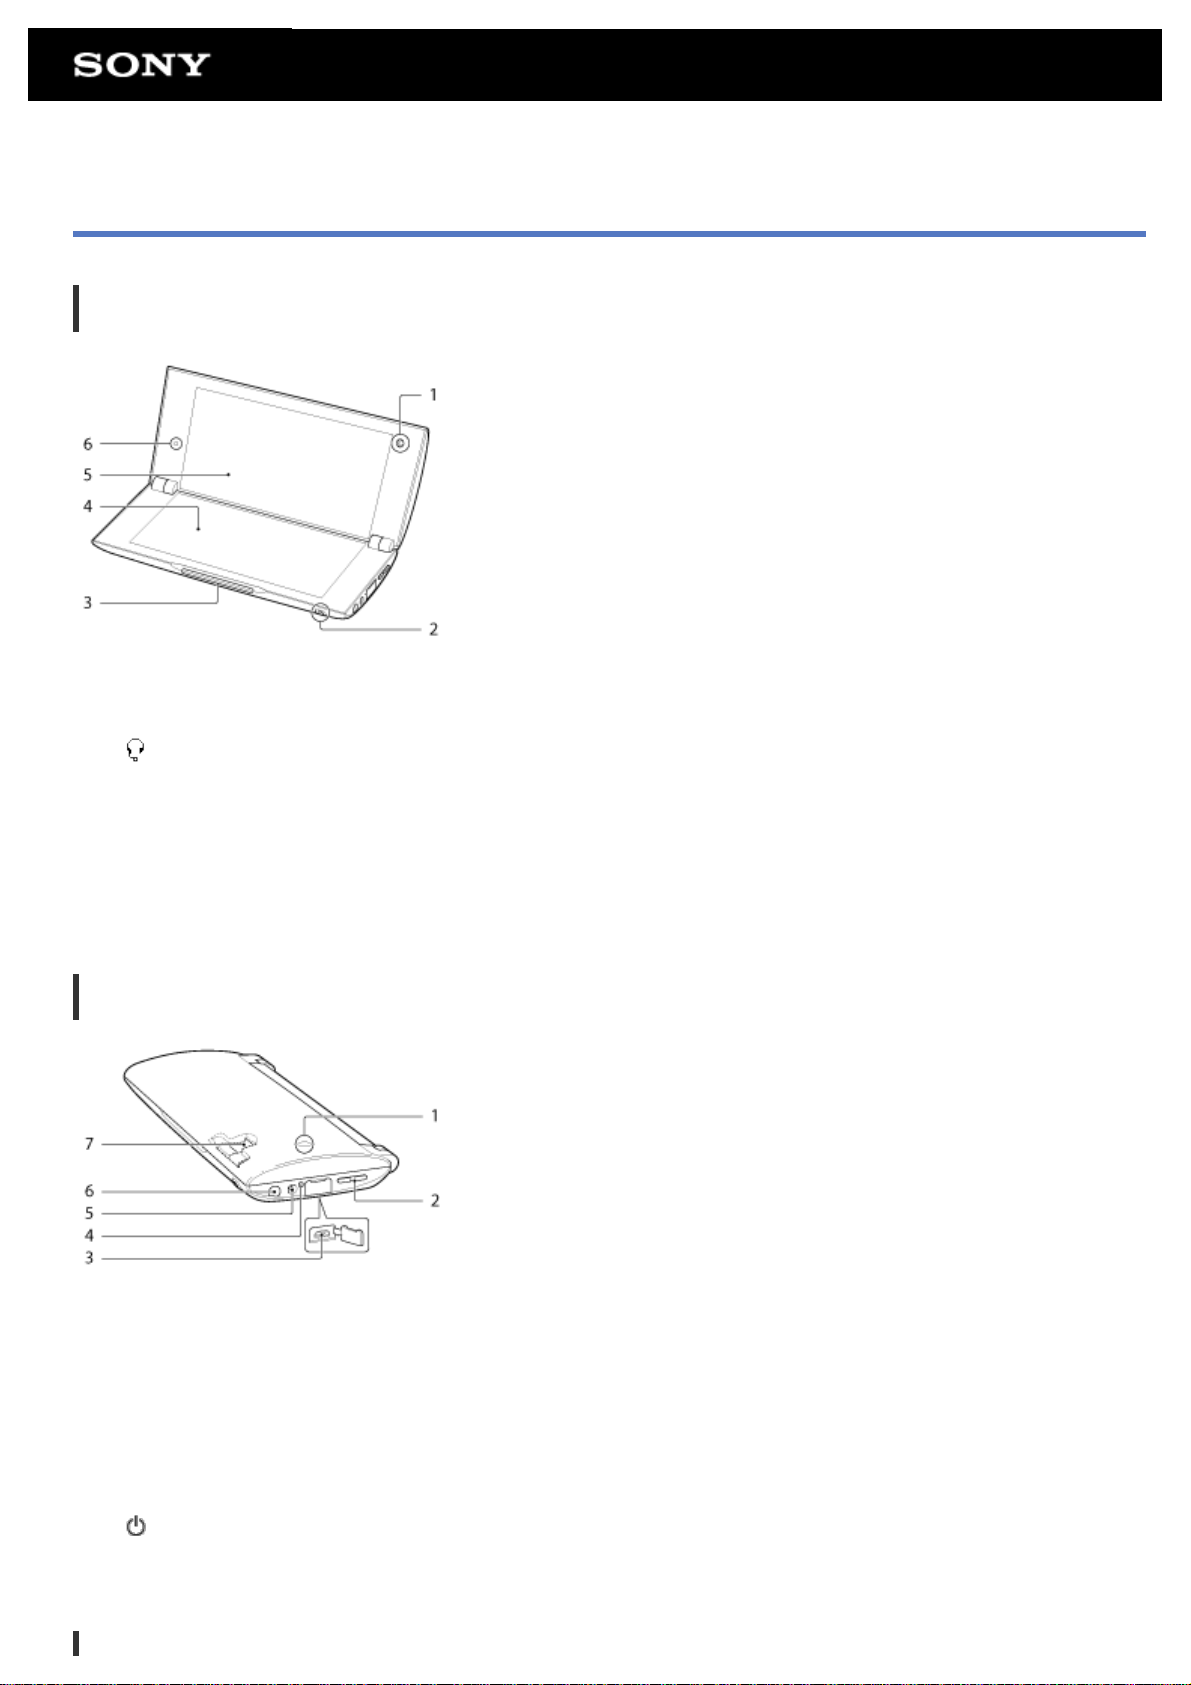
Parts and Controls
Front
1. Front camera lens
2.
3. Notification LED
4. Touch screen (Lower screen)
5. Touch screen (Upper screen)
6. Ambient light sensor
(Headphone) jack
Top & side
1. Rear camera lens
2. VOL + / – (Volume) button
3. USB Micro -B connector
4. Charge indicator
5. Charge connector
6.
7. SIM card slot
(Power) button
Page 46
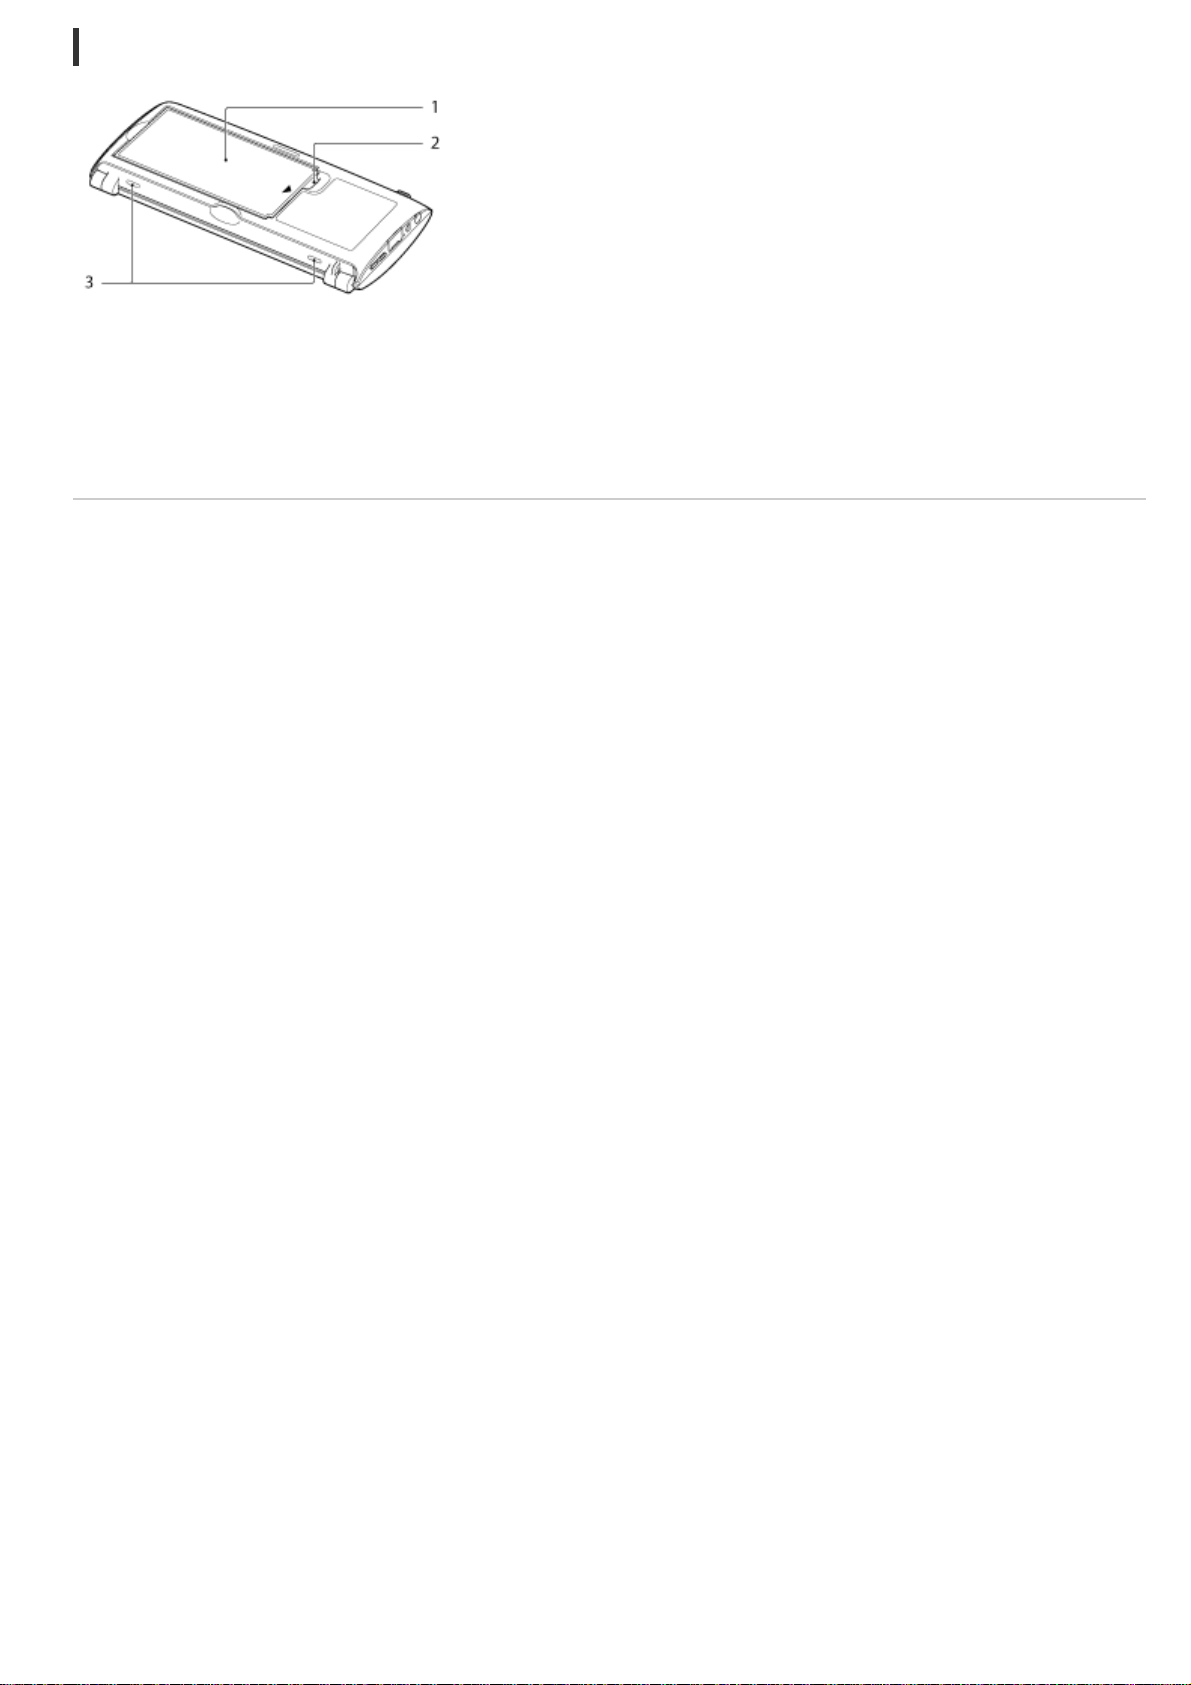
Bottom (bottom cover opened)
1. Battery pack
2. microSD memory card slot
3. Buttons for opening the bottom cover
Related Topic
Turning On or Shutting Down Your Tablet Device
Charging the Battery
Using the Home Screen
Page 47
Checking the Supplied Items
AC adapter
AC power cord (mains lead)
microSD memory card (2 GB) (trial sample)
Rechargeable lithium-ion battery pack
Quick Start Guide
Important Information
Page 48
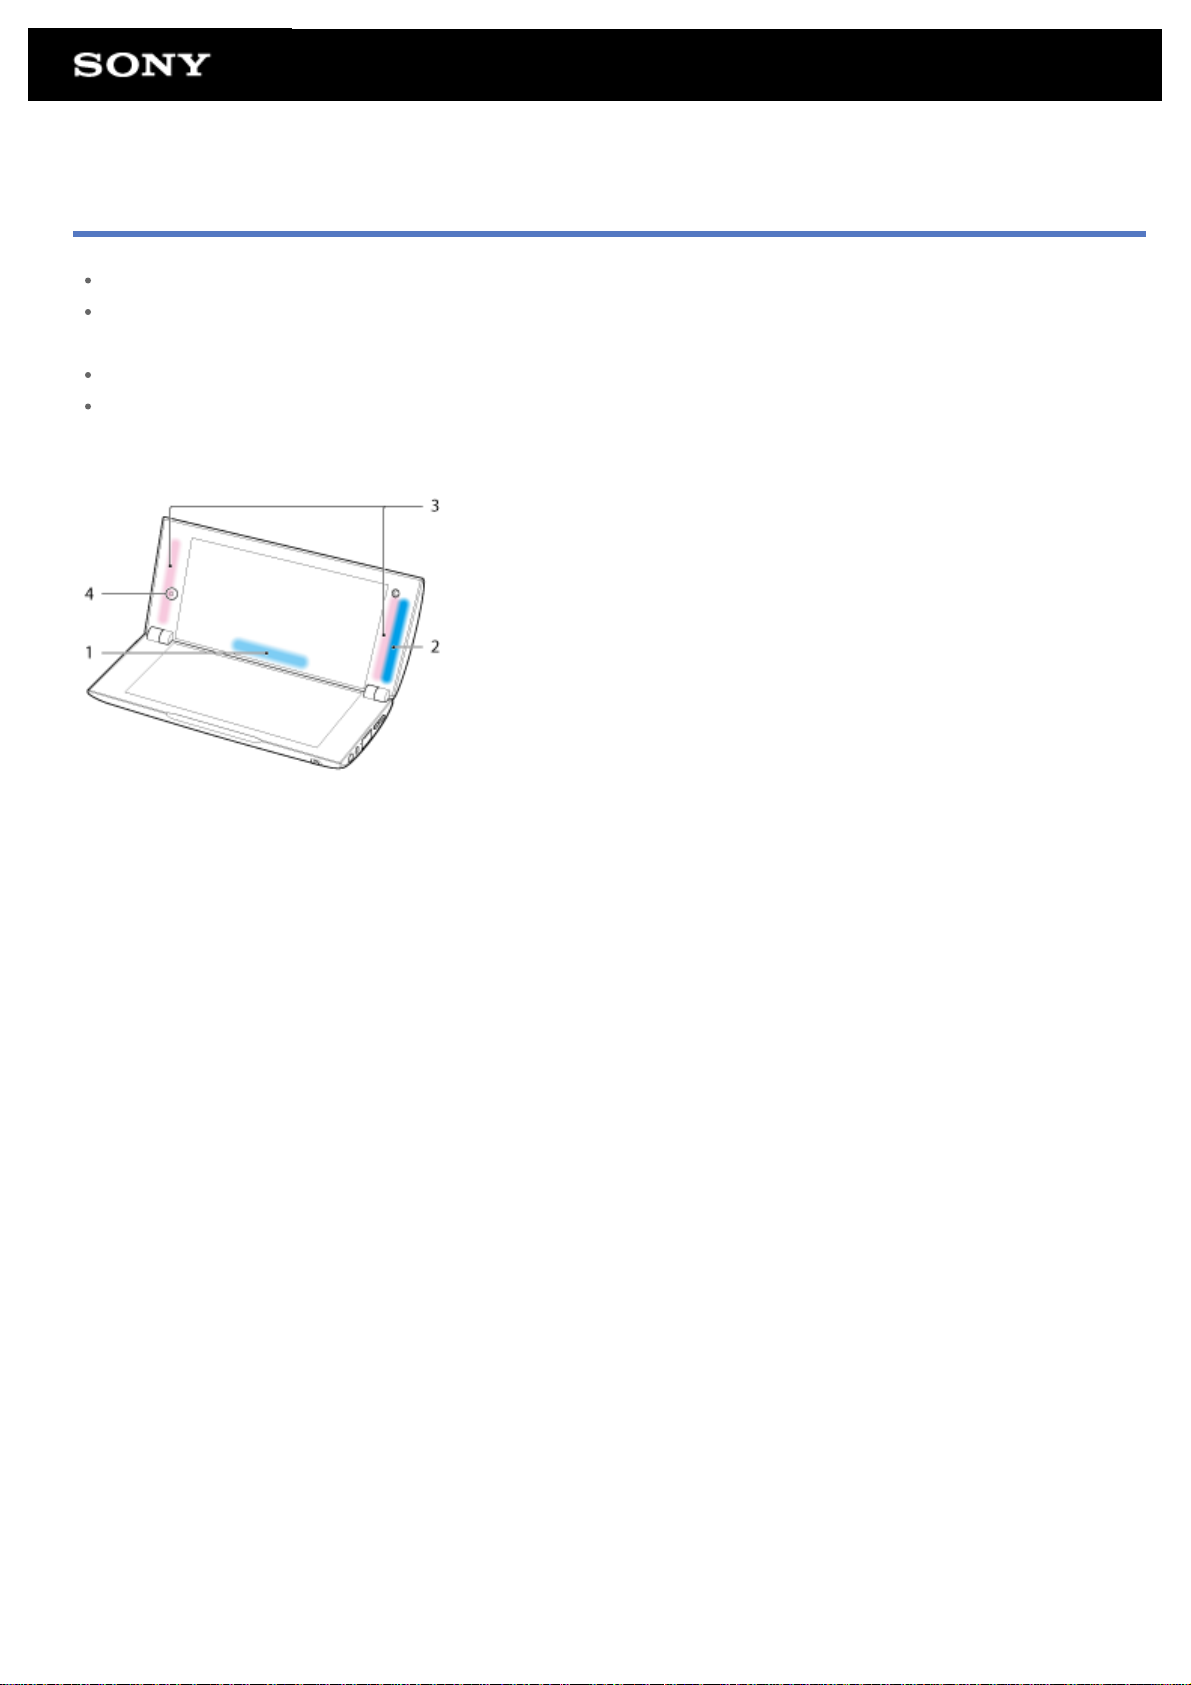
Notes on Holding Your Tablet Device
In landscape orientation, hold your tablet device so the front camera lens is at the top.
In portrait orientation, hold your tablet device so the front camera lens is at the bottom. Be careful not to hold
the ambient light sensor.
Some apps may not support screen rotation. Some apps may rotate the screen in reverse.
Be careful not to hold or cover the antennas shown in the figure below while using the Wi-Fi, Bluetooth, GPS,
or mobile communications functions.
1. Wi-Fi / Bluetooth
2. GPS
3. Mobile communications
4. Ambient light sensor
Page 49

Resetting Your Tablet Device
If your tablet device is not performing as expected, and you cannot force-quit your tablet device by pressing and
holding the power button for about 10 seconds, remove the battery pack after unplugging the AC adapter, then
install the battery pack in your tablet device again. Wait a while after you install the battery pack in your tablet
device before turning on your tablet device.
Note
Resetting the tablet device does not revert the settings to factory default, but unsaved data or settings may be
lost.
Reset the tablet device only when you cannot turn it off or force-quit it.
Page 50
Reverting to Factory Default (Initializing Data)
By reverting the tablet device factory default, all installed apps and settings will be deleted to give you a “clean”
tablet.
1. Tap [
2. Tap [Reset tablet] at the bottom of the menu on the right.
All data is initialized and the tablet device automatically restarts.
Note
It is recommended that you make a backup copy before deleting data in the internal memory [Details].
All data in the data storage area is deleted, including the Google account information, the system data and
settings, and any application data you have downloaded.
User data such as music, photos, and eBooks imported from a microSD memory card or a device connected
via USB is not deleted.
To delete all user data such as music, photos, and eBooks, tap [Erase SD card] to put a check mark in the
box, and then tap [Reset tablet].
It is recommended that you make a backup copy of important data because the user data cannot be restored
once deleted.
Related Topic
Changing the Settings
Apps & Widgets] - [ Settings] - [Backup & reset] - [Factory data reset].
Page 51
How to Maintain Battery Life
Using your tablet device as described below will reduce battery consumption.
Reduce the screen brightness.
Set a short period of inactivity before the screen turns off (switches to sleep mode) automatically.
Turn the screen off (switch to sleep mode) when you will not be using your tablet device.
Shut down your tablet device when you do not use it for a long time.
Turn on airplane mode to turn off the wireless communications or Bluetooth function [Details].
Disconnect USB compatible devices.
Related Topic
Adjusting the Screen Brightness
Turning the Screen On/Off (Sleep Mode)
Setting the Time that Elapses Before the Screen Turns Off (Goes to Sleep)
Turning On or Shutting Down Your Tablet Device
Page 52
Adjusting the Screen Brightness
You can set the screen brightness manually, or set the automatic brightness setting to let the tablet device adjust
the brightness automatically.
1. Tap [
2. To adjust the brightness manually, tap or drag the brightness adjustment bar. To adjust the brightness
automatically, Tap [Automatic brightness].
A check mark is put in the box for that setting.
3. Tap [OK].
Hint
When a check mark is put in the [Automatic brightness] box, the screen may automatically become brighter
but not darken. To darken the screen, adjust manually.
You can also adjust the screen brightness on the control panel displayed by tapping the status bar.
Related Topic
Confirming Download or Update Information on the Status Bar
Apps & Widgets] - [ Settings] - [Display] - [Brightness].
Page 53

Notes on Using Voice Communications Apps
When you use voice communications apps such as those for Internet telephone or voice chat in the following
cases, both parties cannot talk simultaneously. Take turns speaking.
Headphones without a microphone function are connected to the headphone jack.
Nothing is connected to the headphone jack.
You can talk simultaneously when a headset is connected to the headphone jack.
When you attempt to use Internet telephone or voice chat over mobile network, you may not be able to
establish a connection. Use Wi- Fi instead.
Page 54

Notes on Use
Cover
Close the cover of your tablet device securely.
Caring for your tablet device
Remove the battery pack when cleaning the tablet device.
Clean the cabinet with a soft, dry cloth or one slightly moistened with a mild detergent solution. Do not use a
detergent solution for cleaning the touch screen. Do not use an abrasive pad, scouring powder, or solvent
such as alcohol or benzine, as these may damage the finish of your tablet device.
If your tablet device is exposed to moisture such as rain or extreme humidity, wipe your tablet device with a
soft dry cloth. Do not dry with an oven or dryer.
Clean the lens of the built -in camera with a blower brush or a soft brush. If the lens is extremely dirty, wipe it
off with a soft dry cloth. Do not rub the lens, as it is sensitive to pressure.
Usage environment
Do not use or leave the tablet device where the temperature is extremely high (about 35 °C or higher) or low
(about 5 °C or lower), or in a humid place such as a bathroom or sauna. If you use or leave the tablet device
out of the range stated, the tablet device may stop automatically to protect the internal circuitry.
Do not take your tablet device directly from a cold place to a warm place. A sudden change of the
temperature causes moisture condensation, and moisture may condense inside the tablet device. If this
happens, leave the tablet device at room temperature until it dries before using.
Sample data
Sample data is installed on your tablet device at the factory for a trial of music, videos, photos, and books.
Once you delete the sample data, you cannot restore it. Please note that Sony will not provide replacement
sample data if deleted.
Page 55
Checking the Android Version
You can confirm the version of the Android operating system running on your tablet device.
1. Tap [
You can check the version of Android running on your tablet device in [Android version].
Related Topic
Updating Android to the Latest Version
Apps & Widgets] - [ Settings] - [About tablet].
Page 56
Updating Android to the Latest Version
Update your tablet device to the latest version of Android when updates become available.
Note
Once you have updated, you cannot return your tablet device to an older version of Android. Updating
requires the remaining battery level to be at 50% or greater and use of the AC adapter. Your tablet device
may no longer turn on if the battery is depleted while updating.
The data stored on the internal storage (memory space in your tablet device) will not be erased by updating.
There must be enough free space on the internal storage to download the update files when updating.
Some applications may not be compatible with the updated version of Android, and they may no longer run
after updating.
Be sure to check the Android version that each application is compatible with before updating.
Updating may take longer if you connect to the Internet using the mobile communications function. In addition,
large data charges may be incurred depending on the service you subscribe to.
1. Tap [
2. Tap [System updates].
The screen to start updating is displayed when an update is available. Start updating by following the
instructions on the screen.
Related Topic
Checking the Android Version
Apps & Widgets] - [ Settings] - [About tablet].
Page 57
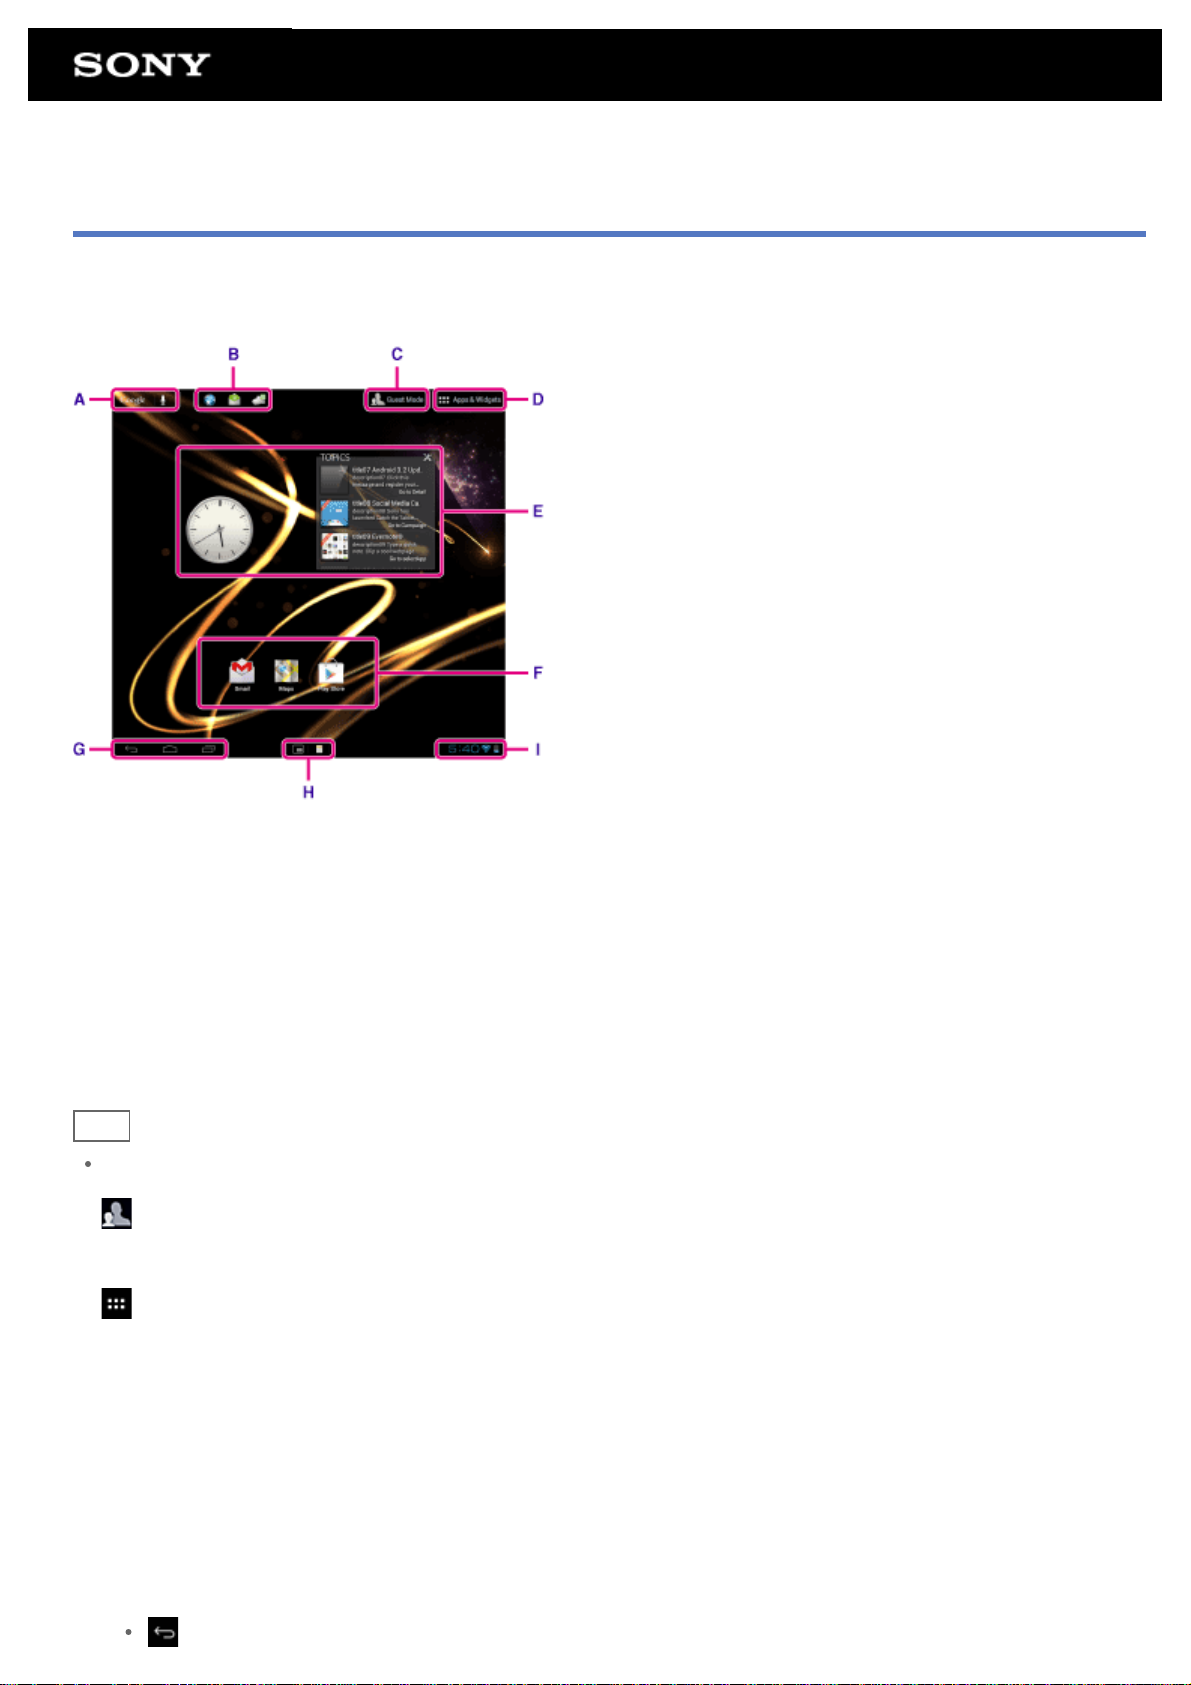
Using the Home Screen
The Home screen consists of five separate screens. You can customize screens to fit your needs by placing your
favorite apps and widgets on the screens.
A: Google search
Tap the box to easily search with Google.
B: Quick launcher
The Quick launcher is displayed on every page of the Home screen, so registering apps you use often gives you
quick access to them.
1. Tap and hold an icon on the Home screen, and then drag it into the Quick launcher.
Hint
You can move icons within Quick launcher, and move them out of the Quick launcher.
C:
Guest Mode
Tap this to use Guest Mode for sharing the tablet device with other users such as your family or friends.
Apps & Widgets
D:
Tap this to display the apps list and the widgets list.
E: Widgets
Widgets are simple apps running on the Home screen. You can choose your favorite widgets from the widgets list
and place them on the Home screen.
F: Apps
You can choose your favorite apps from the apps list and place them on the Home screen.
G: Basic operation buttons
(Back): Tap this to return to the previous screen.
Page 58

(Home): Tap this to display the Home screen.
(Recent Apps): Tap this to display the apps used recently.
: Tap this to hide the keyboard when the keyboard is displayed.
H: Small Apps
You can open small versions of certain apps, such as the browser and calculator, even while another app is
already in use.
I: Status bar
The status bar displays the remaining battery level and Wi-Fi connection icons. Notification icons are also
displayed to tell you that downloading is complete, you have e-mails, or updates are available. By tapping the
status bar, you can display the notification panel and control panel.
Related Topic
Searching with Google
Sharing the Tablet Device with Family or Friends (Guest Mode)
Using the Apps & Widgets List
Confirming Download or Update Information on the Status Bar
Using “Small Apps”
Page 59
Sharing the Tablet Device with Family or Friends (Guest Mode)
If you share your tablet device with other users, registering Guest Mode enables you to make a Home screen for
the guest. On the Home screen for the guest, only apps the guest is allowed to use are displayed, and you can
set what wallpaper is displayed according to the mode.
To register a Guest Mode
1. Tap [ Guest Mode] on the Home screen.
2. Tap [Start].
3. Enter a name for the Guest Mode by following the on-screen instructions, and then tap [Next].
4. Select whether to restrict the use of apps, and then tap [Next].
If you select [Limited applications], tap apps you will allow the guest to use on the app selection screen,
and then tap [SAVE] at the top right of the screen.
5. Select whether to set an unlock code, and then tap [Next].
To set an unlock code, select [Set code].
If you select [Set code], set a cancellation code by following the on- screen instructions.
6. Check the registration information for the Guest Mode, and then tap [Done].
Related Topic
Using the Home Screen
Switching to Guest Mode
Page 60
Switching to Guest Mode
1. Tap [ Guest Mode] on the Home screen.
2. Select the desired mode.
The Home screen switches to the selected Guest Mode.
To cancel Guest Mode
1. Tap [ Exit] on the Home screen.
2. If an unlock code is set, enter the unlock code, and then tap [OK].
Hint
To change the wallpaper in Guest Mode, tap and hold the Home screen to display the wallpaper selection
screen, and then select a desired wallpaper.
To edit or delete a Guest Mode, tap and hold the thumbnail of a Guest Mode on the mode selection screen,
and then tap [Edit] or [Delete].
To add a new Guest Mode, tap [ New mode] on the mode selection screen.
Note
The Guest Mode function is not for security purposes. It is for restraining the restricted applications from
being displayed.
The Guest Mode function does not allow each user to store and protect personal data.
Some apps may be accessible through other apps even if you restrict them using Guest Mode.
Make sure not to forget the unlock code and secret answer you set. If you do forget them, you will need to
reset tablet device settings factory default.
If you forget the unlock code, entering the secret answer correctly will allow you to reset the unlock code.
You may not be able to switch to Guest Mode if you installed home application made by a company other
than Sony.
You cannot update the system software during Guest Mode.
Even if you switch to Guest Mode, apps used recently and notifications will remain. Apps running in the
background such as apps playing music in the background also will not stop.
Since some tablet device functions are restricted in Guest Mode, Small Apps and the Quick launcher will not
be available.
Related Topic
Sharing the Tablet Device with Family or Friends (Guest Mode)
Page 61
Adding Apps or Widgets to the Home Screen
You can flick the Home screen right/left to scroll between up to five screens. Adding app icons or widgets to your
favorite location allows you to start apps easily.
1. Flick to display the Home screen on which you want to place apps icons or widgets, and then tap [
& Widgets] at the top right of the screen.
2. Select the item you want to add to the Home screen from [Apps] or [Widgets].
3. Tap and hold the icon of the app or widget, then drop it when the Home screen is displayed.
The icon or widget is added to the page you drop the icon or widget onto.
To delete an icon from the Home screen
Tap and hold the icon, and drag and drop it to
To organize icons using folders
You can use folders to organize icons on the Home screen.
1. Tap and hold an icon, then drag it on top of another icon.
The two icons are then combined into a folder.
2. Tap the combined icon folder, then tap [Unnamed Folder].
3. Enter a new folder name, and then tap
The folder is shown with the new folder name.
Hint
(Remove).
.
Apps
To add an app to a folder, tap and hold the icon, then drag and drop it into the folder.
To remove an app from a folder, tap to open the folder, then drag the icon out of the folder. When all apps are
removed from the folder, the folder is deleted automatically.
Related Topic
Using the Home Screen
Using the Apps & Widgets List
Page 62
Using the Apps & Widgets List
When you tap [ Apps & Widgets] on the Home screen, the apps and widgets list is displayed.
The apps list displays the icons of all available apps. The widgets list displays widgets that you can place on the
Home screen. If an app is supplied with a widget, place the widget on the Home screen so that you can operate
the app from the Home screen easily.
Switching between the apps and widgets list
1. Tap [Apps] or [Widgets] at the top left of the screen.
Hint
The apps and widgets list contains multiple pages. Flick left and right to move between pages. The apps list
is displayed before the list of widgets.
Sorting apps and widgets
1. Tap at the top right of the screen and select a sorting method.
[A to Z] : Sort by name.
[Newest first] : Sort by date of update.
Uninstalling (Deleting) an application
1. Tap and hold the icon of the app you want to uninstall from the apps list.
2. While holding the icon, drag and drop it to [
Note
Some applications cannot be uninstalled (deleted). This does not indicate a malfunction of the tablet device or
a bug in the application.
Uninstall] displayed on the Home screen.
Displaying the app information
1. Tap and hold the icon of the app you want to check information of.
2. While holding the icon, drag and drop it to [
Hint
If the Play Store app is installed, is displayed to the left of . You can start the Play Store app by
tapping
Related Topic
.
App info] displayed on the Home screen.
Page 63

Using the Home Screen
Adding Apps or Widgets to the Home Screen
List of Apps
Page 64
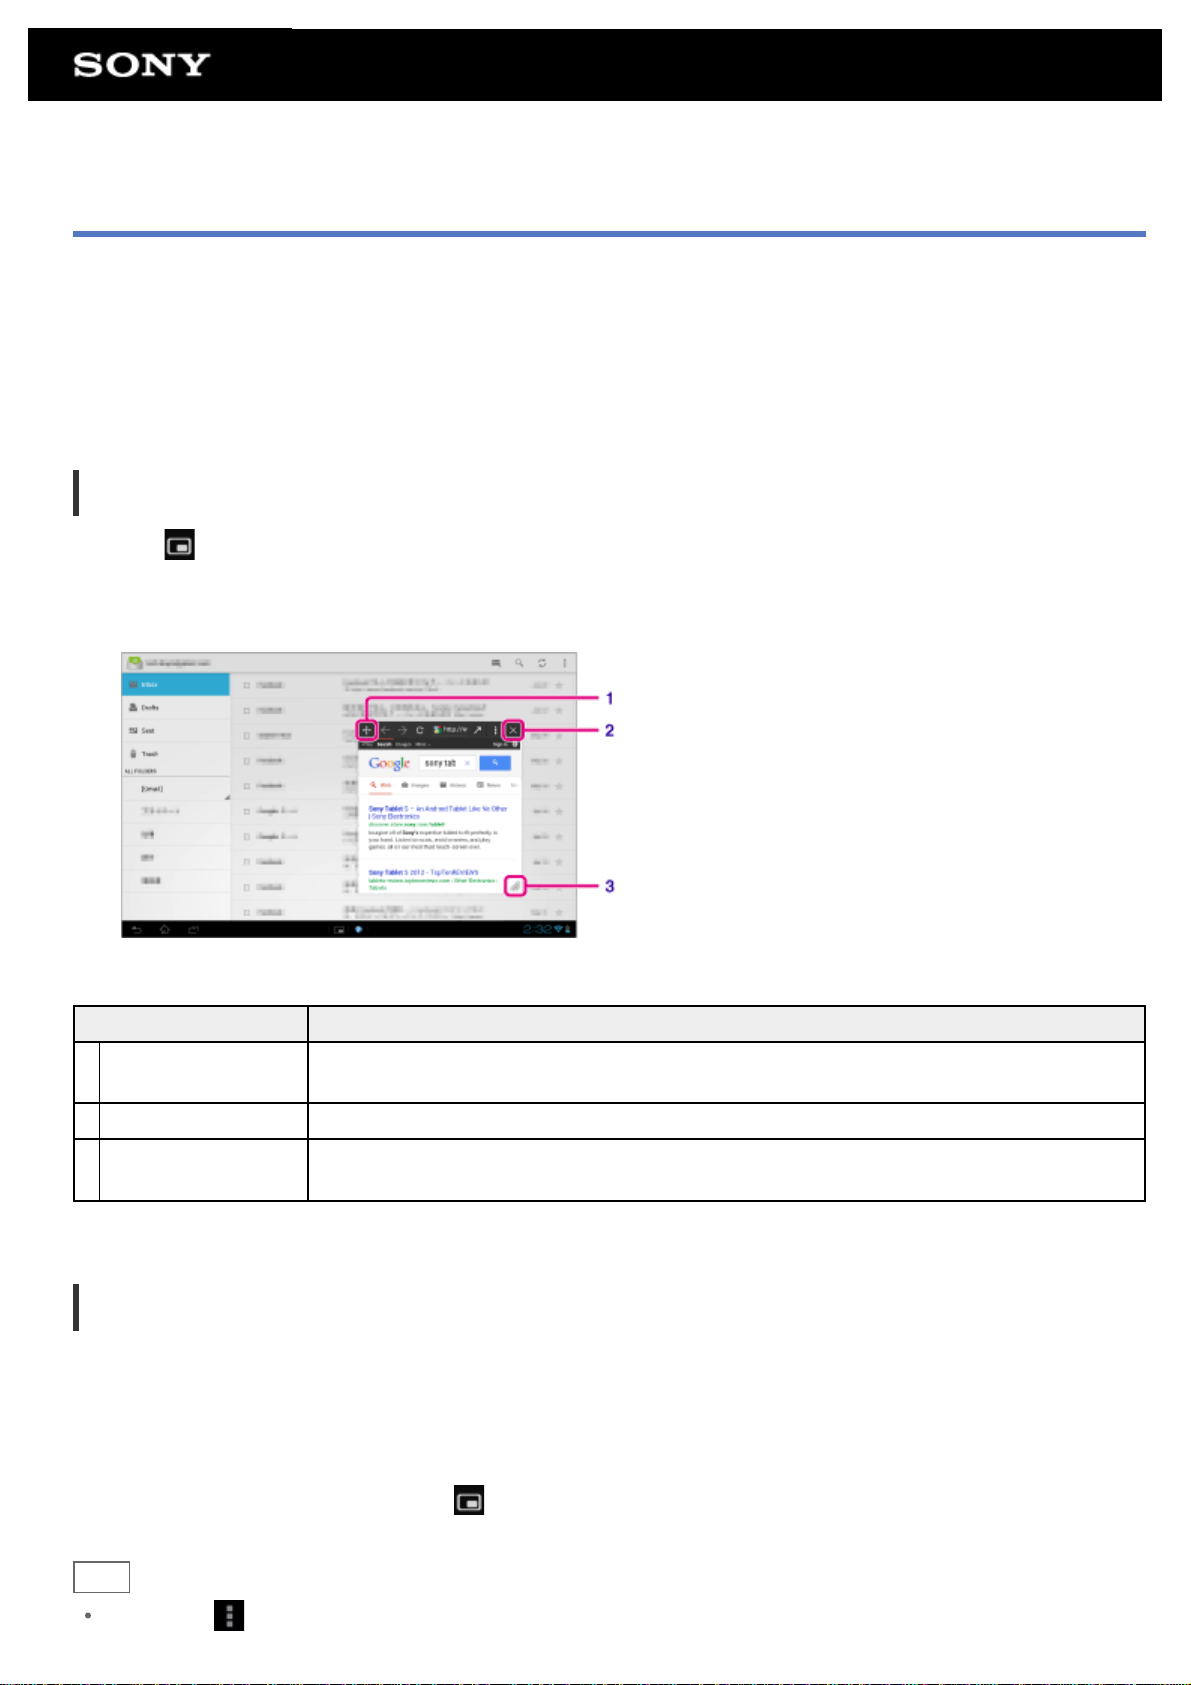
Using “Small Apps”
There are a number of apps installed on the tablet device called Small Apps. Small Apps give you the flexibility to
open certain apps without closing other apps. For example, you may have an app such as the Email app open
and want to open another app such as the Browser app. Instead of closing the Email app and opening the
Browser app, you can keep the Email app open and start the Browser Small App. The Small App (Browser) is
then displayed over the existing app (Email).
To start Small Apps
1. Tap on the Home screen.
The Small Apps launcher appears.
2. Tap the app you want to start.
Display on the screen Description
1 Move
2 Close Closes Small Apps.
Expand/Contract the
3
window
Dragging this moves the Small Apps window. Double tap to resize the window to a size
appropriate for the screen (Unavailable in some apps that cannot resize the window.).
Drag to expand/contract the window (Unavailable in some apps that cannot resize the
window.).
To set a shortcut
You can create shortcuts for Small Apps you often use.
1. On the Small Apps launcher, tap and hold the app you want to set.
The menu appears.
2. Tap [Create shortcut to this item].
A shortcut is created to the right of
Hint
.
By tapping on the Small Apps launcher and then tapping [Clear shortcut], you can delete the shortcut you
Page 65
set.
To use a widget
You can display a widget while another app is in use.
To add a widget
1. Tap [
2. Tap the widget you want to add.
3. Enter a label name, and then tap [OK].
The widget is added to the Small Apps launcher.
To delete a widget
1. On the Small Apps launcher, tap and hold the widget you want to delete.
The menu appears.
2. Tap [Remove from screen].
Hint
Only widgets can be deleted from the Small Apps launcher. Apps cannot be deleted from the launcher.
Related Topic
Using the Home Screen
Using the Calculator
Add] on the Small Apps launcher.
Browsing Websites
Page 66
Searching with Google
You can search websites, apps downloaded to the tablet device or data using Google Search.
To search by text
1. Tap [Google] on the top left of the Home screen, and enter keywords.
2. Tap an item on the search result list.
By tapping
To search by voice
on the keyboard, you can start the Browser app and also display the search results.
1. On the top left of the Home screen tap
2. Speak keywords by following the on-screen instructions.
The Browser app starts and displays the search results.
Related Topic
Entering Text
, or [Google] and then tap .
Page 67
Confirming Download or Update Information on the Status Bar
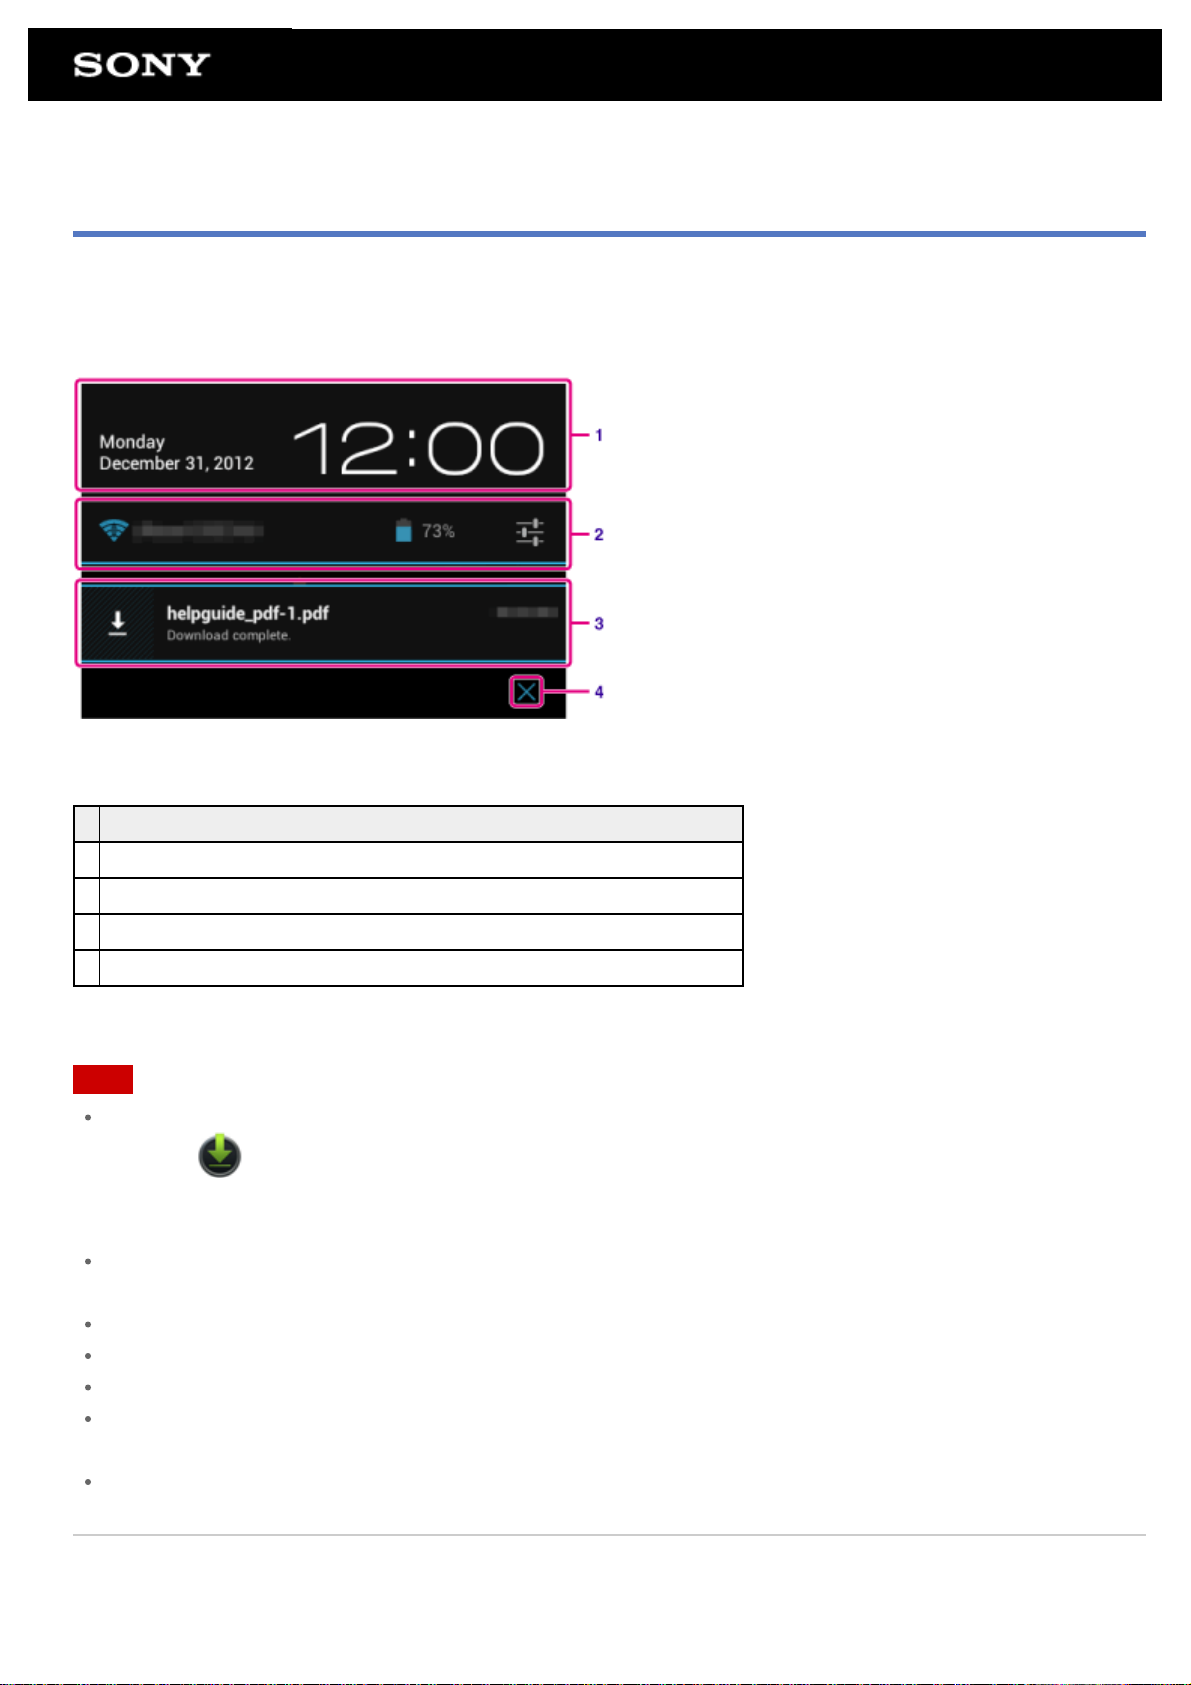
The notification icons tell you that downloading is complete, you have e-mails, or updates are available. By
tapping the status bar, you can display the notification panel. You can display the control panel and open
downloaded files directly from the notification panel.
Description
1 Tap to display the control panel.
2 Displays the status of the battery and Wi-Fi connection.
3 Tap to open items you are notified about and related apps directly.
4 Closes the notification panel.
Note
If you close the notification panel, the notification will be deleted. You can display the downloaded content
from the [
You can control the following items from the control panel.
Airplane mode: Turns on/off airplane mode. When this mode is turned on, wireless communications are turned
off.
Wi-Fi: Displays the Wi-Fi setting screen [Details].
Auto-rotate screen: Locks the screen so it does not rotate automatically [Details].
Brightness: Adjusts the screen brightness [Details].
Notifications: Turns on/off notifications. If you turn this off, the notification icons will not appear on the status
bar.
Settings: Displays the settings screen.
Downloads] app.
Related Topic
Changing the Settings
Page 68
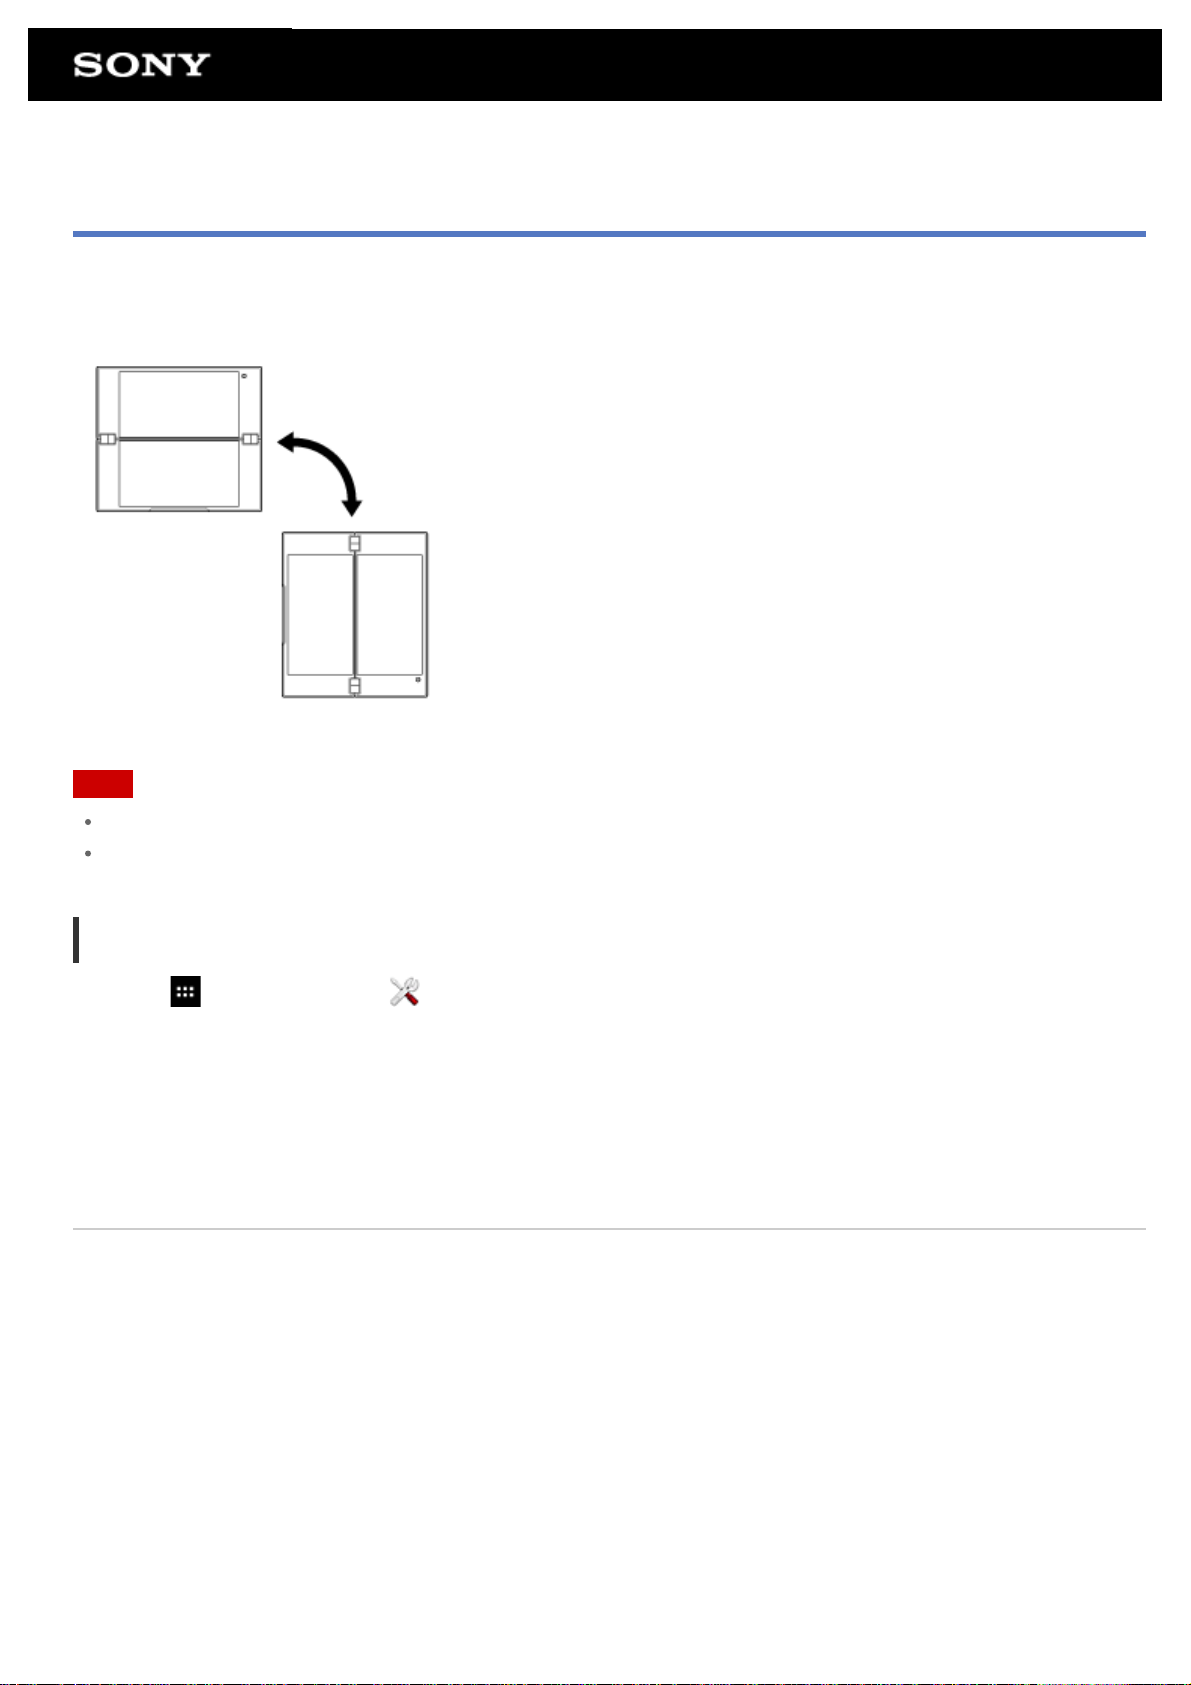
Configuring Screen Rotation
The screen rotates when you turn your tablet device sideways as shown below.
Note
Depending on the application, the screen may rotate regardless of the direction your tablet device is held.
Some apps may not support screen rotation. Some apps may rotate the screen in reverse.
Setting the screen to not rotate
1. Tap [ Apps & Widgets] - [ Settings] - [Display] - [Auto -rotate screen] in that order to remove the check
mark and disable screen rotation.
To set the screen to rotate again
Tap [Auto-rotate screen] again to add a check mark and enable screen rotation.
You can also turn on/off the screen rotation on the control panel displayed from the status bar.
Related Topic
Confirming Download or Update Information on the Status Bar
Changing the Settings
Page 69
Configuring to Lock the Screen
If you set the lock function, the screen is automatically locked for security purposes when turning the screen on
(deactivating sleep mode).
To configure the lock function
1. Tap [ Apps & Widgets] - [ Settings] - [Security] - [Screen lock] in that order.
2. Tap the desired setting from the following items.
[None]: Lock function not used.
[Slide]: Default setting. Tap
[Pattern]: Trace nine pass points with a finger. If you fail to unlock five times, the entry screen for the Google
account will appear. Enter your account name, and you will receive the procedure to unlock by e-mail.
[PIN]: Set a code of your choice consisting of four or more numbers.
[Passwords]: Set a password consisting of four or more numbers/letters.
Hint
Make sure to write down the PIN number or password you set and keep it in a safe place.
, then tap to unlock.
3. Follow the on-screen instructions.
Related Topic
Changing the Settings
Page 70
Entering Text
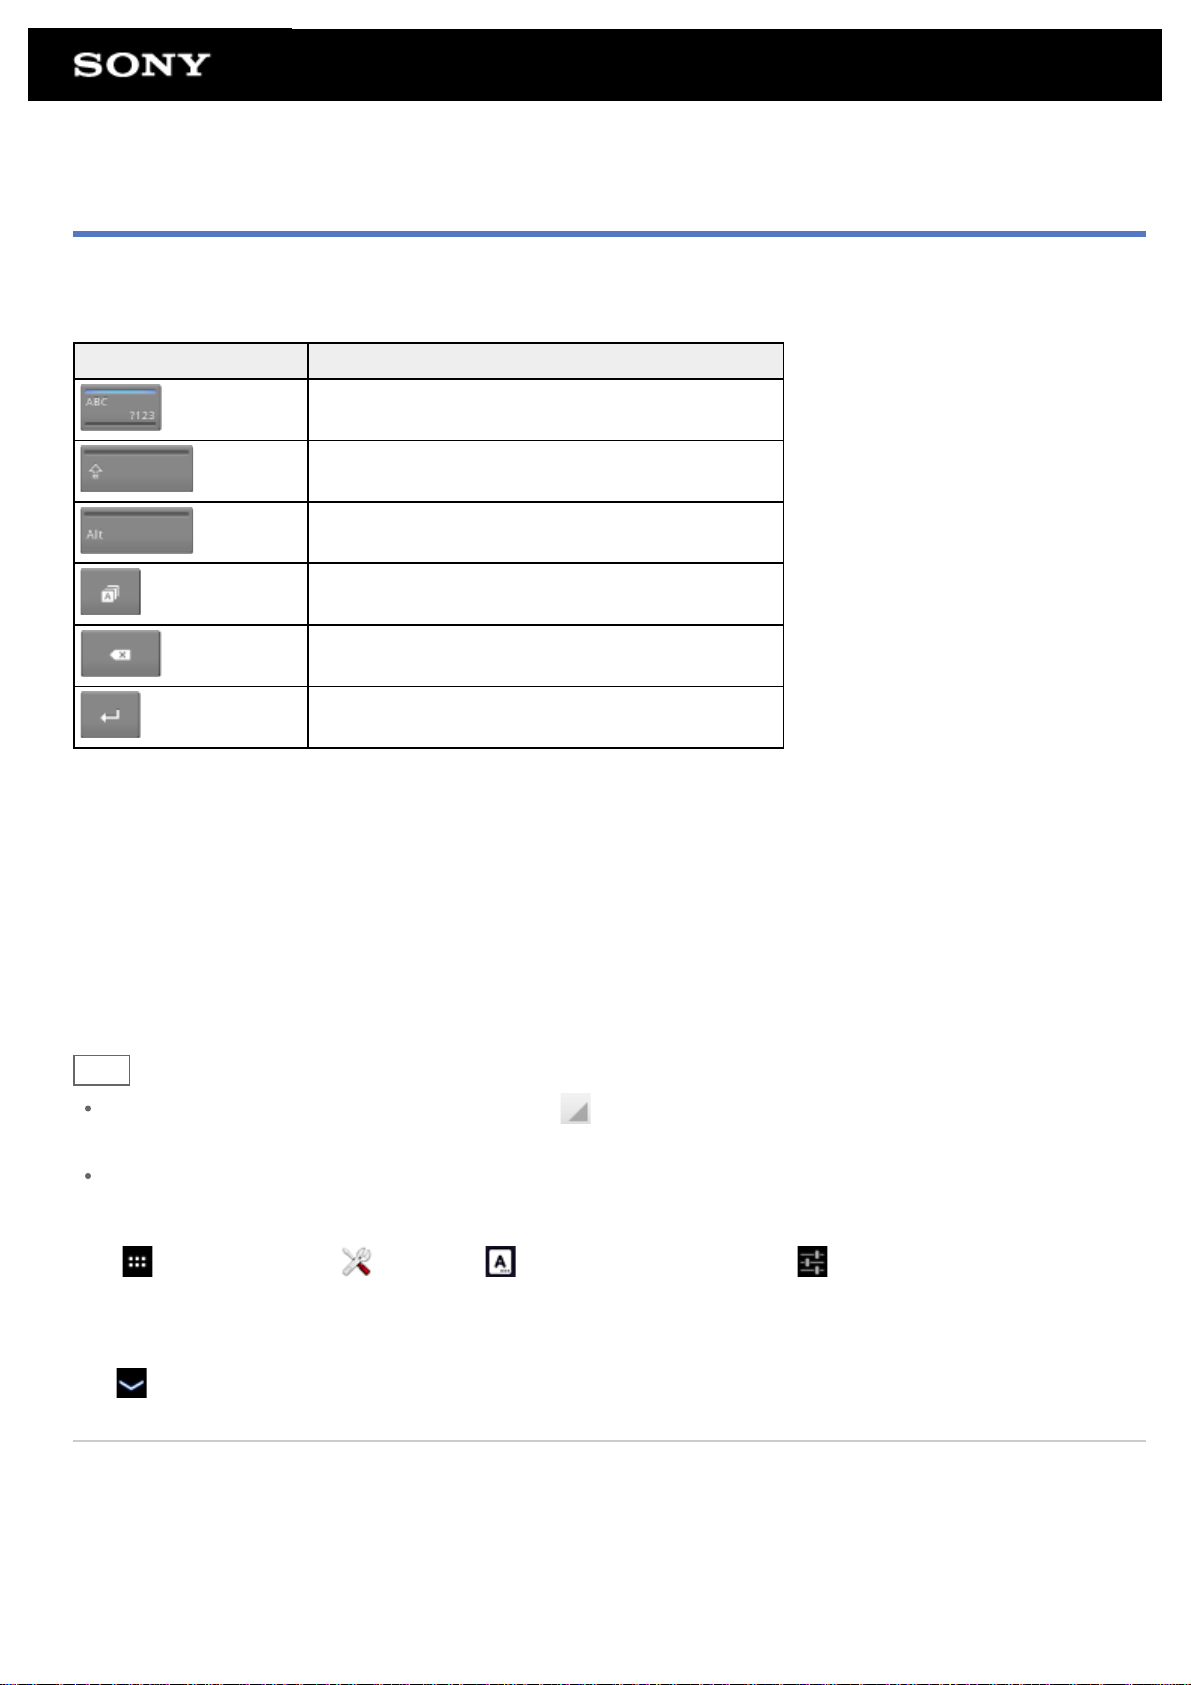
You can enter text using the keyboard displayed on the screen.
Display on the screen Description
Switches between letters, numbers and symbols.
1
*
2
*
3
*
Enters capital letters.
Enters other symbols.
Switches the input language.
Deletes text.
Enters or adds linefeeds.
*1 Capital-letter entry will deactivate after you enter one letter. Tap this key every time you enter a capital letter.
To input capital letters continuously (caps lock), double -tap the key. To cancel the caps lock, press this key
again.
*2 This appears when you enter numbers or symbols.
*3 This appears when you have selected multiple languages to use for input. Every time you tap the key, the
input mode switches between the modes you have set. Tap and hold to display the input mode switching
screen.
Hint
Pressing and holding a key with a triangle mark on the bottom right corner allows you to enter letters or
symbols, etc. related to the letter of the key.
To enter a URL or letters, tap the area where you want to enter text to display the on-screen keyboard.
To set the input language
Tap [
followed by [Input languages], and then put a check mark on the languages to use.
To hide the on-screen keyboard
Apps & Widgets] - [ Settings] - [ Language & input]. Then tap next to [Standard keyboard]
Tap
Related Topic
Changing the Settings
on the bottom left of the screen.
Page 71
Selecting Text
You can copy or search text from the menu that is displayed by selecting text on a website or URL.
1. Tap and hold the text.
The selected text will be highlighted.
2. Tap the desired item from the menu at the top right of the screen.
Hint
You can change the range of text selected by dragging the cursor that appears in step 1 across the text.
To paste text
1. Tap and hold the location to paste the text, and then tap [PASTE] or [CLIPBOARD].
Hint
Tap [CLIPBOARD] to display in a list the history of text that has been copied. Text that is frequently used can
also be added to Favorites.
You can change the location to paste the text by dragging the cursor to a new location.
Page 72
Configuring a Google Account
You must sign up for a Google account to use services provided by Google, such as Google Play Store (free
registration).
With a Google account, you can sync apps such as Email, Calendar and People on your tablet device with other
devices that also support Google services.
Use your current Google account
If you already have a Google account that you use with a computer or smartphone, you can use that account with
your tablet device too. Input your account name and password in the login screen displayed for Google service
apps.
Note
Make sure that your tablet device is connected to the Internet when you sign up for a new Google account or
log in.
Sign up for a new Google account on your tablet device
You can sign up for a Google account when you use your tablet device for the first time or start a Google service
app for the first time.
Hint
You do not have to sign up for another Google account if you already have one.
You can sign up for a Google account by tapping [ Apps & Widgets] - [ Settings] - [Accounts & sync] -
[Add account] (at the top right of the screen) - [Google] in that order.
You can also sign up for a Google account by accessing Google (https://www.google.com/accounts/) directly.
Related Topic
Entering Text
Synchronizing the Account
Changing the Settings
Page 73
Backing Up Data on Your Tablet Device
You should copy the data in your tablet device and store it on another storage device (backup). Various data
such as recorded images, downloaded music and video content will accumulate in your tablet device as you use
them. If unexpected problems occur with your tablet device, that data may be damaged or lost. As a preventive
measure in case of such accidents, you should make frequent backups so you will be able to restore your
important data.
Note
Some data on your tablet device cannot be backed up.
Some settings and applications may not have any backup method. Make written notes and keep them in a
safe place.
Data you can back up
You can copy and store the following data with your tablet device for backup.
Music/movie/eBook files without copyright protection
Pictures/wallpapers
That data is stored in the following folders.
Music files: \Music
Wallpaper files: \Pictures
Movie files: \Movie
Picture files: \DCIM
eBook files: \Reader
Backing up data (copying)
Data is stored on the microSD memory card. Copy the data to a computer periodically.
Note
Since video content purchased at Video Unlimited*1 is copyrighted, you cannot back it up by the above
mentioned method. Copy it on a computer using “Media Go” computer software. Go here to learn more about
the Media Go application.
http://mediago.sony.com/enu/introduction/
*1 Video Unlimited is a video service available on Sony Entertainment Network.
Related Topic
Checking the Free Space
Page 74
Importing Content from Your Computer
If you connect a computer to your tablet device using a commercially available Micro-USB cable, you can copy
data on the computer to your tablet device. The copied data can then be played back on your tablet device.
1. Connect your tablet device to your computer with a commercially available Micro -USB cable.
2. On the computer, open a folder that includes the file you want to export to the tablet device.
3. Click the [Start] button on your computer.
4. Click [Computer].
5. Double- click the model name of your tablet device.
6. Double- click the destination to save the data.
7. Drag and drop the file you want to copy onto this screen.
Note
The menu name displayed in the procedure above varies depending on your computer operating system,
computer environment or the Android operating system of the tablet device.
Do not turn off the tablet device or remove the Micro-USB cable while copying data. Doing so may cause the
data to be damaged.
The copied data will be stored in the microSD memory card. You cannot change the destination to save the
data.
Only copied data in supported file formats can be played back on your tablet device.
Check the free space of your tablet device when you import data from the computer.
Related Topic
Connecting to a Computer
Checking the Free Space
Supported Formats
Page 75
Supported Formats
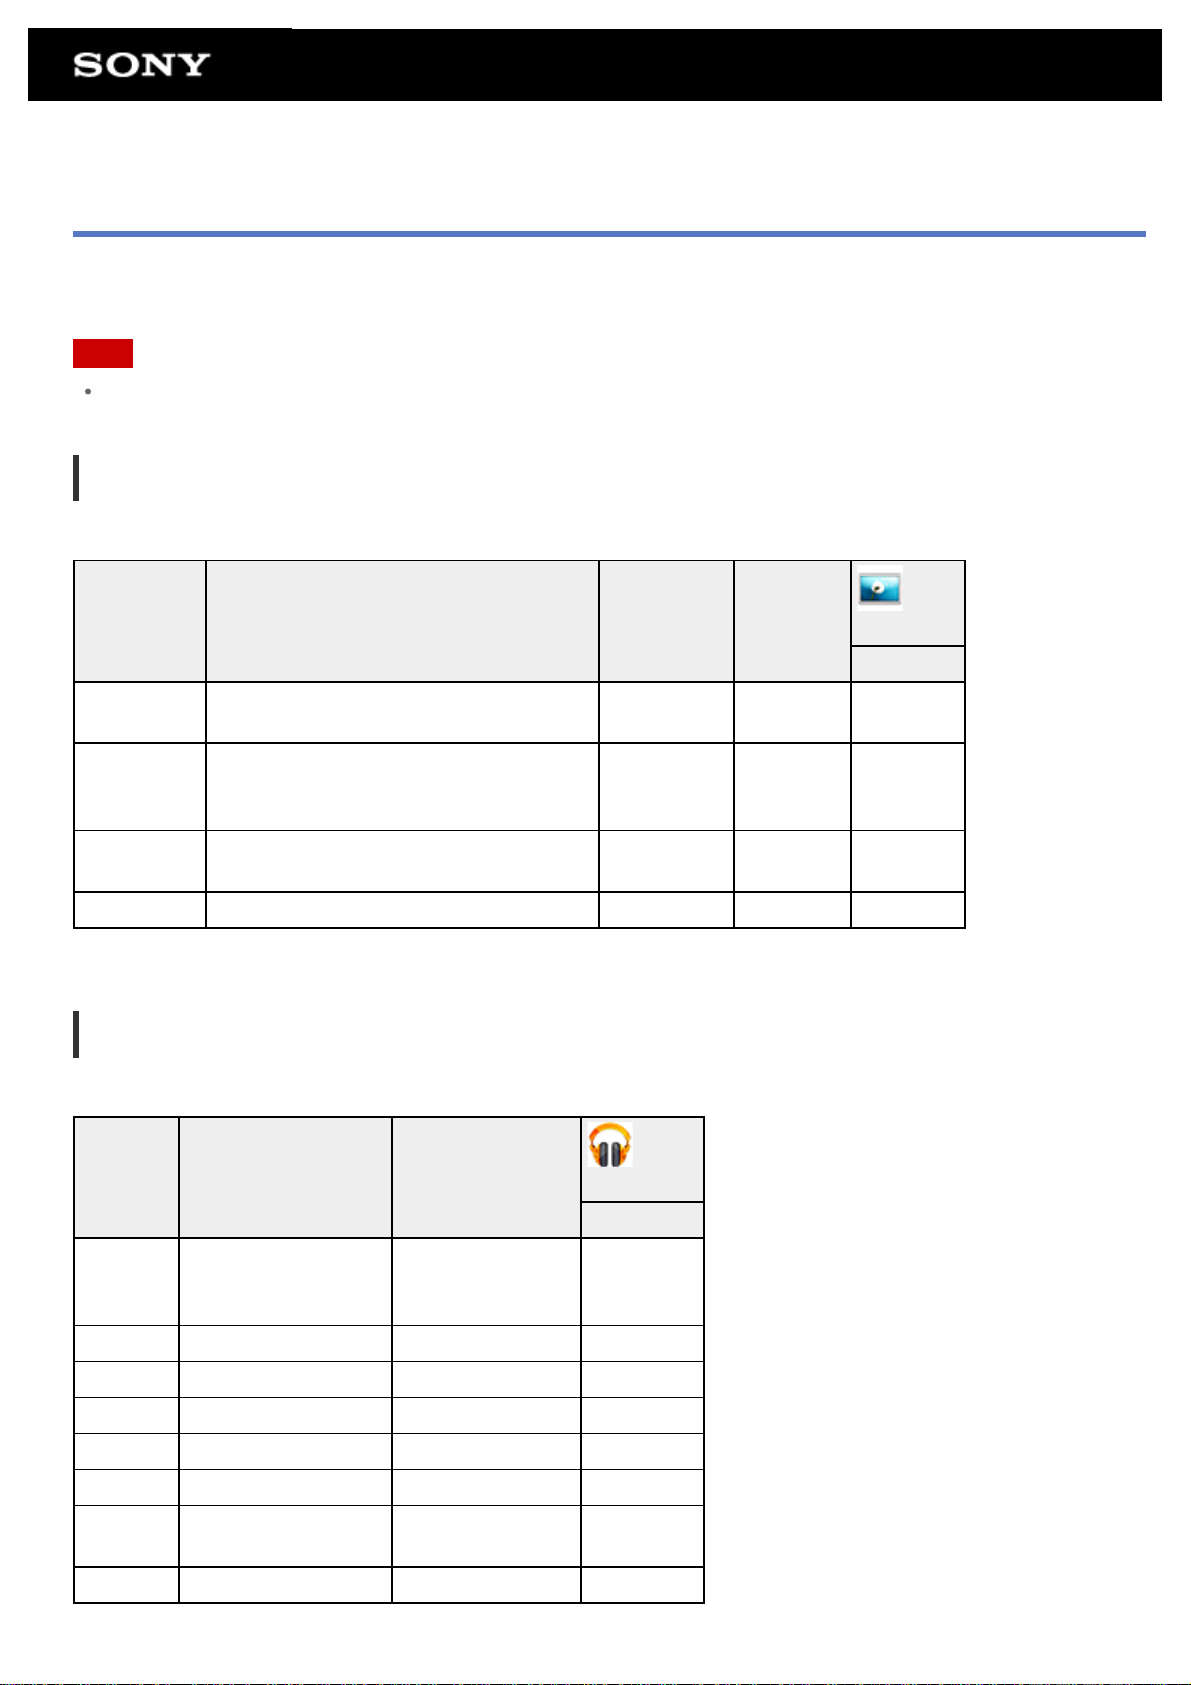
Playable formats vary depending on the app or content used.
Note
Some files may not be playable on your tablet device.
Videos
Format/
Codec
H.263 Profile0
H.264 / AVC Baseline Profile 1920 × 1080 10
MPEG-4 Simple Profile / Advanced Simple Profile 1920 × 1080 10
WMV Simple Profile / Main Profile 1920 × 1080 10 -
Profile
Maximum
resolution
704 × 576
(4CIF)
Maximum
bit rate
(Mbps)
4
Music
Format/
Codec
Sampling rate (kHz)
Maximum bit rate
(kbps)
Play Music
Extension
Gallery
Extension
.mp4
.3gp
.mp4
.m4v
.3gp
.mp4
.3gp
.m4a
AAC Up to 48 320
MP3 Up to 48 320 .mp3
WAV 44.1 - .wav
WMA 44.1 320 WMA Pro 44.1 192 FLAC Up to 48 - .flac
MIDI - Vorbis Up to 48 256 .ogg
.mp4
.3gp
.mid
.xmf
Page 76
Photos
Format/
Codec
JPEG 6048 × 4032 .jpg
GIF 2000 × 2000 .gif
PNG 2000 × 2000 .png
BMP 2000 × 2000 .bmp
WBMP 2000 × 2000 .wbmp
WEBP 2000 × 2000 .webp
Related Topic
Importing Content from Your Computer
Maximum
resolution (pixels)
Gallery
Extension
Page 77
Changing the Settings
Various settings of your tablet device can be configured in the settings menu.
1. Tap [
2. Tap the individual menu items to configure settings.
The menu items are as follows:
WIRELESS & NETWORKS
Wi-Fi: Turning on/off the Wi-Fi function [Details], setting Wi- Fi [Details].
Bluetooth: Turning on/off the Bluetooth function [Details], paring [Details].
Data usage: Checking the data usage status.
More…: Setting Airplane mode, VPN, etc.
DEVICE
Sound: Setting the notification sound, tap sound (operation sound), etc.
Display: Settings such as screen brightness [Details], time that elapses before the screen turns off (goes to
sleep) [Details], and font size.
Storage: Checking the capacity of the internal memory of the tablet device or SD memory card.
Battery: Checking the remaining battery level and operating time.
Apps: Checking the installed app information.
PERSONAL
Accounts & sync: Settings for synchronization of accounts such as e-mail [Details].
Location services: Settings to identify your present location [Details].
Security: Security settings such as the Screen lock function [Details].
Apps & Widgets] - [ Settings] and the desired items.
Language & input: Settings for the language used in menus and the keyboard [Details].
Backup & reset: Making a backup copy of data and initializing [Details].
SYSTEM
Date & time: Setting the date & time and display.
Accessibility: Setting the text-to-speech function, etc.
About tablet: Checking the Android version.
Note
Display may be distorted with some apps if you set [Font size] to [Large] or [Huge] in [Display]. If that occurs,
set [Font size] to [Normal].
Page 78
Checking the Free Space
When you install apps or import data from other devices, etc., you can check the free space of the tablet device.
1. Tap [
Related Topic
Backing Up Data on Your Tablet Device
Importing Content from Your Computer
Apps & Widgets] - [ Settings] - [Storage].
Page 79
Synchronizing the Account
Synchronizing with the account enables you to check variety of information set on the tablet device online.
1. Tap [
2. Set the switch at the top right of the screen to [ON].
3. Tap [ADD ACCOUNT], and then select the account you want to synchronize.
4. Tap the account you added, and then select the item you want to synchronize.
5. Tap
To delete an account
1. Tap the account you want to delete on the account list.
2. Tap
Note
The account is removed from the tablet device, but the account itself is not deleted.
Related Topic
Configuring a Google Account
Apps & Widgets] - [ Settings] - [Accounts & sync].
, and then go back to the account list.
(Option menu) - [Remove account].
Page 80
List of Apps
The following apps are preinstalled on your tablet device. You can start each app by tapping its icon.
Hint
When (Option menu) appears at the top right of the screen, you can tap it to display the option menu.
The Music player app has been updated to become the WALKMAN app.
The Video player app has been updated to become the Movies app.
The features of the DLNA app have been integrated into the WALKMAN, Movies, and Album apps.
Calendar
Manage your schedule and synchronize the schedule with Google Calendar [Details].
Browser
Browse Internet websites [Details].
Camera
Shoot photos or movies [Details].
People
Manage contacts for your friends or colleagues [Details].
Desk clock
Display the current time [Details].
Email
Send or receive PC e-mail messages [Details].
Movies
Play back movie files [Details].
WALKMAN
Page 81
Play back music files [Details].
Album
View photos [Details].
Gallery
Browse or edit photos [Details].
Social Feed Reader
Access social networking services such as Twitter or Facebook [Details].
Socialife
Check the latest news, blogs and posts on Facebook and Twitter all in one app [Details].
Wi -Fi checker
Check the connection status and hints for troubleshooting Wi-Fi (wireless LAN) [Details].
Reader by Sony
Purchase and browse eBooks [Details].
Video chat plugged into Skype
Use your Skype account to make Internet voice and video calls with other Skype users anywhere in the world free
of charge, and save on calls to domestic and international phones [Details].
Help guide
Display this Help guide online. You can download it to the tablet device [Details].
Sony Select
Access a website that introduces Sony-recommended apps [Details].
Video Unlimited *
1
Access Sony’s premium video delivery service [Details].
Music Unlimited *
1
Page 82
Access Sony’s cloud music delivery service [Details].
PlayMemories Online *
1
Enjoy your photos and videos across your favorite devices, instantly! [Details]
Xperia Link
Internet connection from your tablet by using smartphone [Details].
PS Store *
1
Purchase and download PlayStation games from the PlayStation(R)Store [Details].
Crash Bandicoot(R) *
1
Play this classic game for the first generation PlayStation.
MediEvil *
1
Play this classic game for the first generation PlayStation.
Pinball Heroes
Play pinball on your tablet device.
Settings
Change various settings of your tablet device [Details].
Messaging
Send or receive SMS (short messages).
Play Music
Play back music.
Calculator
Make basic calculations [Details].
Gmail
Page 83
Send or receive Gmail [Details].
Google Search
Make Google searches [Details].
Messenger
Exchange instant messages with other Google+ users.
Play Movies *
1
Play back movies you have rented from Google Play.
Maps
Find your location and search destinations/routes (Google Maps).
Local
Use this service to find information on shops and places.
Navigation
Use this Internet-aided GPS navigation system that includes a voice guidance function.
Latitude
Find out where your friends are on a map.
Play Store
Download or purchase new apps and update apps [Details].
Downloads
Use the download manager to display or manage Internet content downloads.
Foursquare *
1
Share with friends and acquaintances information on shops and places you visit, or get money-saving information
[Details].
Crackle *
1
Page 84
View full-length and full-size Hollywood movies and TV programs [Details].
Ustream *
1
Stream live video using the built-in camera, and communicate with viewers [Details].
Evernote
Evernote turns your tablet into an extension of your brain. Evernote is a free app that helps you remember
everything across all of your tablet [Details].
HD Games
Download high quality games to your Android tablet from the Top HD Games at Gameloft's online store [Details].
*1 Apps or services may not be available in some countries/regions.
Page 85
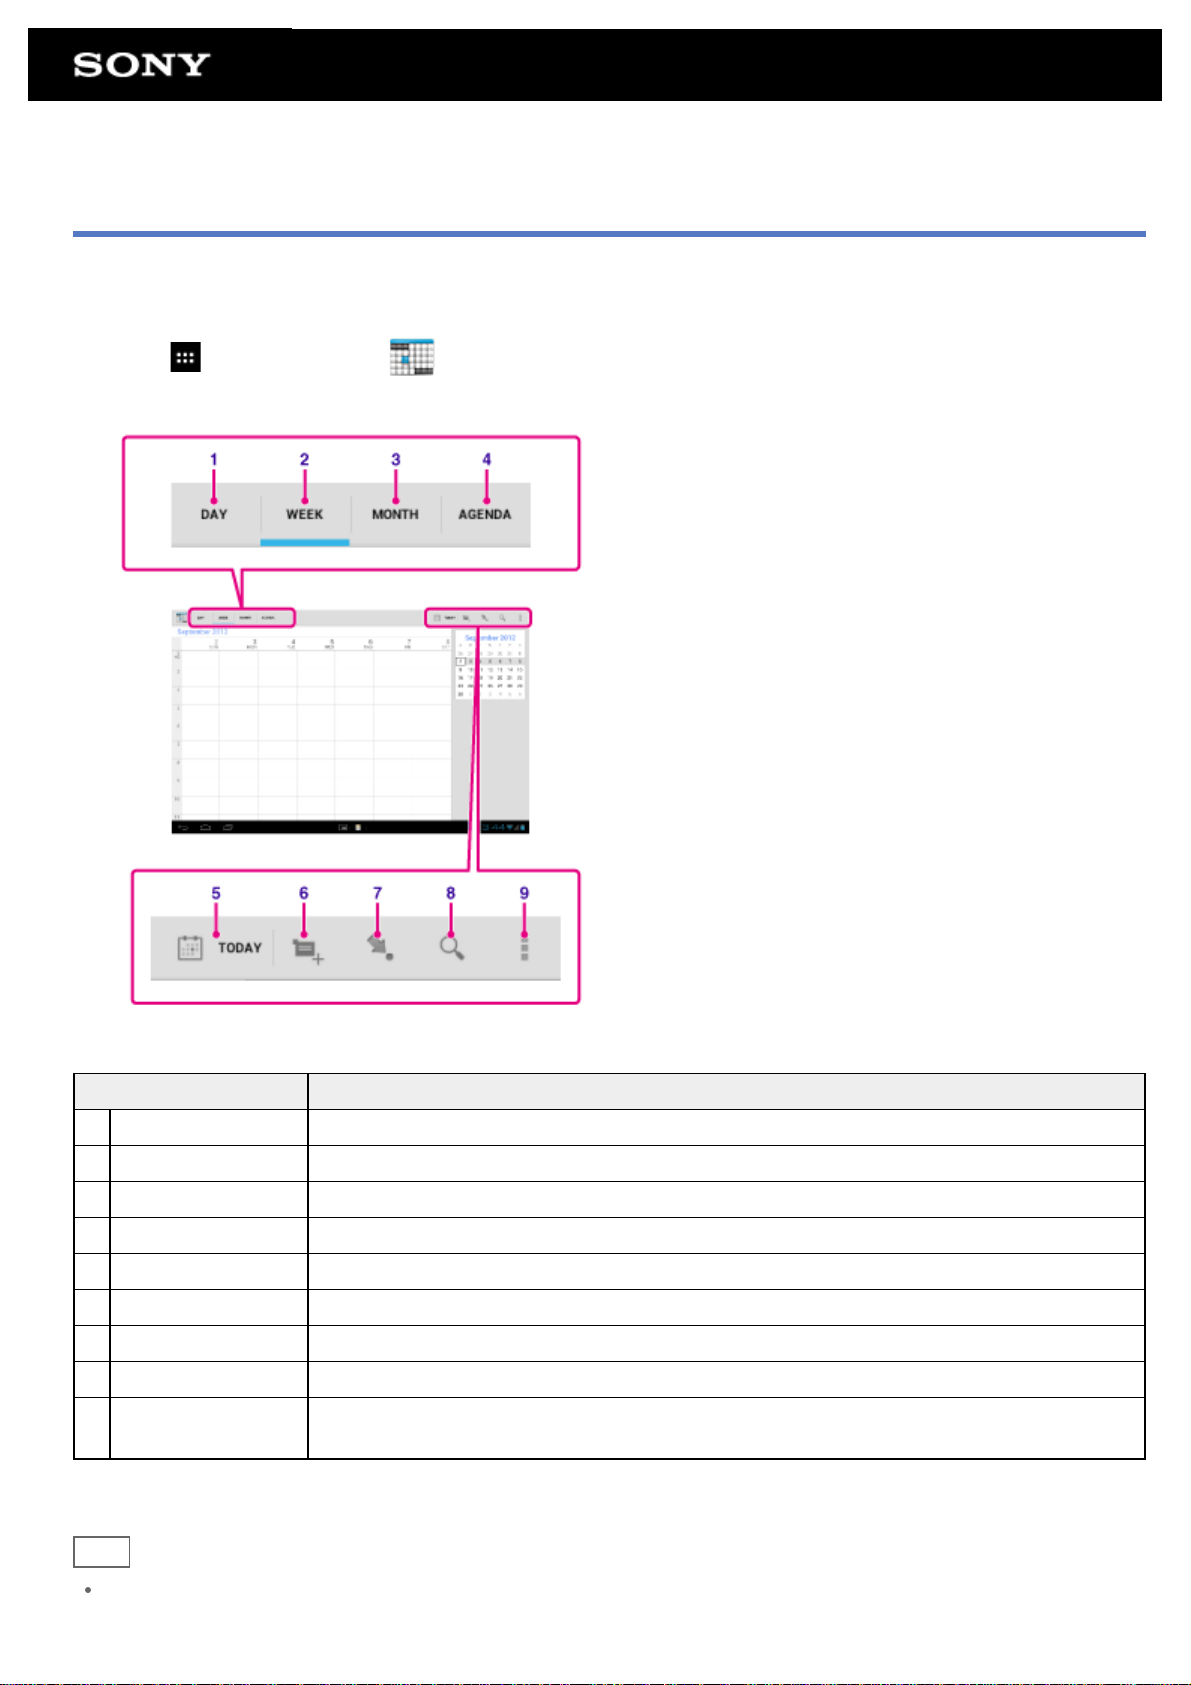
Using the Calendar
You can manage your schedule on your tablet device. By registering your Google account, you can sync your
Google Calendar and your schedule data.
1. Tap [
The calendar is displayed.
Apps & Widgets] - [ Calendar].
Display on the screen Description
1 DAY Displays the events for one day.
2 WEEK Displays the calendar by week.
3 MONTH Displays the calendar by month.
4 AGENDA Displays the list of scheduled items.
5 TODAY Displays today’s schedule.
6 New event Adds events.
7 Set date Sets a date to be displayed.
8 Search Searches for an event.
9 Option menu
Hint
You can flick up/down/right/left on the schedule list or mini-calendar to browse through months or dates and
times to find events.
Makes detailed settings such as refreshing the display or configuring general settings
for Calendar.
Page 86
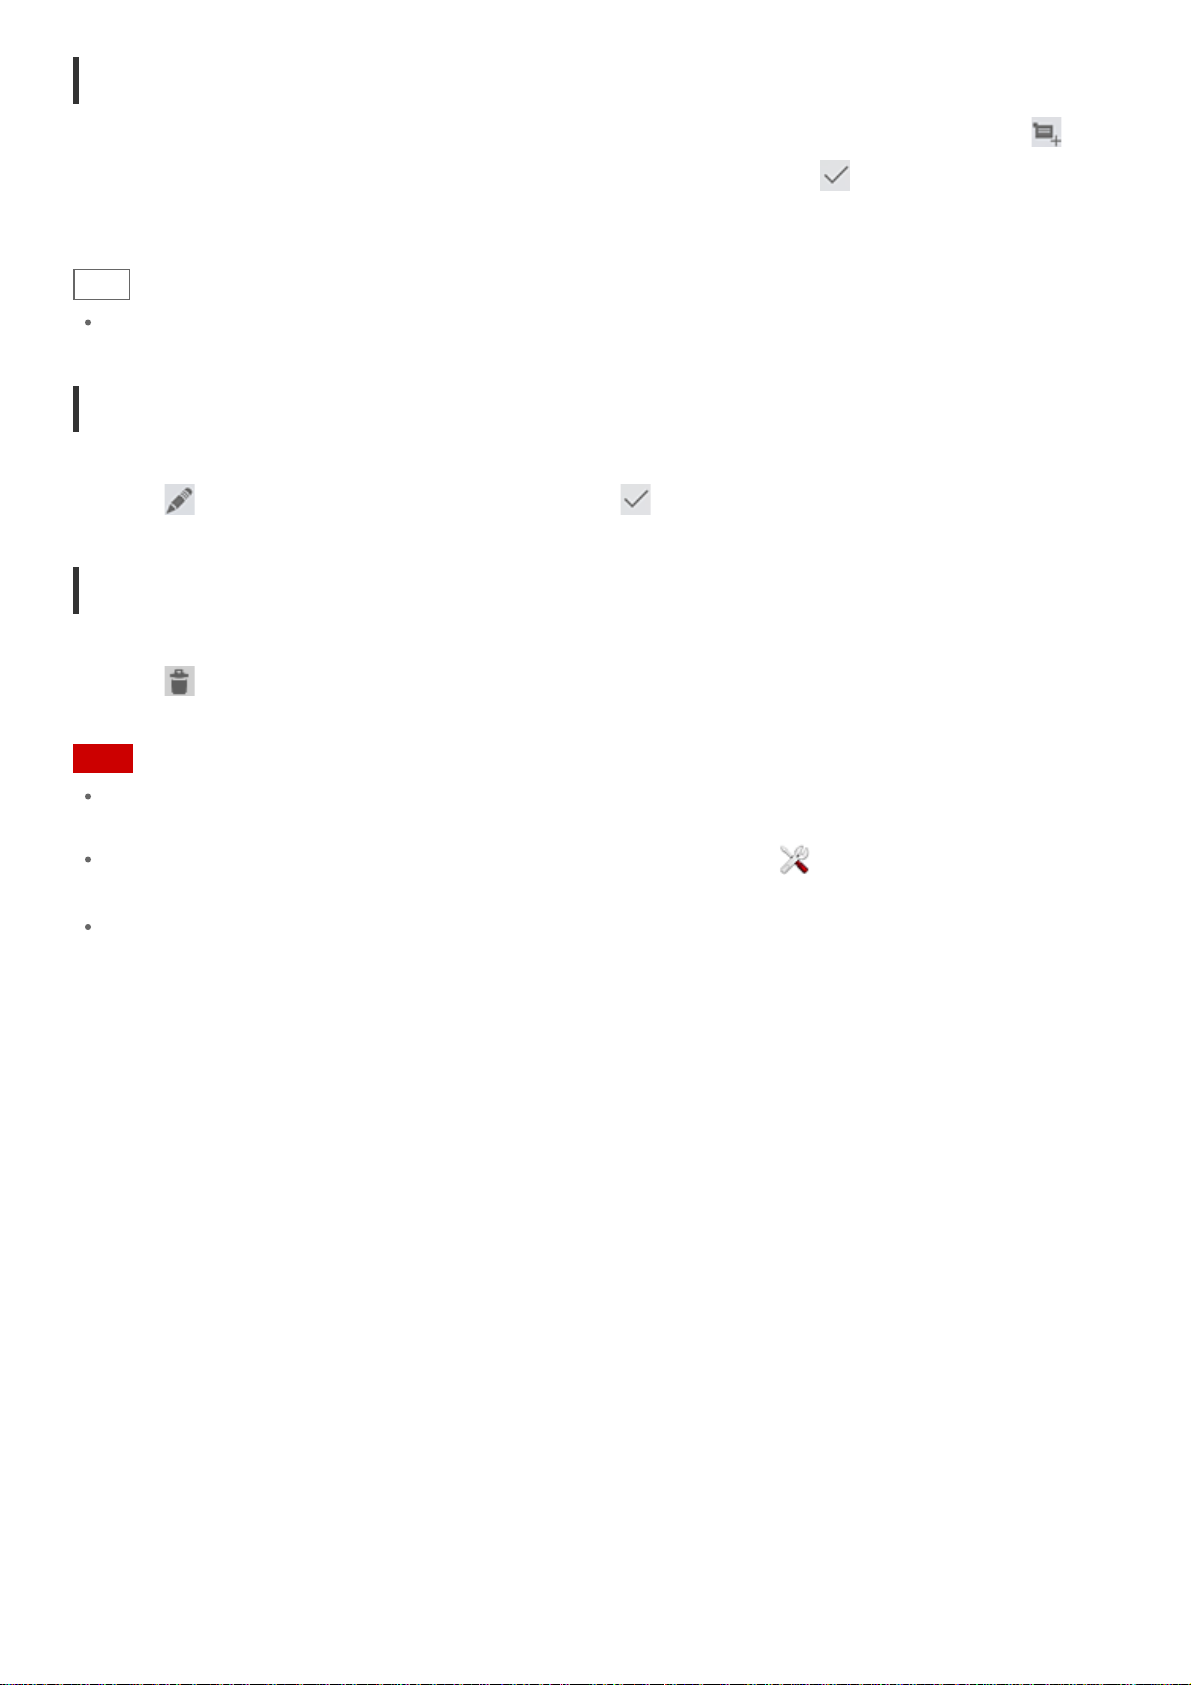
Adding an event
1. Tap and hold the date and time you want to add an event for, and then tap [New event]. Or, tap .
2. Input the starting date and time and details of the schedule, and then tap [
screen.
Hint
You can have your tablet device notify you when close to the scheduled date and time.
DONE] at the top right of the
Changing an event
1. Tap the event you want to change.
2. Tap
, input the item to be changed, and then tap [ DONE] at the top right of the screen.
Deleting an event
1. Tap the event you want to delete.
2. Tap
followed by [OK].
Note
When you share the schedule on Google Calendar, choose the people with whom you share it very carefully
to prevent your schedule from being disclosed to undesired users.
If your calendar is not synced with Google Calendar automatically, tap [ Settings] followed by [Accounts &
sync], and make sure the switch at the top right of the screen is set to [ON].
If your calendar is set to sync with Google Calendar automatically and you change the schedule on a
computer or other devices, your tablet device will connect with Google Calendar automatically. This may
cause unexpected communications charges.
Page 87
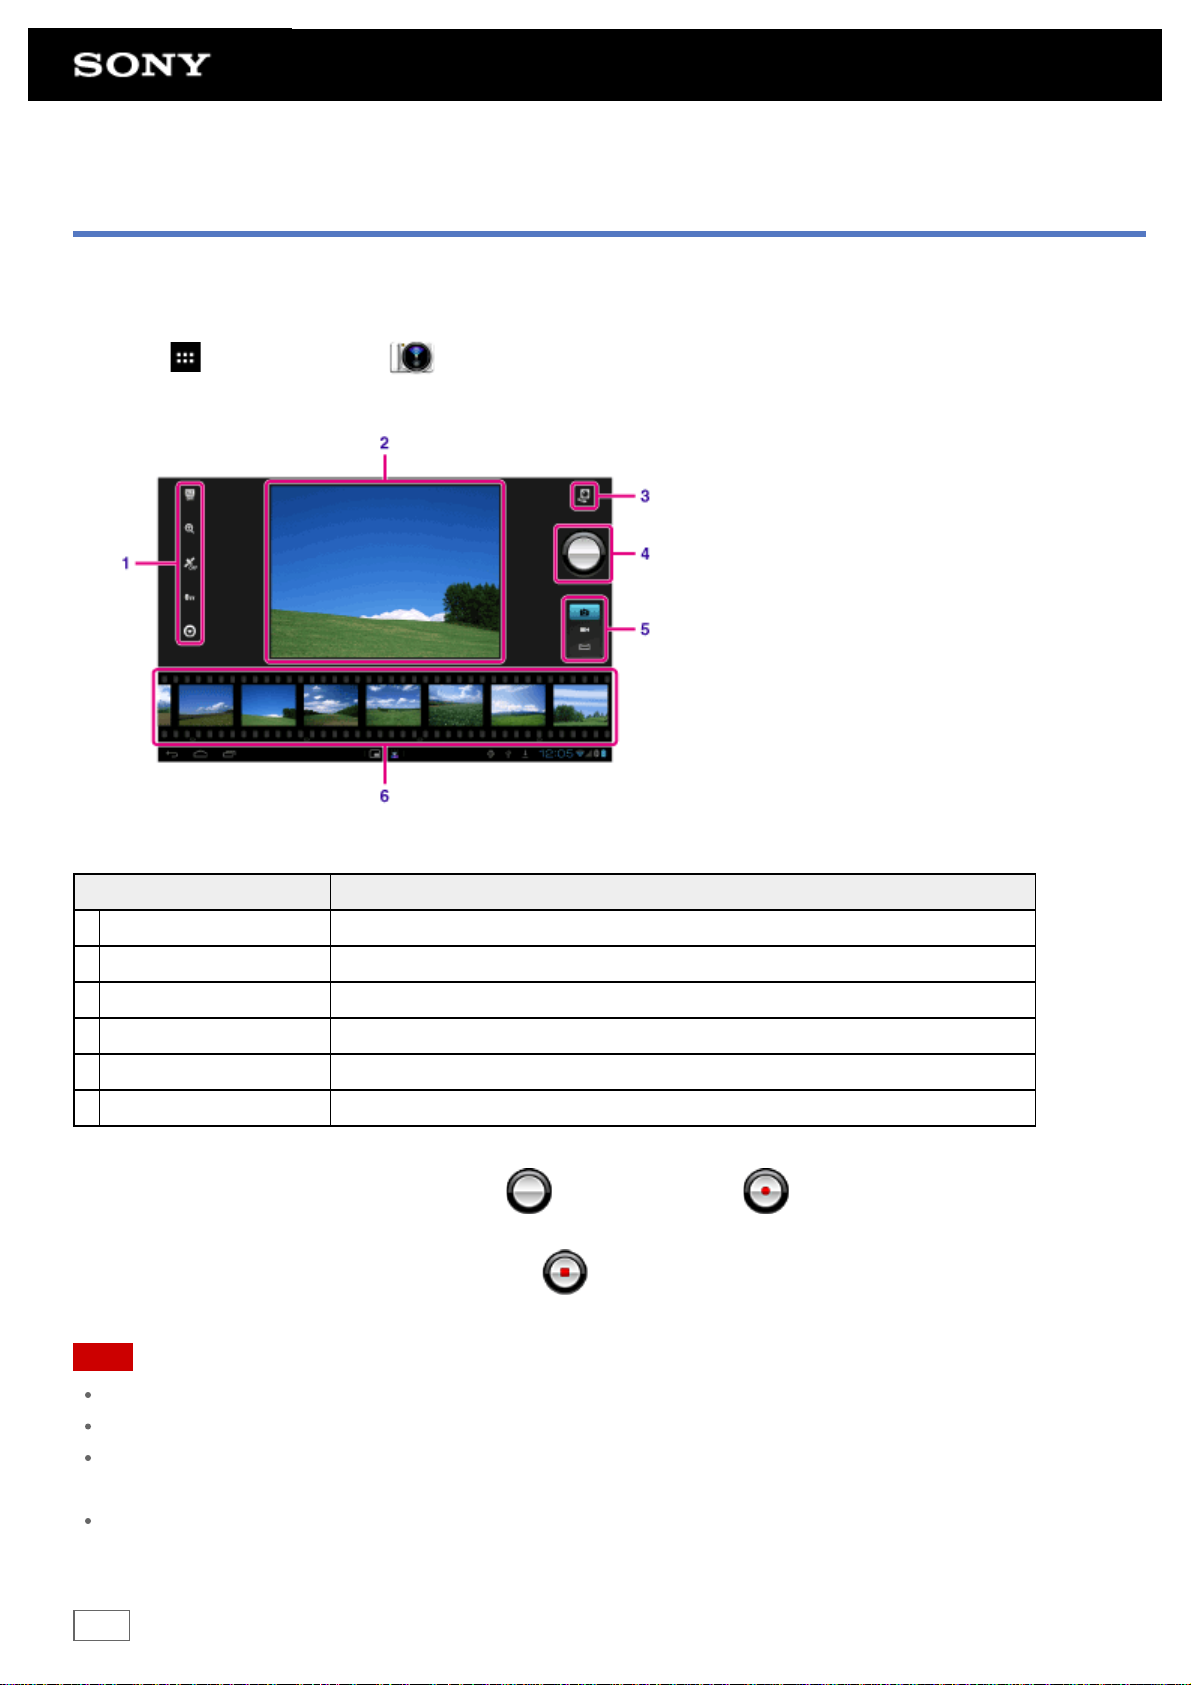
Shooting Photos/Movies
You can shoot photos and movies using the built- in front and rear cameras. Various shooting settings such as
image size are also available. Location information also can be added to photos.
1. Tap [
The Camera app starts.
Display on the screen Description
1 Detailed settings Makes detailed settings for recording photos or movies.
Apps & Widgets] - [ Camera].
2 Preview screen Previews the subject you are aimed at.
3 Camera switching Switches between the front camera and rear camera.
4 Recording button Starts recording a photo or movie.
5 Switch recording mode Switches the recording mode among photo, movie, and panoramic photo.
6 Recording history Displays thumbnails of recorded photos or movies.
2. Aim the camera to your subject, and tap
For photos: A photo is taken.
For movies: Movie recording starts. Tapping
Note
Make sure that a microSD memory card is inserted before using the camera.
All photos and movies are stored on the microSD memory card.
Do not touch the lenses of the built-in cameras. If the lenses become dirty or scratched, image quality may be
affected.
Do not let direct sunlight enter the lenses of the built-in cameras regardless of whether your tablet device is
turned on or off. Doing so may cause the camera to malfunction.
to shoot a photo or to shoot a movie.
again stops recording.
Hint
Page 88
The rear camera is equipped with an auto -focus function. After you tap , a photo is shot when the subject
comes into focus.
In order to add location information to the photos, GPS must be enabled or your tablet device must be
connected to the network when you take photos [Details].
You can also view pictures you took and media from apps you play back.
Shooting Panoramic Photos
1. Start the Camera app.
2. Tap
3. Point the camera at the edge of the subject, and tap
Panoramic photo recording starts. Pan or tilt the camera to the opposite end of the subject, and tap
again to stop recording.
Hint
When you hold your tablet device sideways, you can shoot landscape panoramic photos. When you hold your
tablet device upright, you can shoot portrait panoramic photos.
at the right side of the screen.
.
Ending the Camera app
Tap displayed on the status bar at the bottom left of the screen. If the status bar is not displayed, tap the
bottom left of the screen once.
Related Topic
Notes on Recorded Photos/Movies
Page 89

Notes on Recorded Photos/Movies
Copyright and portrait rights
The images and sounds you record on your tablet device may be copyrighted. Unauthorized use of such
materials other than for personal use may violate copyright laws. Using or modifying images or names of other
people without their permission may violate portrait rights. You should thus take into account copyright and
portrait rights when putting recorded images on Internet websites. Some performances, shows and exhibits may
restrict recording, even if it is for personal use. Unauthorized recording of such materials may be contrary to
copyright laws.
Page 90
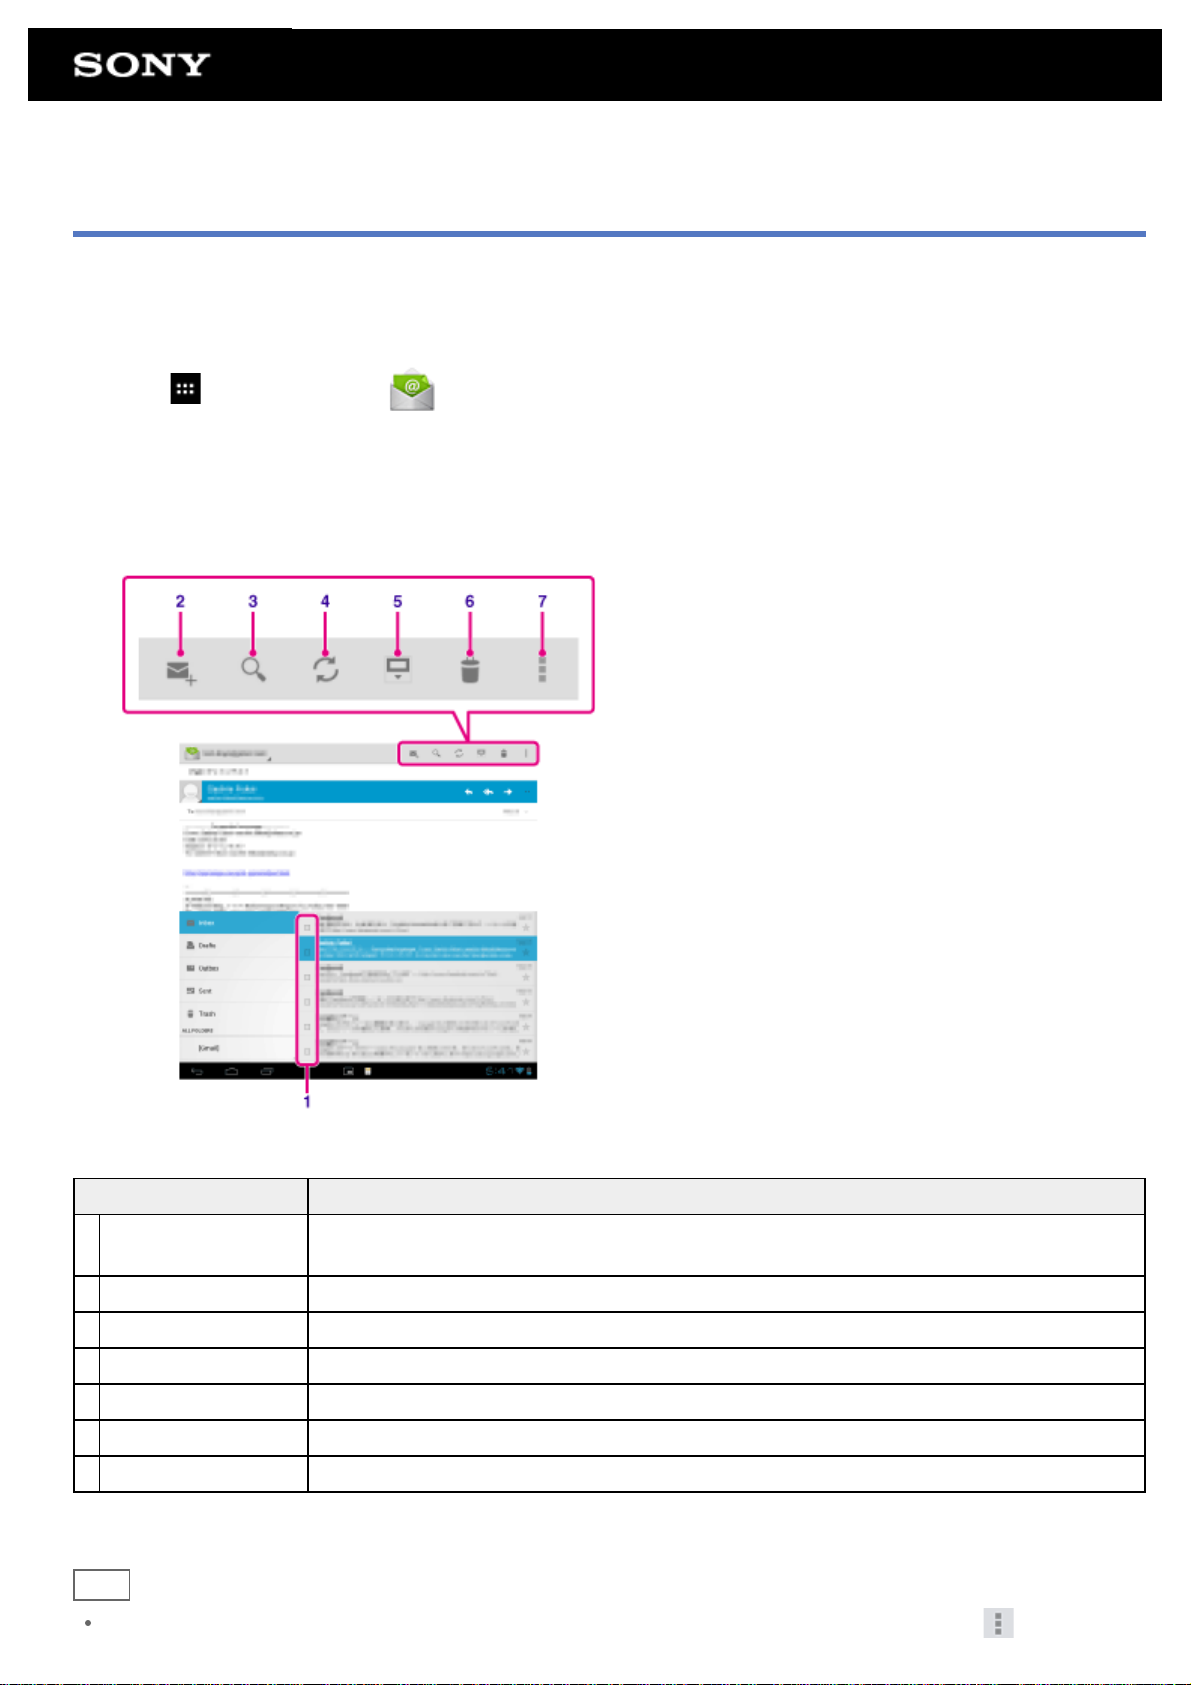
Configuring an E-mail Account
The e-mail account you usually use on your computer can be used on the tablet device. If you register multiple email accounts, you can handle e-mails of all the accounts at the same time. You can also search or sort received
e-mail messages.
1. Tap [
The Email app starts and the screen to set an account is displayed.
2. Input your e-mail address and password, and tap [Next].
3. Follow the on-screen instructions to set the e-mail account.
When setting is complete, the e-mail list screen is displayed.
Apps & Widgets] - [ Email].
Display on the screen Description
1 Selection
2 Compose an e-mail Composes and sends an e-mail [Details].
3 Search Searches for e-mails from the e-mail list.
4 Refresh Receives e- mails.
5 Switch the display Switches display of e-mails to full screen or to the upper screen.
6 Delete Deletes the e-mail opened.
7 Option menu Sorts e-mails, adds/removes accounts, etc.
Hint
You can set for each account the number of received e-mails to be put in a folder by tapping (Option
Allows you to select e-mails by tapping check boxes to move e -mails to another folder
or delete them together.
Page 91

menu) - [Settings] - (e-mail account you want to change settings of) - [Messages per folder] on the e-mail list
screen.
Searches cover the subject, sender, and e-mail body of all the e-mails saved on the server.
Results are displayed 10 at a time from the latest e-mails. To search for older e-mails, tap [Load more
messages].
Note
Ask your network administrator, etc. about how to connect to Microsoft Exchange Server.
For details on setting an e-mail address supplied by an Internet provider, refer to the provider’s website,
support center, etc.
Related Topic
Composing/Sending an E-mail
Receiving/Deleting E -mails
Page 92
Composing/Sending an E-mail
1. On the e-mail list screen, tap at the top right of the screen.
The e-mail composing screen is displayed.
2. Tap [To], and then input the recipient’s e-mail address.
3. Input the subject at [Subject].
4. Input the message at [Compose email].
5. Tap [
Your e- mail is sent.
Hint
Tapping in step 2 allows you to get the address from the [ People] app.
Tapping in step 3 allows you to attach a file to your e-mail.
Tapping [Save draft] while composing allows you to save the draft.
Related Topic
Receiving/Deleting E -mails
SEND].
Page 93
Receiving/Deleting E-mails
1. On the e-mail list screen, tap at the top right of the screen.
New messages are displayed in the inbox. Tap on the e-mails to open them.
To display the e-mail full-screen
On the e-mail list screen, tap
To reply to an e-mail
Tap
To forward an e-mail
Tap
(Reply) or (Reply to all), compose your message, and tap [SEND].
(Forward), compose your forwarding message, and tap [SEND].
. To return to the original size, tap .
Deleting an e-mail
1. Put a check mark in the box of the e-mail you want to delete on the e -mail list screen, or open the e-mail
and tap at the top right of the screen.
2. Tap [OK].
The e-mail is deleted.
Related Topic
Composing/Sending an E-mail
Page 94
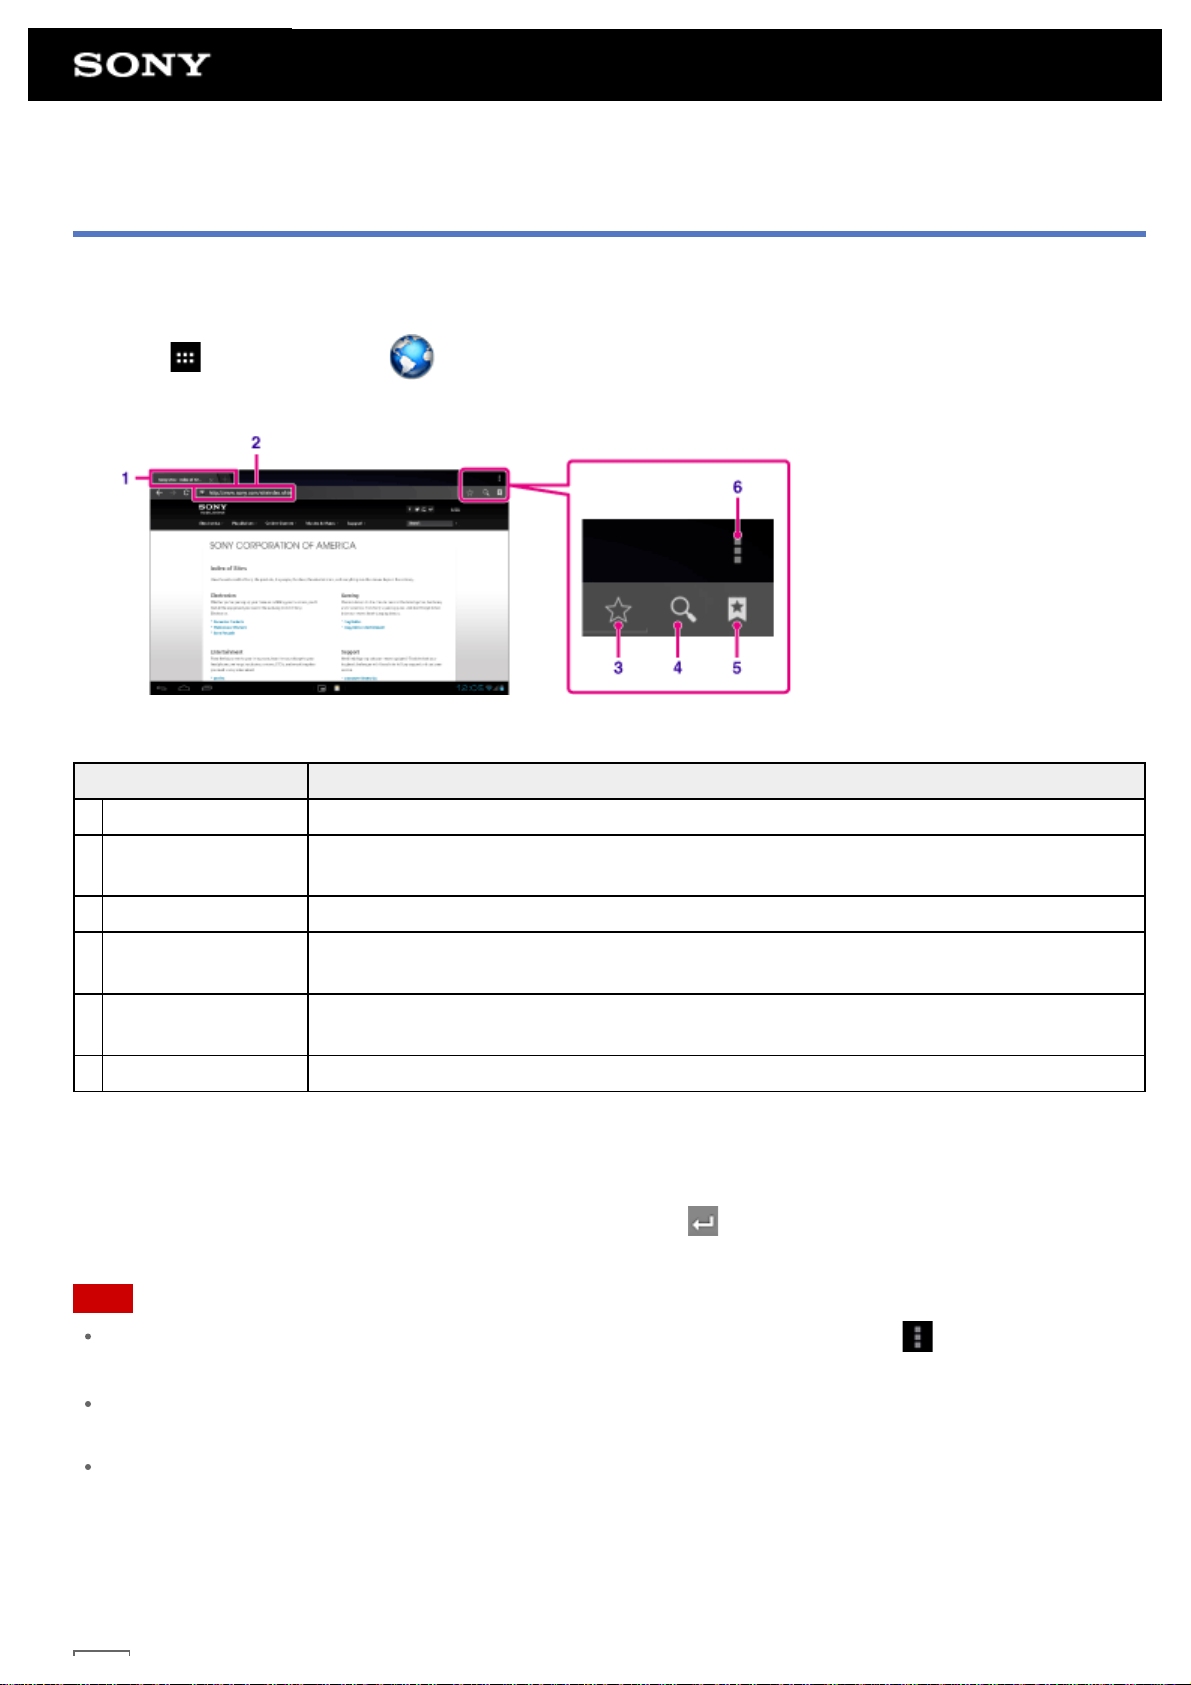
Browsing Websites
The Browser app lets you access and browse websites on the Internet. You can display/switch between multiple
websites by using tabs.
1. Tap [
The Browser app starts.
Display on the screen Description
1 Tab Allows you to add a tab to browse multiple websites by switching between tabs.
2 Address bar
3 Add bookmark Adds the website that you are browsing to the bookmarks.
Apps & Widgets] - [ Browser].
Allows you to input the address (URL) of the desired website. The on-screen keyboard
is displayed when you tap the address bar.
4 Search
5 Bookmark/History
6 Option menu Makes detailed settings such as switching to the Browser in Small Apps, etc.
2. Tap the address bar on the browser.
The on-screen keyboard is displayed.
3. Input the address (URL) of the desired website, and tap the
Note
If the content does not display correctly, tap [Settings] followed by [Advanced] in the (Option menu), then
tap [Enable Quick view] to remove the check mark.
Certain websites may not be displayed because the browser does not support the photo/movie formats or
plug-ins used by the website.
You can launch the browser using the Small Apps feature. In this case, the following functions are not
supported.
Playing back flash content
Browsing websites by using tabs
Bookmarks and access histories
Allows you to input a keyword to search for on the web. The on-screen keyboard is
displayed when you tap the search button.
Allows you to select a website to browse from the bookmarks or access the access
history.
key.
Page 95
Hint
You can search the Internet by inputting a keyword or phrase instead of the address (URL) in step 3.
If the address bar is not displayed at the top of the screen, tap the tab.
You can copy or search text from the menu that is displayed by selecting text on a website or URL.
If the website is displayed differently from when browsed on a computer, tap (Option menu) at the top right
of the screen and put a check mark in [Request desktop site] in the menu. You can then browse the website
as on a computer.
You can set whether to view as a desktop or mobile site for each tab.
To add/delete a tab
To add a tab, tap
To delete a tab, tap
Related Topic
Selecting Text
Adding Bookmarks
Accessing Sites from Bookmarks/Access History
at the right end of the tabs list.
at the right end inside the tab.
Page 96
Adding Bookmarks
The bookmark function allows you to record addresses (URLs) of websites you visit frequently, allowing you to
access those sites quickly. You can also add shortcuts to these URLs on the Home screen.
To add a bookmark for an address (URL)
Tap
To make a shortcut on the Home screen for an address (URL)
Tap
To access a website from its bookmark
Tap
Related Topic
Accessing Sites from Bookmarks/Access History
at the right of the address bar to check the detailed information, and then tap [OK].
at the right of the address bar, select [ Home screen] as the destination, and then tap [OK].
to bring up the list of registered bookmarks. Tap the desired website from the list.
Page 97
Accessing Sites from Bookmarks/Access History
You can access a website from a registered bookmark or the access history.
1. Tap
2. Tap [BOOKMARKS] or [HISTORY].
3. Tap the item you want to display.
To delete the access history
Tap
.
[BOOKMARKS]: Displays the list of registered bookmarks.
[HISTORY]: Displays the list of websites you accessed previously.
while the access history is up.
Page 98
Using the Calculator
You can use your tablet device as a calculator. In addition to the four arithmetic operations of addition,
subtraction, multiplication and division, trigonometric function, exponent function, logarithm, etc. are available.
1. Tap [
The Calculator app starts.
Hint
This app can use as Small Apps.
Related Topic
Using “Small Apps”
Apps & Widgets] - [ Calculator].
Page 99
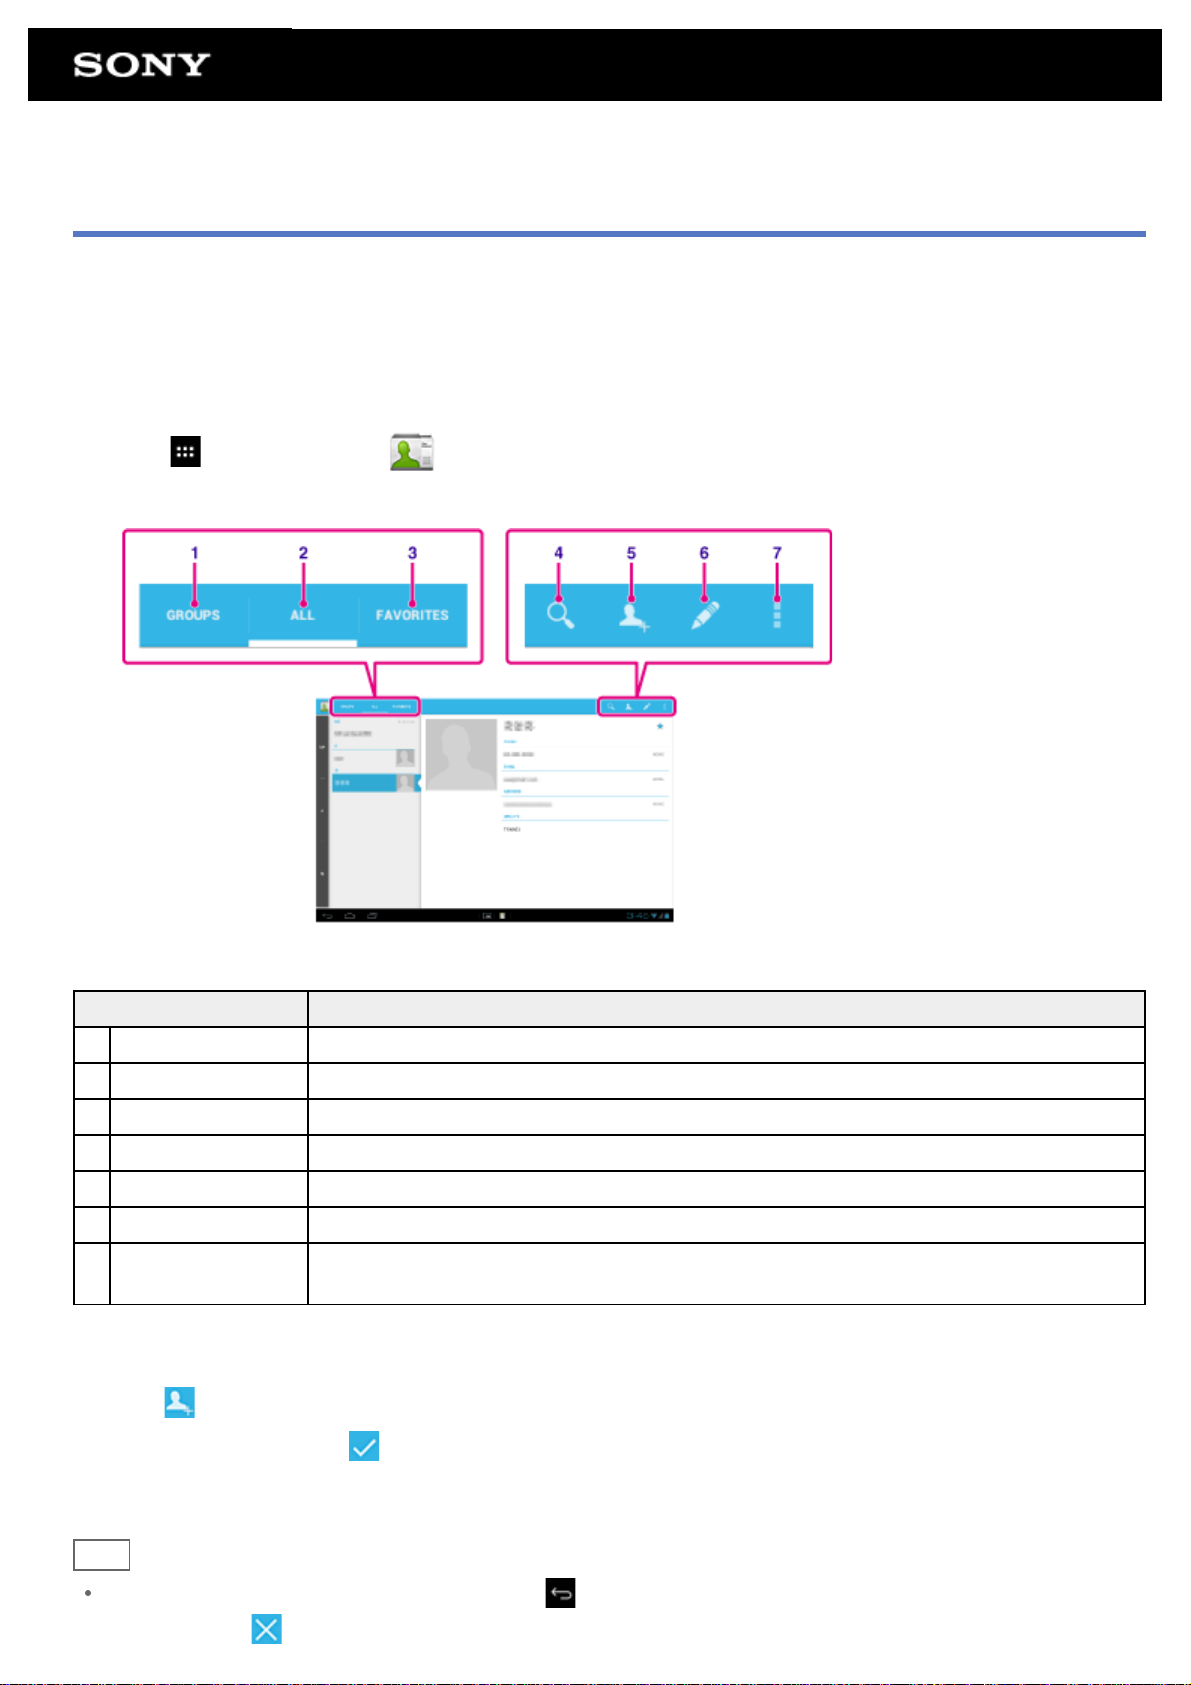
Registering Contacts
You can register names, phone numbers, addresses, etc. as frequently used contacts. By registering your Google
account, you can sync People with Gmail Contacts, making your contacts even more handy.
If using Microsoft Exchange Server, you can manage your work contacts by connecting to Microsoft Exchange
Server.
1. Tap [
The People app starts.
Display on the screen Description
Apps & Widgets] - [ People].
1 GROUPS Displays the groups of contacts.
2 ALL Displays all contacts.
3 FAVORITES Displays the contacts you registered as FAVORITES.
4 Search Searches for a contact.
5 New contact Registers a new contact.
6 Edit contact Edits a selected contact.
7 Option menu
2. Tap [ALL] at the top left of the screen.
3. Tap
4. Input the data, and tap [
The contact is registered.
Hint
The contact can also be registered by tapping (Back) at the bottom left of the Home screen in step 3.
.
Makes detailed settings such as sharing contacts with other apps or deleting the
contacts.
DONE].
When you tap [
DISCARD], the data you are editing is discarded.
Page 100
To edit contacts
Tap the contact you want to edit, and then tap
To delete contacts
Tap the contact you want to delete, and then tap
To switch what contacts are displayed
Tap
individual accounts. You can also specify all accounts or multiple accounts.
Note
Related Topic
Grouping/Joining Contacts
(Option menu) - [Contacts to display] - (the account), and you can switch between the contacts lists of
If your contacts are not synced with Google contacts automatically, tap [ Settings] followed by [Accounts &
sync], and check that the switch at the top right of the screen is set to [ON].
at the top right of the displayed screen.
(Option menu) - [Delete].
 Loading...