

Page 1

2-684-488-11(1)
Hard Disk Recorder
SVR-HD700/HD900
Operating Instructions
© 2006 Sony Corporation
Page 2

WARNING
To reduce the risk of fire or electric
shock, do not expose this apparatus to
rain or moisture.
To avoid electrical shock, do not open
the cabinet. Refer servicing to qual ified
personnel only.
The mains lead must only be changed
at a qualified service shop.
Disposal of Old Electrical &
Electronic Equipment
This symbol is applicable only in the
European Union and other European
countries with separate collection
systems.
Precautions
• This unit operates on 220 – 240 V
AC, 50 Hz. Check that the unit’s
operating voltage is identical with
your local power supply.
• To prevent fire or shock hazard, do
not place objects filled with liquids,
such as vases, on the apparatus.
Precautions
This equipment has been tested and
found to comply with the limits set out
in the EMC Directive using a
connection cable shorter than 3 metres.
On safety
Should any solid object or liquid fall
into the cabinet, unplug the recorder
and have it checked by qualified
personnel before operating it any
further.
About the hard disk drive
The hard disk has a high storage
density, which enables long recording
durations and quick access to the
written data. However, it can easily be
damaged by shock, vibration or dust,
and should be kept away from magnets.
If the hard disk drive should
malfunction, you cannot recover lost
data. To avoid losing important data,
observe the following precautions.
• Do not apply a strong shock to the
recorder.
• Do not place the recorder in a
location subject to mechanical
vibrations or in an unstable location.
• Do not place the recorder on top of a
hot surface, such as a VCR or
amplifier (receiver).
• Do not use the recorder in a place
subject to extreme changes in
temperature (temperature gradient
less than 10 °C/hour).
• Do not move the recorder with its
mains lead connected.
• Do not disconnect the mains lead
while the power is on.
• When disconnecting the mains lead,
turn off the power and make sure that
the hard disk drive is not operating
(the clock is displayed in the front
panel display and all recording or
playback has stopped).
• Do not move the recorder for one
minute after you have unplugged the
mains lead.
• Do not attempt to replace or upgrade
the hard disk by yourself, as this may
result in malfunction.
About repairing the hard
disk drive
• The contents of the hard disk drive
may be checked in case of repair or
inspection during a malfunction or
modification. However, the contents
will not be backed up or saved by
Sony.
• If the hard disk needs to be formatted
or replaced, it will be done at the
discretion of Sony. All contents of
the hard disk drive will be erased,
including contents that violate
copyright laws.
On power sources
• The recorder is not disconnected
from the AC power source (mains) as
long as it is connected to the wall
outlet, even if the recorder itself has
been turned off.
• If you are not going to use the
recorder for a long time, be sure to
disconnect the recorder from t he wall
outlet. To disconnect the AC power
cord (mains lead), grasp the plug
itself; never pull the cord.
• Before disconnecting the AC power
cord (mains lead), check that the
recorder’s hard disk is not operating
(recording or playback) on the front
panel display.
On placement
• Place the recorder in a location with
adequate ventilation to prevent heat
build-up in the recorder.
• Do not place the recorder on a soft
surface such as a rug that might block
the ventilation holes.
• Do not place the recorder in a
confined space such as a bookshelf or
similar unit.
• Do not place the recorder in a
location near heat sources, or in a
place subject to direct sunlight,
excessive dust, or mechanical shock.
• Do not place the recorder in an
inclined position. It is designed to be
operated in a horizontal position
only.
• Keep the recorder away from
equipment with strong magnets, such
as microwave ovens, or large
loudspeakers.
• Do not place heavy objects on the
recorder.
• Install this recorder so that the AC
power cord can be unplugged from
the wall socket immediately in the
event of trouble.
2
Page 3

On recording
• Note that the contents of the
recording cannot be compensated for
under any and all conditions,
including conditions that may arise
due to a malfunction of this unit.
• Make trial recordings before making
the actual recording.
Copyrights
Television programmes, films, video
tapes, discs, and other materials may be
copyrighted. Unauthorized recording
of such material may be contrary to the
provisions of the copyright laws. Also,
use of this recorder with cable
television transmission may require
authorization from the cable television
transmitter and/or programme owner.
IMPORTANT NOTICE
Caution: This recorder is capable
of holding a still video image or
on-screen display image on your
television screen indefinitely. If
you leave the still video image or
on-screen display image
displayed on your TV for an
extended period of time you risk
permanent damage to your
television screen. Plasma display
panels and projection televisions
are especially susceptible to this.
If you have any questions or problems
concerning your recorder, please
consult your nearest Sony dealer.
About this manual
Check your model name
The instructions in this manual
are for 2 models: SVR-HD700
and SVR-HD900. Check your
model name by looking at the
front panel of the recorder.
• In this manual, the internal hard disk
drive is written as “HDD.”
• Instructions in this manual describe
the controls on the remote. You can
also use the controls on the recorder
if they have the same or similar
names as those on the remote.
• The on-screen display illustrations
used in this manual may not match
the graphics displayed on your TV
screen.
3
Page 4

Table of Contents
WARNING . . . . . . . . . . . . . . . . . . . . . . . . . . . . . . . . . . . . . . . . . . . . . . . . . . . . . . . . . . . 2
Precautions . . . . . . . . . . . . . . . . . . . . . . . . . . . . . . . . . . . . . . . . . . . . . . . . . . . . . . . . . . 2
Ways to Use Your Hard Disk Recorder . . . . . . . . . . . . . . . . . . . . . . . . . . . . . . . . . . . . 6
Guide to Displays . . . . . . . . . . . . . . . . . . . . . . . . . . . . . . . . . . . . . . . . . . . . . . . . . . . . . 7
System Menu . . . . . . . . . . . . . . . . . . . . . . . . . . . . . . . . . . . . . . . . . . . . . . . . . . . . . . 7
Sub-menu . . . . . . . . . . . . . . . . . . . . . . . . . . . . . . . . . . . . . . . . . . . . . . . . . . . . . . . . 7
OPTIONS. . . . . . . . . . . . . . . . . . . . . . . . . . . . . . . . . . . . . . . . . . . . . . . . . . . . . . . . . 8
Options/sub-menu items . . . . . . . . . . . . . . . . . . . . . . . . . . . . . . . . . . . . . . . . . . . . . 8
Hookups and Settings . . . . . . . . . . . . . . . . . . . . . . . . . . . . . . . . . . . . . . 9
Hooking Up the Recorder . . . . . . . . . . . . . . . . . . . . . . . . . . . . . . . . . . . . . . . . . . . . . . . 9
Step 1: Unpacking . . . . . . . . . . . . . . . . . . . . . . . . . . . . . . . . . . . . . . . . . . . . . . . . . . . . . 9
Step 2: Connecting the Aerial Cables . . . . . . . . . . . . . . . . . . . . . . . . . . . . . . . . . . . . . 10
Step 3: Connecting the Video Cords/HDMI Cord . . . . . . . . . . . . . . . . . . . . . . . . . . . . 11
Step 4: Connecting the Audio Cords . . . . . . . . . . . . . . . . . . . . . . . . . . . . . . . . . . . . . . 13
Step 5: Connecting the Mains Lead . . . . . . . . . . . . . . . . . . . . . . . . . . . . . . . . . . . . . . 14
Step 6: Preparing the Remote . . . . . . . . . . . . . . . . . . . . . . . . . . . . . . . . . . . . . . . . . . 15
Controlling TVs with the remote. . . . . . . . . . . . . . . . . . . . . . . . . . . . . . . . . . . . . . . 15
If you have more than one Sony HDD recorder. . . . . . . . . . . . . . . . . . . . . . . . . . . 16
Step 7: Initial Setup . . . . . . . . . . . . . . . . . . . . . . . . . . . . . . . . . . . . . . . . . . . . . . . . . . . 17
Easy Setup. . . . . . . . . . . . . . . . . . . . . . . . . . . . . . . . . . . . . . . . . . . . . . . . . . . . . . . 17
Watching TV . . . . . . . . . . . . . . . . . . . . . . . . . . . . . . . . . . . . . . . . . . . . 19
Selecting a Channel . . . . . . . . . . . . . . . . . . . . . . . . . . . . . . . . . . . . . . . . . . . . . . . . . .19
Selecting a channel from the Programme List. . . . . . . . . . . . . . . . . . . . . . . . . . . . 19
Selecting a channel from the Favourite List. . . . . . . . . . . . . . . . . . . . . . . . . . . . . . 19
Making your own Favourite List . . . . . . . . . . . . . . . . . . . . . . . . . . . . . . . . . . . . . . . 20
Additional Viewing Methods . . . . . . . . . . . . . . . . . . . . . . . . . . . . . . . . . . . . . . . . . . . . 20
Checking programme information (i Plate) . . . . . . . . . . . . . . . . . . . . . . . . . . . . . . 20
Watching a programme with a digital text service . . . . . . . . . . . . . . . . . . . . . . . . . 21
Pausing a TV broadcast (TV Pause) . . . . . . . . . . . . . . . . . . . . . . . . . . . . . . . . . . . 21
Watching another programme in the sub-picture (Picture-in-Picture) . . . . . . . . . . 22
Other viewing options . . . . . . . . . . . . . . . . . . . . . . . . . . . . . . . . . . . . . . . . . . . . . . 22
GUIDE (Electronic Programme Guide) Overview . . . . . . . . . . . . . . . . . . . . . . . . . . . . 23
Watching a programme from the GUIDE . . . . . . . . . . . . . . . . . . . . . . . . . . . . . . . . 23
Recording from the GUIDE . . . . . . . . . . . . . . . . . . . . . . . . . . . . . . . . . . . . . . . . . . 24
Checking/changing/cancelling the GUIDE timer settings. . . . . . . . . . . . . . . . . . . . 26
Recording . . . . . . . . . . . . . . . . . . . . . . . . . . . . . . . . . . . . . . . . . . . . . 27
Recording the Programme You are Watching . . . . . . . . . . . . . . . . . . . . . . . . . . . . . . 27
Extending the current recording (Quick Timer) . . . . . . . . . . . . . . . . . . . . . . . . . . . 28
Setting the Timer . . . . . . . . . . . . . . . . . . . . . . . . . . . . . . . . . . . . . . . . . . . . . . . . . . . . . 29
Checking/changing/cancelling timer settings (Timer List) . . . . . . . . . . . . . . . . . . . 30
About simultaneous two-channel recording and priorities . . . . . . . . . . . . . . . . . . . 31
Recording Time . . . . . . . . . . . . . . . . . . . . . . . . . . . . . . . . . . . . . . . . . . . . . . . . . . . . . . 31
4
Page 5

Playback . . . . . . . . . . . . . . . . . . . . . . . . . . . . . . . . . . . . . . . . . . . . . . 32
Playing a Recorded Programme (Title List) . . . . . . . . . . . . . . . . . . . . . . . . . . . . . . . . 32
Playback options . . . . . . . . . . . . . . . . . . . . . . . . . . . . . . . . . . . . . . . . . . . . . . . . . . 34
Playing from the beginning of the programme you are recording
(Chasing Playback) . . . . . . . . . . . . . . . . . . . . . . . . . . . . . . . . . . . . . . . . . . . . . 35
Playing a previous recording while making another
(Simultaneous Rec and Play) . . . . . . . . . . . . . . . . . . . . . . . . . . . . . . . . . . . . . 35
Managing the HDD Contents . . . . . . . . . . . . . . . . . . . . . . . . . . . . . . . . . 36
Labelling a Title (Entering Characters) . . . . . . . . . . . . . . . . . . . . . . . . . . . . . . . . . . . . 36
Protecting a Title . . . . . . . . . . . . . . . . . . . . . . . . . . . . . . . . . . . . . . . . . . . . . . . . . . . . . 37
Freeing Up Space on the HDD . . . . . . . . . . . . . . . . . . . . . . . . . . . . . . . . . . . . . . . . . . 37
Erasing a title. . . . . . . . . . . . . . . . . . . . . . . . . . . . . . . . . . . . . . . . . . . . . . . . . . . . . 37
Erasing all titles (Format Hard Disk) . . . . . . . . . . . . . . . . . . . . . . . . . . . . . . . . . . . 38
Settings and Adjustments . . . . . . . . . . . . . . . . . . . . . . . . . . . . . . . . . . . 39
Operation Settings (Settings) . . . . . . . . . . . . . . . . . . . . . . . . . . . . . . . . . . . . . . . . . . . 39
Digital TV Settings
(DTV Settings) . . . . . . . . . . . . . . . . . . . . . . . . . . . . . . . . . . . . . . . . . . . . . . . . . . . 40
Video Settings (Video) . . . . . . . . . . . . . . . . . . . . . . . . . . . . . . . . . . . . . . . . . . . . . . . . 42
Audio Settings (Audio) . . . . . . . . . . . . . . . . . . . . . . . . . . . . . . . . . . . . . . . . . . . . . . . . 43
Setting/changing the Password (Password) . . . . . . . . . . . . . . . . . . . . . . . . . . . . . . . . 44
System Settings (Others) . . . . . . . . . . . . . . . . . . . . . . . . . . . . . . . . . . . . . . . . . . . . . . 45
Easy Setup (Resetting the Recorder) . . . . . . . . . . . . . . . . . . . . . . . . . . . . . . . . . . . . . 46
Additional Information . . . . . . . . . . . . . . . . . . . . . . . . . . . . . . . . . . . . . 47
Troubleshooting . . . . . . . . . . . . . . . . . . . . . . . . . . . . . . . . . . . . . . . . . . . . . . . . . . . . . 47
Notes About This Recorder . . . . . . . . . . . . . . . . . . . . . . . . . . . . . . . . . . . . . . . . . . . . 50
Specifications . . . . . . . . . . . . . . . . . . . . . . . . . . . . . . . . . . . . . . . . . . . . . . . . . . . . . . . 50
Guide to Parts and Controls . . . . . . . . . . . . . . . . . . . . . . . . . . . . . . . . . . . . . . . . . . . . 52
Glossary . . . . . . . . . . . . . . . . . . . . . . . . . . . . . . . . . . . . . . . . . . . . . . . . . . . . . . . . . . . 55
Digital TV Channel List (as of April 2006) . . . . . . . . . . . . . . . . . . . . . . . . . . . . . . . . . . 56
Index . . . . . . . . . . . . . . . . . . . . . . . . . . . . . . . . . . . . . . . . . . . . . . . . . . . . . . . . . . . . . .59
5
Page 6
Ways to Use Your Hard Disk Recorder
Recording Reference pages
Record two programmes at the
same time
– Twin Tuner
Easy Recording from the
channel guide
– GUIDE
Playback Reference pages
“Recording the Programme You are Watching” on page 27
,
“Recording from the GUIDE” on page 24
,
Quick access to recorded titles
– Title List
Play the beginning of a title
while it is being recorded
– Chasing Playback
Watching one title while
recording another
– Simultaneous Rec and Play
“Playing a Recorded Programme (Title List)” on page 32
,
“Playing from the beginning of the programme you are
,
recording (Chasing Playback)” on page 35
“Playing a previous recording while making another
,
(Simultaneous Rec and Play)” on page 35
6
Page 7
Guide to Displays
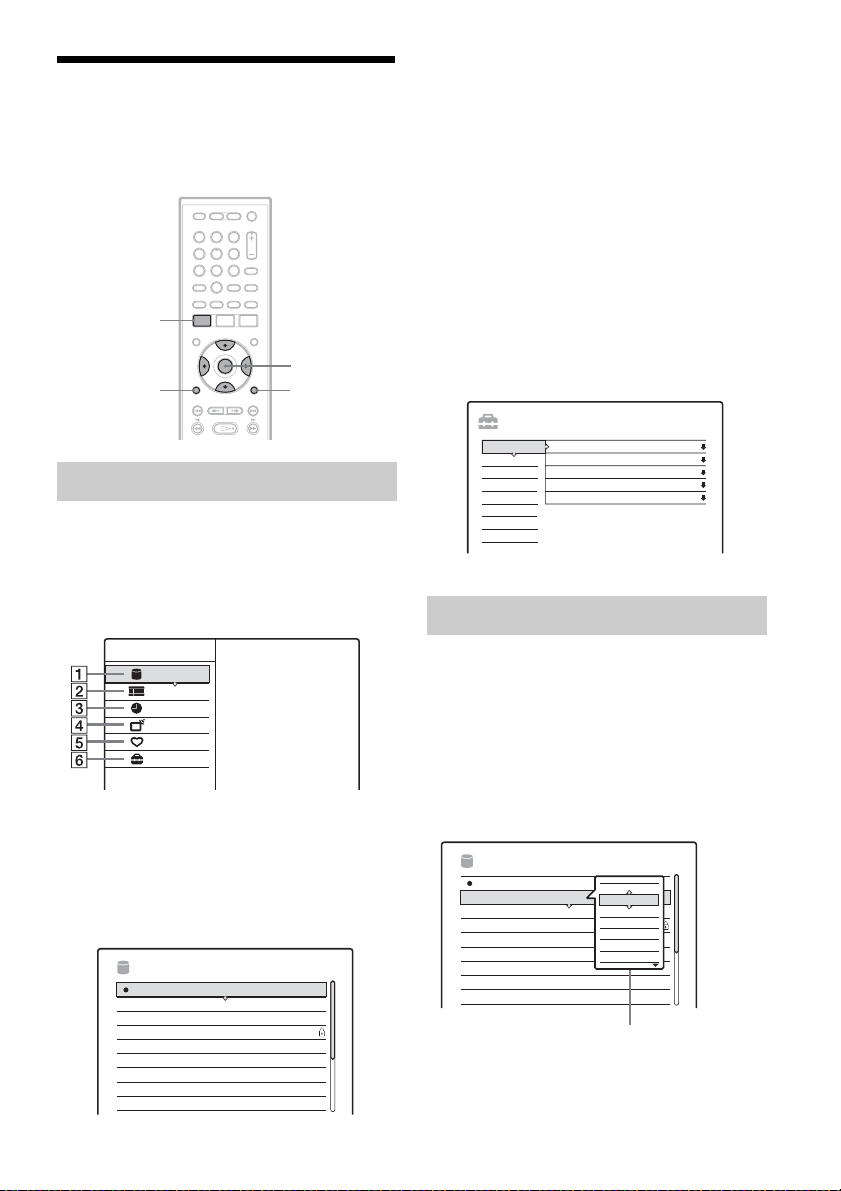
The following displays are used to operate this
recorder. Once you become familiar with the basic
operations, you will find the recorder easy to use.
321
654
8 97
0
SYSTEM
MENU
</M/m/,,
ENTER
OPTIONSRETURN
System Menu
The System Menu appears when you press
SYSTEM MENU, and provides entries to all of
the recorder’s main functions, such as timer
recording and setup.
Select an option by pressing M/m and ENTER.
B GUIDE (page 23)
Displays the GUIDE, which allows you to
watch or record a programme.
C TIMER (page 29)
Displays the “Timer-Standard” display,
which allows you to set the timer manually.
D PROGRAMME LIST (page 19)
Displays the scrollable list of all available TV
and radio channels.
E FAVOURITE LIST (page 19)
Displays preset channels of the Favourite List.
F SETUP (page 39)
Displays the “Setup” display for setting up the
recorder to suit your preferences.
SETUP
Settings
DTV Settings
Video
Audio
Password
Others
Easy Setup
Time Zone
i Plate timeout
FP Display
Power Save
Command Mode
NSW/ACT
60 Sec.
Normal
Off
HDD 1
Sub-menu
SYSTEM MENU
TITLE LIST
GUIDE
TIMER
PROGRAMME LIST
FAVOURITE LIST
SETUP
A TITLE LIST (page 32)
Displays the list of the recorded titles,
including the recording information, which
allows you to select a title to play.
TITLE LIST
NEW
NEW
Tennis
Tra ve l
Mystery
World Sports
Family
Nature
News
Weather
148/250GB
27.10
Fri
Wed
25.10
Tue
24.10
Wed
18.10
Mon
16.10
Sat
14.10
Fri
13.10
Thu
12.10
ThuMusical History
12.10
The sub-menu appears when you select an item
from a list menu (e.g., a title from the Title List
menu), and press ENTER. The sub-menu displays
options applicable only to the selected item. (The
displayed options differ depending on the
situation.)
Select an option by pressing M/m and ENTER.
Example: The Title List menu
TITLE LIST
NEW
NEW
Tennis
Tra ve l
Mystery
World Sports
Family
Nature
News
Weather
Options for the selected item
Fri
Close
Wed
Play
Play Beginning
Tue
Repeat Play
Wed
Erase
Mon
Protect
Sat
Rename
Fri
Thu
ThuMusical History
148/250GB
27.10
25.10
24.10
18.10
16.10
14.10
13.10
12.10
12.10
,continued
7
Page 8
OPTIONS
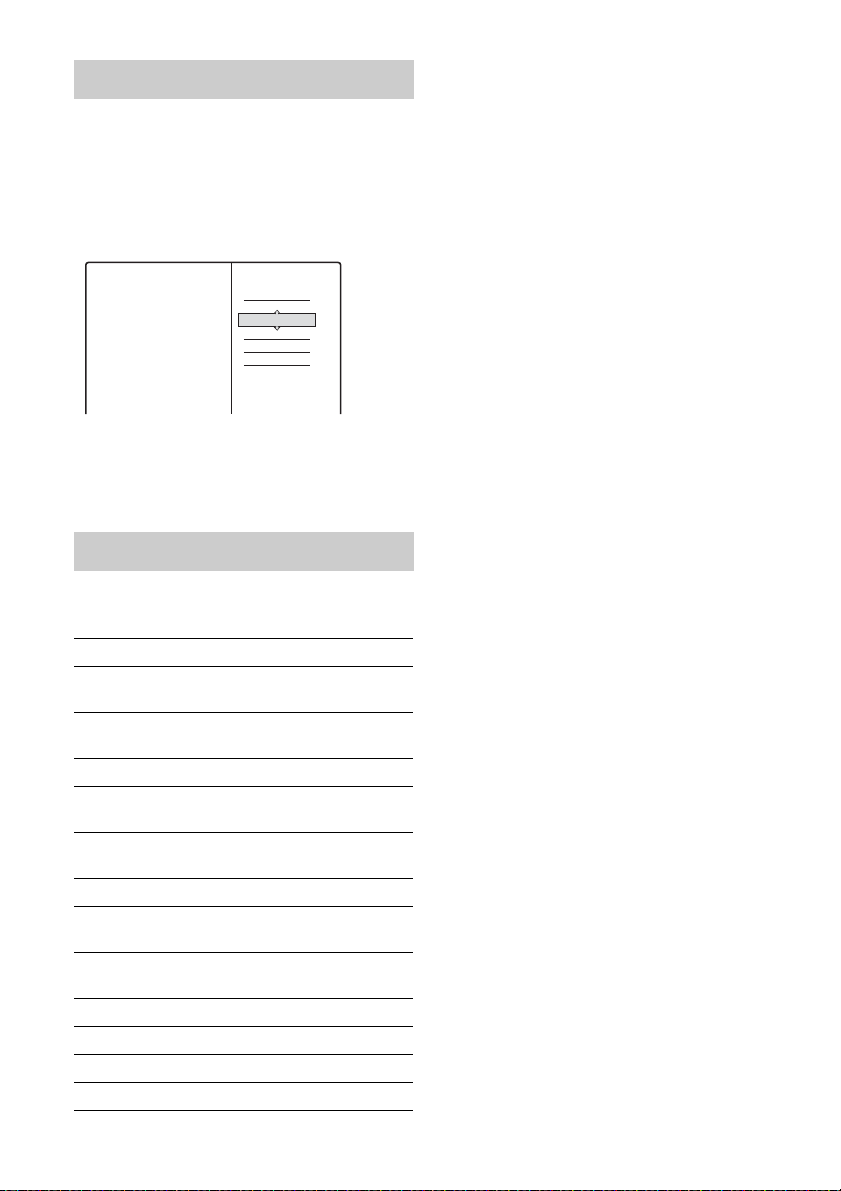
The OPTIONS menu appears when you press
OPTIONS, and displays options applicable to the
operating status of the recorder. (The displayed
options differ depending on the situation.)
Press M/m to select an option and press ENTER.
Example: when watching TV.
Close
Disk Info
REC
Play
Play Beginning
To return to the previous display
Press RETURN.
Options/sub-menu items
The displayed items differ depending on the status
of the recorder.
Close Turns off the menu
Disk Info Displays disk information
REC/REC
STOP
Play Starts playback (page 32)
Play Beginning Starts playback from the
Display 3 (or 9)
titles
Sort Titles Changes the title order (page 33)
Timer Sets the timer for recording
Erase Erases a title or timer setting
Protect Protects a title (page 37)
Repeat Play Repeats playback (page 33)
Rename Changes the title name (page 36)
Modify Changes a timer setting (page 30)
(page 28)
Starts or stop recording (page 27)
beginning of the title (page 33)
Shows the extended Title List
(page 32)
(page 29)
(page 37)
8
Page 9

Hookups and Settings
Hooking Up the Recorder
Follow steps 1 to 7 to hook up and adjust the settings of the recorder.
b Notes
• Plug cords securely to prevent unwanted noise.
• Refer to the instructions supplied with the components to be connected.
• You cannot connect this recorder to a TV that does not have a video input jack.
• Be sure to disconnect the mains lead of each component before connecting.
Step 1: Unpacking
Check that you have the following items:
• Audio/video cord (phono plug × 3 y phono plug × 3) (1)
• Component video cord (phono plug × 3 y phono plug × 3) (1)
•Mains lead (1)
• Aerial cable (2 : long × 1, short × 1)
• Remote commander (remote) (1)
• R6 (size AA) batteries (2)
Hookups and Settings
9
Page 10
Step 2: Connecting the Aerial Cables
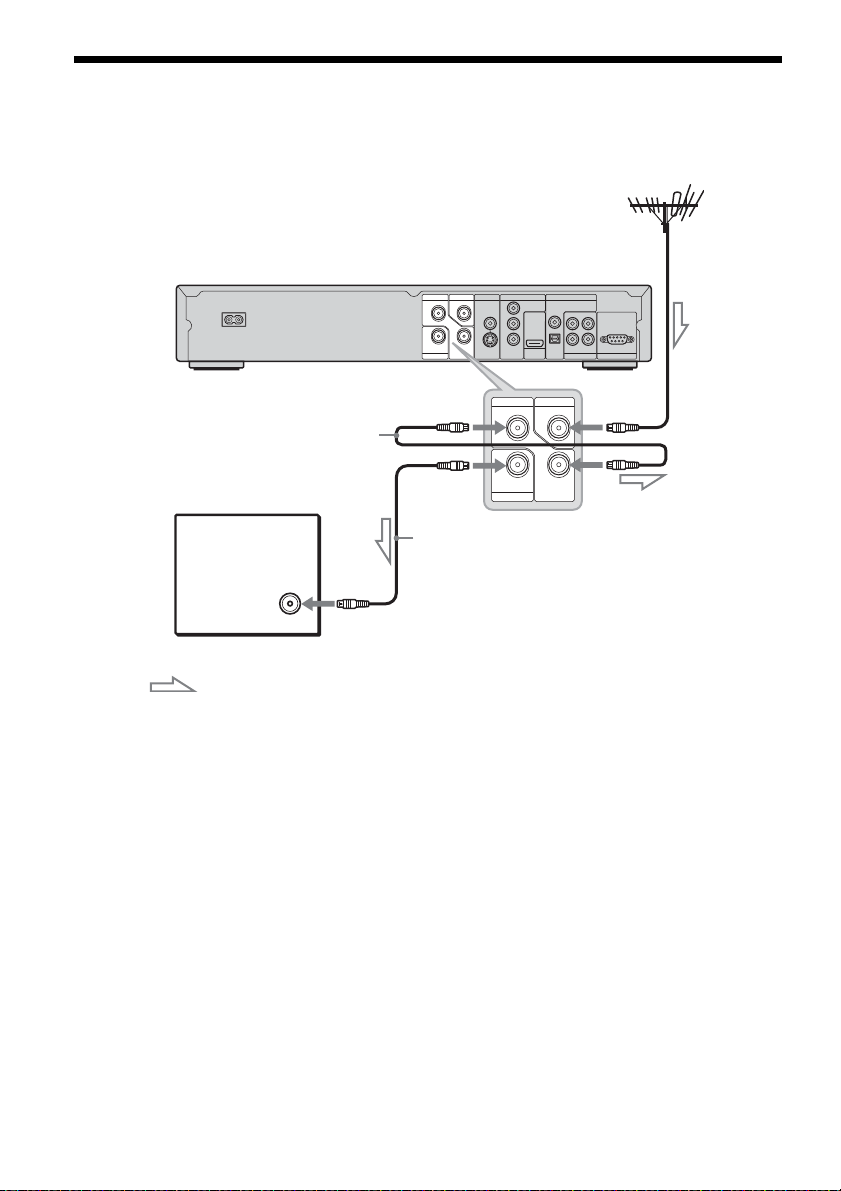
Connect the aerial cables by following the steps below. Do not connect the mains lead until you reach
“Step 5: Connecting the Mains Lead” on page 14.
HDD recorder
AERIAL INRF THROUGH
COMPONENT VIDEO OUT
~
AC IN
to RF THROUGH IN
Short aerial cable (supplied)
IN
AERIAL OUT
OUT
VIDEO OUT DIGITAL AUDIO OUT
VIDEO
S VIDEO
RF THROUGH
PCM / DOLBY DIGITAL
Y
COAXIAL
HDMI
OUT
OPTICAL
AERIAL IN
LRL
R
12
AUDIO OUT FOR SERVICE USE
to AERIAL
IN
PB/
B
C
P
R/
R
C
IN
TV
to AERIAL
OUT
AERIAL OUT
OUT
to RF THROUGH OUT
Long aerial cable (supplied)
: Signal flow
1 Disconnect the aerial cable from your TV and connect it to the AERIAL IN jack on the rear panel
of the recorder.
2 Connect the RF THROUGH IN jack and the RF THROUGH OUT jack using the short aerial cable
(supplied).
3 Connect the AERIAL OUT jack of the recorder to the aerial input of your TV using the long aerial
cable (supplied).
10
Page 11

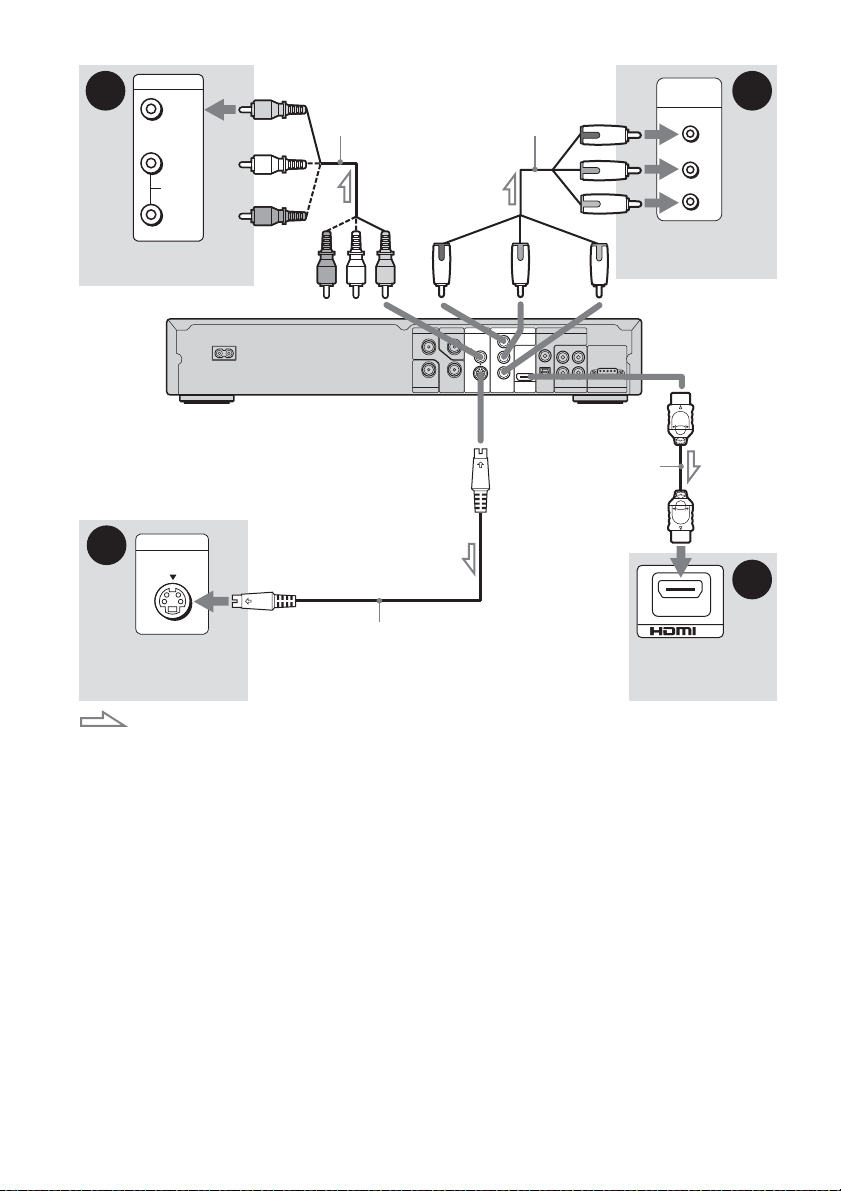
Step 3: Connecting the Video Cords/HDMI Cord
Select one of the following patterns A through D, according to the input jack on your TV monitor,
projector, or AV amplifier (receiver). This will enable you to view pictures.
A Connecting to a video input jack
You will enjoy standard quality images.
B Connecting to an S VIDEO input jack
You will enjoy high quality images.
C Connecting to component video input jacks (Y, PB/CB, PR/CR)
You will enjoy accurate colour reproduction and high quality images.
If your TV accepts 720p/1080i format signals, you must use this connection.
D Connecting to an HDMI input jack*
Use a certified HDMI cord (not supplied) to enjoy high quality digital picture through the HDMI OUT
jack.
* This hard disk recorder is based on version 1.1 of High-Definition Multimedia Interface Specifications.
This hard disk recorder incorporates High-Definition Multimedia Interface (HDMI™) technology.
HDMI, the HDMI logo and High-Definition Multimedia Interface are trademarks or registered trademarks of HDMI
Licensing LLC.
z Hints
• The HIGH DEFINITION OUT indicator on the front panel lights up when outputting 720p/1080i video signals from
the HDMI OUT jack or the COMPONENT VIDEO OUT jacks.
• The recorder’s default video output setting is “1080i.” If the connected TV does not display pictures when using
pattern C or D, change “Video Format” to “576p” or “576i” (page 43).
Hookups and Settings
,continued
11
Page 12
INPUT
VIDEO
L
AUDIO
R
TV, projector, or AV
amplifier (receiver)
~
to VIDEO OUT
AC IN
Audio/video cord
(supplied)
(yellow)
to S VIDEO OUT
IN
AERIAL OUT
AERIAL INRF THROUGH
OUT
Component video
cord (supplied)
COMPONENT VIDEO OUT
VIDEO OUT DIGITAL AUDIO OUT
VIDEO
S VIDEO
Y
PB/
B
C
P
R/
R
C
to HDMI
OUT
HDMI
OUT
PCM / DOLBY DIGITAL
COAXIAL
LRL
OPTICAL
12
AUDIO OUT FOR SERVICE USE
(green)
(blue)
(red)
HDMI cord
(not supplied)
TV, projector, or AV
amplifier (receiver)
to COMPONENT
VIDEO OUT
R
COMPONENT
VIDEO IN
Y
B
P /C
B
R
P /C
R
HDD recorder
CA
B
INPUT
S VIDEO
TV, projector, or AV
amplifier (receiver)
S-video cord
(not supplied)
: Signal flow
When playing “wide screen” images
Some recorded images may not fit your TV
screen. To change the picture size, see “Aspect
Ratio (TV Type)” (page 42).
b Notes
• When using connection C or D, make the appropriate
settings under “Video Format” in the “Video” setup
(page 43).
• You cannot connect the HDMI OUT jack (connection
D) to DVI jacks that are not HDCP compliant (e.g.,
DVI jacks on PC displays).
D
IN
TV, projector, or AV
amplifier (receiver)
12
Page 13
Step 4: Connecting the Audio Cords
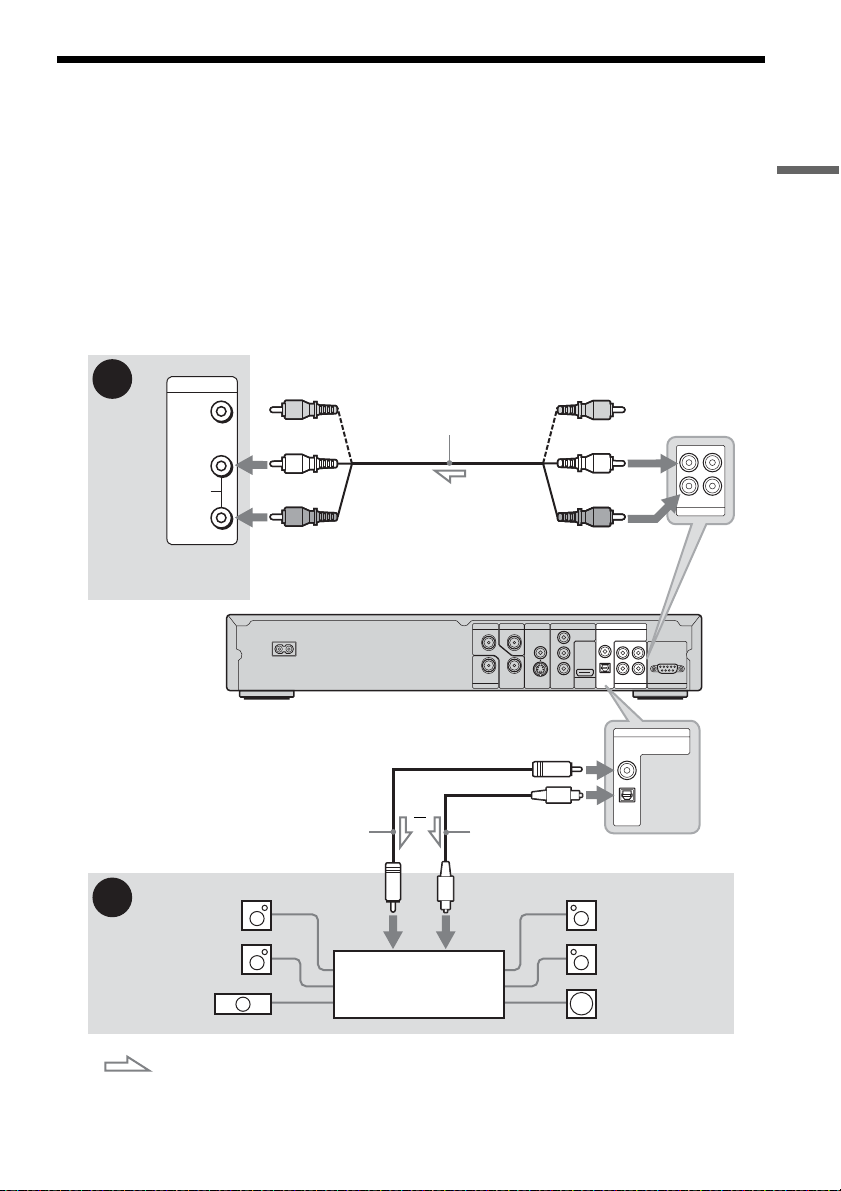
Select one of the following patterns A or B, according to the input jack on your TV monitor, projector,
or AV amplifier (receiver). This will enable you to listen to sound.
When you connect to the TV using an HDMI cord and want to output only from the TV, the following
connection is not necessary.
A Connecting to audio L/R input jacks
This connection will use your TV’s or stereo amplifier’s (receiver’s) two speakers for sound.
B Connecting to a digital audio input jack
If your AV amplifier (receiver) has a Dolby*1 Digital decoder and a digital input jack, use this connection.
You can enjoy Dolby Digital (5.1ch) surround effects.
Hookups and Settings
A
INPUT
VIDEO
L
AUDIO
R
TV, projector, or AV
amplifier (receiver)
HDD recorder
Coaxial digital cord (not supplied)
[Speakers]
B
Rear (L)
Front (L)
Centre
2
(yellow)*
Audio/video cord
(supplied)
(white)
(red)
to AUDIO OUT (L/R) 1 or 2
AERIAL INRF THROUGH
VIDEO OUT DIGITAL AUDIO OUT
IN
AERIAL OUT
VIDEO
OUT
S VIDEO
~
AC IN
to DIGITAL AUDIO OUT (COAXIAL or OPTICAL)
or
Optical digital cord
(not supplied)
to coaxial or optical input
AV amplifier (receiver)
with a decoder
(yellow)
(white)
(red)
COMPONENT VIDEO OUT
Y
PB/
C
B
R/
P
C
R
HDMI
OUT
[Speakers]
PCM / DOLBY DIGITAL
COAXIAL
LRL
OPTICAL
12
AUDIO OUT FOR SERVICE USE
DIGITAL AUDIO OUT
PCM / DOLBY DIGITAL
COAXIAL
OPTICAL
Rear (R)
Front (R)
Subwoofer
LRL
R
12
AUDIO OUT
R
*1
: Signal flow
Manufactured under license from Dolby Laboratories.
“Dolby,” and the double-D symbol are trademarks of Dolby Laboratories.
*2
The yellow plug is used for video signals (page 11).
,continued
13
Page 14
z Hint
For correct speaker location, see the operating
instructions supplied with the connected components.
b Notes
• In the connection B, after you have completed the
connection, make the appropriate settings under
“Digital Output” in the “Audio” setup (page 43).
Otherwise, no sound or a loud noise will come from
your speakers.
• When you connect the recorder to an AV amplifier
(receiver) using an HDMI cord, Dolby Digital and
MPEG audio signals are converted to PCM signals
when output through the HDMI OUT jack.
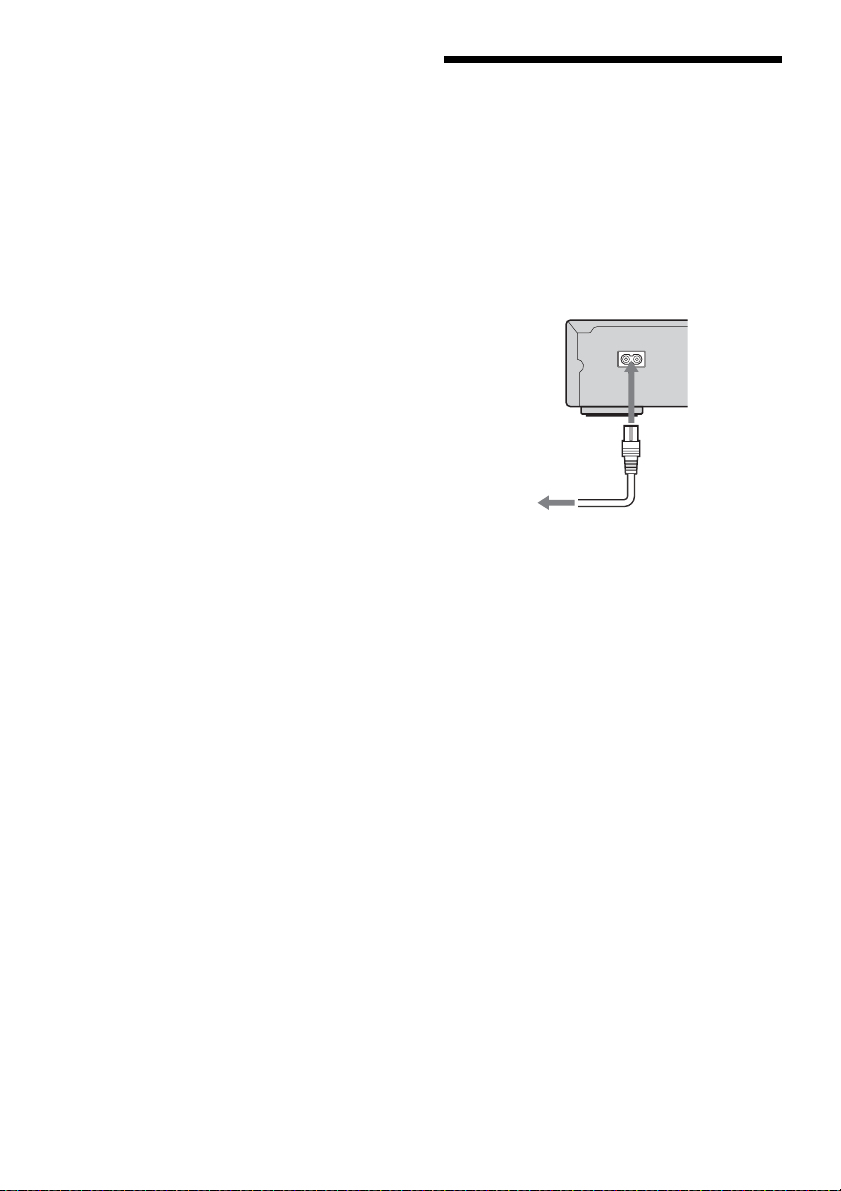
Step 5: Connecting the Mains Lead
Connect the supplied mains lead to the AC IN
terminal of the recorder. Then plug the recorder
into the mains. After you connect the mains lead,
you must wait for a short while before
operating the recorder. You can operate the
recorder once the front panel display lights up and
the recorder enters standby mode.
~ AC IN
to AC IN
1
2
to mains
14
Page 15
Step 6: Preparing the Remote
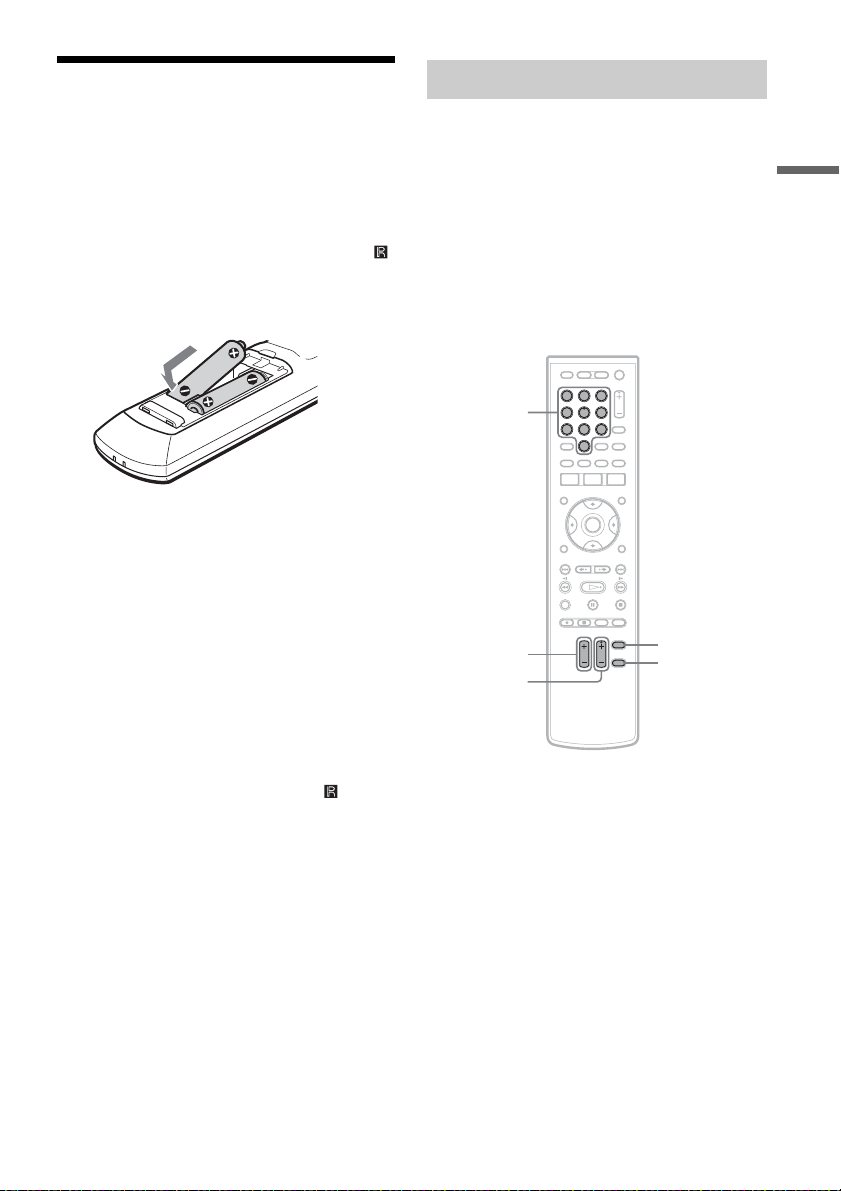
You can control the recorder using the supplied
remote. Insert two R6 (size AA) batteries by
matching the 3 and # ends on the batteries to the
markings inside the battery compartment. When
using the remote, point it at the remote sensor
on the recorder.
Controlling TVs with the remote
You can adjust the remote’s signal to control your
TV.
b Notes
• Depending on the connected unit, you may not be able
to control your TV with some or all of the buttons
below.
• If you enter a new code number, the code number
previously entered will be erased.
• When you replace the batteries of the remote, the code
number may be reset to the default setting. Set the
appropriate code number again.
Hookups and Settings
b Notes
• If the supplied remote interferes your other Sony HDD
recorder, change the command mode number for this
recorder (page 16).
• Use the batteries correctly to avoid possible leakage
and corrosion. Do not touch the liquid with bare hands
should leakage occur. Observe the following:
– Do not use a new battery with an old battery, or
batteries of different manufacturers.
– Do not attempt to recharge the batteries.
– If you do not intend to use the remote for an extended
period of time, remove the batteries.
– If battery leakage occurs, wipe out any liquid inside
the battery compartment, and insert new batteries.
• Do not expose the remote sensor (marked on the
front panel) to strong light, such as direct sunlight or
lighting apparatus. The reco rder may not respond to the
remote.
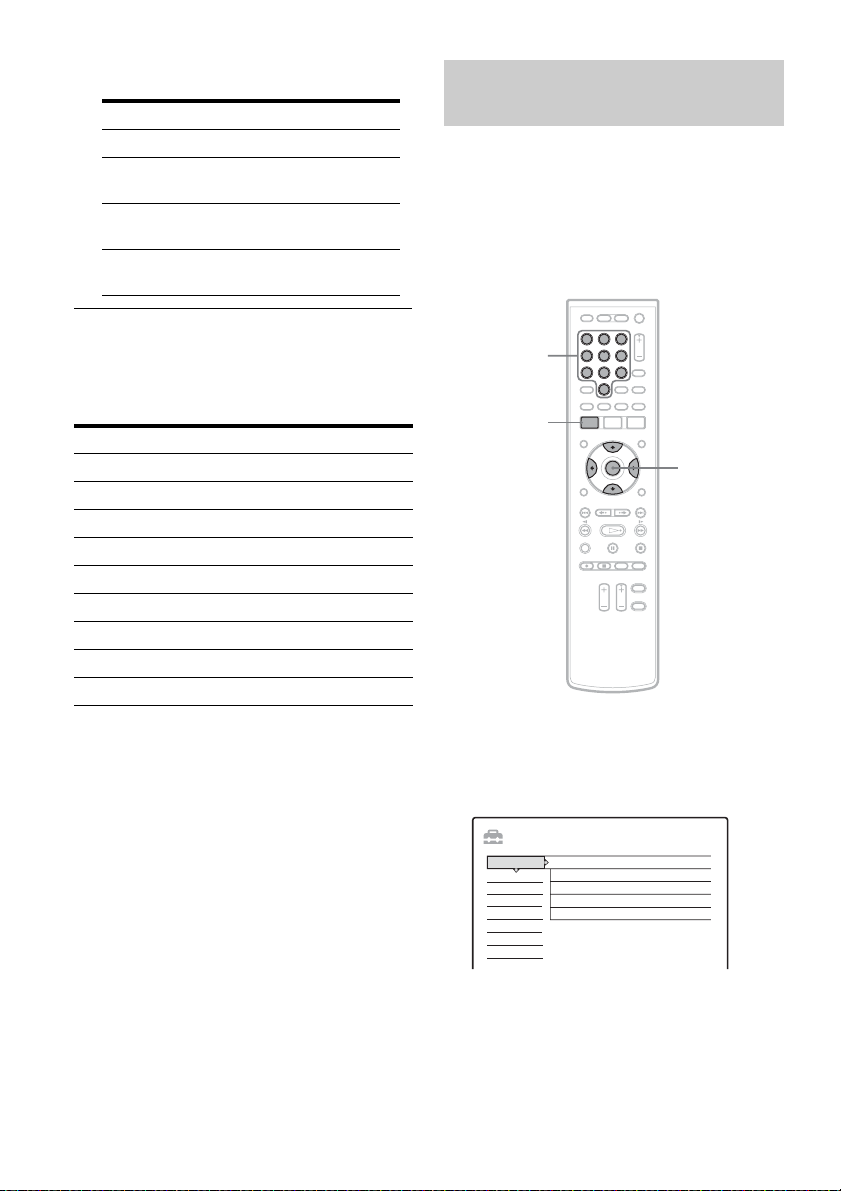
Number
buttons
TV VOL +/–
TV PROG +/–
321
654
8 97
0
TV [/1
TV/VIDEO
1 Hold down TV [/1.
2 Enter your TV’s manufacturer code (see
“Code numbers of controllable TVs”
below) using the number buttons.
,continued
15
Page 16
3 Release TV [/1.
The following buttons are for TV.
Buttons Operations
TV [/1 Turns your TV on or off
TV VOL +/– Adjusts the volume of
your TV
TV PROG +/– Selects the programme
position on your TV
TV/VIDEO Switches your TV’s
input source
If you have more than one Sony HDD recorder
If the supplied remote interferes with your other
Sony HDD recorder, set the command mode
number for this recorder and the supplied remote
to one that differs from the other Sony HDD
recorder.
The default command mode setting for this
recorder and the supplied remote is HDD1.
Code numbers of controllable TVs
If more than one code number is listed, try
entering them one at a time until you find the one
that works with your TV.
Manufacturer Code number
Sony 01 (default)
Hitachi 24
Panasonic 17, 49
Philips 06, 08
Samsung 71
Sanyo 25
Thomson 43
Toshiba 38
JVC 33
Number
buttons
SYSTEM
MENU
321
654
8 97
0
</M/m/,,
ENTER
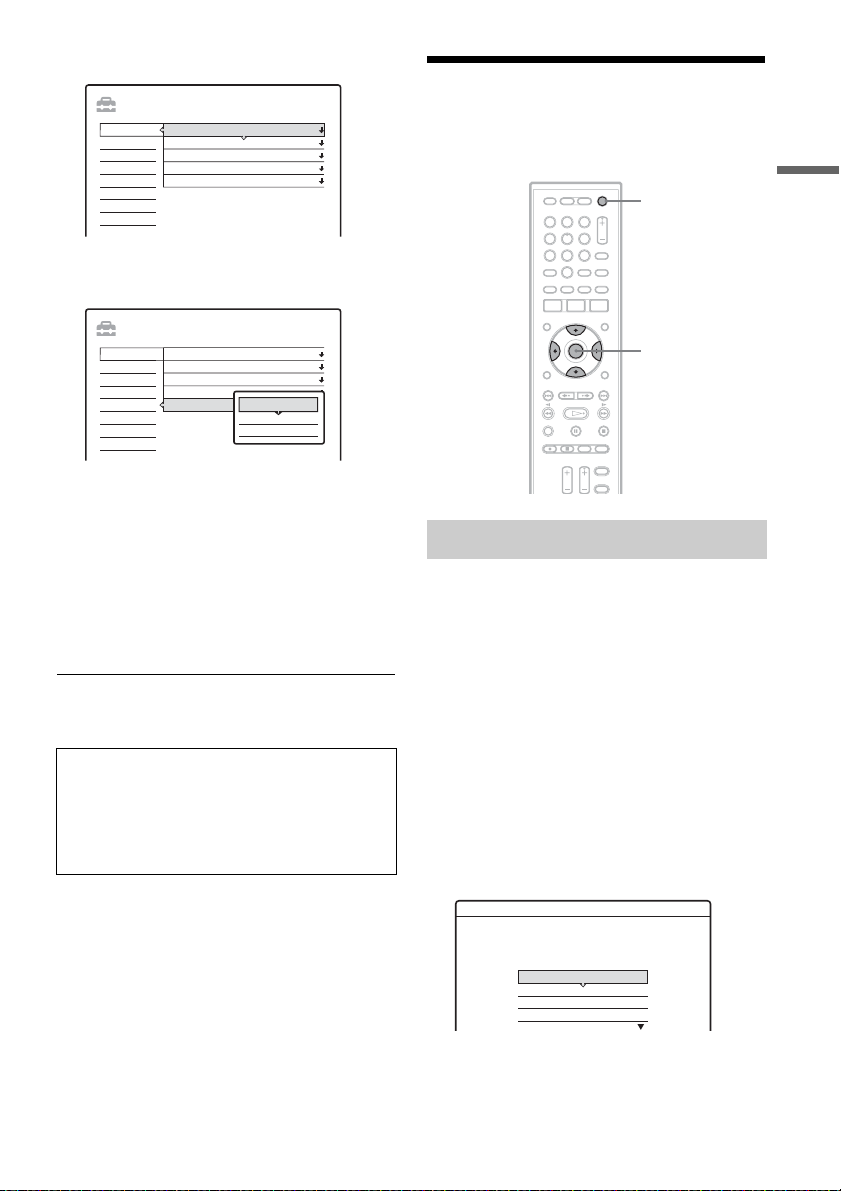
1 Press SYSTEM MENU.
The System Menu appears.
2 Select “SETUP,” and press ENTER.
SETUP
Settings
DTV Settings
Video
Audio
Password
Others
Easy Setup
Time Zone
i Plate timeout
FP Display
Power Save
Command Mode
NSW/ACT
60 sec.
normal
off
HDD 1
16
Page 17
3 Select “Settings,” and press ENTER.
SETUP
Settings
DTV Settings
Video
Audio
Password
Others
Easy Setup
Time Zone
i Plate timeout
FP Display
Power Save
Command Mode
NSW/ACT
60 Sec.
Normal
Off
HDD 1
4 Select “Command Mode,” and press
ENTER.
SETUP
Settings
DTV Settings
Video
Audio
Password
Others
Easy Setup
Time Zone
i Plate timeout
FP Display
Power Save
Command Mode
NSW/ACT
60 Sec.
Normal
Off
HDD1
HDD 1
HDD2
HDD3
5 Select the command mode (HDD1, HDD2,
or HDD3), and press ENTER.
6 Press ENTER and the number button (1, 2,
or 3) at the same time for more than three
seconds so it matches the mode you
selected above.
Example: Command mode is HDD2.
Press ENTER and 2 at the same time.
To return to the previous step
Press RETURN.
Check that the command mode of the remote is
set to the default setting of HDD1 before you try
to change the command mode for the recorder. If
the command mode for the remote is changed to
HDD2 or HDD3, you may be unable to operate
this recorder.
b Note
In step 1, you can also use the SYSTEM MENU button
on the recorder.
Step 7: Initial Setup
Make the basic adjustments to start using this hard
disk recorder.
[/1
321
654
8 97
0
</M/m/,,
ENTER
Easy Setup
“Easy Setup” allows you to set the time zone and
preset the channels automatically.
1 Press [/1 to turn on the recorder.
2 Turn on the TV and switch the input
selector so that the signal from the
recorder appears on the TV screen.
A message about the initial settings appears.
• If the message does not appear, select “Easy
Setup” from “SETUP” in the System Menu
to run the Easy Setup function (page 46).
3 Select “Start,” and press ENTER.
The setup display for selecting the time zone
appears.
Easy Setup
Select the time zone.
NSW/ACT
VIC
OLD
SA
1/3
Hookups and Settings
The options are:
NSW/ACT y VIC y QLD y SA y
WA y TAS y NT
,continued
17
Page 18

4 Select the time zone for your area, and
press ENTER.
The setup display for tuner setting appears.
Easy Setup-Tuning
Select the tuning method.
Quick Tuning
Auto Tuning
2/3
5 Select the tuning method, and press
ENTER.
If you select “Quick Tuning,” select your city
and press ENTER.
The recorder automatically starts searching
for all of the receivable channels and presets
them.
z Hint
If you want to run “Easy Setup” again, select “Easy
Setup” from “SETUP” in the System Menu (page 46).
Note about the clock setting
This recorder automatically adjusts its clock
according to the time signals from the broadcaster
in the area selected in step 4 above, or “Time
Zone” in the “Settings” Setup. You do not need to,
(and cannot manually) adjust the clock for Day
Light Savings Time, and these are the ONLY
settings that affect the clock.
Since the clock entirely depends on the
broadcaster sending the correct time signals, if
“Time Zone” in “Settings” Setup (page 39) is
correct and yet the clock is wrong, it is not a
malfunction.
Easy Setup-Quick Tuning
Searching for receivable channels.
Please wait.
Number of channels found: 16
3/3
Other option:
“Auto Tuning”: Presets all receivable
channels.
For details, see page 41.
6 Press ENTER when “finish” appears.
“Easy Setup” is finished.
If necessary, set up for your TV (see below).
To return to the previous step
Press RETURN.
To select the picture size according to your TV
Set “Aspect Ratio” in “Video” setup (page 42).
To select the type of video signals output from
the HDMI OUT or COMPONENT VIDEO OUT
jacks
Set “Video Format” in “Video” setup (page 43).
To select the audio output method from the
DIGITAL AUDIO OUT jack
Set “Digital Output” in “Audio” setup (page 43).
18
Page 19
Watching TV
)
Selecting a channel from the Favourite List
Selecting a Channel
You can select a channel using:
• the PROG +/– buttons
• a complete channel list (Programme List)
• a pre-selected channel list (Favourite List)
• the GUIDE (see page 23)
Selecting a channel from the Programme List
The Programme List display allows you to select
a channel from a scrollable list of all available TV
and radio channels.
(remote
321
654
8 97
0
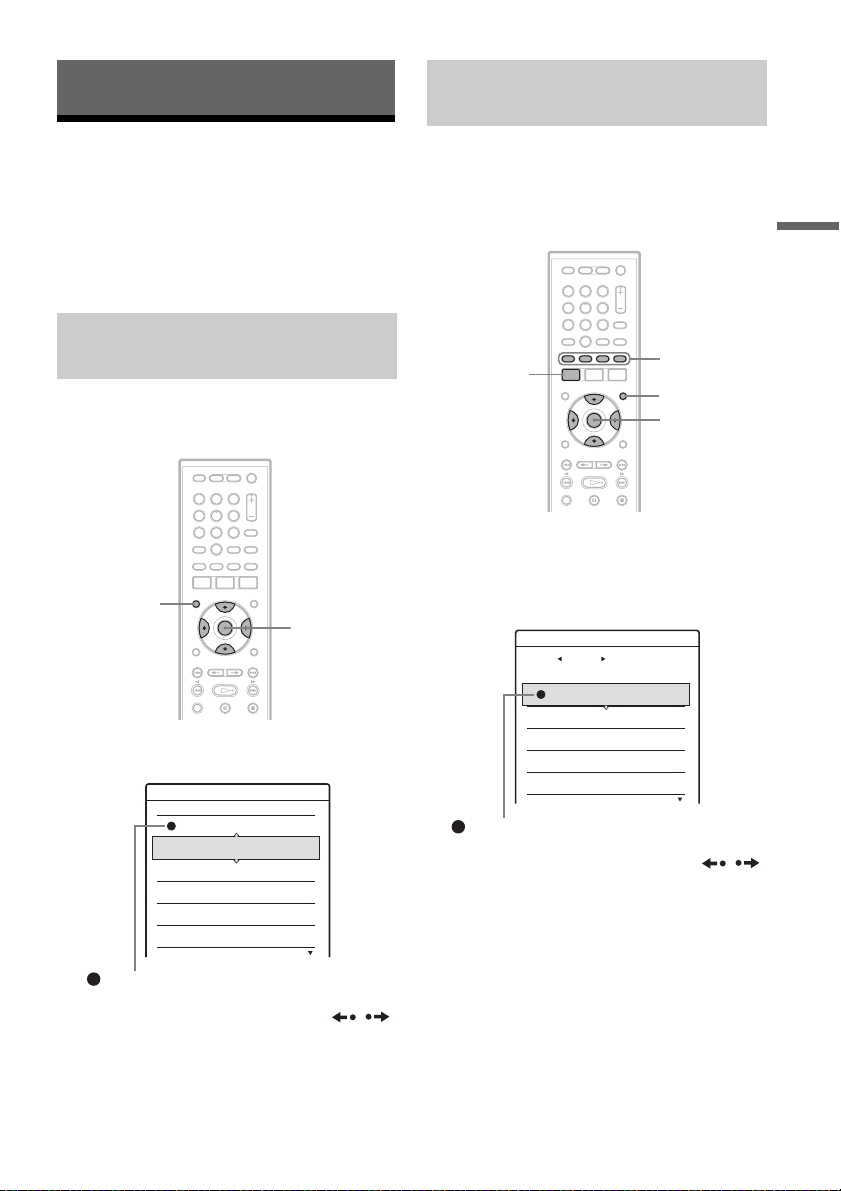
PROG LIST
</M/m/,,
ENTER
1 Press PROG LIST.
The scrollable channel list appears.
Programme List
DDE News
AAC
NCE 5
Channel J
Digital Teletext
DAF 2
1
2
3
4
5
6
You can list up your favourite TV or radio
channels, and select the channel from the list
display.
If you have not made a Favourite List, see
“Making your own Favourite List” below first.
321
654
8 97
SYSTEM
MENU
0
Coloured
control buttons
FAVOURITE
</M/m/,,
ENTER
1 Press FAVOURITE.
A “Favourite List” display appears.
2 Press </, to select the Favourite List
you want to view.
Favourite List 2
FAV.1 FAV.2 FAV.3 FAV.4
NAC HDTV
CLST TV
DAF DIGITAL 1
NEU Digital
AD2 Digital
(red) indicates the channel you are recording.
1
11
54
185
202
Press M/m to scroll the list. Or press /
to go to the previous/next page.
3 Select the channel you want to watch or
listen to, and press ENTER.
Watching TV
(red) indicates the channel you are recording.
Press M/m to scroll the list. Or press /
to go to the previous/next page.
2 Select the channel you want to watch or
listen to, and press ENTER.
b
Notes
• To select a channel not on the Favourite Lists, press
FAVOURITE to turn off the list, and press PROG
LIST to select the channel from the Programme List
(page 19).
• After step 3, the PROG +/– buttons select only the
channels on the Favourite List. To return the button’s
status, press PROG LIST to display the Programme
List, then select a channel and press ENTER.
,continued
19
Page 20
Making your own Favourite List
You can create up to four Favourite Lists (e.g.
each for four of your family members).
Additional Viewing Methods
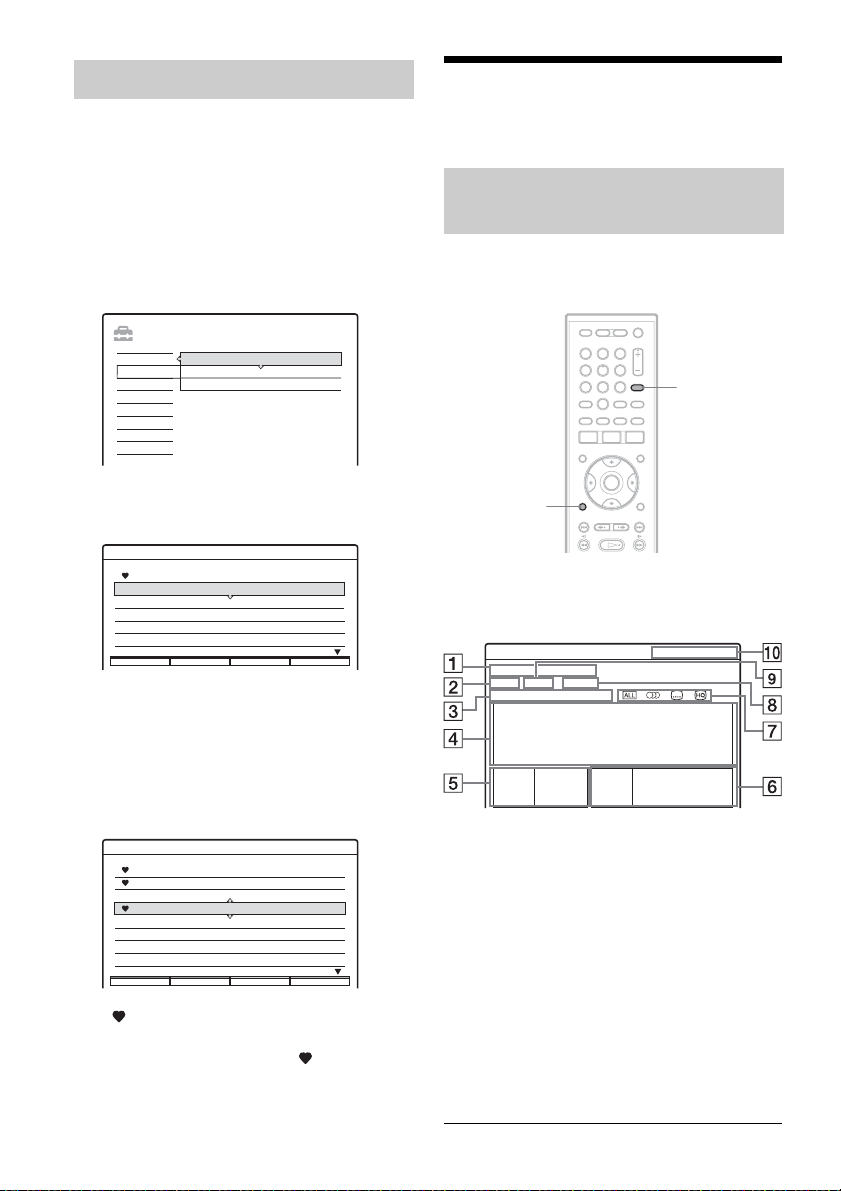
1 Press SYSTEM MENU.
The System Menu appears.
2 Select “SETUP,” and press ENTER.
The Setup Display appears.
3 Select “DTV Settings,” and press ENTER.
SETUP
Settings
DTV Settings
Video
Audio
Password
Others
Easy Setup
Favourite
Parental Lock
Tuning
4 Select “Favourite,” and press ENTER.
A list of all receivable channels appears.
Favourite List 1
Programme
001
002
003
004
005
Page Up Page Down Show Fav. List
Service
DDE News
AAC
NCE 5
Channel J
Digital Teletext
Next List
• Press the red or green button to go to the
previous or next page.
• Press the yellow button repeatedly to switch
to other Favourite Lists.
5 Select the channel you want to add to your
Favourite List, and press ENTER.
Favourite List 1
Programme
001
002
003
004
005
006
007
“ ” appears next to the selected channel.
• To cancel the selection, select the channel
and press ENTER so that “ ” disappears.
• To view the list of your selection, press the
blue button. Press the button again to display
all the channels.
Service
DDE News
AAC
NCE 5
Channel J
Digital Teletext
CH72
CH106
Next ListPage Up Page Down Show Fav. List
Checking programme information (i Plate)
The programme information display allows you to
view information of the programmes being
broadcast or recorded now.
321
654
8 97
0
RETURN
Press INFO while watching TV or recording.
The programme information display (i Plate)
appears.
Information-Current Mon 30.10 20:10
Hobbies and Interests
TV 1 2 3 NCE 1
Mon 30.10 20:00 - 21:00
Today's Hint: How to make finger puppets.
Picture 1080i Audio Dolby Digital
A Programme name
B TV or Radio
C Date and time of the programme
D Information of programme
E Video format
F Audio format
G Parental, audio, and video information
H Channel name
I Channel number
J Date and time
INFO
MPEG (Unknown)
MPEG (Unknown)
20
Page 21
To turn off the display
Press INFO or RETURN.
Pausing a TV broadcast (TV Pause)
z Hint
The i Plate display will turn off after 60 seconds if no
button is pressed. You can change the display duration in
“i Plate timeout” of “Settings” setup (page 39).
Watching a programme with a digital text service
Many digital TV channels broadcast information
via their text service. This recorder has access to
dedicated text channels transmitted by the
broadcasters.
b Note
The appearance, content, and navigation methods of all
digital text services are decided by the broadcaster.
321
654
8 97
0
TELETEXT
</M/m/,,
ENTER
You can pause a current TV broadcast, and then
continue watching the programme at a later time.
This is useful when you receive an unexpected
phone call or visitor while watching TV.
321
654
8 97
0
./>
H
X
/
m/M
x
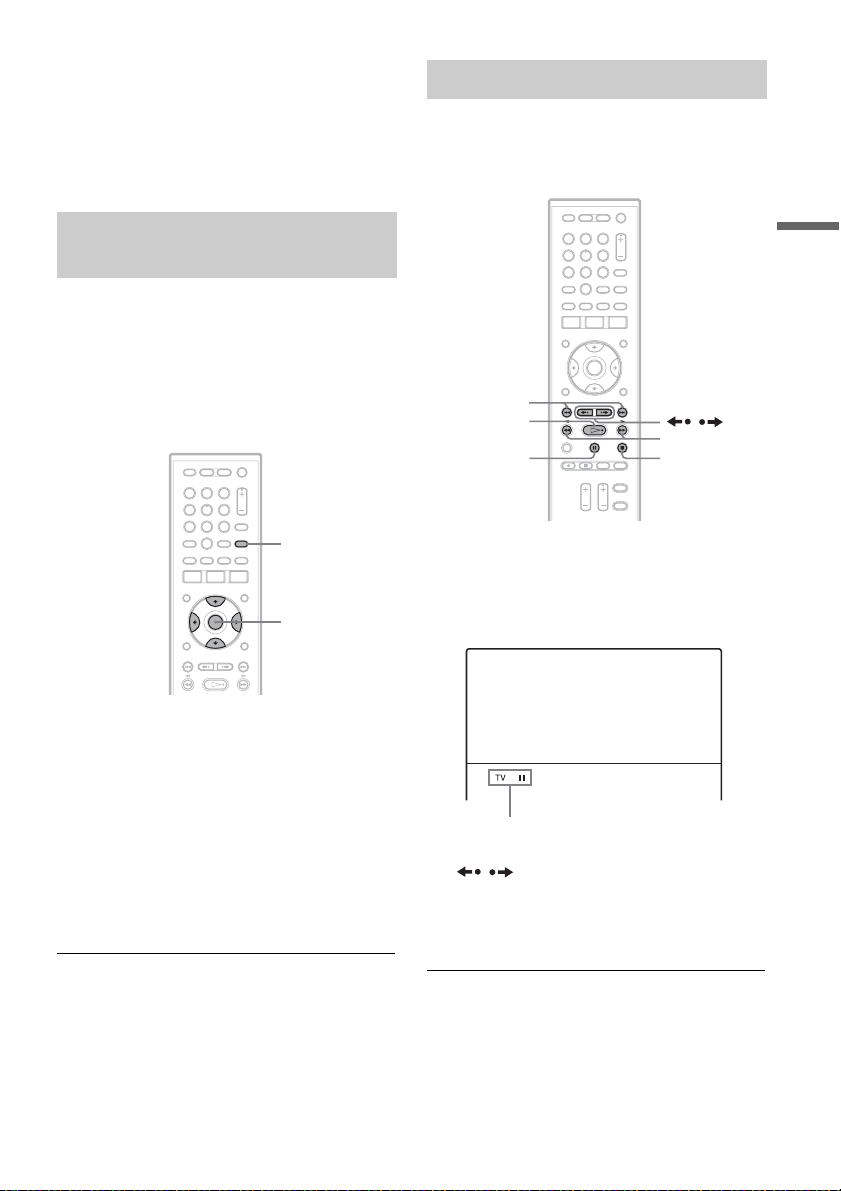
1 While watching a TV programme by way of
this recorder, press X.
The picture pauses. If there is enough space on
the HDD, you can pause the picture for up to
three hours.
Watching TV
1 Select a dedicated channel broadcasting
digital text.
2 Press TELETEXT.
The digital teletext display appears.
3 Follow the on-screen instructions to obtain
your required selection.
On some pages the TV programme may also
be displayed on the text screen. On-screen
instructions will inform you how to change
the displayed programme.
To turn off the text page display
Press TELETEXT again.
TV pause
To reverse or forward the picture, press
/ , ./>, or m/M
(see page 34).
2 Press H or X again to resume watching
the paused programme.
,continued
21
Page 22
b Notes
• Paused titles are not saved to the HDD, once TV Pause
is cancelled.
• This function may be cancelled when:
– any buttons other than X, / , ./>, or
m/M is pressed.
– the recorder is turned off.
– a second recording is started.
• It may take a few seconds to resume playback of the
paused programme.
• Even if you fast forward the paused programme, there
will always be a time difference of about ten seconds or
more between the paused programme and the current
TV broadcast.
Watching another programme in
the sub-picture (Picture-inPicture)
You can view a current TV broadcast in the subpicture while watching another TV programme.
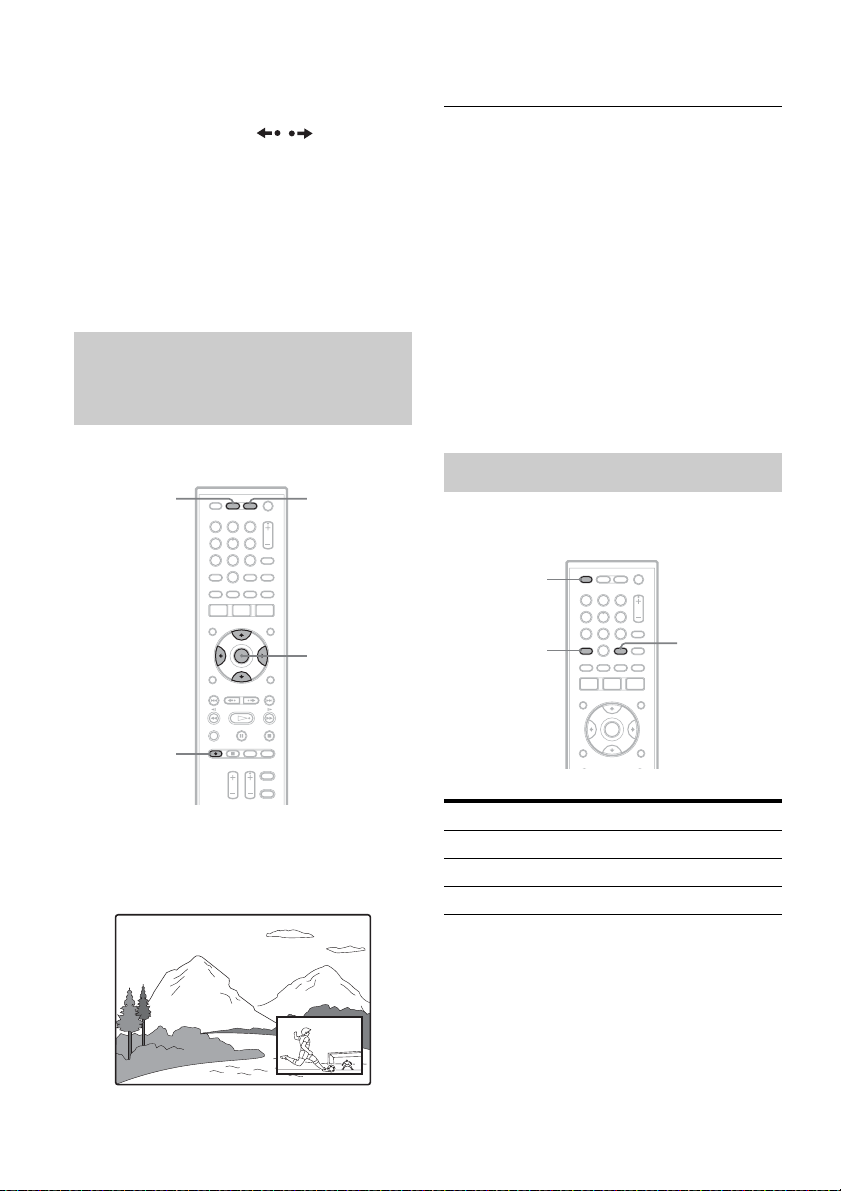
PIP
321
654
8 97
0
SWAP
</M/m/,,
ENTER
To switch the main and sub-pictures, press SWAP.
To move the sub-picture position, press </,.
To turn off the sub-picture
Press PIP again.
z Hints
• You can record a TV programme in the sub-picture.
Press SWAP to switch the main and sub-pictures, and
press z REC.
• You can also view a TV programme while playing back
a recorded title (page 34).
b Notes
• You can only change programme position for the
picture appearing in the sub-picture. For other
operations, the picture has to be switched to the main
picture.
• Only main picture audio is output.
Other viewing options
You can use the following buttons for TV viewing
as well as for playback.
MUTING
AUDIO
321
654
8 97
0
SUBTITLE
z REC
Press PIP during recording or while watching
TV.
A sub-picture appears in the corner with another
TV programme being broadcast.
To change the programme position for the subpicture, press M/m.
22
Buttons
Operations
AUDIO Selects the sound.
SUBTITLE Turns the subtitles on and off.
MUTING Mutes the sound.
Page 23
GUIDE (Electronic Programme Guide) Overview
The GUIDE provides a quick and easy way to:
• View a complete list of all available channels.
• View a channel list related to a chosen category.
• Select a programme to be recorded.
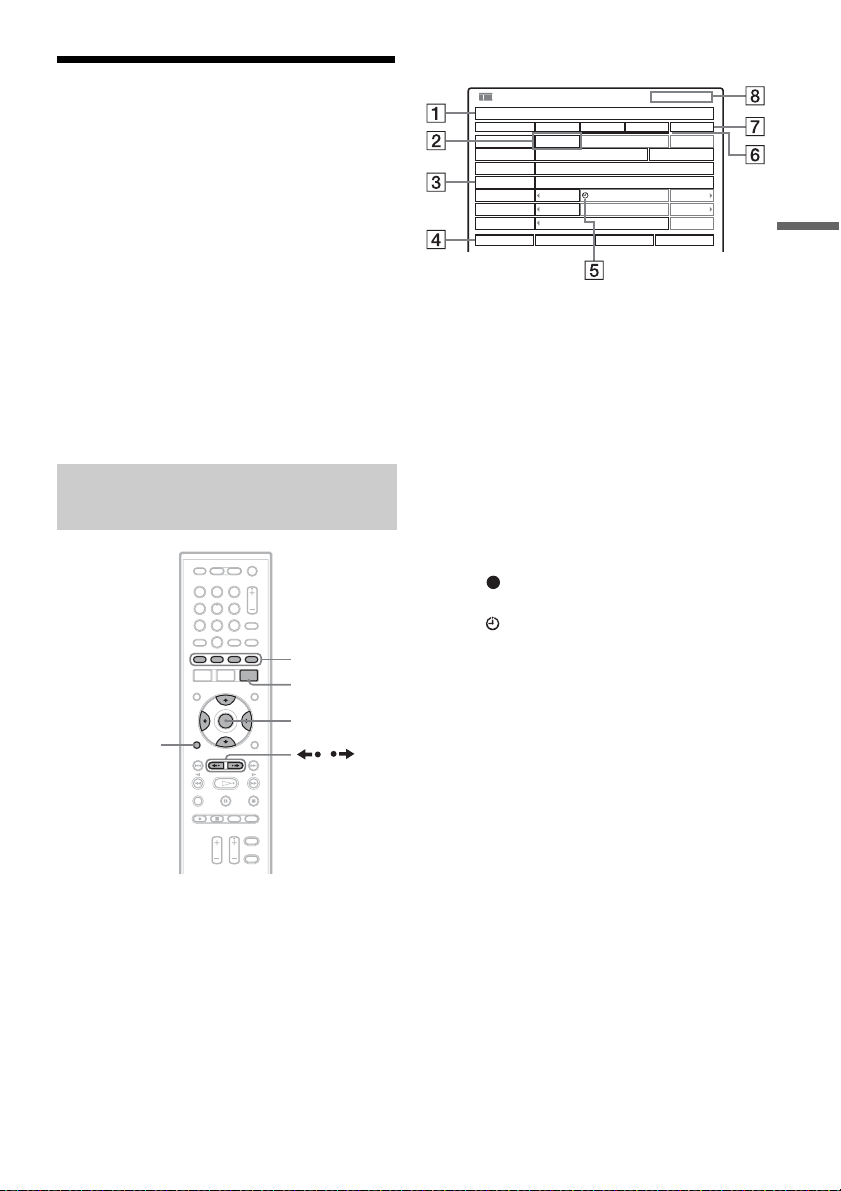
Example of GUIDE Display:
GUIDE (All Programmes)
040 DDE NEWS 15
Mon 30.10
DDE NEWS 15
NCE
J9
CMY
AAC
NCE 1
EFF News
19:30 20:00 20:30 21:00
DDE News
DDE News DDE News
Live from Prague
No Event Information
No Event Information
Opening... Foreign Markets - Mor... No Event...
John's... Hobbies and Interests Fabulous...
EFF News
Category - 24 hour + 24 hour
1 hour. view
Mon 30.10 19:48
NCE News
EFF
News
Watching TV
b Note
Digital Services availability depends on the broadcaster.
As of Spring 2006, only present and following
programme information is available. If “No Event
Information” is displayed frequently, it is not a
malfunction of the recorder.
Digital Services are not immediately available when the
recorder is first turned on.
Watching a programme from the GUIDE
321
654
8 97
0
RETURN
Coloured
control buttons
GUIDE
</M/m/,,
ENTER
/
1 Press GUIDE.
The GUIDE display shows a seven channel
programme list covering a two hour period.
A Logical channel number and the
programme name that is currently
highlighted in the list
B Programme name: The currently
viewed programme is highlighted. Note
that long programme names may be
cut.
C Channel name
D Coloured control buttons
E Icons: Appears depending on the
channel and programme settings
: Indicates the programme being
recorded (page 24)
: Indicates the programme the timer is
set for (page 24)
F Event bar (e.g. Indicates the period
when a timer recording is set)
G Time slot
H Current time and date
• Press , to view the schedule for the next
two hours depending on availability from
the broadcaster.
• Press the blue or yellow button to view the
next or previous 24 hours programme
schedule.
• Press the green button to toggle the display
between the two hours schedule viewing
(half hour time slots) and the one hour
schedule viewing (30 minutes time slots).
,continued
23
Page 24
2 Press </M/m/, to select a programme,
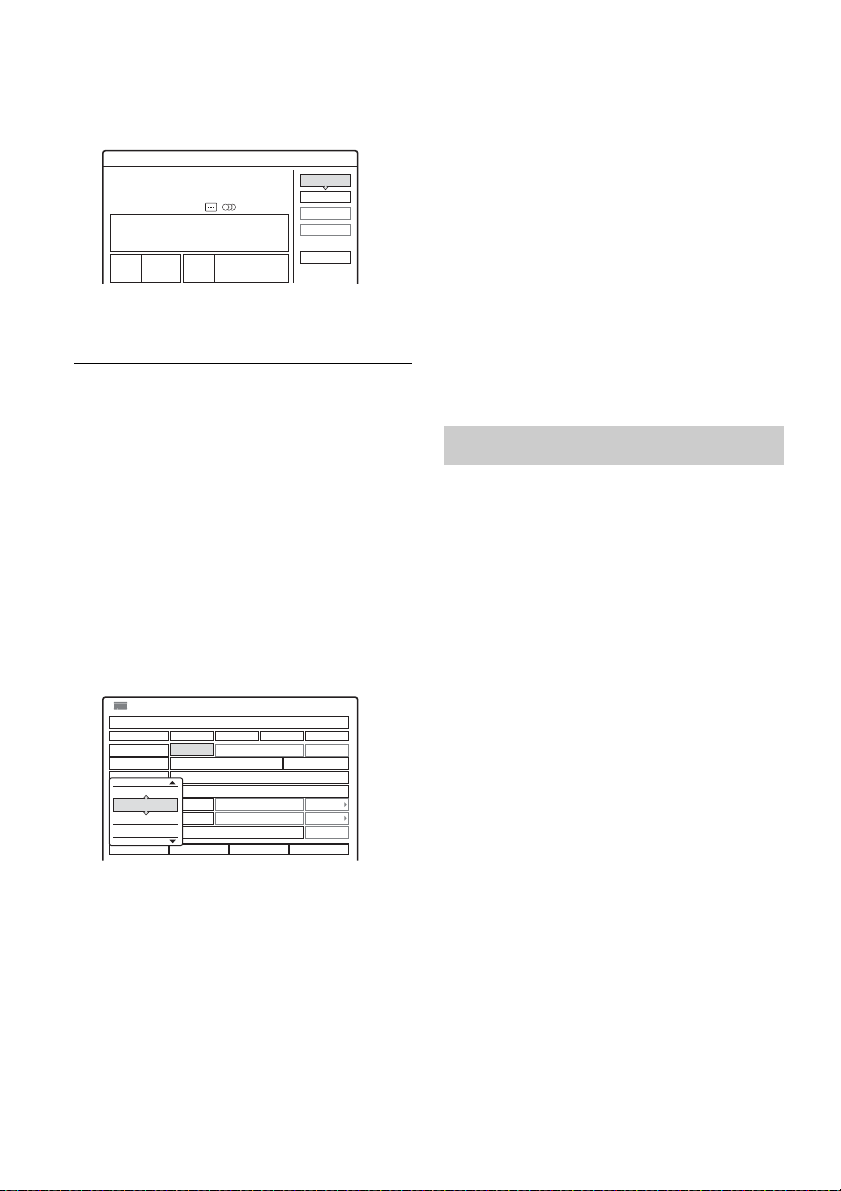
and press ENTER.
The programme information of the selected
programme appears.
Event Action
Select an action for this event
Hobbies and Interests
TV 123 NCE 1
Mon 30.10 20:00 - 21:00
Today's Hint: How to make finger puppets.
Picture 1080i
Audio Dolby Digital
MPEG (Unknown)
MPEG (Unknown)
Timer
View Channel
Modify
Erase
Close
3 Select “View Channel,” and press ENTER
to watch the programme.
To turn off the GUIDE display
Press GUIDE or RETURN.
To display channels by category
You can select a category* to display only the
related channels.
For example, if you select “News” from the submenu, only the channels related to “News” will be
shown in the GUIDE.
* The category of each channel is determined by the
broadcaster.
1 Press GUIDE to display the GUIDE.
2 Press the red button.
The sub-menu appears.
GUIDE (All Programmes)
040 DDE NEWS 15
Mon 30.10
DDE NEWS 15
NCE
J9
CMY
All Programmes
AAC
Favourite List 1
Favourite List 2
NCE 1
Favourite List 3
EFF News
19:30 20:00 20:30 21:00
DDE News
DDE News DDE News
Live from Prague
No Event Information
No Event Information
Opening... Foreign Markets - Mor... No Event...
John's... Hobbies and Interests Fabulous...
EFF News
Category - 24 hour + 24 hour
1 hour. view
Mon 30.10 19:48
NCE News
EFF
News
3 Select the category you want, and press
ENTER.
The selected category is displayed in a title
bar at the top of the GUIDE display and only
channels related to that category will be
shown in the list.
◆ Examples of categories
• All Programmes (a complete channel list)
• Favourite List 1 to 4 (the favourite channels
you have stored in the Favourite List)
(page 20)
• Films (movies available for viewing)
• News (all news channels)
• Entertainment (all entertainment channels)
• Sports (all sports channels)
• Kids (all children’s channels)
• Music (all music channels)
Recording from the GUIDE
The GUIDE feature simplifies recording or setting
of the timer. Simply select the programme you
want to record in the GUIDE display. The date,
time, and channel of the programme are set
automatically.
z Hints
• Timer recordings will be made regardless whether or
not the recorder is turned on. You can turn off the
recorder without affecting the recording even after
recording starts.
• You can record or set the timer for two TV prog rammes
at the same time. Note that a third timer setting
overlapping two other settings cannot be made.
• To record or set the timer for a programme tha t does not
appear in the GUIDE, see “Recording” for details
(page 27).
b Notes
• Check that recorder has enough a vailable disk space for
the recording (page 28).
• If any digital teletext is operated while recording, its
contents will be recorded on the HDD.
24
Page 25
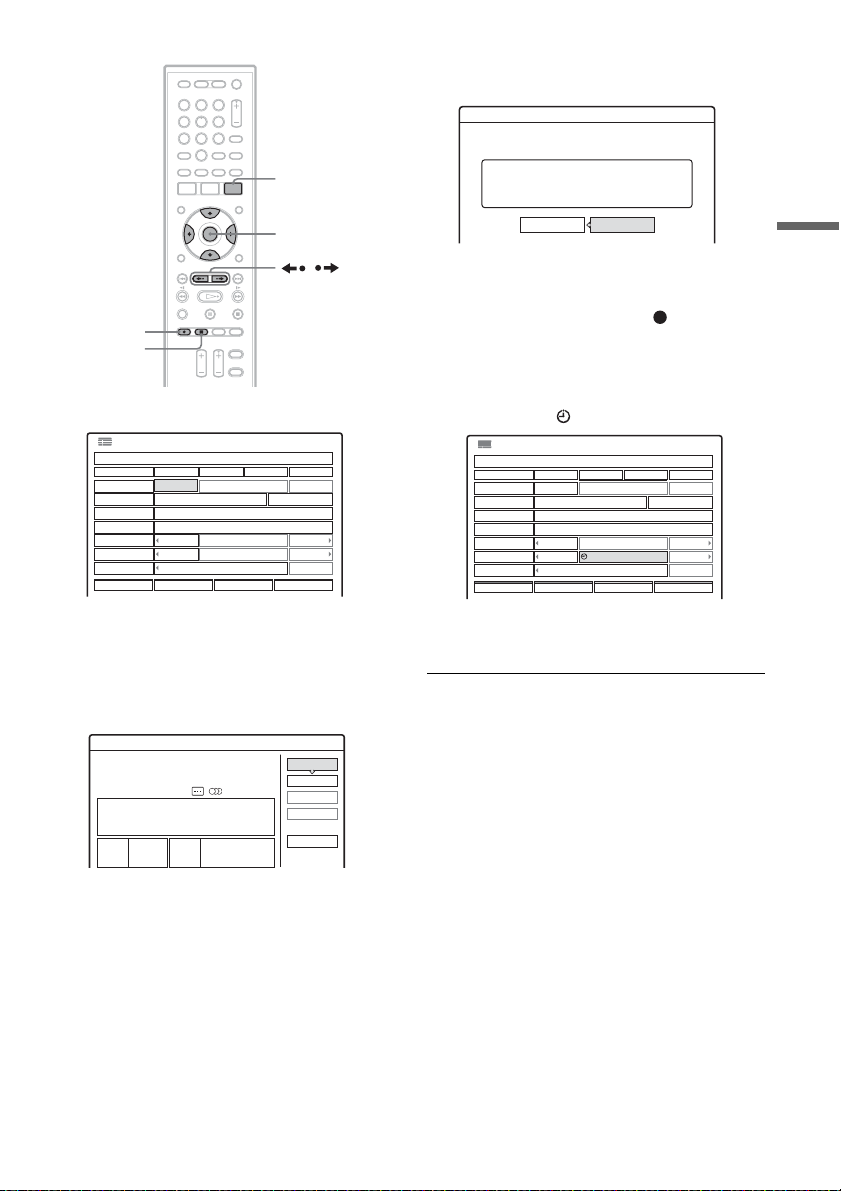
3 Select “Timer,” and press ENTER.
321
654
8 97
0
GUIDE
The display asks for confirmation.
Timer
Are you sure you want to record this title?
Hobbies and Interests
Mon 30.10 20:00-21:00 NCE 1
</M/m/,,
ENTER
/
z REC
x REC
STOP
1 Press GUIDE to display the GUIDE.
GUIDE (All Programmes)
040 DDE NEWS 15
Mon 30.10
DDE NEWS 15
NCE
J9
CMY
AAC
NCE 1
EFF News
19:30 20:00 20:30 21:00
DDE News
DDE News DDE News
Live from Prague
No Event Information
No Event Information
Opening... Foreign Markets - Mor... No Event...
John's... Hobbies and Interests Fabulous...
EFF News
Category 1 hour. view - 24 hour + 24 hour
Mon 30.10 19:48
NCE News
EFF
News
2 Select a current TV/radio broadcast or a
future programme you want to record, and
press ENTER.
The programme information of the selected
programme appears.
Event Action
Select an action for this event
Hobbies and Interests
TV 123 NCE 1
Mon 30.10 20:00 - 21:00
Today's Hint: How to make finger puppets.
Picture 1080i
Audio Dolby Digital
MPEG (Unknown)
MPEG (Unknown)
Timer
View Channel
Modify
Erase
Close
OK Cancel
4 Select “OK,” and press ENTER.
• When you select a programme currently
broadcast, recording starts. (red) appears
on the GUIDE, indicating the programme is
being recorded. The recording continues
until the programme finishes.
• When you set a timer for a future
programme, appears on the GUIDE.
GUIDE (All Programmes)
040 DDE NEWS 15
Mon 30.10
DDE NEWS 15
NCE
J9
CMY
AAC
NCE 1
EFF News
19:30 20:00 20:30 21:00
DDE News
DDE News DDE News
Live from Prague
No Event Information
No Event Information
Opening... Foreign Markets - Mor... No Event...
John's... Hobbies and Interests Fabulous...
EFF News
Category 1 hour. view - 24 hour + 24 hour
The recorder will automatically start
recording when the programme starts.
To stop recording during timer recording
Select the channel being recorded, and press x
REC STOP. Note that it may take a few seconds
for the recorder to stop recording.
b Note
The GUIDE programme start and end time are
determined by the broadcaster.
Mon 30.10 19:48
NCE News
EFF
News
Watching TV
,continued
25
Page 26
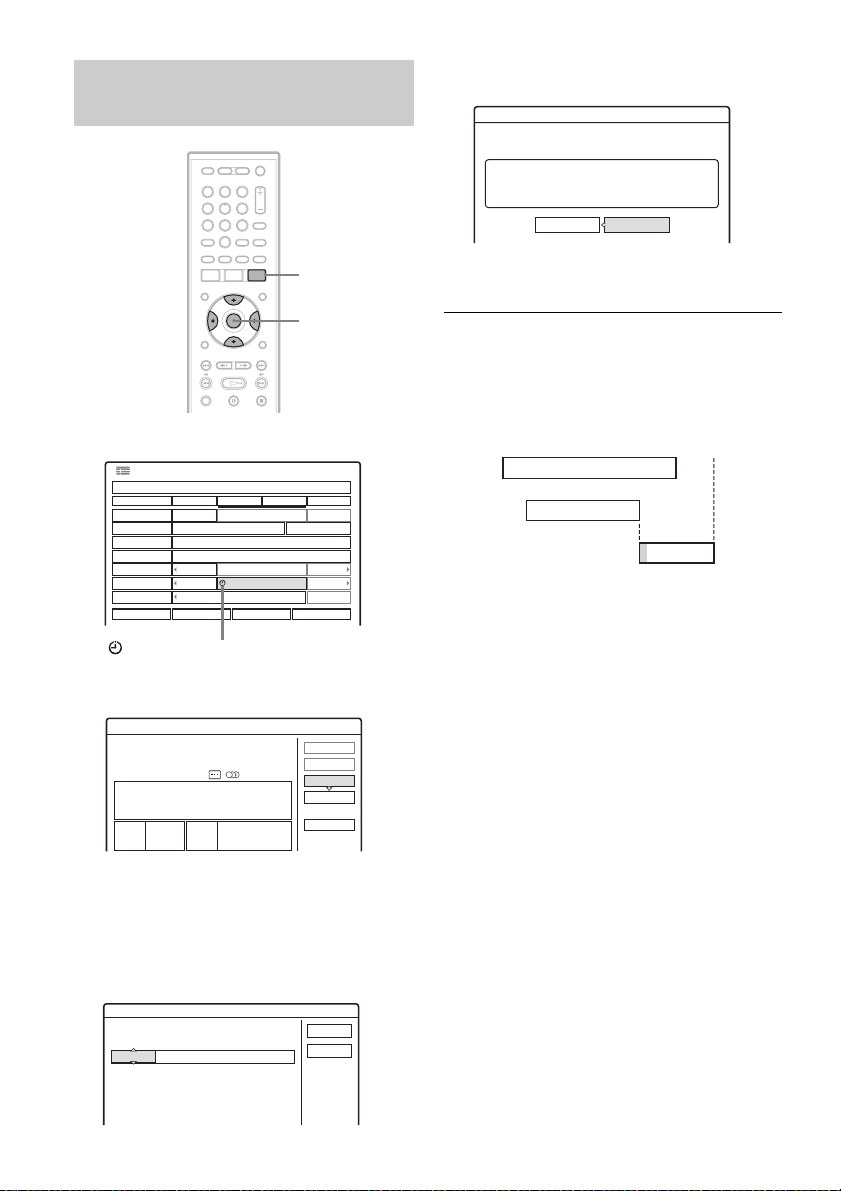
Checking/changing/cancelling the GUIDE timer settings
“Erase”: Erases the timer setting. Select “OK”
and press ENTER.
Erase
Are you sure you want to erase this timer setting?
321
654
8 97
0
GUIDE
</M/m/,,
ENTER
1 Press GUIDE to display the GUIDE.
GUIDE (All Programmes)
040 DDE NEWS 15
Mon 30.10
DDE NEWS 15
NCE
J9
CMY
AAC
NCE 1
EFF News
19:30 20:00 20:30 21:00
DDE News
DDE News DDE News
Live from Prague
No Event Information
No Event Information
Opening... Foreign Markets - Mor... No Event...
John's... Hobbies and Interests Fabulous...
EFF News
Category - 24 hour + 24 hour
1 hour. view
indicates the programme
that the timer is set for.
Mon 30.10 19:48
NCE News
EFF
News
2 Select a programme, and press ENTER.
Event Action
Select an action for this event
Hobbies and Interests
TV 123 NCE 1
Mon 30.10 20:00 - 21:00
Today's Hint: How to make finger puppets.
Picture 1080i
Audio Dolby Digital
MPEG (Unknown)
MPEG (Unknown)
Timer
View Channel
Modify
Erase
Close
Today 20:00-21:00 NCE 1
OK Cancel
To change or cancel the other settings, repeat
steps 2 and 3.
When the end time of one recording and the start
time of another are the same
While recording two programmes (A, B),
recording (C) may be delayed by the previous
recording (B).
7:00 9:00 10:00
A
B
C
z Hint
You cannot modify the timer setting for the current
recording. To change the recording duration, see
page 28.
3 Press M/m to select one of the options, and
press ENTER.
“Modify”: Changes the timer setting. Select
an item using </, and change using M/m.
Select “OK” and press ENTER.
Timer - Standard
26
Set the timer manually.
Day and Time
Today 20 : 00 - 21 : 00 NCE1
OK
Cancel
Page 27
Recording
Recording the Programme You are Watching
You can also stop the recording from the Title
List.
1 Press TITLE LIST to select the title, and press
ENTER.
2 Select “Stop Recording,” and press ENTER.
3 Select “OK,” and press ENTER.
This section introduces the basic operation to
record the current TV programme to the hard disk
(HDD). This recorder can record two TV
programmes at the same time and up to 250 titles
can be saved to the HDD, providing there is space.
For an explanation of how to make timer
recordings, see page 29.
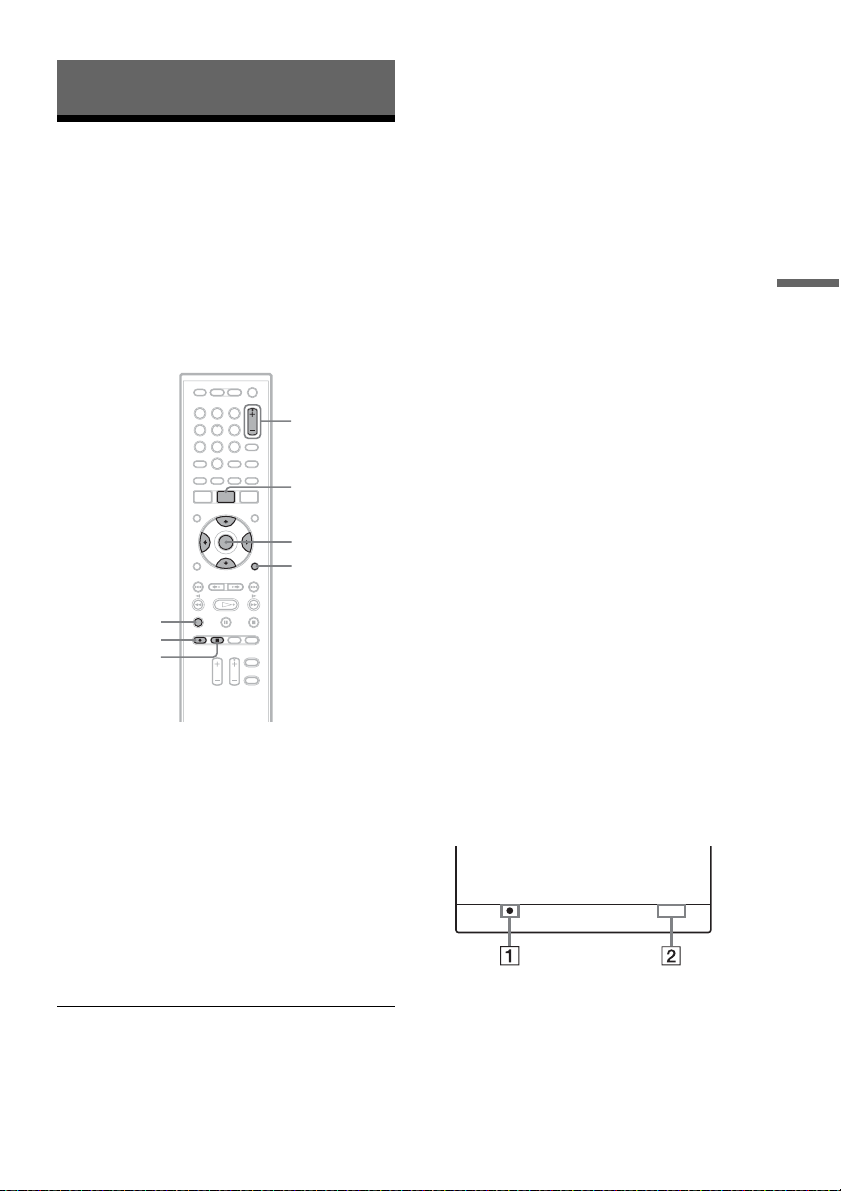
321
654
8 97
0
DISPLAY
z REC
x REC STOP
PROG +/–
TITLE LIST
</M/m/,,
ENTER
OPTIONS
1 Turn on the recorder and switch the input
selector on your TV so that the signal from
the recorder appears on your TV screen.
2 Press PROG +/– to select the programme
position you want to record.
For details about selecting channels, see
page 19.
3 Press z REC.
Recording starts.
Recording stops automatically at the end of
the programme.
To stop recording
Select the programme position being recorded,
and press x REC STOP.
Note that it may take a few seconds for the
recorder to stop recording.
To watch another TV programme while
recording
Press PROG +/– to select the programme position
you want to watch.
z Hints
• You can also record the current TV broadcast using the
GUIDE display (page 24).
• While recording two programmes, two REC indicators
are lit on the recorder.
• You can also record radio programmes.
b Notes
• After pressing z REC, it may take a short while to
start recording.
• If there is a power failure, the programme you are
recording may be erased.
• While recording two programmes, you can select only
the channels in same stream of recording channels.
To check recording information
Press DISPLAY during recording.
Each time you press the button, the display
changes as follows:
Display 1 t Display 2 t Display off
The displays differ depending on the recording
status.
◆ Display 1
HDD 1:23:45
A Recording status
B Recording time
Recording
,continued
27
Page 28
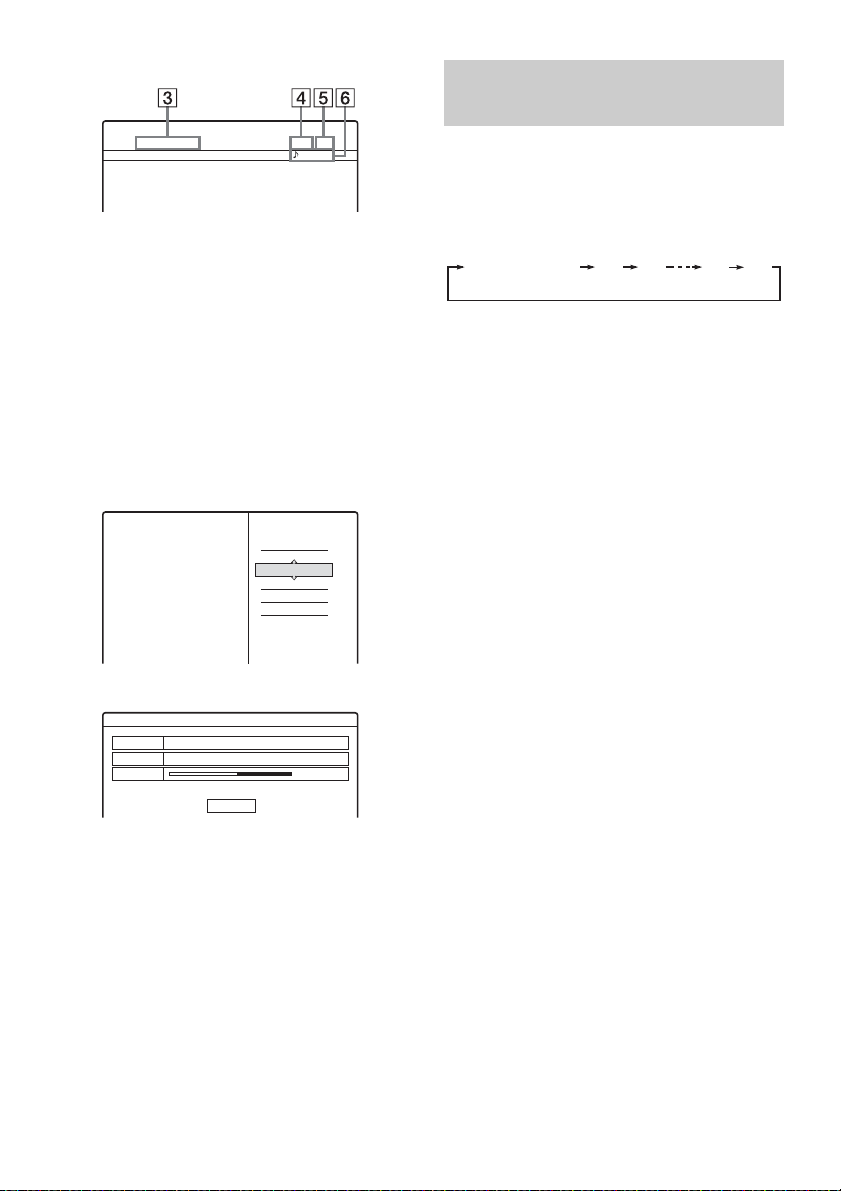
◆ Display 2
Hobbies and Interests
025NCE1
Dolby Digital
C Programme name
D Channel name
E Channel number
F Audio signal information
Press DISPLAY to turn off the display.
To check the space on the HDD (Disk Info)
You can check remaining space on the HDD and
the number of titles in the “Disk Info” display.
1 Press OPTIONS.
The OPTIONS menu appears.
Extending the current recording (Quick Timer)
You can extend the current recording in 30-minute
increments.
Press z REC repeatedly to set the duration.
Each press advances the time in 30-minute
increments. The maximum duration is six hours.
End of programme
The time counter decreases minute by minute to
0:00, then the recorder stops recording (power
does not turn off). Even if you turn off the recorder
during recording, the recorder continues to record
until the time counter runs out.
z Hint
You can set the Quick Timer for two programmes at the
same time. After setting the Quick Timer for one
programme, select another channel to record and press
z REC repeatedly to set the duration in the same way.
0:30 1:00 5:30 6:00
Close
Disk Info
REC
Play
Play Beginning
2 Select “Disk Info,” and press ENTER.
Disk Information
Media
HDD
Title no.
123
Remainder
Close
z Hints
• The OPTIONS menu differs depending on the
situation.
• You can also check the remaining disk space on the
front panel display (page 54).
120/250GB
b Note
If the programme has no GUIDE information, the
recorder automatically stops recording after six hours
rather than until the end of the programme.
28
Page 29
Setting the Timer
You can set the date, time, and channel name of up
to 40 programmes one month in advance.
z Hints
• Timer recordings will be made regardless whether or
not the recorder is turned on. You can turn off the
recorder without affecting the recording even after
recording starts.
• You can set the timer for two TV programmes
overlapped at the same time. Note that a third timer
setting overlapping two other settings cannot be made.
b Notes
• Check that recorder has enough av ailable disk space for
the recording (page 28).
• If any digital teletext is operated while recording, its
contents will be recorded on the HDD.
321
654
8 97
0
</M/m/,,
ENTER
Today y Tomorrow y Wed 1.11 y
…… y Tue 28.11 y Sun (every Sunday)
y …… y Sat (every Saturday) y
Mon-Fri (Monday to Friday) y Mon-Sat
(Monday to Saturday) y Sun-Sat (Sunday to
Saturday) y Today
3 Press , to set the start time, the stop
time, and the programme position by
pressing M/m.
• If you make a mistake, select the item and
change the setting.
4 Select “OK,” and press ENTER.
The Timer List (page 30) appears. The
TIMER REC indicator lights up on the front
panel and the recorder is ready to start
recording.
To stop recording during timer recording
Select the programme position being recorded,
and press x REC STOP.
You can also stop recording from the Title List.
1 Press TITLE LIST to select the title currently
being recorded and press ENTER.
2 Select “Stop Recording” from the sub-menu
and press ENTER.
3 Select “OK,” and press ENTER.
Recording
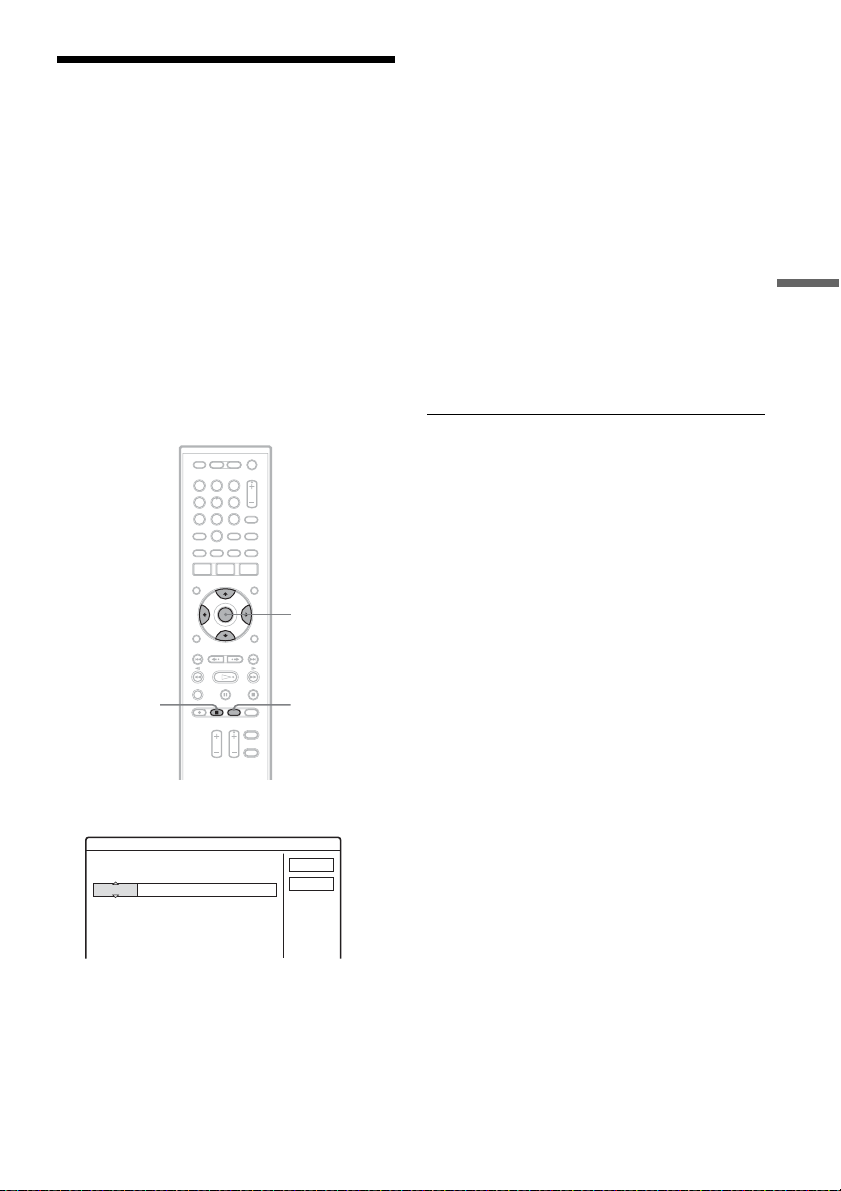
TIMERx REC STOP
1 Press TIMER.
Timer - Standard
Set the timer manually.
Day and Time
Today 20 : 00 - 21 : 00 NCE1
OK
Cancel
2 Press M/m to set the date and press ,.
The date changes as follows:
Example: Today is 30.10 (Monday)
Note that it may take a few seconds for the
recorder to stop recording.
b Note
If a message indicating that the HDD is full appears on
the screen, make available space for the recording
(page 37).
,continued
29
Page 30
Checking/changing/cancelling timer settings (Timer List)
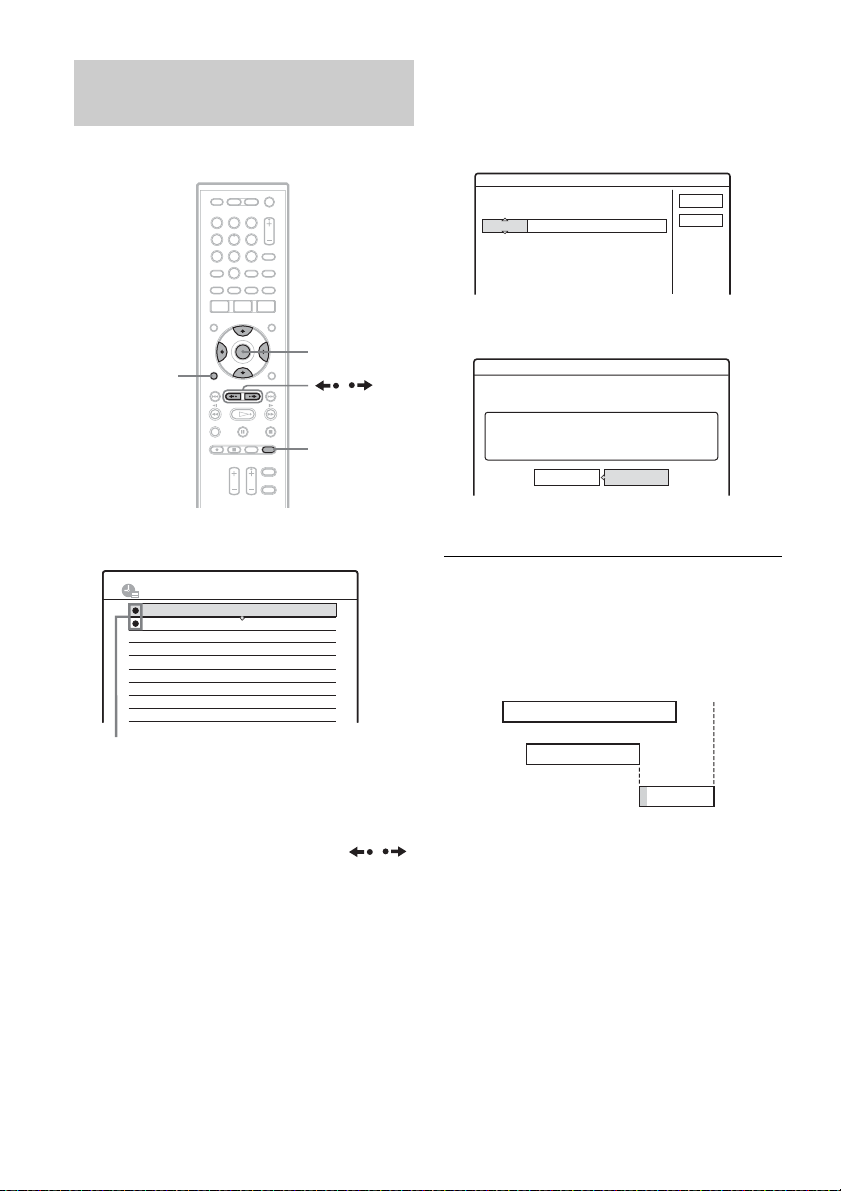
You can check, change, or cancel timer settings
using the Timer List.
321
654
8 97
0
3 Select one of the options, and press
ENTER.
“Modify”: Changes the timer setting.
Select an item using </, and change using
M/m. Select “OK” and press ENTER.
Timer - Standard
Set the timer manually.
Day and Time
Today 20 : 00 - 21 : 00 NCE1
OK
Cancel
</M/m/,,
ENTER
RETURN
/
TIMER LIST
1 Press TIMER LIST.
The Timer List appears.
TIMER LIST
Tod ay
20:30-21:30
Tod ay
20:30-21:30
Tod ay
22:00-23:00
22:30-23:30
Tomorrow
z (red): Indicates the setting currently
being recorded.
10:30
AAB
DEF
GHI
DEF
Timer information displays the recording
date, time, etc.
Press M/m to scroll the list. Or press
/
to go to the previous/next page.
2 Select the timer setting you want to change
or cancel, and press ENTER.
The sub-menu appears.
“Erase”: Erases the timer setting. Select “OK”
and press ENTER.
Erase
Are you sure you want to erase this timer setting?
Today 20:00-21:00 NCE 1
OK Cancel
To change or cancel the other settings, repeat
steps 2 and 3.
When the end time of one recording and the start
time of another are the same
While recording two programmes (A, B), the
recording (C) may be delayed after finishing the
previous recording (B).
7:00 9:00 10:00
A
B
C
To turn off the Timer List
Press TIMER LIST or RETURN.
z Hint
While recording, you cannot modify the timer setting for
the current recording.
30
Page 31

About simultaneous two-channel recording and priorities
Notes about simultaneous recording
• You cannot use TV Pause function while
recording two channels. The function is
cancelled if you start recording a third channel.
• You cannot record a third channel while
recording two channels. Recording does not start
even if the timer is set.
When three recordings overlap
• The recording that starts earlier has priority.
• When the start time is the same, manual
recording has priority over a timer recording.
Recording Time
Recording time differs depending on whether the
recorded programme is HD (High Definition) or
SD (Standard Definition) signal. Note that the
recording times in the following table are
approximate and that actual times may differ.
Note also that the maximum continuous recording
time for a single title is six hours. Contents beyond
this time will not be recorded.
Recording time (hours)
HD900 HD700
HD only
(15 Mbps)
SD only
(8 Mbps)
The above recording time is approximate, and
may be different depending on the amount of data
of the programme.
36 hours
(Approx.)
69 hours
(Approx.)
23 hours
(Approx.)
44 hours
(Approx.)
Recording
31
Page 32
Playback
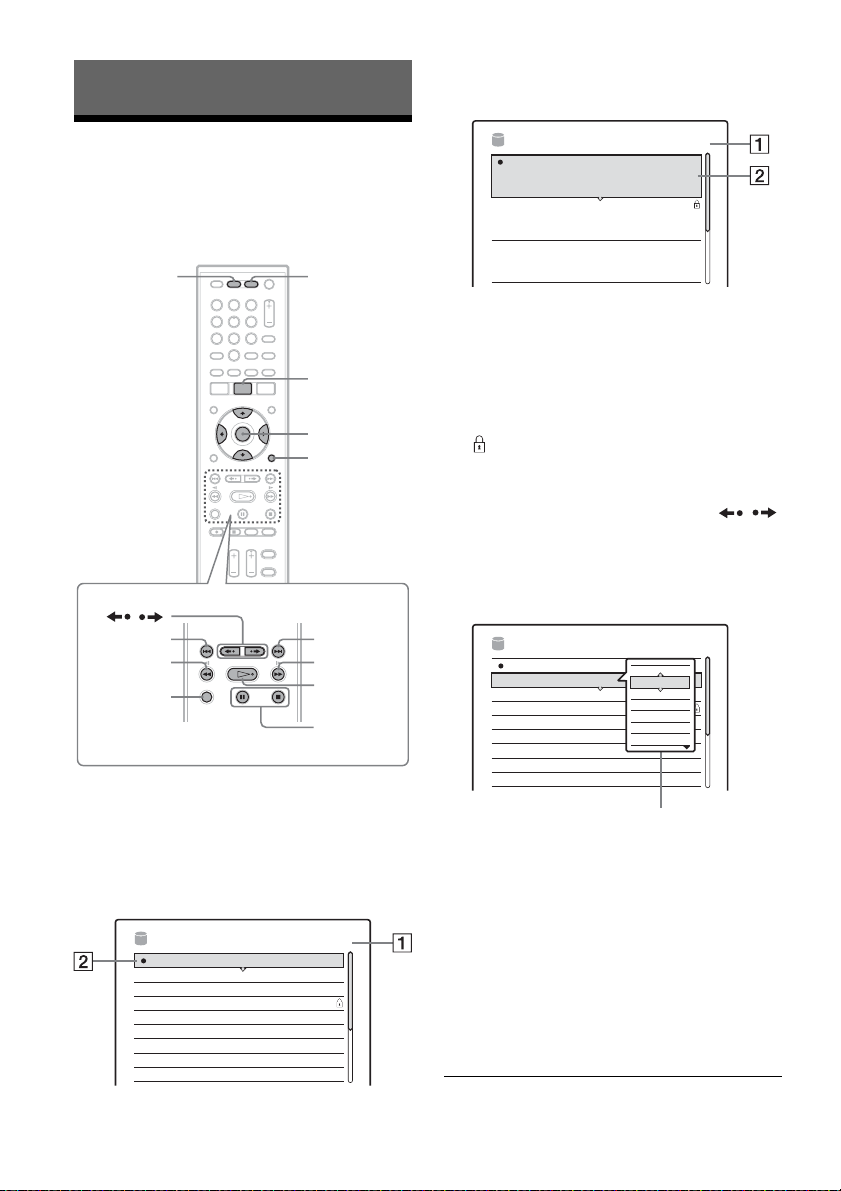
To show the extended Title List, press
OPTIONS to select “Display 3 titles,” and
press ENTER.
Playing a Recorded Programme (Title List)
You can play back the recorded programme by
selecting the title from the Title List.
PIP
321
654
8 97
0
SWAP
TITLE LIST
</M/m/,,
ENTER
OPTIONS
/
.
m
DISPLAY
>
M
H
X/x
1 Turn on the recorder and switch the input
selector on your TV so that the signal from
the recorder appears on your TV screen.
2 Press TITLE LIST.
The Title List appears.
NEW
NEW
TITLE LIST
Tennis
Tra ve l
Mystery
World Sports
Family
Nature
News
Weather
148/250GB
27.10
Fri
Wed
25.10
Tue
24.10
Wed
18.10
Mon
16.10
Sat
14.10
Fri
13.10
Thu
12.10
ThuMusical History
12.10
TITLE LIST
Tennis
NEW AAB
Fri 27.10. 2006 13:00 - 14:00 (0H30M)
Tra ve l
Wed 25.10. 2006 20:00 - 20:30 (0H30M)
NEW
Mystery
Tue 24.10. 2006 9:00 - 10:00 (1H00M)
148/250GB
0.9GB
DEF
0.3GB
AAB
0.8GB
A Disk space (remainder/total)
B Title information:
Displays the title name and recording date.
Title size is shown in the 3 titles list.
z (red): Indicates the title currently being
recorded.
: Indicates the protected title.
“NEW”: Indicates that the title is newly
recorded (not played back yet).
Press M/m to scroll the list. Or press
/
to go to the previous/next page.
3 Select the title you want to play, and press
ENTER.
The sub-menu appears.
TITLE LIST
NEW
NEW
Tennis
Tra ve l
Mystery
World Sports
Family
Nature
News
Weather
148/250GB
27.10
Fri
Close
Wed
25.10
Play
Play Beginning
Tue
24.10
Repeat play
Wed
18.10
Erase
Mon
16.10
Protect
Sat
14.10
Rename
Fri
13.10
Thu
12.10
ThuMusical History
12.10
Sub-menu
4 Select one of the options, and press
ENTER.
Playback starts.
“Play”: plays the selected title.
If you select after you stop playback, playback
starts from the point where you stopped
(Resume Play).
“Play Beginning”: plays from the beginning
of the title.
“Repeat Play”: plays the selected title
repeatedly.
32
To stop playback
Press x.
Page 33
To change the title order (Sort)
While the Title List menu is turned on, press
OPTIONS to select “Sort Titles.” Press M/m to
select the item, and press ENTER.
Order Sorted
By Date in order of when the titles were
By Title in alphabetical order.
Unseen Title in order of whether the title was
recorded. The title that is recorded
most recently is listed at the top.
played back or not. The title that is
not played back and recorded most
recently is listed at the top.
To turn off the Title List
Press TITLE LIST.
To start from the beginning of a title
When you press H again after you stop
playback, the recorder resumes playback from the
point where you pressed
x (Resume Play).
To start from the beginning, select “Play
Beginning” from the sub-menu in step 4 above,
and press ENTER. Playback starts from the
beginning of the title.
To play a title repeatedly
Select “Repeat Play” from the sub-menu in step 4
above, and press ENTER.
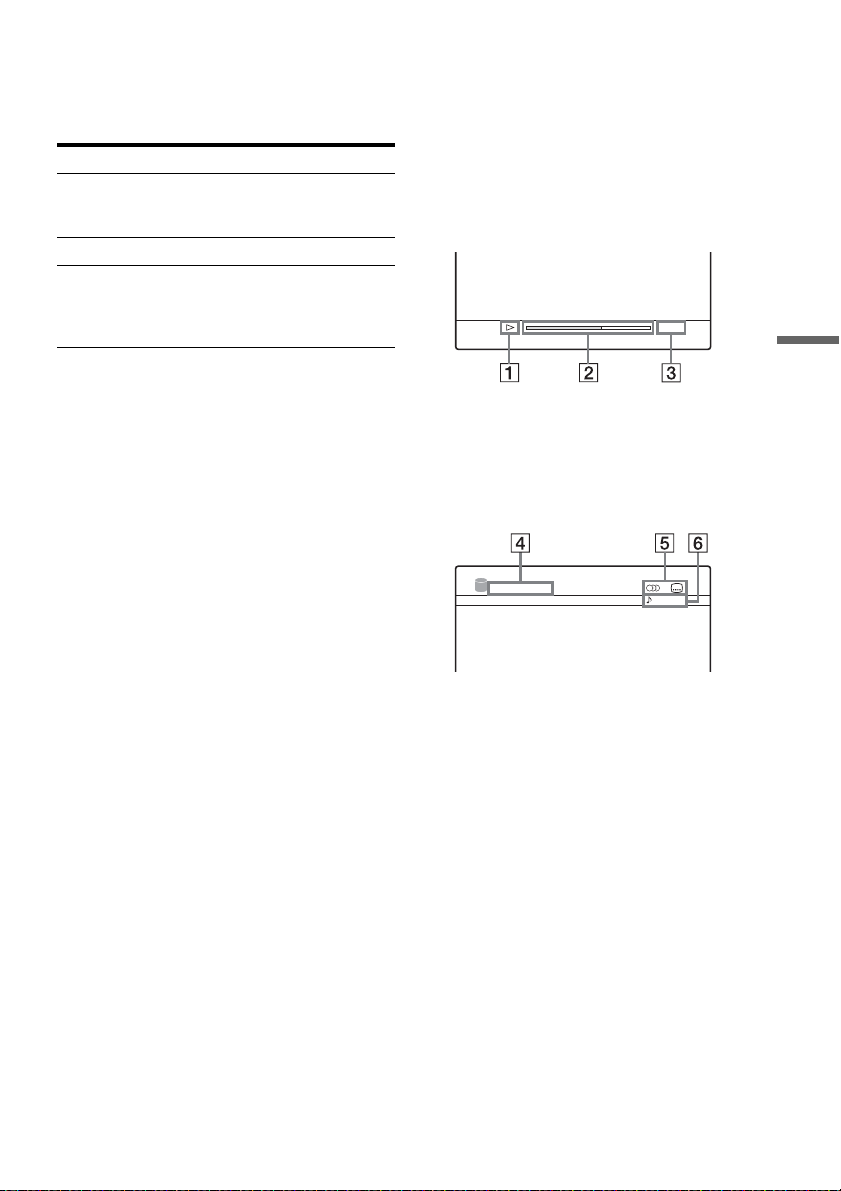
To check playback information
Press DISPLAY.
Each time you press the button, the display
changes as follows:
Display 1 t Display 2 t Display off
The displays differ depending on the playing
status.
◆ Display 1
HDD 0:23:45
A Play mode
B Playing status bar
C Playing time
◆ Display 2
Hobbies and Interests
Dolby Digital
Playback
z Hints
• You can also select “TITLE LIST” from the System
Menu.
• The sub-menu displays options applicable only to
selected item. The displayed options differ depending
on the situation.
b Notes
You can also select “Play Beginning” from the
OPTIONS menu.
D Title name
E Available functions (audio/subtitle)
F Audio signal information
z Hint
You can also check playback information on the front
panel display (page 54).
,continued
33
Page 34
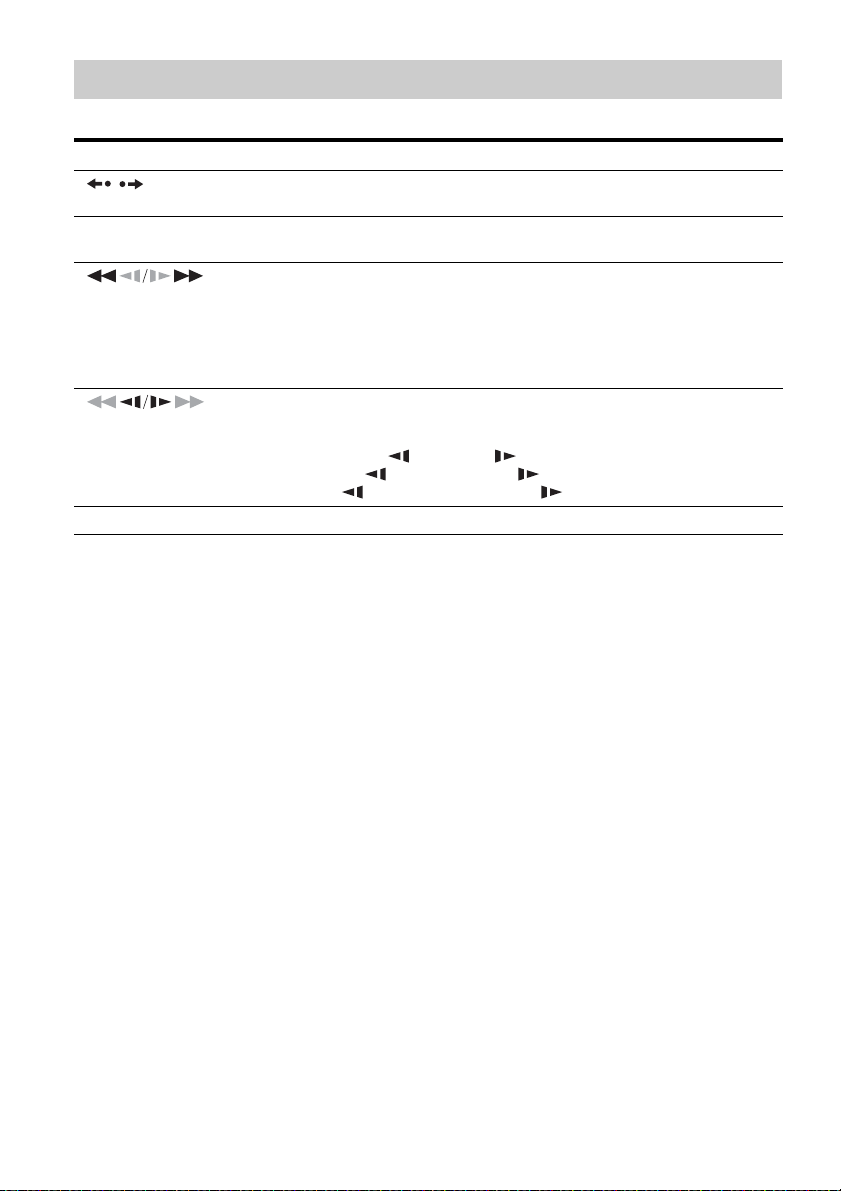
Playback options
To check the position of the buttons below, see the illustration on page 32.
Buttons
/ (instant replay/
instant advance)
. (previous)/
> (next)
(fast reverse/fast forward)
(slow) Plays in slow motion when pressed in pause mode.
X (pause) Pauses playback.
Operations
Replays the scene/briefly fast forwards the scene.
Goes to the beginning of the previous/next chapter point. Chapter points are
marked in about five minute intervals.
Fast reverses/fast forwards the disk when pressed during playback.
Search speed changes as follows:
fast reverse fast forward
m1 T t 1M
m2 T T t t 2M
m3 T T T t t t 3M
The speed changes as follows:
slow reverse slow forward
2 T T t t 2
3 T T T t t t 3
To resume normal playback, press H.
To watch TV in the sub-picture (Picture-inPicture)
You can view a current TV broadcast in the subpicture during playback.
Press PIP during playback.
A sub-picture appears in the corner with a TV
programme being broadcast.
1 T t 1
b Note
• You cannot switch the main and the sub-picture.
• You can only change channels for the picture appearing
in the sub-picture.
To change the programme position for the subpicture, press M/m.
To move the sub-picture position, press </,.
To turn off the sub-picture, press PIP again.
34
Page 35

Playing from the beginning of the programme you are recording (Chasing Playback)
“Chasing Playback” allows you to view the
recorded part of a programme while the recording
is being made. You do not need to wait until the
recording finishes.
1 Press TITLE LIST while recording.
2 Select the title currently being recorded
(appears with “z”), and press ENTER.
3 Select “Play” from the sub-menu and
press ENTER.
Playback starts from the beginning of the
programme you are recording.
Chasing Playback pauses when you fast
forward to the point that you are recording.
b Notes
• Chasing Playback does not start immediately after
recording starts.
• Even if you fast forward the recorded programme,
there will always be a time difference of about ten
seconds or more between the recorded programme and
the current TV broadcast.
Playback
Playing a previous recording while making another (Simultaneous Rec and Play)
“Simultaneous Rec and Play” allows you to view
a previously recorded programme while recording
programmes. Playback continues even if a timer
recording starts.
1 Press TITLE LIST while recording.
2 Select the title you want to play, and press
ENTER.
3 Select “Play” from the sub-menu, and
press ENTER.
Playback starts.
35
Page 36
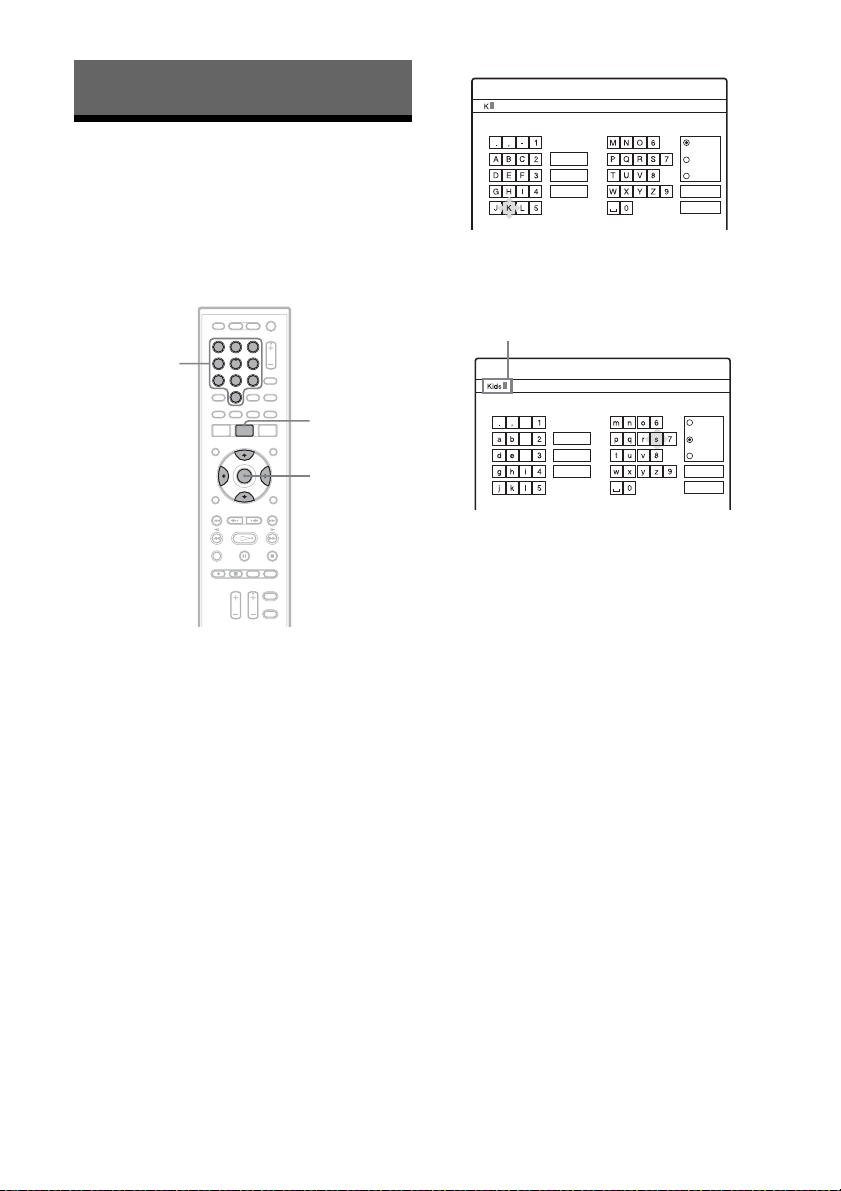
Managing the HDD Contents
Input Title Name
Labelling a Title (Entering Characters)
You can label a title by entering characters. You
can enter up to 37 characters for a title, but the
actual number of characters displayed in the
menus such as the Title List will vary.
Number
buttons
321
654
8 97
0
TITLE LIST
</M/m/,,
ENTER
1 Press TITLE LIST.
The Title List appears.
2 Select a title, and press ENTER.
The sub-menu appears.
3 Select “Rename,” and press ENTER.
The display for entering characters appears.
4 Press </M/m/, to move the cursor to
the right of the screen and select “A”
(upper-case), “a” (lower-case), or
“Symbol,” and press ENTER.
The characters of the selected type are
displayed.
5 Press </M/m/, to select the character
you want to enter, and press ENTER.
The selected character appears at the top of
the display.
Back
Clear All
Space
"A"
"a"
Symbol
Cancel
Finish
6 Repeat steps 4 and 5 to enter the
remaining characters.
Input row
Input Title Name
-
Back
c
Clear All
f
Space
"A"
"a"
Symbol
Cancel
Finish
To erase a character, move the cursor to the
right of the character at the input row. Select
“Back” and press ENTER.
To insert a character, move the cursor to the
right of the point where you want to insert the
character. Select the character and press
ENTER.
To erase all of the characters, select “Clear
All” and press ENTER.
7 Select “Finish,” and press ENTER.
To cancel the setting, select “Cancel.”
36
Page 37
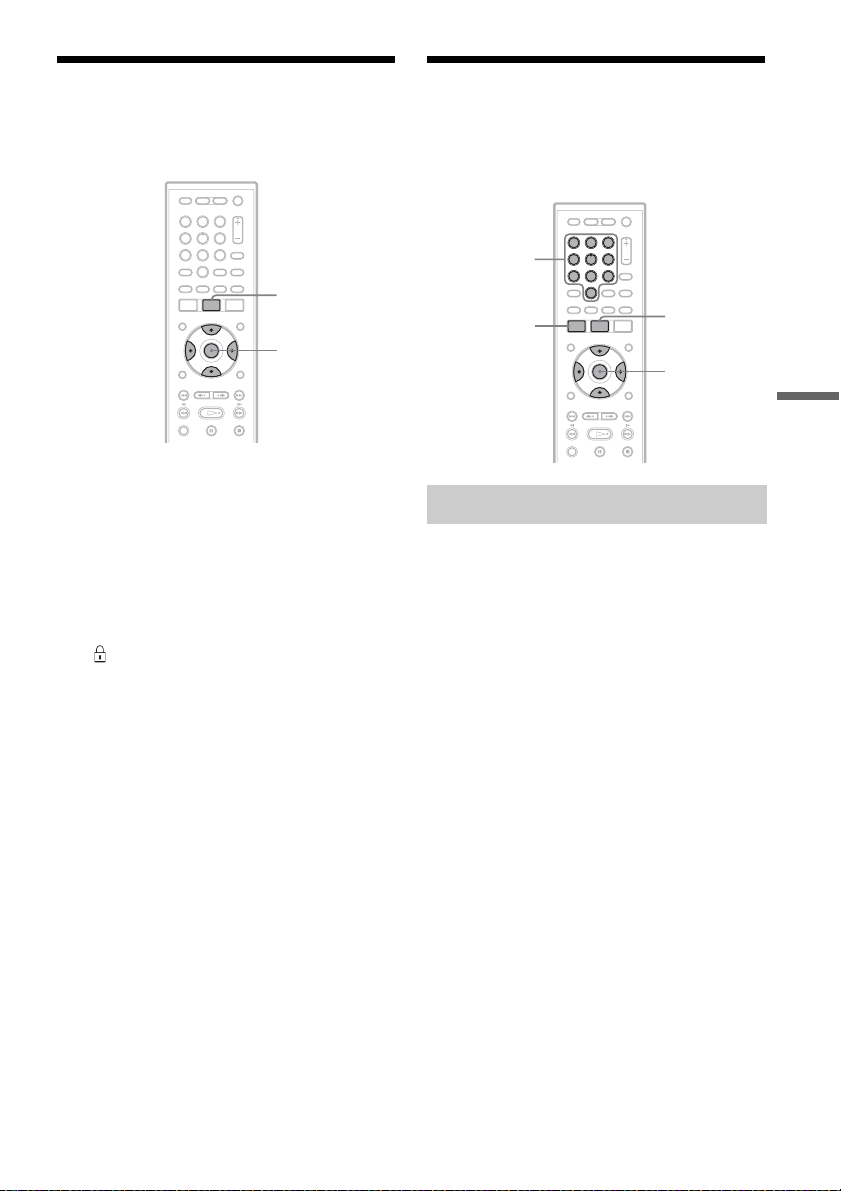
Protecting a Title
Freeing Up Space on the
You can protect titles to prevent accidental
erasure.
321
654
8 97
0
TITLE LIST
</M/m/,,
ENTER
1 Press TITLE LIST.
The Title List appears.
2 Select a title, and press ENTER.
The sub-menu appears.
3 Select “Protect,” and press ENTER.
4 Select “On” when the Protection display
appears.
“ ” appears next to the protected title.
To cancel the protection, select “Off.”
HDD
You can erase recorded titles to create disk space.
Number
buttons
SYSTEM
MENU
321
654
8 97
0
TITLE LIST
</M/m/,,
ENTER
Erasing a title
1 Press TITLE LIST.
The Title List appears.
2 Select a title, and press ENTER.
The sub-menu appears.
3 Select “Erase,” and press ENTER.
4 Select “OK” when asked for confirmation.
The selected title is erased.
Managing the HDD Contents
,continued
37
Page 38

Erasing all titles (Format Hard Disk)
You can erase all the titles in the HDD at once.
Note that any protected titles, including the timer
settings, will also be erased.
1 Press SYSTEM MENU while the recorder is
in stop mode.
2 Select “SETUP,” and press ENTER.
3 Select “Others,” and press ENTER.
4 Select “Format Hard Disk,” and press
ENTER.
The display for entering the password
appears.
5 Enter your four digit password using the
number buttons.
• If you have not yet set a password, enter
“0000” (default). To set or change the
password, see page 44.
The display asks for confirmation.
6 Select “OK” and press ENTER.
7 Select “Start” and press ENTER.
All titles in the HDD are erased.
The recorder automatically turns off.
b Note
If you forget your password, you will have to reset it by
selecting “Factory Setup” in “Others” setup (page 45).
38
Page 39
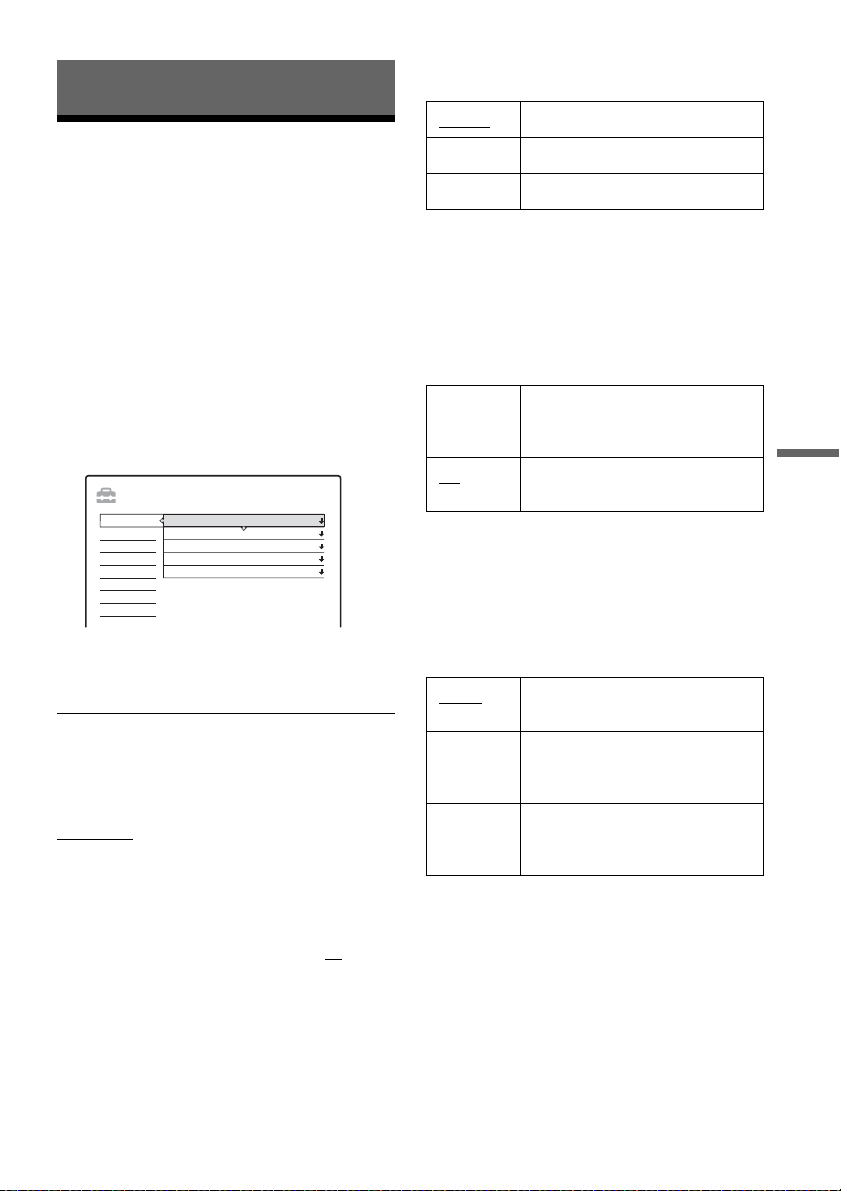
Settings and Adjustments
Operation Settings (Settings)
FP (front panel) Display
Adjusts the lighting of the front panel display.
Normal Brightens the lighting.
Dimmer Dims the lighting.
Off Turns off the lighting.
The “Settings” setup helps you to make clock and
other settings for the recorder.
1 Press SYSTEM MENU while the recorder is
in stop mode.
2 Select “SETUP,” and press ENTER.
3 Select “Settings,” and press ENTER.
The “Settings” setup appears with the
following options. The default settings are
underlined.
SETUP
Settings
DTV Settings
Video
Audio
Password
Others
Easy Setup
Time Zone
i Plate timeout
FP Display
Power Save
Command Mode
b Note
In step 1, you can also use the SYSTEM MENU button
on the recorder (page 53).
Time Zone
Selects the time zone of your area for clock
setting.
The options are:
NSW/ACT y VIC y QLD y SA y WA
y TAS y NT
i Plate timeout
Sets the display duration for a programme
information box (i Plate).
The time options are: 5, 10, 15, 20, 30, 60
(seconds)
See page 20 for details.
NSW/ACT
60 Sec.
Normal
Off
HDD 1
Sec.
b Note
When “Power Save” (below) is set to “On,” the front
panel display is turned off during standby regardless of
this setting.
Power Save
Selects whether this recorder is in power save
mode when the power is turned off (standby).
On Sets to power save mode. The
front panel display is off when the
recorder is in standby.
Off Does not set to power save mode.
Normally, select this.
Command Mode
Changes the Command Mode of the recorder if
another HDD recorder is assigned the same
Command Mode. Be sure to match the Command
Mode of the supplied remote to the setting made
here. For details, see “If you have more than one
Sony HDD recorder” on page 16.
HDD1
The default Command Mode of
this recorder.
HDD2 Select this if the default Command
Mode conflicts with other HDD
recorder.
HDD3 Select this if the default Command
Mode conflicts with other HDD
recorder.
Settings and Adjustments
39
Page 40
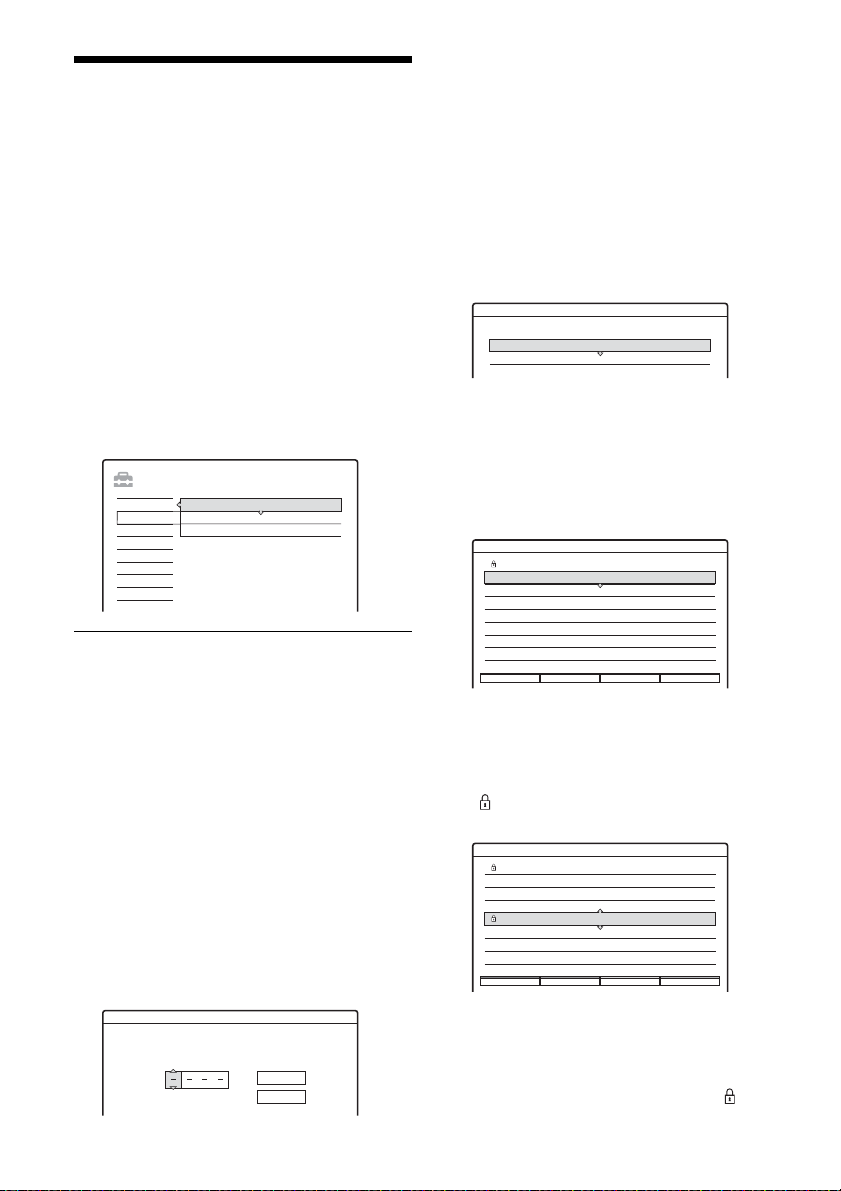
Digital TV Settings (DTV Settings)
The “DTV Settings” setup enables you to take full
advantage of Digital TV Broadcasting services
such as favourites channels setting or to prevent
children’s viewing unsuitable channels and
programmes.
1 Press SYSTEM MENU while the recorder is
in stop mode.
2 Select “SETUP,” and press ENTER.
3 Select “DTV Settings,” and press ENTER.
The “DTV Settings” setup appears with the
following options.
SETUP
Settings
DTV Settings
Video
Audio
Password
Others
Easy Setup
Favourite
Sets the channels as a favourite in Favourite Lists.
See “Making your own Favourite List” (page 20).
Parental Lock
You can lock certain unsuitable channels for
children, or set an rate so that any programme
classed above that rate by the broadcaster is
restricted.
When you select the locked channel or limited TV
programme, you need to enter the password.
1 After step 3 above, select “Parental Lock” and
press ENTER.
The display for entering the password
appears.
Favourite
Parental Lock
Tuning
2 Enter your four-digit password using the
number buttons, then select “OK” and press
ENTER.
• If you have not yet set a password, enter
“0000” (default). To set or change the
password, see page 44.
• If you forget your password, you will have
to reset it by selecting “Factory Setup” in
“Others” setup (page 45).
The Parental Lock menu appears.
DTV Settings - Parental Lock
Lock Channels
Set Parental Rating
Make the following settings.
◆Lock Channels
1 Select “Lock Channels,” and press ENTER.
All available TV channels are listed in the
display.
Lock Channels
Programme
001
002
003
004
005
006
007
Page Up Page Down Show CH Lock
Service
DDE News
AAC
NCE 5
Channel J
Digital Teletext
CH72
CH106
Press the red or green button to go to the
previous/next page.
2 Select the programme position you want to
lock, then press ENTER.
“ ” appears next to the locked programme
position.
Lock Channels
Programme
001
002
003
004
005
006
007
Page Up Page Down Show CH Lock
Service
DDE News
AAC
NCE 5
Channel J
Digital Teletext
CH72
CH106
40
Passwo rd
Enter password.
OK
Cancel
• Press the blue button to view the list
showing only the locked channels. Press the
blue button again to display all the channels.
• To unlock the channels, select a locked
channel and press ENTER so that “ ”
disappears.
Page 41
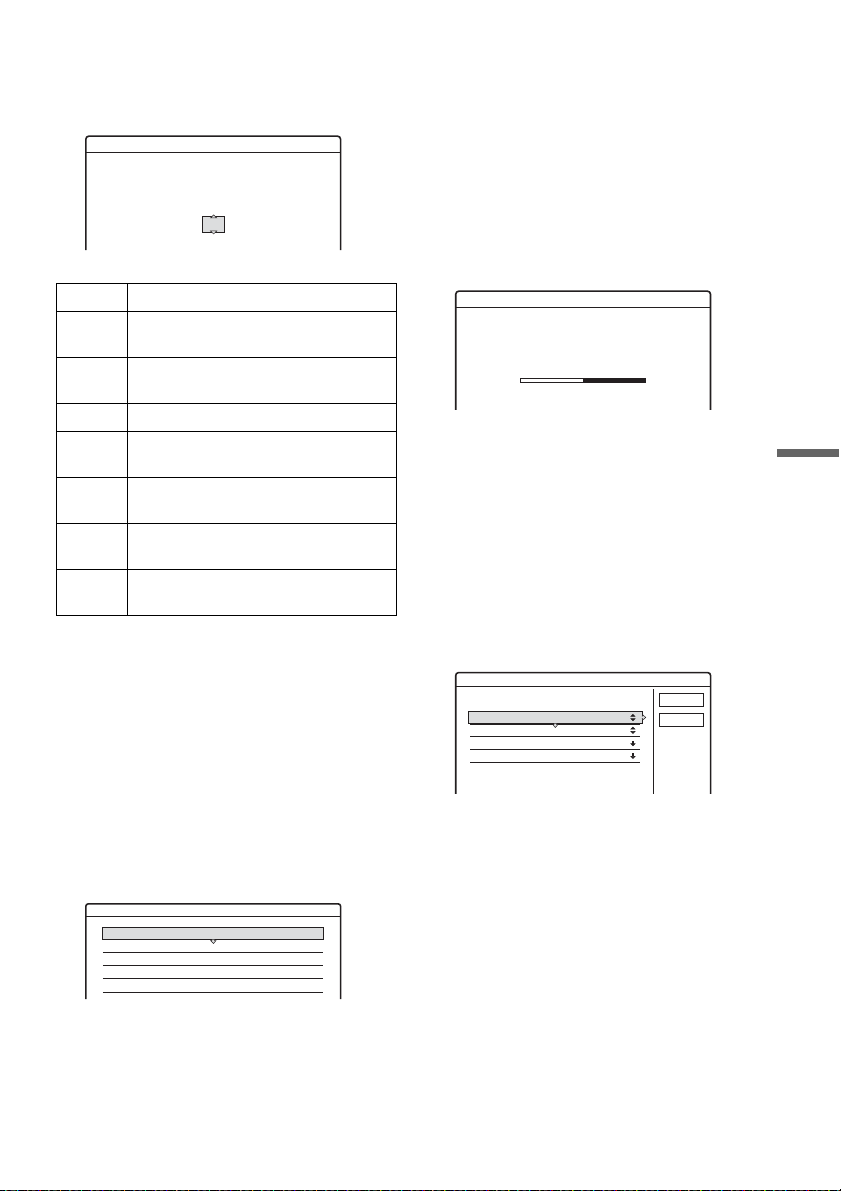
◆ Set Parental Rating
1 Select “Set Parental Rating,” and press
ENTER.
Set Parental Rating
An event will be locked when it is rated at,or above
the following rating:
Rating:
---
All Requires password for all programmes.
G Locks ‘General’ and above
programmes.
PG Locks ‘Parental Guidance’ and above
programmes.
M Locks ‘Mature’ and above programmes.
MA Locks ‘Mature Adult’ and above
programmes.
AV Locks ‘Adult/Violence’ and above
programmes.
R Locks ‘Restricted’ and above
programmes.
---
No restriction.
(default)
2 Press M/m to set the desired rating limit and
press ENTER.
b Note
This function relies on the broadcaster sending the
correct rate classification for each programme.
Tuning
Makes tuner settings for the recorder.
◆Quick Tuning
Quickly presets all receivable channels in your
area.
1 Select “Quick Tuning,” and press ENTER.
2 Select the city you live in, and press ENTER.
See “Digital TV Channel List” (page 56) to
check the channels available in your area. The
display asks for confirmation.
3 Select “Start” and press ENTER.
All receivable channels are preset.
DTV Settings-Quick Tuning
Searching for receivable channels.
Please wait.
Number of channels found: 32
4 Press ENTER when “Finish” appears.
◆Auto Tuning
Presets all receivable channels.
If some channels cannot be preset after Quick
Tuning, try this.
◆Manual Tuning
Presets channels manually. If some channels could
not be set automatically, you can set them
manually.
1 Select “Manual Tuning,” and press ENTER.
DTV Settings - Manual Tuning
Programme
Frequency
Bandwidth
Priority
42
627 . 500 MHz
7 MHz
High
OK
Cancel
Settings and Adjustments
After step 3 of “Digital TV Settings (DTV
Settings)” (page 40), select “Tuning” and press
ENTER.
The “DTV Settings - Tuning” menu appears.
DTV Settings-Tuning
Quick Tuning
Auto Tuning
Manual Tuning
Programme Hide
Signal Strength
Make the following settings.
2 Select the channel you want to preset.
3 Select “OK” and press ENTER.
4 Press ENTER when “OK” appears.
Repeat steps 2 to 4 to preset another channel.
◆Programme Hide
Disables unused or unwanted channels manually.
The disabled programme positions will be skipped
when you press PROG +/–, and will not appear in
the Programme List or the GUIDE.
,continued
41
Page 42
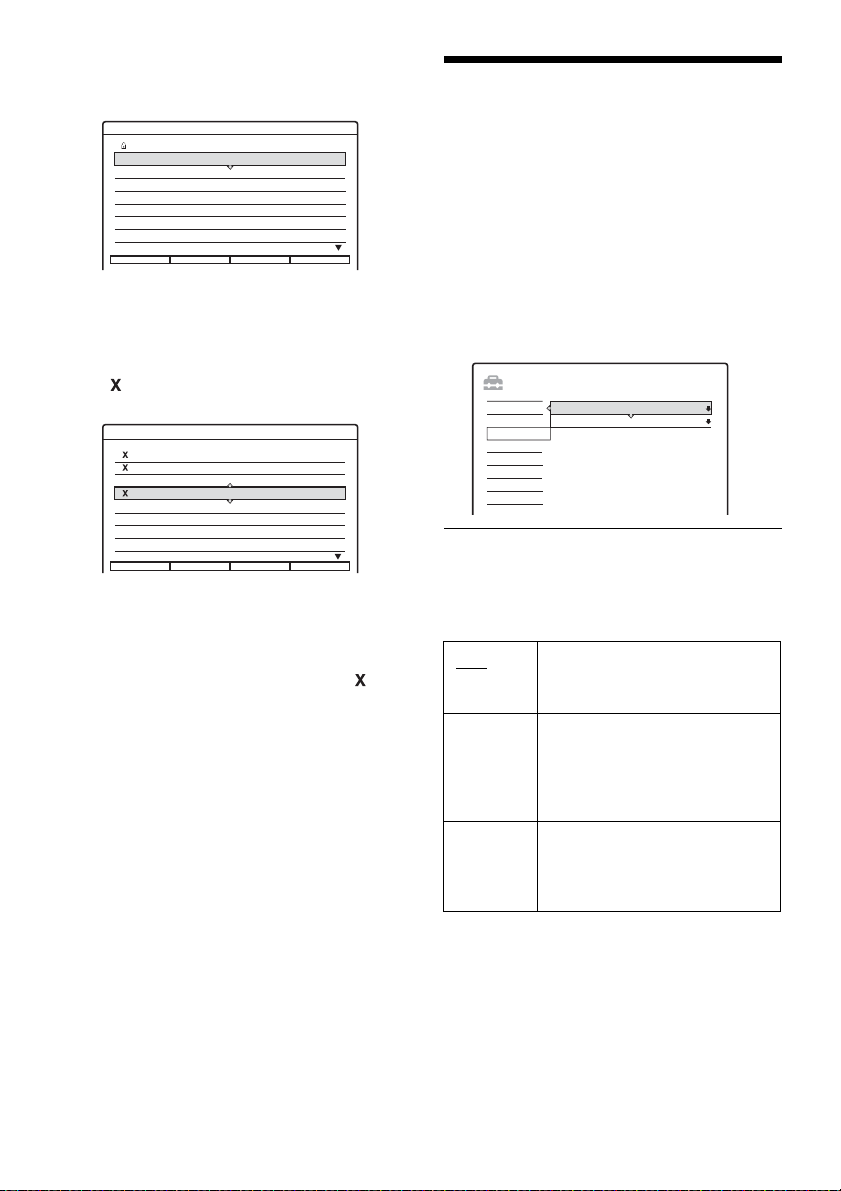
Select “Programme Hide,” and press ENTER.
1
All receivable channels are listed in the
display.
Programme Hide
Programme
001
002
003
004
005
006
007
Page Up Page Down Show CH Lock
Service
DDE News
AAC
NCE 5
Channel J
Digital Teletext
CH72
CH106
Press the red or green button to go to the
previous/next page.
2 Select the programme position you want to
disable, then press ENTER.
“ ” appears next to the disabled programme
position.
Programme Hide
Programme
001
002
003
004
005
006
007
Page Up Page Down Show CH Lock
• Press the blue button to view the list
showing only the disabled channels. Press
the button again to display all the channels.
• To cancel the setting, select a disabled
channel and press ENTER so that “ ”
disappears.
◆ Signal Strength
Indicates the strength of the input signals from the
AERIAL IN jack.
Service
DDE News
AAC
NCE 5
Channel J
Digital Teletext
CH72
CH106
Video Settings (Video)
The “Video” setup allows you to adjust items
related to the image.
1 Press SYSTEM MENU while the recorder is
in stop mode.
2 Select “SETUP,” and press ENTER.
3 Select “Video,” and press ENTER.
The “Video” setup appears with the following
options. The default settings are underlined.
SETUP
Settings
DTV Settings
Video
Audio
Password
Others
Easy Setup
Aspect Ratio(TV Type)
Video Format
Aspect Ratio (TV Type)
Selects the picture size according to the type of
connected TV (wide-screen/wide mode TV or
conventional 4:3 screen TV).
16:9 Select this when connecting to a
wide-screen TV or TV with a wide
mode function.
4:3 Pan
Scan
Select this when connecting to a
4:3 screen TV. Automatically
displays a wide picture on the
entire screen and cuts off the
portions that do not fit.
16 : 9
1080i
42
4:3 Letter
Box
Select this when connecting to a
4:3 screen TV. Displays a wide
picture with bands on the upper
and lower portions of the screen.
z Hint
You can also change this setting by pressing the blue
button.
Page 43
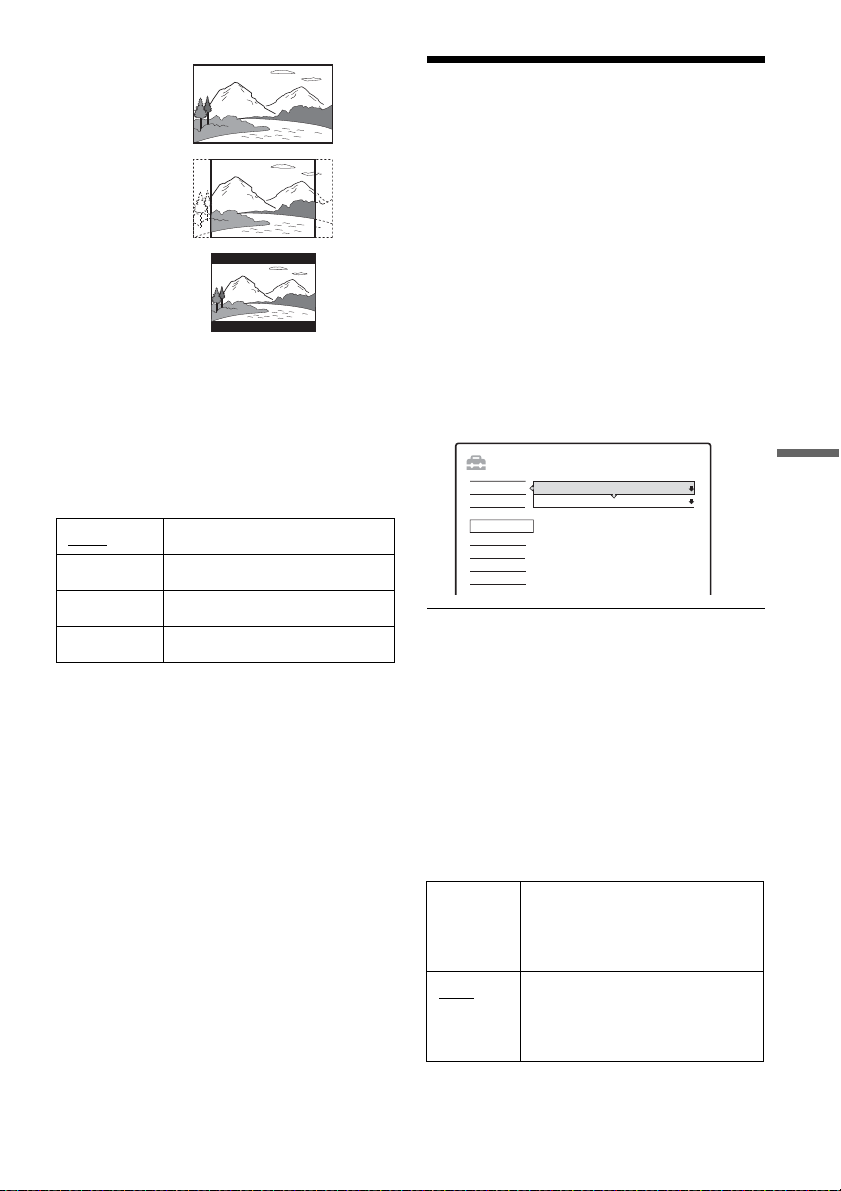
16:9
4:3 Pan Scan
4:3 Letter Box
Video Format
Selects the type of video signals output from the
HDMI OUT or COMPONENT VIDEO OUT
jacks. If the picture is not clear, natural, or to your
satisfaction, try another option that suits your TV/
projector, etc. For details, refer also to the
instruction manual supplied with the TV/
projector, etc.
1080i Sends 1920x1080i video signals.
720p Sends 1280x720p video signals.
576p Sends 720x576p video signals.
Audio Settings (Audio)
The “Audio” setup allows you to adjust the sound
according to the connection conditions.
When outputting through the HDMI OUT jack,
Dolby Digital signals and MPEG audio signals are
converted to PCM signals regardless of the
settings below.
1 Press SYSTEM MENU while the recorder is
in stop mode.
2 Select “SETUP,” and press ENTER.
3 Select “Audio,” and press ENTER.
The “Audio” setup appears with the following
options. The default settings are underlined.
SETUP
Settings
DTV Settings
Video
Audio
Password
Others
Easy Setup
Digital Output
MPEG Volume Control
PCM
+5
Settings and Adjustments
576i Sends 720x576i video signals.
b Notes
• When you connect the S VIDEO OUT jack or VIDEO
OUT jacks to the TV, the recorder always outputs 576i
video signals.
• If your TV accepts 720p/1080i format signals, this
setting must be made.
z Hint
You can also change this setting by pressing the yellow
button.
Digital Output
Switches the method for outputting audio signals
when you connect the DIGITAL AUDIO OUT
jack to a component such as an AV amplifier
(receiver).
For connection details, see “Step 4: Connecting
the Audio Cords” on page 13.
If you connect a component that does not accept
the selected audio signal, a loud noise (or no
sound) will come out from the speakers, and may
affect your ears or cause speaker damage.
Dolby
Digital
Select this when the recorder is
connected to an audio component
with a built-in Dolby Digital
decoder.
PCM
Select this when the recorder is
connected to an audio component
without a built-in Dolby Digital
decoder.
,continued
43
Page 44

MPEG Volume Control
Adjusts the MPEG audio level between –5 to +5.
Note that this setting does not apply to Dolby
Digital signals.
Setting/changing the Password (Password)
The “Password” setup allows you to set or change
the password for certain operations.
1 Press SYSTEM MENU while the recorder is
in stop mode.
2 Select “SETUP,” and press ENTER.
3 Select “Password,” and press ENTER.
4 Select “Change Password,” and press
ENTER.
The display for entering the password
appears.
Passwo rd
Enter password.
OK
Cancel
5 Enter your current password using the
number buttons, then select “OK,” and
press ENTER.
• If you have not yet set a password, enter
“0000” (default).
The display for setting a new password
appears.
6 Enter your new password using the number
buttons, then select “OK” and press
ENTER.
44
b Note
If you forget your password, you will have to reset it by
selecting “Factory Setup” in “Others” setup (page 45).
Page 45
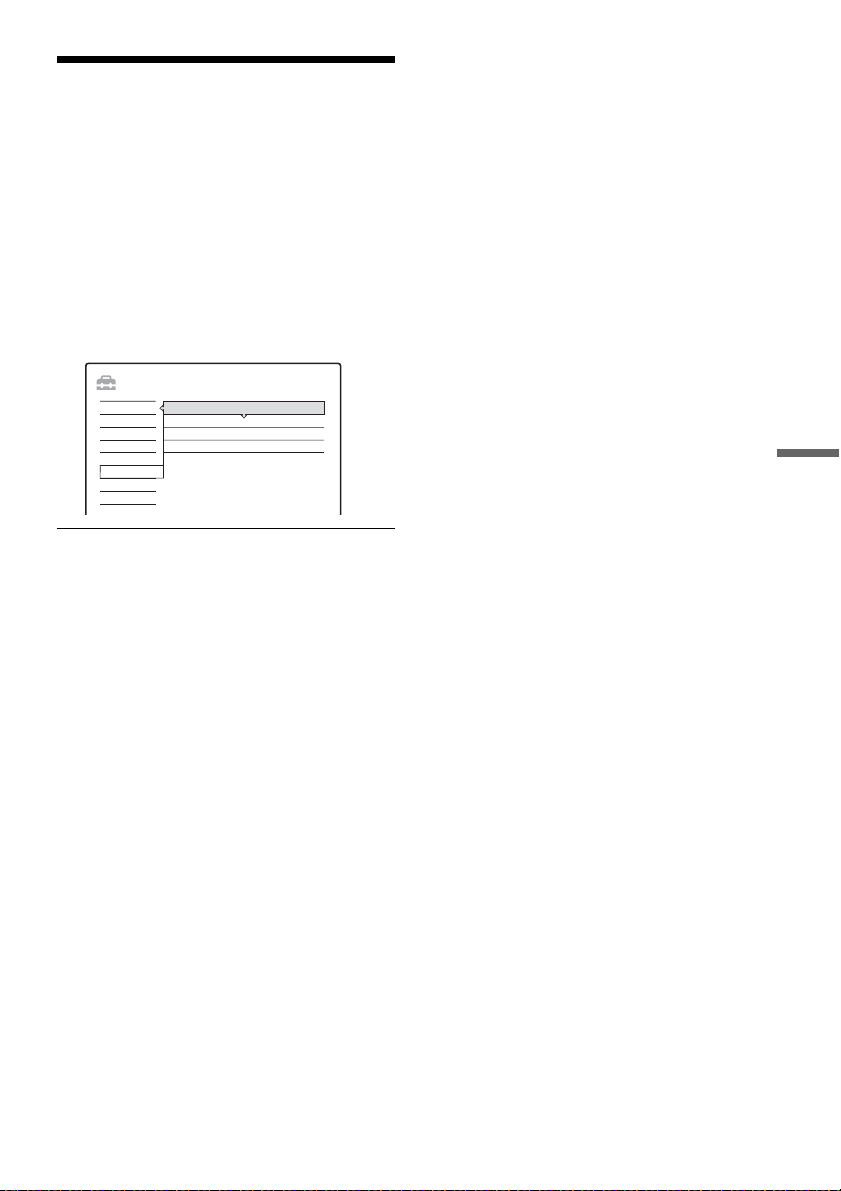
System Settings (Others)
The “Others” setup allows you to set up other
operational settings.
1 Press SYSTEM MENU while the recorder is
in stop mode.
2 Select “SETUP,” and press ENTER.
3 Select “Others,” and press ENTER.
The “Others” setup appears with the
following options.
SETUP
Settings
DTV Settings
Video
Audio
Password
Others
Easy Setup
Factory Setup
Allows you to return the setup settings to their
defaults without affecting the recorded titles in the
HDD. Note that all of your previous settings,
including the timer settings, will be lost.
1 Select “Factory Setup,” and press ENTER.
2 Select “Start,” and press ENTER.
The setup settings return to their defaults, and
the recorder automatically turns off.
Factory Setup
Format Hard Disk
S/W Update
Manufacturer Information
Manufacturer Information
Displays the current software version of your
recorder.
1 Select “Manufacturer Information,” and press
ENTER.
2 Press ENTER to return to the previous menu.
Settings and Adjustments
Format Hard Disk
Erases all the recorded titles in the HDD at once.
Note that protected titles are also erased.
See “Erasing all titles (Format Hard Disk)”
(page 38).
S/W Update
This is for possible future updates (currently not
planned).
45
Page 46

Easy Setup (Resetting the Recorder)
Select this to run the “Easy Setup.”
1 Press SYSTEM MENU while the recorder is
in stop mode.
2 Select “SETUP,” and press ENTER.
3 Select “Easy Setup,” and press ENTER.
SETUP
Settings
DTV Settings
Video
Audio
Password
Others
Easy Setup
Begin Easy Setup
4 Press ENTER to select “Begin Easy Setup”.
5 Follow the instructions for “Easy Setup”
(page 17) from step 2.
46
Page 47

Additional Information
Troubleshooting
If you experience any of the following difficulties
while using the recorder, use this troubleshooting
guide to help remedy the problem before
requesting repairs. Should any problem persist,
consult your nearest Sony dealer.
Power
The power does not turn on.
, Check that the mains lead is connected securely.
Tuner
The channel is not found or stored or missed.
, Make sure that your aerial is properly connected
to the recorder.
, Confirm with your dealer that you are in an area
that can receive a digital terrestrial broadcasting
signal.
, Check your aerial installation.
Picture
There is no picture.
, Re-connect all connecting cords securely.
, The connecting cords are damaged.
, Check the connection to your TV (page 10).
, Switch the input selector on your TV (such as to
“VCR”) so that the signal from the recorder
appears on the TV screen.
Picture noise appears.
, Noises may appear in the pictures recorded on
the HDD, which is due to the characteristics of
HDD, and is not a malfunction.
There is no picture or the picture noise appears
when connected to the HDMI OUT jack.
, Try the following: 1Turn the recorder off and
on again.
and on again.
then connect it again.
, If the HDMI OUT jack is used for video output,
changing the “Video Format” setting in the
“Video” setup may solve the problem (page 43).
Connect the TV and the recorder using a video
jack other than the HDMI OUT, and switch the
TV’s input to the connected video input so that
you can see the on-screen displays. Change the
“Video Format” setting in the “Video” setup, and
switch the TV’s input back to HDMI. If the
picture still does not appear, repeat the steps and
try other options.
, The recorder is connected to an input device that
is not HDCP compliant (page 11).
2Turn the connected equipment off
3Disconnect the HDMI cord and
TV programme reception does not fill the
screen.
, Select the correct source using the TV/VIDEO
button, or select a channel of any TV programme
using the PROG +/– buttons.
Picture breaks up.
, Signal strength is low.
, Check the aerial installation.
TV programme pictures are distorted.
, Reorient or upgrade the TV aerial.
, Adjust the picture (see the TV’s instruction
manual).
, Place the recorder and TV farther apart.
, Place the TV and any bunched aerial cables
farther apart.
, The RF cable is connected to the AERIAL OUT
jack on the recorder. Connect the cable to the
AERIAL IN jack.
Additional Information
,continued
47
Page 48

TV channels cannot be changed.
, The channel is hidden (page 41).
, A timer recording started, which changed the
channels.
, The Parental Lock is activated (page 40).
, When the Favourite List is displayed, you can
select channels only from the Favourite List.
Press FAVOURITE to turn off the list, then press
PROG LIST and select the channel (page 19).
, You can select channels only from the Favourite
List by pressing PROG +/–, once you use
Favourite List.
, Two recordings are in progress.
The picture does not fill the screen.
, Set “Aspect Ratio” in the “Video” setup to fit the
screen size of your TV (page 42).
Sound
There is no sound.
, Re-connect all connecting cords securely.
, The connecting cord is damaged.
, The input source setting on the amplifier or the
connection to the amplifier is incorrect.
, The recorder is in reverse play, fast-forward,
slow motion, or pause mode.
, If the audio signal does not come through the
DIGITAL AUDIO OUT (OPTICAL or
COAXIAL) jacks, check the “
settings in “Audio” setup (page 43).
, A scrambled channel is selected.
, The sound is muted. Press MUTING.
Digital Output”
Recording/Timer recording/
Erasing
The channel cannot be changed from the
channel you are recording.
, Set the TV’s input source to “TV.”
Nothing was recorded even though you set the
timer setting correctly.
, There was a power failure during recording.
, The recorder’s internal clock stopped due to a
power failure. Wait for the recorder to adjust
itself.
, The channel was disabled after the timer
recording was set. See “Programme Hide” on
page 41.
, Disconnect the mains lead from the mains, and
connect it again.
, The programme contains copy protection signals
that restrict copying.
, There is not enough disk space for the recording.
, A scrambled channel is selected.
, Two other programmes were being recorded at
the start of the Timer Recording.
Recording does not stop immediately after you
press x REC STOP.
, It will take a few seconds for the recorder to input
disk data before recording can stop.
, The recorder does not stop immediately if
x
REC STOP
started.
is pressed soon after a recording
Sound breaks up.
, Signal strength is low.
, Check the aerial installation.
, If the DIGITAL AUDIO OUT jacks are used,
check “Digital Output” in Audio setup (page 43).
Playback
The recorder does not start playback from the
beginning.
, Resume play was activated (page 33).
TV Pause does not work.
, You are recording to the disk or the disk is full.
48
Recording does not stop after you press x.
,
Press xREC STOP.
Timer recording is not complete or did not start
from the beginning.
, There was a power failure during recording. If
the power recovers when there is a timer
recording, the recorder resumes recording.
, If manual recording was under way, the
recording was given priority over the timer
setting (see page 31).
Page 49

Clock
Others
The clock is stopped or incorrect.
, Check the time zone setting (page 39).
, If your area is correctly selected and yet the clock
is wrong, it is not a malfunction. For details, see
page 18.
, The clock stopped due to a power failure. Wait
for the recorder to adjust itself.
Display
The clock does not appear in the front panel
display.
, “FP Display” in “Settings” setup is set to “Off”
(page 39).
, The “Power Save” in “Settings” setup is set to
“On,” and the recorder is in standby (page 39).
Remote control
The remote does not function.
, Batteries are weak.
, The remote is too far from the recorder.
, The remote’s manufacturer code returned to the
default setting when you replaced the batteries.
Reset the code (page 15).
, Turn on the recorder.
, The remote is not pointed at the remote sensor on
the recorder.
, Different command modes are set for the
recorder and remote. Set the same command
mode (page 16). The default command mode
setting for this recorder and the supplied remote
is HDD1.
The recorder does not operate properly.
, Restart the recorder. Press down [/1 on the
recorder for more than ten seconds until
“POWER OFF” appears in the front panel
display.
, When static electricity, etc., causes the recorder
to operate abnormally, turn off the recorder and
wait until the clock appears in the front panel
display. Then, unplug the recorder and after
leaving it off for a while, plug it in again.
The Parental Lock does not work.
, Check the Parental Lock options settings
(page 40).
Mechanical sound is heard when the recorder
is off.
, While the recorder is updating the clock
information, operational noises (such as the
internal fan) may be heard, even when the power
is off. This is not a malfunction.
Additional Information
Other Sony equipment responds to the remote.
, The same command mode is set for both the
equipment and recorder. Set a different
command mode for the recorder (page 16).
,continued
49
Page 50

Notes About This Recorder
Specifications
On operation
If the recorder is brought directly from a cold to a
warm location, or is placed in a very damp room,
moisture may condense inside the recorder.
Should this occur, the recorder may not operate
properly. In this case, leave the recorder turned on
for about half an hour until the moisture
evaporates.
On adjusting volume
Do not turn up the volume while listening to a
section with very low level inputs or no audio
signals. If you do, the speakers may be damaged
when a peak level section is played.
On cleaning
Clean the cabinet, panel, and controls with a soft
cloth slightly moistened with a mild detergent
solution. Do not use any type of abrasive pad,
scouring powder or solvent such as alcohol or
benzine.
About repairing the hard disk drive
• It may be necessary to access data stored on the
hard disk for testing purposes; there is no
intention to copy or store the data, titles or any
other information.
• If replacement or initialization (format) is
required, the hard disk will be formatted at our
discretion. In this case, please note that all of the
contents recorded there will be erased (including
any data found to violate copyright law).
System
Transmission standards: DVB-T
Channel coverage: 51 - 858 MHz
The above channel coverage merely ensures the
channel reception within these ranges. It does not
guarantee the ability to receive signals in all
circumstances.
Aerial out: 75-ohm asymmetrical aerial socket
Video format: MP@ML, MP@HL
Audio format: Dolby Digital, MPEG (I and II)
Outputs
AUDIO OUT: Phono jacks (2 each)/2 Vrms/10
kilohms
VIDEO OUT: Phono jack/1.0 Vp-p/75 ohms
S VIDEO OUT: 4-pin mini DIN/Y:1.0 Vp-p,
C: 0.3 Vp-p (PAL)/75 ohms
DIGITAL AUDIO OUT (OPTICAL): Optical
output jack/–18 dBm (wave length: 660 nm)
DIGITAL AUDIO OUT (COAXIAL): Phono
jack/0.5 Vp-p/75 ohms
COMPONENT VIDEO OUT
(Y, P
B/CB, PR/CR):
Phono jack/Y: 1.0 Vp-p, P
P
R/CR: 0.7 Vp-p/75 ohms
HDMI OUT:
Type A (19-pin)
B/CB: 0.7 Vp-p,
50
Page 51

General
Power requirements: 220-240 V AC, 50 Hz
Power consumption:
SVR-HD700: 34 W
SVR-HD900: 36 W
Dimensions (approx.): 430 × 80 × 306 mm
(width/height/depth) incl. projecting parts
Hard disk drive capacity:
SVR-HD700: 160 GB (approx.)
SVR-HD900: 250 GB (approx.)
Mass (approx.): 4.0 kg
Operating temperature: 5ºC to 35ºC
Operating humidity: 25% to 80%
Supplied accessories:
Audio/video cord (1)
Component video cord (1)
Mains lead (1)
Aerial cable (2: long ×1, short ×1)
Remote commander (remote) (1)
R6 (size AA) batteries (2)
Specifications and design are subject to change
without notice.
Additional Information
51
Page 52
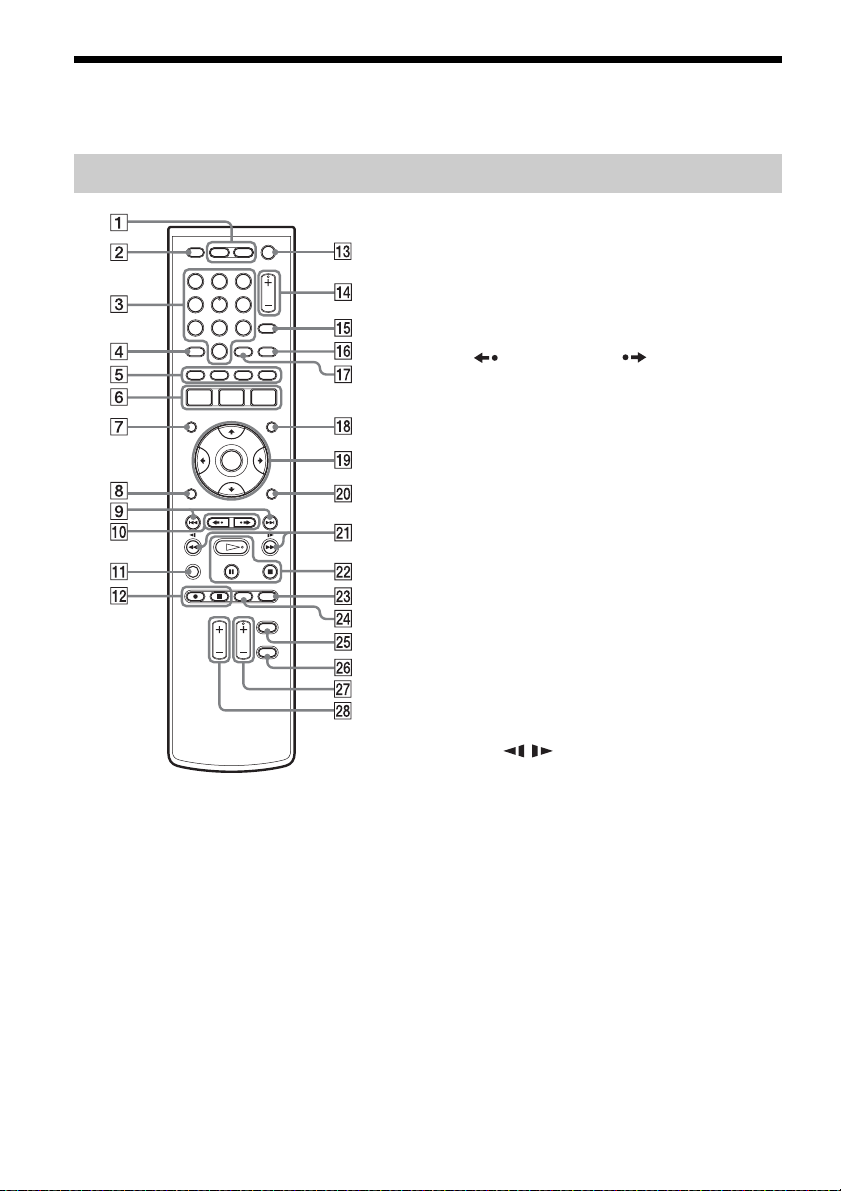
Guide to Parts and Controls
For more information, see the pages in parentheses.
Remote
321
654
8 97
0
A PIP (Picture-in-Picture) button (22, 34)
SWAP button (22)
B MUTING button (22)
C Number buttons (44)
The number 5 button has a tactile dot*.
D AUDIO button (22)
The AUDIO button has a tactile dot*.
E Coloured multimedia applications and
interactive services control buttons (23)
F SYSTEM MENU button (16, 39)
TITLE LIST button (32)
GUIDE (Electronic Programme Guide)
button (23)
G PROG LIST button
(19)
H RETURN button (18)
I ./> (previous/next) buttons (34)
J (instant replay)/ (instant advance)
buttons (19, 34)
K DISPLAY button (27, 33)
L z REC button (27)
x REC STOP button (27)
M [/1 (on/standby) button (17)
N PROG (programme) +/– buttons (27)
The + button has a tactile dot*.
O INFO button (20)
P TELETEXT
button (21)
Q SUBTITLE button (22)
R FAVOURITE button (19)
S </M/m/,/ENTER button (17)
T OPTIONS button (8)
U m / M (search) buttons (34)
V H (play) button (32)
X (pause) button (34)
x (stop) button (32)
The H button has a tactile dot*.
W TIMER LIST button (30)
X TIMER button (29)
Y TV [/1 button (15)
Z TV/VIDEO button (15)
wj TV PROG +/– button (15)
The + button has a tactile dot*.
wk TV VOL (volume) +/– buttons (15)
* Use the tactile dot as a reference when operating the
recorder.
52
Page 53
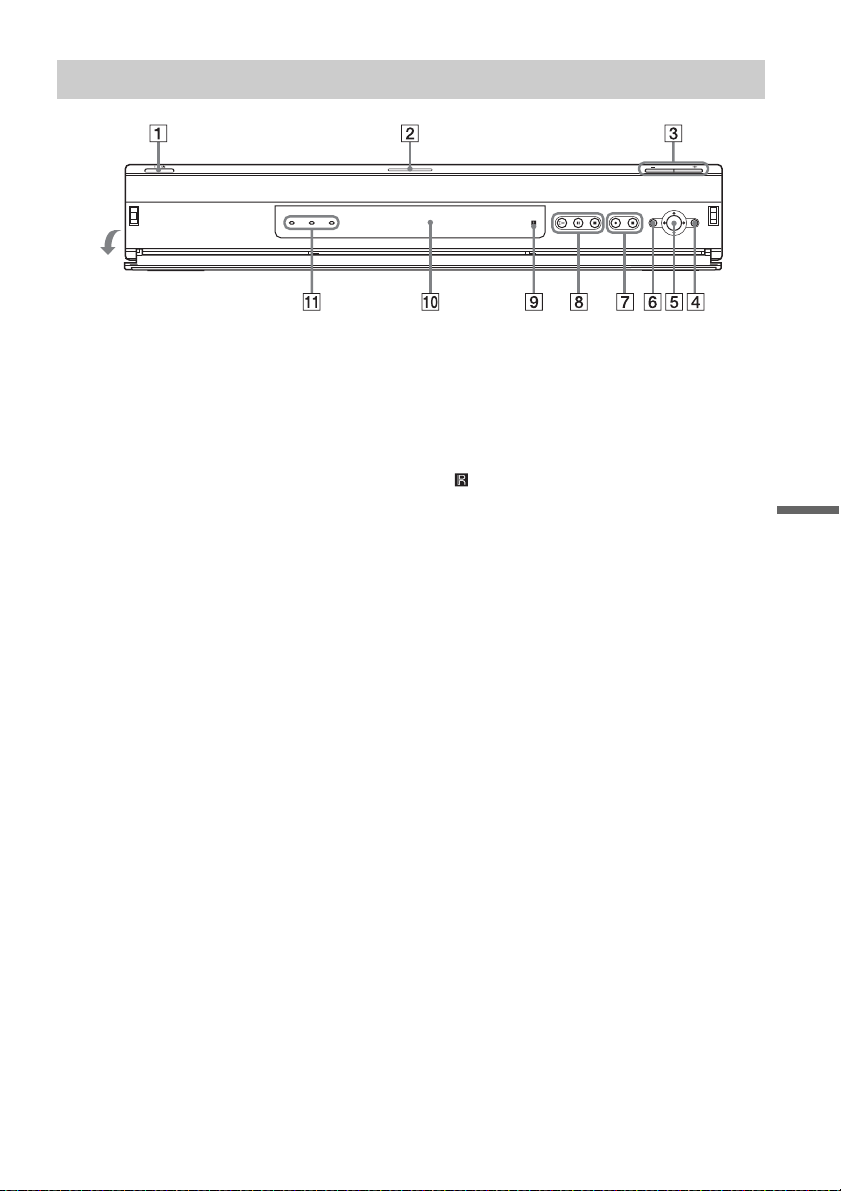
Front panel
A [/1 (on/standby) button (17)
B HIGH DEFINITION OUT indicator (11)
C PROGRAM +/– buttons (27)
The + button has a tactile dot*.
D SYSTEM MENU button (16, 39)
E </M/m/,/ENTER button (17)
F RETURN button (18)
G z REC button (27)
x REC STOP button (27)
H H (play) button (32)
X (pause) button (34)
x (stop) button (32)
The H button has a tactile dot*.
I (remote sensor) (15)
J Front panel display (54)
K REC indicators (27)
TIMER REC indicator (29)
* Use the tactile dot as a reference when operating the
recorder.
Additional Information
,continued
53
Page 54
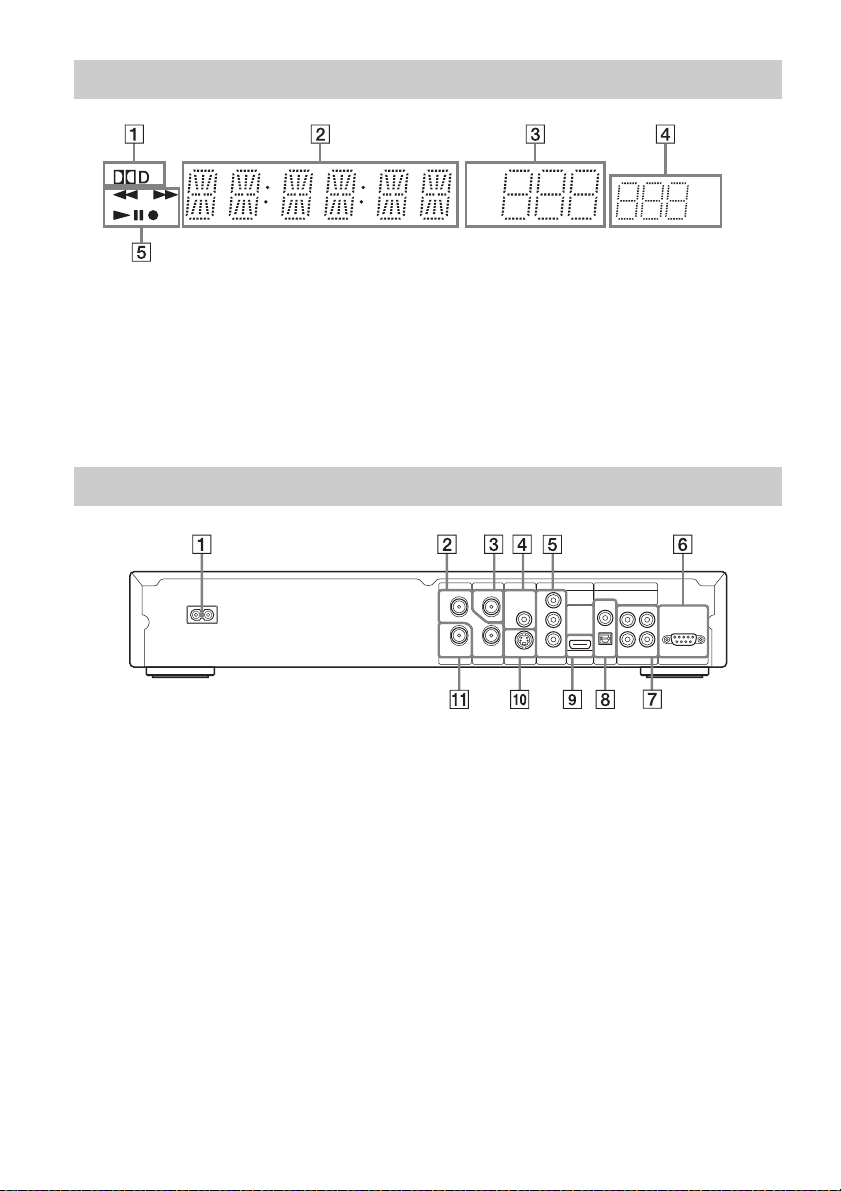
Front panel display
GBCH
A Audio signal indicators
B Displays the following:
• Playing time/remaining time
•Clock
C Programme position
D Remaining disk space
E Playing/recording status
z Hint
You can dim or turn off the front panel display by setting “FP Display” to “Dimmer” or “Off” in “Settings” setup
(page 39).
Rear panel
~ AC IN
A AC IN terminal (14)
B RF THROUGH IN/OUT jacks (10)
C AERIAL IN jack (10)
D VIDEO OUT jack (11)
E COMPONENT VIDEO OUT (Y, P
R/CR) jacks (11)
P
F SERVICE USE terminal
For maintenance by qualified service
personnel only.
B/CB,
AERIAL INRF THROUGH
IN
OUT
AERIAL OUT
G AUDIO OUT 1/2 (L/R) jacks (13)
H DIGITAL AUDIO OUT (COAXIAL/
OPTICAL) jacks (13)
I HDMI OUT (high-definition multimedia
interface out) jack (11)
J S VIDEO OUT jack (11)
K AERIAL OUT jack (10)
COMPONENT VIDEO OUT
VIDEO OUT DIGITAL AUDIO OUT
Y
VIDEO
PB/
B
C
P
R/
R
C
S VIDEO
HDMI
OUT
PCM / DOLBY DIGITAL
COAXIAL
LRL
OPTICAL
12
AUDIO OUT FOR SERVICE USE
R
54
Page 55

Glossary
Dolby Digital (page 13, 43)
Digital audio compression technology developed
by Dolby Laboratories. This technology conforms
to multi-channel surround sound. The rear channel
is stereo and there is a discrete subwoofer channel
in this format. Dolby Digital provides the same
discrete channels of high quality digital audio
found in “Dolby Digital” theater surround sound
systems.
Good channel separation is realized because all of
the channel data is recorded discretely, and little
deterioration occurs because all channel data
processing is digital.
GUIDE (page 23)
The GUIDE (electronic programme guide) is a
guide showing programmes which can be
displayed on a conventional television (via the
Digital Terrestrial Television tuner included in
this recorder) as the now and next programmes or
the television schedule for a day or more at a time.
Hard disk drive (page 2)
A hard disk drive is a whole mechanical system
that consists of disks and drive. Disks are flat,
circular, rigid plates coated with a thin magnetic
media. Magnetic heads record data on the rapidly
spinning disks, and this enables the speedy and
efficient reading and writing of data.
Additional Information
HDMI (High-Definition Multimedia Interface)
(page 11)
HDMI is an interface that supports both video and
audio on a single digital connection. The HDMI
connection carries standard to high definition
video signals and multi-channel audio signals to
AV components such as HDMI equipped TVs, in
digital form without degradation.
The HDMI specification supports HDCP (Highbandwidth Digital Contents Protection), a copy
protection technology that incorporates coding
technology for digital video signals.
55
Page 56
Digital TV Channel List (as of April 2006)
Cities with an asterisk “*” are the default settings
of Quick Tuning (page 41).
ACT
Canberra* ABC9ASBS30CTC6WIN11CBN
Tuggeranong ABC59SBS57CTC62WIN65CBN
Weston
Creek/
Woden
NSW
Armidale ABUN32SBS29NBN38NEN35NRN
Batemans
Bay/Moruya
Bega ABN35SBS32WIN29CTC33CBN
Bega/Cooma ABSN
Bombala ABSN62SBS66CBN63CTC59WIN
Bouddi ATN61TCN62TEN65NBN68NEN
Broken Hill ABLN10SBS12BKN9s38A
Central
Tablelands
Central
Western
Slopes
Coffs
Harbour
Cooma Town ABSN55SBS67CBN64CTC58WIN
Cooma/
Monaro
Dubbo ABQN58SBS55CBN61CTC67WIN
Eden ABSN55SBS68WIN61CTC64CBN
Gosford* ABHN37SBS34ATN61TCN62TEN
Grafton/
Kempsey
Illawarra* ABWN51SBS54WIN36CTC37CBN
Kings Cross ABN30SBS34ATN48TCN33TEN
Kotara ABHN37SBS38NBN36NEN53NRN
ABC59SBS57CTC62WIN65CBN
ABN9ASBS7WIN10CTC63CBN
50
NRN56ABHN37SBS
ABCN36SBS42CBN37CTC43WIN
ABQN12SBS44CBN41CTC46WIN
ABDN61SBS68NBN67NEN56NRN
ABSN29SBS35CBN43CTC32WIN
NBN68NRN56NEN
ABDN36SBS39NBN33NEN30NRN
34
59
56
Manly/
Mosman
Manning
River
Merewether ABHN37SBS38NBN36NEN53NRN
12
Murrumbidgee
Irrigation Area
68
Murwillumbah
68
Narooma ABN56SBS53WIN59CTC62CBN
Newcastle* ABHN37SBS38NBN36NEN53NRN
Nowra North ABWN66SBS63WIN34CTC40CBN
41
Richmond/
58
Tweed
Stanwell
30
Park
SW Slopes/E
Riverina
Sydney* ABN12SBS34ATN6TCN8TEN
60
59
Tamworth ABUN54SBS51NBN60NEN57NRN
-
Ulladulla ABWN28SBS31WIN52CTC46CBN
Upper Namoi ABUN8SBS36NBN37NEN9ANRN
40
Wagga
45
Wagga
Wollongong* ABWN52SBS54CBN46WIN40CTC
64
Wyong ABHN37SBS38ATN61TCN62TEN
61
40
64
VIC
Albury North ABAV31AMV58GLV64SBS29VTV
67
Apollo Bay ABV
65
Bairnsdale ABLV56SBS52AMV59GLV65VTV
Ballarat ABRV41SBS43AMV46BCV40VTV
38
Bendigo ABEV48SBS28VTV54AMV31BCV
38
Bright ABAV41AMV43GLV46SBS40VTV
45
51
ABN30SBS34ATN48TCN33TEN
ABTN7SBS9ANBN12NEN9NRN
ABGN11SBS33AMN30MTN
ABRN29SBS40NBN37NEN35NRN
ABRN29SBS40NBN37NEN35NRN
ABWN52SBS49WIN40CTC43CBN
ABMN46SBS48CBN47CTC51WIN
D44
35
ABN55SBS54CBN58CTC64WIN
NBN68NEN59NRN
54
6
56
45
44
51
32
65
51
43
32
46
50
11
63
49
40
61
43
65
61
62
37
51
37
Page 57
Bruthen ABLV38SBS
Cann River ABLV12SBS48AMV53GLV9AVTV
Casterton ABWV54SBS54AMV63BCV60VTV
Churchill ABLV49SBS51AMV67GLV53VTV
Cobden ABRV
Colac ABRV52SBS
Coleraine ABWV
Corryong ABAV32AMV37GLV34VTV
Ferntree
Gully
Foster ABLV56SBS59AMV62GLV53VTV
Genoa ABLV30SBS28AMV39GLV33VTV
Goulburn
Valley
Halls Gap ABV54SBS51AMV63BCV60VTV
Horsham ABWV55SBS49AMV53BCV56VTV
Khancoban ABAV59AMV53GLV65VTV
Kiewa ABAV41AMV44GLV47SBS36VTV
Kiewa Valley AMV50GLV55VTV
Lakes
Entrance
Latrobe
Valley
Lorne ABV
Mallacoota ABLV56SBS53AMV62GLV59VTV
Marysville ABV60SBS57ATV54GTV51HSV
Melbourne* ABV12SBS29HSV6GTV8ATV
Mildura/
Sunraysia
Murray
Valley
Mytleford ABAV53AMV54GLV64SBS58VTV
Nhill ABWV66SBS67AMV61BCV64VTV
Nowa Nowa ABLV
Orbost ABLV37SBS40AMV43GLV38VTV
Portland ABWV59SBS68AMV65BCV62VTV
ABV47SBS50ATV54GTV44HSV
ABGV37SBS36AMV45GLV42VTV
ABLV61SBS58AMV64GLV53VTV
ABLV42SBS30AMV33GLV39VTV
ABMV11SBS28PTV31STV7MDV
ABSV58SBS59AMV62BCV65VTV
28
59
53
42
40
62
67
58
51
Rosebud ABV60SBS57ATV54GTV51HSV
Safety Beach ABV60SBS57ATV54GTV51HSV
55
Selby ABV47SBS50ATV54GTV44HSV
66
South Yarra ABV60SBS57ATV54GTV51HSV
50
Tawonga
South
Upper
Murray
Upwey ABV47SBS50ATV54GTV44HSV
Warburton ABV60SBS57ATV54GTV51HSV
Warrnambool
41
Warrnambool
65
City
Western
44
Victoria
9
QLD
Airlie Beach ABQ50SBS28TNQ41STQ47RTQ
57
Atherton ABNQ67SBS55TNQ64STQ61RTQ
52
Ayr ABTQ62SBS56TNQ53STQ59RTQ
Babinda ABNQ42SBS52TNQ46STQ43RTQ
46
Bell ABDQ55SBS52TNQ-STQ-RTQ
Boonah ABQ42SBS39BTQ51QTQ45TVQ
67
Bowen ABTQ11SBS12TNQ9STQ-RTQ
36
Bowen Town ABTQ-SBS34TNQ40STQ46RTQ
Brisbane* ABQ12SBS36BTQ6QTQ8TVQ
65
Cairns ABNQ8SBS29TNQ6STQ11RTQ
63
Cairns East ABNQ42SBS52TNQ46STQ43RTQ
11
Cairns North ABNQ42SBS52TNQ46STQ43RTQ
33
Cardwell ABNQ-SBS-TNQ-STQ43RTQ
60
Charters
61
Towers
Collinsville ABQ56SBS-TNQ62STQ59RTQ
63
Currumbin ABQ62SBS36TVQ56QTQ59BTQ
44
Darling
56
Downs
ABAV31AMV34GLV45SBS7VTV
ABAV9ASBS7AMV12GLV8VTV
ABWV50SBS53AMV51BCV48VTV
ABRV59SBS68AMV65BCV62VTV
ABWV6SBS7AMV12BCV9AVTV
ABQ54SBS51TNQ60STQ57RTQ
NRN43NEN65NBN
ABDQ37SBS49TNQ40STQ34RTQ
68
63
63
41
63
40
10
41
63
45
56
10
44
58
65
49
48
43
11
12
49
49
49
63
65
53
46
,continued
Additional Information
-
-
57
Page 58
Eidsvold ABQ56SBS-TNQ-STQ-RTQ
Esk ABQ39SBS51TVQ48QTQ42BTQ
Gold Coast* ABQ62SBS36TVQ56BTQ53QTQ
NRN43NEN65NBN
Goondiwindi ABGQ56SBS60TNQ62STQ59RTQ
Gordonvale ABRQ42SBS52RTQ49STQ43TNQ
Gympie ABQ62SBS36TNQ47RTQ68STQ
Gympie
Town
Herberton ABNQ67SBS55TNQ64STQ61RTQ
Hervey Bay ABWQ56SBS53TNQ68STQ59RTQ
Mackay ABMQ10SBS29RTQ35STQ9ATNQ
Mareeba ABNQ42SBS52TNQ46STQ43RTQ
Miles
Miriam Vale/
Bororen
Mission
Beach
Monto ABWQ57SBS-TNQ63STQ60RTQ
Moura ABQ53SBS-TNQ-STQ-RTQ
Mossman ABNQ40SBS38TNQ48STQ45RTQ
Murgon ABDQ56SBS-TNQ62STQ59RTQ
Nambour ABQ62SBS36TNQ47RTQ68STQ
Noosa/
Tewantin
Port Douglas ABNQ54SBS66TNQ-STQ57RTQ
Proserpine ABMQ52SBS55TNQ61STQ58RTQ
Ravenshoe ABNQ42SBS52TNQ46STQ43RTQ
Redlynch ABNQ61SBS58TNQ-STQ-TNQ
Rockhampton
Rockhampton
East
Shute
Harbour
Southern
Downs
Stuart ABTQ54SBS51TNQ60STQ57RTQ
ABQ62SBS36TNQ47RTQ68STQ
ABMSQ
ABWQ56SBS-TNQ-STQ-RTQ
ABNQ56SBS50TNQ68STQ53RTQ
ABRQ11SBS37RTQ12STQ38TNQ
ABRQ57SBS54TNQ63STQ60RTQ
ABSQ45SBS48RTQ43STQ51TNQ
SBS-TNQ60STQ57RTQ
63
ABQ62SBS36STQ65TNQ47RTQ
ABQ56SBS53TNQ62STQ59RTQ
68
Sunshine
-
Coast
45
Toowoomba ABDQ55SBS67RTQ64STQ58TNQ
59
Townsville ABTQ31SBS37RTQ41STQ38TNQ
Wide Bay ABWQ9ASBS28RTQ10STQ7TNQ
65
46
SA
Adelaide* ABS12SBS33NWS8ADS11SAS
65
Adelaide
65
Foothills
Elizabeth
58
South
Renmark/
62
Loxton
South East ABGS39SBS40SES
32
Spencer Gulf
49
North
Victor
66
Harbour
-
WA
40
Perth* ABW12SBS29NEW11STW8TVW
66
Roleystone ABW56SBS53NEW65STW62TVW
-
Toodyay ABW56SBS53NEW65STW62TVW
51
TAS
65
Hobart* ABC8SBS9ATVT7TNT10TasTV
65
North East ABNT41SBS44TVT50TNT38TasTV
68
NT
63
Batchelor ABD56SBS53QQQ50NTD59TND
64
49
Darwin* ABD30SBS29TND32NTD
-
36
66
65
52
63
ABQ62SBS36QTQ59STQ65TNQ
RTQ68BTQ53TVQ
ABS64SBS61ADS54NWS66SAS
ABS64SBS61ADS54NWS66SAS
ABRS39SBS40RTS
ABNS38SBS41GTS
ABS56SBS53ADS65SAS59NWS
IMP
65
47
56
61
36
9
6
57
57
35
32
44
62
6
59
59
11
52
62
31
58
Page 59

Index
Words in quotations appear in
the on-screen displays.
Numerics
16:9 42
4:3 Letter Box
4:3 Pan Scan 42
A
Aerial 10
“Aspect Ratio (TV Type)”
Audio 22, 43
Audio cord 13
“Auto Tuning”
B
Batteries 15
C
Chasing Playback 35
Checking/changing/
cancelling timer settings
(Timer List)
“Command Mode”
Component video input 11
COMPONENT VIDEO OUT
12
Connecting 11
the aerial cable 10
the audio cords
the video cords 11
Controlling TVs with the
remote
D
“Digital Output” 43
Digital Services
Digital Text viewing
EPG 23
Favourites 19
“Disk Info”
Display
front panel display
Dolby Digital 13, 55
“DTV Settings” 40
42
42
41
30
17, 39
13
15
21
28
54
E
Easy Setup 17, 46
Enter characters
EPG
recording
Viewing a list of
Viewing programmes
“Erase” 26, 30, 37
36
24
available channels
23
related to a specific
category.
24
F
“Factory Setup” 45
“Favourite”
Favourite List 19
“Format Hard Disk” 38, 45
Front panel
Front panel display 54
40
53
G
GUIDE 23
H
HDMI 11
HDMI OUT 11, 12
I
i Plate 20, 39
“i Plate timeout”
39
L
“Lock Channels” 40
M
Mains Lead 14
“Manual Tuning”
“Manufacturer Information”
45
“Modify”
“MPEG Volume Control” 44
41
26, 30
O
On-screen display
Sub-menu
System Menu
OPTIONS
Options/sub-menu items 8
“Others” 45
7
7
8
P
“Parental Lock” 40
Parts and controls 52
“Password” 44
Picture-in-Picture
“Play Beginning” 33
Playback 32, 33, 34
fast forward
fast reverse 34
instant advance 34
instant replay
resume play 33
slow-motion play 34
Playing status bar
“Power Save” 39
“Programme Hide” 41
Programme List
“Protect” 37
22, 34
34
34
33
19
Q
Quick Timer 28
“Quick Tuning”
18, 41
R
Rear panel 54
REC 27
Recording
Remote 15, 52
“Rename”
“Repeat Play” 33
Resetting the recorder 46
Resume Play
27
EPG 24
recording time 27
while watching another
programme
27
36
33
,continued
Index
59
Page 60

S
S VIDEO 11
“S/W Update”
Searching
fast reverse/fast forward
locating the beginning of
“Set Parental Rating” 41
Simultaneous Rec and Play 35
Slow-motion play
Sort 33
Sub-menu 7
System Menu
45
34
the chapter
34
7
34
T
“Time Zone” 18, 39
TIMER 29
Timer recording
check/change/cancel
30
EPG timer setting
manual setting 29
Title List 32
33
Sort
Troubleshooting 47
“Tuning” 41
TV Pause
21
26,
24
V
Video cord 11
“Video Format” 43
42
“Video”
Video input 11
2-684-488-11(1)
Sony Corporation Printed in Taiwan
 Loading...