

Sony SVR-3000 User Guide
01_COV.book Page 1 Wednesday, July 10, 2002 3:33 PM
Digital Network Recorder
Installation Guide
Please use this manual first
3-078-316-01
SVR-3000
© 2002 by Sony Electronics Inc.

02_GET.fm Page 2 Friday, July 12, 2002 4:29 PM
Sony is a registered trade mark of Sony Corporation. TiVo, TV your way, TiVo Central, the TiVo logo, the series 2 logo, Season Pass are trademarks of
TiVo Inc. © 2002 Sony Electronics Inc.

02_GET.fm Page 3 Wednesday, August 7, 2002 1:13 PM
WARNING
To reduce the risk of fire or shock hazard, do not expose the unit to rain or moisture.
This symbol is intended to alert the user to the presence
of uninsulated “dangerous voltage” within the product’s
enclosure that may be of significant magnitude to
constitute a risk of electric shock to persons.
This symbol is intended to alert the user to the presence
of important operating and maintenance (servicing)
instructions in the literature accompanying the appliance.
Note to the CATV Installer
This reminder is provided to call the CATV system installer’s attention to
Article 820-40 of the NEC that provides guidelines for proper grounding and,
in particular, specifies that the cable ground shall be connected to the grounding
system of the building as close to the point of cable entry as practical.
Attention
Telephone Line Interruption
Periodically, the SVR Recorder dials in to the TiVo Personal TV Service, via your
telephone line using a toll free or local number. If you pick up your telephone
during the tim e information is being transferred, you will hear static noise. If you
would like to use your telephone while the information is being transferred you
can hang up and pick up your telephone again. The SVR Recorder will
disconnect and allow you to place your call. You can also interrupt the transfer
at any time by temporarily unplugging the phone line from the receiver.
You are cautioned that any changes or modifications not
expressly approved in this manual could void your authority to
operate this equipment.
The SVR Recorder is intended for use only within the United States.
Caution
To reduce the risk of fire, use only No. 26 AWG or larger telecommunication
line cord.
Owner’s Record
The model and serial numbers are located on the back of the SVR Recorder.
Record these numbers in the space provided below. Refer to these numbers
whenever you need to call your sales or service representative regarding
this product.
Model Number:
Serial Number:
TiVo Service Number: 110-
Customer Support
For Hardware and Installation
To arrange for the installation of your SVR Recorder, call the dealer from
whom you purchased your system.
For general information, or to resolve problems related to the operation of
your SVR Recorder, please contact your Sony dealer or visit Sony website
at http://www.sony.com/service. If your dealer or installer is unable to
answer your questions, call the Sony Direct Response Center at 1-877-585SONY (7669) or http://www.sel.sony.com/service.
TiVo Service and Activation
To use most of the features of your SVR Recorder, you will need to activate
the TiVo Service. You can activate the TiVo Service on the web at http://
www.tivo.com/activate, or by calling TiVo Customer Care at 1-877-367-
8486). TiVo Customer Care can also help you if you have questions about
your channel lineup, program guide data, or on screen messages.
Macrovision Information
This product incorporates copyright protection technology that is protected
by U.S. patents and other intellectual property rights. Use of this copyright
protection technology is granted by Macrovision for home and other
limited pay per view uses only. Reverse engineering or disassembly is
prohibited.
Note on Recording Programming
Programming may be recorded for home viewing only. All other recording
is expressly prohibited. Some programming may not be recorded. An
additional recording fee may be applied. Call your program providers for
details.
3

02_GET.fm Page 4 Wednesday, August 7, 2002 1:32 PM
IMPORTANT SAFETY INSTRUCTIONS
1 Read these instructions.
2 Keep these instructions.
3 Heed all warnings.
4 Follow all instructions.
5 Do not use this apparatus near water.
6 Clean only with dry cloth.
7 Do not block any ventilation openings. Install in accordance with the manufacturer’s
instructions.
8 Do not install near any heat sources such as radiators, heat resisters, stoves, or other apparatus
(including amplifiers) that produce heat.
9 Do not defeat the safety purpose of the polarized or grounding-type plug. A polarized plug
has two blades with one wider than the other. A grounding type plug has two blades and a
third grounding prong. The wide blade or the third prong are provided for your safety. If the
provided plug does not fit into your outlet, consult an electrician for replacement of the
obsolete outlet.
4
IMPORTANT SAFETY INSTRUCTIONS
10 Protect the power cord from being walked on or pinched particularly at plugs, convenience
receptacles, and the point where they exit from the apparatus.
11 Only use attachments/ accessories specified by the manufacturer.
12 Use only with the cart, stand, tripod, bracket, or table specified by the manufacturer, or sold
with the apparatus. When a cart is used, use caution when moving the cart/apparatus
combination to avoid injury from tip-over.
13 Unplug this apparatus during lighting storms or when unused for long periods of time.
14 Refer all servicing to qualified service personnel. Servicing is required when the apparatus
has been damaged in any way, such as power-supply cord or plug is damaged, liquid has
been spilled or objects have fallen into the apparatus, the apparatus has been exposed to rain
or moisture, does not operate normally, or has been dropped.

02_GET.fm Page 5 Wednesday, August 7, 2002 1:40 PM
When using your telephone equipment, basic safety precautions should always be
followed to reduce the risk of fire, electric shock and injury to persons, including the
following:
Do not use this product near water, for example, near a bath tub, wash bowl, kitchen sink or
15
laundry tub, in a wet basement or near a swimming pool.
16 Avoid using a telephone (other than a cordless type) during an electrical storm. There many
be a remote risk of electric shock from lightning.
17 Do not use the telephone to report a gas leak in the vicinity of the leak.
18 Use only the power cord and batteries indicated in this manual. Do not dispose of batteries
in a fire. They may explode. Check with local codes for possible special disposal
instructions.
IMPORTANT SAFETY INSTRUCTIONS
5
02_GET.fm Page 6 Wednesday, August 7, 2002 6:15 PM
Table of contents
Getting Started
7 Overview
8 Carton Contents
9 Parts, Controls, and Functions
9 Front Panel
10 Back Panel
11 Remote Control
13Installing Batteries
Connecting Your Equipment
15 Connection Examples
16 Example 1: Antenna or cable, with a VCR, and splitting the
signal
18 Example 2: Antenna or cable, with a VCR
20 Example 3: Antenna or cable, without a VCR
22 Example 4: Satellite set-top box with serial connection, and a
VCR, using S-Video cables
24 Example 5: Satellite set-top box with IR input, and a VCR,
using S-Video cables
About This Installation Guide
This Installation Guide is part of the complete documentation for your
SVR Recorder. This Installation Guide describes how to connect the
SVR Recorder and activate the TiVo Service. The Start Here poster provides
an easy to read summary of this Installation Guide. The TiVo Viewer’s
Guide provides detailed information about how to use your TiVo Service,
and how to use the different features of this product.
26 Example 6: Satellite or cable box with IR input, and a VCR,
using RF cables
28 Example 7: Satellite and antenna or cable, with a VCR
30 Example 8: Satellite and cable with boxes, with a VCR
32 Continuing Your Connection Steps
35 Back Panel Connections Reference
39 General Hints
Setting Up Your System
41 Programming Your Remote Control
Additional Information
45 Troubleshooting
51 Specifications
52 FCC Regulations and Information
The TiVo Viewer’s Guide and this Installation Guide contain some sections
with the same name, such as the Troubleshooting section, and similar or
related information. These sections are in fact different, but do relate to each
other. You will find information regarding connections and activating the
TiVo Service in this Installation Guide. You will find information about the
different features of the SVR Recorder, and using the TiVo Service, in the
TiVo Viewer’s Guide.
A Note provides information that may be necessary to complete the task.
Getting Started
6
01_COV.book Page 7 Wednesday, July 10, 2002 3:33 PM
Getting Started
Getting Started
Overview
Your SVR Recorder comes complete with everything you need to enjoy and enhance
your television viewing experience.
You’ll need to have a standard phone line (analog) for the SVR Recorder to use. You do
not need to install a new phone jack or phone number for the SVR Recorder to work.
However, the SVR Recorder should always be connected to your phone line.
You can find detailed instructions for connecting your SVR Recorder on the
Start Here poster and in “Connecting Your Equipment” on page 15.
1 Connect Your SVR Recorder.
Note
This Installation Guide describes how to connect
the SVR Recorder and activate the TiVo Service.
The Start Here poster provides an easy to read
summary of this Installation Guide. The TiVo
Viewer’s Guide provides detailed information
about how to use your TiVo Service.
2 Complete Guided Setup,
and activate your TiVo
Service.
Overview
7
01_COV.book Page 8 Wednesday, July 10, 2002 3:33 PM
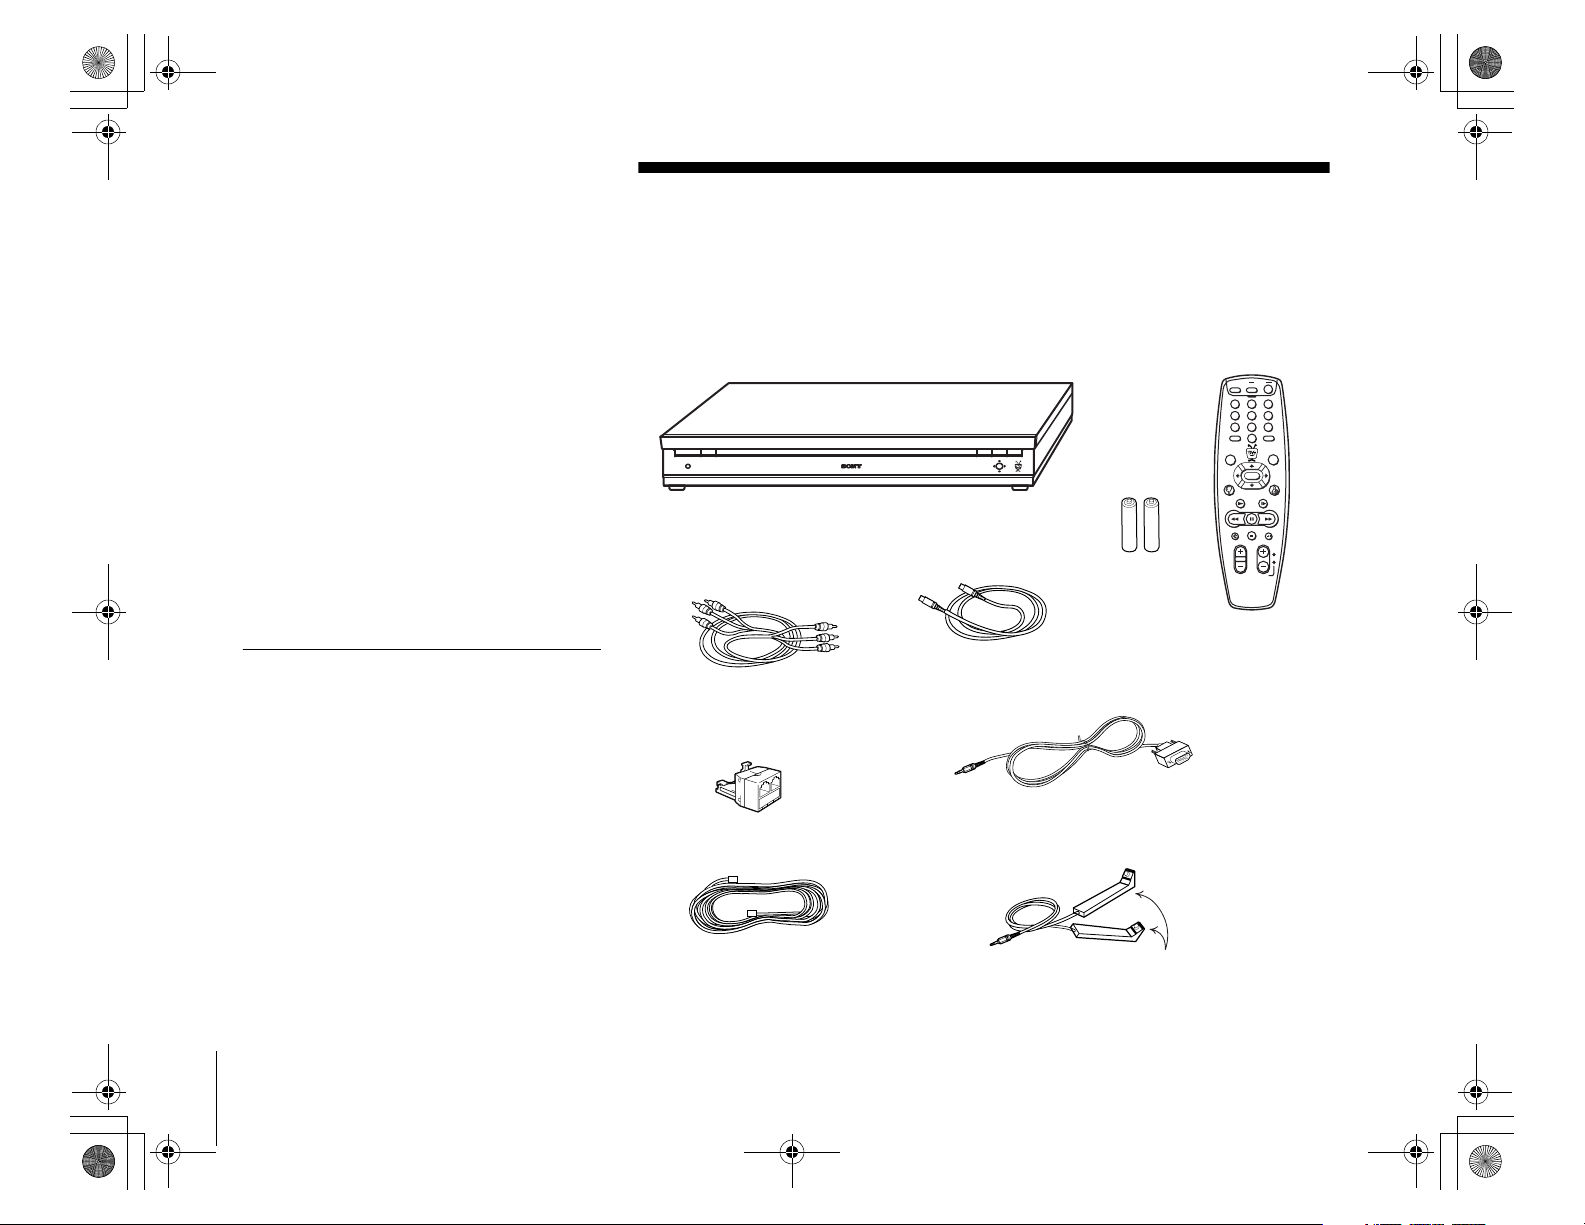
Carton Contents
Check your carton to make sure all of the following items are included. If you are
missing any items, contact your Sony dealer.
Notes
• Your SVR Recorder comes with 25 feet of
phone cord for you to use to connect to
your nearest phone jack. You don’t need a
dedicated phone line (your SVR Recorder
only needs to share the phone line for five
to ten minutes a day), but you may wish to
consider installing a jack nearby.
• Your SVR Recorder cannot be used with any
digital phone system. Doing so will damage
your SVR Recorder and void your warranty.
SVR Recorder
Audio/Video cables
Phone splitter
Phone cord
S-Video cable
Serial Control cable
IR Control cable
Remote Control
Size AA (R6)
batteries
IR Emitters
POWER
123
654
987
0
SELECT
8
Carton Contents
02_GET.fm Page 9 Wednesday, July 17, 2002 4:28 PM
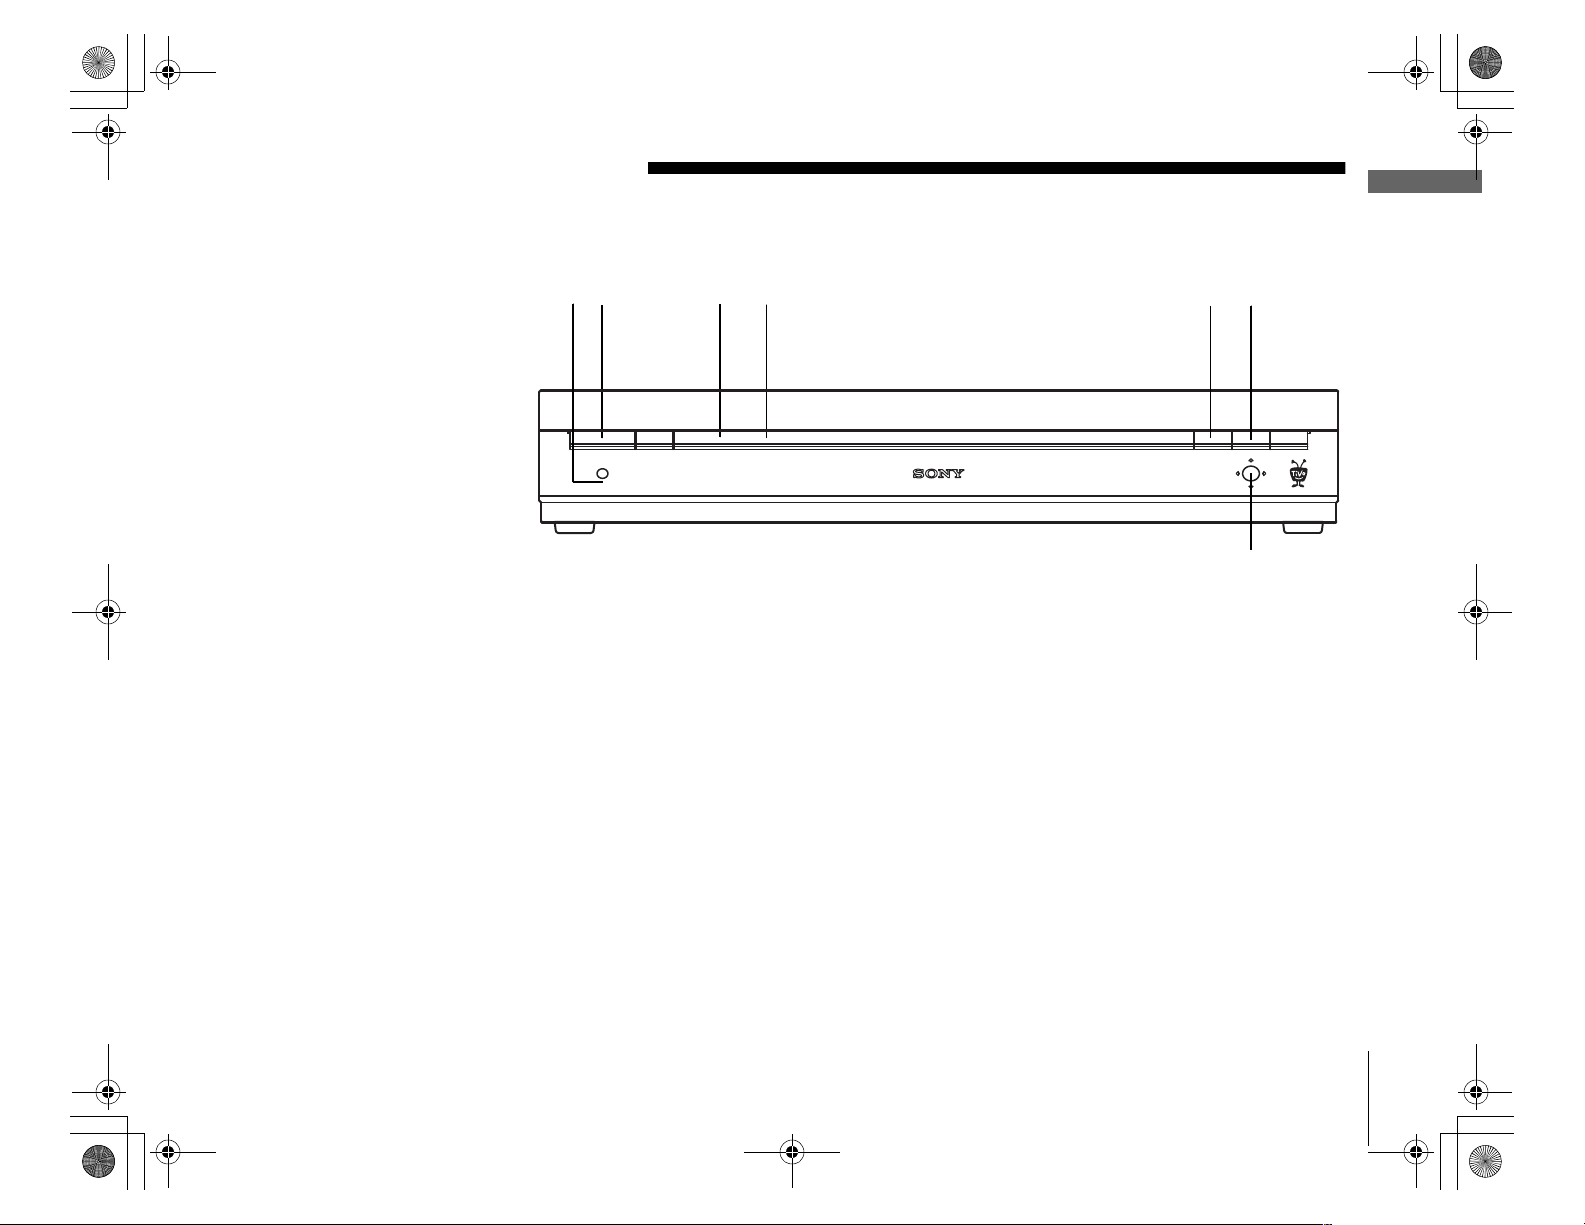
Parts, Controls, and Functions
Front Panel
4123
1 Power button/LED
Green indicates that the SVR Recorder is powered on.
B Connecting LED
Amber indicates that the SVR recorder is connecting to the telephone line.
C Remote Control Signal Reception Window
Receives control signals from your Remote Control.
D Recording LED
Red indicates that the SVR Recorder is recording a program.
Yellow indicates that the SVR Recorder is currently using the telephone line to call
the TiVo Service.
The LED may appear orange if the unit is both recording a program and using the
telephone line.
E LIVE TV/GUIDE button
Switches between live TV and program guide.
F SELECT buttons
Select (chooses) the currently highlighted item in a menu.
G Navigation arrows
Moves the highlighted area or cursor left, right, up, or down.
Parts, Controls, and Functions
5
6
7
Getting Started
9
02_GET.fm Page 10 Tuesday, July 16, 2002 8:58 PM
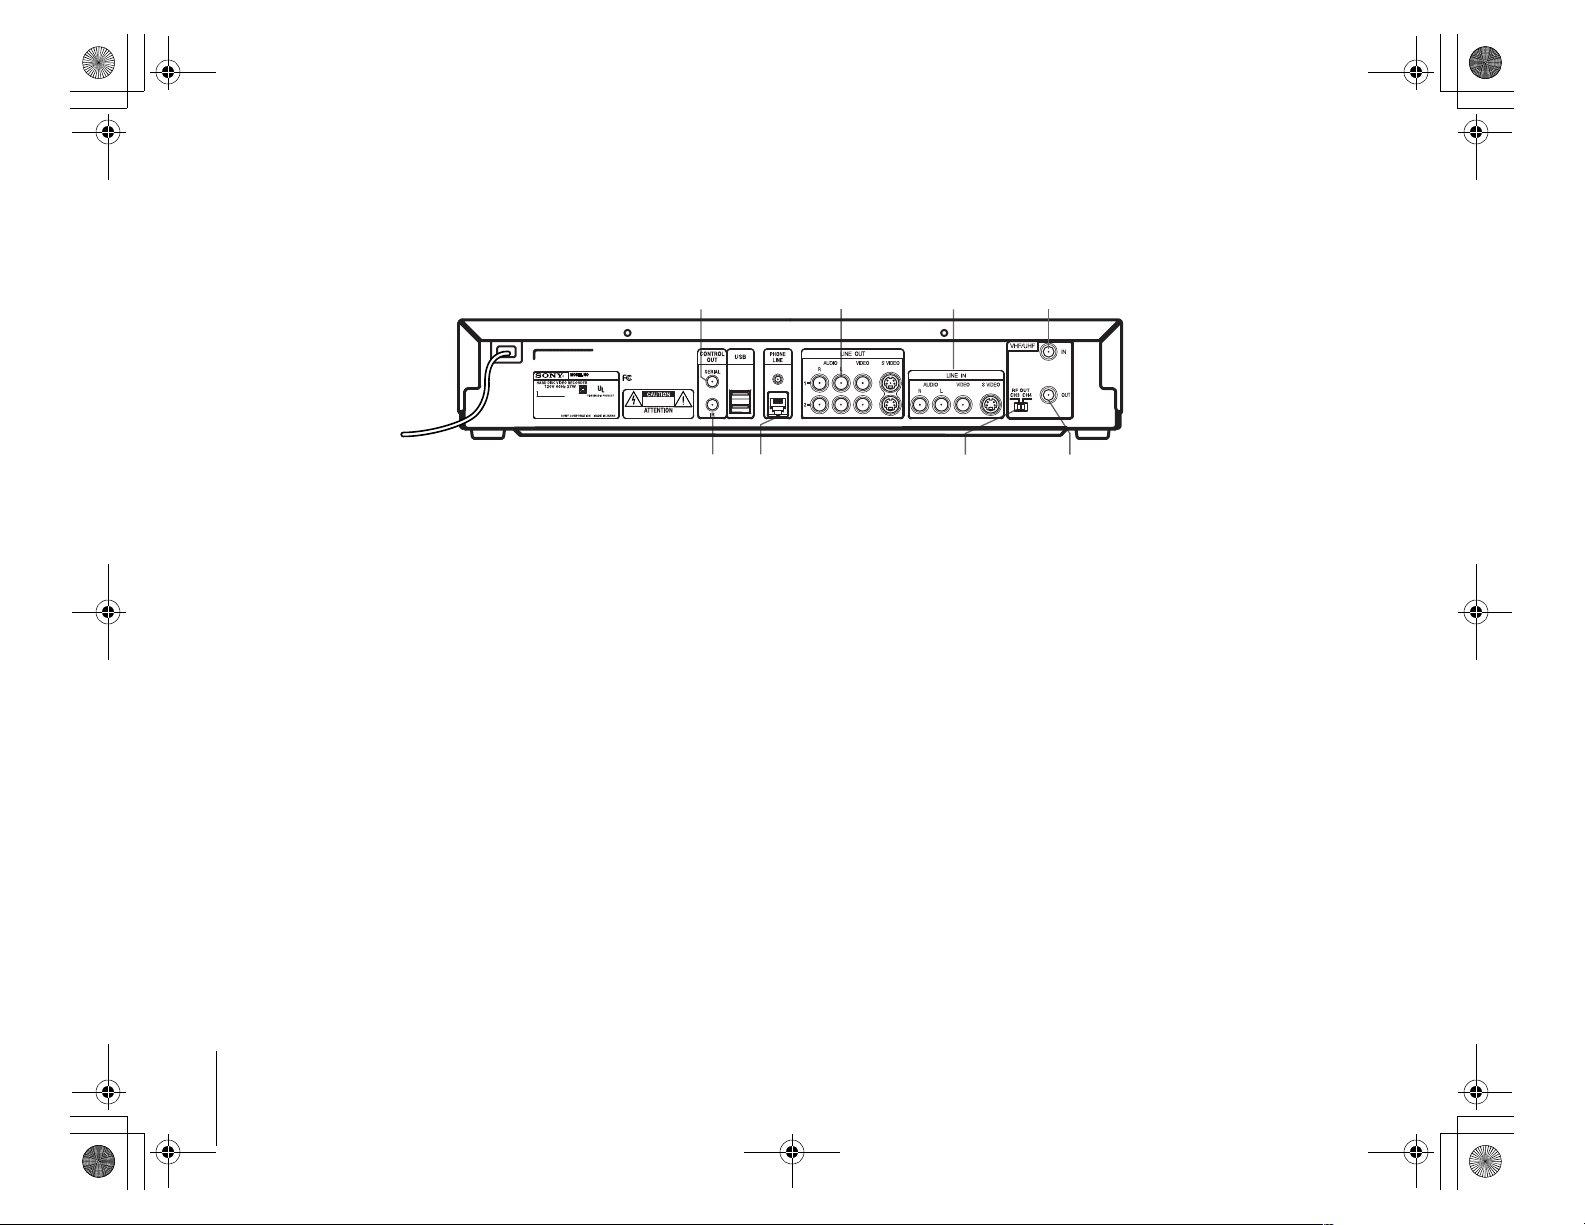
Back Panel
This section provides a brief explanation of the jacks and switch on the back panel and where they are located. You can find detailed
information about each jack and switch, and how it is used, on the page number indicated in parentheses.
1 Cntrl (control) Out Serial jack
Connect to your satellite set-top box so the SVR Recorder can
change channels on your satellite set-top box (see page 35).
B A/V Input jacks
a)
Connect the right (red) and left (white) jacks to the cable box or
satellite receiver audio output jacks of the same color (see page 36).
b) Connect the composite video (yellow) jack to the cable box or
satellite receiver composite video output (see page 36).
c) Connect the S-Video jack to the cable box or satellite receiver
S-Video output jack if available. This connection provides a
better picture than the composite video connection (see page 37).
C A/V Output jacks
a) Connect the right (red) and left (white) jacks to the TV, VCR and/
or audio system audio input jacks of the same color (two sets
available) (see page 37).
b) Connect the composite video (yellow) jack to the TV and/or VCR
composite video input (two jacks available) (see page 37).
c) Connect the S-Video jack to the TV S-Video input jack if
available. This connection provides a better picture than the
composite video connection (see page 37).
7
3
21
8
D RF In
Connect to your off-air antenna or cable service if you do not
have a digital satellite receiver or cable box so the
SVR Recorder can receive sound and pictures (see page 38).
E RF Out
Connect to your TV if your TV does not have A/V inputs so
you can view sound and pictures (see page 38).
F Ch 3|4 switch
Set to the channel that does not broadcast a station in your
area. Tune your TV to this channel to view sound and pictures
from the SVR Recorder if you connected your TV using
RF Out (see page 38).
G Cntrl (control) Out IR jack
Connect to your satellite or cable set-top box so the SVR
Recorder can change channels on your satellite or cable
set-top box (see page 35).
H Phone Line jack
Connect to your phone line so the SVR Recorder can receive
program and other information from the TiVo Service
(see page 35).
6
4
5
10
Parts, Controls, and Functions
01_COV.book Page 11 Wednesday, July 10, 2002 3:33 PM
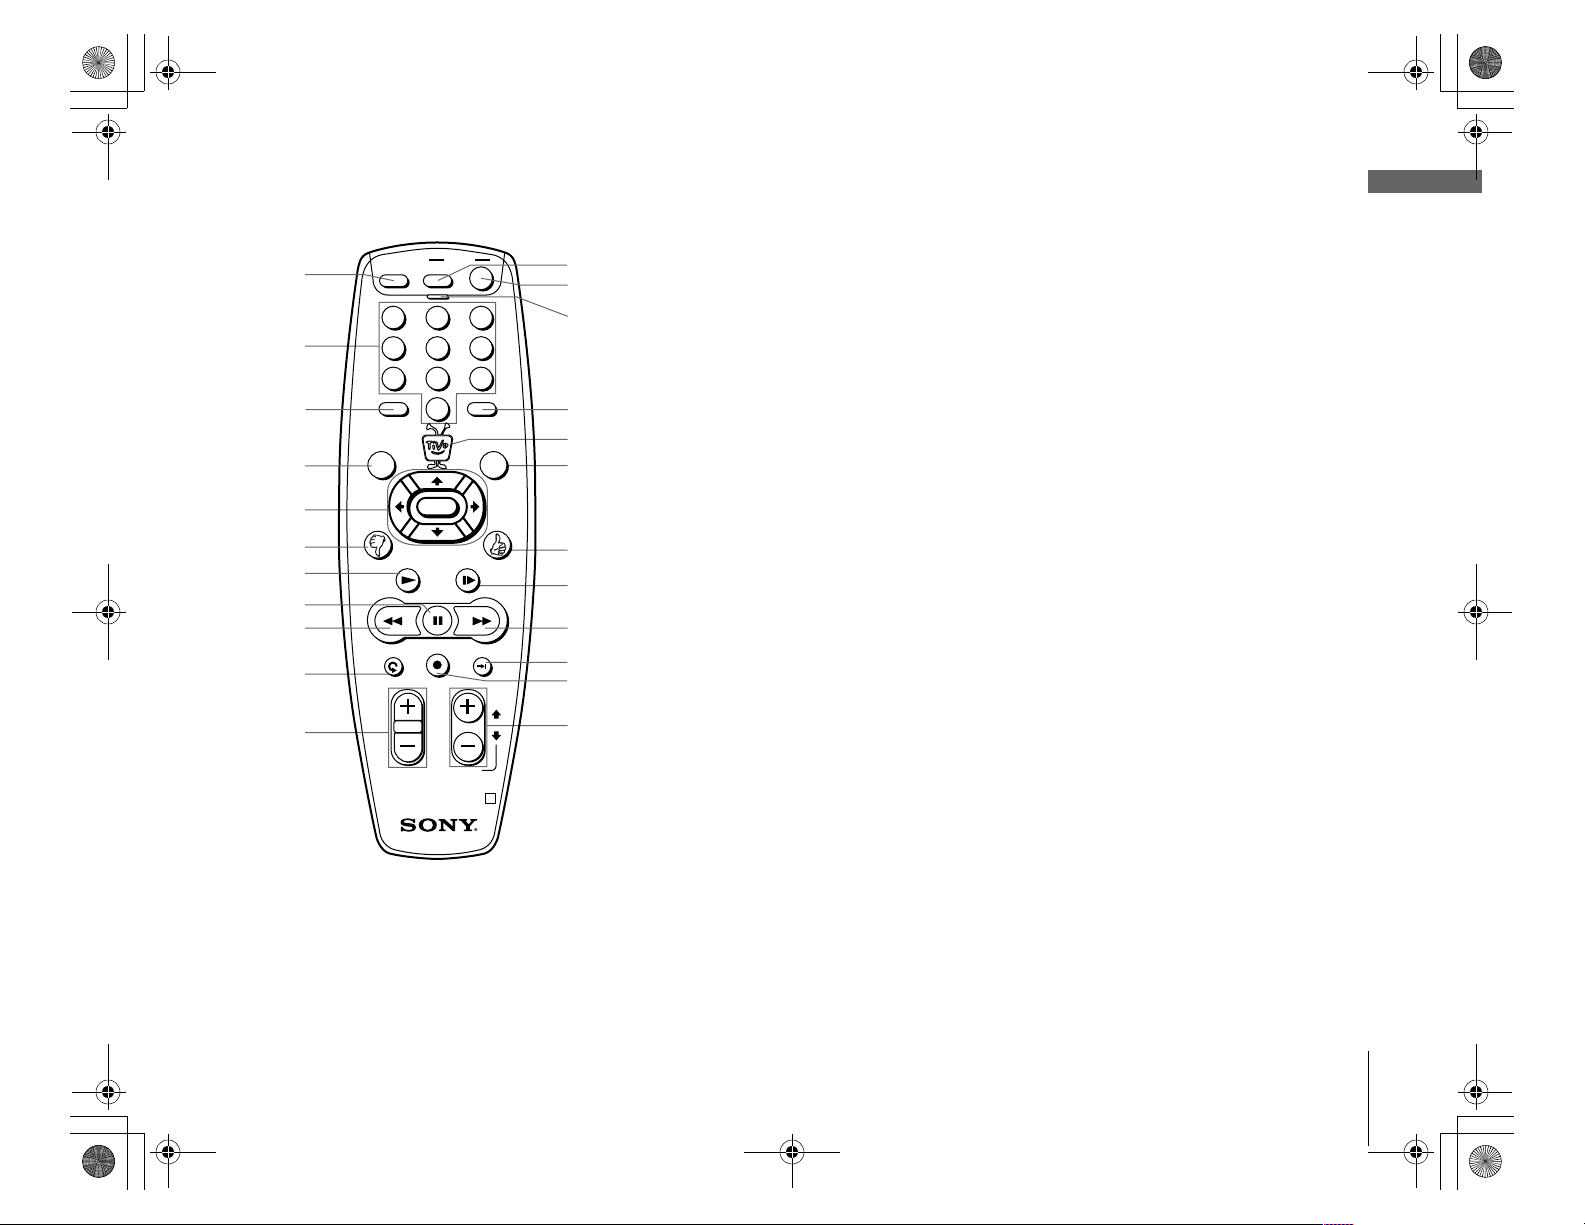
1
2
3
4
5
6
7
8
9
q;
MUTING TV
LIST
BACK
REPLAY
POWER
123
654
987
ENTERCLEAR
0
JUMP
LIVE TV
GUIDE
SELECT
PLAY SLOW
PAUSE FWD
REC ON/OFF
ADVANCE
VOL CH
qa
PAGE
RMT-V303 R
qs
qd
qf
qg
qh
qj
qk
ql
w;
wa
ws
wd
Remote Control
Use the Remote Control to complete Guided Setup and activate your TiVo Service. For
complete instructions on how to use the Remote Control, refer to the TiVo Viewer’s Guide.
1 MUTING button
Mutes the sound of your TV. See “Programming Your Remote Control” on page 41
to set up the Remote Control to operate your TV.
B Number keys
Enter numbers for changing channels and entering setup information.
C CLEAR button
Closes the Program Banner and Status Bar, and clears the text characters you enter
in any text entry box.
D LIST button
Opens the “Now Playing List” of recorded programs.
E Navigation arrows and SELECT buttons
Moves the highlighted area or cursor left, right, up, or down, and chooses (selects)
the currently highlighted item in a menu.
F Thumbs Down button
Use to indicate that you don’t like a program. You can apply up to three thumbs
down for any program.
G PLAY button
Plays a program at normal speed.
H PAU S E but t on
Pauses playback. Once in pause mode, you can use the BACK and FWD (forward)
buttons to reverse or advance frame-by-frame.
Getting Started
I BACK button
Plays a program in reverse fast search mode. Shows a program in reverse
frame-by-frame when in pause mode.
J (Instant) REPLAY button
Replays the previous eight seconds of the current program.
K VOL (volume) +/– buttons
Controls the volume of your TV. See “Programming Your Remote Control” on
page 51 to set up the Remote Control to operate your TV or audio system.
Parts, Controls, and Functions
11

01_COV.book Page 12 Wednesday, July 10, 2002 3:33 PM
L TV POWER button
Turns your TV or audio system on and off. See “Programming Your Remote
Control” on page 41 to set up the Remote Control to operate your TV.
M (Stand-by) POWER button
Puts your SVR Recorder into and out of stand-by mode. When in stand-by mode,
the unit can record selected and suggested programs and connect to the TiVo
Service as needed.
N Remote Active LED
Flashes while the Remote Control is transmitting signals or being programmed.
O ENTER/JUMP button
Sets the currently entered number as the channel to watch, or jumps back to the
previously set channel.
P TiVo button
Opens TiVo Central, which provides access to features and options.
Q LIVE TV/GUIDE button
Switches between live TV and program guide.
R Thumbs Up button
Use to indicate that you like a program. You can apply up to three thumbs up for
any program.
12
Parts, Controls, and Functions
S SLOW button
Plays a program in slow speed.
T FWD (forward) button
Plays a program in fast search mode. Shows a program frame-by-frame when in
pause mode.
U ADVANCE button
Advances the viewing of a program either to the end of a recorded program or to
the current time in LIVE TV.
V REC (record) ON/OFF button
Starts or stops recording of the current program.
W CH (channel) +/– or PAGE buttons
Changes the SVR Recorder’s program channel shown on your TV. Also pages up
and down in channel and program listing guides.

01_COV.book Page 13 Wednesday, July 10, 2002 3:33 PM
Notes
• When the batteries become weak, the
Remote Active LED flashes. If the Remote
Control does not work properly, the
batteries may be weak.
• When replacing batteries, replace both
batteries with new ones. Do not mix
different types of batteries together.
Installing Batteries
Before you can use the Remote Control, you must insert the supplied batteries. If you
want to use this Remote Control to operate other audio/video equipment, such as a TV
or stereo, you must program the Remote Control (see page 41).
Pull the latch and lift the cover to open the battery
1
compartment.
Insert two size AA batteries (supplied).
2
Be sure to match the + and – marks on the batteries with the + and – marks inside
the battery compartment.
Getting Started
• When you remove the batteries, any
manufacturer codes you’ve programmed
may be erased. To program the Remote
Control again, see “Programming Your
Remote Control” on page 41.
Close the cover.
3
Insert the tabs on the cover into the gaps in the rear of the battery compartment.
Then, lower the cover onto the Remote Control until you hear the latch click.
Parts, Controls, and Functions
13

01_COV.book Page 14 Wednesday, July 10, 2002 3:33 PM

01_COV.book Page 15 Wednesday, July 10, 2002 3:33 PM
Connecting Your Equipment
Connecting Your Equipment
Connection Examples
This section provides examples showing how to connect the SVR Recorder to your
existing antenna, cable, satellite, or audio-visual system. Choose the example closest to
your configuration and follow the steps in that section.
Note
Your SVR Recorder is not designed for
carrying heavy loads such as a TV.
Structurally, the SVR Recorder is only
capable of supporting the weight of one or
two common consumer components such
as VCRs, DVD players or A/V Receivers
(provided they have four good, broad,
padded feet for distribution of the weight
near the corners of the SVR Recorder).
Example 1: Antenna or cable, with a VCR, and splitting the signal (see page 16)
Example 2: Antenna or cable, with a VCR (see page 18)
Example 3: Antenna or cable, without a VCR (see page 20)
Example 4: Satellite set-top box with serial connection, and a VCR, using S-Video
cables (see page 22)
Example 5: Satellite set-top box with IR input, and a VCR, using S-Video cables
(see page 24)
Example 6: Satellite or cable box with IR input, and a VCR, using RF cables (see
page 26)
Example 7: Satellite and antenna or cable, with a VCR (see page 28)
Example 8: Satellite and cable with boxes, with a VCR (see page 30)
If you have trouble or if your configuration isn’t covered by one of these examples, see
“Back Panel Connections Reference” on page 35.
If you have a more advanced system (perhaps including a stereo game system, laser
disc player, or switch box), see “General Hints” on page 39.
Equipment
Connecting Your
Connection Examples
15
Not
03_hookup.fm Page 16 Tuesday, July 16, 2002 9:02 PM
e
If you have cable with a set-top box and if
you want to split the signal, use the following
procedure.
1 Attach the RF splitter to the RF Coaxial
cable coming out of the wall, before it
connects to the cable box.
2 Connect one of the RF Coaxial cables
coming from the RF splitter to the RF In
jack on the back of your set-top box.
3 Connect the set-top box’s RF Out jack to
the SVR Recorder’s RF In jack using an
RF Coaxial cable. This will let the SVR
Recorder record your premium channels
normally.
4 Attach the other RF Coaxial cable coming
from the RF splitter to your TV or VCR’s
RF In. You won’t be able to watch
premium channels with this connection,
but other channels will work fine if your
TV or VCR is cable-ready (which most
are).
Example 1: Antenna or cable, with a VCR, and splitting the signal
Splitter
OUT
IN
OUT
SVR
Recorder
Antenna
Audio
VCR
TV
A
B
Audio Video S-Video
RL
OUT
Antenna In
In
RL
Video
IN
Ch
3/4
or
RF
Out
Optional
16
Connection Examples

01_COV.book Page 17 Wednesday, July 10, 2002 3:33 PM
Notes
• Make sure that all of your TV equipment
is turned off, including unplugging your
SVR Recorder.
• If your TV has only one audio jack instead
of two, connect just the white audio
cable, and leave the red audio cable
disconnected.
Use this example if you have an antenna or cable without a set-top box, you have a
VCR, and you want to split your signal to watch one program while you record another.
You’ll need to purchase an RF signal splitter or switch box and at least two extra RF cables
at your local electronics store.
Connect the program source cable to the SVR Recorder using
1
the splitter.
The program source cable is the cable that your cable company installed, or the
one that’s connected to your antenna.
If your TV or VCR can accept multiple inputs, use an RF signal splitter. Once
connected, you can switch between watching your SVR Recorder and watching
your VCR or TV by changing the “Input” or “Source” on your TV using the
appropriate button on your TV’s remote.
Attach your existing program source cable to the Input section of the RF splitter.
Then connect the splitter to the RF In jack on the back of the SVR Recorder using
an RF Coaxial cable.
Connect the other splitter output to your TV.
2
Use another RF Coaxial cable to connect the other output of the splitter directly to
your TV.
Once connected, you can switch between watching TiVo and watching TV in
bypass mode using your TV’s “Input”, “Source”, or “TV/Video” button (on either
your TV or the TV’s remote).
Continue.
3
Now continue with step 3 on page 32.
Equipment
Connecting Your
Connection Examples
17
03_hookup.fm Page 18 Tuesday, July 16, 2002 9:03 PM
Note
Make sure that all of your TV equipment is
turned off, including unplugging your SVR
Recorder.
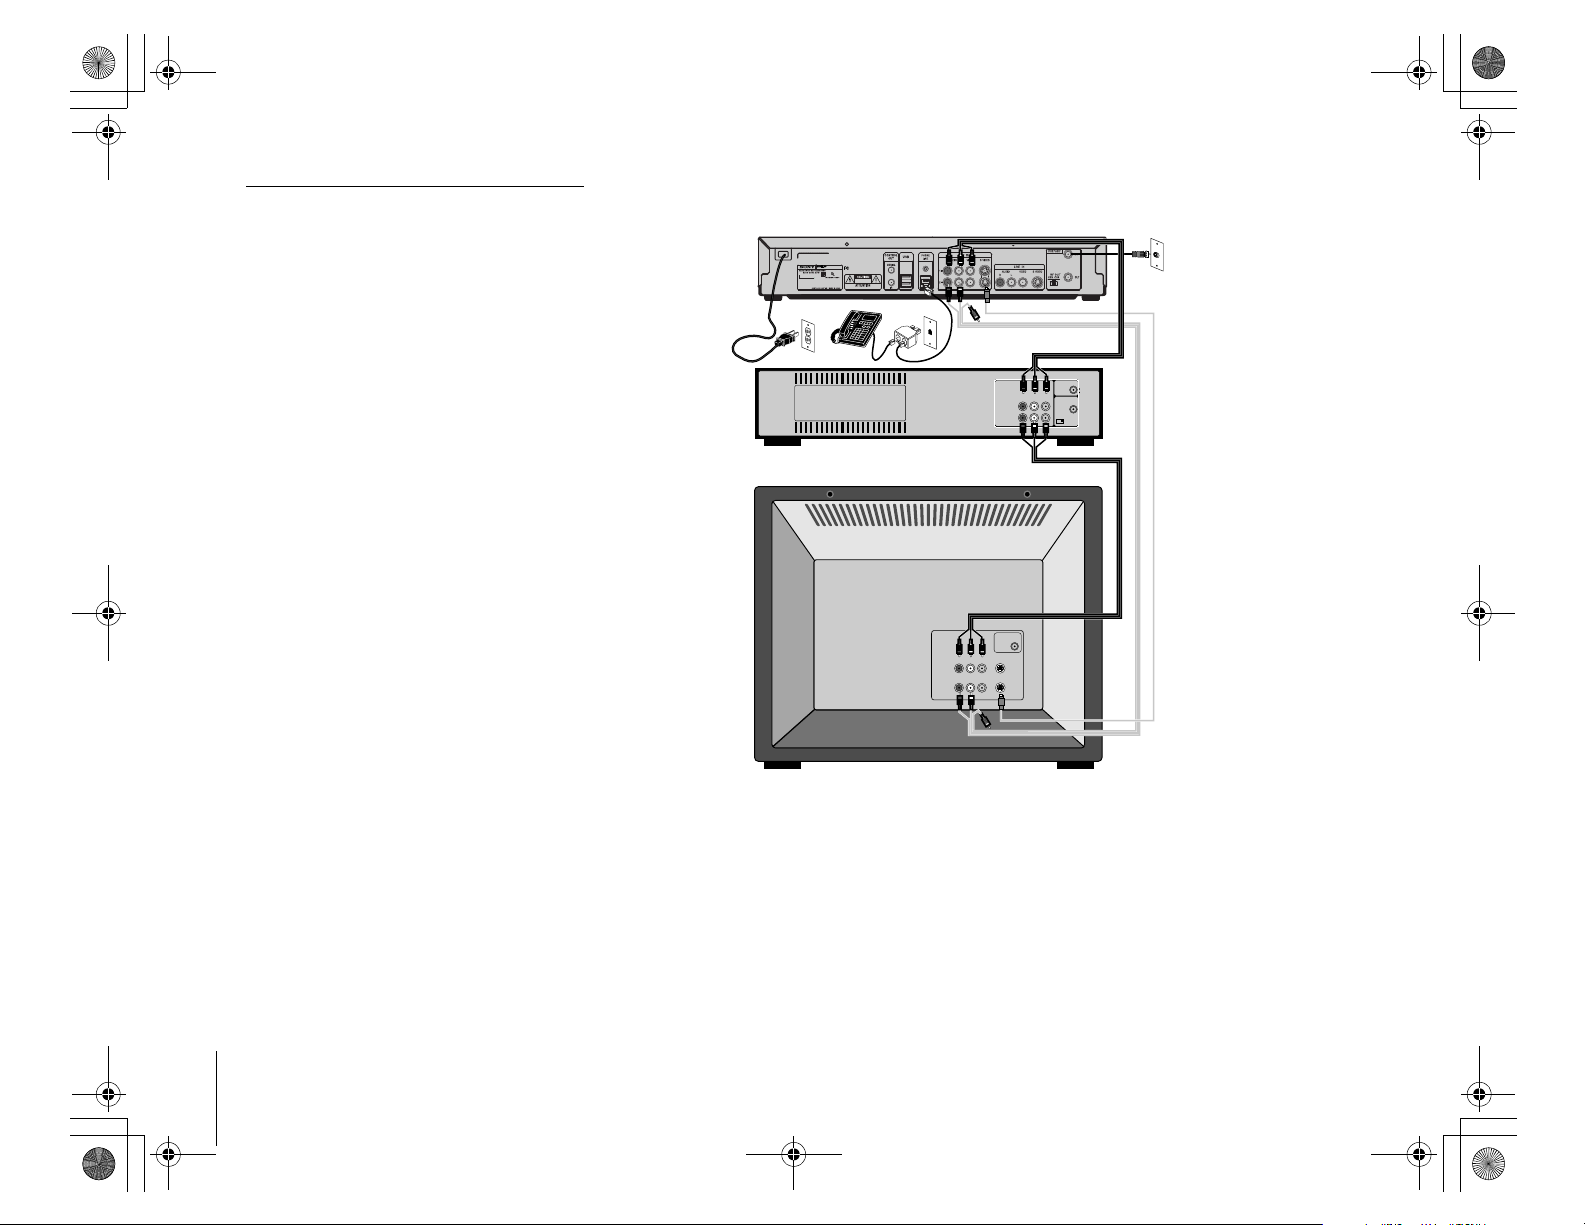
Example 2: Antenna or cable, with a VCR
SVR
Recorder
Audio
RL
VCR
TV
A
B
Audio Video S-Video
RL
OUT
Antenna In
Video
IN
Antenna
In
Ch
3/4
RF
Out
Optional
18
Connection Examples
 Loading...