

Page 1

3-060-082-01 (1)
©2000 by Sony Corporation. Reproduction in whole or in part
without written permission is prohibited. All rights reserved.
Please use this manual first.
Page 2

TiVo, TiVo Central, and the TiVo logo are trademarks of TiVo Inc. 2000 TiVo Inc.
All rights reserved. TiVo Inc., 894 Ross Drive, Sunnyvale, CA 94089.
Page 3

WARNING
To reduce the risk of fire or shock hazard, do not expose the unit to rain or
moisture.
This symbol is intended to alert the user to the presence
of uninsulated “dangerous voltage” within the product’s
enclosure that may be of significant magnitude to
constitute a risk of electric shock to persons.
This symbol is intended to alert the user to the presence
of important operating and maintenance (servicing)
instructions in the literature accompanying the appliance.
Note to the CATV Installer
This reminder is provided to call the CATV system installer’s attention to
Article 820-40 of the NEC that provides guidelines for proper grounding
and, in particular, specifies that the cable ground shall be connected to the
grounding system of the building as close to the point of cable entry as
practical.
Attention
Telephone Line Interruption
Periodically, the SVR Recorder dials in to the TiVo Personal TV Service, free
of charge, via your telephone line using a toll free or local number. If you
pick up your telephone during the time information is being transferred,
you will hear static noise. If you would like to use your telephone while the
information is being transferred you can hang up and pick up your
telephone again. The SVR Recorder will disconnect and allow you to place
your call. You can also interrupt the transfer at any time by temporarily
unplugging the phone line from the receiver.
You are cautioned that any changes or modifications not
expressly approved in this manual could void your authority to
operate this equipment.
The SVR Recorder is intended for use only within the United States.
Owner’s Record
The model and serial numbers are located on the back of the SVR Recorder.
Record these numbers in the space provided below. Refer to these numbers
whenever you need to call your sales or service representative regarding
this product.
Model Number:
Serial Number:
Customer Support
For Hardware and Installation
To arrange for the installation of your SVR Recorder, call the dealer from
whom you purchased your system.
For general information, or to resolve problems related to the operation of
your SVR Recorder, please contact your Sony dealer. If your dealer or
installer is unable to answer your questions, call the Sony Direct Response
Center at 1-877-585-SONY (7669).
For Programming (TiVo Service and Activation)
To use most of the features of your SVR Recorder, you will need to activate
the TiVo Service (page 50). You can activate the TiVo Service on the web at
http://www.tivo.com/activate, or by calling TiVo Customer Care at 1-877For-TiVo (877-367-8486). TiVo Customer Care can also help you if you have
questions about your channel lineup, program guide data, or on screen
messages.
Macrovision Information
This product incorporates copyright protection technology that is protected
by U.S. patents and other intellectual property rights. Use of this copyright
protection technology is granted by Macrovision for home and other
limited pay per view uses only. Reverse engineering or disassembly is
prohibited.
Note on Recording Programming
Programming may be recorded for home viewing only. All other recording
is expressly prohibited. Some programming may not be recorded. An
additional recording fee may be applied. Call your program providers for
details.
3
Page 4

Page 5

Table of contents
Getting Started
7 Overview
8 Carton Contents
9 Parts, Controls, and Functions
9 Front Panel
10 Back Panel
11 Remote Control
13Installing Batteries
Connecting Your Equipment
15 Connection Examples
16 Example 1: Antenna or cable, with a VCR, and splitting the
signal
18 Example 2: Antenna or cable, with a VCR
20 Example 3: Antenna or cable, without a VCR
22 Example 4: Satellite set-top box with serial connection, and a
VCR, using S-Video cables
24 Example 5: Satellite set-top box with IR input, and a VCR,
using S-Video cables
About This Setup Guide
This Setup Guide is part of the complete documentation for your
SVR Recorder. This Setup Guide describes how to connect the
SVR Recorder and activate the TiVo Service. The Start Here poster provides
an easy to read summary of this Setup Guide. The TiVo Viewer’s Guide
provides detailed information about how to use your TiVo Service, and how
to use the different features of this product.
26 Example 6: Satellite or cable box with IR input, and a VCR,
using RF cables
28 Example 7: Satellite and antenna or cable, with a VCR
30 Example 8: Satellite and cable with boxes, with a VCR
32 Continuing Your Connection Steps
35 Back Panel Connections Reference
39 General Hints
Setting Up Your System
41 Guided Setup
50 Activating the TiVo Service
51 Programming Your Remote Control
Additional Information
55 Troubleshooting
61 Specifications
62 FCC Regulations and Information
The TiVo Viewer’s Guide and this Setup Guide contain some sections with
the same name, such as the Troubleshooting section, and similar or related
information. These sections are in fact different, but do relate to each other.
You will find information regarding connections and activating the TiVo
Service in this Setup Guide. You will find information about the different
features of the SVR Recorder, and using the TiVo Service, in the TiVo
Viewer’s Guide.
A Note provides information that may be necessary to complete the task.
Getting Started
5
Page 6

Page 7
Getting Started
Getting Started
Overview
Your SVR Recorder comes complete with everything you need to enjoy and enhance
your television viewing experience.
You’ll need to have a standard phone line (analog) for the SVR Recorder to use. You do
not need to install a new phone jack or phone number for the SVR Recorder to work.
However, the SVR Recorder should always be connected to your phone line.
You can find detailed instructions for connecting your SVR Recorder on the
Start Here poster and in “Connecting Your Equipment” on page 15.
1 Connect Your SVR Recorder.
Note
This Setup Guide describes how to connect the
SVR Recorder and activate the TiVo Service. The
Start Here poster provides an easy to read
summary of this Setup Guide. The TiVo Viewer’s
Guide provides detailed information about how to
use your TiVo Service.
2 Complete Guided Setup,
and activate your TiVo
Service.
Overview
7
Page 8

Carton Contents
Check your carton to make sure all of the following items are included. If you are
missing any items, contact your Sony dealer.
Notes
• Your SVR Recorder comes with 50 feet of
phone cord for you to use to connect to
your nearest phone jack. You don’t need a
dedicated phone line (your SVR Recorder
only needs to share the phone line for five
to ten minutes a day), but you may wish to
consider installing a jack nearby.
SVR Recorder
Remote Control
123
Size AA (R6)
batteries
RF Coaxial cableAC power cord
S-Video cable
Serial Control cable
Audio/Video cables
Phone splitter
RCA Home Control cable IR Control cable
Phone cord
Serial adapter
POWER
654
987
0
SELECT
• Your SVR Recorder cannot be used with any
digital phone system. Doing so will damage
your SVR Recorder and void your warranty.
8
Carton Contents
IR Emitters
Page 9

Parts, Controls, and Functions
Front Panel
1 23
1 Receiving LED
Green indicates that the SVR Recorder is powered on.
Amber indicates that the SVR Recorder is receiving a signal from the Remote
Control.
The LED may appear yellow-green if the unit is both powered on and receiving a
signal from the Remote Control.
The LED turns off when you press POWER on the Remote Control to set the
Recorder to standby mode (see page 12, number 13).
Getting Started
B Remote Control Signal Reception Window
Receives control signals from your Remote Control.
C Recording LED
Red indicates that the SVR Recorder is recording a program.
Yellow indicates that the SVR Recorder is currently using the telephone line to call
the TiVo Service.
The LED may appear orange if the unit is both recording a program and using the
telephone line.
Parts, Controls, and Functions
9
Page 10
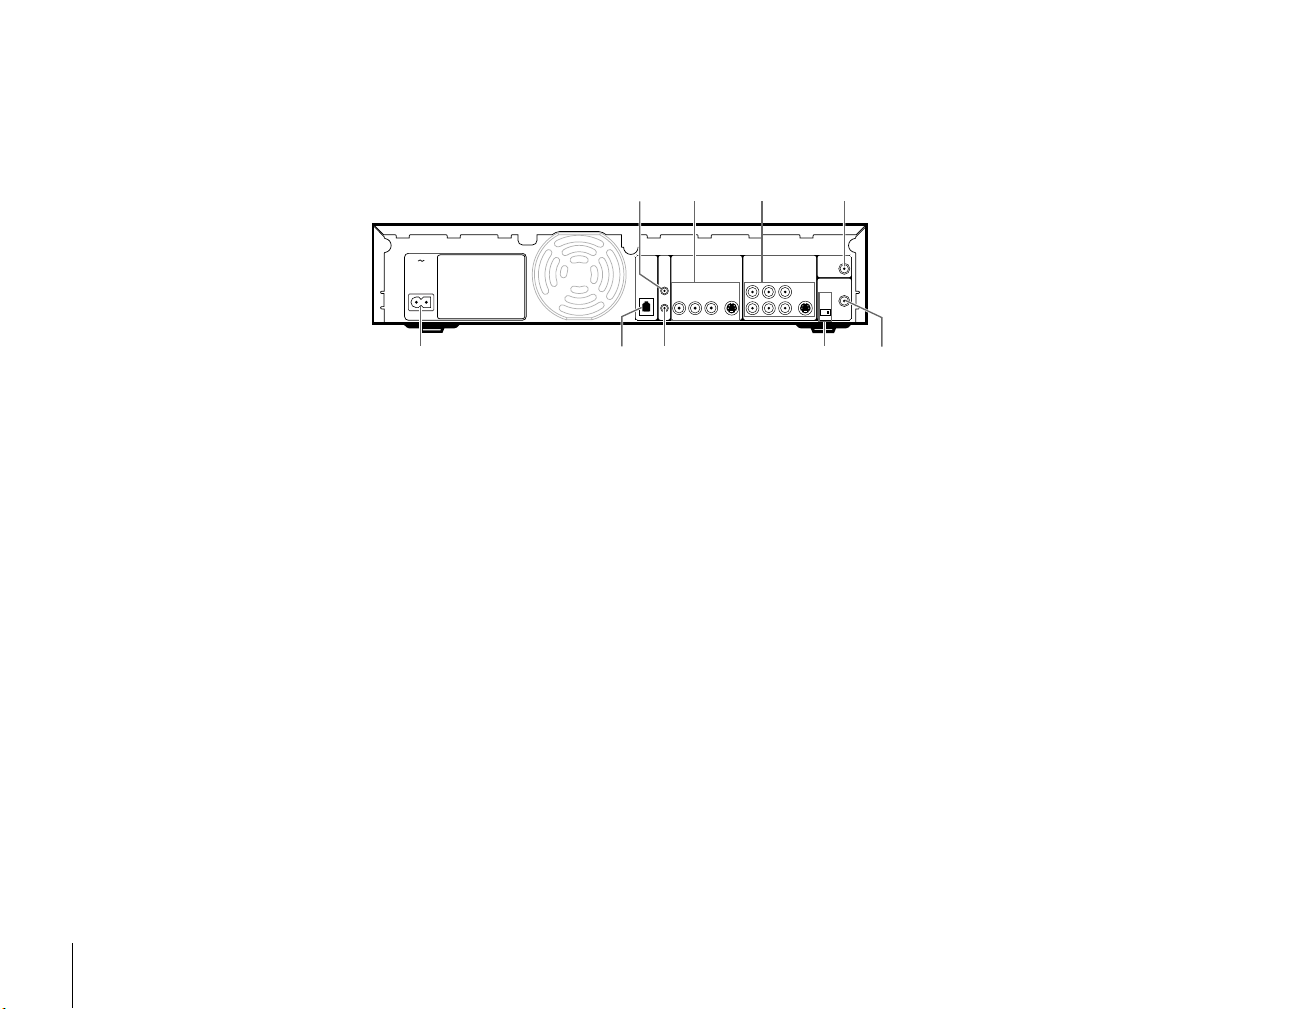
Back Panel
This section provides a brief explanation of the jacks and switch on the back panel and where they are located. You can find detailed
information about each jack and switch, and how it is used, on the page number indicated in parentheses.
1 Cntrl (control) Out Serial jack
Connect to your satellite set-top box so the SVR Recorder can
change channels on your satellite set-top box (see page 35).
B A/V Input jacks
a)
Connect the right (red) and left (white) jacks to the cable box or
satellite receiver audio output jacks of the same color (see page 36).
b) Connect the composite video (yellow) jack to the cable box or
satellite receiver composite video output (see page 36).
c) Connect the S-Video jack to the cable box or satellite receiver
S-Video output jack if available. This connection provides a
better picture than the composite video connection (see page 37).
C A/V Output jacks
a) Connect the right (red) and left (white) jacks to the TV, VCR and/
or audio system audio input jacks of the same color (two sets
available) (see page 37).
b) Connect the composite video (yellow) jack to the TV and/or VCR
composite video input (two jacks available) (see page 37).
c) Connect the S-Video jack to the TV S-Video input jack if
available. This connection provides a better picture than the
composite video connection (see page 37).
10
Parts, Controls, and Functions
9
21
InAC
8
Phone
Out
Line
Serial
Audio
RL
IR
7
3
Video
4
OutputsInputsCntrl
RF
In
Ch
S-VideoS-Video
3 | 4
RF
Out
6
5
D RF In
Connect to your off-air antenna or cable service if you do not
have a digital satellite receiver or cable box so the
SVR Recorder can receive sound and pictures (see page 38).
E RF Out
Connect to your TV if your TV does not have A/V inputs so
you can view sound and pictures (see page 38).
F Ch 3|4 switch
Set to the channel that does not broadcast a station in your
area. Tune your TV to this channel to view sound and pictures
from the SVR Recorder if you connected your TV using
RF Out (see page 38).
G Cntrl (control) Out IR jack
Connect to your satellite or cable set-top box so the SVR
Recorder can change channels on your satellite or cable
set-top box (see page 35).
H Phone Line jack
Connect to your phone line so the SVR Recorder can receive
program and other information from the TiVo Service
(see page 35).
I AC~In jack
Connect to an AC power outlet so the SVR Recorder can
receive power (see page 35).
Page 11
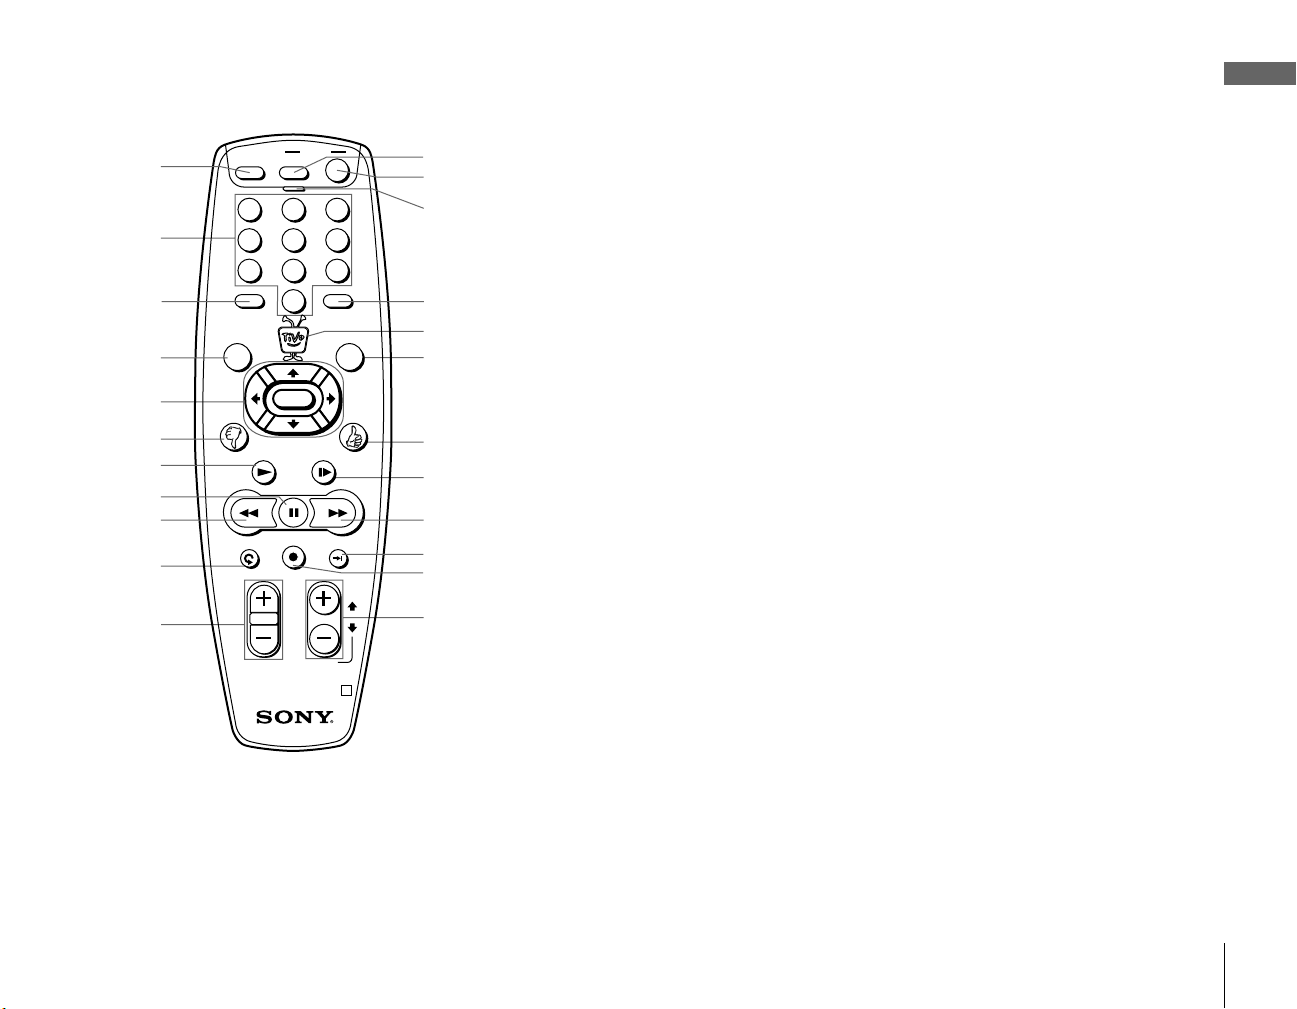
1
2
3
4
5
6
7
8
9
q;
qa
MUTING TV
LIST
BACK
REPLAY
POWER
123
0
SELECT
PLAY SLOW
PAUSE FWD
REC ON/OFF
VOL CH
RMT-V303 R
ENTERCLEAR
ADVANCE
PAGE
JUMP
654
987
LIVE TV
GUIDE
qs
qd
qf
qg
qh
qj
qk
ql
w;
wa
ws
wd
Remote Control
Use the Remote Control to complete Guided Setup and activate your TiVo Service. For
complete instructions on how to use the Remote Control, refer to the TiVo Viewer’s Guide.
1 MUTING button
Mutes the sound of your TV. See “Programming Your Remote Control” on page 51
to set up the Remote Control to operate your TV.
B Number keys
Enter numbers for changing channels and entering setup information.
C CLEAR button
Closes the Program Banner and Status Bar, and clears the text characters you enter
in any text entry box.
D LIST button
Opens the “Now Playing List” of recorded programs.
E Navigation arrows and SELECT buttons
Moves the highlighted area or cursor left, right, up, or down, and chooses (selects)
the currently highlighted item in a menu.
F Thumbs Down button
Use to indicate that you don’t like a program. You can apply up to three thumbs
down for any program.
G PLAY button
Plays a program at normal speed.
H PAU S E bu t to n
Pauses playback. Once in pause mode, you can use the BACK and FWD (forward)
buttons to reverse or advance frame-by-frame.
Getting Started
I BACK button
Plays a program in reverse fast search mode. Shows a program in reverse
frame-by-frame when in pause mode.
J (Instant) REPLAY button
Replays the previous eight seconds of the current program.
K VOL (volume) +/– buttons
Controls the volume of your TV. See “Programming Your Remote Control” on
page 51 to set up the Remote Control to operate your TV or audio system.
Parts, Controls, and Functions
11
Page 12

L TV POWER button
Turns your TV or audio system on and off. See “Programming Your Remote
Control” on page 51 to set up the Remote Control to operate your TV.
M (Stand-by) POWER button
Puts your SVR Recorder into and out of stand-by mode. When in stand-by mode,
the unit can record selected and suggested programs and connect to the TiVo
Service as needed.
N Remote Active LED
Flashes while the Remote Control is transmitting signals or being programmed.
O ENTER/JUMP button
Sets the currently entered number as the channel to watch, or jumps back to the
previously set channel.
P TiVo button
Opens TiVo Central, which provides access to features and options.
Q LIVE TV/GUIDE button
Switches between live TV and program guide.
R Thumbs Up button
Use to indicate that you like a program. You can apply up to three thumbs up for
any program.
S SLOW button
Plays a program in slow speed.
T FWD (forward) button
Plays a program in fast search mode. Shows a program frame-by-frame when in
pause mode.
U ADVANCE button
Advances the viewing of a program either to the end of a recorded program or to
the current time in LIVE TV.
12
Parts, Controls, and Functions
V REC (record) ON/OFF button
Starts or stops recording of the current program.
W CH (channel) +/– or PAGE buttons
Changes the SVR Recorder’s program channel shown on your TV. Also pages up
and down in channel and program listing guides.
Page 13

Notes
• When the batteries become weak, the
Remote Active LED flashes. If the Remote
Control does not work properly, the
batteries may be weak.
• When replacing batteries, replace both
batteries with new ones. Do not mix
different types of batteries together.
Installing Batteries
Before you can use the Remote Control, you must insert the supplied batteries. If you
want to use this Remote Control to operate other audio/video equipment, such as a TV
or stereo, you must program the Remote Control (see page 51).
Pull the latch and lift the cover to open the battery
1
compartment.
Insert two size AA batteries (supplied).
2
Be sure to match the + and – marks on the batteries with the + and – marks inside
the battery compartment.
Getting Started
• When you remove the batteries, any
manufacturer codes you’ve programmed
may be erased. To program the Remote
Control again, see “Programming Your
Remote Control” on page 51.
Close the cover.
3
Insert the tabs on the cover into the gaps in the rear of the battery compartment.
Then, lower the cover onto the Remote Control until you hear the latch click.
Parts, Controls, and Functions
13
Page 14

Page 15

Connecting Your Equipment
Connecting Your Equipment
Connection Examples
This section provides examples showing how to connect the SVR Recorder to your
existing antenna, cable, satellite, or audio-visual system. Choose the example closest to
your configuration and follow the steps in that section.
Note
Your SVR Recorder is not designed for
carrying heavy loads such as a TV.
Structurally, the SVR Recorder is only
capable of supporting the weight of one or
two common consumer components such
as VCRs, DVD players or A/V Receivers
(provided they have four good, broad,
padded feet for distribution of the weight
near the corners of the SVR Recorder).
The SVR Recorder is well-designed for
stacking since ventilation enters at the front
bottom edge of the SVR Recorder and exits
at mid-rear. This helps the SVR Recorder
“breathe in” cool air and “exhaust out” the
warm air at the rear where it’s least likely to
harm the other components in your A/V
stack.
Example 1: Antenna or cable, with a VCR, and splitting the signal (see page 16)
Example 2: Antenna or cable, with a VCR (see page 18)
Example 3: Antenna or cable, without a VCR (see page 20)
Example 4: Satellite set-top box with serial connection, and a VCR, using S-Video
cables (see page 22)
Example 5: Satellite set-top box with IR input, and a VCR, using S-Video cables
(see page 24)
Example 6: Satellite or cable box with IR input, and a VCR, using RF cables (see
page 26)
Example 7: Satellite and antenna or cable, with a VCR (see page 28)
Example 8: Satellite and cable with boxes, with a VCR (see page 30)
If you have trouble or if your configuration isn’t covered by one of these examples, see
“Back Panel Connections Reference” on page 35.
If you have a more advanced system (perhaps including a stereo game system, laser
disc player, or switch box), see “General Hints” on page 39.
Equipment
Connecting Your
Connection Examples
15
Page 16
Not
e
If you have cable with a set-top box and if
you want to split the signal, use the following
procedure.
Example 1: Antenna or cable, with a VCR, and splitting the signal
Splitter
OUT
IN
OUT
1 Attach the RF splitter to the RF Coaxial
cable coming out of the wall, before it
connects to the cable box.
2 Connect one of the RF Coaxial cables
coming from the RF splitter to the RF In
jack on the back of your set-top box.
3 Connect the set-top box’s RF Out jack to
the SVR Recorder’s RF In jack using an
RF Coaxial cable. This will let the SVR
Recorder record your premium channels
normally.
4 Attach the other RF Coaxial cable coming
from the RF splitter to your TV or VCR’s
RF In. You won’t be able to watch
premium channels with this connection,
but other channels will work fine if your
TV or VCR is cable-ready (which most
are).
SVR
Recorder
VCR
TV
RF
InAC
Phone
Out
Line
Serial
Audio
RL
IR
OutputsInputsCntrl
In
Video
OUT
S-VideoS-Video
Ch
3/4
RF
Out
Antenna
Audio
In
RL
Video
IN
Ch
3/4
or
RF
Out
Optional
Antenna In
Audio Video S-Video
A
RL
B
16
Connection Examples
Page 17

Notes
• Make sure that all of your TV equipment
is turned off, including unplugging your
SVR Recorder.
• If your TV has only one audio jack instead
of two, connect just the white audio
cable, and leave the red audio cable
disconnected.
Use this example if you have an antenna or cable without a set-top box, you have a
VCR, and you want to split your signal to watch one program while you record another.
You’ll need to purchase an RF signal splitter or switch box and at least two extra RF cables
at your local electronics store.
Connect the program source cable to the SVR Recorder using
1
the splitter.
The program source cable is the cable that your cable company installed, or the
one that’s connected to your antenna.
If your TV or VCR can accept multiple inputs, use an RF signal splitter. Once
connected, you can switch between watching your SVR Recorder and watching
your VCR or TV by changing the “Input” or “Source” on your TV using the
appropriate button on your TV’s remote.
Attach your existing program source cable to the Input section of the RF splitter.
Then connect the splitter to the RF In jack on the back of the SVR Recorder using
an RF Coaxial cable.
Connect the other splitter output to your TV.
2
Use another RF Coaxial cable to connect the other output of the splitter directly to
your TV.
Once connected, you can switch between watching TiVo and watching TV in
bypass mode using your TV’s “Input”, “Source”, or “TV/Video” button (on either
your TV or the TV’s remote).
Continue.
3
Now continue with step 3 on page 32.
Equipment
Connecting Your
Connection Examples
17
Page 18
Note
Make sure that all of your TV equipment is
turned off, including unplugging your SVR
Recorder.
Example 2: Antenna or cable, with a VCR
SVR
Recorder
VCR
InAC
Phone
Out
Line
Serial
Audio
RL
IR
OutputsInputsCntrl
Video
OUT
S-VideoS-Video
Audio
RL
Video
IN
Antenna
In
Ch
3/4
RF
Out
Antenna
In
Ch
3/4
RF
Out
Optional
18
Connection Examples
TV
A
B
Antenna In
Audio Video S-Video
RL
Page 19

Use this example if you have an antenna or cable without a cable box, and you have a
VCR, and you do not need to split your signal in order to watch one program while you
record another.
Find your program source cable.
1
The program source cable is the cable that your cable company installed, or the
one that’s connected to your antenna. This cable is probably already hooked up to
your VCR or TV; if so, disconnect it.
Connect your program source cable to the RF In jack on the
2
back of the SVR Recorder.
Continue.
3
Now continue with step 3 on page 32.
Equipment
Connecting Your
Connection Examples
19
Page 20

Note
Make sure that all of your TV equipment is
turned off, including unplugging your SVR
Recorder.
Example 3: Antenna or cable, without a VCR
Cable or Antenna
Antenna
Video
Video S-Video
Antenna In
OutputsInputsCntrl
In
S-VideoS-Video
Ch
3/4
RF
Out
SVR
Recorder
TV
InAC
Phone
Out
Line
Serial
Audio
RL
IR
Audio
RL
INPUT
20
Connection Examples
Page 21

Use this example if you have an antenna or cable without a cable box, or you do not
have a VCR.
Find your program source cable.
1
The program source cable is the cable that your cable company installed, or the
one that’s connected to your antenna. This cable is probably already hooked up to
your VCR or TV; if so, disconnect it.
Connect your program source cable to the RF In jack on the
2
back of the SVR Recorder.
Connect the SVR Recorder to your TV.
3
If your TV has a composite video input, connect an Audio/Video cable (supplied)
from the SVR Recorder Output to your TV’s Input. If not, connect the RF coaxial
cable (supplied) from the RF Out jack on the back of the SVR Recorder to RF In
on the back of your TV.
Continue.
4
Now continue with step 4 on page 34.
Equipment
Connecting Your
Connection Examples
21
Page 22

Notes
• Make sure that all of your TV equipment is
turned off, including unplugging your
SVR Recorder.
• You may need to use the serial adapter or
the RCA Home Control Cable (both
supplied) to connect to your set-top box’s
Serial Control jack. If you have a Serial
Control jack that doesn’t work with any of
the adapters we provide, use the Cntrl Out
IR jack and the IR Control cable instead.
Example 4: Satellite set-top box with serial connection, and a VCR,
using S-Video cables
Satellite
Receiver
SVR Recorder
VCR
Serial
Control
InAC
Phone
Out
Line
Serial
Audio
RL
Video
IR
Audio
IN
OUT
Audio
RL
RL
Outputs
OutputsInputsCntrl
Video S-Video
Video
Satellite
In
Ch
3/4
RF
Out
RF
In
S-VideoS-Video
Ch
3/4
RF
Out
Antenna
In
Ch
3/4
RF
Out
Optional
22
Connection Examples
TV
A
B
Antenna In
Audio Video S-Video
RL
Page 23

Note
A serial connection works better than IR, so
use serial when possible.
Use this example if you have a satellite set-top box with a serial connection, and your
satellite set-top box uses S-video cables.
Connect the SVR Recorder to your satellite set-top box.
1
Connect one end of the Serial Control cable (supplied) to the Cntrl Out Serial In
jack on the back of the SVR Recorder.
Your satellite set-top box may have two jacks that look like Serial Control jacks. If
so, use the one labeled “low speed data.” You may need to use the 9 to 25 pin
serial adapter (supplied) to match your jacks, or the RCA Home Control cable (for
some RCA boxes).
Connect your program source/video input to the SVR Recorder.
2
Disconnect any cables that you have connecting your satellite set-top box to your
VCR and/or TV. Use the S-Video cable (supplied) to connect the S-Video Out of
your satellite set-top box to the S-Video input on the back of the SVR Recorder.
You must also use the left (white) and right (red) Audio/Video cables to connect
the Audio Out on your satellite set-top box to Audio In on the back of the SVR
Recorder, as illustrated here.
Continue.
3
Now continue with step 3 on page 32.
Equipment
Connecting Your
Connection Examples
23
Page 24

Notes
• Make sure that all of your TV equipment
is turned off, including unplugging your
SVR Recorder.
• You may need to purchase a second
S-Video cable if one wasn’t supplied with
your satellite set-top box or VCR.
• Since your TV source comes from a box
that can only display one channel at a
time, it’s not possible for you to split
your signal and watch one channel on
your TV while the SVR Recorder records
a different channel.
Example 5: Satellite set-top box with IR input, and a VCR, using
S-Video cables
Antenna
Outputs
Satellite
Receiver
SVR
Recorder
VCR
InAC
Phone
Out
Line
Serial
Audio
RL
Video
IR
Audio
IN
OUT
Audio
RL
RL
OutputsInputsCntrl
Video S-Video
Video
In
Ch
3/4
RF
Out
RF
In
S-VideoS-Video
Ch
3/4
RF
Out
Antenna
In
Ch
3/4
RF
Out
Optional
24
Connection Examples
TV
A
B
Antenna In
Audio Video S-Video
RL
Page 25

Use this example if you have a satellite set-top box and VCR, no Serial Control jack,
and your satellite set-top box uses S-Video cables.
Connect the SVR Recorder to your satellite box.
1
Since you use a satellite set-top box to receive your television signal, the SVR
Recorder needs to be able to change channels on your box in order to record
shows and display live TV.
Connect the SVR Recorder to the infrared (IR) receiver of your satellite set-top
box using the IR Control cable (supplied). Start by plugging the IR Control cable
into the Cntrl Out IR jack on the back of the SVR Recorder. Next, locate the IR
receiver on your satellite set-top box – it’s usually a small dark red window or
button on the front of the box.
Place the IR Emitter (from the IR Control cable) on top of the satellite set-top box,
sticking out slightly. The IR Emitter has an adhesive strip so you can adhere it to
the set-top box. If it is not possible to stick the IR Emitter directly onto the
window, place it in front of or as close as possible to the window.
Connect your program source/video input to the SVR Recorder.
2
Disconnect any cables that you have connecting your satellite set-top box to your
VCR and/or TV. Use the S-Video cable (supplied) to connect the S-Video Out of
your satellite set-top box to the S-Video input on the back of the SVR Recorder.
You must also use the left (white) and right (red) Audio/Video cables to connect
the Audio Out on your satellite set-top box to the Audio In on the back of the SVR
Recorder, as illustrated here.
Continue.
3
Now continue with step 3 on page 32.
Equipment
Connecting Your
Connection Examples
25
Page 26

Notes
• Make sure all of your TV equipment is
turned off, including unplugging your
SVR Recorder.
• Most satellite set-top boxes have S-Video
out or Composite out jacks. Check the
back of your satellite set-top box
carefully; if there are jacks other than RF
Out, follow the steps in Example 4 on
page 22.
• If you have a cable set-top box that you
are only using because your TV and VCR
are not cable-ready, and you don’t watch
premium channels, then you don’t need
your cable set-top box any more. The
SVR Recorder is cable-ready. Follow
Example 2 on page 18.
Example 6: Satellite or cable box with IR input, and a VCR, using
RF cables
Cable In
RL
Ch
3/4
RF
Out
RF
OutputsInputsCntrl
In
S-VideoS-Video
Ch
3/4
RF
Out
Antenna
In
Video
Ch
3/4
RF
Out
Optional
Cable
Box
SVR
Recorder
VCR
InAC
Phone
Out
Line
Serial
Audio
RL
Video
IR
Audio
IN
OUT
26
Connection Examples
TV
A
B
Antenna In
Audio Video S-Video
RL
Page 27

Use this example if you have a cable or satellite set-top box, the satellite box has no
serial input jack, and the cable or satellite box has no Composite Video and L/R audio
output jacks.
Connect the SVR Recorder to your cable or satellite box.
1
Since you use a cable set-top box or satellite set-top box to receive your television
signal, the SVR Recorder needs to be able to change channels on your box in
order to record shows and display live TV.
Connect the SVR Recorder to the infrared (IR) receiver of your box using the IR
Control cable (supplied). Start by plugging the IR Control cable into the Cntrl Out
IR jack on the back of the SVR Recorder. Next, locate the IR receiver on your box
– it’s a small dark red window or button on the box’s front.
Place the IR Emitter (from the IR Control cable) on top of your set-top box,
sticking out slightly. The IR Emitter has an adhesive strip so you can adhere it to
the set-top box. Position the IR Emitter in front of or as close as possible to the
window.
Connect your program source to the SVR Recorder.
2
Find the RF coaxial cable coming from the RF Out jack of your satellite box or
cable set-top box. This cable is probably already hooked up to your VCR or TV; if
so, disconnect it. Now connect this cable to the RF In jack on the back of the SVR
Recorder.
Continue.
3
Now continue with step 3 on page 32.
Equipment
Connecting Your
Connection Examples
27
Page 28

Notes
• Make sure that all of your TV equipment is
turned off, including unplugging your SVR
Recorder.
• You may need to use the Serial adapter or
the RCA Home Control cable (both
supplied) to connect to your set-top box’s
Serial Control jack. If you have a Serial
Control jack that doesn’t work with any of
the adapters we provide, use the IR jack
and the IR Control cable instead.
Example 7: Satellite and antenna or cable, with a VCR
Satellite
Satellite
Receiver
SVR Recorder
VCR
Serial
Control
InAC
Phone
Out
Line
Serial
Audio
RL
Video
IR
Audio
IN
OUT
Audio
RL
RL
Outputs
OutputsInputsCntrl
Video S-Video
Video
Satellite
In
Ch
3/4
RF
Out
Cable/
Antenna
RF
In
S-VideoS-Video
Ch
3/4
RF
Out
Antenna
In
Ch
3/4
RF
Out
Optional
28
Connection Examples
TV
A
B
Antenna In
Audio Video S-Video
RL
Page 29

Notes
Use this example if you have a satellite set-top box and either an antenna or cable (with
no cable box), and a VCR.
• Since you use a satellite set-top box to
receive your television signal, the SVR
Recorder needs to be able to change
channels on your box in order to record
shows and display live TV.
• A serial connection works better than
IR, so use serial if possible.
• If your satellite set-top box has two
jacks that look like Serial Control jacks,
use the one labeled “low speed data.”
You may need to use the 9 to 25 pin
serial adapter (supplied) to match your
box.
Connect the SVR Recorder to your satellite box.
1
Serial Connection - If your satellite set-top box has a Serial In jack, you can
connect the SVR Recorder to your box using the Serial Control cable (supplied).
Otherwise, use the IR connection.
IR Connection - Start by plugging the IR Control cable into the Cntrl Out IR
jack on the back of the SVR Recorder.
Next, locate the IR receiver on your satellite set-top box – it’s usually a small dark
red window or button on the front of the box. Place the IR Emitter (from the IR
Control cable) on top of the satellite set-top box, sticking out slightly. The IR
Emitter has an adhesive strip so you can adhere it to the set-top box. If it is not
possible to stick the IR Emitter directly onto the window, place the it in front of or
as close as possible to the window.
Connect your program source/video input to the SVR Recorder.
2
a) Disconnect any satellite or antenna/cable connections to your VCR and/or TV.
Connect the satellite box to the input of the SVR Recorder using the S-Video
cable (preferred) and the left (white) and right (red) Audio/Video cables. If you
don’t have an S-Video output, use the Yellow Composite Video cable instead.
b) Connect your coaxial antenna or cable to the RF In jack on the back of the
SVR Recorder.
Continue.
3
Now continue with step 3 on page 32.
Equipment
Connecting Your
Connection Examples
29
Page 30

Notes
• Make sure that all of your TV equipment is
turned off, including unplugging your
SVR Recorder.
• You may need to use the Serial adapter or
the RCA Home Control cable (both
supplied) to connect to your set-top box’s
Serial Control jack. If you have a Serial
Control jack that doesn’t work with any of
the adapters we provide, use the IR jack
and the IR Control cable instead.
Example 8: Satellite and cable with boxes, with a VCR
Cable
Antenna
Outputs
In
Audio
RL
Audio
RL
Video S-Video
Ch
3/4
RF
Out
Satellite
Satellite
Outputs
In
Audio
RL
Video S-Video
Ch
3/4
RF
Out
RF
OutputsInputsCntrl
In
Video
OUT
S-VideoS-Video
Ch
3/4
RF
Out
Antenna
Audio
In
RL
Video
IN
Ch
3/4
RF
Out
Optional
Cable Box
Satellite
Receiver
SVR Recorder
VCR
Serial
Control
InAC
Phone
Out
Line
Serial
IR
30
Connection Examples
TV
A
B
Antenna In
Audio Video S-Video
RL
Page 31

Notes
Use this example if you have both a satellite set-top box and a cable set-top box.
• Since you use both a satellite and cable
set-top box to receive your television
signal, the SVR Recorder needs to be
able to change channels on both of your
set-top boxes in order to record shows
and display live TV.
• If your satellite set-top box doesn’t
include a Serial In jack, then place the
other end of the IR Control cable with
the second IR Emitter on top of your
satellite receiver, in front and as close
as possible to the IR window.
Connect the SVR Recorder to your satellite box and your cable
1
box.
Serial Connection - If your satellite set-top box has a Serial In jack, connect the
SVR Recorder to it using the Serial Control cable (supplied). If your satellite set-
top box has two jacks that look like Serial Control jacks, use the one labeled “low
speed data.” You may need to use the 9 to 25 pin Serial adapter (supplied) to
match your box.
IR Connection - Plug the IR Control cable into the Cntrl Out IR jack on the back
of the SVR Recorder. Next, locate the IR receiver on your cable box – it’s usually
a small dark red window or button on the front of the box. Place the IR Emitter
(from the IR Control cable) in front of the IR receiver, sticking out slightly. The IR
Emitter has an adhesive strip so you can adhere it to the box. If it is not possible to
stick the IR Emitter directly in front of the window, place it as close to the window
as possible.
Connect your program source/video input to the SVR Recorder.
2
a) Disconnect any satellite or cable connections to your VCR and/or TV.
b) Connect the satellite box to the input of the SVR Recorder using the S-Video
cable (preferred) and the left (white) and right (red) Audio/Video cables. If you
don’t have an S-Video output, use the Yellow Audio/Video cable instead.
Equipment
Connecting Your
c) Connect your cable set-top box to the RF In jack on the back of the SVR
Recorder using the RF Coaxial cable (supplied).
Continue.
3
Now continue with step 3 on page 32.
Connection Examples
31
Page 32

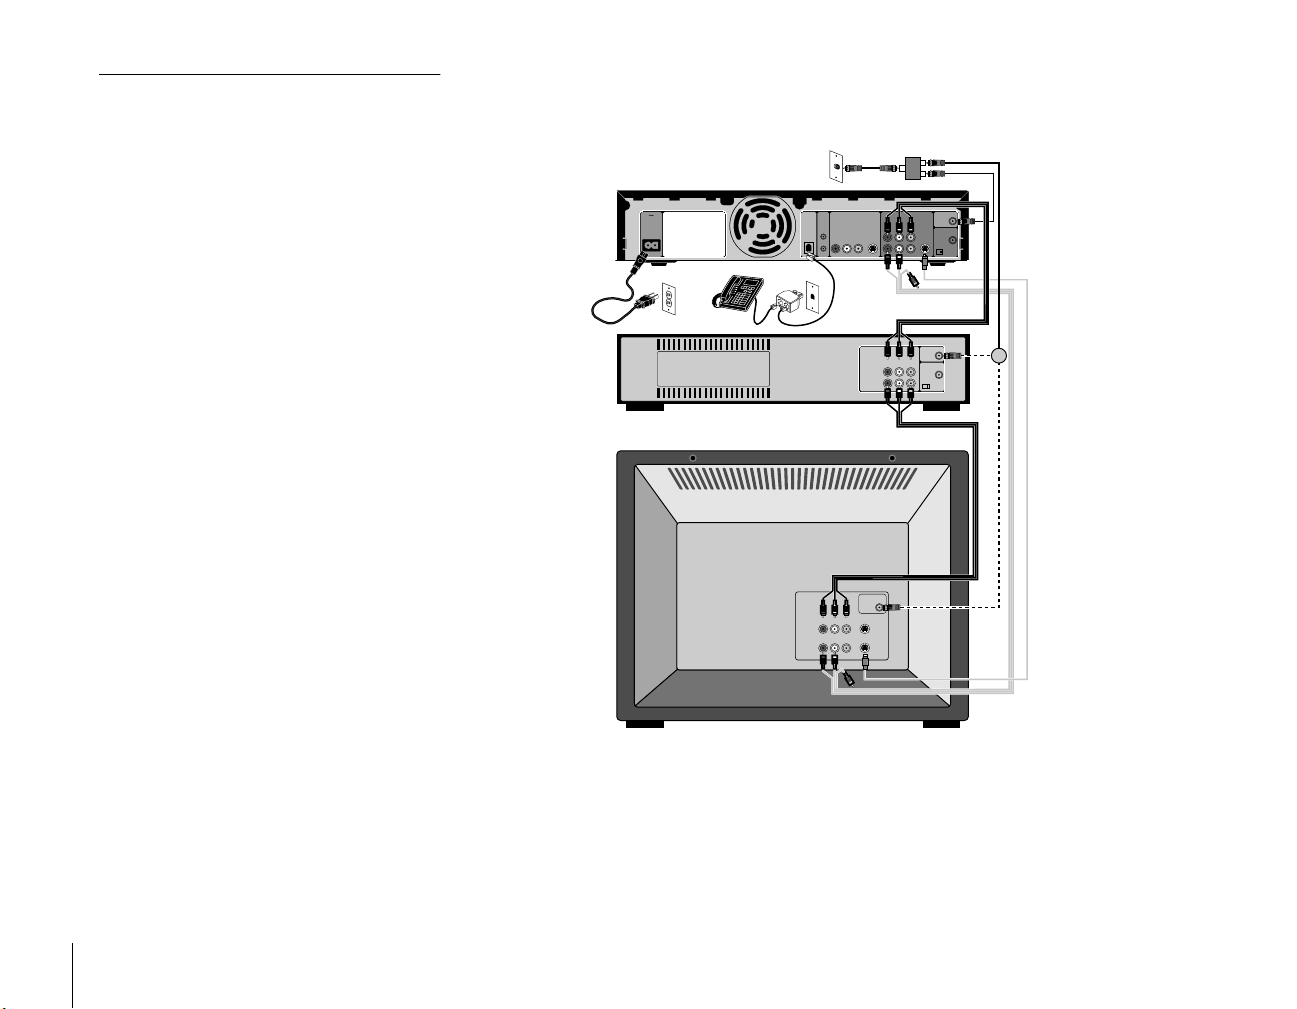
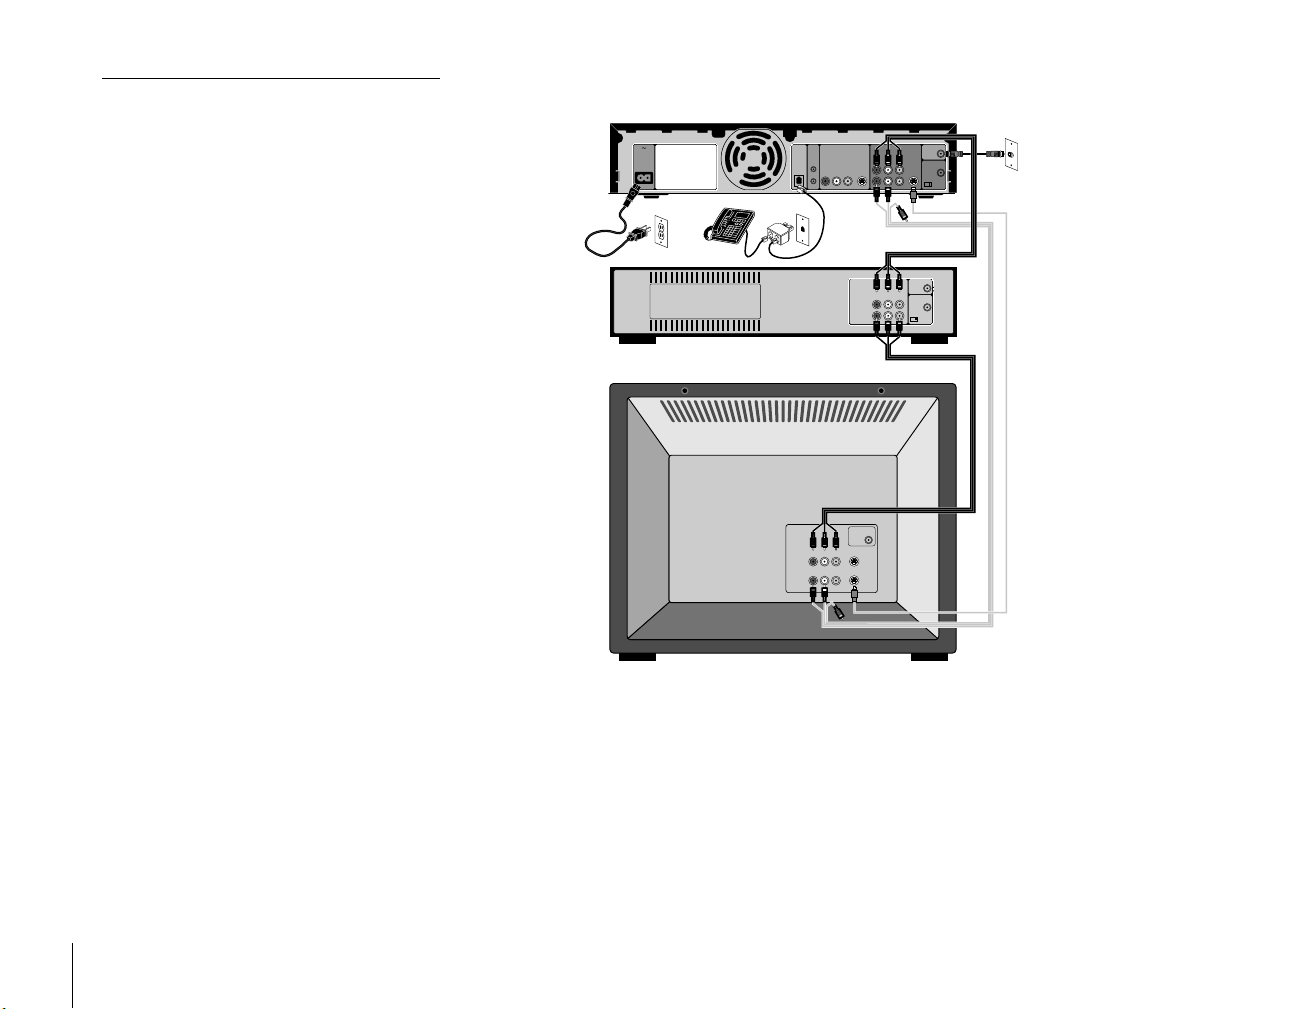
Continuing Your Connection Steps
Note
Your VCR is probably already hooked up to
your TV. So, once you’ve connected the SVR
Recorder to your VCR, you’ve also indirectly
hooked up the SVR Recorder to your TV. The
SVR Recorder will send its signal to your
VCR, and in turn your VCR will send the SVR
Recorder’s signal to your TV.
IR Output to Sony VCR
To cable/satellite box if needed
RF
SVR
Recorder
Sony
VCR
TV
InAC
Phone
Line
A
B
OutputsInputsCntrl
Out
Serial
Audio
RL
Video
IR
AudioVideoS-Video
RL
In
S-VideoS-Video
Ch
3/4
RF
Out
Antenna
Audio
In
RL
Video
IN
Ch
3/4
RF
OUT
Out
Antenna In
Once you’ve completed steps 1 and 2 for your particular connection, continue here
with step 3.
Connect the SVR Recorder to your TV and/or VCR.
3
If you don’t have a VCR, skip to step 3c.
3a Video Output to VCR and TV.
First, look at the back of your VCR and see what types of jacks are available.
Choose the best you have from the following options, and connect the SVR
Recorder output to your VCR input.
• S-Video cable, along with the Left/Right (white and red) Audio cable (best)
• Composite Video (yellow) and Left/Right Audio (white and red) (better)
• RF Out, using the RF Coaxial cable (good)
Next, connect your VCR output to your TV input, again using the best
connection available (see Note).
If you are connecting using RF Coaxial cable, you need to select between output
on channel 3 or 4 using the Ch 3|4 switch next to the RF Out jack on the back of
the SVR Recorder. To get the best picture, select the channel that is not occupied
Optional
by a local broadcast channel. For example, if there is a local broadcast station on
channel 4, select channel 3. You will need to tune your VCR to this channel to
receive the SVR Recorder.
Your VCR should also have a switch that controls its channel output. Make sure
4
that both the SVR Recorder and any other equipment are all using the same
channel – that is, if the SVR Recorder uses channel 3 for output, you must also
set your VCR to use channel 3 for output, and then tune your TV to channel 3 to
receive a signal.
32
Continuing Your Connection Steps
Page 33

Notes
3b IR Output to VCR - Sony VCRs only.
• If you have a VCR that has S-Video inputs
and outputs, and your TV also has an
S-Video input, it’s preferable to have the
SVR Recorder send its signal to your VCR
and have your VCR send its signal to your
TV. You won’t be able to connect the SVR
Recorder directly to your TV since the SVR
Recorder only has one S-Video Out jack.
• Even if you’ve connected through your
VCR, you may want to directly connect the
SVR Recorder to your VCR and TV. For
example, if your VCR doesn’t have S-Video
jacks but your TV has an S-Video Input, you
probably will want to connect the SVR
Recorder directly to your TV to take
advantage of the better picture quality of
S-Video cables. Also, if your TV has
picture-in-picture capabilities, you could
watch a videotape on your VCR while you’re
watching the SVR Recorder.
• If your TV has only one audio jack instead of
two, connect just the white audio cable, and
leave the red audio cable disconnected.
If you own a Sony VCR, you can use the IR Control cable (supplied) to save
programs to a videotape in the VCR using the “Save to my VCR function”.
(Once connected, refer to your TiVo Viewer’s Guide for instructions on how to
save programs to your VCR.)
• Plug the IR Control cable into the Cntrl Out IR jack on the back of the SVR
Recorder. If you are using a cable or satellite set-top box, you may have
already done this.
• Place one IR Emitter (from the IR Control cable) in front of the IR window on
the Sony VCR. You can adhere the IR Emitter using its adhesive bottom.
3c Video Output directly to TV.
• If you already did step 3a, this step is optional.
• Look at the back of your TV and the SVR Recorder and see what types of
jacks are available. Connect the SVR Recorder output to your TV input using
the best possible connection from the following options:
• S-Video cable, along with the Left/Right (white and red) Audio cable
(best)
• Composite Video (yellow) and Left/Right Audio cable (white and red)
(better)
• RF Output, using the black RF Coaxial cable (good)
• If you are connecting using RF Coaxial cable, you need to select between
3b
output on channel 3 or 4 using the small switch next to the RF Out jack on the
back of the SVR Recorder. To get the best picture, select the channel that is
not occupied by a local broadcast channel. For example, if there is a local
broadcast station on channel 4, select channel 3. You will need to tune your
VCR to this channel to receive the SVR Recorder.
Equipment
Connecting Your
Continuing Your Connection Steps
33
Page 34

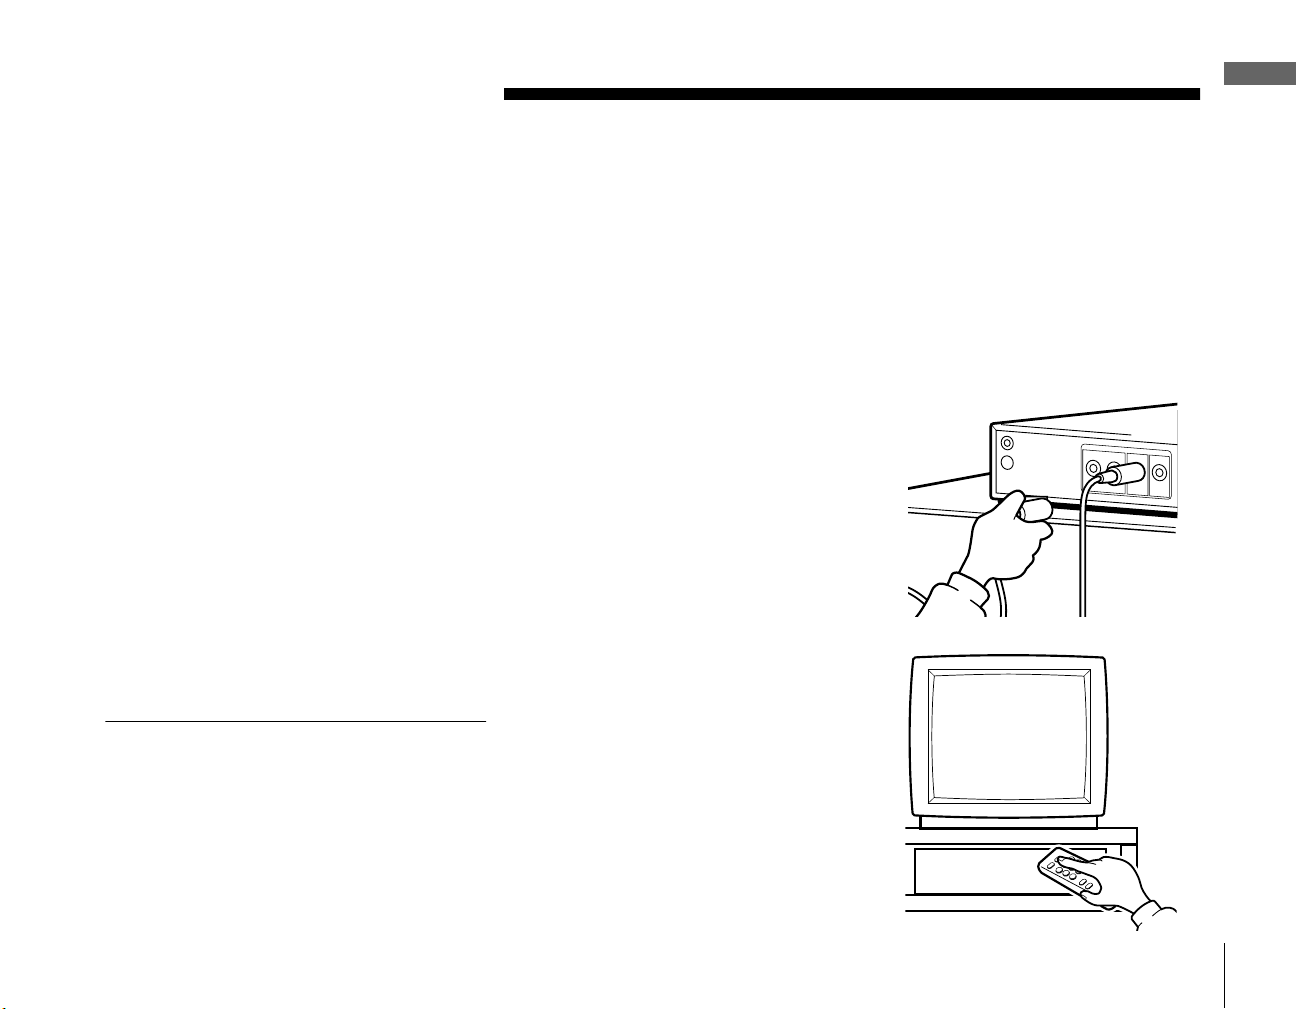
Connect the SVR Recorder to your telephone line.
4
Connect the SVR Recorder to your home telephone line. Use the phone cord
(supplied). If you do not have a spare telephone jack for the SVR Recorder, you
can plug the phone splitter (supplied) into your telephone jack. Then plug your
phone into one of the splitter’s jacks and the SVR Recorder into the other.
Plug in the SVR Recorder power.
5
Now you should have everything connected and ready to go. Check all the
connections one more time, then turn on your TV equipment. To turn on the
SVR Recorder, plug the power cord into the back of the SVR Recorder. After a
few moments, you should see TiVo’s Welcome Screen.
If you do not, you may need to change channels or change which input your TV
uses. If you used RF Coaxial cable in step 3, make sure you’re viewing the same
channel (3 or 4) that you selected. If you’re using S-Video or Audio/Video
cables, you’ll need to change your TV so that it displays the appropriate input.
On some TVs, you need to use the “Input” button to switch inputs; other TVs
might label this the “Select” or “Video” button. Other TVs require that you keep
changing channels until the alternate input is displayed. If you have trouble,
double-check your connections and look for help in Additional Information (see
pages 55–60).
Guided Setup.
6
Once you see the Welcome to TiVo! screen, continue with the instructions in
Setting Up Your System on pages 41–54 to set up and activate the TiVo Service.
34
Continuing Your Connection Steps
Page 35

Back Panel Connections Reference
This section describes the use of the connection jacks and switch on the back panel of
the SVR Recorder. The cables are illustrated on page 8, and the back panel is illustrated
on page 10. If your setup doesn’t match any of the examples in this section, use this
information for general reference.
AC ~ In
When you’ve finished making all of the other connections, plug in the AC power cord
(supplied) to turn on the SVR Recorder. The SVR Recorder does not use a separate on
and off switch; plugging it in switches it on.
Phone Line
Connect the SVR Recorder to your phone line using the telephone cord (supplied). If
you do not have a spare telephone jack for the SVR Recorder, use the phone splitter
(supplied).
Cntrl (control) Out Serial
If you have a satellite set-top box or cable set-top box and it features a Serial In jack
(sometimes labeled “Low Speed Data”), you can connect the SVR Recorder to your
box using the Serial Control cable (supplied), allowing the SVR Recorder to change
channels and control your box. A serial connection works better than an IR, so use
serial when possible.
Equipment
Connecting Your
Cntrl (control) Out IR
If you have a satellite set-top box or cable set-top box that doesn’t include a Serial In
jack, connect the SVR Recorder to the IR sensor of your cable set-top box or satellite
set-top box using the IR Control cable (supplied). Start by plugging the IR Control
cable into the Cntrl Out IR jack on the back of the SVR Recorder. Next, locate the IR
receiver on your cable or satellite set-top box – it’s usually a small dark red window or
Back Panel Connections Reference
35
Page 36

button on the front of the box. Place the IR Emitter (from the IR Control cable) on top
of the receiver, sticking out slightly. The IR Emitter has an adhesive strip so you can
adhere it to the set-top box. If it is not possible to stick the IR Emitter directly onto the
receiver, place it in front of or as close as possible to the receiver. Ignore this jack if
you’re using the Cntrl Out (Serial) jack.
You can also use the IR Control cable to save programs to your Sony VCR. Plug the
supplied IR Control cable into the Cntrl Out IR jack on the back of the SVR Recorder.
Position the first IR Emitter in front of the IR receiver on your Sony VCR. You can
secure the IR Emitter (from the IR Control cable) using the supplied adhesive strip.
Optionally, position the second IR Emitter in front of the IR receiver on your satellite
set-top box or cable set-top box so it is slightly extended.
Once this connection is made, refer to your TiVo Viewer’s Guide for instructions on
how to save programs to your VCR.
Audio R and L Inputs
Use these jacks if you have a satellite set-top box, cable set-top box, or digital cable
set-top box. Connect the left (white) and right (red) audio out jacks of your set-top box
to the SVR Recorder’s audio input using the Audio/Video cables (supplied). Note that
you will use these jacks for audio if you’re using either the yellow Video Input or
S-Video Input. Ignore these jacks if you’re using the RF In jack.
36
Back Panel Connections Reference
Composite Video Input
Use this jack if your satellite set-top box, cable set-top box, or digital cable set-top box
does not include an S-Video Output jack. Connect the Video Out of your set-top box to
the SVR Recorder using the video connector (yellow) on the Audio/Video cables
(supplied). Use this jack only if you can’t use S-Video Input. Ignore this jack if you’re
using the RF In jack.
Page 37

S-Video Input
S-Video will result in a higher quality image than composite video, so use this jack if
you have a satellite set-top box or cable set-top box that features an S-Video out jack.
Connect the S-Video Out from your set-top box to the SVR Recorder using the S-Video
cable (supplied).
Audio R and L Outputs (2 each)
If your TV or stereo features audio input jacks, connect the left (white) and right (red)
Audio Output jacks from the SVR Recorder to your TV or stereo using the Audio/
Video cables (supplied). If you have both a TV and a VCR, you might use one set of
Audio cables for the TV and the other cables for the VCR; see pages 15 through 31 for
examples. Ignore these jacks if you’re using the RF Out jack.
Composite Video Outputs (2)
If your TV or VCR features a Composite video jack but doesn’t have an S-Video input,
connect the SVR Recorder to your TV or VCR’s Video In using the yellow video
connector on the Composite Audio/Video cables (supplied). If you have both a TV and
a VCR, you might use one cable for the TV and the other cable for the VCR. Ignore
this jack if you’re using S-Video Output or the RF Out jack.
S-Video Output
If your TV or VCR features an S-Video input jack, connect it to the SVR Recorder
using a second S-Video cable (not supplied). S-Video is preferred over other
connections since it provides the highest quality picture. Ignore this jack if you’re using
Composite Video Outputs or RF Out – but you should disconnect those other
connections and use this one instead if your TV or VCR does feature an S-Video input
jack.
Equipment
Connecting Your
Back Panel Connections Reference
37
Page 38

RF In
If you have cable or an antenna and don’t have a satellite set-top box or cable set-top
box, connect your cable or antenna to the SVR Recorder using your existing coaxial
cable (the one coming out of the wall). Ignore this jack if you’re using Audio/Video
Input or S-Video Input. If you have a cable box that features both RF Out and S-Video
output or Audio/Video output, choose S-Video or Audio/Video instead of RF.
RF Out
If your TV has multiple inputs and you can use the SVR Recorder’s S-Video Output or
Audio/Video Output, do not use the RF Out jack. But if your TV only has RF In,
connect the SVR Recorder to your TV’s RF In using the RF Coaxial cable (supplied),
and see “Ch 3|4 Switch” below. Use the Remote Control supplied with the SVR
Recorder to change program channels shown on your TV.
Ch 3|4 Switch
If you use RF Out, set the output to channel 3 or 4 using this switch. To get the best
picture, select the channel that is not occupied by a local broadcast channel. For
example, if there is a local broadcast station on channel 4, select channel 3 for the
output on the SVR Recorder. You will need to tune your television to this channel
(3 or 4) to receive a signal through the SVR Recorder.
38
Back Panel Connections Reference
Page 39

General Hints
• Study the “Back Panel Connections Reference” section on page 35 to learn what
jacks are available on your SVR Recorder.
• Make sure the SVR Recorder receives its signal from your TV source. Work out
where your TV signal comes from (satellite, cable or antenna). If you have to go
through a switch box or set-top box or stereo, test the output cable on your TV before
taking that output and plugging it into the SVR Recorder’s input jacks.
• Decide where the SVR Recorder should send its signal. You’ll need to get the signal
to your TV eventually, but you could choose to have the video signal go through a
VCR or to a switch box or A/V receiver before it reaches the TV. If you want the
SVR Recorder to be able to save shows to a VCR, you’ll also need to have the SVR
Recorder’s output go to a VCR.
• You may have a lot of sources of video. In addition to the SVR Recorder and a VCR,
you may have a video game player, a laser disc player, a DVD player, and a video
camera. If so, consider using a switch box or an A/V receiver that has input jacks for
your devices, along with an output to your TV and speakers. Then, that A/V receiver
or switch box will let you choose what to display on your TV.
• If you’re having trouble, see Troubleshooting on pages 55–60. Also, try the Support
section on the TiVo website (http://www.tivo.com/).
Equipment
Connecting Your
General Hints
39
Page 40

Page 41

Setting Up Your System
Setting Up Your System
Notes
• Although your part of the setup process
won’t take much time at all, once the second
call begins, the SVR Recorder will be
processing data for 2–3 hours. You may
want to initiate setup just before bedtime so
the SVR Recorder can work while you sleep.
• For questions about Guided Setup, service
and activation, contact TiVo Customer Care:
1-877-367-8486
http://www.tivo.com
™
Guided Setup
Once you’ve connected your SVR Recorder, the next step is to set up and activate the
TiVo Service. Guided Setup will take 20 minutes, plus 2–3 hours of processing time.
Depending upon your program source (antenna, cable, or satellite), Guided Setup will
present you with sequential screens that you’ll respond to, step-by-step. Generally
speaking, the more sophisticated your system, the more steps you’ll complete.
During Guided Setup, the recorder will make two phone calls to the TiVo Service. If
you need to use the phone during either of these calls, simply pick up the telephone and
the SVR Recorder will hang up. The SVR Recorder will have to redo that phone call,
so try to run Guided Setup at a time when you won’t need to use the phone for a while
and when you don’t need the TV to watch your favorite program.
Navigating in Setup
You’ll be using the navigation arrows and the SELECT
button on the Remote Control to go through the Guided
Setup sequence. As you do, you’ll encounter lists with
multiple choice items. The blue highlight bar moves from
item to item as you press the UP and DOWN arrows on the
Remote Control. Once you’ve identified what you want to do, move the blue highlight
bar to your selection and press the SELECT button to confirm your choice.
System
Setting Up Your
Notice the on-screen arrows that move with the highlight bar. These arrows indicate the
possible paths you may take from your current location. If you don’t see a down arrow
at the bottom of a list, there are no more elements in that direction. If you make a
mistake, you can go back to a prior screen and fix it using the LEFT ARROW. You can
also change or add to your setup information later without doing the complete Guided
Setup process. Refer to your TiVo Viewer’s Guide for details.
Guided Setup
41
Page 42

Not
e
Step-by-Step Instructions
Antenna users: TiVo uses the channel lineup of
a nearby cable system to determine which
channels you receive. If there is no cable
company that serves your Zip Code, enter the
Zip Code of a nearby community. TiVo will
automatically make sure the channel numbers
are correct for the broadcast stations.
Guided Setup walks you through the steps necessary for your particular programming
source (antenna, cable, satellite, etc.) and equipment configuration. Depending
upon your program source, you may not encounter all of the Guided
Setup screens.
Program Source. The first step is to specify what kind of television programming
source you have. If you have more than one source of programming (for example, both
satellite and cable), you can choose that here. Press the UP/DOWN arrows on the
Remote Control to highlight your program source(s), then press SELECT to choose
that option and move to the next screen. If you have a cable A/B system, you can only
pick one to watch with your SVR Recorder. See “Connecting Your Equipment” on
pages 15–39 for information about splitting your signal in order to watch the other
channels.
Cable Box. If you chose cable as your program source, do you have a set-top cable
box, or does your cable come straight out of your wall and into your TV?
Satellite Connection. If you chose satellite as your programming source, did you
connect the control cable to a serial jack on the back of your satellite set-top box, or
did you use the IR Control cable? A serial connection is preferable, if your satellite
box has a serial jack available.
42
Guided Setup
Page 43

Zip Code. Use the number keys on the Remote Control to enter your Zip Code. TiVo
uses your Zip Code to determine which cable and/or satellite companies serve you, or
to get a list of broadcast channels for antenna users.
Time Zone. Choose your time zone. TiVo uses this information to be sure your TV
listing information is correct.
Daylight Savings. Choose whether your area observes daylight saving time or not.
TiVo uses this information to be sure your TV listings are correct, as some areas don’t
observe daylight saving time.
Area Code. Use the number keys on the Remote Control to type your area code. TiVo
uses your area code to determine the local dial-in numbers available to you.
System
Setting Up Your
Guided Setup
43
Page 44

Phone Dialing Options. If your phone system requires special dialing options and
you need to change the default settings the Recorder uses to dial out, you may choose
“Yes” to do that here. Most people won’t need to change the settings. If you choose
yes, refer to your Tivo Viewer’s Guide for help on the various settings.
First Setup Call. Next, the Recorder will make a toll-free setup call. This call takes
about a minute, plus 1-2 minutes to import data. You can see the status of the call on
the screen. Press SELECT to start the call. When the indexing is finished, press
SELECT to continue. If the phone call fails and you need help, see the
Troubleshooting section (on page 55).
Dial-In Numbers. TiVo displays a list of the dial-in numbers available for your area
code. Choose the number you want to use to access the TiVo Service.
If the area code has no access numbers, you can try a nearby area code. To do so,
choose “Try Another Area Code”. If none of the numbers listed are in your local
calling area, choose “None of the Above”. On the No Local Numbers screen,
choose “Request 800 number authorization”. Please note that if there are local dial-in
numbers available to you and you choose TiVo’s 800 number, you will soon get a
message and need to choose one of the local numbers. There is no need to use the toll-
free 800 number if the daily call will be a local call.
44
Guided Setup
Page 45

Dialing Format. Choose the dialing format you need. For example, should the dial-in
number be preceded by your area code and should a “1” precede the area code? In some
areas, even local numbers must be dialed using the area code.
Providers. Choose your satellite or cable provider from this list.
For cable users, the
list is determined by your Zip Code and what is known about cable companies in your
area. If the choice is obvious to you, select it and move on to the next screen.
Sometimes, however, the same cable company will broadcast from multiple locations,
(called “head ends”) in a given geography. When this occurs, TiVo’s list of providers
will have entries with very similar names, and it may be difficult to know for sure
which one is yours. You can try looking at your cable bill to match it to one of the
choices, but if you still aren’t sure, make your best guess and proceed to the next
screen. You will test your guess in a minute when you view your channel lineups and
start to customize your channels (see “Channels You Watch” on page 47).
System
Setting Up Your
Guided Setup
45
Page 46

Lineups. For cable program sources, choose the type of service you buy from your
cable company. Lineups usually have names like “Basic,” “Extended Basic,” “Primary
Plus,” or similar. If you’re not sure which lineup you buy from your cable company,
your cable bill may tell you. “Rebuild” lineups is a term cable companies use on their
bill when they are in the process of creating new channel lineups. Usually you would
be informed by your cable company that you were being switched to a “Rebuild”
lineup, and your cable bill would indicate this as well. If you’re not sure, guess.
If you have satellite service, this screen will show you the additional lineups that you
may subscribe to, such as Basic or Premium. Select all the lineups that apply to you,
and then press the RIGHT ARROW. Do not press the RIGHT ARROW until all
of the lineups to which you already subscribe have checkmarks to their
left on the screen. To select a lineup that does not have a checkmark, use the
UP/ DOWN ARROWS to highlight the lineup, then press SELECT.
46
Guided Setup
Page 47

Note
• If you know that channel 5 should be
ABC, check to see that TiVo has this
information correct. Use the CH
(channel) +/– buttons as a shortcut to
go up or down a whole screen at a
time. If you’re not sure whether you
receive a channel, leave it selected.
You can check later when Guided
Setup is complete. You can always
change your lineup from Messages &
Setup later and deselect the channel.
• If you have both cable and satellite
sources connected to the Recorder,
you may notice more than one channel
with identical station IDs, but the
Recorder functions are not affected.
Channels You Watch. Next you will see a list of channels based on the program
source, cable or satellite provider, and lineup(s) you selected. Make sure the channel
numbers match the networks on this list the way they do when you watch TV. If you
had to make a guess about your provider or lineup, this is where you should check to be
sure you were right. If you have satellite as your program source and
selected the Premium Channel Lineup, none of the premium channels will
be selected. Go through the list and select the channels you subscribe to.
Look at the channel numbers and stations in the list to see if they match each other
correctly. Perhaps you are familiar enough with your channels to make the verification
easy. If you aren’t sure, locate a channel guide or quick-reference card from your cable
or satellite company that lists the channel numbers and stations. There is also a website
called TVQuest (http://www.tvquest.com) that you can check. If you determine that the
channel numbers and networks don’t match, use the LEFT ARROW to go back and
choose a different provider or lineup, and try again.
Once you’ve determined that your channel list is correct, you can proceed to customize
it. The list starts with a checkmark next to the channels that are in the lineup(s) you
selected. If you don’t receive or never watch a particular station, use the UP/DOWN
arrows to highlight it and press SELECT to remove the checkmark. If you subscribe to
premium channels that aren’t checked, highlight them and press SELECT. In this way
you create your own custom lineup.
Once your SVR Recorder is set up and you are watching TV, when you
change channels up and down, you will only see the channels you check
on this screen — so you’ll only see the channels you really receive and watch. In
addition, when you are looking for programs to record, you will only see programs on
these channels. You can easily check and uncheck channels later if you change your
mind. When you are satisfied with your lineup, press the RIGHT ARROW to continue.
System
Setting Up Your
Guided Setup
47
Page 48

Connection to receiver screens. If you chose satellite or cable with a set-top box
as your program source, these screens allow you to choose the cable type that you used
to connect your set-top box to your SVR Recorder. If you have multiple inputs (such as
satellite and cable), you will need to specify the cable type for each program source.
Use the UP/DOWN arrows until the picture of the SVR Recorder matches the cable
connection you used. When the Video Status says “Video OK,” press SELECT to
continue. If not, double check that the cable is firmly connected to the SVR Recorder
and that you have selected the correct cable type.
Set-top Box IR Setup screens. If you have a cable or satellite box that you have
connected with the IR Control cable, you will be guided through choosing the correct
IR codes.
Cable/Satellite Box Brand. Choose the brand name of your cable or satellite
set-top box. This narrows down the possible control codes the SVR Recorder
might use to change channels on the set-top box.
Cable/Satellite Box Channels. Choose the maximum number of digits (either
two or three) in the channel numbers that you see on your TV.
Enter Key. When you change channels on your set-top box, using your set-top
box remote, does the remote require you to press an ENTER key?
IR Checklist. This screen is a checklist for getting ready to test the SVR
Recorder’s ability to change your set-top box channels. It reminds you to double-
check your connections and a few other things.
48
Guided Setup
IR Test Instructions. This screen has instructions for the IR Checklist screen.
Page 49

IR Picking List. This screen presents a list of IR codes superimposed over Live
TV. Each code has a fast, medium, and slow choice. First, find a code that works,
then try the different speeds for that code. Use the fastest speed that changes the
channels correctly every time. Use the UP/DOWN arrows to move the highlight
bar down the list of codes. For each code, press the CH (channel) +/– buttons
10–15 times. Pay close attention to how well the code you’re testing changes
channels. When you find the code that works best, press SELECT to choose that
code.
Program Call. The last step of Guided Setup is to make a second call to get the
program guide listings. Press SELECT to start the call, which will use the telephone for
about 10-20 minutes. During this call, the TiVo Service downloads all your program
guide information for the next two weeks. Immediately following the call, the SVR
Recorder spends 1–2 hours sorting and indexing the data so that it can be searched. The
more channels you receive, the longer it takes to sort the information.
If you need to use the phone during the program call, simply pick up the telephone and
the SVR Recorder will hang up. You will then need to repeat the program call when
you are done using the phone line.
If the Recorder repeatedly reports a busy signal trying to connect, try choosing a
different local dial-in number, or try making the call during off-peak hours.
System
Setting Up Your
Congratulations! When the SVR Recorder has finished importing and indexing your
program guide information, it will beep three times. Press SELECT to continue, and
you’ll see the Congratulations! screen shown at left.
Guided Setup
49
Page 50

Activating the TiVo Service
If you haven’t activated the TiVo Service already, you’ll be instructed to visit the TiVo
website at http://www.tivo.com/activate/ or call 1-877-367-8486 to activate.
The TiVo Service includes program guide listings, Search by Name functionality,
Season Passes, TiVolution Magazine, Network Showcases, software updates, and
more. Initially, you will receive the TiVo Service for a few days grace period. If you
haven’t activated the service by the end of the grace period, your SVR Recorder will
stop receiving the TiVo Service. Activate today! Don’t miss a single day of personal
TV.
From this Congratulations! screen, press the TiVo button on your Remote Control
to go to TiVo Central and begin to enjoy TiVo Personal Television.
Go to page 51 for instructions on programming your Remote Control to control your
TV power, volume, and mute.
For help in getting started with TiVo Personal Television, refer to the TiVo Viewer’s
Guide.
50
Activating the TiVo Service
Page 51

Programming Your Remote Control
You can set your Remote Control to control your TV’s power, muting, and volume by
using the “Remote Control Setup” option on the Messages & Setup screen. Or you
can set your Remote Control to control the volume on your stereo if you have it
connected to your TV.
Once you’ve followed these steps to tell your Remote Control how to control your TV,
you’ll be able to put away your TV’s remote and use the Remote Control from now on.
You’ll only need your VCR’s remote for watching videotapes.
Follow these steps to set up your Remote Control using the on-screen code entry
method. If this method doesn’t work, try the Learning Mode Method (page 53) or Code
Search Method (page 54) methods.
Start at TiVo Central.
1
Press the TiVo button to go to TiVo Central.
Navigate to SVR Remote - TV.
2
Choose “Messages & Setup”, then “SVR Remote Setup”, then
“SVR Remote - TV”.
Identify your TV.
3
Use the CH (Channel) +/– buttons to scroll down the list of TV brands page by
page, choose your TV brand from the list, and press SELECT. If you have been
using a TV remote control other than the one that came with your TV, select your
TV brand, not the brand of the remote.
System
Setting Up Your
Programming Your Remote Control
51
Page 52

Note
If you have your stereo hooked up to your
TV, you can program the Remote Control’s
VOL (volume) and MUTING buttons to send
signals to your stereo rather than to your TV.
Go to “Messages & Setup”, then “SVR
Remote Setup”, then “SVR Remote - TV”.
Press the TiVo and VOL buttons to
illuminate the LED before you enter the
code.
Enter the Remote Control code.
4
When you select your TV brand, you will see a screen with one or more four-digit
codes for your TV.
a) Cover the end of the Remote Control with your hand to shield the IR Emitter.
b) On the Remote Control, press and hold the TiVo and TV POWER buttons
simultaneously for about three seconds, until the remote’s LED illuminates.
Release the buttons and the LED will remain illuminated.
c) Use the number keys on your Remote Control to enter the four-digit code you
want to test (start with the first code in the list on the screen).
d) After pressing the fourth digit of the code, the LED will flash three times,
indicating that you entered a valid code.
e) Test the code by pointing your Remote Control in the direction of the TV and
pressing the TV POWER button. If this turns the TV off, you have found the
correct code. Now you can use the Remote Control to turn your TV on and off,
control volume, and mute the sound.
f) If the Remote Control could not turn your TV off, try the next code listed for
your TV.
52
Programming Your Remote Control
Page 53

Note
Learning Mode Method
• You can program the following keys with
the Learning Remote method:
TV POWER, VOL (volume) +/–, and
MUTING.
• Do not attempt this method if there is
bright fluorescent lighting or other IR
interference.
• Unlike code entry and code search, you
need to program each button individually
in learning mode.
• If you have a stereo system connected to
the SVR Recorder, you can program the
POWER button on the Remote Control to
turn on/off your stereo. To do so, use
code 1975 instead of 0975 in step 1. You
can program the POWER button to turn
on/off both your TV and your stereo.
• To reset the Remote Control back to the
manufacturer’s settings, press and hold
the TiVo and TV POWER buttons together
for three seconds until the LED on the
Remote Control remains lit. Enter code
0981 (or 1981) using the number keys on
the Remote Control.
The Remote Control has the ability to “learn” codes from your TV (and/or audio
system) remote. This method works for every remote controlled TV (or stereo).
Put the Remote Control in learning mode.
1
a) Press the TiVo button and TV POWER simultaneously for 3 seconds until the
LED on the Remote Control remains lit continuously.
b) Using the number keys on the Remote Control, enter the code 0975. The Remote
Control LED flashes three times. You have 30 seconds to complete the next step.
Position the two remotes.
2
Position the TV remote and the Remote Control head-to-head about two inches
apart with their IR emitters facing each other. (The Remote Control’s IR emitter
is at the end that you point at the TV.)
Send the signal to the Remote Control.
3
a) Press the button on the Remote Control that you want to teach. For example, TV
POWER or MUTING. The Remote Control LED will flash rapidly to indicate
that it is ready to be taught. You have 4 seconds to do the next step.
b) Press the equivalent button on the TV remote. For example, if you pressed TV
POWER on the Remote Control, press the power button on the TV remote.
c) Press and hold the equivalent button on the TV remote until the Remote
Control’s LED flashes three times to indicate that it has learned the code, or
repeat this step until the LED does flash three times.
d) This step can be repeated as many times as needed.
Exit learning mode and test the code.
4
a) Press the CLEAR button on the Remote Control to exit learning mode.
b) Point the Remote Control at the TV and press the button you just taught. For
example, if you’ve just taught the TV POWER button, it should turn on the TV.
System
Setting Up Your
Programming Your Remote Control
53
Page 54

Note
• In this method, when you find the correct
code, it will automatically program the
TV POWER, VOL +/–, and MUTING
buttons on the Remote Control.
• If you have a stereo system connected to
the SVR Recorder, you can program the
POWER button on the Remote Control to
turn on and off both the stereo and your
TV. To do so, use code 1999 instead of
0999 in step 1.
• To reset the Remote Control back to the
manufacturer’s settings, press and hold
the TiVo and TV POWER buttons together
for three seconds until the LED on the
Remote Control remains lit. Enter code
0981 (or 1981) using the number keys on
the Remote Control.
Code Search Method
Another method of programming the Remote Control to operate your TV and/or stereo
system is the code search method. The Remote Control has hundreds of available
codes. The correct code for your TV might be available, yet not listed on the screen for
your TV brand.
Put the Remote Control in code search mode.
1
a) Press the TiVo button and TV POWER simultaneously for three seconds until
the LED on the Remote Control remains lit continuously.
b) Release the buttons and the LED remains illuminated.
c) Using the number keys on the Remote Control, enter the code 0999.
Test the code.
2
a) Point the Remote Control at the TV, press TV POWER and see if the TV turns
off or on.
b) If the TV does turn off or on, confirm that MUTE and VOL (volume) +/– also
operate the TV. If they do, go to step 4 below. If they do not, continue with
step 3.
Try another code.
3
Continue to cycle through each code by pressing CH+, then test the code by
repeating step 2 above. Remember, there are hundreds of codes. If the LED goes
out. you have reached the end of the codes.
Program the Remote Control with the correct code.
4
a) When the code allows the Remote Control to operate the TV power, volume and
muting, press ENTER to set the code and exit Code Search mode.
54
Programming Your Remote Control
b) You can also press CLEAR to exit Code Search mode without setting a new
code.
Page 55

Additional Information
Additional Information
Troubleshooting
TiVo and Sony are dedicated to providing you with quality support and customer
service. If you have any questions or difficulties, first refer to the troubleshooting
section in the manuals. If you still need help, see below for the appropriate customer
service department to contact:
Contact Sony at 1-877-585-SONY (7669) if you need assistance on the following
areas:
• Connecting your SVR Recorder with your TV and other A/V equipment.
• Initial Guided Setup difficulties (e.g. phone calls failing).
• Programming the Remote Control to control your TV or A/V equipment.
• Changing channels.
• A system that does not function properly after restart.
• Questions about your Warranty.
Contact TiVo at 1-877-FOR-TiVo (877-367-8486) if you need assistance on the
following areas:
• Activating or using a feature of the TiVo Service.
• Getting correct channel lineup data or program guide data.
• Understanding an onscreen message from TiVo regarding your TiVo Service
account.
You can also refer to the FAQ’s listed in the web sites below.
TiVo: http://www.tivo.com
Sony: http://www.sony.com/service or email at custserv@info.sel.sony.com
When you call either TiVo or Sony, you will need to reference your model and serial
number located on the inside of the back cover of this Setup Guide.
Troubleshooting
Additional
Information
55
Page 56

Symptom Solution
My SVR Recorder isn’t making the
setup phone calls.
• Do not use a wireless phone connection.
• Verify that your phone line is working by connecting a phone to the phone cord and
checking for a dial tone. Make sure the phone cord is connected to the
SVR Recorder and the wall jack.
• Try another local dial-in number from the Dial In Numbers screen. For
information on how to change the local dial-in number and other phone dialing
options, refer to the TiVo Viewer’s Guide.
• You may need to change your phone dialing options from the default. After making
changes, make a test call (choose “Make Test Call” from the Phone Connection
screen).
• If you have voice mail or other non-standard dial tone, turn off “dial tone
detection”.
• If you have call waiting, disable it by entering the correct prefix in “Call Waiting
Prefix” (usually “*70,”).
• If you use a dial prefix for outside lines, set “Dial Prefix” (for example, “9,”).
• Your phone line may have low voltage. Try turning off “phone availability
detection”.
• If you have a caller ID box, try removing it from the line since some models
interfere with the SVR Recorder modem’s ability to make a call.
56
Troubleshooting
• If you have a fax machine or computer modem connected to the same line, make
sure they are not using the line.
• It could be that you have too much line noise to make a connection. The
SVR Recorder ships with a 50' phone cord. Try a shorter cord, or you can buy a line
noise filter at your local electronics store.
• If the recorder repeatedly reports a busy signal trying to connect, try choosing a
different local dial-in number, or try making the call during off-peak hours.
Page 57

Symptom Solution
On the “Channels You Watch” screen,
some or all of my lineup information is
incorrect.
From within Guided Setup, go left to the Cable Providers and Cable Lineups
screens and verify that you chose the correct cable/satellite provider and lineup. You
may need to go through all of the selections to find the right one since cable providers
are often changing their names and lineups.
My channels aren’t changing.
(continued on next page)
If you use cable with no set-top box:
• Be sure that you are using the SVR Recorder’s Remote Control and that you hold it
so that the TiVo button points toward the SVR Recorder.
• When you press any button on the Remote Control, does the Remote Active LED
flash? If the LED does not flash, check to make sure that the batteries are positioned
correctly in the Remote Control and that the batteries are good. If the LED does
flash, make sure the green receiving light on the SVR Recorder flashes yellow when
you press any button on the Remote Control. If it does not, power cycle your
SVR Recorder (unplug the AC power cord, wait 15 seconds, then reinsert the AC
power cord). It may be necessary to do this several times.
If you use cable with a set-top box:
• Make sure the set-top box is turned on.
• Make sure you are using the Remote Control and that you hold it so that the TiVo
button points toward the SVR Recorder, not the cable box.
• Is the IR Control cable plugged into the lower IR jack on the back of the
SVR Recorder?
• Is the IR Emitter positioned so that it covers the IR receiver on the cable box?
• Did you select a working code from the list of codes for your cable box during
Guided Setup? To verify, use the TiVo button to go to TiVo Central -> Messages
& Setup -> Cable/Satellite Box -> Control Cable Setup. Once you find a
code that changes your channels, press SELECT to choose that code.
Additional
Information
Troubleshooting
57
Page 58

Symptom Solution
My channels aren’t changing.
(continued)
If you use a satellite set-top box with a Serial Control cable:
• Make sure the set-top box is turned on.
• Is the Serial Control cable plugged into the upper serial jack on the back of the
SVR Recorder?
• Make sure that the Serial Control cable is connected to the “low speed data” jack on
the back of the satellite set-top box.
• Unplug the satellite set-top box from the wall, then plug it back in.
If you are using an RCA satellite set-top box, use your RCA set-top box’s remote
control to specify low speed data. To do this, press the MENU button on the RCA settop box’s remote -> Options -> System Options -> Data Port -> Low Speed
Data.
If you use a satellite set-top box with an IR Control cable:
• Make sure the set-top box is turned on.
• Is the IR Control cable plugged into the lower IR jack on the back of the
SVR Recorder, not the cable box.
• Is the IR Emitter positioned so that it covers the IR window on your satellite box?
58
Troubleshooting
• Did you select a working code from the list of codes for your satellite box during
Guided Setup? To verify this, use the TiVo button to go to TiVo Central ->
Messages & Setup -> Cable/Satellite Box -> Control Cable Setup. Once
you find a code that changes your channels, press the SELECT button on the
Remote Control to choose that code.
Page 59

Symptom Solution
When I power on my TV, I see a blue
screen with a frowning TiVo in the
upper left corner of my screen.
Your SVR Recorder is having trouble tuning to the channel you are on. Follow these
steps to restore the video:
• If you have a cable/satellite set-top box, make sure it is turned on.
• Try changing channels. If you see the frowning TiVo on every channel, your video
cable may have come loose. Check to make sure all the cable connections on the
back of your SVR Recorder are secure.
• Verify that you are receiving a video signal by temporarily connecting the video
source directly to the TV.
• Power cycle your SVR Recorder (unplug the AC power cord, wait 15 seconds, then
reinsert the AC power cord).
• Try swapping out your video cables to determine if one of your cables is bad.
• Go to Messages and Setup and choose “Cable/Satellite Box,” then choose
“Connection to Recorder.” Verify that the cable that is selected on this screen is the
same cable you have used to connect your set-top box to the SVR Recorder. The
“Video Status” on this screen should say “OK” when the correct input is selected.
I don’t see my cable provider on the list
in Guided Setup.
• If you are in Guided Setup, use the LEFT ARROW to go to the Zip Code screen to
verify that you entered the correct zip code.
• Go through the first setup call again. See “First Setup Call” in Guided Setup.
• Check all of the cable providers listed for your Zip Code. Make sure your cable
company hasn’t merged or changed its name.
Troubleshooting
Additional
Information
59
Page 60

Symptom Solution
Audio/Video is out of sync. • Try changing channels.
• Press the PAUSE button on the Remote Control, move back a frame or two, then
press PAUSE again to resume play.
• Press the TiVo button to go to TiVo Central, then press the LIVE TV button to return
to live television.
• Power cycle your SVR Recorder (unplug the power cord, wait 15 seconds, then
reinsert the power cord).
• If you are using your stereo, it must be hooked up between the SVR Recorder and
your TV to avoid an audio/video delay.
60
Troubleshooting
Page 61

Specifications
Inputs and outputs
Video In
S-Video 4-pin mini DIN (1)
Composite Video RCA (1)
Video Out
S-Video 4-pin mini DIN (1)
Composite Video RCA (2)
Audio Line In
Stereo L/R RCA (1 pair)
Audio Line Out
Stereo L/R RCA (2 pairs)
RF In
F-connector Female (1)
RF Out
F-connector Female (1)
Telephone
RJ-11 female, 2 wire (1)
Control Out
3.5 mm mini jack sockets (2)
General
Power requirements
120 V AC, 60 Hz
Power consumption
40 W
Operating temperature
21°C to 45°C (70°F to 113°F)
Operating Humidity
5% to 80%
Dimensions
Approx. 430 × 97 × 290.5 mm (w/h/d)
(Approx. 17 × 3 × 13 inches) including
projecting parts and controls
Mass
Approx. 4.1 kg (9 lb 1 oz)
147
1
8
8
Supplied accessories
Remote Control (1)
Size AA (R6) batteries (2)
AC power cord (1)
RF Coaxial cable (1)
Audio/Video cables (2)
IR Control cable (serial to two IR Emitters) (1)
Serial Control cable (1)
Serial adapter (1)
S-Video cable (1)
Phone cord (1)
Phone splitter (1)
Additional
Information
Specifications
61
Page 62

FCC Regulations and Information
This device complies with Part 68 of the FCC rules.
The FCC Part 68 label is located on the back of this
product. This label contains the FCC number for this
equipment and the Ringer Equivalence Number
(REN). If requested, this information must be
provided to your telephone company.
Your SVR Recorder has been registered by the Federal Communication Commission
(FCC) as not being harmful to the telephone network when connected directly to the
telephone lines. In order to fully comply with the Rules of the FCC, the following
instructions should be read carefully and followed completely where applicable:
1
The Federal Communication Commission (FCC) has established Rules which permit this
device to be directly connected to the telephone network. Standardized jacks are used for
these connections. This equipment should not be used on party lines or coin phones.
2 If this device is malfunctioning, it may also be causing harm to the telephone network; this
device should be disconnected until the source of the problem can be determined and until
repair has been made. If this is not done, the telephone company may temporarily disconnect
service.
3 The telephone company may make changes in its technical operations and procedures; if such
changes affect the compatibility or use of this device, the telephone company is required to
give adequate notice of the changes. You will be advised of your right to file a complaint with
the FCC.
4 If the telephone company requests information on what equipment is connected to their lines,
inform them of:
a. The telephone number to which this unit is connected.
b.The ringer equivalence number.
c. The USOC jack required.
d.The FCC Registration Number.
5 Items (b) and (d) are indicated on the label. The Ringer Equivalence Number (REN) is used
to determine how many devices can be connected to your telephone line. In most areas, the
sum of the RENs of all devices on any one line should not exceed five (5). If too many
devices are attached, they may not ring properly.
62
FCC Regulations and Information
Page 63

Service Requirements
In the event of equipment malfunction, all repairs should be performed by Sony or an authorized
agent. It is the responsibility of users requiring service to report the need for service to our company
or to one of our authorized agents. For service, call 1-877-585-SONY (7669).
Declaration of Conformity
Trade Name: Sony
Model No.: SVR-2000
Responsible Party: Sony Electronics Inc.
Address: 1 Sony Drive, Park Ridge, NJ
07656 USA
Telephone No.: 201-930-6972
This device complies with Part 15 of the FCC
rules. Operation is subject to the following two
conditions: (1) This device may not cause harmful
interference, and (2) this device must accept any
interference received, including interference that
may cause undesired operation.
Radio Interference Information
This equipment has been tested and found to comply with the limits for a Class B digital device,
pursuant to Part 15 of the FCC Rules. These limits are designed to provide reasonable protection
against harmful interference in a residential installation. This equipment generates, uses and can
radiate radio frequency energy and, if not installed and used in accordance with the instructions,
may cause harmful interference to radio communications. However, there is no guarantee that
interference will not occur in a particular installation. If this equipment does cause interference to
radio or television reception (which you can determine by turning the equipment off and on), you
are encouraged to try to correct the interference by one or more of the following measures:
• Reorient or relocate the receiving antenna (the antenna for radio or television that is receiving the
interference)
• Change the position of the SVR Recorder with respect to the radio or television equipment that is
receiving the interference
• Move the SVR Recorder away from the equipment that is receiving the interference
• Plug the SVR Recorder into a different outlet so that the SVR Recorder and the equipment
receiving the interference are on different branch circuits
Shielded I/O cable and cords must be used for this equipment to comply with the relevant FCC
regulations. Changes or modifications not expressly approved in writing by Sony Electronics, Inc.,
void the user’s authority to operate this equipment.
If these measures do not eliminate the interference, you should consult your SVR Recorder dealer
or an experienced radio/television technician for additional suggestions. In addition, you may find
the following booklet prepared by the Federal Communications Commission helpful: “How to
Identify and Resolve Radio-TV Interference Problems.” This booklet is available from the U.S.
Government Printing Office, Washington, D.C., 20402 Stock No. 004-000-00345-4.
Additional
Information
FCC Regulations and Information
63
Page 64

Page 65

Page 66

Page 67

Page 68

Printed in U.S.A.
the Troubleshooting section) for questions about
Refer to this Setup Guide (specifically
your Warranty, connecting the SVR Recorder,
initial Guided Setup difficulties (e.g. phone calls failing),
programming the Remote Control,
changing channels, or if your system
does not function properly after restart.
If you still have questions, contact Sony at:
1-877-585-SONY (7669)
http://www.sony.com/dnr
for questions about TiVo Service activation,
Refer to The TiVo Viewer’s Guide
getting correct channel lineups or program
guide data, or on-screen messages from
TiVo regarding your Service account.
If you still have questions, contact TiVo at:
1-877-FOR-TiVo (877-367-8486)
http://www.tivo.com
 Loading...