

Page 1
Video Cassette
Player
Operating Instructions
3-194-445-02 (3)
SVP-DC1
1997 by Sony Corporation
1
Page 2
WARNING
To prevent fire or shock hazard, do not
expose the unit to rain or moisture.
This symbol is intended to alert the
user to the presence of uninsulated
“dangerous voltage” within the
product‘s enclosure that may be of
sufficient magnitude to constitute a
risk of electric shock to persons.
This symbol is intended to alert the
user to the presence of important
operating and maintenance
(servicing) instructions in the
literature accompanying the
appliance.
Precautions
Safety
• If anything falls into the cabinet, turn on the unit
and have it checked by qualified personnel before
operating it any further.
Installing
• Allow adequate air circulation to prevent internal
heat buildup.
• Do not place the unit on surfaces (rugs, blankets,
etc.) or near materials (curtains, draperies) that
may block the ventilation slots.
• Do not install the unit near heat sources such as
radiators or air ducts, or in a place subject to
direct sunlight, excessive dust, mechanical
vibration or shock.
• Do not install the unit in an inclined position. It is
designed to be operated in a horizontal position
only.
• Keep the unit and cassettes away from
equipment with strong magnets, such as
microwave ovens or large loudspeakers.
• Do not place heavy objects on the unit.
This player has a Y/C
filtering technique
incorporated under license
from Faroudja Laboratories
Inc.
• If the unit is brought directly from a cold to a
warm location, moisture may condense inside the
unit and cause damage to the video head and
tape. If the moisture condensation occurs, the
DEW indicator on the front of the unit lights up
in red. In this case, let the mositure evaporate
until the indicator turns off. To avoid this, when
you first install the unit, or when you move it
from a cold to a warm location, wait for about
one hour before operating the unit.
Information
For customers in the USA
This equipment has been tested and found to
comply with the limits for a Class B digital device,
pursuant to Part 15 of the FCC Rules. These limits
are designed to provide reasonable protection
against harmful interference in a residential
installation. This equipment generates, uses, and
can radiate radio frequency energy and, if not
installed and used in accordance with the
instructions, may cause harmful interference in a
residential installation. This equipment generates,
uses, and can radiate radio frequency energy and, if
not installed and used in accordance with the
instructions, may cause harmful interference to
radio communications. However, there is no
guarantee that interference will not occur in a
particular installation. If this equipment does cause
harmful interference to radio or television
reception, which can be determined by turning the
equipment off and on, the user is encouraged to try
to correct the interference by one or more of the
following measures:
— Reorient or relocate the receiving antenna.
— Increase the separation between the equipment
and receiver.
— Connect the equipment into an outlet on a circuit
different from that to which the receiver is
connected.
— Consult the dealer or an experienced radio/TV
technician for help.
Caution
You are cautioned that any changes or
modifications not expressly approved in this
manual could void your authority to operate this
equipment.
Owner’s record
The model number is located at the rear and front
of the unit and the serial number on the top. Record
the serial number in the space provided below.
Refer to these numbers whenever you call upon
your Sony dealer regarding this product.
Model No. SVP-DC1 Serial No.
2
Page 3

Welcome!
Table of contents
Thank you for purchasing the Sony Video
Cassette Player. Here are some of the features
you’ll enjoy with your Video Cassette Player:
• Optimum Picture Control automatically
optimizes playback performance.
• Automatic tracking function adjusts the
tracking condition for optimum picture.
• Auto head cleaner cleans the video heads
automatically each time a tape is loaded or
unloaded.
• Auto-repeat play function enables your
Video Cassette Player to play only the
recorded portion repeatedly.
• One time play function enables the VCP to
play the recorded portion of a tape once and
rewind the tape automatically to the
beginning.
• You can control the VCP with the supplied
remote commander remotely. You can also
use the optional remote control unit
connected to the CONTROL S IN jack as a
wired remote control.
4 Setting up the remote commander
5 Power Supply
6 Connecting the Video Cassette Player
7 Playing a tape
12 Troubleshooting
13 Specifications
14 Index to parts and controls
Back cover
Index
3
Page 4
Setting up the
remote
commander
Notes
• With normal use, the
batteries should last for
approximately three to six
months.
• If you do not use the remote
commander for an extended
period of time, remove the
batteries to avoid possible
damage from battery
leakage.
• Do not use a new battery
with an old one.
• Do not use different types of
batteries.
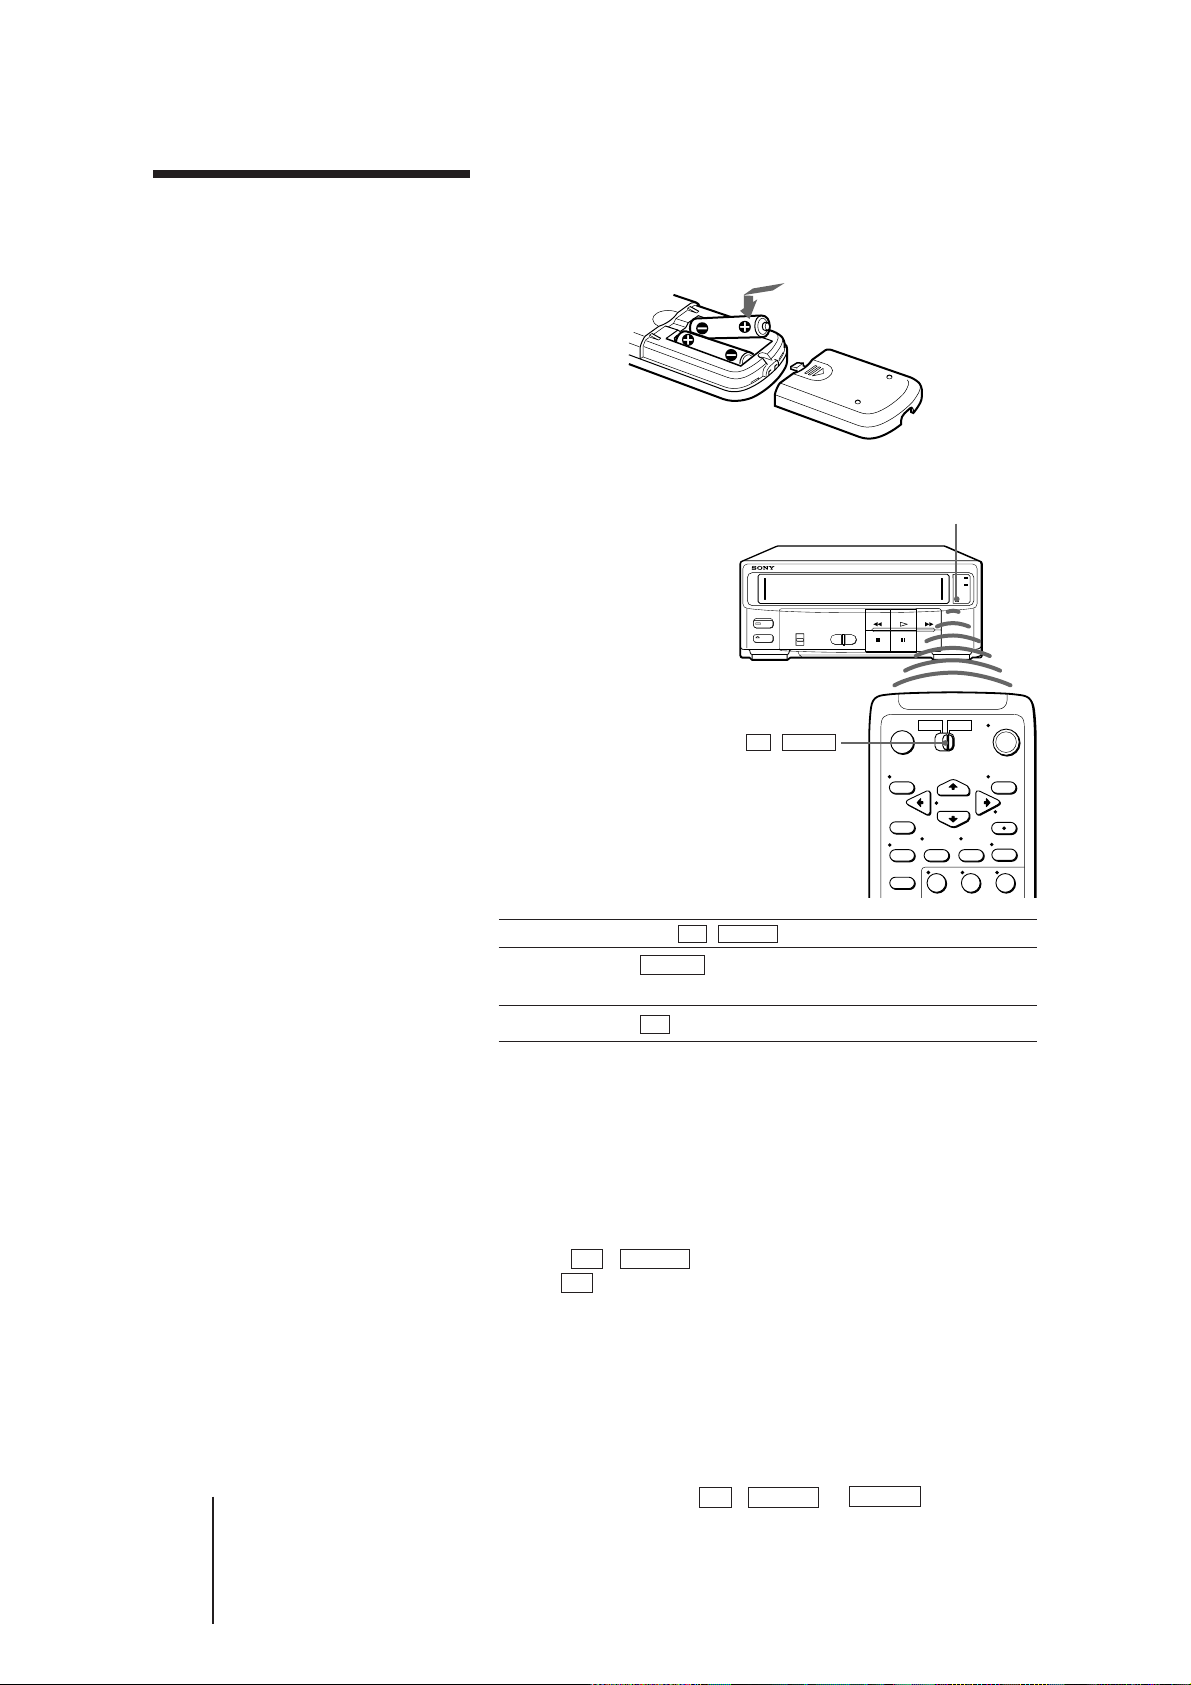
Inserting the batteries
Insert two size AA (R6) batteries by matching the + and – on
the batteries to the diagram inside the battery compartment.
Using the remote commander
You can use this
remote commander to
operate this Video
Cassette Player (VCP)
and a Sony TV. Buttons
on the remote
commander marked
with a dot (•) can be
used to operate your
Sony TV.
TV / VIDEO
Remote sensor
6
Tips
• If you set your TV’s code
number correctly while the
TV is turned on, the TV
turns off automatically.
• If you set the code number
20 for your TV, you can use
almost all the buttons
marked with a dot (•), and
the TV/CAPTION/TEX,
CAPTION CH1/CH2,
RESET and Q. VIEW
buttons on the remote
commander.
4
123
To operate Set TV / VIDEO to
the VCP VIDEO and point at the remote sensor on the
VCP
a Sony TV TV and point at the remote sensor on the TV
Controlling other TVs with the remote
commander
The remote commander is preprogramed to control nonSony TVs. If your TV is listed in the table on the next page,
set the appropriate manufacturer’s code number.
1 Set TV / VIDEO at the top of the remote commander
to TV .
2 Hold POWER down, and enter your TV’s code
number(s) using the number buttons. Then release
POWER.
Now you can use the POWER, VOL +/–, CH +/–, and TV/
VTR buttons to control your TV. You can also use the
buttons marked with a dot (•) to control a Sony TV. To
control the VCP, reset TV / VIDEO to VIDEO .
SONY SVP-DC1 (E) 3-194-445-02 (3)
Page 5
Code numbers of controllable TVs;
If more than one code number is listed, try entering them
one at a time until you find the one that works with your
TV.
Notes
• If the TV uses a different
remote control system from
the one programmed to
work with the VCR, you
cannot control your TV with
the remote commander.
• If you enter a new code
number, the code number
previously entered will be
erased.
• When you replace the
batteries of the remote
commander, the code
number automatically resets
to 01 (Sony). Reset the
appropriate code number.
Manufacturer Code
number
Sony 01
Akai 04
AOC 04
Centurion 12
Coronado 03
Curtis Mathes 12
Daytron 12
Emerson 03,04,14
Fisher 11
General Electric 06,10
Gold Star 03,04,17
Hitachi 02,03
J.C. Penny 04,12
JVC 09
KMC 03
Magnavox 03,08,12
Marantz 04,13
MGA/Mitsubishi 04,12,13,17
NEC 04,12
Manufacturer Code
number
Panasonic 06, 19
Philco 03, 04
Philips 08
Pioneer 16
Portland 03
Quasar 06, 18
Radio Shack 05, 14
RCA 04, 10
Sampo 12
Sanyo 11
Scott 12
Sears 07, 10, 11
Sharp 03, 05, 18
Sylvania 08, 12
Teknika 03, 08, 14
Toshiba 07
TVS 20
Wards 03, 04, 12
Yorx 12
Zenith 15
Power Supply
Note
• Before connecting the
battery, check the polarity.
If the polarity of the battery
is not correct, a fuse may be
blown out.
This Video Cassette Player operates on 12 V DC.
‘
’
‘
’
PC
When the input level of the PC (Power Control) terminal on
the Video Cassette Player is HIGH (+12 V), the POWER
switch lights up and the power is supplied to the Video
Cassette Player. To turn it on, press the POWER switch.
When the input level becomes LOW (0 V), the power of the
VCP is turned off. If the tape is inserted in the cassette
compartment (in stop, play, fast-forward or rewind mode),
the VCP stops the tape operation, ejects the tape and turns
off.
5
SONY SVP-DC1 (E) 3-194-445-02 (3)
Page 6

Connecting the
Video Cassette
Player
Connecting to the TV
Use the VMC-710M/720M audio/video cable (not
supplied).
If your TV has left and right audio input jacks, use a VMC910MS cable (not supplied).
Video Cassette Player
VIDEO
AUDIO
IN
OUT
Audio/video cable
VMC-710M/720M (not supplied)
IN
VIDEO
AUDIO
TV
Connecting to other video equipment
You can connect a TV game, etc. to AUDIO/VIDEO IN.
When the power of the Video Cassette Player is off, the VCP
outputs signals from AUDIO/VIDEO IN through AUDIO/
VIDEO OUT and displays the picture on the TV screen.
Cable supplied with a TV game
VIDEO
AUDIO
IN
OUT
Video Cassette Player
TV
IN
VIDEO
AUDIO
Connecting to the remote control unit
By connecting the remote control unit RM-V200 (not
supplied) to CONTROL S IN you can use the wired remote
control.
6
SONY SVP-DC1 (E) 3-194-445-02 (3)
Page 7

Playing a tape
This section shows you how to play back a video tape.
The Video Cassette Player automatically detects tape speed
according to the recording mode (SP, LP, or EP).
1 Turn on your TV and set the TV to video input.
0 REW
6 EJECT
) FF
· PLAY
P PAUSE
p STOP
6
1
23
456
8
7
(
7
'
·
0)
p
9
0
P
#3
CASSETTE
indicator
6 EJECT
& SLOW
7 FRAME
P PAUSE
3/#
SEARCH
) FF
· PLAY
p STOP
0 REW
2 Insert a tape.
The Video Cassette Player turns on
and starts playing automatically.
When the tape reaches the end, the
Video Cassette Player rewinds it to
the beginning. (The power remains
on.)
Additional tasks
To
Stop play
Pause play
Resume play after pause
Fast-forward the tape
Rewind the tape
Play at high speed
View the picture during
fast-forward or rewind
Play in slow motion
Play frame by frame
Eject the tape
Press
p STOP
P PAUSE
P PAUSE or · PLAY
) FF
0 REW
During playback, keep pressing
) FF or 0 REW.
During playback, press
SEARCH or 3 SEARCH on the
remote commander.
During fast-forward, keep
pressing ) FF.
During rewind, keep pressing
0 REW.
During playback or pause, press
& SLOW.
During pause, press
advance the picture one frame.
6 EJECT
#
7 FRAME to
SONY SVP-DC1 (E) 3-194-445-02 (3)
7
Page 8

Playing a tape (continued)
Maximum playing time
When playing the tape, the Video Cassette Player
automatically detects the tape speed. See the table below for
the maximum playing time for each speed: SP (Standard
Play), LP (Long Play), and EP (Extended Play).
Tips
•You can eject a tape even
when the power is off.
When you press 6 EJECT,
the Video Cassette Player
turns on automatically.
After ejecting the tape, the
Video Cassette Player turns
off again.
• Adjust the picture using
TRACKING +/– on the
Video Cassette Player if:
– Streaks appear while
playing in slow motion.
– Bands appear on the top
or bottom while pausing.
– The picture shakes while
pausing.
• The CASSETTE indicator on
the front of the Video
Cassette Player lights in
green whenever the cassette
is inserted even when the
power is off.
Notes
• When the pause mode lasts
for more than about five
minutes, the Video Cassette
Player will automatically
enter the stop mode.
In pause mode, the P
PAUSE button blinks.
• When the stop mode lasts
for more than about five
minutes, the VCP will
automatically turn off.
• The playback sound is
muted during various speed
playback modes except for
normal speed playback.
• Noise appears on the screen
while pausing as the VCP is
two-head type. Especially,
the pause mode picture of
the tape recorded in the SP
mode is not stable. This is
not a malfunction of this
VCP.
Tape type
Maximum playing time
SP LP EP
T-160 2 hrs. 40 min. 5 hrs. 20 min. 8 hrs.
T-120 2 hrs. 4 hrs. 6 hrs.
T-60 1 hr. 2 hrs. 3 hrs.
T-30 30 min. 1 hr. 1 hr. 30 min.
8
SONY SVP-DC1 (E) 3-194-445-02 (3)
Page 9

Repeat play
You can play the recorded portion of a tape repeatedly.
1 Set the AUTO switch to a.
AUTO
6
1
456
7
(
7
'
OFF
23
8
0
p STOP
9
2 Insert the recorded tape.
The Video Cassette Player starts playing.
After playing the recorded portion, the VCP rewinds
the tape to the beginning and plays the same recorded
portion repeatedly.
To stop playing
Press p STOP.
Conditions of the tape for repeat play
To use the repeat play function, the tape must meet the
following conditions:
• The blank portion at the beginning of a tape must be less
than 25 seconds.
• There must be a blank space of more than 5 seconds just
after the end of the recorded portion. If not, the VCP may
continue to play the next recorded portion or play to the
end of the tape.
To cancel repeat play mode
Set the AUTO switch to OFF.
P
#3
·
0)
p
p STOP
9
SONY SVP-DC1 (E) 3-194-445-02 (3)
Page 10

Playing a tape (continued)
One Time Play
You can play the recorded portion of a tape once and rewind
the tape automatically to the beginning of that portion.
ÅÅ
Å
1 Set the AUTO switch to .
ÅÅ
AUTO
6
1
456
7
(
7
'
OFF
23
8
9
0
2 Insert the recorded tape.
The Video Cassette Player starts playing. When the tape
reaches the end of the portion of the tape to be played,
the VCP rewinds the tape to the beginning and stops.
To play again, press · PLAY.
Conditions of the tape for one time play
To use the one time play function, the tape must meet the
following conditions:
• The blank portion at the beginning of a tape must be less
than 25 seconds.
• There must be a blank space of more than 5 seconds just
after the end of the recorded portion. If not, the VCP may
continue to play the next recorded portion or play to the
end of the tape.
To cancel one time play mode
Set the AUTO switch to OFF.
10
P
#3
·
0)
p
· PLAY
SONY SVP-DC1 (E) 3-194-445-02 (3)
Page 11

TRACKING +/–
Notes
• The Video Cassette Player
may not reproduce a good
quality picture if the tape or
the recording is in poor
condition.
• When you play a tape
recorded with the
copyguard system, you may
occasionally see distortion
in the upper part of the
picture. This is not a
malfunction of the Video
Cassette Player.
Adjusting the tracking
Though the Video Cassette Player automatically adjusts the
tracking when playing a tape, distortion may occur if the
tape was recorded in poor condition. If so, manually adjust
the tracking condition by pressing TRACKING +/– on the
VCP. The distortion should disappear as you press one of
the two buttons. To resume automatic tracking adjustments,
press TRACKING + and – simultaneously.
SONY SVP-DC1 (E) 3-194-445-02 (3)
11
Page 12

Troubleshooting
Power
Playback
Symptom
The POWER switch
does not function.
The power is turned on
but the unit does not
operate.
The playback picture
does not appear on the
TV screen.
The picture is not clear.
The picture rolls
vertically during
picture search.
Remedy
• The input level of the PC terminal is LOW (0V). Input 12 V to the
terminal (HIGH).
• The battery's voltage is other than 12 V DC.
• There is no battery capacity.
• The battery is connected with incorrect polarity.
• The safety device on the unit has been activated. Leave the unit
turned off over an hour.
• The battery capacity is low.
• Make sure the TV is set to video input.
• Adjust the tracking with the TRACKING +/– buttons.
• The video heads are dirty (see details below). Clean the video heads
using the Sony V-25CL video head cleaning cassette. If this cleaning
cassette is not available in your area, have the heads cleaned at your
nearest Sony service facility (a standard service charge will be
required). Do not use a commercially available wet-type cleaning
cassette, as it may damage the video heads.
• The video heads may have to be replaced. Consult your local Sony
service facility for more information.
• Adjust the vertical hold control on the TV or monitor.
Others
The picture has no
sound.
A tape cannot be
inserted.
The remote
commander does not
function.
The unit needs to be
cleaned.
• The tape is defective. Use a new tape.
• If the CASSETTE indicator lights in green, a tape is already in the
cassette compartment.
• Make sure you are pointing the remote commander at the remote
sensor on the VCP.
• Replace all the batteries in the remote commander with new ones if
they are weak.
• Make sure the TV / VIDEO remote control switch is set correctly.
• Clean with a dry, soft cloth, or a soft cloth slightly moistened with a
mild detergent solution. Do not use any type of solvent, such as
alcohol or benzine.
If you have any questions or problems concerning your Video
Cassette Player, please consult your nearest Sony service facility.
Symptoms caused by contaminated video heads
• Normal picture
• Rough picture •Unclear picture • No picture (or
black & white
screen appears)
12
initial
terminal
SONY SVP-DC1 (E) 3-194-445-02 (3)
Page 13

Specifications
System
Format
VHS NTSC standard
General
Power requirements
12 V DC (10 V–16 V DC)
Video signal
NTSC color, EIA standards
Tape speed
SP: 33.35 mm/s
3
⁄8 inches/s)
(1
LP: 16.67 mm/s
11
⁄16 inches/s)
(
EP: 11.11 mm/s
7
⁄16 inches/s)
(
Maximum playback time
6 hrs. in EP mode (with T120 tape)
Fast-foward and rewind
time
Approx. 4 min. 30 sec. (with
T-120 tape)
Inputs and outputs
AUDIO/VIDEO OUT
VIDEO OUT, Phono jack (1)
Output signal: 1 Vp–p,
75 ohms, unbalanced,
sync negative
AUDIO OUT, Phono jack (1)
Rated output level: –8 dBs
(0 dBs = 0.775 Vrms)
Load impedance: 47
kilohms
Output impedance: less
than 10 kilohms
AUDIO/VIDEO IN
VIDEO IN, Phono jack (1)
Input signal: 1 Vp-p, 75
ohms, unbalanced, sync
negative
AUDIO IN, Phono jack (1)
Input level: –8 dBs (0 dBs =
0.775 Vrms)
Input impedance: more
than 47 kohms
Power consumption
13 W
Operating temperature
5°C to 40°C (41°F to 104°F)
Storage temperature
– 20°C to 60°C (–4°F to
140°F)
Dimensions
Approx. 240 x 95 x 300 mm
(w/h/d) (Approx. 9
x 117⁄8 inches) including
projecting parts and controls
Mass
Approx. 3.3 kg (7 lb 4 oz)
1
⁄2 x 33⁄4
Supplied accessories
Remote commander RMT-V251
(1)
Size AA (R6) batteries (2)
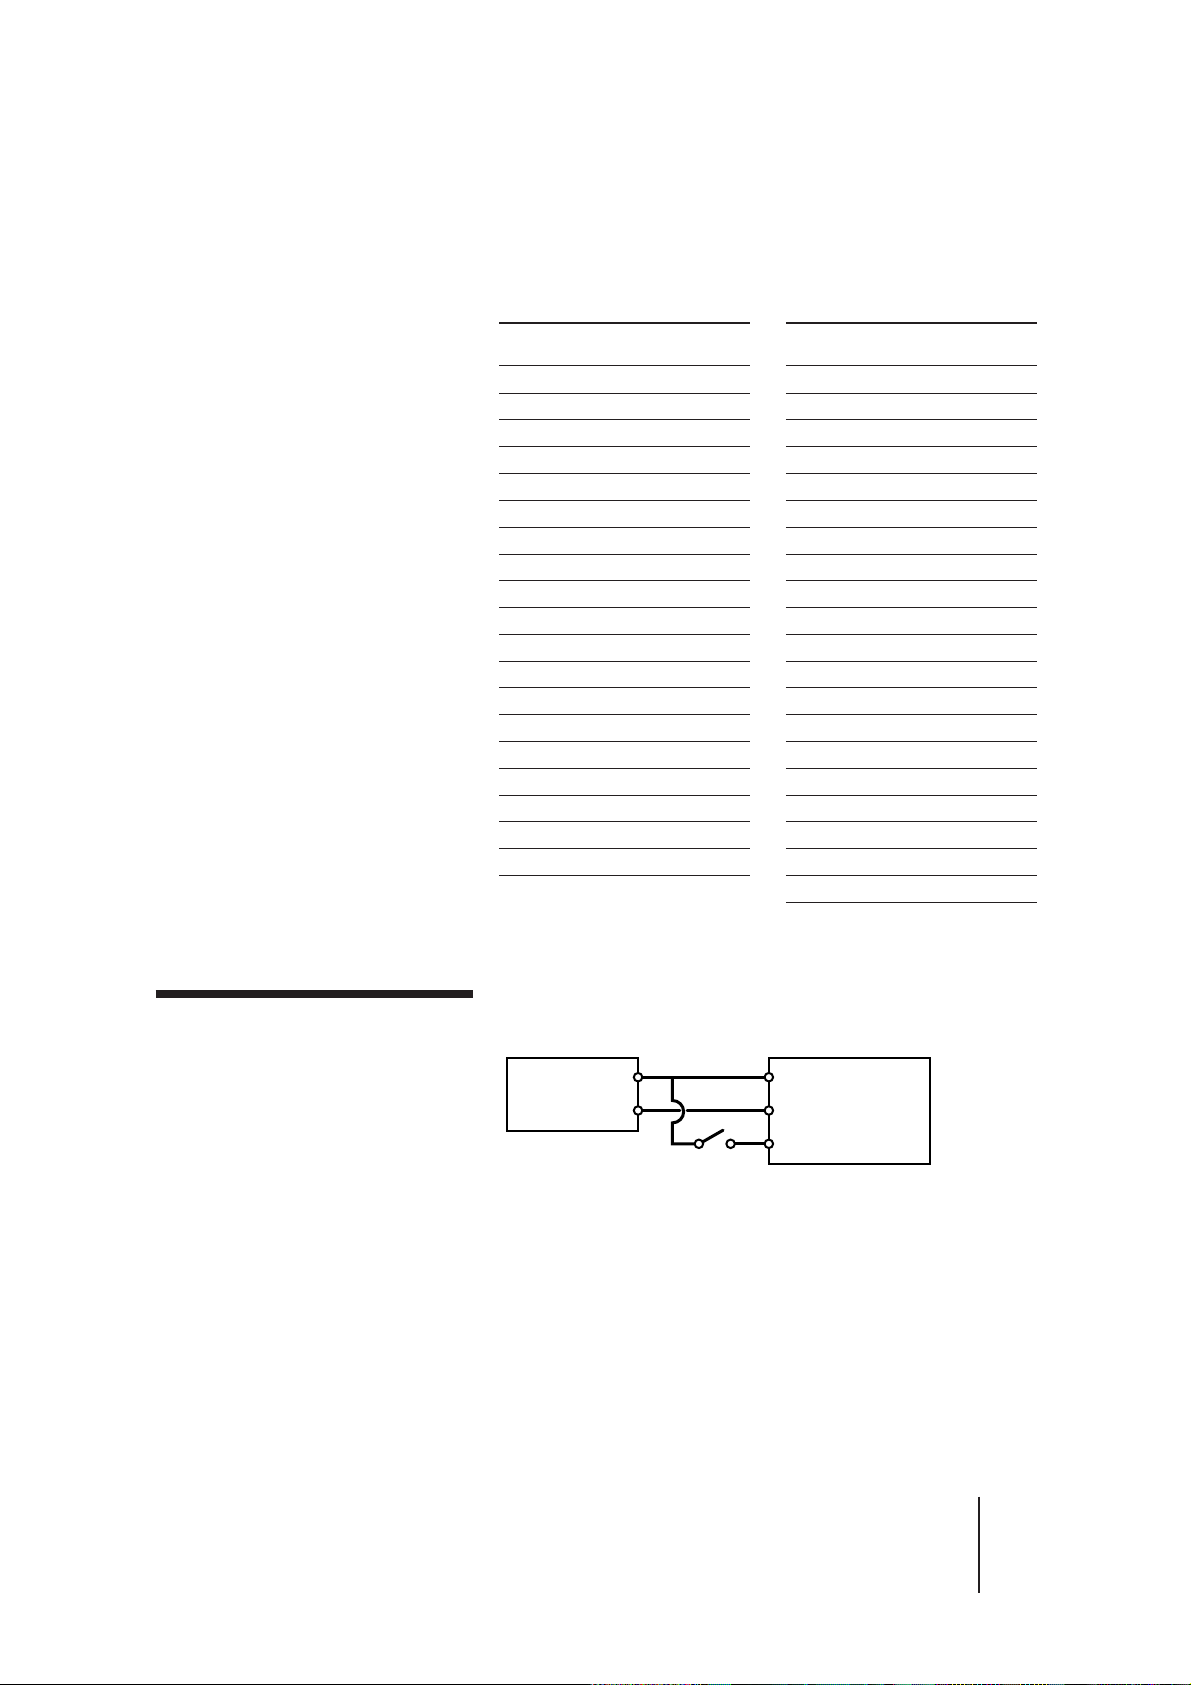
Pin assignment
DC 12 V terminals
34
12
Pin No. Signal
1 POWER CONTROL
2 GND (–)
3NC
4 +12 V
Recommended receptacle: Molex
TYPE 5557-NR
Design and specifications are
subject to change without notice.
CONTROL S IN
Minijack (1)
13
SONY SVP-DC1 (E) 3-194-445-02 (3)
Page 14

Index to parts
and controls
Refer to the pages indicated in ( ) for details.
Front panel
6
1 POWER switch/indicator
2 Cassette compartment
3 0 REW (rewind) button/indicator (7)
Rear panel
1 DC 12 V terminals (5)
2 CONTROL S IN jack (6)
3 AUDIO/VIDEO IN jacks (phono type) (6)
4 · PLAY button/indicator (7, 10)
5 ) FF (fast-forward) button/indicator (7)
6 CASSETTE indicator (8)
7 DEW indicator (2)
8 Remote sensor
9 P PAUSE button/indicator (7)
!º p STOP button/indicator (7, 9)
!¡ TRACKING +/– buttons (11)
!™ AUTO switch (9, 10)
!£ 6 EJECT button/indicator (7)
4 AUDIO/VIDEO OUT jacks (phono type) (6)
14
SONY SVP-DC1 (E) 3-194-445-02 (3)
Page 15

Remote commander
1 6 EJECT button (7)
2 RESET button (for controllable TV when entering
the code number 20)
3 SLEEP TIMER button (for TV)
4 DISPLAY button (for TV)
1
2
3
4
5
6
7
8
9
0
!¡
6
1
23
456
8
7
(
7
'
·
0)
p
9
0
P
#3
!™
!£
!¢
!∞
!§
!¶
!•
!ª
@º
@¡
@™
@£
@¢
@∞
5 TV/CAPTION/TEX button (for controllable TV
when entering the code number 20)
6 CAPTION CH1/CH2 button (for controllable
TV when entering the code number 20)
7 Q. VIEW button (for controllable TV when
entering the code number 20)
8 ' FRAME button
The button does not function with this VCP.
9 7 FRAME button (7)
!º 3/# SEARCH buttons (7)
!¡ 0 REW (rewind) button (7)
!™ TV / VIDEO remote control switch (4)
!£ POWER switch
!¢ Menu operation buttons (for TV)
!∞ AUDIO MONITOR button (for TV)
!§ TV/VTR button (for TV)
!¶ MUTE button (for TV)
!• Number buttons (for TV)
!ª & SLOW button (7)
The button does not function with this VCP.
@º CH (channel) +/– buttons (for TV)
@¡ VOL (volume) +/– buttons (for TV)
@™ P PAUSE button (7)
@£ ) FF (fast-forward) button (7)
@¢ · PLAY button (7, 10)
@∞ p STOP button (7, 9)
15
SONY SVP-DC1 (E) 3-194-445-02 (3)
Page 16

Index
A, B
AV connection 6
Auto head cleaner 3
Auto tracking adjustment 11
C, D
Cleaning the video heads 12
Connecting
the remote control unit 6
the TV game, etc. 6
the Video Cassette Player
and your TV 6
CONTROL S IN jack 6
E, F, G, H, I, J, K
EP mode 8
L, M, N
LP mode 8
O
One time play 10
P, Q
Playback at various speeds 7
R
Remote commander
inserting batteries 4
index to parts and
controls 15
Repeat play 9
S, T, U, V, W, X, Y, Z
Searching at various speeds 7
SP mode 8
Sony Corporation Printed in Indonesia
16
SONY SVP-DC1 (E) 3-194-445-02 (3)
 Loading...