

Page 1
Video Cassette
Recorder
3-201-538-01(2)
Operating Instructions
Mode d’emploi
Manual de Instrucciones
US
FR
ES
j
SVO-1630
1998 by Sony Corporation
Page 2
English
WARNING
To prevent fire or shock hazard, do not
expose the unit to rain or moisture.
This symbol is intended to alert the
user to the presence of uninsulated
“dangerous voltage” within the
product’s enclosure that may be of
sufficient magnitude to constitute a
risk of electric shock to persons.
This symbol is intended to alert the
user to the presence of important
operating and maintenance (servicing)
instructions in the literature
accompanying the appliance.
For the customers in the USA
This equipment has been tested and found to comply with
the limits for a Class B digital device, pursuant to Part 15 of
the FCC Rules. These limits are designed to provide
reasonable protection against harmful interference in a
residential installation. This equipment generates, uses, and
can radiate radio frequency energy and, if not installed and
used in accordance with the instructions, may cause harmful
interference to radio communications. However, there is no
guarantee that interference will not occur in a particular
installation. If this equipment does cause harmful
interference to radio or television reception, which can be
determined by turning the equipment off and on, the user is
encouraged to try to correct the interference by one or more
of the following measures:
• Reorient or relocate the receiving antenna.
• Increase the separation between the equipment and
receiver.
• Connect the equipment into an outlet on a circuit different
from that to which the receiver is connected.
• Consult the dealer or an experienced radio/TV technician
for help.
You are cautioned that any changes or modifications not
expressly approved in this manual could void your authority
to operate this equipment.
Owner’s record
The model number is located at the front of the unit and the
serial number on the rear. Record the serial number in the
space provided below. Refer to them whenever you call upon
your Sony dealer regarding this product.
Model No. SVO-1630 Serial No.
(FAROUDJA
logo)
Caution
Television programs, films, video tapes and other materials
may be copyrighted. Unauthorized recording of such material
may be contrary to the provisions of the copyright laws. Also,
use of this recorder with cable television transmission may
require authorization from the cable television transmission
and/or program owner.
This player has a Y/C filtering
technique incorporated under license
from Faroudja Laboratories Inc.
Declaration of Conformity
Model Number : SVO-1630
Trade Name : SONY
Responsible Party : Sony Electronics Inc.
Address : 1 Sony Drive, Park Ridge,
NJ.07656 USA
Telephone No. : 201-930-1000
This device complies with Part 15 of the FCC Rules.
Operation is subject to the following two conditions: (1) This
device may not cause harmful interference, and (2) this
device must accept any interference received, including
interference that may cause undesired operation.
2 (US)
Page 3

Table of Contents
Overview
Setup
Precautions ................................................................4 (US)
Features......................................................................5 (US)
Location of Parts and Controls ................................6 (US)
Front panel .....................................................................6 (US)
Display window ............................................................. 7 (US)
Rear panel ...................................................................... 7 (US)
Remote commander ....................................................... 8 (US)
Setting Up the Remote Commander ........................9 (US)
Basic Connections .................................................. 10 (US)
Setting the Language ..............................................11 (US)
Setting the Clock ..................................................... 12 (US)
Setting the clock...........................................................12 (US)
Adjusting to Daylight Saving Time ............................. 14 (US)
Basic Operations
Additional Operations
Recording.................................................................16 (US)
Recording ..................................................................... 16 (US)
Sensor recording .......................................................... 17 (US)
Checking the tape threading.........................................18 (US)
Checking the used time ................................................ 18 (US)
Playing a Tape .......................................................... 19 (US)
Playing a tape ............................................................... 19 (US)
Playing/searching at various speeds.............................23 (US)
Repeat playback ........................................................... 24 (US)
Using the index function .............................................. 26 (US)
Using the blank search function...................................28 (US)
One time play ............................................................... 29 (US)
Adjusting the Picture .............................................. 30 (US)
Adjusting the Tracking................................................. 30 (US)
Using the Adaptive Picture Control (APC).................. 31 (US)
Timer Recording/Playback...................................... 32 (US)
Timer recording/playback ............................................ 32 (US)
Checking/changing/cancelling timer settings .............. 36 (US)
Editing with Another VCR .......................................38 (US)
Connecting another VCR for editing ........................... 38 (US)
Editing with another VCR............................................ 39 (US)
Recording TV Programs..........................................40 (US)
Connecting the VCR and TV ....................................... 40 (US)
Presetting channels....................................................... 42 (US)
Recording TV programs............................................... 45 (US)
Recording TV programs using the timer...................... 48 (US)
US
English
Others
Troubleshooting.......................................................50 (US)
Specifications .......................................................... 52 (US)
3 (US)
Page 4

Precautions
On safety
•Operate the unit on 120 V AC, 60 Hz only.
• The nameplate indicating operating voltage, power
consumption, etc., is located on the rear of the unit.
•If anything falls into the cabinet, unplug the unit and
have it checked by qualified personnel before
operating it any further.
• Do not drop or place heavy objects on the power
cord. If the power cord is damaged, turn off the power
immediately. It is dangerous to use the unit with a
damaged power cord.
•Unplug the unit from the wall outlet if you do not
intend to use it for an extended period of time. To
disconnect the cord, pull it out by the plug, never by
the cord.
On installation
•Allow adequate air circulation to prevent internal heat
buildup.
•Do not place the unit on surfaces (rugs, blankets, etc.)
or near materials (curtains, draperies) that may block
the ventilation slots.
•Do not install the unit near heat sources such as
radiators or air ducts, or in a place subject to direct
sunlight, excessive dust, mechanical vibration or
shock.
•Do not install the unit in an inclined position. It is
designed to be operated in a horizontal position only.
•Keep the unit and cassettes away from equipment
with strong magnets, such as microwave ovens or
large loudspeakers.
•Do not place heavy objects on the unit.
•If the unit is brought directly from a cold to a warm
location, moisture may condense inside the VCR and
cause damage to the video head and tape. When you
first install the unit, or when you move it from a cold
to a warm location, wait for about one hour before
operating the unit.
On cleaning
As a safety precaution, unplug the unit before cleaning
it.
• To keep the unit looking brand-new, periodically
clean it with a mild detergent solution. Never use
strong solvents as thinner or benzene, or abrasive
cleaners since they will damage the cabinet. When
cleaning, keep liquid away from electrical contacts
and connectors.
• When there is a buildup of dust on air vents, use a
vacuum cleaner to remove it.
On repacking
• Before repacking, disconnect all cables and
connecting cords.
• Do not throw away the carton and packing materials.
They make an ideal container with which to transport
the unit. When shipping the unit to another location,
repack it.
On transportation
When transporting the unit, protect it from vibration
and impact.
If you have any questions about this unit, contact your
authorized Sony dealer.
On video cassettes
Remove and store video cassettes after recording or
playback.
4 (US)
Page 5

Features
•Sensor recording that enables your VCR to record automatically
whenever video signals are input through the VIDEO IN jack
•Auto-repeat playback function that enables your VCR to repeat play of
only the recorded portion of the tape automatically
•Key inhibit function that locks the buttons on the VCR
•CONTROL S IN/OUT jacks that offer remote control of the tape
operation with other Sony video equipment
If you use the optional RM-V200 wired remote control unit, you can
control up to approximately 50 VCRs connected via CONTROL S IN/
OUT in series.
•Index scan/index search functions that easily locate the beginning of the
desired scene
•DUAL MODE SHUTTLE ring that easily advances and rewinds the tape
to locate a desired scene
•On-screen menu that displays information in three languages (English,
French or Spanish)
•Memory back-up function that, using a built-in rechargeable battery,
retains settings and adjustments (including the clock) for up to 30 days
when a power interruption occurs
•Timer recording/playback function that enables you to record/play at
preset times, daily or weekly, by setting the timer
•APC (Adaptive Picture Control) function that automatically optimizes
recording and playback performance
1)
•SQPB
that enables you to play video tapes recorded in S-VHS format
Overview
..........................................................................................................................................................................................................
1) SQPB is an abbreviation of S-VHS Quasi Playback. The quality of the
picture is not as high as those of the original picture.
5 (US)
Page 6
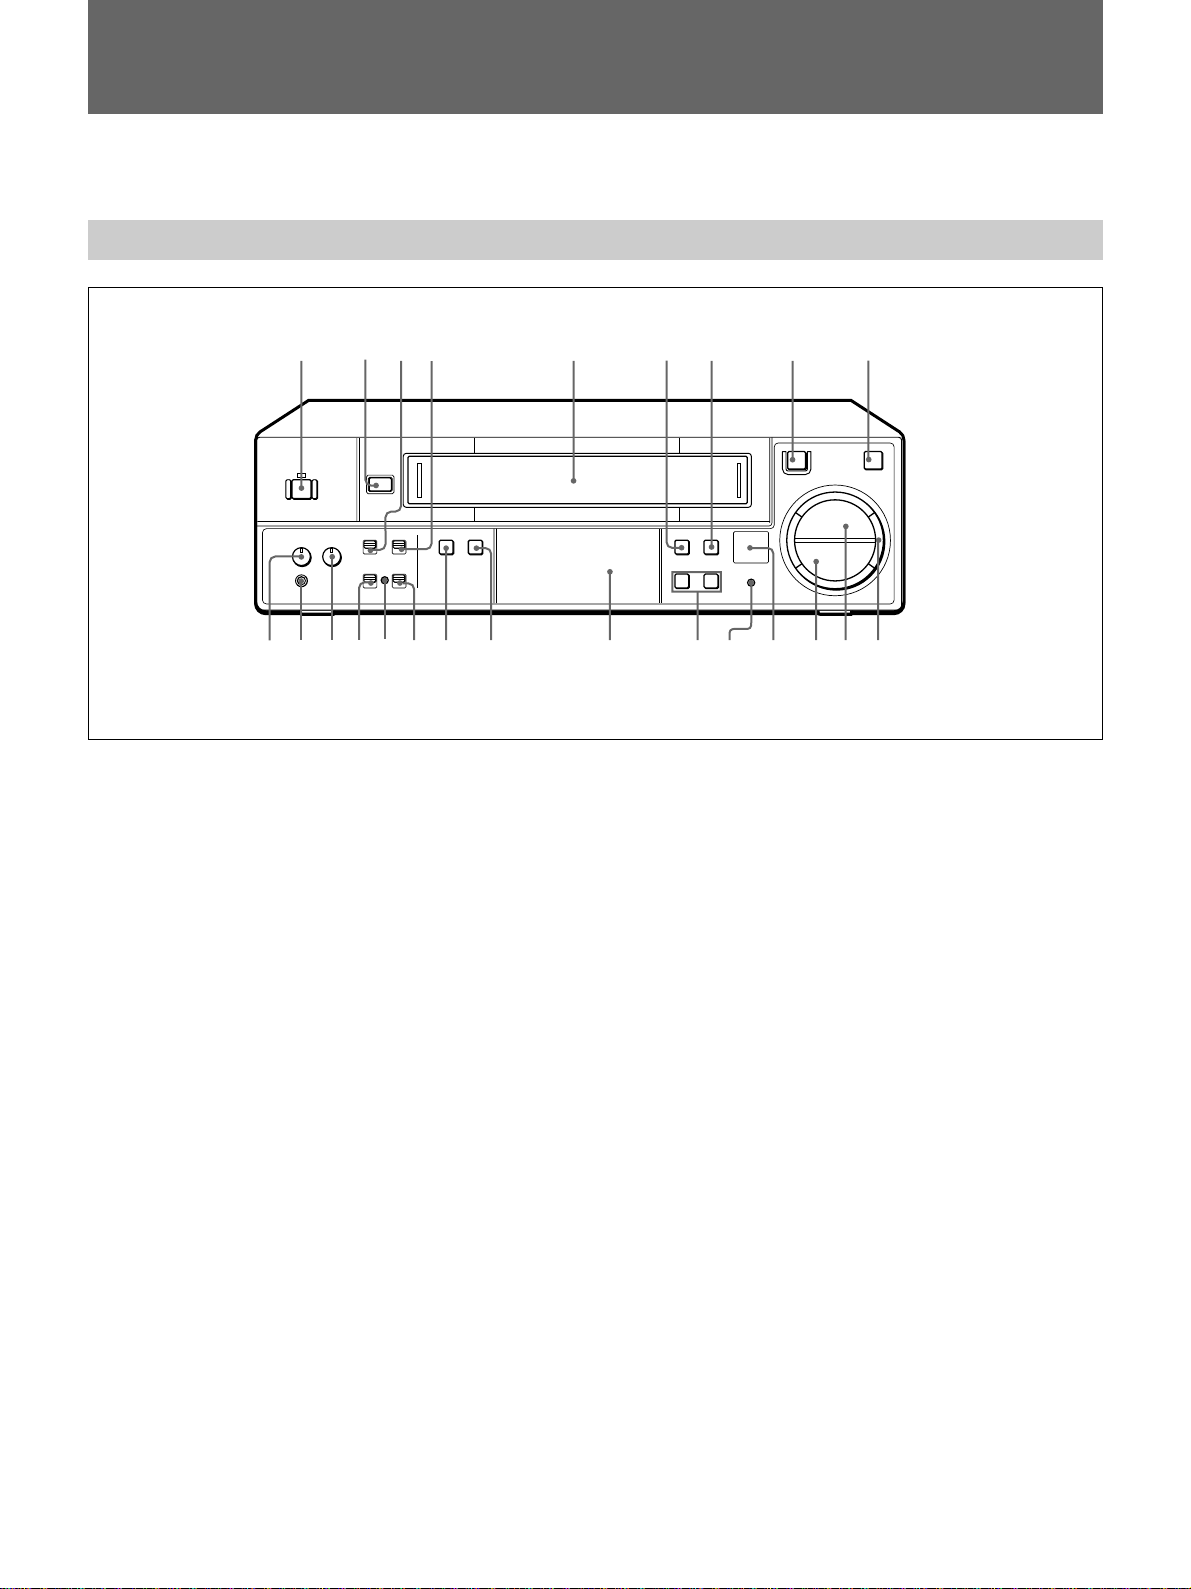
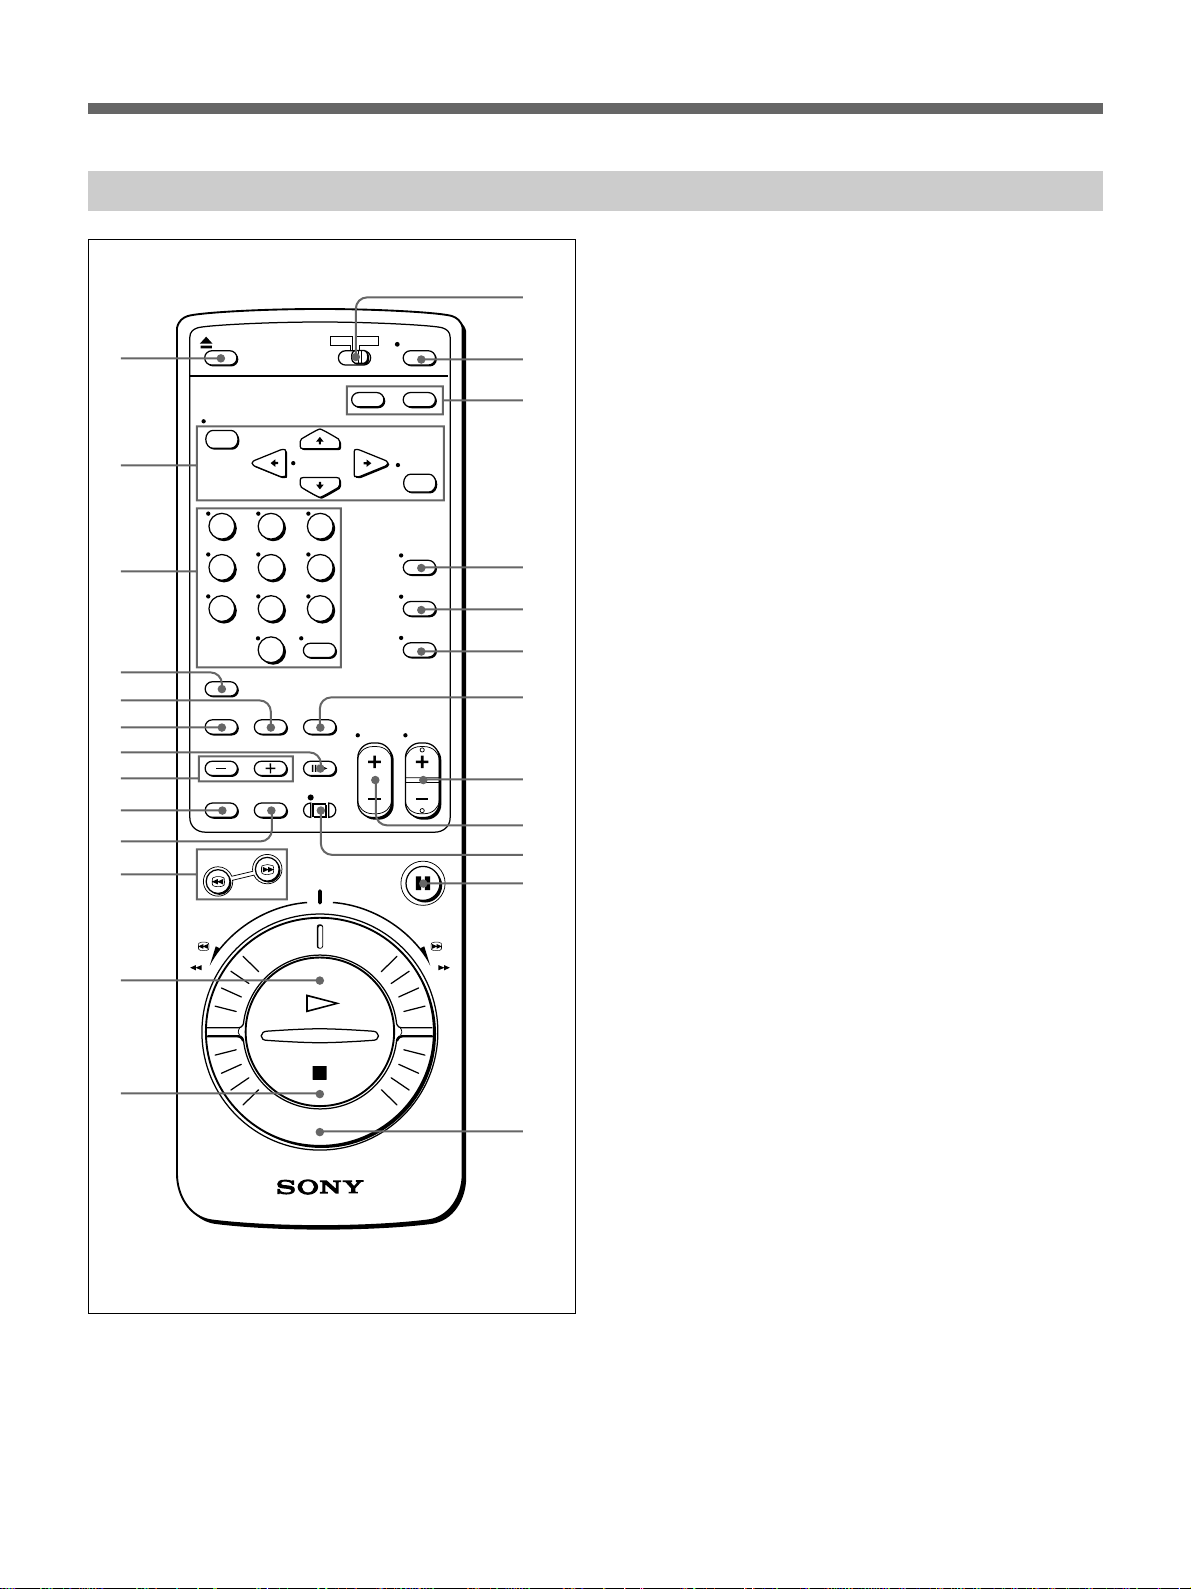
Location of Parts and Controls
Refer to the pages indicated in ( ) for details.
Front panel
134
2
6
@º
@™@¡ !ª
1 POWER switch/indicator (16 (US))
2 6 EJECT button (19
3 KEY INHIBIT ON/OFF switch (9
(US))
(US))
4 AUTO REPEAT ON/OFF switch (24
5 Cassette compartment (16
6 TAPE SPEED (SP/EP) button (16
7 TIMER button (32
8 r REC button (16
(US))
(US))
9 P PAUSE button (16
!º DUAL MODE SHUTTLE ring (19
!¡ ( PLAY button (19
!™ p STOP button (16
(US))
(US))
(US))
(US))
(US))
(US))
(US))
5
!¶!•@£@¢
67 8 9
rP
(
p
!¢
!º!¡!™!£!∞!§
!£ Remote sensor (9 (US))
!¢ RESET button (50
!∞ CH/TRACKING –/+ buttons (23
!§ Display window (7
!¶ INPUT SELECT button (16
!• SAP button (47
!ª REMOTE ON/OFF switch (9
@º SENSOR REC indicator (18
@¡ SENSOR REC ON/OFF switch (18
@™ REC LEVEL (recording volume) control (18
(US))
(US))
(US))
(US))
(US))
(US))
(US))
(US))
(US))
@£ Headphones jack
@¢ PHONES LEVEL (headphones volume) control
6 (US)
Page 7
Display window
5
TIMER
REC
KEY
INHIBIT
4
VTR
X 2
CATV
LINE
TUNER
AUTO
!¡!™!£
123
10
3
0
3
10
20
AUTO TRACKING
L R
SP EP
!∞!§
!¢
H M S
STEREO MAIN / L
9
0
6
8
SAP
AM
PM
SUB / R
7
1 Peak level meter
2 TIMER indicator
3 Tape operation indicators
4 VTR indicator
5 CATV indicator
6 Linear time counter
7 Clock
8 Stereo/bilingual indicators
9 Channel number indicator
!º Input mode indicators
!¡ AUTO indicator
!™ REC (recording) indicator
!£ KEY INHIBIT indicator
!¢ Cassette in indicator
!∞ Tape speed indicators (SP/EP)
!§ AUTO TRACKING indicator
Rear panel
1 3 4 52
1 AC IN connector
2 CONTROL S IN/OUT jacks (5
3 AUDIO IN R/L jacks (10
4 VIDEO IN jack (10
(US))
5 VHF/UHF IN/OUT jacks (40
6 RF CHANNEL 3/4 switch (41
7 VIDEO OUT jack (10
(US))
8 AUDIO OUT R/L jacks (10
678
(US))
(US))
(US))
(US))
(US))
7 (US)
Page 8
Location of Parts and Controls
Remote commander
1
2
3
4
5
6
7
8
9
0
!¡
!™
!£
!¢
!∞
!§
!¶
!•
!ª
@º
@¡
@™
@£
@¢
@∞
1 6 EJECT button (19 (US))
2 Menu operation buttons (11
(US))
MENU button
CURSOR 4/$/“/” buttons
EXECUTE button
3 Number buttons and ENTER button (46
4 COUNTER RESET button (20
5 AUTO TRACKING button (30
6 INPUT SELECT button (16
7 7 FRAME button (23
(US))
8 & SLOW –/+ buttons (23
9 BLANK SEARCH button (28
!º INDEX button (26
(US))
!¡ 3/# SEARCH buttons (19
!™ · PLAY button (19
!£ p STOP button (16
(US))
(US))
!¢ [TV] / [VTR] remote control switch (9
!∞ POWER switch (16
(US))
(US))
(US))
(US))
(US))
(US))
(US))
(US))
!§ TIMER buttons
ON/OFF button (32
CLEAR button (36
!¶ TV/VTR button (42
!• AUDIO MONITOR button (22
!ª DISPLAY button (20
@º TAPE SPEED (SP/EP) button (16
@¡ CH (channel) +/– button (11
(US))
(US))
(US))
(US))
(US))
(US))
(US))
@™ VOL (volume) +/– button
@£ r REC button (16
@¢ P PAUSE button (16
@∞ DUAL MODE SHUTTLE ring (19
(US))
(US))
(US))
(US))
8 (US)
Page 9
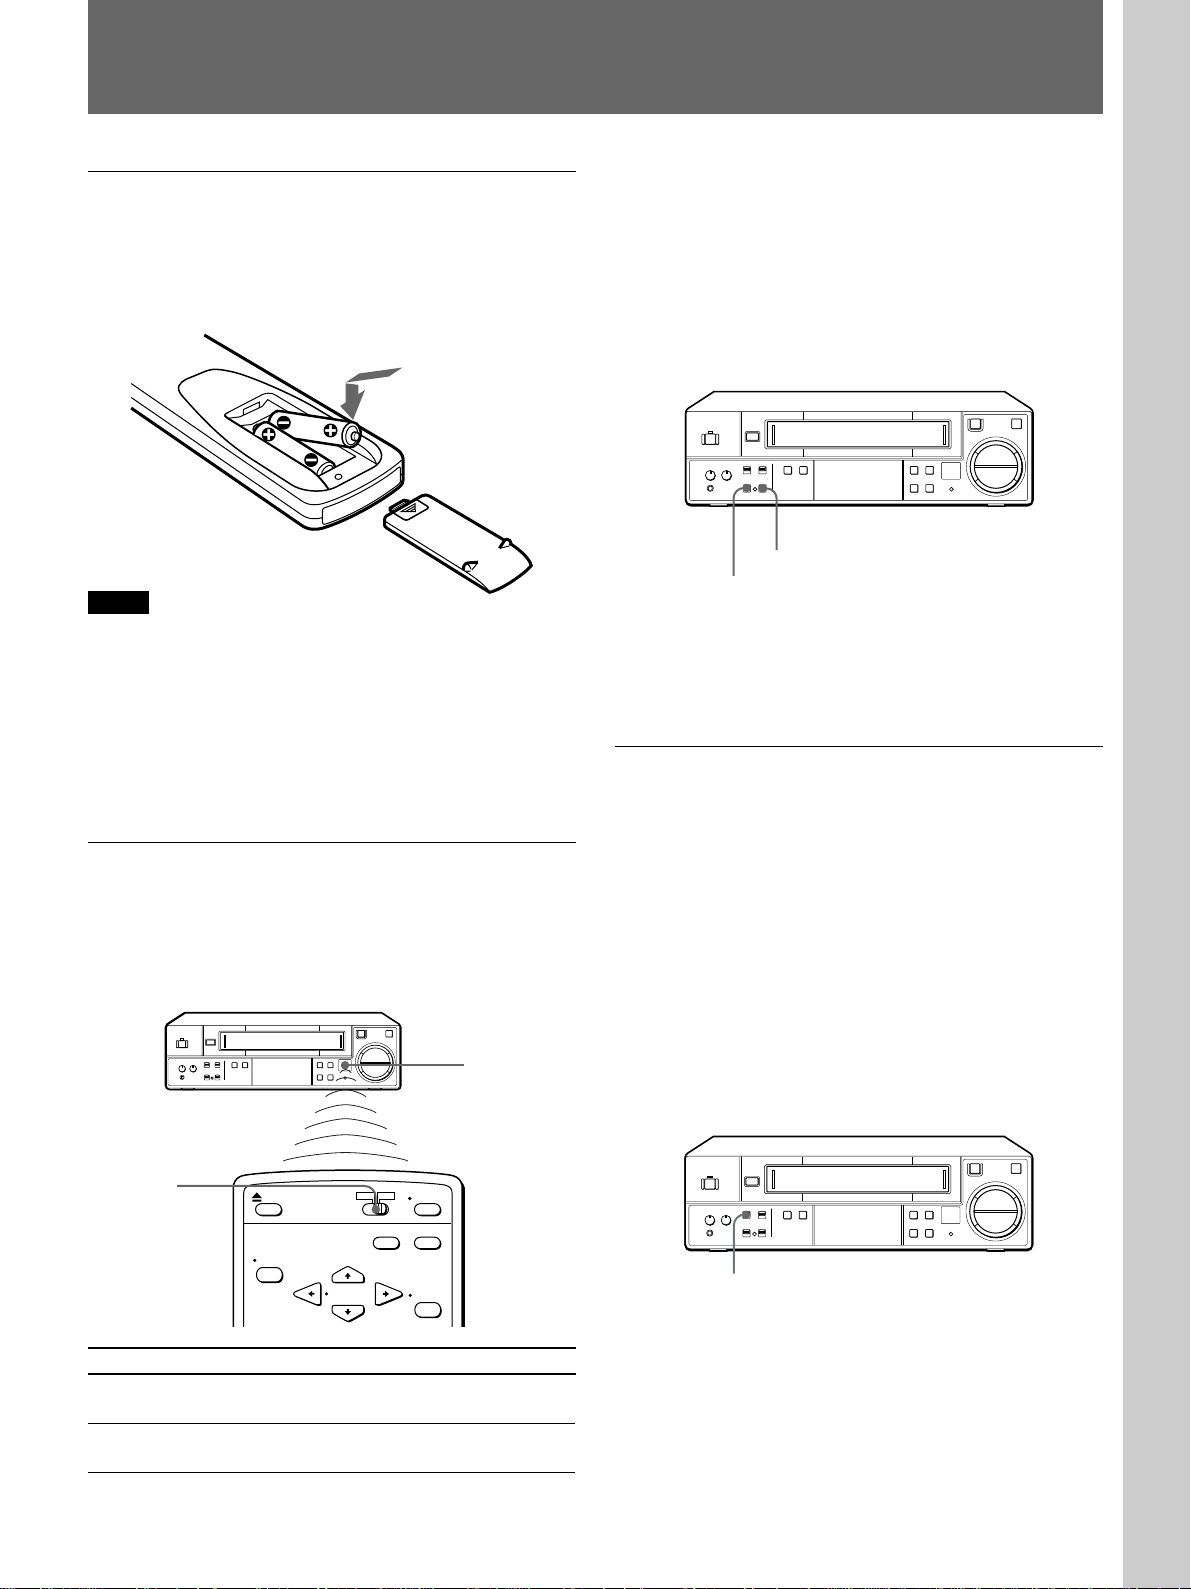
Setting Up the Remote Commander
Setup
Inserting the batteries
Insert two size AA (R6) batteries (supplied) by
matching the + and – on the batteries to the diagram
inside the battery compartment.
Be sure to install the
batteries from the ’ side.
Notes
•With normal use, the batteries should last for
approximately three to six months.
•If you do not use the remote commander for an
extended period of time, remove the batteries to avoid
possible damage from battery leakage.
•Do not use a new battery with an old one.
•Do not use different types of batteries.
Using the remote commander
You can use this remote commander to operate this
VCR and a Sony TV. Buttons on the remote
commander marked with a dot (•) can be used to
operate your TV.
6
rP
(
p
Remote sensor
To control the VCR with the remote
commander
•Set the REMOTE ON/OFF switch on the VCR to
ON.
•Set the SENSOR REC ON/OFF switch on the VCR
to OFF.
If the settings of these switches are incorrect, the
remote commander does not function.
6
REMOTE ON/OFF
SENSOR REC ON/OFF
rP
(
p
To disable the remote commander control
Set the REMOTE ON/OFF switch to OFF. At this
setting, you cannot control this VCR from the remote
commander.
Locking the buttons on the VCR
You can lock the buttons on the VCR. This is
convenient if you want to prevent accidental
operations while controlling this VCR with a wired
control unit (not supplied). It is also convenient when
you use this VCR in a public place; this protects the
VCR from mishaps caused by other people touching it.
To lock the buttons on the VCR
Set the KEY INHIBIT ON/OFF switch on the VCR to
ON.
“KEY INHIBIT” appears in the VCR’s display
window.
[TV]/[VTR]
To operate Set [TV] / [VTR] to
the VCR [VTR] and point at the remote sensor
on the VCR
a Sony TV TV and point at the remote sensor on
the [TV]
6
KEY INHIBIT ON/OFF
rP
(
p
To resume normal operation
Set the KEY INHIBIT ON/OFF switch to OFF.
9 (US)
Page 10
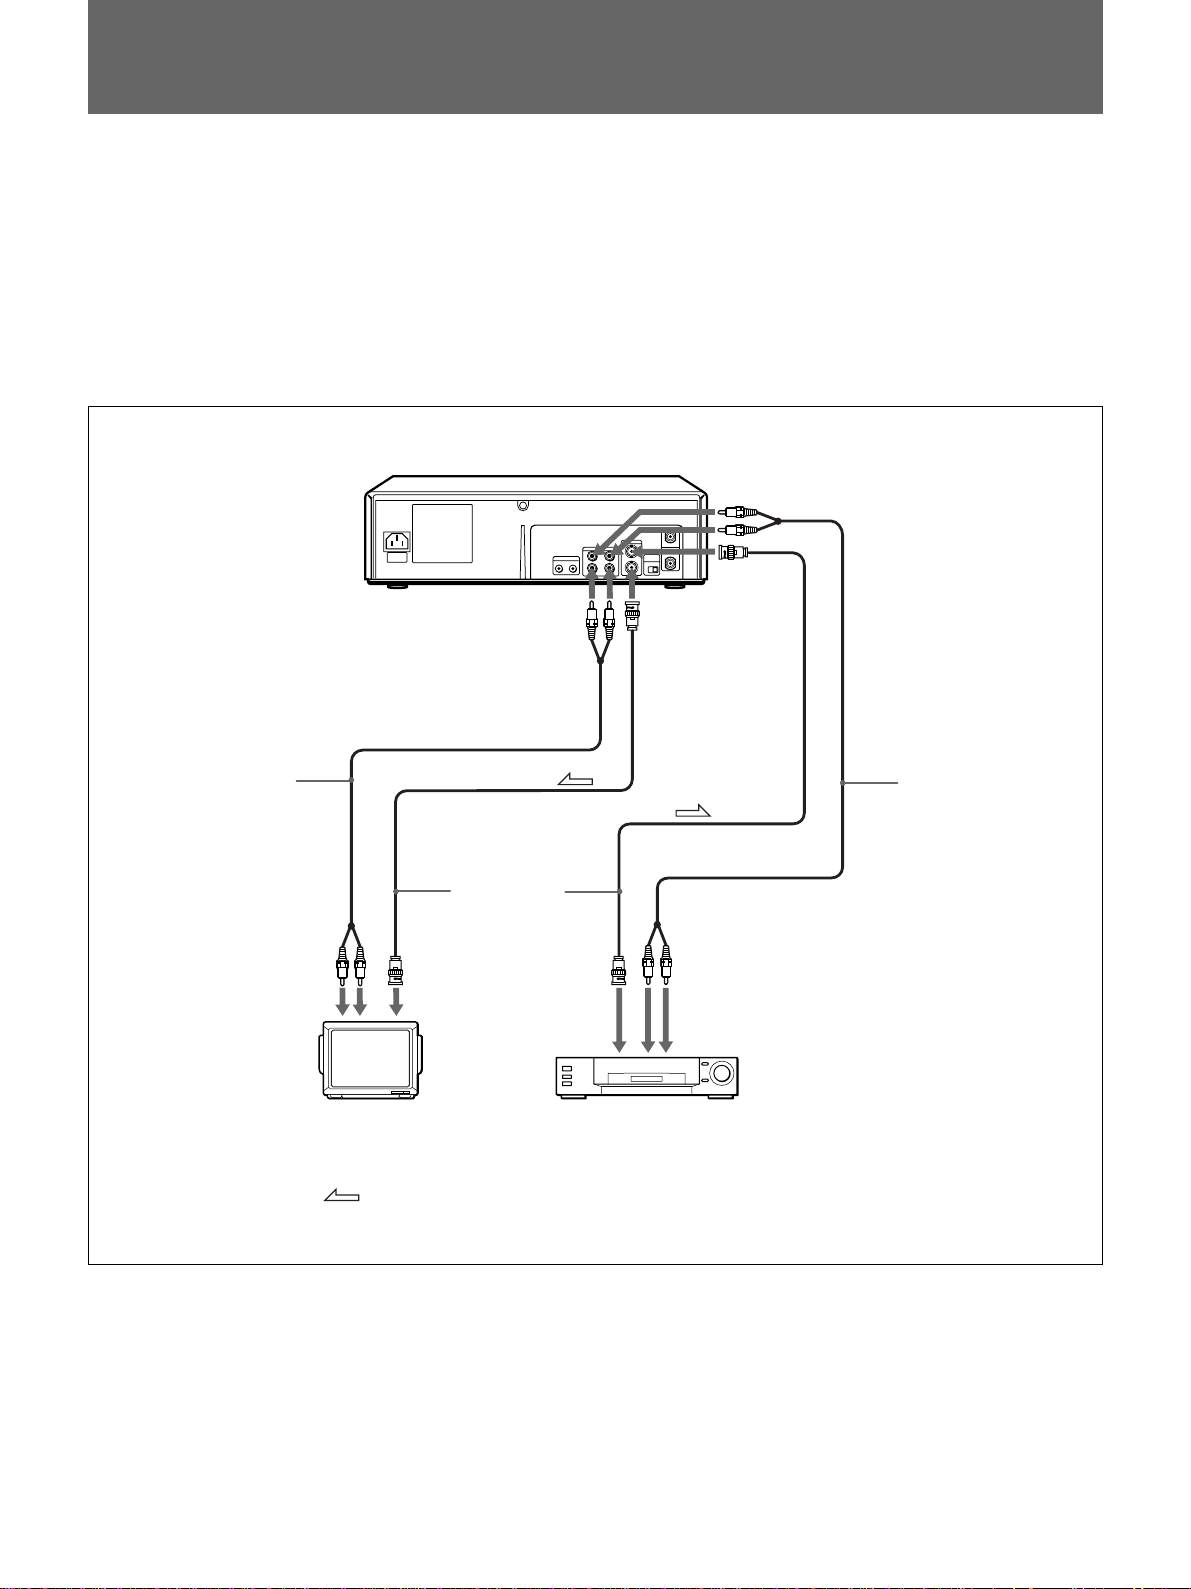
Basic Connections
Before you get started
•Turn off the power of all equipment.
•Do not connect the AC power cords until all of the connections are
completed.
•Be sure to make connections firmly. Loose connections may cause
picture distortion.
With the following connections, you can monitor the picture and sound.
Audio cable
(not supplied)
IN R/L
Video cable
(not supplied)
to VIDEO INto AUDIO
SVO-1630
to AUDIO
OUT R/L
to VIDEO OUT
to AUDIO
IN R/L
to VIDEO
IN
to VIDEO
OUT
Audio cable
(not supplied)
to AUDIO
OUT R/L
10 (US)
Monitor
Signal flow
Input sources
(another VCR, video camera,
CS tuner etc.)
Page 11

Setting the Language
Select either English, French or Spanish for the on-screen menu language.
MENU
CURSOR
4/$
EXECUTE
CH +/–
1 Press MENU.
The main menu appears on the TV screen.
1. CLOCK SET
DAYLIGHT SET
LANGUAGE
2. TIMER REC/PLAY SET
3. TUNER PRESET
4. SET UP
USED TIME
2 Make sure that 1.CLOCK SET /DAYLIGHT SET/LANGUAGE is
selected, and press EXECUTE.
The LANGUAGE menu appears.
[ CLOCK SET ]
01 - 01 - 00 00 : 00
[ DAYLIGHT SET ]
MODE NO USE
WEEK MONTH TIME
ON 1ST - SUN 04 02 : 00
OFF LST - SUN 10 02 : 00
[ LANGUAGE ]
ENGLISH
3 Press CURSOR 4/$ to flash the language.
[ CLOCK SET ]
01 - 01 - 00 00 : 00
[ DAYLIGHT SET ]
MODE NO USE
WEEK MONTH TIME
ON 1ST - SUN 04 02 : 00
OFF LST - SUN 10 02 : 00
[ LANGUAGE ]
ENGLISH
4 Select the language: ENGLISH, FRANCAIS or ESPANOL, using CH
+/–, then press EXECUTE.
The main menu appears in the selected language.
Example: ESPANOL
1. AJUSTE RELOJ
HORA DE VERANO
IDIOMA
2. AJUSTE GRAB TEMP/REP
3. MEM SINTONIZADOR
4. AJUSTE
TIEMPO USADO
5 Press MENU to return to the normal display.
11 (US)
Page 12

Setting the Clock
Setting the clock
MENU
CURSOR
Z/z
EXECUTE
CH +/–
Set the time and date to use the timer feature for recording/playback
programs.
1 Press MENU.
The main menu appears.
1. CLOCK SET
DAYLIGHT SET
LANGUAGE
2. TIMER REC/PLAY SET
3. TUNER PRESET
4. SET UP
USED TIME
2 Make sure that 1. CLOCK SET/DAYLIGHT SET/LANGUAGE is
selected, and press EXECUTE.
The CLOCK SET menu appears on the screen and the month flashes.
[ CLOCK SET ]
01 - 01 - 00 00 : 00
[ DAYLIGHT SET ]
MODE NO USE
WEEK MONTH TIME
ON 1ST - SUN 04 02 : 00
OFF LST - SUN 10 02 : 00
[ LANGUAGE ]
ENGLISH
3 Set the month using CH +/–.
[ CLOCK SET ]
07 - 01 - 00 00 : 00
[ DAYLIGHT SET ]
MODE NO USE
WEEK MONTH TIME
ON 1ST - SUN 04 02 : 00
OFF LST - SUN 10 02 : 00
[ LANGUAGE ]
ENGLISH
4 Press CURSOR ” to flash the day.
Set the day using CH +/–.
[ CLOCK SET ]
07 - 04 - 00 00 : 00
[ DAYLIGHT SET ]
MODE NO USE
WEEK MONTH TIME
ON 1ST - SUN 04 02 : 00
OFF LST - SUN 10 02 : 00
[ LANGUAGE ]
ENGLISH
12 (US)
Page 13
5 Press CURSOR ” to flash the year.
Set the year using CH +/–.
[ CLOCK SET ]
07 - 04 - 99 00 : 00
[ DAYLIGHT SET ]
MODE NO USE
WEEK MONTH TIME
ON 1ST - SUN 04 02 : 00
OFF LST - SUN 10 02 : 00
[ LANGUAGE ]
ENGLISH
6 Press CURSOR ” to flash the hour.
Set the hour using CH +/–.
[ CLOCK SET ]
07 - 04 - 99 15 : 00
[ DAYLIGHT SET ]
MODE NO USE
WEEK MONTH TIME
ON 1ST - SUN 04 02 : 00
OFF LST - SUN 10 02 : 00
[ LANGUAGE ]
ENGLISH
7 Press CURSOR ” to flash the minutes.
Set the minutes using CH +/–.
[ CLOCK SET ]
07 - 04 - 99 15 : 00
[ DAYLIGHT SET ]
MODE NO USE
WEEK MONTH TIME
ON 1ST - SUN 04 02 : 00
OFF LST - SUN 10 02 : 00
[ LANGUAGE ]
ENGLISH
8 Press EXECUTE to start the clock.
Notes
•You cannot set the clock during timer recording/playback or in timer
recording/playback standby mode.
•To change or correct a setting
“ or ” to flash the item you want to change and reset it.
•To recall the date and clock on the screen, select 1. CLOCK SET/
DAYLIGHT SET/LANGUAGE in the main menu and press EXECUTE.
before starting the clock, press CURSOR
13 (US)
Page 14
Setting the Clock
Adjusting to Daylight Saving Time
Adjust to Daylight Saving Time when the season changes.
MENU
CURSOR
Z/z/4/$
EXECUTE
CH +/–
1 Display the DAYLIGHT SET menu.
Follow steps 1 and 2 in “Setting the clock” on page 12 (US).
[ CLOCK SET ]
07 - 04 - 99 15 : 00
[ DAYLIGHT SET ]
MODE NO USE
WEEK MONTH TIME
ON 1ST - SUN 04 02 : 00
OFF LST - SUN 10 02 : 00
[ LANGUAGE ]
ENGLISH
2 Press CURSOR 4/$ to flash the setting of “MODE”.
[ CLOCK SET ]
07 - 04 - 99 15 : 00
[ DAYLIGHT SET ]
MODE NO USE
WEEK MONTH TIME
ON 1ST - SUN 04 02 : 00
OFF LST - SUN 10 02 : 00
[ LANGUAGE ]
ENGLISH
3 Select USE using CH +/– to make Daylight Saving Time adjustment.
[ CLOCK SET ]
07 - 04 - 99 15 : 00
[ DAYLIGHT SET ]
MODE USE
WEEK MONTH TIME
ON 1ST - SUN 04 02 : 00
OFF LST - SUN 10 02 : 00
[ LANGUAGE ]
ENGLISH
4 Press CURSOR $, and set the date and time when the Daylight Saving
Time adjustment is to be made.
WEEK ON
Set the week to make Daylight Saving Time adjustment using
CH +/–: Select 1ST, 2ND, 3RD, 4TH or LST for the first, second,
third, fourth or last week.
Then press CURSOR ” and set the day of the week using CH +/–:
SUN, MON, ..., SAT.
MONTH ON
Press CURSOR ” and set the month using CH +/–: 01, 02, ..., 12
for January, February, ..., December.
TIME ON
Press CURSOR ” and set the time using CH +/–. The time can only
be set between 01 and 22.
Then press CURSOR ” and set the minutes using CH +/–.
Note
To correct settings before completing the settings, press CURSOR
“/”/4/$ to flash the setting you want to change, and reset it.
14 (US)
Page 15

5 Press CURSOR $, and set the date and time to change back to
standard time in the same way.
6 Press EXECUTE, and then press MENU to return to the normal
display.
15 (US)
Page 16

Recording
Recording
POWER
INPUT SELECT
6
rP
(
p
This section shows you how to record the signal from the input sources
connected to the VCR.
1 Turn on the power of the equipment to be used.
r REC
TAPE SPEED p STOP
P PAUSE
POWER
2 Insert a tape with its safety tab in place.
The cassette in indicator flashes for about 5 seconds and the VCR
checks the tape threading.
During this period, · PLAY, r REC, FF ), REW 0, SEARCH
# and SEARCH 3 do not function.
See “Checking the tape threading” on page 18 (US) for details.
3 Press INPUT SELECT until the LINE indicator appears in the VCR’s
display window.
4 Set the recording speed, SP (standard play) or EP (extended play), by
pressing TAPE SPEED.
See “To select tape speeds” on page 17 (US).
5 Start recording by pressing r REC.
INPUT
SELECT
TAPE
SPEED
r REC
P PAUSE
p STOP
The REC indicator on the VCR lights up. When the tape reaches the
end, the VCR automatically rewinds it to the beginning.
Notes
•If you insert a tape with its safety tab removed, the VCR will eject it
when you press r REC. To record on this tape, cover the tab hole on the
cassette with adhesive tape.
•If “DISPLAY” is set to ON in the SET UP menu, the current time or tape
counter, and “r” while recording, are displayed on the monitor screen
but are not recorded on the tape.
See “Displaying the time counter and current time” on page 20 (US) for details.
•Whenever you insert a tape and first start recording, Adaptive Picture
Control (APC) automatically improves recording quality by adjusting the
VCR to the condition of the video heads and tape. There is about a 6second delay before the VCR actually starts recording when r REC is
pressed.
See “Using the Adaptive Picture Control (APC)” on page 31 (US) for details.
•If a power interruption occurs while recording, the VCR will resume
recording as soon as the power is restored.
16 (US)
To stop recording
Press p STOP.
To cut an unwanted scene while recording
Press P PAUSE, and press it again to resume recording.
Note
When the recording pause mode lasts for more than about 5 minutes, the
VCR enters the stop mode.
Page 17
Basic Operations
To select tape speeds
When recording, select either SP (standard play) or EP
(extended play) by pressing TAPE SPEED. EP
provides recording time three times as long as SP.
However, SP provides better picture quality. You can
mix SP and EP on the same tape. When playing a tape,
the VCR automatically detects the tape speed. See the
table below for the maximum recording/playback time
in each speed.
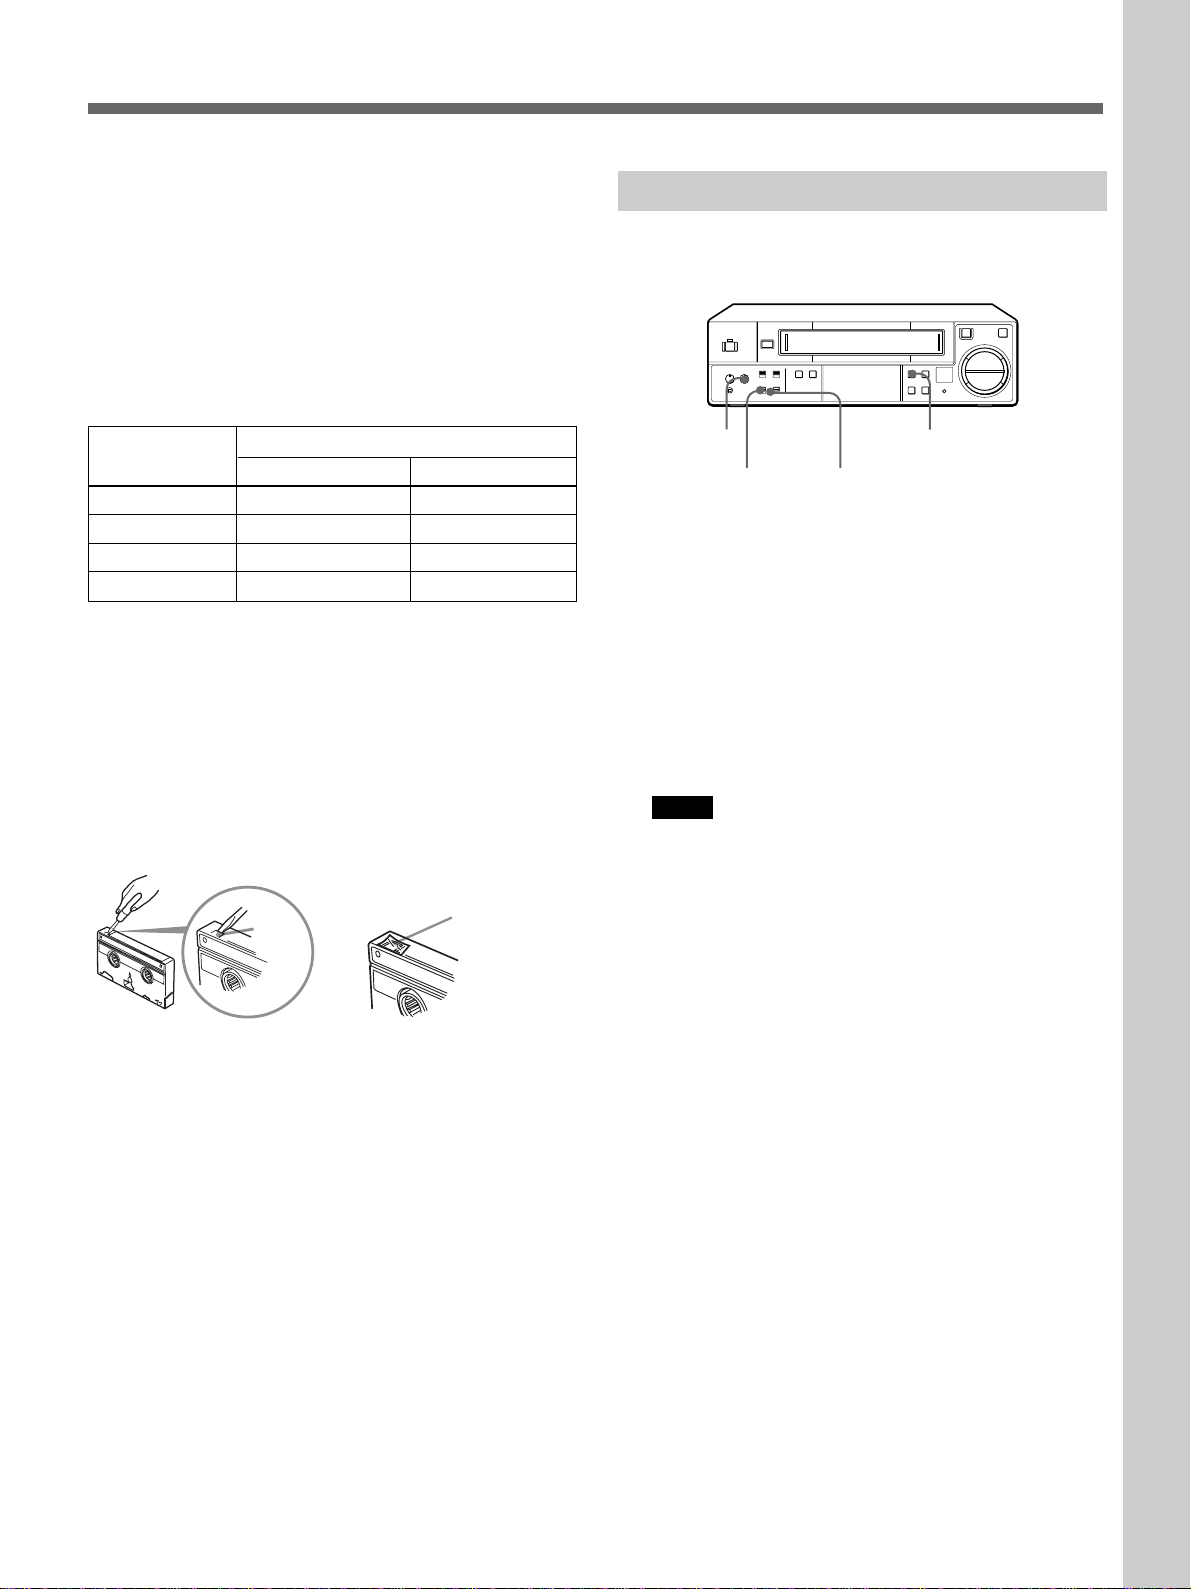
Tape type Maximum recording/playback time
SP EP
T-160 2 hrs. 40 min. 8 hrs.
T-120 2 hrs. 6 hrs.
T-60 1 hr. 3 hrs.
T-30 30 min. 1 hr. 30 min.
Saving a recording
Video tapes have a safety tab to protect against
accidental recording. To prevent accidental erasure of
a recording, break off the safety tab with a screwdriver
or other similar tool. A tape with its safety tab
removed is ejected if you try to record on it.
To record on this tape, simply cover the tab hole with
adhesive tape.
Safety
tab
Adhesive tape
Sensor recording
The VCR can automatically start recording whenever a
video signal is input through the VIDEO IN jack.
6
REC LEVEL
SENSOR REC ON/OFF SENSOR REC indicator
TAPE SPEED
rP
(
p
1 Insert a tape with its safety tab in place.
2 Press TAPE SPEED to select the tape speed.
3 Check that the REC LEVEL control is set to the
center position.
4 Set the SENSOR REC ON/OFF switch to ON.
The SENSOR REC indicator lights up, and the
VCR turns off to stand by for sensor recording.
Notes
• If you insert a tape with its safety tab removed,
the SENSOR REC indicator will flash and the
VCR will eject it when you set the SENSOR REC
ON/OFF switch to ON.
• If no cassette has been inserted, the SENSOR
REC indicator will flash when you set the
SENSOR REC ON/OFF switch to ON.
5 Input a video signal through the VIDEO IN jack.
The VCR starts recording. When the tape reaches
the end during recording, the VCR stops recording
and turns off.
If the video signal input stops, the VCR stops
recording and returns to the standby mode. The
SENSOR REC indicator remains lit.
To stop sensor recording
Set the SENSOR REC ON/OFF switch to OFF.
The VCR stops recording and turns off.
To cancel sensor recording
Set the SENSOR REC ON/OFF switch to OFF.
17 (US)
Page 18
Recording
Checking the tape threading
To ensure correct operation, the VCR checks
automatically the tape threading whenever you insert a
tape, and it takes about 5 seconds. If an error is
detected, the VCR ejects the tape.
During this period, tape operation buttons such as ·
PLAY, r REC, FF ), REW 0, SEARCH # and
SEARCH 3 do not function.
If you consider it unnecessary to check the tape
threading, you can cancel it in the SET UP menu.
1 Press MENU and select 4.SET UP/USED TIME,
then press EXECUTE.
2 Press CURSOR 4/$ to flash the setting of
“THREAD CHECK”.
[ SET UP ]
TIMER PB END
REPEAT MODE
APC
DISPLAY
STOP TIMER
THREAD CHECK
[ USED TIME ]
HEAD 00005H
REW
REPEAT
ON
OFF
5M
ON
Checking the used time
You can check the amount of time the video head has
been used in the USED TIME menu.
1 Press MENU and select 4. SET UP/USED TIME,
then press EXECUTE.
2 Check the head counter.
[ SET UP ]
TIMER PB END
REPEAT MODE
APC
DISPLAY
STOP TIMER
THREAD CHECK
[ USED TIME ]
HEAD 00005H
REW
REPEAT
ON
OFF
5M
ON
Head counter
3 Press MENU to return to the normal display.
3 Set to OFF to cancel the tape threading check
using CH +/–.
[ SET UP ]
TIMER PB END
REPEAT MODE
APC
DISPLAY
STOP TIMER
THREAD CHECK
[ USED TIME ]
HEAD 00005H
REW
REPEAT
ON
OFF
5M
OFF
4 Press EXECUTE, and then press MENU to return
to the normal display.
18 (US)
Page 19

Playing a Tape
Playing a tape
6 EJECT
6
p STOP ( PLAY
DUAL MODE SHUTTLE ring
rP
(
p
P PAUSE
6 EJECT
This section shows you how to play a video tape.
1 Turn on the power of the equipment to be used.
2 Insert a tape.
The VCR turns on automatically.
The cassette in indicator flashes for about 5 seconds and the VCR
checks the tape threading.
During this period, · PLAY, r REC, FF ), REW 0, SEARCH
# and SEARCH 3 do not function.
See “Checking the tape threading” on page 18 (US) for details.
3 Press · PLAY to start playing.
When the tape reaches the end, the VCR automatically rewinds it to
the beginning. (The power remains on.)
Additional tasks
To Press
Stop play p STOP
Pause play P PAUSE
Resume play after pause P PAUSE or · PLAY
Search forward Turn the DUAL MODE SHUTTLE (DMS) ring to #
during playback
Search backward Turn the DMS ring to 3 during playback
Fast-forward the tape Turn the DMS ring to FF ) during stop
Rewind the tape Turn the DMS ring to REW 0 during stop
Eject the tape 6 EJECT
P PAUSE
· PLAY
p STOP
DUAL
MODE
SHUTTLE
ring
For further information on searching and playback functions, see “Playing/
searching at various speeds” on page 23 (US).
Note
The display will not appear during still mode, slow-motion playback, or
high-speed playback.
About SQPB (S-VHS Quasi Playback)
This videocassette recorder can play tapes recorded in S-VHS format.
However, the resolution and quality of the picture is not as high as those of
the original picture recorded in S-VHS format.
You cannot record programs in S-VHS format with this VCR.
19 (US)
Page 20
Playing a Tape
Displaying the time counter and current time
You can turn the display on the screen on or off.
MENU
CURSOR
4/$
EXECUTE
DISPLAY
CH +/–
1 Press MENU and select 4.SET UP/USED TIME, then press
EXECUTE.
The SET UP menu appears.
[ SET UP ]
TIMER PB END
REPEAT MODE
APC
DISPLAY
STOP TIMER
THREAD CHECK
[ USED TIME ]
HEAD 00000H
REW
REPEAT
ON
OFF
5M
ON
2 Press CURSOR 4/$ to flash the setting of “DISPLAY”.
[ SET UP ]
TIMER PB END
REPEAT MODE
APC
DISPLAY
STOP TIMER
THREAD CHECK
[ USED TIME ]
HEAD 00000H
REW
REPEAT
ON
OFF
5M
ON
3 Select ON or OFF using CH +/–.
[ SET UP ]
TIMER PB END
REPEAT MODE
APC
DISPLAY
STOP TIMER
THREAD CHECK
[ USED TIME ]
HEAD 00000H
REW
REPEAT
ON
ON
5M
ON
Using the time counter
20 (US)
COUNTER
RESET
4 Press EXECUTE, and then press MENU to return to the normal
display.
To switch the display between the time counter and current
time
Press DISPLAY.
At the point on a tape that you want to find later, press COUNTER RESET
to reset the counter to “0H00M00S”. When you rewind or advance the tape
to this point, refer to the counter.
Notes
•When a tape is reinserted, the counter returns to “0H00M00S”.
•The counter will not work on tape portions with no recording.
•You can also refer to the time counter in the display window.
Page 21
Setting the STOP TIMER
MENU
When p STOP is pressed, the tape of the video cassette is left bound
around the video drum for a while. You can set this period of time to 1
minute or 5 minutes in the SET UP menu.
CURSOR
4/$
EXECUTE
CH +/–
1 Press MENU and select 4.SET UP/USED TIME, then press
EXECUTE.
The SET UP menu appears.
[ SET UP ]
TIMER PB END
REPEAT MODE
APC
DISPLAY
STOP TIMER
THREAD CHECK
[ USED TIME ]
HEAD 00000H
REW
REPEAT
ON
ON
5M
ON
2 Press CURSOR 4/$ to flash the setting of “STOP TIMER”.
[ SET UP ]
TIMER PB END
REPEAT MODE
APC
DISPLAY
STOP TIMER
THREAD CHECK
[ USED TIME ]
HEAD 00000H
REW
REPEAT
ON
ON
5M
ON
3 Select 1M (1 minute) or 5M (5 minutes) using CH +/–.
[ SET UP ]
TIMER PB END
REPEAT MODE
APC
DISPLAY
STOP TIMER
THREAD CHECK
[ USED TIME ]
HEAD 00000H
REW
REPEAT
ON
ON
1M
ON
4 Press EXECUTE, and then press MENU to return to the normal
display.
21 (US)
Page 22
Playing a Tape
Playing stereo and bilingual programs
Press AUDIO MONITOR to select the desired sound. Each press of the
button changes the display on the VCR.
AUDIO
MONITOR
To listen to a
Stereo tape
Stereo
Left channel
Right channel
Monaural on
normal audio track
Bilingual tape
Left and right
channels
Left channel
Right channel
Sound on normal
audio track (SAP)
Press AUDIO MONITOR until
the display window indicator
shows
“STEREO”
“MAIN/L”
“SUB/R”
No indication
For details on SAP programs, refer to page 47 (US).
Note
When you play a tape recorded in monaural, the sound is heard in
monaural, regardless of the AUDIO MONITOR setting.
How sound is recorded on a video tape
This VCR records sound onto two different tracks. High-fidelity sound
(usually stereo) is recorded onto the main track along with the picture.
Monaural sound is recorded onto the normal audio track along the edge of
the tape.
Monaural sound
Hi-fi sound and
video signals
Normal audio track
Main track
22 (US)
Page 23
Playing/searching at various speeds
6
CH/TRACKING –/+
DUAL MODE SHUTTLE ring
p STOP
rP
(
p
( PLAY
P PAUSE
7 FRAME
& SLOW
–/+
3/#
SEARCH
P PAUSE
· PLAY
You can play back a tape at various speeds: high-speed, slow motion,
frame by frame and so on. These options are also useful for searching for a
specific point during playback. The sound is muted during these
operations.
Playback
options
Playing at various
speeds:
One-fifth the
normal speed
Normal speed
Twice the
normal speed
High speed
Fast-fowarding/
Rewinding
Viewing the
picture during
fast-forward or
rewind
Locking in a highspeed picture
Locking in a slowmotion picture
Playing frame by
frame
Operation
During playback, turn the DUAL
MODE SHUTTLE ring right
(forward) or left (reverse) to:
1/5 (forward only)
1
X2
# or 3
During stop, turn the DMS ring
to FF ) or to REW 0 and
release.
During fast-forward, turn the
DMS ring to FF ).
During rewind, turn the ring to
REW 0.
During playback or pause,
press # SEARCH or 3
SEARCH.
During playback or pause,
press & SLOW –/+. You can
increase the playback speed
with the + button and decrease
the speed with the – button.
During pause, press 7
FRAME to advance the picture
one frame.
To resume normal
playback
Release the ring.
Press · PLAY.
To return to the previous
mode, release the ring.
Press · PLAY.
Press · PLAY.
Press · PLAY or P
PAUSE.
DUAL
MODE
SHUTTLE
ring
Note
Adjust the picture using CH/TRACKING –/+ on the VCR if:
– streaks appear while playing in slow motion.
– the picture shakes while pausing.
23 (US)
Page 24
Playing a Tape
Repeat playback
6
AUTO REPEAT
ON/OFF
rP
p STOP
( PLAY
MENU
CURSOR
4/$
EXECUTE
CH +/–
With this VCR, you can play back a desired portion of a tape repeatedly.
(
p
The VCR plays from the beginning of the tape to the end of the recorded
portion.
1 Press MENU and select 4.SET UP/USED TIME, then press
EXECUTE.
The SET UP menu appears.
[ SET UP ]
TIMER PB END
REPEAT MODE
APC
DISPLAY
STOP TIMER
THREAD CHECK
[ USED TIME ]
HEAD 00000H
REW
REPEAT
ON
ON
5M
ON
2 Press CURSOR 4/$ to flash the setting of “REPEAT MODE”.
[ SET UP ]
TIMER PB END
REPEAT MODE
APC
DISPLAY
STOP TIMER
THREAD CHECK
[ USED TIME ]
HEAD 00000H
REW
REPEAT
ON
ON
5M
ON
3 Set to REPEAT using CH +/–, then press EXECUTE.
· PLAY
p STOP
4 Press MENU to return to the normal display.
5 Set the AUTO REPEAT ON/OFF switch on the VCR to ON.
6 Insert the tape to be played.
7 Rewind the tape to the beginning.
8 Press · PLAY.
After playing only the recorded portion, the VCR repeatedly rewinds
the tape to the beginning of the tape and plays the same portion.
To stop playing
Press p STOP.
To cancel auto-repeat playback
Set the AUTO REPEAT ON/OFF switch on the VCR to OFF.
Notes
•The auto-repeat playback function does not work in the fast-forward,
rewind, picture search, slow or recording mode.
•When you press · PLAY near the end of the recorded portion, the
auto-repeat playback function may not work. In this case, rewind the
tape a little and press · PLAY again.
24 (US)
Page 25
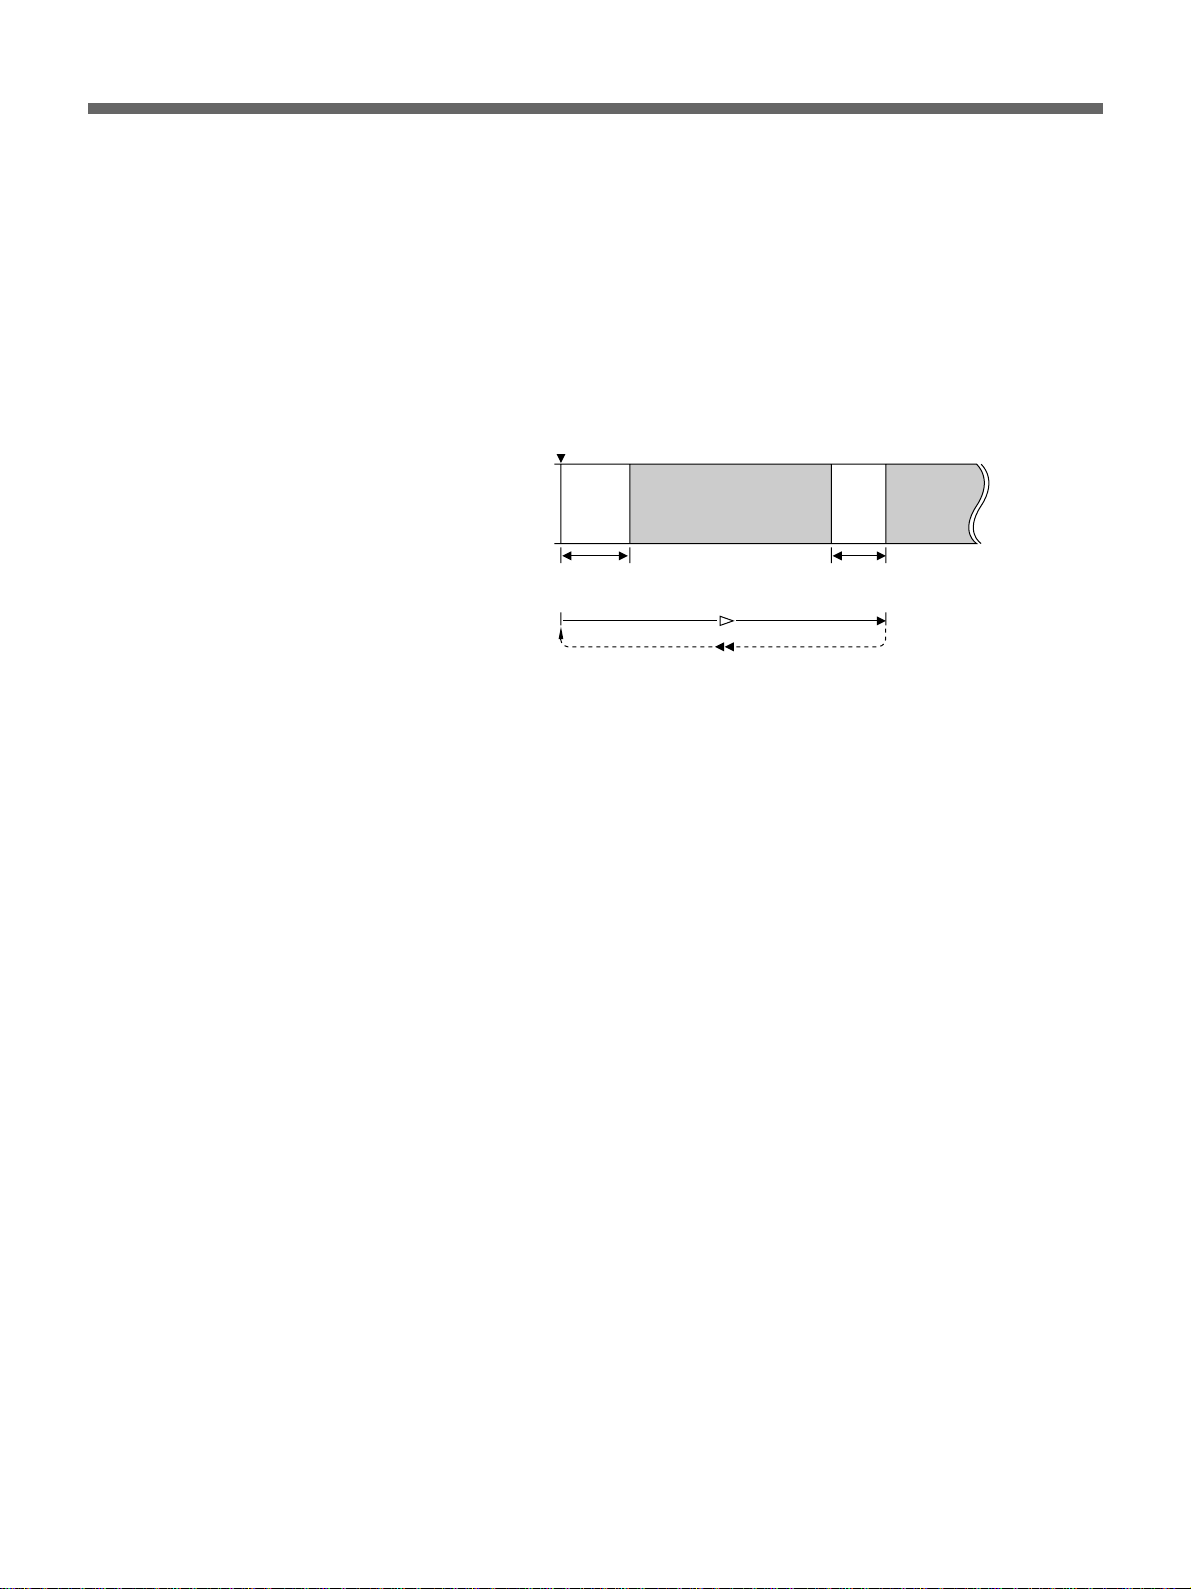
Tape conditions required for auto-repeat playback
To use the auto-repeat playback function, the tape must meet the following
conditions:
•The blank portion at the beginning of the tape must be less than 25
seconds.
•There must be a blank portion of more than 5 seconds just after the end of
the recorded portion. If not, the VCR may continue to play the next
recorded portion or play back until the end of the tape.
Beginning
blank recorded portion blank recorded
portion
less than
25 sec.
more than
5 sec.
25 (US)
Page 26
Playing a Tape
Using the index function
The VCR automatically marks an index signal at the point where recording
starts (with the exception of when you start recording from recording
pause). Use this as a reference to find the beginning of the recording. Since
the index number indicates the relative position from the current position,
specify how many index signals ahead or behind the specific index signal
is from the current position. The VCR can search up to 19 index signals
ahead or behind of the current position.
Watching the beginning of each recording consecutively — Index scan
6
rP
(
p
You can watch the beginning of each recording consecutively by detecting
the index signal one by one.
1 Insert an indexed tape into the VCR.
DUAL MODE
SHUTTLE ring
2 Press INDEX once.
The AUTO indicator appears in the display window.
3 Turn the DUAL MODE SHUTTLE ring clockwise to FF ) or
counterclockwise to REW 0.
0 : 01 : 23
INDEX 1
SCAN
DISPLAY
• To watch succeeding programs, turn it to FF ).
• To watch preceding programs, turn it to REW 0.
The VCR locates the next or previous index signal, and plays the tape
for approximately 10 seconds, and then moves to the next index signal.
The index number on the screen increases one by one.
26 (US)
INDEX
DUAL
MODE
SHUTTLE
ring
Notes
•The information may not appear if “DISPLAY” is set to OFF in the SET
UP menu.
See “Displaying the time counter and current time” on page 20 (US) for details.
•If the current time is displayed, press DISPLAY to switch to the time
counter.
Page 27
Locating an index — Index search
6
rP
(
p
DUAL MODE
SHUTTLE ring
You can locate an index by indicating how many index signals ahead or
behind that index signal is from the tape’s current position.
1 Insert an indexed tape into the VCR.
2 Press INDEX repeatedly until the index number you want to find
appears on the screen.
3 Turn the DUAL MODE SHUTTLE ring clockwise to FF ) or
counterclockwise to REW 0.
0 : 03 : 51
INDEX 6
SEARCH
DISPLAY
• To locate succeeding programs, turn it to FF ).
• To locate preceding programs, turn it to REW 0.
The VCR starts searching and the index number on the TV screen
counts down to zero. Playback starts automatically from that point.
INDEX
DUAL
MODE
SHUTTLE
ring
Notes
•The information may not appear if “DISPLAY” is set to OFF in the SET
UP menu.
See “Displaying the time counter and current time” on page 20 (US) for details.
•If the current time is displayed, press DISPLAY to switch to the time
counter.
27 (US)
Page 28
Playing a Tape
Using the blank search function
The VCR locates the unrecorded (blank) portion of the tape and stops
automatically using the blank search function.
You can use this function to find the end of the recording.
1 Insert a tape into the VCR.
2 Press BLANK SEARCH during playback or in stop mode.
DISPLAY
BLANK
SEARCH
BLANK SEARCH
0 : 03 : 51
The AUTO indicator appears in the display window, and “BLANK
SEARCH” appears on the screen.
The VCR advances rapidly and automatically stops at the beginning of
an unrecorded portion.
Notes
•The information may not appear if “DISPLAY” is set to OFF in the SET
UP menu.
See “Displaying the time counter and current time” on page 20 (US) for details.
•If the current time is displayed, press DISPLAY to switch to the time
counter.
•If you activate the blank search function with non-recorded tape or a tape
with no blanks, the VCR searches for the blank all the way to the end of
the tape, rewinds to the beginning of the tape and stops.
28 (US)
Page 29
One time play
6
AUTO REPEAT ON/OFF
rP
(
p
( PLAY
MENU
CURSOR
4/$
EXECUTE
CH +/–
Using one VCR, you can play the desired portion of the tape once and
rewind the tape automatically to the beginning of that portion.
Use a tape that meets the conditions for auto-repeat playback.
1 Press MENU and select 4.SET UP/USED TIME, then press
EXECUTE.
The SET UP menu appears.
[ SET UP ]
TIMER PB END
REPEAT MODE
APC
DISPLAY
STOP TIMER
THREAD CHECK
[ USED TIME ]
HEAD 00000H
REW
REPEAT
ON
ON
5M
ON
2 Press CURSOR 4/$ to flash the setting of “REPEAT MODE”.
[ SET UP ]
TIMER PB END
REPEAT MODE
APC
DISPLAY
STOP TIMER
THREAD CHECK
[ USED TIME ]
HEAD 00000H
REW
REPEAT
ON
ON
5M
ON
· PLAY
3 Set to ONE TIME using CH +/–.
[ SET UP ]
TIMER PB END
REPEAT MODE
APC
DISPLAY
STOP TIMER
THREAD CHECK
[ USED TIME ]
HEAD 00000H
REW
ONE TIME
ON
ON
5M
ON
4 Press EXECUTE, and then press MENU to return to the normal
display.
5 Set the AUTO REPEAT ON/OFF switch on the VCR to ON.
6 Insert a recorded tape into the VCR.
7 Press · PLAY to start playback.
Playback starts. When the tape reaches the end of the portion of the
tape to be played, the VCR rewinds the tape to the beginning and
stops.
To start playback again, press · PLAY.
To cancel one time play
Set the AUTO REPEAT ON/OFF switch to OFF.
29 (US)
Page 30
Adjusting the Picture
Adjusting the Tracking
6
AUTO TRACKING indicator
CH/TRACKING –/+
rP
(
p
AUTO
TRACKING
Though the VCR automatically adjusts the tracking when playing a tape
(the AUTO TRACKING indicator flashes in the display window, then
lights steadily), distortion may occur if the tape was recorded in poor
condition. If so, manually adjust the tracking condition.
Press CH/TRACKING –/+. (The AUTO TRACKING indicator goes off.)
The distortion should disappear as you press one of the two buttons.
To return to automatic adjustment
Press AUTO TRACKING on the remote commander, or CH/TRACKING
–/+ on the VCR simultaneously.
30 (US)
Page 31

Using the Adaptive Picture Control (APC)
Adaptive Picture Control (APC) automatically improves recording and
playback quality by adjusting the VCR to the condition of the video heads
MENU
CURSOR
4/$
and tape. To maintain better picture quality, it is recommended to set
“APC” to ON in the SET UP menu.
1 Press MENU and select 4.SET UP/USED TIME, then press
EXECUTE
CH +/–
EXECUTE.
The SET UP menu appears.
[ SET UP ]
TIMER PB END
REPEAT MODE
APC
DISPLAY
STOP TIMER
THREAD CHECK
[ USED TIME ]
HEAD 00000H
REW
REPEAT
OFF
ON
5M
ON
2 Press CURSOR 4/$ to flash the setting of “APC”.
[ SET UP ]
TIMER PB END
REPEAT MODE
APC
DISPLAY
STOP TIMER
THREAD CHECK
[ USED TIME ]
HEAD 00000H
REW
REPEAT
OFF
ON
5M
ON
3 Set to ON to use APC function using CH +/–, then press EXECUTE.
[ SET UP ]
TIMER PB END
REPEAT MODE
APC
DISPLAY
STOP TIMER
THREAD CHECK
[ USED TIME ]
HEAD 00000H
REW
REPEAT
ON
ON
5M
ON
4 Press MENU to return to the normal display.
To use APC during playback
The APC function automatically works on all types of tapes, including
rental tapes. You can play a tape using the APC function even if the tape
was not recorded with it.
To use APC while recording
Whenever you insert a tape and first start recording, the VCR adjusts to the
tape using the APC function.
This adjustment is retained until the tape is ejected. There is a short delay
before the VCR actually starts recording while the VCR analyzes the tape.
31 (US)
Page 32

Timer Recording/Playback
Timer recording/playback
6
rP
(
p
This section shows you how to let the VCR automatically start and stop
recording/playing a program. You can preset up to 8 programs.
Before you start...
•Check that the clock is set correctly.
TIMER
•For timer recording, insert a tape with its safety tab in place. Make sure
the tape is longer than the total recording time you are programming.
•Turn on the power of the equipment to be used.
• Check that the SENSOR REC indicator is not lit. If it is lit, set the
MENU
TIMER
ON/OFF
SENSOR REC ON/OFF switch to OFF.
1 Press MENU and select 2.TIMER REC/PLAY SET, then press
EXECUTE.
CURSOR
Z/z/4/$
EXECUTE
The TIMER REC/PLAY menu appears and today’s date flashes.
[ TIMER REC/PLAY ]
DATE START STOP MODE
0 4 – –:– – – –:– – – – SP
– – – –:– – – –:– – – – – –
– – – –:– – – –:– – – – – –
– – – –:– – – –:– – – – – –
– – – –:– – – –:– – – – – –
– – – –:– – – –:– – – – – –
– – – –:– – – –:– – – – – –
– – – –:– – – –:– – – – – –
2 Set the “DATE” to start recording/playing using CH +/–.
CH +/–
[ TIMER REC/PLAY ]
DATE START STOP MODE
1 0 – –:– – – –:– – – – SP
– – – –:– – – –:– – – – – –
– – – –:– – – –:– – – – – –
– – – –:– – – –:– – – – – –
– – – –:– – – –:– – – – – –
– – – –:– – – –:– – – – – –
– – – –:– – – –:– – – – – –
– – – –:– – – –:– – – – – –
32 (US)
Note
You can preset the date within a one-month time frame only, except
for daily/weekly recording/playback, which remains effective until
changed.
To record or play the same program every day or every week, see “Daily/
weekly recording/playback” on page 34 (US).
3 Press CURSOR ” and set the time to start recording/playing using
CH +/–:
Press CURSOR ” to flash the hour under “START”, then set the hour
using CH +/– .
[ TIMER REC/PLAY ]
DATE START STOP MODE
1 0 1 3:– – – –:– – – – SP
– – – –:– – – –:– – – – – –
– – – –:– – – –:– – – – – –
– – – –:– – – –:– – – – – –
– – – –:– – – –:– – – – – –
– – – –:– – – –:– – – – – –
– – – –:– – – –:– – – – – –
– – – –:– – – –:– – – – – –
Page 33

Press CURSOR ” to flash the minutes under “START”, then set the
[ TIMER REC/PLAY ]
1 0 1 3:1 5 1 4:0 0 P B
– – – –:– – – –:– – – – – –
– – – –:– – – –:– – – – – –
– – – –:– – – –:– – – – – –
– – – –:– – – –:– – – – – –
– – – –:– – – –:– – – – – –
– – – –:– – – –:– – – – – –
– – – –:– – – –:– – – – – –
DATE START STOP MODE
minutes using CH +/– .
[ TIMER REC/PLAY ]
DATE START STOP MODE
1 0 1 3:1 5 – –:– – – – SP
– – – –:– – – –:– – – – – –
– – – –:– – – –:– – – – – –
– – – –:– – – –:– – – – – –
– – – –:– – – –:– – – – – –
– – – –:– – – –:– – – – – –
– – – –:– – – –:– – – – – –
– – – –:– – – –:– – – – – –
4 Press CURSOR z, then set the time to stop recording/playing in the
same way using CH +/– .
[ TIMER REC/PLAY ]
DATE START STOP MODE
1 0 1 3:1 5 1 4:0 0 – – SP
– – – –:– – – –:– – – – – –
– – – –:– – – –:– – – – – –
– – – –:– – – –:– – – – – –
– – – –:– – – –:– – – – – –
– – – –:– – – –:– – – – – –
– – – –:– – – –:– – – – – –
– – – –:– – – –:– – – – – –
5 Press CURSOR z and set the “MODE” using CH +/–.
•To record the input signals from AUDIO/VIDEO IN jacks, set the
“MODE” to AV.
•To program timer playback, set the “MODE” to PB.
[ TIMER REC/PLAY ]
DATE START STOP MODE
1 0 1 3:1 5 1 4:0 0 A V SP
– – – –:– – – –:– – – – – –
– – – –:– – – –:– – – – – –
– – – –:– – – –:– – – – – –
– – – –:– – – –:– – – – – –
– – – –:– – – –:– – – – – –
– – – –:– – – –:– – – – – –
– – – –:– – – –:– – – – – –
6 Press CURSOR z and set the tape speed (SP or EP) using CH +/–.
Refer to page 17 (US) for details on tape speeds.
Note
You cannot set the tape speed for a timer playback.
[ TIMER REC/PLAY ]
DATE START STOP MODE
1 0 1 3:1 5 1 4:0 0 A V EP
– – – –:– – – –:– – – – – –
– – – –:– – – –:– – – – – –
– – – –:– – – –:– – – – – –
– – – –:– – – –:– – – – – –
– – – –:– – – –:– – – – – –
– – – –:– – – –:– – – – – –
– – – –:– – – –:– – – – – –
To preset another timer setting, press $ to flash the date of the next
line, and repeat steps 2 to 5.
To correct settings before completing timer settings, press CURSOR
Z/z/4/$ to flash the setting you want to change, and reset it.
(continue)
33 (US)
Page 34

Timer Recording/Playback
MENU
POWER
TIMER
ON/OFF
EXECUTE
CH –
7 After completing the settings, press EXECUTE, then press TIMER
ON/OFF.
The TIMER indicator lights up in the display window and the VCR
turns off and stands by for recording/playback.
The VCR automatically turns on and starts recording/playing 15
seconds before the preset start time.
Notes
•You can use TIMER on the VCR instead of TIMER ON/OFF on the
remote commander.
•The TIMER indicator flashes if you set the start time within 5
minutes.
•If you insert a tape with its safety tab removed, the VCR will eject it
at the preset start time for timer recording.
•If no cassette has inserted, the TIMER indicator does not appear.
To stop timer recording/playback
To stop the tape during timer recording/playback, press TIMER ON/OFF
to turn off the TIMER indicator in the display window.
Notes
•The timer playback function can be used together with the auto-repeat
playback function.
• The timer recording/playback cannot be made when the SENSOR REC
ON/OFF switch is set to ON.
•If a power interruption occurs during timer recording/playback, and if the
preset stop time is not over when the power is restored, the VCR will
resume timer recording/playback.
•Even if a power interruption occurs during timer recording/playback
standby, the setting is effective until the preset stop time is over. If the
power is restored during the preset recording/playback time, the VCR
starts recording or playing immediately.
34 (US)
Daily/weekly recording/playback
You can preset the VCR to record or play the same program every day of
the week (daily recording/playback) or the same program on the same day
every week (weekly recording/playback). Press CH – in step 2 until the
desired setting appears in the “DATE” position.
Each time CH – is pressed, the setting changes as follows:
4 (today) n SAT (every Saturday) n FRI n THU n WED n TUE
n MON n SUN n MO-FR (Monday to Friday) n MO-SA (Monday
to Saturday) n MO-SU (everyday)
Using the VCR before timer recording/playback begins
Press TIMER ON/OFF to turn off the TIMER indicator in the display
window, then press POWER.
The VCR is ready for use.
After using the VCR, press TIMER ON/OFF again to turn on the TIMER
indicator in the display window.
Page 35

About warning beep
A warning beep sounds in the following cases:
•If you press TIMER ON/OFF when
– no program is set for timer recording/playback
– no cassette has been inserted
•If you try to change the timer program during timer recording/playback
•If you try to reset the clock during timer recording
•If you try to set for timer recording when the clock has not been set
Selecting the tape performance after a timer playback
1 Press MENU and select 4.SET UP/USED TIME, then press
EXECUTE.
MENU
CURSOR
4/$
EXECUTE
The SET UP menu appears.
[ SET UP ]
TIMER PB END
REPEAT MODE
APC
DISPLAY
STOP TIMER
THREAD CHECK
[ USED TIME ]
HEAD 00000H
REW
REPEAT
ON
ON
5M
ON
CH +/–
2 Press CURSOR 4/$ to flash the setting of “TIMER PB END”.
3 Set to REW or STOP using CH +/–.
[ SET UP ]
TIMER PB END
REPEAT MODE
APC
DISPLAY
STOP TIMER
THREAD CHECK
[ USED TIME ]
HEAD 00000H
STOP
REPEAT
ON
ON
5M
ON
•When you select REW, the VCR stops playing at the preset stop
time, rewind the tape to the beginning, and then turns off the power.
•When you select STOP, the VCR stops playing at the preset stop
time, and then turns off the power.
4 Press EXECUTE, and then press MENU to return to the normal
display.
35 (US)
Page 36

Timer Recording/Playback
Checking/changing/cancelling timer settings
POWER
This section shows you how to check, change and cancel the timer settings
after you have stored them in the VCR.
TIMER
rP
(
p
MENU
POWER
TIMER
CLEAR
TIMER
ON/OFF
EXECUTE
CURSOR
“/”/4/$
1 Press TIMER ON/OFF to turn off the TIMER indicator in the display
window.
2 Press POWER to turn on the VCR.
3 Press MENU and select 2. TIMER REC/PLAY SET, then press
EXECUTE.
The TIMER REC/PLAY menu appears.
[ TIMER REC/PLAY ]
DATE START STOP MODE
1 0 1 3:1 5 1 4:0 0 P B
MON 0 2:0 0 0 3:0 0 AV SP
0 4 1 1:0 0 1 1:5 0 AV EP
MO-SA
0 9:0 0 1 0:3 0 P B
– – – –:– – – –:– – – – – –
– – – –:– – – –:– – – – – –
– – – –:– – – –:– – – – – –
– – – –:– – – –:– – – – – –
6
4 Check the timer settings:
If you do not need to change or cancel the settings, press EXECUTE,
then TIMER ON/OFF to return to recording/playback standby.
CH +/–
5 Change or cancel the timer setting:
• To change the setting, press CURSOR “/”/4/$ to flash the item
you want to change, and reset it using CH +/–.
[ TIMER REC/PLAY ]
DATE START STOP MODE
1 0 1 3:1 5 1 4:0 0 P B
MON 0 2:0 0 0 4:0 0 AV SP
0 4 1 1:0 0 1 1:5 0 AV EP
MO-SA
0 9:0 0 1 0:3 0 P B
– – – –:– – – –:– – – – – –
– – – –:– – – –:– – – – – –
– – – –:– – – –:– – – – – –
– – – –:– – – –:– – – – – –
• To cancel the setting, press CURSOR “/”/4/$ to flash any of the
settings of the program you want to cancel, then press TIMER
CLEAR.
[ TIMER REC/PLAY ]
DATE START STOP MODE
1 0 1 3:1 5 1 4:0 0 P B
MON 0 2:0 0 0 3:0 0 AV SP
0 4 – –:– – – –:– – – – SP
MO-SA
0 9:0 0 1 0:3 0 P B
– – – –:– – – –:– – – – – –
– – – –:– – – –:– – – – – –
– – – –:– – – –:– – – – – –
– – – –:– – – –:– – – – – –
36 (US)
Page 37

6 Press EXECUTE.
The VCR returns to the original screen. When there are any other timer
settings left in the TIMER REC/PLAY menu, press TIMER ON/OFF
to return to recording/playback standby.
Note
You can use TIMER on the VCR instead of TIMER ON/OFF on the
remote commander.
To check the timer settings during timer recording/playback
Press MENU and select 2. TIMER REC/PLAY SET. After checking, press
EXECUTE, and then MENU to turn off the display.
When the timer settings overlap
The VCR will not record/play overlapping programs. If any of your timer
settings overlap, change the settings.
Case 1
Program 1
(listed first )
Program 2
(listed next )
Case 2
Program 1
Program 2
10:00
10:00
Will be
cut off
10:30
10:50
Will be
cut off
11:00
11:30
11:30
Case 1: If you preset two programs to start recording/playing at the
same time...
The program listed first in the TIMER REC/PLAY menu has priority over
the other programs. The timer settings of lower priority programs will start
recording/playing when the VCR stops recording/playing the higher
priority program.
Case 2: If you preset program 1 to start recording/playing before
program 2 is finished recording/playing...
Program 1 will start recording/playing after program 2 has finished.
Note
The VCR starts recording 15 seconds before the preset start time.
About memory back-up function
The VCR has a memory back-up function. Even if the power is
interrupted, settings and adjustments are retained for up to 30 days using
the built-in rechargeable battery.
37 (US)
Page 38

Editing with Another VCR
Connecting another VCR for editing
This section shows you how to edit to or from another VCR. You can
make a copy of a tape using this VCR for recording or playback.
Notes
•Make sure you connect the plugs to jacks of the same color.
•If the other VCR is a monaural type, leave the red plugs unconnected.
•If the other VCR has an editing function, use this function to avoid
deterioration in picture quality.
How to hook up to record on this VCR
SVO-1630
Monitor
to AUDIO
IN R/L
Signal flow
How to hook up to record on another VCR
SVO-1630
to AUDIO
OUT R/L
to VIDEO OUT
to VIDEO IN
Another VCR
to VIDEO
OUT
to VIDEO IN
to AUDIO
OUT R/L
Monitor
Another VCR
to AUDIO
IN R/L
38 (US)
Signal flow
Page 39

Editing with another VCR
Additional Operations
6
INPUT SELECT
TAPE SPEED
r REC
rP
(
p
p STOP
P PAUSE
[TV] / [VTR]
INPUT
SELECT
TAPE
SPEED
When recording on this VCR
Before you start editing
•Press INPUT SELECT to display “LINE” in the display window.
•Press TAPE SPEED (SP/EP) to select the recording tape speed.
•Set the [TV] / [VTR] switch on the remote commander to [VTR] .
1 Insert a source tape into the other (playback) VCR. Search for the point
to start playback and set it to playback pause.
2 Insert a tape with its safety tab in place into this (recording) VCR.
Search for the point to start recording and press P PAUSE.
3 Press r REC on this VCR and set it to recording pause.
4 To start editing, press the P PAUSE buttons on both VCRs to release
the VCRs from pause.
For best results, press the pause button on the other VCR just before
pressing P PAUSE on this VCR.
To stop editing
Press the p STOP buttons on both VCRs.
When playing back on this VCR
r REC
P PAUSE
p STOP
Before you start editing
•Set the [TV] / [VTR] switch on the remote commander to [VTR] .
•Select the input to which this VCR is connected on the other (recording)
VCR.
1 Insert a source tape into this (playback) VCR. Search for the point to
start playback and press P PAUSE.
2 Insert a tape with its safety tab in place into the other (recording) VCR.
Search for the point to start recording and set it to recording pause.
3 To start editing, press the P PAUSE buttons on both VCRs to release
the VCRs from pause.
For best results, press P PAUSE on this VCR just before pressing the
pause button on the other VCR .
To stop editing
Press the p STOP buttons on both VCRs.
Notes
•To make your editing more precise, use the pause buttons on the VCRs.
•To cut out unwanted scenes while editing, press P PAUSE on the
recording VCR when unwanted scenes begin. When they end, press P
PAUSE again to resume recording.
39 (US)
Page 40

Recording TV Programs
This section shows you how to record TV programs.
Before recording, connect the antenna and TV to the VCR and set up the
VCR’s tuner.
Connecting the VCR and TV
A Use this hookup if you’re using:
•VHF/UHF antenna (you get channels 2-13 and channels 14 and higher)
•UHF-only antenna (you get channels 14 and higher)
•separate VHF and UHF antennas
Rear of TV
SVO-1630
VHF/UHF IN
VHF/UHF OUT
B Use this hookup if you’re using:
• a VHF-only antenna (you get channels 2-13 only)
• a cable TV system
SVO-1630
VHF/UHF IN
VHF/UHF OUT
or
or
or
or
VHF/UHF
A
VHF
B
UHF
VHF
C
UHF
Rear of TV
VHF/UHF
A
VHF
B
UHF
VHF
C
UHF
Match the type of
connector on your
TV: A, B, or C.
Match the type of
connector on your
TV: A, B, or C.
For connector types
B and C, no UHF
connection is
required.
40 (US)
If you cannot connect your antenna cable to the VCR directly
If your antenna cable is a flat cable (300-ohm twin lead cable), attach the
external antenna connector (not supplied) so that you can connect the cable
to the VHF/UHF IN jack. If you have separate cables for VHF and UHF
antennas, you may use a U/V band mixer. For details, see page 41 (US).
Page 41

Setting the RF CHANNEL
Attaching an UHF/VHF band mixer
RF
CHANNEL
34
6
POWER
rP
(
p
( PLAY
When connecting the VCR to the TV using only the
antenna, you must set the RF CHANNEL switch on
the rear of the VCR so that the TV can receive the
correct signal from the VCR.
If you connect the VCR to the TV using the audio/
video cable (not supplied), you can skip this step.
1 Set the RF CHANNEL switch on the rear of the
VCR to 3 or 4, whichever channel is not used in
your area. If both are used, set the switch to either
channel.
2 Press POWER to turn on the VCR.
3 Insert a recorded tape into the VCR and press (
PLAY.
4 Turn on your TV and set it to the channel you
selected in step 1 (channel 3 or 4).
The playback picture appears on the TV screen.
Whenever you use the VCR, set the TV to the
channel selected in step 1.
Attaching the external antenna connector
300-ohm twin lead
cable
300-ohm twin lead cable
EAC-66 UHF/VHF
band separator/
mixer
(not supplied)
75-ohm coaxical cable
When using both 75-ohm coaxial cable and 300-ohm
twin lead cable for VHF/UHF antenna, use the EAC66 UHF/VHF band separator/mixer (not supplied) to
connect the antenna to the VCR.
1 Loosen the screws on the mixer.
2 Wind the twin leads around the screws on the
mixer.
3 Retighten the screws.
4 Connect the 75-ohm coaxial cable to the mixer.
Caution
Connections between the VCR’s VHF/UHF OUT
connectors and the antenna terminals of the TV
receiver should be made only as shown in the
instructions. Failure to do so may result in operation
that violates the regulations of the Federal
Communications Commission regarding the use and
operation of RF devices. Never connect the output of
the VCR to an antenna or make simultaneous (parallel)
antenna and VCR connections at the antenna terminals
of your receiver.
EAC-35B antenna connector (not supplied)
When using a 300-ohm twin lead cable for VHF/UHF
antenna, use the EAC-35B antenna connector (not
supplied) to connect the antenna to the VCR.
1 Loosen the screws on the antenna connector.
2 Wind the twin leads around the screws on the
antenna connector.
3 Retighten the screws.
Note to CATV system installer
This reminder is provided to call the CATV system
installer’s attention to Article 820-40 of the NEC
which provides guidelines for proper grounding and, in
particular, specifies that the cable ground shall be
connected to the grounding system of the building, as
close to the point of cable entry as practical.
41 (US)
Page 42

Recording TV Programs
Presetting channels
This VCR is capable of receiving VHF channels 2 to 13, UHF channels 14
to 69 and unscrambled CATV channels 1 to 125. First, we recommend
that you preset the receivable channels in your area using automatic
presetting. Then, if there are any unwanted channels, disable them
manually. If you have decided which channels you wish to preset, set them
directly using manual presetting.
Before you start…
•Turn on the VCR and the TV.
•Set the TV to the VCR channel (the channel set by the RF CHANNEL
switch, channel 3 or 4). If your TV is connected to the VCR using audio/
video jacks, set the TV to video input.
•Press TV/VTR to display the VTR indicator in the VCR’s display
window.
•Press INPUT SELECT to display “TUNER” in the VCR’s display
window.
Presetting all receivable channels automatically
1 Press MENU and select 3. TUNER PRESET, then press EXECUTE.
MENU
CURSOR
“/”/$
EXECUTE
The TUNER PRESET menu appears on the TV screen.
Make sure the setting of “NORM/CATV” is flashing.
[ TUNER PRESET ] 125CH
NORM/CATV
AUTO PRESET
MANUAL SET
2 Select NORM or CATV using CURSOR “/”:
•To preset cable TV channels, select CATV.
•To preset VHF and UHF channels, select NORM.
CH +/–
[ TUNER PRESET ] 125CH
NORM/CATV
AUTO PRESET
MANUAL SET
NORM
ADD
CATV
ADD
42 (US)
3 Press CURSOR $ to flash “AUTO PRESET”, then press EXECUTE.
All receivable channels are preset in numerical sequence. When no
more receivable channels can be found, presetting stops and the
picture from the lowest numbered channel is displayed on the TV
screen.
[ TUNER PRESET ] 125CH
NORM/CATV
AUTO PRESET
MANUAL SET
NORM
ADD
Page 43

Presetting/disabling channels manually
1 Press MENU and select 3. TUNER PRESET, then press EXECUTE.
The TUNER PRESET menu appears on the TV screen.
MENU
[ TUNER PRESET ] 125CH
CURSOR
“/”/4/$
EXECUTE
CH +/–
NORM/CATV
AUTO PRESET
MANUAL SET
NORM
ADD
2 Select “MANUAL SET” by pressing CURSOR 4/$.
[ TUNER PRESET ] 125CH
NORM/CATV
AUTO PRESET
MANUAL SET
NORM
ADD
3 Select the channel to preset or disable by pressing CH +/–.
[ TUNER PRESET ] 33CH
NORM/CATV
AUTO PRESET
MANUAL SET
NORM
ADD
4 Select ADD or ERASE using CURSOR “/”:
•To preset a channel, select ADD.
•To disable a channel, select ERASE.
[ TUNER PRESET ] 33CH
NORM/CATV
AUTO PRESET
MANUAL SET
NORM
ERASE
5 Repeat steps 3 and 4 to preset or disable channels as required, then
press EXECUTE.
43 (US)
Page 44

Recording TV Programs
Cable TV channel assignment
Cable TV systems use letters or numerals to designate channels. This VCR
is designed to correspond with standard cable systems. The chart below
shows the channel numbers on this VCR and the corresponding cable TV
channels. Note that the channel number assignment shown in the chart
may not correspond to the channel number used by your local cable
company. Check with your local cable TV company for more information
on the available channels.
Number on this VCR
Cable TV channel A-8 2 3 ... 12 13 A B C D
18 19 20 21 22 23 24 25 26 27 28 29 30 31
EFGHI JKLMNOPQR
32 33 34 35 36 37 38 ... 93 94 95 96 97 98
S T U V W W+1 W+2 ... W+57W+58 A-5 A-4 A-3 A-2
99 100 101 ... 124 125
A-1 W+59W+60 ... W+83W+84
1 2 3 ... 12 13 14 15 16 17
44 (US)
Page 45

Recording TV programs
6
INPUT SELECT
TAPE SPEED
CH/TRACKING –/+
rP
(
p
p STOP
TV/VTR
INPUT
SELECT
TAPE
SPEED
CH +/–
r REC
This section shows you how to record TV programs in the most basic way:
manual recording. With manual recording, you start the VCR recording
when the program begins, then stop it when the program ends. The VCR
can also start and stop recording automatically.
See “Recording TV programs using the timer” on pages 48 (US) and 49 (US).
1 Turn on your TV and tune in to the VCR:
• If the TV is connected to the VCR using the audio/video cable, set
the TV to video input.
• If the TV is connected to the VCR using only the antenna, set the TV
to the channel for the VCR and press TV/VTR on the remote
commander to display the VTR indicator in the VCR’s display
window.
• When using a cable box, turn it on.
2 Insert a tape with its safety tab in place.
The cassette in indicator flashes for about 5 seconds and the VCR
checks the tape threading.
During this period, · PLAY, r REC, FF ), REW 0, SEARCH
# and SEARCH 3 do not function.
See “Checking the tape threading” on page 18 (US) for details.
3 Press INPUT SELECT until the TUNER indicator appears in the
VCR’s display window.
r REC
p STOP
4 Select the desired channel by pressing CH/TRACKING –/+ on the
VCR or CH +/– on the remote commander.
5 Select the tape speed, SP (standard play) or EP (extended play), by
pressing TAPE SPEED.
See “To select tape speeds” on page 17 (US).
6 Start recording by pressing r REC .
The REC indicator on the VCR lights up. When the tape reaches the
end, the VCR automatically rewinds it to the beginning.
Notes
•If you insert a tape with its safety tab removed, the VCR will eject it
when you press r REC. To record on this tape, cover the tab hole on the
cassette with adhesive tape.
•If “DISPLAY” is set to ON in the SET UP menu, the current time or tape
counter, and “r” while recording, are displayed on the monitor screen
but are not recorded on the tape.
See “Displaying the time counter and current time” on page 20 (US) for more
details.
•If a power interruption occurs while recording, the VCR will resume
recording as soon as the power is restored.
To stop recording
Press p STOP.
45 (US)
Page 46

Recording TV Programs
To select channels using the number buttons on the remote
commander
Enter the desired channel number using the number buttons, then press
ENTER.
TV/VTR
Number
buttons and
ENTER
TAPE
SPEED
P PAUSE
To cut out an unwanted scene while recording
Press P PAUSE when unwanted scenes begin, and press P PAUSE again
to resume recording.
Note
When the recording pause mode lasts for more than about 5 minutes, the
VCR enters the stop mode.
To use Adaptive Picture Control (APC) function while
recording
Set “APC” to ON in the SET UP menu.
For details, refer to “Using Adaptive Picture Control” on page 31 (US).
To select tape speeds
Press TAPE SPEED and select SP (standard play) or EP (extended play).
For details, refer to “To select tape speeds” on page 17 (US).
Watching a TV program while recording another
You can watch a TV program and record another at the same time.
1 Press TV/VTR on the remote commander to turn off the VTR indicator
in the display window.
2 If the TV is connected to the VCR using the audio/video cable, set the
TV to TV input.
If the TV is connected to the VCR using only the antenna cable, skip
this step.
3 Select the desired channel on the TV.
Notes
•You may not be able to watch a TV program while recording another
depending on your hookup.
•If you don’t want to watch TV while recording, you can turn off the TV.
When using a cable box, make sure to leave it on.
46 (US)
Page 47

Recording stereo and SAP programs
Stereo programs
6
SAP
rP
(
p
AUDIO
MONITOR
This VCR automatically records stereo programs in stereo. When stereo
programs are received, the STEREO indicator appears in the display
window. The stereo program will be recorded in stereo on the main track
and in monaural (left and right channels mixed) on the normal audio track.
SAP programs
Normally, this VCR records main sound on both main and normal audio
tracks. To record SAP sound on the normal audio track, press SAP to turn
on the SAP indicator in the display window.
Notes
•If you press SAP when no SAP program is received, the SAP indicator
will not appear in the display window.
In this case, the main sound is recorded in monaural on the normal audio
track.
•The SAP mode is effective even if you turn off the VCR. TO resume
normal mode, press SAP again.
To monitor SAP sound while recording
Press AUDIO MONITOR repeatedly until you can hear the SAP sound.
Press this button again to hear the main sound.
For information on how the VCR records sound, see “How sound is recorded on
a video tape” on page 22 (US).
47 (US)
Page 48

Recording TV Programs
Recording TV programs using the timer
6
rP
(
p
TIMER
This section shows you how to let the VCR automatically start and stop
recording TV programs. You can preset up to 8 programs.
For details on the timer setting procedure, see “Timer Recording/Playback” on
page 32 (US) to 37 (US).
Before you start...
•Check that the clock is set correctly.
•Insert a tape with its safety tab in place. Make sure the tape is longer than
MENU
TIMER
ON/OFF
the total recording time.
•Turn on your TV and tune in to the VCR.
When using a cable box, turn it on.
•Check that the SENSOR REC indicator is not lit. If it is lit, set the
CURSOR
“/”/4/$
EXECUTE
SENSOR REC ON/OFF switch to OFF.
1 Press MENU and select 2. TIMER REC/PLAY SET, then press
EXECUTE.
[ TIMER REC/PLAY ]
DATE START STOP MODE
1 0 – –:– – – –:– – – – SP
– – – –:– – – –:– – – – – –
– – – –:– – – –:– – – – – –
– – – –:– – – –:– – – – – –
– – – –:– – – –:– – – – – –
– – – –:– – – –:– – – – – –
CH +/–
– – – –:– – – –:– – – – – –
– – – –:– – – –:– – – – – –
2 Set the date, start and stop times, channel, and tape speed using CH +/–
.
Follow steps 2 to 5 in “Timer recording/playback” on pages 32 (US)
and 33 (US).
[ TIMER REC/PLAY ]
DATE START STOP MODE
1 0 2 1:0 0 2 2:5 5 2 6 EP
– – – –:– – – –:– – – – – –
– – – –:– – – –:– – – – – –
– – – –:– – – –:– – – – – –
– – – –:– – – –:– – – – – –
– – – –:– – – –:– – – – – –
– – – –:– – – –:– – – – – –
– – – –:– – – –:– – – – – –
Notes
•You can preset the date within a one-month time frame only, except
for daily/weekly recording, which remains effective until changed.
•Only the channels preset in the VCR will appear when setting
“MODE”.
•To change or correct a setting, press CURSOR “/”/4/$ to flash the
item you want to change, and reset it.
Channel
48 (US)
Page 49

3 After completing the settings, press EXECUTE, then press TIMER
ON/OFF.
The TIMER indicator lights up in the display window and the VCR
turns off and stands by for recording.
When using a cable box, leave it on.
The VCR automatically turns on and starts recording at the preset start
time, and turns off at the preset stop time.
To stop timer recording
To stop while the VCR is recording a program, press TIMER ON/OFF to
turn off the TIMER and REC indicators in the display window.
Notes
•If a power interruption occurs during timer recording, and if the preset
stop time is not over when the power is restored, the VCR will resume
timer recording.
•Even if a power interruption occurs during timer recording standby, the
setting is effective until the preset stop time is over. If the power is
restored during the preset recording time, the VCR starts recording
immediately.
To record the SAP programs
Press SAP on the VCR while receiving a SAP program to activate the SAP
mode. The SAP indicator in the display window turns on.
49 (US)
Page 50

Troubleshooting
Power
Playback
Symptom
The POWER switch does not
function.
The power is turned on, but the unit
does not operate.
The power is turned on, but no
indicator appear in the display
window or the indicators are not
displayed correctly.
The playback picture does not
appear on the TV screen.
The picture is not clear.
The picture rolls vertically during
picture search.
The picture has no sound.
The picture does not appear during
auto repeat play.
Repeat playback of the desired
portion cannot be made.
Remedy
• Connect the AC power cord securely.
• Set the KEY INHIBIT ON/OFF switch to OFF.
• Make sure the SENSOR REC ON/OFF switch is set to OFF.
• Press RESET or disconnect the AC power cord from the wall
outlet.
• Make sure the TV is set to the channel for the VCR. If you are
using a monitor, set it to video input.
• Adjust the tracking with the CH/TRACKING –/+ buttons.
• The video heads are dirty (see below). Clean the video heads
using the Sony T-25CL video head cleaning cassette. If this
cleaning cassette is not available in your area, have the heads
cleaned at your nearest Sony service facility (a standard service
charge will be required.) Do not use a commercially available
wet-type cleaning cassette, as it may damage the video heads.
• The video heads may have to be replaced. Consult your local
Sony dealer for more information.
• Adjust the vertical hold control on the TV or monitor.
• The tape is defective. Use a new tape.
• Make sure you are using a tape with the blank of less than 25
seconds at the beginning.
• Make sure you are using a tape with the blank suitable for auto
repeat play.
(See page 25 (US).)
Symptoms caused by contaminated video heads
• Normal picture• Rough picture• Unclear picture
initial
• No picture
(or black & white
screen appears)
(
terminal
50 (US)
Page 51

Others
Recording
Timer
recording/
playback
Others
Symptom
The tape ejects when you press
r REC.
Nothing happens when you press
r REC.
A TV program does not appear on
the TV screen.
TV reception is poor.
SAP sound is not recorded.
The sound is not recorded in hi-fi.
The timer does not operate.
The desired operation cannot be
selected.
A tape cannot be inserted.
The remote commander does not
function.
A mechanical noise is heard in the
stop mode.
The VCR needs to be cleaned.
Remedy
• Check that the safety tab has not been removed.
• Make sure the tape has been wound to the beginning.
• Select the correct source with the INPUT SELECT button. Select
“TUNER” when recording TV programs; select “LINE” when
recording from other equipment.
• Make sure the TV is set to the channel for the VCR. If you are
using a monitor, set it to video input.
• Adjust the TV antenna.
• When not recording SAP sound, make sure the SAP indicator in
the display window is lit.
• Make sure the REC LEVEL control has benn adjusted correctly.
• Check that the clock is set.
• Make sure a tape has been inserted.
• Check that the safety tab has not been removed.
• Make sure the tape has been wound to the beginning.
• Make sure a program has been set for timer recording/playback.
• Make sure your timer settings have not already passed the
current time.
• Make sure the SENSOR REC ON/OFF switch is set to OFF.
• Make sure the KEY INHIBIT ON/OFF switch is set to OFF.
• Check that a tape isn’t already in the tape compartment.
• Make sure you are pointing the remote commander at the remote
sensor on the VCR.
• Replace all the batteries in the remote commander with new
ones if they are weak.
• Make sure the TV/VTR switch is set to VTR.
• Make sure the REMOTE ON/OFF switch is set to ON.
• When a tape is inserted and the VCR is left in the stop mode with
the power turned on for about 1 minute or 5 minutes (selectable),
the tape protection mechanism is activated automatically and a
mechanical noise is heard.
• Clean the cabinet, panel and controls with a dry, soft cloth, or a
soft cloth slightly moistened with a mild detergent solution. Do not
use any type of solvent, such as alcohol or benzine.
(See page 21 (US).)
If you have any questions or problems concerning your unit,
please consult your nearest Sony dealer.
51 (US)
Page 52

Specifications
System
Format VHS NTSC standard
Video recording system
Rotary two-head helical scanning
FM system
Video signal NTSC color, EIA standards
Tape speed SP: 33.35 mm/s (1
EP: 11.12 mm/s (
Fast-forward and rewind time
Approx. 2 min. 30 sec. (with T-120
tape)
Video resolution 240 lines (SP mode)
Video S/N 44 dB (SP mode)
Audio frequency response
20 Hz – 20 kHz (hi-fi)
Distortion Less than 0.5 % (hi-fi)
Dynamic range 90 dB (hi-fi)
3
/8 inches/s)
7
/16 inches/s)
Tuner section
Channel coverage VHF 2 to 13
UHF 14 to 69
CATV A-8 to A-1, A to W, W+1 to
W+84
Antenna 75-ohm antenna terminal for VHF/
UHF
Inputs and outputs
Timer section
Clock Quartz locked
Timer indication 24-hour cycle
Timer setting 8 programs at max.
Power back-up 30 days
General
Power requirements
120 V AC, 60 Hz
Power consumption
16 W (max.)
Operating temperature
5°C to 40°C (41°F to 104°F)
Storage temperature
–20°C to 60°C (– 4°F to 140°F)
Dimensions Approx. 360 × 98 × 304 mm
(Approx. 141/4 × 37/8 × 12 inches)
including projecting parts and
controls
Mass Approx. 4 kg (8 lb 13 oz)
Supplied accessories
Remote commander RMT-V190A (1)
Size AA (R6) batteries (2)
AC power cord (1)
(w/h/d)
LINE IN VIDEO IN, BNC jack (1)
Input signal: 1 Vp-p, 75 ohms,
unbalanced, sync negative
AUDIO IN, phono jack (2)
Input level: –8 dBs (0 dBs = 0.775
Vrms)
Input impedance: more than 47
kilohms
LINE OUT VIDEO OUT, BNC jack (1)
Output signal: 1 Vp-p, 75 ohms,
unbalanced, sync negative
AUDIO OUT, phono jack (2)
Output level: –8 dBs
Load impedance: 47 kilohms
Output impedance: less than 10
kilohms
HEADPHONE Stereo mini jack (1)
CONTROL S IN/OUT
Minijack (2)
52 (US)
Design and specifications are subject to change
without notice.
Page 53

53 (US)
Page 54

French
AVERTISSEMENT
Afin d’éviter tout risque d’incendie ou
d’électrocution, ne pas exposer cet
appareil à la pluie ou à l’humidité.
Ce symbole est destiné à alerter l’utilisateur
sur la présence d’une “tension dangereuse”
non isolée à l’intérieur du coffret qui peut
être suffisamment forte pour constituer un
risque d’électrocution pour une personne.
Ce symbole est destiné à alerter
l’utilisateur sur la présence d’instructions
importantes sur le fonctionnement et
l’entretien (réparation) dans les instructions
accompagnant cet appareil.
Ce magnétoscope utilise une
(FAROUDJA
logo)
Attention
Les émissions de télévision, les films, les vidéocassettes et
autres informations audiovisuelles peuvent être protégés par
des droits d’auteur. L’enregistrement non autorisé de telles
informations peut constituer une violation des lois sur la
propriété artistique. L’emploi de ce magnétoscope pour
l’enregistrement d’émissions télévisées par câble peut
nécessiter l’autorisation de l’exploitant du réseau câblé et/ou
du propriétaire du programme.
technique de filtrage Y/C intégrée
sous licence de Faroudja
Laboratories Inc.
2 (FR)
Page 55

Table des matières
Présentation
Installation
Opérations de base
Précautions ................................................................ 4 (FR)
Caractéristiques ........................................................ 5 (FR)
Emplacement des composants
et des commandes ................................................ 6 (FR)
Panneau frontal .............................................................. 6 (FR)
Fenêtre d’affichage ........................................................ 7 (FR)
Panneau arrière............................................................... 7 (FR)
Télécommande ............................................................... 8 (FR)
Préparation de la télécommande ............................. 9 (FR)
Raccordement de base ........................................... 10 (FR)
Sélection de la langue d’affichage......................... 11 (FR)
Réglage de l’horloge ............................................... 12 (FR)
Réglage de l’horloge .................................................... 12 (FR)
Réglage de l’heure d’été .............................................. 14 (FR)
Enregistrement ........................................................ 16 (FR)
Enregistrement ............................................................. 16 (FR)
Fonction d’enregistrement par détecteur...................... 17 (FR)
Vérification du bobinage de la cassette........................ 18 (FR)
Contrôle de la durée d’utilisation................................. 18 (FR)
Lecture d’une cassette............................................ 19 (FR)
Lecture d’une cassette.................................................. 19 (FR)
Lecture/recherche à différentes vitesses....................... 23 (FR)
Lecture répétée............................................................. 24 (FR)
Utilisation de la fonction d’index................................. 26 (FR)
Utilisation de la fonction de recherche des blancs....... 28 (FR)
Lecture simple.............................................................. 29 (FR)
Réglage de l’image .................................................. 30 (FR)
Réglage de l’alignement............................................... 30 (FR)
Utilisation du contrôle adaptatif de l’image (APC) ..... 31 (FR)
Lecture/enregistrement par programmateur ........ 32 (FR)
Lecture/enregistrement par programmateur................. 32 (FR)
Vérification/modification/annulation des réglages du
programmateur........................................................ 36 (FR)
FR
French
Opérations complémentaires
Divers
Montage avec un autre magnétoscope ................. 38 (FR)
Raccordement d’un autre magnétoscope
pour le montage ...................................................... 38 (FR)
Montage avec un autre magnétoscope ......................... 39 (FR)
Enregistrement d’émissions télévisées ................ 40 (FR)
Raccordement du magnétoscope et du téléviseur ........ 40 (FR)
Présélection des canaux ............................................... 42 (FR)
Enregistrement d’émissions télévisées......................... 45 (FR)
Enregistrement d’émissions télévisées
avec le programmateur............................................ 48 (FR)
Dépannage ............................................................... 50 (FR)
Spécifications .......................................................... 52 (FR)
3 (FR)
Page 56

Précautions
Sécurité
•Faites uniquement fonctionner l’appareil sur une
tension d’alimentation de 120 V CA, 60 Hz.
•La plaquette signalétique indiquant la tension
d’alimentation, la consommation électrique, etc., est
située à l’arrière de l’appareil.
•Si quoi que ce soit venait à pénétrer dans le châssis,
débranchez l’appareil et faites-le vérifier par le
personnel qualifié avant de le remettre en service.
•Ne laissez pas tomber le cordon d’alimentation et ne
posez pas d’objets lourds dessus. Si le cordon
d’alimentation est endommagé, mettez
immédiatement l’appareil hors tension. Il est
dangereux de faire fonctionner cet appareil avec un
cordon endommagé.
•Débranchez l’appareil de la prise murale si vous
prévoyez de ne pas l’utiliser pendant une période
prolongée. Pour débrancher le cordon, saisissez-le par
la fiche; ne tirez jamais sur le cordon proprement dit.
Installation
•Assurez une circulation d’air adéquate afin d’éviter
toute surchauffe interne.
•Ne placez pas l’appareil sur des surfaces textiles
(tapis, couvertures, etc.) ni à proximité de tissus
(rideaux, draperies) qui risquent d’obstruer les
orifices de ventilation.
•N’installez pas l’appareil à proximité de sources de
chaleur telles que des radiateurs et ne le soumettez
pas au rayonnement direct du soleil, à de la poussière
en excès ni à des chocs mécaniques.
•N’installez pas l’appareil dans une position inclinée.
Il a uniquement été conçu pour fonctionner dans une
position horizontale.
•Gardez l’appareil et les cassettes à l’écart de systèmes
générant de puissants champs magnétiques tels qu’un
four à micro-ondes ou des haut-parleurs de forte
puissance.
•Ne posez pas d’objets lourds sur l’appareil.
•Si l’appareil est transporté directement d’un endroit
froid dans un endroit chaud, de l’humidité risque de
se condenser à l’intérieur et d’endommager la tête
vidéo et la bande magnétique. Lorsque vous installez
cet appareil pour la première mise en service ou
lorsque vous le transportez d’un endroit froid dans un
endroit chaud, attendez environ une heure avant de le
faire fonctionner.
A propos des cassettes vidéo
Retirez et rangez les cassettes vidéo après
l’enregistrement ou la lecture.
Entretien
Pour des raisons de sécurité, débranchez l’appareil
avant de le nettoyer.
•Pour garder à l’appareil l’aspect du neuf, nettoyez-le
périodiquement avec une solution détergente neutre.
N’utilisez jamais de solvants puissants comme du
diluant ou de la benzine ni de produits à récurer
abrasifs, car ils risquent de ternir le fini du châssis.
Lors du nettoyage, gardez les liquides à l’écart des
contacts électriques et des connecteurs.
•Si de la poussière s’est accumulée dans les ouïes de
ventilation, éliminez-la au moyen d’un aspirateur.
Remballage
•Avant de remballer l’appareil, débranchez tous les
cordons et câbles de connexion.
•Conservez le carton d’emballage et les matériaux de
conditionnement, car ils constituent une protection
idéale en vue du transport de l’appareil. Lors du
transport de l’appareil, remballez-le comme illustré
sur le carton.
Transport
Lors du transport de l’appareil, protégez-le des
vibrations et des impacts.
Si vous avez des questions à propos de cet appareil,
consultez votre revendeur Sony.
4 (FR)
Page 57

Caractéristiques
•La fonction d’enregistrement par détecteur qui permet à votre
magnétoscope d’activer automatiquement l’enregistrement chaque fois
que des signaux vidéo sont entrés via la prise VIDEO IN
•La fonction de répétition de lecture automatique vous permet de
programmer votre magnétoscope pour ne reproduire automatiquement
que le passage enregistré de la cassette
•La fonction de verrouillage des touches désactive le fonctionnement des
touches du magnétoscope
•Les prises CONTROL S IN/OUT vous permettent de commander le
défilement de la bande magnétique à distance au départ d’un autre
appareil vidéo Sony
Si vous utilisez une télécommande filaire RM-V200 en option, vous
pouvez commander jusqu’à environ 50 magnétoscopes connectés en série
via CONTROL S IN/OUT.
•Les fonctions de balayage des index/recherche d’index vous permettent
de localiser rapidement le début d’une scène de votre choix
•La bague DUAL MODE SHUTTLE qui permet d’avancer et de
rembobiner facilement la bande pour localiser une scène particulière
•Les écrans de menu affichent les informations dans trois langues
(français, anglais ou espagnol)
•La fonction de sauvegarde de mémoire conserve, grâce à la batterie
rechargeable intégrée, les réglages (y compris de l’horloge) pendant une
durée de 30 jours en cas d’interruption de l’alimentation
•La fonction d’enregistrement/lecture par programmateur vous permet
d’activer un enregistrement/lecture à une heure programmée, sur une base
quotidienne ou hebdomadaire, en réglant le programmateur
•La fonction de contrôle adaptatif de l’image (APC) optimise
automatiquement les performances d’enregistrement et de lecture
•La fonction SQPB
enregistrées dans le format S-VHS
1)
vous permet de reproduire des cassettes vidéo
Présentation
..........................................................................................................................................................................................................
1) SQPB est une abréviation de “S-VHS Quasi Playback (Quasilecture SVHS)”. La qualité de l’image n’est cependant pas aussi bonne que celle
de l’image originale.
5 (FR)
Page 58

Emplacement des composants et des commandes
Pour plus de détails, reportez-vous aux pages indiquées entre parenthèses.
Panneau fr ontal
134
2
6
@º
@™@¡ !ª
!¶!•@£@¢
1 Commutateur/indicateur POWER (16 (FR))
2 Touche 6 EJECT (19
3 Commutateur KEY INHIBIT ON/OFF (9
(FR))
(FR))
4 Commutateur AUTO REPEAT ON/OFF (24
5 Compartiment à cassette (16
6 Touche TAPE SPEED (SP/EP) (16
7 Touche TIMER (32
8 Touche r REC (16
(FR))
(FR))
9 Touche P PAUSE (16
!º Bague DUAL MODE SHUTTLE (19
!¡ Touche ( PLAY (19
!™ Touche p STOP (16
(FR))
(FR))
(FR))
(FR))
(FR))
(FR))
5
(FR))
67 8 9
rP
(
p
!¢
!£ Capteur de télécommande (9
!¢ Touche RESET (50
!∞ Touches CH/TRACKING –/+ (23
!§ Fenêtre d’affichage (7
!¶ Touche INPUT SELECT (16
!• Touche SAP (47
!ª Commutateur REMOTE ON/OFF (9
@º Indicateur SENSOR REC (18
!º!¡!™!£!∞!§
(FR))
(FR))
(FR))
(FR))
(FR))
(FR))
(FR))
(FR))
@¡ Commutateur SENSOR REC ON/OFF (18
@™ Commande REC LEVEL
(volume d’enregistrement) (18
(FR))
@£ Prise pour casque d’écoute
@¢ Commande PHONES LEVEL
(volume du casque d’écoute)
(FR))
6 (FR)
Page 59

Fenêtre d’affichage
5
TIMER
REC
KEY
INHIBIT
4
VTR
X 2
CATV
LINE
TUNER
AUTO
!¡!™!£
STEREO MAIN / L
0
123
10
3
0
3
10
20
AUTO TRACKING
L R
SP EP
!∞!§
!¢
6
H M S
SAP
SUB / R
9
8
AM
PM
7
1 Indicateur de niveau de crête
2 Indicateur TIMER
3 Indicateurs de défilement de la cassette
4 Indicateur VTR
5 Indicateur CATV
6 Compteur de durée linéaire
7 Horloge
8 Indicateurs d’émission stéréo/bilingue
9 Indicateur de numéro de canal
!º Indicateurs de mode d’entrée
!¡ Indicateur AUTO
!™ Indicateur REC (enregistrement)
!£ Indicateur KEY INHIBIT
!¢ Indicateur de présence de cassette
!∞ Indicateurs de vitesse de défilement de la bande
(SP/EP)
!§ Indicateur AUTO TRACKING
Panneau arrière
1 3 4 52
1 Connecteur AC IN
2 Prises CONTROL S IN/OUT (5
3 Prises AUDIO IN R/L (10
4 Prise VIDEO IN (10
(FR))
5 Prises VHF/UHF IN/OUT (40
6 Commutateur RF CHANNEL 3/4 (41
7 Prise VIDEO OUT (10
(FR))
8 Prises AUDIO OUT R/L (10
678
(FR))
(FR))
(FR))
(FR))
(FR))
7 (FR)
Page 60

Emplacement des composants et des commandes
Télécommande
1 Touche 6 EJECT (19 (FR))
2 Touches d’exploitation de menu (11
Touche MENU
Touches CURSOR 4/$/“/”
Touche EXECUTE
3 Touches numériques et touche ENTER (46
4 Touche COUNTER RESET (20
5 Touche AUTO TRACKING (30
6 Touche INPUT SELECT (16
7 Touche 7 FRAME (23
8 Touches & SLOW –/+ (23
9 Touche BLANK SEARCH (28
!º Touche INDEX (26
!¡ Touches 3/# SEARCH (19
!™ Touche · PLAY (19
!£ Touche p STOP (16
!¢ Sélecteur de télécommande [TV] / [VTR] (9
!∞ Commutateur POWER (16
!§ Touches TIMER
Touche ON/OFF (32
Touche CLEAR (36
!¶ Touche TV/VTR (42
!• Touche AUDIO MONITOR (22
!ª Touche DISPLAY (20
@º Touche TAPE SPEED (SP/EP) (16
@¡ Touche CH (canal) +/– (11
@™ Touche VOL (volume) +/–
@£ Touche r REC (16
@¢ Touche P PAUSE (16
@∞ Bague DUAL MODE SHUTTLE (19
1
2
3
4
5
6
7
8
9
0
!¡
!™
!£
!¢
!∞
!§
!¶
!•
!ª
@º
@¡
@™
@£
@¢
@∞
(FR))
(FR))
(FR))
(FR))
(FR))
(FR))
(FR))
(FR))
(FR))
(FR))
(FR))
(FR))
(FR))
(FR))
(FR))
(FR))
(FR))
(FR))
(FR))
(FR))
(FR))
(FR))
(FR))
(FR))
8 (FR)
Page 61

Préparation de la télécommande
Installation
Introduction des piles
Introduisez deux piles AA (R6) (fournies) en faisant
correspondre les pôles + et – des piles au diagramme à
l’intérieur du compartiment à piles.
Veillez à installer la pile
en introduisant d’abord
le côté ’ .
Remarques
•Dans des conditions normales d’utilisation, les piles
offrent une autonomie d’approximativement trois à
six mois.
•Si vous prévoyez de ne pas utiliser la télécommande
pendant une période prolongée, retirez les piles pour
éviter tout dommage résultant d’une éventuelle fuite
des piles.
•N’utilisez pas une pile neuve et une pile usagée en
même temps.
•
N’utilisez pas différents types de piles en même temps.
Pour commander le magnétoscope avec la
télécommande
•Réglez le commutateur REMOTE ON/OFF du
magnétoscope sur ON.
•Réglez le commutateur SENSOR REC ON/OFF du
magnétoscope sur OFF.
Si les réglages de ces commutateurs sont incorrects, la
télécommande ne fonctionnera pas.
6
REMOTE ON/OFF
SENSOR REC ON/OFF
rP
(
p
Pour désactiver la fonction de commande à
distance
Réglez le commutateur REMOTE ON/OFF sur OFF.
Avec ce réglage, vous ne pouvez pas commander ce
magnétoscope à l’aide de la télécommande.
Verrouillage des touches du
magnétoscope
Utilisation de la télécommande
Vous pouvez utiliser cette télécommande pour exploiter
ce magnétoscope et un téléviseur Sony. Les touches de
la télécommande identifiées par un point (•) peuvent
être employées pour commander votre téléviseur.
6
[TV]/[VTR]
Pour commander Réglez [TV] / [VTR] sur
le magnétoscope [VTR] et dirigez-la vers le capteur de
télécommande du magnétoscope
un téléviseur Sony [TV] et dirigez-la vers le capteur de
télécommande du téléviseur
rP
(
p
Capteur de
télécommande
Vous pouvez verrouiller les touches du magnétoscope.
Cette fonction s’avère bien pratique pour éviter toute
manipulation accidentelle pendant que vous
commandez ce magnétoscope à l’aide d’une
télécommande filaire (non fournie). Elle est également
bien pratique lorsque vous utilisez le magnétoscope
dans un lieu public, car elle empêche tout
dysfonctionnement à la suite de manipulations par
d’autres personnes.
Verrouillage des touches du magnétoscope
Réglez le commutateur KEY INHIBIT ON/OFF du
magnétoscope sur ON.
L’indication “KEY INHIBIT” apparaît dans la fenêtre
d’affichage du magnétoscope.
6
KEY INHIBIT ON/OFF
rP
(
p
Pour reprendre le mode de fonctionnement
normal
Réglez le commutateur KEY INHIBIT ON/OFF sur
OFF.
9 (FR)
Page 62

Raccordement de base
Avant de commencer...
•Mettez tous les appareils hors tension.
•Ne branchez pas le cordon d’alimentation avant que toutes les connexions
aient été établies.
•Etablissez fermement les connexions. Des connexions lâches peuvent
provoquer des distorsions dans l’image.
Les connexions suivantes vous permettent de contrôler l’image et le son.
SVO-1630
à AUDIO IN R/L
à VIDEO
IN
Câble audio
(non fourni)
à AUDIO IN R/L
Moniteur
Sens du signal
Câble video
(non fourni)
à VIDEO IN
à AUDIO
OUT R/L
à VIDEO OUT à AUDIO OUT R/L
Sources d’entrée
(autre magnétoscope, caméra vidéo,
syntoniseur CS, etc.)
à VIDEO OUT
Câble audio
(non fourni)
10 (FR)
Page 63

Sélection de la langue d’affichage
Sélectionnez le français, l’anglais ou l’espagnol comme langue d’affichage
des menus.
MENU
CURSOR
4/$
EXECUTE
CH +/–
1 Appuyez sur MENU.
Le menu principal apparaît sur l’écran du téléviseur.
1. CLOCK SET
DAYLIGHT SET
LANGUAGE
2. TIMER REC/PLAY SET
3. TUNER PRESET
4. SET UP
USED TIME
2 Assurez-vous que 1.CLOCK SET/DAYLIGHT SET/LANGUAGE a
été sélectionné et appuyez ensuite sur EXECUTE.
Le menu LANGUAGE apparaît.
[ CLOCK SET ]
01 - 01 - 00 00 : 00
[ DAYLIGHT SET ]
MODE NO USE
WEEK MONTH TIME
ON 1ST - SUN 04 02 : 00
OFF LST - SUN 10 02 : 00
[ LANGUAGE ]
ENGLISH
3 Appuyez sur CURSOR 4/$ pour faire clignoter la langue.
[ CLOCK SET ]
01 - 01 - 00 00 : 00
[ DAYLIGHT SET ]
MODE NO USE
WEEK MONTH TIME
ON 1ST - SUN 04 02 : 00
OFF LST - SUN 10 02 : 00
[ LANGUAGE ]
ENGLISH
4 Sélectionnez la langue de votre choix: ENGLISH, FRANCAIS ou
ESPANOL à l’aide de la touche CH +/– et appuyez ensuite sur
EXECUTE.
Le menu principal apparaît dans la langue sélectionnée.
Exemple: FRANCAIS
1. REGL.HORL.
HEURE D'ETE
LANGUE
2. REGLAGE ERG/LEC PROG
3. PREREGLAGE RADIO
4. PREREG
DUREE UTIL.
5 Appuyez sur MENU pour revenir à l’affichage normal.
11 (FR)
Page 64

Réglage de l’horloge
Réglage de l’horloge
Réglez l’heure et la date pour pouvoir utiliser la fonction de
programmation d’enregistrement et de lecture.
MENU
1 Appuyez sur MENU.
CURSOR
Z/z
EXECUTE
CH+/–
Le menu principal apparaît.
1. REGL.HORL.
2. REGLAGE ERG/LEC PROG
3. PREREGLAGE RADIO
4. PREREG
2 Assurez-vous que 1. REGL. HORL./HEURE DÉTE/LANGUE a été
sélectionné et appuyez ensuite sur EXECUTE.
Le menu REGL. HORL. apparaît sur l’écran et le mois se met à
clignoter.
HEURE D'ETE
LANGUE
DUREE UTIL.
[ REGL.HORL. ]
01 - 01 - 00 00 : 00
[ HEURE D'ETE ]
MODE ARRET
SEM. MOIS HEUR
ON 1ER - DIM 04 02 : 00
OFF
[ LANGUE ]
FRANCAIS
DER
- DIM 10 02 : 00
3 Réglez le mois avec les touches CH +/–.
[ REGL.HORL. ]
07 - 01 - 00 00 : 00
[ HEURE D'ETE ]
MODE ARRET
SEM. MOIS HEUR
ON 1ER - DIM 04 02 : 00
OFF
[ LANGUE ]
FRANCAIS
DER
- DIM 10 02 : 00
4 Appuyez sur CURSOR ” pour faire clignoter le jour.
Réglez le jour avec les touches CH +/–.
[ REGL.HORL. ]
07 - 04 - 00 00 : 00
[ HEURE D'ETE ]
MODE ARRET
SEM. MOIS HEUR
ON 1ER - DIM 04 02 : 00
OFF
[ LANGUE ]
FRANCAIS
DER
- DIM 10 02 : 00
12 (FR)
Page 65

5 Appuyez sur CURSOR ” pour faire clignoter l’année.
Réglez l’année avec les touches CH +/–.
[ REGL.HORL. ]
07 - 04 - 99 00 : 00
[ HEURE D'ETE ]
MODE ARRET
SEM. MOIS HEUR
ON 1ER - DIM 04 02 : 00
OFF
[ LANGUE ]
FRANCAIS
DER
- DIM 10 02 : 00
6 Appuyez sur CURSOR ” pour faire clignoter l’heure.
Réglez l’heure avec les touches CH +/–.
[ REGL.HORL. ]
07 - 04 - 99 15 : 00
[ HEURE D'ETE ]
MODE ARRET
SEM. MOIS HEUR
ON 1ER - DIM 04 02 : 00
OFF
[ LANGUE ]
FRANCAIS
DER
- DIM 10 02 : 00
7 Appuyez sur CURSOR ” pour faire clignoter les minutes.
Réglez les minutes avec les touches CH +/–.
[ REGL.HORL. ]
07 - 04 - 99 15 : 00
[ HEURE D'ETE ]
MODE ARRET
SEM. MOIS HEUR
ON 1ER - DIM 04 02 : 00
OFF
[ LANGUE ]
FRANCAIS
DER
- DIM 10 02 : 00
8 Appuyez sur EXECUTE pour faire démarrer l’horloge.
Remarques
•Vous ne pouvez pas régler l’horloge en cours de lecture/enregistrement
par programmateur ni en mode de veille de lecture/enregistrement par
programmateur.
•Pour changer ou corriger un réglage
appuyez sur CURSOR “ ou ” pour faire clignoter le paramètre que vous
voulez changer ou corriger et modifiez-le.
•Pour rappeler la date et l’heure à l’écran, sélectionnez 1. REGL. HORL./
HEURE D’ETE/LANGUE dans le menu principal et appuyez sur
EXECUTE.
avant le démarrage de l’horloge,
13 (FR)
Page 66

Réglage de l’horloge
Réglage de l’heure d’été
Changez le réglage de l’horloge au moment du passage à l’heure d’été.
MENU
CURSOR
Z/z/4/$
EXECUTE
CH +/–
1 Affichez le menu HEURE D’ETE. Exécutez les étapes 1 et 2 de la
procédure de “Réglage de l’horloge” à la page 12 (FR).
[ REGL.HORL. ]
07 - 04 - 99 15 : 00
[ HEURE D'ETE ]
MODE ARRET
SEM. MOIS HEUR
ON 1ER - DIM 04 02 : 00
OFF
[ LANGUE ]
FRANCAIS
2
Appuyez sur CURSOR 4/$ pour faire clignoter le réglage de “MODE”.
[ REGL.HORL. ]
07 - 04 - 99 15 : 00
[ HEURE D'ETE ]
MODE ARRET
SEM. MOIS HEUR
ON 1ER - DIM 04 02 : 00
OFF
[ LANGUE ]
FRANCAIS
DER
- DIM 10 02 : 00
DER
- DIM 10 02 : 00
3 Sélectionnez MARCHE avec les touches CH +/– pour procéder au
réglage de l’heure d’été.
[ REGL.HORL. ]
07 - 04 - 99 15 : 00
[ HEURE D'ETE ]
MODE MARCHE
SEM. MOIS HEUR
ON 1ER - DIM 04 02 : 00
OFF
[ LANGUE ]
FRANCAIS
DER
- DIM 10 02 : 00
14 (FR)
4 Appuyez sur CURSOR $ et changez la date et l’heure au moment de
régler l’heure d’été.
SEM. ON
Réglez la semaine du passage à l’heure d’été avec les touches
CH +/–: Sélectionnez 1ER, 2EM, 3EM, 4EM ou DER pour la
première, la deuxième, la troisième, la quatrième ou la dernière
semaine.
Appuyez ensuite sur CURSOR ” et réglez le jour de la semaine
avec les touches CH +/–: DIM, LUN, ..., SAM.
MOIS ON
Appuyez sur CURSOR ” et réglez le mois avec les touches CH +/–:
01, 02, ..., 12 pour janvier, février, ..., décembre.
HEUR ON
Appuyez sur CURSOR ” et réglez l’heure avec les touches CH +/–.
L’heure peut uniquement être réglée entre 01 et 22.
Appuyez ensuite sur CURSOR ” et réglez les minutes avec les
touches CH +/–.
Page 67

Remarque
Pour corriger les réglages avant la fin de la procédure de réglage,
appuyez sur CURSOR “/”/4/$ pour faire clignoter le réglage que
vous voulez corriger et modifiez-le.
5 Appuyez sur CURSOR $ et réglez la date et l’heure pour revenir à
l’heure normale suivant la même procédure.
6 Appuyez sur EXECUTE et puis sur MENU pour revenir à l’affichage
normal.
15 (FR)
Page 68

Enregistrement
Enregistrement
6
rP
(
p
Cette section vous explique comment enregistrer le signal au départ des
sources d’entrée raccordées au magnétoscope.
1 Mettez sous tension l’appareil que vous comptez utiliser.
POWER
INPUT SELECT
r REC
TAPE SPEED p STOP
P PAUSE
POWER
INPUT
SELECT
TAPE
SPEED
r REC
P PAUSE
p STOP
2 Introduisez une cassette dont l’onglet de sécurité est intact.
L’indicateur de cassette clignote pendant environ 5 secondes et le
magnétoscope vérifie le bobinage de la cassette.
Durant cette période, les touches · PLAY, r REC, FF ), REW
0, SEARCH # et SEARCH 3 sont inopérantes.
Pour plus de détails, voir “Vérification du bobinage de la cassette” à la page 18 (FR).
3 Appuyez sur INPUT SELECT jusqu’à ce que l’indicateur LINE
apparaisse dans la fenêtre d’affichage du magnétoscope.
4 Réglez la vitesse de défilement de la bande, SP (durée standard) ou EP
(longue durée), en appuyant sur TAPE SPEED.
Voir “Pour sélectionner la vitesse de défilement de la bande” à la
page 17 (FR).
5 Démarrez l’enregistrement en appuyant sur r REC.
L’indicateur REC du magnétoscope s’allume. Lorsque la cassette arrive en
fin de bande, le magnétoscope la rembobine automatiquement au début.
Remarques
•Si vous introduisez une cassette dont l’onglet de sécurité a été brisé, elle
est éjectée lorsque vous appuyez sur r REC. Pour pouvoir enregistrer sur
cette cassette, recouvrez l’orifice de bande adhésive.
• Si “DISPLAY” est réglé sur ON dans le menu PREREG, l’heure ou le
compteur de bande, ainsi que l’indication “r” en cours d’enregistrement,
s’affichent sur l’écran du moniteur mais ne sont pas enregistrés sur la cassette.
Pour plus de détails, voir “Affichage du compteur de durée et de l’heure” à la
page 20 (FR).
•Chaque fois que vous introduisez une cassette et que vous démarrez
l’enregistrement, la fonction de contrôle adaptatif de l’image (APC)
optimise automatiquement la qualité d’enregistrement en ajustant le
magnétoscope à l’état de la bande magnétique et des têtes vidéo. Il faut
compter un décalage d’environ 6 secondes avant que le magnétoscope
démarre l’enregistrement proprement dit après que vous avez appuyé sur
la touche r REC.
Pour plus de détails, voir “Utilisation du contrôle adaptatif de l’image (APC)” à
la page 31 (FR).
•Si une panne de courant se produit en cours d’enregistrement, le
magnétoscope reprendra l’enregistrement dès que l’alimentation aura été
rétablie.
16 (FR)
Pour arrêter l’enregistrement
Appuyez sur p STOP.
Pour couper une scène indésirable en cours d’enregistrement
Appuyez sur P PAUSE. Appuyez ensuite à nouveau sur cette touche pour
reprendre l’enregistrement.
Remarque
Si le mode de pause d’enregistrement est activé pendant plus d’environ 5
minutes, le magnétoscope passe automatiquement en mode d’arrêt.
Page 69

Opérations de base
Pour sélectionner la vitesse de défilement de
la bande
Pour l’enregistrement, sélectionnez SP (durée
standard) ou EP (longue durée) en appuyant sur TAPE
SPEED. Le mode EP assure une durée
d’enregistrement triple de celle du mode SP. Mais le
mode SP fournit cependant une meilleure qualité
d’image. Vous pouvez employer les modes SP et EP
sur la même cassette. Lorsque vous reproduisez une
cassette, le magnétoscope détecte automatiquement la
vitesse de défilement de la bande. Consultez le tableau
ci-dessous pour la durée de lecture/enregistrement
maximum dans chaque vitesse.
Type de cassette
T-160 2 heures 40 min. 8 heures
T-120 2 heures 6 heures
T-60 1 heure 3 heures
T-30 30 min. 1 heure 30 min.
Durée de lecture/enregistrement maximum
SP EP
Sauvegarde d’un enregistrement
Les cassettes vidéo sont dotées d’un onglet de sécurité
destiné à prévenir tout enregistrement accidentel. Pour
empêcher l’effacement accidentel d’un enregistrement,
brisez l’onglet de sécurité à l’aide d’un tournevis ou
d’un ustensile similaire. Une cassette dont l’onglet de
sécurité a été brisé est éjectée du magnétoscope si vous
essayez d’enregistrer dessus.
Pour pouvoir enregistrer sur cette cassette, recouvrez
simplement de bande adhésive l’orifice de l’onglet.
Bande adhésive
Onglet de
sécurité
Fonction d’enregistrement par
détecteur
Le magnétoscope peut démarrer automatiquement
l’enregistrement chaque fois qu’un signal vidéo est
entré via la prise VIDEO IN.
6
REC LEVEL
SENSOR REC ON/OFF
TAPE SPEED
Indicateur SENSOR REC
rP
(
p
1 Introduisez une cassette dont l’onglet de sécurité
est intact.
2 Appuyez sur TAPE SPEED pour sélectionner la
vitesse de défilement de la bande.
3 Vérifiez si la commande REC LEVEL est réglée
sur la position centrale.
4 Réglez le commutateur SENSOR REC ON/OFF
sur ON.
L’indicateur SENSOR REC s’allume et le
magnétoscope se met hors tension pour passer en
mode de veille d’enregistrement par détecteur.
Remarques
• Si vous introduisez une cassette dont l’onglet de
sécurité a été brisé, l’indicateur SENSOR REC se
met à clignoter et le magnétoscope éjecte la
cassette lorsque vous réglez le commutateur
SENSOR REC ON/OFF sur ON.
• Si aucune cassette n’a été introduite, l’indicateur
SENSOR REC se met à clignoter lorsque vous
réglez le commutateur SENSOR REC ON/OFF
sur ON.
5 Entrez un signal vidéo via la prise VIDEO IN.
Le magnétoscope démarre l’enregistrement. Si la
cassette arrive en fin de bande en cours
d’enregistrement, le magnétoscope arrête
l’enregistrement et se met hors tension.
Si l’entrée du signal vidéo est interrompue, le
magnétoscope arrête l’enregistrement et revient en
mode de veille. L’indicateur SENSOR REC reste
allumé.
Pour arrêter un enregistrement par détecteur
Réglez le commutateur SENSOR REC ON/OFF sur
OFF.
Le magnétoscope arrête l’enregistrement et se met hors
tension.
Pour annuler un enregistrement par détecteur
Réglez le commutateur SENSOR REC ON/OFF sur
OFF.
17 (FR)
Page 70

Enregistrement
Vérification du bobinage de la cassette
Pour garantir un bon fonctionnement, le magnétoscope
contrôle automatiquement le bobinage de la cassette
chaque fois que vous en introduisez une, ce qui prend
environ 5 secondes. Si le magnétoscope détecte une
erreur, la cassette est éjectée.
Durant cette période, les touches de commande de
cassette · PLAY, r REC, FF ), REW 0,
SEARCH # et SEARCH 3 sont inopérantes.
Si vous jugez inutile de procéder à la vérification du
bobinage de la cassette, vous pouvez la désactiver dans
le menu PREREG.
1 Appuyez sur MENU et sélectionnez 4.PREREG/
DUREE UTIL. et appuyez ensuite sur EXECUTE.
2 Appuyez sur CURSOR 4/$ pour faire clignoter le
réglage de “VERI. ENREG.”.
[ PREREG ]
FIN LECT PROG
MODE REPETITION
APC
AFFICHAGE
ARRET MINUTERIE
VERI. ENREG. ON
[ DUREE UTIL. ]
TETE 00005H
REMB
REPETER
ON
OFF
5M
Contrôle de la durée d’utilisation
Vous pouvez vérifier la durée d’utilisation des têtes
vidéo via le menu DUREE UTIL.
1 Appuyez sur MENU, sélectionnez 4. PREREG/
DUREE UTIL. et appuyez ensuite sur EXECUTE.
2 Contrôlez le compteur de tête vidéo.
[ PREREG ]
FIN LECT PROG
MODE REPETITION
APC
AFFICHAGE
ARRET MINUTERIE
VERI. ENREG. ON
[ DUREE UTIL. ]
TETE 00005H
REMB
REPETER
ON
OFF
5M
Compteur de tête vidéo
3 Appuyez sur MENU pour revenir à l’affichage
normal.
3 Sélectionnez OFF pour désactiver le contrôle du
bobinage de la cassette à l’aide des touches
CH +/–.
[ PREREG ]
FIN LECT PROG
MODE REPETITION
APC
AFFICHAGE
ARRET MINUTERIE
VERI. ENREG. OFF
[ DUREE UTIL. ]
TETE 00005H
REMB
REPETER
ON
OFF
5M
4 Appuyez sur EXECUTE et ensuite sur MENU
pour revenir à l’affichage normal.
18 (FR)
Page 71

Lecture d’une cassette
Lecture d’une cassette
6 EJECT
6
p STOP ( PLAY
Bague DUAL MODE SHUTTLE
rP
(
p
P PAUSE
6 EJECT
P PAUSE
· PLAY
Cette section vous explique comment reproduire une cassette vidéo.
1 Mettez sous tension l’appareil que vous comptez utiliser.
2 Introduisez une cassette.
Le magnétoscope se met automatiquement sous tension.
L’indicateur de cassette clignote pendant environ 5 secondes et le
magnétoscope vérifie le bobinage de la cassette.
Durant cette période, les touches · PLAY, r REC, FF ), REW
0, SEARCH # et SEARCH 3 sont inopérantes.
Pour plus de détails, voir “Vérification du bobinage de la cassette” à la page
18 (FR).
3 Appuyez sur · PLAY pour démarrer la lecture.
Lorsque la cassette arrive en fin de bande, le magnétoscope la
rembobine automatiquement au début. (Le magnétoscope reste sous
tension.)
Fonctions complémentaires
Pour Appuyez sur
Arrêter la lecture p STOP
Activer une pause de lecture P PAUSE
Reprendre la lecture après une pause P PAUSE ou · PLAY
Lancer une recherche avant Tournez la bague DUAL MODE
SHUTTLE (DMS) sur # en cours de
lecture
Lancer une recherche arrière Tournez la bague DMS sur 3 en cours
de lecture
Avancer rapidement la cassette Tournez la bague DMS sur FF ) en
mode d’arrêt
Rembobiner la cassette Tournez la bague DMS sur REW 0 en
mode d’arrêt
Ejecter la cassette 6 EJECT
p STOP
Bague
DUAL
MODE
SHUTTLE
Pour des informations plus détaillées sur les fonctions de recherche et de lecture,
reportez-vous à la section “Lecture/recherche à différentes vitesses” à la page 23
(FR).
Remarque
L’affichage n’apparaît pas durant les modes d’arrêt sur image, de lecture
au ralenti ou de lecture en accéléré.
A propos de la lecture SQPB (Quasilecture S-VHS)
Ce magnétoscope peut reproduire des cassettes enregistrées dans le format
S-VHS. La résolution et la qualité de l’image ne sont cependant pas aussi
bonnes que celles de l’image originale enregistrée en format S-VHS.
Vous ne pouvez pas enregistrer d’émissions en format S-VHS avec ce
magnétoscope.
19 (FR)
Page 72

Lecture d’une cassette
Affichage du compteur de durée et de l’heure
Vous pouvez activer et désactiver l’affichage sur l’écran.
MENU
CURSOR
4/$
EXECUTE
DISPLAY
CH +/–
1 Appuyez sur MENU, sélectionnez 4.PREREG/DUREE UTIL. et
appuyez ensuite sur EXECUTE.
Le menu PREREG apparaît.
[ PREREG ]
FIN LECT PROG
MODE REPETITION
APC
AFFICHAGE
ARRET MINUTERIE
VERI. ENREG. ON
[ DUREE UTIL. ]
TETE 00000H
REMB
REPETER
ON
OFF
5M
2 Appuyez sur CURSOR 4/$ pour faire clignoter le réglage du
paramètre “AFFICHAGE”.
[ PREREG ]
FIN LECT PROG
MODE REPETITION
APC
AFFICHAGE
ARRET MINUTERIE
VERI. ENREG. ON
[ DUREE UTIL. ]
TETE 00000H
REMB
REPETER
ON
OFF
5M
3 Sélectionnez ON ou OFF avec les touches CH +/–.
[ PREREG ]
FIN LECT PROG
MODE REPETITION
APC
AFFICHAGE
ARRET MINUTERIE
VERI. ENREG. ON
[ DUREE UTIL. ]
TETE 00000H
REMB
REPETER
ON
ON
5M
4 Appuyez sur EXECUTE et ensuite sur MENU pour revenir à
Pour commuter l’affichage du compteur de durée et de l’heure
Appuyez sur DISPLAY.
Utilisation du compteur de durée
A un endroit de la cassette que vous voulez pouvoir retrouver
ultérieurement, appuyez sur COUNTER RESET pour réinitialiser le
compteur sur “0H00M00S”. Observez le compteur lorsque vous
COUNTER
RESET
20 (FR)
rembobinez ou que vous faites avancer la bande magnétique pour retrouver
cet endroit.
Remarques
•Lorsqu’une cassette est réintroduite dans le magnétoscope, le compteur
•Le compteur est inopérant sur les passages non enregistrés d’une cassette.
•Vous pouvez également vous référer au compteur de durée dans la fenêtre
l’affichage normal.
revient à “0H00M00S”.
d’affichage.
Page 73

Réglage du paramètre STOP TIMER
Lorsque vous appuyez sur la touche p STOP, la bande magnétique de la
cassette vidéo reste autour du tambour vidéo pendant un moment. Vous
MENU
CURSOR
4/$
pouvez régler la durée de cette période sur 1 minute ou 5 minutes dans le
menu PREREG.
1 Appuyez sur MENU, sélectionnez 4.PREREG/DUREE UTIL. et
EXECUTE
CH +/–
appuyez ensuite sur EXECUTE.
Le menu PREREG apparaît.
2 Appuyez sur CURSOR 4/$ pour faire clignoter le réglage de
“ARRET MINUTERIE”.
[ PREREG ]
FIN LECT PROG
MODE REPETITION
APC
AFFICHAGE
ARRET MINUTERIE
VERI. ENREG. ON
[ DUREE UTIL. ]
TETE 00000H
[ PREREG ]
FIN LECT PROG
MODE REPETITION
APC
AFFICHAGE
ARRET MINUTERIE
VERI. ENREG. ON
[ DUREE UTIL. ]
TETE 00000H
REMB
REPETER
ON
ON
5M
REMB
REPETER
ON
ON
5M
3 Sélectionnez 1M (1 minute) ou 5M (5 minutes) avec les touches
CH +/–.
[ PREREG ]
FIN LECT PROG
MODE REPETITION
APC
AFFICHAGE
ARRET MINUTERIE
VERI. ENREG. ON
[ DUREE UTIL. ]
TETE 00000H
REMB
REPETER
ON
ON
1M
4 Appuyez sur EXECUTE et ensuite sur MENU pour revenir à
l’affichage normal.
21 (FR)
Page 74

Lecture d’une cassette
Lecture d’émissions stéréo et bilingues
Appuyez sur AUDIO MONITOR pour sélectionner le son de votre choix.
Chaque pression sur cette touche change l’affichage du magnétoscope.
AUDIO
MONITOR
Pour visionner une
Cassette stéréo
Stéréo
Canal gauche
Canal droit
Monaural sur la piste
audio normale
Cassette
bilingue
Canaux gauche
et droit
Canal gauche
Canal droit
Son de la piste
audio normale
(SAP)
Appuyez sur AUDIO MONITOR
jusqu’à ce que l’indicateur
apparaisse dans la fenêtre
d’affichage
“STEREO”
“MAIN/L”
“SUB/R”
Pas d’indication
Pour plus de détails sur les émissions SAP, reportez-vous à la page 47 (FR).
Remarque
Lorsque vous reproduisez une cassette enregistrée en monaural, le son est
diffusé en monaural, quel que soit le réglage AUDIO MONITOR.
Comment le son est enregistré sur une cassette vidéo
Ce magnétoscope enregistre le son sur deux pistes différentes. Le son
haute fidélité (généralement stéréo) est enregistré sur la piste principale
avec l’image. Le son monaural est enregistré sur la piste audio normale, le
long du bord de la bande magnétique.
Son monaural
Son hi-fi et
signaux vidéo
Piste audio normale
Piste principale
22 (FR)
Page 75

Lecture/recherche à différentes vitesses
6
CH/TRACKING –/+
Bague DUAL MODE SHUTTLE
rP
p STOP ( PLAY
7
FRAME
&
SLOW –/+
3/#
SEARCH
P PAUSE
· PLAY
Bague
DUAL
MODE
SHUTTLE
(
p
P PAUSE
Vous pouvez reproduire une cassette à différentes vitesses: en accéléré, au
ralenti, image par image, etc. Ces options s’avèrent bien pratiques pour
rechercher un passage spécifique en cours de lecture. Le son est coupé
durant ces opérations.
Options de
lecture
Lecture à
différentes
vitesses:
Cinquième de la
vitesse normale
Vitesse normale
Vitesse double de
la normale
Grande vitesse
Avance rapide/
rembobinage
Visualisation de
l’image en cours
d’avance rapide
ou de
rembobinage
Recherche à
grande vitesse
Recherche au
ralenti
Lecture image par
image
Remarque
Opération
En cours de lecture, tournez
la bague DUAL MODE
SHUTTLE vers la droite
(avant) ou vers la gauche
(arrière) pour:
1/5 (avant uniquement)
1
X2
# ou 3
En mode d’arrêt, tournez la
bague DMS sur FF ) ou
sur REW 0 et relâchez-la.
En cours d’avance rapide,
tournez la bague DMS sur FF
).
En cours de rembobinage,
tournez la bague sur REW
0.
En cours de lecture ou
pause, appuyez sur #
SEARCH ou 3SEARCH.
En cours de lecture ou de
pause, appuyez sur &
SLOW –/+. Vous pouvez
accélérer la vitesse de lecture
avec la touche + et la ralentir
avec la touche –.
En mode de pause, appuyez
sur 7 FRAME pour avancer
d’une image.
Pour reprendre la lecture
normale
Relâchez la bague.
Appuyez sur · PLAY.
Pour revenir au mode
précédent, relâchez la
bague.
Appuyez sur · PLAY.
Appuyez sur · PLAY.
Appuyez sur · PLAY ou
P PAUSE.
Ajustez l’image à l’aide des touches CH/TRACKING –/+ du
magnétoscope si:
– des rayures apparaissent en cours de lecture au ralenti;
– l’image sautille en mode de pause.
23 (FR)
Page 76

Lecture d’une cassette
Lecture répétée
6
AUTO REPEAT
ON/OFF
rP
p STOP
( PLAY
MENU
CURSOR
4/$
EXECUTE
CH +/–
Ce magnétoscope vous permet de reproduire de manière répétée un
(
p
passage spécifique d’une cassette. Le magnétoscope reproduit la cassette
du début à la fin de la section enregistrée.
1 Appuyez sur MENU, sélectionnez 4.PREREG/DUREE UTIL. et
appuyez ensuite sur EXECUTE.
Le menu PREREG apparaît.
[ PREREG ]
FIN LECT PROG
MODE REPETITION
APC
AFFICHAGE
ARRET MINUTERIE
VERI. ENREG. ON
[ DUREE UTIL. ]
TETE 00000H
REMB
REPETER
ON
ON
5M
2 Appuyez sur CURSOR 4/$ pour faire clignoter le réglage de “MODE
REPETITION”.
[ PREREG ]
FIN LECT PROG
MODE REPETITION
APC
AFFICHAGE
ARRET MINUTERIE
VERI. ENREG. ON
[ DUREE UTIL. ]
TETE 00000H
REMB
REPETER
ON
ON
5M
· PLAY
p STOP
3 Sélectionnez REPETER. avec les touches CH +/– et appuyez ensuite
sur EXECUTE.
4 Appuyez sur MENU pour revenir à l’affichage normal.
5 Réglez le commutateur AUTO REPEAT ON/OFF du magnétoscope
sur ON.
6 Introduisez la cassette à reproduire.
7 Rembobinez la cassette au début.
8 Appuyez sur · PLAY.
Après avoir reproduit la seule section enregistrée, le magnétoscope
rembobine la cassette au début et reproduit la même section de bande
de manière répétée.
Pour arrêter la lecture
Appuyez sur p STOP.
Pour désactiver la lecture répétée automatique
Réglez le commutateur AUTO REPEAT ON/OFF du magnétoscope sur
OFF.
24 (FR)
Page 77

Remarques
•La fonction de lecture répétée automatique est inopérante dans les modes
d’avance rapide, de rembobinage, de recherche d’image, de ralenti et
d’enregistrement.
•Si vous appuyez sur · PLAY près de la fin de la section enregistrée, il
se peut que la fonction de lecture répétée automatique soit inopérante.
Dans ce cas, rembobinez un peu la cassette et appuyez à nouveau sur ·
PLAY.
Conditions requises pour la lecture répétée automatique
Pour pouvoir exploiter la fonction de lecture répétée automatique, la
cassette doit réunir les conditions suivantes:
•La section vierge au début de la cassette doit faire moins de 25 secondes.
•Il doit y avoir un passage blanc de plus de 5 secondes juste après la fin de
la section enregistrée. Sinon, il se peut que le magnétoscope continue la
lecture par la section enregistrée suivante ou même jusqu’à la fin de la
cassette.
Début
section
blanc
section enregistrée
blanc
enregistrée
moins de 25 s.
plus de 5 s.
25 (FR)
Page 78

Lecture d’une cassette
Utilisation de la fonction d’index
Le magnétoscope insère automatiquement un signal d’index à l’endroit où
l’enregistrement démarre (sauf lorsque vous démarrez l’enregistrement
depuis le mode de pause d’enregistrement). Utilisez cet index comme point
de référence pour localiser le début de l’enregistrement. Comme le numéro
d’index indique une position relative par rapport à la position actuelle,
spécifiez le nombre de signaux d’index en amont ou en aval dont le signal
d’index spécifique est éloigné de la position actuelle. Le magnétoscope
peut rechercher jusqu’à 19 signaux d’index en amont ou en aval de la
position actuelle.
Visualisation consécutive du début de chaque enregistrement – Balayage d’index
6
Bague DUAL MODE SHUTTLE
rP
(
p
DISPLAY
INDEX
Vous pouvez regarder consécutivement le début de chaque enregistrement
en détectant les signaux d’index un par un.
1 Introduisez une cassette indexée dans le magnétoscope.
2 Appuyez une fois sur INDEX.
L’indicateur AUTO apparaît dans la fenêtre d’affichage.
3 Tournez la bague DUAL MODE SHUTTLE dans le sens horaire vers
FF ) ou antihoraire vers REW 0.
0 : 01 : 23
INDEX 1
SCAN
• Pour regarder les émissions suivantes, tournez-la vers FF ).
• Pour regarder les émissions précédentes, tournez-la vers REW 0.
Le magnétoscope localise le signal d’index suivant ou précédent et
reproduit la cassette pendant environ 10 secondes, avant de passer au
signal d’index suivant. Le numéro d’index à l’écran augmente d’une
unité.
Remarques
•Les informations peuvent ne pas s’afficher si “AFFICHAGE” est réglé
sur OFF dans le menu PREREG.
Pour plus de détails, voir “Affichage du compteur de durée et de l’heure” à la
page 20 (FR).
•Si l’heure est affichée, appuyez sur DISPLAY pour commuter le
compteur de durée.
26 (FR)
Bague
DUAL
MODE
SHUTTLE
Page 79

Localisation d’un index – Recherche d’index
6
Bague DUAL MODE SHUTTLE
rP
(
p
DISPLAY
Vous pouvez localiser un index en indiquant le nombre de signaux d’index
en amont ou en aval qui le séparent de la position actuelle sur la cassette.
1 Introduisez une cassette indexée dans le magnétoscope.
2 Appuyez plusieurs fois de suite sur INDEX jusqu’à ce que le numéro
d’index voulu apparaisse sur l’écran.
3 Tournez la bague DUAL MODE SHUTTLE dans le sens horaire vers
FF ) ou antihoraire vers REW 0.
0 : 03 : 51
INDEX 6
SEARCH
•Pour localiser les émissions suivantes, tournez-la vers FF ).
•Pour localiser les émissions précédentes, tournez-la vers REW 0.
Le magnétoscope démarre la recherche et le numéro d’index affiché
sur l’écran du téléviseur est décompté jusqu’à zéro. La lecture démarre
automatiquement à partir de ce point.
INDEX
Bague
DUAL
MODE
SHUTTLE
Remarques
•Les informations peuvent ne pas s’afficher si “AFFICHAGE” est réglé
sur OFF dans le menu PREREG.
Pour plus de détails, voir “Affichage du compteur de durée et de l’heure” à la
page 20 (FR).
•Si l’heure est affichée, appuyez sur DISPLAY pour commuter le
compteur de durée.
27 (FR)
Page 80

Lecture d’une cassette
Utilisation de la fonction de recherche des blancs
Le magnétoscope localise les passages non enregistrés (blancs) sur la
cassette et s’arrête automatiquement à l’aide de la fonction de recherche
des blancs.
Vous pouvez utiliser cette fonction pour localiser la fin d’un
enregistrement.
1 Introduisez une cassette dans le magnétoscope.
2 Appuyez sur BLANK SEARCH en cours de lecture ou en mode
d’arrêt.
DISPLAY
BLANK
SEARCH
BLANK SEARCH
0 : 03 : 51
L’indicateur AUTO apparaît dans la fenêtre d’affichage, et “BLANK
SEARCH” apparaît sur l’écran.
Le magnétoscope avance rapidement et s’arrête automatiquement au
début d’un passage non enregistré.
Remarques
•Les informations peuvent ne pas s’afficher si “AFFICHAGE” est réglé
sur OFF dans le menu PREREG.
Pour plus de détails, voir “Affichage du compteur de durée et de l’heure” à la
page 20 (FR).
•Si l’heure est affichée, appuyez sur DISPLAY pour commuter le
compteur de durée.
•Si vous activez la fonction de recherche des blancs sur une cassette non
enregistrée ou sur une cassette qui ne comporte pas de blancs, le
magnétoscope poursuit la recherche des blancs jusqu’à la fin de la
cassette, rembobine la cassette et s’arrête.
28 (FR)
Page 81

Lecture simple
6
AUTO REPEAT ON/OFF
rP
(
p
( PLAY
MENU
CURSOR
4/$
EXECUTE
CH +/–
En utilisant un magnétoscope, vous pouvez reproduire un passage
déterminé d’une cassette et rembobiner automatiquement la bande
magnétique au début de ce passage.
Utilisez une cassette qui satisfait aux conditions de lecture répétée
automatique.
1 Appuyez sur MENU, sélectionnez 4.PREREG/DUREE UTIL. et
appuyez ensuite sur EXECUTE.
Le menu PREREG apparaît.
[ PREREG ]
FIN LECT PROG
MODE REPETITION
APC
AFFICHAGE
ARRET MINUTERIE
VERI. ENREG. ON
[ DUREE UTIL. ]
TETE 00000H
REMB
REPETER
ON
ON
5M
2 Appuyez sur CURSOR 4/$ pour faire clignoter le réglage de “MODE
REPETITION”.
[ PREREG ]
FIN LECT PROG
MODE REPETITION
APC
AFFICHAGE
ARRET MINUTERIE
VERI. ENREG. ON
[ DUREE UTIL. ]
TETE 00000H
REMB
REPETER
ON
ON
5M
· PLAY
3 Sélectionnez UNIQUE avec les touches CH +/–.
[ PREREG ]
FIN LECT PROG
MODE REPETITION
APC
AFFICHAGE
ARRET MINUTERIE
VERI. ENREG ON
[ DUREE UTIL. ]
TETE 00000H
REMB
UNIQUE
ON
ON
5M
4 Appuyez sur EXECUTE et ensuite sur MENU pour revenir à
l’affichage normal.
5 Réglez le commutateur AUTO REPEAT ON/OFF du magnétoscope
sur ON.
6 Introduisez une cassette enregistrée dans le magnétoscope.
7 Appuyez sur · PLAY pour démarrer la lecture.
La lecture démarre. Lorsque la cassette arrive à la fin du passage à
reproduire, le magnétoscope rembobine la cassette au début et s’arrête.
Pour redémarrer la lecture, appuyez sur · PLAY.
Pour annuler la lecture simple
Réglez le commutateur AUTO REPEAT ON/OFF sur OFF.
29 (FR)
Page 82

Réglage de l’image
Réglage de l’alignement
6
Indicateur AUTO TRACKING
CH/TRACKING –/+
rP
(
p
AUTO
TRACKING
Bien que le magnétoscope ajuste automatiquement l’alignement pendant la
lecture d’une cassette (l’indicateur AUTO TRACKING clignote dans la
fenêtre d’affichage, puis s’allume en continu), des distorsions peuvent se
produire si la cassette a été enregistrée dans de mauvaises conditions. Si
c’est le cas, procédez au réglage manuel de l’alignement.
Appuyez sur CH/TRACKING –/+. (L’indicateur AUTO TRACKING
s’éteint.) Les distorsions doivent disparaître lorsque vous appuyez sur
l’une des deux touches.
Pour revenir en mode de réglage automatique
Appuyez sur la touche AUTO TRACKING de la télécommande, ou
simultanément CH/TRACKING –/+ du magnétoscope.
30 (FR)
Page 83

Utilisation du contrôle adaptatif de l’image (APC)
La fonction de contrôle adaptatif de l’image (APC) améliore
automatiquement la qualité de lecture et d’enregistrement en ajustant le
MENU
CURSOR
4/$
magnétoscope à l’état des têtes vidéo et de la bande magnétique. Pour
maintenir la meilleure qualité d’image possible, il est conseillé de régler
“APC” sur ON dans le menu PREREG.
EXECUTE
CH +/–
1 Appuyez sur MENU, sélectionnez 4.PREREG/DUREE UTIL. et
appuyez ensuite sur EXECUTE.
Le menu PREREG apparaît.
[ PREREG ]
FIN LECT PROG
MODE REPETITION
APC
AFFICHAGE
ARRET MINUTERIE
VERI. ENREG. ON
[ DUREE UTIL. ]
TETE 00000H
REMB
REPETER
OFF
ON
5M
2 Appuyez sur CURSOR 4/$ pour faire clignoter le réglage de “APC”.
[ PREREG ]
FIN LECT PROG
MODE REPETITION
APC
AFFICHAGE
ARRET MINUTERIE
VERI. ENREG ON
[ DUREE UTIL. ]
TETE 00000H
REMB
REPETER
OFF
ON
5M
3 Sélectionnez ON pour exploiter la fonction APC avec les touches
CH +/– et appuyez ensuite sur EXECUTE.
[ PREREG ]
FIN LECT PROG
MODE REPETITION
APC
AFFICHAGE
ARRET MINUTERIE
VERI. ENREG ON
[ DUREE UTIL. ]
TETE 00000H
REMB
REPETER
ON
ON
5M
4 Appuyez sur MENU pour revenir à l’affichage normal.
Pour activer la fonction APC en cours de lecture
La fonction APC est activée automatiquement avec tous les types de
cassettes, y compris les cassettes de location. Vous pouvez reproduire une
cassette avec la fonction APC même si la cassette n’a pas été enregistrée
avec cette fonction.
Pour activer la fonction APC en cours d’enregistrement
Chaque fois que vous introduisez une cassette et que vous démarrez
l’enregistrement pour la première fois, le magnétoscope s’adapte à la
cassette à l’aide de la fonction APC.
Ce réglage est maintenu jusqu’à ce que la cassette ait été éjectée. Il y a un
bref décalage avant que le magnétoscope démarre l’enregistrement
proprement dit pendant lequel il analyse la cassette.
31 (FR)
Page 84

Lecture/enregistrement par programmateur
Lecture/enregistrement par programmateur
6
rP
(
p
Cette section vous indique comment programmer le démarrage et l’arrêt
automatiques de l’enregistrement/lecture d’une émission. Vous pouvez
ainsi programmer 8 émissions.
Avant de commencer...
•Vérifiez si l’horloge est correctement réglée.
TIMER
•Pour un enregistrement par programmateur, introduisez une cassette dont
l’onglet de sécurité est intact. Assurez-vous que la longueur de bande
disponible est supérieure à la durée totale des enregistrements que vous
avez programmés.
MENU
TIMER
ON/OFF
CURSOR
Z/z/4/$
EXECUTE
CH +/–
•Mettez sous tension l’appareil que vous comptez utiliser.
• Vérifiez si l’indicateur SENSOR REC n’est pas allumé. S’il est allumé,
réglez le commutateur SENSOR REC ON/OFF sur OFF.
1 Appuyez sur MENU, sélectionnez 2.REGLAGE ERG/LEC PROG et
appuyez ensuite sur EXECUTE.
Le menu REGLAGE ERG/LEC PROG apparaît et la date
d’aujourd’hui se met à clignoter.
[ REGLAGE ERG/LEC PROG ]
DATE DEBUT ARRET MODE
0 4 – –:– – – –:– – – – SP
– – – –:– – – –:– – – – – –
– – – –:– – – –:– – – – – –
– – – –:– – – –:– – – – – –
– – – –:– – – –:– – – – – –
– – – –:– – – –:– – – – – –
– – – –:– – – –:– – – – – –
– – – –:– – – –:– – – – – –
2 Réglez la “DATE” de début d’enregistrement/lecture avec les touches
CH +/–.
[ REGLAGE ERG/LEC PROG ]
DATE DEBUT ARRET MODE
1 0 – –:– – – –:– – – – SP
– – – –:– – – –:– – – – – –
– – – –:– – – –:– – – – – –
– – – –:– – – –:– – – – – –
– – – –:– – – –:– – – – – –
– – – –:– – – –:– – – – – –
– – – –:– – – –:– – – – – –
– – – –:– – – –:– – – – – –
32 (FR)
Remarque
Vous pouvez programmer la date dans un délai d’un mois seulement,
sauf pour l’enregistrement/lecture quotidien/hebdomadaire, qui reste
opérant jusqu’à ce que vous le modifiiez.
Pour enregistrer ou reproduire le même programme tous les jours ou chaque
semaine, reportez-vous à la section “Lecture/enregistrement quotidien/
hebdomadaire” à la page 34 (FR).
3 Appuyez sur CURSOR ” et réglez l’heure de début d’enregistrement/
lecture avec les touches CH +/–:
Appuyez sur CURSOR ” pour faire clignoter l’heure sous “DEBUT”
et réglez ensuite l’heure avec les touches CH +/– .
[ REGLAGE ERG/LEC PROG ]
DATE DEBUT ARRET MODE
1 0 1 3:– – – –:– – – – SP
– – – –:– – – –:– – – – – –
– – – –:– – – –:– – – – – –
– – – –:– – – –:– – – – – –
– – – –:– – – –:– – – – – –
– – – –:– – – –:– – – – – –
– – – –:– – – –:– – – – – –
– – – –:– – – –:– – – – – –
Page 85

Appuyez sur CURSOR ” pour faire clignoter les minutes sous
[ REGLAGE ERG/LEC PROG ]
1 0 1 3:1 5 1 4:0 0 LC
– – – –:– – – –:– – – – – –
– – – –:– – – –:– – – – – –
– – – –:– – – –:– – – – – –
– – – –:– – – –:– – – – – –
– – – –:– – – –:– – – – – –
– – – –:– – – –:– – – – – –
– – – –:– – – –:– – – – – –
DATE DEBUT ARRET MODE
“DEBUT” et réglez ensuite les minutes avec les touches CH +/– .
[ REGLAGE ERG/LEC PROG ]
DATE DEBUT ARRET MODE
1 0 1 3:1 5 – –:– – – – SP
– – – –:– – – –:– – – – – –
– – – –:– – – –:– – – – – –
– – – –:– – – –:– – – – – –
– – – –:– – – –:– – – – – –
– – – –:– – – –:– – – – – –
– – – –:– – – –:– – – – – –
– – – –:– – – –:– – – – – –
4 Appuyez sur CURSOR z et réglez ensuite l’heure de fin
d’enregistrement/lecture de la même manière avec les touches CH +/– .
[ REGLAGE ERG/LEC PROG ]
DATE DEBUT ARRET MODE
1 0 1 3:1 5 1 4:0 0 – – SP
– – – –:– – – –:– – – – – –
– – – –:– – – –:– – – – – –
– – – –:– – – –:– – – – – –
– – – –:– – – –:– – – – – –
– – – –:– – – –:– – – – – –
– – – –:– – – –:– – – – – –
– – – –:– – – –:– – – – – –
5
Appuyez sur CURSOR z et réglez le “MODE” avec les touches CH +/–.
•Pour enregistrer les signaux entrés via les prises AUDIO/VIDEO IN,
réglez “MODE” sur AV.
•Pour régler une lecture par programmateur, réglez “MODE” sur LC.
[ REGLAGE ERG/LEC PROG ]
DATE DEBUT ARRET MODE
1 0 1 3:1 5 1 4:0 0 A V SP
– – – –:– – – –:– – – – – –
– – – –:– – – –:– – – – – –
– – – –:– – – –:– – – – – –
– – – –:– – – –:– – – – – –
– – – –:– – – –:– – – – – –
– – – –:– – – –:– – – – – –
– – – –:– – – –:– – – – – –
6 Appuyez sur CURSOR z et réglez la vitesse de défilement de la bande
(SP ou EP) avec les touches CH +/–.
Pour plus de détails sur le réglage de la vitesse de défilement de la bande,
voir page 17 (FR).
Remarque
Vous ne pouvez pas régler la vitesse de défilement de la bande pour
une lecture par programmateur.
[ REGLAGE ERG/LEC PROG ]
DATE DEBUT ARRET MODE
1 0 1 3:1 5 1 4:0 0 A V E P
– – – –:– – – –:– – – – – –
– – – –:– – – –:– – – – – –
– – – –:– – – –:– – – – – –
– – – –:– – – –:– – – – – –
– – – –:– – – –:– – – – – –
– – – –:– – – –:– – – – – –
– – – –:– – – –:– – – – – –
Pour programmer un autre réglage, appuyez sur $ pour faire clignoter
la date sur la ligne suivante et répétez les étapes 2 à 5.
Pour corriger des réglages avant la fin de la procédure de
programmation, appuyez sur CURSOR Z/z/4/$ pour faire clignoter
le réglage que vous voulez changer et modifiez-le.
(suite)
33 (FR)
Page 86

Lecture/enregistrement par programmateur
MENU
POWER
TIMER
ON/OFF
EXECUTE
CH –
7 Après avoir terminé les réglages, appuyez sur EXECUTE et puis sur
TIMER ON/OFF.
L’indicateur TIMER s’allume dans la fenêtre d’affichage, le
magnétoscope se met hors tension et passe en mode de veille de
lecture/enregistrement.
Le magnétoscope se met ensuite automatiquement sous tension et
démarre la lecture/enregistrement 15 secondes avant l’heure
programmée.
Remarques
•Vous pouvez utiliser la touche TIMER du magnétoscope au lieu de la
touche TIMER ON/OFF de la télécommande.
•L’indicateur TIMER se met à clignoter si vous réglez l’heure de
début dans les 5 minutes.
•Si vous introduisez une cassette dont l’onglet de sécurité a été brisé,
le magnétoscope l’éjectera à l’heure de début programmée d’un
enregistrement par programmateur.
•Si aucune cassette n’a été introduite dans le magnétoscope,
l’indicateur TIMER n’apparaît pas.
Pour arrêter un enregistrement/lecture par programmateur
Pour arrêter la cassette pendant un enregistrement/lecture par
programmateur, appuyez sur TIMER ON/OFF de façon à désactiver
l’indicateur TIMER dans la fenêtre d’affichage.
Remarques
•La fonction de lecture par programmateur peut être utilisée avec la
fonction de lecture répétée automatique.
• L’enregistrement/lecture par programmateur ne peut être exécuté lorsque
le commutateur SENSOR REC ON/OFF est réglé sur ON.
•Si une panne de courant survient pendant un enregistrement/lecture par
programmateur, et si l’heure d’arrêt programmée n’est pas dépassée
lorsque l’alimentation est rétablie, le magnétoscope reprend
l’enregistrement/lecture.
•Même si une panne de courant survient alors que le magnétoscope se
trouve en mode de veille d’enregistrement/lecture par programmateur, le
réglage reste effectif jusqu’à ce que l’heure d’arrêt programmée soit
passée. Si l’alimentation est rétablie pendant la période d’enregistrement/
lecture programmée, le magnétoscope démarre immédiatement
l’enregistrement/lecture.
Lecture/enregistrement quotidien/hebdomadaire
Vous pouvez programmer le magnétoscope pour enregistrer ou reproduire
la même émission chaque jour de la semaine (lecture/enregistrement
quotidien) ou le même jour de chaque semaine (lecture/enregistrement
hebdomadaire). Appuyez sur CH – à l’étape 2 jusqu’à ce que le réglage
voulu apparaisse à la position “DATE”.
Chaque fois que vous appuyez sur CH –, le réglage change selon la
séquence suivante:
34 (FR)
4 (aujourd’hui) n SAM (tous les samedis) n VEN n JEU n MER n
MAR n LUN n DIM n LU-VE (du lundi au vendredi) n LU-SA (du
lundi au samedi) n LU-DI (chaque jour)
Page 87

Utilisation du magnétoscope avant un enregistrement/lecture
par programmateur
Appuyez sur TIMER ON/OFF pour désactiver l’indicateur TIMER dans la
fenêtre d’affichage et appuyez ensuite sur POWER.
Le magnétoscope est prêt à l’emploi.
Lorsque vous avez terminé d’employer le magnétoscope, appuyez à
nouveau sur TIMER ON/OFF pour réactiver l’indicateur TIMER dans la
fenêtre d’affichage.
A propos du bip sonore
Un bip sonore d’avertissement retentit dans les cas suivants:
•Si vous appuyez sur TIMER ON/OFF lorsque
- aucune émission n’a été programmée en vue d’un enregistrement/lecture
par programmateur
- aucune cassette n’a été introduite
•Si vous essayez de changer les réglages du programmateur durant un
enregistrement/lecture par programmateur
•Si vous essayez de régler l’horloge pendant un enregistrement par
programmateur
•Si vous essayez de régler un enregistrement par programmateur alors que
l’horloge n’a pas été réglée
Sélection des opérations de la cassette après une lecture par programmateur
MENU
CURSOR
4/$
EXECUTE
CH +/–
1 Appuyez sur MENU, sélectionnez 4.PREREG/DUREE UTIL. et
appuyez ensuite sur EXECUTE.
Le menu PREREG apparaît.
[ PREREG ]
FIN LECT PROG
MODE REPETITION
APC
AFFICHAGE
ARRET MINUTERIE
VERI. ENREG. ON
[ DUREE UTIL. ]
TETE 00000H
REMB
REPETER
ON
ON
5M
2 Appuyez sur CURSOR 4/$ pour faire clignoter le réglage de “FIN
LECT PROG”.
3 Sélectionnez REMB ou ARRET avec les touches CH +/–.
[ PREREG ]
FIN LECT PROG
MODE REPETITION
APC
AFFICHAGE
ARRET MINUTERIE
VERI. ENREG. ON
[ DUREE UTIL. ]
TETE 00000H
•Si vous sélectionnez REMB, le magnétoscope arrête la lecture à
l’heure d’arrêt programmée, rembobine la cassette au début et se met
ensuite hors tension.
•Si vous sélectionnez ARRET, le magnétoscope arrête la lecture à
l’heure d’arrêt programmée et se met ensuite hors tension.
ARRET
REPETER
ON
ON
5M
4 Appuyez sur EXECUTE et puis sur MENU pour revenir à l’affichage
normal.
35 (FR)
Page 88

Lecture/enregistrement par programmateur
Vérification/modification/annulation des réglages du programmateur
POWER
Cette section vous explique comment vérifier, modifier et annuler les
réglages du programmateur que vous avez mémorisés dans le
6
rP
(
p
magnétoscope.
1 Appuyez sur TIMER ON/OFF pour désactiver l’indicateur TIMER
TIMER
MENU
POWER
TIMER
CLEAR
TIMER
ON/OFF
EXECUTE
CURSOR
“/”/4/$
dans la fenêtre d’affichage.
2 Appuyez sur POWER pour mettre le magnétoscope sous tension.
3 Appuyez sur MENU, sélectionnez 2. REGLAGE ERG/LEC PROG et
appuyez ensuite sur EXECUTE.
Le menu REGLAGE ERG/LEC PROG apparaît.
[ REGLAGE ERG/LEC PROG ]
DATE DEBUT ARRET MODE
1 0 1 3:1 5 1 4:0 0 LC
LUN 0 2:0 0 0 3:0 0 AV SP
0 4 1 1:0 0 1 1:5 0 AV EP
LU-SA
0 9:0 0 1 0:3 0 LC
– – – –:– – – –:– – – – – –
– – – –:– – – –:– – – – – –
– – – –:– – – –:– – – – – –
– – – –:– – – –:– – – – – –
4 Vérification des réglages du programmateur:
Si vous ne devez pas modifier ni annuler les réglages, appuyez sur
CH +/–
EXECUTE et puis sur TIMER ON/OFF pour revenir en mode de veille
de lecture/enregistrement.
5 Modification ou annulation des réglages du programmateur:
•Pour modifier un réglage, appuyez sur CURSOR “/”/4/$ pour faire
clignoter le paramètre que vous voulez changer et changez-le avec les
touches CH +/–.
[ REGLAGE ERG/LEC PROG ]
DATE DEBUT ARRET MODE
1 0 1 3:1 5 1 4:0 0 LC
LUN 0 2:0 0 0 4:0 0 AV SP
0 4 1 1:0 0 1 1:5 0 AV EP
LU-SA
0 9:0 0 1 0:3 0 LC
– – – –:– – – –:– – – – – –
– – – –:– – – –:– – – – – –
– – – –:– – – –:– – – – – –
– – – –:– – – –:– – – – – –
•Pour annuler un réglage, appuyez sur CURSOR “/”/4/$ pour faire
clignoter l’un des réglages du programme que vous voulez annuler et
appuyez ensuite sur TIMER CLEAR.
[ REGLAGE ERG/LEC PROG ]
DATE DEBUT ARRET MODE
1 0 1 3:1 5 1 4:0 0 LC
LUN 0 2:0 0 0 3:0 0 AV SP
0 4 – –:– – – –:– – – – SP
LU-SA
0 9:0 0 1 0:3 0 LC
– – – –:– – – –:– – – – – –
– – – –:– – – –:– – – – – –
– – – –:– – – –:– – – – – –
– – – –:– – – –:– – – – – –
36 (FR)
Page 89

6 Appuyez sur EXECUTE.
Le magnétoscope revient à l’écran de départ. S’il reste d’autres
réglages de programmation dans le menu REGLAGE ERG/LEC
PROG, appuyez sur TIMER ON/OFF pour revenir en mode de veille
de lecture/enregistrement.
Remarque
Vous pouvez utiliser la touche TIMER du magnétoscope au lieu de la
touche TIMER ON/OFF de la télécommande.
Pour vérifier les réglages du programmateur pendant un
enregistrement/lecture par programmateur
Appuyez sur MENU, sélectionnez 2. REGLAGE ERG/LEC PROG. Après
vérification, appuyez sur EXECUTE et puis sur MENU pour désactiver
l’affichage.
Si des réglages du programmateur se chevauchent
Le magnétoscope n’enregistre/reproduit pas les émissions qui se
chevauchent. Si des programmations se chevauchent, changez les réglages.
Cas 1
Programme 1
(premier sur
la liste )
Programme 2
(second sur
la liste )
Cas 2
Programme 1
Programme 2
10:00
Sera coupé
10:30
10:00
10:50
Sera
coupé
11:00
11:30
11:30
Cas 1: Si vous avez programmé le début d’un enregistrement/lecture
pour la même heure...
La première émission programmée dans le menu REGLAGE ERG/LEC
PROG a la priorité sur les autres émissions. L’enregistrement/lecture par
programmateur des émissions d’un rang de priorité inférieur démarre
lorsque le magnétoscope a terminé l’enregistrement/lecture des émissions
d’un rang de priorité supérieur.
Cas 2: Si vous programmez le début de l’enregistrement/lecture de
l’émission 1 avant que l’enregistrement/lecture de l’émission 2 soit
terminé...
L’enregistrement/lecture de l’émission 1 démarre après la fin de
l’enregistrement/lecture de l’émission 2.
Remarque
Le magnétoscope démarre l’enregistrement 15 secondes avant l’heure de
début programmée.
A propos de la fonction de sauvegarde de mémoire
Le magnétoscope est doté d’une fonction de sauvegarde de la mémoire.
Même si l’alimentation est interrompue, les réglages mémorisés sont
conservés jusqu’à 30 jours grâce à la pile rechargeable intégrée.
37 (FR)
Page 90

Montage avec un autre magnétoscope
Raccordement d’un autre magnétoscope pour le montage
Cette section vous présente comment effectuer un montage sur ou depuis
un autre magnétoscope. Vous pouvez réaliser une copie d’une cassette en
utilisant ce magnétoscope pour l’enregistrement ou pour la lecture.
Remarques
•
Veillez à brancher les fiches sur les prises identifiées par la même couleur.
•Si l’autre magnétoscope est de type monaural, ne branchez pas les fiches
rouges.
•Si l’autre magnétoscope est doté d’une fonction de montage, utilisez cette
fonction afin d’éviter toute détérioration de la qualité de l’image.
Raccordement pour enregistrer sur ce magnétoscope
SVO-1630
Moniteur
L’autre magnétoscope
à AUDIO
IN R/L
Sens du signal
à VIDEO IN
à VIDEO
OUT
Raccordement pour enregistrer sur un autre magnétoscope
SVO-1630
L’autre magnétoscope
à AUDIO
OUT R/L
à VIDEO OUT
à VIDEO IN
à AUDIO
OUT R/L
Moniteur
à AUDIO
IN R/L
38 (FR)
Sens du signal
Page 91

Montage avec un autre magnétoscope
Opérations complémentaires
6
INPUT SELECT
TAPE SPEED
r REC
rP
(
p
p STOP
P PAUSE
[TV] / [VTR]
INPUT
SELECT
TAPE
SPEED
Si vous utilisez ce magnétoscope comme enregistreur
Avant de commencer
•
Appuyez sur INPUT SELECT pour afficher “LINE” dans la fenêtre d’affichage.
•Appuyez sur TAPE SPEED (SP/EP) pour sélectionner la vitesse
d’enregistrement de la cassette.
•Réglez le sélecteur [TV] / [VTR] de la télécommande sur [VTR].
1
Introduisez une cassette source dans l’autre magnétoscope (lecteur). Recherchez
l’endroit de début de lecture et activez le mode de pause de lecture.
2 Introduisez dans ce magnétoscope (enregistreur) une cassette dont
l’onglet de sécurité est intact. Recherchez l’endroit de début
d’enregistrement et appuyez sur P PAUSE.
3 Appuyez sur la touche r REC de ce magnétoscope et activez-le en
mode de pause d’enregistrement.
4 Pour démarrer le montage, appuyez sur la touche P PAUSE des deux
magnétoscopes de manière à désactiver le mode de pause.
Pour obtenir les meilleurs résultats, appuyez sur la touche de pause de
l’autre magnétoscope juste avant d’appuyer sur la touche P PAUSE de
ce magnétoscope.
Pour arrêter le montage
Appuyez sur la touche p STOP des deux magnétoscopes.
r REC
P PAUSE
p STOP
Si vous utilisez ce magnétoscope comme lecteur
Avant de commencer
•Réglez le sélecteur [TV] / [VTR] de la télécommande sur [VTR].
•Sélectionnez l’entrée via laquelle ce magnétoscope est connecté à l’autre
magnétoscope (enregistreur).
1 Introduisez une cassette source dans ce magnétoscope (lecteur).
Recherchez le point de début de lecture et appuyez sur P PAUSE.
2 Introduisez dans l’autre magnétoscope (enregistreur) une cassette dont
l’onglet de sécurité est intact. Recherchez l’endroit de début
d’enregistrement et activez le mode de pause d’enregistrement.
3 Pour démarrer le montage, appuyez sur la touche P PAUSE des deux
magnétoscopes de manière à désactiver le mode de pause.
Pour obtenir les meilleurs résultats, appuyez sur la touche P PAUSE
de ce magnétoscope juste avant d’appuyer sur la touche de pause de
l’autre magnétoscope.
Pour arrêter le montage
Appuyez sur la touche p STOP des deux magnétoscopes.
Remarques
•Pour obtenir un montage encore plus précis, utilisez les touches de pause
des magnétoscopes.
•Pour couper des scènes indésirables en cours de montage, appuyez sur la
touche P PAUSE du magnétoscope enregistreur lorsqu’une scène
indésirable commence. Lorsqu’elle se termine, appuyez à nouveau sur P
PAUSE pour reprendre l’enregistrement.
39 (FR)
Page 92

Enregistrement d’émissions télévisées
Cette section présente comment enregistrer des émissions télévisées.
Avant l’enregistrement, raccordez l’antenne et la télécommande au
magnétoscope et réglez le syntoniseur du magnétoscope.
Raccordement du magnétoscope et du téléviseur
A Utilisez ce raccordement si vous utilisez:
•une antenne VHF/UHF (vous captez les canaux 2-13 et les canaux 14 et
supérieurs);
•une antenne uniquement UHF (vous captez les canaux 14 et supérieurs);
•des antennes VHF et UHF séparées.
Arrière du
téléviseur
VHF/UHF
SVO-1630
VHF/UHF IN
ou
VHF
Raccordez en
fonction du
A
connecteur du
téléviseur: A, B ou C.
B
VHF/UHF OUT
B Utilisez ce raccordement si vous utilisez:
• une antenne uniquement VHF (vous captez les canaux 2-13);
• un réseau de télédistribution par câble.
SVO-1630
VHF/UHF OUT
VHF/UHF IN
ou
ou
ou
UHF
VHF
C
UHF
Arrière du
téléviseur
VHF/UHF
VHF
UHF
VHF
UHF
Raccordez en
fonction du
A
connecteur du
téléviseur: A, B ou C.
Pour les connecteurs
B
de type B et C,
la connexion
UHF n’est pas
nécessaire.
C
40 (FR)
Si vous ne pouvez pas directement raccorder votre câble d’antenne au
magnétoscope
Si votre câble d’antenne est de type plat (câble bifilaire de 300 ohms), fixez
un connecteur d’antenne externe (non fourni) de façon à pouvoir brancher
le câble sur la prise VHF/UHF IN. Si vous disposez de câbles séparés pour
les antennes VHF et UHF, il se peut que vous deviez employer un
mélangeur de bande U/V. Pour plus de détails, voir page 41 (FR).
Page 93

Réglage du commutateur RF CHANNEL
1 Desserrez les vis du connecteur d’antenne.
RF
CHANNEL
34
6
POWER
rP
(
p
( PLAY
Si vous raccordez le magnétoscope au téléviseur
uniquement au moyen de l’antenne, vous devez régler
le commutateur RF CHANNEL à l’arrière du
magnétoscope de façon à ce que le téléviseur puisse
recevoir le signal correct du magnétoscope.
Si vous raccordez le magnétoscope au téléviseur à
l’aide d’un câble audio/vidéo (non fourni), vous
pouvez sauter cette étape.
1 Réglez le commutateur RF CHANNEL à l’arrière
du téléviseur sur la position 3 ou 4, suivant le canal
qui n’est pas utilisé dans votre zone géographique.
Si les deux sont utilisés, réglez le commutateur sur
l’un des deux canaux.
2 Appuyez sur POWER pour mettre le
magnétoscope sous tension.
3 Introduisez une cassette enregistrée dans le
magnétoscope et appuyez sur ( PLAY.
4 Mettez votre téléviseur sous tension et réglez-le sur
le canal que vous avez sélectionné à l’étape 1
(canal 3 ou 4).
L’image de lecture apparaît sur l’écran du
téléviseur.
Chaque fois que vous voulez utiliser le
magnétoscope, réglez le téléviseur sur le canal
sélectionné à l’étape 1.
Montage du connecteur d’antenne externe
Câble bifilaire de
300 ohms
2 Enroulez les fils du câble bifilaire autour des vis du
connecteur d’antenne.
3 Resserrez les vis.
Montage d’un mélangeur de bande UHF/VHF
Câble bifilaire de 300 ohms
Mélangeur/
séparateur de
bande UHF/VHF
EAC-66 (non
fourni)
Câble coaxial de 75 ohms
Si vous utilisez à la fois un câble coaxial de 75 ohms et
un câble bifilaire de 300 ohms pour l’antenne VHF/
UHF, utilisez un mélangeur/séparateur de bande UHF/
VHF EAC-66 (non fourni) pour raccorder l’antenne au
magnétoscope.
1 Desserrez les vis sur le mélangeur.
2 Enroulez les fils du câble bifilaire autour des vis du
mélangeur.
3 Resserrez les vis.
4 Raccordez le câble coaxial de 75 ohms au
mélangeur.
Attention
Les raccordements entre les connecteurs VHF/UHF
OUT du magnétoscope et les bornes d’antenne du
récepteur de télévision doivent exclusivement être
réalisés de la façon décrite dans les instructions
suivantes. Le non-respect de ces instructions peut
résulter en une violation des réglementations de la
Commission fédérale des Communications sur
l’utilisation et le fonctionnement des appareils de
radiofréquence. Ne raccordez jamais la sortie du
magnétoscope à une antenne et ne raccordez jamais
simultanément (en parallèle) l’antenne et le
magnétoscope aux bornes d’antenne de votre récepteur.
Connecteur d’antenne EAC-35B (non fourni)
Si vous utilisez un câble bifilaire de 300 ohms pour
l’antenne VHF/UHF, utilisez un connecteur d’antenne
EAC-35B (non fourni) pour raccorder l’antenne au
magnétoscope.
Remarque pour l’installateur du système CATV
La présente remarque est destinée à attirer l’attention
des installateurs de systèmes CATV sur l’article 82040 du NEC qui stipule les instructions relatives à une
mise à la terre adéquate. Il prévoit plus
particulièrement que le câble de mise à la terre doit
être raccordé au circuit de terre du bâtiment aussi près
que possible de l’entrée du câble.
41 (FR)
Page 94

Enregistrement d’émissions télévisées
Présélection des canaux
Ce magnétoscope est capable de recevoir les canaux VHF 2 à 13, les
canaux UHF 14 à 69 et les chaînes de télédistribution non brouillées 1 à
125. Nous vous conseillons de commencer par présélectionner les canaux
captables dans votre zone géographique à l’aide de la fonction de
présélection automatique et, ensuite, de désactiver manuellement les
éventuels canaux que vous jugez indésirables. Si vous avez décidé quels
canaux vous souhaitez présélectionner, réglez-les directement à l’aide de
la fonction de présélection manuelle.
Avant de commencer...
•Mettez le magnétoscope et le téléviseur sous tension.
•Réglez le téléviseur sur le canal vidéo (le canal défini par le commutateur
RF CHANNEL, soit le canal 3 ou 4). Si votre téléviseur est raccordé au
magnétoscope via les prises audio/vidéo, réglez le téléviseur sur l’entrée
vidéo.
•Appuyez sur TV/VTR pour afficher l’indicateur VTR dans la fenêtre
d’affichage du magnétoscope.
•Appuyez sur INPUT SELECT pour afficher “TUNER” dans la fenêtre
d’affichage du magnétoscope.
Présélection automatique de tous les canaux captables
1 Appuyez sur MENU, sélectionnez 3. PREREGLAGE RADIO et
MENU
CURSOR
“/”/$
EXECUTE
appuyez ensuite sur EXECUTE.
Le menu PREREGLAGE RADIO apparaît sur l’écran du téléviseur.
Assurez-vous que le réglage de “NORM/CATV” clignote.
[ PREREGLAGE RADIO ] 125CH
NORM/CATV
PREREGLAGE AUTO
REGLAGE MANUEL
NORM
AJOUTER
2 Sélectionnez NORM ou CATV à l’aide des touches CURSOR “/”:
•Pour présélectionner les canaux de télévision, sélectionnez CATV.
CH +/–
•Pour présélectionner des canaux VHF et UHF, sélectionnez NORM.
[ PREREGLAGE RADIO ] 125CH
NORM/CATV
PREREGLAGE AUTO
REGLAGE MANUEL
CATV
AJOUTER
42 (FR)
Page 95

3 Appuyez sur CURSOR $ pour faire clignoter “PREREGLAGE
AUTO” et appuyez ensuite sur EXECUTE.
Tous les canaux captables sont présélectionnés par ordre numérique.
Lorsque plus aucun canal n’est détecté, la présélection est interrompue
et l’image du canal portant le plus petit numéro apparaît sur l’écran du
téléviseur.
[ PREREGLAGE RADIO ] 125CH
NORM/CATV
PREREGLAGE AUTO
REGLAGE MANUEL
CATV
AJOUTER
Présélection/désactivation manuelles de canaux
1 Appuyez sur MENU, sélectionnez 3. PREREGLAGE RADIO et
MENU
CURSOR
“/”/4/$
EXECUTE
appuyez ensuite sur EXECUTE.
Le menu PREREGLAGE RADIO apparaît sur l’écran du téléviseur.
[ PREREGLAGE RADIO ] 125CH
NORM/CATV
PREREGLAGE AUTO
REGLAGE MANUEL
NORM
AJOUTER
2 Sélectionnez “REGLAGE MANUEL” à l’aide des touches CURSOR
4/$.
[ PREREGLAGE RADIO ] 125CH
CH +/–
NORM/CATV
PREREGLAGE AUTO
REGLAGE MANUEL
NORM
AJOUTER
3 Sélectionnez un canal à présélectionner ou à désactiver à l’aide des
touches CH +/–.
[ PREREGLAGE RADIO ] 33CH
NORM/CATV
PREREGLAGE AUTO
REGLAGE MANUEL
NORM
AJOUTER
(suite)
43 (FR)
Page 96

Enregistrement d’émissions télévisées
4 Sélectionnez AJOUTER ou EFFACER à l’aide des touches CURSOR
“/”:
•Pour présélectionner un canal, sélectionnez AJOUTER.
•Pour désactiver un canal, sélectionnez EFFACER.
[ PREREGLAGE RADIO ] 33CH
NORM/CATV
PREREGLAGE AUTO
REGLAGE MANUEL
5 Répétez les étapes 3 et 4 pour présélectionner ou désactiver les canaux
de votre choix et appuyez ensuite sur EXECUTE.
Assignation des canaux de télédistribution
Les systèmes de télédistribution par câble emploient des lettres ou des
numéros pour désigner les canaux. Ce magnétoscope est conçu pour
correspondre aux systèmes câblés standard. Le tableau ci-dessous présente
les numéros des canaux sur ce magnétoscope et les canaux de
télédistribution correspondants. Attention que l’assignation des numéros
de canaux présentée dans le tableau ci-dessous peut ne pas correspondre
aux numéros des canaux utilisés par votre compagnie de télédistribution
locale. Vérifiez auprès de votre compagnie de télédistribution quels sont
les canaux captables.
Numéros sur ce magnétoscope
Canaux de télédistribution
NORM
EFFACER
1 2 3 ... 12 13 14 15 16 17
A-8 2 3 ... 12 13 A B C D
18 19 20 21 22 23 24 25 26 27 28 29 30 31
EFGHI JKLMNOPQR
32 33 34 35 36 37 38 ... 93 94 95 96 97 98
S T U V W W+1 W+2 ... W+57 W+58 A-5 A-4 A-3 A-2
99 100 101 ... 124 125
A-1 W+59W+60 ... W+83W+84
44 (FR)
Page 97

Enregistrement d’émissions télévisées
6
TAPE SPEED
CH/TRACKING –/+
p STOPINPUT SELECT
rP
(
p
r REC
TV/VTR
INPUT
SELECT
TAPE
SPEED
CH +/–
Cette section présente comment enregistrer des émissions télévisées
suivant la méthode la plus simple, à savoir l’enregistrement manuel. Pour
enregistrer manuellement, démarrez l’enregistrement sur le magnétoscope
lorsque l’émission voulue commence et arrêtez-le lorsque l’émission se
termine. Le magnétoscope peut également démarrer et arrêter
automatiquement l’enregistrement.
Voir “Enregistrement d’émissions télévisées avec le programmateur” aux pages
48 (FR) et 49 (FR).
1
Mettez votre téléviseur sous tension et syntonisez-le sur le magnétoscope:
•Si le téléviseur est raccordé au magnétoscope à l’aide d’un câble
audio/vidéo, réglez le téléviseur sur l’entrée vidéo.
•Si le téléviseur est connecté au magnétoscope uniquement à l’aide de
l’antenne, réglez le téléviseur sur le canal du magnétoscope et appuyez
ensuite sur la touche TV/VTR de la télécommande de manière à
afficher l’indicateur VTR dans la fenêtre d’affichage du magnétoscope.
•Si vous utilisez un décodeur, mettez-le sous tension.
2 Introduisez une cassette dont l’onglet de sécurité est intact.
L’indicateur de cassette clignote pendant environ 5 secondes et le
magnétoscope vérifie le bobinage de la cassette.
Durant cette période, les touches · PLAY, r REC, FF ), REW
0, SEARCH # et SEARCH 3 sont inopérantes.
Pour plus de détails, voir “Vérification du bobinage de la cassette” à la page 18 (FR).
3 Appuyez sur INPUT SELECT jusqu’à ce que l’indicateur TUNER
apparaisse dans la fenêtre d’affichage du magnétoscope.
r REC
p STOP
4 Sélectionnez le canal voulu en appuyant sur les touches CH/
TRACKING –/+ du magnétoscope ou CH +/– de la télécommande.
5 Sélectionnez la vitesse de défilement de la bande, SP (durée standard)
ou EP (longue durée), en appuyant sur TAPE SPEED.
Voir “Pour sélectionner la vitesse de défilement de la bande” à la page 17 (FR).
6 Démarrez l’enregistrement en appuyant sur r REC.
L’indicateur REC du magnétoscope s’allume. Lorsque la cassette arrive
en fin de bande, le magnétoscope la rembobine automatiquement.
Remarques
•Si vous introduisez une cassette dont l’onglet de sécurité a été brisé, le
magnétoscope l’éjecte lorsque vous appuyez sur r REC. Pour pouvoir
enregistrer sur cette cassette, recouvrez l’orifice de bande adhésive.
•Si “DISPLAY” est réglé sur ON dans le menu PREREG, l’heure ou le
compteur de bande, ainsi que l’indication “r” en cours d’enregistrement,
s’affichent sur l’écran du moniteur mais ne sont pas enregistrés sur la
cassette.
Pour plus de détails, voir “Affichage du compteur de durée et de l’heure” à la
page 20 (FR).
•Si une panne de courant se produit en cours d’enregistrement, le
magnétoscope reprendra l’enregistrement dès que l’alimentation aura été
rétablie.If a power interruption occurs while recording, the VCR will
resume recording as soon as the power is restored.
Pour arrêter l’enregistrement
Appuyez sur p STOP.
45 (FR)
Page 98

Enregistrement d’émissions télévisées
Pour sélectionner les canaux à l’aide des touches numériques
de la télécommande
Introduisez le numéro du canal voulu à l’aide des touches numériques et
appuyez ensuite sur ENTER.
Pour couper une scène jugée indésirable en cours
d’enregistrement
TV/VTR
Touches
numériques
et ENTER
TAPE
SPEED
P PAUSE
Appuyez sur P PAUSE lorsque la scène indésirable commence et appuyez
ensuite à nouveau sur P PAUSE pour reprendre l’enregistrement.
Remarque
Si le mode de pause d’enregistrement dure plus d’environ 5 minutes, le
magnétoscope passe en mode d’arrêt.
Pour activer la fonction de contrôle adaptatif de l’image (APC)
en cours d’enregistrement
Réglez “APC” sur ON dans le menu PREREG.
Pour plus de détails, voir “Utilisation du contrôle adaptatif de l’image” à la page
31 (FR).
Pour sélectionner la vitesse de défilement de la bande
Appuyez sur TAPE SPEED et sélectionnez SP (durée standard) ou EP
(longue durée).
Pour plus de détails, voir “Pour sélectionner la vitesse de défilement de la bande”
à la page 17 (FR).
Regarder une émission télévisée tout en en enregistrant une
autre
Vous pouvez regarder une émission télévisée et en enregistrer
simultanément une autre.
1 Appuyez sur la touche TV/VTR de la télécommande de manière à
désactiver l’indicateur VTR dans la fenêtre d’affichage.
2 Si le téléviseur est raccordé au magnétoscope avec un câble audio/
vidéo, réglez le téléviseur sur l’entrée vidéo.
Si le téléviseur est raccordé au magnétoscope uniquement au moyen du
câble d’antenne, sautez cette étape.
3 Sélectionnez le canal voulu sur le téléviseur.
Remarques
•Suivant le raccordement que vous avez effectué, il se peut que vous ne
puissiez pas regarder une émission télévisée pendant que vous en
enregistrez une autre.
•Si vous ne souhaitez pas regarder la télévision pendant l’enregistrement,
vous pouvez mettre le téléviseur hors tension. Si vous utilisez un
décodeur, veillez cependant à le laisser sous tension.
46 (FR)
Page 99

Enregistrement d’émissions stéréo et SAP
6
rP
(
p
Ce magnétoscope enregistre automatiquement les émissions en stéréo.
Lorsque des émissions stéréo sont captées, l’indicateur STEREO apparaît
dans la fenêtre d’affichage. L’émission stéréo est enregistrée en stéréo sur
la piste principale et en monaural (canaux gauche et droit mixés) sur la
Emissions stéréo
SAP
piste audio normale.
Emissions SAP
En principe, ce magnétoscope enregistre le son sur les pistes audio
principale et normale. Pour enregistrer le son SAP sur la piste audio
normale, appuyez sur SAP pour activer l’indicateur SAP dans la fenêtre
d’affichage.
Remarques
•Si vous appuyez sur SAP alors qu’aucune émission SAP n’est captée,
l’indicateur SAP n’apparaît pas dans la fenêtre d’affichage.
Dans ce cas, le son principal est enregistré en monaural sur la piste audio
AUDIO
MONITOR
normale.
•Le mode SAP est effectif même si vous mettez le magnétoscope hors
tension. Pour revenir en mode normal, appuyez à nouveau sur SAP.
Pour contrôler le son SAP en cours d’enregistrement
Appuyez plusieurs fois de suite sur AUDIO MONITOR jusqu’à ce que
vous entendiez le son SAP. Appuyez à nouveau sur cette touche pour
écouter le son principal.
Pour plus d’informations sur l’enregistrement des sons par ce magnétoscope, voir
“Comment le son est enregistré sur une cassette vidéo” à la page 22 (FR).
47 (FR)
Page 100

Enregistrement d’émissions télévisées
Enregistrement d’émissions télévisées avec le programmateur
6
rP
(
p
Cette section vous explique comment programmer le magnétoscope pour
le démarrage et l’arrêt automatiques de l’enregistrement d’émissions de
télévision. Vous pouvez ainsi programmer 8 émissions.
Pour plus de détails sur la procédure de réglage du programmateur, voir
“Enregistrement/lecture par programmateur” aux pages 32 (FR) à 37 (FR).
TIMER
Avant de commencer...
•Vérifiez si l’horloge est correctement réglée.
MENU
TIMER
ON/OFF
•Introduisez une cassette dont l’onglet de sécurité est intact. Assurez-vous
que la longueur de bande disponible est supérieure à la durée totale
d’enregistrement.
•Mettez votre téléviseur sous tension et syntonisez-le sur le magnétoscope.
CURSOR
“/”/4/$
EXECUTE
Si vous utilisez un décodeur, mettez-le sous tension.
• Vérifiez si l’indicateur SENSOR REC n’est pas allumé. S’il est allumé,
réglez le commutateur SENSOR REC ON/OFF sur OFF.
1 Appuyez sur MENU, sélectionnez 2. REGLAGE ERG/LEC PROG et
appuyez ensuite sur EXECUTE.
[ REGLAGE ERG/LEC PROG ]
DATE DEBUT ARRET MODE
1 0 – –:– – – –:– – – – SP
– – – –:– – – –:– – – – – –
CH +/–
– – – –:– – – –:– – – – – –
– – – –:– – – –:– – – – – –
– – – –:– – – –:– – – – – –
– – – –:– – – –:– – – – – –
– – – –:– – – –:– – – – – –
– – – –:– – – –:– – – – – –
2 Réglez la date, les heures de début et de fin, le canal et la vitesse de
défilement de la bande à l’aide des touches CH +/–.
Exécutez les étapes 2 à 5 de la procédure de “Lecture/enregistrement
par programmateur” aux pages 32 (FR) et 33 (FR).
[ REGLAGE ERG/LEC PROG ]
DATE DEBUT ARRET MODE
1 0 2 1:0 0 2 2:5 5 2 6 EP
– – – –:– – – –:– – – – – –
– – – –:– – – –:– – – – – –
– – – –:– – – –:– – – – – –
– – – –:– – – –:– – – – – –
– – – –:– – – –:– – – – – –
– – – –:– – – –:– – – – – –
– – – –:– – – –:– – – – – –
Remarques
•Vous pouvez programmer la date dans un délai d’un mois seulement,
sauf pour l’enregistrement/lecture quotidien/hebdomadaire, qui reste
opérant jusqu’à ce que vous le modifiiez.
•Seuls les canaux présélectionnés sur le magnétoscope apparaissent
lors du réglage de “MODE”.
Pour changer ou corriger un réglage, appuyez sur CURSOR “/”/4/$
•
pour faire clignoter le paramètre que vous voulez modifier, et changez-le.
Canal
48 (FR)
 Loading...