

Sony SU-W200 User Manual
4-092-134-11 (1)
Wall-Mount Bracket
Operating Instructions
This Wall-Mount Bracket is designed for use only with a Sony 23-inch LCD
Color TV that specifies the use of the Bracket in its Operating Instructions.
To Customers
Sufficient expertise is required for installing this product. Be sure to
subcontract the installation to Sony dealers or contractors and pay
adequate attention to safety during the installation.
Mode d’emploi
Ce support de fixation mural est conçu pour être utilisé uniquement avec
un téléviseur couleur ACL 23 pouces de Sony dont le mode d’emploi
spécifie l’utilisation du support.
A l’attention des clients
Une certaine expérience est requise pour installer ce produit. Confiez
l’installation à des revendeurs Sony ou à des professionnels et portez
une attention particulière à la sécurité au cours de l’installation.
Manual de instrucciones
Este soporte de montaje mural ha sido diseñado para utilizarse únicamente
con un televisor en color de pantalla de cristal líquido de 23 pulgadas de
Sony cuyo manual de instrucciones especifique el uso de dicho soporte.
Para los clientes
Para la instalación de este producto se precisan conocimientos y
experiencia suficientes. Asegúrese de contratar la instalación a un
distribuidor o contratista de Sony y de prestar especial atención a la
seguridad durante la instalación.
US
FR
ES
SU-W200
© 2003 Sony Corporation
M90
Thank you for purchasing this product.
To Customers
Sufficient expertise is required for installing this product. Be sure to
subcontract the installation to Sony dealers or contractors and pay adequate
attention to safety during the installation. We are not liable for any damage
or injury caused by mishandling or improper installation. Your Statutory
Rights (if any) are not affected.
WARNING
To avoid risk of serious injury or damage to the TV caused by dropping it,
observe the following precautions.
• Do not hang from the TV or the Wall-Mount Bracket installed on the wall.
• Be careful not to trap the AC power adaptor cord of the TV when you secure
the TV to the Wall-Mount Bracket.
• Follow the installation procedures and installation direction described in this
manual.
For a safety installation, consult your Sony dealer or qualified service
personnel.
• Before installing, confirm that the wall has sufficient strength to support the
TV and the Wall-Mount Bracket. The installation location should be a flat,
perpendicular wall with a reinforcing material inside.
• Do not apply a weight other than the TV to the Wall-Mount Bracket installed
on the wall.
• Do not disassemble, modify or change the parts of the Wall-Mount Bracket.
For Sony Dealers
Sufficient expertise is required for installing this product. Be sure to read this
instruction manual thoroughly to do the installation work safely. We are not
liable for any damage or injury caused by mishandling or improper
installation. After installation, please hand this installation manual to the
customers.
2

Caution
• This Wall-Mount Bracket is only for Sony 23-inch LCD Color TVs.
Do not use the bracket with a TV whose operating instructions do not specify
the use of this bracket.
• Be especially careful not to drop the TV when you install it high on a wall.
US
3
Installation
For Sony Dealers
For the installation, have ready eight commercially available mounting screws,
anchor bolts, etc. that are appropriate for the wall.
The type and length of the screws required depend on the material and
strength of the wall. If you do not know which material your wall is made of,
consult your Sony dealer or qualified service personnel.
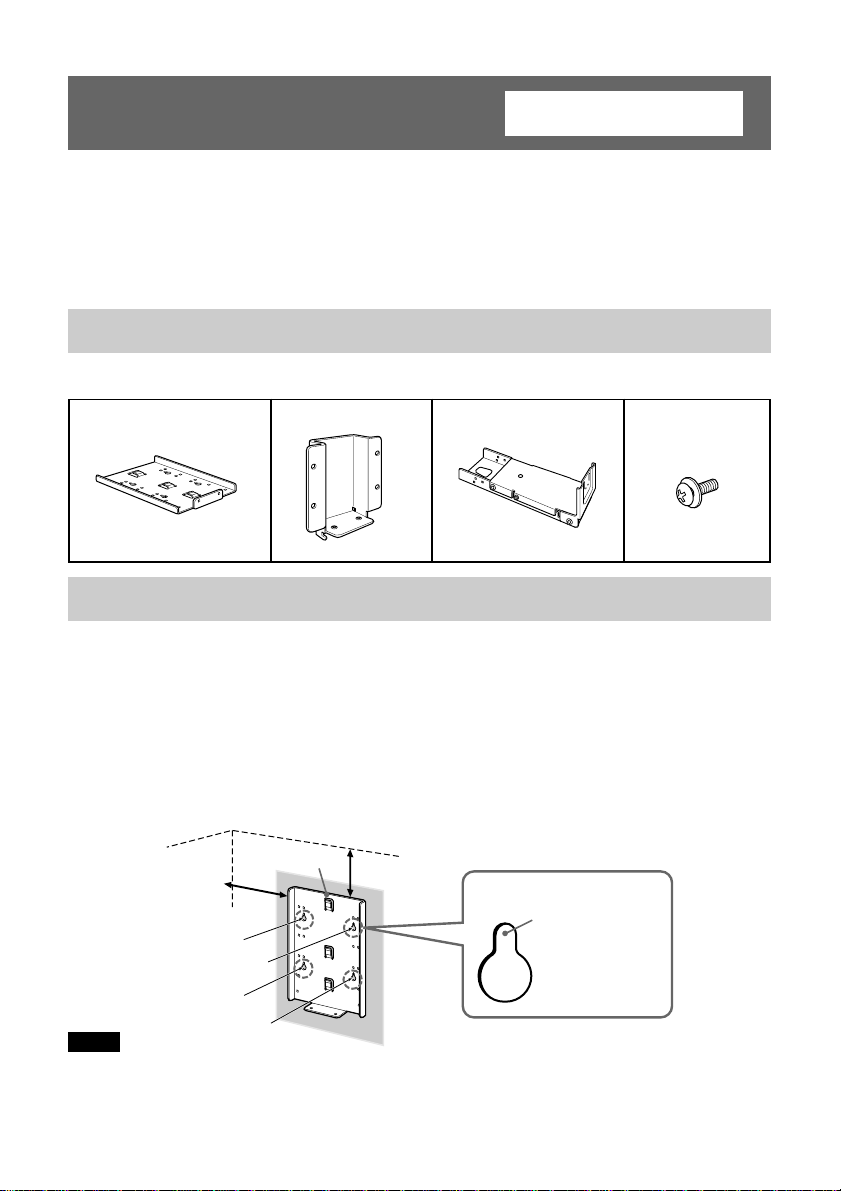
Step 1: Check the parts
Check all the parts are included in the package.
Bracket A (1) Bracket B (1) Bracket C (1) Screw (4)
(with a washer)
Step 2: Decide the installation location
Decide the location on the wall to install the TV.
Then, place bracket A on the installation location and mark the four screw
holes on the wall using a pencil.
Before marking the location of the holes, make sure that the distance between
the upper edge of bracket A and the ceiling is 20 cm (7 7/8 inches) or more, and
that between the side edge of bracket A and the side wall is 25 cm (9 7/8 inches)
or more.
Ceiling
25 cm (9 7/8 inches)
or more
Bracket A
20 cm (7 7/8
inches) or
more
Mark this
portion using
a pencil.
Note
Attach bracket A level with the floor.
4
Wall
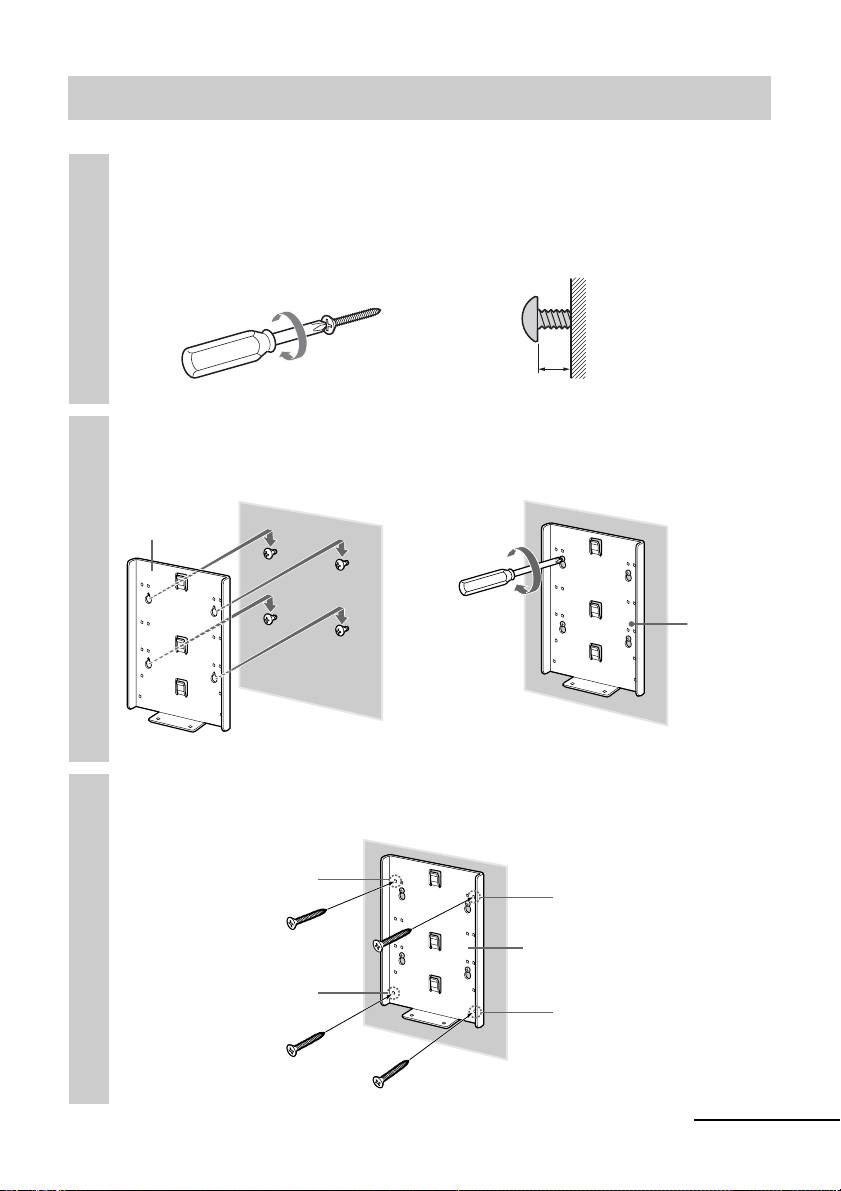
Step 3: Secure bracket A to the wall
Insert four of the screws you prepared at the positions
marked in Step 2 (page 4).
1
Do not tighten the screws completely for the moment. Keep a space of 2
to 3 mm (3/32 to 1/8 inches) from the wall.
Wall
Screws you
prepared
Press bracket A to the wall and slide it down. Then fully
tighten the four screws on the wall.
2
Bracket A
2 - 3 mm (3/32 - 1/8 inches)
,
Wall
Fully tighten four of the screws you prepared in screw
holes 1 to 4 firmly.
3
1
Screws you
prepared
4
3
Bracket A
2
Bracket A
Wall
continued
5
Step 4: Attach bracket B to the TV
Before attaching bracket B, disconnect the AC power adaptor and all the
cables from the TV.
For how to remove the rear cover of the TV, refer to the Operating Instructions
supplied with the TV.
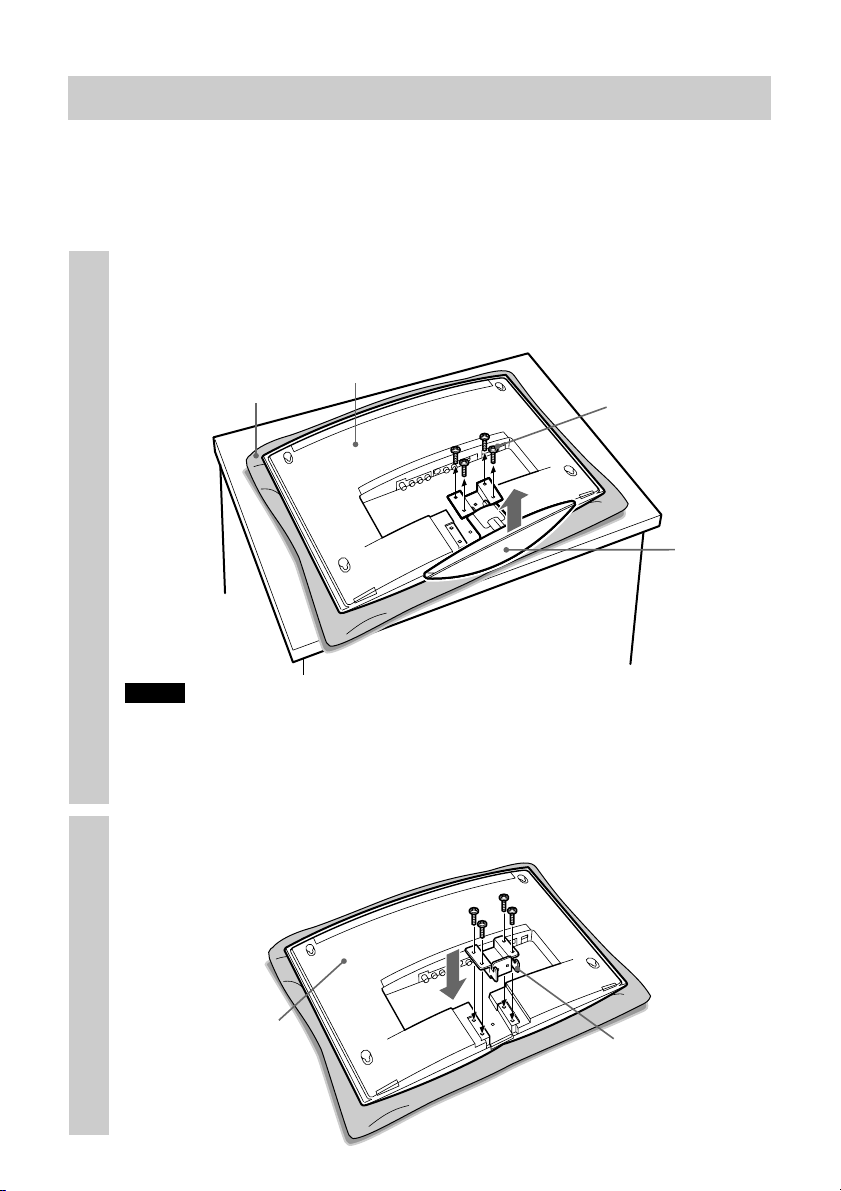
Remove the four screws as illustrated below, and detach
the TV stand from the TV.
1
To prevent damaging the surface of the LCD display, place the TV on a
soft mat.
Rear of the TV
Soft mat
Remove these screws.
Notes
• Place the TV body only on the table as illustrated above. If the TV stand is also on
the table level to the TV body, the TV body may become unstable and cause
damage.
• When removing the TV stand, hold it firmly.
Secure bracket B to the TV firmly using the four screws
removed in step 1.
2
Rear of the TV
Bracket B
TV stand
6

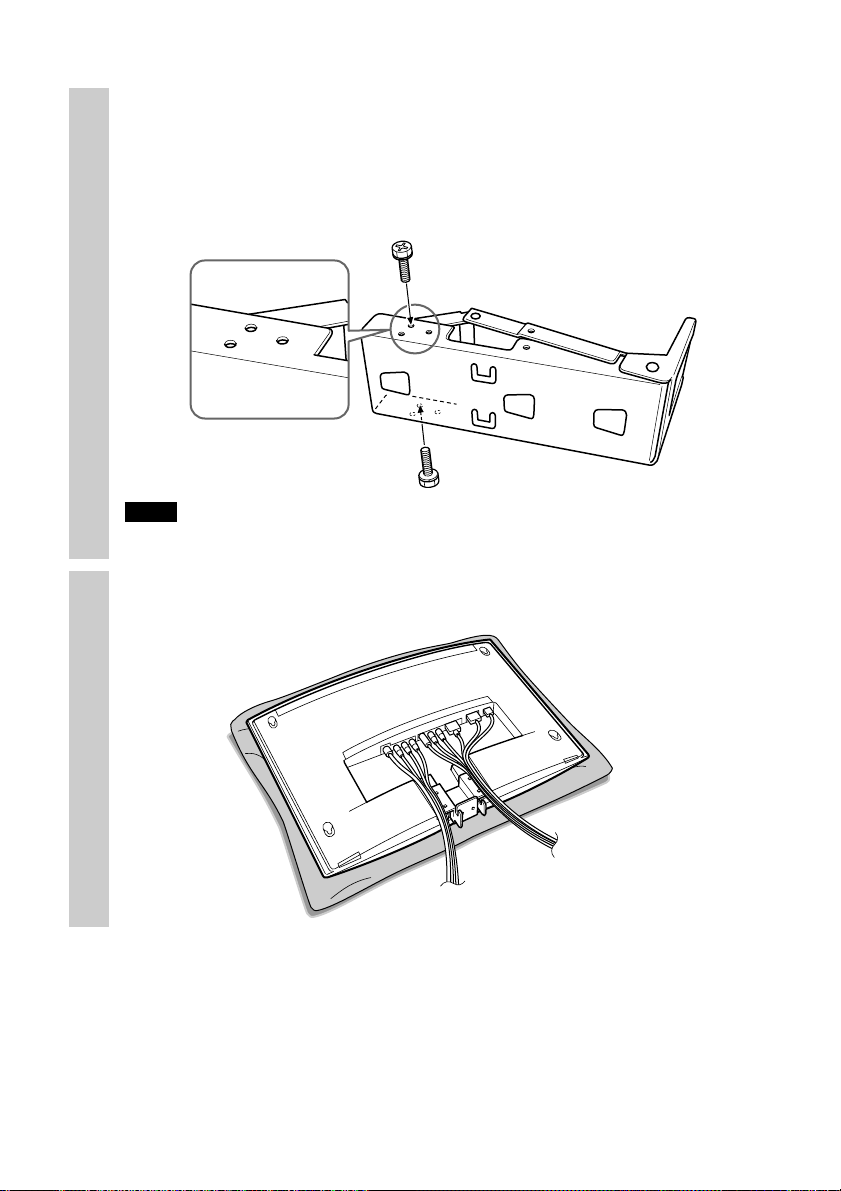
Step 5: Attach bracket C to the TV
You can adjust the angle of the Wall-Mount Bracket to one of four different
angles (0, 5, 10 or 15 degrees). Change the position of the stay according to the
desired angle. (If you choose 0 degrees, there is no need to change the position
of the stay.)
Remove the two screws as illustrated below.
1
Pull out the stay as illustrated below.
2
15
10
5
15
10
5
continued
7
Align the screw holes of the stay with the holes
10
15
5
corresponding to the desired angle on bracket C, and
3
secure the stay using the two screws removed in step 1.
The illustration below shows how to align the holes when you choose an
angle of 10 degrees.
Note
Be careful not to get your fingers pinched between the stay and the bracket.
Connect the cables to the TV so that they pass along the
sides of bracket B.
4
8
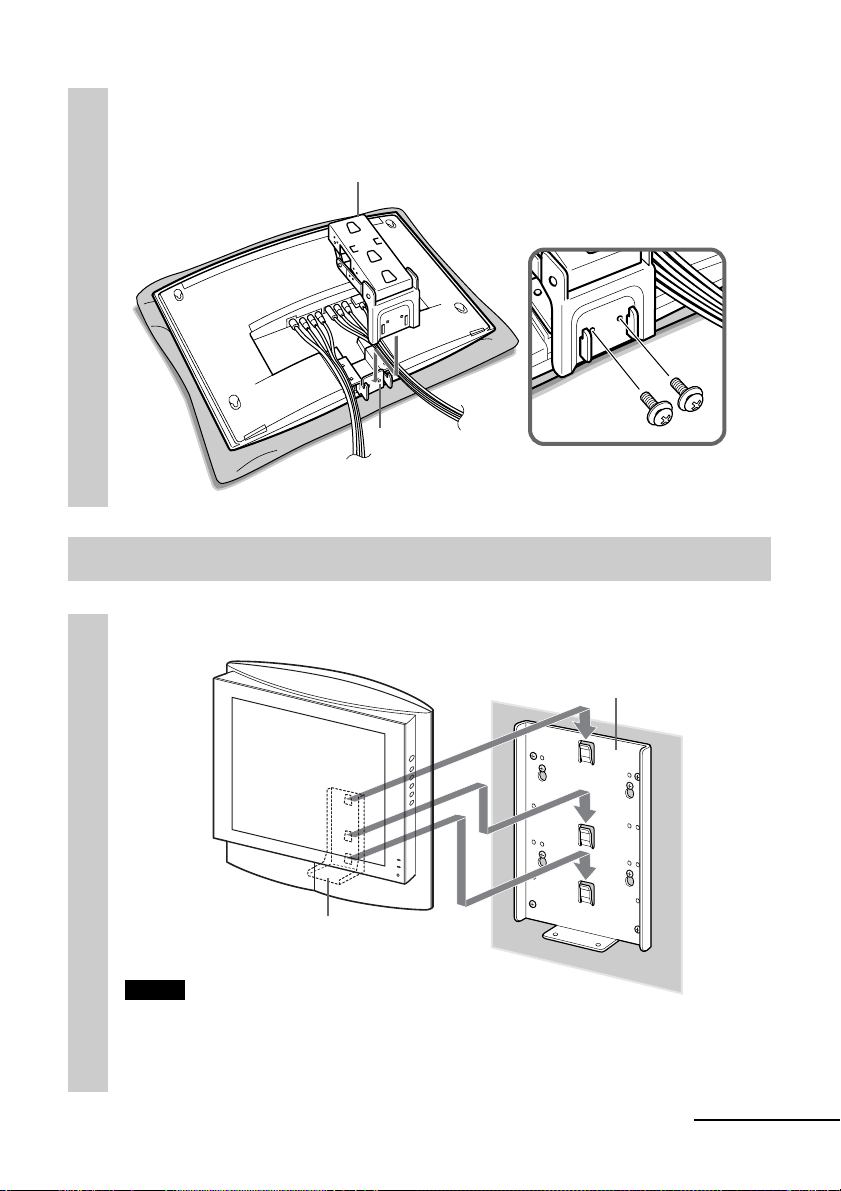
Fix bracket C into bracket B as illustrated below, and
secure them firmly using the two screws supplied.
5
Bracket C
Bracket B
Step 6: Secure the TV to the wall
Hook bracket C on bracket A.
1
Bracket C
Two screws
(supplied)
Bracket A
Wall
Notes
• Secure the TV to the wall without the rear cover.
• Hold the TV firmly. Be especially careful when you secure the TV in a high place.
• Do not release the TV until you confirm that bracket C is firmly secured to bracket
A at three locations.
continued
9
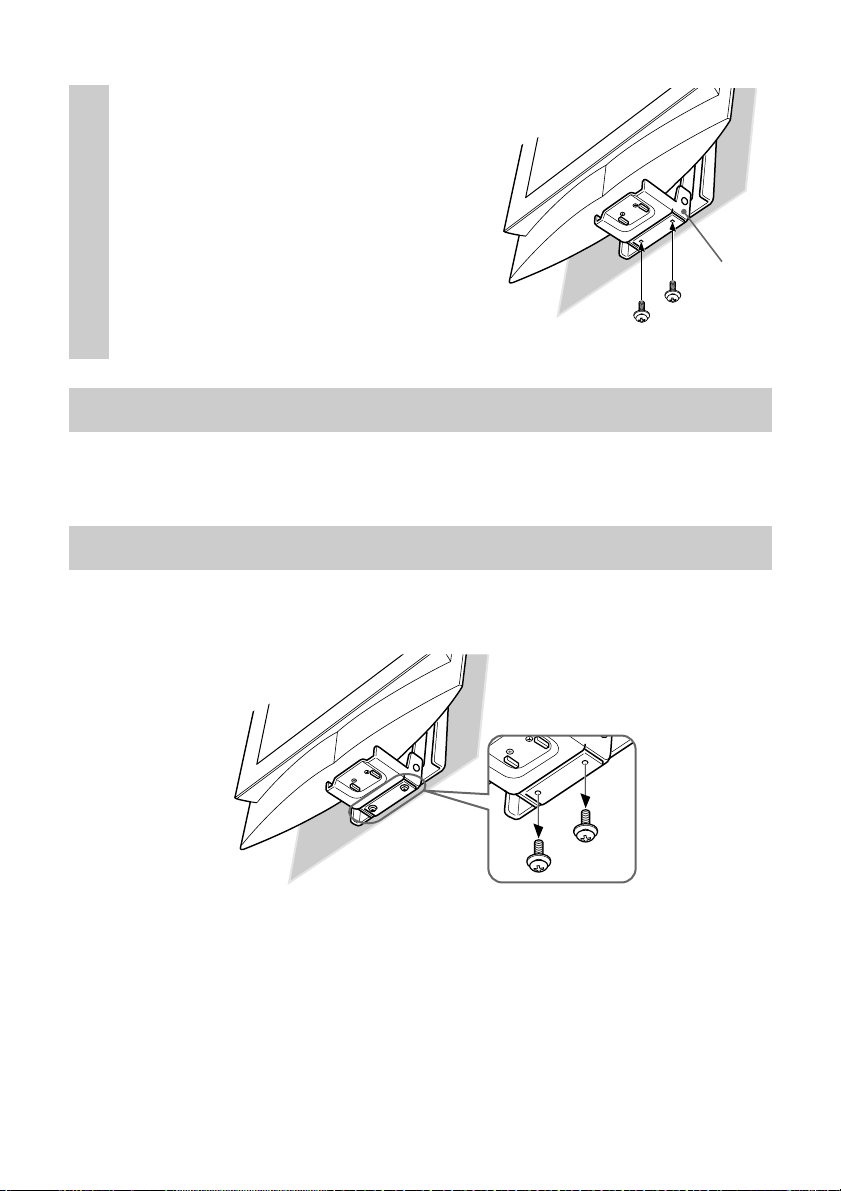
Align the screw holes on
bracket C with those on
2
bracket A, and fully tighten
Bottom view
Wall
the two screws supplied.
Bracket A
Two screws
(supplied)
Step 7: Replace the rear cover on the TV
For details on how to replace the rear cover, refer to the Operating Instructions
of the TV.
Detaching the TV from the Wall-Mount Bracket
To detach the TV, remove the rear cover from the TV, then remove the two
screws.
10
Wall
Two
screws
 Loading...