

Floating Stand SU-PF1
4-092-988-25 (1)
For Customers and Sony Dealers in Europe
Floating Stand
Instructions
Gebrauchsanweisung
Istruzioni
Mode d’emploi
Instructies
Οδηγίες
Yönergeler
Instrucciones
Instruções
Vejledning
Instruksjoner
Bruksanvisning
GB
DE
IT
FR
NL
GR
TR
ES
PT
DK
NO
SE
Käyttöohje
SU-PF1
© 2004 Sony Corporation
FI
Thank you for purchasing this product.
To Customers
This product should only be installed by qualified Sony service representatives, as it requires at least two
people, special care, safety, and technique. Sony is not liable for any accidents or damages caused by incorrect
installation or handling. Your Statutory Rights (if any) are not affected.
WARNING
If the safety precautions are not observed or the product is used incorrectly, it may result in serious injury or fire.
This instruction manual shows the correct handling of the product and important precautions necessary to prevent
accidents. Be sure to read this manual thoroughly and use the product correctly. Keep this manual available for
future reference.
For Sony dealers
Installation of a plasma TV requires two people, special care and technique. When installing a plasma TV, refer to
this manual carefully. Sony is not liable for any accidents or damages caused by incorrect installation or handling.
Your Statutory Rights (if any) are not affected. Please give this manual to the customer after installation.
On Safety
Products by Sony are designed with safety in mind. If the products are used incorrectly, however, it may result in a
serious injury through fire, electric shock, the product toppling over, or the product dropping. Be sure to observe
the precautions for safety to prevent such accidents.
CAUTION
This Floating Stand is intended for use only with the following products. Use with other apparatus is capable of
resulting in instability causing possible injury.
Specified products (As of March 2004) : Flat Panel Colour TV
(KE-42MR1/KDE-P42MRX1/KE-P42MRX1/KE-50MR1/KDE-P50MRX1/
KE-P50MRX1/KLV-L42MRX1/KDL-L42MRX1(UK))
We recommend installing the Floating Stand a short distance away from the wall.
2 (GB)
WARNING
If the following precautions are not observed, serious injury or death through fire, electric shock, the
product toppling over, or the product dropping can result.
Be sure to subcontract the installation to Sony dealers.
If persons other than Sony dealers do the installation work, this may result in serious injury, as the Display Unit
and the stand are very heavy.
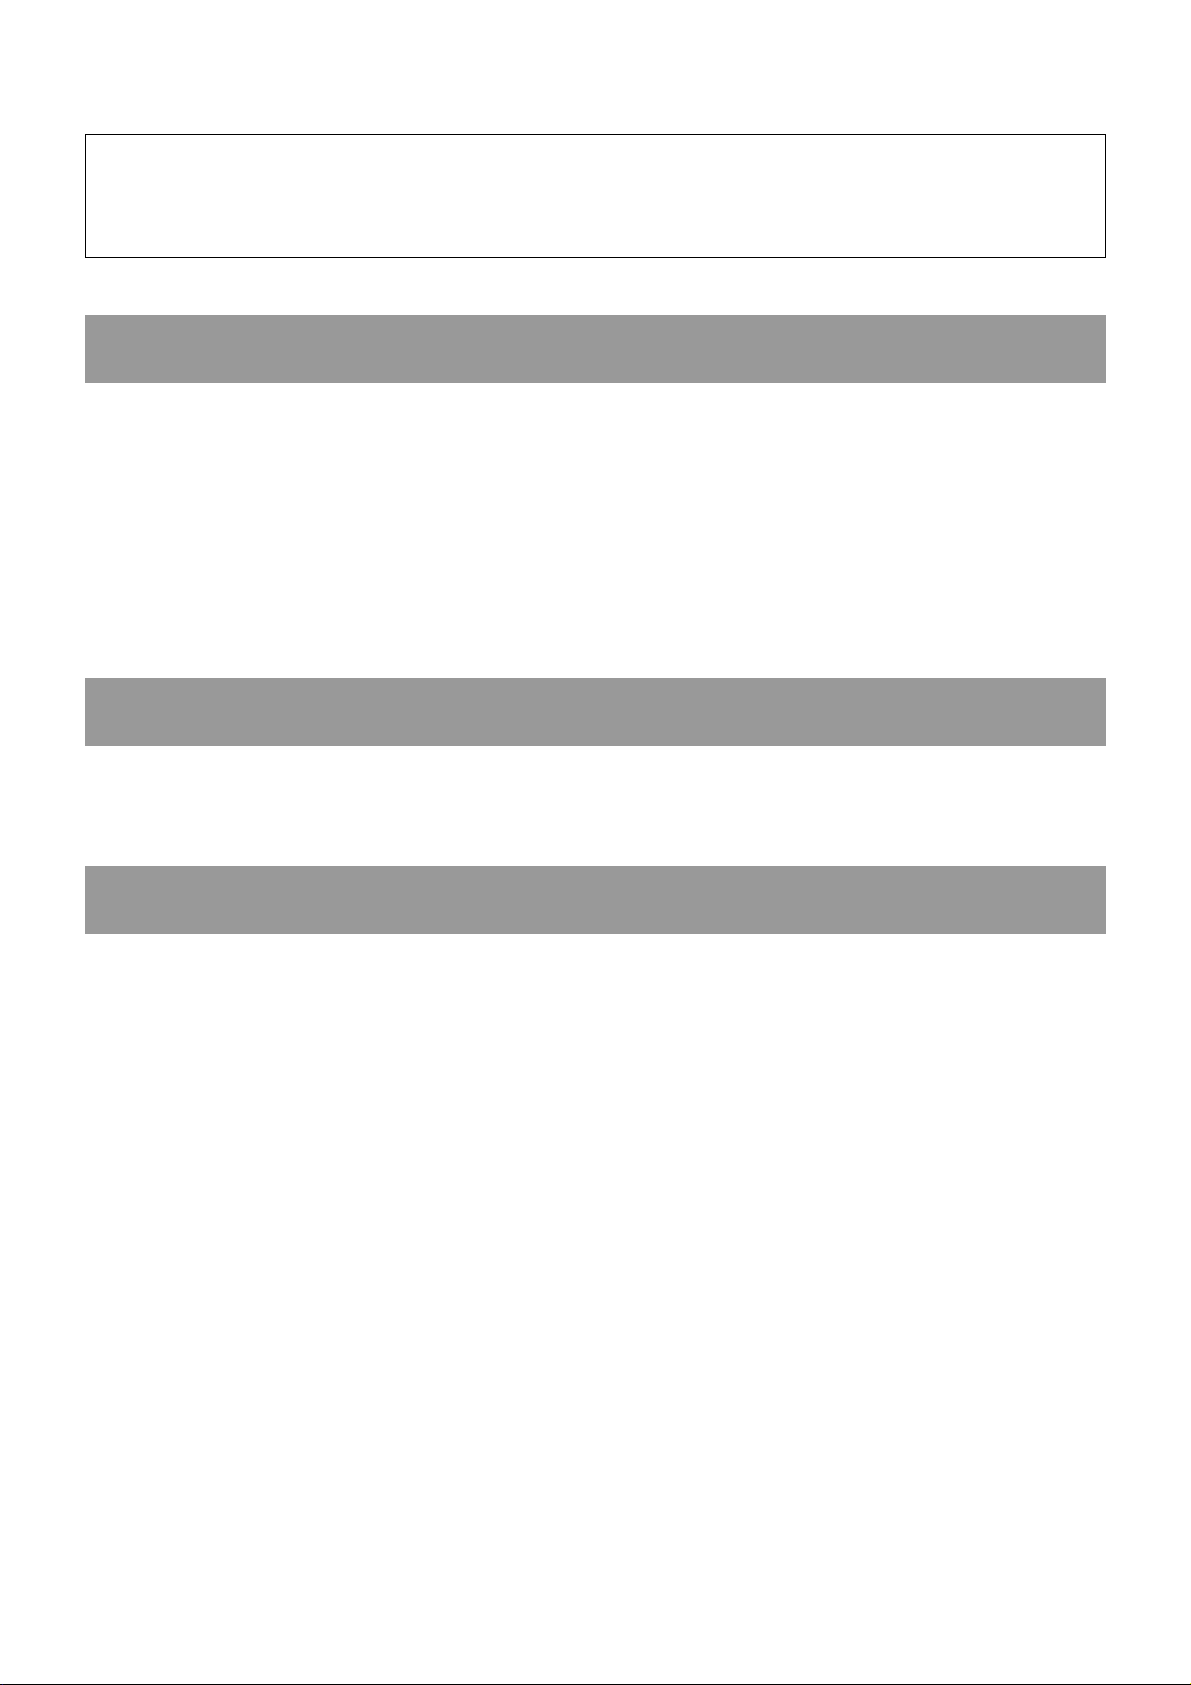
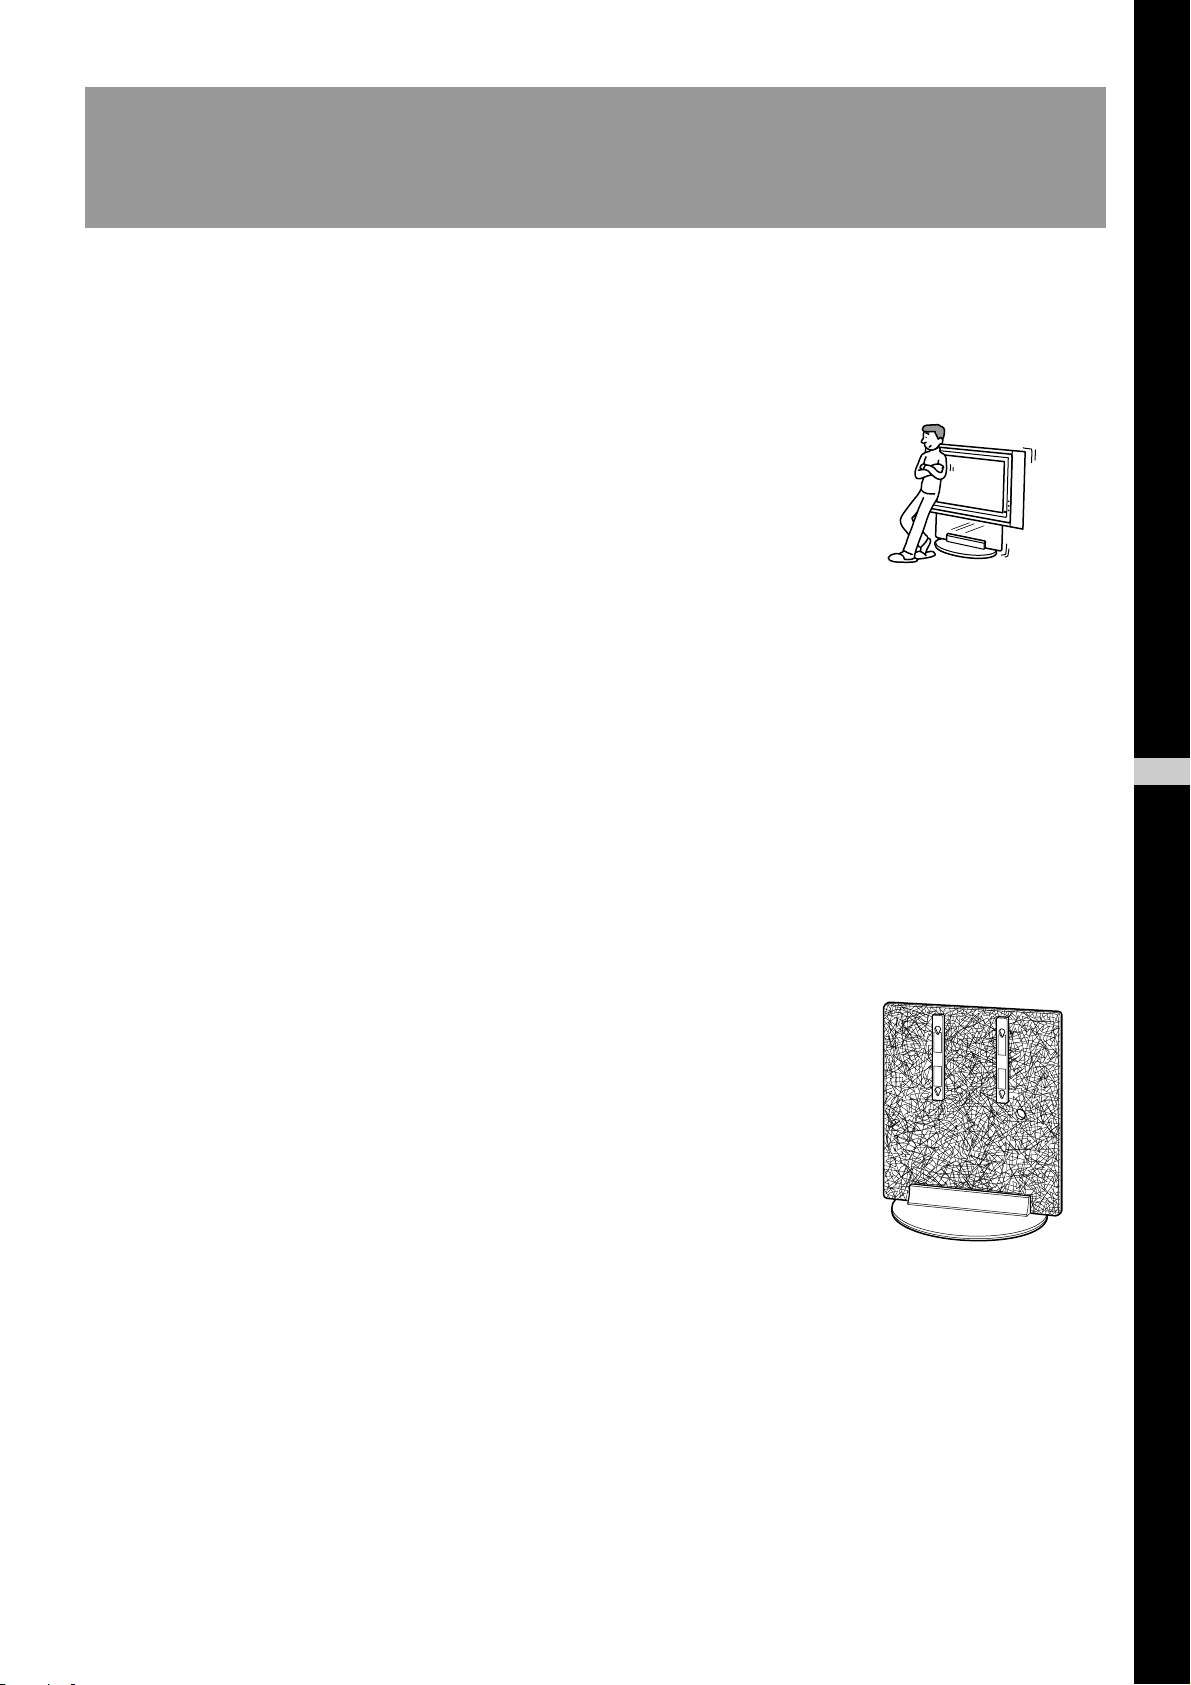
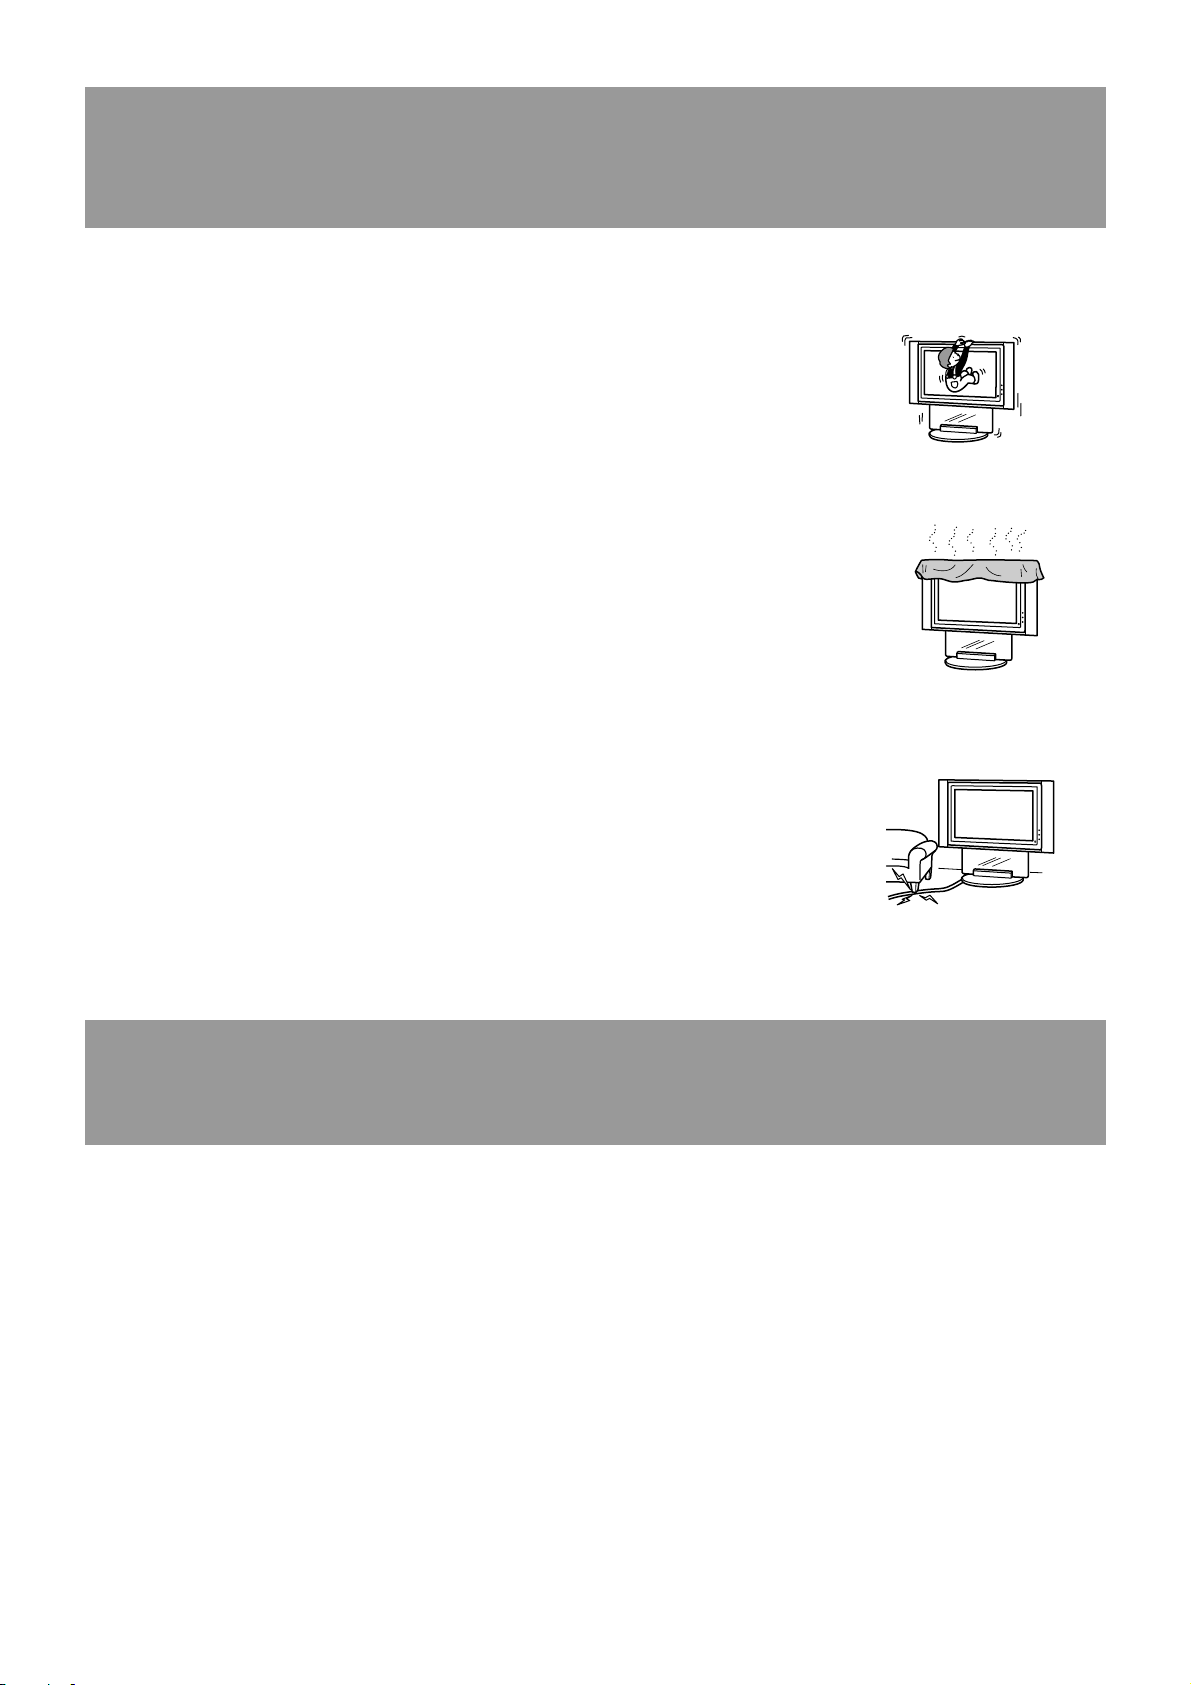
Do not lean on or hang from the stand.
The stand may topple over and cause injury.
Be sure to take measures to prevent the stand from toppling over.
If you fail to do so, the Floating Stand may topple over during an earthquake and cause injury or property damage.
Anchor the stand to a wall, etc. to prevent it from toppling over.
Be sure to install the stand on a solid and flat floor.
Do not install the Floating Stand so that it leans in one direction. If you do so, the Floating Stand may topple over
or the Display Unit may fall. This may cause injury.
If you install the stand on a soft surface such as a mat or a carpet, lay a board over the designated location
beforehand.
GB
English
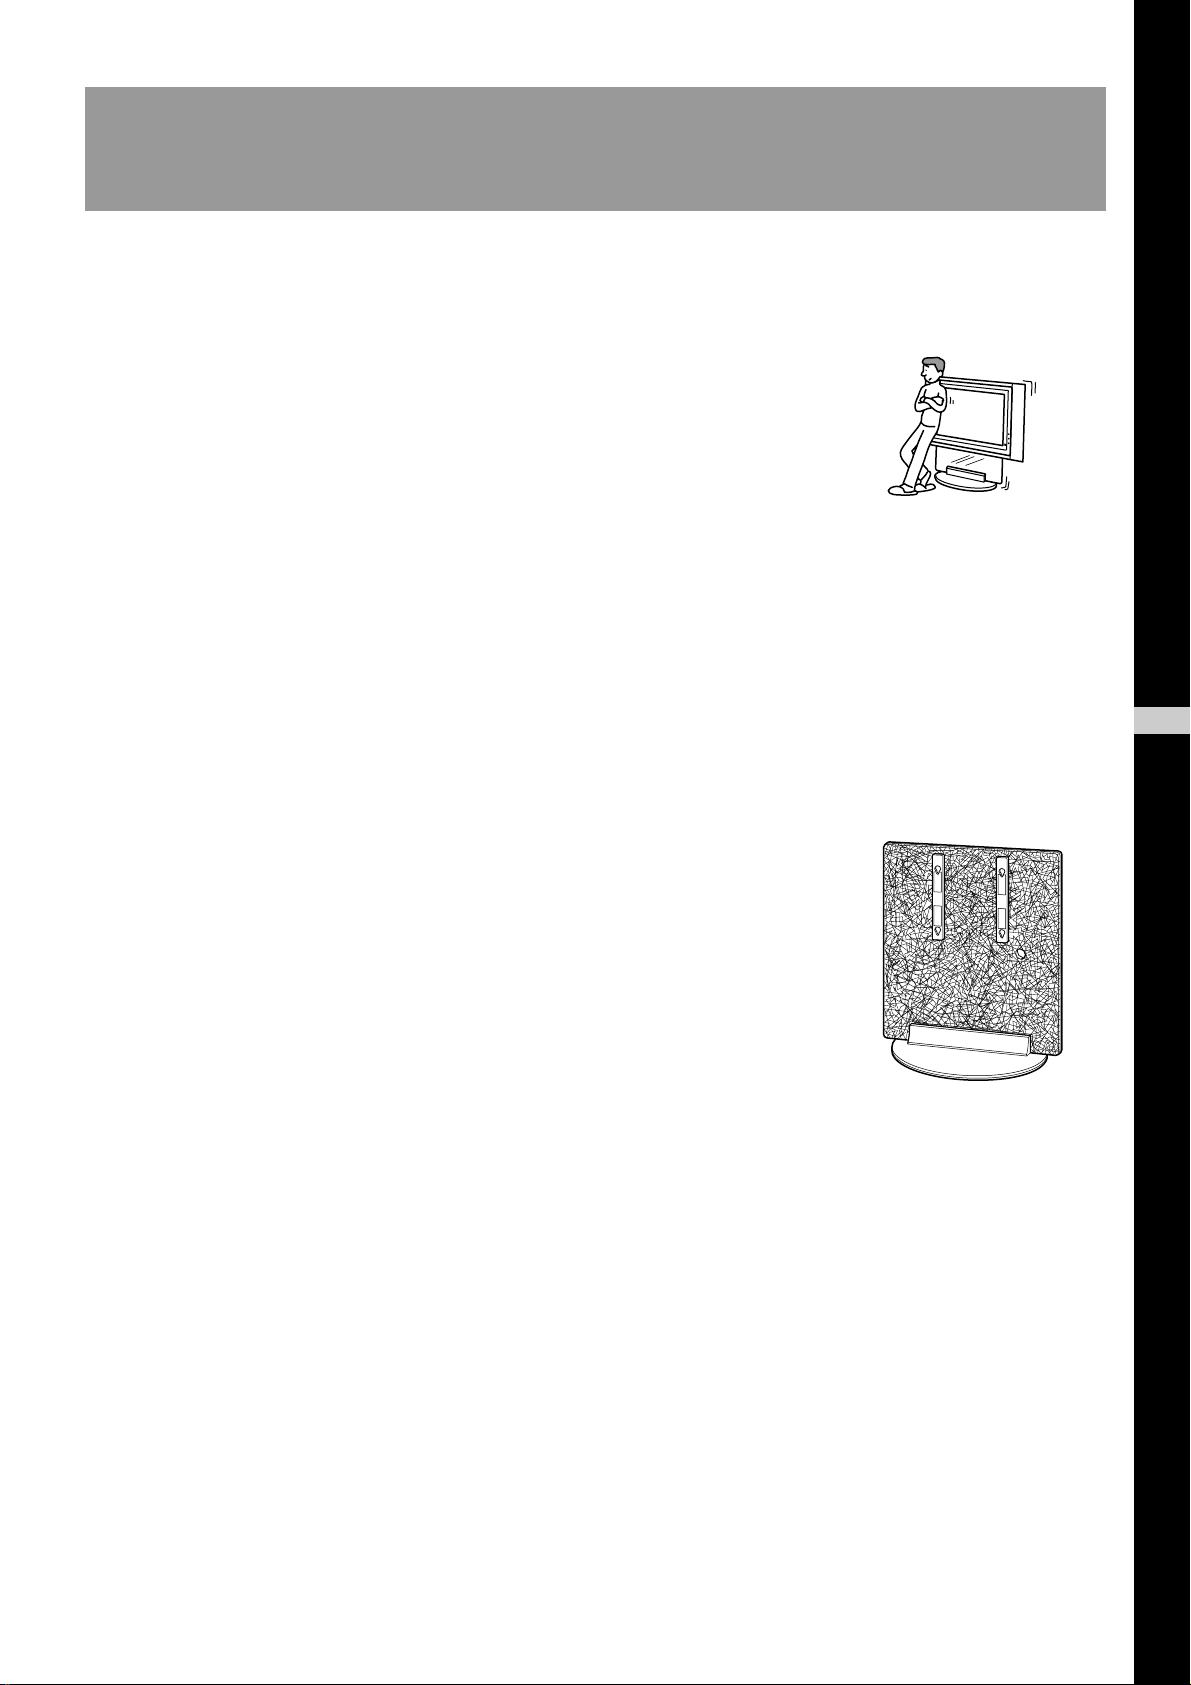
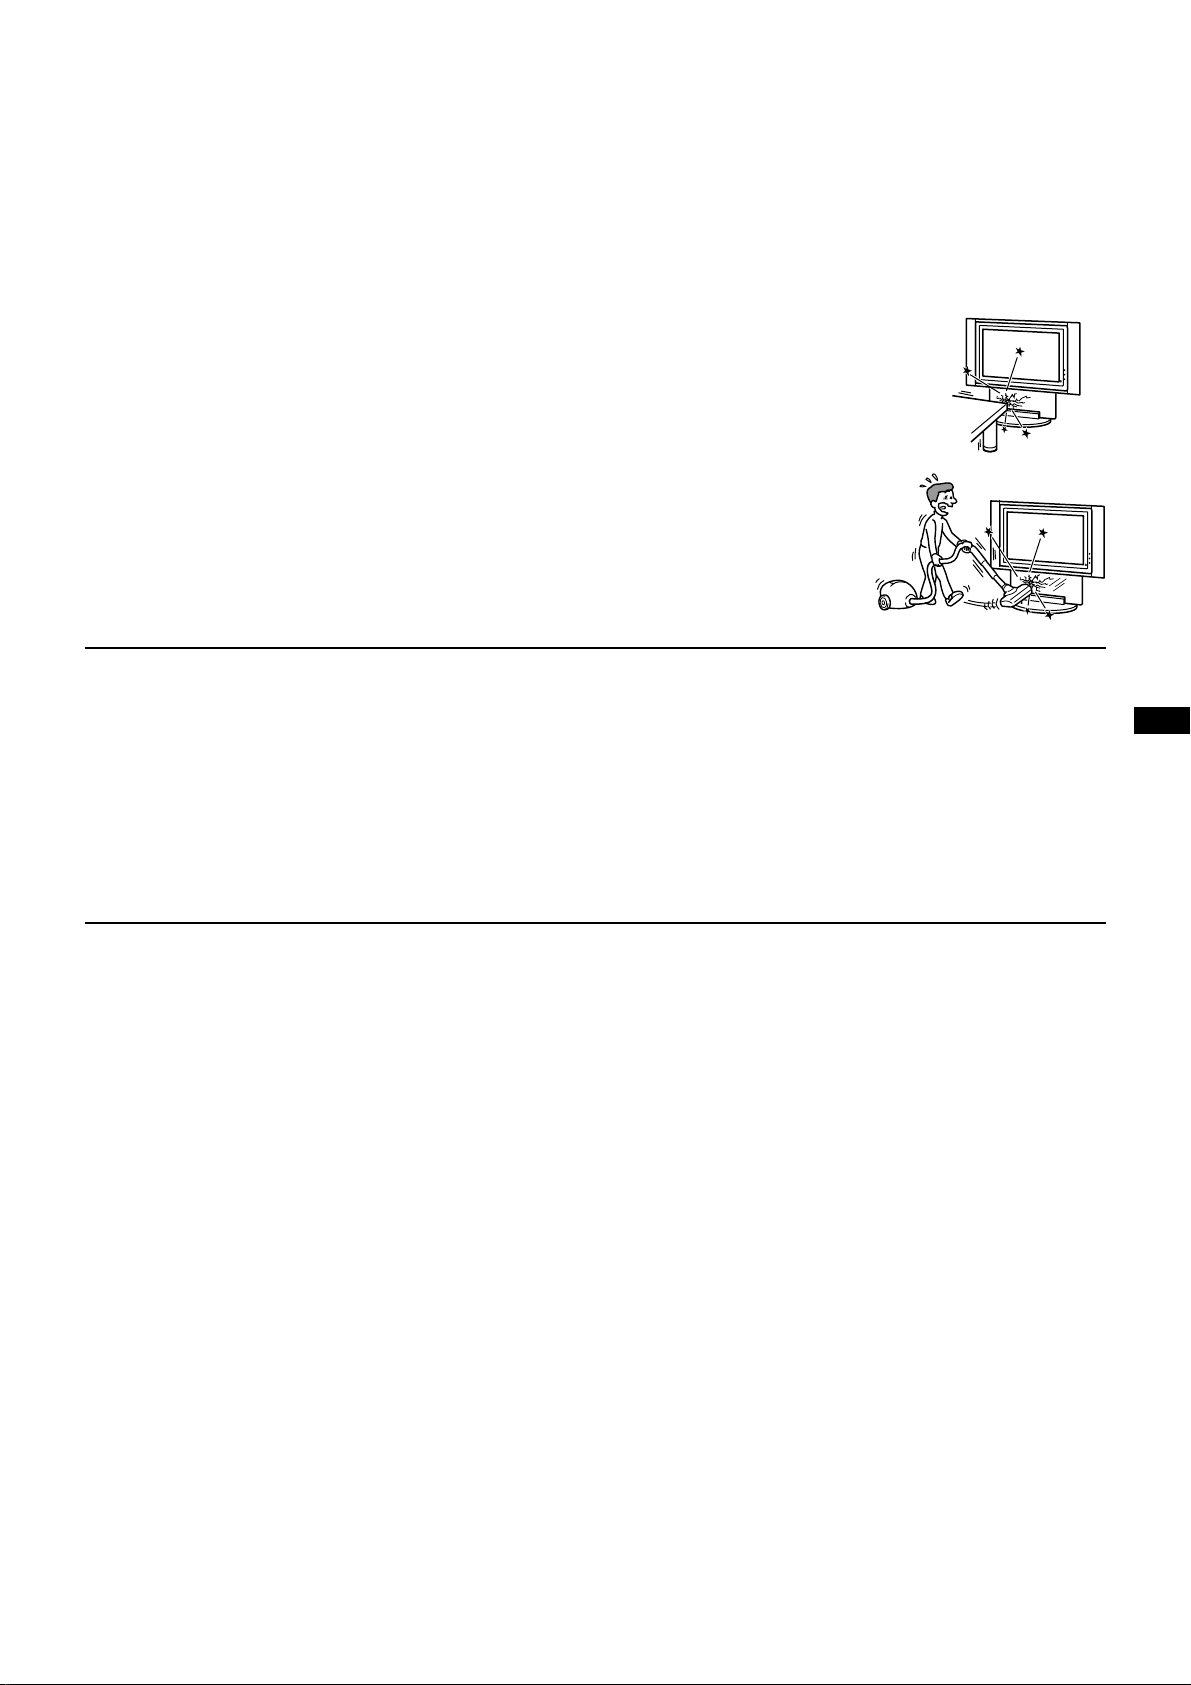
Do not use a cracked stand.
Do not use the Floating Stand if any cracks appear in it.
The glass may break and the Display Unit may fall, or the stand may topple over.
This may cause injury.
Cracked Stand
3 (GB)
WARNING
If the following precautions are not observed, serious injury or death through fire, electric shock, the
product toppling over, or the product dropping can result.
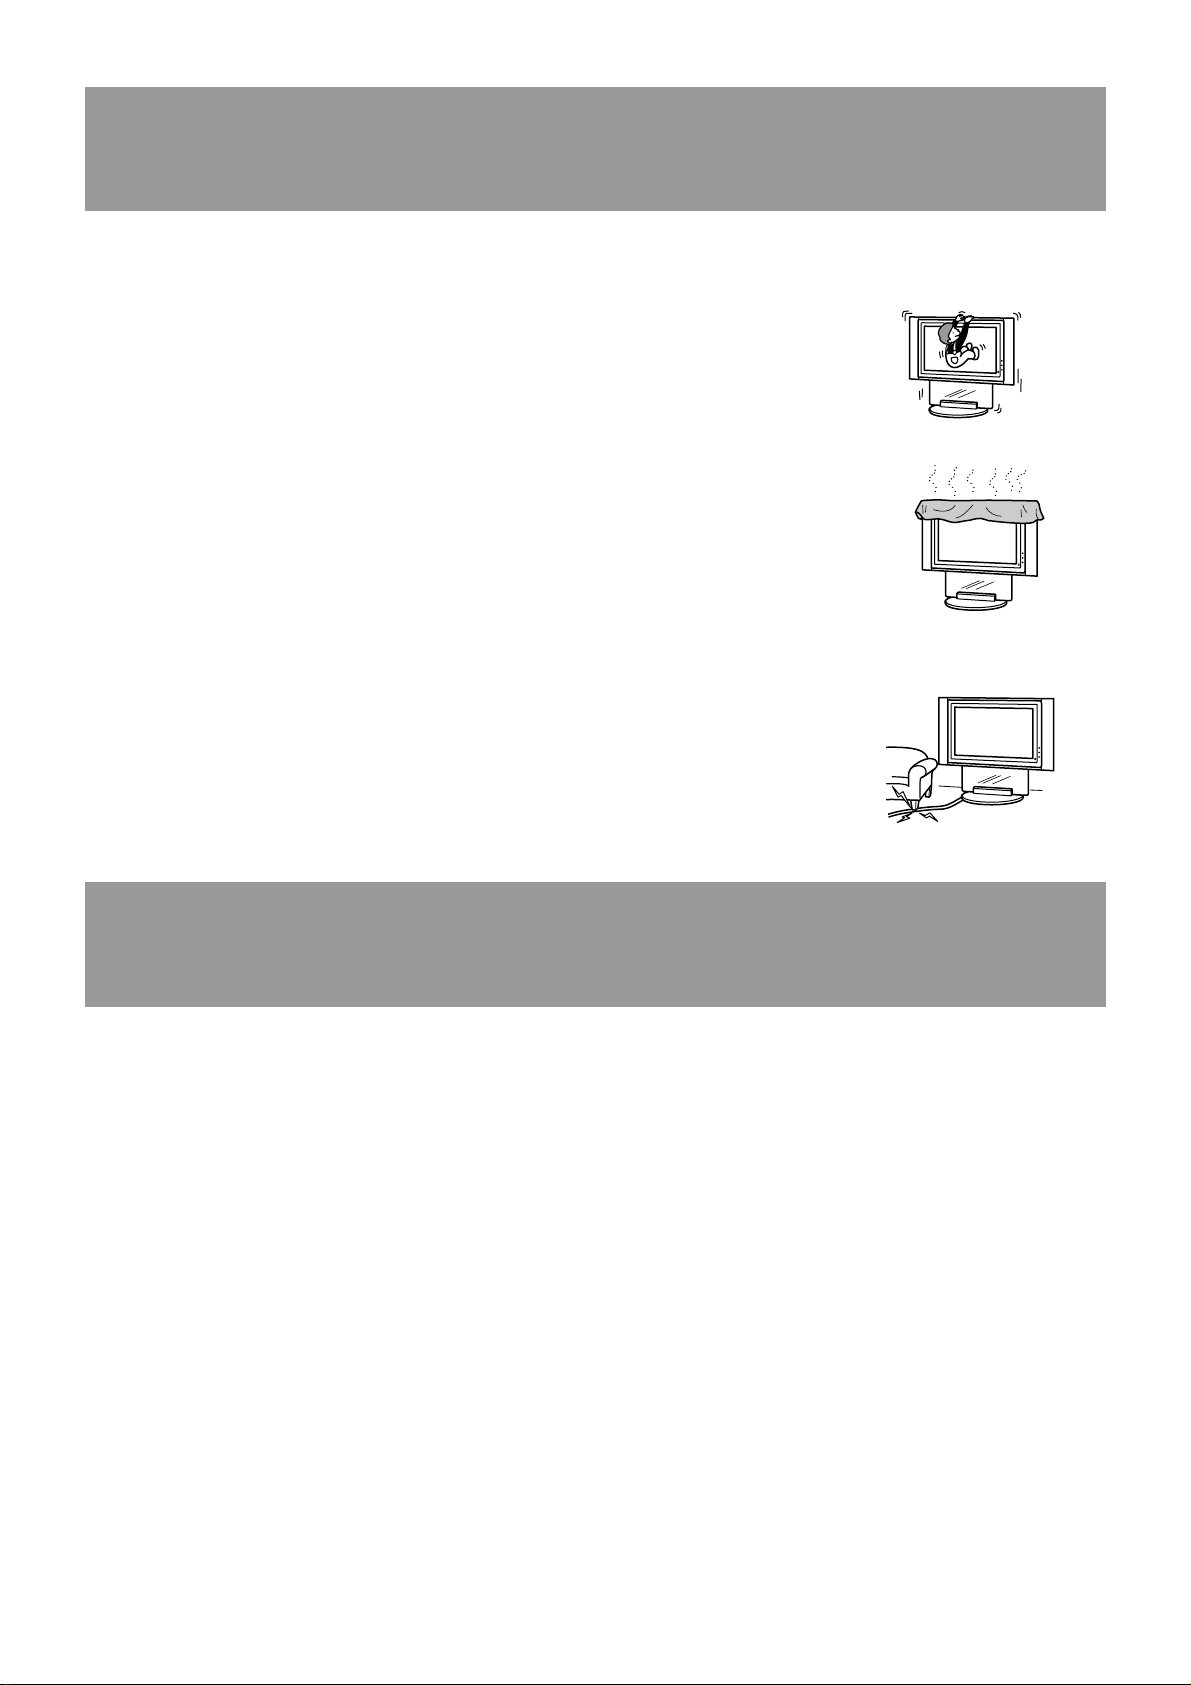
Do not lean on or hang from the stand with the Display Unit installed on it.
The stand may topple over and cause serious injury or death.
Do not cover the ventilation hole of the Display Unit.
If you cover the ventilation hole (with a cloth, etc.), heat may build up inside and
cause fire.
Do not allow the mains lead or the Display Interface Cable to be pinched.
• Do not allow the mains lead or the Display Interface Cable to be pinched when
you install the Display Unit on the stand. If the mains lead or the Display
Interface Cable is damaged, this may result in a fire or an electric shock.
• Do not step on the mains lead or the Display Interface Cable when you carry the
Display Stand. The mains lead or the Display Interface Cable may be damaged,
and this may result in a fire or an electric shock.
CAUTION
If the following precautions are not observed, injury or property damage may occur.
Do not install any equipment other than the specified product.
This stand is designed for use with the specified product only. If you install equipment other than specified, it may
fall and cause injury or property damage.
Attaching the Display Unit.
Be sure to attach the Display Unit to the stand with the supplied fixing plates. If the Display Unit is not attached
securely, it may fall and cause injury.
Do not apply weight to the glass or subject it to any kind of impact.
Do not apply weight to the glass with your hand when installing the Display Unit. Do not hit the glass with hard
objects, such as a screwdriver, etc.
The glass may break and cause injury.
4 (GB)
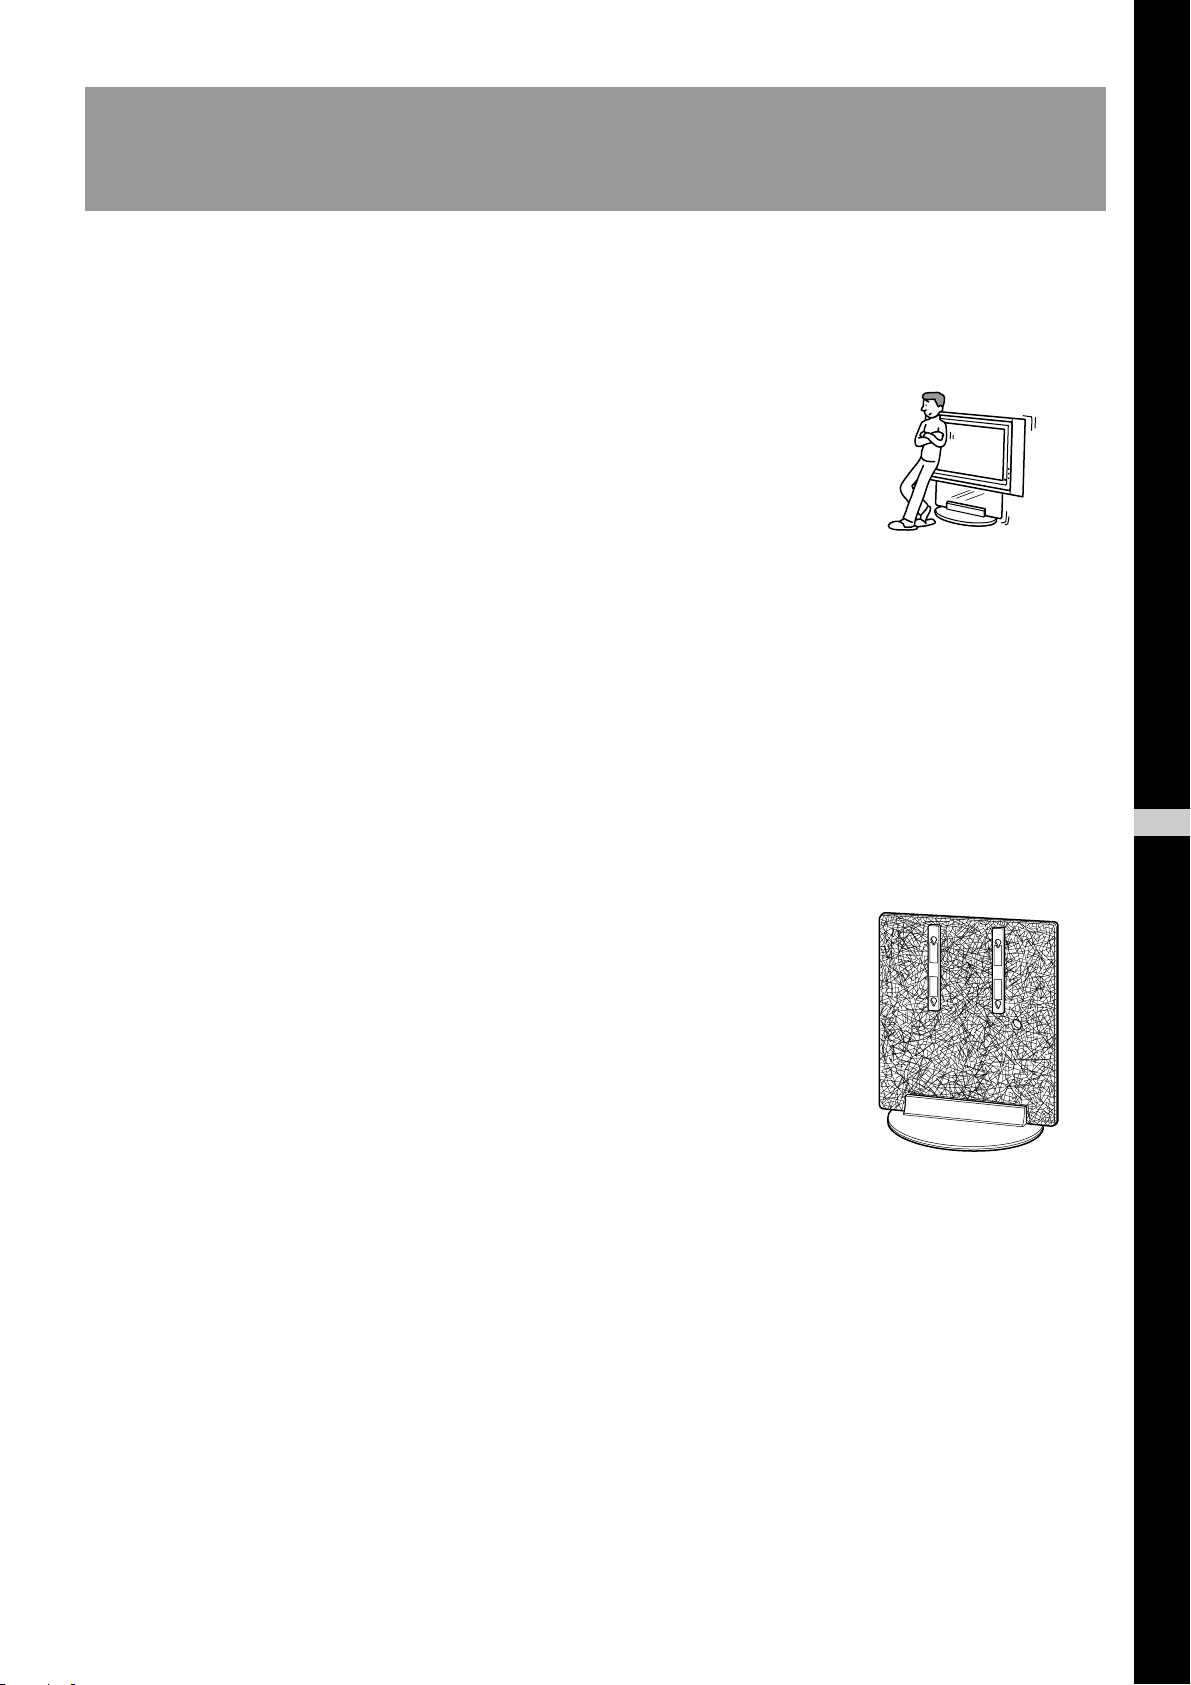
When carrying the Floating Stand
Trying to move the Floating Stand alone, or without following the proper procedures, may cause injury. To avoid
this, be sure to follow the advice given below.
• Be sure that two or more persons carry the Floating Stand only after removing the Display Unit.
• Be careful not to allow your toes to be pinched under the bottom plate or the corner of the glass.
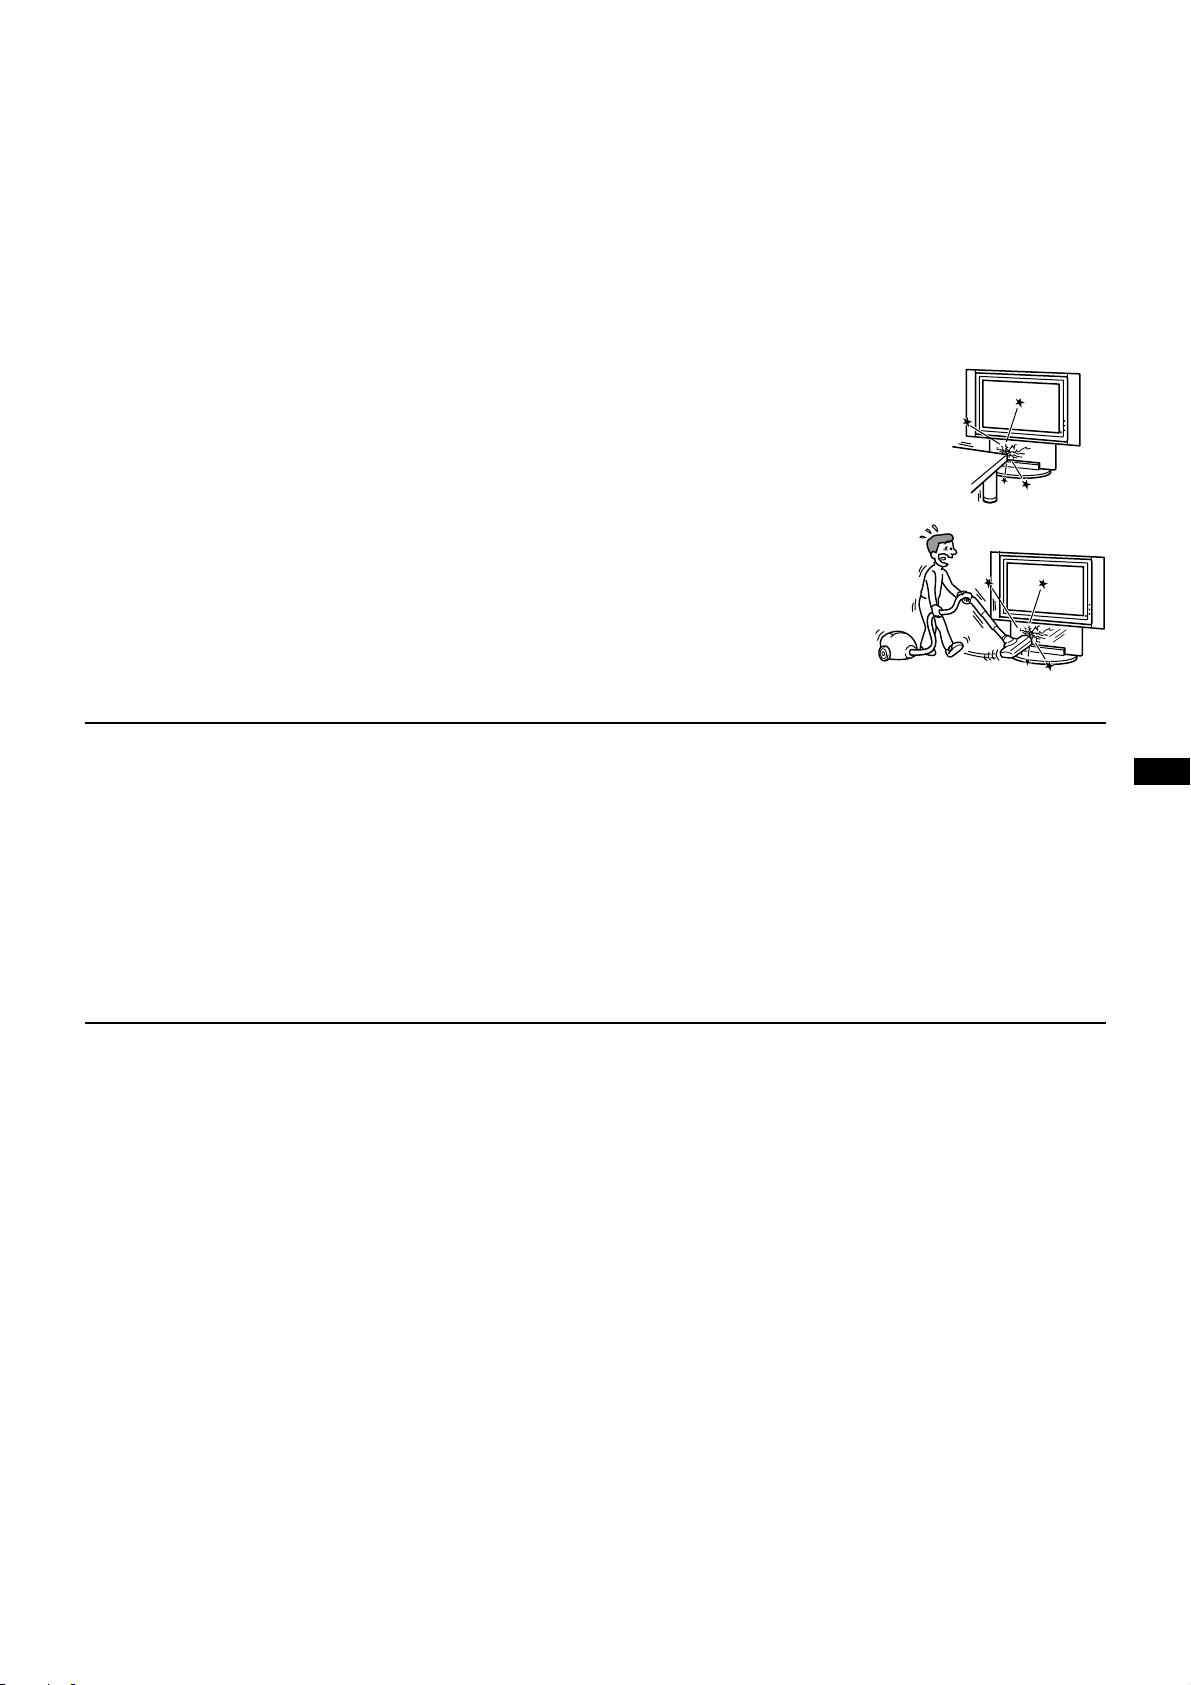
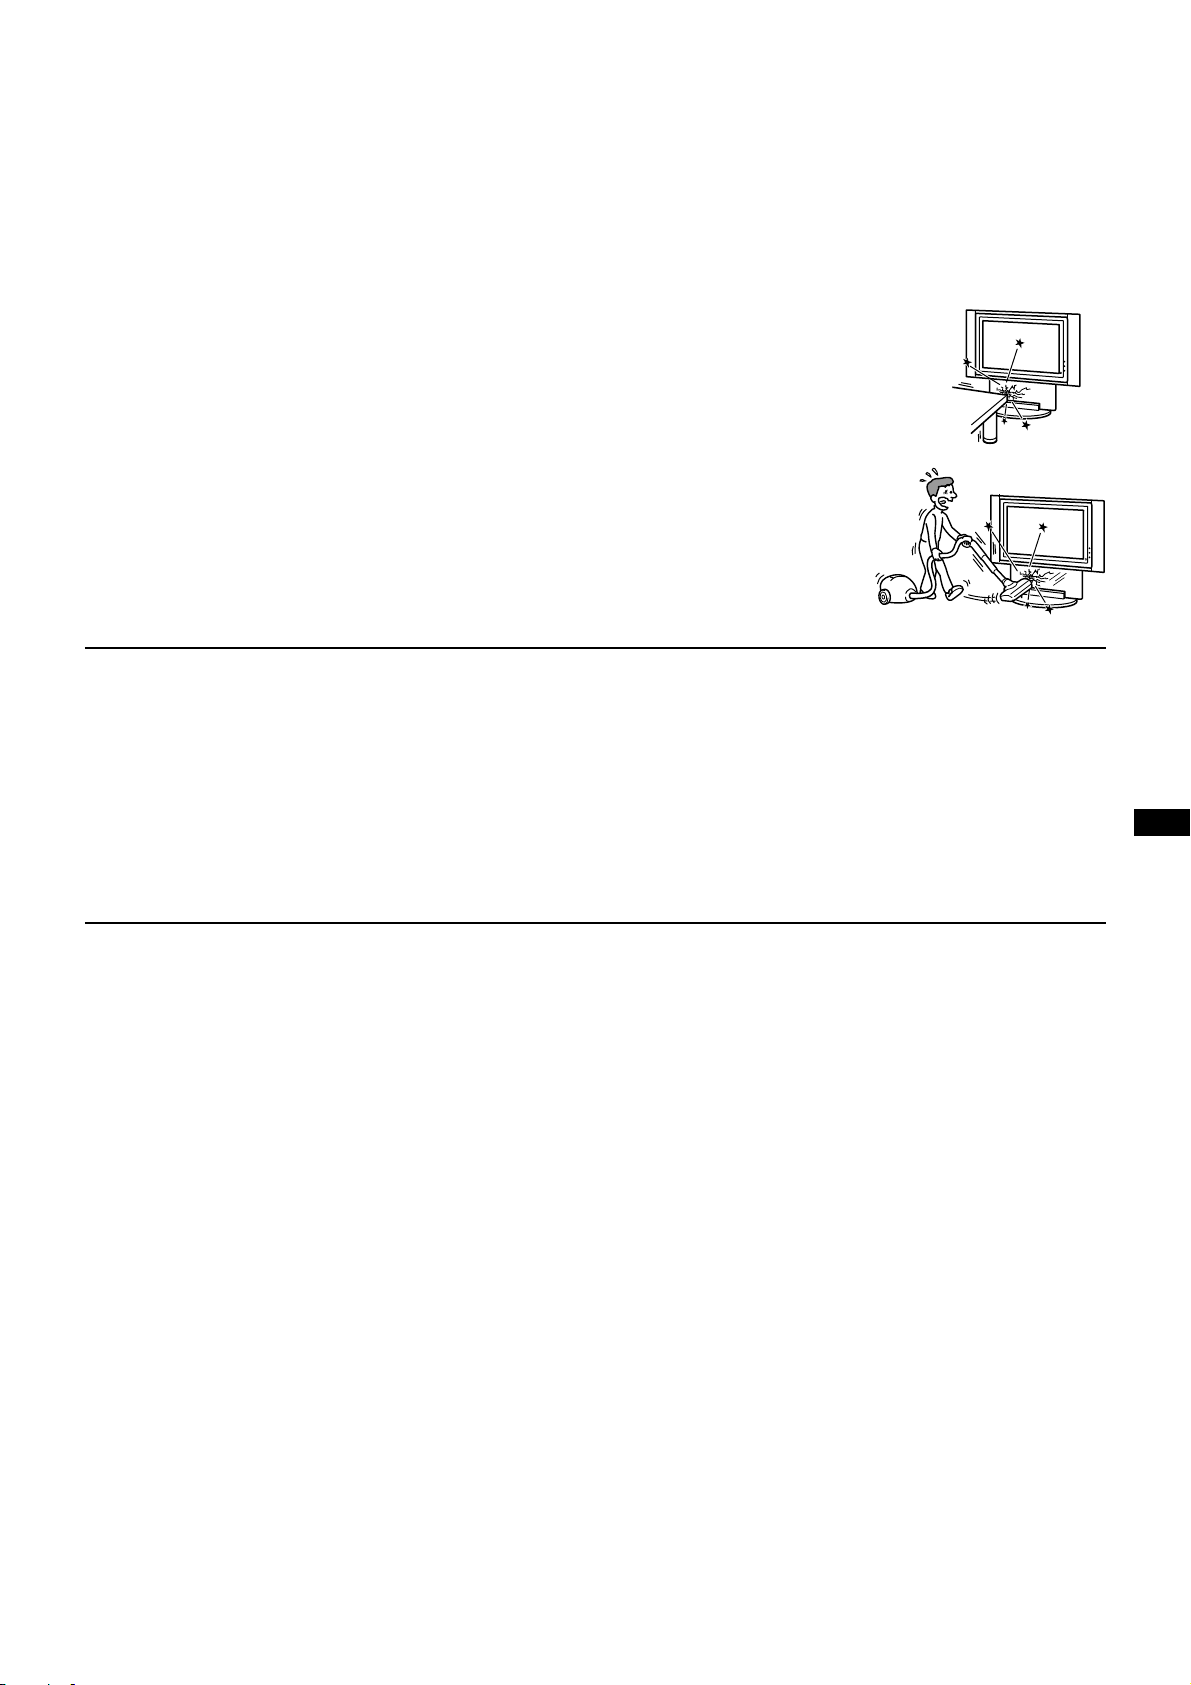
Do not subject the glass to excessive shock.
This stand is made of tempered glass, but care should be taken. If the glass breaks,
glass fragments could cause injury, so observe the precautions below.
• Do not hit the glass or drop sharp-pointed objects on the glass. Avoid excessive
shock.
• Do not scratch or poke the glass with sharp-edged objects.
• Do not let hard objects such as a vacuum cleaner hit the edges of the glass.
Note on installation
Install the stand on a solid and flat floor. Do not allow the stand to be installed at an angle or incline. To avoid this,
observe the following precautions.
– If you install the stand on a soft surface such as a mat or a carpet, lay a board over the designated location
beforehand.
– Do not install the stand in a place subject to direct sunlight or near a heater.
– Do not install the stand in a hot or humid place, or outdoors.
Note on use
To keep the stand clean, occasionally wipe the stand with a dry soft cloth. Stubborn stains may be removed with a
cloth slightly dampened with diluted detergent. Then wipe the area with a dry soft cloth. Do not use any type of
chemicals, such as thinner or benzine, as they may damage the finish of the stand.
5 (GB)
For Sony dealers
Be sure to thoroughly read the safety precautions described above and pay
special attention to safety during the installation, maintenance, checking, and
repair of this product.
Be sure that two or more persons do the installation work.
Be sure that two or more persons install the Display Unit on the Floating Stand. If one person does the installation
work alone, this may result in an accident or injury. Be sure to keep small children away during the installation.
Be sure to install the Display Unit securely, following the proper procedure.
If the Display Unit is not installed securely, it may fall and cause injury.
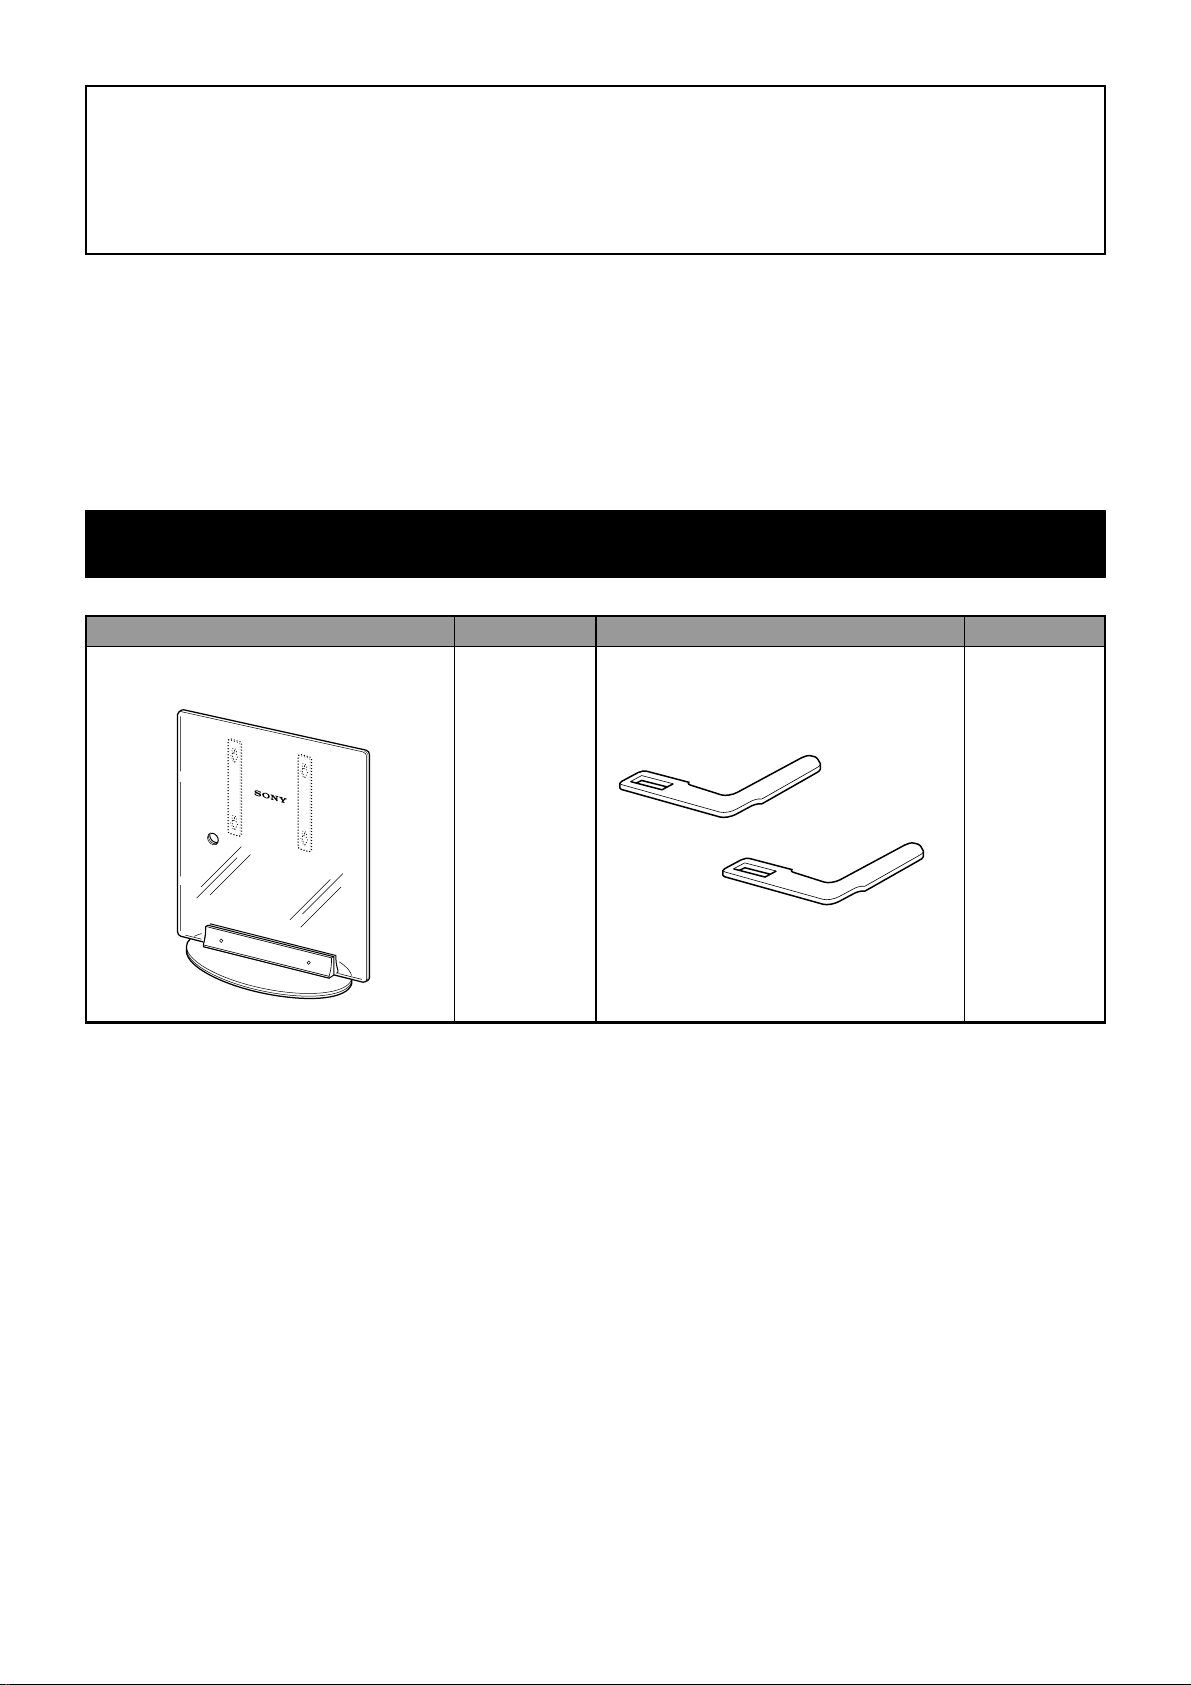
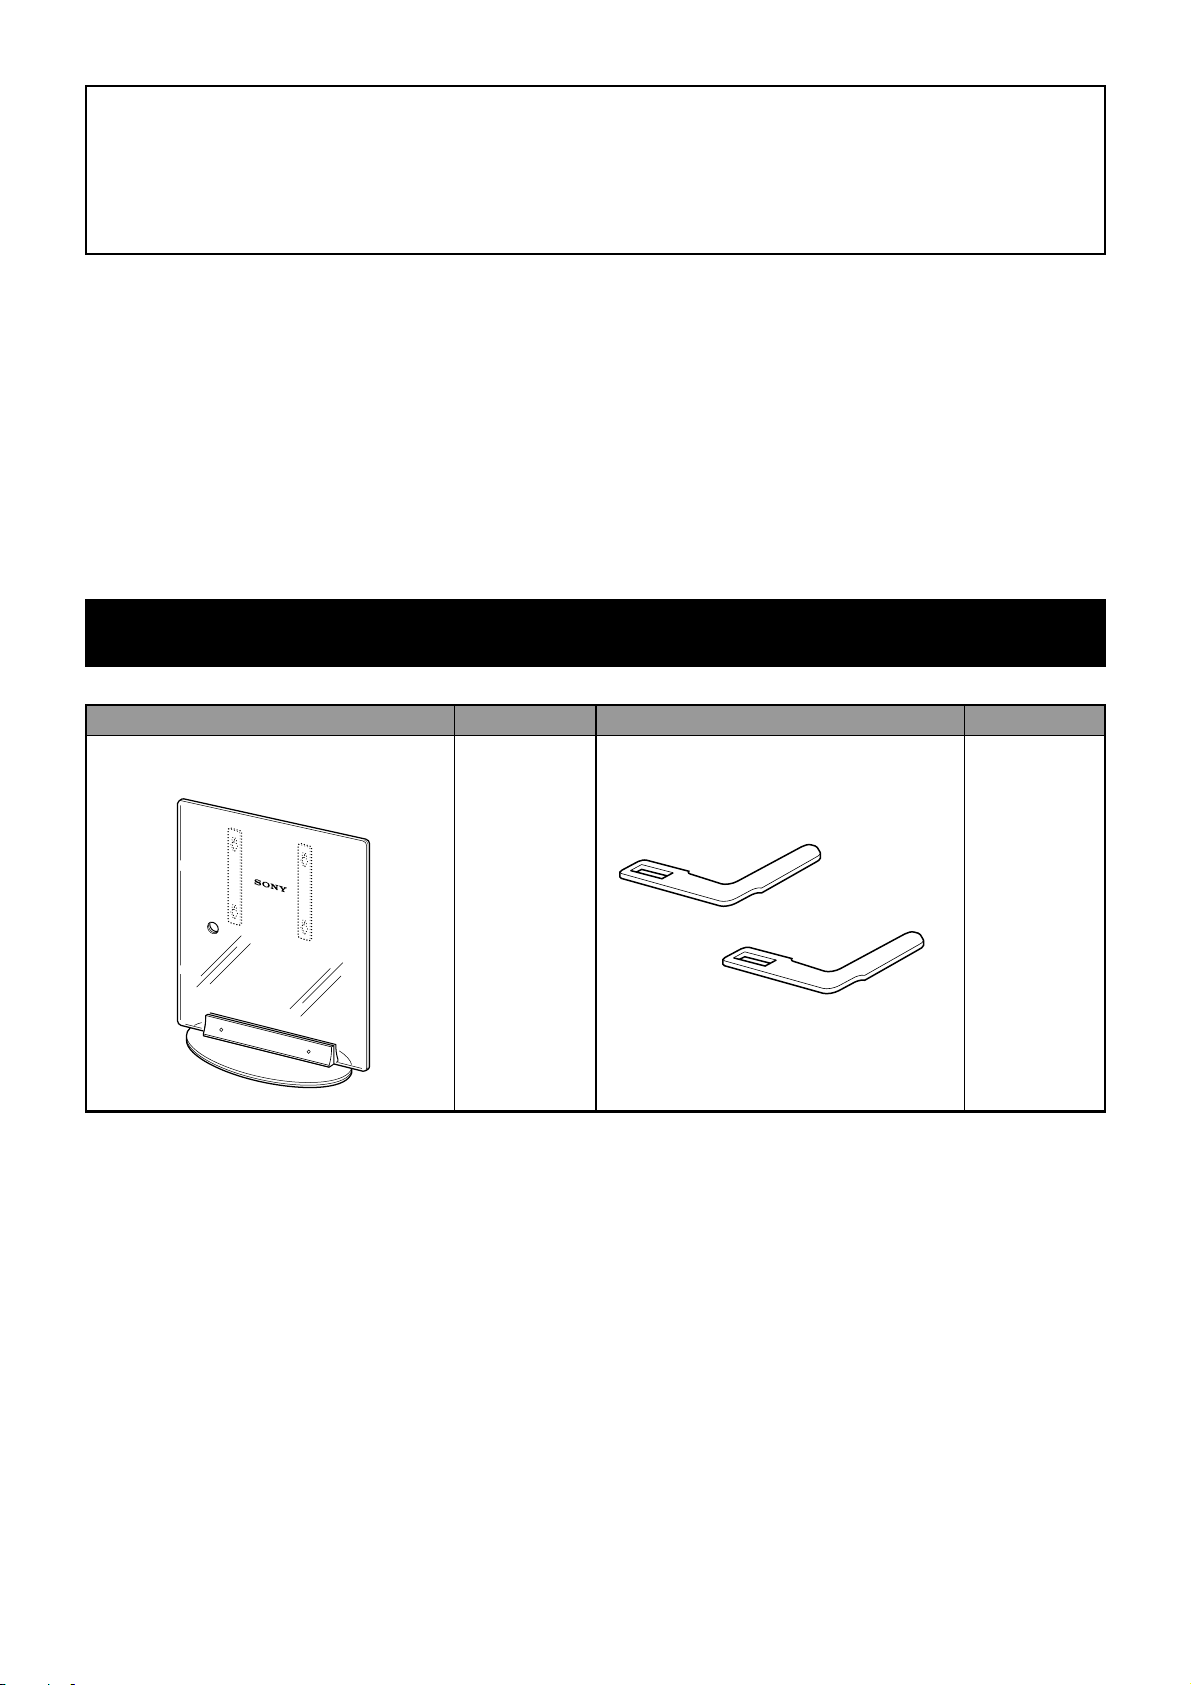
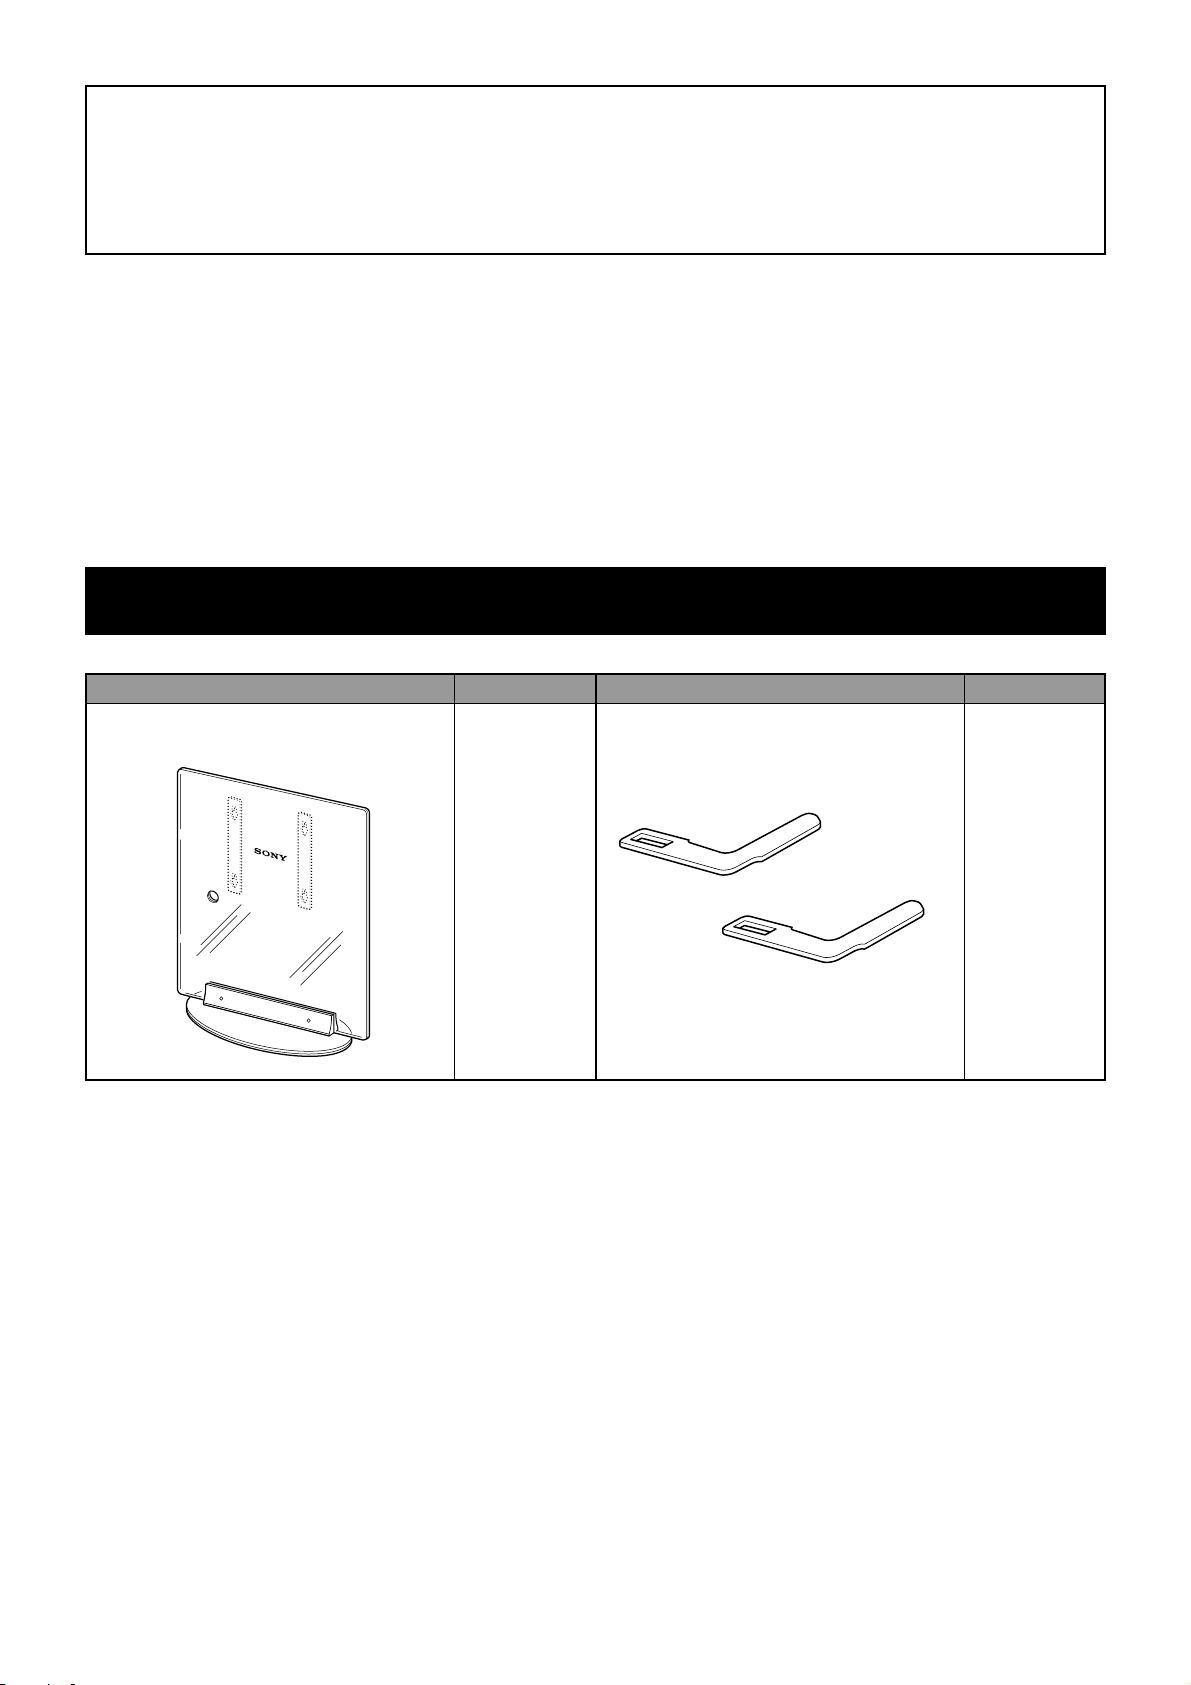
Check the parts
Name Quantity Name Quantity
Floating Stand Fixing plate
12
6 (GB)
Install the Display Unit
WARNING
If you allow the mains lead to be pinched under or between pieces of equipment, this may result in a short
circuit or an electric shock.
If you stumble over the mains lead or the Display Interface Cable, the stand may topple over, and cause injury.
Draw the mains lead and the Display Interface Cable through the hole on the
stand.
Decide on the installation location and lay the stand down before installing the Display Unit.
Since the Display Unit is heavy, it is recommended that you decide on the installation location beforehand and
lay the stand down there before installing the Display Unit on the stand.
Note
Do not push or pull the stand while it is on the floor. The rubber footings on the base of the stand may come off.
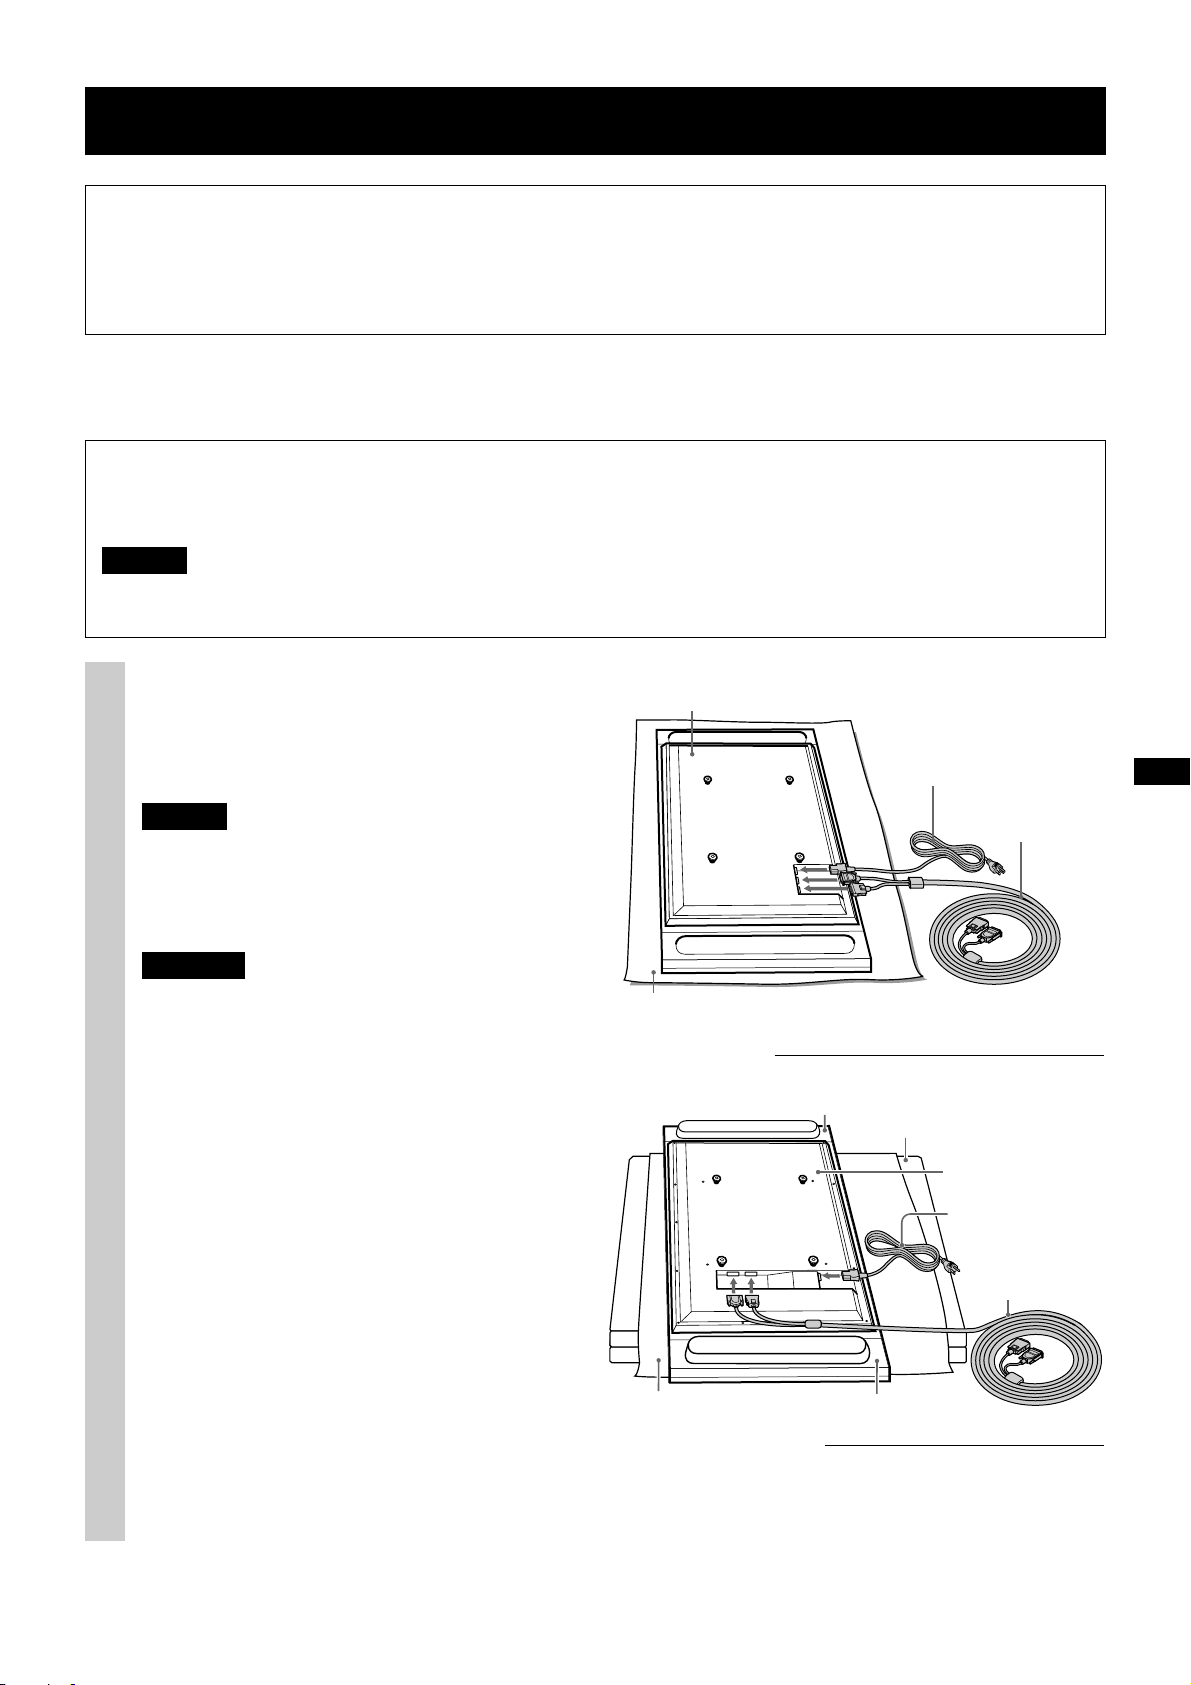
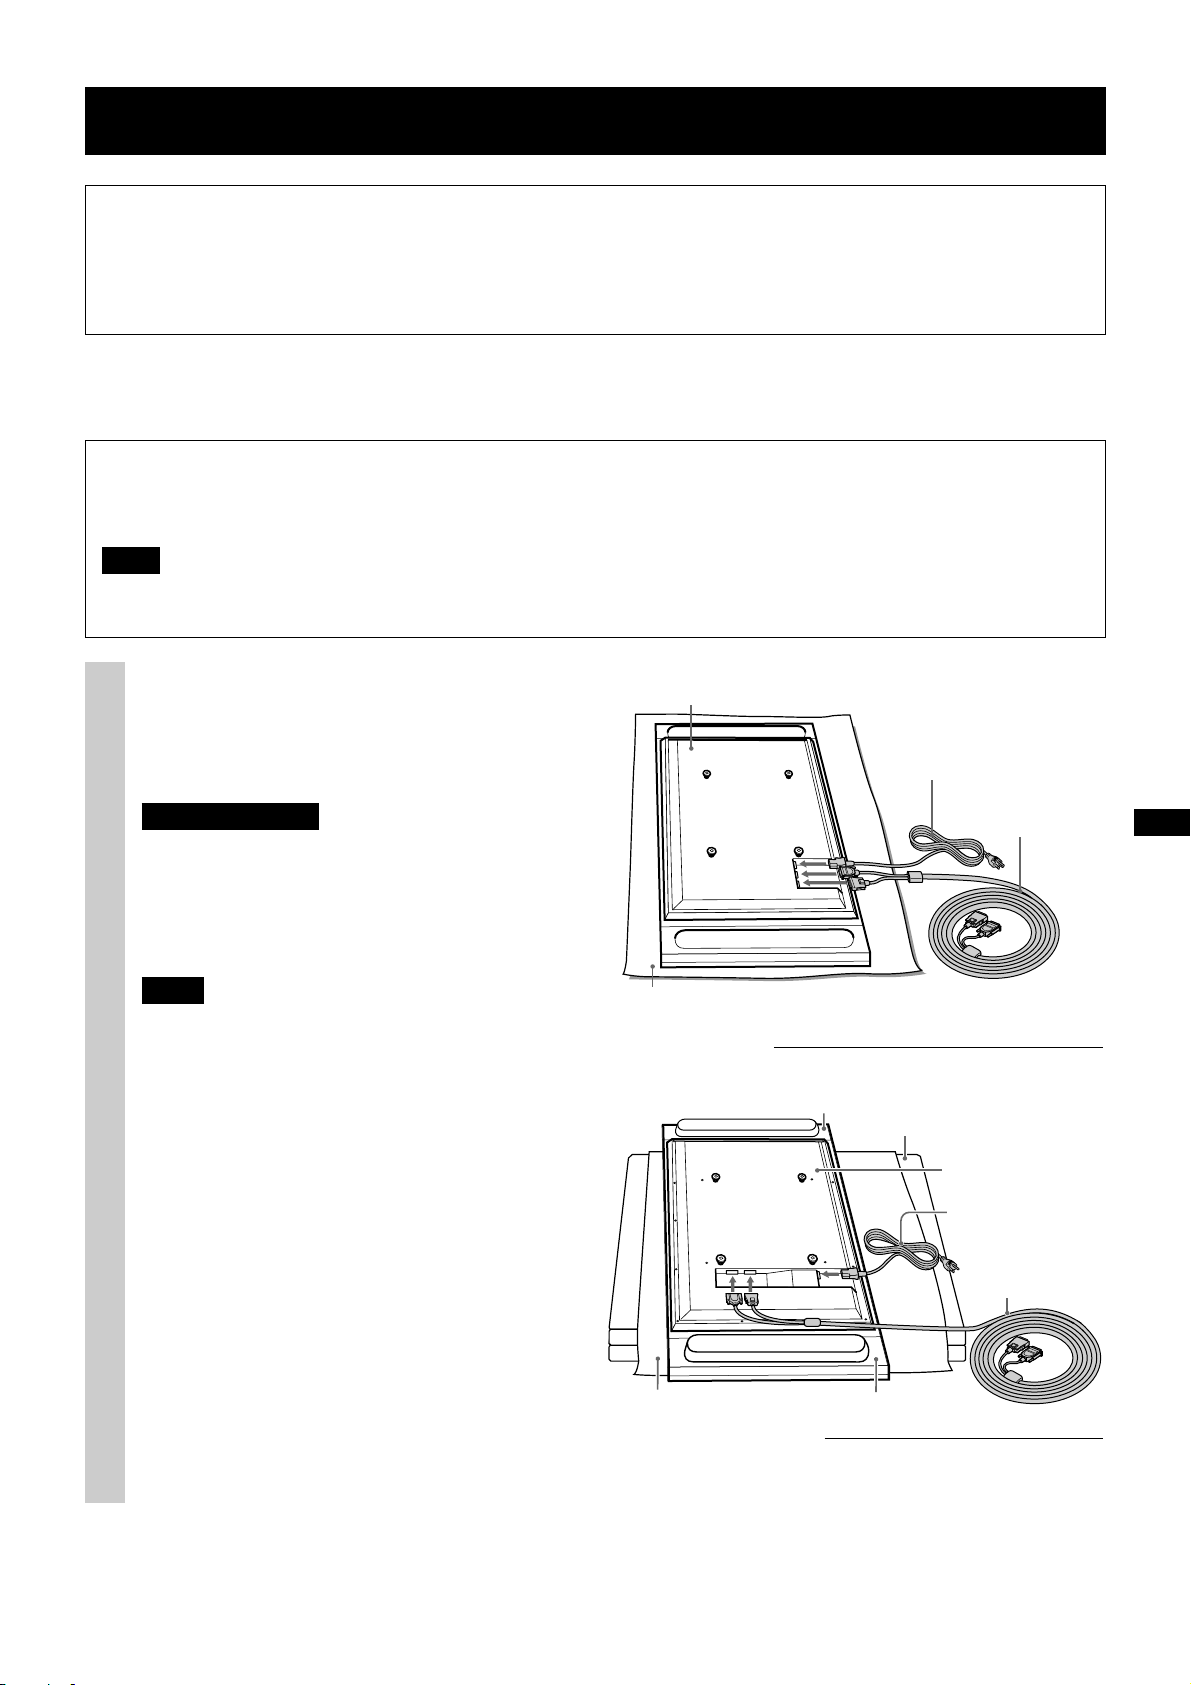
Connect the mains lead and the
1
Display Interface Cable to the
Display Unit.
z Tip
See the instruction manual of the Sony
Flat Panel Colour Television or LCD Color
Television for more details on connecting the
mains lead and the Display Interface Cable.
Notes
• If the weight of the Display Unit is placed on
the speakers, deformation or a loose
connection of the speakers may result. To
avoid this, observe the following. (KLVL42MRX1, KDL-L42MRX1(UK) only)
– Do not hold the speakers when carrying
the Display Unit.
–When connecting cables to the Display
Unit, place packing material, etc. on the
floor and lay the Display Unit face down
on it so that the speakers on either side of
the Display Unit are clear of the packing
material, etc.
• Be sure to place the Display Unit stably.
• Use soft cloth to protect the screen of the
Display Unit from damage or dirt.
Rear side of the Display Unit
Mains lead
Display
Interface Cable
Soft rag
KE-42MR1/KDE-P42MRX1/KE-P42MRX1/
KE-50MR1/KDE-P50MRX1/KE-P50MRX1
Speaker (left)
Packing material, etc.
Rear side of the
Display Unit
Mains lead
Display Interface
Cable
Soft rag
Illustrations without model names that appear from now on are based on the Flat Panel colour television KLVL42MRX1, KDL-L42MRX1(UK).
Speaker (right)
KLV-L42MRX1/KDL-L42MRX1(UK)
7 (GB)

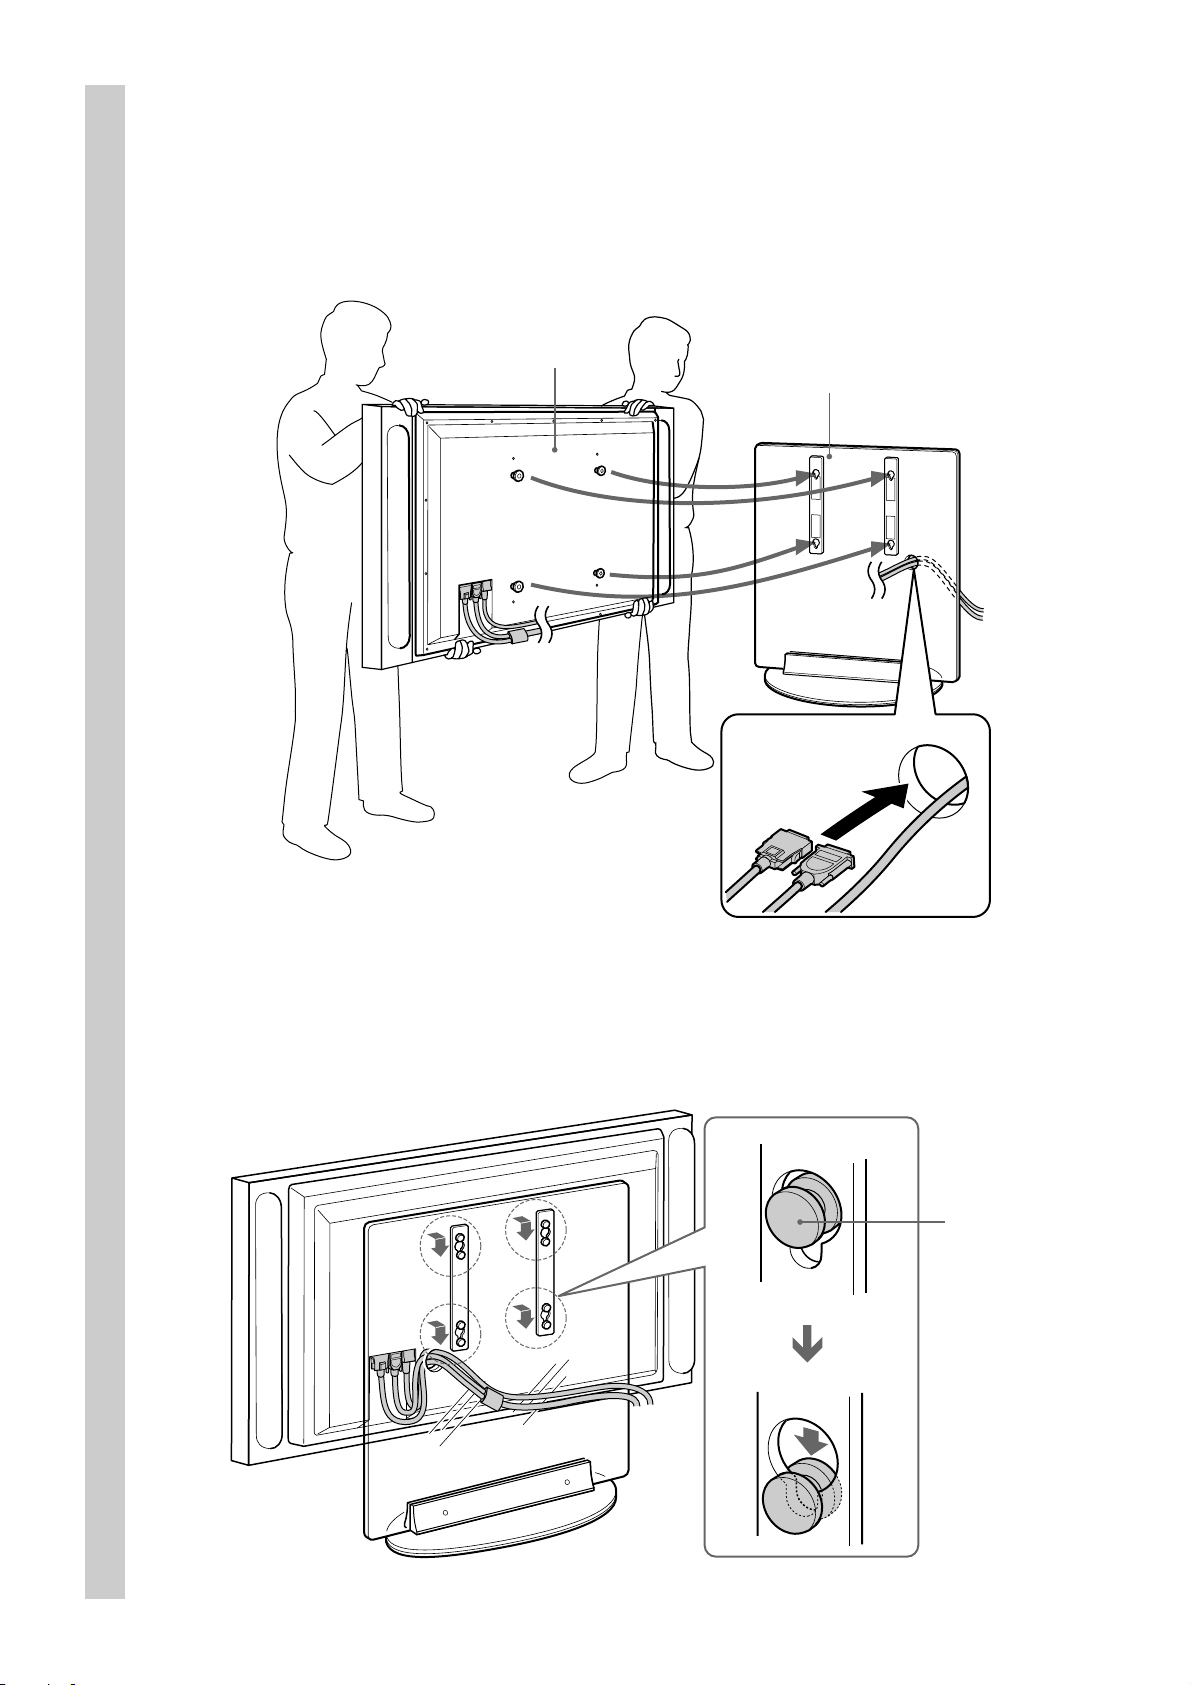
Install the Display Unit on the stand.
2
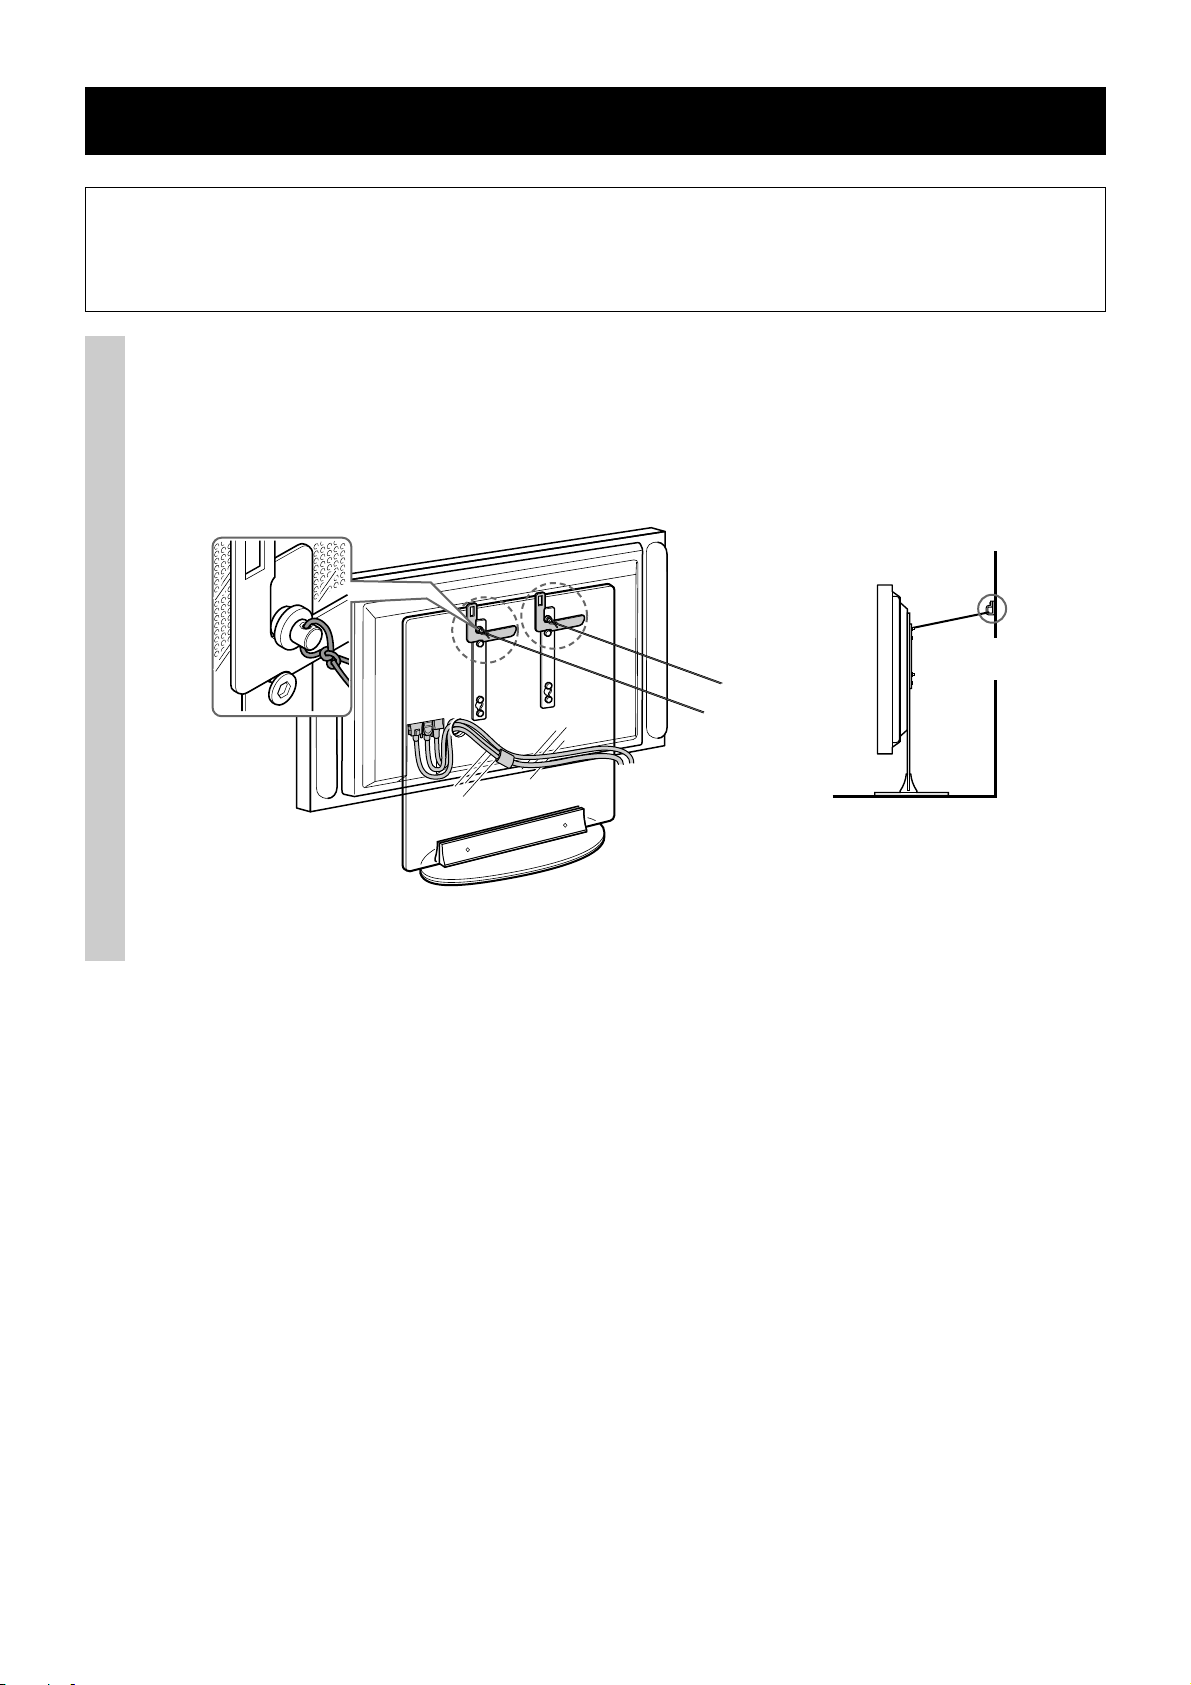
1 Draw the mains lead and the Display Interface Cable through the hole on the stand.
2 Check the position of the four holes on the fixtures on the stand beforehand.
Fit the hooks on the rear of the Display Unit into the holes on the fixtures of the stand.
Rear side of
the Display Unit
Front side of the stand
2
1
3 Confirm that the hooks on the rear of the Display Unit are completely inserted into the four holes on the
fixtures. Then slide the Display Unit straight downward until it snaps on.
Hook
8 (GB)
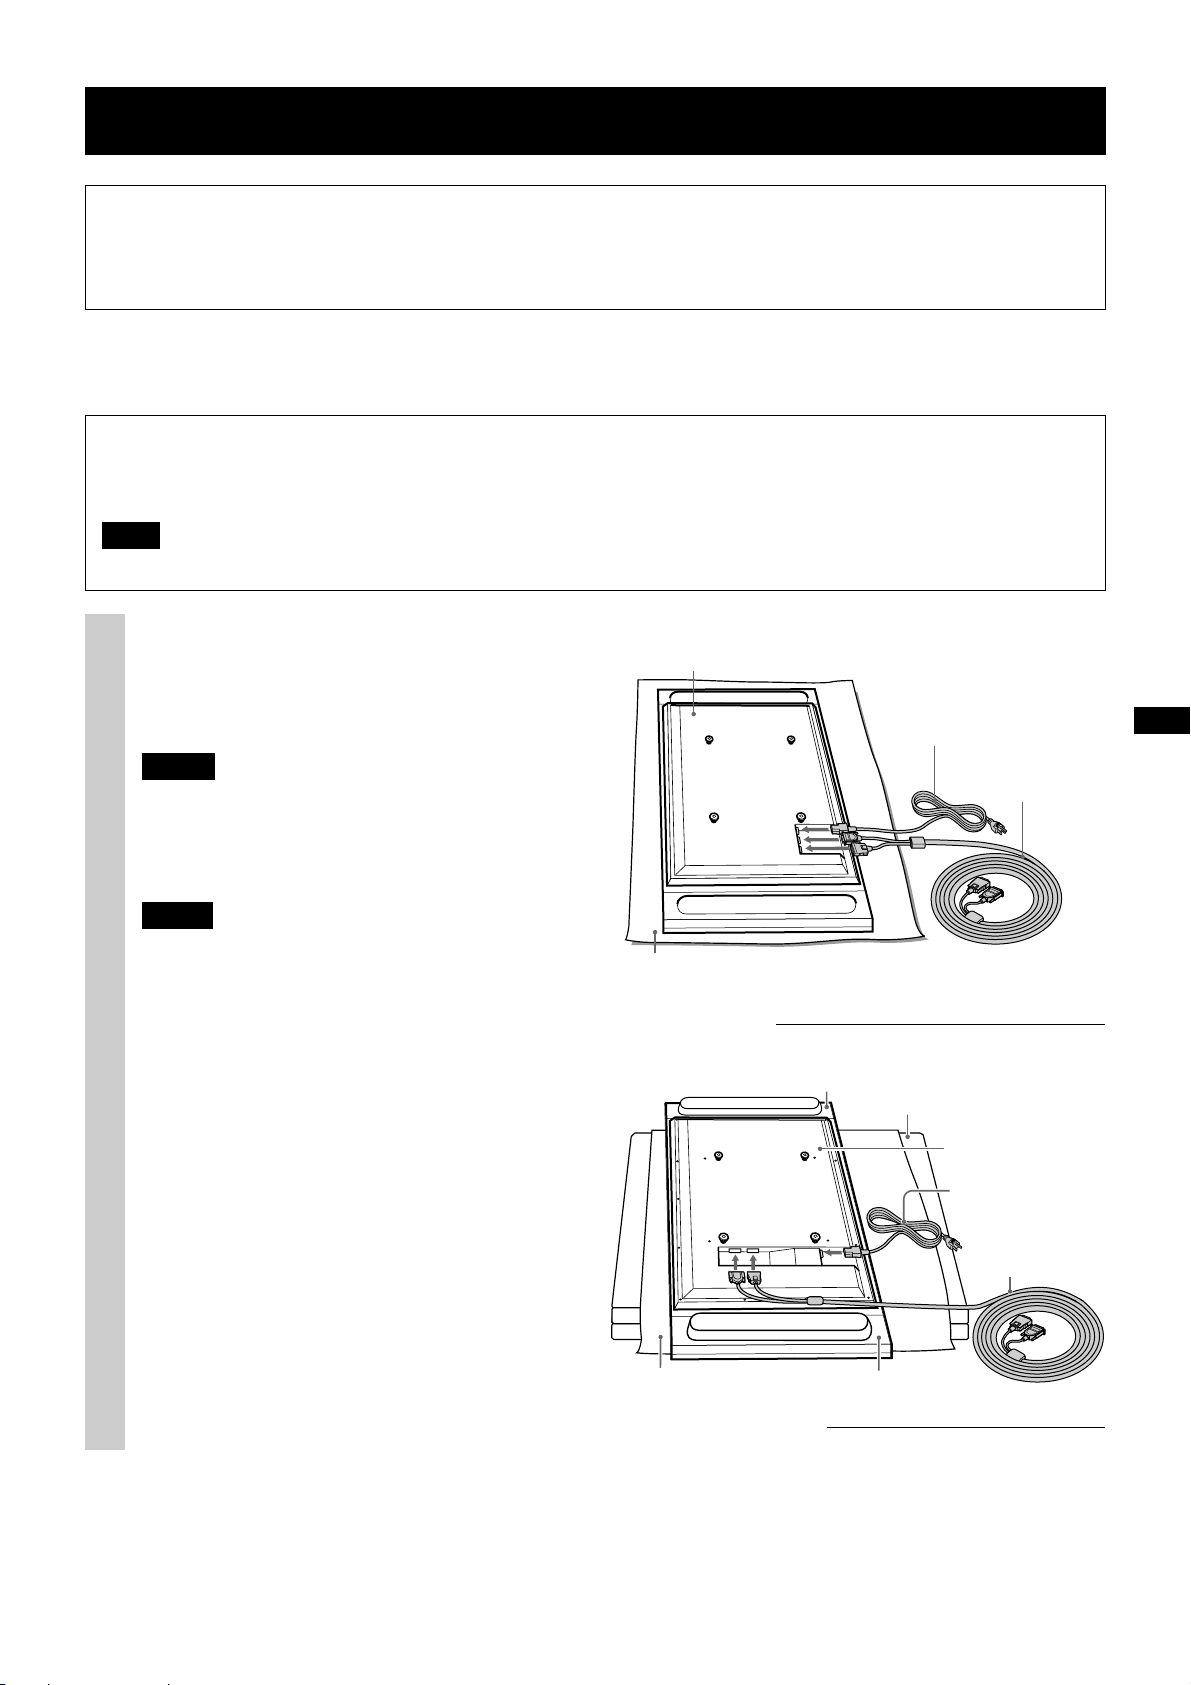
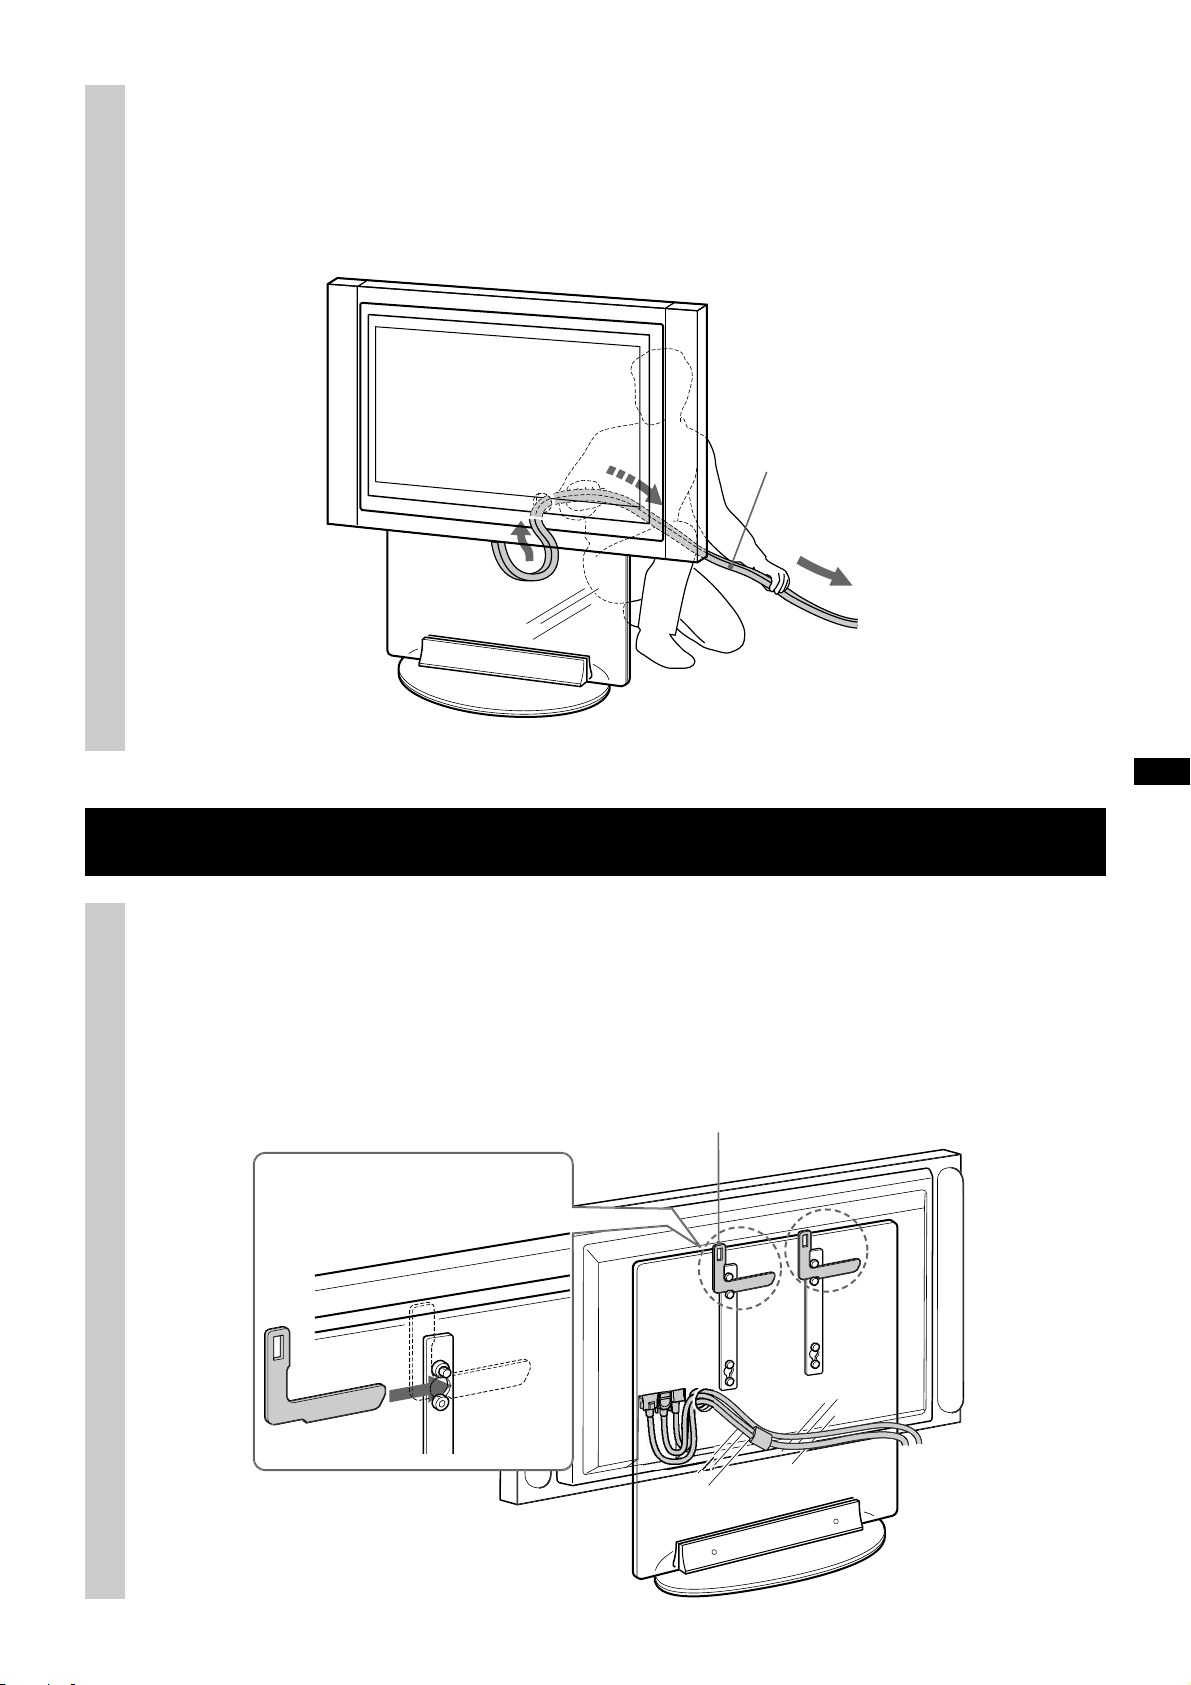
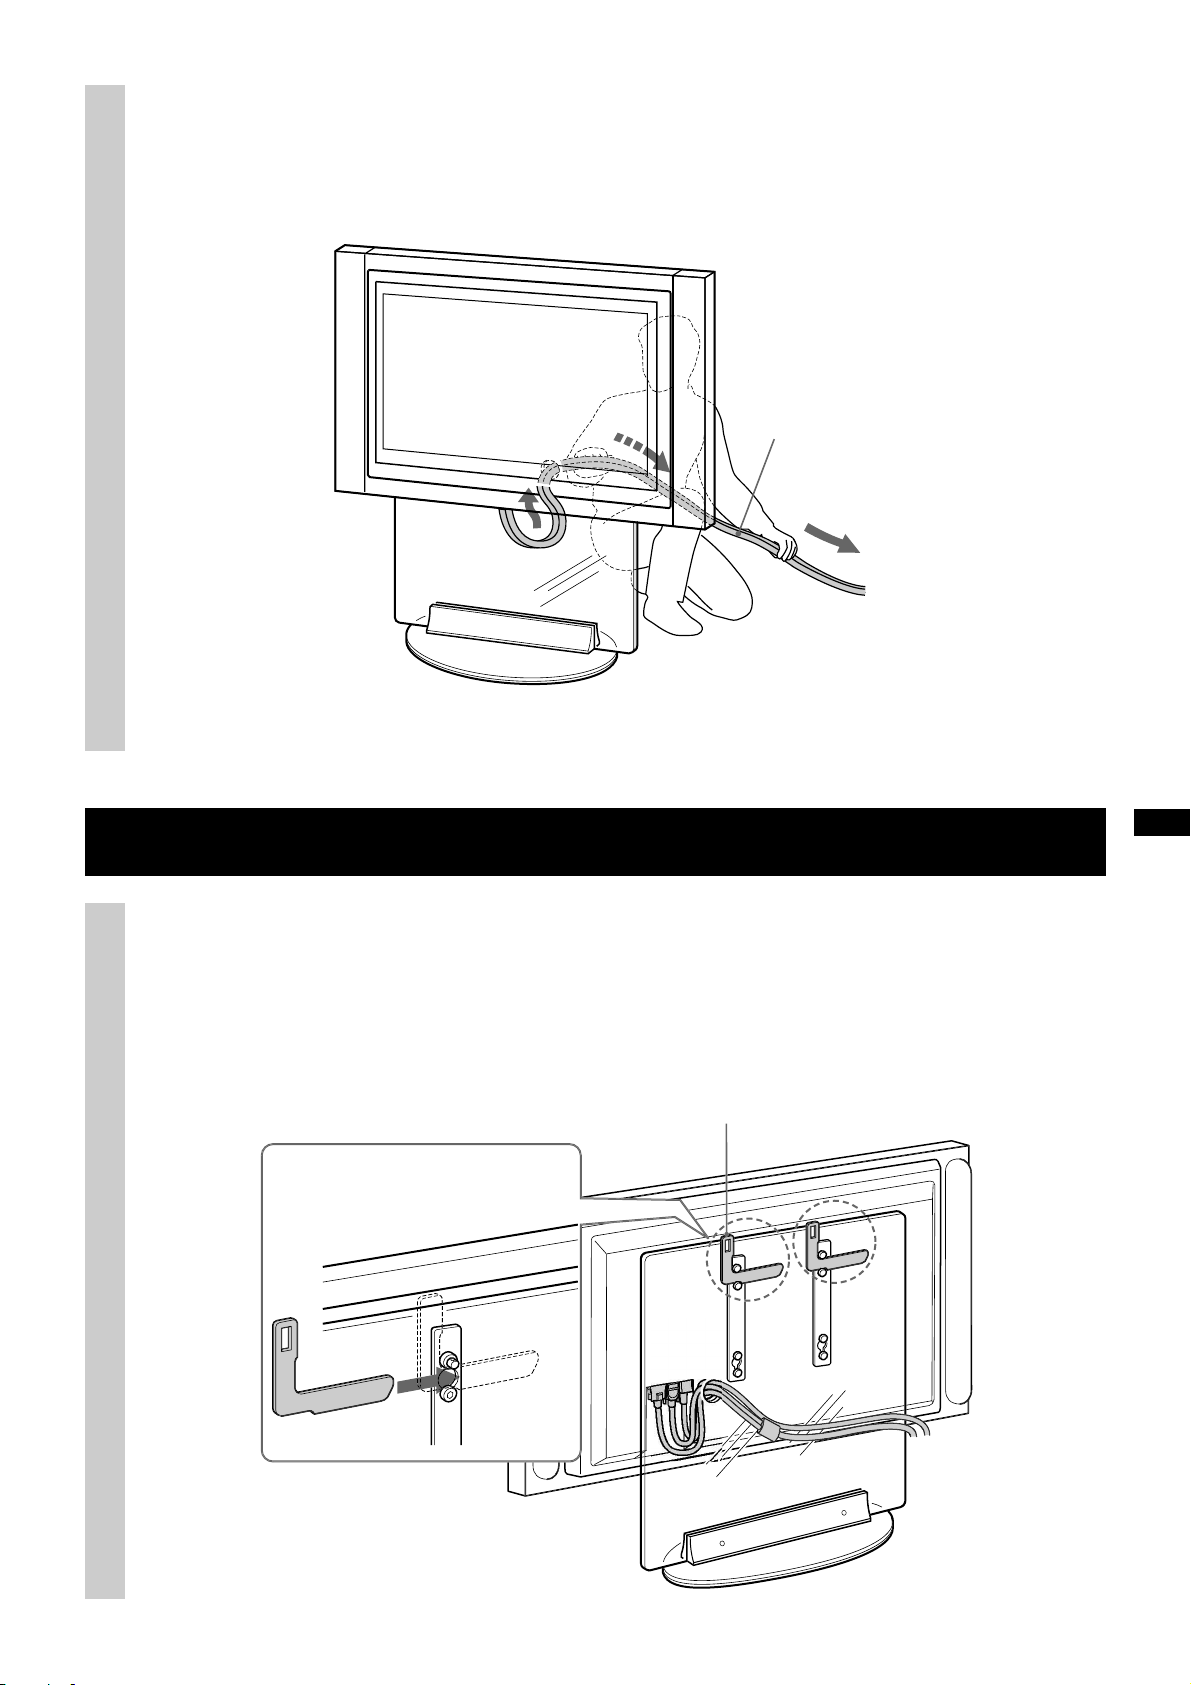
Take up the slack out of the mains lead and Display Interface Cable
3
already drawn through the hole on the stand.
Pull the ends of the mains lead and Display Interface Cable already drawn through the hole on the stand and
take up the slack out of the lead and the cable.
Mains lead and Display Interface
Cable
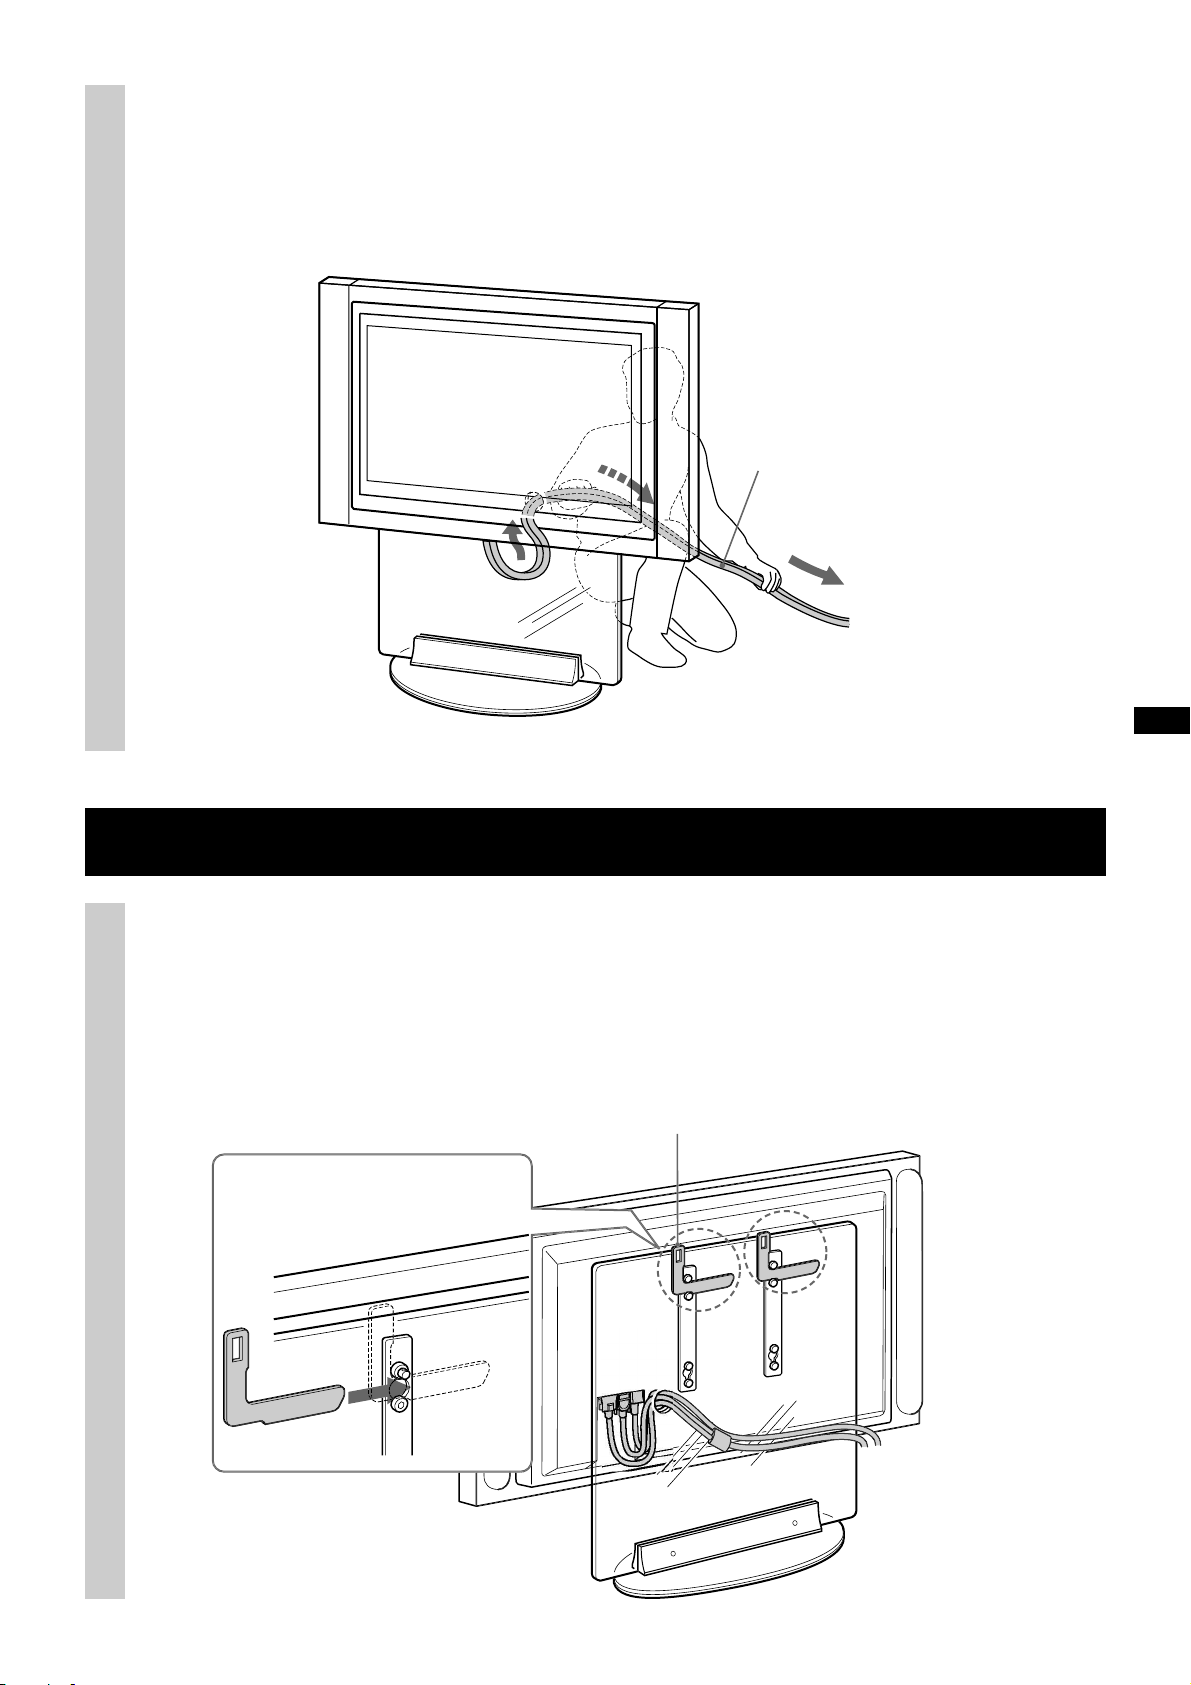
Fix the Display Unit
Attach the fixing plate to prevent the Display Unit from falling.
1 Insert the fixing plate between the screw on the upper part of the fixture on the stand and the hook on the
Display Unit.
2 Slide the fixing plate until the corner of the L-figure hits against the screw.
Fixing plate
9 (GB)
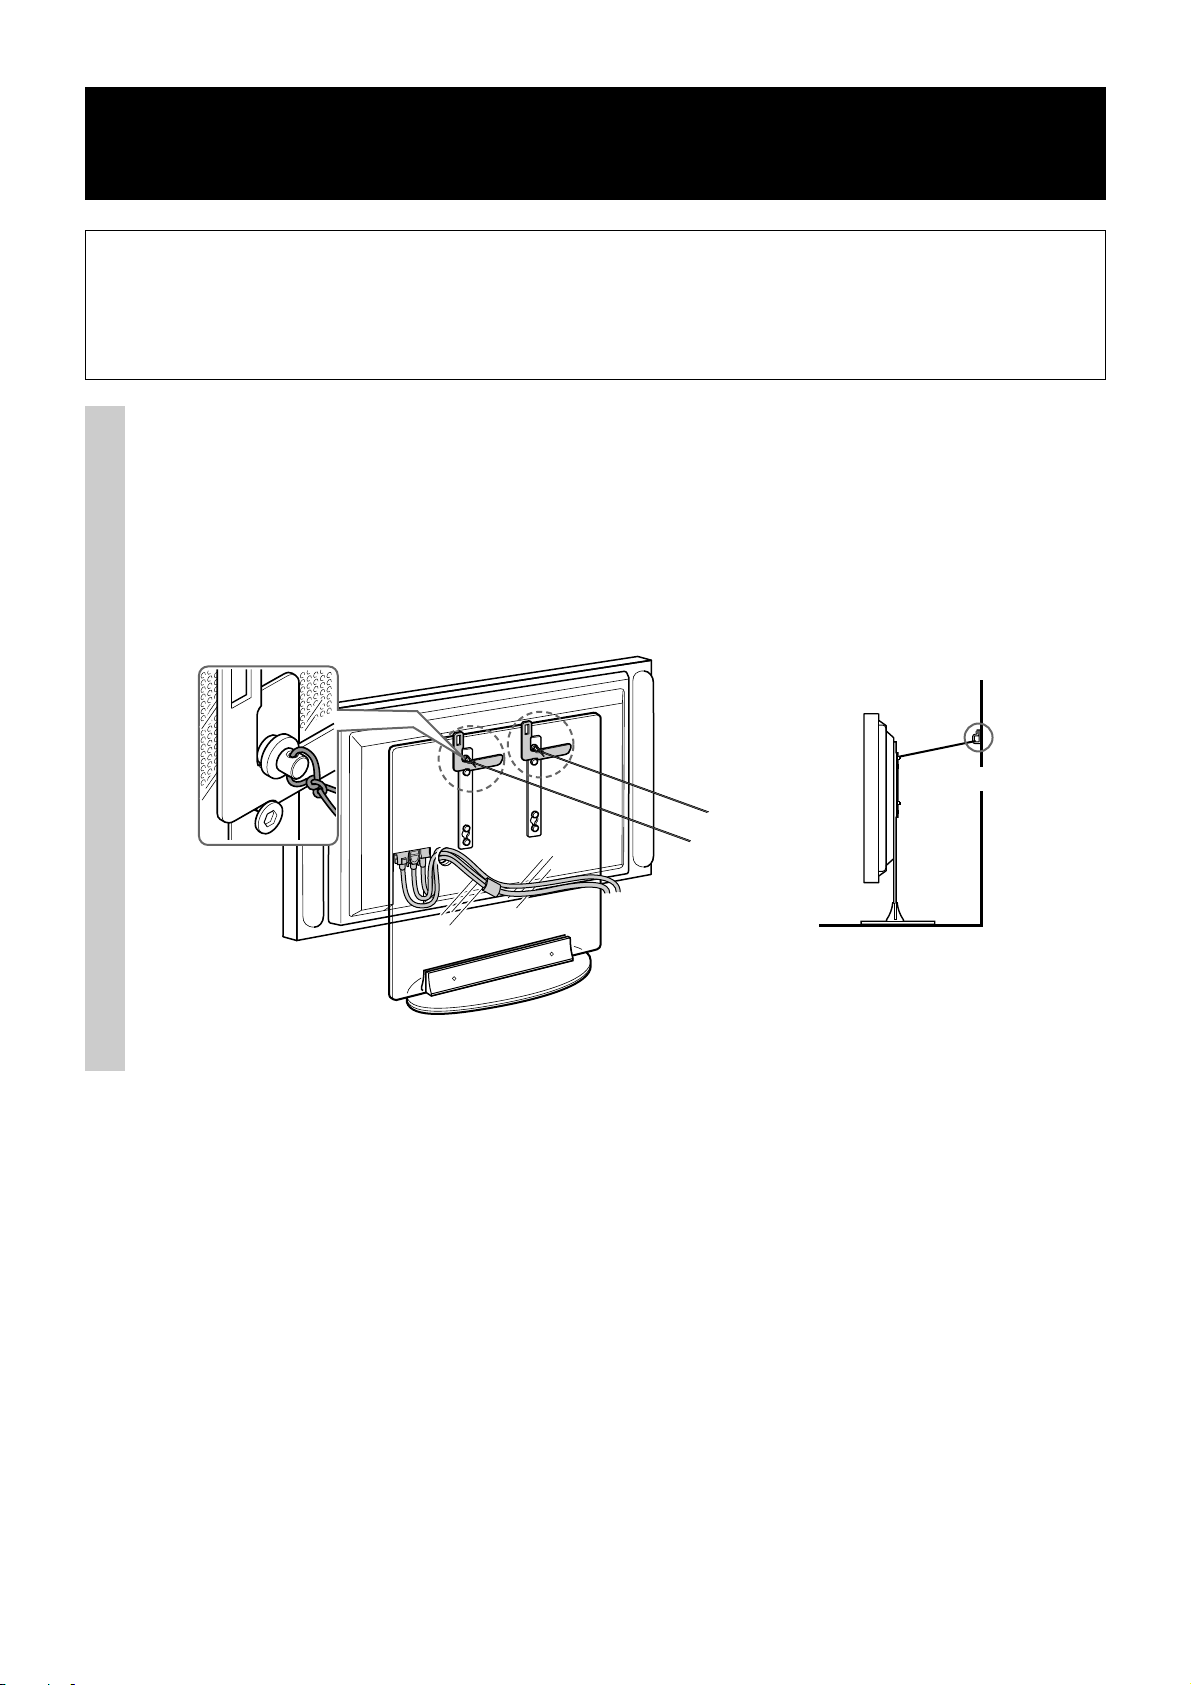
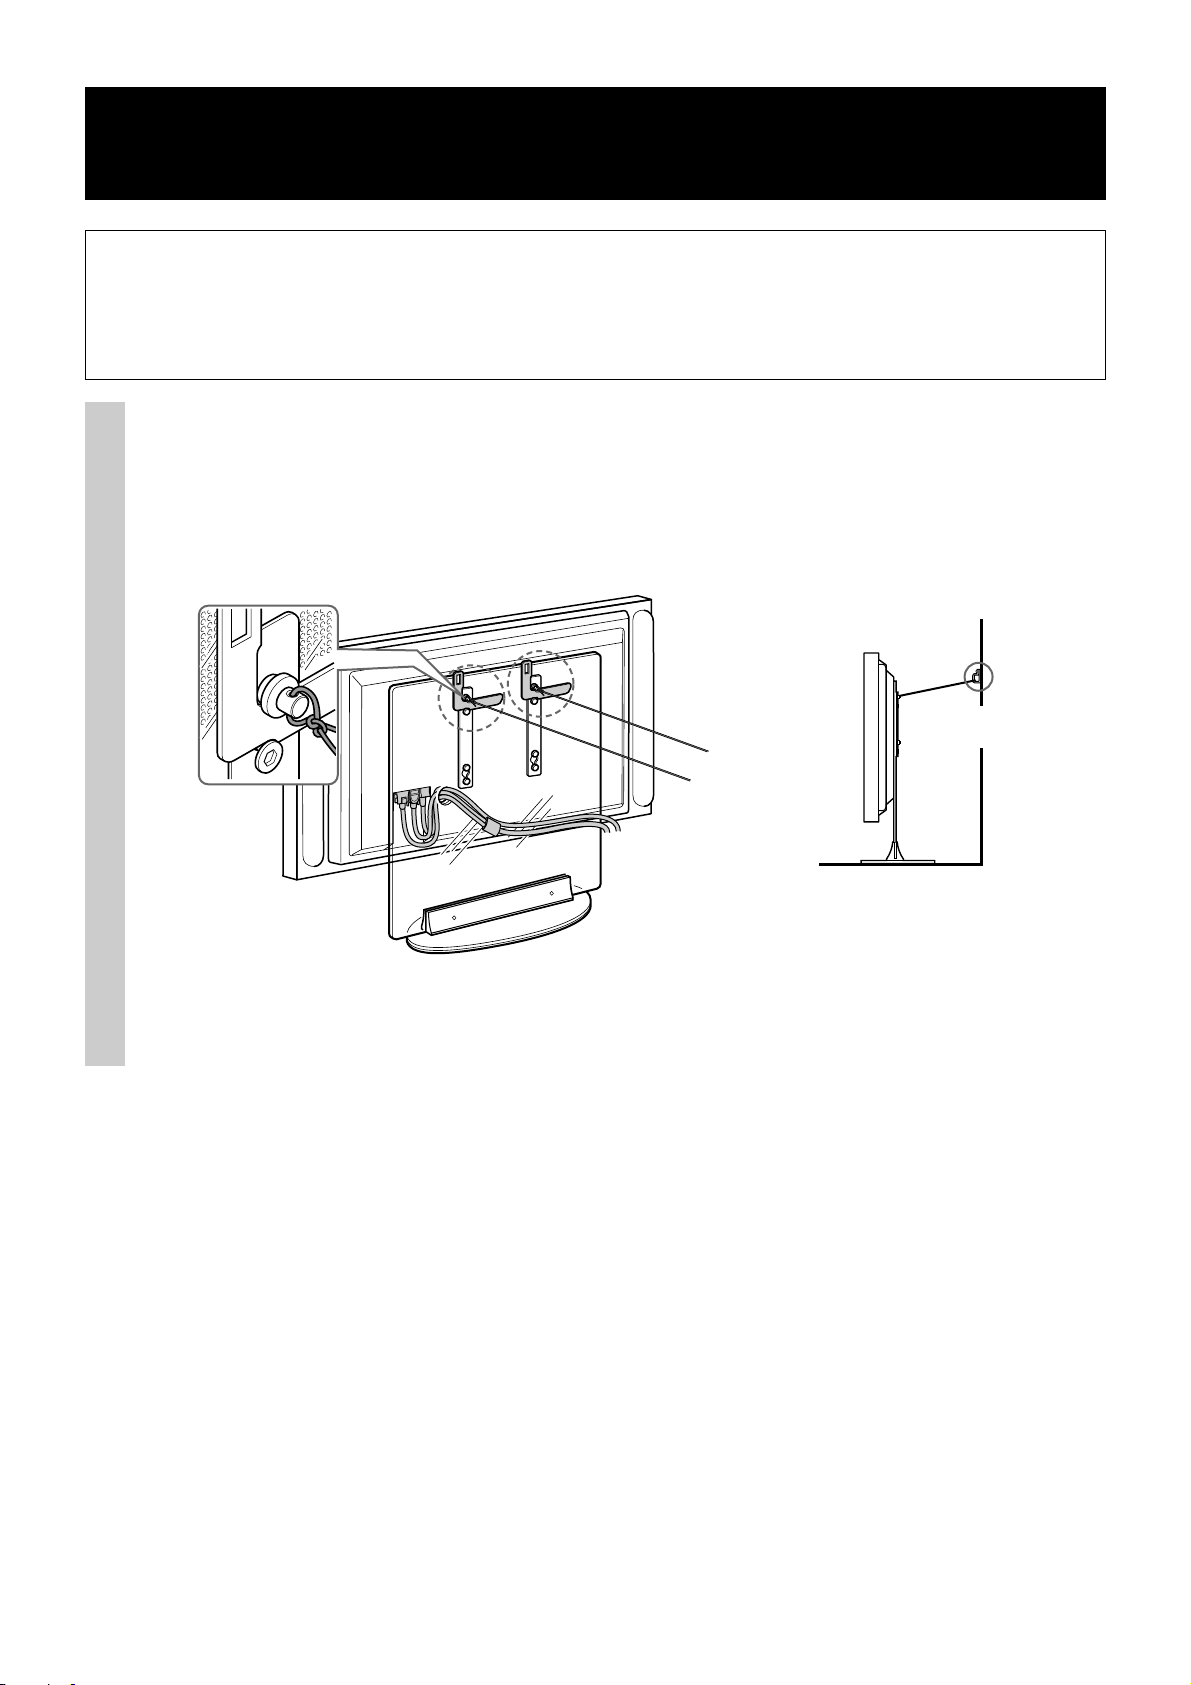
Safety measures to prevent toppling over
WARNING
Be sure to take measures to prevent the stand from toppling over. If you fail to do so, the Floating Stand may
topple over during an earthquake and cause injury or property damage. Anchor the stand by using a rope or
chain with fastening one end of it to the securing hook and the other end to the wall or pillar.
Prepare a commercially available rope or chain and wall anchor bracket beforehand.
1 Secure the wall anchor bracket to a solid wall or pillar.
2 Pass the rope or chain through both holes of the anchor attachments and then tighten the other end of the
rope or chain to the wall anchor bracket.
Anchor attachment
2
1
Wall anchor
bracket
10 (GB)
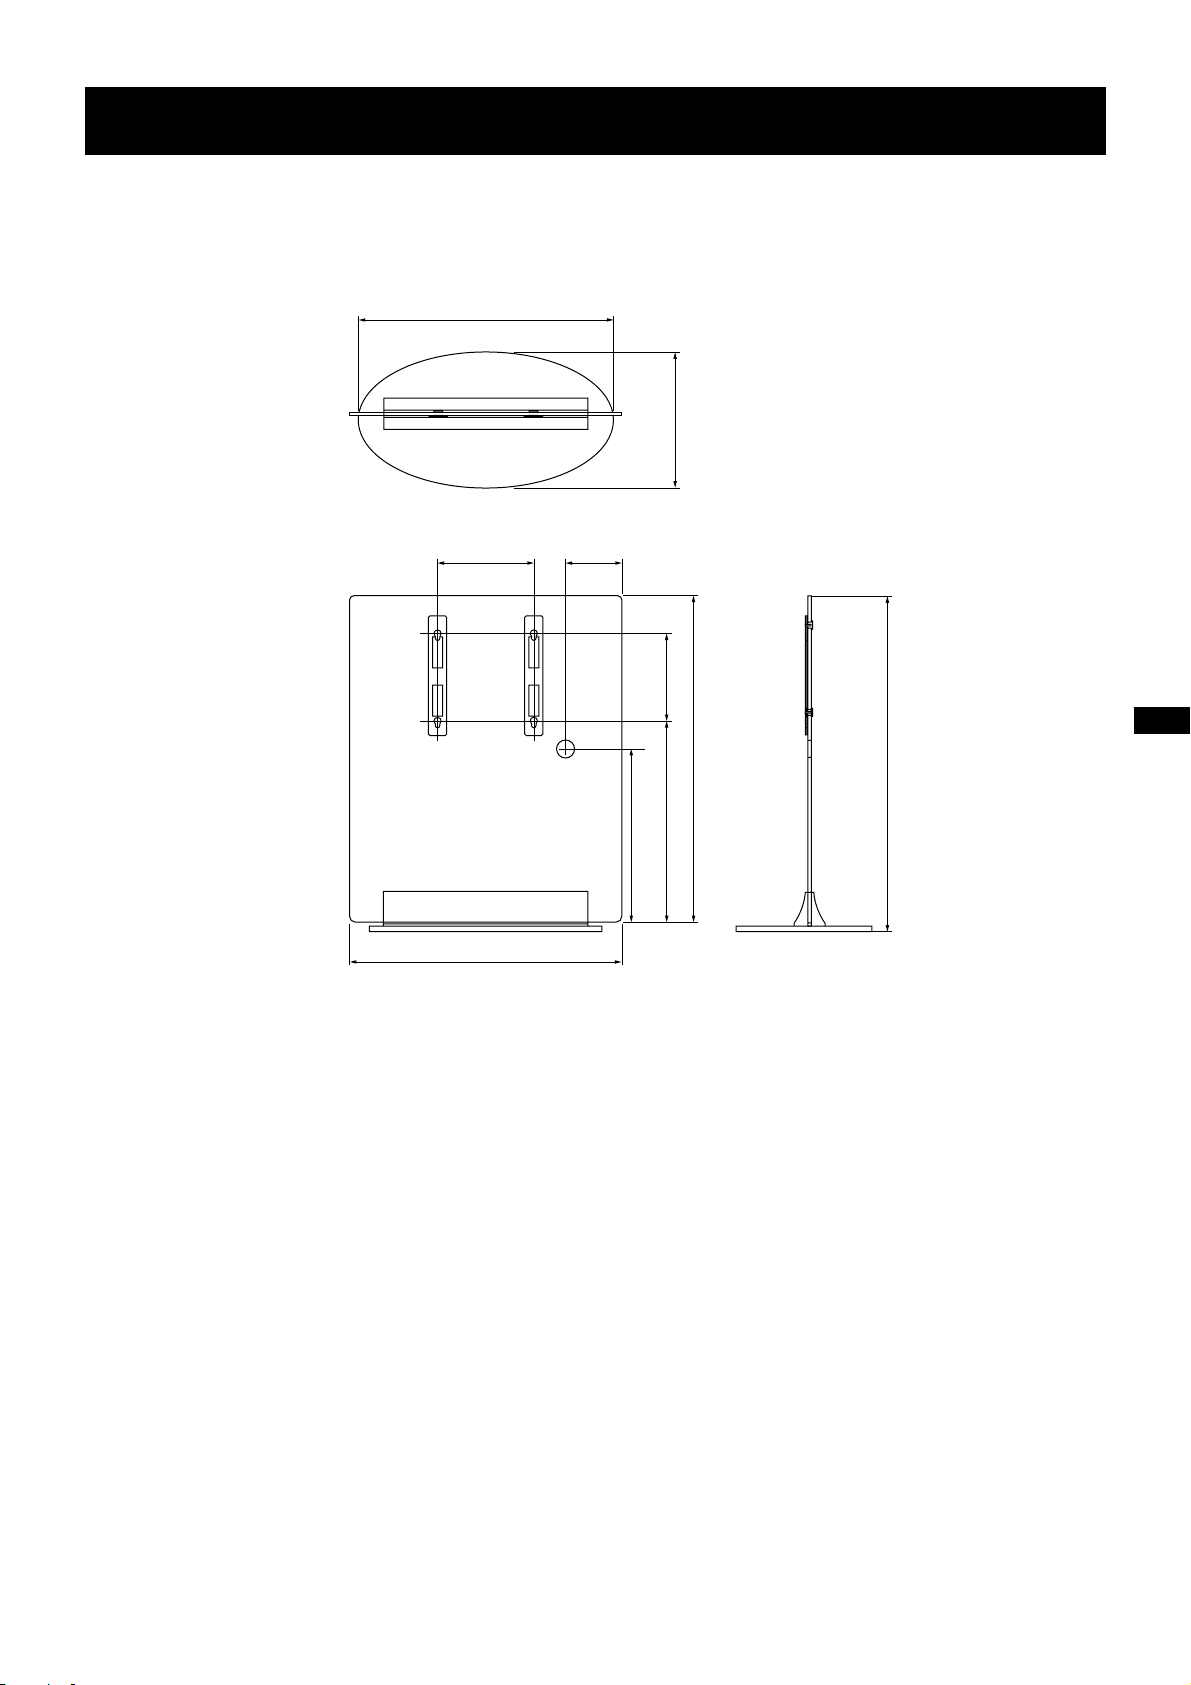
Specifications
Unit: mm (inches)
Weight: 57 kg (125 lb 11 oz)
900 (35 7⁄16)
)
32
⁄
29
480 (18
340 (13 3⁄8)
960 (37 25⁄32)
195 (7 11⁄16)
7
)
16
⁄
)
1
32
⁄
9
713 (28
617 (24
)
32
⁄
)
310 (12
32
⁄
21
1160 (45
)
32
⁄
17
1182 (46
Design and specifications are subject to change without notice.
11 (GB)
Danke, dass Sie sich für dieses Produkt entschieden haben.
Hinweis an Kunden
Die Installation dieses Produkts sollte ausschließlich von qualifiziertem Kundendienstpersonal von Sony
durchgeführt werden, da hierfür mindestens zwei Personen erforderlich sind, mit besonderer Sorgfalt
gearbeitet werden muss und spezielle Sicherheitsmaßnahmen und Arbeitsabläufe zu beachten sind. Sony
übernimmt keine Haftung für Unfälle bzw. Schäden, die durch eine fehlerhafte Installation oder
unsachgemäßen Umgang mit dem Produkt entstehen. Ihre gesetzlich vorgeschriebenen Rechte (sofern
vorhanden) bleiben davon unberührt.
ACHTUNG
Wenn die Sicherheitsmaßnahmen nicht eingehalten werden oder das Produkt unsachgemäß verwendet wird,
besteht Feuergefahr und die Gefahr schwerer Verletzungen.
Diese Gebrauchsanweisung erläutert die richtige Handhabung des Produkts und enthält wichtige
Sicherheitshinweise, um Unfälle zu verhindern. Lesen Sie diese Anweisungen sorgfältig durch und verwenden Sie
das Produkt sachgemäß. Bewahren Sie diese Gebrauchsanweisung zum späteren Nachschlagen sorgfältig auf.
Für Sony-Händler
Für die Installation eines Plasmafernsehgeräts sind mindestens zwei Personen erforderlich, es muss mit besonderer
Sorgfalt gearbeitet werden und es sind spezielle Arbeitsabläufe zu beachten. Lesen Sie diese Gebrauchsanweisung
sorgfältig durch, wenn Sie mit der Installation eines Plasmafernsehgeräts betraut sind. Sony übernimmt keine
Haftung für Unfälle bzw. Schäden, die durch eine fehlerhafte Installation oder unsachgemäßen Umgang mit dem
Produkt entstehen. Ihre gesetzlich vorgeschriebenen Rechte (sofern vorhanden) bleiben davon unberührt.
Händigen Sie diese Gebrauchsanweisung nach der Installation bitte an den Kunden aus.
Sicherheit
Bei der Entwicklung von Sony-Produkten wird besonderer Wert auf den Faktor Sicherheit gelegt. Wenn ein
Produkt jedoch nicht sachgemäß verwendet wird, kann es durch Feuer, einen elektrischen Schlag, das Umkippen
oder das Herunterfallen des Geräts zu schweren Verletzungen kommen. Beachten Sie bitte unbedingt die
Sicherheitsmaßnahmen, um solche Unfälle zu vermeiden.
VORSICHT
Dieser Glasständer wurde ausschließlich für die folgenden Geräte konzipiert. Wenn Sie andere Geräte auf diesem
Ständer montieren, sind diese Geräte unter Umständen nicht stabil befestigt und es besteht Unfallgefahr.
Spezifizierte Produkte (Stand: März 2004): Farbfernsehgerät mit Flachbildschirm
(KE-42MR1/KDE-P42MRX1/KE-P42MRX1/KE-50MR1/
KDE-P50MRX1/KE-P50MRX1/KLV-L42MRX1/KDL-L42MRX1(UK))
Es empfiehlt sich, den Glasständer nicht zu nahe an der Wand aufzustellen.
2 (DE)
ACHTUNG
Bitte beachten Sie unbedingt die folgenden Sicherheitsmaßnahmen! Andernfalls kann es durch Feuer,
einen elektrischen Schlag, das Umkippen oder das Herunterfallen des Geräts zu schweren oder gar
tödlichen Verletzungen kommen.
Lassen Sie die Installation unbedingt von einem Sony-Händler ausführen.
Werden die Installationsarbeiten von anderen Personen als den Fachleuten eines Sony-Händlers ausgeführt,
besteht die Gefahr schwerer Verletzungen, denn das Display und der Ständer sind sehr schwer.
Lehnen und hängen Sie sich nicht an den Ständer.
Andernfalls könnte der Ständer umkippen und Sie könnten sich verletzen.
Ergreifen Sie unbedingt geeignete Maßnahmen, um ein Umkippen des
Ständers zu verhindern.
Andernfalls könnte der Glasständer bei einem Erdbeben umkippen und es besteht die Gefahr von Sachschäden
und Verletzungen. Verankern Sie den Ständer an einer Wand usw., damit er nicht umkippen kann.
Stellen Sie den Ständer unbedingt auf einer stabilen und ebenen Bodenfläche
auf.
Achten Sie beim Aufstellen des Glasständers darauf, dass dieser nicht geneigt steht. Andernfalls kann der
Glasständer umkippen oder das Display kann herunterfallen. Dabei besteht die Gefahr von Verletzungen.
Wenn Sie den Ständer auf einer weichen Oberfläche, wie z. B. einer Matte oder einem Teppich, aufstellen, legen Sie
eine feste Platte unter den Ständer.
Verwenden Sie den Ständer nicht, wenn Sprünge zu sehen sind.
Verwenden Sie den Glasständer nicht, wenn das Glas Sprünge zeigt.
Das Glas könnte springen, so dass das Display herunterfällt, und der Ständer
könnte umkippen. Dadurch kann es zu Verletzungen kommen.
Gesprungenes Glas
DE
Deutsch
3 (DE)
ACHTUNG
Bitte beachten Sie unbedingt die folgenden Sicherheitsmaßnahmen! Andernfalls kann es durch Feuer,
einen elektrischen Schlag, das Umkippen oder das Herunterfallen des Geräts zu schweren oder gar
tödlichen Verletzungen kommen.
Lehnen und hängen Sie sich nicht an den Ständer, wenn das Display darauf
installiert ist.
Andernfalls könnte der Ständer umkippen und schwere oder gar tödliche
Verletzungen verursachen.
Blockieren Sie nicht die Lüftungsöffnung am Display.
Wenn Sie die Lüftungsöffnung abdecken (zum Beispiel mit einem Tuch), kann es
im Inneren des Geräts zu einem Wärmestau kommen, der ein Feuer auslösen kann.
Achten Sie darauf, das Netzkabel und Display-Schnittstellenkabel nicht
einzuklemmen.
• Achten Sie darauf, das Netzkabel und das Display-Schnittstellenkabel bei der
Montage des Displays am Ständer nicht einzuklemmen. Wenn das Netzkabel
oder das Display-Schnittstellenkabel beschädigt wird, besteht Feuergefahr oder
die Gefahr eines elektrischen Schlags.
•Treten Sie nicht auf das Netzkabel oder das Display-Schnittstellenkabel, wenn
Sie das Display tragen. Das Netzkabel und das Display-Schnittstellenkabel
könnten beschädigt werden. In diesem Fall besteht Feuergefahr oder die Gefahr
eines elektrischen Schlags.
VORSICHT
Wenn Sie die folgenden Sicherheitsmaßnahmen nicht beachten, besteht die Gefahr von Verletzungen
und Sachschäden.
Montieren Sie auf dem Ständer ausschließlich die angegebenen Geräte.
Dieser Ständer ist ausschließlich für die angegebenen Geräte konzipiert. Wenn Sie andere als die angegebenen
Geräte installieren, kann der Ständer umkippen und es besteht die Gefahr von Sachschäden und Verletzungen.
Befestigen des Displays.
Befestigen Sie das Display unbedingt mithilfe der mitgelieferten Fixierwinkel. Wenn das Display nicht sicher
befestigt wird, kann es herunterfallen und Verletzungen verursachen.
Üben Sie keinen Druck auf das Glas aus und stoßen Sie nicht dagegen.
Stützen Sie sich beim Installieren des Displays nicht mit den Händen auf dem Glas ab. Stoßen Sie nicht mit harten
Gegenständen, wie z. B. einem Schraubenzieher, an den Ständer.
Das Glas kann springen und Verletzungen verursachen.
4 (DE)
Wenn Sie den Glasständer tragen
Wenn Sie versuchen, den Glasständer allein umzustellen, oder dabei nicht die erforderlichen
Sicherheitsmaßnahmen beachten, kann es zu Verletzungen kommen. Um dies zu vermeiden, gehen Sie unbedingt
wie im Folgenden erläutert vor.
• Zum Tragen des Glasständers sind mindestens zwei Personen erforderlich. Nehmen Sie unbedingt zuvor das
Display ab.
• Achten Sie darauf, sich nicht die Zehen unter der Bodenplatte oder der Glaskante einzuklemmen.
Schützen Sie das Glas vor heftigen Stößen.
Dieser Ständer besteht aus gehärtetem Glas, aber Sie sollten ihn trotzdem mit
Sorgfalt behandeln. Wenn das Glas springt, kann es zu Verletzungen durch
Glassplitter kommen. Beachten Sie deshalb die folgenden Sicherheitsmaßnahmen.
• Stoßen Sie nicht gegen das Glas und lassen Sie keine scharfkantigen
Gegenstände auf das Glas fallen. Setzen Sie das Glas keinen heftigen Stößen aus.
• Kratzen Sie nicht mit scharfkantigen Gegenständen über das Glas und stoßen
Sie nicht mit solchen Gegenständen gegen das Glas.
• Stoßen Sie nicht mit harten Gegenständen, wie z. B. einen Staubsauger, gegen
die Glaskanten.
Hinweis zur Installation
Stellen Sie den Ständer auf einer stabilen und flachen Bodenfläche auf. Stellen Sie den Ständer nicht schräg oder
geneigt auf. Befolgen Sie dazu die folgenden Sicherheitsmaßnahmen:
–Wenn Sie den Ständer auf einer weichen Oberfläche, wie z. B. einer Matte oder einem Teppich, aufstellen, legen
Sie eine feste Platte unter den Ständer.
– Stellen Sie den Ständer nicht in der Nähe von Heizungen oder an Orten auf, an denen er direktem Sonnenlicht
ausgesetzt ist.
– Stellen Sie den Ständer nicht an einem sehr warmen oder feuchten Ort oder im Freien auf.
Hinweis zur Verwendung
Um den Ständer sauber zu halten, wischen Sie ihn gelegentlich mit einem trockenen weichen Tuch ab. Hartnäckige
Verschmutzungen können Sie mit einem Tuch entfernen, das Sie leicht mit einer Lösung aus Wasser und
Reinigungsmittel angefeuchtet haben. Wischen Sie den Bereich anschließend mit einem weichen, trockenen Tuch
ab. Verwenden Sie keine Chemikalien wie Verdünnung oder Benzin. Diese könnten die Oberfläche des Ständers
angreifen.
5 (DE)
Für Sony-Händler
Lesen Sie die oben erläuterten Sicherheitsmaßnahmen sorgfältig durch und
beachten Sie bei der Installation, der Wartung, der Überprüfung und der
Reparatur des Ständers alle relevanten Sicherheitsmaßnahmen.
Die Installationsarbeiten müssen unbedingt von mindestens zwei Personen
ausgeführt werden.
Das Display muss von mindestens zwei Personen auf dem Glasständer installiert werden. Wenn Sie versuchen, das
Display allein am Ständer zu montieren, besteht Unfallgefahr und Sie können sich verletzen. Halten Sie kleine
Kinder bei der Installation unbedingt fern.
Gehen Sie bei der Installation des Displays unbedingt wie im Folgenden
beschrieben vor, um eine sichere Installation zu gewährleisten.
Wenn das Display nicht sicher installiert wird, kann es herunterfallen und Verletzungen verursachen.
Überprüfen Sie die gelieferten Teile
Bezeichnung Menge Bezeichnung Menge
Glasständer Fixierwinkel
12
6 (DE)
Installieren des Displays
ACHTUNG
Wenn das Netzkabel unter oder zwischen irgendwelchen Teilen eingeklemmt wird, kann es zu einem
Kurzschluss kommen und es besteht die Gefahr eines elektrischen Schlags.
Wenn Sie über das Netzkabel oder das Display-Schnittstellenkabel stolpern, kann der Ständer umkippen und
Verletzungen verursachen.
Ziehen Sie das Netzkabel und das Display-Schnittstellenkabel durch die
Bohrung im Ständer.
Legen Sie vor der Montage des Displays den Aufstellort fest und stellen Sie den Ständer auf den Boden.
Das Display ist schwer. Legen Sie deshalb zunächst den Aufstellort fest und stellen Sie den Ständer dort ab,
bevor Sie das Display am Ständer montieren.
Hinweis
Ziehen und schieben Sie den Ständer nicht, wenn er auf dem Boden steht. Andernfalls können sich die
Gummifüße von der Bodenplatte des Ständers lösen.
Schließen Sie das Netzkabel und
1
das Display-Schnittstellenkabel an
das Display an.
z Tipp
Näheres zum Anschließen des Netzkabels und
des Display-Schnittstellenkabels finden Sie in der
Bedienungsanleitung zum Sony-Farbfernsehgerät
mit Flachbildschirm oder LCD-Bildschirm.
Hinweise
•Wenn das Gewicht des Displays auf den
Lautsprechern ruht, können diese sich
verformen oder die Verbindung kann sich
lockern. Beachten Sie die folgenden
Sicherheitsmaßnahmen, um dies zu
vermeiden (nur bei den Modellen KLVL42MRX1, KDL-L42MRX1(UK)):
–Halten Sie das Display beim Tragen nicht
an den Lautsprechern.
– Legen Sie zum Anschließen von Kabeln an
das Display Verpackungsmaterial o. ä. auf
den Fußboden und legen Sie das Display
mit dem Bildschirm nach unten so auf das
Verpackungsmaterial, dass die
Lautsprecher an den beiden Seiten des
Displays über das Verpackungsmaterial
hinausragen.
• Achten Sie darauf, dass das Display stabil
liegt.
• Legen Sie ein weiches Tuch unter das Display,
um den Bildschirm des Displays vor Schäden
oder Verschmutzungen zu schützen.
Rückseite des Displays
Weiches Tuch
KE-42MR1/KDE-P42MRX1/KE-P42MRX1/
Lautsprecher (links)
Weiches Tuch
Netzkabel
DisplaySchnittstellenkabel
KE-50MR1/KDE-P50MRX1/KE-P50MRX1
Verpackungsmaterial u. ä.
Rückseite des
Displays
Netzkabel
DisplaySchnittstellenkabel
Lautsprecher (rechts)
KLV-L42MRX1/KDL-L42MRX1(UK)
Von jetzt an zeigen Abbildungen, bei denen der Modellname nicht ausdrücklich angegeben ist, das
Farbfernsehgerät KLV-L42MRX1 bzw. KDL-L42MRX1(UK) mit Flachbildschirm.
7 (DE)

Montieren Sie das Display am Ständer.
2
1 Ziehen Sie das Netzkabel und das Display-Schnittstellenkabel durch die Bohrung im Ständer.
2 Überprüfen Sie zuvor die Position der vier Bohrungen in den Halterungen am Ständer.
Führen Sie die Haken an der Rückseite des Displays durch die Bohrungen in den Halterungen am
Ständer.
Rückseite des Displays
Vorderseite des Ständers
2
1
3 Vergewissern Sie sich, dass Sie die Haken am Display vollständig durch die vier Bohrungen in den
Halterungen geführt haben. Senken Sie das Display dann gerade nach unten ab, bis die Haken fest in den
Halterungen sitzen.
Haken
8 (DE)
Ziehen Sie das Netzkabel und das Display-Schnittstellenkabel durch die
3
Öffnung im Ständer, so dass die Kabel nicht durchhängen.
Nachdem Sie das Netzkabel und das Display-Schnittstellenkabel durch die Öffnung im Ständer gezogen
haben, ziehen Sie die Kabel so weit an, dass sie nicht durchhängen.
Netzkabel und Display-Schnittstellenkabel
Fixieren des Displays
Bringen Sie die Fixierwinkel an, um das Display so zu fixieren, dass es
nicht herunterfallen kann.
1 Schieben Sie je einen Fixierwinkel zwischen die Schraube am oberen Teil der Halterung am Ständer und
dem Haken am Display.
2 Schieben Sie den Fixierwinkel so weit, bis die innere Ecke des Winkels an die Schraube stößt.
Fixierwinkel
9 (DE)
Sicherheitsmaßnahmen, um ein Kippen des Geräts
zu verhindern
ACHTUNG
Ergreifen Sie unbedingt geeignete Maßnahmen, um ein Umkippen des Ständers zu verhindern. Andernfalls
könnte der Glasständer bei einem Erdbeben umkippen und es besteht die Gefahr von Sachschäden und
Verletzungen. Sichern Sie den Ständer, indem Sie ein Seil oder eine Kette am Sicherungsbolzen anbringen und
das andere Ende des Seils bzw. der Kette an einer Wand oder einem Pfeiler befestigen.
Halten Sie eine handelsübliche Sicherungskette oder ein handelsübliches Sicherungskabel sowie einen
Maueranker bereit.
1 Bringen Sie den Maueranker an einer soliden Wand oder einem Pfeiler an.
2 Ziehen Sie die Sicherungskette oder das Sicherungskabel durch die beiden Bohrungen der
Sicherheitsbeschläge und befestigen Sie dann das andere Ende der Kette oder des Kabels am Maueranker.
Sicherheitsbeschläge
2
1
Maueranker
10 (DE)

Technische Daten
Maßeinheit: mm
Gewicht: 57 Kg
900
480
340
960
195
617
310
713
1160
1182
Änderungen, die dem technischen Fortschritt dienen, bleiben vorbehalten.
11 (DE)
Grazie per avere acquistato il presente prodotto.
Per i clienti
L’installazione del presente prodotto deve essere eseguita esclusivamente da personale di assistenza Sony
qualificato, poiché richiede la presenza di almeno due persone, particolare attenzione, il rispetto delle norme di
sicurezza e competenza. Sony non può essere ritenuta responsabile per eventuali incidenti o danni causati da
un uso o un’installazione errati. I diritti legali, se previsti, non vengono violati.
ATTENZIONE
In caso di inosservanza delle precauzioni di sicurezza o di uso errato del prodotto, è possibile che si verifichino
ferite gravi o incendi.
Nel presente manuale delle istruzioni, vengono descritte le modalità d’uso del prodotto e importanti precauzioni
necessarie per evitare incidenti. Leggere attentamente il presente manuale e utilizzare il prodotto in modo corretto.
Assicurarsi inoltre di conservare il presente manuale per eventuali riferimenti futuri.
Per gli installatori Sony
L’installazione del televisore al plasma richiede la presenza di due persone, particolare attenzione e competenza.
Durante l’installazione del televisore al plasma, consultare attentamente il presente manuale. Sony non può essere
ritenuta responsabile per eventuali incidenti o danni causati da un uso o un’installazione errati. I diritti legali, se
previsti, non vengono violati. Dopo avere completato l’installazione, consegnare il presente manuale al cliente.
Informazioni sulla sicurezza
Sebbene i prodotti Sony siano progettati per essere sicuri, è possibile che se il prodotto viene utilizzato in modo
errato si verifichino ferite gravi dovute a incendi, scosse elettriche, al capovolgimento o alla caduta del prodotto
stesso. Onde evitare tali incidenti, assicurarsi di osservare le precauzioni per la sicurezza.
AVVERTENZA
Il presente supporto mobile è stato progettato per essere utilizzato esclusivamente con i prodotti riportati di
seguito. L’uso con altri apparecchi potrebbe comportare il rischio di instabilità con conseguenti ferite.
Prodotti specificati (marzo 2004): televisore a colori a schermo piatto
(KE-42MR1/KDE-P42MRX1/KE-P42MRX1/KE-50MR1/KDE-P50MRX1/
KE-P50MRX1/KLV-L42MRX1/KDL-L42MRX1(UK))
Si consiglia di installare il supporto mobile a distanza ridotta da una parete.
2 (IT)
ATTENZIONE
Se le precauzioni riportate di seguito non vengono rispettate, è possibile procurarsi ferite gravi o mortali
a causa di incendi o scosse elettriche oppure in seguito al capovolgimento o alla caduta del prodotto.
Assicurarsi che l’installazione venga eseguita da un installatore Sony.
Se l’installazione non viene eseguita da un installatore Sony, è possibile procurarsi ferite gravi in quanto il display e
il supporto sono estremamente pesanti.
Non appoggiarsi né aggrapparsi al supporto.
Il supporto potrebbe capovolgersi e causare ferite.
Assicurarsi di prendere le dovute precauzioni in modo che il supporto non si
capovolga.
Diversamente, è possibile, ad esempio durante un terremoto, che il supporto mobile si capovolga causando ferite o
danni a oggetti. Fissare saldamente il supporto ad una parete, onde evitare che si capovolga.
Assicurarsi di installare il supporto su un pavimento solido e piano.
Non installare il supporto mobile in posizione inclinata, onde evitare che il supporto stesso si capovolga o che il
display cada causando ferite.
Se il supporto viene installato su una superficie morbida quale un tappeto, prima appoggiarvi sopra un pannello.
Non utilizzare il supporto se danneggiato.
Non utilizzare il supporto mobile se presenta incrinature.
Il vetro potrebbe rompersi e il display cadere o il supporto capovolgersi
provocando ferite.
Supporto incrinato
IT
Italiano
3 (IT)

ATTENZIONE
Se le precauzioni riportate di seguito non vengono rispettate, è possibile procurarsi ferite gravi o mortali
a causa di incendi o scosse elettriche oppure in seguito al capovolgimento o alla caduta del prodotto.
Non appoggiarsi né aggrapparsi al supporto quando il display è installato.
Il supporto potrebbe capovolgersi causando ferite gravi o mortali.
Non coprire la presa di ventilazione del display.
Se la presa di ventilazione viene coperta (con un panno o simili), è possibile che
l’apparecchio si surriscaldi provocando incendi.
Fare attenzione che il cavo di alimentazione o il cavo di interfaccia del display
non si pieghino.
• Durante l’installazione del display sul supporto, evitare che il cavo di
alimentazione e il cavo di interfaccia del display si pieghino. Se i suddetti cavi
vengono danneggiati, è possibile che si verifichino incendi o scosse elettriche.
• Durante il trasporto del supporto del display, non camminare sul cavo di
alimentazione o sul cavo di interfaccia del display. Diversamente, i suddetti cavi
potrebbero danneggiarsi e causare incendi o scosse elettriche.
AVVERTENZA
Se le precauzioni riportate di seguito non vengono rispettate, è possibile causare ferite o danni a
oggetti.
Non installare apparecchi diversi da quelli specificati.
Il presente supporto è stato progettato per essere utilizzato esclusivamente con i prodotti specificati. Se vengono
installati apparecchi diversi da quelli specificati, è possibile che cadano e provochino ferite o danni a oggetti.
Applicazione del display.
Assicurarsi di applicare il display al supporto utilizzando le piastre di fissaggio in dotazione. Se il display non
viene applicato in modo saldo, è possibile che cada causando ferite.
Non applicare pressione eccessiva sul vetro, né sottoporlo ad urti di alcun
genere.
Durante l’installazione del display, non applicare pressione eccessiva sul vetro con le mani. Non colpire il vetro con
oggetti, quale un cacciavite o simili, onde evitare che si rompa causando ferite.
4 (IT)
Durante il trasporto del supporto mobile
Se si tenta di spostare il supporto mobile da soli o se non vengono osservate le procedure corrette, è possibile che
vengano causate ferite. Per evitare tale problema, assicurarsi di seguire le precauzioni riportate di seguito.
• Assicurarsi che il supporto mobile venga trasportato da due o più persone solo dopo avere rimosso il display.
• Fare attenzione a non schiacciarsi le dita sotto alla piastra inferiore o all’angolo del vetro.
Non sottoporre il vetro a urti eccessivi.
Sebbene il presente supporto sia costruito in vetro temperato, occorre maneggiarlo
con cura. Se il vetro si rompe, i frammenti potrebbero causare ferite; pertanto,
osservare le precauzioni riportate di seguito.
•Non colpire il vetro né lasciarvi cadere sopra oggetti estremamente appuntiti.
Evitare urti eccessivi.
•Non graffiare né colpire il vetro con oggetti appuntiti.
•Non urtare gli spigoli del vetro con oggetti pesanti quali un aspirapolvere.
Nota sull’installazione
Installare il supporto su una superficie solida e piana. Non installare il supporto in una posizione angolare né in
pendenza. Onde evitare quanto riportato sopra, osservare le seguenti precauzioni.
– Se il supporto viene installato su una superficie morbida quale un tappeto, prima appoggiarvi sopra un
pannello.
–Non installare il supporto in luoghi soggetti alla luce solare diretta né in prossimità di impianti di riscaldamento.
–Non installare il supporto in luoghi soggetti a temperature elevate o umidi né in esterni.
Nota sull’uso
Per mantenere pulito il supporto, pulirlo periodicamente con un panno morbido asciutto. Rimuovere le macchie
persistenti con un panno leggermente inumidito con un detergente diluito. Quindi, asciugare l’area con un panno
morbido asciutto. Non utilizzare sostanze chimiche, quali solventi o benzene, onde evitare di danneggiare la
finitura del supporto.
5 (IT)
Per gli installatori Sony
Assicurarsi di leggere attentamente le precauzioni per la sicurezza di cui sopra e
di prestare particolare attenzione durante l’installazione, la manutenzione, i
controlli e le riparazioni del presente prodotto.
Assicurarsi che l’installazione venga eseguita da almeno due persone.
Assicurarsi che l’installazione del display sul supporto mobile venga eseguita da almeno due persone. Se
l’installazione viene eseguita da una sola persona, è possibile causare incidenti o ferite. Assicurarsi che durante
l’installazione non vi siano bambini presenti.
Assicurarsi che il display venga installato in modo saldo seguendo le
istruzioni.
Se il display non viene installato in modo saldo, è possibile che cada causando ferite.
Identificazione delle parti
Nome Quantità Nome Quantità
Supporto mobile Piastra di fissaggio
12
6 (IT)
Installazione del display
ATTENZIONE
Se il cavo di alimentazione rimane incastrato sotto o tra parti dell’apparecchio, è possibile che si verifichino
cortocircuiti o scosse elettriche.
Prestare attenzione a non inciampare nel cavo di alimentazione o nel cavo di interfaccia del display, onde
evitare che il supporto si capovolga e causi ferite.
Fare passare il cavo di alimentazione e il cavo di interfaccia del display
attraverso il foro del supporto.
Stabilire la posizione di installazione e collocarvi il supporto prima di installare il display.
Poiché il display è pesante, si consiglia di stabilire la posizione di installazione, quindi di collocarvi il supporto
prima di installare il display.
Nota
Non spingere né tirare il supporto mentre è collocato a terra. Diversamente, è possibile che i piedini in gomma
alla base del supporto vengano rimossi.
Collegare al display il cavo di
1
alimentazione e il cavo di
interfaccia del display.
z Suggerimento
Per ulteriori informazioni sul collegamento del
cavo di alimentazione e del cavo di interfaccia
del display, consultare il manuale delle istruzioni
del televisore a colori a schermo piatto o del
televisore a colori LCD Sony.
Note
• Se il peso del display grava sui diffusori, è
possibile questi ultimi vengano deformati o
che i relativi collegamenti si allentino. Per
evitare tali problemi, attenersi a quanto segue
(solo KLV-L42MRX1, KDL-L42MRX1(UK)).
–Non afferrare i diffusori durante il
trasporto del display.
– Durante il collegamento dei cavi al
display, posizionare l’imballaggio o un
materiale simile sul pavimento e collocare
su di esso il display con lo schermo rivolto
verso il basso, in modo che i diffusori su
entrambi i lati dell’apparecchio non
poggino sull’imballaggio o sull’altro
materiale utilizzato.
• Assicurarsi di posizionare in modo stabile il
display.
• Utilizzare un panno morbido per proteggere
lo schermo del display da danni o sporcizia.
Parte posteriore del display
Panno morbido
KE-42MR1/KDE-P42MRX1/KE-P42MRX1/
KE-50MR1/KDE-P50MRX1/KE-P50MRX1
Diffusore (sinistro)
Panno morbido
Diffusore (destro)
Cavo di alimentazione
Cavo di interfaccia
del display
Imballaggio o materiale simile
Parte posteriore del
display
Cavo di
alimentazione
Cavo di interfaccia
del display
KLV-L42MRX1/KDL-L42MRX1(UK)
Le illustrazioni riportate da questo punto in poi per le quali non viene specificato un nome di modello si basano sul
televisore a colori a schermo piatto KLV-L42MRX1, KDL-L42MRX1(UK).
7 (IT)
Installare il display sul supporto.
2
1 Fare passare il cavo di alimentazione e il cavo di interfaccia del display attraverso il foro del supporto.
2 Verificare innanzitutto la posizione dei quattro fori sulle parti di fissaggio del supporto.
Applicare i ganci posti nella parte posteriore del display ai fori sulle parti di fissaggio del supporto.
Parte posteriore del display
Parte anteriore del supporto
2
1
3 Verificare che i ganci nella parte posteriore del display siano completamente inseriti nei quattro fori sulle
parti di fissaggio. Quindi fare scorrere il display perpendicolarmente verso il basso finché non si trova in
posizione.
Gancio
8 (IT)
Eliminare l’eventuale allentamento del cavo di alimentazione e del cavo
3
di interfaccia del display inseriti nel foro del supporto.
Tirare le estremità dei suddetti cavi inseriti nel foro del supporto per eliminarne l’allentamento.
Cavo di alimentazione e cavo di
interfaccia del display
Fissaggio del display
Applicare la piastra di fissaggio per evitare che il display cada.
1 Inserire la piastra di fissaggio tra la vite nella parte superiore della parte di fissaggio del supporto e il
gancio del display.
2 Fare scorrere la piastra di fissaggio finché l’angolo della parte a L non entra in contatto con la vite.
Piastra di fissaggio
9 (IT)
Misure di sicurezza per evitare che il supporto si
capovolga
Avvertimento
Assicurarsi di prendere le dovute precauzioni in modo che il supporto non si capovolga. Diversamente, è
possibile che il supporto mobile si capovolga, ad esempio durante un terremoto, causando ferite o danni a
oggetti. Fissare saldamente il supporto, legando le estremità di una catena o di un cavo al gancio di sicurezza e
ad una parete o ad una colonna.
Preparare un cavo o una catena e una staffa di ancoraggio a parete disponibili in commercio.
1 Fissare la staffa di ancoraggio ad una parete o ad una colonna sufficientemente solida.
2 Fare passare il cavo o la catena in entrambi i fori degli attacchi di ancoraggio, quindi fissare l’altra
estremità del cavo o della catena alla staffa di ancoraggio a parete.
Attacchi di ancoraggio
2
1
Staffa di ancoraggio
a parete
10 (IT)

Caratteristiche tecniche
Unità di misura: mm
Peso: 57 kg
900
480
340
960
195
617
310
713
1160
1182
Il design e le caratteristiche tecniche sono soggetti a modifiche senza preavviso.
11 (IT)

Merci d’avoir fait l’acquisition de ce produit.
A l’attention des clients
L’installation de ce produit doit être réalisée par des techniciens agréés Sony car elle exige la présence d’au
moins deux personnes, certaines précautions, ainsi que des connaissances techniques et l’application de
mesures de sécurité. Sony ne peut en aucun cas être tenu responsable de tout accident ou dommage provoqué
par l’installation ou la manutention incorrecte du produit. Cette clause ne remet pas en cause vos droits légaux
(le cas échéant).
AVERTISSEMENT
Le non-respect des consignes de sécurité ou l’usage incorrect de ce produit peut provoquer des blessures graves ou
des incendies.
Ce mode d’emploi définit l’utilisation correcte du produit et énumère les précautions essentielles pour éviter tout
accident. Lisez attentivement ce manuel et utilisez correctement le produit. Conservez soigneusement ce manuel
pour pouvoir le consulter ultérieurement.
A l’attention des détaillants Sony
Un téléviseur à écran plasma doit être monté par deux personnes spécialisées. Lors de l’installation d’un téléviseur
à écran plasma, reportez-vous au présent mode d’emploi. Sony ne peut en aucun cas être tenu responsable de tout
accident ou dommage provoqué par l’installation ou la manutention incorrecte du produit. Cette clause ne remet
pas en cause vos droits légaux (le cas échéant). Le présent mode d’emploi doit être remis au client après
installation.
A propos des mesures de sécurité
Les produits Sony sont conçus pour vous offrir le maximum de sécurité. Toutefois si les produits sont utilisés de
façon incorrecte, ils peuvent provoquer des blessures graves en cas d’incendie, d’électrocution, de chute ou s’ils
basculent de leur support. Veillez à observer les consignes de sécurité préconisées pour éviter de tels accidents.
ATTENTION
Ce support indépendant est conçu pour être utilisé avec les produits suivants. L’utilisation d’autres appareils avec
ce support peut rendre celui-ci instable et entraîner des blessures.
Equipement spécifié (á partir de mars 2004) : Téléviseur couleur à écran plat
(KE-42MR1/KDE-P42MRX1/KE-P42MRX1/KE-50MR1/
KDE-P50MRX1/KE-P50MRX1/KLV-L42MRX1/
KDL-L42MRX1(UK))
Nous vous recommandons de monter le support indépendant à une faible distance du mur.
2 (FR)

AVERTISSEMENT
Le non-respect des consignes suivantes peut être fatal ou entraîner des blessures graves en cas
d’incendie, d’électrocution, de chute de l’appareil ou s’il bascule de son support.
Confiez l’installation aux revendeurs Sony.
L’installation du produit par des personnes autres que les revendeurs Sony risque de provoquer des blessures
graves car l’écran et le support sont très lourds.
Ne vous appuyez pas sur et ne vous suspendez pas au support.
Le support risque de basculer et de provoquer des blessures.
Prenez toutes les mesures nécessaires afin d’éviter que le support ne tombe.
Dans le cas contraire, le support indépendant risque de tomber lors d’un tremblement de terre et de provoquer des
dommages corporels ou matériels. Ancrez le support au mur etc., afin d’éviter qu’il ne tombe.
Veillez à monter le support sur une surface plane et solide.
Ne montez pas le support indépendant s’il penche d’un côté. Sinon le support risque de basculer ou l’écran risque
de tomber. Ceci pourrait provoquer des blessures.
Si vous montez le support sur une surface moelleuse comme un tapis ou une moquette, posez au préalable une
plaque sur l’emplacement concerné.
N’utilisez pas de support fissuré.
N’utilisez pas le support indépendant s’il est fissuré.
Le verre risque de se rompre et l’écran du téléviseur peut tomber ou le support
risque de basculer. Ceci pourrait provoquer des blessures.
Support fissuré
FR
Français
3 (FR)

AVERTISSEMENT
Le non-respect des consignes suivantes peut être fatal ou entraîner des blessures graves en cas
d’incendie, d’électrocution, de chute de l’appareil ou s’il bascule de son support.
Ne vous appuyez pas sur et ne vous suspendez pas au support sur lequel
l’écran est monté.
Le support risque de basculer et d’entraîner des blessures graves ou la mort.
Ne bouchez pas les orifices de ventilation de l’écran.
Si vous couvrez les orifices de ventilation (avec un drap ou autre), l’écran risque de
surchauffer et de provoquer un incendie.
Veillez à ne pas coincer le cordon d’alimentation ou le câble d’interface vidéo.
•Veillez à ne pas coincer le cordon d’alimentation ou le câble d’interface vidéo
lorsque vous installez l’écran sur le support. Si le cordon d’alimentation ou le
câble d’interface vidéo est endommagé, ceci peut provoquer un incendie ou une
électrocution.
•Ne marchez pas sur le cordon d’alimentation ou le câble d’interface vidéo
lorsque vous transportez l’écran. Si le cordon d’alimentation ou le câble
d’interface vidéo est endommagé, ceci peut provoquer un incendie ou une
électrocution.
ATTENTION
Le non-respect des précautions suivantes peut entraîner des dommages corporels ou matériels.
N’installez pas d’autre équipement que le produit spécifié.
Ce support est conçu pour être utilisé uniquement avec le produit spécifié. Si vous installez un autre équipement
que celui spécifié, il risque de tomber et de provoquer des dommages corporels ou matériels.
Fixation de l’écran du téléviseur.
Veuillez fixer l’écran du téléviseur au support à l’aide des plaques de fixation fournies. Si l’écran n’est pas
correctement monté, il risque de tomber et de provoquer des blessures.
Ne vous appuyez pas sur le verre et ne le soumettez pas à des chocs.
Ne vous appuyez pas sur le verre avec les mains lors du montage de l’écran. Ne cognez pas le verre avec des objets
durs, tels qu’un tournevis, etc. Le verre risque de se briser et de provoquer des blessures.
4 (FR)

Lors du transport du support indépendant
Vous risquez de vous blesser si vous essayez de déplacer le support indépendant seul ou sans tenir compte des
procédures appropriées. Afin d’éviter cela, suivez le conseil ci-dessous.
• Assurez-vous qu’au moins deux personnes transportent le support indépendant uniquement après avoir retiré
l’écran du téléviseur.
•Veillez à ne pas coincer vos pieds sous le socle ou au coin de la plaque de verre.
Ne soumettez pas le verre à un choc trop violent.
Même si ce support est réalisé en verre trempé, il est nécessaire de le manier avec
précaution. Si le verre se rompt, les éclats de verre peuvent provoquer des
blessures. Respectez les mesures de sécurité ci-dessous.
•Ne cognez pas le verre et ne laissez aucun objet pointu tomber dessus. Evitez les
chocs violents.
•Ne rayez pas le verre et évitez de le cogner avec des objets pointus.
•Ne frappez pas les bords du verre avec un objet lourd, tel un aspirateur.
Remarque à propos de l’installation
Montez le support sur une surface plane et solide. Le support doit être installé à la verticale et jamais incliné. Pour
éviter cette situation, respectez les précautions suivantes :
– Si vous montez le support sur une surface moelleuse comme un tapis ou une moquette, posez au préalable une
plaque sur l’emplacement concerné.
–N’installez pas le support dans un endroit exposé à la lumière du soleil directe ou à proximité d’une source de
chaleur.
–N’installez pas le support dans un endroit exposé à la chaleur ou à l’humidité, ou à l’extérieur.
Remarque à propos de l’utilisation
Pour maintenir le support propre, nettoyez-le de temps en temps avec un chiffon doux et sec. Les tâches tenaces
peuvent être nettoyées avec un chiffon légèrement imprégné de détergent dilué. Essuyez ensuite la surface avec un
chiffon doux et sec.
N’utilisez pas de produits chimiques, tels qu’un diluant ou de l’essence, car ils endommagent la surface du
support.
5 (FR)

Pour les revendeurs Sony
Lisez attentivement les consignes de sécurité énoncées ci-dessus et soyez
particulièrement attentifs lors de l'installation, de la maintenance, du contrôle et
de la réparation de ce produit.
Lors de cette étape, assurez-vous qu’au moins deux personnes effectuent
l’installation.
Assurez-vous qu’au moins deux personnes effectuent l’installation de l’écran sur le support indépendant.
L’installation par une seule personne risque de provoquer un accident ou des blessures. Eloignez les enfants en bas
âge lors de l’installation.
Assurez-vous de monter l’écran en respectant la procédure recommandée.
Si l’écran n’est pas correctement monté, il risque de tomber et de provoquer des blessures.
Vérification des pièces
Nom Quantité Nom Quantité
Support indépendant Plaque de fixation
12
6 (FR)

Montage de l’écran du téléviseur
AVERTISSEMENT
Si vous coincez le cordon d’alimentation sous ou entre des pièces de l’appareil, ceci peut provoquer un courtcircuit ou une électrocution.
Si vous trébuchez sur le cordon d’alimentation ou le câble d’interface vidéo, le support risque de tomber et de
provoquer des blessures.
Passez le cordon d’alimentation et le câble d’interface vidéo à travers l’orifice
du support.
Choisissez l’emplacement de montage et posez le support sur le sol avant d’installer l’écran du
téléviseur.
Comme l’écran est lourd, il est recommandé de choisir l’emplacement de montage et d’y poser le support
indépendant avant d’installer l’écran du téléviseur sur le support.
Remarque
Ne poussez pas et ne tirez pas sur le support lorsqu’il est sur le sol. Les patins en caoutchouc situés à la base du
support risqueraient de s’enlever.
Raccordez le cordon
1
d’alimentation et le câble
d’interface vidéo à l’écran du
téléviseur.
z Conseil
Pour obtenir davantage d’informations sur le
raccordement du cordon d’alimentation et du
câble d’interface de l’écran, reportez-vous au
mode d’emploi du téléviseur couleur à écran plat
ou du téléviseur couleur LCD Sony.
Remarques
• Si le poids de l’appareil est supporté par les
enceintes, celles-ci risquent de se déformer ou
de se desserrer. Pour éviter cela, observez les
instructions suivantes. (KLV-L42MRX1, KDLL42MRX1(UK) uniquement)
–Ne déplacez pas l’appareil en le tenant par
les enceintes.
– Lorsque vous connectez les câbles à
l’appareil, placez le matériel d’emballage
sur le sol et posez l’écran de l’appareil
dessus, afin que les enceintes de chaque
côté de l’appareil ne dépassent pas du
matériel d’emballage.
•Veillez à placer l’appareil de façon stable.
• Pour éviter de rayer ou de salir la surface de
l’écran, protégez-la avec un linge doux.
Face arrière de l’écran
Chiffon doux
KE-42MR1/KDE-P42MRX1/KE-P42MRX1/
Haut-parleur (gauche)
Chiffon doux
Cordon d’alimentation
Câble d’interface
de l’écran
KE-50MR1/KDE-P50MRX1/KE-P50MRX1
Matériel d’emballage
Face arrière de
l’écran
Cordon
d’alimentation
Câble d’interface
de l’écran
Haut-parleur (droit)
KLV-L42MRX1/KDL-L42MRX1(UK)
Les illustrations sans nom de modèle apparaissant à partir de ce point font référence au téléviseur couleur à écran
plat KLV-L42MRX1, KDL-L42MRX1(UK).
7 (FR)

Installez le téléviseur sur le support.
2
1 Passez le cordon d’alimentation et le câble d’interface vidéo à travers l’orifice du support.
2 Vérifiez préalablement la position des quatre orifices sur le support.
Fixez les crochets à l’arrière de l’écran dans les orifices du support.
Face arrière de
l’écran du téléviseur
Face avant du support
2
1
3 Assurez-vous que les crochets à l’arrière de l’écran sont entièrement insérés dans les quatre orifices
prévus à cet effet. Puis, faites glisser l’écran vers le bas jusqu’à ce qu’il s’encliquette.
Crochet
8 (FR)

Tendez le cordon d’alimentation et le câble vidéo que vous avez passés à
3
travers l’orifice du support.
Tirez sur les extrémités du cordon d’alimentation et du câble d’interface vidéo à travers l’orifice du support
pour tendre le cordon et le câble.
Cordon d’alimentation et câble
d’interface vidéo
Fixation de l’écran du téléviseur
Fixez la plaque de fixation pour éviter que l’écran ne tombe.
1 Insérez la plaque de fixation entre la vis située dans la partie supérieure du dispositif de fixation du
support et le crochet de l’écran du téléviseur.
2 Glissez la plaque de fixation jusqu’à ce que le coin de la pièce en L touche la vis.
Plaque de fixation
9 (FR)

Mesures de sécurité pour éviter le basculement
AVERTISSEMENT
Prenez les dispositions nécessaires pour empêcher le basculement du support. Si vous ne prenez pas ces
dispositions, le support indépendant risque de tomber en cas de tremblement de terre et de provoquer des
dégâts matériels ou des blessures. Ancrez le support à l’aide d’une corde ou d’une chaîne en attachant l’une des
ses extrémités au crochet de fixation et l’autre au mur ou au pilier.
Préparez au préalable une corde ou une chaîne disponible dans le commerce, ainsi qu’un support d’ancrage
mural.
1 Fixez le support d’ancrage mural à un mur ou un pilier solide.
2 Faites passer la corde ou la chaîne par les orifices des dispositifs d’ancrage, puis serrez l’autre extrémité
de la corde ou de la chaîne sur le support d’ancrage mural.
Pièces d’ancrage
2
1
Patte d’ancrage
mural
10 (FR)

Spécifications
Unité : mm
Poids : 57 kg
900
480
340
960
195
617
310
713
1160
1182
La conception et les spécifications du produit sont sujettes à modification sans préavis.
11 (FR)

Dank u voor uw aankoop van dit product.
Voor klanten
Dit product mag alleen door bevoegde servicetechnici van Sony worden geïnstalleerd. De installatie moet
namelijk worden uitgevoerd door ten minste twee personen en er zijn speciale zorg, veiligheid en kennis
vereist voor deze installatie. Sony is niet aansprakelijk voor ongelukken of schade als gevolg van onjuist
handelen of onjuiste installatie. Uw wettelijke rechten (indien van toepassing) worden niet aangetast.
WAARSCHUWING
Als er geen rekening wordt gehouden met de veiligheidsmaatregelen of als het product onjuist wordt gebruikt, kan
dit ernstig letsel of brand tot gevolg hebben.
In deze gebruiksaanwijzing wordt beschreven hoe het product moet worden gebruikt en worden belangrijke
voorzorgsmaatregelen gegeven die zijn vereist om ongelukken te voorkomen. Lees deze gebruiksaanwijzing
aandachtig door en gebruik het product op de juiste manier. Bewaar de gebruiksaanwijzing voor toekomstig
gebruik.
Voor Sony-handelaars
Er zijn twee personen, speciale zorg en kennis vereist voor de installatie van een plasmatelevisie. Lees deze
handleiding aandachtig door tijdens de installatie van een plasmatelevisie. Sony is niet aansprakelijk voor
ongelukken of schade als gevolg van onjuist handelen of onjuiste installatie. Uw wettelijke rechten (indien van
toepassing) worden niet aangetast. Geef deze gebruiksaanwijzing aan de klant nadat het product is geïnstalleerd.
Veiligheid
Bij het ontwerpen van producten houdt Sony rekening met de veiligheid. Als de producten onjuist worden
gebruikt, kan dit echter ernstig letsel veroorzaken als gevolg van brand, elektrische schokken, omvallen van het
product of vallen van het product. Houd rekening met de veiligheidsmaatregelen om dergelijke ongelukken te
voorkomen.
LET OP
Deze zwevende standaard is alleen bedoeld voor gebruik met de volgende producten. Gebruik met andere
producten leidt wellicht tot instabiliteit. Dit kan letsel tot gevolg hebben.
Opgegeven producten (vanaf maart 2004): Flatpanel-kleurentelevisie
(KE-42MR1/KDE-P42MRX1/KE-P42MRX1/KE-50MR1/
KDE-P50MRX1/KE-P50MRX1/KLV-L42MRX1/KDL-L42MRX1(UK))
U kunt de zwevende standaard het beste een stukje bij de muur vandaan installeren.
2 (NL)

WAARSCHUWING
Als er geen rekening wordt gehouden met de volgende voorzorgsmaatregelen, kan dit leiden tot ernstig
letsel of de dood als gevolg van brand, elektrische schokken, omvallen van het product of vallen van het
product.
Besteed de installatie uit aan Sony-handelaars.
Als andere personen dan Sony-handelaars de installatie uitvoeren, kan dit ernstig letsel tot gevolg hebben, omdat
het beeldscherm en de standaard erg zwaar zijn.
U moet niet op de standaard leunen of aan de standaard gaan hangen.
De standaard kan dan omvallen en letsel veroorzaken.
Neem voldoende maatregelen om te voorkomen dat de standaard omvalt.
Als u dit niet doet, kan de zwevende standaard omvallen tijdens een aardbeving en letsel of beschadiging van
eigendommen tot gevolg hebben. Veranker de standaard aan een muur of iets dergelijks om te voorkomen dat de
standaard omvalt.
Installeer de standaard op een stevige, vlakke ondergrond.
Installeer de zwevende standaard niet zodat deze overhelt naar een kant. Als u dit wel doet, kan de zwevende
standaard omvallen of kan het beeldscherm vallen. Dit kan letsel tot gevolg hebben.
Als u de standaard op een zachte ondergrond, zoals een mat of een kleed, plaatst, legt u eerst een plank op de
gewenste plaats.
Gebruik geen gebarsten standaard.
Gebruik de zwevende standaard niet als deze is gebarsten.
Het glas kan breken en het beeldscherm kan vallen of de standaard kan omvallen.
Dit kan letsel veroorzaken.
Gebarsten standaard
NL
Nederlands
3 (NL)

WAARSCHUWING
Als er geen rekening wordt gehouden met de volgende voorzorgsmaatregelen, kan dit leiden tot ernstig
letsel of de dood als gevolg van brand, elektrische schokken, omvallen van het product of vallen van het
product.
Leun niet op en hang niet aan de standaard als het beeldscherm op de
standaard is bevestigd.
De standaard kan omvallen. Dit kan ernstig letsel of de dood tot gevolg hebben.
Dek de ventilatieopeningen van het beeldscherm niet af.
Als u de ventilatieopeningen afdekt (bijvoorbeeld met een doek), kan het
beeldscherm oververhit raken. Dit kan brand tot gevolg hebben.
Het netsnoer en de beeldschermkabel mogen niet beklemd raken.
•Het netsnoer en de beeldschermkabel mogen niet beklemd raken wanneer u het
beeldscherm op de standaard installeert. Wordt het netsnoer of de
beeldschermkabel beschadigd, dan kan dit leiden tot brand of elektrische
schokken.
• Ga niet op het netsnoer of de beeldschermkabel staan wanneer u de standaard
verplaatst. Het netsnoer of de beeldschermkabel kan worden beschadigd. Dit
kan leiden tot brand of elektrische schokken.
LET OP
Als er geen rekening wordt gehouden met de volgende voorzorgsmaatregelen, kan dit letsel of
beschadiging van eigendommen tot gevolg hebben.
Plaats geen andere apparaten dan de opgegeven producten op de standaard.
Deze standaard is alleen geschikt voor gebruik met de opgegeven producten. Als u andere apparaten plaatst dan
de opgegeven producten, kunnen deze vallen. Dit kan letsel of beschadiging van eigendommen tot gevolg hebben.
Het beeldscherm bevestigen.
Bevestig het beeldscherm op de standaard met de bijgeleverde montageplaten. Als het beeldscherm niet goed is
bevestigd, kan dit vallen en letsel veroorzaken.
Oefen geen druk uit op het glas en stel het niet bloot aan harde schokken.
Oefen geen druk uit op het glas met uw hand tijdens het installeren van het beeldscherm. Sla niet op het glas met
harde voorwerpen, zoals een schroevendraaier of iets dergelijks.
Het glas kan breken en letsel veroorzaken.
4 (NL)

De zwevende standaard verplaatsen
Als u de zwevende standaard alleen, of niet volgens de juiste procedure, verplaatst, kan dit letsel veroorzaken.
Volg het onderstaande advies om dit te voorkomen.
•Twee of meer personen moeten de zwevende standaard dragen. De standaard mag pas worden opgetild nadat
het beeldscherm is verwijderd.
• Zorg dat uw tenen niet beklemd raken onder de onderste plaat of de hoek van het glas.
Stel het glas niet bloot aan erge schokken.
Deze standaard is gemaakt van getemperd glas, maar u moet nog steeds
voorzichtig zijn. Als het glas breekt, kunnen glassplinters letsel veroorzaken. U
moet dus rekening houden met de onderstaande voorzorgsmaatregelen.
• Sla niet tegen het glas en laat geen voorwerpen met scherpe punten op het glas
vallen. Vermijd erge schokken.
• Kras niet op het glas en duw niet met scherpe voorwerpen tegen het glas.
• Laat geen harde voorwerpen, zoals een stofzuiger, tegen de randen van het glas
stoten.
Opmerking over de installatie
Installeer de standaard op een stevige, vlakke vloer. De standaard mag niet met een hoek of leunend in één richting
worden geïnstalleerd. Neem de volgende voorzorgsmaatregelen in acht om dit te voorkomen.
– Als u de standaard op een zacht oppervlak, zoals een mat of vloerkleed, installeert, moet u eerst een plank op de
gewenste locatie leggen.
– Installeer de standaard niet op een locatie waar deze wordt blootgesteld aan direct zonlicht of aan de warmte
van een verwarmingsbron.
– Installeer de standaard niet op een hete of vochtige locatie of buiten.
Opmerking over het gebruik
U kunt de standaard schoon houden door deze regelmatig schoon te vegen met een droge, zachte doek. U kunt
hardnekkige vlekken verwijderen met een doek die licht is bevochtigd met verdund zeepsop. Veeg het gebied
vervolgens droog met een droge, zachte doek. Gebruik geen chemicaliën, zoals thinner of benzine, omdat deze de
afwerking van de standaard kunnen aantasten.
5 (NL)

Voor Sony-handelaars
Lees de bovenstaande veiligheidsmaatregelen aandachtig door en houd
voldoende rekening met de veiligheid tijdens het installeren, onderhouden,
controleren en repareren van dit product.
Ten minste twee personen moeten het installatiewerk uitvoeren.
Ten minste twee personen moeten het beeldscherm op de zwevende standaard bevestigen. Als één persoon het
installatiewerk uitvoert, kan dit een ongeluk of letsel tot gevolg hebben. Houd kleine kinderen uit de buurt tijdens
de installatie.
Bevestig het beeldscherm stevig op de standaard volgens de juiste procedure.
Als het beeldscherm niet stevig is bevestigd, kan dit vallen en letsel veroorzaken.
De onderdelen controleren
Naam Aantal Naam Aantal
Zwevende standaard Montageplaatje
12
6 (NL)

Het beeldscherm installeren
WAARSCHUWING
Als het netsnoer beklemd raakt onder of tussen onderdelen van de apparatuur, kan dit kortsluiting of
elektrische schokken tot gevolg hebben.
Als u over het netsnoer of de beeldschermkabel struikelt, kan de standaard omvallen. Dit kan letsel tot gevolg
hebben.
Het netsnoer en de beeldschermkabel door het gat in de standaard leiden.
Bepaal eerst de installatieplaats en leg de standaard neer voordat u het beeldscherm installeert.
Aangezien het beeldscherm zwaar is, kunt u het beste eerst bepalen waar u dit wilt installeren en het
beeldscherm daar neerleggen voordat u het beeldscherm op de standaard installeert.
Opmerking
Duw of druk niet op de standaard als deze op de vloer ligt. De rubberen steunen aan de onderzijde van de
standaard kunnen losraken.
Sluit het netsnoer en de
1
beeldschermkabel aan op het
beeldscherm.
z Tip
Raadpleeg de gebruiksaanwijzing van de Sony
flatpanel-kleurentelevisie of LCDkleurentelevisie voor meer informatie over het
aansluiten van het netsnoer en de
beeldschermkabel.
Opmerkingen
• Als de luidsprekers het gewicht van het
beeldscherm moeten dragen, kan dit
vervorming of een losse aansluiting van de
luidsprekers tot gevolg hebben. Houd
rekening met de volgende punten om dit te
voorkomen. (Alleen voor de KLV-L42MRX1,
KDL-L42MRX1(UK))
–Houd de luidsprekers niet vast als u het
beeldscherm verplaatst.
–Wanneer u de kabels aansluit op het
beeldscherm, plaatst u
verpakkingsmateriaal op de vloer en legt u
het beeldscherm met het glas naar
beneden op de vloer zodat de luidsprekers
aan beide kanten van het beeldscherm niet
op het verpakkingsmateriaal rusten.
• Zorg ervoor dat het beeldscherm stabiel ligt.
• Gebruik een zachte doek om het glas van het
beeldscherm te beschermen tegen
beschadiging of vuil.
Achterkant van het beeldscherm
Zachte doek
KE-42MR1/KDE-P42MRX1/KE-P42MRX1/
KE-50MR1/KDE-P50MRX1/KE-P50MRX1
Luidspreker (links)
Verpakkingsmateriaal, enzovoort
Zachte doek
Luidspreker (rechts)
KLV-L42MRX1/KDL-L42MRX1(UK)
Netsnoer
Beeldschermkabel
Achterkant van het
beeldscherm
Netsnoer
Beeldschermkabel
De afbeeldingen die vanaf nu worden weergegeven zonder vermelding van de modelnaam, zijn gebaseerd op de
flatpanel-kleurentelevisie KLV-L42MRX1, KDL-L42MRX1(UK).
7 (NL)

Installeer het beeldscherm op de standaard.
2
1 Leid het netsnoer en de beeldschermkabel door het gat in de standaard.
2 Controleer eerst de positie van de vier bevestigingsgaten op de standaard.
Pas de haken aan de achterzijde van het beeldscherm in de bevestigingsgaten van de standaard.
Achterzijde van het
beeldscherm
2
Voorzijde van de standaard
1
3 Controleer of de haken aan de achterzijde van het beeldscherm volledig in de bevestigingsgaten zijn
geplaatst. Schuif vervolgens het beeldscherm recht omlaag tot dit vastklikt.
Haak
8 (NL)

Trek het netsnoer en de beeldschermkabel die al door het gat in de
3
standaard zijn geleid, strak zodat de speling verdwijnt.
Trek aan de uiteinden van het netsnoer en de beeldschermkabel die al door het gat in de standaard zijn
geleid en trek het netsnoer en de kabel strak zodat de speling verdwijnt.
Netsnoer en beeldschermkabel
Het beeldscherm monteren
Bevestig het montageplaatje om te voorkomen dat het beeldscherm valt.
1 Plaats het montageplaatje tussen de schroef aan de bovenzijde van de standaard en de haak van het
beeldscherm.
2 Schuif het montageplaatje tot de hoek van de L-figuur tegen de schroef komt.
Montageplaatje
9 (NL)

Veiligheidsmaatregelen om omvallen te voorkomen
WAARSCHUWING
Neem voldoende maatregelen om te voorkomen dat de standaard omvalt. Als u dit niet doet, kan de zwevende
standaard omvallen tijdens een aardbeving en letsel of beschadiging van eigendommen tot gevolg hebben. Zet
de standaard vast met een koord of ketting. Bevestig het ene uiteinde van het koord of de ketting aan de
bevestigingshaak en het andere uiteinde aan de muur of de pilaar.
Leg van tevoren een koord of ketting en het muuranker klaar.
1 Bevestig het muuranker aan een stevige muur of pilaar.
2 Trek het koord of de ketting door beide bevestigingspunten voor het muuranker en bevestig het andere
uiteinde van het koord of de ketting aan het muuranker.
Bevestigingspunt voor
het muuranker
2
1
Muuranker
10 (NL)

Technische gegevens
Eenheid: mm
Gewicht: 57 kg
900
480
340
960
195
617
310
713
1160
1182
Wijzigingen in ontwerp en technische gegevens voorbehouden zonder kennisgeving.
11 (NL)

Σας ευχαριστούµε που αγοράσατε αυτ το προϊν.
Για τους πελάτες
Η τοποθέτηση του παρντος προϊντος πρέπει να πραγµατοποιείται µνο απ πεπειραµένους
αντιπροσώπους της Sοny, καθώς απαιτούνται τουλάχιστον δύο άτοµα, ιδιαίτερη προσοχή, ασφάλεια
και τεχνική. Η Sοny δεν αναλαµβάνει καµία ευθύνη για τυχν ατυχήµατα ή ζηµιές που ενδέχεται να
προκληθούν απ λανθασµένους χειρισµούς ή µη κατάλληλη τοποθέτηση. ∆εν επηρεάζονται τα νµιµα
δικαιώµατά σας (εάν υπάρχουν).
ΠΡΟΕΙ∆ΟΠΟΙΗΣΗ
Εάν δεν ληφθούν οι προφυλάξεις για την ασφάλεια ή το προϊν χρησιµοποιηθεί µε λανθασµένο τρπο
ενδέχεται να προκληθεί σοβαρς τραυµατισµς ή πυρκαγιά.
Στο παρν εγχειρίδιο οδηγιών παρουσιάζεται ο σωστς τρπος χειρισµού του προϊντος καθώς και
σηµαντικές προφυλάξεις οι οποίες είναι απαραίτητες για την αποφυγή ατυχηµάτων. ∆ιαβάστε προσεκτικά
το παρν εγχειρίδιο και χρησιµοποιήστε σωστά το προϊν. Φυλάξτε το παρν εγχειρίδιο για µελλοντική
χρήση.
Για τους αντιπροσώπους της Sοny
Η τοποθέτηση µιας τηλερασης πλάσµατος πρέπει να γίνεται απ δύο άτοµα, µε ιδιαίτερη προσοχή και
τεχνική. Κατά την τοποθέτηση της τηλερασης πλάσµατος, ανατρέξτε στο παρν εγχειρίδιο
ακολουθώντας προσεκτικά τις οδηγίες. Η Sοny δεν αναλαµβάνει καµία ευθύνη για τυχν ατυχήµατα ή
ζηµιές που ενδέχεται να προκληθούν απ λανθασµένους χειρισµούς ή µη κατάλληλη τοποθέτηση. ∆εν
επηρεάζονται τα νµιµα δικαιώµατά σας (εάν υπάρχουν). Μετά την τοποθέτηση, παρακαλούµε παραδώστε
το παρν εγχειρίδιο οδηγιών στους πελάτες.
Ασφάλεια
Τα προϊντα της Sοny σχεδιάζονται µε γνώµονα την ασφάλεια. Σε περίπτωση λανθασµένου χειρισµού
ενδέχεται να προκληθεί σοβαρς τραυµατισµς λγω πυρκαγιάς, ηλεκτροπληξίας, ανατροπής ή πτώσης
του προϊντος. Για να αποφύγετε τέτοιου είδους ατυχήµατα, βεβαιωθείτε τι λαµβάνονται οι προφυλάξεις
ασφάλειας.
ΠΡΟΣΟΧΗ
Η παρούσα κινητή βάση έχει σχεδιαστεί για να χρησιµοποιείται µνο µε τα ακλουθα προϊντα. Η χρήση
µε άλλες συσκευές ενδέχεται να οδηγήσει σε αστάθεια και πιθανώς να προκληθεί τραυµατισµς.
Συµβατά προϊντα (Μάρτιος 2004): Έγχρωµη Επίπεδη Τηλεραση
(KE-42MR1/KDE-P42MRX1/KE-P42MRX1/KE-50MR1/KDE-P50MRX1/
KE-P50MRX1/KLV-L42MRX1/KDL-L42MRX1(UK))
Συνιστάται η τοποθέτηση της κινητής βάσης να πραγµατοποιείται σε µικρή απσταση απ τον τοίχο.
2 (GR)

ΠΡΟΕΙ∆ΟΠΟΙΗΣΗ
Εάν δεν ληφθούν οι ακλουθες προφυλάξεις, ενδέχεται να προκληθεί σοβαρς τραυµατισµς ή
θάνατος λγω πυρκαγιάς, ηλεκτροπληξίας, ανατροπής ή πτώσης του προϊντος.
Αναθέστε την τοποθέτηση του προϊντος σε αντιπροσώπους της Sοny.
Εάν η τοποθέτηση δεν διεκπεραιωθεί απ αντιπροσώπους της Sοny, ενδέχεται το µεγάλο βάρος της
οθνης και της βάσης να προκαλέσει σοβαρ τραυµατισµ.
Μη στηρίζεστε και µην κρέµεστε απ τη βάση.
Η βάση µπορεί να πέσει απ τη θέση της και να προκαλέσει τραυµατισµ.
Βεβαιωθείτε τι έχετε λάβει τα απαραίτητα µέτρα ώστε να αποτραπεί η
πτώση της βάσης.
Σε αντίθετη περίπτωση, η κινητή βάση ενδέχεται να ανατραπεί κατά τη διάρκεια ενς σεισµού µε
συνέπεια τραυµατισµούς ή υλικές ζηµιές. Στερεώστε τη βάση σε έναν τοίχο, κ.λπ. ώστε να αποτρέψετε
ενδεχµενη ανατροπή της.
Τοποθετήστε τη βάση σε στέρεο και επίπεδο δάπεδο.
Μην τοποθετείτε την κινητή βάση µε τέτοιο τρπο ώστε να κλίνει προς µία κατεύθυνση. Σε µια τέτοια
περίπτωση, ενδέχεται να προκληθεί ανατροπή της κινητής βάσης ή πτώση της οθνης. Επίσης υπάρχει
πιθαντητα τραυµατισµού.
Εάν θέλετε να τοποθετήσετε τη βάση πάνω σε µια µαλακή επιφάνεια πως σε χαλί ή µοκέτα, τοποθετήστε
πρώτα στο συγκεκριµένο σηµείο ένα πλατύ κοµµάτι ξύλου.
Μην χρησιµοποιείτε ραγισµένη βάση.
Εάν παρατηρήσετε ραγίσµατα στη κινητή βάση, µην τη χρησιµοποιήσετε.
Το γυαλί µπορεί να σπάσει και η οθνη να πέσει ή η βάση να ανατραπεί. Σε
οποιαδήποτε απ τις παραπάνω περιπτώσεις µπορεί να προκληθεί
τραυµατισµς.
Ραγισµένη βάση
GR
Eλληνικά
3 (GR)

ΠΡΟΕΙ∆ΟΠΟΙΗΣΗ
Εάν δεν ληφθούν οι ακλουθες προφυλάξεις, ενδέχεται να προκληθεί σοβαρς τραυµατισµς ή
θάνατος λγω πυρκαγιάς, ηλεκτροπληξίας, ανατροπής ή πτώσης του προϊντος.
Μην στηρίζεστε και µην κρατιέστε απ την βάση ταν η οθνη είναι
τοποθετηµένη πάνω σε αυτήν.
Η βάση ενδέχεται να ανατραπεί και να προκαλέσει σοβαρ τραυµατισµ ή
θάνατο.
Μην καλύπτετε την περιοχή εξαερισµού της οθνης.
Εάν καλύψετε την περιοχή εξαερισµού (µε κάποιο πανί, κ.λπ.), ενδέχεται να
αυξηθεί η θερµοκρασία στο εσωτερικ της οθνης και να προκληθεί
πυρκαγιά.
Αποφύγετε την άσκηση πιέσεων στο καλώδιο τροφοδοσίας ή στο καλώδιο
σύνδεσης της οθνης.
• Αποφύγετε την άσκηση πιέσεων στο καλώδιο τροφοδοσίας ή στο καλώδιο
σύνδεσης της οθνης κατά την εγκατάσταση της οθνης στη βάση. Εάν
το καλώδιο τροφοδοσίας ή το καλώδιο σύνδεσης της οθνης έχει υποστεί
ζηµιά, µπορεί να προκληθεί πυρκαγιά ή ηλεκτροπληξία.
• Κατά τη µεταφορά της βάση της οθνης µην πατάτε το καλώδιο
τροφοδοσίας ή καλώδιο σύνδεσης της οθνης. Το καλώδιο τροφοδοσίας ή
καλώδιο σύνδεσης της οθνης µπορεί να υποστεί ζηµιά, γεγονς που
µπορεί να προκαλέσει πυρκαγιά ή ηλεκτροπληξία.
ΠΡΟΣΟΧΗ
Εάν δεν ληφθούν οι ακλουθες προφυλάξεις, ενδέχεται να προκληθούν τραυµατισµοί ή υλικές ζηµιές.
Μην συνδέετε συσκευές διαφορετικές απ τις καθορισµένες.
Η παρούσα βάση έχει σχεδιαστεί για να χρησιµοποιείται µνο µε τα καθορισµένα προϊντα. Εάν
συνδέσετε συσκευή διαφορετική απ αυτήν που καθορίζεται, ενδέχεται να προκληθεί πτώση µε συνέπεια
τραυµατισµούς ή υλικές ζηµιές.
Σύνδεση της οθνης.
Τοποθετήστε τη την οθνη στη βάση χρησιµοποιώντας τα ελάσµατα στερέωσης που παρέχονται. Εάν η
οθνη δεν έχει στερεωθεί καλά µπορεί να πέσει και να προκαλέσει τραυµατισµ.
Μην στηρίζετε βάρος στο γυαλί.
Μην στηρίζετε µε τα χέρια το βάρος σας στο γυαλί κατά την τοποθέτηση της οθνης. Προσέξτε να µην
πέσουν πάνω στο γυαλί βαριά αντικείµενα, πως ένα κατσαβίδι κ.λπ.
Το γυαλί ενδέχεται να σπάσει µε συνέπεια την πρκληση τραυµατισµού.
4 (GR)

Κατά τη µεταφορά της κινητής βάσης
Εάν επιχειρήσετε vα µετακινήσετε την κινητή βάση µνος σας ή χωρίς να ακολουθήσετε τις κατάλληλες
διαδικασίες, υπάρχει πιθαντητα να προκληθεί τραυµατισµς. Για να αποφύγετε κάτι τέτοιο,
ακολουθήστε τις παρακάτω συµβουλές.
• Βεβαιωθείτε τι δύο ή περισστερα άτοµα µεταφέρουν την κινητή βάση αφού προηγουµένως έχει
αποσυνδεθεί η οθνη.
• Προσέξτε να µη µαγκώσετε τα δάκτυλα του ποδιού σας κάτω απ την πλάκα της βάσης ή τη γωνία του
γυαλιού.
Μην υποβάλλετε το γυαλί σε υπερβολικούς κραδασµούς.
Παρλο που η βάση αυτή είναι κατασκευασµένη απ σκληρυµένο γυαλί, θα
πρέπει να επιδεικνύετε προσοχή. Σε περίπτωση που το γυαλί σπάσει, τα
θραύσµατα µπορεί να προκαλέσουν τραυµατισµ. Για το λγο αυτ τηρήστε
τις παρακάτω προφυλάξεις.
•Μην χτυπάτε το γυαλί και µην ρίχνετε σε αυτ αιχµηρά αντικείµενα.
Αποφύγετε την έκθεση σε υπερβολικούς κραδασµούς.
•Μην χαράζετε και µην αγγίζετε το γυαλί µε αιχµηρά αντικείµενα.
•Μην επιτρέπετε σε σκληρά αντικείµενα, πως για παράδειγµα οι
ηλεκτρικές σκούπες, να χτυπούν στις άκρες του γυαλιού.
Παρατήρηση σχετικά µε την εγκατάσταση
Τοποθετείτε τη βάση σε στέρεο και επίπεδο έδαφος. Μην τοποθετείτε τη βάση υπ γωνία ή µε κλίση προς
τη µια πλευρά. Για να αποφύγετε κάτι τέτοιο, τηρήστε τις ακλουθες προφυλάξεις.
– Εάν πρκειται να εγκαταστήσετε τη βάση πάνω σε µαλακή επιφάνεια πως σε χαλί ή µοκέτα,
τοποθετήστε πρώτα στο συγκεκριµένο σηµείο µια σανίδα ή πλάκα.
–Μην τοποθετείτε τη βάση σε θέση που να τη βλέπει ο ήλιος ή κοντά σε καλοριφέρ.
–Μην τοποθετείτε τη βάση σε ζεστά ή υγρά µέρη, ή σε εξωτερικούς χώρους.
Παρατηρήσεις σχετικά µε τη χρήση
Καθαρίζετε τη βάση περιστασιακά µε ένα στεγν και µαλακ πανί. Για να αποµακρύνετε επίµονους
ρύπους, χρησιµοποιήστε ένα πανί βρεγµένο µε αραιωµένο απορρυπαντικ. Στη συνέχεια, σκουπίστε την
περιοχή µε ένα στεγν µαλακ πανί. Μην χρησιµοποιείτε διαλυτικά οποιουδήποτε τύπου, πως για
παράδειγµα νέφτι ή βενζίνη, καθώς ενδέχεται η επιφάνεια της βάσης να καταστραφεί.
5 (GR)

Για τους αντιπροσώπους της Sοny
∆ιαβάστε προσεκτικά τις προφυλάξεις ασφαλείας που περιγράφονται
παραπάνω και τηρήστε τα µέτρα ασφαλείας κατά τη διάρκεια της
τοποθέτησης, της συντήρησης, του ελέγχου και της επισκευής του
συγκεκριµένου προϊντος.
Βεβαιωθείτε τι η τοποθέτηση πραγµατοποιείται απ δύο ή περισστερα
άτοµα.
Βεβαιωθείτε τι η τοποθέτηση της οθνης πάνω στην κινητή βάση πραγµατοποιείται απ δύο ή
περισστερα άτοµα. Εάν η τοποθέτηση πραγµατοποιηθεί απ ένα µνο άτοµο, ενδέχεται να προκληθεί
ατύχηµα ή τραυµατισµς. Κατά τη διάρκεια της τοποθέτησης αποµακρύνετε τα παιδιά.
Βεβαιωθείτε τι η οθνη τοποθετήθηκε µε ασφάλεια, ακολουθώντας σωστά
τη διαδικασία.
Εάν η οθνη δεν τοποθετηθεί µε ασφάλεια, ενδέχεται να προκληθεί πτώση της µε συνέπεια
τραυµατισµούς.
Ελέγξτε τα εξαρτήµατα
Ονοµασία Ποστητα Ονοµασία Ποστητα
Κινητή Βάση Έλασµα στερέωσης
12
6 (GR)

Τοποθέτηση της Μονάδας της Οθνης
ΠΡΟΕΙ∆ΟΠΟΙΗΣΗ
Εάν το καλώδιο τροφοδοσίας συµπιέζεται απ άλλες συσκευές, ενδέχεται να προκληθεί
βραχυκύκλωµα ή ηλεκτροπληξία.
Εάν παραπατήσετε στο καλώδιο τροφοδοσίας ή στο καλώδιο σύνδεσης της οθνης, η βάση ενδέχεται
να ανατραπεί και να προκαλέσει τραυµατισµούς.
Τραβήξτε το καλώδιο τροφοδοσία και το καλώδιο σύνδεσης της οθνης
µέσα απ την οπή στη βάση.
Πριν τοποθετήσετε την οθνη πάνω στη βάση, ακουµπήστε τη βάση στο σηµείο τοποθέτησης που
έχετε επιλέξει.
Επειδή το βάρος της οθνης είναι µεγάλο, σας συνιστούµε να τοποθετήσετε αρχικά την βάση στο
σηµείο που έχετε επιλέξει, πριν τοποθετήσετε επάνω σε αυτήν την οθνη.
Σηµείωση
Μην µετακινείτε τη βάση για σο διάστηµα βρίσκεται στο δάπεδο. Ενδέχεται τα ελαστικά στηρίγµατα
της κινητής βάσης να φύγουν απ τη θέση τους.
Συνδέστε το καλώδιο τροφοδοσίας
1
και το καλώδιο σύνδεσης της
οθνης στην οθνη.
z Συµβουλή
Για περισστερες λεπτοµέρειες σχετικά µε τη
σύνδεση του καλωδίου τροφοδοσίας και του
καλωδίου σύνδεσης της οθνης, ανατρέξτε στο
εγχειρίδιο οδηγιών της έγχρωµης επίπεδης
τηλερασης ή της έγχρωµης τηλερασης
οθνης LCD της Sοny.
Σηµειώσεις
• Εάν τοποθετήσετε την οθνη επάνω στα
ηχεία, ενδέχεται να προκληθεί παραµρφωση
του σχήµατος ή χαλάρωση της σύνδεσης των
ηχείων λγω του βάρους της οθνης. Για να
αποφευχθεί αυτ, λάβετε τις ακλουθες
προφυλάξεις. (µνο για τα µοντέλα KLVL42MRX1, KDL-L42MRX1(UK))
–Μην κρατάτε τα ηχεία ταν µεταφέρετε
την οθνη.
– Κατά τη σύνδεση των καλωδίων στην
οθνη, τοποθετήστε τα υλικά που
περιέχονται στη συσκευασία, στο δάπεδο
και ακουµπήστε την οθνη επάνω σε αυτά,
ώστε τα ηχεία που υπάρχουν στις δύο
πλευρές της οθνης να µην εφάπτονται µε
τα υλικά της συσκευασίας.
• Βεβαιωθείτε τι η οθνη έχει στερεωθεί µε
ασφάλεια.
• Χρησιµοποιήστε ένα µαλακ πανί για να
προστατέψετε την οθνη απ ζηµιές ή
ρύπους.
Πίσω πλευρά της οθνης
Μαλακ πανί
KE-42MR1/KDE-P42MRX1/KE-P42MRX1/
KE-50MR1/KDE-P50MRX1/KE-P50MRX1
Ηχείο (αριστερ)
Μαλακ πανί
Καλώδιο τροφοδοσίας
Καλώδιο
σύνδεσης της
οθνης
Υλικά συσκευασίας και άλλα
Πίσω πλευρά της
οθνης
Καλώδιο
τροφοδοσίας
Καλώδιο σύνδεσης
της οθνης
Ηχείο (δεξι)
KLV-L42MRX1/KDL-L42MRX1(UK)
Οι εικνες που εµφανίζονται παρακάτω και δεν περιέχουν την ένδειξη µοντέλου, αφορούν στα µοντέλα
KLV-L42MRX1, KDL-L42MRX1(UK) της έγχρωµης επίπεδης τηλερασης.
7 (GR)

Τοποθετήστε την οθνη στη βάση.
2
1 Τραβήξτε το καλώδιο τροφοδοσίας και το καλώδιο σύνδεσης της οθνης µέσα απ την οπή στη
βάση.
2 Ελέγξτε προηγουµένως τη θέση των τεσσάρων οπών στα µνιµα προσαρτήµατα στην πλάτη της
βάσης.
Ταιριάξτε τα άγκιστρα στο πίσω µέρος της οθνης στις οπές στα µνιµα προσαρτήµατα της
βάσης.
Πίσω πλευρά της οθνης
Εµπρς πλευρά της βάσης
2
1
3 Βεβαιωθείτε τι τα άγκιστρα στη πίσω πλευρά της οθνης έχουν εισχωρήσει τελείως στις
τέσσερις οπές στην πλάτη της βάσης. Στη συνέχεια αφήστε την οθνη προς τα κάτω µέχρι να
κουµπώσει πάνω στη βάση.
Αγκιστρο
8 (GR)

Τεντώστε τα καλώδια τροφοδοσίας και σύνδεσης της οθνης
3
τραβώντας τα µέσα απ την οπή που τα είχατε ήδη περάσει.
Τραβήξτε τις άκρες των καλωδιών τροφοδοσίας και σύνδεσης της οθνης που είχαν ήδη περάσει
µέσα απ την οπή της βάσης και τεντώστε τα.
Καλώδιο τροφοδοσίας και καλώδιο
σύνδεσης της οθνης
Στερέωση της οθνης
Τοποθετήστε τα ελάσµατα στερέωσης για να αποτρέψετε πτώση της
µονάδας.
1 Τοποθετήστε το έλασµα στερέωσης µεταξύ των βιδών στο πάνω µέρος του µνιµου
προσαρτήµατος της βάσης και του άγκιστρου στο πίσω µέρος της οθνης.
2 Μετακινήστε το έλασµα στερέωσης µέχρι η γωνία του (σε σχήµα L) ελάσµατος να ακουµπήσει τις
βίδες.
Έλασµα στερέωσης
9 (GR)

Μέτρα ασφαλείας για την αποφυγή ανατροπής
ΠΡΟΕΙ∆ΟΠΟΙΗΣΗ
Βεβαιωθείτε τι έχετε λάβει τα απαραίτητα µέτρα ώστε να αποτραπεί η πτώση της βάσης. Σε αντίθετη
περίπτωση, η κινητή βάση ενδέχεται να ανατραπεί κατά τη διάρκεια ενς σεισµού µε συνέπεια
τραυµατισµούς ή υλικές ζηµιές. Στερεώστε τη βάση χρησιµοποιώντας ένα σκοινί ή µια αλυσίδα και
ασφαλίζοντας το ένα άκρο στο άγκιστρο ασφαλείας και το άλλο άκρο στον τοίχο ή την κολώνα.
Εφοδιαστείτε µε ένα σκοινί ή µια αλυσίδα και ένα στήριγµα τοίχου απ αυτά που διατίθενται στο
εµπριο.
1 Ασφαλίστε το στήριγµα τοίχου σε έναν στέρεο τοίχο ή µια κολώνα.
2 Περάστε το σκοινί ή την αλυσίδα µέσα και απ τις δύο οπές των προσαρτηµάτων στήριξης και
στη συνέχεια στερεώστε το άλλο άκρο του σκοινιού ή της αλυσίδας στο στήριγµα του τοίχου.
Προσάρτηµα στήριξης
2
Στήριγµα τοίχου
1
10 (GR)

Τεχνικά χαρακτηριστικά
Μονάδα: mm
Βάρος: 57 kg
900
480
340
960
195
617
310
713
1160
1182
Η σχεδίαση και τα τεχνικά χαρακτηριστικά µπορεί να αλλάξουν χωρίς προειδοποίηση.
11 (GR)

Bu ürünü sat›n ald›¤›n›z için teflekkür ederiz.
Müflterilerimize
Bu ürün, en az iki kifli, özel dikkat, güvenlik ve teknik gerektirdi¤inden, sadece kalifiye Sony servis temsilcileri
taraf›ndan kurulmal›d›r. Sony yanl›fl tafl›ma veya kurulumdan dolay› do¤acak kazalar veya hasarlardan
sorumlu de¤ildir. Kanuni haklar›n›z (e¤er varsa) bundan etkilenmezler.
UYARI
Güvenlik önlemlerine uyulmaz ve ürün yanl›fl kullan›l›rsa, yang›na veya ciddi yaralanmalara neden olabilir.
Bu elkitab›, kazalar› önlemek ve ürünün do¤ru kullan›lmas›n› sa¤lamak için gerekli önemleri gösterir. Bu elkitab›n›
bafltan sona okumaya ve ürünü do¤ru kullanmaya dikkat edin. Bu elkitab›n›, ileride de baflvurmak için saklay›n.
Sony sat›c›lar›na
Bir plazma TV’sinin kurulumu en az iki kifli, özel dikkat, ve teknik gerektirir. Bir plazma TV’sini kurarken, bu
elkitab›na dikkatlice baflvurunuz. Sony yanl›fl tafl›ma veya kurulumdan dolay› do¤acak kaza veya hasarlardan
sorumlu de¤ildir. Kanuni haklar›n›z (e¤er varsa) bundan etkilenmezler. Lütfen kurulumdan sonra bu elkitab›n›
müflteriye veriniz.
Güvenlik
Sony taraf›ndan gelifltirilen ürünler, güvenlik önde tutularak tasarlan›r. Bununla birlikte, ürün yanl›fl kullan›l›rsa,
yanma, elektrik çarpmas›, ürünün düflürülmesi veya ürünün y›k›lmas› gibi nedenlerle ciddi yaralanmalara neden
olabilir. Kazalar› önlemek için, güvenlik önlemlerine uymaya dikkat edin.
TEDB‹R
Bu Ayaks›z Sehpa sadece afla¤›daki ürünler ile kullanmak üzere planlanm›flt›r. Baflka cihazlar ile kullan›m›
dayan›ks›zl›ktan dolay› yaralanmalara yol açabilir.
Belirtilen ürünler (Mart 2004 itibari ile):Düz Panel Renkli TV
(KE-42MR1/KDE-P42MRX1/KE-P42MRX1/KE-50MR1/
KDE-P50MRX1/KE-P50MRX1/KLV-L42MRX1/KDL-L42MRX1(UK))
Ayaks›z Sehpan›n, duvar ile aras›nda k›sa bir mesafe olacak biçimde kurulmas›n› öneririz.
2 (TR)

UYARI
Afla¤›daki önlemlere uyulmamas› durumunda, yang›n, elektrik çarpmas›, ürünün y›k›lmas› veya ürünün
düflürülmesi sonucu ölüm veya ciddi yaralanma olas›l›¤› vard›r.
Kurulum iflini Sony sat›c›s›na verin.
Kurulum ifli Sony sat›c›lar›ndan baflkalar› taraf›ndan yap›l›rsa, sehpan›n a¤›rl›¤› nedeniyle ciddi yaralanmalar
meydana gelebilir.
Sehpaya yaslanmay›n ve as›lmay›n.
Sehpa y›k›l›p yaralanmalara neden olabilir.
Sehpan›n y›k›lmamas› için önlem al›n.
Aksi taktirde, Ayaks›z Sehpa deprem durumunda y›k›l›p yaralanmalara veya mal kayb›na neden olabilir. Sehpan›n
y›k›lmas›n› önlemek için duvar, vs.ye ba¤lay›n.
Sehpan›n sert ve düzgün zemin üzerine kuruldu¤undan emin olun.
Sehpan›n bir yöne e¤imli olarak kurulmas›na izin vermeyin. Aksi takdirde, Ayaks›z Sehpa devrilebilir ya da
Görüntü Birimi düflebilir ve bu yaralanmalara neden olabilir.
Sehpay› kilim ya da hal› gibi yumuflak zemine kurarsan›z, alt›na bir tahta yerlefltirin.
Çatlak sehpa kullanmay›n.
Üzerinde çatlak varsa Ayaks›z Sehpa’y› kullanmay›n.
Cam k›r›labilir ve Görüntü Birimi düflebilir veya sehpa devrilebilir.
Bu da yaralanmalara neden olabilir.
Çatlak Sehpa
TR
Türkçe
3 (TR)

UYARI
Afla¤›daki önlemlere uyulmamas› durumunda, yang›n, elektrik çarpmas›, ürünün y›k›lmas› veya ürünün
düflürülmesi sonucu ölüm veya ciddi yaralanma olas›l›¤› vard›r.
Görüntü Birimi kurulduktan sonra sehpaya yaslanmay›n veya as›lmay›n.
Sehpa y›k›l›p ölüme veya yaralanmalara neden olabilir.
Görüntü Birimi’nin havaland›rma deli¤ini örtmeyin.
Havaland›rma deli¤ini örterseniz (örtü vs. ile), içinde ›s›nma oluflabilir ve yang›na
sebep olur.
Güç kablosunun veya Görüntü Arabirim Kablosunun s›k›flmas›na engel olun.
• Görüntü Birimi sehpaya kurulurken güç kablosunun veya Görüntü Arabirim
Kablosunun s›k›flmamas›na dikkat edin. Güç kablosu veya Görüntü Arabirim
Kablosu zarar görürse, yang›na veya elektrik çarpmas›na neden olabilir.
• Görüntü Birimi Sehpas›n› tafl›rken güç kablosuna veya Görüntü Arabirim
Kablosuna basmay›n. Güç kablosu veya Görüntü Arabirim Kablosu zarar
görebilir ve yang›na veya elektrik çarpmas›na neden olabilir.
TEDB‹R
Afla¤›daki önlemlere uyulmazsa, yaralanma veya mal kayb› oluflabilir.
Belirtilen ürünlerden baflka herhangi bir cihaz kurmay›n.
Bu sehpa, belirtilen ürünlerle birlikte kullan›lmak üzere tasarlanm›flt›r. Belirtilen ürünlerden baflka cihazlar
kurarsan›z, düflüp yaralanmalara veya mal kayb›na neden olabilir.
Görüntü Birimini ba¤lay›n.
Görüntü Biriminin, birlikte verilen sabitleme plakalar› kullan›larak sehpaya ba¤lanmas›na dikkat edin. Görüntü
Birimi sa¤lam biçimde ba¤lanmazsa, düflüp yaralanmalara neden olabilir.
Cama a¤›rl›¤›n›z› vermeyin veya herhangi bir çarpmaya maruz b›rakmay›n.
Görüntü Birimini kurarken ellerinizi cama dayamay›n. Cama tornavida vs. gibi a¤›r nesneler ile vurmay›n.
Aksi takdirde, cam k›r›labilir ve yaralanmalara neden olabilir.
4 (TR)

Ayaks›z Sehpay› tafl›rken
Ayaks›z Sehpa’y› tek bafl›n›za veya ilgili yönergelere uymadan tafl›maya çal›flmak yaralanmalara neden olabilir.
Bundan sak›nmak için, afla¤›daki önerilere uydu¤unuzdan emin olun.
• Ayaks›z Sehpan›n, üzerindeki Görüntü Birimi al›nd›ktan sonra en az iki kifli taraf›ndan tafl›nmas›na dikkat edin.
• Ayak parmaklar›n›z›n alt plakan›n veya cam›n kenar›n›n alt›nda s›k›flmamas›na dikkat edin.
Cama afl›r› sars›nt› uygulamay›n.
Bu sehpa yumuflat›lm›fl camdan yap›lm›fl olmakla birlikte, yine de dikkat gerektirir. Cam
k›r›l›rsa, k›r›klar yaralanmaya neden olabilece¤i için afla¤›daki önlemlere uyun.
• Cama vurmay›n ve üzerine keskin uçlu nesneler düflürmeyin. Afl›r› sars›nt›lardan koruyun.
• Cam› keskin nesnelerle kaz›may›n ve dürtmeyin.
• Elektrikli süpürge gibi sert nesneleri cam›n kenar›na çarpmay›n.
Kurulum hakk›nda not
Sehpay› sert ve düz bir zemin üzerine kurun. Sehpan›n e¤imli veya bir yöne yüklenecek biçimde kurulmas›na izin
vermeyin. Bunu önlemek için afla¤›daki önlemlere uyun.
– Sehpay› paspas veya hal› gibi yumuflak bir yüzeye kuracaksan›z, belirlenen yere önce bir tahta yerlefltirin.
– Sehpay› do¤rudan günefl alan veya ›s›t›c›lara yak›n yerlere kurmay›n.
– Sehpay› s›cak veya nemli yerlere ya da d›fl mekanlara kurmay›n.
Kullan›m hakk›nda not
Sehpay› temizlemek için, belirli aral›klarla kuru ve yumuflak bir bez kullan›n. ‹natç› lekeler, suland›r›lm›fl bulafl›k
deterjan›yla biraz ›slat›lm›fl bir bezle ç›kar›labilir. Ard›ndan bölgeyi yumuflak, kuru bir bezle silin. Sehpan›n
parlakl›¤›n› bozabilece¤i için, tiner, benzin gibi kimyasal maddeler kullanmay›n.
5 (TR)

Sony Sat›c›lar› için
Yukar›da aç›klanan güvenlik önlemlerini bafltan sona okuyun ve bu ürünün
kurulum, bak›m, denetim ve onar›m ifllemleri s›ras›nda, güvenli¤e gerekli
dikkati gösterin.
Kurulum iflleminin iki veya daha fazla kiflinin yapt›¤›ndan emin olun
Görüntü Birimi’ni Ayaks›z sehpa üzerine iki veya daha fazla kiflinin kurdu¤undan emin olun. E¤er kurulumu bir
kifli tek bafl›na yaparsa, bu kaza veya yaralanma ile sonuçlanabilir. Kurulum esnas›nda küçük çocuklar›n uzakta
tutuldu¤undan emin olun.
Afla¤›daki uygun yöntemi izleyerek, Görüntü Birimi’ni sa¤lam olarak
kurdu¤unuzdan emin olun.
E¤er Görüntü Birimi sa¤lam olarak kurulmazsa, düflebilir ve yaralanmaya sebep olabilir.
Parçalar› denetleme
Ad› Miktar› Ad› Miktar›
Ayaks›z Sehpa Sabitleme plakas›
12
6 (TR)

Görüntü Birimini Kurma
UYARI
Güç kablosu cihaz›n alt›nda veya parçalar› aras›nda s›k›fl›rsa, k›sa devreye veya elektrik çarpmas›na neden
olabilir.
Güç kablosuna veya Görüntü Arabirim Kablosuna tak›l›rsan›z, sehpa devrilip yaralanmalara neden olabilir.
Güç Kablosunu ve Görüntü Arabirim Kablosunu sehpadaki delikten geçirin.
Kurulum yerine karar verin ve sehpay› yat›r›n.
Sehpa a¤›rd›r; bu nedenle, kurulum yerine önceden karar vermeniz ve Görüntü Birimini üzerine kurmadan
önce sehpay› buraya yat›rman›z önerilir.
Not
Sehpa zemin üzerindeyken itmeyin veya çekmeyin. Aksi taktirde, sehpan›n taban›ndaki lastik ayaklar yerinden
ç›kabilir.
Görüntü Birimi’nin arka taraf›
Güç Kablosunu ve Görüntü
1
Arabirim Kablosunu Görüntü
Birimine ba¤lay›n.
zz
z ‹pucu
zz
Güç kablosunu ve Görüntü Arabirim
Kablosunu ba¤lama konusunda ayr›nt›l› bilgi
için Sony’nin Düz Panel Renkli Televizyon veya
LCD Renkli Televizyon yönerge elkitab›na
bak›n.
Güç kablosu
Görüntü Arabirim
Kablosu
Notlar
• E¤er Görüntü Birimi’nin a¤›rl›¤›
hoparlörlerin üzerine verilirse, deformasyon
veya hoparlörde ba¤lant› kayb› oluflabilir.
Bunu önemek için afla¤›dakileri yap›n›z.
(sadece KLV-L42MRX1, KDL-42MRX1(UK))
– Görüntü Birimini tafl›rken hoparlörleri
tutmay›n.
– Görüntü Birimi’nin kablolar›n›
ba¤larken, paketleme malzemesi vs. yere
koyun ve Görüntü Birimi’ni onun
üzerine yüz üstü gelecek flekilde yat›r›n,
böylece Görüntü Birimi’nin iki taraf›nda
bulunan hoparlörler paketleme
malzemesinin vs. d›fl›nda kalacaklard›r.
• Görüntü Birimi’ni özenle yerlefltirdi¤inizden
emin olun.
• Görüntü Birimi’nin ekran›n› hasardan veya
pislikten korumak için yumuflak bir örtü
kullan›n.
Bundan sonra model ismi olmayan resimler Düz Panel renkli televizyon KLV-L42MRX1, KDL-42MRX1(UK) ile
alakal›d›r.
Yumuflak bez
Yumuflak bez
KE-42MR1/KDE-P42MRX1/KE-P42MRX1/
KE-50MR1/KDE-P50MRX1/KE-P50MRX1
hoparlör (sol)
Paketleme malzemesi, vs.
Görüntü Birimi’nin
arka taraf›
Güç kablosu
Görüntü Arabirim
Kablosu
hoparlör (sa¤)
KLV-L42MRX1/KDL-L42MRX1(UK)
7 (TR)

Görüntü birimini sehpaya kurun.
2
1 Güç Kablosunu ve Görüntü Arabirim Kablosunu sehpadaki delikten geçirin.
2 Önce, sehpadaki sabitleyicide yer alan dört deli¤in konumunu denetleyin.
Görüntü Biriminin arkas›ndaki kancalar› sehpan›n sabitleyicisindeki deliklere geçirin.
Görüntü Biriminin arka taraf›
2
Sehpan›n ön taraf›
1
3 Görüntü Biriminin arkas›ndaki kancalar›n sabitleyicideki dört deli¤e tam tak›l›p tak›lmad›¤›n› denetleyin.
Görüntü Birimini, yerine oturuncaya kadar, düz olarak afla¤› do¤ru kayd›r›n.
Kanca
8 (TR)

Sehpadaki delikten geçen güç kablosunun ve Görüntü Arabirim Kablosunun
3
gevflekli¤ini al›n.
Sehpadaki delikten geçen güç kablosunun ve Görüntü Arabirim Kablosunun uçlar›n› çekerek fazlal›klar›n›
toplay›n.
Güç kablosu ve Görüntü Arabirim
Kablosu
Görüntü Birimini Sabitleme
Görüntü Biriminin düflmemesi için sabitleme plakas›n› ba¤lay›n.
1 Sabitleme plakas›n›, sehpadaki sabitleyicinin üst k›sm›ndaki vida ile Görüntü Birimindeki kancan›n
aras›na sokun.
2 Sabitleme plakas›n›, L-profilin köflesi vidaya temas edinceye kadar itin.
Sabitleme plakas›
9 (TR)

Düflmeyi önlemek için al›nacak güvenlik önlemleri
UYARI
Sehpan›n devrilmesine engel olmak için gereken önlemleri ald›¤›n›zdan emin olun. Aksi takdirde, Ayaks›z
Sehpa deprem s›ras›nda devrilebilir ve yaralanmaya ya da di¤er eflyalar›n zarar görmesine neden olabilir.
Sehpay› bir ip ya da zincirin bir ucundan güvenlik kancas›na, di¤er ucundan da duvara ba¤layarak sabitleyin.
Önceden ip veya zincir ve duvar ba¤lama kancas› haz›r ediniz.
1 Duvar ba¤lama kancas›n› sa¤lam bir duvar veya sütuna sabitleyin.
2 ‹p veya zinciri kanca ba¤lant›lar›n›n deliklerinden geçirin ve ip veya zincirin di¤er ucunu duvar ba¤lama
kancas›na ba¤lay›n.
Kanca ba¤lant›s›
2
1
Duvar ba¤lama
kancas›
10 (TR)

Teknik Özellikler
Birim: mm
A¤›rl›k: 57 kg
900
480
340
960
195
617
310
713
1160
1182
Tasar›m ve teknik özellikler, haber verilmeksizin de¤ifltirilebilir.
11 (TR)

Gracias por adquirir este producto.
Para clientes
Únicamente representantes de servicio Sony calificados deben instalar este producto ya que se requieren al
menos dos personas, además de cuidado, medidas de seguridad y conocimientos técnicos especiales. Sony no
se responsabiliza de los accidentes o daños que se produzcan debido a la instalación o el manejo incorrectos.
Sus derechos legales (en caso de haberlos) no se ven afectados.
ADVERTENCIA
Si no se respetan las precauciones de seguridad o si el producto no se utiliza correctamente, pueden producirse
lesiones graves o incendios.
Este manual de instrucciones muestra el manejo correcto del producto, además de precauciones importantes
necesarias para evitar accidentes. Asegúrese de leerlo detenidamente y utilizar el producto correctamente.
Conserve el manual para consultarlo en el futuro.
Información para los distribuidores de Sony
La instalación de un televisor de plasma requiere al menos dos personas, además de un cuidado y conocimientos
técnicos especiales. Al instalar un televisor de plasma, consulte este manual cuidadosamente. Sony no se
responsabiliza de los accidentes o daños que se produzcan debido a la instalación o el manejo incorrectos. Sus
derechos legales (en caso de haberlos) no se ven afectados. Proporcione este manual al cliente una vez finalizada la
instalación.
Seguridad
Los productos de Sony están diseñados pensando en la seguridad. Sin embargo, si los productos se utilizan
incorrectamente, pueden provocar lesiones graves a raíz de un incendio, una descarga eléctrica, que el producto
vuelque o que se caiga. Para evitar tales accidentes, asegúrese de cumplir las precauciones de seguridad.
PRECAUCIÓN
Este soporte de suspensión ha sido diseñado para ser utilizado sólo con los productos siguientes. Si se utiliza con
otros equipos podría desequilibrarse y provocar daños personales.
Equipos especificados (a partir de marzo de 2004) : Televisor en color de panel plano
(KE-42MR1/KDE-P42MRX1/KE-P42MRX1/KE-50MR1/
KDE-P50MRX1/KE-P50MRX1/KLV-L42MRX1/
KDL-L42MRX1(UK))
Se recomienda instalar el soporte de suspensión a una cierta distancia de la pared.
2 (ES)

ADVERTENCIA
Si no se tienen en cuenta las siguientes precauciones, pueden provocarse lesiones graves o incluso la
muerte a raíz de un incendio, una descarga eléctrica, que el producto vuelque o que se caiga.
Asegúrese de contratar la instalación a un distribuidor Sony.
Si otras personas no calificadas realizan la instalación, pueden producirse lesiones graves puesto que el monitor y
el soporte son muy pesados.
No se apoye en el soporte ni se agarre a él.
Podría volcarse y provocar lesiones.
Tome las debidas precauciones para evitar que el soporte se vuelque.
De lo contrario, el soporte de suspensión puede desequilibrarse durante un terremoto y provocar daños personales
o materiales. Fije el soporte a la pared, etc. para evitar que se vuelque.
Asegúrese de instalar el soporte en una superficie plana y sólida.
No instale el soporte de suspensión de forma que quede inclinado, ya que podría volcarse dicho soporte o caerse el
monitor y provocar lesiones.
Si instala el soporte en una superficie blanda, como un felpudo o una alfombra, cubra primero dicha zona con un
panel.
No utilice un soporte dañado.
No utilice el soporte de suspensión si presenta fisuras.
El cristal podría romperse y el monitor podría caerse, o bien el soporte podría
volcarse, lo que puede causar daños personales.
Soporte dañado
ES
Español
3 (ES)

ADVERTENCIA
Si no se tienen en cuenta las siguientes precauciones, pueden provocarse lesiones graves o incluso la
muerte a raíz de un incendio, una descarga eléctrica, que el producto vuelque o que se caiga.
No se apoye en el soporte ni se agarre a él con el monitor instalado en el
mismo.
El soporte podría volcarse y provocar lesiones graves o la muerte.
No obstruya el orificio de ventilación del monitor.
Si se cubre el orificio de ventilación (con un paño, etc.), el monitor podría
sobrecalentarse y provocar un incendio.
Procure que el cable de alimentación o el cable de la interfaz de la pantalla
no queden atrapados.
•Procure que el cable de alimentación o el cable de la interfaz de la pantalla no
queden atrapados cuando instale el monitor en el soporte. Si el cable de
alimentación o el cable de la interfaz de la pantalla quedan dañados, puede
producirse un incendio o una descarga eléctrica.
•No pise el cable de alimentación ni el cable de la interfaz de la pantalla cuando
transporte el soporte del monitor. El cable de alimentación o el de la interfaz de
la pantalla podrían quedar dañados, lo que podría provocar un incendio o una
descarga eléctrica.
PRECAUCIÓN
Si no se respetan las precauciones siguientes, pueden producirse lesiones o daños materiales.
No instale ningún equipo que no sea el producto especificado.
Este soporte está diseñado para utilizarse únicamente con el producto especificado. Si lo utiliza con otros
productos, puede caerse y provocar daños personales o materiales.
Instalación del monitor.
Utilice las placas de fijación suministradas para instalar el monitor en el soporte. Si el monitor no queda
firmemente sujeto, podría caerse y provocar lesiones.
No aplique peso al cristal ni lo someta a golpes.
Al instalar el monitor, no se apoye con la mano en el cristal. No lo golpee con objetos duros, como un
destornillador, etc., ya que puede romperse el cristal y provocar lesiones.
4 (ES)

Transporte del soporte de suspensión
Si intenta mover el soporte de suspensión usted solo o sin seguir los procedimientos adecuados, puede provocar
daños personales. Para evitarlo, asegúrese de seguir los consejos ofrecidos a continuación.
•Procure que dos o más personas transporten el soporte de suspensión únicamente después de retirar el monitor.
•Tenga cuidado de no pillarse los dedos de los pies debajo de la placa inferior o el ángulo del cristal.
No exponga el cristal a golpes fuertes.
Aunque este soporte está construido con vidrio endurecido, debe manipularse con
cuidado. Si el cristal se rompe, los fragmentos de vidrio pueden provocar daños
personales. Para evitar esta situación, tome las precauciones que se indican a
continuación.
•No golpee el cristal ni deje caer objetos puntiagudos sobre el mismo. Evite los
impactos fuertes.
•No raye ni presione el cristal con objetos afilados.
• Evite que objetos contundentes, como una aspiradora, golpeen los bordes del
cristal.
Nota sobre la instalación
Instale el soporte en una superficie plana y sólida. No lo instale en un ángulo ni inclinado. Para instalarlo
correctamente, tome las precauciones siguientes.
– Si instala el soporte en una superficie blanda, como un felpudo o una alfombra, cubra primero dicha zona con un
panel.
–No instale el soporte cerca de un calefactor ni en un lugar expuesto a la luz solar directa.
–No instale el soporte en un lugar cálido o húmedo, ni al aire libre.
Nota sobre el uso
Para mantener el soporte limpio, utilice un paño suave y seco. Las manchas difíciles pueden eliminarse limpiando
la zona afectada con un paño ligeramente humedecido con detergente diluido y, posteriormente, secándola con un
paño suave y seco. No utilice ningún producto químico, como disolventes o bencina, ya que pueden dañar el
acabado del soporte.
5 (ES)

Para distribuidores Sony
Lea detenidamente las instrucciones de seguridad descritas anteriormente y
ponga especial atención a la seguridad durante la instalación, el mantenimiento,
la comprobación y la reparación del producto.
Asegúrese de que dos o más personas realizan el proceso de instalación.
Procure que dos o más personas realicen el proceso de instalación del monitor en el soporte de suspensión. Si este
proceso lo realiza una sola persona, puede producirse un accidente o lesiones. Procure que los niños pequeños se
mantengan alejados del lugar donde se realiza la instalación.
Instale el monitor firmemente siguiendo el procedimiento adecuado.
De lo contrario, puede caerse y provocar daños personales.
Compruebe las piezas
Nombre Cantidad Nombre Cantidad
Soporte de suspensión Placa de fijación
12
6 (ES)

Instalación del monitor
ADVERTENCIA
Si el cable de alimentación queda atrapado debajo de un componente o entre dos o más componentes, podría
producirse un cortocircuito o una descarga eléctrica.
Si tropieza con el cable de alimentación o el cable de la interfaz de la pantalla, el soporte podría volcarse y
provocar lesiones.
Haga pasar el cable de alimentación y el de la interfaz de la pantalla a través
del orificio del soporte.
Elija la ubicación de instalación y coloque el soporte en el suelo antes de instalar el monitor.
Debido a que el monitor es pesado, se recomienda que elija la ubicación de instalación y que coloque el soporte
de suspensión en el suelo antes de instalar el monitor encima.
Nota
No empuje el soporte de suspensión ni tire de él cuando esté en el suelo. Si lo hace, pueden desprenderse las
almohadillas de goma de la base.
Conecte el cable de alimentación
1
y el cable de la interfaz de la
pantalla al monitor.
z Sugerencia
Consulte el manual de instrucciones del televisor
en color de panel plano o el televisor en color de
pantalla de cristal líquido de Sony para obtener
más información sobre cómo conectar el cable de
alimentación y el de la interfaz de la pantalla.
Notas
• Si la pantalla se coloca sobre los altavoces, es
posible que éstos se deformen o que su
conexión se afloje. Para evitarlo, tenga en
cuenta estos consejos. (Sólo KLV-L42MRX1,
KDL-L42MRX1(UK))
–No sujete los altavoces mientras traslada el
monitor.
– Al conectar cables al monitor, coloque el
material de embalaje, etc., en el suelo y el
monitor boca abajo sobre éste para que los
altavoces situados a los lados del mismo
queden libres.
• Asegúrese de que el monitor presente una
posición estable.
• Utilice un trapo suave para que la pantalla del
monitor no se dañe o se ensucie.
Parte posterior del monitor
Paño suave
KE-42MR1/KDE-P42MRX1/KE-P42MRX1/
KE-50MR1/KDE-P50MRX1/KE-P50MRX1
Altavoz (izquierdo)
Paño suave
Altavoz (derecho)
Cable de alimentación
Cable de la
interfaz de la
pantalla
Material de embalaje, etc.
Parte posterior del
monitor
Cable de
alimentación
Cable de la
interfaz de la
pantalla
KLV-L42MRX1/KDL-L42MRX1(UK)
Las ilustraciones sin nombres de modelo que aparecen a partir de este punto corresponden al televisor en color de
panel plano KLV-L42MRX1, KDL-L42MRX1(UK).
7 (ES)

Instale el monitor en el soporte.
2
1 Haga pasar el cable de alimentación y el de la interfaz de la pantalla a través del orificio del soporte.
2 Compruebe previamente la posición de los cuatro orificios de las unidades de fijación del soporte.
Introduzca los ganchos de la parte posterior del monitor en los orificios de las unidades de fijación del
soporte.
Parte posterior
del monitor
Parte frontal del soporte
2
1
3 Compruebe que los ganchos de la parte posterior del monitor estén completamente introducidos en los
cuatro orificios de las unidades de fijación. A continuación, deslice el monitor hacia abajo hasta que quede
fijado.
Gancho
8 (ES)

Elimine las holguras del cable de alimentación y del cable de la interfaz
3
de la pantalla introducidos en el orificio del soporte.
Tire de los extremos del cable de alimentación y del de la interfaz de la pantalla introducidos en el orificio
del soporte y elimine las holguras de estos cables.
Cable de alimentación y cable
de la interfaz de la pantalla
Colocación del monitor
Coloque la placa de fijación para evitar que el monitor se caiga.
1 Introduzca la placa de fijación entre el tornillo situado en la parte superior de la unidad de fijación del
soporte y el gancho del monitor.
2 Deslice la placa de fijación hasta que el ángulo en forma de L toque el tornillo.
Placa de fijación
9 (ES)

Medidas de seguridad para evitar el vuelco
ADVERTENCIA
Tome las debidas precauciones para evitar que el soporte se vuelque. De lo contrario, dicho soporte puede
caerse durante un terremoto y provocar daños personales o materiales. Fije el soporte con una cuerda o cadena
sujetando uno de los extremos de la misma al gancho de seguridad y el otro extremo a la pared o una columna.
Prepare con anterioridad una cuerda o una cadena disponible en el mercado y un soporte de anclaje de
pared.
1 Fije el soporte de anclaje de pared a una pared o a una columna sólidas.
2 Pase la cuerda o la cadena por ambos orificios de los accesorios de anclaje y, por último, fije el otro
extremo de la cuerda o de la cadena al soporte de anclaje de pared.
Accesorios de anclaje
2
Soporte de anclaje
a la pared
1
10 (ES)

Especificaciones
Unidad: mm
Peso: 57 kg
900
480
340
960
195
617
310
713
1160
1182
El diseño y las especificaciones están sujetos a cambios sin previo aviso.
11 (ES)

Obrigado por ter adquirido este produto.
Para os clientes
Este produto só deve ser instalado por um técnico qualificado dos serviços de assistência da Sony e requer pelo
menos duas pessoas e uma atenção, segurança e técnica especiais. A Sony não se responsabiliza por quaisquer
acidentes ou danos provocados por uma instalação incorrecta ou utilização indevida. Os seus direitos
estatutários (se existirem) não são afectados.
AVISO
O não cumprimento das precauções de segurança ou a utilização incorrecta do produto, pode provocar um
acidente grave ou um incêndio.
Este manual de instruções descreve as precauções importantes necessárias para evitar acidentes e utilizar o produto
de forma correcta. Leia este manual na íntegra e utilize o produto correctamente. Guarde este manual para futuras
consultas.
Para os agentes da Sony
A instalação de um televisor de plasma requer duas pessoas e um cuidado e técnica especiais. Quando instalar um
televisor de plasma, consulte este manual com atenção. A Sony não se responsabiliza por quaisquer acidentes ou
danos provocados por uma instalação incorrecta ou utilização indevida. Os seus direitos estatutários (se existirem)
não são afectados. Após a instalação, entregue este manual de instruções ao cliente.
Segurança
Os produtos da Sony são concebidos para oferecer a máxima segurança. No entanto, se utilizados de forma
incorrecta, podem provocar acidentes graves no caso de incêndio, choque eléctrico ou queda. Para evitar esse tipo
de acidentes, respeite as precauções de segurança.
ATENÇÃO
Esta base rotativa só pode ser utilizada com os produtos indicados abaixo. A utilização com outros aparelhos pode
causar instabilidade e, possivelmente, um acidente.
Produtos especificados (a partir de Março de 2004) : Televisor a cores com ecrã plano
(KE-42MR1/KDE-P42MRX1/KE-P42MRX1/KE-50MR1/
KDE-P50MRX1/KE-P50MRX1/KLV-L42MRX1/
KDL-L42MRX1(UK))
A base rotativa deve ser instalada a curta distância da parede.
2 (PT)

AVISO
Se não respeitar as precauções indicadas a seguir, pode haver perigo de morte ou acidente grave
resultantes de um incêndio, um choque eléctrico ou queda do produto.
A instalação do produto deve ser feita por agentes da Sony.
Se a instalação não for efectuada por agentes da Sony, pode ocorrer um acidente grave porque o ecrã e a base são
muito pesados.
Não se pendure na base.
A base pode cair e provocar ferimentos.
Tome as precauções necessárias para evitar que a base se vire.
Se não o fizer, a base rotativa pode virar-se durante um terramoto e provocar um acidente grave ou danos
materiais. Prenda a base a uma parede, etc., para evitar que se vire.
Instale a base num pavimento resistente e nivelado.
Não instale a base rotativa torta. Se o fizer a base rotativa pode virar-se e o ecrã cair. Se isso acontecer, pode
provocar um acidente.
Se quiser instalar a base num superfície mole, por exemplo, em cima de um tapete, coloque uma tábua por baixo da
base.
Não utilize uma base rachada.
Não utilize a base rotativa se estiver rachada.
O vidro pode partir-se e provocar a queda do televisor ou a base pode cair.
Qualquer uma destas situações pode provocar ferimentos.
Base rachada
PT
Português
3 (PT)

AVISO
Se não respeitar as precauções indicadas a seguir, pode haver perigo de morte ou acidente grave
resultantes de um incêndio, um choque eléctrico ou queda do produto.
Não se encoste nem pendure na base com o ecrã instalado.
A base pode cair e provocar um acidente grave ou a morte.
Não tape as aberturas de ventilação do ecrã.
Se tapar a abertura de ventilação (com um pano, etc.), o ecrã pode sobreaquecer e
incendiar-se.
O cabo de alimentação ou de interface do televisor não podem ser trilhados.
•O cabo de alimentação ou de interface do televisor não podem ser trilhados
durante a instalação do televisor na base. Se o cabo de alimentação ou de
interface do televisor ficar danificado, pode ocorrer um incêndio ou um choque
eléctrico.
• Quando transportar a base do televisor, evite pisar o cabo de alimentação ou de
interface do televisor. O cabo de alimentação ou de interface do televisor pode
estar danificado, o que pode provocar um incêndio ou um choque eléctrico.
ATENÇÃO
Se não respeitar as precauções indicadas a seguir, pode provocar um acidente ou danos materiais.
Instale unicamente os produtos especificados.
Esta base só pode ser utilizada com os produtos especificados. A instalação de qualquer outro equipamento que
não o especificado, pode resultar na queda da base e provocar um acidente ou danos materiais.
Instalação do televisor.
Utilize as placas de fixação fornecidas para instalar o televisor na base. Se o televisor não for instalado com
segurança, pode cair e provocar ferimentos.
Não faça força sobre o vidro nem o submeta a nenhum tipo de impacto.
Quando instalar o ecrã não faça força com as mãos sobre o vidro. Não bata no vidro com objectos duros, como uma
chave de parafusos, etc.
O vidro pode partir-se e provocar um acidente.
4 (PT)

Transportar a base rotativa
Se tentar mover a base rotativa sozinho ou sem observar os procedimentos adequados, pode ferir-se. Para o evitar,
siga os conselhos dados abaixo.
•A base rotativa deve ser transportada por duas ou mais pessoas, mas só depois de se retirar o televisor.
•Tenha cuidado para não ficar com os dedos dos pés entalados por baixo da placa inferior ou do canto do vidro.
Não sujeite o vidro a choques.
Embora se trate de uma base de vidro temperado, há que ter algum cuidado.
Observe as precauções indicadas abaixo porque se o vidro se partir, os fragmentos
podem provocar ferimentos.
•Não bata no vidro nem deixe cair objectos pontiagudos sobre o mesmo. Evite
todo o tipo de choques.
•Não risque nem fure o vidro com objectos pontiagudos.
• Evite bater com objectos pesados como, por exemplo, um aspirador, nos cantos
do vidro.
Nota sobre a instalação
Instale a base numa superfície sólida e plana. Não a instale em ângulo nem inclinada numa direcção. Para evitar
esta situação, observe as seguintes precauções:
– Se quiser instalar a base numa superfície macia como, por exemplo, um tapete, ponha primeiro uma tábua no
local designado.
–Não instale a base perto de um aquecedor ou num local exposto à incidência directa dos raios solares.
–Não instale a base no exterior ou em locais quentes ou húmidos.
Nota sobre a utilização
Limpe a base, de vez em quando, com um pano macio e seco. Para retirar as manchas mais difíceis, utilize um pano
ligeiramente humedecido numa solução de detergente. Depois, limpe-a com um pano macio e seco. Não utilize
qualquer tipo de químicos, como diluente ou benzina, porque pode estragar o acabamento da base.
5 (PT)

Para os agentes da Sony
Leia as precauções de segurança na íntegra e preste especial atenção às medidas
de segurança que é preciso tomar durante a instalação, manutenção, verificação
e reparação deste produto.
A instalação deve ser feita por duas ou mais pessoas.
A instalação do ecrã na base rotativa tem de ser feita por duas ou mais pessoas. Se a instalação for feita por apenas
uma pessoa, pode provocar um acidente ou ferimentos. Não deixe que as crianças se aproximem durante a
instalação da base.
Siga o procedimento adequado para instalar o ecrã com segurança.
Se não o instalar com segurança, o ecrã pode cair e provocar um acidente.
Verificação dos acessórios
Designação Quantidade Designação Quantidade
Base rotativa Placa de fixação
12
6 (PT)

Instalação do televisor
AVISO
Se o cabo de alimentação ficar entalado por baixo ou entre peças do equipamento, pode ocorrer um choque
eléctrico ou um curto-circuito.
Se tropeçar no cabo de alimentação ou de interface do ecrã, a base pode virar-se e provocar um acidente.
Passe o cabo de alimentação e o cabo de interface do televisor pelo orifício
na base.
Escolha o local de instalação e ponha a base no chão antes de instalar o ecrã.
Como o ecrã é pesado, deve escolher primeiro o local da instalação e pôr a base no chão antes de instalar o ecrã
na base.
Nota
Não empurre nem puxe a base enquanto estiver no chão. Os pés de borracha da base podem soltar-se.
Ligue o cabo de alimentação e o
1
cabo de interface ao ecrã.
z Sugestão
Consulte o manual de instruções do televisor a
cores com ecrã plano ou do televisor a cores com
ecrã LCD, para obter mais informações sobre
como ligar o cabo de alimentação e o cabo de
interface do ecrã.
Notas
• Se colocar o ecrã apoiado nos altifalantes,
estes podem ficar deformados ou mal ligados.
Para o evitar, observe as seguintes
precauções: (só nos modelos KLV-L42MRX1,
KDL-L42MRX1(UK))
–Não transporte o ecrã pegando-lhe pelos
altifalantes.
– Quando ligar os cabos ao ecrã, coloque o
material de embalagem, etc. no chão e
coloque o ecrã voltado para baixo em cima
dele, de maneira a que os altifalantes de
ambos os lados do ecrã fiquem fora do
material de embalagem, etc.
• Coloque o ecrã numa posição estável.
• Utilize um pano macio para proteger o ecrã
de danos ou sujidade.
Parte posterior do ecrã
Cabo de alimentação
Cabo de interface
do televisor
Pano macio
KE-42MR1/KDE-P42MRX1/KE-P42MRX1/
KE-50MR1/KDE-P50MRX1/KE-P50MRX1
Altifalante (esquerdo)
Material da embalagem, etc.
Parte posterior do
ecrã
Cabo de
alimentação
Cabo de interface
do televisor
Pano macio
As ilustrações sem o nome do modelo que aparecem a partir de agora, baseiam-se no televisor a cores com ecrã
plano KLV-L42MRX1, KDL-L42MRX1(UK).
Altifalante (direito)
KLV-L42MRX1/KDL-L42MRX1(UK)
7 (PT)

Instale o televisor na base.
2
1 Passe o cabo de alimentação e o cabo de interface do televisor pelo orifício na base.
2 Em primeiro lugar, verifique a posição dos quatro orifícios nas fixações da base.
Fixe os ganchos, que se encontram na parte posterior do televisor, nos orifícios da base.
Parte posterior do
televisor
Parte da frente da base
2
1
3 Os ganchos na parte posterior do televisor têm que ser completamente introduzidos nos quatro orifícios
das fixações. Depois, mantendo o televisor direito, empurre-o para baixo até encaixar.
Gancho
8 (PT)

Estique bem a parte dos cabos de alimentação e de interface do televisor
3
que já passou pelo orifício na base.
Puxe as pontas dos cabos de alimentação e de interface do televisor que já passaram pelo orifício na base e
estique bem os cabos.
Cabo de alimentação e cabo de
interface do televisor
Fixe o televisor
Para evitar a queda do televisor, monte a placa de fixação.
1 Introduza a placa de fixação entre o parafuso, que se encontra na parte superior da fixação, na base e o
gancho no televisor.
2 Empurre a placa de fixação até que o canto da figura em L fique encostado ao parafuso.
Placa de fixação
9 (PT)

Medidas de segurança para evitar que se vire
AVISO
Tome as precauções necessárias para evitar que a base se vire. Se não o fizer, a base rotativa pode virar-se
durante um terramoto e provocar um acidente grave ou danos materiais. Fixe a base utilizando uma corda ou
corrente prendendo uma das extremidades ao gancho de fixação e a outra à parede ou pilar.
Utilize uma corda ou uma corrente e um suporte de fixação na parede à venda do mercado.
1 Prenda o suporte de fixação a uma parede sólida ou a um pilar.
2 Enfie a corda ou a corrente em ambos os orifícios dos acessórios de fixações e prenda a outra extremidade
da corda ou corrente ao suporte de fixação na parede.
Acessório de fixação
2
1
Suporte para fixação
na parede
10 (PT)

Características técnicas
Unidade: mm
Peso: 57 kg
900
480
340
960
195
617
310
713
1160
1182
Design e características técnicas sujeitos a alterações sem aviso prévio.
11 (PT)

Tak, fordi du har købt dette produkt.
Til kunder
Dette produkt må kun monteres af kvalificerede Sony-servicemedarbejdere, da monteringen kræver mindst to
personer med den nødvendige viden om sikkerhed. Sony kan ikke holdes ansvarlig for ulykker eller materielle
skader forårsaget af ukorrekt behandling eller montering. Dine lovsikrede rettigheder påvirkes ikke.
ADVARSEL!
Hvis sikkerhedsforskrifterne ikke overholdes, eller produktet anvendes på ukorrekt vis, kan det medføre brand
eller personskade.
Denne vejledning beskriver korrekt håndtering af produktet og de vigtigste forholdsregler, som er nødvendige for
at forhindre ulykker. Læs denne vejledning grundigt, og brug produktet korrekt. Gem denne vejledning til senere
brug.
Til Sony-forhandlere
Montering af et plasma-TV kræver to personer med den nødvendige viden om sikkerhed. Denne vejledning skal
følges nøje ved montering af et plasma-TV. Sony kan ikke holdes ansvarlig for ulykker eller materielle skader
forårsaget af ukorrekt behandling eller montering. Dine lovsikrede rettigheder påvirkes ikke. Giv denne vejledning
til kunden efter monteringen.
Om sikkerhed
Sonys produkter er udformet med henblik på at opnå bedst mulig sikkerhed. Hvis produkterne anvendes forkert,
kan det dog medføre alvorlig personskade som følge af brand, elektrisk stød, eller fordi produktet vælter eller
falder ned. Undgå sådanne ulykker ved at overholde sikkerhedsforskrifterne.
FORSIGTIG!
Denne bevægelige konsol er kun beregnet til brug med følgende produkter. Anvendelse sammen med andre
apparater kan forårsage ustabilitet og føre til personskade.
Specificerede produkter (fra marts 2004) : Farve-TV med fladskærm
(KE-42MR1/KDE-P42MRX1/KE-P42MRX1/KE-50MR1/
KDE-P50MRX1/KE-P50MRX1/KLV-L42MRX1/KDL-L42MRX1(UK))
Vi anbefaler, at den bevægelige konsol monteres på kort afstand af væggen.
2 (DK)

ADVARSEL!
Hvis følgende forholdsregler ikke overholdes, kan det medføre alvorlig personskade eller død som følge
af brand, elektrisk stød, eller fordi produktet vælter eller falder ned.
Lad monteringen udføre af kvalificerede Sony-forhandlere.
Hvis andre personer end Sony-forhandlere udfører monteringen, kan det medføre personskade, da skærmen og
konsollen er meget tunge.
Læn dig ikke ind over konsollen, og hæng ikke på den.
Konsollen kan vælte og forårsage personskade.
Sørg for at tage passende forholdsregler for at forhindre, at konsollen vælter.
Hvis du ikke gør dette, kan den bevægelige konsol vælte og forårsage personskade eller materiel skade. Fastgør
konsollen til en væg, søjle eller lignende for at forhindre, at den vælter.
Monter konsollen på et fast, fladt gulv.
Monter ikke den bevægelige konsol, så den hælder i en bestemt retning. Hvis du gør det, kan den bevægelige
konsol vælte, eller skærmen kan falde ned. Dette kan forårsage personskade.
Hvis du monterer konsollen på en blød overflade som f.eks. en måtte eller et tæppe, skal du først lægge en plade
over stedet.
Brug ikke en konsol, der er revnet.
Brug ikke den bevægelige konsol, hvis der skulle opstå revner i den.
Glasset kan gå itu, og skærmen kan falde ned, eller konsollen kan vælte. Dette kan
forårsage personskade.
Revnet konsol
DK
Dansk
3 (DK)

ADVARSEL!
Hvis følgende forholdsregler ikke overholdes, kan det medføre alvorlig personskade eller død som følge
af brand, elektrisk stød, eller fordi produktet vælter eller falder ned.
Læn dig ikke ind over konsollen, og hæng ikke over den, når skærmen står på
den.
Konsollen kan vælte og forårsage alvorlig personskade eller dødsfald.
Skærmens ventilationsåbning må ikke tildækkes.
Hvis du tildækker ventilationsåbningen (med en klud el.lign.), kan der
akkumuleres varme indeni, og der kan opstå brand.
Sørg for, at netledningen og skærmkablet ikke bliver klemt.
• Sørg for, at netledningen og skærmkablet ikke bliver klemt, når du monterer
skærmen på standeren. Hvis netledningen eller skærmkablet er beskadiget, kan
dette medføre brand eller elektrisk stød.
• Undgå at træde på netledningen eller skærmkablet, når du bærer
skærmstanderen. Netledningen eller skærmkablet kan blive beskadiget, og dette
kan medføre brand eller elektrisk stød.
FORSIGTIG!
Hvis følgende forholdsregler ikke overholdes, kan der opstå materiel skade eller personskade.
Monter kun det specificerede produkt.
Denne konsol er udelukkende udviklet til brug sammen med det specificerede produkt. Hvis du monterer andet
udstyr end det specificerede, kan det falde ned og forårsage personskade eller materiel skade.
Fastgørelse af skærmen.
Sørg for at fastgøre skærmen til konsollen med de medfølgende opspændingsplader. Hvis skærmen ikke monteres
korrekt, kan den falde ned og forårsage personskade.
Udsæt ikke glasset for vægt, og undgå at støde til det.
Udsæt ikke glasset for vægt med hænderne, når skærmen monteres. Undgå at ramme glasset med tunge
genstande, som f.eks. en skruetrækker.
Glasset kan gå i stykker og forårsage personskade.
4 (DK)

Når du bærer den bevægelige konsol
Hvis du forsøger at flytte den bevægelige konsol alene eller uden at følge sikkerhedsanvisningerne, kan du
forårsage personskade. Du kan undgå dette ved at overholde de forholdsregler, der angives nedenfor.
• Lad to eller flere personer bære den bevægelige konsol, men ikke før skærmen er fjernet.
• Sørg for, at du ikke får tæerne i klemme under glassets nederste plade eller hjørne.
Udsæt ikke glasset for voldsomme stød.
Denne konsol er fremstillet af hærdet glas, men vær alligevel forsigtig. Hvis glasset
går itu, kan glasstumperne forårsage personskade. Følg derfor nedenstående
forskrifter.
• Slå ikke på glasset, og tab ikke spidse genstande ned på glasset. Undgå
voldsomme stød.
• Rids ikke i glasset, og stik ikke i det med skarpe genstande.
• Lad ikke hårde genstande, f.eks. en støvsuger, ramme glassets kanter.
Bemærkning til montering
Monter konsollen på et fast, fladt gulv. Sørg for, at konsollen ikke installeres i en vinkel, eller hældende i én retning.
Følg nedenstående forskrifter for at undgå dette.
–Hvis konsollen monteres på en blød overflade som f.eks. en måtte eller et gulvtæppe, skal du først anbringe et
bræt på stedet.
– Konsollen må ikke monteres på et sted, der er udsat for direkte sollys eller i nærheden af en radiator.
– Konsollen må ikke monteres på et varmt eller fugtigt sted eller udendørs.
Bemærkning til brug
Konsollen holdes ren ved regelmæssigt at tørre den af med en tør, blød klud. Genstridige pletter fjernes med en
klud, som er fugtet let med en opløsning med rengøringsmiddel. Derefter aftørres området med en tør, blød klud.
Brug ikke nogen former for kemikalier, f.eks. fortynder eller rensebenzin, da det kan beskadige konsollens finish.
5 (DK)

Til Sony-forhandlere
Sørg for at læse ovennævnte sikkerhedsforskrifter grundigt, og vær særlig
opmærksom på sikkerheden under montering, vedligeholdelse, kontrol og
reparation af dette produkt.
Sørg for, at mindst to personer udfører monteringen.
Sørg for, at to eller flere personer monterer skærmen på den bevægelige konsol. Hvis én person udfører
monteringsarbejdet alene, kan det medføre en ulykke eller personskade. Sørg for at holde små børn væk under
monteringen.
Sørg for at montere skærmen sikkert ved at følge den rigtige procedure.
Hvis skærmen ikke monteres sikkert, kan den falde ned og forårsage personskade.
Kontroller delene
Navn Antal Navn Antal
Bevægelig konsol Opspændingsplade
12
6 (DK)

Monter skærmen
ADVARSEL!
Hvis netledningen bliver klemt under eller mellem de forskellige udstyrsdele, kan dette forårsage kortslutning
eller elektrisk stød.
Hvis du falder over netledningen eller skærmkablet, kan konsollen vælte og forårsage personskade.
Træk netledningen og skærmkablet gennem hullet i konsollen.
Vælg et monteringssted, og læg konsollen ned, inden skærmen monteres.
Skærmen er tung, og det anbefales derfor, at placeringen bestemmes på forhånd, og at konsollen lægges ned på
det pågældende sted, inden skærmen monteres på konsollen.
Bemærk!
Skub eller træk ikke i konsollen, mens den ligger på gulvet. Gummifødderne i bunden af konsollen kan falde
af.
Tilslut netledningen og
1
skærmkablet til skærmen.
z Tip!
Se vejledningen til Sonys farve-TV med
fladskærm eller LCD-farve-TV, hvis du ønsker
yderligere oplysninger om tilslutningen af
netledningen og skærmkablet.
Bemærk!
• Hvis skærmens vægt placeres på højttalerne,
kan der opstå deformation eller en løs
forbindelse i højttalerne. Dette kan undgås
ved at overholde følgende. (kun KLVL42MRX1, KDL-L42MRX1(UK))
–Hold ikke på højttalerne, når skærmen
bæres.
–Når kablerne tilsluttes til skærmen,
placeres emballagen osv. på gulvet, og
skærmen lægges på den med forsiden
nedad, så højttalerne på hver side af
skærmen er fri af emballagen osv.
• Sørg for at placere skærmen stabilt.
•Brug et blødt klæde for at beskytte skærmen
mod beskadigelse eller snavs.
Skærmens bagside
Netledning
Skærmkabel
Blødt underlag
KE-42MR1/KDE-P42MRX1/KE-P42MRX1/
KE-50MR1/KDE-P50MRX1/KE-P50MRX1
Højttaler (venstre)
Emballage osv.
Skærmens bagside
Netledning
Skærmkabel
Blødt underlag
Illustrationer uden modelnavne, der vises fra nu af, er baseret på farve-TV'et med fladskærm KLV-L42MRX1, KDLL42MRX1(UK).
Højttaler (højre)
KLV-L42MRX1/KDL-L42MRX1(UK)
7 (DK)

Monter skærmen på konsollen.
2
1 Træk netledningen og skærmkablet gennem hullet i konsollen.
2 Kontroller positionen af de fire huller på beslagene på konsollen på forhånd.
Monter krogene bag på skærmen i hullerne på beslagene på konsollen.
Skærmens bagside
2
Standerens forside
1
3 Kontroller, at krogene bag på skærmen sidder helt inde i de fire huller på beslagene. Skyd dernæst
skærmen lige nedad, indtil den klikker på plads.
Krog
8 (DK)

Tag slækket af netledningen og skærmkablet, som allerede er trukket
3
gennem hullet i konsollen, op.
Træk i enderne af netledningen og skærmkablet, som allerede er trykket gemmen hullet i konsollen, og tag
slækket fra ledningen og kablet op.
netledningen og skærmkablet
Fastgør skærmen
Fastgør opspændingspladen for at forhindre skærmen i at falde ned.
1 Sæt opspændingspladen ind mellem skruen på den øverste del af beslaget på konsollen og krogen på
skærmen.
2 Skub til opspændingspladen, indtil hjørnet af L-figuren rammer skruen.
Opspændingsplade
9 (DK)

Sikkerhedsforanstaltninger til at forhindre, at
konsollen vælter
ADVARSEL!
Sørg for at tage passende forholdsregler for at forhindre, at konsollen vælter. Hvis du ikke gør dette, kan den
bevægelige konsol vælte og forårsage personskade eller materiel skade. Fastgør konsollen ved hjælp af et reb
eller en kæde ved at fastgøre den ene ende til sikkerhedskrogen og den anden ende til væggen eller søjlen.
Klargør et reb eller en kæde og et vægforankringsbeslag.
1 Fastgør vægforankringsbeslaget til en solid væg eller søjle.
2 Før rebet eller kæden gennem begge huller i forankringsanordningen, og fastgør derefter den anden ende
af rebet eller kæden til vægforankringsbeslaget.
Forankringsanordning
2
1
Vægforankringsbeslag
10 (DK)
 Loading...