

Page 1
For Customers and Sony Dealers in Europe
Wall-Mount Bracket
4-092-246-22 (1)
Instructions
Gebrauchsanweisung
Istruzioni
Mode d’emploi
Instructies
√‰ËÁ›Â˜
Yönergeler
Instrucciones
Instruções
Vejledning
Instruksjoner
Bruksanvisning
GB
DE
IT
FR
NL
GR
TR
ES
PT
DK
NO
SE
Käyttöohje
SU-PW1
© 2002 Sony Corporation
FI
Page 2
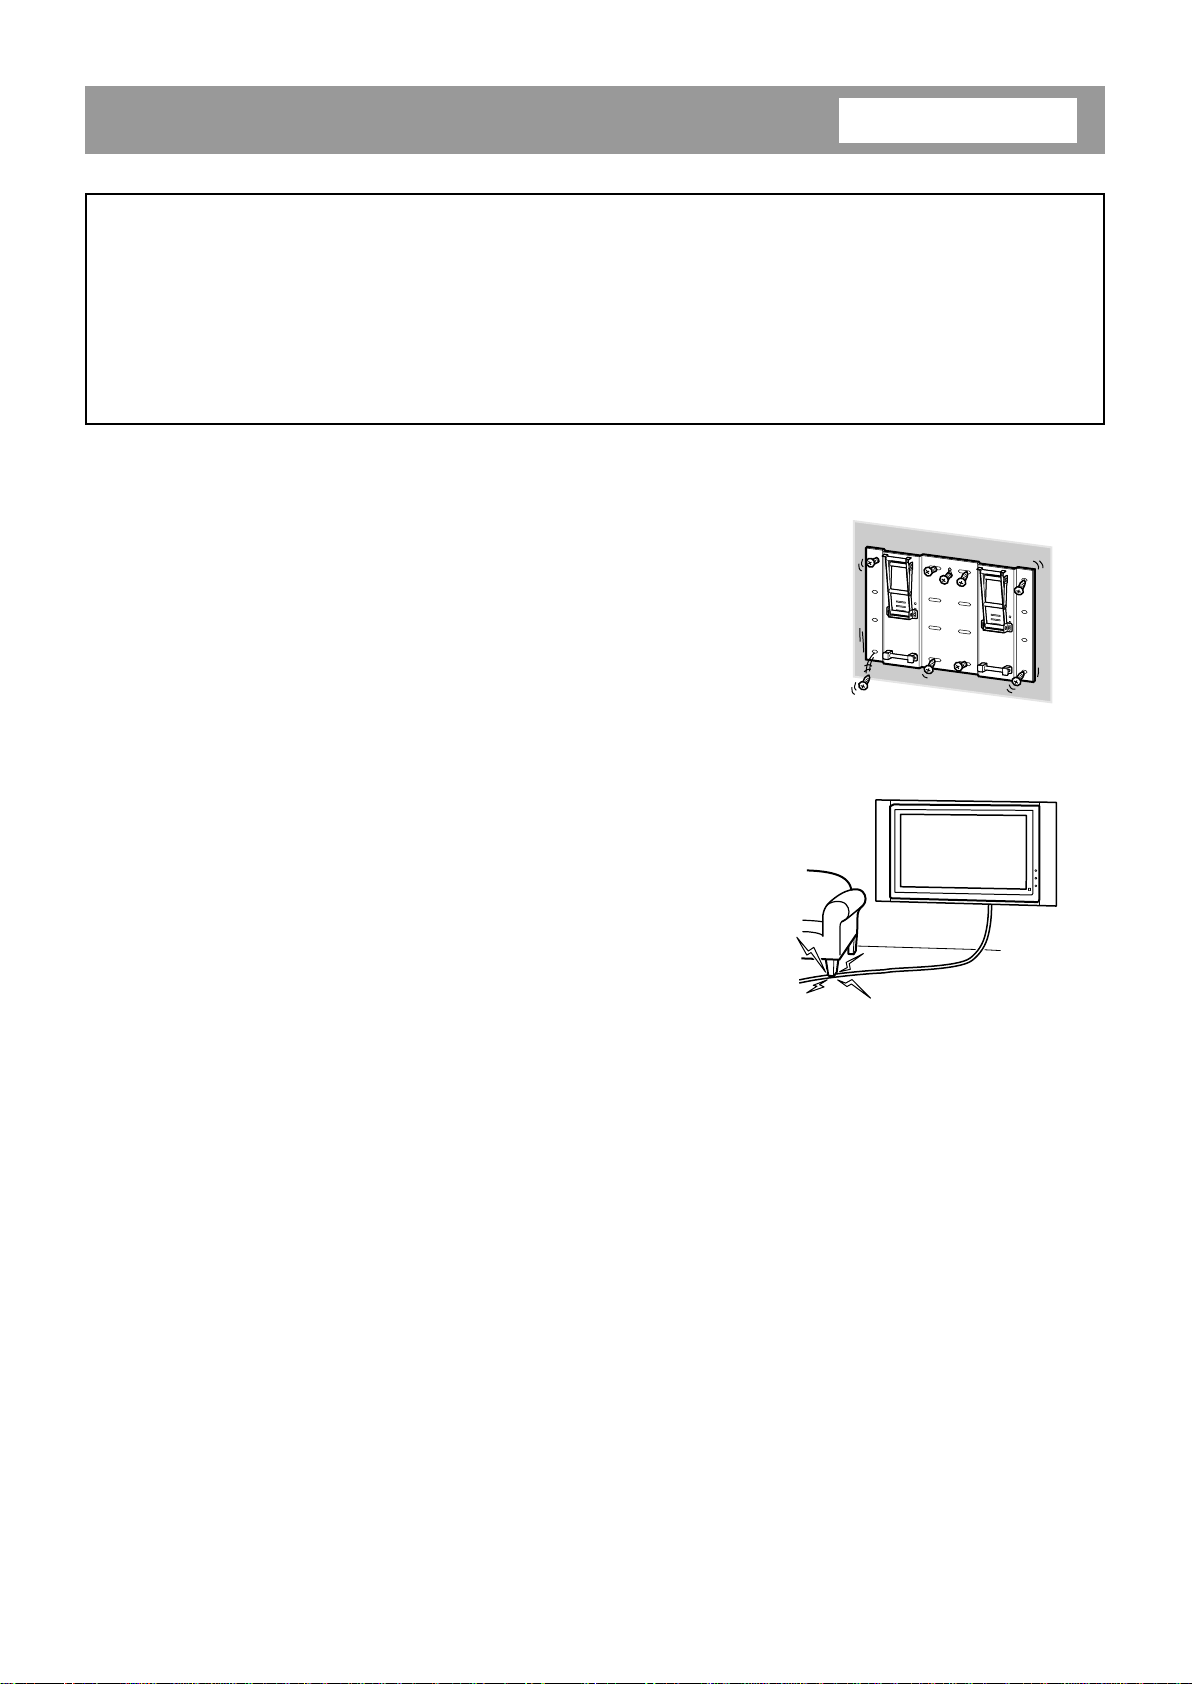
Thank you for purchasing this product.
To Customers
Sufficient expertise is required for installing this product. Be sure to subcontract the installation to Sony dealers
or contractors and pay adequate attention to safety during the installation.
WARNING
If the safety precautions are not observed and the product is used incorrectly, it may result in a fire or serious
injury.
This instruction manual shows the important precautions necessary to prevent accidents and to promote the correct
handling of the product. Be sure to read this instruction manual thoroughly and use the product correctly. Be sure
to keep this instruction manual available for future reference.
For Sony Dealers
Sufficient expertise is required for installing this product. Be sure to read this instruction manual thoroughly to do
the installation work safely. We are not liable for any damage or injury caused by mishandling or improper
installation. After installation, please hand this installation manual to the customers.
This Wall-Mount Bracket is designed by Sony for use with the specified product. Do not use this bracket with
equipment other than the following product.
Specified product: Flat panel Colour Television (KE-42MR1/KE-50MR1)
On Safety
Products by Sony are designed with safety in mind.
If the product is used incorrectly, however, it may result in serious injury through a fire, an electric shock or by
causing the product to topple over. Be sure to observe the proper safety precautions to prevent accidents.
2 (GB)
Page 3
For Customers
WARNING
If the following precautions are not observed, there is a possibility of either death or serious injury
through a fire, an electric shock or an explosion.
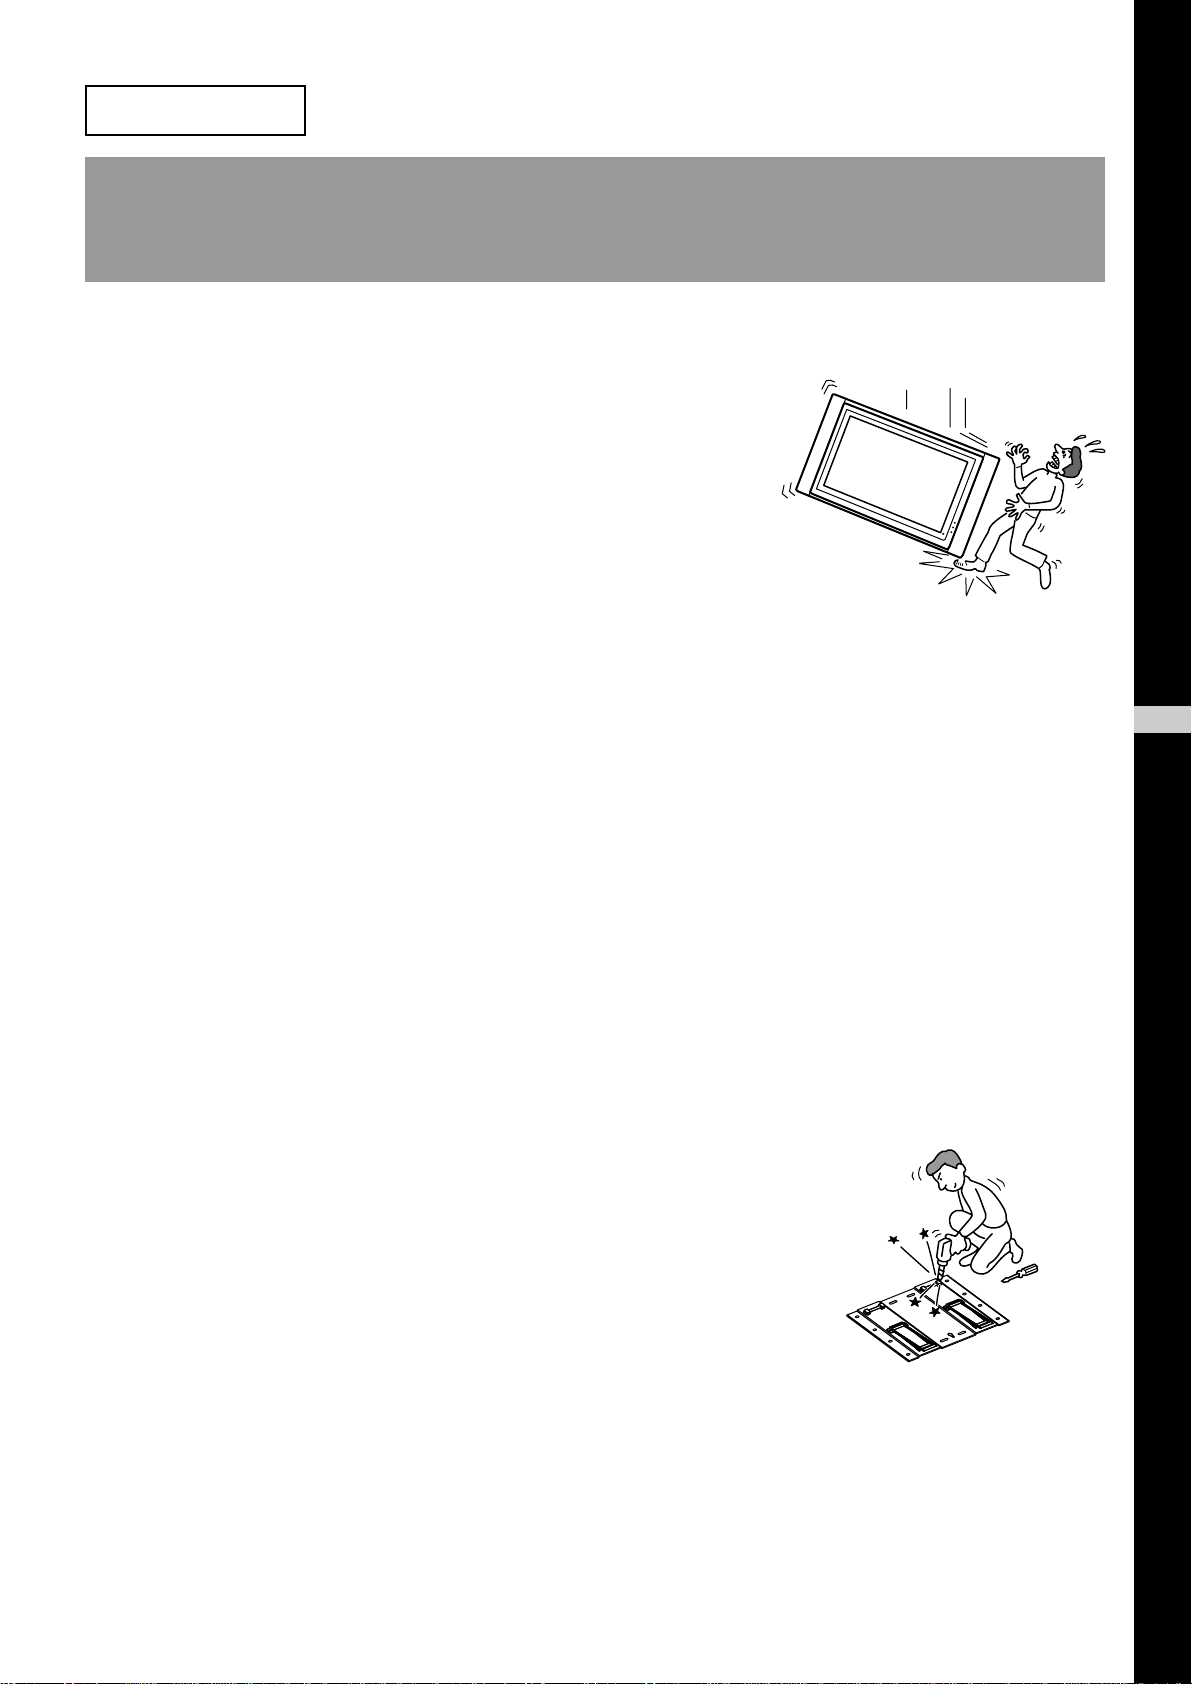
Be sure to subcontract the installation to qualified contractors and keep small
children away during the installation.
If persons other than qualified contractors install the Wall-Mount Bracket,
the following accidents may happen.
• The Display Unit may fall and cause a serious injury such as a bruise or a
fracture during an earthquake.
• If the wall on which the Wall-Mount Bracket is installed is unstable,
uneven, or not perpendicular to the floor, the unit may fall and cause
injury or property damage. The wall should be capable of supporting a
weight of at least four (4) times the Display Unit weight (KE-42MR1: 53
kg × 4 = 212 kg, KE-50MR1: 39 kg × 4 = 156 kg).
• If the installation of the Wall-Mount Bracket on the wall is not
sufficiently sturdy, the unit may fall and cause injury or property
damage.
Be sure to subcontract the installation to qualified contractors when moving
or dismounting the Wall-Mount Bracket.
If persons other than qualified contractors transport or dismount the Wall-Mount Bracket, the Display Unit may
fall and cause injury or property damage. Be sure that two or more persons carry or dismount the Wall-Mount
Bracket.
Do not spill liquid of any kind on the Display Unit.
If you allow the Display Unit to get wet, this may result in a fire or an electric shock.
Do not remove bolts, etc., after mounting the Display Unit.
If you do so, the Display Unit may fall.
Do not disassemble or make alterations to the parts of the Wall-Mount
Bracket.
If you do so, the Wall-Mount Bracket may fall and cause injury or property
damage.
GB
English
Do not mount any equipment other than the specified product.
This Wall-Mount Bracket is designed for use with the specified product. If you mount equipment other than the
specified product, it may fall and cause injury or property damage.
3 (GB)
Page 4
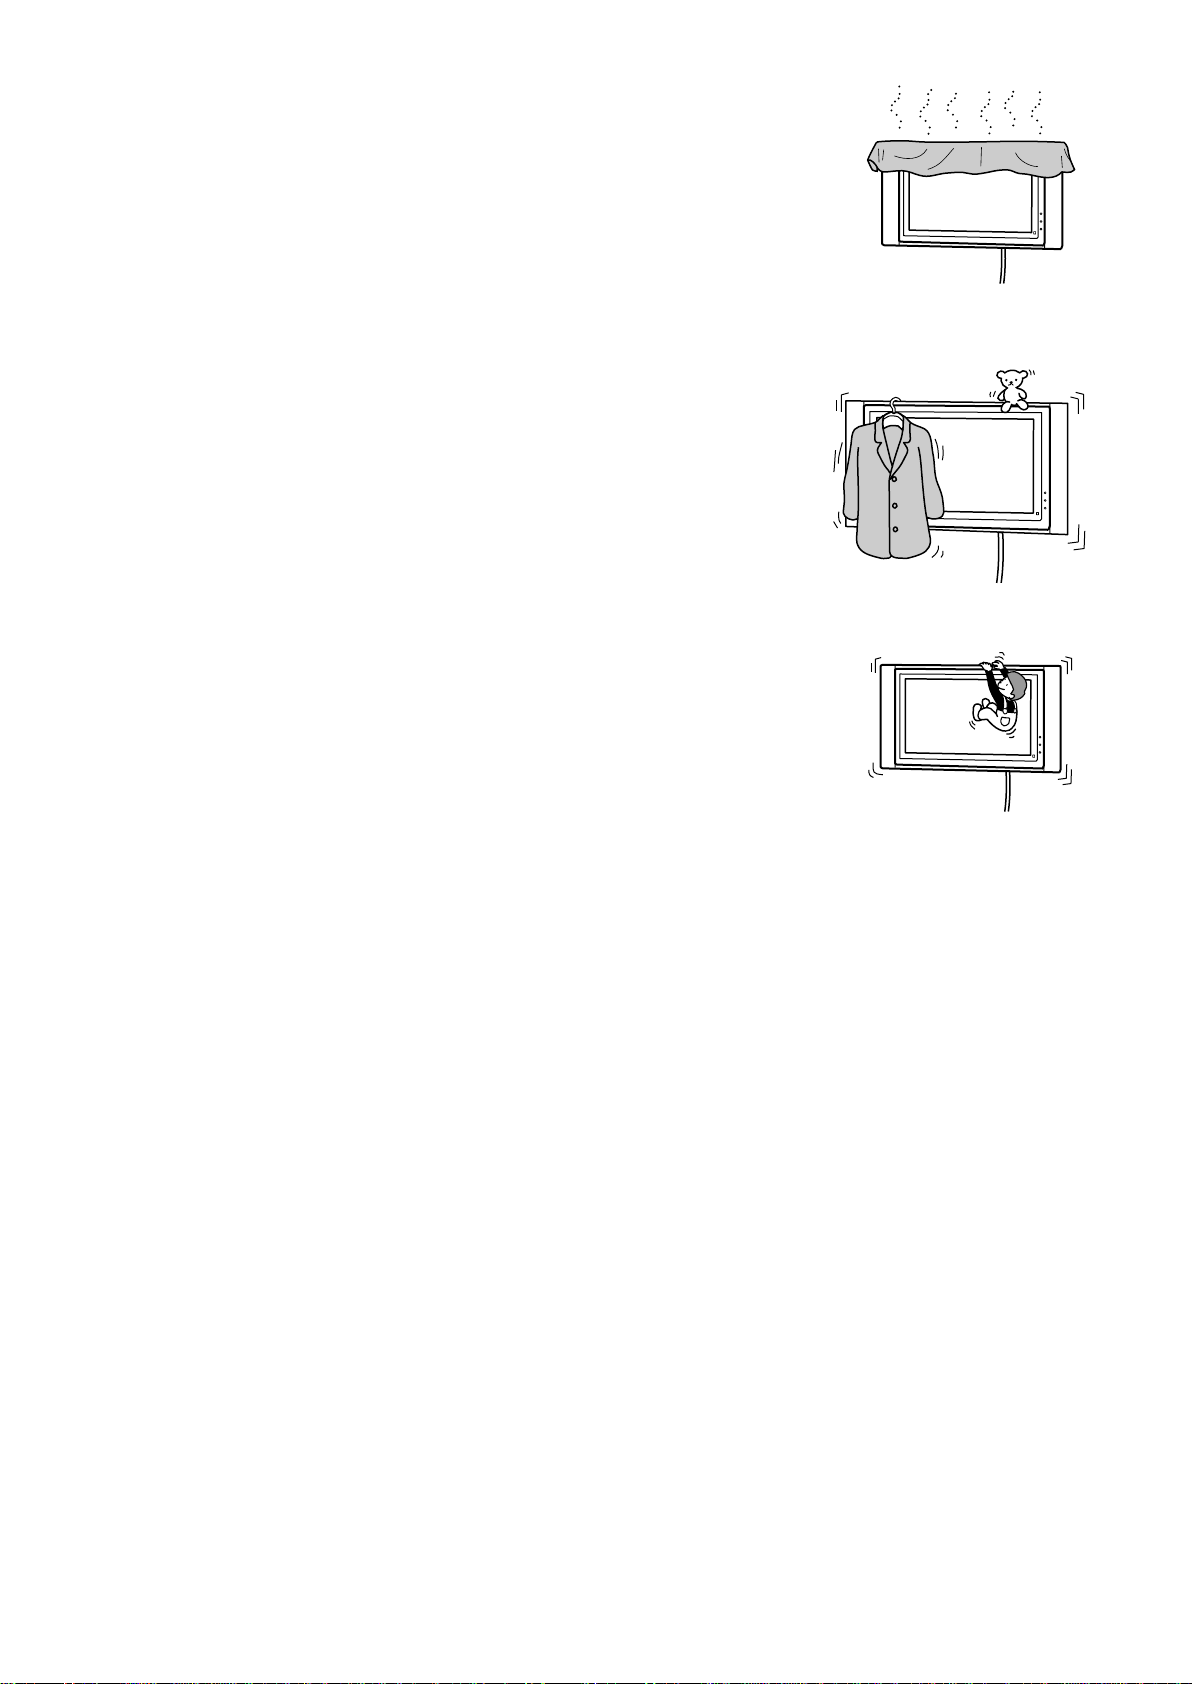
Do not block the ventilating holes on the Display Unit.
If you block the ventilating holes on the Display Unit by covering the top of
the Display Unit with a cloth or the like, the Display Unit may become
overheated and this may cause a fire.
Do not apply any load other than the Display Unit on the Wall-Mount
Bracket.
If you do so, the Display Unit may fall and cause injury or property
damage.
Do not lean on or hang from the Display Unit.
The Display Unit may fall and the user may be caught under the weight of
the unit and suffer serious injury.
To prevent a fire or an electric shock, do not expose the Display Unit to rain
or moisture.
If you allow the Display Unit to get wet, this may result in a fire or an electric shock.
Never place the Display Unit in hot, humid or excessively dusty places. Do not
install the Display Unit where it may be exposed to mechanical vibrations.
If you do so, this may cause a fire or an electric shock.
Keep flammable objects or open flames (e.g. candles) away from the Display
Unit.
To prevent a fire, keep flammable objects or open flames (e.g. candles) away from the Display Unit.
4 (GB)
Page 5

CAUTION
If the following precautions are not observed, there is a possibility of injury or property damage.
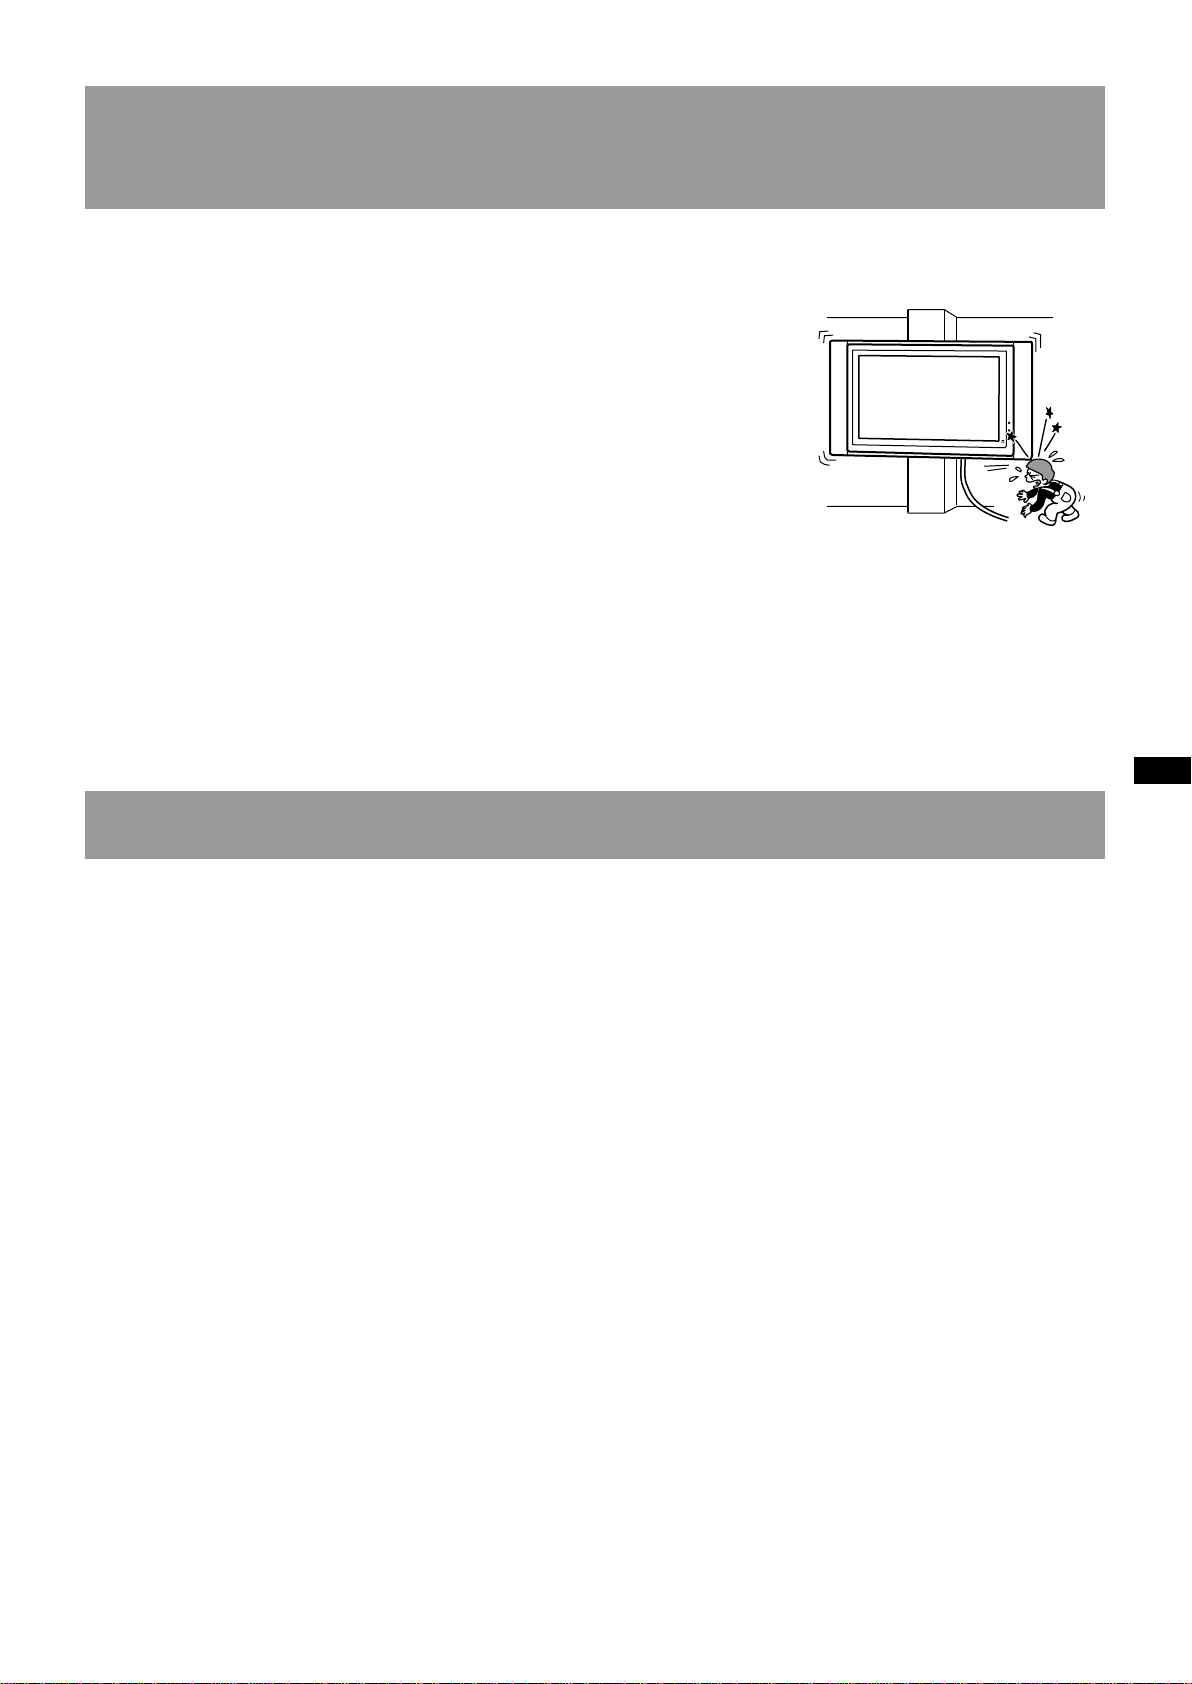
Do not install the Wall-Mount Bracket on wall surfaces where the corners or
the sides of Display Unit would protrude away from the wall surface.
Do not install the Wall-Mount Bracket on wall surfaces such as a pillar,
where the corners or the sides of Display Unit would protrude away from
the wall surface. If a person or object happens to hit the protruded corner
or side of the Display Unit, this may cause injury or property damage.
Do not handle the product with excessive force during cleaning or
maintenance.
Do not apply excessive force on the topside of the Display Unit.
If you do so, this may cause injury or property damage by causing the Display Unit to fall.
Do not install the Display Unit over or under an air-conditioner.
If you do so, the Display Unit may be exposed to air currents from the air-conditioner. This may result in a
malfunction of the Display Unit.
Precautions
• If you use the Display Unit installed on the Wall-Mount Bracket for a long time, the wall behind or above the
Display Unit may become discolored or the wallpaper may come unstuck, depending on the material of the wall.
If the Wall-Mount Bracket is removed after installing them on the wall, the screw holes are left.
• If you have routed 300 ohm feeder cables behind the wall, we recommend that you change them to 75 ohm
coaxial cables.
If it is necessary to continue to use 300 ohm feeder cables, be sure to confirm that sufficient space is available
between the Display Unit and the feeder cables behind the wall before starting the installation.
Consult your contractor on an appropriate installation location where the Display Unit suffers no radio noise
before starting the installation.
5 (GB)
Page 6
Install the Wall-Mount Bracket
For Sony Dealers
WARNING To Customers
Sufficient expertise is required for installing this product. Be sure to subcontract the installation to Sony dealers
or contractors and pay adequate attention to safety during the installation.
To Sony Dealers
The following instructions are for Sony Dealers only. Be sure to read safety precautions described above and
pay adequate attention to safety during the installation, maintenance and checking of this product.
Be sure to install the Wall-Mount Bracket securely to the wall following the
instructions in this instruction manual.
If any of the screws are loose or fall out, the Wall-Mount Bracket may fall
and cause injury or property damage. Be sure to use the appropriate screws
for the material of the wall and install the unit securely, using eight or more
M8 or the equivalent screws.
Do not allow the Power Cord or the Display Cable to be pinched.
If the Power Cord or the Display Cable is pinched between the unit and the
wall or is bent or twisted by force, the metallic part of the cord or cable may
be exposed and cause a short circuit or a break in the cord or cable. This
may cause a fire or an electric shock.
Be sure to use the supplied screws and attachment parts properly following
the instructions given in this instruction manual. If you use substitute items,
the Display Unit may fall, and cause bodily injury to someone or damage to
the Display Unit.
Be sure to assemble the bracket properly following the instructed procedure
explained in this instruction manual.
If any of the screws are loose or fall out, the Display Unit may fall, and cause bodily injury to someone or damage
to the Display Unit.
Be sure to tighten the bolts and screws securely in the designated position.
If you fail to do so, the Display Unit may fall, and cause bodily injury to someone or damage to the Display Unit.
Be careful not to subject the Display Unit to shock during installation.
If the Display Unit is exposed to shock, it may fall or break apart. This may cause injury.
6 (GB)
Page 7
Be sure to install the Display Unit on a wall that is both perpendicular and
flat.
If you fail to do so, the Display Unit may fall and cause injury.
After proper installation of the Display Unit, secure the cables properly.
If people or objects get tangled in the cables, this may result in injury.
Be careful not to hurt your hands or fingers during the installation.
Be careful not to hurt your hands or fingers when installing the Wall-Mount Bracket or the Display Unit.
The screws needed to secure the Wall-Mount Bracket to the wall are not
supplied.
Use the appropriate screws for the wall material and structure when mounting the Wall-Mount Bracket.
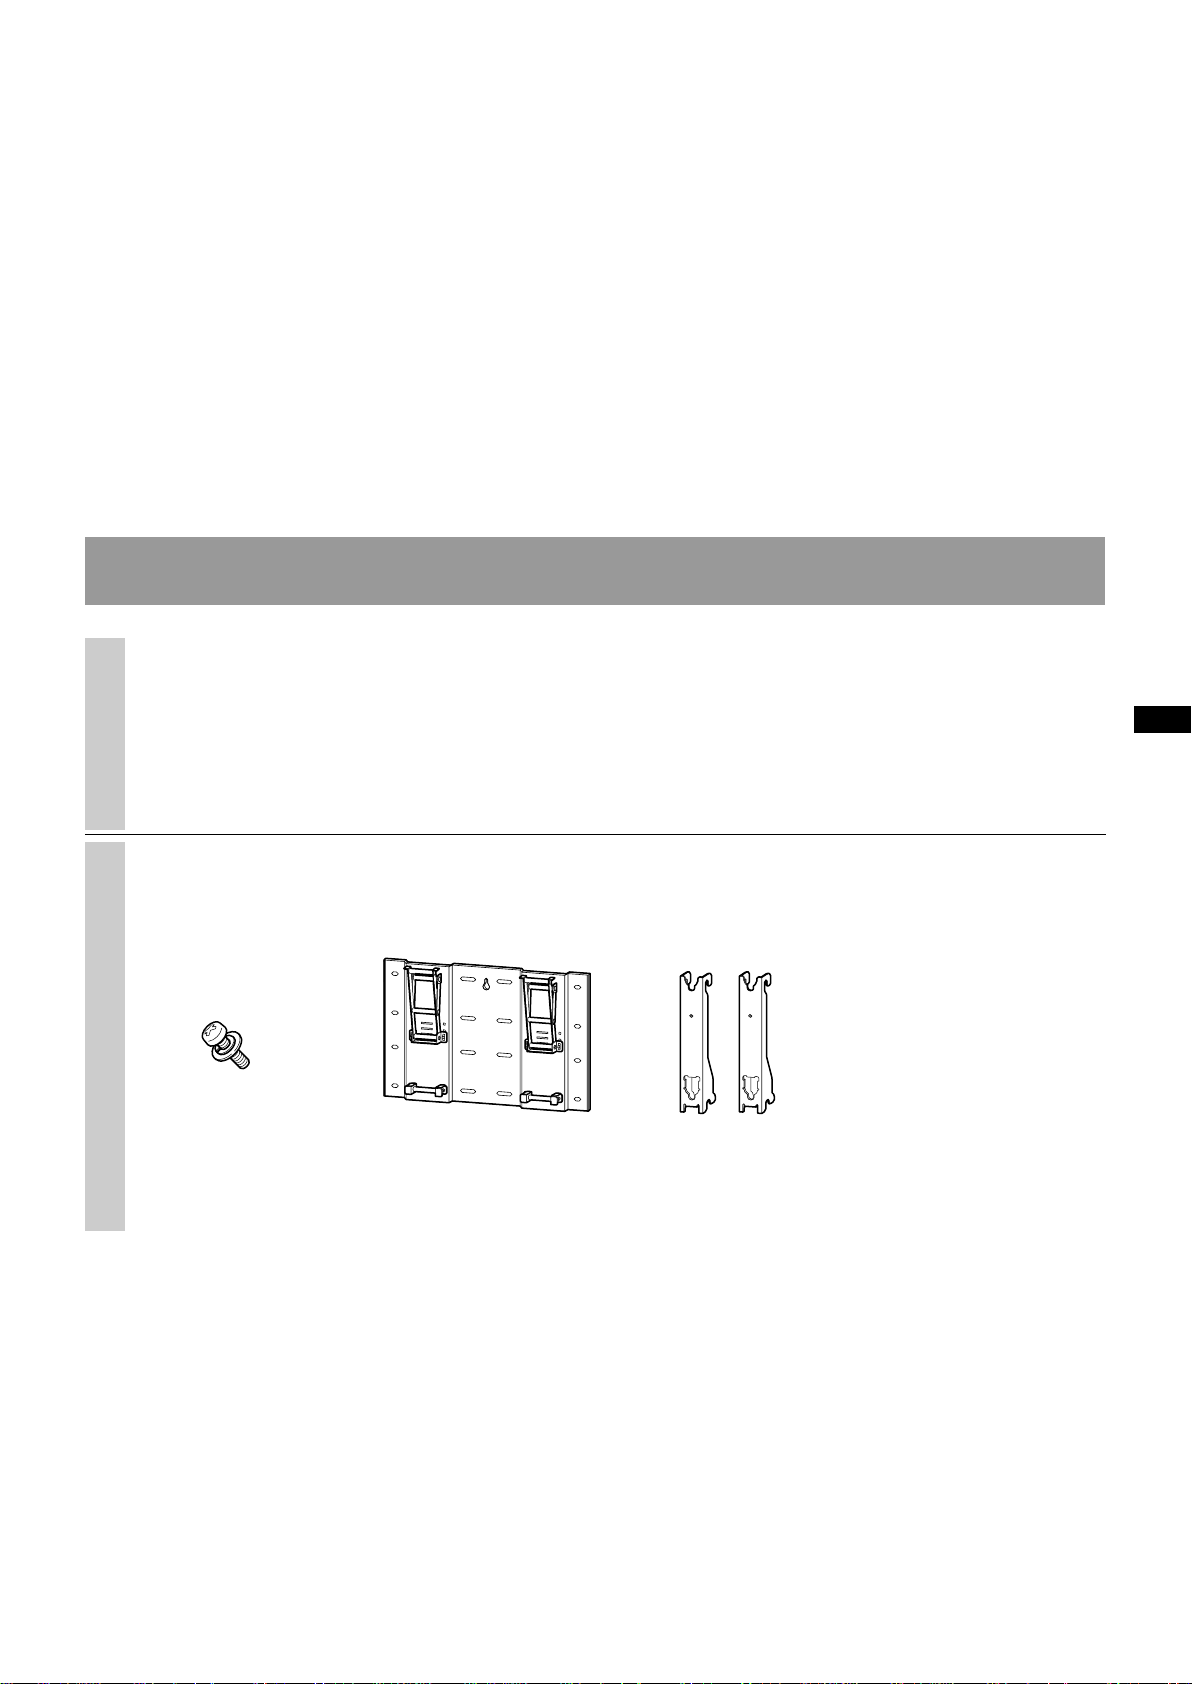
Step 1: Check the parts required for the installation
Prepare a Phillips driver and the
1
appropriate screws (eight or more
M8 or the equivalent screws, not
supplied), depending on the
material of the wall, beforehand.
2
Open the package and check the
parts.
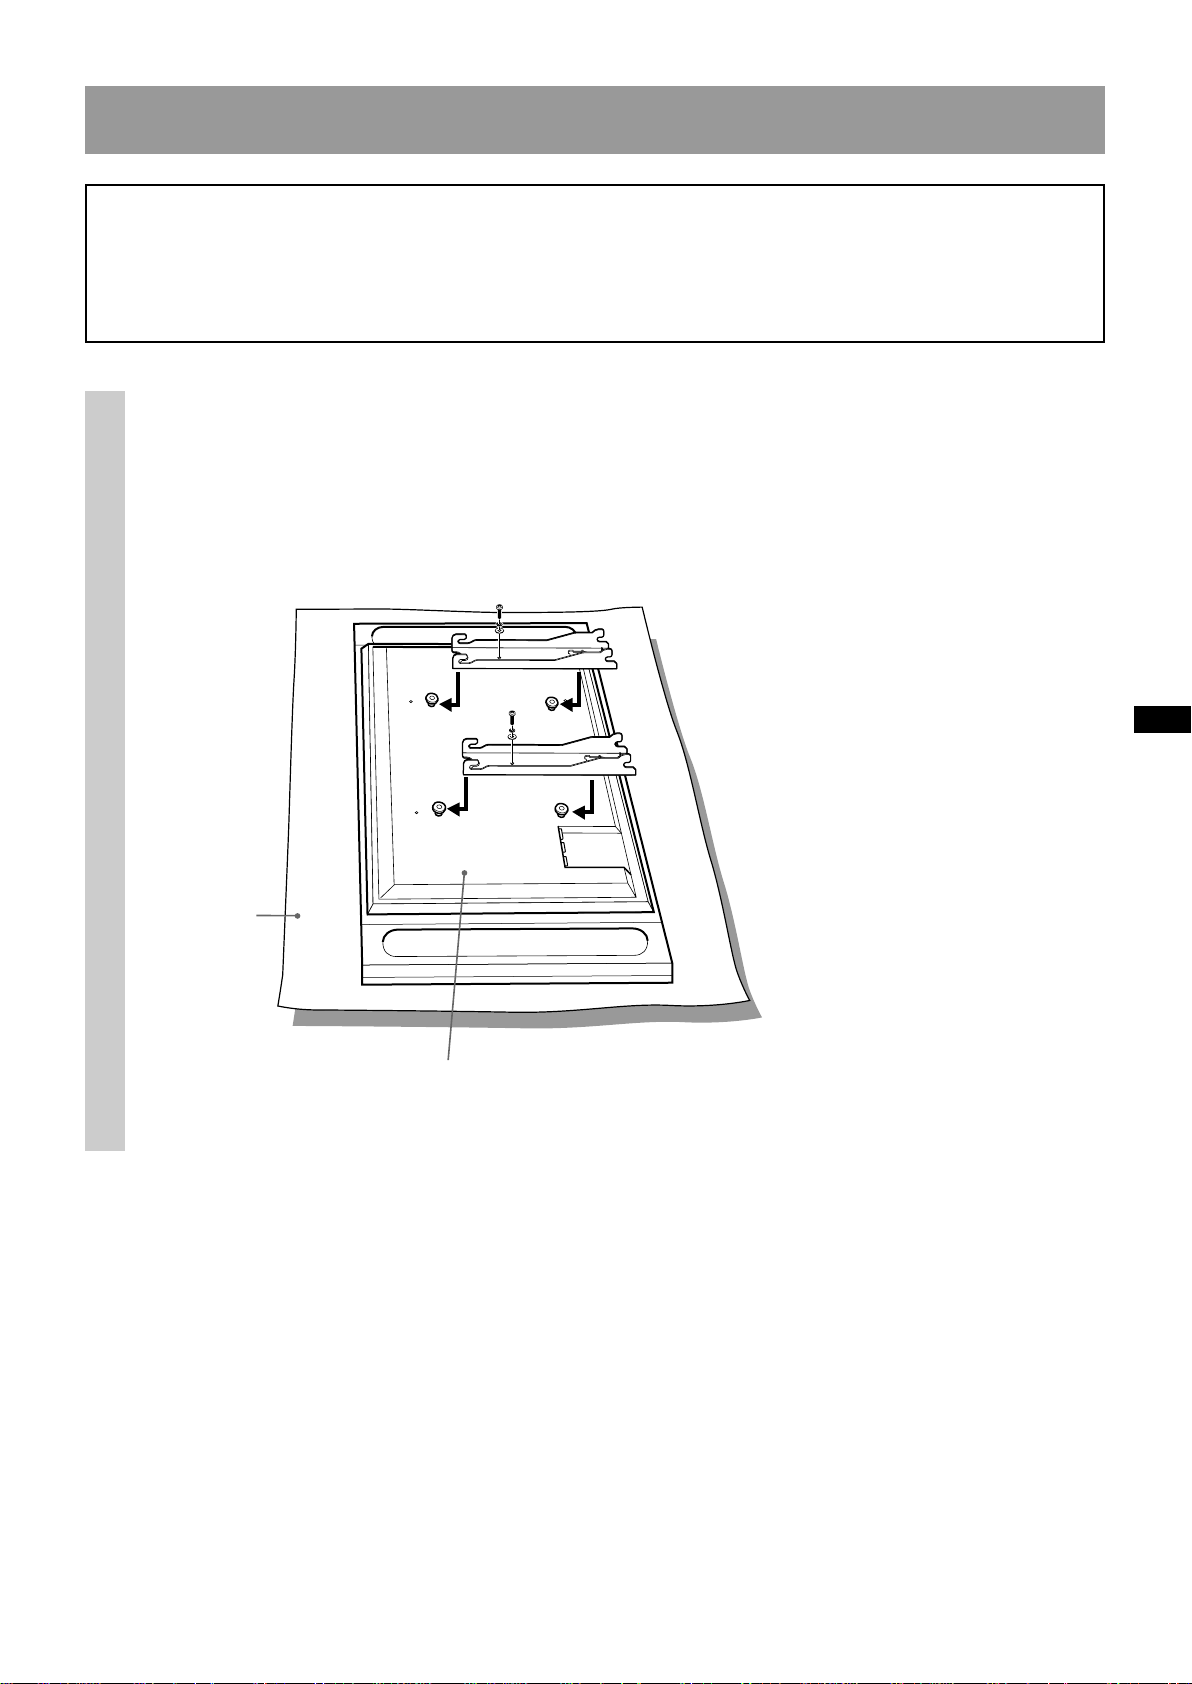
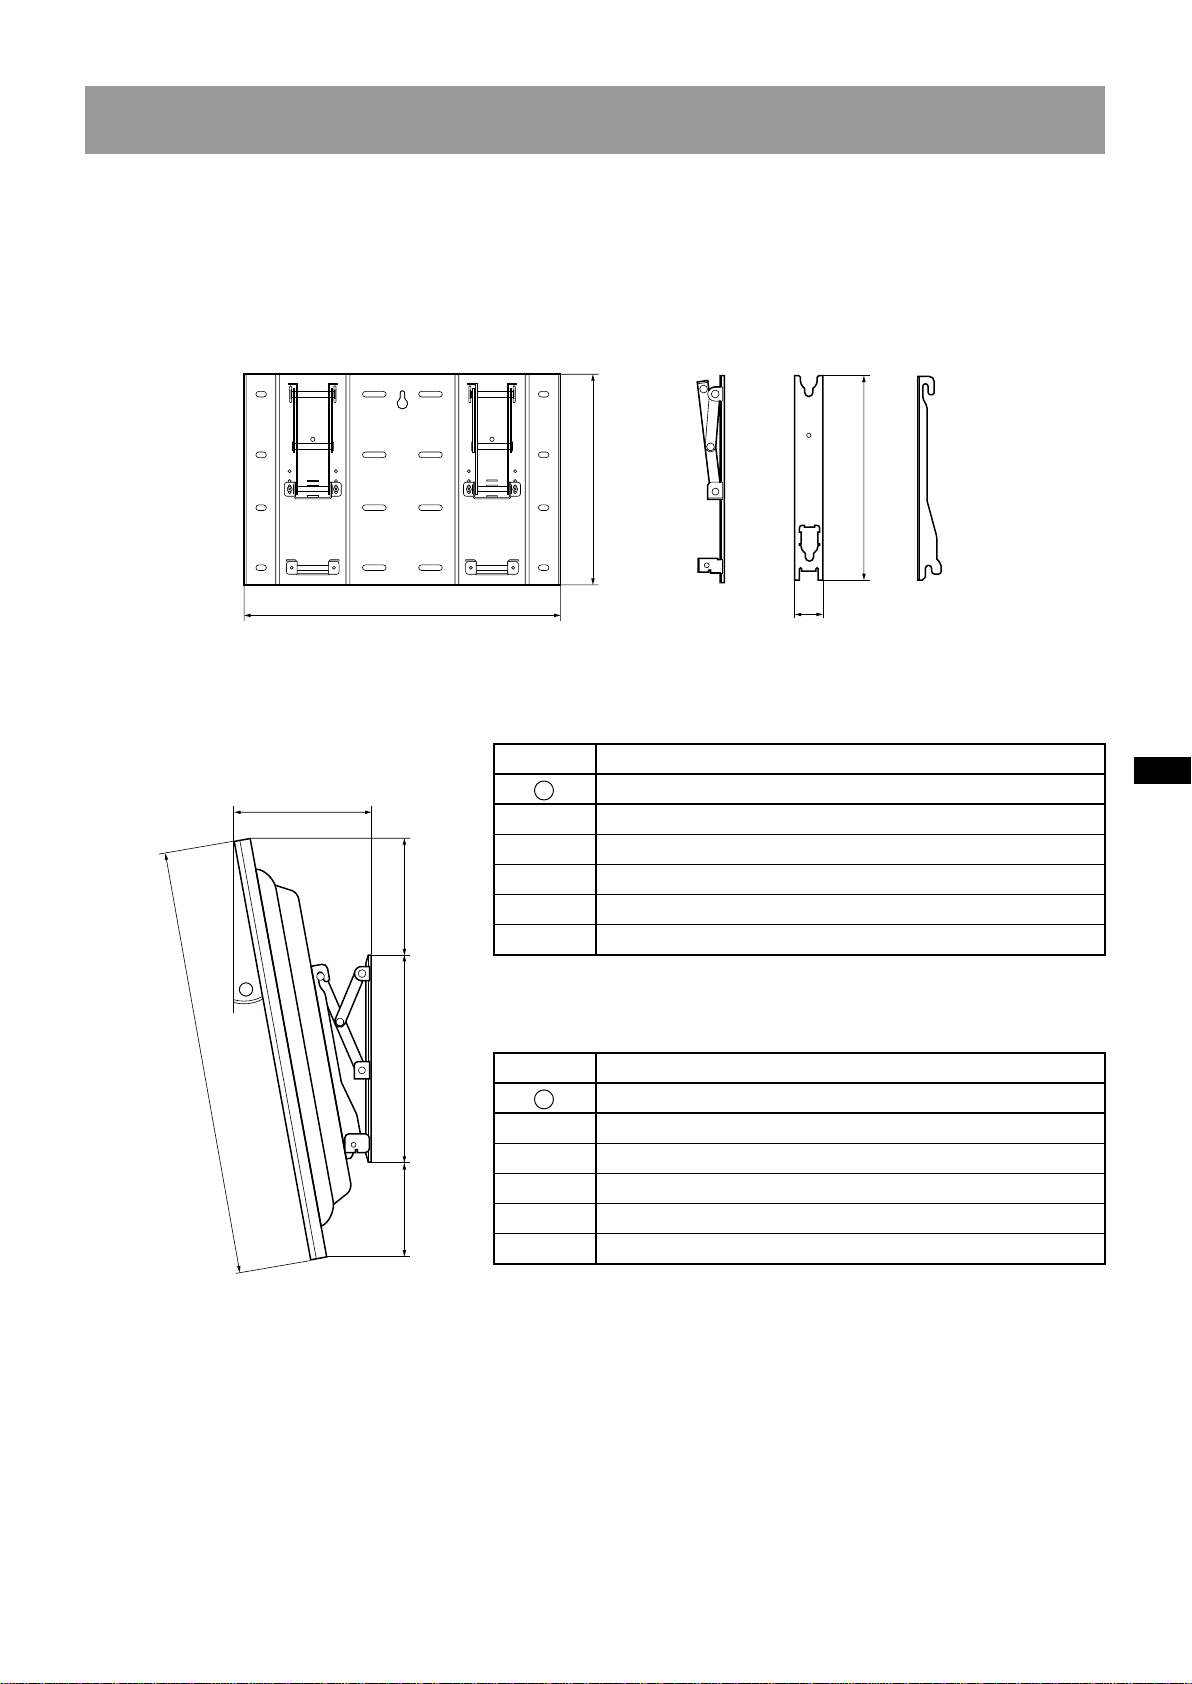
Screws (+PSW5 × 12) (2) Plate Unit (1) Mounting Hook Unit (2)
7 (GB)
Page 8
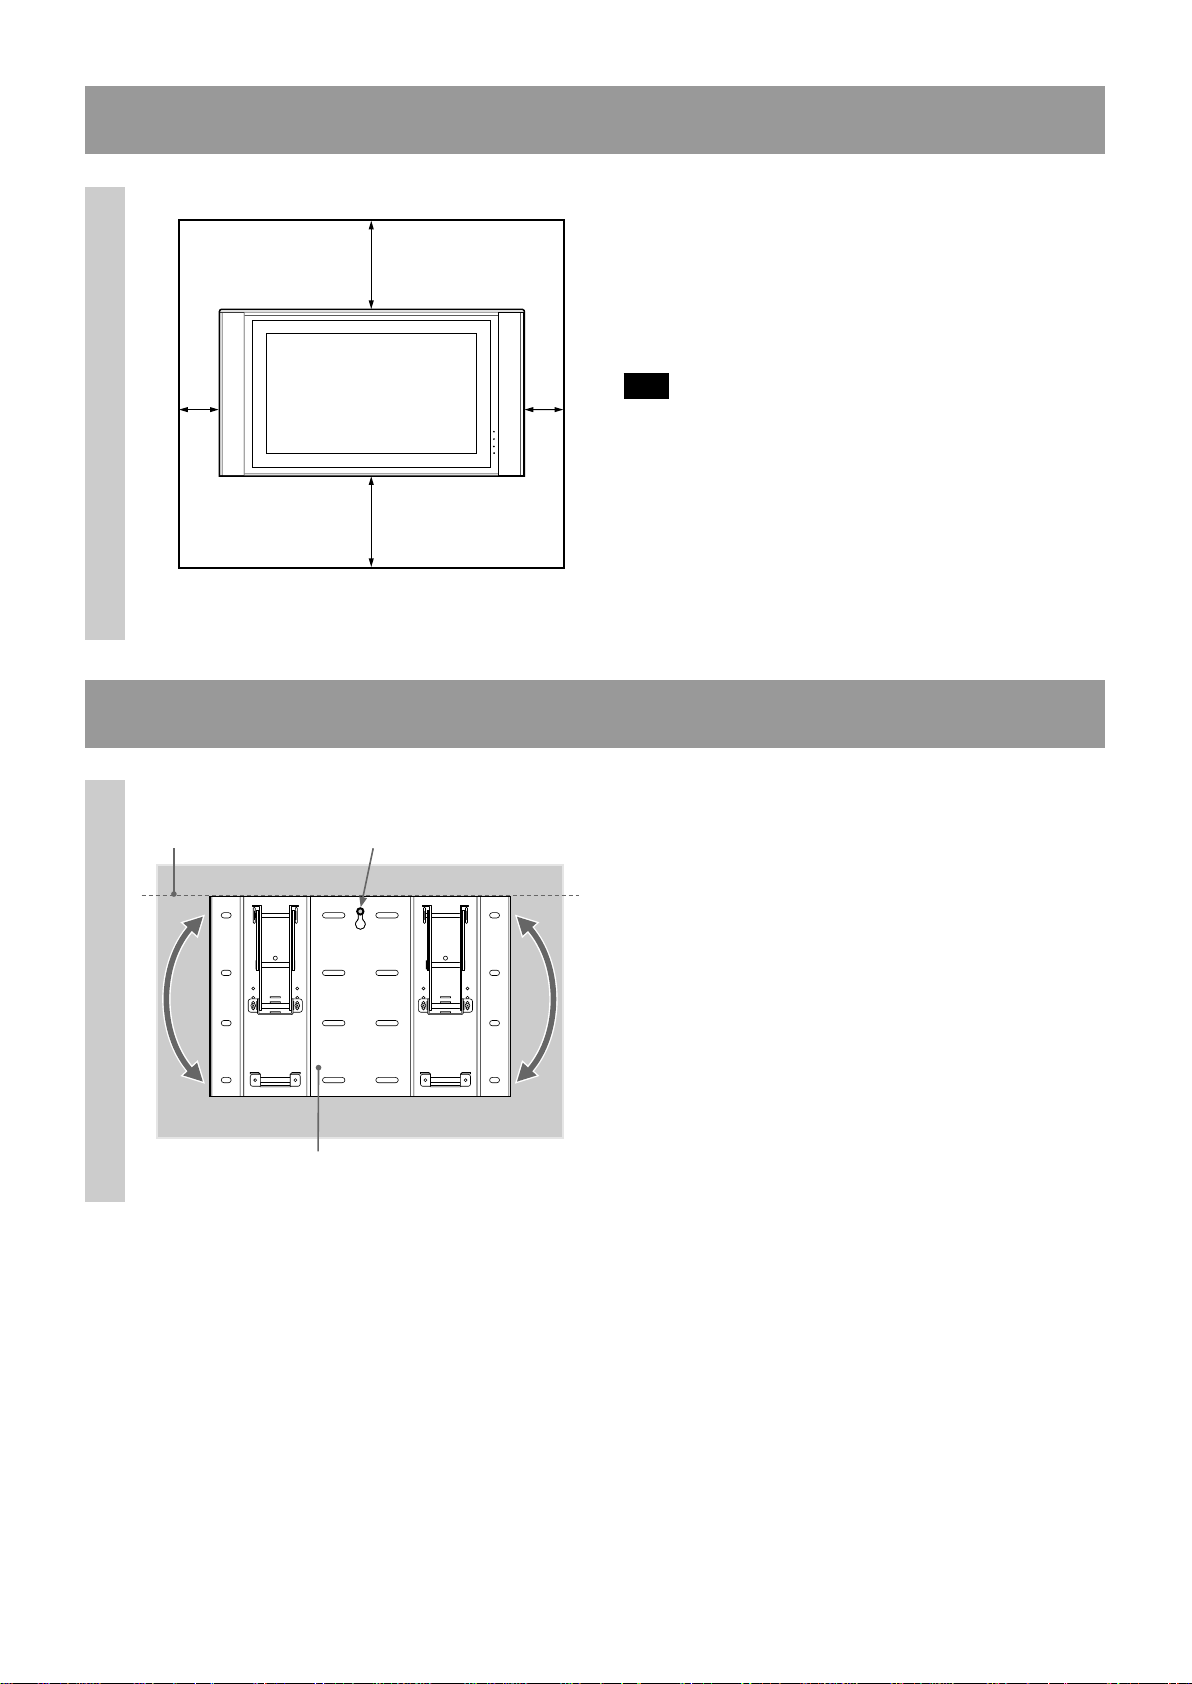
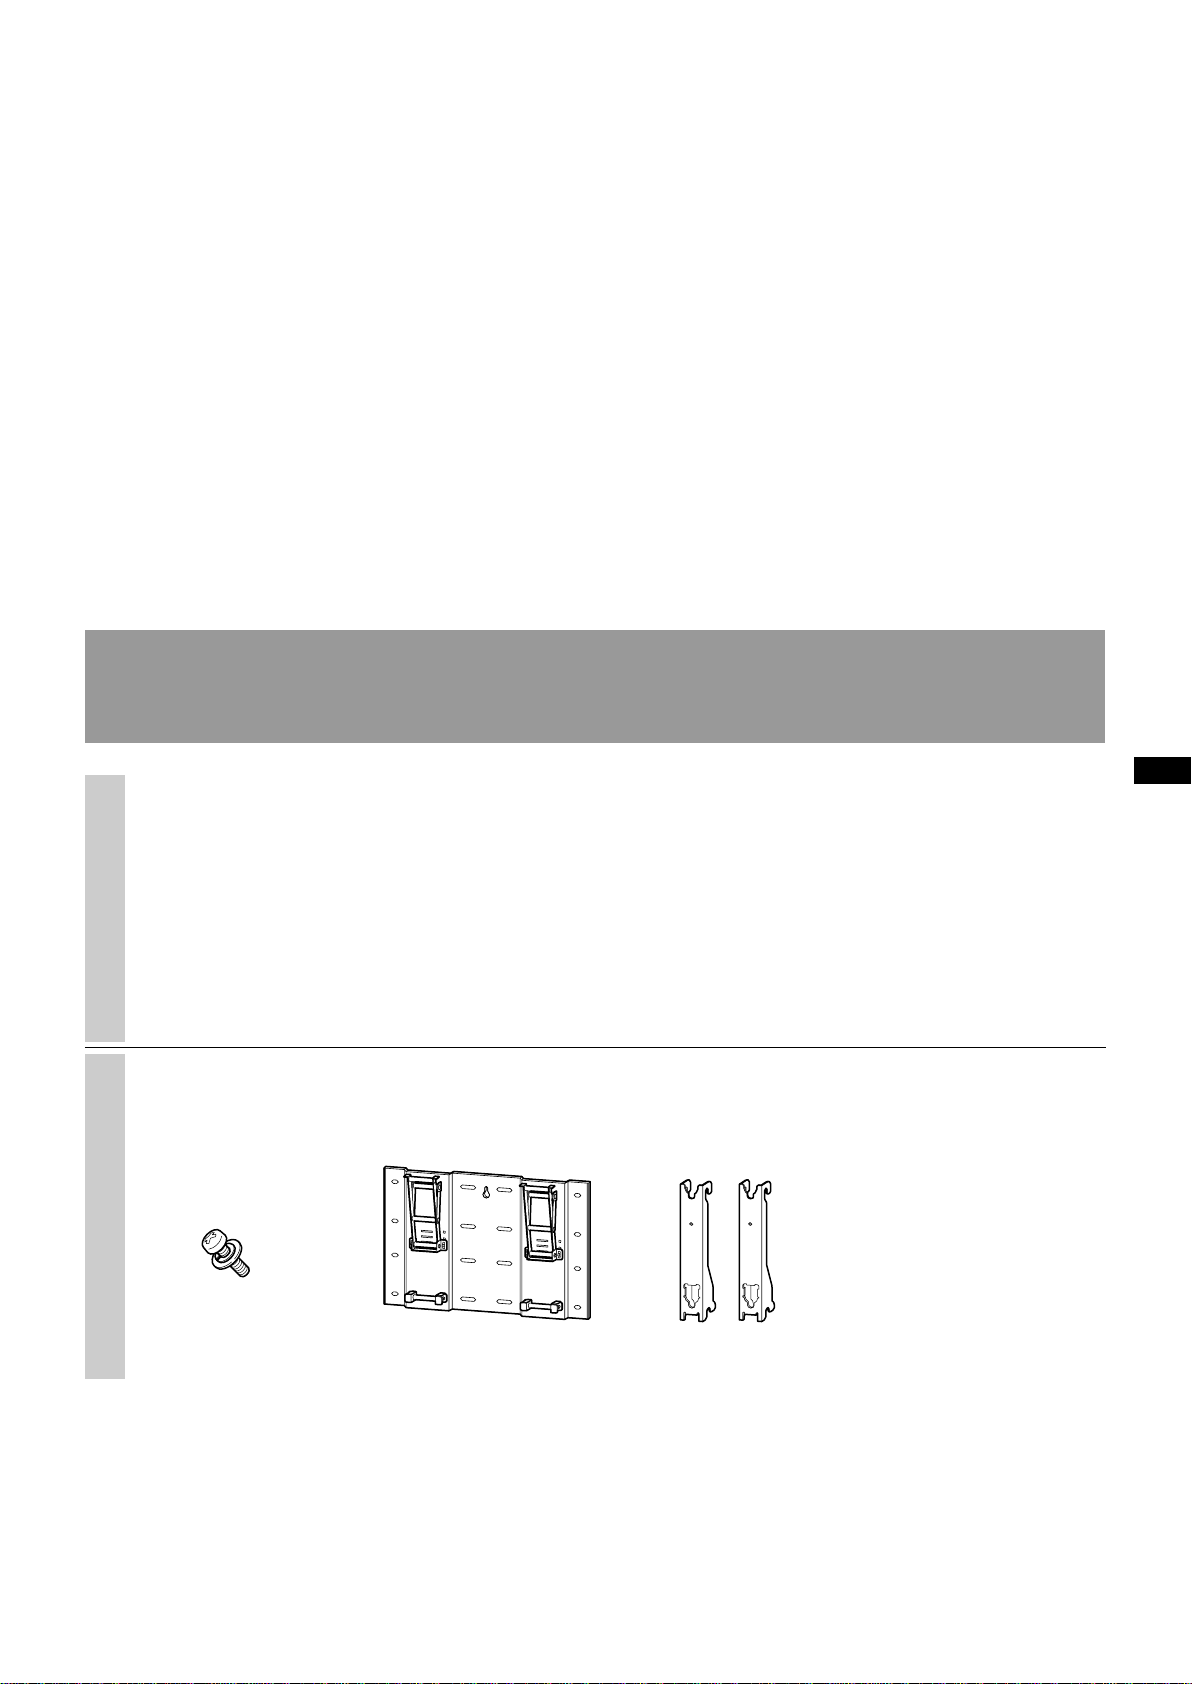
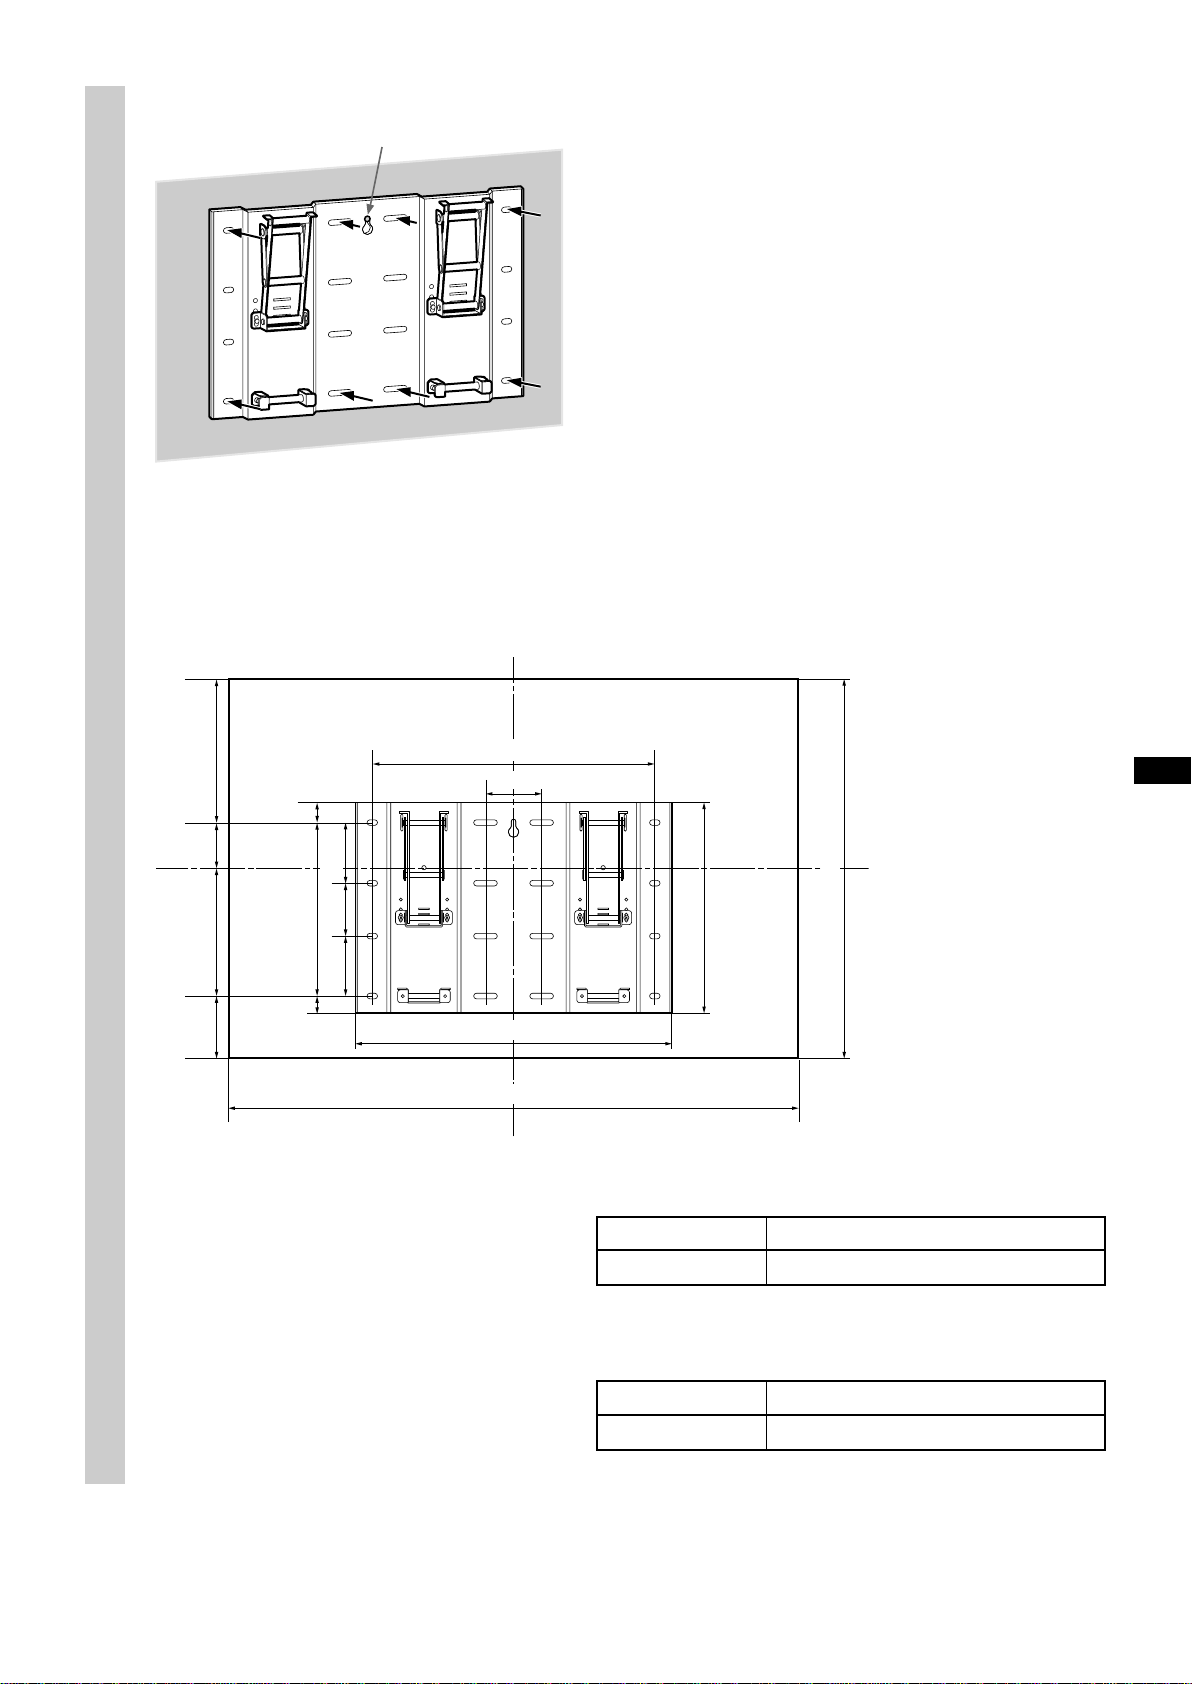
Step 2: Decide on the installation location
Unit: mm
1
300
Be sure to keep the distance
between the Plate Unit and the
ceiling or the protruding parts of
the wall as shown in the diagram on
the left.
100 100
100
Tip
See the cross section diagram in “Specifications” (p.15
(GB)) for details on dimensions when the Display Unit
is installed on the wall.
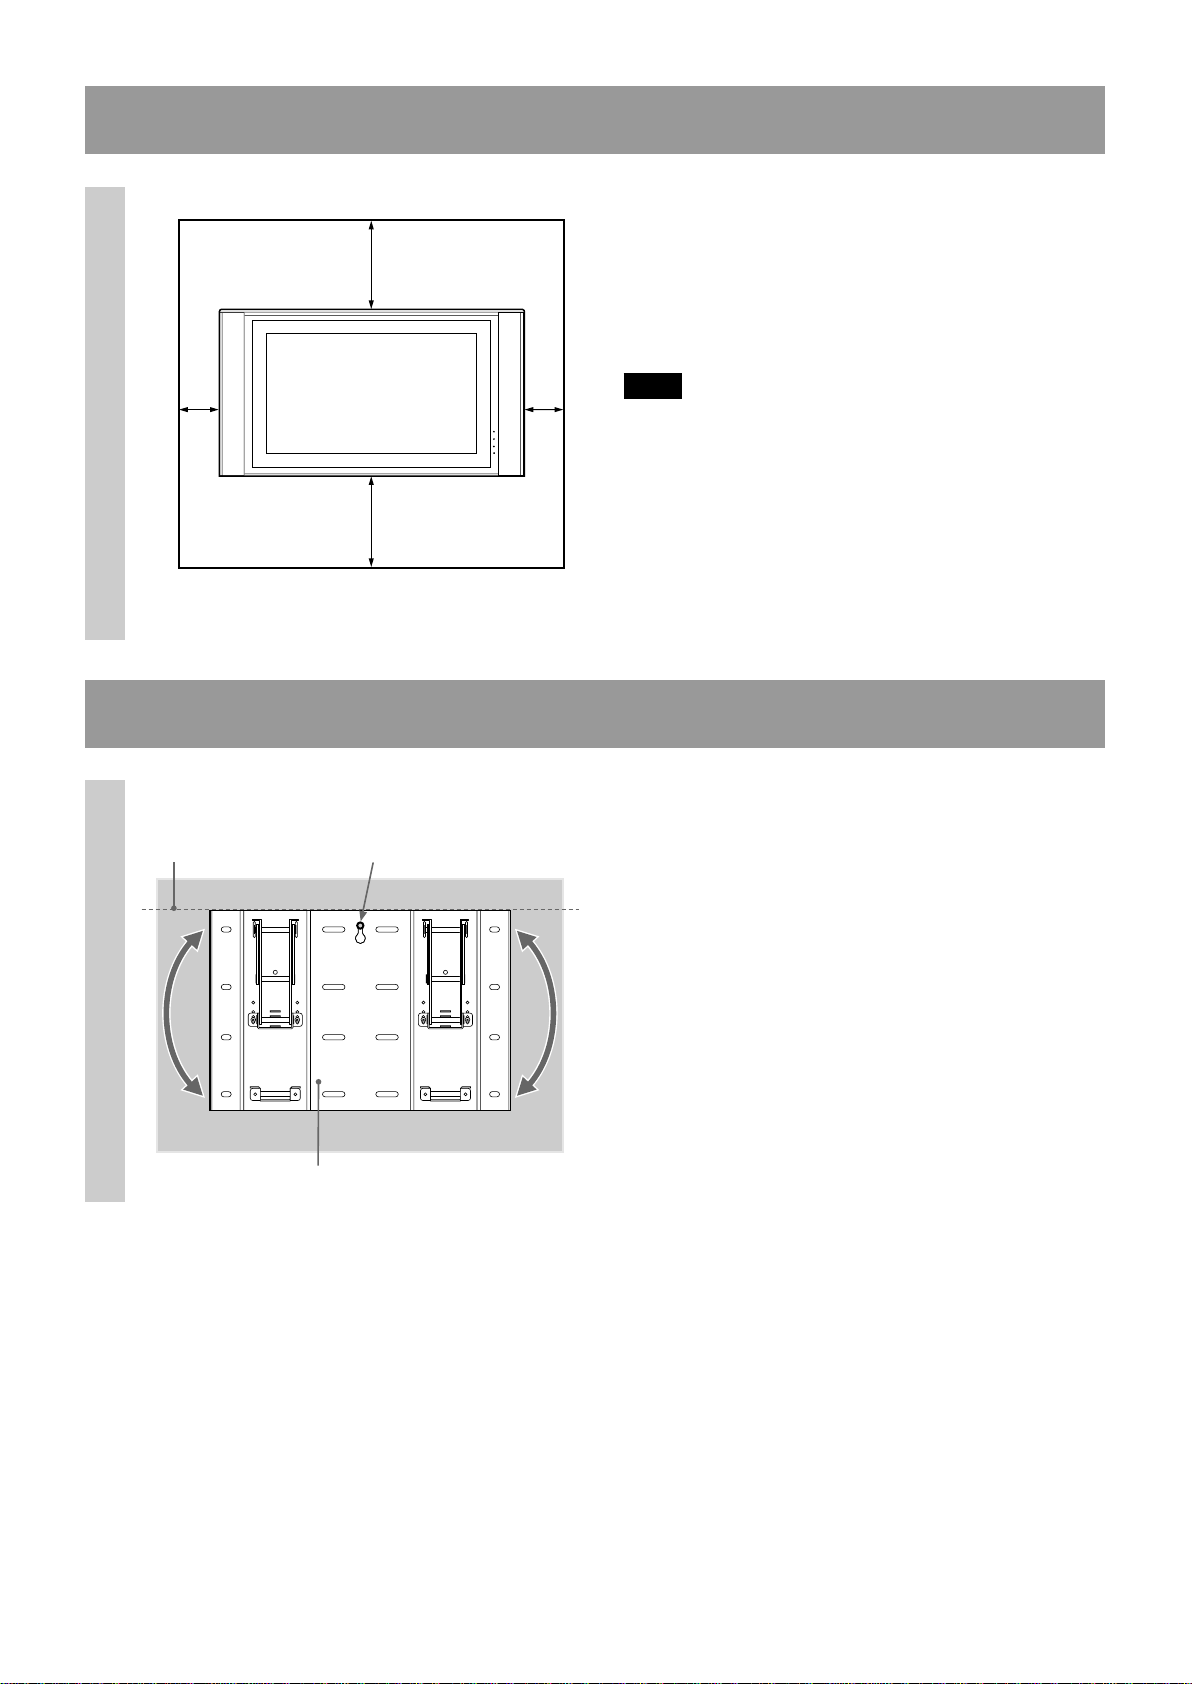
Step 3: Install the Plate Unit on the wall
1
Align the unit so that
it is exactly level.
Plate Unit
Screw hole to be used for
temporarily attaching the
bracket.
Screw the Plate Unit to the wall
temporarily and align the position
of the Plate Unit so that it is exactly
level.
WARNING
• The screws securing the Wall-Mount Bracket to the
wall are not supplied.
• Be sure to use the appropriate screws, depending
on the material and structure of the wall.
8 (GB)
Page 9
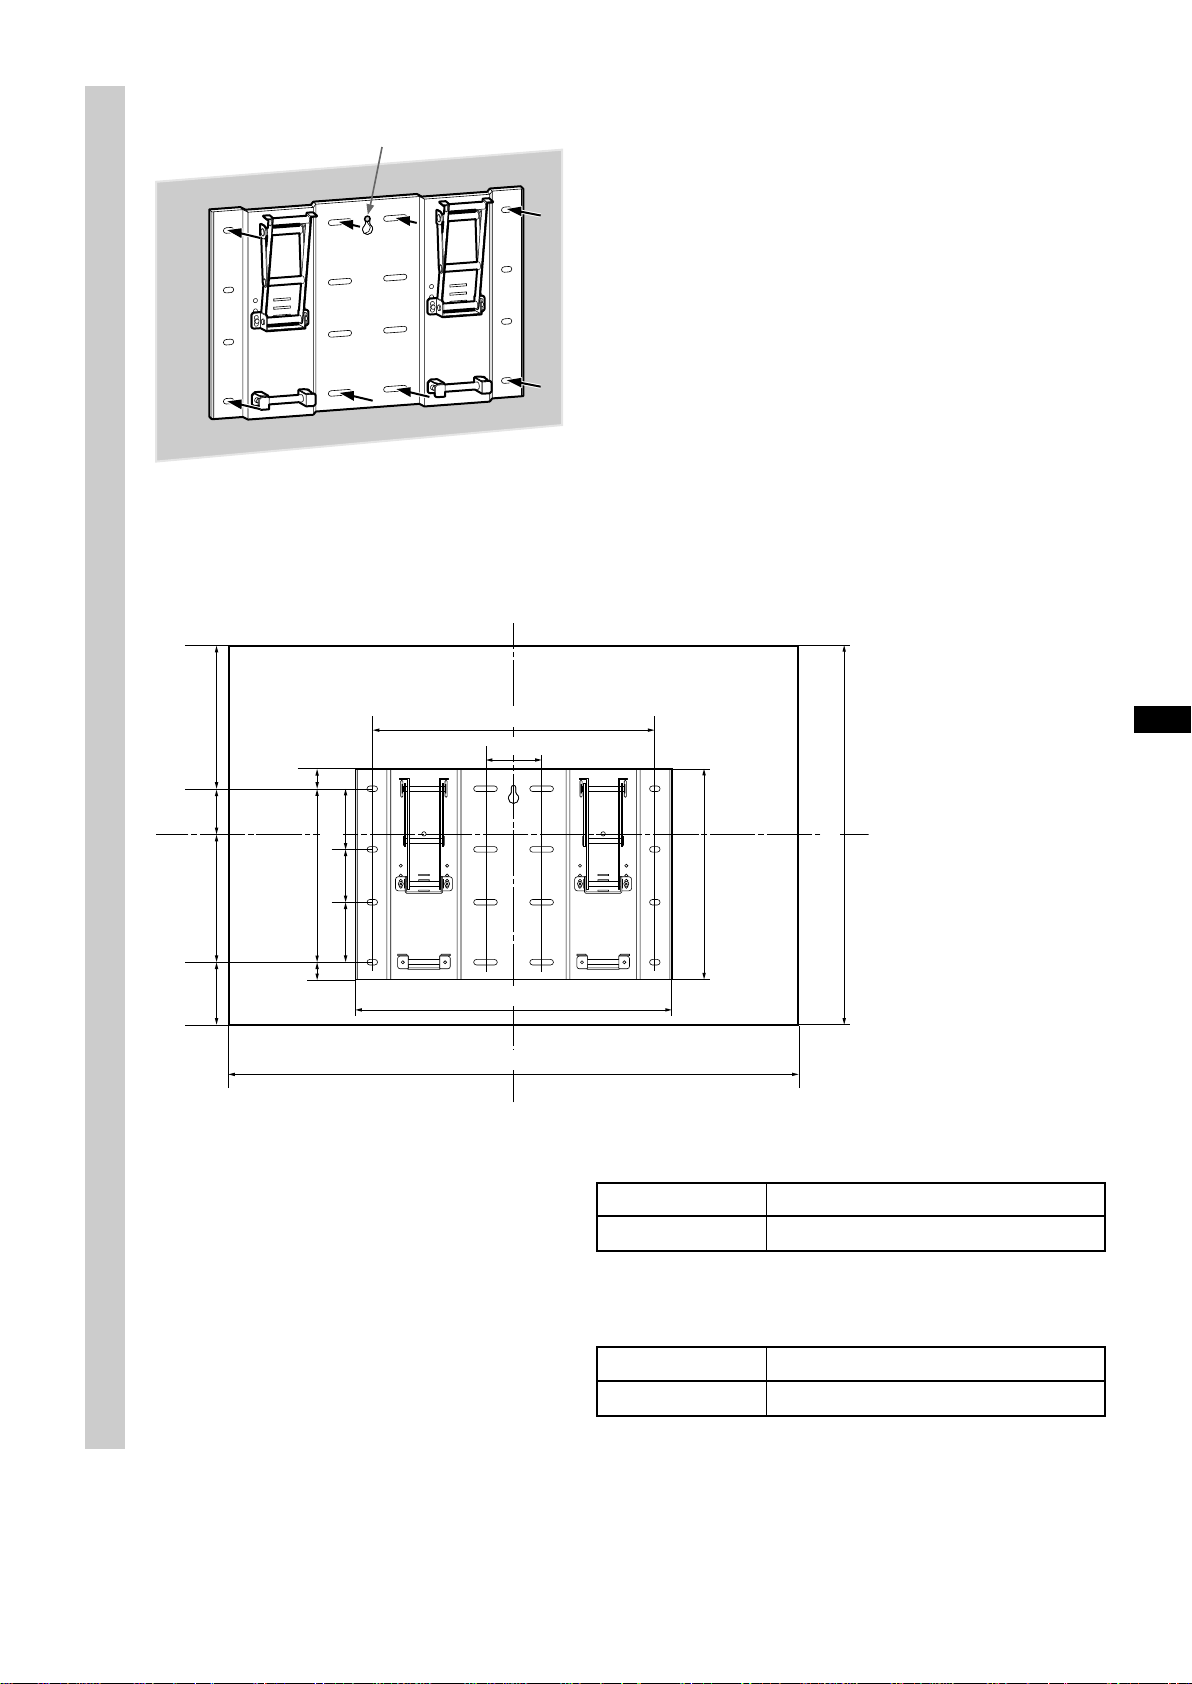
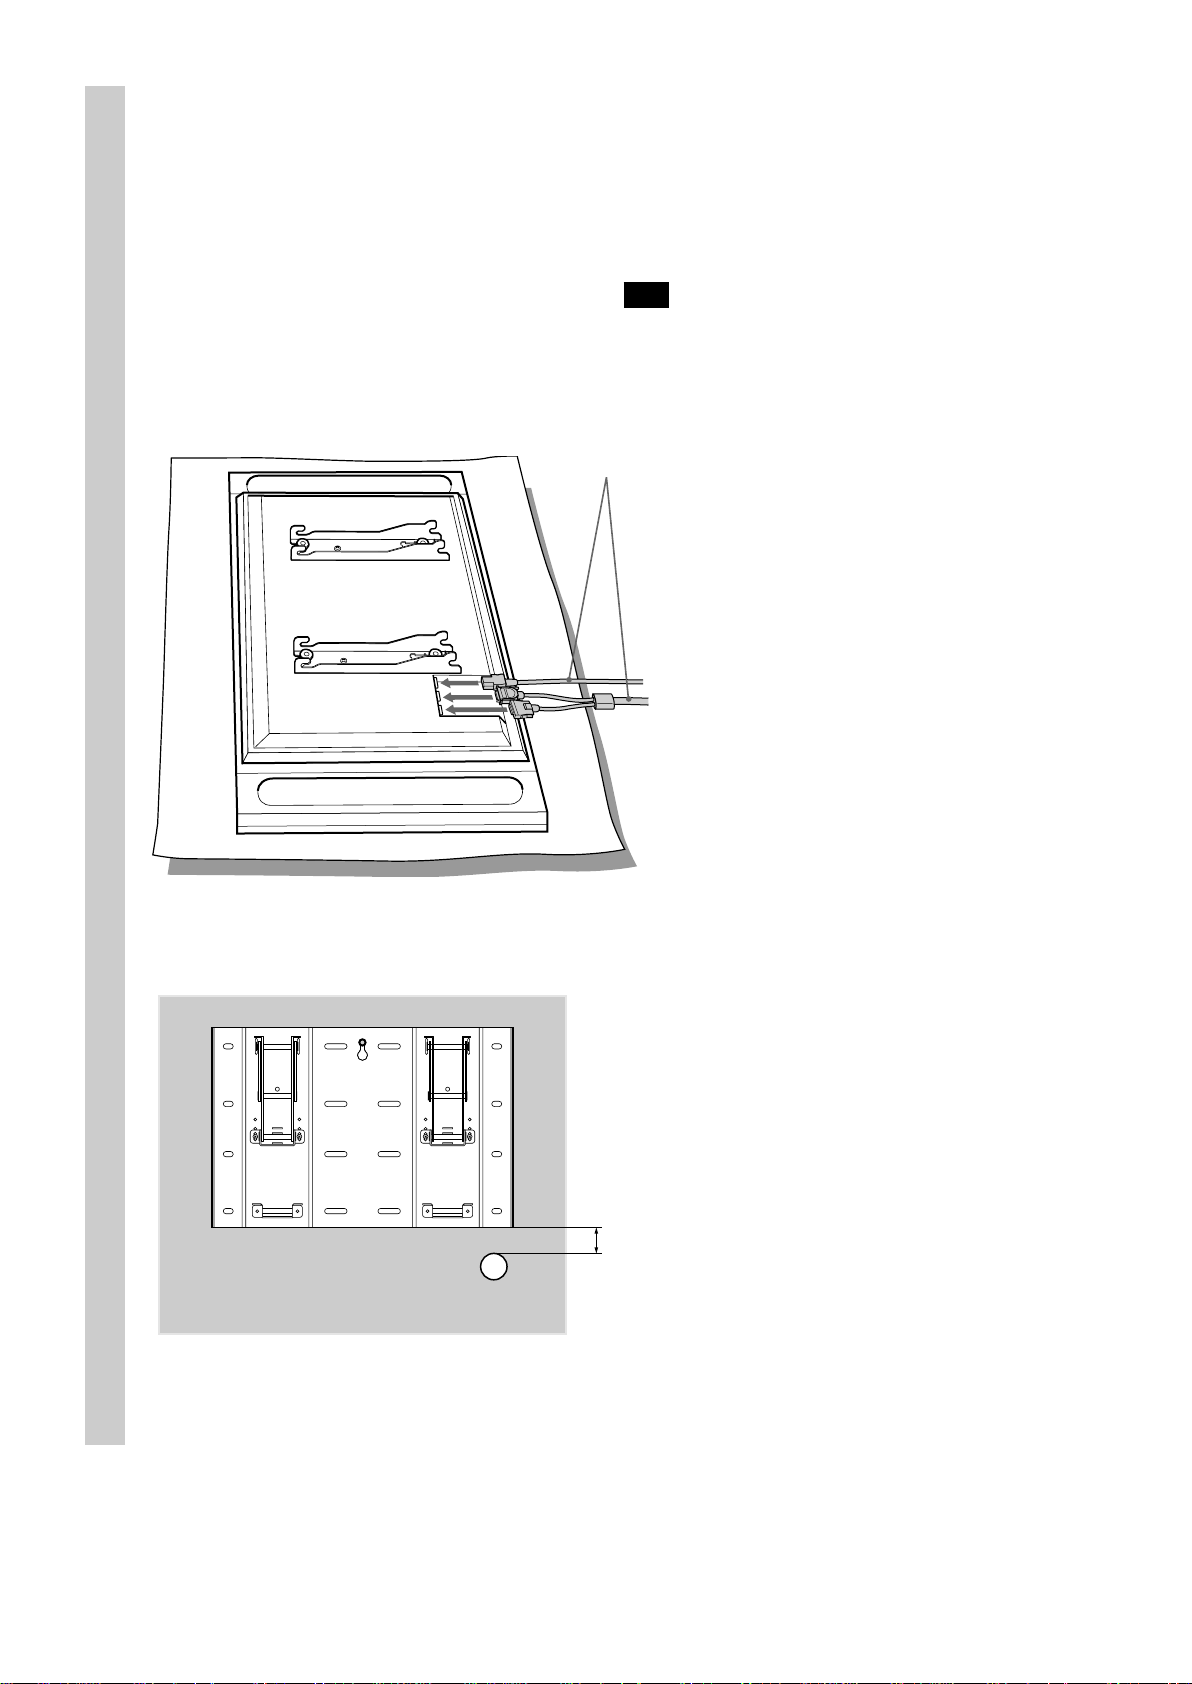
2
KE-42MR1/KE-50MR1
2
Fix the Plate Unit to the wall using
eight or more M8 or the equivalent
screws (not supplied).
1Be sure to tighten the screws securely so that they
1
will not come loose.
2Firmly tighten the screw screwed in temporarily in
Procedure 1.
WARNING
• We recommend using the screw hole locations
specified in the diagram on the left when attaching
the Plate Unit temporarily. If the Plate Unit cannot
be attached securely enough, use additional screws.
• Be sure to confirm that the Plate Unit is securely
fixed to the wall.
35
DC
FE
35
330
110
110
110
530
140
B
400
600
A
KE-50MR1 Unit: mm
ABCDEF
1,573 856 342 86 244 184
KE-42MR1 Unit: mm
ABCDEF
1,352 720 208 152 178 182
9 (GB)
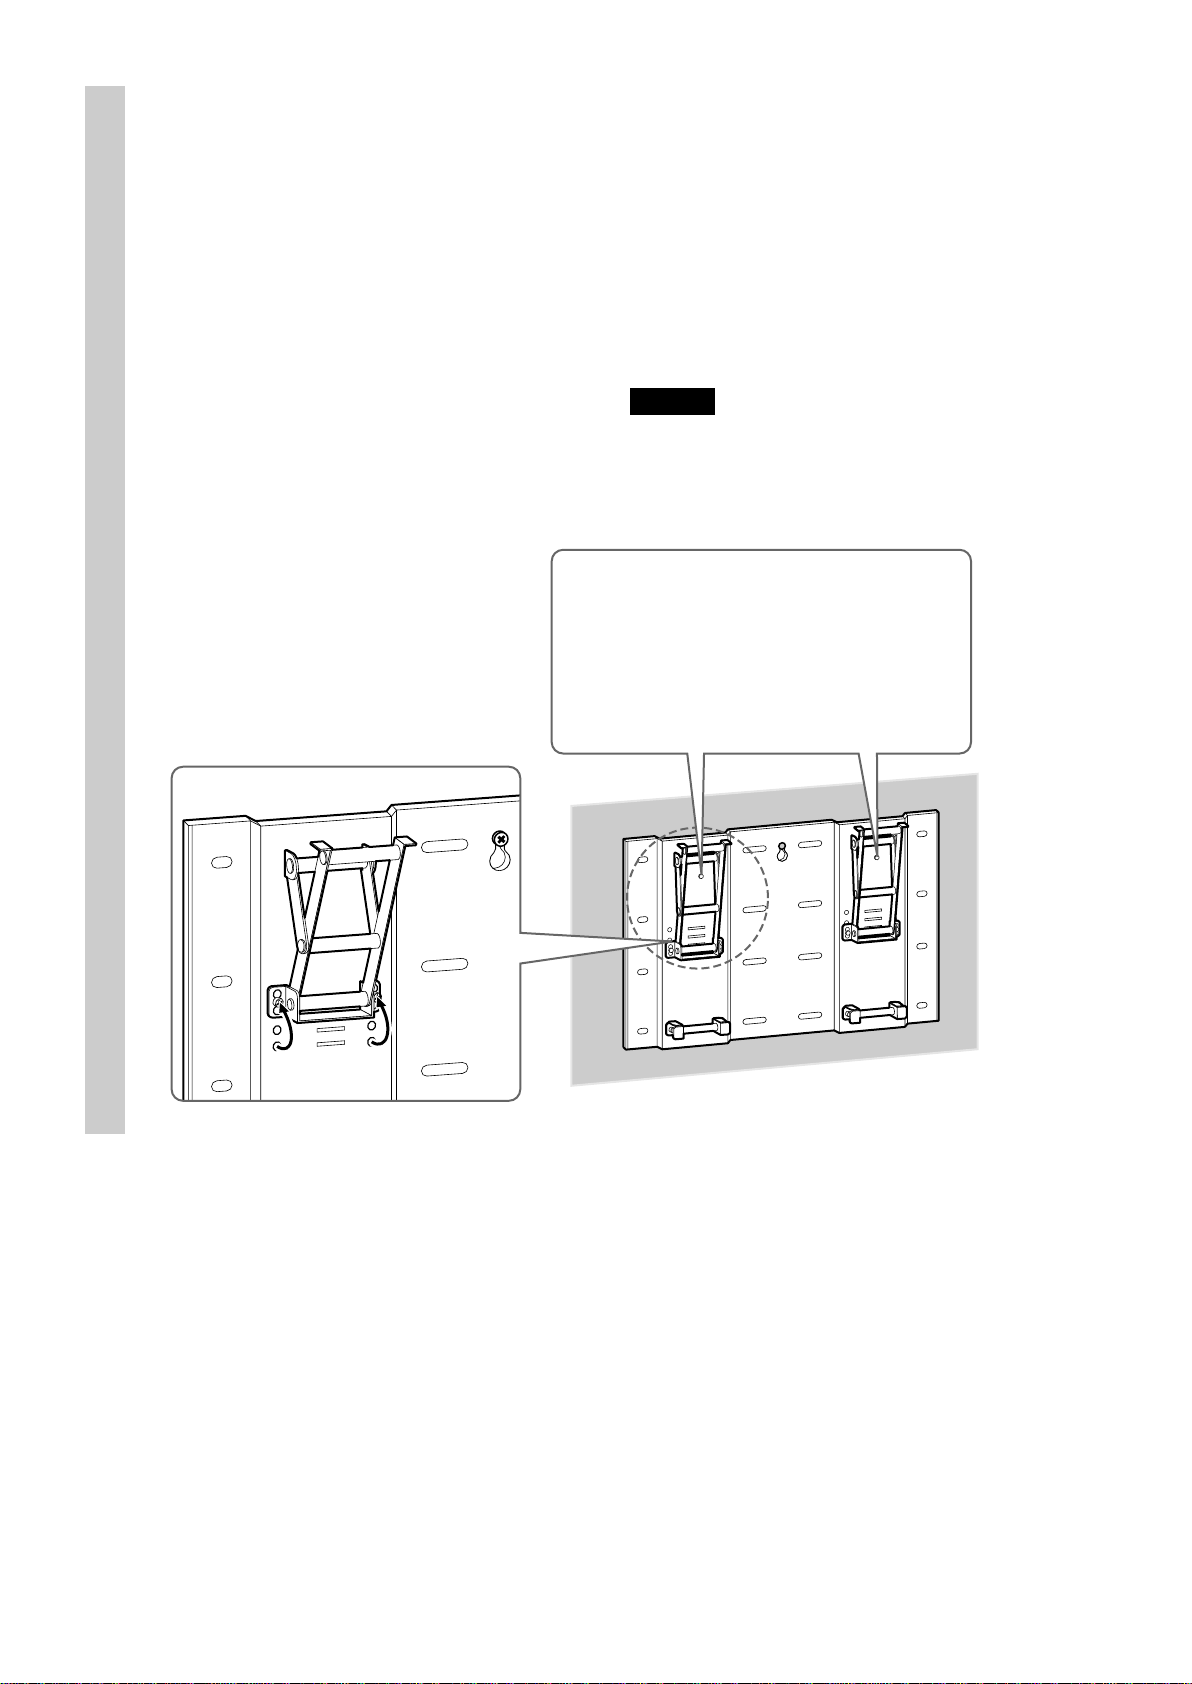
Page 10

Adjust the angle of the arms.
3
1Take out the screws from the right and left sides of
the arm base. Then choose the notch corresponding
to the desired angle (0, 5, 10, 15 or 20 degrees) and
fit the arm base to it.
2Firmly secure each arm base using the screws taken
out in Procedure 1.
Note
Be sure to adjust the angles of the right and the left
arms to the same angle.
• 0 degrees: Leave the white screws as they
are tightened.
• Other than 0 degrees: Take out the white
screws.
10 (GB)
Page 11
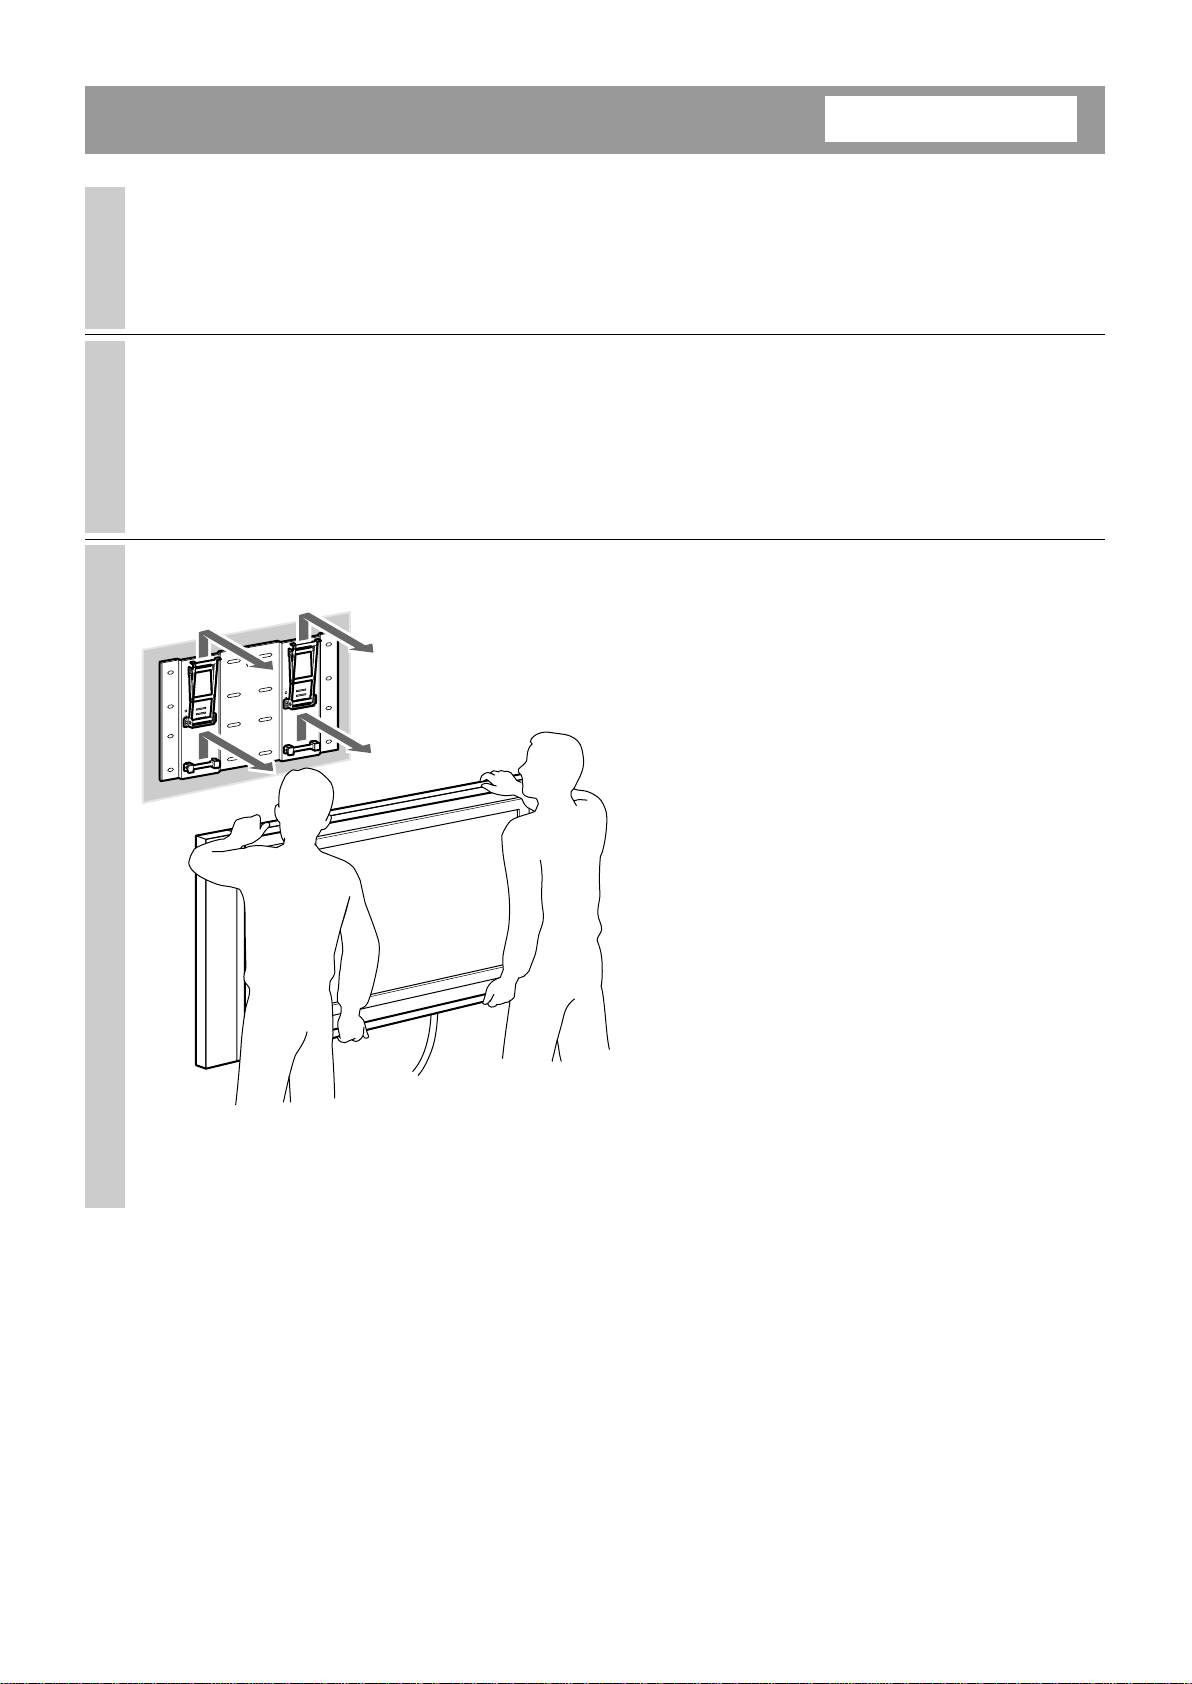
Step 4: Install the Display Unit
WARNING
Be sure to complete the installation before connecting the Power Cord to the wall outlet. If you allow the Power
Cord to be pinched under or between pieces of equipment, this may result in a short circuit or an electric shock.
If you stumble over the Power Cord or the Display Interface Cable, the stand may topple over, and this may
result in injury.
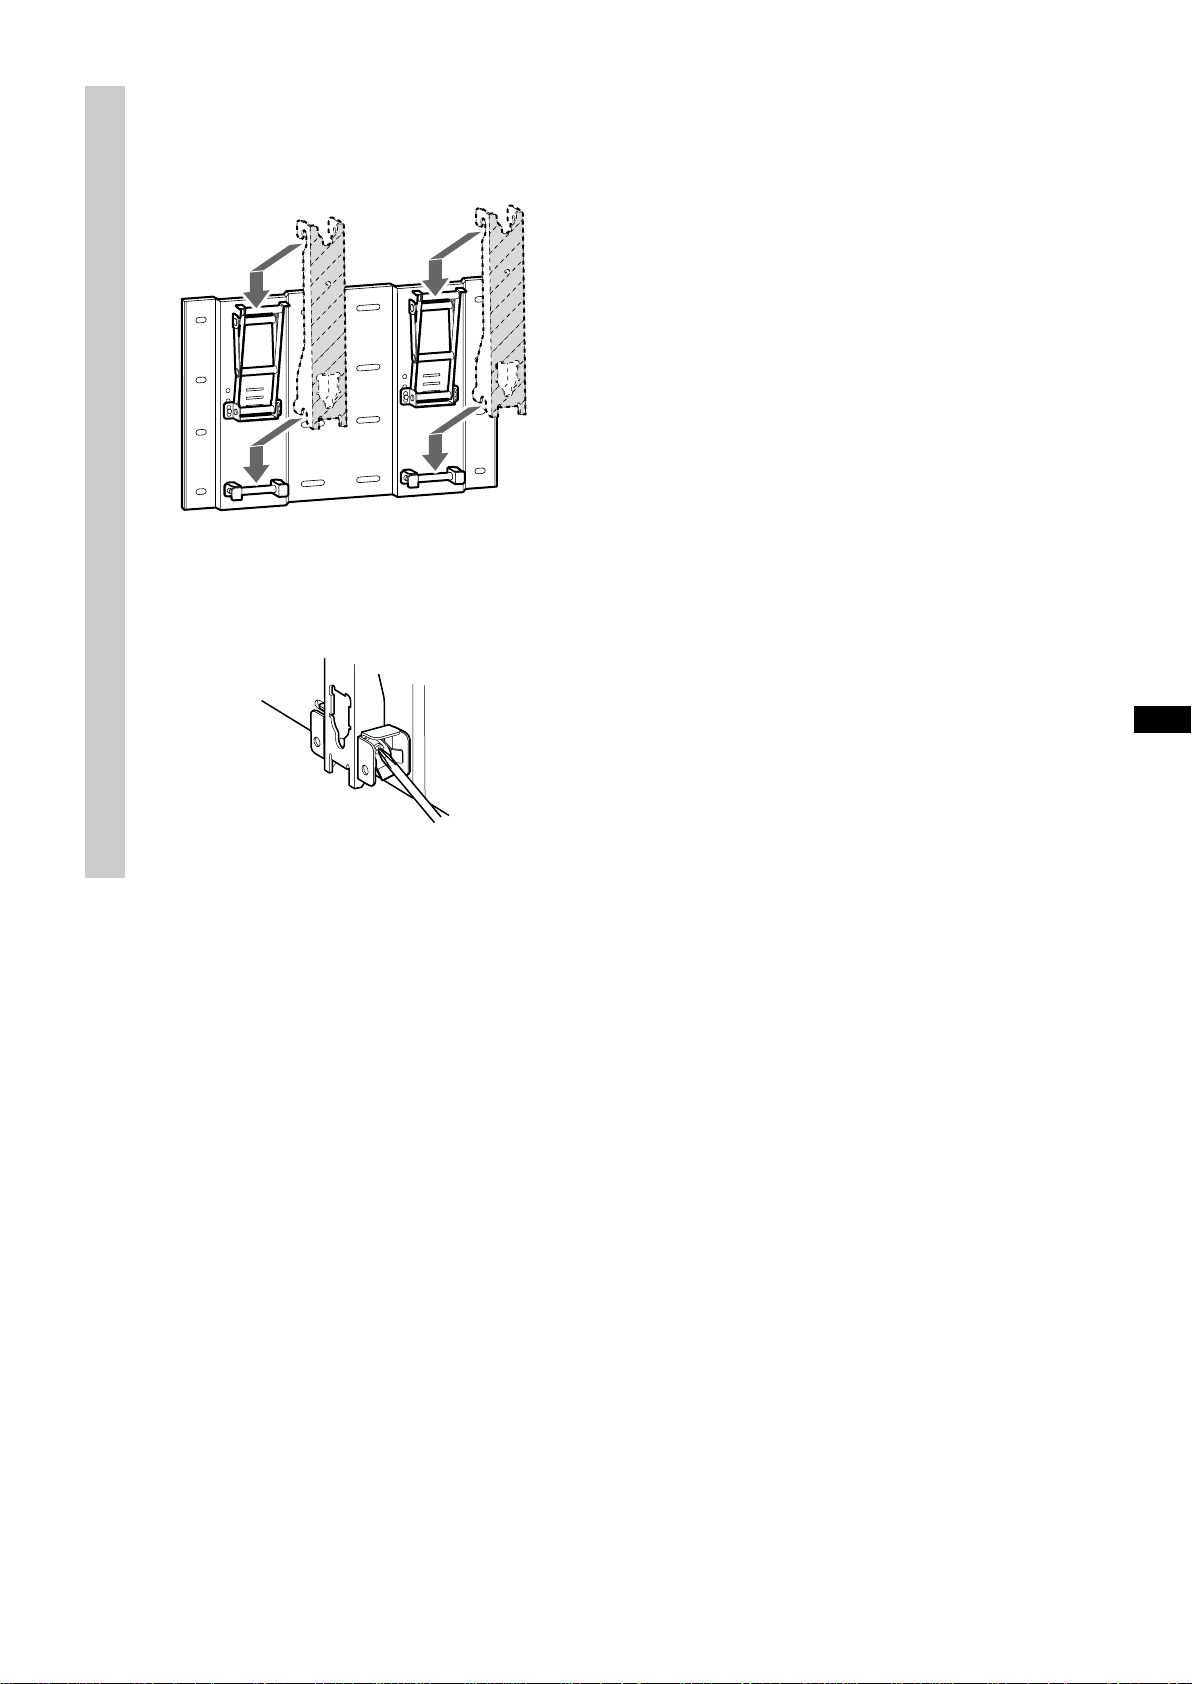
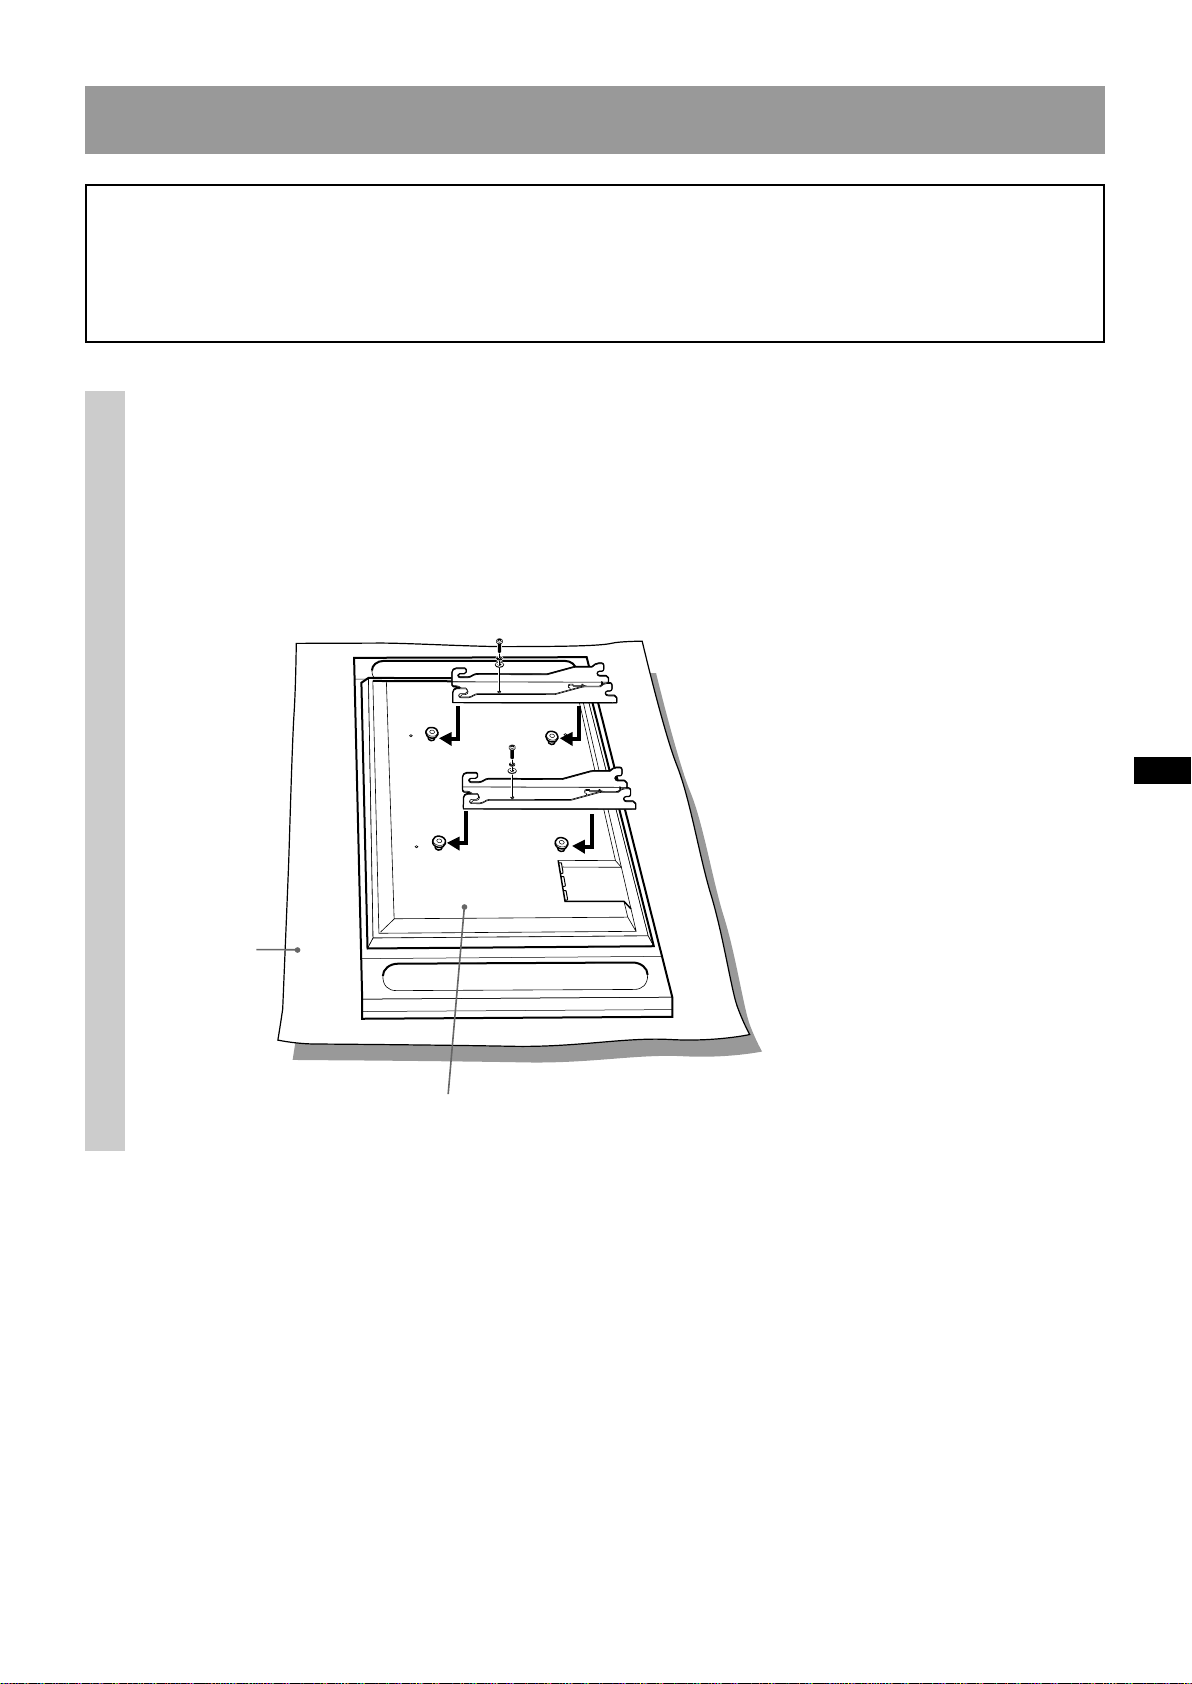
Hitch the Mounting Hook Unit on
1
the hooks on the rear side of the
Display Unit. Then slide the
Mounting Hook Unit and fix it using
the supplied screws (+PSW5 × 12).
Soft rag such
as a blanket
Rear side of the Display Unit
11 (GB)
Page 12
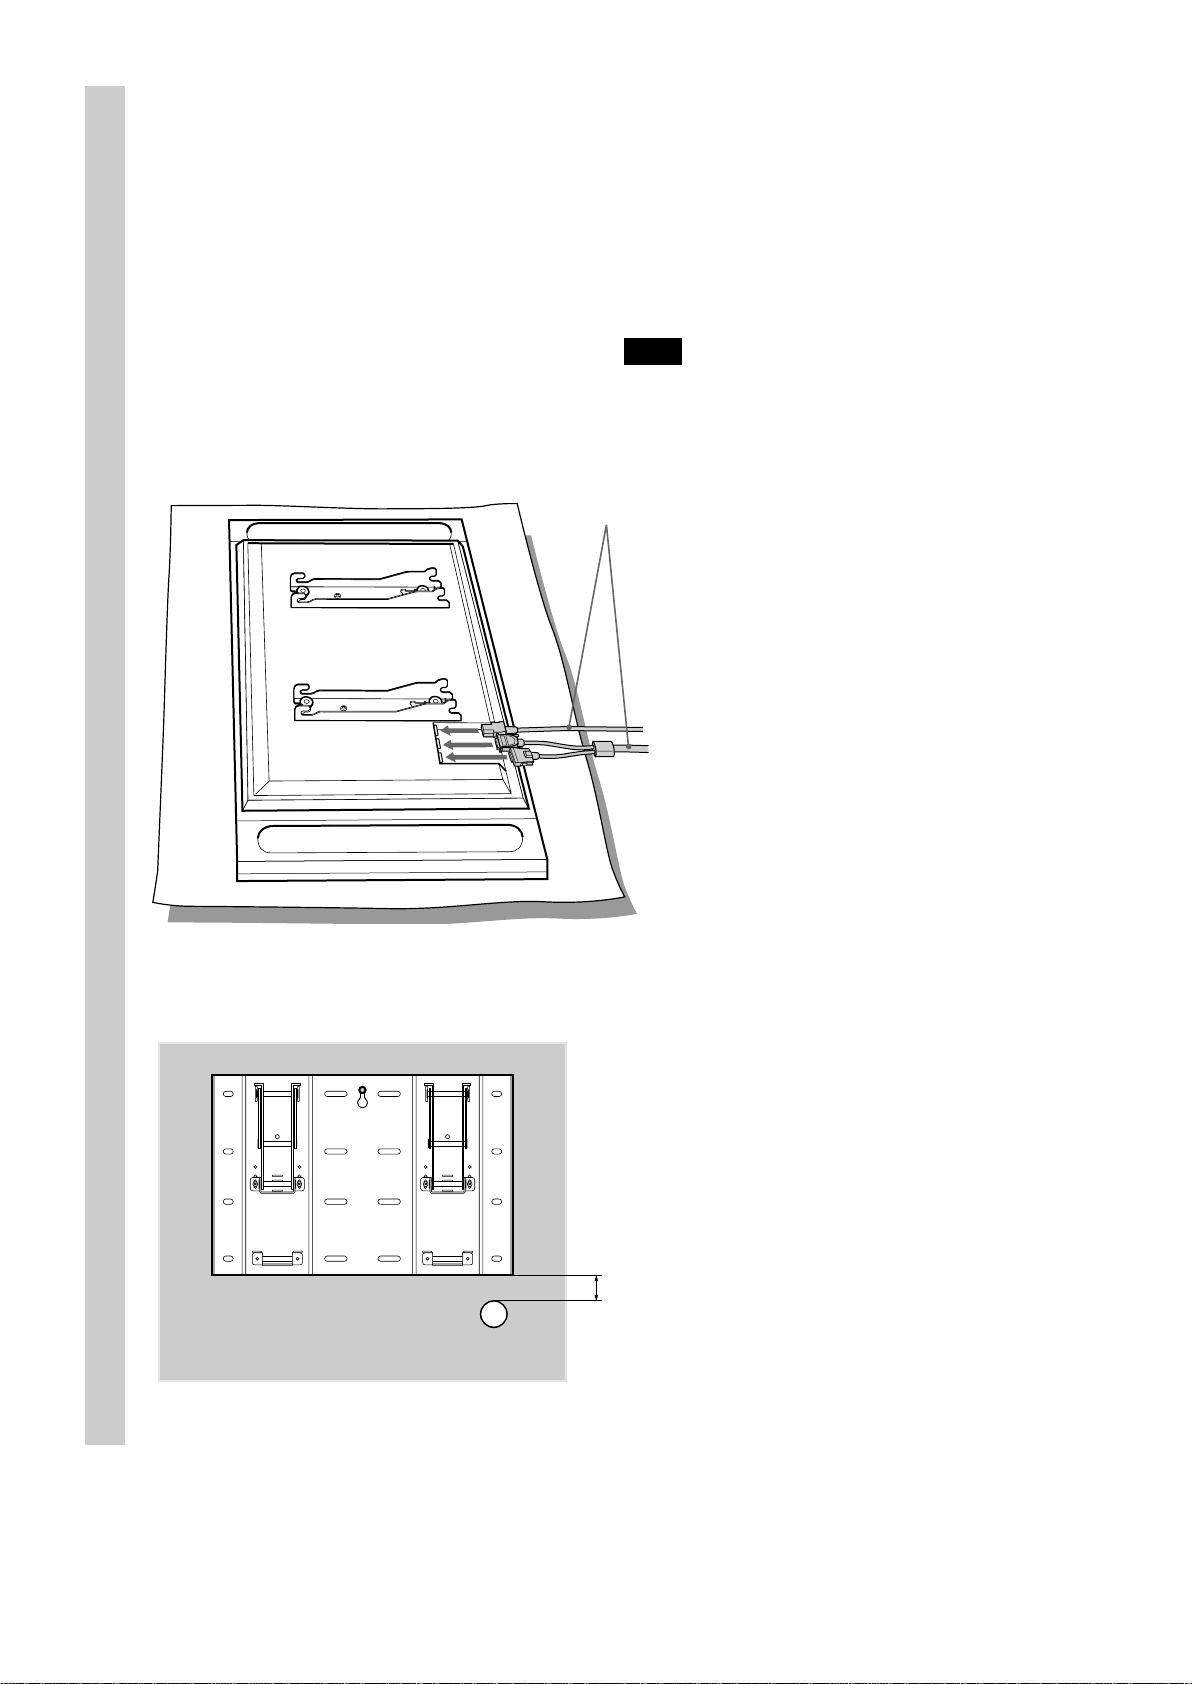
2
Connect the Power Cord and the
Display Cable supplied with the
Display Unit to the Display Unit.
Connect the Power Cord and the Display Cable to the
connectors on the rear side of the Display Unit.
Tip
See the instruction manual of the Flat Panel Colour
Television (KE-42MR1/KE-50MR1) for more details
on connecting the Power Cord and the Display Cable.
Power cord and Display
Interface Cable
Fasten the Display Interface Cable and the Power
Cord to the wall, etc. When you route the cable and
the cord in the wall, bore a 50 mm diameter hole in
the wall as shown in the diagram in the left.
10 mm
12 (GB)
Page 13
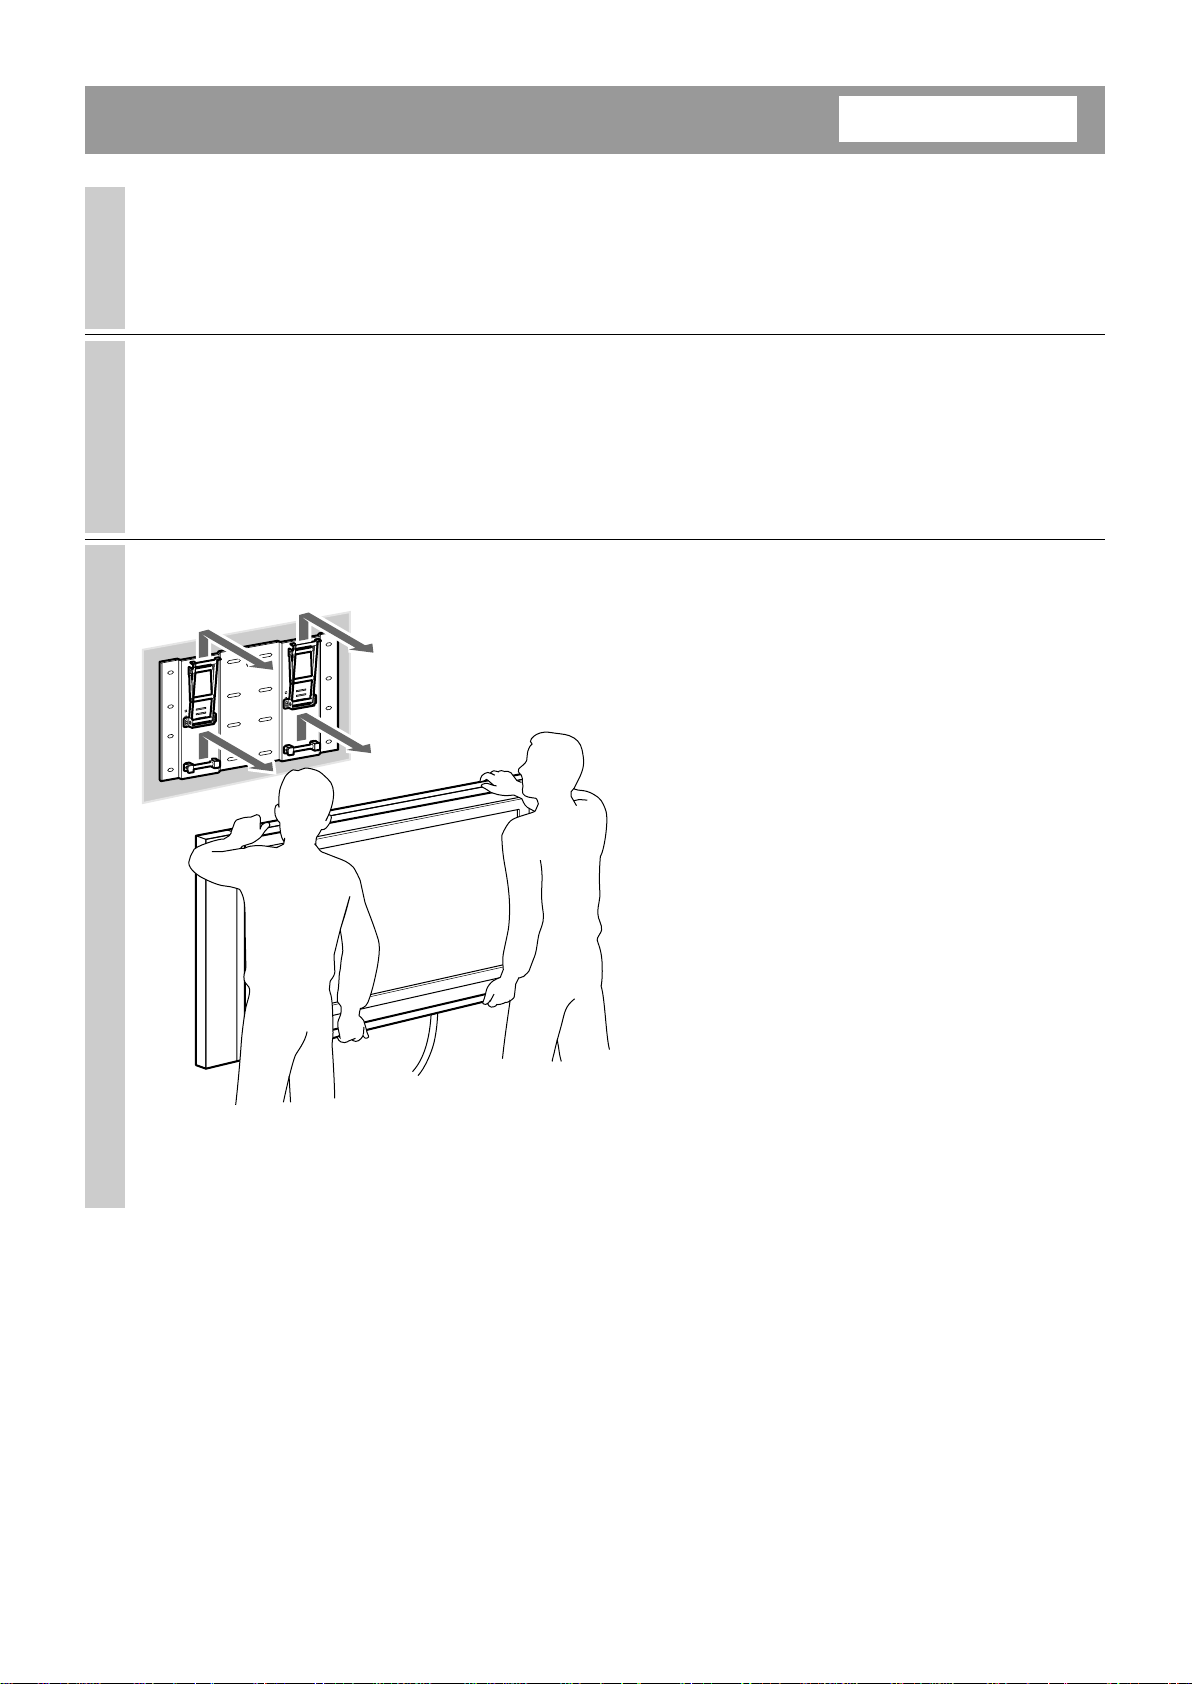
3
Install the Display Unit on the Plate
Unit.
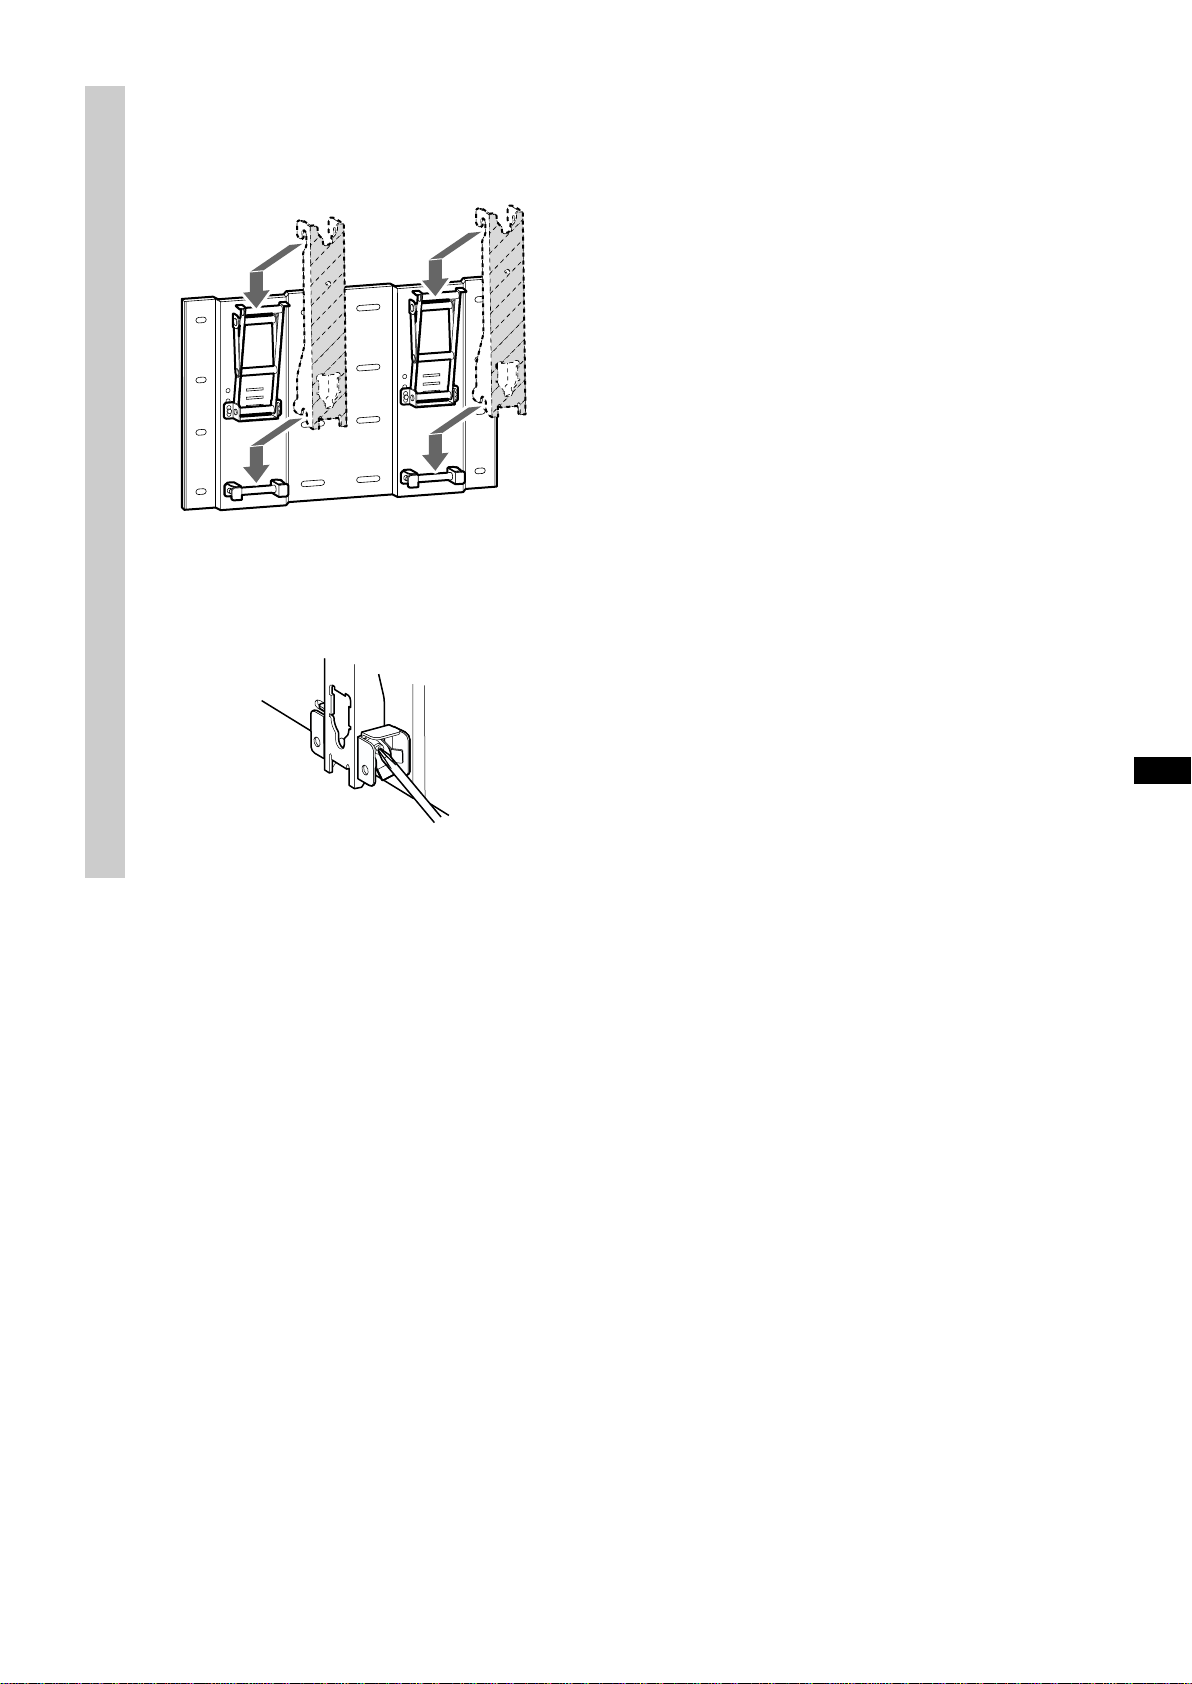
2
4
1Hold the Display Unit and bring it close to the Plate
Unit so as to align the lower hooks of the Mounting
Hook Units with the lowest support shafts near the
bottom of the Plate Unit.
2Hitch the upper and lower hooks of the two
Mounting Hook Units onto the four support shafts
of the Plate Unit all at the same time as shown in
the diagram on the left.
3Confirm the eight hooks are firmly hooked on the
four shafts on the Plate Unit.
4Firmly tighten the securing screws on the right and
the left with a long shaft Phillips screwdriver.
13 (GB)
Page 14
Removing the Display Unit
1
2
3
For Sony Dealers
Unplug the Power Cord from the
wall outlet.
Loosen the securing screws on the
right and left until they will not turn
any more.
Be sure that two or more persons
hold the Display Unit and slide it
upward to remove the Display Unit.
WARNING
• Be sure that two or more persons hold the Display
Unit when carrying it.
• Be careful not to allow the cords and cables to get
hung up when removing the Display Unit.
• Be careful not to hurt your hands or fingers when
removing the Display Unit.
14 (GB)
Page 15
Specifications
Unit: mm
Weight: 8.0 kg
Design and specifications are subject to change without notice.
A
Angle
400
600
385
51
KE-42MR1 Unit: mm
Angle Dimensions
B
a ABCDE
0° 720 160 173 400 147
5° 720 207 162 400 156
10° 720 253 148 400 164
C
15° 720 297 130 400 172
20° 720 339 108 400 178
a
KE-50MR1 Unit: mm
DE
Angle Dimensions
a ABCDE
0° 856 166 307 400 149
5° 856 225 296 400 160
10° 856 283 280 400 169
15° 856 338 260 400 177
20° 856 391 235 400 183
15 (GB)
Page 16
Danke, dass Sie sich für dieses Produkt entschieden haben.
Hinweis an Kunden
Zur Installation dieses Produkts sind entsprechende Kenntnisse erforderlich. Lassen Sie die
Installationsarbeiten unbedingt von Ihrem Sony-Händler oder entsprechenden Fachleuten ausführen und
beachten Sie bei der Installation die nötigen Sicherheitsvorkehrungen.
ACHTUNG
Wenn die Sicherheitsmaßnahmen nicht eingehalten werden und das Produkt unsachgemäß verwendet wird,
besteht Feuergefahr und die Gefahr schwerer Verletzungen.
Diese Gebrauchsanweisung enthält wichtige Sicherheitshinweise, deren Beachtung Unfälle verhindert und die
richtige Handhabung des Produkts gewährleistet. Lesen Sie diese Anweisungen sorgfältig durch und verwenden
Sie das Produkt sachgemäß. Bewahren Sie diese Gebrauchsanweisung zum späteren Nachschlagen auf.
Für Sony-Händler
Zur Installation dieses Produkts sind entsprechende Kenntnisse erforderlich. Lesen Sie diese Gebrauchsanweisung
unbedingt sorgfältig durch, damit eine sichere Ausführung der Arbeiten gewährleistet ist. Der Hersteller
übernimmt keine Haftung für Verletzungen bzw. Sachschäden, die durch unsachgemäßen Umgang mit dem
Produkt oder eine fehlerhafte Installation verursacht werden. Händigen Sie diese Gebrauchsanweisung nach der
Installation dem Kunden aus.
Diese Wandhalterung wurde von Sony ausschließlich für die angegebenen Geräte konzipiert. Verwenden Sie
die Halterung ausschließlich mit folgenden Geräten.
Spezifiziertes Produkt: Farbfernsehgerät mit Flachbildschirm (KE-42MR1/KE-50MR1)
Sicherheit
Bei der Entwicklung von Sony-Produkten wird besonderer Wert auf den Faktor Sicherheit gelegt.
Wenn das Produkt jedoch nicht sachgemäß verwendet wird, kann es durch Feuer, einen elektrischen Schlag oder
durch das Umkippen des Geräts zu schweren Verletzungen kommen. Befolgen Sie bitte unbedingt die
angegebenen Sicherheitsmaßnahmen, um Unfälle zu vermeiden.
2 (DE)
Page 17
Für Kunden
ACHTUNG
Wenn Sie die folgenden Sicherheitsmaßnahmen nicht beachten, besteht die Gefahr von schweren oder
gar tödlichen Verletzungen durch Feuer, einen elektrischen Schlag oder eine Explosion.
Lassen Sie die Installationsarbeiten unbedingt von qualifizierten Fachleuten
ausführen und halten Sie kleine Kinder bei der Installation unbedingt fern.
Wenn die Wandhalterung nicht von qualifizierten Fachleuten installiert
wird, besteht die Gefahr folgender Unfälle.
• Das Fernsehgerät kann bei einem Erdbeben herunterfallen und schwere
Verletzungen wie Blutergüsse oder Knochenbrüche verursachen.
• Wenn die Wand, an der die Wandhalterung installiert wird, nicht stabil,
nicht eben oder nicht senkrecht zum Fußboden ist, kann das
Fernsehgerät herunterfallen. Dabei besteht die Gefahr von Verletzungen
oder Sachschäden. Die Wand muss eine Tragfähigkeit von mindestens
dem Vierfachen (4) des Gewichts des Fernsehgeräts aufweisen (KE42MR1: 53 kg × 4 = 212 kg, KE-50MR1: 39 kg × 4 = 156 kg).
• Wenn die Wandhalterung nicht ausreichend stabil installiert wird, kann
das Fernsehgerät herunterfallen. Dabei besteht die Gefahr von
Verletzungen oder Sachschäden.
Lassen Sie die Installationsarbeiten beim Versetzen oder Abnehmen der
Wandhalterung unbedingt von qualifizierten Fachleuten ausführen.
Wenn die Wandhalterung von anderen Personen als qualifizierten Fachleuten abgenommen oder transportiert
wird, kann das Fernsehgerät herunterfallen und Verletzungen oder Sachschäden verursachen. Zum Abnehmen
bzw. Transportieren der Wandhalterung sind mindestens zwei Personen erforderlich.
Achten Sie darauf, dass keinerlei Flüssigkeit in das Fernsehgerät gelangt.
Wenn das Fernsehgerät nass wird, besteht Feuergefahr oder die Gefahr eines elektrischen Schlags.
Entfernen Sie nach der Montage des Fernsehgeräts keine Schrauben usw.
Andernfalls kann das Fernsehgerät herunterfallen.
Versuchen Sie nicht, die Komponenten der Wandhalterung zu zerlegen oder
zu modifizieren.
Andernfalls kann die Wandhalterung herunterfallen und es besteht die
Gefahr von Sachschäden und Verletzungen.
DE
Deutsch
Installieren Sie an der Halterung ausschließlich die angegebenen Geräte.
Diese Wandhalterung wurde ausschließlich für die angegebenen Geräte konzipiert. Wenn Sie andere als die
angegebenen Geräte an der Wandhalterung installieren, kann sie herunterfallen und es besteht die Gefahr von
Sachschäden und Verletzungen.
3 (DE)
Page 18
Blockieren Sie nicht die Lüftungsöffnungen des Fernsehgeräts.
Wenn Sie die Lüftungsöffnungen am Fernsehgerät blockieren, indem Sie
eine Tischdecke oder etwas Ähnliches darauf legen, kann sich das
Fernsehgerät überhitzen. In diesem Fall besteht Brandgefahr.
Befestigen Sie zusätzlich zu dem Fernsehgerät keine weiteren Lasten an der
Wandhalterung.
Andernfalls kann das Fernsehgerät herunterfallen und es besteht die
Gefahr von Sachschäden und Verletzungen.
Lehnen und hängen Sie sich nicht an das Fernsehgerät.
Das Fernsehgerät könnte auf Sie fallen und schwere Verletzungen verursachen.
Um Feuergefahr und die Gefahr eines elektrischen Schlags zu vermeiden,
setzen Sie das Fernsehgerät weder Regen noch sonstiger Feuchtigkeit aus.
Wenn das Fernsehgerät nass wird, besteht Feuergefahr oder die Gefahr eines elektrischen Schlags.
Stellen Sie das Fernsehgerät nicht in heißer, feuchter oder übermäßig
staubiger Umgebung auf. Stellen Sie das Fernsehgerät nicht an Orten auf, an
denen es mechanischen Vibrationen ausgesetzt ist.
Andernfalls besteht Feuergefahr oder die Gefahr eines elektrischen Schlags.
Halten Sie brennbare Materialien bzw. offenes Feuer (z. B. Kerzen) vom
Fernsehgerät fern.
Um Feuergefahr zu vermeiden, halten Sie brennbare Materialien bzw. offenes Feuer (z. B. Kerzen) vom
Fernsehgerät fern.
4 (DE)
Page 19
VORSICHT
Wenn Sie die folgenden Sicherheitsmaßnahmen nicht beachten, besteht die Gefahr von Verletzungen
und Sachschäden.
Installieren Sie die Wandhalterung nicht an Wänden, bei denen die Ecken
oder die Seiten des Fernsehgeräts über die Wandfläche hinausragen.
Installieren Sie die Wandhalterung nicht an Wänden, wie z. B. einer Säule,
bei denen die Ecken oder die Seiten des Fernsehgeräts über die Wandfläche
hinausragen. Andernfalls könnten Personen oder Gegenstände gegen die
vorstehenden Ecken oder Seiten des Fernsehgeräts stoßen. Dabei besteht
die Gefahr von Verletzungen und Sachschäden.
Wenden Sie bei Reinigungs- bzw. Wartungsarbeiten nicht zu viel Kraft an.
Drücken Sie nicht zu stark auf die Oberseite des Fernsehgeräts.
Andernfalls kann das Fernsehgerät herunterfallen und es besteht die Gefahr von Sachschäden und Verletzungen.
Montieren Sie das Fernsehgerät nicht über oder unter einer Klimaanlage.
Andernfalls ist das Fernsehgerät dem Luftstrom von der Klimaanlage ausgesetzt. Dies könnte zu Fehlfunktionen
des Fernsehgeräts führen.
Sicherheitsmaßnahmen
• Wenn das Fernsehgerät längere Zeit an der Wandhalterung montiert bleibt, kann sich die Wand hinter und über
dem Fernsehgerät verfärben und die Tapete kann sich von der Wand lösen. Dies hängt vom Material der Wand
ab. Wenn die Wandhalterung später von der Wand abgenommen wird, bleiben die Bohrlöcher sichtbar.
• Wenn hinter der Wand 300-Ohm-Speisekabel verlegt sind, empfiehlt es sich, diese durch 75-Ohm-Koaxialkabel
zu ersetzen.
Wenn es nicht möglich ist, die 300-Ohm-Speisekabel auszutauschen, achten Sie vor der Installation darauf, dass
zwischen dem Fernsehgerät und den Speisekabeln hinter der Wand ausreichend Platz ist.
Lassen Sie sich von den mit der Installation betrauten Fachleuten bei der Wahl der Montageposition beraten,
damit das Fernsehgerät keinen Funkstörungen ausgesetzt ist.
5 (DE)
Page 20
Installieren der Wandhalterung
Für Sony-Händler
ACHTUNG Hinweis an Kunden
Zur Installation dieses Produkts sind entsprechende Kenntnisse erforderlich. Lassen Sie die
Installationsarbeiten unbedingt von Ihrem Sony-Händler oder entsprechenden Fachleuten ausführen und
beachten Sie bei der Installation die nötigen Sicherheitsvorkehrungen.
Für Sony-Händler
Die folgenden Anweisungen richten sich ausschließlich an Sony-Händler. Lesen Sie die oben erläuterten
Sicherheitsmaßnahmen sorgfältig durch und beachten Sie bei der Installation, der Wartung und der
Überprüfung dieses Produkts alle geeigneten Sicherheitsmaßnahmen.
Beachten Sie beim Installieren der Wandhalterung an der Wand unbedingt
die Anweisungen in dieser Gebrauchsanweisung.
Wenn Schrauben nicht fest sitzen oder gar herausfallen, kann die
Wandhalterung herunterfallen und Verletzungen oder Sachschäden
verursachen. Verwenden Sie unbedingt Schrauben, die für das Material der
Wand geeignet sind, und befestigen Sie die Halterung sicher mit
mindestens acht M8-Schrauben oder entsprechenden Schrauben.
Achten Sie darauf, das Netzkabel und das Bildschirmkabel nicht
einzuklemmen.
Wenn das Netzkabel oder das Bildschirmkabel zwischen dem Gerät und
der Wand eingeklemmt wird oder mit Gewalt gebogen oder verdreht wird,
wird möglicherweise die Kabelisolierung beschädigt. Die blanken Drähte
können zu einem Kurzschluss führen und die Kabel können brechen. In
diesem Fall besteht Feuergefahr oder die Gefahr eines elektrischen Schlags.
Verwenden Sie die mitgelieferten Schrauben und Montageteile unbedingt
wie in dieser Gebrauchsanweisung erläutert. Wenn Sie andere Teile
verwenden, kann das Fernsehgerät herunterfallen. Dabei besteht die Gefahr
von Verletzungen bzw. Schäden am Gerät.
Gehen Sie bei der Montage der Halterung unbedingt genau nach den
Anweisungen in dieser Gebrauchsanweisung vor.
Wenn Schrauben nicht fest sitzen oder gar herausfallen, kann das Fernsehgerät herunterfallen. Dabei besteht die
Gefahr von Verletzungen bzw. Schäden am Gerät.
Ziehen Sie alle Schraubenbolzen und Schrauben unbedingt fest an.
Andernfalls kann das Fernsehgerät herunterfallen. Dabei besteht die Gefahr von Verletzungen bzw. Schäden am
Gerät.
Schützen Sie das Fernsehgerät bei der Montage vor Stößen.
Wenn das Fernsehgerät Stößen ausgesetzt wird, kann es herunterfallen oder beschädigt werden. Außerdem besteht
die Gefahr von Verletzungen.
6 (DE)
Page 21
Montieren Sie das Fernsehgerät unbedingt an einer senkrechten und ebenen
Wand.
Andernfalls kann das Fernsehgerät herunterfallen und Verletzungen verursachen.
Sichern Sie die Kabel ordnungsgemäß, nachdem das Fernsehgerät korrekt
installiert wurde.
Wenn jemand über die Kabel stolpert oder sich Gegenstände darin verfangen, besteht Verletzungsgefahr.
Klemmen Sie sich bei der Montage nicht die Hände oder Finger ein.
Gehen Sie bei der Montage der Wandhalterung und bei der Installation des Fernsehgeräts bitte vorsichtig vor, damit
Sie sich nicht an Händen oder Fingern verletzen.
Die Schrauben, die zum Befestigen der Wandhalterung an der Wand benötigt
werden, sind nicht im Lieferumfang enthalten.
Verwenden Sie zur Installation der Wandhalterung für Material und Struktur der Wand geeignete Schrauben.
Schritt 1: Überprüfen der für die Installation
1
2
benötigten Teile
Legen Sie sich einen
Kreuzschlitzschraubenzieher und für
das Material der Wand geeignete
Schrauben (mindestens acht M8Schrauben oder entsprechende
Schrauben, nicht mitgeliefert)
zurecht.
Öffnen Sie die Verpackung und
überprüfen Sie den Inhalt.
Schrauben (+PSW5 × 12) (2) Montageplatte (1) Befestigungsstreben (2)
7 (DE)
Page 22
Schritt 2: Festlegen der Montageposition
Maßeinheit: mm
1
300
Halten Sie zwischen der
Montageplatte und der Decke bzw.
den vorstehenden Teilen der Wand
unbedingt die in der Abbildung
links gezeigten Abstände ein.
100 100
100
Tipp
Näheres zu den Abmessungen bei Montage des
Fernsehgeräts an der Wand finden Sie im Aufriss
unter „Technische Daten“ (S. 15 (DE)).
Schritt 3: Installieren der Montageplatte an der W and
Richten Sie die Platte
vollkommen
1
waagerecht aus.
Bohrloch für die
provisorische Befestigung
der Halterung.
Montageplatte
Schrauben Sie die Montageplatte
provisorisch an der Wand fest und
richten Sie die Montageplatte
vollkommen waagerecht aus.
ACHTUNG
• Die Schrauben, die zum Befestigen der
Wandhalterung an der Wand benötigt werden, sind
nicht im Lieferumfang enthalten.
• Verwenden Sie unbedingt Schrauben, die für das
Material und die Struktur der Wand geeignet sind.
8 (DE)
Page 23
2
KE-42MR1/KE-50MR1
2
Befestigen Sie die Montageplatte
mit mindestens acht M8-Schrauben
oder entsprechenden Schrauben
(nicht mitgeliefert) an der Wand.
1
1Ziehen Sie die Schrauben unbedingt fest an, damit
sie sich nicht lösen können.
2Ziehen Sie die in Schritt 1 provisorisch eingedrehte
Schraube fest an.
ACHTUNG
• Es empfiehlt sich, beim provisorischen Befestigen
der Montageplatte die in der Abbildung links
angegebenen Bohrlöcher zu verwenden. Wenn sich
die Montageplatte nicht sicher genug befestigen
lässt, verwenden Sie zusätzliche Schrauben.
• Vergewissern Sie sich, dass die Montageplatte fest
an der Wand montiert ist.
35
DC
FE
35
330
110
110
110
530
140
B
400
600
A
KE-50MR1 Maßeinheit: mm
ABCDEF
1.573 856 342 86 244 184
KE-42MR1 Maßeinheit: mm
ABCDEF
1.352 720 208 152 178 182
9 (DE)
Page 24
3
Stellen Sie den Winkel der
Halterungsarme ein.
1Entfernen Sie die Schrauben links und rechts unten
an den Halterungsarmen. Wählen Sie dann die
Kerbe, die dem gewünschten Winkel entspricht (0,
5, 10, 15 oder 20 Grad) und befestigen Sie die
Halterungsarme dort.
2Befestigen Sie die beiden Halterungsarme sicher
mit den Schrauben, die Sie in Schritt 1 entfernt
haben.
Hinweis
Stellen Sie unbedingt für die Halterungsarme links
und rechts denselben Winkel ein.
• 0 Grad: Lassen Sie die weißen Schrauben
angezogen, wie sie sind.
• Andere Position als 0 Grad: Entfernen Sie
die weißen Schrauben.
10 (DE)
Page 25
Schritt 4: Installieren des Fernsehgeräts
ACHTUNG
Führen Sie erst die Installation vollständig durch und schließen Sie dann das Netzkabel an eine Netzsteckdose
an. Wenn das Netzkabel unter oder zwischen irgendwelchen Teilen eingeklemmt wird, kann es zu einem
Kurzschluss kommen und es besteht die Gefahr eines elektrischen Schlags. Wenn Sie über das Netzkabel oder
das Bildschirmschnittstellenkabel stolpern, kann der Ständer umkippen und Verletzungen verursachen.
Hängen Sie die Befestigungsstreben
1
an den Haken an der Rückseite des
Fernsehgeräts ein. Verschieben Sie
dann die Befestigungsstreben und
fixieren Sie sie mithilfe der
mitgelieferten Schrauben (+PSW5 ×
12).
Weiche
Unterlage,
z. B. Decke
Rückseite des Fernsehgeräts
11 (DE)
Page 26
2
Schließen Sie das Netzkabel und das
Bildschirmkabel (mit dem
Fernsehgerät geliefert) an das
Fernsehgerät an.
Schließen Sie das Netzkabel und das Bildschirmkabel
an die Anschlüsse an der Rückseite des Fernsehgeräts
an.
Tipp
Näheres zum Anschließen des Netzkabels und des
Bildschirmkabels finden Sie in der
Bedienungsanleitung zum Farbfernsehgerät mit
Flachbildschirm (KE-42MR1/KE-50MR1).
Netzkabel und
Bildschirmschnittstellenkabel
12 (DE)
Befestigen Sie das Bildschirmschnittstellenkabel und
das Netzkabel an der Wand o. ä. Wenn Sie die Kabel
in der Wand verlegen, bohren Sie wie in der
Abbildung links gezeigt ein Loch mit einem
Durchmesser von 50 mm.
10 mm
Page 27
3
Montieren Sie das Fernsehgerät an
der Montageplatte.
2
4
1Heben Sie das Fernsehgerät an und halten Sie es
nahe an die Montageplatte, so dass Sie die unteren
Haken der Befestigungsstreben an den untersten
Trageschäften der Montageplatte ausrichten
können.
2Hängen Sie wie in der Abbildung links gezeigt die
oberen und unteren Haken der zwei
Befestigungsstreben gleichzeitig in die vier
Trageschäfte der Montageplatte ein.
3Vergewissern Sie sich, dass die acht Haken in die
vier Schäfte der Montageplatte eingehängt sind.
4Ziehen Sie die Sicherungsschrauben links und
rechts mit einem langen
Kreuzschlitzschraubenzieher fest an.
13 (DE)
Page 28
Abnehmen des Fernsehgeräts
1
2
3
Für Sony-Händler
Lösen Sie das Netzkabel von der
Netzsteckdose.
Lösen Sie die Sicherungsschrauben
links und rechts so weit, bis sie sich
nicht mehr weiterdrehen lassen.
Heben Sie das Fernsehgerät an und
so weit hoch, dass Sie es abnehmen
können. Hierfür sind mindestens
zwei Personen erforderlich!
ACHTUNG
• Zum Tragen des Fernsehgeräts sind mindestens
zwei Personen erforderlich.
• Achten Sie darauf, dass sich die Kabel beim
Abnehmen des Fernsehgeräts nirgendwo
verfangen.
• Gehen Sie beim Abnehmen des Fernsehgeräts bitte
vorsichtig vor, damit Sie sich nicht an Händen oder
Fingern verletzen.
14 (DE)
Page 29
Technische Daten
Maßeinheit: mm
Gewicht: 8,0 kg
Änderungen, die dem technischen Fortschritt dienen, bleiben vorbehalten.
400
600
385
51
KE-42MR1 Maßeinheit: mm
Grad Abmessungen
B
a ABCDE
0° 720 160 173 400 147
5° 720 207 162 400 156
10° 720 253 148 400 164
C
15° 720 297 130 400 172
20° 720 339 108 400 178
a
Grad
A
DE
KE-50MR1 Maßeinheit: mm
Grad Abmessungen
a ABCDE
0° 856 166 307 400 149
5° 856 225 296 400 160
10° 856 283 280 400 169
15° 856 338 260 400 177
20° 856 391 235 400 183
15 (DE)
Page 30
Complimenti per l’acquisto del presente prodotto.
Per i clienti
Per l’installazione del presente prodotto, è necessario disporre di sufficiente competenza. Assicurarsi che
l’installazione venga eseguita da un installatore Sony o da personale qualificato e di prestare particolare
attenzione durante l’installazione.
ATTENZIONE
In caso di inosservanza delle precauzioni di sicurezza e di uso errato del prodotto, è possibile che si verifichino
incendi o danni alle persone.
Nel presente manuale delle istruzioni, vengono descritte importanti precauzioni necessarie per evitare incidenti e
per garantire il corretto uso del prodotto. Leggere attentamente il presente manuale delle istruzioni e di utilizzare il
prodotto in modo corretto. Assicurarsi inoltre di conservare il presente manuale delle istruzioni per riferimenti
futuri.
Per gli installatori Sony
Per l’installazione del presente prodotto, è necessario disporre di sufficiente competenza. Assicurarsi di leggere
attentamente il presente manuale delle istruzioni per installare il prodotto in modo sicuro. Sony non può essere
ritenuta responsabile di eventuali danni o ferite causati da un uso o da un’installazione errati. Dopo avere
completato l’installazione, consegnare il presente manuale al cliente.
La presente staffa di montaggio a parete è stata progettata da Sony esclusivamente per l’uso con il prodotto
specificato. Non utilizzare il presente supporto con apparecchi diversi dal seguente prodotto.
Prodotto specificato: Televisore a colori a schermo piatto (KE-42MR1/KE-50MR1)
Informazioni sulla sicurezza
Sebbene i prodotti Sony siano progettati per essere sicuri, è possibile che se il prodotto viene utilizzato in modo
errato si verifichino ferite gravi dovute a incendi, scosse elettriche o al capovolgimento del prodotto stesso. Onde
evitare incidenti, assicurarsi di osservare le appropriate precauzioni per la sicurezza.
2 (IT)
Page 31

Per i clienti
ATTENZIONE
Se le precauzioni riportate di seguito non vengono rispettate, è possibile procurarsi ferite gravi o mortali
a causa di incendi, scosse elettriche o esplosioni.
Assicurarsi che l’installazione venga eseguita da personale qualificato e di
tenere lontani i bambini durante l’installazione.
Se l’installazione della staffa di montaggio a parete viene eseguita da
personale non qualificato, è possibile che si verifichino gli incidenti descritti
di seguito.
• È possibile che il display cada, ad esempio durante un terremoto,
causando ferite gravi quali contusioni o fratture.
• Se la parete sulla quale viene installata la staffa di montaggio è instabile,
irregolare o non perpendicolare al pavimento, è possibile che
l’apparecchio cada e provochi ferite o danni a oggetti. È necessario che la
parete sia in grado di sostenere un peso almeno quattro (4) volte
superiore a quello del display (KE-42MR1: 53 kg × 4= 212 kg, KE-50MR1:
39 kg × 4= 156 kg).
• Se la staffa di montaggio non viene installata alla parete in modo
sufficientemente saldo, è possibile che l’unità cada e provochi ferite o
danni a oggetti.
In caso di spostamento o smontaggio della staffa a parete, assicurarsi che
l'operazione venga eseguita da personale qualificato.
Se la staffa a parete viene trasportata o smontata da personale non qualificato, è possibile che il display cada e
provochi ferite o danni a oggetti. Assicurarsi che la staffa a parete venga trasportata o smontata da almeno due
persone.
Non versare liquidi di alcun tipo sul display.
Se il display dovesse bagnarsi, potrebbero generarsi incendi o scosse elettriche.
Dopo avere completato il montaggio del display, non rimuovere i bulloni né
altri elementi simili.
Diversamente, è possibile che il display cada.
Non smontare né modificare i componenti della staffa di montaggio a parete.
Diversamente, è possibile che la staffa di montaggio a parete cada e
provochi ferite o danni a oggetti.
IT
Italiano
Non montare apparecchi diversi dal prodotto specificato.
La presente staffa di montaggio a parete è stata progettata esclusivamente per l’uso con il prodotto specificato. Se
vengono montati apparecchi diversi dal prodotto specificato, è possibile che cadano e provochino ferite o danni a
oggetti.
3 (IT)
Page 32

Non ostruire le prese di ventilazione del display.
Se la parte superiore del display viene coperta con un panno o simili,
ostruendo in tal modo le prese di ventilazione, è possibile che l’apparecchio
stesso si surriscaldi e che si generino incendi.
Non applicare alla staffa di montaggio a parete una pressione diversa dal
peso del display.
Diversamente, è possibile che il display cada e provochi ferite o danni a oggetti.
Non appoggiarsi né aggrapparsi al display.
Diversamente, è possibile che il display cada e che si riportino ferite gravi
restando schiacciati sotto il peso dell’apparecchio.
Per evitare incendi o scosse elettriche, non esporre il display alla pioggia o
all’umidità.
Se il display dovesse bagnarsi, potrebbero generarsi incendi o scosse elettriche.
Non collocare il display in luoghi caldi, umidi o eccessivamente polverosi, né
installare l’apparecchio in luoghi in cui potrebbe risultare esposto a vibrazioni
meccaniche.
Diversamente, è possibile che si generino incendi o scosse elettriche.
Tenere il display lontano da oggetti infiammabili o fiamme libere, quali
candele o simili.
Per evitare incendi, tenere il display lontano da oggetti infiammabili o fiamme libere, quali candele o simili.
4 (IT)
Page 33

AVVERTIMENTO
In caso di inosservanza delle seguenti precauzioni, potrebbero verificarsi ferite o danni a oggetti.
Non installare la staffa di montaggio su pareti dalle quali gli angoli o i lati del
display potrebbero sporgere.
Non installare la staffa di montaggio su pareti quali una colonna da cui gli
angoli o i lati del display potrebbero sporgere. Se una persona o un oggetto
dovessero urtare l’angolo o il lato sporgente del display, potrebbero
verificarsi ferite o danni a oggetti.
Non esercitare una pressione eccessiva sul prodotto durante le operazioni di
pulizia o manutenzione.
Non esercitare una pressione eccessiva sulla parte superiore del display.
Diversamente, è possibile che il display cada e provochi ferite o danni a oggetti.
Non installare il display sopra o sotto ad un condizionatore d’aria.
Diversamente, è possibile che il display risulti esposto a correnti d’aria provenienti dal condizionatore, causando
problemi di funzionamento dell’apparecchio stesso.
Precauzioni
• A seconda del materiale della parete, l’uso prolungato del display installato sulla staffa di montaggio potrebbe
causare lo scolorimento della parete dietro o al di sopra dell’apparecchio oppure lo scollamento della carta da
parati. Se, dopo l’installazione, la staffa di montaggio viene rimossa, sulla parete rimarranno i fori delle viti.
• Se nella parete sono stati fatti passare cavi di alimentazione da 300 ohm, si consiglia di sostituirli con cavi
coassiali da 75 ohm.
Se è necessario continuare ad utilizzare cavi di alimentazione da 300 ohm, prima di procedere all’installazione
assicurarsi di verificare che vi sia spazio sufficiente tra il display e i cavi di alimentazione nella parete.
Prima dell’installazione, rivolgersi ad un installatore per informazioni sul luogo di installazione appropriato,
dove il display non sia soggetto a disturbi radio.
5 (IT)
Page 34

Installazione della staffa di montaggio a parete
Per gli installatori Sony
ATTENZIONE Per i clienti
Per l’installazione del presente prodotto, è necessario disporre di sufficiente competenza. Assicurarsi che
l’installazione venga eseguita da un installatore Sony o da personale qualificato e di prestare particolare
attenzione durante l’installazione.
Per gli installatori Sony
Le seguenti istruzioni sono rivolte esclusivamente agli installatori Sony. Assicurarsi di leggere le precauzioni
per la sicurezza di cui sopra e di prestare particolare attenzione durante l’installazione, la manutenzione e i
controlli del presente prodotto.
Assicurarsi di installare la staffa di montaggio alla parete in modo saldo
seguendo le istruzioni riportate nel presente manuale.
Se le viti non sono serrate in modo saldo o fuoriescono, è possibile che la
staffa di montaggio a parete cada e provochi ferite o danni a oggetti.
Assicurarsi di utilizzare le viti appropriate al materiale della parete e di
installare l’apparecchio in modo saldo, utilizzando almeno otto viti M8 o di
un tipo equivalente.
Prestare attenzione affinché il cavo di alimentazione e il cavo del display non
si pieghino.
Se il cavo di alimentazione o il cavo del display rimangono incastrati tra
l’apparecchio e la parete o vengono attorcigliati forzatamente, è possibile
che la parte metallica del cavo resti scoperta provocando cortocircuiti o
rotture nel cavo stesso. Ciò potrebbe causare incendi o scosse elettriche.
Assicurarsi di utilizzare le viti in dotazione e le parti di montaggio in modo
appropriato seguendo le istruzioni riportate nel presente manuale. Se
vengono utilizzati accessori diversi, è possibile che il display cada
danneggiandosi o provocando ferite a persone.
Assicurarsi di montare la staffa in modo corretto seguendo la procedura
descritta nel presente manuale delle istruzioni.
Se le viti non sono serrate in modo saldo o fuoriescono, è possibile che il display cada danneggiandosi o
provocando ferite a persone.
Stringere i bulloni e le viti in modo saldo nella posizione corretta.
Diversamente, è possibile che il display cada danneggiandosi o provocando ferite a persone.
Durante l’installazione, prestare attenzione a non sottoporre il display ad urti.
Se il display viene sottoposto ad urti, è possibile che cada o si rompa, provocando ferite a persone.
6 (IT)
Page 35

Assicurarsi di installare il display ad una parete perpendicolare al pavimento e
piatta.
Diversamente, è possibile che il display cada e provochi ferite a persone.
Dopo avere installato correttamente il display, fissare i cavi in modo saldo.
Se i cavi dovessero costituire un ostacolo per le persone o gli oggetti, potrebbero verificarsi ferite o danni.
Durante l’installazione, prestare attenzione a non ferirsi le mani o le dita.
Durante l’installazione della staffa di montaggio a parete o del display, prestare attenzione a non ferirsi le mani o le
dita.
Le viti necessarie per fissare la staffa di montaggio alla parete non sono in
dotazione.
Utilizzare viti appropriate al materiale e alla struttura della parete per il montaggio della staffa.
Punto 1: Verifica dei componenti necessari
all’installazione
1
2
Procurarsi innanzitutto un cacciavite
Philips e le viti appropriate (almeno
otto viti M8 o di un tipo
equivalente, non in dotazione) in
base al materiale della parete.
Aprire la confezione e verificare i
componenti.
Viti (+PSW5 × 12) (2) Piastra (1) Ganci di montaggio (2)
7 (IT)
Page 36

Punto 2: Individuazione del luogo di installazione
Unità di misura: mm
1
300
Assicurarsi che la distanza tra la
piastra e il soffitto o le parti
sporgenti della parete corrisponda a
quanto indicato nella figura a
sinistra.
100 100
100
Suggerimento
Per ulteriori informazioni sulle dimensioni in caso il
display venga di installazione a parete, consultare la
figura relativa alla sezione trasversale
dell’apparecchio in “Caratteristiche tecniche” (p.15
(IT)).
Punto 3: Installazione della piastra alla parete
Allineare l’apparecchio in
posizione perfettamente
parallela rispetto al
pavimento.
Piastra
Foro per vite da utilizzare
per l’applicazione
provvisoria della staffa.
Fissare provvisoriamente la piastra
alla parete utilizzando delle viti,
quindi posizionarla in modo
perfettamente parallelo rispetto al
pavimento.
ATTENZIONE
• Le viti necessarie per fissare la staffa di montaggio
alla parete non sono in dotazione.
• Assicurarsi di utilizzare le viti appropriate in base
al materiale e alla struttura della parete.
8 (IT)
Page 37

2
KE-42MR1/KE-50MR1
2
Fissare la piastra alla parete
utilizzando almeno otto viti M8 o di
tipo equivalente (non in dotazione).
1Assicurarsi di fissare le viti in modo saldo affinché
1
non si allentino.
2Stringere saldamente la vite utilizzata
temporaneamente per la procedura 1.
ATTENZIONE
• Per applicare provvisoriamente la piastra, si
consiglia di utilizzare i fori per viti indicati nella
figura a sinistra. Se non è possibile fissare
saldamente la piastra, utilizzare altre viti.
• Assicurarsi di verificare che la piastra sia fissata in
modo saldo alla parete.
35
DC
FE
35
330
110
110
110
530
140
B
400
600
A
KE-50MR1 Unità di misura: mm
ABCDEF
1.573 856 342 86 244 184
KE-42MR1 Unità di misura: mm
ABCDEF
1.352 720 208 152 178 182
9 (IT)
Page 38

3
Regolare l’angolazione dei bracci.
1Rimuovere le viti dai lati destro e sinistro della base
del braccio. Selezionare la tacca corrispondente
all’angolazione desiderata (0, 5, 10, 15 o 20 gradi),
quindi posizionare la base del braccio in base ad
essa.
2Fissare saldamente la base del braccio utilizzando
le viti rimosse per la procedura 1.
Nota
Assicurarsi di regolare i bracci destro e sinistro
sulla stessa angolazione.
• 0 gradi: Lasciare le viti bianche nel modo
in cui sono state serrate.
• Angolo diverso da 0 gradi: Rimuovere le
viti bianche.
10 (IT)
Page 39

Punto 4: Installazione il display
ATTENZIONE
Assicurarsi di completare l’installazione prima di collegare il cavo di alimentazione alla presa di rete. Se
il cavo di alimentazione rimane incastrato sotto o tra parti dell’apparecchio, è possibile che si verifichino
cortocircuiti o scosse elettriche. Se si inciampa sul cavo di alimentazione o sul cavo di interfaccia del display, il
supporto potrebbe capovolgersi causando ferite.
Applicare il gancio di montaggio ai
1
gancetti situati nella parte
posteriore del display. Quindi fare
scorrere il gancio di montaggio e
fissarlo utilizzando le viti in
dotazione (+PSW5 × 12).
Superficie
morbida, ad
esempio una
coperta
Parte posteriore del display
11 (IT)
Page 40

2
Collegare al display il cavo di
alimentazione e il cavo del display in
dotazione con l’apparecchio.
Collegare il cavo di alimentazione e il cavo del display
ai connettori situati nella parte posteriore del display.
Suggerimento
Per ulteriori informazioni sul collegamento del cavo
di alimentazione e del cavo del display, consultare il
manuale delle istruzioni del televisore a colori a
schermo piatto (KE-42MR1/KE-50MR1).
Cavo di alimentazione e cavo
di interfaccia del display
Fissare alla parete il cavo di interfaccia del display e il
cavo di alimentazione. Per fare passare i cavi
all’interno della parete, praticare un foro di 50 mm di
diametro nella parete stessa, come mostrato nella
figura a sinistra.
10 mm
12 (IT)
Page 41

3
2
4
Installare il display sulla piastra.
1Tenendo il display, avvicinarlo alla piastra in modo
da allineare i gancetti inferiori dei ganci di
montaggio con gli assi di supporto situati vicino
alla parte inferiore della piastra.
2Applicare contemporaneamente i gancetti superiori
e inferiori dei due ganci di montaggio ai quattro
assi di supporto della piastra come mostrato nella
figura a sinistra.
3Verificare che gli otto gancetti siano fissati in modo
saldo ai quattro assi della piastra.
4Stringere saldamente le viti di fissaggio nelle parti
destra e sinistra utilizzando un cacciavite Phillips
lungo.
13 (IT)
Page 42

Rimozione del display
1
2
Per gli installatori Sony
Scollegare il cavo di alimentazione
dalla presa di rete.
Allentare completamente le viti di
fissaggio nelle parti destra e sinistra.
3
Per la rimozione del display,
assicurarsi che esso venga sostenuto
e fatto scorrere verso l’alto da
almeno due persone.
ATTENZIONE
• Per il trasporto del display, assicurarsi che
intervengano almeno due persone.
• Durante la rimozione del display, assicurarsi che i
cavi siano sistemati in modo corretto.
• Durante la rimozione del display, prestare
attenzione a non ferirsi le mani o le dita.
14 (IT)
Page 43

Caratteristiche tecniche
Unità di misura: mm
Peso: 8,0 kg
Il design e le caratteristiche tecniche sono soggetti a modifiche senza preavviso.
A
Gradi
400
600
385
51
KE-42MR1 Unità di misura: mm
Gradi Dimensioni
B
a ABCDE
0° 720 160 173 400 147
5° 720 207 162 400 156
10° 720 253 148 400 164
C
15° 720 297 130 400 172
20° 720 339 108 400 178
a
KE-50MR1 Unità di misura: mm
DE
Gradi Dimensioni
a ABCDE
0° 856 166 307 400 149
5° 856 225 296 400 160
10° 856 283 280 400 169
15° 856 338 260 400 177
20° 856 391 235 400 183
15 (IT)
Page 44

Nous vous remercions d’avoir fait l’acquisition de ce produit.
A l’attention des clients
Une certaine expérience est requise pour installer ce produit. Confiez l’installation à des revendeurs Sony ou à
des professionnels et portez une attention particulière à la sécurité au cours de l’installation.
AVERTISSEMENT
Le non-respect des règles de sécurité et l’utilisation incorrecte de ce produit peut provoquer un incendie ou des
blessures graves.
Ce mode d’emploi indique les précautions essentielles pour éviter tout accident et garantir une bonne utilisation
du produit. Lisez attentivement ce mode d’emploi et veillez à utiliser ce produit correctement. Conservez ce mode
d’emploi pour toute référence ultérieure.
A l’attention des revendeurs Sony
Une certaine expérience est requise pour installer ce produit. Lisez ce mode d’emploi attentivement afin de
procéder à l’installation en toute sécurité. Nous ne sommes nullement responsables de tout dommage ou blessure
consécutif(ve) à une mauvaise utilisation ou à une installation incorrecte. Une fois l’installation effectuée, remettez
ce manuel d’installation aux clients.
Ce support de fixation mural est conçu par Sony pour être utilisé avec le produit spécifié. N’utilisez pas ce
support avec un autre appareil que le produit suivant.
Produit spécifié : téléviseur couleur à écran plat (KE-42MR1/KE-50MR1)
Sécurité
Les produits Sony sont conçus pour vous offrir le maximum de sécurité.
Toutefois si ce produit est utilisé de façon incorrecte, il peut provoquer des blessures graves en cas d’incendie,
d’électrocution ou de chute de l’appareil. Veillez à observer les précautions de sécurité préconisées pour éviter de
tels accidents.
2 (FR)
Page 45

A l’attention des clients
AVERTISSEMENT
Le non-respect des précautions suivantes peut entraîner la mort ou des blessures graves en cas
d’incendie, d’électrocution ou d’explosion.
Confiez l’installation à des professionnels qualifiés et tenez les enfants à
l’écart pendant la durée de l’installation.
Si des personnes autres que des professionnels qualifiés installent le
support de fixation mural, les accidents suivants peuvent se produire :
• L’écran peut tomber et causer des blessures graves comme des
hématomes ou des fractures en cas de tremblement de terre.
• Si le mur sur lequel le support de fixation mural est fixé est instable,
inégal ou non perpendiculaire au sol, l’appareil risque de tomber et de
vous blesser ou de provoquer des dommages matériels. Le mur doit
pouvoir supporter un poids équivalent à quatre (4) fois le poids de
l’écran (KE-42MR1: 53 kg × 4= 212 kg, KE-50MR1: 39 kg × 4= 156 kg).
• Si l’installation du support de fixation mural n’est pas assez solide,
l’appareil risque de tomber et de vous blesser ou de provoquer des
dommages matériels.
Confiez l’installation à des professionnels qualifiés lorsque vous déplacez ou
démontez le support de fixation mural.
Si des personnes autres que des professionnels qualifiés transportent ou démontent le support de fixation mural,
l’écran peut tomber et provoquer des blessures ou des dommages matériels. Deux personnes au moins doivent
porter ou démonter le support de fixation mural.
Ne renversez aucun liquide sur l’écran.
Si ce dernier venait à être mouillé, il risquerait de provoquer un incendie ou une électrocution.
Ne retirez pas de boulons, etc., après l’installation de l’écran.
Dans le cas contraire, l’écran risque de tomber.
Ne démontez pas ou n’apportez pas de modifications aux pièces du support
de fixation mural.
Dans le cas contraire, le support risque de tomber et de vous blesser ou de
provoquer des dommages matériels.
FR
Français
N’utilisez pas d’autre appareil que le produit spécifié.
Ce support de fixation mural est conçu pour être utilisé avec le produit spécifié. Si vous installez un autre appareil
que le produit spécifié, il risque de tomber et de vous blesser ou de provoquer des dommages matériels.
3 (FR)
Page 46

Ne bloquez pas les orifices de ventilation de l’écran.
Si vous bloquez les orifices de ventilation de l’écran en couvrant la partie
supérieure de l’écran avec un tissu ou autre, l’écran peut surchauffer et ceci
risque de provoquer un incendie.
N’appliquez aucune charge autre que l’écran sur le support de fixation mural.
Dans le cas contraire, l’écran risque de tomber et de vous blesser ou de
provoquer des dommages matériels.
Ne vous appuyez pas sur l’écran ou ne vous pendez pas après.
L’écran risquerait de tomber et l’utilisateur serait coincé par le poids de
l’appareil, il en résulterait des blessures graves.
Pour éviter tout risque d’incendie ou d’électrocution, n’exposez pas l’écran à
la pluie ou à l’humidité.
Si l’écran venait à être mouillé, il risquerait de déclencher un incendie ou une électrocution.
Ne placez jamais l’écran dans des endroits chauds, humides ou extrêmement
poussiéreux. N’installez pas l’écran à des endroits où il serait soumis à des
vibrations mécaniques.
Dans le cas contraire, ceci risque de provoquer un incendie ou un risque d’électrocution.
Conservez les objets inflammables ou les flammes nues (ex : bougies) à l’écart
de l’écran.
Pour éviter tout risque d’incendie, gardez les objets inflammables ou les flammes nues (ex : bougies) à l’écart de
l’écran.
4 (FR)
Page 47

ATTENTION
Le non-respect des précautions suivantes risque de provoquer des blessures ou des dommages matériels.
N’installez pas le support de fixation mural sur des surfaces murales où les
coins ou les côtés de l’écran dépasseraient.
N’installez pas le support de fixation mural sur des surfaces murales, telles
qu’un pilier où les coins ou les côtés de l’écran dépasseraient de la surface.
Si une personne ou un objet venait à heurter le coin ou les côtés de l’écran,
ceci risquerait de provoquer une blessure ou d’endommager appareil.
N’exercez aucune force excessive sur le produit en cours de nettoyage ou
d’entretien.
N’exercez pas une force excessive sur la face supérieure de l’écran.
Dans le cas contraire, l’écran risque de tomber et de vous blesser ou entraîner des dommages matériels.
N’installez pas l’écran sur ou sous un climatiseur.
Dans le cas contraire, l’écran risque d’être exposé aux courants d’air du climatiseur. Ceci risquerait de provoquer
un dysfonctionnement de l’écran.
Précautions
• Si vous utilisez l’écran fixé au support de fixation mural pendant une longue période, le mur situé derrière ou
au-dessus de l’écran peut se décolorer ou le papier peut se décoller selon le matériau du mur. Les trous des vis
restent apparents si vous démontez le support de fixation mural après son installation.
• Si vous avez fait passer des câbles d’alimentation de 300 ohms derrière le mur, nous vous recommandons de les
remplacer par des câbles coaxiaux de 75 ohms.
Toutefois, s’il est nécessaire de continuer à utiliser des câbles d’alimentation de 300 ohms, un espace
suffisamment important doit être prévu entre l’écran et les câbles d’alimentation derrière le mur avant de
procéder à l’installation.
Avant de procéder à l’installation, consultez votre installateur sur l’emplacement où l’écran ne subira aucune
interférence radio.
5 (FR)
Page 48

A l’attention des
Installation du support de fixation mural
revendeurs Sony
AVERTISSEMENT A l’attention des clients
Une certaine expérience est requise pour installer ce produit. Confiez l’installation à des revendeurs Sony ou à
des professionnels et portez une attention particulière à la sécurité au cours de l’installation.
A l’attention des revendeurs Sony
Les instructions suivantes concernent les revendeurs Sony uniquement. Lisez attentivement les consignes de
sécurité décrites ci-dessus et accordez une attention particulière à la sécurité lors de l’installation, de l’entretien
et de la vérification de ce produit.
Veillez à installer le support de fixation mural correctement au mur en suivant
les instructions de ce mode d’emploi.
Si certaines des vis sont desserrées ou sont absentes, le support de fixation
mural peut tomber et provoquer des blessures ou des dommages matériels.
Veillez à utiliser les vis appropriées selon le matériau du mur et installez
l’appareil correctement en utilisant au moins huit vis M8 ou équivalentes.
Le cordon d’alimentation ou le câble de l’écran ne doivent pas être coincés.
Si le cordon d’alimentation ou le câble de l’écran est coincé entre l’appareil
et le mur ou s’il est plié ou tordu en forçant, la partie métallique du cordon
ou du câble peut être exposée et provoquer un court-circuit ou une cassure
du cordon ou du câble. Ceci risquerait de provoquer un incendie ou une
électrocution.
Veillez à utiliser les vis et les pièces de fixation fournies en suivant les
instructions de ce mode d’emploi. Si vous utilisez d’autres éléments de
fixation, l’écran risque de tomber et de vous blesser ou d’être endommagé.
Veillez à monter le support correctement en suivant la procédure décrite dans
ce mode d’emploi.
Si certaines vis sont desserrées ou sont absentes, l’écran risque de tomber et de blesser quelqu’un ou d’être
endommagé.
Veillez à serrer les boulons et les vis correctement dans la position indiquée.
Dans le cas contraire, l’écran risque de tomber et de vous blesser ou d’être endommagé.
Veillez à ne pas faire subir de chocs à l’écran pendant l’installation.
Si l’écran est soumis à des chocs, il risque de tomber ou de se casser. Ceci risquerait de vous blesser.
6 (FR)
Page 49

Veillez à installer l’écran sur un mur qui soit à la fois perpendiculaire au sol et
plat.
Dans le cas contraire, l’écran risque de tomber et de vous blesser.
Après une installation correcte de l’écran, fixez les câbles correctement.
Si des personnes ou des objets se prennent dans les câbles, ceci risque de provoquer des blessures.
Prenez garde de ne pas vous blesser aux mains ou aux doigts pendant
l’installation.
Prenez garde à ne pas vous blesser aux mains ou aux doigts lors de l’installation du support de fixation mural ou
de l’écran.
Les vis nécessaires pour fixer solidement le support de fixation mural au mur
ne sont pas fournies.
Utilisez les vis appropriées selon le matériau et la structure du mur lors du montage du support de fixation mural.
Etape 1: Vérification des pièces requises pour
l’installation
1
2
Préparez préalablement un
tournevis cruciforme et les vis
nécessaires (au moins huit vis M8 ou
équivalentes, non fournies), selon le
matériau du mur.
Ouvrez l’emballage et vérifiez les
pièces.
Vis (+PSW5 × 12) (2) Plaque de fixation (1) Crochet de fixation (2)
7 (FR)
Page 50

Etape 2: Choix de l’emplacement d’installation
Unité: mm
1
300
Veillez à conserver une distance
suffisante entre la plaque de
fixation et le plafond ou les parties
saillantes du mur comme indiqué sur
l’illustration à gauche.
100 100
100
Conseil
Pour obtenir plus de détails sur les dimensions
lorsque l’écran est fixé au mur, reportez-vous à la
coupe transversale du paragraphe « Spécifications »
(p.15 (FR)).
Etape 3: Installation de la plaque de fixation sur le mur
1
Alignez l’appareil de
sorte qu’il soit
parfaitement de niveau.
Plaque de fixation
Percez le trou à utiliser
pour fixer temporairement
le support.
Vissez temporairement la plaque de
fixation au mur et alignez la
position de la plaque de sorte
qu’elle soit parfaitement de niveau.
AVERTISSEMENT
• Les vis requises pour fixer solidement le support de
fixation mural ne sont pas fournies.
• Utilisez des vis appropriées, selon le matériau et la
structure du mur.
8 (FR)
Page 51

2
KE-42MR1/KE-50MR1
2
Fixez la plaque de fixation au mur à
l’aide d’au moins huit vis M8 ou
équivalentes minimum (non
fournies).
1
1Veillez à serrer les vis correctement de sorte qu’elles
ne se desserrent pas.
2Serrez fermement les vis fixées temporairement au
cours de la Procédure 1.
AVERTISSEMENT
• Il est recommandé d’utiliser les emplacements de
trous de vis spécifiés dans l’illustration à gauche
lors de la fixation temporaire d’une plaque. Si la
plaque de fixation n’est pas fixée assez solidement,
utilisez des vis supplémentaires.
• Vérifiez que la plaque est bien fixée solidement au
mur.
35
DC
FE
35
330
110
110
110
530
140
B
400
600
A
KE-50MR1 Unité: mm
ABCDEF
1 573 856 342 86 244 184
KE-42MR1 Unité: mm
ABCDEF
1 352 720 208 152 178 182
9 (FR)
Page 52

3
Ajustez l’angle des bras.
1Retirez les vis des parties droite et gauche de la
base des bras. Choisissez ensuite l’encoche
correspondant à l’angle de votre choix (0, 5, 10, 15
ou 20 degrés) et installez-y la base du bras.
2Fixez solidement chaque base de bras à l’aide des
vis retirées au cours de la Procédure 1.
Remarque
Veillez à ajuster les angles des bras droit et gauche
selon le même angle.
• 0 degré: Laissez les vis blanches en
place.
• Autre angle: Retirez les vis blanches.
10 (FR)
Page 53

Etape 4: Installation de l’écran
AVERTISSEMENT
L’installation doit être terminée avant de procéder au raccordement du cordon d’alimentation à la prise secteur.
Si le cordon d’alimentation se trouve coincé sous ou entre des pièces de l’équipement, ceci peut provoquer un
court-circuit ou un risque d’électrocution. Si vous accrochez le cordon d’alimentation ou le câble d’interface de
l’écran, le support risque de basculer et de vous blesser.
Accrochez le crochet de fixation aux
1
crochets situés à l’arrière de l’écran.
Faites ensuite glisser le crochet de
fixation et fixez-le à l’aide des vis
fournies (+PSW5 × 12).
Tissu doux
comme une
couverture
Arrière de l’écran
11 (FR)
Page 54

2
Raccordez à l’écran le cordon
d’alimentation et le câble d’écran
fourni avec l’écran sur celui-ci.
Raccordez le cordon d’alimentation et le câble de
l’écran aux connecteurs situés à l’arrière de l’écran.
Conseil
Pour plus de détails sur le raccordement du cordon
d’alimentation et du câble d’écran, reportez-vous au
mode d’emploi du téléviseur couleur à écran plat (KE42MR1/KE-50MR1).
Cordon d'alimentation et
câble d'interface vidéo
Fixez le câble d’interface de l’écran et le cordon
d’alimentation au mur, etc. Si vous faites passer le
câble et le cordon dans le mur, percez un trou de 50
mm de diamètre dans le mur comme illustré à gauche.
10 mm
12 (FR)
Page 55

3
Installez l’écran sur la plaque de
fixation.
2
4
1Maintenez l’écran et rapprochez-le de la plaque de
façon à aligner les crochets inférieurs du crochet de
fixation sur les tiges inférieures situées dans la
partie basse de la plaque de fixation.
2Accrochez les crochets de fixation inférieurs et
supérieurs aux quatre tiges de support de la plaque
de fixation de façon simultanée comme indiqué sur
l’illustration de gauche.
3Vérifiez que les huit crochets sont solidement
accrochés aux quatre tiges de la plaque de fixation.
4Vissez à fond les vis de fixation de droite et de
gauche avec un tournevis cruciforme à long
manche.
13 (FR)
Page 56

Dépose de l’écran
1
2
3
A l’attention des revendeurs Sony
Débranchez le cordon
d’alimentation de la prise secteur.
Desserrez les vis de fixation de
droite et de gauche jusqu’à ce
qu’elles ne tournent plus.
Veillez à ce que deux personnes
minimum tiennent l’écran et le
soulèvent pour le déposer.
AVERTISSEMENT
• Veillez à ce que deux personnes minimum portent
l’écran.
• Veillez à ce que les cordons et les câbles ne pendent
pas lorsque vous retirez l’écran.
• Faites attention à ne pas vous blesser aux mains ou
aux doigts pendant la dépose de l’écran.
14 (FR)
Page 57

Spécifications
Unité: mm
Poids: 8,0 kg
La conception et les spécifications sont sujettes à modifications sans préavis.
A
Degré
400
600
385
51
KE-42MR1 Unité: mm
Degré Dimensions
B
a ABCDE
0° 720 160 173 400 147
5° 720 207 162 400 156
10° 720 253 148 400 164
C
15° 720 297 130 400 172
20° 720 339 108 400 178
a
KE-50MR1 Unité: mm
DE
Degré Dimensions
a ABCDE
0° 856 166 307 400 149
5° 856 225 296 400 160
10° 856 283 280 400 169
15° 856 338 260 400 177
20° 856 391 235 400 183
15 (FR)
Page 58

Dank u voor uw aankoop van dit product.
Voor klanten
Installatie van dit product vereist voldoende kennis. U moet de installatie uitbesteden aan Sony dealers of
installateurs. Houd rekening met de veiligheid tijdens de installatie.
WAARSCHUWING
Als u de voorzorgsmaatregelen niet opvolgt en het product onjuist gebruikt, kan dit brand of ernstig letsel tot
gevolg hebben.
In deze gebruiksaanwijzing worden de belangrijkste voorzorgsmaatregelen beschreven om ongelukken te
voorkomen en wordt aangegeven hoe u het product moet gebruiken. Lees deze gebruiksaanwijzing aandachtig
door en gebruik het product op de juiste manier. Bewaar deze gebruiksaanwijzing voor het geval u deze later als
referentiemateriaal nodig hebt.
Voor Sony dealers
Installatie van dit product vereist voldoende kennis. U moet deze gebruiksaanwijzing aandachtig doorlezen zodat
het installatiewerk veilig kan worden uitgevoerd. Sony is niet aansprakelijk voor schade of letsel als gevolg van
onjuist handelen of onjuiste installatie. Geef deze gebruiksaanwijzing na de installatie aan de klanten.
Deze wandmontagesteun is ontworpen door Sony voor het opgegeven product. Gebruik deze steun niet met
andere producten dan het volgende product.
Opgegeven product: flatpanel-kleurentelevisie (KE-42MR1/KE-50MR1)
Veiligheid
Bij het ontwerpen van producten houdt Sony rekening met de veiligheid.
Als het product onjuist wordt gebruikt, kan dit leiden tot ernstige verwondingen door brand, elektrische schokken
of door het omvallen van het product. Houd rekening met de juiste veiligheidsmaatregelen om ongelukken te
voorkomen.
2 (NL)
Page 59

Voor klanten
WAARSCHUWING
Als u de volgende voorzorgsmaatregelen niet in acht neemt, kan dit leiden tot de dood of ernstig letsel
door brand, elektrische schokken of explosies.
U moet de installatie uitbesteden aan gekwalificeerde installateurs. Kleine
kinderen moeten uit de buurt worden gehouden tijdens de installatie.
Als de wandmontagesteun wordt geïnstalleerd door andere personen dan
gekwalificeerde installateurs, kunnen er ongelukken gebeuren.
• Het beeldscherm kan vallen tijdens een aardbeving en ernstig letsel,
zoals kneuzingen of botbreuken, veroorzaken.
• Als de muur waarop de wandmontagesteun is bevestigd, instabiel of
onregelmatig is of niet loodrecht op de vloer staat, kan de steun vallen
en letsel of beschadiging van eigendommen tot gevolg hebben. De muur
moet ten minste vier (4) keer het gewicht van het beeldscherm kunnen
dragen (KE-42MR1: 53 kg × 4 = 212 kg, KE-50MR1: 39 kg × 4 = 156 kg).
• Als de wandmontagesteun niet stevig genoeg op de muur is bevestigd,
kan de steun vallen en letsel of beschadiging van eigendommen tot
gevolg hebben.
U moet de installatie uitbesteden aan gekwalificeerde installateurs als u de
wandmontagesteun wilt verplaatsen of verwijderen.
Als de wandmontagesteun wordt verplaatst of verwijderd door andere personen dan gekwalificeerde installateurs,
kan het beeldscherm vallen en letsel of beschadiging van eigendommen tot gevolg hebben. De wandmontagesteun
moet worden gedragen of verwijderd door twee of meer personen.
Mors geen vloeistof op het beeldscherm.
Als het beeldscherm nat wordt, kan dit brand of elektrische schokken veroorzaken.
Verwijder geen bouten na het bevestigen van het beeldscherm.
Als u dit wel doet, kan het beeldscherm vallen.
U moet de wandmontagesteun niet uit elkaar halen of de onderdelen
aanpassen.
Als u dit wel doet, kan de wandmontagesteun vallen en letsel of
beschadiging van eigendommen tot gevolg hebben.
NL
Nederlands
Monteer geen andere apparatuur dan het opgegeven product.
Deze wandmontagesteun is ontworpen voor het opgegeven product. Als u andere apparatuur dan het opgegeven
product monteert, kan deze vallen en letsel of beschadiging van eigendommen tot gevolg hebben.
3 (NL)
Page 60

Blokkeer de ventilatiegaten van het beeldscherm niet.
Als u de ventilatiegaten van het beeldscherm blokkeert door de bovenzijde
van het beeldscherm af te dekken met bijvoorbeeld een kleed, kan het
beeldscherm oververhit worden. Dit kan brand veroorzaken.
Plaats geen ander gewicht dan het beeldscherm op de wandmontagesteun.
Als u dit wel doet, kan het beeldscherm vallen en letsel of beschadiging
van eigendommen tot gevolg hebben.
U moet niet op het beeldscherm leunen of aan het beeldscherm gaan
hangen.
Het beeldscherm kan vallen en de gebruiker kan beklemd raken onder het
gewicht van het beeldscherm en zo ernstig letsel oplopen.
Stel het beeldscherm niet bloot aan regen of vocht om brand of elektrische
schokken te voorkomen.
Als het beeldscherm nat wordt, kan dit brand of elektrische schokken veroorzaken.
Plaats het beeldscherm nooit in warme, vochtige of extreem stoffige
omgevingen. Installeer het beeldscherm niet op een plek waar dit wordt
blootgesteld aan mechanische trillingen.
Als u dit wel doet, kan dit brand of elektrische schokken veroorzaken.
Houd brandbare voorwerpen of open vuur (bijvoorbeeld kaarsen) uit de
buurt van het beeldscherm.
Houd brandbare voorwerpen of open vuur (bijvoorbeeld kaarsen) uit de buurt van het beeldscherm om brand te
voorkomen.
4 (NL)
Page 61

LET OP
Als u de volgende voorzorgsmaatregelen niet in acht neemt, kan dit leiden tot letsel of beschadiging
van eigendommen.
Installeer de wandmontagesteun niet op oppervlakken waarbij de hoeken of
de zijkanten van het beeldscherm uitsteken.
Installeer de wandmontagesteun niet op oppervlakken, zoals pilaren,
waarbij de hoeken of de zijkanten van het beeldscherm uitsteken. Als een
persoon of voorwerp tegen de uitstekende hoek of zijkant van het
beeldscherm aankomt, kan dit letsel of beschadiging van eigendommen tot
gevolg hebben.
Gebruik niet teveel kracht bij het reinigen en onderhouden van het product.
Duw niet te hard op de bovenzijde van het beeldscherm.
Als u dit wel doet, kan dit letsel of beschadiging van eigendommen veroorzaken omdat het beeldscherm kan
vallen.
Plaats het beeldscherm niet boven of onder een airconditioning.
Als u dit doet, kan het beeldscherm worden blootgesteld aan de luchtstromen van de airconditioning. Dit kan
leiden tot storing in het beeldscherm.
Voorzorgsmaatregelen
• Als u het beeldscherm op de wandmontagesteun lange tijd gebruikt, kan de muur achter of boven het
beeldscherm verkleuren of kan het behang kan losraken, afhankelijk van het materiaal waarvan de muur is
gemaakt. Als de wandmontagesteun wordt verwijderd nadat deze op de muur is geïnstalleerd, blijven de gaten
van de schroeven in de muur.
• Als er achter de muur voedingskabels van 300 ohm lopen, kunt u deze kabels het beste vervangen door
coaxkabels van 75 ohm.
Als u toch voedingskabels van 300 ohm moet gebruiken, controleert u of er voldoende ruimte tussen het
beeldscherm en de voedingskabels achter de muur is voordat u de steun installeert.
Voordat de steun wordt geïnstalleerd, moet u contact opnemen met de installateur over een goede plaats voor de
wandmontagesteun waar de radio geen storingen veroorzaakt in het beeldscherm.
5 (NL)
Page 62

De wandmontagesteun installeren
Voor Sony dealers
WAARSCHUWING Voor klanten
Installatie van dit product vereist voldoende kennis. U moet de installatie uitbesteden aan Sony dealers of
installateurs. Houd rekening met de veiligheid tijdens de installatie.
Voor Sony dealers
De volgende instructies zijn alleen bestemd voor Sony dealers. Lees de veiligheidsmaatregelen die hierboven
worden beschreven, door en houd rekening met de veiligheid tijdens installatie, onderhoud en controle van dit
product.
Bevestig de wandmontagesteun stevig op de muur volgens de instructies in
deze gebruiksaanwijzing.
Als schroeven loszitten of uit de muur vallen, kan de wandmontagesteun
vallen en letsel of beschadiging van eigendommen tot gevolg hebben.
Gebruik de juiste schroeven voor het materiaal waarvan de muur is
gemaakt, en installeer de steun stevig met acht of meer M8-schroeven of
gelijksoortige schroeven.
Het netsnoer en de beeldschermkabel mogen niet beklemd raken.
Als het netsnoer of de beeldschermkabel beklemd raakt tussen de steun en
de muur, wordt gebogen of met kracht wordt gedraaid, kan het metalen
gedeelte van het snoer of de kabel worden blootgelegd en een kortsluiting
of een breuk in het snoer of de kabel veroorzaken. Dit kan leiden tot brand
of elektrische schokken.
Gebruik de bijgeleverde schroeven en bevestigingsonderdelen op de juiste
manier aan de hand van de instructies in deze gebruiksaanwijzing. Als u
vervangende items gebruikt, kan het beeldscherm vallen en ernstig
lichamelijk letsel of beschadiging van het beeldscherm tot gevolg hebben.
Monteer de steun op de juiste manier aan de hand van de procedure die in
deze gebruiksaanwijzing wordt beschreven.
Als schroeven loszitten of uit de muur vallen, kan het beeldscherm vallen en ernstig lichamelijk letsel of
beschadiging van het beeldscherm tot gevolg hebben.
Draai de bouten en schroeven goed vast in de aangegeven positie.
Als u dit niet doet, kan het beeldscherm vallen en ernstig lichamelijk letsel of beschadiging van het beeldscherm tot
gevolg hebben.
Stel het beeldscherm niet bloot aan schokken tijdens de installatie.
Als het beeldscherm wordt blootgesteld aan schokken, kan dit vallen of breken. Dit kan letsel veroorzaken.
6 (NL)
Page 63

Installeer het beeldscherm op een muur die loodrecht en vlak is.
Als u dit niet doet, kan het beeldscherm vallen en letsel veroorzaken.
Nadat het beeldscherm juist is geïnstalleerd, moet u de kabels goed
vastmaken.
Als personen of objecten verstrikt raken in de kabels, kan dit letsel tot gevolg hebben.
Let op dat u uw handen en vingers niet bezeert tijdens de installatie.
Let op dat u uw handen of vingers niet bezeert tijdens de installatie van de wandmontagesteun of het beeldscherm.
De schroeven waarmee de wandmontagesteun op de muur wordt bevestigd,
worden niet bijgeleverd.
Gebruik de juiste schroeven voor het materiaal en de structuur van de muur wanneer u de wandmontagesteun
installeert.
Stap 1: De vereiste onderdelen voor de installatie
controleren
Leg voor de installatie een
1
2
Schroeven (+PSW5 × 12) (2) Plaat (1) Montageklemmen (2)
kruiskopschroevendraaier en de
juiste schroeven klaar (acht of meer
M8-schroeven of gelijksoortige
schroeven, niet bijgeleverd),
afhankelijk van het materiaal
waarvan de muur is gemaakt.
Open de verpakking en controleer
de onderdelen.
7 (NL)
Page 64

Stap 2: De plaats voor de installatie bepalen
Eenheid: mm
1
300
Houd de afstand tussen de plaat en
het plafond of de uitstekende
gedeelten van de muur aan die in
de afbeelding links wordt
aangegeven.
100 100
100
Tip
Raadpleeg de afbeelding in "Technische gegevens"
(p.15 (NL)) voor meer informatie over afmetingen
wanneer het beeldscherm aan de muur is bevestigd.
Stap 3: De plaats op de muur bevestigen
1
De plaat precies recht
zetten.
Plaat
Schroefgat dat moet worden
gebruikt om de steun tijdelijk
te bevestigen.
Schroef de plaat tijdelijk op de muur
en zet de plaat precies recht.
WAARSCHUWING
• De schroeven waarmee de wandmontagesteun op
de muur wordt bevestigd, worden niet bijgeleverd.
• Gebruik de juiste schroeven, afhankelijk van het
materiaal en de structuur van de muur.
8 (NL)
Page 65

2
KE-42MR1/KE-50MR1
2
Bevestig de plaat op de muur met
acht of meer M8-schroeven of
gelijksoortige schroeven (niet
bijgeleverd).
1
1Draai de schroeven goed vast zodat deze niet
kunnen losraken.
2Draai de schroef die tijdelijk is vastgeschroefd in
procedure 1, goed vast.
WAARSCHUWING
• Als u de plaat tijdelijk bevestigt, kunt u het beste de
plaatsen voor de schroefgaten gebruiken die in de
afbeelding links worden aangegeven. Als de plaat
niet goed kan worden bevestigd, moet u extra
schroeven gebruiken.
• Controleer of de plaat goed op de muur is
bevestigd.
35
DC
FE
35
330
110
110
110
530
140
B
400
600
A
KE-50MR1 Eenheid: mm
ABCDEF
1.573 856 342 86 244 184
KE-42MR1 Eenheid: mm
ABCDEF
1.352 720 208 152 178 182
9 (NL)
Page 66

Pas de hoek van de armen aan.
3
1Verwijder de schroeven aan de linker- en
rechterzijde van de arm. Kies vervolgens de
inkeping die overeenkomt met de gewenste hoek
(0, 5, 10, 15 of 20 graden) en bevestig de arm hierin.
2 Bevestig elke arm stevig met de schroeven die in
procedure 1 zijn verwijderd.
Opmerking
Stel dezelfde hoeken in voor de linker- en
rechterarmen.
• 0 graden: Laat de witte schroeven
vastgedraaid.
• Anders dan 0 graden: Verwijder de
witte schroeven.
10 (NL)
Page 67

Stap 4: Het beeldscherm installeren
WAARSCHUWING
De installatie moet zijn voltooid voordat u de stekker van het netsnoer in het stopcontact steekt. Als het
netsnoer onder of tussen de apparatuur beklemd raakt, kan dit leiden tot kortsluiting of elektrische schokken.
Als u over het netsnoer of de beeldschermkabel struikelt, kan de standaard omvallen. Dit kan letsel tot gevolg
hebben.
Bevestig de montageklemmen op de
1
haken aan de achterzijde van het
beeldscherm. Verschuif de
montageklemmen en schroef deze
vast met de bijgeleverde schroeven
(+PSW5 × 12).
Zachte doek,
zoals een deken
Achterzijde van het beeldscherm
11 (NL)
Page 68

2
Sluit het netsnoer en de
beeldschermkabel aan op het
beeldscherm.
Sluit het netsnoer en de beeldschermkabel aan op de
aansluitingen aan de achterzijde van het beeldscherm.
Tip
Raadpleeg de gebruiksaanwijzing van de flatpanelkleurentelevisie (KE-42MR1/KE-50MR1) voor meer
informatie over het aansluiten van het netsnoer en de
beeldschermkabel.
Netsnoer en aansluitkabel
voor het beeldscherm
Bevestig de beeldschermkabel en het netsnoer op de
muur. Als u de kabel en het snoer door de muur leidt,
moet u een gat met een diameter van 50 mm in de
muur boren zoals in de afbeelding links wordt
aangegeven.
10 mm
12 (NL)
Page 69

3
Monteer het beeldscherm op de
plaat.
2
4
1Til het beeldscherm op om de onderste haakjes van
de montageklemmen uit te lijnen met de stangetjes
aan de onderzijde van de plaat.
2Bevestig de bovenste en onderste haakjes van de
twee montageklemmen tegelijkertijd op de vier
stangetjes van de plaat zoals in de afbeelding links
wordt aangegeven.
3Controleer of de acht haakjes goed zijn bevestigd
op de vier stangetjes van de plaat.
4Draai de schroeven aan de linker- en rechterzijde
stevig vast met een lange
kruiskopschroevendraaier.
13 (NL)
Page 70

Het beeldscherm verwijderen
1
2
Voor Sony dealers
Trek de stekker van het netsnoer uit
het stopcontact.
Draai de schroeven aan de linker- en
rechterzijde los.
3
Houd het beeldscherm vast met
twee of meer personen en schuif het
beeldscherm omhoog om dit te
verwijderen.
WAARSCHUWING
• De wandmontagesteun moet worden
vastgehouden door twee of meer personen.
• Let op dat de snoeren en kabels nergens achter
blijven haken wanneer u het beeldscherm
verwijdert.
• Let op dat u uw handen en vingers niet bezeert
tijdens het verwijderen van het beeldscherm.
14 (NL)
Page 71

Technische gegevens
Eenheid: mm
Gewicht: 8,0 kg
Wijzigingen in ontwerp en technische gegevens voorbehouden zonder voorafgaande kennisgeving.
400
600
385
51
KE-42MR1 Eenheid: mm
Hoek Afmetingen
B
a ABCDE
0° 720 160 173 400 147
5° 720 207 162 400 156
10° 720 253 148 400 164
C
15° 720 297 130 400 172
20° 720 339 108 400 178
a
Hoek
A
DE
KE-50MR1 Eenheid: mm
Hoek Afmetingen
a ABCDE
0° 856 166 307 400 149
5° 856 225 296 400 160
10° 856 283 280 400 169
15° 856 338 260 400 177
20° 856 391 235 400 183
15 (NL)
Page 72

™·˜ В˘¯·ЪИЫЩФ‡МВ Ф˘ ·БФЪ¿Ы·ЩВ ·˘Щfi ЩФ ЪФ˚fiУ.
°È· ÙÔ˘˜ ¶ÂÏ¿Ù˜
°И· ЩЛУ ЩФФı¤ЩЛЫЛ ·˘ЩФ‡ ЩФ˘ ЪФ˚fiУЩФ˜ ··ИЩВ›Щ·И В·ЪО‹˜ ЩВ¯УИО‹ ВМВИЪ›· О·И О·Щ¿ЪЩИЫЛ. ∞У·ı¤ЫЩВ, МВ
Ы‡М‚·ЫЛ ˘ВЪБФП·‚›·˜, ЩЛУ ЩФФı¤ЩЛЫЛ ЫВ ·УЩИЪФЫТФ˘˜ ‹ ЩВ¯УИОФ‡˜ ЩЛ˜ Sony О·И ‰ТЫЩВ И‰И·›ЩВЪЛ ЪФЫФ¯‹ ЫВ
ı¤М·Щ· ·ЫК¿ПВИ·˜ О·Щ¿ ЩЛУ ЩФФı¤ЩЛЫЛ.
¶ƒ√∂π¢√¶√π∏™∏
∂¿У ‰ВУ ЩЛЪЛıФ‡У ФИ ЪФК˘П¿НВИ˜ БИ· ЩЛУ ·ЫК¿ПВИ· О·И ЩФ ЪФ˚fiУ ¯ЪЛЫИМФФИЛıВ› МВ П·Уı·ЫМ¤УФ ЩЪfiФ, МФЪВ› У·
ЪФО·П¤ЫВИ ˘ЪО·БИ¿ ‹ ЫФ‚·Ъfi ЩЪ·˘М·ЩИЫМfi.
∆Ф ·ЪfiУ ВБ¯ВИЪ›‰ИФ Ф‰ЛБИТУ ·ЪФ˘ЫИ¿˙ВИ ЩИ˜ ЫЛМ·УЩИО¤˜ ЪФК˘П¿НВИ˜ Ф˘ В›У·И ··Ъ·›ЩЛЩВ˜ БИ· ЩЛУ ·ФК˘Б‹
·Щ˘¯ЛМ¿ЩˆУ О·И БИ· ЩФ ЫˆЫЩfi ¯ВИЪИЫМfi ЩФ˘ ЪФ˚fiУЩФ˜. ¢И·‚¿ЫЩВ ЪФЫВОЩИО¿ ·˘Щfi ЩФ ВБ¯ВИЪ›‰ИФ Ф‰ЛБИТУ О·И
¯ЪЛЫИМФФИ‹ЫЩВ ЫˆЫЩ¿ ЩФ ЪФ˚fiУ. º˘П¿НЩВ ЩФ ·ЪfiУ ВБ¯ВИЪ›‰ИФ БИ· МВППФУЩИО‹ ¯Ъ‹ЫЛ.
°È· ÙÔ˘˜ ∞ÓÙÈÚÔÛÒÔ˘˜ Ù˘ Sony
°И· ЩЛУ ЩФФı¤ЩЛЫЛ ·˘ЩФ‡ ЩФ˘ ЪФ˚fiУЩФ˜ ··ИЩВ›Щ·И В·ЪО‹˜ ЩВ¯УИО‹ ВМВИЪ›· О·И О·Щ¿ЪЩИЫЛ. ¢И·‚¿ЫЩВ ЪФЫВОЩИО¿
·˘Щfi ЩФ ВБ¯ВИЪ›‰ИФ Ф‰ЛБИТУ ¤ЩЫИ ТЫЩВ У· ВОЩВП¤ЫВЩВ ЩИ˜ ВЪБ·Ы›В˜ ЩФФı¤ЩЛЫЛ˜ МВ ·ЫК¿ПВИ·. ¢ВУ ·У·П·М‚¿УФ˘МВ О·М›·
В˘ı‡УЛ БИ· Щ˘¯fiУ ˙ЛМИ¿ ‹ ЩЪ·˘М·ЩИЫМfi Ф˘ МФЪВ› У· ЪФОПЛıВ› ·fi П·Уı·ЫМ¤УФ˘˜ ¯ВИЪИЫМФ‡˜ ‹ О·О‹ ЩФФı¤ЩЛЫЛ.
ªВЩ¿ ЩЛУ ЩФФı¤ЩЛЫЛ, ·Ъ·О·ПФ‡МВ ·Ъ·‰ТЫЩВ ·˘Щfi ЩФ ВБ¯ВИЪ›‰ИФ Ф‰ЛБИТУ ЫЩФ˘˜ ВП¿ЩВ˜.
∆Ф ·ЪfiУ ™Щ‹ЪИБМ· ∆Ф›¯Ф˘ ¤¯ВИ Ы¯В‰И·ЫЩВ› ·fi ЩЛ Sony БИ· ¯Ъ‹ЫЛ МВ ЩФ ЪФ‰И·БЪ·КfiМВУФ ЪФ˚fiУ. ªЛ
¯ЪЛЫИМФФИВ›ЩВ ЩЛ ‚¿ЫЛ ·˘Щ‹ МВ Ы˘ЫОВ˘‹ ‰И·КФЪВЩИО‹ ·fi ЩЛУ ·ОfiПФ˘ıЛ.
™˘Ì‚·Ù‹ Û˘Û΢‹: ŒÁ¯ÚˆÌË ∂›Â‰Ë ∆ËÏÂfiÚ·ÛË (KE-42MR1/KE-50MR1)
™¯ÂÙÈο Ì ÙËÓ ·ÛÊ¿ÏÂÈ·
∆· ЪФ˚fiУЩ· ЩЛ˜ Sony Ы¯В‰И¿˙ФУЩ·И МВ БУТМФУ· ЩЛУ ·ЫК¿ПВИ·.
∂¿У fiМˆ˜ ЩФ ЪФ˚fiУ ¯ЪЛЫИМФФИЛıВ› МВ П·Уı·ЫМ¤УФ ЩЪfiФ, МФЪВ› У· Ф‰ЛБ‹ЫВИ ЫВ ЫФ‚·Ъfi ЩЪ·˘М·ЩИЫМfi ВН·ИЩ›·˜
˘ЪО·БИ¿˜, ЛПВОЩЪФПЛН›·˜ ‹ ¤КЩФУЩ·˜ ·fi ЩЛ ı¤ЫЛ ЩФ˘. °И· У· ·ФК‡БВЩВ Щ˘¯fiУ ·Щ˘¯‹М·Щ· ‚В‚·ИˆıВ›ЩВ fiЩИ ЩЛЪВ›ЩВ
ЩИ˜ ВУ‰В‰ВИБМ¤УВ˜ ЪФК˘П¿НВИ˜ ·ЫК¿ПВИ·˜.
2 (GR)
Page 73

°È· ÙÔ˘˜ ¶ÂÏ¿Ù˜
¶ƒ√∂π¢√¶√π∏™∏
∂¿У ‰ВУ ЩЛЪЛıФ‡У ФИ ·ОfiПФ˘ıВ˜ ЪФК˘П¿НВИ˜, ˘¿Ъ¯ВИ Иı·УfiЩЛЩ· ЪfiОПЛЫЛ˜ ı·У¿ЩФ˘ ‹ ЫФ‚·ЪФ‡
ЩЪ·˘М·ЩИЫМФ‡ ВН·ИЩ›·˜ ˘ЪО·БИ¿˜, ЛПВОЩЪФПЛН›·˜ ‹ ¤ОЪЛНЛ˜.
ºЪФУЩ›ЫЩВ У· ·У·ı¤ЫВЩВ, МВ Ы‡М‚·ЫЛ ˘ВЪБФП·‚›·˜, ЩЛУ ЩФФı¤ЩЛЫЛ ЫВ
ВИ‰ИОВ˘М¤УФ˘˜ ЩВ¯УИОФ‡˜ О·И ОЪ·Щ‹ЫЩВ М·ОЪИ¿ Щ· ·И‰И¿ О·Щ¿ ЩЛ ‰И¿ЪОВИ· ЩЛ˜
ЩФФı¤ЩЛЫЛ˜.
∂¿У Л ЩФФı¤ЩЛЫЛ ЩФ˘ ™ЩЛЪ›БМ·ЩФ˜ ∆Ф›¯Ф˘ Ъ·БМ·ЩФФИЛıВ› ·fi ¿ЩФМ· Ф˘
‰ВУ В›У·И ВВИЪ·М¤УФИ ЩВ¯УИОФ›, МФЪВ› У· ЪФОПЛıФ‡У Щ· ·ОfiПФ˘ı·
·Ù˘¯‹Ì·Ù·.
• ™В ВЪ›ЩˆЫЛ ЫВИЫМФ‡, Л ªФУ¿‰· ЩЛ˜ √ıfiУЛ˜ МФЪВ› У· ¤ЫВИ О·И У·
ЪФО·П¤ЫВИ ЫФ‚·ЪФ‡˜ ЩЪ·˘М·ЩИЫМФ‡˜, fiˆ˜ МТПˆВ˜ ‹ О·Щ¿БМ·Щ·.
• ∂¿Ó Ô ÙÔ›¯Ô˜ ÛÙÔÓ ÔÔ›Ô ÙÔÔıÂÙÂ›Ù·È ÙÔ ™Ù‹ÚÈÁÌ· ∆Ô›¯Ô˘ Â›Ó·È ·ÛÙ·ı‹˜,
·УФМФИfiМФЪКФ˜ ‹ ‰ВУ В›У·И О¿ıВЩФ˜ МВ ЩФ ‰¿В‰Ф, Л МФУ¿‰· МФЪВ› У· ¤ЫВИ
ЪФО·ПТУЩ·˜ ЩЪ·˘М·ЩИЫМfi ‹ ˘ПИО¤˜ ˙ЛМИ¤˜. √ ЩФ›¯Ф˜ ı· Ъ¤ВИ У· ¤¯ВИ
ИО·УfiЩЛЩ· ЫЩ‹ЪИНЛ˜ ‚¿ЪФ˘˜ ЩФ˘П¿¯ИЫЩФУ Щ¤ЫЫВЪИ˜ (4) КФЪ¤˜ ЩФ ‚¿ЪФ˜ ЩЛ˜
ªФУ¿‰·˜ √ıfiУЛ˜ (KE-42MR1: 53 kg × 4 = 212 kg, KE-50MR1: 39 kg × 4 =
156 kg).
• ∂¿Ó Ë ÙÔÔı¤ÙËÛË ÙÔ˘ ™ÙËÚ›ÁÌ·ÙÔ˜ ∆Ô›¯Ô˘ ÛÙÔÓ ÙÔ›¯Ô ‰ÂÓ Â›Ó·È ·ÚÎÂÙ¿
ÁÂÚ‹, Ë ÌÔÓ¿‰· ÌÔÚ› Ó· ¤ÛÂÈ Î·È Ó· ÚÔηϤÛÂÈ ÙÚ·˘Ì·ÙÈÛÌfi ‹ ˘ÏÈΤ˜
˙ËÌȤ˜.
™В ВЪ›ЩˆЫЛ МВЩ·КФЪ¿˜ ‹ ·ФЫ‡У‰ВЫЛ˜ ЩФ˘ ™ЩЛЪ›БМ·ЩФ˜ ∆Ф›¯Ф˘, ·У·ı¤ЫЩВ МВ
Ы‡М‚·ЫЛ ˘ВЪБФП·‚›·˜- ЩЛУ ЩФФı¤ЩЛЫЛ ЫВ ВИ‰ИОВ˘М¤УФ˘˜ ЩВ¯УИОФ‡˜.
∂¿У Л МВЩ·КФЪ¿ ‹ Л ·ФЫ‡У‰ВЫЛ ЩФ˘ ™ЩЛЪ›БМ·ЩФ˜ ∆Ф›¯Ф˘ Ъ·БМ·ЩФФИЛıВ› ·fi ¿ЩФМ· Ф˘ ‰ВУ В›У·И ВИ‰ИОВ˘М¤УФИ
ЩВ¯УИОФ›, Л ªФУ¿‰· ЩЛ˜ √ıfiУЛ˜ МФЪВ› У· ¤ЫВИ О·И У· ЪФО·П¤ЫВИ ЩЪ·˘М·ЩИЫМfi ‹ ˘ПИО¤˜ ˙ЛМИ¤˜. µВ‚·ИˆıВ›ЩВ fiЩИ Л
МВЩ·КФЪ¿ ‹ Л ·ФЫ‡У‰ВЫЛ ЩФ˘ ™ЩЛЪ›БМ·ЩФ˜ ∆Ф›¯Ф˘ Ъ·БМ·ЩФФИВ›Щ·И ·fi ‰‡Ф ‹ ВЪИЫЫfiЩВЪ· ¿ЩФМ·.
ªË ¯‡ÓÂÙ ˘ÁÚ¿ ÔÔÈÔ˘‰‹ÔÙ ›‰Ô˘˜ ¿Óˆ ÛÙË ªÔÓ¿‰· Ù˘ √ıfiÓ˘.
∂¿У ·К‹ЫВЩВ ЩЛ ªФУ¿‰· ЩЛ˜ √ıfiУЛ˜ У· ‚Ъ·¯В›, МФЪВ› У· ЪФОПЛıВ› ˘ЪО·БИ¿ ‹ ЛПВОЩЪФПЛН›·.
ªËÓ ·Ê·ÈÚ›Ù ÌÔ˘ÏfiÓÈ·, ÎÏ. ªÂÙ¿ ÙËÓ ÙÔÔı¤ÙËÛË Ù˘ ªÔÓ¿‰·˜ Ù˘ √ıfiÓ˘.
∂¿Ó οÓÂÙ οÙÈ Ù¤ÙÔÈÔ, Ë ªÔÓ¿‰· Ù˘ √ıfiÓ˘ ÌÔÚ› Ó· ¤ÛÂÈ.
ªЛУ ·ФЫ˘У·ЪМФПФБ‹ЫВЩВ О·И МЛУ О¿УВЩВ ЩЪФФФИ‹ЫВИ˜ ЫЩ· ВН·ЪЩ‹М·Щ· ЩФ˘
™ЩЛЪ›БМ·ЩФ˜ ∆Ф›¯Ф˘.
∂¿Ó οÓÂÙ οÙÈ Ù¤ÙÔÈÔ, ÙÔ ™Ù‹ÚÈÁÌ· ∆Ô›¯Ô˘ ÌÔÚ› Ó· ¤ÛÂÈ ÚÔηÏÒÓÙ·˜
ÙÚ·˘Ì·ÙÈÛÌfi ‹ ˘ÏÈΤ˜ ˙ËÌȤ˜.
GR
EППЛУИО¿
ªЛУ ЩФФıВЩВ›ЩВ Ы˘ЫОВ˘¤˜ ‰И·КФЪВЩИО¤˜ ·fi ЩИ˜ ЪФ‰И·БЪ·КfiМВУВ˜.
∆Ф ·ЪfiУ ™Щ‹ЪИБМ· ∆Ф›¯Ф˘ ¤¯ВИ Ы¯В‰И·ЫЩВ› БИ· ¯Ъ‹ЫЛ МВ ЩФ ЪФ‰И·БЪ·КfiМВУФ ЪФ˚fiУ. ∂¿У ЩФФıВЩ‹ЫВЩВ Ы˘ЫОВ˘‹
‰И·КФЪВЩИО‹ ·fi ЩЛУ ЪФ‰И·БЪ·КfiМВУЛ, МФЪВ› У· ¤ЫВИ О·И У· ЪФО·П¤ЫВИ ЩЪ·˘М·ЩИЫМfi ‹ ˘ПИО¤˜ ˙ЛМИ¤˜.
3 (GR)
Page 74

ªЛ КЪ¿ЫЫВЩВ ЩИ˜ Ф¤˜ ·ВЪИЫМФ‡ ЩЛ˜ ªФУ¿‰·˜ √ıfiУЛ˜.
∂¿У КЪ¿НВЩВ ЩИ˜ Ф¤˜ ·ВЪИЫМФ‡ ЩЛ˜ ªФУ¿‰·˜ ЩЛ˜ √ıfiУЛ˜ ЫОВ¿˙ФУЩ·˜ ЩФ
¿Уˆ М¤ЪФ˜ ЩЛ˜ ªФУ¿‰·˜ √ıfiУЛ˜ МВ ·У› ‹ О¿ЩИ ·ЪВМКВЪ¤˜, Л ªФУ¿‰· ЩЛ˜
√ıfiУЛ˜ МФЪВ› У· ˘ВЪıВЪМ·УıВ› МВ ·ФЩ¤ПВЫМ· ЩЛУ Иı·УfiЩЛЩ· ЪfiОПЛЫЛ˜
˘ЪО·БИ¿˜.
ªËÓ ÙÔÔıÂÙ›Ù ÛÙÔ ™Ù‹ÚÈÁÌ· ∆Ô›¯Ô˘ ¿ÏÏ· ÊÔÚÙ›· ÂÎÙfi˜ Ù˘ ªÔÓ¿‰·˜ Ù˘
√ıfiÓ˘.
∂¿Ó οÓÂÙ οÙÈ Ù¤ÙÔÈÔ, Ë ªÔÓ¿‰· Ù˘ √ıfiÓ˘ ÌÔÚ› Ó· ¤ÛÂÈ ÚÔηÏÒÓÙ·˜
ÙÚ·˘Ì·ÙÈÛÌfi ‹ ˘ÏÈΤ˜ ˙ËÌȤ˜.
ªЛ ЫЩЛЪ›˙ВЫЩВ О·И МЛУ ОЪ¤МВЫЩВ ·fi ЩЛ ªФУ¿‰· ЩЛ˜ √ıfiУЛ˜.
∏ ªÔÓ¿‰· Ù˘ √ıfiÓ˘ ÌÔÚ› Ó· ¤ÛÂÈ, Ì ·ÔÙ¤ÏÂÛÌ· Ô ¯Ú‹ÛÙ˘ Ó· ‰Â¯ı›
ÙÔ ‚¿ÚÔ˜ Ù˘ ÌÔÓ¿‰·˜ Î·È Ó· ˘ÔÛÙ› ÛÔ‚·Úfi ÙÚ·˘Ì·ÙÈÛÌfi.
°И· ЩЛУ ·ФЩЪФ‹ ˘ЪО·БИ¿˜ ‹ ЛПВОЩЪФПЛН›·˜, МЛУ ВОı¤ЩВЩВ ЩЛ ªФУ¿‰· ЩЛ˜
√ıfiУЛ˜ ЫЩЛ ‚ЪФ¯‹ ‹ ЫВ ˘БЪ·Ы›·.
∂¿У ·К‹ЫВЩВ ЩЛ ªФУ¿‰· ЩЛ˜ √ıfiУЛ˜ У· ‚Ъ·¯В›, МФЪВ› У· ЪФОПЛıВ› ˘ЪО·БИ¿ ‹ ЛПВОЩЪФПЛН›·.
ªЛУ ЩФФıВЩВ›ЩВ ФЩ¤ ЩЛ ªФУ¿‰· ЩЛ˜ √ıfiУЛ˜ ЫВ ˙ВЫЩ¿, ˘БЪ¿ ‹ ФП‡
ЫОФУИЫМ¤У· М¤ЪЛ. ªЛУ ЩФФıВЩВ›ЩВ ЩЛ ªФУ¿‰· ЩЛ˜ √ıfiУЛ˜ ЫВ ЫЛМВ›· Ф˘
ВОЩ›ıВУЩ·И ЫВ МЛ¯·УИОФ‡˜ ОЪ·‰·ЫМФ‡˜.
∫¿ЩИ Щ¤ЩФИФ МФЪВ› У· ЪФО·П¤ЫВИ ˘ЪО·БИ¿ ‹ ЛПВОЩЪФПЛН›·.
∫Ъ·Щ‹ЫЩВ В‡КПВОЩ· ·УЩИОВ›МВУ· ‹ КПfiБВ˜ (.¯. ОВЪИ¿) М·ОЪИ¿ ·fi ЩЛ ªФУ¿‰·
ЩЛ˜ √ıfiУЛ˜.
°И· ЩЛУ ·ФЩЪФ‹ ˘ЪО·БИ¿˜, ОЪ·Щ‹ЫЩВ В‡КПВОЩ· ·УЩИОВ›МВУ· ‹ КПfiБВ˜ (.¯. ОВЪИ¿) М·ОЪИ¿ ·fi ЩЛ ªФУ¿‰· ЩЛ˜
√ıfiУЛ˜.
4 (GR)
Page 75

¶ƒ√™√Ã∏
∂¿У ‰ВУ ЩЛЪЛıФ‡У ФИ ·ОfiПФ˘ıВ˜ ЪФК˘П¿НВИ˜, ˘¿Ъ¯ВИ Иı·УfiЩЛЩ· У· ЪФОПЛıФ‡У ЩЪ·˘М·ЩИЫМФ› ‹ ˘ПИО¤˜
˙ЛМИ¤˜.
ªËÓ ÙÔÔıÂÙ›Ù ÙÔ ™Ù‹ÚÈÁÌ· ∆Ô›¯Ô˘ Û ÂÈÊ¿ÓÂȘ ÙÔ›¯ˆÓ, fiÔ˘ ÔÈ ÁˆÓ›Â˜ ‹ ÔÈ
Ï¢ڤ˜ Ù˘ ªÔÓ¿‰·˜ Ù˘ √ıfiÓ˘ ÌÔÚ› Ó· ÚÔÂͤ¯Ô˘Ó ηٿ Ôχ ·fi ÙËÓ
ÂÈÊ¿ÓÂÈ· ÙÔ˘ ÙÔ›¯Ô˘.
ªЛУ ЩФФıВЩВ›ЩВ ЩФ ™Щ‹ЪИБМ· ∆Ф›¯Ф˘ ЫВ ВИК¿УВИВ˜ fiˆ˜ ФИ ОФПТУВ˜, fiФ˘ ФИ
БˆУ›В˜ ‹ ФИ ПВ˘Ъ¤˜ ЩЛ˜ ªФУ¿‰·˜ ЩЛ˜ √ıfiУЛ˜ МФЪВ› У· ЪФВН¤¯Ф˘У О·Щ¿
ФП‡ ·fi ЩЛУ ВИК¿УВИ· ЩФ˘ ЩФ›¯Ф˘. ∂¿У Щ˘¯fiУ ¤У· ¿ЩФМФ ‹ ¤У· ·УЩИОВ›МВУФ
¯Щ˘‹ЫВИ ЫВ БˆУ›· ‹ ПВ˘Ъ¿ ЩЛ˜ ªФУ¿‰·˜ √ıfiУЛ˜ Ф˘ ЪФВН¤¯ВИ, МФЪВ› У·
ЪФОПЛıФ‡У ЩЪ·˘М·ЩИЫМФ› ‹ ˘ПИО¤˜ ˙ЛМИ¤˜.
ªЛ ¯ЪЛЫИМФФИВ›ЩВ ˘ВЪ‚ФПИО‹ ‰‡У·МЛ, О·Щ¿ ЩФУ О·ı·ЪИЫМfi ‹ ЩЛ Ы˘УЩ‹ЪЛЫ‹
ЩФ˘ ЪФ˚fiУЩФ˜.
ªËÓ ·ÛΛ٠˘ÂÚ‚ÔÏÈ΋ ‰‡Ó·ÌË ÛÙËÓ Â¿Óˆ ÏÂ˘Ú¿ Ù˘ ªÔÓ¿‰·˜ Ù˘ √ıfiÓ˘.
∂¿Ó οÓÂÙ οÙÈ Ù¤ÙÔÈÔ, Ë ªÔÓ¿‰· Ù˘ √ıfiÓ˘ ÌÔÚ› Ó· ¤ÛÂÈ ÚÔηÏÒÓÙ·˜ ÙÚ·˘Ì·ÙÈÛÌfi ‹ ˘ÏÈΤ˜ ˙ËÌȤ˜.
ªЛУ ЩФФıВЩВ›ЩВ ЩЛ ªФУ¿‰· ЩЛ˜ √ıfiУЛ˜ ¿Уˆ ‹ О¿Щˆ ·fi ОПИМ·ЩИЫЩИО¿
МЛ¯·У‹М·Щ·.
∂¿У О¿УВЩВ О¿ЩИ Щ¤ЩФИФ, Л ªФУ¿‰· ЩЛ˜ √ıfiУЛ˜ МФЪВ› У· ВОЩВıВ› ЫВ ЪВ‡М·Щ· ·¤Ъ· ·fi ЩФ ОПИМ·ЩИЫЩИОfi. ∞˘Щfi МФЪВ› У·
ЪФО·П¤ЫВИ ‰˘ЫПВИЩФ˘ЪБ›· ЫЩЛ ªФУ¿‰· ЩЛ˜ √ıfiУЛ˜.
¶ÚÔÊ˘Ï¿ÍÂȘ
• ∂¿У Л ªФУ¿‰· ЩЛ˜ √ıfiУЛ˜ ·Ъ·МВ›УВИ ЩФФıВЩЛМ¤УЛ ¿Уˆ ЫЩФ ™Щ‹ЪИБМ· ∆Ф›¯Ф˘ БИ· МВБ¿ПФ ¯ЪФУИОfi ‰И¿ЫЩЛМ·, Ф
ЩФ›¯Ф˜ ›Ыˆ ‹ ¿Уˆ ·fi ЩЛ ªФУ¿‰· ЩЛ˜ ФıfiУЛ˜ МФЪВ› У· НВıˆЪИ¿ЫВИ ‹ Л Щ·ВЩЫ·Ъ›· МФЪВ› У· НВОФПП‹ЫВИ,
·Ó¿ÏÔÁ· Ì ÙÔ ˘ÏÈÎfi ÙÔ˘ ÙÔ›¯Ô˘. ∂¿Ó ÙÔ ™Ù‹ÚÈÁÌ· ∆Ô›¯Ô˘ ·Ê·ÈÚÂı› ÌÂÙ¿ ÙËÓ ÙÔÔı¤ÙËÛ‹ ÙÔ˘ ÛÙÔÓ ÙÔ›¯Ô, ÔÈ Ùڇ˜
·fi ÙȘ ‚›‰Â˜ ̤ÓÔ˘Ó ÛÙÔÓ ÙÔ›¯Ô.
• ∂¿У ¤¯ВЩВ О·ПТ‰И· ЩЪФКФ‰ФЫ›·˜ ·УЩ›ЫЩ·ЫЛ˜ 300 ohm ВЪ·ЫМ¤У· ›Ыˆ ·fi ЩФУ ЩФ›¯Ф, Ы·˜ Ы˘УИЫЩФ‡МВ У· Щ·
·УЩИО·Щ·ЫЩ‹ЫВЩВ МВ ФМФ·НФУИО¿ О·ПТ‰И· ·УЩ›ЫЩ·ЫЛ˜ 75 ohm.
∂¿У ¯ЪВИ·ЫЩВ› У· ВН·ОФПФ˘ı‹ЫВЩВ У· ¯ЪЛЫИМФФИВ›ЩВ О·ПТ‰И· ЩЪФКФ‰ФЫ›·˜ 300 ohm, КЪФУЩ›ЫЩВ У· ‚В‚·ИˆıВ›ЩВ fiЩИ
ВН·ЫК·П›˙ВЩ·И В·ЪО‹˜ ¯ТЪФ˜ МВЩ·Н‡ ЩЛ˜ ªФУ¿‰·˜ ЩЛ˜ √ıfiУЛ˜ О·И ЩˆУ О·Пˆ‰›ˆУ ЩЪФКФ‰ФЫ›·˜ ›Ыˆ ·fi ЩФУ
ЩФ›¯Ф, ЪИУ ·fi ЩЛУ ЩФФı¤ЩЛЫЛ.
¶ЪИУ НВОИУ‹ЫВИ Л ЩФФı¤ЩЛЫЛ, Ы˘М‚Ф˘ПВ˘ıВ›ЩВ ЩФУ ЩВ¯УИОfi Ы·˜ Ы¯ВЩИО¿ МВ ЩЛУ О·Щ¿ППЛПЛ ı¤ЫЛ ЩФФı¤ЩЛЫЛ˜, fiФ˘ Л
ªФУ¿‰· ЩЛ˜ √ıfiУЛ˜ ‰В ı· ˘Ф‚¿ППВЩ·И ЫВ ·ЪВМ‚ФП¤˜ Ъ·‰ИФО˘М¿ЩˆУ.
5 (GR)
Page 76

∆ÔÔı¤ÙËÛË ÙÔ˘ ™ÙËÚ›ÁÌ·ÙÔ˜
∆Ô›¯Ô˘
°È· ÙÔ˘˜ ∞ÓÙÈÚÔÛÒÔ˘˜
Ù˘ Sony
¶ƒ√∂π¢√¶√π∏™∏ °È· ÙÔ˘˜ ¶ÂÏ¿Ù˜
°И· ЩЛУ ЩФФı¤ЩЛЫЛ ·˘ЩФ‡ ЩФ˘ ЪФ˚fiУЩФ˜ ··ИЩВ›Щ·И В·ЪО‹˜ ЩВ¯УИО‹ ВМВИЪ›· О·И О·Щ¿ЪЩИЫЛ. ∞У·ı¤ЫЩВ, МВ
Ы‡М‚·ЫЛ ˘ВЪБФП·‚›·˜, ЩЛУ ЩФФı¤ЩЛЫЛ ЫВ ·УЩИЪФЫТФ˘˜ ‹ ЩВ¯УИОФ‡˜ ЩЛ˜ Sony О·И ‰ТЫЩВ И‰И·›ЩВЪЛ ЪФЫФ¯‹ ЫВ
ı¤М·Щ· ·ЫК¿ПВИ·˜ О·Щ¿ ЩЛУ ЩФФı¤ЩЛЫЛ.
°È· ÙÔ˘˜ ∞ÓÙÈÚÔÛÒÔ˘˜ Ù˘ Sony
√И ·ОfiПФ˘ıВ˜ Ф‰ЛБ›В˜ ·КФЪФ‡У МfiУФ ЩФ˘˜ ·УЩИЪfiЫˆФ˘˜ ЩЛ˜ Sony. ¢И·‚¿ЫЩВ ЩИ˜ ЪФК˘П¿НВИ˜ ·ЫК¿ПВИ·˜ Ф˘
ВЪИБЪ¿КФУЩ·И ·Ъ·¿Уˆ О·И ‰ТЫЩВ И‰И·›ЩВЪЛ ЫЛМ·Ы›· ЫЩЛУ ·ЫК¿ПВИ· О·Щ¿ ЩЛ ‰И¿ЪОВИ· ЩЛ˜ ЩФФı¤ЩЛЫЛ˜, ЩЛ˜
Ы˘УЩ‹ЪЛЫЛ˜, ЩФ˘ ВП¤Б¯Ф˘ О·И ЩЛ˜ ВИЫОВ˘‹˜ ·˘ЩФ‡ ЩФ˘ ЪФ˚fiУЩФ˜.
ºÚÔÓÙ›ÛÙ ӷ ÙÔÔıÂÙ‹ÛÂÙ ÙÔ ™Ù‹ÚÈÁÌ· ∆Ô›¯Ô˘ Ì ·ÛÊ¿ÏÂÈ· ÛÙÔÓ ÙÔ›¯Ô,
·ОФПФ˘ıТУЩ·˜ ЩИ˜ Ф‰ЛБ›В˜ Ф˘ ‰›УФУЩ·И ЫЩФ ·ЪfiУ ВБ¯ВИЪ›‰ИФ Ф‰ЛБИТУ.
∂¿У О¿ФИ· ·fi ЩИ˜ ‚›‰В˜ ¯·П·ЪТЫВИ ‹ НВ‚И‰ˆıВ› ВУЩВПТ˜ О·И ‚БВИ, ЩФ
™Щ‹ЪИБМ· ∆Ф›¯Ф˘ МФЪВ› У· ¤ЫВИ ЪФО·ПТУЩ·˜ ЩЪ·˘М·ЩИЫМfi ‹ ˘ПИО¤˜ ˙ЛМИ¤˜.
ГЪЛЫИМФФИ‹ЫЩВ ЩИ˜ О·Щ¿ППЛПВ˜ ‚›‰В˜, ·У¿ПФБ· МВ ЩФ ˘ПИОfi ЩФ˘ ЩФ›¯Ф˘ О·И
ЩФФıВЩ‹ЫЩВ ЩЛ МФУ¿‰· МВ ·ЫК¿ПВИ·, ¯ЪЛЫИМФФИТУЩ·˜ ФОЩТ ‹ ВЪИЫЫfiЩВЪВ˜
‚›‰В˜ M8 ‹ ИЫФ‰‡У·МВ˜.
ªËÓ ·Ê‹ÓÂÙ ӷ Ì·ÁΈı› ÙÔ ∫·ÏÒ‰ÈÔ ∆ÚÔÊÔ‰ÔÛ›·˜ ‹ ÙÔ ∫·ÏÒ‰ÈÔ Ù˘ √ıfiÓ˘.
∂¿У ЩФ ∫·ПТ‰ИФ ∆ЪФКФ‰ФЫ›·˜ ‹ ЩФ ∫·ПТ‰ИФ ЩЛ˜ √ıfiУЛ˜ М·БОˆıВ› МВЩ·Н‡
ЩЛ˜ МФУ¿‰·˜ О·И ЩФ˘ ЩФ›¯Ф˘ ‹ В¿У П˘Б›ЫВИ ‹ ЫЩЪВ‚ПˆıВ› МВ ‰‡У·МЛ, ЩfiЩВ ЩФ
МВЩ·ППИОfi М¤ЪФ˜ ЩФ˘ О·Пˆ‰›Ф˘ МФЪВ› У· ВОЩВıВ› ·О¿П˘ЩФ О·И У·
ЪФО·П¤ЫВИ ‚Ъ·¯˘О‡ОПˆМ· ‹ О·И У· ЩЫ·О›ЫВИ ЩФ О·ПТ‰ИФ. ∞˘Щfi МФЪВ› У·
ВИК¤ЪВИ ˘ЪО·БИ¿ ‹ ЛПВОЩЪФПЛН›·.
ºЪФУЩ›ЫЩВ У· ¯ЪЛЫИМФФИ‹ЫВЩВ ЩИ˜ ·ЪВ¯fiМВУВ˜ ‚›‰В˜ О·И Щ· Ы˘У‰ВЩИО¿
ВН·ЪЩ‹М·Щ·, МВ ЩФУ ВУ‰В‰ВИБМ¤УФ ЩЪfiФ О·И ·ОФПФ˘ıТУЩ·˜ ЩИ˜ Ф‰ЛБ›В˜ ЩФ˘
·ЪfiУЩФ˜ ВБ¯ВИЪИ‰›Ф˘ Ф‰ЛБИТУ. ∂¿У ¯ЪЛЫИМФФИ‹ЫВЩВ ˘ФО·Щ¿ЫЩ·Щ· БИ· О¿ФИ·
ВН·ЪЩ‹М·Щ·, Л ªФУ¿‰· ЩЛ˜ √ıfiУЛ˜ МФЪВ› У· ¤ЫВИ О·И У· ЪФО·П¤ЫВИ
ЫˆМ·ЩИОfi ЩЪ·˘М·ЩИЫМfi ·ЩfiМˆУ ‹ У· ˘ФЫЩВ› ˙ЛМИ¿ Л ›‰И· Л ªФУ¿‰· √ıfiУЛ˜.
ºЪФУЩ›ЫЩВ У· Ы˘У·ЪМФПФБ‹ЫВЩВ ЫˆЫЩ¿ ЩФ ЫЩ‹ЪИБМ·, ·ОФПФ˘ıТУЩ·˜ ЩЛ
‰И·‰ИО·Ы›· Ф˘ ВЪИБЪ¿КВЩ·И ЫЩФ ·ЪfiУ ВБ¯ВИЪ›‰ИФ Ф‰ЛБИТУ.
∂¿У О¿ФИ· ·fi ЩИ˜ ‚›‰В˜ ¯·П·ЪТЫВИ ‹ НВ‚И‰ˆıВ› ВУЩВПТ˜ О·И ‚БВИ, Л ªФУ¿‰· ЩЛ˜ √ıfiУЛ˜ МФЪВ› У· ¤ЫВИ О·И У· ЪФО·П¤ЫВИ
ЫˆМ·ЩИОfi ЩЪ·˘М·ЩИЫМfi ЫВ О¿ФИФУ ‹ У· ˘ФЫЩВ› ˙ЛМИ¿ Л ›‰И· Л ªФУ¿‰· √ıfiУЛ˜.
ºÚÔÓÙ›ÛÙ ӷ ÛÊ›ÍÂÙ ٷ ÌÔ˘ÏfiÓÈ· Î·È ÙȘ ‚›‰Â˜ ÁÂÚ¿ Î·È ÛÙȘ ÚÔ‚ÏÂfiÌÂÓ˜
ı¤ÛÂȘ ÙÔ˘˜.
™Â ·ÓÙ›ıÂÙË ÂÚ›ÙˆÛË, Ë ªÔÓ¿‰· Ù˘ √ıfiÓ˘ ÌÔÚ› Ó· ¤ÛÂÈ Î·È Ó· ÚÔηϤÛÂÈ ÛˆÌ·ÙÈÎfi ÙÚ·˘Ì·ÙÈÛÌfi Û οÔÈÔÓ ‹
Ó· ˘ÔÛÙ› ˙ËÌÈ¿ Ë ›‰È· Ë ªÔÓ¿‰· √ıfiÓ˘.
¶ÚÔÛ¤¯ÂÙ ÒÛÙ ӷ ÌËÓ ˘Ô‚¿ÏÏÂÙ·È Û ¯Ù˘‹Ì·Ù· Ë ªÔÓ¿‰· Ù˘ √ıfiÓ˘ ηٿ
ÙËÓ ÙÔÔı¤ÙËÛË.
∂¿Ó Ë ªÔÓ¿‰· Ù˘ √ıfiÓ˘ ˘Ô‚ÏËı› Û ¯Ù˘‹Ì·Ù· ÌÔÚ› Ó· ¤ÛÂÈ ‹ Ó· Û¿ÛÂÈ. ∫¿ÙÈ Ù¤ÙÔÈÔ ÌÔÚ› Ó· ÚÔηϤÛÂÈ
ÙÚ·˘Ì·ÙÈÛÌfi.
6 (GR)
Page 77

∆ÔÔıÂÙ‹ÛÙ ÙË ªÔÓ¿‰· Ù˘ √ıfiÓ˘ Û ÙÔ›¯Ô, Ô ÔÔ›Ô˜ Â›Ó·È Î·È Î·Ù·ÎfiÚ˘ÊÔ˜
Î·È Â›Â‰Ô˜.
™Â ·ÓÙ›ıÂÙË ÂÚ›ÙˆÛË, Ë ªÔÓ¿‰· Ù˘ √ıfiÓ˘ ÌÔÚ› Ó· ¤ÛÂÈ Î·È Ó· ÚÔηϤÛÂÈ ÙÚ·˘Ì·ÙÈÛÌfi.
∞ÊÔ‡ ÙÔÔıÂÙ‹ÛÂÙ ۈÛÙ¿ ÙË ªÔÓ¿‰· Ù˘ √ıfiÓ˘, ·ÛÊ·Ï›ÛÙ ٷ ηÏ҉ȷ
Û‡Ìʈӷ Ì ÙÔÓ ÂӉ‰ÂÈÁ̤ÓÔ ÙÚfiÔ.
∂¿У ¿ЩФМ· ‹ ·УЩИОВ›МВУ· МВЪ‰В˘ЩФ‡У ЫЩ· О·ПТ‰И·, МФЪВ› У· ЪФОПЛıФ‡У ЩЪ·˘М·ЩИЫМФ›.
¶ÚÔÛ¤ÍÙ ӷ ÌËÓ ÙÚ·˘Ì·Ù›ÛÂÙ ٷ ¯¤ÚÈ· Û·˜ ‹ Ù· ‰¿ÎÙ˘Ï¿ Û·˜ ηٿ ÙËÓ
ÙÔÔı¤ÙËÛË.
¶ÚÔÛ¤ÍÙ ӷ ÌËÓ ÙÚ·˘Ì·Ù›ÛÂÙ ٷ ¯¤ÚÈ· Û·˜ ‹ Ù· ‰¿ÎÙ˘Ï¿ Û·˜ ηٿ ÙËÓ ÙÔÔı¤ÙËÛË ÙÔ˘ ™ÙËÚ›ÁÌ·ÙÔ˜ ∆Ô›¯Ô˘ ‹ Ù˘
ªÔÓ¿‰·˜ Ù˘ √ıfiÓ˘.
√È ‚›‰Â˜ Ô˘ ¯ÚÂÈ¿˙ÔÓÙ·È ÁÈ· ÙË ÛÙÂÚ¤ˆÛË ÙÔ˘ ™ÙËÚ›ÁÌ·ÙÔ˜ ∆Ô›¯Ô˘ ÛÙÔÓ ÙÔ›¯Ô
‰ÂÓ ·Ú¤¯ÔÓÙ·È.
°И· ЩЛ ЫЩВЪ¤ˆЫЛ ЩФ˘ ™ЩЛЪ›БМ·ЩФ˜ ∆Ф›¯Ф˘, ¯ЪЛЫИМФФИ‹ЫЩВ ‚›‰В˜ Ф˘ В›У·И О·Щ¿ППЛПВ˜ БИ· ЩФ ˘ПИОfi О·И ЩЛУ О·Щ·ЫОВ˘‹
ЩФ˘ ЩФ›¯Ф˘.
µ‹Ì· 1: ŒÏÂÁ¯Ô˜ ÙˆÓ ÂÍ·ÚÙËÌ¿ÙˆÓ Ô˘ ··ÈÙÔ‡ÓÙ·È
ÁÈ· ÙËÓ ÙÔÔı¤ÙËÛË
∂ÊԉȷÛÙ›Ù ÂÎ ÙˆÓ ÚÔÙ¤ÚˆÓ ÌÂ
1
2
¤У· О·ЩЫ·‚›‰И Philips О·И МВ ЩИ˜
О·Щ¿ППЛПВ˜ ‚›‰В˜ (ФОЩТ ‹
ВЪИЫЫfiЩВЪВ˜ ‚›‰В˜ M8 ‹ ИЫФ‰‡У·МВ˜
Ф˘ ‰ВУ ·Ъ¤¯ФУЩ·И), ·У¿ПФБ· МВ ЩФ
˘ПИОfi О·Щ·ЫОВ˘‹˜ ЩФ˘ ЩФ›¯Ф˘.
∞ÓÔ›ÍÙ ÙË Û˘Û΢·Û›· Î·È ÂϤÁÍÙÂ
Ù· ÂÍ·ÚÙ‹Ì·Ù·.
µ›‰Â˜ (+PSW5 × 12) (2)
ªÔÓ¿‰· µ¿Û˘ (1) ªФУ¿‰· ∞БОИЫЩЪˆУ ™ЩВЪ¤ˆЫЛ˜ (2)
7 (GR)
Page 78

µ‹М· 2: ∫·ıФЪИЫМfi˜ ЩЛ˜ ı¤ЫЛ˜ ЩФФı¤ЩЛЫЛ˜
ªÔÓ¿‰·: mm
1
300
ºЪФУЩ›ЫЩВ У· ‰И·ЩЛЪЛıВ› Л ·fiЫЩ·ЫЛ
МВЩ·Н‡ ЩЛ˜ ªФУ¿‰·˜ µ¿ЫЛ˜ О·И ЩЛ˜
ФЪФК‹˜ ‹ ЩˆУ ЪФВНВ¯fiУЩˆУ
ЩМЛМ¿ЩˆУ ЩФ˘ ЩФ›¯Ф˘, fiˆ˜ ‰В›¯УВИ
ЩФ ‰И¿БЪ·ММ· ·ЪИЫЩВЪ¿.
100 100
100
™˘Ì‚Ô˘Ï‹
¢В›ЩВ ЩФ ‰И¿БЪ·ММ· ЩФМ‹˜ ЫЩЛУ ВУfiЩЛЩ· "∆В¯УИО¿
¯·Ъ·ОЩЛЪИЫЩИО¿" (ЫВП.15 (GR)) БИ· ПВЩФМ¤ЪВИВ˜
Ы¯ВЩИО¿ МВ ЩИ˜ ‰И·ЫЩ¿ЫВИ˜, fiЩ·У Л ªФУ¿‰· √ıfiУЛ˜
ЩФФıВЩВ›Щ·И ЫЩФУ ЩФ›¯Ф.
µ‹Ì· 3: ∆ÔÔı¤ÙËÛË Ù˘ ªÔÓ¿‰·˜ µ¿Û˘ ÛÙÔÓ ÙÔ›¯Ô
1
∂˘ı˘БЪ·ММ›ЫЩВ ЩЛ
МФУ¿‰· ¤ЩЫИ ТЫЩВ У·
В›У·И ВУЩВПТ˜ ФЪИ˙fiУЩИ·.
ªÔÓ¿‰· µ¿Û˘
∆Ъ‡· ‚›‰·˜, Л ФФ›·
¯ЪЛЫИМФФИВ›Щ·И БИ· ЩЛУ
ЪФЫˆЪИУ‹ Ы‡У‰ВЫЛ ЩФ˘
ЫЩЛЪ›БМ·ЩФ˜.
µИ‰ТЫЩВ ЪФЫˆЪИУ¿ ЩЛ ªФУ¿‰·
µ¿ЫЛ˜ ЫЩФУ ЩФ›¯Ф О·И В˘ı˘БЪ·ММ›ЫЩВ
ЩЛ ı¤ЫЛ ЩЛ˜, ¤ЩЫИ ТЫЩВ У· В›У·И
ВУЩВПТ˜ ФЪИ˙fiУЩИ·.
¶ƒ√∂π¢√¶√π∏™∏
• √È ‚›‰Â˜ ÁÈ· ÙË ÛÙÂÚ¤ˆÛË ÙÔ˘ ™ÙËÚ›ÁÌ·ÙÔ˜ ∆Ô›¯Ô˘
ÛÙÔÓ ÙÔ›¯Ô ‰ÂÓ ·Ú¤¯ÔÓÙ·È.
• ºЪФУЩ›ЫЩВ У· ¯ЪЛЫИМФФИ‹ЫВЩВ ЩИ˜ О·Щ¿ППЛПВ˜ ‚›‰В˜,
·Ó¿ÏÔÁ· Ì ÙÔ ˘ÏÈÎfi Î·È ÙËÓ Î·Ù·Û΢‹ ÙÔ˘ ÙÔ›¯Ô˘.
8 (GR)
Page 79

2
KE-42MR1/KE-50MR1
2
™ЩВЪВТЫЩВ ЩЛ ªФУ¿‰· µ¿ЫЛ˜ ЫЩФУ
ЩФ›¯Ф, ¯ЪЛЫИМФФИТУЩ·˜ ФОЩТ ‹
ВЪИЫЫfiЩВЪВ˜ ‚›‰В˜ M8 ‹ ·УЩ›ЫЩФИ¯В˜
(‰ВУ ·Ъ¤¯ФУЩ·И).
1
1ºÚÔÓÙ›ÛÙ ӷ ÛÊ›ÍÂÙ ÙȘ ‚›‰Â˜ ÁÂÚ¿, ¤ÙÛÈ ÒÛÙ ӷ ÌË
¯·Ï·ÚÒÛÔ˘Ó.
2µИ‰ТЫЩВ ЫКИОЩ¿ ЩЛ ‚›‰· Ф˘ ВЪ¿Ы·ЩВ ЪФЫˆЪИУ¿
ÛÙË ¢È·‰Èηۛ· 1.
¶ƒ√∂π¢√¶√π∏™∏
• °È· ÙËÓ ÚÔÛˆÚÈÓ‹ Û‡Ó‰ÂÛË Ù˘ ªÔÓ¿‰·˜ Ù˘ µ¿Û˘,
Ы·˜ Ы˘УИЫЩФ‡МВ У· ¯ЪЛЫИМФФИ‹ЫВЩВ ЩИ˜ ЩЪ‡В˜ БИ·
ЩИ˜ ‚›‰В˜ Ф˘ ‚Ъ›ЫОФУЩ·И ЫЩИ˜ ı¤ЫВИ˜ Ф˘
О·ıФЪ›˙ФУЩ·И ·fi ЩФ ‰И¿БЪ·ММ· ·ЪИЫЩВЪ¿. ∂¿У Л
ЫЩВЪ¤ˆЫЛ ЩЛ˜ ªФУ¿‰·˜ ЩЛ˜ µ¿ЫЛ˜ ‰ВУ В›У·И ·ЪОВЩ¿
·ЫК·П‹˜, ¯ЪЛЫИМФФИ‹ЫЩВ ЪfiЫıВЩВ˜ ‚›‰В˜.
• µВ‚·ИˆıВ›ЩВ fiЩИ Л ªФУ¿‰· ЩЛ˜ µ¿ЫЛ˜ ¤¯ВИ ЫЩВЪВˆıВ›
ÁÂÚ¿ ÛÙÔÓ ÙÔ›¯Ô.
35
DC
FE
35
330
110
110
110
530
140
B
400
600
A
KE-50MR1 ªÔÓ¿‰·: mm
ABCDE F
1.573 856 342 86 244 184
KE-42MR1 ªÔÓ¿‰·: mm
ABCDE F
1.352 720 208 152 178 182
9 (GR)
Page 80

ƒ˘ıÌ›ÛÙ ÙË ÁˆÓ›· ÙˆÓ ‚Ú·¯ÈfiÓˆÓ.
3
1µБ¿ПЩВ ЩИ˜ ‚›‰В˜ ·fi ЩЛ ‰ВНИ¿ О·И ЩЛУ ·ЪИЫЩВЪ‹
ПВ˘Ъ¿ ЩЛ˜ ‚¿ЫЛ˜ ЩФ˘ О¿ıВ ‚Ъ·¯›ФУ·. ∫·ЩfiИУ,
ВИП¤НЩВ ЩЛУ ВБОФ‹ Ф˘ ·УЩИЫЩФИ¯В› ЫЩЛУ ВИı˘МЛЩ‹
БˆУ›· (0, 5, 10, 15 ‹ 20 МФ›ЪВ˜) О·И ЪФЫ·ЪМfiЫЩВ ЩЛ
‚¿ЫЛ ЩФ˘ ‚Ъ·¯›ФУ· Ы’ ·˘Щ‹У.
2™ЩВЪВТЫЩВ БВЪ¿ ЩЛ ‚¿ЫЛ О¿ıВ ‚Ъ·¯›ФУ·,
¯ЪЛЫИМФФИТУЩ·˜ ЩИ˜ ‚›‰В˜ Ф˘ ·К·ИЪ¤Ы·ЩВ ЫЩЛ
¢И·‰ИО·Ы›· 1.
™ËÌ›ˆÛË
µÂ‚·Èˆı›Ù fiÙÈ ¤¯ÂÙ ڢıÌ›ÛÂÈ ÙÔ ‰ÂÍÈfi Î·È ÙÔÓ
·ЪИЫЩВЪfi ‚Ъ·¯›ФУ· ЫЩЛУ ›‰И· БˆУ›·.
• 0 МФ›ЪВ˜: ∞К‹ЫЩВ ЫКИБМ¤УВ˜ ЩИ˜ ПВ˘О¤˜
‚›‰Â˜.
• √ÔÈ·‰‹ÔÙ ÙÈÌ‹ ÂÎÙfi˜ ·fi 0 ÌÔ›Ú˜:
∞Ê·ÈÚ¤ÛÙ ÙȘ Ï¢Τ˜ ‚›‰Â˜.
10 (GR)
Page 81

µ‹Ì· 4: ∆ÔÔı¤ÙËÛË Ù˘ ªÔÓ¿‰·˜ Ù˘ √ıfiÓ˘
¶ƒ√∂π¢√¶√π∏™∏
ºЪФУЩ›ЫЩВ Л ЩФФı¤ЩЛЫЛ У· ¤¯ВИ ФПФОПЛЪˆıВ›, ЪФЩФ‡ Ы˘У‰¤ЫВЩВ ЩФ ∫·ПТ‰ИФ ∆ЪФКФ‰ФЫ›·˜ ЫЩЛУ Ъ›˙· ЩФ›¯Ф˘.
∂¿У ·К‹ЫВЩВ ЩФ ∫·ПТ‰ИФ ∆ЪФКФ‰ФЫ›·˜ М·БОˆМ¤УФ О¿Щˆ ‹ МВЩ·Н‡ ЩˆУ Ы˘ЫОВ˘ТУ, МФЪВ› У· ЪФОПЛıВ›
‚Ъ·¯˘О‡ОПˆМ· ‹ ЛПВОЩЪФПЛН›·. ∂¿У ЫОФУЩ¿„ВЩВ ЫЩФ ∫·ПТ‰ИФ ∆ЪФКФ‰ФЫ›·˜ ‹ ЫЩФ ∫·ПТ‰ИФ ¢И·Ы‡У‰ВЫЛ˜ ЩЛ˜
√ıfiУЛ˜, Л ‚¿ЫЛ МФЪВ› У· ·У·ЩЪ·В› О·И У· ЪФОПЛıВ› ·Щ‡¯ЛМ·.
™˘У‰¤ЫЩВ ЩЛ ªФУ¿‰· ЩˆУ ∞БОИЫЩЪˆУ
1
™ЩВЪ¤ˆЫЛ˜ ЫЩ· ¿БОИЫЩЪ·, ЫЩЛУ ›Ыˆ
ПВ˘Ъ¿ ЩЛ˜ ªФУ¿‰·˜ √ıfiУЛ˜.
∫·ЩfiИУ, Ы‡ЪВЩВ ЩЛ ªФУ¿‰· ЩˆУ
∞БОИЫЩЪˆУ ™ЩВЪ¤ˆЫЛ˜ О·И ЫЩВЪВТЫЩВ
ЩЛ ¯ЪЛЫИМФФИТУЩ·˜ ЩИ˜ ·ЪВ¯fiМВУВ˜
‚›‰В˜ (+PSW5 × 12).
ª·Ï·Îfi
‡Ê·ÛÌ·, .¯.
ÌÈ· ÎÔ˘‚¤ÚÙ·
¶›Ûˆ ÏÂ˘Ú¿ Ù˘ ªÔÓ¿‰·˜ Ù˘ √ıfiÓ˘
11 (GR)
Page 82

2
™˘Ó‰¤ÛÙ ÙÔ ∫·ÏÒ‰ÈÔ ∆ÚÔÊÔ‰ÔÛ›·˜
Î·È ÙÔ ∫·ÏÒ‰ÈÔ Ù˘ √ıfiÓ˘ Ô˘
·Ú¤¯ÔÓÙ·È Ì·˙› Ì ÙË ªÔÓ¿‰· Ù˘
√ıfiÓ˘, ÛÙË ªÔÓ¿‰· Ù˘ √ıfiÓ˘.
™˘Ó‰¤ÛÙ ÙÔ ∫·ÏÒ‰ÈÔ ∆ÚÔÊÔ‰ÔÛ›·˜ Î·È ÙÔ ∫·ÏÒ‰ÈÔ
Ù˘ √ıfiÓ˘ ÛÙȘ ˘Ô‰Ô¯¤˜ Û‡Ó‰ÂÛ˘ ÛÙËÓ ›Ûˆ ÏÂ˘Ú¿
Ù˘ ªÔÓ¿‰·˜ Ù˘ √ıfiÓ˘.
™˘Ì‚Ô˘Ï‹
°И· ВЪИЫЫfiЩВЪВ˜ ПЛЪФКФЪ›В˜ Ы¯ВЩИО¿ МВ ЩЛ Ы‡У‰ВЫЛ
ЩФ˘ ∫·Пˆ‰›Ф˘ ∆ЪФКФ‰ФЫ›·˜ О·И ЩФ˘ ∫·Пˆ‰›Ф˘ ЩЛ˜
√ıfiУЛ˜, Ы˘М‚Ф˘ПВ˘ıВ›ЩВ ЩФ ВБ¯ВИЪ›‰ИФ Ф‰ЛБИТУ ЩЛ˜
ŒБ¯ЪˆМЛ˜ ∂›В‰Л˜ ∆ЛПВfiЪ·ЫЛ˜ (KE-42MR1/KE50MR1).
ÙÔ ∫·ÏÒ‰ÈÔ ∆ÚÔÊÔ‰ÔÛ›·˜ Î·È ÙÔ
∫·ÏÒ‰ÈÔ ¢È·Û‡Ó‰ÂÛ˘ Ù˘ √ıfiÓ˘
12 (GR)
™ЩВЪВТЫЩВ ЩФ ∫·ПТ‰ИФ ¢И·Ы‡У‰ВЫЛ˜ ЩЛ˜ √ıfiУЛ˜ О·И ЩФ
∫·ПТ‰ИФ ∆ЪФКФ‰ФЫ›·˜ ЫЩФУ ЩФ›¯Ф, ОП. ŸЩ·У ВЪУ¿ЩВ
Щ· ‰‡Ф О·ПТ‰И· ЫЩФ ЩФ›¯Ф, ·УФ›НЩВ ЫЩФУ ЩФ›¯Ф МИ·
ЩЪ‡· ‰И·М¤ЩЪФ˘ 50 mm fiˆ˜ ‰В›¯УВИ ЩФ ‰И¿БЪ·ММ·
·ЪИЫЩВЪ¿.
10 mm
Page 83

3
∆ÔÔıÂÙ‹ÛÙ ÙË ªÔÓ¿‰· Ù˘ √ıfiÓ˘
¿Óˆ ÛÙË ªÔÓ¿‰· Ù˘ µ¿Û˘.
2
4
1∫Ú·Ù‹ÛÙ ÙË ªÔÓ¿‰· Ù˘ √ıfiÓ˘ Î·È Ê¤ÚÙ ÙËÓ
ОФУЩ¿ ЫЩЛ ªФУ¿‰· ЩЛ˜ µ¿ЫЛ˜, ¤ЩЫИ ТЫЩВ У·
В˘ı˘БЪ·ММИЫЩФ‡У Щ· О¿Щˆ ¿БОИЫЩЪ· ЩЛ˜ ªФУ¿‰·˜
ЩˆУ ∞БОИЫЩЪˆУ ™ЩВЪ¤ˆЫЛ˜ МВ ЩФ˘˜ О¿Щˆ ¿НФУВ˜
ЫЩ‹ЪИНЛ˜, ОФУЩ¿ ЫЩФ О¿Щˆ М¤ЪФ˜ ЩЛ˜ ªФУ¿‰·˜ ЩЛ˜
µ¿ЫЛ˜.
2™˘Ó‰¤ÛÙ ٷ˘Ùfi¯ÚÔÓ· fiÏ· Ù· ¿Óˆ Î·È Ù· οو
¿БОИЫЩЪ· ЩˆУ ‰‡Ф ªФУ¿‰ˆУ ∞БОИЫЩЪˆУ ™ЩВЪ¤ˆЫЛ˜
ЫЩФ˘˜ Щ¤ЫЫВЪИ˜ ¿НФУВ˜ ЫЩ‹ЪИНЛ˜ ЩЛ˜ ªФУ¿‰·˜ ЩЛ˜
µ¿ЫЛ˜, fiˆ˜ ‰В›¯УВИ ЩФ ‰И¿БЪ·ММ· ·ЪИЫЩВЪ¿.
3µВ‚·ИˆıВ›ЩВ fiЩИ Щ· ФОЩТ ¿БОИЫЩЪ· ¤¯Ф˘У Б·УЩ˙ˆıВ›
БВЪ¿ ЫЩФ˘˜ Щ¤ЫЫВЪИ˜ ¿НФУВ˜ ЩЛ˜ ¶П¿О·˜ ЩЛ˜ µ¿ЫЛ˜.
4™К›НЩВ О·П¿ ЩИ˜ ‚›‰В˜ ЫЩВЪ¤ˆЫЛ˜, ·ЪИЫЩВЪ¿ О·И ‰ВНИ¿,
¯ЪЛЫИМФФИТУЩ·˜ ¤У· М·ОЪ‡ О·ЩЫ·‚›‰И Phillips.
13 (GR)
Page 84

∞Ê·›ÚÂÛË Ù˘ ªÔÓ¿‰·˜ Ù˘
√ıfiÓ˘
1
2
3
°È· ÙÔ˘˜ ∞ÓÙÈÚÔÛÒÔ˘˜
Ù˘ Sony
∞ÔÛ˘Ó‰¤ÛÙ ÙÔ ∫·ÏÒ‰ÈÔ
∆ÚÔÊÔ‰ÔÛ›·˜ ·fi ÙËÓ Ú›˙· ÙÔ›¯Ô˘.
•В‚И‰ТЫЩВ ЩИ˜ ‚›‰В˜ ЫЩВЪ¤ˆЫЛ˜,
‰ВНИ¿ О·И ·ЪИЫЩВЪ¿, М¤¯ЪИ У· МЛ
ЫЩЪ›‚Ф˘У ¿ППФ.
ºЪФУЩ›ЫЩВ ‰‡Ф ‹ ВЪИЫЫfiЩВЪ· ¿ЩФМ·
У· ОЪ·ЩФ‡У ЩЛ ªФУ¿‰· ЩЛ˜ √ıfiУЛ˜
О·И Ы‡ЪВЩ¤ ЩЛУ ЪФ˜ Щ· ¿Уˆ БИ· У·
ЩЛУ ·К·ИЪ¤ЫВЩВ.
¶ƒ√∂π¢√¶√π∏™∏
• ºЪФУЩ›ЫЩВ ‰‡Ф ‹ ВЪИЫЫfiЩВЪ· ¿ЩФМ· У· ОЪ·ЩФ‡У ЩЛ
ªÔÓ¿‰· Ù˘ √ıfiÓ˘, ηٿ ÙË ÌÂÙ·ÊÔÚ¿ Ù˘.
• ¶ÚÔÛ¤ÍÙ ӷ ÌËÓ ·Ê‹ÛÂÙ ٷ ηÏ҉ȷ Ó· ÎÚÂÌ·ÛÙÔ‡Ó
О·И У· М·БОТЫФ˘У, О·Щ¿ ЩЛУ ·К·›ЪВЫЛ ЩЛ˜ ªФУ¿‰·˜
ЩЛ˜ √ıfiУЛ˜.
• ¶ÚÔÛ¤ÍÙ ӷ ÌËÓ ÙÚ·˘Ì·Ù›ÛÂÙ ٷ ¯¤ÚÈ· Û·˜ ‹ Ù·
‰¿ÎÙ˘Ï¿ Û·˜ ηٿ ÙËÓ ·Ê·›ÚÂÛË Ù˘ ªÔÓ¿‰·˜ Ù˘
√ıfiÓ˘.
14 (GR)
Page 85

∆В¯УИО¿ ¯·Ъ·ОЩЛЪИЫЩИО¿
ªÔÓ¿‰·: mm
µ¿ÚÔ˜: 8,0 kg
∏ Ы¯В‰›·ЫЛ О·И Щ· ЩВ¯УИО¿ ¯·Ъ·ОЩЛЪИЫЩИО¿ МФЪВ› У· ·ПП¿НФ˘У ¯ˆЪ›˜ ЪФВИ‰ФФ›ЛЫЛ.
ªÔ›Ú˜
A
400
600
385
51
KE-42MR1 ªÔÓ¿‰·: mm
ªÔ›Ú˜ ¢È·ÛÙ¿ÛÂȘ
B
a ABCDE
0° 720 160 173 400 147
5° 720 207 162 400 156
10° 720 253 148 400 164
C
15° 720 297 130 400 172
20° 720 339 108 400 178
a
KE-50MR1 ªÔÓ¿‰·: mm
DE
ªÔ›Ú˜ ¢È·ÛÙ¿ÛÂȘ
a ABCDE
0° 856 166 307 400 149
5° 856 225 296 400 160
10° 856 283 280 400 169
15° 856 338 260 400 177
20° 856 391 235 400 183
15 (GR)
Page 86

Bu ürünü sat›n ald›¤›n›z için teflekkür ederiz.
Müflteriler için
Bu ürünün kurulmas› için yeterli uzmanl›k gereklidir. Kurulum iflini Sony sat›c›lar›na veya yetkili kiflilere vermeye dikkat
edin ve kurulum s›ras›nda güvenli¤e özen gösterin.
D‹KKAT
Güvenlik önlemlerine uyulmaz ve ürün yanl›fl kullan›l›rsa, yang›na veya ciddi yaralanmalara neden olabilir.
Bu elkitab›, kazalar› önlemek ve ürünün do¤ru kullan›lmas›n› sa¤lamak için gereken önlemleri gösterir. Bu yönerge elkitab›n›
bafltan sona okumaya ve ürünü do¤ru kullanmaya dikkat edin. Bu elkitab›n›, ileride de baflvurmak için saklay›n.
Sony Sat›c›lar› için
Bu ürünün kurulmas› için yeterli uzmanl›k gereklidir. Kurulumu güvenle gerçeklefltirmek için bu yönerge elkitab›n› bafltan
sona okumaya özen gösterin. Hatal› kullan›m veya yanl›fl kurulumdan kaynaklanan hasar veya yaralanmalardan sorumlu
de¤iliz. Kurulumdan sonra, bu elkitab›n› müflteriye verin.
Bu Duvar Konsolu, Sony taraf›ndan belirtilen ürünle kullan›lmak üzere tasarlanm›flt›r. Bu konsolu afla¤›daki üründen baflka
cihazlarla kullanmay›n.
Belirtilen ürün: Düz Ekran Renkli Televizyon (KE-42MR1/KE-50MR1)
Güvenlik
Sony taraf›ndan gelifltirilen ürünler, güvenlik önde tutularak tasarlan›r.
Bununla birlikte, ürün yanl›fl kullan›l›rsa, yanma, elektrik çarpmas› veya ürünün y›k›lmas› gibi nedenlerle ciddi yaralanmalara
neden olabilir. Kazalar› önlemek için ilgili güvenlik önlemlerine uymaya dikkat edin.
2 (TR)
Page 87

Müflteriler için
D‹KKAT
Afla¤›daki önlemlere uyulmamas› durumunda, yang›n, elektrik çarpmas› veya patlama sonucu ölüm
veya ciddi yaralanma olas›l›¤› vard›r.
Kurulum iflini yetkili kiflilere vermeye dikkat edin ve kurulum s›ras›nda çocuklar›
uzakta tutun.
Duvar Konsolu’nu yetkili olmayan kifliler kurarsa, afla¤›daki kazalar olabilir.
• Deprem durumunda Görüntü Birimi düflebilir ve ezilme veya k›r›lma gibi ciddi
bir yaralanmaya neden olabilir.
• Duvar Konsolu’nun kuruldu¤u duvar sabit, düz veya zemine dik de¤ilse, birim
düflebilir ve yaralanmaya veya mal kayb›na neden olabilir. Duvar, Görüntü
Birimi’nin a¤›rl›¤›n›n en az dört (4) kat› kadar a¤›rl›¤› tafl›yabilmelidir (KE42MR1: 53 kg × 4 = 212 kg, KE-50MR1: 39 kg × 4 = 156 kg).
• Duvar Konsolu’nun duvardaki kurulumu yeterince sa¤lam de¤ilse, birim
düflebilir ve yaralanmaya veya mal kayb›na neden olabilir.
Duvar Konsolu’nun tafl›nmas› veya sökülmesi s›ras›nda, kurulum iflini yetkili
kiflilere vermeye dikkat edin.
Duvar Konsolu’nu tafl›ma veya sökme iflini yetkili olmayan kifliler yaparsa, Görüntü Birimi düflebilir ve yaralanma veya mal
kayb›na yol açabilir. Duvar Konsolu’nu tafl›ma veya sökme iflini en az iki kiflinin yapmas›n› sa¤lay›n.
Görüntü Birimi’nin üstüne hiçbir s›v› dökmeyin.
Görüntü Birimi’nin ›slanmas›na izin verirseniz, bu durum yang›na veya elektrik çarpmas›na neden olabilir.
Görüntü Birimi monte edildikten sonra c›vatalar›, vb. ç›karmay›n.
Aksi taktirde, Görüntü Birimi düflebilir.
Duvar Konsolu’nu sökmeyin veya parçalar›nda de¤ifliklik yapmay›n.
Yaparsan›z, Duvar Konsolu düflebilir ve yaralanmaya veya mal kayb›na neden olabilir.
Belirtilen üründen baflka gereçler takmay›n.
Bu Duvar Konsolu, belirtilen ürünle kullan›lmak üzere tasarlanm›flt›r. Belirtilenden baflka ürün takarsan›z, düflüp yaralanmalara
veya mal kayb›na neden olabilir.
TR
Türkçe
3 (TR)
Page 88

Görüntü Birimi’ndeki havaland›rma deliklerini kapatmay›n.
Görüntü Birimi’nin üstünü bir kumafl veya benzeri ile örterek Görüntü
Birimi’ndeki havaland›rma deliklerini kapat›rsan›z, Görüntü Birimi afl›r› ›s›nabilir
ve yang›na neden olabilir.
Duvar Konsolu’na Görüntü Birimi d›fl›nda hiçbir yük uygulamay›n.
Uygularsan›z, Görüntü Birimi düflebilir ve yaralanmaya veya mal kayb›na neden
olabilir.
Görüntü Birimi’ne yaslanmay›n ve as›lmay›n.
Görüntü Birimi düflebilir ve kullan›c› birimin a¤›rl›¤› alt›nda kalarak ciddi biçimde
yaralanabilir.
Yang›n veya elektrik çarpmas›n› önlemek için, Görüntü Birimi’ni ya¤›fl veya
nemden uzak tutun.
Görüntü Birimi’nin ›slanmas›na izin verirseniz, bu durum yang›na veya elektrik çarpmas›na neden olabilir.
Görüntü Birimi’ni hiçbir zaman s›cak, nemli veya afl›r› tozlu yerlere koymay›n.
Görüntü Birimi’ni, mekanik titreflimlere maruz kalabilece¤i yerlere kurmay›n.
Kurarsan›z, yang›na veya elektrik çarpmas›na neden olabilir.
Yan›c› nesneleri veya aç›k alevleri (örne¤in mumlar›) Görüntü Birimi’nden uzak
tutun.
Yang›na neden olmamak için yan›c› nesneleri veya aç›k alevleri (örne¤in mumlar›) Görüntü Birimi’nden uzak tutun.
4 (TR)
Page 89

UYARI
Afla¤›daki önlemlere uyulmazsa yaralanma veya mal kayb› tehlikesi oluflur.
Duvar Konsolu’nu, Görüntü Biriminin köfle veya kenarlar›n›n ç›k›nt› oluflturaca¤›
duvar yüzeylerine kurmay›n.
Duvar Konsolu’nu, Görüntü Biriminin köfle veya kenarlar›n›n ç›k›nt› oluflturaca¤›
sütun gibi duvar yüzeylerine kurmay›n. Kifli veya nesnelerin Görüntü Birimi’nin
köflesine veya kenar›na çarpmas› yaralanma veya mal kayb›na yol açabilir.
Temizlik veya bak›m s›ras›nda ürüne afl›r› güç uygulamay›n.
Görüntü Biriminin üst kenar›na afl›r› güç uygulamay›n.
Uygularsan›z, bu durum Görüntü Biriminin düflmesine yol açarak yaralanma veya mal kayb›na neden olabilir.
Görüntü Birimi’ni klima cihaz›n›n üstüne veya alt›na kurmay›n.
Aksi taktirde, Görüntü Birimi klima cihaz›ndan gelen hava ak›mlar›na maruz kalabilir. Bu da Görüntü Birimi’nde bir ar›zaya yol
açabilir.
Önlemler
• Görüntü Birimini uzun süre Duvar Konsolu’na kurulu halde kullan›rsan›z, duvar›n malzemesine ba¤l› olarak, Görüntü
Biriminin arkas›ndaki veya üzerindeki duvar›n rengi solabilir veya duvar ka¤›d› kalkabilir. Duvar Konsolu duvara
tak›ld›ktan sonra kald›r›l›rsa, vida delikleri geride kal›r.
• Duvar›n arkas›ndan 300 ohm besleyici kablolar geçirdiyseniz, bunlar› 75 ohm koaksiyal kablolarla de¤ifltirmenizi öneririz.
300 ohm besleyici kablolar kullanmay› sürdürmek gerekliyse, kuruluma bafllamadan önce duvar›n arkas›nda Görüntü Birimi
ile besleyici kablolar aras›nda yeterli alan bulunmas›na dikkat edin.
Kuruluma bafllamadan önce, Görüntü Birimi’nin telsiz parazitinden etkilenmeyece¤i uygun bir kurulum yeri konusunda
yetkili kifliye dan›fl›n.
5 (TR)
Page 90

Duvar Konsolu’nun Kurulmas›
Sony Sat›c›lar› için
D‹KKAT Müflteriler için
Bu ürünün kurulmas› için yeterli uzmanl›k gereklidir. Kurulum iflini Sony sat›c›lar›na veya yetkili kiflilere vermeye dikkat
edin ve kurulum s›ras›nda güvenli¤e özen gösterin.
Sony Sat›c›lar› için
Afla¤›daki yönergeler yaln›zca Sony Sat›c›lar› içindir. Yukar›da aç›klanan güvenlik önlemlerini okuyun ve bu ürünün
kurulum, bak›m ve denetim ifllemleri s›ras›nda güvenli¤e gerekli dikkati gösterin.
Duvar Konsolu’nun, bu yönerge elkitab›ndaki yönergeler izlenerek duvara sa¤lam
biçimde kurulmas›n› sa¤lay›n.
Vidalardan biri gevfler veya düflerse, Duvar Konsolu düflebilir ve yaralanmaya veya
mal kayb›na neden olabilir. Duvar›n malzemesine uygun vidalar kullanmaya dikkat
edin ve sekiz veya daha çok M8 veya eflde¤er vida kullanarak birimi sa¤lam
biçimde kurun.
Güç Kablosunun veya Görüntü Kablosunun s›k›flmas›na engel olun.
Güç Kablosu veya Görüntü Kablosu birim ile duvar aras›nda s›k›fl›rsa veya
zorlanarak bükülürse, kablonun madeni k›sm› a盤a ç›kabilir ve k›sa devreye veya
kablonun kopmas›na neden olabilir. Bu, yang›na veya elektrik çarpmas›na neden
olabilir.
Bu yönerge elkitab›nda verilen yönergelere uyarak, ürün ile birlikte sa¤lanan ve
ba¤lant›lar› uygun biçimde kullanmaya dikkat edin. Baflka ö¤eler kullan›rsan›z,
Görüntü Birimi düflebilir ve insanlar›n yaralanmas›na veya Görüntü Birimi’nin
hasar görmesine neden olabilir.
Deste¤in, bu yönerge elkitab›nda aç›klanan yönteme uygun olarak düzgün
biçimde monte edilmesini sa¤lay›n.
Vidalardan biri gevfler veya düflerse, Görüntü Birimi düflebilir ve insanlar›n yaralanmas›na veya Görüntü Birimi’nin hasar
görmesine neden olabilir.
C›vata ve vidalar›n belirtilen yerde sa¤lam biçimde s›k›lmas›na dikkat edin.
Aksi taktirde, Görüntü Birimi düflebilir ve insanlar›n yaralanmas›na veya Görüntü Birimi’nin hasar görmesine neden olabilir.
Kurulum s›ras›nda Görüntü Birimi’nin sars›lmamas›na dikkat edin.
Görüntü Birimi sars›nt›ya maruz kal›rsa düflebilir veya k›r›labilir. Bu da yaralanmalara neden olabilir.
6 (TR)
Page 91

Görüntü Birimi’nin dik ve düz bir duvara kurulmas›na dikkat edin.
Aksi taktirde, Görüntü Birimi düflüp yaralanmalara neden olabilir.
Görüntü Birimi’nin düzgün biçimde kurulmas›ndan sonra, kablolar› iyice
sa¤lamlaflt›r›n.
Kifli veya nesneler kablolara dolafl›rsa, bu durum yaralanmaya neden olabilir.
Kurulum s›ras›nda ellerinizi veya parmaklar›n›z› yaralamamaya dikkat edin.
Duvar Konsolu’nu veya Görüntü Birimini kurarken ellerinizi veya parmaklar›n›z› yaralamamaya dikkat edin.
Duvar Konsolu’nun duvara sabitlenmesi için gereken vidalar temin
edilmemektedir.
Duvar Konsolu’nu monte ederken duvar malzemesi ve yap› için uygun vidalar kullan›n.
1. Ad›m: Kurulum için gerekli parçalar› denetleme
Bir y›ld›z tornavida ve duvar›n
1
malzemesine ba¤l› olarak uygun
vidalar› (temin edilmemifl olan sekiz
veya daha çok M8 veya eflde¤er vida)
önceden haz›rlay›n.
2
Paketi aç›n ve parçalar› denetleyin.
Vidalar (+PSW5 × 12) (2) Plaka Birimi (1) Montaj Kancas› Birimi (2)
7 (TR)
Page 92

2. Ad›m: Kurulum yerini kararlaflt›rma
Birim: mm
1
300
Soldaki flemada gösterildi¤i gibi, Plaka
Birimi ile tavan veya duvar›n ç›k›nt›
yapan k›s›mlar› aras›ndaki uzakl›¤›
korumaya dikkat edin.
‹pucu
100 100
100
Görüntü Birimi duvara monte edilirken, boyutlar hakk›nda
bilgi almak için “Teknik Özellikler” (s.15 (TR))
bölümündeki kesite bak›n.
3. Ad›m: Plaka Birimini duvara kurma
1
Birimi tamamen düz
olacak flekilde hizalay›n.
Plaka Birimi
Deste¤in geçici olarak
tak›lmas› için kullan›lacak
olan vida deli¤i.
Plaka Birimini duvara geçici olarak
vidalay›n ve Plaka Biriminin konumunu
tamamen düz olacak flekilde hizalay›n.
D‹KKAT
• Duvar Konsolu’nu duvara sabitleyen vidalar temin
edilmemektedir.
• Duvar›n malzeme ve yap›s›na ba¤l› olarak uygun
vidalar› kullanmaya dikkat edin.
8 (TR)
Page 93

2
KE-42MR1/KE-50MR1
2
Sekiz veya daha çok M8 veya eflde¤er
vida (temin edilmemifltir) kullanarak
Plaka Birimini duvara sabitleyin.
1Vidalar›n gevflemeyecekleri flekilde iyice s›k›lmalar›n›
1
sa¤lay›n.
21. ifllemde geçici olarak tak›lan vidalar› iyice s›k›flt›r›n.
D‹KKAT
• Plaka Birimini geçici olarak takarken, soldaki flemada
belirtilen vida deliklerinin kullan›lmas›n› öneririz. Plaka
Birimi yeterince güvenli olarak tak›lamazsa, ek vidalar
kullan›n.
• Plaka Biriminin duvara sa¤lam biçimde sabitlendi¤inden
emin olun.
35
DC
FE
35
330
110
110
110
530
140
B
400
600
A
KE-50MR1 Birim: mm
ABCDE F
1.573 856 342 86 244 184
KE-42MR1 Birim: mm
ABCDE F
1.352 720 208 152 178 182
9 (TR)
Page 94

Kollar›n aç›s›n› ayarlay›n.
3
1Kol taban›n›n sa¤ ve sol taraflar›ndan vidalar› ç›kar›n.
‹stenen aç›ya (0, 5, 10, 15 veya 20 derece) uygun olan
yivi seçin ve kol taban›n› ona tak›n.
21. ifllemde ç›kar›lan vidalar› kullanarak her kol taban›n›
iyice sa¤lamlaflt›r›n.
Not
Sa¤ ve sol kollar›n aç›lar›n› ayn› aç› ile ayarlamaya dikkat
edin.
• 0 derece: ‹yice s›k›ld›klar›nda beyaz
vidalar› b›rak›n.
• 0 derece d›fl›nda: Beyaz vidalar›
ç›kar›n.
10 (TR)
Page 95

4. Ad›m: Görüntü Birimini Kurma
D‹KKAT
Güç Kablosunu duvardaki prize takmadan önce kurulumun tamamlanmas›na dikkat edin. E¤er Güç Kablosu cihaz›n
alt›nda veya parçalar›n aras›nda s›k›fl›rsa, k›sa devreye veya elektrik çarpmas›na neden olabilir. Güç kablosuna veya
Görüntü Arabirim Kablosuna tak›l›rsan›z, sehpa devrilip yaralanmalara neden olabilir.
Montaj Kancas› Birimini Görüntü
1
Biriminin arka taraf›ndaki kancalara
tak›n. Daha sonra Montaj Kancas›
Birimini kayd›r›n ve temin edilen
vidalar› kullanarak sabitlefltirin
(+PSW5 × 12).
Yumuflak bez
Görüntü Biriminin arka taraf›
11 (TR)
Page 96

2
Görüntü Birimi ile birlikte verilen Güç
Kablosu ve Görüntü Kablosunu
Görüntü Birimine ba¤lay›n.
Güç Kablosunu ve Görüntü Kablosunu, Görüntü Biriminin
arka taraf›ndaki ba¤lay›c›lara tak›n.
‹pucu
Güç Kablosunu ve Görüntü Kablosunu ba¤lama konusunda
ayr›nt›l› bilgi için Düz Ekran Renkli Televizyon’un (KE42MR1/KE-50MR1) yönerge elkitab›na bak›n.
Güç Kablosu ve Görüntü
Arabirim Kablosu
Görüntü Arabirim Kablosunu ve Güç Kablosunu duvara,
vb. tutturun. Kablolar› duvardan geçirirken, soldaki flemada
gösterildi¤i gibi, duvara 50 mm çap›nda bir delik aç›n.
10 mm
12 (TR)
Page 97

3
2
4
Görüntü birimini Plaka Birimine Kurma.
1Görüntü Birimini tutun ve Montaj Kancas› Birimlerinin
alttaki kancalar›, Plaka Biriminin taban›na yak›n olan en
alt destek millerine göre hizalanacak flekilde, Plaka
Birimine yaklaflt›r›n.
2‹ki Montaj Kancas› Biriminin üst ve alt kancalar›n›,
Plaka Biriminin dört destek miline, soldaki semada
gösterildi¤i gibi hepsi ayn› anda olmak üzere tak›n.
3Sekiz kancan›n, Plaka Birimindeki dört mile sa¤lam
biçimde tak›lmas›n› sa¤lay›n.
4Sa¤ ve soldaki emniyet vidalar›n› uzun bir y›ld›z mil
tornavidas› ile iyice s›k›flt›r›n.
13 (TR)
Page 98

Görüntü Birimini Kald›rma
1
2
Sony Sat›c›lar› için
Güç Kablosunu duvardaki prizden
ç›kar›n.
Sa¤ ve soldaki emniyet vidalar›n›,
daha fazla dönmeyecekleri kadar
gevfletin.
3
Görüntü Birimini en az iki kiflinin
tutmas›n› ve Görüntü Birimini
ç›karmak üzere yukar› do¤ru
kayd›rmas›n› sa¤lay›n.
D‹KKAT
• Tafl›ma s›ras›nda Görüntü Birimini en az iki kiflinin
tutmas›n› sa¤lay›n.
• Görüntü Birimini kald›r›rken kablolar›n sarkmamas›na
dikkat edin.
• Görüntü Birimini kald›r›rken ellerinizi veya
parmaklar›n›z› yaralamamaya dikkat edin.
14 (TR)
Page 99

Teknik Özellikler
Birim: mm
A¤›rl›k: 8,0 kg
Tasar›m ve teknik özellikler, haber verilmeksizin de¤ifltirilebilir.
Derece
A
400
600
385
51
KE-42MR1 Birim: mm
Derece Boyut
B
a ABCDE
0° 720 160 173 400 147
5° 720 207 162 400 156
10° 720 253 148 400 164
C
15° 720 297 130 400 172
20° 720 339 108 400 178
a
KE-50MR1 Birim: mm
DE
Derece Boyut
a ABCDE
0° 856 166 307 400 149
5° 856 225 296 400 160
10° 856 283 280 400 169
15° 856 338 260 400 177
20° 856 391 235 400 183
15 (TR)
Page 100

Gracias por adquirir este producto.
Para los clientes
Para la instalación de este producto se precisan conocimientos y experiencia suficientes. Asegúrese de contratar
la instalación a un distribuidor o contratista de Sony y de prestar especial atención a la seguridad durante la
instalación.
ADVERTENCIA
Si no se respetan las precauciones de seguridad y se utiliza el producto de forma incorrecta, existe el riesgo de que
se produzcan lesiones graves o un incendio.
Este manual de instrucciones describe las precauciones que deben tomarse para evitar accidentes y realizar un uso
adecuado del producto. Léalo detenidamente y utilice el producto de forma correcta. Consérvelo para consultarlo
en el futuro.
Para distribuidores Sony
Para la instalación de este producto se precisan conocimientos y experiencia suficientes. Asegúrese de leer
detenidamente este manual de instrucciones para poder realizar con seguridad el proceso de instalación.
Declinamos cualquier responsabilidad por los daños o heridas producidos por una manipulación incorrecta o una
instalación inadecuada. Una vez terminada la instalación, entregue el manual de instrucciones al cliente.
Sony ha diseñado este soporte de montaje mural para utilizarlo con el producto especificado. No utilice este
soporte con otros productos.
Producto especificado: Televisor en color de pantalla plana (KE-42MR1/KE-50MR1)
Seguridad
Los productos Sony se diseñan para garantizar su uso seguro.
Sin embargo, si se utilizan de forma inadecuada, pueden volcarse, o provocar un incendio o una descarga eléctrica
y producir de este modo lesiones graves. Respete las precauciones de seguridad correspondientes para evitar
accidentes.
2 (ES)
 Loading...