

Page 1
FLOOR STAND
3-300-474-11(1)
Instructions
Mode d’emploi
Instrucciones
US
FR
ES
SU-FL71M
© 2008 Sony Corporation
Page 2
On Safety
Thank you for purchasing this product.
Products by Sony are designed with safety in mind.
Incorrect use may result in a serious injury through
fire, electric shock, the product toppling over, or the
product being dropped. Be sure to observe the
precautions for safety to prevent such accidents.
WARNING
If the following precautions are not observed,
serious injury or death can result through fire,
electric shock, or the product toppling over.
Be sure to attach the stand securely by
following the instructions.
If a screw is not tightened securely or it has fallen out, it may cause
the stand to topple over or the TV may fall. This may cause damage
or injury.
For customers
For secure installation, this product should only be installed by
qualified Sony service representatives, as it requires two or
more people, special care, safety, and technique.
This instructions manual shows the correct handling of the product
and important precautions necessary to prevent accidents. Be sure to
read this manual thoroughly and use the product correctly. Keep this
manual available for future reference.
For Sony dealers
Installation of a TV requires two or more people, special care and
technique. When installing a TV, refer to this manual carefully. Sony
is not liable for any accidents or damages caused by incorrect
installation or handling. Please provide this manual to the customer
after installation.
CAUTION
Specified products
The following products are subject to change without notice. Certain
models may be out of stock or discontinued, or may not be available
in certain regions.
Do not install other than the specified products. It could cause injury
or damage.
LCD color TV
KDL-46Z4100/46XBR6
KDL-46WL140/46W4150/46W4100
KDL-46V4100/46SL140/46S4100
KDL-42V4100
KDL-40Z4100/40XBR7/40XBR6
KDL-40WL140/40W4100/40V4150
SU-FL71M
KDL-40V4100/40SL140/40S4100
KDL-40M4000
KDL-37XBR6/37NL140/37N4000
KDL-37M4000/37L4000/37FA400
KDL-32XBR6/32VL140/32NL140
KDL-32N4000/32M4000/32L4000
KDL-32FA400
(As of July 2008)
Be sure to take measures to prevent the
stand from toppling over.
If you fail to do so, the stand may topple over or the TV may fall and
cause injury. Anchor the TV to a wall, pillar, etc., to prevent it from
toppling over.
Be sure to install the stand on a solid and
level floor.
Do not install the stand so that it leans in one direction. If you do so,
it may topple over or the TV may fall. This may cause injury or
damage.
If you install the stand on a soft surface such as a mat or carpet, lay a
board over the designated location to stabilize the floor beforehand.
Do not use a cracked stand.
Do not use the stand if it has sustained any cracks. The glass may
break and cause the TV to topple over, which could cause serious
injury or damage.
Do not climb on the stand and do not use
the stand as a footstool.
Serious injury or death can result if the glass breaks or the stand and
the TV topple over.
Do not pinch the AC power cord or the
connecting cable.
Do not allow the AC power cord or the connecting cable to be
pinched when you install the TV on the stand or move the stand. If
the AC power cord or the connecting cable is damaged, this may
result in fire or electric shock.
Do not move the stand with the TV
attached or with connected equipment
inside.
Moving excessive weight may cause physical injuries or cause the
stand to topple over. Also, any connected equipment within may fall
and cause the glass shelf to break or other property damage.
This stand is designed for use with the products specified above. For
other TVs, refer to their operating instructions, or the supplied
leaflet to verify that the stand can be used.
2 (US)
Page 3
CAUTION
If the following precautions are not observed,
injury or property damage may occur.
Be sure that two or more people do the
assembly and installation.
If one person does the installation work alone, this may result in an
accident or injury. Be sure to keep children away during the
installation.
Do not modify the stand.
It may fall and cause injury.
Do not place anything hot directly on the
stand.
The heat may cause discoloration or deformation of the stand.
NOTE ON USE
Notes on installation
• When assembling, lay the packing materials on the floor to avoid
damage to the floor.
• Before assembling the stand, decide on the installation location.
About load capacity
Do not place any equipment exceeding the
maximum weight capacity on the shelf as
indicated by the illustration or it may break.
2 kg (4 lb 7 oz)
When moving the stand
Trying to move the stand alone, may cause injury. To avoid this, be
sure to follow the advice given below.
• Do not drag the stand. The base parts of the stand may
disassemble and damage the floor.
• Be careful not to allow your hands or feet to be pinched under the
bottom plate.
How to clean the stand
Occasionally wipe it with a dry soft cloth. Stubborn stains may be
removed by wiping with a cloth slightly dampened with mild soap.
Be sure to dry the area afterwards with a dry soft cloth. Do not use
chemicals, such as alcohol, thinner or benzine, as they damage the
finish of the stand.
US
English
3 (US)
Page 4
Preparing for assembly
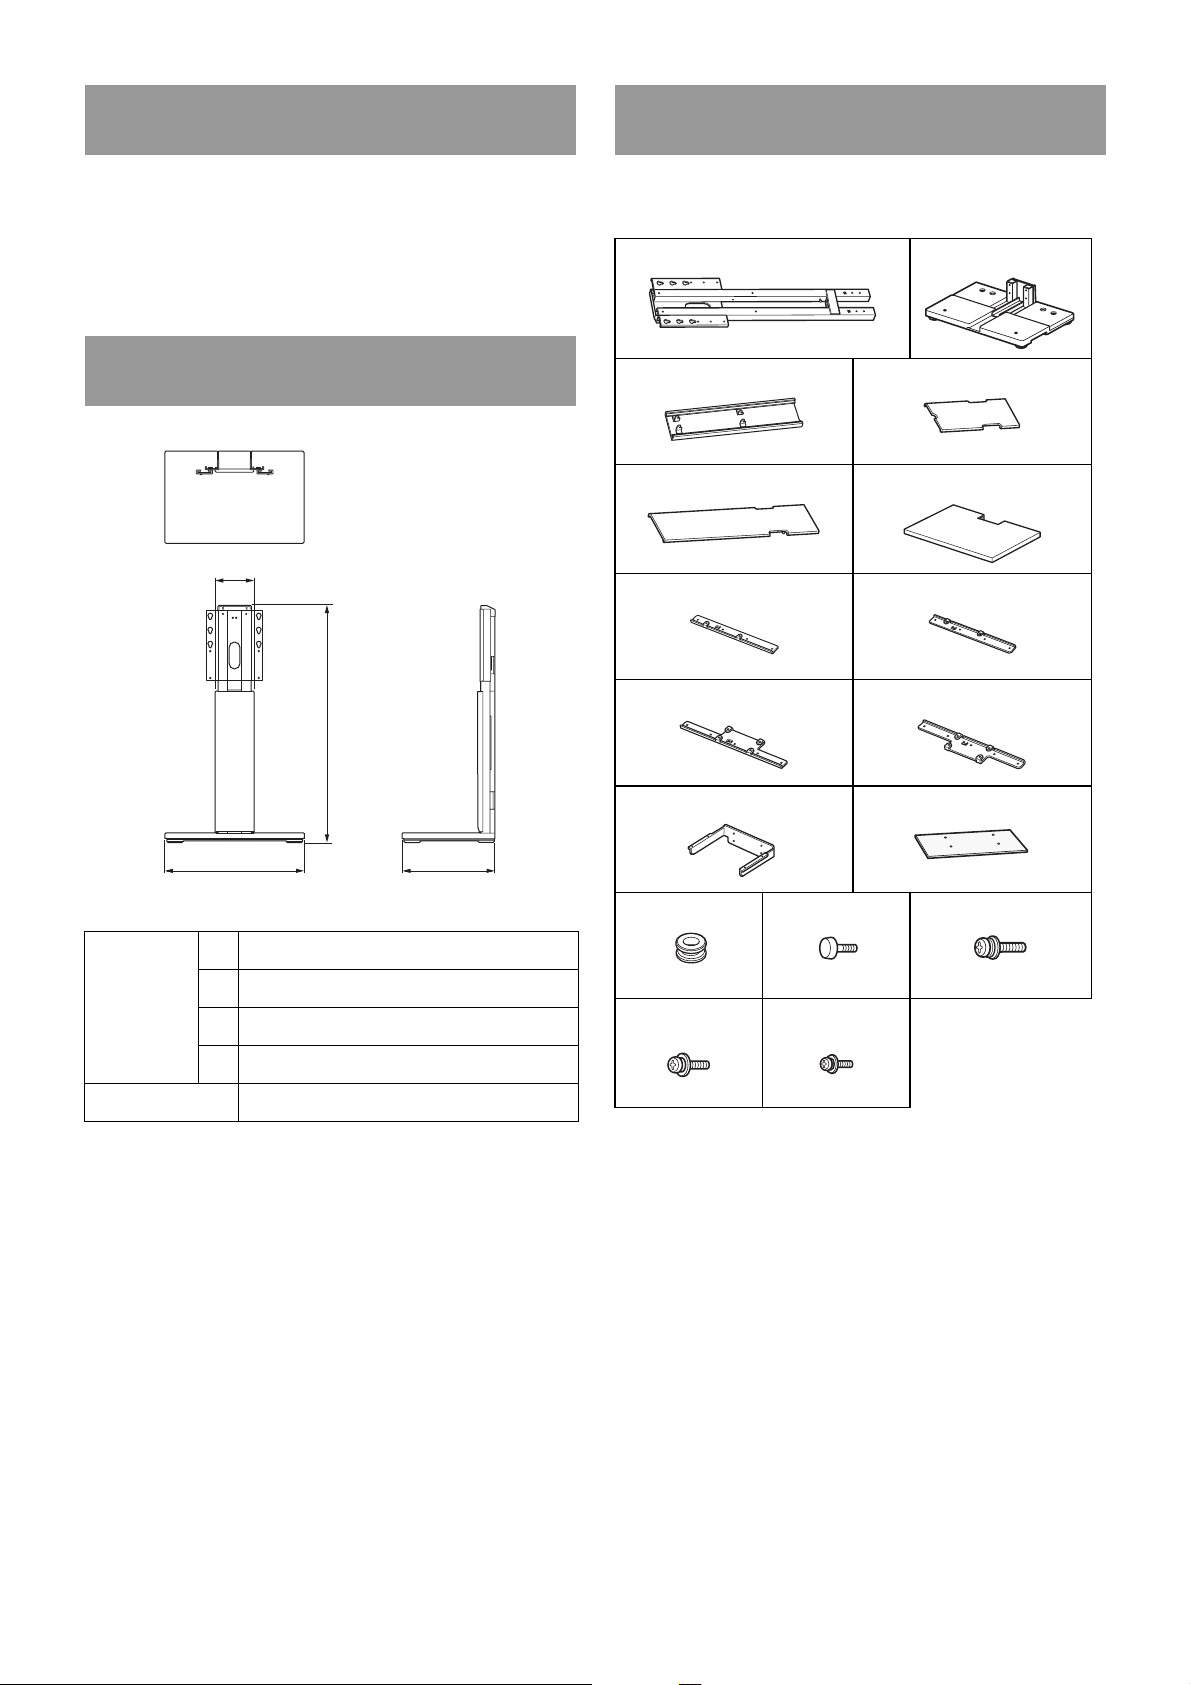
Checking the parts
Before assembling
• Be sure to have a Phillips screwdriver that fits the screws prior to
the assembly.
• When using an electric screwdriver, set the torque setting to
approximately 1.5 N·m {15 kgf·cm}.
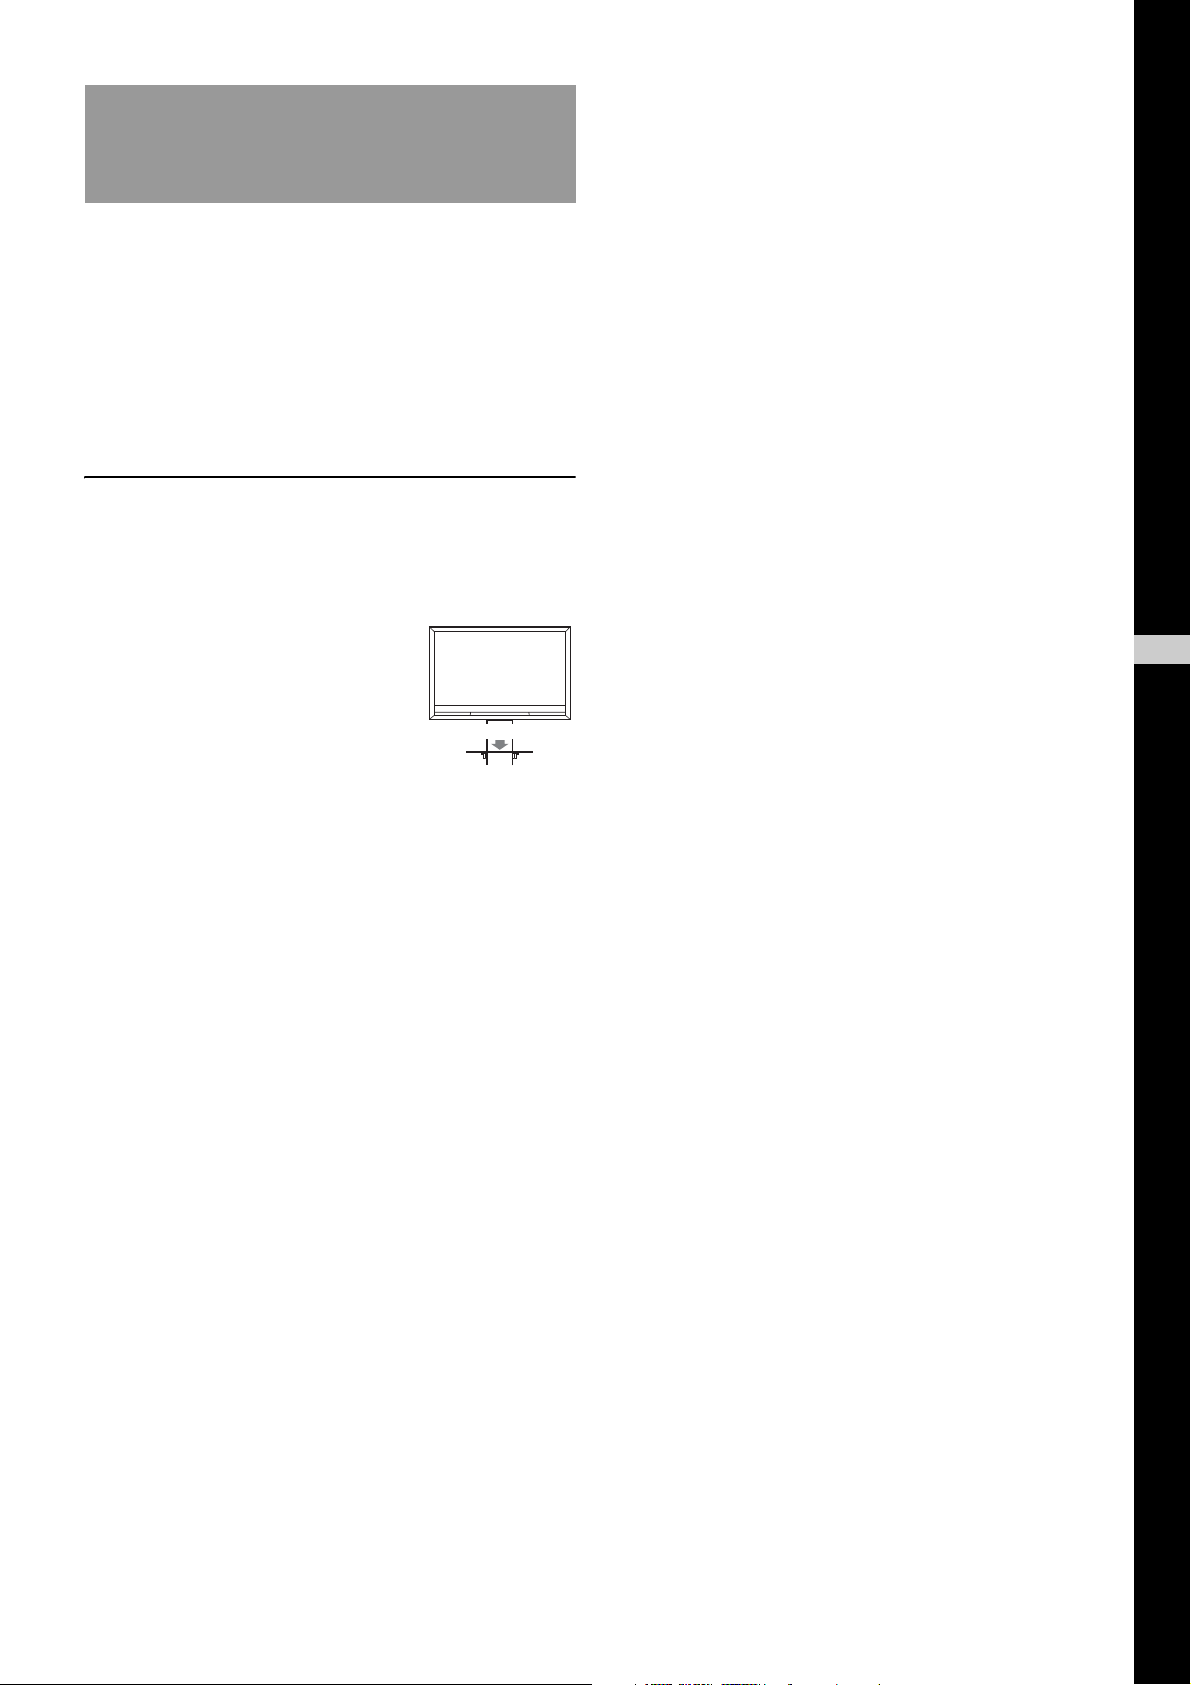
Specifications
d
a
• Verify that all parts are included.
• The parts bags are labeled alphabetically.
Pillar
A
×1
Front Cover
C
Rear Cover Bottom
E
Bracket 32” L
G
Bracket L
I
×1
×1
×1
×1
Rear Cover Top
D
Base Cover
F
Bracket 32” R
H
Bracket R
J
B
Base
×1
×1
×1
×1
×1
Dimensions:
mm (inches)
b
a 1,022 (40 1/4)
b 600 (23 5/8)
c
c 400 (15 3/4)
d 163 (6 1/2)
Weight: 45 kg (99 lb 4 oz)
Design and specifications are subject to change without
notice.
Arm
K
Hook
M
Screw (M5 × 12)
P
×2
×8
×1
Lock Screw
N
Screw (M4 × 8)
Q
L
×2
×8
Shelf
O
×1
Screw (M6 × 16)
×8
4 (US)
Page 5
Installing
The installation should be handled by more than two
people.
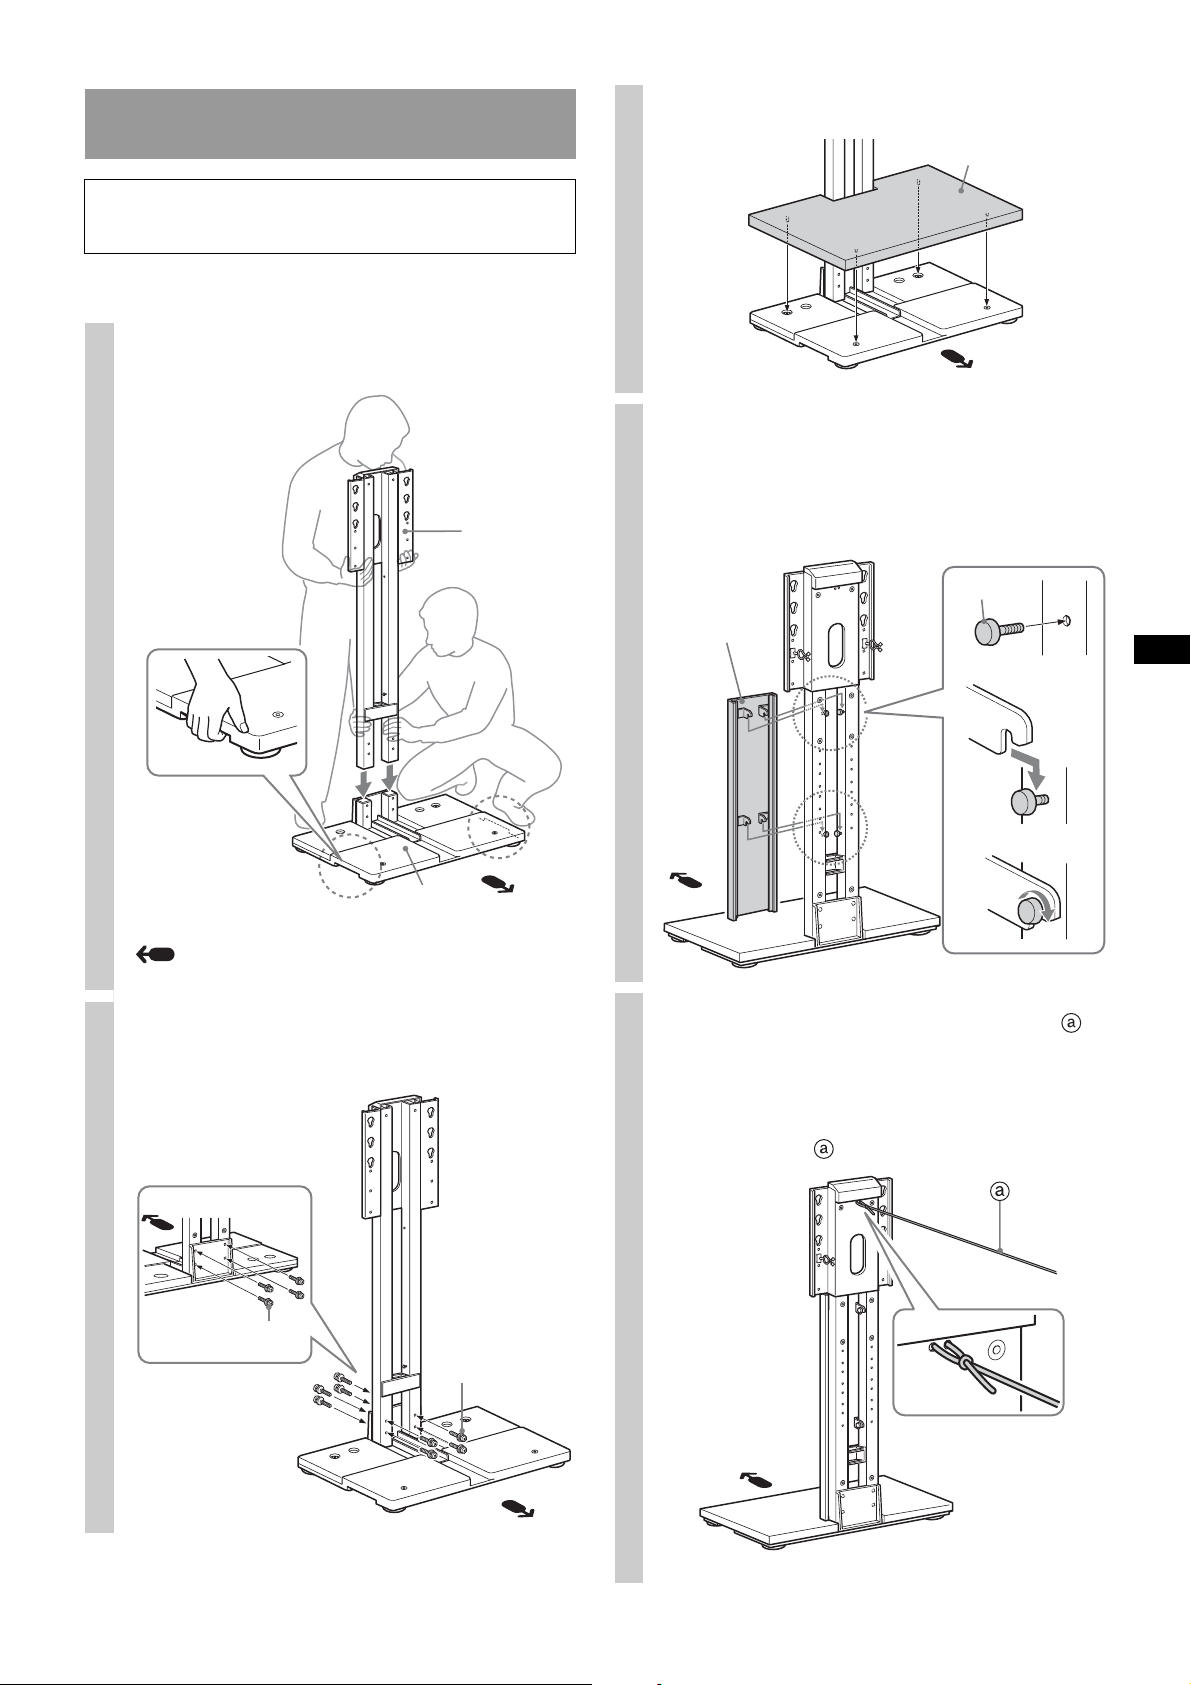
1 Assembling the floor stand
Attach Pillar A to Base B.
1
A
Attach Base Cover F to Base B.
3
F
Attach Front Cover C to Pillar A.
4
1 Screw 2 Lock Screws N to Pillar A. Do not over
tighten.
2 Attach Front Cover C to Pillar A.
3 Secure Lock Screw N (two) tighten firmly.
N
C
1
Arrow direction points to the front of the floor
stand.
Secure Pillar A and Base B with Screw
2
(M5 × 12) P (eight).
B
Secure Pillar A with strong rope or chain
5
(sold separately) to the wall.
~
• Be sure to take measures to prevent the floor stand from
toppling over before attaching the TV to the floor stand.
You cannot secure to A.
2
3
P
P
5 (US)
Page 6
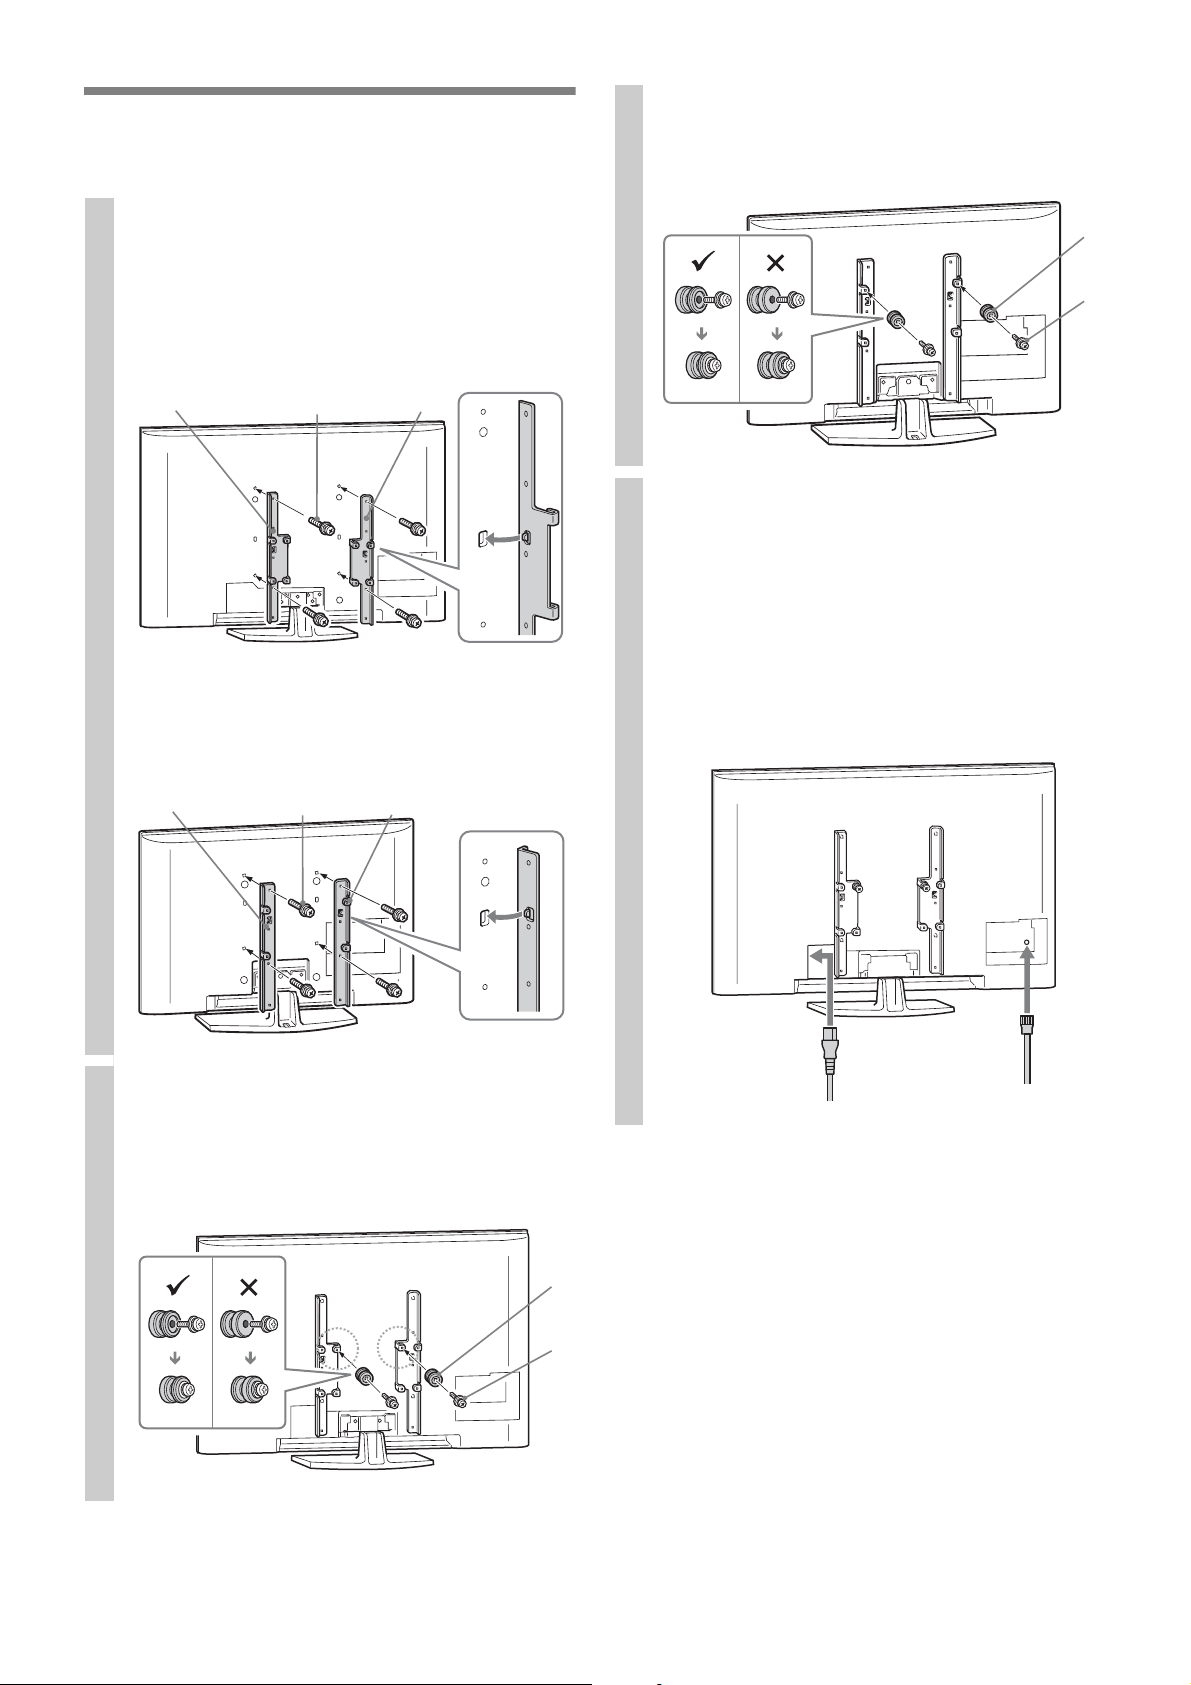
2 Preparing for the installation of the TV
The parts installation differs depending on your TV screen
size.
B For 32 inch:
Adjust Hook M with Screw O (M6 × 16) (two) to the
top position.
Attach 32” bracket GH or Bracket IJ to the
1
TV.
A For 37 inch to 46 inch:
1 Align the tab on the rear of Bracket IJ to the
square hole on the rear of the TV.
2 Secure them with Screw (M6 × 16) O (four).
I
O
J
2
B For 32 inch:
1 Align the tab on the rear of 32” bracket GH to the
square hole on the rear of the TV.
2 Secure them with Screw (M6 × 16) O (four).
1
Connecting the AC power cord and the other
3
cables to the TV.
~
• If the AC power cord is already connected to the TV,
connect the other cables only.
• The cables connecting position differs depending on the TV
model. Be sure to read the operating instructions of your
TV.
• Depending on the TV model, you may not be able to
connect the cables to the TV after installing it to the floor
stand.
M
O
O GH
2
Attach Hook M to 32” bracket GH or Bracket
2
IJ.
A For 37 inch to 46 inch:
Adjust Hook M with Screw O (M6 × 16) (two) to the
top position (inner side).
1
M
O
6 (US)
Page 7
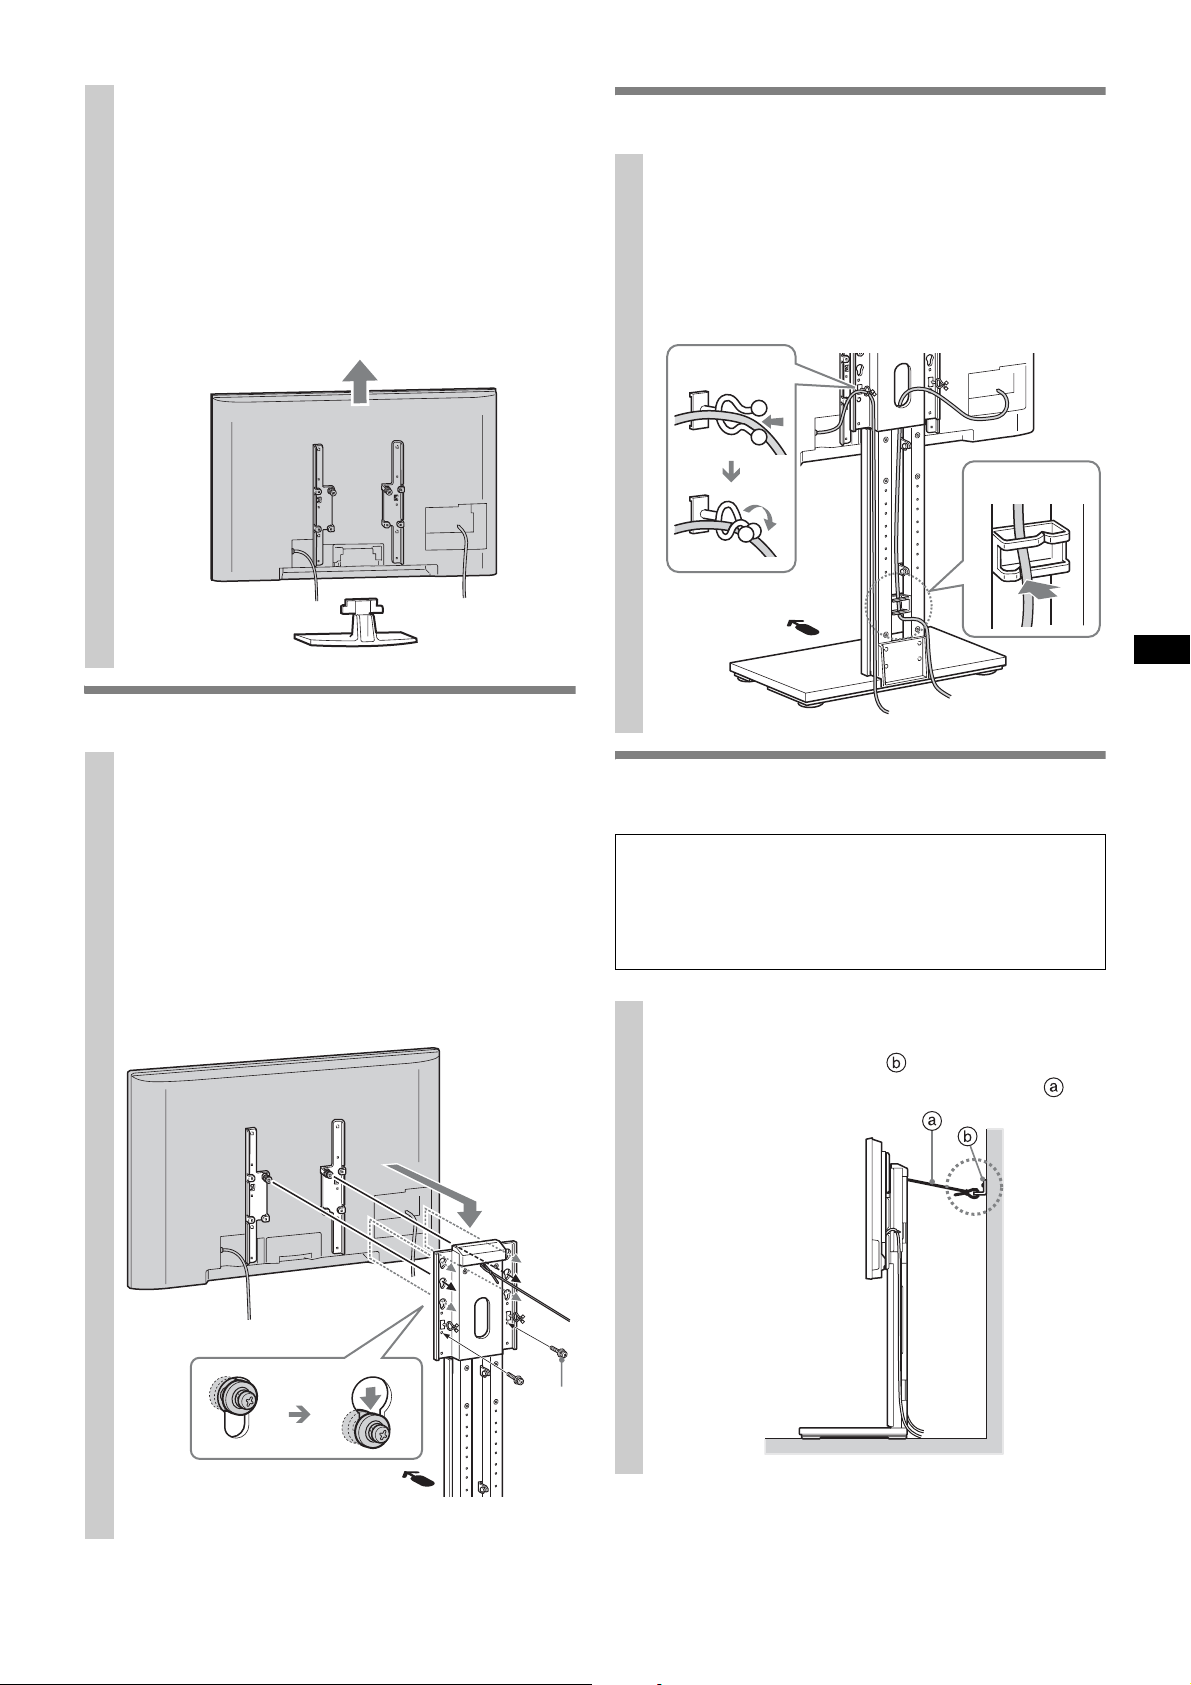
Detach the Table-Top Stand from the TV.
4
Refer to the operating instructions supplied with your
TV for information on how to remove the Table-Top
Stand from the TV.
~
• The number and position of the screws on the rear of the
TV differs, depending on the model of TV; be sure to read
the operating instructions of your TV.
• Do not attach the stand rear covers (if supplied with the
TV).
4 Bundling the cables
After connecting the cables to the TV, bundle
1
the cables.
Secure the AC power cord in the clamper, and bundle
the other cables in the cable holder.
~
• Do not bundle the AC power cord with the cable holder.
Clamper
Cable holder
3 Installing the TV
Attach Pillar A to the TV.
1
1 Insert Hook M which is attached to the TV into the
holes of Pillar A.
The floor stand is adjustable to 3 heights.
~
• Be careful not to pinch the AC power cord between the
Front Cover C and the TV.
2 Secure the TV and Pillar A with Screw (M6 × 16)
O (two).
1
5 Safety measures to prevent toppling
over
For the Center Speaker users:
Attach Arm
prevent toppling over.
(Refer to “Installing the Center Speaker table (For Home
Theatre Systems only)”.)
Secure Pillar A to the wall.
1
Secure wall anchor bracket (sold separately) to a
solid wall and secure with strong rope or chain .
K and Shelf L first, then take measures to
2
O
(Continued)
7 (US)
Page 8
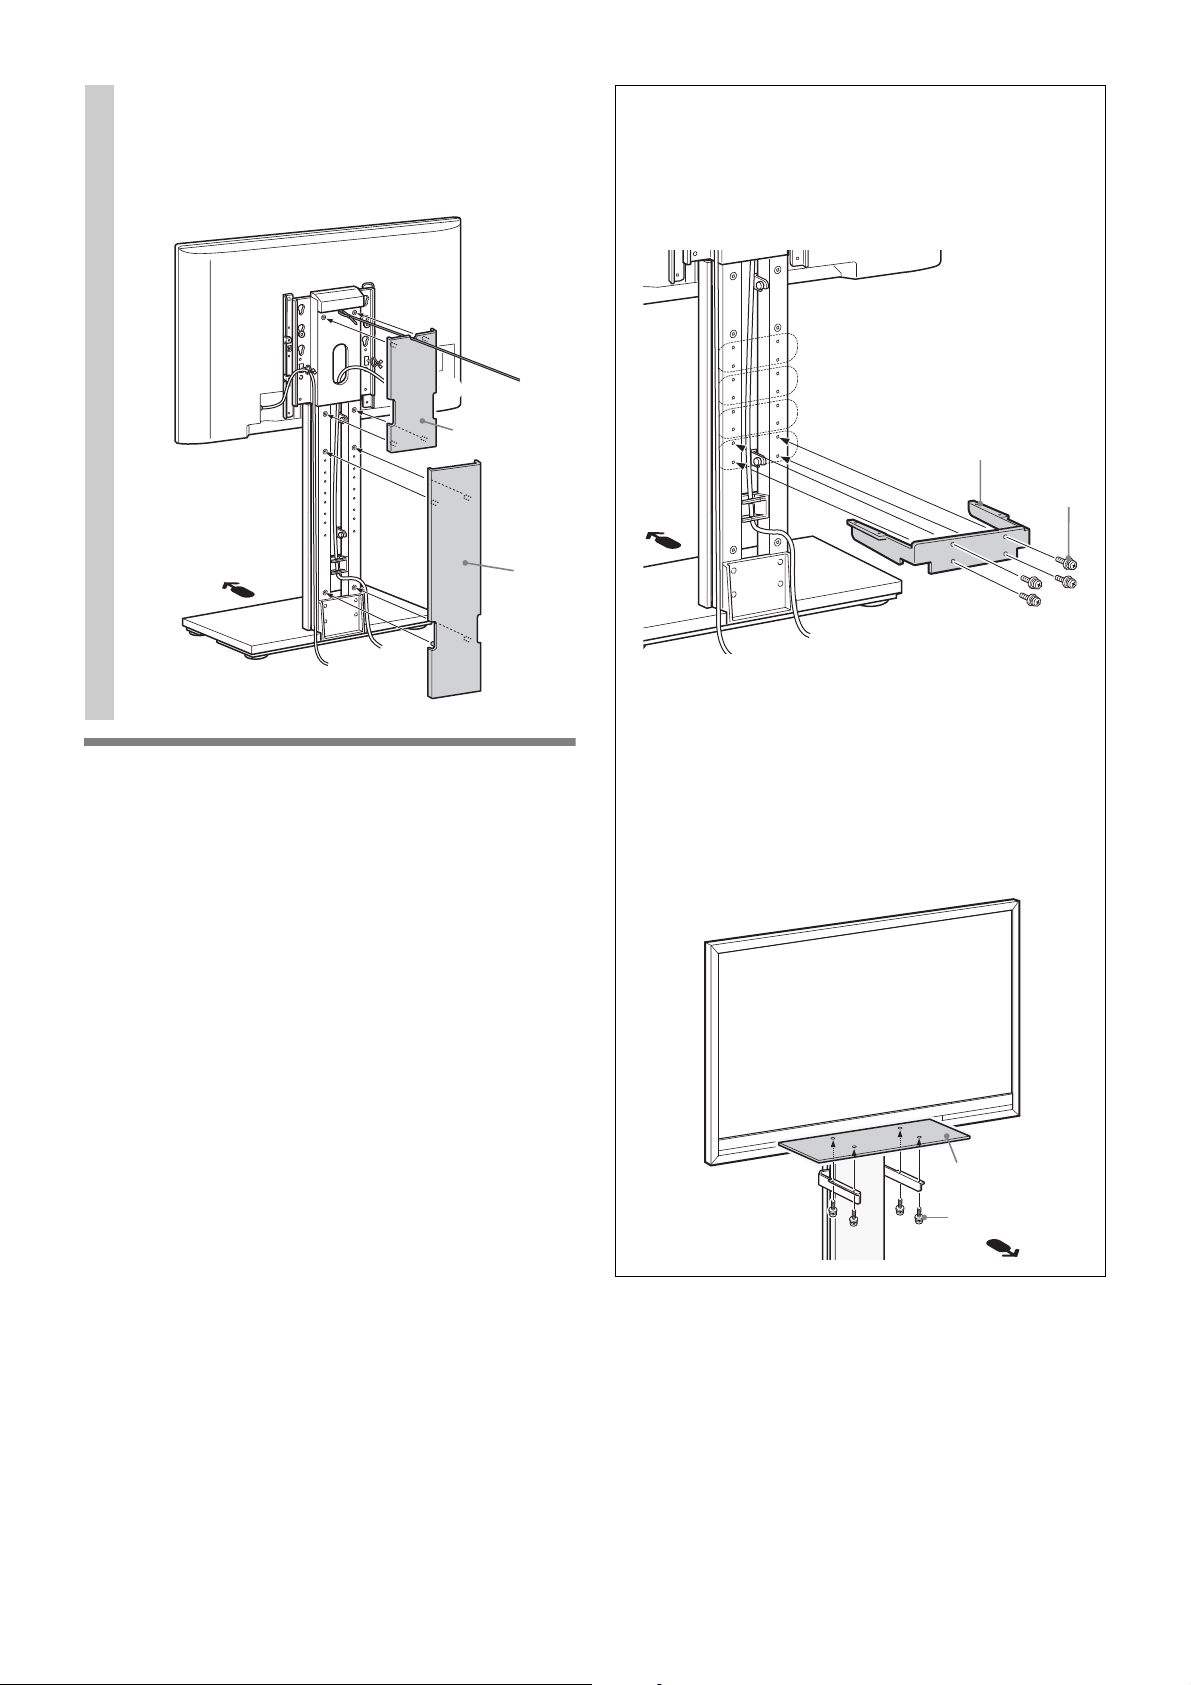
Attach Rear Cover Top D and Rear Cover
2
Bottom E to Pillar
1 Attach Rear Cover Top D to Pillar A.
2 Attach Rear Cover Bottom E to Pillar A.
A.
Installing the Center Speaker Table (For
Home Theatre Systems only)
1 Attach Arm K to Pillar A with Screw (M4 × 8) Q
(four).
Arm K is adjustable to 4 heights.
1
D
2
E
K
Q
1
2 Secure Shelf L with Screw (M4 × 8) Q (four).
~
• Do not use an electric screwdriver when securing the acrylic
board since it may break if the tightening strength is
excessive.
• The maximum weight capacity is 2 kg (4 lb 7 oz). Do not
place any equipment which exceeds 2 kg (4 lb 7 oz) or 380
mm (15 inches) plate width.
8 (US)
2
L
Q
Page 9

Page 10

À propos de la sécurité
Merci d’avoir fait l’acquisition de ce produit.
Les produits Sony sont conçus pour vous offrir un
maximum de sécurité. Une utilisation inappropriée
peut causer des blessures graves en cas d’incendie
et d’électrocution, ou si l’appareil tombe ou
bascule. Veuillez suivre les consignes de sécurité
pour éviter de tels accidents.
AVERTISSEMENT
Le non-respect des consignes suivantes peut
entraîner des blessures graves ou fatales en cas
d’incendie, d’électrocution ou de chute de
l’appareil.
Veillez à fixer le support solidement en
suivant les instructions.
Si une vis n’est pas correctement serrée ou si elle est tombée, le
support risque de basculer ou de faire tomber le téléviseur. Vous
pourriez alors vous blesser ou endommager le téléviseur.
À l’attention des clients
Pour assurer votre sécurité, ce produit ne doit être installé que
par des représentants qualifiés de Sony, car il exige la présence
d’au moins deux personnes, de mesures de sécurité, de
connaissances techniques et de précautions particulières.
Ce mode d’emploi contient la procédure d’utilisation du produit et
les consignes de sécurité essentielles pour éviter tout accident. Lisez
ce manuel attentivement et utilisez le produit correctement.
Conservez ce manuel pour pouvoir le consulter ultérieurement.
À l’attention des détaillants Sony
Un téléviseur doit être installé par au moins deux personnes, en
prenant des précautions particulières et en utilisant les techniques
appropriées. Lors de l’installation d’un téléviseur, consultez ce
mode d’emploi. Sony n’assume aucune responsabilité pour tout
accident ou dommage causé par une installation ou une utilisation
incorrecte. Ce mode d’emploi doit être remis au client après
installation.
ATTENTION
Produits spécifiés
Les produits suivants sont sujets à modification sans préavis. Il est
possible que certains modèles soient en rupture de stock ou
discontinués, ou qu’ils ne soient plus disponibles dans certaines
régions.
N’installez pas d’autres appareils que les produits spécifiés. Vous
pourriez endommager le produit ou vous blesser.
Téléviseur couleur ACL
KDL-46Z4100/46XBR6
KDL-46WL140/46W4150/46W4100
KDL-46V4100/46SL140/46S4100
KDL-42V4100
KDL-40Z4100/40XBR7/40XBR6
SU-FL71M
KDL-40WL140/40W4100/40V4150
KDL-40V4100/40SL140/40S4100
KDL-40M4000
KDL-37XBR6/37NL140/37N4000
KDL-37M4000/37L4000/37FA400
KDL-32XBR6/32VL140/32NL140
KDL-32N4000/32M4000/32L4000
KDL-32FA400
(En date de juillet 2008)
Veuillez prendre toutes les mesures
nécessaires pour éviter que le support ne
bascule.
Sinon, le support pourrait basculer ou faire tomber le téléviseur, et
ainsi causer des blessures. Ancrez le téléviseur à un mur, une
colonne, etc., afin d’éviter qu’il ne bascule.
Veillez à installer le support sur une
surface plane et solide.
N’installez pas le support s’il penche d’un côté. Sinon, le support
pourrait basculer ou faire tomber le téléviseur. Vous pourriez alors
vous blesser ou endommager le téléviseur.
Si vous installez le support sur une surface moelleuse, comme un
tapis ou une moquette, placez d’abord une plaque sur l’emplacement
concerné pour assurer plus de stabilité.
N’utilisez pas de support fissuré.
N’utilisez pas le support s’il est fissuré. Le verre risque de se briser
et de faire basculer le téléviseur, provoquant ainsi des blessures
graves ou des dégâts.
Ne montez pas sur le support et ne
l’utilisez pas comme tabouret.
Le verre risque de se briser ou le support et le téléviseur peuvent
basculer, provoquant ainsi des blessures graves ou fatales.
Veillez à ne pas pincer le cordon
d’alimentation ou le câble de
raccordement.
Veillez à ne pas coincer le cordon d’alimentation ou le câble de
raccordement lorsque vous installez le téléviseur sur le support ou
lorsque vous déplacez ce dernier. Les cordons d’alimentation et
câbles de raccordement endommagés peuvent causer des incendies
ou électrocutions.
Ne déplacez pas le support si le téléviseur
est sur le dessus ou si des appareils
raccordés sont à l’intérieur.
Vous pourriez vous blesser ou faire basculer le support en déplaçant
un poids excessif. De plus, les appareils raccordés pourraient tomber
et briser la tablette en verre, ou causer d’autres dommages.
Ce support est conçu pour être utilisé avec les produits spécifiés cidessus. Pour les autres téléviseurs, consultez leur mode d’emploi ou
dépliant pour vérifier s’ils peuvent être utilisés avec ce support.
2 (FR)
Page 11

ATTENTION
Le non-respect des précautions suivantes peut
entraîner des blessures ou des dommages
matériels.
Veillez à ce que l’assemblage et
l’installation soient effectués par au moins
deux personnes.
Si une seule personne se charge de l’installation, un accident ou des
blessures pourraient survenir. Veillez à éloigner les enfants lors de
l’installation.
Ne modifiez pas le support.
Il pourrait tomber et vous blesser.
Ne placez aucun objet chaud directement
sur le support.
La chaleur pourrait décolorer ou déformer le support.
REMARQUE À PROPOS DE
L’UTILISATION
Remarques à propos de l’installation
• Lors de l’assemblage, placez les matériaux d’emballage au sol
pour protéger le plancher.
• Avant d’assembler le support, choisissez l’emplacement
d’installation.
À propos de la capacité de
charge
Ne placez aucun équipement dépassant le
poids maximal spécifié sur la tablette, tel
qu’indiqué sur l’illustration. Sinon, le support
pourrait se briser.
2 kg (4 lb 7 oz)
FR
Français
Lors du déplacement du support
Vous risquez de vous blesser en déplaçant le support sans aide. Pour
éviter de vous blesser, suivez les consignes ci-dessous.
• Ne faites pas glisser le support. Les pièces de la base du support
pourraient s’enlever et endommager le plancher.
• Veillez à ne pas coincer vos mains ou vos pieds sous la plaque
inférieure.
Procédure de nettoyage du support
Essuyez-le occasionnellement avec un chiffon doux et sec. Les
taches tenaces peuvent être nettoyées avec un chiffon légèrement
imbibé d’une solution savonneuse douce. Veillez ensuite à essuyer
la surface avec un chiffon doux et sec. N’utilisez pas de produits
chimiques, comme l’alcool, un diluant ou du benzène, car ils
peuvent endommager la surface du support.
3 (FR)
Page 12

Préparation pour
l’assemblage
Avant l’assemblage
• Avant de procéder à l’assemblage, assurez-vous d’avoir un
tournevis à tête étoilée correspondant aux vis.
• Pour utiliser un tournevis électrique, réglez le couple de serrage
sur 1,5 N·m {15 kgf·cm} environ.
Vérification des pièces
• Vérifiez si toutes les pièces sont fournies.
• Les sachets des pièces sont étiquetés dans l’ordre alphabétique.
A
Montant
×1
B
Base
×1
Caractéristiques
d
a
b
Panneau avant
C
×1
Panneau arrière inférieur
E
×1
Support pour 32 pouces gauche
G
×1
Support gauche
I
×1
Bras
K
×1
Crochet
c
M
Vis de blocage
N
Panneau arrière supérieur
D
Panneau de base
F
Support pour 32 pouces droit
H
Support droit
J
Ta bl et te
L
Vis (M6 × 16)
O
×1
×1
×1
×1
×1
Dimensions :
mm (pouces)
a 1.022 (40 1/4)
b 600 (23 5/8)
c 400 (15 3/4)
d 163 (6 1/2)
Poids : 45 kg (99 lb 4 oz)
La conception et les caractéristiques sont sujettes à
modifications sans préavis.
Vis (M5 × 12)
P
×2
×8
Vis ( M4 × 8 )
Q
×2
×8
×8
4 (FR)
Page 13

Installation
Veillez à ce que l’installation soit effectuée par au
moins deux personnes.
1 Assemblage du support
Installez le montant A sur la base B.
1
A
Installez le panneau de la base F sur la base
3
B.
F
Installez le panneau avant C sur le montant
4
A.
1 Vissez 2 vis de blocage N sur le montant A. Ne les
serrez pas trop.
2 Installez le panneau avant C sur le montant A.
3 Serrez solidement les vis de blocage N (deux).
N
C
1
B
Le flèche pointe vers l’avant du support.
Fixez le montant A à la base B avec les vis
2
(M5 × 12) P (huit).
P
P
3
Reliez le montant A au mur avec une corde ou
5
une chaîne solide (vendue séparément).
~
• Avant de fixer le téléviseur au support, assurez-vous de
prendre toutes les précautions nécessaires pour éviter qu’il
ne bascule. Vous ne pouvez pas fixer sur A.
2
5 (FR)
Page 14

2 Préparation pour l’installation du
téléviseur
L’installation varie selon la taille de l’écran du téléviseur.
B Pour les écrans de 32 pouces :
Ajustez le crochet M avec les vis O (M6 × 16) (deux)
sur la position supérieure.
Fixez le support pour 32 pouces GH ou le
1
support IJ au téléviseur.
A Pour les écrans de 37 à 46 pouces :
1 Alignez la patte située à l’arrière du support IJ
sur l’ouverture carrée à l’arrière du téléviseur.
2 Fixez-les avec les vis (M6 × 16) O (quatre).
I
O
J
2
B Pour les écrans de 32 pouces :
1 Alignez la patte située à l’arrière du support pour
32 pouces GH sur l’ouverture carrée à l’arrière du
téléviseur.
2 Fixez-les avec les vis (M6 × 16) O (quatre).
1
Connectez le cordon d’alimentation et les
3
autres câbles au téléviseur.
~
• Si le cordon d’alimentation est déjà connecté au téléviseur,
connectez uniquement les autres câbles.
• La position de connexion des câbles varie selon le modèle
de téléviseur. Assurez-vous de lire les instructions
d’utilisation de votre téléviseur.
• Selon le modèle de votre téléviseur, il se peut que vous ne
puissiez pas connecter les câbles après avoir installé le
téléviseur sur le support.
M
O
O GH
2
Fixez le crochet M au support pour 32 pouces
2
GH ou au support IJ.
A Pour les écrans de 37 à 46 pouces :
Ajustez le crochet M avec les vis O (M6 × 16) (deux)
sur la position supérieure (côté intérieur).
1
M
O
6 (FR)
Page 15

Retirez le support de table du téléviseur.
4
Pour savoir comment retirer le support de table du
téléviseur, consultez le mode d’emploi fourni avec ce
dernier.
~
• Le nombre et la position des vis à l’arrière du téléviseur
peuvent varier selon le modèle. Veuillez lire le mode
d’emploi qui l’accompagne.
• Ne fixez pas les panneaux arrière du support (s’ils sont
fournis avec le téléviseur).
4 Regroupement des câbles
Une fois les câbles connectés au téléviseur,
1
regroupez-les.
Fixez le cordon d’alimentation dans la bride, puis
regroupez les autres câbles dans le porte-câble.
~
• Ne placez pas le cordon d’alimentation dans le porte-câble.
Bride
Porte-câble
3 Installation du téléviseur
Fixez le montant A au téléviseur.
1
1 Insérez le crochet M fixé au téléviseur dans les
ouvertures du montant A.
Le support peut être réglé sur 3 hauteurs.
~
• Assurez-vous de ne pas coincer le cordon d’alimentation
entre le panneau avant C et le téléviseur.
2 Fixez le téléviseur au montant A avec les vis
(M6 × 16)
O (deux).
1
5 Mesures de sécurité pour éviter le
basculement
Pour les utilisateurs de l’enceinte centrale :
Fixez d’abord le bras
précautions nécessaires pour éviter que le support puisse
basculer.
(Consultez la section « Installation de la table de
l’enceinte centrale (uniquement pour les cinémas
maison) ».)
Fixez le montant A au mur.
1
Installez le support de fixation murale (vendu
séparément) sur un mur solide et fixez une corde ou
une chaîne résistante .
K et la tablette L, puis prenez les
2
O
(Suite)
7 (FR)
Page 16

Fixez le panneau arrière supérieur D et le
2
panneau arrière inférieur E au montant
1 Fixez le panneau arrière supérieur D au montant
A.
2 Fixez le panneau arrière inférieur E au montant A.
1
A.
Installation de la table de l’enceinte
centrale (uniquement pour les cinémas
maison)
1 Fixez le bras K au montant A avec les vis (M4 × 8)
Q (quatre).
Le bras K peut être réglé sur 4 hauteurs.
D
2
E
K
Q
1
2 Fixez la tablette L avec les vis (M4 × 8) Q (quatre).
~
• N’utilisez pas de tournevis électrique pour fixer le panneau
acrylique car il pourrait se briser en cas de force de serrage
excessive.
• La capacité de charge maximale est de 2 kg (4 lb 7 oz).
N’installez aucun équipement de plus de 2 kg (4 lb 7 oz) ou
d’une largeur supérieure à 380 mm (15 pouces).
8 (FR)
2
L
Q
Page 17

Page 18

Sobre la seguridad
Gracias por adquirir este producto.
Los productos Sony están diseñados pensando en
la seguridad. El uso incorrecto del producto puede
provocar lesiones graves a raíz de un incendio o
una descarga eléctrica, o si el producto vuelca o se
cae. Para evitar tales accidentes, asegúrese de
cumplir con las precauciones de seguridad.
ADVERTENCIA
Si no se tienen en cuenta las precauciones
siguientes, pueden producirse lesiones graves
o incluso la muerte a raíz de un incendio o una
descarga eléctrica, o si el producto vuelca.
Asegúrese de seguir las instrucciones
para instalar firmemente el soporte.
Si un tornillo no está apretado firmemente o se ha caído, el soporte
podría volcar o el televisor podría caer y provocar daños o lesiones.
Información para los clientes
Para garantizar una instalación segura, únicamente deben
instalar este producto representantes de servicio Sony
cualificados, ya que se requieren al menos dos personas, además
de cuidado, medidas de seguridad y conocimientos técnicos
especiales.
Este manual de instrucciones muestra la manera correcta de
manipular el producto, así como precauciones importantes
necesarias para evitar accidentes. Asegúrese de leer este manual
atentamente y de utilizar el producto correctamente. Conserve este
manual para consultarlo en el futuro.
Información para los distribuidores de Sony
La instalación de un televisor requiere al menos dos personas,
además de cuidado y conocimientos técnicos especiales. Al instalar
un televisor, consulte este manual cuidadosamente. Sony no se
responsabiliza de los accidentes o daños que se produzcan debido a
una instalación o manipulación incorrectas. Entregue este manual al
cliente tras la instalación.
PRECAUCIÓN
Productos especificados
Los siguientes productos están sujetos a cambios sin previo aviso.
Es posible que no queden existencias de determinados modelos, o
que se hayan dejado de producir o no se encuentren disponibles en
determinadas regiones.
No instale productos distintos de los especificados. Si lo hace,
podría provocar lesiones o daños.
Televisor LCD en color
KDL-46Z4100/46XBR6
KDL-46WL140/46W4150/46W4100
KDL-46V4100/46SL140/46S4100
KDL-42V4100
KDL-40Z4100/40XBR7/40XBR6
SU-FL71M
KDL-40WL140/40W4100/40V4150
KDL-40V4100/40SL140/40S4100
KDL-40M4000
KDL-37XBR6/37NL140/37N4000
KDL-37M4000/37L4000/37FA400
KDL-32XBR6/32VL140/32NL140
KDL-32N4000/32M4000/32L4000
KDL-32FA400
(a partir de julio de 2008)
Asegúrese de tomar las debidas
precauciones para evitar que el soporte
vuelque.
De lo contrario, el soporte podría volcar o el televisor podría caer y
provocar lesiones. Fije el televisor a una pared, una columna, etc.,
para evitar que vuelque.
Asegúrese de instalar el soporte en una
superficie plana y sólida.
No instale el soporte de modo que se incline en alguna dirección. Si
lo hace, el soporte podría volcar o el televisor podría caer y provocar
lesiones o daños.
Si instala el soporte en una superficie blanda, como un tapete o una
alfombra, cubra primero dicha zona con un panel para estabilizarla.
No utilice un soporte roto.
No utilice el soporte si presenta fisuras. El cristal podría romperse y
hacer caer el televisor, lo que podría provocar lesiones o daños
graves.
No suba en el soporte ni lo utilice como
taburete.
La rotura del cristal del soporte o el vuelco del soporte y el televisor
podrían ocasiones lesiones graves o la muerte.
No aplaste el cable de alimentación de ca
ni el cable de conexión.
Evite aplastar el cable de alimentación de ca o el cable de conexión
cuando instale el televisor en el soporte o cuando desplace el
soporte. Si se daña alguno de estos cables, puede producirse un
incendio o una descarga eléctrica.
No mueva el soporte con el televisor
acoplado o con equipos conectados en su
interior.
El movimiento de peso excesivo podría ocasionarle lesiones o
provocar el vuelco del soporte. Asimismo, cualquier equipo
conectado en el interior podría caer y provocar la rotura de la repisa
de cristal u otros daños materiales.
Este soporte se ha diseñado para utilizarse con los productos
especificados anteriormente. Para comprobar si se puede utilizar
este soporte con otros televisores, consulte los manuales de
instrucciones correspondientes o el folleto suministrado.
2 (ES)
Page 19

PRECAUCIÓN
Si no se tienen en cuenta las siguientes
precauciones, pueden producirse lesiones o
daños materiales.
Asegúrese de que al menos dos personas
realizan el trabajo de montaje e
instalación.
Si una persona realiza sola la instalación, podría sufrir accidentes o
lesiones. Durante la instalación, asegúrese de mantener alejados a
los niños.
No modifique el soporte.
Podría caer y provocar lesiones.
No coloque ningún objeto caliente
directamente sobre el soporte.
El calor podría provocar la decoloración o deformación del soporte.
NOTAS SOBRE EL USO
Notas sobre la instalación
• Cuando realice el montaje, coloque los materiales de embalaje
sobre el suelo para evitar dañarlo.
• Antes de montar el soporte, decida la ubicación de instalación.
Acerca de la capacidad de
carga
No coloque sobre la repisa ningún equipo que
supere el peso máximo permitido que se
indica en la ilustración, ya que podría
romperse.
2 kg (4 lb 7 oz)
ES
Español
Desplazamiento del soporte
Si intenta mover el soporte, podría sufrir lesiones. Para evitarlo,
asegúrese de seguir los consejos que se ofrecen a continuación.
• No arrastre el soporte. Las piezas de la base del soporte podrían
soltarse y dañar el suelo.
• Procure que las manos o los pies no le queden atrapados debajo
de la placa inferior.
Limpieza del soporte
De vez en cuando, limpie el soporte con un paño suave y seco. Las
manchas difíciles pueden eliminarse con un paño ligeramente
humedecido con jabón neutro. Asegúrese de secar la zona a
continuación con un paño suave y seco. No utilice productos
químicos, como alcohol, disolventes o bencina, ya que podrían
dañar el acabado del soporte.
3 (ES)
Page 20

Preparativos para el
Comprobación de las
montaje
Antes del montaje
• Antes de comenzar el montaje, asegúrese de disponer de un
destornillador Phillips adecuado para los tornillos.
• Si utiliza un destornillador eléctrico, ajuste el par a
aproximadamente 1,5 N·m {15 kgf·cm}.
Especificaciones
d
a
piezas
• Compruebe que se incluyen todas las piezas.
• Las bolsas de las piezas están etiquetadas alfabéticamente.
Pilar
A
Cubierta frontal
C
Cubierta posterior inferior
E
Soporte 32” I
G
Soporte I
I
×1
D
×1
F
×1
H
×1
J
Base
B
Cubierta posterior superior
Cubierta de la base
Soporte 32” D
Soporte D
×1
×1
×1
×1
Dimensiones:
mm
(pulgadas)
b
a 1.022 (40 1/4)
b 600 (23 5/8)
c
c 400 (15 3/4)
d 163 (6 1/2)
Peso: 45 kg (99 lb 4 oz)
El diseño y las especificaciones están sujetos a cambios sin
previo aviso.
Brazo
K
Enganche
M
Tornillo (M5 × 12)
P
×2
×8
×1
×1
Tornillo de bloqueo
N
Tornillo (M4 × 8)
Q
L
×2
×8
Repisa
O
×1
×1
Tornillo (M6 × 16)
×8
4 (ES)
Page 21

Instalación
La instalación deben realizarla entre dos personas
como mínimo.
1 Montaje del soporte para el suelo
Coloque el pilar A en la base B.
1
A
Coloque la cubierta de la base F en la base B.
3
F
Coloque la cubierta frontal C en el pilar A.
4
1 Fije 2 tornillos de bloqueo N en el pilar A. No los
apriete demasiado.
2 Coloque la cubierta frontal C en el pilar A.
3 Apriete los tornillos de bloqueo N (dos)
firmemente.
N
C
1
B
La dirección de la flecha señala la parte frontal
del soporte para el suelo.
Fije el pilar A y la base B con los tornillos
2
(M5 × 12) P (ocho).
P
3
Fije el pilar A a la pared con una cuerda o
5
cadena resistente (se vende por separado).
~
• Asegúrese de tomar las debidas precauciones para evitar
que el soporte para el suelo vuelque antes de instalar el
televisor en éste. La cuerda o cadena no se puede fijar al
pilar A.
2
P
5 (ES)
Page 22

2 Preparativos para la instalación del
televisor
La instalación de las piezas varía en función del tamaño de la
pantalla del televisor.
B Para pantallas de 32 pulgadas:
Ajuste el enganche M con los tornillos O (M6 × 16)
(dos) en la posición superior.
Coloque el soporte de 32” GH o el soporte
1
IJ en el televisor.
A Para pantallas de entre 37 y 46 pulgadas:
1 Alinee la pestaña de la parte posterior del soporte
IJ con el orificio cuadrado de la parte posterior
del televisor.
2 Fije ambas partes con los tornillos (M6 × 16) O
(cuatro).
I
O
J
2
B Para pantallas de 32 pulgadas:
1 Alinee la pestaña de la parte posterior del soporte de
32” GH con el orificio cuadrado de la parte
posterior del televisor.
2 Fije ambas partes con los tornillos (M6 × 16) O
(cuatro).
1
Conecte el cable de alimentación de ca y los
3
demás cables al televisor.
~
• Si el cable de alimentación de ca ya se encuentra conectado
al televisor, conecte únicamente los demás cables.
• La posición de conexión de los cables varía en función del
modelo de televisor. Asegúrese de leer el manual de
instrucciones del televisor.
• En función del modelo de televisor, es posible que no pueda
conectarle los cables después de instalarlo en el soporte
para el suelo.
M
O
O GH
2
Coloque el enganche M en el soporte de 32”
2
GH o el soporte IJ.
A Para pantallas de entre 37 y 46 pulgadas:
Ajuste el enganche M con los tornillos O (M6 × 16)
(dos) en la posición superior (parte interna).
1
M
O
6 (ES)
Page 23

Retire el soporte de sobremesa del televisor.
4
Consulte el manual de instrucciones suministrado con
el televisor para obtener información acerca de la
extracción del soporte de sobremesa del televisor.
~
• El número y la posición de los tornillos de la parte posterior
del televisor varía en función del modelo de televisor.
Asegúrese de leer el manual de instrucciones del televisor.
• No instale las cubiertas posteriores del soporte (si se
suministran con el televisor).
4 Enrollado de los cables
Tras conectar los cables al televisor,
1
enróllelos.
Fije el cable de alimentación de ca en la abrazadera y
enrolle los demás cables en el sujetacables.
~
• No enrolle el cable de alimentación de ca en el sujetacables.
Abrazadera
Sujetacables
3 Instalación del televisor
Coloque el pilar A en el televisor.
1
1 Inserte el enganche M que se encuentra colocado en
el televisor en los orificios del pilar A.
El soporte para el suelo puede ajustarse en tres
alturas.
~
• Procure no aplastar el cable de alimentación de ca entre la
cubierta frontal C y el televisor.
2 Fije el televisor y el pilar A con los tornillos
(M6 × 16)
O (dos).
1
5 Medidas de seguridad para evitar el
vuelco
Para los usuarios del altavoz central:
Fije primero el brazo
tome las medidas oportunas para evitar el vuelco.
(Consulte la sección “Instalación de la tabla del altavoz
central (solo en sistemas de cine doméstico)”).
Fije el pilar A a la pared.
1
Fije el soporte de anclaje en la pared (se vende por
separado) a una pared firme y asegúrelo con una cuerda
o cadena resistente .
K y la repisa L y, a continuación,
2
O
(Continúa)
7 (ES)
Page 24

Coloque la cubierta posterior superior D y la
2
cubierta posterior inferior E en el pilar
1 Coloque la cubierta posterior superior D en el pilar
A.
2 Coloque la cubierta posterior inferior E en el pilar
A.
1
A.
Instalación de la tabla del altavoz
central (solo en sistemas de cine
doméstico)
1 Fije el brazo K al pilar A con los tornillos (M4 × 8)
Q (cuatro).
El brazo K puede ajustarse en 4 alturas.
D
2
E
K
1
2 Fije la repisa L con los tornillos (M4 × 8) Q
(cuatro).
~
• No utilice un destornillador eléctrico para fijar la placa
acrílica, ya que podría romperse si se aprieta demasiado.
• El peso máximo es de 2 kg (4 lb 7 oz). No coloque ningún
equipo que pese más de 2 kg (4 lb 7 oz) o con un ancho de
base superior a los 380 mm (15 pulgadas).
Q
8 (ES)
2
L
Q
Page 25

Page 26

Page 27

Page 28

http://www.sony.net/
Printed in China
 Loading...