

Page 1
TV Stand
3-218-211-11(1)
To Customers and Sony Dealers
Instructions
Mode d’emploi
Instrucciones
US
FR
ES
SU-FL300M
SU-FL300L
© 2007 Sony Corporation
Page 2

Thank you for purchasing this product.
For customers
This product should only be installed by qualified Sony
service representatives, as it requires two or more people,
special care, safety, and technique.
CAUTION
Specified products
The following products are subject to change without notice.
Certain models may be out of stock or discontinued, or may
not be available in certain regions.
WARNING
If the safety precautions are not observed or the product is
used incorrectly, it may result in serious injury or fire.
This instruction manual shows the correct handling of the
product and important precautions necessary to prevent
accidents. Be sure to read this manual thoroughly and use the
product correctly. Keep this manual available for future
reference.
For Sony dealers
Installation of a TV requires two or more people, special care
and technique. When installing a TV, refer to this manual
carefully. Sony is not liable for any accidents or damages
caused by incorrect installation or handling. Please give this
manual to the customer after installation.
On Safety
Products by Sony are designed with safety in mind. Incorrect
use may result in a serious injury through fire, electric shock,
the product toppling over, or the product dropping. Be sure to
observe the precautions for safety to prevent such accidents.
LCD Color TV
KDL-46W3000
KDL-46V3000
KDL-46VL130
KDL-46S3000
KDL-40W3000
KDL-40V3000
SU-FL300M
SU-FL300L
This TV Stand is designed for use with the products specified
above. For other TVs, refer to their operating instructions to
verify that the TV Stand can be used.
Some TVs are supplied with a leaflet explaining how to
install the TV Stand.
KDL-40VL130
KDL-40D3000
KDL-40S3000
KDL-40SL130
KDL-32XBR4
KDL-32S3000
KDL-32SL130
KDL-52W3000
KDL-52WL130
KDL-46W3000
KDL-46V3000
KDL-46VL130
KDL-46S3000
2 (US)
Page 3
WARNING
If the following precautions are not observed,
serious injury or death can result through fire,
electric shock, or the product toppling over.
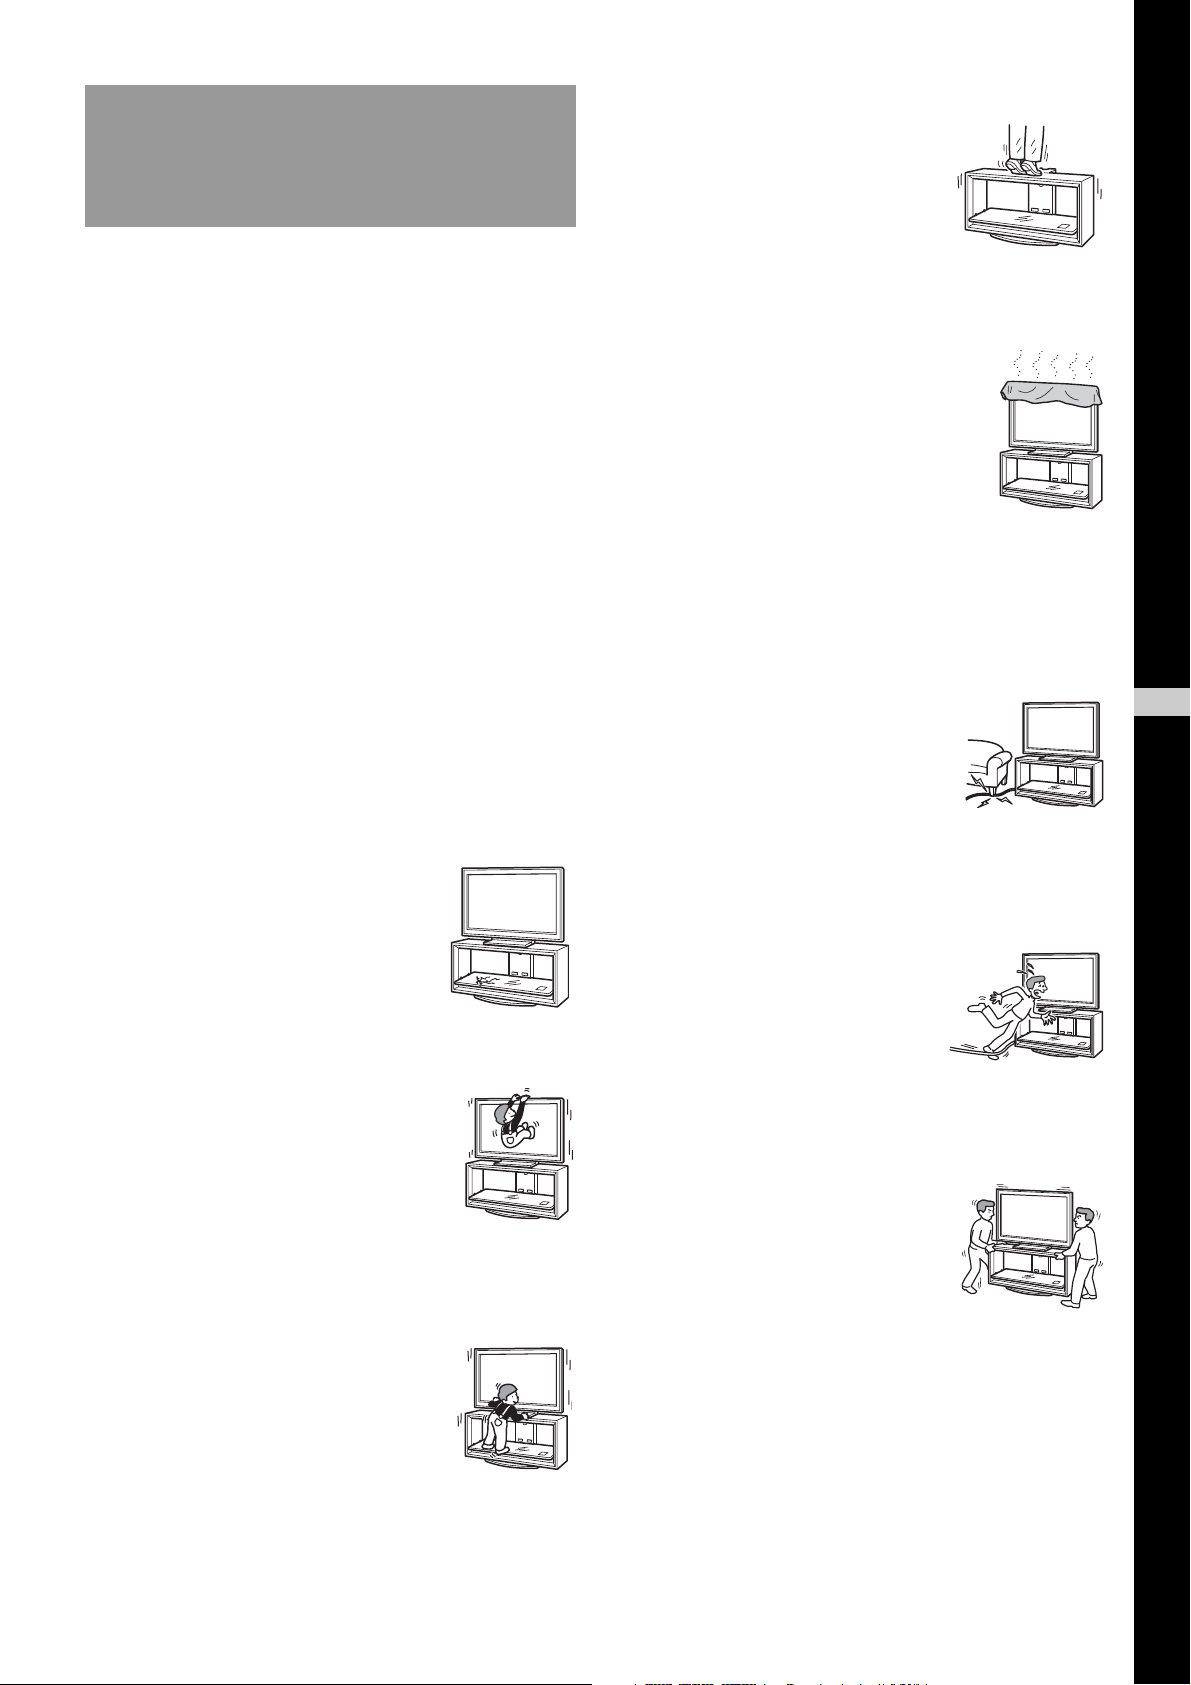
Do not step on the TV Stand.
You may fall, or break the glass and
cause injury.
Products should only be installed by
qualified Sony service
representatives.
The TV and the TV Stand are very heavy; installation by
non-qualified persons could result in serious injury.
Be sure to take measures to prevent
the TV Stand from toppling over.
If you fail to do so, the TV may topple over and cause injury.
Anchor the TV to a wall, etc., to prevent toppling over.
Be sure to install the TV Stand on a
solid and flat floor.
Do not install the TV Stand so that it leans in one direction. If
you do so, the TV Stand may topple over or the TV may fall.
This may cause injury or damage.
If you install the TV Stand on a soft surface such as a mat or
a carpet, lay a board over the designated location beforehand.
Do not use a cracked TV Stand.
Do not cover the ventilation holes of
the TV.
If you cover the ventilation holes (with a
cloth, etc.), heat may build up inside and cause
fire.
Do not allow the AC power cord or
the connecting cable to be pinched.
• Do not allow the AC power cord or the connecting cable to
be pinched when you install the TV on the TV Stand. If
the AC power cord or the connecting cable is damaged,
this may result in fire or electric shock.
• Do not step on the AC power cord or
the connecting cable when you carry
the TV Stand. The AC power cord or
the connecting cable may be damaged,
and this may result in fire or electric
shock.
US
English
Do not use the TV Stand if it has
sustained any cracks. The glass may
break and cause the TV to topple over,
which could cause serious injury or
damage.
Cracked TV Stand
Do not lean on or hang from the TV.
The TV Stand may topple over, or the TV
may fall and cause serious injury or death.
Do not allow children to climb on the
TV Stand or crawl between the
shelves.
If children climb on the TV Stand or get
between the shelves, serious injury or death
can result if the glass breaks or the TV Stand
topples over.
Do not stumble over the AC power
cord or the connecting cables.
You may trip, or may cause the TV
Stand to topple over and cause injury.
Do not move the TV Stand with the
TV attached or with connected
equipment inside.
If you move the TV Stand with the TV
attached, it may hurt your back, or the
TV Stand may topple over and cause
serious injury. Also, any connected
equipment within may fall and cause the
glass shelf to break or other property
damage.
3 (US)
Page 4
CAUTION
If the following precautions are not observed,
injury or property damage may occur.
Do not install any equipment other
than the specified product.
• This TV Stand is designed for use with the specified
product only. If you install equipment other than specified,
it may fall or break, and cause injury.
• Do not place objects such as vases, pottery, etc., on the TV
Stand.
• Do not modify the TV Stand.
• Do not place anything hot directly on the TV Stand. The
heat may cause discoloration or deformation of the TV
Stand.
• Do not place anything directly on the TV Stand that may
damage the glass.
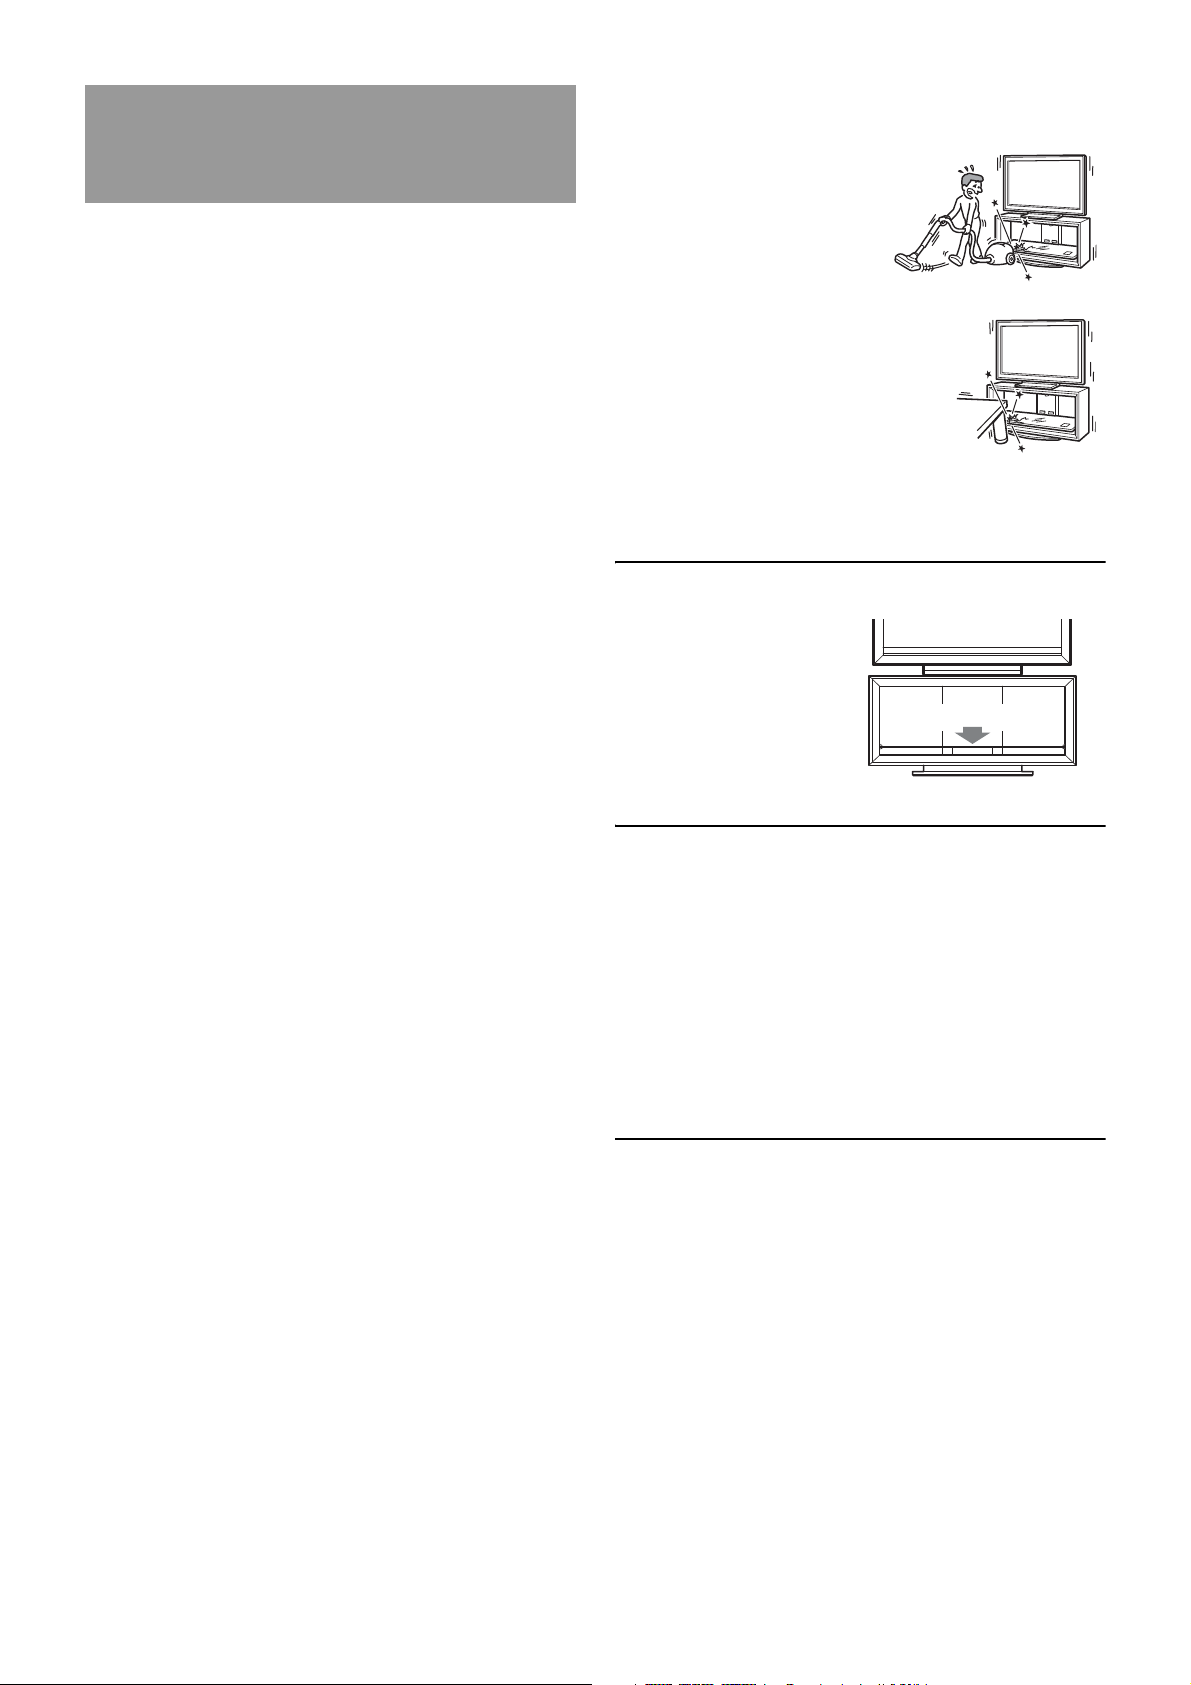
Do not subject the glass to
excessive shock.
This TV Stand is made of
tempered glass, but care should
be taken.
If the glass breaks, glass
fragments could cause injury, so
observe the precautions below.
• Do not hit the glass or drop
sharp-pointed objects on the
glass. Avoid excessive shock.
• Do not scratch or poke the
glass with sharp-pointed
objects.
• Do not let hard objects such
as a vacuum cleaner hit the
edges of the glass.
Note on carrying capacity
Be sure to secure the TV.
Secure the TV to the TV Stand using the supplied anchor
attachments. If the TV is not installed securely, it may fall, or
the TV Stand may topple over, and cause injury.
Do not apply weight to the glass or
subject it to any kind of impact.
Do not apply weight to the TV Stand with your hand when
installing the TV. Do not hit the TV Stand with hard objects,
such as a screwdriver, etc. The glass may break and cause
injury.
When carrying the TV Stand
Trying to move the TV Stand alone, or without following the
proper procedures, may cause injury. To avoid this, be sure to
follow the advice given below.
• Be sure that two or more persons carry the TV Stand, and
only after removing the TV, connected equipment and
glass shelves.
• Do not drag the TV Stand. The base parts of the TV Stand
may come off and damage the floor.
• Be careful not to allow your hands or feet to be pinched
under the Base Board.
• Do not grab the glass shelf when carrying the TV Stand.
Do not place any equipment
which exceeds the
maximum weight for each
shelf as indicated in the
illustration.
Otherwise, the shelves may
break.
30 kg (66 lb 2 oz)
Notes on installation
• When assembling, lay the packing materials on the floor to
avoid damage to the floor.
• Install the TV Stand on a solid and flat floor. Do not allow
the TV Stand to be installed at an angle or incline. To
avoid this, observe the following precautions.
– Do not install the TV Stand in a place subject to direct
sunlight or near a heater.
– Do not install the TV Stand in a hot or humid place, or
outdoors.
Note on use
To keep the TV Stand clean, occasionally wipe it with a dry
soft cloth. Stubborn stains may be removed by wiping with a
cloth slightly dampened with mild soap. Be sure to dry the
area afterwards with a dry soft cloth. Do not use chemicals,
such as thinner or benzine, as they damage the finish of the
TV Stand.
4 (US)
Page 5
To Sony dealers
Step 1:
Be sure to thoroughly read the
safety precautions described
previously and pay special
attention to safety during the
installation, maintenance,
checking, and repair of this
product.
Be sure that two or more persons do
the installation work.
Be sure that two or more persons install the TV on the TV
Stand. If one person does the installation work alone, this
may result in an accident or injury. Be sure to keep children
away during the installation.
Be sure to assemble the TV Stand
securely following the instructions.
If a screw is not tightened securely, or
it has fallen out, it may cause the TV
Stand to topple over. This may cause
damage or injury.
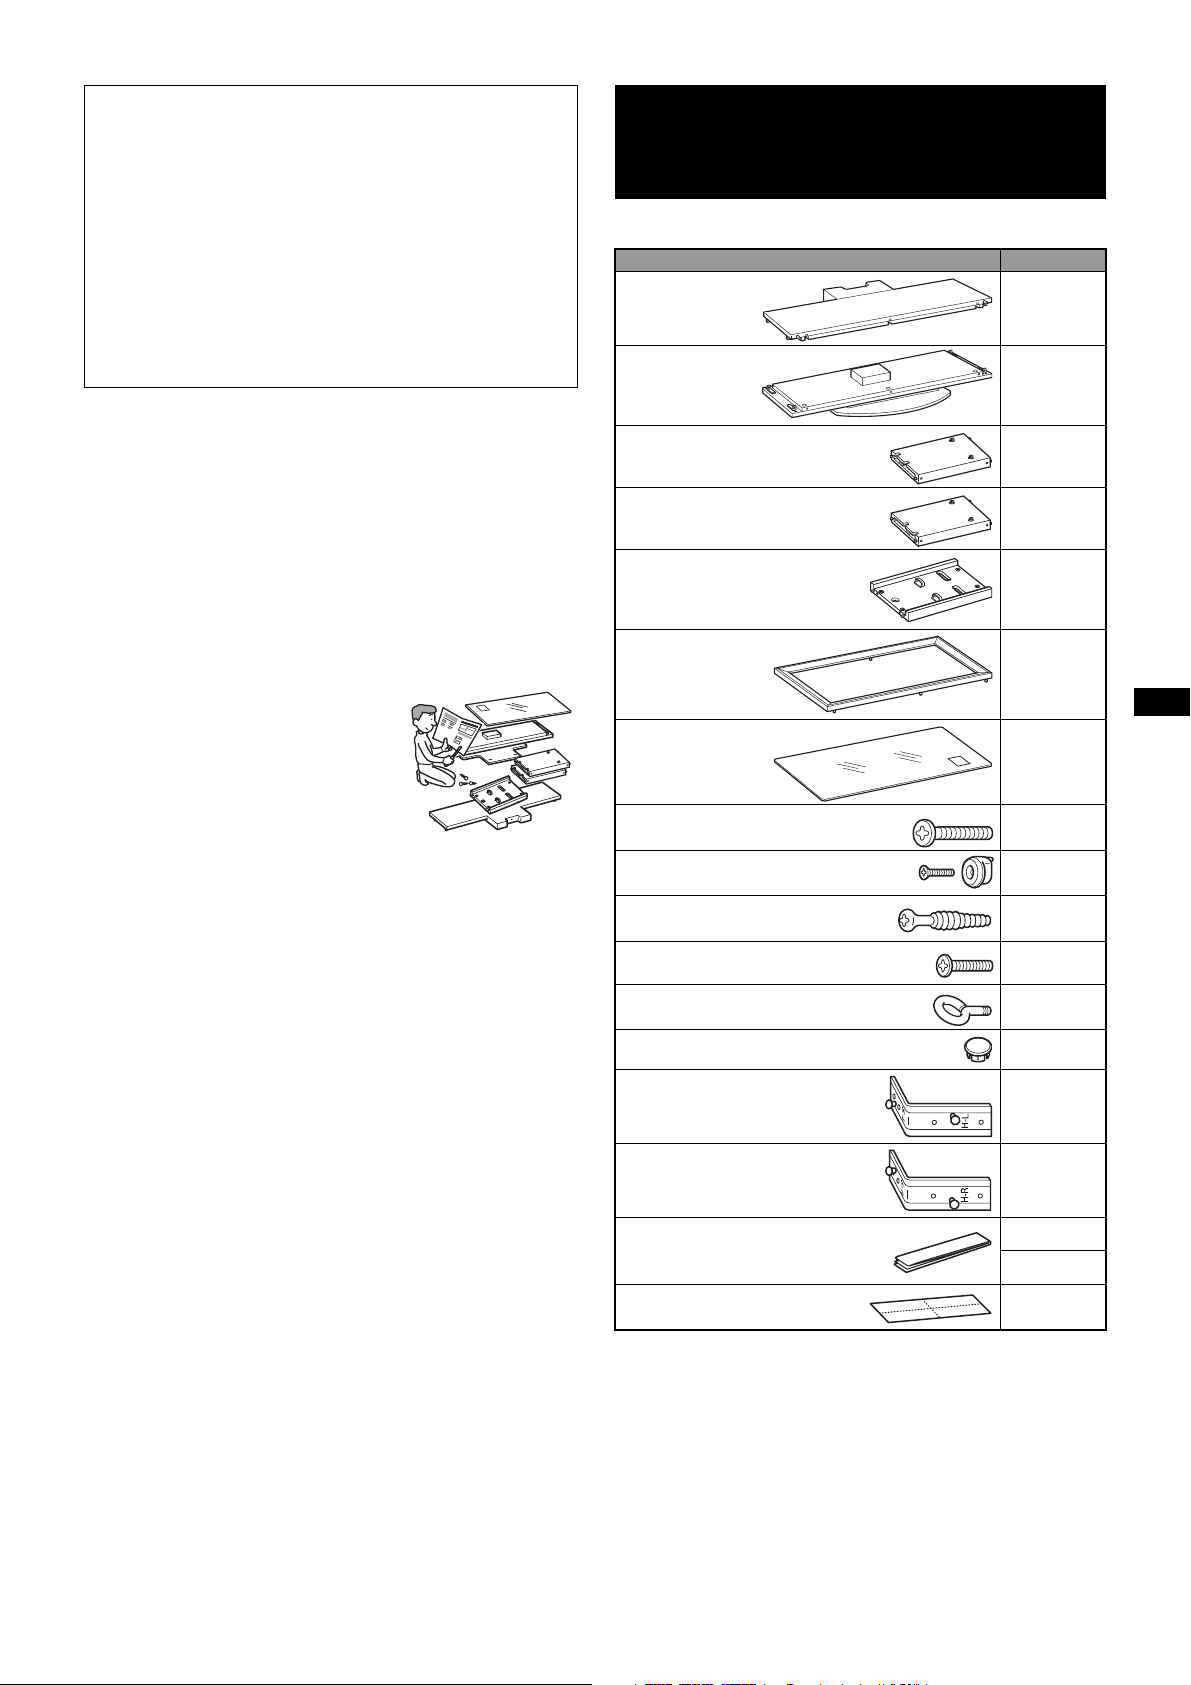
Checking the parts
Name Quantity
Top Board
Base Board
Side Pillar (L)*
Side Pillar (R)*
Rear Pillar
Front Panel
Glass Shelf
1
1
1
1
1
1
1
1
1
Be careful not to injure your hands
or fingers while assembling.
Be careful not to pinch your fingers or hands when
assembling the TV Stand and installing the TV.
Be sure to install the TV securely
following the instructions.
Tighten the screws securely. If the TV is not installed
securely, it may fall and cause injury.
Screw (+PWH5 × 25)
Screw (+K4 × 20) + Sleeve
Cam-lock screw
Screw (+P4 × 15)
Anchor bolt
Screw cap
Speaker Hook (L)
Speaker Hook (R)
Paper template
Tape
1
The illustrations above are for SU-FL300L. This differs
*
from SU-FL300M. For SU-FL300M, there is a cutout part
on the side of the Side Pillar.
2
For SU-FL300M, three paper templates are provided, one
*
for each TV size (32/40/46 inch).
3
*
For SU-FL300L, two paper templates are provided, one
for each TV size (46/52 inch).
3*
2*
8
2
4
4
2
3
1
1
2
3
1
Be sure to have a Phillips screwdriver that fits the screws
indicated above prior to the assembly.
5 (US)
Page 6
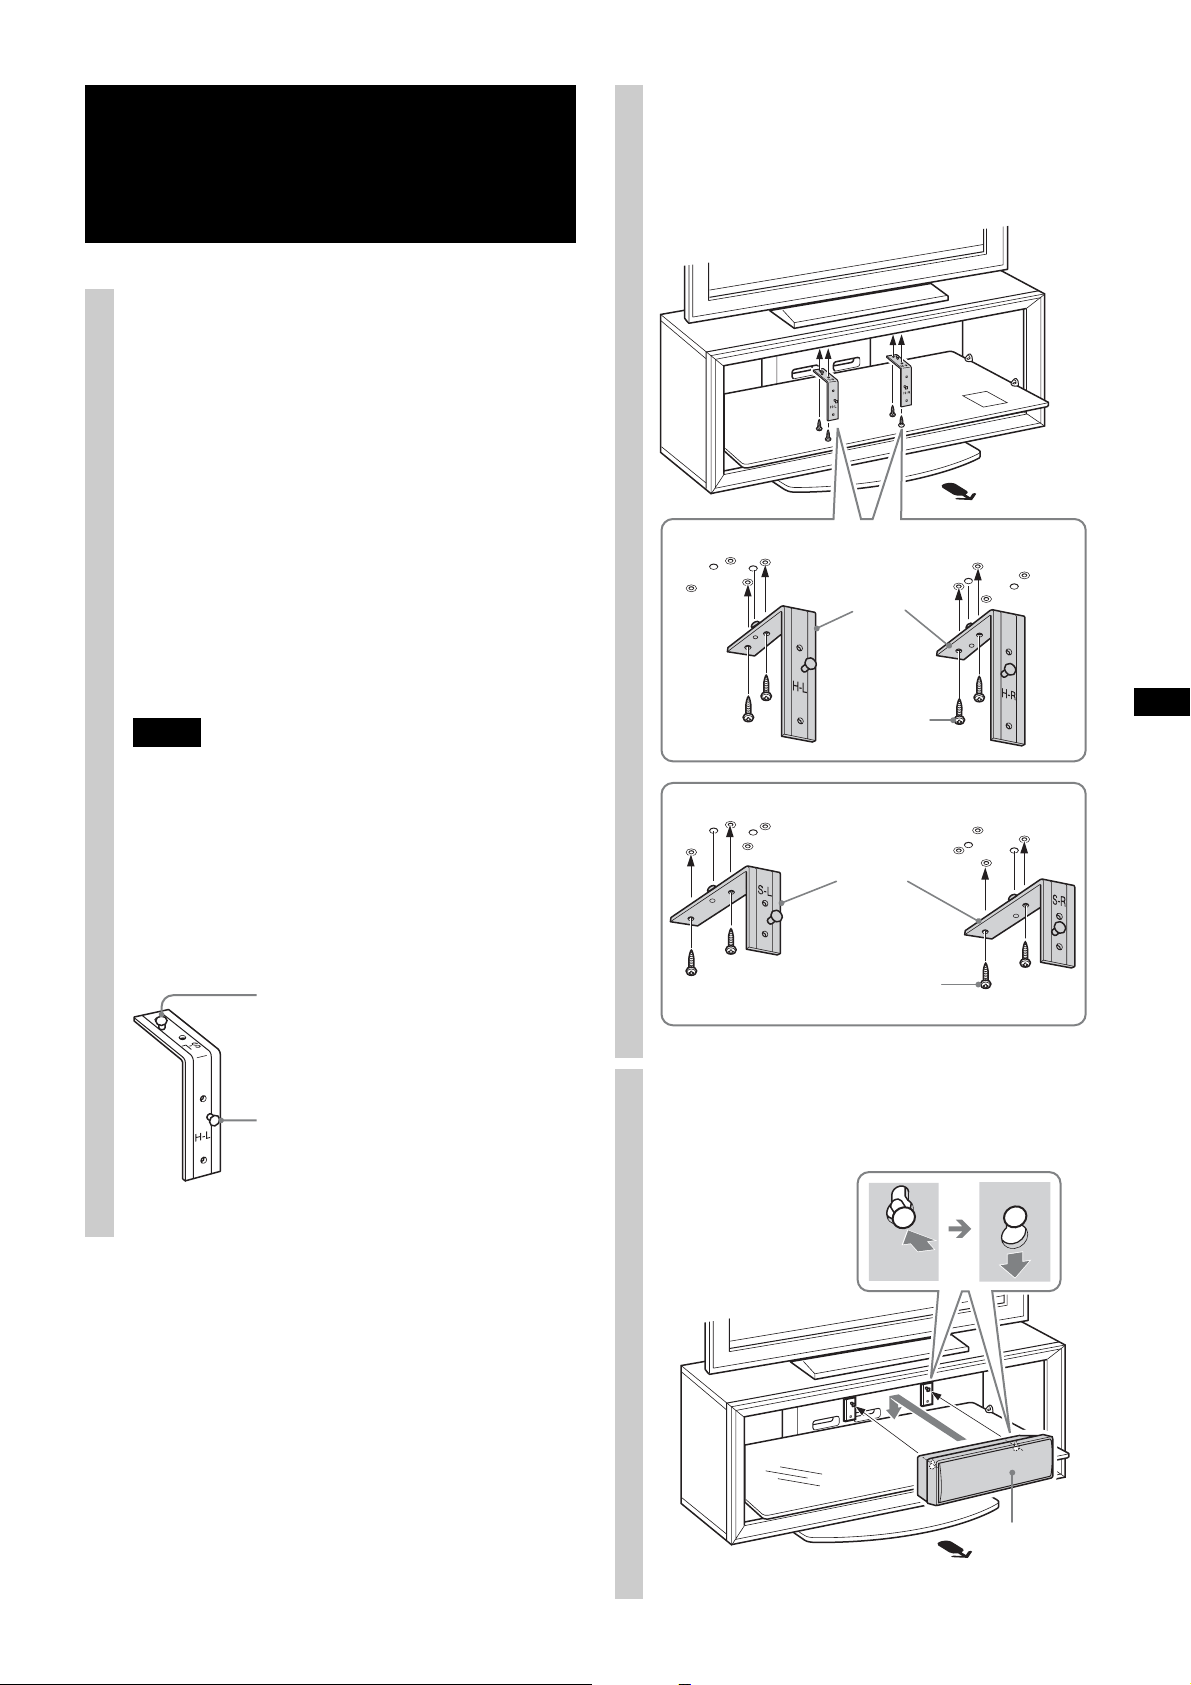
Step 2:
Assembling the TV
2 Attach the Rear Pillar to the Base Board and secure
the two Cam-lock screws with a screwdriver.
Stand
WARNING
If you allow the AC power cord to be pinched under or
between pieces of equipment, this may result in a short
circuit or an electric shock. If you stumble over the AC
power cord or the connecting cable, the TV Stand may
topple over and cause injury.
Decide on the installation location and lay the TV
Stand down before installing the TV.
Since the TV is heavy, it is recommended that you decide
on the installation location beforehand, and assemble the
TV Stand on site.
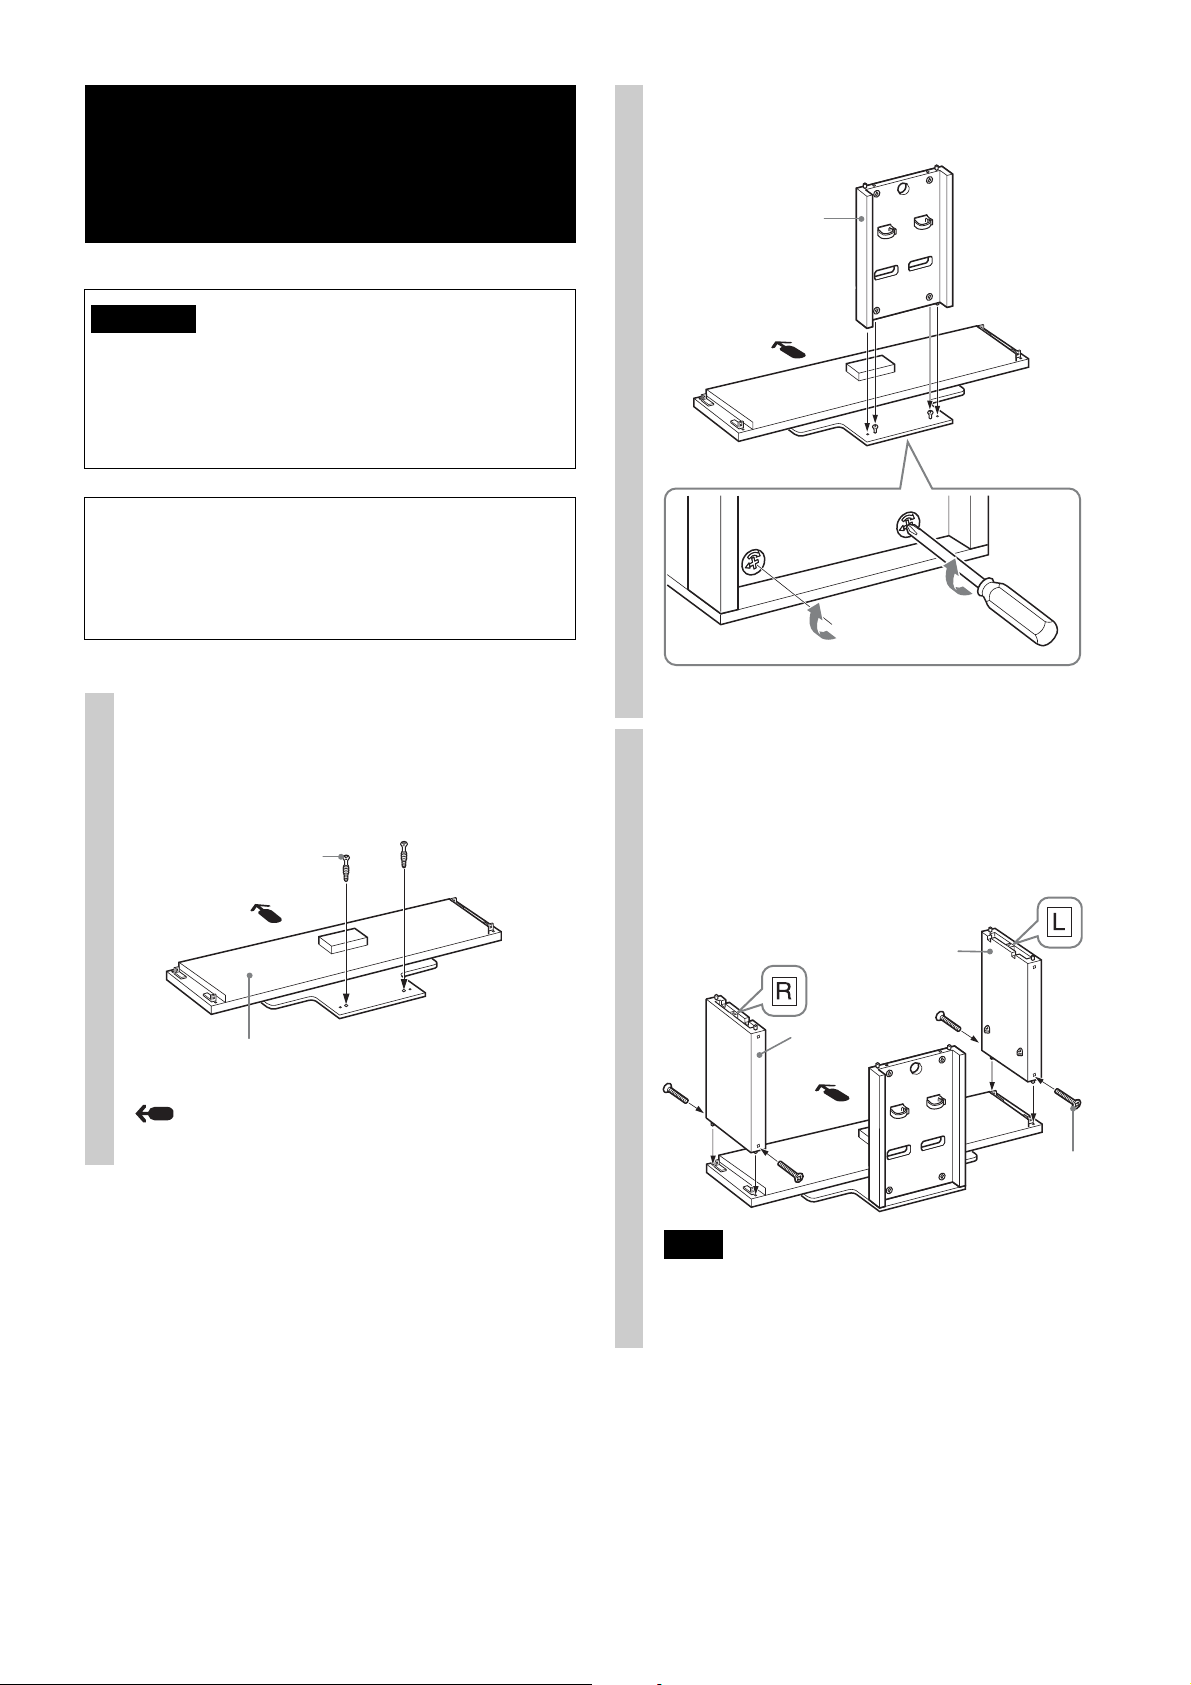
Attach the Rear Pillar to the Base
1
Board.
1 Tighten the two supplied Cam-lock screws to the
Base Board.
Cam-lock screw
Rear Pillar
Attach the Side Pillars to the
2
Base Board.
Secure the Side Pillars and the Base Board with the
four supplied screws (+PWH5 × 25).
Base Board
Arrow direction shows front of the TV Stand.
Side Pillar (L)
Side Pillar (R)
Screw
(+PWH5 × 25)
Note
There are differences between the left and right pillars.
Be sure to install each pillar on the correct side.
6 (US)
Page 7
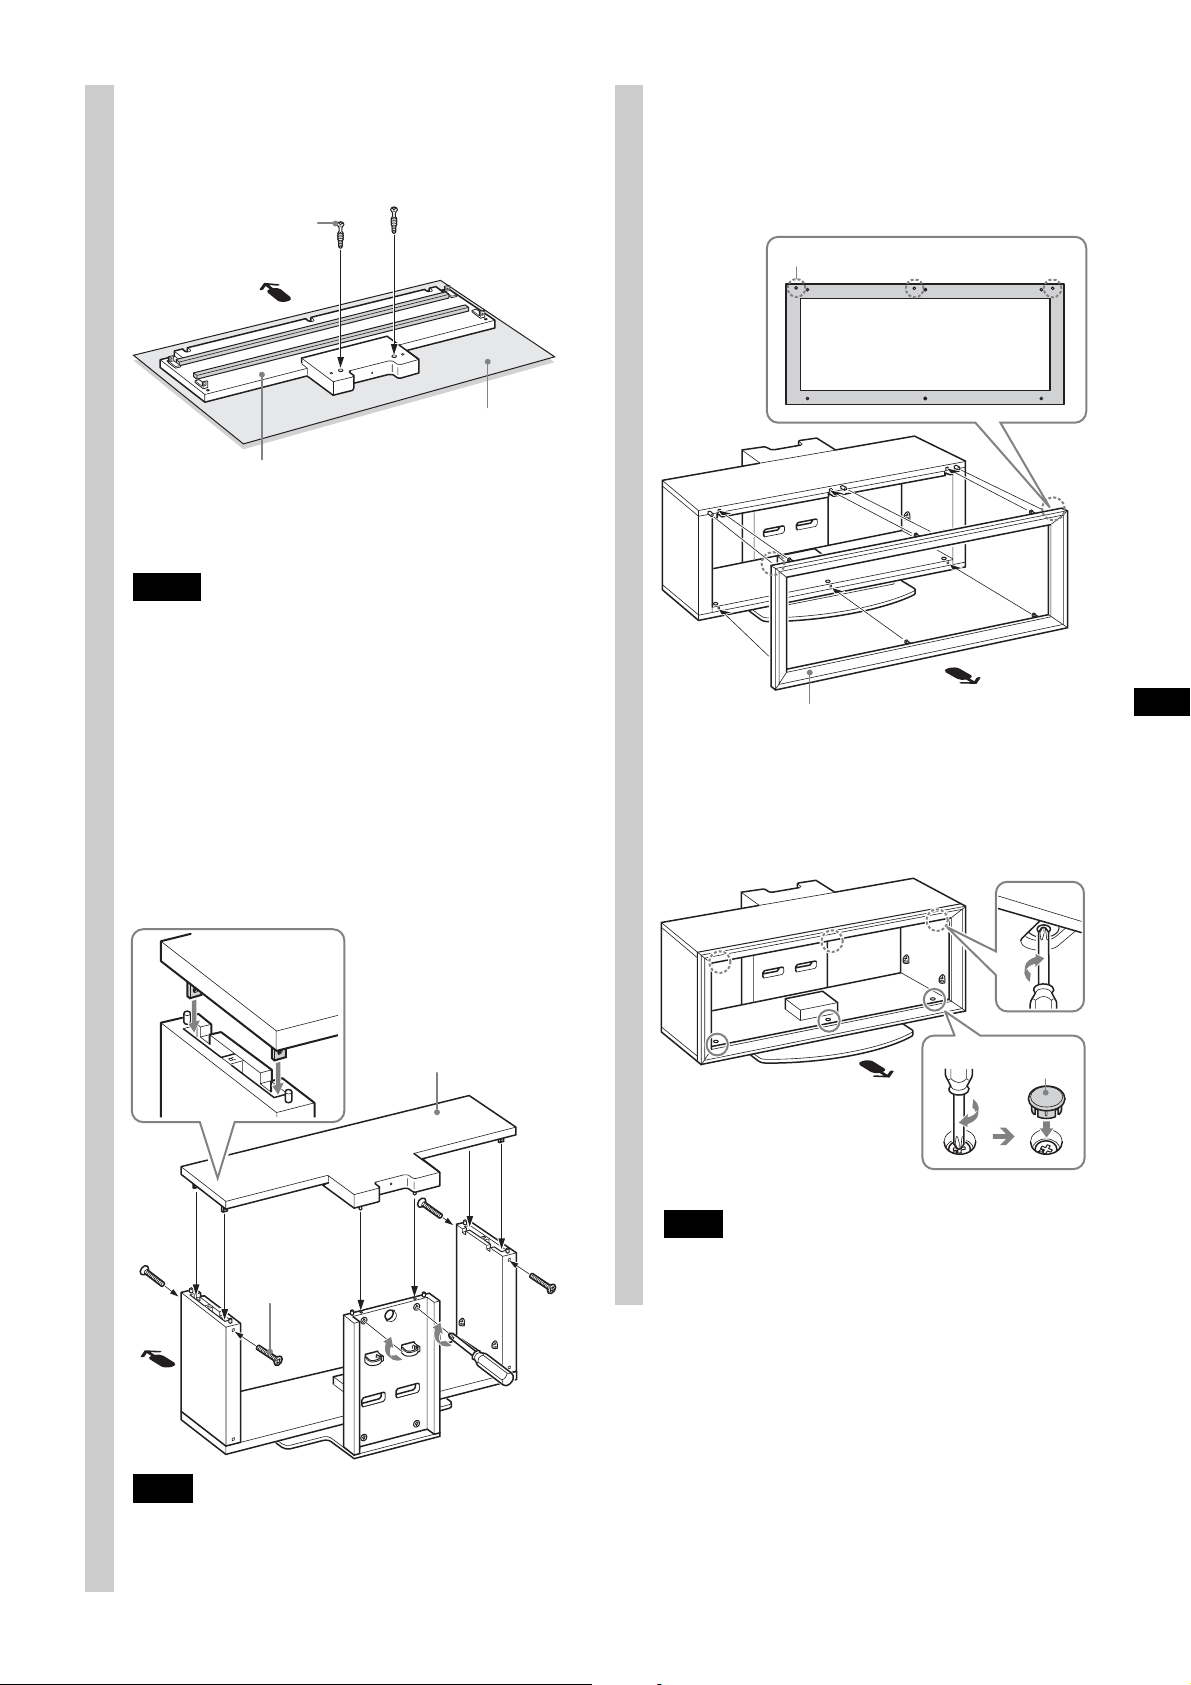
Attach the Top Board.
3
1 Tighten the two supplied Cam-lock screws to the
Top Board .
Cam-lock screw
Soft cloth
Top Board
The illustration shown above is SU-FL300L as an
example. For SU-FL300M, there is only one
reinforcing bar on the Top Board.
Notes
• To prevent damaging the glossy surface of the Top Board,
make sure to clean and place a soft cloth on the work
surface.
• If you attach the Home Theatre System to the TV Stand,
also refer to “Installing the Center Speaker (For Home
Theatre Systems only)” on page 11.
Attach the Front Panel to the TV
4
Stand.
1 Align the three dowels of the TV Stand with the
three holes of the Front Panel.
Dowel hole
Front Panel
2 Align and insert fixing brackets either side of the
Top Board into the Side Pillars.
3 Secure the Side Pillars with the four supplied screws
(+PWH5 × 25). And secure the two remaining Camlock screws on the back side of the Rear Pillar.
Top Board
Screw
(+PWH5 × 25)
2 Turn the six Cam-lock screws on the Top and the
Base Boards clockwise to secure the Front Panel.
And attach the three supplied screw caps to the
three bottom screws.
Screw cap
Note
Be sure to attach the Front Panel in the correct direction.
Note
Be careful not to pinch your fingers when attaching the Top
Board.
(Continued)
7 (US)
Page 8
Attach the Glass Shelf.
5
1 Fully insert the Glass Shelf into the Rear Pillar until
it touches the Rear Pillar.
Step 3:
Preparing for the
installation of the TV
Caution label
Glass Shelf
Note
Attach the Glass Shelf to the TV Stand with the Caution label
at the front right, as shown in the illustration.
2 Tighten the four screws on the Side Pillars to secure
the Glass Shelf and the TV Stand.
Attach the sleeves to the Top
1
Board.
Insert the sleeves of the two supplied screws (+K4 ×
20) into the two front-most holes, then secure with the
screws.
Screw
(+K4 × 20)
+
Sleeve
Note
The other two rear-most holes of the Top Board are not used.
Paste the supplied paper
2
template on the Top Board.
1 Choose the paper template of your TV size from the
supplied paper templates and align the right corner
edges of the paper template with the right corner of
the Top Board.
2 Tape the paper template to the Top Board with the
supplied tape.
Check your TV size.
Paper template
Tap e
8 (US)
Page 9
Step 4:
Step 5:
Installing the TV
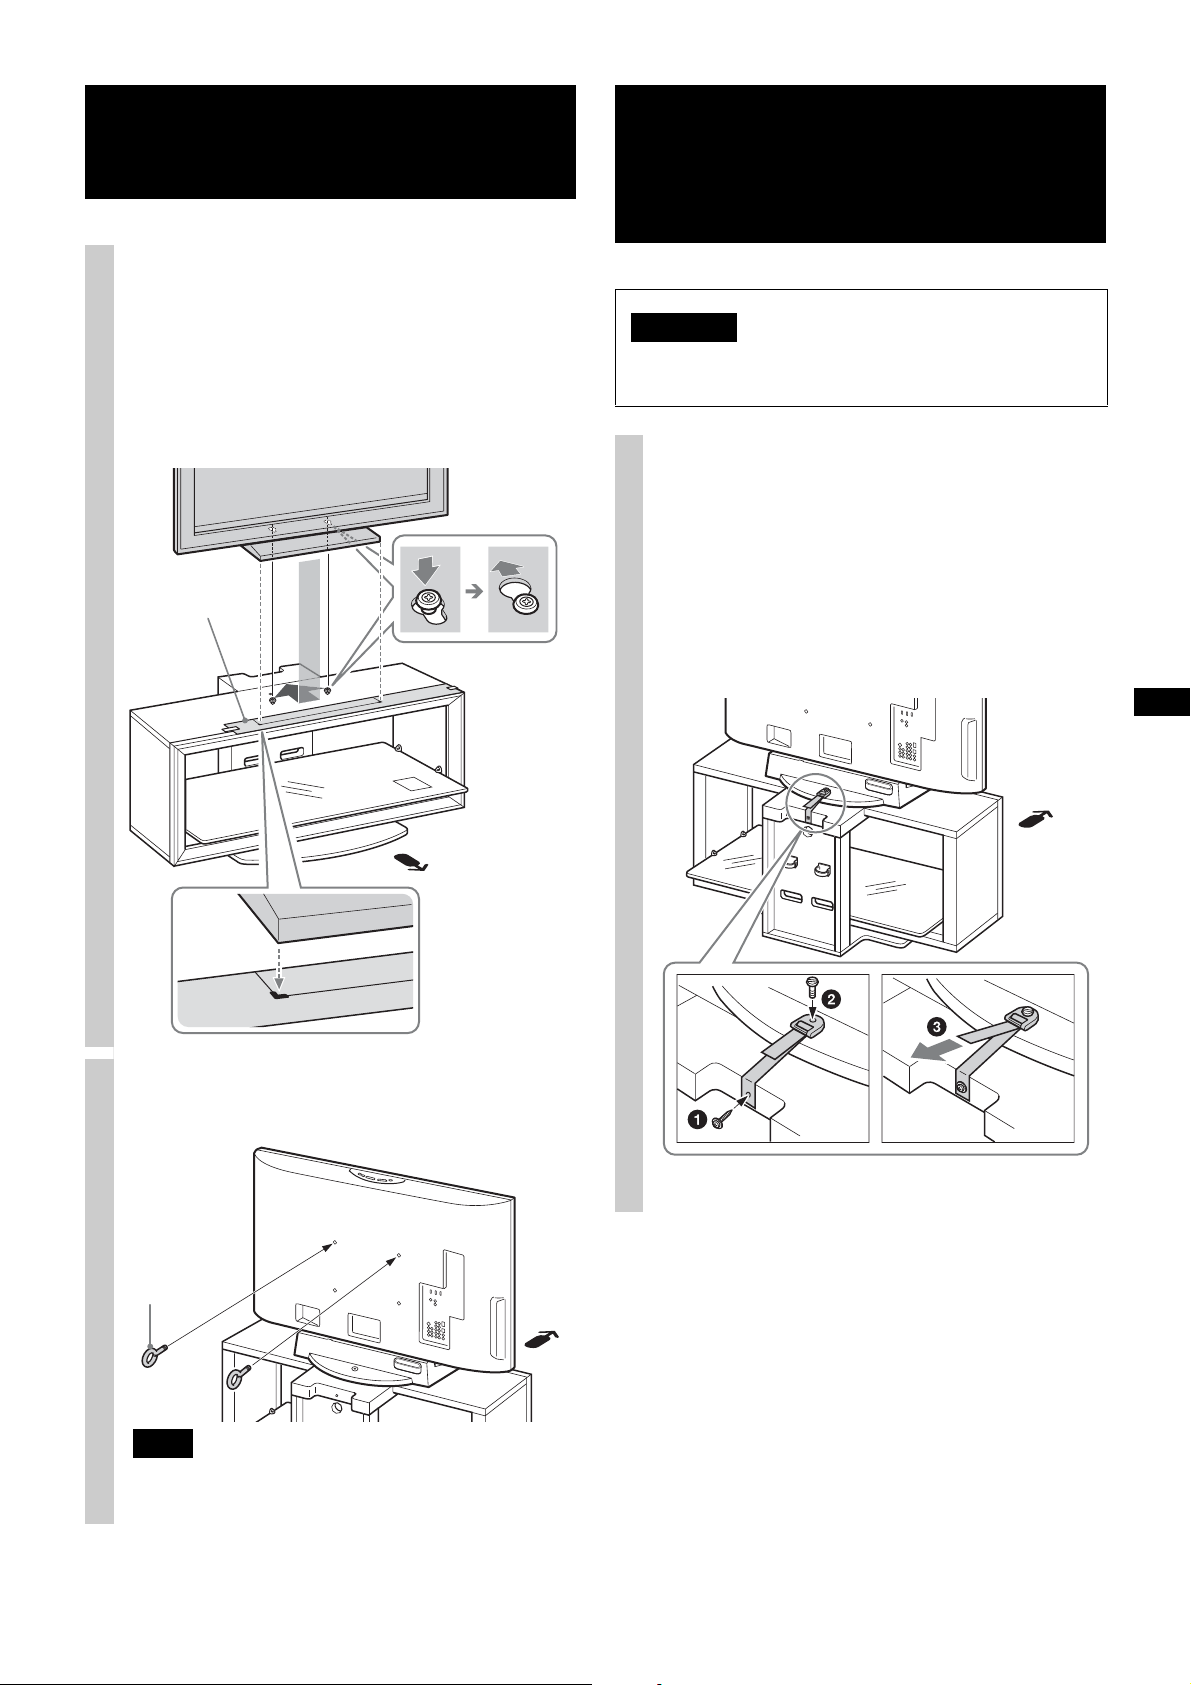
Install the TV onto the TV Stand.
1
1
Referring to the outline of the supplied paper template,
match the outline of the Table-Top Stand to the paper
template outline, so that the holes at the bottom of the
Table-Top Stand align to the sleeves which were
attached in part 1 of the Step 3.
2 Slide the TV back to lock into place.
3 Remove the paper template from the Top Board.
Paper template
Safety measures to
prevent toppling over
WARNING
Be sure to take measures to prevent the TV Stand from
toppling over, and causing possible injury and damage.
Attach the support belt.
1
1 Screw the support belt (supplied with the TV) to the
TV Stand with the wood screw (supplied with the
TV) using the screwdriver.
2 Attach the support belt to the Table-Top Stand, and
screw the belt with the securing screw (supplied
with the TV) using a coin, etc.
3 Adjust the length by tightening the support belt
while holding the Table-Top Stand.
Attach the anchor bolts.
2
Secure the two supplied anchor bolts to the rear of the TV.
Anchor bolt
Note
If the two anchor bolts are not used to secure the TV, it may
fall and cause injury.
(Continued)
9 (US)
Page 10
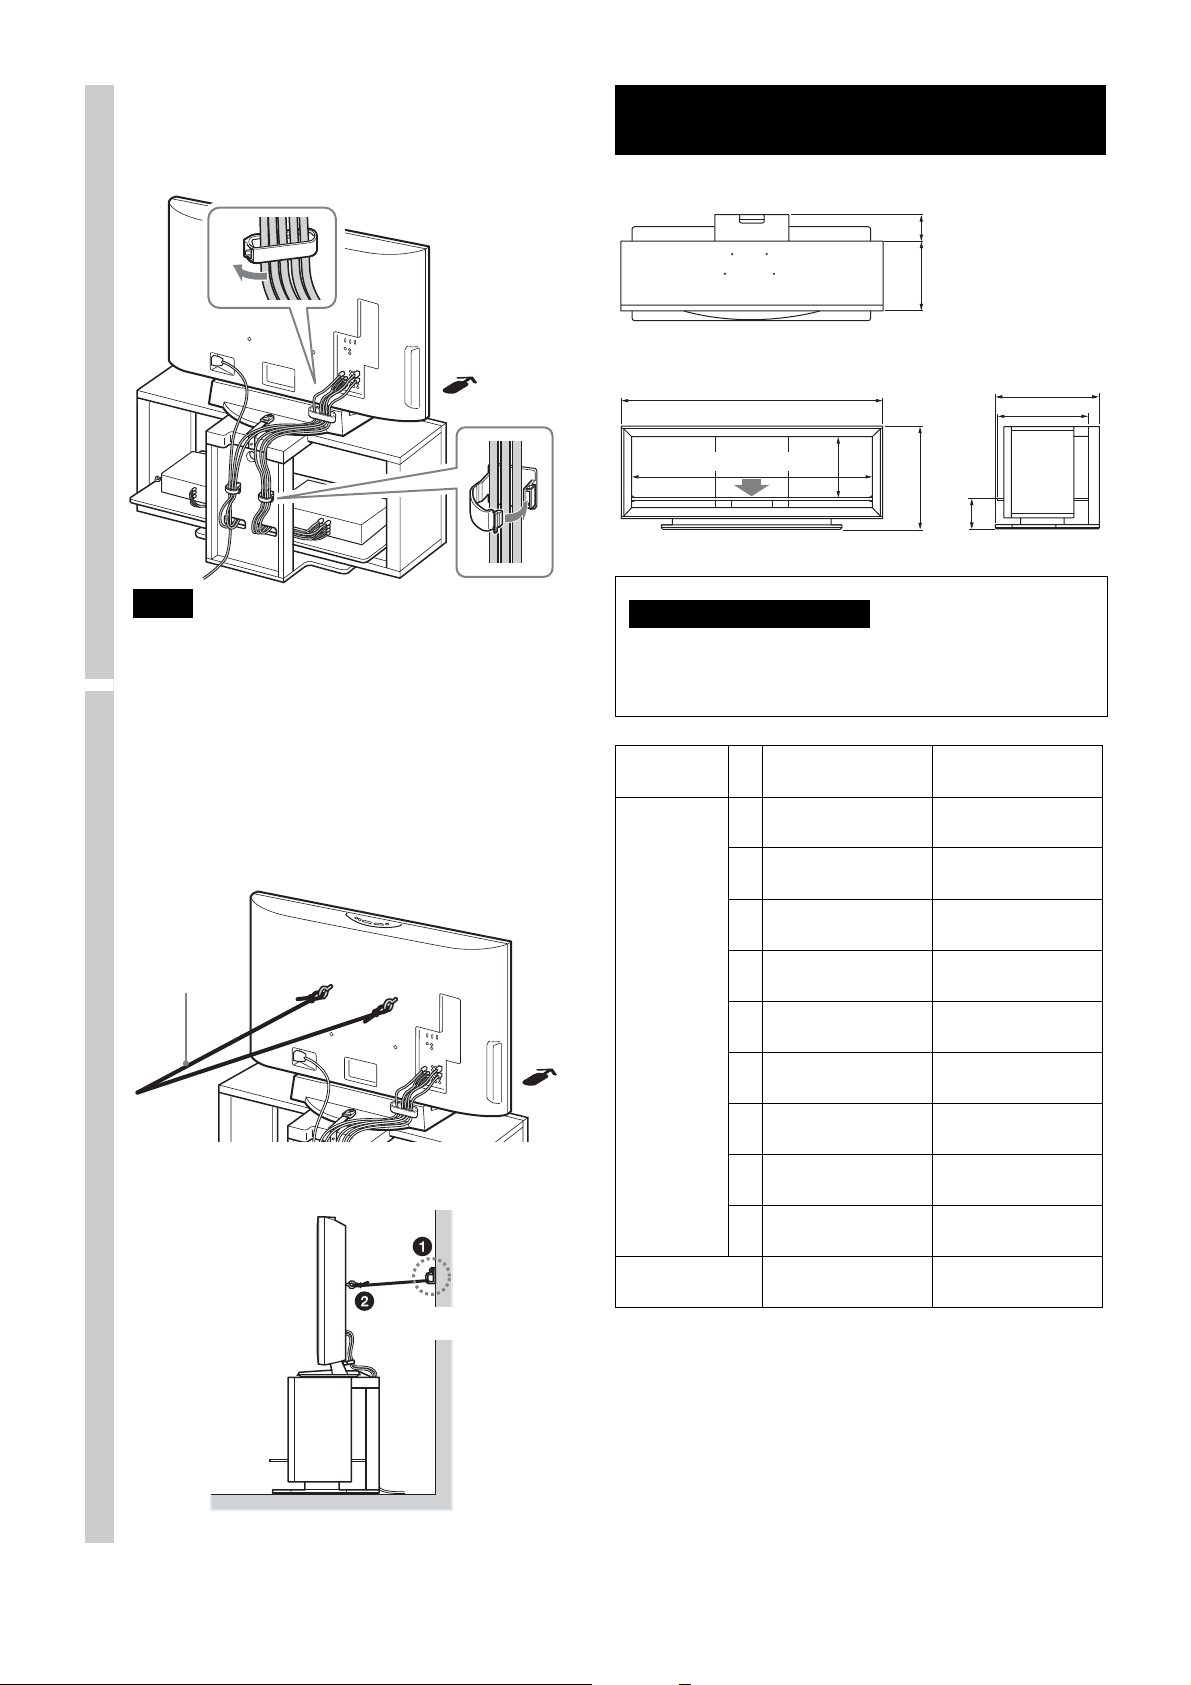
Connect the cables.
2
Run the cables through the cable holders and the Rear
Pillar holes.
Specifications
H
I
Note
If the cables are not installed properly, they might be pinched
and damaged, and could result in electric shock, etc.
Anchor the TV to the wall.
3
Prepare a strong, commercially-available rope or chain
and wall anchor bracket for this purpose.
1 Secure the wall anchor bracket to a solid wall.
2 Pass the rope or chain through both holes of the
anchor bolts and then tighten the other end of the
rope or chain to the wall anchor bracket.
Strong rope or
chain
Wall anchor bracket
A
30 kg (66 lb 2 oz)
D
Note on carrying capacity
Do not place any equipment on the Glass Shelf which
exceeds its maximum weight, as it may break and cause
injury.
Dimensions:
mm (inches)
Weight: 35 kg
Design and specifications are subject to change without
notice.
A 1,035
B 503
C 487
D 895
E 303
F 418
G 146
H 120
I 272
E
SU-FL300M SU-FL300L
(40 3/4)
(19 7/8)
(19 1/4)
(35 1/4)
(12)
(16 1/2)
(5 3/4)
(4 3/4)
(10 3/4)
(77 lb 3 oz)
B
G
(114 lb 11 oz)
C
F
1,280
(50 1/2)
503
(19 7/8)
518
(20 1/2)
1,140
(45)
303
(12)
468
(18 1/2)
146
(5 3/4)
130
(5 1/8)
340
(13 1/2)
52 kg
10 (US)
Page 11
Installing the Center
Speaker (For Home
Theatre Systems only)
The Center Speaker model SS-CT71/CNP2200 is for
the following Home Theatre System models:
DAV-HDX665
DAV-HDX466
DAV-HDX465
DAV-HDX267W
DAV-HDX266
DAV-HDX265
DAV-HDZ235
The Center Speaker model SS-CT72/CT74 is for the
following Home Theatre System models:
DAV-HDX900W
DAV-HDX501W
DAV-HDX500
Notes
• The products above are subject to change without notice,
may be out of stock, or discontinued.
• Certain models may not be available in certain regions.
HT-SF2000
DAV-DZ556KB
DAV-DZ250KW
DAV-DZ250K
DAV-DZ151KB
DAV-DZ150K
DAV-DZ1000
DAV-DZ850KW
Attach the Speaker Hook.
1
Secure each Speaker Hook with the supplied screws
(+P4 × 15) (two screws each for left/right) to the under
side of the Top Board.
SS-CT71/CNP2200
Speaker
Hook
Screw
(+P4 × 15)
SS-CT72/CT74
Before attaching the Speaker Hook:
For SS-CT71/CNP2200, the H-L/H-R markings should
face forward.
For SS-CT72/CT74, the S-L/S-R markings should face
forward.
Speaker hook screw for
SS-CT72/CT74
Speaker hook screw for
SS-CT71/CNP2200
Speaker
Hook
Screw
(+P4 × 15)
Hang the Center Speaker onto
2
the hook screws as shown.
Center Speaker
11 (US)
Page 12

Merci d’avoir fait l’acquisition de ce
produit.
ATTENTION
À l’attention des clients
Ce produit doit être installé uniquement par des
représentants agrées du service technique Sony, car il
exige la présence d’au moins deux personnes, des
mesures de sécurité, des connaissances techniques et une
attention particulière.
AVERTISSEMENT
Le non-respect des consignes de sécurité ou l’usage incorrect
de ce produit peut provoquer des blessures graves ou un
incendie.
Ce mode d’emploi contient la procédure d’utilisation du
produit et les précautions essentielles pour éviter tout
accident. Lisez attentivement ce manuel et utilisez
correctement le produit. Conservez ce manuel pour pouvoir
le consulter ultérieurement.
À l’attention des détaillants Sony
Un téléviseur doit être installé par deux personnes au moins,
en prenant les précautions d’usage et en utilisant les
techniques appropriées. Lors de l’installation d’un téléviseur,
reportez-vous au présent mode d’emploi. Sony décline toute
responsabilité en cas d’accident ou de dommages provoqués
par une installation ou une utilisation incorrecte. Le présent
mode d’emploi doit être remis au client après installation.
À propos de la sécurité
Produits spécifiés
Les produits suivants sont sujets à modification sans préavis.
Il est possible que certains modèles ne soient plus en stock ou
que leur production ait été arrêtée, ou encore qu’ils ne soient
plus disponibles dans certaines régions.
Téléviseur couleur ACL
KDL-46W3000
KDL-46V3000
KDL-46VL130
KDL-46S3000
KDL-40W3000
KDL-40V3000
SU-FL300M
SU-FL300L
Ce support TV est conçu pour être utilisé avec les produits
spécifiés ci-dessus. Pour les autres téléviseurs, reportez-vous
à leur mode d’emploi pour vérifier si vous pouvez utiliser ce
support TV.
Certains téléviseurs sont fournis avec un livret qui explique
comment installer le support TV.
KDL-40VL130
KDL-40D3000
KDL-40S3000
KDL-40SL130
KDL-32XBR4
KDL-32S3000
KDL-32SL130
KDL-52W3000
KDL-52WL130
KDL-46W3000
KDL-46V3000
KDL-46VL130
KDL-46S3000
Les produits Sony sont conçus pour vous offrir le maximum
de sécurité. L’utilisation incorrecte peut provoquer des
blessures graves en cas d’incendie, d’électrocution, ou si
l’appareil tombe ou bascule. Assurez-vous d’observer les
consignes de sécurité pour éviter de tels accidents.
2 (FR)
Page 13

AVERTISSEMENT
Le non-respect des consignes suivantes peut
être fatal ou entraîner des blessures graves en
cas d’incendie, d’électrocution, ou si l’appareil
bascule.
Ne montez pas sur le support TV.
Vous risquez de tomber ou de briser le
verre et de vous blesser.
Les produits ne doivent être installés
que par des représentants agréés du
service technique Sony.
Le téléviseur et son support sont très lourds ; toute installation
par un tiers non agréé risque de provoquer des blessures graves.
Assurez-vous de prendre toutes les
mesures nécessaires afin d’éviter
que le support TV ne bascule.
Dans le cas contraire, le téléviseur risque de basculer et de
provoquer des blessures.
Ancrez le téléviseur sur un mur, etc., afin d’éviter qu’il ne bascule.
Assurez-vous d’installer le support
TV sur une surface plane et solide.
N’installez pas le support TV s’il penche d’un côté. Sinon, le
support TV risque de basculer ou le téléviseur risque de tomber.
Vous pourriez endommager le téléviseur ou vous blesser.
Si vous installez le support TV sur une surface moelleuse,
comme un tapis ou une moquette, posez au préalable une
plaque à l’emplacement concerné.
N’utilisez pas de support TV fissuré.
N’utilisez pas le support TV s’il est
fissuré. Le verre risque de casser et de
faire basculer le téléviseur, provoquant
ainsi des blessures graves ou des dégâts.
Support TV fissuré
Ne vous appuyez pas sur le téléviseur
et ne vous y suspendez pas.
Le support TV risque de basculer et le
téléviseur risque de tomber, ce qui peut
provoquer des blessures graves, voire la mort.
Ne bouchez pas les orifices de
ventilation du téléviseur.
Si vous couvrez les orifices de ventilation du
téléviseur (avec un drap ou autre), le
téléviseur risque de surchauffer et de
provoquer un incendie.
Assurez-vous de ne pas coincer le
cordon d’alimentation CA ou le câble
de raccordement.
• Assurez-vous de ne pas coincer le cordon d’alimentation
CA ou le câble de raccordement lorsque vous installez le
téléviseur sur le support TV. L’endommagement du cordon
d’alimentation CA ou du câble de raccordement peut
entraîner un incendie ou l’électrocution.
• Ne marchez pas sur le cordon
d’alimentation CA ou sur le câble de
raccordement lorsque vous transportez
le support TV. Le cordon
d’alimentation CA ou le câble de
raccordement peuvent être endommagés, entraînant un
incendie ou l’électrocution.
Assurez-vous de ne pas vous
prendre les pieds dans le cordon
d’alimentation CA ou dans les câbles
de raccordement.
Vous pourriez tomber, le support TV
pourrait basculer et vous risqueriez de
vous blesser.
FR
Français
Assurez-vous que les enfants ne
grimpent pas sur le support TV et
empêchez-les de se faufiler entre les
étagères.
Si des enfants grimpent sur le support TV ou
sur les étagères, ils risquent de briser le verre,
de faire basculer le support TV ou de faire
basculer le téléviseur, ce qui peut provoquer
des blessures graves, voire la mort.
Ne déplacez pas le support TV si le
téléviseur est fixé dessus ou si des
appareils y sont raccordés.
Si vous déplacez le support TV lorsque le
téléviseur est fixé dessus, vous pourriez
vous faire mal au dos, le support TV
pourrait tomber et vous risqueriez de vous
blesser. De plus, les appareils raccordés
pourraient tomber et briser l’étagère en
verre.
3 (FR)
Page 14

ATTENTION
Le non-respect des précautions suivantes peut
entraîner des dommages corporels ou
matériels.
N’installez pas d’autre équipement
que le produit spécifié.
• Ce support TV est conçu pour être utilisé uniquement avec
le produit spécifié. Si vous installez un autre équipement
que celui spécifié, il risque de tomber ou de se briser et de
provoquer des blessures.
• Ne placez aucun objet sur le support TV, tels que vases,
poteries, etc.
• Ne démontez pas sur le support TV.
• Ne placez aucun objet chaud directement sur le support
TV. La chaleur risque de décolorer ou de déformer le
support TV.
• Ne placez aucun objet sur le support TV pouvant briser le
verre.
Assurez-vous de bien fixer le
téléviseur.
Fixez le téléviseur au support TV à l’aide des fixations
fournies. Si le téléviseur n’est pas installé correctement, il
risque de tomber ou le support TV risque de basculer,
entraînant des blessures.
Ne vous appuyez pas sur le verre et
ne le soumettez pas à des chocs.
Ne vous appuyez pas sur le support TV avec les mains lors de
l’installation du téléviseur. Ne cognez pas le support TV avec
des objets durs, tels qu’un tournevis, etc. Le verre risque de
se briser et de provoquer des blessures.
Transport du support TV
Vous risquez de vous blesser si vous essayez de déplacer
vous-même le support TV ou si vous ne tenez pas compte des
procédures appropriées énoncées ci-après. Afin d’éviter cela,
suivez les conseils ci-dessous.
• Assurez-vous qu’au moins deux personnes transportent le
support TV et que vous avez préalablement retiré le
téléviseur, les appareils qui lui sont raccordés et les
étagères en verre.
• Ne tirez pas sur le support TV. Les pièces de la base du
support TV risquent de s’enlever et vous risquez
d’endommager votre sol.
• Assurez-vous de ne pas coincer vos mains ou vos pieds
sous le panneau inférieur.
• Lorsque vous transportez le support TV, ne le tenez pas
par l’étagère en verre.
Ne soumettez pas le verre à un choc
trop violent.
Même si ce support TV est en
verre trempé, il est nécessaire de
le manier avec précaution.
Si le verre rompt, les bris de
verre peuvent provoquer des
blessures. Il est par conséquent
important de respecter les
consignes de sécurité cidessous.
• Ne heurtez pas le verre et ne
laissez aucun objet pointu
tomber dessus. Évitez les
chocs violents.
• Ne rayez pas le verre et
évitez de le heurter avec des objets pointus.
• Ne frappez pas les bords du verre avec un objet lourd, tel
qu’un aspirateur.
Remarque à propos de la capacité de
charge
Ne placez aucun
équipement qui dépasse la
capacité de charge
maximale de chaque
étagère, comme indiqué sur
l’illustration.
Sinon, les étagères risquent
de se rompre.
30 kg (66lb 2 oz)
Remarques à propos de l’installation
• Lorsque vous montez le support TV, protégez le sol avec
les emballages.
• Installez le support TV sur une surface plane et solide. Le
support ne doit jamais être installé selon un angle ou
incliné. Pour éviter cela, respectez les consignes de
sécurité suivantes.
– N’installez pas le support TV dans un endroit exposé à
la lumière directe ou à proximité d’une source de
chaleur.
– N’installez pas le support TV dans un endroit exposé à
la chaleur ou à l’humidité, ni à l’extérieur.
Remarque à propos de l’utilisation
Pour maintenir le support TV propre, nettoyez-le de temps en
temps avec un chiffon doux et sec. Les taches tenaces
peuvent être nettoyées avec un chiffon légèrement imprégné
de savon au pH neutre. Assurez-vous d’essuyer ensuite la
surface avec un chiffon doux et sec. N’utilisez pas de
produits chimiques, tels qu’un diluant ou de l’essence, car ils
endommageront la surface du support TV.
4 (FR)
Page 15

À l’attention des
Étape1:
revendeurs Sony
Lisez attentivement les consignes
de sécurité énoncées ci-dessus et
soyez particulièrement attentif lors
de l’installation, de la
maintenance, du contrôle et de la
réparation de ce produit.
Assurez-vous que le travail
d’installation soit effectué par au
moins deux personnes.
L’installation du téléviseur sur le support TV doit être
effectuée par au moins deux personnes. Si une seule personne
se charge de l’installation, un accident ou des blessures
peuvent être occasionnés. Assurez-vous d’éloigner les
enfants lors de l’installation.
Assurez-vous de monter le support
TV correctement en suivant les
instructions.
Si une vis n’est pas correctement
serrée ou si elle est tombée, le support
TV risque de basculer. Vous pourriez
vous blesser ou endommager le
téléviseur.
Vérification des pièces
Nom Quantité
Panneau
supérieur
Panneau
inférieur
Pilier latéral (L)*
Pilier latéral (R)*
Pilier arrière
Panneau avant
Étagère en verre
Vis (+PWH5 × 25)
Vis (+K4 × 20) + Manchon
Vis à cames
1
1
1
1
1
1
1
1
1
8
2
4
Prenez garde de ne pas vous blesser
les mains ou les doigts pendant le
montage.
Évitez de vous pincer les doigts ou les mains lorsque vous
assemblez le support TV ou installez le téléviseur.
Assurez-vous d’installer le téléviseur
correctement en suivant les
instructions.
Serrez les vis correctement. Si le téléviseur n’est pas installé
correctement, il risque de tomber et de provoquer des
blessures.
Vis (+P4 × 15)
Boulon d’ancrage
Capuchon de vis
Crochet d’enceinte (L)
Crochet d’enceinte (R)
Gabarit en papier
Bande
1
Les illustrations ci-dessus sont destinées au SU-FL300L.
*
Elles sont différentes du SU-FL300M. Le SU-FL300M
possède une découpe sur le côté du pilier latéral.
2
Sur le SU-FL300M, trois gabarits en papier sont fournis :
*
un pour chaque format de téléviseur (32/40/46 pouces).
3
*
Sur le SU-FL300L, deux gabarits en papier sont fournis :
un pour chaque format de téléviseur (46/52 pouces).
3*
2*
4
2
3
1
1
2
3
1
Vous devez disposer d’un tournevis cruciforme correspondant
aux vis indiquées avant de procéder à l’assemblage.
5 (FR)
Page 16

Étape2:
Montage du support TV
AVERTISSEMENT
Si vous coincez le cordon d’alimentation CA sous ou entre
des pièces de l’équipement, ceci peut provoquer un courtcircuit ou une électrocution. Si vous trébuchez sur le cordon
d’alimentation CA ou le câble de raccordement, le support
TV risque de basculer et de provoquer des blessures.
Choisissez l’emplacement d’installation et posez
le support TV sur le sol avant d’installer le
téléviseur.
Comme le téléviseur est lourd, il est recommandé de choisir
au préalable l’emplacement d’installation, et de monter le
support TV sur place.
2 Fixez le pilier arrière au panneau inférieur et serrez
les deux vis à cames à l’aide d’un tournevis.
Pilier arrière
Fixez le pilier arrière au panneau
1
inférieur.
1 Serrez les deux vis à cames fournies au panneau
inférieur.
Vis à cames
Panneau inférieur
Le sens de la flèche indique l’avant du support
TV.
Fixez les piliers latéraux au
2
panneau inférieur.
Fixez les piliers latéraux au panneau inférieur à l’aide
des quatre vis fournies (+PWH5 × 25).
Pilier latéral (L)
Pilier latéral (R)
Remarque
Il existe des différences entre les piliers gauche et droit.
Assurez-vous d’installer chaque pilier du côté adéquat.
Vis
(+PWH5 × 25)
6 (FR)
Page 17

Fixez le panneau supérieur.
3
1 Serrez les deux vis à cames fournies au panneau
supérieur.
Vis à cames
Tissus doux
Panneau supérieur
L’illustration ci-dessus représente le SU-FL300L à titre
d’exemple. Le SU-FL300M ne possède qu’une barre
de renforcement sur le panneau supérieur.
Remarques
• Pour éviter d’endommager la surface brillante du panneau
supérieur, assurez-vous de la nettoyer et de placer un
chiffon doux sur la surface de travail.
• Si vous raccordez le système Home Theatre au support du
téléviseur, consultez aussi « Installation de l’enceinte
centrale (pour les systèmes Home Theatre uniquement) » à
la page 11.
Remarque
Veillez à ne pas vous coincer les doigts lors de la fixation du
panneau supérieur.
Fixez le panneau avant au
4
support TV.
1 Alignez les trois goujons du support TV sur les trois
orifices du panneau avant.
Orifice de goujon
2 Alignez et insérez les supports de fixation situés de
part et d’autre du panneau supérieur dans les piliers
latéraux.
3 Fixez les piliers latéraux à l’aide des quatre vis
fournies (+PWH5 × 25). Ensuite, serrez les deux vis
à cames restantes au dos du pilier arrière.
Panneau supérieur
Vis
(+PWH5 × 25)
Panneau avant
2 Tournez les six vis à cames dans le sens des
aiguilles d’une montre sur les panneaux supérieur et
inférieur pour fixer le panneau avant. Ensuite, fixez
les trois capuchons de vis fournis aux trois vis
inférieures.
Capuchon
de vis
Remarque
N’oubliez pas de fixer le panneau avant dans le sens adéquat.
(Suite)
7 (FR)
Page 18

Fixez l’étagère en verre.
5
1 Insérez complètement l’étagère en verre dans la
rainure du pilier arrière jusqu’à ce qu’elle entre en
contact avec ce dernier.
Étiquette
« Attention »
Étagère en verre
Remarque
Installez l’étagère en verre sur le support TV en prenant soin
de la placer avec l’étiquette « Attention » vers l’avant, sur la
droite, comme indiqué ci-dessus.
2 Serrez les quatre vis sur les piliers latéraux pour
fixer l’étagère en verre et le support TV.
Étape3:
Préparation à
l’installation du
téléviseur
Fixez les manchons sur le
1
panneau supérieur.
Insérez les manchons des deux vis fournies (+K4 × 20)
dans les deux orifices situés le plus à l’avant, puis
serrez les vis.
Vis
(+K4 × 20)
+
Manchon
Remarque
Les deux autres orifices situés le plus à l’arrière du panneau
supérieur ne sont pas utilisés.
Collez le gabarit en papier fourni
2
sur le panneau supérieur.
1 Choisissez le gabarit en papier adapté à votre
format de téléviseur parmi les gabarits fournis et
alignez les bords du coin droit du gabarit en papier
avec le coin droit du panneau supérieur.
2 Collez le gabarit en papier sur le panneau supérieur
à l’aide de la bande fournie.
Vérifier la taille du téléviseur.
Gabarit en papier
Bande
8 (FR)
Page 19

Étape4:
Étape5:
Installation du téléviseur
Installez le téléviseur sur le
1
support TV.
1
En vous référant au contour du gabarit en papier fourni,
faites correspondre le contour du support de table avec
le contour du gabarit en papier, de sorte que les orifices
du dessous du support de table soient alignés avec les
manchons fixés à la partie 1 de étape 3.
2 Faites glisser le téléviseur vers l’arrière pour le
mettre en place.
3 Retirez le gabarit en papier du panneau supérieur.
Gabarit en
papier
Mesures de sécurité
pour éviter le
basculement
AVERTISSEMENT
Assurez-vous de prendre toutes les mesures nécessaires
afin d’éviter que le support TV ne bascule, ce qui pourrait
provoquer des blessures et des dégâts.
Fixez la courroie de soutien.
1
1 Vissez la courroie de soutien (fournie avec le
téléviseur) sur le support TV avec la vis à bois
(fournie avec le téléviseur) à l’aide du tournevis.
2 Fixez la courroie de soutien au support de table et
vissez la courroie avec la vis de fixation (fournie
avec le téléviseur TV) à l’aide d’une pièce de
monnaie, etc.
3 Réglez la longueur en serrant la courroie de soutien
tout en maintenant le support de table.
Fixez les boulons d’ancrage.
2
Fixez les deux boulons d’ancrage fournis à l’arrière du téléviseur.
Boulon
d’ancrage
Remarque
Si vous n’utilisez pas les deux boulons d’ancrage pour fixer le
téléviseur, celui-ci risque de tomber et vous pourriez vous blesser.
(Suite)
9 (FR)
Page 20

Raccordez les câbles.
2
Faites passer les câbles dans les passe câbles et les
orifices du pilier arrière.
Caractéristiques
techniques
H
I
Remarque
Si les câbles ne sont pas installés correctement, vous risquez
de les coincer ou de les endommager et de provoquer ainsi
une électrocution, etc.
Fixez le téléviseur au mur.
3
Pour cela, vous devez vous procurer une corde ou une
chaîne solide disponible dans le commerce, ainsi qu’un
support de fixation murale.
1
Placez le support de fixation murale sur un mur solide.
2
Faites passer la corde ou la chaîne à travers les deux
trous des boulons d’ancrage, puis fixez l’autre extrémité
de la corde ou de la chaîne au support de fixation murale.
Corde ou chaîne
résistante
Support de fixation murale
A
30 kg (66 lb 2 oz)
D
Remarque à propos de la capacité de charge
Ne placez sur l’étagère en verre aucun équipement qui
dépasse sa capacité de charge maximale, car elle risque
de se briser et vous pourriez vous blesser.
Dimensions :
mm (pouces)
Poids : 35 kg
La conception et les caractéristiques techniques sont sujettes
à modification sans préavis.
A 1035
B 503
C 487
D 895
E 303
F 418
G 146
H 120
I 272
E
SU-FL300M SU-FL300L
(40 3/4)
(19 7/8)
(19 1/4)
(35 1/4)
(12)
(16 1/2)
(5 3/4)
(4 3/4)
(10 3/4)
(77lb 3oz)
B
G
(114 lb 11 oz)
C
F
1280
(50 1/2)
503
(19 7/8)
518
(20 1/2)
1140
(45)
303
(12)
468
(18 1/2)
146
(5 3/4)
130
(5 1/8)
340
(13 1/2)
52 kg
10 (FR)
Page 21

Installation de
l’enceinte centrale
(pour les systèmes
Home Theatre
uniquement)
Le modèle d’enceinte centrale SS-CT71/CNP2200 est
destiné aux modèles Home Theatre suivants :
DAV-HDX665
DAV-HDX466
DAV-HDX465
DAV-HDX267W
DAV-HDX266
DAV-HDX265
DAV-HDZ235
HT-SF2000
DAV-DZ556KB
DAV-DZ250KW
DAV-DZ250K
DAV-DZ151KB
DAV-DZ150K
Fixez le crochet d’enceinte.
1
Fixez chaque crochet d’enceinte à l’aide des vis
fournies (+P4 × 15) (deux vis chacun pour la gauche/
droite) à la face inférieure du panneau supérieur.
SS-CT71/CNP2200
Crochet
d’enceinte
Le modèle d’enceinte centrale SS-CT72/CT74 est
destiné aux modèles Home Theatre suivants :
DAV-HDX900W
DAV-HDX501W
DAV-HDX500
Remarques
• Les produits ci-dessus sont sujets à modification sans
préavis, il se peut qu’ils ne soient plus en stock ou que leur
production ait été arrêtée.
• Il est possible que certains modèles ne soient pas
disponibles dans certaines régions.
Avant de fixer le crochet d’enceinte :
Pour le SS-CT71/CNP2200, les repères H-L/H-R
doivent être orientés vers l’avant.
Pour le SS-CT72/CT74, les repères S-L/S-R doivent
être orientés vers l’avant.
DAV-DZ1000
DAV-DZ850KW
Vis du crochet d’enceinte pour
SS-CT72/CT74
Vis
(+P4 × 15)
SS-CT72/CT74
Crochet
d’enceinte
Vis
(+P4 × 15)
Suspendez l’enceinte centrale sur
2
les vis des crochets, comme illustré.
Vis du crochet d’enceinte pour
SS-CT71/CNP2200
Enceinte
centrale
11 (FR)
Page 22

Gracias por comprar este producto.
Información para los clientes
Únicamente representantes de servicio Sony autorizados
deben instalar este producto, ya que se requieren al
menos dos personas, además de cuidado, medidas de
seguridad y conocimientos técnicos especiales.
PRECAUCIÓN
Productos especificados
Los siguientes productos están sujetos a cambios sin previo
aviso. Es posible que no haya existencias disponibles de
determinados productos, que dejen de producirse algunos
productos o que no estén disponibles en determinadas
regiones.
ADVERTENCIA
Si no se siguen las medidas de seguridad o el producto se
utiliza incorrectamente, pueden producirse lesiones graves o
incendios.
Este manual de instrucciones muestra la manera correcta de
manipular el producto, así como precauciones importantes
necesarias para evitar accidentes. Lea este manual
atentamente y utilice el producto correctamente. Conserve
este manual para consultarlo en el futuro.
Información para los distribuidores de Sony
La instalación de un televisor requiere al menos dos personas,
además de un cuidado y conocimientos técnicos especiales.
Al instalar un televisor, consulte este manual
cuidadosamente. Sony no se responsabiliza de los accidentes
o daños que se produzcan debido a la instalación o manejo
incorrectos. Entregue este manual al cliente tras la
instalación.
Sobre la seguridad
Los productos de Sony están diseñados pensando en la
seguridad. El uso incorrecto del producto puede provocar
lesiones graves a raíz de un incendio o una descarga eléctrica,
o si el producto vuelca o se cae. Para evitar tales accidentes,
asegúrese de cumplir las precauciones de seguridad.
Televisor LCD en color
KDL-46W3000
KDL-46V3000
KDL-46VL130
KDL-46S3000
KDL-40W3000
KDL-40V3000
SU-FL300M
SU-FL300L
Este soporte para TV se ha diseñado para utilizarse con los
productos especificados anteriormente. Para comprobar si es
posible utilizar este soporte para TV con otros televisores,
consulte los manuales de instrucciones correspondientes.
Algunos televisores se suministran con un folleto en el que se
explica cómo instalar el soporte para TV.
KDL-40VL130
KDL-40D3000
KDL-40S3000
KDL-40SL130
KDL-32XBR4
KDL-32S3000
KDL-32SL130
KDL-52W3000
KDL-52WL130
KDL-46W3000
KDL-46V3000
KDL-46VL130
KDL-46S3000
2 (ES)
Page 23

ADVERTENCIA
Si no se tienen en cuenta las precauciones
siguientes, pueden producirse lesiones graves
o incluso la muerte a raíz de un incendio o una
descarga eléctrica, o si el producto vuelca.
Únicamente representantes de
servicio Sony autorizados deben
instalar los productos.
El televisor y el soporte para TV son muy pesados; por tanto,
si alguna persona no cualificada intenta llevar a cabo la
instalación, podría sufrir alguna lesión.
Tome las debidas precauciones para
evitar que el soporte para TV se
vuelque.
De lo contrario, el televisor podría volcarse y provocar
lesiones. Fije el televisor a una pared, etc., para evitar que se
vuelque.
No permita que los niños se suban
en el soporte para TV ni que gateen
por las repisas.
Si se suben niños encima del soporte para
TV o gatean entre las repisas, el cristal
podría romperse y el soporte para TV
volcarse, provocando lesiones graves o la
muerte.
No se suba al soporte para TV.
Podría caerse, o romper el cristal y
provocar lesiones.
No cubra los orificios de ventilación
del televisor.
Si se cubren los orificios de ventilación (con
un paño, etc.), el monitor podría
sobrecalentarse y provocar un incendio.
Asegúrese de instalar el soporte
para TV en una superficie plana y
sólida.
No instale el soporte para TV de modo que se incline en
cualquier dirección. En caso contrario, el soporte para TV
podría volcarse o el televisor podría caer. Esto podría
provocar lesiones o daños.
Si instala el soporte para TV en una superficie blanda, como
un tapete o una alfombra, cubra primero dicha zona con un
panel.
No utilice un soporte para TV
dañado.
No utilice el soporte para TV si presenta
fisuras. El cristal podría romperse y el
televisor podría volcar, lo que podría
provocar lesiones o daños materiales
graves.
Soporte para TV dañado
No se apoye en el televisor ni se
cuelgue de él.
Podría volcarse el soporte para TV o caerse el
televisor y provocar lesiones graves o la
muerte.
Procure evitar que se aplaste el
cable de alimentación o el cable de
conexión.
• Evite también que se aplaste el cable de alimentación o el
cable de conexión al instalar el televisor en el soporte para
TV. Si se daña alguno de estos cables, puede producirse un
incendio o una descarga eléctrica.
• No pise el cable de alimentación ni el
de conexión al transportar el soporte
para TV. Dichos cables podrían
dañarse y provocar un incendio o una
descarga eléctrica.
Tenga cuidado de no tropezar con el
cable de alimentación o los cables
de conexión.
Si tropezara, el soporte para TV podría
volcarse y provocar lesiones.
ES
Español
(Continuación)
3 (ES)
Page 24

No mueva el soporte para TV cuando
esté el televisor acoplado o cuando
haya algún equipo conectado en el
interior.
Si mueve el soporte para TV con el
televisor acoplado, podría dañarse la
espalda, o bien el soporte para TV podría
volcarse y provocar heridas graves.
Asimismo, podría caerse cualquier
equipo conectado en el interior,
rompiendo la repisa de vidrio o provocando otros daños
materiales.
PRECAUCIÓN
Si no se tienen en cuenta las siguientes
precauciones, pueden producirse daños
personales o materiales.
No instale equipos que no sean el
producto especificado.
• Este soporte para TV se ha diseñado para utilizarse
únicamente con el producto especificado. Si instala
equipos que no sean los especificados, pueden caerse o
dañarse y provocar lesiones.
• No coloque encima del soporte para TV objetos como
jarrones, cerámica, etc.
• No modifique el soporte para TV.
• No coloque ningún objeto caliente directamente encima
del soporte para TV. El calor puede ocasionar la
decoloración o deformación del soporte para TV.
• No coloque nada que pueda dañar el cristal directamente
encima del soporte para TV.
Asegúrese de fijar bien el televisor.
Utilice los accesorios de anclaje suministrados para fijar el
televisor en el soporte para TV. Si no instala el televisor
adecuadamente, puede caerse, o el soporte para TV puede
volcarse y provocar lesiones.
No aplique peso al cristal ni lo
someta a golpes.
Al instalar el televisor, no se apoye con la mano en el soporte
para TV. No golpee el soporte para TV con objetos duros,
como un destornillador, etc., ya que puede romperse el cristal
y provocar lesiones.
Transporte del soporte para TV
Si intenta mover el soporte para TV usted solo o sin seguir
los procedimientos adecuados, puede sufrir alguna lesión.
Para evitarlo, asegúrese de seguir los consejos que se ofrecen
a continuación.
• Procure que dos o más personas transporten el soporte
para TV, pero sólo después de haber retirado el televisor, el
equipo conectado y las repisas de vidrio.
• No arrastre el soporte para TV. Las piezas de la base del
soporte para TV podrían soltarse y dañar el suelo.
• Tenga cuidado de que las manos o los pies no queden
atrapados debajo de la placa base.
• No agarre el soporte para TV por la repisa de vidrio
durante su transporte.
4 (ES)
Page 25

No someta el cristal a golpes
fuertes.
Aunque este soporte para TV
está construido con vidrio
endurecido, debe tenerse
cuidado.
Si el cristal se rompe, los
fragmentos pueden provocar
lesiones. Para evitar esta
situación, tome las precauciones
que se indican a continuación.
• No golpee el cristal ni deje
caer objetos puntiagudos
sobre el mismo. Evite los
impactos fuertes.
• No raye ni presione el cristal
con objetos puntiagudos.
• Evite que objetos contundentes, como una aspiradora,
golpeen los bordes del cristal.
Nota sobre la capacidad de carga
No coloque ningún equipo
que supere el peso máximo
permitido para cada repisa
indicado en la ilustración.
En caso contrario, las
repisas podrían romperse.
30 kg (66 lb 2 oz)
Notas sobre la instalación
Información para los
distribuidores de Sony
Procure leer detenidamente las
instrucciones de seguridad
descritas anteriormente y prestar
especial atención a la seguridad
durante la instalación,
mantenimiento, comprobación y
reparación del producto.
Asegúrese de que al menos dos o
más personas realizan el trabajo de
instalación.
Asegúrese de que al menos dos o más personas instalan el
televisor en el soporte para TV. Si una persona realiza sola la
instalación, puede sufrir accidentes o lesiones. Durante la
instalación, procure mantener alejados a los niños.
Asegúrese de seguir las
instrucciones para instalar
firmemente el soporte para TV.
Si un tornillo no está apretado
firmemente o se cae, el soporte para
TV podría volcarse. Esto podría
producir lesiones o daños materiales.
• Al llevar a cabo el montaje, coloque el material de
embalaje sobre el suelo para evitar que se dañe el suelo.
• Instale el soporte para TV sobre una superficie plana y
sólida. No lo instale en ángulo ni inclinado. Para ello,
respete las precauciones siguientes.
– No instale el soporte para TV en un sitio expuesto a la
luz directa del sol ni cerca de un calentador.
– No instale el soporte para TV en un sitio caluroso o
húmedo, ni al aire libre.
Nota sobre el uso
Para mantener el soporte para TV limpio, utilice un paño
suave y seco. Las manchas resistentes pueden eliminarse con
un paño ligeramente humedecido con jabón neutro.
Asegúrese de secar la zona a continuación con un paño suave
y seco. No utilice productos químicos, como disolventes o
bencina, ya que pueden dañar el acabado del soporte para TV.
Tenga cuidado de no lastimarse las
manos o dedos durante el montaje.
Tenga cuidado de no pillarse los dedos ni las manos al montar
el soporte para TV e instalar el televisor.
Asegúrese de seguir las
instrucciones para instalar
firmemente el televisor.
Apriete firmemente los tornillos. Si no instala el televisor
adecuadamente, puede caerse y provocar lesiones.
5 (ES)
Page 26

Paso 1:
Comprobación de las
piezas
Nombre Cantidad
Placa superior
1
Placa base
1
3
*
Con el modelo SU-FL300L, se suministran dos plantillas
de papel, una para cada tamaño de televisor (46/52
pulgadas).
Antes de comenzar el montaje, asegúrese de disponer de un
destornillador Phillips adecuado para fijar los tornillos
indicados arriba.
Pilar lateral (L)*
Pilar lateral (R)*
Pilar trasero
Panel frontal
Repisa de vidrio
Tornillo (+PWH5 × 25)
Tornillo (+K4 × 20) + Funda
Tornillo de bloqueo
Tornillo (+P4 × 15)
Perno de anclaje
1
1
1
1
1
1
1
8
2
4
4
2
Tapa del tornillo
Gancho de la bocina (L)
Gancho de la bocina (R)
Plantilla de papel
Cinta adhesiva
*1Las ilustraciones anteriores corresponden al modelo
SU-FL300L. Éstas son diferentes para el modelo
SU-FL300M. Para dicho modelo, existe una parte cortada
en el lado del pilar lateral.
2
*
Con el modelo SU-FL300M, se suministran tres plantillas
de papel, una para cada tamaño de televisor (32/40/46
pulgadas).
3*
2*
6 (ES)
3
1
1
2
3
1
Page 27

Paso 2:
Montaje del soporte
2 Coloque el pilar trasero en la placa base y fije los
dos tornillos de bloqueo con un destornillador.
para TV
ADVERTENCIA
Si el cable de alimentación de ca queda atrapado debajo de
un componente o entre dos o más componentes del equipo,
podría producirse un cortocircuito o una descarga eléctrica.
Si tropieza con el cable de alimentación o con el cable de
conexión, el soporte para TV podría volcarse y provocar
lesiones.
Elija la ubicación de instalación y coloque el
soporte para TV en el suelo antes de instalar el
televisor.
Debido a que el televisor es pesado, se recomienda que elija
la ubicación de instalación de antemano y que coloque el
soporte para TV en el suelo.
Coloque el pilar trasero en la
1
placa base.
1 Apriete los dos tornillos de bloqueo suministrados
en la placa base.
Pilar trasero
Coloque los pilares laterales en
2
la placa base.
Fije los pilares laterales y la placa base con los cuatro
tornillos suministrados (+PWH5 × 25).
Tornillo de bloqueo
Placa base
La dirección que marca la flecha muestra la parte
frontal del soporte para TV.
Pilar lateral (L)
Pilar lateral (R)
Tornillo
(+PWH5 × 25)
Nota
Existen diferencias entre los pilares de la derecha y de la
izquierda.
Asegúrese de instalar cada pilar en el lado correcto.
(Continuación)
7 (ES)
Page 28

Coloque la placa superior.
3
1 Apriete los dos tornillos de bloqueo suministrados
en la placa superior.
Tornillo de bloqueo
Paño suave
Placa superior
La ilustración que se muestra anteriormente
corresponde a un ejemplo del modelo SU-FL300L. En
el modelo SU-FL300M sólo hay una barra de refuerzo
en la placa superior.
Notas
• Para evitar dañar la superficie satinada de la placa superior,
asegúrese de utilizar un paño suave para limpiarla y para
proteger la superficie de trabajo.
• Si coloca el sistema de sala de cine doméstico en el soporte
del televisor, consulte el apartado “Instalación de la bocina
central (sólo en sistemas de sala de cine doméstico)” que
encontrará en la página 13.
Nota
Tenga cuidado de no pillarse los dedos al colocar la placa
superior.
Fije el panel frontal al soporte
4
para TV.
1 Alinee las tres espigas del soporte para TV con los
tres orificios del panel frontal.
Orificio de la espiga
2 Alinee e inserte los soportes de fijación a ambos
lados de la placa superior en los pilares laterales.
3 Fije los pilares laterales con los cuatro tornillos
suministrados (+PWH5 × 25). A continuación, fije
los dos tornillos de bloqueo restantes en la parte
posterior del pilar trasero.
Placa superior
Tornillo
(+PWH5 × 25)
Panel frontal
2 Gire los seis tornillos de bloqueo de la placa
superior y la placa base hacia la derecha para fijar el
panel frontal. A continuación, coloque las tres tapas
de tornillos suministradas en los tres tornillos
inferiores.
Tapa del
tornillo
Nota
Asegúrese de colocar el panel frontal en la dirección correcta.
8 (ES)
Page 29

Fije la repisa de vidrio.
5
1 Inserte completamente el estante de vidrio en el
pilar posterior hasta que ambos entren en contacto.
Repisa de vidrio
Etiqueta de
precaución
Paso 3:
Preparación para la
instalación del televisor
Coloque las fundas en la placa
1
superior.
Inserte las fundas de los dos tornillos suministrados
(+K4 × 20) en los dos orificios situados en la parte
frontal y, a continuación, fíjelas con los tornillos.
Nota
Coloque la repisa de vidrio en el soporte para TV de modo
que la etiqueta de “Precaución” aparezca situada en la parte
frontal derecha, tal como se muestra en la ilustración.
2 Apriete los cuatro tornillos de los pilares laterales
para fijar la repisa de vidrio y el soporte para TV.
Tornillo
(+K4 × 20)
+
Funda
Nota
Los otros dos orificios situados en la parte posterior de la
placa superior no se utilizan.
(Continuación)
9 (ES)
Page 30

Pegue la plantilla de papel
2
suministrada en la placa
superior.
1 Seleccione la plantilla de papel que corresponda al
tamaño de su televisor entre las plantillas de papel
suministradas y haga coincidir los bordes de la
esquina derecha de la plantilla de papel con la
esquina derecha de la placa superior.
2 Pegue la plantilla de papel a la placa superior con la
cinta adhesiva suministrada.
Compruebe el tamaño de su
televisor.
Plantilla de papel
Cinta
adhesiva
Paso 4:
Instalación del televisor
Instale el televisor en el soporte
1
para TV.
1 Haga coincidir el contorno del soporte de
sobremesa con el de la plantilla de papel
suministrada, de modo que los orificios situados en
la parte inferior del mismo queden alineados con las
fundas colocadas en la sección 1 del paso 3.
2 Deslice la parte posterior del televisor de modo que
quede encajado en su sitio.
3 Extraiga la plantilla de papel de la placa superior.
Plantilla de
papel
10 (ES)
Page 31

Fije los pernos de anclaje.
2
Fije los dos pernos de anclaje suministrados a la parte
posterior del televisor.
Paso 5:
Medidas de seguridad
para evitar el vuelco
Perno de
anclaje
Nota
Si no se usan los dos pernos de anclaje para fijar el televisor,
podría caerse y provocar lesiones.
ADVERTENCIA
Tome las debidas precauciones para evitar que el soporte
para TV se vuelque y provoque posibles lesiones y daños
materiales.
Coloque la cinta de sujeción.
1
1 Atornille la cinta de sujeción (suministrada con el
televisor) al soporte para TV con el tornillo de
madera (suministrado con el televisor) mediante el
destornillador.
2 Fije la cinta de sujeción al soporte de sobremesa y
atornille la cinta con el tornillo de fijación
(suministrado con el televisor) mediante una
moneda, etc.
3 Apriete la cinta de sujeción para ajustar la longitud
mientras sujeta el soporte de sobremesa.
(Continuación)
11 (ES)
Page 32

Conecte los cables.
2
Pase los cables a través de los portacables y de los
orificios del pilar trasero.
Especificaciones
H
I
Nota
Si no se instalan los cables correctamente, es posible que
queden atrapados y que sufran daños, lo cual podría provocar
descargas eléctricas, etc.
Fije el televisor a la pared.
3
Prepare antes una cuerda resistente o una cadena y un
soporte de anclaje a la pared como los que suelen
encontrarse en el mercado.
1
Fije el soporte de anclaje a la pared en una pared sólida.
2
Pase la cuerda o la cadena por los dos agujeros de los
pernos de anclaje y tense el otro extremo de la cuerda
o la cadena en el soporte de anclaje a la pared.
Cuerda o
cadena
resistentes
A
30 kg (66 lb 2 oz)
D
Nota sobre la capacidad de carga
No coloque ningún equipo en la repisa de vidrio que
supere su peso máximo autorizado, ya que podría
romperse y provocar lesiones.
Dimensiones:
mm (pulgadas)
Peso:
A 1.035
B 503
C 487
D 895
E 303
F 418
G 146
H 120
I 272
E
SU-FL300M SU-FL300L
(40 3/4)
(19 7/8)
(19 1/4)
(35 1/4)
(16 1/2)
(5 3/4)
(4 3/4)
(10 3/4)
(77 lb 3 oz)
(12)
35 kg
B
G
1.280
(50 1/2)
503
(19 7/8)
518
(20 1/2)
1.140
(45)
303
(12)
468
(18 1/2)
146
(5 3/4)
130
(5 1/8)
340
(13 1/2)
52 kg
(114 lb 11 oz)
C
F
12 (ES)
Soporte de anclaje a la
pared
El diseño y las especificaciones están sujetos a cambios sin
previo aviso.
Page 33

Instalación de la bocina
central (sólo en
sistemas de cine
doméstico)
El modelo SS-CT71/CNP2200 de la bocina central se
utiliza con los siguientes modelos de sistema de cine
doméstico:
DAV-HDX665
DAV-HDX466
DAV-HDX465
DAV-HDX267W
DAV-HDX266
DAV-HDX265
DAV-HDZ235
HT-SF2000
DAV-DZ556KB
DAV-DZ250KW
DAV-DZ250K
DAV-DZ151KB
DAV-DZ150K
Coloque el gancho de la bocina.
1
Fije cada gancho de la bocina con los tornillos
suministrados (+P4 × 15) (dos tornillos para el derecho/
izquierdo) a la parte inferior de la placa superior.
SS-CT71/CNP2200
Gancho de
la bocina
El modelo SS-CT72/CT74 de la bocina central se
utiliza con los siguientes modelos de sistema de cine
doméstico:
DAV-HDX900W
DAV-HDX501W
DAV-HDX500
Notas
• Los productos mencionados anteriormente están expuestos
a cambios sin previo aviso, es posible que no haya
existencias o que éstos dejen de producirse.
• Es posible que determinados modelos no estén disponibles
en determinadas regiones.
Antes de colocar el gancho de la bocina:
En los modelos SS-CT71/CNP2200, las marcas H-L/
H-R deben estar orientadas hacia delante.
En el modelo SS-CT72/CT74, las marcas S-L/S-R
deben estar orientadas hacia delante.
DAV-DZ1000
DAV-DZ850KW
Tornillo del gancho de la bocina del
modelo SS-CT72/CT74
Tornillo
(+P4 × 15)
SS-CT72/CT74
Gancho de
la bocina
Tornillo
(+P4 × 15)
Cuelgue la bocina central en los
2
tornillos del gancho tal y como
se muestra en la ilustración.
Tornillo del gancho de la bocina
del modelo SS-CT71/CNP2200
Bocina central
13 (ES)
Page 34

Page 35

Page 36

http://www.sony.net/
Printed in Thailand
 Loading...