

Page 1
TV Stand
4-416-701-11(1)
Instructions
Mode d’emploi
Instrucciones
Instruções
Lea este manual antes de usar el producto
US
FR
ES
PT
Printed in China
SU-B553S
SU-B463S
© 2012 Sony Corporation
Page 2
Owner’s Record
The model and serial numbers are located at the rear
of the TV Stand. Record these numbers in the
spaces provided below.
Refer to them whenever you call upon your Sony
dealer regarding this TV Stand.
Notes on installation
Do not allow the TV Stand to be installed at an angle
or incline. To avoid this, observe the following
precautions.
• If you install the TV Stand on a soft surface such
as a mat or a carpet, lay a board over the
designated location beforehand.
Model Name
Serial No.
On Safety
Thank you for purchasing this product.
Products by Sony are designed with safety in
mind.
This instructions manual shows the correct handling
of the product and important precautions necessary to
prevent accidents. Be sure to read this manual
thoroughly and use the product correctly. Keep this
manual available for future reference.
CAUTION
Specified products
This TV Stand is designed for use with the specified
product only. If you install equipment other than
specified, it may fall or break, and cause injury.
Illustrations used in this manual show of the KDL46HX85x, unless otherwise stated.
LCD TV
SU-B553S KDL-55HX85x
SU-B463S KDL-46HX85x
* In the actual model names, the “x” indicates
numbers and/or characters specific to each model.
Note on use
Cleaning
To keep the TV Stand clean, occasionally wipe it with
a dry soft cloth. Stubborn stains may be removed by
wiping with a cloth slightly dampened with mild
soap. Be sure to dry the area afterwards with a dry
soft cloth. Do not use chemicals, such as thinner or
benzine, as they damage the finish of the TV Stand.
Do not modify the TV Stand.
It may fall and cause injury.
Be sure to install the TV securely
following the instructions.
Tighten the screws securely. If the TV is not installed
securely, it may fall and cause injury.
Be careful not to injure your hands
or fingers while assembling.
• Be careful not to hurt your fingers or hands when
installing the TV.
Be sure to secure the TV.
Secure the TV to the TV Stand using the supplied
screws. If the TV is not installed securely, it may fall,
or the TV Stand may topple over, and cause injury.
GB
2
Page 3
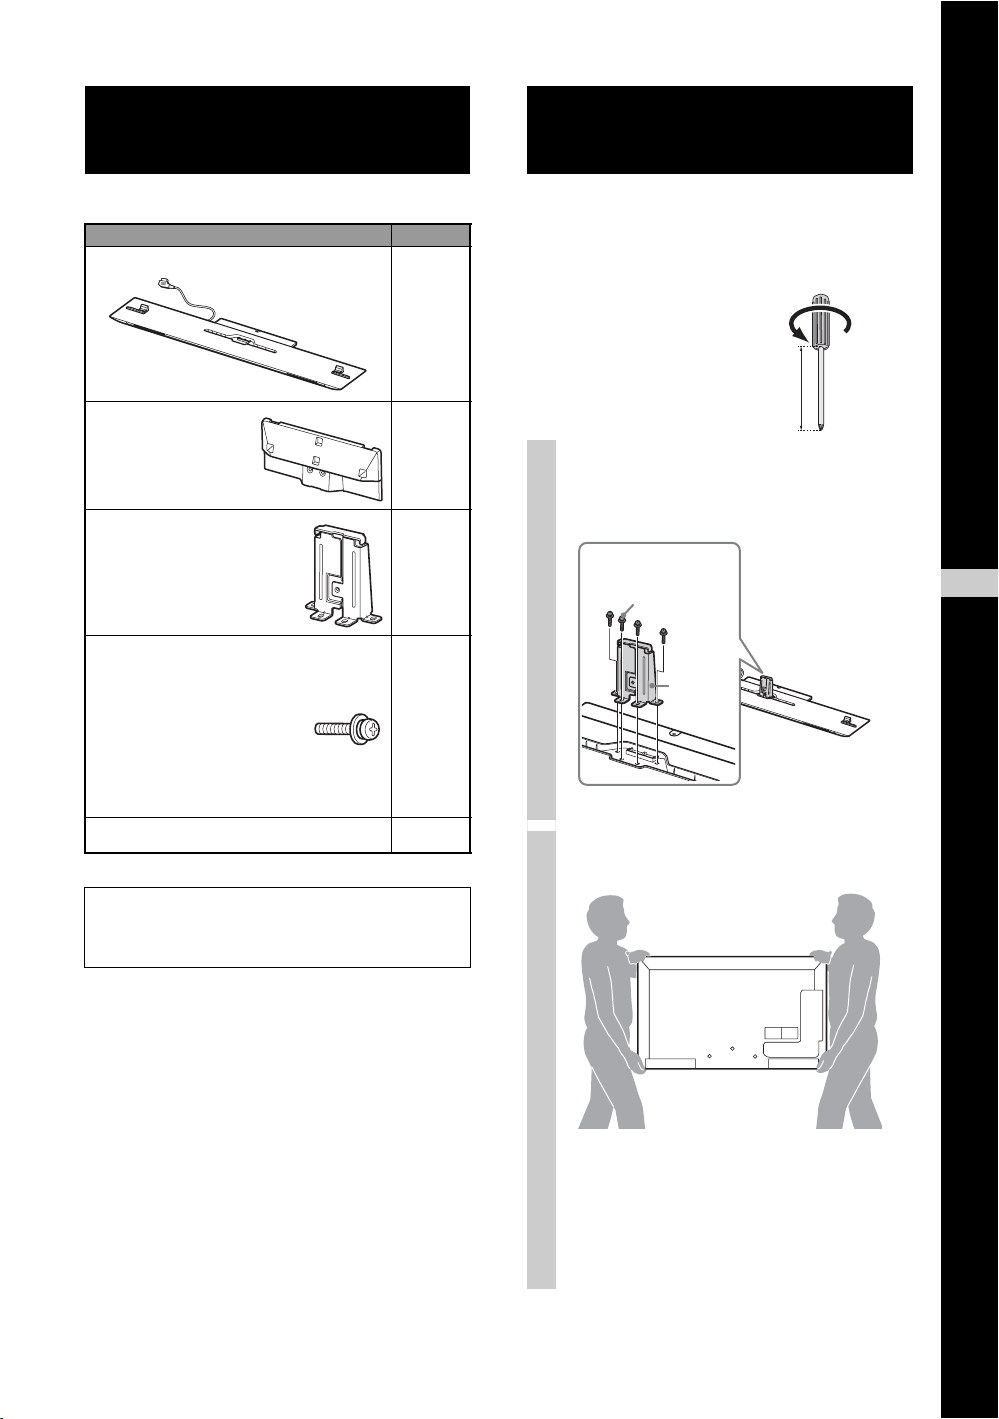
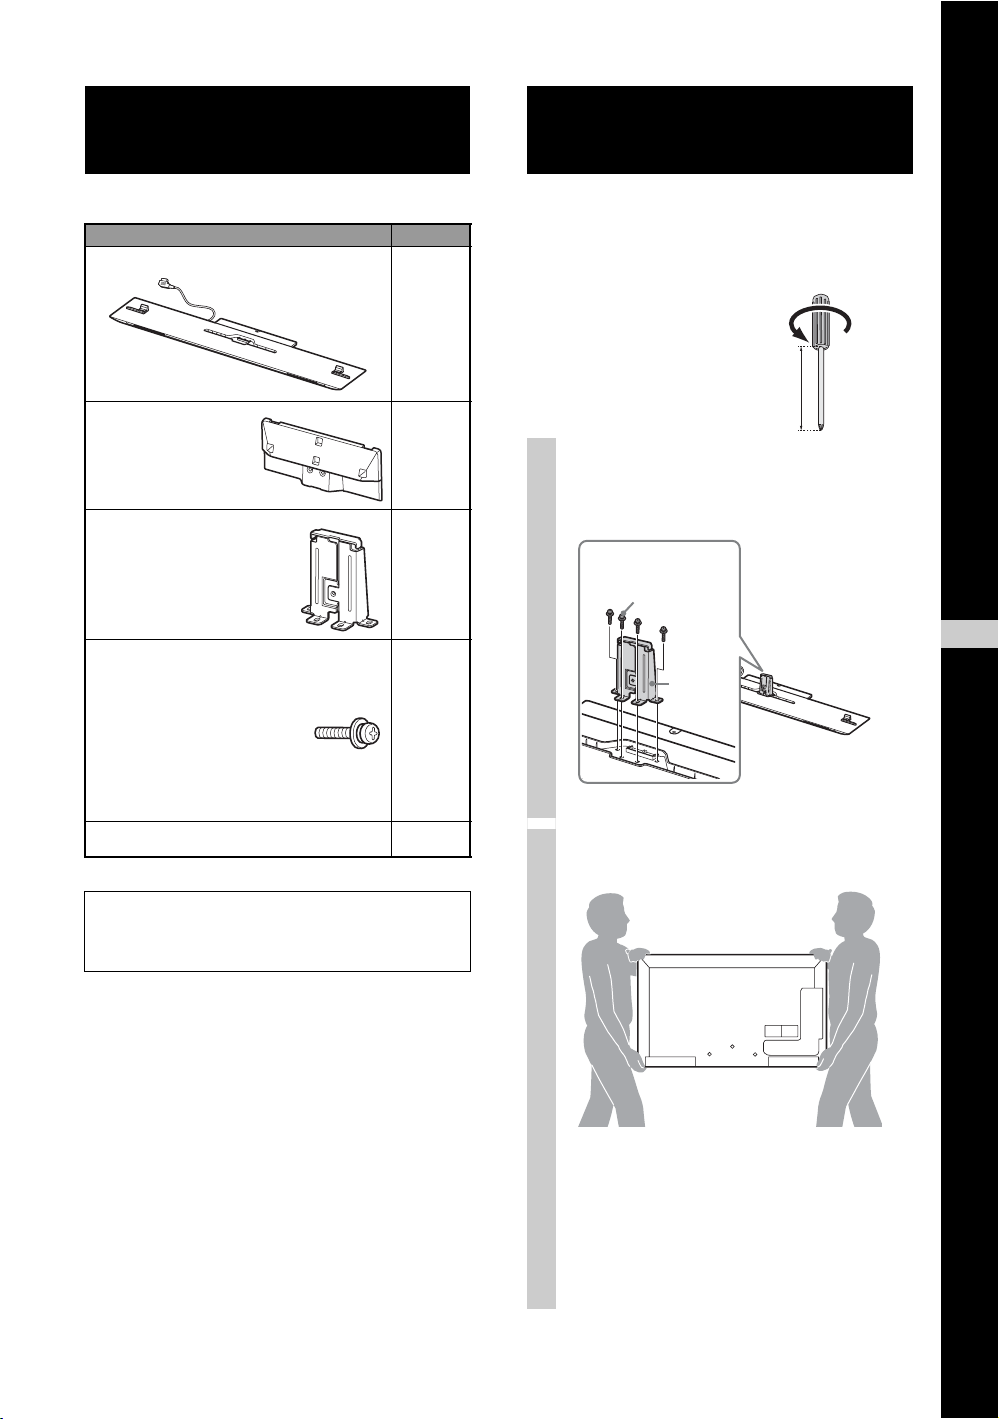
Step 1:
Checking the parts
Step 2:
Installing the TV
Name
Stand
Joint
Neck
TV Stand Neck Attachment
Screw
(PSW5 × 16) (× 3)
Joint Screw
(PSW5 × 16) (× 3)
Neck Screw
(PSW5 × 16) (× 4)
Quantity
1
1
1
10
Before assembling
• Be sure to have a Phillips screwdriver that fits the screws
prior to the assembly.
• When using an electric
screwdriver, set the torque
setting to approximately
1.5 N·m {15 kgf·cm}.
12 cm ~
Attach the Neck to the TV Stand
1
with the four Neck Screws
(PSW5 × 16) (supplied).
Neck Screw
(PSW5 × 16)
Neck
US
English
Instructions manual 1
Refer to the operating instructions supplied with
your TV for information on how to remove the
Table-Top Stand from the TV.
Prepare the TV.
2
When moving the TV, be sure that two or more
persons install the TV on the TV Stand as
shown in the illustration. If one person does
the installation work alone, this may result in
an accident or injury.
(Continued)
GB
3
Page 4
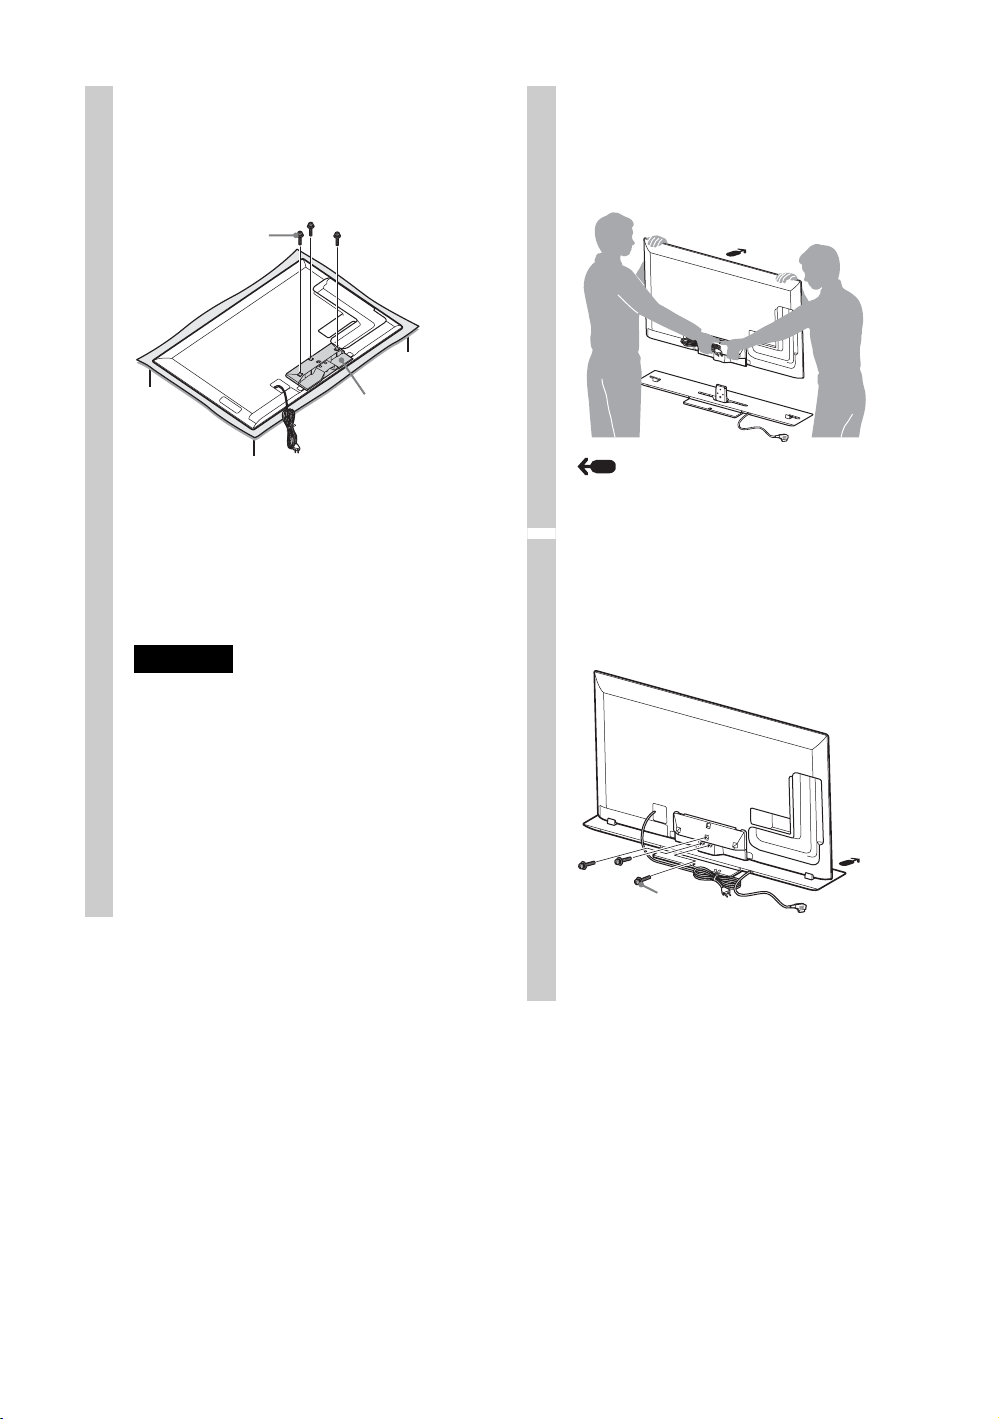
Attach the supplied Joint to the
3
rear of the TV with the three
screws (PSW5 × 16) (supplied).
Slide the supplied Joint up to attach.
Joint Screw
(PSW5 × 16)
Joint
Install the TV onto the TV Stand.
4
When installing the TV on the TV Stand, hold
the TV as shown in the illustration and install
it on the two brackets of the TV Stand.
~
• Make sure to keep the removed screws.
• When removing the Table-Top Stand from the
Display, lay the display face down on a stable
work surface that is larger than the Display.
• To prevent damaging the surface of the LCD
display, make sure to place a soft cloth on the
work surface.
CAUTION
• If pressure or shock is applied to the surface of the
Display, the LCD display may break or become
damaged.
• Lay the display face down on a stable and level
surface with the Table-Top Stand hanging over the
edge of the surface.
Having the display face and the base of the TableTop Stand on the same level surface will create an
unstable working condition and can damage the
Display.
Arrow direction shows front of the TV
Stand.
Secure the TV and the TV Stand
5
with the three TV Stand Neck
Attachment Screws (PSW5 × 16)
(supplied).
TV Stand Neck
Attachment Screw
(PSW5 × 16)
GB
4
Page 5
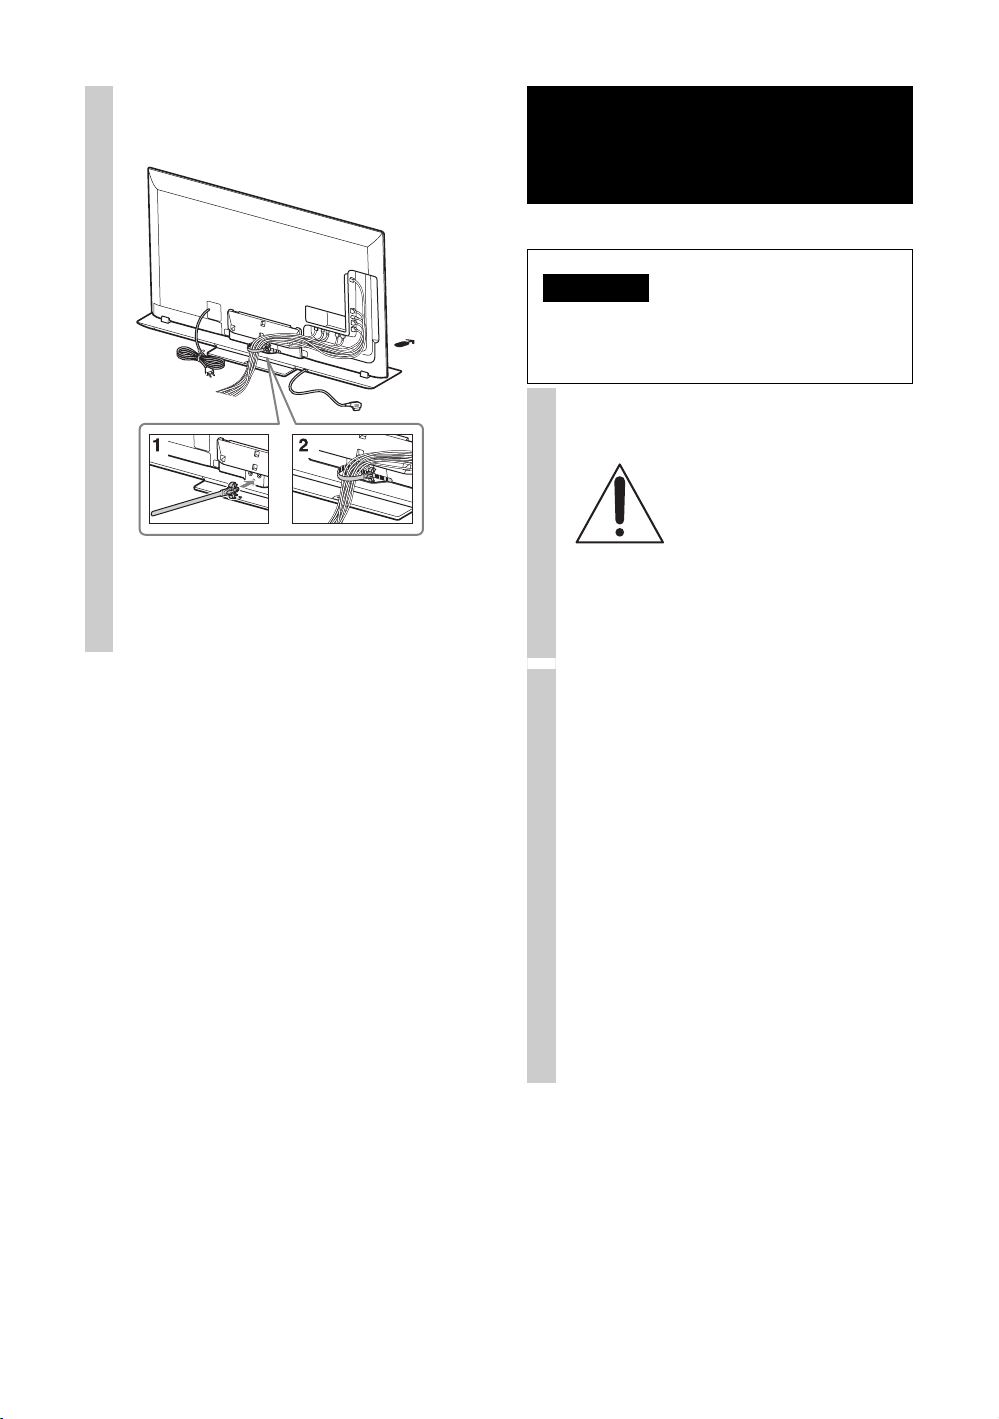
Bundling the cables.
6
Use the cable clamper supplied with the TV.
~
• Do not bundle the AC power cord together with
other cables.
Step 3:
Safety measures to
prevent toppling over
WARNING
Be sure to take measures to prevent the TV Stand
from toppling over, and causing possible injury
and damage.
Securing the TV and the TV
Stand
Sony strongly recommends
taking measures to prevent the
TV from toppling over.
Unsecured TVs may topple
and result in property damage,
serious bodily injury or even
death.
Preventing the TV and the TV
Stand from toppling
• Secure the TV to a wall and/or board.
• Do not allow children to play or climb on
furniture and TV sets.
• Avoid placing or hanging items on the TV.
• Never install the TV on:
– slippery, unstable and/or uneven
surfaces.
– furniture that can easily be used as steps,
such as a chest of drawers.
• Install the TV where it cannot be pulled,
pushed, or knocked over.
• Route all AC power cords and connecting
cables so that they are not accessible to
curious children.
(Continued)
5
GB
Page 6
Recommended measures to
secure the TV and the TV Stand
Consider the following measures when
securing your TV to a board (not supplied).
1 Secure the board for the TV.
Make sure the board can adequately
support the weight of the TV. Use two
angle braces (not supplied) to secure the
board. For each angle brace use the
appropriate hardware to:
• Attach one side of the angle brace to the
wall stud.
• Attach the other side to the board.
Angle brace
(not supplied)
Board
2 Secure the TV to the board.
Use the optional hardware listed below
(not supplied):
• M4 × 12 machine screw (screwed into the
TV Stand)
• A screw or similar (attach it to the board)
• Rope or chain (strong enough to support the
weight of the TV). Make sure that there is
no excess slack in the rope or chain.
An alternative way to secure the TV is with an
optional Sony Support Belt Kit.
Screw hole
on the TV
Stand
M4 × 12
machine
screw (not
supplied)
Screw
(not supplied)
Rope or
chain (not
supplied)
~
Contact Sony Customer Support to obtain the
optional Support Belt Kit by providing your
TV Stand model name (SU-B553S/B463S).
• For United States call: 1-800-488-7669 or visit:
www.sony.com/accessories
• For Canada call: 1-877-899-7669
GB
6
Page 7
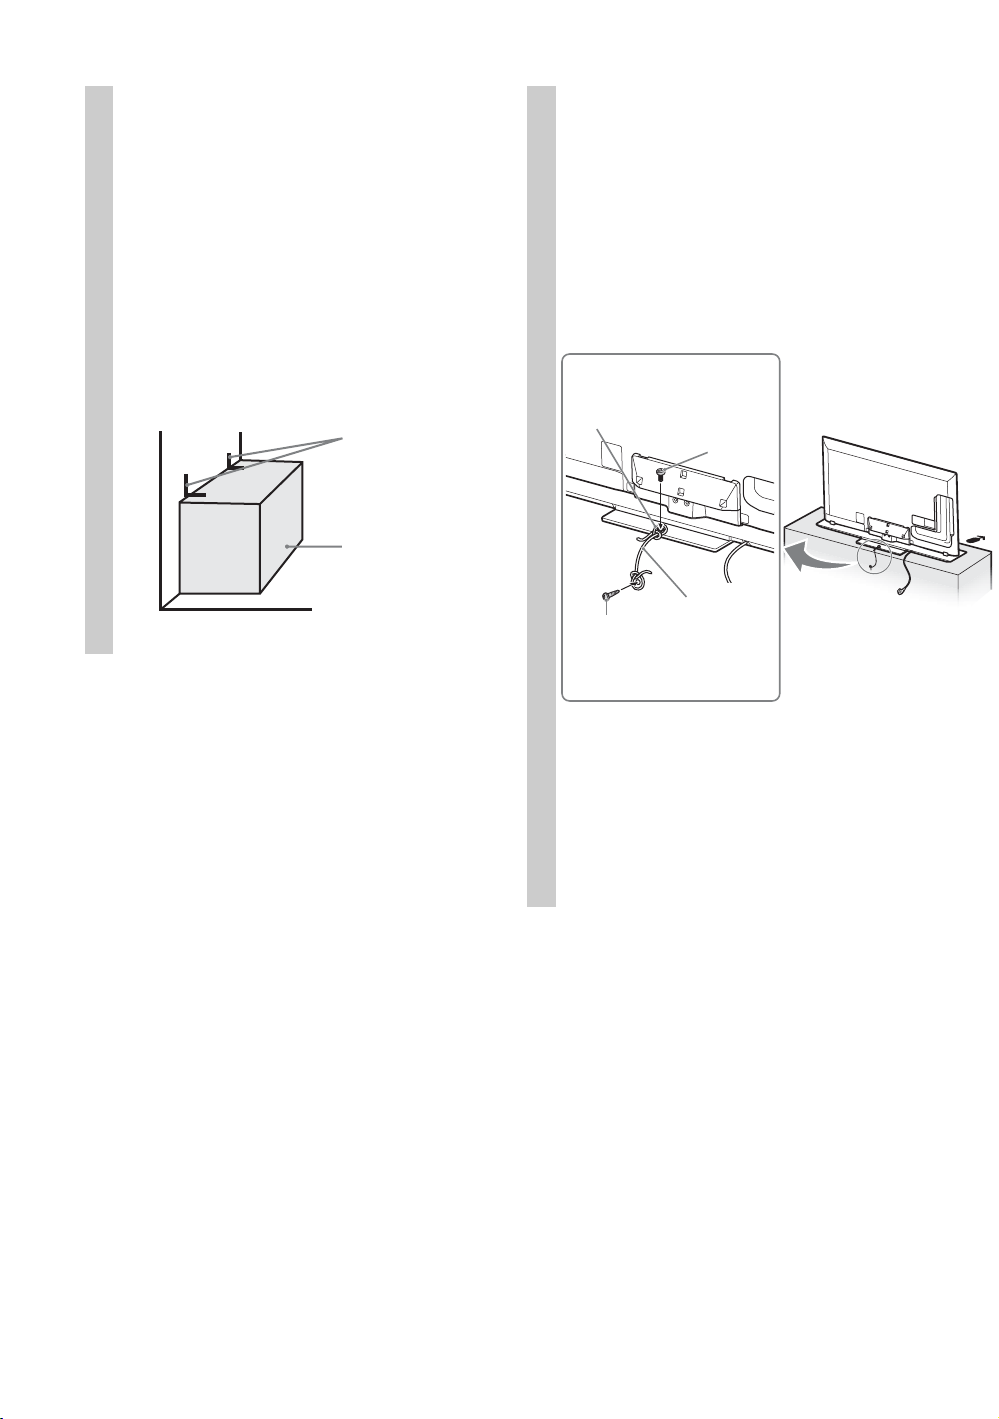
3 Anchor the TV to the Wall.
Anchor the TV to the wall by using bolts,
wall anchor and chain (or rope).
~
• TV SET is shipped with screws attached to the
rear of the TV. (They are fastened in the screw
holes for wall mounting.) Be sure to remove the
upper two screws prior to anchoring the TV on a
wall.
• Securing the TV to the board without securing the
TV and the board to the wall provides minimum
protection against the TV toppling over. For
further protection, be sure to follow the three
measures recommended.
Anchor bolts (M6, not supplied)
Rope or chain
(not supplied)
Wallmount
holes
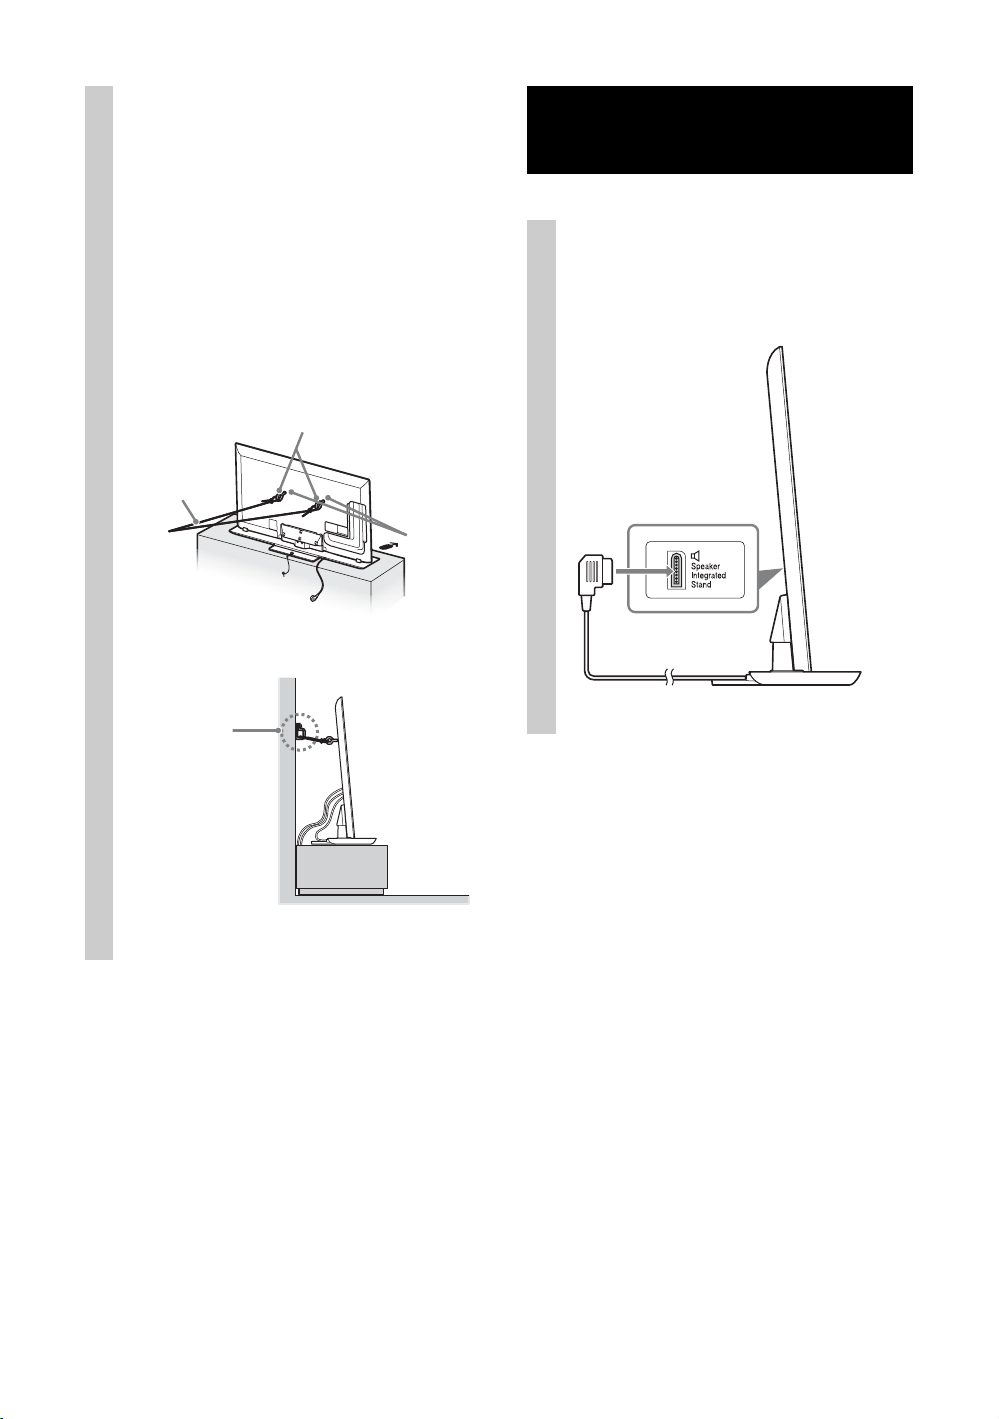
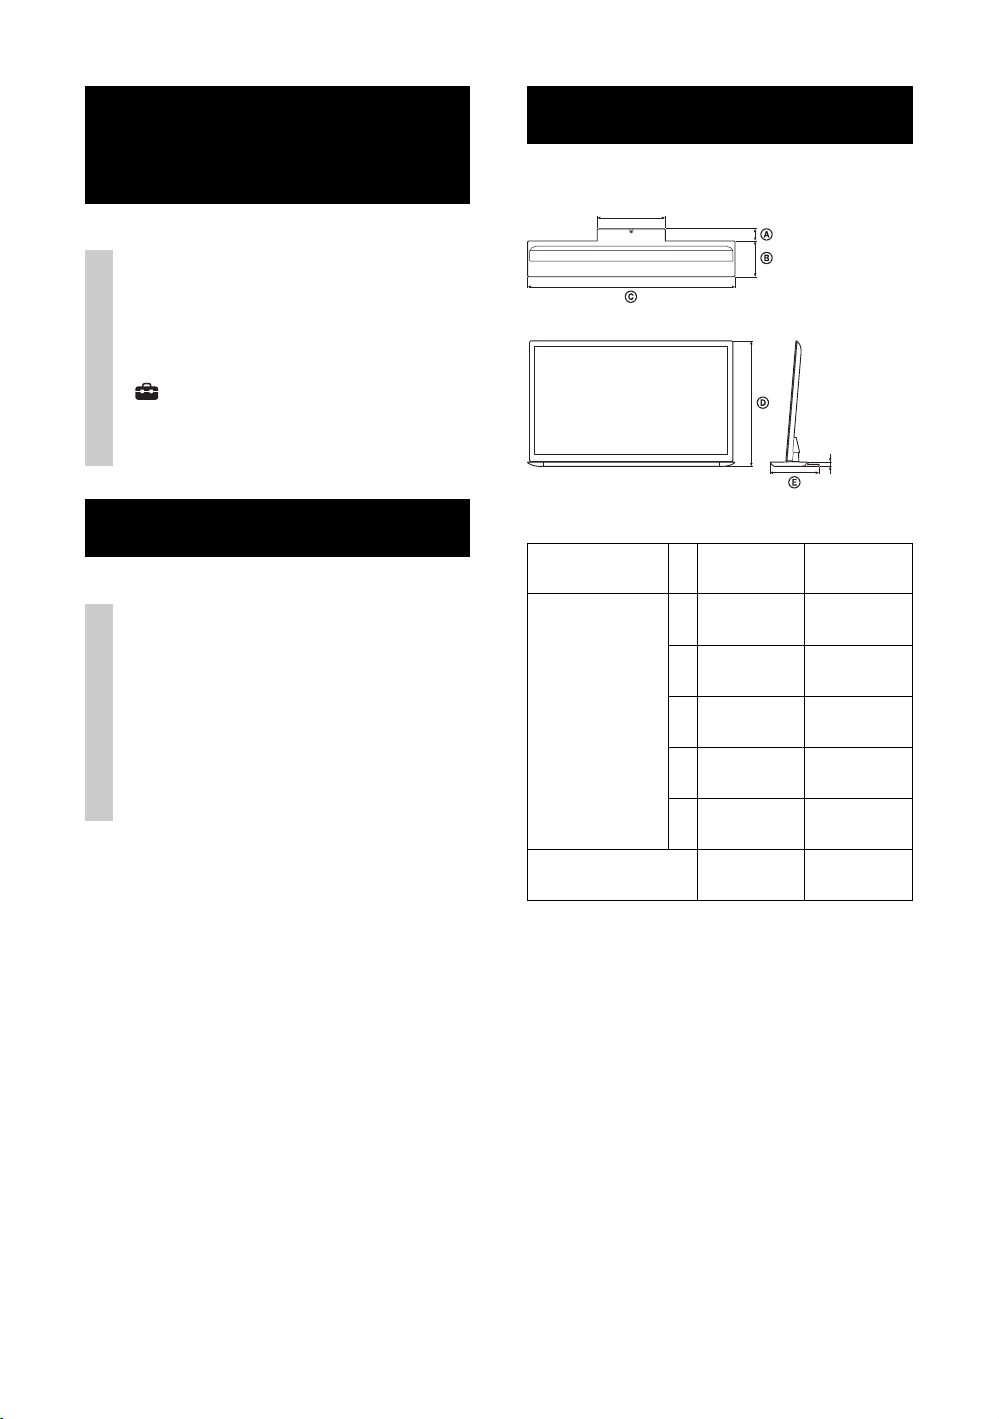
Step 4:
Connecting the TV
Connect the TV with a Speaker
Integrated Stand to the TV
Stand using the cable of the TV
Stand.
Wall-anchor
(not supplied)
GB
7
Page 8
Step 5:
(
)
Performing the TV
settings
Set to “Speaker Integrated Stand” in
“TV Position” menu.
Press the HOME button of the remote of the
TV and select the menu as follows:
Settings > Sound > TV Position > Speaker
Integrated Stand
Troubleshooting
Specifications
361 mm
14 1/4 inches
SU-B553S SU-B463S
24 mm
(15/16
inches)
Sound
No sound from the TV Stand:
• Check the cable connection.
Abnormal sound:
• Check the sound setting.
Set “TV Position” to “Speaker Integrated
Stand” in the “Sound” setting.
Dimensions: mm
(inches)
Stand Weight:
A 72 (2 7/8) 65 (2 5/8)
B 223 (8 7/8) 190 (7 1/2)
C 1,294 (51) 1,097 (43 1/4)
D 772 (30 3/8) 663 (26 1/8)
E 295 (11 5/8) 255 (10 1/8)
6.4 kg
(14.2 lb)
5.3 kg
(11.7 lb)
Speakers
Full Range (2)
Design and specifications are subject to change
without notice.
GB
8
Page 9

Page 10
Fiche d’identification
Les numéros de modèle et de série sont indiqués à
l’arrière du téléviseur. Inscrivez ces numéros dans
les espaces ci-dessous.
Faites-y référence chaque fois que vous appelez
votre détaillant Sony au sujet de ce support TV.
Assurez-vous de bien fixer le
téléviseur.
Fixez le téléviseur au support TV à l’aide des vis
fournies. Si le téléviseur est mal fixé, il peut tomber
ou le support TV peut basculer et provoquer des
blessures.
N° de modèle
N° de série
Sécurité
Merci d’avoir acheté ce produit.
Les produits fabriqués par Sony sont conçus
pour être sécuritaires.
Le présent manuel d’instruction illustre la façon
correcte de manipuler ce produit ainsi que les
mesures à prendre nécessaires en vue d’éviter les
accidents. Lisez attentivement ce manuel et utilisez le
produit correctement. Conservez ce manuel pour le
consulter dans l’avenir.
ATTE NT ION
Produits
Ce support TV est conçu pour être utilisé uniquement
avec l’appareil spécifié. Si vous installez un appareil
autre que celui spécifié, ce dernier peut tomber ou se
briser et provoquer des blessures. À moins
d’indications contraires, les illustrations utilisées
dans le présent manuel montrent le modèle KDL46HX85x.
TV ACL
SU-B553S KDL-55HX85x
SU-B463S KDL-46HX85x
* Dans les noms de modèle actuels, le « x » indique
les chiffres et/ou caractères spécifiques à chaque
modèle.
Installation
N’installez pas le support TV à un angle ou sur un
plan incliné. Pour éviter cela, observez les mesures
suivantes.
• Si vous installez le support TV sur une surface
souple comme un tapis ou une moquette, placez
d’abord une planche sur l’emplacement désigné.
Utilisation
Nettoyage
Pour conserver le support TV propre, essuyez-le de
temps à autres avec un chiffon doux et sec. Les taches
tenaces peuvent être enlevées à l’aide d’un chiffon
légèrement imbibé d’un savon doux. Assurez-vous
ensuite de sécher l’endroit à l’aide d’un chiffon doux
et sec. N’utilisez pas de produits chimiques comme
un diluant ou du benzène car ils endommagent la
surface du support TV.
Ne modifiez pas le support TV.
Il pourrait tomber et entraîner des blessures.
Assurez-vous de bien installer le
téléviseur en suivant les
instructions.
Serrez bien les vis. Si le téléviseur n’est pas installé
correctement, il peut tomber et entraîner des
blessures.
Assurez-vous de ne pas vous
blesser aux mains ou aux doigts lors
de l’assemblage.
• Assurez-vous de ne pas vous blesser aux doigts ou
aux mains lors de l’installation du téléviseur.
FR
2
Page 11
Étape 1 :
Vérification des pièces
Étape 2 :
Installation du téléviseur
Nom
Support
Articulation
Col
Vis de fixation du col au
support TV
(PSW5 × 16) (× 3)
Vis d’articulation
(PSW5 × 16) (× 3)
Vis du col
(PSW5 × 16) (× 4)
Quantité
1
1
1
10
Avant le montage
• Assurez-vous d’avoir un tournevis Phillips de la taille des
vis avant le montage.
• Lors de l’utilisation d’un
tournevis électrique,
réglez son couple à
environ 1,5 N·m
{15 kgf·cm}.
Fixez le col au support TV à
1
l’aide des quatre vis du col
12 cm ~
(PSW5 × 16) (fournies).
Vis du col
(PSW5 × 16)
Col
FR
Français
Manuel d’instructions 1
Consultez les directives de fonctionnement fournies
avec le téléviseur sur la façon d’enlever le support
de table du téléviseur.
Préparez le téléviseur.
2
Lors du déplacement du téléviseur, assurezvous qu’au moins deux personnes installent le
téléviseur sur le support TV, tel qu’illustré. Si
une personne seule procède à l’installation,
cela peut entraîner un accident ou des
blessures.
(Suite)
3
FR
Page 12

Fixez l’articulation fournie à
3
l’arrière du téléviseur à l’aide de
trois vis (PSW5 × 16) (fournies).
Faites glisser l’articulation fournie vers le haut
pour la fixer.
Vis d’articulation
(PSW5 × 16)
Articulation
Installez le téléviseur sur le
4
support TV.
Lors de l’installation du téléviseur sur le
support TV, tenez le téléviseur comme sur
l’illustration et placez-le sur les deux pièces
d’appui du support TV.
~
• Assurez-vous de conserver les vis enlevées.
• Lors de la dépose du support de table de l’écran,
placez l’écran face vers le bas sur une surface de
travail stable d’une superficie plus grande que
celle de l’écran.
• Pour éviter d’endommager la surface de l’écran
LCD, assurez-vous de placer un chiffon doux sur
la surface de travail.
ATTE NT ION
• Si la surface de l’écran subit une pression ou un
choc, l’écran LCD peut se briser ou être
endommagé.
• Déposez l’écran face vers le bas sur une surface
stable et de niveau, le support de table dépassant
le rebord de la surface.
Si le devant de l’écran et la base du support de
table sont au même niveau, le tout devient instable
et cela peut endommager l’écran.
La flèche indique l’avant du support TV.
Fixez le téléviseur et le support
5
TV à l’aide des trois vis de
fixation du col au support TV
(PSW5 × 16) (fournies).
Vis de fixation du
col au support TV
(PSW5 × 16)
FR
4
Page 13

Groupage des câbles.
6
Utilisez le serre-câble fourni avec le téléviseur.
~
• Ne regroupez pas le cordon d’alimentation CA
avec les autres câbles.
Étape 3 :
Mesures de sécurité
visant à empêcher le
basculement
AVERTISSEMENT
Prenez les mesures nécessaires afin d’éviter que
le support TV ne bascule et ne cause des
blessures et des dommages.
Fixer le téléviseur et le support
TV
Sony recommande fortement
de prendre les mesures
nécessaires pour prévenir le
basculement du téléviseur.
Des téléviseurs qui ne sont pas
fixés solidement peuvent
basculer et entraîner des
dommages matériels, des
blessures corporelles graves ou
même mortelles.
Prévenir le basculement du
téléviseur et du support TV
• Fixer solidement le téléviseur à un mur et/
ou à un panneau.
• Ne pas laisser les enfants jouer ou monter
sur les meubles et les téléviseurs.
• Éviter de placer ou d’accrocher des objets
sur le téléviseur.
• Ne jamais installer le téléviseur sur :
– des surfaces glissantes, instables et/ou
inégales.
– un meuble qui peut facilement servir
d’escalier, comme une commode à
tiroirs.
• Installez le téléviseur où il ne peut pas être
tiré, poussé ou renversé.
• Acheminez les cordons d’alimentation CA
et les cordons connecteurs afin qu’ils ne
soient pas accessibles aux enfants curieux.
(Suite)
5
FR
Page 14

Mesures recommandées pour
fixer solidement le téléviseur et
le support TV
Tenez compte des mesures suivantes lorsque
vous fixez votre téléviseur à un panneau (non
fourni).
1 Fixer solidement le panneau pour le
téléviseur.
Vous assurer que le panneau peut supporter
adéquatement le poids du téléviseur.
Utiliser deux attaches angulaires (non
fournies) pour fixer solidement le panneau.
Avec chaque attache angulaire, utiliser la
quincaillerie appropriée pour :
• fixer un côté de l’attache angulaire au
poteau mural.
• fixer l’autre côté au panneau.
Attache
angulaire
(non fourni)
Panneau
2 Fixer solidement le téléviseur au panneau.
Utiliser la quincaillerie optionnelle
mentionnée ci-dessous (non fournie) :
• Vis à métal M4 × 12 (vissée dans le support
TV)
• Une vis ou l’équivalent (la fixer au
panneau)
• Une corde ou une chaîne (assez solide pour
supporter le poids du téléviseur). Vous
assurer qu’il n’y a pas de mou excessif dans
la corde ou la chaîne.
Un moyen alternatif de fixer le téléviseur est à
l’aide de l’ensemble de sangle de maintien
Sony (optionnel).
Trou de vis
sur le
support TV
Vis à métal
M4 × 12 (non
fournie)
Vis
(non fourni)
Corde ou
chaîne (non
fourni)
~
Communiquer avec le service à la clientèle de
Sony pour obtenir l’ensemble de sangle de
maintien en option de Sony en fournissant le
nom du modèle de votre support TV
(SU-B553S/B463S).
• Pour le Canada, téléphoner au : 1-877-899-7669
• Pour les États-Unis, téléphoner au :
1-800-488-7669 ou visiter :
www.sony.com/accessories
FR
6
Page 15

3 Attacher le téléviseur au mur.
Fixez le téléviseur au mur avec des
boulons, un dispositif d’ancrage au mur et
une chaîne (ou une corde).
~
• Le fait de fixer le téléviseur au panneau sans fixer
le téléviseur et le panneau au mur fournit une
protection minimale contre le basculement du
téléviseur. Pour une protection additionnelle,
suivre les trois mesures recommandées.
Boulons d’ancrage (M6, non fourni)
Corde ou
chaîne (non
fourni)
Trous de
montage
au mur
Dispositif
d’ancrage au
mur (non
fourni)
Étape 4 :
Raccordement du
téléviseur
Raccordez le téléviseur avec
Speaker Integrated Stand au
support TV à l’aide du câble du
support TV.
FR
7
Page 16

Étape 5 :
(
)
Effectuer les réglages du
téléviseur
Réglez à « H-parleurs intég au supprt »
dans le menu « Position Télé ».
Appuyez sur la touche HOME de la
télécommande du téléviseur et sélectionnez le
menu de la façon suivante :
Réglages > Son > Position Télé >
H-parleurs intég au supprt
Spécifications
361 mm
14 1/4 pouces
24 mm
(15/16
pouces)
Dépannage
Son
Aucun son reproduit par le support TV :
• Vérifiez la connexion du câble.
Son anormal :
• Vérifiez le réglage du son.
Réglez « Position Télé » à « H-parleurs
intég au supprt » dans le réglage « Son ».
SU-B553S SU-B463S
Dimensions : mm
(inches)
Poids du support :
A 72 (2 7/8) 65 (2 5/8)
B 223 (8 7/8) 190 (7 1/2)
C 1 294 (51) 1 097 (43 1/4)
D 772 (30 3/8) 663 (26 1/8)
E 295 (11 5/8) 255 (10 1/8)
6,4 kg
(14,2 lb)
5,3 kg
(11,7 lb)
Haut-parleurs
Gamme étendue (2)
La conception et les caractéristiques techniques sont
sujettes à modification sans préavis.
FR
8
Page 17

Page 18

Registro de propiedad
El modelo y el número de serie están situados en la
parte posterior del soporte para TV. Anote esos
números en el espacio que tiene a continuación.
Refiérase a ellos cuando contacte con su
distribuidor Sony acerca de este soporte para TV.
Nombre de modelo
N° de serie
Asegúrese de fijar el televisor.
Fije el televisor al soporte para TV con los tornillos
suministrados. Si no instala el televisor de forma
segura, éste podría caerse o el soporte para TV podría
volcarse y provocar lesiones.
Notas sobre la instalación
Evite que el soporte para TV quede instalado de
forma inclinada. Para evitar esta situación, tenga en
cuenta las siguientes precauciones.
• Si se instala el soporte para TV sobre una
superficie suave, como un tapete o alfombra,
coloque previamente un panel en la ubicación
designada.
Seguridad
Gracias por adquirir este producto.
Los productos Sony se diseñan teniendo en
cuenta la seguridad.
Este manual de instrucciones muestra la
manipulación correcta del producto y las
precauciones importantes necesarias para evitar
accidentes. Asegúrese de leer detenidamente este
manual y utilizar el producto de forma correcta.
Guarde este manual para consulta futura.
PRECAUCIÓN
Productos especificados
Este soporte para TV está diseñado para su
utilización sólo con los productos especificados. Si
realiza la instalación de otros aparatos que no sean
aquellos especificados, este soporte podría caerse o
dañarse y provocar lesiones. Las ilustraciones
utilizadas en este manual muestran el modelo KDL46HX85x, a menos que se indique lo contrario.
Televisor digital a color con
pantalla de cristal líquido
Nota sobre la utilización
Limpieza
Para mantener limpio el soporte para TV, realice una
limpieza periódica con un paño seco y suave. Las
manchas difíciles pueden limpiarse con un paño
ligeramente humedecido con una solución de jabón
neutro. Asegúrese de secar el área con un paño suave
y seco. Nunca utilice productos químicos, como
disolventes o bencina, ya que podrían dañar el
acabado del soporte para TV.
No modifique el soporte para TV.
Podría caerse y provocar lesiones.
Asegúrese de instalar correctamente
el televisor siguiendo las
instrucciones.
Apriete los tornillos de forma segura. Si no instala el
televisor adecuadamente, puede caerse y provocar
lesiones.
Tenga cuidado de no lesionarse las
manos o dedos durante el armado.
• Tenga cuidado de no lesionarse las manos o dedos
durante la instalación del televisor.
SU-B553S KDL-55HX85x
SU-B463S KDL-46HX85x
* En los nombres de modelo reales, “x” indica los
números y/o caracteres específicos de cada
modelo.
ES
2
Page 19

Paso 1:
Comprobación de las
partes
Nombre
Soporte
Junta
Cantidad
1
Paso 2:
Instalación del televisor
Antes del armado
• Antes del armado, asegúrese de contar con un
destornillador de cruz adecuado para los tornillos.
• Al utilizar un
destornillador eléctrico,
ajuste la configuración del
par de apriete en
aproximadamente 1,5 N·m
{15 kgf·cm}.
12 cm ~
1
Cuello
1
Tornillo de sujeción del
cuello del soporte para TV
(PSW5 × 16) (× 3)
Tornillo de la junta
(PSW5 × 16) (× 3)
Tornillo del cuello
(PSW5 × 16) (× 4)
Manual de instrucciones 1
Para obtener más información sobre cómo extraer el
soporte de sobremesa del televisor, consulte las
instrucciones de operación suministradas con el
televisor.
10
Fije el cuello en el soporte para
1
TV con los cuatro tornillos del
cuello (PSW5 × 16)
(suministrados).
Tornillo del
cuello
(PSW5 × 16)
Cuello
ES
Español
(continúa)
3
ES
Page 20

Prepare el TV.
2
Cuando cambie de lugar el TV, asegúrese de
que dos o más personas instalen el televisor en
el soporte para TV como se muestra en la
ilustración. Si una sola persona se encarga del
trabajo de instalación, esto podría provocar
accidentes o lesiones.
Fije la junta suministrada a la
3
parte posterior del televisor con
cos tres tornillos (PSW5 × 16)
(suministrados).
Deslice la junta suministrada hacia arriba para
fijarla.
Tornillo de la junta
(PSW5 × 16)
PRECAUCIÓN
• Si se ejerce presión sobre la superficie de la
pantalla o ésta se somete a impactos, la pantalla
LCD podría dañarse.
• Coloque la pantalla mirando hacia abajo sobre
una superficie estable y nivelada, de forma que el
soporte de sobremesa sobresalga por el borde de
la superficie.
Si coloca la cara de la pantalla y la base del
soporte de sobremesa en una superficie al mismo
nivel, las condiciones de trabajo serán inestables y
la pantalla podría sufrir daños.
Instale el televisor en el soporte
4
para TV.
Cuando instale el TV en el soporte para TV,
sostenga el televisor como muestra la
ilustración e instálelo en los dos soportes del
soporte para TV.
~
• Asegúrese de conservar los tornillos extraídos.
• Al extraer el soporte de sobremesa de la pantalla,
coloque la pantalla mirando hacia abajo sobre una
superficie de trabajo estable que sea más grande
que la pantalla.
• Para evitar dañar la superficie de la pantalla LCD,
asegúrese de colocar un paño suave en la
superficie de trabajo.
ES
4
La dirección de la flecha muestra la
parte frontal del soporte para TV.
Junta
Page 21

Fije el televisor y el soporte
5
para TV con los tres tornillos de
sujeción del cuello del soporte
para TV (PSW5 × 16)
(suministrados).
Tornillo de sujeción
del cuello del
soporte para TV
(PSW5 × 16)
Sujeción de los cables.
6
Utilice el fijador de cables suministrado con el
televisor.
Paso 3:
Medidas de seguridad
para evitar que el soporte
para TV se caiga
WARNING
Asegúrese de tomar las medidas necesarias para
evitar que el soporte para TV se caiga, lo que
podría causar lesiones y daños.
Fijación del TV y del soporte
para TV
Sony recomienda
especialmente tomar medidas
para evitar que el televisor se
caiga.
Los televisores que no están
instalados de manera segura
pueden caerse y provocar
daños a la propiedad, causar
lesiones corporales o incluso la
muerte.
~
• No sujete el cable de alimentación de ca junto con
otros cables.
Medidas para evitar que se
caigan el TV y el soporte para
TV
• Instale el TV de modo que quede fijo a la
pared o base.
• No permita que los niños jueguen o se
cuelguen del mueble o del TV.
• Evite colocar o colgar elementos en el TV.
• No instale nunca el TV en:
– superficies resbaladizas, inestables o
irregulares.
– muebles que pueden utilizarse
fácilmente como escalones, como una
cómoda.
• Instale el TV donde no puedan deslizarlo,
empujarlo o hacerlo caer.
• Coloque todos los cables de alimentación
ca y cables de conexión de modo que no
estén al alcance de los niños.
(continúa)
ES
5
Page 22

Medidas recomendadas para la
instalación del TV y del soporte
para TV
Preste atención a las siguientes medidas de
seguridad cuando instale un TV en una base
(no proporcionada).
1 Fije la base para el TV.
Asegúrese de que la base tolere
correctamente el peso del TV. Utilice dos
soportes en ángulo (no suministrados) para
fijar la base. Para cada soporte en ángulo,
utilice el herraje adecuado a fin de:
• sujetar un lado del soporte para ángulo a la
pared.
• sujetar el otro lado a la base.
Soporte en
ángulo (no
suministrado)
Base
2 Fije el TV a la base.
Utilice los herrajes opcionales que se
enumeran a continuación (no
suministrado):
• Tornillo mecanizado M4 × 12 (atornillado
al soporte para TV)
• Un tornillo o elemento similar (sujetado a
la base)
• Cuerda o cadena (lo suficientemente fuerte
para tolerar el peso del TV). Asegúrese de
que no haya demasiada longitud sobrante
de cuerda o cadena.
También puede utilizarse para este fin el Kit de
correa de soporte Sony opcional.
Orificio para
tornillo en el
soporte para
TV
Tornillo (no
suministrado)
Tornillo
mecanizado
M4 × 12 (no
suministrado)
Cuerda o
cadena (no
suministrado)
~
Póngase en contacto con nuestro servicio de
asistencia al cliente suministrando el nombre
del modelo de su soporte para TV
(SU-B553S/B463S).
• Visite la página de Internet
http://esupport.sony.com/ES/LA
ES
6
Page 23

3 Anclaje de TV a la pared.
s
Sujete el TV a la pared mediante pernos,
tornillos de anclaje y cadena (o soga).
~
• Fijar el TV a la base sin sujetar el TV ni la base a
la pared no es garantía suficiente de que el TV
permanezca en su sitio. Para una mayor
protección, siga las tres medidas recomendadas
anteriormente.
Tornillos de fijación (M6, no suministrado)
Cuerda o
cadena (no
suministrado)
Anclaje (no
suministrado)
Orificio
de
montaje
de la
pared
Paso 4:
Conexión del televisor
Conecte el televisor con un
Speaker Integrated Stand al
soporte para TV con el cable del
soporte para TV.
ES
7
Page 24

Paso 5:
(
)
Configuración de los
ajustes del televisor
Ajústelo en “Base Altavoz Integrado”
en el menú “Posición TV”.
Pulse el botón HOME del control remoto del
televisor y seleccione el menú tal como se
indica a continuación:
Ajustes > Sonido > Posición TV > Base
Altavoz Integrado
Especificaciones
361 mm
14 1/4 pulgada
24 mm
(15/16
pulgada)
Resolución de problemas
Sonido
No sale sonido del soporte para TV:
• Verifique la conexión del cable.
Sonido anormal:
• Verifique los ajustes de sonido.
Ajuste “Posición TV” en “Base Altavoz
Integrado” en el ajuste “Sonido”.
SU-B553S SU-B463S
Dimensiones: mm
(pulgada)
Peso del soporte: Kg
(libras)
A 72 (2 7/8) 65 (2 5/8)
B 223 (8 7/8) 190 (7 1/2)
C 1 294 (51) 1 097 (43 1/4)
D 772 (30 3/8) 663 (26 1/8)
E 295 (11 5/8) 255 (10 1/8)
6,4 kg
(14,2 lb)
5,3 kg
(11,7 lb)
Bocinas
Rango completo (2)
“Only for Mexico”/“Solo para México”
Consumo de energía en modo normal 60Wh/día
(considerando 5 horas de uso al día) Consumo de
energía en modo de espera 13.3Wh/día (considerando
19 horas en modo de espera al día)
El diseño y las especificaciones están sujetos a
cambios sin previo aviso.
ES
8
Page 25

Page 26

Registro do proprietário
O modelo e número de série estão localizados na
parte traseira do suporte de televisor. Anote esses
números nos espaços abaixo.
Utilize-os quando ligar para o seu revendedor Sony
para obter informações sobre o suporte de televisor.
Nome do modelo
Número de série
Sobre segurança
Obrigado por comprar este produto.
Os produtos da Sony são projetados tendo
em mente a segurança.
Este manual de instruções mostra o correto manuseio
do produto e precauções importantes necessárias para
prevenir acidentes. Certifique-se de ler todo o manual
e usar o produto corretamente. Mantenha esse manual
disponível para referências futuras.
Certifique-se de fixar a TV.
Fixe a TV ao suporte de televisor usando os parafusos
fornecidos. Se a TV não for instalada com segurança,
ela pode cair, ou o suporte de televisor pode virar,
causando lesões.
Notas sobre a instalação
Não permita que o suporte de televisor seja instalado
em um ângulo ou inclinado. Para evitá-lo, observe as
seguintes precauções.
• Se instalar o suporte de televisor em uma
superfície macia, como um tapete ou carpete,
coloque antes uma tábua no local.
Nota sobre o uso
Limpeza
Para manter o suporte de televisão limpo, passe
ocasionalmente um pano seco sobre ele. Manchas
persistentes podem ser removidas, passando um pano
ligiramente umedecido com sabão suave. Certifiquese de secar a área com um pano seco e macio. Não
use produtos químicos, como tíner ou benzina, uma
vez que eles danificam o acabamento do suporte de
televisor.
Não modifique o suporte de
televisor.
Ele pode cair e causar lesões.
CUIDADO
Produtos especificados
Este suporte de televisor foi projetado apenas para o
uso com o produto especificado. Se você instalar
equipamentos que não sejam os especificados, ele
pode cair ou quebrar, causando lesões. As ilustrações
usadas neste manual mostram o KDL-46HX85x,
exceto quando indicado.
TV digital com tela
de cristal líquido
SU-B553S KDL-55HX85x
SU-B463S KDL-46HX85x
* Nos nomes reais de modelos, o “x” indica
números e/ou caracteres específicos de cada
modelo.
Certifique-se de instalar a TV de
forma segura, seguindo as
instruções.
Aperte os parafusos de forma segura. Se a TV não for
instalada de forma segura, ela pode cair e causar
lesões.
Cuidado para não machucar suas
mãos ou dedos durante a
montagem.
• Cuidado para não machucar seus dedos ou mãos
ao instalar a TV.
PT
2
Page 27

Passo 1:
Verificando as peças
Passo 2:
Instalando a TV
Nome
Suporte
Junta
Base vertical
Parafuso de fixação da Base
vertical do suporte de
televisor
(PSW5 × 16) (× 3)
Parafuso da junta
(PSW5 × 16) (× 3)
Parafuso da Base vertical
(PSW5 × 16) (× 4)
Quantida
1
1
1
10
Antes de montar
• Certifique-se de ter uma chave de fenda Phillips que se
adapte aos parafusos antes de montar.
• Ao usar uma chave de
fenda elétrica, defina o
torque em
aproximadamente
1,5 N·m {15 kgf·cm}.
Prenda a Base vertical no
1
suporte de televisor com quatro
12 cm ~
parafusos (PSW5 × 16)
(fornecidos).
Parafuso da
Base vertical
(PSW5 × 16)
Base
vertical
PT
Português
Manual de instruções 1
Consulte as instruções de operação fornecidas com
sua TV para informações sobre como remover o
pedestal da TV.
Prepare a TV.
2
Ao mover a TV, certifique-se de que pelo
menos duas pessoas instalem a TV no suporte
de televisor, conforme mostrado na ilustração.
Se uma pessoa realizar a instalação sozinha,
isso pode resultar em acidente ou lesões.
(Continua)
3
PT
Page 28

Fixe a junta fornecida na parte
3
traseira da TV com três
parafusos (PSW5 × 16)
(fornecidos).
Deslize a junta para cima para fixar.
Parafuso da junta
(PSW5 × 16)
Junta
Instale a TV no suporte de
4
televisor.
Ao instalar a TV no suporte de televisor,
segure a TV conforme mostrado na ilustração
e instale a TV nos dois suportes do suporte de
televisor.
~
• Certifique-se de guardar os parafusos removidos.
• Para remover o pedestal do monitor, deite o
monitor com a face para baixo em uma superfície
de trabalho estável que seja maior do que ele.
• Para evitar danificar a superfície do monitor LCD,
coloque um pano macio sobre a superfície de
trabalho.
CUIDADO
• A tela LCD pode quebrar ou ser danificada, se for
aplicada pressão ou choque à superfície do
monitor.
• Coloque o monitor com a face para baixo em uma
superfície estável e plana com o pedestal
pendendo para fora da superfície.
A colocação da face do monitor e da base do
pedestal em superfícies do mesmo nivel criará
condições de trabalho pouco estáveis e poderá
danificar o monitor.
A direção da seta mostra a frente do
suporte de televisor.
Fixe a TV e o suporte de
5
televisor com os 3 parafusos de
fixação da Base vertical do
suporte de televisor
(PSW5 × 16) (fornecidos).
Parafuso de fixação
do pescoço do suporte
de televisor (PSW5 × 16)
PT
4
Page 29

Agrupando os cabos.
6
Use o prendedor de cabo fornecido com a TV.
~
• Não agrupe o cabo de alimentação CA junto com
os demais cabos.
Passo 3:
Medidas de segurança
para prevenir a queda
AVISO
Certifique-se de tomar medidas para evitar que o
suporte de televisor vire e cause possíveis lesões
ou danos.
Instalando a TV e o suporte de
televisor de forma segura
A Sony recomenda que sejam
tomadas medidas de segurança
para evitar que a TV caia.
As TVs que não estão
instaladas de forma segura
podem cair e provocar danos
materiais, ferimentos graves
ou até mesmo a morte.
Para evitar a queda da TV e o
suporte de televisor
• Prenda a TV de forma segura na parede e/
ou em uma estante.
• Não permita que crianças brinquem ou
subam nos móveis e nos aparelhos de TV.
• Evite colocar ou pendurar objetos na TV.
• Nunca instale a TV em:
– superfícies escorregadias, instáveis e/ou
irregulares.
– móveis que possam ser escalados, como
armários com gavetas.
• Instale a TV onde ela não possa ser puxada,
empurrada ou derrubada.
• Cuide para que os cabos de alimentação CA
e os cabos de conexão não estejam ao
alcance de crianças.
(Continua)
5
PT
Page 30

Medidas recomendadas para a
instalação segura da TV e o
suporte de televisor
Considere as seguintes medidas quando
instalar a sua TV em uma estante (não
fornecida).
1 Fixe a estante onde a TV será instalada.
Certifique-se de que a estante seja
adequada para suportar o peso da TV.
Utilize dois suportes tipo mão francesa
(não fornecidos) para fixar a estante. Para
cada suporte utilize parafusos apropriados
para:
• fixar um lado do suporte na parede.
• fixar o outro lado na estante.
Suporte tipo
mão francesa
(não
fornecido)
Estante
2 Fixe a TV na estante.
Utilize os itens listados a seguir (não
fornecidos):
• Um parafuso M4 × 12 (parafusado no
suporte de televisor)
• Um parafuso ou outro fixador similar (para
fixá-lo na estante)
• Corda ou corrente (forte o suficiente para
suportar o peso da TV). Certifique-se de
que não haja folga excessiva na corda ou na
corrente.
Outra medida é prender a TV com um kit de
cinto de segurança Sony (não fornecido).
Furo para
parafuso no
suporte de
televisor
Parafuso
M4 × 12 (não
fornecido)
Parafuso (não
fornecido)
Corda ou
corrente
(não
fornecida)
PT
6
Page 31

3 Prenda a TV na parede.
Prenda a TV na parede utilizando os
parafusos, prendedor de parede e corrente
(ou corda).
~
• Fixar a TV na estante sem fixar a TV e a estante
na parede proporcionará uma proteção mínima
contra a queda da TV. Para uma proteção maior,
certifique-se de seguir as três medidas
recomendadas.
Parafusos com olhal (M6, não fornecidos)
Corda ou
corrente (não
fornecida)
Furos de
montagem
de parede
Prendedor de
parede com
olhal (não
fornecido)
Passo 4:
Conectando a TV
Conecte a TV com Speaker
Integrated Stand ao suporte de
televisor usando o cabo do
suporte de televisor.
PT
7
Page 32

Passo 5:
Executando os ajustes da
TV
Defina como “Rack com Alto-Falantes”
no menu “Posição da TV”.
Pressione o botão HOME do controle remoto
da TV e selecione o menu da seguinte forma:
Ajustes > Som > Posição da TV > Rack
com Alto-Falantes
Solução de problemas
Especificações
361 mm (14 1/4 polegadas)
SU-B553S SU-B463S
24 mm
(15/16
polegadas)
Som
Nenhum som do suporte de televisor:
• Verifique a conexão do cabo.
Som anormal:
• Verifique o ajuste de som.
Defina “Posição da TV” como “Rack com
Alto-Falantes” nos ajustes “Som”.
Dimensões: mm
(polegadas)
Peso do suporte:
A 72 (2 7/8) 65 (2 5/8)
B 223 (8 7/8) 190 (7 1/2)
C 1.294 (51) 1.097 (43 1/4)
D 772 (30 3/8) 663 (26 1/8)
E 295 (11 5/8) 255 (10 1/8)
6,4 kg
(14,2 lb)
5,3 kg
(11,7 lb)
Alto-falantes
Full Range (2)
Projeto e especificações estão sujeitos a mudanças
sem aviso.
ADVERTÊNCIA
• Evite o uso prolongado do aparelho com volume
alto (potência superior a 85 decibéis), pois isto
poderá prejudicar a sua audição (Lei Federal No
11.291/06).
PT
8
Page 33

Recomendações Importantes Sobre
o Nível de Volume
Caro(a) consumidor(a)
Maximize o prazer de ouvir a música com este
aparelho lendo estas recomendações que ensinam
você a t irar o máximo proveito do aparelho quando
reproduzir um som a um nível seguro. Um nível que
permite que o som seja alto e claro, sem distorção e
sem causar desconforto e, o mais importante, de uma
forma que proteja a sua sensibilidade auditiva.
Para estabelecer um nível seguro:
• Ajuste o controle de volume a um nível baixo.
• Aumente lentamente o som até poder ouvi-lo
confortavelmente e claramente, sem distorções.
Uma vez estabelecido um nível de som
confortável:
• Ajuste o controle de volume e deixe-o nesta
posição. O minuto gasto para fazer este ajuste
agora protegerá a sua audição no futuro. Afinal de
contas, nós queremos que você ouça durante toda
a vida.
Usando sabiamente, o seu novo equipamento de som
proporcionará a você uma vida toda de
entretenimento e prazer. A Sony recomenda que você
evite a exposição prolongada a ruídos muito altos.
Nível de
Decibéis
30 Biblioteca silenciosa, sussurros leves
40 Sala de estar, refrigerador, quarto longe do
trânsito
50 Trânsito leve, conversação normal, escritório
silencioso
60 Ar condicionado a uma distância de 6 m,
máquina de costura
70 Aspirador de pó, secador de cabelos,
restaurante ruidoso
80 Tráfego médio de cidade, coletor de lixo,
alarme de despertador a uma distância de
60 cm
OS RUÍDOS ABAIXO PODEM SER PERIGOSOS
EM CASO DE EXPOSIÇÃO CONSTANTE
90 Metrô, motocicleta, tráfego de caminhão,
cortador de grama
100 Caminhão de lixo, serra elétrica, furadeira
pneumática
120 Show de banda de rock em frente às caixas
acústicas, trovão
140 Tiro de arma de fogo, avião a jato
180 Lançamento de foguete
Informação cedida pela Deafness Research Foundation,
por cortesia.
Exemplos
A seguir, incluímos uma tabela com os níveis de
intensidade sonora em decibéis e os exemplos de
situações correspondentes para a sua referência.
PT
9
Page 34

Page 35

 Loading...