

Sony SU-558 User Manual
4-098-717-03 (2)
Monitor Stand
取付説明書
Mounting Instructions
Instructions de montage
Montageanleitung
Instrucciones de montaje
Instruzioni per il montaggio
安装说明书
お買い上げいただきありがとうございます。
安全のための注意事項を守らないと、人身事故になることが
あります。
この取付説明書には、事故を防ぐための重要な注意事項と製品の取り扱い
かたを示してあります。この取付説明書をよくお読みのうえ、製品を安全
にお使いください。お読みになったあとは、いつでも見られるところに必
ず保管してください。
C
D
E
アームカバー/ Arm cover / Cache
M
スタンド可動範囲スタンド可動範囲
スタンド可動範囲
スタンド可動範囲スタンド可動範囲
range / Mobilité du support
250.3 (9 27/32)
単位:mm / Unit: mm (inches) / Unité: mm (pouces)
/ Stand movable
64°
74°
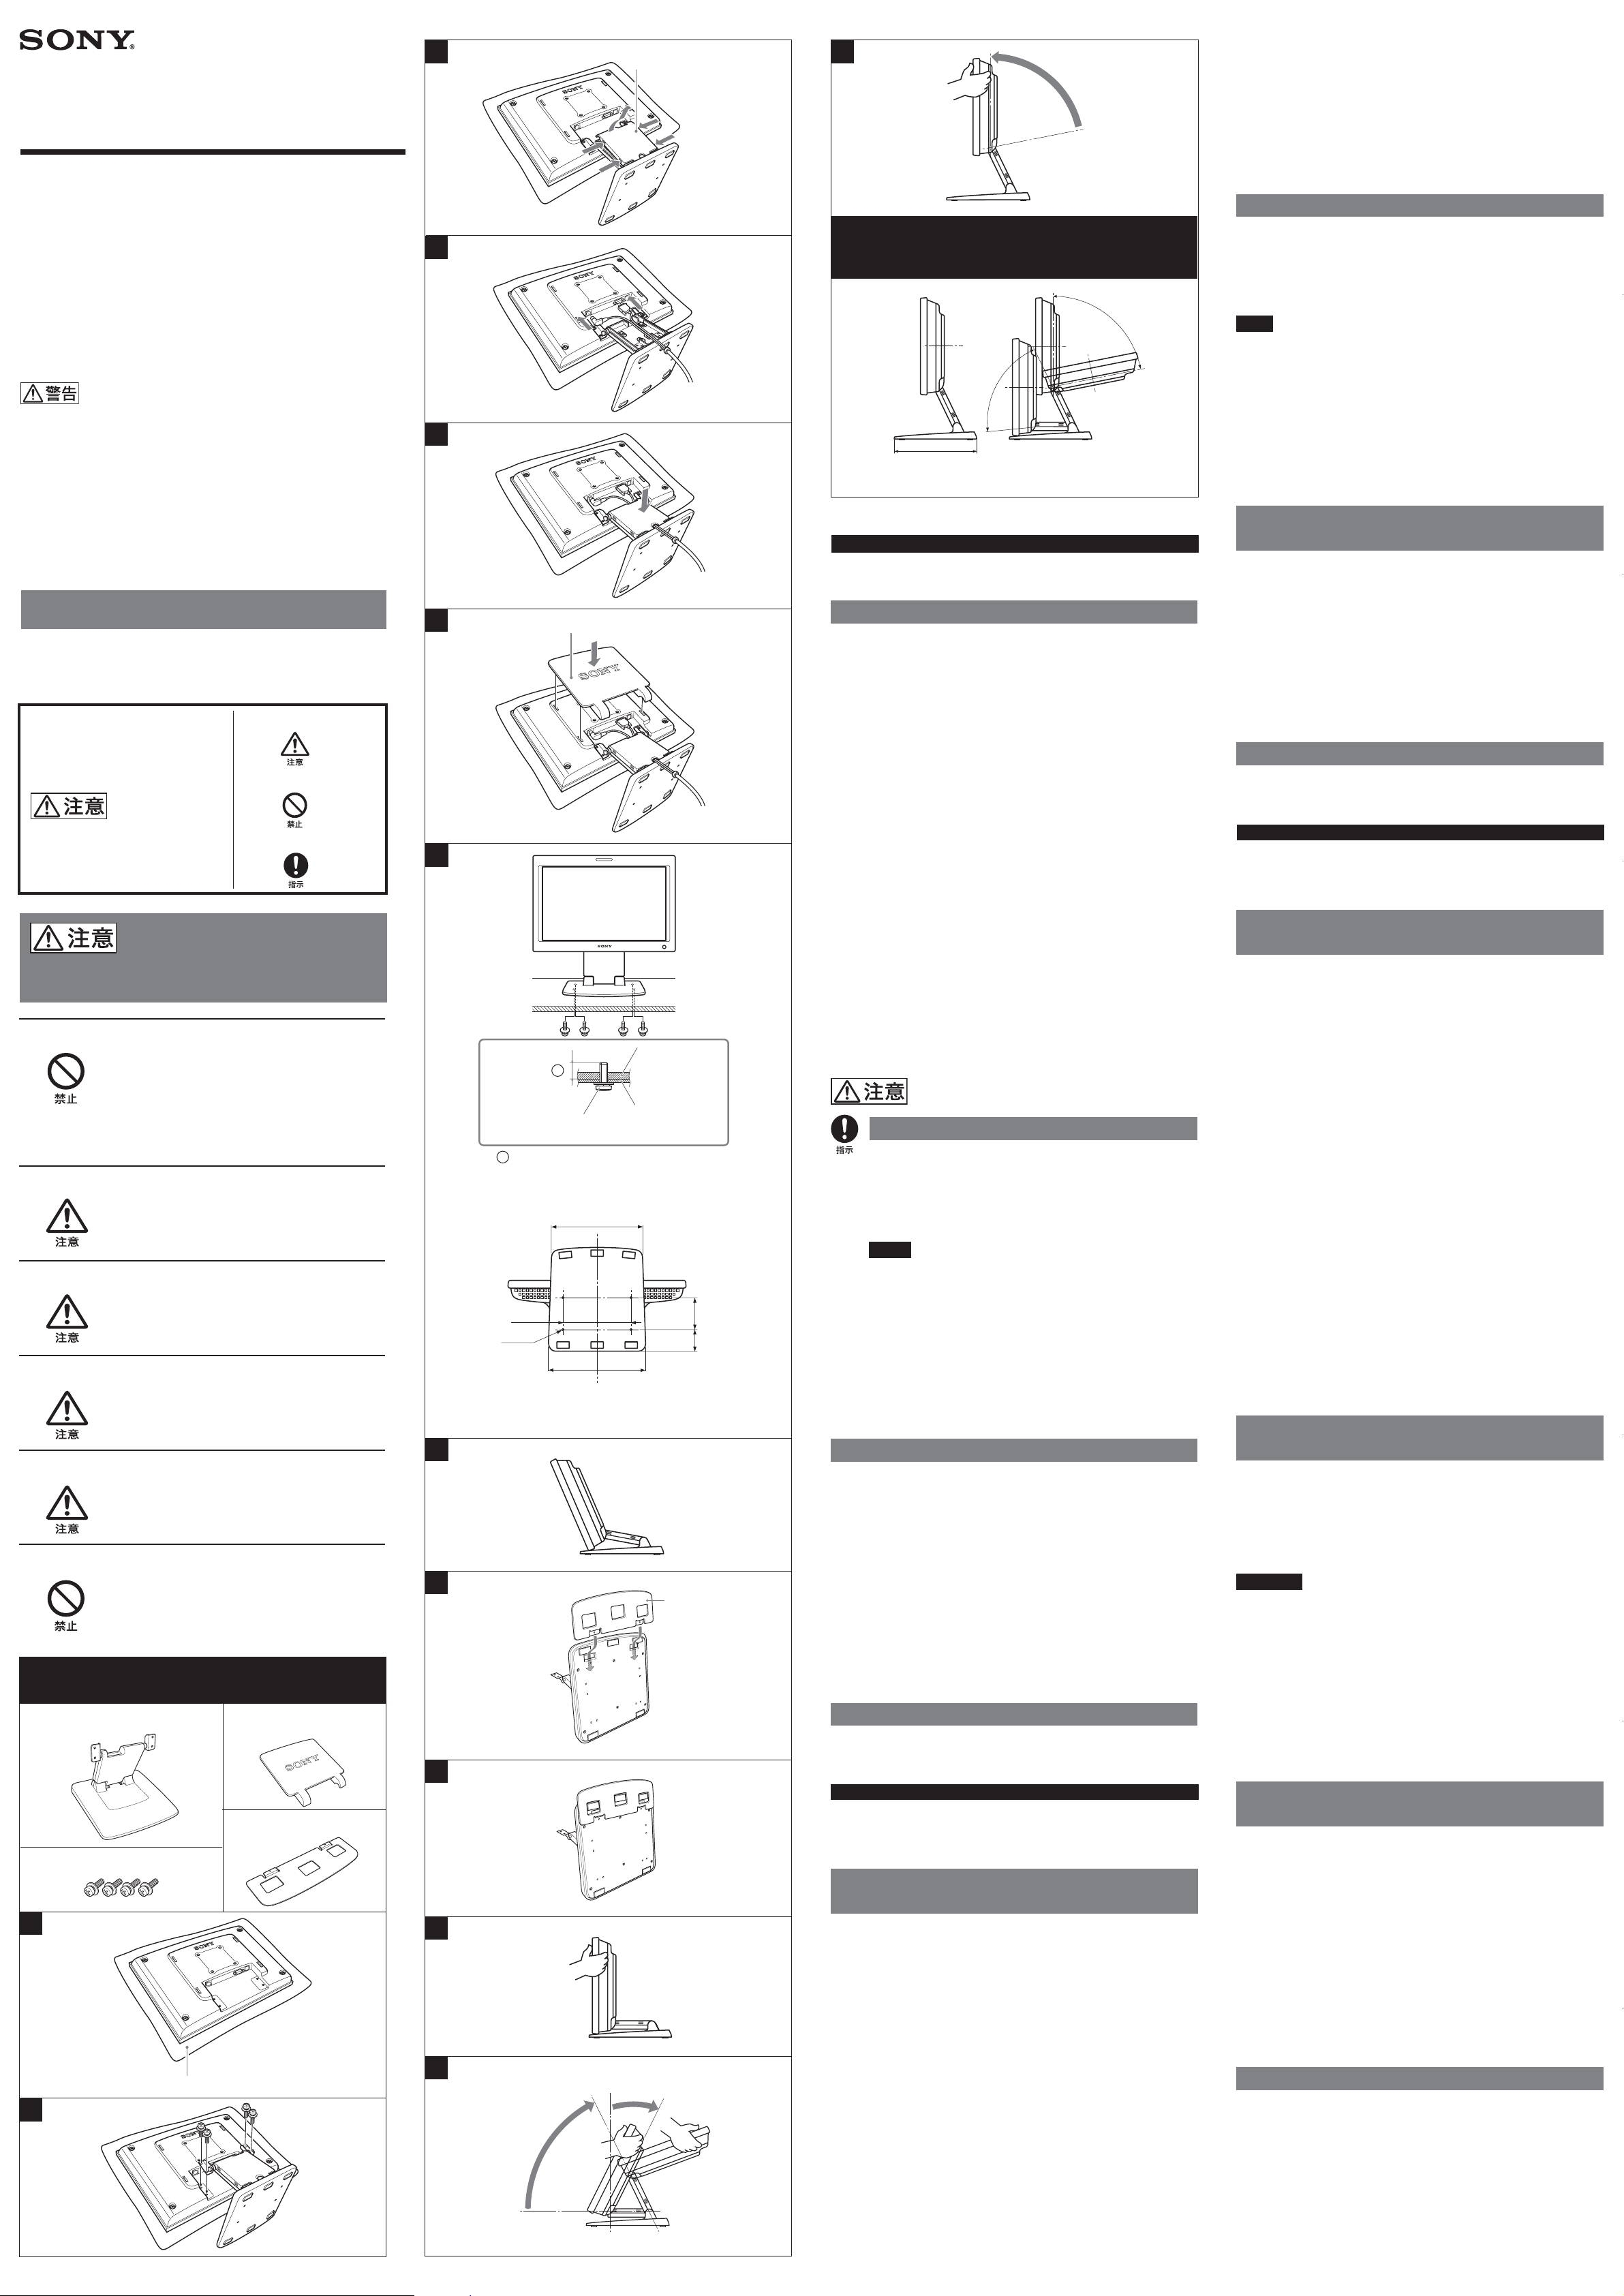
4 Reconnect the cables removed previously, and bundle them together
as shown in the illustration.
D
5 Align the arm cover with the Monitor Stand, and re-attach it by pushing
E
it in.
6 Aligning the prongs on the decorative cover (supplied) with the four
holes on the back of the LCD monitor, attach it by pushing it in firmly.
F
To prevent the monitor from toppling over
When the monitor is installed on a shelf, it may topple over or fall, causing
injury. Be sure to use the screw holes on the bottom of the stand to attach
the monitor securely to the monitor stand. There are four screw holes.
Confirm the location of these holes, and attach commercially available
screws from the bottom of any base you may place it on. G
Notes
• If the screws you use are too long, you may damage the Monitor Stand.
• Do not place the monitor in a location where it is subject to vibration or the
possibility of being struck.
If you use the monitor tilted forward as shown in the illustration, it may
topple over or fall, causing injury. Be sure to attach the supplied attachment
to the stand. H
1 Insert the lugs of the supplied attachment to the holes on the bottom of
the stand until they click. I J
SU-558
Sony Corporation 2003 Printed in Japan
安全のために
ソニー製品は安全に充分に配慮して設計されています。しかし、まちがった
使いかたをすると、転倒などにより死亡や大けがなど人身事故につながるこ
とがあり、危険です。事故を防ぐために次のことを必ずお守りください。
• 安全のための注意事項を守る。
警告表示の意味
取付説明書および製品では、次のような
表示をしています。表示の内容をよく理
解してから本文をお読みください。
この表示の注意事項を守らないと、事故
などにより、死亡や大けがの原因とな
ります。
注意を促す記号
行為を禁止する記号
行為を指示する記号
F
G
飾りカバー/ Decorative cover / Couvercle décoratif
日本語日本語
日本語
日本語日本語
SU-558は、LMD-170W/230WLCDモニター専用のモニタースタンド
です。以下の手順に従って、取り付けを行ってください。
LCDモニターへの取り付け
取り付ける前に
• LCDモニターに接続している電源コード、入出力ケーブルをすべて抜いて
おきます。
• 柔らかい布を準備してください。
• イラストはLMD-170WLCDモニターを使用していますが、LMD-230W
LCDモニターへの取り付けも同様な手順で取り付けられます。
1 平らで安定した場所に柔らかい布などを敷き、LCDモニターを画面を下
にして静かに置く。A
2 LCDモニターの後面にあるネジ穴4か所にモニタースタンドのネジ穴を
合わせ、付属のネジ(M4×12)4本でしっかり固定する。B
3 取り付けたモニタースタンドから、図のようにアームカバーの両サイ
ドの滑り止め4か所を内側に押さえ、手前に外す。 C
Adjusting the angle or position of the LCD
monitor
Grasp the LCD monitor with both hands when
adjusting its angle or position.
To raise the position of the monitor
1 Grasp both sides of the monitor. K
2 1 Lean the monitor back by tilting it on the upper hinge, as shown.
2 Raise the monitor by tilting it on the lower hinge, as shown.
L
3 Face the monitor to the front by tilting it forward on the upper hinge. M
Specifications
Mass: Approx. 5.2 kg (11 lb 7 oz)
Français
Le SU-558 est un support d’écran conçu pour être utilisé avec le moniteur
d’écran LMD-170W/230W. Procédez comme suit pour assembler le support
d’écran au moniteur d’écran.
下記の注意事項を守らないと、
事故などにより、死亡や大けがの原因となります。
不安定な場所に設置しない
次のような場所に設置すると、倒れたり落ちたりして、け
がの原因となることがあります。
・ぐらついた台の上
・傾いたところ
・振動や衝撃のかかるところ
また、設置・取り付け場所の強度を充分にお確かめください。
スタンド取り付けの際は接続ケーブルを抜く
ディスプレイに接続されているケーブルを、すべてはずし
てください。接続したままスタンドを取り付けるとケーブ
ルが傷つき火災や感電の原因になることがあります。
取り付けには付属のネジを使う
付属のネジ以外を使用すると、ネジがゆるみ機器の落下で
けがをすることがあります。
他の機器には使用しない
落下・転倒してけがの原因になることがあります。
ケーブルの上にスタンドを置かない
電源コードや接続コードの上にスタンドを置くとコードが
断線し火災や感電の原因になることがあります。
移動の際は、飾りカバーを持たない
移動の際、ディスプレイを持ち上げる場合は、飾りカバー
を持たないでください。
飾りカバーが外れ、ディスプレイが落下し、けがの原因と
なることがあります。
部品表部品表
部品表
部品表部品表
/ Parts number /
Numéro de pièce
モニタースタンド/ Monitor Stand /
Support d’écran
ネジ(4本)/ Screws (4) / Vis (4)
飾りカバー/ Decorative
cover / Couvercle décoratif
アタッチメント/ Attachment /
Accessoire
A
底面鉄板/ Metallic
a
M5ネジ/ M5 screw /
Vis M5
a: 6〜10ミリ/ 6 to 10 mm (1/4 to 13/32 inch) /
6 à 10 mm (1/4 à 13/32 pouces)
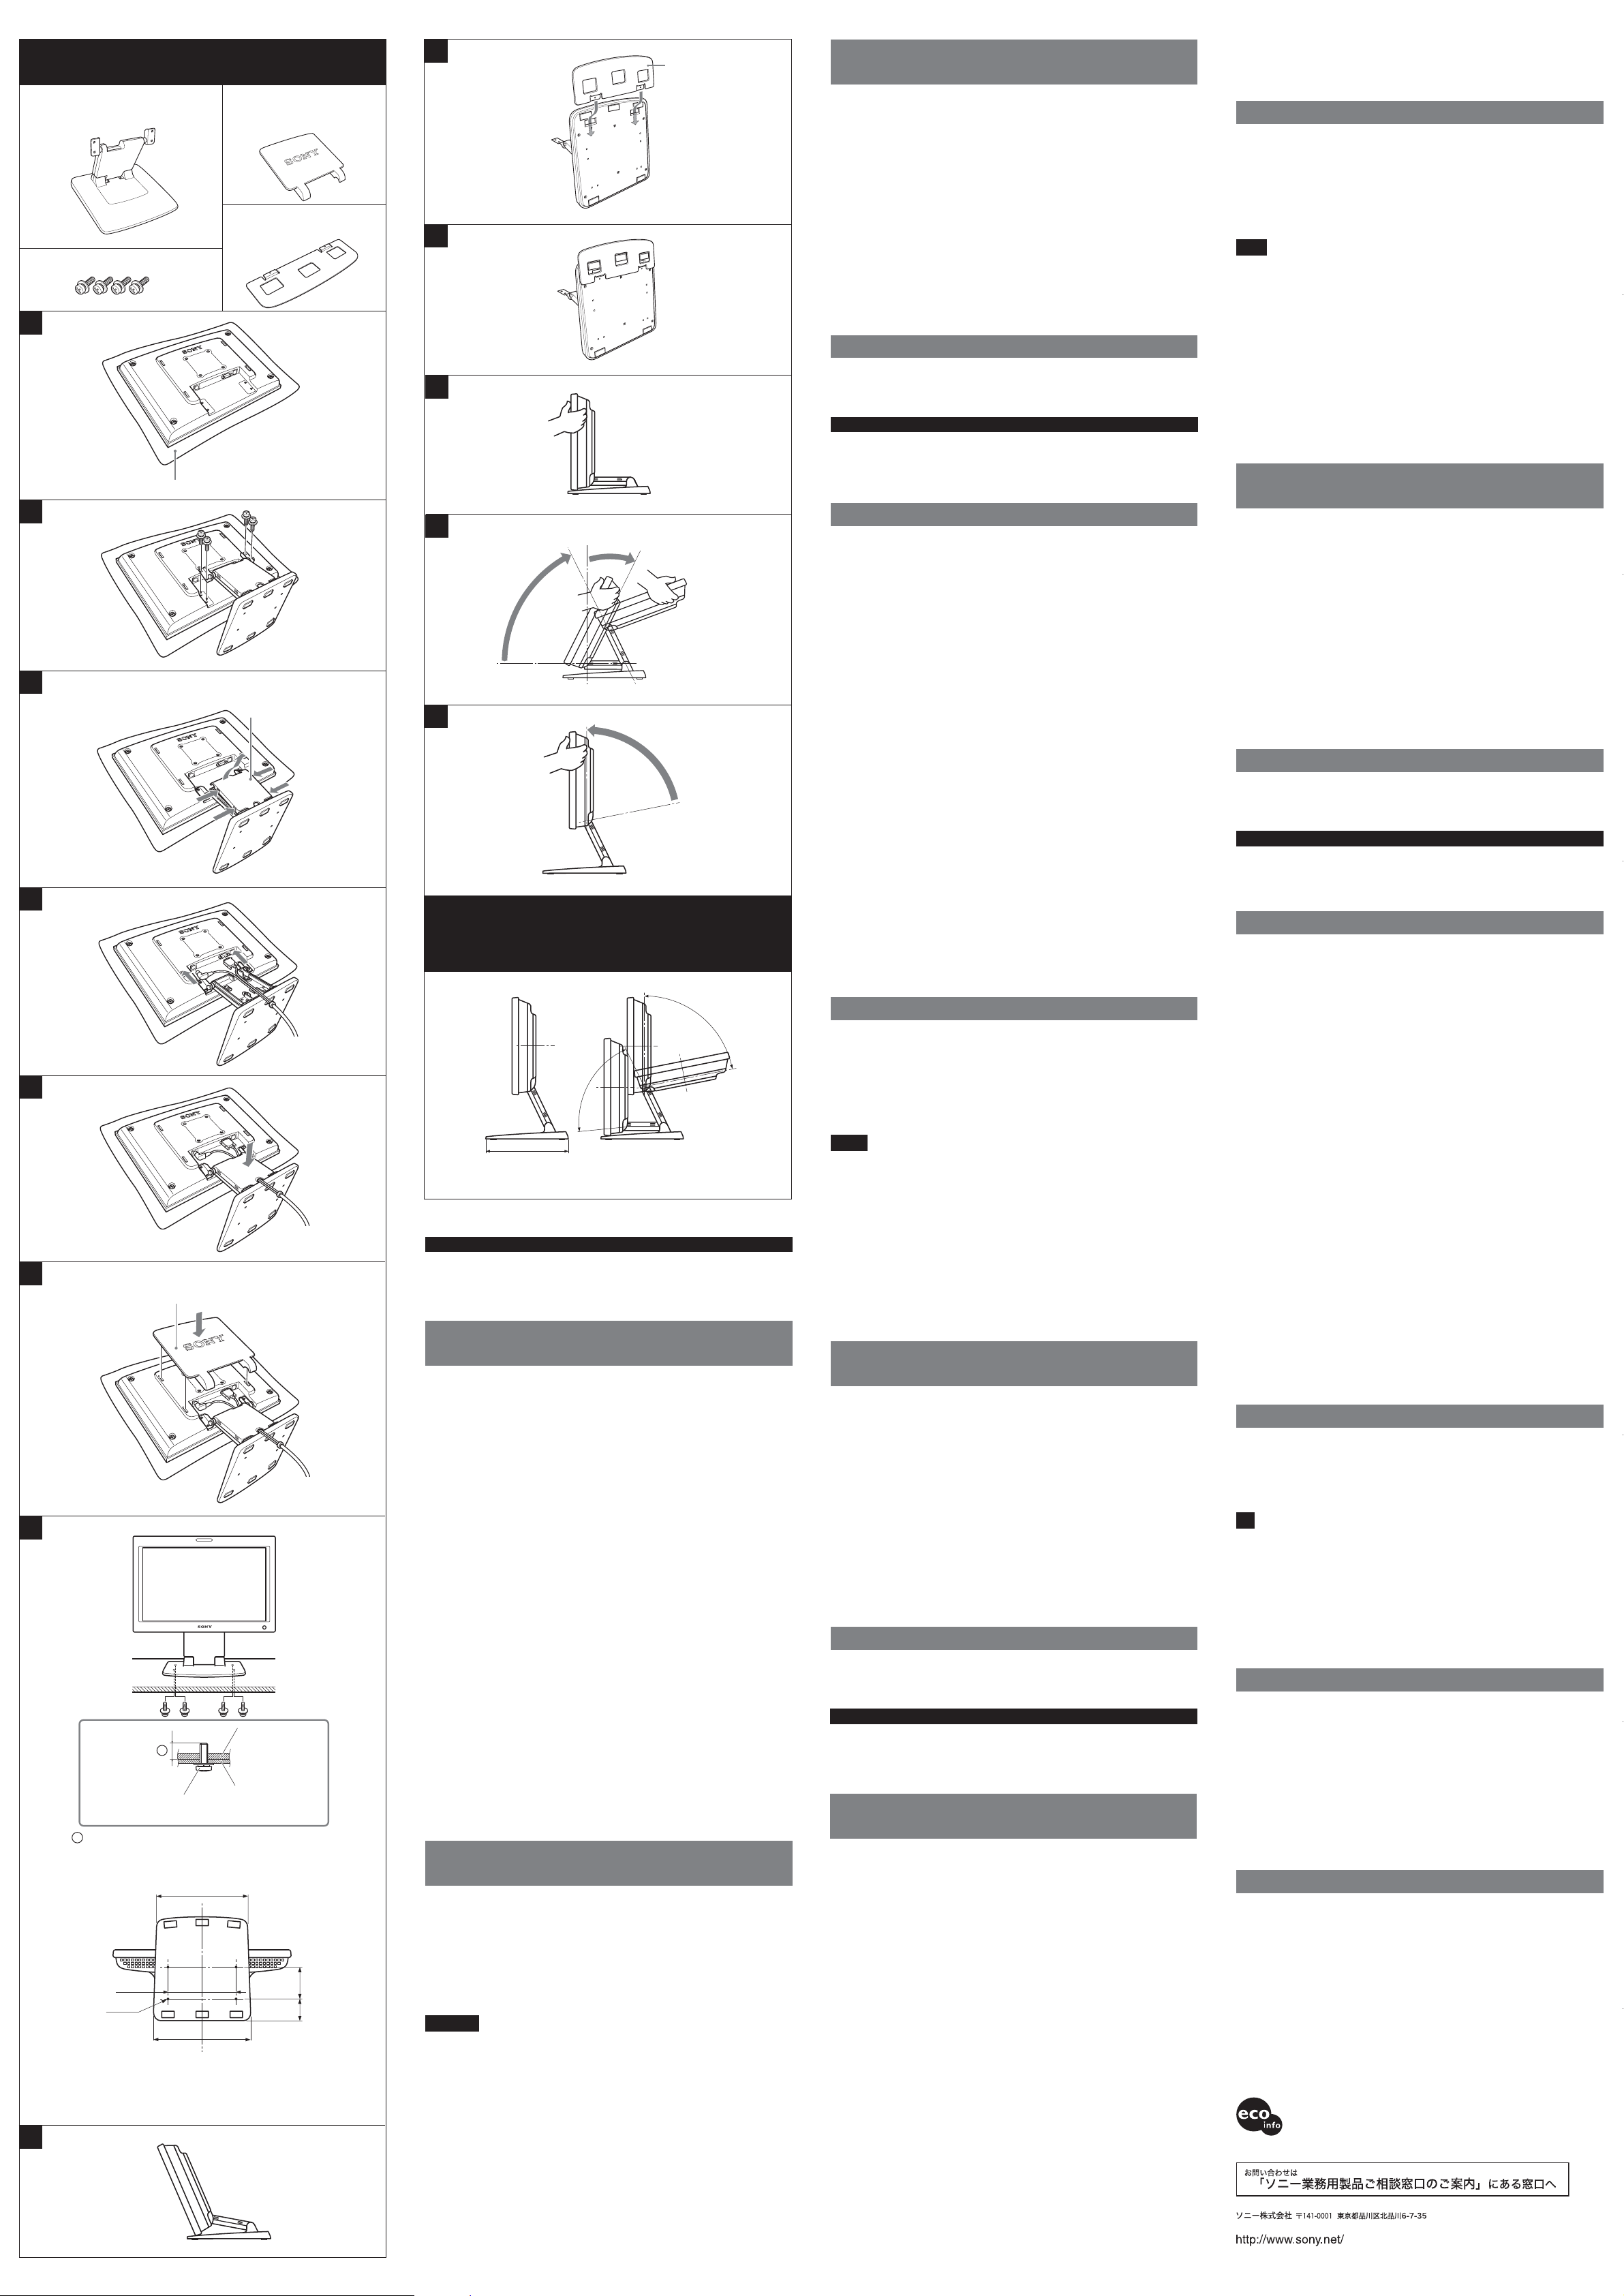
ネジの位置/ Position of the screws / Position des vis
223.4 (8 25/32)
165.1 (6 11/32)
4-M5
240.2 (9 15/32)
モニタースタンドを裏から見た図/ View from the bottom of the
Monitor Stand / Vue de dessous du support d’écran
bottom panel /
Panneau inférieur
métallique
取付物/ Attached
object / Objet assemblé
76.2
52.2
H
I
アタッチメント/
Attachment /
Accessoire
J
K
4 あらかじめ抜いておいたケーブルを接続し直し、図のように束ねて
はわせる。D
5 アームカバーをモニタースタンドに合わせ、押し込むようにして取り付
ける。E
6 LCDモニターの後面にある4つの穴に、飾りカバー(付属)の突起を合わ
せ押し込み取り付ける。F
Assemblage du support d’écran au
moniteur d’écran
Avant d’installer le support d’écran
• Débranchez le cordon d’alimentation et tout câble de connexion du
moniteur d’écran.
• Dépliez un chiffon doux de grande taille.
• Le schéma illustre le moniteur d’écran LMD-170W, mais la procédure
expliquée est exactement la même que celle requise pour l’assemblage
du LMD-230W.
1 Dépliez un chiffon doux de grande taille sur une surface plate et stable
転倒防止の処置をする
棚などに設置する際は、倒れたり落ちたりしてけがの原因になるこ
とがあります。必ず裏面のネジ穴を使いスタンドを固定してくださ
い。スタンドの裏には固定用ネジ穴が4か所開いています。その位置
を確かめ、スタンドを置いた台などの下から市販のネジを使用して
固定します。G
ご注意
長さ制限を越えたネジを使用しますと、スタンドを破損してしまう
ことがあります。
(3)
)
16
/
1
(2
図のように前傾して使用する際は、倒れたり落ちたりしてけがの原
因になることがあります。必ず付属のアタッチメントをスタンド本
体に取り付けて使用してください。H
1 モニタースタンドの裏の穴に付属のアタッチメントの爪
をカチッと音がするまで差し込む。
IJ
LCDモニターの角度・位置調整
モニターの角度・位置調整は両手でモニターを持って行ってください。
モニタ ー の位置を上げるには
1 モニターの左右を両手で持つ。K
2 1スタンド上側のヒンジを回転させ、モニターを後ろへ倒す。
2スタンド下側のヒンジを回転させ、モニターを後ろへ倒す。L
3 スタンドの上側のヒンジを回転させ、モニターを前方に起こす。
M
主な仕様
質量:約5.2kg
English
The SU-558 is a Monitor Stand designed for use with the LMD-170W/230W
LCD Monitor. Attach it to the LCD monitor following the procedure given
below.
Attaching the Monitor Stand to the LCD
monitor
et posez-y doucement la face du moniteur d’écran. A
2 Alignez les quatre orifices situés à l’arrière du moniteur d’écran avec
les orifices correspondants du support d’écran et fixez fermement le
support d’écran à l’aide des quatre vis fournies (M4×12). B
3 Poussez les quatre butées sur les côtés du cache, comme illustré sur
le schéma, retirez le cache en le tirant vers vous. C
4 Raccordez de nouveau les câbles et groupez-les comme illustré sur le
schéma. D
5 Alignez le cache avec le support d’écran et fixez-le de nouveau en le
poussant. E
6 Alignez les broches sur le couvercle décoratif (fourni) avec les quatre
orifices situés à l’arrière du moniteur d’écran et fixez le cache en le
poussant fermement. F
Afin de prévenir tout risque de
basculement du moniteur
Si vous installez ce moniteur sur une étagère, il risque de basculer ou de
tomber, ce qui pourrait vous blesser. Veillez à utiliser les trous de vis situés
dans la partie inférieure du support afin de fixer solidement le moniteur à
son support. Vous trouverez quatre trous de vis. Vérifiez l’emplacement de
ces trous et fixez des vis disponibles dans le commerce par-dessous la
base sur laquelle vous placerez le moniteur. G
Remarques
• Si les vis utilisées sont trop longues, vous risquez d’endommager le
support d’écran.
• N’installez pas le moniteur dans un endroit où il risque de subir des
vibrations ou des heurts.
Si vous utilisez le moniteur en position inclinée vers l’avant, comme indiqué
sur l’illustration, il risque de basculer ou de tomber, ce qui pourrait vous
blesser. Veillez à fixer l’accessoire fourni au support. H
1 Insérez les saillies de l’accessoire fourni dans les trous de la partie
inférieure du support, jusqu’à ce qu’elles s’encliquetent. I J
Réglage de l’angle d’inclinaison ou de la
position du moniteur d’écran
Pour régler l’angle d’inclinaison ou la position du
moniteur, vous devez le saisir à deux mains.
Pour relever le moniteur
1 Attrapez les deux côtés du moniteur. K
Before installing the Monitor Stand
• Disconnect the power cord and any connecting cables from the LCD
monitor.
• Prepare a large soft cloth.
• The illustration shows the LMD-170W LCD Monitor, but the procedure
explained is exactly the same as that required for attaching the LMD230W.
2 1 Inclinez le moniteur vers l’arrière en le faisant pivoter sur l’axe
supérieur, comme illustré.
2 Relevez le moniteur en le faisant pivoter sur l’axe inférieur, comme
illustré. L
3 Replacez le moniteur face à vous en le faisant pivoter vers l’avant sur
l’axe supérieur. M
B
柔らかい布など/ Soft cloth / Chiffon doux
L
2
1
1 Spread a large soft cloth on a flat, stable surface, and gently place the
LCD monitor face-down on the cloth. A
2 Align the four screw holes on the back of the LCD monitor with the
corresponding screw holes on the Monitor Stand, and attach it securely
using the four screws supplied (M4×12).
B
3 Pushing in the four stoppers on the sides of the arm cover as shown in
the illustration, remove it by pulling it towards you. C
Spécifications
Poids : environ 5,2 kg (11 lb 7 oz)
Teilenummer / Número de componentes /
Numero dei componeti / 部件号
Monitorständer / Soporte del monitor /
supporto per monitor / 监视器支架
Schraube (4) / Tornillo (4) / vite (4)/
螺丝(4)
Dekoabdeckung / Cubierta
decorativa / coperchio
decorativo / 装饰盖
Halterung / Dispositivo de
sujeción / Attacco / 附件
A
Weiches Tuch / Trozo de tela acolchada / panno morbido / 软布
B
C
Abdeckung des Ständerarms / Cubierta del soporte /
coperchio del braccio / 支臂盖
D
E
F
Dekoabdeckung / Cubierta decorativa /
coperchio decorativo / 装饰盖
G
I
Halterung /
Dispositivo de
sujeción / Attacco /
附件
J
K
L
2
1
M
Tiefe und Einstellbereich des Ständers / Gama
de soportes que pueden moverse / gamma di
inclinazione del supporto / 支架活动范围
74°
64°
250,3
Einheit: mm / Unidad: mm / Unità: mm / 单位: mm
Deutsch
Der Monitorständer SU-558 wurde für den LCD-Monitor LMD-170W/230W
konzipiert. Bringen Sie ihn wie im Folgenden beschrieben am LCD-Monitor
an.
Anbringen des Monitorständers am LCDMonitor
Vorbereitungen für die Installation des
Monitorständers
• Lösen Sie das Netzkabel und alle Verbindungskabel vom LCD-Monitor.
• Halten Sie ein großes, weiches Tuch bereit.
• In den Abbildungen ist der LCD-Monitor LMD-170W zu sehen. Beim
Anbringen des LMD-230W gehen Sie bitte genauso vor.
1 Breiten Sie ein großes, weiches Tuch auf einer ebenen, stabilen
Oberfläche aus und legen Sie den LCD-Monitor vorsichtig mit der
Vorderseite nach unten auf das Tuch. A
2 Richten Sie die vier Schraubenbohrungen an der Rückseite des LCD-
Monitors an den vier entsprechenden Schraubenbohrungen am
Monitorständer aus und befestigen Sie ihn sicher mit den vier
mitgelieferten Schrauben (M4×12). B
Einstellen des Winkels oder der Position
des LCD-Monitors
Fassen Sie den LCD-Monitor zum Einstellen des
Neigungswinkels oder der Position mit beiden
Händen.
So stellen Sie den Monitor höher ein
1 Fassen Sie den Monitor an beiden Seiten. K
2 1 Neigen Sie den Monitor wie in der Abbildung gezeigt mithilfe des
oberen Scharniers nach hinten.
2 Ziehen Sie den Monitor wie in der Abbildung gezeigt mithilfe des
unteren Scharniers nach oben.
L
3 Neigen Sie den Monitor mithilfe des oberen Scharniers wieder nach
M
vorne.
Technische Daten
Gewicht: ca. 5,2 kg
Español
El soporte del monitor SU-558 ha sido diseñado para utilizarse con los
modelos de monitor LCD LMD-170W/230W. Fíjelo al monitor LCD
siguiendo los pasos descritos a continuación.
Fijación del soporte al monitor LCD
Antes de instalar el soporte del monitor
• Desconecte el cable de alimentación y todos los cables conectores del
monitor LCD.
• Prepare un trozo de tela grande y acolchada.
• La imagen muestra el Monitor LCD LMD-170W, pero los pasos descritos
son los mismos que requiere el modelo LMD-230W.
1 Extienda un trozo de tela grande y acolchada sobre una superficie
plana y estable. A continuación, coloque el monitor LCD sobre la tela
con cuidado y con la pantalla hacia abajo. A
2 Alinee los cuatro orificios para los tornillos de la parte trasera del
monitor LCD con los orificios para los tornillos del soporte del monitor y
fíjelos correctamente con los cuatro tornillos suministrados (M4×12).
B
3 Presione los cuatro retenes de los lados de la cubierta del soporte, tal
y como se muestra en la ilustración, y retírela tirando de ella hacia
C
usted.
4 Vuelva a conectar los cables que extrajo anteriormente y agrúpelos tal
y como se muestra en la ilustración. D
5 Alinee la cubierta del soporte con el soporte del monitor y vuelva a
fijarla presionándola. E
6 Alinee las clavijas de la cubierta decorativa (suministrada) con los
cuatro orificios de la parte trasera del monitor LCD, fíjelo presionando
firmemente. F
Para evitar que el monitor se vuelque
Si instala el monitor en una estantería, puede volcarse o caerse y provocar
lesiones. Asegúrese de utilizar los orificios para tornillos situados en la
parte inferior del soporte para sujetar el monitor con seguridad. Existen
cuatro orificios para tornillos. Busque estos orificios e introduzca en ellos
los tornillos, que puede adquirir en establecimientos especializados, desde
la parte inferior de la base encima de la cual desea colocar el monitor. G
Notas
• Si los tornillos son demasiado largos, podría dañar el soporte del monitor.
• No coloque el monitor en un lugar sometido a vibraciones porque existiría
la posibilidad de que se golpease.
Si utiliza el monitor inclinado hacia adelante como se muestra en la
ilustración, puede volcarse o caerse y provocar lesiones. Asegúrese de fijar
correctamente el dispositivo de sujeción suministrado al soporte. H
1 Introduzca las lengüetas del dispositivo de sujeción suministrado en
los orificios de la parte inferior del soporte hasta que encajen
completamente. I J
Ajuste del ángulo o la posición del
monitor LCD
Sujete el monitor LCD con ambas manos cuando
ajuste su ángulo o posición.
Para elevar la posición del monitor
1 Sujete ambos lados del monitor. K
2 1 Eche el monitor hacia atrás inclinándolo sobre la bisagra superior
tal como se muestra.
2 Eleve el monitor inclinándolo sobre la bisagra inferior tal como se
muestra. L
3 Oriente el monitor hacia la parte frontal inclinándolo hacia adelante
sobre la bisagra superior. M
6 Allineare le sporgenze del coperchio decorativo (in dotazione) con i
quattro fori situati nella parte posteriore del monitor LCD, quindi
applicare il coperchio premendo su di esso. F
Per evitare che il monitor si capovolga
Se il monitor viene installato su un ripiano, è possibile che si capovolga o
cada causando ferite. Assicurarsi di utilizzare i fori per le viti nella parte
inferiore del supporto per fissare in modo saldo il monitor al supporto
stesso. I fori per le viti sono quattro. Verificare la posizione di tali fori, quindi
inserire viti disponibili in commercio dalla parte inferiore della superficie
sulla quale si esegue l’installazione. G
Note
• Se la lunghezza delle viti è eccessiva, è possibile che il supporto per
monitor risulti danneggiato.
• Non collocare il monitor in punti in cui sia soggetto a vibrazioni ovvero
rischi di essere urtato.
Se il monitor viene utilizzato inclinato in avanti, come illustrato nella figura, è
possibile che si capovolga o cada causando ferite. Assicurarsi di applicare
l’attacco in dotazione al supporto.
H
1 Inserire le alette sporgenti dell’attacco in dotazione nei fori presenti
nella parte inferiore del supporto finché non scattano in posizione.
I J
Regolazione dell’angolazione o della
posizione del monitor LCD
Per regolare l’angolazione o la posizione del
monitor LCD, afferrarlo con entrambe le mani.
Per sollevare il monitor
1 Afferrare entrambi i lati del monitor. K
2 1 Inclinare il monitor all’indietro facendolo ruotare sul cardine
superiore, come illustrato.
2 Sollevare il monitor facendolo ruotare sul cardine inferiore, come
illustrato.
L
3 Collocare nuovamente il monitor in posizione verticale facendolo
ruotare sul cardine superiore. M
Caratteristiche tecniche
Peso: circa 5,2 kg
中文
SU-558 是设计用于 LMD-170W/230W 液晶监视器的监视器支架。请按以下
步骤将其安装于液晶监视器。
安装液晶监视器支架
安装监视器支架之前
• 断开电源线以及液晶监视器的所有其他接线。
• 准备一大块软布。
• 插图显示 LMD-170W 液晶监视器,但所介绍的安装步骤与 LMD-230W 安
装所需的步骤完全相同。
1 将一大块软布铺在平坦而稳固的表面上,然后将液晶监视器正面朝下轻轻
放置在软布上。A
2 将液晶监视器背面的四个螺丝孔与监视器支架上对应的螺丝孔对齐,然后
用四个附带的螺丝(M4 × 12)将其安装固定。B
3 如图所示将支臂盖几侧的四个制动器按入,向外拉出支臂盖将其卸下。
C
4 重新连接先前卸下的电缆,并如图所示将它们绑扎在一起。D
5 将支臂盖与监视器支架对齐,然后将其按入重新安装。E
6 将装饰盖(附带)的插销与液晶监视器背面的四个孔对齐,然后将其用力
按入进行安装。F
防止监视器翻倒
将监视器安装在架子上时,它可能会翻倒或掉落而造成伤害。请务必利用支架
底部的螺丝孔将监视器牢牢地安装在监视器支架上。支架底部有四个螺丝孔。
请确认这些孔的位置,并从要放置支架的台面底部装上市售的螺丝。G
注
• 所用的螺丝若过长可能会损坏监视器支架。
• 请勿将监视器放置在有振动或可能被撞击的地方。
如果您使用监视器时使其如图示那样向前倾,监视器可能会翻倒或掉落而造成
伤害。请务必将附件安装在支架上。H
Metallunterseite /
a
M5-Schraube / Tornillo M5 /
vite M5 /
M5 螺丝
a : 6 bis 10 mm / 6 a 10 mm / da 6 a 10 mm / 6 至 10 mm
Position der Schrauben / Posición de los tornillos /
posizione delle viti / 螺丝位置
223,4
165,1
4-M5
240,2
Ansicht von der Unterseite des Monitorständers / Vista de la
parte inferior del soporte del monitor / vista dal lato inferiore
del supporto per monitor / 监视器支架底部仰视图
Panel inferior
metálico /pannello
inferiore metallico /
金属底板
Stellfläche / Objeto fijado /
oggetto a cui è fissato il
supporto /
附件
H
52,2 76,2
3 Drücken Sie die vier Arretierungen an den Seiten der
Ständerarmadeckung wie in der Abbildung dargestellt nach innen und
ziehen Sie die Abdeckung zum Entfernen auf sich zu. C
4 Schließen Sie die zuvor gelösten Kabel wieder an und bündeln Sie sie
wie in der Abbildung dargestellt. D
5 Richten Sie die Abdeckung des Ständerarms am Monitorständer aus
und bringen Sie sie wieder an, indem Sie sie hineindrücken. E
6 Richten Sie die vier Vorsprünge an der Dekoabdeckung (mitgeliefert)
an den vier Öffnungen an der Rückseite des LCD-Monitors aus und
bringen Sie die Abdeckung an, indem Sie sie fest hineindrücken. F
So verhindern Sie ein Umfallen des
Monitors
Wenn Sie den Monitor in einem Regal aufstellen, kann er um- bzw.
herunterfallen. In diesem Fall besteht Verletzungsgefahr. Befestigen Sie
den Monitor unbedingt sicher am Monitorständer, indem Sie Schrauben
durch die Schraubenlöcher in der Bodenplatte des Ständers drehen. Vier
Schraubenlöcher sind vorhanden. Sehen Sie nach, wo sich diese
Schraubenlöcher befinden und bringen Sie handelsübliche Schrauben von
der Unterseite einer beliebigen Stellfläche her an. G
Hinweise
• Wenn die verwendeten Schrauben zu lang sind, kann der Monitorständer
beschädigt werden.
• Stellen Sie den Monitor nicht an einem Ort auf, wo er Vibrationen
ausgesetzt ist oder angestoßen werden kann.
Wenn Sie den Monitor wie in der Abbildung gezeigt nach vorne geneigt
verwenden, kann er um- bzw. herunterfallen. In diesem Fall besteht
Verletzungsgefahr. Bringen Sie unbedingt die mitgelieferte Halterung am
Ständer an. H
Especificaciones
Peso: Aprox. 5,2 kg
Italiano
Il supporto SU-558 per monitor è stato progettato unicamente per il monitor
LCD modello LMD-170W/230W. Per installare il supporto sul monitor LCD,
attenersi alla seguente procedura.
Montaggio dell’apposito supporto al
monitor LCD
Prima di effettuare il montaggio del monitor
• Scollegare il cavo di alimentazione ed eventuali cavi di collegamento dal
monitor LCD.
• Preparare un panno morbido di ampie dimensioni.
• L’illustrazione si riferisce al monitor LCD modello LMD-170W, tuttavia la
procedura riportata è la stessa per il modello LMD-230W.
1 Sistemare un panno morbido di ampie dimensioni su una superficie
piana e stabile, quindi collocarvi sopra il monitor LCD capovolto
prestando particolare attenzione. A
2 Allineare i quattro fori per le viti situati nella parte posteriore del monitor
LCD con i corrispondenti quattro fori per le viti situati sul supporto per
monitor, quindi applicare quest’ultimo in modo saldo utilizzando le
quattro viti in dotazione (M4×12). B
3 Spingendo i quattro fermi da entrambi i lati del coperchio del braccio,
come mostrato nell’illustrazione, rimuoverlo tirandolo a sé. C
4 Ricollegare i cavi precedentemente rimossi, quindi sistemarli come
mostrato nell’illustrazione. D
1 将附件的凸缘插入支架底部上的孔中,直至听到喀嗒声。I J
调整液晶监视器的角度或位置
在调整液晶监视器的角度或位置时,请用双手抓住它。
要升高液晶监视器的位置
1 抓住监视器的两侧。K
2 1 如图所示,将监视器沿上部铰链转动使其向后倾斜。
2 如图所示,将监视器沿下部铰链转动使其升高。L
3 将监视器沿上部铰链转动使其朝向前方。M
规格
重量:约 5.2 kg
この説明書は100%古紙再生紙とVOC(揮発性有機化合物)
ゼロ植物油型インキを使用しています。
Printed on 100% recycled paper using VOC (Volatile Organic
Compound)-free vegetable oil based ink.
1 Schieben Sie die Laschen der mitgelieferten Halterung in die Löcher
an der Unterseite der Bodenplatte des Ständers hinein, bis sie mit
einem Klicken einrasten. I J
5 Allineare il coperchio del braccio con il supporto per monitor, quindi
applicarlo nuovamente premendo su di esso.
E
Printed in Japan
 Loading...