

Page 1

FM Ster eo
S200
TM
FM-AM Receiver
4-227-587-11(1)
Operating Instructions
Mode d’emploi
GB
FR
STR-LSA1
2000 Sony Corporation
Page 2

WARNING
Precautions
To prevent fire or shock
hazard, do not expose the
unit to rain or moisture.
To avoid electrical shock,
do not open the cabinet.
Refer servicing to qualified
personnel only.
On safety
Should any solid object or liquid fall into
the cabinet, unplug the receiver and have it
checked by qualified personnel before
operating it any further.
On power sources
• Before operating the receiver, check that
the operating voltage is identical with
your local power supply. The operating
voltage is indicated on the nameplate at
the bottom of the receiver.
• The unit is not disconnected from the AC
power source (mains) as long as it is
connected to the wall outlet, even if the
unit itself has been turned off.
• If you are not going to use the receiver
for a long time, be sure to disconnect the
receiver from the wall outlet. To
disconnect the AC power cord, grasp the
plug itself; never pull the cord.
• AC power cord must be changed only at
the qualified service shop.
On placement
• Do not install the appliance in a confined
space, such as a bookcase or built-in
cabinet.
• Place the receiver in a location with
adequate ventilation to prevent heat
buildup and prolong the life of the
receiver.
• Do not place the receiver near heat
sources, or in a place subject to direct
sunlight, excessive dust or mechanical
shock.
• The nameplate is located on the bottom
exterior.
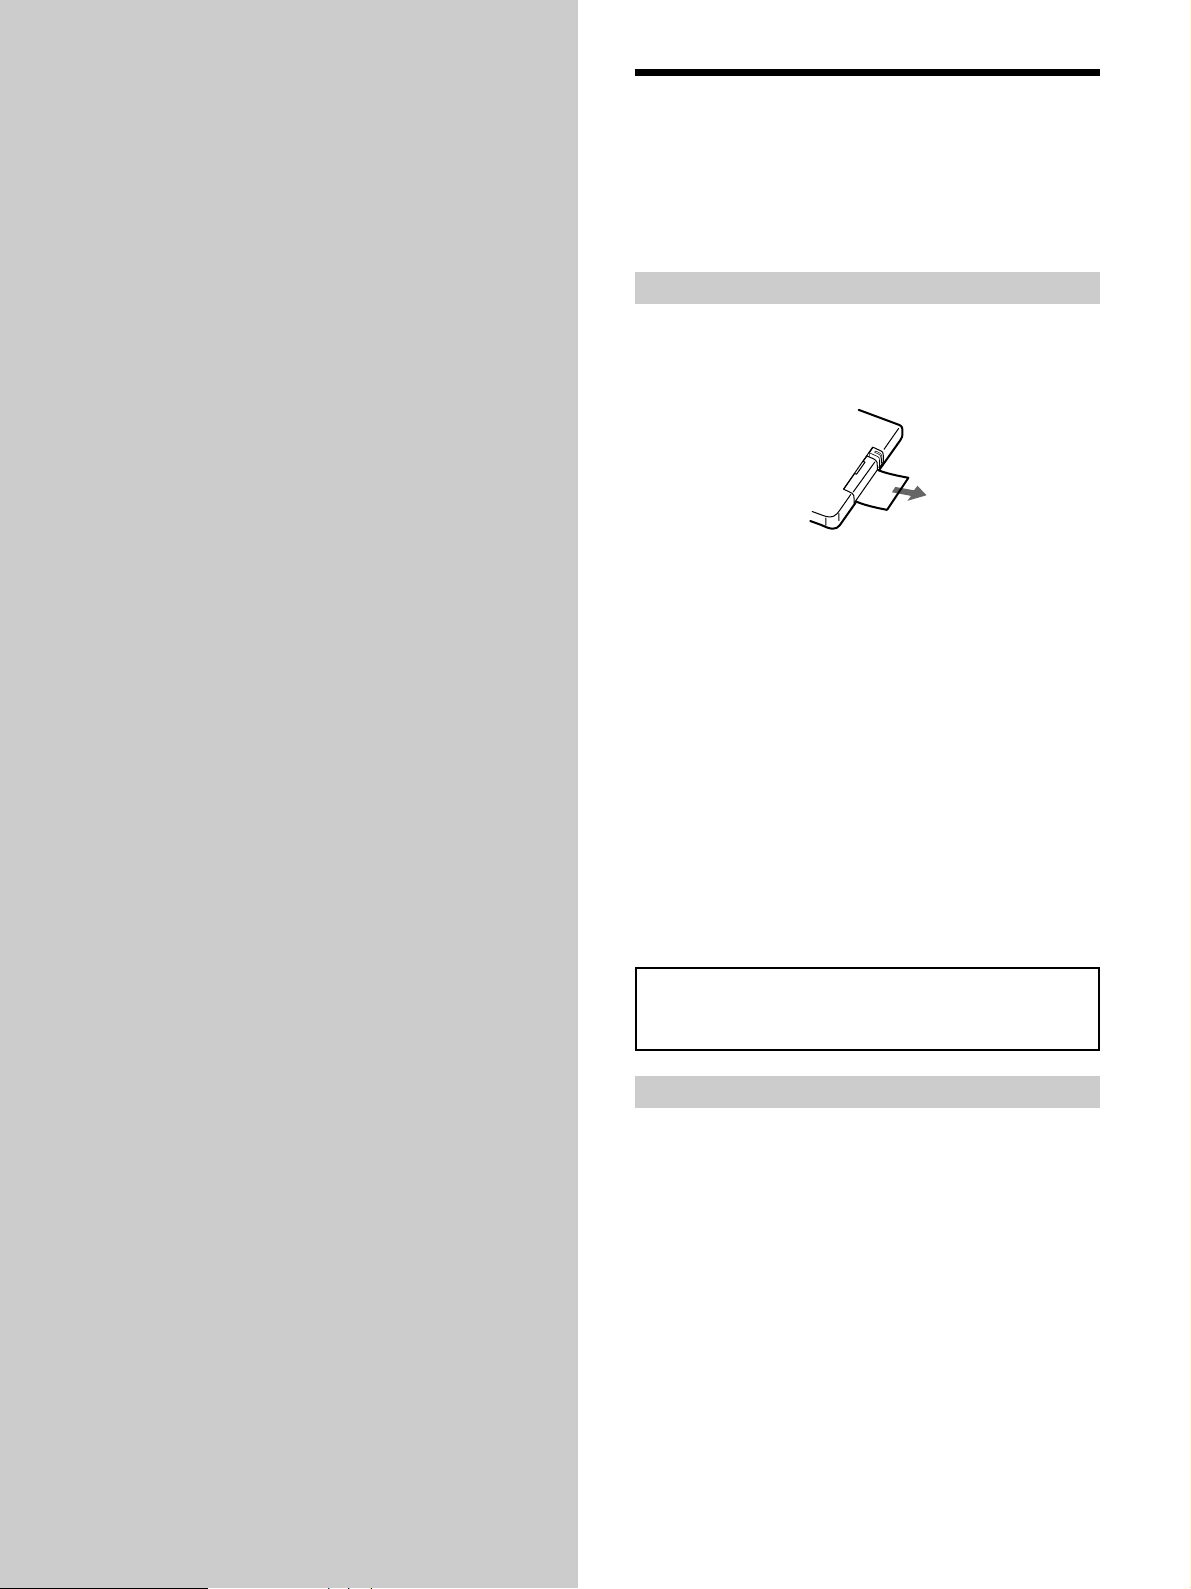
Replacing the battery in the remote
Slide out and remove the battery case, and
insert a new lithium battery CR2025 with
the + side facing up. And then, slide the
battery case back in.
1
2
1 Keep pushing.
2 Pull out.
CAUTION
Danger of explosion if battery is incorrectly
replaced. Replace the battery only with
the same or equivalent type recommended
by the manufacturer. Discard unused
batteries according to the manufacturer’s
instructions.
A lithium
battery
CR2025
If you have any question or problem
concerning your receiver, please
consult your nearest Sony dealer.
On operation
Before connecting other components, be
sure to turn off and unplug the receiver.
On cleaning
Clean the cabinet, panel and controls with
a soft cloth slightly moistened with a mild
detergent solution. Do not use any type of
abrasive pad, scouring powder or solvent
such as alcohol or benzine.
GB
2
Page 3

About This Manual
The instructions in this manual are for the STR-LSA1.
Conventions
• Controls in these instructions are those on the receiver;
these may, however, be substituted by controls on the
supplied remote that are similarly named, or, when
different, appear in the instructions within parentheses.
Example: Rotate VOLUME (or press VOL +/– on the
remote repeatedly).
• The following icons are used in this manual:
Z Indicates a procedure that requires use of the
remote.
z Indicates hints and tips for making the task easier.
TABLE OF CONTENTS
Hooking Up the System 4
Unpacking 4
Antenna Hookups 5
Audio Component Hookups 6
Speaker System Hookup 7
Basic Operation 8
Before You Turn On the Receiver 8
Selecting the Component 8
Location of Parts 10
Front Panel Parts Description 10
Remote Parts Description 12
Adjusting the Sound 14
Setting Sound Parameters 15
Receiving Broadcasts 17
Manual Tuning 18
Automatic Tuning 19
Preset Tuning 19
Other Operations 21
Naming Preset Stations and Program Sources 22
Recording 23
Adjusting the Brightness of the Display 23
Using the Sleep Timer 24
Other Settings Using the Setup Menu 24
About i.LINK 26
Additional Information 28
Troubleshooting 28
Specifications 30
Display Messages 31
GB
3
Page 4
Hooking Up
Unpacking
the System
This chapter describes how to connect
various audio components to the
receiver. Be sure to read the sections
for the components you have before
you actually connect them to the
receiver.
Check that you received the following items with the unit:
• AM loop antenna (1)
• Remote commander (remote) (1)
Before using the supplied remote
The supplied remote already contains a battery. Before
using the remote, pull out the insulating sheet to allow the
power to flow from the battery.
To avoid battery leakage
If you don’t use the remote for an extended period of time,
remove the battery to avoid possible damage from battery
leakage and corrosion.
z
When to replace the battery
Under normal conditions, the battery should last for about 6
months. When the remote no longer operates the receiver, replace
the battery with a new one.
Notes on lithium battery
• Keep the lithium battery out of the reach of the children.
Should the battery be swallowed, immediately consult a doctor.
• Wipe the battery with a dry cloth to assure a good contact.
• Be sure to observe the correct polarity when inserting the
battery.
• Do not hold the battery with metallic tweezers, otherwise a
short-circuit may occur.
WARNING
Battery may explode if mistreated.
Do not recharge, disassemble, or dispose of in fire.
Before you get started
• Turn off the power to all components before making
any connections.
• Do not connect the AC power cords until all of the
connections are completed.
• Be sure to make connections firmly to avoid hum and
noise.
• When connecting an audio cable, be sure to match the
color-coded pins to the appropriate connectors on the
components: white (left, audio) to white; and red (right,
audio) to red.
GB
4
Page 5
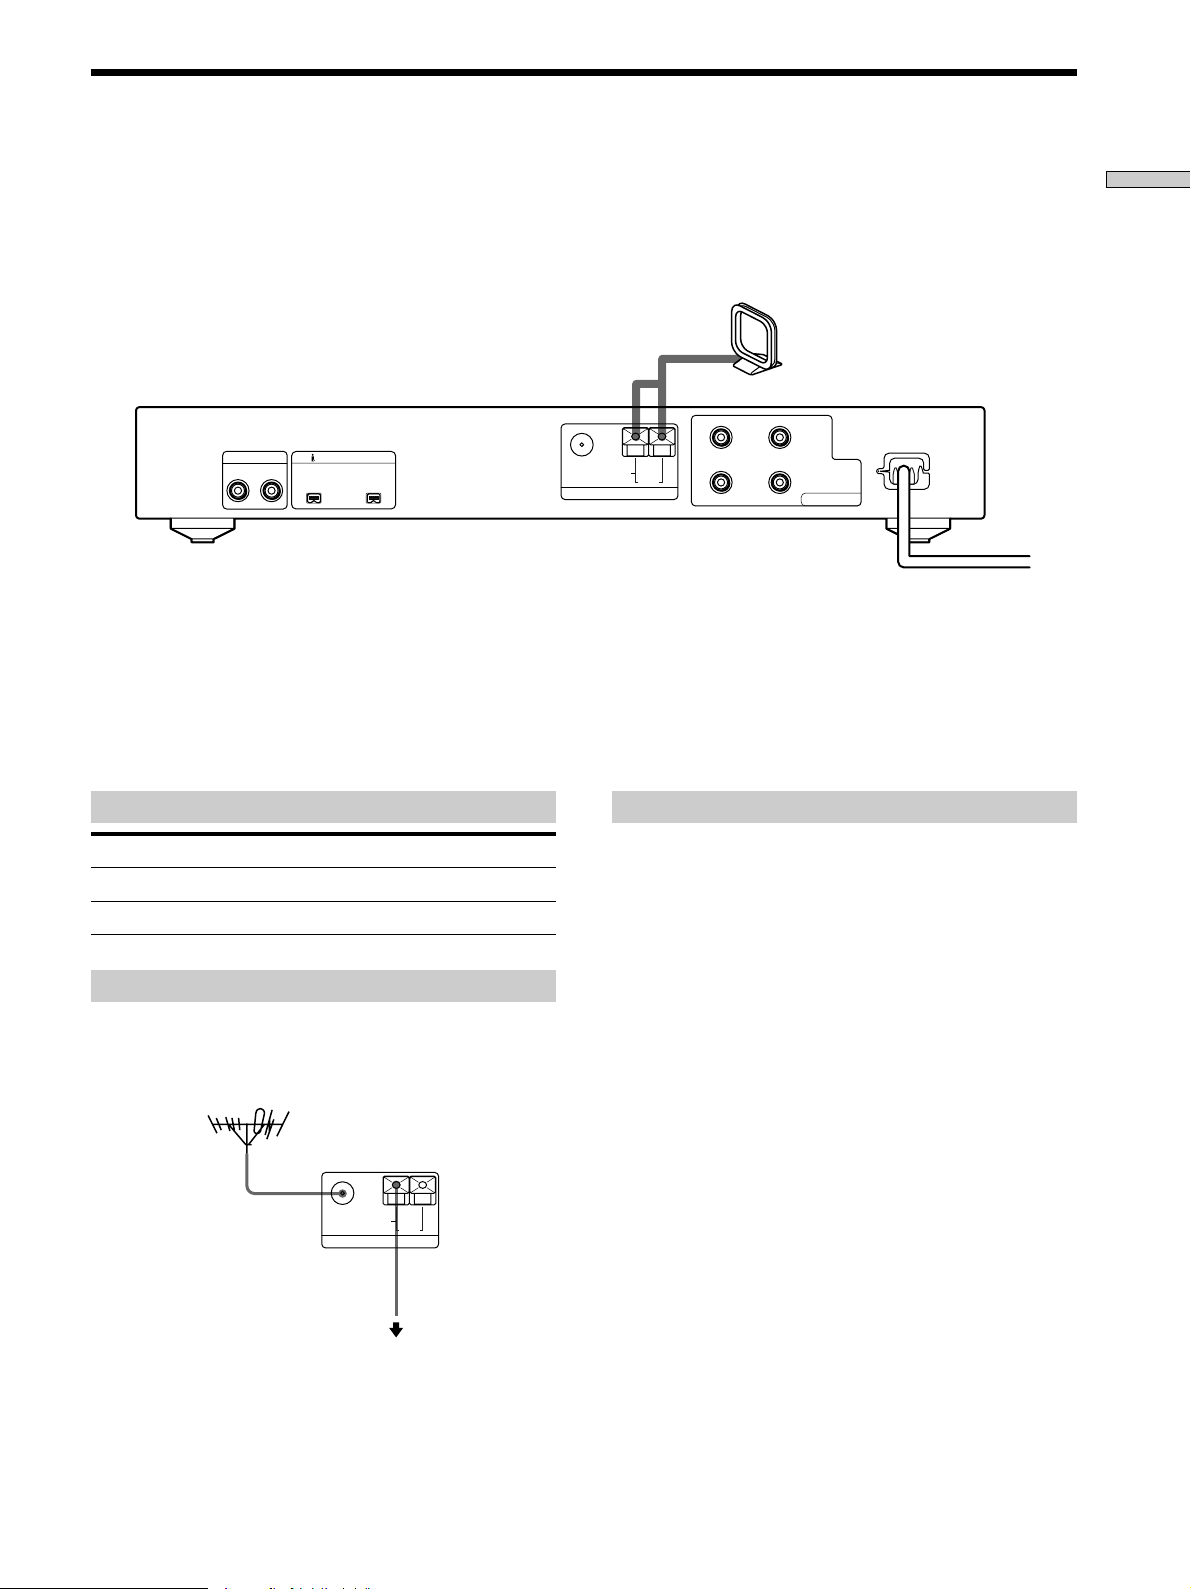
Antenna Hookups
Hooking Up the System
AM loop antenna
(supplied)
ANALOG IN
RL
i.LINK S200
v v
Terminals for connecting the antennas
Connect the To the
AM loop antenna AM terminals
FM antenna 75Ω COAXIAL FM terminal
Connecting an FM antenna
Use a 75-ohm coaxial cable (not supplied) to connect the
receiver to an outdoor FM antenna as shown below.
75
Ω
COAXIAL
FM
U
ANTENNA
+
RL
AM
–
+
IMPEDANCE
–
SPEAKERS
USE 4-16Ω
Note on antenna hookups
To prevent noise pickup, keep the AM loop antenna away
from the receiver and other components.
Outdoor FM antenna
Receiver
75
Ω
U
COAXIAL
FM
ANTENNA
AM
Ground wire
(not supplied)
To ground
Important
If you connect the receiver to an outdoor antenna, ground
it against lightning. To prevent a gas explosion, do not
connect the ground wire to a gas pipe.
GB
5
Page 6
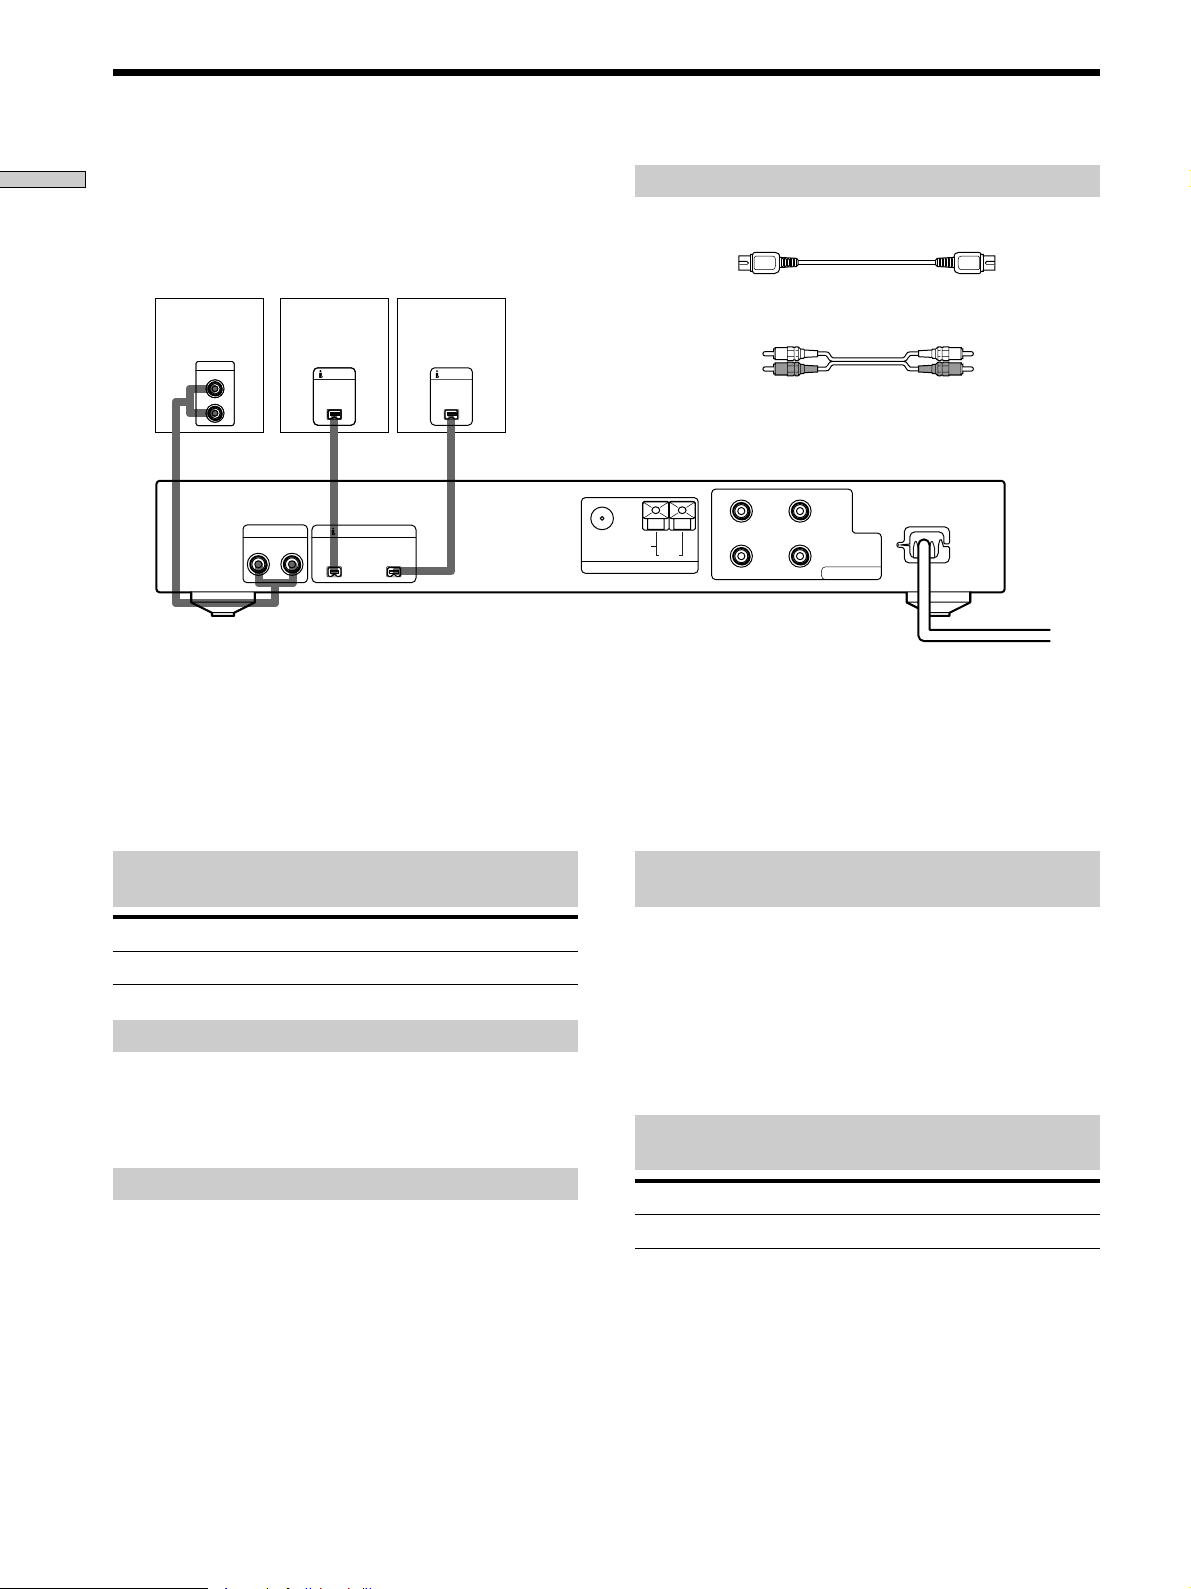
Audio Component Hookups
Hooking Up the System
Tape deck,
etc.
LINE OUT
LINE OUT
L
L
R
R
L
You can connect components to either i.LINK S200 connector.
*
ANALOG IN
RL
MD deck,
etc.*
i.LINK
;
i.LINK S200
v v
CD player,
etc.*
i.LINKi.LINK
;
Required cables
i.LINK cables (not supplied)
Audio cables (not supplied)
White (L) White (L)
Red (R) Red (R)
+
75
Ω
COAXIAL
FM
U
ANTENNA
RL
AM
–
+
IMPEDANCE
USE 4-16Ω
–
SPEAKERS
Connectors for connecting i.LINK
components
Connect a To the
MD deck, CD player, etc. i.LINK S200 connector
Note on i.LINK component hookups
If a metal object should fall into the i.LINK S200
connector, short-circuiting may occur and damage the
components.
About optional i.LINK connecting cables
Be sure to use the Sony i.LINK S200 connecting cables
(4 pins-4 pins).
About i.LINK components to be used in
combination with the receiver
The following i.LINK components can be used with the
receiver.
• MDS-LSA1 MD Deck
• CDP-LSA1 CD Player
z
For general information about i.LINK
See “About i.LINK” on page 26.
Connectors for connecting other audio
components
Connect a To the
Tape deck, etc. ANALOG IN connectors
GB
6
Page 7
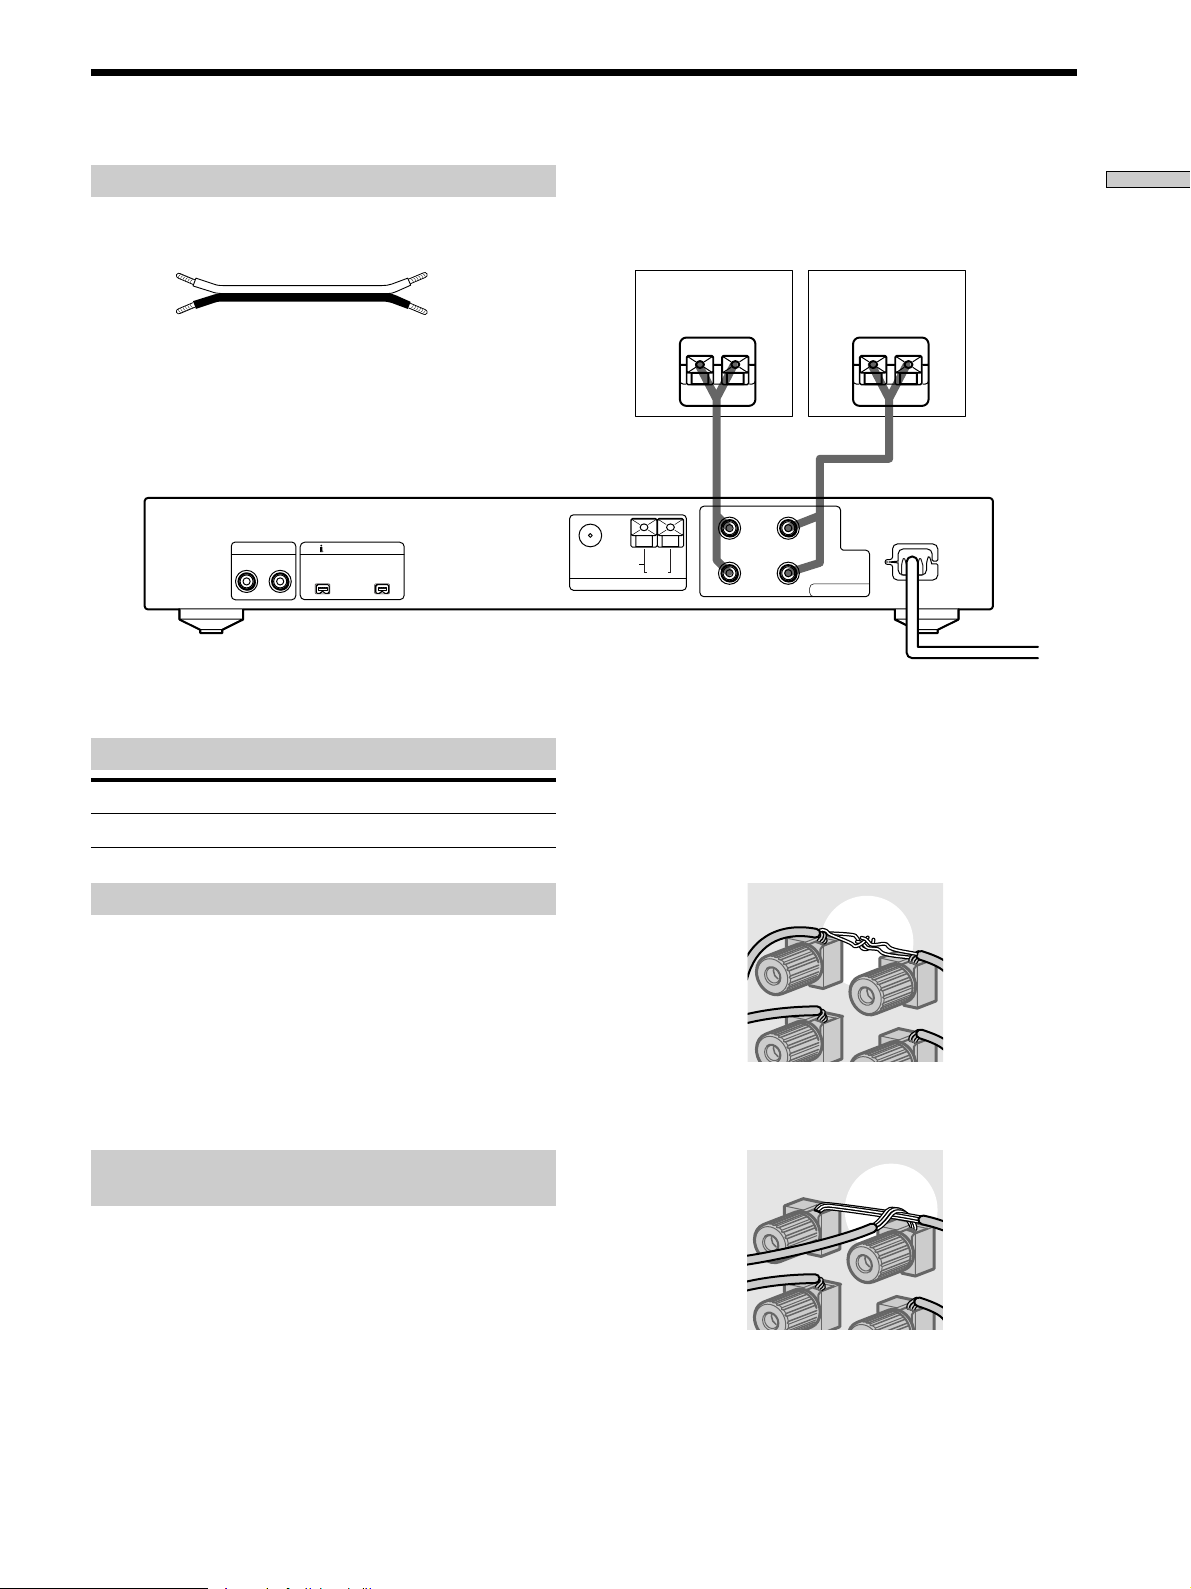
Speaker System Hookup
Required cables
Speaker cables (not supplied)
One for each speaker
(+) (+)
(–) (–)
ANALOG IN
RL
i.LINK S200
v v
Terminals for connecting the speakers
Connect the To the
Speakers (4 to 16 ohms) SPEAKERS terminals
Right speaker (R) Left speaker (L)
e
75
Ω
COAXIAL
FM
U
ANTENNA
E
+
RL
AM
–
e
+
–
SPEAKERS
E
IMPEDANCE
USE 4-16Ω
Make sure the stripped ends of each speaker
cable do not touch another speaker terminal or
the stripped end of another speaker cable.
Examples of poor conditions of the speaker cable
Hooking Up the System
Notes on speaker system hookup
• Twist the stripped ends of the speaker cables about 10
mm. Be sure to match the speaker cable to the
appropriate terminal on the components: + to + and –
to –. If the cables are reversed, the sound will be
distorted and will lack bass.
• If you use speakers with low maximum input rating,
adjust the volume carefully to avoid excessive output
on the speakers.
To avoid short-circuiting the speaker
cables
A short-circuiting in the speaker cables will mute the
speakers, and may even damage the receiver. To prevent
this, make sure to take the following precautions when
connecting the speakers.
Stripped speaker cable is touching another speaker
terminal.
Stripped cables are touching each other due to excessive
removal of insulation.
GB
7
Page 8
Basic
?/1
?/1
i
I
VOLUME
JOG MENU
Before You Turn On the Receiver
Operation
This chapter describes basic receiver
operation.
Connecting the AC power cord
Before connecting the AC power cord of this receiver to a
wall outlet:
• Connect the speakers to the receiver (see page 7).
Connect the AC power cords of your audio components to
a wall outlet.
Note on the VOLUME control
To avoid damaging your speakers, be sure to rotate the
VOLUME control counterclockwise immediately after you
turn on the receiver.
Selecting the Component
Do the procedure below to select the component (program
source). After connecting all of your components to the
receiver, we recommend that you do this to verify that the
connections were made correctly.
Jog dial
1 Press ?/1 to turn on the receiver.
2 Press JOG MENU repeatedly until a component
name appears in the display. Then rotate the jog
dial (or press FUNCTION +/– on the remote
repeatedly) to select one of the components
(program sources) that you have connected (e.g.,
an MD deck or CD player).
3 Turn on the component and start playing it.
4 Rotate VOLUME clockwise (or press VOL + on the
remote repeatedly) to turn up the volume.
GB
8
Page 9

z
To verify which component is currently selected
Press DISPLAY. If the selected component is the CDP-LSA1 or
MDS-LSA1, “N N n n” appears for a few seconds in the
display of the component.
This function is especially useful for verifying the selected
component when more than one component of the same type
(e.g., two CD players) are connected to the receiver. Note that
this function works with Sony components only. For more
details, see page 24.
z
You can monitor the CD sound while recording from a CD to
an MD (when using the CDP-LSA1 and MDS-LSA1 only)
Switch the program source to the MD deck as you are recording.
However, the sound can’t be monitored during High-speed CD
Synchro-recording.
z
The LINC between the receiver and the program source is
automatically established
The receiver automatically establishes a LINC with a component
when you select it as the program source. The LINC is
automatically canceled when you turn off the receiver or when
you select a non-i.LINK component as the program source. For
details on “Establishing a LINC,” see page 27.
If you don’t obtain normal sound output after performing
the procedure in page 8, look for the reason in the
checklist below and take the appropriate measures to
correct the problem.
There is no sound no matter which component is
selected.
, Check that both the receiver and all components
are turned on.
, Check that the volume level isn’t turned down to –
∞ dB.
, Check that all speaker cables are connected
correctly.
, Press the MUTING button on the remote to turn
off the MUTING indicator on the receiver.
There’s no sound from a specific component.
, Check that the cable(s) used for the connection is
(are) fully inserted into the connectors on both the
receiver and the component.
The program source can’t be selected or changed.
, The selection of a program source is momentarily
disabled after the component hookup has been
changed (“NEW CONNECT” appears in the
display at this time). “FUNC. Locked” appears in
the display of the receiver if you try to select a
program source at this time.
, The program source can’t be changed while a
component is establishing a LINC with the
receiver; e.g., when an MD deck is establishing a
LINC with the receiver in order to record a radio
program on the MD. “FUNC. Locked” appears in
the display of the receiver if you try to select a
program source at this time.
There are other circumstances under which the
program source cannot be selected. In these cases,
note the contents of the error message that appears
in the display and see “Display Messages” on page
31.
No sound is heard from one of the speakers.
, Connect a pair of headphones to the PHONES
connector to verify that sound is output from the
headphones.
If only one channel is output from the headphones,
the component may not be connected to the
receiver correctly. Check that all the cables are
fully inserted into the connectors on both the
receiver and the component.
If both channels are output from the headphones,
the speaker may not be connected to the receiver
correctly. Check the connection of the speaker
which is not outputting any sound.
The left and right speaker output is unbalanced.
, Press the JOG MENU button repeatedly until
“Sound Menu” appears in the display. Then rotate
the jog dial until “SP. Balance” appears in the
display, and then press the ENTER button. Rotate
the jog dial to adjust the speaker balance.
If you encounter a problem that is not included above, see
“Troubleshooting” on page 28.
Basic Operation
z
When a message appears in the display
See page 31.
GB
9
Page 10

Location of Parts
This chapter provides information
about the location and function of the
buttons and controls on the front
panel and supplied remote.
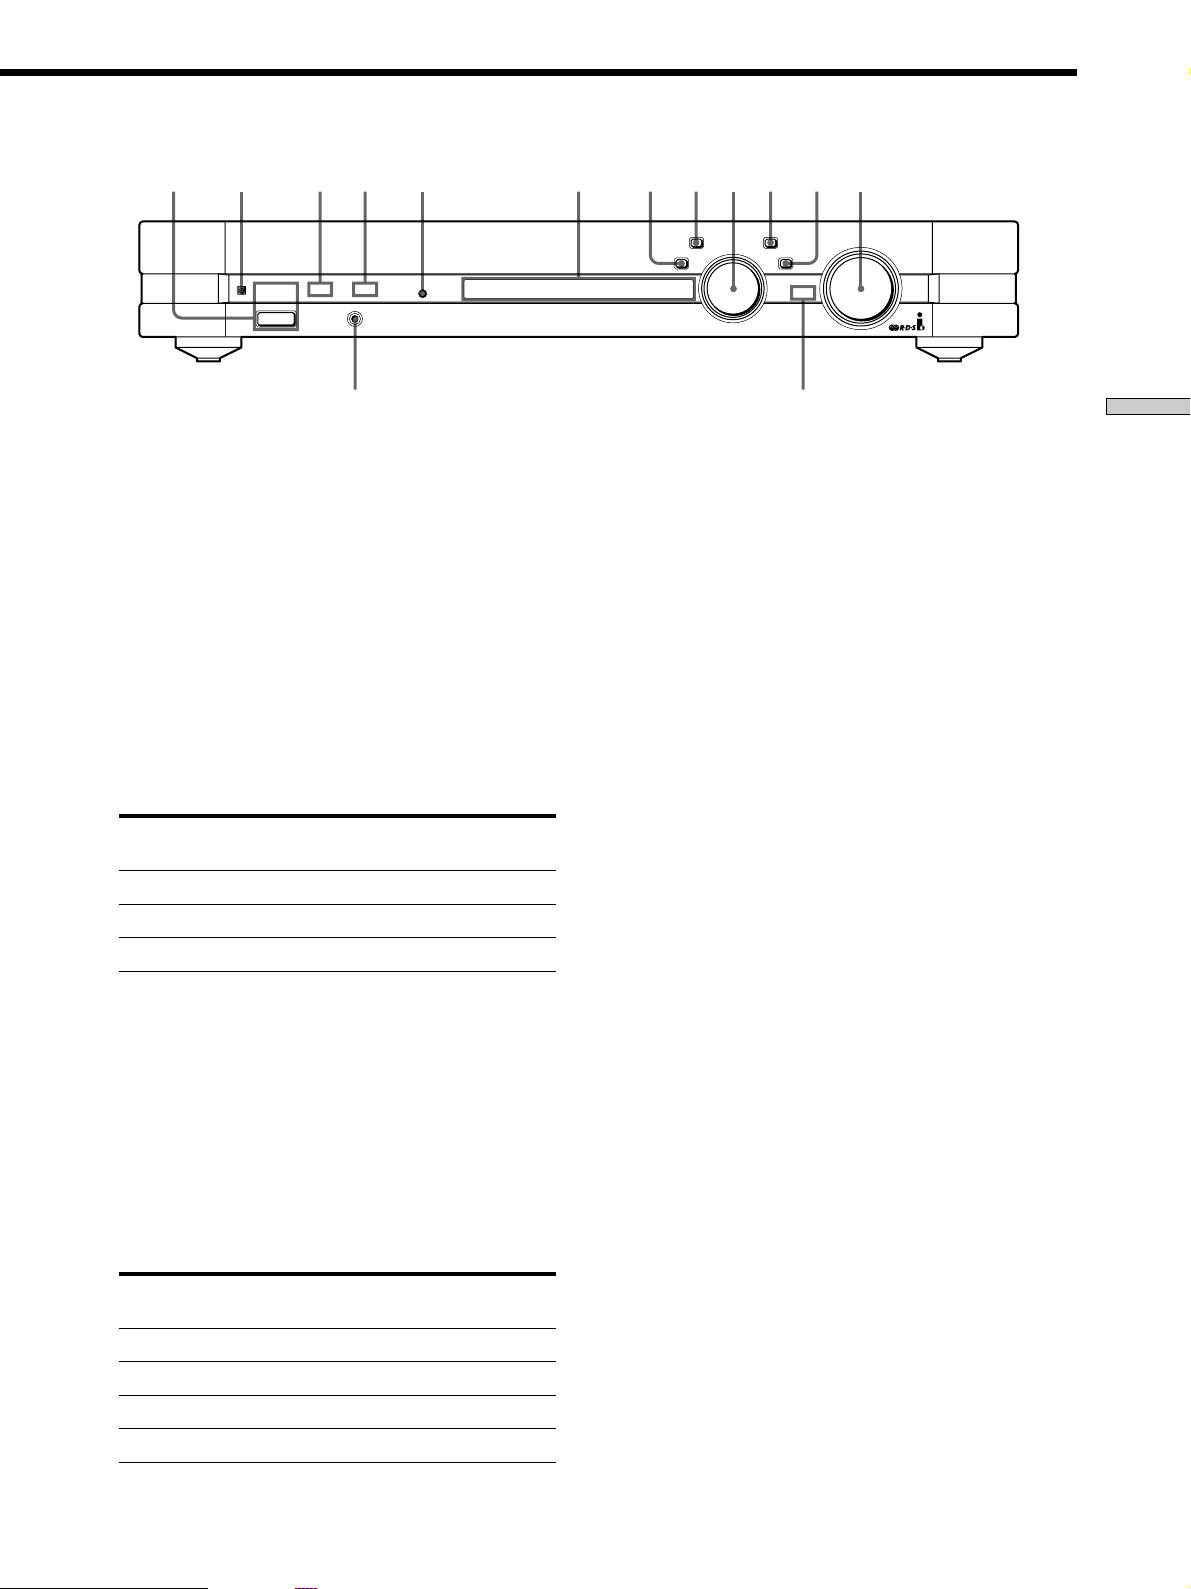
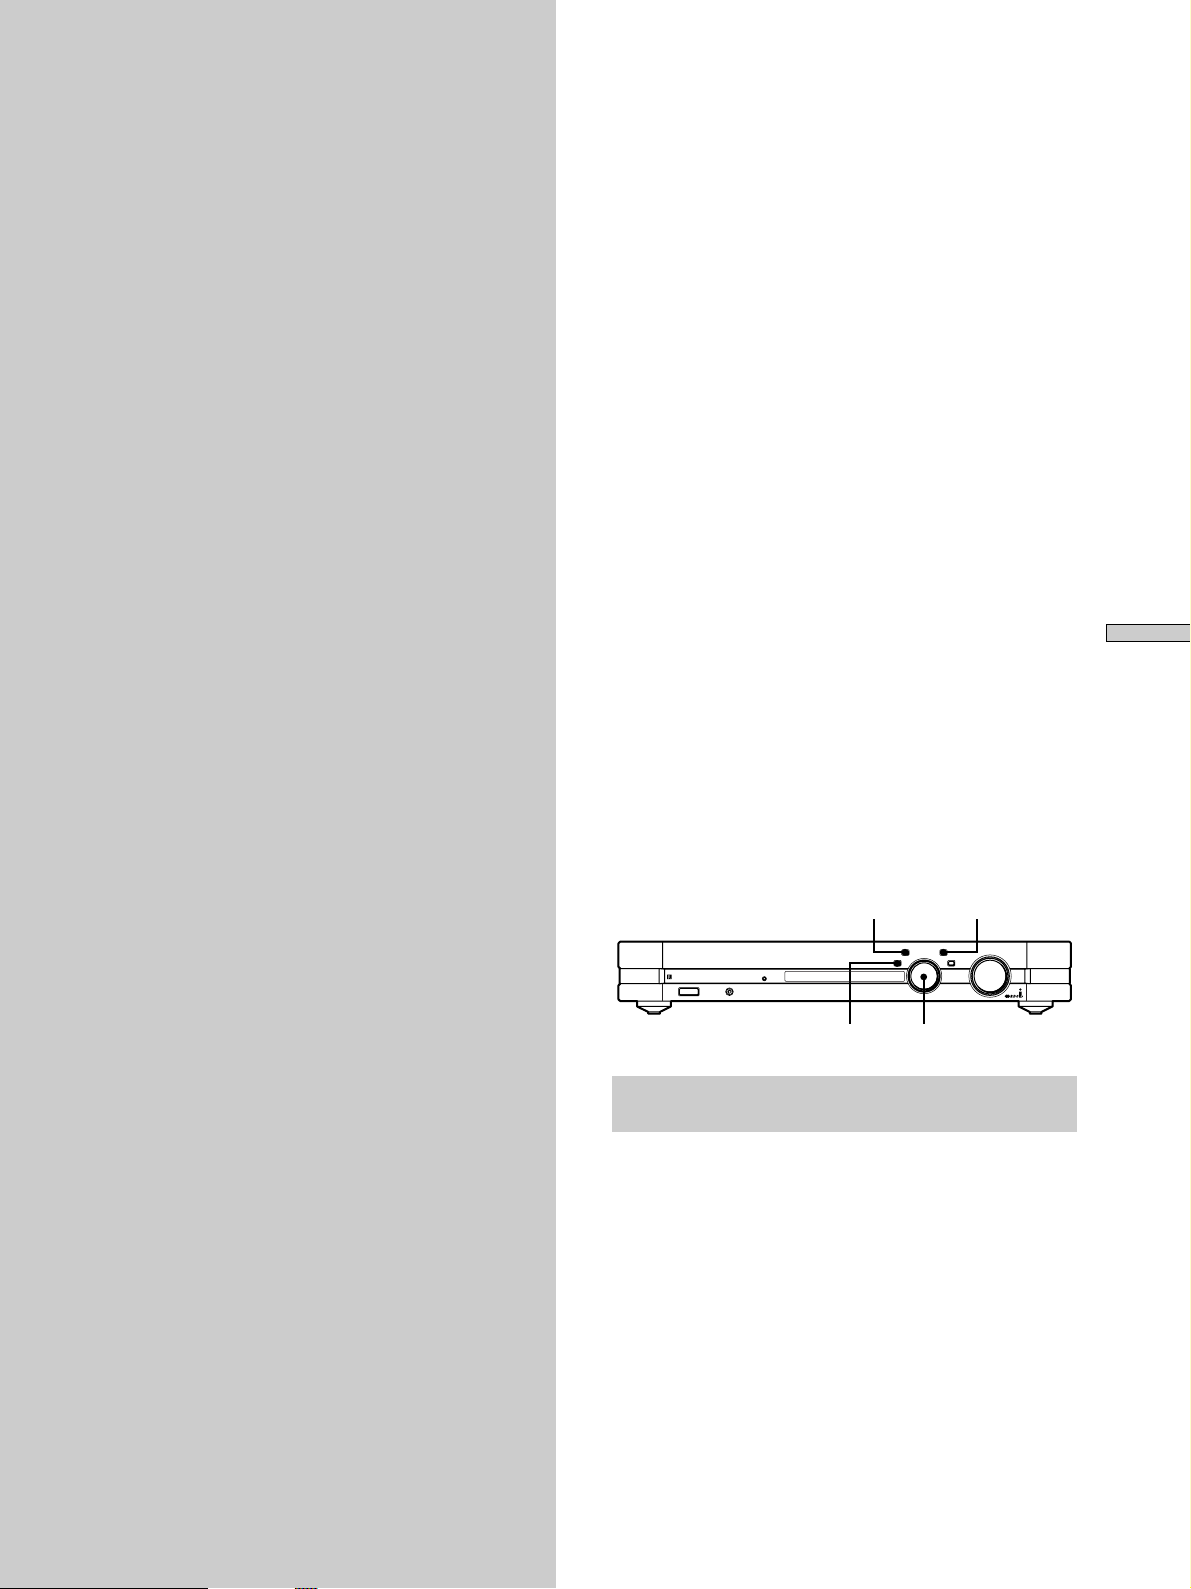
Front Panel Parts Description
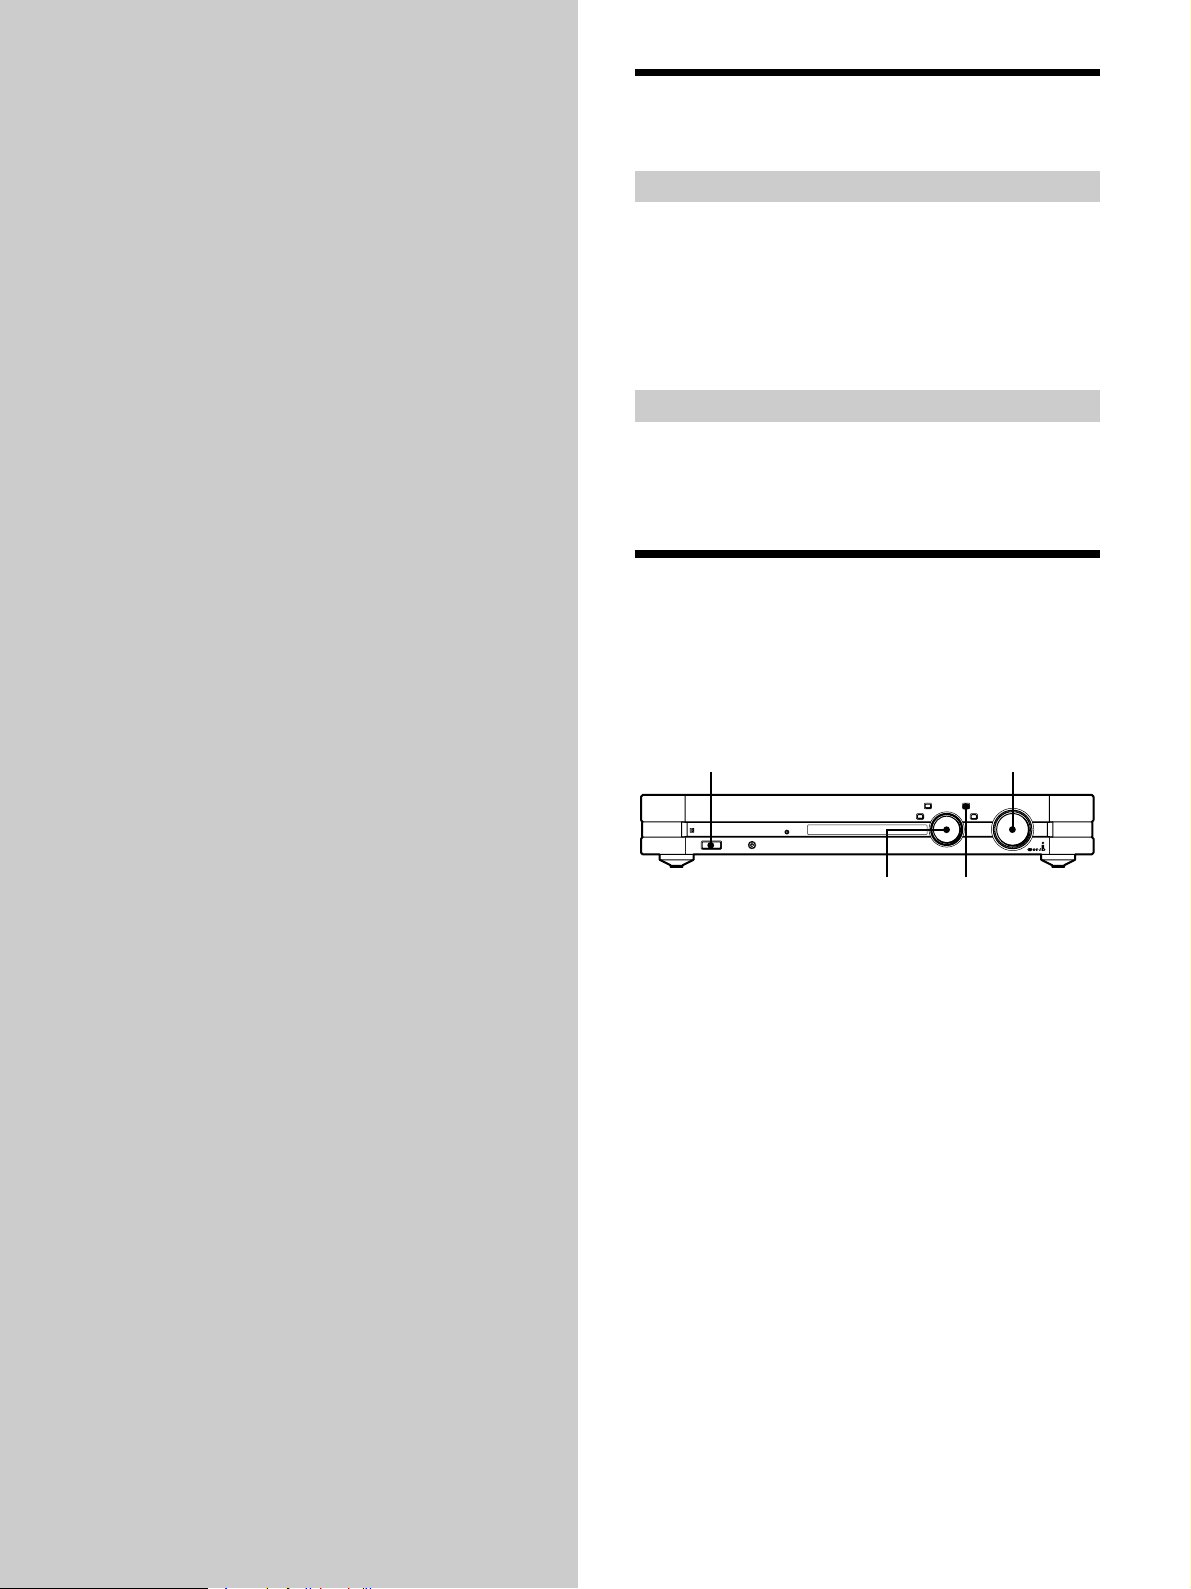
1 ?/1 switch
Press to turn the receiver on and off.
To avoid damaging your speakers, be sure to rotate the
VOLUME control counterclockwise immediately after
you turn on the receiver.
STANDBY indicator
Lights up when the receiver is turned off.
2 Remote sensor
When using the supplied remote, point it towards this
sensor (
3 SLEEP indicator
Lights up when the Sleep Timer function is activated
(page 24).
4 H.A.T.S. indicator
Lights up during H.A.T.S. (High-quality digital Audio
Transmission System) function is activated (page 25).
).
5 DISPLAY button
Press repeatedly to change the information in the
display window as follows:
Index name of the component
Model name of the component
When the built-in tuner is selected
Index name of the preset station1) or program
1) An index name appears only if one has been assigned to the
selected component or preset station (page 22).
2) If the model name isn’t known, the category of the component
appears (e.g., “CD” or “MD”). If the category isn’t known,
“Unknown” appears.
3) Appears only during RDS reception (page 18).
When you press the DISPLAY button while the Ping
function is on, “N N n n” appears for a few
seconds in the display of the currently selected
component (page 25).
v
v
v
station name
v
Frequency
3)
1)
2)
10
GB
Page 11
A
BECD GFHJKLI
STANDBY SLEEP H.A.T.S
?/1
DISPLAY
NM
6 Display
Shows various types of information.
7 BAND/< button
Selects the FM or AM band. If you press this button
while the receiver is turned off, the receiver
automatically turns on and tunes to the station that
was last received.
Use this button to move the cursor when entering an
index name for a component or preset station.
8 TUNE MODE/> button
When the built-in tuner is selected, press to select the
tuning mode. The mode indication appears in the
display as follows:
To select Press TUNE MODE repeatedly
to light up
Manual T uning MANUAL
Automatic T uning AUTO
Preset Tuning PRESET
Use this button to move the cursor when entering an
index name for a component or preset station.
9 Jog dial
Rotate to select the program source, tune to stations,
preset the stations, enter index names, or change
settings.
q; JOG MENU button
Press repeatedly to change the jog dial function. The
indication corresponding to the jog dial function
appears in the display as follows:
To Press JOG MENU repeatedly to
display
Select a component A component name
Adjust the sound Sound Menu
Make various settings Setup Menu
Receive broadcasts* Station name or frequency
TUNE MODE JOG MENU
i
BAND
I
ENTER
VOLUME
MUTING
After a component name appears
Rotate the jog dial to select the component you want to use.
After “Sound Menu” appears
You can use the jog dial and ENTER button to adjust the
sound (page 14).
After “Setup Menu” appears
You can use the jog dial and ENTER button to preset radio
stations (page 19), name preset stations or connected
components (page 22), or make other settings (page 24).
After a station name or frequency appears
You can use the jog dial to select a preset station (page 20) or
tune to a radio station either manually (page 18) or
automatically (page 19).
qa ENTER button
Press to enter a setting made with the jog dial.
qs VOLUME control
After turning on the selected component, rotate to
adjust the volume.
qd MUTING indicator
Lights up when the MUTING button on the supplied
remote is pressed.
qf i connector
Connects headphones. When the headphones are
connected, the kutput to the speakers is automatically
cut off.
Location kf Parts
Selectable only when the built-in tuner is selected.
*
11
GB
Page 12
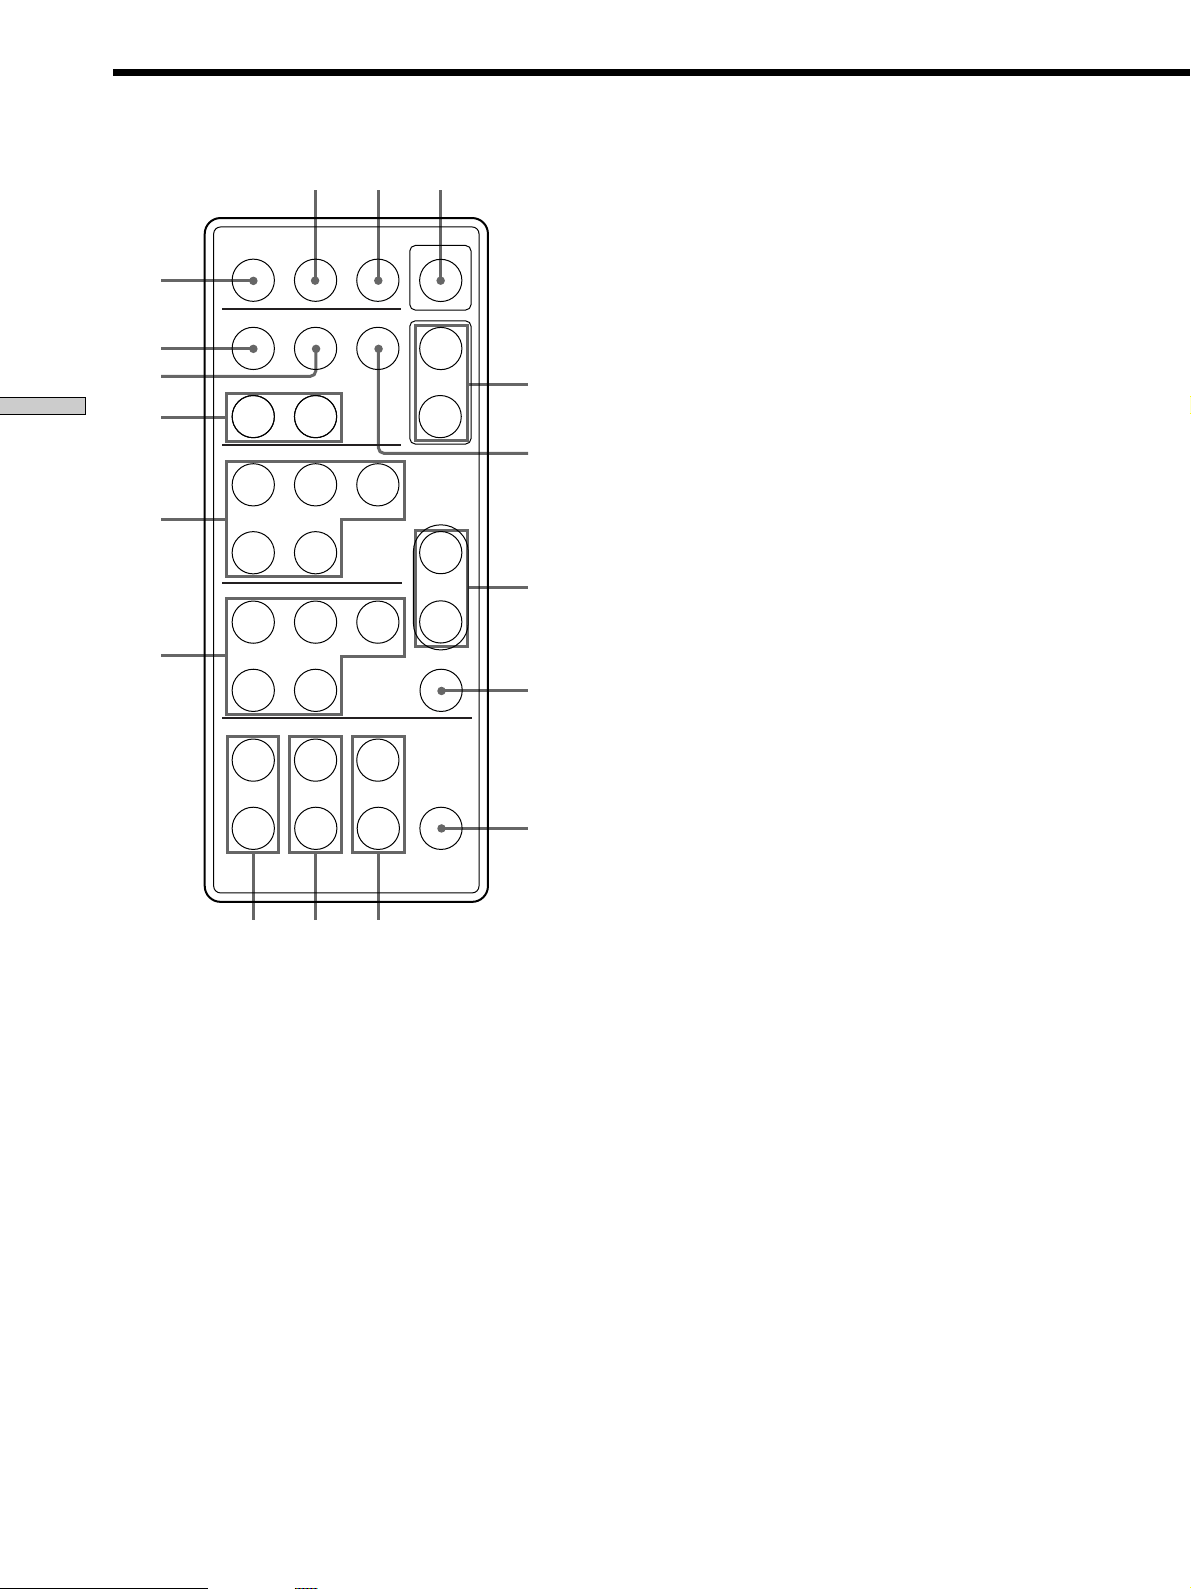
Remote Parts Description
O
N
M
Location of Parts
L
K
J
SHIFT
DISPLAY
FM MODE
SLEEP
TUNER
BAND
PRESET
DIMMER
+–
CD
NX x
.>
MD
N
.>
EQ
+
BASS
–
Xx
+
MID
–
+
TREBLE
–
AQP
RECEIVER
?/1
+
FUNCTION
–
+
VOL
–
MUTING
EQ
BANK
B
C
D
E
F
1 ?/1 switch
Press to turn the receiver on and off. When the
receiver is turned off, the STANDBY indicator on the
receiver turns on.
To avoid damaging your speakers, be sure to rotate the
VOLUME control on the receiver counterclockwise
immediately after you turn on the receiver.
2 FUNCTION +/– buttons
Press these buttons repeatedly to select the component
you want to use.
3 FM MODE button
If “STEREO” flashes in the display and the FM stereo
reception is poor, press this button. “MONO” lights
up in the display and there will be no stereo effect, but
the sound will improve.
4 VOL +/– buttons
Press these buttons repeatedly to adjust the volume.
5 MUTING button
Press to mute the sound output from the receiver.
When the sound is muted, the MUTING indicator on
the receiver lights up.
6 EQ BANK button
Press repeatedly to select a preset equalizer setting.
H
7 TREBLE +/– buttons
After selecting preset equalizer setting, press
repeatedly to adjust the treble level.
GI
8 MID +/– buttons
After selecting preset equalizer setting, press
repeatedly to adjust the midrange level.
9 BASS +/– buttons
After selecting preset equalizer setting, press
repeatedly to adjust the bass level.
12
GB
Page 13

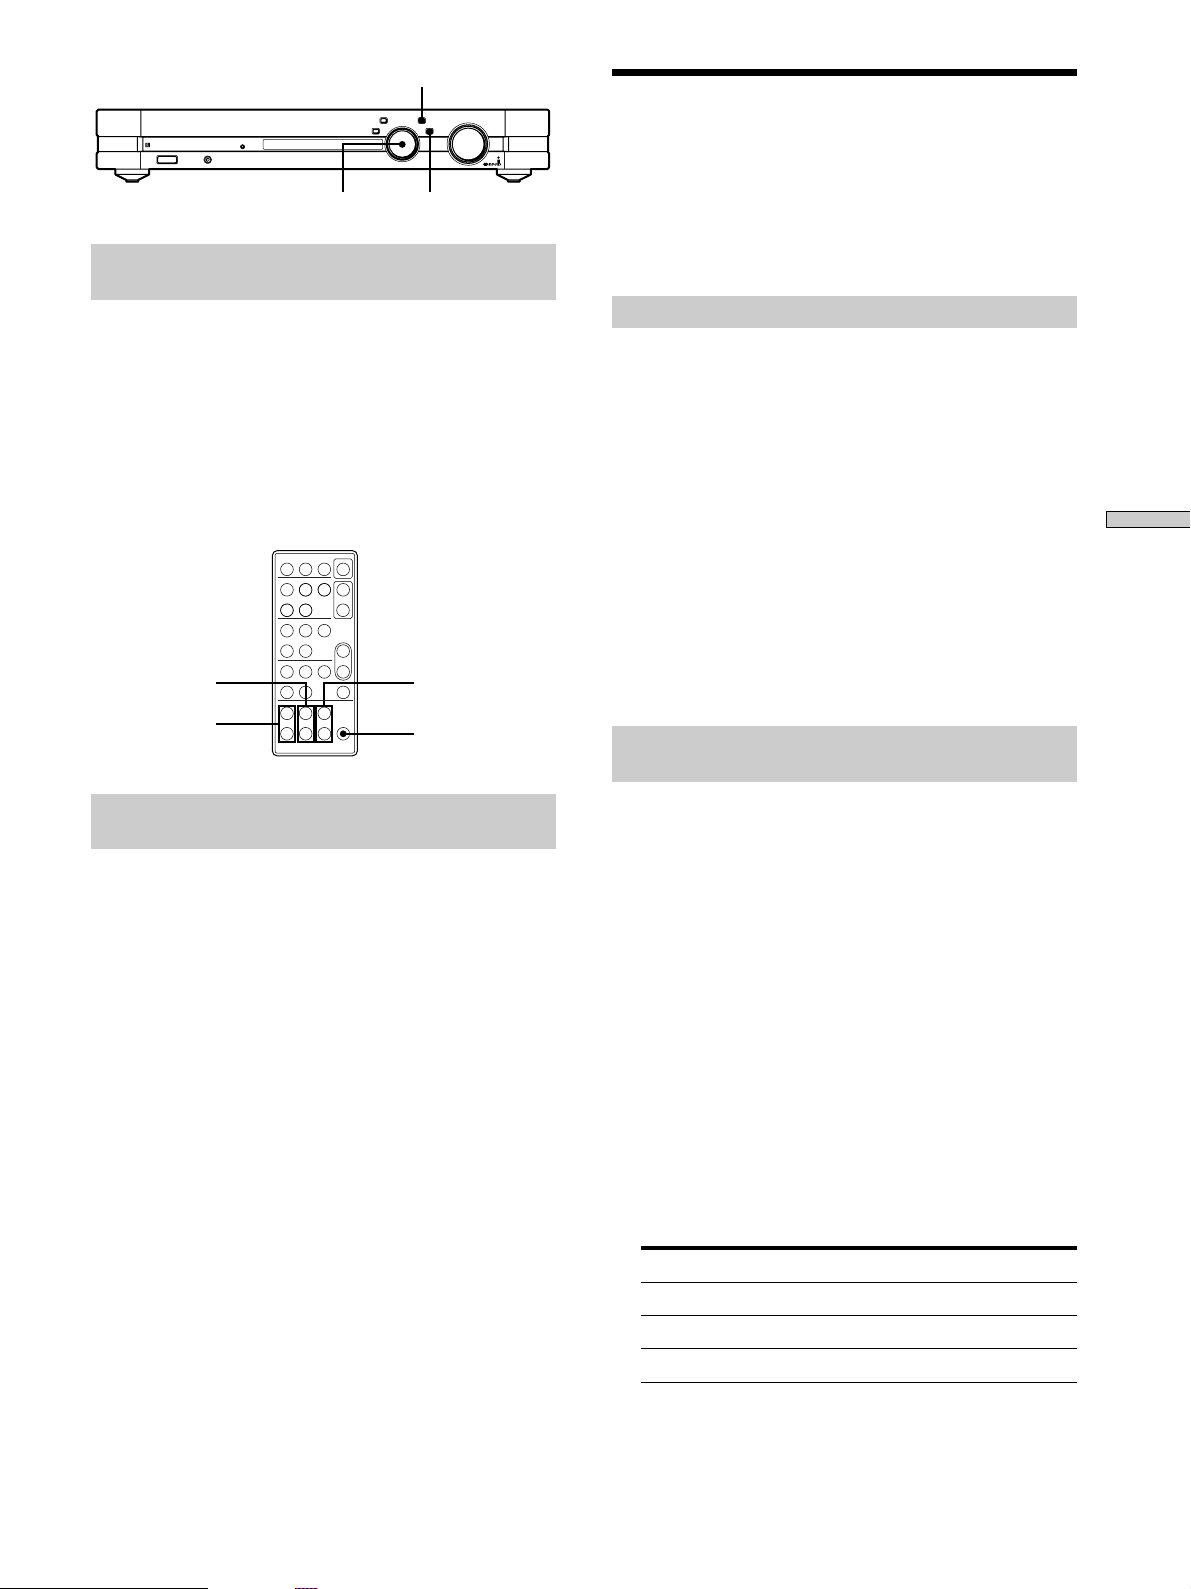
q; MD deck operation buttons
Use these buttons to operate a Sony MD deck.
MD N button
Press to start playback on the MD deck.
MD X button
Press to pause playback on the MD deck.
MD x button
Press to stop playback on the MD deck.
MD ./> buttons
Press to locate a track on the MD deck.
Note
This remote transmits Sony MD1 codes.
qa CD player operation buttons
Use these buttons to operate a Sony CD player.
CD N button
Press to start playback on the CD player.
CD X button
Press to pause playback on the CD player.
qh DIMMER button
Press repeatedly to change the brightness level of the
display.
qj DISPLAY button
Press repeatedly to select the information to be
displayed. This button has the same function as the
DISPLAY button on the receiver (5 in page 10).
Location kf Parts
CD x button
Press to stop playback on the CD player.
CD ./> buttons
Press to locate a track on the CD player.
Note
This remote transmits Sony CD1 codes.
qs PRESET +/– buttons
Press repeatedly to tune in a preset station.
qd SHIFT button
Changes the memory page containing preset stations.
qf BAND button
Selects the FM or AM band. If you press this button
while the receiver is turned off, the receiver
automatically turns on and tunes to the station that
was last received.
qg SLEEP button
Press to activate the Sleep Timer function. When the
Sleep Timer function is activated, the SLEEP indicator
on the receiver lights up.
13
GB
Page 14

Adjusting the Sound
This chapter describes how to use the
Sound Menu to adjust the equalizer
parameters and speaker balance. The
adjusted equalizer parameter can be
stored in the memory of the receiver
for later recall.
All sound adjustments can be made with the Sound
Menu. The Sound Menu contains following submenus:
EQ BANK submenu
Nine preset settings are stored and can be recalled using
this submenu. EQ1 to 5 stores five three-band equalizer
settings; Parametric EQ1 to 3 stores three parametric
equalizer settings; and EQ FLAT stores one flat pattern.
EQ Control submenu
After selecting one of the three-band equalizer settings
stored in EQ1 to 5 through the EQ BANK submenu, you
can change the bass, midrange, and treble parameters of
the selected setting through the EQ Control submenu.
The EQ Control submenu can be accessed only after you
have selected one of the three-band equalizer settings (i.e.,
a setting stored in EQ1 to 5).
EQ Condition submenu
After selecting one of the parametric equalizer settings in
Parametric EQ1 to 3 and EQ FLAT through the EQ BANK
submenu, you can check the level, frequency, and slope of
each band.
The EQ Condition submenu can be accessed only after
you have selected one of the parametric equalizer patterns
(i.e., a setting stored in Parametric EQ1 to 3 and EQ
FLAT).
Note that you can check, but can’t change the parameters
using the receiver. You can change the parametric
equalizer settings only from a personal computer, etc.,
connected through the i.LINK network.
EQ Memory submenu
After adjusting the bass, midrange, or treble parameter of
a three-band equalizer setting, you can store the changed
setting to EQ1 to 5 with the EQ Memory submenu.
SP. Balance submenu
Use this submenu to adjust the speaker balance.
z
What is a three-band equalizer?
It’s a kind of an equalizer that provides separate adjustments of
the bass, midrange, and treble levels.
z
What is a parametric equalizer?
It’s a kind of an equalizer that specifies up to three points as the
center frequencies and selects slope type for each center
frequency.
14
GB
Page 15
JOG MENU
i
I
?/1
Jog dial
ENTER
Brief descriptions of buttons and controls
used to adjust the sound
JOG MENU button: Press repeatedly to select Sound
Menu.
Jog dial: After pressing the JOG MENU button, rotate to
select a submenu, preset equalizer setting, or parameter.
ENTER button: Press to enter a setting made using the
jog dial.
?/1
+
–
+–
NX x
.>
+
N
Xx
MID +/–
BASS +/–
.>
+
–+–+–
–
TREBLE +/–
EQ BANK
Setting Sound Parameters
Do the procedure below to select a preset equalizer
setting, set the parameters of the equalizer settings, store
adjusted equalizer parameters, and adjust the speaker
balance.
Selecting an equalizer setting
1 Press JOG MENU repeatedly until “Sound Menu”
appears in the display.
2 Press ENTER.
“EQ BANK” appears in the display.
3 Press ENTER and rotate the jog dial to select the
equalizer setting.
The selected equalizer setting is automatically applied
and the normal display reappears after several
seconds.
z
You can use the remote to select the equalizer setting
Press EQ BANK repeatedly.
Setting the equalizer parameters
(EQ1 to 5)
Adjusting the Sound
Brief descriptions of buttons on the
remote used to adjust the sound
BASS +/– buttons: Press repeatedly to adjust the bass
level of the selected equalizer setting.
MID +/– buttons: Press repeatedly to adjust the
midrange level of the selected equalizer setting.
TREBLE +/– buttons: Press repeatedly to adjust the treble
level of the selected equalizer setting.
EQ BANK button: Press repeatedly to select the equalizer
setting.
1 Do steps 1 to 3 in “Selecting an equalizer setting”
on this page to select the equalizer setting to be
adjusted.
The parameters can be set only for the equalizer
settings stored in EQ1 to 5. The parameters stored in
Parametric EQ1 to 3 and EQ FLAT cannot be changed
on this receiver.
2 Press JOG MENU repeatedly until “Sound Menu”
appears in the display.
3 Rotate the jog dial until “EQ Control” appears in
the display.
“EQ Control” doesn’t appear if a setting stored in
Parametric EQ1 to 3 or EQ FLAT has been selected.
4 Press ENTER and rotate the jog dial to select the
parameter to be set.
Select To adjust the
BASS Bass setting
MID Midrange setting
TREBLE Treble setting
15
GB
Page 16

Setting Sound Parameters
5 Press ENTER and rotate the jog dial to set the
selected parameter.
Each parameter can be set in a range of –10 dB to +10
dB in 1-dB steps.
6 If you want to set other parameters, repeat steps 4
and 5.
z
You can use the remote to adjust the tone parameters
Press BASS+/–, MID +/–, or TREBLE +/–.
Checking the parametric equalizer
settings (Parametric EQ1 to 3)
Adjusting the Sound
1 Do steps 1 to 3 in “Selecting an equalizer setting”
on page 15 to select the parametric equalizer
setting to be checked.
The settings can be checked for the patterns stored in
Parametric EQ1 to 3 only.
2 Press JOG MENU repeatedly until “Sound Menu”
appears in the display.
3 Rotate the jog dial until “EQ Condition” appears in
the display.
“EQ Condition” doesn’t appear if a pattern in EQ1 to 5
or EQ FLAT has been selected.
4 Press ENTER to overwrite the parameter(s) of
current preset setting with new parameter(s). If
you don’t want to overwrite the parameters,
rotate the jog dial to select the number of a preset
setting where the adjusted parameter(s) is (are) to
be stored, then press ENTER.
“Memorized EQX” appears for a few seconds, and
then the normal display reappears. “X” is the number
of the setting selected to store the parameter(s).
z
You can reset the contents of the preset equalizing patterns
to their factory settings
See page 25.
Adjusting the speaker balance
1 Press JOG MENU repeatedly until “Sound Menu”
appears in the display.
2 Rotate the jog dial until “SP. Balance” appears in
the display, then press ENTER.
3 Rotate the jog dial to adjust the speaker balance.
4 Press ENTER and rotate the jog dial to select the
parameter to be checked.
One of the nine parameters appears in the display.
Rotate the jog dial to display next parameter.
The normal display will reappear after several
seconds.
Storing adjusted parameters
1 Do steps 1 to 6 in “Setting the equalizer
parameters” on page 15 and this page to adjust
the parameter(s).
2 Press JOG MENU repeatedly until “Sound Menu”
appears in the display.
3 Rotate the jog dial until “EQ Memory” appears in
the display, then press ENTER again.
“Memory to EQX?” appears in the display. “X,” which
appears as a number from 1 to 5, is the number of the
currently selected preset pattern in EQ BANK
submenu.
16
GB
Page 17
Receiving Broadcasts
This chapter describes how to receive
FM or AM broadcasts and how to
preset selected stations.
You can tune to stations on this receiver in the following
ways:
Manual Tuning
You can rotate the jog dial to tune to the station you want
(see page 18).
Automatic Tuning
If you don’t know the frequency of the station you want,
you can let the receiver scan all available stations in your
area (see page 19).
Preset Tuning
After you have tuned in stations using Manual Tuning or
Automatic Tuning, you can preset them to the receiver
(see page 19). Then you can tune in any of the stations by
rotating the jog dial (see page 20). Up to 30 FM or AM
stations can be preset.
RDS functions
This receiver also allows you to use RDS (Radio Data
System), which enables radio stations to send additional
information along with the regular program signal. With
this receiver, only the display of program station name is
available.
Note that only FM stations provide RDS services.
*
Receiving Broadcasts
Not all FM stations provide RDS service, nor do they provide the
*
same types of services. If you aren’t familiar with the RDS services
in your area, check with your local radio stations for details.
Before you begin, make sure you have:
• Connected an FM and AM antenna to the receiver (see
page 5).
JOG MENUTUNE MODE
i
I
?/1
BAND
Jog dial
Brief descriptions of buttons and controls
on the receiver used to receive broadcasts
TUNE MODE button: Press to select tuning mode.
JOG MENU button: Press to select the mode of the jog
dial.
BAND button: Press to select the FM or AM band.
Jog dial: Rotate to select tuner, tune to a station manually
or automatically, or tune to a preset station.
GB
17
Page 18

BAND
PRESET +/–
+–
NX x
.>
N
Xx
.>
+
–+–+–
?/1
+
–
+
–
FM MODESHIFT
FUNCTION +/–
Manual Tuning
For details on the buttons and controls used in this
section, see “Brief descriptions of buttons and controls on
the receiver used to receive broadcasts” on page 17 and
“Brief descriptions of buttons on the remote used to
receive broadcasts” on this page.
Receiving Broadcasts
Brief descriptions of buttons on the
remote used to receive broadcasts
PRESET +/– buttons: Press to select a preset station.
BAND button: Press to select the FM or AM band.
SHIFT button: Press to select a memory page (A, B, or C)
for presetting radio stations or tuning to preset stations.
FUNCTION +/– buttons: Press repeatedly to select the
tuner.
FM MODE button: If “STEREO” flashes in the display
and the FM stereo reception is poor, press this button to
improve the sound. “MONO” lights up in the display
and you will not be able to enjoy stereo effect, but the
sound will be less distorted.
Note
If “MONO” appears in the display even when the FM broadcast
is received normally, press this button to turn off the “MONO”
indication.
z
When you tune to a station that provides RDS services
The program station name appears in the display.
Notes
• RDS may not work properly if the station you tuned to is not
transmitting the RDS signal properly or if the signal strength is
weak.
• After you disconnect the AC power cord of the receiver, RDS
program station names may not be saved correctly. To prevent
this, preset the RDS stations (page 19).
1 Press JOG MENU repeatedly until a component
name appears in the display.
2 Rotate the jog dial until “TUNER” appears in the
display.
The last received station is tuned in.
3 Press BAND to select the FM or AM band.
4 Press TUNE MODE repeatedly until “MANUAL”
lights up in the display.
5 Rotate the jog dial.
Rotate the dial clockwise to increase the tuning
frequency. Rotate it counterclockwise to decrease the
tuning frequency.
When the receiver reaches the end of either
band
Tuning starts over again in the same direction.
6 If you tune in an AM station, adjust the AM loop
antenna to optimize the reception.
7 Repeat steps 3 to 6 to tune in another station.
z
You can change to the tuner quickly
Press BAND on either the receiver or the remote. Or press
FUNCTION +/– on the remote repeatedly until “TUNER”
appears in the display.
z
If you try to tune more precisely than is possible for the
tuning scale
You won’t be able to tune in the exact frequency. The receiver
scans frequencies in the following units:
FM: 50 kHz
AM: 9 kHz
18
GB
Page 19

Automatic Tuning
Preset Tuning
For details on the buttons and controls used in this
section, see “Brief descriptions of buttons and controls on
the receiver used to receive broadcasts” on page 17 and
“Brief descriptions of buttons on the remote used to
receive broadcasts” on page 18.
1 Press JOG MENU repeatedly until a component
name appears in the display.
2 Rotate the jog dial until “TUNER” appears in the
display.
The last received station is tuned in.
3 Press BAND to select the FM or AM band.
4 Press TUNE MODE repeatedly until “AUTO” lights
up in the display.
5 Rotate the jog dial.
When you rotate the dial clockwise, the receiver scans
from low to high; when you rotate it counterclockwise,
the receiver scans from high to low.
When the receiver reaches either end of the
band
Scanning is repeated in the same direction.
The receiver stops scanning whenever a station is
received.
6 To continue scanning, rotate the jog dial again.
For details on the buttons and controls used in this
section, see “Brief descriptions of buttons and controls on
the receiver used to receive broadcasts” on page 17 and
“Brief descriptions of buttons on the remote used to
receive broadcasts” on page 18.
Before tuning to preset stations, be sure to preset them by
performing steps on “Presetting radio stations” below.
Presetting radio stations
1 Press JOG MENU repeatedly until a component
name appears in the display.
2 Rotate the jog dial until “TUNER” appears in the
display.
The last received station is tuned in.
3 Tune in the station that you want to preset using
Manual Tuning or Automatic Tuning (page 18 and
this page).
4 Press JOG MENU repeatedly until “Setup Menu”
appears in the display.
5 Rotate the jog dial until “Preset Memory” appears
in the display, and press ENTER.
“MEMORY” lights up in the display for several
seconds. Do steps 6 and 7 before “MEMORY” turns
off.
Receiving Broadcasts
z
You can select the tuner quickly
Press BAND on either the receiver or on the remote. Or, press
FUNCTION +/– on the remote repeatedly until “TUNER”
appears in the display.
6 Rotate the jog dial to select the memory page and
preset number.
The memory page appears and the preset number
flashes. The memory page and preset number
indication changes each time you rotate the jog dial as
follows:
tA1yA2y...yA0yB1yB2y...yB0T
tC0y...yC2yC1T
To select the memory page quickly
Press SHIFT on the remote repeatedly.
If “MEMORY” turns off or preset number stops
flashing before you select the memory page and preset
number, start again from step 4.
19
GB
Page 20

Preset Tuning
7 Press ENTER to store the station.
8 Repeat steps 3 to 7 to preset another station.
To change a preset number to another station
Do steps 1 to 7 to preset the new station to the number.
Tuning to preset stations
1 Press JOG MENU repeatedly until a component
name appears in the display.
2 Rotate the jog dial until “TUNER” appears in the
display.
The last received station is tuned in.
3 Press TUNE MODE repeatedly until “PRESET” lights
up in the display.
Receiving Broadcasts
4 Rotate the jog dial to select the preset station you
want (or press PRESET +/– on the remote
repeatedly).
Each time you rotate the jog dial (or press PRESET +/–
on the remote repeatedly), the receiver tunes in one
preset station at a time, in the corresponding order
and direction as follows:
tA1yA2y...yA0yB1yB2y...yB0T
tC0y...yC2yC1T
To select the memory page quickly
Press SHIFT on the remote repeatedly.
20
GB
Page 21

Other Operations
JOG MENUi
i
I
?/1
I ENTER
Jog dial
Brief descriptions of buttons and controls
on the receiver that appear in this chapter
< button: Use to move the cursor back when naming
preset stations or program sources.
> button: Use to move the cursor forward when naming
preset stations or program sources.
JOG MENU button: Press to select the menu.
Jog dial: Use to select characters or menu items.
ENTER button: Press to enter the completed name of the
preset station or program source, or enter the selected
item in menu operation.
+–
NX x
.>
N
Xx
.>
+
–+–+–
?/1
+
–
+
–
DIMMERSLEEP
Brief descriptions of buttons on the
remote that appear in this chapter
DIMMER button: Use to select the brightness of the
display.
SLEEP button: Use to activate the Sleep Timer.
Other Operations
21
GB
Page 22

Naming Preset Stations and Program Sources
You can enter a name of up to eight characters for preset
stations (excluding RDS stations) and up to 11 characters
for program sources (for up to 10 i.LINK components).
These names (for example, “LISSA CD”) appear in the
receiver’s display when a station or program source is
selected.
Note that no more than one name can be entered for each
preset station or program source.
This function is useful for distinguishing components of
the same kind. For example, two CD players can be
specified as “CD 1” and “CD 2”, respectively.
1 Press JOG MENU repeatedly until a component
name appears in the display.
2 To index a preset station
Rotate the jog dial until “TUNER” appears in the
display.
The last received station is tuned in.
To index a program source
Rotate the jog dial to select the program source
(component) to be named, then go to step 4.
Other Operations
3 Tune to the preset station you want to create an
index name for.
If you aren’t familiar with how to tune to preset
stations, see “Tuning to preset stations” on page 20.
If you attempt to name an i.LINK component
after you’ve already named 10 i.LINK
components
“List Full” appears in the display. To continue, erase
unwanted index name(s).
7 Press ENTER.
“MEMORY” lights up in the display for about one
second and the index name is entered.
To assign index names to other stations
Repeat steps 2 to 7.
Notes
• You can’t create index names for RDS stations and the
component connected to the ANALOG IN connectors. “Not In
Use” appears in step 5 at this time.
• You can name only the preset station currently being tuned to
or the program source currently being selected. You can’t name
stations which are not preset.
To erase an index name
1 Press JOG MENU repeatedly until “Setup Menu”
appears in the display.
2 Rotate the jog dial until “Name Erase” appears in
the display, and press ENTER.
4 Press JOG MENU repeatedly until “Setup Menu”
appears in the display.
5 Rotate the jog dial until “Name Input” appears in
the display, and press ENTER.
6 Create an index name by using the jog dial, <, and
>.
Rotate the jog dial to select a character, then press > to
move the cursor to the next position.
To select the character type
Press DISPLAY repeatedly until the character type you
want appears in the display.
To insert a space
Rotate the jog dial until a blank space appears in the
display (the space character is between “]” and “A”).
To reenter a character
Press < or > repeatedly until the character to be
changed flashes, then rotate the jog dial to select a
character.
3 Rotate the jog dial to select the index name you
want to erase.
4 Press ENTER.
Selected index name is erased.
Note
You can erase index names only for i.LINK components using
this procedure.
22
GB
Page 23

Recording
v
When recording to and from the i.LINK components, you
don’t have to do any operations on the receiver. For
details, refer to the operating instructions supplied with
the playback and recording components.
Do the procedure below to record from a component
connected to the ANALOG IN connectors or from the
built-in tuner to the i.LINK MD deck. Refer to the
instruction manual of the MD deck if you need help.
Adjusting the Brightness of the Display Z
You can select one of three brightness levels for the
display. The JOG MENU button can be turned off when a
low brightness level is selected.
Press DIMMER on the remote while the power is on.
Each time you press DIMMER, the brightness of the
display changes as follows:
The display is fully lit and the JOG MENU button is on.
1 Select the component to be recorded.
2 Prepare the component for playing.
3 Insert a blank MD into the MD deck and adjust the
recording level, if necessary.
4 Start recording on the MD deck, then start
playback on the playback component.
Note
While the MD deck is recording from a component connected to
the ANALOG IN connectors or from the built-in tuner, you can’t
select other components.
v
The display lights up dimly and the JOG MENU button is on.
v
The display lights up dimly and the JOG MENU button is off.
v
The display and the JOG MENU button are both off.
z
If any change occurs in the display information while the
display is turned off
The display turns back on (dimly) for several seconds to show
the new information, and then turns off again.
z
The brightness level of the displays on the MDS-LSA1 MD
Deck and CDP-LSA1 CD Player can be linked to that of the
receiver’s display through the i.LINK Control function
The brightness level can be linked only when the i.LINK Control
function is activated. For details, see page 26.
Other Operations
GB
23
Page 24

Using the Sleep Timer Z
You can set the receiver to turn off automatically at a
specified time.
Press SLEEP on the remote while the power is on.
“SLEEP” lights up in the display.
Each time you press SLEEP, the time display changes as
shown below.
t 2:00 t 1:30 t 1:00 t 0:30 t 0:20 t 0:10 t OFF
After you specified the time, the display goes back the
status before you pressed the SLEEP button.
To check the remaining time before the receiver
turns off
Press SLEEP. The remaining time appears in the display.
To cancel the Sleep Timer
Press SLEEP again while the remaining time appears.
“OFF” appears in the display and the Sleep Timer is
canceled.
z
When you turn on the i.LINK Control function (see this page)
When the receiver turns off, the corresponding i.LINK
component turns off automatically at the same time.
Other Operations
Other Settings Using the Setup Menu
By using the i.LINK Control function, operations on the
receiver can be automatically linked with the kperation of
specific components.
Linking receiver operations with the
operation of i.LINK components (i.LINK
Control)
When i.LINK Control is turned on, the following
operations are linked:
• When you press the CD N button or MD N button on
the remote, the receiver and the corresponding
component turn on and the component starts to play.
• When the N button on the CD player or MD deck is
pressed to start playback, or the CD N button or MD
N button on the remote of the receiver is pressed, the
respective component is automatically selected as the
program source.
• When the display brightness on the receiver is changed,
the same change occurs to the brightness level of the
displays on the MDS-LSA1 MD Deck or CDP-LSA1 CD
Player.
• When Sleep Timer turns off the receiver, the
corresponding i.LINK component also turns off.
• When you turn the receiver on or off, the corresponding
i.LINK component also turns on or off.
• When the i.LINK MD deck or CD player is selected and
no operation has been done on the receiver for more
than one minute, the receiver turns off automatically
when you turn off the selected i.LINK component.
However, when the Sleep Timer is activated, the
receiver won’t turn off until the specified time elapses.
24
1 Press JOG MENU repeatedly until “Setup Menu”
appears in the display.
2 Rotate the jog dial until “i.LINK Ctrl” appears in the
display, and then press ENTER.
3 Rotate the jog dial until “On” appears in the
display, and then press ENTER.
To turn off the i.LINK Control function
Do the procedure above, selecting “Off” in step 3.
Notes
• The i.LINK Control functions described above may not work
properly on certain components and under certain conditions.
• Make sure i.LINK Control is active on only one component
within the i.LINK configuration. For example, when two STRLSA1s are hooked up in the same configuration, turn on the
i.LINK Control function on only one receiver and not the other.
GB
Page 25

Other Settings Using the Setup Menu
Verifying which component is currently
selected (Ping function)
When the Ping function is turned on, you can verify
which of the components is currently selected by pressing
the DISPLAY button on the receiver. An indication
momentarily appears in the display of the currently
selected component. The indication varies depending on
the component. For example, if the selected component is
either the CDP-LSA1 or the MDS-LSA1,
“N N n n” appears in the display of the
component. Note that this function works on Sony
i.LINK MD deck and CD player only.
1 Press JOG MENU repeatedly until “Setup Menu”
appears in the display.
2 Rotate the jog dial until “Ping” appears in the
display, and then press ENTER.
3 Rotate the jog dial until “On” appears in the
display, and then press ENTER.
To turn off the Ping function
Do the procedure above, selecting “Off” in step 3.
Improving the quality of the audio signal
(H.A.T.S. function)
When the H.A.T.S. function is turned on, digital audio
signals are momentarily stored in a buffer prior to output.
This reduces the jitter that sometimes occurs during
digital transmission. When this function is turned on, the
H.A.T.S. indicator on the front panel lights up whenever
the digital audio signal is input to the receiver.
1 Press JOG MENU repeatedly until “Setup Menu”
appears in the display.
2 Rotate the jog dial until “H.A.T.S.” appears in the
display, and then press ENTER.
Notes
• Due to the operating principle of the H.A.T.S. function, a slight
time lag is introduced between the initiation of an operation
(e.g., pressing the play button, stop button, or pause button)
and the actual audio output.
• The H.A.T.S. function is effective only for the components
supporting this function.
• On this receiver, the H.A.T.S. function works only with digital
audio signals with a sampling frequency of 44.1 kHz.
• The H.A.T.S. function does not work when the program source
component selected by the receiver is also selected by another
component (e.g., another receiver or the MD deck). This is
because the receiver controls the transmission rate of the digital
audio signals output from the program source component, and
for proper signal transmission, there must be only one
component which receives audio signal from a source
component within the i.LINK configuration.
• The H.A.T.S. function doesn’t work under the following
conditions:
— When the MD is recording from the CD player, and the CD
player or the MD deck is selected as the program source.
— When the sampling frequency of the digital signal is not 44.1
kHz.
Clearing the receiver’s memory
The procedure below clears all the menu settings you
made from the receiver’s memory and restores the factory
settings.
1 Press JOG MENU repeatedly until “Setup Menu”
appears in the display.
2 Rotate the jog dial until “All Clear” appears in the
display, and then press ENTER.
3 Rotate the jog dial until “Yes” appears in the
display, and then press ENTER.
“Make Sure ?” appears in the display.
4 Rotate the jog dial until “Yes” appears in the
display, and then press ENTER.
Other Operations
3 Rotate the jog dial until “On” appears in the
display, and then press ENTER.
To turn off the H.A.T.S. function
Do the procedure above, selecting “Off” in step 3.
25
GB
Page 26

About i.LINK
This section explains the general specifications and major
features of i.LINK. Read this section before doing any
i.LINK-related operation.
Note that i.LINK connections and operations may vary,
depending on the component. For details regarding the
connection of i.LINK components to this unit, see “Audio
Component Hookups” on page 6.
i.LINK functions
i.LINK is a serial digital interface that supports the
bidirectional transmission of audio and video signals,
commands, and even component status information. All
that is needed to hook up i.LINK components with i.LINK
connecting cables. Audio and video components
connected within an i.LINK configuration can be used to
perform a wide range of operations and data exchanges
that is sure to expand as the number and variety of i.LINK
components grows.
Since i.LINK allows data to be transmitted from one
component to other components to which it is not directly
connected, there is no need to pay attention to connection
order. However, due to differences in characteristics or
specifications, operation of or data exchange with certain
Other Operations
i.LINK components may not be possible, even when they
are connected.
Branch connections
• Any i.LINK component with three or more i.LINK
connectors can serve as a branch point.
• Up to 63 i.LINK components can be connected in a
single configuration. However, the maximum number
of components that can be daisy-chained in a single
route is 17 (i.e., a maximum of 16 i.LINK connecting
cables in a row). Each i.LINK cable used in a single
route is called a “hop.” For example, there are six hops
in the route between A and C in the illustration below,
and three hops in the route between A and D.
BA
DC
Each route between A and B; A and C; A and D; B and C; B
and D; and C and D in the illustration above can have 16
hops (i.e., 17 components).
Loop-connection
A signal output from one component is transmitted to all
other components. A loop connection should thus be
avoided to prevent the return of a signal to its source.
Correct Incorrect (looped)
z
What is i.LINK?
i.LINK is a trademark proposed by Sony Corporation and
accepted by companies throughout the world as an easy-toremember name for the IEEE 1394 world standard of the Institute
of Electrical and Electronics Engineers.
i.LINK connections
The use of i.LINK connecting cables to connect i.LINK
components as shown below is called a “daisy chain”
configuration.
i.LINK connecting cable
i.LINK
component
i.LINK
component
Data can be transmitted between any two
components even if they are indirectly connected.
i.LINK
component
i.LINK
component
i.LINK
component
26
GB
Page 27

Notes
• Some i.LINK components (such as personal computers) don’t
transfer signals when they are turned off. Refer to the
operation manual of each component to be connected before
you hook them up.
• The maximum transmission rate of an i.LINK component is
printed near its i.LINK connector. The indications S100, S200,
and S400 refer to maximum transmission rates of 100, 200, or
400 Mbps*, respectively. The actual transmission rate may be
faster or slower, depending on the dif ferences in transmission
rates and specifications among the connected components.
z
What is Mbps?
“Mbps” is an abbreviation for megabits per second. It indicates
the amount of data transmitted per second. For example, a rate
of 200 Mbps means 200 megabits of data are transmitted in one
second.
Establishing a LINC
Before an audio signal can be transmitted between i.LINK
components, a “LINC” must first be established between
the receiving component (of the audio signal) and the
sending component. Establishing a “LINC” means
establishing a logical path for the transmission of digital
audio signals between the two components. Each logical
path has an ID number. Since the component that sends
an audio signal must output the signal to a path, and the
component that receives the signal must input it from the
same path, the path must be mutually known by both
components. During the establishment of a LINC, the
following communication occurs between the two i.LINK
components.
Other Operations
Example
A component establishing a LINC with a CD player in
order to receive an audio signal from the CD player
1 The component that will receive an audio signal
from the CD player sends a request and path
information to the CD player to establish a
transmission path for the audio signal.
The component
that receives
the audio signal
1
,
2
CD player
(sending
component)
<
2 The CD player responds to the component, agreeing
to the establishment of a LINC.
The digital audio signal transmission becomes possible
only after the communication described above has
occurred and a LINC has been established.
27
GB
Page 28

Additional
Troubleshooting
Information
If you experience any of the following difficulties while
using the receiver, use this troubleshooting guide to help
you remedy the problem. Also, see page 9 to verify that
the connections are correct. Should any problem persist,
consult your nearest Sony dealer.
There’s no sound or only a very low-level sound
is heard.
, Check that the speakers and components are
connected securely.
, Make sure that you’ve selected the correct
component on the receiver.
, Press MUTING on the remote if the MUTING
indicator is lit.
, Use the i.LINK connecting cable for 200 Mbps
transmission rate.
, The protective device on the receiver has been
activated because of a short circuit. Turn off the
receiver, eliminate the short-circuit problem and
turn kn the power again.
The left and right sounds are unbalanced or
reversed.
, Check that the speakers and components are
connected correctly and securely.
, Adjust speaker balance using Sound Menu (page
16).
Severe hum or noise is heard.
, Check that the speakers and components are
connected securely.
, Check that the connecting cables are away from a
transformer or motor, and at least 3 meters away
from a TV set or fluorescent light.
, Move your TV away from the audio components.
, The connectors are dirty. Wipe them with a cloth
slightly moistened with alcohol.
Recording can’t be done.
, Check that the components are connected correctly.
Radio stations can’t be tuned in.
, Check that the antennas are connected securely.
Adjust the antennas and connect an outdoor
antenna if necessary.
, The signal strength of the stations is too weak
(when tuning in with automatic tuning). Use
manual tuning.
, No stations have been preset or the preset stations
have been cleared. Preset the stations (see page
19).
28
GB
Page 29

RDS doesn’t work.
, Make sure that you’re tuned to an FM RDS station.
, Select a stronger FM station.
The remote doesn’t function.
, Point the remote towards the remote sensor
the component that you want to operate.
, Remove any obstacles in the path between the
remote and the component.
, Replace the battery in the remote with a new one,
if it is weak.
Reference sections for clearing the
receiver’s memory
To clear See
Index names page 22
All memorized settings page 25
on
Additional Information
29
GB
Page 30

Specifications
Amplifier section
Power output 50 W + 50 W (4 ohms
Frequency response
7 Hz - 20 kHz ±0.3dB
Tone control Bass: 100 Hz ±10 dB
Midrange: 1 kHz
Treble: 10 kHz ±10 dB
Analog input Sensitivity: 250 mV
Impedance: 50 kilohms
Headphone output
Accepts low and high
FM tuner section
Tuning range 87.5 - 108.0 MHz
Antenna terminal
75 ohms, unbalanced
Sensitivity Mono: 7 µV/22.1 dBf
Stereo: 70 µV/42.1 dBf
Additional Information
THD Mono: 0.3% at 1 kHz
Stereo: 0.5% at 1 kHz
Selectivity 55 dB at 400 kHz
DIN, 1 kHz)
±10 dB
impedance
AM tuner section
Tuning range 531 - 1602 kHz
Antenna Loop antenna
THD 0.5% at 400 Hz
Selectivity 35 dB at 9 kHz
Intermediate frequency
450 kHz
General
Power requirements
230 V AC, 50/60 Hz
Power consumption
140 W
Dimensions (w/d/h)
430 × 335 × 70 mm
including projecting
parts and controls
Mass (Approx.)
6.3 kg
Supplied accessories See page 4.
Design and specifications are subject
to change without notice.
Separation 35 dB at 1 kHz
Intermediate frequency
10.7 MHz
GB
30
Page 31

Display Messages
The following table explains the various messages that appear in the display.
Message Error code(s) Cause and/or remedy
CANNOT LINC C78:11/C78:12 The receiver can’t establish a LINC with a component because of an existing LINC between
NO SIGNAL C78:04 No signal is output from the selected component. Verify that the signal is output from the
C78:22 The format of the input signal is not supported.
C78:31 The communication between the receiver and the selected component is unstable. Or, the
BUS FULL C78:15 The signal bus within the i.LINK configuration is full and no more signals can be output
LOOP CONNECT C78:03 The i.LINK connection is looped. Check the connection (see page 26).
NEW CONNECT — An i.LINK component has been connected to or disconnected from the i.LINK
FUNC. Locked — You can’t select a component because the LINC between the other component and the
Select FUNC. — Select another component.
Input Occupied Cancel the LINC between the other component and the receiver.
Off Processing — While the i.LINK Control function is activated, the corresponding i.LINK component turns
the receiver and another component. Cancel the LINC between the receiver and the other
component.
component (e.g., by recording from the component).
format of the input signal is not supported. Check the condition and the signal format of
the selected component.
from the receiver. Cancel the LINC between the component and the receiver.
configuration. Wait several seconds for the indication to turn off.
receiver is currently established. Cancel the LINC between the other component and the
receiver.
off automatically when you turn off the receiver. However, it may take a while for the
component to turn off and no operations are possible on the receiver while this indication
is flashing. Wait several seconds for the indication to turn off.
Additional Information
31
GB
Page 32

AVERTISSEMENT
Précautions
Afin d’éviter tout risque
d’incendie ou
d’électrocution, ne pas
exposer cet appareil à la
pluie ou à l’humidité.
Afin d’éviter tout risque
de choc électrique, ne pas
ouvrir le coffret. Confier
toute réparation à un
technicien qualifié
uniquement.
Sécurité
Si un solide ou un liquide tombait dans le
coffret, débranchez l’ampli-tuner et faitesle vérifier par un technicien qualifié avant
de le remettre en service.
Sources d’alimentation
• Avant de mettre en service l’ampli-tuner,
vérifiez que sa tension de
fonctionnement correspond à celle du
courant secteur local. La tension de
fonctionnement est indiquée sur la
plaque signalétique sous l’ampli-tuner.
• L’ampli-tuner n’est pas déconnecté de la
source d’alimentation tant qu’il est
branché sur une prise murale, même si
vous le mettez hors tension.
• Si vous ne comptez pas utiliser l’amplituner pendant un certain temps,
débranchez-le de la prise murale. Pour
débrancher le cordon, tirez sur la fiche et
jamais sur le cordon proprement dit.
• Si le cordon d’alimentation secteur doit
être remplacé, adressez-vous à un
technicien qualifié uniquement.
Installation
• N’installez pas l’appareil dans un espace
confiné comme dans une bibliothèque ou
un meuble encastré.
• Installez l’ampli-tuner dans un endroit
bien ventilé pour éviter tout risque de
surchauffe interne et prolonger la durée
de vie des composants.
• N’installez pas l’ampli-tuner près d’une
source de chaleur, dans un endroit en
plein soleil, poussiéreux ou exposé à des
chocs mécaniques.
• La plaque signalétique se trouve sous
l’appareil.
Fonctionnement
Avant de raccorder d’autres appareils,
mettez l’ampli-tuner hors tension et
débranchez-le.
Nettoyage
Nettoyez le coffret, le panneau et les
commandes avec un chiffon doux
légèrement imprégné d’une solution
détergente douce. N’utilisez pas de
tampon abrasif, poudre à récurer ou
solvant, comme de l’alcool ou de la
benzine.
Remplacement de la pile de la
télécommande
Tirez et sortez le porte-pile et insérez une
pile au lithium CR2025 neuve avec la face
+ dirigée vers la haut. Réinsérez ensuite le
porte-pile.
Pile au lithium CR2025
1
2
1 Tout en appuyant.
2 Tirez.
ATTENTION
Danger d’explosion en cas de mauvais
remplacement de la pile. Remplacer la pile
seulement par une pile identique ou du
type recommandé par le fabricant. Mettre
les piles inutilisées au rebut selon les
instructions du fabricant.
En cas de question ou de problème
concernant l’ampli-tuner , consultez le
revendeur Sony le plus proche.
FR
2
Page 33

Au sujet de ce manuel
Les instructions de ce mode d’emploi sont destinées au
modèle STR-LSA1.
Conventions
•Les commandes indiquées dans ce mode d’emploi sont
celles de l’ampli-tuner ; elles peuvent être remplacées
par celles de la télécommande fournie qui ont le même
nom ou un nom similaire ou, si elles sont différentes,
elles sont indiquées entre parenthèses dans le mode
d’emploi.
Exemple: Tournez VOLUME (ou appuyez à plusieurs
reprises sur VOL +/– de la télécommande).
• Les icônes suivantes sont utilisées dans ce manuel:
ZIndique une opération qui exige l’emploi de la
télécommande.
zIndique des conseils et suggestions pouvant
faciliter les manipulations.
TABLE DES MATIÈRES
Raccordement de la chaîne4
Déballage 4
Raccordement des antennes 5
Raccordement d’appareils audio6
Raccordement du système acoustique7
Opérations élémentaires 8
Avant de mettre l’ampli-tuner en service8
Sélection d’un appareil 8
Nomenclature10
Description des éléments du panneau avant10
Description de la télécommande 12
Réglage du son14
Paramétrage du son15
Réception radio 17
Accord manuel18
Accord automatique 19
Accord d’une station préréglée 19
Autres opérations 21
Désignation des stations préréglées et des sources
de programme 22
Enregistrement23
Réglage de la luminosité de l’afficheur23
Utilisation de la minuterie sommeil24
Autres réglages effectués avec Setup Menu24
A propos du système i.LINK 26
Informations complémentaires 28
Guide de dépannage28
Spécifications30
Messages apparaissant sur l’afficheur 31
FR
FR
3
Page 34

Raccordement
Déballage
de la chaîne
Ce chapitre explique comment
raccorder divers appareils audio à
l’ampli-tuner. Veuillez lire les
paragraphes concernant les appareils
que vous avez avant de les raccorder
à l’ampli-tuner.
Vérifiez si tous les accessoires suivants ont été livrés avec
l’appareil:
• Antenne cadre AM (1)
• Télécommande (infrarouge) (1)
Avant d’utiliser la télécommande fournie
La télécommande fournie contient déjà une pile. Avant de
l’utiliser, détachez la feuille isolante pour que le courant
puisse circuler vers la télécommande.
Pour éviter une fuite de la pile
Si vous n’utilisez pas la télécommande pendant un certain temps,
retirez la pile pour qu’elle ne fuie pas et n’endommage pas la
télécommande.
z
Quand remplacer la pile
Normalement, la pile devrait durer 6 mois environ. Lorsque la
télécommande ne parvient plus à faire fonctionner l’ampli-tuner,
remplacez la pile par une neuve.
Remarques sur la pile au lithium
• Gardez la pile au lithium hors de portée des enfants.
En cas d’ingestion, contactez immédiatement un médecin.
• Essuyez la pile avec un chiffon sec pour assurer un bon contact.
• Respectez la polarité lorsque vous insérez la pile.
• Ne tenez pas la pile avec une pince métallique, sinon un courtcircuit peut se produire.
AVERTISSEMENT
La pile peut exploser si elle est mal utilisée.
Ne pas la recharger, démonter ni jeter au feu.
Avant de commencer
• Mettez tous les appareils hors tension avant d’effectuer
les liaisons.
• Ne raccordez les cordons d’alimentation secteur que
lorsque toutes les liaisons sont terminées.
• Enfoncez les fiches à fond dans les prises pour éviter
tout bourdonnement et bruit.
• Lors du raccordement d’un câble audio, branchez les
fiches sur les prises de même couleur: blanc (gauche,
audio) à blanc et rouge (droit, audio) à rouge.
FR
4
Page 35

Raccordement des antennes
Raccordement de la chaîne
Antenne cadre AM
(fournie)
ANALOG IN
RL
i.LINK S200
v v
Bornes pour le raccordement des
antennes
Raccordez Aux
l’antenne cadre AM bornes AM
l’antenne FM borne 75Ω COAXIAL FM
Raccordement d’une antenne FM
Utilisez un câble coaxial de 75 ohms (non fourni) pour
raccorder l’ampli-tuner à une antenne FM extérieure,
comme indiqué ci-dessous.
75
Ω
COAXIAL
FM
U
ANTENNA
+
RL
AM
–
+
IMPEDANCE
–
SPEAKERS
USE 4-16Ω
Remarque sur le raccordement des
antennes
Pour éviter tout bourdonnement, éloignez l’antenne cadre
AM de l’ampli-tuner et des autres appareils.
Antenne extérieure FM
Ampli-tuner
75
Ω
U
COAXIAL
FM
ANTENNA
AM
Fil de terre
(non fourni)
A la terre
Important
Si vous raccordez l’ampli-tuner à une antenne extérieure,
veillez à la mettre à la terre, par mesure de protection
contre la foudre. Afin d’éviter tout risque d’explosion, ne
raccordez pas le fil de terre à un tuyau de gaz.
FR
5
Page 36

Raccordement d’appareils audio
Raccordement de la chaîne
Platine à
cassette, etc.
LINE OUT
LINE OUT
L
L
L
R
R
ANALOG IN
Platine MD,
RL
etc.*
i.LINK
;
i.LINK S200
v v
Lecteur CD,
etc.*
i.LINKi.LINK
;
Câbles nécessaires
Câbles i.LINK (non fournis)
Câbles audio (non fournis)
Blanc (G) Blanc (G)
Rouge (D) Rouge (D)
75
Ω
COAXIAL
FM
U
ANTENNA
+
RL
AM
–
+
IMPEDANCE
USE 4-16Ω
–
SPEAKERS
Vous pouvez raccorder ces appareils à l’un ou l’autre des deux
*
connecteurs i.LINK S200.
Connecteurs pour le raccordement
d’appareils i.LINK
Raccordez Aux
une platine MD, un lecteur CD, etc. connecteurs i.LINK S200
Remarque sur le raccordement d’appareils
i.LINK
Si un objet métallique tombait dans le connecteur i.LINK
S200, un court-circuit peut se produire et endommager les
composants.
A propos des câbles de liaison i.LINK
optionnels
Veuillez utiliser des câbles de liaison i.LINK S200 (4
broches-4 broches) de marque Sony.
A propos des appareils i.LINK pouvant
être utilisés avec l’ampli-tuner
Les appareils i.LINK suivants peuvent être utilisés avec
l’ampli-tuner.
• Platine MD MDS-LSA1
• Lecteur CD CDP-LSA1
z
Pour des informations d’ordre général sur le système i.LINK
Voir “A propos du système i.LINK” à la page 26.
Connecteurs pour le raccordement
d’appareil audio
Raccordez Aux
une platine à cassette, etc. connecteurs ANALOG IN
FR
6
Page 37

Raccordement du système acoustique
Cordons nécessaires
Cordons d’enceinte (non fournis)
Un pour chaque enceinte
(+) (+)
(–) (–)
ANALOG IN
RL
i.LINK S200
v v
Bornes pour le raccordement des
enceintes
Raccordez Aux
des enceintes (4 à 16 ohms) bornes SPEAKERS
Remarques sur le raccordement du
système acoustique
• Torsadez chaque extrémité dénudée des cordons
d’enceintes sur 10 mm environ. Veillez à insérer les
cordons d’enceintes dans les bornes appropriées des
appareils: + à + et – à –. Si les cordons sont inversés, le
son présentera de la distorsion et les graves feront
défaut.
• Si vous utilisez des enceintes d’une faible puissance
maximale, réglez soigneusement le volume pour éviter
toute sortie de son excessive des enceintes.
75
Ω
COAXIAL
FM
Enceinte droite
U
AM
ANTENNA
(D)
E
+
RL
–
Enceinte gauche
e
E
+
IMPEDANCE
USE 4-16Ω
–
SPEAKERS
(G)
Assurez-vous que les extrémités dénudées de
chaque cordon ne touchent pas l’autre borne
d’enceinte ou l’extrémité dénudée d’un autre
cordon.
Exemple de branchements dangereux d’un
cordon d’enceinte
Le cordon d’enceinte dénudé touche la borne de l’autre
enceinte.
Raccordement de la chaîne
e
Pour éviter de court-circuiter les cordons
d’enceintes
En cas de court-circuit des cordons d’enceintes, le son est
coupé et l’ampli-tuner peut être endommagé. Pour éviter
ce type de problème, prenez les précautions suivantes
lorsque vous raccordez les enceintes.
Les cordons dénudés sont en contact car une partie trop
longue de leur gaine a été enlevée.
FR
7
Page 38

Opérations
?/1
?/1
i
I
VOLUME
JOG MENU
Avant de mettre l’amplituner en service
élémentaires
Ce chapitre décrit les opérations de
base de l’ampli-tuner.
Branchement du cordon d’alimentation
secteur
Avant de brancher le cordon d’alimentation secteur de cet
ampli-tuner sur une prise murale:
• Branchez les enceintes sur l’ampli-tuner (voir page 7).
Branchez ensuite les cordons d’alimentation secteur de
vos appareils audio sur une prise murale.
Remarque sur la commande VOLUME
Afin d’éviter d’endommager les haut-parleurs, tournez la
commande VOLUME dans le sens antihoraire
immédiatement après la mise en service de l’ampli-tuner.
Sélection d’un appareil
Pour sélectionner un appareil (source de programme)
procédez de la façon suivante. Après avoir raccordé tous
les appareils à l’ampli-tuner, il est conseillé d’effectuer la
procédure suivante pour voir si toutes les liaisons ont été
effectuées correctement.
Molette
1 Appuyez sur ?/1 pour mettre l’ampli-tuner en
service.
2 Appuyez à plusieurs reprises sur JOG MENU jusqu’à
ce que le nom d’un appareil apparaisse sur
l’afficheur. Tournez ensuite la molette (ou appuyez
à plusieurs reprises sur FUNCTION +/– de la
télécommande) pour sélectionner un des appareils
(sources de programme) raccordés à l’ampli-tuner
(platine MD, lecteur CD, etc.).
3 Allumez l’appareil et commencez la lecture.
4 Tournez VOLUME dans le sens horaire (ou appuyez
à plusieurs reprises sur VOL + de la télécommande)
pour augmenter le volume.
FR
8
Page 39

z
Pour vérifier l’appareil actuellement sélectionné
Appuyez sur DISPLAY. Si l’appareil sélectionné est le CDP-LSA1
ou MDS-LSA1, “N N n n” apparaît pendant quelques
secondes sur l’afficheur de l’appareil.
Cette fonction est particulièrement utile lorsque vous voulez
vérifier l’appareil sélectionné parmi plusieurs appareils de même
type (deux lecteurs CD, par exemple) raccordés à l’ampli-tuner.
Toutefois, cette fonction n’agit qu’avec les appareils Sony. Pour
les détails, voir page 24.
z
Vous pouvez contrôler le son du CD pendant
l’enregistrement d’un CD sur un MD (lorsque les CDP-LSA1 et
MDS-LSA1 sont utilisés seulement)
Pour ce faire, sélectionnez la platine MD comme source sonore
pendant l’enregistrement. Toutefois, vous ne pourrez pas
contrôler le son pendant l’enregistrement synchro rapide de CD.
z
La liaison LINC entre l’ampli-tuner et la source de
programme s’établit automatiquement
L’ampli-tuner établit automatiquement une liaison LINC avec
l’appareil sélectionné comme source de programme. La liaison
LINC est automatiquement annulée lorsque vous éteignez
l’ampli-tuner ou lorsque vous sélectionnez un appareil sans
liaison i.LINK comme source de programme. Pour les détails,
voir “Etablissement d’une liaison LINC” à la page 27).
Si vous n’obtenez aucun son après avoir effectué la
procédure indiquée à la page 8, recherchez-en la raison à
vous reportant à la liste suivante et prenez les mesures
nécessaires pour résoudre le problème.
Aucun son quel que soit l’appareil sélectionné.
, Assurez-vous que l’ampli-tuner et tous les autres
appareils sont allumés.
, Assurez-vous que le volume n’est pas réduit à
–∞ dB.
, Assurez-vous que tous les branchements
d’enceintes sont corrects.
, Appuyez sur la touche MUTING de la
télécommande pour éteindre le témoin MUTING
sur l’ampli-tuner.
La source de programme ne peut pas être
sélectionnée ni changée.
, La sélection d’une source de programme est
momentanément désactivée après le changement
d’appareil raccordé. (“NEW CONNECT” apparaît
sur l’afficheur à ce moment.) “FUNC. Locked”
apparaît sur l’afficheur de l’ampli-tuner si vous
essayez de sélectionner une source de programme
à ce moment.
, La source de programme ne peut pas être changée
pendant l’établissement d’une liaison LINC avec
l’ampli-tuner, par exemple lorsque la platine MD
est en train d’établir une liaison LINC avec l’amplituner pour enregistrer un programme radio sur le
MD. “FUNC. Locked” apparaît sur l’afficheur de
l’ampli-tuner si vous essayez de sélectionner une
source de programme à ce moment.
Il existe d’autres circonstances où la source de
programme ne peut pas être sélectionnée. Dans ce
cas, notez le contenu du message d’erreur qui
apparaît sur l’afficheur et reportez-vous à
“Messages apparaissant sur l’afficheur” à la page
31.
Aucun son en provenance des enceintes.
, Raccordez un casque d’écoute à la prise PHONES
pour vérifier que le casque transmet le son.
S’il ne transmet qu’une voie, l’appareil est
probablement mal raccordé à l’ampli-tuner.
Assurez-vous que tous les câbles sont insérés à
fond dans les connecteurs de l’ampli-tuner et de
l’appareil.
Si le casque transmet les deux voies, une enceinte
n’est peut-être pas bien raccordée à l’ampli-tuner.
Vérifiez le branchement de l’enceinte qui ne
fournit aucun son.
Opérations élémentaires
Aucun son d’un appareil particulier.
, Assurez-vous que le(s) câble(s) utilisé(s) pour la
liaison est (sont) bien inséré(s) dans les
connecteurs de l’ampli-tuner et de l’appareil.
Le son des enceintes gauche et droite est
déséquilibré.
, Appuyez à plusieurs reprises sur la touche JOG
MENU jusqu’à ce que “Sound Menu” apparaisse
sur l’afficheur. Tournez la molette jusqu’à ce que
“SP. Balance” s’affiche et appuyez sur la touche
ENTER. Tournez ensuite la molette pour ajuster
l’équilibre des enceintes.
Si le problème rencontré n’est pas mentionné ci-dessus,
reportez-vous à “Guide de dépannage” à la page 28.
z
Lorsqu’un message apparaît sur l’afficheur.
Voir page 31.
FR
9
Page 40

Nomenclature
Description des éléments du panneau avant
L’emplacement et la fonction de
chaque touche et commande du
panneau avant de l’ampli-tuner et de
la télécommande fournie sont décrits
dans ce chapitre.
1 Interrupteur ?/1
Sert à mettre l’ampli-tuner en et hors service.
Réduisez le volume de l’ampli-tuner immédiatement
après sa mise en service en tournant la commande
VOLUME dans le sens antihoraire pour ne pas
endommager vos enceintes.
Témoin STANDBY
S’allume lorsque l’ampli-tuner est hors service.
2 Capteur de télécommande
Lorsque vous utilisez la télécommande fournie,
dirigez-la vers le capteur (
3 Témoin SLEEP
S’allume lorsque la minuterie est en service (page 24).
4 Témoin H.A.T.S.
S’allume lorsque la fonction H.A.T.S. (Système de
transmission audionumérique de haute qualité) est en
service (page 25).
5 Touche DISPLAY
Une pression répétée de cette touche permet de
changer les informations qui apparaissent sur
l’afficheur dans l’ordre suivant:
).
v
Nom de l’appareil
v
Nom de modèle de l’appareil
Lorsque le tuner intégré est sélectionné
Nom de la station préréglée1) ou nom de la
1) Le nom n’apparaît que si l’appareil ou la station préréglée
sélectionné est désigné par un nom particulier (page 22).
2) Si vous ne connaissez pas le nom de modèle, la catégorie de
l’appareil apparaît (par ex. “CD” ou “MD”). Si la catégorie n’est
pas connue, “Unknown” apparaît.
3) Apparaît lors de la réception RDS (page 18).
Si vous appuyez sur la touche DISPLAY lorsque la
fonction Ping est en service, “N N n n”
apparaîtra pendant quelques secondes sur l’afficheur
de l’appareil actuellement sélectionné (page 25).
v
station RDS
v
Fréquence
1)
2)
3)
10
FR
Page 41

A
BECD GFHJKLI
STANDBY SLEEP H.A.T.S
?/1
DISPLAY
NM
6 Afficheur
Indique divers types d’informations.
7 Touche BAND/<
Sert à sélectionner la gamme FM ou AM. Si vous
appuyez sur cette touche lorsque l’ampli-tuner est
hors service, il s’allumera automatiquement et
accordera la dernière station reçue.
Cette touche sert à déplacer le curseur lors de la
désignation d’un appareil ou d’une station préréglée.
8 Touche TUNE MODE/>
Lorsque le tuner intégré est sélectionné, cette touche
sert à sélectionner le mode d’accord. L’indication de
mode apparaît sur l’afficheur de la façon suivante:
Pour sélectionner Appuyez à plusieurs reprises
sur TUNE MODE pour allumer
l’accord manuel MANUAL
l’accord automatique AUTO
l’accord d’une station PRESET
préréglée
Cette touche sert à déplacer le curseur lors de la
désignation d’un appareil ou d’une station préréglée.
9 Molette
Sert à sélectionner la source de programme, à accorder
les stations, à prérégler les stations, à saisir les noms
ou à changer les réglages.
q; Touche JOG MENU
Une pression répétée de cette touche sert à changer la
fonction de la molette. L’indication correspondant à la
fonction de la molette apparaît sur l’afficheur comme
suit:
Pour Appuyez à plusieurs reprises
sur JOG MENU pour afficher
sélectionner un appareil un nom d’appareil
ajuster le son Sound Menu
faire divers réglages Setup Menu
recevoir des émissions* un nom de station ou une
Seulement lorsque le tuner intégré est sélectionné.
*
fréquence
TUNE MODE JOG MENU
i
BAND
I
ENTER
VOLUME
MUTING
Lorsqu’un nom d’appareil apparaît
Tournez la molette pour sélectionner l’appareil que vous
voulez utiliser.
Lorsque “Sound Menu” apparaît
Vous pouvez utiliser la molette et la touche ENTER pour
régler le son (page 14).
Lorsque “Setup Menu” apparaît
Vous pouvez utiliser la molette et la touche ENTER pour
prérégler les stations radio (page 19), désigner les stations
préréglées ou les appareils raccordés par un nom (page 22)
ou effectuer d’autres réglages (page 24).
Lorsqu’un nom de station ou une fréquence apparaît
Vous pouvez utiliser la molette pour sélectionner une station
préréglée (page 20) ou accorder une station radio
manuellement (page 18) ou automatiquement (page 19).
qa Touche ENTER
Sert à valider le réglage effectué avec la molette.
qs Commande VOLUME
Sert à ajuster le volume après la mise en service de
l’appareil sélectionné.
qd Témoin MUTING
S’allume lorsque vous appuyez sur la touche
MUTING de la télécommande fournie.
qf Prise i
Sert à brancher un casque. Dans ce cas, le son des
enceintes est automatiquement coupé.
11
Nomenclature
FR
Page 42

Description de la télécommande
AQP
RECEIVER
SHIFT
+–
DISPLAY
FM MODE
?/1
+
FUNCTION
–
B
C
SLEEP
DIMMER
O
TUNER
N
M
Nomenclature
L
BAND
PRESET
CD
NX x
K
J
.>
MD
N
.>
EQ
+
BASS
–
Xx
+
MID
–
+
TREBLE
–
+
VOL
–
MUTING
EQ
BANK
D
E
F
1 Interrupteur ?/1
Sert à mettre l’appareil en et hors service. Lorsque
l’ampli-tuner est hors service, le témoin STANDBY
s’allume sur l’ampli-tuner.
Réduisez le volume de l’ampli-tuner immédiatement
après sa mise en service en tournant la commande
VOLUME sur l’ampli-tuner dans le sens antihoraire
pour ne pas endommager vos enceintes.
2 Touches FUNCTION +/–
Une pression répétée de ces touches permet de
sélectionner un appareil.
3 Touche FM MODE
Si “STEREO” clignote sur l’afficheur et que la
réception FM stéréo est mauvaise, appuyez sur cette
touche. “MONO” s’allume et la réception s’améliore
mais l’effet stéréo est supprimé.
4 Touches VOL +/–
Une pression répétée de ces touches permet de régler
le volume.
5 Touche MUTING
Sert à couper la sortie sonore de l’ampli-tuner. Lorsque
le son est coupé, le témoin MUTING s’allume sur
l’ampli-tuner.
6 Touche EQ BANK
Une pression répétée de cette touche permet de
sélectionner un réglage d’égaliseur préréglé.
H
GI
7 Touches TREBLE +/–
Après la sélection d’un réglage d’égaliseur, une
pression répétée de cette touche permet de régler le
niveau de l’aigu.
8 Touches MID +/–
Après la sélection d’un réglage d’égaliseur, une
pression répétée de cette touche permet de régler le
niveau du médium.
9 Touches BASS +/–
Après la sélection d’un réglage d’égaliseur, une
pression répétée de cette touche permet de régler le
niveau du grave.
12
FR
Page 43

q; Touches d’exploitation de la platine MD
Les touches sont utilisées pour la commande d’une
platine MD Sony.
qh Touche DIMMER
Une pression répétée de cette touche permet de
changer le niveau de luminosité de l’afficheur.
Touche MD N
Début de la lecture sur la platine MD.
Touche MD X
Pause de la lecture sur la platine MD.
Touche MD x
Arrêt de la lecture sur la platine MD.
Touches MD ./>
Localisation d’une plage sur la platine MD.
Remarque
La télécommande transmet des codes MD1 Sony.
qa Touches d’exploitation du lecteur CD
Les touches sont utilisées pour la commande d’un
lecteur CD Sony.
Touche CD N
Début de la lecture sur le lecteur CD.
Touche CD X
Pause de la lecture sur le lecteur CD.
qj Touche DISPLAY
Une pression répétée de cette touche permet de
sélectionner l’information à afficher. Cette touche a la
même fonction que la touche DISPLAY de l’amplituner (5 page 10).
Nomenclature
Touche CD x
Arrêt de la lecture sur le lecteur CD.
Touches CD ./>
Localisation d’une plage sur le lecteur CD.
Remarque
La télécommande transmet des codes CD1 Sony.
qs Touches PRESET +/–
Une pression répétée de ces touches permet d’accorder
une station préréglée.
qd Touche SHIFT
Sert à changer les stations préréglées dans les pages de
mémoire.
qf Touche BAND
Sert à sélectionner la gamme FM ou AM. Si vous
appuyez sur cette touche lorsque l’ampli-tuner est
hors service, il s’allumera automatiquement et
accordera la dernière station reçue.
qg Touche SLEEP
Sert à mettre la minuterie en service. Dans ce cas, le
témoin SLEEP de l’ampli-tuner s’allume.
13
FR
Page 44

Réglage du son
Ce chapitre décrit comment utiliser le
menu sonore pour ajuster les
paramètres de l’égaliseur et l’équilibre
des enceintes. Les paramètres réglés
peuvent être enregistrés dans la
mémoire de l’ampli-tuner pour un
rappel ultérieur.
Tous les réglages de menu peuvent être effectués sur le
menu sonore (Sound Menu). Ce menu contient les sousmenus suivants:
Sous-menu EQ BANK
Neuf préréglages peuvent être mémorisés et rappelés à
l’aide de ce sous-menu. EQ1 à 5 permettent de mémoriser
cinq réglages d’égaliseur à trois bandes, Parametric EQ1 à
3 permettent de mémoriser trois réglages d’égaliseur
paramétrique et EQ FLAT sert à mémoriser un motif plat.
Sous-menu EQ Control
Après avoir sélectionné un des réglages d’égaliseur à trois
bandes mémorisés dans EQ1 à 5 à l’aide du sous-menu
EQ BANK, vous pouvez changer les paramètres du grave,
du médium et de l’aigu du réglage sélectionné à l’aide du
sous-menu EQ Control.
Vous ne pouvez accéder au sous-menu EQ Control
qu’après avoir sélectionné un des réglages d’égaliseur à
trois bandes (c’est-à-dire un réglage mémorisé sur EQ1 à
5).
Sous-menu EQ Condition
Après avoir sélectionné un des réglages d’égaliseur
paramétrique EQ1 à 3 et EQ FLAT à l’aide du sous-menu
EQ BANK, vous pouvez vérifier le niveau, la fréquence et
la pente de chaque bande.
Vous ne pouvez accéder au sous-menu EQ Condition
qu’après avoir sélectionné un des réglages d’égaliseur
paramétrique (c’est-à-dire un réglage mémorisé sur
Parametric EQ1 à 3 et EQ FLAT).
Il est possible de vérifier les paramètres sur l’ampli-tuner
mais il n’est pas possible de les changer. Les paramètres
des réglages d’égaliseur paramétrique peuvent être
changés seulement sur un ordinateur, etc. relié par le
réseau i.LINK.
14
FR
Sous-menu EQ Memory
Après avoir réglé les paramètres du grave, du médium et
de l’aigu d’un réglage d’égaliseur à trois bandes, vous
pouvez mémoriser le nouveau réglage sur EQ1 à 5 à l’aide
sous-menu EQ Memory.
Sous-menu SP. Balance
Utilisez ce sous-menu pour ajuster l’équilibre des
enceintes.
z
Qu’est-ce qu’un égaliseur à trois bandes ?
Il s’agit d’un égaliseur qui permet d’effectuer des réglages
indépendants de graves, médiums et aigus.
z
Qu’est-ce qu’un égaliseur paramétrique ?
Il s’agit d’une sorte d’égaliseur qui spécifie trois points au
maximum comme fréquences centrale et sélectionne le type de
pente pour chaque fréquence centrale.
Page 45

JOG MENU
i
I
?/1
Molette
ENTER
Brève description des touches et
commandes utilisées pour le réglage du
son
Paramétrage du son
Effectuez la procédure suivante pour sélectionner un
réglage d’égaliseur préréglé, changer les réglages
d’égaliseur, mémoriser les réglages effectués et ajuster
l’équilibre des enceintes.
Sélection d’un réglage d’égaliseur
Touche JOG MENU: Une pression répétée de cette touche
permet de sélectionner Sound Menu.
Molette: Après avoir appuyé sur la touche JOG MENU,
tournez la molette pour sélectionner un sous-menu, un
réglage d’égaliseur ou un paramètre.
Touche ENTER: Sert à valider le réglage effectué avec la
molette.
?/1
+
–
+–
NX x
.>
+
N
Xx
MID +/–
BASS +/–
.>
+
–+–+–
–
TREBLE +/–
EQ BANK
Brève description des touches de la
télécommande utilisées pour le réglage
du son
Touches BASS +/–: Une pression répétée de ces touches
permet de régler le niveau du grave du réglage
d’égaliseur sélectionné.
Touches MID +/–: Une pression répétée de ces touches
permet de régler le niveau du médium du réglage
d’égaliseur sélectionné.
Touches TREBLE +/–: Une pression répétée de ces
touches permet de régler le niveau de l’aigu du réglage
d’égaliseur sélectionné.
Touche EQ BANK: Une pression répétée de ces touches
permet de sélectionner le réglage d’égaliseur.
1 Appuyez de façon répétée sur JOG MENU jusqu’à
ce que “Sound Menu” apparaisse sur l’afficheur.
2 Appuyez sur ENTER.
“EQ BANK” apparaît sur l’afficheur.
3 Appuyez sur ENTER et tournez la molette pour
sélectionner le réglage d’égaliseur.
Le réglage d’égaliseur sélectionné est
automatiquement validé et l’affichage normal
réapparaît quelques secondes plus tard.
z
Vous pouvez utiliser la télécommande pour sélectionner le
réglage d’égaliseur.
Appuyez de façon répétée sur EQ BANK.
Paramétrage de l’égaliseur (EQ1 à 5)
1 Effectuez les étapes 1 à 3 de “Sélection d’un
réglage d’égaliseur ” sur cette page pour
sélectionner le réglage d’égaliseur à ajuster.
Les paramètres des réglages d’égaliseur mémorisés
sur EQ1 à 5 peuvent être changés sur l’ampli-tuner
mais pas ceux qui ont été mémorisés sur EQ1 à 3 et EQ
FLAT.
2 Appuyez de façon répétée sur JOG MENU jusqu’à
ce que “Sound Menu” apparaisse sur l’afficheur.
3 Tournez la molette jusqu’à ce que “EQ Control”
apparaisse sur l’afficheur.
“EQ Control” n’apparaît pas si aucun réglage
mémorisé sur Parametric EQ1 à 3 ou EQ FLAT n’a été
sélectionné au préalable.
4 Appuyez sur ENTER et tournez la molette pour
sélectionner le paramètre qui doit être réglé.
Sélectionnez Pour ajuster
BASS le grave
MID le médium
TREBLE l’aigu
Réglage du son
15
FR
Page 46

Paramétrage du son
5 Appuyez sur ENTER et tournez la molette pour
régler le paramètre sélectionné.
Chaque paramètre peut être réglé de –10 dB à +10 dB
par paliers de 1 dB.
6 Si vous voulez régler d’autres paramètres, répétez
les étapes 4 et 5.
z
La télécommande peut être utilisée pour régler les
paramètres sonores
Appuyez sur BASS +/–, MID +/– ou TREBLE +/–.
Vérification des réglages de l’égaliseur
paramétrique (Parametric EQ1 à 3)
Réglage du son
1 Effectuez les étapes 1 à 3 de “Sélection d’un
réglage d’égaliseur ” à la page 15 pour sélectionner
le réglage d’égaliseur que vous voulez vérifier.
Seuls les réglages mémorisés sur Parametric EQ1 à 3
peuvent être vérifiés.
2 Appuyez de façon répétée sur JOG MENU jusqu’à
ce que “Sound Menu” apparaisse sur l’afficheur.
3 Tournez la molette jusqu’à ce que “EQ Condition”
apparaisse sur l’afficheur.
“EQ Condition” n’apparaît pas si un réglage EQ1 à 5
ou EQ FLAT est sélectionné.
4 Appuyez sur ENTER pour remplacer les paramètres
du préréglage actuel par les nouveaux paramètres.
Si vous ne voulez pas remplacer les paramètres,
tournez la molette pour sélectionner le numéro de
préréglage où vous voulez mémoriser les
paramètres, puis appuyez sur ENTER.
“Memorized EQX” apparaît pendant quelques
secondes, puis l’affichage normal réapparaît. “X” est le
numéro de préréglage sélectionné pour la
mémorisation des paramètres.
z
Les préréglages d’égaliseur par défaut peuvent être rétablis
Pour ce faire, voir page 25.
Réglage de l’équilibre des enceintes
1 Appuyez de façon répétée sur JOG MENU jusqu’à
ce que “Sound Menu” apparaisse sur l’afficheur.
2 Tournez la molette jusqu’à ce que “SP. Balance”
apparaisse sur l’afficheur, puis appuyez sur ENTER.
3 Tournez la molette pour ajuster l’équilibre des
enceintes.
4 Appuyez sur ENTER et tournez la molette pour
sélectionner le paramètre à vérifier.
Un des neuf paramètres apparaît sur l’afficheur.
Tournez la molette pour afficher le paramètre suivant.
L’affichage normal réapparaît quelques secondes plus
tard.
Mémorisation des paramètres ajustés
1 Effectuez les étapes 1 à 6 de “Paramétrage de
l’égaliseur ” à la page 15 et sur cette page pour
ajuster le(s) paramètre(s).
2 Appuyez de façon répétée sur JOG MENU jusqu’à
ce que “Sound Menu” apparaisse sur l’afficheur.
3 Tournez la molette jusqu’à ce que “EQ Memory”
apparaisse sur l’afficheur, puis appuyez une
nouvelle fois sur ENTER.
“Memory to EQX?” apparaît sur l’afficheur. “X”, qui
est un nombre de 1 à 5, indique le numéro de réglage
actuellement sélectionné dans le sous-menu EQ
BANK.
16
FR
Page 47

Réception radio
Ce chapitre indique comment recevoir
des émissions FM ou AM et comment
présélectionner certaines stations.
Sur cet ampli-tuner, les stations peuvent être accordées de
la façon suivante:
Accord manuel
Vous pouvez accorder une station en tournant
simplement la molette (voir page 18).
Accord automatique
Si vous ne connaissez pas la fréquence de la station
souhaitée, vous pouvez laisser l’appareil faire l’accord
successivement sur toutes les stations disponibles dans la
région (voir page 19).
Accord d’une station préréglée
Après avoir accordé une station en utilisant l’accord
manuel ou automatique, vous pouvez la prérégler (voir
page 19). Il vous suffira ensuite de tourner la molette (voir
page 20) pour accorder cette station. Vous pouvez
prérégler jusqu’à 30 stations FM ou AM.
Fonctions RDS
Avec cet ampli-tuner, vous pouvez aussi utiliser le RDS
(Système de données radio) qui permet aux stations radio
de transmettre des informations supplémentaires en
même temps que le signal radio ordinaire. Sur cet amplituner, seul l’affichage des noms des stations RDS est
disponible.
Notez que seules les stations FM fournissent des stations
RDS.*
Réception radio
* Toutes les stations FM ne transmettent pas de services RDS, et celles
qui en transmettent n’offrent pas toutes les mêmes types de services.
Si vous ne connaissez pas bien le système RDS, consultez votre
société de radiodiffusion locale pour les détails.
Avant de commencer, assurez-vous que vous avez:
• Raccordé les antennes FM et AM à l’ampli-tuner (voir
page 5).
JOG MENUTUNE MODE
i
I
?/1
BAND
Molette
Brève description des touches et
commandes de l’ampli-tuner utilisées
pour la réception radio
Touche TUNE MODE: Sert à sélectionner un mode
d’accord.
Touche JOG MENU: Sert à sélectionner la fonction de la
molette.
Touche BAND: Sert à sélectionner la gamme FM ou AM.
Molette: Sert à sélectionner la radio, à accorder une
station manuellement ou automatiquement ou à accorder
une station préréglée.
17
FR
Page 48

BAND
PRESET +/–
+–
NX x
.>
N
Xx
.>
+
–+–+–
?/1
+
–
+
–
FM MODESHIFT
FUNCTION +/–
Accord manuel
Pour de plus amples informations sur les touches et
commandes utilisées dans ce paragraphe, reportez-vous à
“Brève description des touches et commandes de l’amplituner utilisées pour la réception radio” à la page 17 et
“Brève description des touches de la télécommande
utilisées pour la réception radio” sur cette page.
Brève description des touches de la
télécommande utilisées pour la réception
radio
Touches PRESET+/–: Servent à sélectionner une station
préréglée.
Touche BAND: Sert à sélectionner la gamme FM ou AM.
Touche SHIFT: Sert à sélectionner une page mémoire (A,
B ou C) pour le préréglage de stations radio ou l’accord de
stations préréglées.
Réception radio
Touches FUNCTION +/–: Servent à sélectionner la radio.
Touche FM MODE: Si “STEREO” clignote sur l’afficheur
et que la réception FM stéréo est mauvaise, appuyez sur
cette touche pour améliorer le son. “MONO” s’allumera
sur l’afficheur et l’effet stéréo sera supprimé mais le son
sera moins parasité.
Remarque
Si “MONO” apparaît sur l’afficheur pendant la réception
normale d’une émission FM, appuyez sur cette touche pour
éteindre l’indication “MONO”.
z
Lorsque vous accordez une station qui offre des services RDS
Le nom de la station RDS apparaît sur l’afficheur.
Remarques
• Le système RDS peut ne pas fonctionner correctement si la
station accordée ne transmet pas correctement le signal RDS ou
si le signal est trop faible.
• Après le débranchement du cordon d’alimentation de l’amplituner, les noms des stations RDS risquent de ne pas être
sauvegardés correctement. Pour éviter ce problème, vous
pouvez prérégler les stations RDS (page 19).
1 Appuyez de façon répétée sur JOG MENU jusqu’à
ce que le nom d’un appareil apparaisse sur
l’afficheur.
2 Tournez la molette jusqu’à ce que “TUNER”
apparaisse sur l’afficheur.
La dernière station reçue est accordée.
3 Appuyez sur BAND pour sélectionner la gamme FM
ou AM.
4 Appuyez de façon répétée sur TUNE MODE jusqu’à
ce que “MANUAL” s’allume sur l’afficheur.
5 Tournez la molette.
Tournez la molette dans le sens horaire pour
augmenter la fréquence et dans le sens antihoraire
pour diminuer la fréquence.
Lorsque l’ampli-tuner atteint la fin de la
gamme
L’accord reprend depuis le début dans le même sens.
6 Si vous accordez une station AM, ajustez l’antenne
cadre AM pour optimiser la réception.
7 Répétez les étapes 3 à 6 pour accorder une autre
station.
z
Vous pouvez sélectionner rapidement la radio
Appuyez sur BAND de l’ampli-tuner ou de la télécommande. Ou
bien, appuyez de façon répétée sur FUNCTION +/– de la
télécommande jusqu’à ce que “TUNER” apparaisse sur
l’afficheur.
z
Si vous essayez d’accorder plus précisément une station
Vous ne pourrez pas l’accorder sur la fréquence exacte car
l’ampli-tuner accorde les fréquences de la façon suivante:
FM: par unités de 50 kHz
AM: par unités de 9 kHz
18
FR
Page 49

Accord automatique
Pour de plus amples informations sur les touches et
commandes utilisées dans ce paragraphe, reportez-vous à
“Brève description des touches et commandes de l’amplituner utilisées pour la réception radio” à la page 17 et
“Brève description des touches de la télécommande
utilisées pour la réception radio” à la page 18.
Accord d’une station préréglée
Pour de plus amples informations sur les touches et
commandes utilisées dans ce paragraphe, reportez-vous à
“Brève description des touches et commandes de l’amplituner utilisées pour la réception radio” à la page 17 et
“Brève description des touches de la télécommande
utilisées pour la réception radio” à la page 18.
1 Appuyez de façon répétée sur JOG MENU jusqu’à
ce qu’un nom d’appareil apparaisse sur l’afficheur.
2 Tournez la molette jusqu’à ce que “TUNER”
apparaisse sur l’afficheur.
La dernière station reçue est accordée.
3 Appuyez sur BAND pour sélectionner la gamme FM
ou AM.
4 Appuyez de façon répétée sur TUNE MODE jusqu’à
ce que “AUTO” s’allume sur l’afficheur.
5 Tournez la molette.
Lorsque vous tournez la molette dans le sens horaire,
l’exploration des stations s’effectue de la fréquence
inférieure à la fréquence supérieure et lorsque vous
tournez la molette dans le sens antihoraire,
l’exploration s’effectue de la fréquence supérieure à la
fréquence inférieure.
Lorsque l’ampli-tuner atteint l’extrémité de la
gamme
L’exploration reprend dans le même sens.
Lorsqu’une station est accordée, l’exploration s’arrête.
Avant d’accorder une station mémorisée, il faut prérégler
les stations comme indiqué dans “Préréglage de stations
radio” ci-dessous.
Préréglage de stations radio
1 Appuyez de façon répétée sur JOG MENU jusqu’à
ce qu’un nom d’appareil apparaisse sur l’afficheur.
2 Tournez la molette jusqu’à ce que “TUNER”
apparaisse sur l’afficheur.
La dernière station reçue est accordée.
3 Accordez la station que vous voulez prérégler en
utilisant l’accord manuel ou l’accord automatique
(page 18 et cette page).
4 Appuyez de façon répétée sur JOG MENU jusqu’à
ce que “Setup Menu” apparaisse sur l’afficheur.
5 Tournez la molette jusqu’à ce que “Preset Memory”
apparaisse sur l’afficheur et appuyez sur ENTER.
“MEMORY” s’allume sur l’afficheur pendant quelques
secondes. Effectuez les étapes 6 et 7 avant que
“MEMORY” s’éteigne.
Réception radio
6 Pour continuer l’exploration, tournez à nouveau la
molette.
z
Vous pouvez sélectionner rapidement la radio
Appuyez sur BAND de l’ampli-tuner ou de la télécommande. Ou
bien, appuyez de façon répétée sur FUNCTION +/– de la
télécommande jusqu’à ce que “TUNER” apparaisse sur
l’afficheur.
6 Tournez la molette pour sélectionner la page
mémoire et le numéro de préréglage.
La page mémoire apparaît et le numéro de préréglage
clignote. La page mémoire et le numéro de préréglage
changent à chaque rotation de la molette de la façon
suivante:
tA1yA2y...yA0yB1yB2y...yB0T
tC0y...yC2yC1T
Pour sélectionner rapidement la page
mémoire
Appuyez de façon répétée sur SHIFT de la
télécommande.
Si “MEMORY” s’éteint ou le numéro de préréglage
cesse de clignoter avant que vous sélectionniez la page
mémoire et le numéro de préréglage, recommencez
depuis l’étape 4.
19
FR
Page 50

Accord d’une station préréglée
7 Appuyez sur ENTER vous mémoriser la station.
8 Répétez les opérations 3 à 7 pour prérégler une
autre station.
Pour changer la station mémorisée sur un
numéro de préréglage
Effectuez les étapes 1 à 7 pour prérégler une nouvelle
station sur ce numéro.
Accord d’une station préréglée
1 Appuyez de façon répétée sur JOG MENU jusqu’à
ce qu’un nom d’appareil apparaisse sur l’afficheur.
2 Tournez la molette jusqu’à ce que “TUNER”
apparaisse sur l’afficheur.
La dernière station reçue est accordée.
Réception radio
3 Appuyez de façon répétée sur TUNE MODE jusqu’à
ce que “PRESET” s’allume sur l’afficheur.
4 Tournez la molette pour sélectionner la station
préréglée souhaitée (ou appuyez de façon répétée
sur PRESET +/– de la télécommande).
A chaque rotation de la molette (ou pression de
PRESET +/– de la télécommande), une station est
accordée dans la direction et l’ordre correspondants:
tA1yA2y...yA0yB1yB2y...yB0T
Pour sélectionner rapidement la page
mémoire
Appuyez de façon répétée sur SHIFT de la
télécommande.
tC0y...yC2yC1T
20
FR
Page 51

Autres opérations
JOG MENUi
i
I
?/1
I ENTER
Molette
Brève description des touches et
commandes de l’ampli-tuner apparaissant
dans ce chapitre
Touche <: Sert à déplacer le curseur vers l’arrière lors de
la désignation des stations préréglées et des sources de
programme.
Touche >: Sert à déplacer le curseur vers l’avant lors de la
désignation des stations préréglées et des sources de
programme.
Touche JOG MENU: Sert à sélectionner le menu.
Molette: Sert à sélectionner les caractères et les
paramètres du menu.
Touche ENTER: Sert à enregistrer le nom de la station
préréglée ou de la source de programme ou à valider le
paramètre sélectionné sur le menu.
+–
NX x
.>
N
Xx
.>
+
–+–+–
?/1
+
–
+
–
DIMMERSLEEP
Brève description des touches de la
télécommande apparaissant dans ce
chapitre
Touche DIMMER: Sert à sélectionner la luminosité de
l’afficheur.
Touche SLEEP: Sert à mettre la minuterie en service.
Autres opérations
21
FR
Page 52

Désignation des stations préréglées et des sources de programme
Vous pouvez attribuer un nom de huit caractères à chaque
station préréglée (sauf les stations RDS) et de 11 caractères
aux sources de programme (pour 10 appareils i.LINK au
maximum). Ce nom d’index (par exemple, “LISSA CD”)
apparaîtra sur l’afficheur de l’ampli-tuner quand une
station ou une source de programme sera sélectionnée.
Un seul nom peut être enregistré pour chaque station
préréglée ou source de programme.
Cette fonction permet de distinguer des appareils de
même type, par exemple 2 lecteurs CD pourront être
désignés respectivement par “CD 1” et “CD 2”.
1 Appuyez de façon répétée sur JOG MENU jusqu’à
ce qu’un nom d’appareil apparaisse sur l’afficheur.
2 Pour indexer une station préréglée
Tournez la molette jusqu’à ce que “TUNER”
apparaisse sur l’afficheur.
La dernière station reçue est accordée.
Pour indexer une source de programme
Tournez la molette pour sélectionnez la source de
programme (appareil) que vous voulez désigner,
Autres opérations
puis passez à l’étape 4.
Pour changer de caractère
Appuyez de façon répétée sur < ou > jusqu’à ce que le
caractère qui doit être changé clignote, puis tournez la
molette pour sélectionner un caractère.
Si vous essayez d’attribuer un nom à un
appareil i.LINK après avoir déjà désigné 10
appareils i.LINK
“List Full” apparaîtra sur l’afficheur. Pour continuer,
effacez les noms inutiles.
7 Appuyez sur ENTER.
“MEMORY” s’allume sur l’afficheur pendant une
seconde environ et le nom est mémorisé.
Pour désigner d’autres stations
Refaites les opérations 2 à 7.
Remarques
• Vous ne pouvez pas créer de noms pour les stations RDS et les
appareils reliés par les prises ANALOG IN. “Not In Use”
apparaît à l’étape 5 à ce moment.
• Vous ne pouvez créer un nom que pour la station préréglée
actuellement accordée ou la source de programme sélectionnée.
Il n’est pas possible de désigner les stations qui n’ont pas été
préréglées.
3 Accordez la station préréglée pour laquelle vous
voulez créer un nom.
Si vous ne savez pas comment accorder une station
préréglée, reportez-vous à “Accord d’une station
préréglée” à la page 20.
4 Appuyez de façon répétée sur JOG MENU jusqu’à
ce que “Setup Menu” apparaisse sur l’afficheur.
5 Tournez la molette jusqu’à ce que “Name Input”
apparaisse sur l’afficheur et appuyez sur ENTER.
6 Créez un nom en utilisant la molette, < et >.
Tournez la molette pour sélectionner un caractère, puis
appuyez sur > pour faire avancer le curseur à la
position suivante.
Pour sélectionner le type de caractères
Appuyez de façon répétée sur DISPLAY jusqu’à ce que
le type de caractères souhaité apparaisse sur
l’afficheur.
Pour insérer un espace
Tournez la molette jusqu’à ce qu’un espace apparaisse
sur l’afficheur (le caractère de l’espace se trouve entre
“]” et “A”).
Pour supprimer un nom
1 Appuyez de façon répétée sur JOG MENU jusqu’à
ce que “Setup Menu” apparaisse sur l’afficheur.
2 Tournez la molette jusqu’à ce que “Name Erase”
apparaisse sur l’afficheur et appuyez sur ENTER.
3 Tournez la molette pour sélectionner le nom que
vous voulez supprimer.
4 Appuyez sur ENTER.
Le nom sélectionné est supprimé.
Remarque
Cette procédure ne permet d’effacer que les noms des appareils
i.LINK.
22
FR
Page 53

Enregistrement
v
Lorsque vous enregistrez vers ou depuis des appareils
i.LINK, aucune opération n’est nécessaire sur l’amplituner. Pour de plus amples informations, consultez le
mode d’emploi fourni avec le lecteur et l’enregistreur.
Procédez de la façon suivante pour enregistrer depuis un
appareil relié aux prises ANALOG IN ou depuis le tuner
intégré vers la platine MD i.LINK. Consultez le mode
d’emploi de la platine MD si nécessaire.
Réglage de la luminosité de l’afficheur Z
Vous avez le choix entre trois niveaux de luminosité. La
touche JOG MENU peut être éteinte lorsqu’un niveau de
luminosité faible est choisi.
Appuyez sur DIMMER de la télécommande lorsque
l’ampli-tuner est en service.
A chaque pression de DIMMER, la luminosité de
l’afficheur change de la façon suivante:
1 Sélectionnez la source devant être enregistrée.
2 Préparez l’appareil pour la lecture.
3 Insérez un MD vierge dans la platine MD et ajustez
le niveau sonore, si nécessaire.
4 Démarrez l’enregistrement sur la platine MD, puis
la lecture sur le lecteur.
Remarque
Lorsque la platine MD enregistre depuis un appareil relié aux
prises ANALOG IN ou depuis le tuner intégré, il n’est pas
possible de sélectionner d’autres appareils.
L’afficheur est complètement éclairé et la touche
JOG MENU est éclairée.
v
L’afficheur est faiblement éclairé et la touche
JOG MENU est éclairée.
v
L’afficheur est faiblement éclairé et la touche
JOG MENU est éteinte.
v
L’afficheur et la touche JOG MENU sont tout deux éteints.
z Si des changements d’information ont lieu lorsque l’afficheur
est éteint
L’afficheur se rallumera (faible luminosité) pendant quelques
secondes pour montrer les nouvelles informations, puis il
s’éteindra à nouveau.
z Le niveau de luminosité de l’afficheur de la platine MD
MDS-LSA1 et du lecteur CD CDP-LSA1 peut être synchronisé sur
celui de l’ampli-tuner grâce à la fonction i.LINK Control
Le niveau de luminosité peut être synchronisé seulement lorsque
la fonction i.LINK Control est en service. Pour les détails, voir
page 26.
Autres opérations
FR
23
Page 54

Utilisation de la minuterie
Autres réglages effectués
sommeil Z
L’ampli-tuner peut être réglé pour s’éteindre
automatiquement après l’écoulement d’un temps précis.
Appuyez sur SLEEP de la télécommande lorsque
l’ampli-tuner est allumé.
“SLEEP” s’allume sur l’afficheur.
A chaque pression sur SLEEP, le temps change de la façon
suivante.
t 2:00 t 1:30 t 1:00 t 0:30 t 0:20 t 0:10 t OFF
Après avoir spécifié le temps, les indications affichées
avant que vous n’appuyiez sur la touche SLEEP
réapparaissent.
Pour vérifier le temps restant jusqu’à la mise
hors service de l’ampli-tuner
Appuyez sur SLEEP. Le temps restant apparaît sur
l’afficheur.
Pour mettre la minuterie sommeil hors service
Appuyez une nouvelle fois sur SLEEP pendant que le
temps restant est indiqué.
“OFF” apparaît sur l’afficheur et la minuterie sommeil est
mise hors service.
Autres opérations
z Lorsque la fonction i.LINK Control est en service (voir cette
page)
Si l’ampli-tuner est éteint, l’appareil i.LINK correspondant
s’éteindra également.
avec Setup Menu
La fonction i.LINK Control permet de relier les opérations
de l’ampli-tuner et celles des autres appareils.
Liaison des opérations de l’ampli-tuner et
de celles d’un autre appareil i.LINK (i.Link
Control)
Lorsque la fonction i.LINK Control est en service, les
opérations suivantes sont reliées:
• Lorsque vous appuyez sur la touche CD N ou MD N
de la télécommande, l’ampli-tuner et l’appareil
correspondant s’allument et la lecture commence.
• Lorsque vous appuyez sur la touche N du lecteur CD
ou de la platine MD pour la lecture, ou sur la touche
CD N ou MD N de la télécommande de l’amplituner, l’appareil correspondant est automatiquement
sélectionné comme source de programme.
• Lorsque la luminosité de l’afficheur de l’ampli-tuner
change, le niveau de luminosité de l’afficheur de la
platine MD MDS-LSA1 ou du lecteur CD CDP-LSA1
change de la même façon.
• Lorsque la minuterie sommeil est mise hors service sur
l’ampli-tuner, l’appareil i.LINK correspondant est
également mis hors service.
• Lorsque vous mettez l’ampli-tuner en ou hors service,
l’appareil i.LINK correspondant se met également en ou
hors service.
• Lorsque la platine MD ou le lecteur CD i.LINK est
sélectionné et qu’aucune opération n’est effectuée
pendant plus d’une minute, l’ampli-tuner se met
automatiquement hors service lorsque vous éteignez
l’appareil i.LINK sélectionné.
Toutefois lorsque la minuterie sommeil est activée,
l’ampli-tuner ne se met hors service que lorsque le
temps spécifié s’est écoulé.
24
1 Appuyez de façon répétée sur JOG MENU jusqu’à
ce que “Setup Menu” apparaisse sur l’afficheur.
2 Tournez la molette jusqu’à ce que “i.LINK Ctrl”
apparaisse sur l’afficheur, puis appuyez sur ENTER.
3 Tournez la molette jusqu’à ce que “On” apparaisse
sur l’afficheur, puis appuyez sur ENTER.
Pour désactiver la fonction i.LINK Control
Effectuez les opérations mentionnées ci-dessus et
sélectionnez “Off” à l’étape 3.
Remarques
• Les fonctions i.LINK Control décrites ci-dessus peuvent ne pas
agir correctement sur certains appareils et dans certaines
circonstances.
• Assurez-vous que i.LINK Control a été activé sur un seul des
appareils reliés par une configuration i.LINK. Par exemple, si
deux STR-LSA1 sont reliés dans cette configuration, activez la
fonction i.LINK Control sur un seul des amplis-tuners.
FR
Page 55

Autres réglages effectués avec Setup Menu
Vérification de l’appareil actuellement
sélectionné (Fonction Ping)
Lorsque la fonction Pingest activée, vous pouvez vérifier
l’appareil sélectionné en appuyant sur la touche DISPLAY
de l’ampli-tuner. Une indication apparaît
momentanément sur l’afficheur de l’appareil sélectionné.
L’indication varie selon l’appareil. Par exemple, si
l’appareil sélectionné est le CDP-LSA1 ou le MDS-LSA1,
“N N n n” apparaîtra sur l’afficheur de l’appareil.
Cette fonction n’est valide qu’avec une platine MD et un
lecteur CD i.LINK Sony.
1 Appuyez de façon répétée sur JOG MENU jusqu’à
ce que “Setup Menu” apparaisse sur l’afficheur.
2 Tournez la molette jusqu’à ce que “Ping”
apparaisse sur l’afficheur, puis appuyez sur ENTER.
3 Tournez la molette jusqu’à ce que “On” apparaisse
sur l’afficheur, puis appuyez sur ENTER.
Pour désactiver la fonction Ping
Effectuez les opérations mentionnées ci-dessus et
sélectionnez “Off” à l’étape 3.
Amélioration de la qualité du signal audio
(Fonction H.A.T.S.)
Lorsque la fonction H.A.T.S. est activée, les signaux
audionumériques sont momentanément mémorisés dans
une mémoire tampon avant d’être transmis. Ceci permet
de réduire les instabilités qui se produisent parfois
pendant la transmission numérique. Lorsque cette
fonction est activée er qu’un signal audionumérique est
fourni à l’anpli-tuner, l’indicateur H.A.T.S. s’allume sur le
panneau avant.
1 Appuyez de façon répétée sur JOG MENU jusqu’à
ce que “Setup Menu” apparaisse sur l’afficheur.
2 Tournez la molette jusqu’à ce que “H.A.T.S.”
apparaisse sur l’afficheur, puis appuyez sur ENTER.
Remarques
• En raison du principe même de la fonction H.A.T.S., un léger
décalage de temps est introduit entre l’activation d’une
opération (par ex. une pression de la touche de lecture, la
touche d’arnêt ou la touche depause) et la sortie sonore.
• La fonction H.A.T.S. ne peut être utilisée qu’avec les appareils
présentant cette fonction.
• Sur cer ampli-tuner, la fonction H.A.T.S. n’agit que sur les
signaux audionumériques enregistrés à une fréquence
d’échantillonnage de 44,1 kHz.
• La fonction H.A.T.S. n’agit pas lorsque la source de programme
sélectionnée sur l’ampli-tuner est déjà sélectionnée sur un autre
appareil (par ex. un autre ampli-tuner ou la platine MD). Ceci
provient du fait que l’ampli-tuner contrôle la vitesse de
transfert des signaux audionumériques sortant de l’appareil
source et que, pour que la transmission du signal soit correcte,
un seul appareil doit recevoir le signal audio d’un appareil
source dans une configuration i.LINK.
• La fonction H.A.T.S. n’agit pas dans les situations suivantes:
— La platine MD est en train d’enregistrer un CD et le lecteur
CD ou la platine MD est sélectionné comme source de
programme.
— La fréquence d’échantillonnage du signal numérique n’est
pas 44,1 kHz.
Effacement de la mémoire de l’amplituner
Cette opération efface tous les réglages de menu
mémorisés et rétablit les réglages par défaut.
1 Appuyez de façon répétée sur JOG MENU jusqu’à
ce que “Setup Menu” apparaisse sur l’afficheur.
2 Tournez la molette jusqu’à ce que “All Clear”
apparaisse sur l’afficheur, puis appuyez sur ENTER.
3 Tournez la molette jusqu’à ce que “Yes” apparaisse
sur l’afficheur, puis appuyez sur ENTER.
“Make Sure ?” apparaît sur l’afficheur.
4 Tournez la molette jusqu’à ce que “Yes” apparaisse
sur l’afficheur, puis appuyez sur ENTER.
Autres opérations
3 Tournez la molette jusqu’à ce que “On” apparaisse
sur l’afficheur, puis appuyez sur ENTER.
Pour désactiver la fonction H.A.T.S.
Effectuez les opérations mentionnées ci-dessus et
sélectionnez “Off” à l’étape 3.
25
FR
Page 56

A propos du système i.LINK
Ce paragraphe explique les caractéristiques générales et
techniques du système i.LINK. Veuillez le lire
attentivement avant d’effectuer une opération i.LINK.
Les connexions et le fonctionnement du système i.LINK
peuvent varier selon l’appareil. Pour plus d’informations
sur le raccordement d’appareils i.LINK à cet appareil,
reportez-vous à “Raccordement d’appareils audio” à la
page 6.
Fonctionnement du système i.LINK
Le système i.LINK est une interface série numérique
permettant la transmission bidirectionnelle de données
audio et vidéo numériques ainsi que certaines
informations sur les appareils. Il suffit d’utiliser des câbles
i.LINK pour raccorder plusieurs appareils i.LINK. Les
appareils audio et vidéo reliés par un câble i.LINK
peuvent être utilisés pour un grand nombre de fonctions
et pour l’échange de données, qui dans l’avenir seront de
plus en plus fréquents vu l’accroissement constant du
nombre d’appareils i.LINK.
Comme le système i.LINK permet de transférer des
données d’un appareil à un autre même s’ils ne sont pas
directement raccordés, l’ordre de connexion n’est pas
Autres opérations
important. Toutefois, en raison des différences de
caractéristiques générales ou techniques, il se peut
qu’avec certains appareils i.LINK l’échange de données
ou la commande des appareils soit impossible, bien qu’ils
soient reliés entre eux.
Liaisons arborescentes
• Tout appareil i.LINK muni de trois connecteurs i.LINK
ou plus peut servir de point de branchement.
• En tout 63 appareils i.LINK peuvent être reliés entre
eux. Cependant, le nombre maximal d’appareils
pouvant être raccordés en cascade sur une seule ligne
est limité à 17 (16 câbles de liaison i.LINK au
maximum). Chaque câble i.LINK utilisé par ligne est
appelé “maillon”. Par exemple, il y a six maillons sur la
ligne de A à C ci-dessous et trois maillons sur la ligne de
A à D.
BA
DC
Chaque ligne de A à B, A à C, A à D, B à C, B à D et C à D
ci-dessus peut avoir 16 maillons (17 appareils).
Liaison en boucle
Dans ce cas, le signal d’un appareil est transmis à tous les
autres appareils. Lors d’une liaison en boucle, il faut éviter
de faire revenir le signal à sa source.
Bon Mauvais (bouclé)
z Que signifie “i.LINK” ?
i.LINK est une marque de fabrique qui a été proposée par Sony
Corporation, et acceptée dans le monde entier. Ce nom est plus
simple à retenir que la norme internationale IEEE 1394, établie
par l’Institut des Ingénieurs en Electricité et Electronique.
Liaisons i.LINK
La liaison d’appareils i.LINK avec des câbles i.LINK, telle
qu’illustrée ci-dessous, est appelée configuration en
“cascade”.
Câble de liaison i.LINK
Appareil
i.LINK
Appareil
i.LINK
Les données peuvent être transmises d’un appareil à
l’autre même s’ils ne sont pas directement reliés.
Appareil
i.LINK
Appareil
i.LINK
Appareil
i.LINK
26
FR
Page 57

Remarques
• Certains appareils i.LINK (par ex, les ordinateurs) ne
transmettent pas les signaux lorsqu’ils sont éteints. Consultez le
manuel de chaque appareil avant d’effectuer les liaisons.
• La vitesse de transfert maximale d’un appareil i.LINK est
indiquée près du connecteur i.LINK. Les indications S100, S200
et S400 désignent les vitesses de transfert maximales de 100,
200 ou 400 Mbps*. La vitesse réelle peut être plus rapide ou
plus lente en raison des différences de vitesses et des
caractéristiques techniques des appareils reliés.
z Que signifie “Mbps” ?
“Mbps” signifie mégabits par seconde. Il s’agit de la quantité de
données pouvant être transmises en une seconde. Par exemple,
une vitesse de transfert de 200 Mbps signifie que 200 mégabits de
données peuvent être envoyés en une seconde.
Etablissement d’une liaison LINC
Avant qu’un signal audio puisse être transmis entre des
appareils i.LINK, une liaison “LINC” doit être établie
entre l’appareil recevant le signal audio et l’appareil
envoyant le signal audio. L’établissement d’une liaison
“LINC” signifie qu’un chemin logique est établi entre
deux appareils pour la transmission des signaux
audionumériques. Chaque henin logique à un numéro
d’identification. Comme l’appareil qui envoie un signal
audio et celui qui le reçoit utilise le même chemin, ce
chemin doit être connu des deux appareils. Pendant
l’établissement d’une liaison LINC, la communication
s’effectue de la façon suivante entre les deux appareils.
Autres opérations
Exemple
Un appareil établit une liaison LINC avec un lecteur CD
pour recevoir un signal audio de ce dernier
1 L’appareil qui reçoit un signal audio du lecteur CD
envoie une demande et des informations concernant
le chemin conduisant au lecteur CD pour ouvrir une
voie au signal audio.
Appareil recevant
le signal audio
1
,
2
Lecteur CD (appareil
envoyant le signal)
<
2 Le lecteur CD répond à l’appareil et accepte
l’établissement d’une liaison LINC.
La transmission d’un signal audionumérique est possible
seulement après l’établissement de la communication
mentionnée ci-dessus et d’une liaison LINC.
27
FR
Page 58

Informations
Guide de dépannage
complémentaires
Si vous rencontrez un des problèmes suivants quand vous
utilisez l’ampli-tuner, utilisez ce guide de dépannage pour
essayer de le résoudre. Reportez-vous aussi à la page 9
pour voir si toutes les liaisons sont correctes. Si le
problème persiste, consultez votre revendeur Sony.
Pas de son ou son extrêmement faible.
, Vérifiez si les enceintes et les appareils sont
raccordés correctement.
, Vérifiez si vous avez sélectionné le bon appareil
sur l’ampli-tuner.
, Appuyez sur la touche MUTING si l’indicateur
MUTING est allumé.
, Utilisez un câble de liaison i.LINK pour une
vitesse de transfert de 200 Mbps.
, Le dispositif de protection de l’ampli-tuner s’est
déclenché à cause d’un court-circuit. Mettez
l’ampli-tuner hors tension, éliminez la cause du
court-circuit, puis remettez l’ampli-tuner sous
tension.
Les sons des voies gauche et droite sont
déséquilibrés ou inversés.
, Vérifiez si les enceintes et les appareils sont
raccordés correctement et fermement.
, Ajustez la balance des enceintes dans le menu
sonore (page 16).
Bourdonnement ou parasites importants.
, Vérifiez si les enceintes et les appareils sont
raccordés correctement.
, Assurez-vous que les câbles de liaison ne sont pas
à proximité d’un transformateur ou d’un moteur et
qu’ils se trouvent à au moins 3 mètres d’un
téléviseur ou d’une lampe fluorescente.
, Eloignez le téléviseur des appareils audio.
, Les connecteurs sont sales. Essuyez-les avec un
chiffon légèrement imprégné d’alcool.
28
Enregistrement impossible.
, Vérifiez si les appareils sont raccordés
correctement.
Impossible d’accorder des stations radio.
, Vérifiez si les antennes sont raccordées fermement.
Réglez les antennes et raccordez au besoin une
antenne extérieure.
, Le signal des stations est trop faible (lors de
l’accord automatique). Utilisez l’accord manuel.
, Vous n’avez pas préréglé de stations ou elles ont
été supprimées. Préréglez des stations (voir page
19).
FR
Page 59

Le RDS ne fonctionne pas.
, Vérifiez si une station FM RDS a été accordée.
, Sélectionnez une station FM plus puissante.
La télécommande ne fonctionne pas.
, Dirigez la télécommande vers le détecteur
l’appareil que vous voulez faire fonctionner.
, Enlevez tout obstacle éventuel entre la
télécommande et l’appareil.
, Si la pile de la télécommande est faible, remplacez-
la par une neuve.
Pages de référence pour l’annulation de la
mémoire de l’ampli-tuner
Pour annuler Voir
les noms d’index page 22
tous les réglages mémorisés page 25
de
Informations complémentaires
29
FR
Page 60

Spécifications
Informations complémentaires
Section Amplificateur
Puissance de sortie
50 W + 50 W (4 ohms
DIN, 1 kHz)
Réponse en fréquence
7 Hz - 20 kHz ±0,3 dB
Réglage du timbre
Grave: 100 Hz ±10 dB
Médium: 1 kHz ±10 dB
Aigu: 10 kHz ±10 dB
Entrée analogique
Sensibilité : 250 mV
Impédance : 50 kilohms
Sortie de casque
Accepte un casque de
haute et basse
impédance
Section Tuner FM
Plage d’accord
87,5 - 108,0 MHz
Borne d’antenne
75 ohms, asymétrique
Sensibilité Mono: 7 µV/22,1 dBf
Stéréo: 70 µV/ 42,1 dBf
DHT Mono: 0,3% à 1 kHz
Stéréo: 0,5% à 1 kHz
Section Tuner AM
Plage d’accord
531 - 1602 kHz
Antenne Antenne cadre
DHT
0,5% à 400 Hz
Sélectivité 35 dB à 9 kHz
Fréquence intermédiaire
450 kHz
Généralités
Alimentation 230 V CA, 50/60 Hz
Consommation
140 W
Dimensions (l/p/h)
Env. 430 × 335 × 70 mm
saillies et commandes
comprises
Poids (Env.) 6,3 kg
Accessoires fournis
Voir page 4.
La conception et les spécifications
peuvent être modifiées sans préavis.
Sélectivité 55 dB à 400 kHz
Séparation 35 dB à 1 kHz
Fréquence intermédiaire
10,7 MHz
FR
30
Page 61

Messages apparaissant sur l’afficheur
La signification des différents messages qui apparaissent sur l’afficheur est indiquée dans le tableau suivant.
Message Code(s) d’erreur Cause et/ou solution
CANNOT LINC C78:11/C78:12 L’ampli-tuner ne peut pas établir de liaison LINC avec un appareil parce qu’une autre
NO SIGNAL C78:04 Aucun signal fourni par l’appareil sélectionné. Vérifiez que le signal est fourni par
C78:22 Le format du signal d’entrée n’est pas supporté.
C78:31 La communication entre l’ampli-tuner et l’appareil sélectionné est instable. Ou bien, le
BUS FULL C78:15 Le bus de signal lors d’une liaison i.LINK est plein et aucun autre signal ne peut être
LOOP CONNECT C78:03 La liaison i.LINK est bouclée. Vérifiez la liaison (voir page 26).
NEW CONNECT — Un appareil i.LINK a été branché ou débranché de la configuration i.LINK. Attendez
FUNC. Locked — Sélection d’un appareil impossible parce qu’une autre liaison LINC existe entre l’ampli-
Select FUNC. — Sélectionnez un autre appareil.
Input Occupied Annulez la liaison LINC entre l’autre appareil et l’ampli-tuner.
Off Processing — Pendant que la fonction i.LINK Control est activée, l’appareil correspondant s’éteint
liaison existe entre l’ampli-tuner et l’autre appareil. Annulez la liaison LINC entre l’amplituner et l’autre appareil.
l’appareil (par ex. en enregistrant depuis l’appareil).
format du signal reçu n’est pas approprié. Vérifiez l’état et le format du signal de l’appareil
sélectionné.
transmis par l’ampli-tuner. Annulez la liaison LINC entre l’appareil et l’ampli-tuner.
quelques secondes que l’indication s’éteigne.
tuner et un autre appareil.
Annulez la liaison LINC entre l’ampli-tuner et l’autre appareil.
automatiquement lorsque vous éteignez l’ampli-tuner. Il faut parfois un certain temps pour
que l’appareil s’éteigne et aucune opération n’est possible sur l’ampli-tuner pendant que
cette indication clignote. Attendez quelques secondes que l’indication s’éteigne.
Informations complémentaires
31
FR
Page 62

Page 63

Page 64

Sony Corporation Printed in Japan
 Loading...