

Sony StorStation LIB-81 Quick Start Manual
AIT Library
4-663-200-13(1)
クイックスタートガイド Page 4 _____________________________
Quick Start Guide Page 10 _________________________________
Page 16 ____________________________________
Page 21 ____________________________________
Mode d’emploi Page 26 ____________________________________
Gebrauchsanweisung Seite 32 ______________________________
Manual de instrucciones página 38 ___________________________
お買い上げいただきありがとうございます。
電気製品は安全のための注意事項を守らないと、
火災や人身事故になることがあります。
この取扱説明書には、事故を防ぐための重要な注意事項と製品の取り扱いかたを示してあり
ます。この取扱説明書をよくお読みのうえ、製品を安全にお使いください。お読みになった
あとは、いつでも見られるところに必ず保管してください。
JP
GB
CS
CT
FR
DE
ES
LIB-81
© 2006 Sony Corporation

INFORMATION
You are cautioned that any changes or modifications not
expressly approved in this manual could void your authority to
operate this equipment.
WARNING
To reduce the risk of fire or electric shock, do not expose this
apparatus to rain or moisture.
To avoid electrical shock, do not open the cabinet. Refer
servicing to qualified personnel only.
Caution
The mains plug on this equipment must be used to disconnect
mains power.
Please ensure that the socket outlet is installed near the
equipment and shall be easily accessible.
Notice
Use the power cord set approved by the appropriate testing
organization for the specific countries where this unit is to be
used.
Declaration of Conformity
Trade Name: SONY
Model No.: LIB-81
Responsible Party: Sony Electronics Inc.
Address: 16530 Via Esprillo San Diego, CA. 92127
U.S.A.
Telephone No.: 858-942-2230
This device complies with Part 15 of the FCC Rules. Operation is
subject to the following two conditions:
(1) This device may not cause harmful interference, and
(2) This device must accept any interference received, including
interference that may cause undesired operation.
ATTENTION
According to the EU Directives related to product safety, EMC
and R&TTE the manufacturer of this product is Sony
Corporation, 1-7-1 Konan Minato-ku Tokyo, 108-0075 Japan.
The Authorised Representative is Sony Deutschland GmbH,
Hedelfinger Strasse 61,70327 Stuttgart, Germany. For any
service or guarantee matters please refer to the addresses given
in separate service or guarantee documents.
WARNING
Before performing any installation or maintenance procedures,
be sure that the library power switch is in the off position and
that the power cord is disconnected from the library.
WARNING
The standalone library weighs around 13.5 kg. At least 2 people
are needed to move or lift the library. Make sure you install the
rack-mount library in the lowest possible location in the rack.
For best results, use a rack with extension support legs.
INFORMATION
This equipment has been tested and found to comply with the
limits for a Class B digital device, pursuant to Part 15 of the FCC
Rules. These limits are designed to provide reasonable
protection against harmful interference in a residential
installation. This equipment generates, uses, and can radiate
radio frequency energy and, if not installed and used in
accordance with the instructions, may cause harmful
interference to radio communications. However, there is no
guarantee that interference will not occur in a particular
installation. If this equipment does cause harmful interference to
radio or television reception, which can be determined by
turning the equipment off and on, the user is encouraged to try
to correct the interference by one or more of the following
measures:
• Reorient or relocate the receiving antenna.
• Increase the separation between the equipment and receiver.
• Connect the equipment into an outlet on a circuit different
from that to which the receiver is connected.
• Consult the dealer or an experienced radio/TV technician for
help.
All interface cables used to connect peripherals must be shielded
in order to comply with the limits for a digital device pursuant
to Subpart B of Part 15 of FCC Rules.
If you have any questions about this product, please contact
the Sony Support Center written on the warranty card.
AUFMERKSAMKEIT
Im Sinne der EU Richtlinien bezüglich Produktsicherheit, EMV
und R&TTE ist Sony Corporation, 1-7-1 Konan Minato-ku
Tokyo, 108-0075 Japan der Hersteller dieses Produktes.
Bevollmächtigter ist Sony Deutschland GmbH, Hedelfinger
Strasse 61,D-70327 Stuttgart. Für Service oder
Garantieangelegenheiten wenden Sie sich bitte an die in
separaten Service oder Garantiedokumenten angegebenen
Adressen.
RoHS 指令(欧州環境規制)に対応済
European Union Restriction of Hazardous
Substances Directive compliant.
Entspricht der Richtlinie der Europäischen
Union zur Beschränkung der Verwendung
gefährlicher Stoffe.
Für Kunden in Deutschland
Diese Ausrüstung erfüllt die Europäischen EMCBestimmungen für die Verwendung in folgender/folgenden
Umgebung(en):
• Wohngegenden
• Gewerbegebiete
• Leichtindustriegebiete
(Diese Ausrüstung erfüllt die Bestimmungen der Norm
EN55022, Klasse B.)
ACHTUNG
Zur Trennung vom Netz ist der Netzstecker aus der Steckdose
zu ziehen, welche sich in der Nähe des Gerätes befinden muß
und leicht zugänglich sein soll.
HINWEISE
• Maschinenlärminformations-Verordnung - 3. GPSGV, der
höchste Schalldruckpegel beträgt 70 dB(A) oder weniger
gemäss EN ISO 7779.
• Zum Netzanschluß dieses Gerätes ist eine geprüfte Leitung zu
verwenden.
Es sind die zutreffenden nationalen Errichtungs- und/oder
Gerätebestimmungen zu beachten. (Für einen Nennstrom bis
6A)
2

Es ist eine geprüfte flexible PVC-ummantelte Leitung
entsprechend IEC 60227 (H05VV-F 3G 0,75 mm
H05VVH2-F 3G 0,75 mm
2
) zu verwenden. Andernfalls ist
2
oder
eine flexible Leitung aus synthetischem Gummi entsprechend
IEC 60245 (Bauartkurzzeichen H05RR-F 3G 0,75 mm
verwenden.
Operating environment
Installation Horizontal
Temperature 10 °C to 35 °C
Relative Humidity 20% to 80% (no condensation)
Ratings Input Voltage 100 V - 240 V
Frequency 50 / 60 Hz
Current AIT-5 Model 55 W (Max)
Mass approx. 13.5 kg
AIT-4 Model 55 W (Max)
AIT-3 Ex Model 55 W (Max)
AIT-3 Model 55 W (Max)
AIT-2 Model 50 W (Max)
AIT-1 Model 50 W (Max)
Betriebsumgebung
Installation Horizontal
Temperatur 10 °C bis 35 °C
Relative Luftfeuchtigkeit 20% bis 80%
Elektrische
Daten
Masse ca. 13,5 kg
Eingangsspannung 100 V - 240 V
Frequenz 50 / 60 Hz
Strom Modell AIT-5 55 W (max.)
(nicht kondensierend)
Modell AIT-4 55 W (max.)
Modell AIT-3 Ex 55 W (max.)
Modell AIT-3 55 W (max.)
Modell AIT-2 50 W (max.)
Modell AIT-1 50 W (max.)
2
) zu
LED Notice:
This product is classified as a CLASS 1 LED PRODUCT.
Bei diesem Laufwerk handelt es sich um ein LED-Produkt
der Klasse 1.
The LED of the barcode reader incorporated inside this
product complies with IEC 60825-1.
LED (barcode reader)
Wavelength: 630-660 nm
R&TTE Compliance
The Radio and Telecommunications Terminal Equipment
Directive, known as the R&TTE directive or RTTE
for short, is the main route to compliance for Radio and
Telecoms equipment that is sold in Europe.
3

目次
開梱する ........................................................................................5
同梱品を確認する .......................................................................5
本機を設置する ...........................................................................6
電源ケーブルを接続する ..........................................................6
ホストコンピューターに接続する .........................................7
電源を入れる / 切る ...................................................................8
このあとは ....................................................................................9
© 2006 Sony Corporation. All rights reserved.
商標について
・ Sony、StorStation、Advanced Intelligent Tape は日本およびその他の国におけるソニー株式会社の登録商標または商
標です。
・ その他、本書に記載されている製品名は各社の登録商標または商標です。
電波障害自主規制について
この装置は、情報処理装置等電波障害自主規制協議会(VCCI)の基準に基づくクラス B 情報技術装置です。この装置
は、家庭環境で使用することを目的としていますが、この装置がラジオやテレビジョン受信機に接近して使用されると、
受信障害を引き起こすことがあります。取扱説明書に従って正しい取り扱いをして下さい。
4
開梱する
同梱品を確認する
メモ
・ 本機の重量は約 13.5 kg です。必ず 2 人以上で作業し
てください。腰を痛めたり、落下してけがの原因または
機器の損傷につながる可能性があります。
・ 箱と梱包材、輸送ネジは、本機を移動したり輸送したり
するときに必要です。捨てないで必ず保管してくださ
い。
1
箱に記載されている手順に従って、本機を箱から取
り出す。
ビニールやテープなどの梱包材も取り除いてください。
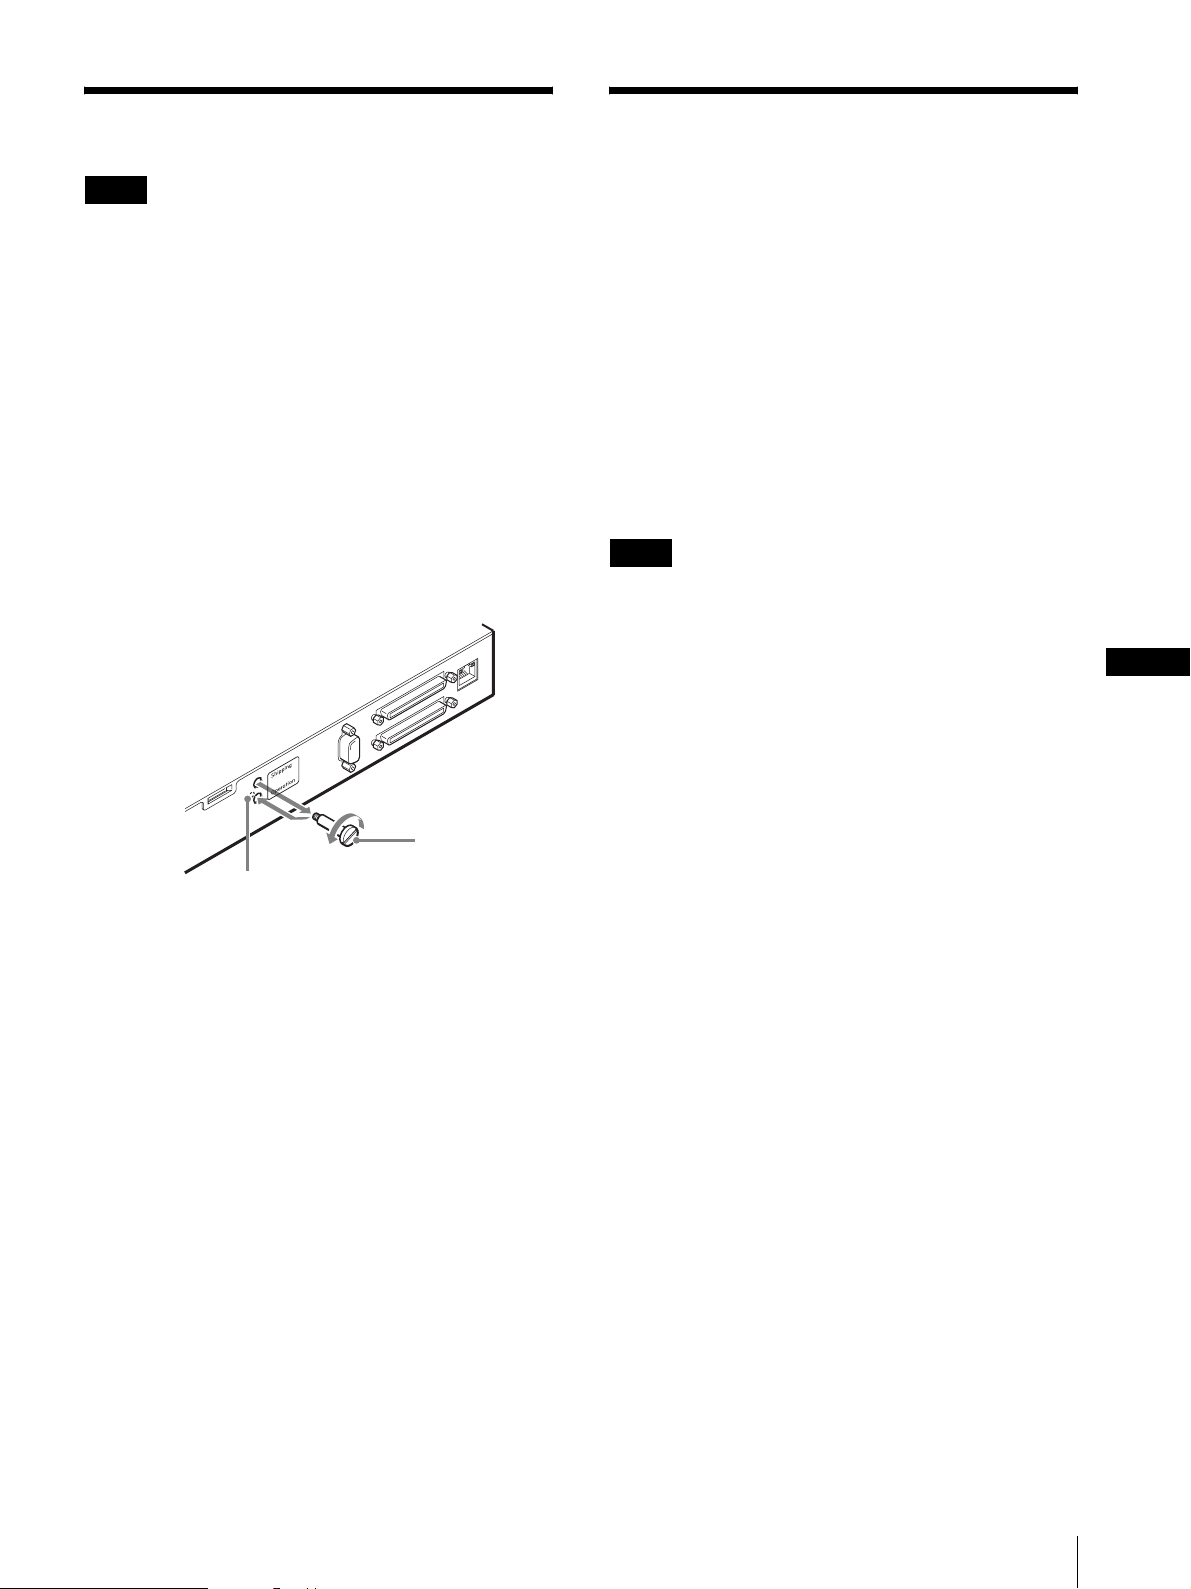
2
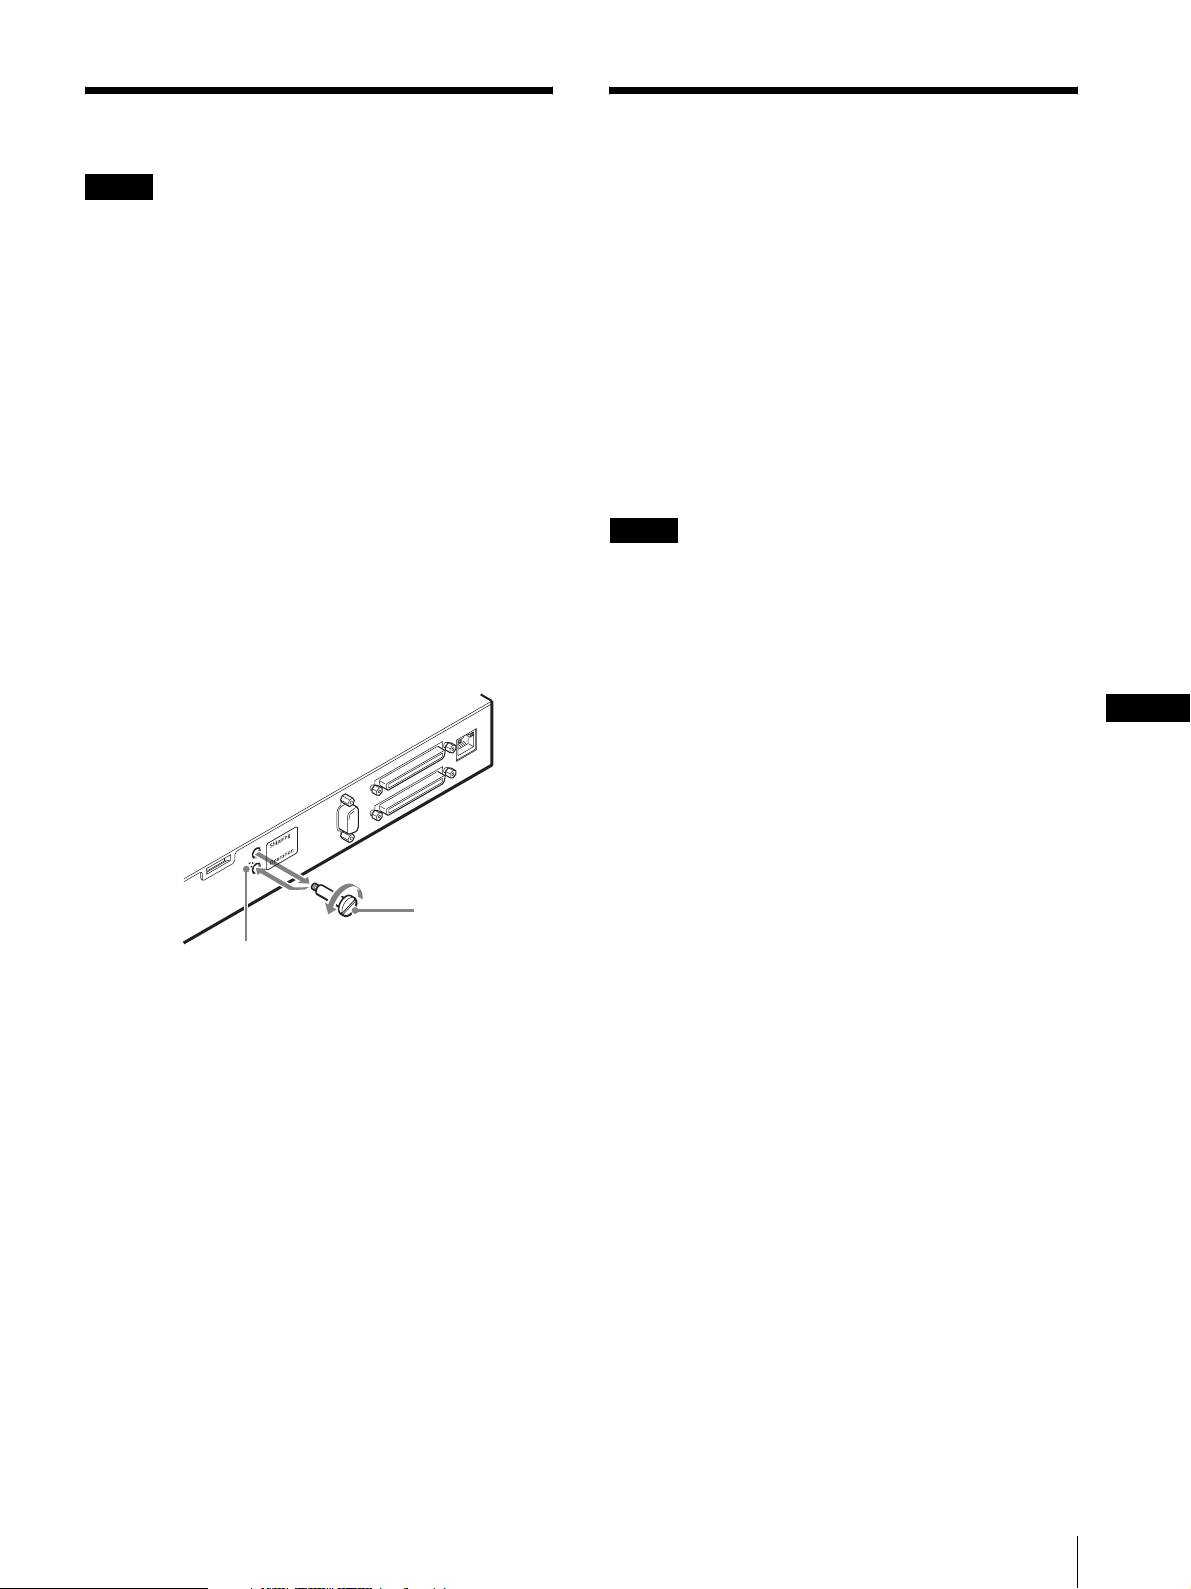
コインなどを使って、本機背面の輸送ネジを取り外
し、保管位置(下の穴)に取り付ける。
輸送ネジは、左に回すと取り外せます。
輸送ネジ
保管位置
パッケージを開けたら、以下のものがそろっているかお
確かめください。付属品の中に欠けているものがあると
きは、お買い上げ店にご連絡ください。
・ LIB-81 本体(1)
・ 電源ケーブル(1)
・ SCSI ターミネーター(1)
・ クイックスタートガイド(1)
・ エアーフィルター(ACY-FL81)(4)
・ 保証書(1)
・ 安全のために(1)
・ バーコードラベル(1 シート)(バーコードリーダー内
蔵モデルのみ同梱)
メモ
上記以外に、説明書、書類、ケーブル、クリーニング
カートリッジなどが同梱されている場合があります。
JP
取扱説明書は、ソニーのホームページからダウンロードし
てください。
日本語
http://www.sony.co.jp/Products/storagesolution/
documents/manual_sony.html
英語
http://www.sony.net/Products/storagesolution/
documents/manual_sony.html
開梱する / 同梱品を確認する
5
本機を設置する
電源ケーブルを接続する
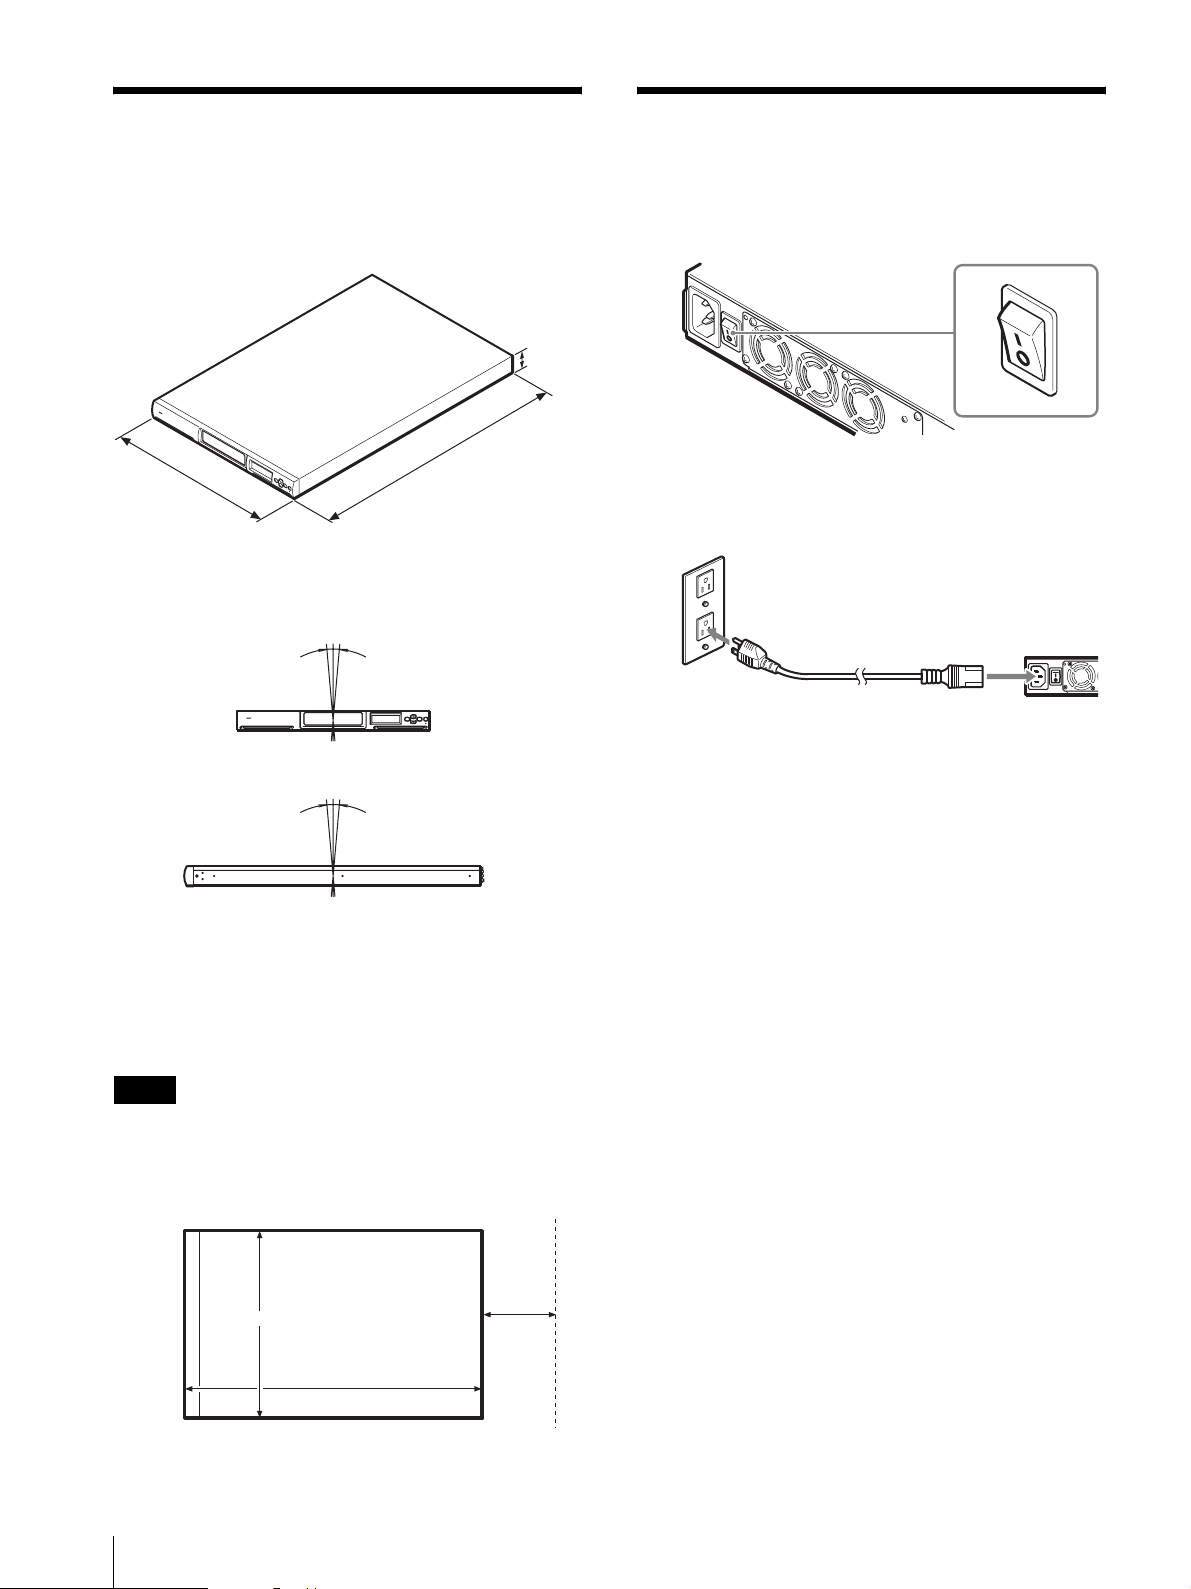
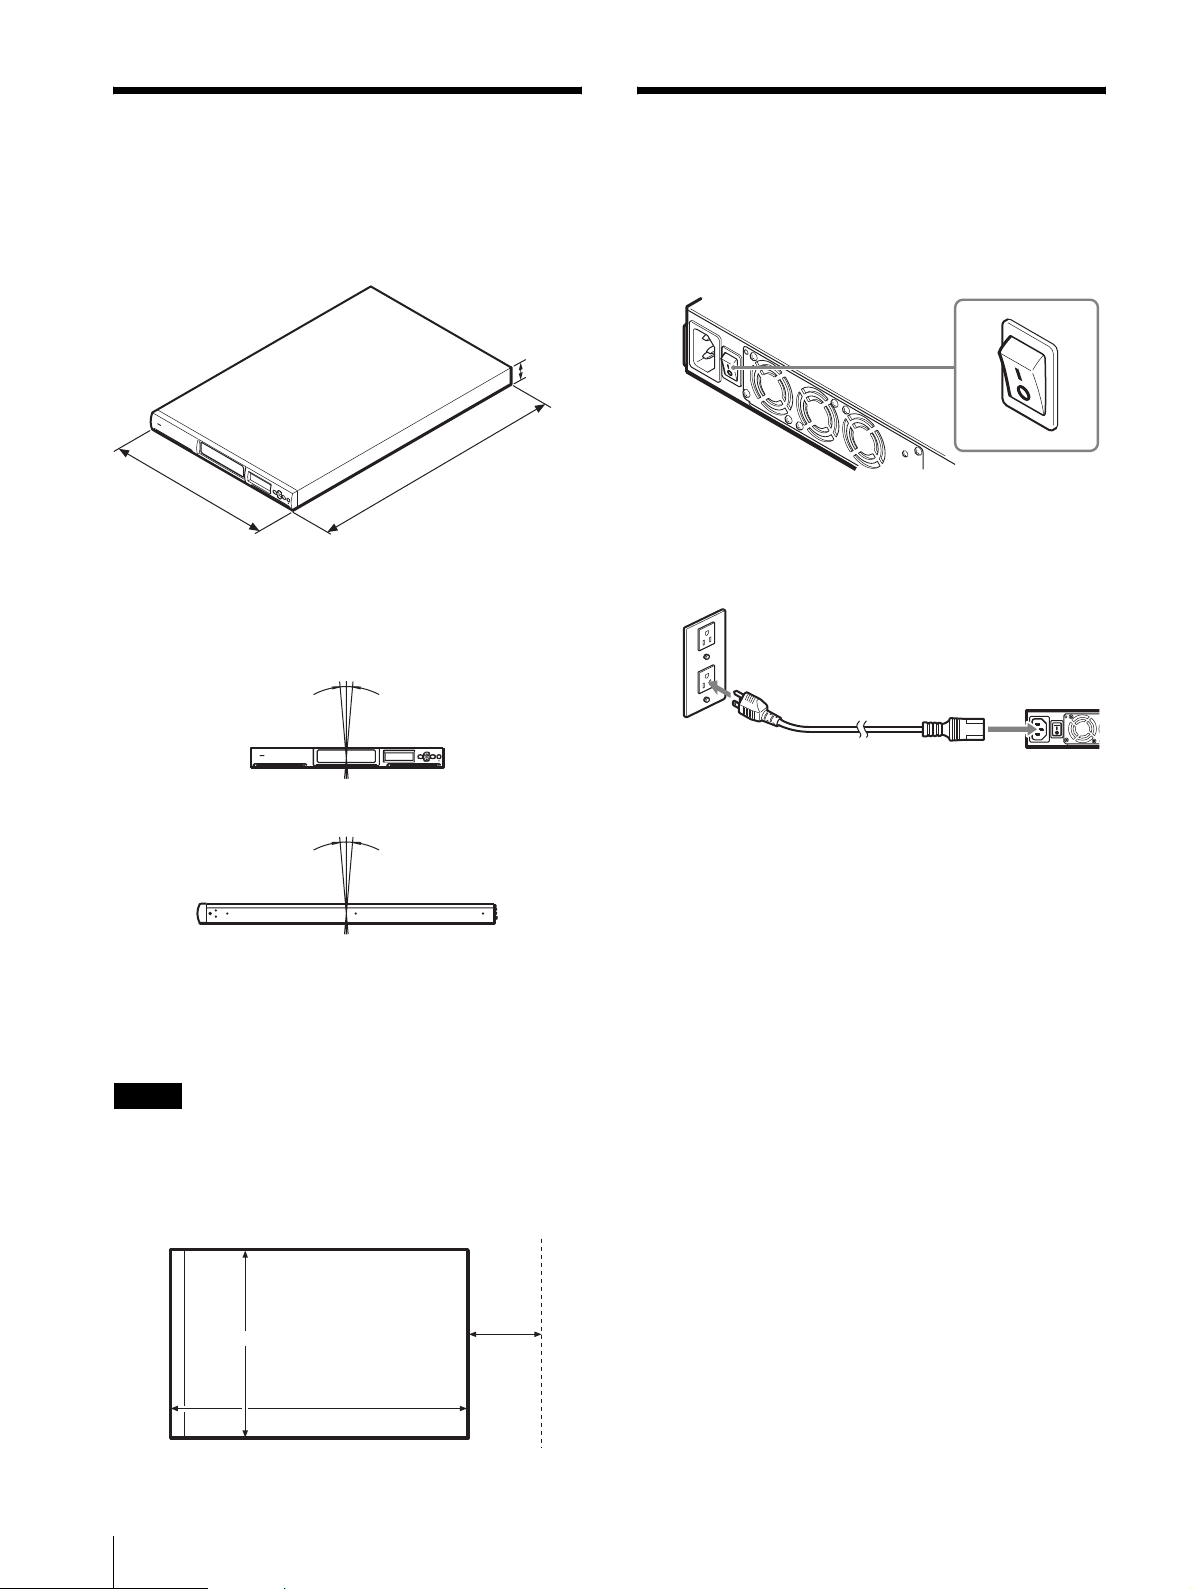
本機の質量は約 13.5 kg で、大きさは以下のとおりです。
あらかじめ設置場所の強度とスペースを十分確認してか
ら、設置してください。
43 mm
(1U)
430 mm
また、本機の前面、両側面の傾斜度がそれぞれ± 1 度以
内になるように、水平に設置してください。
前面
1˚
1˚
660 mm
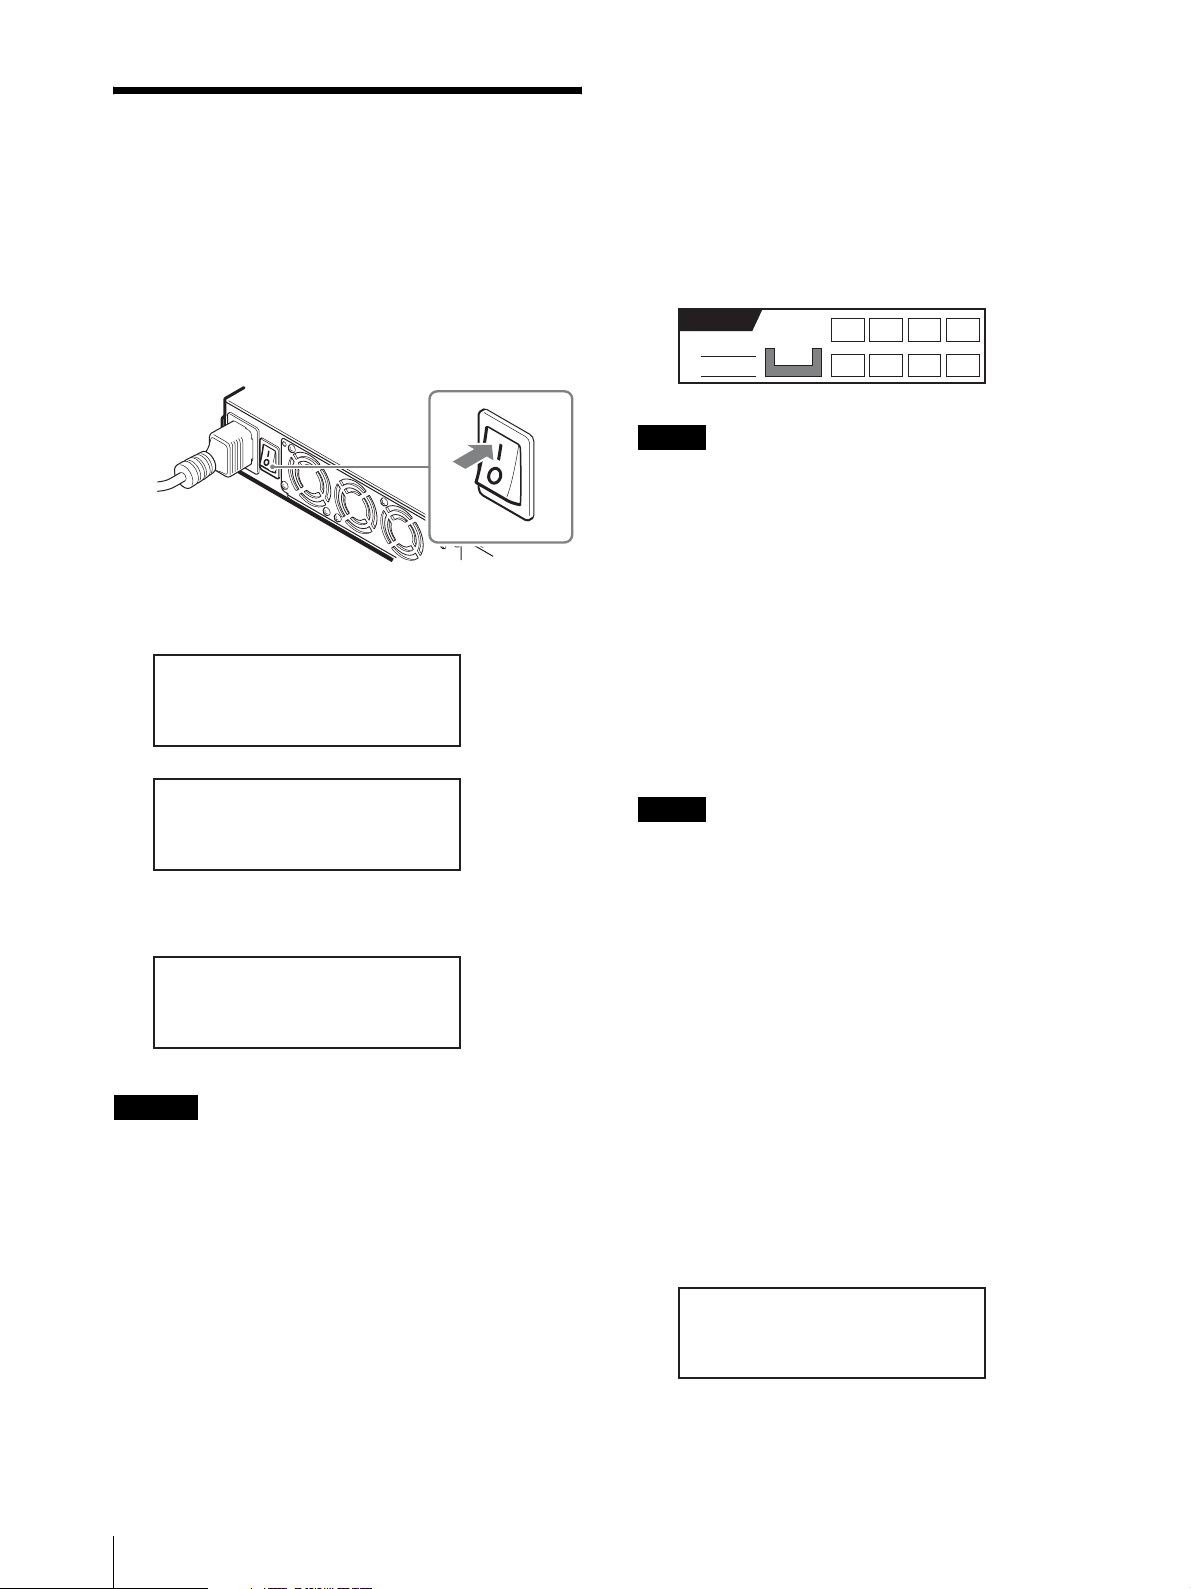
1
本機背面の電源スイッチがオフになっている(○が
押されている)ことを確認する。
2
電源ケーブルの一方を本機の電源コネクターに接続
し、もう一方をコンセントに接続する。
側面
別売のラックマウントキットを使用すると、本機をほと
んどの EIA STANDARD(ユニバーサルピッチ)の 19
インチラックに据え付けることができます。ラックマウ
ントキットについては、お買い上げ店にお問い合わせく
ださい。
メモ
コンセントに近く、水平な場所に設置してください。ま
た、本機の後部には空気が循環するように 150 mm 以上
のスペースを空けてください。
430 mm前面
1˚
1˚
背面
150 mm
以上
660 mm
本機を設置する / 電源ケーブルを接続する
6
ホストコンピューターに
接続する
SCSI ケーブルで、本機とホストコンピューターを接続し
ます。ここでは、一般的な接続手順を説明します。接続
には、内蔵されている AIT ドライブに合わせて、以下の
SCSI ケーブルで接続してください。
・ AIT-5、AIT-4、AIT-3 Ex、AIT-3 ドライブが内蔵さ
れている場合は、市販の Ultra 160 対応の SCSI ケー
ブルで接続します。
・ AIT-2、AIT-1 ドライブが内蔵されている場合は、
SCSI-3 仕様に準拠した市販の Wide Ultra LVD 対応の
SCSI ケーブルで接続します。
本機側は 68 ピンハーフピッチのコネクターを使用してい
ます。
他の SCSI 機器も接続するときは、『取扱説明書』(PDF)
の第 2 章「設置する」の「SCSI 周辺機器を接続する」 を
参照してください。
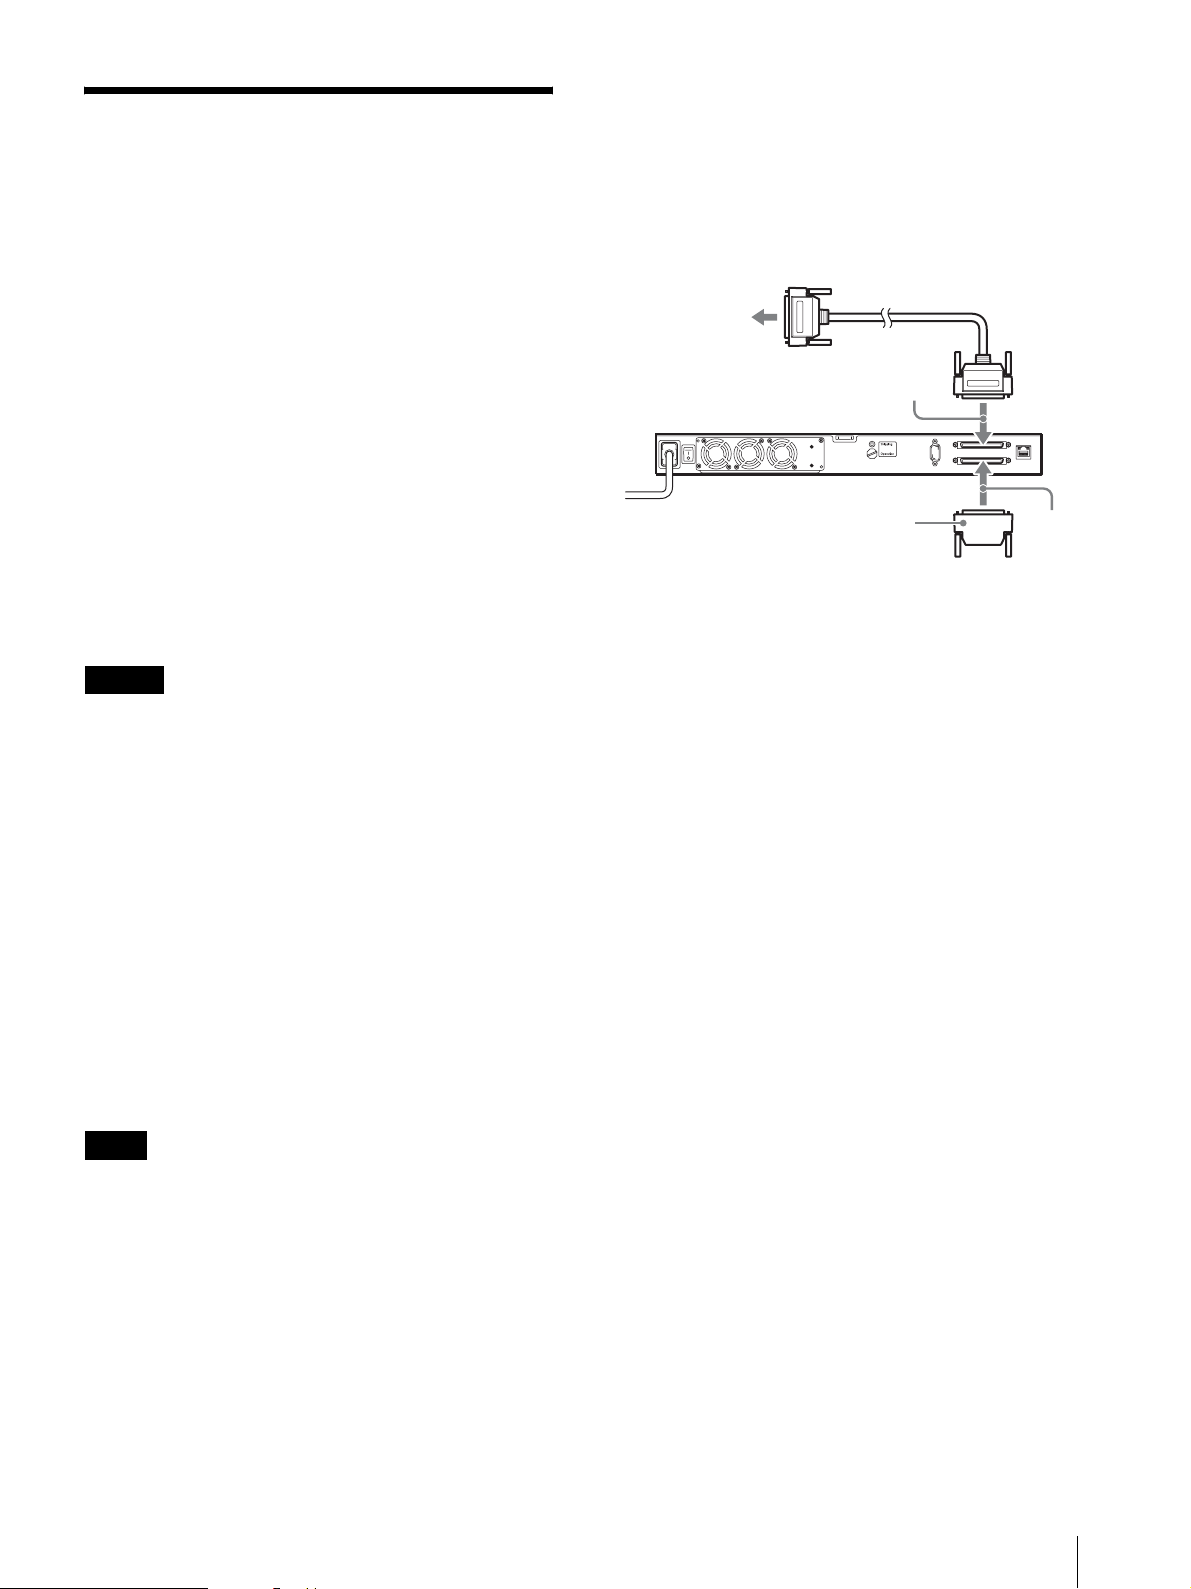
2
図のようにして、SCSI ケーブルとターミネータ-を
取り付ける。
1 市販の SCSI ケーブルを使って、本機とホストコン
ピュータを接続します。
SCSI ケーブルは、次の図のように接続します。
2 次の図のように、コネクターに、付属のターミ
ネーターを取り付けます。
ホストコン
ピューター
1
ターミネーター
2
ご注意
・ 本機を HVD(High Voltage Differential)SCSI バス
に接続しないでください。接続すると、本機または
SCSI バス上の他のデバイスが故障する恐れがありま
す。
・ SCSI ケーブルを接続するときは、本機、ホストコン
ピューターおよびすべての接続機器の電源を切ってくだ
さい。
・ 本機を SCSI の終端に接続する場合は、必ず付属のター
ミネーターを取り付けてください。
・ LVD(Low Voltage Differential)SCSI では、ホスト
コンピューターと SCSI バス上の最後の機器とをつなぐ
SCSI ケーブルの全長(内部および外部ケーブルのすべ
ての長さを含む)が、12 m 未満になるようにしてくだ
さい。本機の内部ケーブルの長さは 2 m です。
・ 分岐はできません。
メモ
・ SCSI バスについては、『取扱説明書』(PDF)の「その
他」 の「SCSI の構成について」を参照してください。
・ あらかじめ必要な SCSI ケーブルを用意しておいてくだ
さい。SCSI ケーブルの仕様については、『取扱説明書』
(PDF)の「その他」の「SCSI ケーブル、ターミネー
タ-仕様」 を参照してください。
1
ホストコンピュータと本機の電源が切られているこ
とを確認する。
ホストコンピューターに接続する
7

電源を入れる / 切る
電源を入れる
本機の電源を入れてから、ホストコンピューターの電源
を入れます。
1
本機背面の電源スイッチを押す。
バーコードリーダーが内蔵されていないモデルの場合
バーコードを読み取るように設定を変更すると、エラー
になりますので、バーコードの読み取り設定を変更しな
いようにしてください。
2
日付と時刻を変更するときは[ENTER]ボタンを押
す。変更しないときは、[CANCEL]ボタンを押す。
日付と時刻の設定方法については、『取扱説明書』
(PDF)の第 2 章「設置する」の「日付と時刻を設定
する」を参照してください。
起動すると、次のステータス画面が表示されます。
液晶ディスプレイに次のようなメッセージが表示さ
れ、起動処理が始まります。(起動するまで、数分か
かります。)
LIB-81
Initializing
起動処理が終了すると、時刻設定のモードになりま
す。
Jan/01/2001 12:00:00
[ENTER] to set the
Date and Time
[CANCEL] to exit
ご注意
バーコードリーダー内蔵モデルの場合
本機の工場出荷時は、バーコードを読み取らないように
設定されています。
バーコードを読み取るように設定を変更している場合に、
バーコードラベルが貼られていないカートリッジを使用
すると、電源を入れた後のイニシャライズの時間が非常
に長くなります。
バーコードの読み取り設定については、『取扱説明書』の
第 3 章「基本的な使いかた」の「バーコードの設定をす
る」を参照してください。
READY
メモ
・ 本機の電源が切れている間は、日付と時刻は更新されま
せん。本機を起動したときには、毎回日付と時刻の設定
を行うことをおすすめします。
・ 5 分間何も操作しないでいると、自動的にステータス画
面に移行します。
3
本機の電源を入れた後 10 秒以上待ってから、ホスト
コンピューターの電源を入れる。
DHCP を使用している場合は、30 秒以上お待ちく
ださい。
このあとは、『取扱説明書』(PDF)の第 2 章「設置
する」の「初期設定をする」にお進みください。
メモ
・ 本機より先にホストコンピューターが立ち上がると、
SCSI ID が正しく認識されません。必ず、本機の電源を
入れてから、ホストコンピューターの電源を入れてくだ
さい。
・ 上記のように動作しないときは、『取扱説明書』(PDF)
の「その他」 の「故障かな?と思ったら」を参照してく
ださい。
1234
567
8AIT3
電源を切る
本機の電源を切るときは、操作パネルでシステムの終了
処理を行なってから、電源スイッチを押します。
1
ステータス表示から、[MENU]ボタンを 2 秒以上押
す。
電源を入れる / 切る
8
2
V ボタン、v ボタンを使って[9.System Down]を
選択し、[ENTER]ボタンを押す。
Menu 12:34
7.Tape Inventory
8.Password
9.System Down
3
[2.Shutdown]を選択し、[ENTER]ボタンを押
す。
System Down 12:34
1.Reset
2.Shutdown
4
[[ENTER] to activate]が表示されたら、
[ENTER]ボタンを押す。
Shutdown
[ENTER] to activate
システムの終了処理が行われます。
このあとは
『取扱説明書』(PDF)をお読みになり、カートリッジを
セットしたり、必要に応じてネットワークに接続するな
どして、本機を使用するために必要な設定を行います。
『取扱説明書』(PDF)には、本機の操作や設定、ご使用
上のご注意など、本機を使用するために必要なことを記
載しています。必ずお読みください。
取扱説明書は、ソニーのホームページからダウンロードし
てください。
日本語
http://www.sony.co.jp/Products/storagesolution/
documents/manual_sony.html
英語
http://www.sony.net/Products/storagesolution/
documents/manual_sony.html
Shutdown
*** Wait a minute ***
5
次のメッセージが表示されたら、背面の電源スイッ
チを押す。
Ready for shutdown
Press the power
switch on the rear
of the Library
ご注意
・ 背面の電源スイッチを押すだけで電源を切ることもでき
ますが、上記の手順に従って電源を切ることをお勧めし
ます。
・ 再度電源を入れるときは、10 秒間待ってから電源を入
れてください。
・ 本機を輸送する場合は、輸送ネジを取り付ける必要があ
ります。その場合は、上記の手順を行って電源を切って
ください。
メモ
操作ボタンが誤って押されることを防ぐため、操作ボタ
ンを無効にするように設定することもできます。設定方
法は、『取扱説明書』(PDF)の第 3 章「基本的な使いか
た」 の「フロントパネルのボタンを無効にする」を参照し
てください。
このあとは
9

Table of Contents
Unpacking ............................................................ 11
Checking the Package Contents ......................... 11
Installing the AIT library ................................... 12
Connecting the Power Cable .............................. 12
Connecting to the Host Computer ..................... 13
Turning the Power On/Off .................................. 14
What’s next? ........................................................ 15
© 2006 Sony Corporation. All rights reserved.
Trademarks
• Sony, StorStation and Advanced Intelligent Tape are trademarks or registered trademarks of Sony Corporation in this
country, other countries, or both.
• Other product names are trademarks or registered trademarks of their respective owners in this country, other
countries, or both.
10
Unpacking
Checking the Package
Notes
• The AIT library weighs approximately 13.5 kg
(29.8 lbs.). At least two people are needed in order to
handle the library. Handling the AIT library on your
own could result in back injury or other accidents
resulting in injury or in damage to the AIT library.
• You will need the box, packing materials and transport
screw if you wish to move or transport the AIT library
in the future. Retain them for future use.
1
Remove the AIT library from the box as indicated
on the box.
Remove the packing materials, such as plastic
covers and tapes.
2
Remove the transport screw (turn
counterclockwise) from the Shipping position
(upper hole) at the rear of the library, and then set it
in the Operation position (lower hole) with a screw
driver or coin.
Contents
After opening the package, make sure all of the
following items are present. Contact your dealer if
anything is missing.
• LIB-81 AIT library (1)
• Power cable (1)
• SCSI terminator (1)
• Quick Start Guide (this manual) (1)
• Air Filter (ACY-FL81) (4)
• Safety Notice (1)
• Bar code labels (1 sheet; only supplied with models
equipped with a bar code reader)
Note
In addition to the above, other documentation, cables,
and cleaning cartridges may also be included.
Download the Operating Instructions from the
Sony Web site.
http://www.sony.net/Products/storagesolution/
documents/manual_sony.html
GB
Operation position
Transport screw
Unpacking / Checking the Package Contents
11
Installing the AIT library
Connecting the Power
The library weighs about 13.5 kg (29.8 lb.) and has the
following dimensions. Before installing the library,
make sure that the surface on which you are placing it is
large and strong enough.
43 mm
(1.75 in.)
(1U)
430 mm (16.9 in.)
660 mm (26.0 in.)
Also, set the library horizontally so that its front and
sides are inclined by no more than ±1 degree in any
direction.
Front
1˚
1˚
Cable
1
Confirm that the power switch on the rear of the
AIT library is turned off (a is pressed).
2
Connect one end of the power cable to the power
supply connector and the other end to the power
outlet.
Side
With the ACY-RK81 rack mounting kit (sold
separately), the AIT library can be installed on an
EIA-standard, universal pitch 19-inch rack. Contact
your dealer for information about the rack mounting kit.
Note
Install the AIT library on a horizontal surface near an
AC power outlet. Also, leave a gap of about 150 mm
(5.9 in.) behind the rear of the unit to allow air to
circulate.
Front
430 mm (16.9 in.)
660 mm (26.0 in.)
1˚
1˚
Rear
150 mm
(5.9 in.)
12
Installing the AIT library / Connecting the Power Cable

Connecting to the Host
Computer
Connect the AIT library and the host computer with a
SCSI cable. This section explains general connecting
steps. Connect the library with the appropriate SCSI
cable, depending on the AIT drive.
• When the library is equipped with the AIT-5, AIT-4,
AIT-3 Ex, or AIT-3 drive, use a commercially
available Ultra 160 cable.
• When the library is equipped with the AIT-2 or AIT-1
drive, use a commercially available Wide Ultra LVD
SCSI cable that conforms to SCSI-3.
The library side uses the 68-pin half pitch connector.
When connecting other SCSI devices together with the
AIT Library, refer to “Connecting SCSI Peripheral
Devices” in Chapter 2 of the “Operating Instructions”
(PDF).
Caution
• Do not connect the AIT library to an HVD (High
Voltage Differential) SCSI bus. If connected, the
library or other devices on the SCSI bus may be
damaged.
• When connecting the SCSI cable, turn off all of the
connecting devices, including the library and the host
computer.
• When connecting the AIT library as the last device on
the SCSI bus, be sure to attach the provided
terminator.
• In LVD (Low Voltage Differential) SCSI, make the
total length of the SCSI cable (internal and external),
which connects the host computer and the device at
the end of the SCSI bus, shorter than 12 meters (39 ft.
4.4 in). (The length of the AIT library internal cable is
2 meters (78.7 in.).)
• SCSI cables cannot be branched.
2
Attach the SCSI cable and terminator as shown in
the figure below.
1 Use a SCSI cable (sold in stores) to connect the
AIT library to the host computer.
2 Attach the provided terminator to the other
connector.
Host computer
1
Terminator
2
Notes
• For information about the SCSI bus, refer to “SCSI
Specifications” in the “Appendix” of the “Operating
Instructions” (PDF).
• Prepare the necessary SCSI cables. For information
about SCSI cable specifications, refer to “SCSI Cable
and Terminator Specifications” in the “Appendix” of
the “Operating Instructions” (PDF).
1
Confirm that the host computer and AIT library are
turned off.
Connecting to the Host Computer
13
Turning the Power On/
Off
Turn the Power On
Turn on the AIT library power, then turn on the host
computer power.
1
Press the power switch on the rear of the library.
2
If you want to change the date and time, press the
[ENTER] button. If you do not want to make
changes, press the [CANCEL] button.
For details about the date and time settings, refer to
“Setting the Date and Time” in Chapter 2 of the
“Operating Instructions” (PDF).
Once the library is started, the status display below
appears.
READY
Notes
• The date and time cannot be updated when the AIT
library is off. For this reason we recommend that you
set the date and time each time you turn on the library.
• If the library is left idle for five minutes, the status
display appears automatically.
1234
567
8AIT3
The following message appears and the startup
process begins. (Startup takes several minutes.)
LIB-81
Initializing
When the startup process ends, the library enters
the time setting mode.
Jan/01/2001 12:00:00
[ENTER] to set the
Date and Time
[CANCEL] to exit
Caution
Models equipped with a bar code reader
By default, the library is not set to read bar codes. If you
modify this setting so that the library can read bar codes
and use cartridges without bar code labels, initialization
after turning on the library takes unusually long. For
details about how to set the library to read bar codes,
refer to “Setting the Bar Code” in Chapter 3 of the
“Operating Instructions” (PDF).
Models without a bar code reader
Modifying the default setting so that the library can read
bar codes generates an error. You should not modify this
setting.
3
After pressing the power switch on the rear of the
library, wait at least 10 seconds before turning on
the host computer.
When using DHCP, wait at least 30 seconds.
Then refer to “Initial Setup” in Chapter 2 of the
“Operating Instructions” (PDF).
Notes
• If you start the host computer before the library, the
SCSI ID is not detected correctly. Therefore, always
start the library before starting the host computer.
• If the library does not work as above, refer to
“Troubleshooting” in the “Appendix” of the
“Operating Instructions” (PDF).
Turn the Power Off
Before turning off the library, perform the system
shutdown procedure from the control panel. After you
have performed the procedure, you can turn off the
library.
1
At the status display, press the [MENU] button for
two seconds.
2
Use the V and v buttons to select “9. System
Down,” then press the [ENTER] button.
Menu 12:34
7.Tape Inventory
8.Password
9.System Down
14
Turning the Power On/Off
 Loading...