

Page 1

User guide
Open-ear Stereo Headset
STH40D
Page 2

Contents
Getting started.............................................................................. 3
Introduction.......................................................................................3
Overview........................................................................................... 3
Learning the basics....................................................................... 4
Wearing the headset........................................................................ 4
Using the remote.............................................................................. 5
Legal information.......................................................................... 7
FCC Statement...................................................................................7
Industry Canada Statement..............................................................7
2
Page 3
Getting started
Introduction
The Open-ear Stereo Headset STH40D keeps you connected with your
surroundings while listening to music or talking on the phone. You can also use the
voice assistant when connected to a compatible Android™ or iOS device.
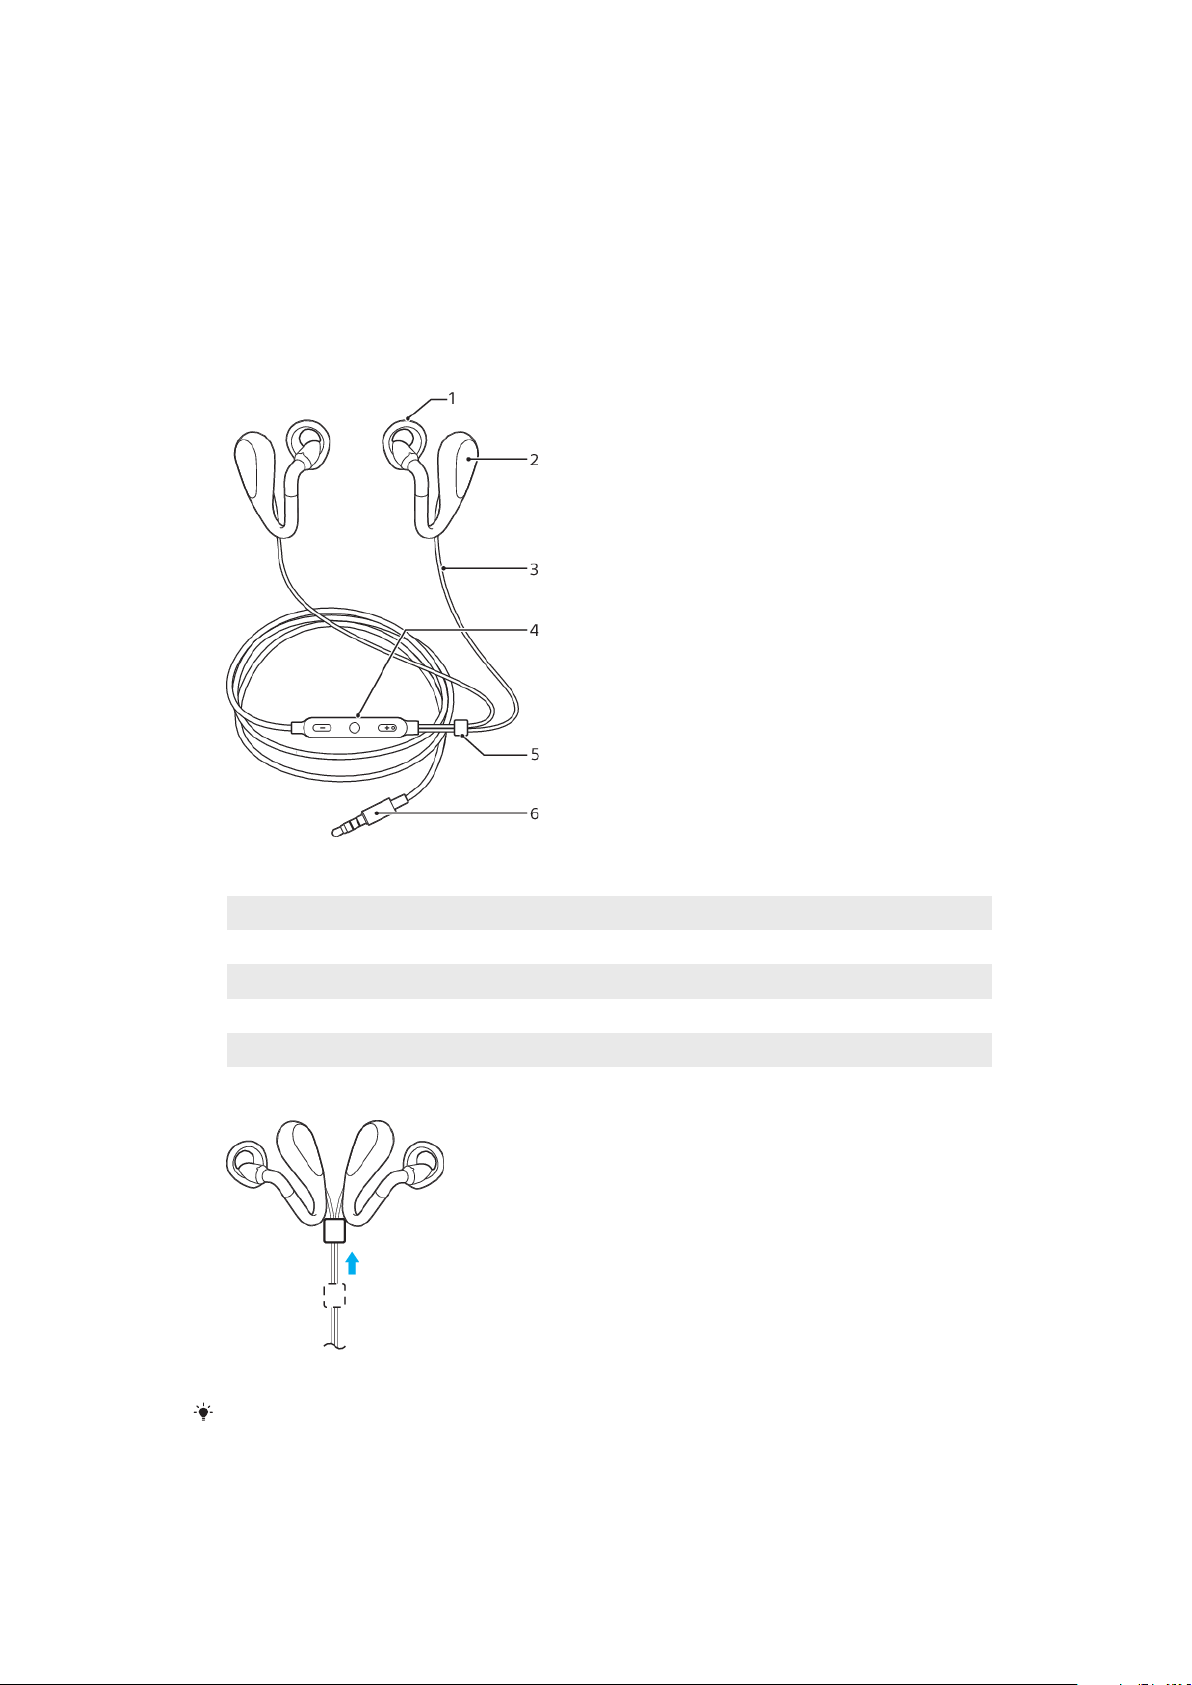
Overview
1 Ring supporter
2 Headphone
3 Cable
4 Remote
5 Tangle slider
6 Input plug
Pull the tangle slider toward the headphones to avoid tangling them when not using the
headset.
3
This is an internet version of this publication. © Print only for private use.
Page 4

Learning the basics
Wearing the headset
Try wearing the headphones this way when putting them on for the first time.
To wear the headset
1 Hold the headphone (R) with your left hand.
2 Gently pull down your right earlobe with your right hand.
3 Slide the headphone from below your ear, then insert the ring supporter into
your ear as shown in the illustration.
4 Put on headphone (L) using the same procedure with opposite hands.
For your safety, do not use your headset to handle calls while you are driving. To prevent
accidents, it is not recommended to use your headset while walking, running or cycling.
To attach the clip
• Attach the clip to the headset cable below the remote. Position the clip so
that you can speak into the microphone for taking calls hands-free, once the
headset is fastened to your clothes.
If you need to adjust the clip, remove the clip and reposition it on the headset cable.
4
This is an internet version of this publication. © Print only for private use.
Page 5

To change the ring supporter
1 Choose the ring supporter size that fits stably in your ear.
2 To remove the ring supporter, hold the headphone tightly and push the ring
supporter straight backward.
3 To attach the ring supporter, align the convex part of the headphone with
the concave part of the ring supporter.
4 When attaching, cover the hook A with the rubber of the ring supporter as
shown in the illustration. Make sure not to tear the ring supporter.
When removing or attaching the ring supporter, do not forcibly pull, push, or twist the ring
supporter, as this can damage or tear the ring supporter. When attaching, make sure the
right/left marks on the ring supporters match the marks on the headphones.
Using the remote
Remote overview
Volume +
1
2 Multi-function key
3 Volume -
This is an internet version of this publication. © Print only for private use.
5
Page 6

4 Microphone
To change the volume
• During a call or when listening to music, press or to increase or
decrease the volume.
If you are connected to an iOS device, adjust the volume directly on the iOS device. The
volume keys on the remote control are only compatible with Android™ devices.
Avoid using your headset on high volume, as this may cause permanent hearing damage or
disturb others around you.
To answer a call
• When you hear an incoming call signal, short press the multi-function key.
To reject a call
• When you hear an incoming call signal, long press the multi-function key.
To pause or skip music tracks
1 When listening to music, press the multi-function key to pause the music
track. Press it again to resume.
2 Press the multi-function key twice to skip to the next track.
3 Press the multi-function key three times to restart the current song. To return
to the previous track press it three times again.
To start the voice assistant
• Long press the multi-function key to start to talk to Google/Siri.
6
This is an internet version of this publication. © Print only for private use.
Page 7

Legal information
Sony STH40D
Prior to use, please read the
This User guide is published by Sony Mobile Communications Inc. or its local aliated company, without
any warranty. Improvements and changes to this User guide necessitated by typographical errors,
inaccuracies of current information, or improvements to programs and/or equipment, may be made by
Sony Mobile Communications Inc. at any time and without notice. Such changes will, however, be
incorporated into new editions of this User guide.
Some functions described in this User guide may not be available for all regions.
All rights reserved.
©2018 Sony Mobile Communications Inc.
4-12-3 Higashi-Shinagawa, Shinagawa-ku, Tokyo 140-0002, Japan
Sony Belgium, bijkantoor van Sony Europe Limited, Da Vincilaan 7-D1, 1935 Zaventem, Belgium
Sony is the trademark or registered trademark of Sony Corporation.
All product and company names mentioned herein are the trademarks or registered trademarks of their
respective owners. Any rights not expressly granted herein are reserved. All other trademarks are property
of their respective owners.
www.sonymobile.com
Visit
All illustrations are for illustration only and may not accurately depict the actual accessory.
FCC Statement
This device complies with Part 15 of the FCC rules. Operation is subject to the
following two conditions: (1) This device may not cause harmful interference, and
(2) This device must accept any interference received, including interference that
may cause undesired operation.
Important information
for more information.
leaflet separately provided.
Industry Canada Statement
CAN ICES-3(B)/NMB-3(B)
7
This is an internet version of this publication. © Print only for private use.
 Loading...