

Sony MHC-MG310AV, MHC-MG110, SS-MG510AV, SS-MG110, SS-RS560 Operating Instructions Manual
...
SONY@
Mini Hi+i
Component
System
4-233-902-12(3)
Operating Instructions
Owner’s Record
The model and serial numbers are located on the rear panel Record the serial number
in the space provided below Refer to them whenever you call upon your Sony dealer
regarding this product
Model No Serial No
MHC-MGSIOAV
MHC-MG31OAV
MHC-MG I 10
0 2001 Sony Corporation

To prevent fire or shock hazard, do not
expose the unit to ram or moisture.
To avmd electrical shock, do not open the cabmet. Refer
serwcmg to qualified personnel only.
Do not mstall the appliance ma confined space, such
as a bookcase or built-m cabmet.
m This appliance IS classified
as a CLASS 1 LASER
product.
The CLASS 1 LASER
PRODUCT MARKING 1s ~
located on the rear exterior.
To prevent fire, do not Cover the ventilation of the
apparatus wth news papers, table-cloths, curtams, etc.
And don’t place lighted candles on the apparatus.
To prevent fire or shock hazard, do not place vases on the
apparatus.
mpr~ous wastes.
NOTICE FOR THE CUSTOMERS IN THE
U.S.A.
WARNING
Thts symbol 1s Intended to alert the
user to the presence of unmsulated
“dangerous voltage” wrthm the
product’s enclosure that may be of
sufficient magmtude to constnte a risk
of electric shock to persons.
This symbol 1s Intended to alert the
user to the presence of important
operatmg and mamtenance (serwcmg)
mstructlons m the literature
accompanymg the appliance.
This eqmpment has been tested and found to comply wth
the limits for a Class B digltal dewce, pursuant to Part 15
of the FCC Rules. These limits are deslgned to prowde
reasonable protectlon agamst harmful mterference m a
resldentml mstallatlon. This eqmpmem generates, uses,
and can radiate radio frequency energy and, if not
mstalled and used m accordance wth the mstructlons,
2
may cause harmful mterference to radio commumcatlons.
However, there IS no guarantee that mterference will not
occur m a particular mstallatlon. If this eqmpment does
cause harmful mterference to radio or telews~on
reception, which can be determmed by tummg the
equtpment off and on, the user 1s encouraged to try to
correct the mterference by one or more of the followmg
measures:
- Reorient or relocate the recewng antenna.
- Increase the separation between the eqmpment and
recewer.
- Connect the eqmpment mto an outlet on a cncutt
different from that to which the recewer IS connected.
- Consult the dealer or an expertenced radio/TV
techntclan for help.
The shlelded Interface cable recommended m this manual
must be used wth this equtpment m order to comply wth
The limits for a digltal dewce pursuant to Subpart B of
Part 15 of FCC Rules.
CAUTION
l
The use of optlcal mstruments wth this product will
mcrease eye hazard.
l
You are cautioned that any changes or modifications
not expressly approved m this manual could void your
authority to operate this eqmpment.
l
Use of this appliance wth some systems may present a
shock or fire hazard. Do not use with any tmxs which
have the followmg markmg located near output.
“WARNING! HAZARDOUS ENERGY’ ..,”
Note to CATV system installer:
This remmder IS prowded to call the CATV system
mstaller’s attention to Ar:lcle 820-40 of the NEC that
prowdes gmdelines for proper grounding and, m
partndar, specifies that the cable ground shall be
connected to the grounding system of the building, as
close to the pomt of cable entry as practical.
NOTICE FOR THE CUSTOMERS IN
CANADA
CAUTION
TO PREVENT ELECTRIC SHOCK, DO NOT USE
THIS POLARIZED AC PLUG WITH AN EXTENSION
CORD, RECEPTACLE OR OTHER OUTLET UNLESS
THE BLADES CAN BE FULLY INSERTED TO
PREVENT BLADE EXPOSURE.
FOR THE CUSTOMERS IN NORTH
AMERICA
/-\ ENERGY STARa 1s a US. reglstered
&$ Ftc ENERGY STAR@ partner, Sony
Corooratlon has determmed that this
product meets the ENERGY STAR@
gmdelines for energy efficiency.
MHC-MGSlOAVIMG3lOAV only
This stereo system IS eqmpped wth the Dolby* Pro Logx
Surround decoder.
* Manufactured under license from Dolby Laboratones.
“Dolby”, “ Pro Lo&‘, and the double-D symbol 00 are
trademarks of Dolby Laboratones. Confidentlal
unpublished works. 01992-1997 Dolby Laboratones.
All rights reserved.
Mam unit
............................................... 4
Remote Control
..................................... 5
_“.“~ _,~~,.-,“” .,----- - ..... _~pm---mm
~”
Getting Started
Hookmg up the system
.......................... 7
Inserting two size AA (R6) battenes into
the remote
........................................
9
Setting up your speakers for Dolby Pro
Logic” ...........................................
10
Setting the time
.................................... 11
Saving the power m standby mode ...... 12
_.._ ... _--_ -,_ ,_--.,~= .... _“I_ ; Y.-l ~,-~-,-_ ....
CD
Loading a CD
...................................... 12
Playing a CD - Normal Play/
Shuffle Play/Repeat Play .............. 14
Programing CD tracks
- Program Play ............................ 15
Labeling a CD
- Disc Memo
...............................
16
Using the CD display .......................... 17
Tuner
Presetting radio stations..
.....................
18
Listening to the radio
- Preset Tuning
...........................
19
Labeling the preset stations
- Station Name ............................ 19
Tape
Loading a tape ..................................... 20
Playing a tape ......................................
20
Recording to a tape
- CD Synchro Recording/
Recording Manually/
Program Edit
.................................
21
Timer-recording radio programs
........
.23
Sound Adjustment
Adjusting the sound
- DBFB/GROOVE/
V-GROOVE . . . . . . . . . . . . . . . . . . . . . . * . . . . . . . . . . .
24
Selecting
the sound effect . . . . . . . . . . . . . . . . . . . . 24
Selecting the surround effect . . . . . . . . . . . . . . . 25
Enjoying Dolby Pro Logic Surround
sound*
. . . . . . . . . . . . . . . . . . . . . . . . . . . . . . . . . . . . . . . . . . . 25
Selecting the sound formation
- Multi room selector* . . . . . . . . . . . . . . . . 25
mpp-m--_II--
~“~____
Other Features
Enhancing video game sound
- Game Sync . . . . . . . . . . . . . . . . . . . . . . . . . . . . . 26
Falling asleep to music
- Sleep Timer . . . . . . . . . . . . . . . . . . . . . . . . . . . . . 26
Wakmg up to music
- Daily Timer . . . . . . . . . . . . . . . . . . . . . . . . . . .
26
,_,, ,, ._ ,“,,“,_.~,_“~.,~,~i ,_ ,,_LIX_. _lll,,“,,^__
~... ““.
Using an Optional Keyboard
Settmg the keyboard . . . . . . . . . . . . . . . . . . . . . . . . . . . . 27
Labeling titles through the keyboard . . . 27
Operatmg the system through the
keyboard . . . . . . . . . . . . . . . . . . . . . . . . . . . . . . . . . . 28
- .,, _ ,,.......... “..“.““~ _^__“, .~ ,.,,,.,,.,,., .,,__ ~“.“,,~ ,^. -
Optional Components
Hookmg up the optional
AN components . . . . . . . . . . . . . . . . . . . . . . . . 28
Connectmg a video game machme . . . . . . 29
Connectmg a sub woofer speaker** . . . . 30
Connecting a DVD player* . . . . . . . . . . . . . . . . . 30
__, I-,_-, “__, ,~~ .,”
_ _ “, ~,___.,~ ,.,, _ _,,,,, _ ,._- 1 “__,,-,,“..-
Additional Information
Precautions . . . . . . . . . . . . . . . . . . . . . . . . . . . . . . . . . . . . .
31
Troubleshootmg . . . . . . . . . . . . . . . . . . . . . . . . . . . . . . . . . . . 32
Messages . . . . . . . . . . . . . . . . . . . . . . . . . . . . . . . . . . . . . . . . . . . . .
34
Specifications . . . . . . . . . . . . . . . . . . . . . . . . . . . . . 35
* MHC-MG5 1 OAV/MGS 1 OAV only
** MHC-MG3 1OAV only
3
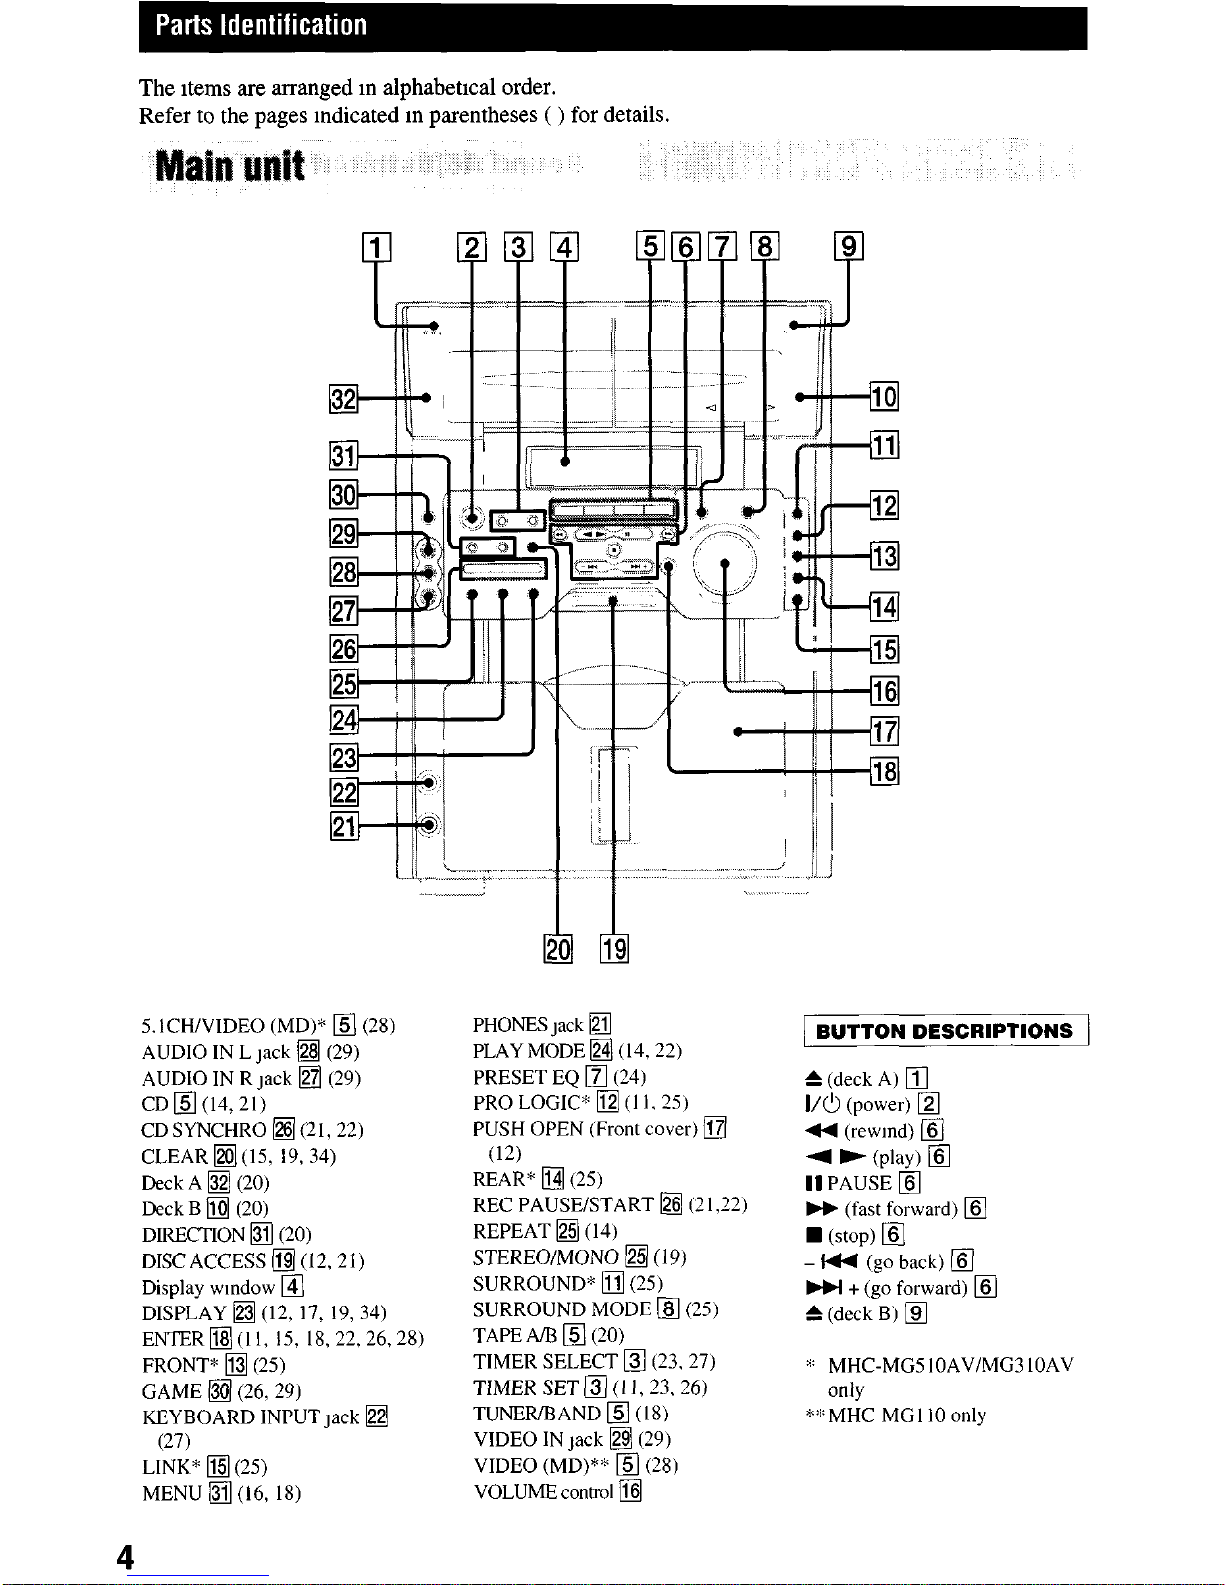
The items are arranged m alphabetlcal order.
Refer to the pages indicated m parentheses ( ) for details.
5.1CH/VIDEO (MD)* q (28)
AUDIO IN L Jack q (29)
AUDIO IN R Jack q (29)
CD@(14,21)
CDSYNCHRO q j(21, 22)
CLEAR q (15, 19,34)
Deck A q (20)
Deck B q (20)
DIRECTION q (20)
DISC ACCESS I@ (12,2 I)
Display wndow
q
DISPLAY q (12, 17, 19,34)
ENTERa(l1, 15, l&22,26,28)
FRONT* q (25)
GAME •j (26, 29)
KEYBOARD 1NPuT~ack
q
(27)
LINK” fl(25)
MENU q (16, 18)
4
PHONES Jack
q
PLAY MODE q (14,22)
PRESET EQ q (24)
PRO LOGIC* q (I 1,25)
PUSH OPEN (Front cover)
q
(12)
REAR” q (25)
REC PAUSE/START •j (2 I ,22)
REPEAT •j (14)
STEREO/MONO q (19)
SURROUND* fl(25)
SURROUND MODE q (25)
TAPE A/B q (20)
TIMER SELECT q (23.27)
TIMER SET q (ll(23.26)
TUNER/BAND q (18)
VIDEO IN Jack q (29)
VIDEO (MD)“”
q
(28)
VOLUME conti-01
q
1 BUTTON DESCRIPTIONS /
& (deck A)
q
l/O (power)
q
44 (rewnd)
q
4 ) Way) IZd
II PAUSE
q
W (fast forward)
q
n
(stop)
q
- H1 (go back) •l
HI + (go forward)
q
f (deck B)
q
SC MHC-MG5 IOAV/MG3 IOAV
only
*:;:MHC-MG1 10 only
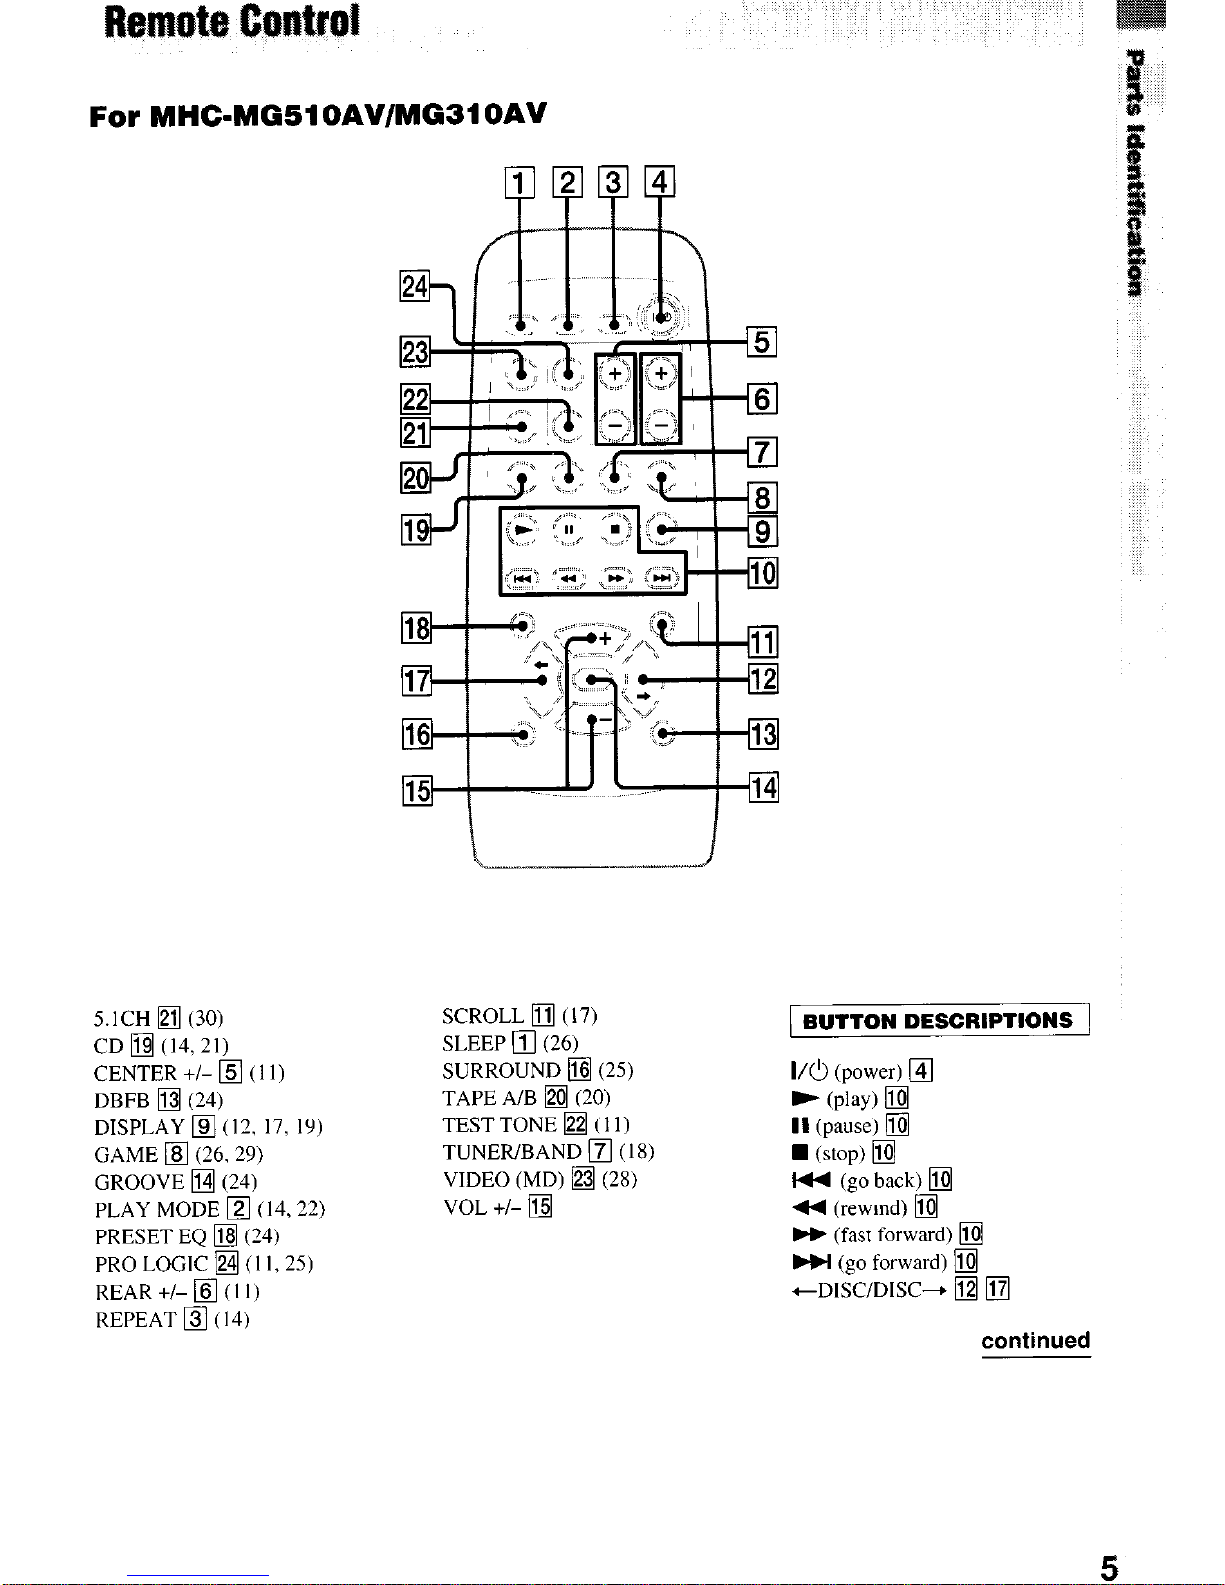
For MHC-MG51 OAV/MG31 OAV
5.1CH q (30)
CD q (14,21)
CENTER +/- q (11)
DBFB q (24)
DISPLAY q (12, 17, 19)
GAME q (26.29)
GROOVE q (24)
PLAY MODE q (14.22)
PRESET EQ q (24)
PRO LOGIC q (I 1.25)
REAR +/- q (I I)
REPEAT q (I 4)
SCROLL q (17)
SLEEP ijj (26)
SURROUND q (25)
TAPE A/B q (20)
TESTTONE
q
(11)
TUNER/BAND
q
(IS)
VIDEO (MD) q (28)
VOL +I-
q
BUTTON DESCRIPTIONS
I/O (power)
q
) (play) •l
II (pause)
q
n
(stop)
q
I44 (go back)
q
44 (rewmd)
q
H (fast forward)
q
HI (go forward)
q
tDISC/DISC--r
q q
continued
5
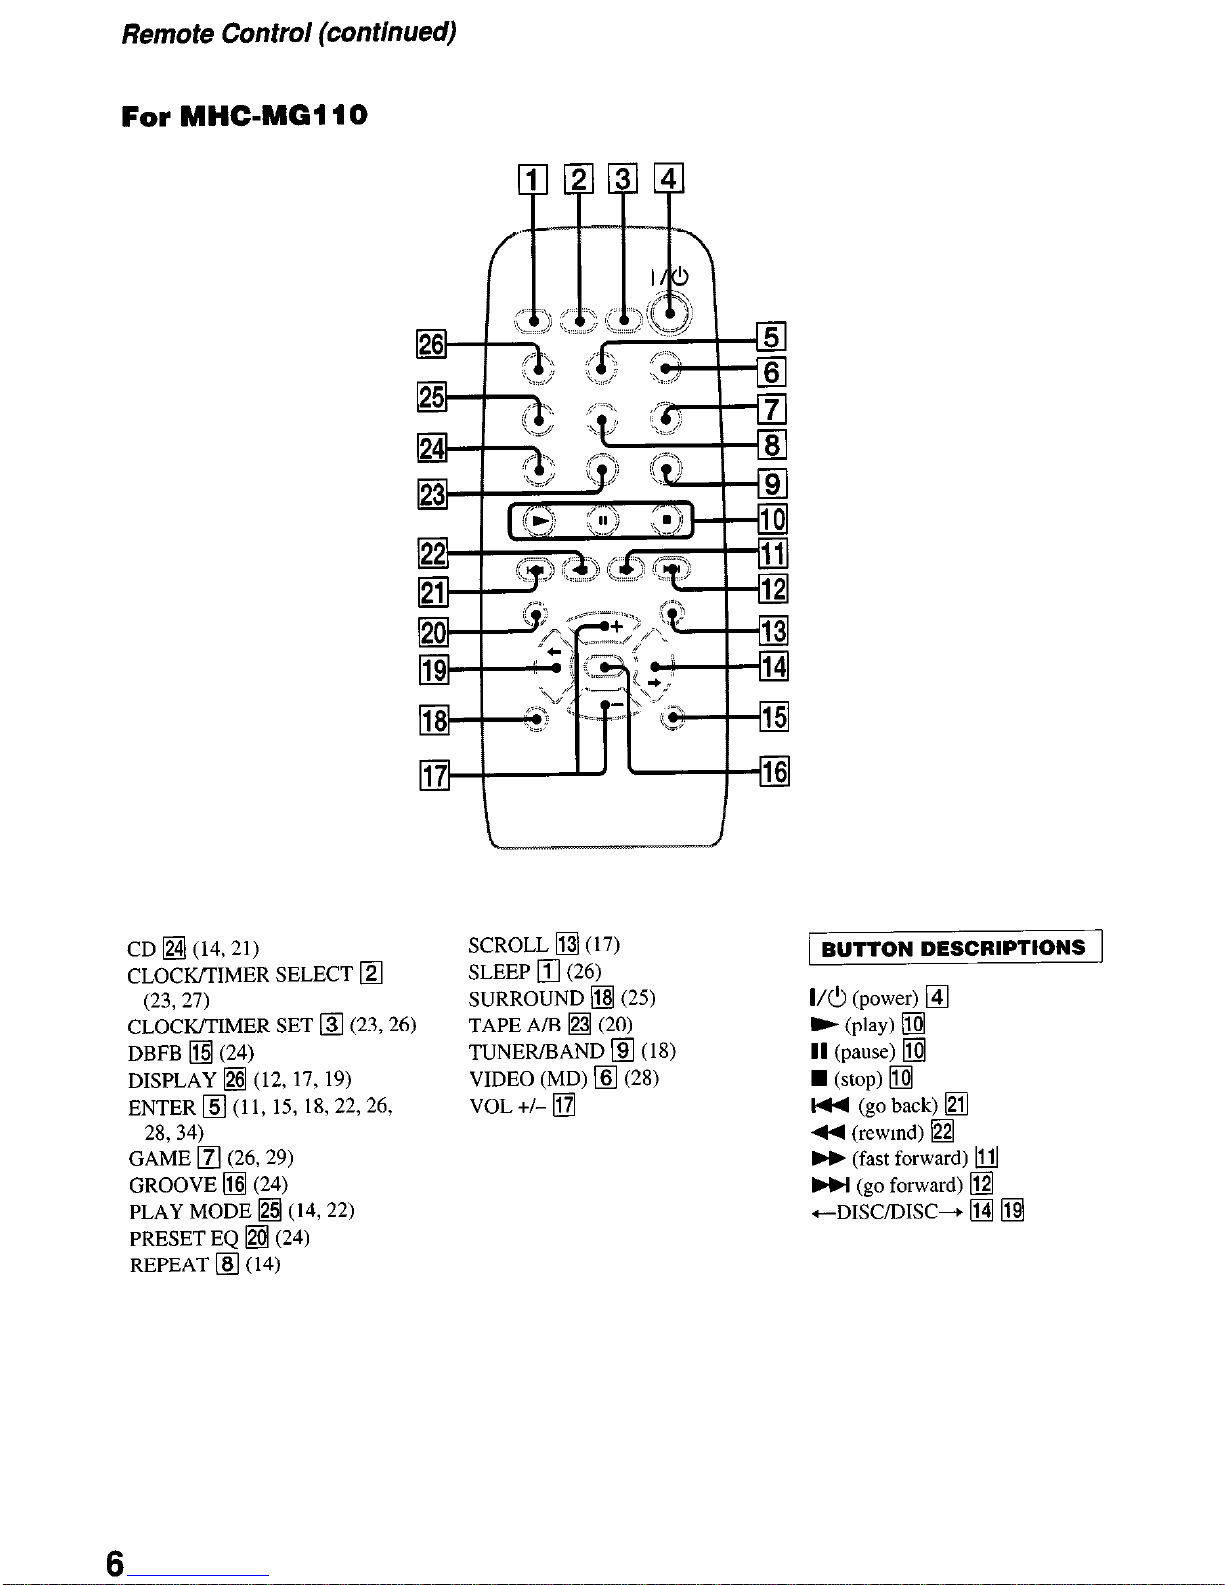
Remote Control (continued)
For MHC-NAG1 10
CD q (14,21)
CLOCK/TIMER SELECT
q
(23,27)
CLOCK/TIMER SET q (23,26)
DBFB q (24)
DISPLAY •j (12, 17, 19)
ENTER q (11, 15, 18,22,26,
28,34)
GAME q (26, 29)
GROOVE i&j (24)
PLAY MODE q (14,22)
PRESET EQ q (24)
REPEAT q (14)
SCROLL q (17)
SLEEP q (26)
SURROUND q (25)
TAPE A/B q (20)
TUNER/BAND q (18)
VIDEO (MD) q (28)
VOL +/-
q
BUTTON DESCRIPTIONS 1
I/O (power)
q
t (play) Ia
II (pause)
q
n (stop) ljjj
I44 (go back)
q
44 (rewmd)
q
W (fast forward)
q
W (go forward)
q
+-DISC/DISC--,
q q

Perform the followmg procedure q to q to hook up your system usmg the supplied cords and
f-9
AM loop antenna
Rear surround
speaker (Right)*
FM antenna
Center surround speaker*
Rear surround
speaker (Left)*
MHC-MGSlOAV IS the model used for illustration purpose.
* MHC-MGS lOAV/MG3 1OAV only
*‘: MHC-MC5 1 OAV only
Hooking up the system (continued)
0 Connect the front speakers.
Connect the speaker cords to the FRONT
SPEAKER Jacks on the unit as shown
below.
Insert only the stripped portion
I
Red (0)
Black (0)
q
Connect the rear surround speakers.
(MHC-MGWOAVIMG310AV only)
Connect the speaker cords to the
SURROUND SPEARER REAR Jacks on
the unit and to the Jacks on the rear
surround speakers as shown below.
Insert only the stripped portion
Red (0)
q
Connect the center surround speaker.
(MHC-MG510AVIMG310AV only)
Connect the speaker cords to the
SURROUND SPEARER CENTER Jacks
on the unit as shown below.
Insert only the stripped portion
Red (0)
B&k (0)
q
Connect the sub woofer.
(MHC-MGJlOAV only)
Connect the speaker cords to the
SURROUND SPEARER SUB WOOFER
Jacks on the unit as shown below.
Insert only the stripped portion
I
Black (0)
B&k (0)
q
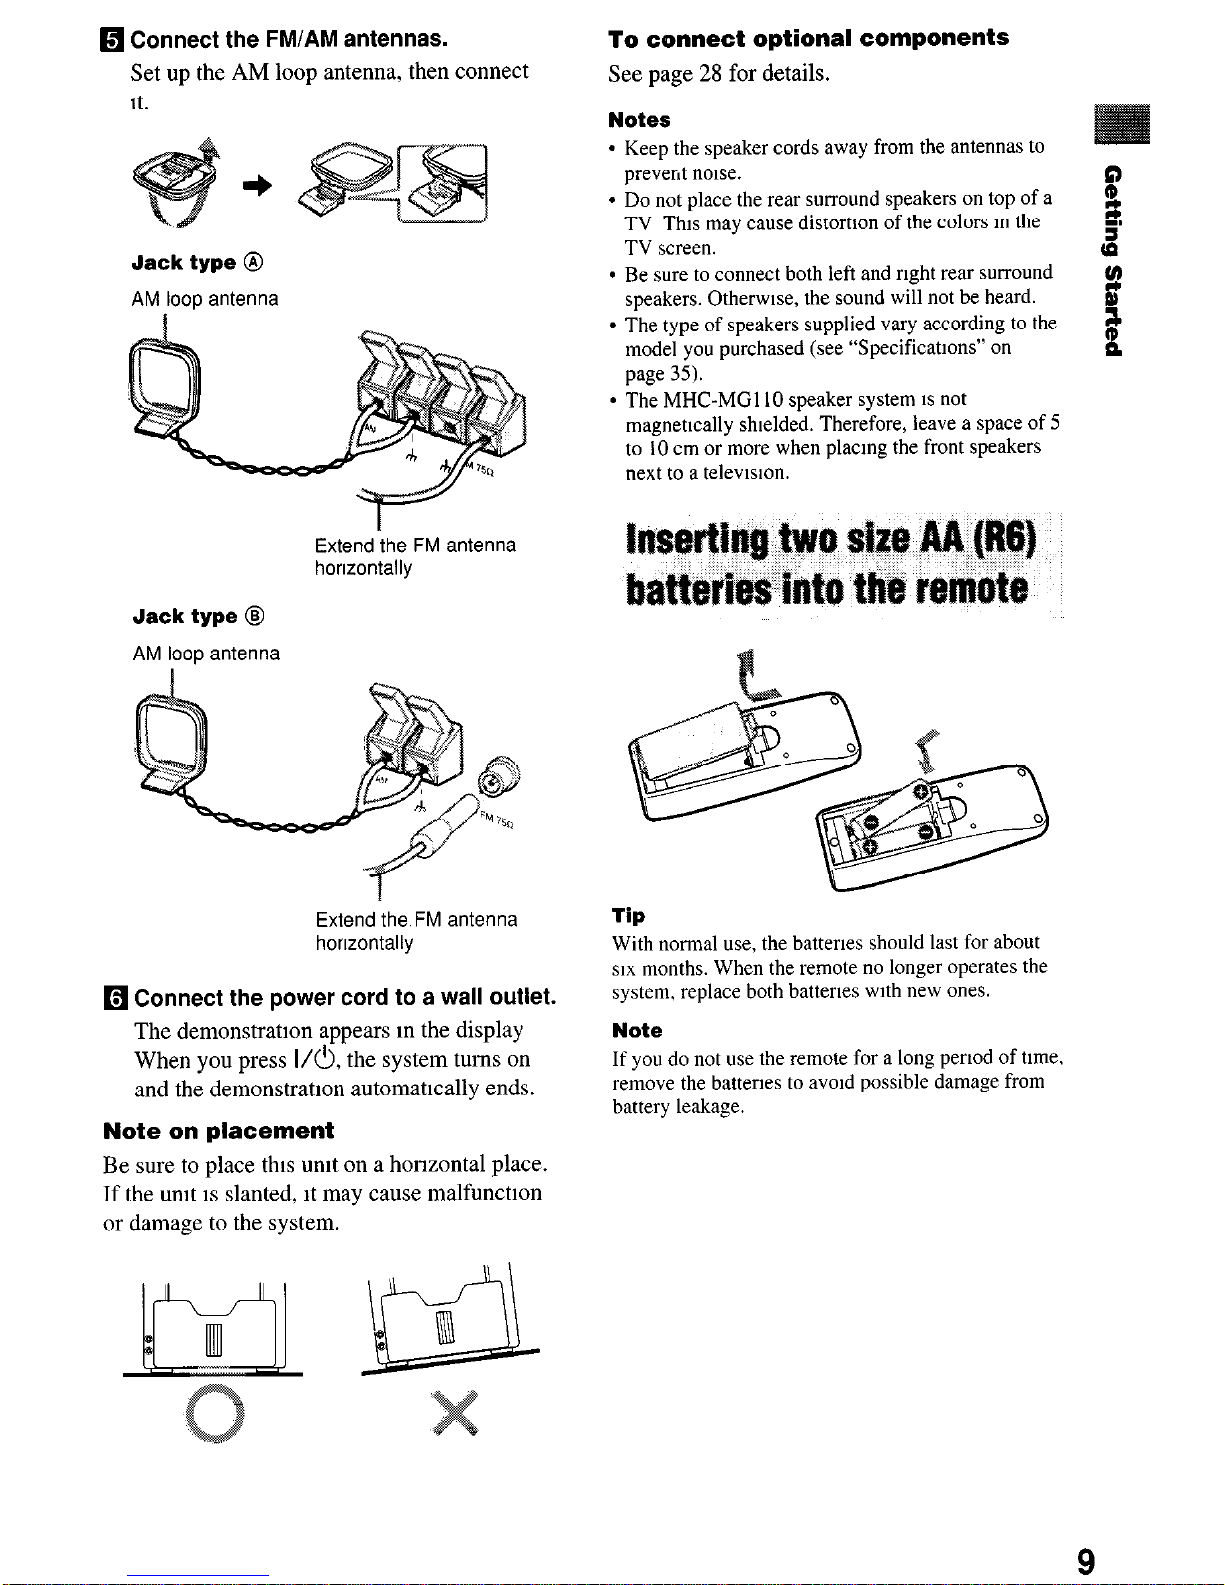
Connect the FM/AM antennas.
Set up the AM loop antenna, then connect
1t.
Jack type @
AM IOOD antenna
Extend the FM antenna
homontally
Jack type @
AM loop antenna
To connect optional components
See page 28 for details.
Notes
l
Keep the speaker cords away from the antennas to
prevent notse.
l
Do not place the rear surround speakers on top of a
TV Thts may cause distortton of the colors m the
TV screen.
l
Be sure to connect both left and rrght rear surround
speakers. Otherwtse, the sound will not be heard.
l
The type of speakers supplied vary according to the
model you purchased (see “Specificatrons” on
page 35).
l
The MHC-MGl 10 speaker system ts not
magnettcally shtelded. Therefore, leave a space of 5
to 10 cm or more when placmg the front speakers
next to a televtston.
Extend the FM antenna
horlzontally
q
Connect the power cord to a wall outlet.
The demonstration appears m the display
When you press I/b, the system turns on
and the demonstration automatically ends.
Note on placement
Be sure to place this unit on a honzontal place.
If the umt 1s slanted, it may cause malfunction
or damage to the system.
Tip
With normal use, the battertes should last for about
SIX months. When the remote no longer operates the
system, replace both battertes wrth new ones.
Note
If you do not use the remote for a long pertod of ttme.
remove the batterms to avotd possible damage from
battery leakage.
9
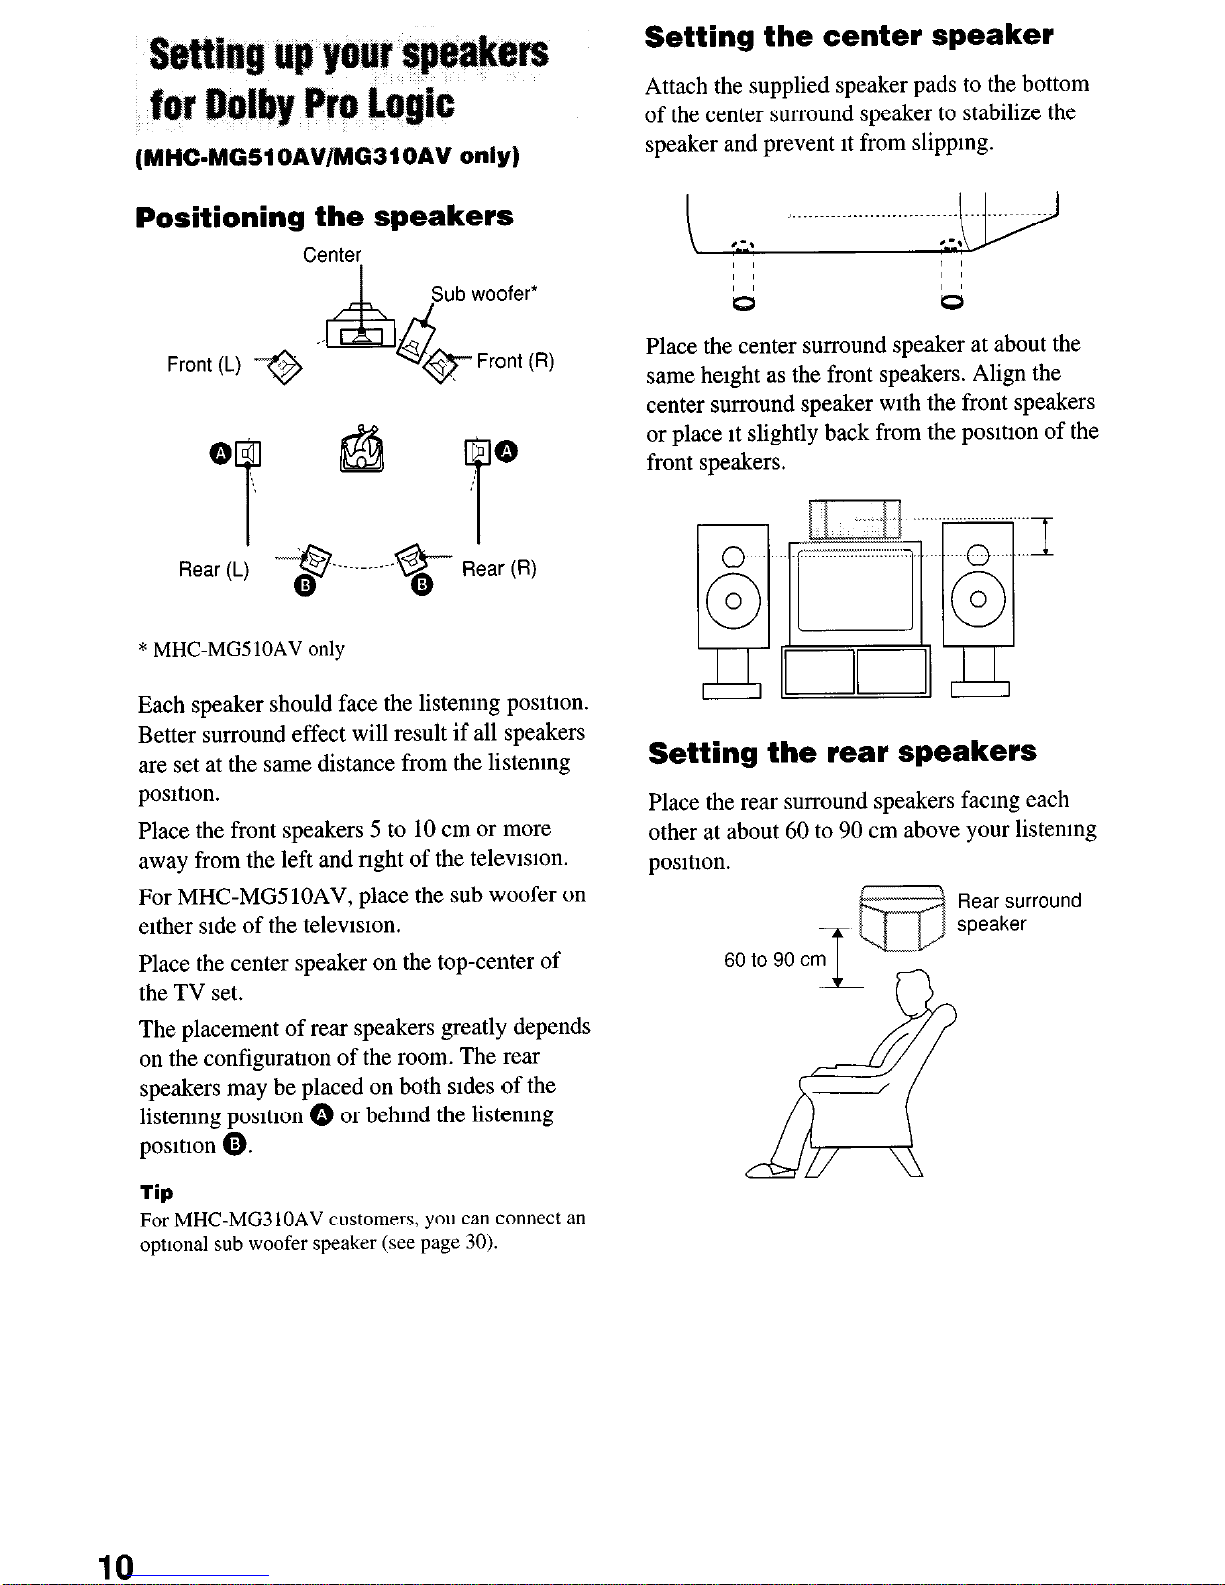
(MHC-MGSiOAVfMG31OAV only)
Positioning the speakers
Center
Sub woofer’
.’ Front(L) -‘@
d
@-
Front (R)
* MHC-MGS 1OAV only
Each speaker should face the listemng position.
Better surround effect will result if all speakers
are set at the same distance from the listemng
position.
Place the front speakers 5 to 10 cm or more
away from the left and nght of the televlslon.
For MHC-MGSlOAV, place the sub woofer on
either side of the television.
Place the center speaker on the top-center of
the TV set.
The placement of rear speakers greatly depends
on the configuration of the room. The rear
speakers may be placed on both sides of the
listening position 0 or behind the listening
position 0.
Tip
For MHC-MG310AV customers, you can connect an
optmnal sub woofer speaker (see page 30).
Setting the center speaker
Attach the supplied speaker pads to the bottom
of the center surround speaker to stabilize the
speaker and prevent it from slippmg.
I
I I
ki
b;
Place the center surround speaker at about the
same height as the front speakers. Align the
center surround speaker with the front speakers
or place tt slightly back from the position of the
front speakers.
Setting the rear speakers
Place the rear surround speakers facmg each
other at about 60 to 90 cm above your listemng
position.
60 to 90 c
Rear surround
speaker
10

Adjusting the speaker volume
of each speaker
- Test tone
1 Press PRO LOGIC.
“DOLBY PL ON” appears.
2 Press TEST TONE on the remote.
The test tone IS heard from the speakers m
the followmg order.
Front (left) ---t Center + Front (nght) --,
Rear + Front (left) + ...
3 From your listenmg position, press
CENTER (+/-) and REAR (+/-) on the
remote to adjust the volume until the
each volume level becomes the same.
4 Press TEST TONE when you fimsh
adjusting.
The test tone turns off.
Note
The test tone feature works only for Dolby Pro Logtc
Surround sound.
1
Turn on the system.
2 Press TIMER SET
When you set the clock for the first time, go
t
::
to step 5.
9
0
3 Press - Itl or W + repeatedly to
fn
select “CLOCK SET”
B
4 Press ENTER.
3
P
5 Press -
W or W + repeatedly to set
the hour.
6
Press ENTER.
7 Press - W or H + repeatedly to set
the mmute.
8
Press ENTER.
Tip
If you made a mtstake or want to change the time,
start OYer from step 1.
Note
The clock settmgs are canceled when you disconnect
the power cord or if a power failure occurs.
11
Press DISPLAY repeatedly while the
system IS off. Each time you press the
button, the system switches cyclically as
follows:
Demonstration + Clock display + Power
Saving Mode
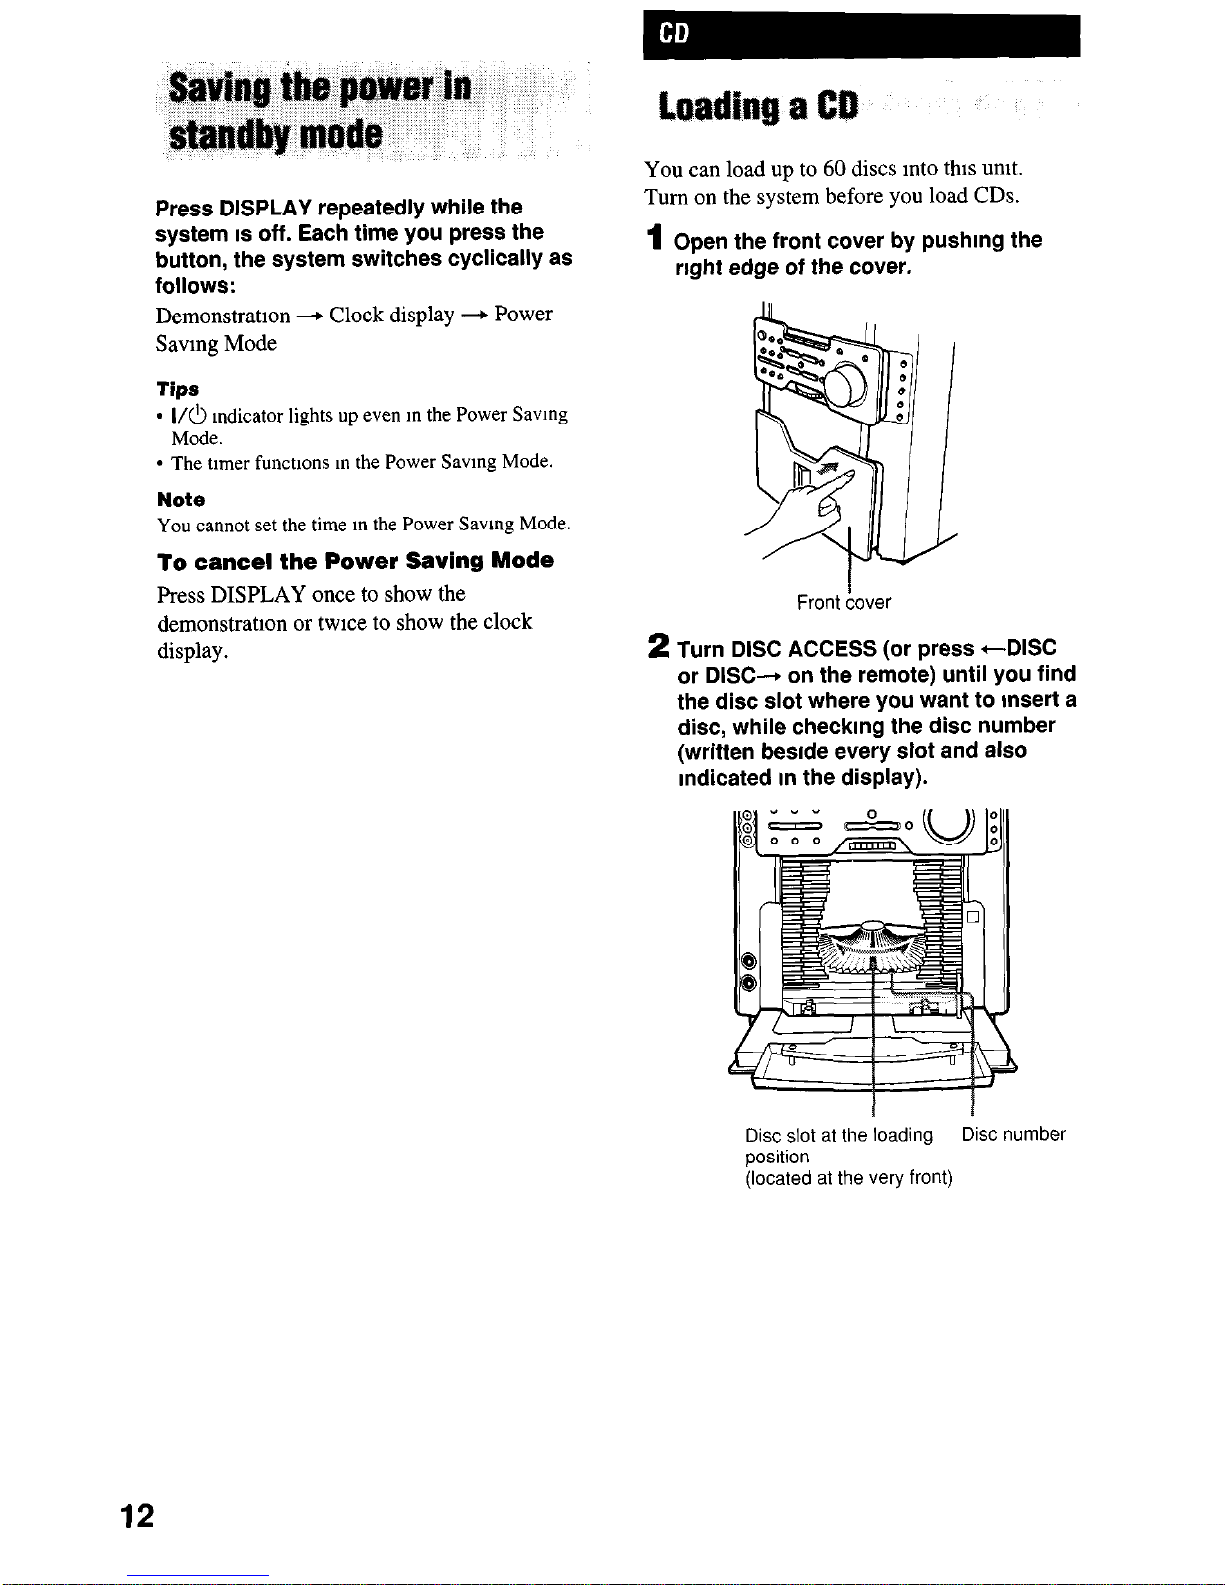
You can load up to 60 discs mto this unit.
Turn on the system before you load CDs.
1
Open the front cover by pushmg the
right edge of the cover.
Tips
l
I/e Indicator lights up even m the Power Savmg
Mode.
l
The timer functions m the Power Savmg Mode.
Note
You cannot set the time m the Power Saving Mode.
To cancel the Power Saving Mode
Press DISPLAY once to show the
demonstration or twice to show the clock
display.
Front &over
2 Turn DISC ACCESS (or press +DlSC
or DISC+ on the remote) until you find
the disc slot where you want to msert a
disc, while checkmg the disc number
(written beside every slot and also
indicated in the display).
Disc slot at the loading Disc number
position
(located at the very front)
12
 Loading...