

Page 1
4-570-617-92(1)
Personal Audio
System
Operating Instructions
Getting started
About SongPal
Listening to music through a
BLUETOOTH connection
Listening to music via a WiFi network
Listening to music with
connected components
Additional information
Refer to the Wi-Fi Startup Guide (separate document) for how to listen
to music stored in your PC or other device over your Wi-Fi network.
SRS-X77
Page 2
Before operating the system, please read this
Polarity of the plug
guide thoroughly and retain it for future reference.
To reduce the risk of fire, do not cover the
ventilation opening of the appliance with
newspapers, tablecloths, curtains, etc.
Do not expose the appliance to naked flame
sources (for example, lighted candles).
To reduce the risk of fire or electric shock, do not
expose this apparatus to dripping or splashing,
and do not place objects filled with liquids, such as
vases, on the apparatus.
Do not install the appliance in a confined space,
such as a bookcase or built-in cabinet.
Do not expose batteries or apparatus with battery
installed to an excessive heat such as sunshine,
fire or the like.
As the main plug is used to disconnect the unit
from the mains, connect the unit to an easily
accessible AC outlet. Should you notice an
abnormality in the unit, disconnect the main plug
from the AC outlet immediately.
The system is not disconnected from the mains as
long as it is connected to the AC outlet, even if the
system itself has been turned off.
CAUTION
When using a LAN cable, use a shielded type.
It should be installed and operated with at least
20 cm and more between the radiator and
person’s body (excluding extremities: hands,
wrists, feet and ankles).
Disposal of Old Electrical &
Electronic Equipment
(Applicable in the European
Union and other European
countries with separate
collection systems)
Precautions
On safety
The nameplate indicating the Sony
trademark, model number and electrical
rating is located on the bottom exterior of
this unit.
The MAC address is located on the bottom
exterior of this unit.
MAC1: MAC address of wired network
MAC2: MAC address of Wi-Fi network
Before operating the unit, be sure that the
operating voltage of the unit is identical
with that of your local power supply.
Where purchased Operating voltage
All countries/regions
Notes on the AC adaptor
When connecting or disconnecting the AC
adaptor, turn off the unit beforehand.
Otherwise, it may cause malfunction.
Use only the supplied AC adaptor. To
avoid damaging the unit, do not use any
other AC adaptor.
Plug the AC adaptor into a nearby wall
outlet. In the case of a problem, unplug it
from the wall outlet immediately.
Do not install the AC adaptor in a confined
space, such as a bookcase or built-in
cabinet.
To reduce the risk of fire or electric shock,
do not expose the AC adaptor to dripping
or splashing, and do not place objects
filled with liquids, such as vases, on the
AC adaptor.
120 V – 240 V AC, 50
Hz/60 Hz
On placement
Do not set the unit in an inclined position.
Do not leave the unit in a location near
heat sources, or in a place subject to
direct sunlight, excessive dust, moisture,
rain or mechanical shock.
GB
2
Page 3
On operation
Note
Do not insert any small objects, etc., into
the jacks or ventilation hole on the rear of
the unit. The unit may short out or
malfunction.
On cleaning
Do not use alcohol, benzine, or thinner to
clean the cabinet.
Others
If you have any questions or problems
concerning this unit that are not covered
in this manual, please consult your
nearest Sony dealer.
When disposing of or giving away this
unit, make sure to initialize it to reset all
settings to the factory defaults (page 20).
If the inside of the unit heats up after
extended use in a hot environment,
charging may not start. This is to protect
the battery and is not a malfunction.
When the inside of the unit has cooled
down, charging will start.
Disposing of the unit
For environment protection, remove the
built-in lithium-ion battery pack from the
unit.
Before removing the battery, drain the
battery by removing the AC adaptor and
using the unit only with the battery.
Take out the lithium-ion battery for
recycling.
Do not open the cabinet other than
when disposing of the unit.
1
Turn off the unit and remove the AC
adaptor.
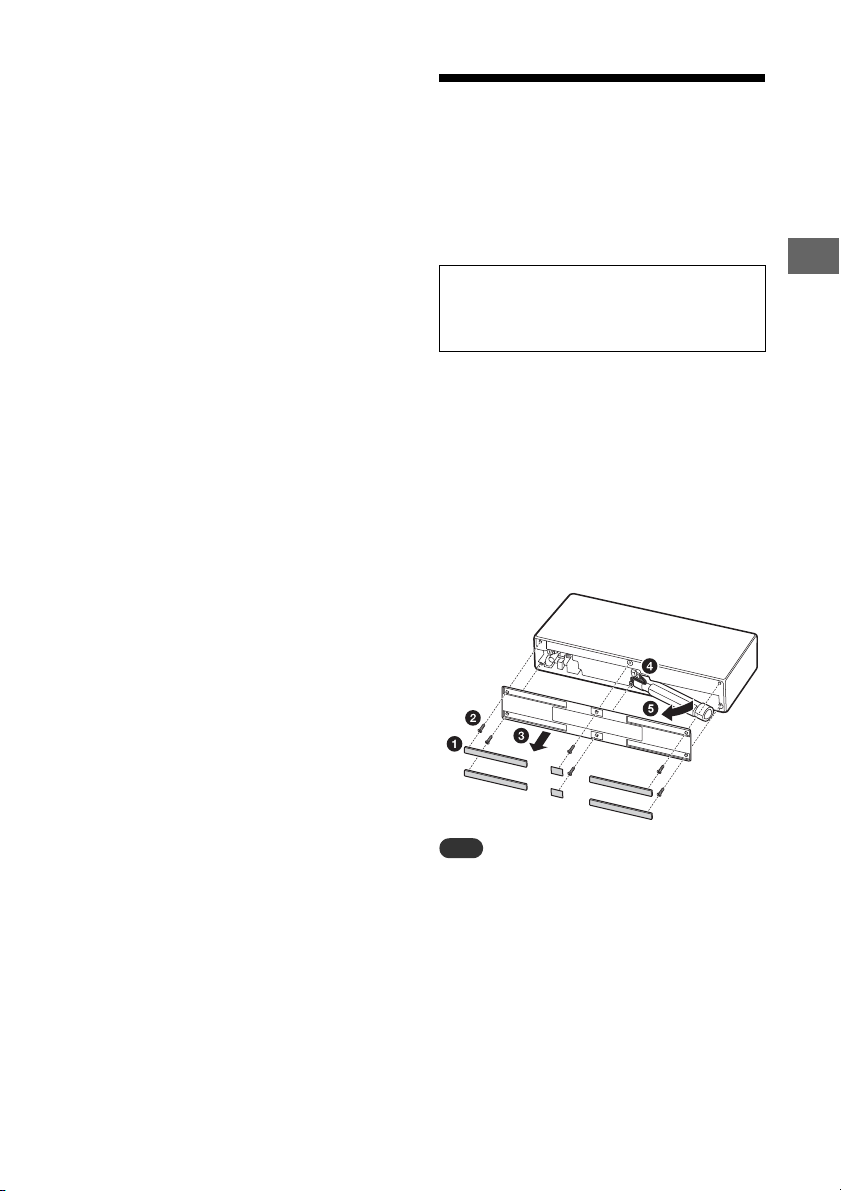
2
Detach the cover of the bottom of the
unit to remove the battery pack.
Remove the 6 rubber covers from the
bottom of the unit.
Remove the 6 screws.
Remove the cover.
Remove the connector plug from the
unit.
Remove the battery.
GB
Be careful not to damage the cord cover with
metallic tweezers, etc. when you remove the
battery pack from the unit.
Do not put the battery into a fire. Also, do not
heat the battery, or apply pressure to the
battery.
GB
3
Page 4
Documents provided
On copyrights
Operating Instructions
(this document)
Explains important safety
information, BLUETOOTH
connection method,
troubleshooting, etc.
Wi-Fi Startup Guide
(separate document)
Explains how to listen to
music stored in your PC or
other device over your WiFi network.
Help Guide (web
document for a PC/
smartphone)
Explains details about the
unit; network and
BLUETOOTH connection
method with various
devices, High-Resolution
Audio playback method,
etc.
http://rd1.sony.net/help/speaker/srs-x77/h_zz/
Windows, the Windows logo, and
Windows Media are either registered
trademarks or trademarks of Microsoft
Corporation in the United States and/or
other countries.
This product is protected by certain
intellectual property rights of Microsoft
Corporation. Use or distribution of such
technology outside of this product is
prohibited without a license from
Microsoft or an authorized Microsoft
subsidiary.
Apple, the Apple logo, AirPlay, iPad,
iPhone, iPod, iPod nano, iPod touch,
iTunes, Mac and OS X are trademarks of
Apple Inc., registered in the U.S. and other
countries. iPad Air and iPad mini are
trademarks of Apple Inc.
App Store is a service mark of Apple Inc.
“Made for iPod,” “Made for iPhone,” and
“Made for iPad” mean that an electronic
accessory has been designed to connect
specifically to iPod, iPhone, or iPad,
respectively, and has been certified by the
developer to meet Apple performance
standards. Apple is not responsible for
the operation of this device or its
compliance with safety and regulatory
standards. Please note that the use of this
accessory with iPod, iPhone, or iPad may
affect wireless performance.
“ ” is a mark of the Wi-Fi Alliance.
Wi-Fi®, Wi-Fi Protected Access® and Wi-Fi
Alliance® are registered marks of the Wi-Fi
Alliance.
Wi-Fi CERTIFIED™, WPA™, WPA2™ and
Wi-Fi Protected Setup™ are marks of the
Wi-Fi Alliance.
“S-Master” is a trademark of Sony
Corporation.
ClearAudio+ and are
trademarks of Sony Corporation.
“DSEE” and are trademarks of
Sony Corporation.
MPEG Layer-3 audio coding technology
and patents licensed from Fraunhofer IIS
and Thomson.
GB
4
Page 5

The BLUETOOTH® word mark and logos
are owned by the Bluetooth SIG, Inc. and
any use of such marks by Sony
Corporation is under license. Other
trademarks and trade names are those of
their respective owners.
The N-Mark is a trademark or registered
trademark of NFC Forum, Inc. in the
United States and in other countries.
Google Play and Android are trademarks
of Google Inc.
Google Cast™ and the Google Cast Badge
are trademarks of Google Inc.
“Xperia” and “Xperia Tablet” are
trademarks of Sony Mobile
Communications AB.
WALKMAN® and WALKMAN® logo are
registered trademarks of Sony
Corporation.
LDAC™ and LDAC logo are trademarks of
Sony Corporation.
DLNA™, the DLNA Logo and DLNA
CERTIFIED™ are trademarks, service
marks, or certification marks of the Digital
Living Network Alliance.
AOSS is a trademark of BUFFALO INC.
This product incorporates Spotify
software which is subject to 3rd party
licenses found here:
https://developer.spotify.com/esdkthird-party-licenses/
Spotify and Spotify logos are trademarks
of the Spotify Group.
The system names and product names
indicated in this manual are generally the
trademarks or registered trademarks of
the manufacturer.
™ and ® marks are omitted in this manual.
Notes on the License
This product contains software that Sony uses
under a licensing agreement with the owner of
its copyright. We are obligated to announce the
contents of the agreement to customers under
requirement by the owner of copyright for the
software.
Please read the contents of the license
described in the separate document included.
Notice on GNU GPL/LGPL applied
software
This product contains software that is subject to
the following GNU General Public License
(hereinafter referred to as “GPL”) or GNU Lesser
General Public License (hereinafter referred to
as “LGPL”). These establish that customers have
the right to acquire, modify, and redistribute the
source code of said software in accordance with
the terms of the GPL or LGPL supplied. The
source code for the above-listed software is
available on the Web.
To download, please access the following URL
then select the model name “SRS-X77”.
URL: http://oss.sony.net/Products/Linux/
Please note that Sony cannot answer or respond
to any inquiries regarding the content of the
source code.
Notes on the update
If you use this unit while connected to the
Internet via a wired or Wi-Fi network, the unit
can update to the latest software automatically.
By updating the software, new features will be
added enabling you to experience more
convenient and stable use.
If you do not want to automatically update the
software, you can disable this function by using
the SongPal installed on your smartphone/
iPhone.
However, the software may be updated
automatically for stable use, etc., even if you
disable this function. Also, if you disable this
function, you can still update the software
manually.
For details about how to set and operate, refer
to the Help Guide.
The unit may not be operational while updating.
Disclaimer regarding services
offered by third parties
Services offered by third parties may be
changed, suspended, or terminated without
prior notice. Sony does not bear any
responsibility in these sorts of situations.
GB
5
Page 6

Table of Contents
Precautions......................................2
Disposing of the unit........................3
Documents provided...................... 4
On copyrights.................................. 4
Getting started
Location and function of
controls.........................................7
About SongPal
What you can do with SongPal ......10
Listening to music through a
BLUETOOTH connection
Pairing the unit with a BLUETOOTH
device and listening to music......11
Listening to music by one-touch
action (NFC) ................................ 13
Listening to music via a Wi-Fi
network
Selecting the method of network
connection..................................14
Connecting with a PC .....................14
Listening to the same music from the
multiple speakers (SongPal Link
function) .....................................16
Listening to various Internet music
services.......................................16
Additional information
Troubleshooting ............................18
What is BLUETOOTH wireless
technology? ...............................20
Specifications.................................21
Listening to music with
connected components
Listening to music on an external
device (AUDIO IN) ....................... 17
GB
6
Page 7

Getting started
Rear of the unit
Location and function of controls
Getting started
UPDATE button
Indicates the status of the unit’s software
update.
CHARGE indicator
Display the charging status of the built-in
lithium-ion battery by the lighting and
flashing of the indicator.
VOL (volume) –/+ buttons
Tap to adjust the volume.
The / (on/standby) indicator flashes
according to the volume adjustment
when tapped.
/ (on/standby) button/indicator
Tap to turn the power of the unit on and
off.
LINK indicator
Indicates the status of the network
connection of the unit.
NETWORK button/indicator
Tap to switch the unit to NETWORK
mode.
Tap to use various music services or
listen to music stored in a device on the
home network with the unit.
(BLUETOOTH) PAIRING button/
indicator
Tap when pairing or connecting with a
BLUETOOTH device or listening to music
with a BLUETOOTH device.
Tap once to switch the unit to
BLUETOOTH mode. Tap and hold to
switch the unit to pairing mode.
AUDIO IN button/indicator
Tap to listen to music in a device
connected to the AUDIO IN jack. The
AUDIO IN indicator lights up when
tapped.
GB
7
Page 8
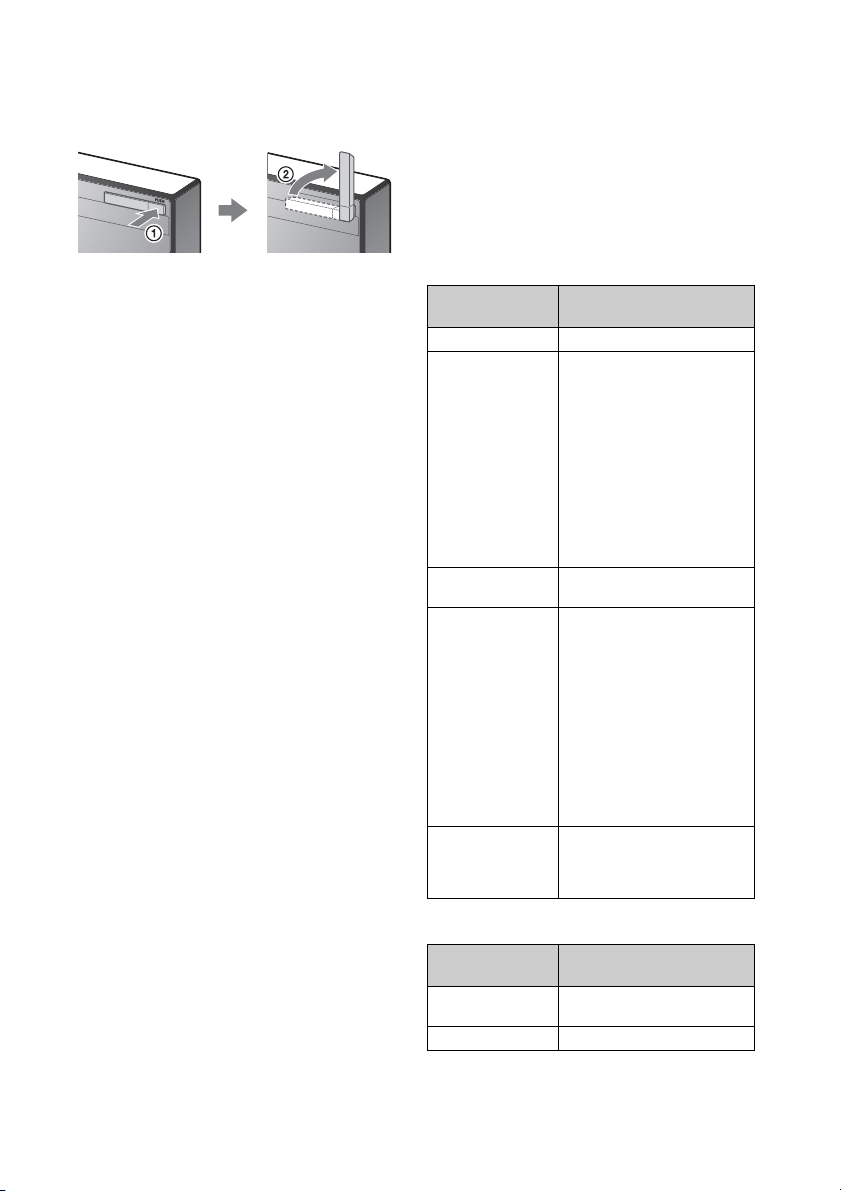
Wi-Fi antenna (aerial)
Set upright during Wi-Fi connection as
below.
AUDIO IN jack
Connect to the headphone jack of a
portable audio device, etc., using a audio
cable (not supplied).
DC IN 18 V jack
Connect the AC adaptor (supplied).
When the indicator is lit or flashing
Push the right side of the antenna
(aerial), and the antenna (aerial)
comes out from the recess.
Bring up the antenna (aerial).
N-Mark
If your smartphone is NFC-compatible,
touch the smartphone on the N-Mark.
The unit will turn on automatically and
registering (pairing) and BLUETOOTH
connection can be made.
NETWORK OFF/ON switch
Turn the network function on and off. Set
this switch to ON when connecting to the
network.
RESET button
Push to reset the unit.
WPS button
Press and hold when connecting to a WiFi network.
Beeps will be heard by pressing and
holding the WPS button for 2 seconds,
which indicates that the unit is ready to
connect to a wireless router.
If your wireless router has a WPS button,
you can use this button to connect to the
network.
DC OUT ONLY port (USB)
Connect a USB device, such as
smartphone, using a USB cable (not
supplied) to charge from the unit. If you
play music on the connected USB device,
sound will not be output from the unit.
LAN port
Use a LAN cable (not supplied) to
connect the PC or the wireless router.
When using a LAN cable, use a shielded
type.
/ (on/stan dby) indicator
Indicator status
(color)
Lights up (green) The unit is turned on.
Lights up (orange) The unit is in the
Turns off The unit is in the standby
Flashes (green) • If you tap the / (on/
Flashes (red) The unit is in the protect
Unit status
BLUETOOTH/Network
standby mode.
The BLUETOOTH/Network
standby function can be set
only when the unit is
connected to an AC outlet
via the AC adaptor. When
the unit is being powered by
the built-in battery only, the
BLUETOOTH/Network
standby function is not
available.
mode.
standby) button to turn off
the unit, the indicator
flashes slowly in green,
then lights up in orange or
turns off. While the
indicator is flashing, the
unit is not operational.
• When you tap the VOL
(volume) –/+ button, the
indicator flashes once or
three times according to
the volume adjustment.
mode. See “/ (on/
standby) indicator is flashing
red” (page 19) for details.
CHARGE indicator
Indicator status
(color)
Turns off Charging of the unit is
Lights up (orange) The unit is charging.
Unit status
completed.
GB
8
Page 9

Indicator status
Unit status
(color)
Flashes slowly
(orange)
Flashes three
times and turns off
(orange)
The built-in battery is
running low and needs to be
charged. In this state, the
unit cannot supply power to
other devices.
If the CHARGE indicator
flashes three times and goes
off when you turn on the
unit, the battery is empty
and needs to be charged.
LINK indicator
Indicator status
(color)
Lights up (orange) The unit is connected to a
Lights up (pink) The unit is connected to a
Flashes (orange) The unit is in the process of
Flashes (pink) The unit is in the process of
Flashes (red) The network connection
Lights up (red) The network connection
Unit status
Wi-Fi network.
wired network.
connecting to a Wi-Fi
network.
connecting to a wired
network.
failed.
failed, or connection failed
even though the network
setting is complete.
NETWORK indicator
Indicator status
(color)
Lights up (white) The unit is in the NETWORK
Flashes (white) The unit is receiving an
Unit status
mode.
audio file via the network.
UPDATE button
Indicator status
(color)
Lights up (orange) The button lights up in
Flashes (orange) • The unit is updating the
Unit status
orange when the unit
detects the latest software
while connected to the
Internet. When you tap and
hold the lit button, the
update of the unit’s software
is started.
software. During the
update, you cannot
operate the unit.
• When the unit turns on for
the first time after the
software update, the
UPDATE button flashes
three times to inform you
that the update is
completed.
Getting started
The color of the lit/flashing indicator changes
depending on the connected music service.
Refer to Help Guide for details.
http://rd1.sony.net/help/speaker/srs-x77/h_zz/
(BLUETOOTH) PAIRING indicator
Indicator status
(color)
Lights up (white) The unit is connected to a
Flashes quickly
(white)
Flashes (white) The unit is searching for a
Unit status
BLUETOOTH device.
The unit is pairing with a
BLUETOOTH device.
BLUETOOTH device to
connect.
GB
9
Page 10

About SongPal
Sound settings of SRS-X77
You can easily customize your sound, or
use Sony’s recommended settings
“ClearAudio+”.
Music service*
You can configure the initial settings to
use music services.
To enjoy music services, a third party
application is required.
Controlling devices on your home network
You can play music stored in your PC or
home network server over your
network.
Refer to Help Guide for detailed
operation.
http://rd1.sony.net/help/speaker/srs-x77/h_zz/
The overview of the devices on the home network is
displayed.
You can select the audio device to play or group the
audio devices using SongPal Link (multi-room
function).
You can select sound sources for playback from the list
of the selectable s ound sources. Also, you can make
various sound/network settings of audio device.
What you can do with SongPal
SongPal is an application for controlling
Sony audio devices which are compatible
with SongPal using your smartphone/
iPhone.
Search for SongPal on Google Play™ or the
App Store, and download it.
Downloading this application on your
smartphone/iPhone provides the following.
change, stop or be terminated without notice.
Sony does not assume any responsibility for such
situations.
What you can control with SongPal varies
depending on the connected device.
The specification and design of the
application may change without notice.
* Depending on the country and region, music
services and their period of availability may
differ.
A separate registration is required for certain
services. An update of the device may be
required.
The services provided by third parties may
GB
10
Refer to SongPal Help for more details.
http://info.songpal.sony.net/help/
Page 11

Note
Tip
Note
Listening to music through a BLUETOOTH connection
Pairing the unit with a BLUETOOTH device and listening to music
You can listen to music from BLUETOOTH
device over a wireless connection.
Before using the BLUETOOTH function,
perform pairing to register your BLUETOOTH
device.
Whe n pairing the unit with a BLUETOOTH device,
place the BLUETOOTH device within one meter
of the unit.
Whe n pairing the unit with a BLUETOOTH device,
connect the unit to the AC outlet or charge the
battery sufficiently.
If your BLUETOOTH device is compliant with
one-touch connection (NFC), skip the next
procedure. See “Listening to music by one-touch
action (NFC)” (page 13).
Turn on the un it.
1
The / (on/standby) indicator lights
up in green.
BLUETOOTH device, terminate the current
BLUETOOTH connection by operating the
currently connected BLUETOOTH device.
Tap and hold the (BLUETOOTH)
3
PAIRING button until beeps
are heard.
The (BLUETOOTH) indicator begins to
flash quickly in white, and the unit
enters pairing mode.
Perform the pairing procedure on
4
the BLUETOOTH device to detect
the unit.
When a list of detected devices appears
on the display of the BLUETOOTH
device, select “SRS-X77”.
If passkey entry is required on the
display of the BLUETOOTH device, enter
“0000”.
Stop playback on the BLUETOOTH device
before performing the pairing procedure.
Loud sound may be output when the
BLUETOOTH connection is established. In
addition, after the connection is established,
loud sound may be output at the time of the
first playback operation. It is recommended
to turn down the volume before starting
playback.
Listening to music through a BLUETOOTH connection
Tap the (BLUETOOTH)
2
PAIR I N G b u tton.
The (BLUETOOTH) indicator begins to
flash in white.
From the factory, pairing information is not
stored in the unit. As such, when you tap
the (BLUETOOTH) PAIRING button,
the (BLUETOOTH) indicator will begin to
flash quickly in white and the unit enters
pairing mode automatically. In this case,
proceed to step 4.
When you tap the (BLUETOOTH)
PAIRING button, the unit tries to make
BLUETOOTH connection with the last
connected BLUETOOTH device. If the
device is nearby, the BLUETOOTH
connection is established automatically
and the (BLUETOOTH) indicator stays lit.
When you want to connect another
Make the BLUETOOTH connection
5
from the BLUETOOTH device.
When the BLUETOOTH connection is
established, the (BLUETOOTH)
indicator stays lit.
If the BLUETOOTH connection is not
established, repeat from step 3.
Adjust the volume on the
6
BLUETOOTH device, or tap the
VOL (volume) –/+ button to
adjust the volume.
11
GB
Page 12

Start playback on the
Tip
Note
Tip
Tip
7
BLUETOOTH device.
You can perform a pairing operation or attempt
to make a BLUETOOTH connection with another
BLUETOOTH device while the BLUETOOTH
connection is established with one BLUETOOTH
device. The currently established BLUETOOTH
connection is canceled when BLUETOOTH
connection with another device is successfully
established.
SongPal does not have a music playback
function via the BLUETOOTH connection. Play
music using the music playback software of
BLUETOOTH devices (such as smartphone, PC,
etc.).
The operations described above may not be
available for certain BLUETOOTH devices. In
addition, the actual operations may differ
depending on the connected BLUETOOTH
device.
Pairing mode of the unit is released after about 5
minutes and the (BLUETOOTH) indicator
flashes slowly. However, when pairing
information is not stored in the unit, such as
from the factory, pairing mode is not released. If
pairing mode is released before finishing the
process, repeat from step 3.
When pairing with a BLUETOOTH device that
cannot display a list of detected devices or that
has no display, you may pair the device by
setting both the unit and the BLUETOOTH device
to pairing mode. At this time, if a passkey other
than “0000” is set on the BLUETOOTH device,
pairing cannot be done with the unit.
Once a pairing operation is performed, it does
not have to be performed again. In the following
cases, however, a pairing operation must be
performed again:
Pairing information was erased when the
BLUETOOTH device was repaired.
You attempt to pair the unit with more than 9
BLUETOOTH devices.
This unit can pair with up to 9 BLUETOOTH
devices. If you pair another BLUETOOTH
device after pairing with 9 devices was
performed, pairing information of the device
that was connected with the unit first is
overwritten with that of the new device.
Pairing registration information of this unit is
erased from the connected device.
If you initialize the unit, all the pairing
information will be erased.
The unit can be paired with multiple devices, but
can only play music from one paired device at a
time.
“Passkey” may be called “Passcode,” “PIN code,”
“PIN number” or “Password,” etc.
GB
12
To cancel the connection with the
BLUETOOTH device
Disconnect the BLUETOOTH connection on
the BLUETOOTH device.
When you finish playing music, the BLUETOOTH
connection may terminate automatically,
depending on the BLUETOOTH device.
Listening to music through a
registered device
After step 2 on “Pairing the unit with a
BLUETOOTH device and listening to music”
(page 11), operate the BLUETOOTH device to
connect with the unit. After adjusting the
volume on the BLUETOOTH device, start
playback on the BLUETOOTH device.
Stop playback on the BLUETOOTH device before
connecting the unit to the BLUETOOTH device.
Page 13

Listening to music by
Tip
one-touch action (NFC)
NFC is a technology for short-range wireless
communication between various devices
such as a mobile phone and IC tag.
Just touch your smartphone on the unit. The
unit is turned on automatically, and pairing
and BLUETOOTH connection are
established.
Beforehand, turn the NFC settings to on and
unlock the screen of the smartphone.
Touch your smartphone on the
1
N-Mark on the unit.
Touch the smartphone on the unit and
maintain contact until the smartphone
responds.
Refer to the user’s guide of your
smartphone for the part of your
smartphone used as touch contact.
disconnected and the unit is connected with the
smartphone.
Listening to music through a BLUETOOTH connection
Follow the on-screen instructions to
establish the connection.
When a BLUETOOTH connection is
established, the (BLUETOOTH)
indicator stops flashing and stays lit.
After completing the connection,
2
start playback on the
smartphone.
To disconnect the established
connection, touch your smartphone on
the N-Mark on the unit.
When you touch an NFC-compliant smartphone on
the unit while another BLUETOOTH device is
connected with this unit, the BLUETOOTH device is
13
GB
Page 14

Tip
Note
Tip
Listening to music via a Wi-Fi network
LAN cable
(not supplied)
Selecting the method of network connection
If you connect this unit to a network, you
can enjoy this unit in various ways.
Depending on your network environment,
setting up methods are different. Select the
appropriate connecting method for your
network environment from below.
For setting the fixed IP address, use the screen in
step 6 of “Connecting with a PC” (page 14).
Connecting with a PC
If your wireless router does not have a WPS
(AOSS) button, configure Wi-Fi settings by
connecting the unit to your PC with a LAN
cable.
Prepare a commercially-available LAN cable
beforehand.
When setting up a Wi-Fi network, the SSID (Wi-Fi
Network Name) and security key (WEP or WPA key)
may be required. The security key (or network key)
uses encryption to limit the devices with which
communication can occur. It is used to provide
higher security for devices communicating via a
wireless router/access point.
Connecting to a Wi-Fi network and a wired
network simultaneously is not possible. When you
connect to a Wi-Fi network, be sure to disconnect
the LAN cable from the unit.
Method for using a smartphone/
iPhone
Install the SongPal application for your
smartphone/iPhone. For details, refer to the
Wi-Fi Startup Guide (separate document).
Method for using a wireless router
with a WPS button
Use the WPS button to connect. For details,
refer to the Wi-Fi Startup Guide (separate
document).
Method for using a PC
See “Connecting with a PC” (page 14).
Method for using a wired network
Refer to Help Guide for details.
http://rd1.sony.net/help/speaker/srs-x77/h_zz/
Record the SSID and password of
1
your router.
For details, refer to the operating
instructions of your router.
SSID (Wi-Fi Network Name)
Password (Security Key)
Connect the unit to the PC with a
2
LAN cable directly.
14
GB
Use a commercially-available LAN cable
to connect.
Page 15

Set the NETWORK OFF/ON switch
Note
Network Settings
SSID
3
to ON, then turn the unit on.
Wait until the LINK indicator stops
flashing and stays lit in pink. It takes
about 1 minute.
When you connect the unit to a PC for the
first time, it takes about 2 minutes until the
LINK indicator stops flashing and stays lit.
Select the SSID of your wireless
6
router and enter the password.
Display [Sony Network Device
4
Settings] on your PC.
Launch a browser.
Enter the following URL in the
address bar.
The above URL is only for when the PC
and unit are connected with a LAN
cable.
Select [Network Settings] from
5
the menu.
See the recorded password in step 1
(page 14).
Select [Apply].
7
When prompted, unplug the LAN
8
cable from the unit.
Check that the LINK indicator
9
lights up in orange.
Set the Wi-Fi antenna (aerial) (page 8).
When the Wi-Fi connection is
established, the LINK indicator lights up
in orange.
It may take more than 1 minute to light
up.
For information on how to listen to music
with this unit, refer to the Wi-Fi Startup
Guide (separate document).
Listening to music via a Wi-Fi network
15
GB
Page 16

Listening to the same
Listening to various
music from the multiple
speakers (SongPal Link
function)
Enjoy music in any room via Wi-Fi.
You can listen to your favorite music stored
in your PCs or mobile phones and
furthermore, music from streaming services,
in different rooms with ultimate sound
quality.
Connect the unit and
1
smartphone/iPhone to your WiFi network.
Connect the unit and smartphone/
iPhone to the same SSID of your router.
Internet music services
Connect the unit and
1
smartphone/iPhone to your WiFi network.
Connect the unit and smartphone/
iPhone to the same SSID of your router.
Install the free application
2
SongPal on your smartphone/
iPhone.
Play music of your desired music
3
service using your smartphone/
iPhone.
Refer to Help Guide for detailed
operation.
http://rd1.sony.net/help/speaker/srs-x77/h_zz/
Install the free application
2
SongPal on your smartphone/
iPhone.
When connecting multiple
3
devices, connect the SongPal
Link compatible devices to your
Wi-Fi network.
Refer to Help Guide for detailed
operation.
http://rd1.sony.net/help/speaker/srs-x77/h_zz/
GB
16
Page 17

Listening to music with connected
Audio cable
(not supplied)
components
Listening to music on an external device (AUDIO IN)
Listening to music with connected components
Connect the device to the AUDIO
1
IN jack with an audio cable (not
supplied).
Tap the AUDIO IN button, then
2
start playback on the connected
device.
Refer to Help Guide for detailed
operation.
http://rd1.sony.net/help/speaker/srs-x77/h_zz/
17
GB
Page 18

Additional information
Troubleshooting
If a problem occurs while operating the unit,
check the following to resolve the problem
before consulting your nearest Sony dealer.
Check to see if the problem is listed in this
“Troubleshooting” section.
Check in Help Guide.
Refer to “How to use” and
“Troubleshooting” in Help Guide for
details.
http://rd1.sony.net/help/speaker/srs-x77/h_zz/
case, erase the pairing information on the
iPhone/iPad/iPod, and then perform the
pairing procedure again.
Unable to connect the unit to a BLUETOOTH
device with one-touch connection (NFC)
Keep the smartphone close to the unit until
the smartphone responds. If the unit fails to
connect, move the smartphone slowly on the
N-Mark of the unit. When the smartphone
responds, follow the on-screen instructions to
establish the connection.
Check that the NFC function of the
smartphone is set to on.
If the smartphone is in a case, remove it.
NFC reception sensitivity varies, depending on
the device. If you repeatedly fail to connect
the unit with a smartphone by one touch,
make the connection by on-screen operation.
Check that your smartphone is compatible
with NFC. Look up information on the issue on
the customer support website.
Check information about the problem on
the customer support website.
http://www.sony-asia.com/support
Connect the unit to an AC outlet via the
AC adaptor to charge the battery. You
may be able to resolve some issues by
charging the battery.
Push the RESET button on the rear of the
unit with a pointed object, such as a pin.
Then turn on the unit.
If the problem persists after doing all of the
above, consult your nearest Sony dealer.
BLUETOOTH
Unable to pair the unit with a BLUETOOTH
device/
BLUETOOTH connection between the unit
and smartphone/iPhone is not possible
using SongPal
Bring the unit and the BLUETOOTH device to
within 1 m (3 ft) of each other.
If the (BLUETOOTH) indicator is not flashing
quickly in white, tap and hold the
(BLUETOOTH) PAIRING button until the
unit beeps and the (BLUETOOTH) indicator
starts flashing quickly in white.
Connect the unit to an AC outlet or charge the
battery of the unit sufficiently.
If you initialize the unit, the unit may not be
able to connect your iPhone/iPad/iPod. In this
GB
18
There is no sound
If you are connecting a PC to the unit, make
sure the audio output setting of the PC is set
for a BLUETOOTH device.
Check that the unit has established
BLUETOOTH connection with the BLUETOOTH
device.
Pair the unit and the BLUETOOTH device
again.
Distorted sound/humming or noise in the
speaker output
Bring the unit and the BLUETOOTH device
closer together. Remove any obstacles
between the unit and the BLUETOOTH device.
Select “Priority on stable connection” for
BLUETOOTH audio streaming playback quality.
Network
A Wi-Fi connection between the unit and
home network is not possible
The unit does not support IEEE 802.11ac. Use
the 2.4 GHz frequency band (IEEE 802.11 b/g/
n) or 5 GHz frequency band (IEEE 802.11 a/n)
for the Wi-Fi network.
When setting a Wi-Fi network using the
SongPal application on your smartphone/
iPhone, connect your smartphone/iPhone to
the Wi-Fi network to be used beforehand.
Page 19

If a LAN cable is connected to the unit,
disconnect it and restart the unit. When a LAN
cable is connected to the unit, the unit
automatically tries to connect to the home
network over a wired network and a wireless
network cannot be used.
Check that your wireless router is turned on.
Bring the unit and wireless router closer
together. Devices that use the 2.4 GHz
frequency band, such as a microwave oven,
BLUETOOTH or digital cordless device, etc.,
may interrupt Wi-Fi communication. Move the
unit away from such devices or turn them off.
Set the Wi-Fi antenna (aerial).
If a Wi-Fi network is not possible even if the
setting of a Wi-Fi network is correct, try the
following.
Turn off the wireless router/access point,
wait a while and turn on the power again.
Turn off the unit, wait a while and turn on
the power again.
Distorted sound/humming or noise in the
unit output
Turn down the volume of the connected
device.
If a connected device has an equalizer
function, turn it off.
Keep the unit away from a microwave oven,
other wireless devices, etc.
Keep the unit away from metal objects.
Connect the unit and wireless router/PC via a
LAN cable, not via Wi-Fi network.
No sound/low sound level
Check that both the unit and connected
device are turned on.
Turn up the volume of the unit and the
connected device.
Check that the connected device is being
played back.
iTunes cannot find the unit via AirPlay
Make sure the PC with iTunes installed and the
unit are connected to the same home
network.
Update the software version of iTunes to the
latest version.
General
/ (on/standby) indicator is flashing red
Push the RESET button on the rear of the unit
with a pointed object, such as a pin. Then turn
on the unit. If the / (on/standby) indicator
keeps flashing, consult your nearest Sony
dealer or the shop you purchased this unit.
The unit has entered standby mode or
BLUETOOTH/Network standby mode
unexpectedly
This is not a malfunction. The unit enters
standby mode or BLUETOOTH/Network
standby mode automatically due to the auto
standby function if no operation is performed
and no sound is input for about 15 minutes.
Refer to Help Guide for details about the auto
standby function.
To check Wi-Fi signal strength
(reception sensitivity)
While the unit is connected to the Wi-Fi
network, tap and hold the NETWORK button
until you hear a beep.
3 ·····
2 ·····
1 ·····
0 ·····
Signal
strength
Number of flashing
function indicators
Flashing stops when any button is tapped.
To receive a stronger signal, try the
following:
Change the direction of the Wi-Fi antenna
(aerial).
Turn off other wireless devices.
To use the BLUETOOTH/Network
standby function
If the BLUETOOTH/Network standby
function is on, the unit turns on
automatically by operating a BLUETOOTH
device or network device, even if the unit is
turned off. The unit will start up more
quickly than usual.
19
Additional information
GB
Page 20

1
Note
Check that the AC adaptor is connected,
then turn on the unit.
2
Press and hold the / (on/standby)
button until it lights up in orange.
The unit turns off and enters the
BLUETOOTH/Network standby mode.
If you operate a BLUETOOTH device or
network device, the unit turns on
automatically and connection starts.
To initialize the unit
Initialize the unit if these measures do not
resolve the problem or if the settings fail.
1
Make sure the unit is turned on. Tap
(press) and hold both the VOL (volume)
– button and / (on/standby) button at
the same time for more than 5 seconds.
The unit will turn off. Settings will return to
their factory defaults, and all BLUETOOTH
pairing information and network settings
will be reset.
If you initialize the unit, the unit may not be able to
connect your iPhone/iPad/iPod. In this case, erase
the pairing information on the iPhone/iPad/iPod,
and then perform the pairing procedure again.
Refer to Help Guide for symptoms other than
the above.
http://rd1.sony.net/help/speaker/srs-x77/h_zz/
What is BLUETOOTH wireless technology?
BLUETOOTH wireless technology is a shortrange wireless technology that enables
wireless data communication between
digital devices, such as a computer and
digital camera. BLUETOOTH wireless
technology operates within a range of about
10m.
Connecting two devices as necessary is
common, but some devices can be
connected to multiple devices at the same
time.
You do not need to use a cable for
connection, nor is it necessary for the
devices to face one another, such is the case
with infrared technology. For example, you
can use such a device in a bag or pocket.
BLUETOOTH standard is an international
standard supported by thousands of
companies all over the world, and employed
by various companies worldwide.
Maximum communication range
Maximum communication range may
shorten under the following conditions.
There is an obstacle such as a person,
metal, or wall between the system and
BLUETOOTH device.
A wireless LAN device is in use near the
system.
A microwave oven is in use near the
system.
A device that generates
electromagnetic radiation is in use near
the system.
20
Interference from other devices
Because BLUETOOTH devices and wireless
LAN (IEEE802.11b/g/n) use the same
frequency, microwave interference may
occur and resulting in communication speed
deterioration, noise, or invalid connection if
the system is used near a wireless LAN
device. In such a case, perform the
following.
Use the system at least 10 m away from
the wireless LAN device.
GB
Page 21

If the system is used within 10 m of a
wireless LAN device, turn off the
wireless LAN device.
Specifications
Interference to other devices
Microwaves emitting from a BLUETOOTH
device may affect the operation of
electronic medical devices. Turn off the
system and other BLUETOOTH devices in the
following locations, as it may cause an
accident.
where inflammable gas is present, in a
hospital, train, airplane, or a gas station
near automatic doors or a fire alarm
To be able to use the BLUETOOTH function, the
BLUETOOTH device to be connected requires the
same profile as the system’s.
Note also that even if the same profile exists,
devices may vary in function depending on their
specifications.
Due to the characteristic of BLUETOOTH wireless
technology, the sound played on the system is
slightly delayed from the sound played on the
BLUETOOTH device during talking on the
telephone or listening to the music.
This system supports security capabilities that
comply with the BLUETOOTH standard to
provide a secure connection when the
BLUETOOTH wireless technology is used, but
security may not be enough depending on the
setting. Be careful when communicating using
BLUETOOTH wireless technology.
We do not take any responsibility for the leakage
of information during BLUETOOTH
communication.
A device featuring the BLUETOOTH function is
required to conform to the BLUETOOTH standard
specified by Bluetooth SIG, and be
authenticated. Even if the connected device
conforms to the above mentioned BLUETOOTH
standard, some devices may not be connected
or work correctly, depending on the features or
specifications of the device.
Noise or sound skips may occur depending on
the BLUETOOTH device connected with the
system, the communication environment or the
usage environment.
Section for Speaker
Speakers
Full range speaker: Approx. 46 mm
diameter × 2 /
Subwoofer: Approx. 62 mm diameter × 1
Section for Amplifier
POWER OUTPUT AND TOTAL HARMONIC
DISTORTION:
Power Output (reference)
Using AC adaptor
Full range speaker: 10W+10W (at 1%
harmonic distortion, 1 kHz, 8 Ω)
Subwoofer: 20W (at 1% harmonic distortion,
100 Hz, 4 Ω)
Using battery
Full range speaker: 6W+6W (at 1% harmonic
distortion, 1 kHz, 8 Ω)
Subwoofer: 12W (at 1% harmonic distortion,
100 Hz, 4 Ω)
Section for Network
Compa tible sta ndards
IEEE 802.11 a/b/g/n (WEP 64 bit,
WEP 128 bit, WPA/WPA2-PSK (AES), WPA/
WPA2-PSK (TKIP))
Radio frequency
2.4/5 GHz band
Section for BLUETOOTH
Output
BLUETOOTH Specification Power Class 2
Maximum communication range
Line of sight Approx. 10 m*
1
Radio frequency
2.4 GHz band (2.4000 GHz – 2.4835 GHz)
Communication System
BLUETOOTH Specification Version 3.0
Compatible BLUETOOTH Profiles*
2
A2DP (Advanced Audio Distribution
Profile)/AVRCP (Audio Video Remote
Control Profile)
Additional information
21
GB
Page 22

Supported codec*
SBC*4/AAC*5/LDAC*
3
6
Transmission bandwidth (A2DP)
20 Hz – 20,000 Hz (with 44.1 kHz sampling)
*1The actual range will vary depending on factors
such as obstacles between devices, magnetic
fields around a microwave oven, static
electricity, reception sensitivity, aerial’s
performance, operating system, software
application, etc.
2
*
BLUETOOTH standard profiles indicate the
purpose of BLUETOOTH communication
between devices.
3
*
Codec: Audio signal compression and
conversion format
4
*
Subband Codec
5
*
Advanced Audio Coding
6
*
LDAC is an audio coding technology developed
by Sony that enables the transmission of High-
Resolution (Hi-Res) Audio content, even over a
BLUETOOTH connection. Unlike other
BLUETOOTH compatible coding technologies
such as SBC, it operates without any down-
conversion of the Hi-Res Audio content*
allows approximately three times more data*
than those other technologies to be transmitted
over a BLUETOOTH wireless network with
unprecedented sound quality, by means of
efficient coding and optimized packetization.
7
*
Excluding DSD format contents
8
*
In comp arison with SBC ( Subband Codi ng) when
the bitrate of 990kbps (96/48kHz) or 909kbps
(88.2/44.1kHz) is selected
7
, and
8
NETWORK OFF/ON switch is OFF)
Approx. 10 hours
Usage life of lithium-ion battery (when the
NETWORK OFF/ON switch is ON)
Approx. 3 hours
Operating temperature
5 °C to 35 °C
Dimensions (w/h/d) (including projecting parts
and controls)
Approx. 300 mm × 132 mm × 60 mm
Mass
Approx. 1.9kg
Suppli ed accessories:
AC power cord (1)
AC adaptor (AC-E1826) (1)
Wi-Fi Startup Guide
Operating Instructions (this document)
Warranty card
Design and specifications are subject to
change without notice.
General
AUDIO IN
ANALOG Φ 3.5 mm stereo mini jack
Network port
10BASE-T/100BASE-TX (Auto Polarity)
DC OUT
USB jack Type A (for charging the battery of
a connected device) (5 V, Max. 1.5 A: labeled
on bottom of system)
Power
DC 18V (using the supplied AC adaptor
connected to AC 120V-240V, 50Hz/60Hz
power supply) or, using built in lithium-ion
battery
Usage life of lithium-ion battery (when the
GB
22
Page 23

Compatible iPhone/iPad/iPod
Note
models
damaged when using your iPhone/iPad/iPod
connected to this unit.
Compatible
models
iPhone 6 Plus
iPhone 6
iPhone 5s
iPhone 5c
iPhone 5
iPhone 4s
iPhone 4
iPhone 3GS
iPad Air 2*
iPad mini 3*
iPad Air*
iPad mini 2*
iPad (4th
generation)*
iPad mini*
iPad (3rd
generation)*
iPad 2*
iPad*
iPod touch
(5th
generation)
iPod touch
(4th
generation)
iPod touch
(3rd
generation)*
iPod nano
(7th
generation)*
AirPlay BLUETOOTH
Additional information
* SongPal does not support iPod touch (3rd
generation) and iPod nano. SongPal, as of
January 2015, does not support the display
optimized for iPad screen.
AirPlay works with iPhone, iPad, and iPod
touch with iOS 4.3.3 or later, Mac with OS X
Mountain Lion or later, and Mac and PC with
iTunes 10.2.2 or later.
Sony cannot accept responsibility in the event that
data recorded to iPhone/iPad/iPod is lost or
23
GB
Page 24

©2015 Sony Corporation Printed in China
 Loading...