

Page 1

MEMORY STORAGE UNIT
SR-R1000
OPERATION MANUAL [English]
1st Edition
Page 2
Before operating the unit, please read this manual
thoroughly and retain it for future reference.
Important Safety Instructions
• Read these instructions.
• Keep these instructions.
• Heed all warnings.
• Follow all instructions.
• Do not use this apparatus near water.
• Clean only with dry cloth.
• Do not block any ventilation openings.
Install in accordance with the manufacturer’s
instructions.
• Do not install near any heat sources such as radiators,
heat registers, stoves, or other apparatus (including
amplifiers) that produce heat.
• Do not defeat the safety purpose of the polarized or
grounding-type plug. A polarized plug has two blades
with one wider than the other. A grounding-type plug
has two blades and a third grounding prong. The wide
blade or the third prong are provided for your safety. If
the provided plug does not fit into your outlet, consult an
electrician for replacement of the obsolete outlet.
• Protect the power cord from being walked on or pinched
particularly at plugs, convenience receptacles, and the
point where they exit from the apparatus.
• Only use attachments/accessories specified by the
manufacturer.
• Use only with the cart, stand, tripod, bracket,
or table specified by the manufacturer, or sold
with the apparatus.
When a cart is used, use caution when moving
the cart/apparatus combination to avoid injury from tipover.
• Unplug this apparatus during lightning storms or when
unused for long periods of time.
• Refer all servicing to qualified service personnel.
Servicing is required when the apparatus has been
damaged in any way, such as power-supply cord or plug
is damaged, liquid has been spilled or objects have fallen
into the apparatus, the apparatus has been exposed to
rain or moisture, does not operate normally, or has been
dropped.
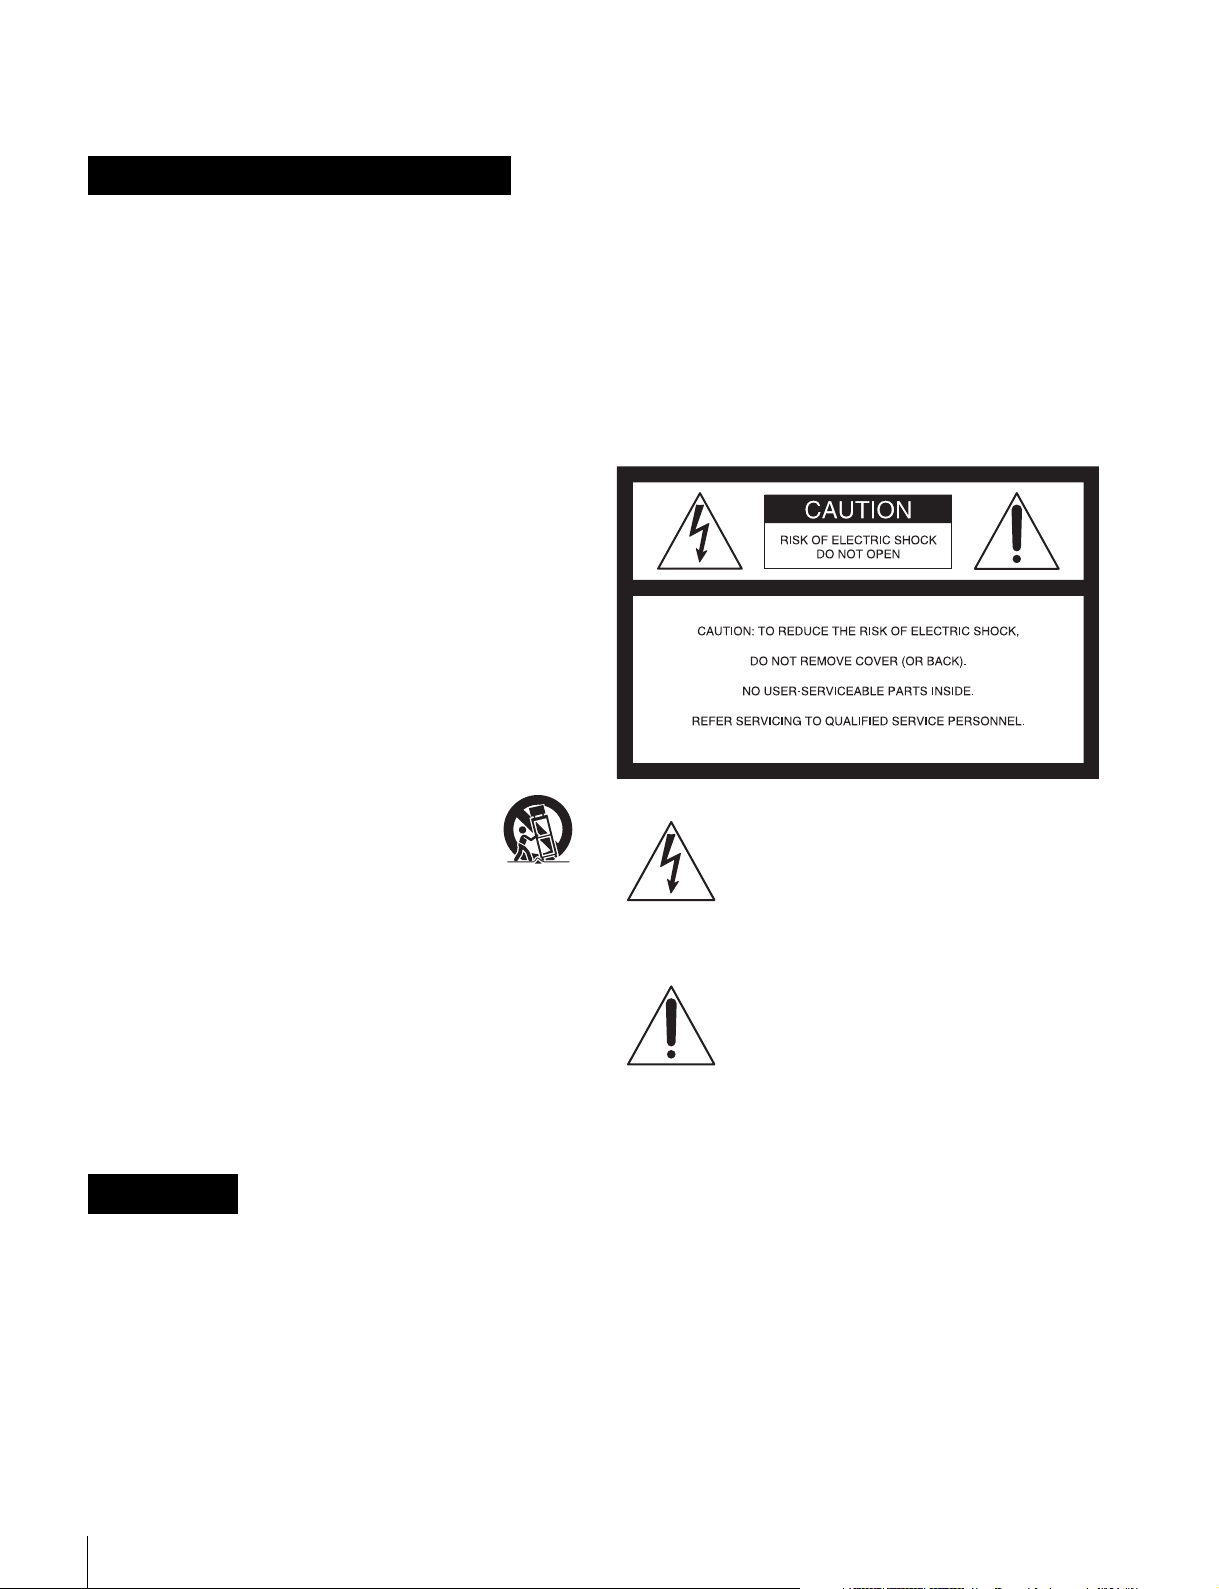
WARNING
To reduce the risk of fire or electric shock,
do not expose this apparatus to rain or
moisture.
To avoid electrical shock, do not open the
cabinet. Refer servicing to qualified
personnel only.
THIS APPARATUS MUST BE EARTHED.
CAUTION
Danger of explosion if battery is incorrectly replaced.
Replace only with the same or equivalent type
recommended by the manufacturer.
When you dispose of the battery, you must obey the law in
the relative area or country.
This apparatus is provided with a main switch on the rear
panel.
Install this apparatus so that user can access the main
switch easily.
To completely turn off the power, turn off the main power
switch on the rear panel.
This symbol is intended to alert the user to
the presence of uninsulated “dangerous
voltage” within the product’s enclosure
that may be of sufficient magnitude to
constitute a risk of electric shock to
persons.
This symbol is intended to alert the user to
the presence of important operating and
maintenance (servicing) instructions in
the literature accompanying the
appliance.
When installing the installation space must be secured in
consideration of the ventilation and service operation.
• Do not block the ventilation slots at the left side and right
side panels, and vents of the fans.
• Leave a space around the unit for ventilation.
• Leave more than 40 cm of space in the rear of the unit to
secure the operation area.
When the unit is installed on the desk or the like, leave at
least 4 cm of space in the left and right sides.
Leaving 40 cm or more of space above the unit is
recommended for service operation.
2
Page 3

WARNING: THIS WARNING IS APPLICABLE
FOR USA ONLY.
If used in USA, use the UL LISTED power
cord specified below.
DO NOT USE ANY OTHER POWER
CORD.
Plug Cap Parallel blade with ground pin
(NEMA 5-15P Configuration)
Cord Type SJT, three 16 or 18 AWG
wires
Length Minimum 1.5 m (4 ft .11 in.),
Less than 2.5 m (8 ft .3 in.)
Rating Minimum 10A, 125V
Using this unit at a voltage other than 120V
may require the use of a different line cord
or attachment plug, or both. To reduce the
risk of fire or electric shock, refer servicing
to qualified service personnel.
WARNING: THIS WARNING IS APPLICABLE
FOR OTHER COUNTRIES.
1. Use the approved Power Cord (3-core mains lead) /
Appliance Connector / Plug with earthing-contacts that
conforms to the safety regulations of each country if
applicable.
2. Use the Power Cord (3-core mains lead) / Appliance
Connector / Plug conforming to the proper ratings
(Voltage, Ampere).
If you have questions on the use of the above Power Cord /
Appliance Connector / Plug, please consult a qualified
service personnel.
CAUTION
The apparatus shall not be exposed to dripping or
splashing. No objects filled with liquids, such as vases,
shall be placed on the apparatus.
CAUTION
The unit is not disconnected from the AC power source
(mains) as long as it is connected to the wall outlet, even if
the unit itself has been turned off.
WARNING
Excessive sound pressure from earphones and headphones
can cause hearing loss.
In order to use this product safely, avoid prolonged
listening at excessive sound pressure levels.
WARNING
Batteries shall not be exposed to excessive heat such as
sunshine, fire or the like.
For kundene i Norge
Dette utstyret kan kobles til et IT-strømfordelingssystem.
Apparatet må tilkoples jordet stikkontakt
För kunderna i Sverige
Apparaten skall anslutas till jordat uttag
For the customers in the U.S.A.
This equipment has been tested and found to comply with
the limits for a Class A digital device, pursuant to Part 15
of the FCC Rules. These limits are designed to provide
reasonable protection against harmful interference when
the equipment is operated in a commercial environment.
This equipment generates, uses, and can radiate radio
frequency energy and, if not installed and used in
accordance with the instruction manual, may cause
harmful interference to radio communications. Operation
of this equipment in a residential area is likely to cause
harmful interference in which case the user will be
required to correct the interference at his own expense.
You are cautioned that any changes or modifications not
expressly approved in this manual could void your
authority to operate this equipment.
All interface cables used to connect peripherals must be
shielded in order to comply with the limits for a digital
device pursuant to Subpart B of Part 15 of FCC Rules.
This device complies with Part 15 of the FCC Rules.
Operation is subject to the following two conditions: (1)
this device may not cause harmful interference, and (2) this
device must accept any interference received, including
interference that may cause undesired operation.
For the customers in Canada
This Class A digital apparatus complies with Canadian
ICES-003.
For the customers in Europe
This product with the CE marking complies with the EMC
Directive issued by the Commission of the European
Community.
Compliance with this directive implies conformity to the
following European standards:
• EN55103-1: Electromagnetic Interference(Emission)
• EN55103-2: Electromagnetic Susceptibility(Immunity)
This product is intended for use in the following
Electromagnetic Environment: E4 (controlled EMC
environment, ex. TV studio).
For the customers in Europe
The manufacturer of this product is Sony Corporation, 17-1 Konan, Minato-ku, Tokyo, Japan.
The Authorized Representative for EMC and product
safety is Sony Deutschland GmbH, Hedelfinger Strasse
61, 70327 Stuttgart, Germany. For any service or
guarantee matters please refer to the addresses given in
separate service or guarantee documents.
This apparatus shall not be used in the residential area.
Suomessa asuville asiakkaille
Laite on liitettävä suojamaadoituskoskettimilla
varustettuun pistorasiaan
3
Page 4

For the customers in Europe, Australia and New
Zealand
WARNING
This is a Class A product. In a domestic environment, this
product may cause radio interference in which case the
user may be required to take adequate measures.
For the State of California, USA only
Perchlorate Material - special handling may apply, See
www.dtsc.ca.gov/hazardouswaste/perchlorate
Perchlorate Material: Lithium battery contains
perchlorate.
For the customers in Taiwan only
Avant d’utiliser l’appareil, veuillez lire attentivement ce
manuel et le conserver pour future référence.
AVERTISSEMENT
Afin de réduire les risques d’incendie ou
d’électrocution, ne pas exposer cet
appareil à la pluie ou à l’humidité.
Afin d’écarter tout risque d’électrocution,
garder le coffret fermé. Ne confier
l’entretien de l’appareil qu’à un personnel
qualifié.
CET APPAREIL DOIT ÊTRE RELIÉ À LA
TERRE.
ATTENTION
Il y a danger d’explosion s’il y a remplacement incorrect
de la batterie. Remplacer uniquement avec une batterie du
même type ou d’un type équivalent recommandé par le
constructeur.
Lorsque vous mettez la batterie au rebut, vous devez
respecter la législation en vigueur dans le pays ou la région
où vous vous trouvez.
Cet appareil est doté d’un interrupteur principal sur son
panneau arrière.
Installez l’appareil de sorte que l’utilisateur puisse
facilement accéder à l’interrupteur principal.
Pour mettre l’appareil complètement hors tension,
éteignez l’interrupteur électrique principal sur le panneau
arrière.
ATTENTION
Par mesure de sécurité, ne raccordez pas le connecteur
pour le câblage de périphériques pouvant avoir une tension
excessive au port NETWORK. Suivez les instructions
pour ce port.
AVERTISSEMENT
1. Utilisez un cordon d’alimentation (câble secteur à 3
fils)/fiche femelle/fiche mâle avec des contacts de mise
à la terre conformes à la réglementation de sécurité
locale applicable.
2. Utilisez un cordon d’alimentation (câble secteur à 3
fils)/fiche femelle/fiche mâle avec des caractéristiques
nominales (tension, ampérage) appropriées.
Pour toute question sur l’utilisation du cordon
d’alimentation/fiche femelle/fiche mâle ci-dessus,
consultez un technicien du service après-vente qualifié.
ATTENTION
Eviter d’exposer l’appareil à un égouttement ou à des
éclaboussures. Ne placer aucun objet rempli de liquide,
comme un vase, sur l’appareil.
ATTENTION
Cet appareil n’est pas déconnecté de la source
d’alimentation secteur tant qu’il est raccordé à la prise
murale, même si l’appareil lui-même a été mis hors
tension.
AVERTISSEMENT
Une pression acoustique excessive en provenance des
écouteurs ou du casque peut provoquer une baisse de
l’acuité auditive.
Pour utiliser ce produit en toute sécurité, évitez l’écoute
prolongée à des pressions sonores excessives.
AVERTISSEMENT
N’exposez pas les batteries à une chaleur excessive, au
soleil ou près d’un feu par exemple.
Pour les clients au Canada
Cet appareil numérique de la classe A est conforme à la
norme NMB-003 du Canada.
Pour les clients en Europe
Ce produit portant la marque CE est conforme à la
Directive sur la compatibilité électromagnétique (EMC)
émise par la Commission de la Communauté européenne.
La conformité à cette directive implique la conformité aux
normes européennes suivantes:
• EN55103-1: Interférences électromagnétiques
(émission)
• EN55103-2: Sensibilité électromagnétique (immunité)
Ce produit est prévu pour être utilisé dans l’environnement
électromagnétique suivant: E4 (environnement EMC
contrôlé, ex. studio de télévision).
Pour les clients en Europe
Le fabricant de ce produit est Sony Corporation, 1-7-1
Konan, Minato-ku, Tokyo, Japon.
4
Page 5

Le représentant autorisé pour EMC et la sécurité des
produits est Sony Deutschland GmbH, Hedelfinger Strasse
61, 70327 Stuttgart, Allemagne. Pour toute question
concernant le service ou la garantie, veuillez consulter les
adresses indiquées dans les documents de service ou de
garantie séparés.
Ne pas utiliser cet appareil dans une zone résidentielle.
VORSICHT
Explosionsgefahr bei Verwendung falscher Batterien.
Batterien nur durch den vom Hersteller empfohlenen oder
einen gleichwertigen Typ ersetzen.
Wenn Sie die Batterie entsorgen, müssen Sie die Gesetze
der jeweiligen Region und des jeweiligen Landes
befolgen.
Pour les clients en Europe, Australie et NouvelleZélande
AVERTISSEMENT
Il s’agit d’un produit de Classe A. Dans un environnement
domestique, cet appareil peut provoquer des interférences
radio, dans ce cas l’utilisateur peut être amené à prendre
des mesures appropriées.
Remarque sur les pixels défectueux de l’écran
LCD
L’écran LCD intégré à cet appareil est fabriqué avec une
technologie de haute précision, ce qui permet d’obtenir
un taux d’au moins 99,99% de pixels qui fonctionnent.
Ainsi, un infime pourcentage de pixels peut être
« bloqué », c’est à dire toujours éteint (noir), toujours
éclairé (rouge, vert ou bleu), ou clignotant. En outre,
après une longue période d’utilisation, en raison des
caractéristiques physiques de l’afficheur à cristaux
liquides, de tels pixels « bloqués » peuvent apparaître
spontanément.
Ces problèmes ne sont pas graves. Sachez que de tels
problèmes n’ont aucun effet sur les données enregistrées.
Bitte lesen Sie dieses Handbuch vor der Benutzung des
Geräts sorgfältig durch und bewahren Sie es zum späteren
Nachschlagen auf.
WARNUNG
Um die Gefahr von Bränden oder
elektrischen Schlägen zu verringern, darf
dieses Gerät nicht Regen oder
Feuchtigkeit ausgesetzt werden.
Um einen elektrischen Schlag zu
vermeiden, darf das Gehäuse nicht
geöffnet werden. Überlassen Sie
Wartungsarbeiten stets nur qualifiziertem
Fachpersonal.
DIESES GERÄT MUSS GEERDET
WERDEN.
Dieses Gerät verfügt über einen Hauptschalter an der
Rückseite.
Installieren Sie das Gerät so, dass der Benutzer leicht auf
den Hauptschalter zugreifen kann.
Um das Gerät vollständig abzuschalten, betätigen Sie den
Hauptstromschalter auf der Rückseite.
VORSICHT
Aus Sicherheitsgründen nicht mit einem PeripheriegerätAnschluss verbinden, der zu starke Spannung für die
NETWORK Buchse haben könnte. Folgen Sie den
Anweisungen für diese Buchse.
WARNUNG
1. Verwenden Sie ein geprüftes Netzkabel (3-adriges
Stromkabel)/einen geprüften Geräteanschluss/einen
geprüften Stecker mit Schutzkontakten entsprechend
den Sicherheitsvorschriften, die im betreffenden Land
gelten.
2. Verwenden Sie ein Netzkabel (3-adriges Stromkabel)/
einen Geräteanschluss/einen Stecker mit den
geeigneten Anschlusswerten (Volt, Ampere).
Wenn Sie Fragen zur Verwendung von Netzkabel/
Geräteanschluss/Stecker haben, wenden Sie sich bitte an
qualifiziertes Kundendienstpersonal.
VORSICHT
Das Gerät ist nicht tropf- und spritzwassergeschützt. Es
dürfen keine mit Flüssigkeiten gefüllten Gegenstände, z.
B. Vasen, darauf abgestellt werden.
VORSICHT
Solange das Netzkabel an eine Netzsteckdose
angeschlossen ist, bleibt das Gerät auch im
ausgeschalteten Zustand mit dem Strommetz verbunden.
WARNUNG
Zu hoher Schalldruck von Ohrhörern und Kopfhörern
kann Gehörschäden verursachen.
Um dieses Produkt sicher zu verwenden, vermeiden Sie
längeres Hören bei sehr hohen Schalldruckpegeln.
WARNUNG
Akkus dürfen keinesfalls übermäßiger Wärmeeinwirkung
ausgesetzt werden, wie z.B. Sonneneinstrahlung, Feuer o.
ä.
Für Kunden in Europa
Dieses Produkt besitzt die CE-Kennzeichnung und erfüllt
die EMV-Richtlinie der EG-Kommission.
Angewandte Normen:
5
Page 6

• EN55103-1: Elektromagnetische Verträglichkeit
(Störaussendung)
• EN55103-2: Elektromagnetische Verträglichkeit
(Störfestigkeit)
Für die folgende elektromagnetische Umgebung: E4
(kontrollierter EMV-Bereich, z.B. Fernsehstudio).
Für Kunden in Europa
Der Hersteller dieses Produkts ist Sony Corporation, 1-7-1
Konan, Minato-ku, Tokyo, Japan.
Der autorisierte Repräsentant für EMV und
Produktsicherheit ist Sony Deutschland GmbH,
Hedelfinger Strasse 61, 70327 Stuttgart, Deutschland. Bei
jeglichen Angelegenheiten in Bezug auf Kundendienst
oder Garantie wenden Sie sich bitte an die in den separaten
Kundendienst- oder Garantiedokumenten aufgeführten
Anschriften.
Dieser Apparat darf nicht im Wohnbereich verwendet
werden.
Für Kunden in Europa, Australien und
Neuseeland
WARNUNG
Dies ist eine Einrichtung, welche die Funk-Entstörung
nach Klasse A besitzt. Diese Einrichtung kann im
Wohnbereich Funkstörungen verursachen; in diesem Fall
kann vom Betreiber verlangt werden, angemessene
Maßnahmen durchzuführen und dafür aufzukommen.
Hinweis zu fehlerhaften Pixeln auf der LCDAnzeige
Die LCD-Anzeige in diesem Geräts wird mit
Hochpräzisionstechnologie hergestellt und erzielt so eine
effektive Pixelrate von mindestens 99,99 %. Ein sehr
geringer Anteil von Pixeln kann jedoch eventuell
„hängenbleiben“, entweder immer aus (schwarz), immer
an (rot, grün oder blau) oder blinken. Außerdem können
nach sehr langem Gebrauch diese „hängengebliebenen“
Pixel spontan auftreten aufgrund der äußeren
Eigenschaften der Flüssigkristallanzeige. Diese
Probleme stellen keine Fehlfunktion dar. Beachten Sie
bitte, dass solche Probleme die aufgezeichneten Daten
nicht betreffen.
6
Page 7

Table of Contents
Chapter 1 Overview
Features.......................................................................................... 10
High-Quality Recording ......................................................................10
Multiple Ports ...................................................................................... 10
Multiple Resolutions............................................................................ 10
Large Storage Capacity........................................................................ 10
Other Features...................................................................................... 11
Chapter 2 Names and Functions of Parts
Control Panel .................................................................................12
Connector Panel............................................................................ 17
Display Screen...............................................................................20
Main Screen .........................................................................................20
File List Screen ....................................................................................23
Chapter 3 Setting Up the Memory Storage Unit
Connecting External Devices....................................................... 24
Using the Unit as a Recorder ............................................................... 24
Using the Unit as a Player ................................................................... 24
Reference Signals .........................................................................25
Reference Signals for Output Video Signals .......................................25
Reference Signal Connections............................................................. 26
Selecting the Reference Signal for Output ..........................................26
Time Code Settings....................................................................... 27
Selecting the Time Data....................................................................... 27
Setting the Time Code Generator ........................................................ 27
Setting the Time Data .......................................................................... 27
Superimposing Character Information........................................29
Handling SRMemory Cards .......................................................... 30
Recommended SRMemory Cards ....................................................... 30
Inserting and Ejecting SRMemory Cards ............................................30
Preventing Accidental Data Loss......................................................... 31
Table of Contents
7
Page 8

Chapter 4 Basic Operations
Selecting Input/Output Ports and SRMemory Slots...................32
Recording.......................................................................................33
Playback .........................................................................................34
Chasing Playback ................................................................................ 34
Variable Speed Playback..................................................................... 34
Still Picture Output.............................................................................. 36
File Operations...............................................................................36
Selecting Audio Signals................................................................38
Selecting the Audio Input Signals ....................................................... 38
Selecting the Audio Signals to Monitor .............................................. 38
Adjusting the Audio Levels ..........................................................39
Adjusting the Output Video Signal ..............................................40
Chapter 5 Menu Items
Saving Settings..............................................................................42
Detailed Menu Description............................................................43
HOME Menu....................................................................................... 43
TC Menu.............................................................................................. 44
VIDEO Menu ...................................................................................... 46
AUDIO Menu...................................................................................... 48
SETUP Menu ...................................................................................... 49
Appendix
FTP File Operations.......................................................................51
Directory Structure .............................................................................. 51
Preparations ......................................................................................... 51
Making FTP Connections.................................................................... 51
Command List ..................................................................................... 52
Restrictions....................................................................................55
Restrictions on Simultaneous Recording and Playback ...................... 55
Troubleshooting ............................................................................56
Salvaging SRMemory Card in the Event Recording does not End
Normally .................................................................................... 56
Error Messages .................................................................................... 58
Warning Messages .............................................................................. 60
Specifications ................................................................................64
MPEG-4 Visual Patent Portfolio License .....................................66
8
Table of Contents
Page 9

Index ..............................................................................................67
Table of Contents
9
Page 10

Chapter 1 Overview
Overview
Features
The SR-R1000 is a storage unit that supports recording and
playback from SRMemory cards, the new-generation of
high-speed memory cards.
Utilizing the high bandwidth and large capacity of the
SRMemory card, the SR-R1000 is capable of real-time
recording and playback of high-quality images for
increased efficiency in live broadcasts, studio and 3D
video productions, and any other video production
applications.
SRMASTER and SRMemory are trademarks of Sony
Corporation.
High-Quality Recording
The SR-R1000 offers high-quality digital recording and
playback by incorporating the HDCAM-SR format,
MPEG4 SStP (Simple Studio Profile).
The unit supports recording and playback of 4:2:2 (10-bit)
and RGB 4:4:4 (10-bit) signals. The following
compression rates are also supported.
• 220 Mbps (SR-Lite)
•440 Mbps (SR-SQ)
Chapter
Dual-stream support
Each port on the unit supports dual-stream video, which
allows each port to handle two streams of video signals.
This allows you to record and play back a pair of 3D
stereoscopic signals or fill/key signals with just a single
port.
The unit can also handle RGB 4:4:4 3D video with a single
port.
4-channel simultaneous recording/
playback
With the ability to simultaneously record and play back
video from four input/output ports, the unit offers high
efficiency in video production.
You can also select which of the video ports and
SRMemory cards you want to use, and access a single
memory card from multiple ports simultaneously.
Chasing playback and delay-free data
transfer
Using the high-speed SRMemory, you can play back a
high-quality video while it is recording to the SRMemory
card.
In addition, fast processing after a recording operation is
complete allows you to quickly eject the SRMemory card
and deliver it to post production without delay.
1
Multiple Ports
The unit supports a maximum of four input/output ports,
and comes standard with one output board installed. Based
on your production needs and environment, you can
replace the existing output board or install optional input/
output boards to flexibly create channel configurations that
consist of 2 In/2 Out, 1 In/3 Out, 3 In/1 Out, 4 In, or 4 Out.
10
Features
Multiple Resolutions
The SR-R1000 supports the 1280 × 720/4:2:2, 1920 × 1080/
4:2:2, and 1920 × 1080/4:4:4 recording formats.
Large Storage Capacity
The SR-R1000 is equipped with four SRMemory slots.
Each slot accepts a memory card of up to 1 TB in storage,
providing a total of up to 4 TB in removable storage
capacity.
Page 11

Other Features
• 16-ch audio (uncompressed, 24 bits, 48 kHz) is
supported.
• FTP protocol is supported for video data transfer in MXF
format via a network.
• Equipped with two network ports that support Gigabit
Ethernet.
• Compatible with Sony VTR protocol and Sony Disk
protocol, and switcher and controller operations are
supported.
Chapter 1 Overview
Features
11
Page 12
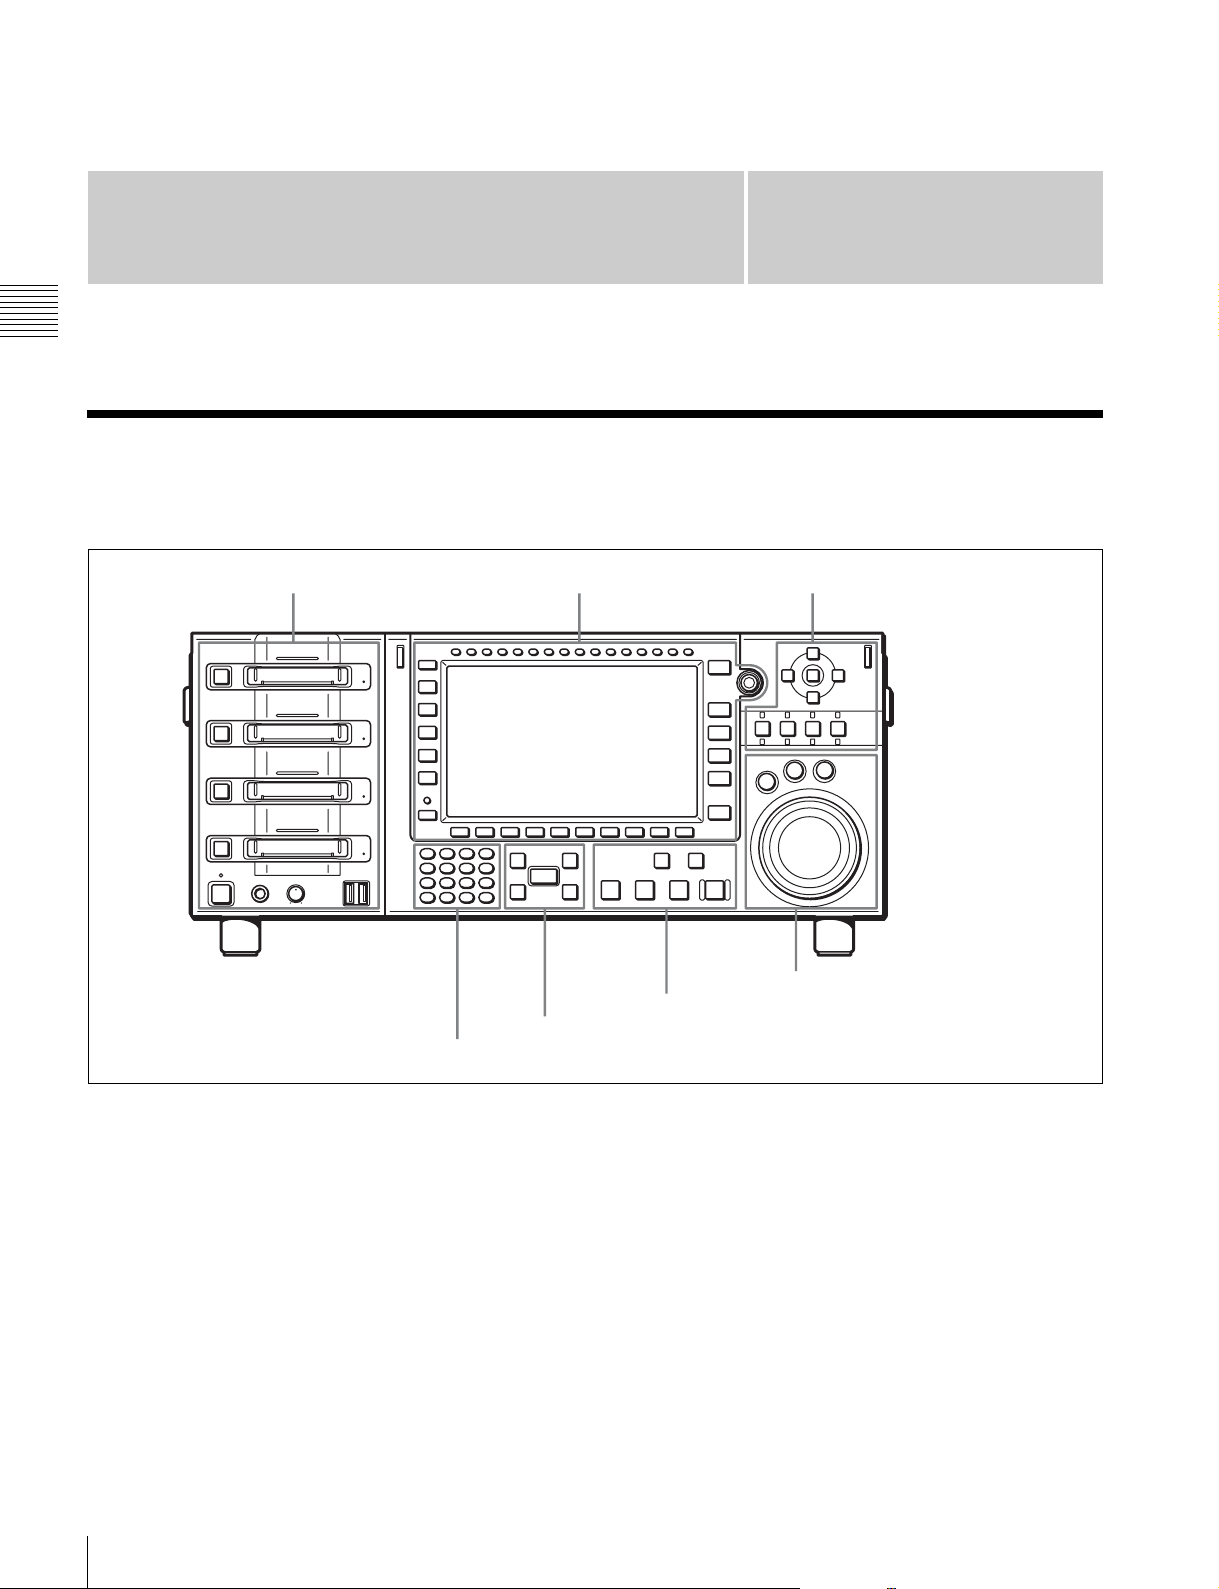
Names and Functions of
Parts
Chapter 2 Names and Functions of Parts
Control Panel
The control panel consists of the following sections:
A SRMemory slot section
(see page 13)
B Menu control section
(see page 14)
Chapter
C Port control section
(see page 15)
2
12
G Search control section (see page 16)
F Recording/playback control section (see page 15)
E Editing control section (see page 15)
D Numeric buttons (see page 15)
Control Panel
Page 13
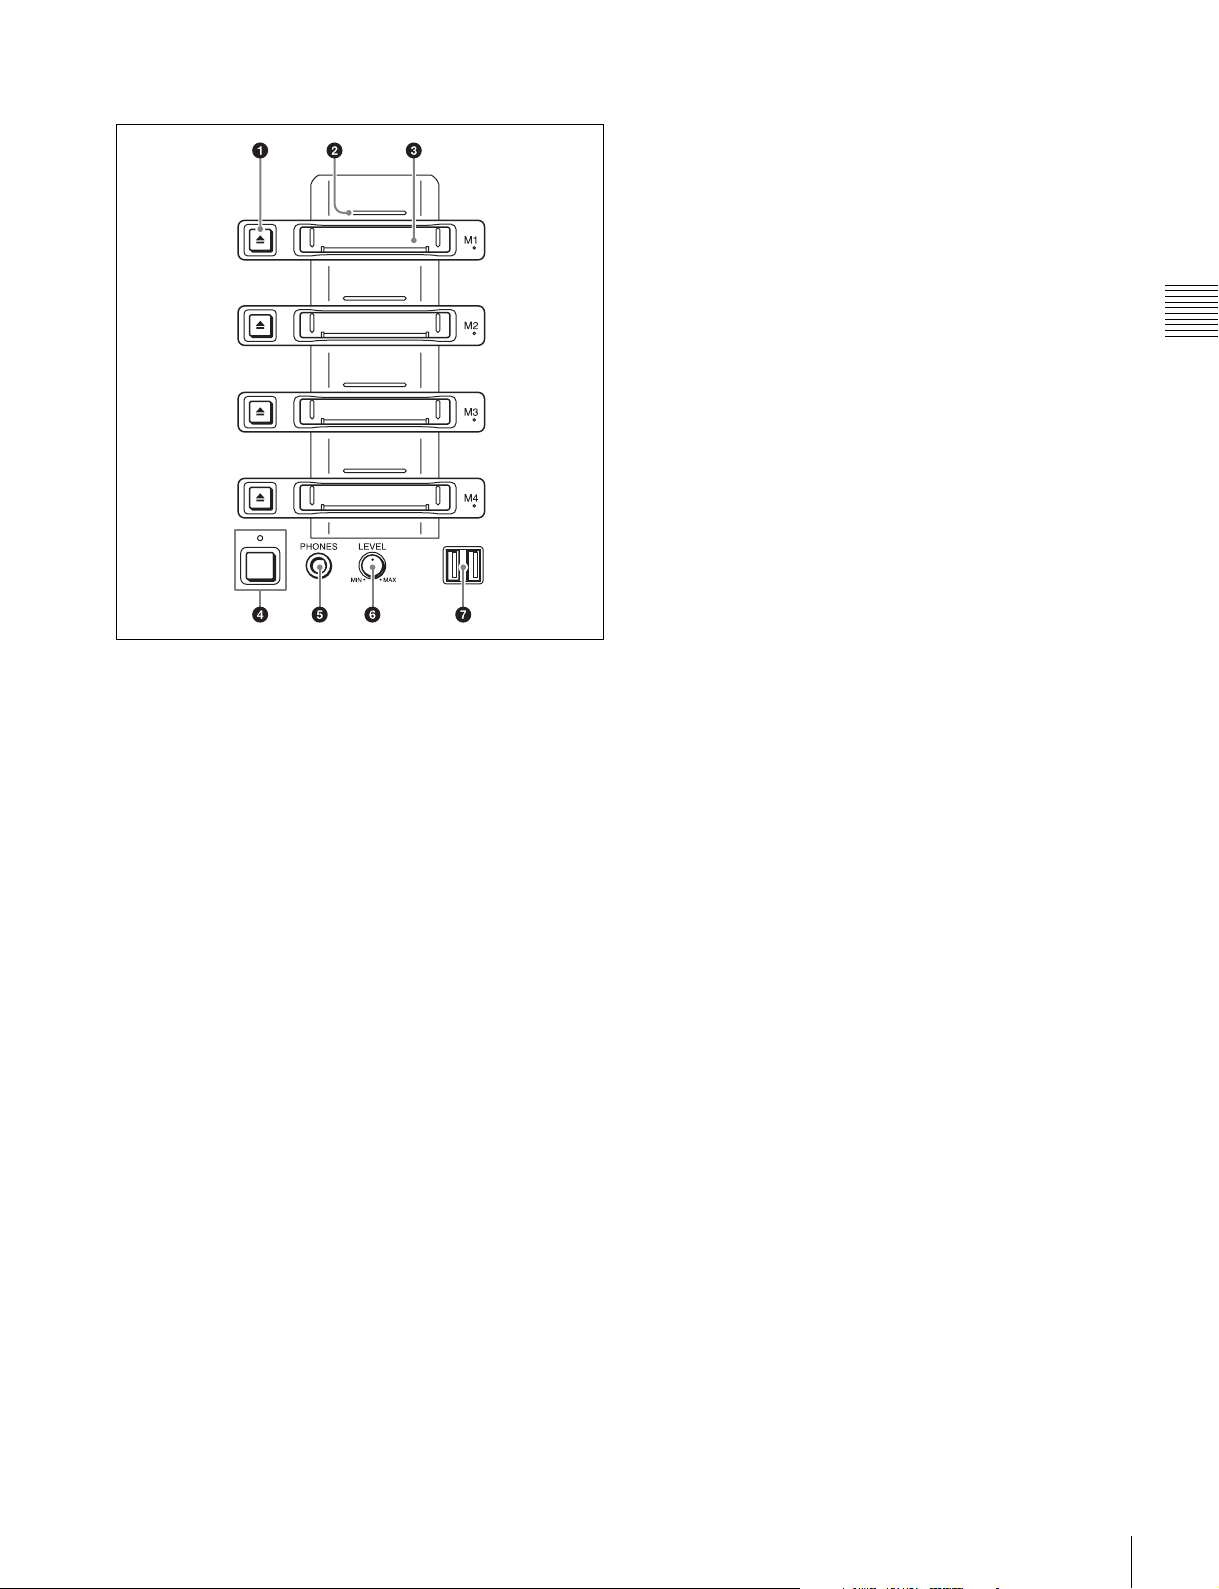
A SRMemory slot section
1) Flashing LED: Flashes at 1-second interval.
Fast flashing LED: Flashes at 1/4-second interval.
For details on salvage operations and formatting when
problems have occurred, see “Troubleshooting” in the
Appendix (page 56).
c SRMemory slot
Insert an SRMemory card.
a Eject button
Ejects a card.
b SRMemory indicator
Indicates the status of the SRMemory card inserted in the
slot.
Off: The SRMemory card is logically detached from the
unit.
Blue: An SRMemory card is connected to the unit and
available for use.
Red: Data is being recorded to the SRMemory card. Or,
files are being copied from another SRMemory card.
Green: Data is being read from the SRMemory card. Or,
data is being read while copying files to another
SRMemory card.
Amber: Data is simultaneously being recorded to and read
from the SRMemory card.
Flashing blue light
being attached to or detached from the unit.
Flashing green light
1)
: The SRMemory card is logically
1)
: Data other than audio and video
signals, such as file name changes, OK/NG/KEEP
flag settings, write protection settings for files, is
being written.
Flashing purple light
1)
: Files are being deleted or
formatting is being performed from the maintenance
menu.
Flashing red light
performed in response to an error.
Fast flashing red light
1)
: Salvaging or formatting is being
1)
: A problem was detected while
processing the SRMemory card. Eject or salvage the
card or perform the appropriate operation as
instructed by the message that appears on the control
panel.
d On/Standby button and indicator
Switches the unit between on and standby when the main
power switch on the connector panel is turned on.
The indicator is lit red in the standby state, and green in the
on state. It is off when the main power switch is off.
e PHONES (headphones) jack
Accepts stereo headphones for monitoring audio during
recording and playback.
f LEVEL (volume) knob
Adjusts the output level of the PHONES jack.
g USB connectors
Currently cannot be used.
Chapter 2 Names and Functions of Parts
Control Panel
13
Page 14
B Menu control section
Chapter 2 Names and Functions of Parts
a DISPLAY button
Displays the video signal on the entire display.
b CH (channel) selection buttons
Select the channel to adjust the audio recording/playback
level or to select an audio input.
c Menu selection buttons (page 41)
Select the menu screen to display on the display.
Currently, the EDIT button cannot be used.
d MULTI CONTROL knob
Sets the audio recording/playback levels, sets menus,
selects files, etc.
e Color display (page 20)
Note on faulty pixels on the LCD panel
The LCD panel fitted to this unit is manufactured with
high precision technology, giving a functioning pixel
ratio of at least 99.99%. Thus a very small proportion of
pixels maybe “stuck”, either always off (black), always
on (red, green, or blue), or flashing. In addition, over a
long period of use, because of the physical characteristics
of the liquid crystal display, such “stuck” pixels may
appear spontaneously. These problems are not a
malfunction. Note that any such problems have no effect
on recorded data.
h DIAG (diagnostic) button
Displays the DIAG menu when pressed together with the
SFT button.
i MEM button
Currently cannot be used.
j Memory selection buttons (M1 to M4) (page 32)
Select the SRMemory card to use.
f Function selection buttons (F1 to F10)
Select a function displayed on the menu screen.
g ALT (alternative) button
Changes the menu screen display.
14
Control Panel
Page 15
C Port control section
E Editing control section
Currently cannot be used.
a Cursor buttons
Move the cursor (shown in reverse video) on the display.
Also used to change settings values.
b PORT SELECT buttons/indicators (page 32)
Buttons: Select the input/output port to use. A button
lights up when selected.
Top indicators: Light up red for input ports, and green for
output ports.
Bottom indicators: Light up red for ports being used for
recording, and green for ports being used for
playback.
D Numeric buttons
a Numeric buttons and +/– buttons
Press to input an edit point or other numerical value at the
position selected by the cursor buttons. Press buttons 0 to
5 while holding down the SFT button to input hexadecimal
A to F for user bits. Also use the +/– buttons to increase or
decrease numerical values.
b SFT (shift) button
Press buttons 0 to 5 while holding down the SFT button to
input hexadecimal A to F for user bits. Use also in
combination with other buttons to perform other
operations.
c RCL (recall) button
Press to recall the previous setting, etc.
F Recording/playback control section
a PREV button
Press to display the image of the first frame in the current
file. Press again to jump to the first frame in the previous
file.
Press this button and the SFT button simultaneously to
display the image of the first frame in the file at the top of
the file list.
b NEXT button
Press to display the image of the first frame in the next file.
Press this button and the SFT button simultaneously to
display the image of the first frame in the file at the end of
the file list.
c EXECUTE button
Press to open the file selected in the file list.
Press the EXECUTE and STOP buttons simultaneously to
close a file.
d STOP button
Press to stop playback or recording.
e PLAY button
Press to start playback. Press the PLAY button while
holding down the REC button to start recording.
If you press the NEXT button while holding down the
PLAY button, the last frame of the current playback file is
displayed. If you press the NEXT button while holding
down the PLAY button during chasing playback, playback
will jump and resume from the playable position that is
closest to the recording position at that moment.
Chapter 2 Names and Functions of Parts
d CLR (clear) button
Press to clear input data.
e SET button
Press to finalize input data.
f REC button
Press the PLAY button while holding down the REC
button to start recording.
Control Panel
15
Page 16
G Search control section
Chapter 2 Names and Functions of Parts
a SHUTTLE button
Press to enter shuttle mode. In this mode, the button is lit
and playback at the speed corresponding to the position of
the search dial is possible (–100 to +100 times normal
playback speed). The search dial clicks at the positions for
still pictures and ±10 times normal playback speed.
b JOG button
Press to enter jog mode. In this mode, the button is lit and
playback at the speed corresponding to the rotational speed
of the search dial is possible (–1 to +1 times normal
playback speed).
c VAR (variable) button
Press to enable noiseless playback in the range of –1 to +1
times normal playback speed. The button lights when
pressed. Playback exceeding this speed range is not
possible.
d Search dial
Rotate clockwise for forward playback, and
counterclockwise for reverse playback.
Shuttle mode: Enables playback at the speed
corresponding to the position (rotation angle) of the
search dial (–100 to +100 times normal playback
speed). The search dial clicks at the positions for still
pictures and ±10 times normal playback speed.
Jog mode: Enables playback at the speed corresponding to
the rotational speed of the search dial (–1 to +1 times
normal playback speed). The search dial does not
click.
Variable mode: Enables noiseless playback at the speed
corresponding to the position of the search dial (–1 to
+1 times normal playback speed).
16
Control Panel
Page 17
Connector Panel
Port A
Port B
Port C
Port D
A Input/output ports (see page 17)
Chapter 2 Names and Functions of Parts
* At the time of shipment from the factory, no boards are
connected to ports A to C.
An output board is connected to port D.
B Remote input/output
A Input/output ports
There are the four ports A to D, and an input board or
output board can be connected to each of them. At the time
of shipment, an output board is connected to port D.
Explanations in this operation manual use the
configuration example of input boards (SRK-R201)
HD Input board (SRK-R201)
a HD SDI INPUT A/B connectors
Input the HD SDI video/audio signals.
b HD SDI INPUT MONITOR A/B/MULTI
connectors
Output the input signals for a monitor.
The MULTI connector currently cannot be used.
c TIME CODE IN connector
Inputs a time code generated by an external device.
section (see page 18)
C Analog output/power supply
section (see page 19)
connected to ports A and C and output boards (SRK-R202)
connected to ports B and D.
d TIME CODE OUT connector
When the time code generator is synchronized to the
external time code signals input via the TIME CODE IN
connector, this outputs the external time codes input via
the TIME CODE IN connector according to the ALT/[F3]
(TC OUT) button setting in the TC menu.
Outputs generated time code signals when the internal time
code generator is generating time codes.
e DIGITAL AUDIO INPUT (AES/EBU) connector
Input the audio signals in AES/EBU format for channels 1
to 16.
Connector Panel
17
Page 18
HD Output board (SRK-R202)
a SD/HD SDI OUT A/B connectors
Output two sets of SD SDI or HD SDI video/audio signals.
Currently, only HD SDI signals are supported.
Chapter 2 Names and Functions of Parts
b SD/HD SDI MONITOR A/B/MULTI connectors
Output the output signals for a monitor. Time data and
other character signals are superimposed and then output
when ALT/[F10] (CHAR ON) in the TC menu is set to On.
The MULTI connector currently cannot be used.
Currently, only HD SDI signals are supported.
B Remote input/output section
c TIME CODE OUT connector
Outputs the playback time code.
d DIGITAL AUDIO OUTPUT (AES/EBU)
connector
Output the audio signals in AES/EBU format for channels
1 to 16.
a REMOTE 1 to 4 (9-pin) connectors
To control the unit from an external device, connect it to
the external device with a remote control cable that has a
9-pin connector.
The Sony 9-pin VTR protocol and Sony 9-pin Disk
protocol are supported.
b VIDEO CONTROL connector
Currently cannot be used.
c REF. INPUT connectors and 75 Ω terminal switch
Input the reference video signal of the selected field
frequency. Input an HD tri-level SYNC signal or SD black
burst signal.
A loop-through connection is also possible. Set the 75 Ω
terminal switch to OFF if you are using a loop-through
connection, and set it to ON if you are not using a loopthrough connection.
d MAINTENANCE connector
Used by the administrator. This is not for normal use.
e GPIO (25-pin) connector
Currently cannot be used.
f NETWORK 1/2 connectors
Accepts a network cable for monitoring the unit by SNMP,
configuring or checking the unit via HTTP, transferring
files via FTP, etc.
CAUTION
• For safety, do not connect the connector for peripheral
device wiring that might have excessive voltage to this
connector.
Follow the instructions for this port.
• When you connect the network cable of the unit to
peripheral device, use a shielded-type cable to prevent
malfunction due to radiation noise.
18
Connector Panel
Page 19
C Analog output/power supply section
a AUDIO MONITOR OUTPUT connectors
Output the audio monitor signals.
Chapter 2 Names and Functions of Parts
b Main power switch
Turns on/off the main power supply. When the main power
is turned on, the On/Standby indicator on the control panel
lights.
Normally, this switch should be left in the top (on) position
during operation, and standby status switching should be
performed using the On/Standby button on the control
panel.
Note
When turning off the main power supply, always make
sure that the On/Standby indicator on the front panel is lit
red (standby state) before turning off the switch.
c - AC IN connector
Connect this connector to an AC outlet using the
recommended power cord.
d U Ground terminal
If necessary, use this for grounding.
Connector Panel
19
Page 20
Display Screen
The color display of the unit is capable of displaying a
four-port display screen that shows all of the four ports and
a one-port display screen that shows only the selected port.
When the screen is four-port display, pressing the PORT
SELECT button of the selected port switches to one-port
display. When the screen is one-port display, pressing the
Chapter 2 Names and Functions of Parts
PORT SELECT button redisplays four-port display.
Main Screen
Four-port display
A Port information display section (see page 21)
a Menu display section
B Status bar
(see page 22)
20
Display Screen
Page 21
One-port display
b Audio level meters
Chapter 2 Names and Functions of Parts
APort information
display section
(see page 21)
BStatus bar
(see page 22)
a Menu display section
a Menu display section (page 41)
Displays a menu.
A Port information display section
Four-port display
a Port name
b SRMemory slot name
c File name
f Remaining time display
e Playback/recording mark
d Video format
b Audio level meters
Displays the audio recording/playback levels.
The meters are only displayed in the one-port display
screen.
g Playback speed
display bar
h Preview display area
i Time data type
j LTC/VITC
k DF/NDF
l F1/F2
m Time code
Display Screen
21
Page 22

One-port display
Chapter 2 Names and Functions of Parts
a Port name
b SRMemory slot name
n Time code (Second area)
m Time code
Indicates the time code based on the setting of the TC
menu.
c File name
d Video format
Displays the video format according to port type.
For input ports
In: Displays the recording format.
For output ports
File: Displays the recording format of a file.
Out: Displays the video format for output via a port.
e Playback/recording mark
A mark is displayed during playback/recording.
f Remaining time display
Indicates the remaining time for SRMemory card. During
recording, indicates the remaining recording time if
recording is continued in the current state.
This is only displayed for input ports.
g Playback speed display bar
Indicates the playback speed and other information for
variable speed playback.
This is only displayed for output ports.
h Preview display area
Shows a preview of the selected file.
i Time data type
Indicates the time data type.
For details on time data type, see “Selecting the Time
Data” (page 27).
j LTC/VITC
Indicates the time code type (LTC or VITC).
k DF/NDF
Indicates the drop frame mode.
n Time code (Second area)
Indicates the time code when the ALT/[F5] (TC2 SEL)
buttons are set to anything other than Off in the TC menu.
This is only displayed in the one-port display screen.
B Status bar
f Remote
control
e Network access
d Copy
c Write-protected
b Button operations inhibited
a Warning message
a Warning message
Displays an icon and a message when a problem is
detected by the unit. To obtain more information on a
detected problem, press the SFT and DIAG buttons
simultaneously to open the maintenance information
display.
b Button operations inhibited
The operation inhibit icon is displayed when button
operations on the control panel are inhibited with the [F5]
(KEY INHI) button in the SETUP menu.
c Write-protected
Indicates the number of the slot in which the writeprotected SRMemory card is inserted.
All slot numbers are displayed when recording and editing
on all SRMemory cards are inhibited with the ALT/[F9]
(REC INHI) buttons in the HOME menu.
d Copy
Indicates the numbers of the source/destination slot when
copying files between SRMemory cards in the unit.
l F1/F2
Indicates the field number.
22
Display Screen
Page 23

e Network access
Indicates the number of the slot with the SRMemory card
which is being accessed from network.
File List Screen
Press the memory selection buttons to display the list of
files in the SRMemory card inserted.
f Remote control
Indicates the input/output port manipulated by a remote
controller.
a SRMemory slot name
b Remaining capacity
d Flag indication
a SRMemory slot name
b Remaining capacity
Indicates the remaining storage capacity.
Chapter 2 Names and Functions of Parts
c Number of files
e File list f Detailed file information
•Video format
•Audio format
c Number of files
Indicates the number of the current file and total number of
files.
d Flag indication
Indicates the flag (OK/NG/KEEP) or lock state set for a
file.
e File list
Displays the list of files in the SRMemory card. The file
list shows the following information.
• File name
• Date created
• Duration
• Access status (the port accessing a file)
f Detailed file information
Displays detailed information on files selected in the file
list. The following information is displayed.
• Start time code
• Duration
• Date updated
Display Screen
23
Page 24

Setting Up the Memory
Storage Unit
Chapter 3 Setting Up the Memory Storage Unit
Connecting External Devices
This section describes how to connect the unit to external
devices to record or play back data. In the explanations in
this section, input boards are connected to ports A and C,
and output boards to ports B and D.
Using the Unit as a Recorder
The following shows an example of connecting an HD
digital player and other devices to the input ports in order
to use the unit as a recorder.
Chapter
HD digital recorder
Remoter controller
3
Video monitor
HD digital player
Video monitor
Remoter controller
Using the Unit as a Player
The following shows an example of connecting an HD
digital recorder and other devices to the output ports in
order to use the unit as a player.
24
Connecting External Devices
Page 25

Reference Signals
This section describes how the reference signals for video
output are selected.
Reference Signals for Output Video Signals
The output video signals of the unit are synchronized and
output as follows depending on the unit’s operation state,
settings, and input signals.
Start
What is the setting of the
HOME menu item [F3]
(REF SEL)?
Ext
Is a signal of the correct
frequency being input
via the REF. INPUT
connector?
No
Synchronize with
the reference video
signal input of the
REF. INPUT
connector.
Input
Is a signal being input
via an HD SDI INPUT
connector?
No
Synchronize with
the video signal
input of an HD SDI
INPUT connector.
Chapter 3 Setting Up the Memory Storage Unit
YesYes
No external synchronization (synchronization is internal)
Reference Signals
25
Page 26

Reference Signal Connections
For playback
Connect reference signals as follows, according to your
recording or playback requirements.
Reference signal connections
For recording signals from a switcher or signal
generator
Reference signal
Switcher or signal generator
Chapter 3 Setting Up the Memory Storage Unit
75 Ω terminal switch: ON
For recording signals from an HD VTR
Reference signal
Reference signal
75 Ω terminal switch: ON
HD serial
input monitor
Note
Either an HD tri-level SYNC signal of an appropriate field
frequency for external synchronization or a black burst
signal can be input as the reference signal. Input a signal of
the appropriate field frequency for your system.
Sync signals in 720P mode
Synchronize with an external sync signal when you want
to record or play back 720P signals on this unit (including
editing).
• When the 720/59.94P system is selected:
EXT HD: 1080/59.94i tri-level SYNC signal
EXT SD: 525 black burst signal
• When the 720/50P system is selected:
EXT HD: 1080/50i tri-level SYNC signal
EXT SD: 625 black burst signal
26
HD digital player
Reference Signals
75 Ω terminal switch: OFF
Selecting the Reference Signal for Output
Press the [F3] (REF SEL) button in the HOME menu to
select the signal to be the reference for operation of the
unit.
Ext: Uses the external reference signal input to the REF.
INPUT connectors as the reference signal.
Input A, Input B, Input C, and Input D: Uses the signal
input to the HD SDI INPUT connector connected to
ports A to D as the reference signal.
To switch the external reference signals between HD and
SD, press the [F4] (EXT REF) button in the HOME menu.
Page 27

Time Code Settings
Selecting the Time Data
The display shows the following types of time data.
Control
panel
indication
TCR LTC TCR The LTC value read by the
TCR VITC TCR The VITC value read by the
TCG TCG The value generated by the
UBR LTC UBR The user bit
UBR VITC UBR The user bit value read by
UBG UBG The user bit value generated
TM1 TM1 Time counter value that can
TM2 TM2 Time counter value for which
1) User bits
These represent supplementary information as part of the recorded time
code, and consist of eight hexadecimal digits (0-9 and A-F).
Selecting the time data
Press the [F5] (TM SEL) button in the TC menu repeatedly
to select the time data display.
TC: Displays the value read by the time code reader or the
value generated by the time code generator. To switch
between VITC and LTC, press the [F10] (TCR SEL)
button in the TC menu.
UB: Displays the user bits inserted in the playback time
code or the user bits inserted in the time code being
recorded. To switch between VITC and LTC, press
the [F10] (TCR SEL) button in the TC menu.
TM1: Displays the time counters that can be preset or
reset.
TM2: Displays the time counters for which the beginning
of the file will be 0. They cannot be preset or reset.
Superimposed
display
Time data type
time code reader during
playback.
time code reader during
playback.
time code generator during
recording.
1)
value read by
the time code reader (LTC)
during playback.
the time code reader (VITC)
during playback.
by the time code generator
during recording.
be preset.
the beginning of the file is 0.
Setting the Time Code Generator
There are two ways to record time codes with the unit. One
way is to record the output of the unit’s internal time code
generator. The other is to directly record time codes that
are input from an external time code generator.
The output from the internal time code generator can either
be set to any initial value, or synchronized with an external
time code generator.
Set the internal time code generator with [F1] (TCG SRC)
in the TC menu.
preset: Generates time codes with the internal time code
generator. Any initial value can be set for the time
codes.
ext-LTC: Synchronizes to the time data of the TIME
CODE IN connector, and regenerates the time codes.
SDI-LTC: Synchronizes to the LTC time data of the video
signal of the HD SDI INPUT A connector, and
regenerates the time codes.
SDI-VITC: Synchronizes to the VITC time data of the
video signal of the HD SDI INPUT A connector, and
regenerates the time codes.
Selecting the signal to regenerate
Select the signal to regenerate with the [F2] (REGENE)
button in the TC menu.
TC & UB: Regenerates both the time code signal and user
bit signal.
TC: Regenerates only the time code signal.
UB: Regenerates only the user bit signal.
For a signal that is not regenerated, the mode always
becomes preset mode regardless of the [F1] (TCG SRC)
button setting.
Setting the Time Data
To set the time codes
Notes
Use the [F3] (RUN) button in the TC menu to select “Rec”
before setting the time code for recording. In rec mode,
time code recording begins from the set value. In “Free”
mode, the time code advances in real time after the setting
has been made.
Chapter 3 Setting Up the Memory Storage Unit
Time Code Settings
27
Page 28

Chapter 3 Setting Up the Memory Storage Unit
1
Use the [F5] (TM SEL) button in the TC menu to select
the TC (time code) to be set.
2
Use the [F8] (TM SET) button in the TC menu to select
preset mode.
The numbers in the time code display section turn
orange.
3
Use the numeric buttons to input the time code.
Pressing a numeric button inputs a value in the
flashing digit in the time code display section. Use the
right and left cursor buttons to move the flashing digit.
Notes
• The values read by the time code reader cannot be reset.
• Time data cannot be reset when the internal time code
generator is locked to external time codes or to values
read by the time code reader.
To set the user bits
1
Use the [F5] (TM SEL) button in the TC menu to select
“UB”.
2
Use the [F8] (TM SET) button to select preset mode.
The numbers in the time code display section turn
orange.
3
Use the numeric buttons to enter the desired user bit
value in hexadecimal notation.
Press the 0 to 5 buttons while holding down the SFT
button to enter the letters A to F.
4
Press the SET button.
To record the current time
To cancel the input data
Press the CLR button.
4
Press the SET button to confirm the input data.
If you press the + or – button and then enter a value,
the input data becomes the result of the addition or
subtraction.
Notes
• The data from an external time code generator cannot be
set.
• The time data cannot be set when the internal time code
generator is locked to external time codes or to values
read by the time code reader.
• Entries made in preset mode are shown in the 24-hour
display even when ±12H is set.
To reset time data
Press the [F7] (TM RESET) button in the TC menu.
The time data is reset as follows in accordance with the
setting of the [F5] (TM SEL) button in the TC menu.
For TC (time codes) or UB (user bits)
The internal time code generator is reset and the time data
display becomes 00:00:00:00 (for TC) or 00 00 00 00 (for
UB).
1
Use the [F4] (DF/NDF) button in the TC menu to
select “DF”.
2
Use the [F3] (RUN) button in the TC menu to select
“Free”.
3
Use the numeric buttons to enter the target time.
4
When the target time arrives, press the SET button.
The time code generator starts operating from the
specified time.
To pause the current time
Press and hold down the [F9] (TM HOLD) button in the
TC menu.
The current time is paused only while the button is held
down.
28
Time Code Settings
Page 29

Superimposing Character Information
To superimpose characters representing the time data,
operation mode, and other information on output signals,
set the ALT/[F10] (CHAR ON) buttons to On in the TC
menu. Character information is superimposed on signals
output from the SD/HD SDI MONITOR connector.
b Drop frame mark of the time code reader
“.”: Drop frame mode
“:”: Non-drop frame mode
c Drop frame mark of the time code generator
“.”: Drop frame mode
“:”: Non-drop frame mode
d Field mark of the VITC data
“ ” (blank space): When displaying fields 1 and 3
“*”: When displaying fields 2 and 4
Contents of superimposed data
a Type of time data
Time data
b Drop frame mark of the time code
reader
c Drop frame mark of the time
code generator
d Field mark of the
VITC data
f Operation modee Port
Note
The example above shows the factory-set contents of data.
If you change the setting of the ALT/[F7] - [F3] (INFO
SEL) buttons in the TC menu, a different type of time data
can also be displayed on the second line.
a Types of time data
Indication Meaning
TCR Time code data of LTC reader
UBR User bit data of LTC reader
TCR. Time code data of VITC reader
UBR. User bit data of VITC reader
TCG Time code data of time code generator
UBG User bit data of time code generator
TM1 Time counter value that can be preset.
TM2 Time counter value for which the beginning of
the file is 0.
e Port
Indicates the output port.
f Operation mode
The contents are divided into blocks A and B as shown in
the following table.
Block A: Operation mode
Block B: Lock state or playback speed
Indication Operation mode
Block A Block B
STOP Stop mode
PLAY Playback mode (unlocked)
PLAY LOCK Playback mode (locked)
JOG STILL Still-picture jog mode
JOG FWD Forward jog
JOG REV Reverse jog
SHUTTLE (Speed) Shuttle mode
VAR (Speed) Variable mode
PORT CLOSE Port closed
To display an error/warning message
The number of error/warning message occurrences
Set the ALT/[F7] – [F3] (INFO SEL) buttons to any value
other than [Time].
The number of error/warning message occurrences flashes
on the second line.
Chapter 3 Setting Up the Memory Storage Unit
Superimposing Character Information
29
Page 30

For details on error messages, see “Error Messages”
(page 58). For details on warning messages, see
“Warning Messages” (page 60).
When error messages and warning messages occur
simultaneously, the number of error message occurrences
flashes twice, and then the number of warning message
occurrences flashes twice.
When a warning message is not being displayed, the
contents set with the ALT/[F7] – [F3] (INFO SEL) buttons
flash on the second line.
To change the superimpose position
The superimpose position can be moved in the horizontal
Chapter 3 Setting Up the Memory Storage Unit
and vertical directions.
To change the position, press the ALT/[F7] – [F1]
(POSITION) buttons in the TC menu and move the
position up, down, left, or right with the cursor buttons.
Switching to a menu screen other than the TC menu screen
ends the setting.
Handling SRMemory Cards
Recommended SRMemory Cards
The SRMemory cards supported by the unit and their
maximum recording times are as follows.
For 59.94i
Model
SR-256S15/S55 114 60
SR-512S25/S55 229 120
SR-1TS25 458 241
For 50i
Maximum recording time
SR-Lite SR-SQ
Unit: minutes (approx.)
Model
SR-256S15/S55 137 72
SR-512S25/S55 274 145
SR-1TS25 550 290
Maximum recording time
SR-Lite SR-SQ
Unit: minutes (approx.)
For 23.97P
Model
SR-256S15/S55 143 75
SR-512S25/S55 286 151
SR-1TS25 573 302
Maximum recording time
SR-Lite SR-SQ
Unit: minutes (approx.)
The maximum recording times may vary depending on the
SRMemory card and recording format.
Inserting and Ejecting SRMemory Cards
30
Handling SRMemory Cards
Always turn on the unit before inserting or ejecting
SRMemory cards.
Page 31

Inserting SRMemory cards
1
Set the On/Standby switch to On.
2
Insert the SRMemory card in any of the SRMemory
slots 1 to 4.
When the SRMemory card is inserted, the mount
process is performed automatically.
Chapter 3 Setting Up the Memory Storage Unit
Ejecting SRMemory cards
Press the corresponding eject button.
The file close and unmount processes are performed, and
the SRMemory card is ejected automatically.
Preventing Accidental Data Loss
To prevent the accidental erasure of data recorded on an
SRMemory card, set the write-protect switch to the “WP”
position.
Write-protect switch
When a card is inserted in this state, the corresponding slot
number will appear in red figure to the right of the writeprotect mark in the status bar, and recording and editing
will be disabled for that card.
To enable recording, return the write-protect switch to its
original position.
Handling SRMemory Cards
31
Page 32

Basic Operations
Chapter
3
Perform a recording or playback operation.
4
Selecting Input/Output Ports and SRMemory Slots
Chapter 4 Basic Operations
The unit is equipped with four input/output ports and four
SRMemory slots, and the signals from an input/output port
can be recorded to SRMemory cards in any of the slots and
the files on the SRMemory cards can be output to any
output port when played back. It is thus necessary to
specify the port and slot to use when recording or playing
back data.
When recording to an SRMemory card from an input port
and when playing back data from an SRMemory card to an
output port, select the port first and then the SRMemory
slot.
Association between input/output port and
SRMemory slot
Once you record or play back data, the unit will memorize
the association between the input/output port and
SRMemory slot selected at that time. The next time you
operate the unit, the SRMemory slot used last time will be
selected automatically if you perform a recording or
playback operation without specifying the SRMemory
slot.
The association will be cleared if another SRMemory slot
is selected or the SRMemory card is ejected from the slot.
For output ports, pressing the EXECUTE button while
holding down the STOP button will also clear the
association between the port and SRMemory slot.
1
Specify the input/output port.
Press any one of the PORT SELECT buttons to specify
the input/output port. A port with the indicator above
the PORT SELECT button lit red is an input port, and
a port with the indicator lit green is an output port.
When a PORT SELECT button is pressed, the button
lights up and a border appears around the
corresponding port in the four-port display screen to
indicate it is selected.
2
Specify the SRMemory slot.
Press any of the M1 to M4 buttons to specify the
SRMemory slot.
32
Selecting Input/Output Ports and SRMemory Slots
Page 33

Recording
This section describes the example of recording input
signals from port A to the SRMemory card in slot M1.
1
Insert the SRMemory card in slot M1.
The slot indicator lights up blue.
already being used for recording in step 3 of the procedure
above.
Note
When multiple SRMemory cards, input and output ports
are used to record or play back files simultaneously, some
functions are limited depending on the SRMemory card
type used or the port configuration. For details, see
“Restrictions on Simultaneous Recording and Playback”
(page 55).
Chapter 4 Basic Operations
2
Select port A with the corresponding PORT SELECT
button.
The PORT SELECT button of port A lights up and a
border appears around port A in the four-port display
screen. The video of the input signal from port A is
displayed in the preview area in the screen.
3
Select M1 with the corresponding memory selection
button.
A list of files in the SRMemory card appears in the
screen.
4
Press the PLAY button while holding down the REC
button.
The input signal from port A is recorded to the
SRMemory card. During recording, “z” is displayed
in the port A area in the screen. Also, the indicator
below the PORT SELECT button and the indicator for
the SRMemory slot are lit red. (If the SRMemory card
is played back at the same time, the indicator turns
amber.)
5
Press the STOP button when you want to stop
recording.
Recording simultaneously to one
SRMemory card
The input signal from another port can be simultaneously
recorded to the SRMemory card during recording. To
record simultaneously, select the SRMemory card that is
Recording
33
Page 34

Playback
This section describes the example of playing back a file in
the SRMemory card inserted in slot M2 on a device
connected to port B.
Chapter 4 Basic Operations
1
Insert the SRMemory card in slot M2.
2
Select port B with the corresponding PORT SELECT
button.
In the four-port display screen a border appears around
port B.
3
Select slot M2 with the corresponding memory
selection button.
Chasing Playback
A file being recorded to an SRMemory card can be played
back without waiting for recording to end.
This section describes the example of recording signals
from port A to slot M1 and playing back the same file
using port B during recording.
1
Select port B with the corresponding PORT SELECT
button during recording from port A to M1.
2
Select M1 with the corresponding memory selection
button.
A list of files in M1 appears in the screen.
3
Use the cursor buttons or MULTI CONTROL knob to
select the file being recorded, and then press the
EXECUTE button.
The file opens. The first frame of the selected file
appears in the preview area for port B in the screen.
4
Press the PLAY button.
Chasing playback begins. The M1 memory indicator
turns amber.
If you press the NEXT button while holding down the
PLAY button during chasing playback, playback will
jump and resume from the playable position that is closest
to the recording position at that moment.
A list of the files recorded to the SRMemory card
appears in the screen.
4
Use the cursor buttons or MULTI CONTROL knob to
select a file, and then press the EXECUTE button.
The file opens. The first frame of the selected file
appears in the preview area for port B in the screen.
5
Press the PLAY button.
Playback begins.
The indicator for slot M2 and the bottom indicator for
port B light up green.
When recording is simultaneously made to an
SRMemory card in slot M2, the slot indicator turns
amber.
If you have not opened the file on the selected port yet, you
can press the PLAY button instead of the EXECUTE
button after you select a file in step 4 to begin playback of
the file.
Variable Speed Playback
In the Jog, Shuttle, and Variable modes, you can change
the playback speed as follows:
Jog mode: The playback speed corresponds to the
rotational speed of the search dial, ranging from –1 to
+1 times normal playback speed.
Shuttle mode: The playback speed corresponds to the
position (rotation angle) of the search dial, ranging
from –100 to +100 times normal playback speed. The
search dial clicks at the positions for still pictures and
±10 times normal playback speed.
Variable mode: The playback speed corresponds to the
position (rotation angle) of the search dial, ranging
from –1 to +1 times normal playback speed.
34
Playback
Page 35

Jog mode playback
Follow the procedure below to play back in jog mode.
Shuttle mode
The data is played back at a speed that corresponds to
the position of the search dial.
The dial clicks at the positions for –10, 0, and +10
times normal playback speed.
3
Return the search dial to the center position or press
the STOP button to stop shuttle mode playback.
1
Press the JOG button so that it lights up.
The unit enters still-picture mode.
2
Rotate the search dial to start playback.
The data is played back slowly at a speed
corresponding to the rotational speed of the search
dial.
3
Stop rotating the search dial to stop jog mode
playback.
Shuttle mode playback
Follow the procedure below to play back in shuttle mode.
To return to normal-speed playback
Press the PLAY button.
Variable mode playback
Follow the procedure below to play back in variable mode.
1
Press the VAR button so that it lights up.
The unit enters variable mode.
2
Rotate the search dial in the desired playback direction
and set the rotation angle as required to achieve the
desired playback speed.
Chapter 4 Basic Operations
1
Press the SHUTTLE button so that it lights up.
The unit enters still-picture mode.
2
Rotate the search dial in the desired playback direction
and set the rotation angle as required to achieve the
desired playback speed.
Variable mode
The data is played back at a speed that corresponds to
the position of the search dial.
The search dial clicks at the positions for still pictures
and ±1 times normal playback speed.
Playback
35
Page 36

3
Return the search dial to the center position or press
the STOP button to stop variable mode playback.
To return to normal-speed playback
Press the PLAY button.
To alternate between normal-speed playback and
variable mode playback
After you have set the search dial to the angle that
corresponds to the desired playback speed, press the
PLAY button or VAR button to select normal-speed
playback or variable mode playback, respectively. To stop
or start variable mode playback, press the STOP button or
VAR button, respectively.
To use only the search dial to switch between jog/
variable mode and shuttle mode
Press the search dial during jog mode playback to switch
to shuttle mode, and press it again to return to jog mode.
Likewise, press the search dial during variable mode
playback to switch to shuttle mode, and press it again to
Chapter 4 Basic Operations
return to variable mode.
Still Picture Output
File Operations
Files recorded to SRMemory cards can be operated on the
unit.
Displaying a file list
1
Insert the SRMemory card containing recorded files in
the SRMemory slot.
2
Press the memory selection button of the slot in which
the SRMemory was inserted.
The file list appears on the display.
To output a still picture, press the [F2] (FREEZE) button in
the HOME menu. The picture that was playing just before
the button was pressed will be frozen on the screen. Select
the field or frame that specifies the still picture with the
ALT/[F2] (FRZ MODE) buttons in the SETUP menu.
To output a still picture continuously
Use the ALT/[F3] (FRZ CTRL) buttons in the SETUP
menu to select “Latch.”
Pressing the buttons outputs a still image, and pressing the
buttons again cancels freezing.
To momentarily output a still picture
Use the ALT/[F3] (FRZ CTRL) buttons in the SETUP
menu to select “Moment.”
A still picture is output for as long as you hold down the
buttons.
File list control menu
The following menu is available when the file list is open.
Button Indication Description
[F1] ITEM Selects any of the following items
as a sort key for sorting the files.
Name
Date
Duration
[F2] ORDER Sorts the file list in ascending or
descending order.
[F3] SELECT Selects any of the following items
to narrow the list down.
All
Check
OK
NG
KEEP
[F4] EXEC Applies the settings configured
with the [F1] to [F3] buttons.
[F5] COPY Copies the selected files.
[F6] DELETE Deletes the selected files.
[F9] INFO DISP Displays the detailed information
on the selected SRMemory card.
[F10] LOCK Locks the selected SRMemory
card to prevent them from being
recorded or deleted.
ALT/[F1] ALL CHK Selects all the files on the selected
SRMemory card.
ALT/[F2] FILE LOCK Locks the selected files to prevent
them from being edited or deleted.
36
File Operations
Page 37

Button Indication Description
ALT/[F3] SET FLAG Sets any of the following flags for
the selected files.
OK
NG
KEEP
None
ALT/
[F10]
ALL DEL Deletes all files in the SRMemory
card.
1
Use the cursor buttons or MULTI CONTROL knob to
select the file.
You can also select multiple files.
2
Press the ALT/[F2] (FILE LOCK) buttons.
The selected file is locked.
To unlock a file, select the locked file and press the
ALT/[F2] buttons.
Deleting a file
1
Use the cursor buttons or MULTI CONTROL knob to
select the file you want to delete.
2
Press the [F6] (DELETE) button.
3
When the confirmation message appears, use the
cursor buttons to select [OK] and press the center
cursor button.
The selected file is deleted.
To delete all files in the SRMemory card, press the
ALT/[F10](ALL DEL) buttons.
Copying a file
You can copy files to another SRMemory card.
1
Use the cursor buttons or MULTI CONTROL knob to
select the file.
2
Press the [F5] (COPY) button.
The screen for selecting the card to which a file is
copied.
To lock an SRMemory card
Locking an SRMemory card will disable recording to and
deleting data in the SRMemory card.
1
Use a memory selection button to select an
SRMemory card to be locked.
2
Press the [F10] (LOCK) button.
The selected SRMemory card is locked.
To unlock an SRMemory card, select the locked
SRMemory card and press the [F10] button.
Setting flags for files
You can set a flag (OK/NG/KEEP) for a file. Setting flags
makes it easier to select files required when editing.
1
Use the cursor buttons or MULTI CONTROL knob to
select the file.
You can also select multiple files.
2
Press the ALT/[F3] (SET FLAG) buttons repeatedly
until the desired flag appears.
Chapter 4 Basic Operations
3
Use the cursor buttons or MULTI CONTROL knob to
select the SRMemory card.
The selected file is copied.
Locking files or SRMemory cards
To lock a file
You can lock files to prevent them from being edited or
deleted.
Locking a file disables the following operations.
• Delete
•Move
• Recording
• Setting flags
Note
Formatting an SRMemory card will also delete the locked
files.
File Operations
37
Page 38

Selecting Audio Signals
This section describes how to select the audio signals to
input or monitor before you start recording or playback.
Selecting the Audio Input Signals
Make the settings as follows in accordance with the audio
input signals.
Chapter 4 Basic Operations
1
Press the AUDIO button and then press the [F1] (AUD
IN) button from the AUDIO menu.
The audio level meters are displayed highlighted.
2
Press the CH selection buttons, and make audio input
signal settings for each channel.
1
Press the PORT SELECT button of the input port you
want to set once or twice to display the one-port
display screen on the color display.
2
Check the audio level meters on the color display and
confirm that the mode is not level setting mode (state
in which the audio level meters are displayed
highlighted in orange).
The channels for which the signals are currently being
monitored are indicated with the reverse video
characters “L” and “R” below the audio level meters.
3
Press [F5] (MON (L)) button or [F6] (MON (R))
button in the HOME menu, and then use the channel
selection buttons to select channels 1 to 16.
To adjust the audio output level of the PHONES
jack
Rotate the LEVEL knob on the control panel.
SDI: Selects the audio signal input from the HD SDI
INPUT A connector.
A/E: Selects the audio signal input from a DIGITAL I/
O (AES/EBU) connector.
Press the CH1 button while holding down the SFT
button to simultaneously select channels 1 to 16.
Selecting the Audio Signals to Monitor
Use the channel selection buttons positioned in the upper
left of the control panel to switch the audio signal output
from the PHONES jack and AUDIO MONITOR
OUTPUT L/R connectors as follows.
To select non-audio data as the audio
input signal
Use the ALT/[F2] (NON-AUD) buttons in the AUDIO
menu to select non-audio data such as Dolby
Dolby Digital (AC-3
1) Dolby is a trademark of Dolby Laboratories.
2) AC-3 is a trademark of Dolby Laboratories.
Note
The following describes the operations for the selected
channels.
• For the input signal, the setting of the ALT/[F2] (NON
AUD) buttons has priority over the setting of the [F1]
(AUD IN) button of the AUDIO menu.
• “DATA” is displayed in white characters in the audio
level meters.
• Audio monitor output (output to the MONITOR
OUTPUT connector and PHONES jack) is turned off.
• The recording level settings of the channels for which
non-audio is selected do not affect the recording or
playback of DATA.
• Non-audio input channels are selected in stereo pairs.
2)
) as the audio input signal.
1)
E and
38
Selecting Audio Signals
Page 39

Adjusting the Audio Levels
This section describes how to adjust the audio level for
recording/playback before you start recording or playback.
The recording level is set automatically when you select
the input port, and the playback level is set automatically
when you select the output port.
To adjust the recording level manually
Press the AUDIO button while the one-port display screen
is displayed to enter level adjustment mode. Then, make
the channel you want to adjust manually active, and use the
cursor buttons or MULTI CONTROL knob to adjust the
level so that the audio level meter indicates a level that is
close to the reference –20 dB when at the average volume
level. When you press the AUDIO button again to exit
level adjustment mode, a horizontal yellow line indicating
the setting value appears on the right of the audio level
meter to indicate that the recording level has been adjusted
manually.
To adjust the recording level
1
Press the PORT SELECT button of the input port you
want to set once or twice to display the one-port
display screen on the color display.
2
Press the button for the channel you want to adjust to
make the channel active.
Check that the audio level meter is displayed
highlighted and that the level display bar appears on
the right of the meter.
3
Use the cursor buttons or MULTI CONTROL knob to
adjust the level.
To exit level adjustment mode
Press the button of the channel that is being adjusted again.
The display of the audio level meter for each channel
returns to normal.
Level settings of output ports
To output at the preset level (output at +4 dB for
a level recorded at the reference –20 dB)
Press the AUDIO button while the one-port display screen
is displayed to enter level adjustment mode. Then, make
the channel you want to output at the preset level active,
and press the MULTI CONTROL knob to set the setting to
the preset level. You can also restore the preset level by
pressing the center cursor button. When you exit level
adjustment mode, the audio level meter display will no
longer be highlighted.
For details on changing the reference output level for the
preset level, see the Installation Manual.
To adjust the playback level manually
Press the AUDIO button while the one-port display screen
is displayed to enter level adjustment mode. Then, make
the channel you want to adjust manually active, and use the
cursor buttons or MULTI CONTROL knob to adjust the
channel to the desired level. When you exit level
adjustment mode, a horizontal yellow line indicating the
setting value appears to the right of the audio level meter
to indicate that the playback level has been manually
adjusted.
Chapter 4 Basic Operations
Level settings of input ports
To record at the reference level
Press the AUDIO button while the one-port display screen
is displayed to enter level adjustment mode. Then, make
the channel you want to record at the reference level
active, and press the MULTI CONTROL knob to set the
setting to the reference value. You can also restore the
reference value by pressing the center cursor button. When
you exit level adjustment mode, audio level meter
highlighting is turned off.
Adjusting the Audio Levels
39
Page 40

Adjusting the Output Video Signal
Setting procedure
Set the output video signal menu items as follows.
1
Press a function selection button (e.g.: [F1]).
The setting value display area lights up.
2
Use the cursor buttons or MULTI CONTROL knob to
change the numerical value.
To set to the preset values
Press the center cursor button or MULTI CONTROL
knob.
Chapter 4 Basic Operations
The prst (preset) indication appears.
3
Press the function selection button (e.g.: [F1]) for the
desired setting value.
Adjusting the master output level
Use the [F1] (MASTER) button in the VIDEO menu to set
the level.
prst: 100% (4000H)
Numerical value: 0.0 (0H) to 141.3% (5A70H)
Adjustable range: –∞ to +3 dB
Adjusting the Y output level
Use the [F2] (Y) button in the VIDEO menu to set the
level.
prst: 100% (4000H)
Numerical value: 0.0 (0H) to 141.3% (5A70H)
Adjustable range: –∞ to +3 dB
Adjusting the PB output level
Use the [F3] (PB) button in the VIDEO menu to set the
level.
prst: 100% (4000H)
Numerical value: 0.0 (0H) to 141.3% (5A70H)
Adjustable range: –∞ to +3 dB
Adjusting the PR output level
Use the [F4] (PR) button in the VIDEO menu to set the
level.
prst: 100% (4000H)
Numerical value: 0.0 (0H) to 141.3% (5A70H)
Adjustable range: –∞ to +3 dB
Adjusting the setup level
Use the [F5] (SETUP) button in the VIDEO menu to set the
level.
prst: 0% (0)
Numerical value: –10.0% to +10.0%
Adjustable range: –10% to +10%
Adjusting the black output level
Use the [F6] (BLK LV) button in the VIDEO menu to set
the level.
prst: 0.0% (110H)
Numerical value: –31.0% (0H) to +31.0% (220H)
Adjustable range: –31.0% to +31.0%
Adjusting the chroma phase output level
Use the [F7] (CRM PH) button in the VIDEO menu to set
the chroma phase.
prst: 0
Value: –127 to +127
Adjustable range: –30° to +30°
Note
In 4:4:4 (RGB 10-bit) mode, adjustment of the output
level, setup level, and chroma phase is disabled.
Adjusting the sync phase
Adjust this when you want to precisely match the output
phase of the unit to the reference signal or when the unit is
used with multiple VTRs and a switcher or other device is
connected and used to create special effects such as fading,
wrapping, and dissolving.
Use the [F8] (SYNC PHASE) button in the VIDEO menu
to adjust the output signal sync phase in relation to the
reference input of the unit.
Press the [F8] button and then press the [F1] (SYNC)
button to roughly adjust the synch phase.
prst: 0 (0)
Numerical value: –128 to +127
Adjustable range: –1.4 to +1.4H
Use the [F2] (FINE) button to finely adjust the sync phase.
prst: 0 (0)
Numerical value: 0 to 1024
Adjustable range: 0 to 323 nsec
40
Adjusting the Output Video Signal
Page 41

Menu Items
Chapter
5
This unit has the following menus to enable a number of
settings.
HOME menu: Sets the basic operation modes for
recording and playback.
TC menu: Makes time code settings.
VIDEO menu: Adjusts video signals.
AUDIO menu: Adjusts audio signals.
SETUP menu: Saves and recalls settings and sets unit
operation settings.
Menu Operating Procedures
Each menu screen can be displayed by pressing the
corresponding menu selection button. Menu items are
assigned to function buttons ([F1] to [F10]) in each menu.
Press the ALT button to display a separate screen
containing separate menu items for function buttons [F1]
to [F10].
Some menus also have submenus. Select a submenu to
open a submenu screen; submenus are registered in the
function menu.
The menu items include operations and settings for the
overall unit and settings for each port. To access menu
items for each port, press a Port Select button to select a
port and then select a menu.
For example, do as follows to change the [F2] (SCAN)
button setting of the ALT/[F10] (PORT CONFIG) button
submenu in the VIDEO menu.
1
Press the VIDEO button.
The VIDEO menu screen appears.
2
Press the ALT button.
A separate VIDEO menu screen appears.
To return to the first page
Press the ALT button again.
Chapter 5 Menu Items
3
Press the [F10] (PORT CONFIG) button.
The PORT CONFIG button submenu appears.
41
Page 42

4
Press the [F2] (SCAN) button to change the setting.
Each press of the button changes the setting.
The menu items include settings for the overall unit and
settings for each port. With the settings for the ports,
different settings can be applied to each port. Make the
settings for each port when the port to be set is selected.
The settings for an input port and output port are only valid
when the corresponding ports are selected.
Chapter 5 Menu Items
Saving Settings
You can store up to 8 sets of unit settings in the user banks
along with title. Overall unit settings, input port settings,
and output port settings are separately stored.
Saving in the user banks
1
Press the SETUP button.
2
Press the [F1] (USER BANK) button.
3
Press one of the following buttons depending on the
settings you want to save.
Overall unit settings: [F4] (SYSTEM SAVE) button
Output port settings: [F5] (PB PORT SAVE) button
Input port settings: [F6] (REC PORT SAVE) button
4
Press one of the [F1] (BANK1) to [F8] (BANK8)
buttons to select the bank in which to store.
Recalling settings from the user banks
1
Press the SETUP button.
2
Press the [F1] (USER BANK) button.
3
Press one of the following buttons depending on the
settings you want to recall.
Overall unit settings: [F1] (SYSTEM RECALL)
button
Output port settings: [F2] (PB PORT RECALL)
button
Input port settings: [F3] (REC PORT RECALL)
button
4
Press one of the [F1] (BANK1) to [F8] (BANK8)
buttons to select the bank to be recalled.
To restore the factory default settings, press the [F9]
(FACTORY) button.
42
Saving Settings
Page 43

Detailed Menu Description
HOME Menu
The HOME menu allows you to set the basic operation
modes for recording and playback.
The Target column displays the following data.
Unit: Settings for the overall unit
In: Settings for the input ports
Settings in the Setting column are the values that appear in
the menu display section of the screen. Underlined values
Out: Settings for the output ports
I/O: Settings for the input/output ports
are the factory default settings.
Button Indication Setting Targ et
[F2] FREEZE Outputs a still picture (the picture that was playing just before the button was
[F3] REF SEL Selects the signal to be the reference for operation of the unit.
[F4] EXT REF Sets whether the reference signal is an HD signal or SD signal when using an
[F5] MON(L) Selects the audio channel output from the MONITOR OUTPUT L connector. (see
[F6] MON(R) Selects the audio channel output from the MONITOR OUTPUT R connector. (see
[F8] 9Pin Turn this On to enable the unit to be controlled from a device connected to a
ALT/[F8] PREROLL Sets the preroll time. This can be set in 1 second increments.
ALT/[F9] REC INH1 Sets record inhibit mode.
pressed). Select the field or frame that specifies the still picture with the ALT/[F2]
(FRZ MODE) buttons in the SETUP menu. (see page 36)
: Forces the reference signal to be external.
Ext
Input A, Input B, Input C, and Input D: Uses the signal from the HD SDI INPUT
connector of ports A to D as the reference signal.
external reference signal.
HD
SD
page 38)
After pressing the button, use the channel selection buttons to select channels 1 to
16.
page 38)
After pressing the button, use the channel selection buttons to select channels 1 to
16.
REMOTE connector.
On
Off
To make the setting, press the ALT/[F8] buttons, use the cursor buttons or MULTI
CONTROL knob to set the value, and then press the ALT/[F8] buttons again.
0 to 5 sec
Off
All: Prohibits all recording.
to 30 sec
: Enables recording.
Out
Unit
Unit
I/O
I/O
I/O
Unit
Unit
Chapter 5 Menu Items
Detailed Menu Description
43
Page 44

TC Menu
The TC menu allows you to set all of the items related to
time codes from a single menu.
Button Indication Setting Targ et
[F1] TCG SRC Selects whether to synchronize the internal time code generator with the external
[F2] REGENE Selects the signal to regenerate when the time code generator is in regenerate
[F3] RUN Selects the running mode of the time code generator.
[F4] DF/NDF Selects the drop frame mode of the time code generator or timer counter.
Chapter 5 Menu Items
[F5] TM SEL Selects the time data to display on the display. To switch between VITC and LTC,
[F7] TM RESET Resets the time counter. I/O
[F8] TM SET Inputs time data. (see page 27) I/O
[F9] TM HOLD The time counter is temporarily stopped while the button is pressed. Out
[F10] TCR SEL Sets the value read by the time code reader.
ALT/[F3] TC OUT Sets the time code that is output from the TIME CODE OUT connector during
ALT/[F4] TM DISP Sets whether TM1 is in 12-hour display mode or 24-hour display mode.
signal. (see page 27)
preset
ext-LTC
SDI-LTC
SDI-VITC
mode.
TC & UB
TC: Regenerates only the time code signal.
UB: Regenerates only the user bit signal.
Free
Rec: The time code advances only during recording.
DF
NDF: Non-drop frame mode
Notes
• This setting is only enabled when the frame frequency of the unit is 29.97 Hz or
• This setting is only valid when [F1] (TCG SRC) is set to “preset.”
press the [F10] (TCR SEL) button. (see page 27)
TC
UB
TM1
TM2
LTC
VITC
recording when the internal time code generator is set to a mode for regenerating
the playback time code.
Through
Regene: Regenerates the time code signal input from the TIME CODE IN
Note
When ±12H is set, the tens digit of the hours value is dropped.
+–12H
24H
: Regenerates both the time code signal and user bit signal.
: The time code advances when the power is on regardless of the unit’s
operation mode.
: Drop frame mode
59.94 Hz.
: Outputs the time code signal input from the TIME CODE IN connector as
is.
connector before outputting it.
In
In
In
I/O
I/O
Out
In
I/O
44
Detailed Menu Description
Page 45

Button Indication Setting Targ et
ALT/[F5] TC2 SEL Sets whether to use two lines for the time code display section and selects the time
code type for 2nd line when the screen is one-port display.
For input ports:
Off
TCG
TM1
TM2
UBG
For output ports:
Off
LTC
VITC
TM1
TM2
UBR
UBV
ALT/[F7] CHAR SET Sets the time code and other character information to superimpose on the signal
[F1] POSITION Allows you to set the display position of character information with the cursor
[F2] SIZE Sets the display size of character information.
[F3] INFO SEL Sets the character information content for when ALT/[F10] (CHAR ON) is set to On.
[F4] TYPE Sets the background of character information.
[F6] WARNING Sets whether to display a flashing warning message on the second line when an
[F10] EXIT Redisplays the previous menu. –
ALT/[F9] META SET Sets uncompressed metadata. I/O
[F1] LINE1 Sets from which lines to acquire the uncompressed metadata.
[F2] LINE2
[F3] LINE3
[F10] EXIT Redisplays the previous menu. –
ALT/
[F10]
CHAR ON Sets whether to superimpose the characters representing the time data and
output from the MONITOR connector of SD/HD SDI. (see page 29)
buttons.
Small
Medium
Time
T&V (Timedata & VITC): Timer counter display information and VITC
T&T1 (Timedata & TM1): Timer counter display information and TM1
T&T2 (Timedata & TM2): Timer counter display information and TM2
T&UB (Timedata & UBIT): Timer counter display information and user bits
T&sta (Timedata & Status): Timer counter display information and operation status
Outl (Outline): White characters with black outlines
Trnsl (Translucent): White characters on a gray screen background
Wo/BG (Without BG): White characters with no background
W/BG
item other than “Time” is selected with [F3] (INFO SEL).
Off
On
In 1080 59.94i, 1080 50i, 23.98P/24P mode:
In 720 59.94i/59.94P/29.97P, 720 50i/25P mode:
operation status on the signal output from the SD/HD SDI MONITOR connector.
(see page 29)
Off
On
(Timedata Only): Timer counter display information only
(With BG): White characters on a black background
9H to 16H or 18H to 20H
9H to 16H or 18H to 25H
I/O
Out
Out
Out
Out
Out
Unit
In
Out
Chapter 5 Menu Items
Detailed Menu Description
45
Page 46

VIDEO Menu
The VIDEO menu allows you to adjust video signals.
Button Indication Setting Targ et
[F1] MASTER Simultaneously adjusts the Y, PB, and PR levels of the HD video signal output via
[F2] Y Adjusts the Y level of the HD video signal output via the SD/HD SDI OUT
[F3] PB Adjusts the Pb level of the HD video signal output via the SD/HD SDI OUT
[F4] PR Adjusts the Pr level of the HD video signal output via the SD/HD SDI OUT
[F5] SETUP Adjusts the setup level of the HD video signal output via the SD/HD SDI OUT
[F6] BLK LV Adjusts the black level of the HD video signal output via the SD/HD SDI OUT
[F7] CRM PH Adjusts the chroma phase of the HD video signal output via the SD/HD SDI OUT
Chapter 5 Menu Items
[F8] SYNC PHASE Adjusts the sync phase of the HD video signal output via the SD/HD SDI OUT
[F8] SYNC Roughly adjusts the sync phase.
[F9] FINE Finely adjusts the sync phase.
[F10] EXIT Redisplays the previous menu. –
[F10] INT SG Sets the type of signal output from the internal signal generator.
ALT/[F1] OUT BLNK Turns on or off vertical interval blanking processing of the HD video signals output
ALT/[F3] YADD Sets whether to forcibly turn off Y add.
ALT/[F5] A/B DISP Sets whether to display the video for the left or right when displaying 3D video
ALT/[F6] VPID SEL Selects VPID to be multiplexed with the HD SDI output in 3D mode.
the SD/HD SDI OUT connectors. (see page 40)
0.0 to 100% (4000H)
connectors. (see page 40)
0.0 to 100% (4000H)
connectors. (see page 40)
0.0 to 100% (4000H)
connectors. (see page 40)
0.0 to 100% (4000H)
connectors. (see page 40)
–10% to 0.0% to 10.0%
connectors. (see page 40)
–31.0% to 0%
connectors. (see page 40)
–127 to 0
connectors. (see page 40)
–128 to 0
0
to 1024
Off
CB100
CB75
SMPTE
ARIB
MB1
MB2
10STEP
PBAR
RAMP
Black
via the SD/HD SDI OUT connectors.
Through
Blank: Performs blanking processing.
Auto
Off
signals on the display.
Link-A
Link-B
MONI: (Only available for the output ports)
Dual
3D: Uses as 3D signals.
to 127
to 127
: Does not perform blanking processing.
: Uses as two separate sets of signals.
to 141.3% (5A70H)
to 141.3% (5A70H)
to 141.3% (5A70H)
to 141.3% (5A70H)
to 31.0%
Out
Out
Out
Out
Out
Out
Out
Out
Out
Out
In
Out
Out
I/O
Out
46
Detailed Menu Description
Page 47

Button Indication Setting Targ et
ALT/[F8] MONITOR
SETTING
[F1] DUAL Sets the monitor output for 3D mode.
[F2] BORDER Selects whether to display a dividing line on the screen when the unit is set to split
[F3] BD LEVEL Sets the brightness level of the dividing line on the screen when the unit is set to
[F4] BD SLOPE Selects whether the dividing line is sloped on the screen when the unit is set to split
[F5] BD POS Sets the position of the dividing line on the screen when the unit is set to split the
[F10] EXIT Redisplays the previous menu. –
ALT/
[F10]
[F2] SCAN Sets the scanning method.
[F3] SIZE Sets the resolution.
[F4] SIGNAL Sets the sampling rate of video signals.
[F5] 2D/3D Sets 2D/3D operation.
PORT CONFIG Sets the input/output signals of the input/output ports. I/O
Sets the settings for monitor output in 3D mode. Out
Link-AB
Link-BA: Outputs with LINK-A and LINK-B interchanged in relation to the main
Note
When this item is set to any of the following, the same signal is output for LINK A
output and LINK B output.
Link-A: Outputs the LINK-A signal.
Link-B: Outputs the LINK-B signal.
Splt-AB: Splits the screen into two and outputs the LINK-A signal to the left screen
Splt-BA: Splits the screen into two and outputs the LINK-B signal to the left screen
FSq-AB: Outputs the LINK-A signal to the 1st field and the LINK-B signal to the 2nd
FSq-BA: Outputs the LINK-B signal to the 1st field and the LINK-A signal to the 2nd
SxS-AB: Splits the screen into two and then reduces the width of the LINK-A signal
SxS-BA: Splits the screen into two and then reduces the width of the LINK-B signal
the screen into two and output the signals to the monitor during 3D mode.
Off
On
split the screen into two and output the signals to the monitor during 3D mode.
1 to 8
the screen into two and output the signals to the monitor during 3D mode.
Off
On
screen into two and output the signals to the monitor during 3D mode.
–480 to 0
Interlace
PsF
Progres
1280 : 720
1920 : 1080
YPbPr
RGB
2D
3D
: Outputs each of the LINK-A signal (the signal input from the HD SDI
INPUT A connector) and LINK-B signal (the signal input from the HD SDI
INPUT B connector) in the same way as with main output.
output.
and the LINK-B signal to the right screen.
and the LINK-A signal to the right screen.
field.
field.
by half and outputs it to left screen and reduces the width of the LINK-B signal
by half and outputs it to the right half.
by half and outputs it to left screen and reduces the width of the LINK-A signal
by half and outputs it to the right half.
to 127
to 480
Out
Out
Out
Out
Out
I/O
I/O
I/O
I/O
Chapter 5 Menu Items
Detailed Menu Description
47
Page 48

Button Indication Setting Targ et
[F6] SDI Sets the format of SDI signals.
HDSDI
3GSDI
[F7] DEPTH Sets the bit length of input/output signals.
[F8] COMPRS Sets the compression mode.
[F9] SET Applies the settings. I/O
[F10] EXIT Redisplays the previous menu. –
10bit (fixed)
SR-SQ
SR-Lite
AUDIO Menu
The AUDIO menu allows you to adjust audio signals.
Button Indication Setting Targ et
[F1] AUD IN
(ch1 to 16)
[F2] METER Switches the display range of the audio level meters between FULL and FINE.
Chapter 5 Menu Items
[F7] SHTL AUD Sets whether to disable the audio signal output during shuttle playback.
[F9] MON MIX Sets the method for mixing the digital audio output via the AUDIO MONITOR
[F10] INT SG Selects the operation of the internal audio test signal generator.
ALT/[F2] NON-AUD Selects a non-audio input signal. The setting is in units of stereo pairs. (see
ALT/[F3] OUT PH Sets the output timing for the digital audio playback signal (SDI and AES/EBU only).
ALT/[F4] CH EXCHG Sets the relation between the digital signals (audio multiplexed with HD SDI output
Selects the input signal for each audio channel. (see page 38)
SDI: Selects the signal input to the HD SDI INPUT A connector.
A/E: Selects the signal input to the DIGITAL AUDIO INPUT (AES/EBU) connector.
: The audio level meter display is from –60 dB to 0 dB, or –40 dB to +20 dB. Use
Full
the ALT/[F10] – [F1] (SCALE) menu item to set which range (peak level: 0 dB or
+20 dB) to display.
Fine: The audio level meter display range is expanded, and the signal level is
indicated by a scale with 0.25 dB steps.
: Turns muting off.
PB
Muting: Turns muting on.
OUTPUT L/R connectors.
add: Simple addition
: Geometric mean
rms
ave: Simple average
: Turns off operation of the audio test signal generator.
off
silence: Silence signal
1 kHz: 1 kHz sine wave (In this case, a 1 kHz, –20 dB sine wave is supplied to all
audio inputs.)
page 38)
When this is set to other than “off,” the setting of AUDIO INPUT select is disabled.
A/E: Selects the signal input to the DIGITAL I/O (AES/EBU) INPUT connector as a
data input.
HD SDI: Selects the signal input to the HD SDI INPUT A connector as a data input.
: Treats input as audio. Select the input signal in AUD IN select.
off
The 64 setting specifies the reference position.
A setting lower than 128 advances the output timing, and a setting higher than 128
delays the output timing.
(128 samples = approx. 2.7 ms, 1 sample = approx. 20 µs)
0 to 128
and AES/EBU-format audio output) assigned to channels 1 to 16, and playback
track.
ch1 to ch16
to 255 samples
I/O
I/O
In
In
I/O
Out
Out
In
In
In
Out
48
Detailed Menu Description
Page 49

Button Indication Setting Targ et
ALT/[F5] A/E IN Selects whether to pass the signals input to the DIGITAL AUDIO INPUT (AES/EBU)
connector through the sampling rate converter.
: Passes the input signals through the sampling rate converter. In this case,
Auto
there are no limitations on input signals.
Vlock: Does not pass the input signals through the sampling rate converter. In this
case, the input signals need to be locked to video signals at 48 kHz. Noise will
occur if this condition is not met.
ALT/
[F10]
[F1] SCALE Sets the mode for displaying digital audio levels.
[F10] EXIT Redisplays the previous menu. –
AUDIO SETTING Sets other settings. I/O
: Displays minus audio levels with the maximum level set to 0 dB.
Peak0
Ref0: Displays plus/minus audio levels with the reference level set to 0 dB.
In
I/O
SETUP Menu
Button Indication Setting Targ et
[F1] USER BANK Saves or recalls menu settings. (see page 42) Unit
[F1] SYSTEM RECALL Recalls overall unit settings from the user banks. Unit
[F2] PB PORT RECALL Recalls output port settings from the user banks. Out
[F3] REC PORT
RECALL
[F4] SYSTEM SAVE Stores overall unit settings in the user banks. Unit
[F5] PB PORT SAVE Stores output port settings in the user banks. Out
[F6] REC PORT SAVE Stores input port settings in the user banks. In
[F10] EXIT Redisplays the previous menu. –
[F2] PANEL SETTING Sets the settings for panel operation. Unit
[F1] BEEP KEY Turns on or off the click sound emitted during panel operation.
[F2] BEEP ALARM Turns on or off the alarm sound when an error occurs.
[F3] REF ALRM Sets whether to display a warning when the video/audio reference signal selected in
[F7] DISPLAY SETTING Sets the settings for the display. Unit
[F1] DIMMER Adjusts the brightness of the display backlight.
[F3] WARN Sets whether to popup warning messages.
[F6] RESIDUAL Sets what to display in the remaining amount indication for the SRMemory card.
[F10] EXIT Redisplays the previous menu. –
[F10] EXIT Redisplays the previous menu. –
Recalls input port settings from the user banks. In
Unit
On
Off
On
Off
REF SEL is not present or not in sync with the video input signal.
On
Off
to 5
1 to 3
Off
On
Time: Displays the remaining recording time.
Capacity: Displays the remaining amount of memory.
Ratio: Displays the remaining amount as a ratio.
Unit
Unit
Unit
Unit
Unit
Chapter 5 Menu Items
Detailed Menu Description
49
Page 50

Button Indication Setting Targ et
[F3] ENABLE Sets the buttons that can be operated on the control panel when the unit is used in
remote control mode.
Disable: Disables all switches and buttons.
Enable: Enables all switches and buttons.
Stp&Ejct (Stop&Eject): Enables only the STOP and Eject buttons.
Lcl map (Local Key Map): Enables the buttons set to Enable in [F4] (MAP).
[F4] MAP Sets the settings for the local key map. Unit
[F1] STOP Sets whether each of the switches and buttons can be operated during remote
[F2] PLAY Unit
[F3] REC Unit
[F4] EJECT Unit
[F5] JOG Unit
[F6] SHTL Unit
[F7] VAR Unit
[F8] NXT/PRV Unit
[F9] EXECUTE Unit
[F10] EXIT Redisplays the previous menu. –
[F5] KEY INHI Sets whether to inhibit the button operations for this unit.
Chapter 5 Menu Items
[F9] SYS FRQ Sets the system frequency.
[F10] SET Applies the setting configured with the [F9] (SYS FRQ) button. –
ALT/[F1] PB MODE Sets the playback mode.
ALT/[F2] FRZ MODE Specifies the freeze mode and freeze timing for during manual freeze (freeze
ALT/[F3] FRZ CTRL Sets the freeze operation performed by button operation.
ALT/[F4] ALPHA LV Sets the output level of ALPHA CHANNEL of LINK B output for during 4:4:4 DUAL
ALT/[F9] ERR DLG Displays error dialogs on the control panel.
control.
Disable
Enable
Off
On: The button operation inhibit icon appears on the status bar and the editing
23.98
24
25
29.97
Field
Frame: Frame playback
control with the control panel, REMOTE 1 to 4 (9-pin) connectors, and GPIO (25pin) connector) or auto freeze.
Field1: Freezes the 1st (odd) field.
Field2: Freezes the 2nd (even) field.
Frame: Freezes in frame mode.
Moment: Performs the freeze operation only while the button is held down.
Latch: Pressing the button performs the freeze operation and pressing the button
LINK output.
White: Outputs the white level.
Black
Off
On
: All buttons are available.
control section, recording/playback section and search control section are
disabled.
: Field playback
again cancels the freeze operation.
: Outputs the black level.
Unit
Unit
Unit
Unit
Unit
Unit
Unit
Unit
Unit
50
Detailed Menu Description
Page 51

Appendix
FTP File Operations
2
Set the IP address and other network setting items for
this unit.
For details, see the Installation Manual.
File operations between this unit and a remote computer
can be carried out by the File Transfer Protocol (called
FTP below).
Directory Structure
The following figure shows the directory structure
example of the SR-R1000 visible to a remote computer.
This figure assumes that the SRMemory cards are inserted
in SRMemory slots 1 and 2.
To connect a computer running Windows Vista or
Windows 7
Disable the Internet Protocol Version 6 (TCP/IPv6).
Windows Vista: (1) Open “Network and Sharing Center”
>“Manage network connections” >“Local Area
Connection” in the control panel. (2) In the “Local
Area Connection Properties”, uncheck the “Internet
Protocol Version 6 (TCP/IPv6)”, and then click the
OK button.
Windows 7: (1) Open “View network status and tasks”
>“Change adapter settings” >“Local Area
Connection” in the control panel. (2) In the “Local
Area Connection Properties”, uncheck the “Internet
Protocol Version 6 (TCP/IPv6)”, and then click the
OK button.
Making FTP Connections
FTP connections between this unit and a remote computer
can be made with either of the following.
• The command prompt
•FTP client software
Appendix
Preparations
1
Connect the network connectors of this unit and a
remote computer with a network cable. Or connect this
unit to the network to which the remote computer is
connected.
This section explains how to use the command prompt. For
more information about using FTP client software, refer to
the documentation of the FTP client software on your
system.
To log in
1
Start the command prompt.
2
Enter “ftp <SP> <IP address>”, and press the Enter
key. (<SP> refers to a space.)
For example, if the IP address of this unit is set to
“192.168.001.010”, enter “ftp 192.168.1.10”.
FTP File Operations
51
Page 52

Refer to the Windows help for more information about
the FTP command.
If the connection succeeds, you are prompted to enter
a user name.
3
Enter the user name “usr1” and press the Enter key.
When the user name is verified, you are prompted to
enter a password.
4
Enter the password and press the Enter key.
PASS
Verifies the password.
Command syntax: PASS <SP> <password> <CRLF>
Input example: PASS sr-r1000
QUIT
Terminates the FTP connection. If a file is being
transferred, terminates after completion of the transfer.
Command syntax: QUIT <CRLF>
The password is set to the model name (“sr-r1000”).
The login is complete when the password is verified.
See page 52 for the FTP protocol commands
supported by this unit.
If the connection times out
This unit terminates FTP connections if no command
is received within 90 seconds of the last command. If
this occurs, log out (see the next section) and repeat
steps 1 to 3.
Note
If you power this unit off during an FTP connection,
the data transferred thus far may be discarded.
To log out
Appendix
To log out after finishing file operations, enter “QUIT” at
the command prompt and press the Enter key.
Command List
The FTP protocol commands supported by this unit
include standard commands (see the next section) and
extended commands (see page 54).
Notes
• To execute FTP commands, you must install application
software on your computer.
• The commands supported by application software vary.
• Only ASCII characters can be used in file names.
Standard commands
In the command syntax, <SP> means a space, entered by
pressing the space bar, and <CRLF> means a new line,
entered by pressing the Enter key.
USER
Verifies the user name.
Command syntax: USER <SP> <user name> <CRLF>
Input example: USER usr1
PORT
Specifies the IP address and port to which this unit should
connect for the next file transfer (for data transfer from this
unit).
Command syntax: PORT <SP> <h1,h2,h3,h4,p1,p2>
<CRLF>
• h1 (most significant byte) to h4 (least significant byte): IP
address
• p1 (most significant byte), p2 (least significant byte): Port
number
Input example: PORT 10,0,0,1,242,48
(IP address: 10.0.0.1, Port number: 62000)
PASV
This command requests this unit to “listen” on a data port
(which is not its default data port). (It puts this unit into
passive mode, waiting for the remote computer to make a
data connection.)
Command syntax: PASV <CRLF>
TYPE
Specifies the type of data to be transferred.
Command syntax: TYPE <SP> <type-code (options
delimited by <SP>)> <CRLF>
<type-code> can be any of the following. However, for the
unit, data is always transferred as “I”, regardless of the
type-code specification.
•A: ASCII
- N: Non-print
- T: Telnet format
- C: ASA Carriage Control
• E: EBCDIC
- N: Non-print
- T: Telnet format
- C: ASA Carriage Control
• I: IMAGE (Binary) (default)
• L: LOCAL BYTE
- SIZE: byte size
Input example: TYPE I
STRU
Specifies the data structure.
52
FTP File Operations
Page 53

Command syntax: STRU <SP> <structure-code>
<CRLF>
<structure-code> can be any of the following. However,
for the unit, the structure is always “F”, regardless of the
structure-code specification.
• F: File structure (default)
• R: Record structure
• P: Page structure
Input example: STRU F
MODE
Specifies the transfer mode.
Command syntax: MODE <SP> <mode-code> <CRLF>
<mode-code> can be any of the following. However, for
the unit, the mode is always “S”, regardless of the modecode specification.
• S: Stream mode (default)
• B: Block mode
• C: Compressed mode
Input example: MODE S
LIST
Sends a list of files from this unit to the remote computer.
Command syntax: LIST <SP> <path-name> <CRLF>
The following data is transferred, depending on whether
<path-name> specifies a directory or file.
• Directory specified: A list of the files in the specified
directory
• File specified: Information about the specified file
• No specification: A list of the files in the current directory
Input example 1: SRMemoryCard1
Input example 2: FILE00000010.MXF
NLST
Sends a list of file names from this unit to the remote
computer, with no other information.
Command syntax: NLST <SP> <path-name> <CRLF>
The following data is transferred, depending on whether
<path-name> specifies a directory or file.
• Directory specified: A list of the file names only in the
specified directory
• No specification: A list of the file names only in the current
directory.
Input example: NLST SRMemoryCard1
RETR
Begins transfer of a copy of a file in the specified path on
this unit to the current directory on the remote computer.
Command syntax: RETR <SP> <path-name> <CRLF>
Input example: RETR FILE00000010.MXF
RNFR
RNTO
Rename a file.
Specify the file to be renamed with the RNFR command,
and specify the new name with the RNTO command.
(Always follow a RNFR command with a RNTO
command.)
Command syntax: RNFR <SP> <path-name (before
change)> <CRLF>
RNTO <SP> <path-name (after change)> <CRLF>
Input example: RNFR FILE00000010.MXF
RNTO SCENE100.MXF
DELE
Deletes the specified file on this unit.
Note
Depending on the directory and file type, deletion may not
be possible.
Command syntax: DELE <SP> <path-name> <CRLF>
Input example: DELE FILE00000099.MXF
STAT
Sends information about properties of the specified file, or
about data transfer status, from this unit to the remote
computer.
When you specify the file, the following property
information is displayed.
• MXF file
- File name (extension (.MXF) excluded)
-Owner name
- Group name
- File protection information
- File type
- File length (frame count)
- File size (bites)
- File update date
- File update time
- DF flag (NDF/DF)
- Starting LTC value
- Flag (OK/NG/KEEP)
- Video scan type (Interlace/PsF/Progressive)
- Video pixel count (e.g., 1920 x 1080)
- Video signal type (YPbPr/RGB)
- Video bit depth (10 bit)
- Video codec information
- Video compression mode
- Video 3D flag
- Audio codec and sampling frequency information
- Number of audio channels
- Non-audio information (1 bit x 16 ch)
- Emphasis information (2 bit x 16 ch)
When you specify the storage, the following storage
information is displayed.
- Model name of SRMemory card
Appendix
FTP File Operations
53
Page 54

- Serial number
- Protection information
- Volume label
- Date access started
- Last format date
- Last update date
- Remaining capacity (GB)
- Remaining capacity of the area for generic files (%)
Command syntax: STAT <SP> <path-name> <CRLF>
The following data is transferred, depending on whether a
file is specified with <path-name>.
• File specified: The properties of the specified file
• Storage specified: The detailed information of the specified
storage
• No specification: RETR transfer progress (%) (for two
sessions)
Output example: 211 45 75
Input example 1: STAT FILE0000001.MXF
Input example 2: STAT SRMemoryCard1
ABOR
Requests this unit to abort a file transfer currently in
progress.
Command syntax: ABOR <CRLF>
SYST
Displays the system name of this unit.
Appendix
Command syntax: SYST <CRLF>
NOOP
Does nothing except return a response. (Used to check
whether this unit is running.)
Command syntax: NOOP <CRLF>
PWD
Displays the current directory (“/” if the directory is the
root directory).
Command syntax: PWD <CRLF>
CWD
Changes the current directory (moves from the current
directory to another directory).
Command syntax: CWD <SP> <path-name> <CRLF>
CDUP
Moves one level up in the directory structure (makes the
parent of the current directory be the current directory).
Command syntax: CDUP <CRLF>
Extended commands
In the Command syntax, <SP> means a space, entered by
pressing the space bar, and <CRLF> means a new line,
entered by pressing the Enter key.
SITE REPF
Transfers the MXF file in the specified path on this unit to
the current directory on the computer.
You can specify a certain section of the body to transfer
only the necessary section of the MXF file with this
command.
Command syntax: SITE REPF <SP> <path-name> <SP>
<start-frame> <SP> <transfer-size> <SP> <Audio
ch count> <SP> <Metadata packet additon>
<CRLF>
Specify the video frame from which to start the transfer by
specifying the offset from the file starting point in <startframe>. (The starting frame is 0.)
Specify the number of video frames for transfer in
<transfer-size>. (To transfer up to the end of the file,
specify 0.)
Specify the number of audio channels of the audio data that
will be transferred with the video in <Audio ch count>.
Specify whether to add a metadata packet in <Metadata
packet addition>. Specify 1 to add a packet, or 0 to not add
a packet.
Input example: SITE REPF FILE00000010.MXF 50 200 4 0
This transfers FILE00000010.MXF. The body consists
of 200 frames starting from frame 50, audio consists of
CH 1 to 4, and a metadata packet will not be added.
SITE MEID
Obtains the ID of a memory card inserted in this unit.
Command syntax: SITE MEID <SP> <memory card slot
number> <CRLF>
Input example: SITE MEID SRMemoryCard1
Moves to a directory as follows, depending on whether a
directory is specified with <path-name>.
• Directory specified: To the specified directory
• No specification: To the root directory
Input example: CWD SRMemoryCard1
54
FTP File Operations
Page 55

Restrictions
When both S25/S15 and S55 cards are
used
Using S25 or S15 cards for recording
Restrictions on Simultaneous Recording and Playback
With this unit, you can record the signals simultaneously
from multiple input ports in separate files on one
SRMemory card and play back the files in the SRMemory
card being used for recording. However, recording and
playback functions are limited depending on the port
configuration or SRMemory card type used.
There are three types of SRMemory cards (S55/S25/S15),
each with a different data transfer rate. Use the card type
that best suits your needs.
•S55
These cards have a data transfer rate of 5.5 Gbps. The
high data transfer rate of this card makes it suitable for
recording multiple signals simultaneously in files and
playing back files at the same time.
•S25
These cards have a data transfer rate of 2.5 Gbps. One or
more signals can be recorded or played back
simultaneously. However, functioning limitations may
arise depending on the card’s transfer rate.
•S15
These cards have a data transfer rate of 1.5 Gbps. One or
more signals can be recorded or played back
simultaneously. However, functioning limitations may
arise depending on the card’s transfer rate.
Using only S55 SRMemory cards
S55
Port A
(Input)
Port B
(Input)
Port C
(Input)
Port D
(Output)
When all SRMemory cards which you use simultaneously
are S55 cards, you can select any of the SRMemory cards
in the unit for both recording and playback. In the above
example, the input signals from port A, B and C can be
simultaneously recorded to one SRMemory card.
S25 or S15
Port A
(Input)
Port B
(Output)
When one or more SR25 or SR15 cards are used, some
limitations to recording and playback apply. The following
table indicates the number of simultaneous recordings that
can be performed in relation to the types of cards that are
used, and the recordable data formats. Refer to the table,
and use the appropriate SRMemory card types based on
your intended purpose
Types of
cards used
At least one
S15 card
Only S25
cards, or a
combination
of S25 and
S55 cards
Only S55
cards
Number of
simultaneous
recordings
1 SR-Lite (2D/3D), SR-SQ (2D/
2 SR-Lite (2D/3D), SR-SQ (2D)
3 and 4 Simultaneous recording not
1 SR-Lite (2D/3D), SR-SQ (2D/
2 SR-Lite (2D/3D), SR-SQ (2D/
3 SR-Lite (2D/3D), SR-SQ (2D/
4 SR-Lite (2D)
1 to 4 SR-Lite (2D/3D), SR-SQ (2D/
Recordable data formats
3D)
The cards must be inserted in
slots 1 and 2.
possible.
3D)
3D)
The cards must be inserted in
slots 1 and 2.
3D)
The cards must be inserted in
slots 1 to 3.
Cards in any of the slots (one
or more) can be used.
3D)
Cards in any of the slots (one
or more) can be used.
Appendix
Restrictions
55
Page 56

Playback only
S25 or S15
Port A (Output)
Port B (Output)
Port C (Output)
Port D (Output)
When you use an S25 or S15 card not for recording but for
playback only, four files can be output simultaneously
from the card. Playback can be made from any SRMemory
card in the unit and multiple files can be played back from
one SRMemory card.
Network access
When using a network cable to access the files in
SRMemory cards, you can access the files if other
recording or playback is in process. However, since SDI
input/output has priority, the transfer rate via the network
may decrease depending on input/output port usage.
Troubleshooting
Salvaging SRMemory Card in the Event Recording does not End Normally
After recording is completed, press the Eject button to
safely eject the SRMemory card, or press the On/Standby
button on the front panel to end unit operation. Recording
will not end normally if the main power switch of the
connector panel is turned off or the power cord is
disconnected during recording. If this happens, the file
system will not be updated and the video/audio data that
was recorded in real time will not be recognized as a file,
resulting in the content of the file that was recorded being
lost.
The unit is equipped with a function (salvage function) for
restoring the data in SRMemory card with minimal loss.
The salvage function allows the file to be restored based on
the marker and other information recorded to the
SRMemory card.
The salvage process takes a few seconds to up to 60
minutes, depending on the state of the SRMemory card
when the recording was interrupted.
Appendix
Notes
• Before turning off the main power switch on the
connector panel, switch the unit to the standby state with
the On/Standby button on the front panel.
• The salvage function is designed to salvage as much
recorded material as possible in the event that an
unforeseen accident occurs but there is no guarantee that
100% of the data will be restored.
• The data immediately before recording was interrupted
cannot be restored even if you execute this function. The
amount of data that is lost is as follows.
In SR-Lite mode: approx. 8 seconds of the data
In SR-SQ mode: approx. 4 seconds of the data
• Each time you insert an SRMemory card containing a
file that has not been restored or turn the power on with
such card in the unit, a confirmation dialog will appear
asking you whether to perform a salvage.
• An SRMemory card containing a file that has not been
restored cannot be used to play back or record.
• Formatting the SRMemory card will enable you to use it
again, but all recorded data will then be lost.
56
Troubleshooting
Page 57

Using salvage to restore files
Notes
1
Insert the SRMemory card for which recording did not
end normally into a slot.
A warning message and a message for confirming
whether to perform the salvage or format appear on the
display.
Notes
• If the write-protect switch on the SRMemory card is
set to the “WP” position, slide the switch to the
opposite position.
• The salvage process cannot be stopped once it is
started. Allow plenty of time for the salvage process
to complete.
2
Use the right and left cursor buttons to select
“Salvage” and then press the center cursor button.
The salvage process begins and the “Please wait.”
message appears.
The message window will be closed automatically
when the process ends.
Note
• If the ALT/[F9] (REC INHI) buttons in the HOME
menu are set to anything other than Off, change it to
Off.
• During the format process, the SRMemory card
being processed and all other cards in the unit cannot
be used.
Before performing the salvage process, be sure to
remove any other SRMemory cards that may be
inserted.
During the salvage process, the SRMemory card being
processed and all other cards in the unit cannot be
used.
In case files cannot be restored with
salvage process
If the SRMemory card cannot be restored even by
performing a salvage, formatting the SRMemory card will
enable you to use it again.
1
Insert the SRMemory card which the salvage did not
end normally into a slot.
A warning message and a message for confirming
whether to perform the salvage or format appear on the
display.
2
Use the right and left cursor buttons to select “Format”
and then press the center cursor button.
The format process begins and the “Please wait.”
message appears.
The message window will be closed automatically
when the process ends.
Appendix
Troubleshooting
57
Page 58

Error Messages
When the unit ceases to operate correctly due to a
malfunction or internal system error, the alarm will sound
and an error message will appear on the display.
After an error message is displayed, eliminate the cause of
the error based on the error message and then turn the unit
back on. If the error message appears again when the unit
is turned on, contact your Sony representative.
Code 1) Indication Meaning
14xx00
14xxpp
260100 POWER SUPPLY UNIT TROUBLE A power failure was detected.
2701ss SLOT Mx EJECT ERROR Pressing the Eject button failed to eject an SRMemory card
2801ss SLOT Mx EXIST ERROR The SRMemory card in the indicated slot could not be
2901ss SLOT Mx EJECT MOTOR LOCK A malfunction of eject motor was detected at the indicated
Appendix
960100 CALENDAR CLOCK ERROR An internal calendar clock error was detected.
A2zz00 SYS1 FRAM CHECKSUM ERROR, etc. An error was detected in FRAM used by SYS1. For details,
A90100 SY-350 OVER CURRENT ERROR An over current was detected in the DC-DC converter on
B3xx00
B3xxpp
B4xx00
B4xxpp
B4xxss
B8zz00 SYS1-SYS2 NO COMMUNICATION ERROR,
B9zz00 CP-SYS1 NO COMMUNICATION ERROR, etc. CP CPU has detected a communication error between
BAzz00 KY-CP NO COMMUNICATION ERROR, etc. KY CPU has detected a communication error between
D1xxpp PORT x ENC DMA1 ERROR, etc. An error was detected during recording via the indicated
D2xxpp PORT x DEC DMA1 ERROR, etc. An error was detected during playback via the indicated
D3xxss SLOT Mx AV WRITE ERROR1, etc. An error occurred while writing to the SRMemory card in
D4xxss SLOT Mx AV READ ERROR1, etc. An error occurred while reading from the SRMemory card
PS FAN1 TROUBLE, etc. A malfunction of cooling fan motor was detected. For
SY CPLD2 INITIAL ERROR, etc. An error was detected at the device initialization stage. For
POWER SUPPLY TEMPERATURE HIGH, etc. Temperature sensor has detected an error. For details, see
etc.
details, see the Maintenance Manual.
from the indicated slot. When the slot indicator is off,
forcibly ejecting an SRMemory card will not damage
recorded data.
detected even though the Eject button had not been
pressed.
slot. When the slot indicator is off, forcibly ejecting an
SRMemory card will not damage recorded data.
see the Maintenance Manual.
the SY-350 board. For details, see the Maintenance
Manual.
details, see the Maintenance Manual.
the Maintenance Manual.
SYS1 CPU has detected a communication error between
CPUs (SYS1, SYS2, CP). For details, see the Maintenance
Manual.
CPUs (SYS1, CP, KP). For details, see the Maintenance
Manual.
CPUs (CP, KY). For details, see the Maintenance Manual.
port. For details, see the Maintenance Manual.
port. For details, see the Maintenance Manual.
the indicated slot. For details, see the Maintenance Manual.
in the indicated slot. For details, see the Maintenance
Manual.
58
Troubleshooting
Page 59

Code 1) Indication Meaning
D5xxss SLOT Mx INTERFACE ERROR1, etc. An error occurred when communicating with the
SRMemory card in the indicated slot.
This SRMemory card cannot be used in its present state.
Remove the SRMemory card and insert it again. If the error
persists, the unit or the SRMemory card may be damaged.
D6xxss SLOT Mx UNMOUNT ERROR1, etc. An error occurred when ejecting the SRMemory card from
the indicated slot.
The ejected SRMemory card may not be available. If the
error code D7xxss appears every time the SRMemory card
is inserted, the card must be salvaged.
Salvage the SRMemory card by following the instructions in
the error display screen or remove the card.
D7xxss SLOT Mx MOUNT ERROR1, etc. An error occurred when inserting an SRMemory card into
the indicated slot.
If the error code D7xxss appears every time the SRMemory
card is inserted, the card must be salvaged.
Salvage the SRMemory card by following the instructions in
the error display screen or remove the card.
D801ss SLOT Mx FILE SYSTEM ERROR An error was detected in the file system on the SRMemory
card in the indicated slot.
If the same error appears every time the SRMemory card is
inserted, the card must be formatted. Format the
SRMemory card by following the instructions in the error
display screen or remove the card.
E101pp PORT x COND3 BAD, STOP REC Recording was stopped because all the space for replacing
bad sectors is consumed on the SRMemory card inserted
in the indicated port.
1) The portion in lower case letters in the above codes is one of the following
numbers.
ss is one of the following numbers which identifies the SRMemory card slot.
01: Slot 1
02: Slot 2
03: Slot 3
04: Slot 4
pp is one of the following numbers which identifies the port.
81: Port A
82: Port B
83: Port C
84: Port D
xx is the number that identifies the error location. For details, see the
Maintenance Manual.
zz is the number that identifies the error type. For details, see the
Maintenance Manual.
Appendix
Troubleshooting
59
Page 60

Warning Messages
When one of the problems described below is detected by
the unit, a warning mark and message appear on the status
bar. Operation can continue even when the warning mark
appears. When multiple errors occur simultaneously, the
number of errors is indicated to the right of the warning
mark.
If you press the SFT button and DIAG button while the
warning mark appears, the maintenance information
display appears, showing the details of the warning
message. A short warning message is displayed on the
status bar for long warning messages. The maintenance
information display shows the whole warning message.
Only one warning message will be displayed even when
multiple problems occur, but you can use the cursor
buttons to check the errors.
After a warning message is displayed, eliminate the cause
of the warning based on the message.
For details on eliminating the causes of warning
messages, see the Maintenance Manual.
To display warning messages as pop-ups
Press the [F2] – [F7] – [F3] (WARN) buttons in the SETUP
menu to change the setting to On.
Warning message
Code 1) Indication2) Meaning
Appendix
010100 NO EXTERNAL REFERENCE
(NO EXT REF)
020100 LOST LOCK Synchronization was lost during playback, recording, or
0601pp PORT x SDI A-B PHASE NG
(P-x A-B PHASE)
0801pp PORT x NO SDI-A INPUT
(P-x NO SDI-A)
0802pp PORT x NO SDI-B INPUT
(P-x NO SDI-B)
110100 AUDIO PLL UNLOCKED
(AUD PLL UNLCK)
1901pp PORT x NO A1/A2 INPUT
(P-x NO A1/A2)
1A01pp PORT x NO A3/A4 INPUT
(P-x NO A3/A4)
1B01pp PORT x NO A5/A6 INPUT
(P-x NO A5/A6)
1C01pp PORT x NO A7/A8 INPUT
(P-x NO A7/A8)
1D01pp PORT x NO A9/A10 INPUT
(P-x NO A9/10)
1E01pp PORT x NO A11/A12 INPUT
(P-x NO A11/12)
No reference signal is input to the selected REF. INPUT
connector. The unit is using the internal reference signal.
editing.
The signals input to the HD SDI INPUT A/B connector at
the indicated port are out of phase with each other.
Signal input to the HD SDI INPUT A connector at the
indicated port cannot be detected.
Signal input to the HD SDI INPUT B connector at the
indicated port cannot be detected. This message appears
only for a signal format that uses the HD SDI INPUT B
connector.
PLL of the audio clock generator is not locked to the video
reference signal.
No carrier detected on digital audio input on channel 1/
channel 2 for the indicated port.
No carrier detected on digital audio input on channel 3/
channel 4 for the indicated port.
No carrier detected on digital audio input on channel 5/
channel 6 for the indicated port.
No carrier detected on digital audio input on channel 7/
channel 8 for the indicated port.
No carrier detected on digital audio input on channel 9/
channel 10 for the indicated port.
No carrier detected on digital audio input on channel 11/
channel 12 for the indicated port.
60
Troubleshooting
Page 61

Code 1) Indication2) Meaning
1F01pp PORT x NO A13/A14 INPUT
(P-x NO A13/A14)
2001pp PORT x NO A15/A16 INPUT
(P-x NO A15/A16)
2101ss SLOT Mx REC INHIBIT
(Mx REC INHBIT)
2201ss SLOT Mx WRITE PROTECTED
(Mx WP SW ON)
2202ss SLOT Mx FS LOCKED
(Mx FS LOCKED)
2203ss SLOT Mx WRITE PROTECTED AND FS
LOCKED (Mx WP AND FS)
2901pp PORT x VPID MISMATCH BITDEPTH
(P-x VPID B-DP)
2A01pp PORT x VPID MISMATCH COLORSPACE
(P-x VPID C-SP)
2B01pp PORT x VPID MISMATCH LINK INFORMATION
(P-x VPID LINK)
2D01pp PORT x INVALID SDI DATA
(P-x INVLD SDI)
470100 RTC BATTERY LOW LEVEL
(RTC BATT LOW)
550100 VIDEO PLL UNLOCKED
(VID PLL UNLCK)
5901pp PORT x INPUT AUDIO DATA MISMATCH
32.000K
(P-x AUDIO FS)
5A01pp PORT x INPUT AUDIO DATA MISMATCH
47.056K
(P-x AUDIO FS)
7301pp PORT x NO REF INFORMATION
(P-x FLD INFO)
7401pp PORT x ASYNCHRONOUS VIDEO INPUT
(P-x ASYNC VIN)
8001pp PORT x 1035 VIDEO INPUT
(P-x 1035 V IN)
E101ss SLOT Mx FULL, NOT RECORDABLE
(Mx FULL)
E102ss SLOT Mx COND3 BAD, NOT RECORDABLE
(Mx COND3 BAD)
E103ss SLOT Mx FUNCTION LIMIT
(Mx FUNC LIMIT)
E104ss SLOT Mx NO FILE
(Mx NO FILE)
No carrier detected on digital audio input on channel 13/
channel 14 for the indicated port.
No carrier detected on digital audio input on channel 15/
channel 16 for the indicated port.
A menu setting prevents recording to the card in the
indicated slot.
The write-protect switch on the SRMemory card is set to on
and prevents recording to the card in the indicated slot.
The SRMemory card in the indicated slot is locked and
cannot be recorded.
The SRMemory card in the indicated slot is write-protected
or locked and cannot be recorded.
The bit length in VPID of the input signal from the indicated
port does not match the system bit length.
The color space in VPID of the input signal from the
indicated port does not match the system color space.
Link data in VPID of the input signal from the specified
connector does not match the data of the connected port.
Note
In 3D systems, this warning appears only when 3D is
selected with the ALT/[F6] (VPID SEL) buttons in the
VIDEO menu.
The data of the SDI input signal is not valid.
The lithium battery on the SY-350 board is low on power.
PLL of the video clock generator is not locked to the video
reference signal.
The frequency of AUDIO input to the indicated port differs
from the unit frequency.
The frequency of AUDIO input to the indicated port differs
from the unit frequency.
Since there is no 30 frames/sec reference data for the 720/
59.94P HD SDI signal input to the indicated port, the signal
cannot be properly locked.
The HD SDI input signal at the indicated port is out of
phase by ±5H or more from the reference signal.
When system recording is set to 1080i, 1035i signal is input
to the indicated port.
The unit handles this input signal as 1080i.
Because SRMemory card in the indicated slot has no
space to use for recording, the record operation/command
for the SRMemory card was terminated.
Delete the files on the SRMemory card.
Recording is not possible because the space to replace the
bad memory cell is consumed on the SRMemory card in
the indicated slot. The recording operation/command was
terminated.
Replace it with a recordable SRMemory card.
Recording and playback operations for the SRMemory card
inserted in the displayed slot were canceled due to
restrictions on recording and playback.
There are no files that can be processed on the SRMemory
card in the indicated slot.
Appendix
Troubleshooting
61
Page 62

Code 1) Indication2) Meaning
E201ss SLOT Mx NEAR END
(Mx NEAR END)
The remaining recording time is less than 5 minutes on the
SRMemory card in the indicated slot.
E202pp PORT x FULL, STOP RECORDING
(P-x FULL STOP)
E30100 KEY INHIBIT
(KEY INHIBIT)
E302pp PORT x REMOTE
(P-x REMOTE)
1) The portion in lower case letters in the above codes is one of the following
numbers.
ss is one of the following numbers which identifies the SRMemory card slot.
01: Slot 1
02: Slot 2
03: Slot 3
04: Slot 4
pp is one of the following numbers which identifies the port.
81: Port A
82: Port B
83: Port C
84: Port D
2) Information inside brackets () indicates the short messages for displaying
on the status bar or the superimposed display.
The SRMemory card in the indicated port is full and
recording was terminated.
Button operation is inhibited.
The indicated port is remote controlled.
Appendix
62
Troubleshooting
Page 63

SRMemory Status Messages
The following warning messages appear depending on the
wear or usage of the SRMemory card. Using repeatedly an
SRMemory card gradually increases the possibility that
errors will occur during recording and playback. When any
Code 1) Indication Meaning
C101ss SLOT Mx CONDITION1 DOUBTFUL
(Mx COND1 DBT)
C102ss SLOT Mx CONDITION1 BAD
(Mx COND1 BAD)
C103ss SLOT Mx CONDITION2 DOUBTFUL
(Mx COND2 DBT)
C104ss SLOT Mx CONDITION2 BAD
(Mx COND2 BAD)
C105ss SLOT Mx CONDITION3 DOUBTFUL
(Mx COND3 DBT)
C106ss SLOT Mx CONDITION3 BAD
(Mx COND3 BAD)
of the following messages appear, it is time to replace an
SRMemory card with a new one. If the “CONDITION x
BAD” message appears, it is best to replace the
SRMemory card with a new one as soon as possible.
Errors increase when writing to/reading from the
SRMemory card in the indicated slot.
Although all errors are corrected, you are recommended to
replace the SRMemory card with a new one.
Errors increase greatly when writing to/reading from the
SRMemory card in the indicated slot.
Although all errors are corrected, you are strongly
recommended to replace the SRMemory card with a new
one.
The SRMemory card in the indicated slot has been used
many times.
Although currently no error occurs in this card, you are
recommended to replace the SRMemory card with a new
one.
The SRMemory card in the indicated slot has been used
too many times.
Although currently no error occurs in this card, you are
strongly recommended to replace the SRMemory card with
a new one.
The SRMemory card in the indicated slot has little space to
replace the bad memory cell.
Although currently no error occurs in this card, you are
recommended to replace the SRMemory card with a new
one.
The SRMemory card in the indicated slot has no space to
replace the bad memory cell.
Although playback is still available, recording is no longer
possible.
You are strongly recommended to replace the SRMemory
card with a new one.
Appendix
1) The portion in lower case letters in the above codes is one of the following
numbers.
ss is one of the following codes which identifies the SRMemory card slot.
01: Slot 1
02: Slot 2
03: Slot 3
04: Slot 4
Troubleshooting
63
Page 64

Specifications
General
Recording format
MPEG4 SStP format
Power requirements
100 V to 240 V AC
Power consumption
Maximum 480 W
Inrush current
(1) Maximum possible inrush current at initial switch-
on (Voltage changes caused by manual
switching):
75 A peak, 5 A r.m.s. (240 V AC)
(2) Inrush current after a mains interruption of five
seconds (Voltage changes caused at zerocrossing):
4 A peak, 2 A r.m.s. (240 V AC)
Operating temperature
5 °C to 40 °C (41 °F to 104 °F)
Storage temperature
–20 °C to +60 °C (–4 °F to +140 °F)
Humidity 25% to 90% (no condensation)
Mass 23 kg (50 lb 11 oz) (with all options
installed)
Dimensions 427 × 174 × 540 mm
Appendix
7
(16
/8 × 6 7/8 × 21 5/16 in) (W/H/D)
Video
422 format
Sampling frequency
Y: 74.25 MHz,
Pb/Pr: 37.125 MHz
Quantization 10 bits
Compression MPEG4 SStP
444 format
Sampling frequency
RGB: 74.25 MHz
Quantization 10 bits
Compression MPEG4 SStP
Audio
Digital audio signal format
Sampling frequency
48 kHz (video sync)
Quantization 24 bits
Headroom 20 dB / 18 dB (selectable)
Analog monitor output
D/A quantization
24 bits
Input/Output Connectors
When the SRK-R201 is installed (optional)
HD SDI INPUT
A/B BNC (2)
HD SDI (1.485 Gbps) (SMPTE-292M /
BTA-S004B standard)
3G SDI (2.97 Gbps) (SMPTE-424M)
INPUT MONITOR
BNC (2)
HD SDI (1.485 Gbps) (SMPTE-292M /
BTA-S004B standard)
3G SDI (2.97 Gbps) (SMPTE-424M)
64
HD SDI OUTPUT
MULTI MONITOR
BNC (1)
HD SDI (1.485 Gbps) (SMPTE-292M /
BTA-S004B standard)
TIMECODE INPUT
BNC (1)
0.5 to 18 Vp-p, 10 kΩ
TIMECODE OUTPUT
BNC (1)
2.2 Vp-p, low impedance
DIGITAL AUDIO (AES/EBU) INPUT
BNC (8)
CH1/2 to CH15/16
AES/EBU format, unbalanced
Specifications
Page 65

When the SRK-R202 is installed (standard
equipped, optional additions supported)
HD SDI OUTPUT
A/B BNC (6) (MONITOR includes character
superimpose)
HD SDI (1.485 Gbps) (SMPTE-292M /
BTA-S004B standard)
3G SDI (2.97 Gbps) (SMPTE-424M)
HD SDI OUTPUT
MULTI MONITOR
BNC (1)
HD SDI (1.485 Gbps) (SMPTE-292M /
BTA-S004B standard)
TIMECODE OUTPUT
BNC (1)
2.2 Vp-p, low impedance
DIGITAL AUDIO (AES/EBU) OUTPUT
BNC (8)
CH1/2 to CH15/16
AES/EBU format, unbalanced
Reference
REF. INPUT
BNC (1 + loop through 1)
75 Ω with terminal switch
HD (tri-level sync)
SD (Black Burst)
NTSC: 0.286 Vp-p, 75 Ω
PAL: 0.3 Vp-p, 75 Ω
Remote
REMOTE1 to REMOTE4
D-sub 9-pin, female (4)
VIDEO CONTROL
D-sub 9-pin, female (1) (for connection
to optional HKDV-900)
GPIO (25P) D-sub 25-pin, female (1)
NETWORK1 to 2
RJ-45 jack (2)
1000BASE-T
MAINTENANCE
USB type (3)
RJ-45 jack (1)
SRK-R202 HD Output Board
SRMemory cards
SR-256S15/S55 (256 GB)
SR-512S25/S55 (512 GB)
SR-1TS25 (1 TB)
Design and specifications are subject to change without
notice.
Notes
• Always make a test recording, and verify that it was
recorded successfully.
SONY WILL NOT BE LIABLE FOR DAMAGES OF
ANY KIND INCLUDING, BUT NOT LIMITED TO,
COMPENSATION OR REIMBURSEMENT ON
ACCOUNT OF FAILURE OF THIS UNIT OR ITS
RECORDING MEDIA, EXTERNAL STORAGE
SYSTEMS OR ANY OTHER MEDIA OR
STORAGE SYSTEMS TO RECORD CONTENT OF
ANY TYPE.
• Always verify that the unit is operating properly before
use. SONY WILL NOT BE LIABLE FOR
DAMAGES OF ANY KIND INCLUDING, BUT
NOT LIMITED TO, COMPENSATION OR
REIMBURSEMENT ON ACCOUNT OF THE LOSS
OF PRESENT OR PROSPECTIVE PROFITS DUE
TO FAILURE OF THIS UNIT, EITHER DURING
THE WARRANTY PERIOD OR AFTER
EXPIRATION OF THE WARRANTY, OR FOR
ANY OTHER REASON WHATSOEVER.
Appendix
Analog audio output
ANALOG MONITOR OUT
XLR, male (2)
HEADPHONE Phone jack (1)
Accessories supplied
Operation Guide (1)
Installation Manual (English version (1), Japanese version
(1))
Operation Manual (CD-ROM) (1)
Optional accessories
SRK-R201 HD Input Board
Specifications
65
Page 66

MPEG-4 Visual Patent Portfolio License
THIS PRODUCT IS LICENSED UNDER THE MPEG-4
VISUAL PATENT PORTFOLIO LICENSE FOR THE
PERSONAL AND NON-COMMERCIAL USE OF A
CONSUMER FOR
(i) ENCODING VIDEO IN COMPLIANCE WITH THE
MPEG-4 VISUAL STANDARD (“MPEG-4
VIDEO”)
AND/OR
(ii) DECODING MPEG-4 VIDEO THAT WAS
ENCODED BY A CONSUMER ENGAGED IN A
PERSONAL AND NON-COMMERCIAL
ACTIVITY AND/OR WAS OBTAINED FROM A
VIDEO PROVIDER LICENSED BY MPEG LA TO
PROVIDE MPEG-4 VIDEO.
NO LICENSE IS GRANTED OR SHALL BE IMPLIED
FOR ANY OTHER USE. ADDITIONAL
INFORMATION INCLUDING THAT RELATING TO
PROMOTIONAL, INTERNAL AND COMMERCIAL
USES AND LICENSING MAY BE OBTAINED FROM
MPEG LA, LLC. SEE HTTP://WWW.MPEGLA.COM
Appendix
MPEG LA is offering licenses for (i) manufacturing/sales
of any storage media storing MPEG-4 Visual video
information (ii) distribution/broadcasting of MPEG-4
Visual video information in any manner (such as online
video distribution service, internet broadcasting, TV
broadcasting). Other usage of this product may be required
to obtain license from MPEGLA.
Please contact MPEG LA for any further information.
MPEG LA, L.L.C., 250 STEELE STREET, SUITE 300,
DENVER, COLORADO 80206, http://www.mpegla.com
66
MPEG-4 Visual Patent Portfolio License
Page 67

Index
Symbols
+/– button 15
Numerics
12-hour display 44
24-hour display
2D/3D
47
3D mode
75 Ω terminal switch
A
AC IN connector 19
Adjusting audio level
Adjusting output video signal
ALT button
Audio input signal
Audio level meter
AUDIO menu
AUDIO MONITOR OUTPUT
connector
Audio signal to monitor
Audio test signal generator
44
46
18
39
14
38
21
48
19
38
48
40
Disable audio signal
DISPLAY button
Display range
Drop frame mode
48
14
48
44
E
Eject button 13
Error message
EXECUTE button
58
15
F
F1 button 14
Features
File
File list screen
File operation
Flag
Flag indication
Formatting
Four-port display
FTP file operations
Function selection button
10
22
23
36
37
23
57
20
51
14
G
GPIO (25-pin) connector 18
Ground terminal
19
Main screen
MAINTENANCE connector
Maintenance information display
MEM button
Memory selection button
Menu
AUDIO
file list
HOME
operating procedure
SETUP
TC
VIDEO
Menu selection button
MULTI CONTROL knob
20
18
14
14
41
48
36
43
41
49
44
46
14
14
N
NETWORK connector 18
NEXT button
Non-audio data
Numeric button
15
38
15
O
On/standby button 13
One-port display
Out
22
Output port
21
17
60
B
Bit length 48
Blanking processing
46
C
CH button 14
Chasing playback
CLR button
Color display
Compression mode
Connecting
external devices
reference signal
Connector panel
Control panel
Copying
Cursor button
37
34
15
14
48
24
26
17
12
15
D
Deleting 37
DIAG button
DIGITAL AUDIO INPUT (AES/
EBU) connector
DIGITAL AUDIO OUTPUT (AES/
EBU) connector
Directory structure
14
17
18
51
H
HD input board 17
HD SDI INPUT A/B connector
HD SDI INPUT MONITOR A/B/
MULTI connector
HOME menu
17
43
17
I
In 22
Inhibit button operation
Input port
Input/output port
17
50
32
J
JOG button 16
Jog mode playback
35
L
LEVEL knob 13
Local key map
Locking
50
37
M
M1 button 14
Main power switch
19
P
PHONES JACK 13
PLAY button
Playback
Playback speed display
PORT SELECT button
Preroll time
PREV button
Preview display area
15
34
22
15
43
15
22
R
RCL button 15
REC button
Record inhibit mode
Recording
Recording simultaneously
REF. INPUT connector
Reference signal
Regenerate
Remaining time display
REMOTE (9-pin) connector
Resolution
Restrictions
Running mode
15
43
33
33
18
25
27
22
47
55
44
Index
18
Index
67
Page 68

S
Salvaging 56
Sampling rate
Saving setting
Scanning method
Screen
SD/HD SDI MONITOR A/B/MULTI
connector
SD/HD SDI OUT A/B connector
SDI signals
Search dial
Selecting port
Selecting reference signal for output
26
Selecting SRMemory slot
SET button
Setting time
SETUP menu
SFT button
SHUTTLE button
Shuttle mode playback
Specifications
SRK-R201
SRMemory card
inserting and ejecting
recommended SRMemory card
SRMemory indicator
SRMemory slot
SRMemory status message
Status bar
Still picture output
STOP button
Superimposing
Index
Superimposing character information
29
Sync signal
System frequency
47
42
47
20
18
48
16
32
32
15
28
49
15
16
35
64
17
30
30
13
13, 32
22
36
15
29
26
50
63
18
User bank
User bit
42
28
V
VAR button 16
Variable mode playback
Variable speed playback
VIDEO CONTROL connector
VIDEO menu
46
W
Warning mark 60
Warning message
Y
Y add 46
35
34
18
60
T
TC menu 44
Time code
Time code generator
TIME CODE IN connector
TIME CODE OUT connector (input
board)
TIME CODE OUT connector (output
board)
Time data
Troubleshooting
27
17
18
resetting
selecting
27
28
27
56
U
Uncompressed metadata 45
USB connector
68
Index
13
17
Page 69

The material contained in this manual consists of information
that is the property of Sony Corporation and is intended solely
for use by the purchasers of the equipment described in this
manual.
Sony Corporation expressly prohibits the duplication of any
portion of this manual or the use thereof for any purpose
other than the operation or maintenance of the equipment
described in this manual without the express written
permission of Sony Corporation.
Page 70

Sony Corporation
SR-R1000 (SY)
4-285-471-01 (1) © 2011
 Loading...