

Page 1

2-190-358-21(1)
FM Stereo/AM PLL
Synthesized Radio
Operating Instructions
Manual de instrucciones
使用說明書(背面)
FM/AM WALKMAN
SRF-M97
Printed on 100% recycled paper using
VOC (Volatile Organic Compound)free vegetable oil based ink.
© 2004 Sony Corporation Printed in China
“WALKMAN” is a registered trademark of Sony
Corporation to represent Headphone Stereo products.
“WALKMAN” es una marca registrada de Sony
Corporation que representa los productos audífonos
estéreo.
Corporation.
is a trademark of Sony Corporation.
es una marca de fábrica de Sony
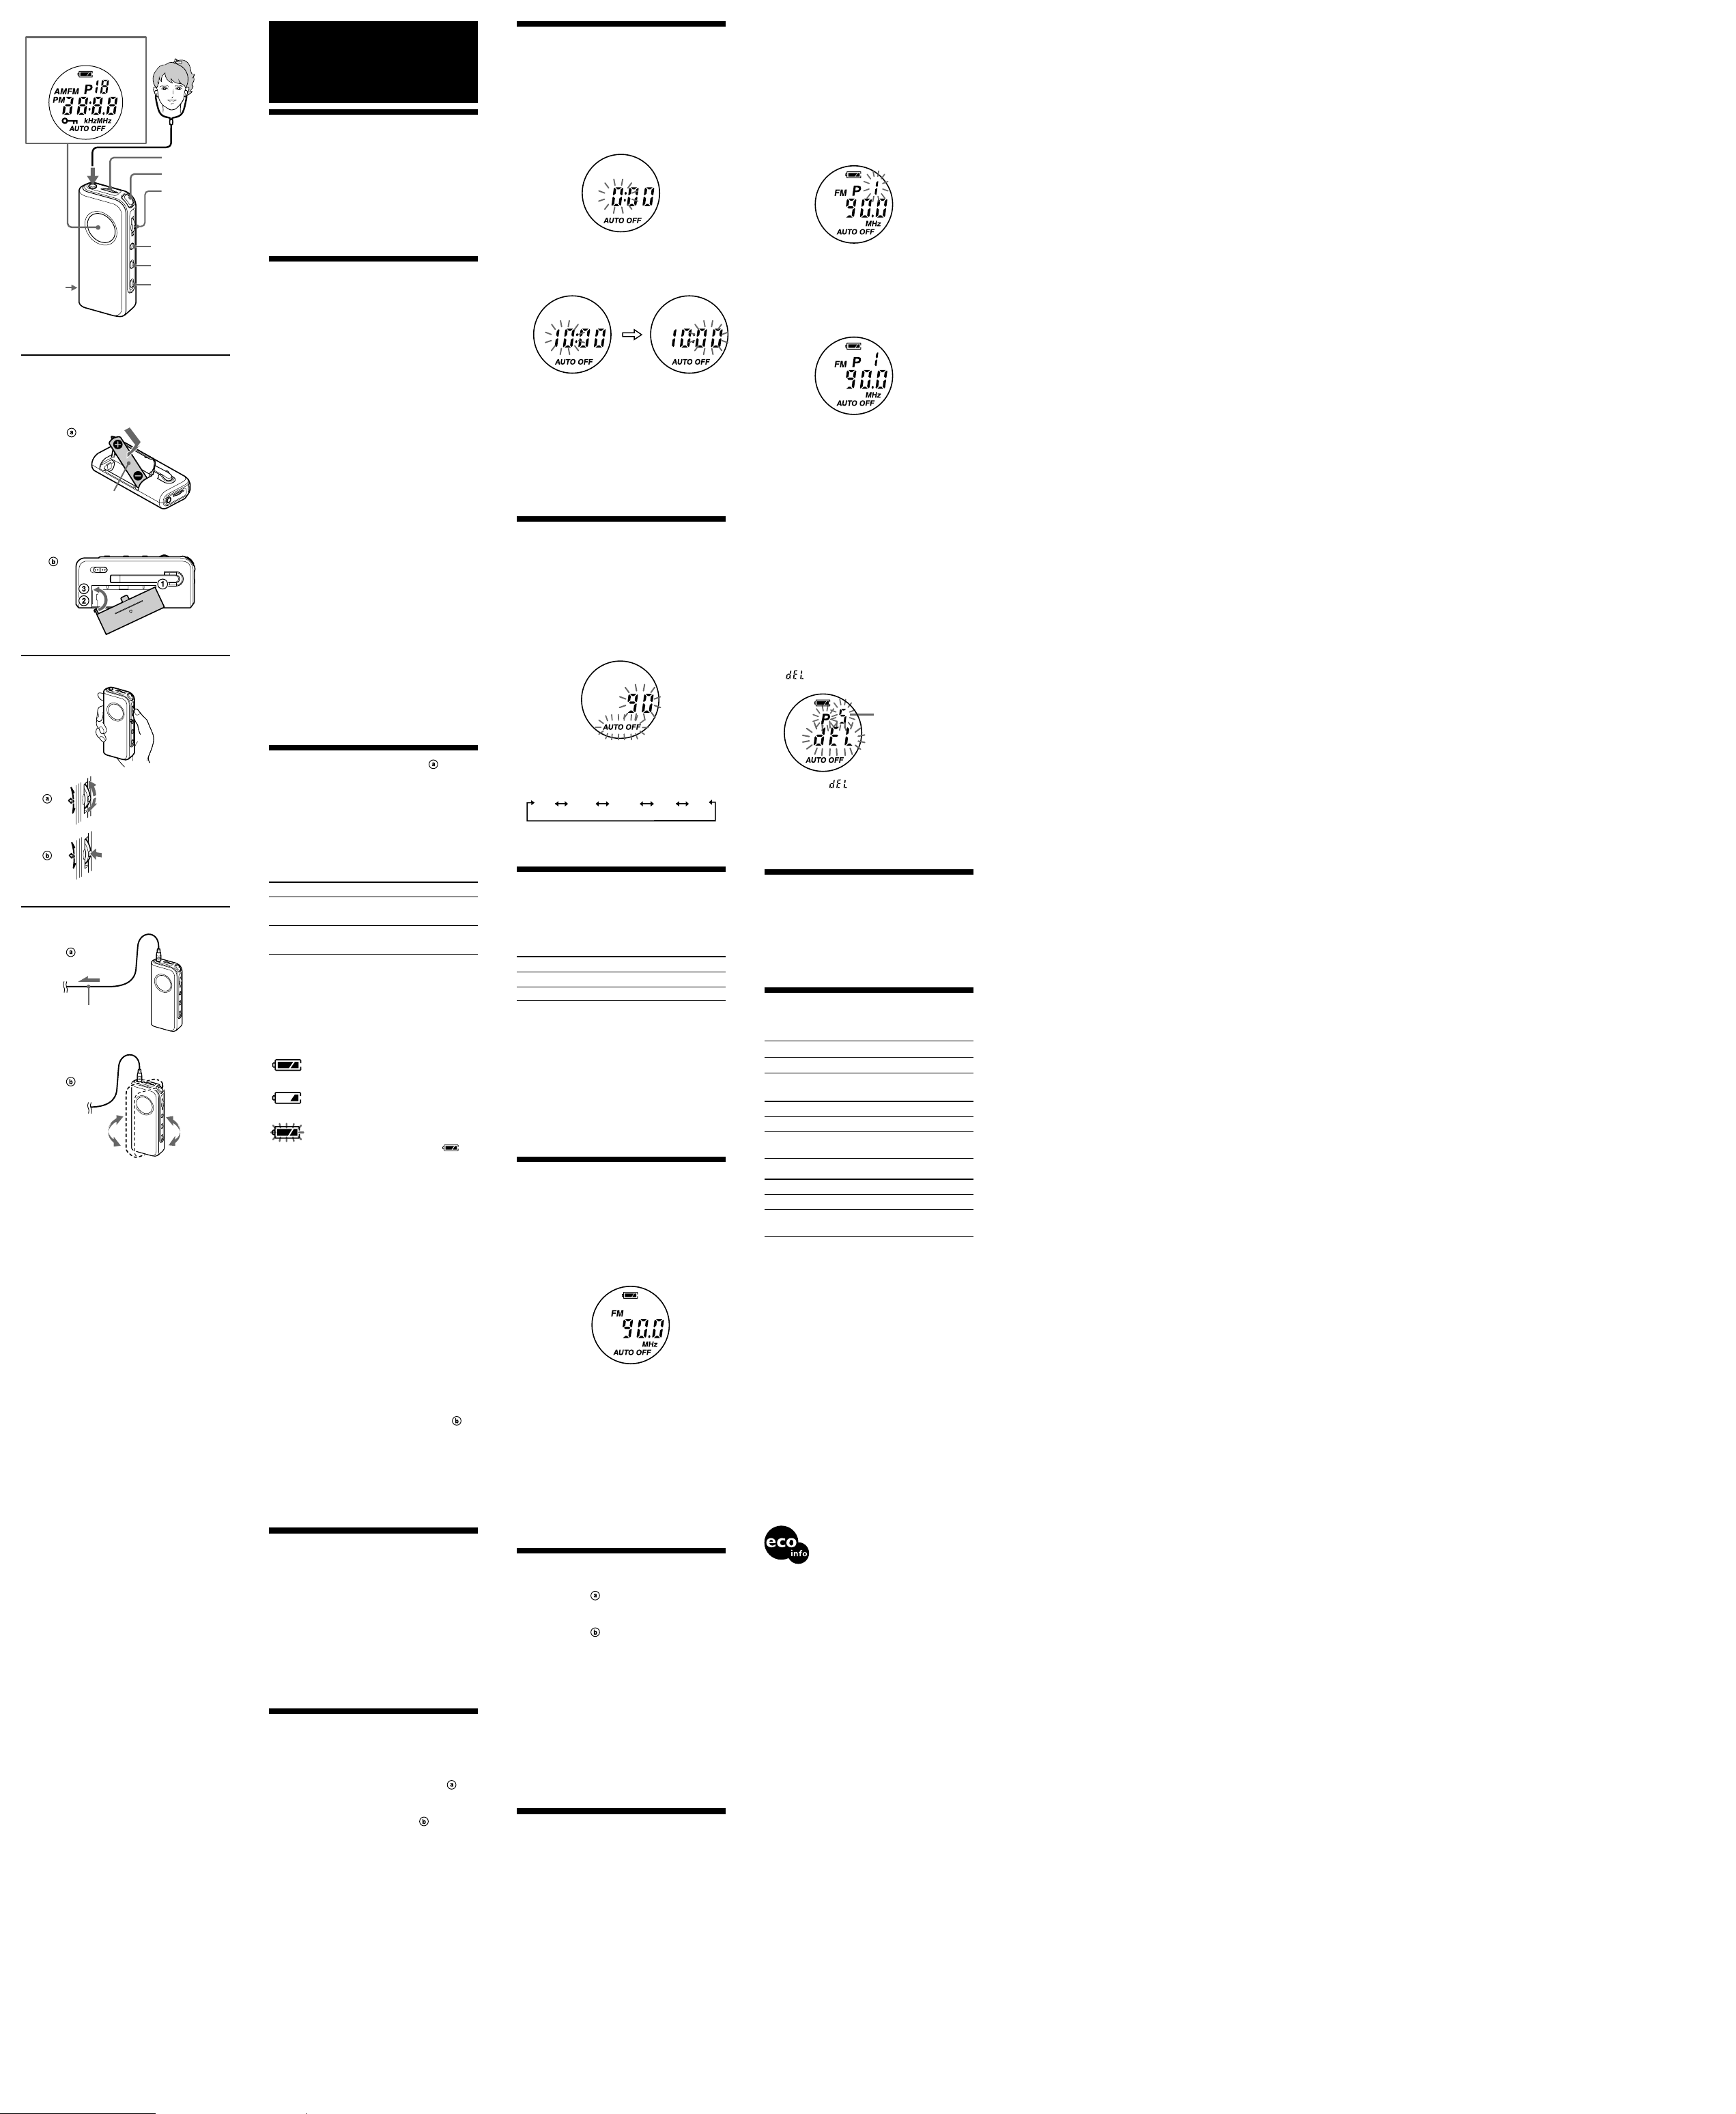
Front
Parte frontal
Display Window
Ventana del visualizador
VOL*
i
FM SENS
DX/LOCAL
*There is a tactile dot beside VOL to show
the direction to turn up the volume.
*Al lado de la tecla VOL hay un punto táctil
que muestra el sentido para subir el
volumen.
A
Insert the E side of the battery
first.
Inserte en primer lugar el polo
E de la pila.
R03 (size AAA) × 1
R03 (tamaño AAA) × 1
POWER
Jog Lever
(ENT/BAND)
Sintonizador
(ENT/BAND)
MODE
MEGABASS
HOLD
B
Slide/Keep sliding
Deslizar/seguir deslizando
Press/Hold down
Pulsar/mantener pulsado
C
Stereo headphones
Auriculares estéreo
English
Features
• FM/AM radio with PLL (Phase Locked Loop)
synthesizer enabling stable reception.
•A total of 20 channels can be preset, 15 FM
channels and 5 AM channels.
• Jog lever allows simple one-hand operation.
• Powerful Bass sound provided by MEGABASS
circuit.
• Auto Power Off Function switches the radio off
automatically. (Can be set to go off after 30, 60, 90,
120 minutes or off.)
• Handy clip attached.
Precautions
• Operate the unit only on 1.5 V DC with one R03
(size AAA) battery.
• The nameplate indicating operating voltage, etc. is
located on the rear exterior.
• Avoid exposure to temperature extremes, direct
sunlight, moisture, sand, dust or mechanical shock.
Never leave in a car parked in the sun.
•Should any solid object or liquid fall into the unit,
remove the battery, and have the unit checked by a
qualified personnel before operating it any further.
• In vehicles or buildings, radio reception may be
difficult or noisy. Try listening near a window.
• To clean the casing, use a soft cloth dampened with
a mild detergent solution.
• This product is not designed to splash resistant, so
you should take care to use the unit when raining,
snowing or in a water-splash place.
Notes on Headphones
Road safety
Do not use headphones while driving, cycling, or
operating any motorized vehicle. It may create a
traffic hazard and is illegal in many areas. It can also
be potentially dangerous to play your headphones at
high volume while walking, especially at pedestrian
crossings. You should exercise extreme caution or
discontinue use in potentially hazardous situations.
Preventing hearing damage
Avoid using headphones at high volume.
Hearing experts advise against continuous, loud and
extended play. If you experience a ringing in your
ears, reduce volume or discontinue use.
Caring for others
Keep the volume at a moderate level. This will allow
you to hear outside sounds and to be considerate to
people around you.
Warning
If there is lightning when you are using the unit, take
off the headphones immediately.
If you have any questions or problems concerning
your unit, please consult your nearest Sony dealer.
Installing the Battery
(See Fig. A- )
1 Open the battery compartment lid and
install one battery (not supplied).
When a battery is first installed, “0:00” or
“AM 12:00” flashes in the display. Once the
current time is set, the flashing stops.
2 Close the lid.
Battery Life (Approx. hours) (JEITA*)
When using FM AM
Sony alkaline LR03 40 65
(size AAA)
Sony R03 16 30
(size AAA)
* Measured by JEITA (Japan Electronics and
Information Technology Industries Association)
standards. The actual battery life may vary
depending on the circumstance of the unit.
You can check the remaining battery power in
the display.
The indicators are as follows:
Indicator
Full strength
x
Weakening
x
Exhausted. Replace with a new battery.
When you press POWER after
installing the new battery, the indicator
changes to “
When the battery becomes exhausted,
the unit will give a long beep and then
turn off.
Note
Do not take more than 3 minutes to replace the
battery, otherwise, your clock setting and preset
stations will be initialized. Should that happen, set the
functions again.
Notes on Battery
• Do not charge the dry battery.
• Do not carry the dry battery together with coins or
other metallic objects. It can generate heat if the
positive and negative terminals of the battery are
accidentally come into contact with metallic objects.
• When you are not going to use the unit for a long
time, remove the battery to avoid damage from
battery leakage and corrosion.
” .
Auto Power Off Function
To prevent the battery from being exhausted by the
radio being unintentionally left on, you can use the
Auto Power Off function to automatically turn off the
radio after 90 minutes. (You can change the time
setting.) (See “Switching Off the Radio Automatically.”)
If the battery compartment lid comes
off (see Fig. A-
The battery compartment lid is designed to come off
when opened with excessive force. To put it back on,
see the illustration.
1 Insert the right hook of the lid into the
right hole in the unit.
2 Hang the left hook on the left part of the
compartment where the lid fits.
3 Slide the left hook towards the left hole in
the unit.
)
MODE Settings
When power is on:
Changes the tuning mode.
“P” is not displayed in manual tuning.
“P” and number are displayed in preset tuning.
During reception with preset
channel:
Deletes preset channel.
When power is off:
Changes Auto Off setting.
Using the Jog Lever
To operate the jog lever, slide it up or down, keep
sliding it, press it, or hold it down.
Slide up or down/keep sliding
(see Fig. B-
When you remove your finger, the convex part will
return to the central position.
):
Press/hold down (see Fig. B- ):
You can press the jog lever only when the convex part
is at the central position.
Setting the Clock
The clock system varies depending on the model you
own.
12-hour system: “AM 12:00” = midnight
24-hour system: “0:00” = midnight
The time display of this clock is a 24-hour system.
1 Press POWER to turn off the power.
2 Press and hold down the jog lever for more
than 2 seconds until “the hour” starts
flashing.
3 Slide or keep sliding the jog lever up or
down to adjust the hour and press the jog
lever.
If you keep sliding the jog lever up or down, the
number changes rapidly.
4 Slide the jog lever up or down to adjust the
minutes and press the jog lever.
“:” starts flashing and the clock starts
operating.
To set the current time exactly to the second,
adjust the minute and then press the jog lever in
time with a time signal (such as a radio station).
To cancel the setting, press MODE.
Note
Once you start setting the clock, you must perform
each step within about 65 seconds, or the clock setting
mode will be cancelled.
Switching Off the
Radio Automatically
— Auto Power Off Function
You can use the Auto Power Off function so that the
radio turns off automatically after a set time. The
factory setting is 90 minutes.
1 Press POWER to turn off the power.
2 Press and hold down MODE for more than
2 seconds until “
start flashing in the display window.
AUTO OFF
” and the time
3 Slide the jog lever up or down to select the
desired time, and then press the jog lever.
Each time you slide the jog lever, the time
changes as follows:
OFF
120
90
To cancel the Auto Power Off function, select “OFF”
in step 3. “
AUTO OFF
” disappears from the display.
30
60
Changing AM Channel
Step
The AM channel step differs depending on areas. The
channel step of this unit is factory-set to 9 kHz or 10
kHz. Change the settings as shown below to be able to
listen to the radio.
When using in Channel step
North and South 10 kHz
American countries/regions
Other countries/regions 9 kHz
Note
When the AM channel step is changed, the clock time
will be kept but the preset stations will be initialized.
1 Press POWER to turn off the power.
2 While sliding the jog lever up or down,
hold down POWER for more than 5
seconds.
You will hear the confirmation beep and the
channel step will change. “10kHz” or “9kHz” will
flash for 3 seconds in the display window.
To change the channel step again, repeat step 2.
Operating the Radio
— Manual Tuning
Connect the headphones cord to the i jack.
1
2 Press POWER to turn on the power.
If “-” is in the display, slide HOLD to turn off
the HOLD function.
3 Press MODE to delete “P” in the display
window.
“P” does not appear in manual tuning.
4 Press the jog lever to select the band.
5 Slide or keep sliding the jog lever up or
down to select the desired frequency.
One slide of the jog lever changes the frequency
by 0.05 MHz* (or 0.1 MHz for North and South
American models) for FM and 9 kHz (or 10 kHz
as determined by your AM channel step settings)
for AM. If you keep sliding the jog lever up or
down, the frequency changes rapidly.
When the frequency matches the broadcast
frequency, the broadcast will be received.
* The frequency display is raised or lowered by a
step of 0.1 MHz. (Example: The 88.05 MHz is
displayed as “88.0 MHz”.)
6 Adjust the volume with VOL.
To turn off the radio, press POWER.
Improving the Reception
FM (See Fig. C- )
The headphones cord serves as the antenna, so extend
it as long as possible.
AM (See Fig. C- )
An AM antenna is built into the unit. Rotate the unit
horizontally until you get the best reception.
To improve stereo program
reception
Set FM SENS to LOCAL if interference is prevalent
when radio wave intensity is dramatically stronger.
Under normal conditions, set to DX.
To obtain Powerful Bass Sound
Switch MEGABASS to ON.
To reduce bass tone, turn MEGABASS to OFF.
If the sound is distorted, turn MEGABASS to OFF.
Presetting your
Favorite Stations
— Preset Tuning
You can preset up to 15 FM stations and 5 AM
stations. To access the stations, simply select the
corresponding preset numbers (AM1-5, FM1-15).
All the preset numbers are preset to certain stations at
the factory. To preset your favourite stations, delete
the preset numbers you do not need or change the
stations you wish to preset.
Presetting or Changing a Station
1 Follow steps 1 to 6 in “Operating the
Radio”, and manually tune in to the station
you wish to preset.
2 Hold down the jog lever until the preset
number flashes.
When all the preset numbers are set to certain
stations (factory-set), “1” flashes and “P”
appears.
When the unit has an available preset number,
only the number flashes and “P” does not appear.
If you do not carry out any further steps, the unit
stops flashing after about 65 seconds. The display
before step 2 is restored.
3 Slide the jog lever up or down to select the
number you wish to preset and press it.
After selecting the preset number (displayed with
“P”) set to the radio station, pressing the jog lever
deletes the preset stations and presets the station
being received.
Example: Display window when you preset
To cancel the presetting mode, press MODE.
90.0 MHz on FM as the position 1.
Tuning in to a Preset Station
1 Press POWER to turn on the power.
If “-” is in the display, slide HOLD to turn off
the HOLD function.
2 Press MODE to show “P” in the display
window.
3 Press the jog lever to select the band.
4 Slide the jog lever up or down to select the
desired preset number (AM1-5, FM1-15).
Only the preset numbers set to certain stations are
displayed.
5 Adjust the volume with VOL.
Deleting a Preset Station
1 Follow steps 1 to 3 in “Tuning in to a
Preset Station”.
2 Slide the jog lever up or down to select the
preset number to be deleted.
3 Hold down MODE for more than 3
seconds until “P”, “ ” and the preset
number flash.
Preset number
to be deleted
4 While the “P”, “ ” and the preset
number are flashing, press the jog lever.
Pressing the jog lever deletes the station set to the
preset number and the unit starts receiving the
station set to the preset number just before it (or,
if that preset number is not set to any station, to
the preset number before that again).
To cancel the deleting mode, press MODE.
Preventing Accidental
Operation
— HOLD Function
When you slide HOLD in the direction of the arrow,
“-” appears in the display. All the other buttons on
the radio will become inoperative.
This function prevents the radio from being
unintentionally turned on, or the radio frequency from
being accidentally changed.
Specifications
Time display:
North and South American 12-hour system
countries/regions
Other countries/regions 24-hour system
Frequency range:
Model for North and South America
countries/regions
Band Frequency range Channel step
FM 87.5 - 108 MHz 0.1 MHz
AM 530 - 1 710 kHz 10 kHz
531 - 1 710 kHz 9 kHz
Model for Other countries/regions
Band Frequency range Channel step
FM 87.5 - 108 MHz 0.05 MHz
AM 531 - 1 602 kHz 9 kHz
Output:
i (headphones) jack
(ø3.5 mm, stereo minijack)
Power output:
2 mW + 2 mW (at 10 % harmonic distortion)
Power requirements:
1.5 V DC, one R03 (size AAA) battery
Auto Power off function:
Approx. 30 minutes, 60 minutes, 90minutes, 120
minutes, and off
Dimensions:
Approx. 37.4 × 84.6 × 21.6 mm (w/h/d)
(Approx. 1
incl. projecting parts and controls
Mass:
Approx. 58.5 g (2.06 oz.)
incl. battery and the headphones
Accessories supplied
Stereo headphones (1)
Design and specifications are subject to change
without notice.
530 - 1 610 kHz 10 kHz
1
/2 × 3 3/8 × 7/8 inches)
Lead-free solder is used for soldering.
Halogenated flame retardants are not
used in printed wiring boards.
PVC is not used in Stereo Headphones
cord.
Español
Características
• Radio FM/AM con sintetizador PLL (bucle de fase
cerrada) que permite obtener una recepción óptima.
• Se pueden programar un total de 20 canales, 15 de
FM y 5 de AM.
• Sintonizador fácil de manipular con una sola mano.
• Sonido de graves potentes gracias al circuito
MEGABASS.
•Función de desconexión automática de la radio.
(Puede programarse para que se apague
transcurridos 30, 60, 90 ó 120 minutos, o puede
desactivarse.)
• Pinza práctica incluida.
Precauciones
• Utilice la unidad sólo con cc de 1,5 V y una pila
R03 (de tamaño AAA).
• La placa donde se indica el voltaje de
funcionamiento, etc. se encuentra en la parte
posterior externa.
• Evite la exposición de la unidad a temperaturas
extremas, la luz solar directa, la humedad, la arena,
el polvo o los golpes. No la deje nunca en un
automóvil estacionado al sol.
• Si se introduce algún objeto sólido o líquido en la
unidad, extraiga la pila y haga revisar la unidad por
personal cualificado antes de seguir utilizándola.
• En vehículos o edificios, es posible que la recepción
de la radio resulte difícil o ruidosa. Trate de
escucharla cerca de una ventana.
• Para limpiar la unidad, utilice un paño suave
humedecido con una solución de detergente poco
concentrada.
•Este producto no se ha diseñado para que sea
resistente al agua, de modo que debe tomar
precauciones a la hora de utilizar la unidad cuando
llueva, nieve o en sitios donde pueda mojarse.
Notas sobre los auriculares
Seguridad vial
No utilice los auriculares mientras conduzca, vaya en
bicicleta o utilice cualquier vehículo motorizado, ya
que podría suponer un peligro para el tráfico y está
prohibido en muchos lugares. Asimismo, puede
resultar peligroso utilizar los auriculares a un volumen
alto mientras camina, sobre todo en pasos de
peatones. Extreme las precauciones o deje de utilizar
la unidad en aquellas situaciones potencialmente
peligrosas.
Prevención de daños en los oídos
Evite utilizar los auriculares a un volumen alto.
Los especialistas en audición desaconsejan la
reproducción continua y prolongada a un volumen
alto. Si percibe pitidos en el oído, baje el volumen o
deje de utilizar la unidad.
Respeto a los demás
Mantenga el volumen a unos niveles moderados. Le
permitirá oír los sonidos del exterior y respetar a
quienes se encuentren a su alrededor.
Advertencia
En caso de que se produzcan relámpagos mientras
utiliza la unidad, deje de utilizar inmediatamente los
auriculares.
Si tiene problemas o preguntas acerca de esta unidad,
póngase en contacto con el distribuidor Sony más
cercano.
Colocación de la pila
(consulte la figura A- )
1 Abra la tapa del compartimiento de la pila y
coloque una pila (no suministrada).
Cuando se coloca una pila por primera vez, “0:00”
o “AM 12:00” parpadearán en el visualizador.
Una vez ajustada la hora actual, el parpadeo se
detiene.
2 Cierre la tapa.
Duración de la pila (horas aproximadas) (JEITA*)
Si utiliza FM AM
Alcalina LR03 Sony 40 65
(tamaño AAA)
R03 Sony
(tamaño AAA)
* Mediciones realizadas de acuerdo con los estándares
de la JEITA (Japan Electronics and Information
Technology Industries Association). La duración real
de las pilas puede variar en función de cada unidad.
Es posible comprobar la energía restante de
la pila en el visualizador.
Los indicadores son los siguientes:
Indicador
Potencia máxima
x
Debilitándose
16 30
x
Agotada. Sustitúyala por una nueva.
Cuando pulse POWER después de
colocar la nueva pila, el indicador
cambiará a “
Cuando se agote la pila, la unidad
emitirá un pitido largo y, a
continuación, se apagará.
Nota
No tarde más de 3 minutos en sustituir la pila, ya que
de lo contrario el ajuste del reloj y las emisoras
programadas se borrarán. Si esto ocurre, vuelva a
ajustar las funciones.
Notas acerca de la pila
• No cargue pilas secas.
• No transporte las pilas secas de modo que entren en
contacto con monedas u otros objetos metálicos. Si
los polos positivo y negativo de la pila entran en
contacto accidentalmente con objetos metálicos,
puede generarse calor.
• Si no utiliza la unidad durante un período de tiempo
prolongado, retire la pila para evitar que se
produzcan daños por fugas o corrosión de la misma.
” .
Función de desconexión
automática
Para evitar que la pila se agote al dejar
accidentalmente conectada la alimentación de la radio,
utilice la función de desconexión automática para que
la radio se apague automáticamente transcurridos 90
minutos. (Puede cambiar el ajuste de tiempo.)
(Consulte “Desconexión automática de la radio”.)
Si se desprende la cubierta del
compartimiento de la pila (consulte
la figura A-
La tapa del compartimiento de la pila se ha diseñado
para que se desprenda si se aplica demasiada fuerza
sobre la misma al abrirla. Para volver a colocarla,
consulte la ilustración.
1 Inserte el gancho derecho de la tapa en el
orificio derecho de la unidad.
2 Coloque el gancho izquierdo en el orificio
correspondiente que se encuentra a la
izquierda del compartimiento.
3 Desplace el gancho izquierdo hacia el
orificio izquierdo de la unidad.
)
Ajustes de MODE
Cuando la unidad está encendida:
Cambia el modo de sintonización.
“P” no aparece durante la sintonización manual.
En la sintonización programada aparecen “P” y el
número.
Durante la recepción con un canal
programado:
Elimina el canal programado.
Cuando la unidad está apagada:
Cambia el ajuste de desconexión automática.
Uso del sintonizador
Para utilizar el sintonizador, deslícelo hacia arriba o
hacia abajo, manténgalo deslizado, púlselo o
manténgalo pulsado.
Deslizamiento hacia arriba o hacia
abajo/deslizamiento continuo
(consulte aumentela figura B- ):
Cuando suelte el dedo, la parte convexa regresará a la
posición central.
Presión/presión continua (consulte
la figura B-
Sólo podrá pulsar el sintonizador cuando la parte
convexa se encuentre en la posición central.
):
Ajuste del reloj
El sistema del reloj varía en función del modelo.
Sistema de 12 horas: “12:00 AM” = medianoche
Sistema de 24 horas: “0:00” = medianoche
La visualización de tiempo de este reloj sigue el
sistema de 24 horas.
1 Pulse POWER para desconectar la
alimentación.
2 Mantenga pulsado el sintonizador durante
más de 2 segundos hasta que “la hora”
empiece a parpadear.
3 Deslice o mantenga deslizado el
sintonizador hacia arriba o hacia abajo para
ajustar la hora y, a continuación, púlselo.
Si mantiene el sintonizador deslizado hacia arriba
o hacia abajo, el número cambiará rápidamente.
4 Deslice el sintonizador hacia arriba o hacia
abajo para ajustar los minutos y, a
continuación, púlselo.
“:” empezará a parpadear y el reloj empezará a
funcionar.
Para ajustar la hora actual exacta, ajuste los
minutos y, a continuación, pulse el sintonizador
para sincronizar la hora con una señal horaria
(como una emisora de radio).
Para cancelar el ajuste, pulse MODE.
Nota
Una vez que inicie el ajuste del reloj, debe realizar
cada paso en 65 segundos, ya que de lo contrario se
cancelará el modo de ajuste del reloj.
Desconexión
automática de la radio
— Función de desconexión
automática
Utilice la función de desconexión automática para que
la radio se apague de forma automática una vez
transcurrido el tiempo programado. El ajuste de
fábrica es 90 minutos.
1 Pulse POWER para desconectar la
alimentación.
2 Mantenga pulsado MODE durante más de
2 segundos hasta que “
hora empiecen a parpadear en el
visualizador.
AUTO OFF
” y la
3 Deslice el sintonizador hacia arriba o hacia
abajo para seleccionar la hora deseada y, a
continuación, púlselo.
Cada vez que deslice el sintonizador, la hora
cambiará de la siguiente forma:
OFF
120
90
Para cancelar la función de desconexión automática,
seleccione “OFF” en el paso 3. “
desaparecerá del visualizador.
30
AUTO OFF
60
”
Cambio del paso de
canal de AM
El paso de canal de AM varía en función de la zona.
El paso de canal de esta unidad se ha ajustado en
fábrica en 9 kHz o 10 kHz. Cambie los ajustes como
se indica a continuación para escuchar la radio.
Si utiliza la unidad en Paso de canal
Países o regiones de 10 kHz
América del Norte y del Sur
Otros países o regiones 9 kHz
Nota
Al cambiar el paso de canal de AM, la hora del reloj
se conservará pero las emisoras programadas se
borrarán.
1 Pulse POWER para desconectar la
alimentación.
2 Mientras desliza el sintonizador hacia arriba
o hacia abajo, mantenga pulsado POWER
durante más de 5 segundos.
Oirá un pitido de confirmación, con lo que
cambiará el paso de canal. “10kHz” o “9kHz”
parpadearán durante 3 segundos en el
visualizador.
Para cambiar de nuevo el paso de canal, repita el
paso 2.
Utilización de la radio
— Sintonización manual
1 Conecte el cable de los auriculares a la
toma i.
2 Pulse POWER para conectar la
alimentación.
Si aparece “-” en el visualizador, deslice
HOLD para desconectar la función HOLD.
3 Pulse MODE para que “P” desaparezca del
visor.
“P” no aparece durante la sintonización manual.
4 Pulse el sintonizador para seleccionar la
banda.
5 Deslice o mantenga deslizado el
sintonizador hacia arriba o hacia abajo para
seleccionar la frecuencia deseada.
Al deslizar el sintonizador una sola vez, la
frecuencia cambia en 0,05 MHz* (o 0,1 MHz en
los modelos de América del Norte y del Sur) para
FM y en 9 kHz (o 10 kHz, según lo que haya
programado en los ajustes de paso de canal de
AM) para AM. Si sigue deslizando el sintonizador
hacia arriba o hacia abajo, la frecuencia cambiará
rápidamente.
Cuando la frecuencia coincida con la de
radiodifusión, se recibirá la emisora.
* La visualización de la frecuencia aumenta o
disminuye a intervalos de 0,1 MHz. (Ejemplo:
88,05 MHz se muestra como “88.0 MHz”.)
6 Ajuste el volumen mediante VOL.
Para apagar la radio, pulse POWER.
Mejora de la recepción
FM (consulte la figura C- )
Dado que el cable de los auriculares cumple la
función de antena, extiéndalo el máximo que pueda.
AM (consulte la figura C- )
La unidad cuenta con una antena de AM integrada.
Gire la unidad en sentido horizontal hasta que obtenga
una recepción óptima.
Para mejorar la recepción de
programas estéreo
Ajuste FM SENS en LOCAL si se producen
interferencias cuando la intensidad de las ondas de
radio aumente drásticamente.
En condiciones normales, ajústelo en DX.
Para obtener unos graves potentes
Ajuste MEGABASS en ON.
Para reducir el sonido de los graves, ajuste
MEGABASS en OFF.
Si el sonido se distorsiona, ajuste MEGABASS en
OFF.
Programación de
emisoras favoritas
— Sintonización
programada
Puede programar un máximo de 15 emisoras de FM y
5 emisoras de AM. Para acceder a las emisoras, basta
con seleccionar los números de presintonía
correspondientes (AM1-5, FM1-15).
Todos los números de presintonía vienen
programados de fábrica con determinadas emisoras.
Para programar las emisoras favoritas, borre los
números de presintonía que no necesite o bien cambie
las emisoras que desea programar.
Programación o cambio de una
emisora
1 Siga los pasos 1 a 6 de “Utilización de la
radio” y sintonice manualmente la emisora
que desea programar.
2 Mantenga pulsado el sintonizador hasta que
el número de presintonía parpadee.
Cuando todos los números de presintonía estén
programados con diferentes emisoras (ajuste de
fábrica), parpadeará “1” y aparecerá “P”.
Cuando la unidad cuente con un número de
presintonía disponible, sólo parpadeará el número,
no aparecerá “P”.
Si no realiza ningún otro paso, la unidad dejará de
parpadear transcurridos aproximadamente 65
segundos. Se restablecerá la visualización anterior
al paso 2.
3 Deslice el sintonizador hacia arriba o hacia
abajo para seleccionar el número que desea
programar y, a continuación, púlselo.
Una vez seleccionado el número de presintonía
(que aparecerá con una “P”) que se asignará a la
emisora de radio, si pulsa el sintonizador se
elimiriarán las la emisora que se esté recibiendo y
las emisoras programadas se borrarán.
Ejemplo: Visualizador cuando se programa
Para cancelar el ajuste de programación, pulse
MODE.
90,0 MHz en FM como la posición 1.
Sintonización de una emisora
programada
1 Pulse POWER para conectar la
alimentación.
Si aparece “-” en el visualizador, deslice
HOLD para desconectar la función HOLD.
2 Pulse MODE para que aparezca “P” en el
visualizador.
3 Pulse el sintonizador para seleccionar la
banda.
4 Pulse el sintonizador hacia arriba o hacia
abajo para seleccionar el número de
presintonía deseado (AM 1-5, FM 1-15).
Sólo aparecerán los números de presintonía
asignados a emisoras.
5 Ajuste el volumen mediante VOL.
Borrado de una emisora
programada
1 Siga los pasos 1 a 3 de “Sintonización de
una emisora programada”.
2 Deslice el sintonizador hacia arriba o hacia
abajo para seleccionar el número de
presintonía que desea borrar.
3 Mantenga pulsado MODE durante más de
3 segundos hasta que “P”, “ ” y el
número de presintonía parpadeen.
Número de
presintonía que
desea borrar
4 Mientras “P”, “ ” y el número de
presintonía parpadeen, pulse el
sintonizador.
Si pulsa el sintonizador, se borrará la emisora
asignada al número de presintonía y la unidad
iniciará la recepción de la emisora asignada al
número anterior (o bien, si este número no se ha
asignado a ninguna emisora, al número de
presintonía anterior a éste).
Para cancelar el ajuste de borrado, pulse MODE.
Prevención de
operaciones
accidentales
— Función HOLD
Si desliza HOLD en la dirección de la flecha,
aparecerá “-” en el visualizador. Los demás
botones de la radio no podrán utilizarse.
Esta función evita que la radio se encienda sin querer,
o que la frecuencia de radio se cambie por accidente.
Especificaciones
Visualización de la hora:
Países o regiones de América Sistema de 12 horas
Norte y América del Sur
Otros países o regiones Sistema de 24 horas
Gama de frecuencias:
Modelo para América del Norte y América del
Sur países o regiones
Banda Gama de frecuencias Paso de canal
FM 87,5 - 108 MHz 0,1 MHz
AM 530 - 1 710 kHz 10 kHz
Modelo para otros países o regiones
Banda Gama de frecuencias Paso de canal
FM 87,5 - 108 MHz 0,05 MHz
AM 531 - 1 602 kHz 9 kHz
Salida:
Toma i (auriculares)
Minitoma estéreo (ø3,5 mm)
Salida de potencia:
2 mW + 2 mW (con un 10% de distorsión armónica)
Requisitos de alimentación:
cc 1,5 V, una pila R03 (de tamaño AAA)
Función de desconexión automática:
Aprox. 30, 60, 90, 120 minutos y desactivación
Dimensiones:
Aprox. 37,4 × 84,6 × 21,6 mm (an/al/pr)
partes salientes y controles incluidos
Peso:
Aprox. 58,5 g con la pila y los auriculares
Accesorios suministrados
Auriculares estéreo (1)
El diseño y las especificaciones están sujetos a
cambios sin previo aviso.
531 - 1 710 kHz 9 kHz
530 - 1 610 kHz 10 kHz
Se ha utilizado soldadura sin plomo.
Las placas del circuito impreso no
contienen retardantes de llama
halogenados.
En el cable de los auriculares estéreo no
se utiliza PVC.
Page 2
正面
顯示窗口
VOL*
i
FM SENS
DX/LOCAL
* 在 VOL 旁有一觸覺點,用以指明調高音量的方
向。
POWER
微動控制柄
(ENT/BAND)
MODE
MEGABASS
HOLD
A
R03(AAA尺寸)× 1
先插入電池的E端。
B
中 文
特點
• 用於穩定接收的 PLL(相位鎖定迴路)合成器的
FM/AM 收音機。
• 最多可以預置 20 個頻道,15 個 FM 頻道和 5
個 AM 頻道。
• 方便的單手操作微動控制柄。
• 通過 MEGABASS 電路提供強勁的低音。
• 自動關機功能可以自動關閉收音機。(可設置於
30、60、90、120 分鐘後關機或取消。)
• 裝有緊固夾。
注意事項
• 本機只能使用 1 枚 1.5 V 直流電的 R03(AAA
尺寸)電池進行操作。
• 標有操作電壓等內容的銘牌位於底部。
• 避免暴露在極端溫度、直射陽光、潮濕、多沙、
多塵或機械震動等場所。
切勿遺留在太陽下的汽車內。
• 若有任何固體或液體落入本機,取出電池,並請
有資格的人員檢查後方能繼續使用。
• 在汽車或建築物內,收音機的接收可能有困難或
有雜音。可嘗試在窗戶附近收聽。
• 要清潔外殼,請用蘸有中性清潔劑的軟布擦拭。
• 本產品不防水,因此當下雨、下雪時或是在有水
濺起的地方,您應當小心使用本機。
耳機的注意事項
道路安全
不要在開車、騎車或駕駛任何機動車時使用耳機。
否則可能會引起交通事故並且在有些地區是違法
的。在走路時,特別步行過馬路時,開著高音量使
用耳機具有潛在的危險。在具有潛在危險的情況
下,您應該十分小心或停止繼續使用耳機。
防止聽力受損
避免開著高音量使用耳機。
聽力專家建議不要持續、高聲和長期使用耳機。如
果您感覺到有耳鳴,請降低音量或停止繼續使用。
顧及他人
使音量保持在一個適中的程度。這樣可以讓您聽到
外界的聲響並且能夠顧及到您周圍的人。
警告
在使用本機時如有閃電,請立刻拔下耳機。
設定時鐘
時鐘系統根據您的機型而異。
12小時制:“AM 12:00”=午夜
24小時制:“0:00”=午夜
本時鐘的時間顯示是 24 小時制
1 按 POWER 以關閉電源。
2 按住微動控制柄 2 秒以上直到小時開始
閃爍。
3 向上或向下滑動或保持滑動微動控制柄
以調整小時,然後按壓微動控制柄。
如果您向上或向下保持滑動微動控制柄,數字
將快速變化。
4 向上或向下滑動微動控制柄以調整分
鐘,然後按壓微動控制柄。
“:”開始閃爍且時鐘開始運行。
要將目前的時間精確到秒,請調整分鐘並在時
間訊號(例如電台時間訊號)出現時按壓微動
控制柄。
要取消設定,請按MODE。
注意
一旦您開始設定時間,每一個步驟必須在65秒內完
成,否則時鐘設定模式將被取消。
自動關閉收音機
- 自動關機功能
您可以使用自動關機功能,以使收音機在設定的時
間過後自動關閉。出廠設定為 90 分鐘。
1 按 POWER 以關閉電源。
2 按住 MODE 2 秒以上直至“
OFF
”(自動關閉)出現,且時間開始在
顯示窗口中閃爍。
AUTO
預置或改變電台
1 按照“操作收音機”中的步驟 1 至 6 操
作,並手動調入您要預置的電台。
2 按住微動控制柄直至聽到確認的嘟嘟
聲。
當所有的預置號碼都設定為特定的電台(出廠
設定)時,“1”閃爍且“P”出現。
當本機內有可用的預置號碼時,只有號碼閃
爍,“P”將不會出現。
如果您未進行任何操作,本機將在 65 秒後停
止閃爍。將恢復到步驟 2 之前的顯示。
3 向上或向下滑動微動控制柄選擇要預置
的號碼並按壓。
當選擇的預置號碼(顯示有“P”)設定有無線
電台時,按壓微動控制柄刪除預置的電台並預
置接收到的電台。
示例:將 FM 90.0 MHz 預置到位置 1 時的顯
示窗口。
要取消預置模式,請按MODE。
調入預置電台
1 按 POWER 以開啟電源。
顯示幕上如果出現“-”,則要滑動 HOLD
以取消 HOLD 功能。
2 按 MODE 使“P”出現在顯示窗口中。
3 按壓微動控制柄選擇波段。
4 向上或向下滑動微動控制柄選擇需要的
預置號碼(AM1-5, FM1-15)。
僅顯示設定有特定電台的預置號碼。
5 用 VOL 調節音量。
刪除預置電台
1 按照“調入預置電台”中的步驟 1 到 3
操作。
2 向上或向下滑動微動控制柄選擇要刪除
的預置號碼。
3 按住 MODE 3 秒以上直至“P”、
“ ”和預置號碼開始閃爍。
C
立體聲耳機
滑動保持滑動
按按住
如果您對本機有任何疑問或問題,請諮詢就近的
Sony經銷商。
安裝電池(參見圖A- )
1 打開電池艙蓋並裝入一枚電池(未附
帶)。
當第一次裝入電池時,顯示幕上會閃爍
“0:00”或“AM 12:00”。一旦設置了目前時
間,閃爍將停止。
2 關上蓋子。
電池壽命(近似小時) (JEITA*)
當使用 FM AM
Sony 鹼性電池 LR03 40 65
(AAA尺寸)
Sony R03 16 30
(AAA尺寸)
* 按照 JEITA(日本電子和資訊技術工業協會)標
準進行測試。電池的實際壽命將根據本機的使用
環境而變化。
您可以從顯示幕中查看電池剩餘電量。
指示燈顯示如下:
指示燈
電量充足
x
電量減弱
x
耗盡。請換新電池。安裝完新電池後,
按 POWER 時,指示燈變為“ ”。
電池要耗盡時,本機將發出一聲很長的
嘟嘟聲然後關閉。
注意
更換電池的時間請不要超過3分鐘,否則您的時鐘設
定和預置的電台將被初始化。發生這種情況時,請
重新設定這些功能。
電池注意事項
• 勿對乾電池進行充電。
• 勿將乾電池同硬幣或其他金屬物件一同攜帶。如
果電池的正負極不小心與金屬物件發生接觸,電
池將會發熱。
• 如果將長時間不使用本機,請取出電池以避免電
池洩漏和腐蝕。
自動關機功能
為了防止由於無意打開收音機而導致電池耗盡,您
可以使用自動關機功能以使收音機在90分鐘後自動
關閉。(您可以改變該時間的設定值。)(請參閱
“自動關閉收音機”。)
電池蓋意外脫落後的安裝(參見圖A- )
打開時過分用力,電池蓋脫落。參見插圖,以將其
裝回。
1 將艙蓋右邊的鉤子插入本機右邊的孔中。
2 將左邊的鉤子掛在電池艙左邊安裝蓋子的地
方。
3 將左邊的鉤子推入本機左邊的孔中。
MODE(模式)設定
電源打開時:
改變調諧模式
“P”不顯示在手動調諧中
“P”與號碼顯示在預置調諧中
接收預置頻道時:
刪除預置的頻道
電源關閉時:
改變自動關閉設定
使用微動控制柄
可通過向上或向下滑動、保持滑動、按壓或按住不
放來操作微動控制柄。
向上或向下滑動保持滑動(參見圖B- ):
當您拿開手指時,突出的部分會回到中間位置。
按壓或按住不放(參見圖B- ):
您只能在突出部分在中間位置的時候才能按壓微動
控制柄。
3 向上或向下滑動微動控制柄以調整所需
的時間,然後按壓微動控制柄。
每次您滑動微動控制柄,時間將如下變化:
OFF
120
90
要取消自動關機功能,請在步驟 3中選擇“OFF”。
“
AUTO OFF
”從顯示幕中消失。
30
60
改變 AM 頻道間隔
AM 頻道間隔根據地區的不同而異。本機的頻道間隔
在出廠時設定為 9 kHz 或 10 kHz。改變以下設定
以便能收聽無線電廣播。
使用地區 頻率步頻
北美和南美洲國家地區 10 kHz
其他國家地區 9 kHz
注意
當 AM 頻道間隔改變時,時鐘時間將保留,但預置
電台將被初始化。
1 按 POWER 以關閉電源。
2 向上或向下滑動微動控制柄的同時,按
住 POWER 5 秒以上。
您將聽到確認的嘟嘟聲,頻道間隔將改變。
“10kHz”或“9kHz”將在顯示窗口中閃爍 3
秒。
要再次改變頻道間隔,請重複步驟 2。
操作收音機
- 手動調諧
1 連接耳機線至 i 插孔。
2 按 POWER 以開啟電源。
顯示幕上如果顯示“-”,則滑動 HOLD 以
取消 HOLD 功能。
3 按 MODE 刪除顯示窗口中的“P”。
在手動調台中不出現“P”。
4 按壓微動控制柄選擇波段。
5 向上或向下滑動或保持滑動微動控制柄
選擇需要的頻率。
每撥動一次微動控制柄,對於 FM 頻率改變
0.05 MHz* (北美和南美洲機型為0.1 MHz),
對於 AM 改變 9 kHz(或 10 kHz,根據 AM
頻道間隔設定而改變)。如果您持續向上或向
下滑動微動控制柄,頻率將快速改變。
當該頻率與廣播頻率相符時,此廣播將被接
收。
* 頻率顯示以 0.1 MHz 為單位遞增或遞減。
(例如:88.05 MHz 顯示為“88.0 MHz”。)
6 用 VOL 調節音量。
要關閉收音機,請按 POWER。
提高接收品質
FM(參見圖C- )
耳機線起著天顯的作用,因此要盡量伸長。
AM(參見圖C- )
AM 天線固定在本機內部。沿水平方向轉動本機直至
獲得最佳接收。
提高立體聲節目的接收品質
如果干擾較為普遍且接收過於強烈,請將FM SENS
設定為LOCAL。
在正常情況下,將其設定為DX。
獲得強勁的低音
請將 MEGABASS 切換至 ON。
要降低低音音調,請MEGABASS 切換至 OFF。
如果聲音失真,請MEGABASS 切換至 OFF。
預置您所喜愛的電台
- 預置調諧
您可最多預置 15 個 FM 電台和 5 個 AM 電台。
要存取電台,只要選擇相應的預置號碼(AM 1-5,
FM 1-15)。
所有的預置號碼在出廠時已被預置了某些電台。若
要預置您喜歡的電台,請刪除不需要的預置號碼或
更改要預置的電台。
要刪除的預置號碼
4 當“ P”、“ ”和 預 設 號碼正在閃爍
時,按壓微動控制柄。
按壓微動控制柄刪除設定到該預置號碼的電
台,本機開始接收設定到前一個預置號碼的電
台( 或 者 , 如 果這個預置號碼沒有設定電台,
則接收再前一個電台)。
要取消刪除模式,請按 MODE。
防止意外的變化
- HOLD 功能
按照箭頭的方向滑動 HOLD 時,“-”出現在顯
示幕上。表示收音機上的所有功能鍵被鎖定。
此功能可防止收音機意外開啟,或收音機頻率被意
外改變。
規格
時間顯示:
北美和南美國家∕地區 12 小時制
其他國家∕地區 24 小時制
頻率範圍:
北美和南美國家地區機型
波段 頻率範圍 頻率步頻
FM 87.5 - 108 MHz 0.1 MHz
AM 530 - 1 710 kHz 10 kHz
531 - 1 710 kHz 9 kHz
其他國家地區機型
波段 頻率範圍 頻率步頻
FM 87.5 - 108 MHz 0.05 MHz
AM 531 - 1 602 kHz 9 kHz
輸出:
i(耳機)插孔
(ø3.5 mm,立體聲迷你插孔)
電源輸出:
2 mW + 2 mW(諧波失真為 10 % 時)
電源要求:
1.5 V DC,一枚R03(AAA尺寸)電池
自動關機功能:
約 30 分鐘、60 分鐘、90 分鐘、120 分鐘和取消
尺寸:
約 37.4 × 84.6 × 21.6 mm(寬高深)
包括突出部分和控制件
重量
約 58.5 g
包括電池和耳機
附件
立體聲耳機(1)
設計和規格若有變動,恕不另行通知。
530 - 1 610 kHz 10 kHz
焊接使用無鉛焊料。
印刷線路板中不使用鹵化阻燃劑。
立體聲耳機筒線中不使用 PVC。
 Loading...