

Page 1
3-223-744-11 (1)
2-Line Cordless
Telephone
Operating Instructions
US
SPP-IM982
©2000 Sony Corporation
Page 2

Owner’s Record
The model and the serial numbers are
located at the bottom of the unit. Record
the serial number in the space provided
below. Refer to these numbers
whenever you call upon your Sony
dealer regarding this product.
Model No. SPP-IM982
Serial No. ________________
US
2
Page 3

IMPORTANT
SAFETY
INSTRUCTIONS
When using your telephone equipment,
basic safety precautions should always
be followed to reduce the risk of fire,
electric shock and injury to persons,
including the following:
1. Read and understand all instructions.
2. Follow all warnings and instructions
marked on the product.
3. Unplug this product from the wall
outlet before cleaning. Do not use
liquid cleaners or aerosol cleaners.
Use a damp cloth for cleaning.
4. Do not use this product near water,
for example, near a bath tub, wash
bowl, kitchen sink, or laundry tub, in
a wet basement, or near a swimming
pool.
5. Do not place this product on an
unstable cart, stand, or table. The
product may fall, causing serious
damage to the product.
6. Slots and openings in the cabinet and
the back or bottom are provided for
ventilation. To protect it from
overheating, these openings must not
be blocked or covered. The openings
should never be blocked by placing
the product on the bed, sofa, rug, or
other similar surface. This product
should never be placed near or over a
radiator or heat register. This product
should not be placed in a built-in
installation unless proper ventilation
is provided.
7. This product should be operated only
from the type of power source
indicated on the marking label. If you
are not sure of the type of power
supply to your home, consult your
dealer or local power company.
8. Do not allow anything to rest on the
power cord. Do not locate this
product where the cord will be abused
by persons walking on it.
9. Do not overload wall outlets and
extension cords as this can result in
the risk of fire or electric shock.
10. Never push objects of any kind into
this product through cabinet slots as
they may touch dangerous voltage
points or short out parts that could
result in a risk of fire or electric shock.
Never spill liquid of any kind on the
product.
11. To reduce the risk of electric shock,
do not disassemble this product, but
take it to a qualified service personnel
when some service or repair work is
required. Opening or removing
covers may expose you to dangerous
voltages or other risks. Incorrect
reassembly can cause electric shock
when the appliance is subsequently
used.
12. Unplug this product from the wall
outlet and refer servicing to qualified
service personnel under the following
conditions:
A. When the power cord or plug is
damaged or frayed.
B. If liquid has been spilled into the
product.
C. If the product has been exposed to
rain or water.
D. If the product does not operate
normally by following the operating
instructions. Adjust only those
controls that are covered by the
operating instructions because
improper adjustment of other controls
may result in damage and will often
require extensive work by a qualified
technician to restore the product to
normal operation.
E. If the product has been dropped or
the cabinet has been damaged.
F. If the product exhibits a distinct
change in performance.
US
3
Page 4

13. Avoid using a telephone (other than
a cordless type) during an electrical
storm. There may be a remote risk of
electric shock from lightning.
14. Do not use the telephone to report a
gas leak in the vicinity of the leak.
SA VE THESE
INSTRUCTIONS
CAUTION:
To reduce the risk of fire or injury to persons by
battery, read and follow these instructions.
1. Use only the following type and size battery
pack: Sony BP-T23.
2. Do not dispose of the battery pack in a fire.
The cell may explode. Check with local codes
for possible special disposal instructions.
3. Do not open or mutilate the battery pack.
Released electrolyte is corrosive and may
cause damage to the eyes or skin. It may be
toxic if swallowed.
4. Exercise care in handling battery pack in
order not to short the battery with conducting
materials such as rings, bracelets, and keys.
The battery or conductor may overheat and
cause burns.
5. Charge the battery pack provided with or
identified for use with this product only in
accordance with the instructions and
limitations specified in the instruction manual
provided for this product.
6. Observe proper polarity orientation between
the battery pack and battery charger.
INFORMATION FOR
GENERAL TELEPHONES
1. This equipment complies with Part 68 of the
FCC rules. On the bottom of this equipment
is a label that contains, among other
information, the FCC certification number and
ringer equivalence number (REN) for this
equipment. If requested, this information
must be provided to the telephone company.
2. The applicable certification jack (connector)
USOC-RJ11C/W, RJ14C/W are used for this
equipment.
3. This equipment is designed to be connected to
the telephone network or premises wiring
using a compatible modular jack that is Part
68 compliant.
The FCC compliant telephone cord and
modular plug is provided with this
equipment.
4. The REN is used to determine the quantity of
devices that may be connected to the
telephone line. Excessive RENs on the
telephone line may result in the devices not
ringing in response to an incoming call.
Typically, the sum of the RENs should not
exceed five (5.0).To be certain of the number
of devices that may be connected to a line, as
determined by the total RENs, contact the
local telephone company.
5. If this equipment (SPP-IM982) causes harm to
the telephone network, the telephone
company will notify you in advance that
temporary discontinuance of service may be
required. But if advance notice isn’t practical,
the telephone company will notify the
customer as soon as possible. Also, you will
be advised of your right to file a complaint
with the FCC if you believe it is necessary.
6. The telephone company may make changes in
its facilities, equipment, operations or
procedures that could affect the operation of
the equipment. If this happens the telephone
company will provide advance notice so you
can make necessary modifications to maintain
uninterrupted service.
7. If trouble is experienced with this equipment
(SPP-IM982), for repair or warranty
information, please contact Sony Direct
Response Center: Tel 1-800-222-7669. If the
equipment is causing harm to the telephone
network, the telephone company may request
that you disconnect the equipment until the
problem is resolved.
8. All repairs will be performed in an authorized
Sony service station.
9. This equipment cannot be used to party lines
or coin lines.
10.This equipment is hearing aid compatible.
If your telephone is equipped
with automatic dialers
When programming emergency numbers and
(or) making test calls to emergency numbers:
1. Remain on the line and briefly explain to
the dispatcher the reason for the call.
2. Perform such activities in the off-peak
hours, such as early morning or late
evenings.
US
4
Page 5

Caution
You are cautioned that any changes or
modifications not expressly approved in this
manual could void your authority to operate this
equipment.
Note
This equipment has been tested and found to
comply with the limits for a Class B digital
device, pursuant to Part 15 of the FCC Rules.
These limits are designed to provide reasonable
protection against harmful interference in a
residential installation. This equipment
generates, uses and can radiate radio frequency
energy and, if not installed and used in
accordance with the instructions, may cause
harmful interference to radio communications.
However, there is no guarantee that interference
will not occur in a particular installation. If this
equipment does cause harmful interference to
radio or television reception, which can be
determined by turning the equipment off and
on, the user is encouraged to try to correct the
interference by one or more of the following
measures:
– Reorient or relocate the receiving antenna.
– Increase the separation between the
equipment and receiver.
– Connect the equipment into an outlet on a
circuit different from that to which the
receiver is connected.
– Consult the dealer or an experienced radio/
TV technician for help.
US
5
Page 6

Table of contents
Getting Started
8 Read this first
9 Step 1: Checking the package
contents
10 Step 2: Setting up the base unit
14 Step 3: Preparing the battery
pack
17 Step 4: Entering the area code
20 Identifying the parts
Basics
24 Making calls
26 Redialing
27 Making another call while
talking
28 Receiving calls
31 Receiving a call while talking
Telephone Features
32 Phone Directory
32 Storing phone numbers and
names
34 Changing a stored name
and/or phone number
35 Erasing a memory location
35 Making calls from the Phone
Directory
37 Setting the ringer type
38 Turning off the ringer of the
handset
39 Switching the phones during a
call
39 To switch from the base unit
to the handset
39 To switch from the handset
to the base unit
40 Talking between the phones
(Intercom)
40 To talk from the handset to
the base unit
40 To talk from the base unit to
the handset
41 Receiving a call while using
the intercom
42 Transferring a call
42 To transfer from the base
unit to the handset
43 To transfer from the handset
to the base unit
44 Having a conference call
44 Making another call while
talking
45 Receiving a call while talking
46 Switching conference from
the handset to the base unit
46 Switching conference from
the base unit to the handset
46 To join on the base unit
while the handset is talking
on one line
46 To join on the handset while
the base unit is talking on
one line
46 To join three-way conference
(four-way conference)
Caller ID Features
47 Understanding the Caller ID
service
47 When you receive a call
48 Looking at the Caller ID list
48 Viewing the Caller ID list
49 Erasing data from the Caller
ID list
US
Table of contents
6
Page 7

51 Using the Caller ID list
51 Calling back a number from
the Caller ID list
52 Storing a number of the
Caller ID list into the Phone
Directory
53 To change the number of
digits of the phone number
55 Using “Caller ID with call
waiting” service
56 Using visual message waiting
service
Additional Information
58 Mounting the base unit on a wall
59 Carrying the handset by the belt
clip
60 Notes on power sources
61 Maintenance
62 Troubleshooting
65 Specifications
66 Index
Back cover LIMITED WARRANTY
Table of contents
US
7
Page 8
Getting Started
Read this first
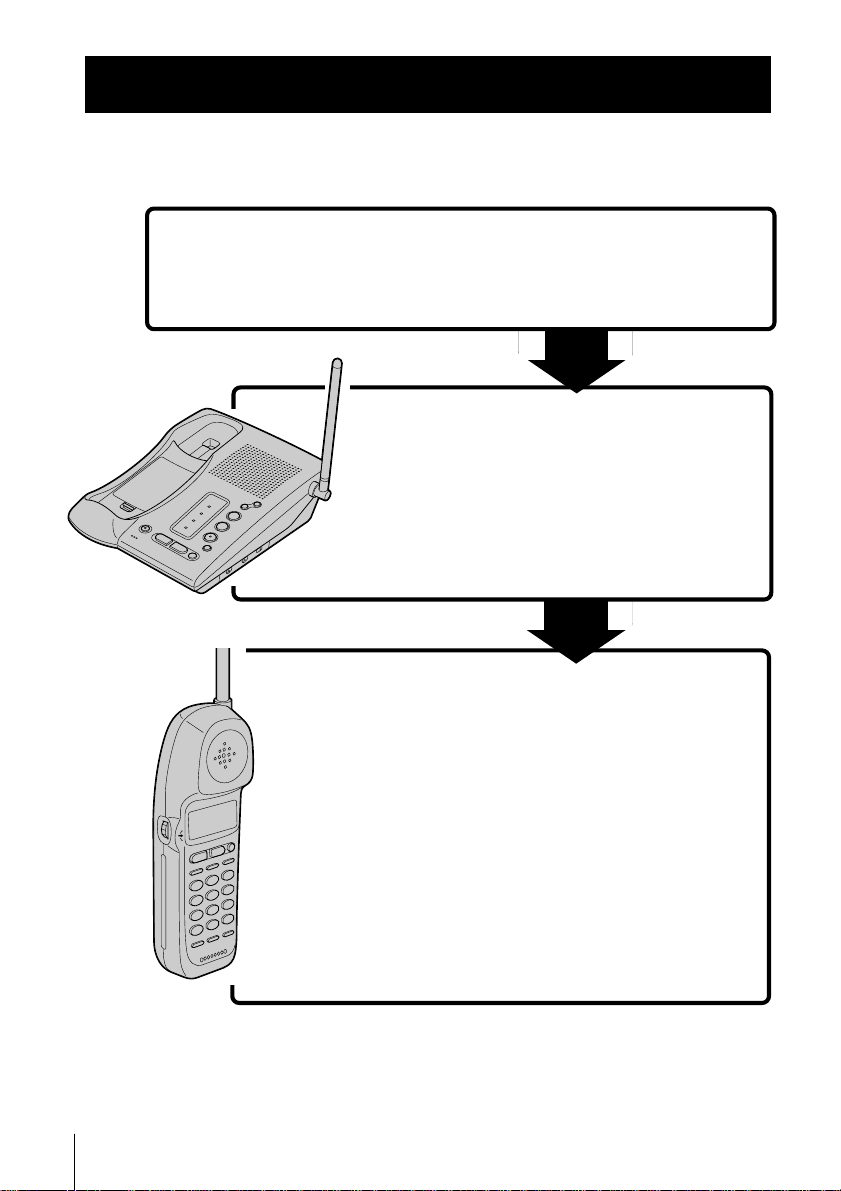
Before you use your phone, you must first set it up. Here’s a quick way
to set up your phone: Steps 1, 2, 3 and 4.
Step 1 (page 9)
First, unpack the phone and the supplied
accessories.
Step 2 (pages 10 to 13)
Next, you need to do three things to set
up the base unit, including finding the
best location for the base unit.
Base unit
US
Getting Started
8
Handset
Step 3 (pages 14 to 15)
Then, insert the battery pack into the
handset and charge it for more than 12
hours.
Step 4 (pages 17 to 19)
Finally, enter the area code to use the
Caller ID service.
That’s it!
Page 9
Step 1
Checking the package contents
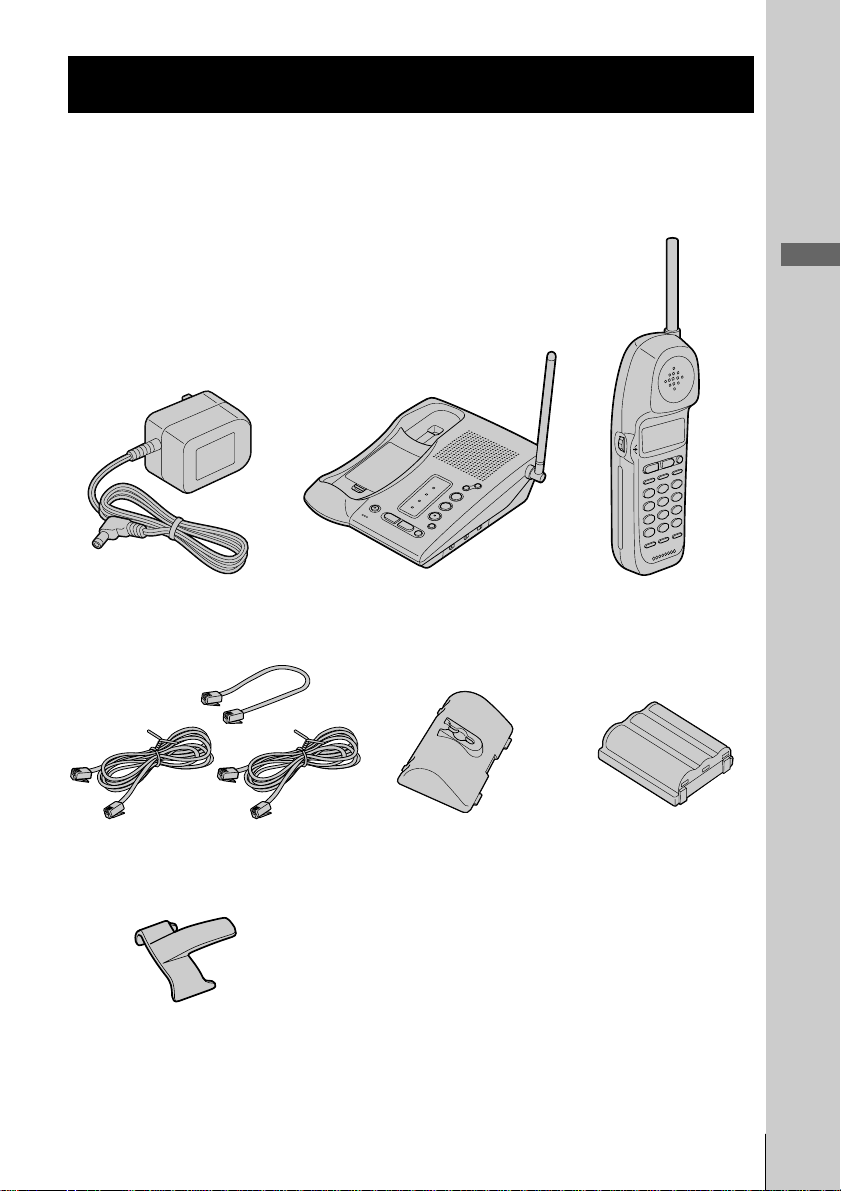
Make sure you have received the following items in the package.
If anything is missing, contact your local Sony dealer.
Getting Started
Telephone line cords (3)
Belt clip
Base unit
Wall bracket for
base unit
HandsetAC power adaptor (AC-T128)
Rechargeable battery
pack (BP-T23)
Getting Started
US
9
Page 10
Step 2
Setting up the base unit
Do the following steps:
• Choose the best location
• Connect the base unit
• Choose the dialing mode
Choose the best location
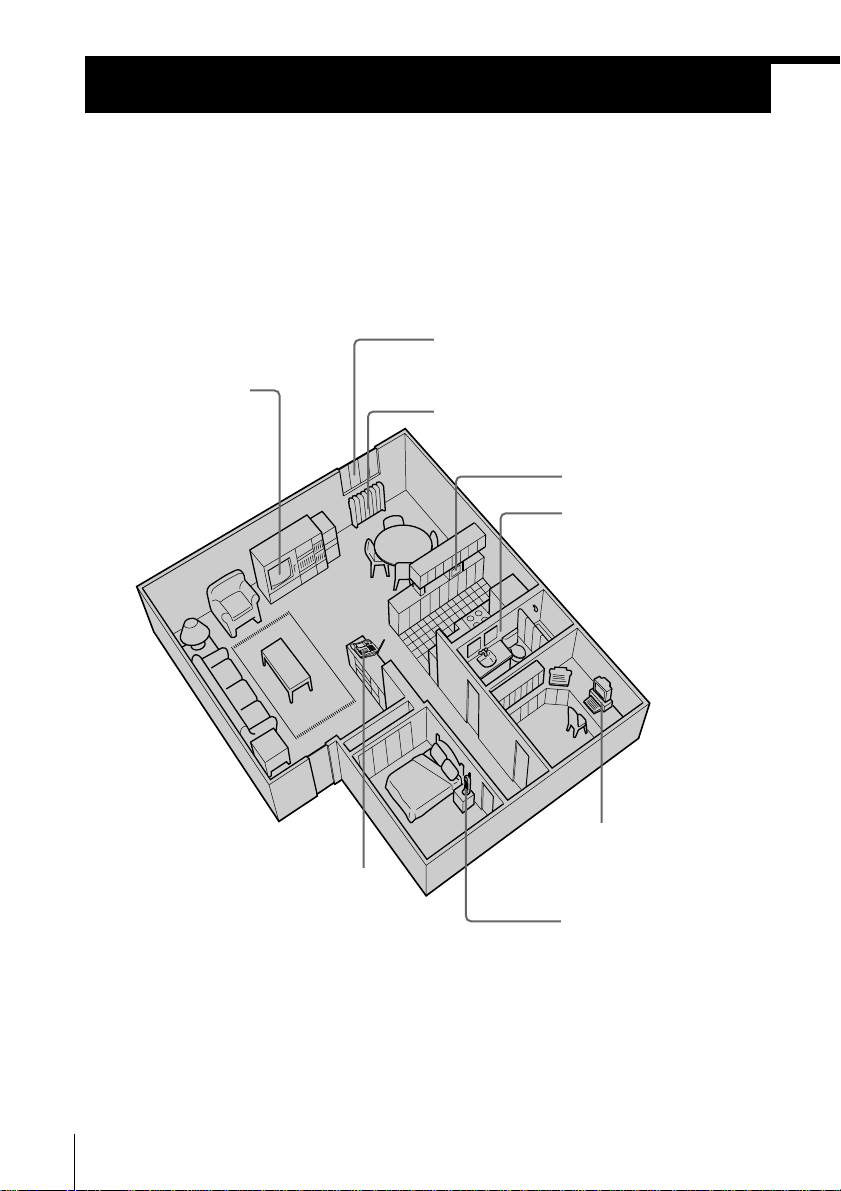
Where you place the base unit affects the reception quality of the
handset.
Away from television
sets and other
electronic equipment
Away from noise sources such as a window
by a street with heavy traffic
Away from heat sources, such as radiators,
airducts, and sunlight
Away from a microwave
oven
Away from excessive
moisture, extremely low
temperatures, dust,
mechanical vibration, or
shock
Away from a personal
computer
Near a central location
and on a level surface
Away from another
cordless telephone
CAUTION: • Should you experience intermittent loss of audio during a conversation, try
US
Getting Started
10
moving closer to the base or move base unit away from other noise sources.
• The cordless telephone operates at a frequency that may cause interference to
nearby TVs and VCRs; the base unit should not be placed near or on the top of
a TV or VCR; and, if interference is experienced, moving the cordless telephone
farther away from the TV or VCR will often reduce or eliminate the
interference.
Page 11
Connect the base unit
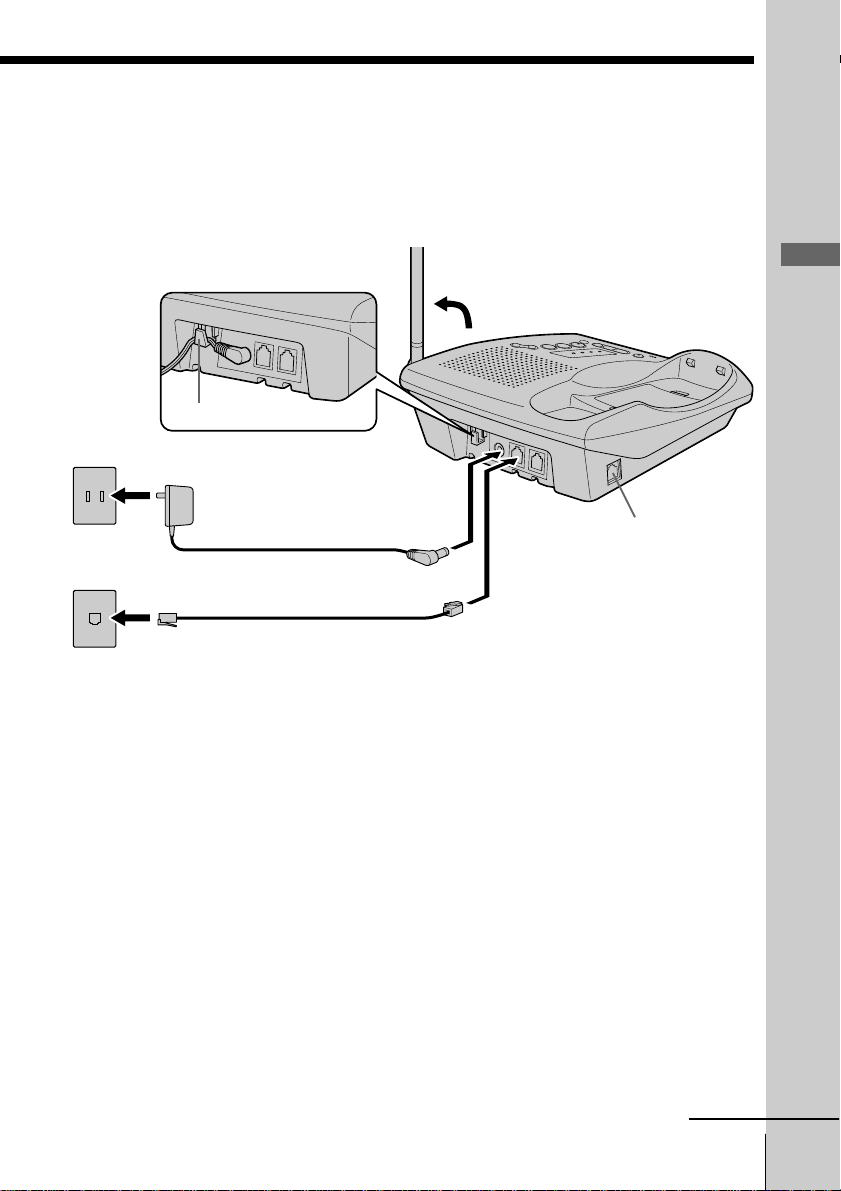
If you want to hang the base unit on the wall, see page 58.
To connect the base unit to a single outlet having two lines
Hook the cord.
To an AC outlet
To the
telephone outlet
AC power adaptor
2
(supplied AC-T128)
Telephone line cord
1
(supplied)
3
To DC IN 9V
To L1/L1+L2
1 Connect the telephone line cord
to the L1/L1+L2 jack and to a
telephone outlet.
Getting Started
DATA jack
2 Connect the AC power adaptor
to the DC IN 9V jack and to an
AC outlet.
3 Raise the antenna. Make sure it
points towards the ceiling.
continued
Getting Started
11
US
Page 12
Step 2: Setting up the base unit (continued)
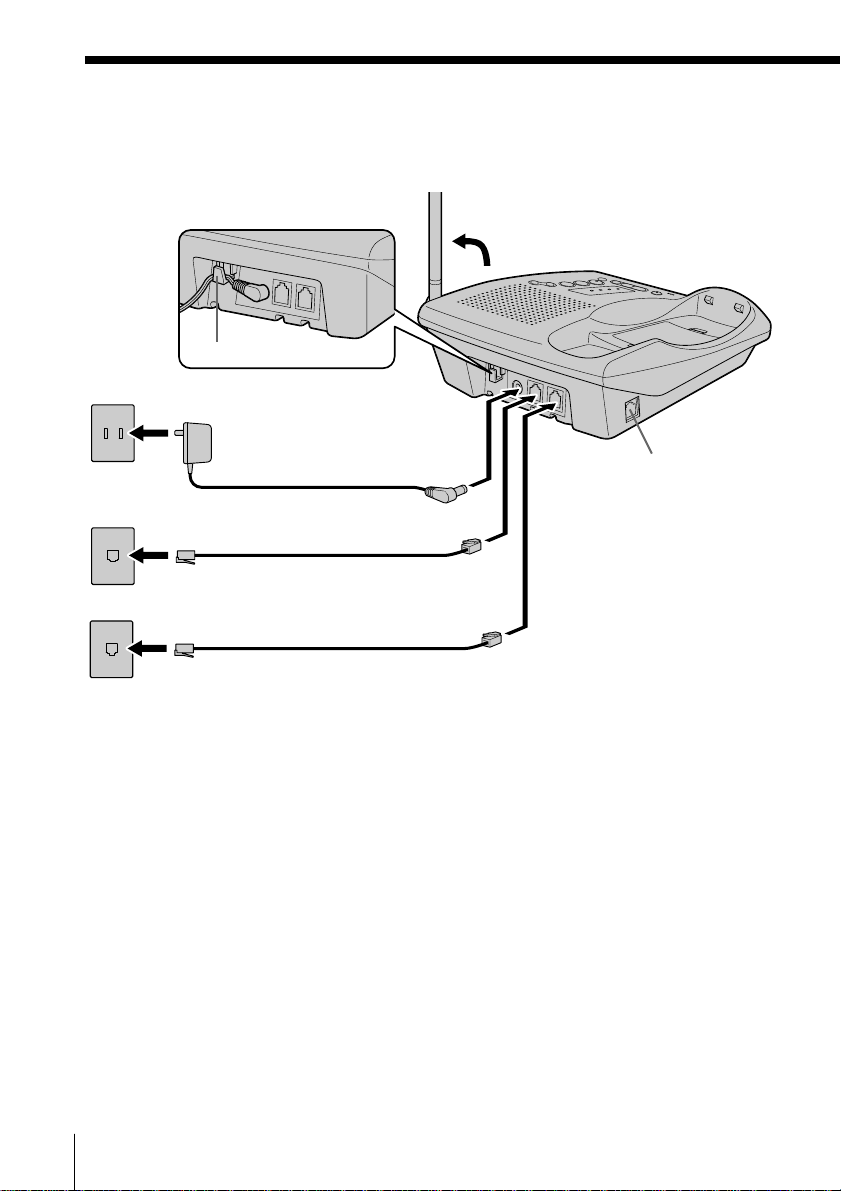
To connect the base unit to two separate outlets
3
Hook the cord.
To an AC outlet
To the
telephone outlets
Line 1
Line 2
1
To DC IN 9V
AC power adaptor
2
(supplied AC-T128)
To L1/L1+L2
Telephone line cord (supplied)
Telephone line cord (supplied)
DATA jack
To L2
1 Connect the telephone line
cords to the L1/L1+L2 and L2
jacks and to the telephone
outlets.
2 Connect the AC power adaptor
to the DC IN 9V jack and to an
AC outlet.
12
US
3 Raise the antenna. Make sure it
points towards the ceiling.
Getting Started
Page 13
Notes
• Use only the supplied AC-T128 AC power adaptor.
Do not use any other AC power adaptor.
• Connect the AC power adaptor to a continuous power
supply.
• Place the base unit close to the AC outlet so that you
can unplug the AC power adaptor easily.
Tips
• If your telephone outlet is not modular, contact your
telephone service company for assistance.
• L1 is the first phone line connected to center pair of
wires. L2 is the second phone line connected to outer
pair of wires.
Connecting a computer or FAX
You can connect a computer or FAX, etc. to the
DATA jack.
Notes
• L2 jack is used for receiving or sending
computer or FAX data in addition to making
or receiving calls.
If a call comes in on L2 jack with the “call waiting” service while a
computer or FAX connected to the DATA jack is receiving or sending
data, that data may be effected.
If you have data communication frequently, we recommend that you
and your callers use L2 jack for data communication only.
• If you have only single outlet having one line, connect the telephone
line cord to the L2 jack.
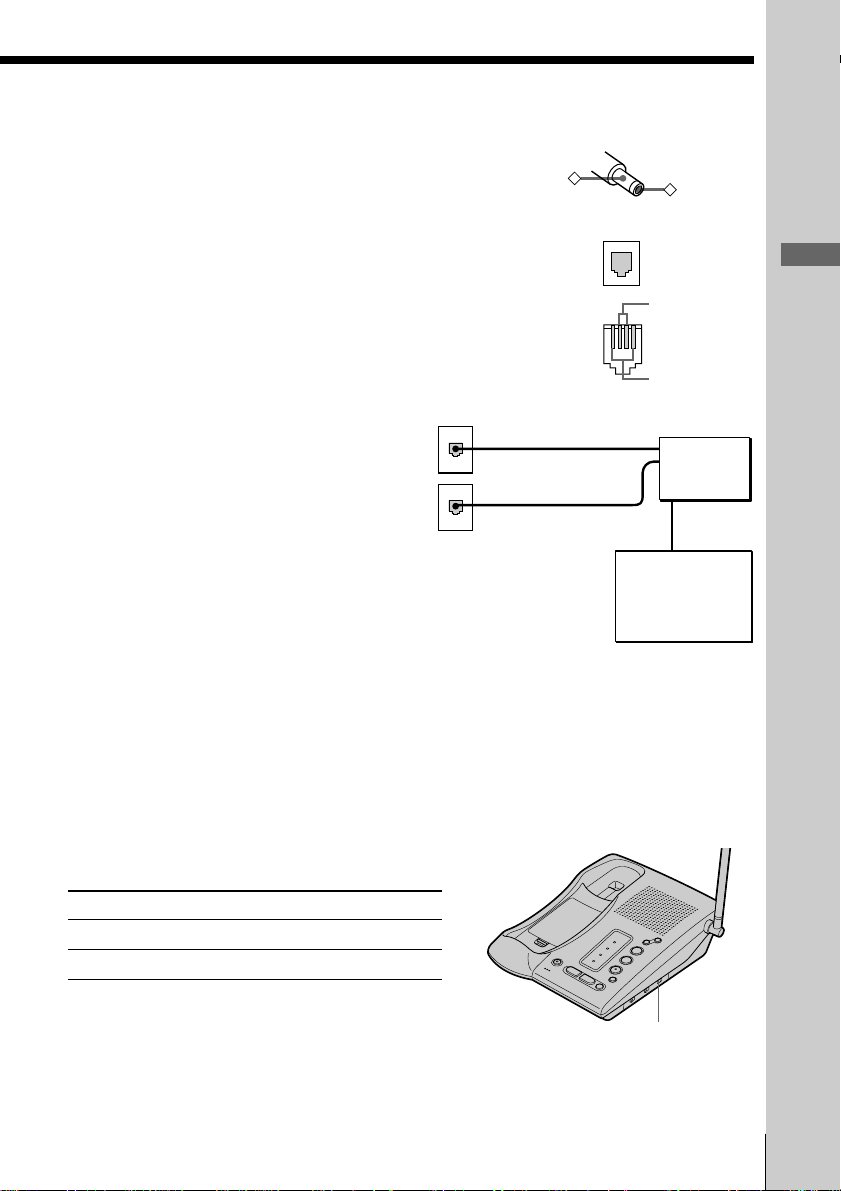
Polarity of the plug
To L1/L1+L2
and/or L2
–
Modular
+
Getting Started
L1
L2
SPP-IM982
To DATA
Computer
or
FAX
Choose the dialing mode
For the telephone to work properly, select an appropriate dialing mode
(tone or pulse).
Depending on your dialing system, set the DIAL
MODE switch as follows:
If your dialing system is Set the switch to
Tone TONE
Pulse PULSE
If you aren't sure of your dialing system
Make a trial call with the DIAL MODE switch set
to TONE.
If the call connects, leave the switch as is;
otherwise, set to PULSE.
DIAL MODE
switch
Getting Started
13
US
Page 14
Step 3
Preparing the battery pack
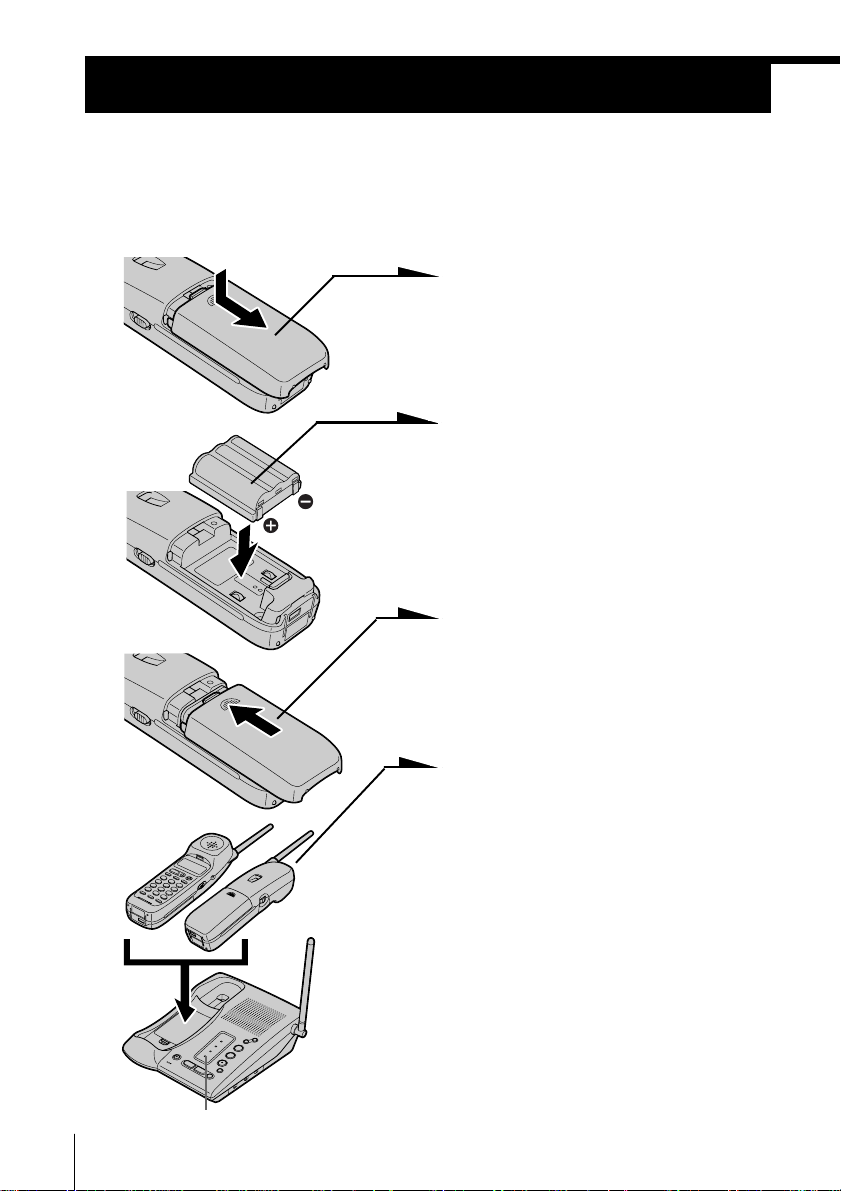
Charge the battery pack for more than 12 hours before you start using
your phone.
1 Slide open the battery
compartment lid of the handset.
2 Insert the battery pack (with
BP-T23
contacts facing down) into the
battery compartment.
3 Close the battery compartment
lid.
14
US
4 Place the handset on the base
unit.
You can place it with either side
facing up.
The CHARGE lamp lights up
when the handset is properly
seated on the charge terminals
of the base unit. Charge the
battery pack for more than 12
hours so that the battery is fully
charged. The CHARGE lamp
remains lit even after charging
is completed.
CHARGE lamp
Getting Started
Page 15

Battery duration
A fully charged battery pack lasts for about:
• Approx. 7 hours when you use the handset continuously
• Approx. 7 days when the handset is in standby mode.
Notes
• The battery pack will gradually discharge over a long period of time, even
when not in use.
• If you leave the battery pack in the handset without charging it, the battery
pack will be completely discharged.
It may require several times of charging to recover to its full capacity.
To obtain the best performance from the battery
Do not place the handset on the base unit after each call. The battery
works best if the handset is returned to the base unit after two or three
calls. However, do not leave the handset off the base unit for a long
period of time as this will completely discharge the battery pack.
When to purchase a new battery pack
If the battery lasts only a few minutes even after 12 hours of charging,
the usable life of the battery has expired and needs replacement.
Contact your local Sony authorized dealer or service center, and ask
for a Sony BP-T23 rechargeable battery pack.
Note
Battery life may vary depending on usage condition and ambient temperature.
Getting Started
continued
Getting Started
15
US
Page 16
Step 3: Preparing the battery pack (continued)
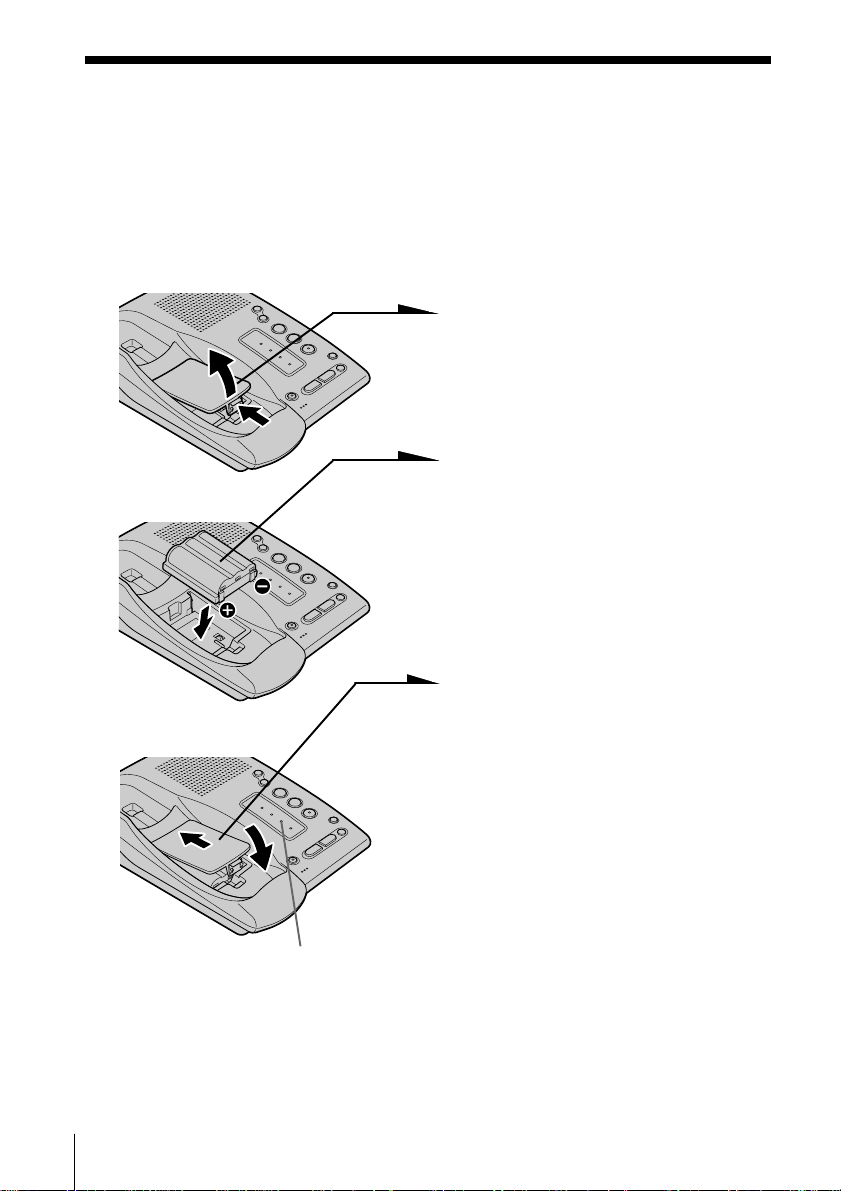
Handset spare battery usage
As only one battery pack is supplied with this unit, it is necessary to
purchase an additional battery pack (optional) for use as a handset
spare battery pack.
1 Open the battery compartment
lid of the base unit.
2 Insert the battery pack (with
contacts facing down) into the
BP-T23
battery compartment.
16
US
3 Close the battery compartment
lid.
The SPARE BATT lamp lights
up. Charge the battery pack for
more than 24 hours so that the
battery is fully charged. The
SPARE BATT lamp remains lit
even after charging is
completed.
SPARE BATT lamp
Getting Started
Page 17
Step 4
Entering the area code
When you use this phone for the first time, or move to an area that has a
different area code, you must enter your home area code. Otherwise, you
cannot use some functions of this phone and the Caller ID functions.
This is also necessary because the phone must be able to select an area code to
properly dial call from the Caller ID list.
Depending on your region, enter 3-digit area code as follows:
Case 1.
If 7-digit dialing (no area code) is accepted for local calls in your area, see “To enter
your home area code” below.
If you live in an area where calls from or to other local areas can also be made by 10-digit dialing
(area code + number), you can register up to 5 local area codes with this telephone to take
advantage of this system. See “To enter the local area code (For 10 digits phone number users)”
on page 18.
Case 2.
If 10-digit dialing (area code + number) is required for all local calls in your area, at
first, enter “000” in your home area code. See “To enter your home area code” below.
Then see “To enter the local area code (For 10 digits phone number users)” on page
18.
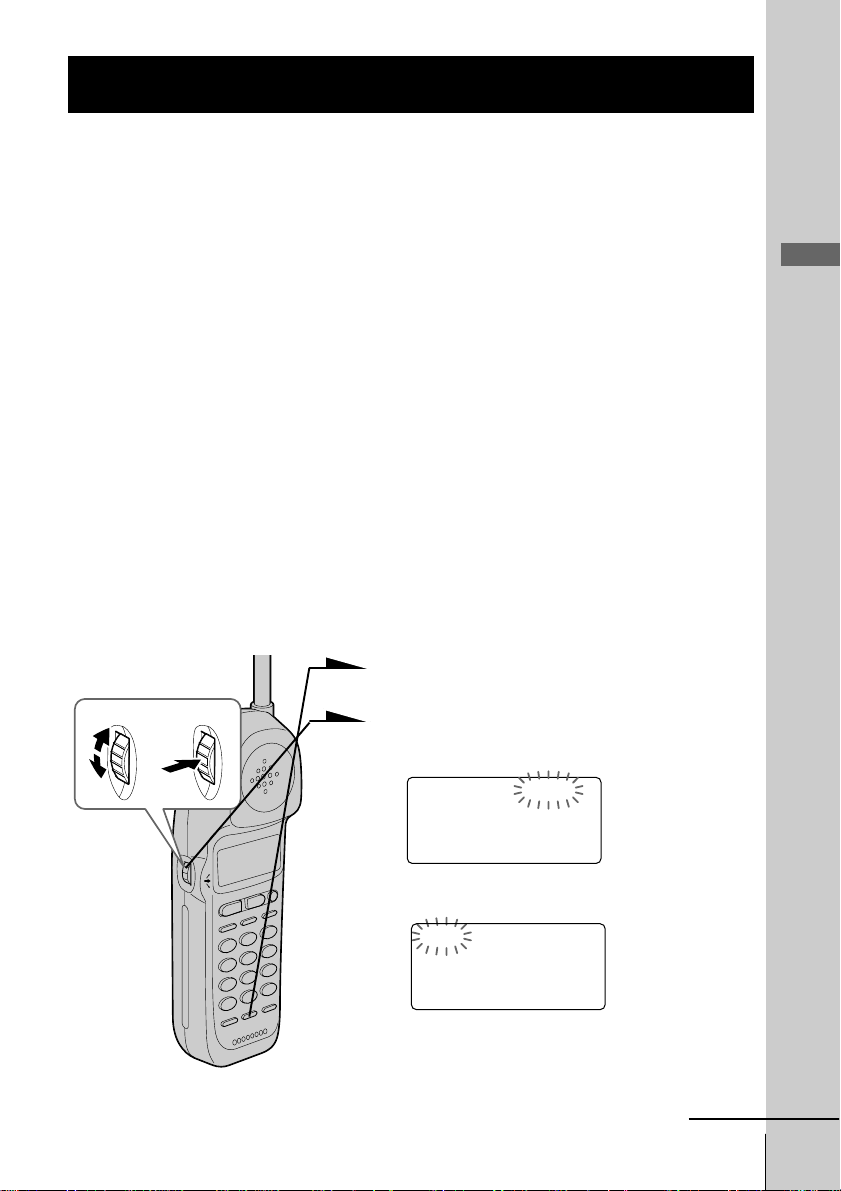
To enter your home area code
Getting Started
Turn Press
1 Press (PGM).
2 Turn Jog Dial up to make “AREA”
flash.
DIRECTORY AREA
RINGER
3 Press Jog Dial.
HOME LOCAL
4 Press Jog Dial again.
“ENTER AREA CODE” appears on
the display.
continued
Getting Started
17
US
Page 18

Step 4: Entering the area code (continued)
5 Enter three digits of your home area code using the dialing keys.
6 Press (PGM).
You will hear a long confirmation beep.
Notes
• If the home area code is already entered, it appears on the display in step 4. To enter a
different home area code, see “To change the home area code” below.
• Do not allow more than 20 seconds to elapse between each step of the procedure.
Tips
• You may press Jog Dial instead of (PGM) in step 6.
• To check the current home area code, perform steps 1 to 4. The home area code appears on the
display for about 20 seconds.
To change the home area code
1 Perform steps 1 to 4 on page 17.
The current home area code appears on the display.
2 Turn Jog Dial down to erase the current home area code.
3 Enter a new home area code using the dialing keys.
4 Press (PGM).
You will hear a long confirmation beep.
To enter the local area code (For 10 digits phone
numbers users)
If a call matches one of the local area codes you entered, the phone number will be
registered with 10 digits in the Caller ID list (area code + number). If a call does not
match one of the local area codes you entered, the phone number will be registered
with 11 digits in the Caller ID list (1 + area code + number). Some regions of the
country allow you to have more than one local area code. (Up to five local area codes
can be entered in this phone.)
1 Perform steps 1 to 3 on page 17.
2 Turn Jog Dial up to make ”LOCAL“ flash.
3 Press Jog Dial.
US
Getting Started
18
HOME LOCAL
#1 #2 #3 #4 #5
Page 19

4 Select the number (”#1“ to ”#5“) to enter the
local area code by turning Jog Dial.
5 Press Jog Dial.
”ENTER AREA CODE“ appears on the display.
6 Enter three digits of the local area code using the dialing
keys.
7 Press (PGM).
You will hear a long confirmation beep.
Notes
• If the local area code is already entered, it appears on the display in step 5. To
enter a different local area code, see “To change the local area code” below.
• Do not allow more than 20 seconds to elapse between each step of the
procedure.
Tips
• You may press Jog Dial instead of (PGM) in step 7.
• To check the current local area code, perform steps 1 to 5. The local area code
appears on the display for about 20 seconds.
To change the local area code
1 Perform steps 1 to 5 on pages 18 to 19.
The current local area code appears on the display.
2 Turn Jog Dial down to erase the current local area code.
3 Enter a new local area code using the dialing keys.
4 Press (PGM).
You will hear a long confirmation beep.
Getting Started
To erase the local area code
You can erase the local area code. Perform steps 1 and 2 above, then
press (PGM).
The local area code will be erased, and you will hear a long
confirmation beep.
Getting Started
19
US
Page 20
Identifying the parts
Refer to the pages indicated in parentheses for details.
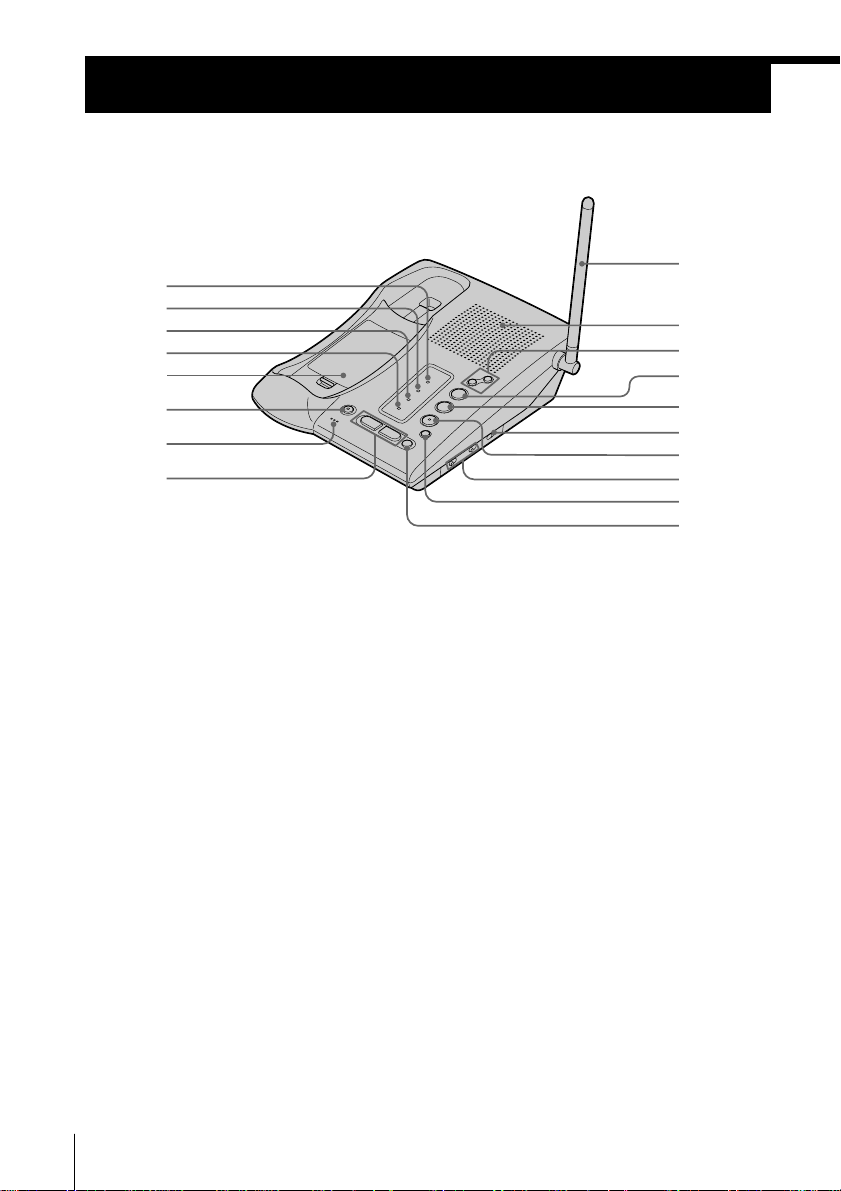
Base Unit
1
2
3
4
5
6
7
8
9
0
qa
qs
qd
qf
qg
qh
qj
qk
1 NEW CALL lamp (p. 48)
Flashes when there is a “NEW”
data in the Caller ID list.
2 MESSAGES lamp (p. 56)
Flashes when you have messages.
3 SPARE BATT lamp (p. 16)
Lights while the spare battery is
being charged.
4 CHARGE lamp (p. 14)
Lights while the battery is being
charged.
5 Battery compartment (p. 16)
6 MUTING button (p. 30)
Mutes your voice during a
conversation.
7 MIC (microphone)
8 LINE buttons (1, 2) (p. 29)
Lets you receive a call.
9 Antenna (p. 11, 58)
US
Getting Started
20
0 Speaker
qa VOL +/– buttons (p. 30)
Adjusts the speaker volume.
qs HOLD button (p. 30)
Puts a call on hold.
qd CONF (conference) button
(p. 44)
Lets you talk with two parties at the
same time.
qf DIAL MODE switch (p. 13)
Selects pulse or tone dialing.
qg INTERCOM button (p. 40)
Lets you talk between the base unit
and handset.
qh RINGER LEVEL switches
(L1, L2) (p. 30)
Adjusts the ringer volume.
qj CALL WAITING/FLASH button
(p. 30)
Switches to a second call if you
have “call waiting” service, or lets
you make a new call.
Page 21
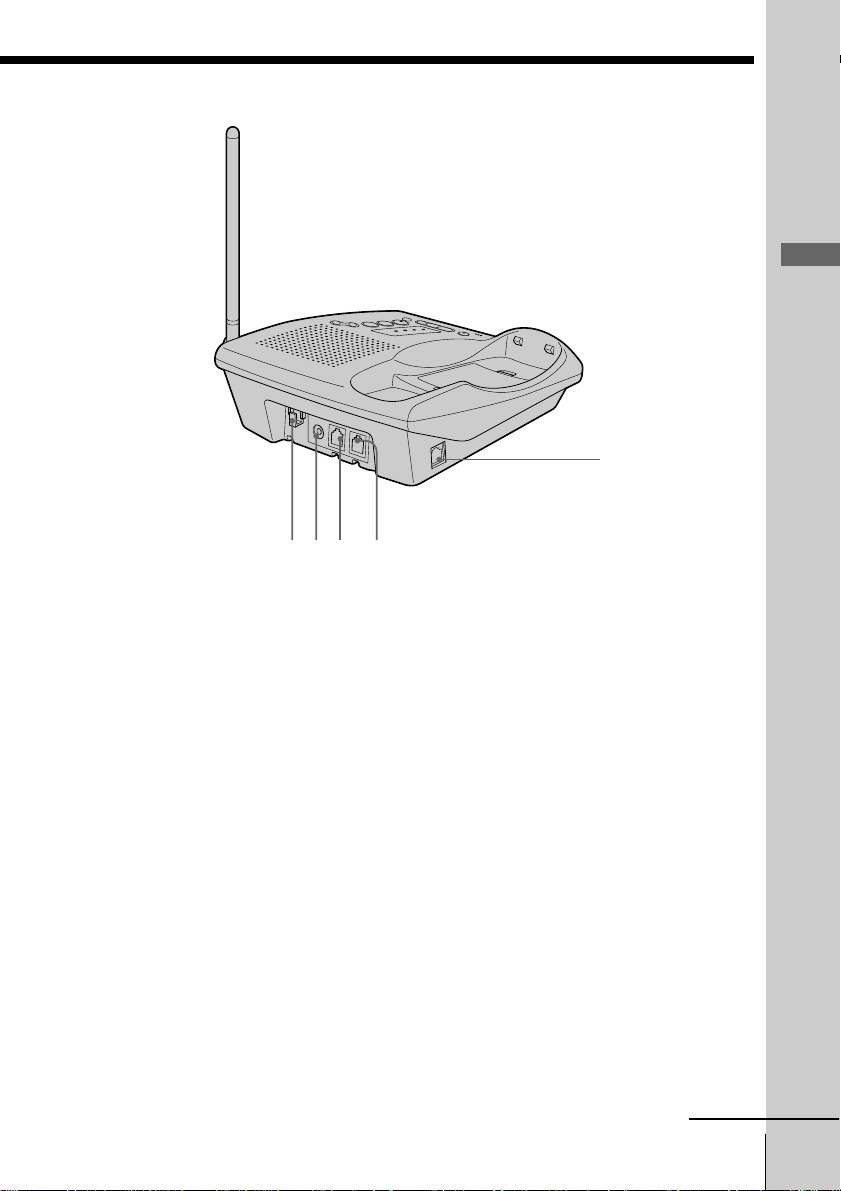
w; wsql wa
qk OFF button (p. 29)
Allows you to disconnect the call.
ql Hook for AC power adaptor
cord (p. 11)
w; DC IN 9V jack (p. 11, 58)
wa L1/L1+L2 jack (p. 11, 58)
ws L2 jack (p. 12, 58)
wd DATA jack (p. 13)
Getting Started
wd
continued
Getting Started
21
US
Page 22
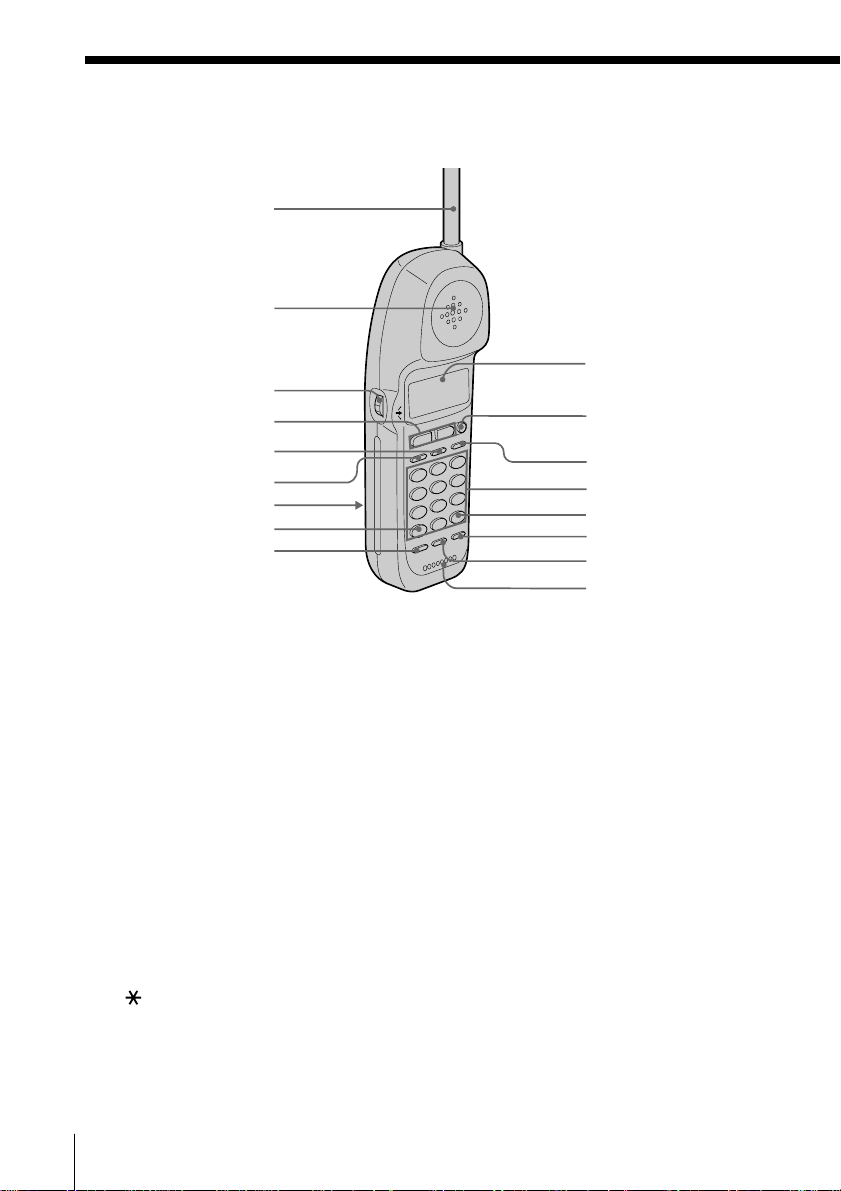
Identifying the parts (continued)
Handset
1
2
3
4
5
6
7
8
9
0
qa
qs
qd
qf
qg
qh
qj
1 Antenna
2 Speaker
3 Jog Dial (p. 17, 32, 48)
4 LINE buttons (1, 2) (p. 24, 28)
Lets you make or receive a call.
5 INTERCOM button (p. 40)
Lets you talk between the base unit
and handset.
6 HOLD button (p. 25)
Puts a call on hold.
7 Battery compartment (p. 14)
8 TONE button (p. 25)
Allows you to switch temporarily to
tone dialing.
US
Getting Started
22
9 CONF (conference) button
(p. 44)
Lets you talk with two parties at the
same time.
q; Display window (p. 24, 47)
qa OFF button (p. 24)
Allows you to disconnect the call.
qs FLASH/CALL WAITING button
(p. 25, 55)
Switches to a second call if you
have “call waiting” service, or lets
you make a new call.
qd Dialing keys (p. 24)
qf # button (p. 53)
Used to change the number of
digits of the phone number in the
Caller ID list.
Page 23
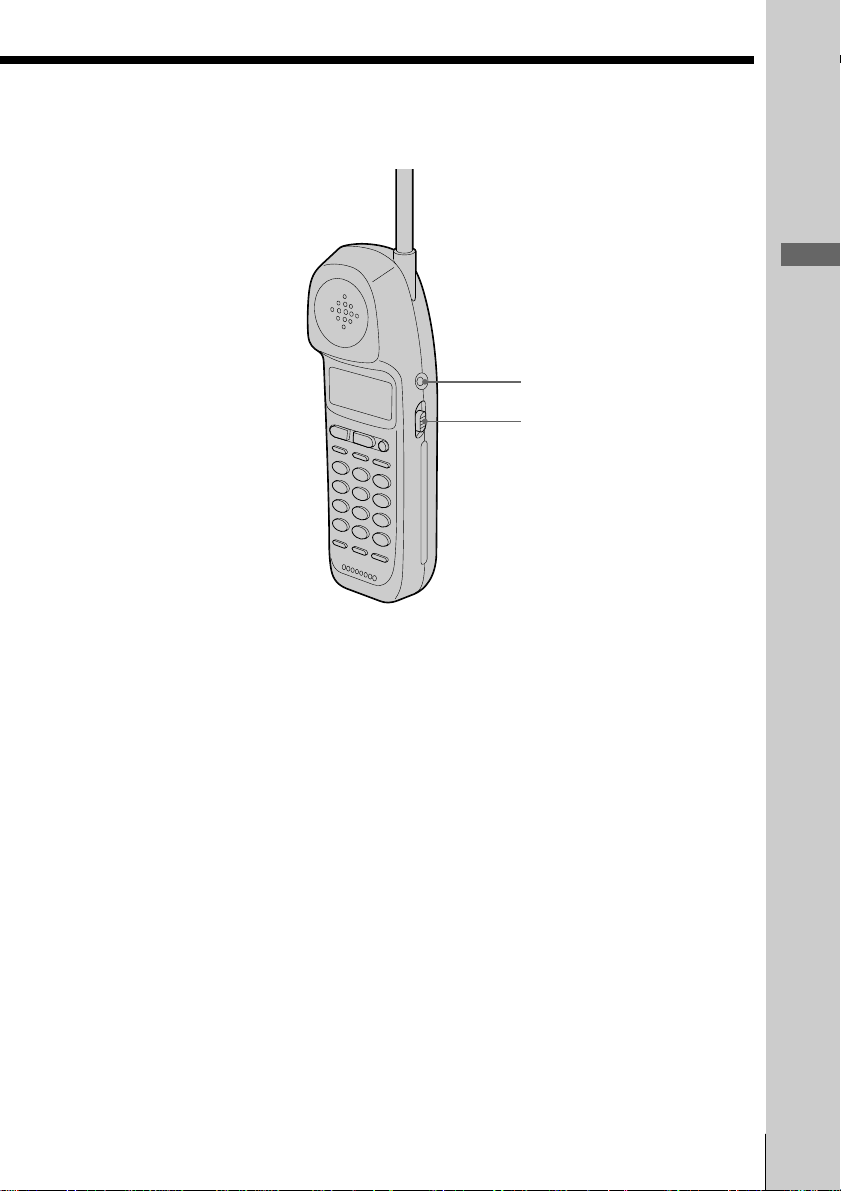
qg REDIAL/PAUSE button
(p. 26, 33)
Redials the last number called/
inserts a pause in the dialing
sequence.
qh PGM (program) button
(p. 17, 32)
Used to store numbers in Phone
Directory.
qj Microphone
qk I (HEADSET) jack (p. 24, 28, 59)
Getting Started
qkqlqkqk
ql VOL (volume) switch (p. 25)
Adjusts the handset volume.
Getting Started
23
US
Page 24
Basics
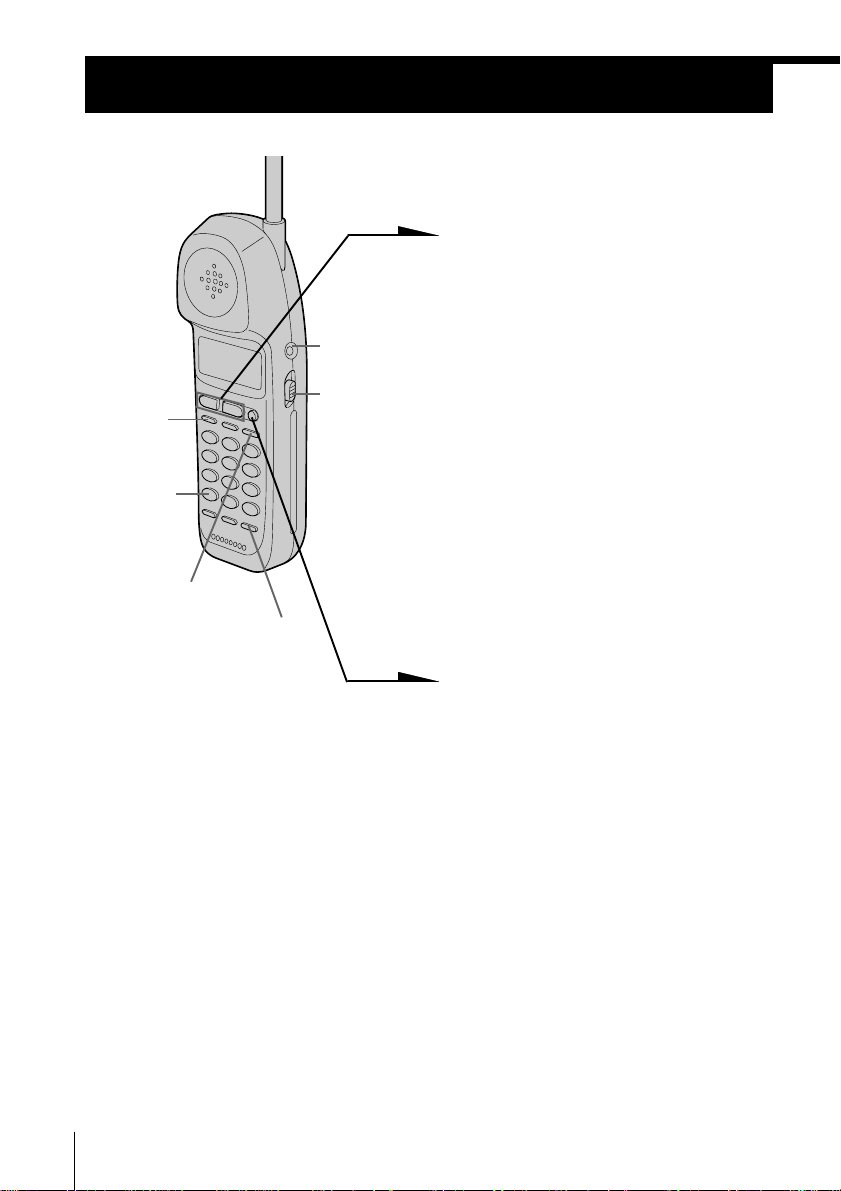
Making calls
(HOLD)
(*TONE)
(FLASH/CALL WAITING)
I (HEADSET)
jack
VOL switch
1 Pick up the handset from the
base unit.
2 Press (LINE 1) or (LINE 2) to
select the line.
The corresponding line button
lights up.
“TALK” appears on the display
and the display also shows the
talk time in hours, minutes and
seconds.
You will then hear a dial tone.
The line button on the base unit
double flashes in succession.
If “CHANNEL SEARCHING...”
appears on the display, move
closer to the base unit.
(REDIAL/PAUSE)
3 Dial the phone number.
4 When you’re done talking, press
(OFF) or replace the handset on
the base unit.
The display and the LINE 1 or
LINE 2 button go off.
Making calls when the headset is connected
When the TL-HD1 headset (optional) is connected to the I
(HEADSET) jack, you can talk through the headset.
Precaution
Avoid listening your headset at so loud a volume that extended play might
affect your hearing.
US
Basics
24
Page 25

Additional tasks
To
Adjust the handset volume
Put a call on hold
Switch to tone dialing
temporarily
Switch to another call
(“call waiting” service*)
* You need to subscribe to the service from your telephone company.
Notes
• When you increase the sound volume, in some cases the back ground noise
may be increased as well. You should adjust the volume accordingly.
• If your conversation is muted and “CHANNEL SEARCHING...” appears on
the display, move closer to the base unit; otherwise, the call will be
disconnected after one minute.
Tips
• If you pick up another phone connected to the same phone line, the hold will
be automatically released and you will be able to resume conversation on
that phone.
• The LINE 1 or LINE 2 button on the handset double flashes in succession,
when the base unit is used. If you press (LINE 1) or (LINE 2) whichever
button is flashing, you can talk to the base unit and to the line connected.
Do this
Set the VOL switch to H (high), M (middle) or L
(low).
Press (HOLD).
The LINE 1 or LINE 2 button will flash slowly.
Press (LINE 1) or (LINE 2) to resume the
conversation.
Press (*TONE) after you’re connected.
The line will remain in tone dialing until
disconnected.
Press (FLASH/CALL WAITING).
Press (FLASH/CALL WAITING) again to return to the
first caller.
Basics
If the battery becomes weak during a call
The handset will beep every three seconds five times and E and
“BATTERY LOW” appears on the display. Finish your call and charge
the battery pack.
For optimum performance, charge the battery for a full 12 hours.
Note that during the first 10 - 15 minutes of charging, the phone will be
inactive, i.e., unable to make or receive a call.
After this initial 10 - 15 minutes, you may be able to use the phone, but
the battery duration will be very short; thus it is recommended that
you fully charge the battery before the next usage.
continued
Basics 25
US
Page 26

Making calls (continued)
If you have a spare battery
You can replace the battery pack without disconnecting the call during
a conversation. To replace the battery pack, perform the following
procedure.
1 Press (HOLD) on the handset.
The call is on hold and “HOLD” appears on the display.
2 Replace the battery pack.
3 Press (LINE 1) or (LINE 2) to resume the conversation.
Redialing
1 Press (LINE 1) or (LINE 2) to select the line.
The corresponding line button lights up.
2 Press (REDIAL/PAUSE) to redial the last number dialed.
Note
If the number exceeds 32 digits or if it is erased, five short error beeps will alert
you that the number cannot be redialed.
To check the phone number before redialing
While the handset is not in use, press (REDIAL/PAUSE).
The last number dialed is displayed for five seconds.
To dial the number, press (LINE 1) or (LINE 2) while the number is
displayed.
Note
The number will not be displayed if the last number dialed exceeds 32 digits or
if it is erased.
To erase the last phone number dialed
While the handset is not in use, press (REDIAL/PAUSE) twice within
five seconds.
The number will be erased from the memory, and you will hear a long
confirmation beep.
US
Basics
26
Page 27

Making another call while talking
Example: Making a call on line 2 while talking on line 1
1 Press (HOLD) while talking.
The line 1 is put on hold and the LINE 1 button flashes
slowly.
2 Press (LINE 2).
3 Dial a phone number for the second party.
Now you can talk to the second party on line 2.
4 To put on hold line 2 and resume the conversation on line 1,
press (HOLD), and then (LINE 1).
or
To disconnect line 2 and resume the conversation on line 1,
press (LINE 1).
Note
If you do not press (HOLD) in step 1, line 1 will be disconnected.
You can talk with two parties at the same time using both line 1 and
line 2, see “Having a conference call” on page 44.
Basics
Basics 27
US
Page 28
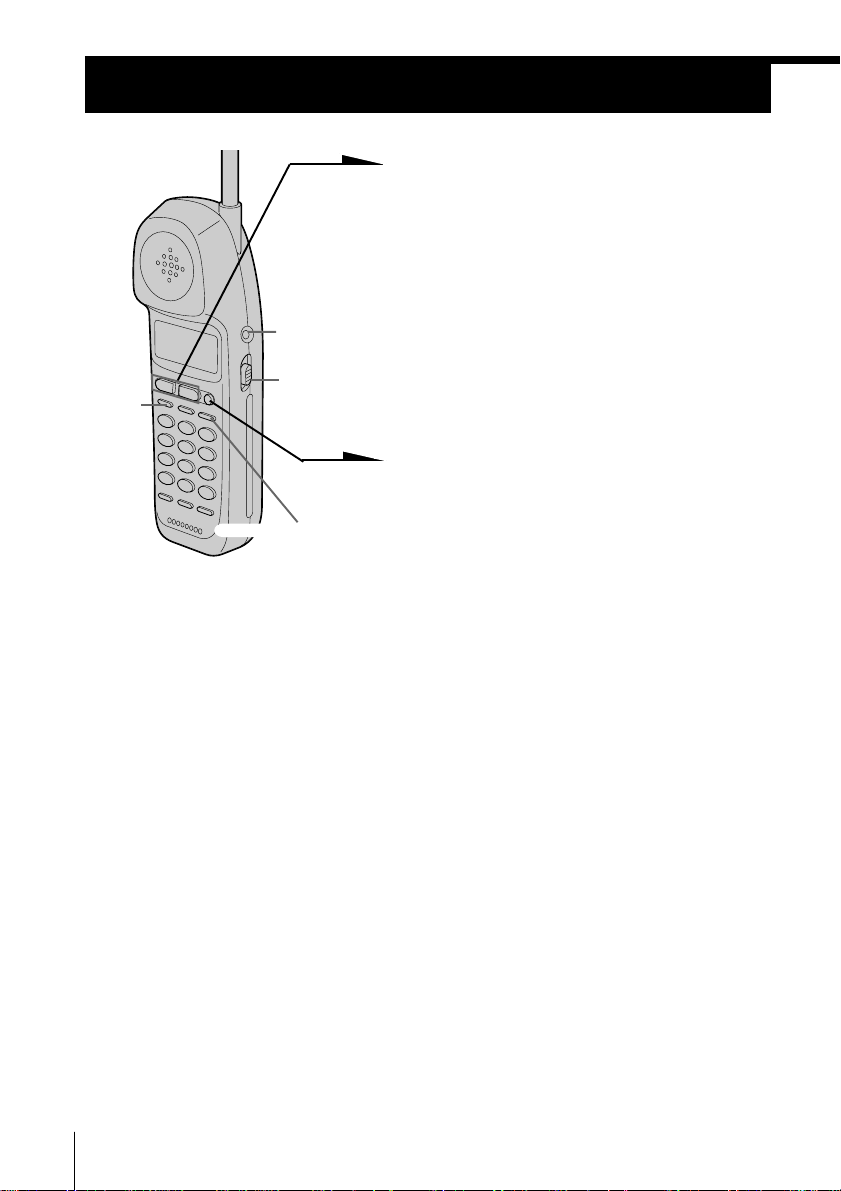
Receiving calls
I (HEADSET)
jack
VOL switch
(HOLD)
(FLASH/CALL WAITING)
1 When you hear the phone ring, press
(LINE 1) or (LINE 2) whichever button
is flashing.
The corresponding line button lights
up.
“TALK” appears on the display and
the display also shows the talk time in
hours, minutes and seconds.
The line button on the base unit
double flashes in succession.
2 When you’re done talking, press
(OFF) or replace the handset on the
base unit.
The display and the LINE 1 or LINE 2
button go off.
Receiving calls when the headset is connected
When the TL-HD1 headset (optional) is connected to the I
(HEADSET) jack, you can talk through the headset.
Precaution
Avoid listening your headset at so loud a volume that extended play might
affect your hearing.
US
Basics
28
Page 29
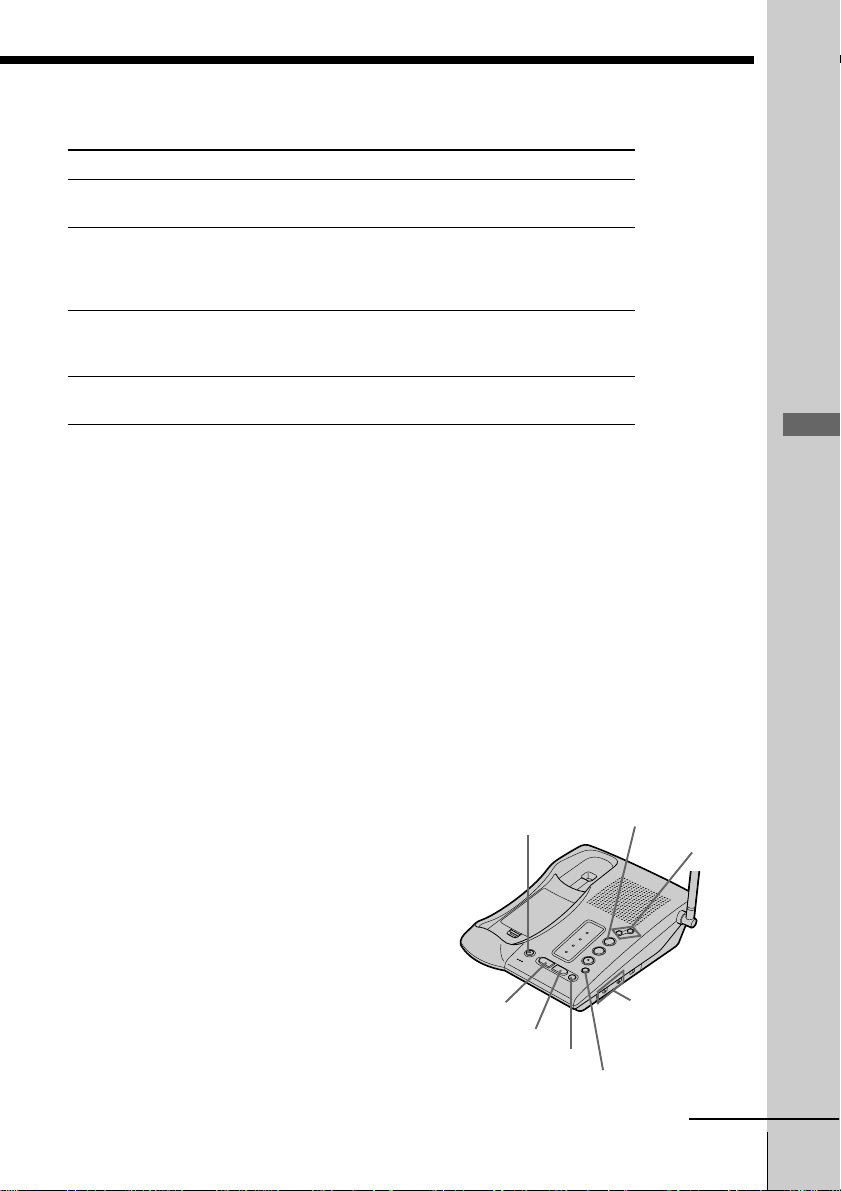
Additional tasks
To
Adjust the handset volume
Put a call on hold
Switch to another call
(“call waiting” service*)
Turn on/off the ringer of
the handset
* You need to subscribe to the service from your telephone company.
Note
If another call comes in by “call waiting” service while conversing with an
outside caller, you will hear two short beeps.
Tip
To inform you of an incoming call, the display shows “** RINGING **” when
ringing.
If you have subscribed to the Caller ID service;
• the caller’s number and/or name appears on the display when you receive a
call (see page 47) or when another call comes in by “call waiting” service.
• the ringer sound changes to a higher tone if the call matches the number
stored in the Phone Directory (memory match function; see page 47).
Do this
Set the VOL switch to H (high), M (middle) or L
(low).
Press (HOLD).
The LINE 1 or LINE 2 button will flash slowly.
Press (LINE 1) or (LINE 2) to resume the
conversation.
Press (FLASH/CALL WAITING).
Press (FLASH/CALL WAITING) again to return to the
first caller.
See “Turning off the ringer of the handset” on
page 38.
Basics
Receiving calls through the speakerphone
When you hear the phone ring, press
(LINE 1) or (LINE 2) whichever button is
flashing.
The corresponding line button lights up.
When you’re done talking, press (OFF).
To obtain the best speakerphone
performance, see page 30.
(LINE 1)
(LINE 2)
(MUTING)
MUTING
lamp
(OFF)
(HOLD)
(VOL)
L1 and L2 RINGER
LEVEL switches
(CALL WAITING/FLASH)
continued
Basics 29
US
Page 30

Receiving calls (continued)
Additional tasks
To
Adjust the speaker volume
Adjust the ringer volume of
the base unit
Put a call on hold
Mute your voice
Switch to another call
(“call waiting” service*)
* You need to subscribe to the service from your telephone company.
Note
Even when you set the L1 or L2 RINGER LEVEL switch on the base unit to OFF,
the handset will ring when the ringer of the handset is turned on (see page 38).
Tips
• To inform you of an incoming call, the line button lights on and off according
to the ring signal even when you set the L1 or L2 RINGER LEVEL switch on
the base unit to OFF.
• If there is an incoming call while on the intercom, the base unit will ring at a
low level even when the L1 or L2 RINGER LEVEL switch on the base unit is
set to OFF.
Do this
During speakerphone conversation, press
(VOL)(+) or (--). Each press of (VOL)(+) or (--)
switches the speaker volume by one of 8 levels.
You can adjust the ringer volume of line 1 and 2
respectively.
Set the L1 or L2 RINGER LEVEL switch on the
base unit to HIGH, LOW or OFF.
Press (HOLD).
The LINE 1 or LINE 2 button will flash slowly.
Press (LINE 1) or (LINE 2) to resume the
conversation.
Press (MUTING) to disable the microphone.
The MUTING lamp lights up.
Press (MUTING) again to cancel.
Press (CALL WAITING/FLASH).
Press (CALL WAITING/FLASH) again to return to the
first caller.
To obtain the best speakerphone performance
• You may not be able to hear the other party’s voice in a noisy place.
Therefore, use the speakerphone in a quiet room.
• Do not bring your hand or other object too close to the microphone
or you will hear a shrill noise (“feedback”).
• When the speaker volume is loud, or the base unit has been placed
close to a wall, you may find that the volume drops suddenly. This
is due to a circuit in the telephone designed to protect against
feedback. In such cases, lower the speaker volume slightly.
US
Basics
30
Page 31

Receiving a call while talking
If another call comes in while talking on the other line, the
corresponding line button will flash.
Example: Receiving a call on line 2 while talking on line 1
1 Press (HOLD) while talking.
The line 1 is put on hold and the LINE 1 button flashes
slowly.
2 Press (LINE 2).
Now you can talk to another caller on line 2.
3 To put on hold line 2 and resume the conversation on line 1,
press (HOLD), and then (LINE 1).
or
To disconnect line 2 and resume the conversation on line 1,
press (LINE 1).
Notes
• If you do not press (HOLD) in step 1, line 1 will be disconnected.
• If another call comes in while talking on the base unit, a beep will be heard
through the base unit and the corresponding line button on the base unit will
flash.
• If another call comes in while talking on the handset, a ringer tone will be
heard once through the handset and the corresponding line button on the
handset will flash. At this time, the base unit will ring and the corresponding
line button will flash normally.
Basics
You can talk with two parties at the same time using both line 1 and
line 2, see “Having a conference call” on page 44.
Basics 31
US
Page 32
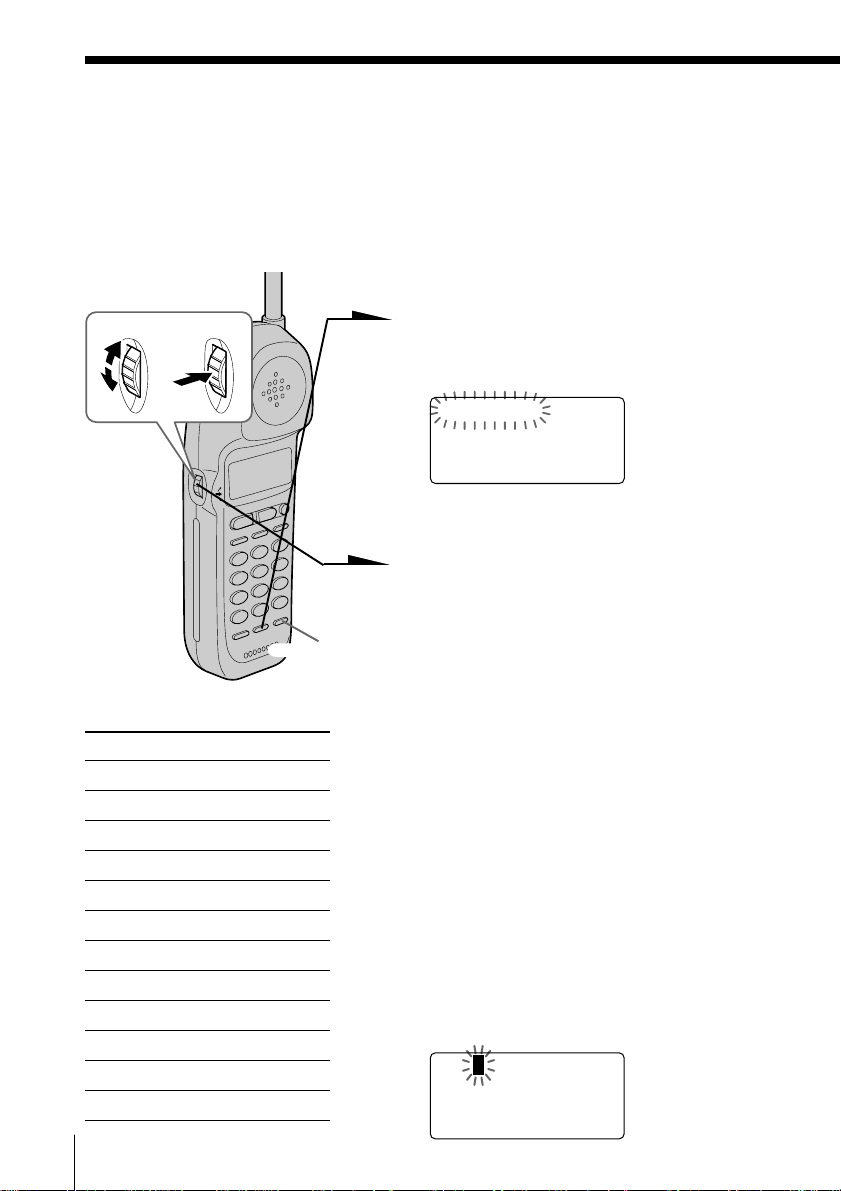
Telephone Features
Phone Directory
You can dial a number by scrolling through the Phone Directory, in
which up to 50 phone numbers can be stored.
Storing phone numbers and names
Example: to store “SONY” “123-4567”.
Turn Press
Character table
Key Character
(1) 1
(2) A t B t C t 2
(3) D t E t F t 3
(4) G t H t I t 4
(5) J t K t L t 5
(6) M t N t O t 6
(7) P t Q t R t S t 7
(8) T t U t V t 8
(9) W t X t Y t Z t 9
(0) 0
(*) *
(#) & t ’ t , t – t . t #
US
Telephone Features
32
(REDIAL/PAUSE)
1 Press (PGM).
(Be sure not to press (LINE 1) and
(LINE 2).)
DIRECTORY AREA
RINGER
If “DIRECTORY” is not flashing, turn
Jog Dial down to make it flash.
2 Press Jog Dial.
“ENTER NAME” appears.
3 Enter the name using the dialing keys.
You can enter up to 16 characters.
Press a dialing key until the desired
character appears. (See the character
table for details.)
Enter successive characters in the same
way.
To enter two characters assigned to the
same key, or to enter a “space”, turn
Jog Dial up to move the cursor to the
right.
Example: to enter “SONY”, press (7)
four times (S), press (6) three times
(O), turn Jog Dial up to move the
cursor, press (6) twice (N), and press
(9) three times (Y).
SONY
Page 33
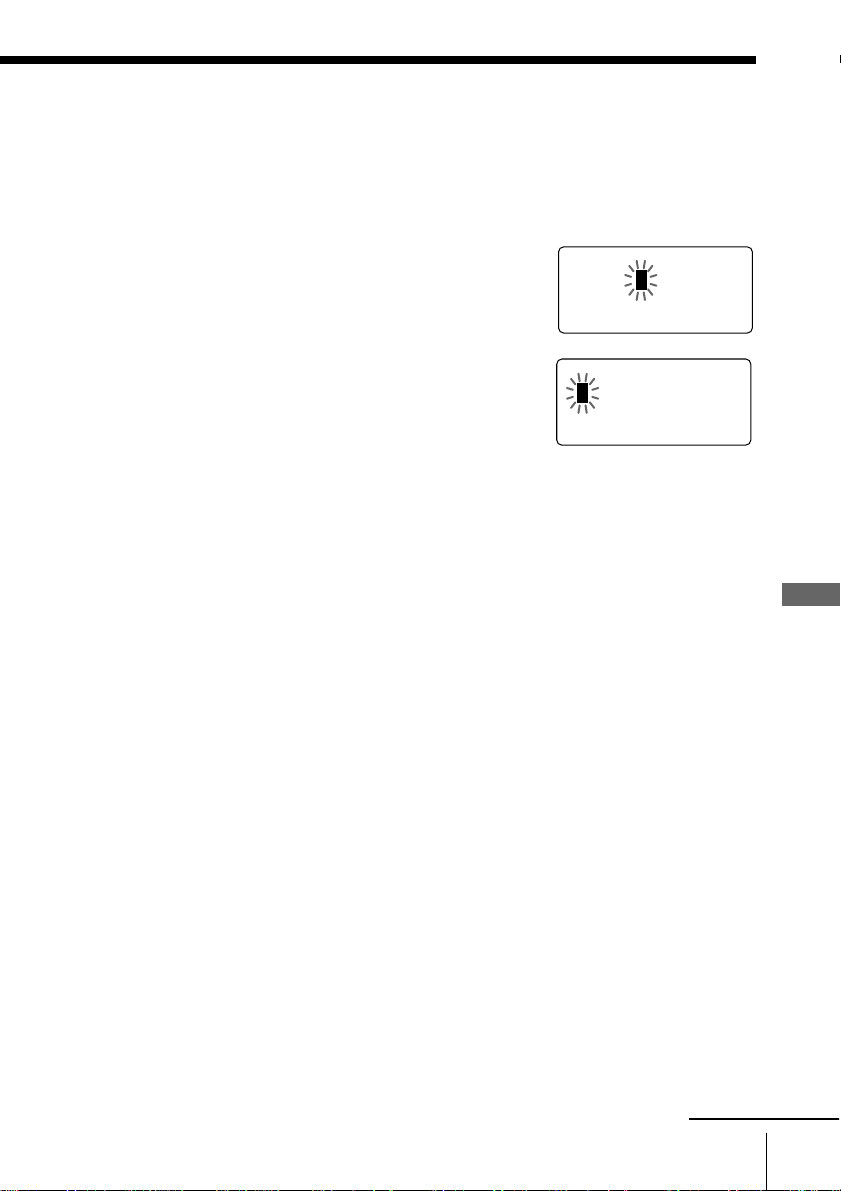
4 Press (PGM).
SONY
123456
7
“ENTER NUMBER” appears.
5 Enter the phone number.
You can enter up to 32 digits, including a tone
and a pause, each of which is counted as one
digit.
When the phone number of 17 digits or more
has been entered, the phone number appears in
two lines.
6 Press (PGM).
You will hear a long confirmation beep, and the
name and the number are stored. The display
goes off.
1234567890123456
1
2
Notes
• If you intend to save a 51st phone number, you will hear five short error
beeps and “MEMORY FULL” will be displayed. You cannot store the phone
number. To store another phone number, erase one of the stored phone
numbers (see page 35).
• Do not allow more than 20 seconds to elapse between each step of the
procedure.
• The total number of phone numbers which can be stored into the Phone
Directory varies according to the number of digits of each phone number. If
all the phone numbers consist of up to 16 digits, you can store up to 50 phone
numbers. However, as the Phone Directory uses two-phone number memory
to store one phone number of 17 digits or more, the total number of phone
numbers which can be stored in the Phone Directory decreases two by two
every time you store a phone number of 17 digits or more.
Tips
• If you have entered a wrong name or number in step 3 or 5, turn Jog Dial
down to erase it. Then enter the correct name or number.
• You may press Jog Dial instead of (PGM) in steps 4 and 6.
To store a number to be dialed via Private Branch Exchange
(PBX)
Before entering a phone number in step 5 above, do as follows:
1 Enter the outside line access digit (e.g., 9).
2 Press (REDIAL/PAUSE).
continued
Telephone Features
Telephone Features
US
33
Page 34
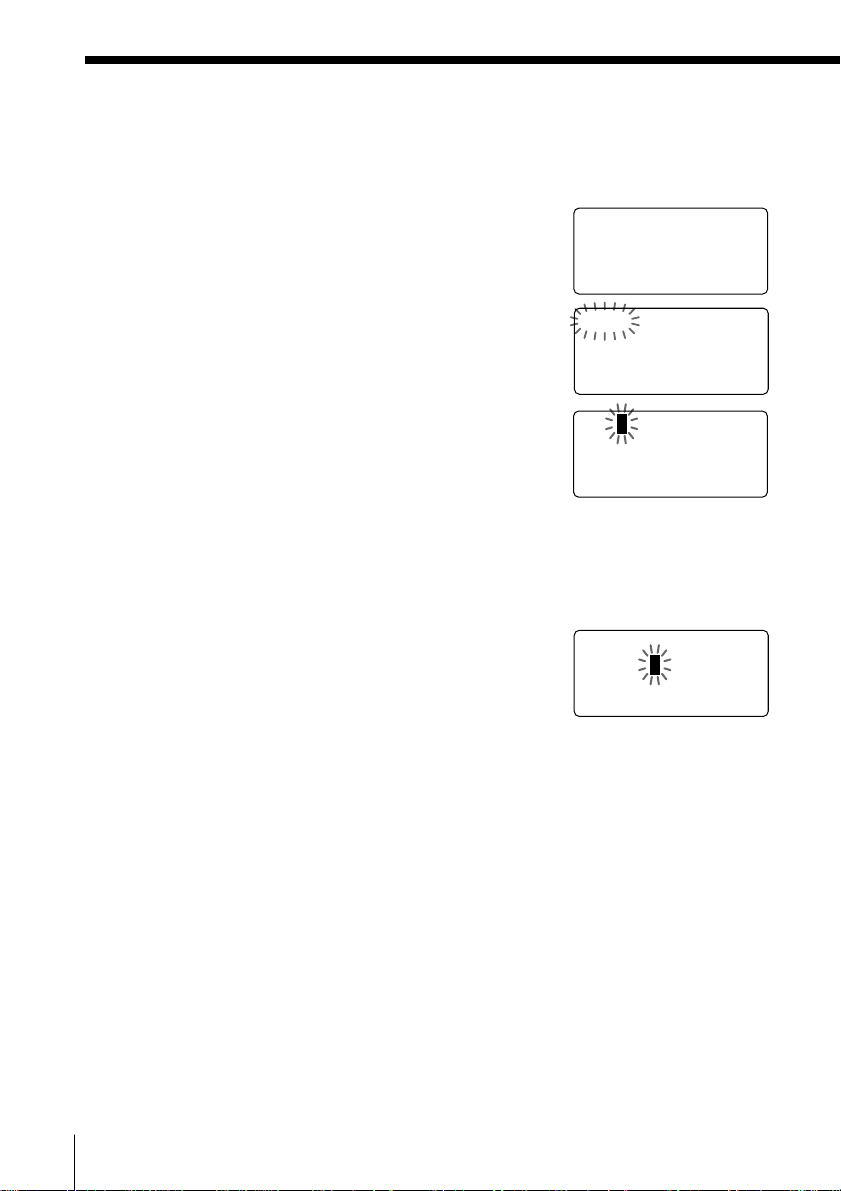
Phone Directory (continued)
SON
1234567
Y
DIAL EDIT ERASE
1234567
Changing a stored name and/or phone number
1 Display the name and phone number you want
to change by doing steps 1 and 2 in “Making
calls from the Phone Directory” on page 35.
2 Press Jog Dial.
3 Turn Jog Dial up to make “EDIT” flash and
press Jog Dial.
The cursor flashes at the last character of the
name.
4 Turn Jog Dial down to erase the characters and
enter the new name.
If you want to change only the number, skip this
step.
5 Press Jog Dial.
The cursor flashes at the last digit of the phone
number.
6 Turn Jog Dial down to erase the number and
enter the new number.
If you don’t want to change the number, skip
this step.
7 Press Jog Dial.
You will hear a long confirmation beep and the
name and/or the number is changed.
SONY
1234567
SMITH
123456
7
Tip
When the phone number of 17 digits or more has been entered, “–” is displayed
next to 15th digit and then the all digits are displayed in two lines after about
two seconds.
US
Telephone Features
34
Page 35
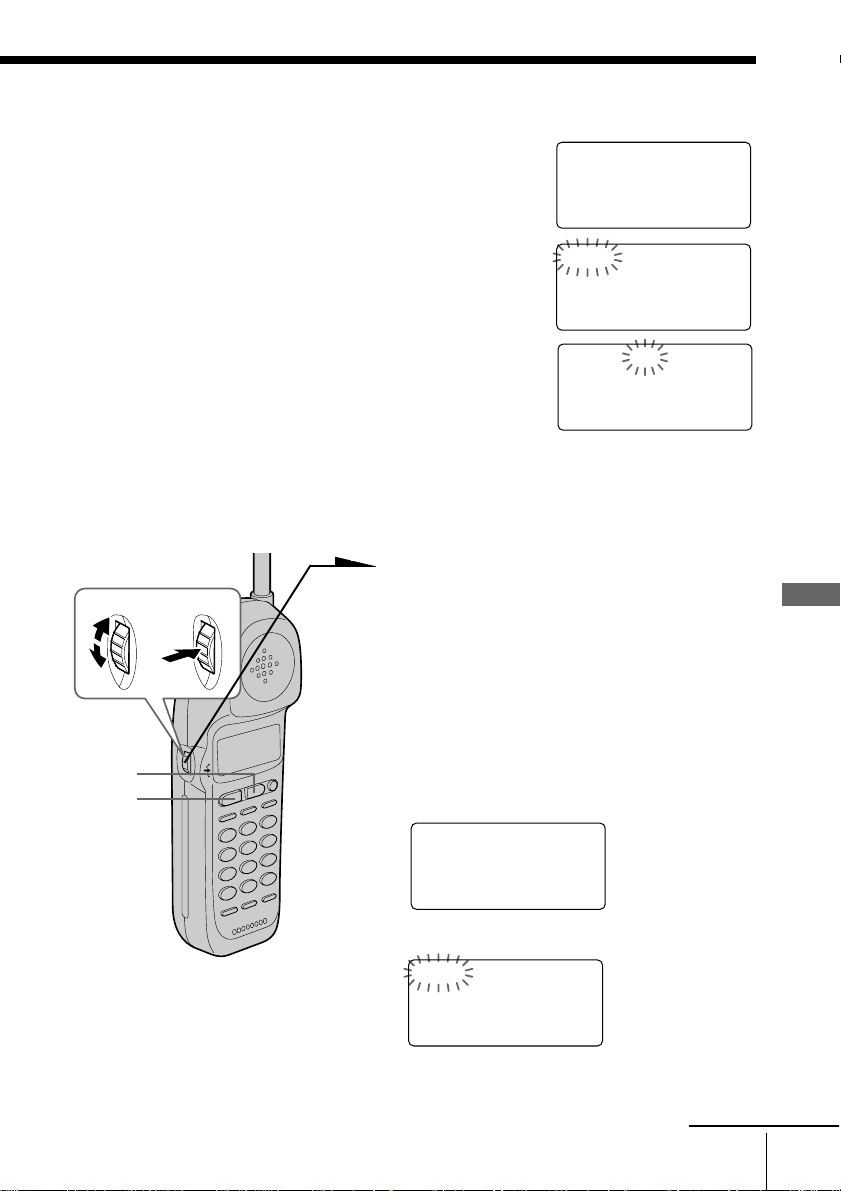
Erasing a memory location
DIAL EDIT ERASE
1234567
ERASE NO YES
1234567
1 Display the name and phone number you want
to erase by doing steps 1 and 2 in “Making calls
from the Phone Directory”.
SONY
1234567
2 Press Jog Dial.
3 Turn Jog Dial up to make “ERASE” flash and
press Jog Dial.
4 Turn Jog Dial up to make “YES” flash, then
press Jog Dial.
You hear a long confirmation beep and the memory location is erased.
Making calls from the Phone Directory
1 Press Jog Dial.
Turn Press
“DIRECTORY” appears on the
display.
2 Display the name and phone number
you want to call.
To search in alphabetical order: Turn
Jog Dial up or down.
(LINE 2)
(LINE 1)
To search by entering the initial
character: Press the dialing key of the
desired character, then turn Jog Dial.
SONY
1234567
Telephone Features
3 Press Jog Dial.
DIAL EDIT ERASE
1234567
4 Press Jog Dial again.
The phone number will be
dialed.
continued
Telephone Features
35
US
Page 36

Phone Directory (continued)
Tips
• You may press (LINE 1) or (LINE 2) to make a call instead of doing steps 3
and 4.
• When you press Jog Dial in step 4, the vacant line is automatically connected.
When neither line is in use, line 1 is connected.
About the search order
The names appear in the following order when you turn Jog Dial up or
down.
• Alphabetical order: ABC...XYZ y symbols y * y # y 0 - 9
t
• Initial character: To search for “SONY” for example, press (7) and
then turn Jog Dial to search through the names starting with P, Q, R,
S or 7.
t
US
Telephone Features
36
Page 37
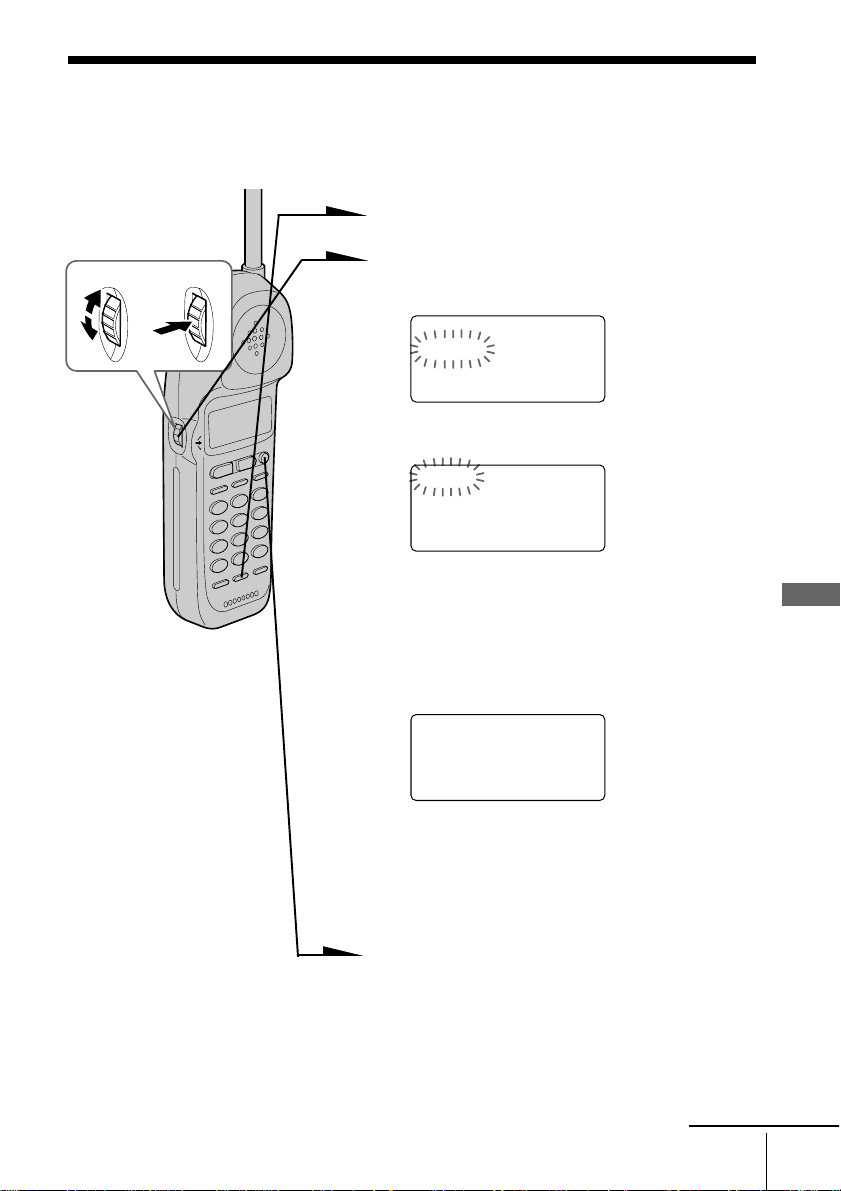
Setting the ringer type
You can select a ringer type of the handset from four type.
1 Press (PGM).
Turn Press
2 Turn Jog Dial up to make “RINGER”
flash.
DIRECTORY AREA
RINGER
3 Press Jog Dial.
LINE1 LINE2
4 Turn Jog Dial to choose the line you
want to set the ringer type.
5 Press Jog Dial.
The current ringer type appears.
RINGER 1
SELECTED
6 Press one of the dialing keys ((1) to
(4)) to select a ringer type.
You will hear the corresponding ringer
tone.
Telephone Features
7 Press (OFF).
continued
Telephone Features
37
US
Page 38

Setting the ringer type (continued)
Turning off the ringer of the handset
1 Perform steps 1 to 5 on page 37.
2 Press (0).
You will hear a confirmation beep.
RINGER OFF
SELECTED
3 Press (OFF).
When “RINGER” is set to “RINGER OFF”
The handset won’t ring. You can still make calls, and also receive
calls if another telephone connected to the same line rings to inform
you on incoming calls.
To turn the ringer on again
Follow the instructions described in “Setting the ringer type” on
page 37.
US
Telephone Features
38
Page 39
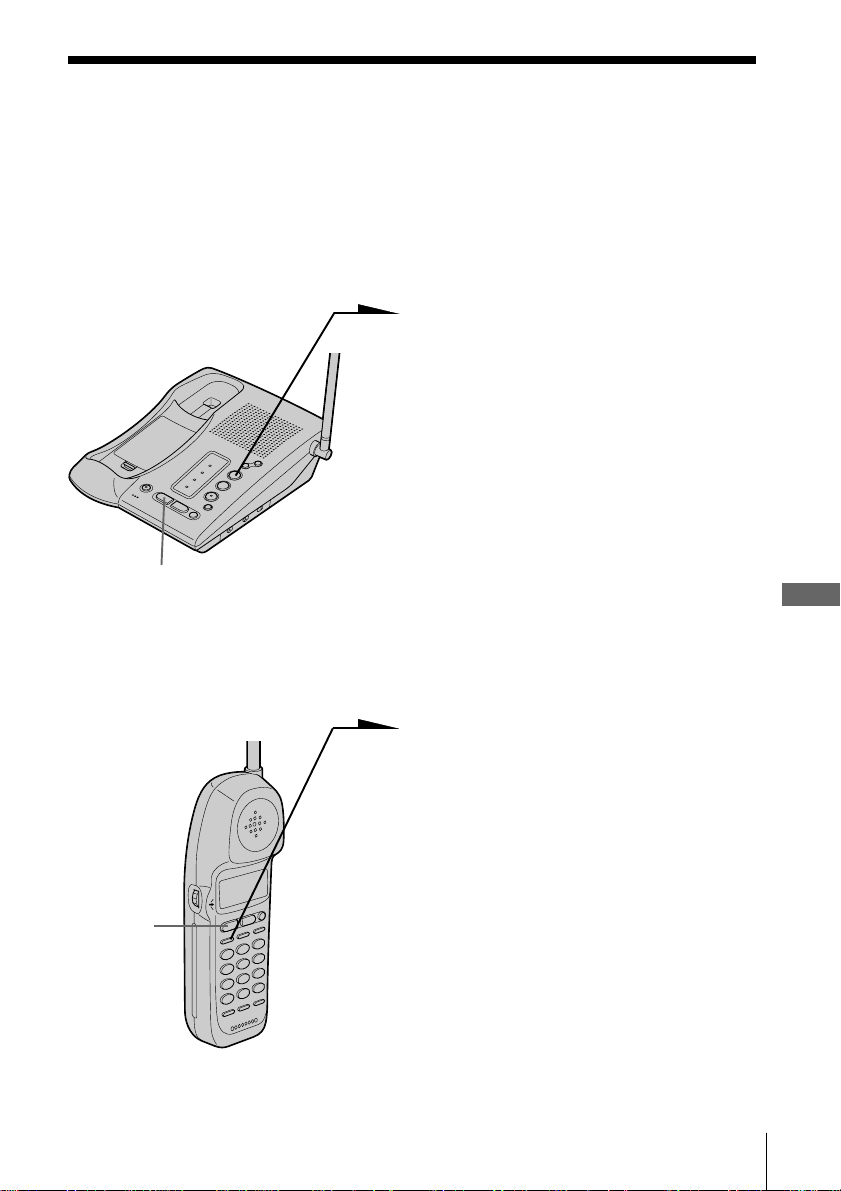
Switching the phones during a call
You can easily switch between the handset and speakerphone on the
base unit without disconnecting the call. The call on line 1 will be
switched to line 1 on another phone and that on line 2 is switched to
line 2.
To switch from the base unit to the handset
Example: While talking on line 1:
1 Press (HOLD) on the base unit.
The call is on hold and “HOLD”
appears on the display of the
handset and the LINE 1 button
flashes slowly.
2 Press (LINE 1) on the handset.
The LINE 1 button on the handset
lights up and the LINE 1 button on
the base unit double flashes in
(LINE 1)
To switch from the handset to the base unit
succession.
You can continue talking to the
caller through the handset.
Telephone Features
Example: While talking on line 1:
1 Press (HOLD) on the handset.
The call is on hold and “HOLD”
appears on the display of the
handset and the LINE 1 button
flashes slowly.
2 Press (LINE 1) on the base unit.
(LINE 1)
Tip
While talking through the speakerphone on the base unit (or handset), if you
press (LINE 1) or (LINE 2) which is flashing on the handset (or base unit), you
can talk to the base unit (or handset) and to the line connected.
The LINE 1 button on the base unit
lights up and the LINE 1 button on
the handset double flashes in
succession.
You can continue talking to the
caller through the speakerphone.
Telephone Features
39
US
Page 40
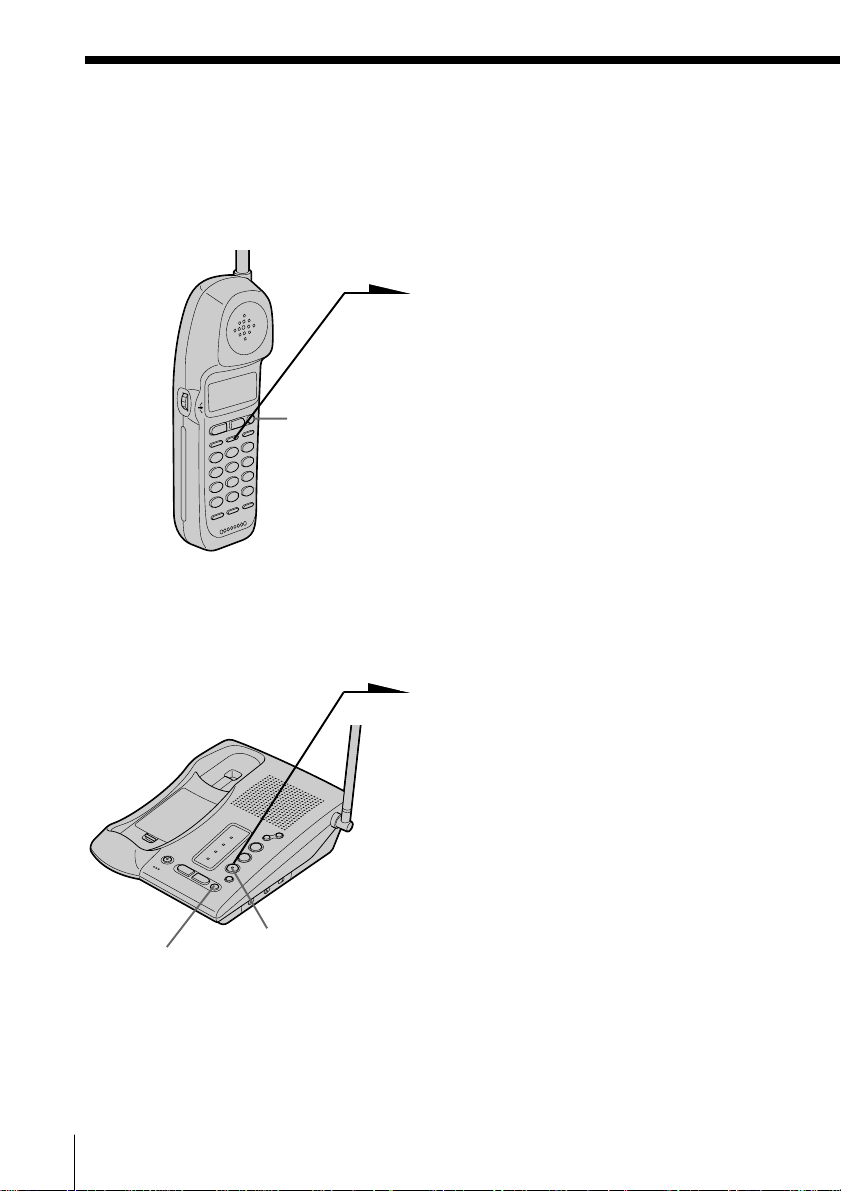
Talking between the phones (Intercom)
You can converse using the base unit and the handset. You can start
the intercom from either phone.
To talk from the handset to the base unit
Press (INTERCOM) on the handset.
After the base unit rings twice, you
will be connected automatically.
When a person at the base unit
(OFF)
answers, you can talk with each other.
“INTERCOM” appears on the display
of the handset and the INTERCOM
lamp on the base unit lights up.
When you are done talking or if no
one answers the phone
Press (OFF) on the handset.
To talk from the base unit to the handset
US
Telephone Features
40
(OFF)
INTERCOM lamp
Press (INTERCOM) on the base unit.
The base unit and handset ring and
“** PAGING **” appears on the
display of the handset.
When a person at the handset presses
(INTERCOM), you can talk with each
other.
“INTERCOM” appears on the display
of the handset and the INTERCOM
lamp on the base unit lights up.
When you are done talking or if no
one answers the phone
Press (OFF) on the base unit.
Page 41

Note
While conversing with an outside caller via the base unit or handset, you
cannot make an intercom call. If you press (INTERCOM), you will hear a busy
tone.
Tips
• You can receive an intercom call on the handset even when “RINGER” is set
to “RINGER OFF”.
• You can receive an intercom call on the base unit even when the L1 or L2
RINGER LEVEL switch on the base unit is set to OFF. The base unit will ring
at a low level.
Receiving a call while using the intercom
When a call comes in, “** RINGING **” appears on the display of
the handset and only the base unit rings at a low level.
The LINE 1 or LINE 2 button flashes.
Press (LINE 1) or (LINE 2) whichever is flashing, then you can answer
the call.
Telephone Features
Telephone Features
41
US
Page 42
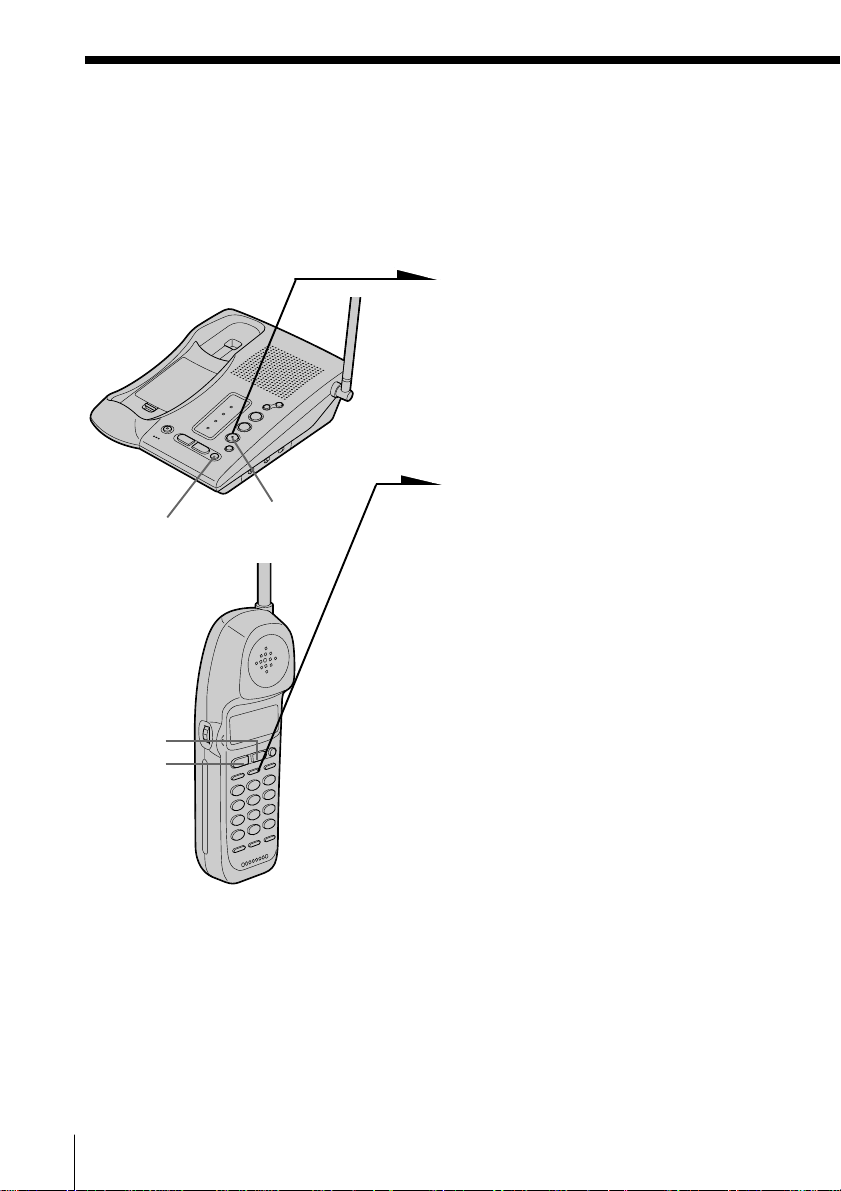
Transferring a call
You can transfer a call between the handset and base unit without
disconnecting the call.
To transfer from the base unit to the handset
1 Press (INTERCOM) to page the
handset.
The call is put on hold on the
base unit and the handset rings.
“** PAGING **” appears on
the display of the handset.
2 Press (INTERCOM) on the
(OFF)
INTERCOM lamp
handset.
“INTERCOM” appears on the
display of the handset and the
INTERCOM lamp on the base
unit lights up.
You can talk between the base
unit and the handset.
3 Press (LINE 1) or (LINE 2)
(LINE 2)
(LINE 1)
Tips
• You can receive an intercom call on the handset even when “RINGER” is set
to “RINGER OFF”.
• If you have accidentally pressed (HOLD) in step 1, just press (INTERCOM)
and you will get the same result as by pressing (INTERCOM) only.
which is flashing on the handset
to talk to the caller with the
handset.
“TALK” appears on the display
of the handset.
If no one answers the phone
Press (OFF) on the base unit.
US
Telephone Features
42
Page 43
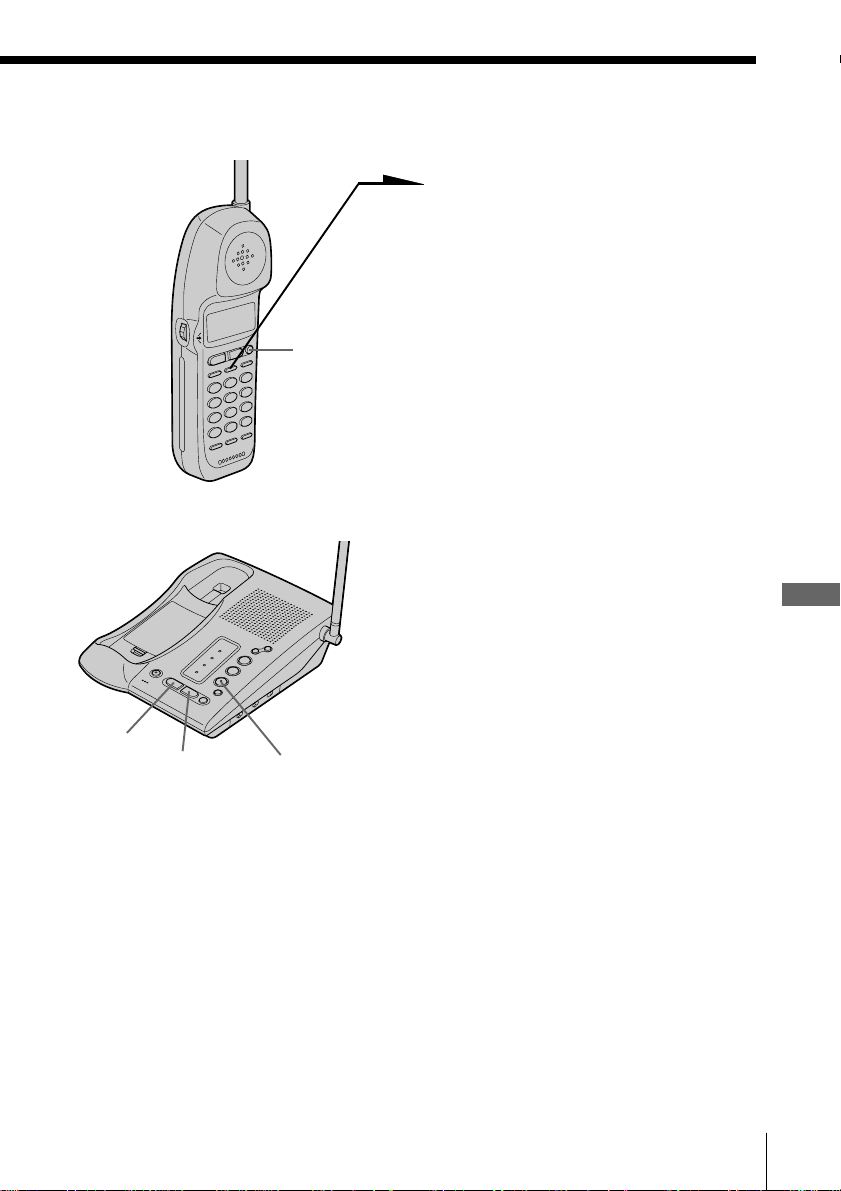
To transfer from the handset to the base unit
1 Press (INTERCOM) to page the
base unit.
The call is put on hold on the
handset.
After the base unit rings twice,
you will be connected
(OFF)
automatically.
When a person at the base unit
answers, you can talk with each
other.
“INTERCOM” appears on the
display of the handset and the
INTERCOM lamp on the base
unit lights up.
2 Press (LINE 1) or (LINE 2)
which is flashing on the base
unit to talk to the caller with the
base unit.
The corresponding line button
of the base unit lights up.
Telephone Features
(LINE 1)
(LINE 2)
Tip
You can receive an intercom call on the base unit even when the L1 or L2
RINGER LEVEL switch on the base unit is set to OFF. The base unit will ring at
a low level.
INTERCOM lamp
If no one answers the phone
Press (OFF) on the handset.
Telephone Features
43
US
Page 44
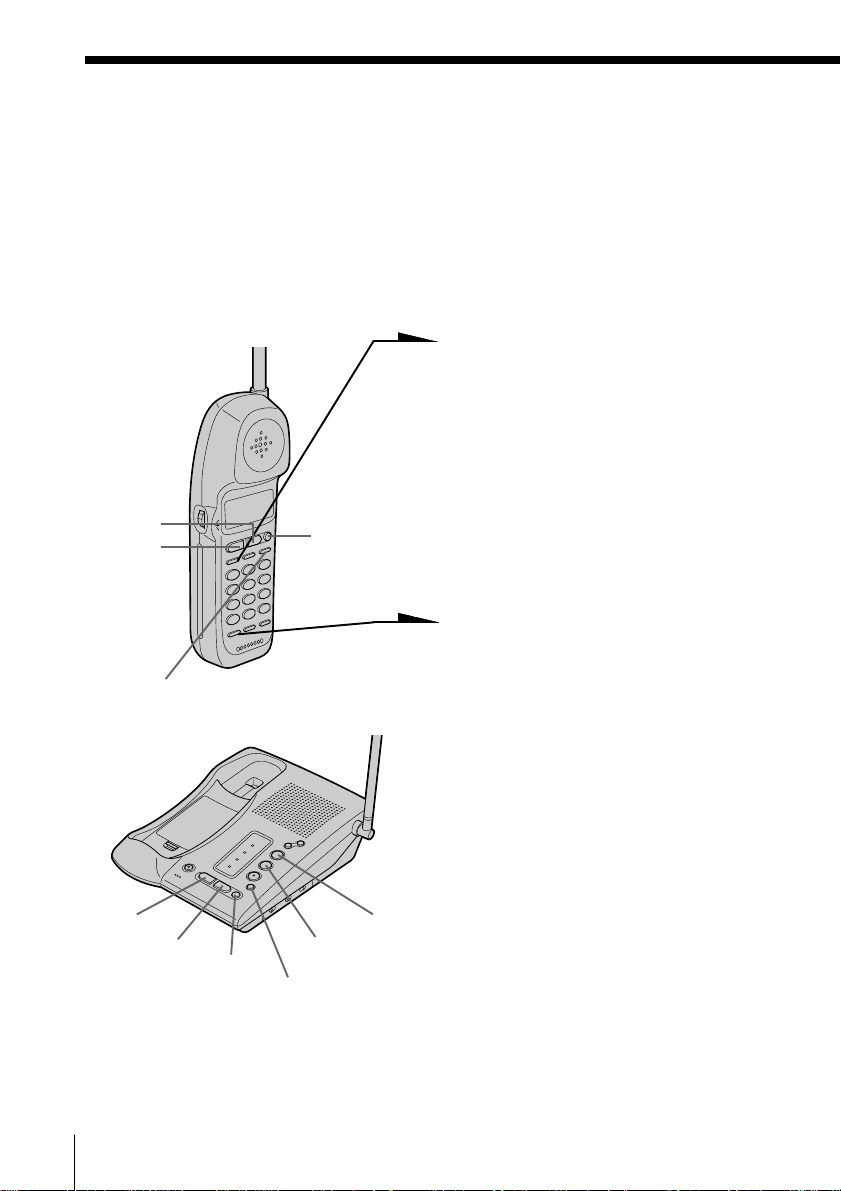
Having a conference call
You can talk on two lines at the same time and you can also talk on one
line, the handset and the base unit at the same time.
Making another call while talking
You can talk with two parties at the same time using both line 1 and
line 2. (Three-way conference)
1 Press (HOLD) while talking on
one line.
The line in use is put on hold.
2 Press (LINE 1) or (LINE 2),
whichever is not used.
(LINE 2)
(LINE 1)
(FLASH/CALL WAITING)
(LINE 1)
(LINE 2)
(OFF)
(OFF)
(HOLD)
(CONF)
(CALL WAITING/FLASH)
3 Dial a phone number for the
second party.
4 Press (CONF) (conference) after
the second party is connected.
“CONFERENCE” appears on
the display.
Now you can talk to both
parties.
US
Telephone Features
44
Page 45

Receiving a call while talking
If another call comes in while talking, the LINE 1 or LINE 2 button on
which another call is coming will flash.
1 Press (HOLD).
The line in use is put on hold.
2 Press (LINE 1) or (LINE 2), on which another call is coming.
3 Press (CONF) (conference).
Now you can talk to both parties. (Three-way conference)
Note
If you do not press (HOLD) in step 1, the first line will be disconnected.
To disconnect the lines during a three-way conference
To disconnect both lines at the same time, press (OFF).
To disconnect line 1 and talk on line 2 only:
Press (LINE 2).
To disconnect line 2 and talk on line 1 only:
Press (LINE 1).
To put the lines on hold during a three-way conference
Press (HOLD). Both lines are put on hold.
To resume the conversations on both lines:
Press (CONF).
To resume the conversation only on one line:
Press (LINE 1) or (LINE 2), for the line you want. (The other line is kept
on hold.)
Telephone Features
Tip
During a three-way conference, you cannot use “call waiting” service even if
you press (FLASH/CALL WAITING) or (CALL WAITING/FLASH).
continued
Telephone Features
45
US
Page 46

Having a conference call (continued)
Switching conference from the handset to the base unit
1 Press (HOLD) on the handset to put both lines on hold.
The LINE 1 and LINE 2 buttons on the handset and the base
unit flash.
2 Press (CONF) on the base unit to resume the conversation.
Switching conference from the base unit to the handset
1 Press (HOLD) on the base unit to put both lines on hold.
The LINE 1 and LINE 2 buttons on the base unit and the
handset flash.
2 Press (CONF) on the handset to resume the conversation.
To join on the base unit while the handset is talking on one line
Press the double flashing (LINE 1) or (LINE 2) on the base unit.
Now you can talk to the handset and to the line connected.
To join on the handset while the base unit is talking on one line
Press the double flashing (LINE 1) or (LINE 2) on the handset.
Now you can talk to the base unit and to the line connected.
To join three-way conference (four-way conference)
Press (LINE 1) or (LINE 2).
US
Telephone Features
46
Page 47
Caller ID Features
Understanding the Caller ID service
Caller ID allows the caller’s phone number to be shown on the display
before the call is answered. In order to use this feature, you must first
subscribe to the Caller ID service. The name of this service may vary
depending on your telephone company.
To use this feature, be sure to enter your home area code (see page 17).
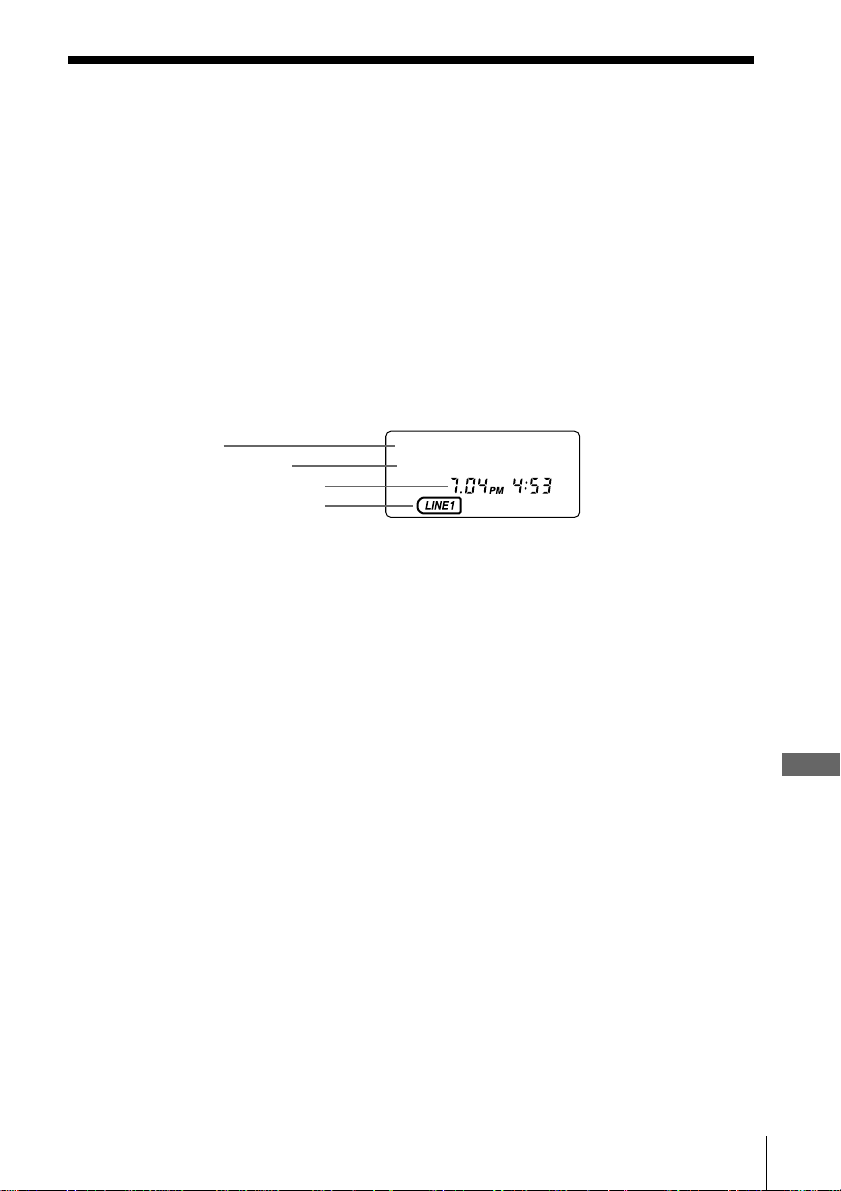
When you receive a call
The phone number appears on the display with the date and time as
shown in the following example.
If your Caller ID service includes the caller name service, the caller’s
name also appears on the display (up to 15 letters).
Caller’s name
Caller’s phone number
The date and time received
The line which received the
Caller ID data
SMITH JOHN
1-201-123-4567
When you answer the call, the Caller ID display changes to the
“TALK” display.
Notes
• The caller’s phone number and/or name will not appear in the following cases:
- “OUT OF AREA”: when the call is made through a telephone company which
does not offer Caller ID service (including international calls).
- “PRIVATE”: when the call is “blocked.” For privacy reasons, many states allow
callers the option to prevent his or her telephone data from being displayed on
the other party’s Caller ID display.
• If the call is from an office which uses multiple lines, the displayed phone number
may not match the number you use to call the extension.
Tips
• Even if the ringer of the handset is set to “RINGER OFF”, you can receive
Caller ID data.
• If a call comes in on both line 1 and 2 simultaneously, the display will show
the data on line 1 and 2 alternately.
About the memory match function
If you receive a call from a phone number which is stored in the Phone
Directory (see page 32), the ringer sound will change to a higher tone from
the second ring.
Note
The memory match function does not work with “OUT OF AREA” or “PRIVATE”
calls; and it may not work with calls made from an office which uses multiple lines
because the number does not always match the one you stored in this phone.
Caller ID Features
Caller ID Features
47
US
Page 48
Looking at the Caller ID list
The phone stores the data of the last 20 calls received including “OUT
OF AREA” and “PRIVATE” calls. It keeps track of all calls received;
even if they were not answered.
Viewing the Caller ID list
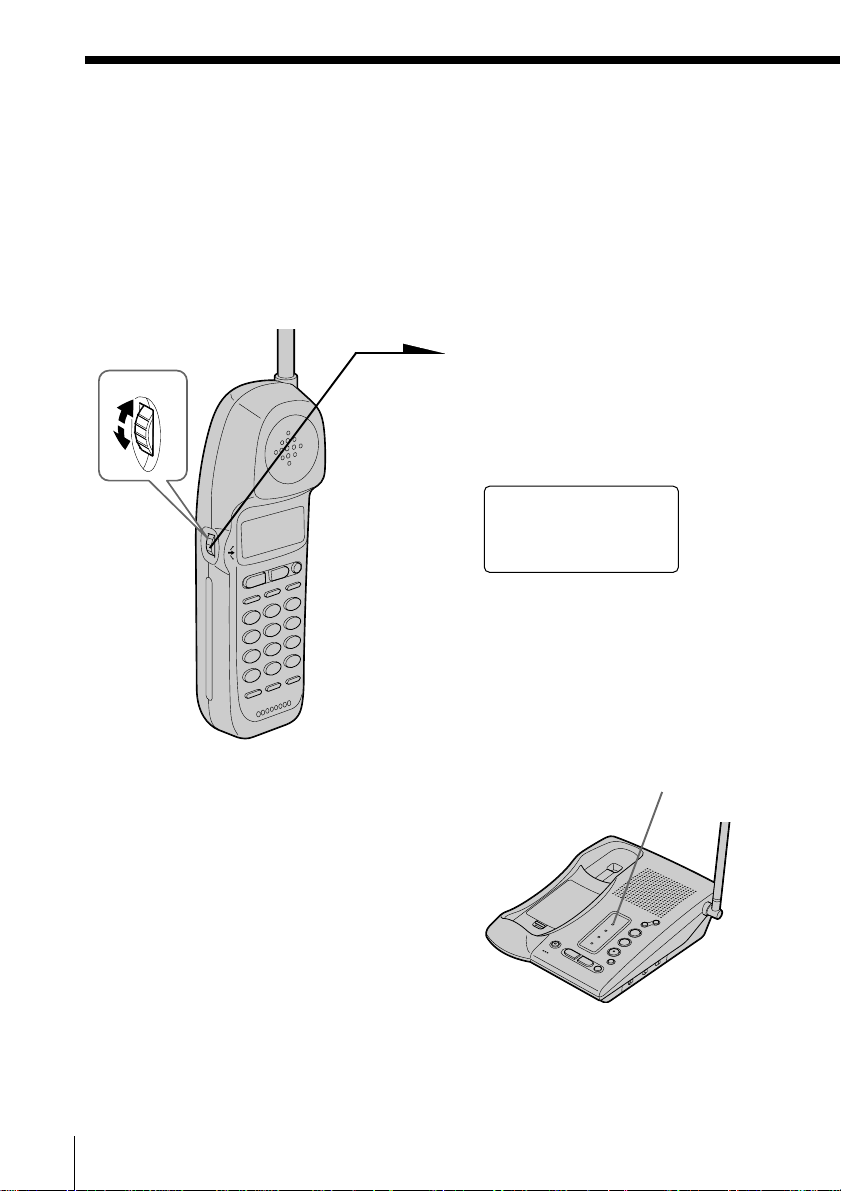
You can look through the Caller ID list to check the phone number
and/or name of the calls received.
1 Turn Jog Dial.
Turn
The display shows the number
of “NEW” (calls which you have
not viewed) and “OLD” (calls
which you have viewed) calls.
NEW O8 OLD 12
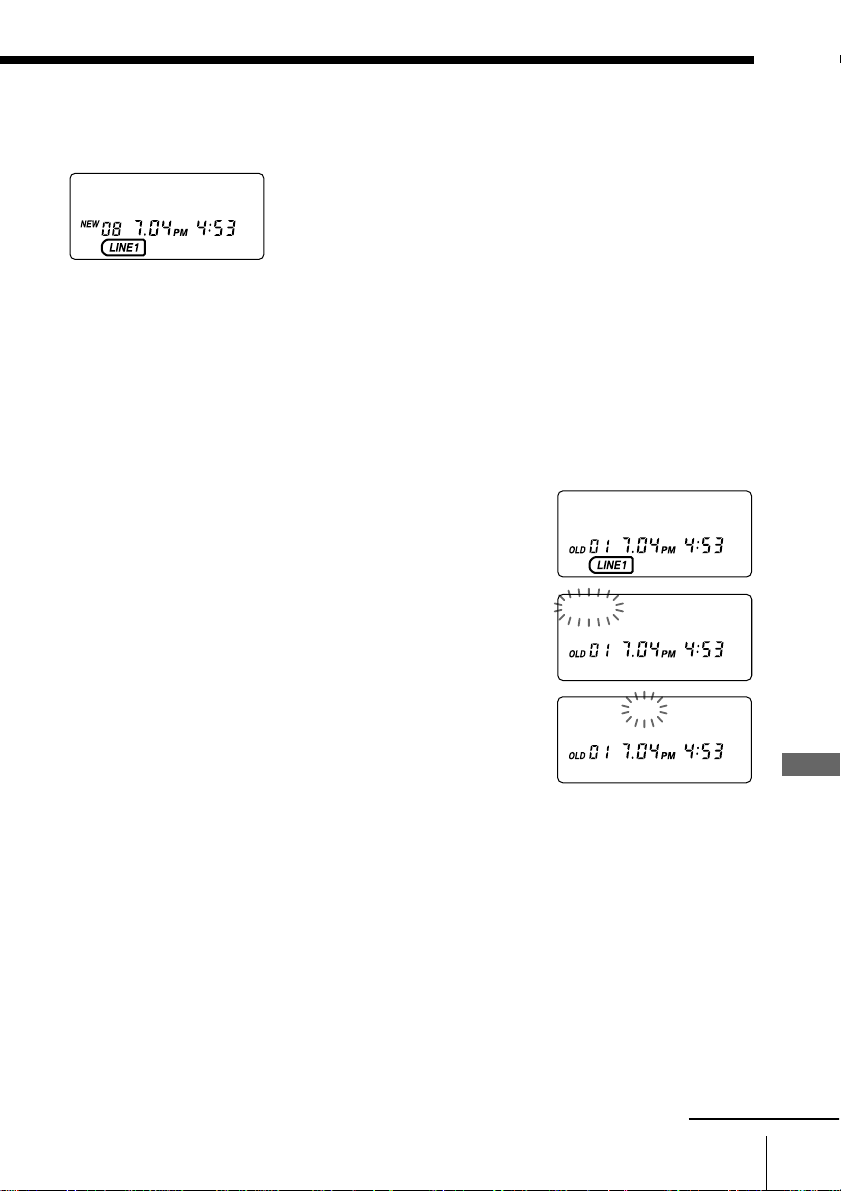
2 Turn Jog Dial down to display
older data or up to display
newer data.
Note
If a 21st call is received, the oldest data is automatically
erased.
Tip
If there is a “NEW” data, the NEW CALL lamp of the
base unit flashes.
US
Caller ID Features
48
NEW CALL lamp
Page 49
About the “*” mark
SMITH JOHN *
1-201-123-4567
“*” appears if there are more than two calls
from the same phone number. The older data
will be replaced by the new data, so the calls
are counted as only one call.
Erasing data from the Caller ID list
Old data will be erased automatically when a 21st call comes in, but
you can also manually erase unnecessary data one by one or erase the
entire list.
To erase the phone number one by one
1 Display the phone number you want to erase
from the Caller ID list (see page 48).
2 Press Jog Dial.
3 Turn Jog Dial up to make “ERASE” flash and
press Jog Dial.
4 Turn Jog Dial up to make “YES” flash, then
press Jog Dial.
You will hear a long confirmation beep and the
data is erased.
SMITH JOHN
1-201-123-4567
DIAL PGM ERASE
1-201-123-4567
ERASE NO YES
1-201-123-4567
Caller ID Features
continued
Caller ID Features
49
US
Page 50
Looking at the Caller ID list (continued)
ERASE NO YES ALL
1-201-123-4567
ALL ERASE NO YES
1-201-123-4567
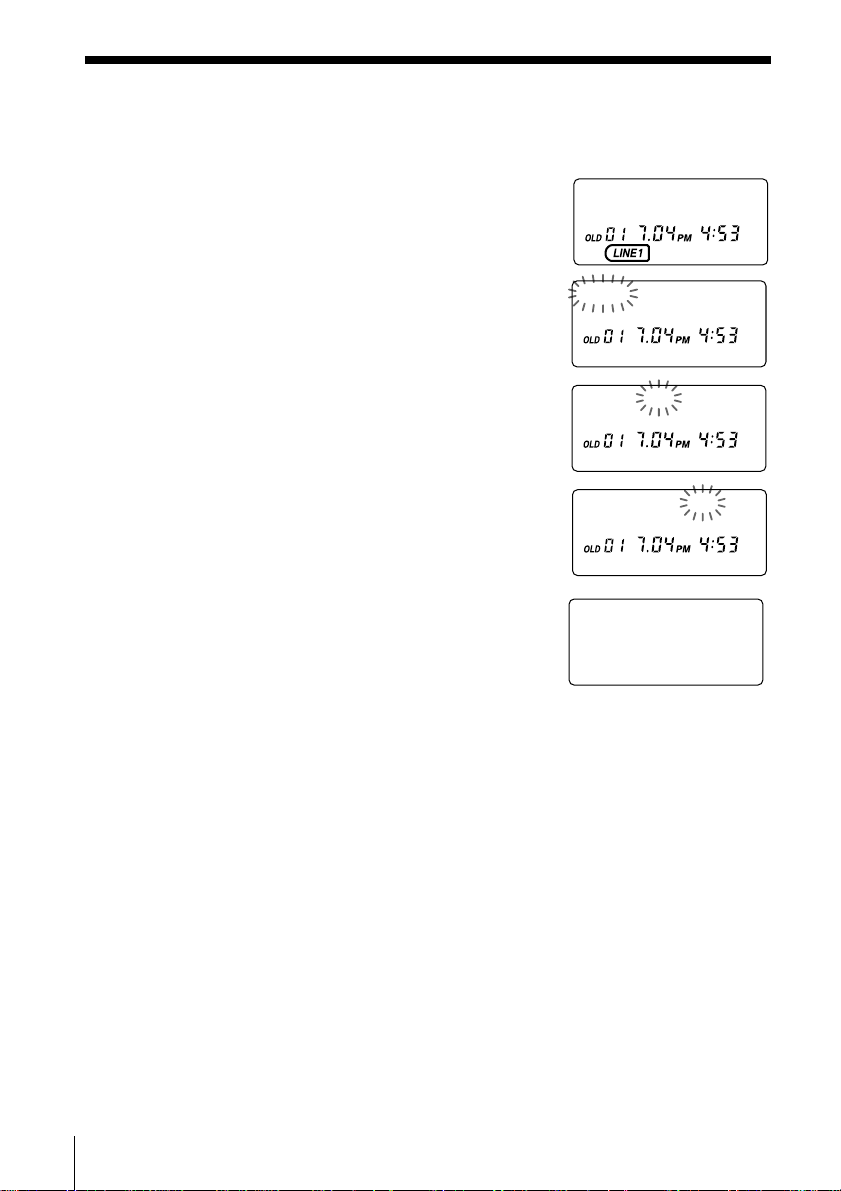
To erase the entire list at once
1 Display any Caller ID data.
SMITH JOHN
1-201-123-4567
2 Press Jog Dial.
DIAL PGM ERASE
1-201-123-4567
3 Turn Jog Dial up to make “ERASE” flash and
press Jog Dial.
4 Turn Jog Dial up to make “ALL” flash, then
press Jog Dial.
5 Turn Jog Dial up to make “YES” flash, then
press Jog Dial.
You will hear a long confirmation beep and the
entire list is erased.
Note
“ALL” appears only when all the data has become “OLD” data. If there is any
“NEW” data, you cannot erase the entire list.
NEW OO OLD OO
US
50
Caller ID Features
Page 51
Using the Caller ID list
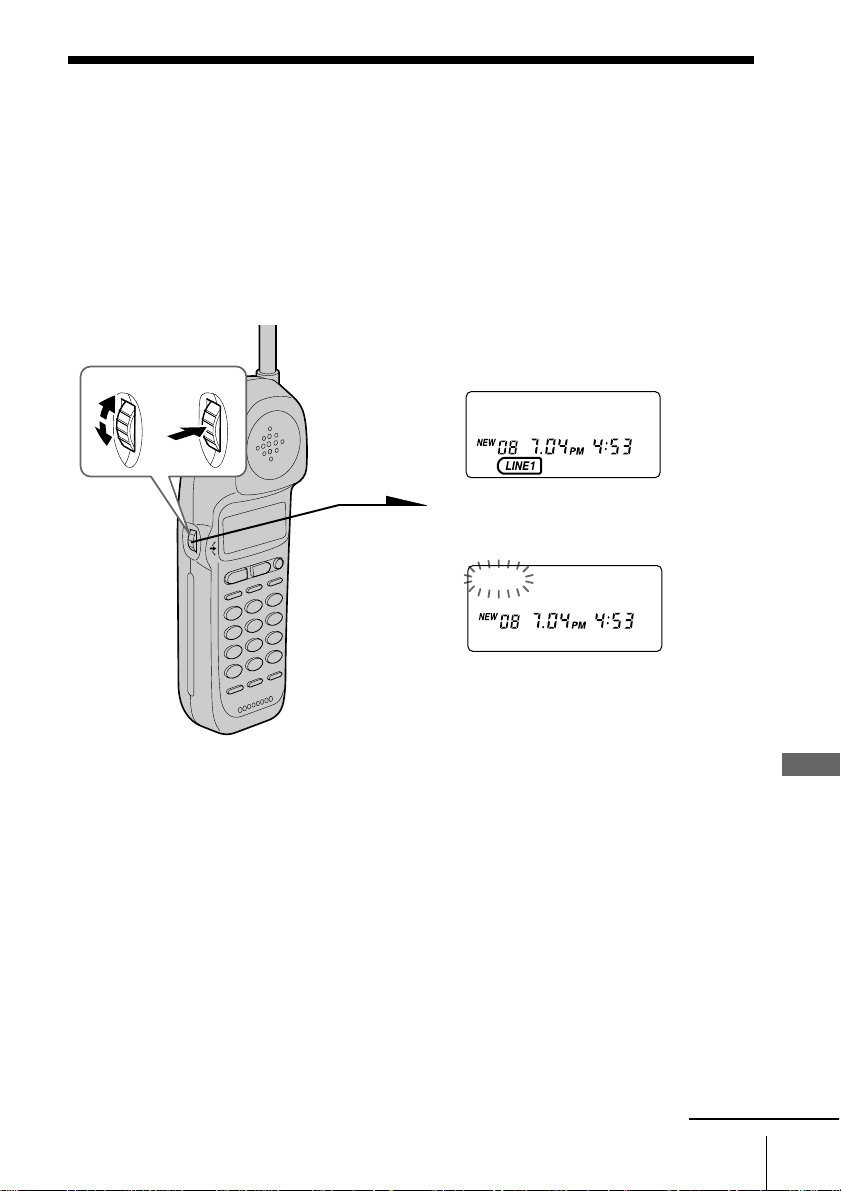
By using the Caller ID list, you can call back a phone number from the
Caller ID list easily, or store numbers from the Caller ID list into the
Phone Directory.
Calling back a number from the Caller ID list
1 Display the phone number you
want to call from the Caller ID
Turn Press
list (see page 48).
SMITH JOHN
1-201-123-4567
2 Confirm the number and press
Jog Dial.
DIAL PGM ERASE
1-201-123-4567
3 Press Jog Dial again.
The phone automatically dials
the displayed number.
Notes
• If the number displayed in step 1 is not the one you should call back, you can
change the number of digits of the phone number as described on page 53.
• If the phone is connected to a Private Branch Exchange (PBX), you may not
be able to call back from the Caller ID list because an outside line access digit
is necessary.
• When neither line is in use, line 1 is automatically connected in step 3. If you
want to select the line manually, press (LINE 1) or (LINE 2) after step 1. You
will then be connected to the line you have chosen.
continued
Caller ID Features
Caller ID Features
US
51
Page 52
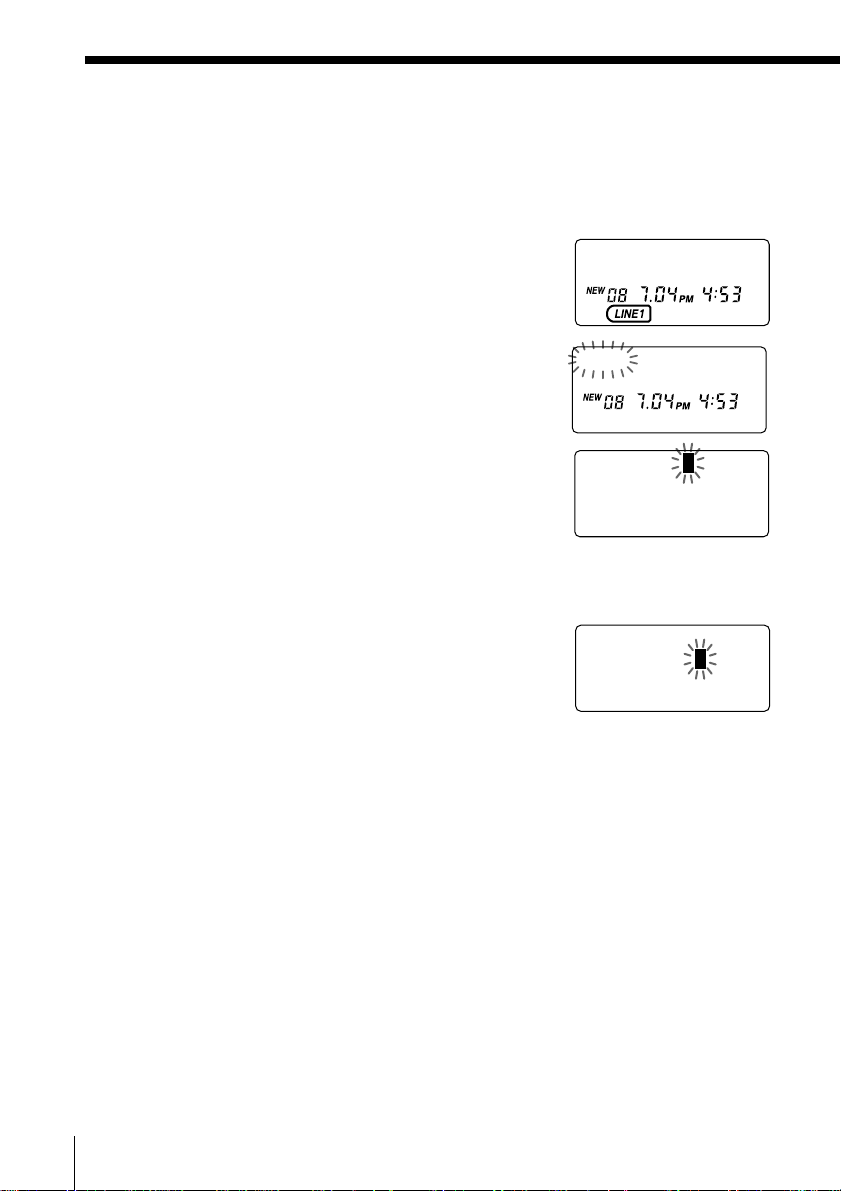
Using the Caller ID list (continued)
SMITH JOH
12011234567
N
SMITH JOHN
1201123456
7
DIAL PGM ERASE
1-201-123-4567
SMITH JOHN
1-201-123-4567
Storing a number of the Caller ID list into the Phone Directory
1 Display the name and phone number you want
to store from the Caller ID list (see page 48).
2 Confirm the number and press Jog Dial.
3 Turn Jog Dial up to make “PGM” flash and
press Jog Dial.
The cursor flashes at the end of the name.
Enter or change the name, if necessary (see page
34).
4 Press Jog Dial.
The cursor flashes at the end of the phone
number.
Enter or change the phone number, if necessary
(see page 34).
5 Press Jog Dial again.
You will hear a long confirmation beep and the
name and number are stored.
Notes
• Do not allow more than 20 seconds to elapse between each step of the
procedure.
• If the number displayed in step 1 is not the one you should store, you can
change the number of digits of the phone number as described on page 53.
• If the phone is connected to a Private Branch Exchange (PBX), you may need
to add an outside line access digit.
52
US
Caller ID Features
Page 53
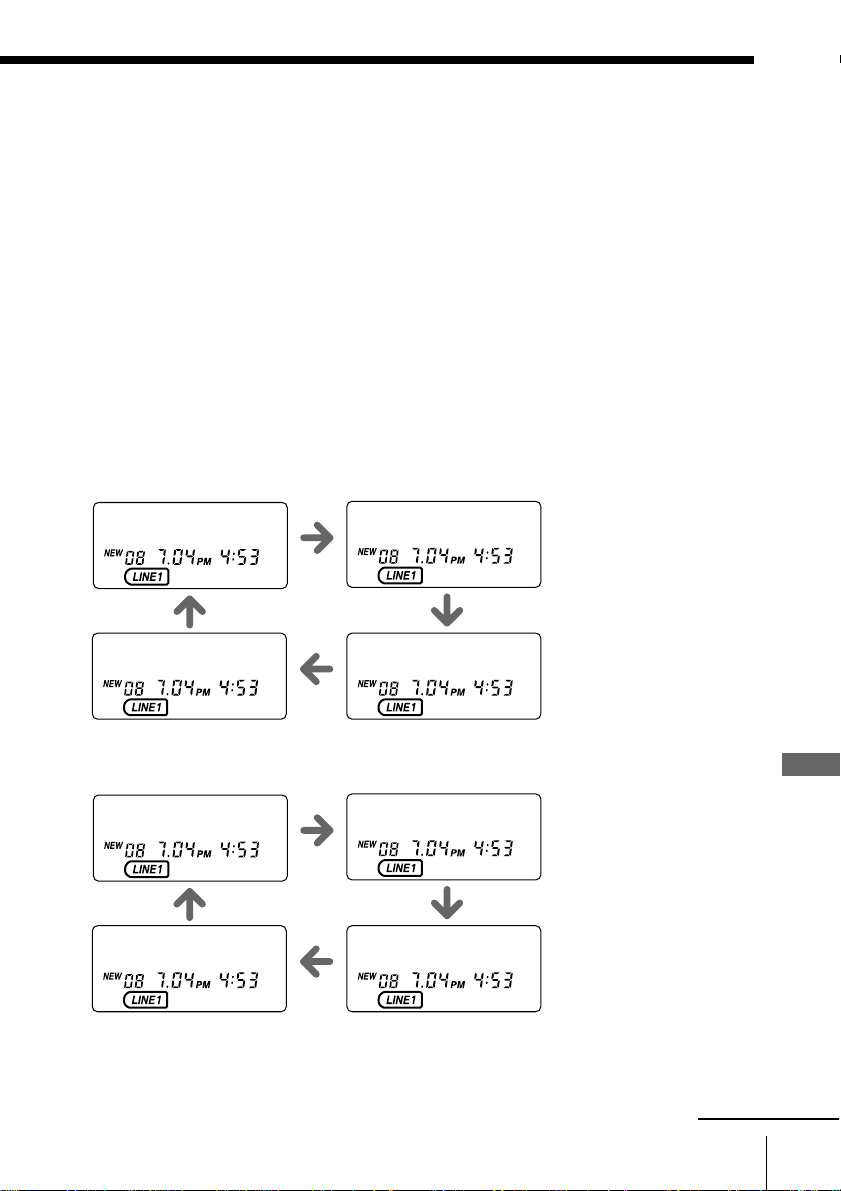
To change the number of digits of the phone number
If the number of digits of the phone number in the Caller ID list is
different from the actual phone number, you need to adjust the
number of digits of the phone number to call back or store into the
Phone Directory .
1 While the phone number from the Caller ID list is displayed,
press (#) repeatedly until the phone number with the
correct number of digits appears on the display.
Each time you press (#), the number of digits changes as
follows:
When the home area code and the local area code do
not match
SMITH JOHN
1-201-123-4567
SMITH JOHN
123-4567
When the home area code matches
SMITH JOHN
123-4567
SMITH JOHN
1-123-4567
SMITH JOHN
201-123-4567
SMITH JOHN
1-123-4567
SMITH JOHN
1-201-123-4567
SMITH JOHN
201-123-4567
Caller ID Features
continued
Caller ID Features
53
US
Page 54
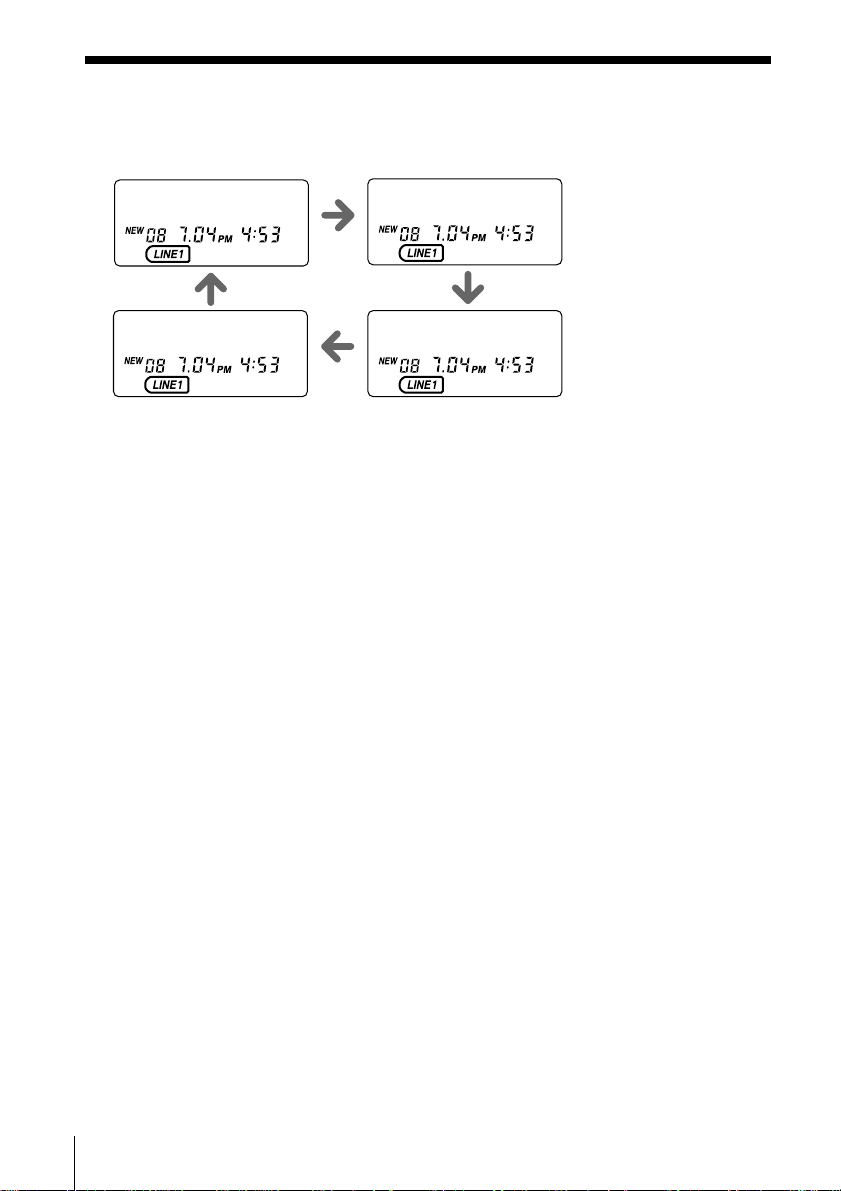
Using the Caller ID list (continued)
When the local area code matches
SMITH JOHN
201-123-4567
SMITH JOHN
1-201-123-4567
SMITH JOHN
1-123-4567
SMITH JOHN
123-4567
2 Continue the operation to call or store the phone number
with the correct number of digits (pages 51 and 52).
Notes
• You need to adjust the number of digits each time you call back from the
Caller ID list as the changes to the Caller ID data is not stored in memory.
• You may not be able to change the number of digits depending on the Caller
ID data.
54
US
Caller ID Features
Page 55
Using “Caller ID with call waiting” service
This telephone is compatible with the “Caller ID with call waiting”
service. Make sure that your telephone company offers this service.
Like the basic Caller ID service, you need to subscribe to “Caller ID
with call waiting” in order to use this service.
Even though you may have already subscribed to “Caller ID” and
“call waiting” as two separate services, you need to request a
subscription to “Caller ID with call waiting” as a single service.
This is a new service that combines the two services.
Even though you now have a “Caller ID with call waiting”
compatible phone, unless you subscribe to the combined “Caller ID
with call waiting” service, you will not be able to see the name
and number of the second caller.
When a new call comes in while you are talking, you hear two short
beeps. The caller’s name and/or phone number of the new call appears
on the display for about 20 seconds.
To switch to another caller
1 To switch to the new caller,
press (FLASH/CALL WAITING).
(If you’re at the base unit, press
(CALL WAITING/FLASH).)
2 To switch back to the first caller,
press (FLASH/CALL WAITING) (or
(CALL WAITING/FLASH)) again.
Caller ID Features
Caller ID Features
US
55
Page 56
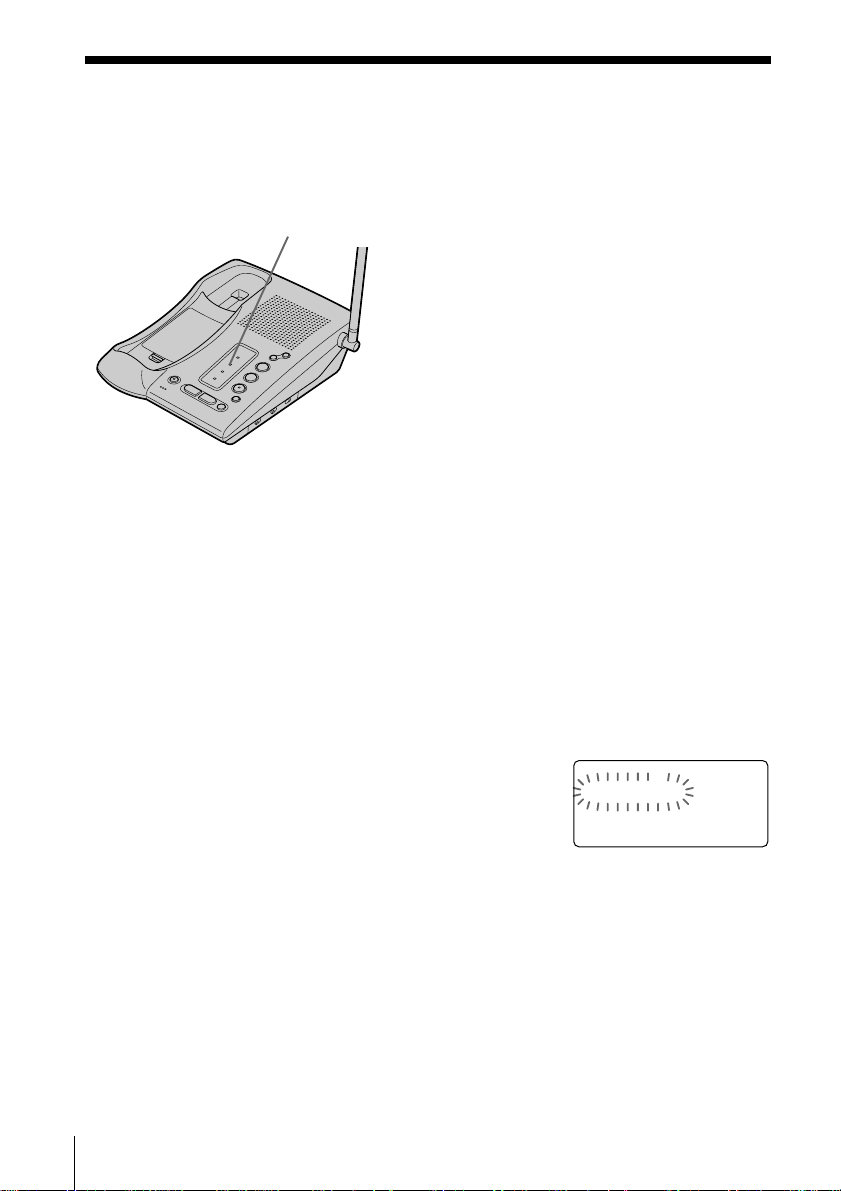
Using visual message waiting service
If you subscribe to your telephone company’s message service which
includes this feature, the display will show that you have messages
waiting to be retrieved.
MESSAGES lamp
If you have messages
The MESSAGES lamp on the base unit
flashes.
The MESSAGES lamp will go off when you
retrieve your messages.
Note
You cannot use this feature, if you have not subscribed to your telephone
company’s message service.
For details on the availability of this service, please ask your telephone
company.
If the MESSAGES lamp remains flashing
If this lamp does not go off (e.g. When you retrieve your messages
with other phones), you can go off the lamp manually.
To go off the MESSAGES lamp
1 Press (PGM) on the handset.
2 Press (#) on the handset.
3 Press Jog Dial.
The MESSAGES lamp on the base unit goes off,
and you will hear a long confirmation beep.
US
Caller ID Features
56
MESSAGES WAITING
LIGHT-OFF RESET
Page 57
Using visual message waiting service (continued)
If you move or change your telephone company
Message waiting signals are sent in one of two ways: FSK signaling or
“stutter” signaling (Your telephone company can provide you with
more information about your service).
The first time this phone receives a voice mail message, it will set itself
to the FSK service and will lock out the stutter service if your
telephone company is in FSK service.
When you move or change your telephone company, you need to
perform the following procedure. The phone will returns to ready state
for either FSK or stutter dial tone voice mail recognition.
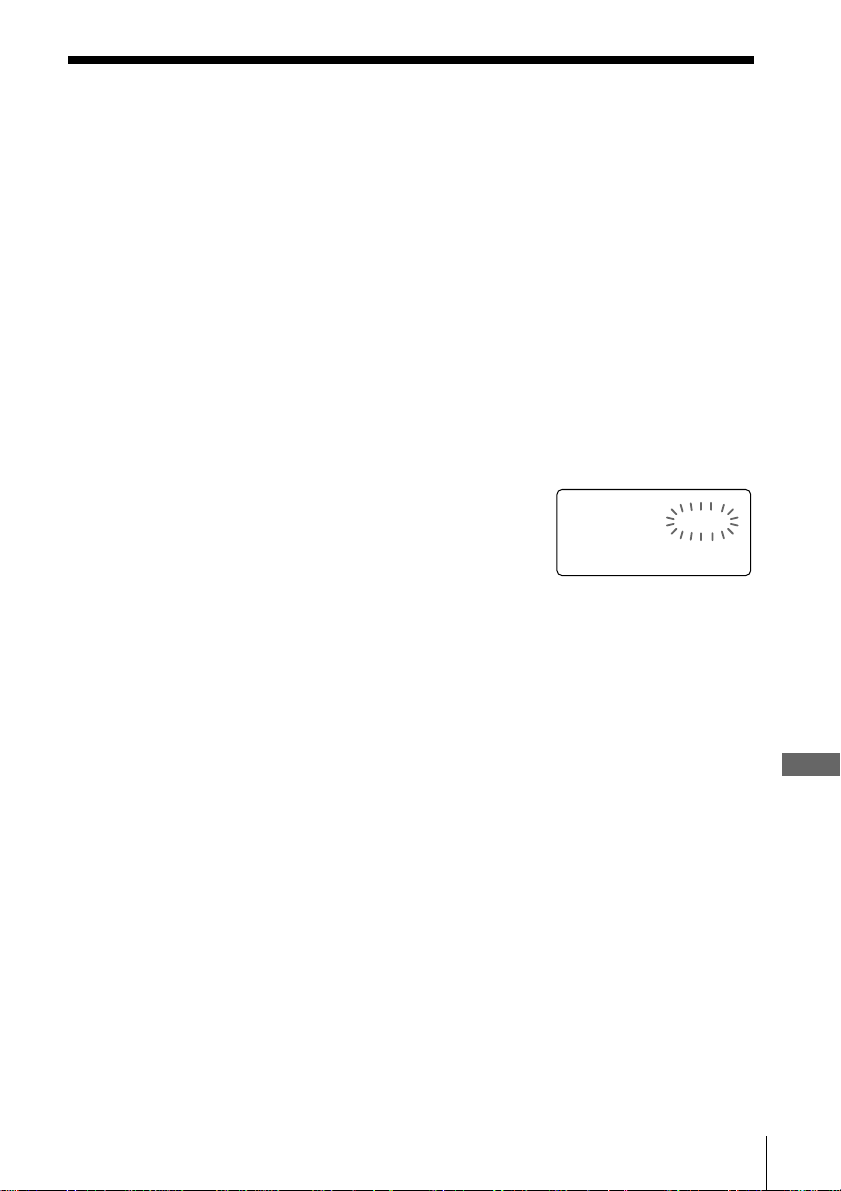
To reset this phone
1 Press (PGM) on the handset.
2 Press (#) on the handset.
3 Turn Jog Dial up to make “RESET” flash and
press Jog Dial.
You will hear a long confirmation beep and the
phone is reset.
MESSAGES WAITING
LIGHT-OFF RESET
Caller ID Features
Caller ID Features
US
57
Page 58
Additional Information
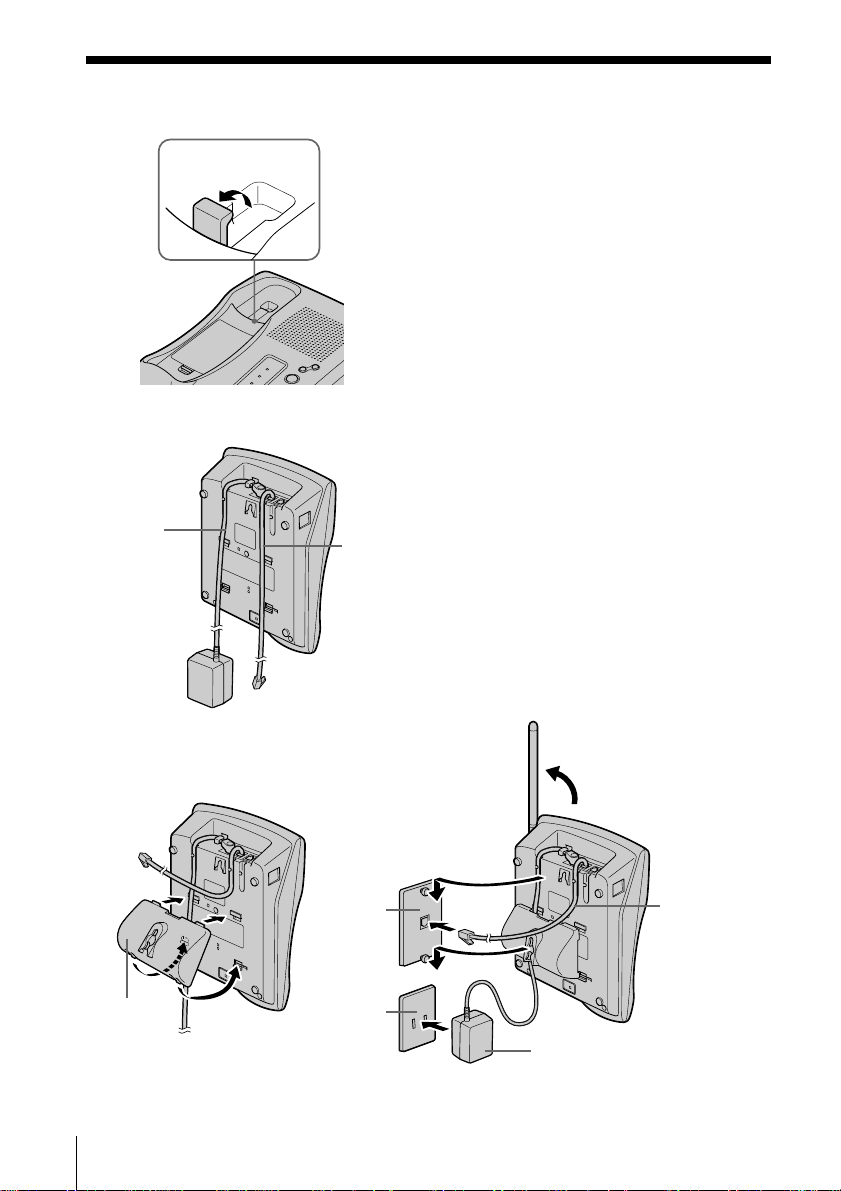
Mounting the base unit on a wall
1
2
AC power
adaptor cord
Hang-up tab
Telephone
line cord
1 Raise the hang-up tab.
2 Plug the telephone line cord(s)
to the L1/L1+L2, and/or L2,
DATA jack(s) and the AC power
adaptor to the DC IN 9V jack,
and hook the cords.
3 Attach the wall bracket to the
center of the base unit.
Align the f marks of the wall
bracket with those of the base
unit.
4 Plug the telephone line cord(s)
to the telephone outlet(s), and
hook the base unit to the wall
plate.
5 Plug the AC power adaptor to
an AC outlet. Then raise the
antenna so that it points
towards the ceiling.
3
Wall
plate
Wall
bracket
Tip
To remove the wall bracket, press the lower tabs.
US
Additional Information58
AC outlet
4,5
Telephone
line cord
AC power
adaptor
Page 59
Carrying the handset by the belt clip
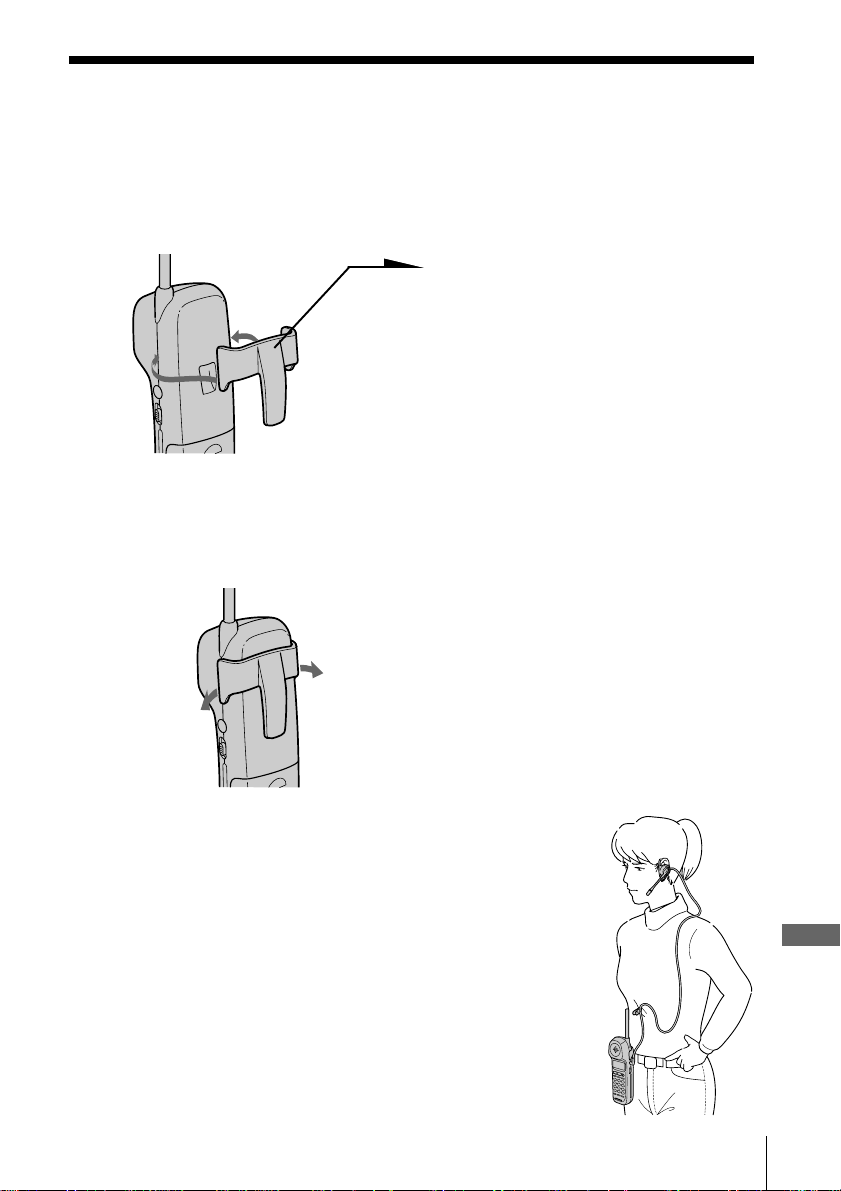
You can hang the handset on the belt by attaching the belt clip to the
handset.
Attaching the belt clip
Press the belt clip to the handset.
Make sure that the side tabs click
and go into the holes on the sides of
the handset.
Note
To prevent the handset from dropping, make sure that each tab is completely
inserted.
Detaching the belt clip
While pressing the back of the belt
clip, pull the sides one by one until
the tabs come off from the holes.
Additional Information
Note
Remove the belt clip carefully to avoid breaking your fingernails.
Using the headset
You can talk on handset without using your hands by
connecting Sony TL-HD1 headset (optional) to the
I (HEADSET) jack on the handset.
Additional Information 59
US
Page 60
Notes on power sources
On battery pack
• Store the battery pack at a
temperature between 41°F (5°C) and
95°F (35°C) for best performance.
• If you do not use the handset for a
long period of time, remove the
battery pack from the handset after
charging for more than 12 hours, and
base unit after charging for more than
24 hours when you have a spare
battery. This maintains battery life.
On power failure
During a power interruption, you
cannot make or receive calls.
For the customers in the USA
RECYCLING NICKEL-CADMIUM
BATTERIES
Nickel-Cadmium batteries
are recyclable. You can help
preserve our environment
by returning your
unwanted batteries to your
nearest point for collection,
recycling or proper
disposal.
Note: In some areas the disposal of nickel-
cadmium batteries in household or
business trash may be prohibited.
RBRC (Rechargeable Battery Recycling
Corporation) advises you about spent battery
collection by the following phone number.
Call toll free number: 1-800-822-8837
(United States and Canada only)
Caution: Do not handle damaged or leaking
nickel-cadmium batteries.
US
Additional Information60
Page 61

Maintenance
• Clean the cabinets with a soft cloth
slightly moistened with water or a
mild detergent solution. Do not use
any type of abrasive pad, scouring
powder or solvent such as alcohol or
benzine as they may damage the
finish of the cabinet.
• If the charge terminals of the base unit
and handset are soiled, wipe them
with a soft cloth.
If you have any questions or problems
concerning your phone, please consult
your nearest Sony dealer.
Additional Information
Additional Information 61
US
Page 62

Troubleshooting
If you’ve experienced any of the following difficulties while using your
phone, use this troubleshooting guide to help you remedy the problem.
Should any problem persist, consult your nearest Sony dealer.
Symptom
You hear five short error
beeps when you press (LINE 1)
or (LINE 2).
You hear no dial tone.
The phone does not connect at
all, even though the number
you dial is correct.
The phone does not redial
correctly.
Making calls
You hear five short error beeps
when you try to redial.
You cannot perform the redial
operations (redialing, checking
and erasing the phone
number), and “CHANNEL
SEARCHING...” appears on the
display.
The handset does not ring.
The base unit does not ring.
Receiving calls
Remedy
• Make sure you have set up the base unit correctly
(page 10).
• Move the handset closer to the base unit.
• Make sure the telephone line cord is securely
connected to the telephone outlet.
• Make sure the battery is fully charged (page 14).
• Make sure the dialing mode is set correctly (page 13).
• Make sure the last dialed number is really the one you
want to dial.
• The number you last dialed exceeds 32 digits
(including the tone and pause digits if used).
• The number you last dialed is erased.
• Move the handset closer to the base unit and perform
the redial operations again.
• Make sure the ringer is turned on (page 38).
• The battery may be weak. Charge the battery for more
than 12 hours (page 14).
• Make sure you have set up the base unit correctly
(page 10).
• Move the handset closer to the base unit.
• Set the L1 or L2 RINGER LEVEL switch on the base
unit to HIGH or LOW.
• Make sure the telephone line cord is securely
connected to the telephone outlet.
US
62
Additional Information
Page 63
Symptom
You hear interference during
conversation.
Your conversation is muted
and “CHANNEL
SEARCHING...” appears on the
display.
You hear a beep every three
During conversation
seconds and E and “BATTERY
LOW” appear on the display.
LINE 1 or 2 button flashes
when not in use.
and 2
LINE 1
buttons
You hear five short error beeps
and cannot store a number in
the Phone Directory.
Phone Directory dialing is
incorrect.
Phone Directory
The handset does not ring
when you use the intercom
from the base unit, and the base
unit does not ring when you
use the intercom from the
handset.
Intercom
When pressing (INTERCOM),
you hear a busy tone and
cannot make an intercom call.
Remedy
• Move the handset closer to the base unit.
• Place the base unit away from noise sources
(page 10).
• This is the out-of-range alarm. Move the handset
closer to the base unit within one minute.
• The battery is weak. Charge the battery for more than
12 hours (page 14).
• Either the handset or the base unit is being used.
• Make sure you follow the procedure for storing the
number correctly (pages 32).
• Make sure the number (including the tone and pause
digits) does not exceed 32 digits.
• Store the correct number (pages 32).
• The battery may be weak. Charge the battery for more
than 12 hours (page 14).
• Move the handset closer to the base unit.
• Place the base unit away from noise sources
(page 10).
Additional Information
• Either the base unit or handset is being used to
converse with an outside caller.
continued
Additional Information
63
US
Page 64

Troubleshooting (continued)
Caller ID
Power source/battery
US
64
Additional Information
Symptom
The caller’s name and/or
phone number does not appear
on the display.
The caller’s name and/or
phone number does not
appear on the display during
call waiting.
You cannot dial the number
from the Caller ID list.
The memory match function
does not work.
You cannot use visual massage
waiting service.
The CHARGE lamp does not
light up when you place the
handset to charge.
The battery duration is short.
The CHARGE lamp flashes.
Remedy
• Make sure you have subscribed to Caller ID service.
• Caller ID service may not work when the phone is
connected to a Private Branch Exchange (PBX).
• The call is made through company which does not
offer Caller ID service. “OUT OF AREA” will appear
on the display.
• The call was “blocked”. “PRIVATE” will appear on
the display.
• You have answered the call while “** RINGING **”
was displayed. Be sure to answer after the Caller ID
data is displayed.
• Make sure you have subscribed to “Caller ID with call
waiting” service (page 55).
• Make sure nobody is talking with another phone on
the same telephone line.
• Make sure you entered your home area code correctly
(page 17).
• You may need to change the number of digits of the
phone number (page 53).
• This function may not work when the phone is
connected to a Private Branch Exchange (PBX).
• If the call is from an office which uses multiple lines,
the phone number may not match the number you
put in the memory.
• If you have stored the phone number with an outside
line access digit in the Phone Directory because the
phone is connected to a Private Branch Exchange
(PBX), the phone number will not match the Caller ID
data.
• Make sure you have subscribed to visual message
waiting service (page 56).
• If you move or change your telephone company, reset
this phone (page 57).
• Wipe the charge terminals of the base unit and the
handset with a soft cloth for better contact of the
charge terminals.
• Make sure the handset is placed on the base unit
properly.
• The battery pack was charged less than 12 hours (due
to power failure, etc.).
• The usage life of the battery has expired and needs
replacement.
• Move the handset closer to the base unit.
• Make sure the battery is inserted in the handset.
• The battery may be completely discharged. Charge
the battery for more than 12 hours (page 14). It may
require several times of charging to recover to its full
capacity.
Page 65

Specifications
General
Frequency band
902 - 928 MHz
Operating channel
30 channels
Dial signal
Tone, 10 PPS (pulse) selectable
Supplied accessories
See page 9.
Handset
Power source
Rechargeable battery pack BP-T23
Battery charging time
Approx. 12 hours
Battery life
Standby: Approx. 7 days
Talk: Approx. 7 hours
Dimensions
Approx. 2 1⁄4 x 7 1⁄2 x 1 15⁄16 inches (w/h/d),
antenna excluded
(approx. 57 x 190 x 48 mm)
Antenna: Approx. 3 1⁄2 inches
(approx. 87 mm)
Mass
Approx. 9.5 oz
(approx. 268 g), battery included
Base unit
Power source
DC 9V from AC power adaptor
AC-T128
Battery charging time
Approx. 24 hours
Dimensions
Approx. 6 3⁄ 4 x 2 3⁄4 x 8 3⁄4 inches (w/h/d),
antenna excluded
(approx. 171 x 68 x 221 mm)
Antenna: Approx. 6 inches
(approx. 150 mm)
Mass
Approx. 1 lb 5 oz
(approx. 582 g), wall bracket excluded
Design and specifications are subject to
change without notice.
Additional Information
Additional Information
65
US
Page 66

Index
A
Adjusting volume
handset volume 25, 29
speaker volume 30
Area code 17
B
Battery pack
charging 14
duration 15
C
Call waiting service 25, 55
Caller ID 47
Caller ID list 48
calling back 51
memory match
function 47
storing in Phone
Directory 52
Caller ID with call
waiting 55
Carrying the handset by
the belt clip 59
Conference 44
Connection 11
D
Dialing mode
choosing 13
switching to the tone
temporarily 25
Directory
Phone Directory 32
E, F, G
Erasing
Caller ID data 49
last phone number
dialed 26
local area code 19
Phone Directory 35
H
Headset 24, 28, 59
Hold 25, 29
Home area code 17
I, J, K
Identifying the parts 20
Intercom 40
L
Local area code 18
Location, base unit 10
M, N
Making calls 24
Memory match
function 47
Mounting the base unit on
a wall 58
Muting 30
O
OUT OF AREA 47
P, Q
Package contents 9
Phone Directory 32
PRIVATE 47
Pulse dialing 13
R
Receiving calls 28
Redialing 26
Ringer
L1/L2 RINGER LEVEL
switch 30
setting the ringer
type 37
turning on/off 38
S
Setting up
base unit 10
handset 14
Spare battery 16
Speakerphone 29, 30
Storing Caller ID data in
Phone Directory 52
Switching phones during a
call 39
T, U
Talking between the
phones 40
Three-way conference 44
Tone dialing
dialing mode 13
switching to 25
Transferring a call 42
Troubleshooting 62
V, W, X, Y, Z
Visual message waiting
service 56
Volume
handset 25, 29
speaker 30
US
Additional Information66
Page 67

Additional Information
Additional Information
US
67
Page 68

US
Additional Information68
Page 69

Additional Information
Additional Information
US
69
Page 70

US
Additional Information70
Page 71

Additional Information
Additional Information
US
71
Page 72

For the customers in the USA
Be sure to save the receipt and attach it to your WARRANTY card when having
your equipment repaired at an authorized Sony service station.
Sony Corporation Printed in China
 Loading...