

Page 1

Cordless
Telephone
with Answering System
3-867-416-11 (1)
Operating Instructions
Manual de instrucciones
US
ES
SPP-A968
©1999 by Sony Corporation
Page 2

Owner’s Record
The model and the serial numbers are
located at the bottom of the unit. Record
the serial number in the space provided
below. Refer to these numbers
whenever you call upon your Sony
dealer regarding this product.
Model No. SPP-A968
Serial No. ________________
IMPORTANT
SAFETY
INSTRUCTIONS
When using your telephone equipment,
basic safety precautions should always
be followed to reduce the risk of fire,
electric shock and injury to persons,
including the following:
1. Read and understand all instructions.
2. Follow all warnings and instructions
marked on the product.
3. Unplug this product from the wall
outlet before cleaning. Do not use
liquid cleaners or aerosol cleaners.
Use a damp cloth for cleaning.
4. Do not use this product near water,
for example, near a bath tub, wash
bowl, kitchen sink, or laundry tub, in
a wet basement, or near a swimming
pool.
5. Do not place this product on an
unstable cart, stand, or table. The
product may fall, causing serious
damage to the product.
6. Slots and openings in the cabinet and
the back or bottom are provided for
ventilation. To protect it from
overheating, these openings must not
be blocked or covered. The openings
should never be blocked by placing
the product on the bed, sofa, rug, or
other similar surface. This product
should never be placed near or over a
radiator or heat register. This product
should not be placed in a built-in
installation unless proper ventilation
is provided.
7. This product should be operated only
from the type of power source
indicated on the marking label. If you
are not sure of the type of power
supply to your home, consult your
dealer or local power company.
8. Do not allow anything to rest on the
power cord. Do not locate this
product where the cord will be abused
by persons walking on it.
9. Do not overload wall outlets and
extension cords as this can result in
the risk of fire or electric shock.
10. Never push objects of any kind into
this product through cabinet slots as
they may touch dangerous voltage
points or short out parts that could
result in a risk of fire or electric shock.
Never spill liquid of any kind on the
product.
11. To reduce the risk of electric shock,
do not disassemble this product, but
take it to a qualified service personnel
when some service or repair work is
required. Opening or removing
covers may expose you to dangerous
voltages or other risks. Incorrect
reassembly can cause electric shock
when the appliance is subsequently
used.
US
2
Page 3

12. Unplug this product from the wall
outlet and refer servicing to qualified
service personnel under the following
conditions:
A. When the power cord or plug is
damaged or frayed.
B. If liquid has been spilled into the
product.
C. If the product has been exposed to
rain or water.
D. If the product does not operate
normally by following the operating
instructions. Adjust only those
controls that are covered by the
operating instructions because
improper adjustment of other controls
may result in damage and will often
require extensive work by a qualified
technician to restore the product to
normal operation.
E. If the product has been dropped or
the cabinet has been damaged.
F. If the product exhibits a distinct
change in performance.
13. Avoid using a telephone (other than
a cordless type) during an electrical
storm. There may be a remote risk of
electric shock from lightning.
14. Do not use the telephone to report a
gas leak in the vicinity of the leak.
SA VE THESE
INSTRUCTIONS
CAUTION:
To reduce the risk of fire or injury to persons by
battery, read and follow these instructions.
1. Use only the following type and size battery
pack: Sony BP-T24.
2. Do not dispose of the battery pack in a fire.
The cell may explode. Check with local codes
for possible special disposal instructions.
3. Do not open or mutilate the battery pack.
Released electrolyte is corrosive and may
cause damage to the eyes or skin. It may be
toxic if swallowed.
4. Exercise care in handling battery pack in
order not to short the battery with conducting
materials such as rings, bracelets, and keys.
The battery or conductor may overheat and
cause burns.
5. Charge the battery pack provided with or
identified for use with this product only in
accordance with the instructions and
limitations specified in the instruction manual
provided for this product.
6. Observe proper polarity orientation between
the battery pack and battery charger.
INFORMATION FOR
GENERAL TELEPHONES
1. This equipment complies with Part 68 of the
FCC rules. On the bottom of this equipment
is a label that contains, among other
information, the FCC registration number and
ringer equivalence number (REN) for this
equipment. If requested, this information
must be provided to the telephone company.
2. The applicable registration jack (connector)
USOC-RJ11C is used for this equipment.
3. This equipment is designed to be connected to
the telephone network or premises wiring
using a compatible modular jack which is Part
68 compliant.
The FCC compliant telephone cord and
modular plug is provided with this
equipment.
4. The REN is used to determine the quantity of
devices which may be connected to the
telephone line. Excessive RENs on the
telephone line may result in the devices not
ringing in response to an incoming call. In
most, but not all areas, the sum of the RENs
should not exceed five (5.0).To be certain of
the number of devices that may be connected
to a line, as determined by the total RENs,
contact the local telephone company.
5. If your equipment (SPP-A968) causes harm to
the telephone network, the telephone
company will notify you in advance that
temporary discontinuance of service may be
required. But if advance notice isn’t practical,
the telephone company will notify the
customer as soon as possible. Also, you will
be advised of your right to file a complaint
with the FCC if you believe it is necessary.
US
US
3
Page 4

6. The telephone company may make changes in
its facilities, equipment, operations or
procedures that could affect the operation of
the equipment. If this happens the telephone
company will provide advance notice in order
for you to make necessary modifications to
maintain uninterrupted service.
7. If trouble is experienced with this equipment
(SPP-A968), for repair or warranty
information, please contact Sony Direct
Response Center: Tel 1-800-222-7669. If the
equipment is causing harm to the telephone
network, the telephone company may request
that you disconnect the equipment until the
problem is resolved.
8. All repairs will be performed in an authorized
Sony service station.
9. This equipment cannot be used to party lines
or coin lines.
10.This equipment is hearing aid compatible.
If your telephone is equipped
with automatic dialers
When programming emergency numbers and
(or) making test calls to emergency numbers:
1. Remain on the line and briefly explain to
the dispatcher the reason for the call.
2. Perform such activities in the off-peak
hours, such as early morning or late
evenings.
Caution
You are cautioned that any changes or
modifications not expressly approved in this
manual could void your authority to operate this
equipment.
Note
This equipment has been tested and found to
comply with the limits for a Class B digital
device, pursuant to Part 15 of the FCC Rules.
These limits are designed to provide reasonable
protection against harmful interference in a
residential installation. This equipment
generates, uses and can radiate radio frequency
energy and, if not installed and used in
accordance with the instructions, may cause
harmful interference to radio communications.
However, there is no guarantee that interference
will not occur in a particular installation. If this
equipment does cause harmful interference to
radio or television reception, which can be
determined by turning the equipment off and
on, the user is encouraged to try to correct the
interference by one or more of the following
measures:
– Reorient or relocate the receiving antenna.
– Increase the separation between the
equipment and receiver.
– Connect the equipment into an outlet on a
circuit different from that to which the
receiver is connected.
– Consult the dealer or an experienced radio/
TV technician for help.
Note on Warranty
Be sure to save the receipt and attach it to
your warranty card when having your
equipment repaired at an authorized Sony
service station.
US
4
Page 5

Table of contents
Getting Started
6 Read this first
7 Step 1: Checking the package
contents
8 Step 2: Setting up the base unit
11 Step 3: Preparing the battery
pack
13 Step 4: Entering your area code
14 Identifying the parts
Basics
17 Making calls
18 Redialing
19 Receiving calls
Telephone Features
21 One-touch dialing
21 Storing phone numbers
22 Making calls with one-touch
dialing
23 Phone Directory
23 Storing phone numbers and
names
24 Changing a stored name
and/or phone number
25 Erasing a memory location
26 Making calls from the Phone
Directory
27 Paging
Answering Machine
Features
28 Preparing the answering machine
28 Setting the day and time
29 Recording the greeting
31 Selecting the ring time
32 Selecting the answering
mode
33 Turning on the answering
function
34 Playing back messages
35 Screening incoming calls
36 Recording a memo
37 Operating from an outside
phone
37 Setting the remote ID
code
38 Picking up new messages
Caller ID Features
39 Understanding the Caller ID
service
39 When you receive a call
40 Looking at the Caller ID list
40 Viewing the Caller ID list
41 Erasing data from the
Caller ID list
43 Using the Caller ID list
43 Calling back a number from
the Caller ID list
44 Storing a number of the
Caller ID list into the Phone
Directory
45 To change the number of
digits of the phone number
46 Using “Caller ID with call
waiting” service
Additional Information
47 Mounting the base unit on a wall
48 Notes on power sources/
Maintenance
49 Troubleshooting
52 Specifications
53 Index
Table of contents
US
US
5
Page 6
Getting Started
Read this first
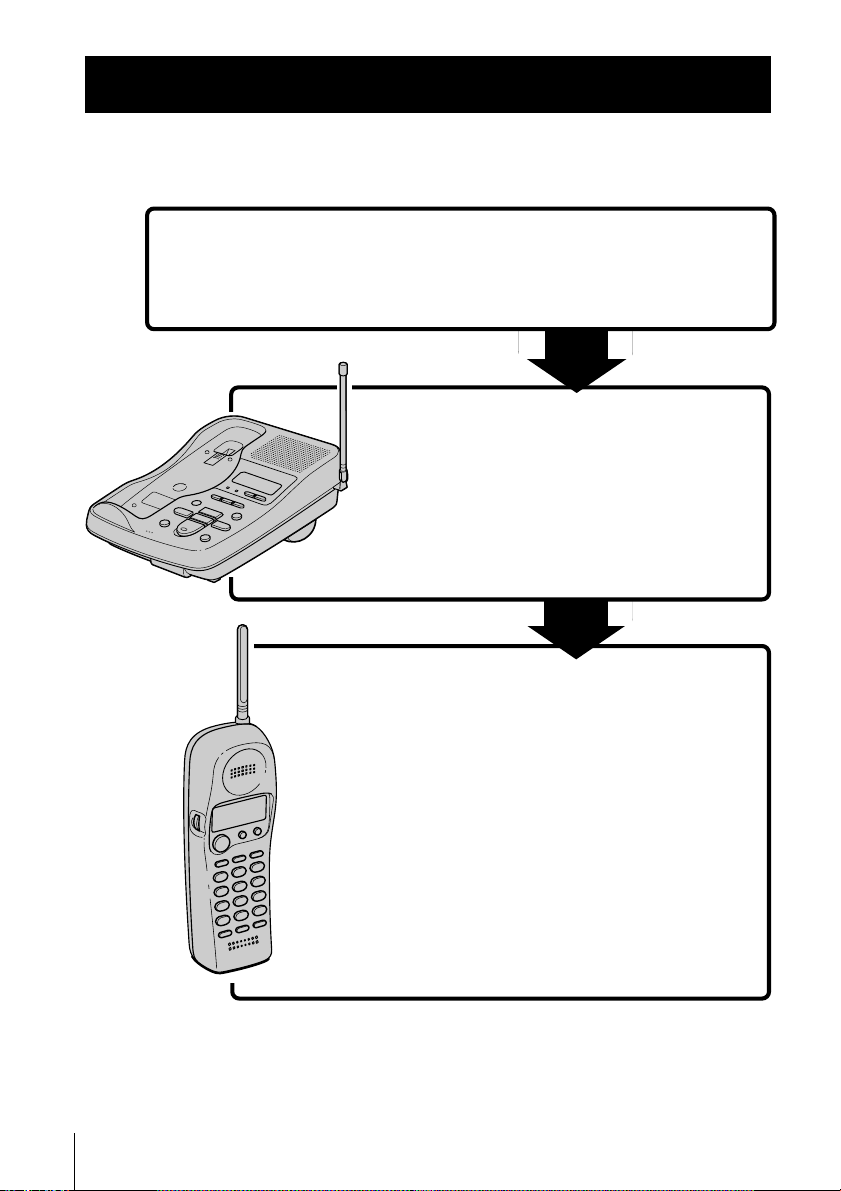
Before you use your phone, you must set it up. Here’s a quick way to
set up your phone: Steps 1, 2, 3 and 4.
Step 1 (page 7)
First, unpack the phone and the supplied
accessories.
Step 2 (pages 8 to 10)
Next, you need to do three things to set
up the base unit, including finding the
best location for the base unit.
Base unit
US
6
Getting Started
Handset
Step 3 (pages 11 to 12)
Then, you need to insert the battery
pack into the handset and charge it for
more than 12 hours.
Step 4 (page 13)
Finally, you need to enter your area
code to use the Caller ID service.
That’s it!
Page 7
Step 1
Checking the package contents
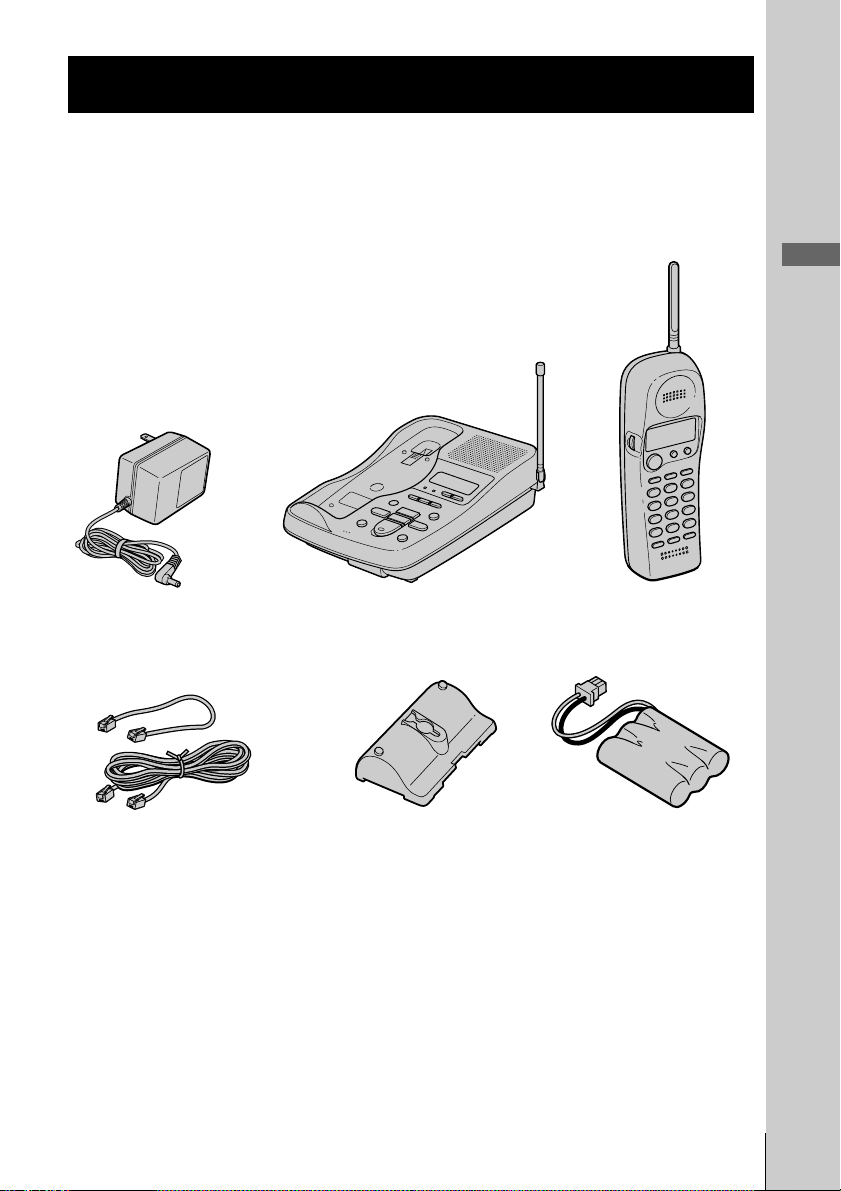
Make sure you have received the following items in the package.
If anything is missing, contact your local Sony dealer.
Getting Started
Telephone line cords (2)
Base unit
Wall bracket/stand for base
unit
HandsetAC power adaptor (AC-T46)
Rechargeable battery
pack (BP-T24)
Getting Started
US
7
Page 8
Step 2
Setting up the base unit
Do the following steps:
• Choose the best location
• Connect the base unit
• Choose the dialing mode
Choose the best location
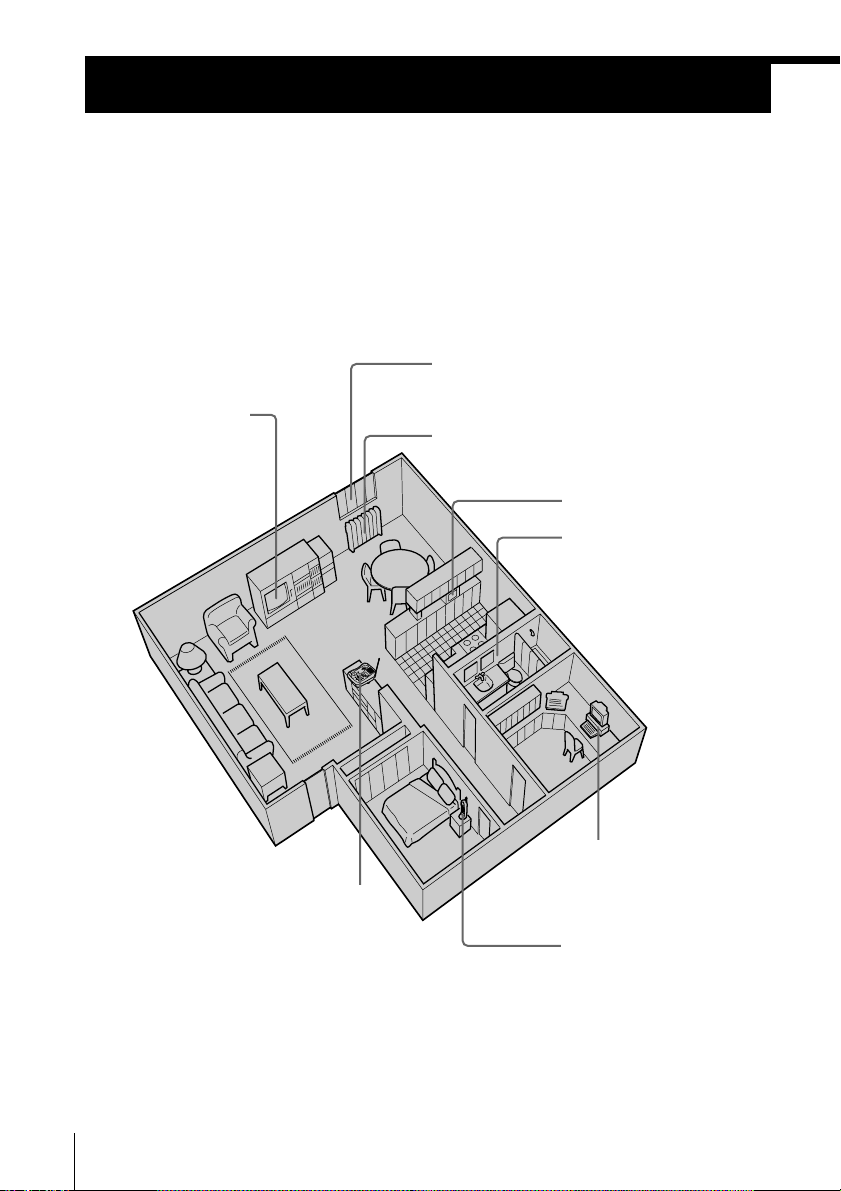
Where you place the base unit affects the reception quality of the handset.
Away from noise sources such as a window
by a street with heavy traffic
Away from television
sets and other
electronic equipment
Away from heat sources, such as radiators,
airducts, and sunlight
Away from a microwave
oven
Away from excessive
moisture, extremely low
temperatures, dust,
mechanical vibration, or
shock
Away from a personal
computer
Near a central location
and on a level surface
Away from another
cordless telephone
CAUTION: • Should you experience intermittent loss of audio during a conversation, try
US
8
Getting Started
moving closer to the base unit or move the base unit from other noise sources.
• The cordless telephone operates at a frequency that may cause interference to
nearby TVs and VCRs; the base unit should not be placed near or on the top of a
TV or VCR; and, if interference is experienced, moving the cordless telephone
farther away from the TV or VCR will often reduce or eliminate the interference.
Page 9
1
2
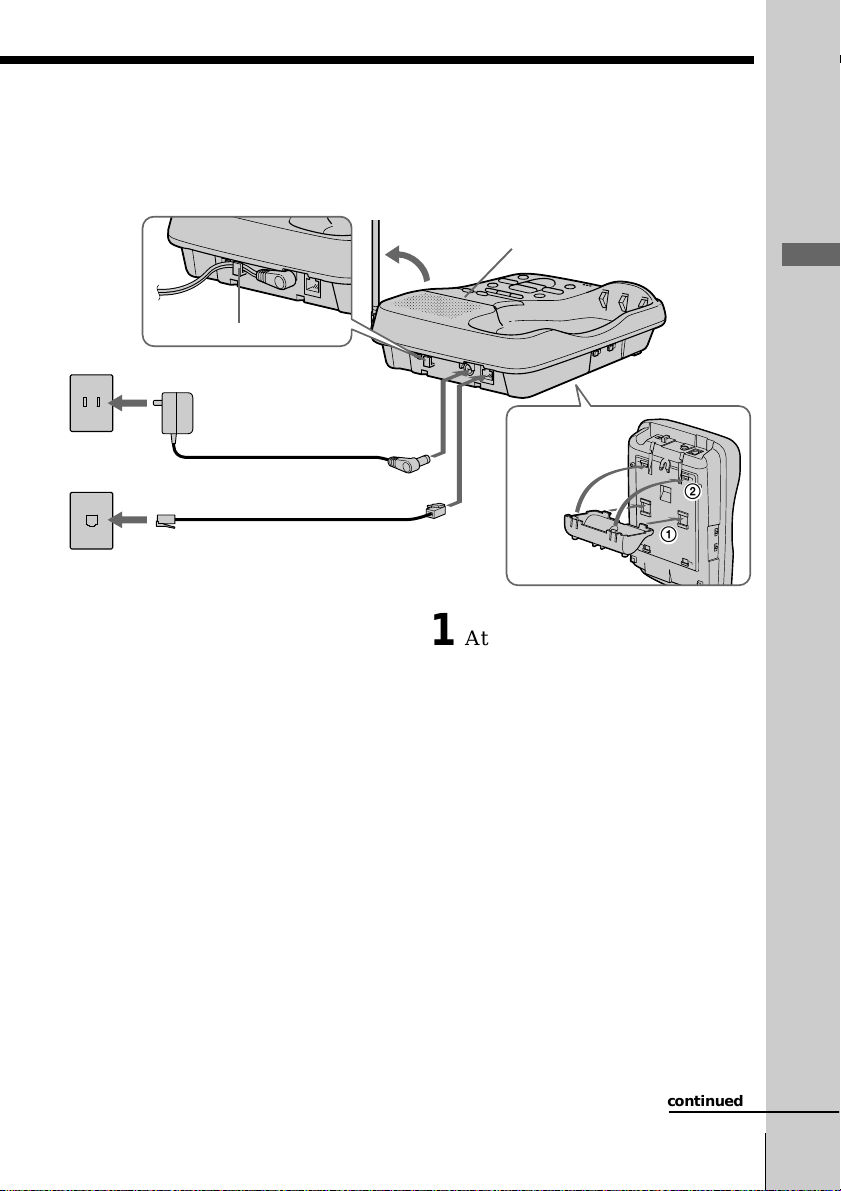
Connect the base unit
If you want to hang the base unit on the wall, see page 47.
3
2
To AC outlet
To
telephone
outlet
Hook the cord.
AC power adaptor
(supplied)
Telephone line cord
(supplied)
To DC IN 9V
To LINE
4
Display window
Align the f
1
marks.
1 Attach the wall bracket on the
bottom of the base unit as
illustrated to use it as a stand.
2 Connect the telephone line cord
to the LINE jack and to a
telephone outlet.
Getting Started
3 Connect the AC power adaptor
to the DC IN 9V jack and to an
AC outlet.
“P” flashes in the display
window.
4 Raise the antenna. Make sure it
points toward the ceiling.
continued
Getting Started
US
9
Page 10

–
+
Step 2: Setting up the base unit (continued)
Notes
• Use only the supplied AC-T46 AC power adaptor.
Do not use any other AC power adaptor.
• Connect the AC power adaptor to a continuous power
supply.
• Place the base unit close to the AC outlet so that you
can unplug the AC power adaptor easily.
Polarity of the plug
Tips
• If your telephone outlet is not modular, contact your
telephone service company for assistance.
• To remove the wall bracket, press the upper tab.
Modular
Choose the dialing mode
For the telephone to work properly, select an appropriate dialing mode
(tone or pulse).
DIAL MODE switch
Depending on your dialing system, set the DIAL MODE switch as
follows:
If your dialing system is Set the switch to
Tone T
Pulse P
If you aren't sure of your dialing system
Make a trial call with the DIAL MODE switch set to T.
If the call connects, leave the switch as is; otherwise, set to P.
US
10
Getting Started
Page 11

Step 3
Preparing the battery pack
Charge the battery pack for more than 12 hours before you start using
your phone.
Red
Hook
Black
BP-T24
1 Slide open the battery
compartment lid of the handset.
2 Connect the battery connector
with correct polarity (black wire
goes on right side and red wire
goes on left).
3 Hook the cords and insert the
battery pack. Then close the lid.
4 Place the handset on the base
unit.
You can place either side facing
up.
The CHARGE lamp lights up
when the handset is properly
seated on the charge terminals
of the base unit. Charge the
battery pack for more than 12
hours so that the battery is fully
charged. The CHARGE lamp
remains lit even after charging
is completed.
Getting Started
CHARGE lamp
continued
Getting Started
11
US
Page 12

Step 3: Preparing the battery pack (continued)
Battery duration
A fully charged battery pack lasts for about:
• Approx. 6 hours when you use the handset continuously
• Approx. 10 days (RING ON mode) or 1 month (RING OFF mode)
when the handset is in standby mode.
Notes
• The battery pack will gradually discharge over a long period of time, even if
not in use.
• If you leave the battery pack in the handset without charging it, the battery
pack will be completely discharged.
It may require several times of charging to recover to its full capacity.
• While charging, the battery pack warms up. This is not a malfunction.
To obtain the best performance from the battery
Do not place the handset on the base unit after each call. The battery
works best if the handset is returned to the base unit after two or three
calls. However, do not leave the handset off the base unit for a long
period of time as this will completely discharge the battery pack.
When to purchase a new battery pack
If the battery lasts only a few minutes even after 12 hours of charging,
the usable life of the battery has expired and needs replacement.
Contact your local Sony authorized dealer or service center, and ask
for Sony BP-T24 rechargeable battery pack.
Note
Battery life may vary depending on usage condition and ambient temperature.
US
12
Getting Started
Page 13

Step 4
Entering your area code
When you use this phone for the first time, or move to an area that has
a different area code, you must enter your area code.
This is necessary because the phone must distinguish local or long
distance calls to properly dial calls from the Caller ID list.
Getting Started
Turn Press
1 Press (VOL/PGM).
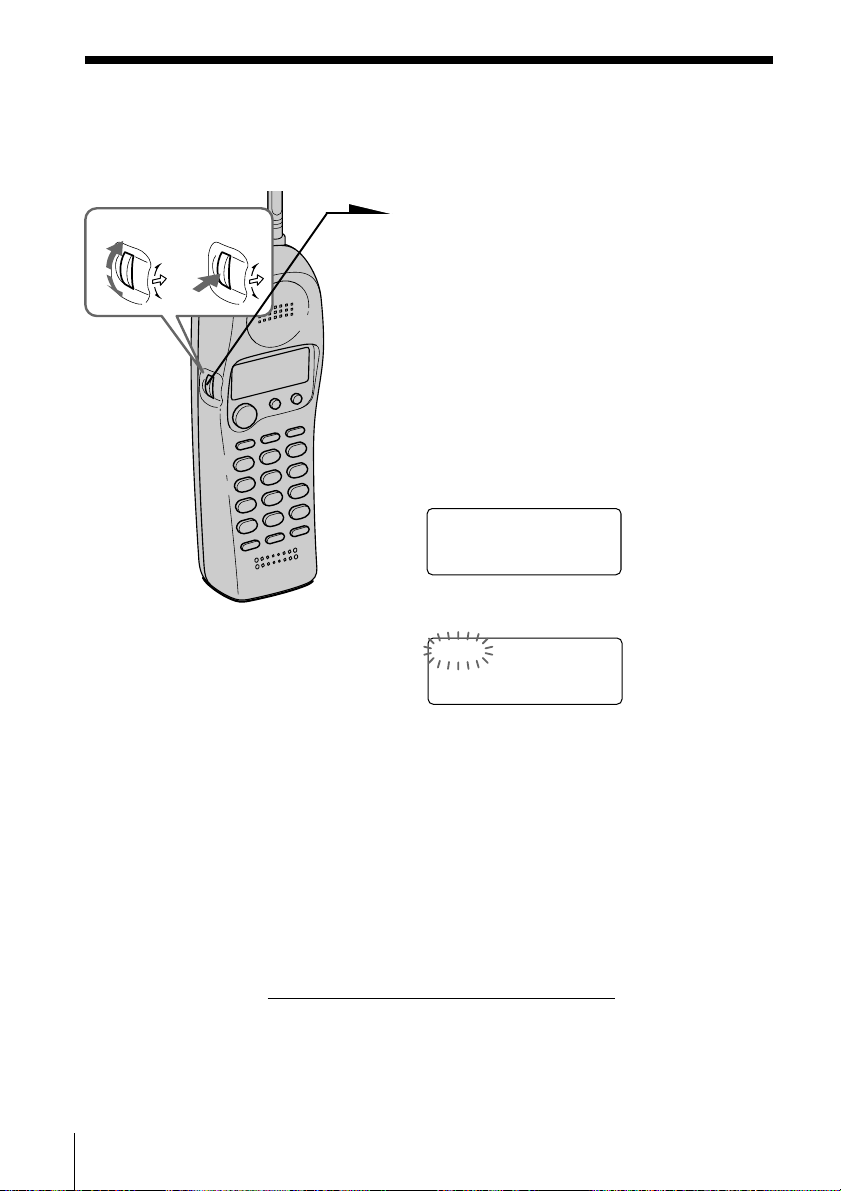
2 Turn Jog Dial up to make “AREA”
flash.
DIRECTORY AREA
3 Press Jog Dial.
“ENTER AREA CODE” appears on
the display.
4 Enter three digits of your area code
using the dialing keys.
5 Press (VOL/PGM).
You hear a long confirmation beep.
Notes
• If an area code is already entered, it appears on the display in step 3. To enter
a different area code, see “To change the area code” below.
• Do not allow more than 20 seconds to elapse between each step of the
procedure.
Tips
• You may press Jog Dial instead of (VOL/PGM) in step 5.
• To check the current area code, perform steps 1 to 3 above. The area code
appears on the display for 20 seconds.
To change the area code
1 Perform steps 1 to 3 above.
The current area code appears on the display.
2 Turn Jog Dial down to erase the current area code.
3 Enter a new area code using the dialing keys.
4 Press (VOL/PGM).
You hear a long confirmation beep.
Getting Started
13
US
Page 14
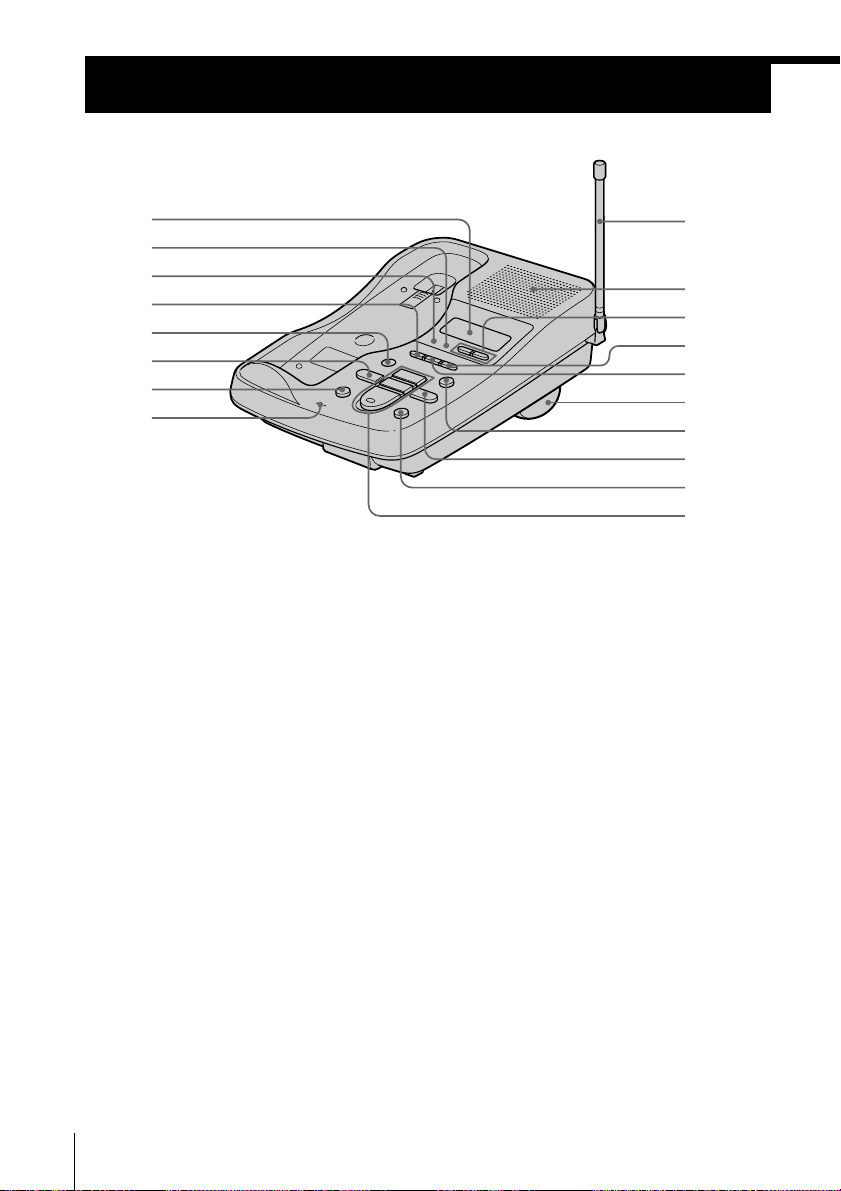
Identifying the parts
Refer to the pages indicated in parentheses for details.
Base Unit
1
2
3
4
5
6
7
8
1 Display window (p.9, 34)
2 IN USE lamp
Lights when the cordless handset is
in use.
3 CHARGE lamp (p. 11)
Lights while the battery is being
charged.
4 GREETING button (p. 29)
Plays back the greeting message.
Also used when recording a
greeting.
5 ERASE button (p. 30, 34)
Erases the recorded greeting or
messages.
6 REPEAT/SLOW button (p. 28,
34)
Press to repeat the current message
or go back to the previous message.
Keep the button pressed for slow
playback of messages.
7 MEMO button (p. 36)
Records a memo message.
8 MIC (microphone) (p. 29, 36)
US
14
Getting Started
9
0
qa
qs
qd
qf
qg
qh
qj
qk
9 Antenna (p. 9, 47)
0 Speaker
qa VOLUME +/– buttons (p. 34)
Adjusts the speaker volume.
qs TIME button (p. 28)
Press when setting the day andtime,
or to check the current time.
qd SET/REC button (p. 28, 29, 37)
Press to set the time or to record a
greeting. Also used when setting
the remote ID code (security code).
qf Wall bracket/stand for base
unit (p. 9, 47)
qg ANSWER ON/OFF button
(p. 33)
Turns the answering function on or
off. Lights when the answering
function is on, and flashes when a
new message is recorded. Also used
when setting the remote ID code
(security code).
qh SKIP/QUICK button (p. 28, 34)
Press to skip to the next message.
Keep the button pressed for quick
playback of messages.
Page 15
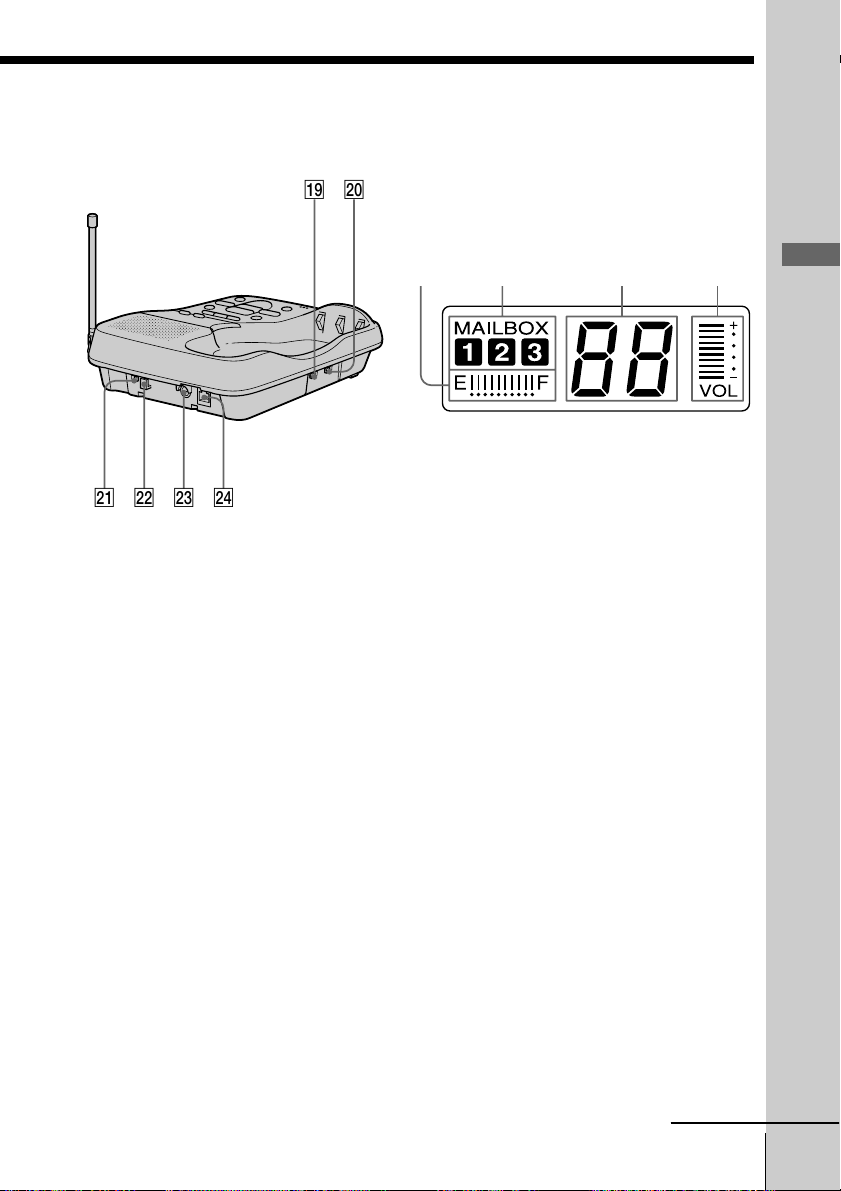
ql w;
Display
The display on the base unit shows the
answering machine operation.
wa
ws
wd
wf
qj HANDSET LOCATOR button
(p. 27)
Allows you to page the cordless
handset.
qk PLAY/STOP (MAILBOX 1, 2, 3)
buttons (p. 34)
Plays back the messages in each
mail box.
ql AUDIBLE INDICATE switch
(p. 32)
Selects the answering mode.
w; RINGER SELECT switch (p. 31)
Selects the ring time.
wa DIAL MODE switch (p. 10)
Selects pulse or tone dialing.
ws Hook for AC power adaptor
cord (p. 9)
wd DC IN 9V jack (p. 9)
wf LINE (telephone line) jack
(p. 9)
12 3 4
1 Memory capacity indicator
(p. 32)
Indicates the available memory
capacity, from E (Empty) to F (Full),
for recording. The bars increase as
the available memory capacity
decreases.
2 MAILBOX indicator (p. 34)
Displayed when there are messages
recorded and when the messages
are being played back.
Flashes when there are new
messages recorded.
3 Message number indicator
(p. 34)
Indicates the number of new
messages recorded. “A” appears in
the announcement only mode. “F”
appears when there is no space to
record messages. “P” appears when
the power is turned on.
4 VOL (volume) indicator
Indicates the speaker volume. The
bars increase as the volume is
turned up.
continued
Getting Started
Getting Started
US
15
Page 16
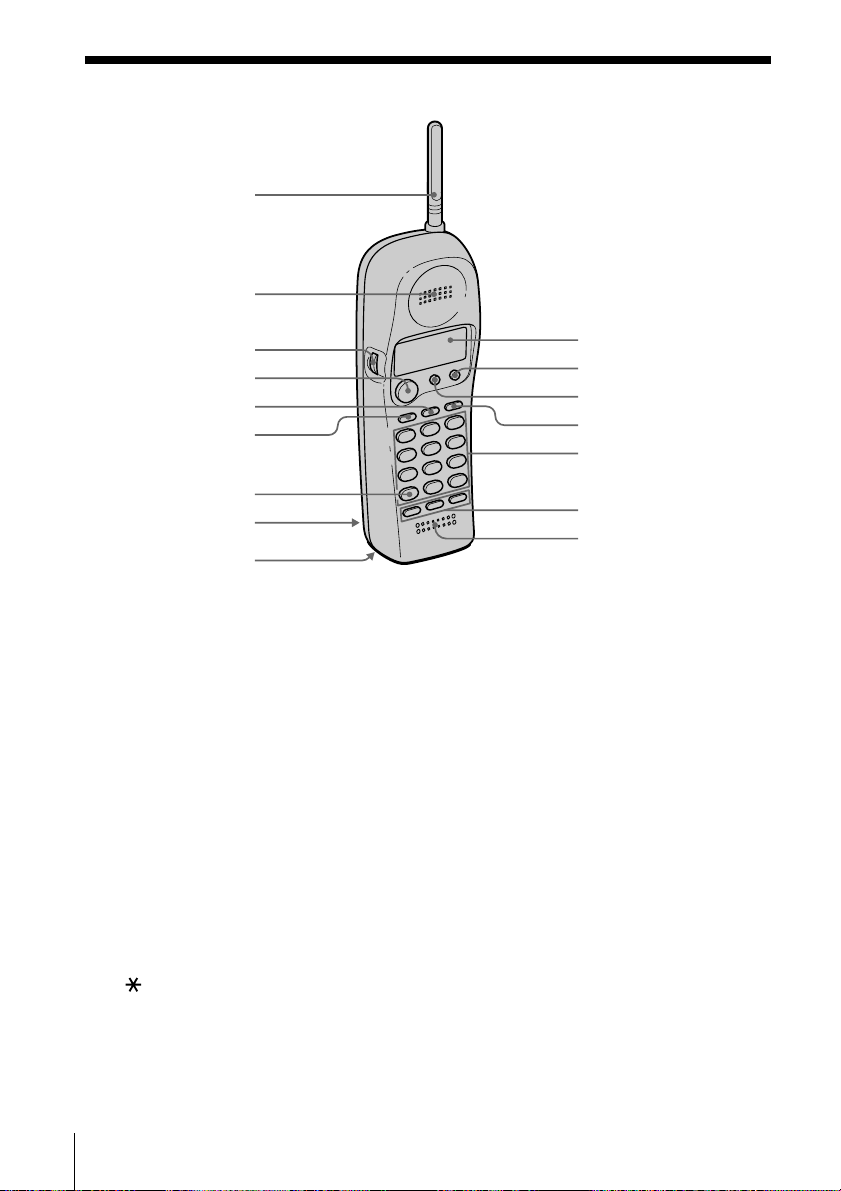
Identifying the parts (continued)
Handset
1
2
3
4
5
6
7
8
9
1 Antenna
2 Speaker
3 Jog dial (p. 13, 23, 40)
4 TALK button (p. 17, 35)
Lets you make or receive a call.
5 REDIAL button (p. 18)
Redials the last number called.
6 VOL (volume) /PGM (program)
button (p. 13, 17, 21, 23)
Used to adjust the speaker volume.
Also used to store numbers in
Phone Directory or for one-touch
dialing.
7 TONE button (p. 17, 38)
Allows you to switch temporarily to
tone dialing.
8 Battery compartment (p. 11)
0
qa
qs
qd
qf
qg
qh
9 RING switch (p. 12, 20)
Switches the ringing mode.
q; Display window (p. 39)
qa CALL WAITING/FLASH button
(p. 19, 46)
Switches to a second call if you
have “call waiting” service, or lets
you make a new call.
qs OFF button (p. 17)
Allows you to disconnect the call.
qd PAUSE button (p. 22)
Inserts a pause in the dialing
sequence.
qf Dialing keys (p. 17)
qg ONE-TOUCH DIAL (A, B, C)
buttons (p. 21)
qh Microphone
16
US
Getting Started
Page 17
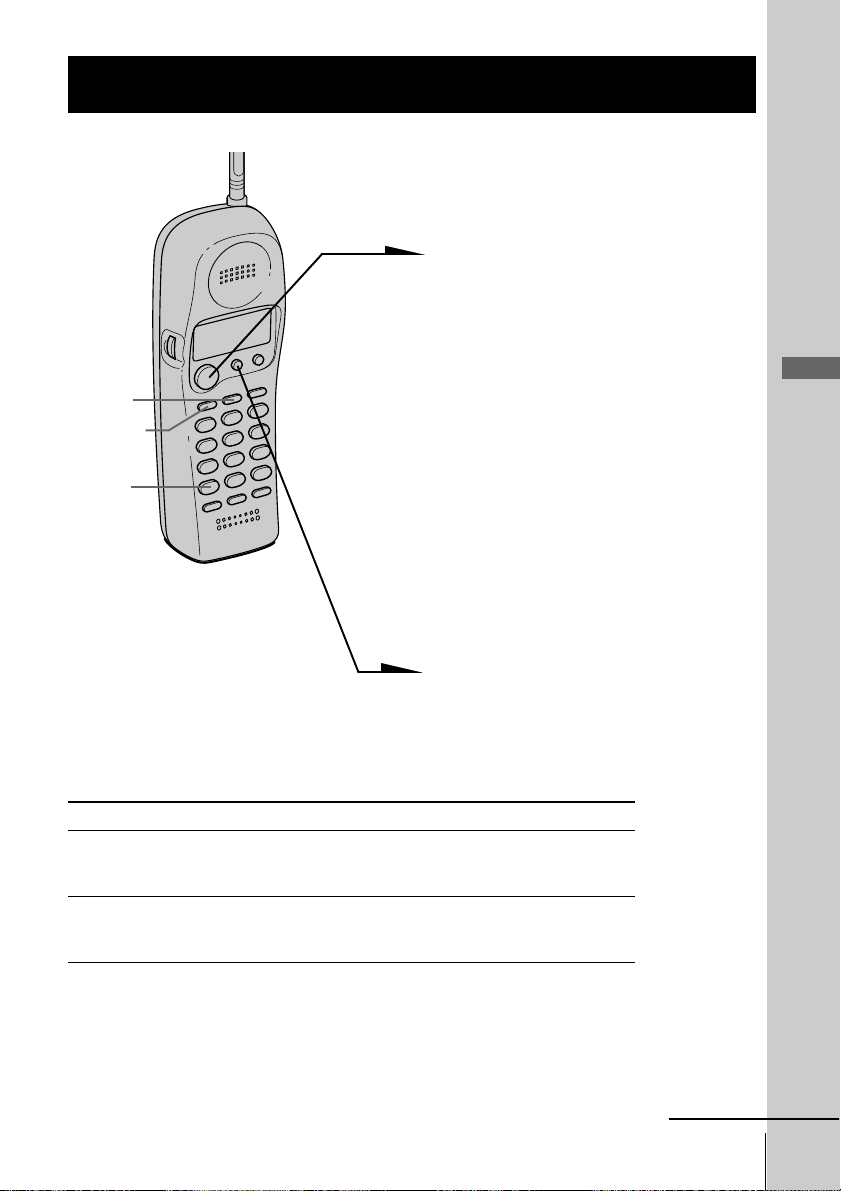
Basics
Making calls
(REDIAL)
(VOL/PGM)
(*TONE)
1 Pick up the handset from the
base unit.
2 Press (TALK) and wait until
“TALK” appears on the display.
The IN USE lamp on the base
unit lights up.
You then hear a dial tone. If you
hear five short error beeps and
“OUT OF RANGE” appears on
the display, move closer to the
base unit.
3 Dial the phone number.
During a conversation, you can
adjust the handset volume.
Follow the procedure described
in the following table.
Basics
4 When you’re done talking, press
(OFF) or replace the handset on
the base unit.
The display goes off.
Additional tasks
To Do this
Adjust the handset volume During phone conversations, press
(VOL/PGM). Each press of (VOL/PGM)
switches the speaker volume by four levels.
Switch to tone dialing temporarily Press (*TONE) after you are connected.
The line will remain in tone dialing until
disconnected.
Notes
• If the handset beeps every second during conversation and “OUT OF
RANGE” appears on the display, move closer to the base unit; otherwise, the
call will be disconnected after one minute.
• When you increase the sound volume, in some cases the background noise
may be increased as well. You should adjust the volume accordingly.
continued
Basics 17
US
Page 18

Making calls (continued)
If the battery becomes weak during a call
The handset will beep every three seconds and E and “BATTERY
LOW” appear on the display. Finish your call and charge the battery
pack.
For optimum performance, charge the battery for a full 12 hours.
Note that during the first 10 - 15 minutes of charging, the phone will
be inactive, i.e., unable to make or receive a call.
After this initial 10 - 15 minutes, you may be able to use the phone, but
the battery duration will be very short; thus it is recommended that
you fully charge the battery before next use.
Redialing
1 Press (TALK) and wait until “TALK” appears on the display.
The IN USE lamp on the base unit lights up.
2 Press (REDIAL) to redial the number last dialed.
Note
If the number exceeds 32 digits or if it is erased, five short error beeps will alert
you that the number cannot be dialed.
To check the phone number before redialing
Without pressing (TALK), press (REDIAL).
The number last dialed is displayed for five seconds.
To dial the number, press (TALK) while the number is displayed.
Note
The number will not be displayed if the last dialed number exceeds 32 digits or
if it is erased.
To erase the last phone number dialed
While the handset is not in use, press (REDIAL) twice.
The number will be erased from the memory, and you will hear a long
confirmation beep.
US
18
Basics
Page 19

Receiving calls
1 When you hear the phone ring,
pick up the handset from the
base unit, and press (TALK) .
“TALK” appears on the display
and the IN USE lamp on the
base unit lights up.
During a conversation, you can
adjust the handset volume.
(CALL WAITING/FLASH)
(VOL/PGM)
Follow the procedure described
in the table below.
2 When you’re done talking, press
(OFF) or replace the handset on
the base unit.
The display and the IN USE
lamp on the base unit go off.
If you have subscribed to the Caller ID service
• the caller’s number and/or name appears on the display when you receive a
call (see page 39).
• the ringer sound changes to a higher tone if the call matches the number
stored on ONE-TOUCH DIAL buttons or in the Phone Directory (memory
match function; see page 39).
Basics
Additional tasks
To Do this
Adjust the handset volume During phone conversations, press
(VOL/PGM).
Each press of (VOL/PGM) switches the
speaker volume by four levels.
Switch to another call Press (CALL WAITING/FLASH).
(“call waiting” service*) Press (CALL WAITING/FLASH) again to
return to the first caller.
* You need to subscribe to the service from your telephone company.
Tip
To inform you of an incoming call, the display shows “**RINGING**” when
ringing.
continued
Basics 19
US
Page 20

Receiving calls (continued)
To turn the ringer off
Set the RING switch on the bottom to OFF.
You can save battery power.
The handset will not ring. You can still make calls, and
also receive calls if another telephone connected to the
same line rings to inform you on incoming calls, but you
cannot page the handset from the base unit.
Note
You cannot receive Caller ID data when the handset is off
and the base unit in RING OFF mode. See page 39 for
details.
RING switch
20
US
Basics
Page 21

Telephone Features
One-touch dialing
You can dial with one touch of a key by storing a phone number on a one-touch dial
button.
Storing phone numbers
1 Press (VOL/PGM).
DIRECTORY AREA
(PAUSE)
Jog Dial
(TALK)
2 Press one of the three
ONE-TOUCH DIAL buttons
((A) to (C)).
You hear a confirmation beep.
A=
If a number is stored, it appears
on the display. To store a new
number, turn Jog Dial to erase it.
3 Enter the phone number you
want to store.
You can enter up to 16 digits,
including a tone and a pause,
each of which is counted as one
digit.
4 Press (VOL/PGM).
You hear a long confirmation
beep, and the number is stored.
The display goes off.
Telephone Features
continued
Telephone Features
21
US
Page 22

One-touch dialing (continued)
Note
Do not allow more than 20 seconds to elapse between each step of the procedure.
Tips
• If you have entered a wrong number in step 3 and have not pressed
(VOL/PGM) (step 4) yet, just turn Jog Dial down to erase it. Then enter the correct
number.
• You may press Jog Dial instead of (VOL/PGM) in step 4.
To store a number to be dialed via Private Branch Exchange
(PBX)
Before entering a phone number in step 3 on page 21, do as follows:
1 Enter the outside line access digit (e.g., 9).
2 Press (PAUSE).
To change a stored number
1 Press (VOL/PGM).
2 Press one of the ONE-TOUCH DIAL buttons ((A) to (C)).
The current number appears on the display.
3 Turn Jog Dial down to erase the current number.
4 Enter a new number.
5 Press (VOL/PGM).
Note
You can replace the stored number with a new number, but you cannot just erase it.
Making calls with one-touch dialing
1 Press (TALK) and wait until “TALK” appears on the display.
2 Press one of the ONE-TOUCH DIAL buttons ((A) to (C)).
The phone number stored on the one-touch dialing button will
appear on the display and will be dialed.
To check the phone number before one-touch dialing
While the handset is not in use, press one of the ONE-TOUCH DIAL
buttons ((A) to (C)).
The number stored on the button appears on the display for five seconds.
To dial the number, press (TALK) while the number is displayed.
US
22
Telephone Features
Page 23

Phone Directory
You can dial a number by scrolling through the Phone Directory.
You can store up to 50 numbers.
Storing phone numbers and names
Example: to store “SONY” “123-4567”.
Turn Press
1 Press (VOL/PGM).
(Be sure not to press (TALK).)
DIRECTORY AREA
Character table
Key Character
(1) 1
(2) A n B n C n 2
(3) D n E n F n 3
(4) G n H n I n 4
(5) J n K n L n 5
(6) M n N n O n 6
(7) P n Q n R n S n 7
(8) T n U n V n 8
(9) W n X n Y n Z n 9
(0) 0
(*) *
(#) #
If “DIRECTORY” is not flashing, turn
Jog Dial down to make it flash.
2 Press Jog Dial.
“ENTER NAME” appears.
3 Enter the name using the dialing keys.
You can enter up to 15 characters.
Press a dialing key until the desired
character appears. (See the character
table for details.)
Enter successive characters in the same
way.
To enter two characters assigned to the
same key, or to enter a “space”, turn
Jog Dial up to move the cursor to the
right.
Example: to enter “SONY”, press (7)
four times (S), press (6) three times
(O), turn Jog Dial up to move the
cursor, press (6) twice (N), and press
(9) three times (Y).
SONY
continued
Telephone Features
Telephone Features
US
23
Page 24
Phone Directory (continued)
DIAL PGM ERASE
1234567
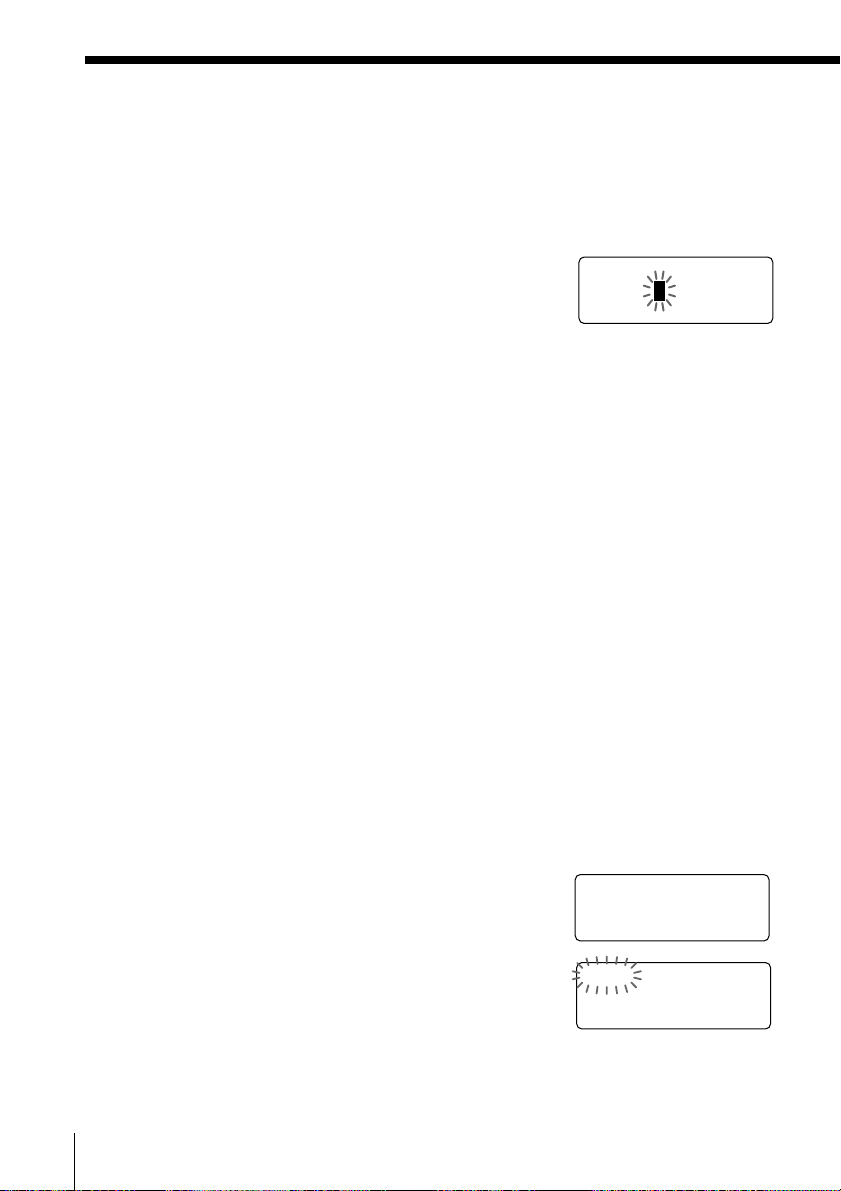
4 Press (VOL/PGM).
“ENTER NUMBER” appears.
5 Enter the phone number.
You can enter up to 16 digits, including a tone
and a pause, each of which is counted as one
digit.
SONY
123456
6 Press (VOL/PGM).
You hear a long confirmation beep, and the
name and the number are stored. The display
goes off.
Notes
• If you try to save a 51st phone number, you will hear five short error beeps
and “MEMORY FULL” will be displayed. You cannot store the phone
number. To store another phone number, erase one of the stored phone
numbers (see page 25).
• Do not allow more than 20 seconds to elapse between each step of the
procedure.
Tips
• If you have entered a wrong name or number in step 3 or 5, turn Jog Dial
down to erase it. Then enter the correct name or number.
• You may press Jog Dial instead of (VOL/PGM) in steps 4 and 6.
• To store a number to be dialed via PBX, follow the steps on page 22 when
entering a phone number.
Changing a stored name and/or phone number
7
1 Display the name and phone number you want
to change by following steps 1 and 2 on page 26.
2 Press Jog Dial.
US
24
Telephone Features
SONY
1234567
Page 25

3 Turn Jog Dial up to make “PGM” flash and
DIAL PGM ERASE
1234567
press Jog Dial.
The cursor flashes at the last character of the
name.
4 Turn Jog Dial down to erase the characters and
enter the new name.
If you want to change only the number, skip this
step.
5 Press Jog dial.
The cursor flashes at the last digit of the phone
number.
6 Turn Jog Dial down to erase the number and
enter the new number.
If you don’t want to change the number, skip
this step.
7 Press Jog Dial.
You hear a long confirmation beep and the
name and/or the number is changed.
Erasing a memory location
SON
Y
1234567
SMITH
123456
7
Telephone Features
1 Display the name and phone number you want
to erase by following steps 1 and 2 on page 26.
2 Press Jog Dial.
3 Turn Jog Dial up to make “ERASE” flash and
press Jog Dial.
4 Turn Jog Dial up to make “YES” flash, then
press Jog Dial.
You hear a long confirmation beep and the
memory location is erased.
SONY
1234567
ERASE NO YES
1234567
continued
Telephone Features
25
US
Page 26
Phone Directory (continued)
Making calls from the Phone Directory
Turn Press
1 Press Jog Dial twice.
“DIRECTORY” appears on the
display.
2 Display the name and phone number
you want to call.
To search in alphabetical order: Turn
Jog Dial up or down.
To search by entering the initial
character: Press the dialing key of the
desired character, then turn Jog Dial.
SONY
1234567
3 Press Jog Dial.
DIAL PGM ERASE
1234567
4 Press Jog Dial again.
The phone number will be dialed.
Tip
You may press (TALK) to make a call instead of following steps 3 and 4.
About the search order
The names appear in the following order when you turn Jog Dial up or
down.
• Alphabetical order: ABC...XYZ ˜ symbols* ˜ * ˜ # ˜ 0 - 9
n
* Symbols appear only when you stored the number having the symbol from
the Caller ID list.
• Initial character: To search for “SONY” for example, press (7) and
then turn Jog Dial to search through the names starting with P, Q, R,
S or 7.
US
26
Telephone Features
n
Page 27
Paging
You can page the handset from the base unit.
Note that you cannot page if the handset is in use.
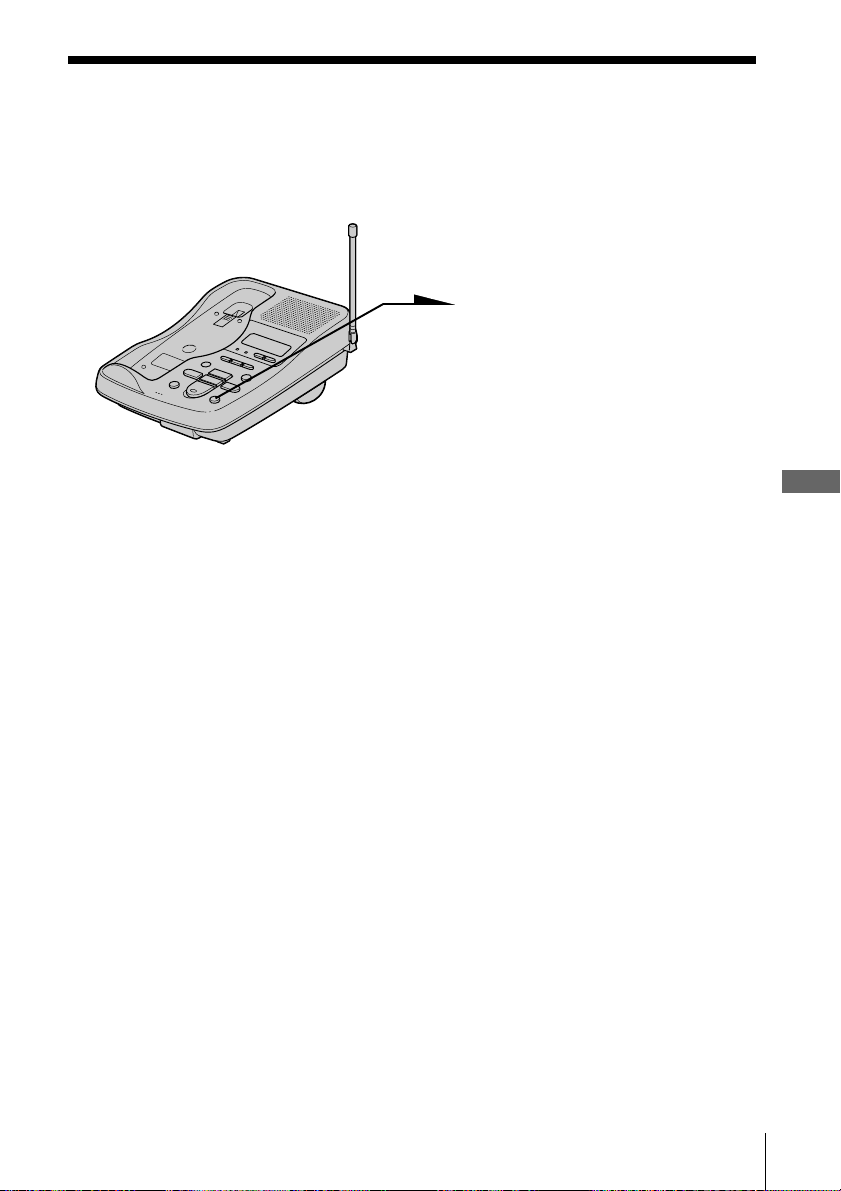
To page
Press (HANDSET LOCATOR).
The handset rings.
When you keep pressing
(HANDSET LOCATOR), the
handset rings continuously.
Note
You cannot page the handset when its RING switch is set to OFF.
Telephone Features
Telephone Features
27
US
Page 28
Answering Machine Features
Preparing the answering machine
Note that you cannot operate the base unit while the handset is in use.
Setting the day and time
Set the day and time so that you can stamp day and time for the
incoming messages. You’ll hear the recorded day and time when you
play back messages.
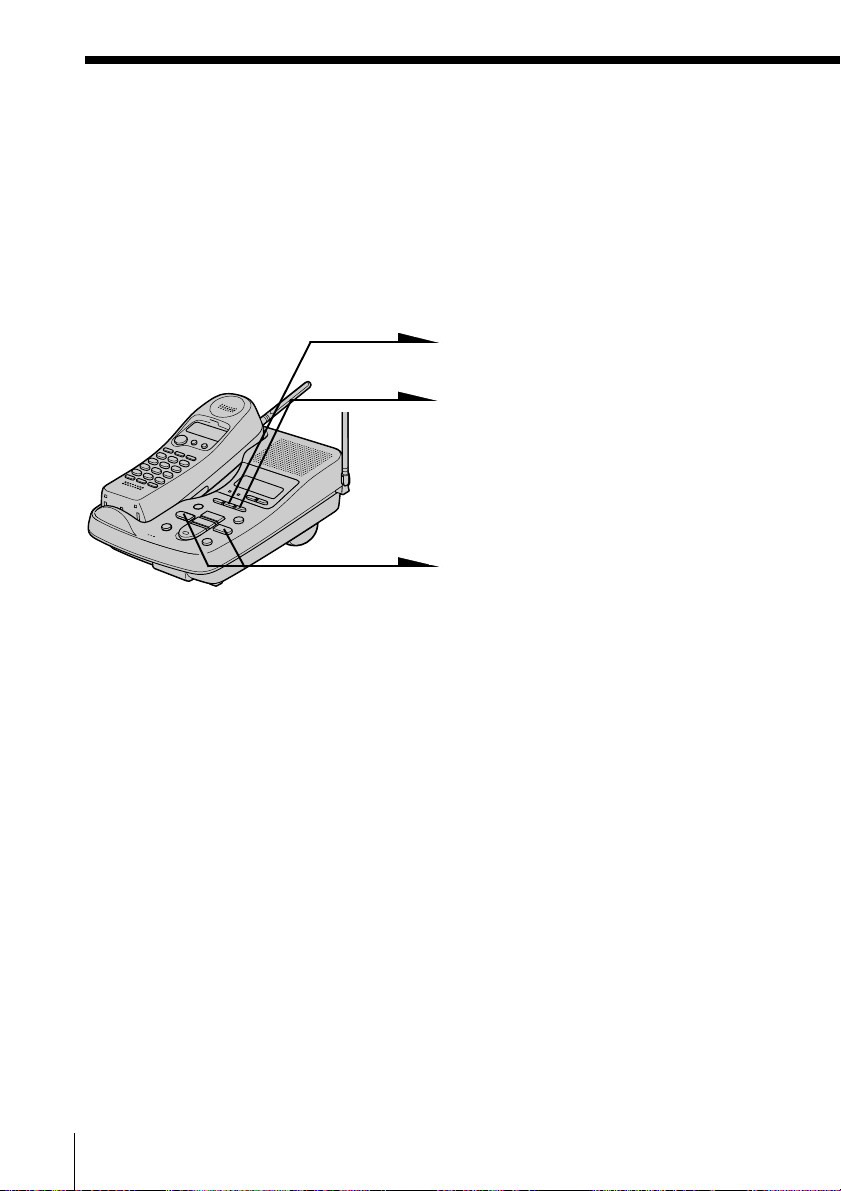
1 Press (SET/REC).
2 Press (TIME).
You hear a voice guide: “Please
set the day. To select, press the
SKIP or REPEAT button. To
enter, press the SET button”.
3 Press (SKIP/QUICK) or
(REPEAT/SLOW) repeatedly
until the correct day of the week
is announced.
Press (SKIP/QUICK) to advance,
or (REPEAT/SLOW) to go back.
4 Press (SET/REC).
You hear a voice guide: “Please set the hour. To select, press
the SKIP or REPEAT button. To enter, press the SET
button”.
5 Press (SKIP/QUICK) or (REPEAT/SLOW) repeatedly until the
correct hour is announced.
6 Press (SET/REC).
You hear a voice guide: “Please set the minute. To select,
press the SKIP or REPEAT button. To enter, press the SET
button”.
US
28
Answering Machine Features
Page 29
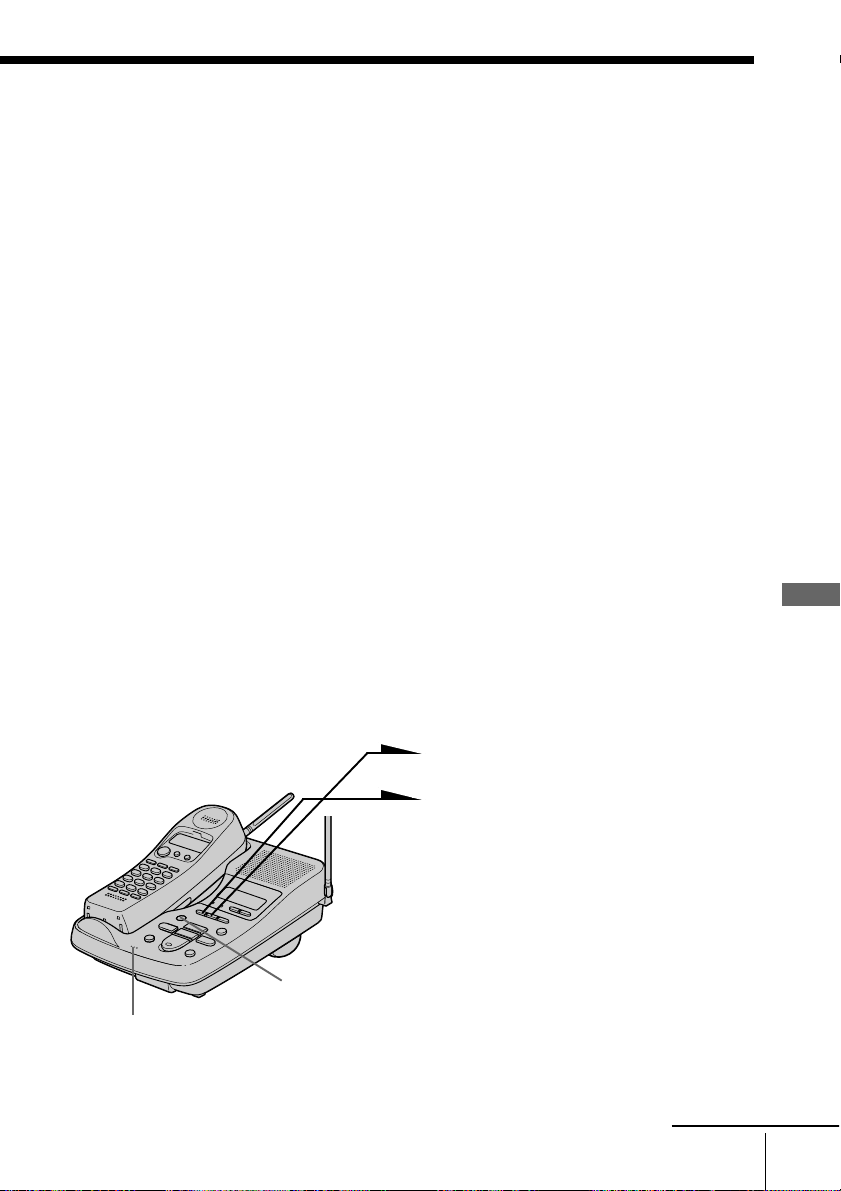
7 Press (SKIP/QUICK) or (REPEAT/SLOW) repeatedly until the
correct minute is announced.
8 Press (SET/REC).
You hear a long confirmation beep, followed by the day and
time. Then the phone starts counting time.
Notes
• Do not allow more than 20 seconds (or 60 seconds when setting the minute)
to elapse between each step of the procedure.
• If a power interruption occurs, the day and time will be erased.
• If the current day and time are not set, you will not hear a time stamp when
you play back recorded messages. If you try to check the current time, you
will hear five short error beeps.
To check the current time
Press (TIME). You hear the current day and time.
Recording the greeting
This answering machine has prerecorded greetings (see page 30).
However, you can record your own greeting.
The greeting must be between two seconds and four minutes long.
You can record only one greeting, and it is used regardless of the
answering mode (“normal” and “announcement only” modes. See
page 32). Therefore, if you decide to change the mode, make sure that
you record a new greeting to match the answering mode.
Answering Machine Features
MIC (Microphone)
(ERASE)
1 Press (SET/REC).
2 Press (GREETING).
You hear a voice guide and a
long confirmation beep.
3 After the tone, start recording.
Speak about 12 inches (30 cm)
away from the microphone.
4 Press (SET/REC) to stop
recording.
The phone automatically
replays the recorded greeting.
continued
Answering Machine Features
29
US
Page 30

Preparing the answering machine (continued)
Notes
• If recording did not succeed, you hear five short error beeps. Start over the
procedure.
• If a call comes in or (TALK) is pressed while recording a greeting, recording
is cancelled. Start over the procedure.
• If you hear five short error beeps while recording, the recording area may be
full. In this case, erase unnecessary messages (see page 34).
Tips
• If four minutes have passed in step 3, recording stops automatically.
• To record the greeting from a touch-tone phone, see page 38.
Prerecorded greeting
Normal mode: “Hello, I’m unable to answer your call right now.
Announcement only mode: “Hello, I’m unable to answer your call right now.
Tips
• If you wish to record your own “announcement only” greeting, follow the
above sequence after setting the AUDIBLE INDICATE switch to ANN ONLY
(page 32). Otherwise, the “normal” greeting will be recorded.
• You have to change the message each time you change the mode.
Please leave your name, number and message after
the tone.”
Please call again. Thank you.”
To check the greeting
Press (GREETING) to play back the greeting.
To change the greeting
Record a new greeting. The new greeting replaces the old one.
To erase the greeting
Press (ERASE) while playing back the greeting.
The answering machine will answer a call with the prerecorded
greeting.
To go back to the factory preset greeting
Press (ERASE) while playing back the greeting. This will bring back
the original greeting.
US
30
Answering Machine Features
Page 31
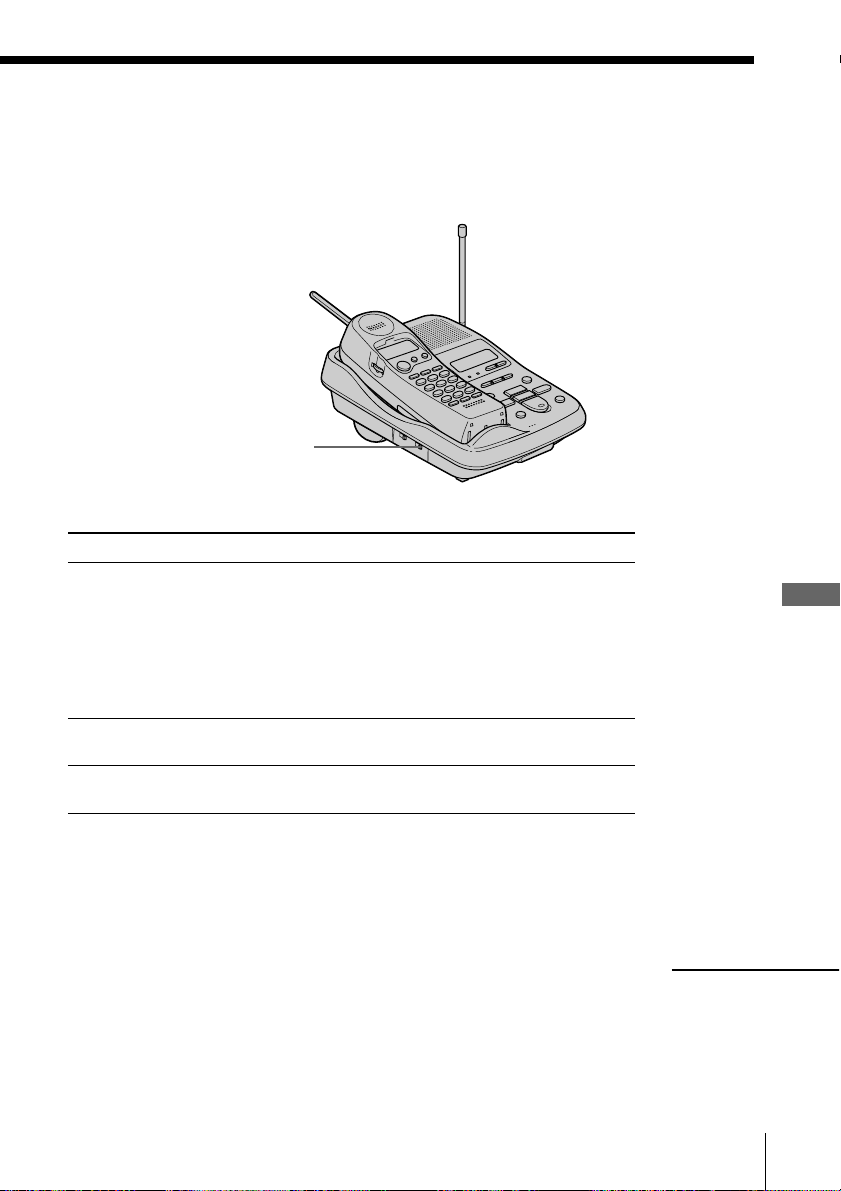
Selecting the ring time
There are three options of ring time. Select the ring time by setting the
RINGER SELECT switch.
RINGER SELECT
switch
Set RINGER SELECT to Mode
TS (Toll Saver) If new messages have been recorded, the phone
answers at the second ring and records incoming
messages; if no new messages are recorded, it
answers at the fifth ring. When you call from an
outside phone and hear more than two rings, you
know that there are no new messages. If you hang
up at this point before the phone answers, you can
save the toll for the call.
5 The phone always answers at the fifth ring and
records incoming messages.
2 The phone always answers at the second ring and
records incoming messages.
Answering Machine Features
continued
Answering Machine Features
31
US
Page 32
Preparing the answering machine (continued)
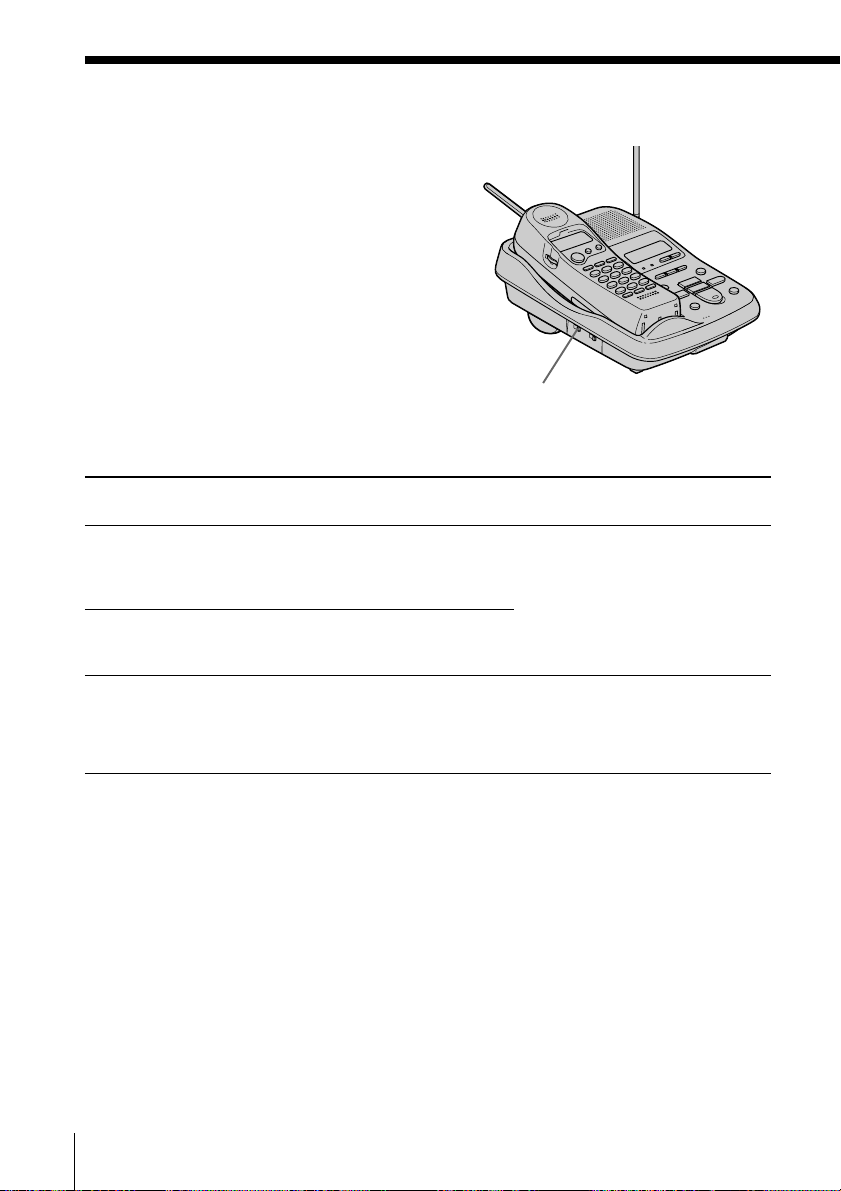
Selecting the answering mode
You can set the answering machine to record
incoming messages (normal mode), or just
make an announcement without recording
messages (announcement only mode).
You can record your own greeting, or use the
factory pre-recorded greetings.
In the normal mode, you also have the option
of having a beep to tell you if you have
received any new incoming messages.
AUDIBLE INDICATE
switch
Set the AUDIBLE When you wish to Pre-recorded greeting
INDICATE to
ON
(normal mode)
OFF
(normal mode)
ANN ONLY
(announcement only
mode)
play a greeting to ask the caller
to leave a message and have the
phone beep to alert you of
recorded incoming messages.
play a greeting to ask the caller
to leave a message but you do
not wish to sound a beep.
make an announcement to the
caller without accepting
incoming messages when, for
example, you are away on a
long vacation.
“Hello, I’m unable to answer
your call right now. Please leave
your name, number and
message after the tone.”
“Hello, I’m unable to answer
your call right now. Please call
again. Thank you.”
Note
The same greeting is used regardless of the answering mode. Therefore, if you
decide to change the mode, make sure that you record a new greeting to match
the answering mode.
When the memory is full
The recording area of this phone’s memory is about 20 minutes
(including the greeting, messages, and memo). If the remaining
recording area becomes less than one minute, “F” flashes on the
display, and the phone automatically switches to announcement only
mode, which does not record messages, and the greeting will be
switched to the pre-recorded greeting.
If you wish to record more messages, erase the existing messages (see
page 34). You can also erase the messages from an outside phone (see
page 38).
US
32
Answering Machine Features
Page 33
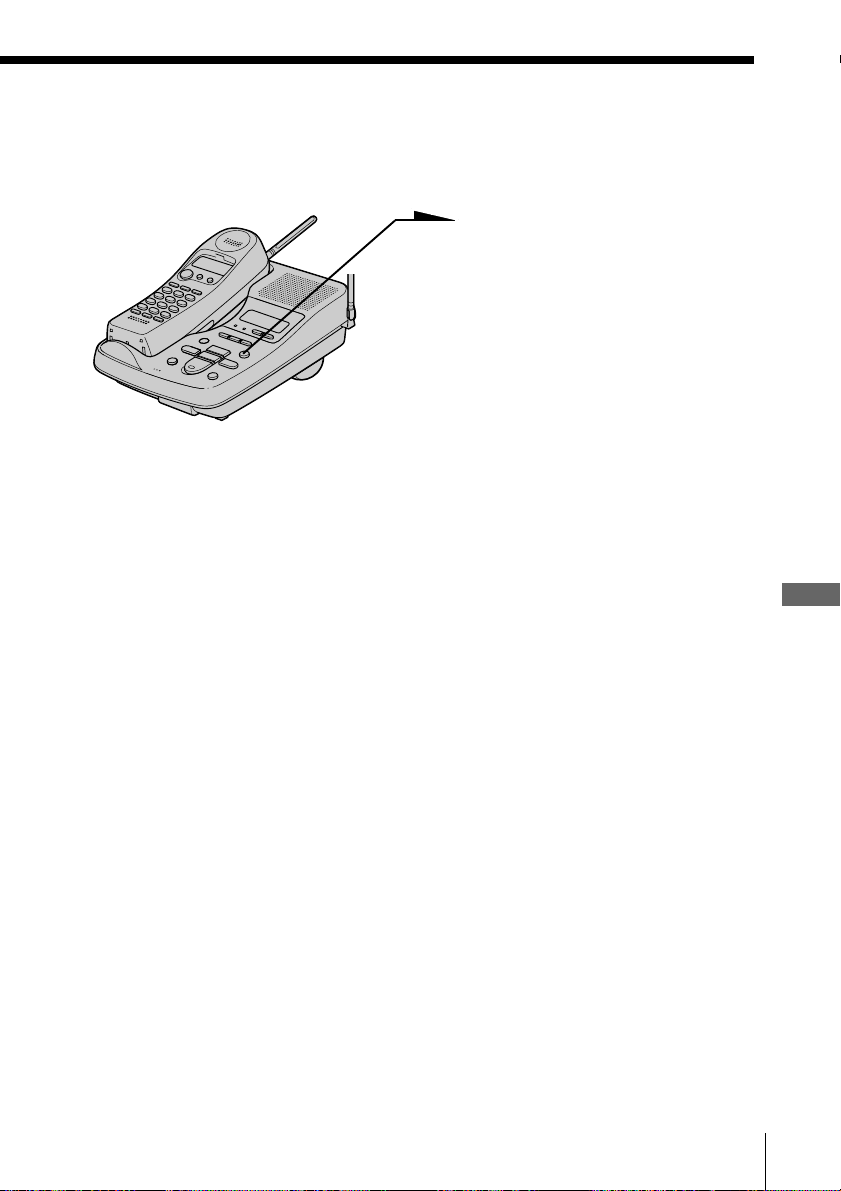
Turning on the answering function
Press (ANSWER ON/OFF)
so that it lights up in red .
Note
When the memory is full, you hear five short error beeps and you cannot turn
on the answering function. Erase unnecessary messages (see page 34).
Tips
• The answering machine will automatically answer a call after 10 rings even if
the answering function is off. The answering function will remain on for all
subsequent calls.
• You can also turn on or off the answering function from an outside phone
(see page 38).
When a caller calls
The caller can choose one of the two ways to leave a message:
• Select a mailbox by pressing (*)(1) (MAILBOX 1), (*)(2)
(MAILBOX 2) or (*)(3) (MAILBOX 3) while the caller hears the
greeting. The greeting stops and a beep will sound, then the caller
can start recording a message.
• Wait until the greeting finishes, then start recording a message.
When the caller does not select a mailbox, the messages goes into
MAILBOX 1.
Answering Machine Features
Notes
• If four minutes have passed while recording the incoming message, the line is
automatically disconnected.
• If the message is shorter than two seconds, it will not be recorded.
To turn off the answering function
Press (ANSWER ON/OFF) so that the red light goes off.
Answering Machine Features
33
US
Page 34
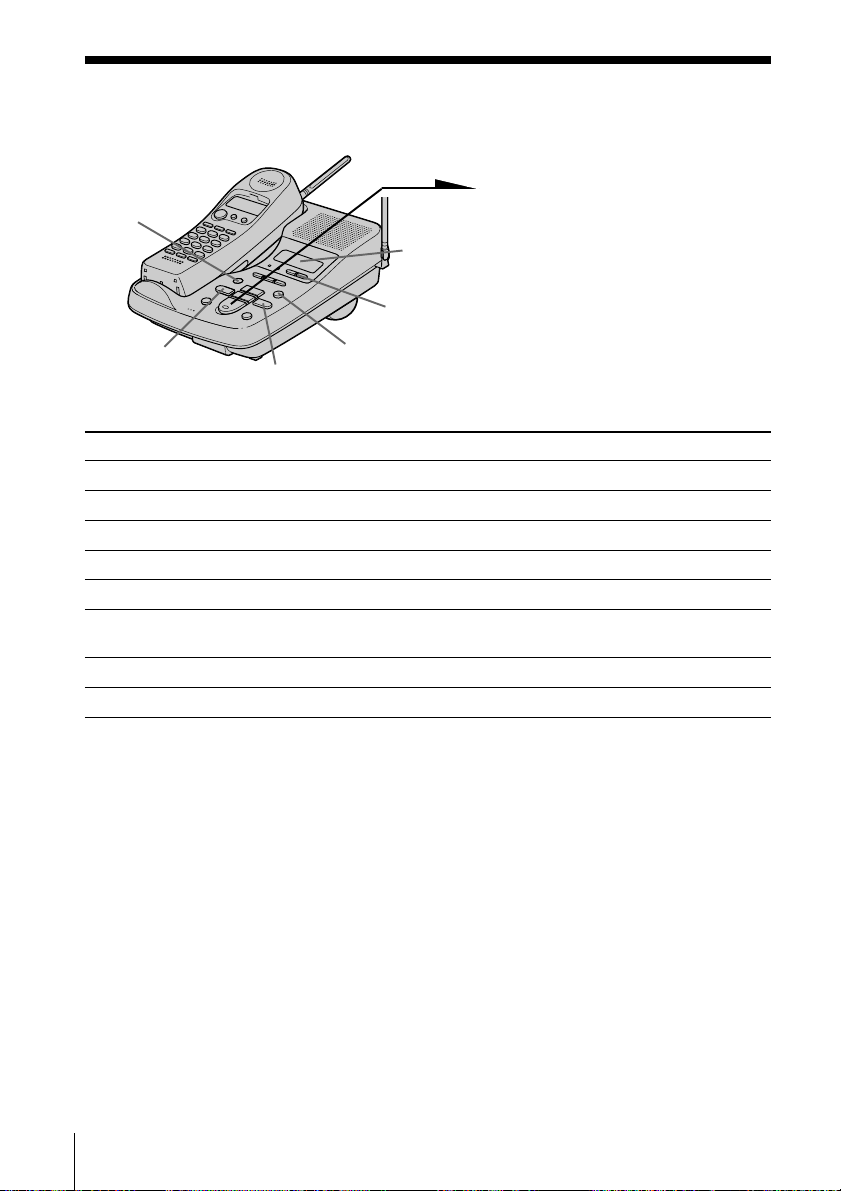
Playing back messages
When you come home
If (ANSWER ON/OFF) flashes in
(ERASE)
Message
number
indicator
(VOLUME)
(REPEAT/SLOW)
(SKIP/QUICK)
(ANSWER ON/OFF)
Additional tasks when playing back messages
To Do this
Adjust the speaker volume Press (VOLUME) (+) or (-).
Stop playback Press the mailbox button again.
Replay the messages Press the mailbox button again.
Skip to the next message Press (SKIP/QUICK) while the current message is playing.
Repeat the current message Press (REPEAT/SLOW) while the current message is playing.
Go back to previous messages Press (REPEAT/SLOW) within the first three seconds of the
Play back slowly Keep (REPEAT/SLOW) pressed during playback.
Play back quickly Keep (SKIP/QUICK) pressed during playback.
current message.
red, or the display shows the
number of new messages and
the MAILBOX indicator flashes,
press the mailbox button
((MAILBOX 1), (MAILBOX 2) or
(MAILBOX 3)). The machine
plays back from the first new
message.
To erase messages
You can erase only the messages you have played back.
• To erase one message, press (ERASE) while the message is being
played back.
• To erase all messages in a mailbox, press (ERASE), and a mailbox
button ((MAILBOX 1), (MAILBOX 2) or (MAILBOX 3)) . A long
confirmation beep sounds and all messages in the selected mailbox
are erased.
Notes
• The display shows the total number of “new” messages. Therefore, it is reset
to “0” when you play back all new messages, even they are not erased yet. Be
sure to erase unnecessary messages before the memory becomes full.
• When the number of new messages exceeds 99, “99” flashes on the counter.
• If a call comes in during playback, the playback stops.
• If a power interruption occurs or the AC power adaptor is disconnected
while erasing a message, all recorded message may be erased.
Tip
You can also listen to the messages or erase the messages from a touch-tone
phone (page 38).
US
34
Answering Machine Features
Page 35
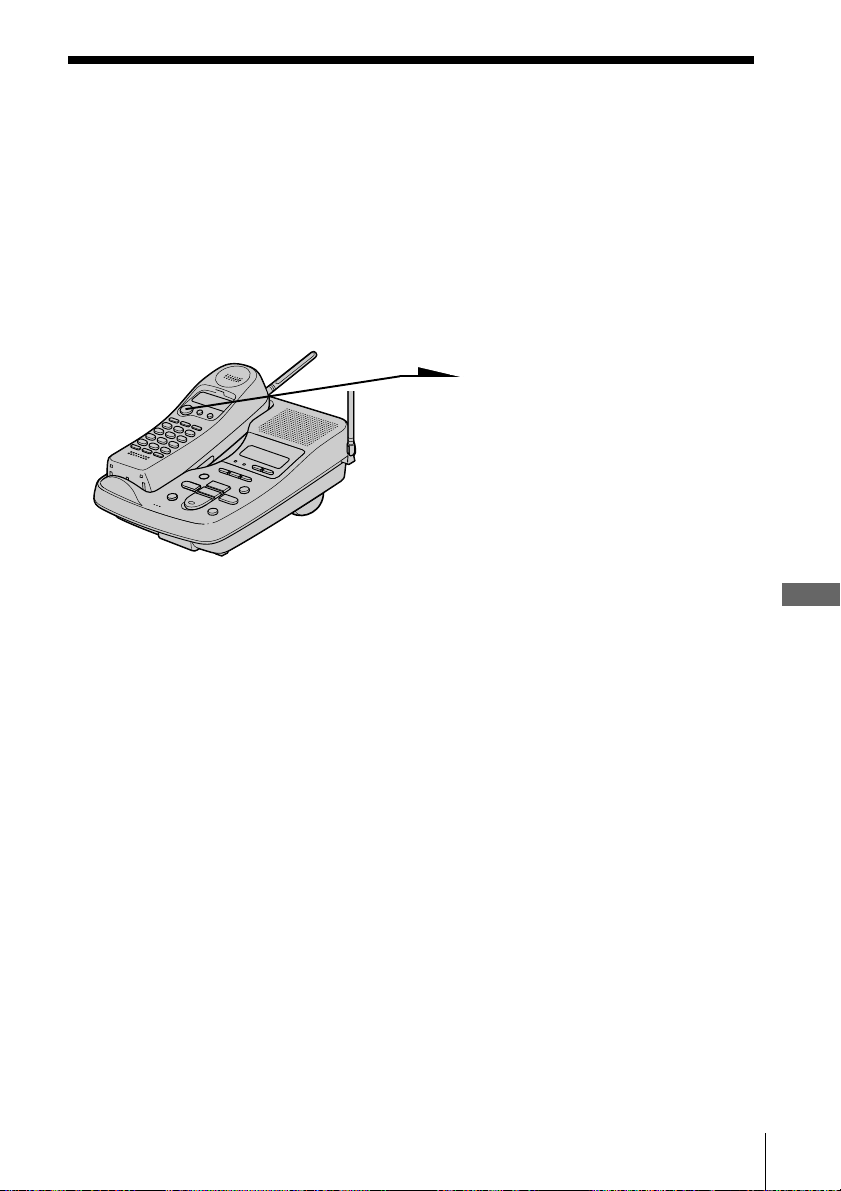
Screening incoming calls
You can screen calls by leaving the answering function on (see page
33) while you are at home. When a call is answered, you can hear the
message being recorded through the base unit (you cannot hear the
message through the handset) but the caller cannot hear you. Then,
you can decide whether to answer the call or not. This function is
available only on the base unit.
To answer the call
Press (TALK).
Recording is cancelled and you
can speak to the caller.
Note
If the volume is set to minimum, you cannot screen the calls.
Tip
You can also answer the call by picking up another phone if it is connected to
the same line.
Answering Machine Features
Answering Machine Features
US
35
Page 36
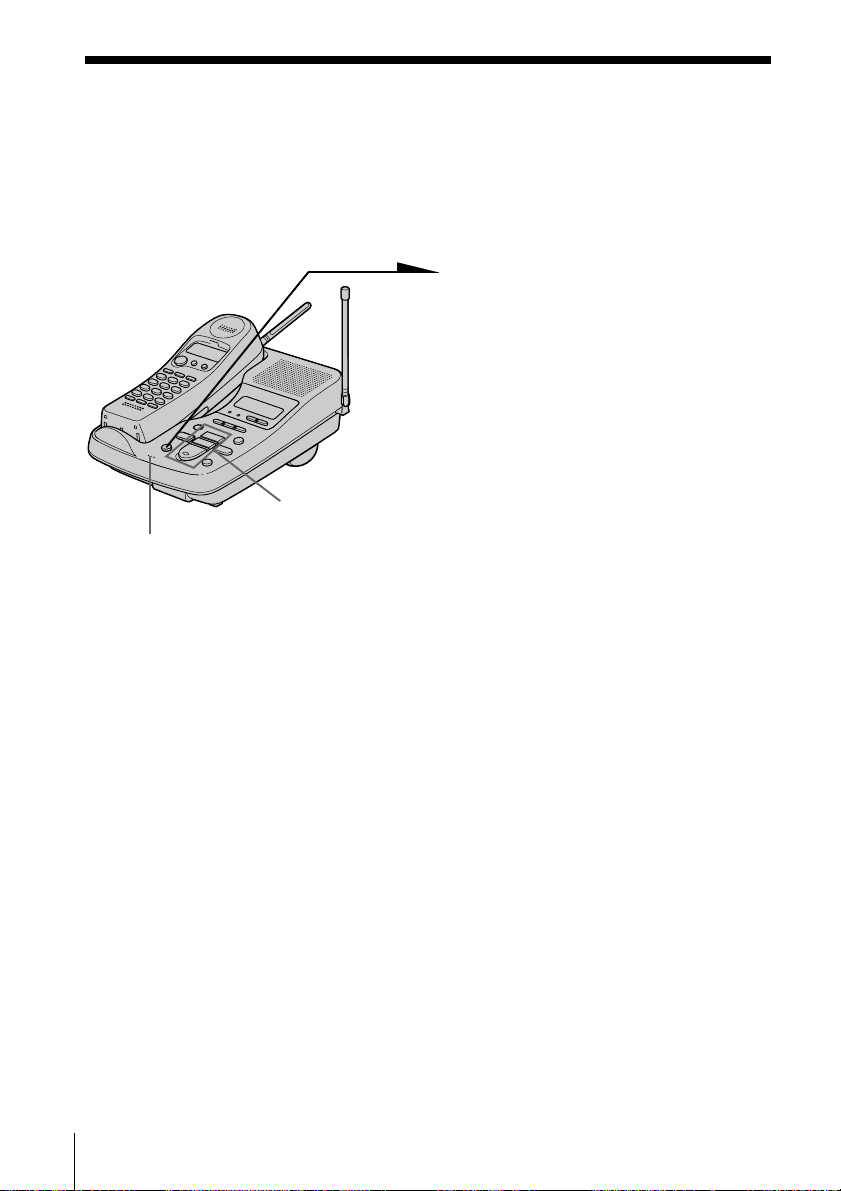
Recording a memo
You can record a “memo” (up to four minutes) as a personal reminder
or as a message for other people. You can play back the recorded
memo like any incoming messages (see page 34).
1 Press (MEMO).
You hear a voice guide.
2 Select a mailbox by pressing
(MAILBOX 1), (MAILBOX 2) or
(MAILBOX 3). You will hear a
voice guide, then a long
confirmation beep.
(MAILBOX 1)
MIC (Microphone)
(MAILBOX 2)
(MAILBOX 3)
3 After the tone, start recording.
Speak about 12 inches (30 cm)
away from the microphone.
4 Press (MEMO) to stop recording.
The message number in the
display increases by one.
Notes
• If you press (MEMO) when the memory is full (“F” flashing on the display),
you hear five short error beeps and you cannot record a memo.
• If a call comes in or (TALK)is pressed while recording a memo, recording is
canceled. Start over the procedure.
• If the remaining memory becomes full while recording, recording stops
automatically and “F” flashes on the display.
Tip
If four minutes have passed in step 3, recording stops automatically, and the
recorded memo is counted as a new message.
US
36
Answering Machine Features
Page 37
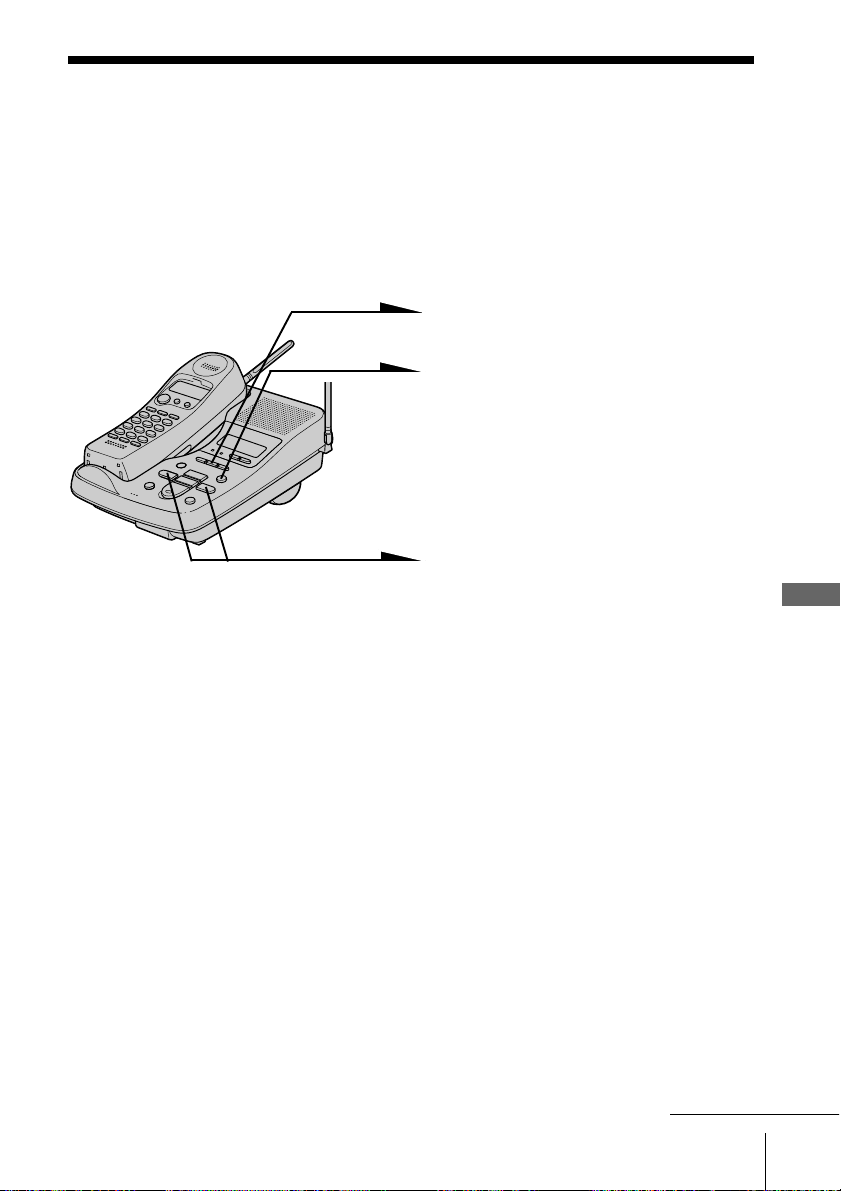
Operating from an outside phone
You can call from a touch-tone phone and pick up new messages
recorded on the phone. First, you just set the remote ID code (security
code) and turn on the answering function before going out.
Setting the remote ID code (security code)
1 Press (SET/REC).
2 Press (ANSWER ON/OFF).
You hear a voice guide:
“Please set the security code. To
select, press the SKIP or
REPEAT button. To enter, press
the SET button”.
3 Set a two-digit number between
00 and 99 by pressing
(SKIP/QUICK) or
(REPEAT/SLOW).
Press (SKIP/QUICK) to increase a
number, or (REPEAT/SLOW) to
decrease.
Each time you press
(SKIP/QUICK) or
(REPEAT/SLOW), the phone
announces a number.
Answering Machine Features
4 Press (SET/REC).
The remote ID code (security
code) is set, and you hear a long
confirmation beep.
To change the remote ID code (security code)
Enter a new remote ID code (security code). The new code will replace
the old one.
Answering Machine Features
continued
37
US
Page 38

Operating from an outside phone (continued)
Picking up new messages
1 Call your phone from a touch-tone phone.
2 While you hear your greeting play, press (#), and your remote ID code
(security code).
You hear a long confirmation beep and the greeting stops. Following the
voice guide informing you of the number of messages recorded, the
phone stands by for you to enter a control code.
3 To do other operations, enter the control code within 20 seconds (see the
table below). To quit, hang up the phone.
Control codes for remote operations
To Press
Play back messages in MAILBOX 1 (#) (1)
Play back messages in MAILBOX 2 (#) (2)
Play back messages in MAILBOX 3 (#) (3)
Repeat the current message (#) (4) while the message is being played back
Skip the current message (#) (6) while the message is being played back
Erase the current message (#) (9) while the message is being played back
Erase all messages in MAILBOX 1 (#) (9) (#) (1)
Erase all messages in MAILBOX 2 (#) (9) (#) (2)
Erase all messages in MAILBOX 3 (#) (9) (#) (3)
Record a new greeting (*) (7). When you hear a long beep, start recording your
(up to one minute) greeting. Press (*) (*) to stop recording.
Turn on the answering function (*) (0)
Turn off the answering function (#) (0)
Stop the current operation (*) (*)
If you forgot to turn the answering function on
Call your phone and let it ring 10 times until it answers. Then the answering function
automatically turns on.
Note
If you enter a wrong remote security code three times, the line will be disconnected.
To use the toll-saver feature
Set RINGER SELECT to TS. See page 31 for details.
US
38
Answering Machine Features
Page 39
Caller ID Features
Understanding the Caller ID service
Caller ID allows the caller’s phone number to be shown on the display
before you answer the call. In order to use this feature, you must first
subscribe to Caller ID service. The name of this service may vary
depending on your telephone company.
To use this feature, be sure to enter your area code (see page 13).
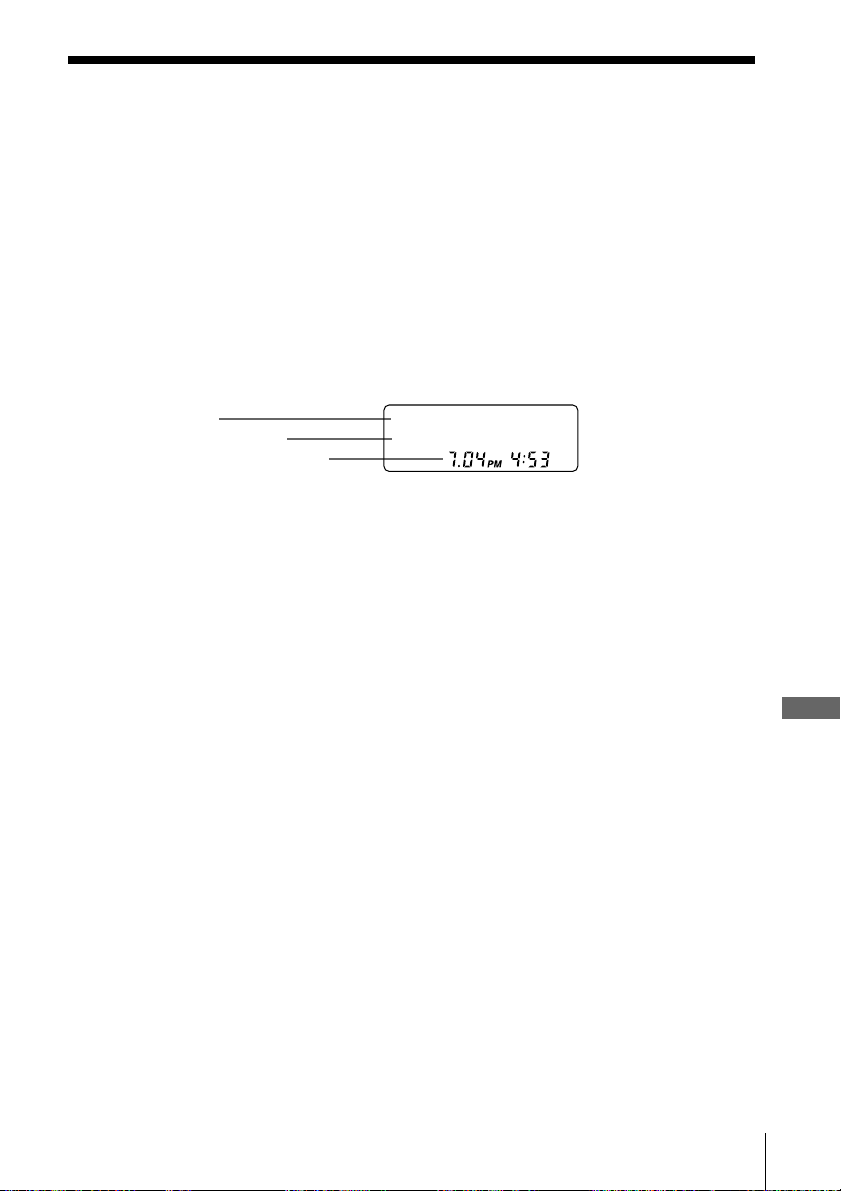
When you receive a call
The phone number appears on the display with the date and time as
shown in the following example.
If your Caller ID service includes the caller name service, the caller’s
name also appears on the display (up to 15 letters).
Caller’s name
Caller’s phone number
The date and time received*
SMITH JOHN
1-201-123-4567
When you answer the call, the Caller ID display changes to the
“TALK” display.
* The date and time in the display are transmitted from the telephone company which
offers the Caller ID service, therefore may differ from the date and time you set on the
base unit.
Notes
• If the RING switch is set to OFF:
- when the handset is off the base unit, the Caller ID is not displayed, and it is
not kept in the Caller ID list (see page 40). If you set it back to RING ON
while the phone is ringing, the Caller ID appears from that moment.
- when the handset is on the base unit, the Caller ID is displayed, and it is kept
in the Caller ID list.
• The caller’s phone number and/or name will not appear in the following
cases:
- “OUT OF AREA”: when the call is made through a telephone company
which does not offer Caller ID service (including international calls).
- “PRIVATE”: when the call is “blocked”. For privacy reasons, many states
allow callers the option to prevent his or her telephone data from being
displayed on the other party’s Caller ID display.
• If the call is from an office which uses multiple lines, the displayed phone
number may not match the number you use to call the extension.
About the memory match function
If you receive a call from a phone number which is stored on one of the
ONE-TOUCH DIAL buttons (see page 21) or in the Phone Directory
(see page 23), the ringer sound will change to a higher tone from the
second ring.
Caller ID Features
Note
The memory match function does not work with “OUT OF AREA” or “PRIVATE”
calls; and it may not work with calls made from an office which uses multiple lines
because the number does not always match the one you stored in this phone.
Caller ID Features
39
US
Page 40
Looking at the Caller ID list
The phone stores the data of the last 20 calls received including “OUT
OF AREA” and “PRIVATE” calls. It keeps track of all calls received;
even if they were not answered.
However, if the RING switch is set to OFF when the handset is off the
base unit, the phone cannot receive the Caller ID data.
Viewing the Caller ID list
You can look through the Caller ID list to check the phone number
and/or name of the calls received.
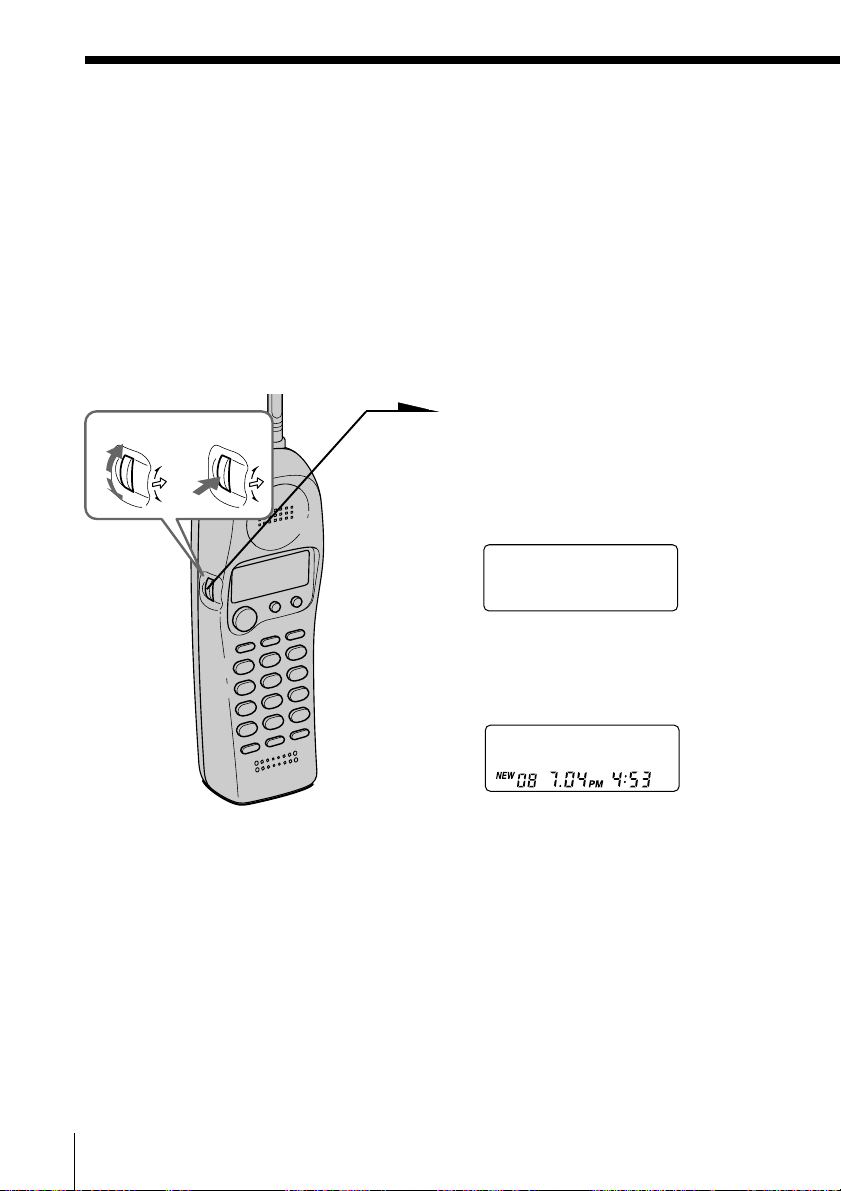
Turn Press
1 Press Jog Dial.
The display shows the number
of “NEW” (calls which you have
not viewed) and “OLD” (calls
which you have viewed) calls.
NEW O8 OLD 12
2 Turn Jog Dial.
The data of the newest call
appears for 20 seconds.
SMITH JOHN
1-201-123-4567
3 Turn Jog Dial down to display
older data or up to display
newer data.
Notes
• If a 21st call is received, the oldest data is automatically erased.
• If there is a “NEW” data, you will hear a new call voice guide at the
beginning of message playback on the base unit, i.e. “You have one new
message and new call”.
40
US
Caller ID Features
Page 41
About the “*” mark
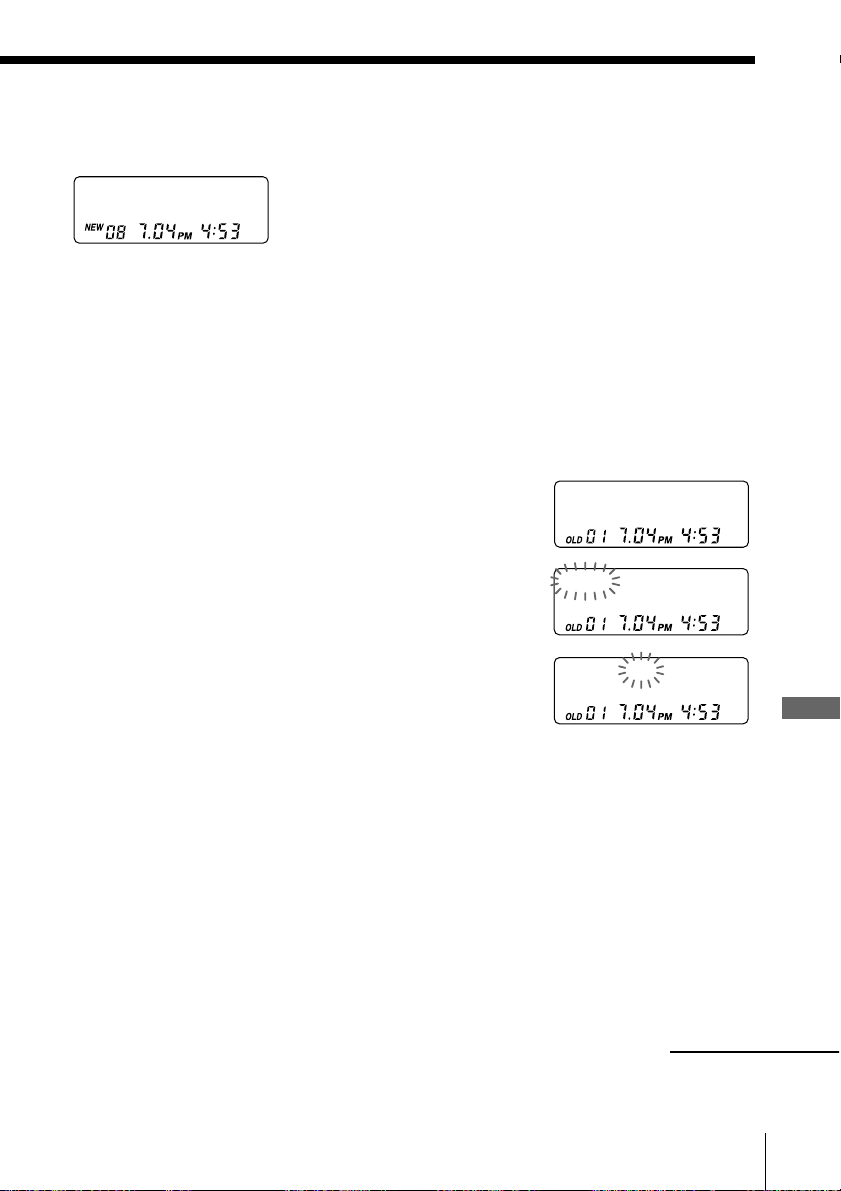
SMITH JOHN *
1-201-123-4567
“*” appears if there are more than two calls
from the same phone number. The older data
will be replaced by the new data, so the calls
are counted as only one call.
Erasing data from the Caller ID list
Old data will be erased automatically when a 21st call comes in, but
you can also manually erase unnecessary data one by one or erase the
entire list.
To erase the phone number one by one
1 Display the phone number you want to erase
from the Caller ID list (see page 40).
SMITH JOHN
1-201-123-4567
2 Press Jog Dial.
3 Turn Jog Dial up to make “ERASE” flash and
press Jog Dial.
4 Turn Jog Dial up to make “YES” flash, then
press Jog Dial.
You hear a long confirmation beep and the data
is erased.
DIAL PGM ERASE
1-201-123-4567
ERASE NO YES
1-201-123-4567
continued
Caller ID Features
Caller ID Features
US
41
Page 42
Looking at the Caller ID list (continued)
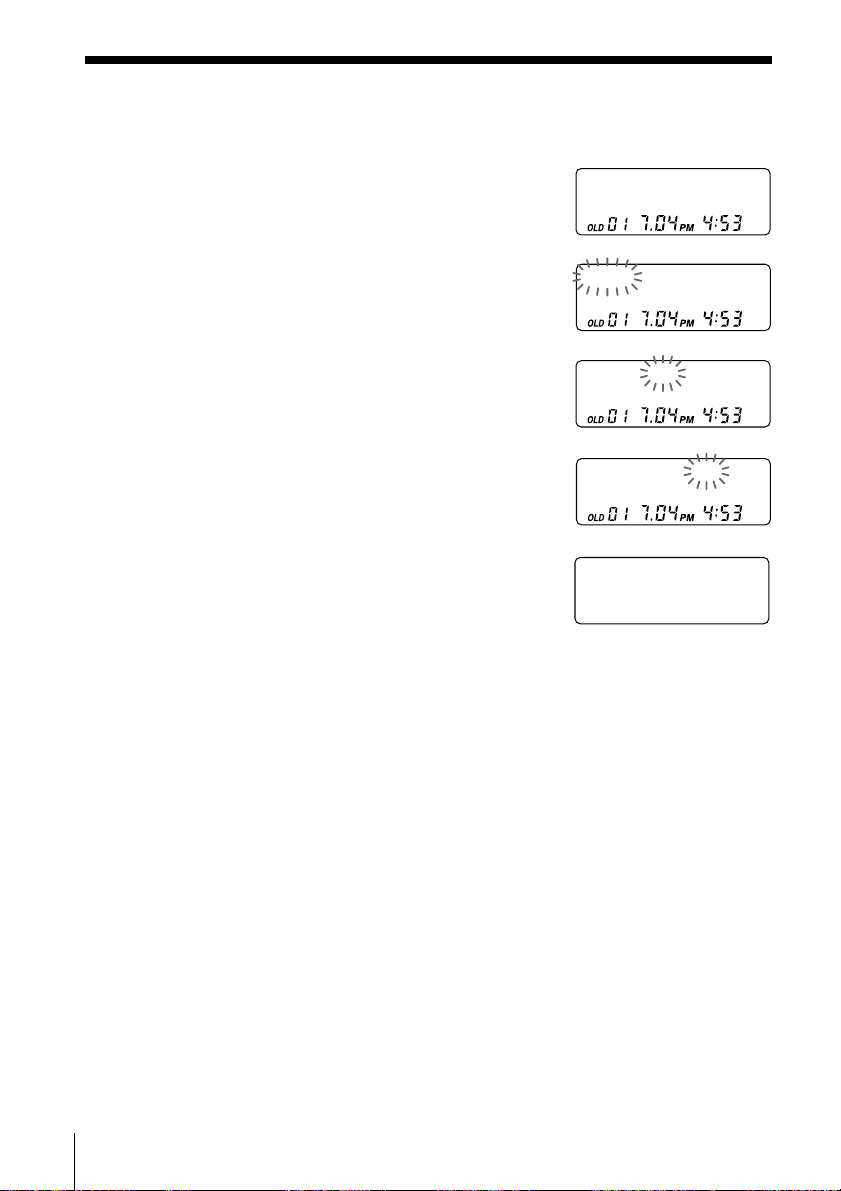
To erase the entire list at once
1 Display any Caller ID data.
SMITH JOHN
1-201-123-4567
2 Press Jog Dial.
DIAL PGM ERASE
1-201-123-4567
3 Turn Jog Dial up to make “ERASE” flash and
press Jog Dial.
4 Turn Jog Dial up to make “ALL” flash, then
press Jog Dial.
5 Turn Jog Dial up to make “YES” flash, then
press Jog Dial.
You hear a long confirmation beep and the
entire list is erased.
Note
“ALL” appears only when all the data had become “OLD” data. If there is any
“NEW” data, you cannot erase the entire list.
ERASE NO YES ALL
1-201-123-4567
ALL ERASE NO YES
1-201-123-4567
NEW OO OLD OO
42
US
Caller ID Features
Page 43
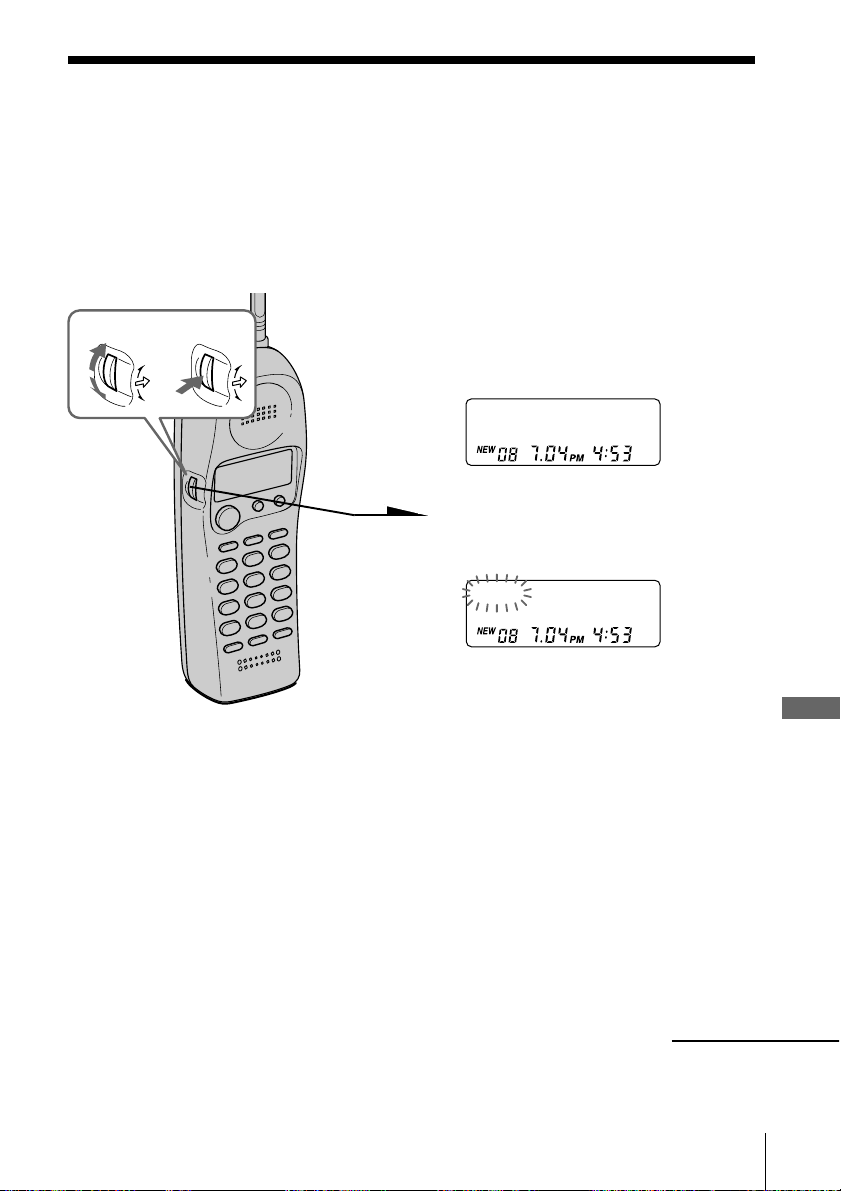
Using the Caller ID list
By using the Caller ID list, you can call back a phone number from the
Caller ID list easily, or store numbers from the Caller ID list into
memory dialing keys.
Calling back a number from the Caller ID list
Turn Press
1 Display the phone number you
want to call from the Caller ID
list (see page 40).
SMITH JOHN
1-201-123-4567
2 Confirm the number and press
Jog Dial.
DIAL PGM ERASE
1-201-123-4567
3 Press Jog Dial again.
The phone automatically dials
the displayed number.
Notes
• If the number displayed in step 1 is not the one you should call back, you can
change the number of digits of the phone number as described on page 45.
• If the phone is connected to a Private Branch Exchange (PBX), you may not
be able to call back from the Caller ID list because an outside line access digit
is necessary.
Tip
You may press (TALK) to make a call instead of following steps 2 and 3.
Caller ID Features
continued
Caller ID Features
43
US
Page 44
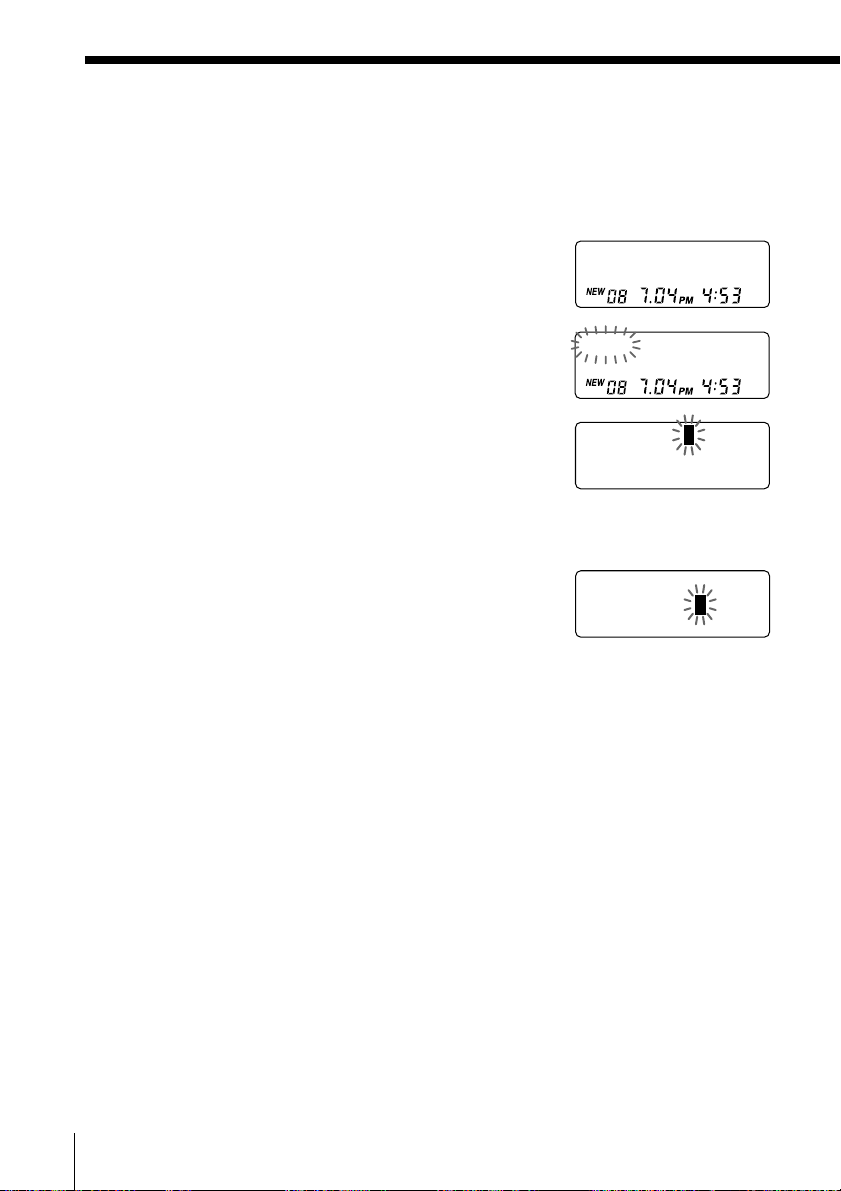
SMITH JOH
12011234567
N
SMITH JOHN
1201123456
7
Using the Caller ID list (continued)
Storing a number of the Caller ID list into the Phone Directory
1 Display the name and phone number you want
to store from the Caller ID list (see page 40).
2 Confirm the number and press Jog Dial.
3 Turn Jog Dial up to make “PGM” flash and
press Jog Dial.
The cursor flashes at the end of the name.
Enter or change the name, if necessary (see
page 24).
4 Press Jog Dial.
The cursor flashes at the end of the phone
number.
Enter or change the phone number, if necessary
(see page 24).
5 Press Jog Dial again.
You hear a long confirmation beep and the
name and number are stored.
SMITH JOHN
1-201-123-4567
DIAL PGM ERASE
1-201-123-4567
Notes
• Do not allow more than 20 seconds to elapse between each step of the
procedure.
• If the number displayed in step 1 is not the one you should call back, you can
change the number of digits of the phone number as described on page 45.
• If the phone is connected to a Private Branch Exchange (PBX), you may need
to add an outside line access digit (see page 22).
US
44
Caller ID Features
Page 45
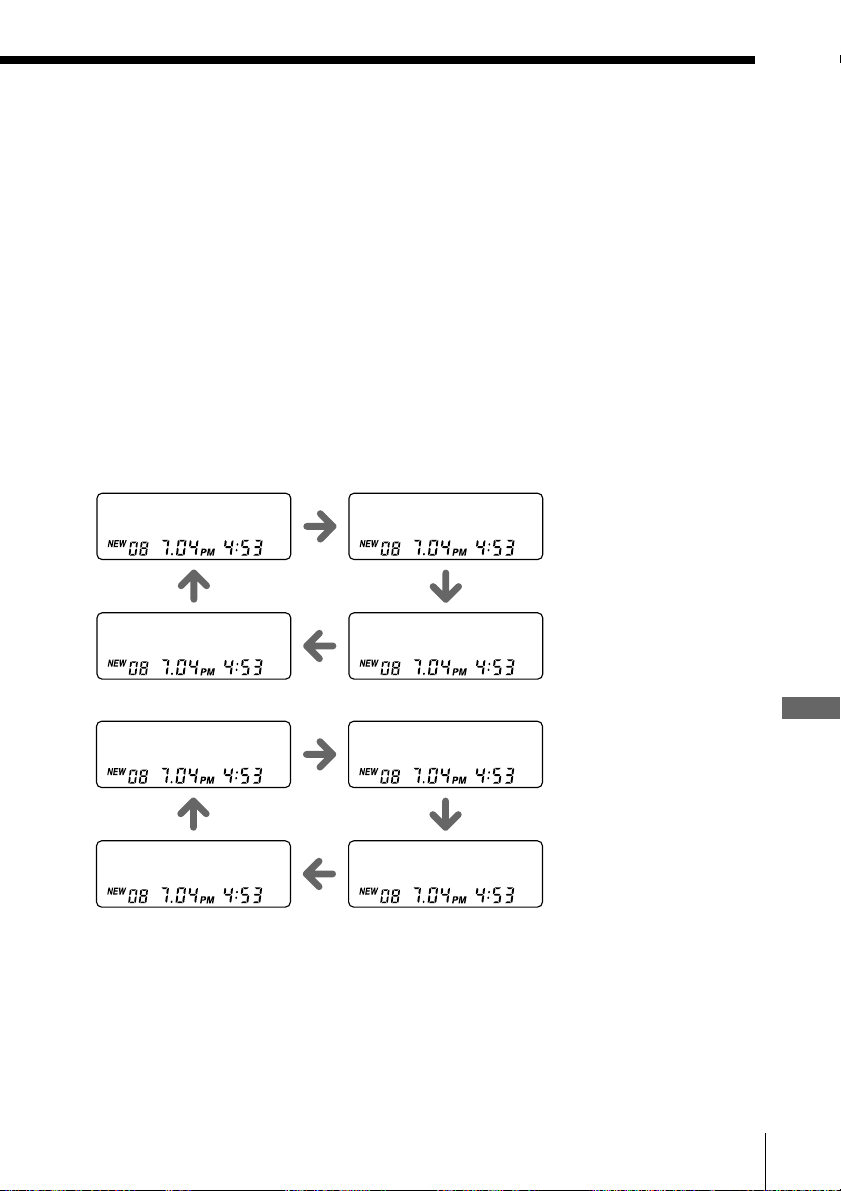
To change the number of digits of the phone number
If the number of digits of the phone number in the Caller ID list is
different from the actual phone number, you need to adjust the
number of digits of the phone number to call back or store into the
phone directory.
1 While the phone number from the Caller ID list is displayed,
press (#) repeatedly until the phone number with the
correct number of digits appears on the display.
Each time you press (#), the number of digits changes as
follows.
When the area code does not match
SMITH JOHN
1-201-123-4567
SMITH JOHN
123-4567
When the area code matches
SMITH JOHN
123-4567
SMITH JOHN
1-123-4567
SMITH JOHN
201-123-4567
SMITH JOHN
1-123-4567
SMITH JOHN
1-201-123-4567
SMITH JOHN
201-123-4567
2 Continue the operation to call or store the phone number
with the correct number of digits (pages 43 and 44).
Notes
• You need to adjust the number of digits each time you call back from the
Caller ID list as the changes to the Caller ID data is not stored in memory.
• You may not be able to change the number of digits depending on the Caller
ID data.
Caller ID Features
Caller ID Features
45
US
Page 46
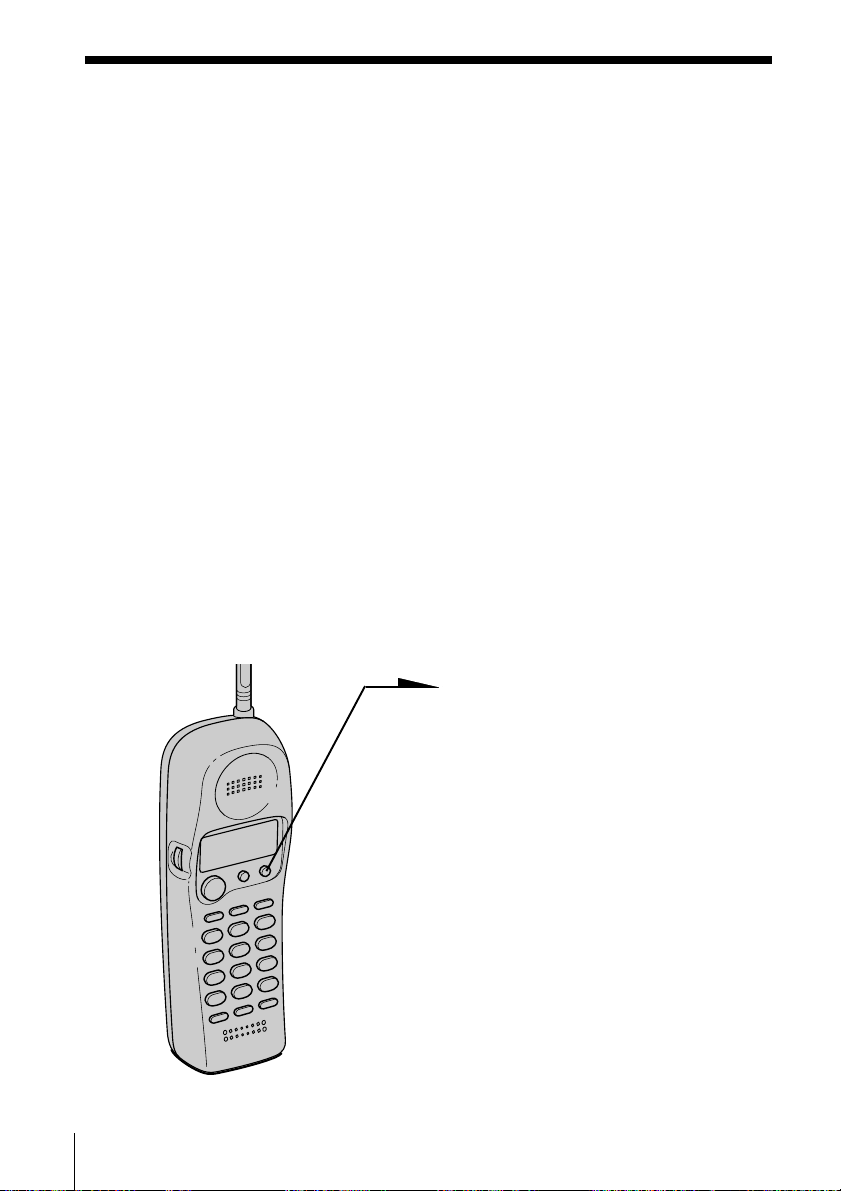
Using “Caller ID with call waiting” service
This telephone is compatible with the “Caller ID with call waiting”
service. Make sure that your telephone company offers this service.
Like the basic Caller ID service, you need to subscribe to “Caller ID
with call waiting” in order to use this service.
Even though you may have already subscribed to “Caller ID” and
“call waiting” as two separate services, you need to request a
subscription to “Caller ID with call waiting” as a single service.
This is a new service that combines the two services.
Even though you now have a “Caller ID with call waiting”
compatible phone, unless you subscribe to the combined “Caller ID
with call waiting” service, you will not be able to see the name
and number of the second caller.
When a new call comes in while you are talking, the caller’s name
and/or phone number of the new call appears on the display for about
20 seconds.
To switch to another caller
46
US
1 To switch to the new caller,
press (CALL WAITING/FLASH).
2 To switch back to the first caller,
press (CALL WAITING/FLASH)
again.
Caller ID Features
Page 47
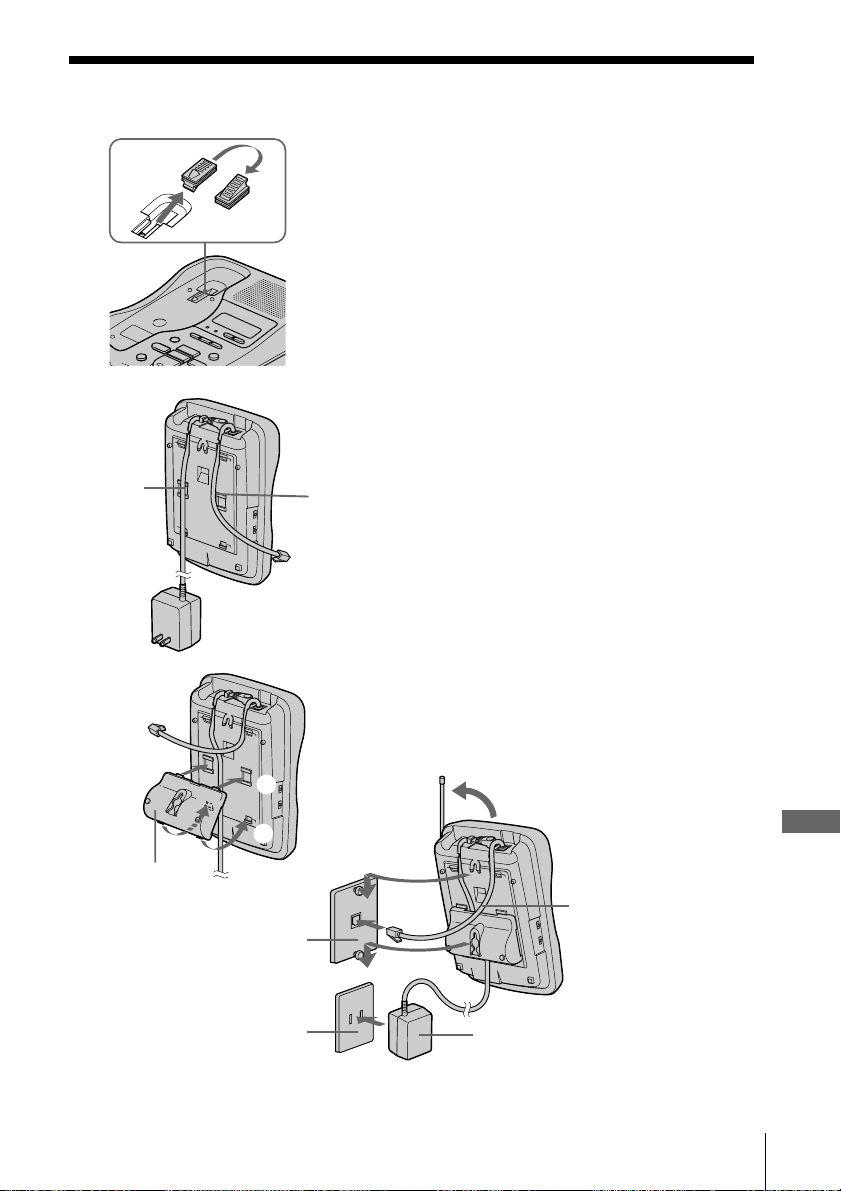
Additional Information
Mounting the base unit on a wall
1
2
AC power
adaptor cord
3
Hang-up tab
Telephone
line cord
1 Reverse the hang-up tab.
2 Plug the telephone line cord to
the LINE jack and the AC power
adaptor to the DC IN 9V jack,
and hook the cords. Use the
shorter cord for mounting.
3 Attach the wall bracket to the
center of the base unit.
Align the f marks of the wall
bracket with those of the base
unit.
4 Plug the telephone line cord to
the telephone outlet, and hook
the base unit to the wall plate.
5 Plug the AC power adaptor to
an AC outlet. Then raise the
antenna so that it points
towards the ceiling.
1
4,5
2
Wall
bracket
Wall
plate
AC outlet
Tip
To remove the wall bracket, press the lower tabs.
AC power
adaptor
Telephone
line cord
Additional Information
Additional Information
US
47
Page 48
Notes on power sources
On battery pack
• Store the battery pack at a
temperature between 41°F (5°C) and
95°F (35°C) for best performance.
• If you do not use the handset for a
long period of time, remove the
battery pack after charging for more
than 12 hours.
On power failure
During a power interruption, you
cannot make or receive calls, and you
cannot use the answering machine.
Maintenance
For the customers in the USA
RECYCLING NICKEL-CADMIUM
BATTERIES
Nickel-Cadmium batteries
are recyclable. You can help
preserve our environment
by returning your
unwanted batteries to your
nearest point for collection,
recycling or proper
disposal.
Note: In some areas the disposal of nickel-
cadmium batteries in household or
business trash may be prohibited.
RBRC (Rechargeable Battery Recycling
Corporation) advises you about spent battery
collection by the following phone number.
Call toll free number: 1-800-822-8837
(United States and Canada only)
Caution: Do not handle damaged or leaking
nickel-cadmium batteries.
• Clean the cabinets with a soft cloth
slightly moistened with water or a
mild detergent solution. Do not use
any type of abrasive pad, scouring
powder or solvent such as alcohol or
benzine as they may damage the
finish of the cabinet.
• If the charge terminals of the base unit
and handset are soiled, wipe them
with a soft cloth.
If you have any questions or problems
concerning your phone, please consult
your nearest Sony dealer.
US
48
Additional Information
Page 49
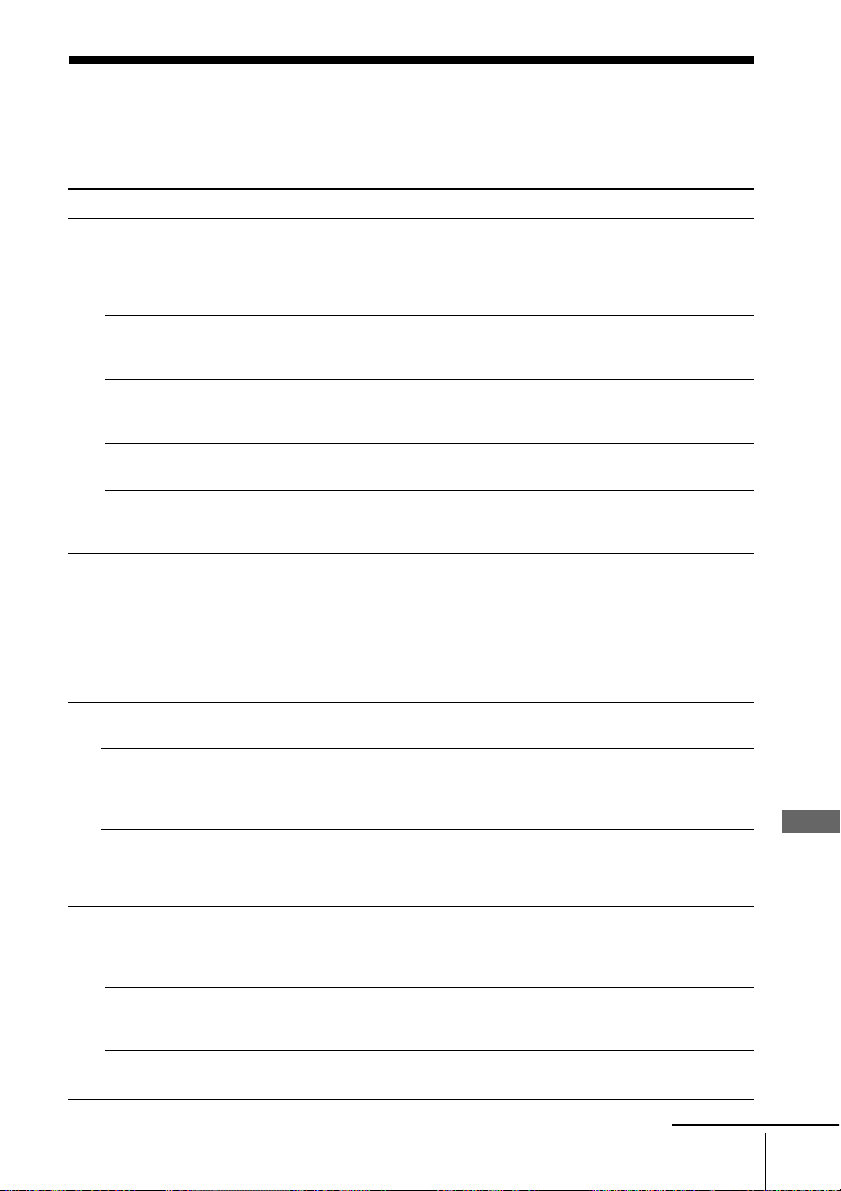
Troubleshooting
If you’ve experienced any of the following difficulties while using your
phone, use this troubleshooting to help you remedy the problem.
Should any problem persist, consult your nearest Sony dealer.
Symptom
You hear five short error
beeps when you press (TALK).
You hear no dial tone.
The phone does not connect at
all, even though the number
Making calls
you dial is correct.
The phone doesn’t redial
correctly.
You hear five short error beeps
when you try to redial.
The handset does not ring.
Receiving calls
You hear interference during
conversation.
You hear a beep every second
during conversation and “OUT
OF RANGE” appears on the
display.
You hear a beep every three
seconds and E and “BATTERY
During conversation
LOW” appear on the display.
You hear five short error beeps
and cannot store a number on a
one-touch dial or in the Phone
Directory.
You hear five short error beeps
when you try to make a onetouch dial call.
Phone Directory
One-touch dialing or Phone
One-touch dialing/
Directory dialing is incorrect.
Remedy
• Make sure you set up the base unit correctly (page 8).
• Move the handset closer to the base unit.
• Replace the handset on the base unit, then pick it up
and try again. If the handset is on the base unit, pick
up the handset and replace it again.
• Make sure the telephone line cord is securely
connected to the telephone outlet (page 9).
• Make sure the battery is fully charged (page 11).
• Make sure the dialing mode is set correctly (page 10).
• Make sure the last dialed number is really the one you
want to dial.
• The number you last dialed exceeds 32 digits
(including the tone and pause digits if used).
• The number you last dialed is erased.
• Set the RING switch on the handset to ON.
• The battery may be weak. Charge the battery for
more than 12 hours (page 11).
• Make sure you set up the base unit correctly (page 8).
• Move the handset closer to the base unit.
• Replace the handset on the base unit, then pick it up.
If the handset is on the base unit, pick up the handset
and replace it again.
• Move the handset closer to the base unit.
• Place the base unit away from noise sources (page 8).
• It is an out-of-range alarm. Move thehandset closer to
the base unit within one minute.
• The battery is weak. Charge the battery for more than
12 hours (page 11).
Note that you cannot use the handset without
charging it for more than one minute.
• Make sure you follow the procedure in storing the
number correctly (pages 21 and 23).
• Make sure the number (including the tone and pause
digits) does not exceed 16 digits.
• You pressed a one-touch dialing button on which no
phone number has been stored.
• Store a correct number (pages 21 and 23).
Additional Information
continued
Additional Information
US
49
Page 50

Troubleshooting (continued)
Symptom
The handset does not ring
when calling from the base
unit.
Paging
You cannot hear anything from
the speaker.
No time stamp is heard.
You cannot record the greeting
properly.
The phone does not record
messages
Answering machine
The phone does not accept your
remote ID code (security code).
You hear error beeps when you
enter your remote ID code
(security code).
A long confirmation beep does
outside phone
not sound when you enter your
Operating from an
remote ID code (security code).
The caller’s name and/or
phone number does not appear
on the display.
Caller ID
The caller’s name and/or
phone number does not appear
on the display during call
waiting.
Remedy
• Set the RING switch to ON.
• Use the VOLUME control on the base unit to increase
the speaker volume.
• Make sure the day and time are set (page 28).
• The day and time may have been cleared due to a
power interruption. Set them again (page 28).
• Keep your message between two seconds and four
minutes.
• Make sure you speak about 12 inches (30 cm) away
from the microphone when recording.
• Check the answering mode. The phone cannot record
messages in announcement only mode (page 32).
• Make sure that the memory is not full. When the
remaining recording area is less than one minute, the
phone switches to announcement only mode
automatically.
• The phone does not record a message that is shorter
than two seconds.
• Even if the message is longer than four minutes, the
phone only records up to four minutes.
• Make sure you call from a touch-tone phone.
• Make sure you entered your remote ID code (security
code) within two seconds after you have entered (#).
• Make sure the remote ID code (security code) is
correct.
• Enter your remote ID code (security code) while the
greeting is being played back.
• Make sure you are calling from a touch-tone phone.
• Make sure you have subscribed to Caller ID service.
• Caller ID service may not work when the phone is
connected to a Private Branch Exchange (PBX).
• Make sure that the handset is on the base unit or the
RING switch is set to ON (page 20).
• The call is made through company which does not
offer Caller ID service. ”OUT OF AREA” will appear
on the display.
• The call was “blocked”. “PRIVATE” will appear on
the display.
• You answered the call while “**RINGING**”is
displayed. Be sure to answer after the Caller ID data is
displayed.
• Make sure you have subscribed to “Caller ID with call
waiting” service (see page 46).
• Make sure nobody is talking on another phone on the
same telephone line.
US
50
Additional Information
Page 51
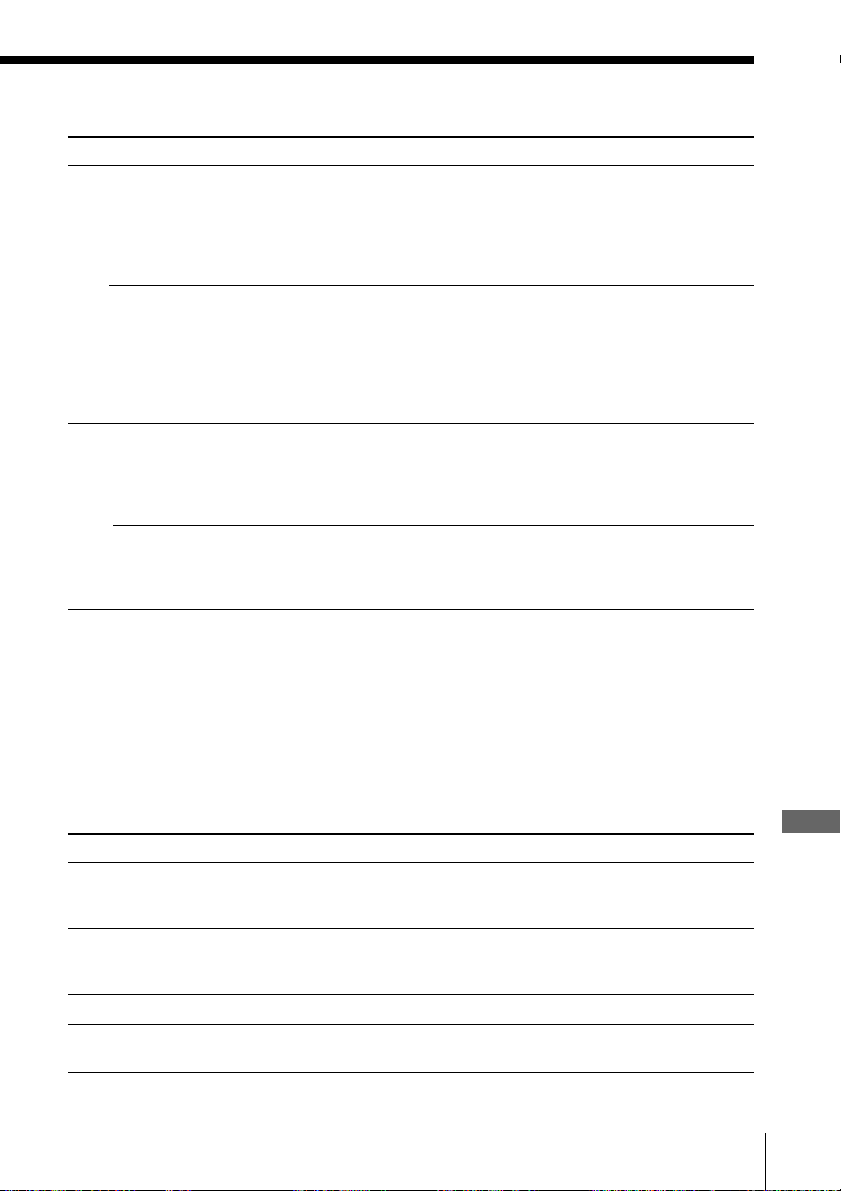
Symptom
You cannot dial the number
from the Caller ID list.
The memory match function
does not work.
Caller ID
The CHARGE lamp does not
light up when you place the
handset to charge.
The battery duration is short.
Power source/battery
Note
If any of the remedy did not work, there may be something wrong with the
handset. Replace the handset on the base unit, then pick it up and try again. If the
handset is on the base unit, pick up the handset and replace it again.
Remedy
• Make sure you entered your area code correctly
(page 13).
• You may need to change the number of digits of the
phone number (page 45).
• This function may not work when the phone is
connected to a Private Branch Exchange (PBX).
• If the call is from an office which uses multiple lines,
the phone number may not match the number you
put in the memory.
• If you stored the phone number with an outside line
access digit in the Phone Directory because the phone
is connected to a Private Branch Exchange (PBX), the
phone number will not match the Caller ID data.
• Wipe the charge terminals of the base unit and the
handset with a soft cloth for better contact of the
charge terminals.
• Make sure the handset is placed on the base unit
properly.
• The battery pack was charged less than 12 hours (due
to power failure, etc.).
• The usable life of the battery has expired and needs
replacement.
Message number indication
The message number indicator on the base unit shows the following information.
When the counter shows
Number (0-99)
P
A
F
It means
Number of messages not yet played back. The indicator
shows up to 99 messages. After that, ”99“ flashes to tell you
that there are 100 or more messages.
Flashes when the day and time is cleared due to a power
interruption, or when you connect the base unit to the AC
outlet for the first time (pages 9 and 29).
The announcement only mode is selected (page 32).
The recording area is full. Erase unnecessary messages
(page 34).
Additional Information
Additional Information
US
51
Page 52

Specifications
General
Spread method
Direct-Sequence Spread-Spectrum
Access method
FDMA-TDD
Frequency band
902 - 928 MHz
Operating channel
20 channels
Dial signal
Tone, 10 PPS (pulse) selectable
Supplied accessories
See page 7.
Handset
Power source
Rechargeable battery pack BP-T24
Battery life
Standby: Approx. 10 days (RING ON
mode)
Approx. 1 month (RING OFF
mode)
Talk: Approx. 6 hours
Dimensions
Approx. 2 3⁄8 x 7 x 1 13⁄16 inches (w/h/d),
antenna excluded
(approx. 58 x 177 x 46 mm)
Antenna: 2 7⁄8 inches (72 mm)
Mass
Approx. 9 oz (approx. 260 g), battery
included
Base unit
Power source
DC 9V from AC power adaptor AC-T46
Battery charging time
Approx. 12 hours
Dimensions
Approx. 6 3⁄4 x 2 3⁄8 x 8 1⁄2 inches (w/h/d),
antenna excluded
(approx. 170 x 60 x 214 mm)
Antenna: 6 1⁄ 2 inches (165 mm)
Mass
Approx. 18 oz (approx. 520 g), wall bracket
excluded
Answering machine
Maximum recording time
About 20 minutes, using incorporated IC
Greeting message
Up to 4 minutes
Incoming message
Up to 4 minutes/message
Memo
Up to 4 minutes/message
Design and specifications are subject to
change without notice.
US
52
Additional Information
Page 53

Index
A
Adjusting volume
handset 17
speaker 34
Announcement only 32
Answering machine
turning on 33
Area code 13
Audible indicate 32
B
Battery pack
charging 11
duration 12
C
Call waiting service 19
Caller ID 39
Caller ID list 40
calling back 43
Memory match function
39
storing in Phone
Directory 44
Caller ID
with call waiting 46
Connection 9
Control codes for remote
operations 38
D
Day and time stamp 28
Dialing mode
choosing 10
switching to the tone
temporarily 17
Directroy
Phone Directory 23
E, F
Erasing
Caller ID data 41
last phone number
dialed 18
messages 34
Phone Directory 23
G, H
Greeting 29
I, J, K
Identifying the parts 14
L
Location, base unit 8
M, N
Mailbox 33, 34
Making calls 17
Memo 36
Memory match funtion 39
Messages 33, 34
Mounting the base unit on
a wall 47
O
One-touch dialing 21
Operating from an outside
phone 37
OUT OF AREA 39
P, Q
Package contents 7
Paging 27
Phone Directory 23
Playing
annoucement only 32
messages 34
PRIVATE 39
Pulse dialing 10
R
Recording
greeting 29
memo 36
Receiving calls 19
Redialing 18
Remote ID code
(security code) 37
Ringer
turning on/off 20
ringer select 31
S
Screening calls 35
Setting up
base unit 8
handset 11
Speaker 17, 34
Stamping messages with
day and time 28
Storing Caller ID data in
Phone Directory 44
T, U
Toll-saver feature 31
Tone dialing
dialing mode 10
switching to 10
Troubleshooting 49
V, W, X, Y, Z
Volume
handset 17
speaker 34
Additional Information
Additional Information
53
US
Page 54

Page 55

Page 56

Page 57

Page 58

Registro del propietario
Los números de modelo y de serie se
encuentran en la parte inferior del
teléfono. Anote el número de serie en el
espacio que se proporciona a
continuación. Refiérase a estos números
cada vez que se comunique con su
distribuidor Sony con respecto al
producto.
o
o
SPP-A968
Modelo N
Serie N
IMPORTANTES
INSTRUCCIONES
DE SEGURIDAD
A fin de reducir el riesgo de incendio,
descarga eléctrica y lesiones a las
personas cuando usted use su equipo
telefónico, siempre debe observar
precauciones básicas de seguridad, entre
ellas:
1. Lea y entienda todas las instrucciones.
2. Siga todas las advertencias e
instrucciones indicadas en el
producto.
3. Desconecte este producto de la línea
telefónica antes de limpiarlo. No use
limpiadores líquidos ni en aerosol.
Use un paño húmedo para limpiarlo.
4. No use este producto cerca del agua,
por ejemplo, cerca de una bañera,
lavabo, fregadero de cocina o
lavadora, en un sótano mojado o cerca
de una piscina.
5. No ponga este producto sobre un
carrito, estante o mesa inestables. El
aparato se puede caer y ocasionar
daños graves al teléfono.
6. Las ranuras y aberturas situadas en la
parte posterior o inferior son parte del
sistema de ventilación. Para evitar el
calentamiento del aparato, no
obstruya o cubra las ranuras de
ventilación y evite dejarlo sobre la
cama, sofá, sillón o superficie similar.
Este producto nunca debe colocarse
cerca de un radiador o calefacción, o
encima de éste. Este producto no debe
colocarse en una instalación
empotrada salvo que se provea
ventilación apropiada.
7. Este producto sólo debe operarse
desde el tipo de fuente de
alimentación indicada en la etiqueta
de especificaciones. Si no está seguro
del tipo de fuente de alimentación en
su hogar, consulte con su distribuidor
o compañía de electricidad local.
8. No deje que nada descanse sobre el
cable eléctrico. No sitúe este producto
en un lugar donde el cable esté
expuesto a abuso debido al tránsito de
la gente.
9. No sobrecargue los tomacorrientes de
pared y cables de extensión, ya que
esto puede ocasionar el riesgo de
incendio o shock eléctrico.
10. Nunca introduzca a presión objetos
de ningún tipo en este producto a
través de las ranuras del gabinete, ya
que pueden hacer contacto con un
punto de voltaje peligroso u ocasionar
un cortocircuito entre piezas que
podría conducir a incendios o shock
eléctrico. Nunca derrame líquidos de
ningún tipo sobre el producto.
11. Para reducir el riesgo de shock
eléctrico, no desarme este producto;
en caso de necesitarse servicio o
reparación, llévelo a personal de
servicio calificado. El abrir o quitar las
tapas puede exponerle a voltaje
peligroso u otros riesgos. El
reensamblaje incorrecto puede
ocasionar shock eléctrico cuando el
aparato se use posteriormente.
ES
2
Page 59

12. Desconecte este producto de la línea
telefónica y refiera el servicio a
personal de servicio calificado bajo las
siguientes condiciones:
A. Cuando el cable eléctrico o el
enchufe se encuentra dañado o
deshilachado.
B. Si se ha derramado líquido dentro
del producto.
C. Si el producto ha estado expuesto
a lluvia o agua.
D. Si el producto no opera
normalmente al seguir las
instrucciones de operación. Sólo debe
ajustar los controles incluidos en las
instrucciones de operación, ya que el
ajuste incorrecto de otros controles
puede producir daños y a menudo
exigirá trabajo extenso por un técnico
calificado para restaurar el producto a
las operaciones normales.
E. Si el producto se ha dejado caer o
el gabinete está dañado.
F. Si el producto exhibe un cambio
perceptible de operación.
13. Evite usar un teléfono (que no sea
del tipo inalámbrico) durante una
tormenta eléctrica. Existe la remota
posibilidad de shock eléctrico debido
a rayos.
14. Para notificar una fuga de gas, no
utilice el teléfono en la vecindad de
dicha fuga.
GUARDE ESTAS
INSTRUCCIONES
PRECAUCIÓN:
Para reducir el riesgo de incendio o lesión a
personas debido a la batería, lea y siga estas
instrucciones:
1. Sólo debe utilizar un paquete de baterías del
siguiente tipo y tamaño: Sony BP-T24.
2. No deseche el paquete de baterías en una
hoguera ya que puede explotar. Compruebe
los reglamentos locales sobre posibles
instrucciones especiales de desecho.
3. No abra ni mutile el paquete de baterías. El
electrólito liberado es corrosivo y puede
ocasionar daños a los ojos o la piel. Puede ser
tóxico si se ingiere.
4. Tenga cuidado al manejar la batería a fin de
evitar cortocircuitos de la batería con
materiales conductores tales como anillos,
pulseras y llaves. La batería o el conductor
puede sobrecalentarse y ocasionar
quemaduras.
5. Sólo debe cargar el paquete de baterías
suministrado o identificado para uso con este
producto de acuerdo con las instrucciones y
limitaciones especificadas en el manual de
instrucciones correspondiente al producto.
6. Observe la orientación de polaridad correcta
entre el paquete de baterías y el cargador de
baterías.
INFORMACIÓN GENERAL
SOBRE LOS TELÉFONOS
1. Este equipo cumple con la Parte 68 de las
reglas de la FCC. En la base de este equipo
hay una etiqueta que contiene, entre otra
información, el número de registro de la FCC
y el número de equivalencia de timbre de
llamada (REN) para este equipo. Cuando se
solicite, esta información deberá ofrecerse a la
compañía telefónica.
2. La toma (conector) de registro aplicable
USOC-RJ11C se utiliza para este equipo.
3. Este equipo ha sido diseñado para conectarse
a la red telefónica o la de un usuario
utilizando una toma modular compatible que
esté de acuerdo con la Parte 68 de la FCC.
Con este equipo se suministran un cable y una
clavija modular que cumplen con las normas
de la FCC.
4. El REN se utiliza para determinar la cantidad
de dispositivos que podrán conectarse a la
línea telefónica. El exceso de REN conectados
a la línea telefónica puede resultar en que los
dispositivos no contesten a llamadas
entrantes. En la mayoría de las zonas, no en
todas, la suma de REN no deberá ser superior
a cinco (5). Para enterarse del número total de
REN que puede conectarse a una línea,
póngase en contacto con la compañía
telefónica.
5. Si su equipo (SPP-A968) produce daños en la
red telefónica, la compañía telefónica le
notificará con antelación que es posible que se
requiera la interrupción temporal del servicio.
Pero si la notificación con antelación no es
práctica, la compañía telefónica lo notificará al
cliente lo antes posible. Además, se le notificará
el derecho a realizar una reclamación a la FCC si
usted lo considera necesario.
ES
ES
3
Page 60

6. La compañía telefónica puede realizar
cambios en sus instalaciones, equipos,
operaciones, o procedimientos que pueden
afectar la operación del equipo. Cuando
suceda esto, la compañía telefónica le avisará
con antelación para que usted realice las
modificaciones necesarias para mantener
ininterrumpido el servicio.
7. Si experimenta algún problema con este
equipo (SPP-A968), con respecto a la
reparación o a la información sobre la
garantía, póngase en contacto con Sony Direct
Response Center: Tel 1-800-222-7669 (Inglés
solamente). Si el equipo causa problemas en
la línea, la compañía telefónica puede
solicitarle que desconecte el equipo hasta que
se resuelva el problema.
8. Todas las reparaciones deberá realizarlas un
centro de reparaciones Sony.
9. Este equipo no deberá utilizarse en líneas
compartidas ni en líneas de pago previo.
10. Este equipo es compatible con dispositivos
para ayuda a la audición.
Si su teléfono dispone de
marcadores automáticos
Cuando programe números de emergencia y (o)
realice llamadas de prueba a los mismos:
1. Permanezca poco tiempo en la línea y
explique a la otra parte la razón de la llamada.
2. Realice tales actividades en horas no punta,
como por la mañana temprano o a últimas
horas de la tarde.
Precaución
Se le advierte que cualquier cambio o
modificación no aprobado expresamente en el
presente manual podría anular su autorización
para operar este equipo.
Nota
Este equipo se ha sometido a pruebas y se ha
determinado que cumple los límites para un
aparato digital Clase B de conformidad con la
Parte 15 de las Reglas FCC. Dichos límites están
diseñados para brindar protección razonable
contra interferencia dañina en una instalación
residencial. Este equipo genera, utiliza y puede
radiar energía de radiofrecuencia y, si no se
instala y se usa de acuerdo con las instrucciones,
puede ocasionar interferencia dañina en las
radiocomunicaciones. Sin embargo, no hay
garantía de que no ocurra interferencia en una
instalación específica. En caso de que este equipo
ocasione interferencia dañina en la recepción de
radio o televisión, que se puede determinar
apagando y encendiendo el equipo, se le insta al
usuario a que trate de corregir la interferencia
mediante una o más de las siguientes medidas:
– Reorientar o reubicar la antena de recepción.
– Aumentar la separación entre el equipo y el
receptor.
– Conectar el equipo en un enchufe de un
circuito distinto al circuito al cual está
conectado el receptor.
– Consultar con el distribuidor o con un técnico
experimentado de radio/televisión para
ayuda.
Nota sobre la garantía
Guarde la factura de compra junto con la
tarjeta de garantía y presente los dos
documentos cuando lleve el equipo para su
reparación a un centro de servicio técnico
autorizado Sony.
ES
4
Page 61

Índice
Procedimientos iniciales
6 Lea esto primero
7 Paso 1: Comprobación del
Paso 2: Instalación de la unidad
8
11 Paso 3: Preparación del paquete
13 Paso 4: Introducción del prefijo
14 Identificación de los componentes
contenido del paquete
base
de batería
Operaciones básicas
17 Realización de llamadas
18 Rellamada
19 Recepción de llamadas
Funciones del teléfono
21 Marcación rápida
21 Almacenamiento de
22 Realización de llamadas
23 Directorio telefónico
23
24 Cambio de un nombre y/o
25 Borrado de ubicaciones de
26 Realización de llamadas
27 Llamada al auricular desde la
números de teléfono
mediante la marcación rápida
Almacenamiento de números
de teléfono y nombres
número de teléfono
almacenado
memoria
desde el directorio telefónico
unidad base
33 Activación de la función de
34 Reproducción de mensajes
35 Admisión o rechazo de llamadas
36 Grabación de memorandos
37 Operación desde un teléfono
37 Ajuste del código ID remoto
38 Recogida de nuevos
contestador
entrantes
externo
(código de seguridad)
mensajes
Características de ID de
llamada
39 Concepto del servicio de ID de
llamada
39 Al recibir una llamada
40 Lista de ID de llamada
40 Visualización de la lista de
41 Eliminación de datos de la
43 Uso de la lista de ID de llamada
43 Realización de llamadas a
44 Almacenamiento de
45 Para cambiar el
46 Uso del servicio de “ID de
ID de llamada
lista de ID de llamada
números de la lista de ID de
llamada
números de la lista de ID de
llamada en el directorio
telefónico
dígitos del
teléfono
llamada con llamada en espera”
número de
número de
ES
Funciones del contestador
automático
28 Preparación del contestador
automático
28 Ajuste del día y la hora
29 Grabación del saludo
31 Selección de las señales de
llamada
32 Selección del modo de
contestación
Información adicional
47 Instalación de la unidad base en
la pared
48 Notas sobre fuentes de
alimentación/mantenimiento
49 Solución de problemas
52 Especificaciones
53 Índice alfabético
Índice
ES
5
Page 62
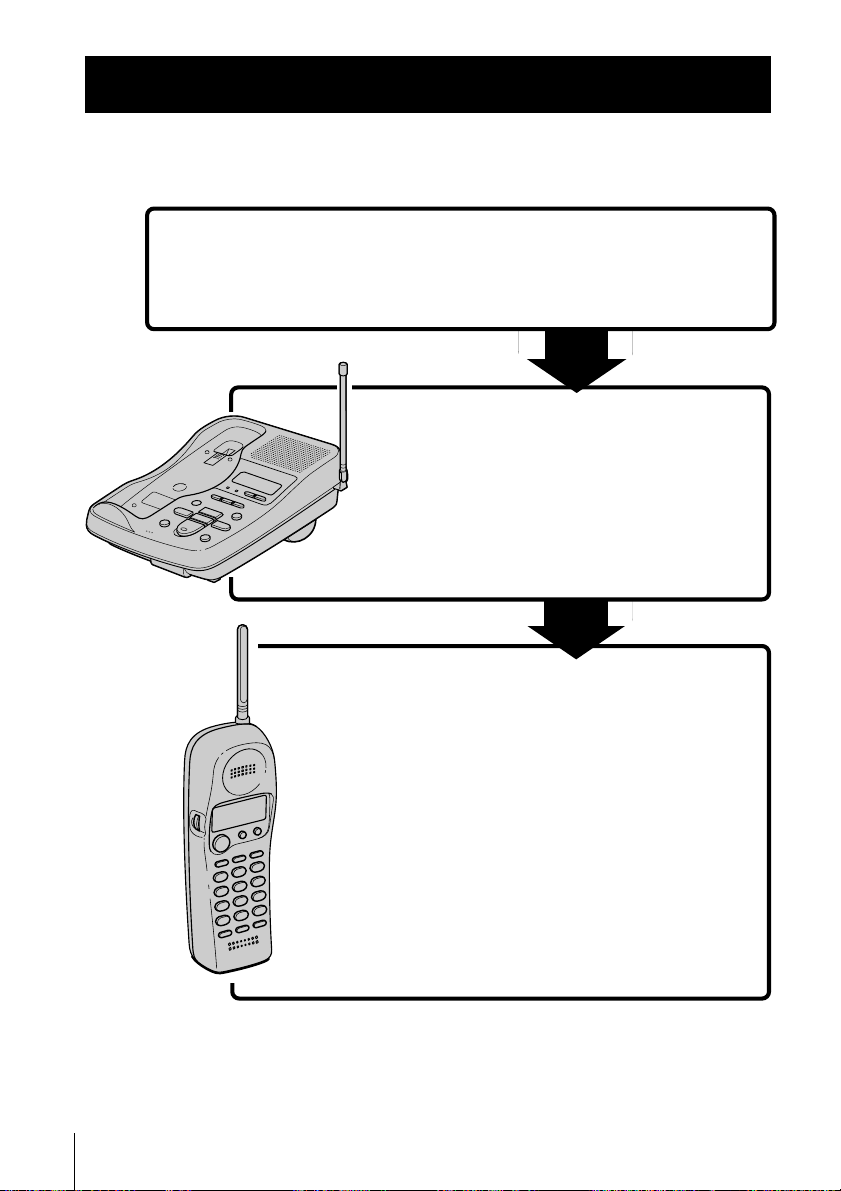
Procedimientos iniciales
Lea esto primero
Antes de utilizar el teléfono, es preciso instalarlo. En los pasos 1, 2, 3 y
4 se describe un método rápido para la instalación del teléfono.
Paso 1 (página 7)
En primer lugar, desembale el teléfono y los
accesorios suministrados.
Paso 2 (páginas 8 a 10)
A continuación, debe realizar tres
acciones para instalar la unidad base,
incluida la localización de ésta.
Unidad base
ES
6
Procedimientos iniciales
Auricular
Paso 3 (páginas 11 a 12)
A continuación, es preciso insertar el
paquete de batería en el auricular y
cargarla durante más de 12 horas.
Paso 4 (página 13)
Por último, debe introducir el prefijo
para utilizar el servicio de ID de
llamada.
¡Eso es todo!
Page 63
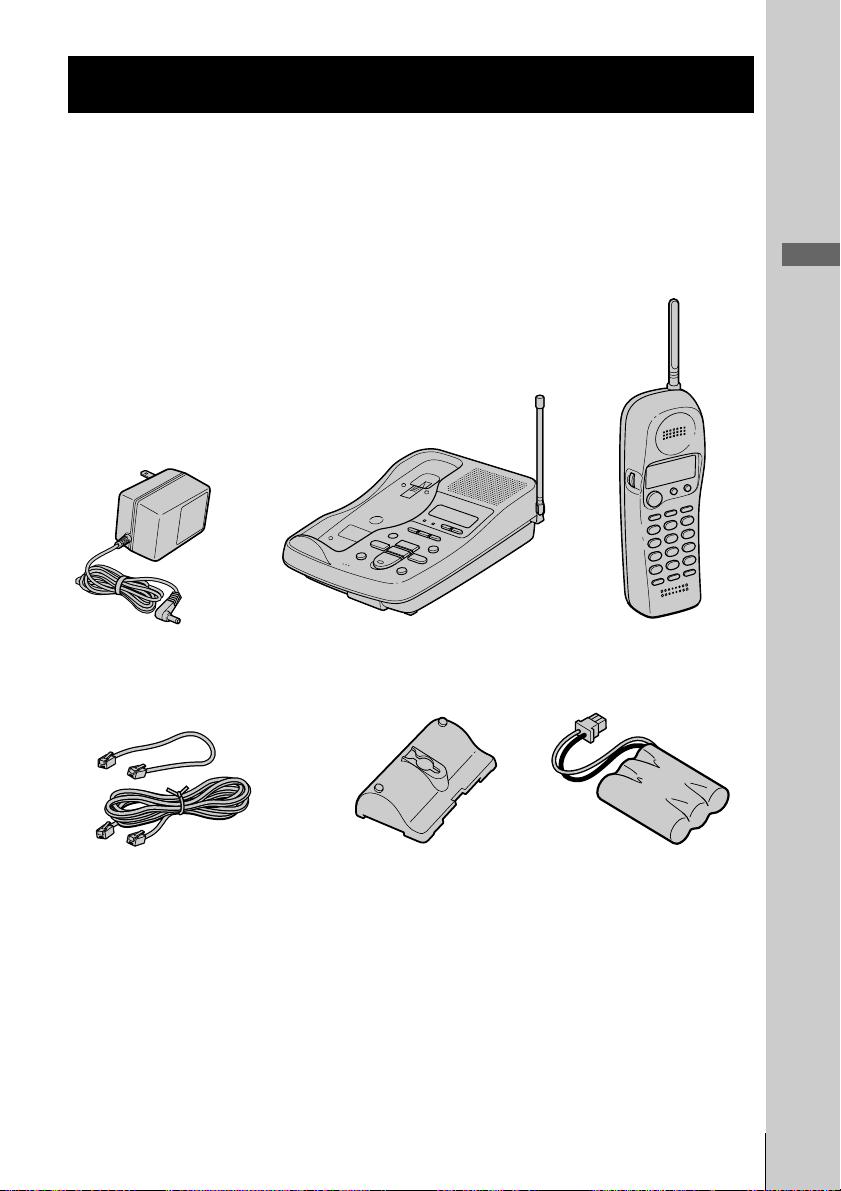
Paso 1
Comprobación del contenido del paquete
Verifique que el paquete incluye los siguientes elementos.
En caso de que falte alguno, póngase en contacto con su proveedor
local Sony.
Procedimientos iniciales
de CA (AC-T46)
Cables de línea
telefónica (2)
Unidad base
Abrazadera de pared/
soporte para la unidad base
AuricularAdaptador de alimentación
Paquete de batería
recargable (BP-T24)
Procedimientos iniciales
ES
7
Page 64
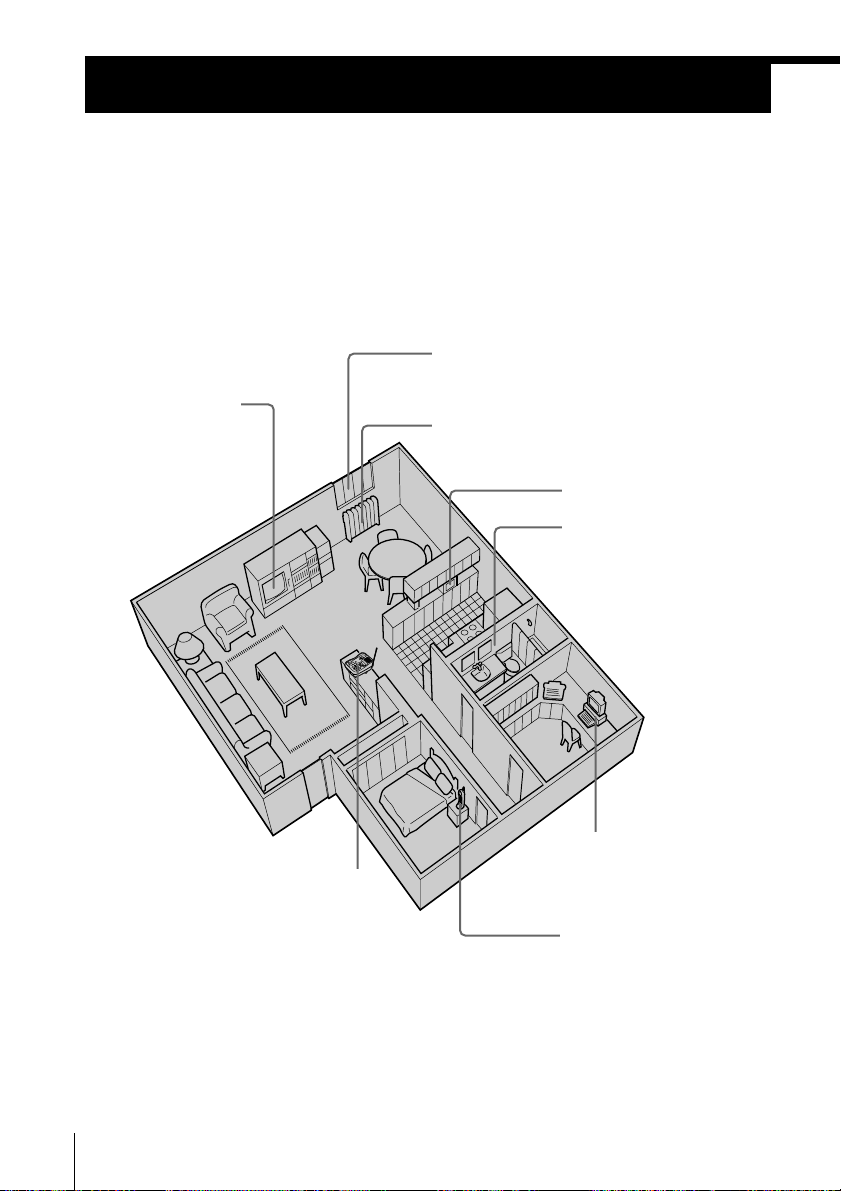
Paso 2
Instalación de la unidad base
Siga estos pasos:
• Elija el mejor emplazamiento
• Conecte la unidad base
• Elija el modo de marcación
Elija el mejor emplazamiento
La situación de la unidad base afecta a la calidad de recepción del
auricular.
Alejada de aparatos
de televisión y otros
equipos electrónicos
Alejada de fuentes de ruido, como una
ventana junto a una calle muy transitada
Alejada de fuentes de calor, como
radiadores, salidas de aire y la luz solar
Alejada de hornos
microondas
Alejada de la humedad
excesiva, temperaturas
extremadamente bajas,
polvo, vibraciones
mecánicas o sacudidas
Alejada de
Cerca de un lugar
céntrico y sobre una
superficie nivelada
PRECAUCIONES: •Si se producen pérdidas intermitentes de sonido durante la
ES
8
Procedimientos iniciales
conversación, acérquese a la unidad base o aleje ésta de otras fuentes
de ruido.
• El teléfono inalámbrico opera con frecuencias que pueden causar
interferencias en los televisores y videograbadoras que se encuentren
en las proximidades. La unidad base no deberá colocarse sobre un
televisor o videograbadora. Si se producen interferencias, bastará con
alejar el teléfono inalámbrico del televisor o videograbadora para
reducir o eliminar sus efectos.
ordenadores
personales
Alejada de otros
teléfonos inalámbricos
Page 65
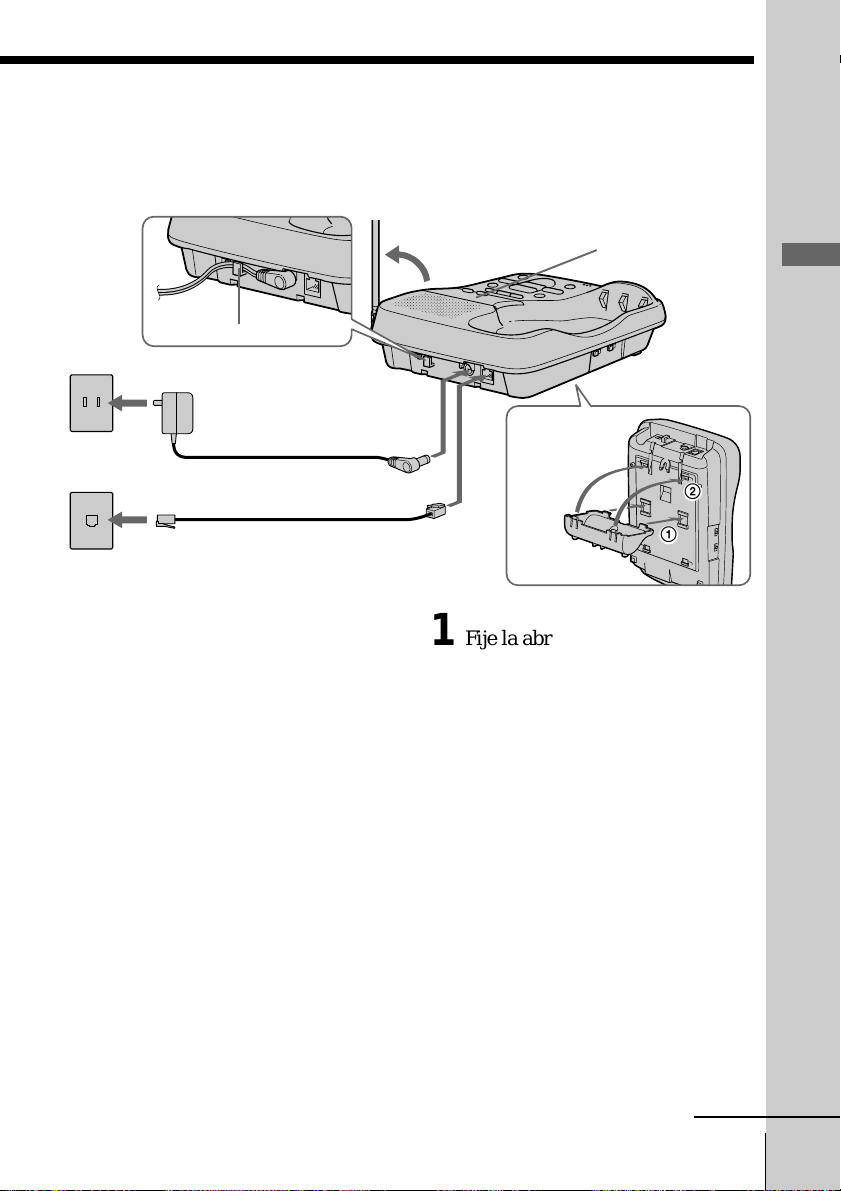
1
2
Conexión de la unidad base
Si desea montar la unidad base en la pared, consulte la página 47.
3
A una toma de CA
2
A una
toma de
teléfono
Enganche el cable.
A DC IN 9V
Adaptador de alimentación
de CA (suministrado)
Cable de línea telefónica
(suministrado)
4
1
A LINE
Visor
Alinee las
marcas f.
1 Fije la abrazadera de pared en la
parte inferior de la unidad base,
según se muestra, para utilizarla
como soporte.
2 Conecte el cable de línea
telefónica a la toma LINE y a la
toma de teléfono.
Procedimientos iniciales
3 Conecte el adaptador de
alimentación de CA a la toma
DC IN 9V y a la toma de CA.
“P” parpadea en el visor.
4 Levante la antena, asegurándose
de que se orienta hacia el techo.
continúa
Procedimientos iniciales
ES
9
Page 66
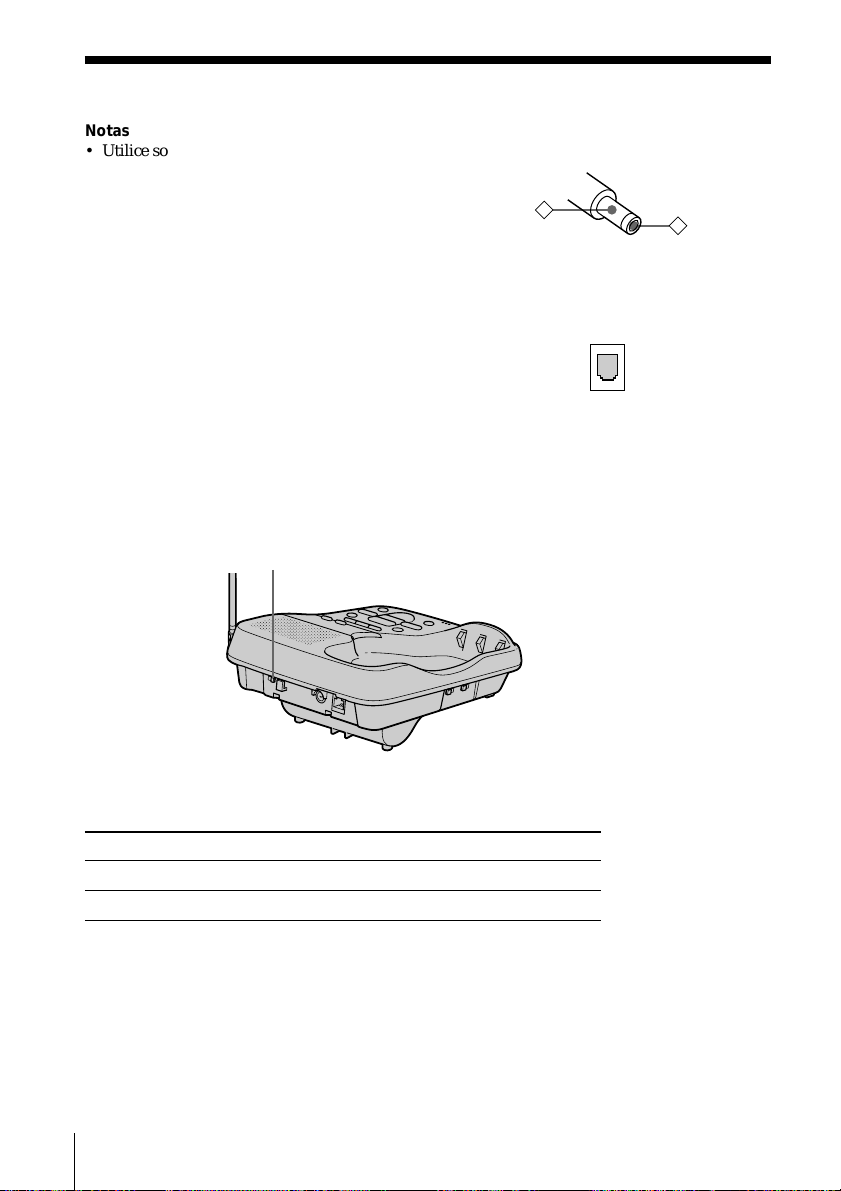
Paso 2: Instalación de la unidad base (continuación)
–
+
Notas
• Utilice solamente el adaptador de alimentación de CA
AC-T46. No utilice otros adaptadores de alimentación
de CA.
• Conecte el adaptador de alimentación de CA a un
suministro de alimentación continuo.
• Sitúe la unidad base cerca de la toma de CA, de forma
que pueda desenchufar el adaptador fácilmente.
Polaridad del enchufe
Consejos
• Si la toma de teléfono no es modular, solicite
asistencia al servicio técnico de la compañía telefónica.
• Para extraer la abrazadera de pared, presione la
lengüeta superior.
Modular
Elección del modo de marcación
Para que el teléfono funcione perfectamente, seleccione un modo de
marcación adecuado (tonos o impulsos).
Interruptor DIAL MODE
Dependiendo del sistema de marcación, ajuste el interruptor DIAL
MODE de la siguiente manera:
Si el sistema de marcación es Ajuste el interruptor en
Tonos T
Impulsos P
Si no conoce el sistema de marcación
Realice una llamada de prueba con el interruptor DIAL MODE
ajustado en T. Si la llamada se conecta, deje el interruptor en esta
posición; de lo contrario, ajústelo en P.
ES
10
Procedimientos iniciales
Page 67
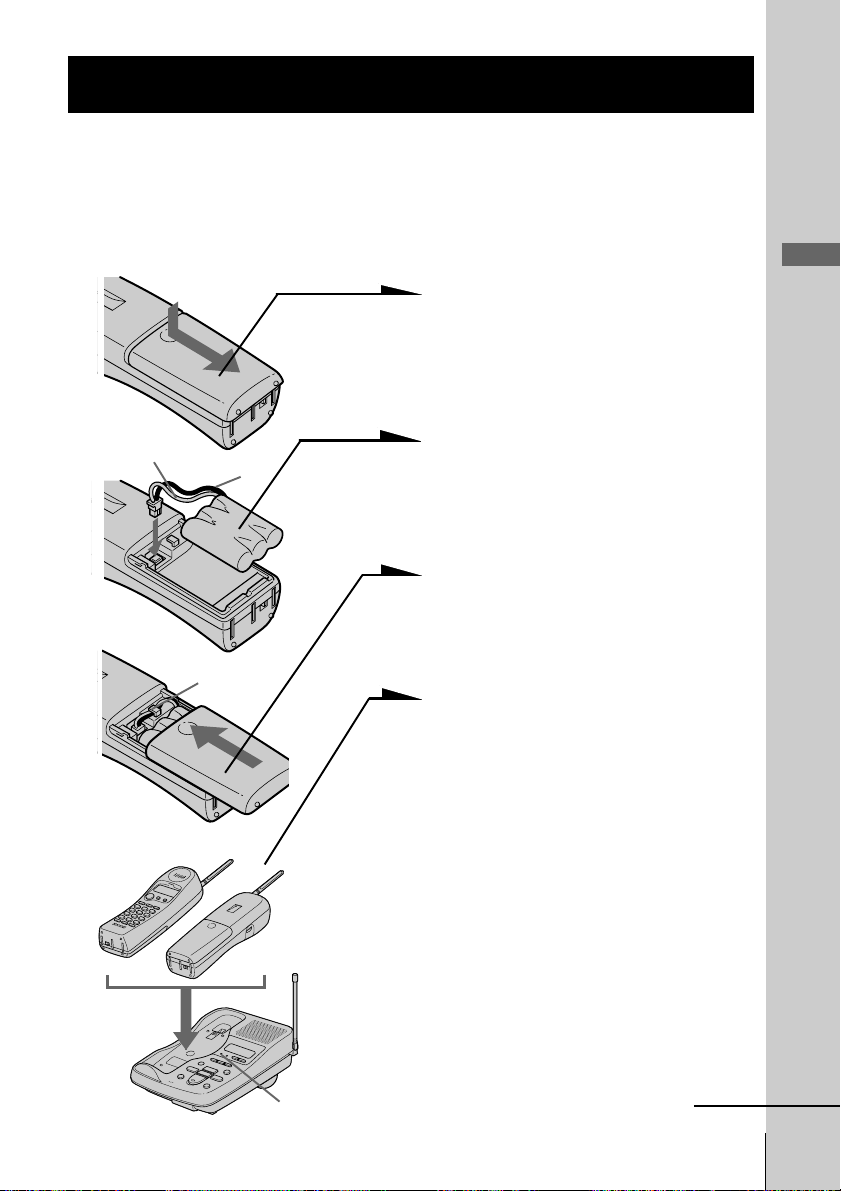
Paso 3
Preparación del paquete de batería
Cargue el paquete de batería durante más de 12 horas antes de
comenzar a utilizar el teléfono.
1 Deslice la tapa del
compartimiento de la batería,
situada en el auricular, para
abrirla.
Procedimientos iniciales
Rojo
Negro
Gancho
BP-T24
2 Conecte el conector del paquete
de batería con la polaridad
correcta (cable negro en el lado
derecho y rojo en el izquierdo).
3 Enganche los cables e inserte el
paquete de batería. A
continuación, cierre la tapa.
4 Coloque el auricular sobre la
unidad base.
Puede situar cualquiera de los
dos lados hacia arriba.
El indicador CHARGE se
ilumina cuando el auricular está
situado correctamente sobre los
terminales de carga de la
unidad base. Cargue el paquete
de batería durante más de 12
horas para que se cargue
completamente. El indicador
CHARGE permanece iluminado
incluso después de finalizarse la
carga.
Indicador CHARGE
continúa
Procedimientos iniciales
11
ES
Page 68

Paso 3: Preparación del paquete de batería (continuación)
Duración del paquete de batería
Un paquete de batería completamente cargado dura
aproximadamente:
• 6 horas si utiliza el auricular de forma continua
• 10 días (modo RING ON) o 1 mes (modo RING OFF) cuando el
auricular se encuentra en modo de espera.
Notas
• El paquete de batería se descargará durante un periodo de tiempo
prolongado, incluso si no está en uso.
• Si deja el paquete de batería en el auricular sin cargarlo, se descargará por
completo.
Es posible que requiera varias cargas para recuperar su capacidad completa.
• Durante la carga, la batería se calienta. Esto no es un fallo de funcionamiento.
Para obtener el máximo rendimiento de la batería
No coloque el auricular en la unidad base después de cada llamada. La
batería funciona mejor si el auricular se coloca en la unidad base
después de dos o tres llamadas. No obstante, no deje el auricular fuera
de la unidad base durante mucho tiempo, ya que si lo hace la batería se
descargará por completo.
Cuándo adquirir un nuevo paquete de batería
Si el paquete de batería sólo dura unos minutos incluso después de
cargarse durante 12 horas, su vida útil ha finalizado y hay que
sustituirlo. Consulte a su proveedor o centro de servicio autorizado
Sony y solicite un paquete de batería recargable Sony BP-T24.
Nota
La duración de la batería puede variar en función de la condición de empleo y
temperatura ambiente.
ES
12
Procedimientos iniciales
Page 69
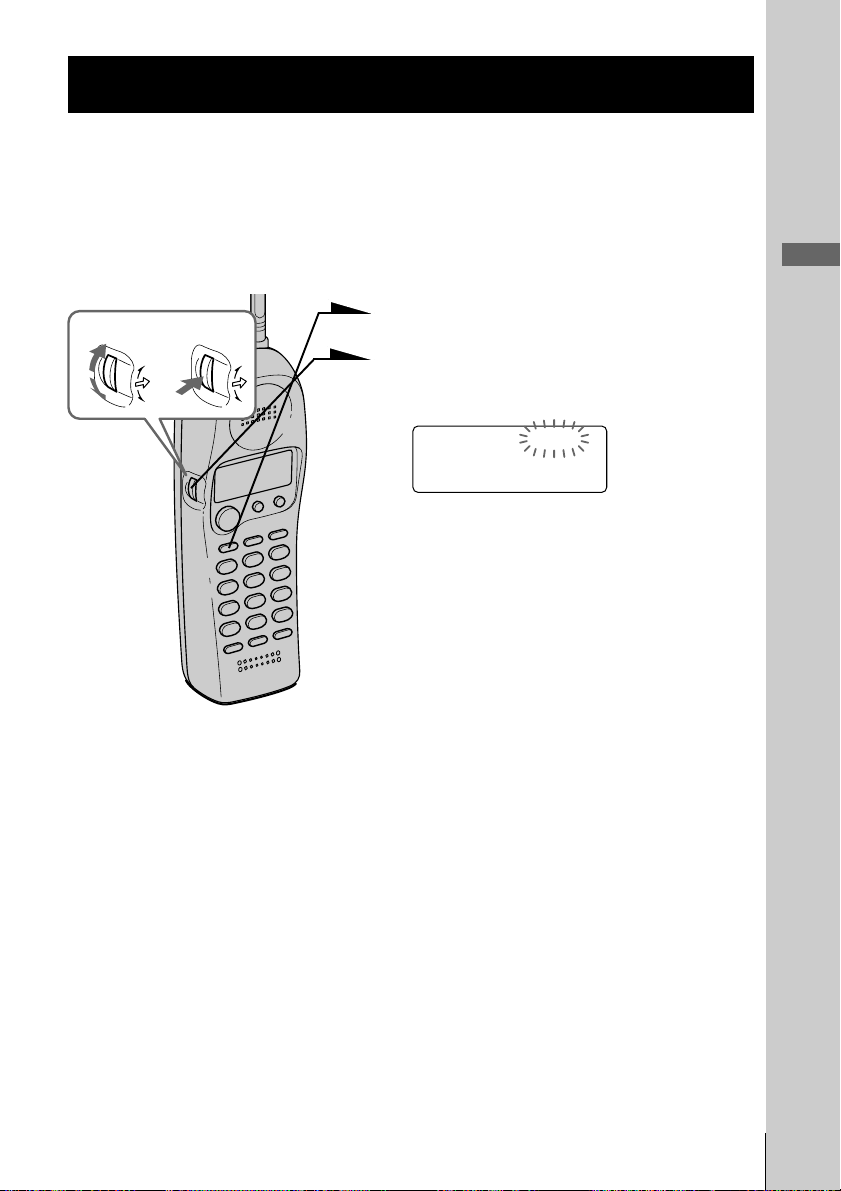
Paso 4
Introducción del prefijo
Al emplear este teléfono por primera vez o al trasladarlo a una zona
donde haya un prefijo distinto, es preciso introducir el prefijo adecuado.
Esto es necesario, ya que el teléfono debe distinguir entre llamadas locales y
conferencias para marcar correctamente los números de la lista de ID de llamada.
Procedimientos iniciales
Gire Pulse
1 Pulse (VOL/PGM).
2 Gire el dial de avance hacia arriba para
que “AREA” parpadee.
DIRECTORY AREA
3 Pulse el dial de avance.
“ENTER AREA CODE” aparece en el
visor.
4 Introduzca tres dígitos
correspondientes a su prefijo; para
ello, emplee las teclas de marcación.
5 Pulse (VOL/PGM).
Se oirá un pitido largo de confirmación.
Notas
• Si ya hay un prefijo introducido, aparecerá en el visor en el paso 3. Para introducir
un prefijo distinto, consulte “Para cambiar el prefijo” más adelante.
• No deje que transcurran más de 20 segundos entre cada paso del proceso.
Consejos
• Puede pulsar el dial de avance en lugar de (VOL/PGM) en el paso 5.
• Para comprobar el prefijo actual, realice los anteriores pasos 1 a 3. El prefijo
aparece en el visor durante 20 segundos.
Para cambiar el prefijo
1 Realice los anteriores pasos 1 a 3.
El prefijo actual aparece en el visor.
2 Gire el dial de avance hacia abajo para borrar el prefijo actual.
3 Introduzca un prefijo nuevo con las teclas de marcación.
4 Pulse (VOL/PGM).
Se oirá un pitido largo de confirmación.
Procedimientos iniciales
13
ES
Page 70
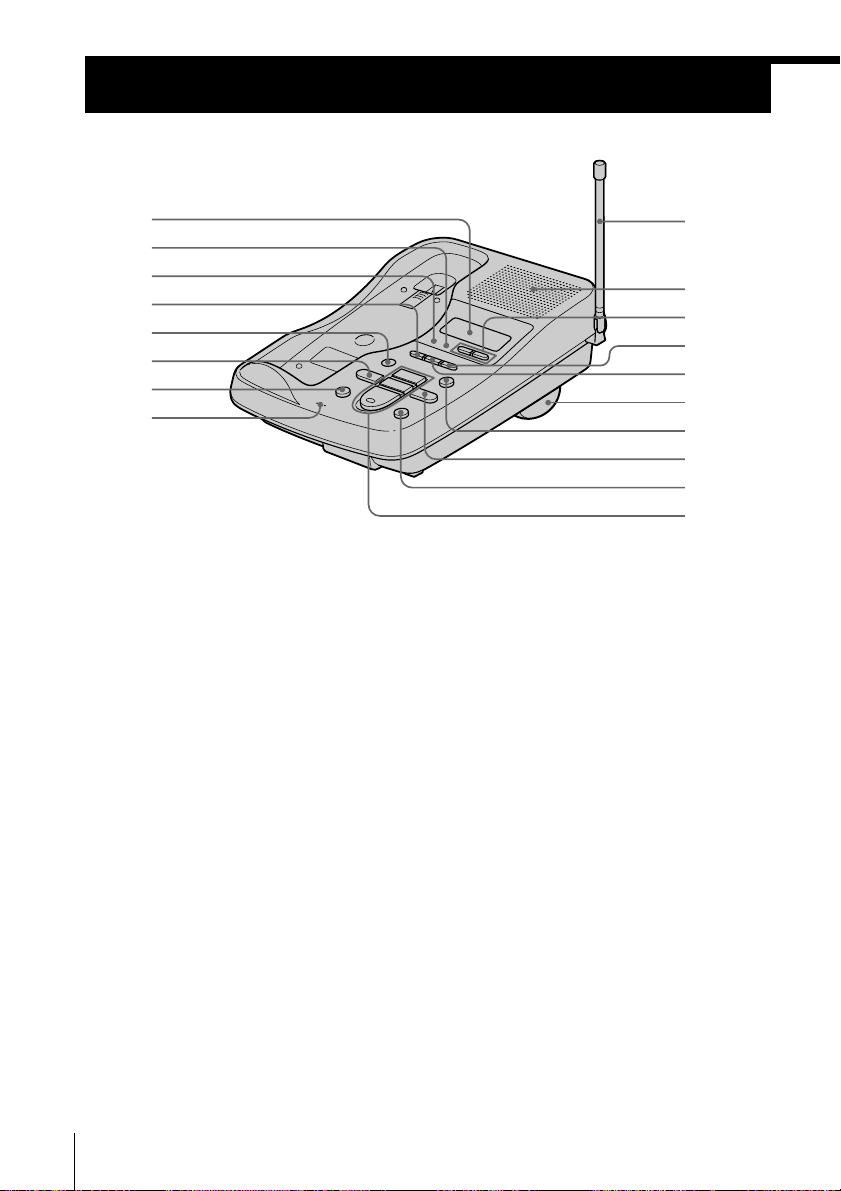
Identificación de los componentes
Consulte las páginas indicadas entre paréntesis para obtener más información.
Unidad base
1
2
3
4
5
6
7
8
1 Visor (p.9, 34)
2 Indicador IN USE
Se ilumina mientras se utiliza el
auricular inalámbrico.
3 Indicador CHARGE (p. 11)
Se ilumina mientras se carga la batería.
4 Botón GREETING (p. 29)
Reproduce el mensaje de saludo.
También se utiliza al grabar un saludo.
5 Botón ERASE (p. 30, 34)
Borra el saludo o mensajes grabados.
6 Botón REPEAT/SLOW (p. 28, 34)
Púlselo para repetir el mensaje
actual o para volver al mensaje
anterior. Mantenga el botón
pulsado para reproducir los
mensajes lentamente.
7 Botón MEMO (p. 36)
Graba memorandos.
8 MIC (micrófono) (p. 29, 36)
9 Antena (p. 9, 47)
0 Altavoz
ES
14
Procedimientos iniciales
9
0
qa
qs
qd
qf
qg
qh
qj
qk
qa Botones VOLUME +/– (p. 34)
Ajustan el volumen del altavoz.
qs Botón TIME (p. 28)
Púlselo al ajustar el día y la hora, o
para comprobar la hora actual.
qd Botón SET/REC (p. 28, 29, 37)
Púlselo para ajustar la hora o para
grabar un saludo. También se utiliza
al ajustar el código ID remoto
(código de seguridad).
qf Abrazadera de pared/soporte
para la unidad base (p. 9, 47)
qg Botón ANSWER ON/OFF (p. 33)
Activa o desactiva la función de
contestador. Se ilumina cuando dicha
función está activada, y parpadea
cuando hay un mensaje nuevo
grabado. También se utiliza al ajustar
el código ID remoto (código de
seguridad).
qh Botón SKIP/QUICK (p. 28, 34)
Púlselo para pasar al mensaje
siguiente. Mantenga el botón
pulsado para reproducir los
mensajes rápidamente.
Page 71
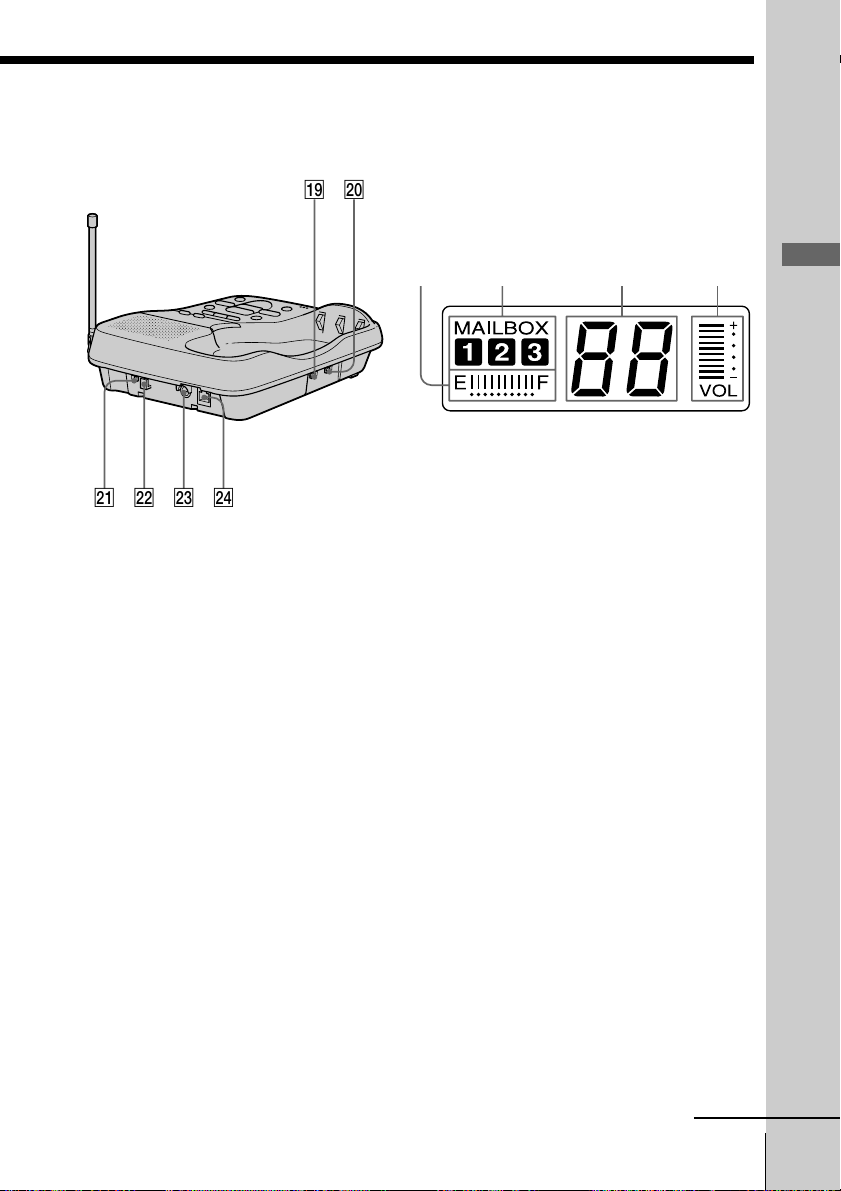
ql w;
Visor
El visor de la unidad base muestra el
funcionamiento del contestador
automático.
wa
ws
wd
wf
qj Botón HANDSET LOCATOR
(p. 27)
Permite llamar al auricular inalámbrico.
qk Botones PLAY/STOP
(MAILBOX 1, 2, 3) (p. 34)
Reproducen los mensajes de cada
buzón.
ql Interruptor AUDIBLE INDICATE
(p. 32)
Selecciona el modo de contestación.
w; Interruptor RINGER SELECT
(p. 31)
Selecciona el número de señales de
llamada.
wa Interruptor DIAL MODE (p. 10)
Selecciona la marcación por
impulsos o por tonos.
ws Gancho para el cable del
adaptador de alimentación de
CA (p. 9)
wd Toma DC IN 9V (p. 9)
wf Toma LINE (línea telefónica)
(p. 9)
12 3 4
1 Indicador de capacidad de la
memoria (p. 32)
Indica la capacidad disponible de la
memoria, de E (vacía) a F (llena),
para grabar. Las barras aumentan al
disminuir la capacidad disponible.
2 Indicador MAILBOX (p. 34)
Aparece cuando hay mensajes
grabados y cuando los mensajes
están reproduciéndose.
Parpadea cuando hay mensajes
nuevos grabados.
3 Indicador de número de
mensajes (p. 34)
Indica el número de mensajes
nuevos grabados. Aparece “A” en el
modo sólo saludo. Aparece “F”
cuando no queda espacio para
grabar mensajes. Aparece “P”
cuando la alimentación está activada.
4 Indicador VOL (volumen)
Indica el volumen del altavoz. Las
barras aumentan al subir el
volumen.
continúa
Procedimientos iniciales
Procedimientos iniciales
ES
15
Page 72
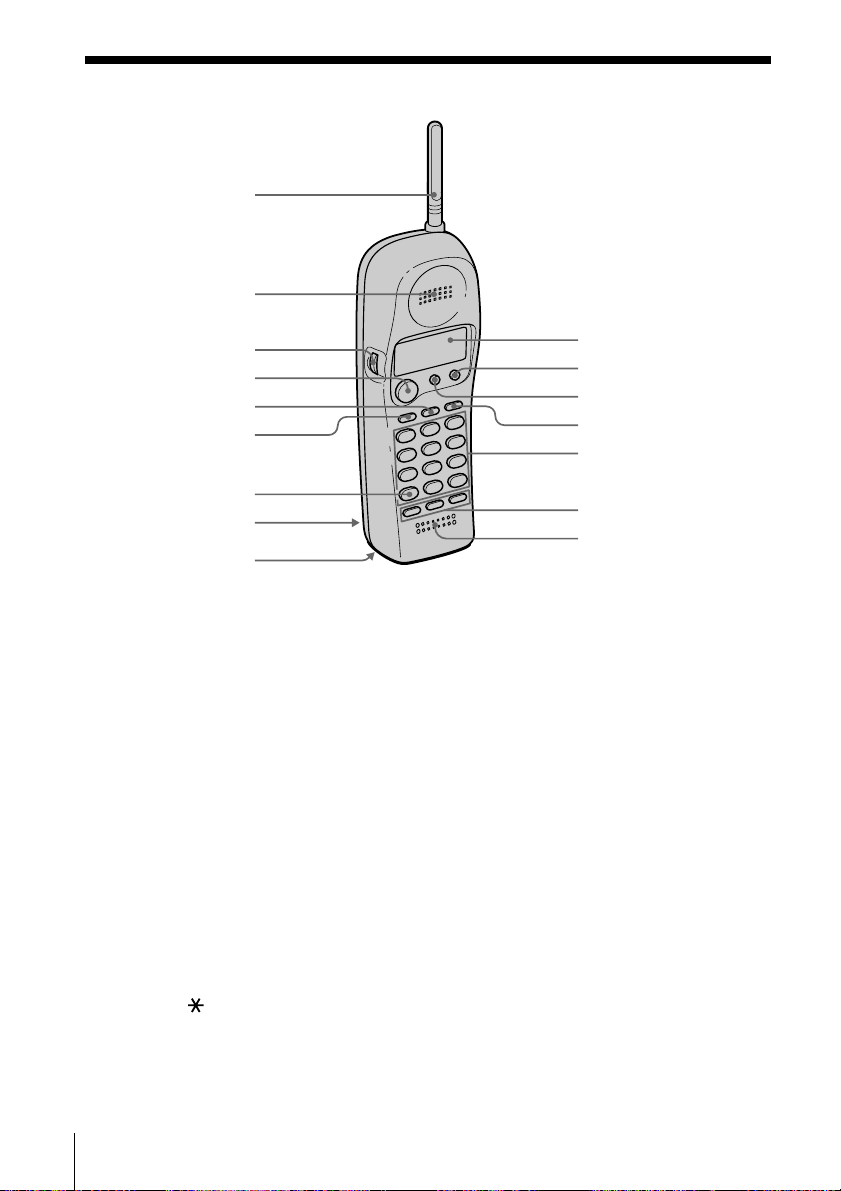
Identificación de los componentes (continuación)
Auricular
1
2
3
4
5
6
7
8
9
1 Antena
2 Altavoz
3 Dial de avance (p. 13, 23, 40)
4 Botón TALK (p. 17, 35)
Permite realizar o recibir llamadas.
5 Botón REDIAL (p. 18)
Vuelve a marcar el último número
marcado.
6 Botón VOL (volumen) /PGM
(programa) (p. 13, 17, 21, 23)
Se utiliza para ajustar el volumen
del altavoz. También se utiliza para
almacenar números en el directorio
telefónico o para la marcación
rápida.
7 Botón TONE (p. 17, 38)
Permite cambiar temporalmente a
la marcación por tonos.
8 Compartimiento de la batería
(p. 11)
ES
16
Procedimientos iniciales
0
qa
qs
qd
qf
qg
qh
9 Interruptor RING (p. 12, 20)
Cambia el modo de señal de
llamada.
0 Visor (p. 39)
qa Botón CALL WAITING/FLASH
(p. 19, 46)
Pasa a una segunda llamada si
dispone del servicio de “llamada en
espera”, o permite realizar una
nueva llamada.
qs Botón OFF (p. 17)
Permite desconectar la llamada.
qd Botón PAUSE (p. 22)
Inserta una pausa en la secuencia de
marcación.
qf Teclas de marcación (p. 17)
qg Botones ONE-TOUCH DIAL (A,
B, C) (p. 21)
qh Micrófono
Page 73
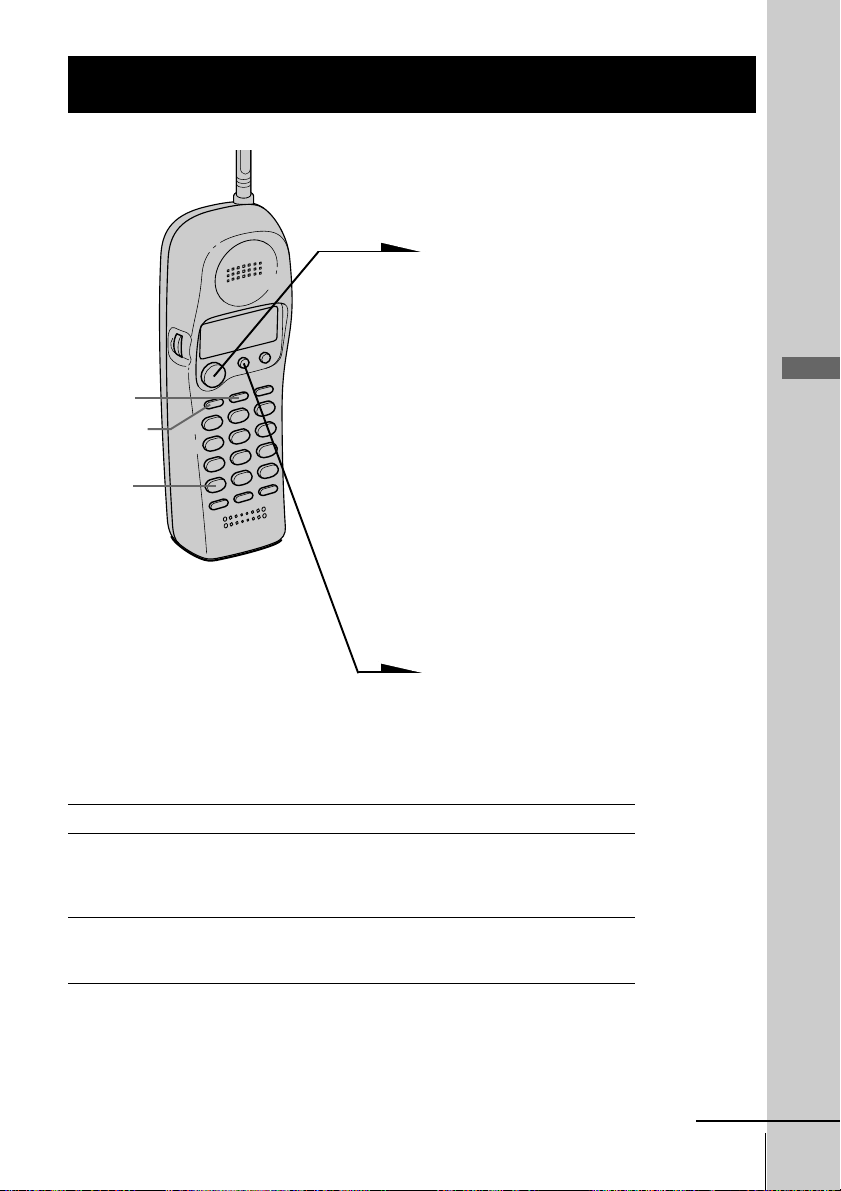
Operaciones básicas
Realización de llamadas
1 Levante el auricular de la
2 Pulse (TALK) y espere hasta que
(REDIAL)
(VOL/PGM)
(*TONE)
3 Marque el número de teléfono.
unidad base.
“TALK” aparezca en el visor.
El indicador IN USE de la
unidad base se ilumina.
A continuación, oirá el tono de
marcación. Si oye cinco pitidos
cortos de error y “OUT OF
RANGE” aparece en el visor,
acérquese a la unidad base.
Durante la conversación, es posible
ajustar el volumen del auricular.
Realice el proceso descrito en la
tabla que aparece más adelante.
Operaciones básicas
4 Cuando finalice la conversación,
pulse (OFF) o vuelva a colocar
el auricular en la unidad base.
El visor se apagará.
Tareas adicionales
Para Realice lo siguiente
Ajustar el volumen del auricular Durante conversaciones telefónicas, pulse
(VOL/PGM). Cada vez que pulse
(VOL/PGM), el volumen del altavoz cambia
en cuatro niveles.
Cambiar temporalmente a la Pulse (*TONE) una vez conectado.
marcación por tonos La línea permanecerá en el modo de
marcación por tonos hasta la desconexión.
Notas
• Si el auricular emite un pitido cada segundo durante la conversación y el
visor muestra “OUT OF RANGE”, acérquese a la unidad base; en caso
contrario, la llamada se desconectará transcurrido un minuto.
• Al aumentar el volumen del sonido, en determinados casos es posible que el
ruido de fondo también aumente. Deberá ajustar el volumen acordemente.
continúa
Operaciones básicas 17
ES
Page 74

Realización de llamadas (continuación)
Si la batería se debilita durante una llamada
El auricular emitirá un pitido cada tres segundos y los indicadores E
y “BATTERY LOW” aparecerán en el visor. Finalice la llamada y
cargue el paquete de batería.
Para obtener un rendimiento óptimo, cargue la batería durante 12
horas.
Tenga en cuenta que durante los primeros 10 - 15 minutos de carga, el
teléfono estará inactivo, es decir, incapaz de realizar o recibir llamadas.
Transcurridos los primeros 10 - 15 minutos, podrá utilizar el teléfono,
pero la duración del paquete de batería será muy corta. Por tanto, se
recomienda que la cargue por completo antes de volver a utilizar el
teléfono.
Rellamada
1 Pulse (TALK) y espere hasta que “TALK” aparezca en el
visor.
El indicador IN USE de la unidad base se ilumina.
2 Pulse (REDIAL) para que vuelva a marcarse el último
número marcado.
Nota
Si el número se compone de más de 32 dígitos o si se ha borrado, cinco pitidos
cortos de error indicarán que no es posible marcar dicho número.
Para comprobar el número de teléfono antes de volver a
marcarlo
Pulse (REDIAL) sin pulsar (TALK).
El último número marcado aparece durante cinco segundos.
Para marcar el número, pulse (TALK) mientras se muestra éste.
Nota
El último número marcado no aparecerá si se compone de más de 32 dígitos o si
se ha borrado.
Para borrar el último número de teléfono marcado
Mientras el auricular no se encuentra en uso, pulse (REDIAL) dos
veces.
El número se borrará de la memoria, y se oirá un pitido largo de
confirmación.
ES
18
Operaciones básicas
Page 75
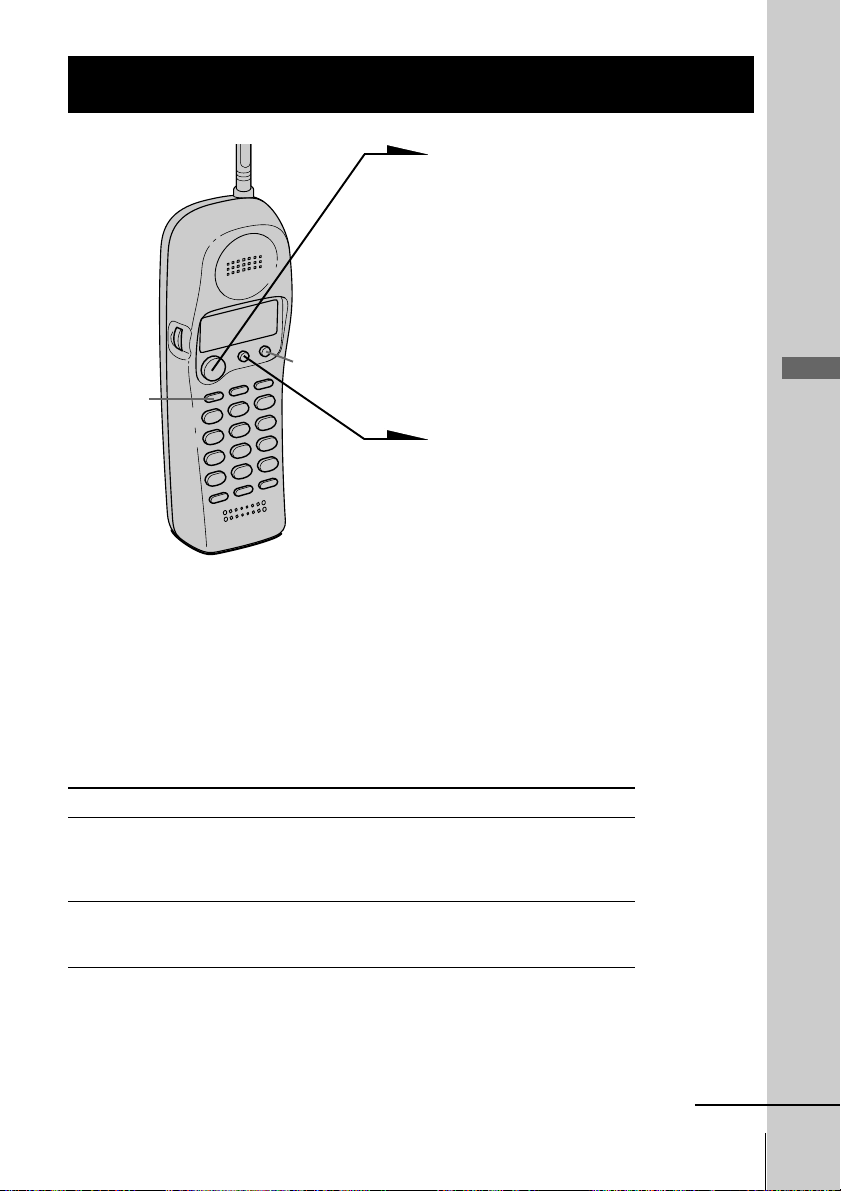
Recepción de llamadas
1 Cuando el teléfono suene,
levante el auricular de la unidad
base y pulse (TALK).
“TALK” aparece en el visor y el
indicador IN USE de la unidad
base se ilumina.
Durante la conversación, puede
ajustar el volumen del auricular.
(CALL WAITING/FLASH)
(VOL/PGM)
Realice el proceso descrito en la
tabla que aparece más adelante.
2 Cuando finalice la conversación,
pulse (OFF) o vuelva a colocar
el auricular en la unidad base.
El visor y el indicador IN USE
de la unidad base se desactivan.
Si se ha abonado al servicio de ID de llamada
• el número y/o nombre de la persona que llama aparecerá en el visor al
recibir una llamada (consulte la página 39).
• el sonido del timbre cambiará a un tono más alto si la llamada coincide con el
número almacenado en los botones ONE-TOUCH DIAL o en el directorio
telefónico (función de comparación en memoria; consulte la página 39).
Operaciones básicas
Tareas adicionales
Para Realice lo siguiente
Ajustar el volumen del auricular Durante conversaciones telefónicas, pulse
(VOL/PGM).
Cada vez que pulse (VOL/PGM), el volumen
del altavoz cambiará en cuatro niveles.
Pasar a otra llamada Pulse (CALL WAITING/FLASH).
(servicio de “llamada en espera”*) Pulse (CALL WAITING/FLASH) de nuevo para
recuperar la primera llamada.
* Es preciso abonarse al servicio de la compañía telefónica.
Consejo
Para informar sobre llamadas entrantes, el visor muestra “**RINGING**”
cuando el teléfono suena.
Operaciones básicas 19
continúa
ES
Page 76

Recepción de llamadas (continuación)
Para desactivar la señal de llamada en el auricular
Ajuste el interruptor RING de la parte inferior en OFF.
Puede ahorrarse energía de la batería.
El auricular no emitirá señales de llamada. Aún
puede realizar llamadas y recibirlas si otro teléfono
conectado a la misma línea suena al recibir llamadas
entrantes, pero no podrá llamar al auricular desde la
unidad base.
Nota
No es posible recibir datos de ID de llamada si el auricular no se encuentra en
la unidad base y ésta está ajustada en modo RING OFF. Consulte la página 39
para más información.
Interruptor RING
ES
20
Operaciones básicas
Page 77
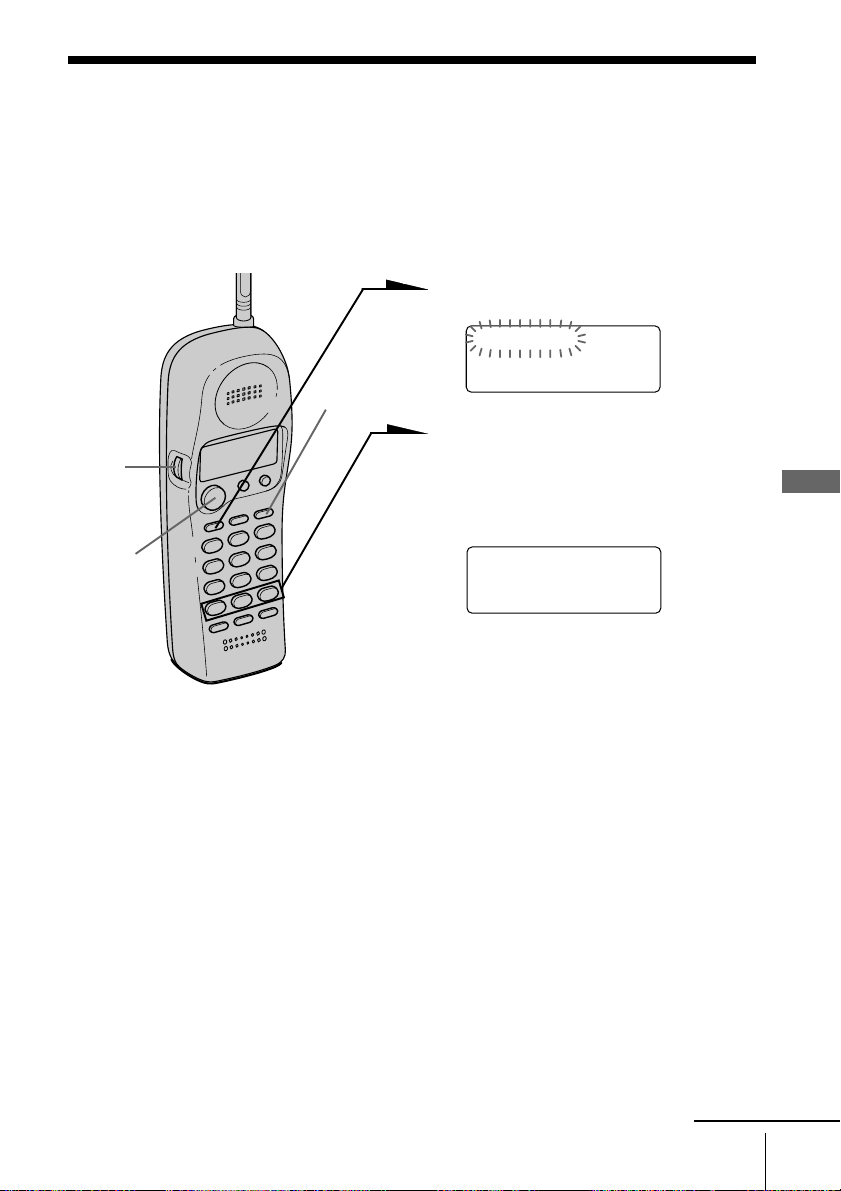
Funciones del teléfono
Marcación rápida
Es posible marcar pulsando una sola tecla mediante el almacenamiento
de números de teléfono en los botones de marcación rápida.
Almacenamiento de números de teléfono
1 Pulse (VOL/PGM).
DIRECTORY AREA
(PAUSE)
2 Pulse uno de los tres botones
Dial de
avance
ONE-TOUCH DIAL ((A) a
(C)).
Se oirá un pitido de confirmación
Funciones del teléfono
.
(TALK)
A=
Si hay algún número
almacenado, aparecerá en el
visor. Para almacenar un
número nuevo, gire el dial de
avance para borrarlo.
3 Introduzca el número de
teléfono que desee almacenar.
Es posible introducir un máximo
de 16 dígitos, incluidos un tono
y una pausa, contándose cada
uno de estos elementos como un
dígito.
4 Pulse (VOL/PGM).
S
e oirá un pitido largo de
confirmación, y el número
quedará almacenado. El visor se
apagará.
Funciones del teléfono
continúa
21
ES
Page 78

Marcación rápida (continuación)
Nota
No deje que transcurran más de 20 segundos entre cada paso del proceso.
Consejos
• Si ha introducido un número incorrecto en el paso 3, pero aún no ha pulsado
(VOL/PGM) (paso 4), basta con girar el dial de avance hacia abajo para
borrarlo. A continuación, introduzca el número correcto.
• Puede pulsar el dial de avance en lugar de (VOL/PGM) en el paso 4.
Para almacenar números que vayan a marcarse mediante
una central privada con extensiones (PBX)
Antes de introducir un número de teléfono en el paso 3 de la página
21, realice lo siguiente:
1 Introduzca el dígito de acceso a la línea exterior (por ejemplo, 9).
2 Pulse (PAUSE).
Para cambiar números almacenados
1 Pulse (VOL/PGM).
2 Pulse uno de los botones ONE-TOUCH DIAL ((A) a (C)).
El número actual aparece en el visor.
3 Gire el dial de avance hacia abajo para borrar el número actual.
4 Introduzca un número nuevo.
5 Pulse (VOL/PGM).
Nota
Es posible sustituir el número almacenado por otro nuevo, pero no es posible
sólo borrarlo.
Realización de llamadas mediante la marcación rápida
1 Pulse (TALK) y espere hasta que “TALK” aparezca en el visor.
2 Pulse uno de los botones ONE-TOUCH DIAL ((A) a (C)).
El número almacenado en el botón de marcación rápida
aparecerá en el visor y se marcará.
Para comprobar el número antes de la marcación rápida
Cuando el auricular no esté utilizándose, pulse uno de los botones
ONE-TOUCH DIAL ((A) a (C)).
El número almacenado en el botón aparece en el visor durante cinco
segundos. Para marcar el número, pulse (TALK) mientras se muestra.
ES
22
Funciones del teléfono
Page 79
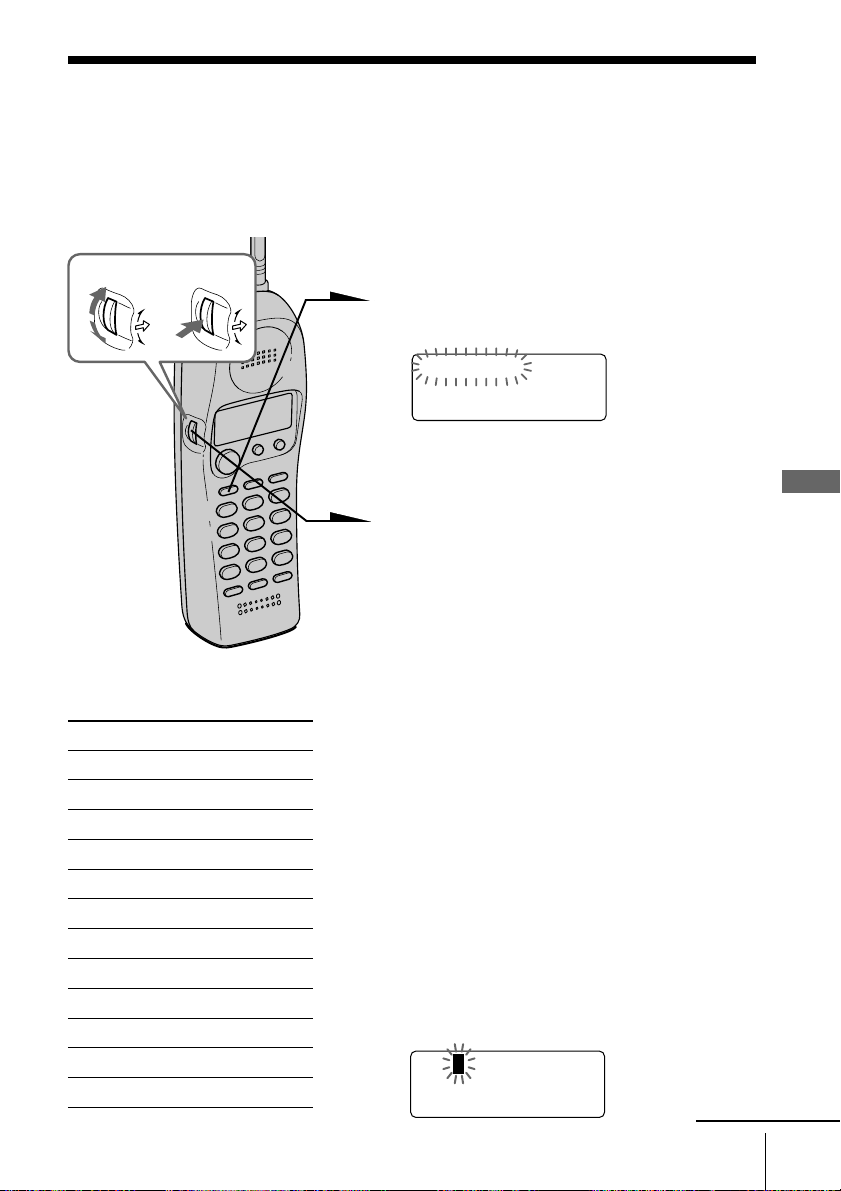
Directorio telefónico
Es posible marcar números desplazándose por el directorio telefónico.
Es posible almacenar hasta 50 números.
Almacenamiento de números de teléfono y nombres
Ejemplo: para almacenar “SONY” “123-
Gire Pulse
4567”.
1 Pulse (VOL/PGM).
(Asegúrese de no pulsar (TALK).)
DIRECTORY AREA
Si “DIRECTORY” no parpadea, gire el
dial de avance hacia abajo para que
parpadee.
2 Pulse el dial de avance.
Aparece “ENTER NAME”.
3 Introduzca el nombre mediante las
teclas de marcación. Es posible
introducir un máximo de 15 caracteres.
Pulse una tecla de marcación hasta que
Tabla de caracteres
Tecla Carácter
(1) 1
(2) A n B n C n 2
(3) D n E n F n 3
(4) G n H n I n 4
(5) J n K n L n 5
(6) M n N n O n 6
(7) P n Q n R n S n 7
(8) T n U n V n 8
(9) W n X n Y n Z n 9
(0) 0
(*) *
(#) #
aparezca el carácter deseado.
(Consulte la tabla de caracteres para
obtener más información.)
Introduzca los otros caracteres de la
misma forma.
Para introducir dos caracteres
asignados a la misma tecla o un
“espacio”, gire el dial de avance hacia
arriba para que el cursor se desplace a
la derecha.
Ejemplo: para introducir “SONY”,
pulse (7) cuatro veces (S), (6) tres
veces (O), gire el dial de avance hacia
arriba para que se desplace el cursor,
pulse (6) dos veces (N), y (9) tres
veces (Y).
SONY
continúa
Funciones del teléfono
Funciones del teléfono
ES
23
Page 80
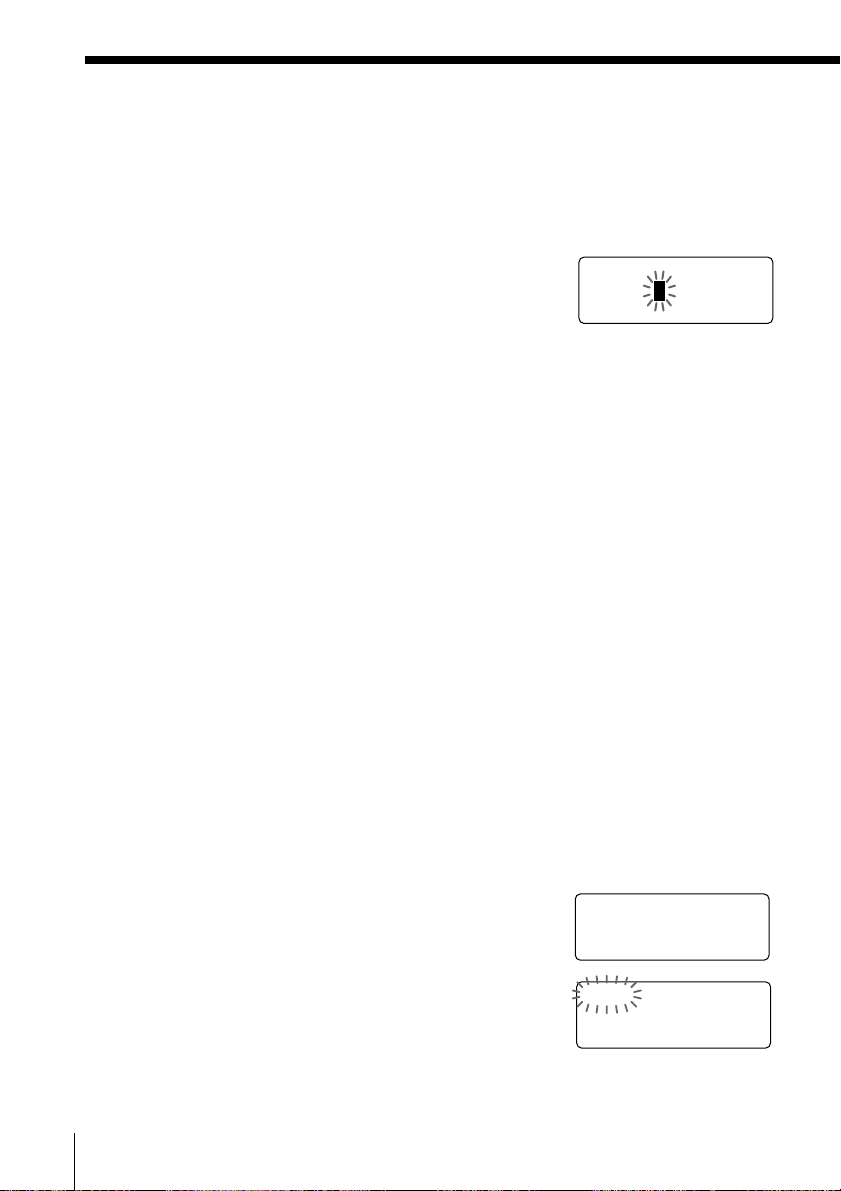
DIAL PGM ERASE
1234567
Directorio telefónico (continuación)
4 Pulse (VOL/PGM).
Aparece “ENTER NUMBER”.
5 Introduzca el número de teléfono.
Es posible introducir hasta 16 dígitos, incluidos
un tono y una pausa, contándose cada uno de
ellos como un dígito.
SONY
123456
6 Pulse (VOL/PGM).
Se oirá un pitido largo de confirmación, y el
nombre y el número quedarán almacenados. El
visor se apagará.
Notas
• Si intenta almacenar el 51º número de teléfono, oirá cinco pitidos cortos de
error, aparecerá “MEMORY FULL” y no será posible almacenar el número de
teléfono. Para almacenar otro número, borre uno de los almacenados
(consulte la página 25).
• No deje que transcurran más de 20 segundos entre cada paso del proceso.
Consejos
• Si ha introducido un nombre o número incorrecto en el paso 3 o 5, gire el dial
de avance hacia abajo para borrarlo. A continuación, introduzca el nombre o
número correcto.
• Puede pulsar el dial de avance en lugar de (VOL/PGM) en los pasos 4 y 6.
• Para almacenar números que vayan a marcarse mediante una central privada
con extensiones (PBX), realice los pasos de la página 22 al introducir números
de teléfono.
Cambio de un nombre y/o número de teléfono almacenado
7
1 Muestre el número y nombre que desee cambiar
siguiendo los pasos 1 y 2 de la página 26.
2 Pulse el dial de avance.
ES
24
Funciones del teléfono
SONY
1234567
Page 81
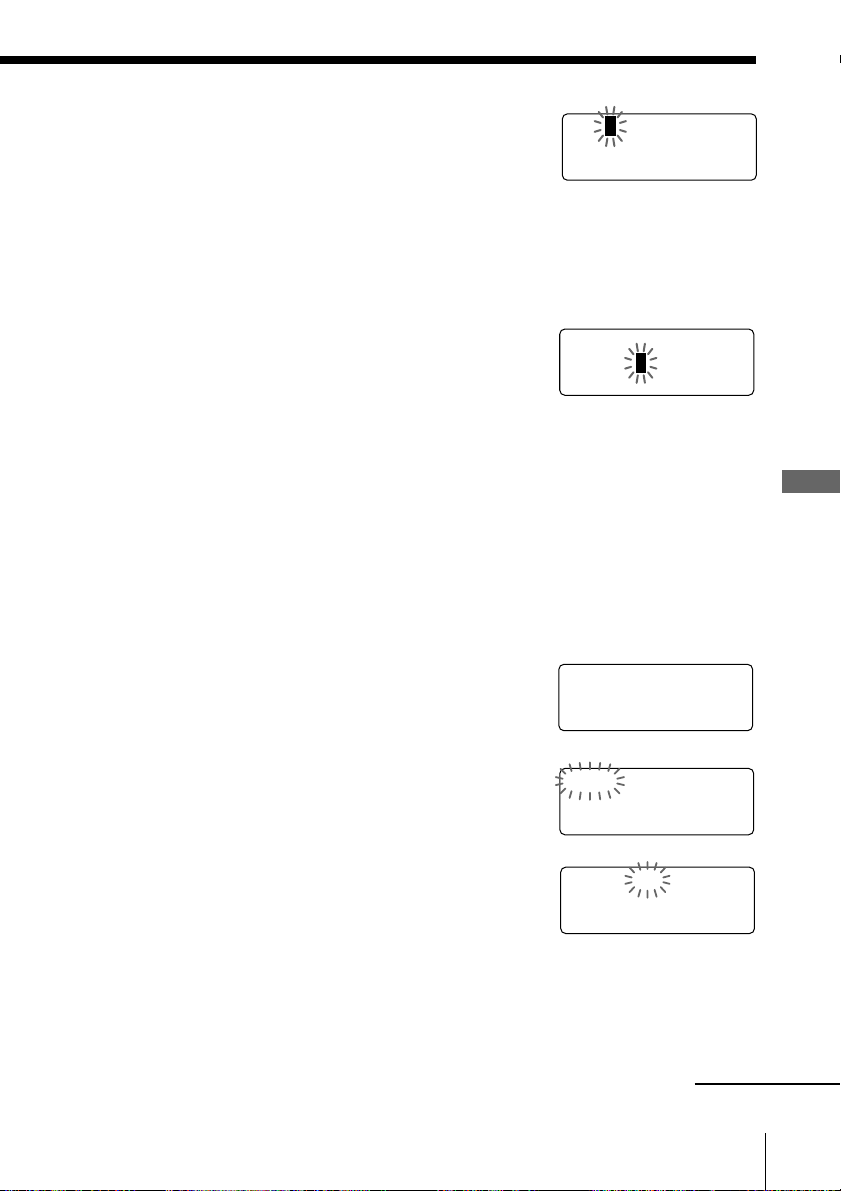
3 Gire el dial de avance hacia arriba para que
DIAL PGM ERASE
1234567
“PGM” parpadee y pulse dicho dial.
El cursor parpadea en el último carácter del
nombre.
4 Gire el dial de avance hacia abajo para borrar los
caracteres e introduzca el nombre nuevo.
Si desea cambiar sólo el número, omita este
paso.
5 Pulse el dial de avance.
El cursor parpadea en el último dígito del
número de teléfono.
6 Gire el dial de avance hacia abajo para borrar el
número e introduzca el nuevo.
Si no desea cambiar el número, omita este paso.
7 Pulse el dial de avance.
Oirá un pitido largo de confirmación y el
nombre y/o el número cambiará.
Borrado de ubicaciones de memoria
SON
Y
1234567
SMITH
123456
7
Funciones del teléfono
1 Muestre el nombre y el número de teléfono que
desee borrar; para ello, siga los pasos 1 y 2 de la
página 26.
2 Pulse el dial de avance.
3 Gire el dial de avance hacia arriba para que
“ERASE” parpadee y pulse dicho dial.
4 Gire el dial de avance hacia arriba para que
“YES” parpadee y pulse dicho dial.
Oirá un pitido largo de confirmación y la
ubicación de memoria se borrará.
SONY
1234567
ERASE NO YES
1234567
continúa
Funciones del teléfono
25
ES
Page 82
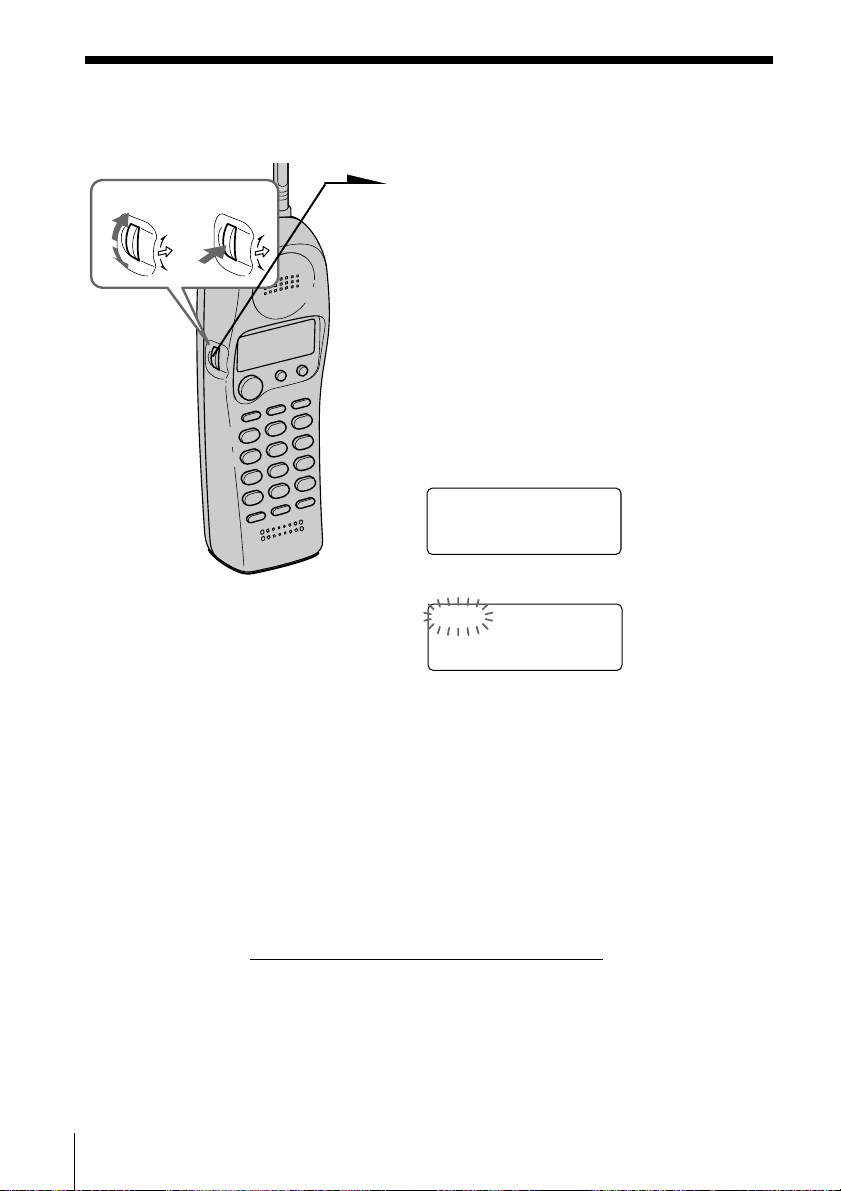
Directorio telefónico (continuación)
Realización de llamadas desde el directorio telefónico
Gire Pulse
1 Pulse el dial de avance dos veces.
“DIRECTORY” aparece en el visor.
2 Muestre el nombre y número de
teléfono al que desee llamar.
Para buscar en orden alfabético: Gire
el dial de avance hacia arriba o abajo.
Para buscar mediante la
introducción del primer carácter:
Pulse la tecla de marcación del carácter
que desee y gire el dial de avance.
SONY
1234567
3 Pulse el dial de avance.
DIAL PGM ERASE
1234567
4 Vuelva a pulsar el dial de avance.
El número se marcará.
Consejo
Puede pulsar (TALK) para realizar llamadas en lugar de seguir los pasos 3 y 4.
Acerca del orden de búsqueda
Los nombres aparecen en el siguiente orden al girar el dial de avance
hacia arriba o abajo.
• Orden alfabético: ABC...XYZ ˜ símbolos* ˜ * ˜ # ˜ 0 - 9
n
* Los símbolos aparecen sólo al almacenar un número que tenga el símbolo
de la lista de ID de llamada.
• Carácter inicial: Para buscar “SONY” por ejemplo, pulse (7) y
después gire el dial de avance para buscar los nombres que
comiencen por P, Q, R, S o 7.
ES
26
Funciones del teléfono
n
Page 83
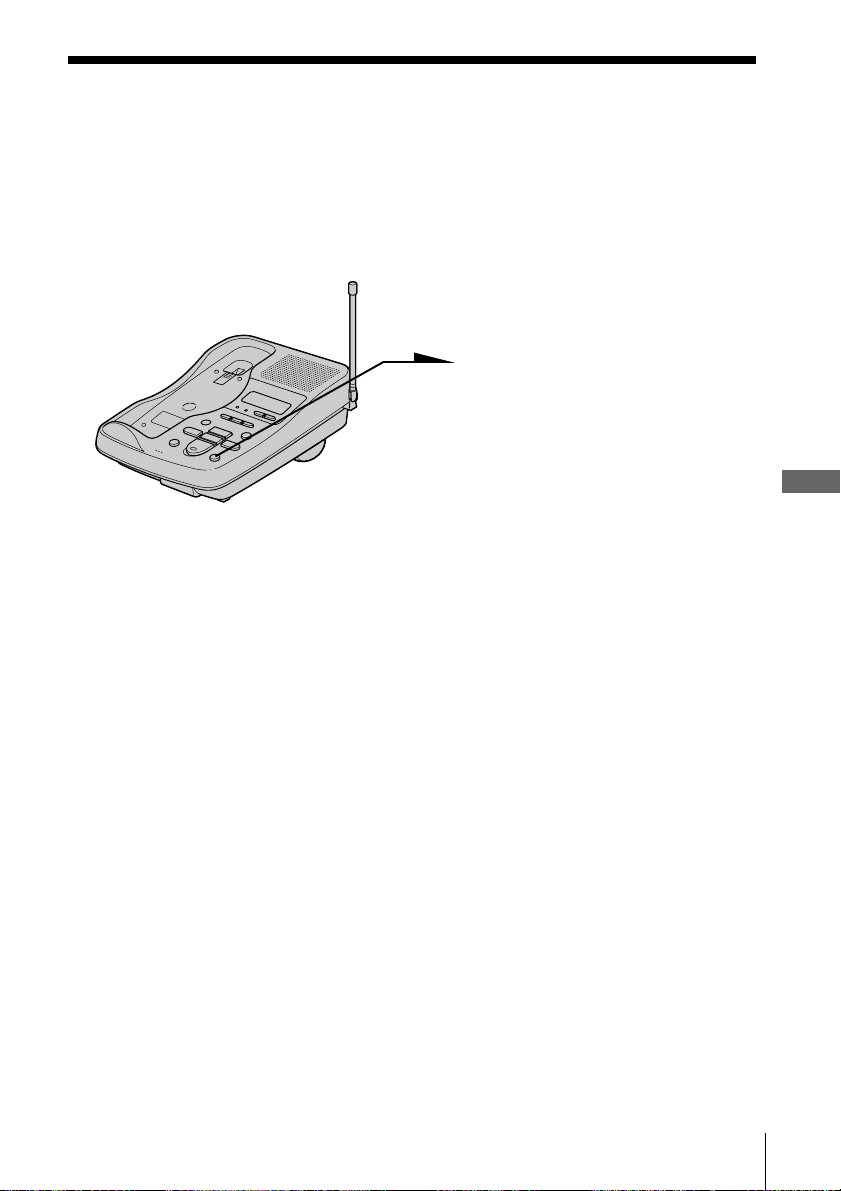
Llamada al auricular desde la unidad base
Es posible llamar al auricular desde la unidad base.
Tenga en cuenta que no es posible llamar al auricular si éste está
utilizándose.
Para llamar al
auricular
Pulse (HANDSET LOCATOR).
El auricular suena.
Si mantiene pulsado
(HANDSET LOCATOR), el
auricular sonará continuamente.
Nota
No es posible llamar al auricular si el interruptor RING de éste está ajustado en
OFF.
Funciones del teléfono
Funciones del teléfono
27
ES
Page 84
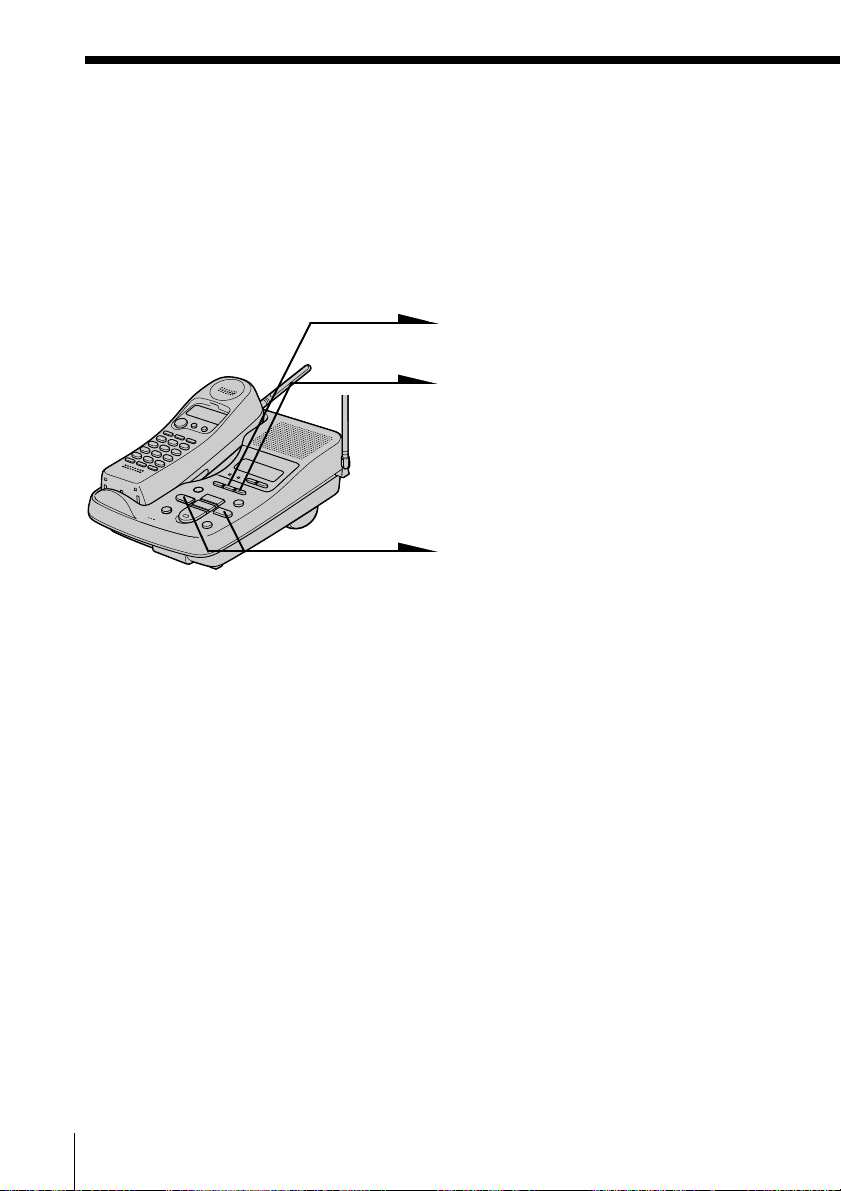
Funciones del contestador automático
Preparación del contestador automático
Observe que no es posible utilizar la unidad base mientras se utiliza el auricular.
Ajuste del día y la hora
Este ajuste permite indicar el día y la hora en los mensajes entrantes.
Al reproducir los mensajes, en la grabación escuchará el día y la hora.
1 Pulse (SET/REC).
2 Pulse (TIME).
Escuchará una guía oral,
indicándole lo siguiente: “Please
set the day. To select, press the
SKIP or REPEAT button. To
enter, press the SET button”.
3 Pulse (SKIP/QUICK) o
(REPEAT/SLOW) varias veces
hasta que se anuncie el día
correcto de la semana.
Pulse (SKIP/QUICK) para
avanzar, o (REPEAT/SLOW) para
retroceder.
4 Pulse (SET/REC).
Escuchará una guía oral, indicándole lo siguiente: “Please
set the hour. To select, press the SKIP or REPEAT button.
To enter, press the SET button”.
5 Pulse (SKIP/QUICK) o (REPEAT/SLOW) varias veces hasta
que se anuncie la hora correcta.
6 Pulse (SET/REC).
Escuchará una guía oral, indicándole lo siguiente: “Please
set the minute. To select, press the SKIP or REPEAT button.
To enter, press the SET button”.
ES
28
Funciones del contestador automático
Page 85
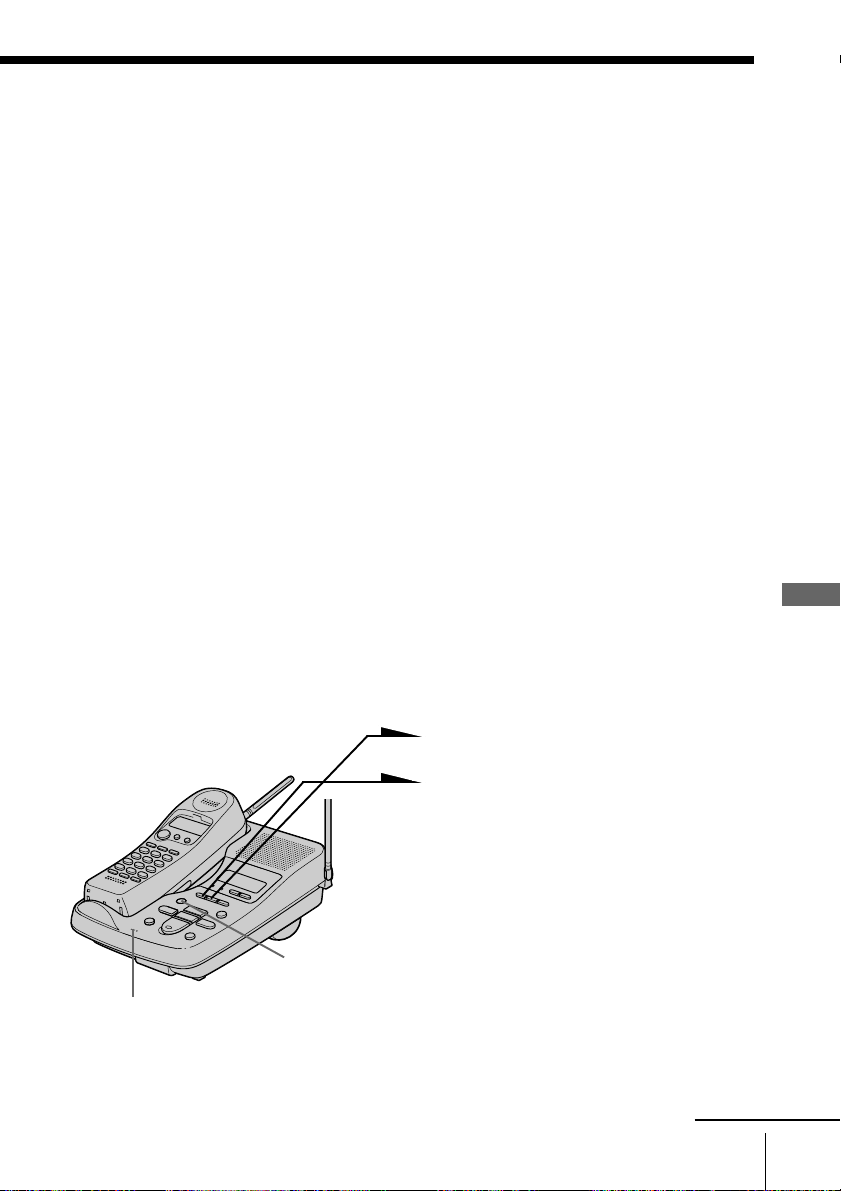
7 Pulse (SKIP/QUICK) o (REPEAT/SLOW) varias veces hasta
que se anuncien los minutos correctos.
8 Pulse (SET/REC).
Se escuchará un pitido largo de confirmación seguido del
día y la hora. A continuación, el teléfono empezará a
cronometrar el tiempo.
Notas
• Entre cada paso del proceso, no deberán transcurrir más de 20 segundos (o 60
segundos cuando ajuste los minutos).
• Si se produce una interrupción de la alimentación, el día y la hora se borrarán.
• Si no ajusta el día y hora actuales, al reproducir los mensajes grabados no
escuchará la indicación horaria. Si intenta comprobar la hora actual, oirá
cinco pitidos cortos de error.
Para comprobar la hora actual
Pulse (TIME). Oirá el día y la hora actuales.
Grabación del saludo
Este contestador automático dispone de saludos previamente grabados
(consulte la página 30). No obstante, puede grabar su propio saludo.
El saludo debe tener una duración comprendida entre dos segundos y
cuatro minutos.
Sólo se puede grabar un saludo, que se utilizará independientemente
del modo de contestación (modos “normal” y “sólo saludo”. Consulte
la página 32). Por tanto, si decide cambiar el modo, asegúrese de
grabar un nuevo saludo que coincida con el modo de contestación.
Funciones del contestador automático
MIC (Micrófono)
(ERASE)
1 Pulse (SET/REC).
2 Pulse (GREETING).
Oirá una guía oral y un pitido
largo de confirmación.
3 Comience la grabación después
del tono. Hable a una distancia
de aproximadamente 30 cm del
micrófono.
4 Pulse (SET/REC) para detener la
grabación.
El teléfono reproduce
automáticamente el saludo
grabado.
continúa
Funciones del contestador automático
29
ES
Page 86

Preparación del contestador automático (continuación)
Notas
• Si la grabación no se ha realizado satisfactoriamente, oirá cinco pitidos cortos
de error. Empiece de nuevo el proceso.
• Si se recibe una llamada o si pulsa (TALK) durante la grabación del saludo,
ésta se cancelará. Realice de nuevo el proceso.
• Si escucha cinco pitidos cortos de error mientras graba, es posible que el área
de grabación esté llena. En este caso, borre los mensajes que no necesite
(consulte la página 34).
Consejos
• Si en el paso 3 transcurren cuatro minutos, la grabación se detendrá
automáticamente.
• Para grabar el saludo desde un teléfono de tonos, consulte la página 38.
Saludo previamente grabado
Modo normal: “Hello, I’m unable to answer your call right now. Please
Modo sólo saludo: “Hello, I’m unable to answer your call right now. Please
Consejos
• Si desea grabar su propio “sólo saludo”, realice la anterior secuencia después
de ajustar el interruptor AUDIBLE INDICATE en ANN ONLY (página 32).
En caso contrario, se grabará el saludo “normal”.
• Es preciso cambiar el mensaje cada vez que cambie el modo.
leave your name, number and message after the tone.”
call again. Thank you.”
Para comprobar el saludo
Pulse (GREETING) para reproducir el saludo.
Para cambiar el saludo
Grabe otro nuevo. Éste sustituirá al anterior.
Para borrar el saludo
Pulse (ERASE) mientras se reproduce el saludo.
El contestador automático contestará a la llamada con el saludo
previamente grabado.
Para recuperar el saludo grabado en fábrica
Pulse (ERASE) mientras se reproduce el saludo. De esta forma se
recuperará el saludo original.
ES
30
Funciones del contestador automático
Page 87
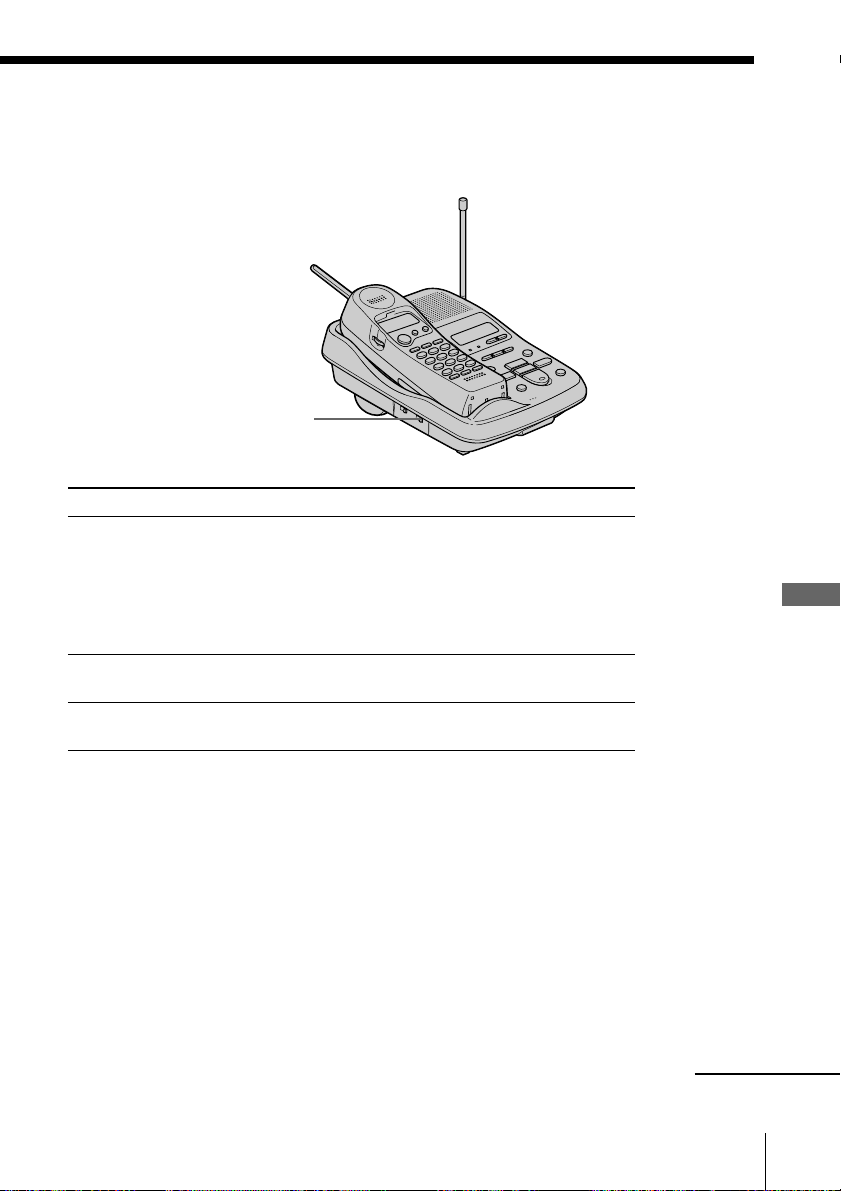
Selección de las señales de llamada
Existen tres opciones de señales de llamada. Seleccione la que desee
con el interruptor RINGER SELECT.
Interruptor
RINGER SELECT
Ajuste RINGER SELECT en Modo
TS (ahorro de costes) Si se han grabado mensajes nuevos, el teléfono
contesta después de la segunda señal y graba
los mensajes entrantes; si no se han grabado
mensajes nuevos, contesta después de la quinta
señal. Así puede ahorrarse el precio de la
llamada al comprobar los mensajes desde un
teléfono externo.
5 El teléfono contesta después de la quinta señal
y graba los mensajes entrantes.
2 El teléfono siempre contesta después de la
segunda señal y graba los mensajes entrantes.
Funciones del contestador automático
continúa
Funciones del contestador automático
31
ES
Page 88
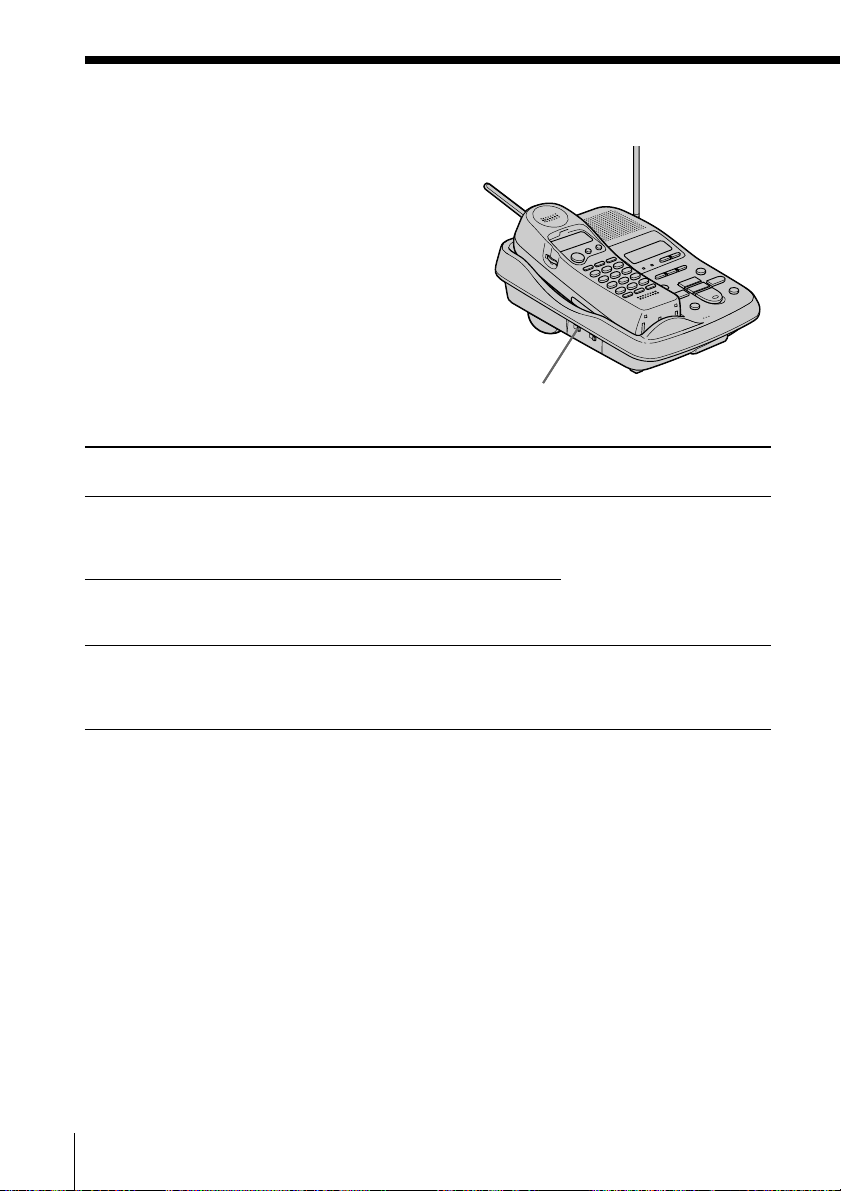
Preparación del contestador automático (continuación)
Selección del modo de contestación
Es posible ajustar el contestador automático
para que grabe mensajes entrantes (modo
normal), o para que salude sin grabar
mensajes (modo sólo saludo).
Puede grabar su propio saludo, o utilizar los
saludos grabados en fábrica.
En el modo normal, también puede disponer
de la opción de oír un pitido que le avise si ha
recibido mensajes entrantes nuevos.
Interruptor AUDIBLE
INDICATE
Ajuste AUDIBLE
INDICATE en
ON
(modo normal)
OFF
(modo normal)
ANN ONLY
(modo sólo saludo)
Nota
Se utilizará el mismo saludo independientemente del modo de contestación.
Por tanto, si decide cambiar el modo, compruebe que graba un saludo nuevo de
acuerdo con el modo de contestación.
Si desea
reproducir un saludo que solicite a la
persona que llama dejar un mensaje y hacer
que el teléfono emita un pitido y le avise
sobre mensajes entrantes grabados.
reproducir un saludo que solicite a la
persona que llama dejar un mensaje, pero
no desea oír el pitido.
saludar a la persona que llama sin aceptar
mensajes entrantes cuando, por ejemplo, se
encuentre de vacaciones durante mucho
tiempo.
Saludo previamente
grabado
“Hello, I’m unable to
answer your call right
now. Please leave your
name, number and
message after the tone.”
“Hello, I’m unable to
answer your call right
now. Please call again.
Thank you.”
Si la memoria está llena
El área de grabación de la memoria del teléfono será de
aproximadamente 20 minutos (incluidos el saludo, los mensajes y el
memorando). Si el área de grabación restante llega a ser inferior a un
minuto, “F” parpadeará en el visor, y el teléfono cambiará
automáticamente al modo sólo saludo, que no permite grabar
mensajes, y el saludo pasará a ser el previamente grabado.
Si desea grabar más mensajes, borre los existentes (consulte la página
34). También es posible borrar los mensajes desde un teléfono externo
(consulte la página 38).
ES
32
Funciones del contestador automático
Page 89
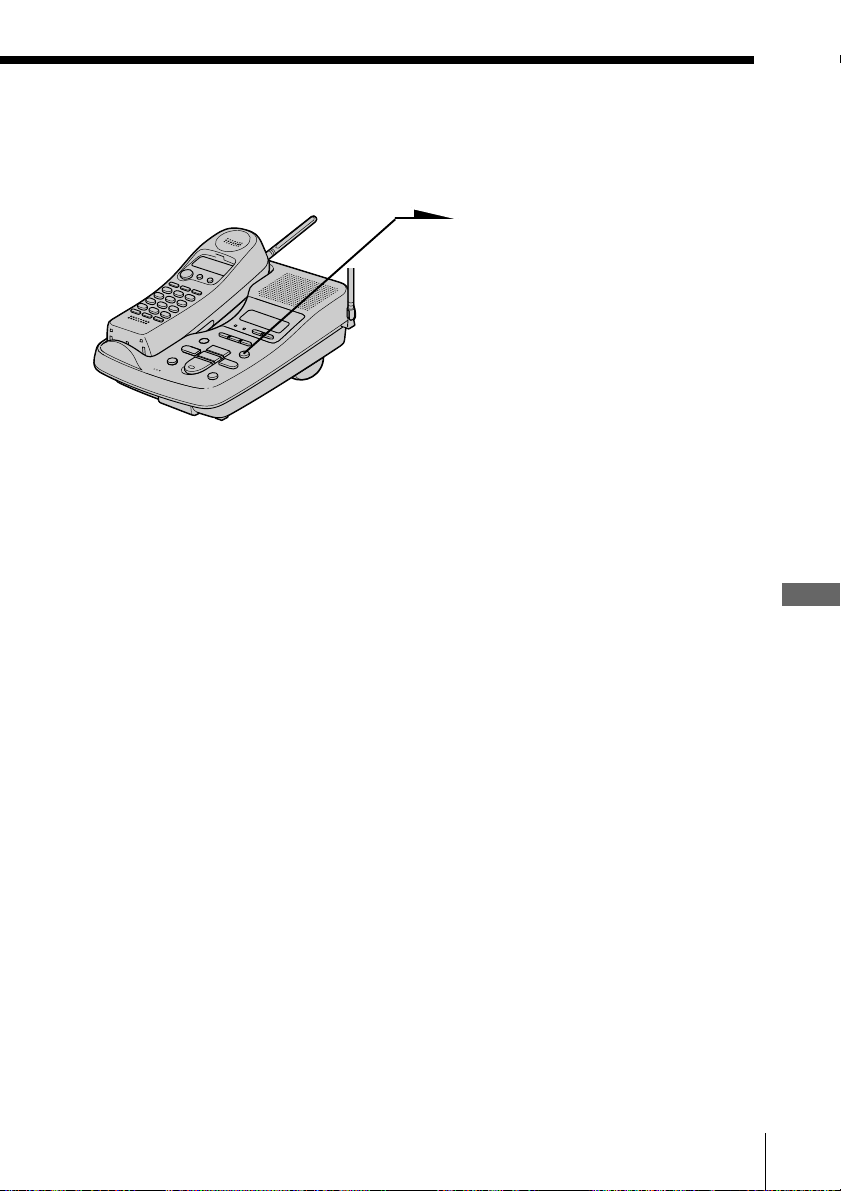
Activación de la función de contestador
Pulse (ANSWER ON/OFF)
para que se ilumine en rojo.
Nota
Si la memoria está llena, se escucharán cinco pitidos cortos de error y la función
de contestador no podrá activarse. Borre los mensajes que no necesite (consulte
la página 34).
Consejos
• El contestador automático contestará automáticamente a la llamada después
de 10 señales de llamada aunque la función de contestador esté desactivada.
Dicha función permanecerá activada para todas las llamadas posteriores.
• También puede activar o desactivar la función de contestador desde un
teléfono externo (consulte la página 38).
Cuando alguien llama
Podrá elegir una de las siguientes formas para dejar un mensaje:
• Seleccionar un buzón pulsando (*)(1) (MAILBOX 1), (*)(2)
(MAILBOX 2) o (*)(3) (MAILBOX 3) mientras la persona que llama
oye el saludo. Éste se detendrá y se oirá un pitido; a continuación,
dicha persona podrá iniciar la grabación del mensaje.
• Esperar hasta que finalice el saludo y, a continuación, iniciar la
grabación del mensaje. Si la persona que llama no selecciona ningún
buzón, los mensajes pasarán a MAILBOX 1.
Funciones del contestador automático
Notas
• Si transcurren 4 minutos durante la grabación del mensaje entrante, la línea
se desconectará automáticamente.
• Si la duración del mensaje es inferior a 2 segundos, no se grabará.
Para desactivar la función de contestador
Pulse (ANSWER ON/OFF) de forma que la luz roja se apague.
Funciones del contestador automático
33
ES
Page 90
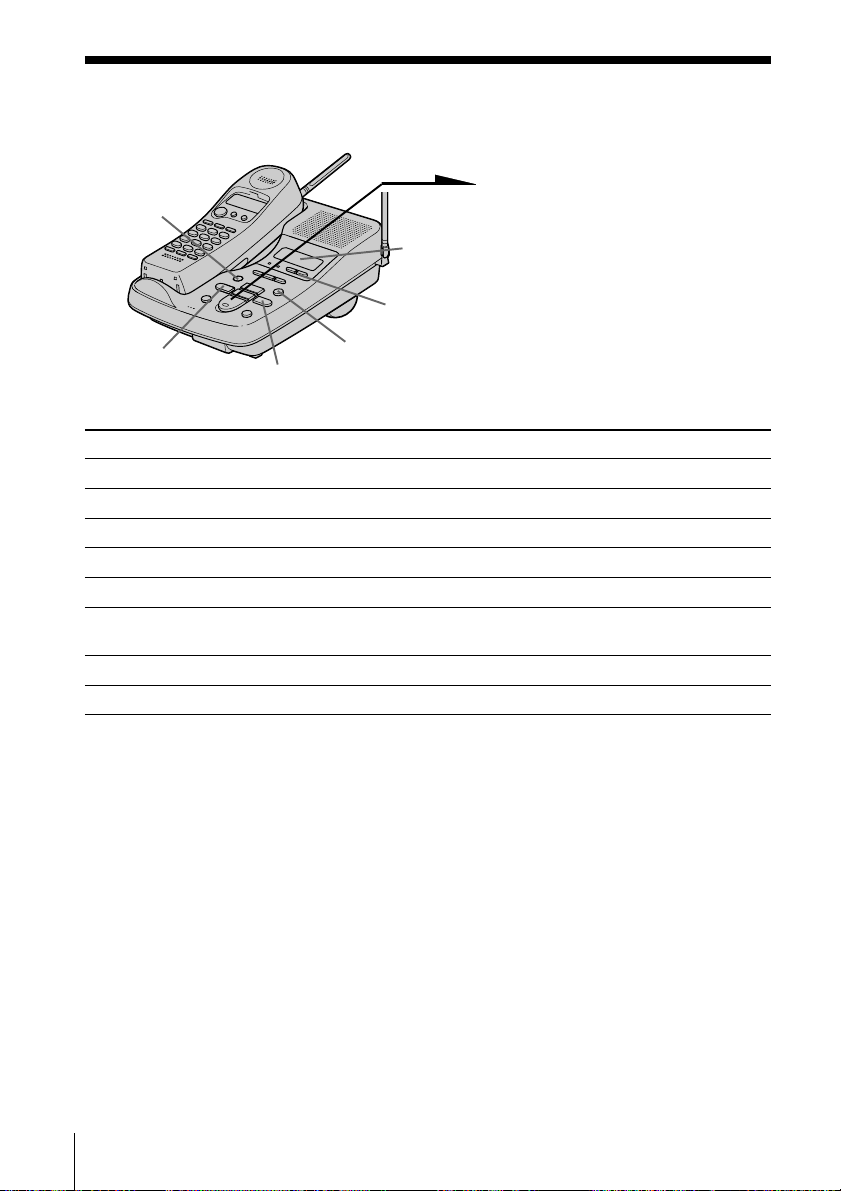
Reproducción de mensajes
Al llegar a casa
Si (ANSWER ON/OFF) parpadea
(ERASE)
Indicador
de
número
de
mensajes
(VOLUME)
en rojo, o si
número de mensajes nuevos y el
indicador MAILBOX parpadea,
pulse el botón del buzón
((MAILBOX 1), (MAILBOX 2) o
(MAILBOX 3)). La unidad
(REPEAT/SLOW)
(ANSWER ON/OFF)
(SKIP/QUICK)
realizará la reproducción desde
el primer mensaje nuevo.
Tareas adicionales al reproducir mensajes
Para Realice lo siguiente
Ajustar el volumen del altavoz Pulse (VOLUME) (+) o (-).
Detener la reproducción Vuelva a pulsar el botón del buzón.
Volver a reproducir los mensajes Vuelva a pulsar el botón del buzón.
Pasar al mensaje siguiente Pulse (SKIP/QUICK) mientras se reproduce el mensaje actual.
Repetir el mensaje actual
Retroceder a mensajes anteriores Pulse (REPEAT/SLOW) en los primeros tres segundos del
Reproducir lentamente Mantenga pulsado (REPEAT/SLOW) durante la reproducción.
Reproducir rápidamente Mantenga pulsado (SKIP/QUICK) durante la reproducción.
Pulse (REPEAT/SLOW) mientras se reproduce el mensaje actual.
mensaje actual.
el visor
muestra el
Para borrar mensajes
Sólo es posible borrar los mensajes que se han reproducido.
• Para borrar un mensaje, pulse (ERASE) mientras lo reproduce.
•
Para borrar todos los mensajes de algún buzón, pulse (ERASE) y el botón del
buzón ((MAILBOX 1), (MAILBOX 2) o (MAILBOX 3)) . Se oirá un pitido largo de
confirmación y todos los mensajes del buzón seleccionado se borrarán.
Notas
• El visor muestra el número total de mensajes “nuevos”. Por tanto, se ajustará
en “0” cuando reproduzca todos los mensajes nuevos, aunque aún no estén
borrados. Asegúrese de borrar los mensajes que no necesita antes de que la
memoria se llene.
• Si el número de mensajes nuevos es superior a 99, “99” parpadeará en el contador.
• Si se recibe una llamada durante la reproducción, ésta se detendrá.
• Si se produce un corte de suministro eléctrico o si el adaptador de alimentación de
CA se desconecta mientras se borra algún mensaje, es posible que se borren todos
los mensajes grabados.
Consejo
También es posible escuchar los mensajes o borrarlos desde un teléfono de
tonos (página 38).
ES
34
Funciones del contestador automático
Page 91
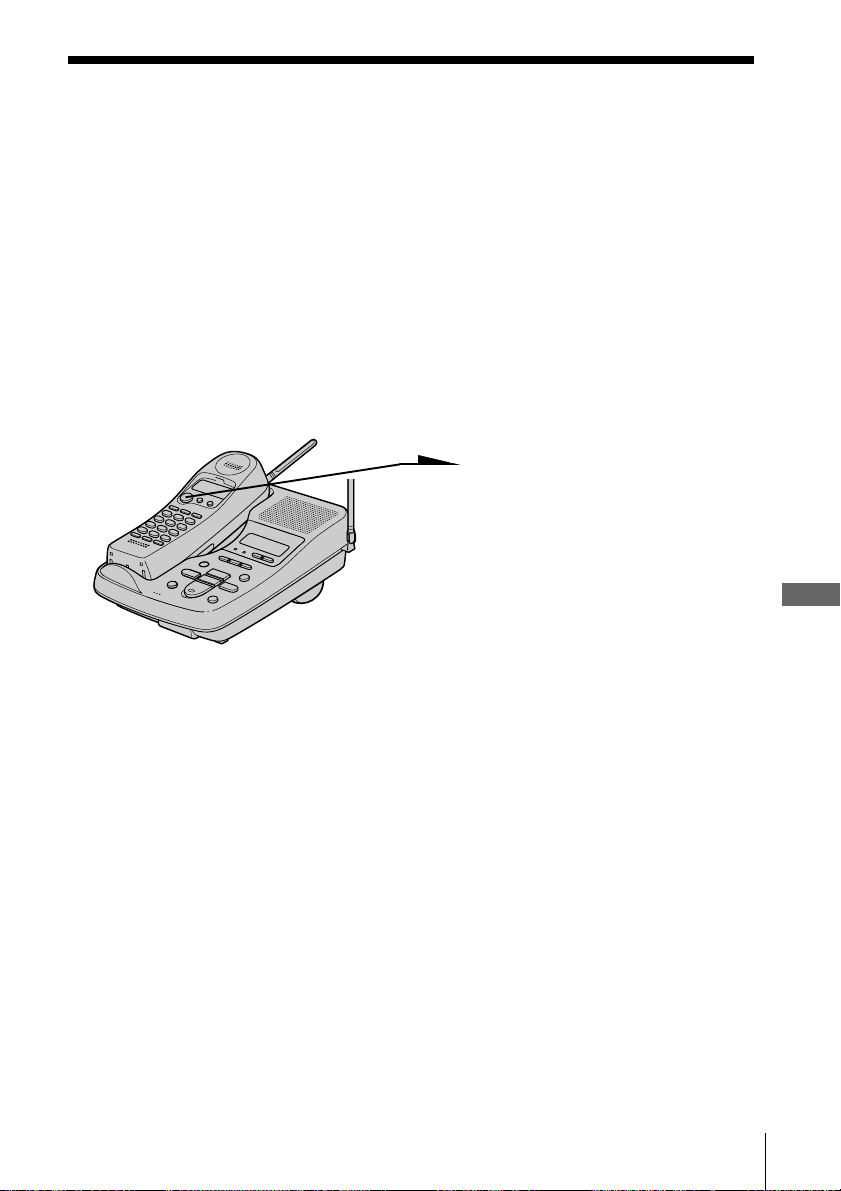
Admisión o rechazo de llamadas entrantes
Es posible aceptar o rechazar llamadas dejando la función de
contestador activada (consulte la página 33) mientras se encuentra en
casa. Al responder a una llamada, podrá oír el mensaje que esté
grabándose mediante la unidad base (no es posible escuchar los
mensajes mediante el auricular), pero la persona que llama no podrá
oírle a usted. Después, podrá decidir si contestar a la llamada o no.
Sólo es posible disponer de esta función en la unidad base.
Para contestar a la
llamada
Pulse (TALK).
La grabación se cancela y podrá
hablar con la persona que llama.
Funciones del contestador automático
Nota
Si el volumen está ajustado al mínimo, no podrá utilizar esta función.
Consejo
También es posible contestar a la llamada levantando el auricular de otro
teléfono que esté conectado a la misma línea.
Funciones del contestador automático
35
ES
Page 92
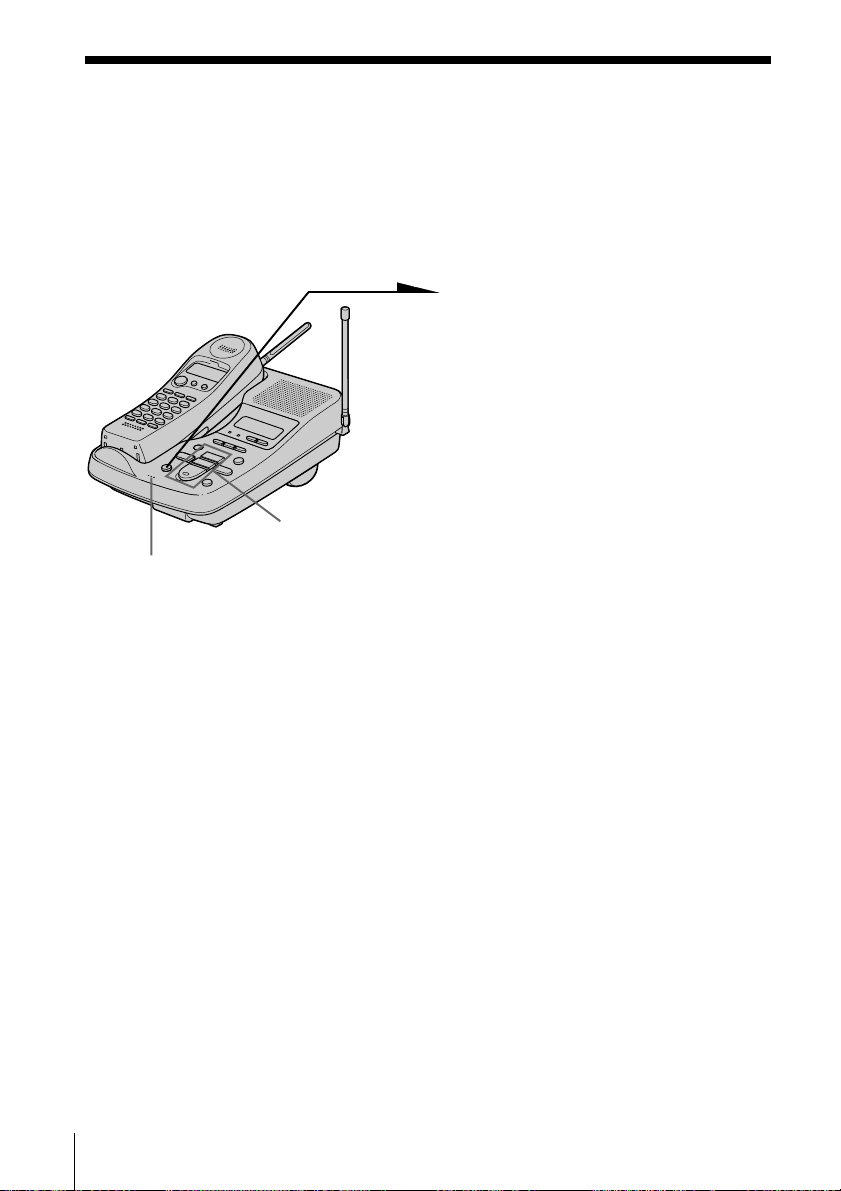
Grabación de memorandos
Es posible grabar un “memorando” (máximo de cuatro minutos) como
recordatorio personal o como mensaje para otra persona. Es posible
reproducir el memorando grabado como cualquier mensaje entrante
(consulte la página 34).
1 Pulse (MEMO).
Oirá una guía oral.
2 Seleccione un buzón pulsando
(MAILBOX 1), (MAILBOX 2) o
(MAILBOX 3). Oirá una guía oral
y después un pitido largo de
confirmación.
(MAILBOX 1)
MIC (Micrófono)
(MAILBOX 2)
(MAILBOX 3)
3 Después del tono, inicie la
grabación. Hable a una distancia
de 30 cm aproximadamente del
micrófono.
4 Pulse (MEMO) para detener la
grabación.
El número de mensaje del visor
aumenta en uno.
Notas
• Si pulsa (MEMO) cuando la memoria está llena (“F” parpadea en el visor),
escuchará cinco pitidos cortos de error y no podrá grabar el memorando.
• Si se recibe una llamada o pulsa (TALK) mientras graba un memorando, la
grabación se cancelará. Vuelva a iniciar el proceso.
• Si la memoria restante se agota mientras graba, la grabación se detendrá
automáticamente y “F” parpadeará en el visor.
Consejo
Si en el paso 3 transcurren 4 minutos, la grabación se detendrá
automáticamente y el memorando grabado se contará como un mensaje nuevo.
ES
36
Funciones del contestador automático
Page 93
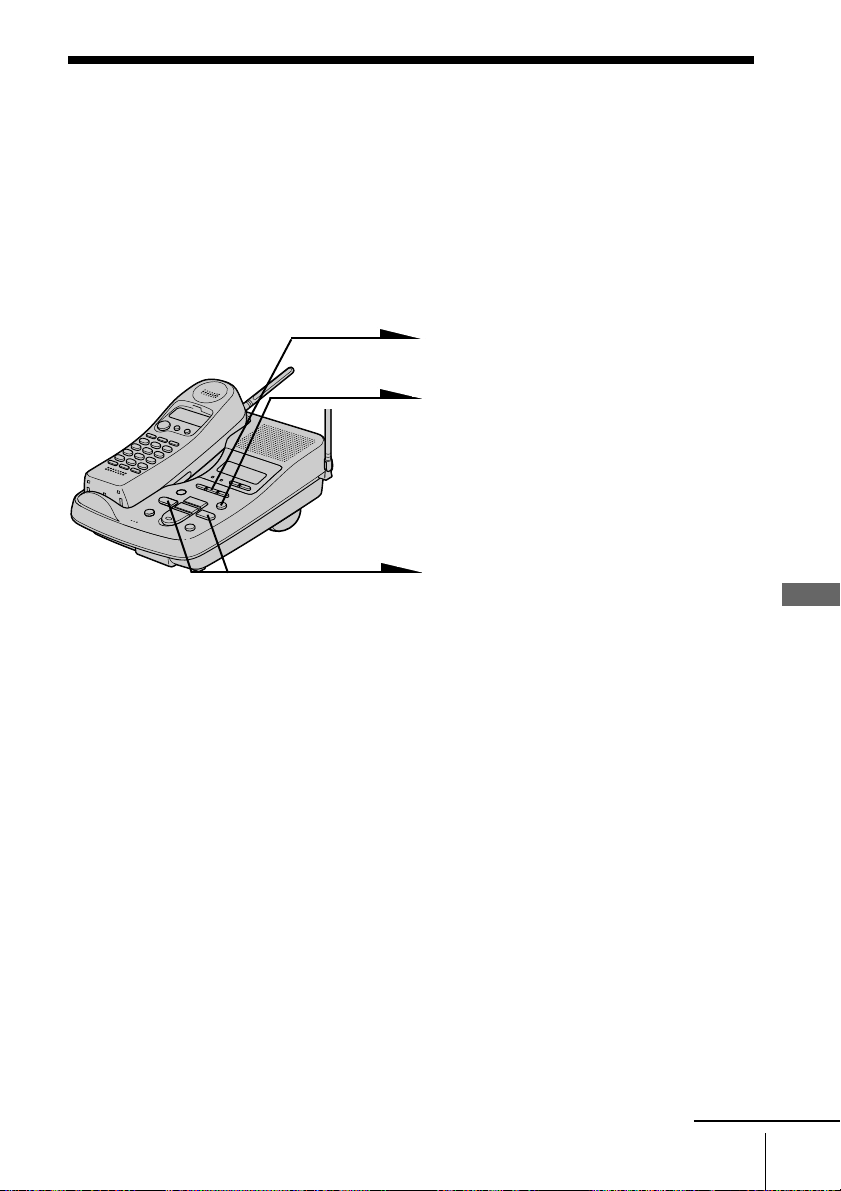
Operación desde un teléfono externo
Es posible llamar desde un teléfono de tonos y recoger los mensajes
nuevos grabados. Basta con definir el código ID remoto (código de
seguridad) y activar la función de contestador antes de salir.
Ajuste del código ID remoto (código de seguridad)
1 Pulse (SET/REC).
2 Pulse (ANSWER ON/OFF).
Oirá una guía oral:
“Please set the security code. To
select, press the SKIP or
REPEAT button. To enter, press
the SET button”.
3 Defina un número de dos
dígitos entre 00 y 99 pulsando
(SKIP/QUICK) o (REPEAT/SLOW).
Pulse (SKIP/QUICK) para que el
número aumente, o
(REPEAT/SLOW) para que
disminuya.
Cada vez que pulse
(SKIP/QUICK) o
(REPEAT/SLOW), el teléfono
anunciará un número.
Funciones del contestador automático
4 Pulse (SET/REC).
El código ID remoto (código de
seguridad) queda definido y se
escucha un pitido largo de
confirmación.
Para cambiar el código ID remoto (código de seguridad)
Introduzca un código nuevo. Éste sustituirá al anterior.
Funciones del contestador automático
continúa
37
ES
Page 94

Operación desde un teléfono externo (continuación)
Recogida de nuevos mensajes
1 Llame a su teléfono desde un teléfono de tonos.
2 Mientras oye la reproducción del saludo, pulse (#) y su código ID
remoto (código de seguridad).
Oirá un pitido largo de confirmación y el saludo se interrumpirá.
Siguiendo la guía oral que informa sobre el número de mensajes grabados,
el teléfono quedará a la espera para que introduzca un código de control.
3 Para realizar otras operaciones, introduzca el código de control en 20
segundos (consulte la tabla siguiente). Para terminar, cuelgue el teléfono.
Códigos de control para operaciones remotas
Para Pulse
Reproducir mensajes en MAILBOX 1 (#) (1)
Reproducir mensajes en MAILBOX 2 (#) (2)
Reproducir mensajes en MAILBOX 3 (#) (3)
Repetir el mensaje actual (#) (4) mientras se reproduce
Omitir el mensaje actual (#) (6) mientras se reproduce
Borrar el mensaje actual (#) (9) mientras se reproduce
Borrar todos los mensajes de MAILBOX 1 (#) (9) (#) (1)
Borrar todos los mensajes de MAILBOX 2 (#) (9) (#) (2)
Borrar todos los mensajes de MAILBOX 3 (#) (9) (#) (3)
Grabar un nuevo saludo (*) (7). Cuando escuche un pitido largo, empiece
(máximo de un minuto) a grabar el saludo. Pulse (*) (*) para detener la
Activar la función de contestador (*) (0)
Desactivar la función de contestador (#) (0)
Detener la operación actual (*) (*)
grabación.
Si ha olvidado activar la función de contestador
Llame a su teléfono y déjelo sonar 10 veces hasta que conteste.
La función de contestador se activará automáticamente.
Nota
Si introduce tres veces un código de seguridad incorrecto, la línea se
desconectará.
Para utilizar la función de ahorro del coste de llamadas
Ajuste RINGER SELECT en TS. Consulte la página 31 para obtener
más información.
ES
38
Funciones del contestador automático
Page 95
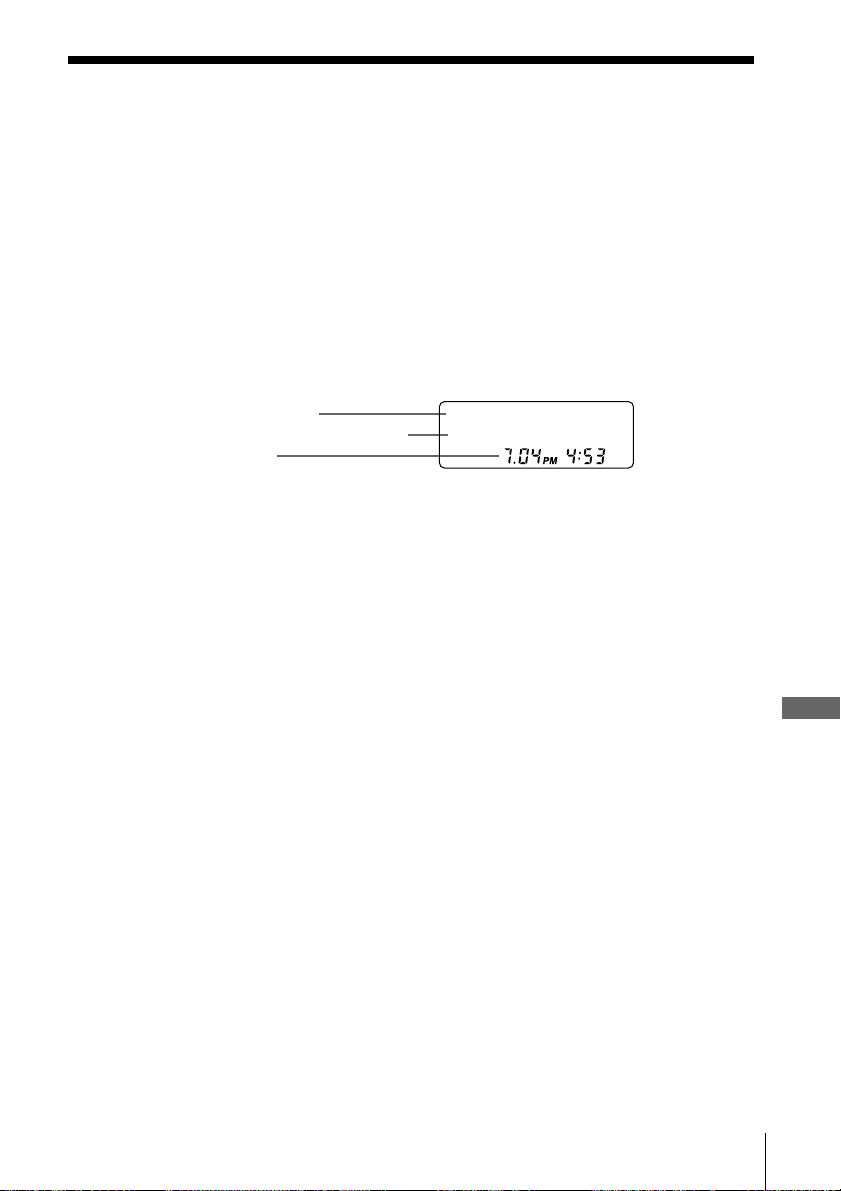
Características de ID de llamada
Concepto del servicio de ID de llamada
El ID de llamada permite que el número de teléfono de la persona que llama aparezca
en el visor antes de contestar a la llamada. Para poder utilizar este servicio, es preciso
solicitarlo. La denominación de este servicio puede variar en función de la compañía
telefónica.
Para emplear este servicio, asegúrese de introducir su prefijo (consulte la página 13).
Al recibir una llamada
El número de teléfono aparece en el visor junto con la fecha y la hora como se muestra
en el siguiente ejemplo.
Si el servicio de ID de llamada incluye el de nombre de la persona que llama, éste
también aparecerá en el visor (máximo de 15 letras).
Nombre de la persona que llama
Número de teléfono de la persona que llama
Fecha y hora de recepción*
Al contestar a la llamada, la indicación de ID de llamada cambia a “TALK”.
* La fecha y la hora que aparece en el visor la transmite la compañía telefónica que ofrezca el servicio de ID
de llamada; por tanto, puede ser diferente a la fecha y hora ajustados en la unidad base.
Notas
• Si el interruptor RING está ajustado en OFF:
- si el auricular no se encuentra en la unidad base, el ID de llamada no aparecerá, y no se
guardará en la lista de ID de llamada (consulte la página 40). Si vuelve a ajustarlo en RING
ON mientras el teléfono suena, el ID de llamada aparecerá a partir de ese momento.
- si el auricular se encuentra en la unidad base, el ID de llamada aparecerá, y se guardará en la
lista de ID de llamada.
• El número de teléfono y/o nombre de la persona que llama no aparecerá en los siguientes
casos:
- “OUT OF AREA”: si la llamada se realiza a través de una compañía telefónica que no ofrezca
el servicio de ID de llamada (incluidas las llamadas internacionales).
- “PRIVATE”: si la llamada está “bloqueada”. Por razones de intimidad, muchos estados
permiten que no aparezca información sobre la persona que llama en el visor de ID de
llamada de la otra parte.
• Si la llamada procede de una oficina en la que se utilizan varias líneas, es posible que el
número de teléfono mostrado no coincida con el número empleado para llamar a la extensión.
SMITH JOHN
1-201-123-4567
Características de ID de llamada
Acerca de la función de comparación en memoria
Si recibe una llamada desde un número de teléfono que esté almacenado en uno de
los botones ONE-TOUCH DIAL (consulte la página 21) o en el directorio telefónico
(consulte la página 23), el sonido de la señal de llamada cambiará a un tono superior a
partir de la segunda señal.
Nota
La función de comparación en memoria no se activa con llamadas “OUT OF AREA” o
“PRIVATE”; y puede no funcionar con llamadas realizadas desde una oficina que emplee varias
líneas debido a que el número no siempre coincida con el almacenado en este teléfono.
Características de ID de llamada
39
ES
Page 96
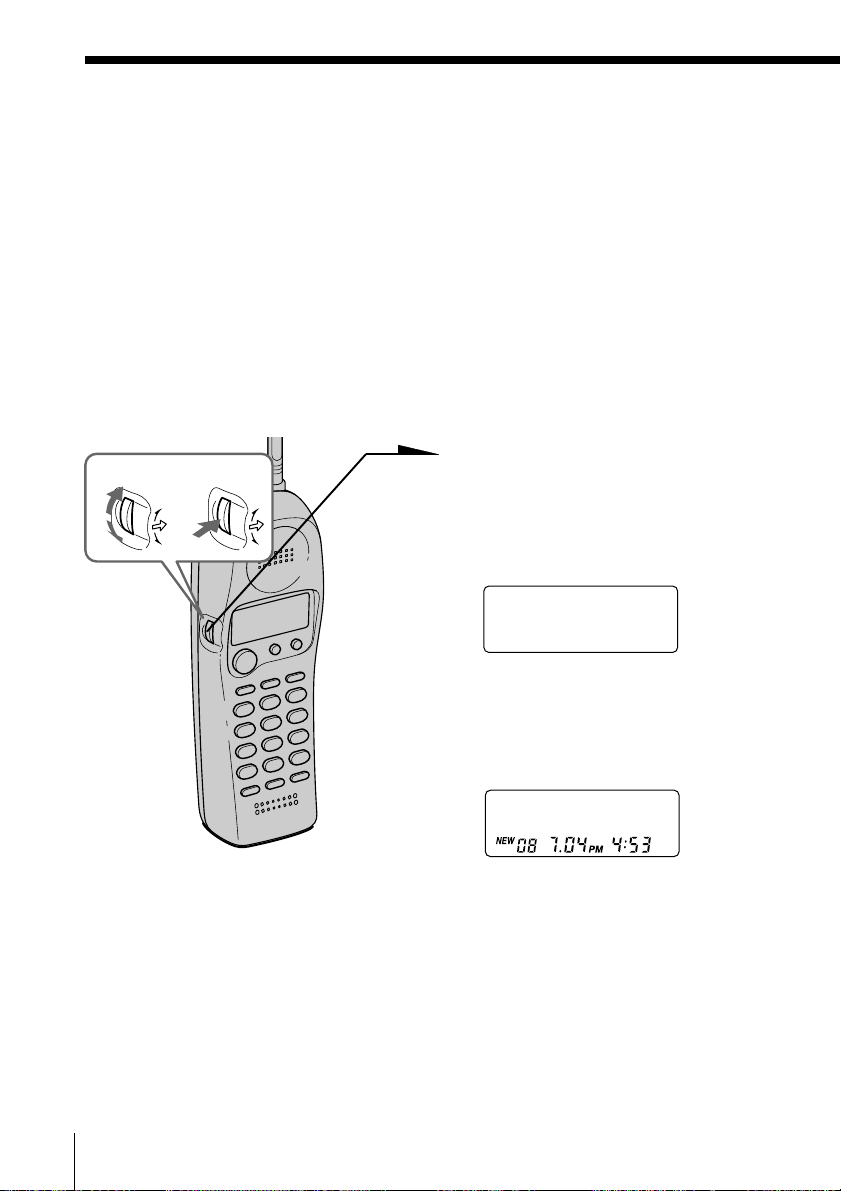
Lista de ID de llamada
El teléfono almacena los datos de las últimas 20 llamadas recibidas
incluidas las llamadas “OUT OF AREA” y “PRIVATE”. Mantiene un
registro de todas las llamadas recibidas, aunque no se hayan
contestado.
No obstante, si el interruptor RING está ajustado en OFF y el auricular
no se encuentra en la unidad base, el teléfono no podrá recibir los
datos de ID de llamada.
Visualización de la lista de ID de llamada
Es posible visualizar la lista de ID de llamada para comprobar el
número de teléfono y/o nombre de las llamadas recibidas.
Gire Pulse
1 Pulse el dial de avance.
El visor muestra el número de
llamadas “NEW” (llamadas que
no se han visualizado) y “OLD”
(llamadas que se han visualizado).
NEW O8 OLD 12
2 Gire el dial de avance.
Los datos de la llamada más
reciente aparecen durante 20
segundos.
SMITH JOHN
1-201-123-4567
3 Gire el dial de avance hacia
abajo para mostrar los datos
más antiguos o hacia arriba para
mostrar los más recientes.
Notas
• Al recibirse la llamada número 21, el dato más antiguo se borra automáticamente.
• Si hay algún dato “NEW”, oirá una guía oral informando sobre la nueva
llamada al principio de la reproducción del mensaje en la unidad base (oirá
“You have one new message and new call”).
ES
40
Características de ID de llamada
Page 97
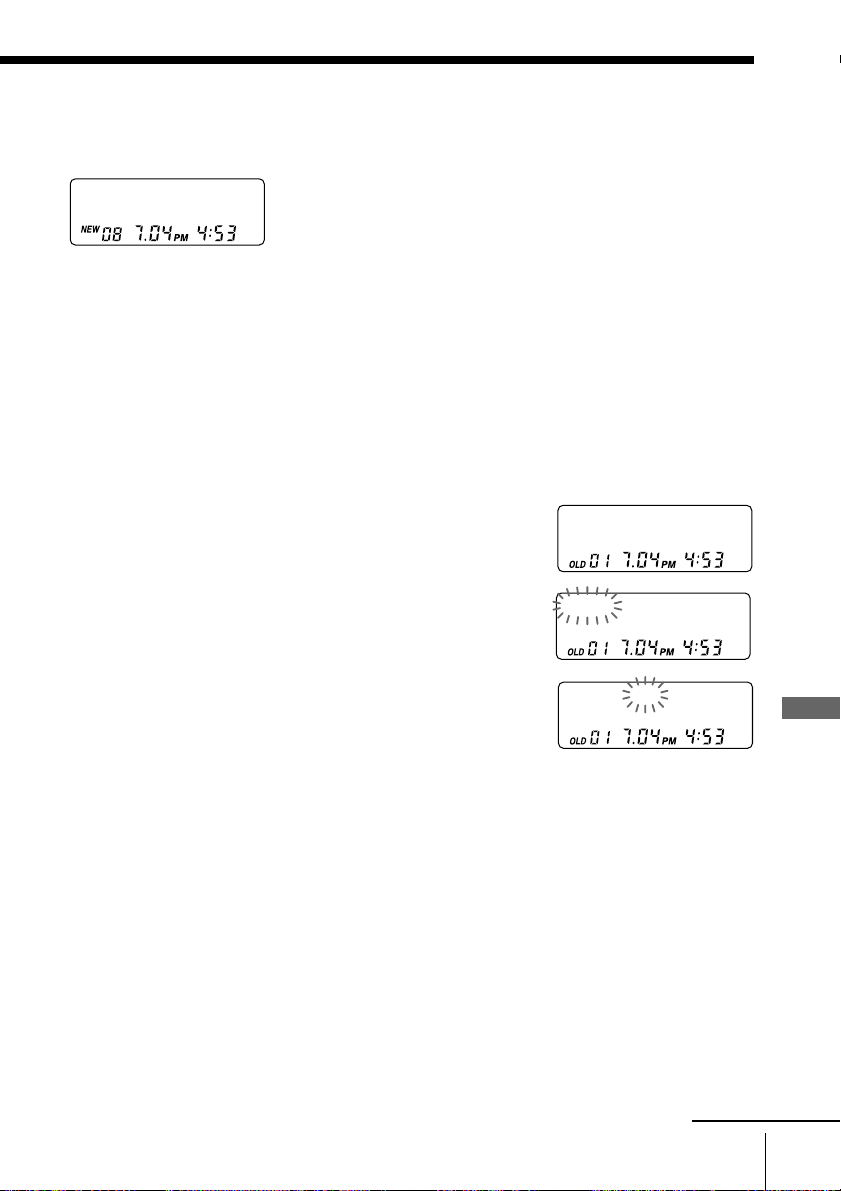
Acerca de la marca “*”
SMITH JOHN *
1-201-123-4567
“*” aparecerá si hay más de dos llamadas del
mismo número de teléfono. El dato más
antiguo se sustituirá por el reciente para que
las llamadas se cuenten sólo como una.
Eliminación de datos de la lista de ID de llamada
Los datos antiguos se borrarán automáticamente al recibirse la llamada
número 21, aunque también es posible borrar manualmente los datos
innecesarios uno por uno o borrar la lista completa.
Para borrar los números de teléfono uno por uno
1 Muestre el número que desee borrar de la lista
de ID de llamada (consulte la página 40).
SMITH JOHN
1-201-123-4567
2 Pulse el dial de avance.
3 Gire el dial de avance hacia arriba para que
“ERASE” parpadee y pulse dicho dial.
4 Gire el dial de avance hacia arriba para que
“YES” parpadee y pulse dicho dial.
Oirá un pitido largo de confirmación y los datos
se borrarán.
DIAL PGM ERASE
1-201-123-4567
ERASE NO YES
1-201-123-4567
continúa
Características de ID de llamada
Características de ID de llamada
ES
41
Page 98
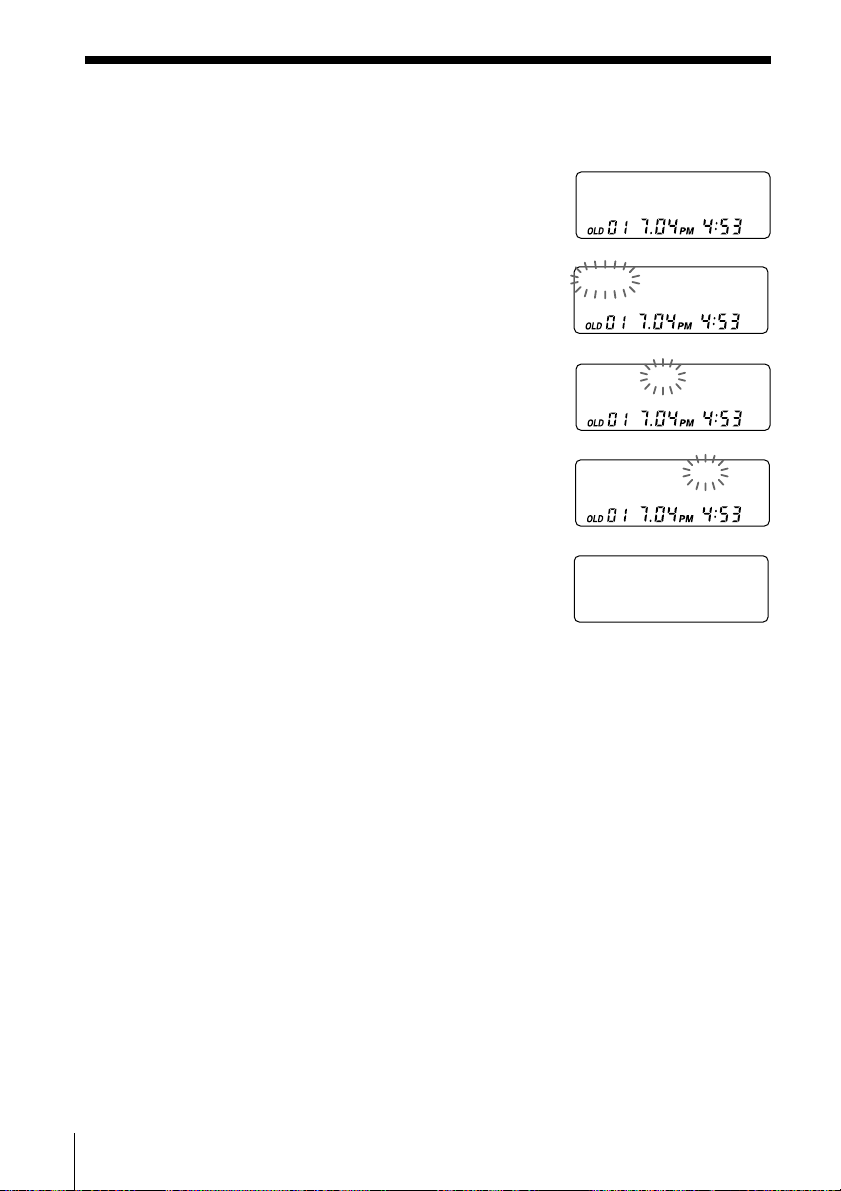
Lista de ID de llamada (continuación)
Para borrar la lista completa de una vez
1 Muestre cualquier dato de ID de llamada.
SMITH JOHN
1-201-123-4567
2 Pulse el dial de avance.
DIAL PGM ERASE
1-201-123-4567
3 Gire el dial de avance hacia arriba para que
“ERASE” parpadee y pulse dicho dial.
4 Gire el dial de avance hacia arriba para que
“ALL” parpadee y pulse dicho dial.
5 Gire el dial de avance hacia arriba para que
“YES” parpadee y pulse dicho dial.
Oirá un pitido largo de confirmación y la lista
completa se borrará.
Nota
“ALL” aparece sólo cuando todos los datos han pasado a ser “OLD”. Si queda
algún dato “NEW”, no podrá borrar la lista completa.
ERASE NO YES ALL
1-201-123-4567
ALL ERASE NO YES
1-201-123-4567
NEW OO OLD OO
ES
42
Características de ID de llamada
Page 99
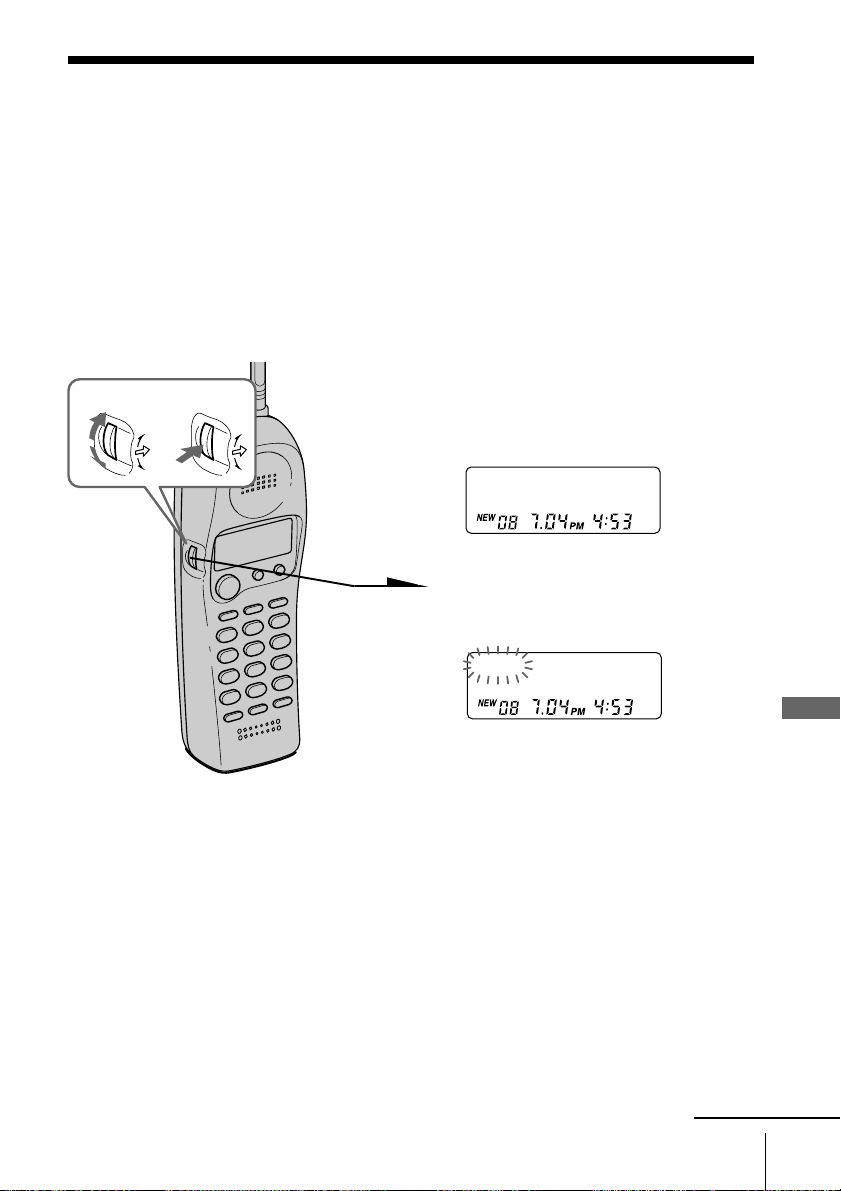
Uso de la lista de ID de llamada
Mediante el uso de la lista de ID de llamada, es posible llamar
fácilmente a un número de teléfono de la lista de ID de llamada, o
almacenar números de dicha lista en las teclas de marcación de
memoria.
Realización de llamadas a números de la lista de ID de llamada
1 Muestre el número de teléfono
Gire Pulse
de la lista de ID de llamada al
que desee llamar (consulte la
página 40).
SMITH JOHN
1-201-123-4567
2 Confirme el número y pulse el
dial de avance.
DIAL PGM ERASE
1-201-123-4567
3 Vuelva a pulsar el dial de
avance.
El teléfono marca
automáticamente el número
mostrado.
Notas
• Si el número mostrado en el paso 1 no es al que desea llamar, puede cambiar
el número de dígitos del número de teléfono como se describe en la página 45.
• Si el teléfono está conectado a una central privada con extensiones (PBX), es
posible que no pueda realizar llamadas desde la lista de ID de llamada, ya
que es necesario un dígito de acceso a la línea exterior.
Consejo
Puede pulsar (TALK) para realizar una llamada en lugar de llevar a cabo los
pasos 2 y 3.
Características de ID de llamada
continúa
Características de ID de llamada
ES
43
Page 100
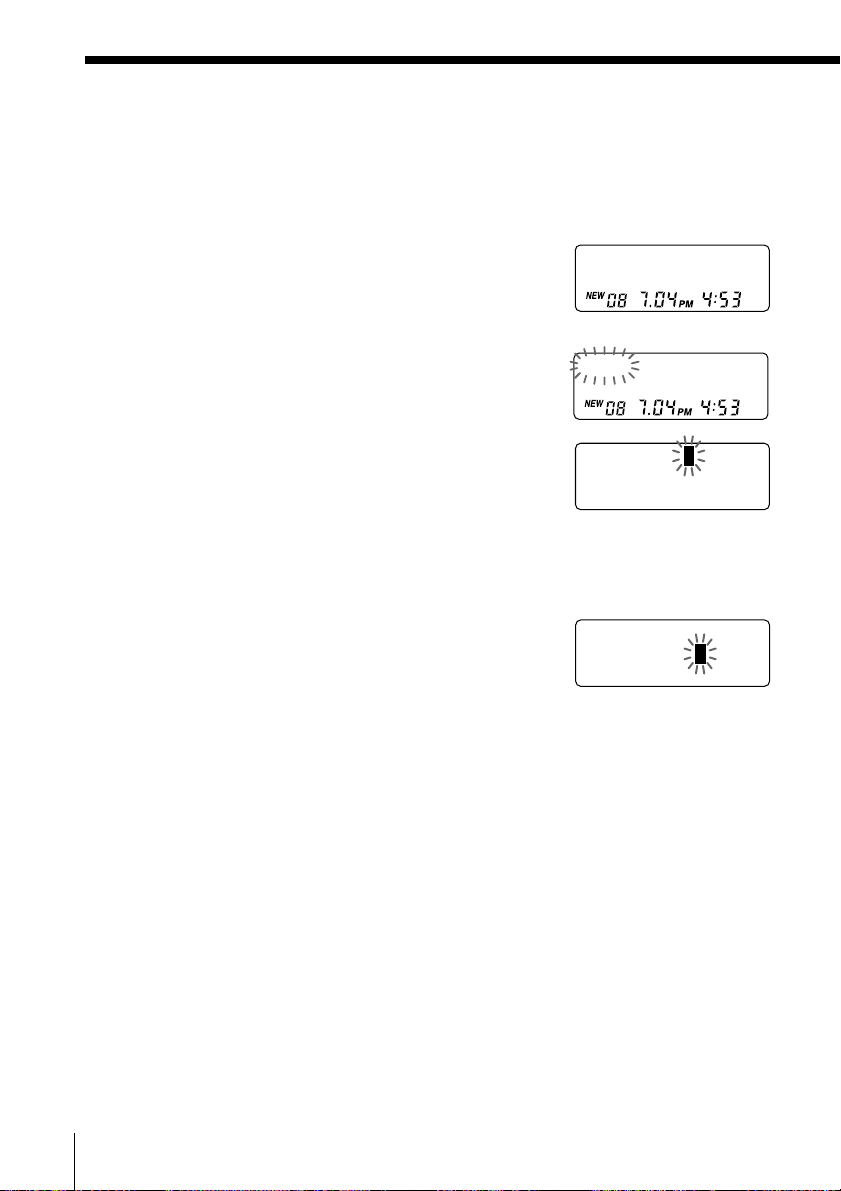
SMITH JOH
12011234567
N
SMITH JOHN
1201123456
7
Uso de la lista de ID de llamada (continuación)
Almacenamiento de números de la lista de ID de llamada en el directorio telefónico
1 Muestre el nombre y número de teléfono que
desee almacenar de la lista de ID de llamada
(consulte la página 40).
2 Confirme el número y pulse el dial de avance.
3 Gire el dial de avance hacia arriba para que
“PGM” parpadee y pulse dicho dial.
El cursor parpadea al final del nombre.
Introduzca o cambie el nombre, si es necesario
(consulte la página 24).
4 Pulse el dial de avance.
El cursor parpadea al final del número de
teléfono.
Introduzca o cambie el número de teléfono, si
es necesario (consulte la página 24).
5 Vuelva a pulsar el dial de avance.
Oirá un pitido largo de confirmación y el
nombre y número quedarán almacenados.
SMITH JOHN
1-201-123-4567
DIAL PGM ERASE
1-201-123-4567
Notas
• No deje que transcurran más de 20 segundos entre cada paso del proceso.
• Si el número mostrado en el paso 1 no es al que desea llamar, puede cambiar
el número de dígitos del número de teléfono como se describe en la página
45.
• Si el teléfono está conectado a una central privada con extensiones (PBX), es
posible que sea necesario añadir un dígito de acceso a la línea exterior
(consulte la página 22).
ES
44
Características de ID de llamada
 Loading...