

Page 1

Cordless
Telephone
with Answering System
Operating Instructions
Mode d'emploi
3-864-049-21 (1)
sfe900«H.
CALLERTD
with call waiting
5PP-A967
©1998 by Sony Corporation
Page 2

WARNING
To prevent fire or shock hazard, do
not expose the unit to rain or
moisture.
To avoid electrical shock, do not open
the cabinet. Refer servicing to
qualified personnel only.
INDUSTRY CANADA NOTICE
NOTICE: The Industry Canada label
identifies certified equipment. This
certification means tlaat the equipment
meets certain telecommunications
network protectis e, operational and
safety requirements as prescribed in the
appropriate Terminal Equipment
Technical Requirements document(s).
The Department does not guarantee the
equipment will operate to the user's
satisfaction.
Before installing this ec^uipment, users
should ensure that it is permissible to be
connected to the facilities of the local
telecommunications company. The
equipment must also be installed using
an acceptable method of connection.
The customer should be aware that
compliance with the above conditions
may not prevent degradation of ser\ ice
in some situations.
Repairs to certified eejuipment should be
coordinated by a representative
designated by the supplier. Anv repairs
or alterations made by the user to this
equipment, or equipment malfunctions
may give the telecommunications
company cause to request the user to
disconnect the equipment.
Users should ensure for their own
protection that the electrical ground
connections of the power utility,
telephone lines and internal metallic
water pipe s\'stem, it present, are
connected together. This precaution ma\-
be particularly important in rural areas.
Caution: Users should not attempt to
make such connections themselves, but
should contact the appropriate electric
inspection authority, or electrician, as
appropriate.
NOTICE: The Ringer Equivalence
Number (REN) assigned to each
terminal device provides an indication
of the maximum number of terminal
allowed to be connected to a telephone
interface. The termination on an
interface may consist of any
combination of devices subjeef only to
the requirement that the sum of the
Ringer Equivalence Number of all the
devices does not exceeci 5.
IMPORTANT INSTRUCTION TO USERS
Your model (SPP-A967) has been
approved by the Industry Canada.
Note
Operation is subject to the following two
conditions: (1) this dex’ice may not cause
interference, and (2) this device must
accept any interference, including
interference that may cause undesired
operation of the device.
Privacy of communications may not be
ensured when using this telephone.
DIGITAL SECURITY CODE
Your SPP-A967 has been assigned a
permanent and unique digital securitycode out of possible 16.7 million codes.
Table of contents
Getting Started
4 Read this first
5 Step 1: Checking the package
contents
6 Step 2: Setting up the base unit
9 Step 3; Preparing the battery
pack
11 Step 4: Entering your area code
12 Identifying the parts
Basics
Making calls
15
16
17
19
19
20
21
21
22
23
24
25
26
26
27
29 Selecting the ring time
.30
Redialing
Receiving calls
Telephone Features
One-touch dialing
Storing phone numbers Caller ID list
Making calls with one-touch
dialing
Phone Directory
Storing phone numbers and
names
Changing a stored name
and/or phone number
Erasing a memory location
Making calls from the Phone
Directory
Paging
Answering Machine
Features
Preparing the answering niachine
Setting the dav and time
Recording the greeting
Selecting the answering
mode
31 Turning on the answering
function
32 Playing back messages
33 Screening incoming calls
34 Recording a memo
35 Operating from an outside
phone
35 Setting the remote ID
aide
36 Picking up new messages
Caller ID Features
Understanding the Caller ID
37
service
37
38
38
39
41
41
42
43
44
45
46
47
50
51
When you receive a call
Looking at the Caller ID list
Viewing the Caller ID list
Erasing data from the
Using the Caller ID list
Calling back a number from
the Caller ID list
Storing a number of the
Caller ID list into the Phone
Directory
To change the number ot
digits of the phone number
Using "Caller ID with Visual
Call Waiting" service
Additional Information
Mounting the base unit on a wall
Nt>tes on power sources/
.Mainte)-\ance
Troubleshooting
Specifications
Index
fable of corner
Page 3

Getting Started
Read this first
Before you use your phone, you must set it up. Here's a quick wav to
set up your phone: Steps 1, 2, 3 and 4.
Step 1 (page 5)
First, unpack the phone and the supplied
accessories.
Step 2 (pages 6 to 8)
Next, you need to do three things to set
up the base unit, including finding the
best location for the base unit.
Step 1
Checking the package contents
Make sure vou ha\ e received the following items in the package.
If anything is missing, contact your local Sony dealer.
AC power adaptor (AC-T46)
Base unit
Handset
4™ Getting Started
Handset
Step 3 (pages 9 to 10)
Then, you need to insert the battery
pack into the handset and charge it for
more than 12 hours.
Step 4 (page 11)
Finally, you need to enter your area
code to use the Caller ID service.
That's it!
Telephone line cords (2)
Wall bracket/stand for base Rechargeable battery
unit pack (BP-T24)
jcttinq St.ivip
Page 4
step 2
Setting up the base unit
Do the following steps:
• Choose the best location
• Connect the base unit
• Choose the dialing mode
Choose the best location
Where you place the base unit affects the reception quality of the handset.
Away from noise sources such as a window
by a street with heavy traffic
Away from television
sets and other
electronic equipment
Away from heat sources, such as radiators,
airducts, and sunlight
Away from a microwave
oven
Away from excessive
moisture, extremely low
temperatures, dust,
mechanical vibration, or
shock
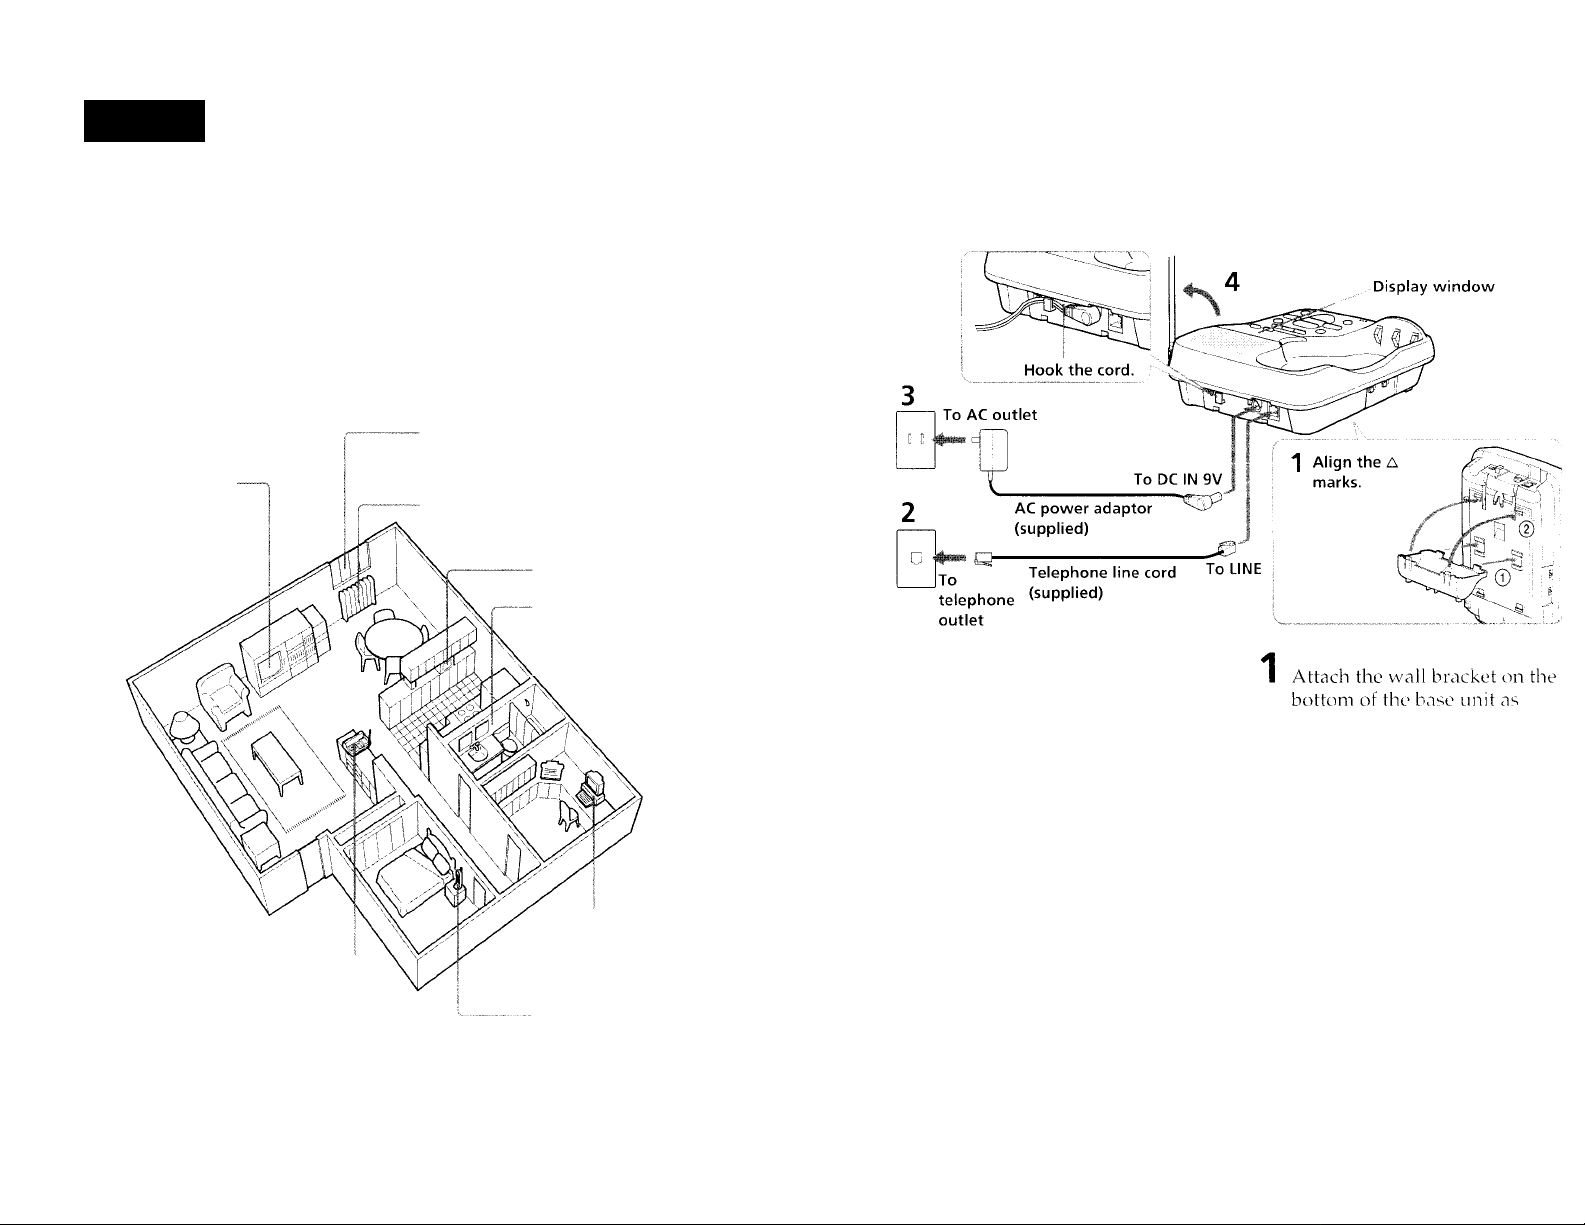
Connect the base unit
It \'ou want to liang the base unit on me wail, see page 4n.
illustrated to use it ns a stand.
Away from a personal
computer
Near a central location
and on a level surface
Away from another
CAUTIONS
TfiC ct)rdles^ tolcphont’ iiper.ites at a tiaHjiicncv’ that ma\’ caiiao intt'rterance to noarb\' T\ s and
VCRs; the base unit should not bo placed near or on the top of a T\ or \'CR; and, if intortoronco is
experienced, nnn'ing the ettrdless telephone farther away turni the T\' or \'C R will oftr-n reduce or
tdimitiate the interferenee.
Sliould you experience intermittent loss of audio durinp a eoin ersation, tr\’ mo\ inp ekiser to the
base unit or mor e the base unit from other noise sources.
Getting Started
cordless telephone
Connect the telephtine line cord
to the LINE jack and to a
telephone outlet.
3 Connect the AC power adaptor
to the DC IN b\' jack and tt' an
AC outlet.
"E" flashes in the displav
window.
Raise the antenna. Make sure
points toward the ce'iling.
continued
Gettk'^a Sîd''ted
Page 5
step 2: Setting up the base unit (continued)
Step 3
Notes
• Use only the supplied AC-T46 AC power adnptor.
Do not use an\ other AC power adaptor.
• Conneet the AC pov\ er adaptor to a eontinuous power
supply.
• Place the base unit close to the AC outlet so that you
can unplug the AC power adaptor easily.
Tips
• If your telephone outlet is not modular, contact your
telephone serxace company for assistance.
• Tr) remove the v\ all bracket, press the upper tab.
Polarity of the plug
Choose the dialing mode
For the telephone to work paroperly, select an appropriate dialing mode
(tone or pulse).
DIAL MODE switch
Depending on your dialing system, set the DIAL MODE switch as
follows;
If your dialing system is
Ttmo T
Pulse P
If you aren't sure of your dialing system
Make a trial call with the DIAL MODE switch set tc> T.
If the call connects, leave the switch ns is; otherwise, set to P.
Set the switch to
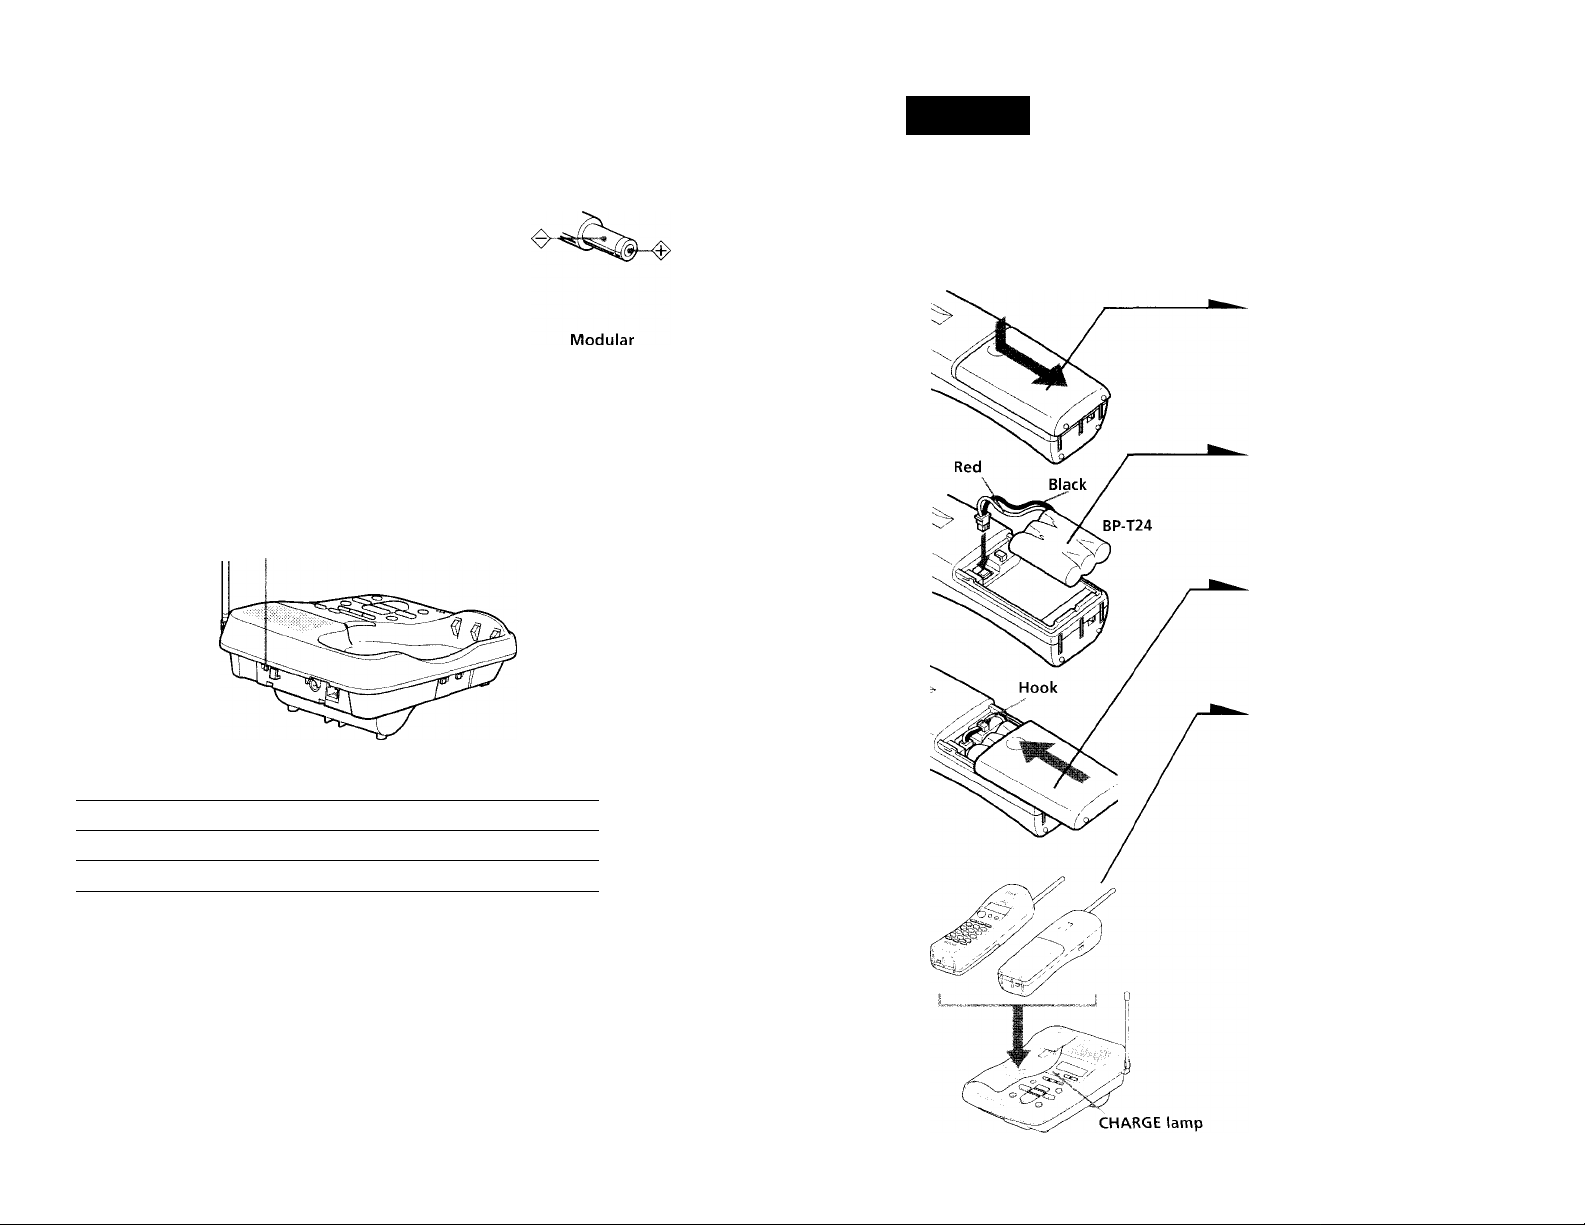
Preparing the battery pack
Charge the battery pack for more than 12 hours before you start using
vour phone.
1
Slide open the battery
compartment lid of the handset.
2
Connect the battery connector
with correct polarity (black wire
goes on right side and red wire
goes on left).
Hook the cords and insert the
battery pack. Then close the lid.
Place the hanciset on the base
unit.
You can place either side facing
up.
The CHARCiE lamp lights up
when the handset is properly
seated on the charge terminals
ot the base unit. Charge the
battery- pack tor more than 12
hours so that the battery is fully
charged. The CHARGE lamp
remains lit even after charging
is completed.
8™ Getting Started
continuel
Getting Started
Page 6
step 3: Preparing the battery pack (continued)
Step 4
Battery duration
A full\- charged battery pack lasts for about:
• 6 hours when you use the handset continuously
10 da\'s (RINCi ON moctc) or 1 month (KING CtFF mode) v\ hen the
handset is in standby mode.
Notes
• The batter\' pack will gradualK discharge o\ er a long period ot time, e\ en it
not in use.
• If you leaye the battery pack in the handset without charging it, the battery
pack v\ ill becompleteh discharged.
It may require seceral times r)f charging to recover to its tull capacity.
• While charging, tlie battery pack warms up. 'Hiis is not a malfunction.
To obtain the best performance from the battery
Do not palace the handset on the base unit after each call. The battery
works best if the handset is returned to the base unit after two or three
calls. However, do not leave the handset off the base unit for a long
period of time as this will compaletelv discharge the battery pack.
When to purchase a new battery pack
If the battery lasts only a few minutes even after 12 hours of charging,
the usable life of the battery' has expaired and needs repalacement.
Contact your local Sony authorized dealer or service center, and ask
for Sony BP-T24 rechargeable battery paack.
Entering your area code
When you use this phone tor the first time, or move to an area that has
a different area code, you must enter your area code.
This is necessary because the phone must distinguish local or bang
distance calls to paropaerlv dial calls from the Caller ID list.
1 Press I VOUPGrr).
2 Turn Jog Dial up to make "AREA"
flash.
directory-'^№
Press Jog Dial.
"ENTER AREA CODE" apapears on
the display.
4 Enter three ciigits of your area code
using ‘
, the dialing kevs.
5 Press C vODPGtT.
You hear a long confirmation beep.
Note
battery lite may yary depaending on usage condition and ambir'ut tempaerature.
Getting Started
10"'
Notes
• K an area code is already entered, it appears on the display in step 3. t o enter
a different area code, see "To change the area code" below.
• Do not allow HTctre than 20 secoiids to elapse between each step of the
prtx'edii re
Tips
• h oLi ma\- press log Dial instead of .,'VOL/PGM' iit step 3.
• it' check the current area code, perk^rm steps 1 to 3 abo\ e. The area code
appears on the displa\' k>r 20 seconds.
To change the area code
1 Perform stepis 1 to 3 abo\ e.
The current area code apapears on the dispalav.
2 Turn Jc)g Dial down to erase the current area code.
3 Enter a new area code using the dialing kevs.
4 Press Cvol/pgmT.
T oil hear a long confirmation beep.
Getting Started
Page 7

Identifying the parts
Refer to the pages indicated in parentheses for details.
[T| Display window (p.7, 32) [2] IN USE lamp
Lights when the cordless handset is
in use.
^ CHARGE lamp (p. 9)
Lights while the battery is being
charged.
[4] GREETING button (p 27)
Pla\ s back the greeting message.
Also used when recording a
greeting.
[5] ERASE button (p. 28, 32)
Erases the ii'corded greetinj^ or
messages.
IE REPEAT/SLOW button (p. 26,
32)
Press to repeat the current message
or go back to the prec ious message.
Keep the button pressed fi'r slow
plac back of messages.
\T\ MEMO button (p. 34)
Records a memo message.
[8J MIC (microphone) (p. 27, 34)
12™ Getting started
[9] Antenna (p. 7, 45) 113 Speaker
ini VOLUME +/- buttons (p 32)
Adjusts the speaker yolume.
[H TIME button (p. 26)
Press when setting the day and
time, or to check the current time.
[ll SET/REC button (p, 26, 27, 35)
Press to set the time or to record a
greeting. Also used when setting
the remote 113 code (security cocte’).
[14] Wall bracket/stand for base
unit (p. 7, 45)
H ANSWER ON/OFF button
(p.31)
Turns the ansvycring function on or
off. 1. ights vyhen the answering
function is on, and flashes when a
new message is recorded. .Also used
when setting the remote ID code
(security code).
\M SKIP/QUICK button (p. 26, 32)
Press to skip to the next message.
Keep the button pressed for quick
playback of messages.
HANDSET LOCATOR button
(p. 25)
Allows you to page the cordless
handset.
PLAY/STOP (MAILBOX 1, 2, 3)
buttons (p. 32)
Plays back the messages in each
mail box.
AUDIBLE INDICATE switch
(p. 30)
Selects tire answering mocie.
RINGER SELECT switch (p 29)
iQ
Selects the ring time.
DIAL MODE switch (p. cS)
Selects pulse or tone dialing.
Hook for AC power adaptor
M
cord (p. 7)
DC IN 9V jack (p 7)
LINE (telephone line) jack
r24!
(p. 7)
Display
1 i'lt: ut>|-Mci\ ui'i u'lC UPiiL Sr
answering machine operation.
MAILBOX j
DBB
EllllllllllFi
O u
LI LI
rn Memory capacity indicator
(p. 30)
Indicates the ayailable memory
capacity, from E (Empty) to F (Full),
for recording. The bars increase as
the ax ailable memory capacity
decreases,
[2] MAILBOX indicator (p. 32)
Displayed when there are messages
recorded and when the messages
are being played back.
Flashes when there are new
messages recorded.
Message number indicator
(p. 32)
Indicates the number of nev\'
messages recorded. ",A" appears m
the announcement only mode. "T"
appears when there is no space to
record messages. "I’" appears when
the povyer is turned on.
|4 VOL (volume) indicator
indicates the speaker yolume 1 he
bars increase as the yolume is
turned up.
ettinci Starter
4j
VOL
continued
Page 8

Identifying the parts (continued)
Handset
Q] Antenna
[2] Speaker
[3] Jog dial (p. 11,21, 38)
[4] TALK button (p. 15, 33)
Lets you make or receive a call.
[U REDIAL button (p. 16)
Redials the last number called.
[6] VOL (volume) /PGM (program)
button (p. 11,15,19, 21)
Used to adjust the speaker volume.
Also used to store numbers in
Phone Directory or for one-touch
dialing.
\T\ t TONE button (p. 15, 36)
■Allows you to switch temporarilv to
tone dialing.
[U Battery compartment (p. 9)
[9J RING switch (p. 10,18)
Switches the ringing mode,
m Display window (p. 37)
M CALL WAITING/FLASH button
(p. 17, 44)
Sw'itches to a second call if you
have "call w'aiting" service, or lets
you make a new call.
[H OFF button (p. 15)
Allows you to disconnect the call.
El PAUSE button (p. 20)
Inserts a pause in the dialing
sequence.
E4 Dialing keys (p. 15)
Ei ONE-TOUCH DIAL (A, B, C)
buttons (p. 19)
Ei Microphone
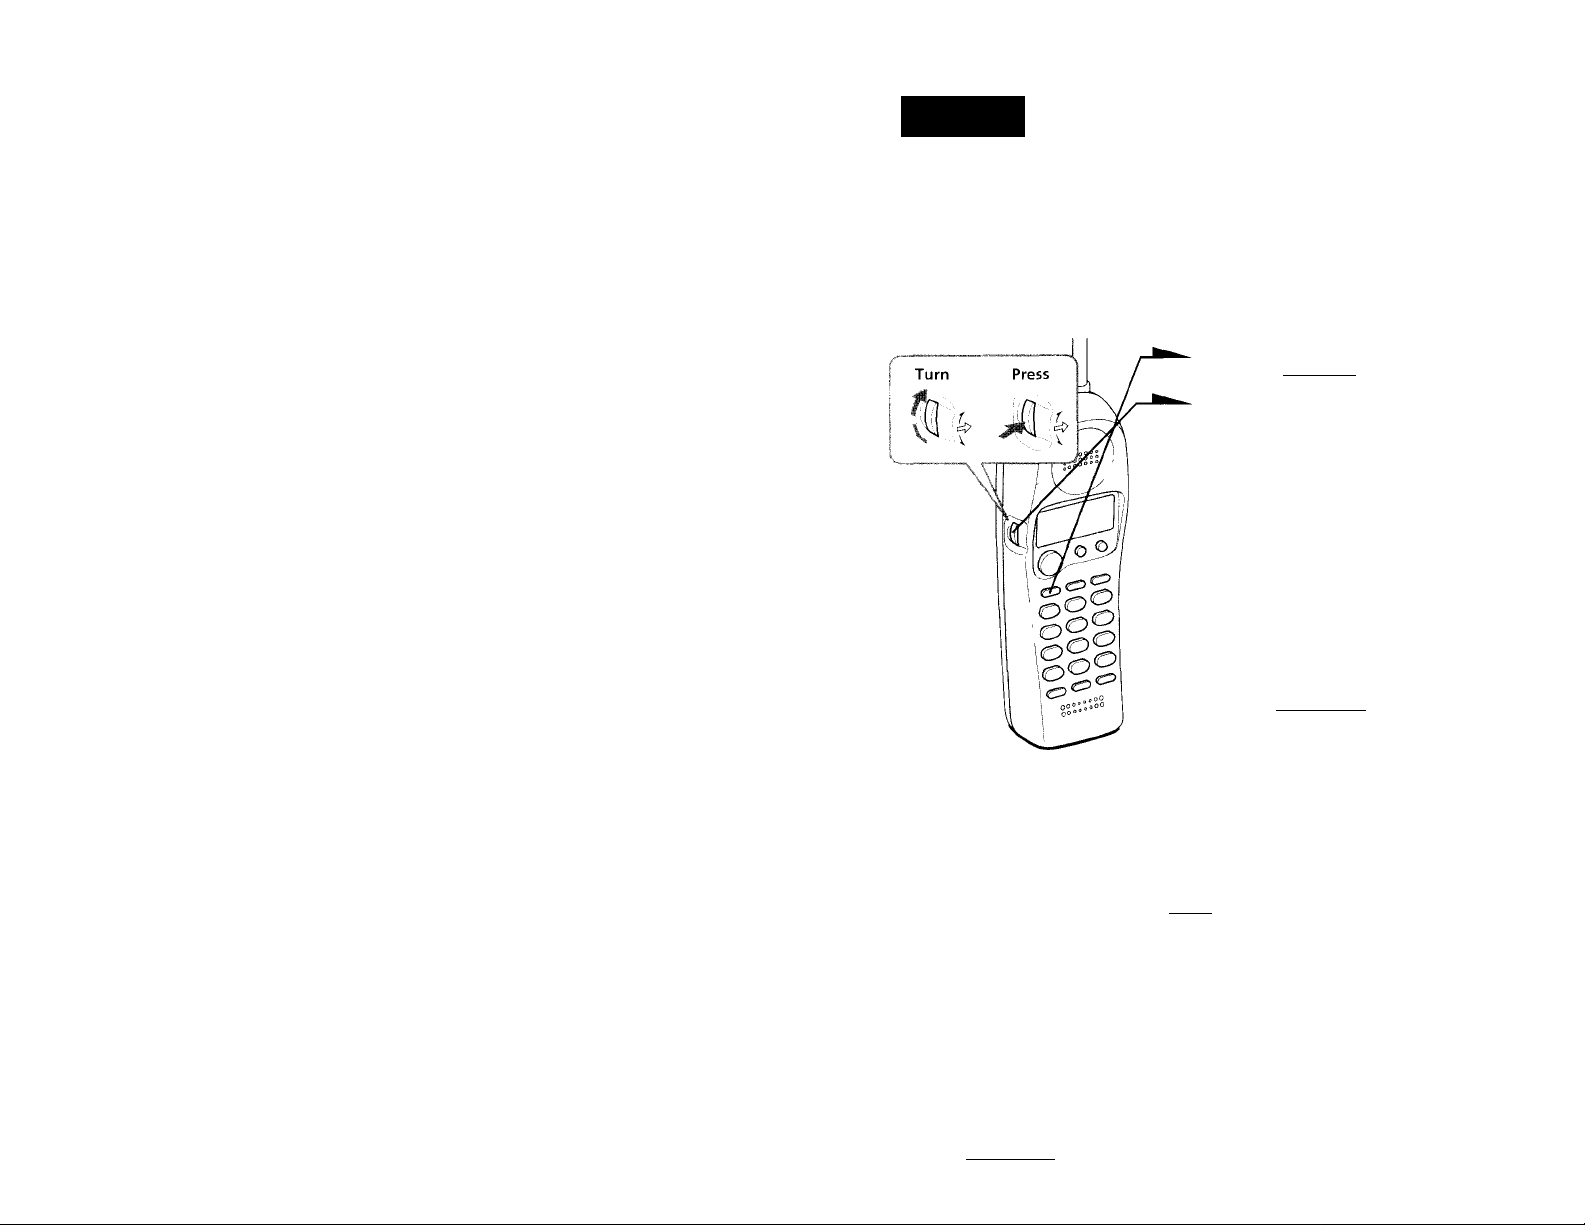
Basics
Making calls
Additional tasks
To
Adiiisl the 1
Switch [o tone diaiinc; tcmptM'crily 1
Notes
• It thr ha.nd-'f'! txT‘p'' t \'
R \,\t .!■ ' appears od tl
cal! wi 11 be d iscc'nnev te
• Wlien \ tui liurea^e the Stuind
ma\ be ii'icrea>et.1 a^ well. un.
landst't \'olume
di'-plaw mo\T' t'los
atter one minute,
Pick up the handset from me
1
base unit.
Press (TALK) and wmit until
2
"TALK" appears on the display.
The IN USE lamp on the base
unit lights up.
You then hear a dial tone. If you
hear five short error beeps and
"OUT OF RANGE" appears on
the display, move closer to the
base unit.
Dial the phone number.
During a conv'ersation, you can
adjust the handset volume.
Fc'illow the procedure described
in the following table.
When you're done talking, press
(off) or replace the handset on
the base unit.
The display goes off.
Do this
Duriny; phone con\ ersations, pre>s
VOL/PGM j. rdrch press ot ; VOL/PGM )
-•witches the speaker x'olume b\' tour le'
rush , ^TONE aftt'T \ ou arc anmcctcd.
Tlie line wil] remain in tone dialing, until
disamnected.
>atu'ii and "C H i 1 M'
aw t
iirii
t'lunuL ill si'UK' vases tlu' backp,rtnind m
iuniid adjust tiu’ \ tilume acnH'dinp!\ .
the ba^e unit: otherw i-^e, tli
dels.
continued
14"' Getting Started
Bcuacs
Page 9

Making calls (continued)
If the battery becomes weak during a call
The handset will beep e\ er\' three seconds anci and "B.ATTTR't'
L-OW" appears on the display. Finish vour call and charge the batter\
pack.
For optimum performance, charge the battery for a full 12 hours.
Note that during the first 10 - 15 minutes of charging, the phone will
be inacti\ e, i.e., unable to make or recoix e a call.
After this initial 10 - 15 minutes, you may be able to use the phone, but
the batterv duration will be very short; thus it is recommended that
vou fully charge the battery before next use.
Redialing
Receiving calls
When you hear the phone ring,
pick up the handset from the
base unit, and press CtaDT) .
"TALK" appears on the display
and the IN USE lamp on the
base unit lights upa.
During a conversation, you can
adjust the handset volume.
Follow the procedure described
in the table below.
1 Press (TalkI and wait until "TALK" appears on the display.
The IN USE lamp on the base unit lights up.
2 Press (redial) to reciial the number last dialed.
Note
If the number exceeds 32 digits or if it is erased, five short error beeps will alert
vou that the number cannot be dialed.
To check the phone number before redialing
Without pressing (talk), press (redial).
The number last dialed is displayed for fix e seconds.
To dial the number, press (TALK) while the number is displayed.
Note
The number will not be dispalayed if the last dialed number exceeds 32 digits or
it it is erased.
To erase the last phone number dialed
While the handset is not in use, press (TiedialT tvx'ice.
The number will be erased from the memory, and v'ou xvill hear a long
confirmation beep.
When you're done talking, press
CQEE) or replace the handset on
the base unit.
The display and the IN USE
lamp on the base unit go off.
If you have subscribed to the Caller ID service
• the caller's number and/or name appears on the display when vou receive a call (see page 37
• the ringer st)und changes to a higher tone if the call matches the number stored on 0\ETOUCI i Dl,'\L buttons or in the Phone Directory (memory match function: see page 37).
Additional tasks
To
Adjust the handset volume
Switch to another call
("call waiting" serxice"”)
* You need to subscribe to the
Tip
To inform \’c>u ot an incoming
ringing.
Do this
During phone conversations, pressCx/OL/PGM/; .
Fach press of fVOL/PGM) switches the speaker volume bv
four levels.
IVt'ss ("CALL WAITING/FLASH),
I’ress ' CALL waiting/fLash , acain to return to the ¡irst caller
seiA’ice from vour telephone companv.
call, the dispia\' shows ";k^RINCtlNCi^^" when
16"' Basics
continued
Basics
Page 10

Telephone Features
Receiving calls (continued)
To turn the ringer off
Set the RING switch on the bottom to OFF.
You can save batterv power.
The handset will not ring. You can still make calls, and
also receive calls if another telephone connected to the
same line rings to inform you on incoming calls, but
you cannot page the handset from the base unit.
Note
You cannot receive Caller ID data when the handset is off
the base unit in RING OFF mode. See page S7 for details.
One-touch dialing
You can dial with one touch of a key by storing a phone number on a one-touch dial
button.
Storing phone numbers
Press rvOLVPGM).
1
1111
Press one of the three
ONE-TOUCH DIAL buttons
((A) to ©).
You hear a confirmation beep.
If a number is stored, it appears
on the display. To store a new
number, turn Jog Dial to erase it.
18"'
Basics
Enter the phone number you
want to store.
You can enter up to 16 digits,
including a tone and a pause,
each of which is counted as one
digit.
Press (TvoTtpgmT.
You hear a long confirmation
beep, and the number is stored.
The display goes off.
continued
Telephone Features
Page 11

One-touch dialing (continued)
Phone Directory
Note
Do not allow more than 20 seconds to elapse between each step ol the pro( cdure
Tips
• If von have entered a v\Tong number in step 3 and ha\ e not pressed
{VoUpgM; (step 4) vet, just turn Jog Dial down to erase it. Then enter the correct
number.
• You may press Jog Dial instead of ( VOL/PGM) in step 4.
To store a number to be dialed via Private Branch Exchange (PBX)
Before entering a phone number in Step 3 on page 19, do as follows:
"1 Enter the outsicie line access digit (e.g., 9).
2 Press (PAUSE).
To change a stored number
1 Press (volTpgm)).
2 Press one of the ONE-TOUCH DIAL buttons ((X) O ©)•
The current number appears on the display.
3 Turn Jog Dial down to erase the current number.
4 Enter a new number.
5 Press (TTOlTpgIVO.
Note
Vcni can replace the sUired number VN'itli a nev\' number, but \ oli cannot just erase it.
Making calls with one-touch dialing
1 Press (Talk) anct wait until "TALK" appears on the display.
2 Press one of the ONE-TOUCH DIAL buttons (:)a) to (cT)).
The phone number storeci on the one-touch dialing button u ill
appiear on the display' and will be dialed.
To check the phone number before one-touch dialing
While the handset is not in use. press one ol the (''Xiy'KUXd I Ol.M
buttons (:)a) to (CT ).
4’he number stored on the button appears on the display tor five seconds.
To dial the number, press TALK I while the number is displaced.
Telephone Feauires
20“
You can dial a number bv scrolling through the Phone Directory.
Y ou can store up to 50 uumbeis.
Storing phone numbers and names
Example: to store "SONY" "123-4567"
Turn
1
Press
J'C
Press (voUpgm).
(Be sure not to press (TALK)).)
, —^
If "DIRECTORY" is not flashing, turn
Jog Dial down to make it flash.
'i
Press Jog Dial.
"ENTER NAME" appears.
'l,g|g
Enter the name using the dialing keys.
You can enter up to 15 characters.
Press a dialing key until the desired
Character table
Key
(1 ;
_ B C — 2
'A)
tA'
■,__5 (
(F'
■: 7,
■ S'.
9
o’
■ Yb ■
Character
I
1
L) ^ p -H. F — 3
D-» 1-1-»1-^4
j ^ K F — :3
M —► N — O —► h
1’ -- Q — R h -
[ ^ i; V — s
\\ —► X —• Y / —
n
*
character appears. (See the character
table for details.)
Enter successive characters in the same
way.
To enter two characters assigned to the
same key, or to enter a "space", turn
Jog Dial up to move the cursor to the
right.
Example: to enter "SONY", press '(_7)
four times (S), press )6) three times
(O), turn Jog Dial up to nun e the
cursor, press twice (N), and press
" X three times JY').
SONS
tt' '
continued
Telephone Featutes
Page 12

Phone Directory (continued)
4 Press CvoL/PGM).
"ENTER NUMBER" appears.
Enter the phone number.
You can enter up to 16 digits, including a tone
and a pause, each of which is counted as one digit.
O Press (VOL/PGM).
You hear a long confirmation beep, and the name and the number are
stored. The display goes off.
Notes
• If you try to save a 51st phone number, you will hear five short error beeps
and "MEMORY FULL" will be displayed. You cannot store the phone
number. To store another phone number, erase one of the stored phone
numbers (see page 23).
• Do not allow more than 20 seconds to elapse between each step of the
procedure.
Tips
• If you haw entered a wrong name or number in step 3 or 5, turn Jog Dial
doivn to erase it. Then enter the correct name or number.
• You may pre.ss Jog Dial instead of CVOLTp'GM') in steps 4 and 6.
• To store a number to be dialed via PBX, follow the steps on page 20 when
entering a phone number.
SONY o,v
12345|B,:
3 Turn jog Dial up to make "PGM" flash and press
Jog Dial.
The cursor flashes at the last character of the
name.
4 Turn Jog Dial down to erase the characters and
enter the new name.
If you want to change only the number, skip this
step.
5 Press Jog dial.
The cursor flashes at the last digit of the phone
number.
6 Turn Jog Dial down to erase the number and enter the new
number.
If vou don't want to change the number, skip this step.
7 Press Jog Dial.
You hear a long confirmation beep and the name and/or the
number is changed.
Erasing a memory location
1 Display the name and phone number you want
to erase bv following steps 1 and 2 on page 24.
S0№
1234657
SMITH a,,
12345ia,:
SONY
1234567
Changing a stored name and/or phone number
1 Display the name and phone number vou want
to change by following steps 1 and 2 on page 24.
2 Press Jog Dial.
220
Telephone Features
SONY
1234567
.¿PGM ERASE
T234^67
2 Press Jog Dial.
3 Turn log Dial up to make "ERASE" flash and
press Jog Dial.
4 T urn log Dial up to make "h'ES" flash, then press Jog Dial,
h'ou hear a Icmg contirmation beep and the memory location
rased.
DIAL PGM ERASE
123^67
ERASE NO YES
1234567
continued
I'eleph'O^'ie Fe.-itures
Page 13

Phone Directory (continued)
Paging
Making calls from the Phone Directory
1 Press Jog Dial twice.
"DIRECTORY" appears on the
display.
Display the name and phone number
you want to call.
To search in alphabetical order: Turn
Jog Dial up or down.
To search by entering the initial
character: Press the dialing key of the
desired character, then turn Jog Dial.
SONY
1234567
Press Jog Dial. ERPSE
4 Press Jog Dial again.
The phone number will be dialed.
You can page the handset from the base unit.
Note that you cannot page it the handset is m use.
To page
Press ( HANDSET LOCATOR).
The handset rings.
When you keep pressing
CTTandset locator~), the
handset rings continuously.
Note
You cannot page the handset when its RING switch is set to OFF.
Tip
You mav press (TALK) to make a call instead of following sfeps 3 and 4.
About the search order
The names appaear in the following order \a hen voii turn Jog Dial up or
down.
• Alphabetical order: ABC....XYZ <—► symbols* <—► t <—► ft <—► 0 - 9
t
______
* S\ nibols appear onl\- when you stored the number ha\ing the s\-mbol from
the Caller ID list.
• Initial character: To search for "SONY” for example, press CA) and
then turn Jog Dial to search through the names starting with P, Q, R,
S or 7.
24™ Telephone Features
^_____________r
Telephone Features
Page 14

Answering Machine Features
Preparing the answering machine
Note that you cannot operate the base unit while the handset is in use.
Setting the day and time
Set the day and time so that you can stamp dav and time for the
incoming messages. You'll hear the recorded dav and time when you
plav back messages.
1
Press (^ET/REC).
2
Press COMDYou hear a \ oice guide: "Please
set the day. To select, press the
SKIP or REPEAT button. To
enter, press the SET button".
Press C^KiP/QuiCK) or (repeat/
SLOVT) repeatedly until the
correct dav of the week is
annoLinceci.
Press (SKIP/quicK) to adx ance,
or CREPEAf/SLOW) to gc) back.
Press (SET/RECd.
You hear a \ oice guide: "Please set the hour. Tt) select, press
the SKIP or REPEAT button. To enter, press the SET
button".
Press Cskip/quicK) or (repeat/SLOW) repeatedly until the correct
7
minute is announced.
Press (SET/RECy
8
You hear a long confirmation beep, followeci by the day and
time. Then the phone starts counting time.
Notes
• Do not allinv more than 20 seconds (or 60 seconds when setting the minute)
to elapse betiveeii each step of the procedure.
• If a power interruption occurs, the day and time will be erased.
• If the current dav and time are not set, you will not hear a time stamp when
\'0U plav back recorded messages. If you trv to check the current time, you
will hear five short error beeps.
To check the current time
Press (TIME). You hear the current day and time.
Recording the greeting
This answering machine has pirerecorded greetings (sec page 2H).
Howcx er, vou can record your own greeting.
The greeting must be between two seconds and four minutes long.
You can record onlv one greeting, and it is used regardless of the
answering mode ("normar and "announcement only" modes. See page
30). Therefore, if vou decide to change the mode, make sure that you
record a new greeting to match the answering mode.
Press (SET/REC).
1
Press / SKiP/QUiCKb or f REPEAT/SLOW repeatedl\' until the
5
correct hour is announced.
Yess (SET/REC).
6
d'oti hear a \ oice guide: "Please set the minute, do select,
prt'ss the SKIP or REPE.YT button. Tfi enter, press the Sk 1
button".
26'' Answenrig Madvrie Fe
Press ( GREETING J.
2
You hear a voice guide and a
long confirmation beep.
•After the tone, start recording.
Speak about 12 inches (30 cm)
aw'ay from the microphone.
Answering Machine Features
continued
Page 15

Preparing the answering machine (continued)
4 Press (SET/REC) to stop recording.
The phone automatically replays the recorded greeting.
Notes
• If recording did not succeed, you hear fi\ e short error beeps. Start o\'er the
procedure.
• If a call comes in or (TAuy) is pressed while recording a greeting, recording
is cancelled. Start over the procedure.
• If \-ou hear fi\ e short error beeps while recording, the recording area mav be
full. In this case, erase unnecessary messages (see page 32).
Tips
• If four minutes have passed in step .3, recording stops automatically.
• To recorcf the greeting from a touch-tone phone, see page 36.
Prerecorded greeting
Normal mode: "Hello, I'm unable to answer vcuir call right now. Please
leave your name, number and message after the tone".
.A..N.N ONLY mode: "Hello, I'm unable to answer your call right now. Please call
again, thank vou".
Tips
• It \'ou U'ish to record your own "announcement oniv" greeting, follow the
above sc'c]uence after setting the /\UDIBLL INDIC.ATE switch to ANN ONLY
(pagi' 3Ut. Otheru ise, the "normal" greeting will be recorded.
• You ha\ e to change the message each time vou change the mode.
To check the greeting
Press PGREETING) to plav back the greeting.
Selecting the ring time
Then' arc three options ot ring time. Select the ring time b\ setting the
RINCh'RSPI i:CT switch.
Set RINGER SELECT to
TS (Tc'll S(i\ er)
MocJe
If new messages ha\’e been recorded, the phone answers at the
seamd ring and records incoming messages; if no new messages are
recorded, it answers at the fifth ring. When \'ou call from an outside
phone and hear more than tw(^ rings,
new messages. If \'ou hang up at this pciint before the pheme
answ ers, uui can sa\ e the toll for tlie call, ¡see }'><ige .k-i).
The phone alw a\ s answers at the fiftln ring and
messages.
The phone always answ ers at the sect^iid :
you know that there arc nc'
and records incornine
messae,es.
xis I
To change the greeting
Record a new greeting. The new greeting replaces the old one.
To erase the greeting
Press Terase) while placing back the greeting.
The answering machine will answer a call with the prerecorded
greeting.
To go back to the factory preset greeting
Press Cerase": while playing back the greeting. This will bring back
tlte original greeting.
28"" Answering Machine Features
continued
:g MarhTio
Page 16

Preparing the answering machine (continued)
Selecting the answering mode
You can set the answering machine to record incoming messages
(Normal mode), or just make an announcement without recording
messages (Announcement only mode).
You can record your own greeting, or use the factory
pre-recorded greetings.
In the normal mode, you also have the option
of having a beep to tell you if you have received
any new incoming messages.
AUDIBLE INDICATE
switch
Set the AUDIBLE INDICATE to
ON
(normal mode)
OFF
(normal mode)
ANN ONLY
(announcement only
mode)
Note
The same greeting is u.sed regardless of the answering mode. Therefore, if you
decide to change the mode, make .sure that you record a new greeting to match
the answering mode.
When you wish to
play a greeting to ask the caller
to leave a message and have the
phone beep to alert you of
recorded incoming messages.
pla\' a greeting to ask the caller
to leave a message but you do
not wish to sound a beep.
make an announcement to the
caller without accepting
incoming messages when, for
example, you are awav on a
long \-acation.
Pre-recorded greeting
'Hello, I'm unable to answer
your call right now. Please leave
your name, number and
message after the tone."
"Flello, I'm unable to an.swer
your call right now. Please cal
again. Thank vou."
Turning on the answering function
Press ( ANSWER on/ofF)
so that it lights up in red.
Note
When the memory is full, you hear fi\-e short error beeps and you cannot turn
on the answering function. Erase unnecessary messages (see page .12).
Tips
The answering machine will automatically answer a call after 10 rings e\ en if
the answering function is off. The answering function will remain on for all
subsequent calls.
You can also turn on or off the answering function from an outside phone
(see page 36).
when a caller calls
The caller can choose one of the two wavs to iea\’e a message:
• Select a mailbox bv pressing vYv 'CD' (MAILBOX 1), CxJ'GP'
(MAILBOX 2) or ® (]L' (М.ЛИЛЮХ 3) while the caller hears the
greeting. The greeting stops and a beep will sound, then the caller
can start recording a message.
• Wait until the greeting finishes, then start recording a message.
When the caller does not select a mailbox, the messages goes into
MAILBOX 1.
IQ
>
3
ui
t
(0
3
U
n
T
3
n
n
(D
l/i
When the memory is full
The recording area of this phone's memory is about 20 minutes
(including the greeting, messages, and memo). If the remaining
recording area becomes less than one minute, "F" flashes on the
display, and the phone automatically switches to ANN ONLY mode,
which does not record messages, and the greeting will be switched t(>
the pre-recorded greeting.
If you wish to record more messages, erase the existing messages (see
page 32). You can also erase the messages from an outside phone (see
page 36).
Answering Machine Features
30"
Notes
• If 4 minulk“^ heU k'
aiitomcdicalK disconnoaied-
It tho mos^<wj;o IS ■shorter than 2 MNTfnds., it will not ho rocordod.
d \\ iiiio rcn
rdiiv' tiu' incL'niinLi mos
To turn off the answering function
Press LAnswer bN.iOFf. so that the red light gcies oft.
¡wenna Machine Featrres 3V
Page 17

Playing back messages
Screening incoming calls
When you come home
If CanswefTon/OFF) flashes in
red, or the displa\’ shows the
number of new messages and
the MAILBOX indicator flashes,
press the mailbox button
(CmailboxT), Cmailbox 2) or
(MAiLBOXdL)). The machine
plays back from the first new
message.
Additional tasks when playing back messages
To
Adjust the speaker volume
Stop playback
Replav the messages
Skip to the next message
Repeat the current message Press rhEPEAT/SLOW^j while the current message is placing.
Go back to previous messages Press ¡TREPEAT/SLOWh within the first three seconds of the
Piav back slowh
Pla\' back quickh'
To erase messages
You can erase only the messages you have played back.
• To erase one message, press (Trase) while the message is being
pilayed back.
• To erase all messages in a mailbox, press CERASE), and a mailbox
button ((MAILBOX to i(T(iAILBOX 2( or ;(MAILBOX 3j) . A long
confirmation beep sounds and all messages in the selected mailbox
a re erased.
Notes
• The displav shows the total number of "new" messages. Therefore, it is reset
to "0" when \’ou play back all new mes.sages, even thev are not erased vet. Be
sure to erase unnecessarv messages hefore the memorv becomes full.
• When the number of new messages exceeds 99, "99" flashes on the counter.
• If a call comes in during playback, the plai back stops.
• It a power interruption occurs or the AC power adaptor is disconnected
while erasing a message, all recorded message may be erased.
Tips
You can also listen to the messages or erase the messages from a touch-tone
pibone (page 3b).
32™
I
Answering Machine Features
Do this
Press fVOLUME'i
Press the mailbox button again.
Press the mailbox button again.
Press CSKIP/QUICK') while the current message is playing
current message.
Keep 1 REPEAT/SLOW) pressed during plavback.
Keep fSklP/QUlCK) pressed during plaxback.
You can screen calls by leas ing the answering function on (see page
31) v\ bile r ou are at home, IVher, a call ;s answered, \ ou can hear th;
message being recorded through the base unit (you cannot laear the
message through the Itandsi't) but the caller cannot hear you. Then,
you can decide vs hether to answer the call or not. I his function is
ax ailable only on the base unit.
To answer the call
Press (TALK).
Recoreiing is cancelled and you
can speak to the caller.
Note
If the volume is set to minimum, \'Ou cannot screen the calls.
Tip
T'ou can also answer the call bv picking up another phone if it is connected to
the same line.
Answering Machine Features
Page 18

Recording a memo
Operating from an outside phone
You can record a "memo" (up to four minutes) as a personal reminder
or as a message for other people. You can play back the recorded
memo like any incoming messages (see page 32).
1 Press ( MEMO~),
You hear a voice guide.
2 Select a mailbox by paressing
CMAILBOX 1 ), ( MAILBOX 2) or
Cmailbox 3). You will hear a
voice guide, then a long
confirmation beep.
3 After the tone, start recording.
Speak about 12 inches (30 cm)
away from the microphone.
Press (MEMO) to stop) recording.
The message number in the
dispalay increases by one.
Notes
• If you press (MEMO) when the memeirv is full ("F" flashing on the displac),
\'OLi hear h\ e short error beeps and \ ou cannot record a memo.
• It a call comes in or (JAL^ is pressed wlhle recording a memo, rectirding is
canceled. Start over the procedure.
• It the remaining memor\' becomes full while recording, rect'rding stops
autkMnaticalK' and "F" flashes on the d\spla\'.
Tip
If four minutes ha\ e passed in h>tep 3, recording stop.^ autt.>maticall\-, and the
recorded memo is counted as a new message.
You can call from a touch-tone phime and pick up new messages
recorded on the phone. First, you jusl set lire jemoie it) code (seci
code) and turn on the answering function before going out.
Setting the remote ID code (security code)
Press rsET/REC).
1
Press (ANSWER ON/OFF).
2
You hear a voice guide:
"Please set the security code. To
select, press the SKIP or
REPEAT button. To enter, press
the SET button."
—3
To change the remote ID code (security code)
Enter a new remote ID code (security code). The neu code will replace
the old one.
Set a two-digit number between
00 and 99 by pressing (skip/
QUICK) or (REPEAT/SLOW).
Press (SKIP/QUICK) to increase a
number, or ( repeat/slow) to
decrease.
Each time you press (SKIP/
QUICK) or (REPEAT/SLQW), the
p>hone announces a number.
Press (SET/REC).
The remote ID code (security
code) is set, and you hear a long
confirmation beep.
34"'
Answering Machine Features
continued
Answering Machine Features
Page 19

Caller ID Features
Operating from an outside phone (continued)
Picking up new messages
1 Call your phone From a touch-tone phone.
2 While \ ou hear your greeting plav, press 'CMyh and \'our remote ID code
(security code).
You hear a long confirmation beep and the greeting stops. Following the
\ oice guide informing you of the number of messages recorded, the
phone stands by for you to enter a control code.
3 To do other operations, enter the control code within 20 seconds (see the
table below). To quit, hang up the phone.
Control codes for remote operations
To Press
Play back messages in MAILBOX 1 QD CC'
Pln\' back messages in MAILBOX 2 (3D
Pla\' back messages in MAILBOX 3 (IT) (A)
Repeat the current me.ssage
Skip the current message
Lrase the current message
Prase all nressages in VIAII.BOX 1
Erase all messages in M.AILBOX 2
Lrase all messages in MAILBO.X 3
Record a new greeting
(up to one minute)
Turn on the answering function
Turn (iff the answering function
Stopr the current operation
If you forgot to turn the answering function on
Call your phone and let it ring 10 times until it nnsevers. Then the answering functicen
automaticallv turns on.
Note
It will enter a wrong remote secante code
3D CDD wliile the message is being played back
iOT) ilfD' 'c hile the message is being plac ed hack
'3 ’ ' 9 ; while the message is being placed hack
tth' ■ 9' ■' 3' i T ■'
(31) (ID 3 3
CJ3' (3) '"3 1
c±D '7. ■ When \ ou liear a long beep, start recording c our
greeting. Press (jt , ( 3 to stop recording,
'3D' 'DpD'
'CttA {OA
’ times, tile line w ill Iv . I iseonneetrel
Understanding the Caller ID service
Caller ID allows the caller's pshone number to be shown on the display
before you answer the call, in order to use this feature, you must first
subscribe to Caller IlD serc ice. The name of this serc ice may vary
deptending on vour telephone company.
To use this feature, be sure to enter your area code (see page 11).
When you receive a call
The pahone number appaears on the dispalay with the date and time as
shown in the following exampale.
If vour Caller ID sere ice includes the caller name sen ice, the caller's
name also appears on the display (up to 15 letters).
Caller's name
Caller's phone number
The date and time received*
When you answer the call, the Caller ID display changes to the
"TALK" display.
^ The date and time in the displa\' are transmitted trom the telephtme company which
otters the Caller 10 serv ice, therefore mav differ from the date and time you set tm the
base unit.
Notes
• if the' RlXC'r switc"h is sot to OFb;
- w'hen the handset is off the base unit, the Caller ID is not displayed, anel it is
not kept in the Caller ID list (see page 38). U \ c'u set it back to RINC. ONI
while the phone is ringing, the Caller ID appears trom that moment.
- when the handset is on the base unit, the Caller ID is displaveei, and it is kept
in the Caller ID list.
• The caller's phone number and/or name u ill not appear in the following
cases:
- "OUT OF AKUA": when the call is made through a telephone company
which does not offer Caller ID service (including international calls).
- "PRIX’ATI:’': when the call is "blocked.'' For pri\ ae\' reast>ns, many -^tatOA
allow callers the option to pre\ ent his or her telephone data trom beinu
displax’ed on the other party's Caller IF) displaw
• If the call is from an office which uses multiple lines, the di^pFivc'-i phtsie
number may not match the number \ ou use to call the extension.
About the memory match function
If \’OLi rocoix o a call from a phone number whielT is stored on one of tlTe
OXE-TOUCH DIAL buttons (see page Id) or in the Phone [.)irector\(see page 2 I ), the ringer sound \\ ill ebango to a higher tone Irom iiDe
second ring.
-------------------
--------
SMITH JOHN
1-201-123-4567
To use the toll-saver feature
Set RIX'CdER SEI.EC'T to TS. See page 2d for details.
36^^ Answering Machine Features
Note
File, meiiu'iv ma W Ì1 i U1K Lu M1 LU 1K U W wi k W i Ili '(.X. I MI . \ RI A or FRI \ , \ Il.
(.alls; and it ma\' nc>t work with kails made ti\)m an tUtice wiiich uses multiple lines
l'iycau'^t.' thè iDumher lUh"~> utd alw a\ ^ match thè ludc \ ou stered iiD this phiuDc.
Caliei ID Feaiuies
Page 20

Looking at the Caller ID list
The phone stores the data of the last 20 calls received including "OUT
OF ARFA" and "PRIVATE" calls. It keeps track ot all calls received;
e\ en if thev were not answered.
However, if the RING switch is set to OFF when the handset is off the
base unit, the phone cannot receive the Caller ID data.
Viewing the Caller ID list
You can look through the Caller ID list to check the phone number
and/or name of the calls received.
1
Press Jog Dial.
The display show's the number
of "NEW" (calls w'hich you have
not view'ed) and "OLD" (calls
w'hich you have viewmd) calls.
NEW 08 OLD 12
Turn Jog Dial.
The data of the newest call
appears for 20 seconds.
About the mark
SMITH JOHN i
1-201-123-4567
NEWnn 'I rnj U C D
U O I.U I PM r J J
apipears if there are more than two calls
from the same phone number. The older data
will be replaced by the new data, so the calls
are counted as only one call.
Erasing data from the Caller ID list
Old data will be erased automatically when a 21st call comes in, but
you can also manually erase unnecessary data one bv one or erase the
entire list.
To erase the phone number one by one
1 Display the phone number you w'ant to erase
from the Caller ID list (see page 38).
2 Press Jog Dial.
3 Turn Jog Dial up to make "ERASE" Hash and
press Jog Dial.
SMITH JOHN ^
I-201-123-4567
plflL.PGM ERASE
1-‘201-123-4567
ri I 'I ri u II- Zf
OLD U I I. U I PM I - J J
NO YES
1-201-123-4567
SMITH JOHN
1-201-123-4567
Wf IV n n ~I n IJ 11. c If
Turn Jog Dial dowm to display
older data or up to display
new'er data.
Notes
• If a 21sl call is recei\'cd, the oldest data is automaticallv erased.
• If there is a "NEW" data, \’ou will hear a new call \x>ice guide at the beginnin^e
t'f message playback on the base unit, i.e. "You ha\ e one new message and
new call".
Caller ID Features
38^'
IJ Cl I.U I PM I - J J
4 Turn Jog Dial up to make "YES" flash, then
press Jog Dial.
You hear a long confirmation Laeep and the data
is erased.
continued
(. alier ID Feaiarcs
Page 21

Looking at the Caller ID list (continued)
Using the Caller ID list
To erase the entire list at once
1 Display any Caller ID data.
SMITH JOHN
1-201-123-4567
2 Press Jog Dial.
r-20I-123-4567
3 Turn Jog Dial up to make "ERASE" flash and
press Jog Dial.
4 Turn Jog Dial up to make "ALL" flash, then
press Jog Dial.
5 Turn Jog Dial up to make "YES" flash, then
press Jog Dial.
You hear a long confirmation beep and the
entire list is erased.
Note
"ALL" appears only when all the data had become "ttLD" data. If there is an\"NEW" data, vou cannot erase the entire list.
ERPSEyNQ=YES ALL
1-20НЙ-4567
PLL ERflSEsNQl^ES
1-201-123-4567
NEW 00 OLO 00
Bv using the Caller ID list, you can call back a pihone number from the
Caller ID list easily, or store numbers from the C aller ID list into
inemorv dialing kcvs.
Calling back a number from the Caller ID list
ERPSE
40^^ Caller ID Features
the displayed number.
Notes
• If the number displaved in step 1 js not the one )'ou should call back, ytui can
chant,;e the number Lfi dieits ot the phone number as described on page 43.
• If the phciue is connected to a lh‘i\ ale Branch bxchange (PBX), \4>u ma\- гк.>1
be able tc^ cal) back from the Caller ID list because an outside line access digit
is necessars’.
Tip
Wni mav proi'
TALK Id make a call instead ot tollcaving >1ерь 2 and .
Caller ID Features
continued
Page 22

Using the Caller ID list (continued)
Storing a number of the Caller ID list into the Phone Directory
1 Display the name and phone number you want
to store from the Caller ID list (see page 38).
SMITH JOHN
I-201-123-4567
2 Confirm the number and press Jog Dial.
DIAL PGM ERPSE
T-201-123-4567
Turn jog Dial up to make “PGM" flash and SMITH JOHI^
press Jog Dial. 120112345B'7
The cursor flashes at the end of the name. .
Enter or change the name, if necessary (see
page 22).
Press jog Dial.
The cursor flashes at the end of the phone
number.
I'.nter or change the phone number, it necessary
(see page 22).
______________
SMITH JOHN.
120112345&&
NEWnn ~i nij U-CZ'
LI O I.U iPM I - J J
To change the number of digits of the phone
number
It the number ot digits of the phone number in the Caller ID list is
different from the actual phone number, vou need to adjust the
numher of digits of the phone number to call back or store intti the
phone directory.
1 While the phone number from the Caller ID list is displayed,
press (w2) repeatedly until the phone number with the
correct number cat digits appears on the display.
Each time you press CtT), the number of digits changes as
follows.
When the area code does not match
SMITH JOHN
1-201-123-4567
NEW ri n '1 n IJ IJ . C Zl
LI Cl 1. LI 1 PM r J J
t
SMITH JOHN
123-4567
NEWnn ~i I’lU U >Z Zl
1 LIU I.U IPM rjJ
When the area code matches
SMITH JOHN
201-123-4567
NEWnn ~l I^IU U CZl
LI 0 I.U 1 PM I- J J
SMITH JOHN
‘Bwi-r
1-123-4567
NEW nn '< I'l II U ■ C Z>
LI Cl I.U IPM r J J
Press jog Dial again.
You hear a long confirmation beep and the name and
number are stored.
Notes
• D(i not iillou more than 2l) seeonda to elap>e between each ‘,tep (h the
procedure.
• It tile nnmher displac'd in step I is not tlie one \nii should call hack, \ vui can
change the number of digits of the phone niimhei' as describetl on pagi' 4.S,
• If the phone is coniu'cted to a l’ri\ ate Branch b\change (PBX), \ ou ma\ need
to add an outside line access digit (see page 201.
_cill0f ID Features
42^
SMITH JOHN
123-4567
NEWnn "I »■»»_» U-CZi
LiCl I.U IPM I JJ
A
1
SMITH JOHN
1-123-4567
NEW n n '• I'l U U ■ C Z*
LI LI I.U 1 PM !■ J J
SMITH JOHN
1-201-123-4567
w
NEWnn ~i nu U 'Z Zl
IJ 0 i. U 1 PM o J J
1
W
SMITH JOHN
201-123-4567
NEW n n ~i ri IJ IJ ■ IZ Zl
IJ Cl I.U IPM I - J J
2 Continue the operation to call or store the phone number
with the correct number of digits (pages 41 and 42).
Notes
• Vou nci'd to adjust the numher of digits each time vou call back from the
Caller ID list as the changes to the Caller ID data is nol sti'i'ed in memory.
• ^ ou ma\' nc't he able to change the numher of digits depending on the Caller
ID data.
Caller ID Features
Page 23

Additional Information
Using "Caller ID with Visual Call Waiting" service
This telephone is compatible with the "Caller ID with Visual Call
Waiting" ser\’ice. Make sure that \'our telephone company offers this
ser\'ice.
Like the basic Caller ID service, you need to subscribe to "Caller ID
with Visual Call Waiting” in order to use this ser\’ice.
Even though you may have already subscribed to "Caller ID" and
"call waiting" as two separate services, you need to request a
subscription to "Caller ID with Visual Call Waiting" as a single
service.
This is a new service that combines the two services.
Even though you now have a "Caller ID with Visual Call Waiting”
compatible phone, unless you subscribe to the combined "Caller ID
with Visual Call Waiting" service, you will not be able to see the
name and number of the second caller.
When a new call comes in while vou are talking, the caller's name
and /or phone number of the new call appears on the displav for about
20 seconds.
Mounting the base unit on a wall
Plug the telephone line cord to
the LINE jack and the AC power
adaptor to the DC IN 9V jack,
and hook the cords. Use the
shorter cord for mounting.
Attach the wall bracket to the
To switch to another caller
1
To switch tt' the nev\- caller,
press CCALL WAITING/FLAShl;'.
To switch back to the first caller,
press CcaTl waitTng/flash )
again.
Tip
I o ri'iiun c the u all bracket, pros tlie Kn\ er tabs.
Caller ID Features r\dc!c.>o'irC intormat'O,'
44“
Page 24

Notes on power sources
Troubleshooting
On battery pack
• Store the battery pack at a
temperature between 41‘'F (3"C) and
95°F (SS^C) for best performance.
• If you do not use the handset for a
long period of time, remove the
battery pack after charging for more
than 12 hours.
• Keep the battery pack away from fire.
• Do not short-circuit the battery
terminals.
• Do not disassemble the battery pack.
Maintenance
On handling
• Do not attempt to disassemble the
casing. Refer servicing to qualified
personnel onlv.
• Do not put foreign objeefs into the
unit. Should any liquid or solid object
fall into the unit, unplug the unit and
have it checked by qualified personnel
before operating the unit any further.
• Do not put anything in the DC IN 9V
(external power input) jack.
• Do not drop the unit as a malfunction
naav result.
46"
Additional Information
On safety
• Do not unnaturally bend or crimp the
cord, and do not place hea\w objects
on it.
• If the cord or plug is damaged, do not
continue to use it. Contact vour local
Sony dealer for replacement.
On power failure
During a power interruptican, you
cannot make or receive calls, and vou
cannot use the answering machine.
On cleaning
• Clean the cabinets with a soft cloth
slightly moistened with water or a
mild detergent solution. Do not use
any type of abrasive pad, scouring
powder or solvent such as alcohol or
benzine as they may damage the
finish of the cabinet.
• If the charge terminals of the base unit
and handset are soiled, wipe them
with a soft cloth.
If you ha\'e any questions or problems
concerning your phone, please consult
vour nearest Sonv dealer.
If \-ou'\ e experienced any of the follcnviip^ difficulties while using \'our
phc>ne, use this troubleshooting to help vou remed\' the problem.
Shfuild any problem persist, consult \ c)ur nearest Sony dealer.
Symptom
You hear fix e short error
beeps xx'hen x’ou prc'ss ( talk)
^ ou hear no dial teine.
c
The phone does not connect at
all, ex’en though the number
\'OLi dial is ci)rrect.
The phone doesn't redial
correctly.
Vou hear fix e shcirt errcir beeps
when you try to redial.
The handset does not ring.
c
3oLi hear interference during
conxersation.
\ou hear a beep ex erx' second
during conx ersation and ”C)L 1
OF RANGF." appear on the
di^plax.
3’ou hear a beep ex erx three
c
seconds and iVi and IT-M I i;TG
LOW" appears on the dispiax.
\ ou hear fix e short error lu'eps
and cannot '-tore a number c>n a
one-touch dial or in the hhom'
О
.2 r;
Directorx.
T3 a;
'i f'u heai' fix о ."hfirt erroa' beeps • 3'ou pressed a f'ne-ttuicli klialing button on xx Inch no
у 5
3
0)
\\ hen X'OU trx' to make a oiae- pirone number ha-- been '-tfired.
О
c
touch dial call.
о
()n(.'-toiich dialing or Пк'пе
nirectorx' dialing i- incorrec
Remedy
Make sure vou si>t up the base unit correctlx (page 6).
Mcn e the handset closer to the base unit.
Replace the handset on the base unit, then pick it up
and try again. If the handset is on the base unit, pick
up the handset and replace it again.
Make sure the telephone line cord is securely
connected to the telephone outlet (page 7).
Make sure the battery is fullx' charged (page 9).
Make sure the dialing mode is set correctiv (page 8).
Make sure the last dialed number is really the cme you
xxvmt to dial.
The number vcui last dialed exceeds 32 digits
(including the tone and pause digits if used).
The number you last dialed is erased.
Set the RING switch on the handset to ON.
The batter)' max be xx eak. Charge the batterx tor
metre than 12 hcuirs (page 9).
Make sure you set up the base unit correct))' (page (d.
Mox e the handset closer to the base unit.
Replace the handset on the base unit, then pick it up.
If the handset is on the base unit, pick up the handset
and replace it again.
\U)X e the handset closer to the base unit.
Пасе the base unit avx ax' from noise sources (page (d.
It is an oLit-xT-range alarm. Mox e the handset ck'ser to
the base unit \\ ithin one minute.
' the batterx tw' moiv tini
1 he hatterx'i"'v\ eak
12 hfHirs (page a).
Note tiiat x'ou cannot use the handset xx'itiiout
charyiny it \or пу>ге than one minute.
Make sure x'OU follow the prafcediire in storing tlie
number convetb' (pages R* and 21 i.
Make ^urt' the numbty (including the tone and p'an
digits! does not exci'od !(■' digit'-.
•dfore a cc'rrect number (pages [ч and 21
Cl
.ddd'tionai Inroriiidtior'
Page 25

Troubleshooting (continued)
|¡ The phone does not record
K messages
E I
E è
? <u
■E T3
ro
a °
O
u
48"
Additional Information
Symptom
The handset does not ring
when calling from the base
unit.
You cannot hear anything from
the speaker.
No time stamp is heard.
'i OLI cannot record the greeting
properly.
The phone does not accept vour
remote ID code (security code).
a
You hear error beeps when you
enter your remote ID code
(security code).
A long confirmation beep does
not sound when you enter your
remote ID code (security code).
The caller's name and/or
phone number does not appear
on the display.
The caller's name and/or
phone number cioes not appear
on the display during call
waiting.
Remedy
Set the RL\G switch to 0\.
Use the VOLUME control on the base unit to increase
the speaker v olume.
Make sure the day and time are set (page 26).
1 he day and time may haye been cleared due to a
power interruption. Set them again (page 26).
Keep your message between two seconds and tour
minutes.
Make sure you speak about 12 indies (30 cm) avwiv
from the microphone when recording.
Check the answering mode. The phone cannot record
messages in AN.N ONLY mode (page 30).
Vlake sure that the memory is not full. When the
remaining recording area is less than one minute, the
phone switches to ANN ONLY mode automatically.
The phone does not record a message that is shorter
than two seconds
Hi en if the me.s.sage is longer than four minutes, the
phone only records up to four minutes.
Make sure you call from a touch-tone phone.
Make sure you entered your remote ID code (security
code) within two seconds after you ha\ e entered Lft3i,
.Make sure the remote ID code (security code) is
correct.
Enter your remote ID code (security code) while the
greeting is being pilayed back.
Make sure you are calling from a touch-tone phone.
Make sure you have subscribed to Caller ID service.
Caller ID .service ma\' not work when the phone is
connected to a Private Branch Exchange (PBX).
Make sure that the handset is on the base unit or the
Rl.NC, switch is set to ON (page IS)
The call is made through company which does not
offer Caller ID serv ice. "C3L P OT .-\RE.A ' will appear
on the display.
Ihe call was "blocked." "PRI\'.\TE" will appear on
the display.
You answered the call while "TpiRINK il\CT*"is
displayed. Be sure to ansu er after the Caller 113 data is
displayed.
Make sure you have subscribed to "Caller ID with
Visual Call Waiting" service (see page 44).
Make sure nobody is talking on another phone on the
same telephone line.
Symptom
d ou cannot dial the number
from the Calk’r ID list.
The memorv' match function
does not work.
The Cl LARGE lamp does not
light up when you place the
handset to charge.
The battery duration is short.
Note
II any ot the remedy did not work, there mav be sonu'thing wrong with the
handset. Replace the handset on the base unit, then pick it up and try again. If the
handset is on the base unit, pick up the hancLset and replace it again.
Remedy
Make sure you I'litered vour area code correctly
(page II).
You mav need to change the number of digits ot the
phone number (page 43).
This function may not work when the phone is
connected to a Private Branch Exchange (PBX).
If the call is from an office which uses multiple lines,
the phone number may not match the number you
put in the memorv.
It you stctred the phone number with an outside line
access digit in the Phone Directory because the phone
is connected to a Private Branch Exchange (PBX), the
phone number will not match the Caller ID data.
Wipe the charge terminals ot the base unit and the
handset with a soft cloth for better contact of the
charge terminals.
Make sure the handset Is placed on the base unit
piroperlv.
The battery pack was charged less than 12 hours (due
to power failure, etc.).
The usable life of the battery has expired and needs
repilacement.
Message number indication
The message number indicator on the base unit shows the following information.
When the counter shows
Number
It means
.NumbkT ol me'>S(iges nol \'et plaveui back. The indicali>r
shows up tc) messages. After that, ’ flashes to tell
YOU that there are l(K) or more messages.
Flashes when the dav and time is cleared due to a powe''
interruption, or when wui connect the base unit to the
/\C tiutlet tor the first time (pages 7 and 27).
The announcement (ml\ mode is >eh‘eted (page tiI],
The recording area is full. Erase unnecessary message:'
(page .22),
Additional Intormation
Page 26

Specifications
General
Spread mcthi'd
Direct-Sequenee Spread-Spectrum
Access method
FDMA-TDD
Frequencv band
TO -h28 Mil/ (100 mVV)
(.Operating channel
20 channels
Dial signal
Tone, 10 PPS (pulse! selectable
Supplied accessories
See page 5.
Handset
I’ower source
Rechcrgeahle batter)' pack BP-T24
Battery life
Standby: Approx. lO days (RING 0.\
mode)
•Approx. I month (RING OFF
mode)
Talk: .Approx, b hours
Dimensions
.Approx. 2 ’sx7\ I '’’ih inches (u/li/d),
antenna excluded
(approx. 5S X 177 X 4(i mm)
Antenna: 2 s inches (72 mm)
Mass
■Approx, h o/ (approx, 26(1 g), battery
included
Base unit
|\>wer source
DC from AC power adaptor ,-\C-14h
Batler\' charging time
.Approx. 12 hours
Dimensions
Appri>\. 0 A X 2 '''X tS ': inches (vv/h/d),
antenna excluded
(approx. 170 X nO X 214 mm)
■Antenna: ft ' : inchc‘^ i 1 (A mm'
,\la>^
..Appix'x. Its tv (approx. 520 g), wall bracket
t’xeluded
Answering machine
Maximum recctrding time
-About 20 minutes, using iiu_orptuated iC
COreeting message
L’p to 4 minutes
incoming message
Up tt> 4 minutes/message
Memo
Up to 4 minutes/message
Design and specifications are subject M
change ^vithout notice.
RECYCLING NICKEL-CADMIUM
BATTERIES
NICKEL-CADMIUM
BATTERY.
BATTERY MUST BE
RECYCLED OR DISPOSED OF
Ni-Cd
Nickel-Cadmium batteries are recyclahle You
can help presenc our en\ ironment b\'
returning your unwanted batterie.s to your
neare.st Factory Service Center for collection,
recycling or proper dispoyal.
Note: In .some areas the disposal of nickel-
cadmium batteries in household or
business trash may be prohibited.
For the Factory Service Center nearest you
call 416-499-SONY (Canada only).
Caution: Do not handle damaged or leaking
nickel-cadmium batterie.s.
PROPERLY.
Index
A
Adjusting \'olume
handset 15
speaker .52
.-\nnouncement onK .50
.Answering machine
turning on 31
■Area code 11
.Audible indicate 30
B
Battery pack
charging 9
duration 10
Call waiting service 17
Caller ID 37
Caller ID list 38
calling back 41
Memory match function
37
storing in Phone
Directory -12
Caller ID with
Visual Call Waiting 44
Connection 7
Control codes for remote
operations 36
Day and time stamp 26
Dialing mode
choosing 8
switching to the tone
temporarily 15
Directroy
Phone Directory 21
E, F
Frasing
Caller ID data 39
last phone number
dialed 16
messages 32
Phone Directory 21
G, H
Greeting 27
1. j. K
Identifying the parts 12
Location, base unit 6
M, N
Mailbox 31,32
Making calls 15
IVIerno 34
Memory match funtion 37
Messages 31, 32
Mounting the base unit on
a wall 45
One-touch dialing 19
Operating from an outside
phone 35
OUT OF ARHA 37
P, Q
Package contents 7
Imaging 25
Phone Directory 21
Playing
annoucement onl\ 30
messages 32
PRIVATH 37
Pulse dialing 8
R
Recording
greeting 27
memo 34
Receix'ing calls 17
Redialing 16
Remote 1D code
(security code) 35
Ringer
turning on/off 18
ringer select 29
Screening calls 33
Setting up
base unit 6
handset 9
Speaker 15, 32
Stamping messages with
day and time 26
Storing Caller ID data in
Phone Directory 42
T, u
Toll-sayer feature 29
Tone dialing
dialing mode 8
switching to 8
Troubleshooting 47
V, W, X, Y, Z
Volume
handset 15
speaker ,32
50*=
Additional Infor.matK
•Additional information
 Loading...