

Page 1

Main Contents
_________________________
», '>,'l
'i\ ■'
M
IMPORTANT SAFETY INSTRUCTIONS
Safety Regulations......................................5
Precautions................................................6 .
TaWe a/ Contents
Looking at Your Phone
Setting up the Phone
Power Connection
Charging the Battery Pack in the Handset... /51
Setting the Current Time
Making Calls
Receiving Calls.........................................23
Using Your Long-distance Service
Transferring Calls Between the
Base Unit and the Handset.........................28
Memory Dialing........................................29.
Recording Your Greeting (OGM)
Playing Back Messages
Recording a Memo Message
Recording a Conversation in Progress
Operating the Answering Machine from
the Handset...............................................38
Operating the Answering Machine from
a Touch-tone Phone
Maintenance.............................................44
If You Have a Problem
UMTTED WARRANTY
.....................................
.....................................
.................................
.....................................
............................
...........................................
.............................
......................
..................................
.............................
..............................
.............
............
.........
.......
7
12
/i |
20 -HB
22
26
31 j
33
36 ,
37
40
47 ■
50 .
2 “
9 „
Cordless Telephone with
Answering System
Operating Instructions
SPP-A40IA60
Before you start using your telephone:
- connect the AC power adaptor to continuous power supply (see page 13).
- charge the batteiy pack for the handset (see page 18).
- record your outgoing message (OGM) first in order to use the telephone answering
function (see page 31).
Page 2

Warning
To prevent fire or shock hazard, do not expose the
set to rain or moisture.
To avoid electrical shock, do not open the cabinet.
Refer servicing to qualified personnel only.
IMPORTANT SAFETY INSTRUCTIONS
When using your telephone equipment, basic safety precautions should always
be followed to reduce the risk of fire, eiectric shock and injury to persons,
including the foilowing:
1. Read and understand all instructions.
2. Follow all warnings and instructions marked on the product.
I
I
I
s
I
3. Unplug this product from the wall outlet before cleaning. Do not use liquid cleaners
of aerosol cleaners. Use a damp cloth for cleaning.
4. Do not use this product near water, for example, near a bath tub, wash bowl,
kitchen sink, or laundry tub, in a wet basement, or near a swimming pool.
5. Do not place this product on an unstable cart, stand, or table. The product may fall,
causing serious damage to the product.
6. Slots and openings in the cabinet and the back or bottom are provided for
ventilation. To protect it from overheating, these openings must not be blocked or
covered. The openings should never be blocked by placing the product on the bed,
sofa, rug, or other similar surface. This product should never be placed near or
over a radiator or heat register. This product should not be plac^ in a built-in
installation unless proper ventilation is provided.
7. This product should be operated only from the type of power source indicated on
the marking label. If you are not sure of the type of power supply to your home,
consult your dealer or local power company.
8. Do not allow anything to rest on the power cord. Do not locate this product where
the cord will be abused by persons walking on it.
9. Do not overload wall outlets and extension cords as this can result in the risk of fire
or electric shock.
10. Never push objects of any kind into this product through cabinet slots as they may
touch dangerous voltage points or short out parts that could result in a risk of fire or
electric shock. Never spill liquid of any kind on the product.
Page 3

11. To reduce the risk of electric shock, do not disassemble this product, but take it to a
qualified service personnel when some service or repair work is required. Opening
or removing covers may expose you to dangerous voltages or other risks. Incorrect
reassembly can cause electric shock when the appliance is subsequently used.
12. Unplug this product from the wall outlet and refer servicing to qualified service
personnel under the following conditions;
A. When the power supply cord or plug is damaged or frayed.
B. If liquid has been spilled into the product.
C. If the product has been exposed to rain or water.
D. If the product does not operate normally by following the operating instructions.
Adjust only those controls, that are covered by the operating instructions
because improper adjustment of other controls may result in damage and will
often require extensive work by a qualified technician to restore the product to
normal operation.
E. If the product has been dropped or the cabinet has been damaged.
F. If the product exhibits a distinct change in performance.
13. Avoid using a telephone (other than a cordless type) during an electrical storm.
There may be a remote risk of electric shock from lightning.
14. Do not use the telephone to report a gas leak in the vicinity of the leak.
I
S
SAVE THESE INSTRUCTIONS
CAUTION:
1. Use only the following type and size battery pack: SONY BP-T16.
2. Do not dispose of the battery pack in a fire. The cell may explode. Check with local
codes for possible special disposal instructions.
3. Do not open or mutilate the battery pack. Released electrolyte is corrosive and may
cause damage to the eyes or skin. It may be toxic if swallowed.
4. Exercise care in handling battery in order not to short the battery with conducting
materials such as rings, bracelets, and keys. The battery or conductor may overheat and
cause bums.
5. Charge the battery pack provided with or identified for use with this product only in
accordance with the instructions and limitations specified in the instruction manual
provided for this product.
6. Observe proper polarity orientation between the battery pack and battery charger.
TO REDUCE THE RISK OF FIRE OR INJURY TO PERSONS BY
BATTERY, READ AND FOLLOW THESE INSTRUCTIONS.
g
I
3
Page 4

n A11ТШМ • "’’O reduce the risk of fire or injury to persons by
UMU I . BATTERY, READ AND FOLLOW THESE INSTRUCTIONS.
1. Use only the following type and size batteries; Size AAA (R03)
2. Do not dispose of the batteries in a fire. The cell may explode. Check with local codes for
possible special disposal instructions.
3. Do not open or mutilate the batteries. Released electrolyte is corrosive and may cause
damage to the eyes or skin. It may be toxic if swallowed.
4. Exercise care in handling batteries in order not to short the battery with conducting
materials such as rings, bracelets, and key. The battery or conductor may overheat and
cause bums.
5. Do not attempt to recharge the batteries provided with or identified for use with this
product. The batteries may leak corrosive electrolyte or explode.
6. Do not attempt to rejuvenate the batteries provided with or identified for use with this
product by heating them. Sudden release of the battery electrolyte may occur causing
bums or irritation to eyes or skin.
7. When replacing batteries, all batteries should be replaced at the same time. Mixing fresh
and discharged batteries could increase internal cell pressure and rupture the discharged
batteries.
8. When inserting batteries into this product, the proper polarity or direction must be
observed. Reverse insertion of batteries can cause charging, and that may result in
leakage or explosion.
9. Remove the batteries from this product if the product will not be used for a long period of
time (several months or more) since during this time the battery could leak in the product.
10. Discard “dead” batteries as soon as possible since “dead” batteries are more likely to leak
in a product.
11. Do not store this product, or the batteries provided with or identified for use with this
product, in high-temperature areas. Batteries that are stored in a freezer or refrigerator foi
the purpose of extending shelf life should be protected from condensation during storage
and defrosting. Batteries should be stabilized at room temperature prior to use after cold
storage.
4
Page 5

Safety Regulations
INFORMATION
This equipment generates and uses radio
frequency energy and if not installed and
used properly, that is, in strict accordance
with the manufacturer’s instructions, may
cause interference to radio and television
reception. It has been type tested and found
to comply with the limits for a Class B
computing device in accordance with the
specifications in Subpart J of Part 15 of FCC
Rules, which are designed to provide
reasonable protection against such
interference in a residential installation.
However, there is no guarantee that
interference will not occur in a particular
installation, if this equipment does cause
interference to ràdio or television reception,
which can be determined by turning the
equipment off and on, the user is encouraged
to try to correct the interference by one or
more of the following measures:
- reorient the receiving antenna
- relocate the equipment with respect to the
receiver
- move the equipment away from the
receiver
- plug the equipment into a different outlet so
that equipment and receiver are on
different branch circuits.
If necessary, the user should consult the
dealer or an experienced radio/television
technician for additional suggestions. The
user may find the following booklet prepared
by the Federal Communications Commission
helpful:
“How to Identify and Resolve Radio-TV
Interference Problems”.
This booklet is available from the U.S.
Government Printing Office, Washington, DC
20402, Stock No.004-000-00345-4.
You are cautioned that any changes or
modifications not expressly approved in this
manual could void your authority to operate
this equipment.
SERVICE REQUIREMENTS
If your cordless telephone model should
malfunction, all repairs will be performed by
an authorize Sony Senrice Center. This unit
has been registered within the FCC for direct
connection to the telephone network. Under
the FCC program, no customer is authorized
to repair this unit. This applies to a unit in
and out of warranty. If an unauthorized
IMPORTANT INSTRUCTIONS TO USERS
Your cordless telephone has been approved
by the Federal Communications Commission
(FCC) as not being harmful to the telephone
network when connected directly to the
telephone lines. In order to fully comply with
the Rules of the FCC, the following
instructions should be read carefully and
followed completely where applicable;
1. The FCC rules require that all direct
connection to the telephone line must be
made through standard plugs and jacks.
No connection can be made to party lines
or coin lines. Prior to connecting your
device to the lines:
_________________
repair is performed, the registration of the
unit for direct connection to the network will
be null and void. If the unit is still in warranty,
the remainder of the warranty period will also
be null and void. It is responsibility of users
requiring service to report the need for
service to their Sony dealer.
a) Upon request from your telephone
company, you must provide the 14 digit
FCC Registration Number and Ringer
Equivalence Number (REN), both of which
are on a label located on an outer surface
of the device.
b) After the telephone company has Installed
the jack, you can connect your cordless
telephone by inserting the mating plug of
your equipment into this jack.
c) All repairs must be accomplished as
described in the “Service requirements”.
Page 6
d) The REN is useful to determine the
quantity of devices you may connect to
your telephone line and still have all of
those devices ring when your number is
called. In most, but not all areas, the sum
of the RENs of all devices should not
exceed five (5.0). To be certain of the
number of devices you may connect to
your line, as determined by the REN, you
should call your local telephone company
to determine the maximum REN for your
calling area.
2. If it appears that your cordless telephone
is malfunctioning, it should be
disconnected from the telephone line until
it can be determined whether your
cordless telephone is the source of the
trouble or not. If your machine needs
repair, it should not be reconnected until
such repairs have been made.
3. If ham does occur, the telephone company
shall, where practicable, notify you, the
customer, that temporary discontinuance
of sen/ice may be required; however,
where prior notice is not practical, the
telephone company may temporarily
discontinue senrice forthwith, if such action
is reasonable in circumstances. In case of
such temporary discontinuance, the
telephone company shall (1) promptly
notify you, the customer, of such
temporary discontinuance (2) afford you,
the customer, the opportunity to correct
the situation which gave rise to the
temporary discontinuance, and (3) inform
you, the customer, of your right to bring a
complaint to the Commission pursuant to
the procedures set forth in the Rules.
Procedures for filling the complaints can
be obtained from your local dealer, or if
necessary, by writing directly to the
manufacturer.
I
IMPORTANT NOTICE
Warning: This telephone operates as a radio transmitter. Conversations over this cordless
telephone may be heard by others on radios within the area of its range of transmission.
• Before initial use, install the rechargeable battery into the battery pack compartment of the
handset and charge it for more than 12 hours.
• Operate the AC power adaptor on 120 V AC, 60 Hz.
• Use the AC power adaptor supplied for this unit. Do not use any other AC power adaptor.
• Do not install the beise unit in a location near a heat source such as radiators or airducts, or in
a place subject to direct sunlight, excessive dust, moisture, rain, mechanical vibration, or
shock.
• Do not place the base unit on or near a TV set or a personal computer to avoid interference.
• Should any liquid or solid object fail into the base unit, unplug the unit and have it checked by
quaiified personnei before operating the phone any further.
• This telephone is designed and approved for single party lines oniy. it should not be
connected to multiple lines or a coin telephone.
If you have any question or problem concerning your telephone that is not covered in this
manual, please consult the nearest Sony Sen/ice Center authorized to service telephone
terminal equipment.
__________
Page 7

Table of Contents
What You Get with Your Phone............................................................................................................. 8
Looking at Your Phone..........................................................................................................................9
Setting up the Phone...........................................................................................................................12
Complete Set-up....................................................................................................................... 12
Telephone Line Connection........................................................................................................ 12
Power Connection.....................................................................................................................13
Installing the Back-up Batteries in the Base Unit............................................................................14
Selecting the DIAL MODE (pulse or tone).....................................................................................15
Setting Other Selectors of the Base Unit.......................................................................................16
Installing the Microcassette.........................................................................................................17
Charging the Battery Pack in the Handset..............................................................................................18
Setting the Current Time......................................................................................................................20
Using as a Telephone......................................................................................................................... 22
Making Calls.......................................................................................................................................22
Redialing a Number............................................................................................................................ 22
Receiving Calls...................................................................................................................................23
Using Call Waiting and FLASH.............................................................................................................25
Putting a Call on Mute..........................................................................................................................25
Changing Channels for Better Reception............................................................................................... 26
Using Your Long-distance Service........................................................................................................ 26
Using the Phone as an Intercom...........................................................................................................27
Transferring Calls Between the Base Unit and the Handset (SPP-A60 only)
Memory Dialing.................................................................................................................................. 29
..............................................
28
Using as a Telephone Answering Machine........................................................................................... 31
Recording Your Greeting (OGM)..........................................................................................................31
Setting the Recording Time.................................................................................................................. 32
Turning Off the Answering Machine.......................................................................................................32
Playing Back Messages.......................................................................................................................33
Call Screening.................................................................................................................................... 35
Recording a Memo Message............................................................................................................... 36
Recording a Conversation in Progress.................................................................................................. 37
Operating the Answering Machine from the Handset...............................................................................38
Operating the Answering Machine from a Touch-tone Phone...................................................................40
Mounting Your Phone on the Wall.........................................................................................................43
Maintenance.......................................................................................................................................44
Power Failure..................................................................................................................................... 44
Back-up Batteries................................................................................................................................44
Specifications...................................................................................................................................... 45
About the Security Code System...........................................................................................................46
If You Have a Problem.........................................................................................................................47
LIMITED WARRANTY........................................................................................................................ 50
This instruction manual covers two models, SPP-A40 and SPP-A60.
The SPP-A60 is provided with speakerphone function but the SPP-A40 Is not.
The illustrations shown in this manual are SPP-A60.
I
Page 8
M?iaf You Get with Your Phone
I
I
I
§
I
%
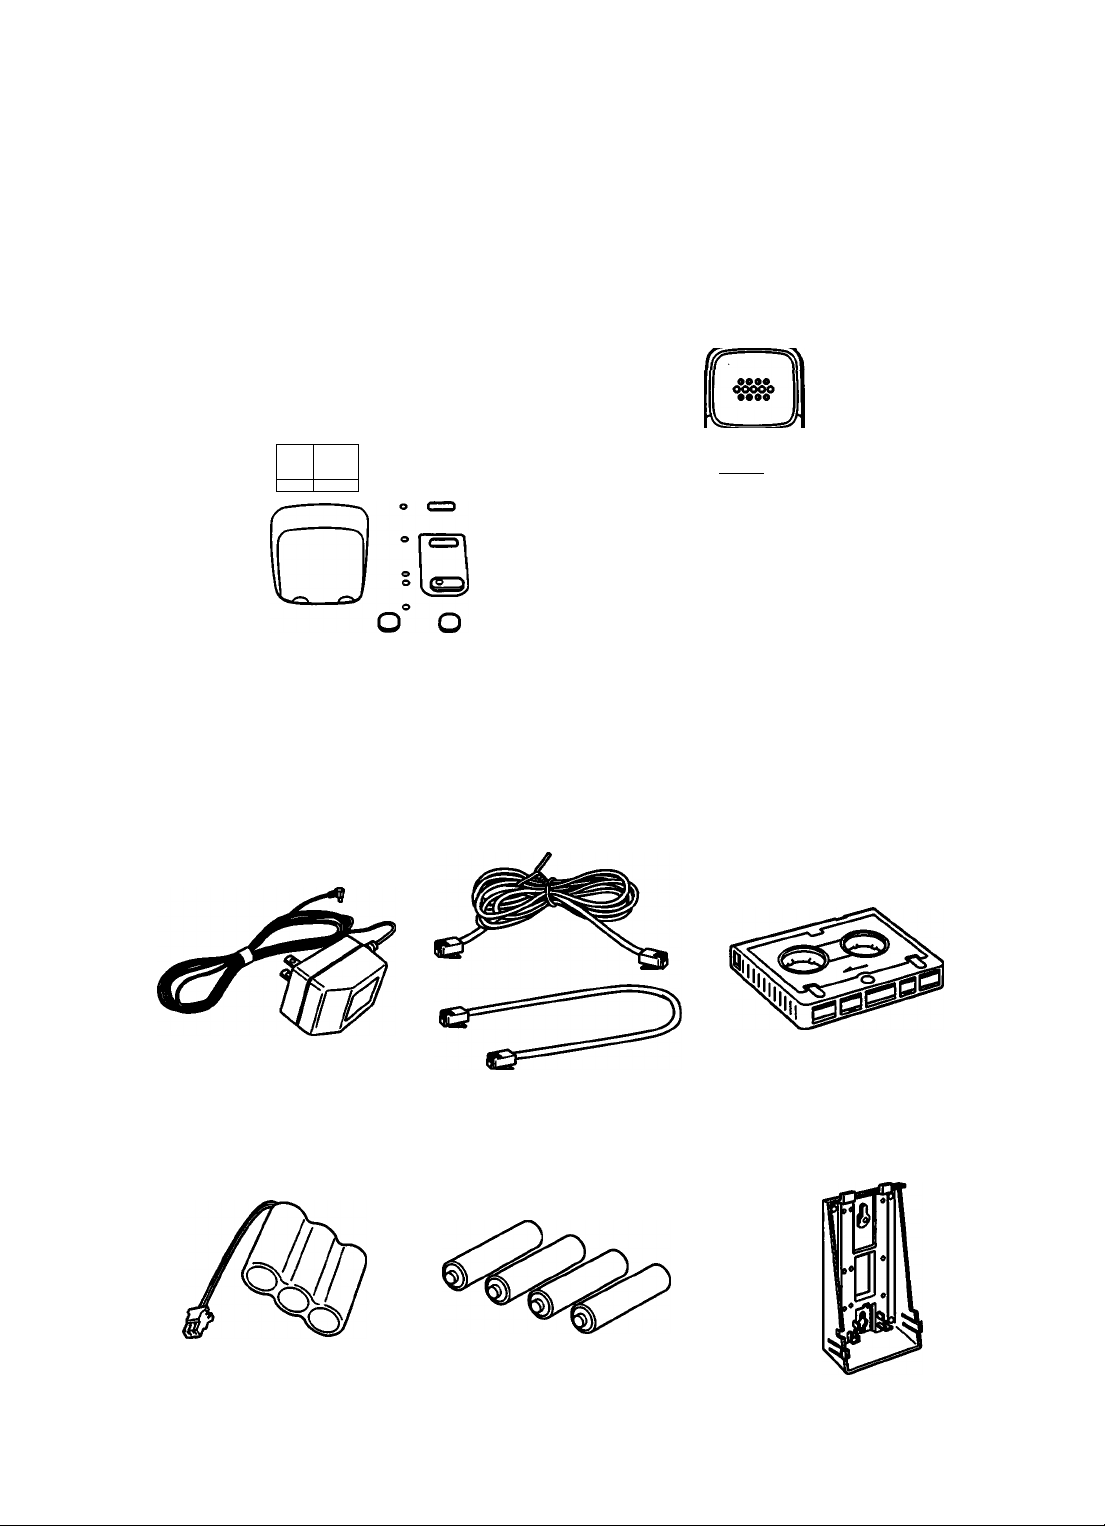
Base Unit (1)
il
llilll
iîîtîî
(SPP-A60)
AC power adaptor
(AC-T42,1)
Handset (1)
Telephone line cord
(long 1, short 1)
Q*o"o
O©0
O0©
©0©
©0©
Microcassette (MC30,1)
Rechargeable battery
pack(BP-T16,1)
Size AAA (R03)
batteries (4)
Wall bracket (1) and
screws (4)
8
Page 9
Looking at Your Phom
Base unit
5
6
7
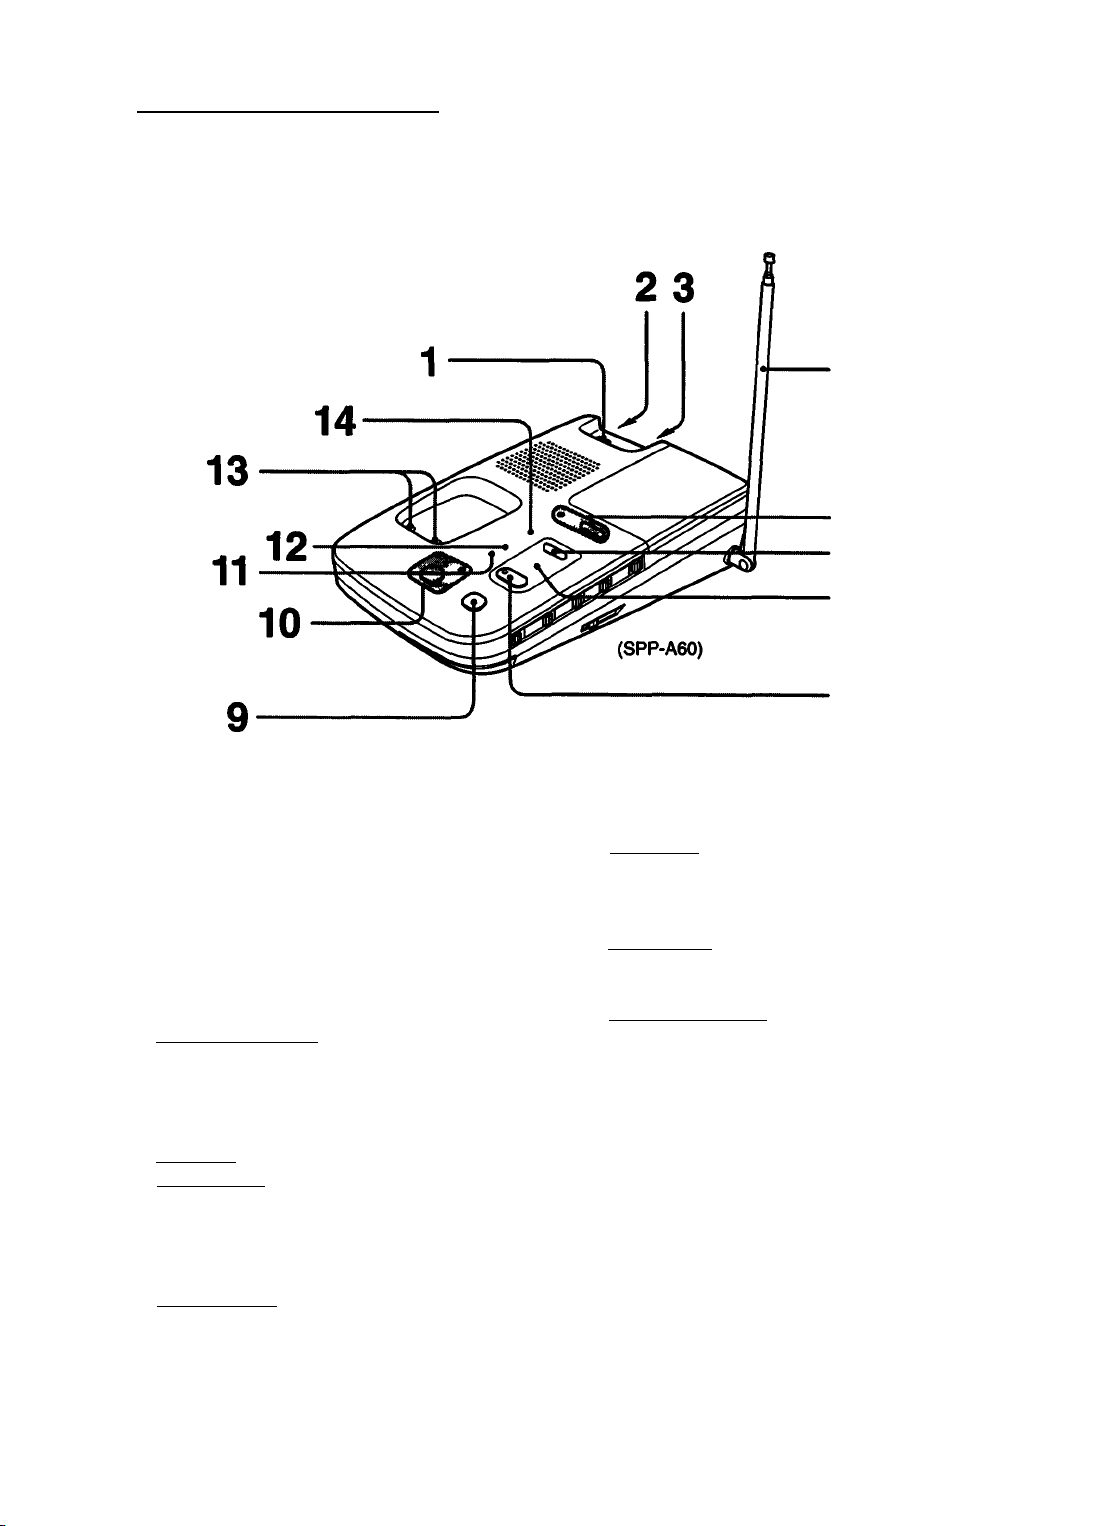
1 Handset hanger hook
2 DC IN 9V jack
3 TEL(telephone) LINE Jack
4 Antenna
5 (CONV/MEMO RECl (conversation/
memo recording) button and lamp (for
SPP-A60)
Press to record the conversation, or to
leave message to other people who use
the phone.
(MEMO REC) (recording) button and
lamp (for SPP<A40)
Press to leave messages to other people
who use the phone.
6 (TAPE RESET) button
Press to reset the tape (after playing back
messages).
7 Message counter LED
Displays the number of messages which
are not played back yet, etc.
8
8 (ANSWER) button and lamp
Press to turn the unit on to receive
messages or to play back messages.
9 (INTERCOM) button
Press to call the handset.
10 (SPEAKERPHONE) button and lamp
(SPP-A60oniy)
Press to receive calls at the base unit.
11 CHARGE lamp
Lights up when the battery pack is being
charged.
12 IN USE lamp
Lights up when the handset is in use.
13 Charge terminals
14 POWER lamp
Lights up when power is supplied to the
unit. Blinks when the batteries are either
exhausted or not installed.
<s
I
r
f
Page 10
Looking at Your Phone
I
I
<5
I
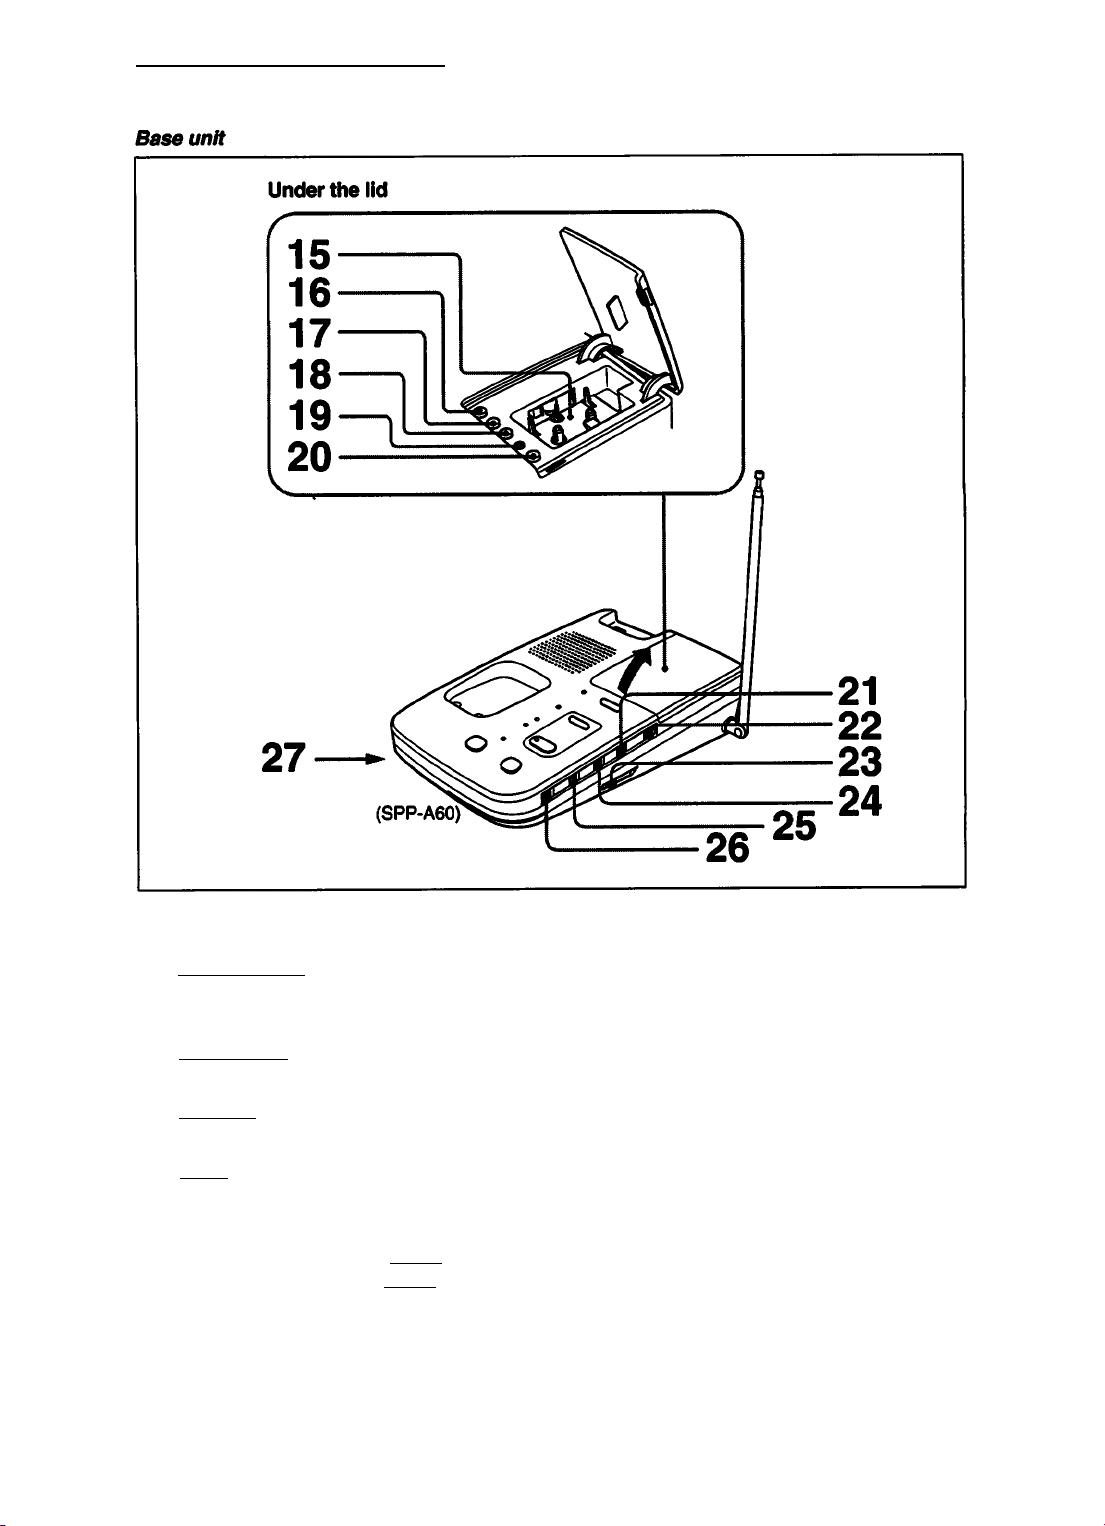
15 Microcassette compartment
16 iREPEAT/REW)frepeat/rewind) button
Press to play back the same message or
to rewind the tape.
17 (STOP/PLAY) button
Press to stop or play back the tape.
18 (SKIP/FF)fskip^ast forward) button
Press to advance the tape.
19 (REC) (recording) button
Press to record your outgoing message.
20 (OG^ (outgoing message) button
Press to record your outgoing message
after you have pressed (RECJ or press to
play back your outgoing message.
21 REC TIME (1/4/ANN ONLY) selector
Select the recording time for incoming
message.
22 RINGER LEVEL selector (HIGH/LOW/
OFF, SPP-A60 only)
Selects the ringer ievel of the base unit.
23 SPEAKER VOL (volume) control
24 RINGER SELECT (3/5n*S) switch
Vary the number of rings before the unit
answers to take a message.
25 CPC ON/OFF switch
Allows you to maximize the time
available on your tape.
26 DIAL MODE (PULSE/TONE) switch
10
27 MIC (microphone)
Page 11
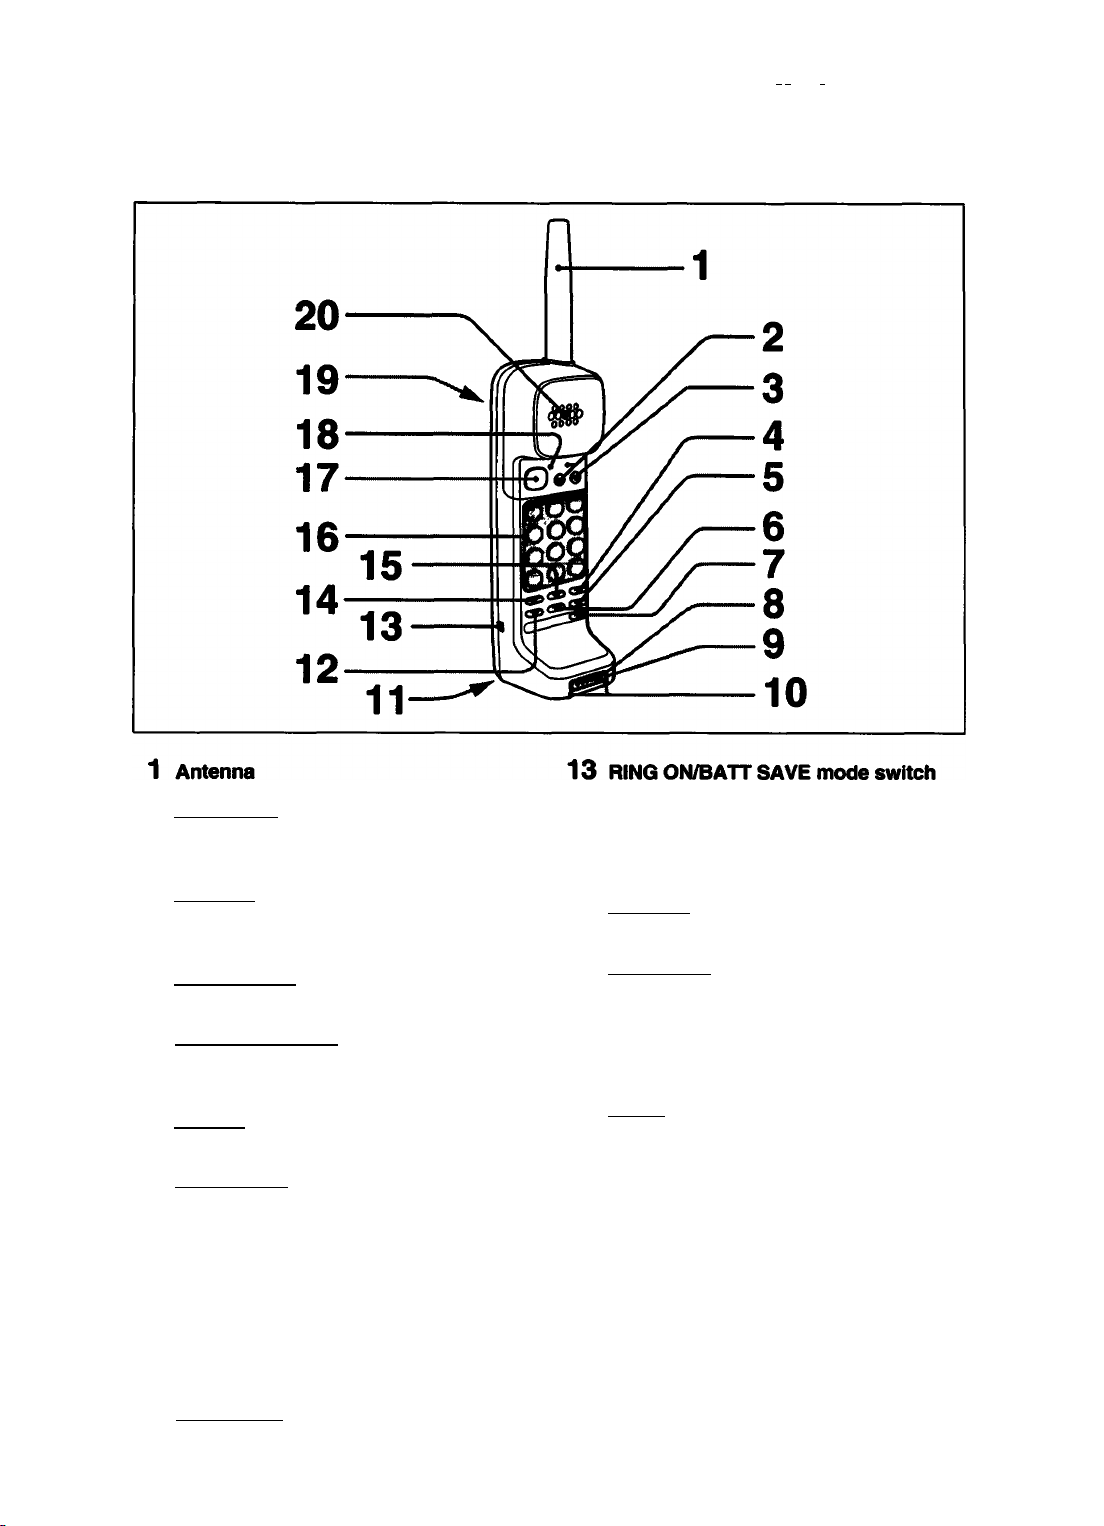
Handset
»MV-.*-:*
'^-*- *.*■’ «fc? V"/»»• -
"'¿.•urn*'""-'-
2 i REMOTE) button and lamp
Press to operate the answering machine
from the handset.
3 (FLASH) button
Accesses caii waiting (or gives you a
new diai tone).
4 (INTERCOM) button
Press to call the base unit.
5 (REDIAiyPAUSE) button
Redials the last number called/inserts a
pause.
6 (MUTE) button
Press to mute your voice.
7 (CHANNEL) button and lamp
Press to change the channel when
interference occurs.
8 Ringer speaker
9 Microphone
10 Charge terminals 11 Battery compartment (rear)
Select RING ON mode or ВАТТ SAVE
mode. The handset will not ring on eui
incoming call when set to BAIT SAVE
mode.
14 (RECALL)button
Press to access speed dialing numbers.
15 (CONV REC) (conversation recording)
button
Press to record the conversation.
16 Dialing keys/Remote operation
buttons
17 (TALK) button
Press to answer a call, access the dial
tone to make a call and hang up when a
call is finished.
18 TALK/BATT LOW lamp
Indicates that the phone is in use. Also
indicates low battery power by lighting
up every 3 seconds.
19 Directory sheet (rear)
20 Speaker
I
SI
f
I
12 (VOL/PGM)(volume/program) button
11
Page 12
I
I
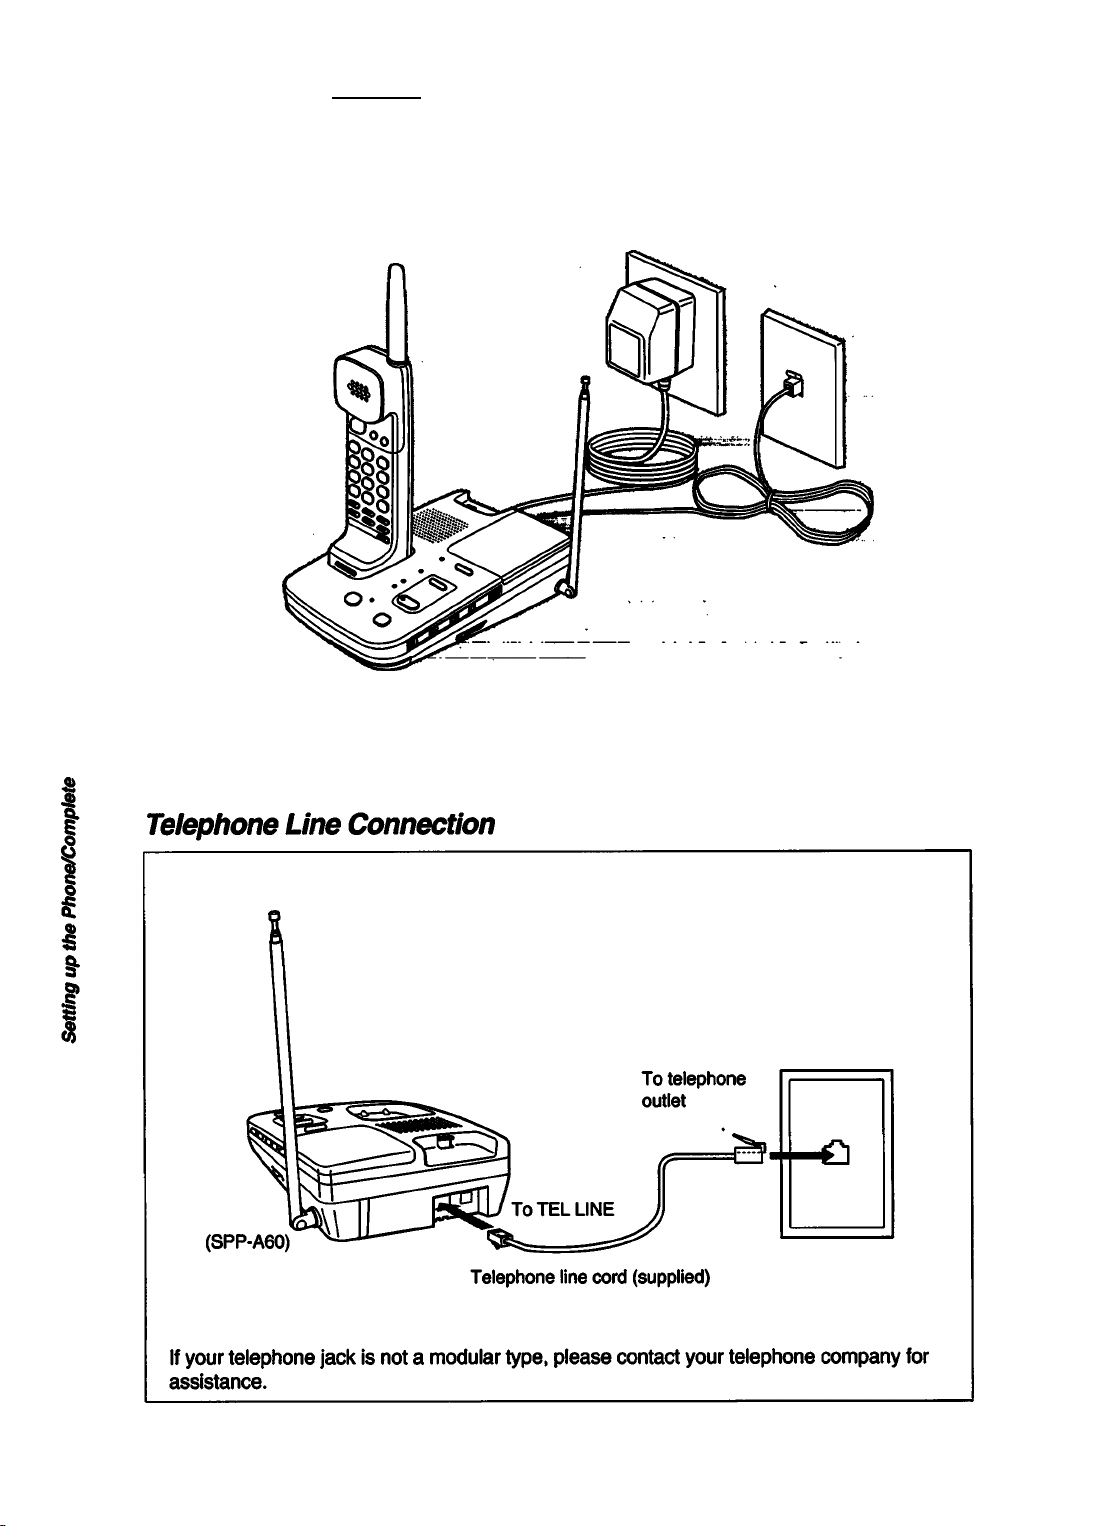
Setting up the Phone
Complete Set-up
Connect the AC power adaptor to continuous power supply.
(SPP-A60)
I
I
Clean the charge tenninals with a soft doth aiiout once a niKNith to ensure proper
chargir^.
12
Page 13
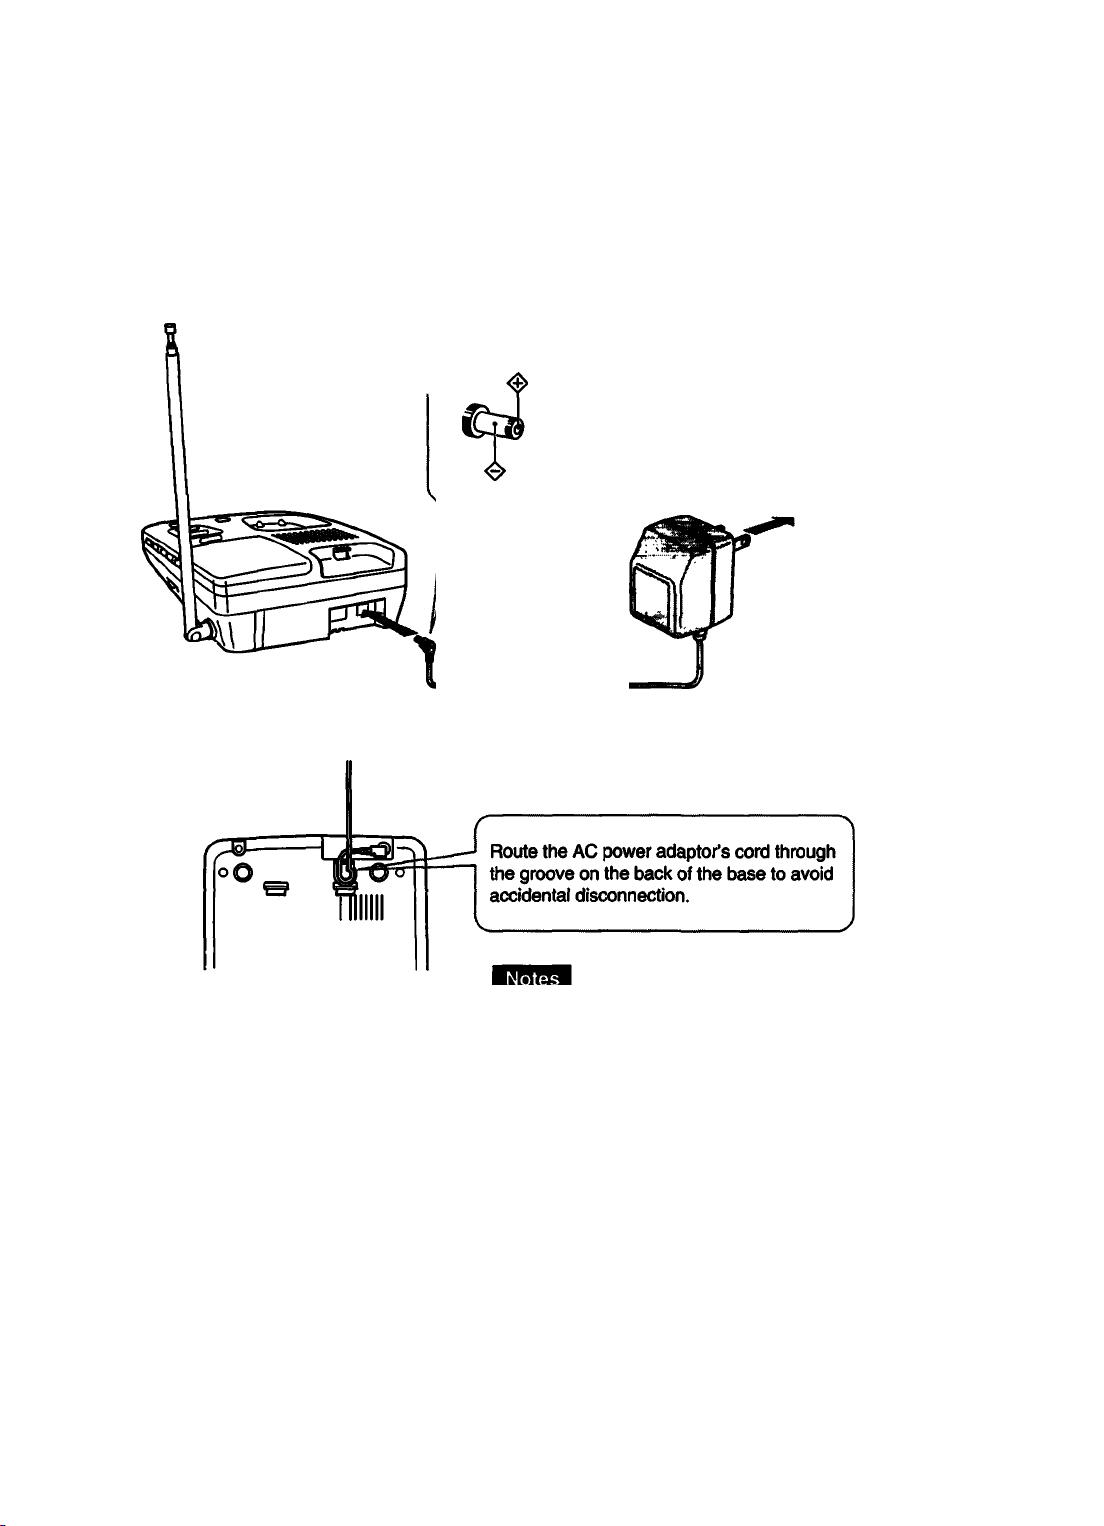
Power Connection
Extend the antenna fully
for best reception.
To wall outlet
(SPP-A60)
To DC IN 9V
AC power adaptor
(supplied)
> Connect the AC power adaptor to
continuous power supply.
If the telephone Is connected to a wall
outlet where power is cut off every night,
the back-up batteries will be exhausted
and the battery pack will not be charged.
The outgoing message, the number of
messages, ID code and current time will
be erased.
»The POWER lamp blinks when the
back-up batteries are either exhausted
or not installed.
> “P” indication blinks on the message
counter LED if the AC power failure
occurred when the back-up batteries
are either exhausted or not insteded.
Do not use any
other AC power
adaptor.
5
I
S
13
Page 14
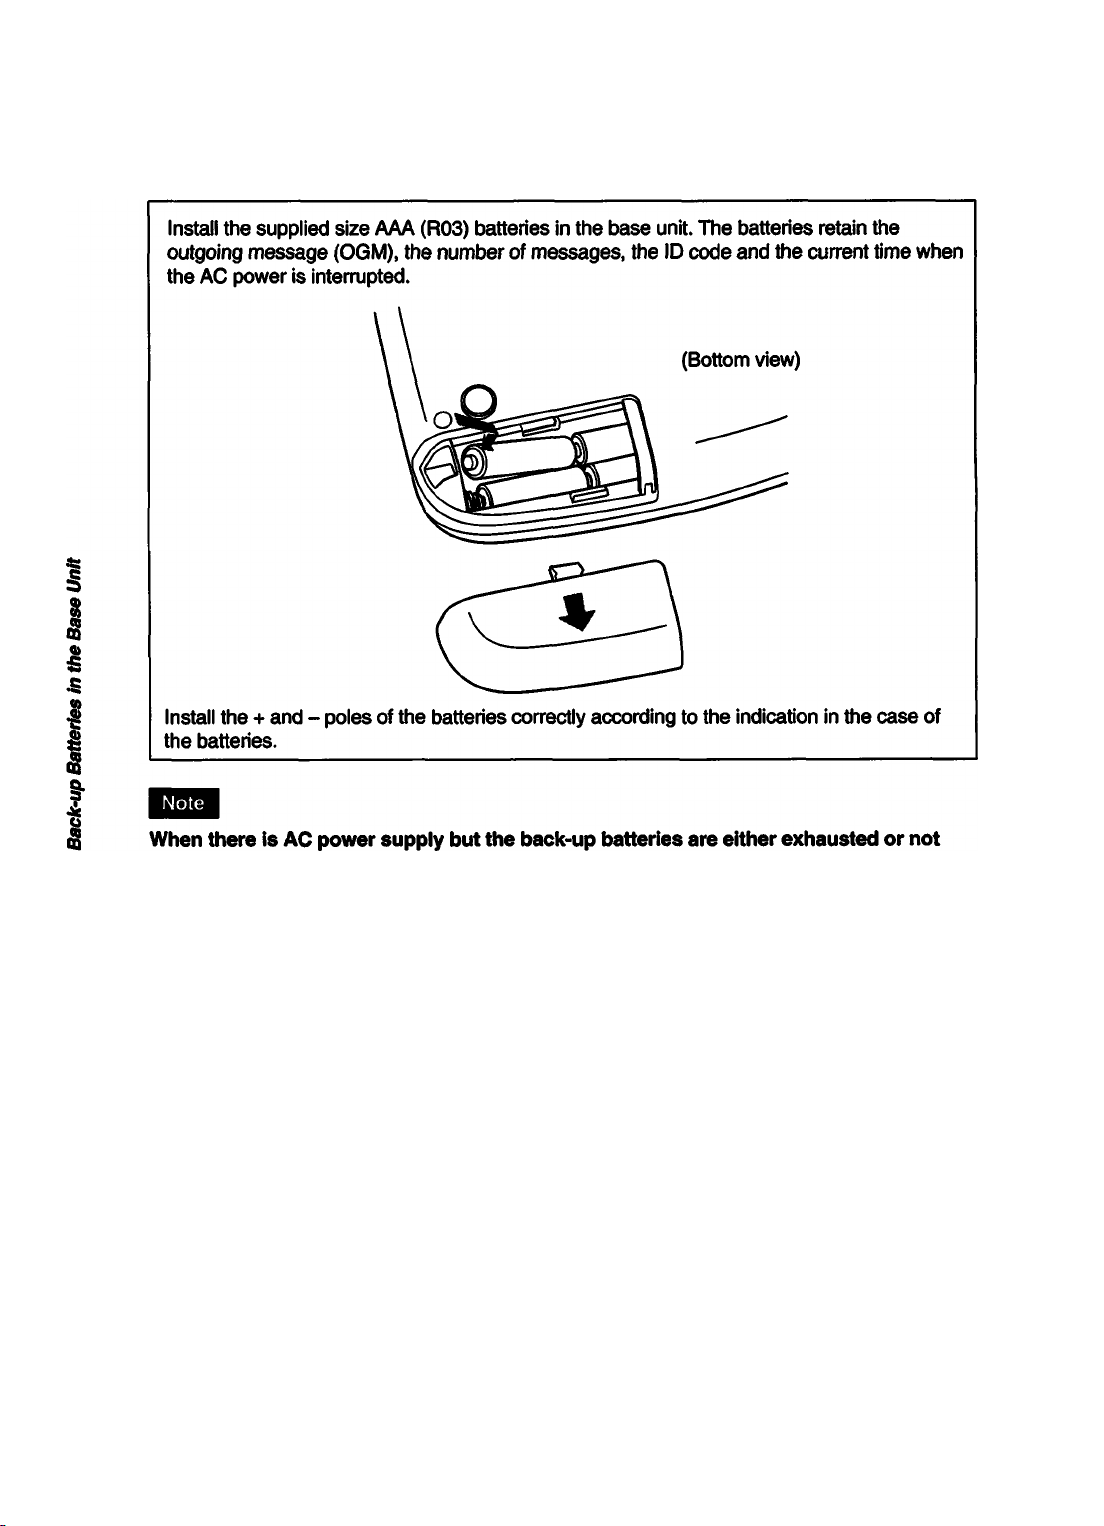
Setting up the Phone
Installing the Back-up Batteries in the Base Unit
installed:
The POWER lamp blinks as a warning. The telephone and answering machine will
operate normally. But the outgoing message, the number of messages, the ID code and
5
the current time will not be retained if a power interruption occurs.
When the back-up batteries are installed but there is no AC power supply:
The telephone and answering machine do not operate. During a power interruption, the
outgoing message, the number or messages, the ID code and the current time are kept in
memory for about 24 hours if the batteries are fresh.
14
Page 15
"3«fCSJ
'..'■;
•■’tr •
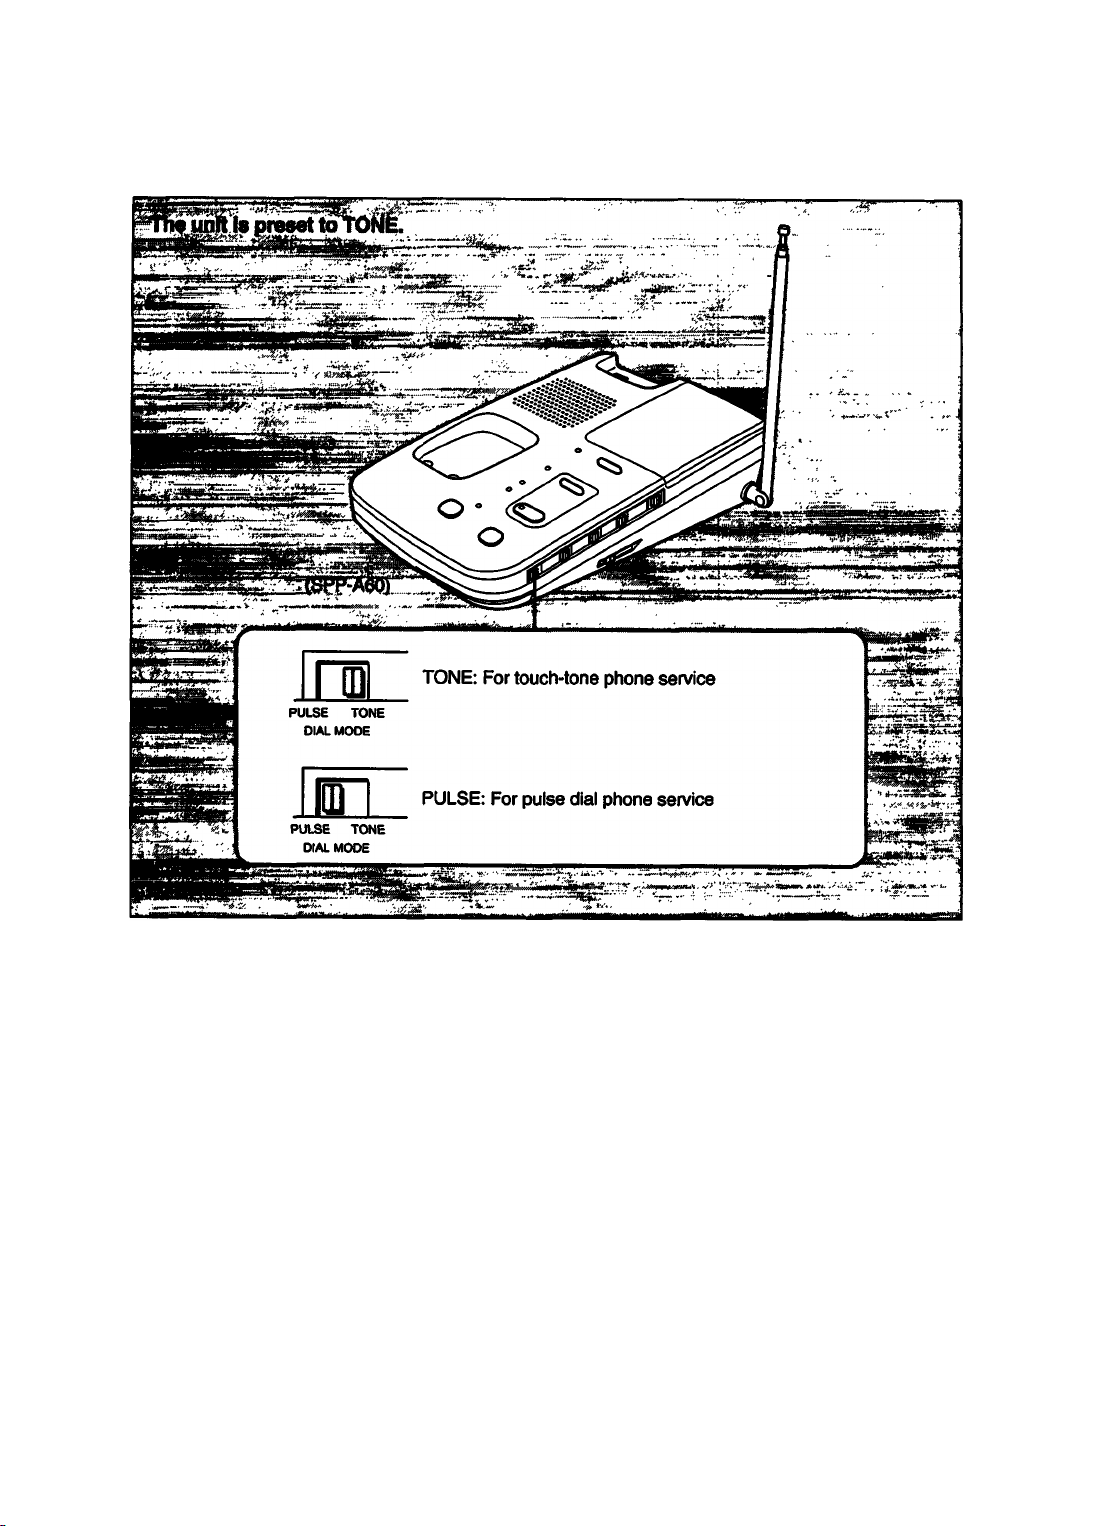
Selecting the DIAL MODE (pulse or tone)
"••WKy ■■"'■■ s\-
">pp
If you do not know which setting Is correct for your telephone line, check as follows.
1 Make sure the DIAL MODE switch located on the side of the base unit is set to TONE.
2 Make a trial call (See page 22).
3 If the call is connected, leave the switch at TONE. Otherwise, set the switch to PULSE.
i
I
15
Page 16
%
Setting up the Phone
Setting Other Selectors of the Base Unit
I
I
«
I
I
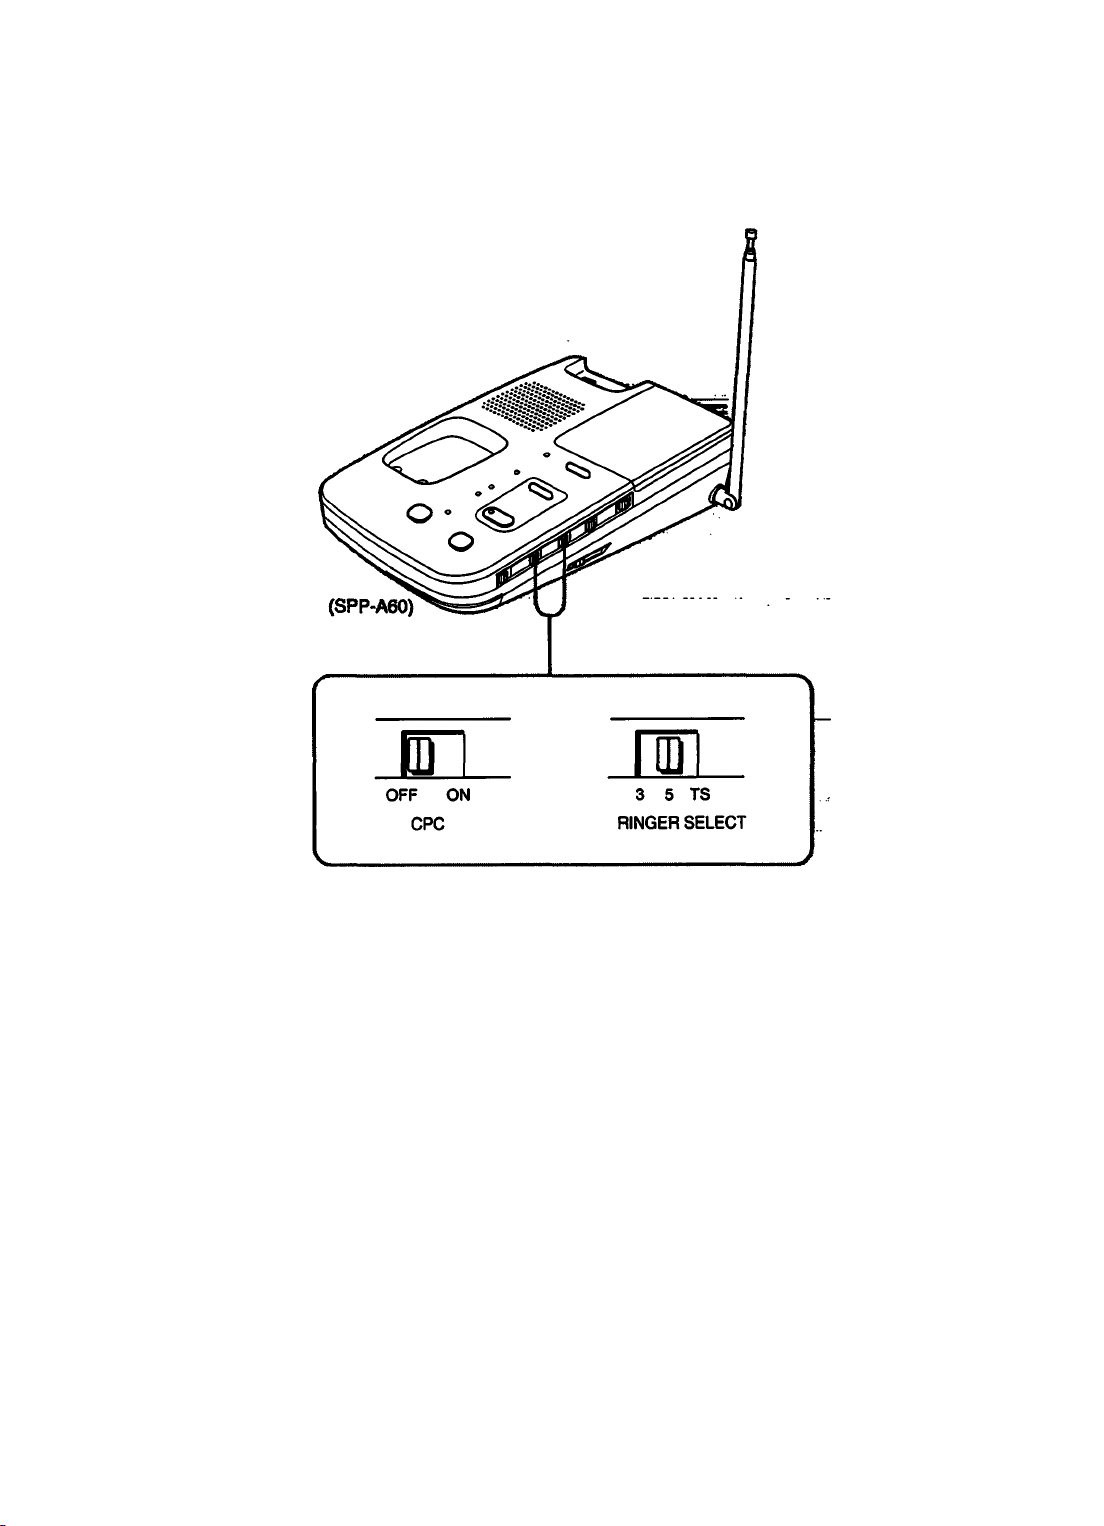
CPC (Calling Patty Control) ON/OFF switch
The CPC switch is useful to maximize the time available on your microcassette when using the
unit as the answering machine.
Set the CPC switch to
ON: To have the unit sense the hang-up click and stop recording immediately.
OFF: Not to have the unit sense the hang-up click. Some length of the dial tone may be
recorded after the caller hangs up.
If you subscribe to "call waiting service”, set the CPC switch to OFF. If it is set to ON, your
caller may be cut off midway while recording his/her message if another call comes in.
16
Page 17
tSКККККm
RINGER SELECT switch (Toll-Saver)
The RINGER SELECT switch allows you to vary the number of rings before the unit answers to
take a message.
Toll Saver allows you to determine if you have any messages by the number of rings before the
unit answers when using the remote operation.
Set the RINGER SELECT switch according to the following table.
PosKionj^ the switch Description
3 The unit always answers after 3 rings.
ynmiillglli
5
TS (Toll Saver)
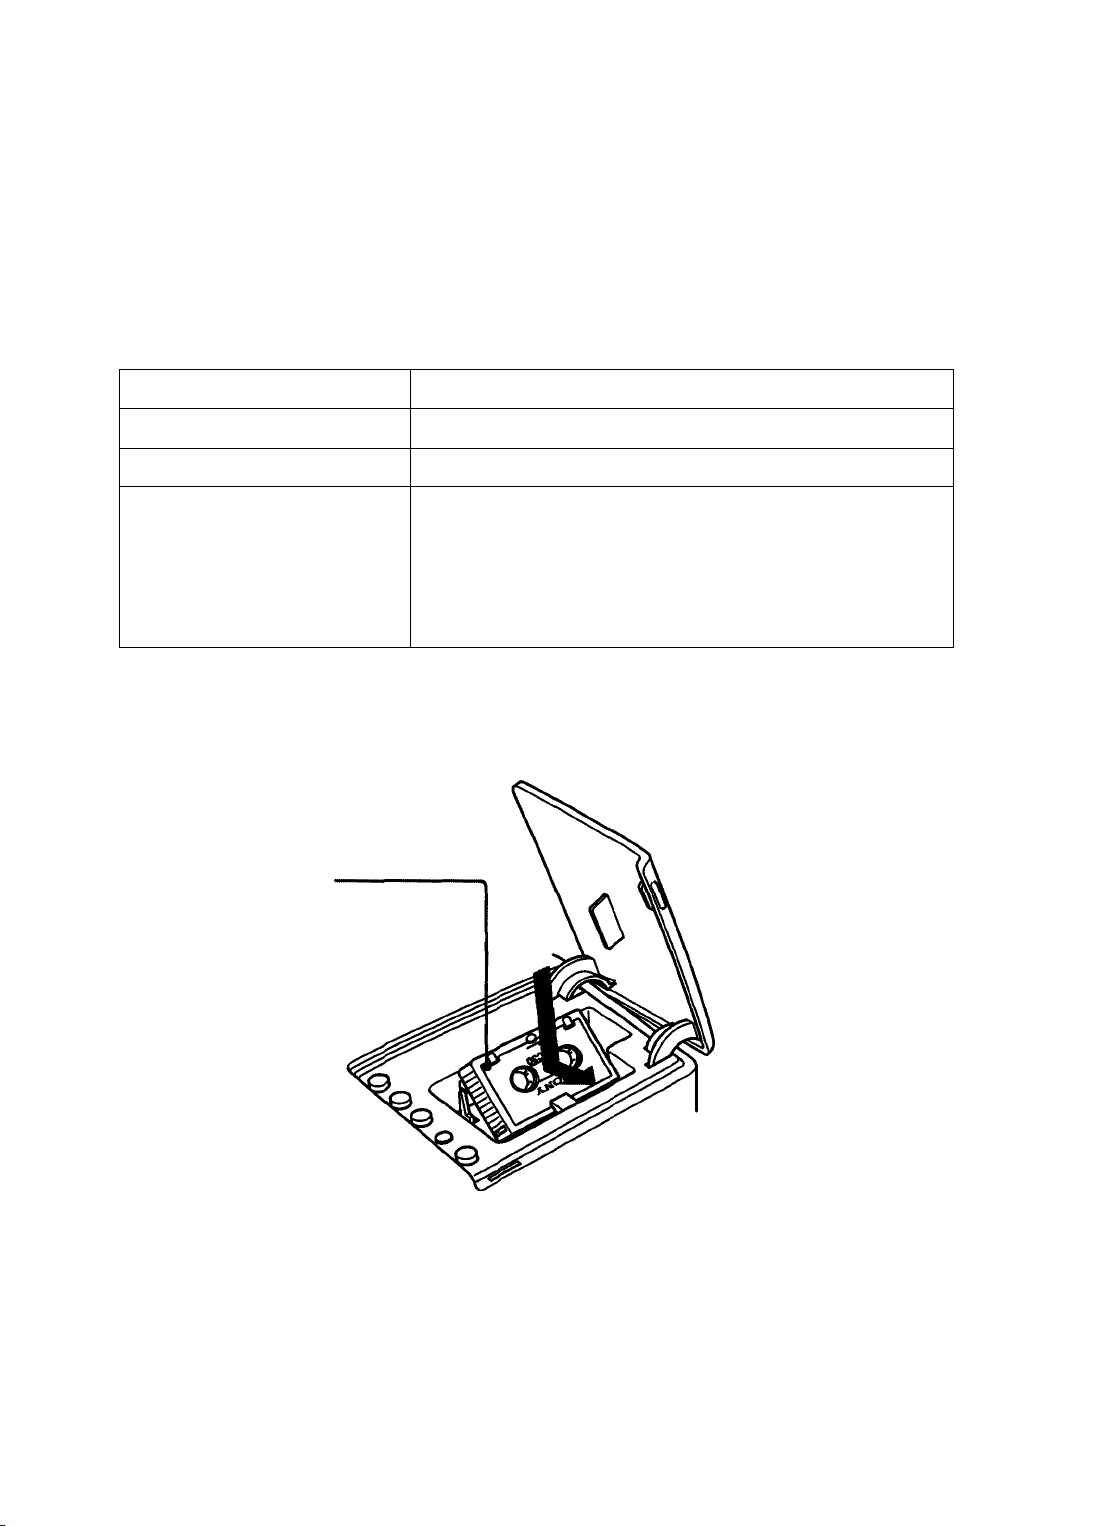
InstalUng the Microcassette
Make sure there is no slack in the tape.
Side for recording
The unit always answers after 5 rings.
If any new (non-played back) messages are recorded, the
unit answers after 3 rings. If no new messages are recorded,
the unit answers after 5 rings. When calling to retrieve your
messages remotely, you will know there are no new
messages when you hear the 4th ring, and hang up without
incurring the cost of the call.
I '
I
?
1 Open the lid.
2 Install the supplied microcassette in the microcassette compartment with the side for
recording facing up.
When you change to a new tape, we recommend a 30-minute microcassette, such as the Sony
MC30.
17
Page 18
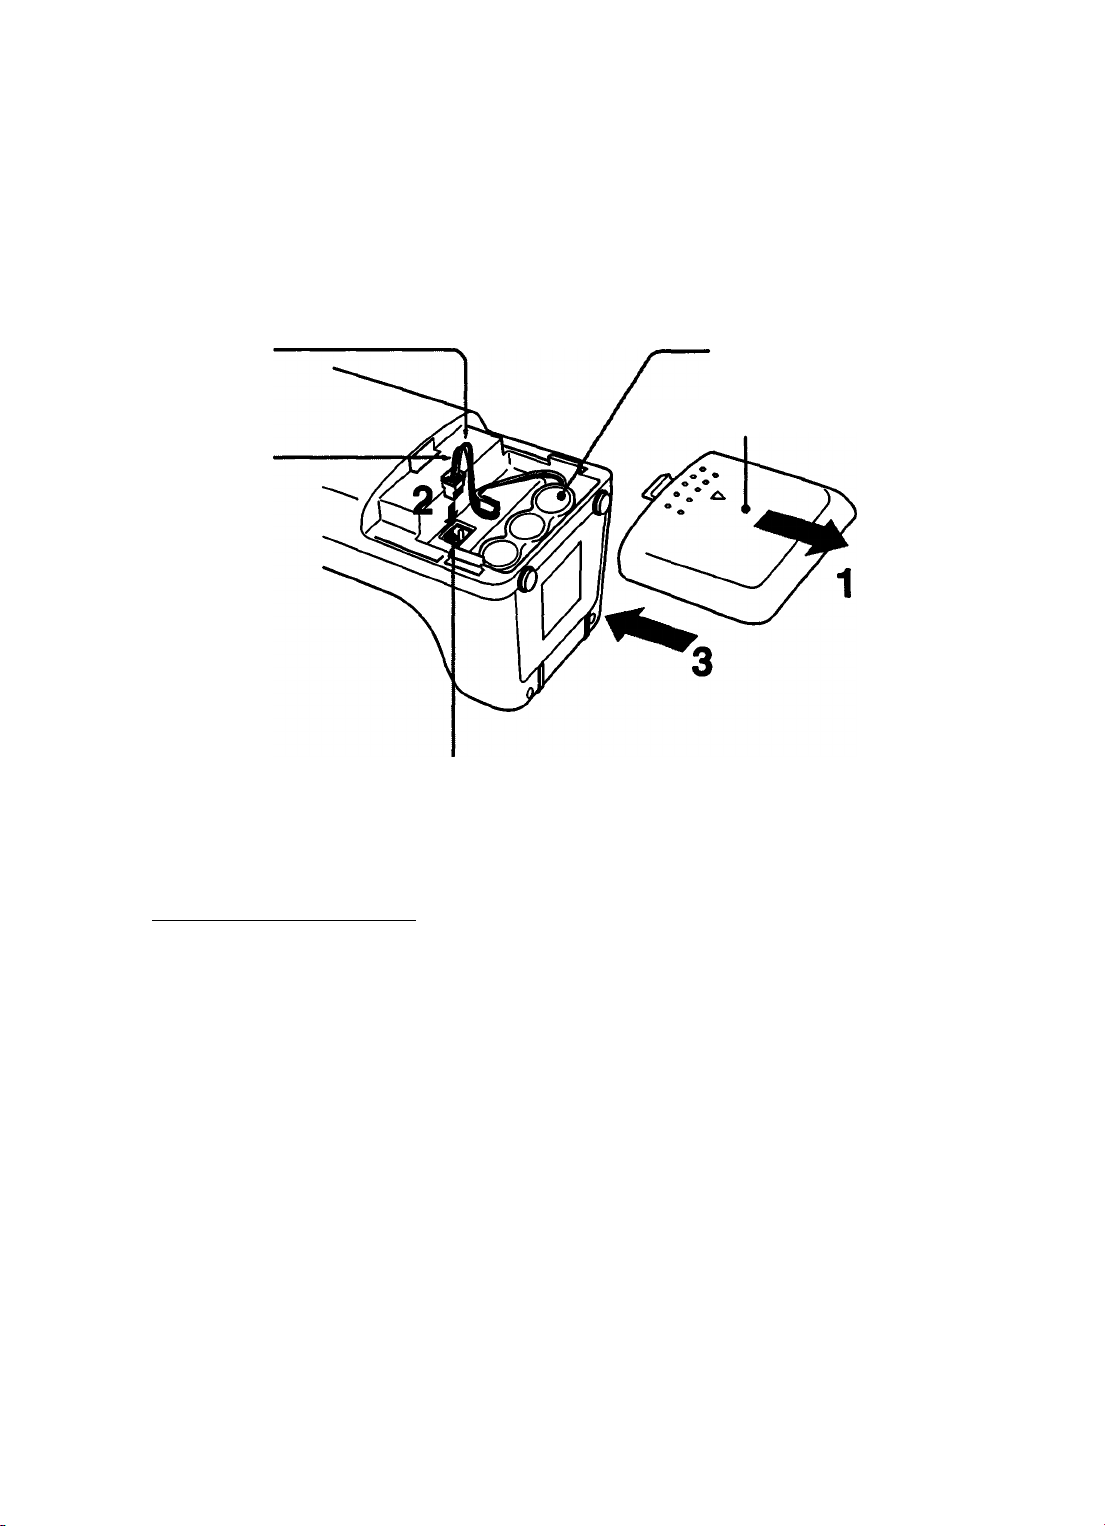
Charging the Battery Pack In the Handset
Before initial use, charge the supplied battery pack for more than 12 hours.
Handset
£
.S
I
t
I
a
Red
Battery compartment lid
Black
Jack
To charge tfie battery pack
1 Remove the battery compartment lid by pushing it downward. The battery pack is packed
separately in the carton box.
Battery pack
2 Place the battery pack in the battery compartment and connect the cord correctly to the jack
as shown on the above illustration.
3 Replace the battery compartment lid by pushing it upward.
4 Place the handset on the base unit and charge the battery pack for more than 12 hours.
The CHARGE lamp lights when the handset is properly seated onto the charge terminals of
the base unit.
18
Page 19
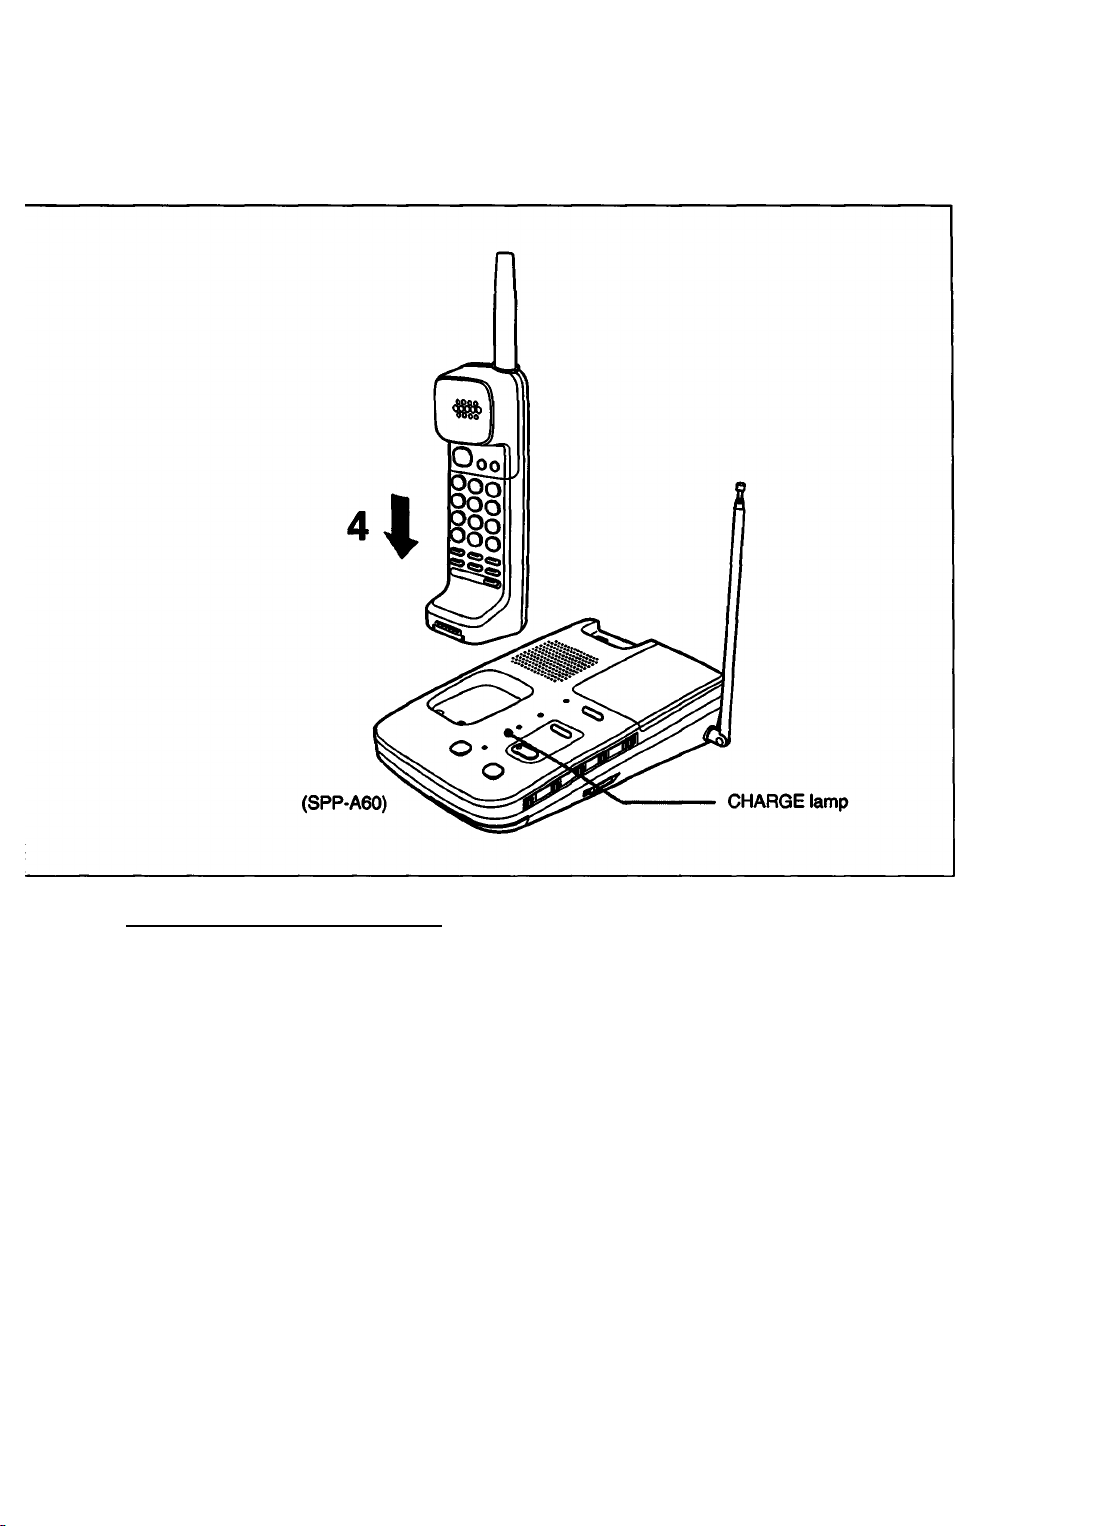
I
I
When to Charge the Battery Pack
As long as the handset is placed back on the base unit after each call, the battery pack will be
recharged continuously.
Battery duration
The battery duration is approximately 7 days in RING ON mode. If talking continuously on the
handset, the duration is approximately 7 hours.
If the handset battery becomes weak
A beep tone will be heard every 3 seconds while you are on the phone.
The call will be disconnected after one minute.
Battery life
Replace the battery pack with a new one when the operating time of the completely charged
battery pack has noticeably shortened.
(Contact your dealer or a Sony Senrice Center for battery replacement.)
If the handset battery is completely discharged, the digital security code will be erased and all
programmed numbers will be lost from memory. Charging the handset battery on the base unit
with handset in RING ON mode will restore the security code. (See page 46 for more
information about the digital security code.)
I
19
Page 20
I
Setting the Current Time
Set the current day of the week and the time before using this phone. Once you set them, the
unit will record the day and time of each incoming message.
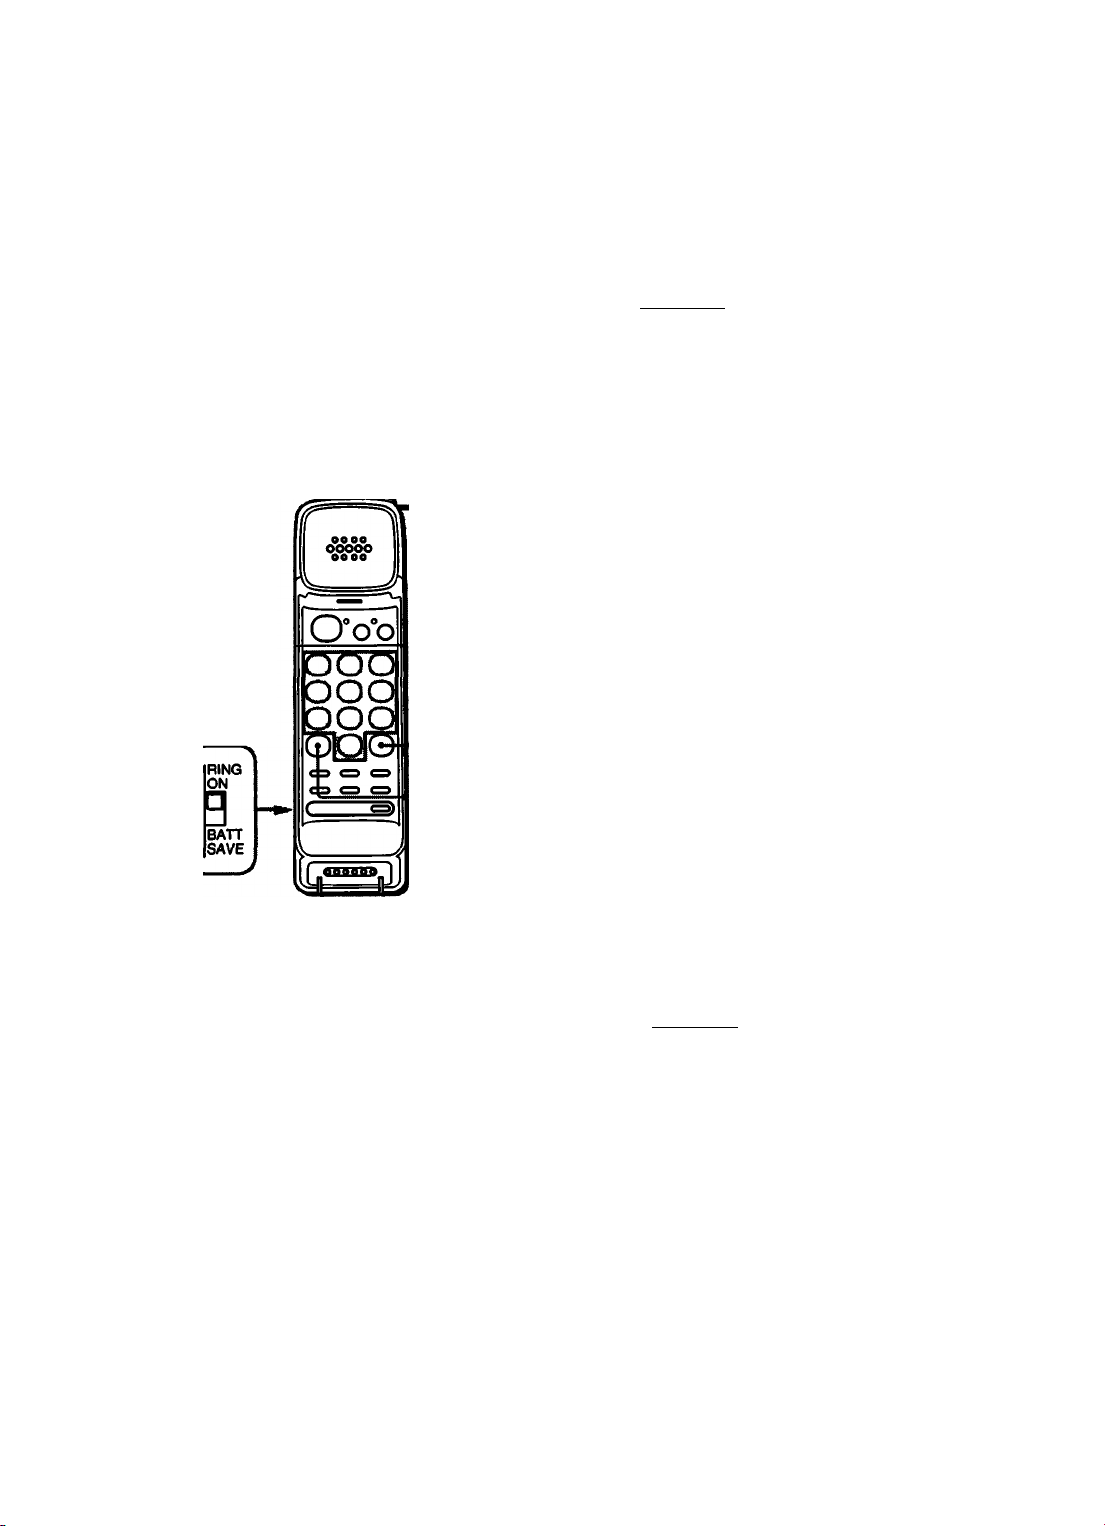
Make sure that the mode switch is set to the
RING ON position.
Press (REMOTE).
1
The REMOTE lamp lights up.
2 Press (#).
3 The keys ® to 0 correspond to the days
of the week as follows. Press the
corresponding key.
© Sunday © Monday © Tuesday
© Wednesday ® Thursday ® Friday
© Saturday
If you press a wrong key, try again from
step 1.
4 Press the dialing keys according to the
current time.
For single digit hour, be sure to press ®
first
MODE switch
•CD
If you press a wrong key, try again from
step 1.
I
•CD
5 Press (*) for AM or (¥) for PM.
You will hear a long confirmation beep
from the handset ringer. The current time
you set will be heard from the base unit
speaker and the handset speaker for
confirmation.
If you press a wrong key, try again from
step 1.
Press (REMOTE) to end operation.
The REMOTE lamp goes off.
Example
Current time Thursday 6:45 PM
Keys to press ® ® ® © ® (#)
20
Page 21

To check the current time
1 Press (REMOTE).
The REMOTE lamp lights up.
2 Press®.
You will hear a long confirmation beep,
and then the present day of the week and
the time anounced.
Press (REMOTE) to end operation.
The REMOTE lamp goes off.
• If 2 minutes elapse while performing steps 2 to 5,
the operation is canceled. Try again from step 1.
• When the power is connected, Sunday, 12:00
AM is set and the built-in clock starts operation.
If you press ® to check the current time without
setting the time, a time which is not the current
time will be announced.
• if a power interruption occurs when the back-up
batteries are either exhausted or not installed, the
current time will be erased. In this case, set the
current time again.
I
&
21
Page 22
Using as a Telephone
Making Calls
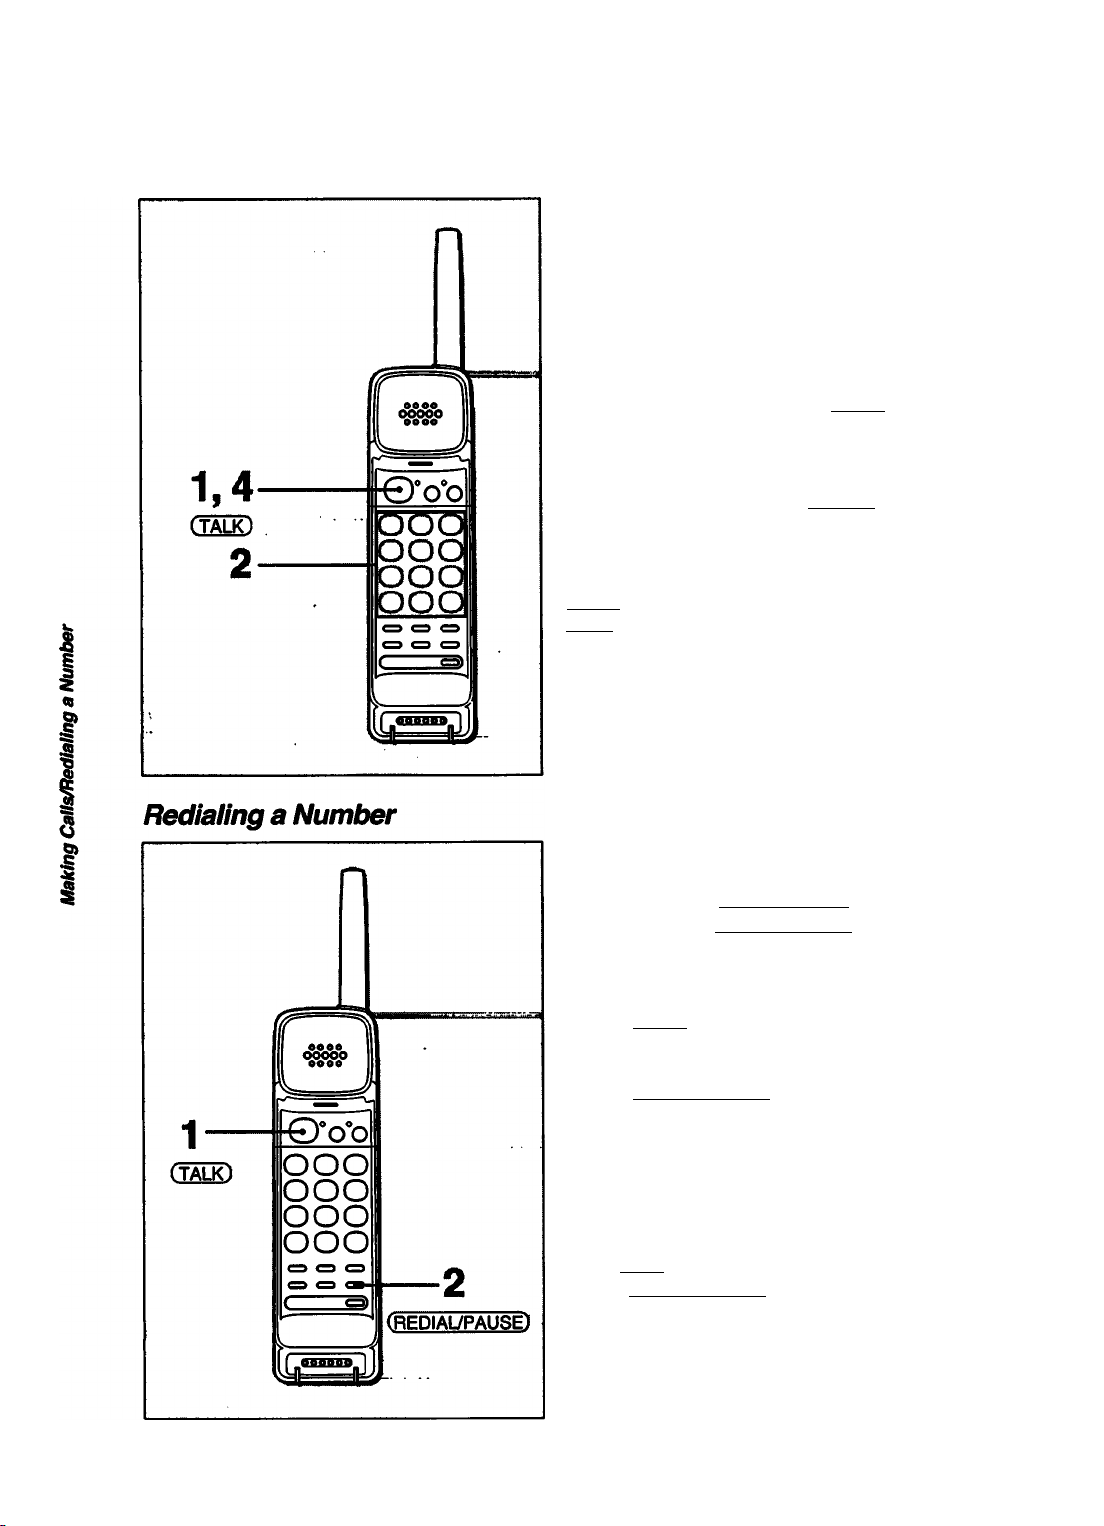
1 Press
The TALK lamp lights up. Confirm the dial
tone.
2 Dial the number.
Talk when your party answers.
3
When you have finished, press (TALK)
4
again or replace the handset on the base
unit to disconnect.
The TALK lamp goes off.
To make another call, press (FLASH) and
dial again.
If interference noise occurs when you press
(TALK), three short alarm beeps or five short
error beeps will sound. In this case, bring the
handset closer to the base unit.
If the line is busy when you call someone, or
you want to call someone you just called,
there is no need to dial the number again
manually. Pressing (REDIAL/PAUSE)
automatically redials the most recently dialed
number.
1 Press (TALK).
The TALK lamp lights up.
2 Press (REDIAL/PAUSE) instead of dialing
the number.
You can redial a phone number of up to 32 digits.
To keep the last number dialed
confidential
Press (REDIAL/PAUSE) twice as soon as
you finish the call. This will erase the redial
memory.
___________
22
Page 23
Receiving Caiis
Ringer mode setting
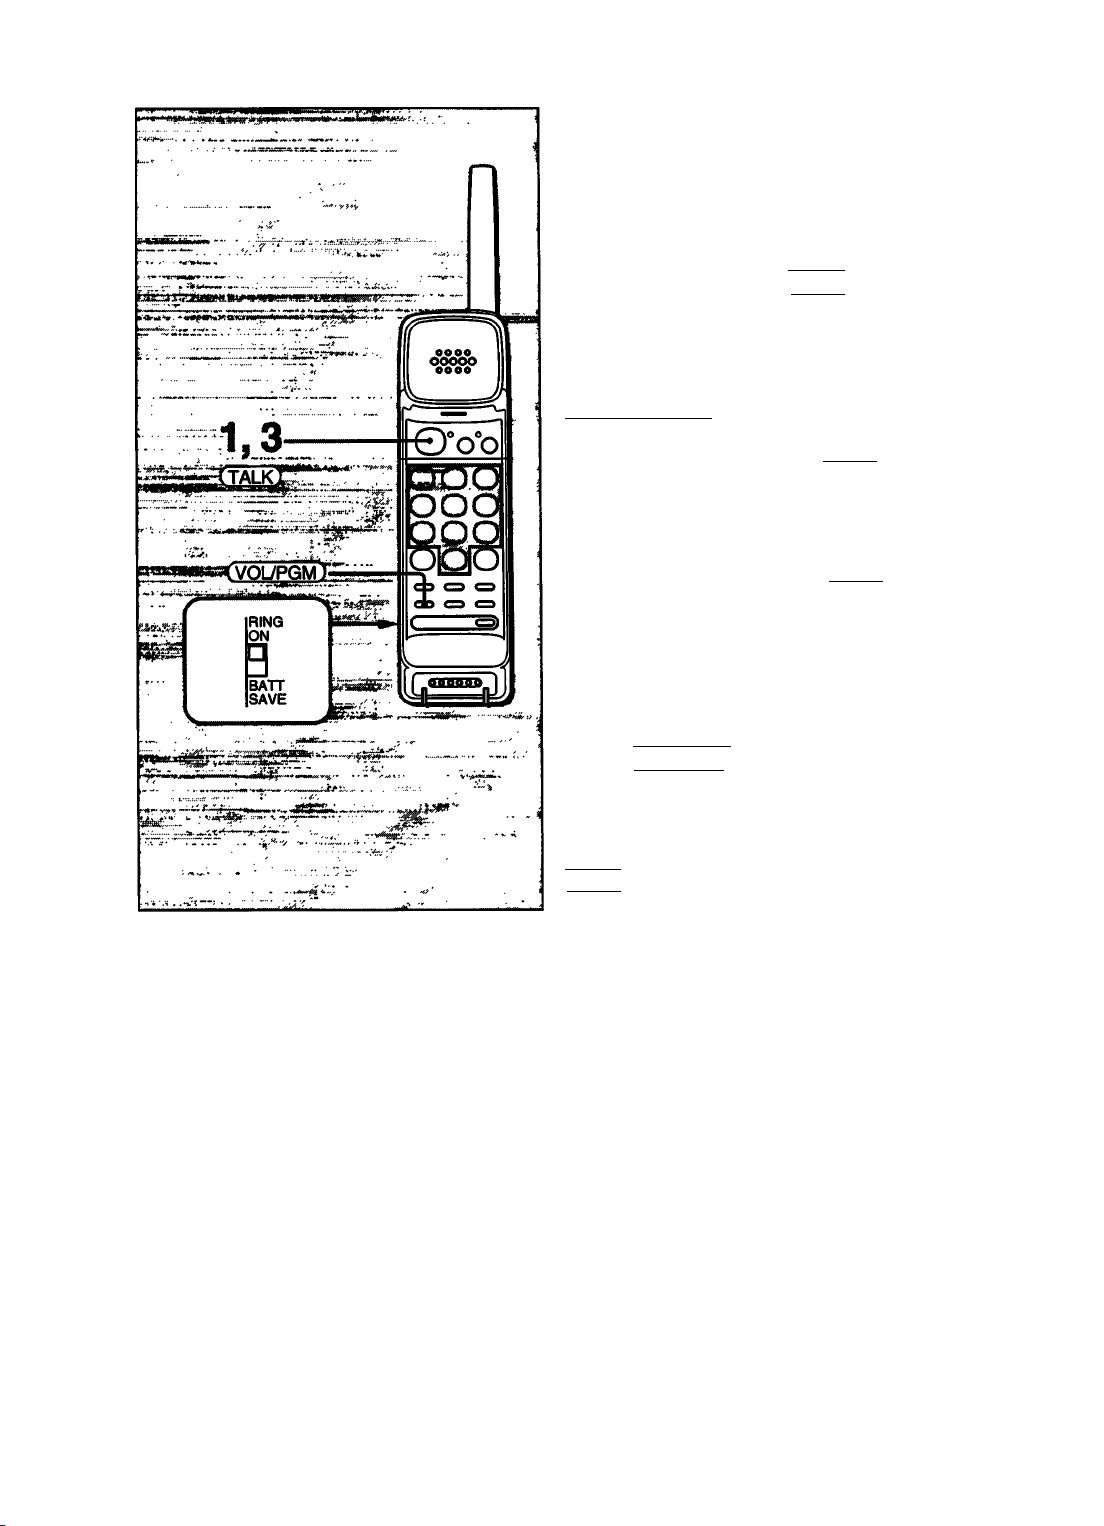
Select either RING ON mode or ВАТТ SAVE
mode using the MODE switch.
RING ON: Normal standby mode. The
handset will ring on an incoming cali.
ВАТТ (battery) SAVE: Prolongs the battery
duration. You can stili make or receive
caiis by simply pressing (TALK).
THE HANDSET WILL NOT RING ON AN
INCOMING CALL WHEN SET TO THE
BATTERY SAVE MODE.
Receiving Calls
When you hear the ring, press (TALK).
1
The TALK lamp lights up.
________________
2 Speak into the microphone.
3 When you have finished, press (TALK)
again or replace the handset on the base
unit to disconnect.
To adjust the volume level of the handset
Adjust the volume of incoming calls through
the handset during conversation. High or low
volume can be alternately selected by
pressing (VOL/PGM).
If you are too far away from the base unit or
there is excessive interference when you press
(TALK), three short aiarm beeps or five short
error beeps wili sound. In this case, bring the
handset closer to the base unit.
w--..»
23
Page 24
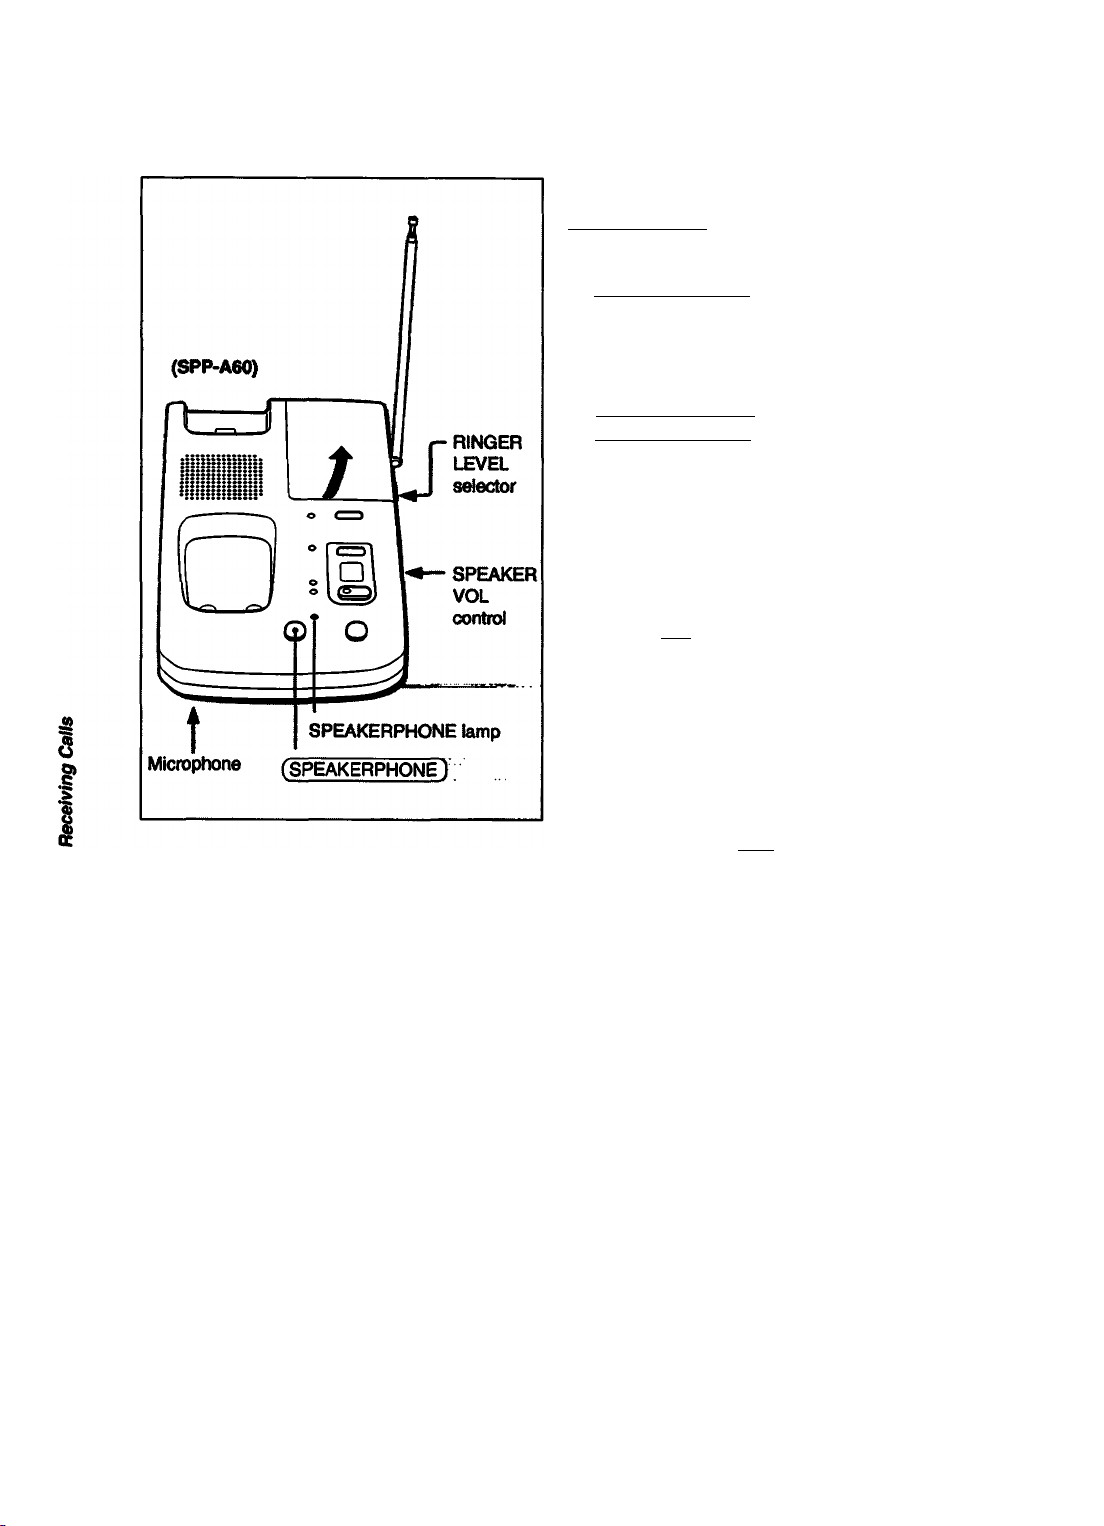
Using as a Telephone
Receiving caiis on the base unit (SPP-A60only)
_______________
1 When you hear the ring, press
(SPEAKERPHONE).
The SPEAKERPHONE lamp lights up.
2 Speak into the base unit.
3 When you are finished, press
(SPEAKERPHONE)again. The
SPEAKERPHONE lamp goes off.
To adjust the volume of the base unit
speaker
Use the SPEAKER VOL control.
SPEAKER VOL
\~m
To adjust the ringer sound level
Select HIGH, LOW or OFF by using the
RINGER LEVEL selector of the base unit.
nn~i
OFF LOW HIGH
RINGER LEVEL
The handset rings even if the RINGER LEVEL
selector of the base unit is set to OFF.
For the best speakerphone results
• You may not be able to hear the other
person’s voice in a noisy place. Use the
speakerphone in a quiet room.
• Do not bring your hand or other object too
dose to the microhpne. This will result in a
shrill noise (howling).
• When speaker volume is loud, or the
telephone has been placed close to a wall,
you may find that the volume drops
suddenly. This is due to a circuit in the
telephone designed to protect against
howling. In such cases, lower the volume
slightly.
24
Page 25
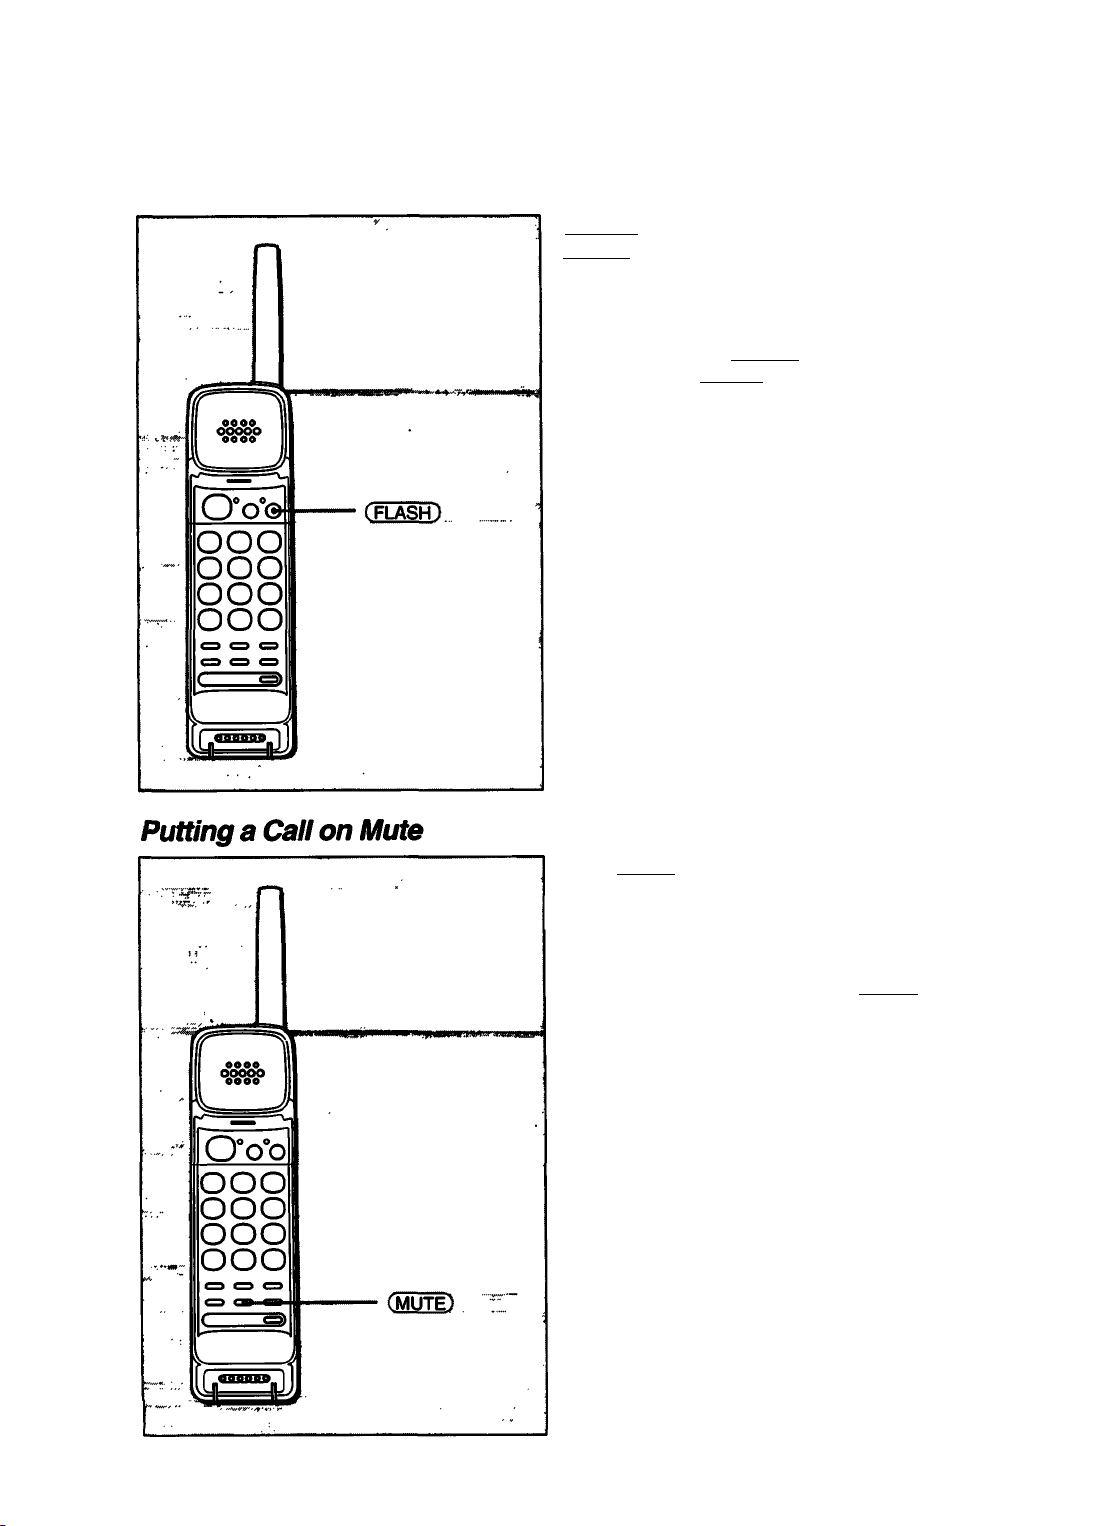
Using Call Waiting and FLASH
If you subscribe to “call waiting service”, press
(FLASH) to switch from one party to the
other.
If you do not have this service, the line will be
disconnected when CFLASH) is pressed.
I
i
i
I
I
£
Press [MUTE] during conversation.
The TALK lamp blinks.
You can hear the other party but the other
party cannot hear you.
To resume conversation, press [MUTE)
again.
The TALK lamp lights up.
s
I
at
I
§
PFi
Page 26
Using as a Telephone
Changing Channels for Better Reception
f
oooo
J
—
------^----------
O'o'o
OOO
OOO
OOO
OOO
o C3 a
s a C3
t
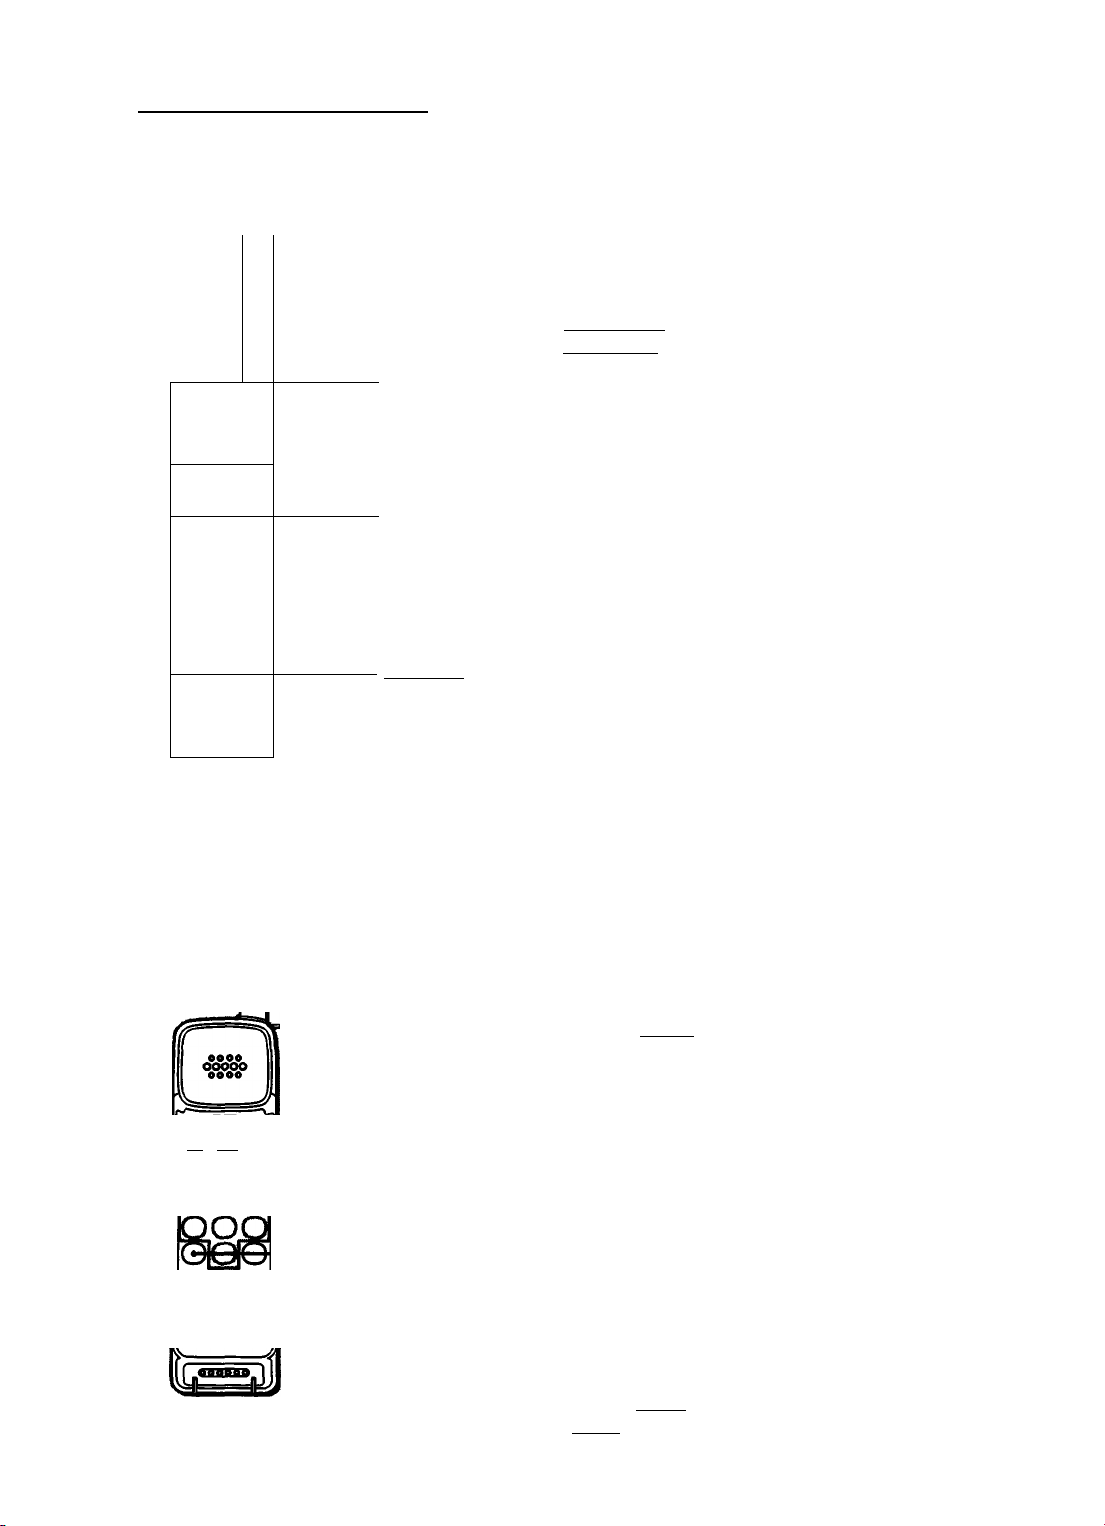
(CHANNEL}.
When you hear interference noise during
conversation on the handset, try bringing the
handset closer to the base unit.
If interference still persists, press
{CHANNEL) of the handset to select an
alternative channel.
The channel lamp blinks, and lights up when
the channel has changed.
• If you tty to change the channel when the
handset is too far fronn the base unit, five short
error beeps will sound and the channel cannot be
changed.
• In this case, bring the handset closer to the base
unit and try again.
!
I
ca
I
s
I
I
?
I
I
Using Your Long-distance Service
0"O^O
OOO
bod
26
t (SEE)
2
’3®crON^
Some services, such as MCI, Sprint and other
“alternative long-distance" companies, may
require the distinct tones generated by a
touch-tone phone. If you have pulse-dial
service, you can still access these senrices
through a process called “mixed dialing”.
1 Press (TÁOD.
2 Dial the access number of the service you
want to use.
3 After you are connected to the service,
press ® (TONE).
This switches your phone temporarily to
emit tone signals.
4 Dial the long-distance number when
instructed by the long-distance company.
> The above procedure is a typical example.
Actual sequences will vary according to the
service you are using.
> The tone mode is canceled when you press
(TALK). You must press the(*) (TONE) each
time you use “mixed dieiling”.
Page 27
Using the Phone as an Intercom
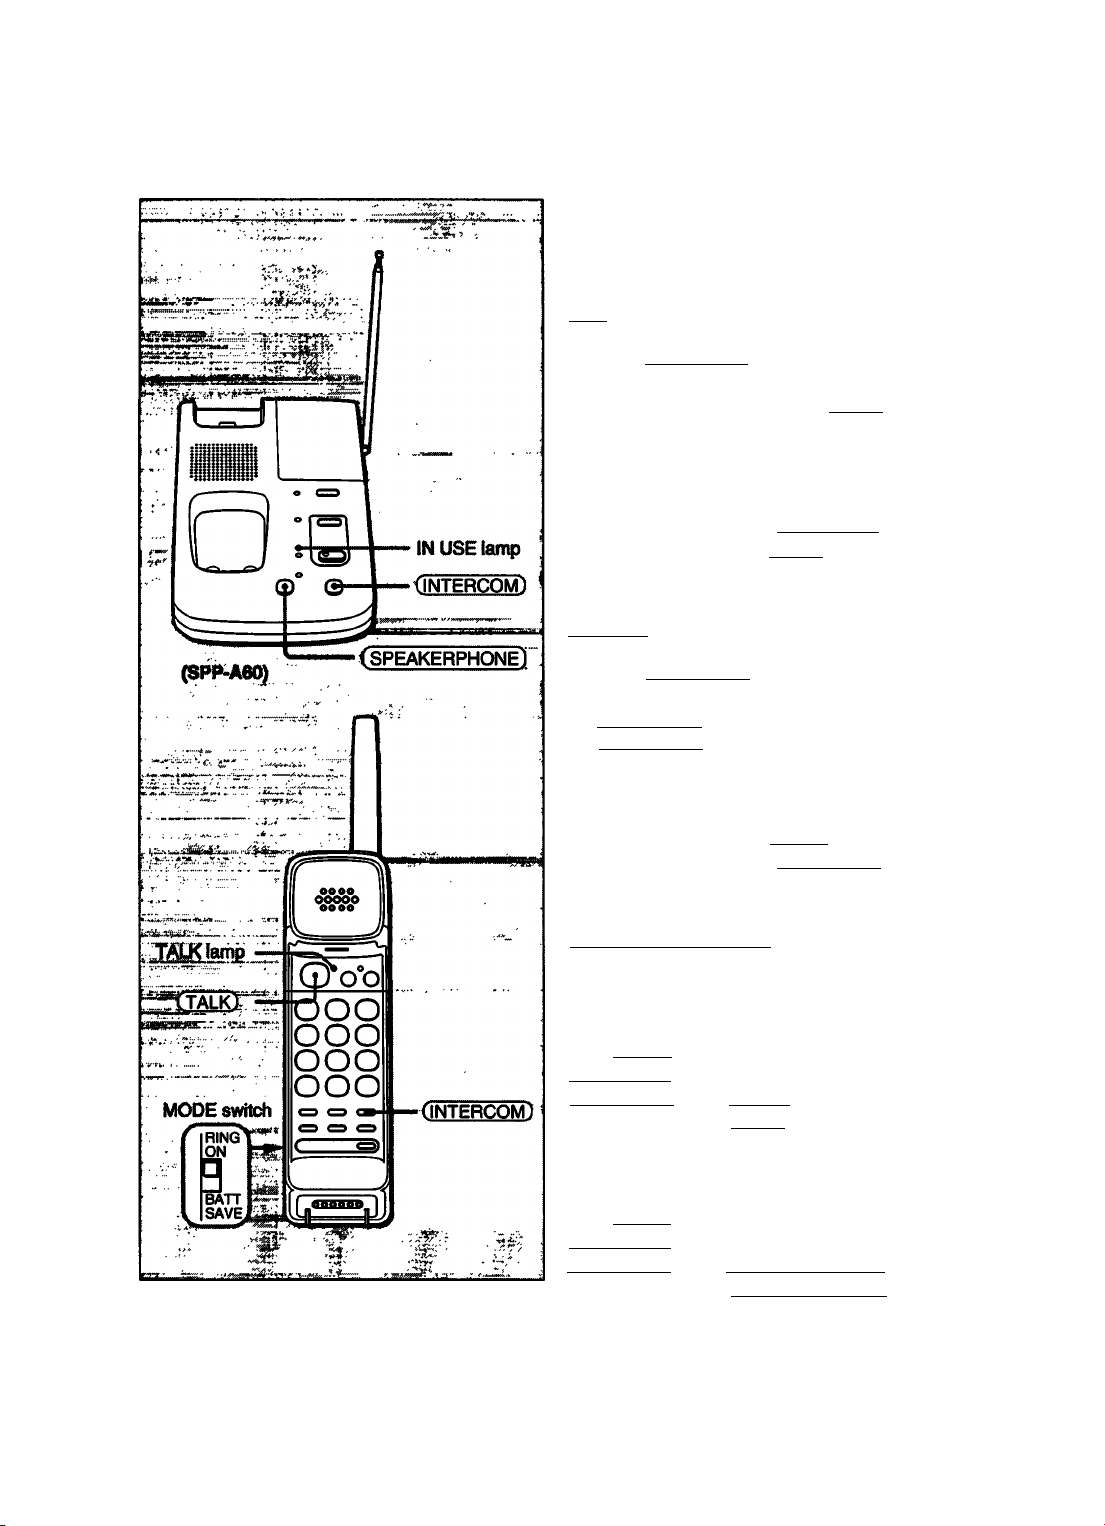
Make sure that the MODE switch on the
handset is set to the RING ON position.
To Call the Handset from tfie Base
Unit_______________________
1 Press (iNTERCOM) on the base unit.
2 When the handset rings, press [TALK),
and communication between the base unit
and the handset starts.
3 To disconnect
On the base unit: Press (iNTERCOM].
On the handset: Press (TALK).
To Call the Base Unit from the Handset
_____________________
1 Press (INTERCOM) on the handset.
"7^
§
2 When the base unit rings, press
(INTERCOM), and the communication
between the base unit and handset starts.
3 To disconnect
On the handset: Press (TALK).
On the base unit: Press (INTERCOM)
If You Receive an Incoming Call while Using Intercom
When a call comes in, you hear the incoming
ring from handset and the base unit speaker.
To answer the call on the handset
Press (TALK) on the handset or
(INTERCOM) on the base unit to disconnect
intercom. Then press (TALK) on the handset
to receive the incoming call.
To answer the call on the base unit
(SPP-A60only)
Press (TALK) on the handset or
(INTERCOM) on the base unit to disconnect
intercom. Then press (SPEAKERPHONE)
on the base unit to receive the incoming call.
_____________
I
SI
3
You cannot use the phone as an intercom when
the telephone line is engaged.
27
Page 28
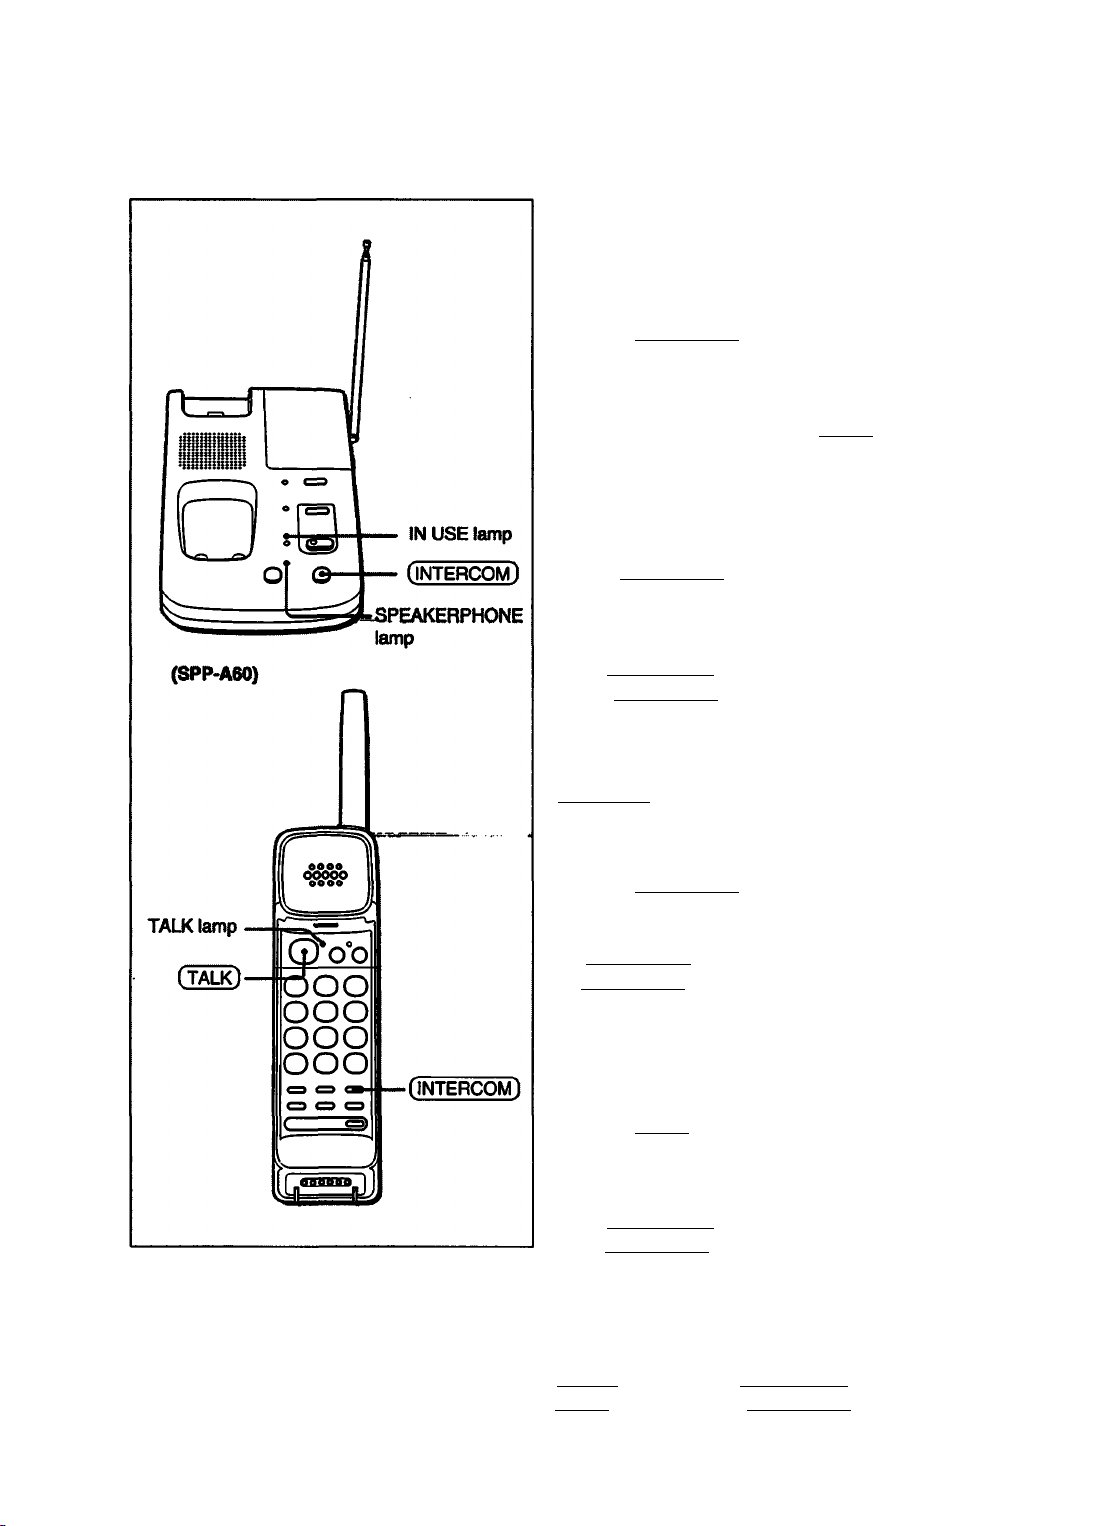
I
I
I
I
9
I
Ç
Using as a Telephone
Transferring Calls Betvveen the Base Unit said the Handset (spp-aso onty)
To Transfer from the Base Unit to
the Handset
1 Ask your party to wait.
2 Press (INTERCOM) on the base unit.
The call will be put on hold and the
SPEAKERPHONE lamp will blink.
3 When the handset rings, press (TALK).
The IN USE lamp will light up.
4 You can speak between the base unit and
the handset.
5 Press (INTERCOM) on the base unit.
The call will be transferred to the handset.
The SPEAKERPHONE lamp will go off.
If no one answers at the handset
Press (INTERCOM) on the base unit again.
You can talk with your party again.
To Transfer from the Handset to the
Base Unit
1 Ask your party to wait.
____________________
iS
OQ
I
I
s
2 Press (INTERCOM) on the handset.
The call will be put on hold.
3 When the base unit rings, press
(INTERCOM) on the base unit.
The SPEAKERPHONE lamp will blink.
4 You can speak between the handset and
the base unit.
5 Press (TALK) on the handset again.
The call will be transferred to the base unit
and the SPEAKERPHONE lamp will light up.
If no one answers at the base unit
Press (INTERCOM) on the handset again.
You can talk with your party again.
When transferring from the handset to the
base unit, the call will be disconnected if
(TALK) is pressed before (INTERCOM) on
the base unit is pressed.
28
Page 29
Memory Dialing
You can program up to 10 frequently called
numbers into memory for speed dialing ((§) to
(D).
You can program a phone number of up to 16
digits for each speed dialing location. (A
(JDi^ and (REDiAL/PAUSE) are each
counted as one digit.)
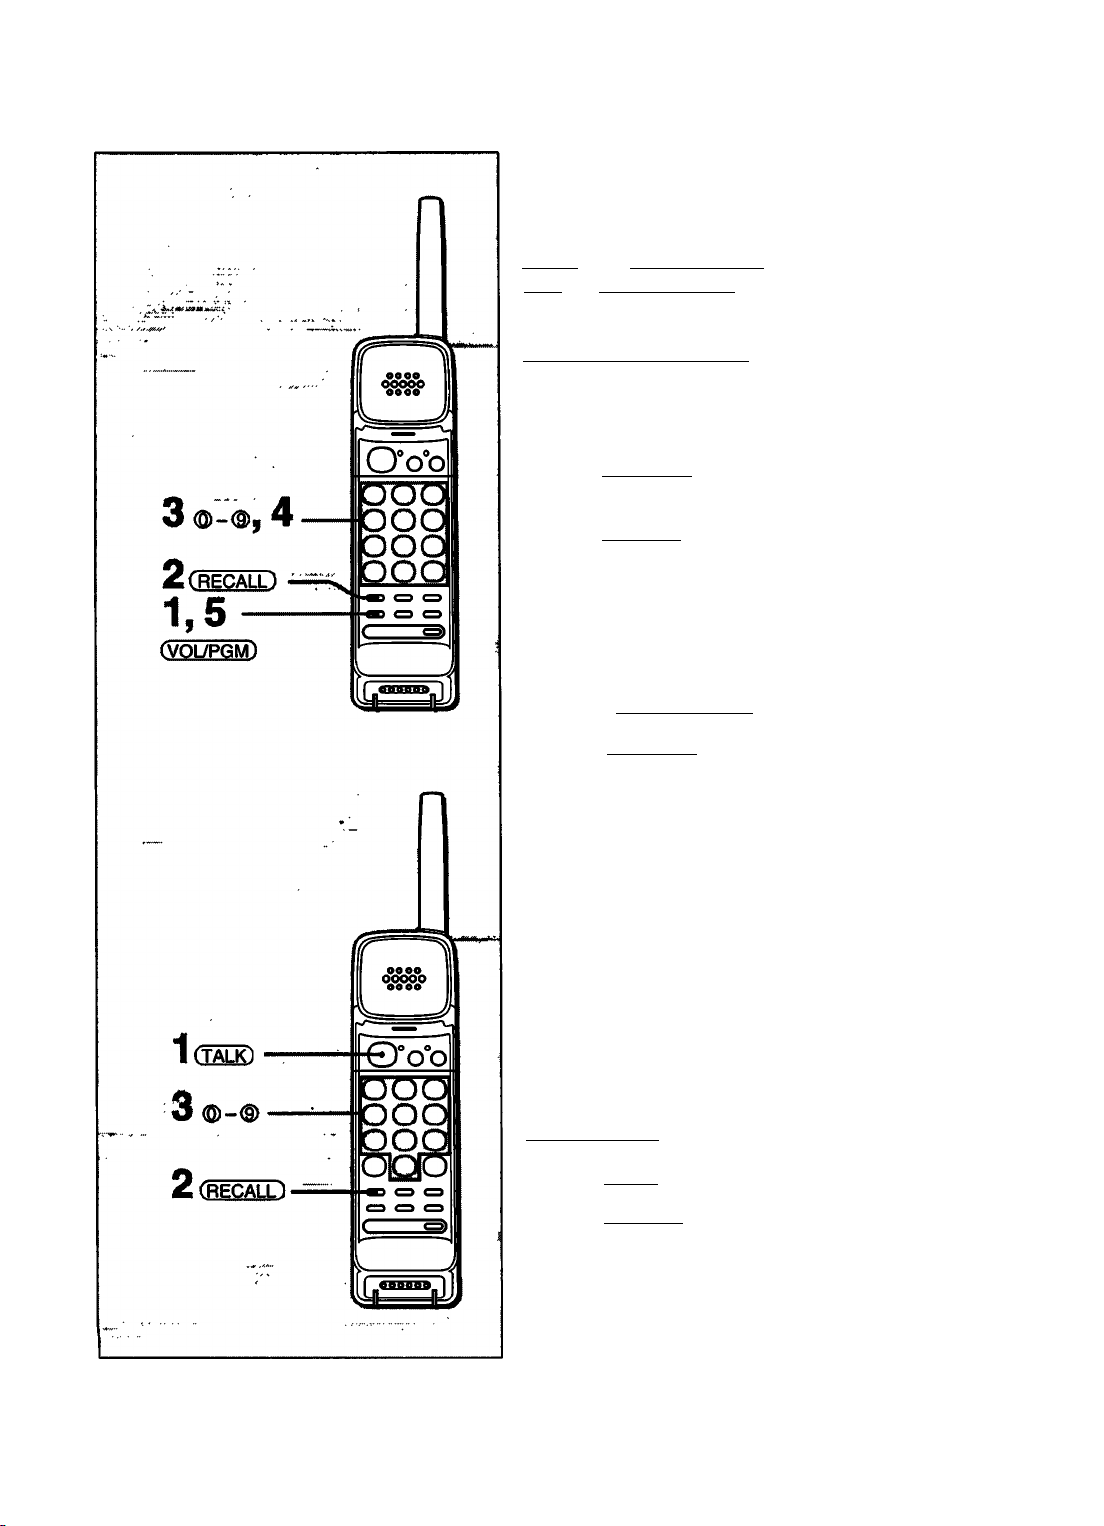
Programming Numbers
Make sure that the MODE switch on the
handset is set to the RING ON position.
1
Press (VOL/PGM).
The TALK lamp blinks.
2
Press (RECALL).
Press a dialing key (® to ®) to designate
3
the speed dialing memory location.
You will hear a confirmation beep.
Dial the phone number you wish to program.
You can program the (§) to ® dialing keys,
®,®and (REDIAL/PAUSE).
___________
5 Press (VOL/PGM).
You will hear a long confirmation beep.
To change a programmed number
Program a new number into the same location
using the procedure above. The old number
will be erased automatically.
• If you try to enter a number that exceeds 16
digits, an alarm will sound. Go back to step 1.
• Do not let more than 20 seconds elapse between
any two steps of the programming procedure.
• If you enter a wrong number, go back to step 1.
• You cannot program when receiving an incoming
call.
Speed Dialing
1 Press (TALK).
2 Press (RECALL).
3 Press the key for the desired location (®
to®).
If you press a key without a phone number
programmed, five short error beeps will sound.
29
Page 30
Using as a Telephone
To Program Numbers for Use with a PBX (Private Branch Exchange)
Example: (if “9” is used to access the outside
line.)
Follow the usual programming procedure as
shown on page 29. Press CREDIAL/PAUSE)
between the “9” and the number. An
automatic 4-second pause is programmed.
Example: To program 123-4567 on the speed
dialing button
Press:
(VOiyPGM) (RECALL)-» speed dialing
location ((S)-(D)(You will hear a confirmation
beep.)-»(9)-»(REDIAL/PAUSE)
0 (1) (D ® -» CVOL/PGM) (You will hear a
long confirmation beep.)
(A (REDIAL/PAUSE) will be counted as one
digit.)
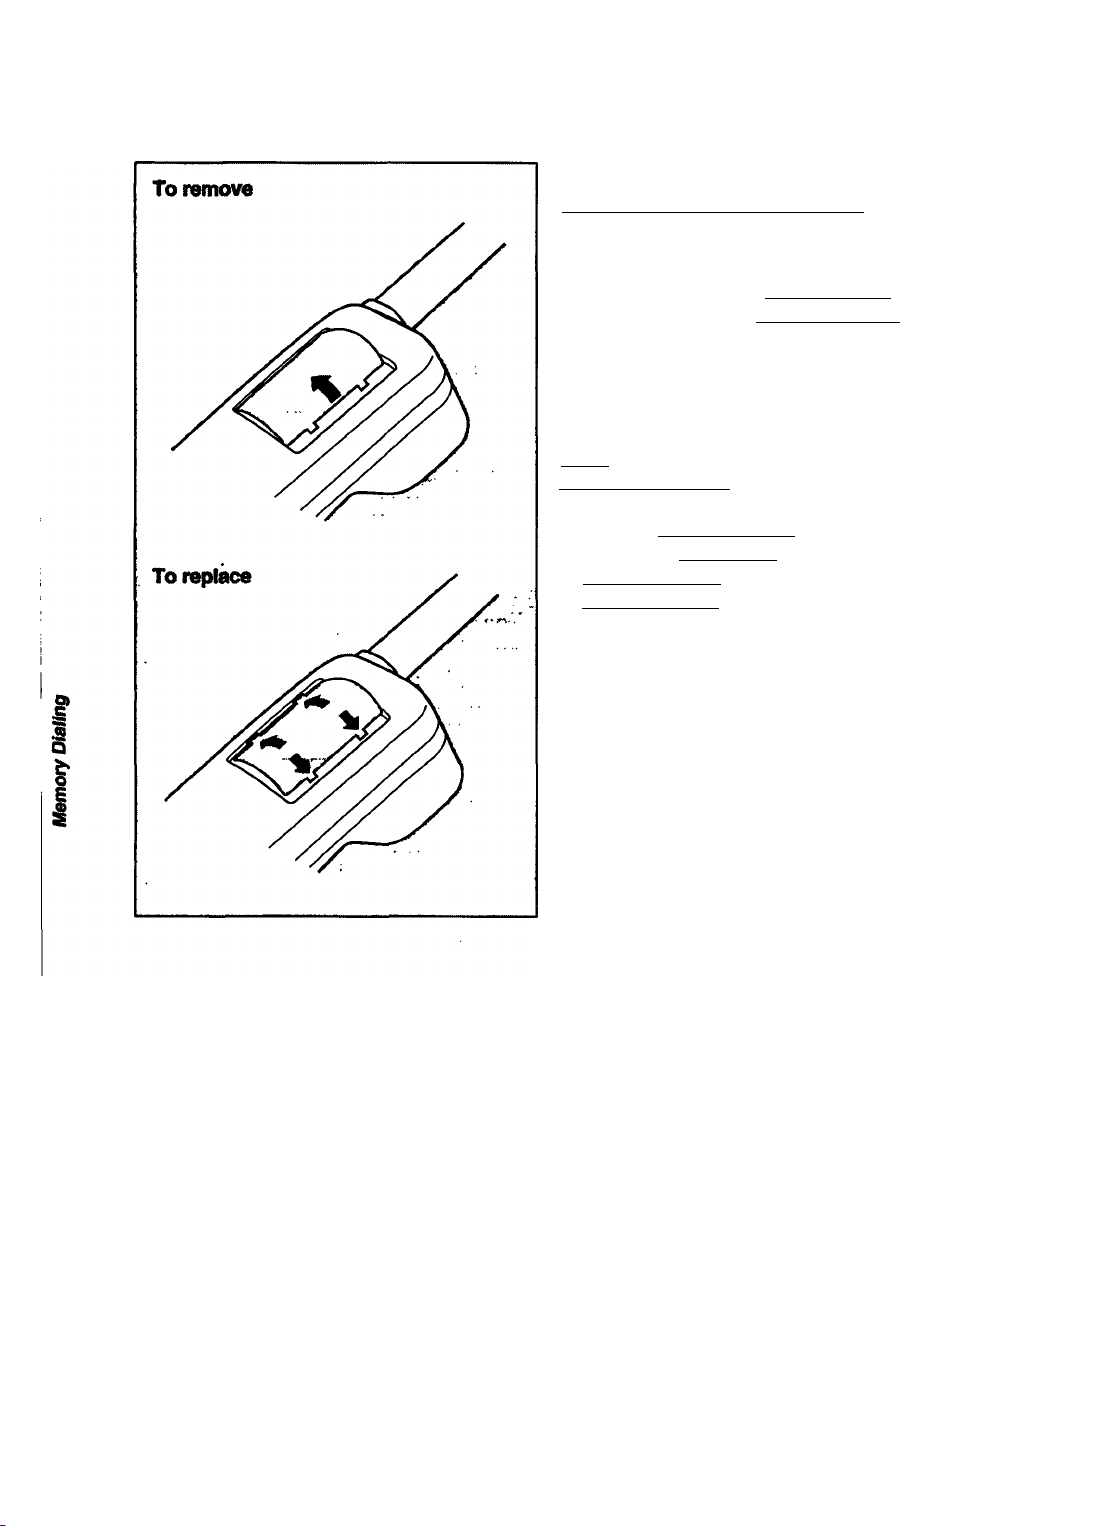
To keep a speed dial directory
Write down the names on the directory sheet,
and place it under the clear cover on the back
of the handset.
30
Page 31
Using as a Telephone Answering Machine
Recording Your Greeting (OGM)
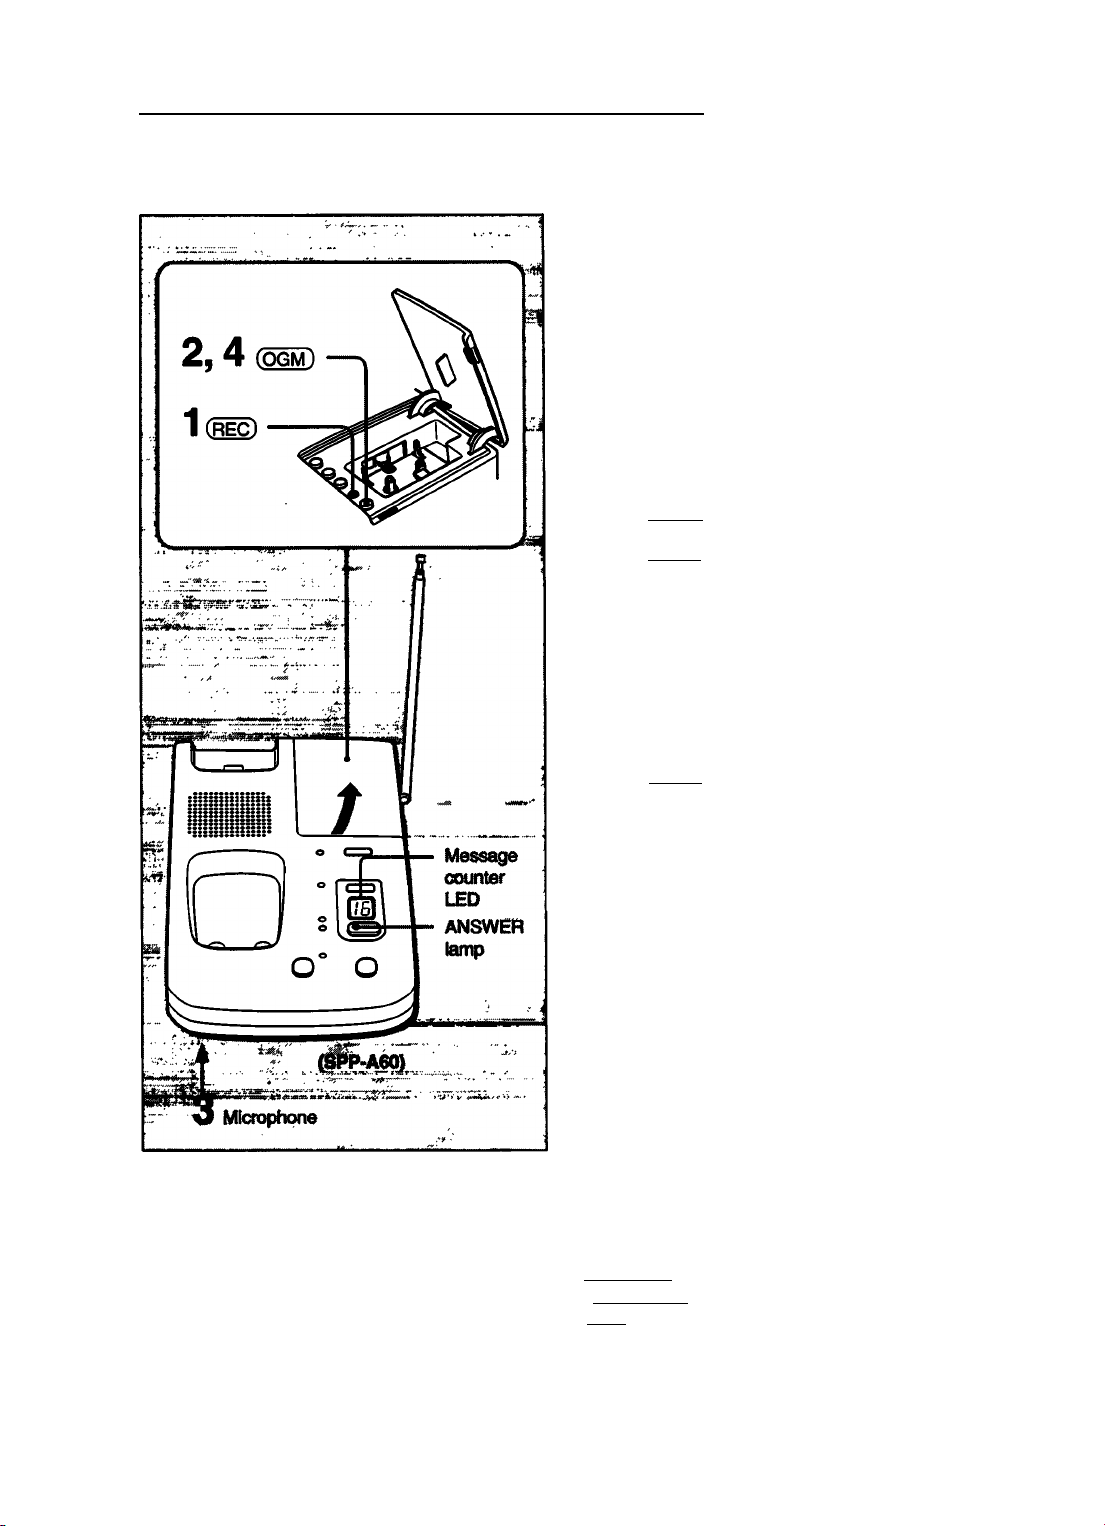
You must record your outgoing message
(OGM) first in order to use the telephone
answering function. The outgoing message
is recorded on an 1C chip (not the
microcassette). This feature allows the
microcassette to record just the incoming
messages, minimizing the operational delay
due to tape movement, and tape wear.
Make sure that the microcassette tape is
installed. (See page 17.)
Press CREC) (under the lid).
1
2
Press (OGM).
A long confirmation beep sounds. You
have up to 16 seconds of recording time.
“16” indication appears and then the
remaining time is shown in the message
counter LED.
Example of OGM
To receive the incoming message:
“Hello, I’m unable to answer your call right
now. Please leave your name, number
and message after the beep tone.“
For announce only:
“Hello, I’m unable to answer your call right
now. Please call again. Thank you.”
3 Speak into the base unit microphone.
Your message is recorded.
Press (OGM) again to stop recording.
The base unit will then:
(1) sound a long confirmation beep.
The ANSWER lamp lights up. “0”
indication appears in the message
counter LED.
(2) automatically replay your OGM for
confirmation.
(3) move the tape to the beginning.
The indication shows while the tape
is being reset.
(4) automatically turn on (ANSWER ON).
The indication shows
“0” when REC TIME selector is set to 1
or 4 (see page 32).
“A” when REC TIME selector is set to
ANN ONLY (see page 32).
' If the base unit does not turn on (ANSWER
ON) erfter recording your OGM, press
(ANSWER).
’ Press (OGM) within 5 seconds after pressing
(REC). Othenvise, five short error beeps will
sound. In this case, repeat from step 1.
’ If your OGM is shorter than 2 seconds, the OGM
is not recorded. If a previous OGM exists, that
OGM is also erased.
<Q
31
Page 32
Using as a Telephone Answering Machine
• If there is no tape installed, the unit will not turn
on (ANSWER ON). (Except for ANN ONLY
mode)
• If the unit receives a call during operation, the
operation is automatically canceled and the
phone rings.
For best recording results
Record in a quiet room and speak close (about
20 cm/8 inches) to the unit.
To play back your OGM for confirmation
Press OG®.
To change your OGM
Record a new OGM over the previous one.
I
OGM backup function
■ 5
I
§
I
• If a power interruption occurs and there are
fresh back-up batteries in the base unit, the
OGM will be retained in memory for about 24
hours.
• If the power interruption occurs and the
back-up batteries in the base unit are
exhausted, the OGM will be erased. If this
happens, "P” indication appears in the
message counter LED when the power is
restored. In this case, record the OGM, and
set the current time (page 20) and the ID
code (see page 40) again.
I
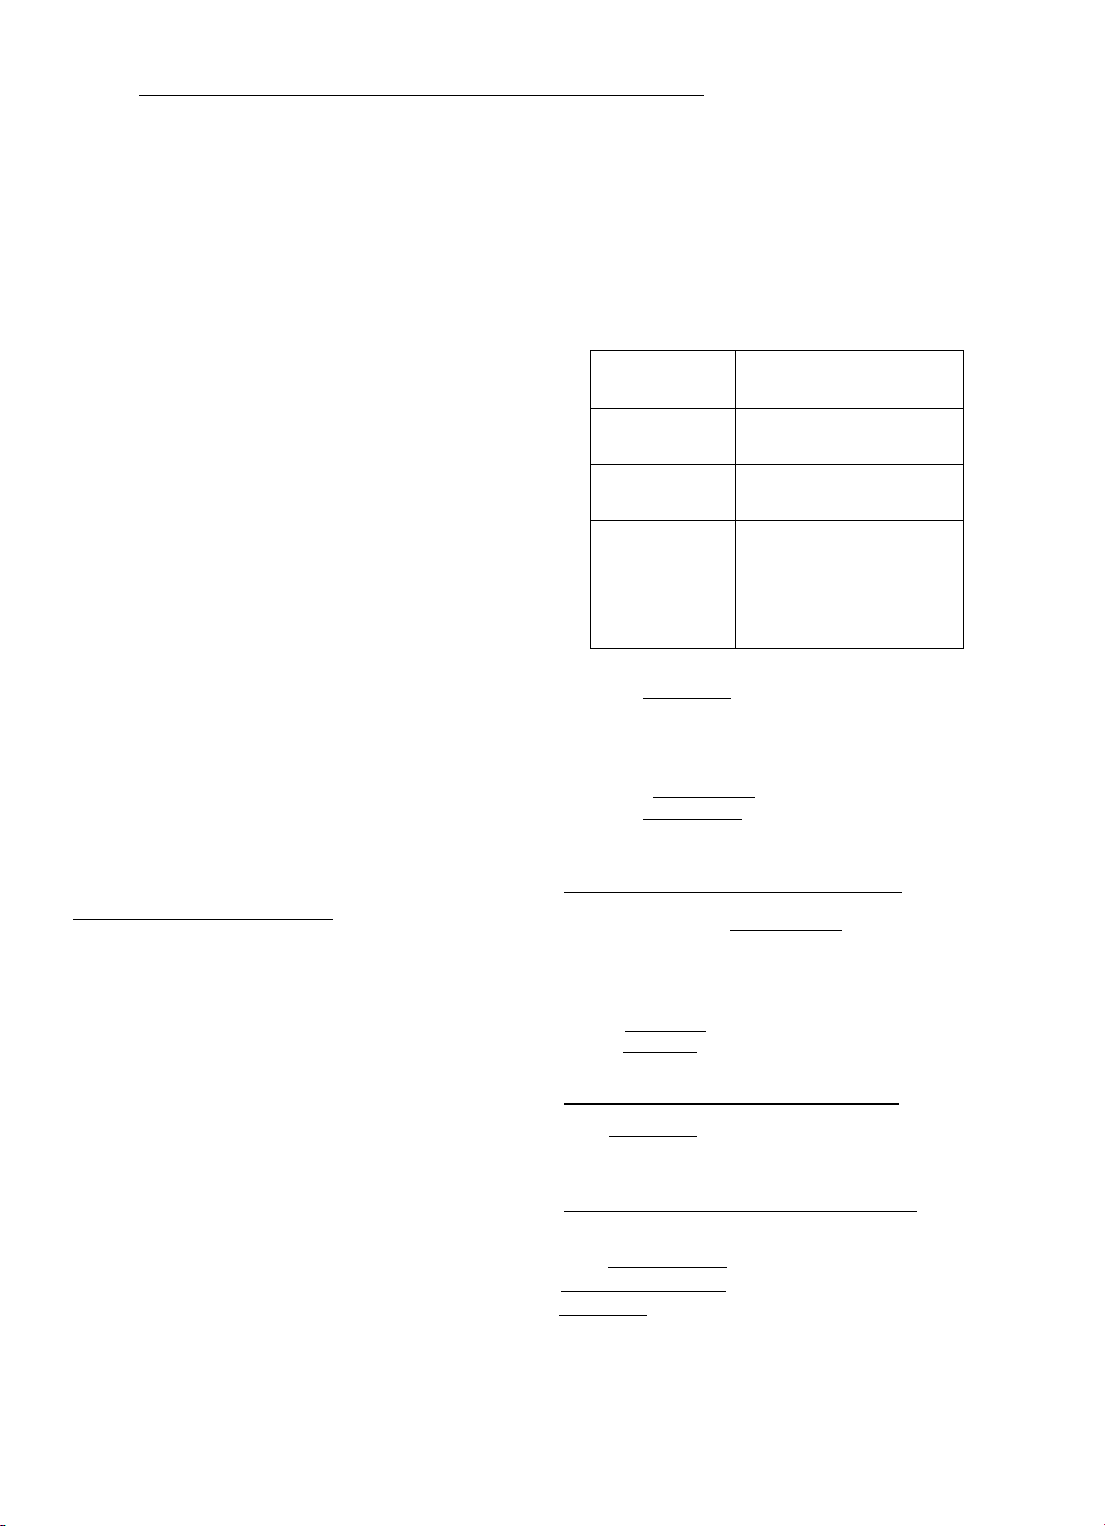
I Setting the Recording Time
(C
I
I
cS
To let the unit record the incoming messages
(ICM), follow the steps below. There are
three options for incoming message recording
time.
The unit will be able to record up to 19
incoming messages.
You cannot turn on the unit without recording your
greeting (OGM) first (see page 31).
1 Select the incoming message recording
time by the REC TIME switch according to
the following table.
0
1 4 ANN ONLY
REC TIME
Selectfon of
the switch
1
4
ANN ONLY
2 Press (ANSWER).
After you play back messages, make sure if you
have enough tape to take more messages. If not,
either press (TAPE RESET) or change to a new
tape.
Turning Off the Answering Machine
Open the lid and press( STOP/PLAY)
The ANSWER lamp goes off.
You cannot turn off the answering machine by
pressing (ANSWER).
Turning on the Answering Machine
Press (ANSWER).
The ANSWER lamp lights up.
When the Tape is Fuii with Messages
After you play back the messages of the tape
and turn off the answering machine, you must
press (TAPE RESET) before pressing
(ANSWER) to turn on the answering
machine.
Description
Allows up to 1 minute
per message.
Allow up to 4 minutes
per message.
Announce only:
No message will be
recorded. “A” appears
in the message counter
LED.
32
Page 33
Playing Back Messages
(SKIP/FF) -
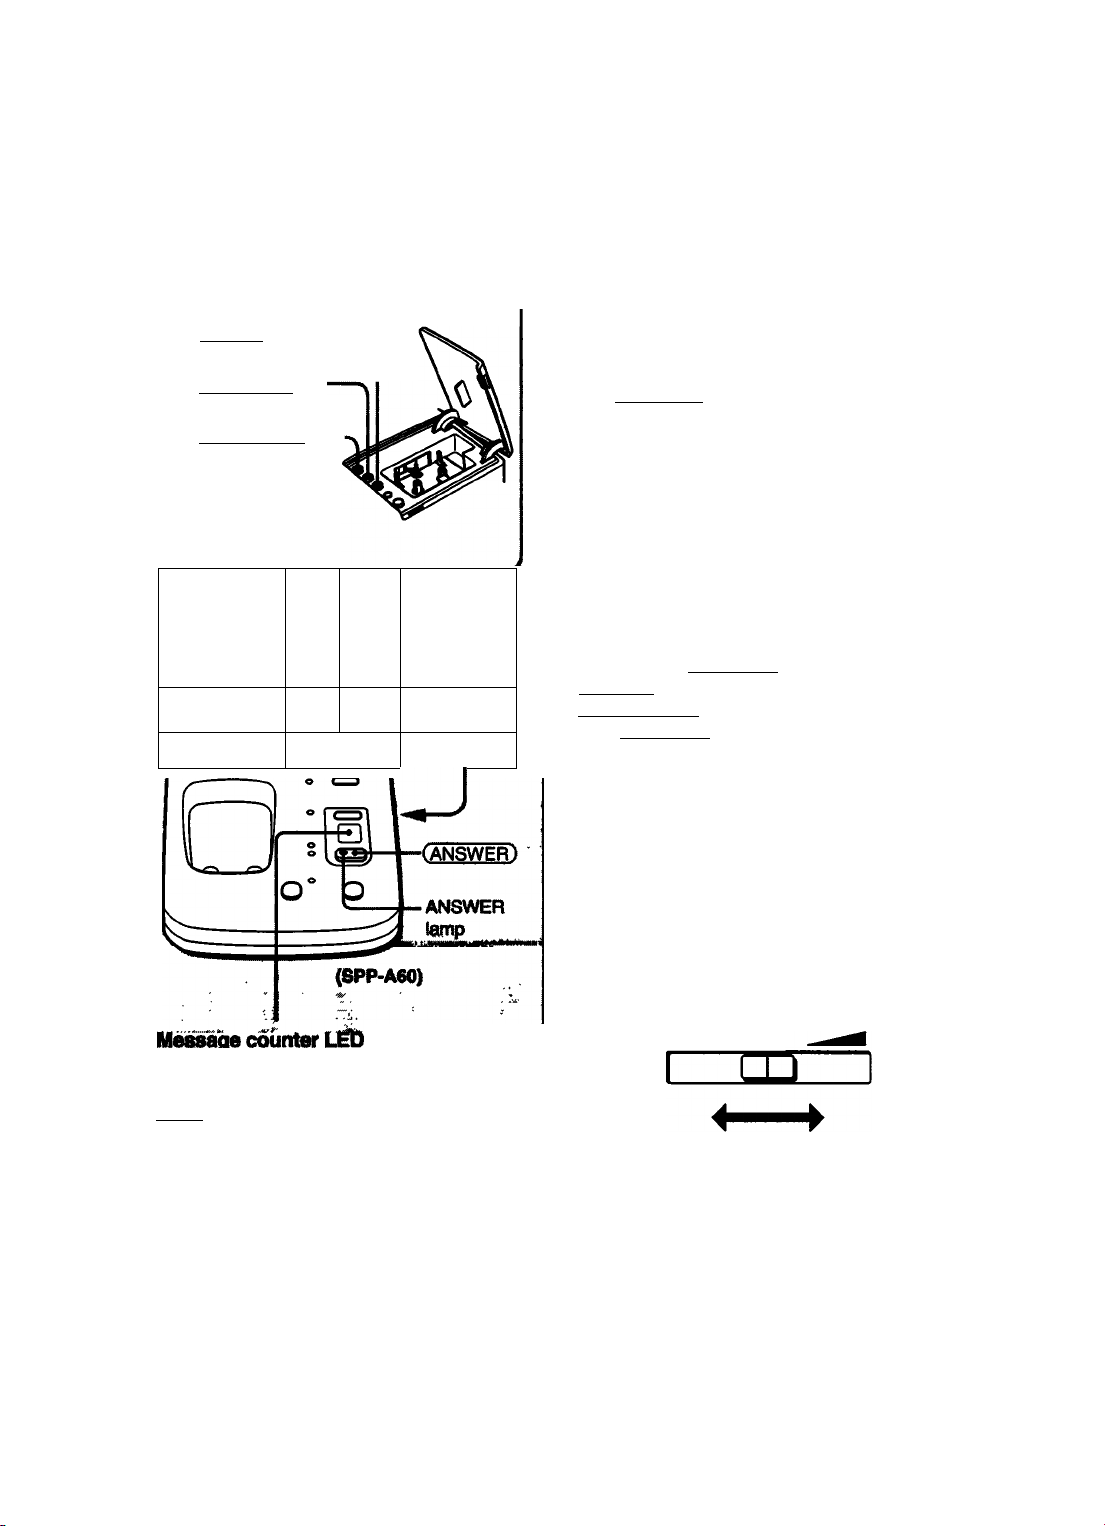
When there are new messages recorded not
yet played back, the ANSWER lamp and the
number of the messages in the message
counter LED blink.
When the tape is at its end or fuil with
‘E” blinks.
(STOP/PLAY ) ■
(REPEAT/REW)-
ni—
___________
L_=_J
I“
SPEAKER VOL
tittitxiuxtxiu
illiliiiliilllli
# i
»|o “tl^Jndla^on stii9m tihe
of nmsaae»,
iV^Tndic^af^tepe movement
rof ofwra^oh.
ONLT^
....................
indication shows that the tape is
«¿tMlI wlh messages.
• "P” indication shows power failure.
Your OGM, the number of mes>
■ages, ID code and current time
are erittlif, and die bacIcHip
are exhausted.
.
Press (ANSWER) to play back the message.
The base unit rewinds the tape and
automatically plays back from the first
message which has not been played back.
After each recorded message, the unit will
announce the day of the week and time of
recording.
If no messages are recorded, five short error
beeps sound.
• Once you press (STOP/PLAY) during playback,
you cannot continue playback by pressing
(ANSWER). In this case, play back manually
using (STOP/PLAY)button.
• If there is a call during tape playback, rewinding,
orfast-fonwarding operation, the operation is
canceled.
When all messages have been played back
The unit is set to record new incoming
messages. The message counter LED shows
“0” (or “A” in ANN ONLY mode).
To adjust the speaker volume of the base
unit
Slide the SPEAKER VOL control.
SPEAKER VOL
33
Page 34

Using as a Teiephone Answering Machine
To skip to the next message
Press (SKIP/FFlduring playback.
The next message will automatically be
played back.
You cannot skip the last message.
To play back the same message again
Press (REPEAT/REW )during playback.
To go back to the beginning of the previous
message, press (REPEAT/REW) within 3
seconds after the playback of the present
message has started.
To play back the messages manually
1 Press (STOP/PLAY) to turn off the
ANSWER lamp.
I
a.
2 To play back the tape, press
(STOP/PLAY);
to rewind the tape, press
(REPEAT/REW):
to fastforward the tape, press
(SKIP/FF).
to stop playing back, press
(STOP/PUY).
To reset the tape
When you played back all the messages and
the tape stops, press (TAPE RESET).
The tape is rewound to the beginning. The
new messages will be recorded over
previously recorded messages.
• If there are messages which have not been
piayed back yet, five short error beeps sound
and the tape cannot be reset.
• If you wish to reset the tape without playing back
ali the messages, press (STOP/PLAY) while
automatically playing back the tape and then
press (TAPE RESET).
• If the unit receives a call during operation, the
operation is automatically canceled and the
phone rings.
34
Page 35
Catl Screening
• •- / - • --- •. ~ ■
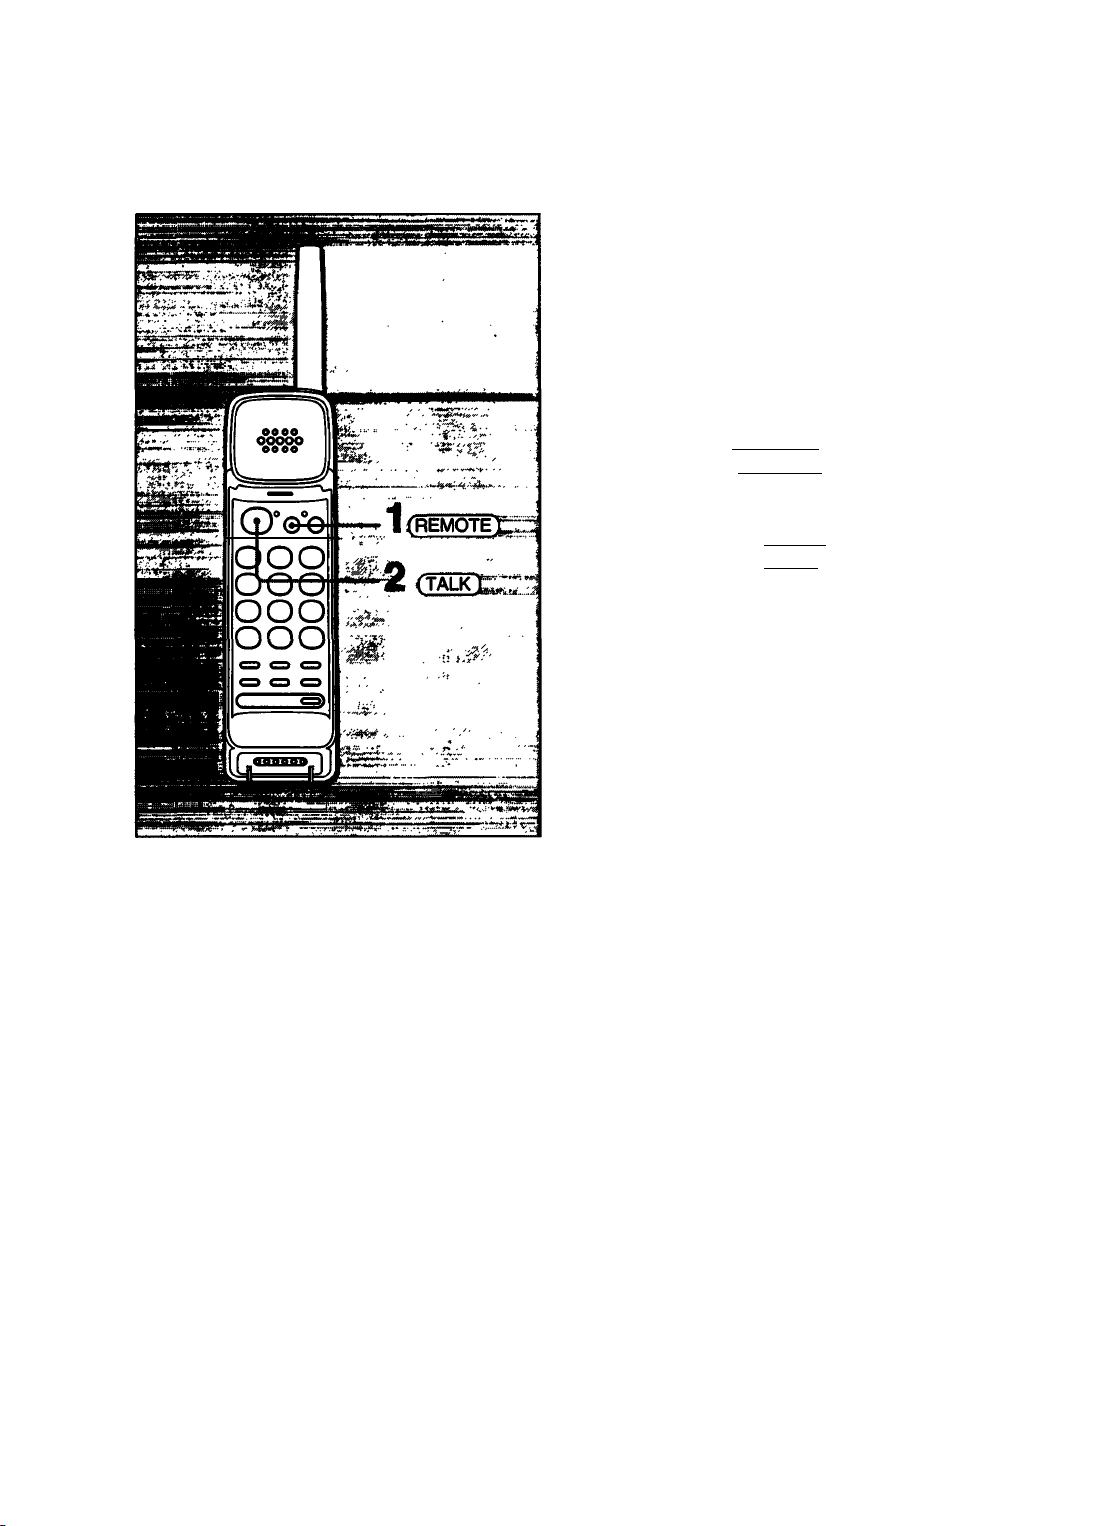
The outgoing message and the callers’
messages being recorded can be heard from
the base unit speaker.
To screen a call at the handset
The TALK and REMOTE lamps blink while
the base unit is answering and recording the
caller’s message.
1 Listen to the caller’s message, pick up the
handset and press [REMOTE].
The base unit will keep recording.
2 If you wish to speak to the caller, pick up
the handset and press (TALK). The base
unit will stop recording.
§
§
35
Page 36
Using as a Telephone Answering Machine
Recording a Memo Message
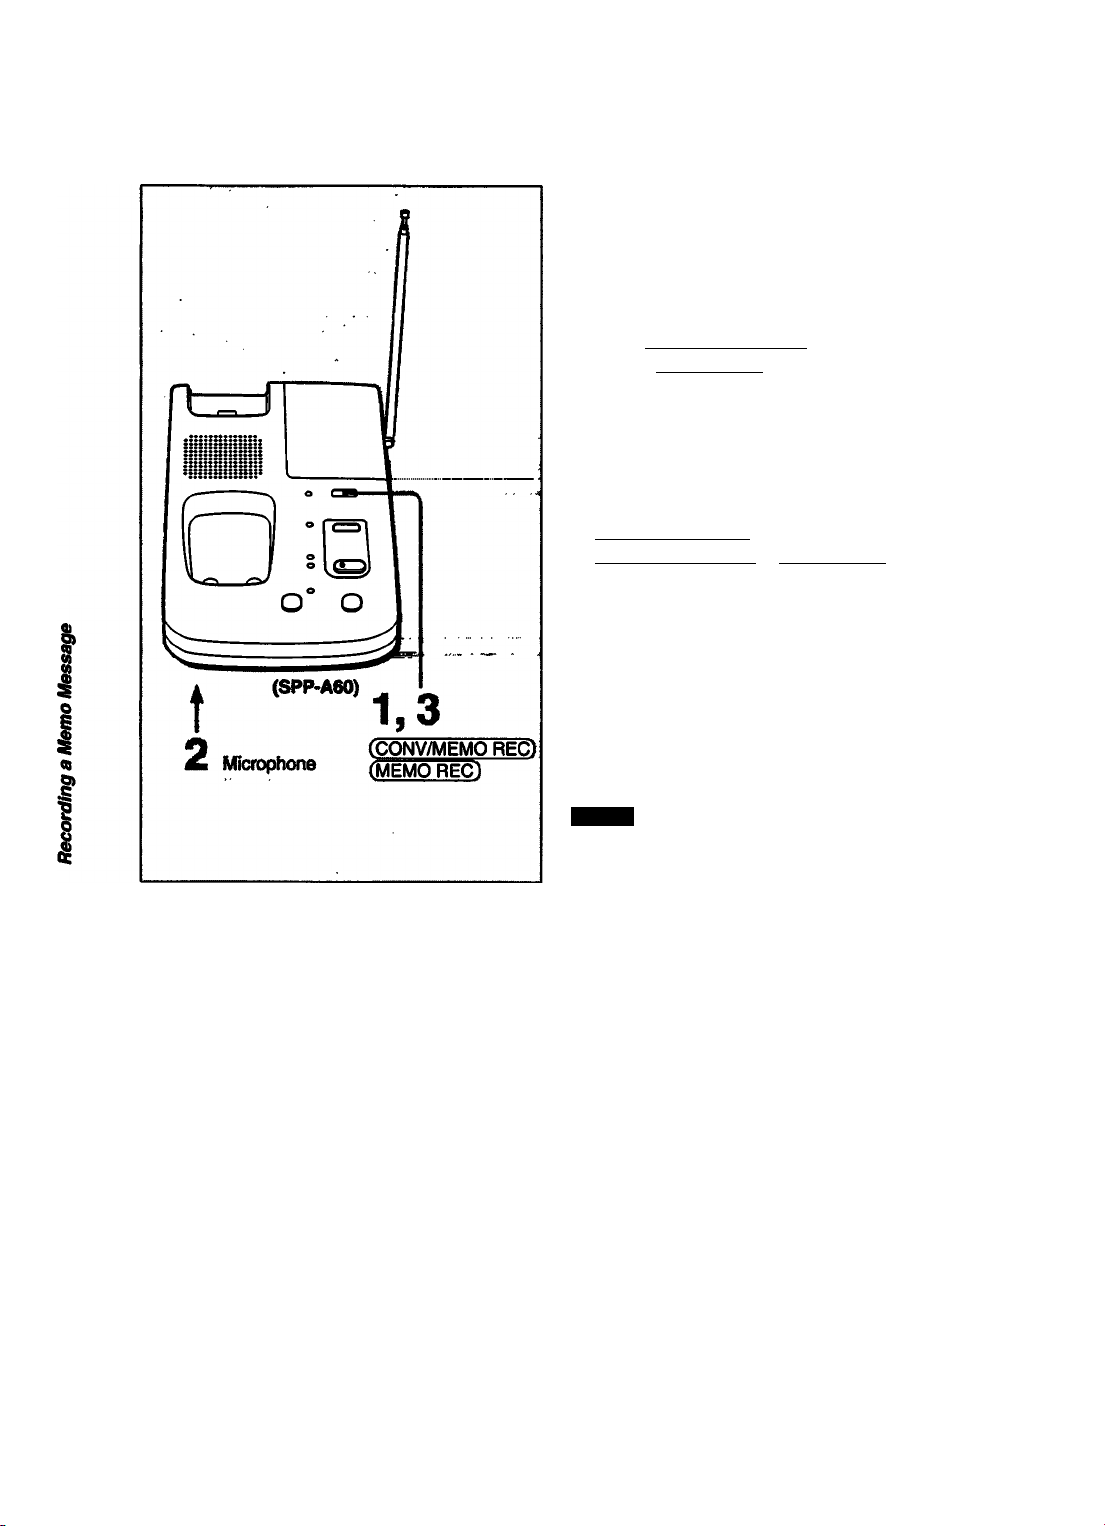
You can leave messages to other members of
your household or users of your phone.
Make sure that the tape is installed and the
answering machine is turned on.
1
Press (CONV/MEMO REC) (forSPPA60) or (MEMO REC) (for SPP-A40).
A long confirmation beep sounds and the
CONV/MEMO REC or MEMO REC lamp
lights up. The unit starts recording.
2
Speak into the base unit microphone.
3
To stop recording, press
(CONV/MEMO REC] or (MEMO REC)
again.
A long confirmation beep sounds and the
CONV/MEMO REC or MEMO REC lamp
goes off. The memo message will be
counted as an incoming message.
______________
To play back memo message
Follow the same steps as “Playing Back
Messages” (see page 33).
Notes
• The CONV/MEMO REC or MEMO REC lamp
lights only during recording a memo message
and it does not stay lit after recording a memo
message.
• If the unit receives a call during recording,
recording operation is automatically canceled
and the phone rings.
36
Page 37
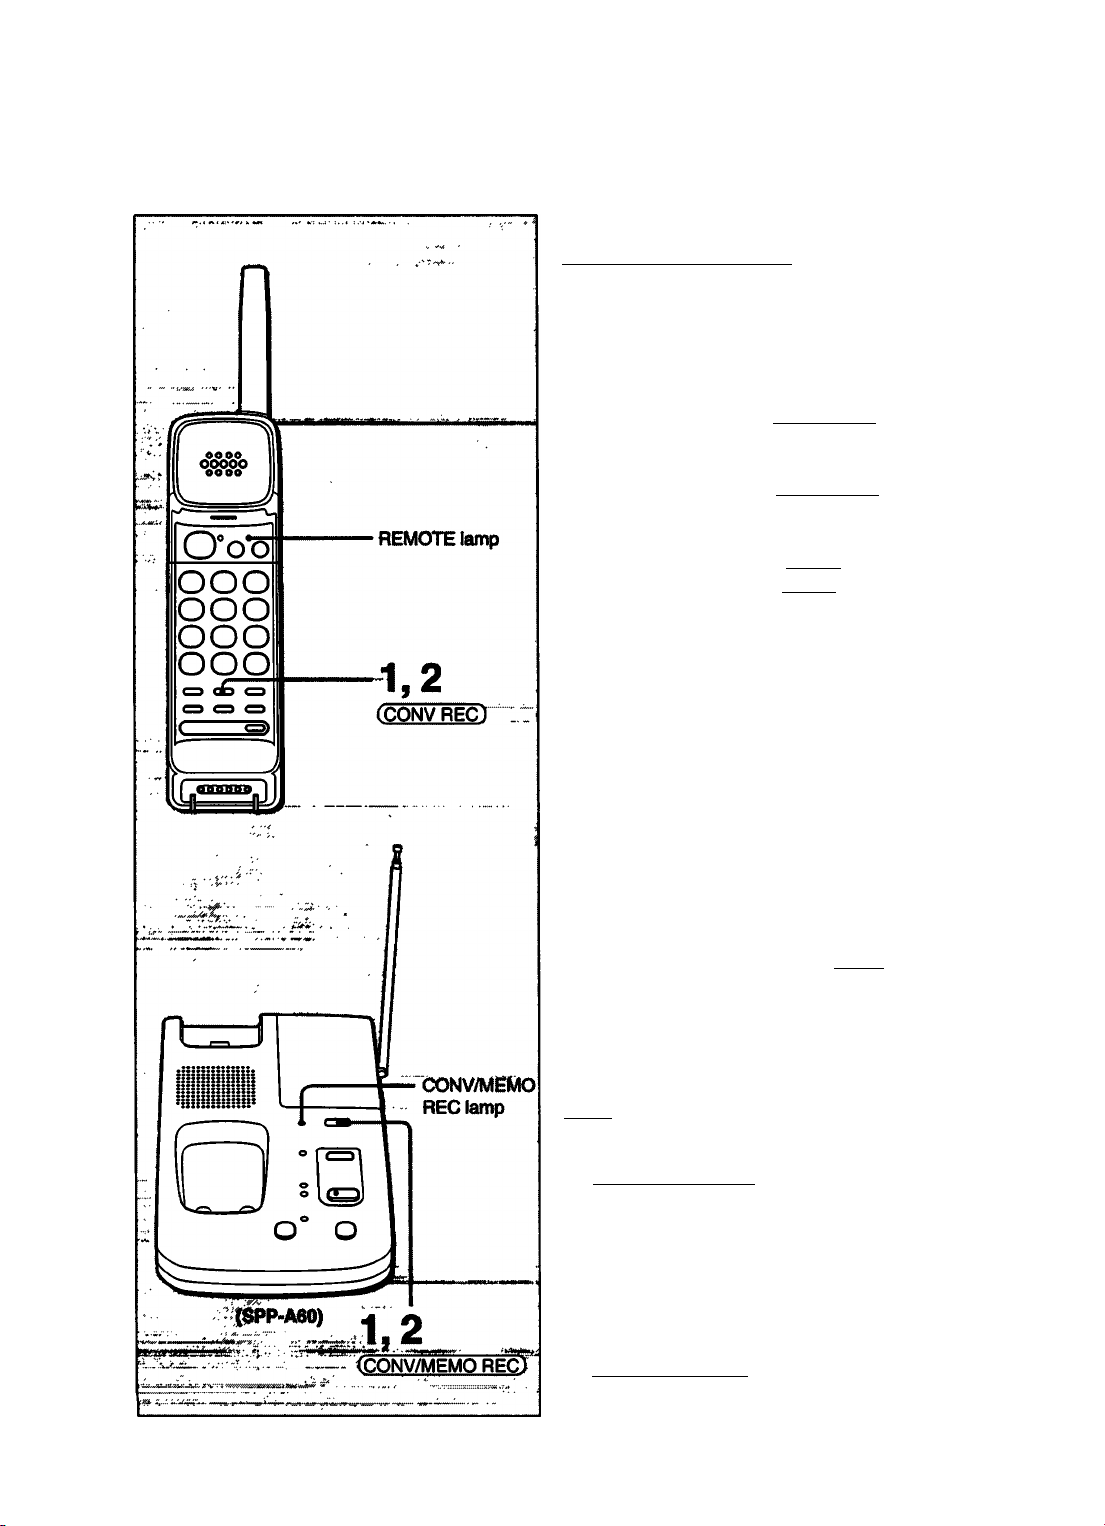
Recording a Conversation in Progress
Recording a Conversation in
Progress at the Handset
While you are talking on phone, you can
record the conversation.
Make sure that the tape is installed and the
answering machine is turned on.
1 To start recording, press (CONV REC).
The REMOTE lamp lights up.
To stop recording, press (CONV REC)
again.
The REMOTE lamp goes off.
Recording also stops when you end the
conversation by pressing (TALK) or
placing the handset on the base unit.
The recorded conversation will be counted
as an incoming message.
To play back a recorded conversation
Follow the same steps as “Playing Back
Messages” (see page 33).
a»
I
a
• Even if the tape comes to the end while recording
a conversation, the REMOTE lamp of the
handset will remain lit. The five short error beeps
sound only when you stop recording. Therefore,
check the tape length before recording.^
• To record the caller’s voice only, press (MUTE).
The TALK lamp blinks. Your voice will not be
recorded, and the caller will not hear you.
___________
Recording a conversation in
progress at the base unit (SPP-A60
only)
_______________________
1 To start recording, press
(CQNV/MEMO REC).
The CONV/MEMO REC lamp lights up.
2 To stop recording, press
(■CQNV/MEMO REC) again.
The CONV/MEMO REC lamp goes off.
Recording also stops when you end the
conversation by pressing
(SPEAKERPHONE).
I
I
37
Page 38
Using as a Telephone Ansm&ing Machine
Operating the Answering Machine from the Handset
You can record your outgoing message, play
back messages and perform other functions
remotely from the handset.
Make sure that the MODE switch on the
handset is set to the RING ON position.
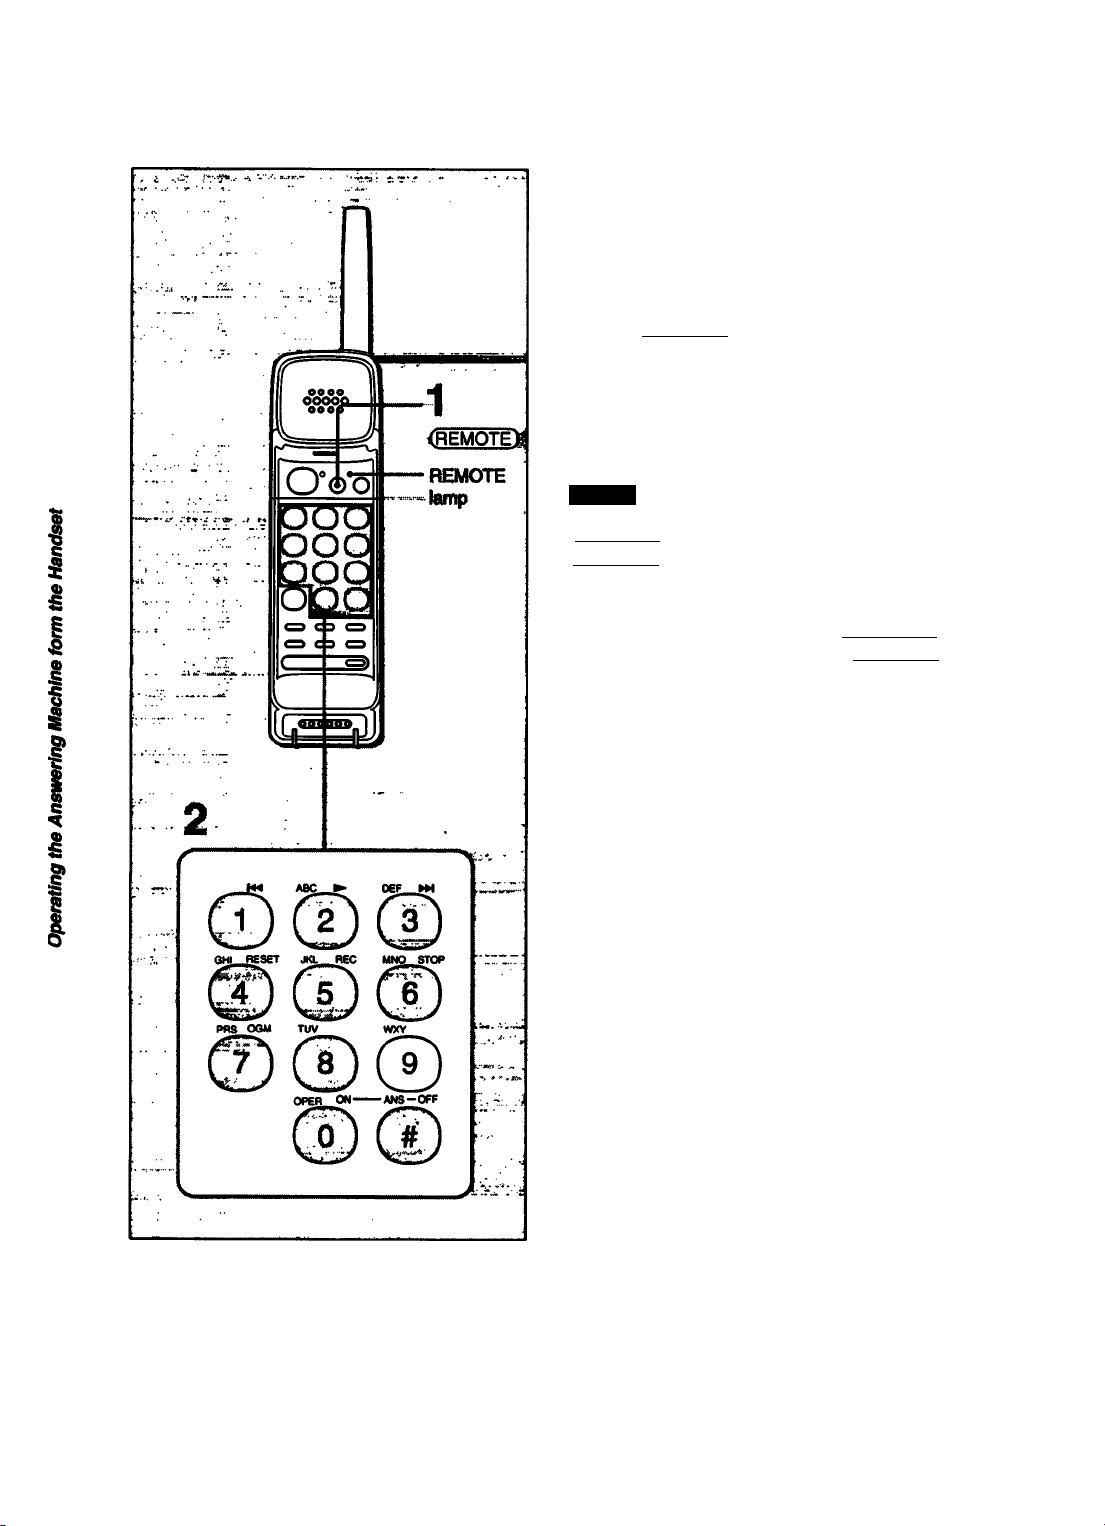
1 Press (REMOTE). Make sure that
REMOTE lamp lights up.
2 Press the dialing key ((§) to ®, ®) for
the desired function (see the table on
page 39).
Notes
• When more than 20 seconds elapse after
(REMOTE) is pressed, a long beep
sounds and the remote operation is
canceled.
• If someone else is operating the base unit,
five busy tones sound. Press (REMOTE)
again to stop busy tones.
• If the unit receives a call during remote
operation, the remote operation is
automatically canceled and the phone rings.
38
Page 39
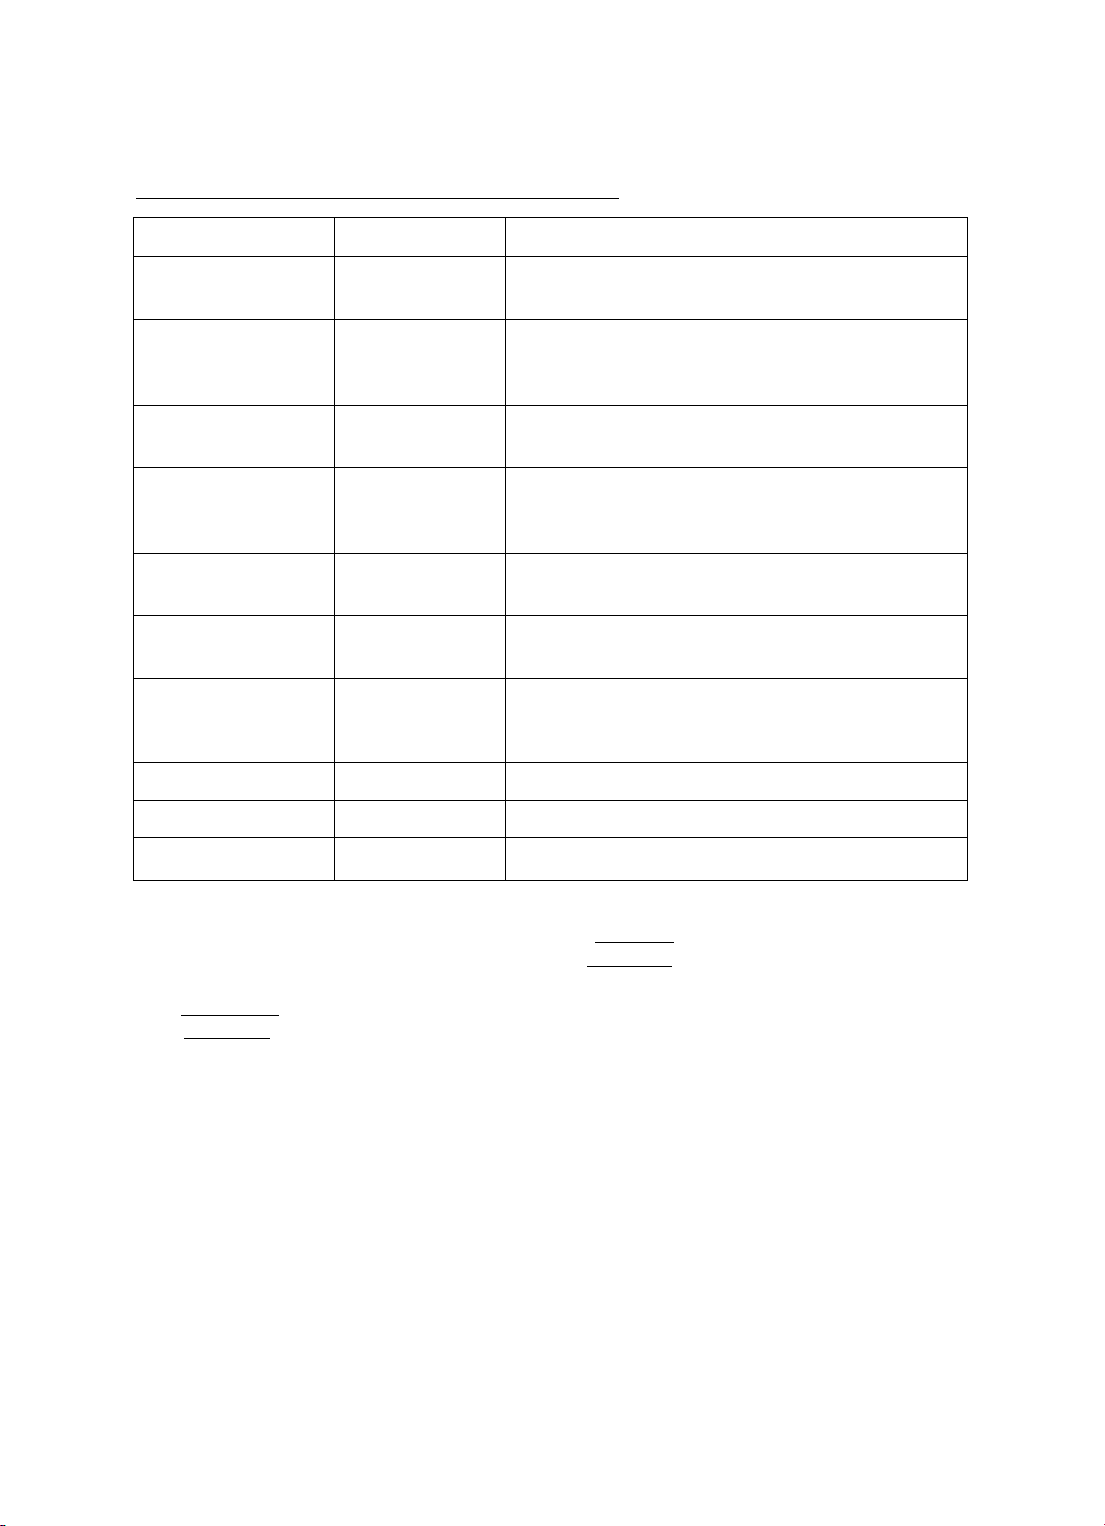
Description of Remote Operation from the Handset
JRjlll0||on
Play back message (§)(►)
Repeat
Skip fonward
Tape reset
Record memo
Record OGM
Check the current
time
Interrupt operation
®(M^)
©(►H)
® (RESET)
(D (REC)
® (OGM)
(D
(D (STOP)
Description
When there are new messages not yet played
back, the messages are played back.
The present message is repeated. If you wish to
repeat the previous message, press within 3
seconds after the present message starts.
The next message is played back. You cannot skip
the last message.
If there are new messages not yet played back, five
short error beeps sound and the tape cannot be
reset.
Record a memo message. Press ® (STOP) to
finish recording.
Press to record your outgoing message.
You cannot play back your OGM at the handset
The current time is announced by the base unit
speaker and the handset speaker. See page 20
al30ut setting the current time.
Press to stop the present operation.
i
ANSWER ON
ANSWER OFF
When there are new messages which have not been play^ back yrt
The number of messages will be announced after you press [REMOTE).
To end remote operation
Press (REMOTE) or replace the handset on the base unit. The REMOTE lamp goes off.
You cannot make a call or use the intercom during the remote operation.
® (ANS-ON)
©©(ANS-OFF) Press® twice to set to ANSWER OFF.
-
I
■z
3*
I
39
Page 40
Using as a Telei^mne Answering Machine
Operating the Answering Machine from a Touch-tone Phone
You can operate the answering machine
remotely from any touch-tone phone while
you are away from your home.
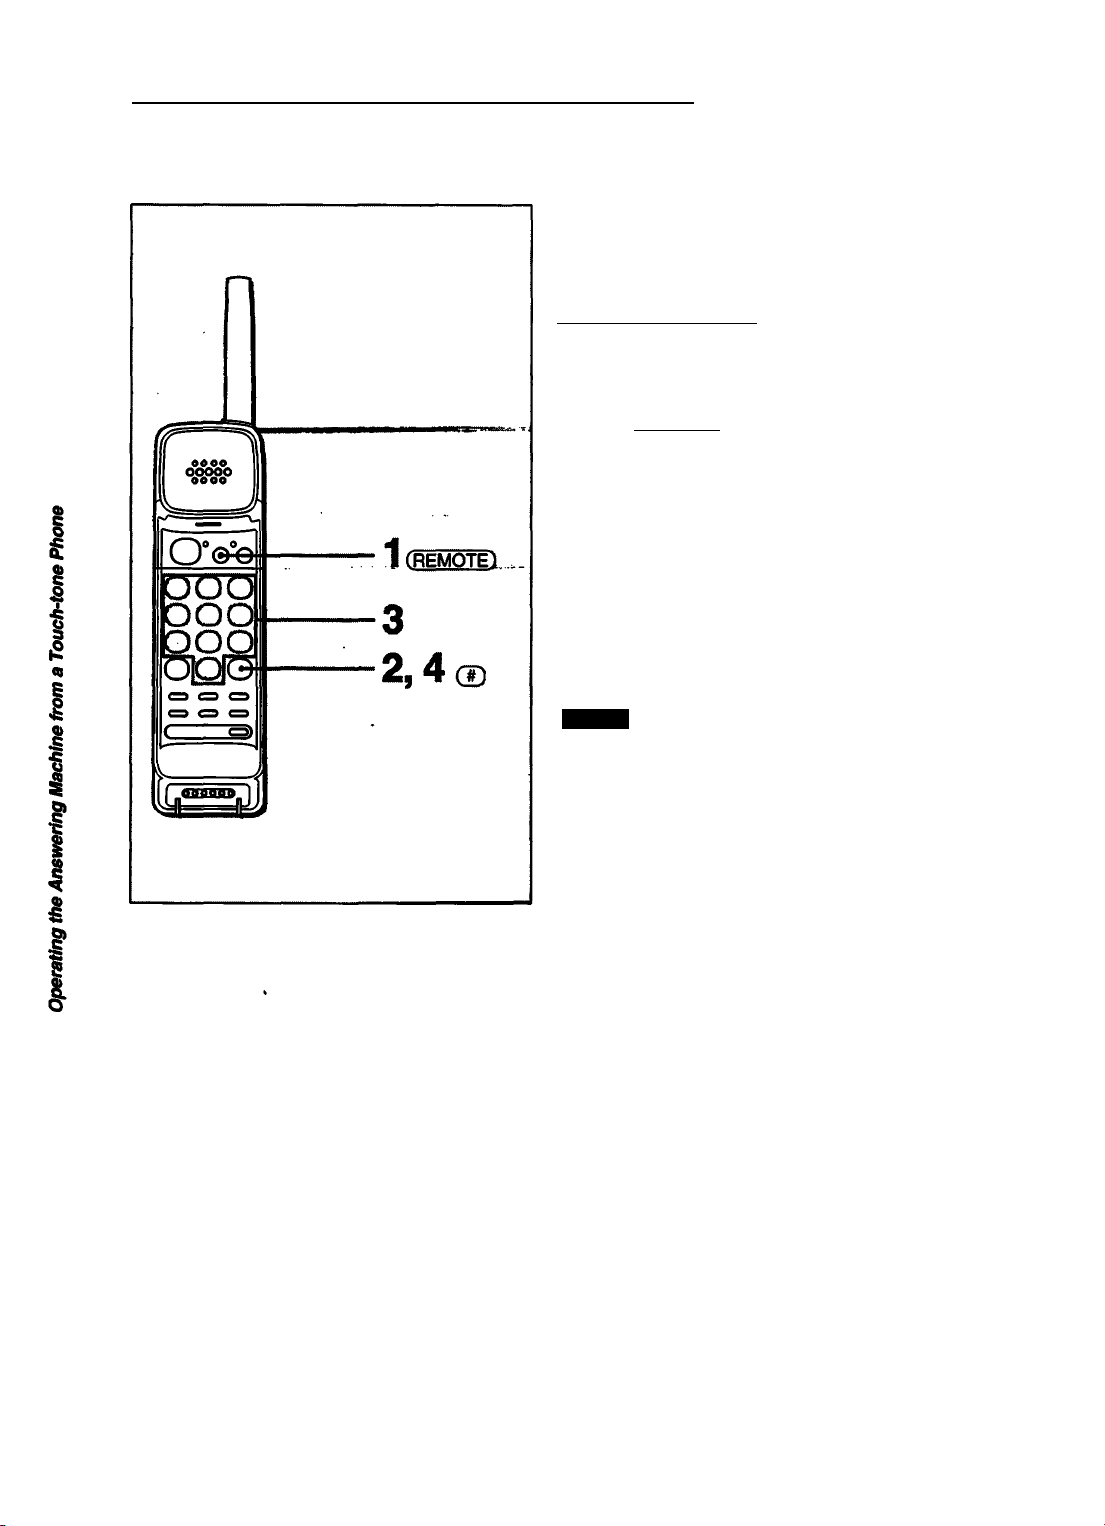
Setting Your ID Code
For remote control operation, you must set
a two-digit ID code at the handset.
1
Press (REMOTE) on the handset.
The REMOTE lamp lights up.
2 Press®.
3 Press any two digits for the ID code.
You can use any two-digit number from
00 to 99.
4 Press®.
You hear a long confirmation beep when
the ID code is set.
Notes
• if you do not set an ID code, you cannot
use the remote operation.
• If a power interuption occurs when the back
up batteries are either exhausted or not
installed, the ID code will be erased. In this
case, reprogram the ID code.
_____________
40
Page 41

Remote Operation from a Touch-tone Phone
When the answering machine is turned on
1 Call your phone from a touch-tone phone.
2 While you hear your outgoing message,
press (F) and your ID code.
Example; When your ID code is 48, press
(I).0.(D.
3 You hear a long confirmation beep from
your phone and the outgoing message
stops, if the code is correct.
If there are messages, you will hearths
number of messages announced.
4 Press the control code for the operation
you want within 20 seconds.
The control codes are described in the
next page.
5 To go to the next operation, press the next
control codes within 20 seconds.
6 Hang up when you are finished.
When the answering machine is not
turned on, or if the tape is fuii with
messages
1 Call your phone from a touch-tone phone.
2 After 10 rings, the unit will pick up and you
will hear intermittent beeps.
3 Press (D and your ID code.
4 You hear a long confirmation beep from
your phone.
If there are messages, you will hear the
number of messages announced.
5 Press the control code for the operation
you want within 20 seconds.
6 To go to the next operation, press the next
control code within 20 seconds.
7 Hang up when you are finished.
• n 20 seconds elapse without pressing s
control code, the line will be disconnected.
• If you do not set an ID code, the unit will not
pick up after 10 rings.
§
I
I
p>
41
I
Page 42
Using as a Telephona Answering Machine
£
1
«o
I
€
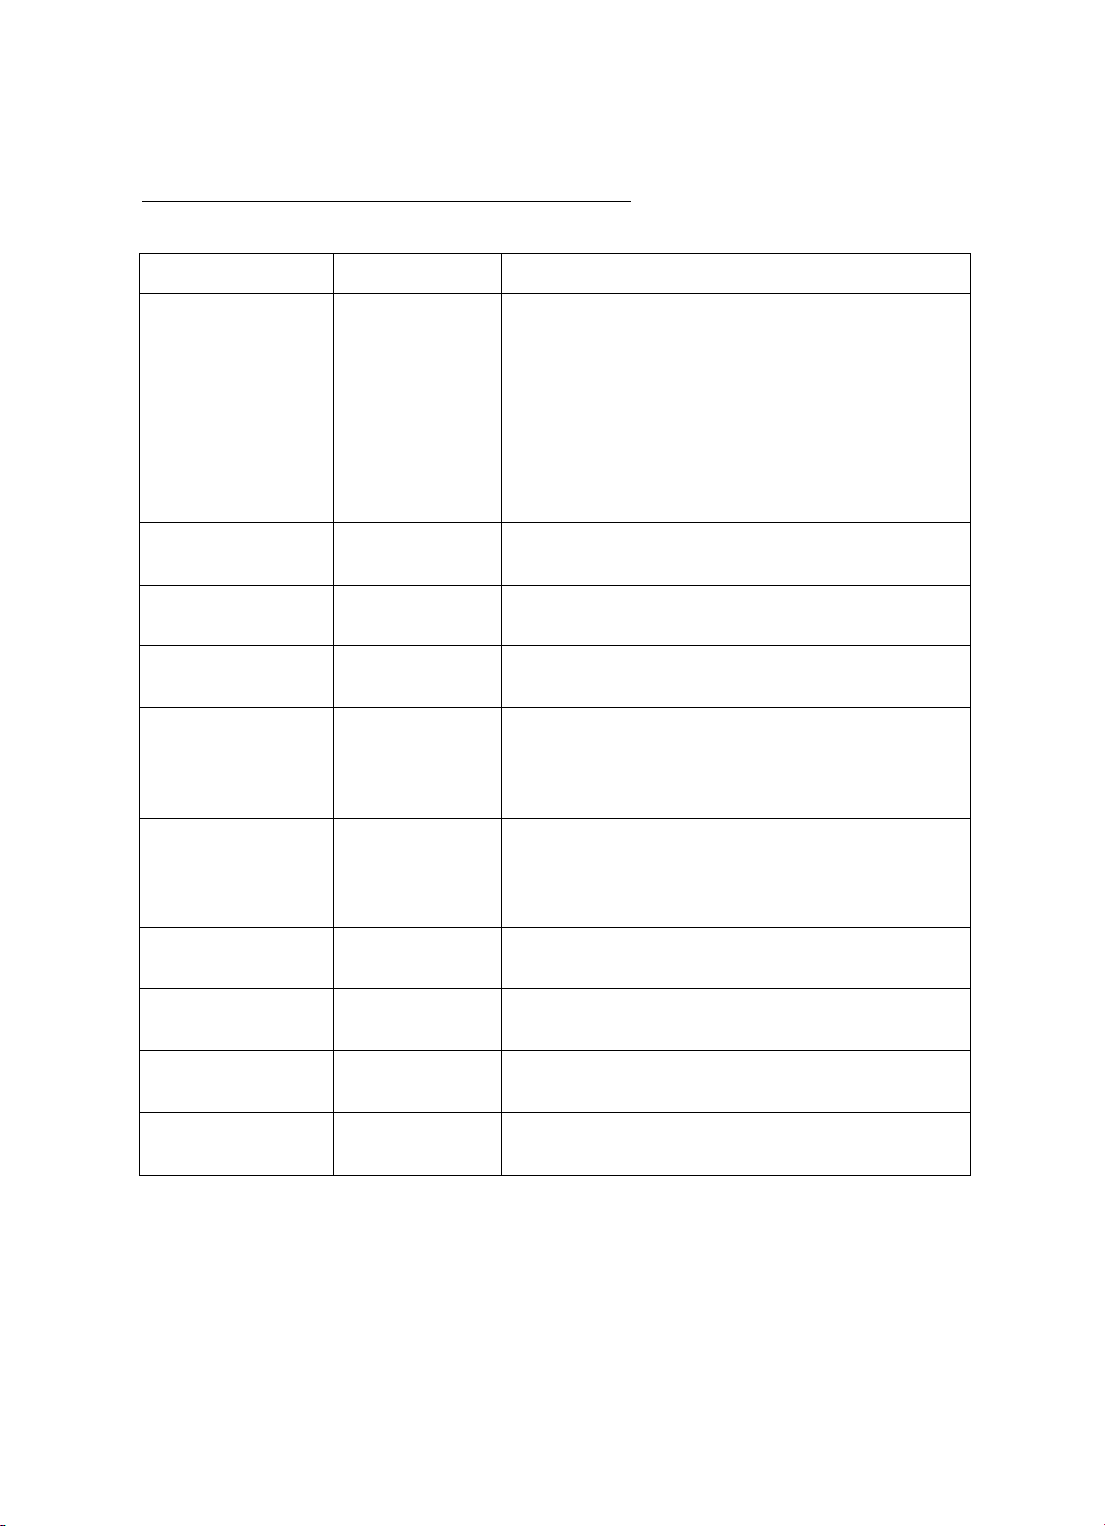
Description of Control Codes for Remote Operation
The table below shows the functions you can operate remotely and the control codes for them.
Function
Play back the
messages
Play back the same
message again
Skip to the next
message
Reset the tape
Record a memo
message
Control code
(DO)®
®® ®
0® ®
®(D®
• The pia^ack stops every 4 minutes. Press the
control code again to continue piayback.
• You hear intermittent beeps while the unit rewinds
the tape.
• When you hang up after playing back messages,
and later call your phone again to play back new
messages, the messages which have been
played back at the previous call will also be
played back again.
• Press the control code during piayback.
• Press the control code during playback.
• You cannot skip the last message.
• You can only reset the tape after ail the messages
have been played back.
• Record the memo message as follows.
1 When you hear a long beep, start speaking.
2 Whenyouarefinished, press®® or hang
up to stop recording.
______________________
Description
I
i
I
I
I
Record outgoing
message
Check the current
time
Interrupt an
operation
Turn on the
answering machine
Turn off the
answering machine
®® ®
®®
®® ®
® ® ®
@
• Record the outgoing message as foiiows.
1 When you hear a iong beep, start speaking.
2 Your phone plays back your outgoing message
for confirmation and turns on answering mode.
• The unit will announce the day of the week and
the current time.
• Your phone stops the operation and waits for the
next controi code.
• You will hear a long confirmation beep.
• You will hear a long confirmation beep.
42
Page 43
Mounting Your Phone on the Wall
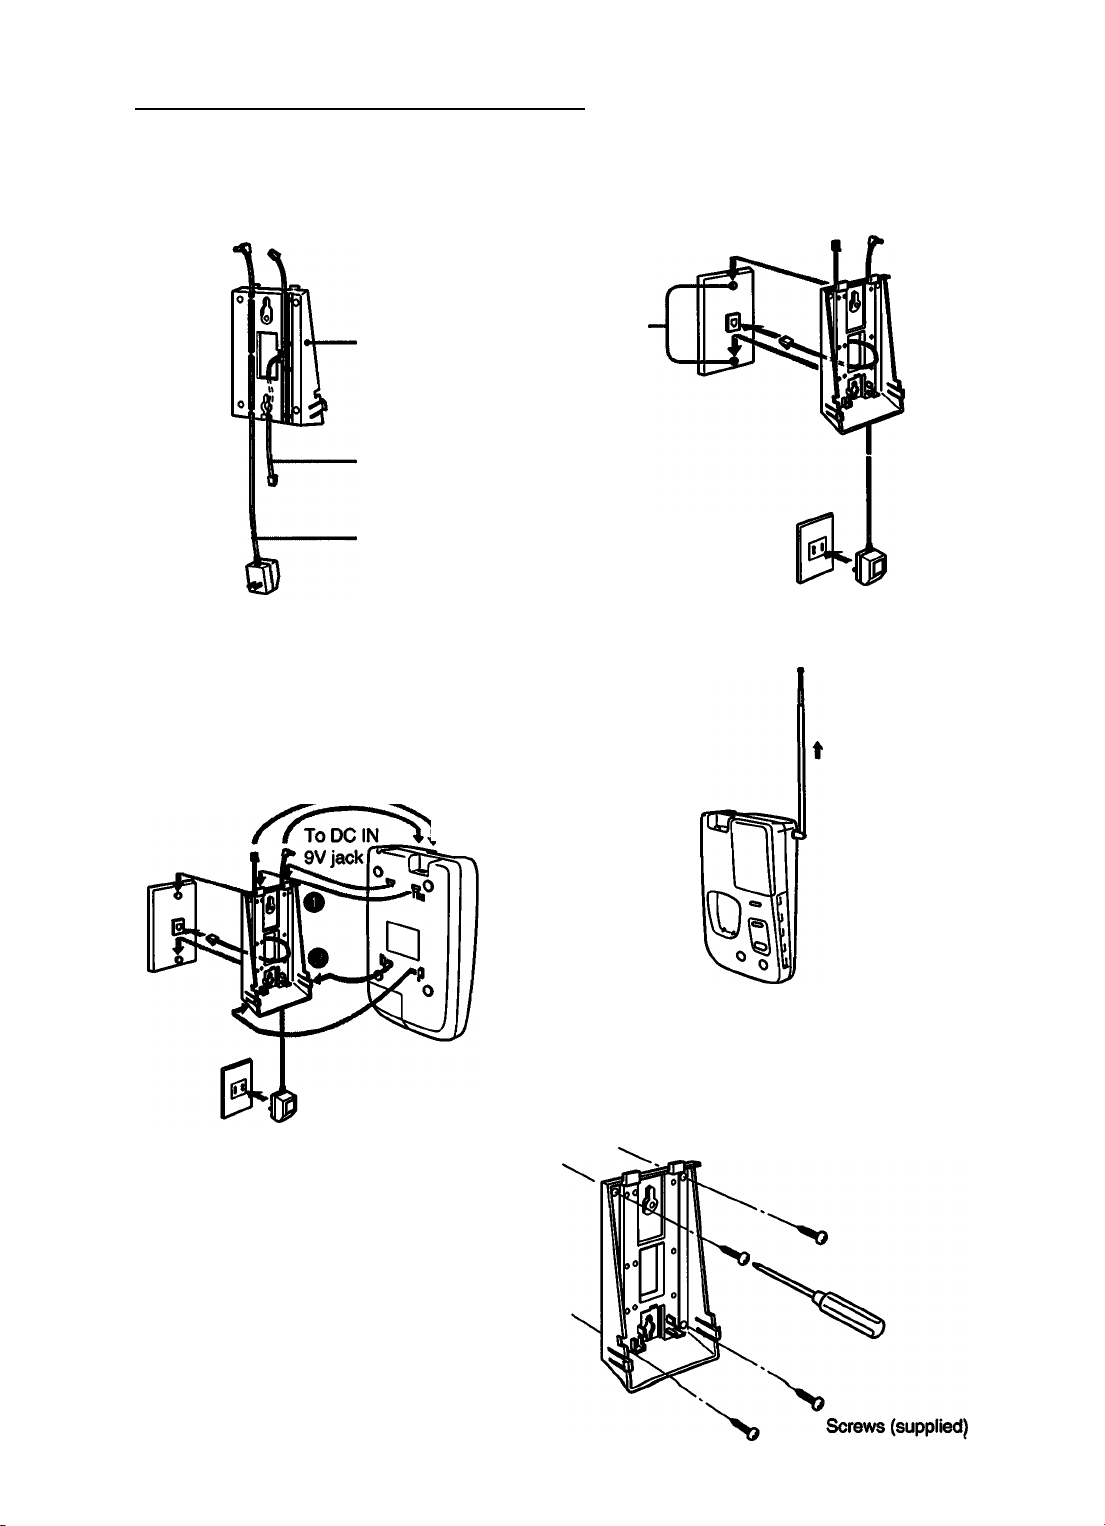
1 Attach the AC adaptor cord and the
connecting line cord to the wall bracket.
Wall bracket
(supplied)
Connecting line cord
(supplied)
AC power adaptor
(supplied)
Align the installation hooks on the
base unit with the slots on the wall
bracket. Insert the phone in the
bracket and push down.
While pressing the parts between
slits of the left and right sides of the
wall bracket, insert the hooks on the
base unit.
__ _
-■ _ ^ , u
— To telephone
[line jack
2 Hook the bracket to the telephone outlet.
Telephone outlet
Hooks
To wall outlet
4 Extend the antenna fully.
§
I
I
3
s
To wall outlet
In step 2, if you cannot hook the bracket,
attach it directly to the wall. Use the
supplied screws.
I
Wall bracket
(supplied)
43
Page 44
Maintenance Back-up Batterìa
I
Cleaning the cabinet
Clean the cabinet with a soft cloth slightly
moistened with water or a mild detergent
solution. DO NOT use solvents such as
alcohol, benzine, or thinner, as they may mar
the finish.
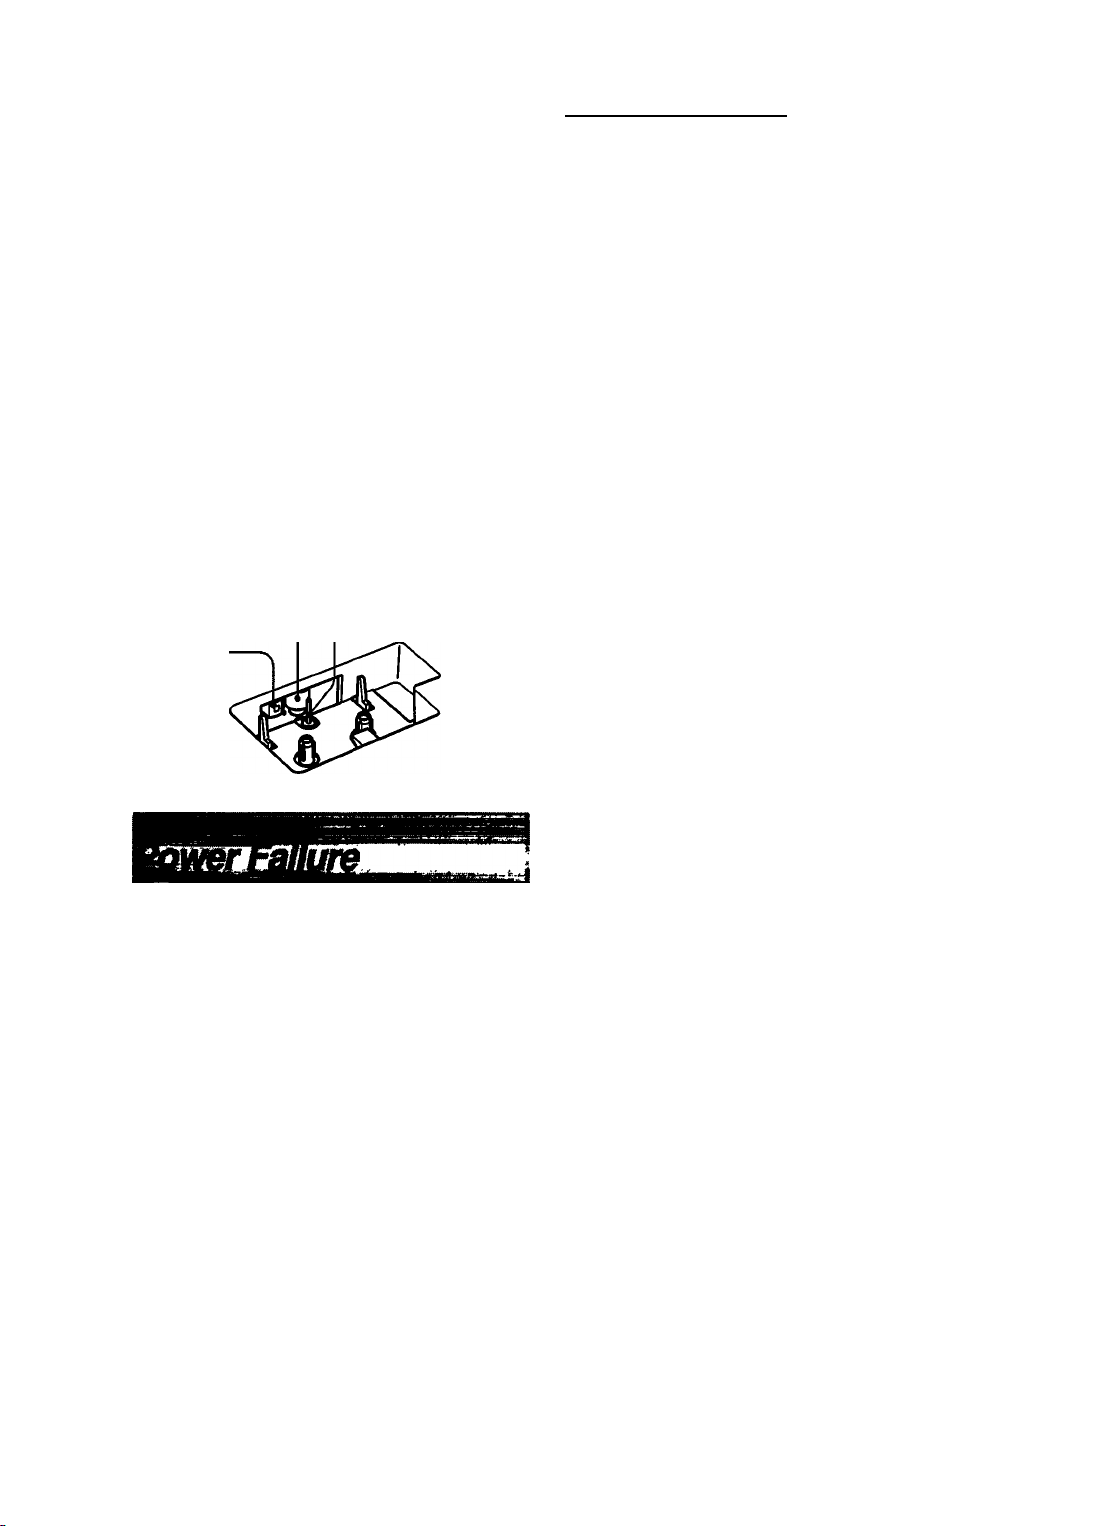
Head cleaning
Dirty tape heads will harm recording and
playback quality, and may cause
malfunctioning. Clean them regularly. Open
the lid and remove the microcassette. Wipe
the head, the pinch roller and the capstan
with a cotton swab slightly moistened in
cleaning fluid or denatured alcohol. You can
also use a soft cloth.
Pinch roller-
Record/ playback
head
- Capstan
Incorrect battery usage may lead to leakage
of battery fluid or bursting of batteries. To
prevent such accidents, obsen/e the following
precautions:
• Install the + and - poles of the batteries
correctly.
• When installing batteries, do not mix new
and used batteries, or batteries of different
types.
• Do not try to recharge batteries.
• When you will not be using the telephone
for a long period of time, remove the
batteries. If a battery leak should develop,
carefully and thoroughly wipe away battery
fluid from the battery compartment.
£
w
I
I
• The base unit will not operate during power
interruption.
• After the power is restored, if the back-up
batteries are not installed or the batteries
are exhausted, “P” indication blinks in the
message counter LED. This means that the
OGM, the number of messages, the ID code
and the current time are erased. (Press any
button on the base unit to turn off “P”
indication.) In this case, set the current
time, record the OGM and set the ID code
again.
44
Page 45

Specifications
General
Frequency control
Operation mode
Operating frequency
Supplied accessories
Base Unit
Power source
Power consumption
Dimensions
Weight
Crystal-controlled PLL
FM
46 MHz/10 channel
49 MHz/10 channel
AC power adaptor (AC-T42,1 )
Telephone line cord (long 1, short 1)
Microcassette (MC30,1)
Rechargeable battery pack (BP-T16,1)
Size AAA (R03) batteries (4)
Remote control card (1)
Directory sheet (1)
Wall mounting bracket (1) and screws (4)
DC 9 V from AC power adaptor
Approx. 7W
Approx. 148 X 66 X 225 mm (w/h/d)
antenna excluded
(Approx. 5 Vs X 2 Vs X 8 Vs inches)
Approx. 700 g (Approx. 1 lb 9 oz)
Handset
Power source
Battery duration
Dimensions
Weight
Answering Machine
Outgoing message
Incoming message
Memo message
Conversation in progress
Design and specifications are subject to change without notice.
Rechargeable battery
Approx. 7 days at RING ON mode
Approx. 1 month at ВАТТ SAVE mode
Approx. 59 X 204 x 70 mm (w/h/d)
antenna excluded
(Approx. 2 Vs X 8 Vs X 2 Vs inches)
Antenna: 80 mm (3 'U inches)
Approx. 330 g (12 oz), battery pack included
Incorporated 1C, up to 16 seconds
Microcassette, recording time selectable (1 or 4 min.)
Up to 19 messages
No time limit
No time limit
I
I
45
Page 46
la
2
CO
I
ABOUT THE SECURHY CODE SYSTEM
Sony cordless telephones are equipped with a security code system that automatically matches
the handset to the base unit through unique security codes. Each time you receive or initiate a
call, the security code is exchanged between the handset and the base unit so that only the
matching handset and base unit are connected. This prevents the problem of “cross-signaling",
where for example the handset of your unit unintentionally connects with the base unit of your
neighbor’s cordless phone and vice-versa.
(This is not to be confused with the interference you may encounter during a call from other
equipment operating nearby, including cordless telephones. The channel selection feature
helps you minimize such interference.)
With the automatic security code system in this unit, a unique code is set when you initially
place the handset on the base to charge, and that code is maintained as long as the AC power
to the base unit is maintained. In case of a prolonged AC power interruption, the base unit will
reset with a new code upon power restoration, and if the handset has been away from the base
during that time, it will need to be placed back on the base for a few seconds for the new code
to be passed on to the handset.
Aside from this situation, the security code system works automatically, and normally you will
not need to worry about it at all. Most other cordless telephones also incorporate similar
security code systems.
Only in the rare event that you need to manually change the code, the following are the
instructions to do so.
i
«
iy
I
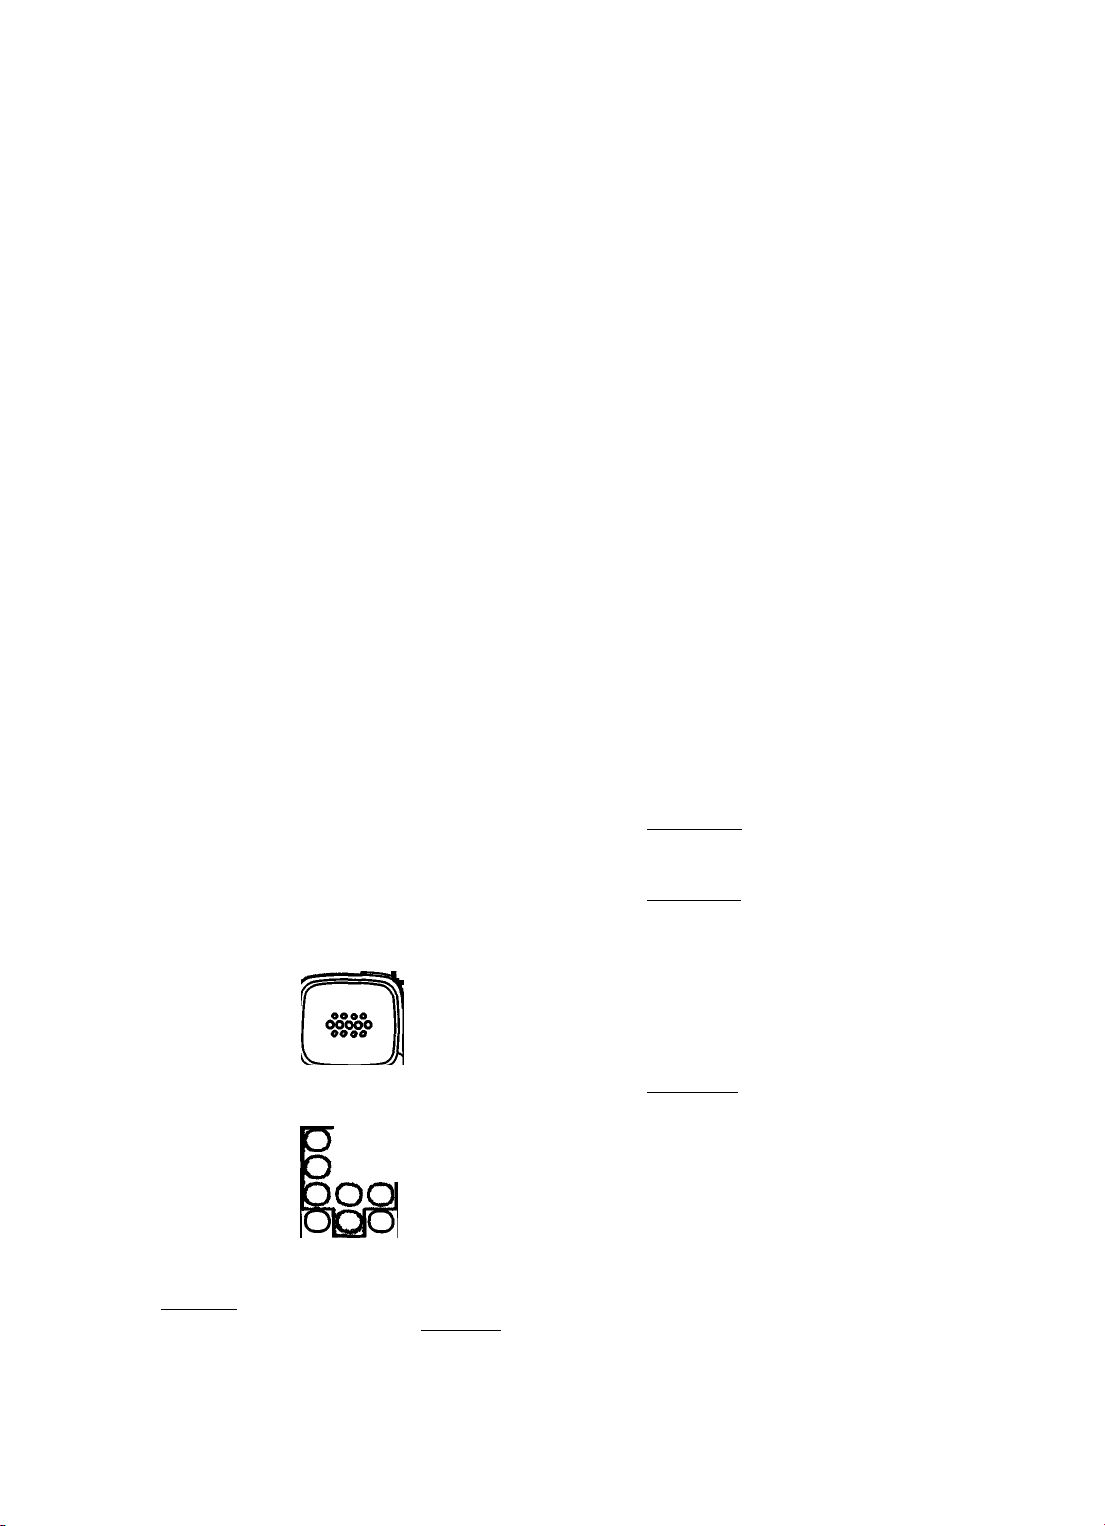
Make sure that the MODE switch is set to RiNG ON position.
ua
oo
1,4-
(VOL/PGM)
(CHANNEL)
46
1
Press CVOiyPGM).
The TALK lamp blinks.
2 Press fCHANNEL).
You will hear a confirmation beep.
3 Press the number between 0 - 65535 by
using the dialing keys.
To set 1,2,5,8,8, for example, press ©,
(D.(D, (D.®.
4 Press (VOL/PGM).
You will hear a long confirmation beep.
5 Immediately place the handset on the
base unit to complete the change.
This procedure will change the code in
both the base unit and the handset.
• A prolonged power failure will erase the digital
security code. To reprogram, place the handset
on the base unit with the handset in RING ON
mode.
> Five short error beeps give warning if you press
any number other than 0 - 65535 (such as
65536).
Page 47
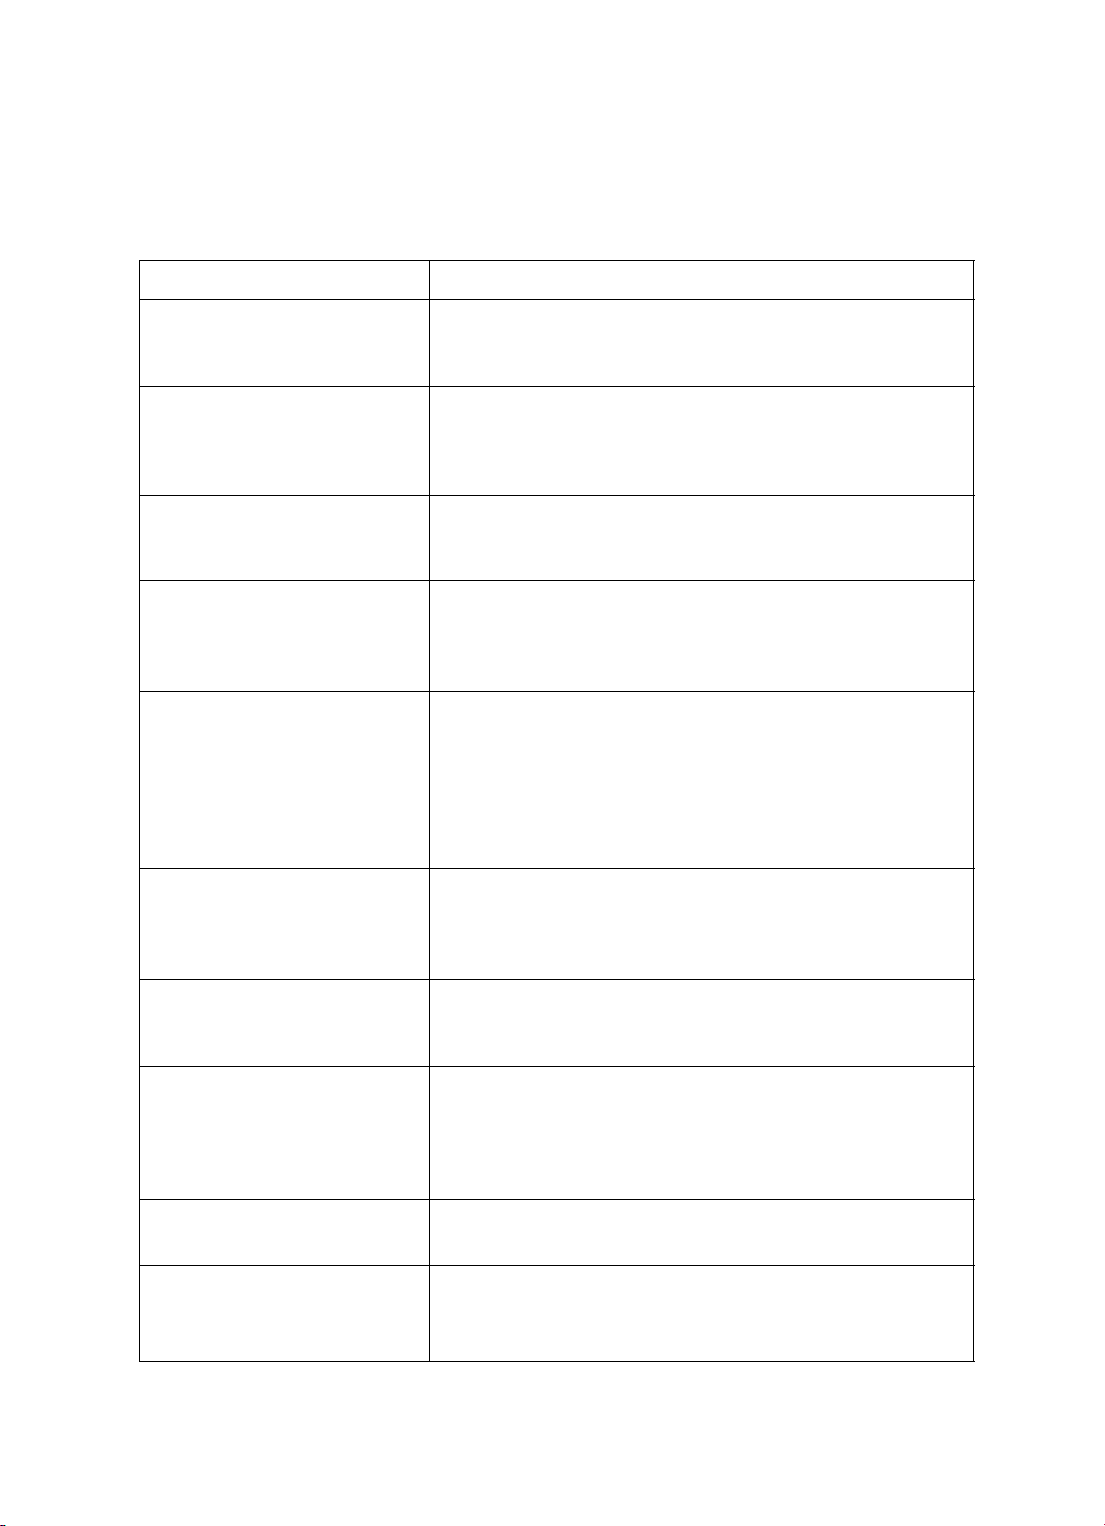
HYouHaveaPnMem
For detailed instrutions, see pages indicated in (
Telephone
'4t afft.»«»«»- ^ «
No dial tone
The TALK lamp blinks and an
alarm sounds.
The line is noisy.
You are connected to a wrong
number, or not connected at
all, even though you dialed
correctly.
The handset does not ring.
Rve short error beeps sound
and the redialing function does
not operate.
Cauee and remedy
• Check the connection of the telephone line cord.
• The handset battery is weak or completely discharged.
Place the handset on the base unit for charging.
• You are too far from the base unit. Come closer to the
base unit.
• The handset battery is weak. Place the handset on the
base unit for charging. 9
• You are too far from the base unit. Come closer to the
base unit.
• Place the base unit away from a noise source.
Check the DIAL MODE switch setting. ®
• Set the RING ON/BATT SAVE mode switch to RING
ON. •
• The handset battery may be weak. Place the handset on
the base unit for charging.
• Extend the base unit antenna vertically.
• The digital security code in the base unit is erased. Place
the handset on the base unit. O
• The last number you dialed was more than 32 digits. You
cannot redial. #
• You have erased the last number. %
• You dialed a wrong number.
I
S
ai
f
Five short error beeps sound
and the memory dialing
function does not operate.
Rve short error beeps sound
while programing the phone
numbers for speed dialing.
Five short error beeps sound
while programing the ID code.
Five short error beeps sound
and an intercom call is not
possible.
• No phone number is programed in the speed dial
location.
• The programing is canceled if you do not perform steps
within 20 seconds. Repeat the steps from the beginning.
•
• The programing is canceled if you press a wrong button.
Repeat from the beginning.
• You pressed a wrong button.
• You tried to set a number which is not between 00-99. 9
The signal from the handset to the base unit or from the
base unit to the handset was not received. Come closer to
the base unit.
47
Page 48
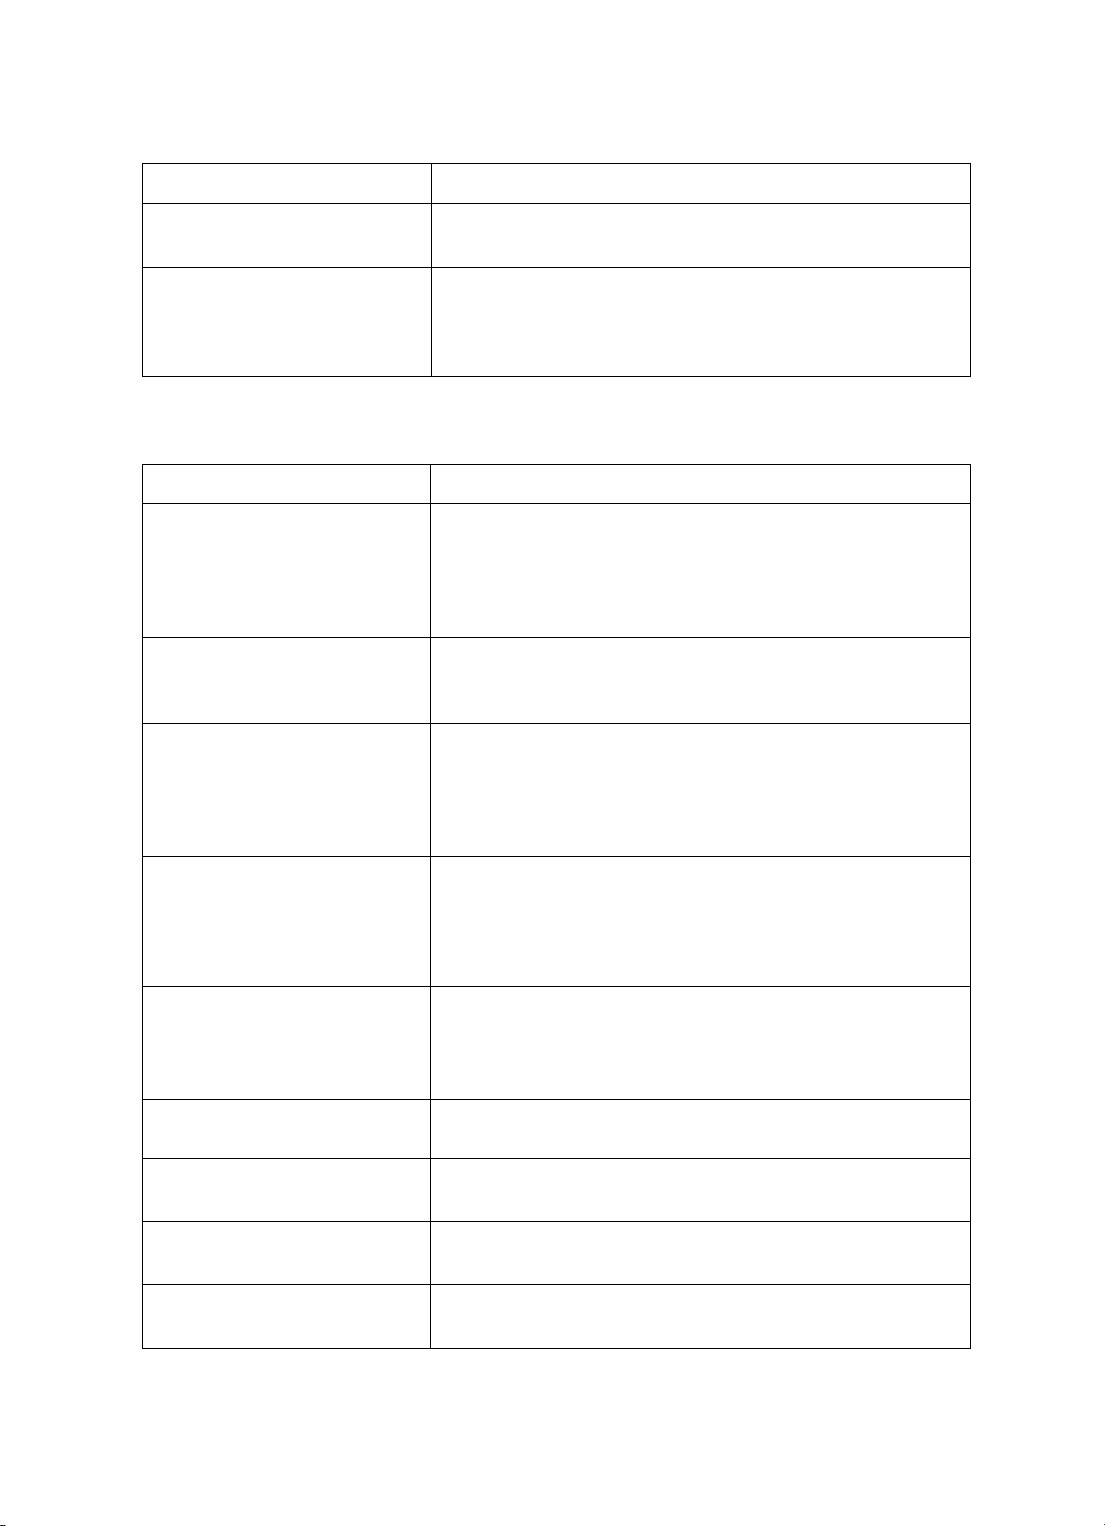
If You Have a Problem
I
I
«0
s
£
I
Probleim
“P” blinks in the message
counter LED.
The POWER lamp blinks.
Answering Machine
Problem Cause and remedy
Five short error beeps sound
while recording the OGM.
Five short error beeps sound
when vou Dress (OGM) to Dlav
back.
Five short error beeps sound
when you press (ANSWER)
to turn on the answering
machine.
Cause and remedy
“P” blinks when you connect first the AC power adaptor or
after a power interruption. Press any button to turn it off. #
• The back-up batteries are not installed in the base unit.
Install the batteries.
• The back-up batteries are exhausted. Replace with new
ones.
• When 5 seconds have passed after pressing (REC), the
recording is canceled. Repeat again from the begining. 9
• If your OGM is less than 2 seconds long, the recording is
canceled. Repeat from the begining. 9
• No tape is installed, install a tape. #
There is no OGM recorded. Record it. 9
• There is no OGM recorded. Record it. #
• No tape is installed. Install a t2^3e. #
• The tape is full and there are messages which have not
been played back yet. Play back the rriessages and press
(TAPE RESET).
48
Five short error beeps sound
when you press
(CONV/MEMO REC)/
CmEMO REC) to record a
memo message.
Five short error beeps sound
when vou Dress (ANSWER)
to play back incoming
messages.
No sound from the speaker of
the base unit.
Five short error beeps sound
when you try to reset the tape.
“A” appears in the message
counter LED.
“E” appears in the message
counter LED.
• The answering machine is not turned on. #
• No tape or the tape is full, or being reset.
• No message is recorded.
Check the SPEAKER VOL control knob.
There are messages which have not been played back yet.
Play back the messages. 9
You have set the answering machine to annoucement only
mode. 9
The tape is at its end or full with messages.
Page 49
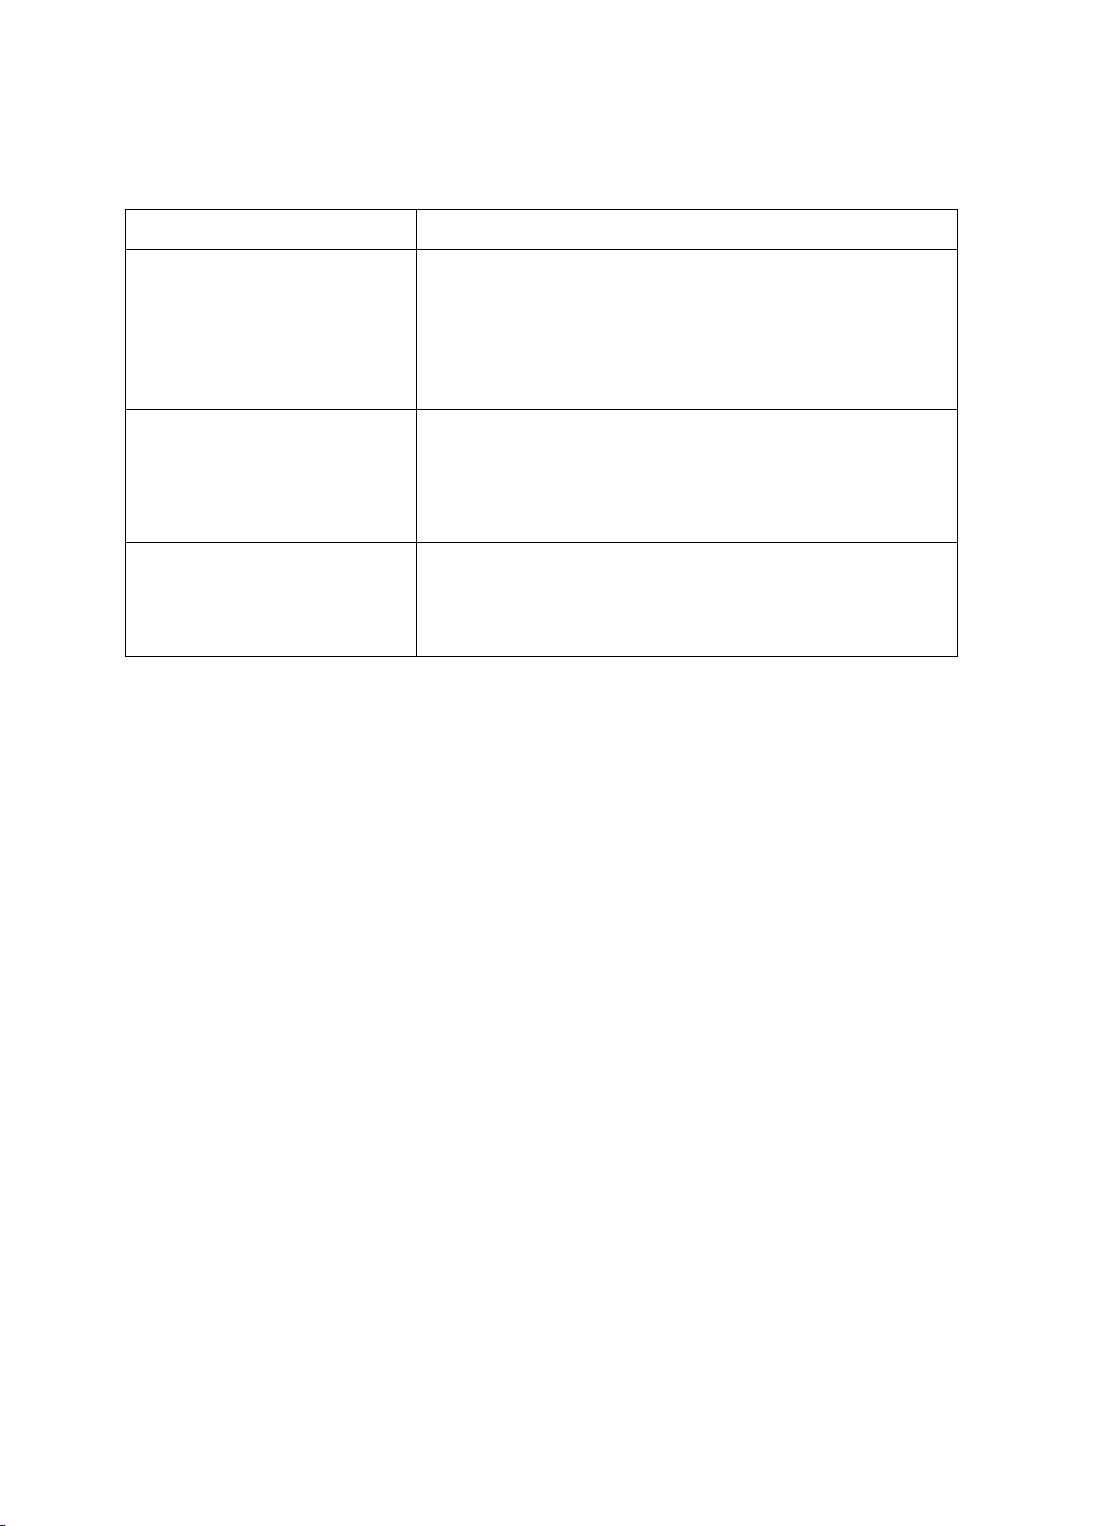
Answering Machine
, md remedy
The phone stops recording
before a caller finishes his/her
message.
When you call your phone
from a touch-tone phone, the
line is disconnected.
Five short error beeps sound
when you try to control
remotely from a touch-tone
phone.
CAUTION:
If you want to have the unit repaired, please bring or mail both the base unit and
the telephone handset to the Sony ^rvice Center.
Otherwise, we may not be able to repair it.
• The messages is longer than the REC TIME switch
setting (1 or 4 minutes). O
• The caller’s voice was too low. The phone disconnects
the line when it detects 7 seconds of silence.
• The CPC switch is set to ON when you have “call waiting
service”. Set to OFF. 9
• You have entered the wrong ID code 3 times.
• You have set the CPC switch to ON. Set to OFF. 9
• If you hear a long beep, 20 seconds have passed since
you have pressed (?) to start the remote control
operation. Start over.
• You have entered the incorrect control code. 9
I
S
I
49
Page 50

SONY CORPORATION OF AMERICA ("SONY") warrants this product against defects in material
or workmanship^ as follows:
1. For a period of 1 year from the date of purchase; SONY will pay the labor charges of your
SONY authorized service facility to repair the defective product. After this 1 year period, you must
pay for ali labor charges.
2. In addition, SONY will supply, at no charge; new or rebuilt replacements for defective parts
for a period of 1 year from the original date of purchase.
To obtain warranty service; you must take the product or deliver the product prepaid, to a SONY
authorized service facility.
This warranty does not cover cosmetic damage; and damage due to acts of God, accident misuse;
abuse; or negligence to this product including the antenna. This warranty is valid only in the United
States of America.
Proof of purchase in the form of a bill of sale or receipted invoice which is evidence that the unit
is within the warranty period must be presented to obtain warranty service;
This warranty is valid only if the serial number appears on the product.
I
§
I
REPAIR OR REPLACEMENT AS PROVIDED UNDER THIS WARRANTY IS THE EXCUUSIVE REMEDY OF THE CONSUMER. SONY SHALL NOT BE UABLE FOR ANY INCIDENTAL OR CONSEQUEN
TIAL DAMAGES FOR BREACH OF ANY EXPRESS OR IMPLIED WARRANTY ON THIS PRODUCT.
EXCEPT TO THE EXTENT PROHIBITED BY APPUCABLE LAW, ANY IMPUED WARRANTY OF
MERCHANTABILITY OR FITNESS FOR A PARTICULAR PURPOSE ON THIS PRODUCT IS UMITED
IN DURATION TO THE DURATION OF THIS WARRANTY.
Some states do not allow the exclusion or limitation of incidental or consequential damages, or
allow limitations on how long an implied warranty lasts, so the above limitations or exclusions may
not apply to you. This warranty gives you specific legal rights, and you may also have other rights
which vary from state to state
For your convenience Sony Corporation of America has established the Customer Information
Center to supply you with product or service information.
TELECOMMUNICATIONS
________________________________________
HELPUNE
(201) 391>6111
PLEASE CALL US WITH YOUR
QUESTIONS AND COMMENTS ON
SONY TELEPHONE PRODUCTS
SONY CORPORATION OF AMERICA
Sony Drive Park Ridge New Jersey 07656
Important: If returning product for service, please see the next page (page 51) for your nearest
Sony Service Center
50
Page 51

Sony Service Centers
Arizona
Phoenix
2240 North Scottsdale Road
Tampa AZ 85281
(602) 949-7669
CaNfomia
Burbank (Los Angeles area)
4100 Riverside Drive Suite A
Burbank. CA 91505
(818) 842-7669
&>sta Mesa (Orange County area)
2729 8ristol Street South
Costa Mesa, CA 92626
(714) 549-4833
San Bruno (San Francisco area)
751 Camino Plaza
San Bruna CA 94066
(415) 871-2810
San Diego
8975 Complex Drive
San Oiega CA 92123
(6191 279-2724
San Jose
1359 Old Oakland Road
San Jose CA 95112
14081 280-7669
Colorado
Denver
Havana Place Center
10740 East Iliff Avenue
Aurora, CO 80014
(3031 755-7669
Florida
Fort Lauderdale
2850 North 28th Terrace
Hollywood. FL 33020
13051 920-5600
Georgia
Atlanta
120 Interstate North Parkway East
Suite 410
Atlanta. GA 30339
14041 953-5871
HawaO
Honpkiki
950 Mapunapuna Street
Honolulu, HI 96819
(808) 834-6622
IMnois
Chicago
1730 West Fullerton, Suite 4
Riverpoint Shopping Center
Chicago, IL 60614
(312) 929-8585
NIhs (Chicago N.W.)
7540 North Caldwell Avenue
Niles, IL 60648
(708) 647-2400
Westmont (Chicago S.W.)
6036-38 South Cass Avenue
Westmont IL 60559
(708) 969-0049
Kansas
___________________
Kansas City
11712 West 95th Street
Overland Park
KS 66214
(913) 888-2622
Maryiand (Washington D.C.)
Washington DtC
5300 Sunnyside Avenue
Beltsville, MD20705
(301) 595-1818
Massachusetts
Boston
390 University Avenue
128 Westwood Irtdustrial Center
Westwood. MA 02090
(6171 329-5130
_____________
Michigan
Detroit
43304 Eleven Mile Road
Novi. Ml 48050
(313) 344-4044
Minnesota
MinneapoKs
4300 W. 36 V] Street
St. Louis Park. MN 55416
(6121 920-8000
Missouri
St. Louie
12462-0 Natural Bridge Road
Bridgeton, MO 63044
(314) 291-2201
New Jersey
Mahwah (N.Y. MetropoMan Area)
386 Route 17 South
Mahwah. NJ 07430
(201) 529-1655
Union
Bradlees Shopping Center
US Highway 22 At Morris Avenue
Union, NJ 07084
(201) 687-5555
Ohio
Cleveland
6370 Vbrk Road
Parma Heights, OH 44130
(216) 845-7669
Pennsylvania
Philadelphia
651 Park Avenue
King of Prussia, PA 19406
(215) 768-8850
Pittsburgh
Wexford Plaza
10610 Perry Highway (Rt. 19NI
Waxford, PA 15090
(412) 935-8466
Texas
Oalas
401 Preston Valley Shoppirtg Center
Dallas, TX 75230
12141 661-3537
Houston
7639 Westheimer
Houston. TX 77063
(7131 783-8761
VIMshington
Seattle
835 Fidalgo
Seattle. WA 98108
(2061 762-6500
Sony District Ser>nce Offices
Western Zone
Western District
Sony Service Company
2729 Bristol Street South
Costa Mesa. CA 92626
(7141 549-4836
Northwestern District
Sony Service Company
1359 Old Oakland Road
San Jose CA 95112
(408) 280-7675
Southwestern District
Sony Service Company
3201 Premier Or.. Suite 1(X)
Irving. TX 75063
(214) 550-5270
Central Zone
MidMIbst District
Sony Service Company
1200 N. Arlington Heights Rd.
Itasca. IL. 60143
(7081 773-7666
East Central District
Sony Service Company
26200 Town Cemer Drive
Suite 300 Novi. Ml 48050
(313) 347-2251
Eastern Zone
Eastern District
Sony Senrice Company
386 Route 17 South
Mahwah. NJ 07430
(2011 529-1616
Mid-Atlantic District
Sony Service Company
651 Park Avenue
King of Prussia, PA 19406
(2151 768-8845
Southeastern District
Sony Service Company
120 Interstate North Parkway East
Suite 414
Atlanta. GA 30339
1404) 953-5858
51
Page 52
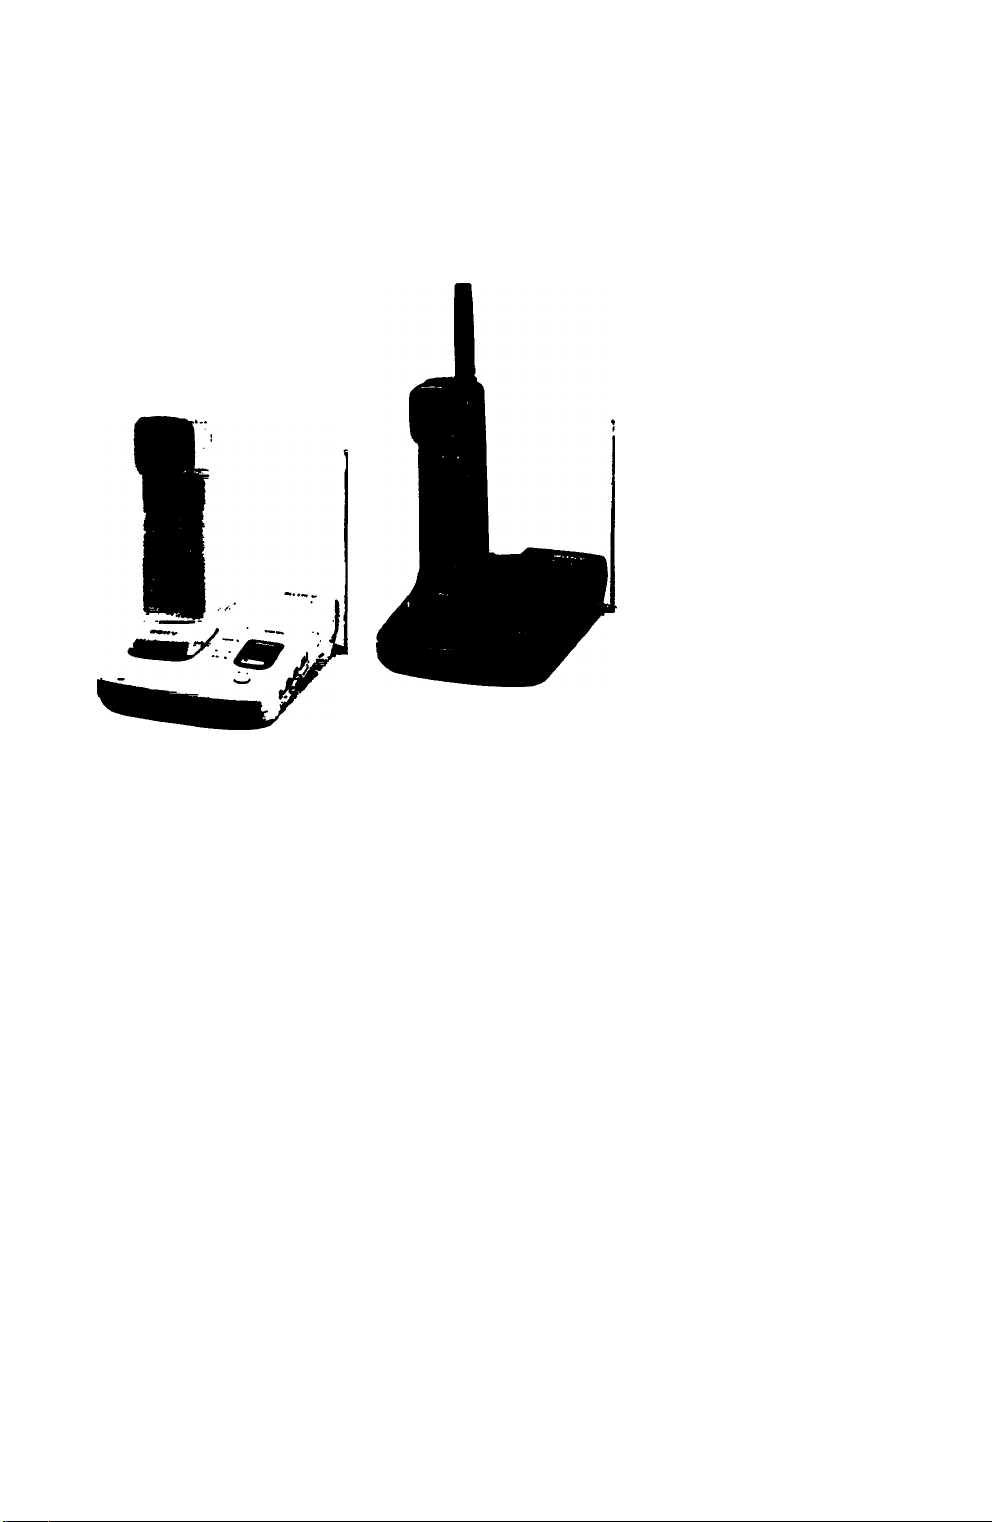
Cordless Telephone with Answering System
SPP-A40IA60
3-755-577-21 (2)
Owner’s record
The model and serial numbers are located at the bottom of
the base unit and the handset. Record the serial number in
the space provided below. Refer to these numbers
whenever you call upon your Sony dealer regarding the
product.
Model No. SPP-
TELECOMMUNICATIONS
PLEASE CALL US WITH YOUR
QUESTIONS AND COMMENTS ON
SONY TELEPHONE PRODUCTS.
©1992 by Sony Corporation Printed in Hong Kong
Serial No.
HELPLINE
(201)391-6111
UDSY01188ZA
 Loading...